


Abstract
Supramalleolar osteotomies are performed to realign the distal tibia and to improve foot and ankle function. This procedure requires a thorough preoperative and intraoperative understanding of limb-deformity parameters and of the center of rotation of angulation method of surgical planning. Radiographic, gait, and clinical analyses along with intraoperative fluoroscopic images are paramount to deformity correction. This article describes the radiographic and clinical analyses and technical considerations in performing a focal dome supramalleolar osteotomy.
Ankle and distal tibial deformities can be complex and may be associated with aberrant pedal mechanics. One must consider the position of the rearfoot, midfoot, and forefoot relative to the tibia when evaluating a patient with a distal tibial deformity [1]. A supramalleolar distal tibial osteotomy may be indicated for talotibial pathology secondary to malunion associated with previous surgery or trauma, physeal arrest, paralytic disorders, tibial torsion, primary and secondary arthritis, and other painful disorders of the talotibial joint [2]. A supramalleolar osteotomy can correct deformities of the distal tibia in all planes: the frontal plane (ankle and tibia varus/valgus), sagittal plane (procurvatum or posterior aligned distal tibial articular surface, recurvatum or anterior aligned distal tibial articular surface), and oblique plane (a combination of frontal and sagittal plane deformities). In addition, this procedure can correct deformities associated with a malaligned ankle arthrodesis. A mild-to-moderate ankle or distal tibial deformity is well tolerated when the rearfoot and midfoot are supple. However, in patients with inadequate compensatory motion (a stiff foot), even small angular deformities may be poorly tolerated.
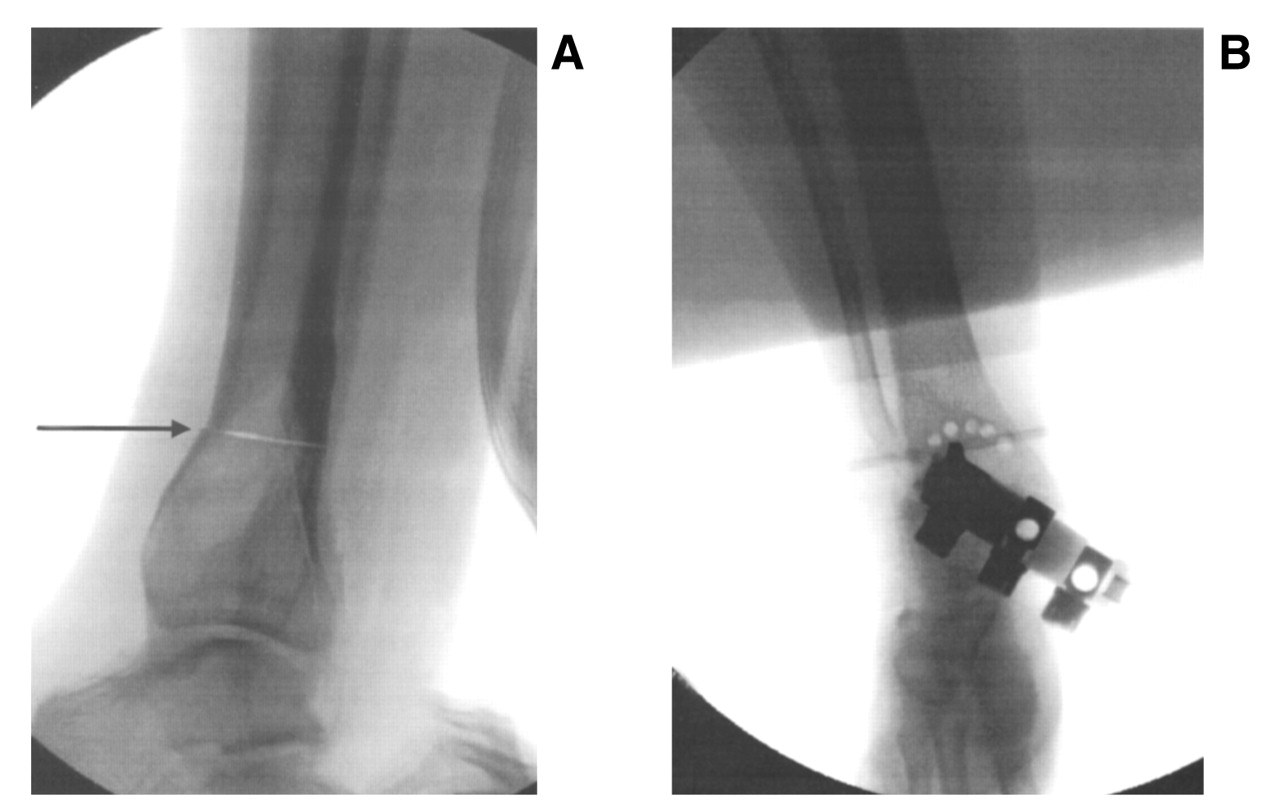
There are several advantages of a supramalleolar osteotomy over arthrodesis procedures. First and foremost, this is a joint-sparing procedure performed in a juxta-articular region, making it an excellent choice of procedures in the pediatric and adolescent population to correct congenital deformities by avoiding joint fusions. Supramalleolar osteotomy is an alternative to multiple foot surgeries when the deformity is located above, at, or just slightly distal to the level of the ankle joint articulation. Supramalleolar osteotomies are usually wedge-cut, straight-cut, or focal dome osteotomies (Figure 1). There are specific advantages to the focal dome osteotomy compared with the straight-cut osteotomy, including a lack of thermal necrosis because a bone saw is not used, minimal periosteal dissection (it can typically be performed percutaneously), and an inherent stability owing to excellent bone-to-bone contact.
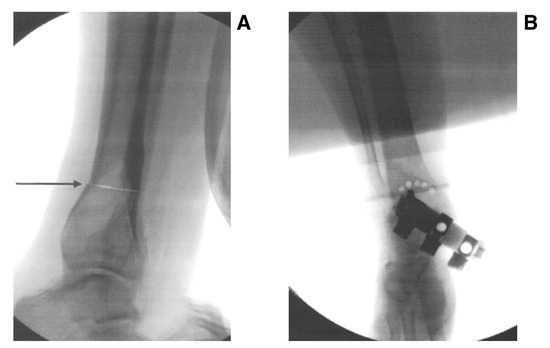
Figure 1.
Radiographic examples of straight-cut/wedge-cut (arrow) (A) and focal dome (with multiple drill holes) (B) supramalleolar osteotomies.
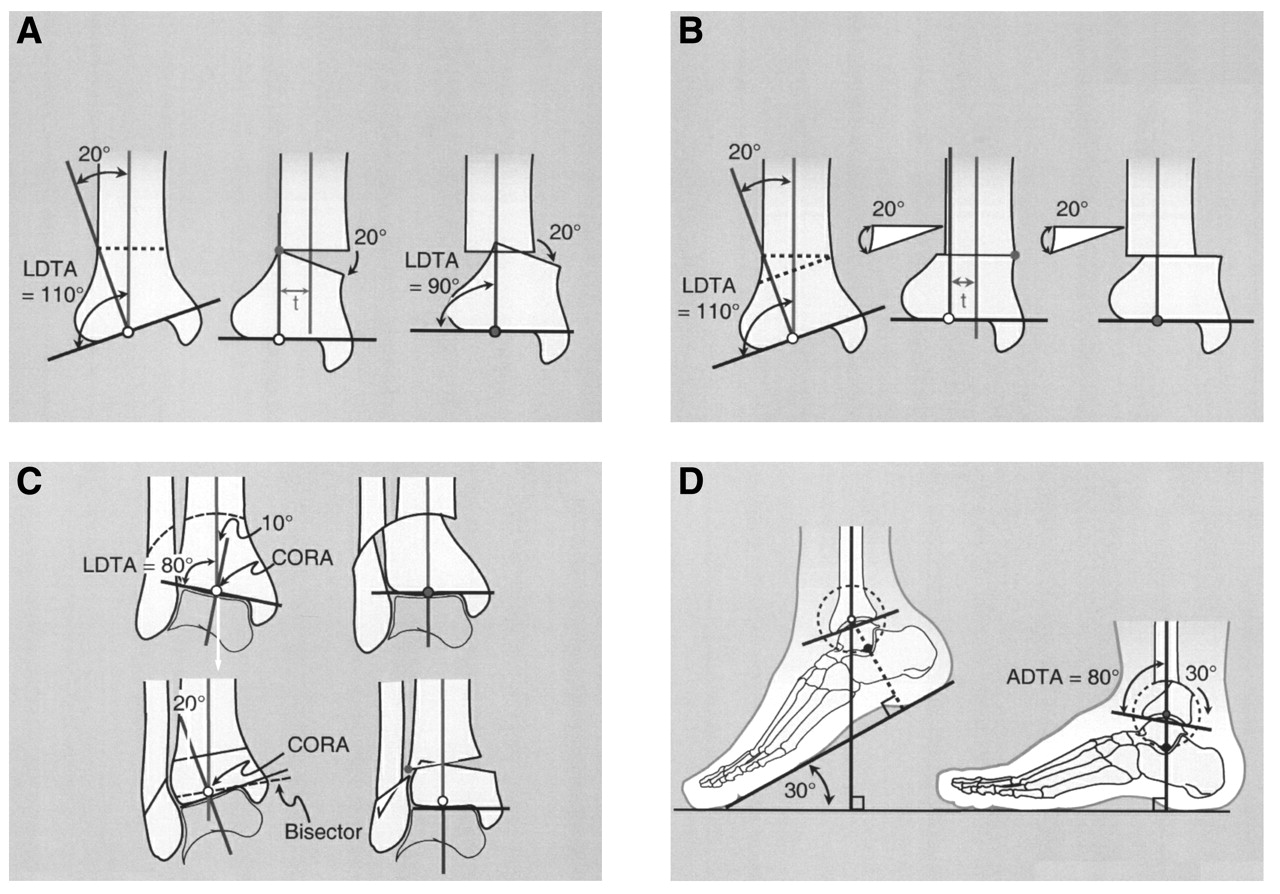
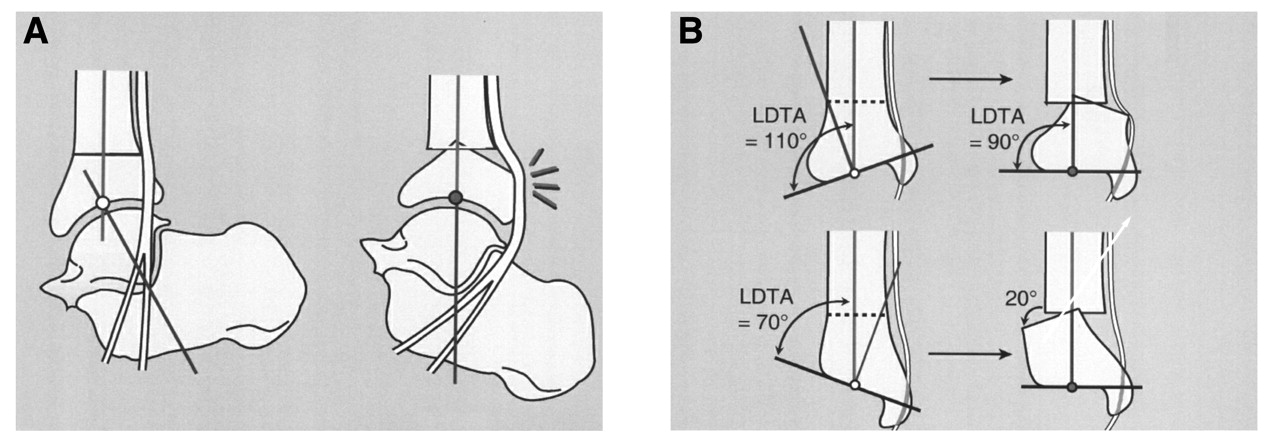
The focal dome supramalleolar osteotomy follows the center of rotation of angulation method described by Paley [3]. The osteotomy is performed around the radius of the ankle joint center of range of motion or articular deformity; thus it eliminates many positional complications because it accounts for the angular and translational components of a typical opening or closing wedge osteotomy performed away from the center of rotation of angulation. The focal dome supramalleolar osteotomy is reliable, has a large cross-sectional area of bone contact, is stable, and minimizes the lengthening or shortening of the tibia [4]. An opening or closing wedge osteotomy performed remote to the center of rotation of angulation will result in translation and, therefore, needs to be realigned once the wedge is completed (Figure 2) [1]. There is typically no need for bone grafting or bone wedge removal.
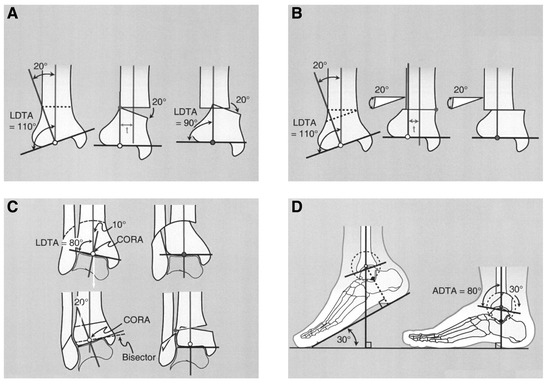
Figure 2.
A varus distal tibial deformity with the center of rotation of angulation (CORA) intra-articular. Corrective opening (A) and closing (B) wedge osteotomies away from the CORA show that the axis of correction is translated laterally on osteotomy correction. The distal tibia must then be translated medially to correct the axis malalignment. C and D, Articular CORA corrected by focal dome osteotomy for varus/valgus deformity (C) and procurvatum/recurvatum deformity (D). There is no translational component to this osteotomy. LDTA, lateral distal tibial angle; ADTA, anterior distal tibial angle. (Reprinted with permission from Paley [1].)
Indications
The most common indication for a supramalleolar osteotomy is a juxta-articular tibial deformity or a malaligned arthrodesis [1,4]. These patients often present with chronic pain, which is often exacerbated by activity. Clinical deformities may or may not be evident. The literature is inconsistent regarding the amount of deformity that should be present before corrective surgery. Johnson [5] states that any deviation from normal is detrimental following distal tibial trauma. Graehl et al [6] state that there should be significant distal tibial deformity before an osteotomy is considered. We base our surgical decision making on clinical signs and symptoms followed by an extensive radiographic assessment of lower-extremity alignment, and we determine whether the malalignment is the causative factor.
Obvious contraindications include impaired neurovascular status and active skin or bone infection. Relative contraindications are determined in the evaluation of the patient’s other comorbid conditions. This procedure requires an extended course of immobilization and nonweightbearing, unless external fixation is used. Patients must be able to tolerate this period of convalescence.
Realignment principles of foot and ankle surgery should ensure that the rearfoot is aligned with the leg and that the forefoot is aligned with the rearfoot. Therefore, comprehensive preoperative and postoperative radiographic and clinical evaluations are paramount to ensure success in managing a patient’s deformities and pathologic entities. Specific angular relationships are critical in appropriately identifying the level of deformity, and intraoperative imaging is necessary to achieve optimal surgical results.
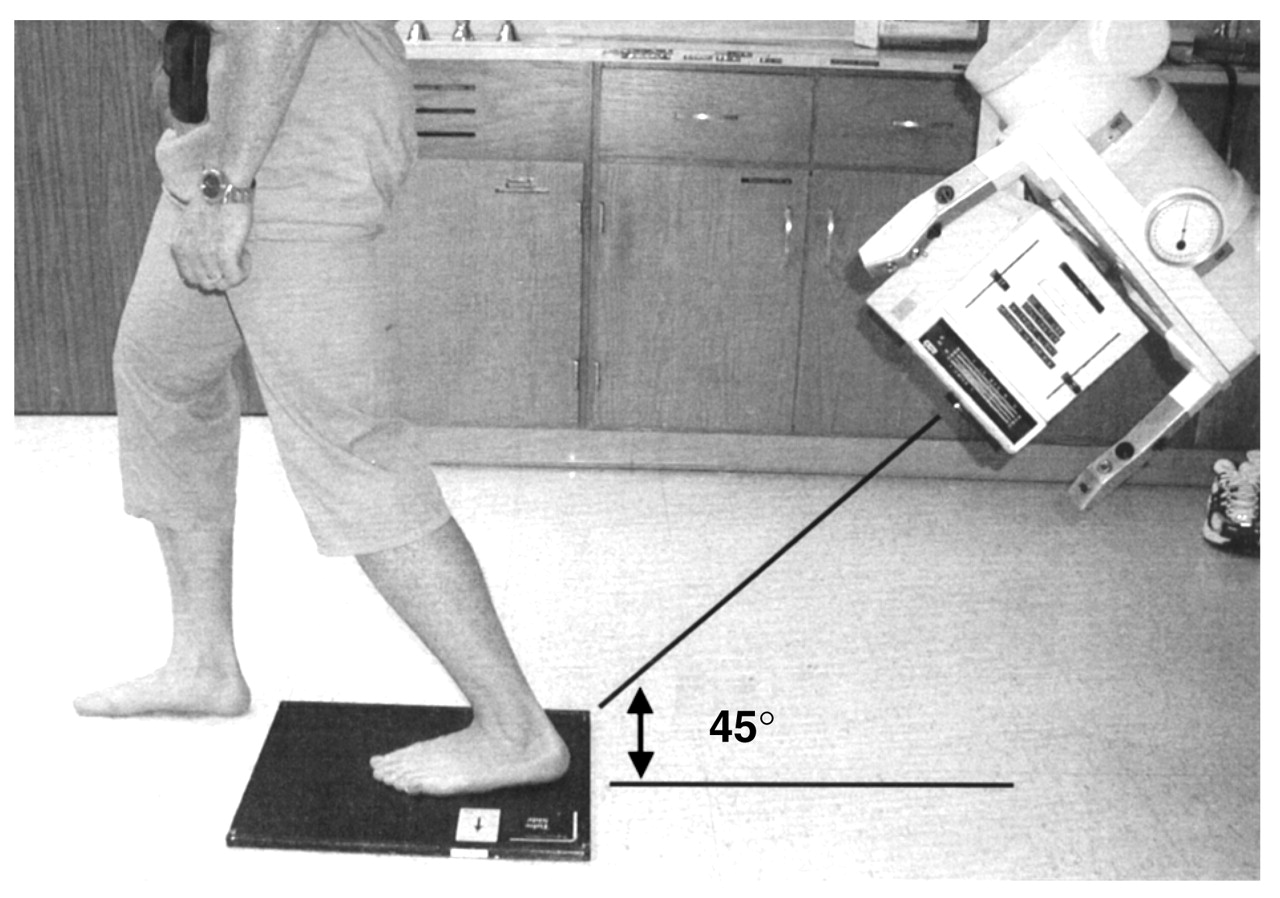
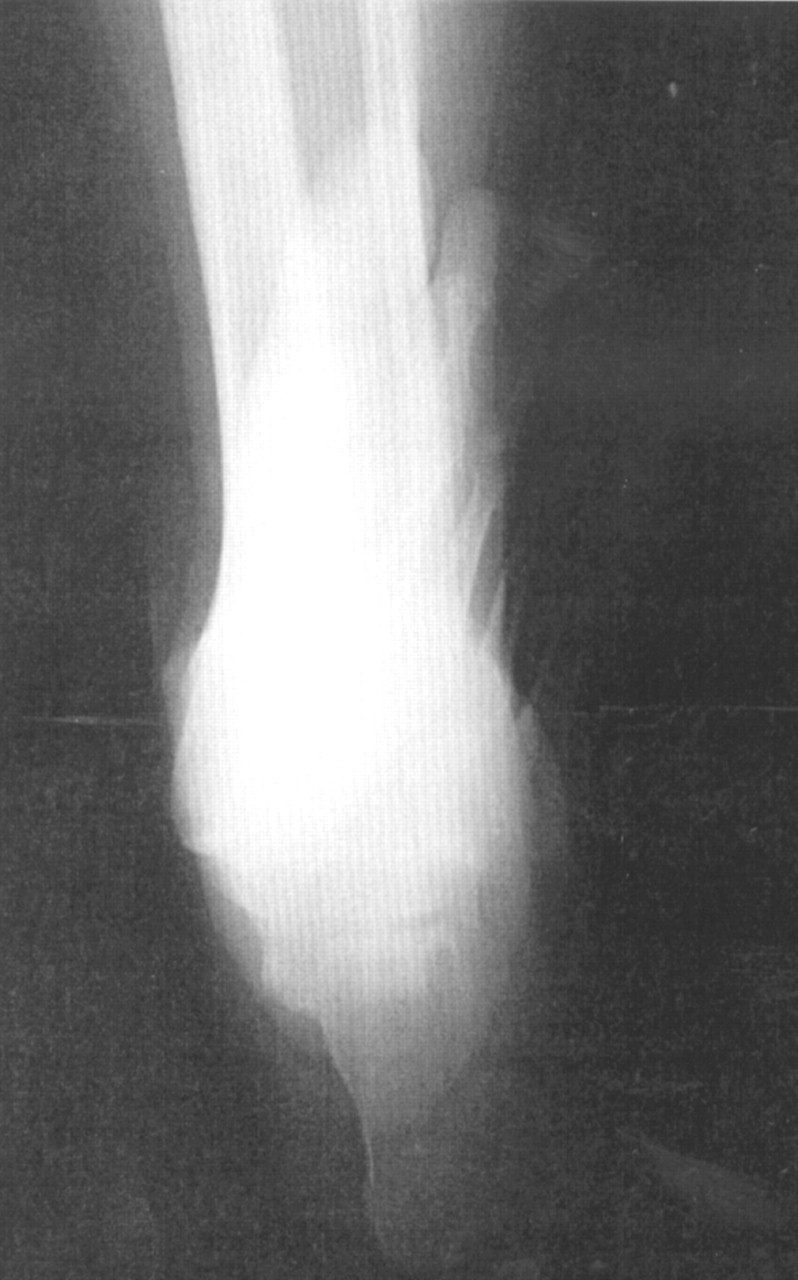
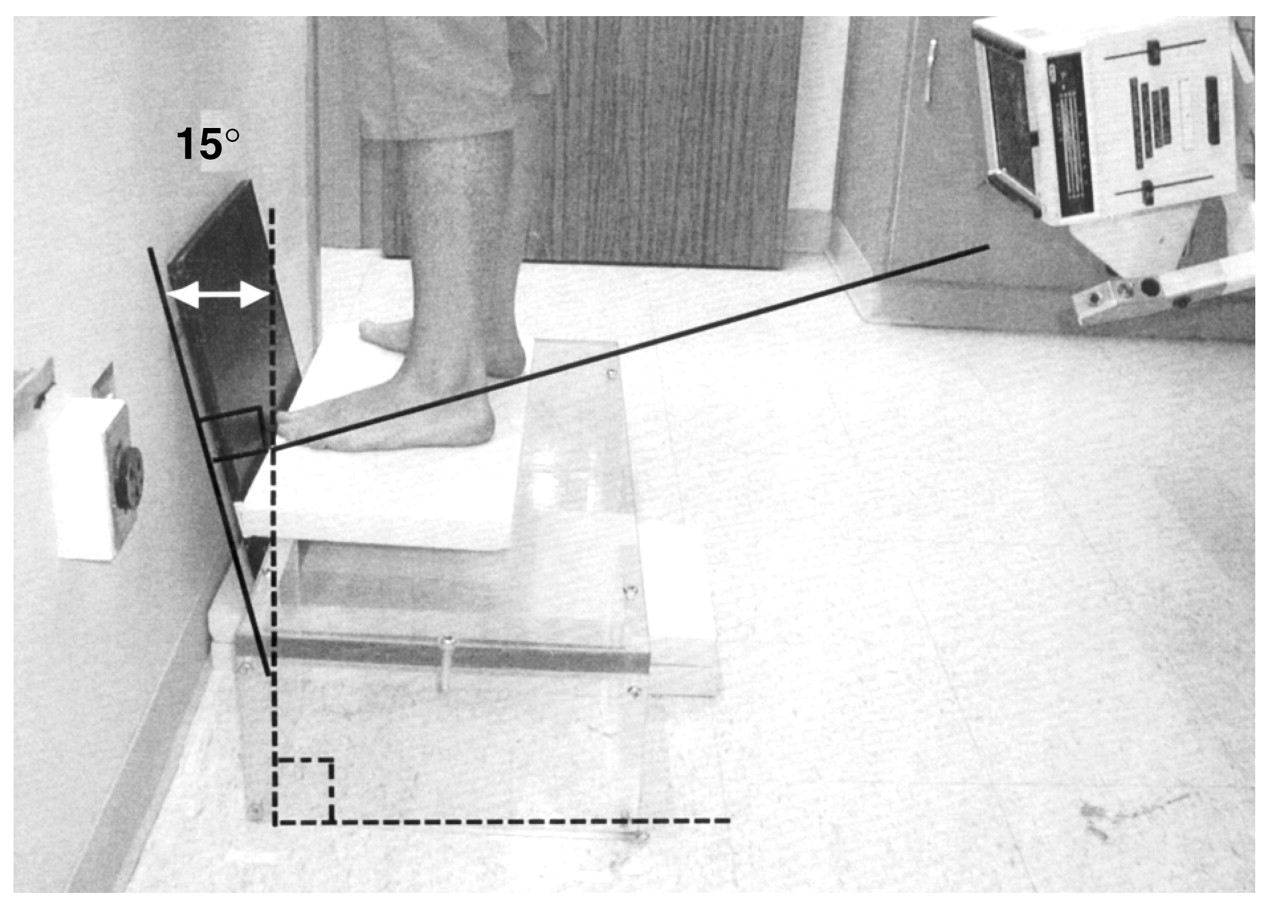
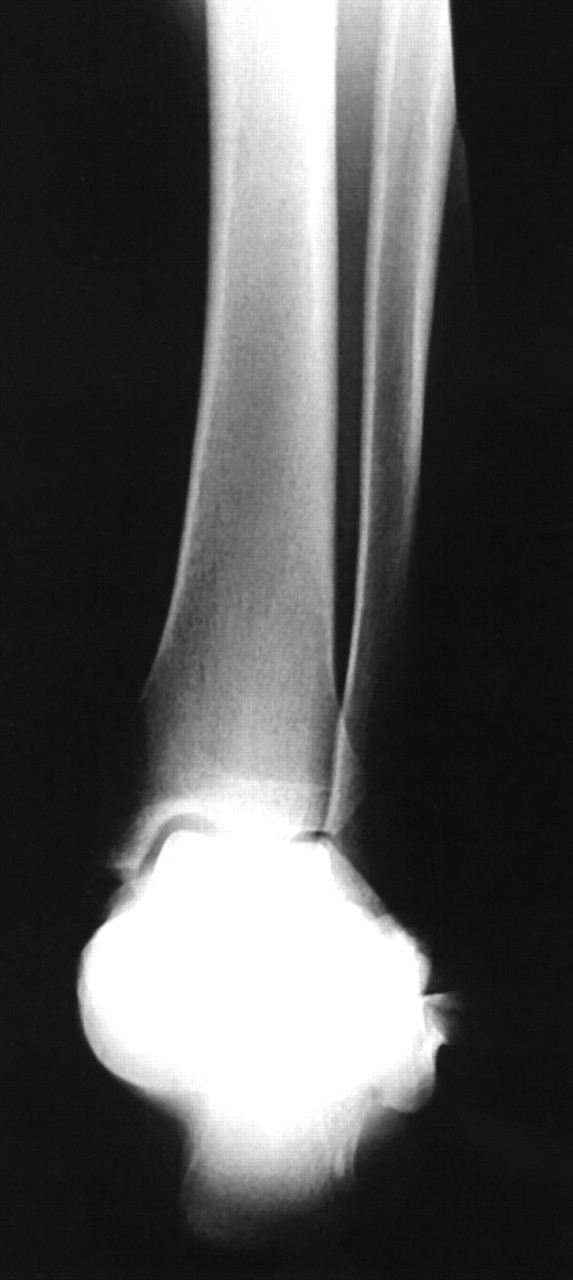
Radiographic assessment should begin with standard anteroposterior and lateral radiographs of the foot and ankle. Additional images are needed to assess the alignment of the rearfoot with the tibia, including long leg calcaneal axial and rearfoot alignment views. These views help identify the level of deformity and can identify any suprastructural skeletal deformity [7]. The long leg calcaneal axial view varies from a standard axial radiograph by its use of a 14 × 17-inch film, and the radiographic projection is aimed at the subtalar joint at 45° cephalad (Figure 3). This radiograph allows visualization of the subtalar joint and can identify any calcaneal-to-tibial deformities (Figure 4). The rearfoot alignment (Cobey/Saltzman) view [8] uses an elevated platform while also using a 14 × 17-inch film positioned 15° from vertical with a posterior radiographic projection, perpendicular to the film, aimed at the ankle (Figure 5). This view evaluates the ankle joint and identifies any calcaneal-to-tibial deformities (Figure 6). This view requires one to fabricate or purchase a special Plexiglas (Röhm, Darmstadt, Germany) stand. Full-leg radiographs (tibia/fibula, including the knee and ankle) may be necessary if the deformity is proximal. Angular assessment should be performed to determine the level of the deformity. The goal of the surgical procedure should be to align these angles as close to normal values as possible. Advanced imaging, such as magnetic resonance imaging or computed tomography, may be warranted to examine joint integrity.
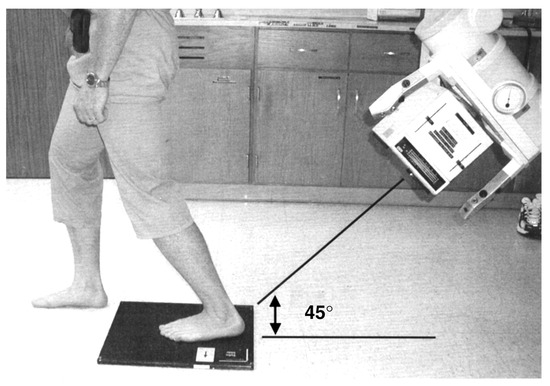
Figure 3.
Patient positioning for the long leg calcaneal axial radiograph. The x-ray beam is oriented at 45° to the posterior aspect of the calcaneus, and the x-ray cassette is placed flat on the floor.
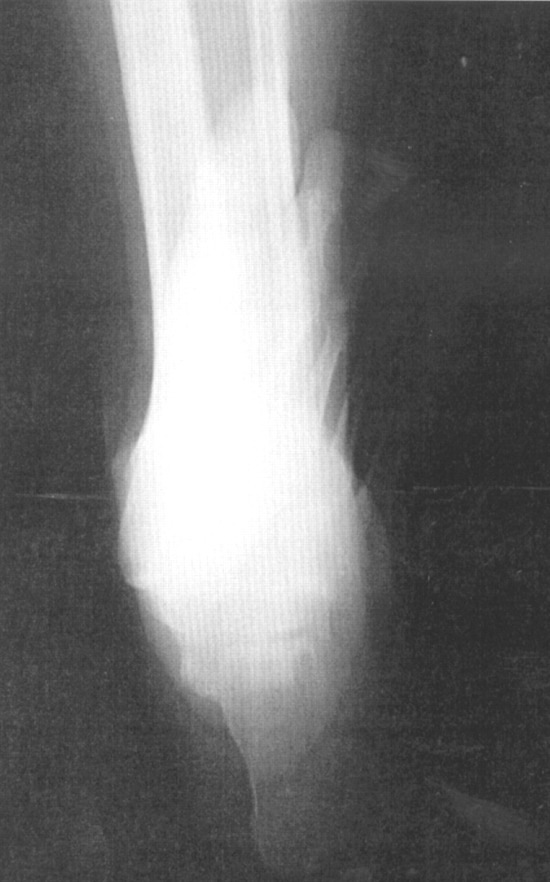
Figure 4.
Long leg calcaneal axial radiograph demonstrating the relationship of the calcaneus to the leg and good visualization of the subtalar space.
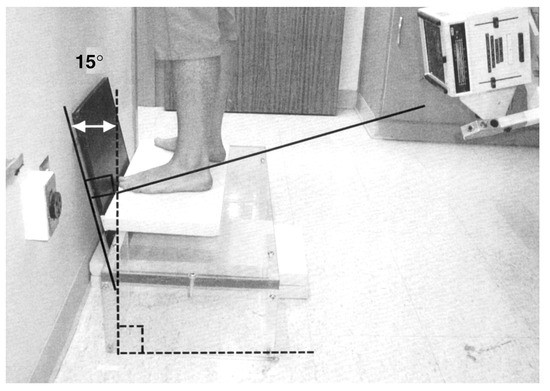
Figure 5.
Patient positioning for the rearfoot alignment (Cobey/Saltzman) radiograph. The x-ray cassette is oriented at 15° from vertical. The x-ray beam is oriented perpendicular to the x-ray cassette.
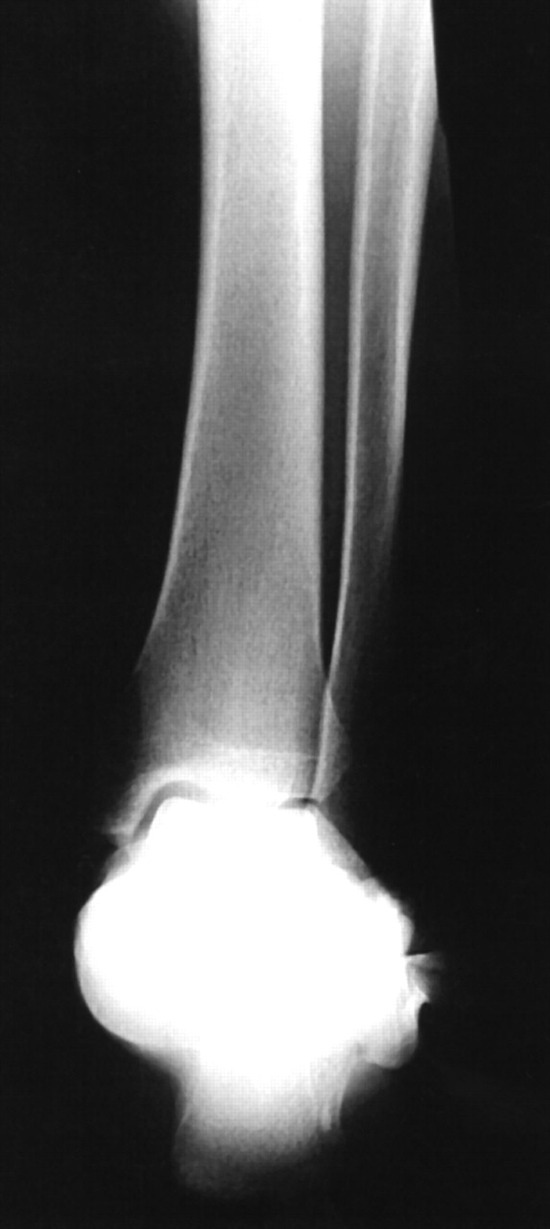
Figure 6.
Rearfoot alignment radiograph allowing for clear evaluation of the ankle joint orientation to the long axis of the tibia.
Deformity Planning
The goal of a realignment procedure is to restore abnormal angles to as close to normal as possible and to realign the center of the ankle joint for proper biomechanical function. Any deviation of the ankle or distal tibia in these planes can result in pain or significant joint destruction of the ankle and adjacent joints.
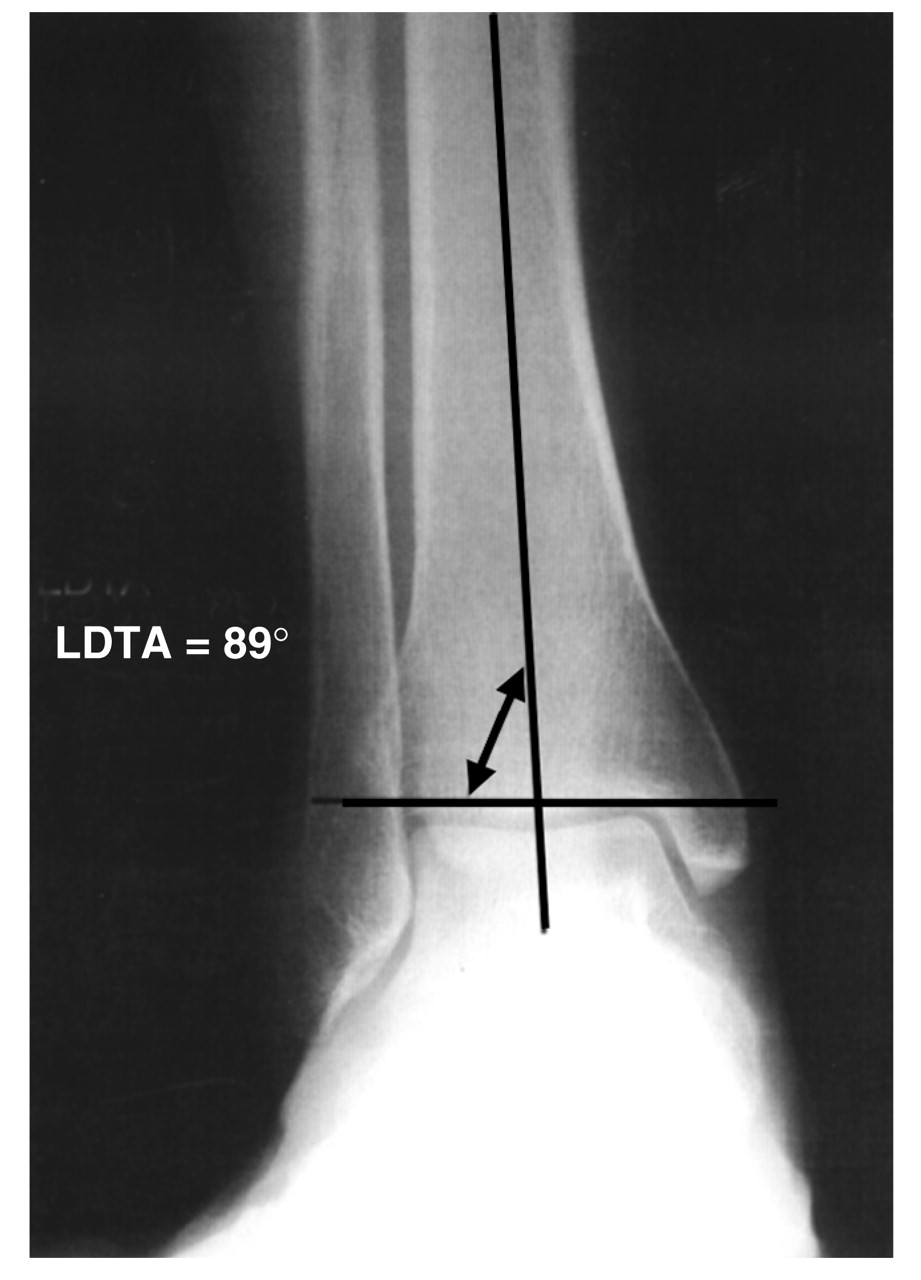
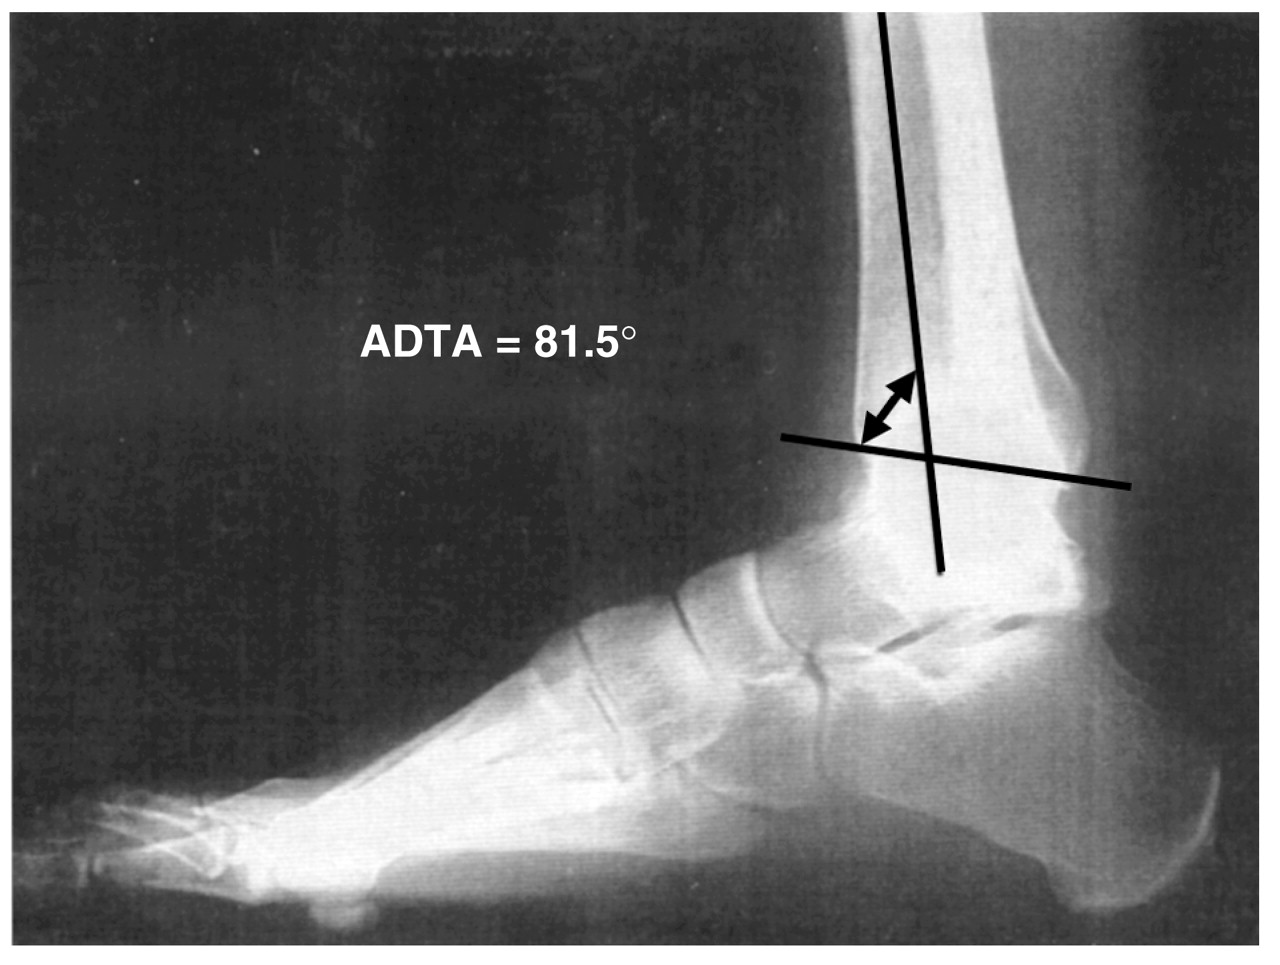
Distal tibial deformities occur in four basic planes: frontal, sagittal, oblique, and rotational; the focal dome osteotomy is ideal for frontal and sagittal plane deformities. In the frontal plane of the distal tibia, the ankle joint orientation line is perpendicular or in slight valgus to the midshaft of the tibia. The joint orientation line of the ankle and the anatomical axis of the tibia make an angle that measures 89° ± 3° [9]. This angle is known as the lateral distal tibial angle (Figure 7). The anterior distal tibial angle, formed by the mechanical axis of the tibia and the joint orientation line of the ankle in the sagittal plane, measures 80°± 3° in the normal lower extremity (Figure 8). An increased anterior distal tibial angle represents a recurvatum deformity. A decreased anterior distal tibial angle represents a procurvatum deformity.
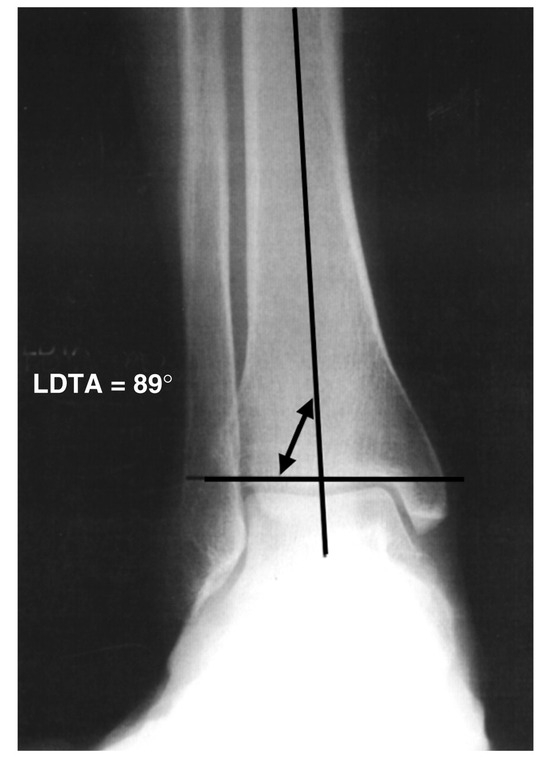
Figure 7.
The lateral distal tibial angle (LDTA) is the lateral angle formed by the anatomical axis of the tibia and the ankle joint orientation line. Normal values range from 86° to 92°.
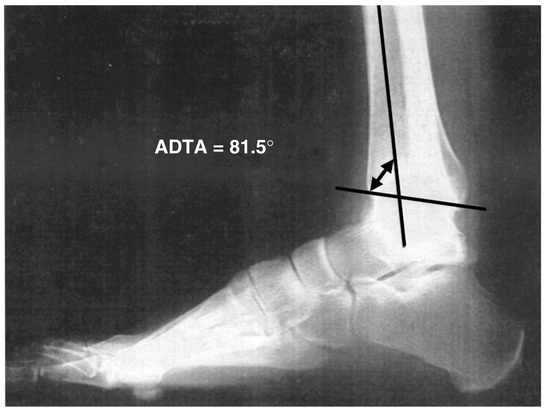
Figure 8.
The anterior distal tibial angle (ADTA) is the anterior angle formed by the mid-diaphyseal line of the tibia and the ankle joint orientation line. Normal values range from 77° to 83°.
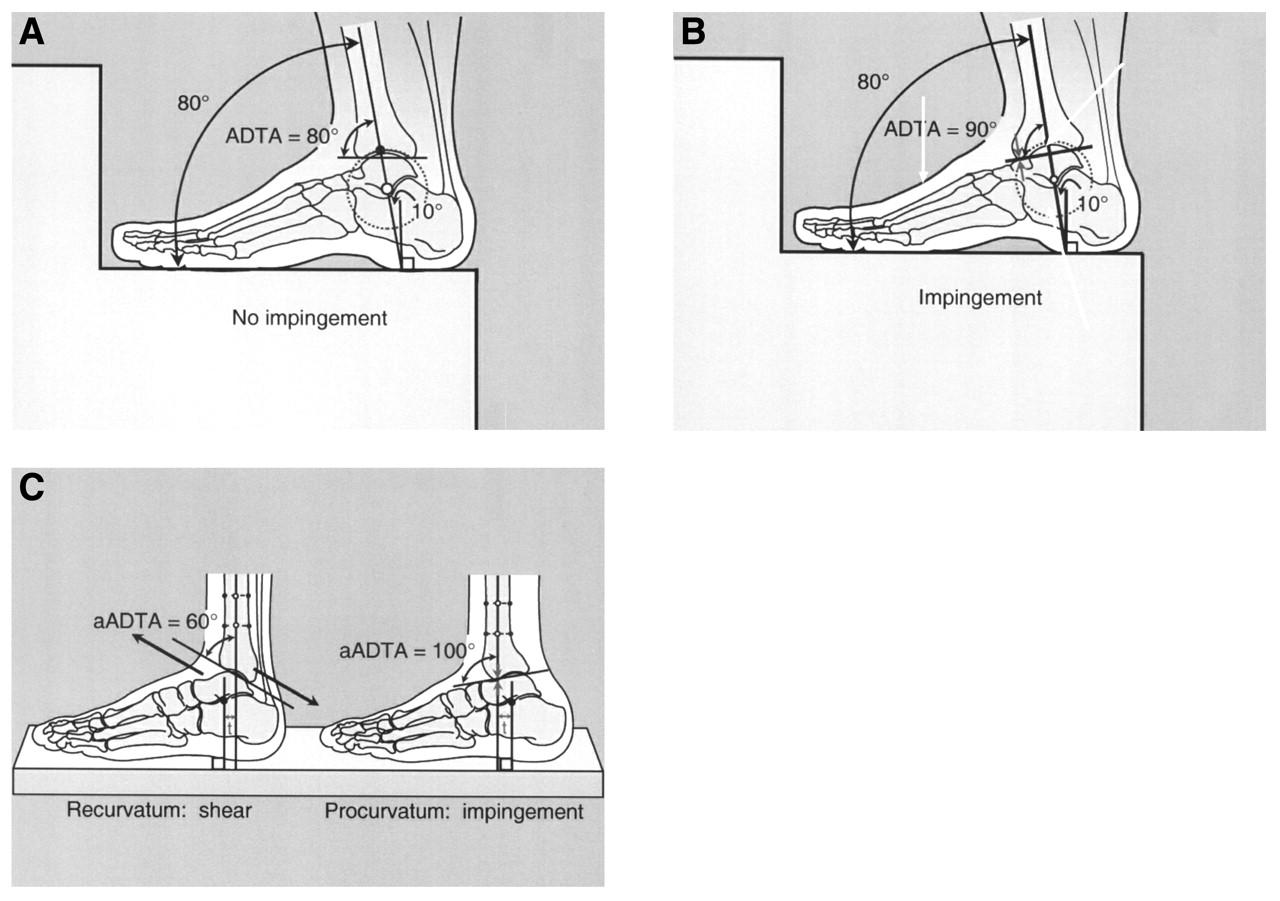
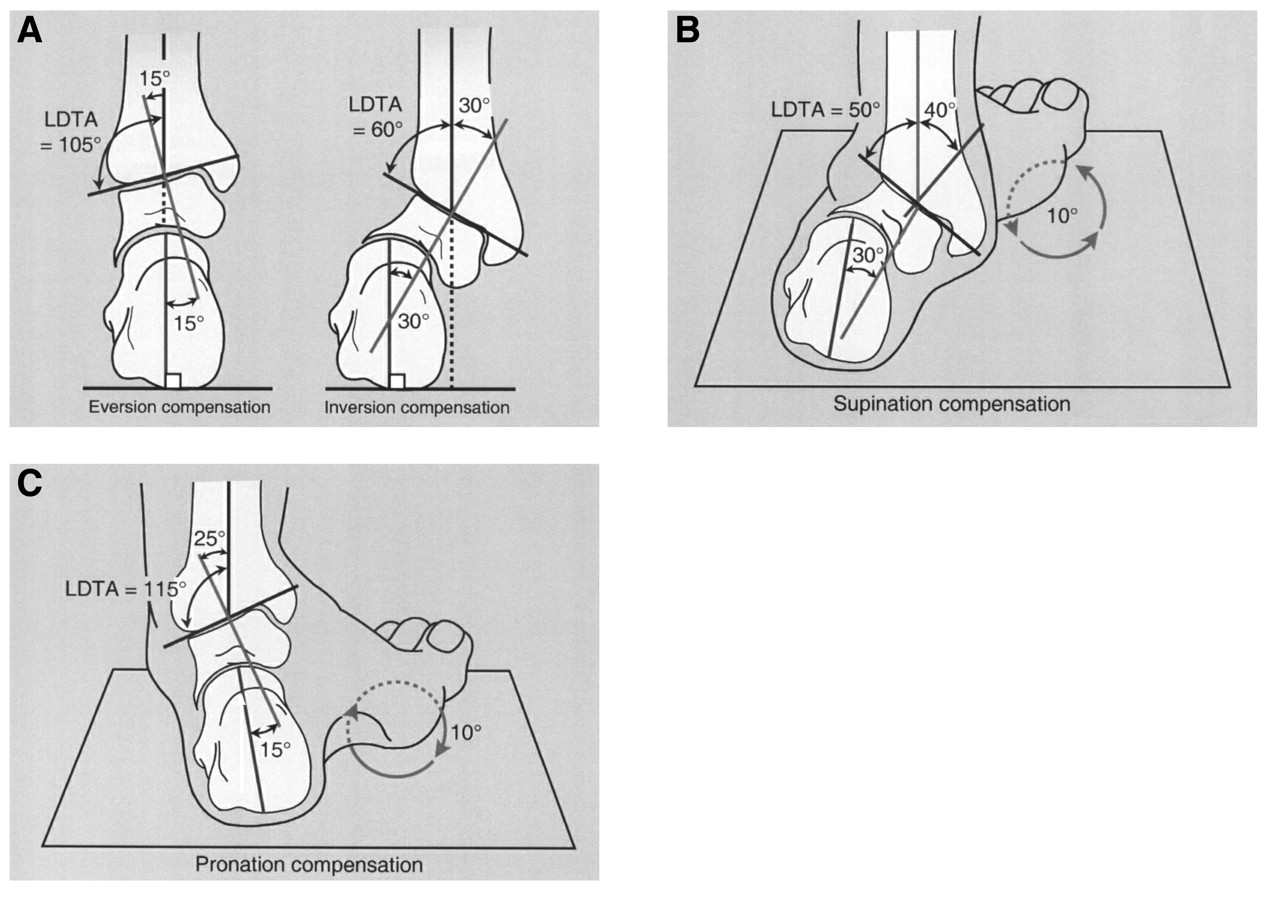
In the sagittal plane of the leg, ankle joint motion is usually 20° of dorsiflexion and 50° of plantarflexion. Therefore, a recurvatum deformity is much more likely to be completely compensated for than a procurvatum deformity because of the amount of compensatory motion available at the ankle (Figure 9) [1]. Frontal plane abnormalities occur in varus or valgus directions. The lateral distal tibial angle is increased with a varus deformity and decreased with a valgus deformity. These deformities are compensated for at the subtalar joint and forefoot. There is 15° of eversion and 30° of inversion available for compensation at the subtalar joint. Therefore, a decreased lateral distal tibial angle (valgus) has a higher likelihood of complete compensation than an increased lateral distal tibial angle (varus) when the subtalar joint has its normal range of motion. Evaluation of subtalar joint range of motion is important because tibial osteotomies may unmask a subtalar deformity (Figure 10) [1]. If this distal (rearfoot) deformity is not addressed, further symptoms may develop. Most deformities are well tolerated when compensation is available and become painful when the deformity falls outside of the compensatory range of motion. McKellop et al [10] noted the importance of the subtalar joint in accommodating an angular deformity of the tibia. Decreased range of motion of the subtalar joint places the ankle at risk in the normal tibia and may especially be a problem with a concomitant distal tibial deformity.
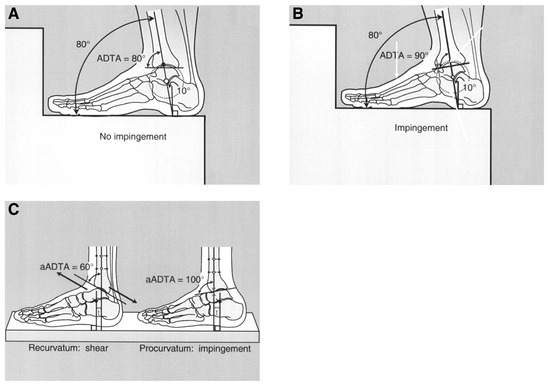
Figure 9.
Ankle joint dorsiflexion and plantarflexion compensation for procurvatum and recurvatum deformities. A, Normal ankle or recurvatum deformity (decreased anterior distal tibial angle [ADTA]) allows increased motion in the dorsiflexory direction; thus no impingement is created. B, Procurvatum deformity (increased ADTA) allows decreased range of motion and anterior ankle impingement. C, The patient better tolerates recurvatum deformities because no impingement symptoms are created, but shear forces created by the deformity lead to rapid joint degeneration. Procurvatum deformities are less well tolerated because of impingement pain, but they degenerate less. aADTA, anatomical anterior distal tibial angle. (Reprinted with permission from Paley [1].)
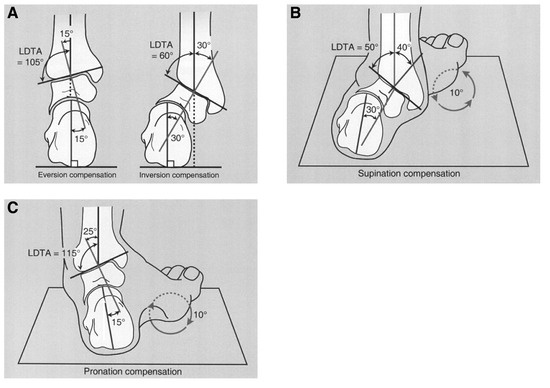
Figure 10 A–C.
Subtalar joint compensation via inversion and eversion for distal tibial deformities. LDTA, lateral distal tibial angle. (Reprinted with permission from Paley [1].)
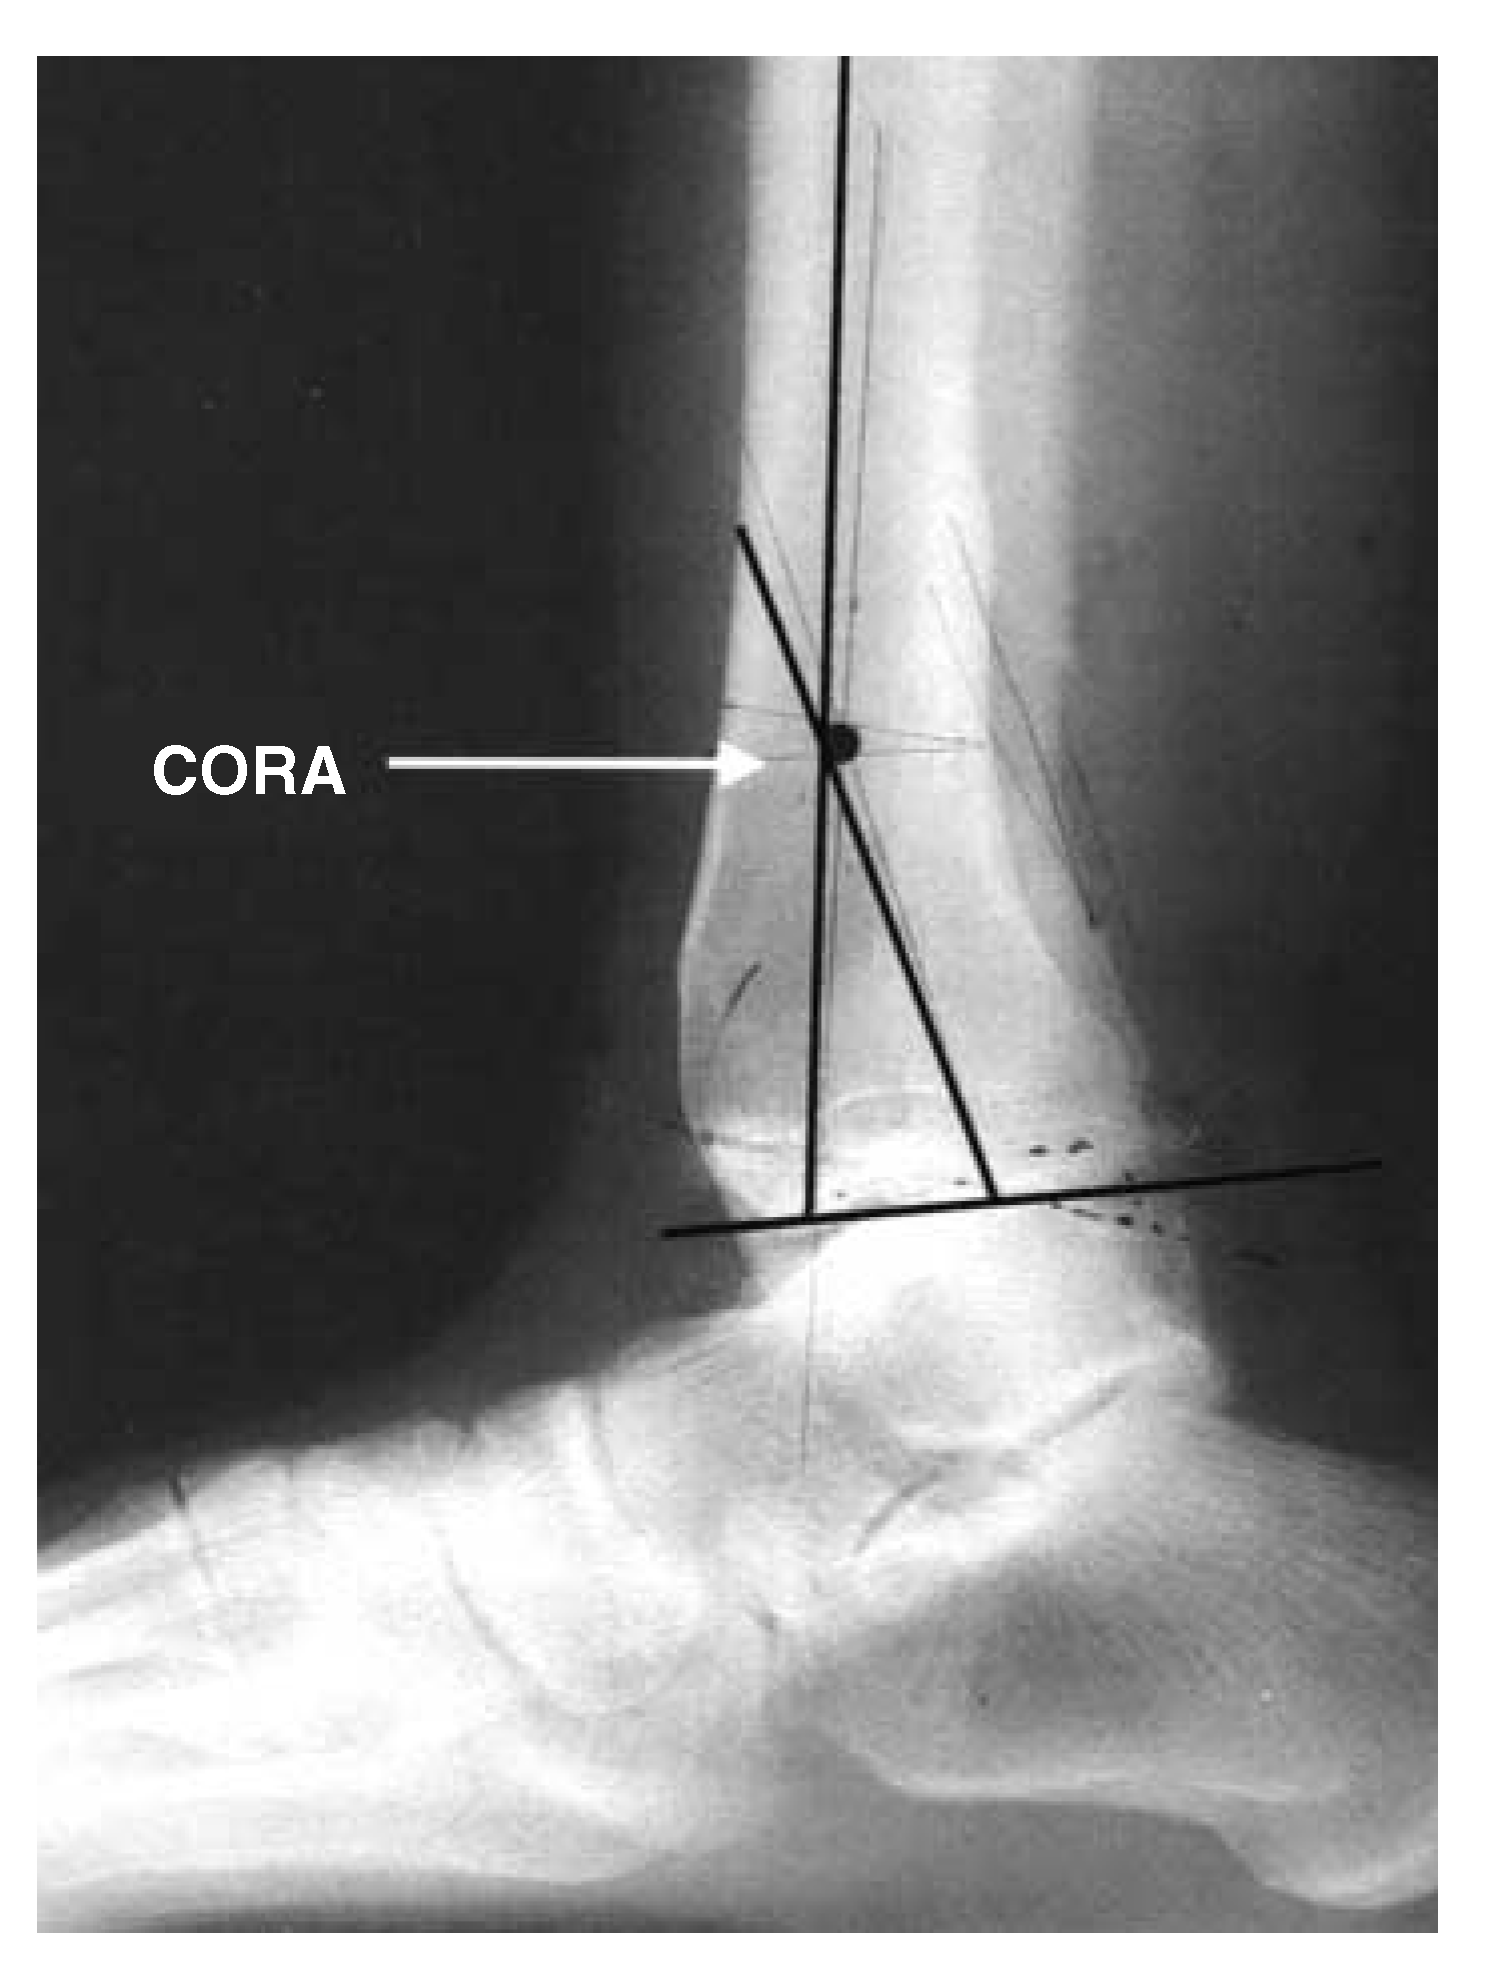
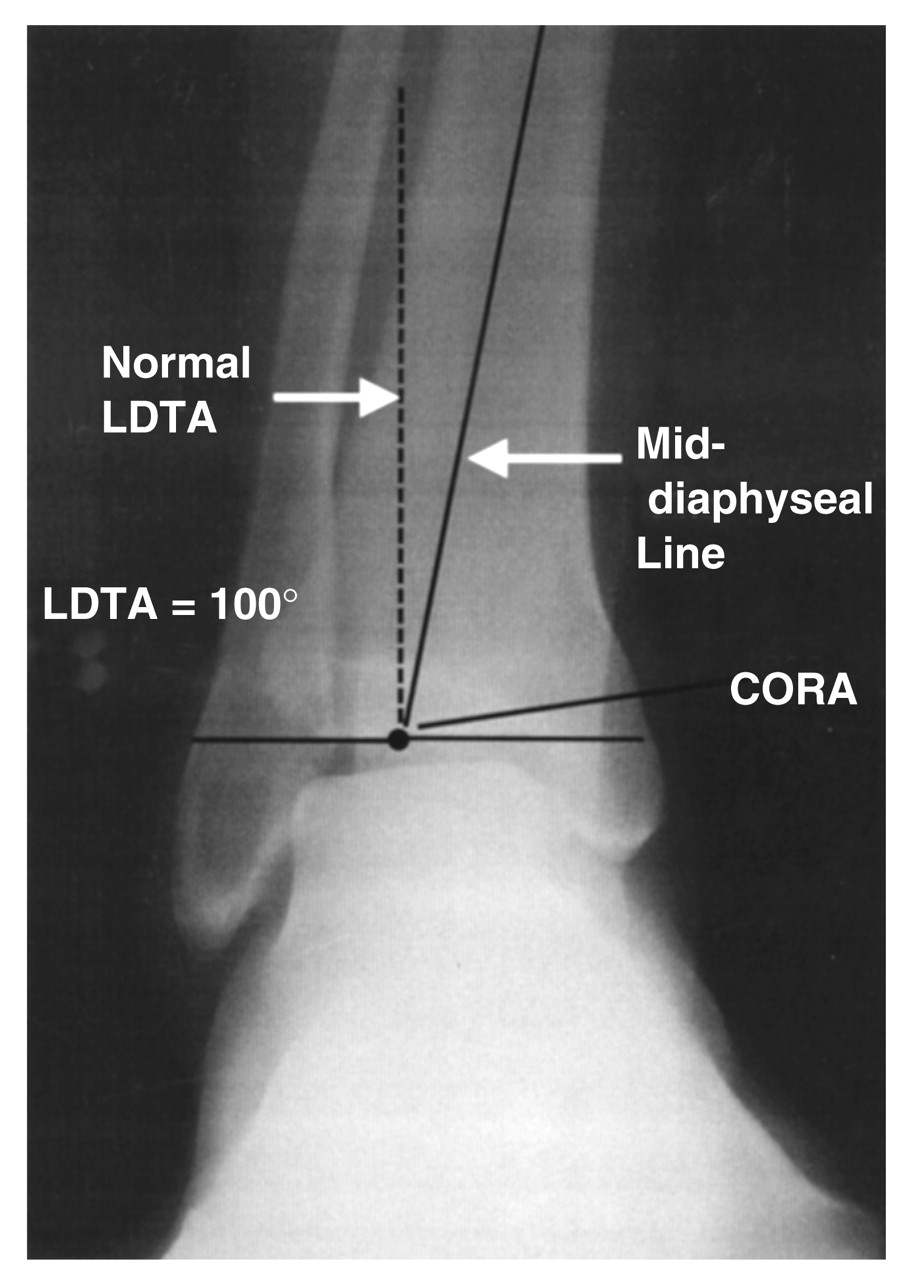
In the radiographic evaluation of tibial deformities, distal and proximal mid-diaphyseal lines of the deformity cross to form an apex. This point is the center of rotation of angulation (Figure 11) [3]. The goal of angular correction is to perform osteotomies as close as possible to the level of the center of rotation of angulation, thus minimizing translation. Performing osteotomies away from the center of rotation of angulation will result in correction of the primary deformity but will also cause a secondary translation, resulting in additional deformities in the lower extremity [11]. When the center of rotation of angulation falls at the level of the ankle joint, a focal dome osteotomy can be performed to minimize translation by centering the focal dome around the center of rotation of angulation using a radial arm proximally so that the osteotomy can be performed in the metaphyseal bone (Figure 12).
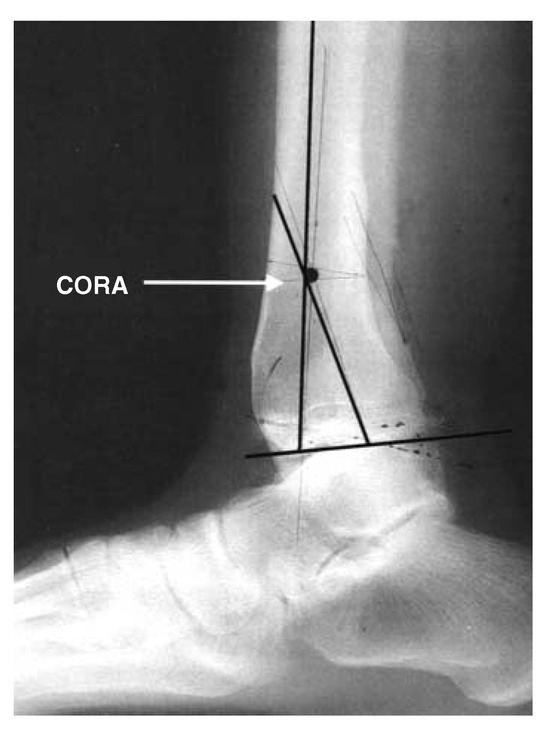
Figure 11.
Example of the center of rotation of angulation (CORA) forming proximal to the ankle joint. This point is found by bisecting the proximal and distal portions of the tibia.
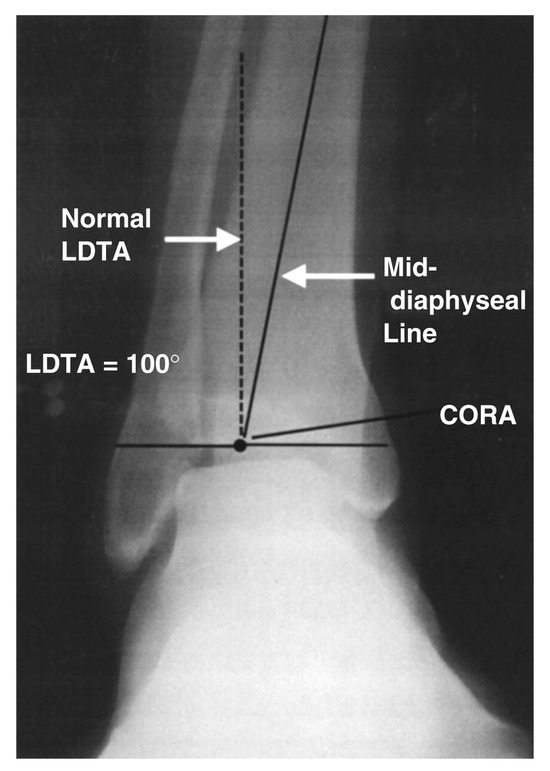
Figure 12.
Example of the center of rotation of angulation (CORA) forming at the level of the ankle joint. Once it is found that there is an abnormal anterior distal tibial angle or lateral distal tibial angle (LDTA), a line forming a normal angle can be drawn in relation to the joint line. The point where this normal line intersects the mid-diaphyseal line is the CORA. This is an appropriate deformity for a focal dome osteotomy.
Adjacent soft-tissue structures must be evaluated. Acute correction of these deformities can place stress on soft-tissue structures, especially the posterior tibial nerve. Acute tarsal tunnel syndrome can be a sequela of an acute varus or procurvatum correction (Figure 13). A prophylactic tarsal tunnel release should be considered when performing acute corrections. Severe deformities may require gradual correction through distraction osteogenesis to prevent neurologic or vascular compromise.
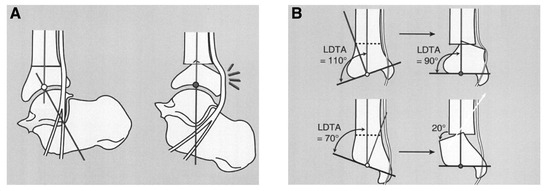
Figure 13.
A, Acute procurvatum-to-recurvatum correction can lead to posterior tibial nerve compression secondary to the posterior bump of the distal tibia. B, Acute varus-to-valgus correction can lead to posterior tibial nerve stretching or compression secondary to the medial bump created by the distal tibia. LDTA, lateral distal tibial angle. (Reprinted with permission from Paley [1].)
Surgical Technique
The patient is placed in the supine position. A bump is placed under the ipsilateral hip until the surgical limb is oriented with the tibial shaft in the frontal plane. The anterior tibial and dorsalis pedis arteries are identified using a hand-held Doppler device and are outlined using a skin marker. Often, the deep peroneal nerve is estimated and mapped as well for orientation. General or spinal anesthesia is typically used, and a thigh tourniquet may be considered for hemostasis but is not frequently used owing to the percutaneous nature of the procedure. The lower extremity is surgically prepared and draped up to the knee. The tarsal tunnel release is performed first when indicated.
Correction of Varus or Valgus Deformity
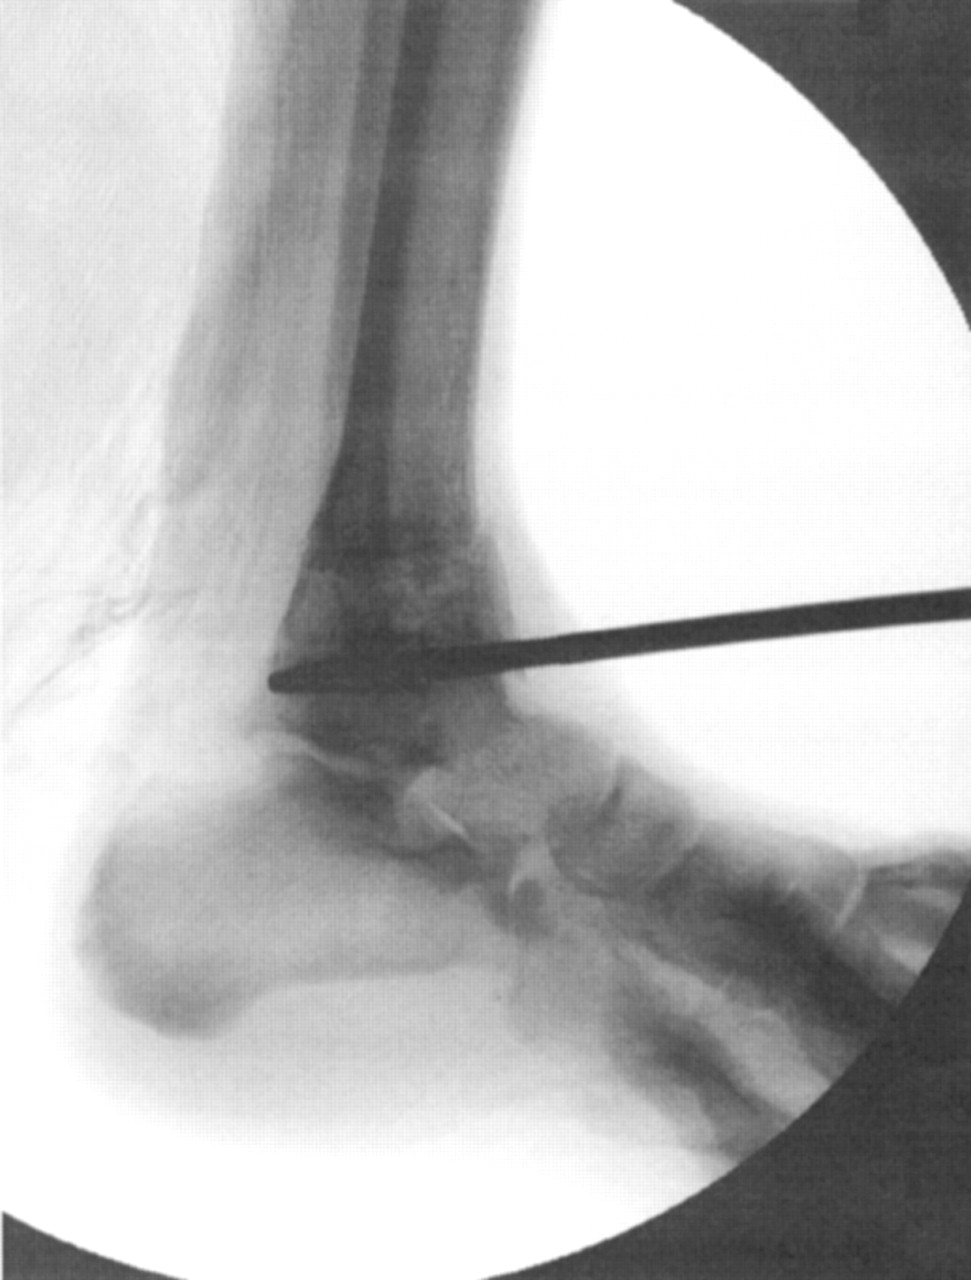
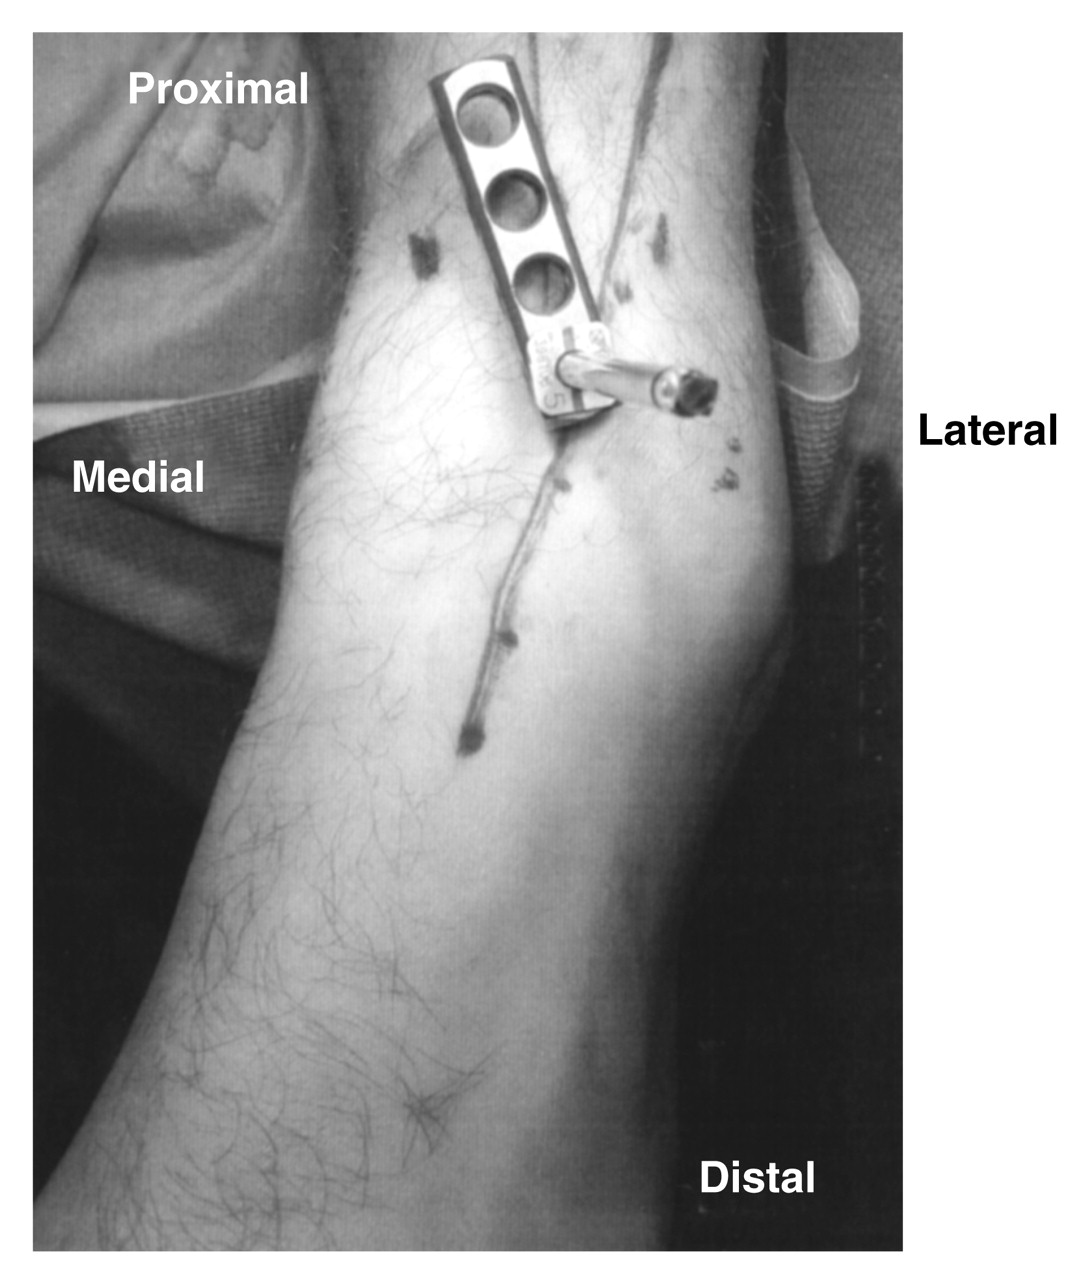
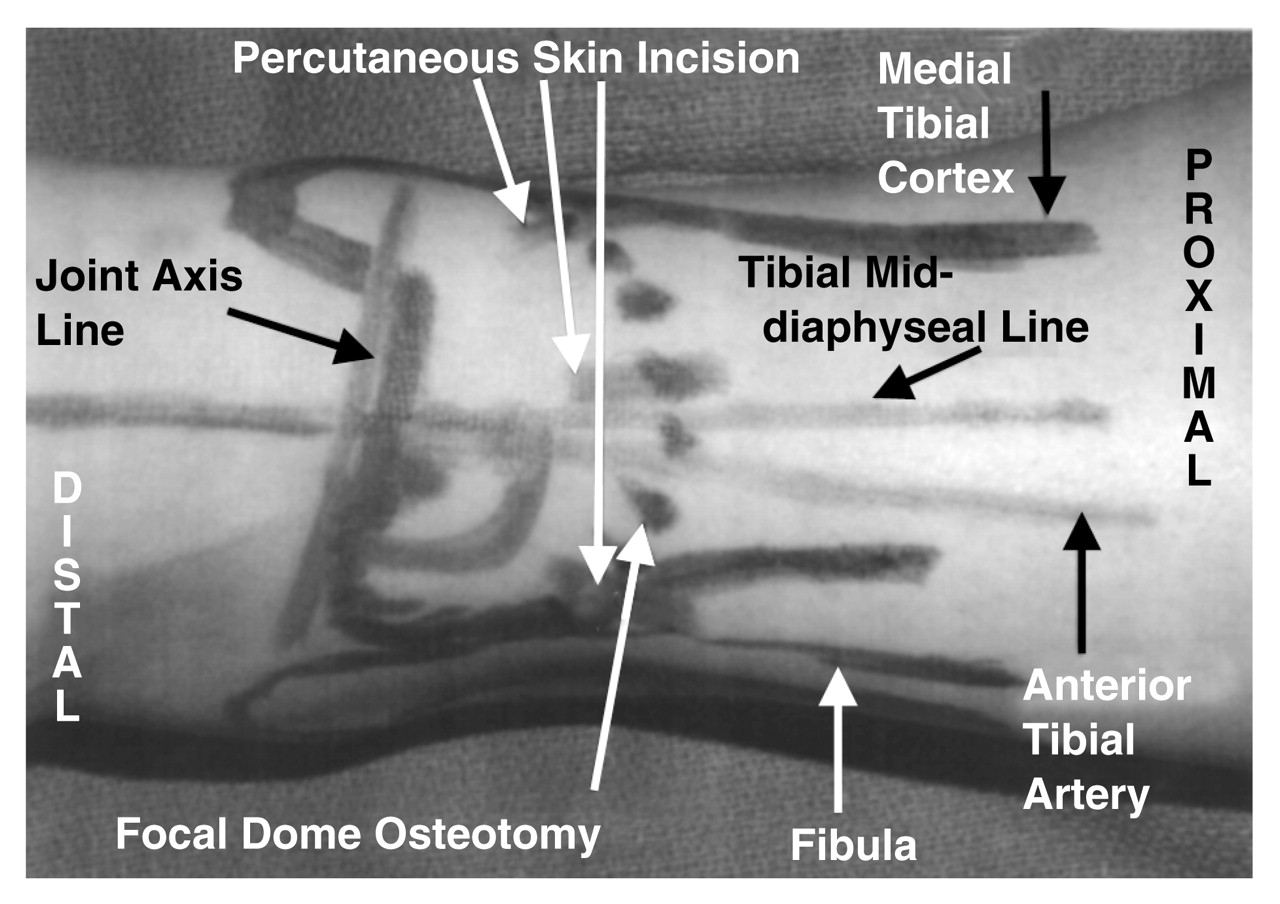
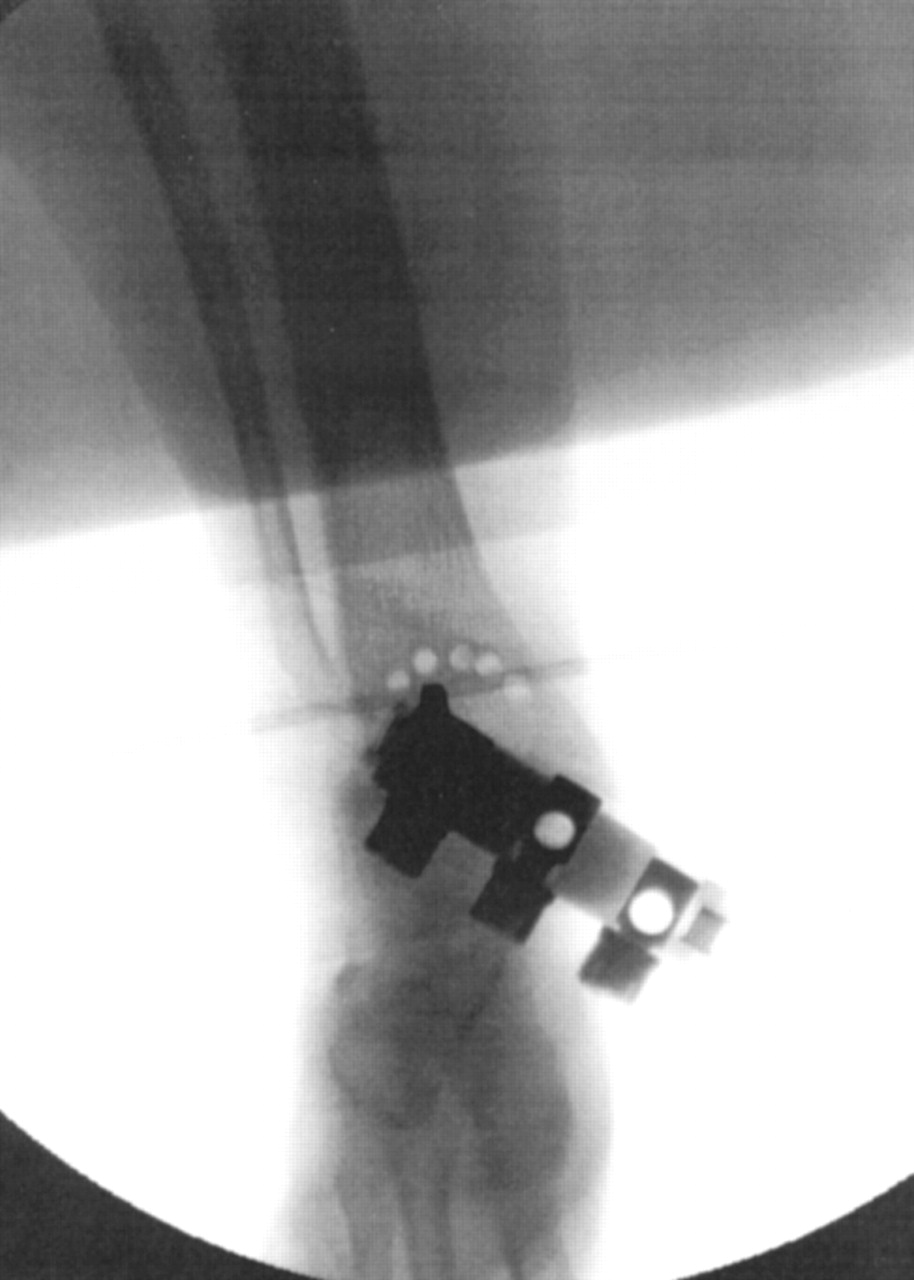
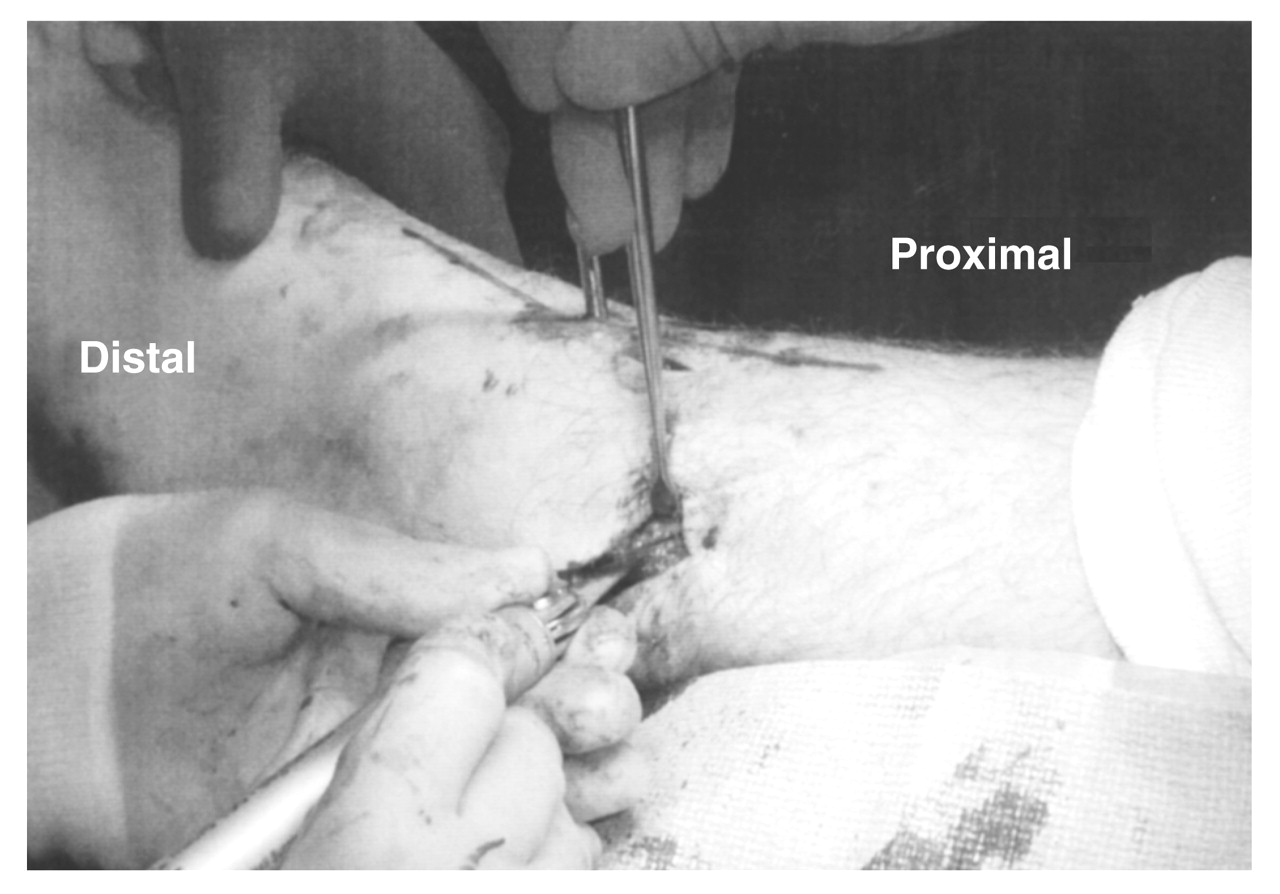
A stab incision is made lateral to the artery. Under image intensification, an appropriate half-pin is placed from anterior to posterior perpendicular to the long axis of the tibia (in the frontal and sagittal planes), which is visualized with anteroposterior and lateral fluoroscopic images. The pin is placed as near to the center of rotation of angulation as possible in the distal metaphyseal region of the tibia (Figure 14). This pin serves as the center of rotation for the osteotomy. When the center of rotation of angulation falls at the ankle joint, the pin is placed a few millimeters proximal to the ankle joint. This proximal placement of the half-pin may create slight translation, but it is usually minimal and has little effect on the limb axis. A radial lever arm guide is then applied to the half-pin to serve as the osteotomy template (Figure 15). We use a Rancho Cube (Smith & Nephew, Memphis, Tennessee) or DePuy/ACE pin holder (Warsaw, Indiana) as the radial arm guide. A standard fixation plate can also be considered as the radial arm guide when other equipment is unavailable. The guide hole and osteotomy level is selected on the basis of the ability of the osteotomy to exit the medial and lateral cortices of the tibia. One must visualize the osteotomy under fluoroscopic imaging to ensure that the osteotomy will exit both tibial cortices in the metaphyseal region of the bone and to avoid violating the ankle joint articulation. Multiple percutaneous incisions (typically three) are created, taking care to avoid neurovascular structures (Figure 16). A periosteal incision is then created to allow for this tissue’s protection while drilling. A drill guide is placed in the lever arm to protect the soft-tissue structures. Multiple percutaneous drill holes are placed from anterior to posterior in the tibia through the incision sites. Usually, two to three drill holes can be made through each incision. These holes form a domelike appearance based around the center of the deformity (Figure 17). An osteotome is then placed into the percutaneous incisions, and the osteotomy is completed in a slow, methodical manner from medial to lateral and anterior to posterior, essentially “connecting the dots or drill holes.” The osteotome should be narrow and essentially fractures the bone between the drill holes. The osteotomy is examined by fluoroscopy and is stressed both medially and laterally to ensure that the osteotomy is complete.
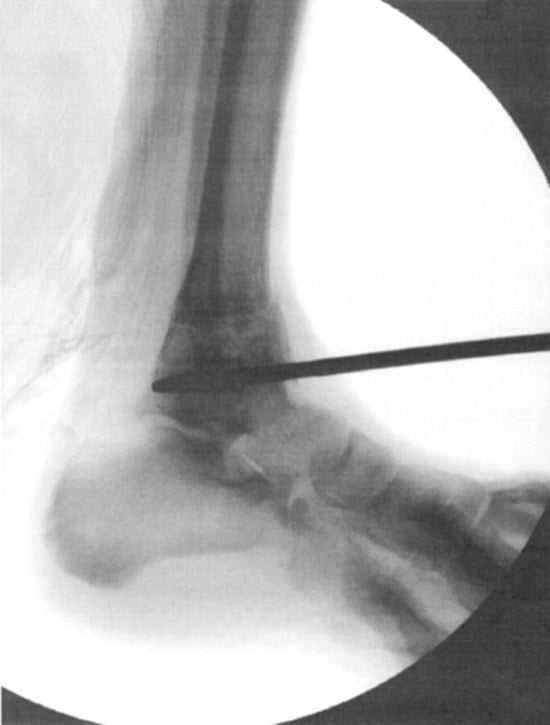
Figure 14.
The pin is placed as distally as possible in the metaphyseal bone and as close to the center of rotation of angulation as possible.
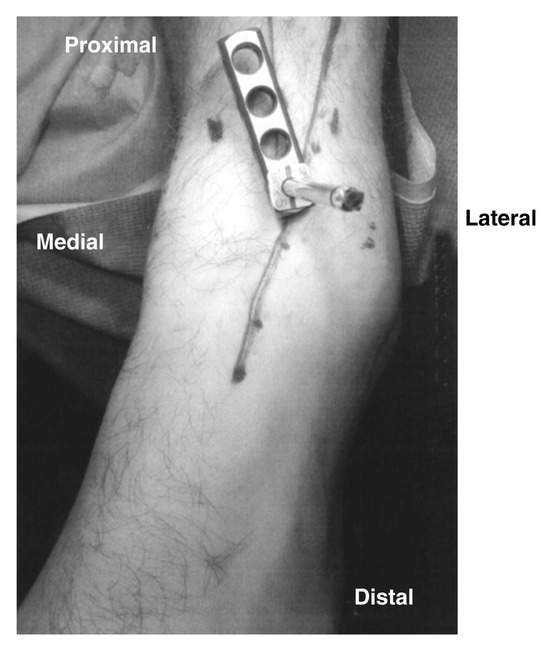
Figure 15.
The lever arm is applied to the half-pin to serve as the osteotomy guide.
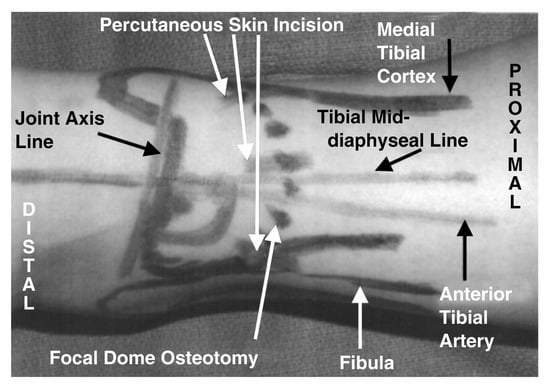
Figure 16.
The structures evaluated during the procedure. The percutaneous incisions are strategically placed away from the neurovascular structures and in areas that will allow the osteotomy to be completed.
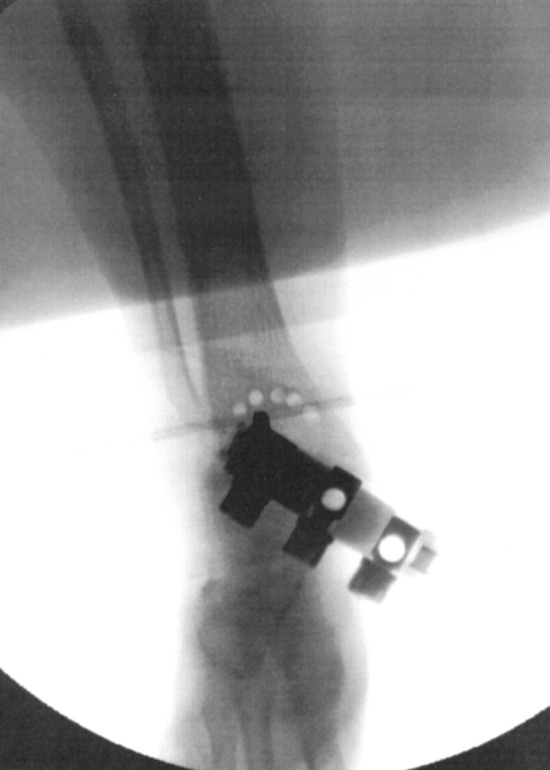
Figure 17.
The drill holes form the outline of the focal dome osteotomy.
Once the tibial osteotomy is complete, a fibular osteotomy may need to be performed to achieve all of the appropriate correction. When the fibular osteotomy is indicated, an incision of a few millimeters is made over the lateral aspect of the fibula near the level of the tibial osteotomy. A linear lateral periosteal incision is then made on the fibula and dissected anteriorly and posteriorly with a periosteal elevator. An osteotomy of the fibula is performed with a sagittal saw oriented from proximal anterior to distal posterior (always in the sagittal plane) (Figure 18).
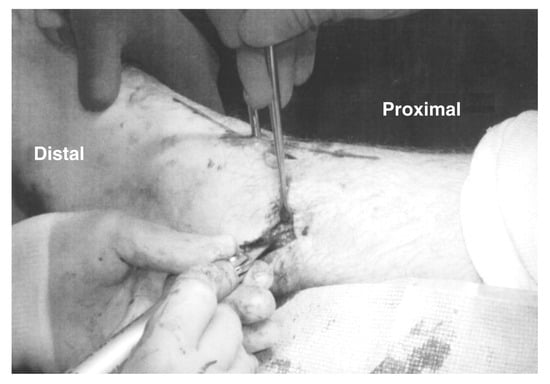
Figure 18.
The fibula is osteotomized to allow for adequate correction. The orientation of the fibular osteotomy depends on the plane of correction of the tibial osteotomy.
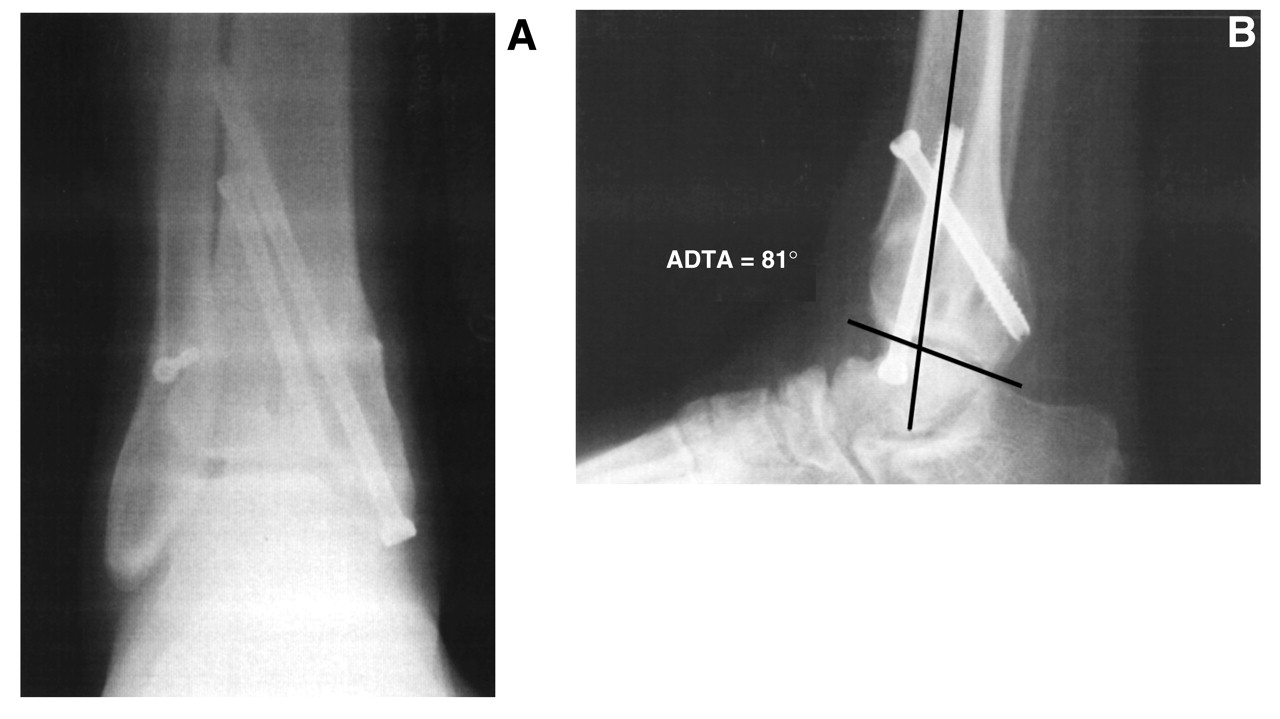
The foot and ankle distal to the osteotomy is then manipulated and rotated in a varus or valgus direction (the direction to correct the deformity). This maneuver is performed under image intensification. The osteotomy is rotated until a normal lateral distal tibial angle is obtained. The tibial osteotomy is fixated using two 6.5- or 8.0-mm partially threaded cannulated crossing screws. One screw is oriented from medial distal to proximal lateral, entering at the medial malleolus, and the other from anterior proximal to distal posterior, entering the tibia proximal to the osteotomy (Figure 19). The fibular osteotomy is fixated with one or two 4.0-mm screws from anterior to posterior.
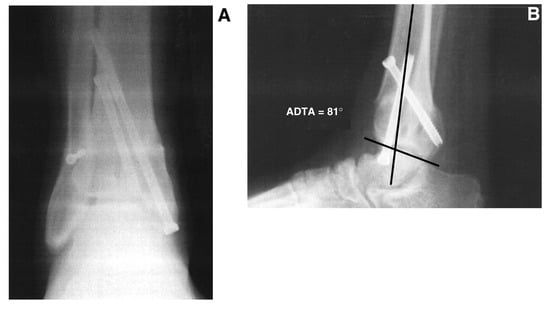
Figure 19.
Anteroposterior (A) and lateral (B) ankle radiographs demonstrating screw fixation and postsurgical orientation of the anterior distal tibial angle (ADTA).
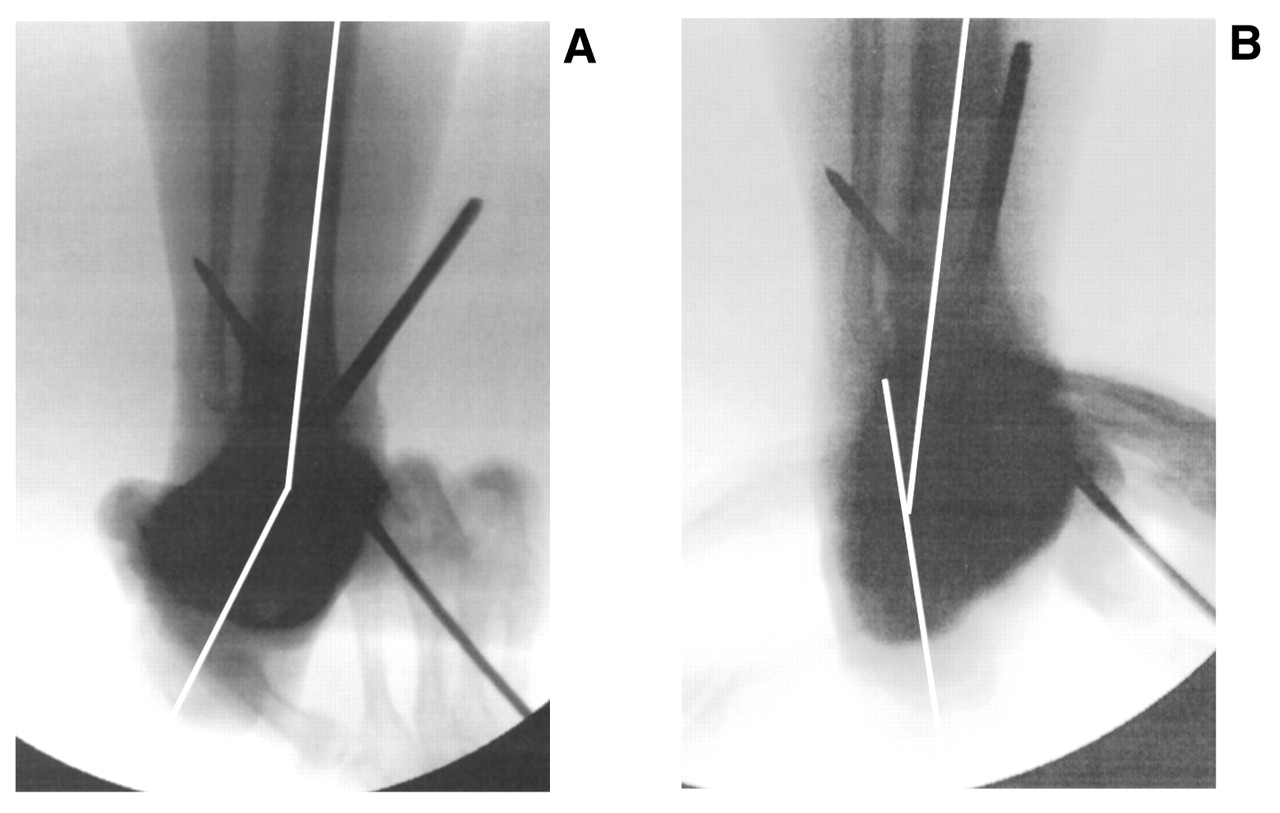
The entire lower extremity is then evaluated under image intensification (long leg calcaneal axial and rearfoot alignment views) to ensure alignment of the ankle with the tibia, the rearfoot with the ankle/tibia, and the forefoot with the rearfoot. The subtalar joint should be taken through its range of motion to ensure that a rearfoot deformity has not been created and that there is adequate motion (Figure 20). Additional procedures, such as calcaneal and midfoot osteotomies, are sometimes necessary to achieve appropriate alignment. External fixation may be warranted in lieu of internal fixation as the primary means of fixation or to augment the internal fixation. This decision is made on a case-by-case basis and is influenced by several factors, including confidence in the adequacy of the initial internal fixation and the patient’s ability to tolerate nonweightbearing. It is important to note that if external fixation is to be used, it is easier to perform the osteotomy and tarsal tunnel release with their respective soft-tissue and skin closure before application of the fixator. During closure, temporary fixation with wires or pins can be used to stabilize the osteotomy until the fixator can be placed. In extremely severe deformities, gradual correction may be considered. Gradual correction is obtained by use of the Ilizarov method or the Taylor Spatial Frame (Smith & Nephew). Description of these techniques is beyond the scope of this article, and they should be performed only by surgeons experienced with the Ilizarov technique.
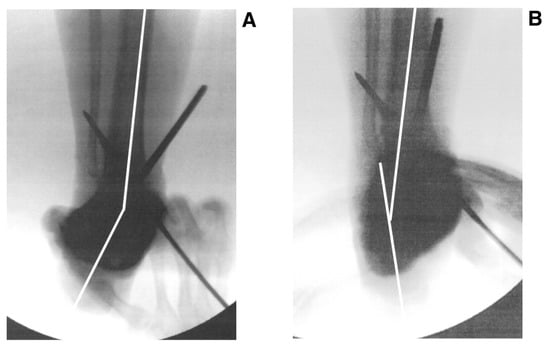
Figure 20.
Radiographs showing stress eversion (A) and stress inversion (B) demonstrating normal subtalar range of motion after surgical correction.
Correction of Recurvatum or Procurvatum Deformity
Correction of procurvatum and recurvatum deformities is performed in a similar manner (Figure 21). The initial approach is medial, and the half-pin is placed from medial to lateral just proximal to the ankle joint. The osteotomy site is carefully selected to ensure that the bony cut will exit the tibia anteriorly and posteriorly without invading the joint articulation. The incisions (again, approximately three) are placed, and a similar drill hole technique is used. Care must be taken to avoid traumatizing the posterior tibial tendon with the scalpel, drill, or osteotome.
The osteotomy is completed percutaneously with an osteotome. The osteotomy of the fibula is oriented from distal lateral to proximal medial in the sagittal plane when indicated. Occasionally, a wedge of bone may need to be resected in a reciprocal manner from the fibula to obtain adequate bone-to-bone contact when rotating the tibia anteriorly or posteriorly. The osseous segment is rotated until the anterior distal tibial angle is in its normal anatomical position. Fixation is performed as described previously. Ankle joint dorsiflexion and plantarflexion are evaluated to ensure that the range of motion is adequate. A tendo Achillis lengthening or gastrocnemius recession may be necessary in procurvatum cases to achieve this range of motion owing to its contracture.
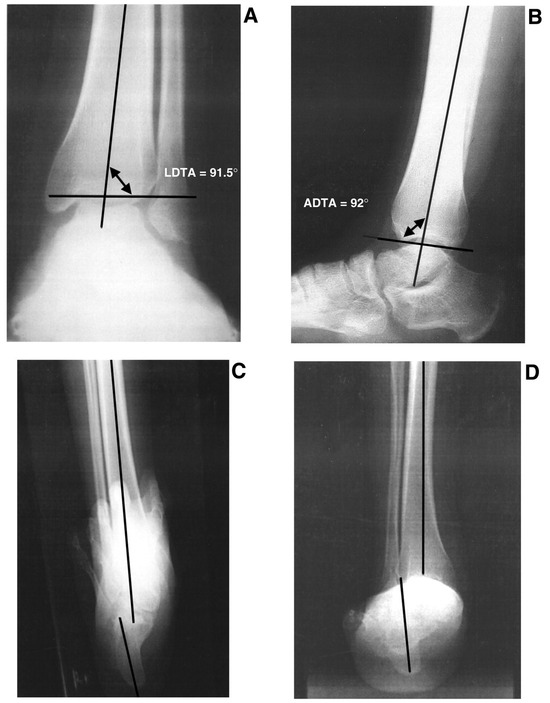
Figure 21 A–D.
Lateral (A and B) and anteroposterior (C and D) radiographs showing a procurvatum deformity. LDTA, lateral distal tibial angle; ADTA, anterior distal tibial angle.
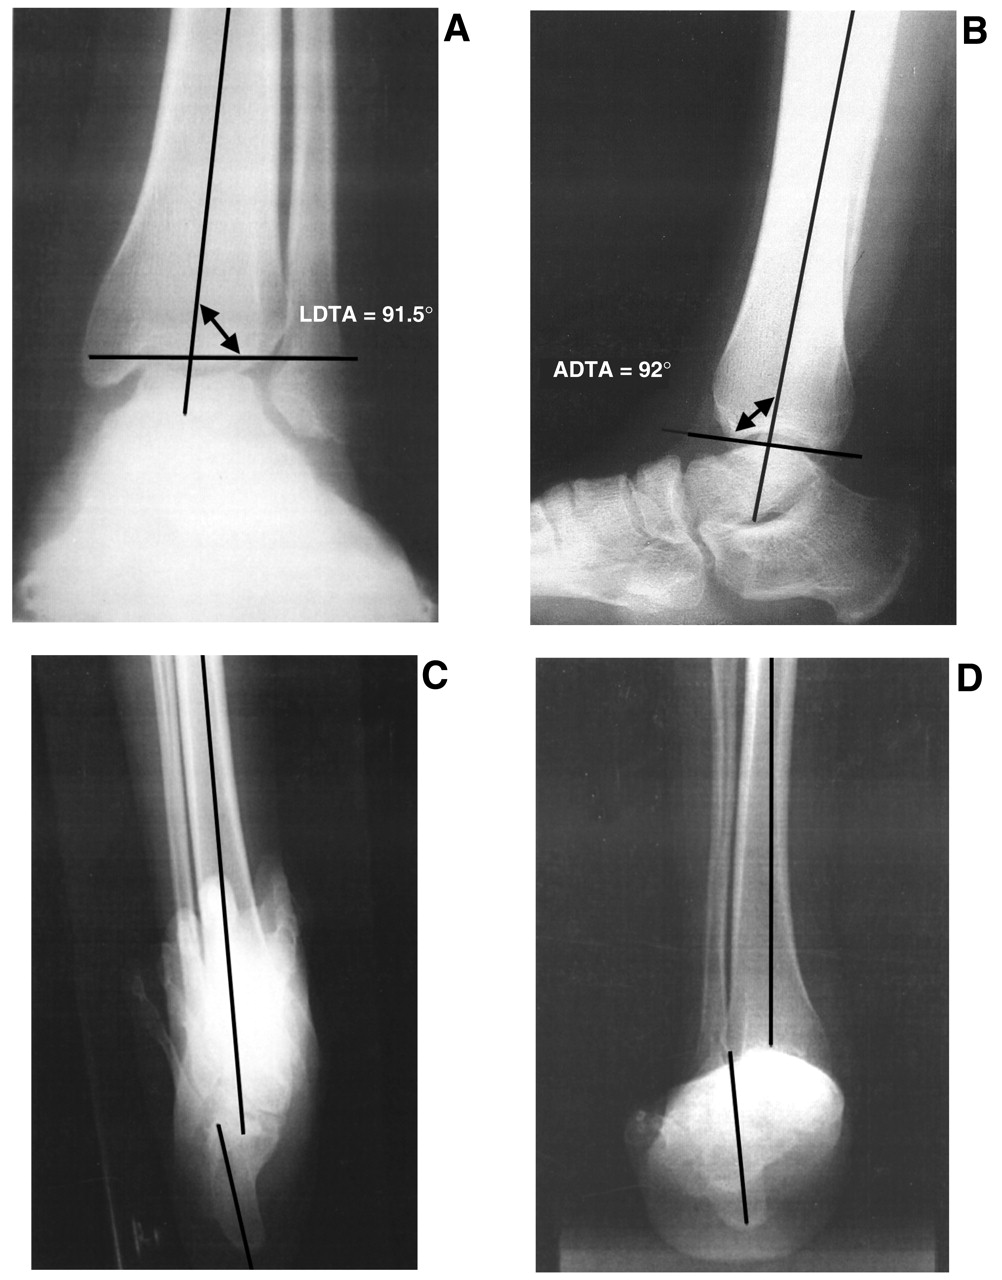
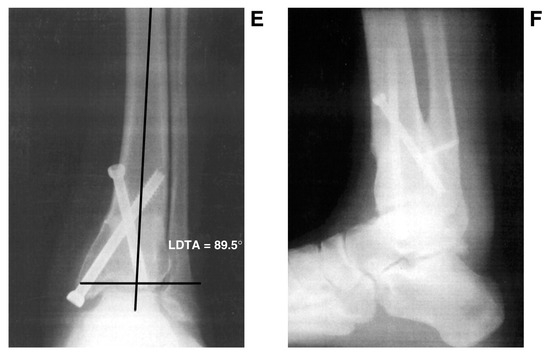
Figure 21 E and F.
Normal angles after surgical correction.
Postoperative Management
The patient is placed in a short-leg nonweightbearing cast for approximately 4 to 8 weeks, when internal fixation is used alone. Serial radiographs are taken to evaluate the osteotomy for healing. Progressive partial weightbearing is permitted when radiographs demonstrate that the osteotomy is healed. The same criteria are used for determining the time of removal of the frame when external fixation is used. Progression to controlled weightbearing in a rocker-bottom fracture brace occurs for 2 to 3 weeks. The physician must evaluate the need for physical therapy, as this is often necessary to maintain range of motion of the foot and ankle and to strengthen and retrain the lower-leg musculature. Activity is then gradually increased on the basis of each patient’s progress.
Complications
Complications can include nonunion of the tibial or fibular osteotomy site, but this is rare because of the location of the osteotomy and its minimal periosteal dissection or bony loss. Adequate fixation and bony apposition of the osteotomy site are essential to avoiding any nonunion.
Nerve traction or entrapment is a potential complication with acute corrections. A prophylactic tarsal tunnel release is performed to eliminate this problem, or gradual correction may be considered.
Additional complications may include edema, which may be controlled with compression therapy. Wound dehiscence is rare with this percutaneous approach. Pin-site infections are not uncommon when using external fixation and are managed with local wound care, daily cleansing of the pin sites, and antibiosis. Again, the percutaneous nature of this specific procedure decreases the complication rate relative to more traditional approaches.
Conclusion
The focal dome supramalleolar osteotomy is a relatively simple procedure but requires a detailed preoperative evaluation, clinically and radiographically, to ensure success. Knowledge of the local anatomy and precise intraoperative image-intensification techniques enhance surgical success.
External fixation may be necessary either as a supplemental or a primary form of fixation. Therefore, a thorough knowledge of external fixation application and principles is essential.
This osteotomy is performed in the metaphyseal region of bone and has an excellent healing rate, minimal bone and periosteal dissection or destruction, and stable bone-to-bone contact. This is an excellent procedural addition to the reconstructive foot and ankle surgeon’s armamentarium.
References
- Paley D: “Ankle and Foot Considerations,” in Principles of Deformity Correction, ed by D Paley, p 571, Springer, New York,2002.
- Mangone PG: Distal tibial osteotomies for the treatment of foot and ankle disorders.Foot Ankle Clin6:583,2001.
- Paley D: “Frontal Plane Mechanical and Anatomic Axis Planning,” in Principles of Deformity Correction, ed by D Paley, p 61, Springer, New York,2002.
- Paley D, Herzenberg JE, Tetsworth K, et al: Deformity planning for the frontal and sagittal plane corrective osteotomies.Orthop Clin North Am25:425,1994.
- Johnson EE: Multiplane correctional osteotomy of the tibia for diaphyseal malunion.Clin Orthop215:223,1987.
- Graehl PM, Hersch MR, Heckman JD: Supramalleolar osteotomy for the treatment of symptomatic tibial malunion.J Orthop Trauma1:281,1987.
- Paley D: The correction of complex foot deformities using Ilizarov’s distraction osteotomies.Clin Orthop293:97,1993.
- Marks RM: “Radiographic Evaluation of the Foot and Ankle,” in Foot and Ankle Disorders, Vol 1, ed by M Myerson, p 83, WB Saunders, Philadelphia,2000.
- Paley D: “Normal Limb Alignment and Joint Orientation,” in Principles of Deformity Correction, ed by D Paley, p 1, Springer, New York,2002.
- McKellop HA, Adolfo L, Sarmiento A: Effects of tibial misalignment on the knee and ankle.Orthop Clin North Am25:415,1994.
- Paley D: “Osteotomy Concepts and Frontal Plane Realignment,” in Principles of Deformity Correction, ed by D Paley, p 99, Springer, New York,2002.
© 2005 American Podiatric Medical Association