Abstract
The contact fatigue performance of carburized gear steels is critical for transmission durability, yet the mechanisms linking alloy-specific microstructure to failure modes remain complex. This study systematically compares the contact fatigue behaviors of 20MnCr5 and 20CrMoH gears using step-loading tests and multi-scale characterization. The results demonstrate a significantly higher contact fatigue limit for 20MnCr5 of 1709 ± 12 MPa compared to 1652 ± 40 MPa for 20CrMoH, despite the latter exhibiting higher initial surface hardness. This hardness–toughness paradox is mechanistically elucidated by the distinct roles of alloying elements: while Molybdenum in 20CrMoH refines the grain size for high static strength, it limits retained austenite stability, resulting in a brittle hard-shell and soft-core structure prone to interface decohesion at martensite lath boundaries. Conversely, Manganese in 20MnCr5 promotes a gentler hardness gradient via favorable diffusion kinetics and stabilizes abundant film-like retained austenite. This microstructure activates a Stress Compensation Mechanism, where strain-induced martensitic transformation generates compressive volume expansion to counteract cyclic stress relaxation. Consequently, 20MnCr5 exhibits mild plastic micropitting driven by transformation toughening, whereas 20CrMoH undergoes severe brittle spalling driven by the Eggshell Effect. These findings confirm that balancing matrix toughness with hardness is more critical than maximizing surface hardness alone for contact fatigue resistance.
1. Introduction
In modern mechanical industries, particularly in aerospace, marine, vehicle, and wind power sectors, gear transmission plays a critical role, as its performance directly influences the stability and efficiency of the entire mechanical system [1,2,3]. With increasing demands for higher load-carrying capacity and power density in gear transmissions [4], more stringent requirements have been placed on contact fatigue failure, one of the primary failure modes affecting gear performance [5,6,7,8]. Carburizing and quenching, as a surface hardening technique for gears, significantly enhances the contact fatigue performance of low-alloy steel gears, leading to its widespread industrial adoption [9,10]. In accordance with the ISO 683-3 standard, 20MnCr5 and 20CrMoH steels are defined as Mn-Cr series and Cr-Mo series hardening steels, respectively. These grades are characterized by favorable machinability and wear resistance [11], making them commonly employed in gears for new energy vehicles.
Compared to failure modes such as bending fatigue and instantaneous fracture, contact fatigue involves a more complex failure mechanism. This type of failure originates from damage evolution in the gear surface and subsurface regions under cyclic contact loading. After a certain number of cycles, it leads to micro-pitting, pitting, and eventually spalling [12,13]. The surface integrity of gears is a major factor influencing contact fatigue performance [14]. Key surface integrity parameters include surface topography [15], residual stress [16], and hardness gradient [17], among others. Additionally, factors such as operating conditions [18] and material properties [19] also affect gear contact fatigue behavior.
To investigate the relationship between gear contact fatigue performance and its influencing factors, numerous studies have been conducted. Regarding the effect of surface integrity, Li et al. [20] examined the influence of barrel polishing on gear surface integrity and systematically evaluated how this process affects surface integrity parameters, providing a theoretical basis for optimizing gear polishing. Sun et al. [21] developed a numerical model for predicting the total contact fatigue life of carburized gears, revealing that surface integrity significantly affects crack initiation location and that crack initiation accounts for the majority of the total contact fatigue life. Wu et al. [22] observed considerable variation in surface integrity characteristics over different operating cycles: surface machining marks are gradually worn away, followed by the appearance of pitting damage during fatigue testing. Wen et al. [23] investigated the effects of the residual stress and hardness gradient on the contact fatigue performance of rough gear surfaces. They proposed a contact calculation method based on asperity modeling and mixed lubrication analysis, demonstrating that increasing surface compressive residual stress and hardness significantly reduces the risk of surface fatigue. Cheng et al. [24] developed a contact model incorporating elastoplastic lubrication, surface roughness, and carburized layer characteristics. Their findings indicated that surface roughness has a notable impact on contact performance, and for heavy-duty gears, a surface roughness Ra below 0.45 μm is recommended for optimal performance.
Regarding operating conditions and materials, Matkovic et al. [25] found that under the same torque and tooth root temperature, lubricated gears exhibited 2 to 5.2 times longer fatigue life than non-lubricated gears, highlighting the critical role of lubrication. Park et al. [26] reported that temperature significantly influences gear wear, as rising flank temperatures alter lubricant film properties and thereby affect wear behavior. Tobie et al. [27] noted that thermal damage and tooth flank wear are dominant under dry running conditions, whereas pitting becomes the main failure mode under adequate oil lubrication. Liu et al. [28] summarized the effects of lubrication on gear performance, indicating that ester-based lubricants improve efficiency at high temperatures, high-viscosity lubricants are beneficial for energy savings and anti-wear performance, spray lubrication is generally more efficient than immersion lubrication, and starved lubrication increases friction and power loss. Jain et al. [29] reviewed the research and development on polymer gears, pointing out that polyamide and cellulose acetate gears and their composites are widely used, while other materials have limited application due to pairing constraints.
Beyond the specific domain of carburized automotive gears, contact fatigue mechanisms manifest uniquely across different material systems, offering valuable comparative insights. For instance, in high-strength bearing steels, failure is often preceded by distinctive subsurface microstructural alterations, such as White Etching Areas (WEAs) and Dark Etching Regions (DERs), driven by complex shear stress states [30]. In heavy-duty wind turbine gears, the failure mode frequently involves a competition between surface-initiated micropitting and subsurface-initiated macropitting [4]. Furthermore, for surface-coated materials, the failure mechanism often shifts to coating delamination or brittle fracture caused by the elastic modulus mismatch between the hard coating and the ductile substrate [31]. These diverse failure behaviors underscore the critical necessity of identifying the specific dominant mechanism—whether surface-driven or subsurface-driven—for the particular alloy system under investigation.
Although extensive research has established the individual effects of surface integrity on fatigue life, most existing studies rely on single-material investigations, lacking a critical comparative perspective across different alloy systems. This limitation hinders the generalization of anti-fatigue design principles, as it remains unclear whether the dominant failure mechanism is governed by macroscopic mechanical properties or microscopic phase stability. Specifically, a critical knowledge gap exists regarding how the distinct microstructural characteristics of Mn-Cr and Cr-Mo series steels—such as retained austenite stability and hardness gradient profiles—competitively influence the transition between micropitting and spalling failure modes.
Driven by this gap, this study aims to test two specific hypotheses: (1) that the strain-induced transformation of retained austenite plays a more decisive role than initial surface hardness in suppressing crack initiation; and (2) that a gentler subsurface hardness gradient effectively shifts the failure mode from catastrophic brittle spalling to progressive micropitting. To verify these hypotheses, systematic step-loading fatigue tests were conducted on 20MnCr5 and 20CrMoH gears, complemented by multi-scale characterization of the damage evolution.
2. Materials and Methods
2.1. Test Gears
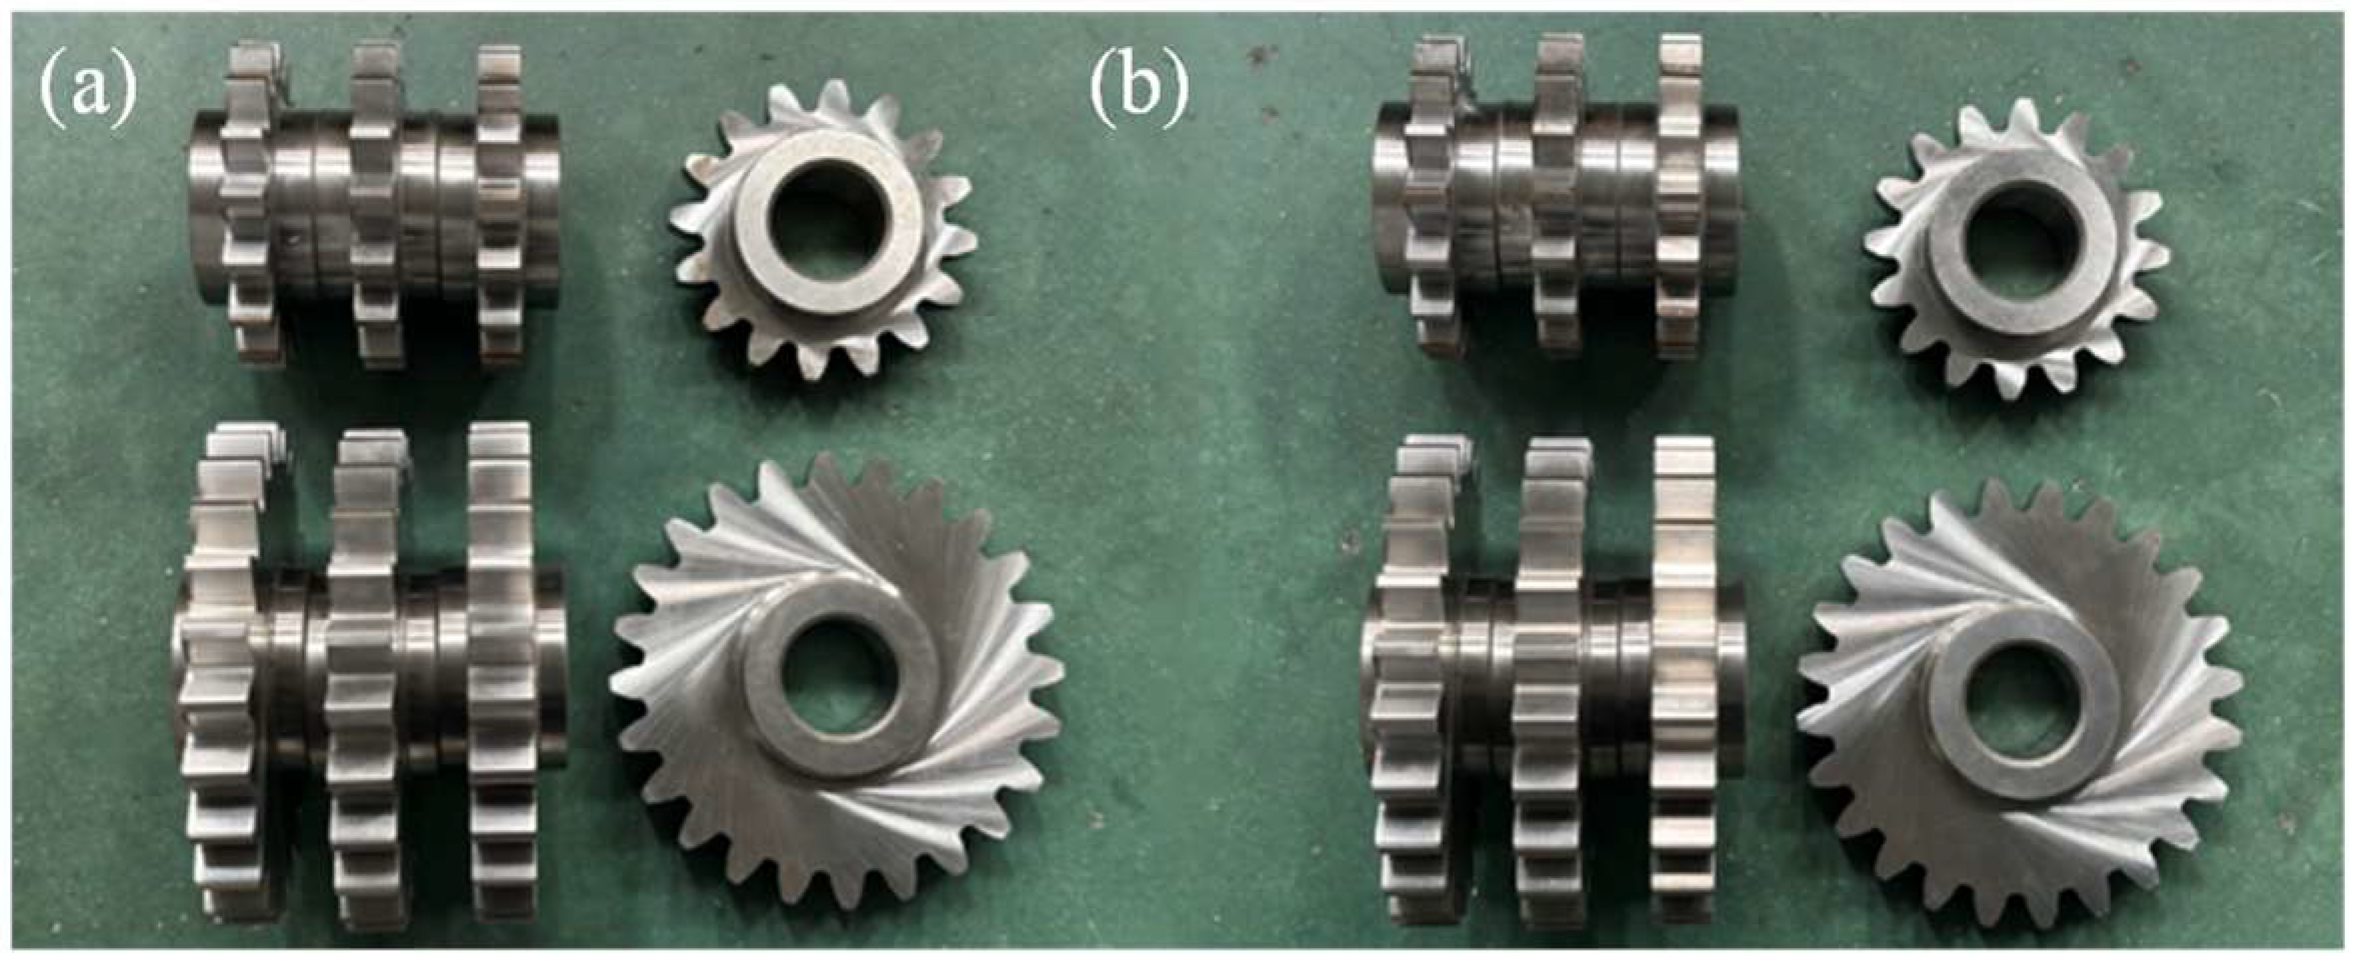
The detailed gear parameters are provided in Table 1. Geometrical parameters of the specimen gears., and photographs of the gear specimens are shown in Figure 1 Chemical composition analysis was conducted on the test gears, with the results for the 20MnCr5 and 20CrMoH gears summarized in Table 2 and Table 3, respectively.
Table 1.
Geometrical parameters of the specimen gears.
Figure 1.
Test gears: (a) 20MnCr5 gears; (b) 20CrMoH gears.
Table 2.
Chemical composition of 20MnCr5.
Table 3.
Chemical composition of 20CrMoH.
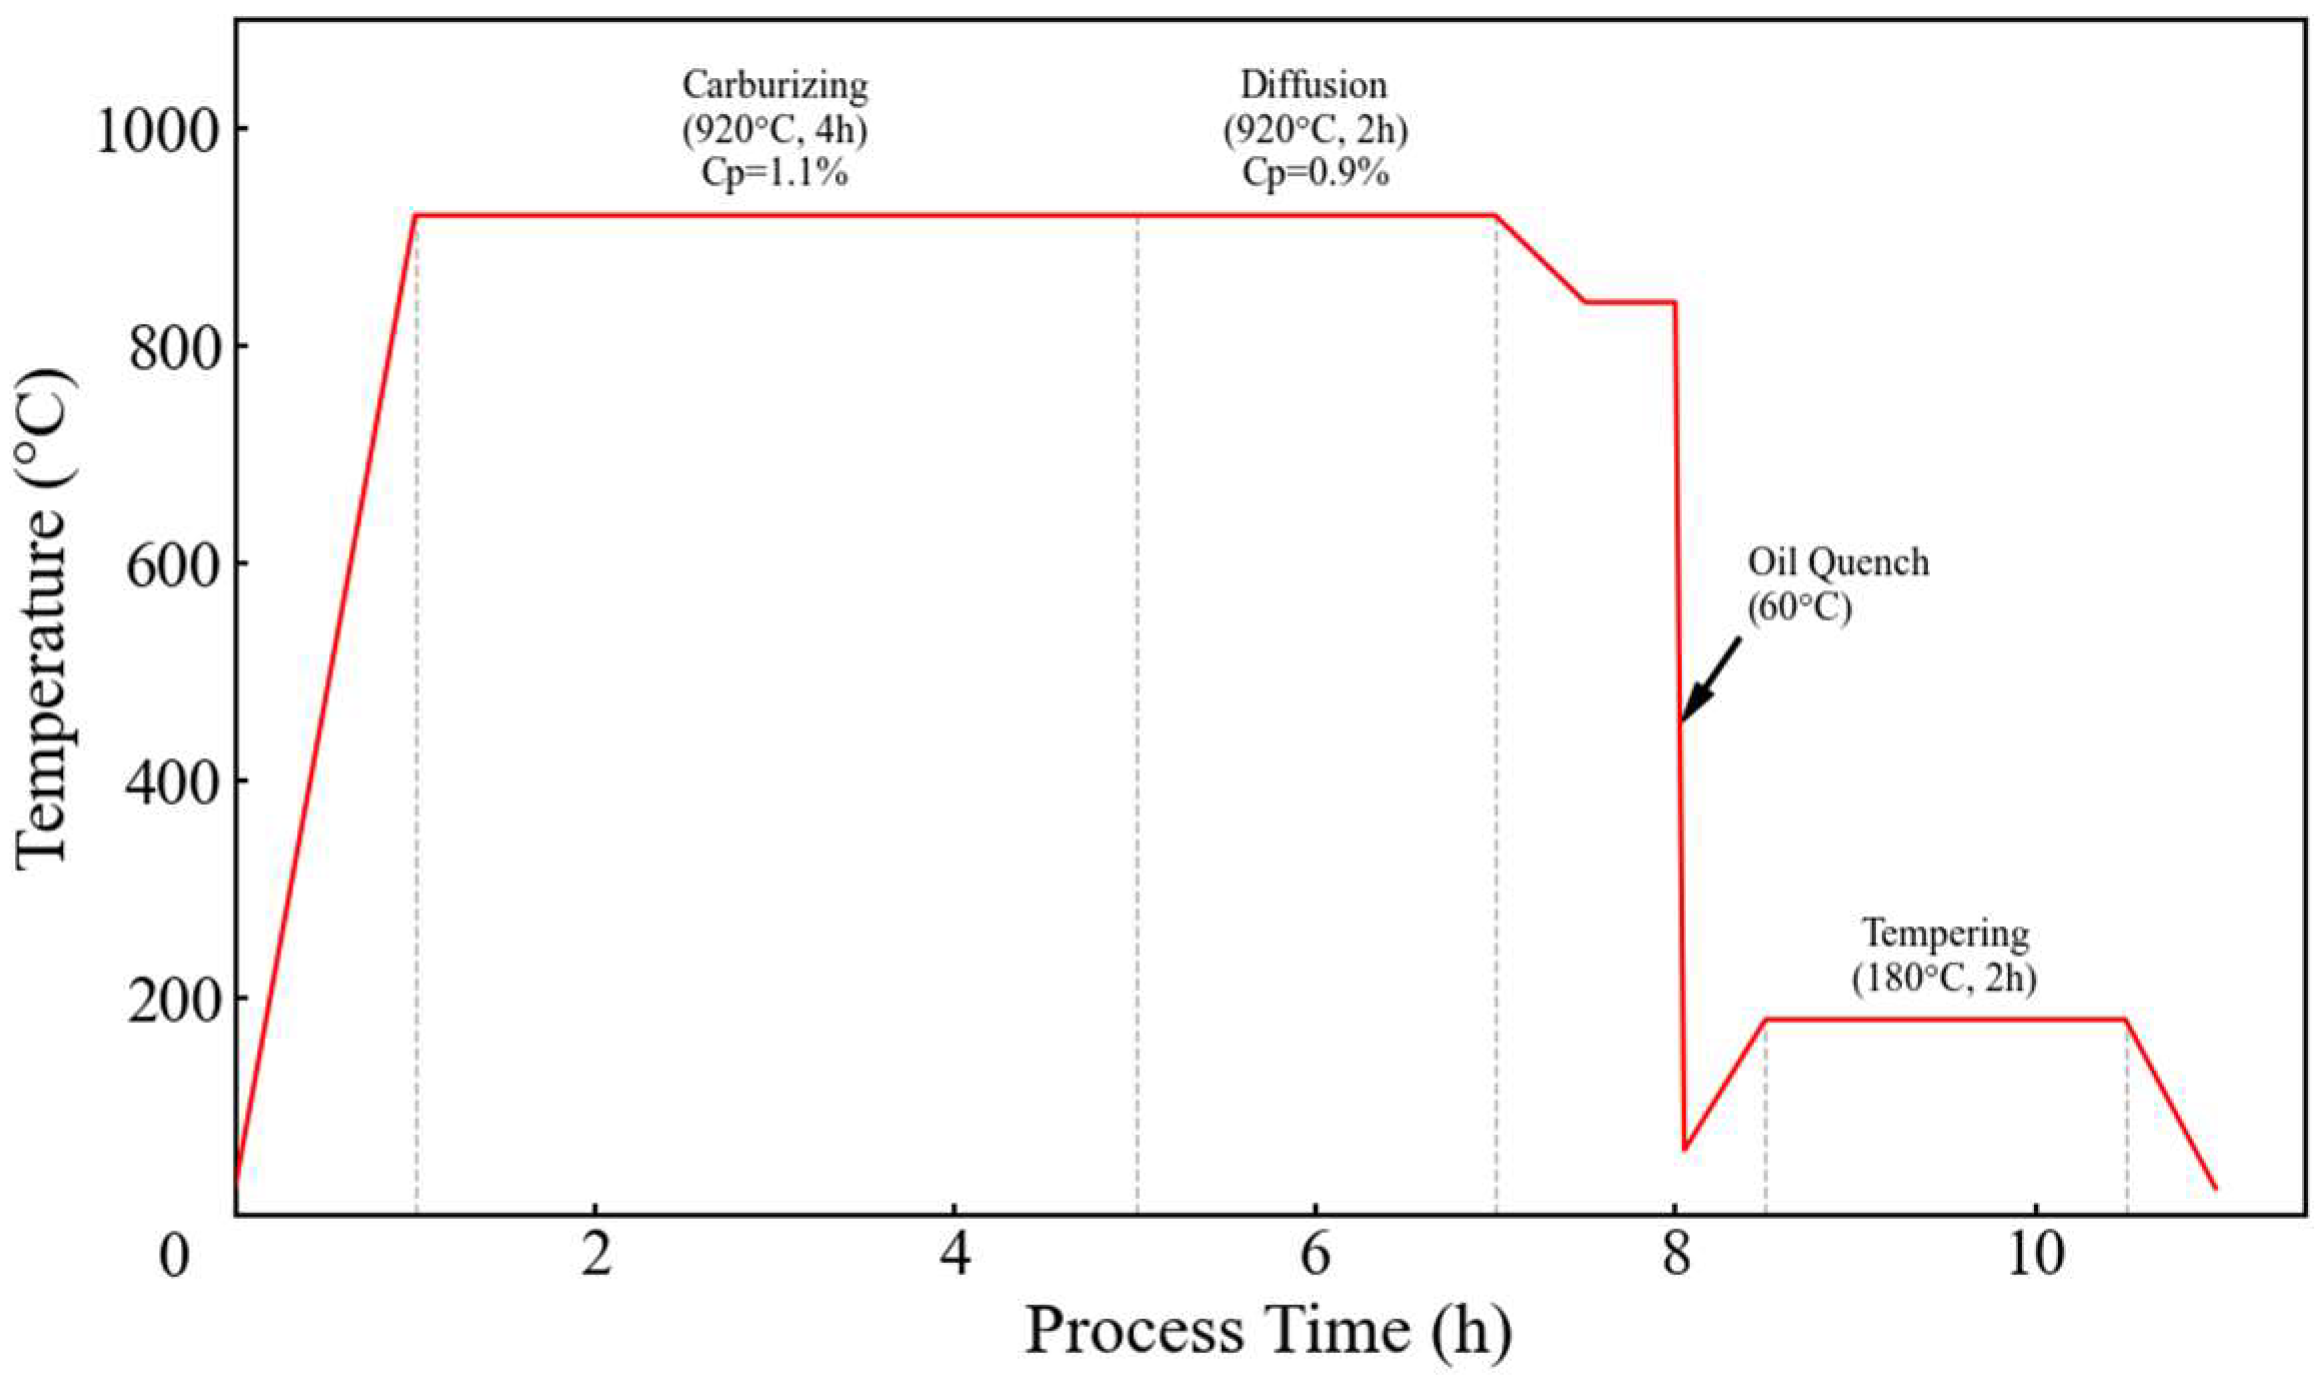
The gears were subjected to a standard gas carburizing and quenching process. To strictly isolate material-intrinsic behaviors from process-induced variations, batches of both gear alloys were heat-treated simultaneously in the same industrial furnace under identical controlled protocols. This ensures that all specimens experienced the exact same thermal history and carbon potential atmosphere. To ensure full thermal reproducibility, the detailed time-temperature profile including specific carbon potentials, holding times, quenching medium, and tempering parameters is illustrated in Figure 2.
Figure 2.
Schematic diagram of the carburizing and quenching heat treatment process.
A comparative analysis of the chemical compositions of the two test gear materials reveals the following key observations. The measured carbon contents of 20MnCr5 and 20CrMoH are 0.21% and 0.20%, respectively, both falling within the standard specified ranges and being numerically close. This indicates consistent control of surface carbon potential after carburizing and quenching, establishing a valid basis for comparison. The manganese content in 20MnCr5 is 1.14%, significantly higher than the 0.59% in 20CrMoH. Manganese enhances hardenability and stabilizes austenite, which is a key factor contributing to the higher retained austenite content in 20MnCr5. The chromium contents of the two materials are 1.14% and 1.01%, respectively, both meeting standard requirements. Chromium promotes carbide formation and improves corrosion resistance, playing a notable role in enhancing surface hardness. The molybdenum content in 20CrMoH is 0.22%, substantially exceeding the 0.01% in 20MnCr5. Molybdenum contributes to grain refinement and improves tempering stability, facilitating the formation of a more uniform and finer martensitic lath structure in 20CrMoH.
2.2. Methods
2.2.1. Fatigue Testing Methods
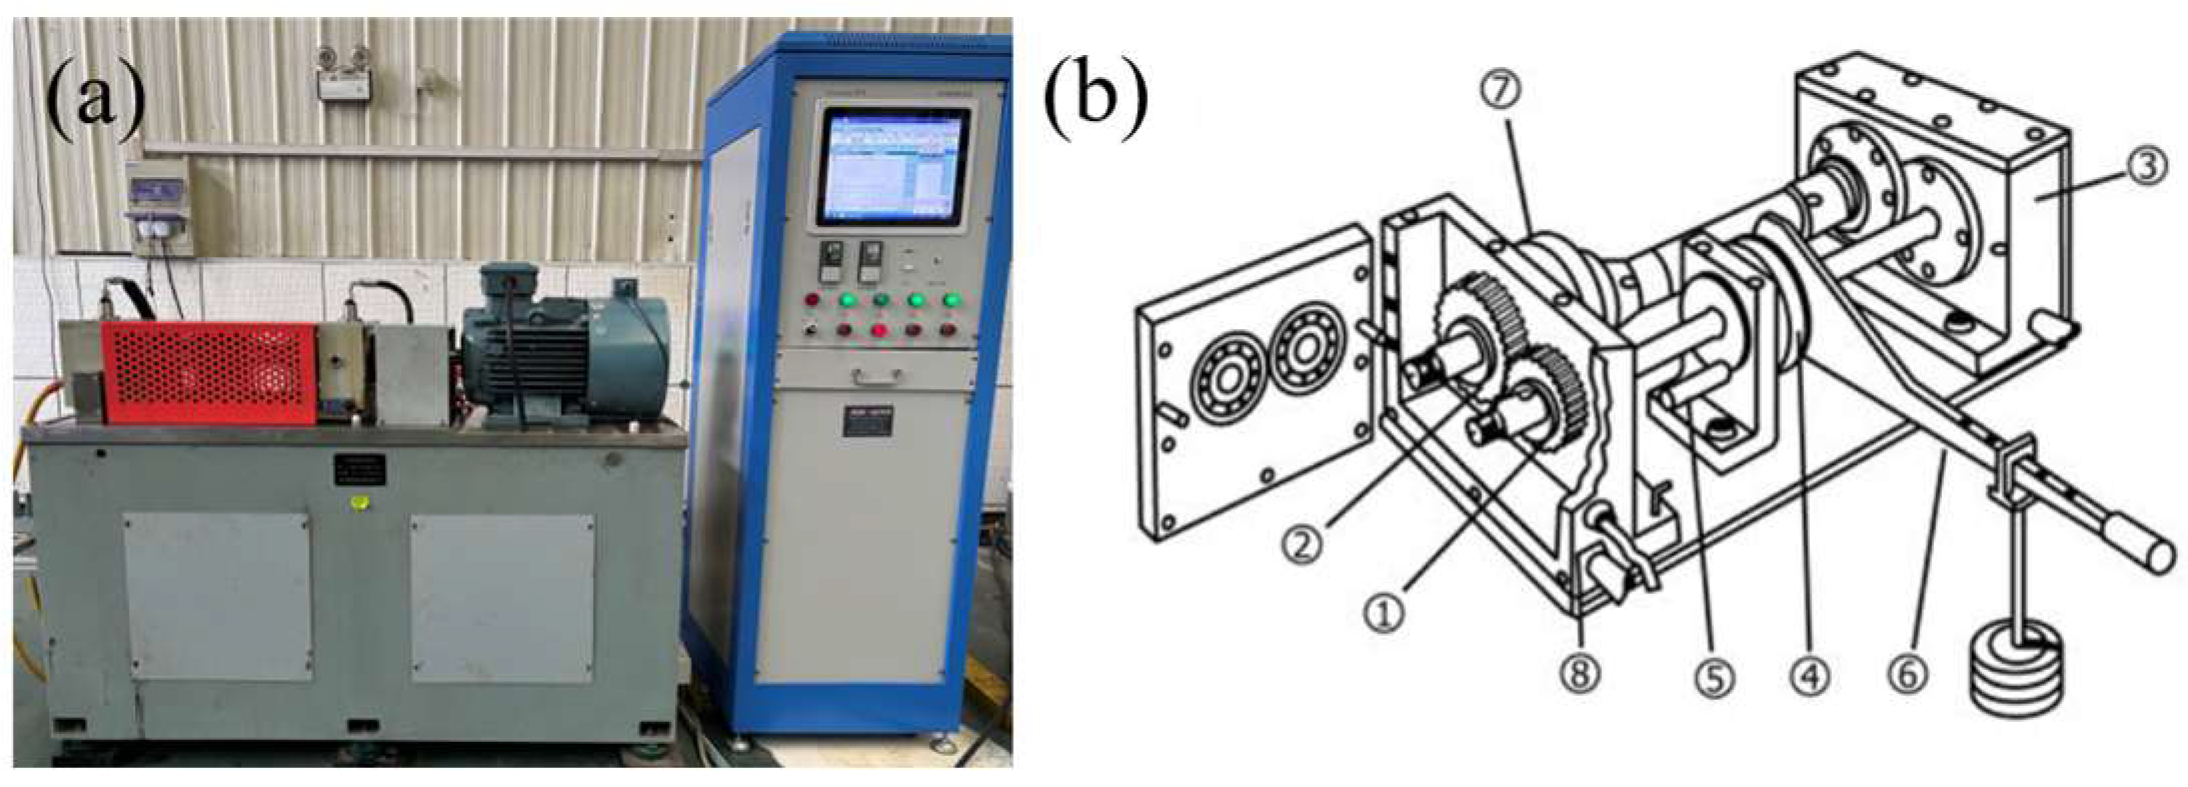
The tests were conducted on an FZG gear contact test rig (Jinan Shunmao Test Instrument Co., Ltd., Jinan, China), which features a center distance of 91.5 mm, a maximum power capacity of 8 kW, and a maximum rotational speed of 2900 r/min. Mechanical loading was employed to ensure accurate load application, monitored by a high-precision torque sensor accuracy class 0.1% to ensure that measurement uncertainties remain negligible relative to the applied load steps. A circulating water-cooling system was coupled with a temperature sensor in Figure 3 with corresponding component descriptions summarized in Table 4 to strictly regulate the oil temperature in the gearbox, maintaining it below 60 °C with minimal fluctuation throughout all load steps. This active thermal management effectively mitigates any geometric heat dissipation constraints imposed by the narrow 14 mm tooth width and ensures that the lubricant viscosity and friction coefficient remain constant, thereby stabilizing the surface traction and the resulting subsurface shear stress distribution pattern throughout the long-cycle testing.
Figure 3.
FZG contact fatigue test rig: (a) FZG Test Rig in Operation; (b) Schematic Diagram of FZG Test Rig.
Table 4.
Description of FZG contact fatigue test rig components.
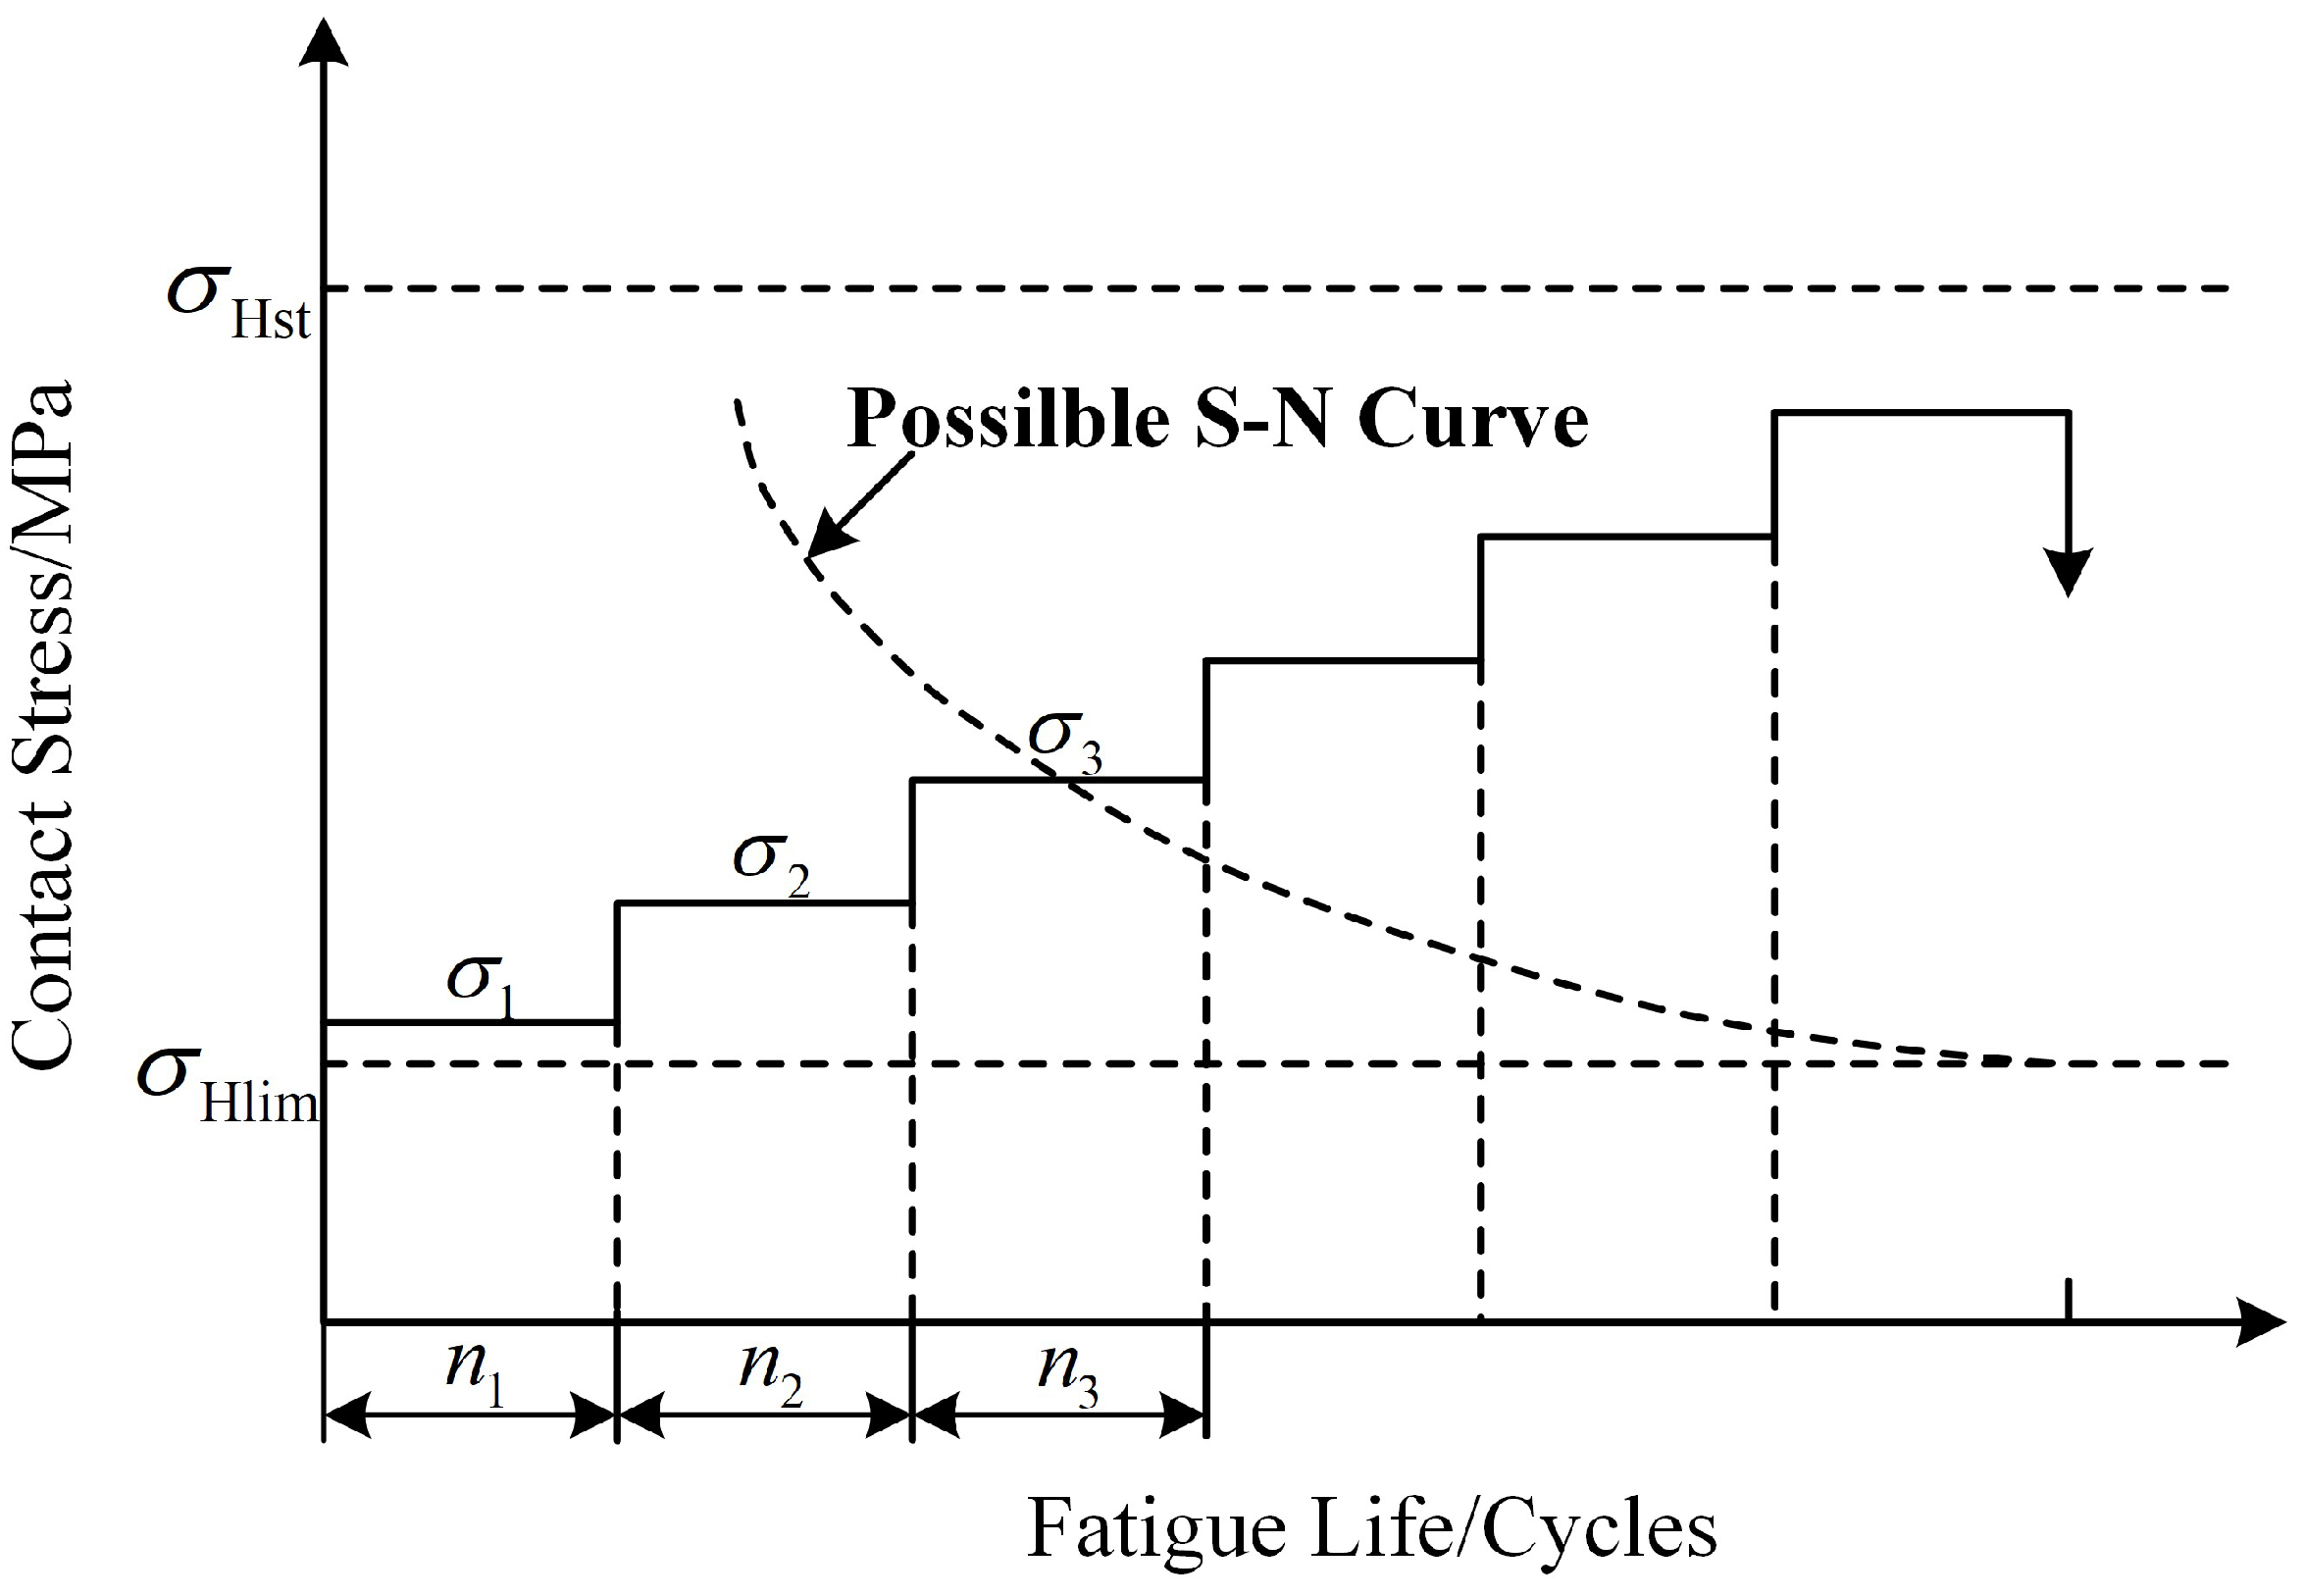
To efficiently and accurately compare the contact fatigue limits of 20MnCr5 and 20CrMoH gears, the step-loading method was employed in this study. Based on the Palmgren–Miner linear cumulative damage rule, this approach enables rapid estimation of the material’s fatigue limit using a single specimen subjected to progressively increasing contact stress levels, with fatigue failure identified at the first occurrence of pitting. The method is particularly suitable for comparative evaluation of gear contact fatigue performance across different materials. A schematic diagram illustrating the principle of this method is presented in Figure 4.
Figure 4.
Schematic diagram of the stepwise load-increase method.
In accordance with standard practice, the step-loading method typically employs 10 to 15 stress levels. The contact stress on the test gears was calculated following the general procedure specified in GB/T 14229-2021, “Gear Contact Fatigue Strength Test Method” [32]. In this study, 13 distinct load levels were designed for the 20MnCr5 and 20CrMoH gears. Each load stage was maintained for a fixed duration of n = 3.0 × 10⁵ cycles. At the end of each stage, the test rig was shut down, and the gear flanks were inspected using a portable optical microscope. The failure criterion was defined as the first observation of macroscopic pitting damage (single pit area > 0.5 mm2 or aggregate area > 4% of the active flank). If no pitting was observed, the load was increased to the next level, and the cycle count resumed. This specific cycle increment and the precise determination of the failure point provide the necessary variables for the Palmgren–Miner linear cumulative damage calculation described in Equation (1). After assembly, a running-in test was conducted under a torque of 35.3 Nm and a rotational speed of 1450 r/min for 2 × 10⁵ cycles to homogenize micro-geometrical variations and ensure consistent profile accuracy across all specimens prior to formal testing.
2.2.2. Characterization Techniques
Metallographic specimens were prepared by sectioning individual teeth from the gear blank at the tooth root. It is important to note that the tooth root served only as the cutting interface for sample extraction. The actual observation and measurement region was strictly located at the pitch line, which corresponds to the maximum contact stress area. This sampling strategy ensures that the characterized microstructure directly reflects the material state in the critical contact zone.
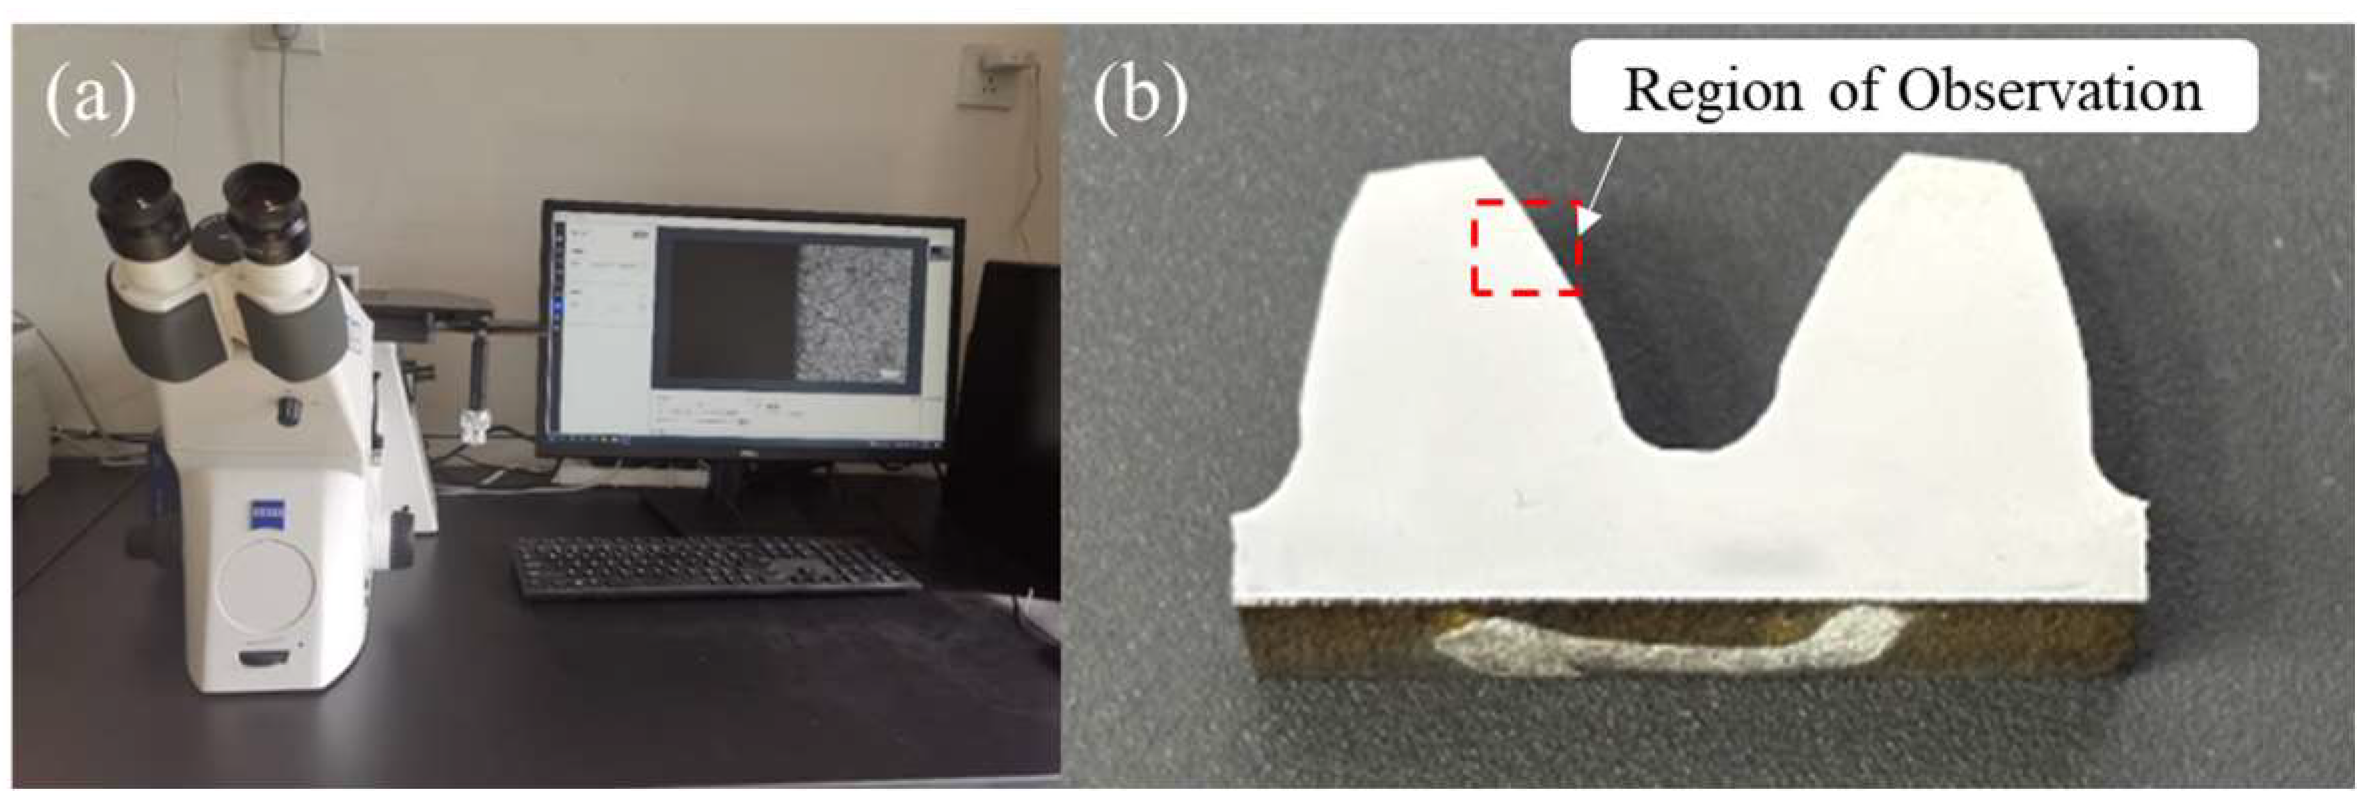
Specimen preparation strictly adhered to the GB/T 13298-2015 standard procedure [33]. The specimens were progressively ground using 400# to 2000# grit SiC sandpaper to remove the cutting-affected layer, followed by mechanical polishing with diamond abrasive to achieve a scratch-free mirror finish. Subsequently, etching with 4% nitric acid alcohol solution for 10–15 s was performed to clearly reveal grain boundaries and metallurgical constituents. Microstructural examination was conducted using an Axio Observer optical microscope (Carl Zeiss Microscopy GmbH, Jena, Germany) at 500× magnification, with representative micrographs of typical fields captured through the integrated image analysis system, as shown in Figure 5.
Figure 5.
Metallographic observation method: (a) microhardness testing device; (b) measurement position.
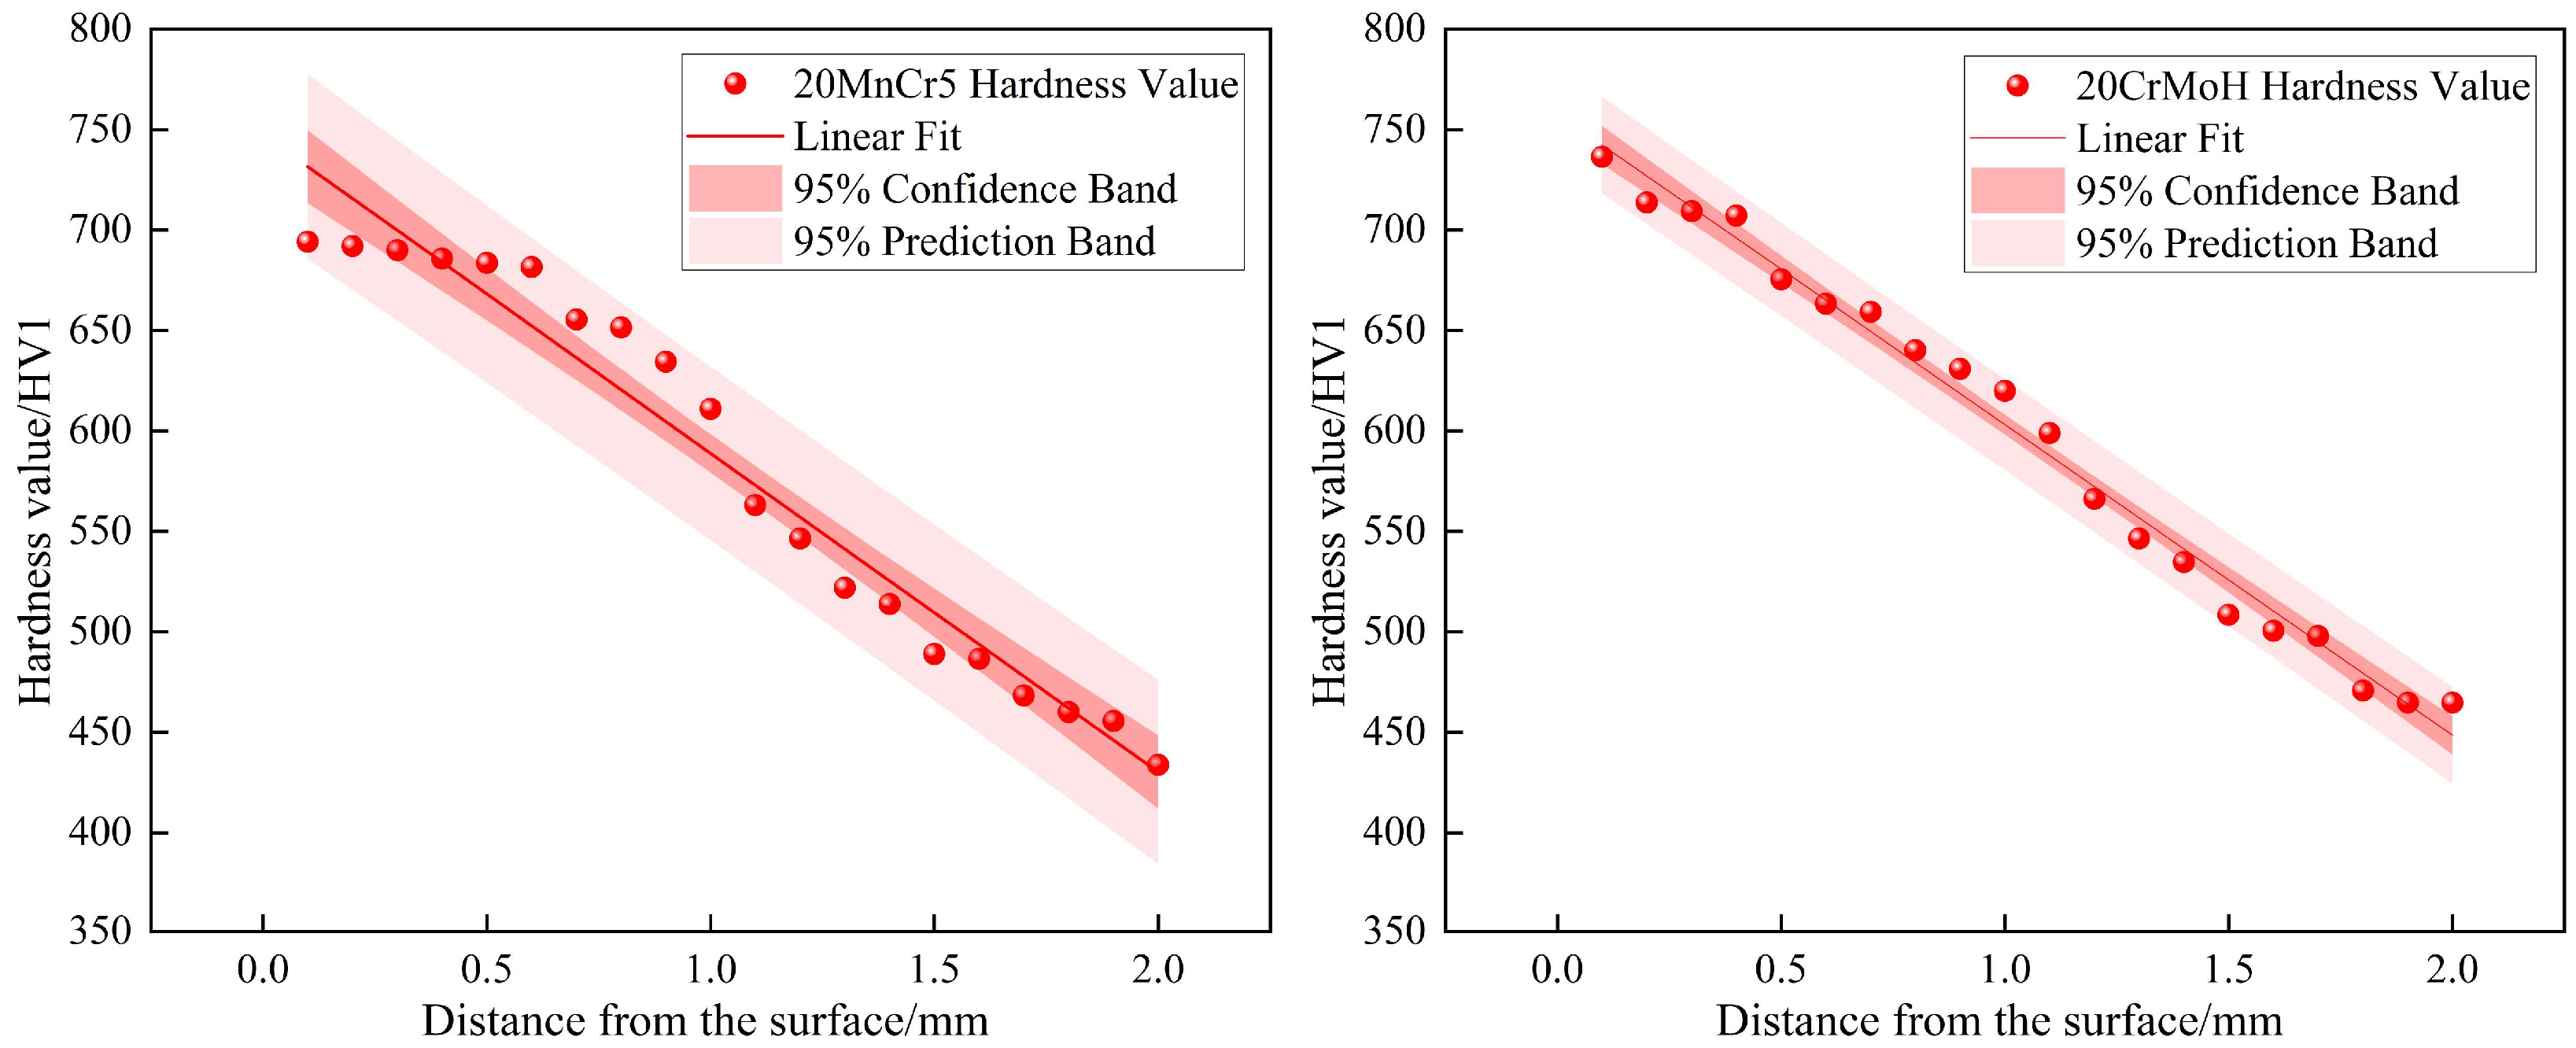
The hardness gradient serves as a critical indicator for evaluating the contact fatigue resistance of gears, as its distribution characteristics directly influence the material’s resistance to plastic deformation and crack initiation behavior under cyclic contact loading. To systematically compare the subsurface hardness distribution from the surface to the core between 20MnCr5 and 20CrMoH gears, hardness gradient testing was performed using an FM-310 microhardness tester (Future-Tech Corp., Kawasaki, Japan) in accordance with the GB/T 32660.1-2016 standard [34]. Specimens were sectioned from the gear tooth root region, with the measurement path oriented perpendicular to the tooth surface. A test load of 9.8 N and a dwell time of 15 s were applied during the measurements. Over the range of 0–2 mm from the tooth surface, indentations were made at 0.1 mm intervals to ensure continuous and reliable data acquisition, as illustrated in Figure 6. By recording the hardness values at various depths, hardness-depth profiles were plotted to analyze the strength degradation behavior in the subsurface region and its potential influence on the contact fatigue performance of the two materials.
Figure 6.
Hardness gradient measurement method: (a) tooth cutting of gears; (b) measurement path; (c) microhardness testing device, The red box in (c) indicates the position of the specimen during testing.
Residual stress represents a critical parameter for evaluating the surface integrity of gears, as its distribution characteristics directly influence the initiation and propagation of contact fatigue cracks. To quantitatively compare the residual stress distributions in the surface and subsurface regions of 20MnCr5 and 20CrMoH gears, measurements were performed using an XL-640 X-ray stress diffractometer (Handan Stress Technology Co., Ltd., Handan, China) with Cr-Kα radiation (wavelength λ = 0.229 nm). The sin2ψ method was employed, with measurement points located at the pitch circle position, consistent with the hardness gradient test locations.
To obtain the residual stress gradient along the direction normal to the tooth surface, electrochemical polishing was applied for layer-by-layer material removal. Each layer was removed to a depth of 0.1 mm, with a total of 10 layers processed, achieving a cumulative depth of 1.0 mm. Residual stress measurements were conducted immediately after each removal step to ensure that the acquired data accurately reflect the stress attenuation behavior from the surface to the subsurface region.
The residual stress depth profiles were obtained using X-ray diffraction combined with electrolytic layer removal. Although non-destructive methods like neutron diffraction exist, the layer removal technique provides superior spatial resolution for the critical near-surface region relevant to contact fatigue [35,36]. A step size of 0.1 mm was selected to balance depth resolution with surface quality; this increment provides sufficient data density to accurately capture the steep stress gradients relevant to contact fatigue, particularly the rapid drop observed in 20CrMoH. While layer removal inevitably induces stress redistribution, no additional mathematical correction factors were applied to the reported data. This is because the removed layer depth is relatively small compared to the bulk stiffness of the gear tooth, minimizing relaxation magnitude. Furthermore, since identical protocols were strictly applied to both materials, any relaxation effect is systematic, ensuring the validity of the relative performance comparison. To further ensure data reliability and eliminate machining artifacts, electrolytic polishing was strictly employed, and the diffraction peaks were fitted using the Pearson VII function, which yielded high goodness-of-fit. The measurement procedure is illustrated in Figure 7.
Figure 7.
Residual stress measurement method: (a) stress analyzer; (b) measurement specimen; (c) electrolytic polishing machine.
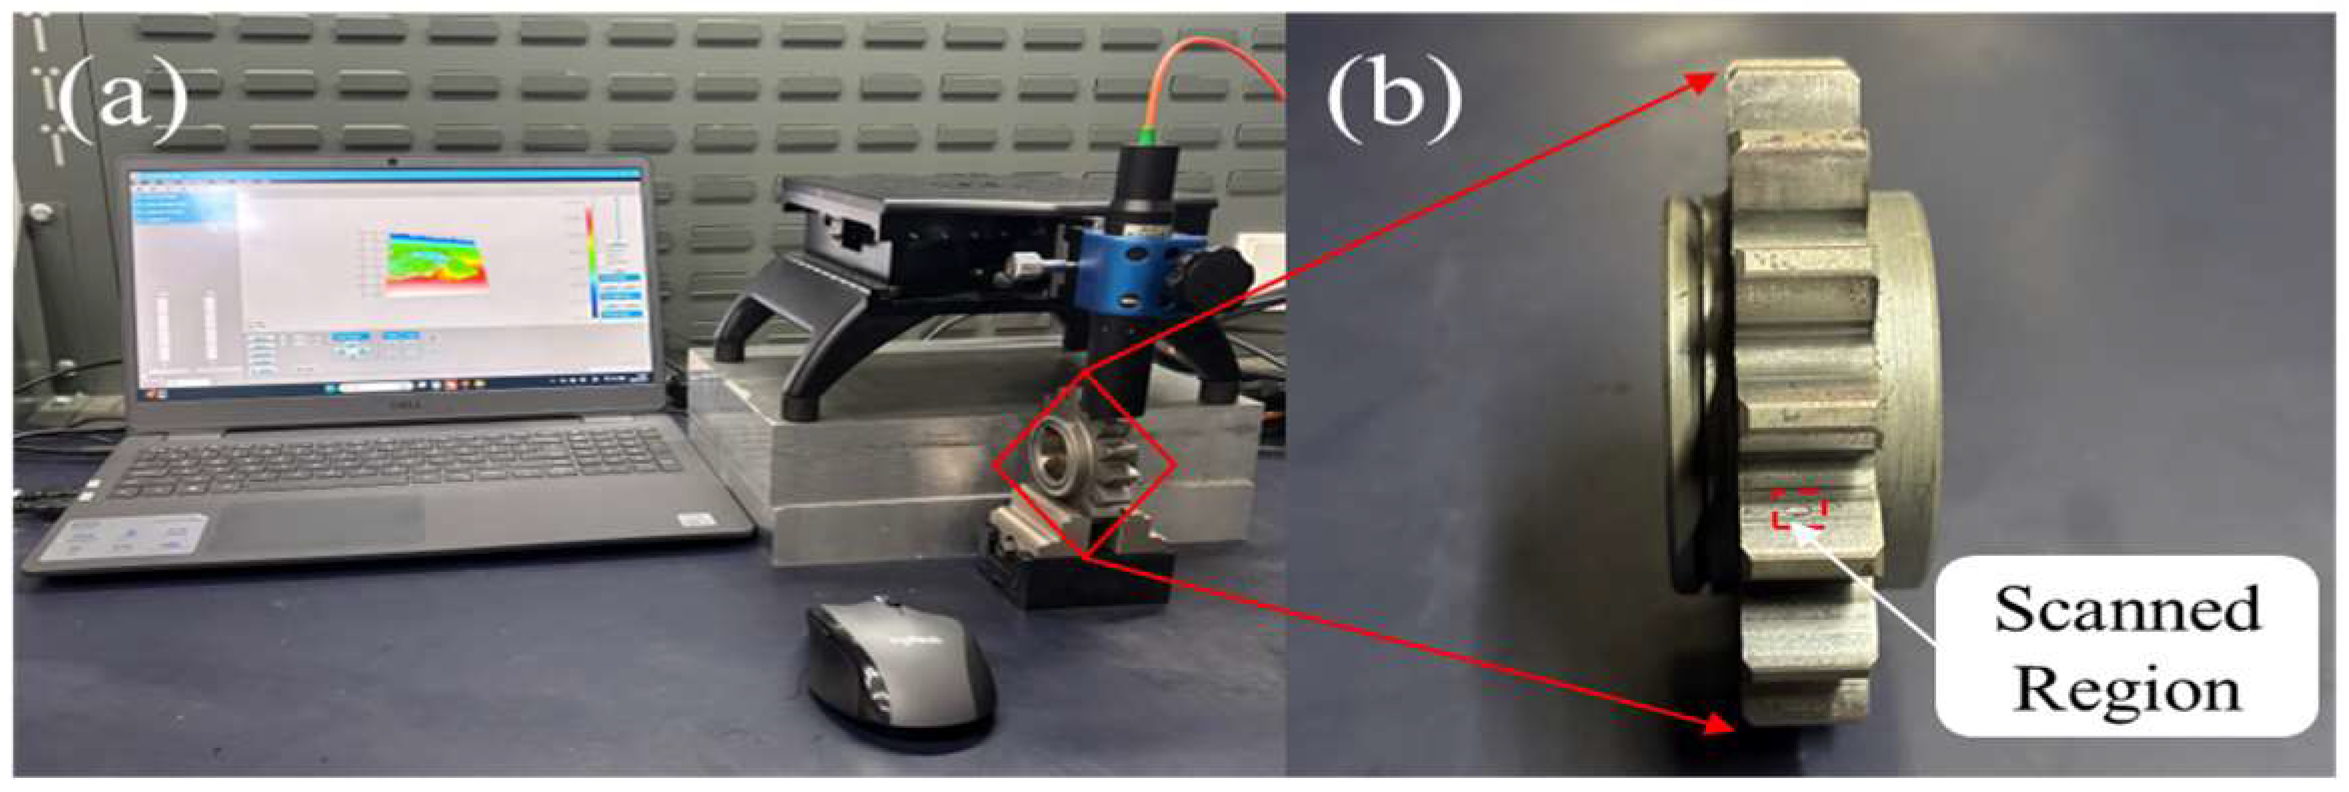
To precisely quantify the microscopic morphological characteristics of contact fatigue failure and elucidate the differences in pitting damage mechanisms between 20MnCr5 and 20CrMoH gears, this study employed an integrated measurement system combining the KSCAN-magic composite 3D scanner (Scantech (Hangzhou) Co., Ltd., Hangzhou, China) calibrated via a certified step-height standard and utilizing blue laser to suppress reflection and the JR50 topography measurement system. This setup enabled multi-scale characterization of pitting damage, spanning from macroscopic morphology to microscopic profile, as illustrated in Figure 8.
Figure 8.
Three-dimensional morphology scanning equipment: (a) 3D surface profilometer; (b) scanned gear.
Pitting specimens were selected according to the following criteria:
- (a)
- location within the main contact area near the pitch circle;
- (b)
- presence of typical pitting initiation and propagation features;
- (c)
- absence of extraneous mechanical damage.
The scanning areas for the 20MnCr5 and 20CrMoH gears were set to 5 mm × 4 mm and 6 mm × 3 mm, respectively, with a uniform sampling interval of 5 μm. The vertical resolution of the system is 0.1 μm. Data post-processing was performed in accordance with ISO 25178 [37] standards. To ensure accurate quantification of both surface roughness and pitting volume, the following filtering pipeline was applied:
- (a)
- Leveling: A Least Squares mean plane fitting was applied to remove macroscopic tilt and establish the reference plane.
- (b)
- Noise Filtering: A Gaussian filter with a cut-off wavelength of λs = 2.5 μm was utilized to eliminate high-frequency microroughness and measurement noise.
- (c)
- Roughness Separation: For surface roughness calculation, a Gaussian filter with a cut-off wavelength of λc = 0.08 mm was employed to separate roughness from waviness.
- (d)
- Volume Calculation: The pitting volume was defined as the void volume enclosed below the LS reference plane.
3. Results and Discussion
3.1. Characterization Result Analysis
3.1.1. Metallographic Analysis
Figure 9 and Figure 10 present the metallurgical structures of the 20MnCr5 and 20CrMoH gears in the surface and core regions, respectively. The microstructures were evaluated and graded in accordance with standards ISO 4967: 2013 and GB/T 25744-2010 [38,39], with the results summarized in Table 5.
Figure 9.
Microstructure of 20MnCr5 gear: (a) surface metallography; (b) core metallography.
Figure 10.
Microstructure of 20CrMoH gear: (a) surface metallography; (b) core metallography.
Table 5.
Metallographic ratings of carburized 20MnCr5 and 20CrMoH steels.
The carburized layers of both gear materials are predominantly composed of martensite, retained austenite, and carbides, while their core microstructures consist of uniform tempered sorbite with minor ferrite content. Both materials demonstrate carbide and core microstructure ratings of Grade 1, indicating comparable degrees of microstructural homogeneity and stability. Nevertheless, substantial differences emerge in the crucial microstructural features of the carburized layers. 20CrMoH exhibits martensite with a Grade 3 classification, characterized by finely distributed laths exhibiting blurred boundaries, indicative of a complete quenching transformation. Its retained austenite, similarly rated Grade 3, appears in relatively low concentration as isolated islands dispersed between martensite laths. In contrast, 20MnCr5 displays a coarser martensite structure achieving a Grade 4 rating with localized lath aggregation, along with retained austenite of Grade 4 classification that demonstrates significantly higher content and forms continuous thin films along martensite lath boundaries.
To address the need for quantitative microstructural metrics, the prior-austenite grain size and carbide distribution were further analyzed. The 20CrMoH gear exhibits a finer prior-austenite grain size average diameter ≈ 20 μm, attributed to the grain-refining effect of Molybdenum. In contrast, the 20MnCr5 gear shows a slightly coarser grain structure average diameter ≈ 30 μm. Regarding carbides, both materials exhibit a Grade 1 distribution, characterized by distinct, fine spherical carbides average diameter < 0.8 μm uniformly dispersed within the martensitic matrix. This microstructural difference has significant mechanical implications: the finer grain size and dispersed carbides in 20CrMoH contribute to its steeper hardness gradient and higher yield strength via the Hall-Petch effect. However, this Mo-driven strengthening creates a mechanistic trade-off. Unlike Manganese which strongly stabilizes austenite, Molybdenum promotes a more complete martensitic transformation, resulting in a lower retained austenite content. Consequently, the high-hardness matrix of 20CrMoH lacks the necessary ductility and transformation-toughening capacity to accommodate local stress concentrations. This inability to plastically relieve stress peaks explains the shift in failure mode from ductile micropitting to the catastrophic brittle spalling observed.
To quantify the microstructural evolution under cyclic contact loading, the retained austenite content was measured before and after testing using XRD. The XRD test was performed using the quasi-tilt fixed Ψ method, with the Gaussian function fitting adopted for peak positioning of both α-phase and γ-phase; the 2θ scanning range was set to 148.00–163.00° for α-phase and 125.00–132.00° for γ-phase. The results are presented in Table 6.
Table 6.
Comparison of Retained Austenite Content Before and After the Test.
To rigorously verify that the superior fatigue resistance of 20MnCr5 is dominantly governed by transformation toughening rather than differences in microstructural quality, we quantitatively compared the heterogeneity metrics. As shown in Table 5, both alloys exhibit identical Grade 1 ratings for carbides, core microstructure, and non-metallic inclusions, indicating a comparable and high level of microstructural homogeneity. With heterogeneity ruled out as a differentiating factor, the dominant mechanism is identified through the XRD quantification: 20MnCr5 exhibits a significantly larger volume of transformed austenite (RA ≈ Δ16.9%) compared to 20CrMoH (RA ≈ Δ12%). This higher transformation volume provides superior energy absorption capability, directly correlating with the observed fatigue limit improvement.
Although EBSD (Electron Backscatter Diffraction) characterization was not performed in this study to visualize the local phase transformation at the crack tip, our quantitative XRD results provide robust macroscopic evidence. The retained austenite content in 20MnCr5 significantly decreased from 44.27% to 27.40% after fatigue testing. According to previous EBSD studies by Yan et al. [40] and Liu et al. [41], this reduction corresponds to the Strain-Induced Martensitic Transformation localized in the plastic deformation zone. While this transformation theoretically follows the subsurface shear stress gradient, depth-resolved quantification was precluded by the surface roughness of the fatigued samples; nonetheless, the aggregate reduction confirms the global toughening effect. This transformation absorbs deformation energy, introduces compressive residual stress, and relaxes local stress concentrations, thereby inhibiting crack propagation. This mechanism explains why 20MnCr5, despite having lower surface hardness than 20CrMoH, exhibits superior contact fatigue life.
3.1.2. Microhardness Analysis
The hardness gradient distribution serves as a critical indicator for evaluating the contact fatigue performance of gears, as its variation characteristics directly influence the material’s stress response and crack initiation behavior under cyclic loading. Figure 11 illustrates the hardness distribution profiles along the direction normal to the tooth surface for both 20MnCr5 and 20CrMoH gears (Statistical analysis and graphical plotting were performed using Origin 2024 (OriginLab Corporation, Northampton, MA, USA)). The results demonstrate that the two materials exhibit fundamentally distinct hardness decay behaviors from the surface to the core region, thereby providing a foundational explanation for their differing fatigue performance.
Figure 11.
Hardness gradient distribution of the gears.
The 20CrMoH gear exhibits a surface hardness of 736.4 HV1.0, which is higher than the 694.1 HV1.0 measured for the 20MnCr5 gear. However, this higher initial hardness acts as a double-edged sword; without sufficient toughness (provided by retained austenite), the harder matrix becomes more notch-sensitive and prone to brittle cracking, proving that surface hardness alone is not the sole determinant of fatigue life. Furthermore, the 20CrMoH specimen demonstrates a more pronounced hardness degradation with increasing depth. At a depth of 0.5 mm, its hardness decreases to 675.4 HV1.0, corresponding to a hardness gradient of −122 HV/mm, with an effective case depth of 1.28 mm. This steep hardness transition suggests limited load-bearing capacity in the subsurface region, making it susceptible to plastic accumulation and crack initiation under contact stress.
It is acknowledged that the hardness profile of carburized layers typically follows a non-linear distribution. However, to quantitatively compare the property degradation rates, a linear regression analysis was performed on the high-density measurement data. The shaded regions in Figure 11 represent the 95% confidence bands of the linear fit. The narrow width of these bands, combined with high coefficients of determination, statistically confirms that the calculated hardness gradients are robust descriptors of the subsurface material properties, effectively distinguishing the physical trend from measurement scatter. Crucially, this statistical stability extends specifically to the carburized–core transition zone, where the narrow confidence bands confirm that the gradient transition is a stable material property rather than an artifact of local heterogeneity.
In contrast, the 20MnCr5 gear, despite its marginally lower surface hardness, maintains a more gradual hardness distribution along the depth direction. At the 0.5 mm depth, the hardness remains at 683.6 HV1.0, with a minimal hardness gradient of −21 HV/mm and an effective case depth of 1.18 mm. Mechanistically, this gentler gradient is attributed to diffusion kinetics: unlike Molybdenum (in 20CrMoH) which strongly retards carbon diffusion leading to a steep concentration profile, Manganese (in 20MnCr5) facilitates a more uniform inward carbon penetration under the same carburizing potential.
It is crucial to note that the Effective Case Depth (ECD) of 20CrMoH is actually deeper than that of 20MnCr5. Typically, a deeper carburized case correlates with higher load-bearing capacity. The observation that 20CrMoH exhibits inferior fatigue life despite its deeper case serves as compelling evidence that the performance deficit is not due to insufficient carburizing depth or process inconsistency. Instead, it confirms that the failure is intrinsically governed by the material’s steeper hardness gradient and brittle microstructural response.
Studies have shown that the geometric characteristics of the hardness gradient exert a decisive influence on the fatigue life of gears. Compared with a steep hardness distribution, a gentle and convex hardness gradient can more effectively cover the subsurface Hertzian shear stress field, significantly inhibiting plastic deformation and the early initiation of cracks [42]. In addition, the gentle gradient distribution can also effectively alleviate the stress concentration in the transition zone between the hardened layer and the core, reducing the risk of subsurface crack initiation in the transition zone [43,44]. Validated by analytical contact mechanics models [23,42], this link exists because the hardness gradient serves as a proxy for depth-dependent shear yield strength τyield. The gentler gradient in 20MnCr5 effectively maintains τyield above the theoretical subsurface Hertzian shear stress τmax, whereas the steep gradient in 20CrMoH creates a weak zone vulnerable to shear yielding.
3.1.3. Residual Stress Analysis
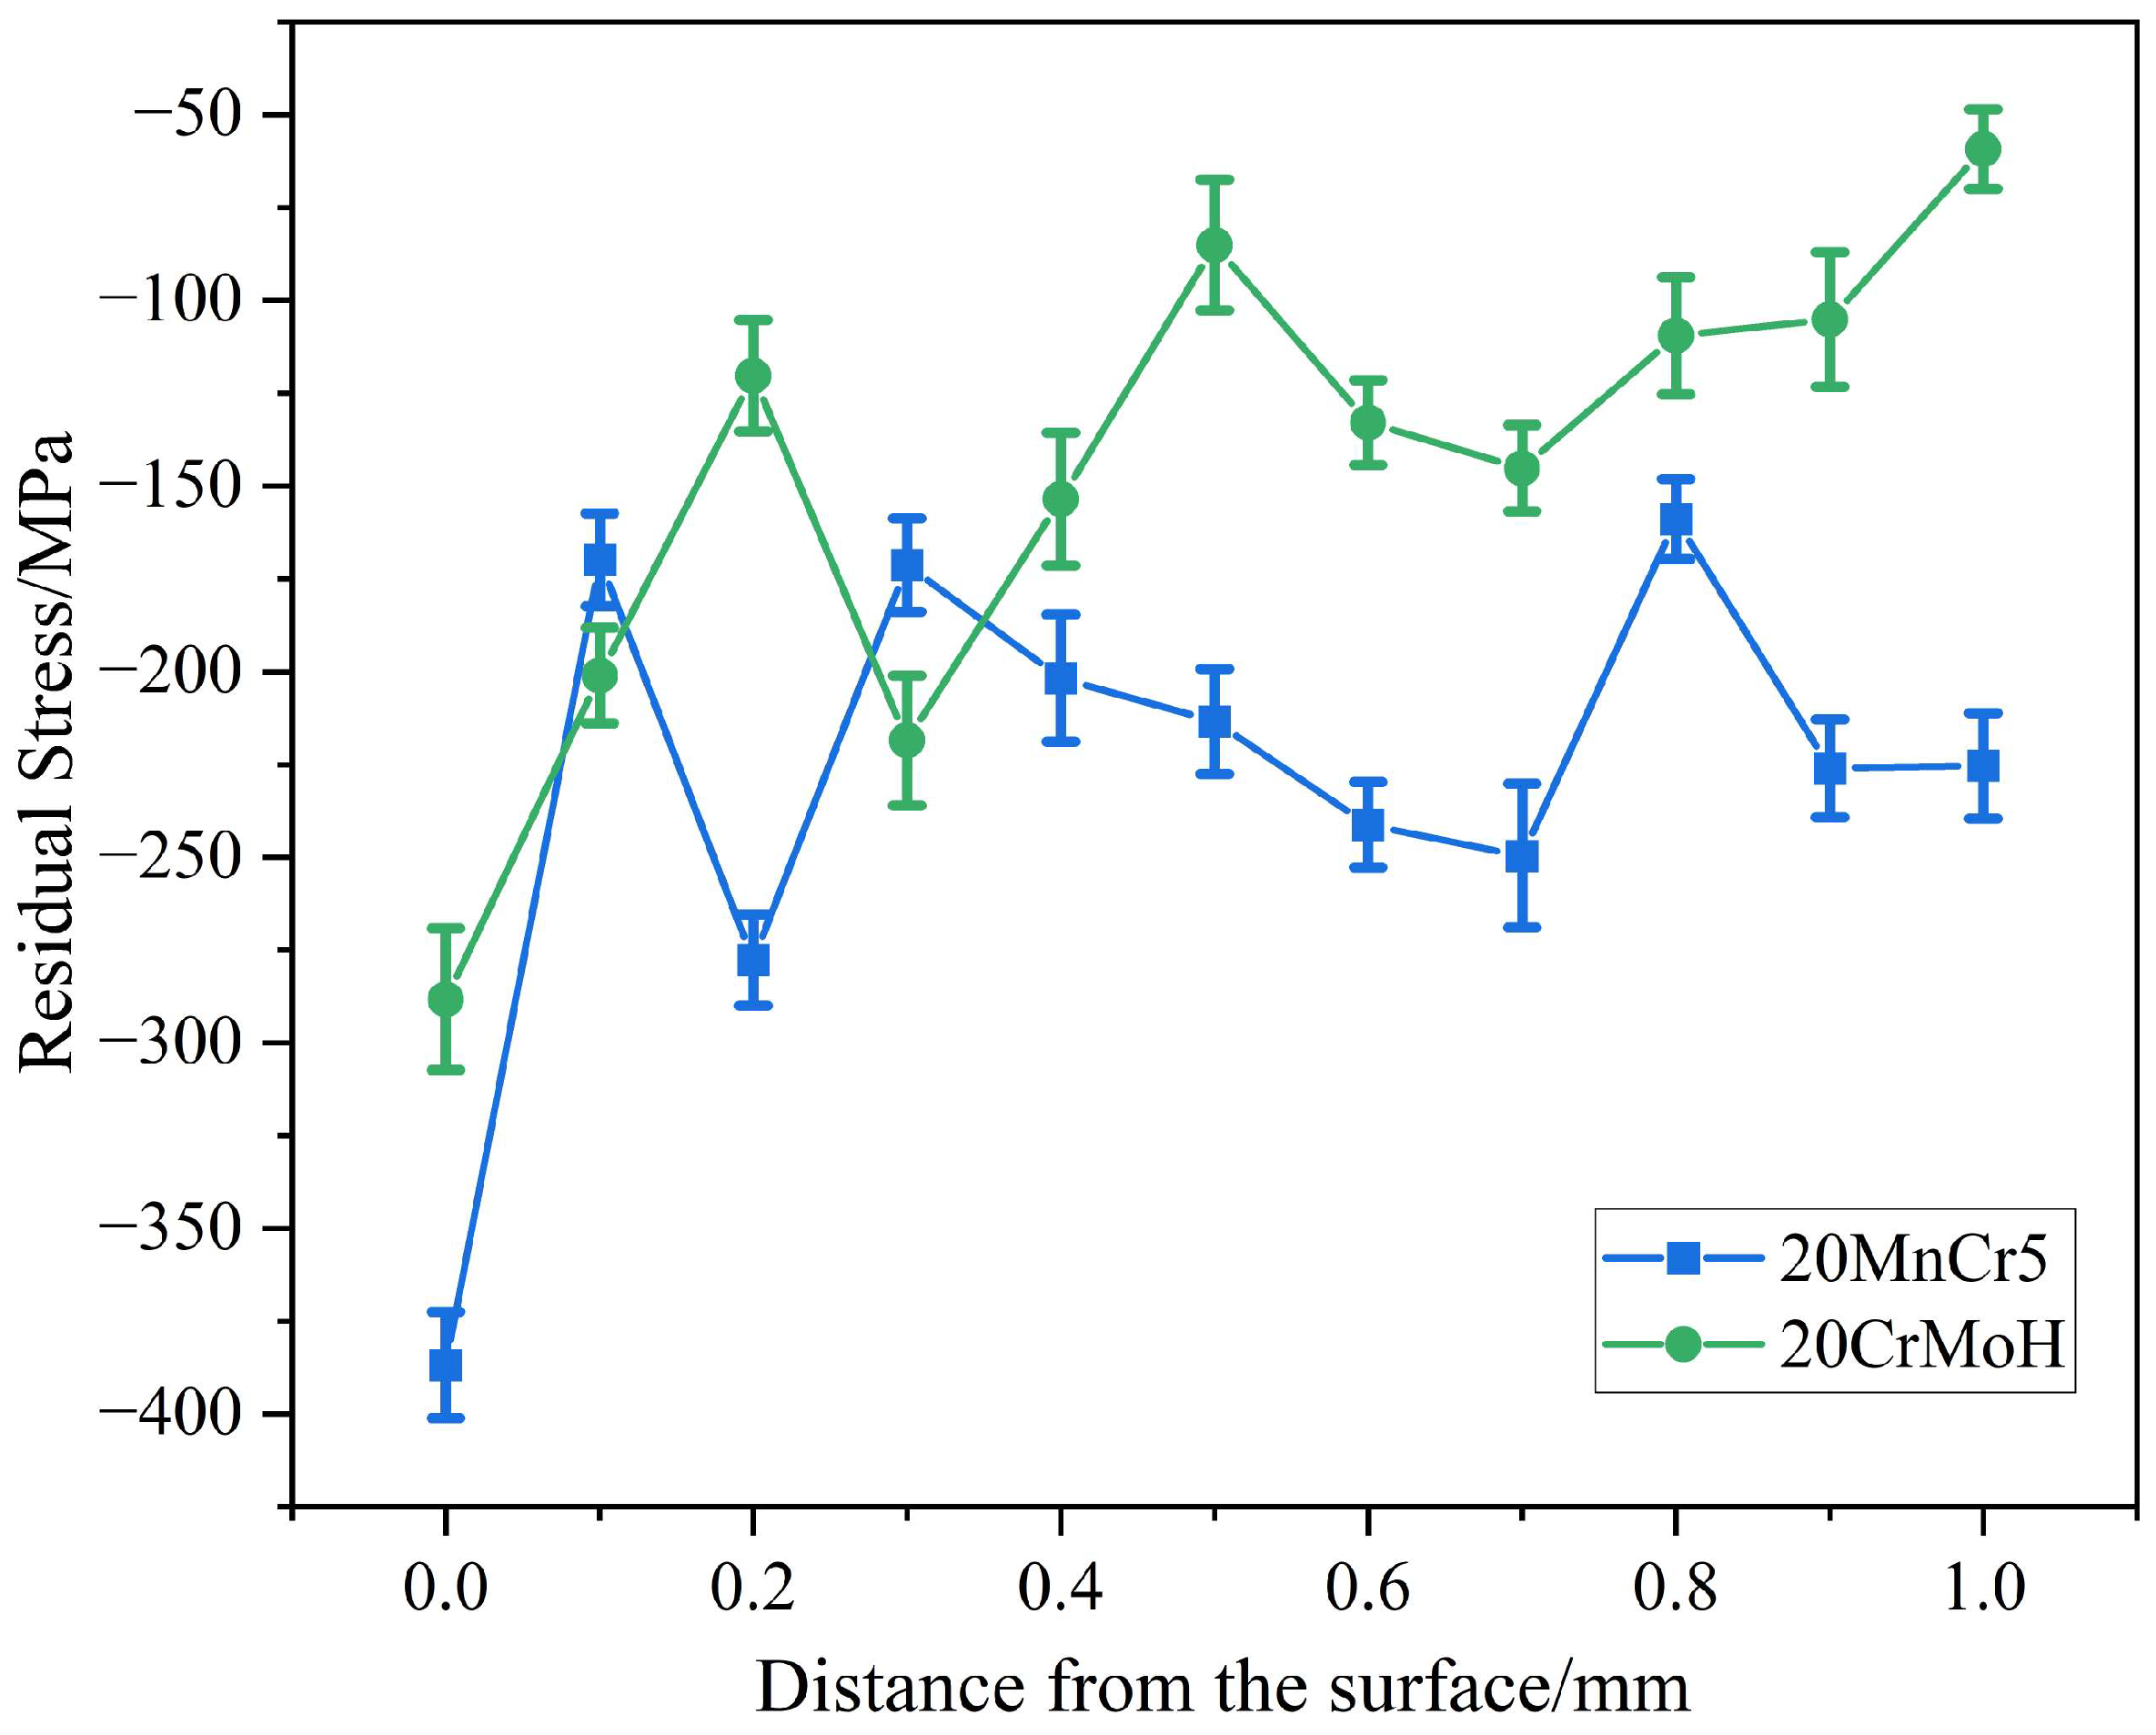
The distribution of residual stress serves as a critical surface integrity parameter influencing the contact fatigue performance of gears. In this paper, the measurement parameters are summarized in Table 7 and Figure 12 presents the residual stress gradient profiles along the direction normal to the tooth surface for both 20MnCr5 and 20CrMoH gears.
Table 7.
Residual stress measurement parameters.
Figure 12.
Residual stress gradient curves.
Both gear materials exhibit compressive residual stress states at the surface, with the 20MnCr5 gear demonstrating a surface residual stress of −386.8 MPa, significantly higher than the −288.3 MPa measured for the 20CrMoH gear. The superior surface compressive stress in 20MnCr5 gear effectively counteracts tensile stresses induced by external loads, thereby enhancing resistance to fatigue crack initiation.
With increasing depth, the two materials display markedly different residual stress attenuation behaviors. The 20MnCr5 gear maintains relatively stable residual stress levels within the 0–0.5 mm depth range, fluctuating between −169.9 MPa and −386.8 MPa. At the 0.5 mm depth, the residual stress measures approximately −213.4 MPa, remaining at −225.3 MPa even at the 1.0 mm depth, indicating gradual attenuation throughout the subsurface region. In contrast, the 20CrMoH gear exhibits more rapid stress attenuation, with residual stress declining to −85.1 MPa at 0.5 mm depth and further diminishing to −59.3 MPa at 1.0 mm depth.
The gradual attenuation characteristics of residual stress in the 20MnCr5 gear correspond well with its hardness gradient behavior. This coordinated mechanical response establishes superior stability in the subsurface region, effectively suppressing both the initiation and propagation of contact fatigue cracks, thereby providing the mechanical foundation for its enhanced contact fatigue limit. Furthermore, regarding dynamic redistribution, the strain-induced transformation in 20MnCr5 generates compressive volume expansion, which effectively compensates for cyclic stress relaxation. In contrast, 20CrMoH lacks this compensation, implying that the performance gap inferred from pre-test profiles is likely amplified during actual service.
3.2. Fatigue Test Results Analysis
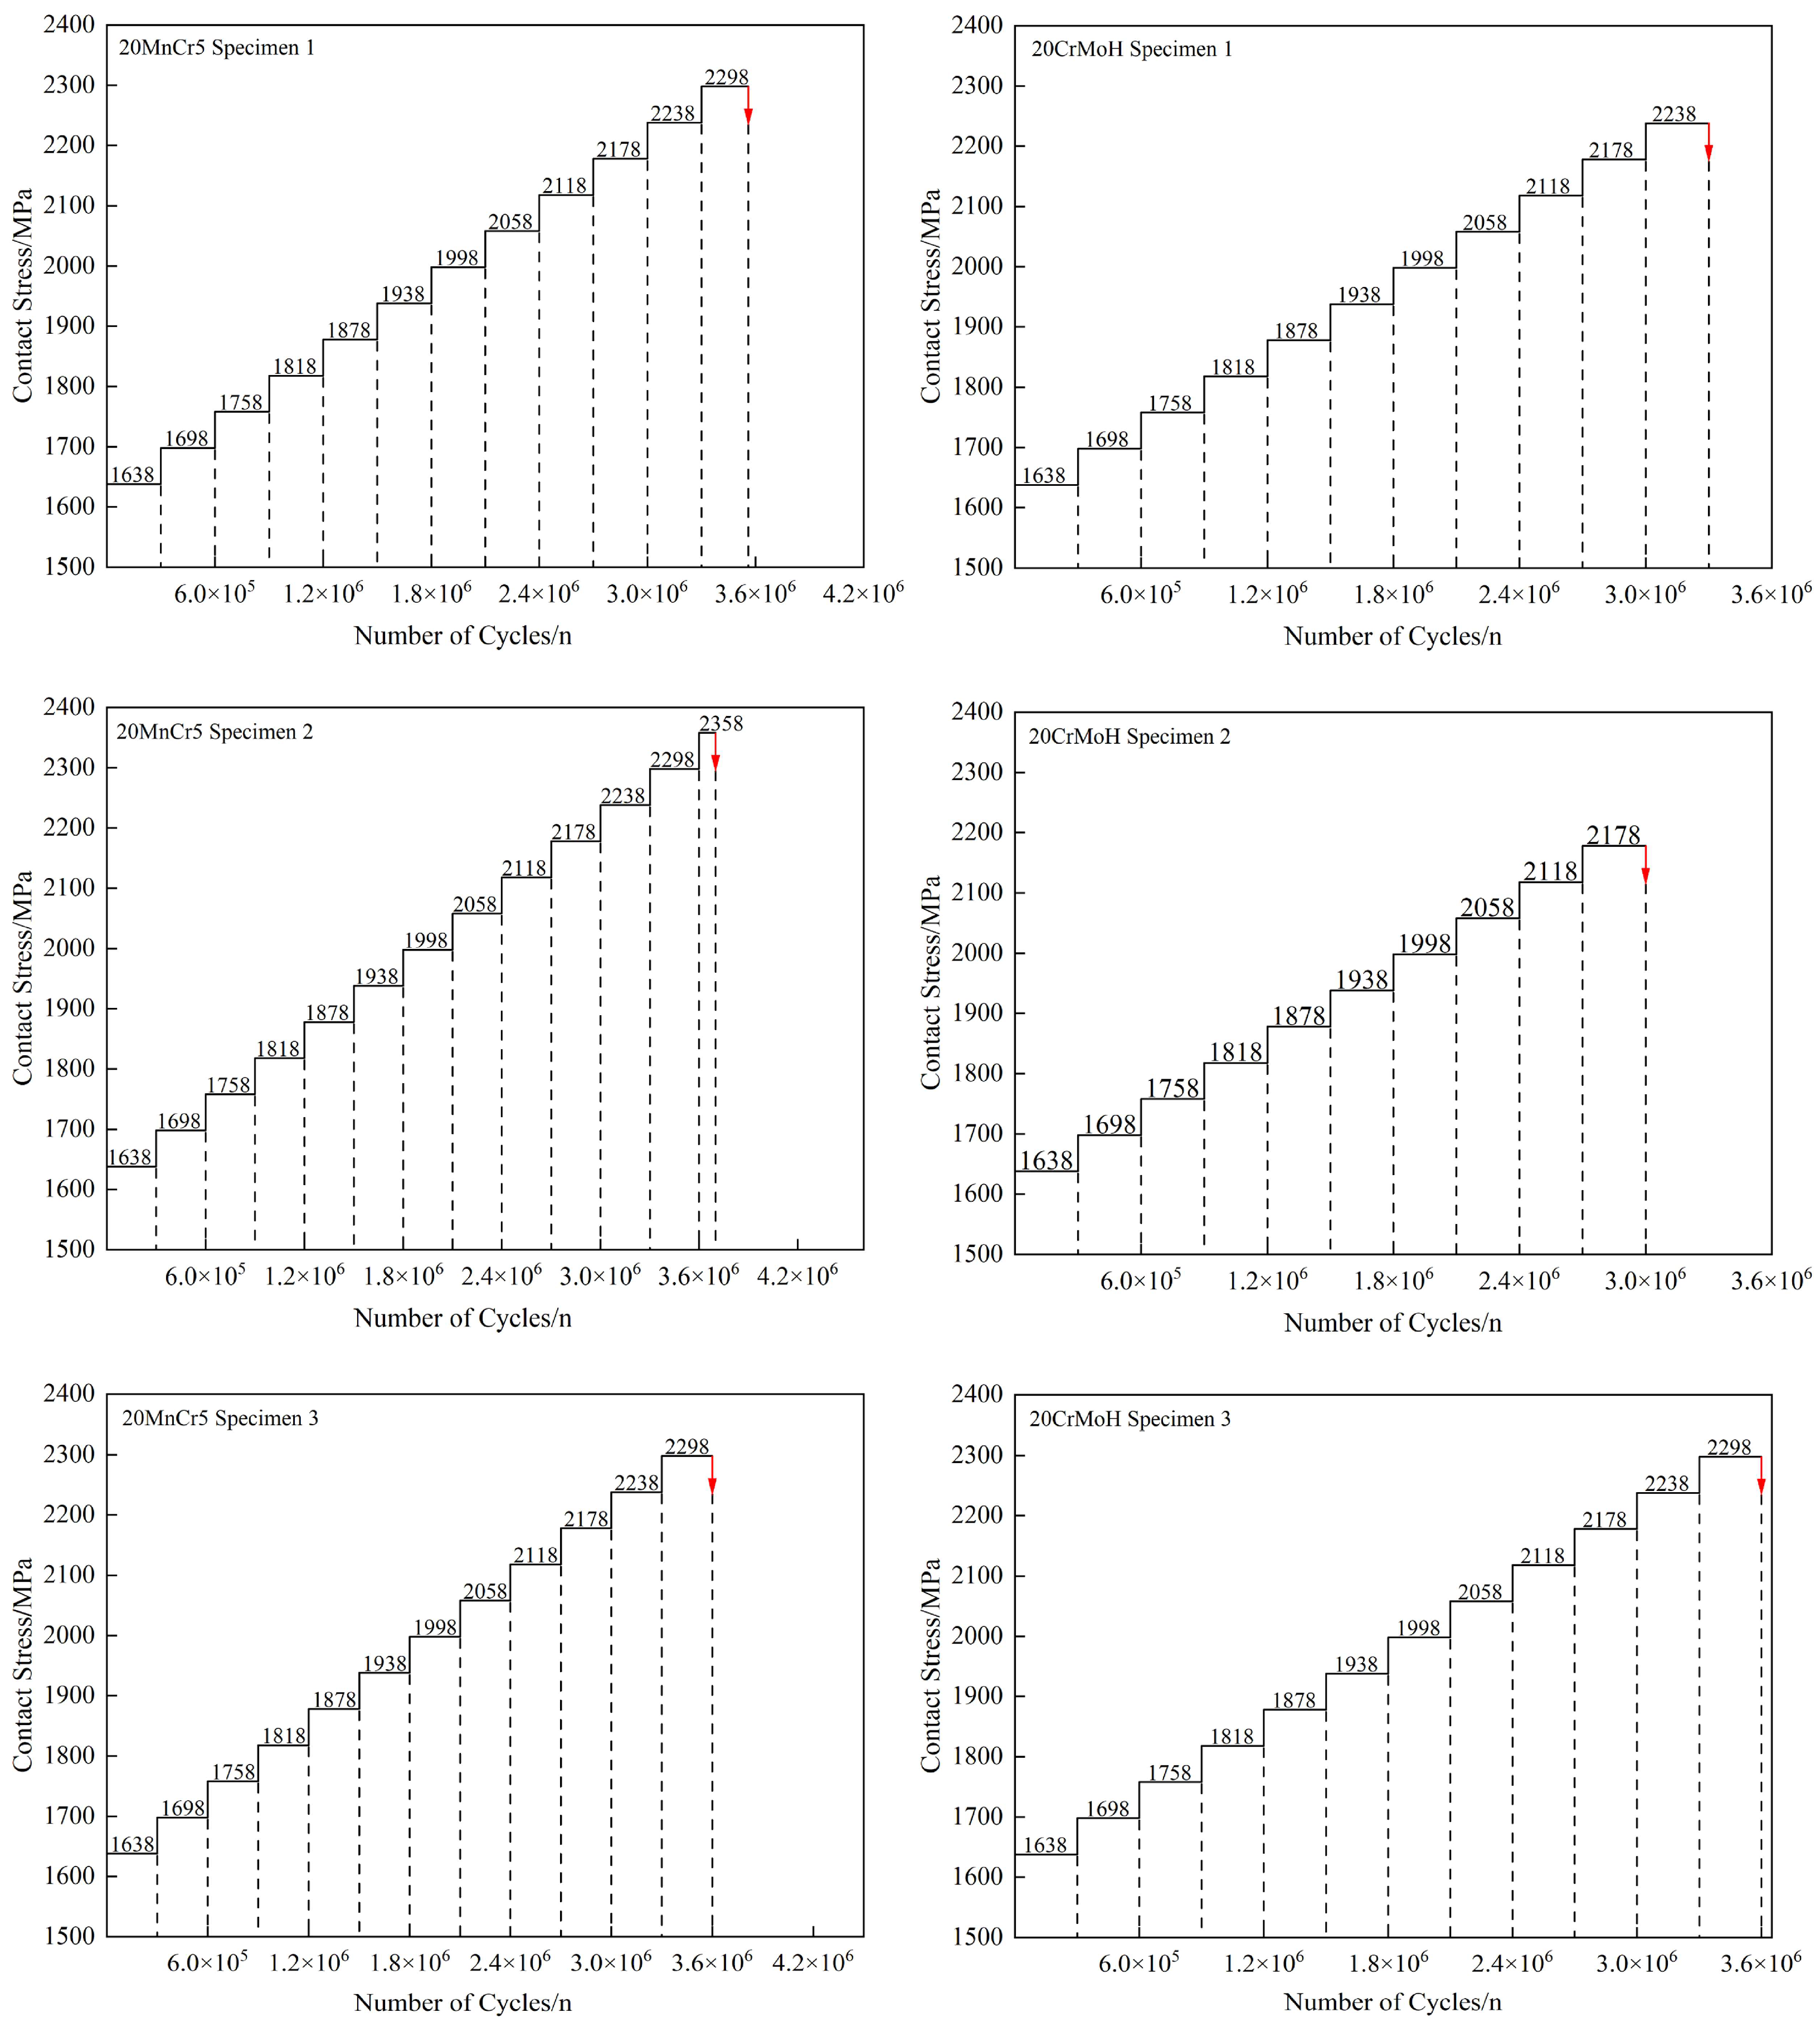
To systematically compare the contact fatigue performance of 20MnCr5 and 20CrMoH gears, contact fatigue tests were conducted using the step-loading method. Three valid specimens from each material were tested, yielding six sets of fatigue failure data. The processed experimental data are summarized in Table 8, while the loading sequence during testing is illustrated in Figure 13 (detailed data are listed in Appendix A).
Table 8.
Data processing results of contact fatigue tests.
Figure 13.
Stepwise load-increase test process for low-carbon alloy steel gears, where the red arrow indicates the occurrence of pitting failure and the termination of the test.
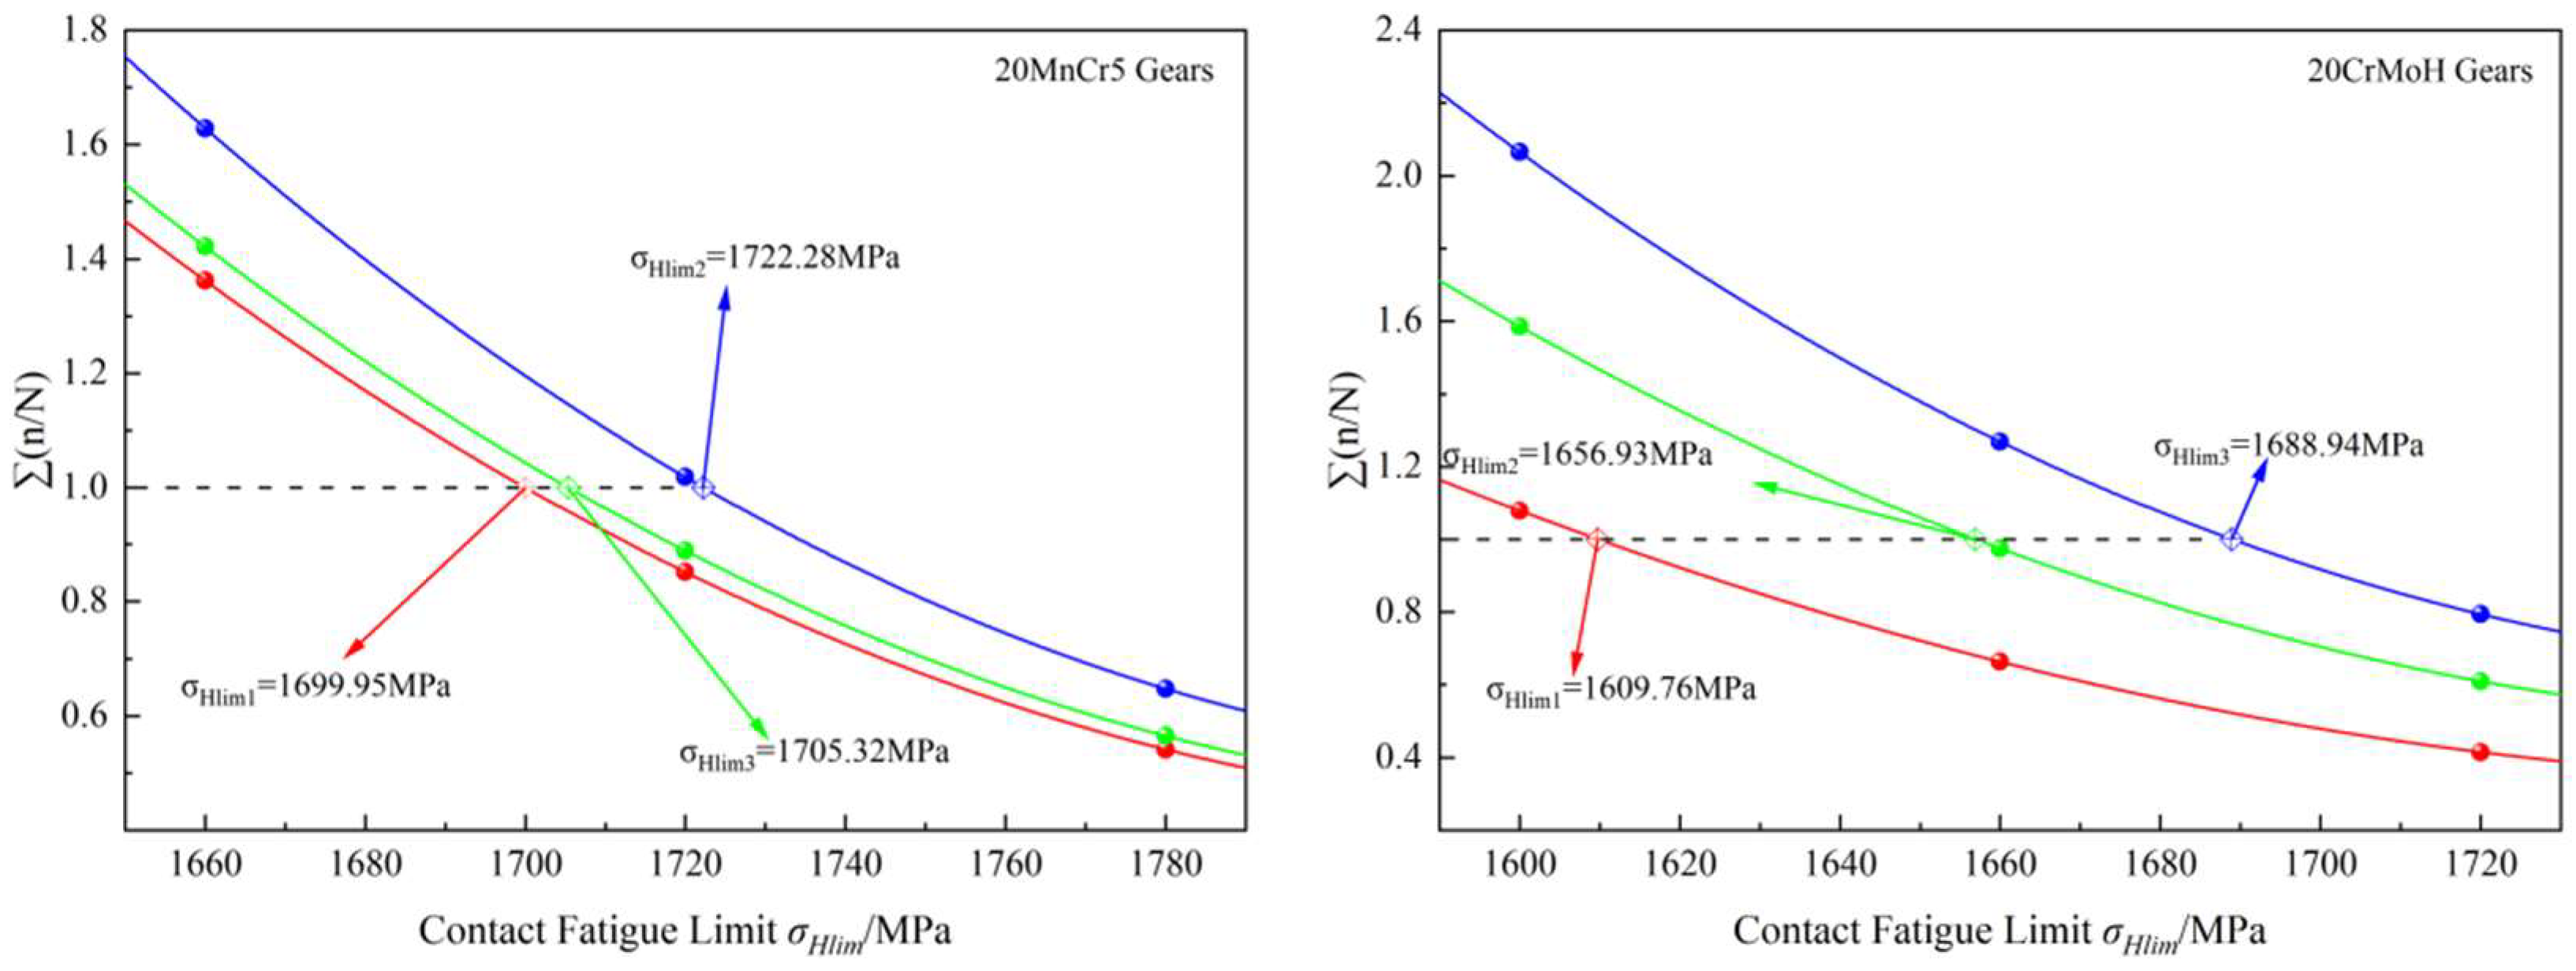
Upon obtaining the fatigue failure data points presented in Table 6 and Figure 12, the contact fatigue limit σHlim was precisely determined using the three assumed S-N curves method combined with cumulative damage interpolation. The procedure was implemented as follows:
a. Three reference S-N curves were postulated, each characterized by distinct assumed fatigue limits designated as σHlim1, σHlim2, and σHlim3. The S-N curve for σHlim calculation was constructed based on the Basquin equation:
where σ: Stress amplitude. N: Fatigue life. m: Fatigue strength exponent. C: Material fatigue constant. For the pitting failure of carburized and quenched gears, the value of m is taken as 13.22 [45]. While m = 13.22 is selected based on the ISO 6336 standard for carburized gears, the sensitivity of the calculated fatigue limit to this assumed slope was further evaluated. A sensitivity analysis varying m within the typical range for high-strength steels m = 10 to 16 revealed that the variation in the calculated fatigue limit σHlim is less than 3%. Crucially, regardless of the m value selected within this range, the relative performance ranking remains unchanged, with 20MnCr5 consistently exhibiting superior fatigue resistance compared to 20CrMoH. Thus, the standard value of 13.22 provides a robust and comparative basis for this study. Furthermore, potential calculation bias from tooth-to-tooth stress variability is minimized by the pre-test running-in process and the high-cycle averaging nature of the protocol (3.0 × 10⁵ cycles per step), which homogenizes local geometric deviations.
b. Adopted as a standardized comparative metric, the cumulative damage index ∑(ni/Ni) was computed at every applied stress level, where n represents the actual number of cycles and N denotes the predicted fatigue life at the corresponding stress level according to the respective S-N curve.
c. A relationship between the cumulative damage index and assumed fatigue limits was established by plotting ∑(ni/Ni) against σHlim, with the three assumed fatigue limits serving as abscissa values and their corresponding cumulative damage indices as ordinate values.
d. After obtaining three sets of data points with stress levels as the abscissa and cumulative damage values as the ordinate, a polynomial fitting was performed to construct a relationship curve. The stress value corresponding to the cumulative damage degree ∑(ni/Ni) = 1 solved from this curve is defined as the contact fatigue limit σHlim of the tested gear, and the data processing results are shown in Figure 14.
Figure 14.
Interpolation results for contact fatigue limit based on stepwise load-increase method.
The experimental results demonstrate that the three repeated tests for 20MnCr5 gears yield contact fatigue limits of 1699.95 MPa, 1705.32 MPa, and 1722.28 MPa, respectively, with a mean value of 1709.2 ± 12 MPa. In comparison, the corresponding values for 20CrMoH gears are 1609.76 MPa, 1656.93 MPa, and 1688.94 MPa, respectively, yielding a mean value of 1651.88 ± 40 MPa. The effect size corresponding to the difference between the two materials, Cohen’s d = 1.952, is classified as a very large effect, indicating that there are significant practical differences in the core service performance of the two materials. The independent samples t-test results show a p-value of 0.075, which is slightly higher than the conventional significance level of p < 0.05. The significantly higher contact fatigue limit of 20MnCr5 gears indicates superior fatigue resistance under identical cyclic contact loading conditions.
These findings are in strong agreement with the aforementioned surface integrity characterization. The enhanced subsurface mechanical properties of 20MnCr5 gears—attributed to their higher retained austenite content, gradual hardness gradient, and more stable residual stress distribution—collectively contribute to delayed fatigue crack initiation and propagation, thereby improving the overall fatigue limit. This study provides definitive experimental evidence for material selection between these two alloys in high-load gear applications.
3.3. Damage Morphology Analysis
To further elucidate the damage evolution behavior of 20MnCr5 and 20CrMoH gears under cyclic contact loading, this section systematically compares the pitting initiation, propagation patterns, and morphological characteristics of the two materials through combined timed-shutdown observations and three-dimensional topography scanning.
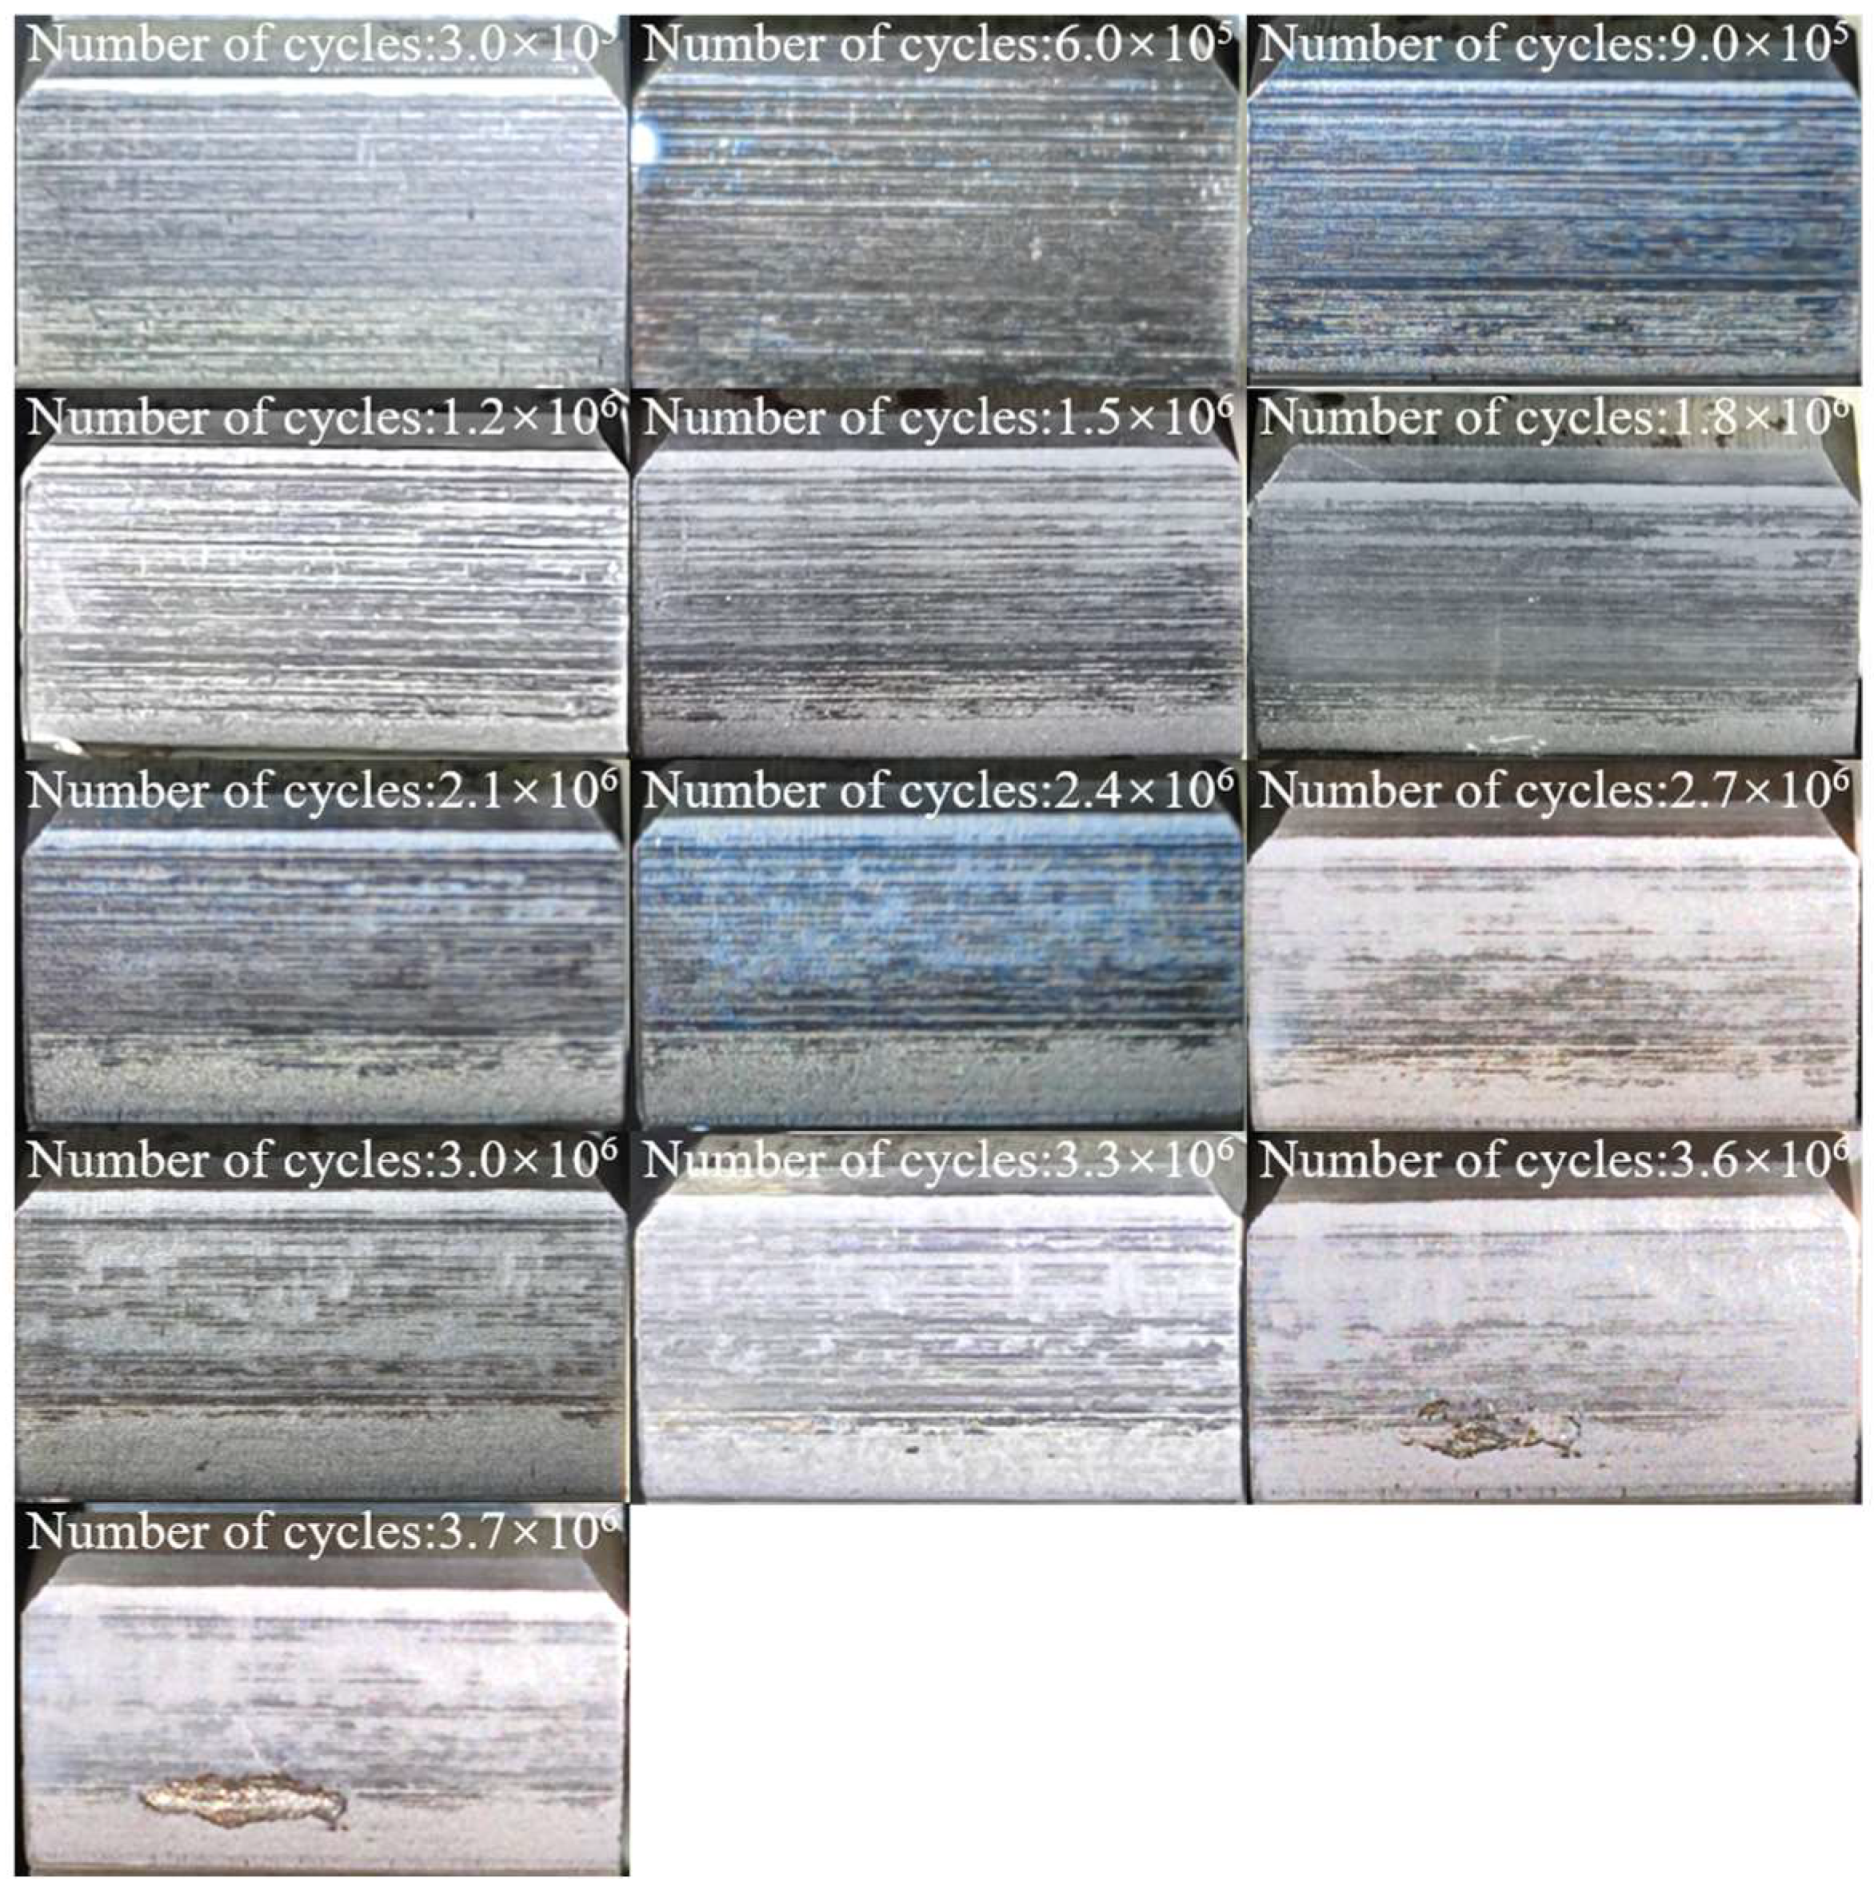
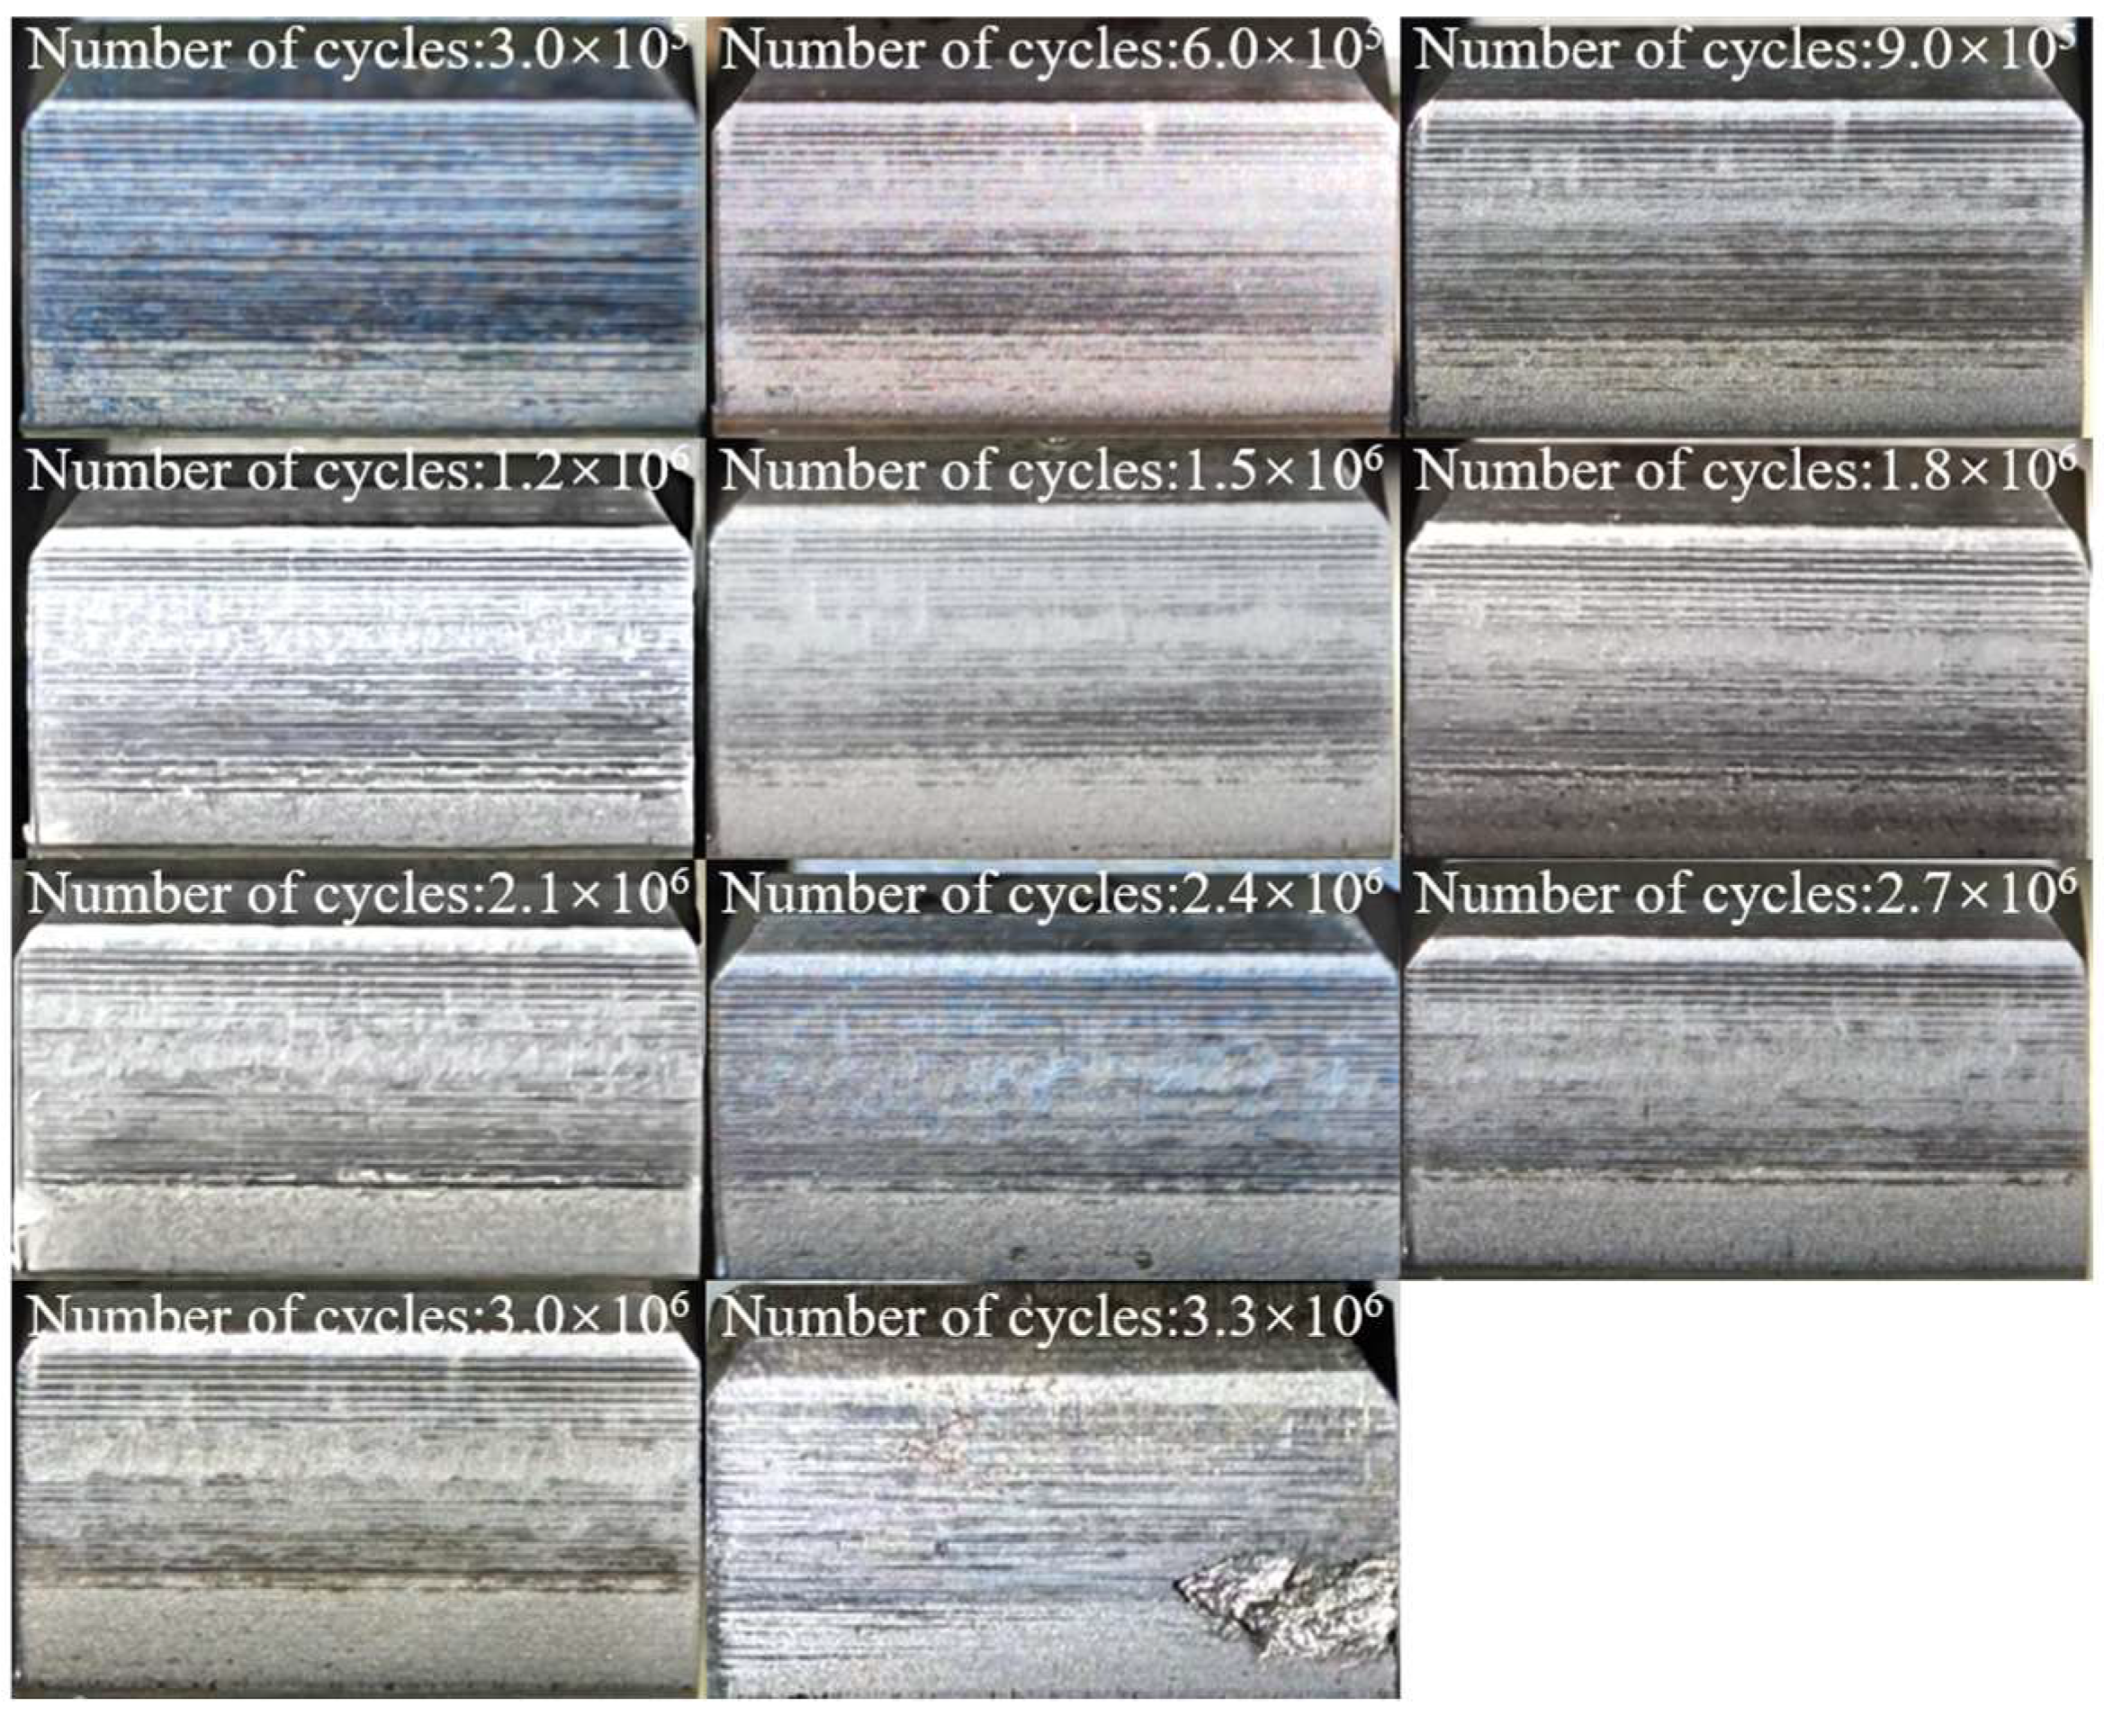
Scheduled shutdown observations reveal that pitting initiation in 20MnCr5 gears occurs relatively late, followed by a slow and uniform propagation process characterized by progressive damage features, as illustrated in Figure 15. In contrast, 20CrMoH gears exhibit earlier pitting initiation with rapid propagation demonstrating a tendency toward sudden spalling, as shown in Figure 16, indicating inferior fatigue resistance resulting from insufficient mechanical support capability in the subsurface region.
Figure 15.
Evolution of tooth surface damage in 20MnCr5 gear.
Figure 16.
Evolution of tooth surface damage in 20CrMoH gear.
The specific pitting sites selected for 3D topography analysis in Figure 17 were chosen based on their phenomenological representativeness of the global tooth-surface behavior. As observed in the macroscopic progression in Figure 15, the 20MnCr5 gear surface exhibits uniform and widespread wear with small-scale material detachment. The selected 3D pit Figure 17a, with its shallow depth and smooth profile, is characteristic of this micropitting mode dominating the entire surface. Conversely, the 20CrMoH gear in Figure 16 displays localized, severe material removal. The selected 3D pit in Figure 17, featuring steep edges and significant depth, typifies the spalling mechanism observed macroscopically. Therefore, these single-site 3D scans effectively capture the distinct failure characteristics inherent to each material’s surface integrity.
Figure 17.
Comparison of 3D pitting morphology: (a) pitting of 20MnCr5 gear; (b) pitting of 20CrMoH gear.
To quantitatively characterize the distinctions in pitting damage mechanisms, the specific pitting sites adjacent to the pitch line, whose damage evolution processes were tracked in Figure 15 and Figure 16, were selected for three-dimensional topography scanning. The resultant three-dimensional morphologies and corresponding key parameters are presented in Figure 17 and Table 9, respectively.
Table 9.
Quantitative parameters of 3D pitting morphology.
According to the standard classification of contact fatigue failures [8], the damage morphology of 20MnCr5 gears is characterized by micropitting. The shallow U-shaped profile indicates a gradual material removal process dominated by surface plasticity. In contrast, 20CrMoH gears exhibit typical spalling features, where the steep, step-like edges suggest a brittle fracture mechanism driven by rapid subsurface crack propagation.
As illustrated in Figure 17a, the pitting on the 20MnCr5 gear exhibits an elongated band-shaped distribution with a contour approximating a stretched ellipse. The maximum pitting depth measures 294.20 μm, with a projected area of 5.84 mm2 and a relatively small volume of 4.893 × 108 μm3. The surface roughness Sa is determined to be 60.01 μm. The pitting edges appear gradual without significant lip formation, while the pitting bottom maintains a relatively flat morphology.
In contrast, Figure 17b reveals that the pitting on the 20CrMoH gear demonstrates a clustered and coalesced morphology. The maximum depth reaches 490.72 μm, with a projected area of 9.327 mm2 and a volume exceeding twice that of 20MnCr5 at 1.016 × 109 μm3. The surface roughness Sa increases to 73.13 μm. Pronounced lip formations are observed along the pitting edges, accompanied by a rough bottom topography, collectively indicating a stronger tendency toward localized brittle spalling. Moreover, the absence of adhesive scuffing characteristics on the flank surfaces rules out local lubrication starvation as a primary factor. Consequently, these significantly deeper pits are attributed to rapid brittle crack propagation facilitated by the material’s lower fracture toughness, rather than tribological insufficiency. To investigate the microscopic geometric characteristics and material removal mechanisms of the pitting damage, cross-sectional profiles were extracted through the deepest points of the two representative pits shown in Figure 17, aligned parallel to the contact sliding direction. The resulting profiles, presented in Figure 18, enable clear quantification of key morphological parameters including depth, sidewall inclination, and edge protrusion. These measurements provide direct visualization of the material failure mode under cyclic contact stress, distinguishing between preferential plastic detachment and brittle spalling mechanisms.
Figure 18.
Pit cross-sectional profiles.
Figure 18 reveals that the pitting profile of the 20MnCr5 gear exhibits a characteristic shallow U-shaped contour. The transition from the pitting edge to the maximum depth occurs at a slope of approximately 15°, without abrupt step-like changes, indicating a uniform and progressive material removal process under cyclic contact stress. The pitting edges demonstrate symmetrical distribution with lip heights not exceeding 20 μm, remaining essentially flush with the tooth surface baseline and showing no significant plastic accumulation. The pitting bottom displays minimal contour fluctuation with near-horizontal characteristics, reflecting a fatigue spalling mechanism dominated by plastic deformation.
In contrast, the pitting cross-section of the 20CrMoH gear presents a steep stepped primary profile superimposed with multiple undulating secondary features. The main pit transitions from edge to maximum depth at slopes ranging from 40° to 50°, representing a significantly steeper gradient compared to the 20MnCr5 gear. Distinct asymmetric lip formations are observed at the pitting edges, with protrusion heights reaching 150–200 μm at both initiation and termination locations. From a fracture mechanics viewpoint, these high lips result from the rapid brittle fracture of the final surface ligament. Unlike 20MnCr5 where crack tip blunting suppresses upward deformation, the brittle matrix of 20CrMoH prevents plastic relaxation, causing the ligament to snap and protrude sharply. The contour at the initiation point exhibits a sharply ascending trend, indicating more severe brittle spalling behavior under cyclic contact stress.
To confirm that these brittle fracture features originate from the intrinsic material response rather than local defects, the non-metallic inclusion content was evaluated in Table 5. Metallographic ratings of carburized 20MnCr5 and 20CrMoH steels. Both materials exhibit a Grade 1 inclusion rating, indicating high cleanliness with no significant stress-concentrating defects observed at the spalling sites. This scarcity of inclusions precludes a statistically meaningful quantitative correlation with pitting density, confirming that failure initiation is governed by the matrix microstructure rather than extrinsic defects. Consequently, the step-like crack path observed in the 20CrMoH profile in Figure 18 is attributed to the intrinsic brittleness of the subsurface layer. Mechanistically, the significant depth of these pits serves as a morphological fingerprint of insufficient subsurface support. The steep hardness drop creates a hard-shell and soft-core mismatch; under cyclic loading, the yielding of the softer subsurface triggers the collapse of the overlying hard case, driving cracks vertically into the depth. The steep hardness gradient and low retained austenite content limit the local plastic deformation capacity, forcing the crack to propagate along low-energy crystallographic planes, thereby resulting in the characteristic steep, brittle edges.
Crucially, these specific damage profiles provide morphological evidence linking failure to interfacial cyclic plasticity. The distinct step-like edges observed in 20CrMoH in Figure 18 spatially correspond to the geometric orientation of martensite lath boundaries. This implies that due to the low fraction of compliant retained austenite, strain incompatibility accumulates at the rigid martensite-austenite interfaces during cyclic loading, eventually triggering localized interface decohesion. In contrast, the smooth, shallow profile of 20MnCr5 suggests that the abundant film-like austenite facilitates strain accommodation through transformation at these interfaces, thereby preventing boundary decohesion and promoting a more homogeneous, transgranular plastic flow mode.
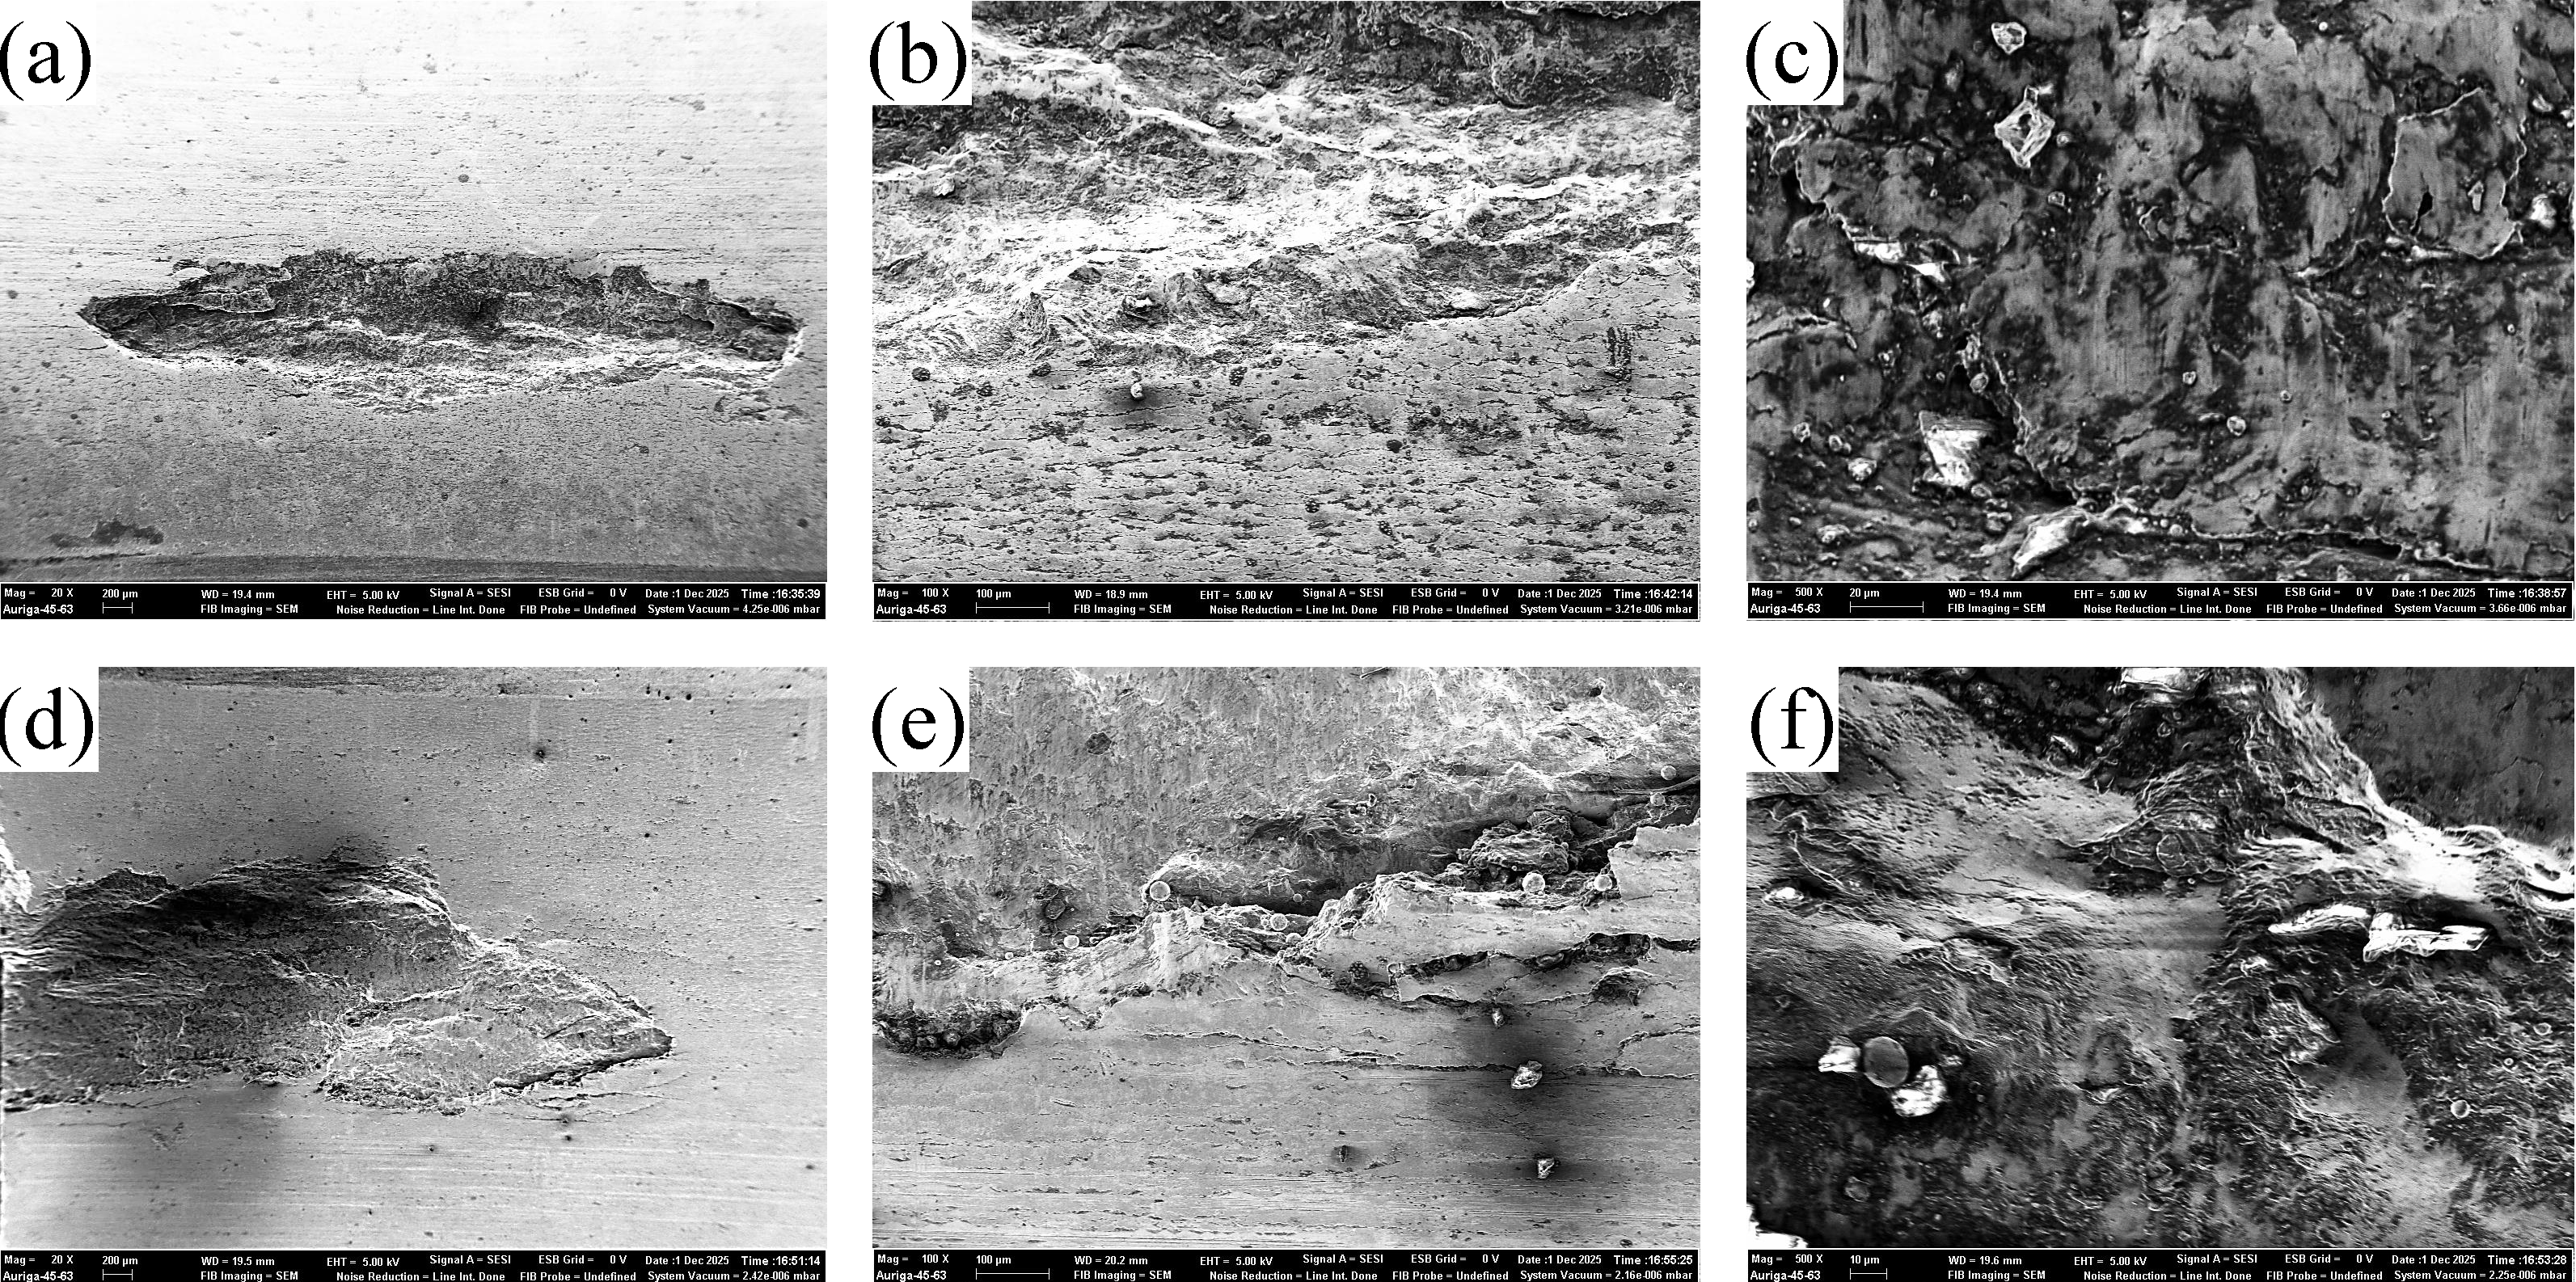
To further validate the fracture mechanisms at the micro-scale, Scanning Electron Microscopy (Carl Zeiss Microscopy GmbH, Oberkochen, Germany) analysis was performed on the representative pitting sites in Figure 19. The 20MnCr5 gear exhibits typical ductile fracture characteristics. The pitting edge is smooth and rounded, showing clear evidence of plastic flow and shear lips without sharp discontinuities. The pit bottom is characterized by rough, torn textures reminiscent of shear dimples, confirming that the material underwent significant plastic deformation prior to detachment, driven by the high toughness of the austenite-rich matrix.
Figure 19.
SEM morphologies of contact fatigue damage characteristics: (a–c) 20MnCr5 gear showing ductile micropitting features; (d–f) 20CrMoH gear showing brittle spalling features. (a,d) Overall morphology; (b,e) Detailed view of the pitting edge; (c,f) Microscopic characteristics of the pit bottom.
In stark contrast, the 20CrMoH gear displays distinct brittle fracture features. The overall morphology reveals a deep, blocky material removal. Crucially, the pitting edge exhibits sharp, step-like cleavage facets and secondary cracks propagating parallel to the edge, perfectly matching the steep profiles observed in the 3D scans. The pit bottom presents a rock-candy-like intergranular fracture appearance with distinct river patterns and cleavage steps. These microscopic features provide direct evidence that the failure in 20CrMoH is governed by rapid brittle crack propagation along weak boundaries, a consequence of its insufficient ductility and lack of transformation toughening.
4. Discussion
It should be noted that quantitative EBSD mapping was not conducted to measure the martensite lath size distribution. Instead, the Prior Austenite Grain Size (PAGS) quantified in Section 3.1.1 serves as a microstructural proxy. Mechanistically, the finer lath structure in 20CrMoH introduces a high density of lath boundaries. In the absence of sufficient retained austenite to relax stress, these abundant boundaries act as preferential paths for rapid inter-lath cracking, directly contributing to the observed step-like brittle spalling. Future work will employ high-resolution EBSD to further validate these local crystallographic features.
Furthermore, the influence of retained austenite on fatigue performance is governed by competing mechanisms rather than a universally positive effect. On one hand, retained austenite is softer than the martensitic matrix, which inevitably reduces surface hardness. Under high loads, this local softening could induce early plastic deformation before transformation toughening is fully activated. In this study, the superior fatigue limit of 20MnCr5 suggests that the beneficial effects of strain-induced martensitic transformation effectively outweighed the detrimental effects of softening. Crucially, since the test temperature (<60 °C) remained far below the tempering point (180 °C), thermal recovery is negligible, confirming the dominance of mechanical transformation.
It is noted that this outcome depends critically on austenite stability; overly stable austenite may fail to transform, while highly unstable austenite may transform prematurely. This delicate balance is intrinsically linked to the carburizing carbon potential; higher potentials would stabilize excessive austenite (compromising hardness), whereas lower potentials would diminish the austenite fraction. This conclusion aligns with Yan et al. [40], who identified SIMT as the primary crack-retardation mechanism, while the observed detriment of the steep hardness gradient in 20CrMoH experimentally corroborates the failure criteria proposed by Zhang et al. [42].
Finally, it is important to acknowledge the experimental boundaries of this study. The contact fatigue limits were determined using a step-loading technique with discrete load increments and fixed cycle blocks, which provides a robust engineering estimate rather than a continuous S-N curve precision. Additionally, the subsurface characterization relied on a 0.1 mm layer-removal resolution; while sufficient for identifying macroscopic gradient trends, this resolution may average out highly localized microstructural variations. These constraints suggest that the reported values should be interpreted as representative material behaviors under the specific testing conditions defined.
5. Conclusions
Through step-loading contact fatigue tests combined with multi-scale surface integrity characterization, this study systematically compared the fatigue performance and underlying microscopic mechanisms of 20MnCr5 and 20CrMoH gears. The main conclusions are as follows:
- (1)
- Fatigue Performance and Statistical Significance: The 20MnCr5 gear exhibits superior contact fatigue resistance of 1709 ± 12 MPa compared to 1652 ± 40 MPa for 20CrMoH. The statistically significant difference confirms that 20MnCr5 is more suitable for high-load applications, challenging the conventional view that higher surface hardness automatically yields better fatigue life.
- (2)
- Role of Manganese and Stress Compensation: The superior performance of 20MnCr5 is governed by a Stress Compensation Mechanism. The Mn-stabilized retained austenite undergoes strain-induced martensitic transformation under cyclic loading. This process not only absorbs deformation energy but also generates compressive volume expansion that effectively counteracts cyclic stress relaxation, maintaining a high residual stress state in the subsurface. Additionally, Mn facilitates a gentler hardness gradient through favorable carbon diffusion kinetics, preventing the formation of mechanical weak zones.
- (3)
- Role of Molybdenum and Brittle Failure: In contrast, 20CrMoH exhibits a Strengthening–Embrittlement Trade-off. While Mo refines the grain size, it reduces austenite stability. The resulting low-toughness matrix, combined with a steep hardness gradient, creates an Eggshell Effect. This structural mismatch leads to interface decohesion along martensite lath boundaries, manifesting as the characteristic step-like brittle spalling.
- (4)
- Morphological Link to Mechanism: Quantitative morphology confirms that failure is matrix-driven rather than defect-driven. The deep, steep-walled pits in 20CrMoH reflect the rapid vertical crack propagation due to insufficient subsurface support, whereas the shallow, smooth micropits in 20MnCr5 reflect the homogenized plastic flow enabled by transformation toughening.
These findings provide a theoretical basis for optimizing gear steels, suggesting that future material design should prioritize the balance between hardness and transformation-induced plasticity rather than pursuing static hardness alone.
Author Contributions
Conceptualization, D.W., L.W. and W.Z.; methodology, W.Z. and X.W.; software, L.W.; validation, W.Z., L.W., X.W., and H.W.; formal analysis, W.Z.; investigation, H.W. and L.W.; resources, D.W., L.W., and H.W.; data curation, W.Z., Q.X. and L.W.; writing—original draft preparation, W.Z.; writing—review and editing, W.Z., D.W., L.W.; visualization, W.Z., R.G.; supervision, D.W. and L.W.; project administration, D.W.; funding acquisition, D.W. and L.W. All authors have read and agreed to the published version of the manuscript.
Funding
This research was supported by the “ZHONGYUAN Talent Program” (ZYYCYU202012112), Graduate Education Reform Project of Henan Province (2023SJGLX021Y), and the Water Conservancy Equipment and Intelligent Operation and Maintenance Engineering Technology Research Centre in Henan Province (Yukeshi2024-01).
Institutional Review Board Statement
Not applicable.
Informed Consent Statement
Not applicable.
Data Availability Statement
The original contributions presented in this study are included in the article. Further inquiries can be directed to the corresponding author.
Acknowledgments
We would like to thank Mohammad Shahril Osman. The development of this study would not have been possible without the inspiration and support provided by Osman during academic exchanges. His recognition and encouragement for the research work served as a crucial source of motivation for the research team. Here, we sincerely acknowledge his time and efforts dedicated to this study.
Conflicts of Interest
Dongfei Wang and Rongxin Guan were employed by the company “National Gear Product Quality Inspection and Testing Center, China Academy of Machinery Zhengzhou Research Institute of Mechanical Engineering Co. Ltd.”. The remaining authors declare that the research was conducted in the absence of any commercial or financial relationships that could be construed as a potential conflict of interest.
Appendix A
| 20MnCr5 Specimen 1 | ||
| Serial No. | Stress σ/MPa | Actual Cycle Count/n |
| 1 | 1638 | 300,000 |
| 2 | 1698 | 300,000 |
| 3 | 1758 | 300,000 |
| 4 | 1818 | 300,000 |
| 5 | 1878 | 300,000 |
| 6 | 1938 | 300,000 |
| 7 | 1998 | 300,000 |
| 8 | 2058 | 300,000 |
| 9 | 2118 | 300,000 |
| 10 | 2178 | 300,000 |
| 11 | 2238 | 300,000 |
| 12 | 2298 | 260,000 |
| 20MnCr5 Specimen 2 | ||
| Serial No. | Stress σ/MPa | Actual Cycle Count/n |
| 1 | 1638 | 300,000 |
| 2 | 1698 | 300,000 |
| 3 | 1758 | 300,000 |
| 4 | 1818 | 300,000 |
| 5 | 1878 | 300,000 |
| 6 | 1938 | 300,000 |
| 7 | 1998 | 300,000 |
| 8 | 2058 | 300,000 |
| 9 | 2118 | 300,000 |
| 10 | 2178 | 300,000 |
| 11 | 2238 | 300,000 |
| 12 | 2298 | 300,000 |
| 13 | 2358 | 100,000 |
| 20MnCr5 Specimen 3 | ||
| Serial No. | Stress σ/MPa | Actual Cycle Count/n |
| 1 | 1638 | 300,000 |
| 2 | 1698 | 300,000 |
| 3 | 1758 | 300,000 |
| 4 | 1818 | 300,000 |
| 5 | 1878 | 300,000 |
| 6 | 1938 | 300,000 |
| 7 | 1998 | 300,000 |
| 8 | 2058 | 300,000 |
| 9 | 2118 | 300,000 |
| 10 | 2178 | 300,000 |
| 11 | 2238 | 300,000 |
| 12 | 2298 | 300,000 |
| 20CrMoH Specimen 1 | ||
| Serial No. | Stress σ/MPa | Actual Cycle Count/n |
| 1 | 1638 | 300,000 |
| 2 | 1698 | 300,000 |
| 3 | 1758 | 300,000 |
| 4 | 1818 | 300,000 |
| 5 | 1878 | 300,000 |
| 6 | 1938 | 300,000 |
| 7 | 1998 | 300,000 |
| 8 | 2058 | 300,000 |
| 9 | 2118 | 300,000 |
| 10 | 2178 | 300,000 |
| 11 | 2238 | 300,000 |
| 20CrMoH Specimen 2 | ||
| Serial No. | Stress σ/MPa | Actual Cycle Count/n |
| 1 | 1638 | 300,000 |
| 2 | 1698 | 300,000 |
| 3 | 1758 | 300,000 |
| 4 | 1818 | 300,000 |
| 5 | 1878 | 300,000 |
| 6 | 1938 | 300,000 |
| 7 | 1998 | 300,000 |
| 8 | 2058 | 300,000 |
| 9 | 2118 | 300,000 |
| 10 | 2178 | 300,000 |
| 20CrMoH Specimen 3 | ||
| Serial No. | Stress σ/MPa | Actual Cycle Count/n |
| 1 | 1638 | 300,000 |
| 2 | 1698 | 300,000 |
| 3 | 1758 | 300,000 |
| 4 | 1818 | 300,000 |
| 5 | 1878 | 300,000 |
| 6 | 1938 | 300,000 |
| 7 | 1998 | 300,000 |
| 8 | 2058 | 300,000 |
| 9 | 2118 | 300,000 |
| 10 | 2178 | 300,000 |
| 11 | 2238 | 300,000 |
| 12 | 2298 | 200,000 |
References
- Wu, J.Z.; Wei, P.T.; Zhu, C.C.; Zhang, P.; Liu, H.J. Development and application of high strength gears. Int. J. Adv. Manuf. Technol. 2024, 132, 3123–3148. [Google Scholar] [CrossRef]
- Li, W.; Deng, S.; Liu, B. Experimental study on the influence of different carburized layer depth on gear contact fatigue strength. Eng. Fail. Anal. 2020, 107, 104225. [Google Scholar] [CrossRef]
- Lu, Z.; Liu, H.; Zhang, R.; Zhu, C.; Shen, Y.; Xin, D. The simulation and experiment research on contact fatigue performance of acetal gears. Mech. Mater. 2021, 154, 103719. [Google Scholar] [CrossRef]
- Liu, H.; Liu, H.; Zhu, C.; Sun, Z.; Bai, H. Study on contact fatigue of a wind turbine gear pair considering surface roughness. Friction 2020, 8, 553–567. [Google Scholar] [CrossRef]
- Li, X.; Shao, W.; Tang, J.Y.; Ding, H.; You, S.Y.; Zhao, J.Y.; Chen, J.L. Numerical modeling and experimental investigation on fatigue failure and contact fatigue life forecasting for 8620H gear. Eng. Fract. Mech. 2024, 296, 109861. [Google Scholar] [CrossRef]
- You, S.; Tang, J.; Zhou, W.; Zhou, W.; Zhao, J.; Chen, H. Research on calculation of contact fatigue life of rough tooth surface considering residual stress. Eng. Fail. Anal. 2022, 140, 106459. [Google Scholar] [CrossRef]
- Lu, Z.H.; Wei, D.; Wei, P.T.; Liu, H.J.; Yan, H.; Yu, S.X.; Deng, G.Y. Contact fatigue performance and failure mechanisms of Fe-based small-module gears fabricated using powder metallurgy technique. J. Mater. Res. Technol. 2023, 26, 1412–1427. [Google Scholar] [CrossRef]
- Fernandes, P.; McDuling, C. Surface contact fatigue failures in gears. Eng. Fail. Anal. 1997, 4, 99–107. [Google Scholar] [CrossRef]
- Liu, Y.; Tang, J.; Liu, H.; Jiang, W. The influence of carbon content gradient and carbide precipitation on the microstructure evolution during carburizing-quenching-tempering of 20MnCr5 bevel gear. Surf. Coat. Technol. 2024, 494, 131387. [Google Scholar] [CrossRef]
- Luan, N.H.K.; Okuyama, T.; Koizumi, K. Microstructures of SUS304 Stainless Steel after Long-Term Service in Vacuum Carburizing Quenching. J. Jpn. Inst. Met. Mater. 2023, 87, 211–218. [Google Scholar] [CrossRef]
- ISO 683-3:2022; Heat-Treatable Steels, Alloy Steels and Free-Cutting Steels Part 3: Case-Hardening Steels. ISO: Geneva, Switzerland, 2022.
- Zhang, X.H.; Wei, P.T.; Parker, R.G.; Liu, G.L.; Liu, H.J.; Wu, S.J. Study on the relation between surface integrity and contact fatigue of carburized gears. Int. J. Fatigue 2022, 165, 107203. [Google Scholar] [CrossRef]
- Rajesh, S.; Marimuthu, P.; Babu, P.D.; Venkatraman, R. Contact fatigue life estimation for asymmetric helical gear drives. Int. J. Fatigue 2022, 164, 107155. [Google Scholar] [CrossRef]
- Lima, B.; Rego, R. Comprehensive surface integrity evaluation during early stages of gear contact fatigue. Int. J. Fatigue 2024, 180, 108114. [Google Scholar] [CrossRef]
- Wu, J.Z.; Wei, P.T.; Guagliano, M.; Yang, J.H.; Hou, S.W.; Liu, H.J. A study of the effect of dual shot peening on the surface integrity of carburized steel: Combined experiments with dislocation density-based simulations. Arch. Civ. Mech. Eng. 2024, 24, 83. [Google Scholar] [CrossRef]
- Wang, W.; Liu, H.J.; Zhu, C.C.; Du, X.S.; Tang, J.Y. Effect of the residual stress on contact fatigue of a wind turbine carburized gear with multiaxial fatigue criteria. Int. J. Mech. Sci. 2019, 151, 263–273. [Google Scholar] [CrossRef]
- Sun, X.S.; Zhao, J.; Song, S.K.; Lu, Y.L.; Sun, H.Y. A numerical model for total bending fatigue life estimation of carburized spur gears considering the hardness gradient and residual stress. Meccanica 2024, 59, 1037–1060. [Google Scholar] [CrossRef]
- Su, J.; Li, S.R.; Hu, B.; Yin, L.R.; Zhou, C.J.; Wang, H.B.; Hou, S.W. Innovative insights into nanofluid-enhanced gear lubrication: Computational and experimental analysis of churn mechanisms. Tribol. Int. 2024, 199, 109949. [Google Scholar] [CrossRef]
- Seetharam, P.K.; Dhamodaran, G.; Sugumar, S.; Mahalingam, K.; Kandapalam, V. Effects of discrete fibre reinforcements on the wear resistance behaviour of polyamide-based spur gears. Phys. Scr. 2025, 100, 015031. [Google Scholar] [CrossRef]
- Li, X.; Shao, W.; Tang, J.Y.; Chen, J.L.; Zhao, J.Y. Towards understanding the influencing mechanism of barrel finishing on tooth surface integrity and contact performance. Wear 2025, 572, 206020. [Google Scholar] [CrossRef]
- Sun, X.S.; Zhao, J.; Song, S.K.; Lu, Y.L.; Sun, H.Y.; Tang, X.J. A numerical model for total contact fatigue life prediction of carburized spur gears considering the surface integrity. Meccanica 2025, 60, 311–334. [Google Scholar] [CrossRef]
- Wu, L.J.; Lv, Y.X.; Zhang, Y.L.; Li, A.H.; Ji, V.C. Contact Fatigue Behavior Evolution of 18CrNiMo7-6 Gear Steel Based on Surface Integrity. Metals 2023, 13, 1605. [Google Scholar] [CrossRef]
- Wen, Y.Q.; Zhou, W.; Tang, J.Y. Composite effects of residual stress and hardness gradient on contact fatigue performance of rough tooth surfaces and optimization design of detailed characteristic parameters. Eng. Fail. Anal. 2024, 162, 108424. [Google Scholar] [CrossRef]
- Cheng, S.L.; Zhou, Y.; Bai, H.Y.; Feng, H.B. The effect of surface integrity on contact performance of carburized gear. J. Braz. Soc. Mech. Sci. Eng. 2021, 43, 480. [Google Scholar] [CrossRef]
- Matkovič, S.; Kalin, M. Effect of the coefficient of friction on gear-tooth root fatigue for both dry and lubricated running polymer gears. Tribol. Int. 2024, 194, 109525. [Google Scholar] [CrossRef]
- Park, C.I. Influence of tooth profile and surface roughness on wear of spur gears considering temperature. J. Mech. Sci. Technol. 2023, 37, 5297–5306. [Google Scholar] [CrossRef]
- Illenberger, C.M.; Tobie, T.; Stahl, K. Damage mechanisms and tooth flank load capacity of oil-lubricated peek gears. J. Appl. Polym. Sci. 2022, 139, e52662. [Google Scholar] [CrossRef]
- Liu, H.; Liu, H.J.; Zhu, C.C.; Parker, R.G. Effects of lubrication on gear performance: A review. Mech. Mach. Theory 2020, 145, 103701. [Google Scholar] [CrossRef]
- Jain, M.; Patil, S. A review on materials and performance characteristics of polymer gears. Proc. Inst. Mech. Eng. Part C-J. Mech. Eng. Sci. 2023, 237, 2762–2790. [Google Scholar] [CrossRef]
- Yin, H.; Wu, Y.; Liu, D.; Zhang, P.; Zhang, G.; Fu, H. Rolling contact fatigue-related microstructural alterations in bearing steels: A brief review. Metals 2022, 12, 910. [Google Scholar] [CrossRef]
- Hu, C.; Zhao, L.; Zhang, Y.; Du, Z.; Deng, Y. The Influence of Hard Coatings on Fatigue Properties of Pure Titanium by a Novel Testing Method. Materials 2024, 17, 835. [Google Scholar] [CrossRef]
- GB/T 14229-2021; Test Method of Surface Contact Strength for Gear Load Capacity. Standards Press of China: Beijing, China, 2021.
- GB/T 13298-2015; Inspection Methods of Microstructure for Metals. Standards Press of China: Beijing, China, 2015.
- GB/T 32660.1-2016; Metallic Materials—Webster Hardness Test—Part 1: Test Method. Standards Press of China: Beijing, China, 2016.
- Prevéy, P.S. X-Ray Diffraction Residual Stress Techniques; ASM International: Almere, The Netherlands, 1986. [Google Scholar] [CrossRef]
- Toparli, M.B.; Fitzpatrick, M.E.; Gungor, S. Determination of Multiple Near-Surface Residual Stress Components in Laser Peened Aluminum Alloy via the Contour Method. Metall. Mater. Trans. A 2015, 46, 4268–4275. [Google Scholar] [CrossRef]
- ISO 25178-1:2016; Geometrical Product Specifications. International Organization for Standardization: Geneva, Switzerland, 2016.
- ISO 4967:2013; Steel—Determination of Content of Non-Metallic Inclusions—Micrographic Method Using Standard Diagrams. International Organization for Standardization: Geneva, Switzerland, 2013.
- GB/T 25744-2010; Metallographic Examination for Carburizing Quenching and Tempering of Steel Parts. Standards Press of China: Beijing, China, 2010.
- Yan, H.; Wei, P.; Su, L.; Liu, H.; Wei, D.; Zhang, X.; Deng, G. Rolling-sliding contact fatigue failure and associated evolutions of microstructure, crystallographic orientation and residual stress of AISI 9310 gear steel. Int. J. Fatigue 2023, 170, 107511. [Google Scholar] [CrossRef]
- Liu, Y.; Jiang, Q.; Gao, J.; Xu, Z.; Chen, S.; Lai, Y.; Wang, W.; Weng, J.; Li, B.; Ye, L. Influence of heat treatment combined with cryogenic treatment on contact fatigue properties of Cr12Mo1V1 steel members. Sci. Rep. 2025, 15, 22077. [Google Scholar] [CrossRef]
- Zhang, B.; He, Y.; Wang, Z. Contact fatigue limit prediction method for heavy-duty gears considering hardness gradient characteristics. Friction 2025, 13, 9441019. [Google Scholar] [CrossRef]
- Sun, Y.; Liang, Y.; Zhang, L.; Peng, G.; Li, Z.; Ran, X. The Influence of Carburizing-Nitriding Composite Heat Treatment on the Friction and Wear Properties of 20Cr3MoWVA Steel. Steel Res. Int. 2025, 96, 2500429. [Google Scholar] [CrossRef]
- Yang, S.; Cheng, P.; Hu, F.; Yu, W.; Zhang, C.; Wang, K.; Wang, M. Very high cycle fatigue properties of 18CrNiMo7-6 carburized steel with gradient hardness distribution. Coatings 2021, 11, 1482. [Google Scholar] [CrossRef]
- ISO 6336-6:2019; Calculation of Load Capacity of Spur and Helical Gears Part 6: Calculation of Service Life Under Variable Load. International Organization for Standardization: Geneva, Switzerland, 2019.
Disclaimer/Publisher’s Note: The statements, opinions and data contained in all publications are solely those of the individual author(s) and contributor(s) and not of MDPI and/or the editor(s). MDPI and/or the editor(s) disclaim responsibility for any injury to people or property resulting from any ideas, methods, instructions or products referred to in the content. |
© 2025 by the authors. Licensee MDPI, Basel, Switzerland. This article is an open access article distributed under the terms and conditions of the Creative Commons Attribution (CC BY) license (https://creativecommons.org/licenses/by/4.0/).