Abstract
This study introduces a model-free reinforcement learning framework based on Q-Learning (QLA) for the multi-objective optimization of Selective Laser Melting (SLM) process parameters for Inconel 718. To efficiently handle the limited experimental dataset, a tabular Q-Learning approach was implemented, in which each parameter combination was treated as a discrete state and every possible transition as an action. Four key process variables laser power (P), scan speed (S), layer thickness (T), and hatch spacing (H) were optimized for two output responses: relative density (RD) and Vickers hardness (VH). The Q-Learning agent iteratively explored various parameter combinations, observed the resulting material properties, and continuously updated its policy to converge toward optimal conditions. The optimal parameter set identified by the framework was P = 270 W, S = 800 mm/s, H = 0.1 mm, and T = 0.08 mm. Despite relying on only 16 experimental trials, the model achieved exceptionally low prediction errors of 0.0503% for RD and 0.0857% for VH, demonstrating substantial reductions in both experimental effort and material consumption. The results confirm that reinforcement learning can autonomously and effectively identify optimal SLM parameter settings, highlighting its strong potential to enhance precision, efficiency, and overall quality in the additive manufacturing of metallic components.
1. Introduction
Machine learning (ML) is a subfield of artificial intelligence that is concerned with training systems to improve themselves. It is useful in various domains, including computer vision, prediction, information retrieval, and the optimization of AM design, processes, and manufacturing [1]. Advanced machine learning algorithms can help optimize process parameters and prevent powder distribution errors during additive manufacturing [2]. Machine learning (ML) techniques provide a more adaptable and cost-efficient method for predicting mechanical properties based on processing and material properties [3].
Traditional methods, such as the central composite design (CCD) in the response surface technique, were used to investigate the effects of four critical SLM process parameters, namely laser power (P), scan speed (V), hatch spacing (HS), and layer thickness (LT), on the SLM-processed Inconel 718. On a comprehensive dataset of 30 experimental samples, the RD model achieved a prediction accuracy with a prediction error of 29.86% [4]. GA (genetic algorithm), GA-BPNN (Backpropagation Neural Network), and AGA-BPNN (adaptive GA BPNN) models on SLM-ed IN718 and RD data. The models consider critical process parameters, including laser power, scan speed, hatch spacing, layer thickness, and RD data points. For 25 experimental samples used in a single-objective optimization framework, the RD error percentages were 26.5% with the GA model, 24.7% with the GA-BPNN model, and 20.1% with the AGA-BPNN model [5]. An evolutionary approach (EVoNN) was used to optimize parameters such as laser power (W), scanning velocity (mm/s), and hatch spacing (mm) based on relative density. The investigation was carried out using IN718 SLM, with 16 experiments resulting in an RD error rate of 6.85% [6]. Response Surface Methodology (RSM), specifically the Box–Behnken design, was used to optimize parameters such as laser power, layer thickness, and scanning speed on the hardness of the IN718 SLM. The investigation focused on a single target and involved 15 experimental trials, resulting in a hardness error rate of 10.94% [7]. Taguchi and super ranking concept techniques, along with process parameters such as laser power (LP), scan speed (SS), and hatch distance (HD), were used to establish a single optimal condition for Inconel 625 using selective laser melting (SLM). The study included nine experimental trials with a hardness error rate of 22.01% [8]. Artificial Neural Networks (ANN) with a focus on process parameters such as Laser Power (LP), Scan Speed (SS), and Hatch Spacing (HS), specifically in the context of Inconel 718 with Selective Laser Melting (SLM). This study included 20 experiments with a hardness error rate of 3.26% [9]. Overall, these methods require a large amount of data, which yields significant prediction errors, and rely heavily on regression models or complex neural networks, which are not always suitable for real-time or small data applications. This limits their ability to reduce costs, save manufacturing time, reduce material waste, and ensure high quality products. They highlighted the utilization of optimization algorithms. These constraints can be solved by applying Q-learning, a subset of the Reinforcement Learning algorithm [10].
This study describes a model-free reinforcement learning approach, specifically Q-learning, for optimizing the SLM parameter values. Reinforcement Learning (RL) algorithms have gained popularity in recent years owing to their ability to increase decision-making efficiency, optimization, and autonomous systems. A review of the current literature reveals that its application for improving the mechanical properties and microstructures in additive manufacturing remains unexplored. Unlike traditional approaches, the proposed Q-learning algorithm (QLA) does not require a regression equation and performs well on smaller datasets. It also learns optimal parameter combinations through state-action-based iterative improvements, making it more flexible and efficient. A model-free, off-policy reinforcement learning approach, specifically a subset of Q-learning, for the optimization of process parameters in metal additive manufacturing. The QLA architecture distinctly represents the interactions among the agent, action space, state space, and environment [11]. Deep Q-Learning was applied to challenges with a continuous action domain. This is a model-free method based on deterministic policy gradients. This algorithm performs well with continuous actions, network designs and hyperparameters [12].
The objective of the current study was to investigate and optimize the influence of the process parameters on the mechanical properties and microstructures. Previous studies have examined the selective laser melting (SLM) method for metal additive manufacturing (AM) [13]. SLM uses laser powder bed fusion (LPBF) [14] to fabricate complex structures [15]. This technology has been widely used for manufacturing titanium, aluminum, stainless, and nickel-based products. Inconel 718 (IN718) is one of the most studied nickel materials employed in this method owing to its wide range of applications in aircrafts, gas turbines, and turbocharger rotors [16,17]. Over 50 process parameters influence the product quality of components made using SLM [18]. The relationship between the processing parameters and the resulting microstructural and mechanical properties of Inconel 718 produced by Selective Laser Melting (SLM) has been widely studied. SLM provides major advantages over conventional fabrication methods by enabling rapid solidification, refined microstructures, and precise control of the molten pool. These conditions lead to ultrafine cellular dendrites, reduced segregation, and improved strengthening. Therefore, optimizing the SLM process parameters is essential to fully exploit its capability to tailor the microstructure and enhance the mechanical performance [19,20]. Design of experiments methods can be applied to determine crucial parameters [21]. The Taguchi design of experiments is useful for selecting significant parameters [22]. Optimized SLM processing parameters have been investigated for their effects on mechanical properties [23]. Based on the literature survey, four important parameters, laser power (P), scan speed (S), hatch spacing (H), and layer thickness (T), were shortlisted, which cover critical aspects such as stability, enhancing densification and bonding, uniform melt pool overlap enhancing microstructural uniformity, fewer imperfections such as porosity, distribution of thermal energy, rate of solidification, finer layers, and strong interparticle bonding. Figure 1 shows an overview of the workflow used in this study.
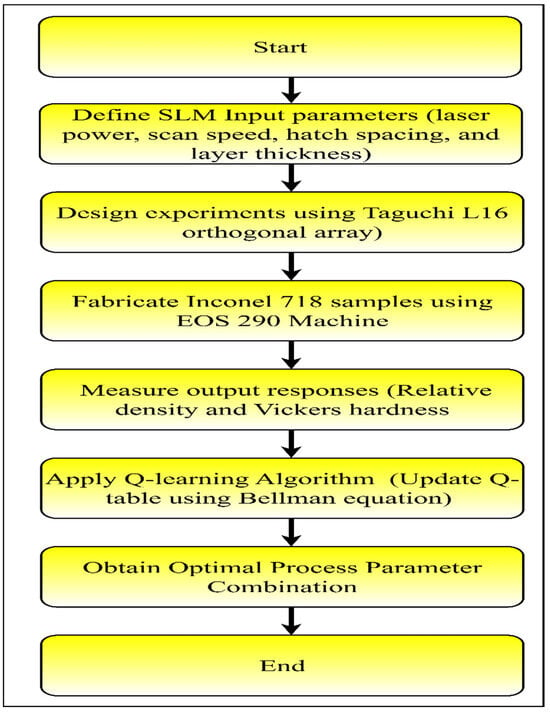
Figure 1.
Flowchart of the current study.
The relative density and Vickers hardness were selected because they serve as comprehensive, sensitive, and experimentally feasible indicators of the component quality in SLM. They reflect both process-induced porosity and mechanical resistance, making them ideal for the performance evaluation and optimization of over 50 influential SLM process parameters. These process parameters were varied to determine the relative density and Vickers hardness. RD and VH are suitable for machine learning and reinforcement learning-based optimization owing to their consistent trends with process parameters, quantifiable nature, and clear objective functions for multi-objective optimization.
2. Materials and Methods
2.1. Inconel 718
Grade 718 is a representative nickel-based superalloy that incorporates niobium and is among the most frequently employed materials for high-temperature applications owing to its precipitation-strengthening properties [24]. The chemical composition of the IN718 alloy [25] is presented in Table 1. Niobium provides precipitation strengthening through the formation of the γ″ (Ni3Nb) phase, which significantly enhances the high-temperature strength, creep resistance, and microstructural stability.

Table 1.
Chemical composition of the IN718 alloy (in wt.%).
Energy-dispersive X-ray (EDX) analysis was performed on the Inconel 718 samples to determine their elemental composition, as shown in Figure 2. EDX mapping revealed a uniform distribution of Ni, Cr, Fe, and Nb, indicating good metallurgical bonding and homogeneity.
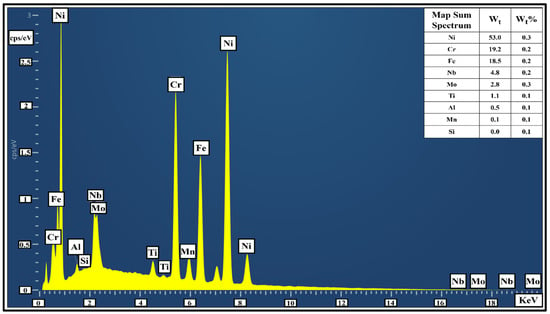
Figure 2.
EDX analysis of Inconel 718.
The Samples were fabricated using an EOS M290 metal 3D printing machine (EOS GmbH, Krailling, Germany) [26] from the IN718 powder material, which was selected for testing. Rectangular sample dimensions were printed using this machine, and each printed sample measured 30 mm × 20 mm × 6 mm. Sixteen (16) test specimens were extracted from the SLM-fabricated Inconel 718 blocks using a Wire electrical discharge machine (Electronica HITECH Job Master D-Zire, Electronica HiTech Machine Tools Pvt. Ltd., Pune, India). This process ensured high-dimensional accuracy without mechanical deformation. Each cube-shaped sample (10 mm × 10 mm × 6 mm) was fabricated using an L16 experimental design.
2.2. Taguchi Design of Experiment and Sample(s) Extraction
The number of experiments to be conducted with the selected orthogonal array is based on the total number of parameters involved and the levels at which they can be varied. Based on an exhaustive literature review, an L16 orthogonal array was created using the Taguchi design of experiments, which included four parameters—laser power (P), scan speed (S), hatch spacing (H), and layer thickness (T)—at four different levels owing to their associated properties. Laser power (P) optimization is critical for achieving a stable and homogenous melt pool, better layer bonding, and fewer flaws such as porosity. The scan speed (S) determines the distribution of heat energy and the rate of solidification in molten pools. An optimized scan speed encourages full fusion and the formation of strong interparticle bonds. Hatch spacing (H), or the distance between parallel laser trajectories, determines the bonding and homogeneity of the melt pool region. The layer thickness (T) determines the depth of each powder layer before melting and solidification in SLM. Because all the process parameters can be modified at four levels, the resulting orthogonal array is L16. The lower and upper bounds used for the parameters were laser power (P) of 250–310 W, Scan speed (S) of 800–1100 mm/s, hatch spacing of 0.09–0.12 mm, and layer thickness of 0.04–0.1 mm. Table 2 presents the selected parameters, their levels, and category values.

Table 2.
SLM process parameters, their levels, and category values.
2.3. Performance Measures
The relative density (RD) and Vickers hardness (VH) were also investigated. The Relative density (RD) was determined using a density measurement kit, and the Vickers hardness (VH) was determined using the Vickers hardness test on the SLM IN718 sample(s).
Calculation of Relative Density (RD) and Vickers Hardness (VH)
Relative density (RD), also known as specific gravity, is defined as the ratio of a material’s density to that of a reference substance, typically water at 4 °C for solids and liquids. In this study, RD was determined using the ME-DNY-43 density measurement kit, which is based on Archimedes’ principle, thereby facilitating an accurate assessment of the porosity of SLM-fabricated Inconel 718 specimens.
The Vickers hardness test is a precise method for evaluating material hardness. In this study, the VH of the fabricated samples was measured using an ECONOMET VH-1MDX hardness tester according to the ASTM E384 standards [27]. A diamond-shaped indenter with a square base was pressed into the polished surface of the sample using a load of 500 g (0.5 kgf) and a dwell time of 15 s.
This machine calculates the density of the sample based on the difference in weight measurements using Equation (1) [28,29].
where
- ρdensity is the density of the sample (g/cm3 or kg/m3);
- ρfluid is the density of the immersion fluid (typically distilled water, ~0.998 g/cm3 at 20 °C);
- ρair is the density of air (typically ~0.0012 g/cm3 at room temperature and pressure);
- massair is the mass of the sample measured in air (g);
- massfluid is the mass of the sample measured in fluid (apparent mass) (g).
The RD of each sample was measured three times by immersing it in water, with individual readings provided by the machine, referred to as trials 1, 2, and 3, as shown in Figure 3a. For each sample, the average of these values was calculated and used to determine the actual value (i.e., the experimental RD). This procedure was repeated for all 16 samples representing the pre-test RD measurements.
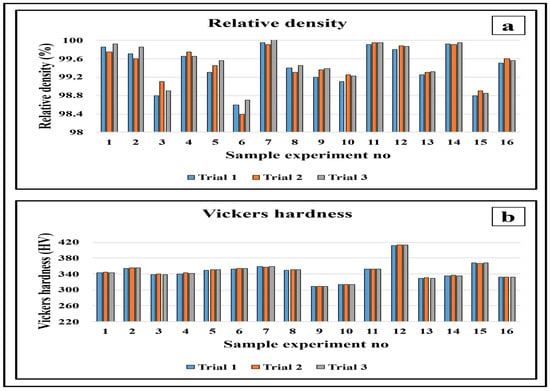
Figure 3.
Bar chart for Inconel 718: (a) relative density and (b) Vickers hardness.
This machine calculates the Vickers hardness number (VHN) using Equation (2) [30], depending on the diagonal length of the indentation:
where
VHN = 1.854.4 × F/d2
- VHN is the Vickers hardness number;
- F = Applied load (in kilograms-force, kgf);
- d = Average diagonal length of the indentation (in millimeters, mm);
- 1.854 = Geometrical constant for Vickers indenter shape.
Each sample was sequentially rough-polished using emery sheets with grit sizes of 200, 400, 600, 800, 1000, 1200, and 1500, followed by final polishing using a disc polishing machine. A Vickers hardness tester was then used to take three measurements at different locations on each sample, referred to as Trials 1, 2, and 3 (Figure 3b). The average of these three measurements was taken as the experimental Vickers hardness (VH) value for each sample, and the same procedure was applied to all 16 samples to obtain the post-test VH measurements. Figure 4 illustrates the procedure used to measure the Vickers hardness indentation geometry and the specific locations of the indentation points. For each indent, the diagonal lengths d1 and d2 were measured, as shown in Figure 4a. Hardness measurements were performed at three equally spaced positions along the vertical axis of the sample surface: the upper region (P1), centre region (P2), and lower region (P3), as shown in Figure 4b. For each sample, the VH value was calculated as the mean of the three regional measurements (P1–P3). In total, 48 hardness impressions were performed (3 indents × 16 samples).
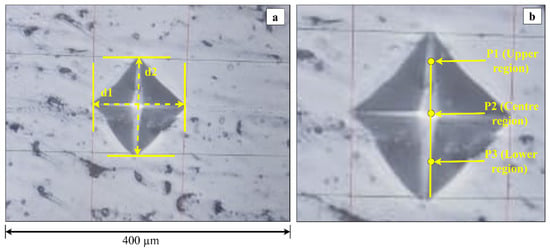
Figure 4.
Vickers indentations: (a) measurements of the diagonal lengths d1 and d2 for each indent and (b) locations of the three hardness test points (P1, P2, and P3) on the sample surface.
2.4. Microstructural Analysis
2.4.1. Optical Microscope
Figure 5a,b show optical micrographs of block 1 along the build-up plane (BUP) and long transverse (LT) directions. On the plane orthogonal to the build direction (BUD), the structure resembles a collection of partially sintered particles. Microstructural analysis of the built plane indicated the presence of two hatched layers in the cross-section. During the printing of Block 1, the angle between the first and second layers was set to 67°, and the LT section micrograph revealed clear melt pool boundaries.
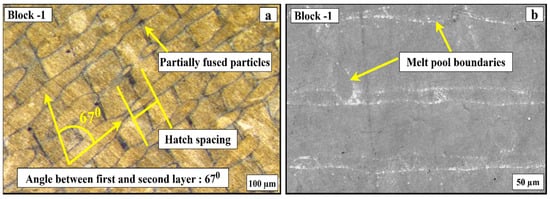
Figure 5.
Optical micrographs of the IN718 specimen (Block 1): (a) along the build plane, and (b) along the plane orthogonal to the long transverse direction.
Block 4 exhibited low-quality physical and mechanical characteristics. This behavior may result from a diminished energy density. The LT section micrograph in Figure 6 confirms the presence of significant porosity, which leads to reduced mechanical performance.
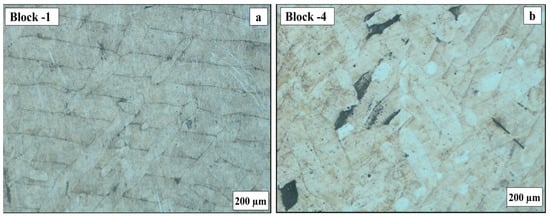
Figure 6.
Optical micrographs along the short traverse of (a) block 1 showing low porosity and (b) block 4 showing high porosity.
2.4.2. SEM Images of Inconel 718
The SEM images of the build-plane sections of the additively manufactured IN718 blocks are shown in Figure 7. The internal microstructural features of the melt pools are distinct in the SEM micrographs but are not visible in the optical images owing to resolution limitations. The cellular features within the solidified melt pools exhibited a range of orientations. The microstructural image indicates that the cellular structures extended beyond the edges of the melt pool. This result affirms the existence of internal microstructural features within the melt pools [31]. Cellular morphology develops as a consequence of local compositional changes and constitutional supercooling [32].
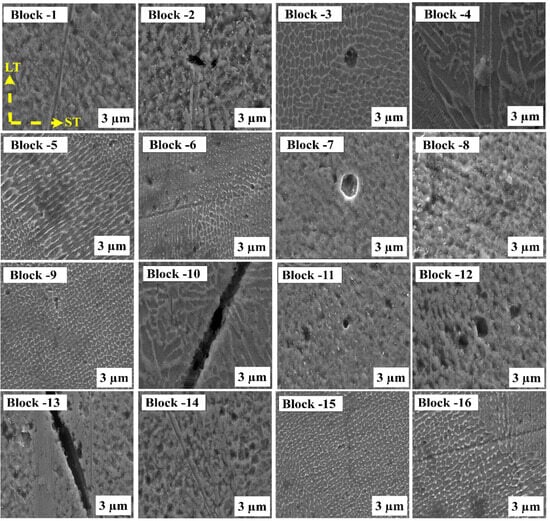
Figure 7.
SEM micrographs of all printed IN718 blocks along the build plane. Block-1–Block-16 corresponds to experiments 1–16.
2.5. Effect of SLM Process Parameters
The Relative density (RD) and Vickers hardness (VH) of parts produced using selective laser melting (SLM) are primarily dependent on the melt pool characteristics, which are mainly controlled by an integrated factor of laser power (P), scan speed (S), hatch spacing (H), and layer thickness (T), called volumetric energy density (VEd). There are three main mechanisms for the formation of porosity: lack of fusion, entrapped gas, and keyhole formation [33,34,35]. VEd governs the extent of powder melting and bonding. Low VEd results in insufficient melting, whereas a very high VEd causes overmelting and gas entrapment. The optimal energy density (VEd) ensures the best combination of relative density (RD) and Vickers hardness (VH) with minimal porosity and cracking, as shown in Table 3. Furthermore, VEd is inversely proportional to the scan speed, layer thickness, and hatch spacing; hence, VEd decreases with an increase in these parameters’ values. As VEd is proportional to P, RD and VH follow a trend similar to that of VEd [36,37]. The relative density decreased with increases in S, H, and T, which follows the relationship discussed previously.

Table 3.
L16 (44) orthogonal array-based experimental plan and Q-learning results.
The Relative density (RD) increased with increasing laser power. At low power, insufficient energy causes incomplete melting and a lack of fusion porosity, thereby lowering the RD. At excessively high powers, overheating and vaporization lead to keyhole porosity and the formation of microcracks. Within the optimal range, a higher laser power improved the powder fusion, reduced the porosity, and stabilized the melt pool, thereby enhancing the RD. However, excessive power causes thermal instability and defect formation, thereby reducing part quality [38]. At high speeds, the reduced energy input causes shallow melt pools, a lack of fusion, and unmelted particles, lowering the RD. At low speeds, excessive energy leads to overheating, vaporization, and keyhole pores. Thus, an optimum scan speed ensures efficient melting and minimizes defects [39,40,41]. At low hatch spacings, excessive overlap leads to residual stress, cracking, and balling. At high hatch spacings, the reduced track overlap causes unmelted gaps and a lack of fusion, lowering the RD. Optimal hatch spacing ensures proper overlap, thereby minimizing porosity [4,42]. At a high layer thickness, insufficient energy causes incomplete melting and interlayer voids, thereby reducing the RD. At low layer thicknesses, better melting improves the density but may cause overheating and longer build times. An optimal layer thickness ensures full fusion and stable density [43]. The Vickers hardness (VH) increased with increasing laser power, which can be attributed to the reduction in porosity at higher power levels. The decrease in VH with increasing scan speed, hatch spacing, and layer thickness followed a similar trend to that of a lower relative density (RD). Higher values of these parameters reduce the volumetric energy density (VEd), leading to increased porosity and, consequently, lower hardness [44,45,46,47].
3. Results and Discussion
3.1. Process Optimization
Optimizing process parameters helps obtain the best results compared to other methods. It avoids trial-and-error testing with actual materials to derive optimal parameters, as it is an expensive process [48]. A certain performance measurement can be attained if the optimal combination of process parameters is well defined [11]. Traditional optimization algorithms use analytical/mathematical approaches and are best suited for continuous, convex, and differentiable problems, whereas non-traditional optimization algorithms use heuristic/metaheuristic/AI-based approaches for complex, nonlinear, non-differentiable, discrete, or combinatorial problems, providing additional benefits. Thus, a model-free Reinforcement Learning (RL) methodology, specifically Q-learning, was chosen, which was transformed into an effective nontraditional optimization solution in the realm of metal AM.
3.2. Q-Learning Algorithm
The Q-learning algorithm is one of the most widely used and representative reinforcement learning approaches and is known for its off-policy learning strategy [49]. This algorithm simulates the learning behavior of an agent interacting with the environment through trial and error. The actions taken by the agent, along with their outcomes, were assessed and encoded as Q-values, which informed future decision-making processes.
The Q-learning mechanism is mathematically formulated to address complex decision-making and optimization challenges in reinforcement learning. The agent’s behavior is a balance between two critical phases, exploration and exploitation, which are used to discover and refine the optimal policy. The iterative update of action value pairs based on environmental feedback forms the core of the Q-learning process, serving as the basis for optimal search strategies in reinforcement-based algorithms.
It focuses on determining the optimal actions and mapping situations to actions, wherein an agent selects actions that maximize the reward in a given state. As illustrated in Figure 8, the Q-learning framework begins with the agent observing the current state (St), which consists of the selected SLM process parameters, such as the laser power (P), scan speed (S), hatch distance (H), and layer thickness (T). Based on this state, the agent executes an action (At) by either exploring new parameter combinations or exploiting the previously learned optimal settings. The environment, representing the SLM process or experimental setup, responds by transitioning to a new parameter state (St+1) and generating a reward (Rt) calculated from the experimental outcomes of the relative density (RD) and Vickers hardness (VH). Subsequently, the agent updates the Q value using the Bellman equation to improve its decision-making policy. Through multiple iterations, the agent learns to maximize the cumulative reward by selecting the most effective parameter combination. Once the maximum reward value is achieved, it signifies the optimal process condition that best approximates the real physical problem, thus ensuring data-efficient and adaptive optimization of the SLM process.
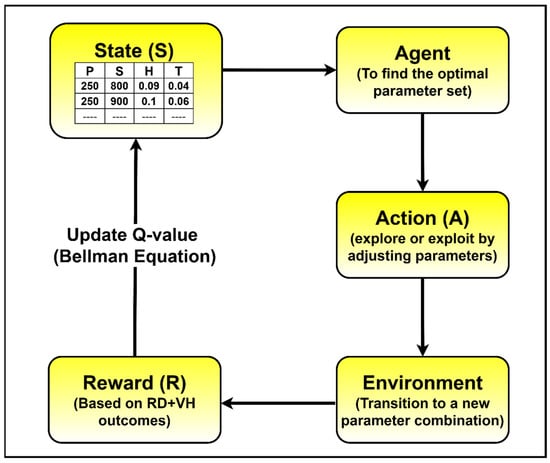
Figure 8.
Proposed Q-learning process.
3.3. Q-Learning Algorithm Parameters
The process begins by initializing the Q-table with zero values for all the state–action combinations. All possible input parameter combinations define the state space, and all possible parameter values constitute the action space. Next, the Q-learning hyperparameters were configured as follows. These include the learning rate (alpha), which is 0.1, the discount factor (gamma), which is 0.9, and the number of episodes (iterations), which is 50, as presented in Table 4. At the beginning of each episode, the initial state is determined by randomly selecting input parameter combinations. The Q-table is used for prediction by choosing the input-parameter combination of the state that maximizes the Q-value, thereby producing optimal results with minimal error.

Table 4.
Q-learning algorithm conditions and parameter constraints.
The algorithm iteratively updates the Q-function based on the method proposed by [50].
where
- Q(st, at) is the current Q-value for taking action at in state st;
- Qnew(st, at) is the updated Q-value after learning from new experience;
- α (alpha) is the Learning rate (0 < α ≤ 1): Determines how much new information overrides old;
- r is the Reward received after taking action at in state st;
- γ (gamma) is the Discount factor (0 < γ ≤ 1): Determines importance of future rewards;
- st is the current state at time step t;
- at is the action taken at time step t;
- st+1 is the next state after action at;
- maxa Q (st+1, a) is the maximum estimated future Q-value from the next state st+1.
Q-Table
The Q-table is a fundamental element of the Q-learning algorithm. It contains the predicted cumulative reward for all possible actions in every state. In this study, the Q-table is a 16 × 16 matrix as shown in Table 3, where each state represents a unique experimental combination of four input process parameters: Laser Power (P), Scan Speed (S), Hatch Spacing (H), and Layer Thickness (T). Each action corresponds to a transition to another state, thereby enabling the agent to explore or exploit different parameter settings. The Q-values were initially set to zero. During the learning process, they are iteratively updated using the Bellman Equation, as shown in Equation (3).
In the implemented Q-learning framework, the reward function is defined to effectively translate the prediction accuracy into a quantitative reward as mentioned in Table 4.
This formulation ensures that lower combined percentage errors in relative density (RD) and Vickers hardness (VH) correspond to higher rewards, thereby guiding the agent toward optimal decision-making. For example, in Sample Experiment No. 3, the calculated reward value was −13.10, which matched the value presented in Table 4. The highest reward value of 23.65, observed for sample experiment No. 5, reflects the most accurate prediction performance. Within this learning framework, the agent iteratively selects actions that represent combinations of the process parameters that minimize the prediction error.
This demonstrates that the lowest total error has the maximum reward value, as shown in Figure 9 (heatmap with diagonal values). Figure 10 presents the Q-value convergence over 50 episodes fitted with an exponential trendline, which highlights the learning trajectory.
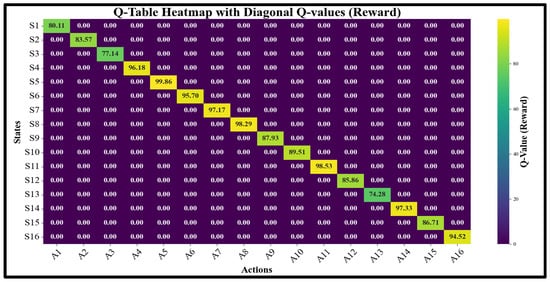
Figure 9.
Q-table heatmap with diagonal Q values.
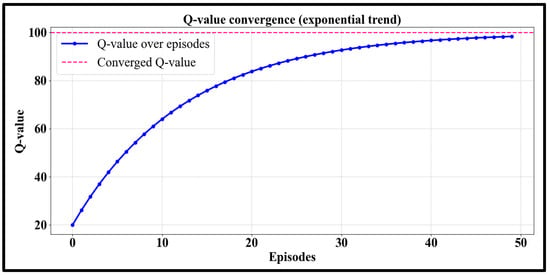
Figure 10.
Convergence plot of rewards or Q-values.
3.4. Calculation of Error Percentage
- Experimental Value: This is the actual experimental or observed value.
- Predicted Value: This is the value estimated by a Q-learning algorithm.
- Percentage prediction Error: This indicates the deviation of the prediction from the actual measurement, expressed as a percentage of the experimental value.
The error percentage quantifies how close the model is to real-world results for properties such as relative density (RD) or Vickers hardness (VH).
3.5. Analysis of Results and Evaluation of Optimized Value
As discussed in the preceding section, the performance measurements were relative density (RD) and Vickers hardness (VH). Table 3 shows the results of the 16 studies and the variability in both the performance metrics. The measured relative density ranged from 98.57% to 99.97%. VH values ranging from 308.5 VH at the minimum to 412.5 VH at the maximum. The maximum relative density was observed in Experiment 7, and the maximum Vickers hardness was observed in Experiment 12. The scatter diagrams in Figure 11a demonstrate the trends in the relative density, whereas Figure 11b illustrates the variation in the Vickers hardness among the tested samples. The correlation between the actual and predicted results was very close, as shown in Figure 11a,b.
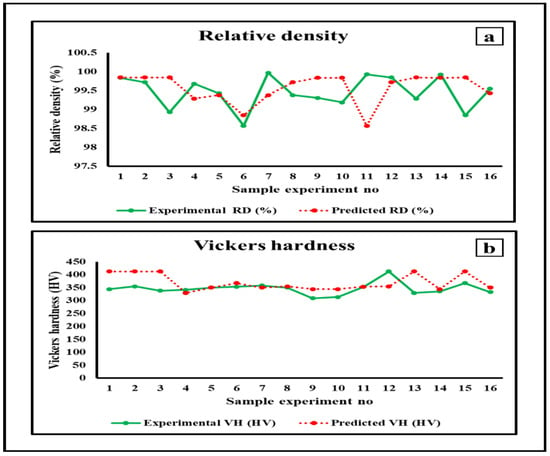
Figure 11.
Trends of testing samples for (a) relative density and (b) Vickers hardness.
3.5.1. Optimization Value Selection Criteria
The identification of the optimized values in Table 3 is based on the experiment having low prediction errors for both RD and VH (%RD and% VH errors). This criterion was used to evaluate each row, as shown in Table 5.

Table 5.
Percentage of error evaluation and reasons for each row.
3.5.2. Analysis of Relative Density (RD) Values Derived from Experiment vs. Q-Learning
Based on the experimental values, the minimum relative density was recorded in Experiment 6, and the maximum was observed in Experiment 7. The highest percentage of error was recorded in Experiment 11, whereas the lowest percentage of RD error occurred in Experiment 1. Based on the Q-learning optimization framework, Experiment 5 was selected as the optimal case for RD, as it yielded the lowest prediction error (0.0503%).
3.5.3. Analysis of Vickers Hardness (VH) Values Derived from Experiment vs. Q-Learning
Based on the experimental values, the minimum Vickers hardness was reported in Experiment 9, whereas the maximum was observed in Experiment 12. The highest percentage of VH error was recorded in Experiment 13, whereas the lowest percentage of VH error was recorded in Experiment 5. According to the Q-learning optimization results, Experiment 5 also produced the lowest VH prediction error (0.0857%), confirming it as the optimal parameter combination for the hardness. Experimental numbers 1–4, 6–16 were not considered because the range of values was not as per the optimized selection criteria mentioned in Section 3.5.1.
Finally, Experiment 5 was considered a predicted parameter combination for optimization, as shown in Table 5.
3.6. Comparison of Classical Method Results and Proposed Work Results
The comparative results of the classical methods and the proposed Q-learning approach are summarized in Table 6. A comparative analysis of the literature indicates that Cuiyuan et al. reported a relative density error of 29.86%, Jing et al. observed 26.5%, and Tiwari et al. documented 6.85%. For the Vickers hardness, Hardik reported an error of 10.94%, whereas Bharath reported an error of 3.26%. The Q-learning optimization approach achieved significantly lower error values, with only 0.0503% for the relative density and 0.0857% for the Vickers hardness, outperforming the RSM, GA, ANN, and EvoNN, as shown in Table 6.

Table 6.
Analysis of the percentage of error across different methods.
These results demonstrate that by employing a Q-learning algorithm based on four input parameters (P, S, H, T) and 16 experimental trials, the prediction accuracy for the multi-objective outputs (relative density and Vickers hardness) was notably improved. The proposed Q-learning algorithm (QLA) significantly reduces data requirements while achieving high predictive accuracy compared with conventional additive manufacturing optimization techniques.
4. Conclusions
This study investigated the influence of four critical SLM parameters—laser power, scan speed, hatch spacing, and layer thickness—on the relative density (RD) and Vickers hardness (VH) of Inconel 718 specimens fabricated via selective laser melting. Although RD and VH are commonly studied properties in additive manufacturing, they were chosen here as representative indicators of both densification quality and mechanical performance, providing a robust basis for their optimization. The novelty of this study lies in the application of a model-free reinforcement learning framework (Q-learning) for the process parameter optimization. Unlike regression-based approaches and conventional machine learning methods (ANN, GA, PSO, RSM), which require large datasets and still yield relatively high error rates, the Q-learning algorithm efficiently optimizes RD and VH using only 16 experimental trials designed using a Taguchi L16 array. The algorithm successfully identified the optimal process parameters (P = 270 W, S = 800 mm/s, H = 0.1 mm, T = 0.08 mm), achieving ultra-low prediction errors of 0.0503% for RD and 0.0857% for VH, respectively.
These findings demonstrate that reinforcement learning can serve as a powerful and data-efficient alternative to traditional optimization techniques in additive manufacturing. Beyond Inconel 718, the proposed framework can be extended to optimize additional responses (e.g., surface roughness, residual stress, and fatigue strength) and applied to other alloys (Ti-6Al-4V and AlSi10Mg) and AM processes, such as Directed Energy Deposition (DED) and Electron Beam Melting (EBM). Thus, this study contributes to the advancement of the integration of artificial intelligence and reinforcement learning into metal additive manufacturing, offering a new pathway for intelligent process optimization. However, the limitations include the fact that this research used a smaller number of datasets and no independent validation. In future, there is scope for researchers to use a large number of datasets with independent validation in similar works.
Author Contributions
Conceptualization: R.S.; writing the original draft: S.B.Y.; Supervision by R.S.; Formal analysis by S.B.Y. and R.S.; Data curation by S.B.Y. and R.S.; Writing, review and editing by S.B.Y. and R.S.; Methodology by S.B.Y. and R.S.; Investigation by S.B.Y. All authors have read and agreed to the published version of the manuscript.
Funding
This research received no external funding.
Institutional Review Board Statement
Not applicable.
Informed Consent Statement
Not applicable.
Data Availability Statement
All data supporting the findings of this study are available from the corresponding author upon reasonable requests.
Acknowledgments
The School of Mechanical Engineering VIT Vellore and Department of Science and Technology, New Delhi, India, provided financial support to acquire a “Direct Metal Laser Sintering Machine” through “Promotion of University Research and Scientific Excellence (PURSE)” under Grant No. SR/PURSE/2020/34 (TPN 56960) and performed the work.
Conflicts of Interest
The authors declare no conflicts of interest.
References
- Khan, H.; Kushwah, K.K.; Singh, S.; Thakur, J.S.; Sadasivuni, K.K. Machine Learning in Additive Manufacturing. In Nanotechnology-Based Addit. Nanotechnology—Based Additive Manufacturing: Product Design, Properties and Applications; Wiley Online Library: Hoboken, NJ, USA, 2022; Volume 1–2, pp. 601–636. [Google Scholar] [CrossRef]
- Wang, C.; Tan, X.; Tor, S.; Lim, C. Machine learning in additive manufacturing: State-of-the-art and perspectives. Addit. Manuf. 2020, 36, 101538. [Google Scholar] [CrossRef]
- Akbari, P.; Zamani, M.; Mostafaei, A. Machine learning prediction of mechanical properties in metal additive manufacturing. Addit. Manuf. 2024, 91, 104320. [Google Scholar] [CrossRef]
- Lu, C.; Shi, J. Relative density and surface roughness prediction for Inconel 718 by selective laser melting: Central composite design and multi-objective optimization. Int. J. Adv. Manuf. Technol. 2022, 119, 3931–3949. [Google Scholar] [CrossRef]
- Lu, C.; Shi, J. Relative density prediction of additively manufactured Inconel 718: A study on genetic algorithm optimized neural network models. Rapid Prototyp. J. 2022, 28, 1425–1436. [Google Scholar] [CrossRef]
- Tiwari, J.; Cozzolino, E.; Devadula, S.; Astarita, A.; Krishnaswamy, H. Determination of process parameters for selective laser melting of inconel 718 alloy through evolutionary multi-objective optimization. Mater. Manuf. Process. 2024, 39, 1019–1028. [Google Scholar] [CrossRef]
- Nadiyadi, H.; Gajera, H.; Bidajwala, R.; Abhisek, K.; Dave, K. Effects of powder bed fusion process parameters on hardness for Inconel 718. Mater. Today Proc. 2020, 38, 2275–2280. [Google Scholar] [CrossRef]
- Sheshadri, R.; Nagaraj, M.; Lakshmikanthan, A.; Chandrashekarappa, M.P.G.; Pimenov, D.Y.; Giasin, K.; Prasad, R.V.S.; Wojciechowski, S. Experimental investigation of selective laser melting parameters for higher surface quality and microhardness properties: Taguchi and super ranking concept approaches. J. Mater. Res. Technol. 2021, 14, 2586–2600. [Google Scholar] [CrossRef]
- Ravichander, B.B.; Rahimzadeh, A.; Farhang, B.; Moghaddam, N.S.; Amerinatanzi, A.; Mehrpouya, M. A prediction model for additive manufacturing of inconel 718 superalloy. Appl. Sci. 2021, 11, 8010. [Google Scholar] [CrossRef]
- Neve, A.G.; Kakandikar, G.M.; Kulkarni, O. Application of Grasshopper Optimization Algorithm for Constrained and Unconstrained Test Functions. Int. J. Swarm Intell. Evol. Comput. 2017, 6, 1000165. [Google Scholar] [CrossRef]
- Dharmadhikari, S.; Menon, N.; Basak, A. A reinforcement learning approach for process parameter optimization in additive manufacturing. Addit. Manuf. 2023, 71, 103556. [Google Scholar] [CrossRef]
- Lillicrap, T.P.; Hunt, J.J.; Pritzel, A.; Heess, N.; Erez, T.; Tassa, Y.; Silver, D.; Wierstra, D. Continuous control with deep reinforcement learning. In Proceedings of the 4th International Conference on Learning Representations—ICLR 2016, San Juan, Puerto Rico, 2–4 May 2016. Conference Track Proceedings. [Google Scholar]
- Song, B.; Zhao, X.; Li, S.; Han, C.; Wei, Q.; Wen, S.; Liu, J.; Shi, Y. Differences in microstructure and properties between selective laser melting and traditional manufacturing for fabrication of metal parts: A review. Front. Mech. Eng. 2015, 10, 111–125. [Google Scholar] [CrossRef]
- Zhao, X.; Wang, T. Laser Powder Bed Fusion of Powder Material: A Review. 3D Print. Addit. Manuf. 2023, 10, 1439–1454. [Google Scholar] [CrossRef]
- Zhong, Y.; Liu, L.; Wikman, S.; Cui, D.; Shen, Z. Intragranular cellular segregation network structure strengthening 316L stainless steel prepared by selective laser melting. J. Nucl. Mater. 2016, 470, 170–178. [Google Scholar] [CrossRef]
- Hosseini, E.; Popovich, V. A review of mechanical properties of additively manufactured Inconel 718. Addit. Manuf. 2019, 30, 100877. [Google Scholar] [CrossRef]
- Kumar, L.J.; Nair, C.K. Laser metal deposition repair applications for Inconel 718 alloy. Mater. Today Proc. 2017, 4, 11068–11077. [Google Scholar] [CrossRef]
- Jiang, H.-Z.; Li, Z.-Y.; Feng, T.; Wu, P.-Y.; Chen, Q.-S.; Feng, Y.-L.; Li, S.-W.; Gao, H.; Xu, H.-J. Factor analysis of selective laser melting process parameters with normalised quantities and Taguchi method. Opt. Laser Technol. 2019, 119, 105592. [Google Scholar] [CrossRef]
- Marques, A.; Cunha, Â.; Silva, M.R.; Osendi, M.I.; Silva, F.S.; Carvalho, Ó.; Bartolomeu, F. Inconel 718 produced by laser powder bed fusion: An overview of the influence of processing parameters on microstructural and mechanical properties. Int. J. Adv. Manuf. Technol. 2022, 121, 5651–5675. [Google Scholar] [CrossRef]
- Chang, C.; Yao, G.; Cox, S.C.; Zhang, X.; Sheng, L.; Liu, M.; Cheng, W.; Lu, Y.; Yan, X. From macro-, through meso- to micro-scale: Densification behavior, deformation response and microstructural evolution of selective laser melted Mg-RE alloy. J. Magnes. Alloy. 2025, 13, 3947–3963. [Google Scholar] [CrossRef]
- Huxol, A.; Villmer, F.-J. DoE Methods for Parameter Evaluation in Selective Laser Melting. IFAC-PapersOnLine 2019, 52, 270–274. [Google Scholar] [CrossRef]
- Eguren, J.A.; Esnaola, A.; Unzueta, G. Modelling of an additive 3d-printing process based on design of experiments methodology. Qual. Innov. Prosper. 2020, 24, 128–151. [Google Scholar] [CrossRef]
- Macoretta, G.; Monelli, B. Effects of SLM process parameters on the fatigue strength of AMed Inconel 718. Procedia Struct. Integr. 2021, 37, 632–643. [Google Scholar] [CrossRef]
- Range, M.; Temperature, C. Special Metals Inconel G-3. Alloy Dig. 2021, 70, Ni-774. [Google Scholar] [CrossRef]
- Prabhu, T.R.; Moganraj, A.; Samuel, M.S.; Praveenkumar, K.; Bobby, S.S.; Prakasam, A. Effect of heat treatment on microstructure high-temperature wear performance of additive manufactured IN718. J. Manuf. Process. 2024, 127, 683–697. [Google Scholar] [CrossRef]
- Wu, Z.; Narra, S.P.; Rollett, A. Exploring the fabrication limits of thin-wall structures in a laser powder bed fusion process. Int. J. Adv. Manuf. Technol. 2020, 110, 191–207. [Google Scholar] [CrossRef]
- ASTM E384-17; Standard Test Method for Microindentation Hardness of Materials. ASTM: West Conshohocken, PA, USA, 2016. [CrossRef]
- Spierings, A.B.; Schneider, M.; Eggenberger, R. Comparison of density measurement techniques for additive manufactured metallic parts. Rapid Prototyp. J. 2011, 17, 380–386. [Google Scholar] [CrossRef]
- ASTM B962-13; ASTM International. Standard Test Methods for Density of Compacted or Sintered Powder Metallurgy (PM) Products Using Archimedes’ Principle. ASTM International: West Conshohocken, PA, USA, 2013.
- Mohrnheim, A.F. Microhardness Testing and Hardness Numbers. In Interpretive Techniques for Microstructural Analysis; Springer: Boston, MA, USA, 1977; pp. 117–126. [Google Scholar] [CrossRef]
- Amato, K.N.; Gaytan, S.M.; Murr, L.E.; Martinez, E.; Shindo, P.; Hernandez, J.; Collins, S.; Medina, F. Microstructures and mechanical behavior of Inconel 718 fabricated by selective laser melting. Acta Mater. 2012, 60, 2229–2239. [Google Scholar] [CrossRef]
- Huang, L.; Cao, Y.; Li, G.; Wang, Y. Microstructure characteristics and mechanical behaviour of a selective laser melted Inconel 718 alloy. Integr. Med. Res. 2019, 9, 2440–2454. [Google Scholar] [CrossRef]
- Kumar, P.; Farah, J.; Akram, J.; Teng, C.; Ginn, J.; Misra, M. Influence of laser processing parameters on porosity in Inconel 718 during additive manufacturing. Int. J. Adv. Manuf. Technol. 2019, 103, 1497–1507. [Google Scholar] [CrossRef]
- DebRoy, T.; Wei, H.L.; Zuback, J.S.; Mukherjee, T.; Elmer, J.W.; Milewski, J.O.; Beese, A.M.; Wilson-Heid, A.; De, A.; Zhang, W. Progress in Materials Science Additive manufacturing of metallic components—Process, structure and properties. Prog. Mater. Sci. 2018, 92, 112–224. [Google Scholar] [CrossRef]
- Balbaa, M.; Mekhiel, S.; Elbestawi, M.; McIsaac, J. On selective laser melting of Inconel 718: Densi fi cation, surface roughness, and residual stresses. Mater. Des. 2020, 193, 108818. [Google Scholar] [CrossRef]
- Kladovasilakis, N.; Charalampous, P.; Tsongas, K.; Kostavelis, I.; Tzovaras, D.; Tzetzis, D. Influence of Selective Laser Melting Additive Manufacturing Parameters in Inconel 718 Superalloy. Materials 2022, 15, 1362. [Google Scholar] [CrossRef]
- Xu, J.; Wu, Z.; Niu, J.; Song, Y.; Liang, C.; Yang, K.; Chen, Y.; Liu, Y. Effect of Laser Energy Density on the Microstructure and Microhardness of Inconel 718 Alloy Fabricated by Selective Laser Melting. Crystals 2022, 12, 1243. [Google Scholar] [CrossRef]
- Yang, H.; Meng, L.; Luo, S.; Wang, Z. Microstructural evolution and mechanical performances of selective laser melting Inconel 718 from low to high laser power. J. Alloys Compd. 2020, 828, 154473. [Google Scholar] [CrossRef]
- Wang, R.; Chen, C.; Liu, M.; Zhao, R.; Xu, S.; Hu, T.; Shuai, S.; Liao, H.; Ke, L.; Vanmeensel, K.; et al. Effects of laser scanning speed and building direction on the microstructure and mechanical properties of selective laser melted Inconel 718 superalloy. Mater. Today Commun. 2022, 30, 103095. [Google Scholar] [CrossRef]
- Liu, S.; Li, H.; Qin, C.; Zong, R.; Fang, X. The effect of energy density on texture and mechanical anisotropy in selective laser melted Inconel 718. Mater. Des. 2020, 191, 108642. [Google Scholar] [CrossRef]
- Zhu, L.; Xu, Z.; Liu, P.; Gu, Y. Effect of processing parameters on microstructure of laser solid forming Inconel 718 superalloy. Opt. Laser Technol. 2018, 98, 409–415. [Google Scholar] [CrossRef]
- Maamoun, A.H.; Xue, Y.F.; Elbestawi, M.A.; Veldhuis, S.C. Effect of Selective Laser Melting Process Parameters on the Quality of Al Alloy Parts: Powder and Dimensional Accuracy. Materials 2018, 11, 2343. [Google Scholar] [CrossRef]
- Sufiiarov, V.; Popovich, A.; Borisov, E.; Polozov, I.; Masaylo, D.; Orlov, A. The effect of layer thickness at selective laser melting. Procedia Eng. 2017, 174, 126–134. [Google Scholar] [CrossRef]
- Moussaoui, K.; Rubio, W.; Mousseigne, M.; Sultan, T.; Rezai, F. Materials Science & Engineering A Effects of Selective Laser Melting additive manufacturing parameters of Inconel 718 on porosity, microstructure and mechanical properties. Mater. Sci. Eng. A 2018, 735, 182–190. [Google Scholar] [CrossRef]
- Wang, Y.; Gao, L.; Yang, L.; Liu, T.; Miao, J.; Zang, Y.; Zhang, S. The Effects of Laser Power on the Performance and Microstructure of Inconel 718 Formed by Selective Laser Melting. Appl. Sci. 2024, 14, 9686. [Google Scholar] [CrossRef]
- Mao, Y.; Gao, Y.; Hu, J.; Shen, X.; Zhou, H. Effect of Hatch Spacing on the Quality of Inconel 718 Alloy Part. Materials 2024, 17, 452. [Google Scholar] [CrossRef] [PubMed]
- Paradise, P.; Patil, D.; Van Handel, N.; Temes, S.; Saxena, A.; Bruce, D.; Suder, A.; Clonts, S.; Shinde, M.; Noe, C.; et al. Improving Productivity in the Laser Powder Bed Fusion of Inconel 718 by Increasing Layer Thickness: Effects on Mechanical Behavior. J. Mater. Eng. Perform. 2022, 31, 6205–6220. [Google Scholar] [CrossRef]
- Sylajakumari, P.A.; Ramakrishnasamy, R.; Palaniappan, G. Taguchi grey relational analysis for multi-response optimization of wear in co-continuous composite. Materials 2018, 11, 1743. [Google Scholar] [CrossRef]
- Jang, B.; Kim, M.; Harerimana, G.; Kim, J.W. Q-Learning Algorithms: A Comprehensive Classification and Applications. IEEE Access 2019, 7, 133653–133667. [Google Scholar] [CrossRef]
- Neves, M.; Vieira, M.; Neto, P. A study on a Q-Learning algorithm application to a manufacturing assembly problem. J. Manuf. Syst. 2021, 59, 426–440. [Google Scholar] [CrossRef]
- Guang, W.; Baraldo, M.; Furlanut, M. Calculating percentage prediction error: A user’s note. Pharmacol. Res. 1995, 32, 241–248. [Google Scholar] [CrossRef]
Disclaimer/Publisher’s Note: The statements, opinions and data contained in all publications are solely those of the individual author(s) and contributor(s) and not of MDPI and/or the editor(s). MDPI and/or the editor(s) disclaim responsibility for any injury to people or property resulting from any ideas, methods, instructions or products referred to in the content. |
© 2025 by the authors. Licensee MDPI, Basel, Switzerland. This article is an open access article distributed under the terms and conditions of the Creative Commons Attribution (CC BY) license.