Abstract
Over time, the industrial use of the welding process has grown in significance and is now one of the primary methods for joining metallic parts. During the welding process, metallurgical and structural modifications occur close to the welded joint. The thermal stresses and geometric distortions are undesirable, and they are a challenge to accurately forecast. Laboratory tests were conducted utilizing the GMAW method on S235JR steel as the base material with the goal of examining the impact of the welding sequence on angular distortion in butt joints when comparing three different welding sequences. Equipment that can determine coordinates in the operational space with metrological accuracy was used to measure distortions. As a result of metrological and statistical analyses, it was found that the sequence factor is shown to substantially influence the final distortions and that the symmetrical method results in less distortions followed by a one-step method.
1. Introduction
Welding processes are the most selected joining processes in the manufacturing and assembling of many components because of their good degree of reliability and high production velocity [1]. Another advantage that motivates this preference is the economic feasibility of the various types of welding compared with other manufacturing processes [2,3]. Gas Metal Arc Welding (GMAW) is one of the most applied and preferred techniques in the industry [4] because of its advantages, namely the capability of all-position welding and good quality of welds. This welding method is versatile, as it can be used in semi-automatic and fully automatic modes, in consonance with the requirements of each type of application [5,6].
Even though there are plenty of advantages in welding processes, one critical problem is that they can often produce high levels of defects, such as shrinkage and distortions [7]. During the welding process, usually non-uniform expansions and contractions occur among the weld and the surrounding regions, and these effects cause distortions [8]. One factor that contributes to the distortions’ appearance is the high temperature of the welded area and its thermal expansion, which is restricted by the surrounding areas where the metal is at a lower temperature, causing compressive stress [9], while high values of tensile stresses are generated in the weld bead [10].
A lot of research has been conducted to overcome these problems and find strategies to control the appearance of the welded components due to distortions. Distortions often increase production costs and time, especially when their values outpace the accepted limits [11]. In order to achieve a minimal occurrence of the distortion effects and residual stresses, it is necessary to analyze the parameters used in the welding process and also the fabrication conditions [12], particularly the material specifications, level of heat input, stiffener arrangements, joint shapes, welding type and continuity, initial distortions and welding sequences, and heat treatments before and after the welding [13,14].
The objective of this work was to investigate the influence of three different welding sequences of the GMAW process on angular distortion in butt-joint welds, performed on S235 steel plates by metrological assessment.
2. Influence of Welding Parameters on Distortions and Residual Stress Levels
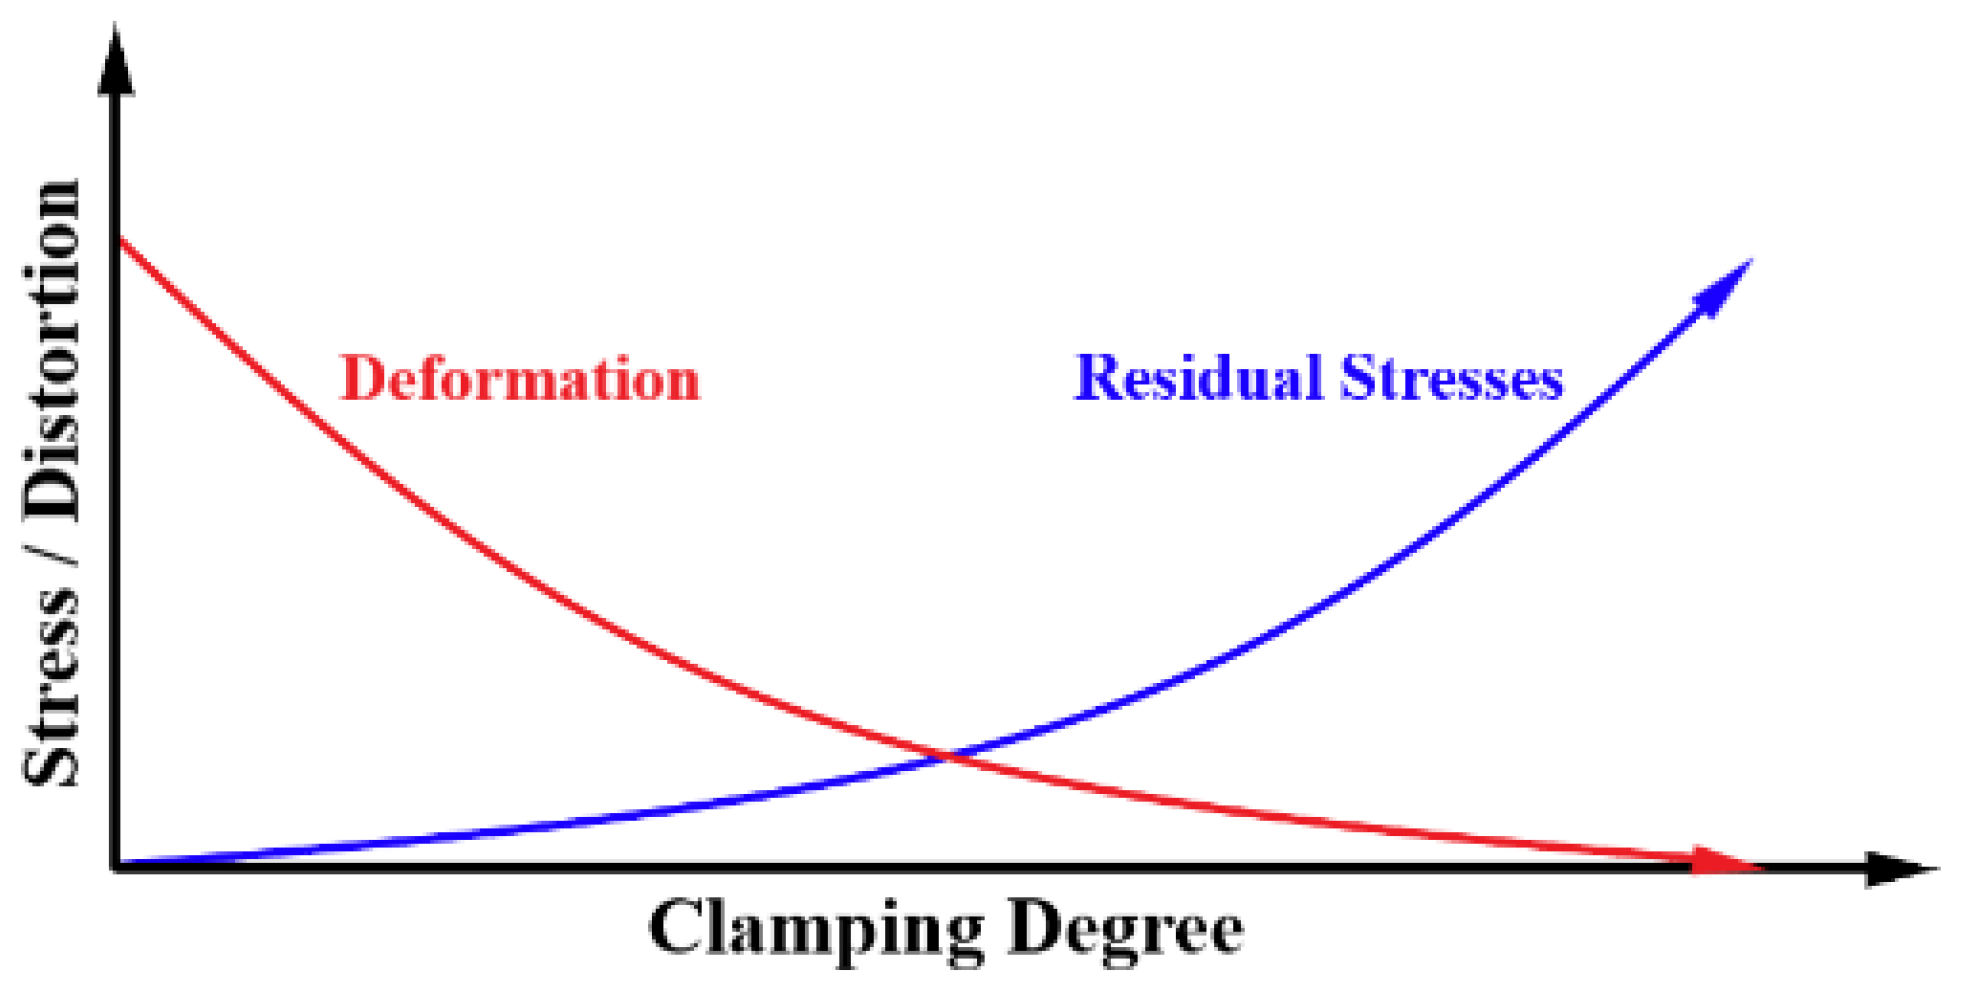
According to D. Radaj [15] and T. Schenk [16], low residual stress levels occur when deformations are not restricted, and high residual stresses emerge when deformations are restricted (see Figure 1). However, the level of residual stresses could be higher than yield stress and, at the limit, it can exceed the ultimate stress [17]. So, in the last years, some researchers have been studying the optimal parameters to minimize residual stresses [18]. These studies have been conducted using numerical [19] and experimental approaches [20] to achieve the appropriate balance between the level of residual stresses and the distortion value [21].
Figure 1.
Relationship between clamping degree and the level of distortion as well as the effect on residual stresses [22].
The most pronounced type of distortion in butt-welded plates is angular distortion [23]; it happens more frequently than other types of distortions, such as tailing and bending, and that is the reason why it is considered the most significant type of distortion [24].
The angular distortion is a rotation of the structure around the welding line [16]. When the transverse shrinkage is not uniform in the thickness direction, the angular distortion occurs in a butt joint [23,25], so the welded component is distorted in angular directions around the weld interface, as it is shown in Figure 2 [26].
Figure 2.
Angular distortion of a butt weld [22].
The welding parameters must be selected considering the results to be achieved, and the choice of those parameters can also influence the distortions on the welded component. Many studies investigated the influences of the welding parameters in such distortions.
According to Vyas et al., if the voltage and the current are increased, bigger distortions are likely to occur, and the distortions decrease when the welding and feeding velocities increase [27].
According to Narwadkar A. and Bhosle S, minor distortions are provided with higher gas flow rates, and they are increased with higher values of voltage and current [28].
Ramani S. and Velmurugan V. concluded that the angular distortions can be directly proportional and influenced by the voltage and the torch travel angle. Contrarily, an opposite effect on distortions can be led with the increase in the length of the electrode and the feed rate [29].
Deng et al., based on numerical simulations, verified that the heat input has a significant influence on the welding distortion. Large heat input is apt to resulting in buckling distortion in thin-plate panel structures. A reduction in heat input is an effective method of decreasing buckling propensity [30].
The study conducted by Sakri A. et al. found, through simulations using FEA with experimental validation, that the angular distortions increased with the rise of the angle of V-preparation [31].
Long e al. verified in their studies that the largest transverse shrinkage occurs at the middle section of the length of the plate and it is gradually reduced to the starting and ending edges of the welding line [32].
A different investigation about the influence on joint gap distortions, number of passes, and time gap between passes was performed by Kumar P. [33] and Kumar A. [34]. With the experiments carried out, it was possible to conclude that an increase in joint gap and number of passes leads to an increase in distortions. On the other hand, the distortions decrease when the time gap between the passes increases.
The Taguchi method was used by Soni S. and Aggarwal N. in research to investigate angular distortions. This investigation concluded that the increase in the current, plate length, and electrode diameter brings an increase in distortions. Concerning the time gap between the passes, it affects the angular distortions oppositely [11].
3. Materials and Methods
3.1. Welding Materials
In order to obtain greater productivity in the laboratory experimentation and compliance with thermal uniformity at the beginning of each bead, the welds of all samples were carried out in an intercalated way and, after the end of each bead, the respective specimen was subjected to uniform cooling in air, without restriction or acceleration. In other words, the welding sequence was carried out in order to wait for the complete cooling of the specimen to start the new subsequent bead. In this way, greater control over standardization and uniformity between the different sequences was obtained.
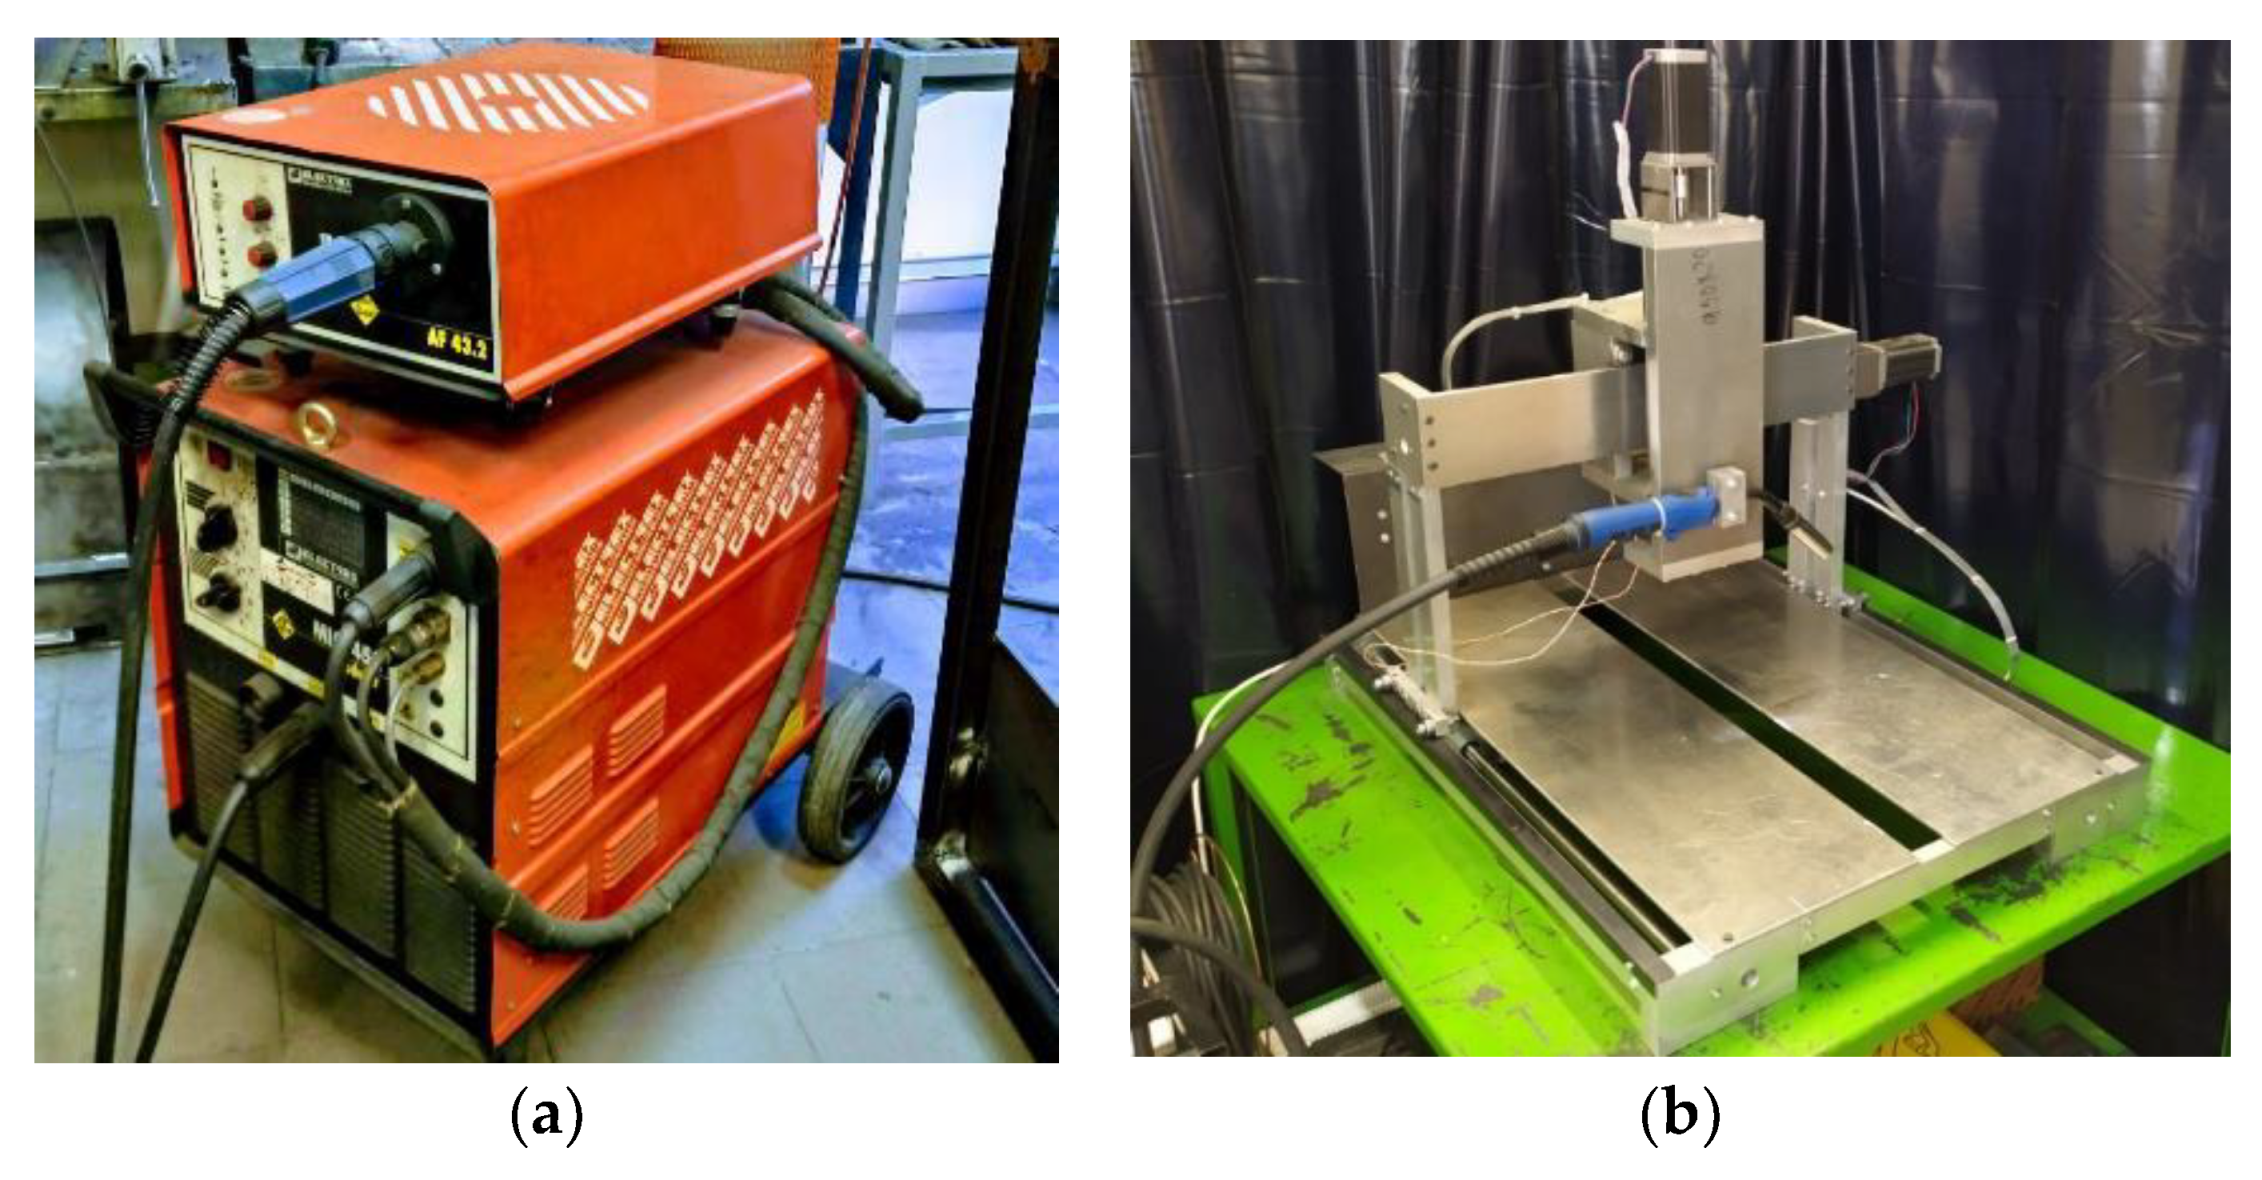
The welding equipment used for the experiment was an MIG 453 modular model machine (Figure 3a). The machine consists of a power source, an electrode feeder, a torch, a gas cylinder, and cables.
Figure 3.
(a) MIG 453 modular welding machine; (b) CNC equipment with welding torch adaptation.
To perform the welding procedure with precision, numerical control equipment was used (Figure 3b), which was developed, manufactured, and tested by members of this work [35]. The equipment can move the torch with three degrees of freedom and activate the trigger in an automated way through programming in G Code in the Grbl Controller 3.6.1 software.
3.1.1. Base Metal and Filler Metal
The base metal adopted for the experiment was S235JR carbon steel (EN 10025), whose chemical composition is indicated in Table 1.
Table 1.
Chemical composition of S235JR steel.
The metal available for the experiment was a Eurotrod M/SG 2 electrode, identified as 1434-A G3Si1 by the ISO standard and 5.18 ER 70S-6 by the AWS (American Welding Society). The electrode is made of steel and coated with copper. The chemical composition and mechanical properties are shown in Table 2 and Table 3, respectively.
Table 2.
Chemical composition of the AWS 5.18 ER 70S-6 electrode.
Table 3.
Mechanical properties of the AWS 5.18 ER 70S-6 electrode.
Re is the yield stress, Rm is the tensile strength, A is the elongation, and K is the impact energy.
For the welding procedures, the recommended ranges for the electrode with a diameter of 0.8 mm indicated in the ESAB catalog (Table 4) according to the classification in the ISO 14341 standard were used.
Table 4.
ESAB recommended parameters for the AWS 5.18 ER 70S-6 electrode.
3.1.2. Shielding Gas
The shielding gas used in the experiment, responsible for beneficially influencing the mechanical properties and preventing contamination of the molten pool by the external environment, was a mixture of 82% argon and 18% carbon dioxide (ISO 14175-M21-ArC-18).
3.1.3. Computerized Metrological Equipment
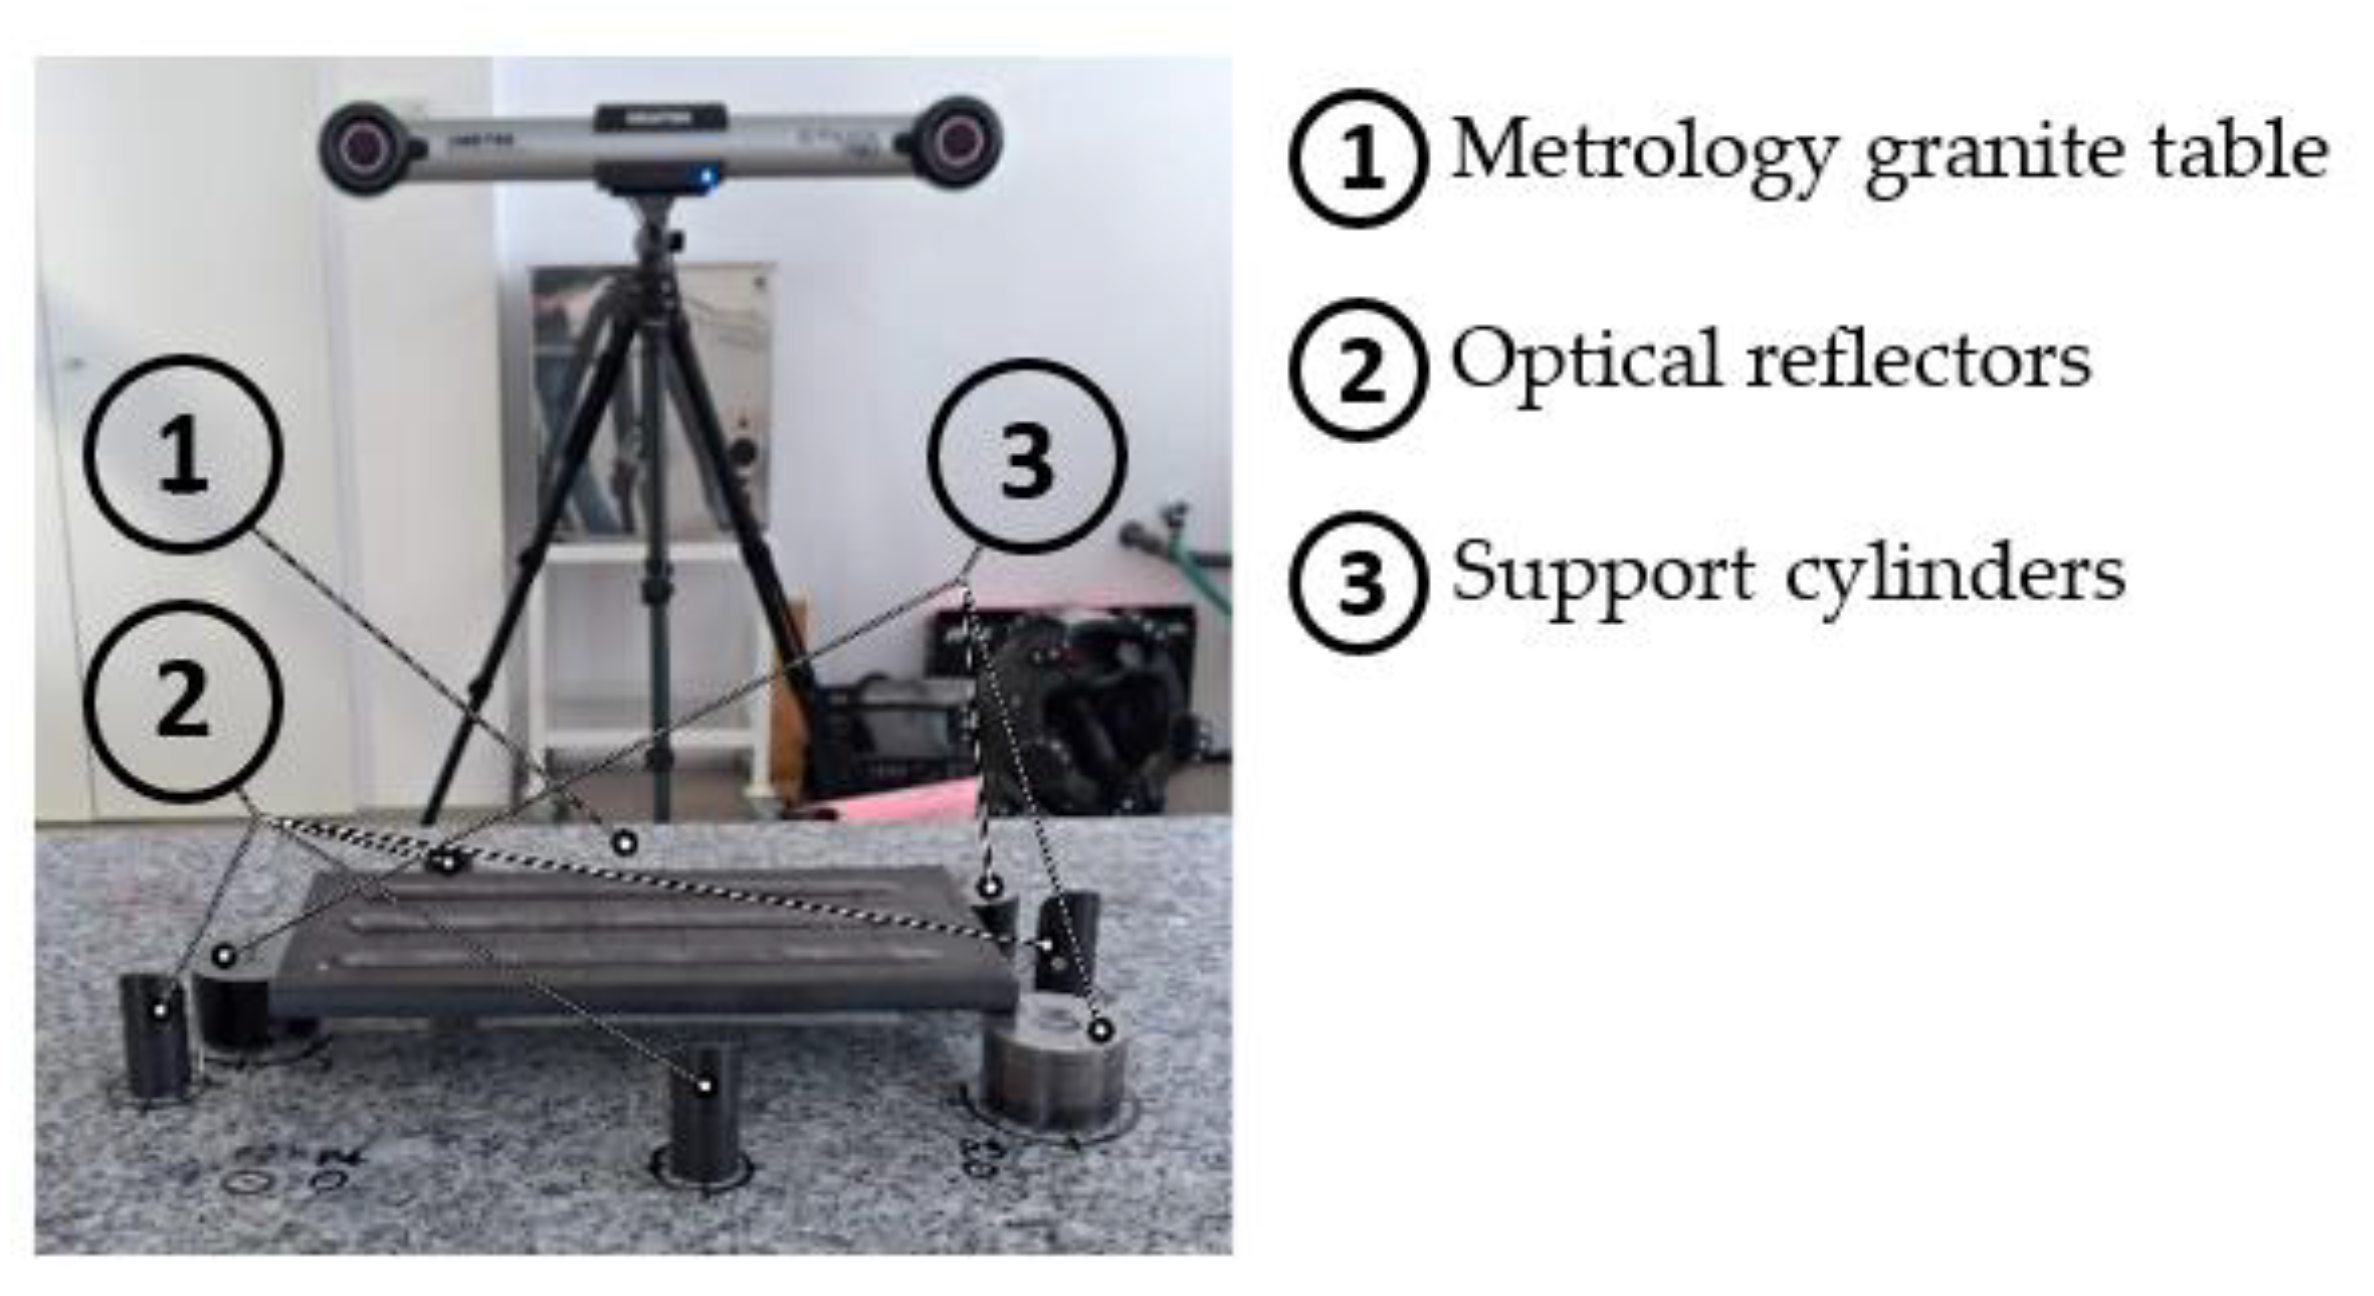
For the analysis of distortions with digital mode, the metrological equipment for acquiring geometric points from Creaform was used, which is composed of C-Track 780, HandyPROBE, and MetraSCAN 3D. In Figure 4, it is possible to observe the experimental set-up for measuring the specimens’ distortions.
Figure 4.
Experimental set-up for measuring distortions of specimens.
3.2. Experimental Procedures
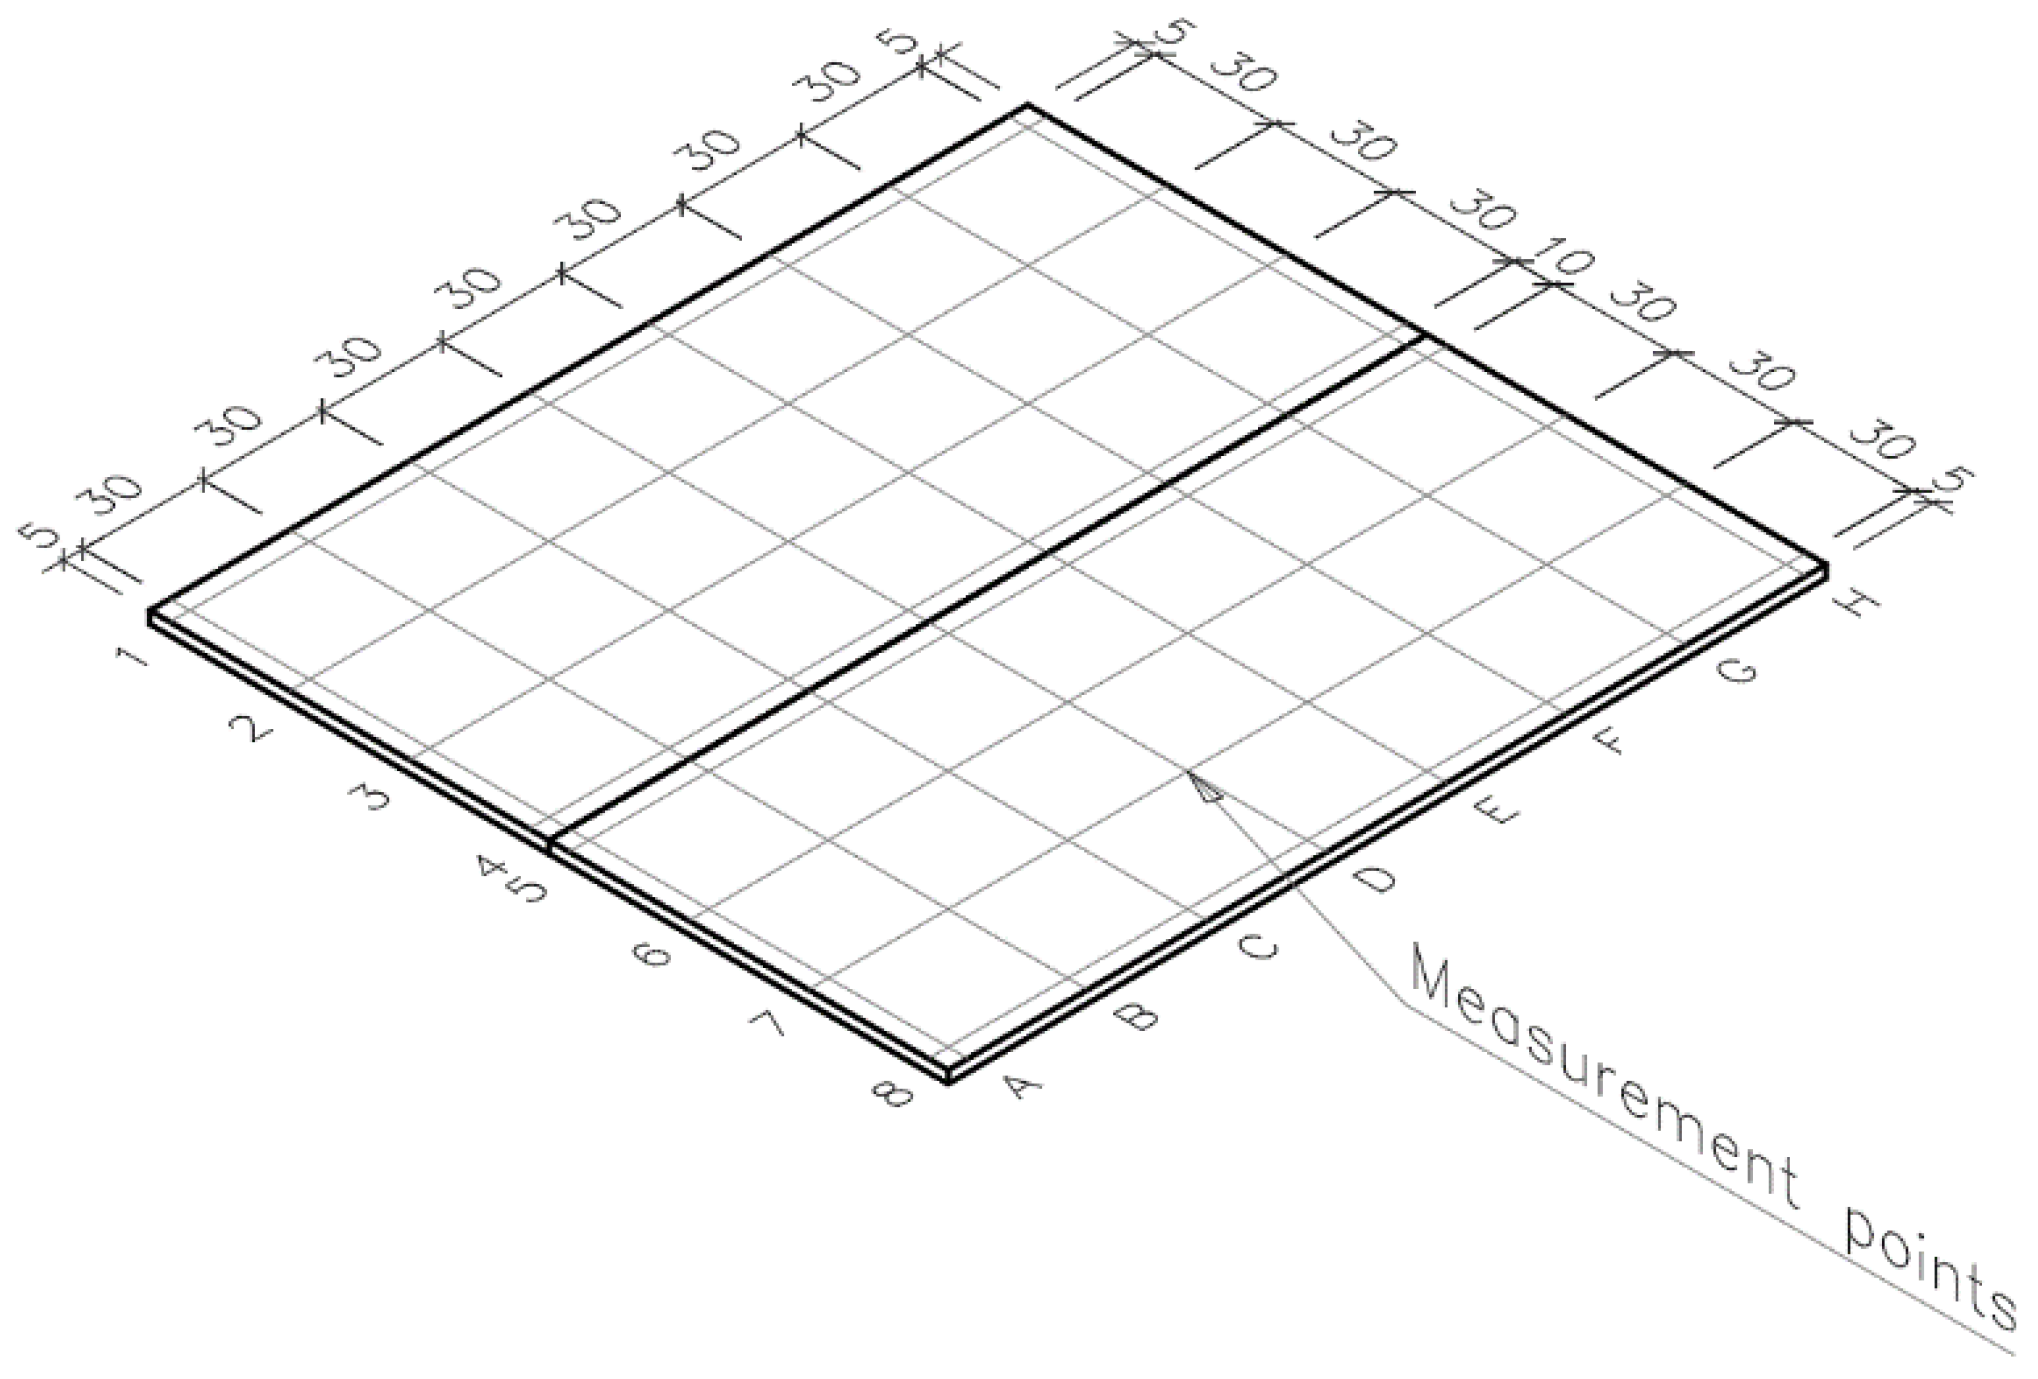
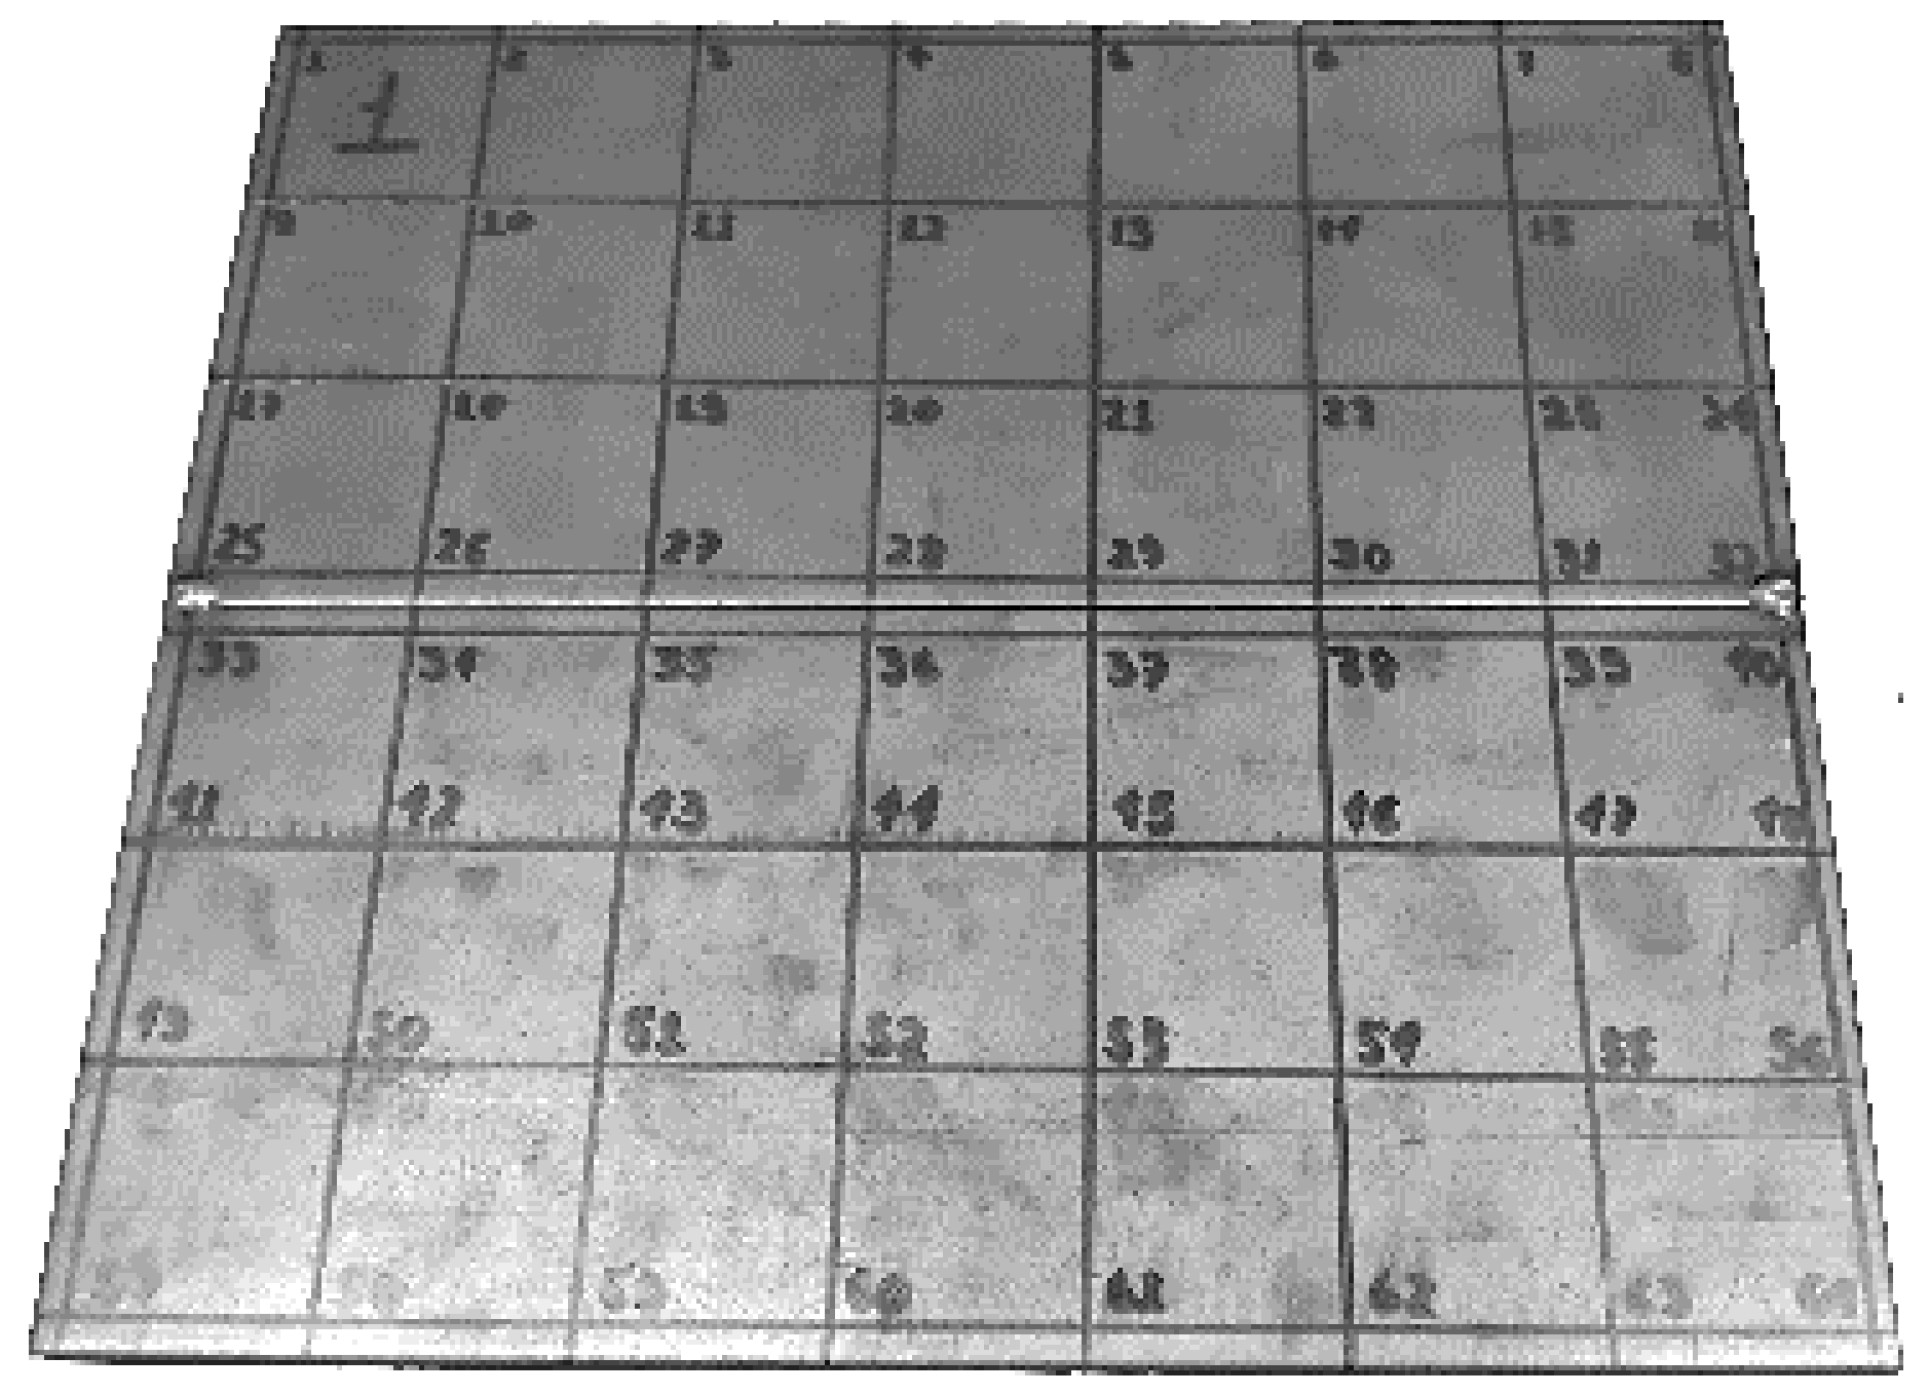
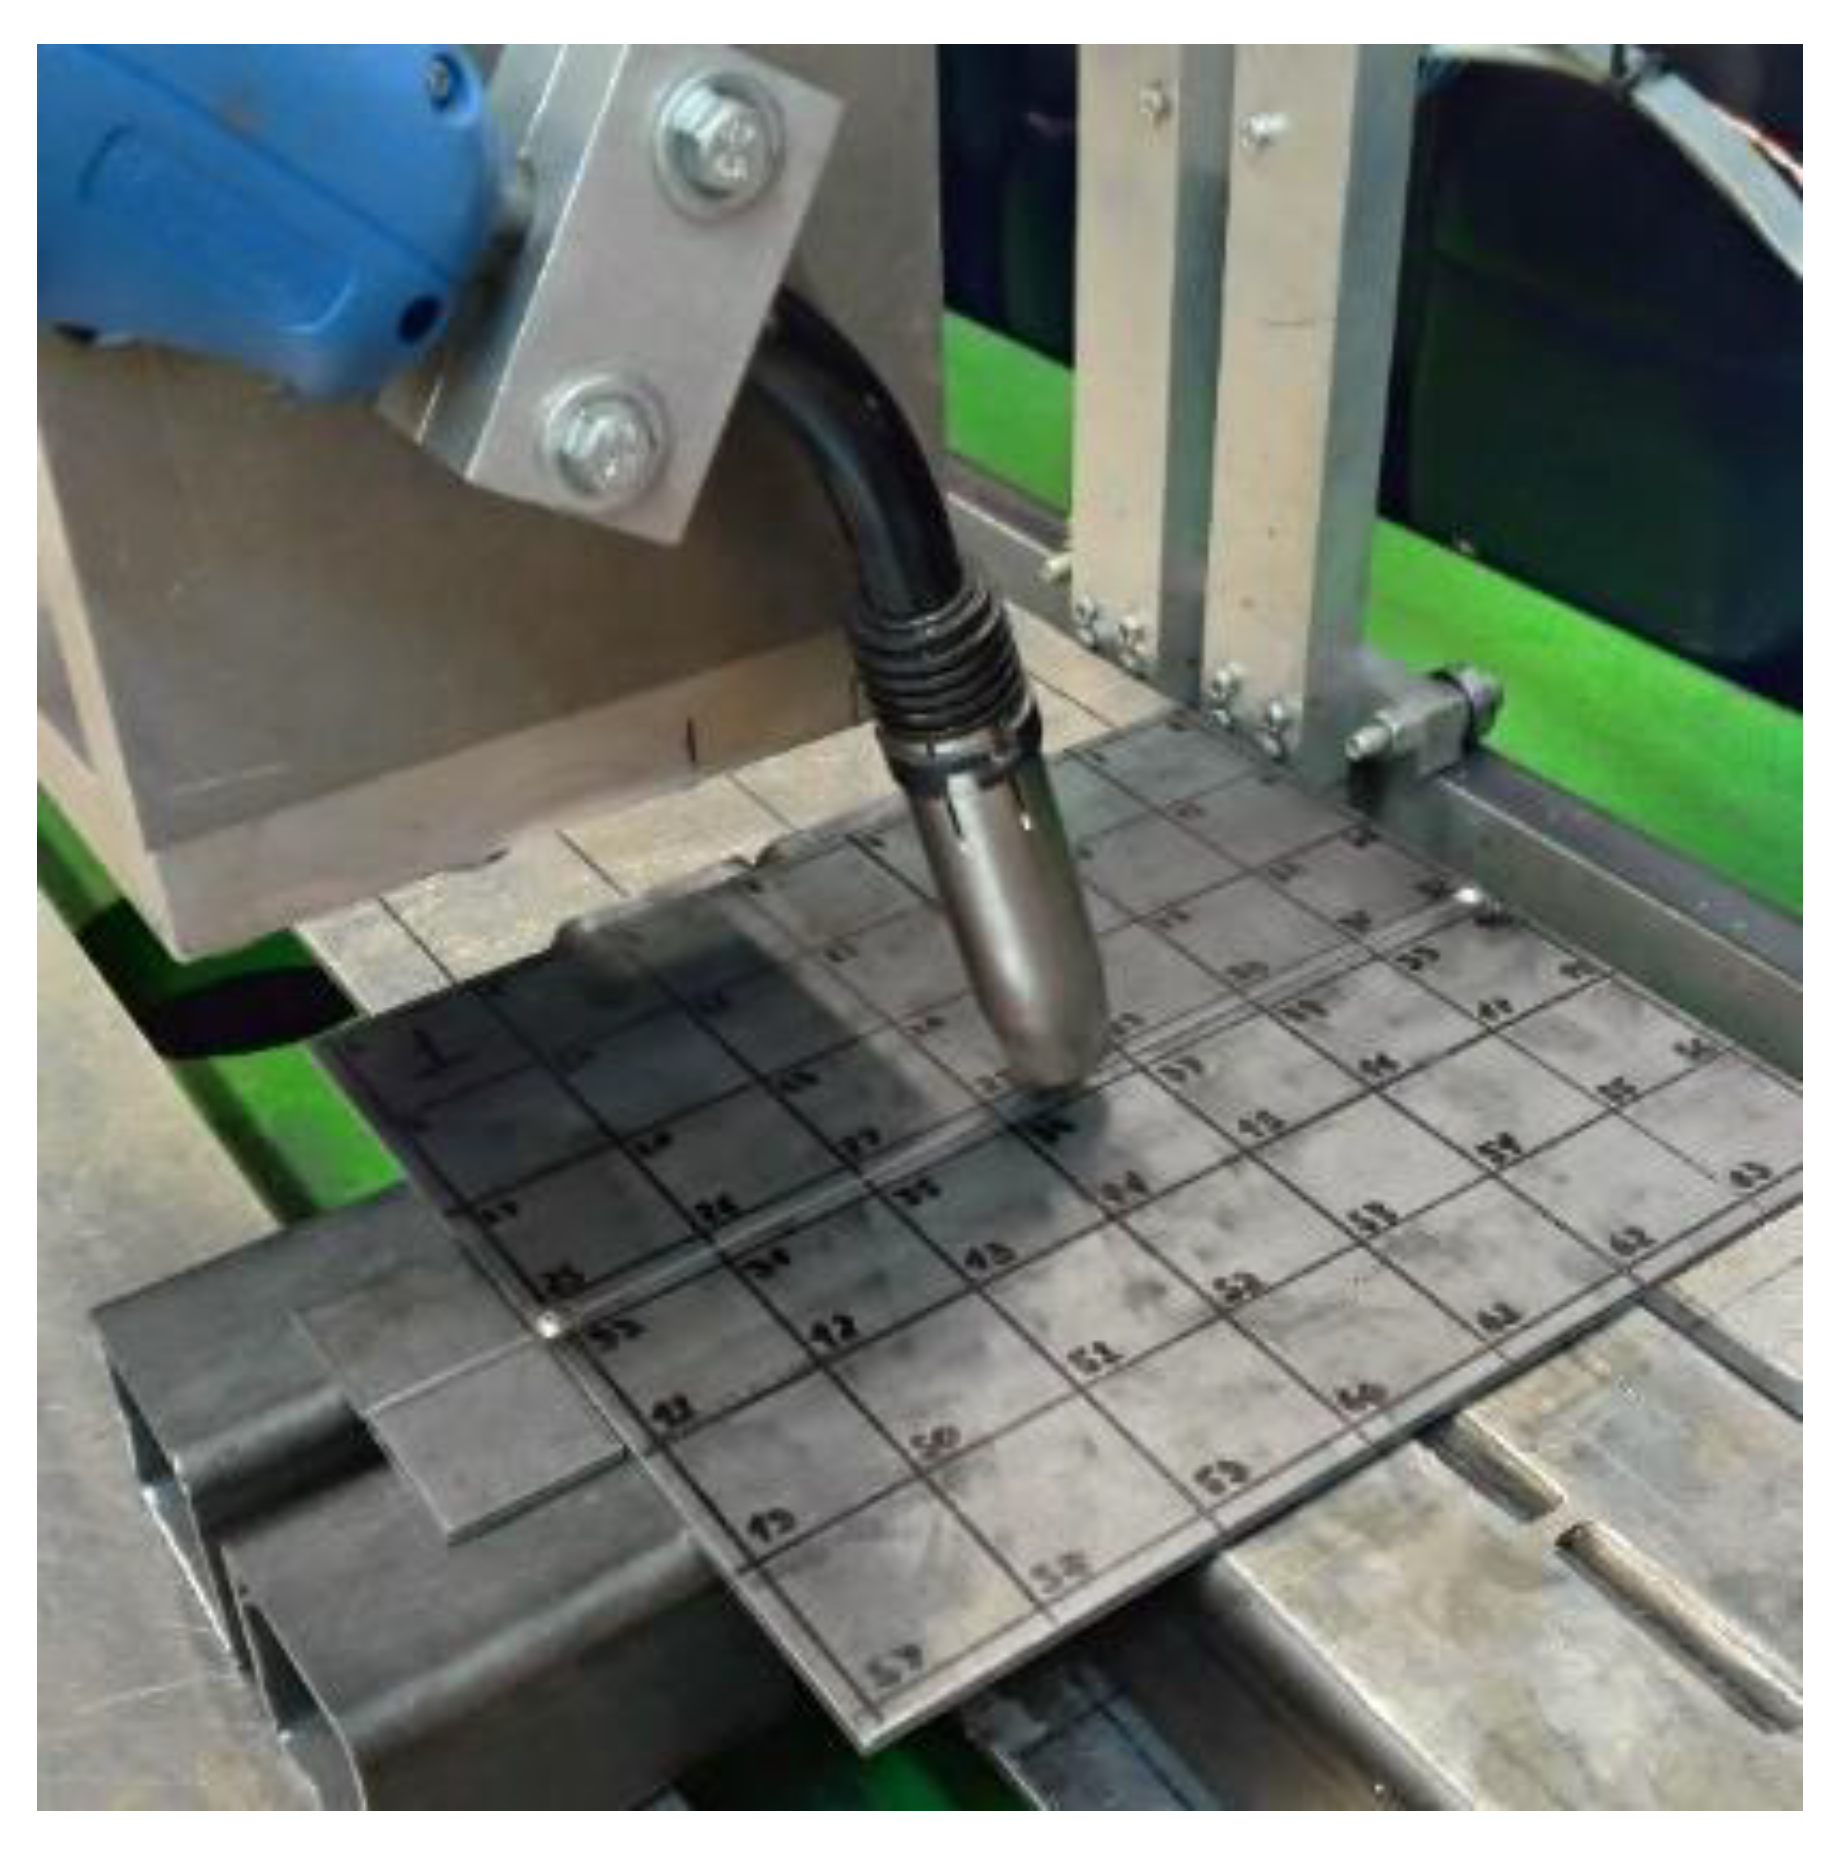
To carry out the experiment, 12 pairs of S235JR steel sheets with dimensions of 220 × 100 × 3 mm were obtained, and a 30 × 30 mm control grid was created (Figure 5) with 64 nodes (measurement points) for the analysis of distortions.
Figure 5.
Control grid created in the samples.
3.2.1. Surface Preparation
The groove shape of the butt joint is the square type. For the preparation of the surfaces, a band saw was used to cut them to the projected dimensions and, later, the surfaces were prepared using an angle grinder with an abrasive disc to remove oxidation and inorganic impurities. Acetone was used to remove oily impurities (Figure 6).
Figure 6.
Steel sheets samples for welding process.
All the samples were prepared following the same procedure and using the same parameter in order to only investigate the influence of the welding sequences.
3.2.2. Butt-Joint Welding Process
The weld beads were performed in the flat position (1G) with the pulling technique, and the parameters were selected within the range recommended by ESAB (as indicated in Table 4). After the fit tests, the welding parameters were selected as indicated in Table 5.
Table 5.
Parameters used in welding of top joints.
Each welding sequence was made in triplicate to guarantee that the experiments would not be affected by human, material, or machine flaws, improving the precision of the investigation. The welding sequences performed were divided into three groups:
- SM: Symmetrical method.
- BM: Backward method.
- SP: Single-pass method with one step.
Figure 7 shows the sequences, indicating the sequence and order of each step, the Figure 7a is the symmetrical method, Figure 7b the backward method, and the Figure 7c the single pass.
Figure 7.
Butt-joint welding sequences, (a) symmetrical method (SM), (b) backward method (BM), and (c) single-pass method (SP).
It was observed that the base metal had a few geometrical discontinuities before the welding process and, because of that, to obtain a higher control of the distortions that were really caused by the welding process, the measurements were performed before and after the welding (Figure 8). The distortions which already existed before were considered and properly compensated for in the analysis.
Figure 8.
Arrangement without movement restrictions during the welding process in top joints.
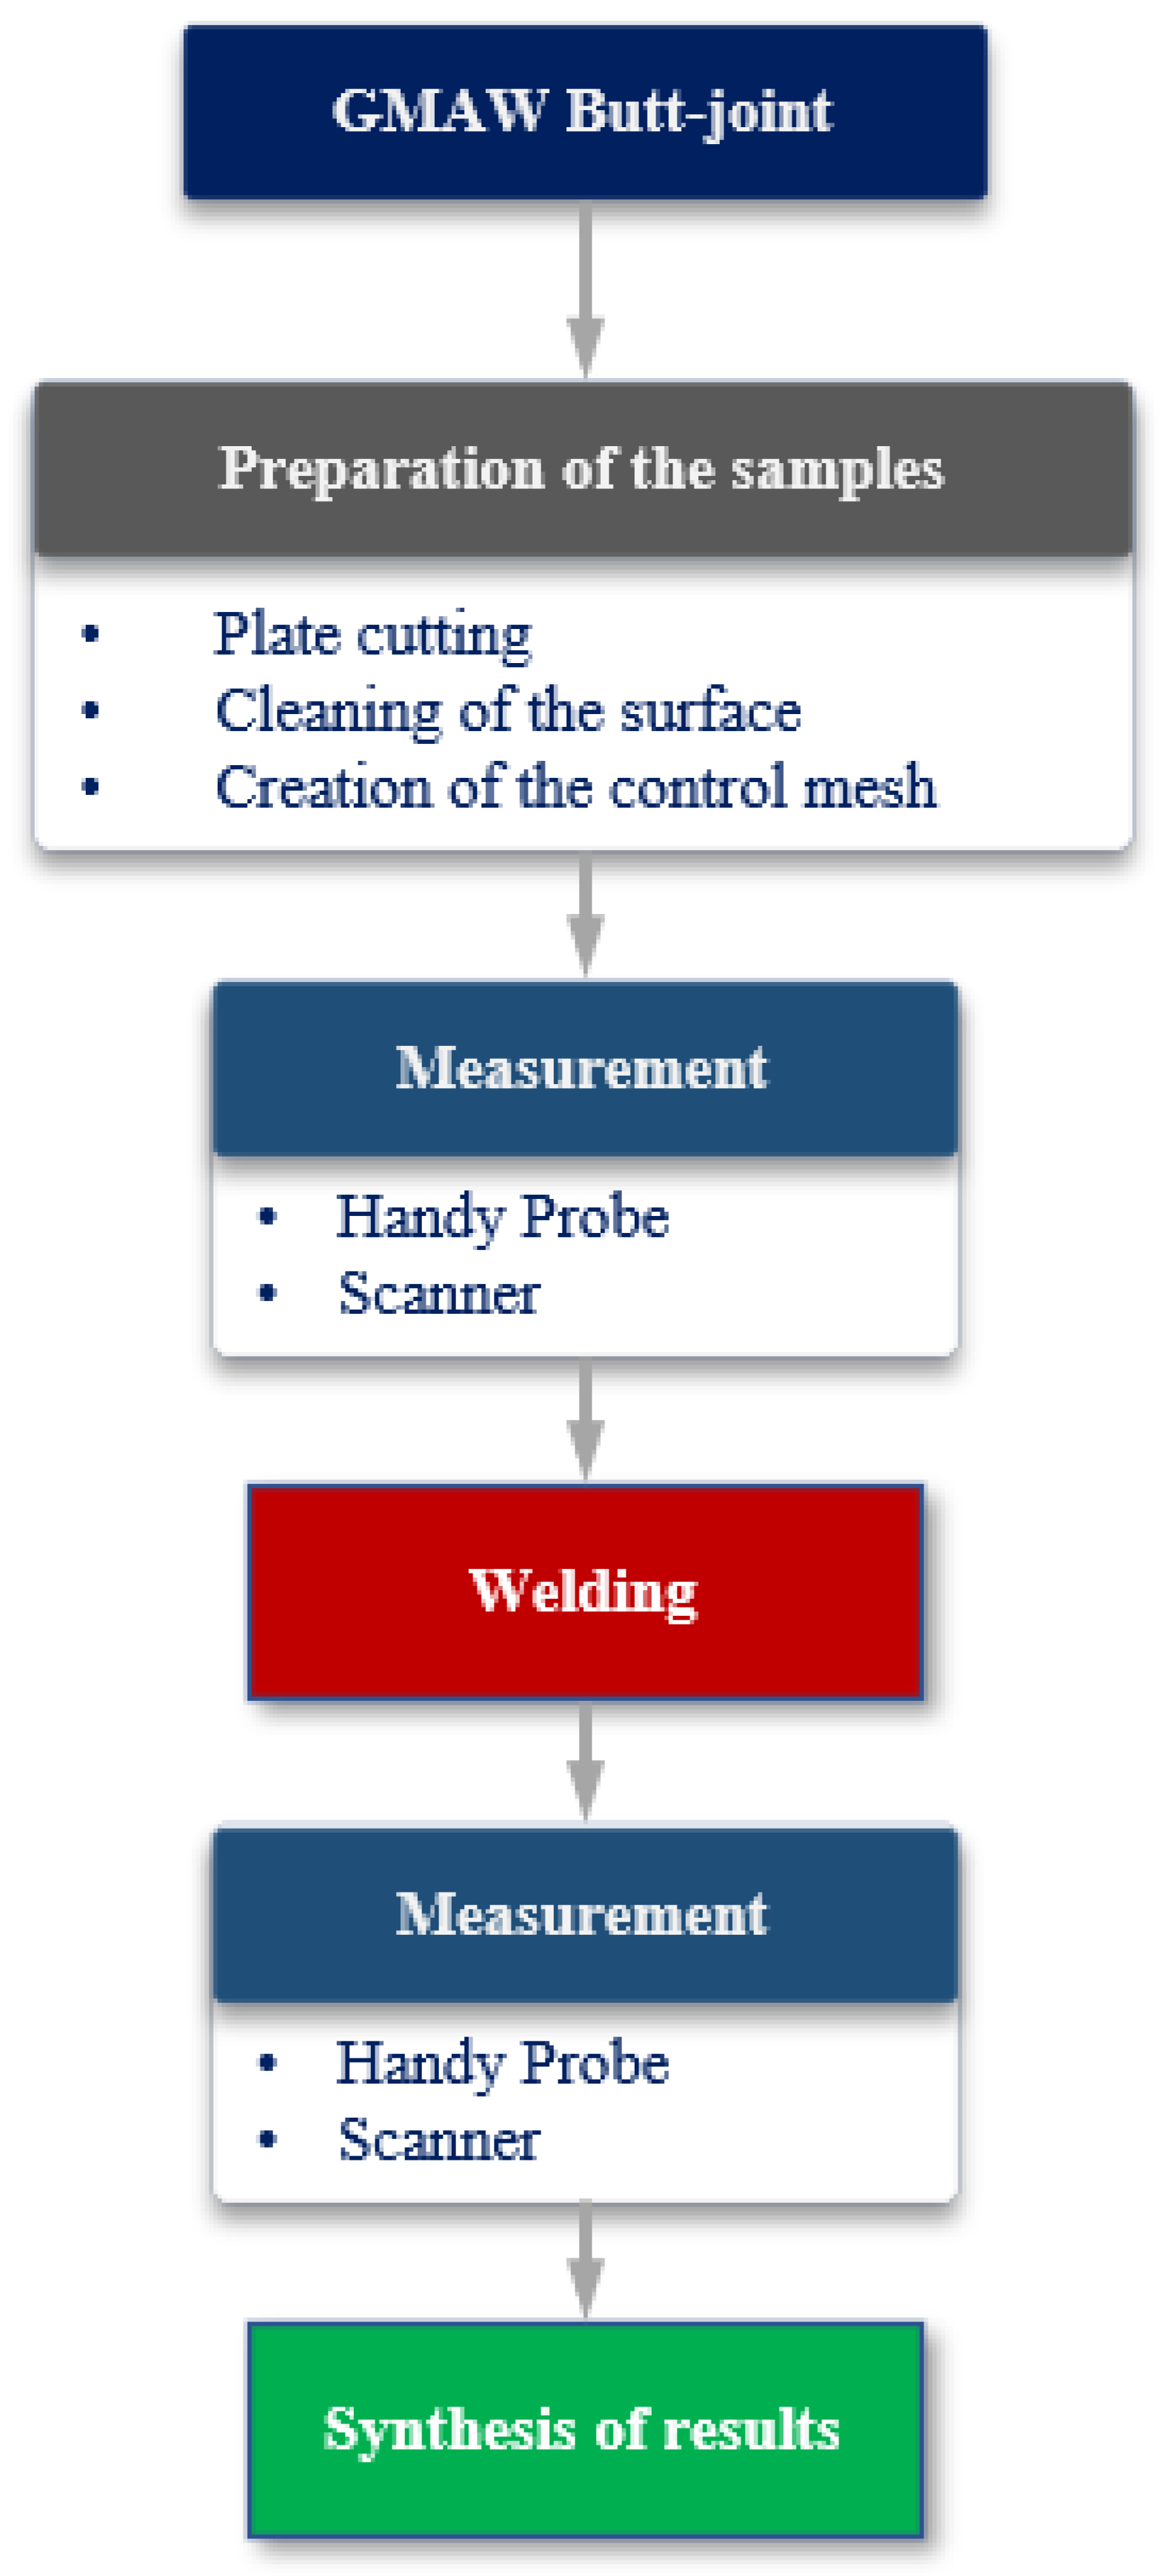
The order of the methodology used is represented in the flowchart of Figure 9. To prepare GMAW butt joints previously, it was necessary to cut carbon steel sheets in agreement with the defined dimensions, followed by a cleaning process using a cloth and solvent (acetone), and then creating a control mesh, drawing orthogonal lines at same distances. Before performing the welding of sheets, a control measurement which is used as reference values was implemented; these measurements were taken using the C-Track 780, HandyPROBE, and MetraSCAN 3D system. The welding process was carried out according to the sequence presented in Figure 7 and using the welding parameters defined in Table 5. The welded sheets were measured with the same equipment used to measure references values. So, a methodology using computerized equipment was performed to measure distortions, making it possible to obtain the coordinates in the operational space with metrological precision.
Figure 9.
Methodology flowchart.
As cited by D. Radaj [15] and T. Schenk [16], when deformations are restricted, high residual stresses arise and, for that reason, the samples were not fixed during the welding procedures. As a consequence of that, the deformations were not restricted in any time of the experiments.
The welding parameters were chosen in order to have a uniform distribution of the stands and ensure a better structural and visual aspect of the whole weld. Moreover, the welding was performed in flat position (1G) with the pulling technique.
The equipment used for data acquisition was the C-Track, which measures coordinates in the space, interconnected with HandyPROBE and MetraSCAN 3D using the softwares Metrolog X4 and VXelements.
4. Results and Discussion
First, the results obtained for each of the experimental replicates were compared for SM, BM, and PM. The parametric t-test method for comparison of means was applied to each pair of data for each experiment (Table 6). The results show no statistically significant differences in any of the cases. The same conclusion is drawn when non-parametric tests are applied (Kruskal–Wallis and Mood’s median test) (Table 7). These tests allow conclusions to be drawn even when the data do not follow a normal distribution and there is no homogeneity of variance.
Table 6.
Parametric (t-test) comparison of the datasets into groups.
Table 7.
p-value for non-parametric tests into groups.
From the parametric and non-parametric comparisons (Table 6 and Table 7), it is possible to conclude that there are no statistically significant differences between the three repetitions of each experiment (evaluated as a whole). A maximum range (difference for each cell between each pair of repeated experiments) was also calculated. The mean range for SM was 0.530 mm, for BM 0.259 mm, and for SP 0.343 mm. For this reason, the averages of vertical displacements can be used for each experiment (SM, BM, and PM).
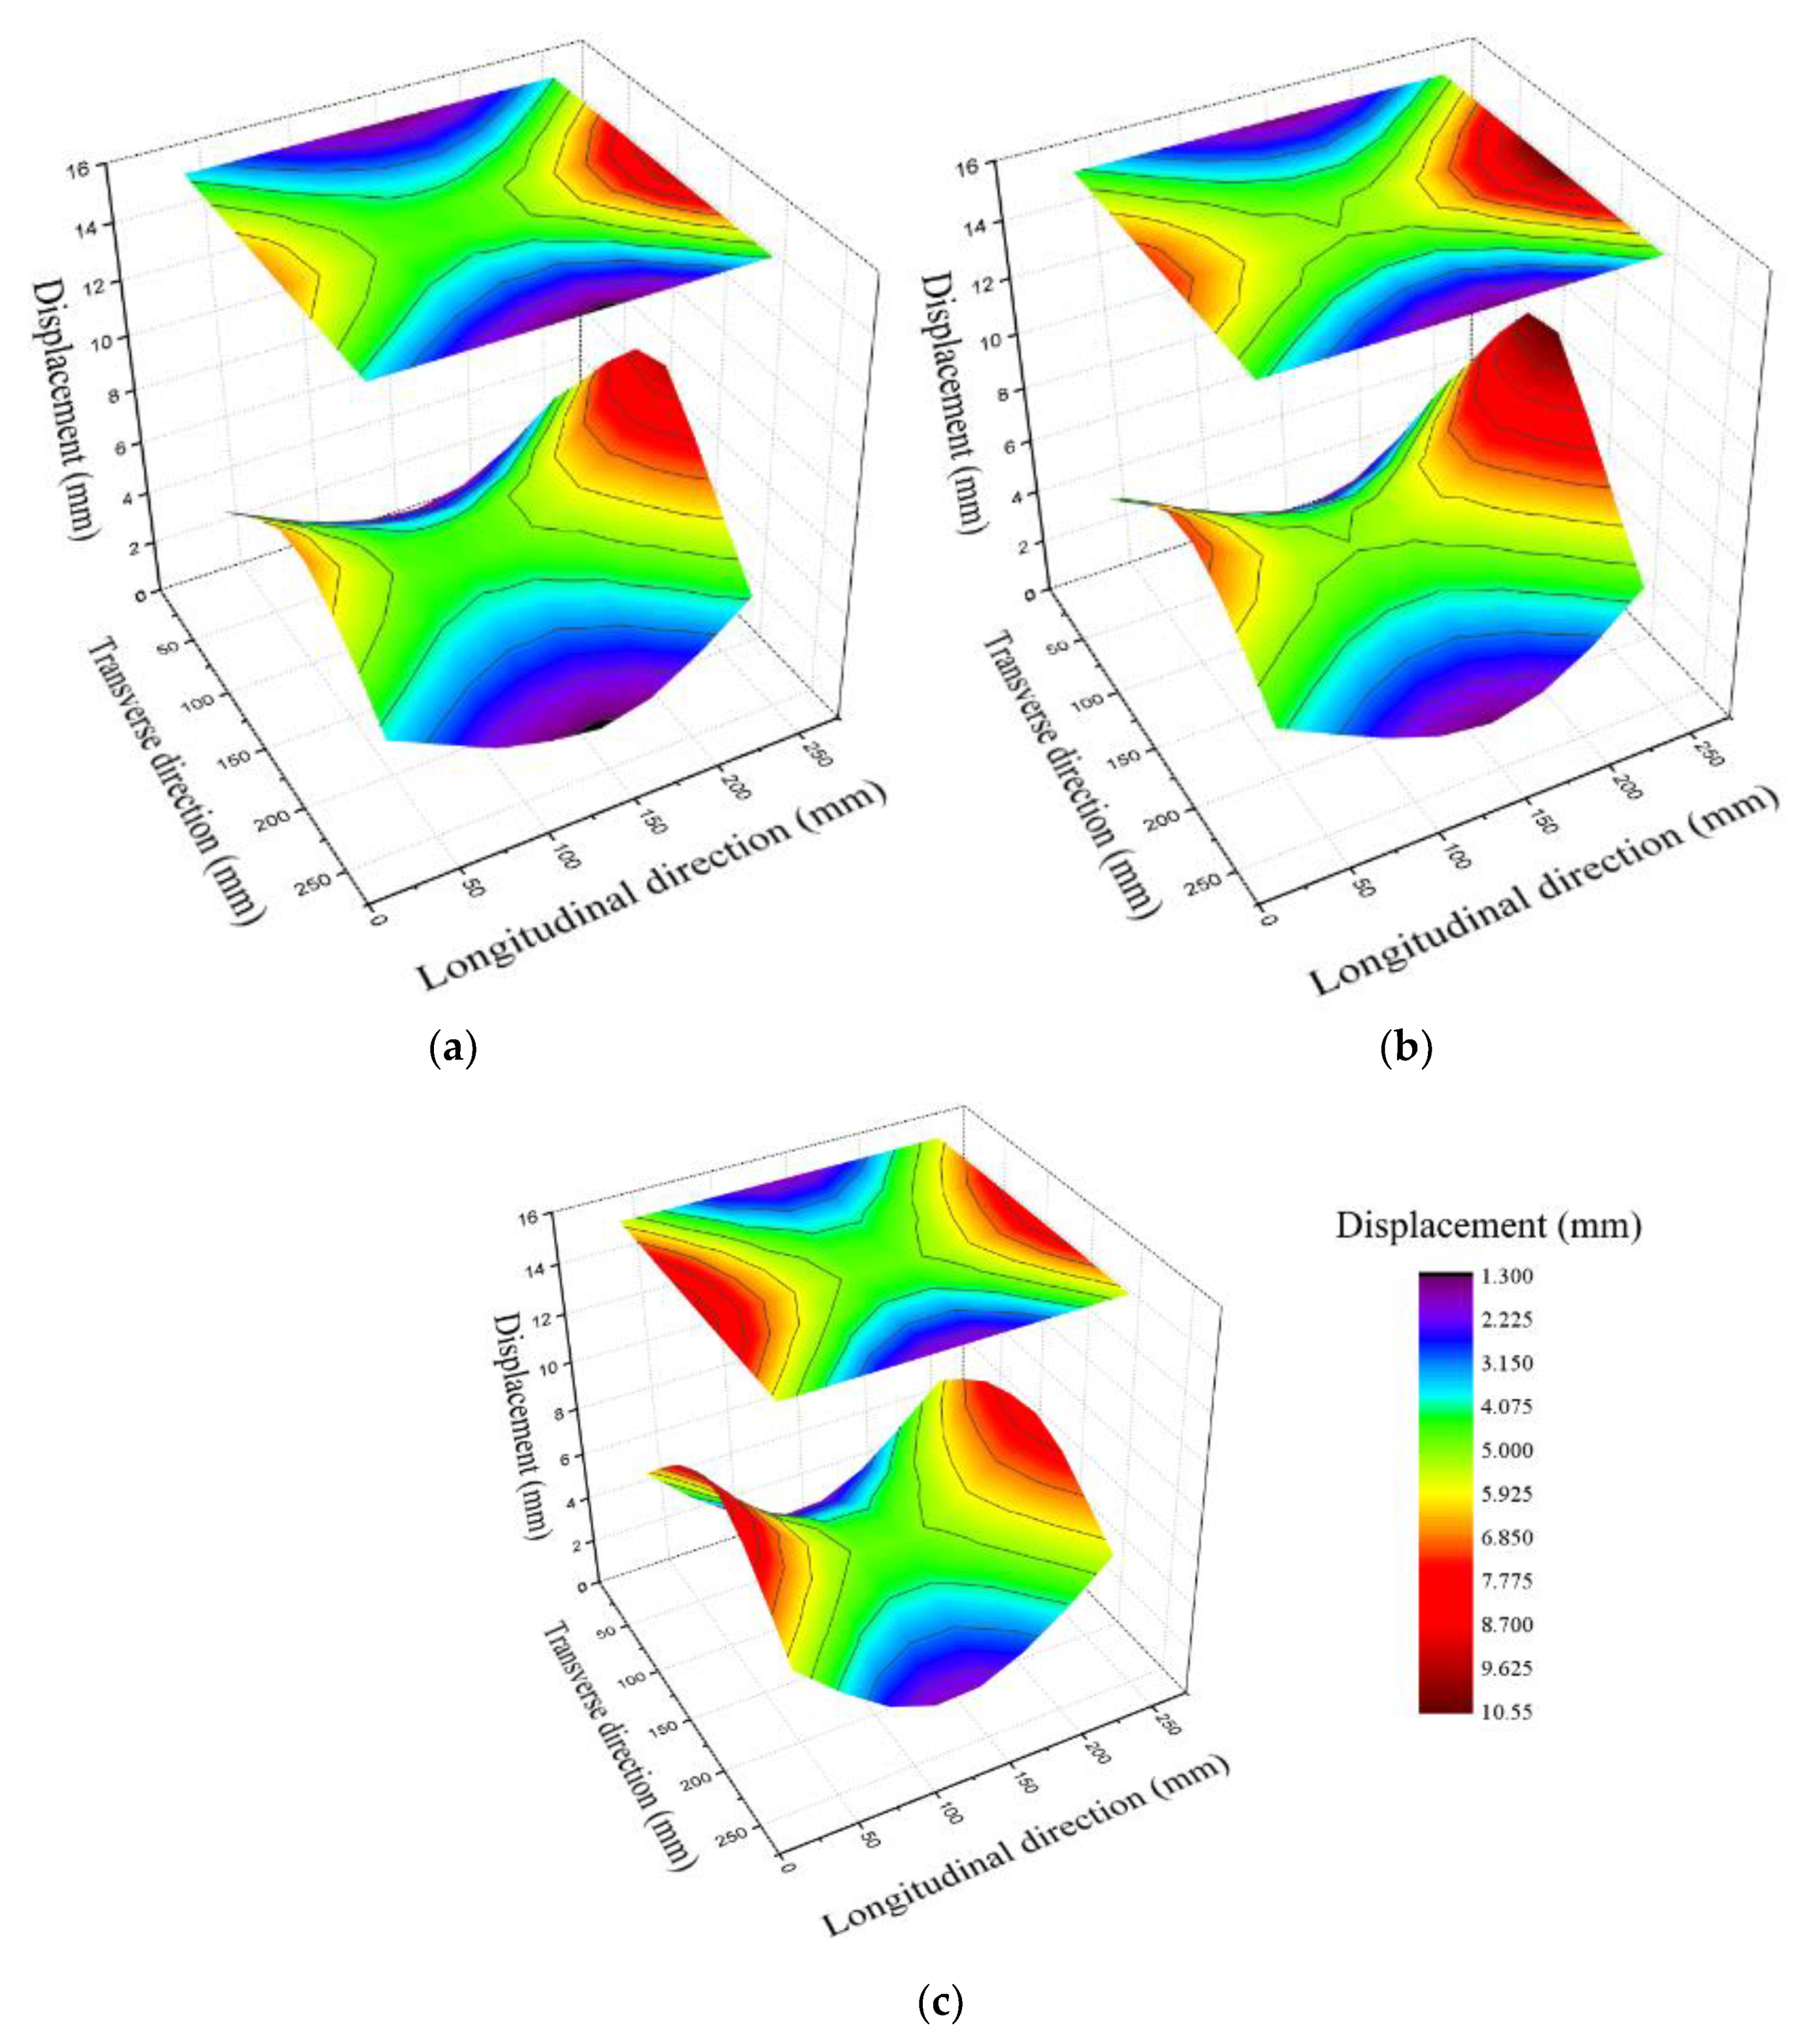
The vertical displacement averages obtained from the three samples can be seen in Figure 10, which represent the three analyzed sequences: (a) the symmetrical method, SM, (b) backward method, BM, and (c) single-pass method, SP.
Figure 10.
Deformation graphs: (a) symmetrical method (SM), (b) backward method (BM) and (c) single-pass method (SP).
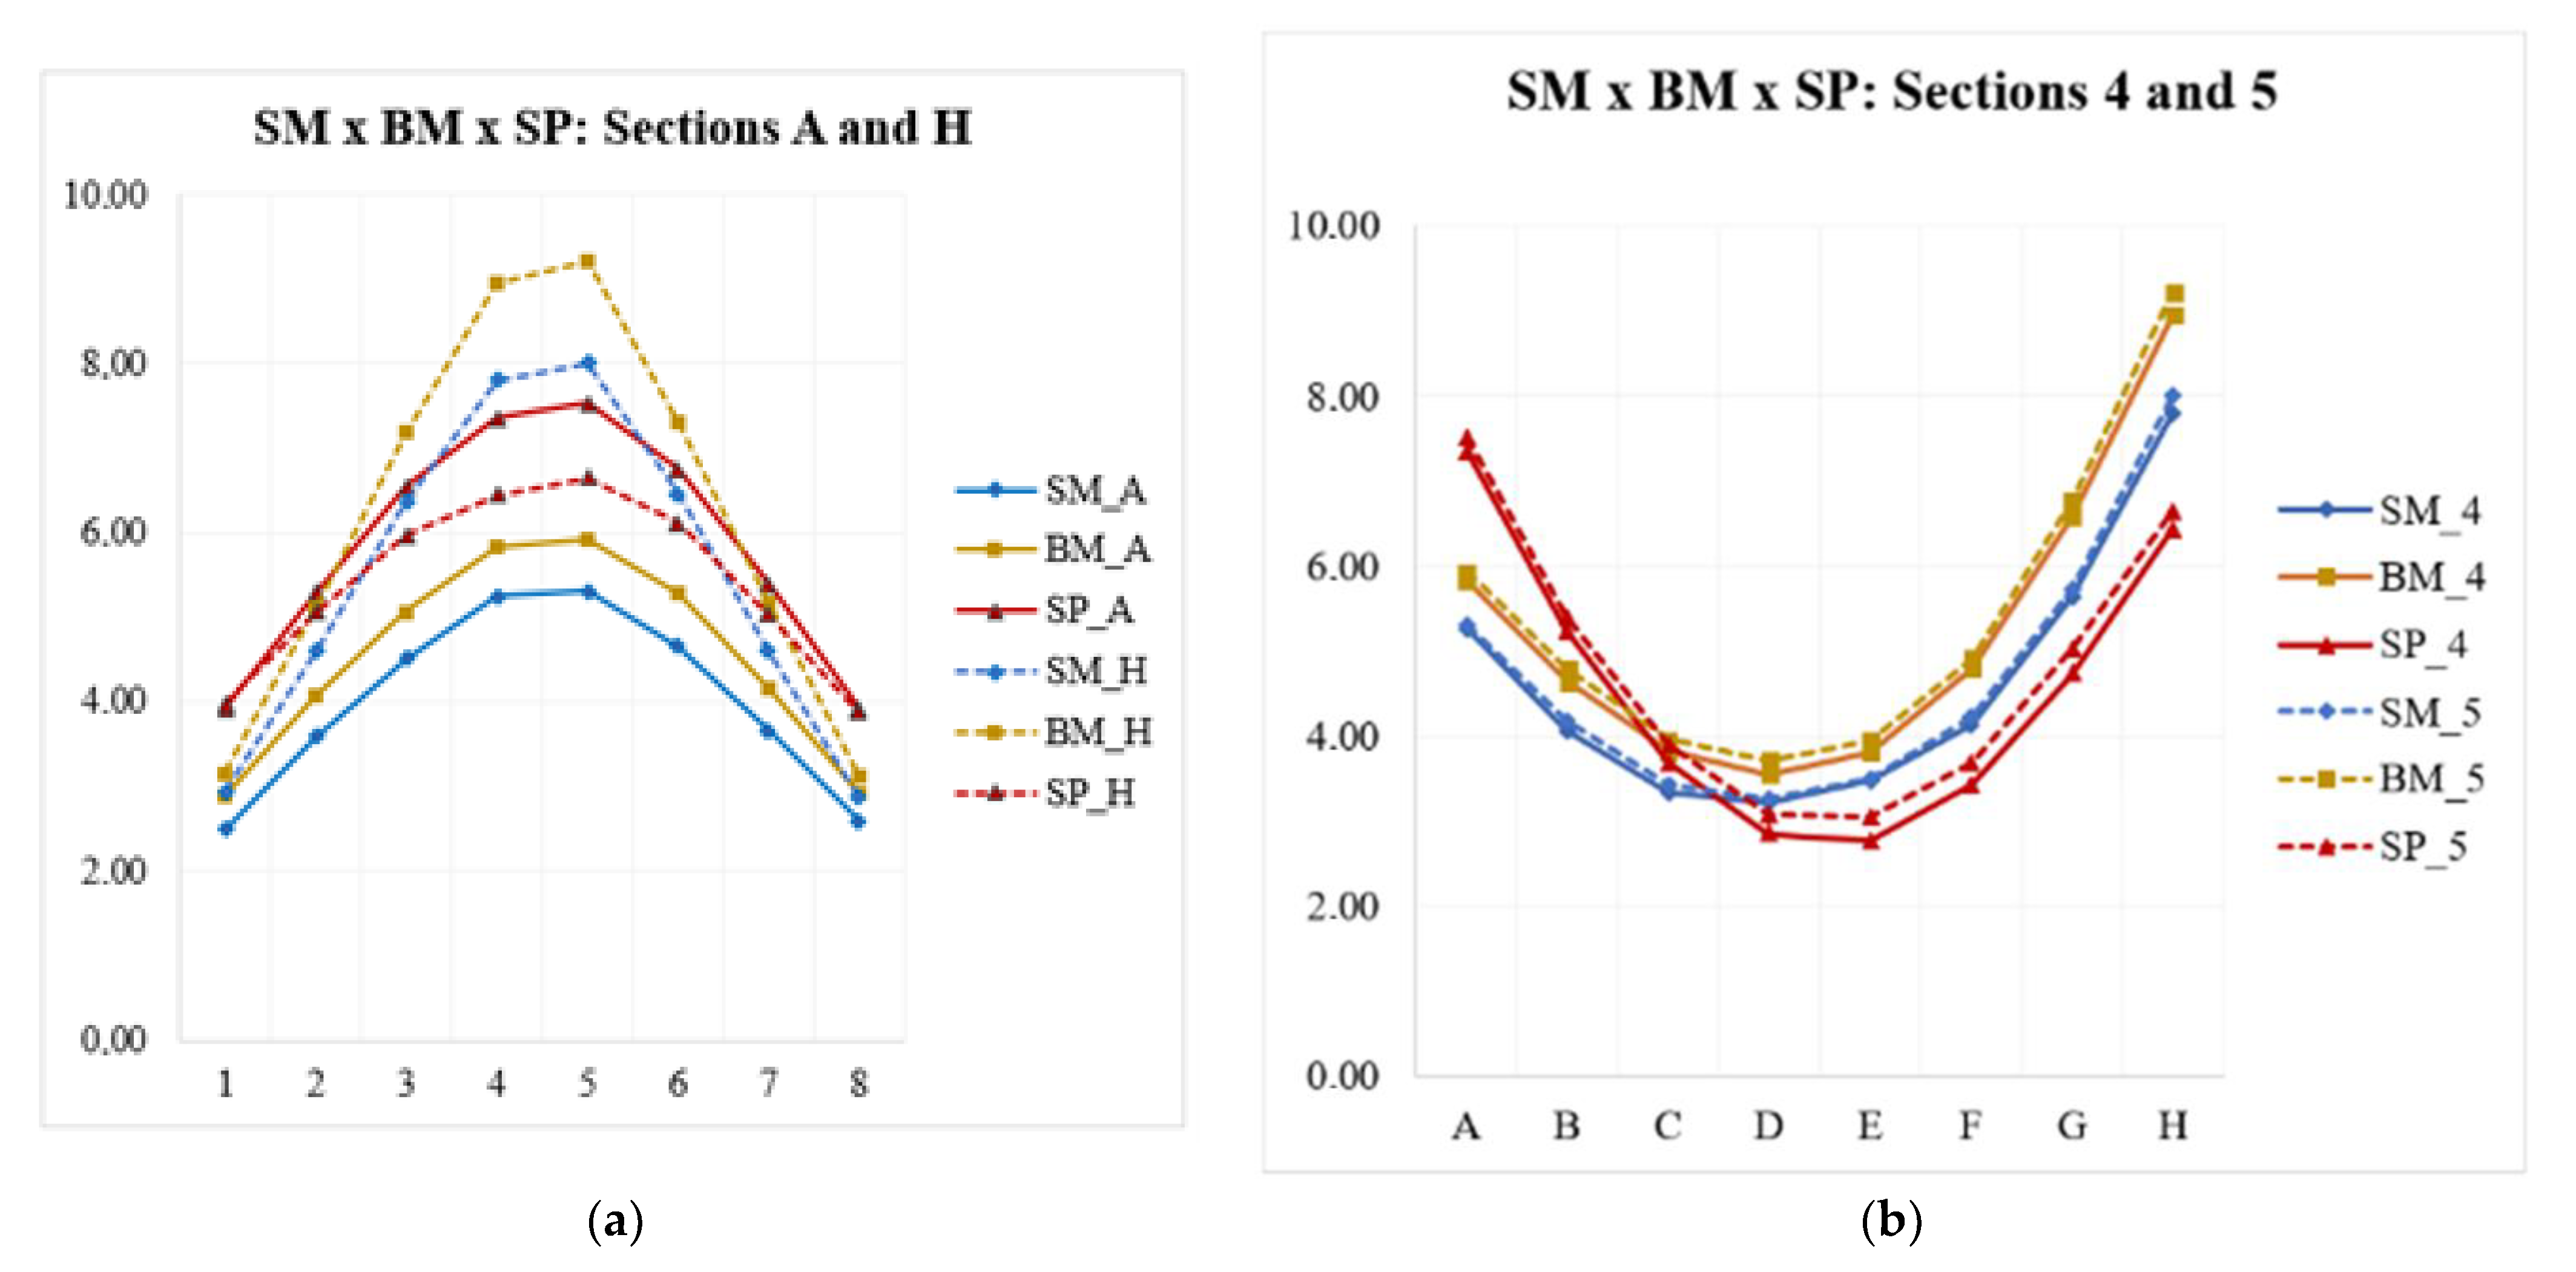
Figure 11a,b indicates the sections with the most expressive distortions (sections A and H and Sections 4 and 5, respectively). Through the comparative graphs of SM × BM × SP, it was possible to analyze the deformation patterns and the amplitudes of the displacements led by welding by comparing the sections. The maximum mean vertical displacement was observed in Section 5 for all welding sequences studied in this work.
Figure 11.
(a) SM × BM × SP scatter plot—Sections A and H; (b) SM × BM × SP scatter plot—Sections 4 and 5.
To verify whether the differences in displacements between the sequences are statistically significant, a one-way ANOVA was performed with the default significance level of 95%.
The sum of vertical displacements was performed and became a single variable for each sample (Table 8). Prior to performing ANOVA, Levene’s test was applied to sample data to verify the homogeneity of variances. The test resulted in the null hypothesis being true in order to conclude that the variances are homogeneous and that it is possible to use the parametric ANOVA test for this data sampling. All the vertical displacements measured were summed and transformed into only one variable for each sample.
Table 8.
Summation of sample distortions in butt-joint welding.
According to what is indicated in Table 9, the p-value obtained with the ANOVA was 0.011, showing the null hypothesis as a result (p < 0.05). Therefore, it is concluded that there is a significant difference in the final distortion of the samples between the welding sequences.
Table 9.
ANOVA analysis between the sequences of butt-joint welding.
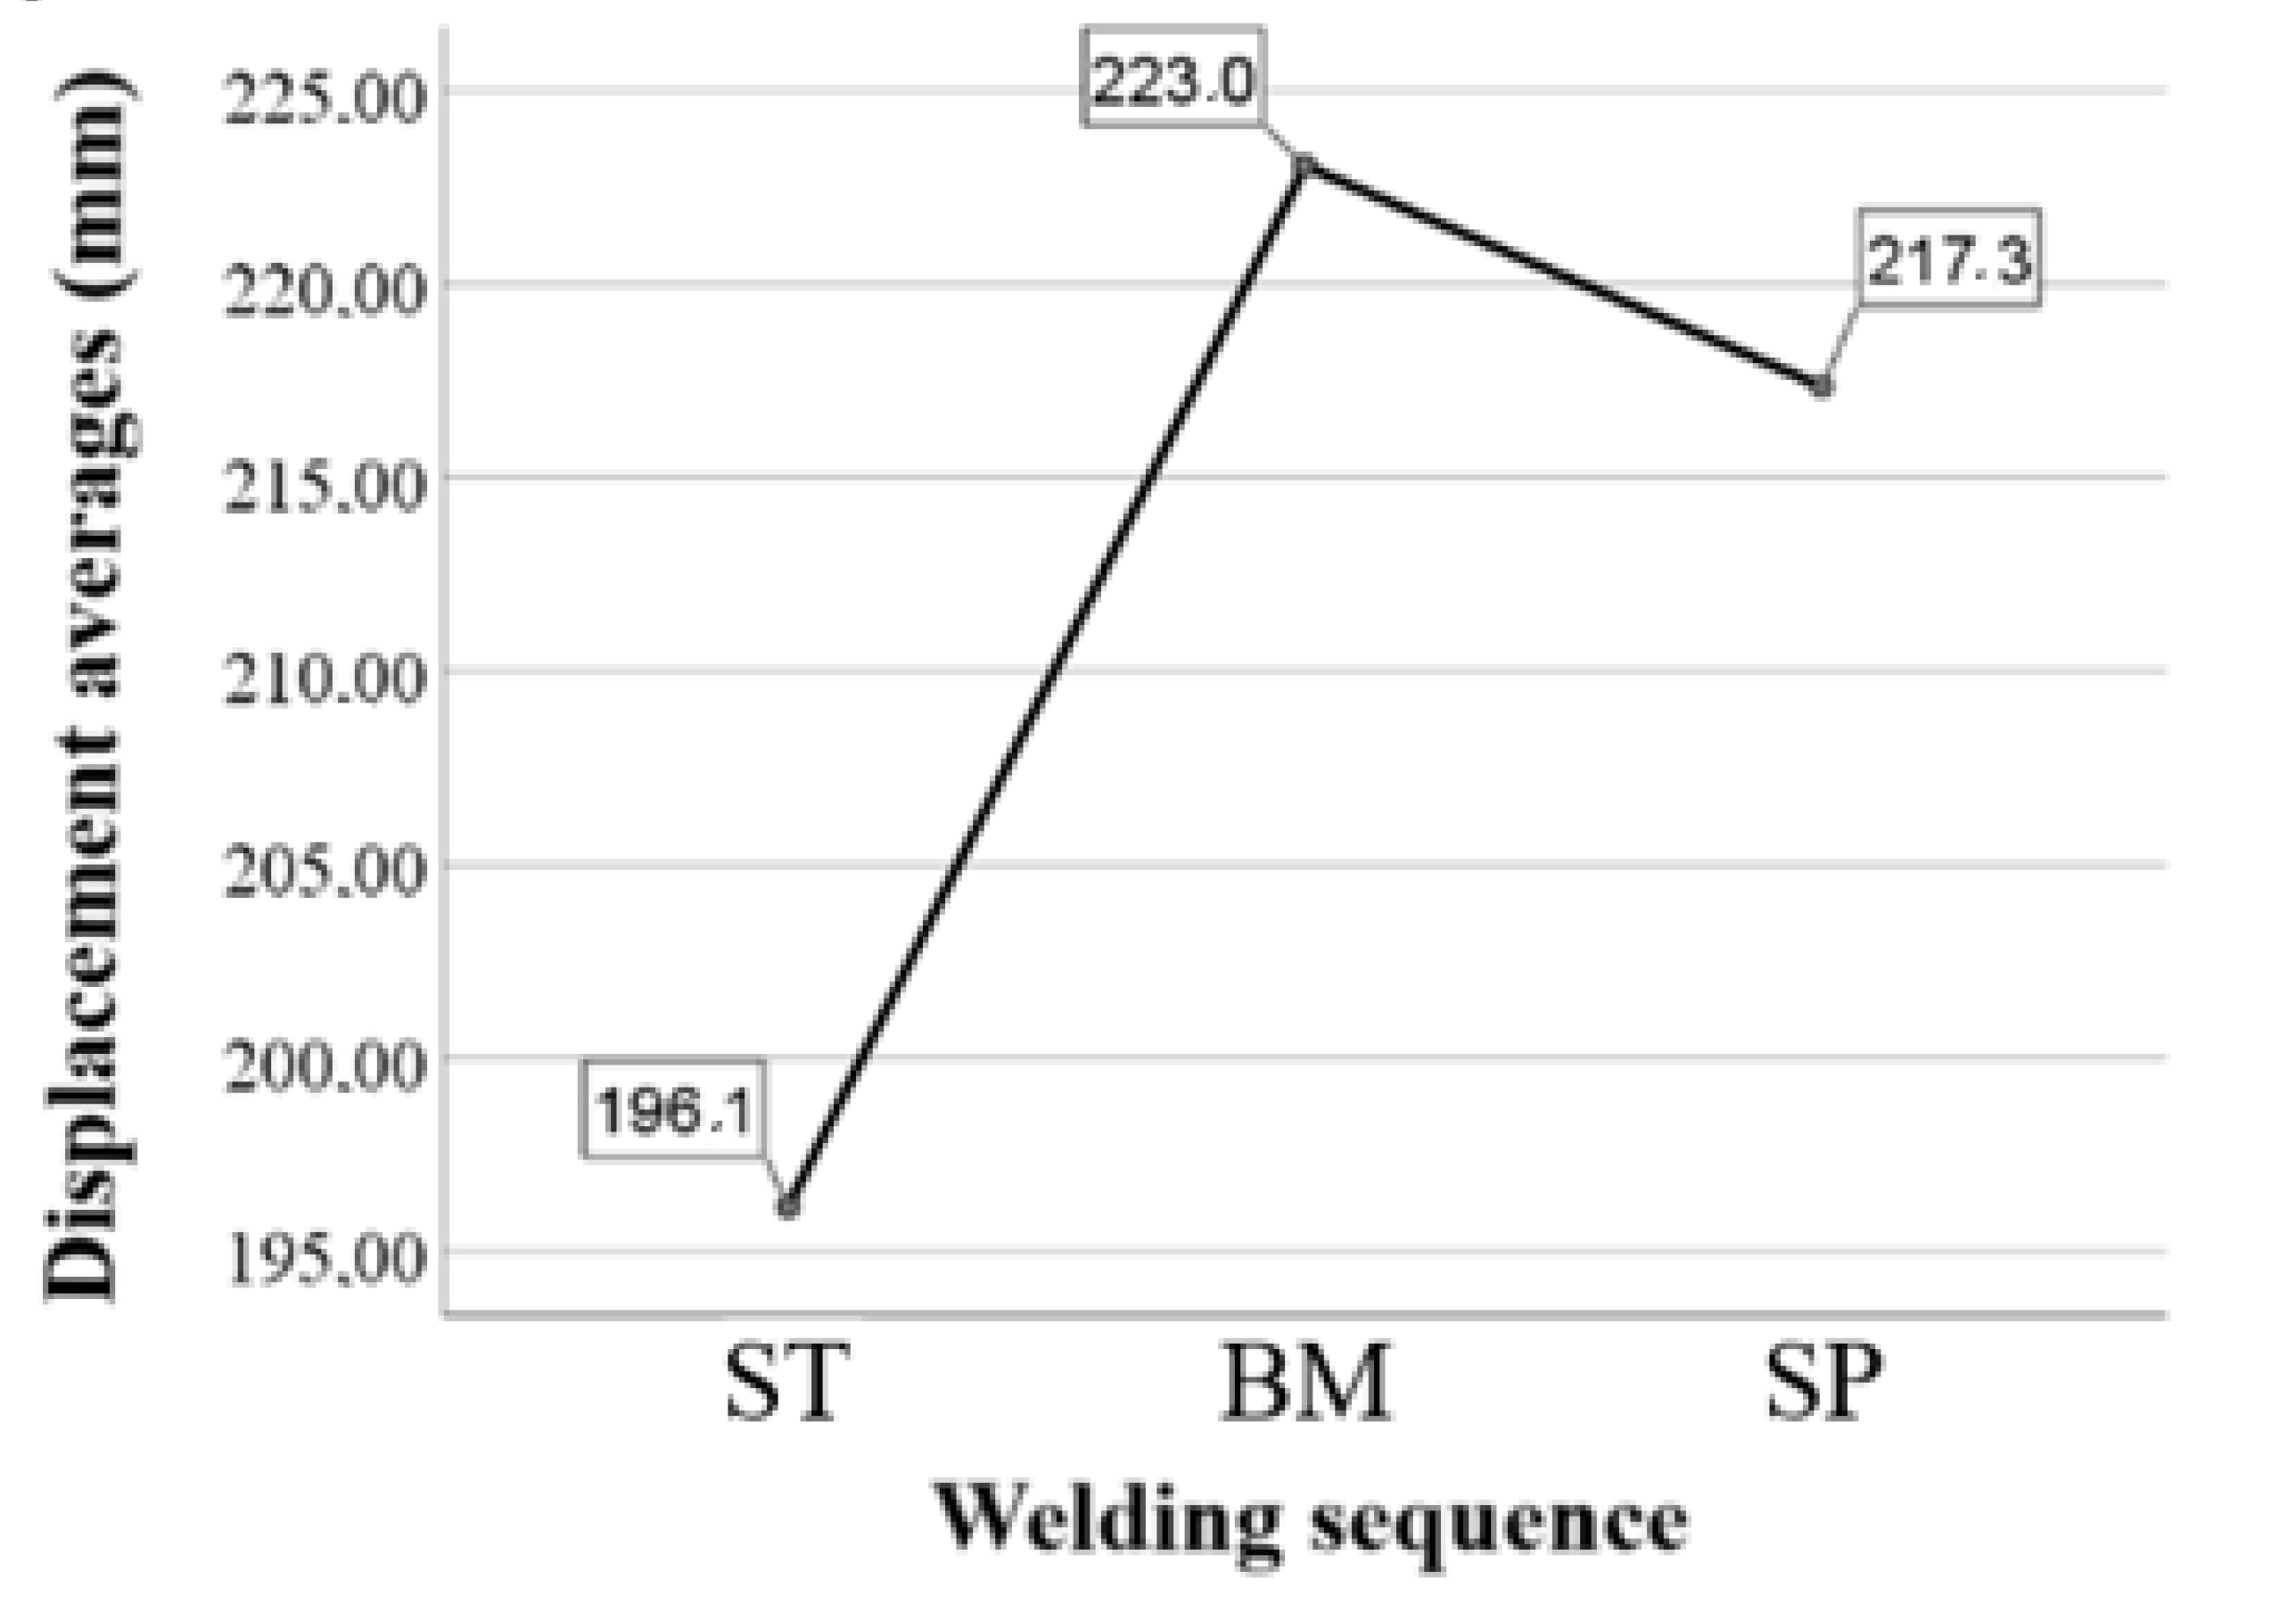
The sequence averages were also calculated (Figure 12), and it was verified that the symmetrical method (SM) sequence deformed around 9.8% less than the single-pass (SP) sequence and 12.0% less than the backward method (BM).
Figure 12.
Graph of the displacement averages of ST, BM, and SP sequences.
In order to make multiple comparisons and verify between which sequences would exist meaningful differences, the Tuckey test was used. According to Table 10, it is possible to conclude that there are significant differences between the distortions that occurred when comparing the sequences SS × SR and the sequences SS × SC, obtaining a p-value of 0.012 and 0.033, respectively. On the other hand, for the interaction between BM × SP, the Tukey test showed that there are no significant differences between the averages of the displacements of the sequences, with a p-value equal to 0.625 (p > 0.05).
Table 10.
Tukey Test—Multiple comparisons between the sequences.
5. Conclusions
In order to not only prevent but also control and correct deformations that can occur in welding processes, it is necessary to study and comprehend which mechanisms and parameters can have any influence on distortions.
As a result of the experimental and theoretical considerations of this work, it was possible to conclude that through the statistical tools, namely ANOVA and Tuckey test, it was verified that there is a significant difference in the distortions between these welding sequences and that this difference is only for the symmetrical method sequence, SM, when compared with the backward method (BM) and single pass (SP).
In the welding snares on the 3 mm plates, there was a greater displacement in Sections 4 and 5 of all specimens, these being the regions closest to the shaft where the welds occurred. For the SS and SR sequences, A5 was the point of greatest displacement (8.01 mm and 9.22 mm, respectively). However, for the SC sequence, the point of the highest displacement peak was A5 (7.52 mm), with a value of 6.1%, 18.4% lower when compared with the points of SS and SR, in that order.
In conclusion, the symmetrical method (SM) was the sequence that least distorted and single pass (SP) was the sequence with the most symmetrical distortions. In average displacement values, the SM sequence deformed around 9.8% less than the single pass (SP) and 12% less than the backward method (BM).
Author Contributions
Conceptualization, J.E.R.; methodology, J.E.R.; software, M.R.M.; validation, I.S.A.; formal analysis, I.S.A. and M.R.M.; investigation, I.S.A.; resources, J.E.R.; data curation, M.R.M.; writing—original draft preparation, J.E.R. and I.S.A.; writing—review and editing, I.S.A. and M.R.M.; visualization, I.S.A.; supervision, J.E.R.; project administration, J.E.R.; funding acquisition, J.E.R. All authors have read and agreed to the published version of the manuscript.
Funding
Financial support was provided by Portugal’s national funding FCT/MCTES (PIDDAC) to Centro de Investigação de Montanha (CIMO) (UIDB/00690/2020 and UIDP/00690/2020) and SusTEC (LA/P/0007/2020).
Institutional Review Board Statement
Not applicable.
Informed Consent Statement
Not applicable.
Data Availability Statement
No data were reported in this study.
Conflicts of Interest
The authors declare no conflict of interest.
References
- Izeda, E.; Pascoal, A.; Simonato, G.; Mineiro, N.; Gonçalves, J.; Ribeiro, J. Optimization of Robotized Welding in Aluminum Alloys with Pulsed Transfer Mode Using the Taguchi Method. Proceedings 2018, 2, 5294. [Google Scholar] [CrossRef]
- Ahmed, Z.I.; Saadoon, A.M. Optimization Process Parameters of Submerged Arc Welding Using Taguchi Method. Int. J. Eng. Adv. Technol. 2015, 5, 149–152. [Google Scholar]
- Daniyan, I.; Tlhabadira, I.; Adeodu, A.; Phokobye, S.; Mpofu, K. Process design and modelling for milling operation of titanium alloy (Ti6Al4V) Using the Taguchi method. Procedia CIRP 2020, 91, 348–355. [Google Scholar] [CrossRef]
- Ribeiro, J.; Gonçalves, J.; Mineiro, N. Welding Process Automation of Aluminum Alloys for the Transport Industry: An Industrial Robotics Approach. In CONTROLO 2020; Springer: Cham, Switzerland, 2021; pp. 72–81. [Google Scholar]
- Pandit, M.; Sood, S.; Mishra, P.; Khanna, P. Mathematical analysis of the effect of process parameters on angular distortion of MIG welded stainless steel 202 plates by using the technique of response surface Methodology. Mater. Today Proc. 2021, 41, 1045–1054. [Google Scholar] [CrossRef]
- Sehrawat, A. Mathematical Modelling for Prediction of Angular Distortion in MIG Welding of Stainless Steel 301. Int. J. Res. Appl. Sci. Eng. Technol. 2020, 8, 884–890. [Google Scholar] [CrossRef]
- Mochizuki, M.; Okano, S. Effect of welding process conditions on angular distortion induced by bead-on-plate welding. ISIJ Int. 2018, 58, 153–158. [Google Scholar] [CrossRef]
- Deng, D.; Murakawa, H. Prediction of welding distortion and residual stress in a thin plate butt-welded joint. Comput. Mater. Sci. 2008, 43, 353–365. [Google Scholar] [CrossRef]
- Deo, M.V. Minimization of bowing distortion in welded stiffeners using differential heating. In Minimization of Welding Distortion and Buckling; Woodhead Publishing: Cambridge, UK, 2011; pp. 169–185. [Google Scholar] [CrossRef]
- Sun, Y.L.; Hamelin, C.J.; Vasileiou, A.N.; Xiong, Q.; Flint, T.F.; Obasi, G.; Francis, J.A.; Smith, M.C. Effects of dilution on the hardness and residual stresses in multipass steel weldments. Int. J. Press. Vessel. Pip. 2020, 187, 104154. [Google Scholar] [CrossRef]
- Soni, S.; Aggarwal, N. Optimization of Distortion in Welding. Int. J. Enhanc. Res. Sci. Technol. Eng. 2015, 4, 128–133. [Google Scholar]
- Mounika, S.; Rao, D.V.N.J.J. Effect of Weld Pass Sequencing On Temperature Distribution and Residual Stresses in Gmaw. J. Therm. Energy Syst. 2019, 4, 23–40. [Google Scholar]
- Podder, D.; Gupta, O.; Das, S.; Mandal, N.R. Experimental and numerical investigation of effect of welding sequence on distortion of stiffened panels. Weld. World 2019, 63, 1275–1289. [Google Scholar] [CrossRef]
- Gannon, L.; Liu, Y.; Pegg, N.; Smith, M. Effect of welding sequence on residual stress and distortion in flat-bar stiffened plates. Mar. Struct. 2010, 23, 385–404. [Google Scholar] [CrossRef]
- Radaj, D. Welding Residual Stresses and Distortion Calculation and Measurement; DVS-Verlag: Düsseldorf, Germany, 2003. [Google Scholar]
- Schenk, T. Modelling of Welding Distortion The Influence of Clamping and Sequencing. Ph.D. Thesis, TU Delft, Delft, The Netherlands, December 2011. [Google Scholar]
- Richter-Trummer, V.; Moreira, M.G.; Ribeiro, J.; de Castro, M.S.T. The Contour Method for Residual Stress Determination Applied to an AA6082-T6 Friction Stir Butt Weld. Residual Stress VIII 2011, 681, 177–181. [Google Scholar] [CrossRef]
- Costa, S.M.; Souza, M.S.; César, M.B.; Gonçalves, J.; Ribeiro, J. Experimental and numerical study to minimize the residual stresses in welding of 6082-T6 aluminum alloy. AIMS Mater. Sci. 2021, 8, 271–282. [Google Scholar] [CrossRef]
- Marques, E.; Pereira, A.; Ribeiro, J. Thermal evaluation of MAG/TIG welding using numerical extension tool. Int. J. Appl. Sci. Eng. 2021, 18, 2021006. [Google Scholar] [CrossRef]
- Nobrega, G.; Souza, M.S.; Martín, M.R.; Rodríguez-Gonzálvez, P.; Ribeiro, J. Parametric Optimization of the GMAW Welding Process in Thin Thickness of Austenitic Stainless Steel by Taguchi Method. Appl. Sci. 2021, 11, 8742. [Google Scholar] [CrossRef]
- Zain-ul-abdein, M.; Nélias, D.; Jullien, J.F.; Deloison, D. Experimental investigation and finite element simulation of laser beam welding induced residual stresses and distortions in thin sheets of AA 6056-T4. Mater. Sci. Eng. A 2010, 527, 3025–3039. [Google Scholar] [CrossRef]
- Garcia, L.M.; Noronha, V.T.; Ribeiro, J. Effect of Welding Orientation in Angular Distortion in Multipass GMAW. J. Manuf. Mater. Process. 2021, 5, 63. [Google Scholar] [CrossRef]
- Irfan, Y.A.; Memduh, K.; Ezgi, D. Angular Distortion in Butt Arc Welding. Int. J. Eng. Sci. Appl. 2018, 2, 137–144. [Google Scholar]
- Zhang, L. Modelling welding stress and distortion in large structures. In Minimization of Welding Distortion and Buckling; Woodhead Publishing: Cambridge, UK, 2011; pp. 99–126. [Google Scholar] [CrossRef]
- Adamczuk, C.; Machado, I.G.; Mazzaferro, J.A.E. Methodology for predicting the angular distortion in multi-pass butt-joint welding. J. Mater. Process. Technol. 2017, 240, 305–313. [Google Scholar] [CrossRef]
- Murugan, B.V.V.; Gunaraj, V. Effects of Process Parameters on Angular Distortion of Gas Metal Arc Welded Structural Steel Plates Mathematical models were developed to study the effects of process variables on the angular distortion of multipass GMA welded structural steel plates. Weld. J. 2005, 84, 165–171. [Google Scholar]
- Vyas, S.M.; Shah, S.I.; Acharya, G.D. Minimization of Distortion During Gas Metal Arc Welding Process: A Review. J. Exp. Appl. Mech. 2017, 8, 48–53. [Google Scholar]
- Narwadkar, A.; Bhosle, S. Optimization of MIG Welding Parameters to Control the Angular Distortion in Fe410WA Steel. Mater. Manuf. Process. 2016, 31, 2158–2164. [Google Scholar] [CrossRef]
- Ramani, S.; Velmurugan, V. Effect of process parameters on angular distortion of mig welded Ai6061 plates. In Proceedings of the All India Manufacturing Technology, Design and Research Conference, no. Aimtdr, Guwahati, India, 12–14 December 2014; Volume 2, pp. 1–6. [Google Scholar]
- Deng, D.; Murakawa, H. FEM prediction of buckling distortion induced by welding in thin plate panel structures. Comput. Mater. Sci. 2008, 43, 591–607. [Google Scholar] [CrossRef]
- Sakri, A.; Guidara, M.; Elhalouani, F. Numerical simulation of MIG type arc welding induced residual stresses and distortions in thin sheets of S235 steel. IOConf. Ser. Mater. Sci. Eng. 2010, 13, 012020. [Google Scholar] [CrossRef]
- Long, H.; Gery, D.; Carlier, A.; Maropoulos, G. Prediction of welding distortion in butt joint of thin plates. Mater. Des. 2009, 10, 4126–4135. [Google Scholar] [CrossRef]
- Kumar, P.; Jafri, S.A.H.; Bharti, P.K.; Siddiqui, M.A. Study of Hazards Related to Cutting Fluids and Their Remedies. Int. J. Eng. Res. Technol. 2014, 3, 1225–1229. [Google Scholar]
- Kumar, A. Effect of Various Parameters on Angular Distortion in Welding. Int. J. Curr. Eng. Technol. 2011, 35, 132–136. [Google Scholar]
- Ribeiro, J.E. Project based learning applied to manufacturing processes course unit. In Proceedings of the EDULEARN18, Palma, Spain, 2–4 July 2018; pp. 6881–6887. [Google Scholar] [CrossRef]
Publisher’s Note: MDPI stays neutral with regard to jurisdictional claims in published maps and institutional affiliations. |
© 2022 by the authors. Licensee MDPI, Basel, Switzerland. This article is an open access article distributed under the terms and conditions of the Creative Commons Attribution (CC BY) license (https://creativecommons.org/licenses/by/4.0/).