Abstract
This study investigates the progressive and critical variations in the outer minor-axis length of 6063-T5 aluminum alloy elliptical-square tubes, each with one of four outer major-to-minor axis length ratios (1.5, 2.0, 2.5, and 3.0), subjected to cyclic bending. The variations in the outer minor-axis length and the critical conditions leading to structural instability were systematically examined. Experimental observations revealed that the relationship between the changes in outer minor-axis length and the number of cycles could be divided into three distinct stages: (1) a rapid increase during the first stage, (2) a gradual and stable growth during the second stage, and (3) a saturation stage where further increase became negligible before final failure. The results showed that higher controlled curvature values corresponded to greater critical variations in the outer minor axis length, while larger axis-length ratios also led to increased critical variations. Furthermore, a modified version of the empirical ovalization model originally proposed by Lee et al. for SUS304 stainless steel circular tubes was employed. Nonlinear regression using the least-squares method yielded fitting parameters that describe the relationship between changes in the outer minor-axis length and the number of bending cycles during the first and second stages. In addition, a logarithmic-linear correlation was established between the critical change in the outer minor-axis length and the controlled curvature. The strong agreement between theoretical predictions and experimental results confirms the reliability and accuracy of the proposed empirical model and its parameterization.
1. Introduction
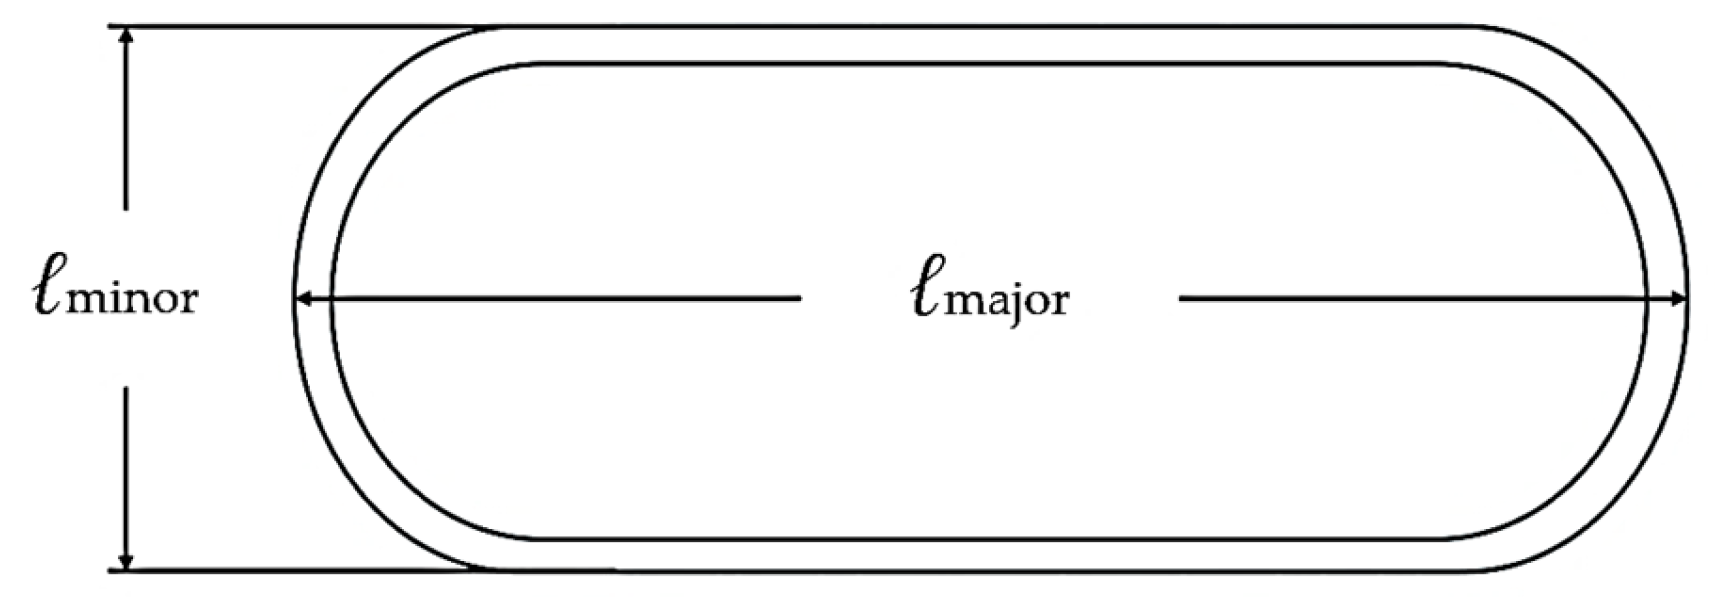
Although traditional circular tubes are standard in piping and structural frameworks, they exhibit inherent performance ceilings in load-carrying capacity, wear endurance, and energy absorption efficiency. In contrast, elliptical-square tubes (as shown in Figure 1) provide several advantages, including improved flow characteristics, higher load-bearing strength, better wear resistance, and enhanced shock absorption performance. When these advantages are coupled with the superior properties of 6063-T5 aluminum alloy—such as excellent corrosion resistance, high formability, and low density, which make it well-suited for high-performance hollow structural components—elliptical-square tubes made from 6063-T5 aluminum alloy become highly applicable across a wide range of industrial fields.
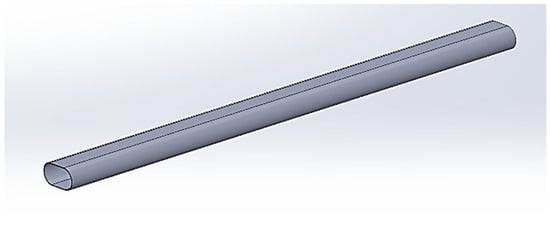
Figure 1.
Geometric schematic of an elliptical-square tube.
Elliptical-square tubes, which integrate the smooth curvature of elliptical cross-sections with the directional characteristics of square profiles, possess unique mechanical properties that balance rigidity and flexibility. Adjusting the outer major-to-minor axis length ratio enhances resistance to lateral deformation along the minor axis, while allowing for energy dissipation and stress relief along the major axis. This geometric configuration not only improves fatigue resistance and structural stability but also broadens their applicability in both engineering and architectural applications.
Significant progress has been made in understanding the bending behavior of smooth circular tubes. Kyriakides and Shaw [1] experimentally investigated the response and stability of thin-walled aluminum and steel tubes subjected to cyclic pure bending within the plastic regime. Their results showed that, under curvature-symmetric loading, the tubes undergo progressive ovalization until a critical value is reached—approximately equal to that observed under monotonic bending—beyond which buckling occurs. They also reported that both material properties and geometric parameters significantly reduce tube life when the diameter-to-thickness (D/t) ratio lies between 15 and 80. Building on this work, Corona and Kyriakides [2] studied the combined effects of cyclic bending history and external pressure on ovalization accumulation and instability in aluminum tubes subjected to plastic bending. Their findings indicated that external pressure accelerates ovalization and decreases the number of cycles to buckling for all bending histories, while instability consistently occurs at a nearly constant critical ovalization value that is largely independent of the loading path. In a subsequent study, Corona and Kyriakides [3] further examined the buckling behavior of stainless steel 304 tubes (D/t = 18.3) under combined bending and external pressure, with particular attention to the formation of angled buckles and the associated variability in critical loads. The results revealed that, under high external pressure, angled buckles developed with considerable scatter due to initial ovality and residual stresses. In contrast, at lower pressures, the tubes exhibited the expected buckling mode with minimal sensitivity to these initial imperfections.
Elchalakani et al. [4] developed a simplified analytical model to predict the moment-rotation response of circular hollow steel tubes under pure bending, explicitly incorporating ovalization effects and rigid-plastic behavior. This model, validated against experimental data, provides a closed-form solution for practical design while accurately capturing the star-shaped plastic collapse mechanism. Limam et al. [5] examined the inelastic bending and collapse of stainless-steel tubes (D/t = 52) under internal pressure using a hybrid experimental and finite-element approach. They observed that bending-induced ovalization and axial wrinkling eventually localize, leading to catastrophic failure; notably, internal pressure was found to enhance stability and increase collapse curvature. Furthermore, Bechle et al. [6] explored the bending of pseudoelastic NiTi tubes, where stress-induced phase transformations result in localized high-curvature regions and diamond-shaped deformation patterns. Their work highlighted that these transformations produce closed moment-rotation hysteresis loops with temperature-dependent moment plateaus characteristic of the pseudoelastic regime.
Jiang et al. [7] examined the bending mechanics of pseudoelastic NiTi tubes, noting that tension-induced phase transformations trigger inhomogeneous deformation—specifically diamond-shaped martensite patterns on the tensile side—while the compressive side maintains relative uniformity. By incorporating tension-compression asymmetry into a finite element (FE) model, they successfully captured the hysteretic moment-rotation response and the evolution of strain localization. Shifting toward structural systems, Li and Wang [8] performed numerical analyses on cable-stiffened single-layer latticed shells. Their findings underscored that cable stiffening markedly improves seismic resistance, with pretension and cross-sectional properties serving as the dominant parameters. Furthermore, Chegeni et al. [9] investigated the degradation of thin-walled steel pipes under combined internal pressure and bending due to corrosion. Their results demonstrated that bending capacity is significantly sensitive to corrosion depth, identifying circumferential morphology as the most detrimental factor to structural integrity.
Kazinakis et al. [10] investigated the bending of pseudoelastic NiTi tubes with moderate diameter-to-thickness ratios, identifying that the interplay between tension-compression asymmetry and phase transformation triggers localized martensite bands. These bands interact with cross-sectional ovalization to reduce bending rigidity, eventually inducing collapse. Their findings—supported by FE simulations—demonstrated that diamond-shaped patterns nucleating on the tensile side promote local ovalization, which, compounded by geometric imperfections, triggers buckling. Furthermore, the coupling between material and geometric nonlinearities was found to intensify with increasing D/t ratios. Silveira et al. [11] shifted focus to the buckling of simply supported square steel plates with central elliptical holes under biaxial compression. Applying constructal design principles and FE-based optimization, they identified configurations that maximize ultimate buckling stress, underscoring the benefits of aligning geometry with the Principle of Optimal Distribution of Imperfections. Additionally, He et al. [12] analytically examined the deformation transition in tube free bending, introducing a correction factor to refine the relationship between die deviation and bending radius. Validated with AA5052 tubes, this method enhances forming accuracy and offers practical guidance for precise bending process design.
Wang et al. [13] evaluated the bending response of square concrete-filled steel tubes (CFSTs) reinforced with internal latticed steel angles. Their results indicated that the internal reinforcement improves crack resistance and delays the neutral axis shift, with the outer tube’s yield strength and thickness identified as the primary determinants of bending capacity. Liu et al. [14] examined multicell concrete-filled round-ended steel tubes (M-CFRTs), revealing ductile failure modes and robust composite interaction between the steel shell and the concrete core. Their systematic analysis of material strength and cell configuration provides essential insights for optimizing structural performance. Yang et al. [15] refined the conventional damping strain energy model by incorporating a reverse off-axis transformation, validated through vibration tests on CFRP hollow tubes. This study established how laminate parameters influence bending and torsional damping, offering a theoretical framework for CFRP drive-shaft optimization. Finally, Wang et al. [16] developed a quadratic analytical model to characterize bending-torsion buckling (BTB) during spatial tube forming. By identifying three distinct BTB regimes based on energy principles, they proposed an analytical method to predict critical load levels, accounting for geometric configurations and initial imperfections.
Elliptical-square tubes are commonly employed in lightweight structural frames, energy-absorbing components, and transport-related assemblies, where the combination of low weight, high stiffness, and controlled deformation is critical. Understanding the evolution of the minor-axis length under cyclic bending provides engineers with a reliable parameter to assess structural stability, predict the onset of irreversible deformation, and guide inspection and maintenance schedules. Furthermore, by quantifying the critical minor-axis deformation, the present study enables design optimization by identifying safe bending limits and informing material selection and cross-sectional sizing to prevent premature instability or failure.
While previous studies have extensively investigated circular and purely elliptical tubes, the mechanical response of elliptical-square tubes—particularly regarding the evolution and critical behavior of the minor-axis length—has received far less attention. Addressing this gap, this study investigates the progressive and critical changes in the outer minor-axis length of 6063-T5 aluminum alloy elliptical-square tubes under cyclic bending. Four distinct outer major-to-minor axis length ratios (1.5, 2.0, 2.5, and 3.0) were examined. Cyclic bending tests were performed using a custom experimental setup to measure and analyze bending moment, curvature, minor-axis deformation, and fatigue life (number of cycles).
The selected outer major-to-minor axis ratios, ranging from 1.5 to 3.0, correspond to cross-sectional shapes commonly encountered in engineering practice. Such ratios are typical in structural members, transportation components (e.g., vehicle frame tubes or rails), and energy-related tubular elements, where elliptical or near-elliptical cross sections are used to optimize strength, stiffness, and material efficiency. By investigating this range of geometries, the present study aims to provide results that are directly relevant and applicable to practical engineering designs.
2. Experiment
Cyclic bending tests were performed on elliptical-square tubes with varying aspect ratios using a bending machine (Li Rong Machinery Co., Ltd., Tainan, Taiwan) integrated with a curvature-ovalization measurement system. The following sections provide comprehensive details regarding the experimental setup, material properties, specimen geometries, and testing protocols.
2.1. Bending Device
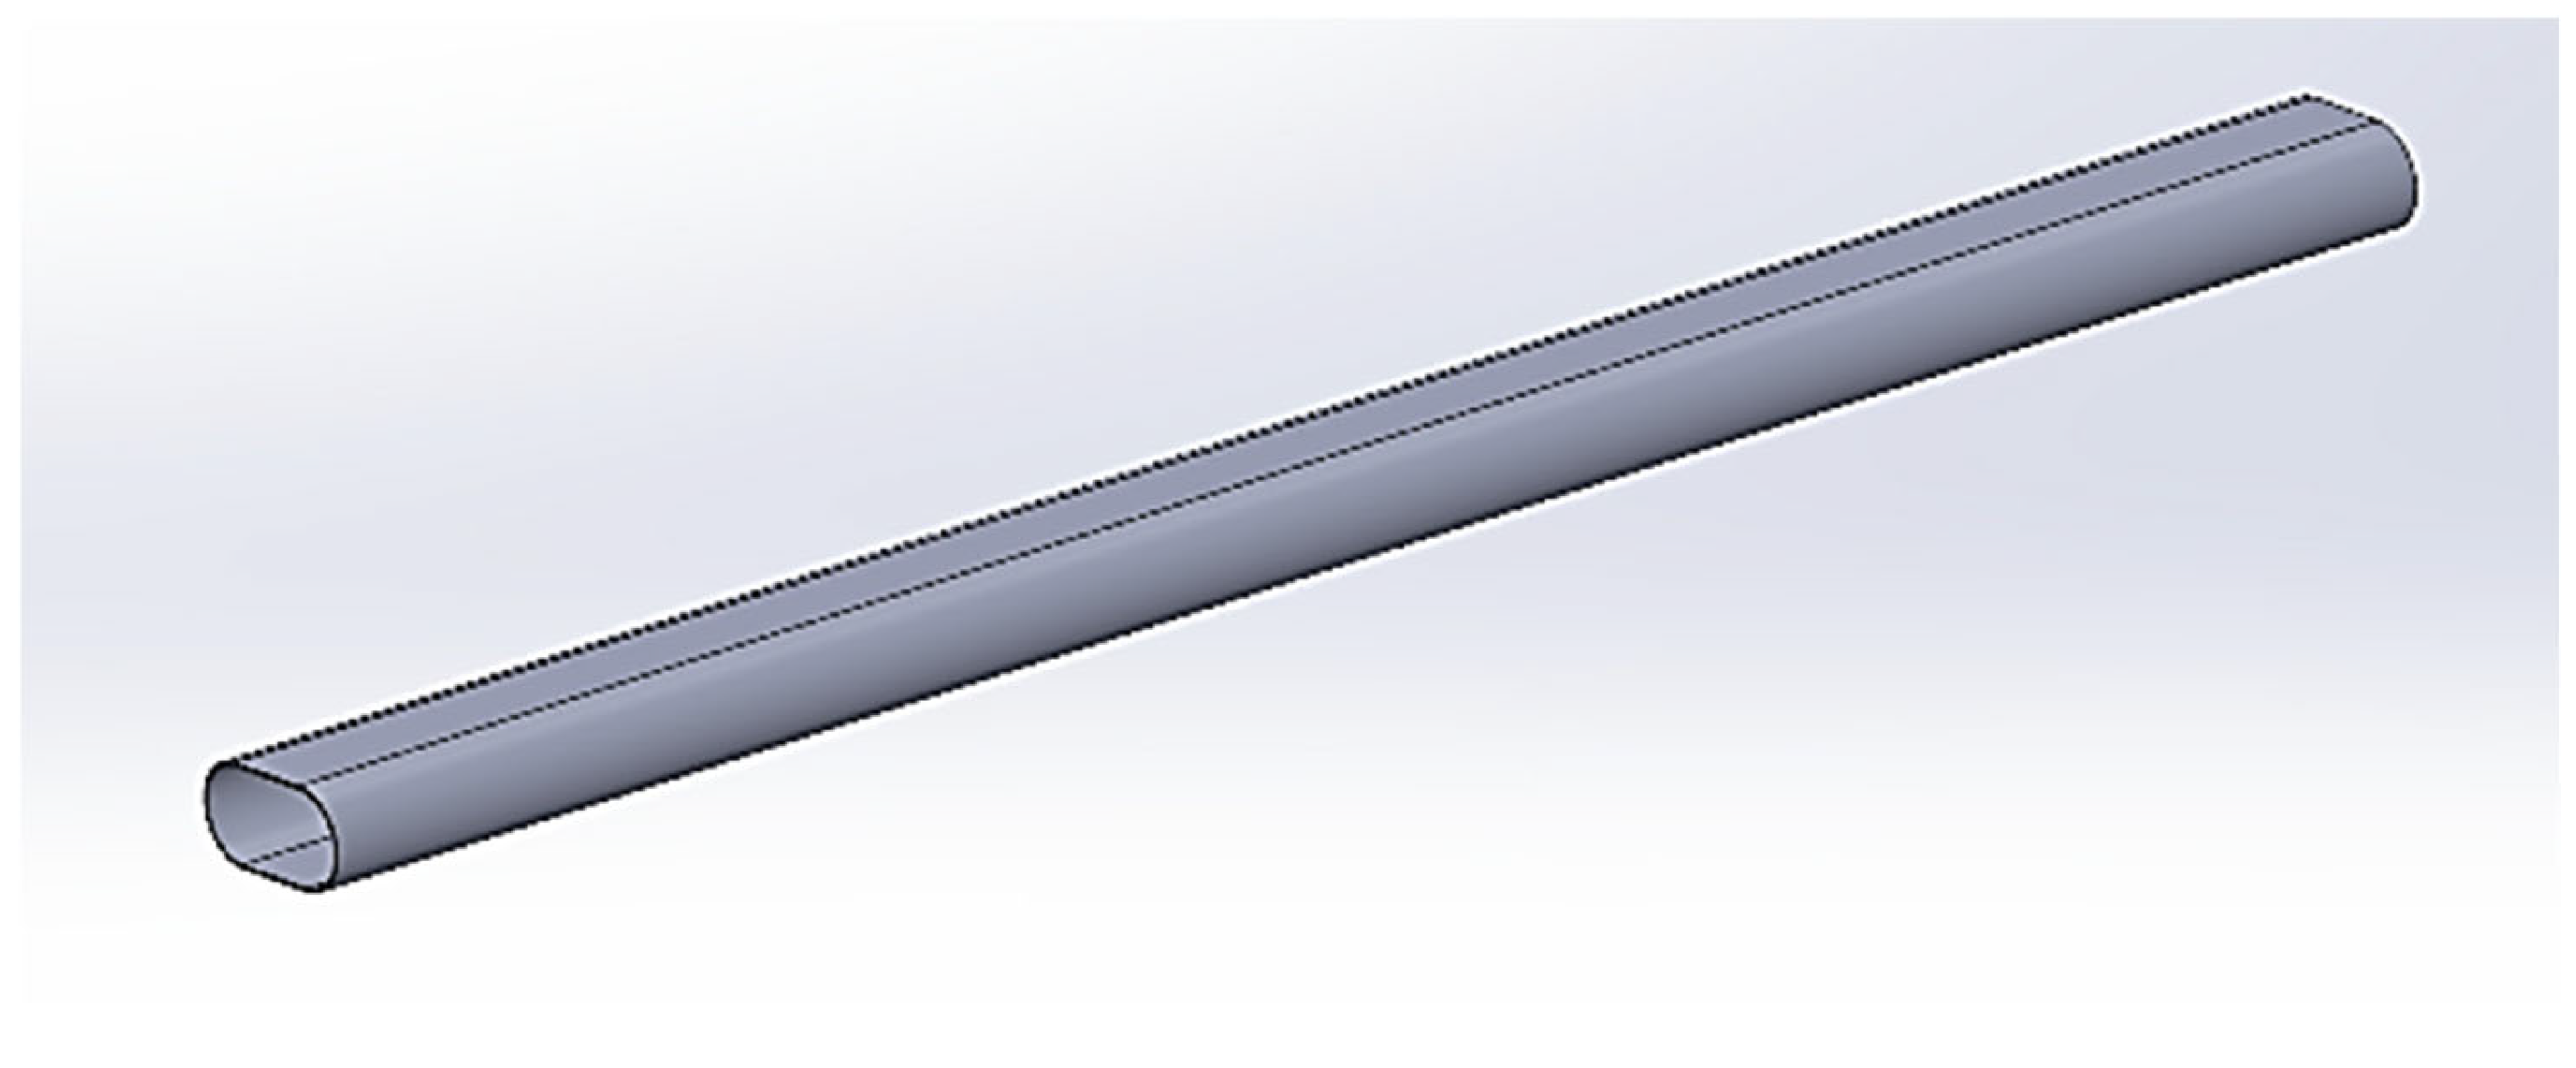
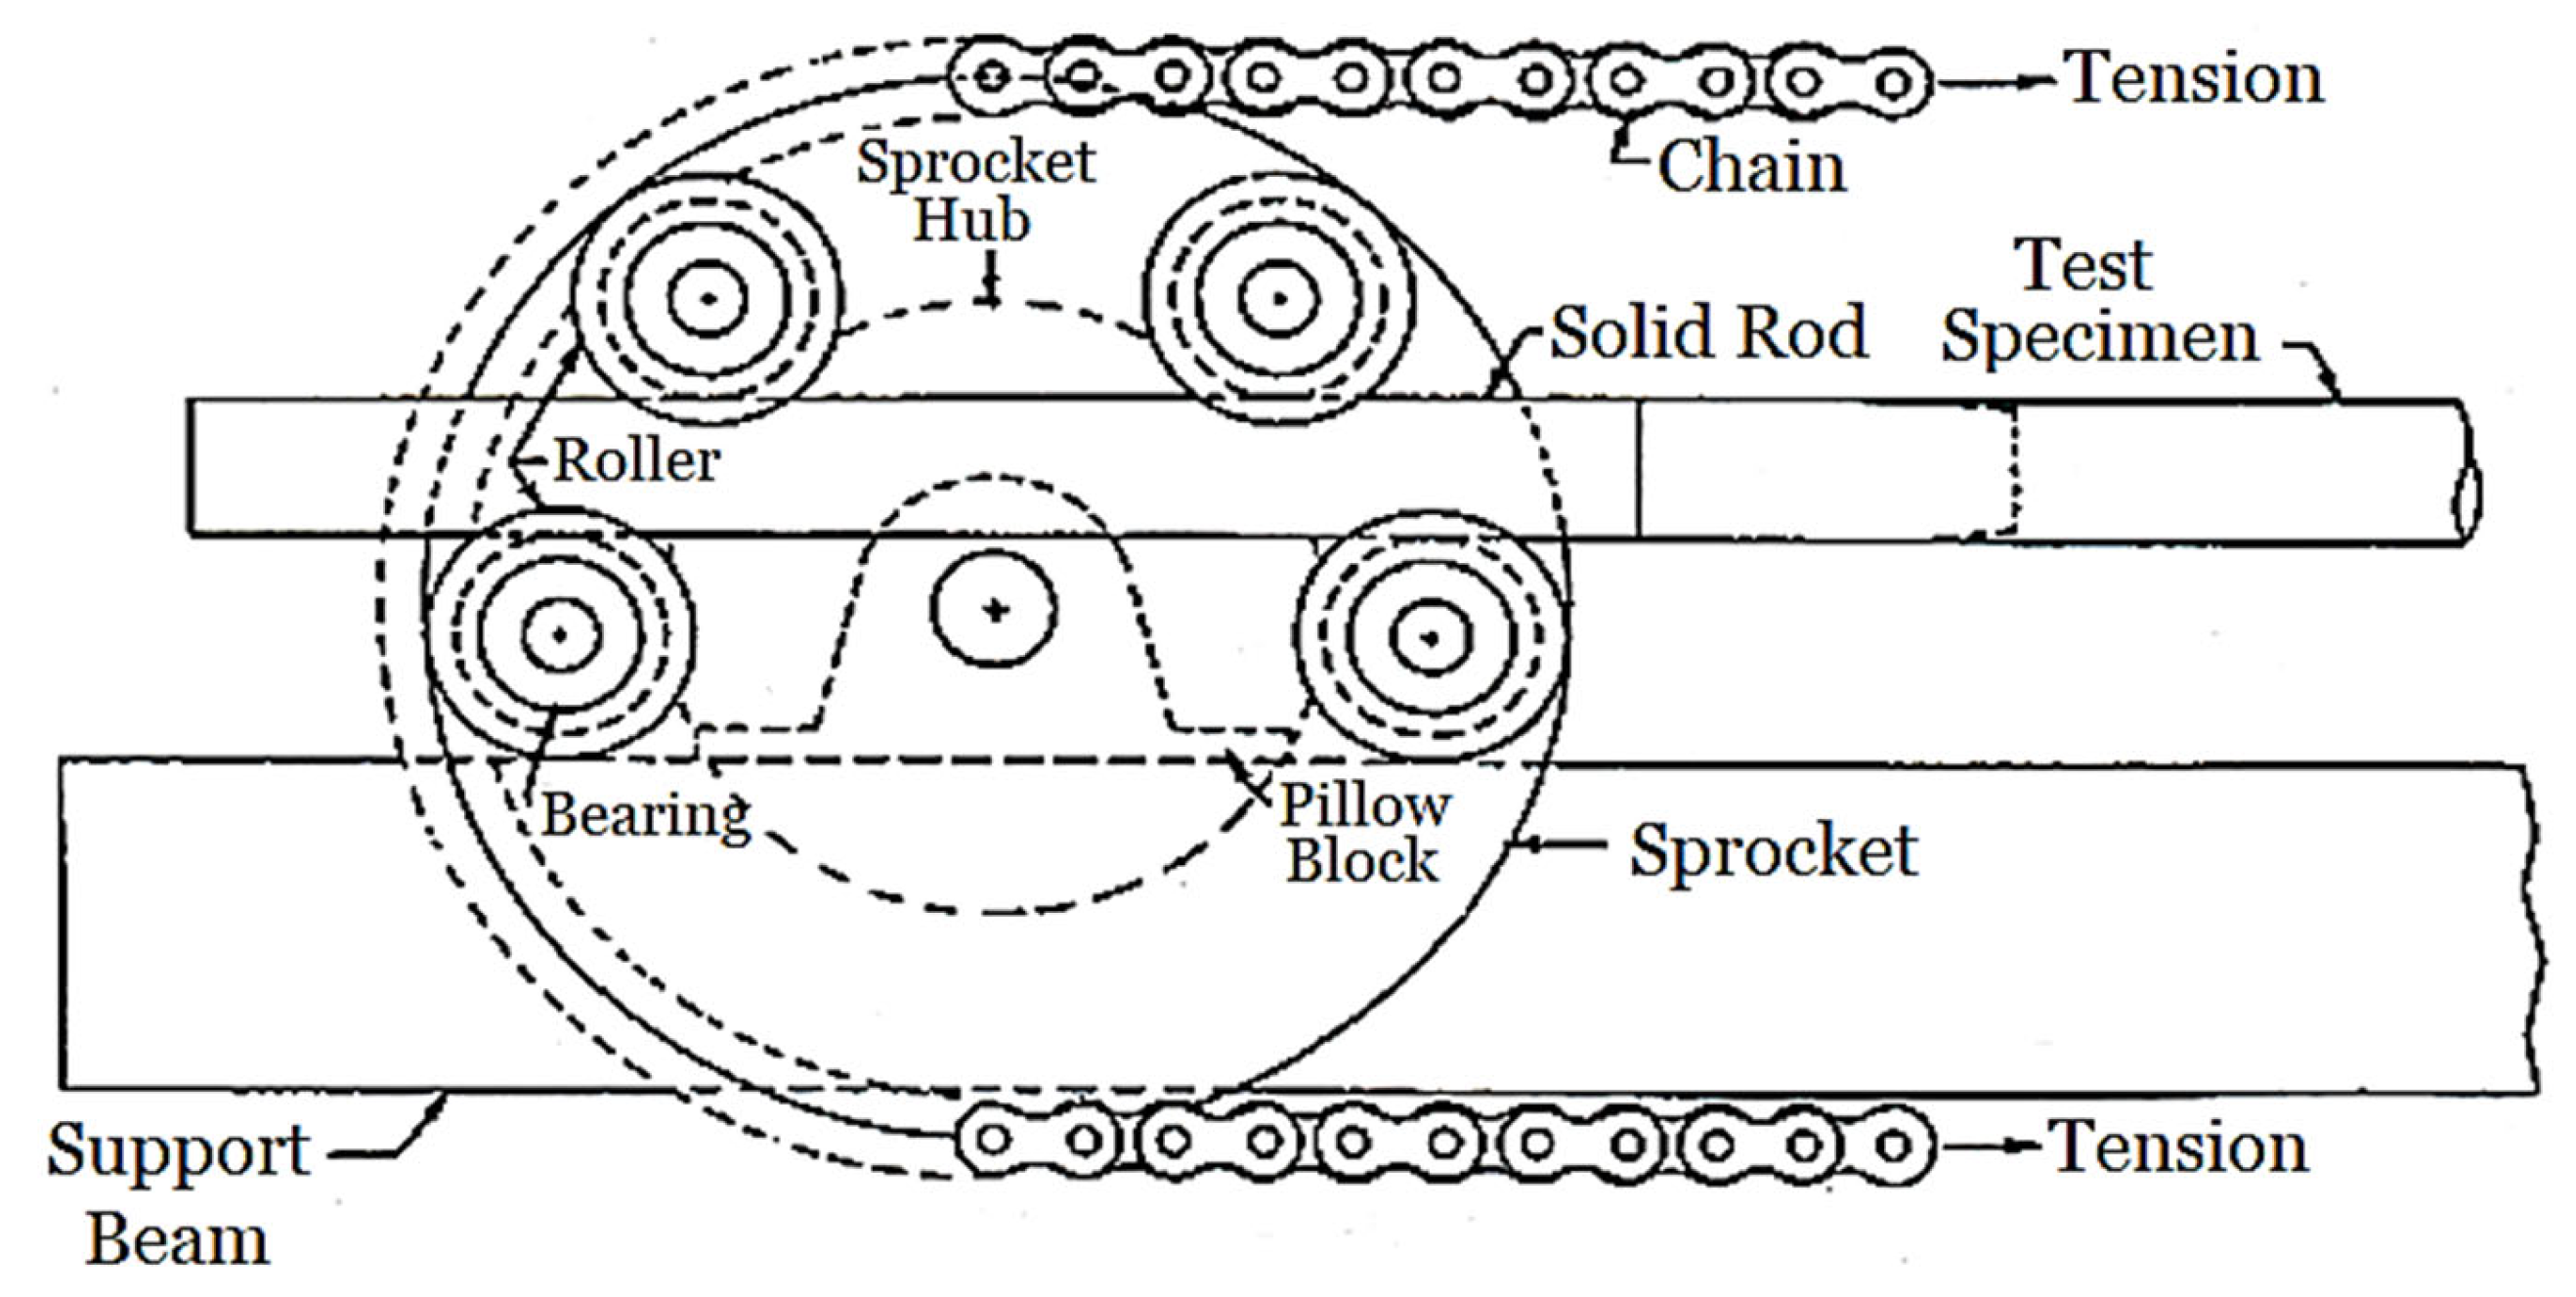
In this study, cyclic bending tests on SUS304 stainless steel elliptical-square tubes were conducted using a custom four-point bending apparatus (Figure 2). The system incorporates two rotating sprockets mounted on support beams, connected by a heavy-duty chain that accommodates specimens up to 1 m in length. To facilitate pure bending, each tube is fitted with solid rod extensions (Figure 3) that permit unrestricted axial movement against the rollers. Bending moments are generated by two concentrated loads from a pair of rollers, with sprocket rotation—triggered by the retraction of the upper or lower hydraulic cylinders—inducing pure bending. Reverse loading is achieved by alternating the flow within the hydraulic circuit. Due to roller spacing constraints, standard circular rods are incompatible with elliptical-square profiles. To address this, a hybrid adapter rod was developed (Figure 4), featuring an elliptical-square cross-section at the specimen interface and a circular cross-section at the roller contact point. Four distinct adapter sizes were fabricated to match the specific aspect ratios under investigation, while maintaining a uniform circular profile at the drive end (Figure 5).
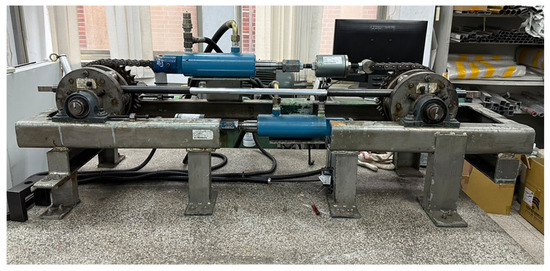
Figure 2.
Photo of the tube-bending machine.
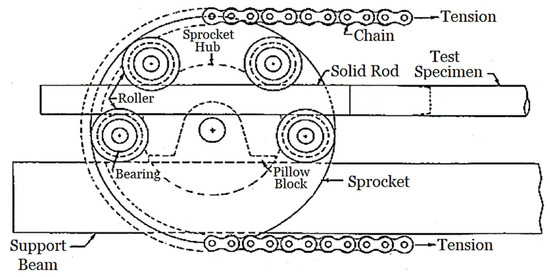
Figure 3.
Schematic diagram of the sprocket.

Figure 4.
Novel solid rod.
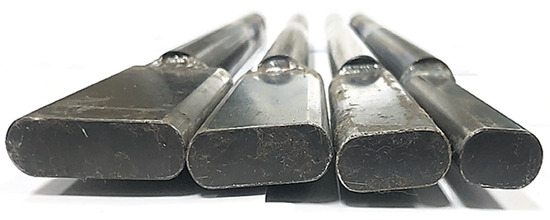
Figure 5.
Four solid rods for four distinctly different outer major-to-minor axis length ratios.
2.2. Curvature-Ovalization Measurement Apparatus (COMA)
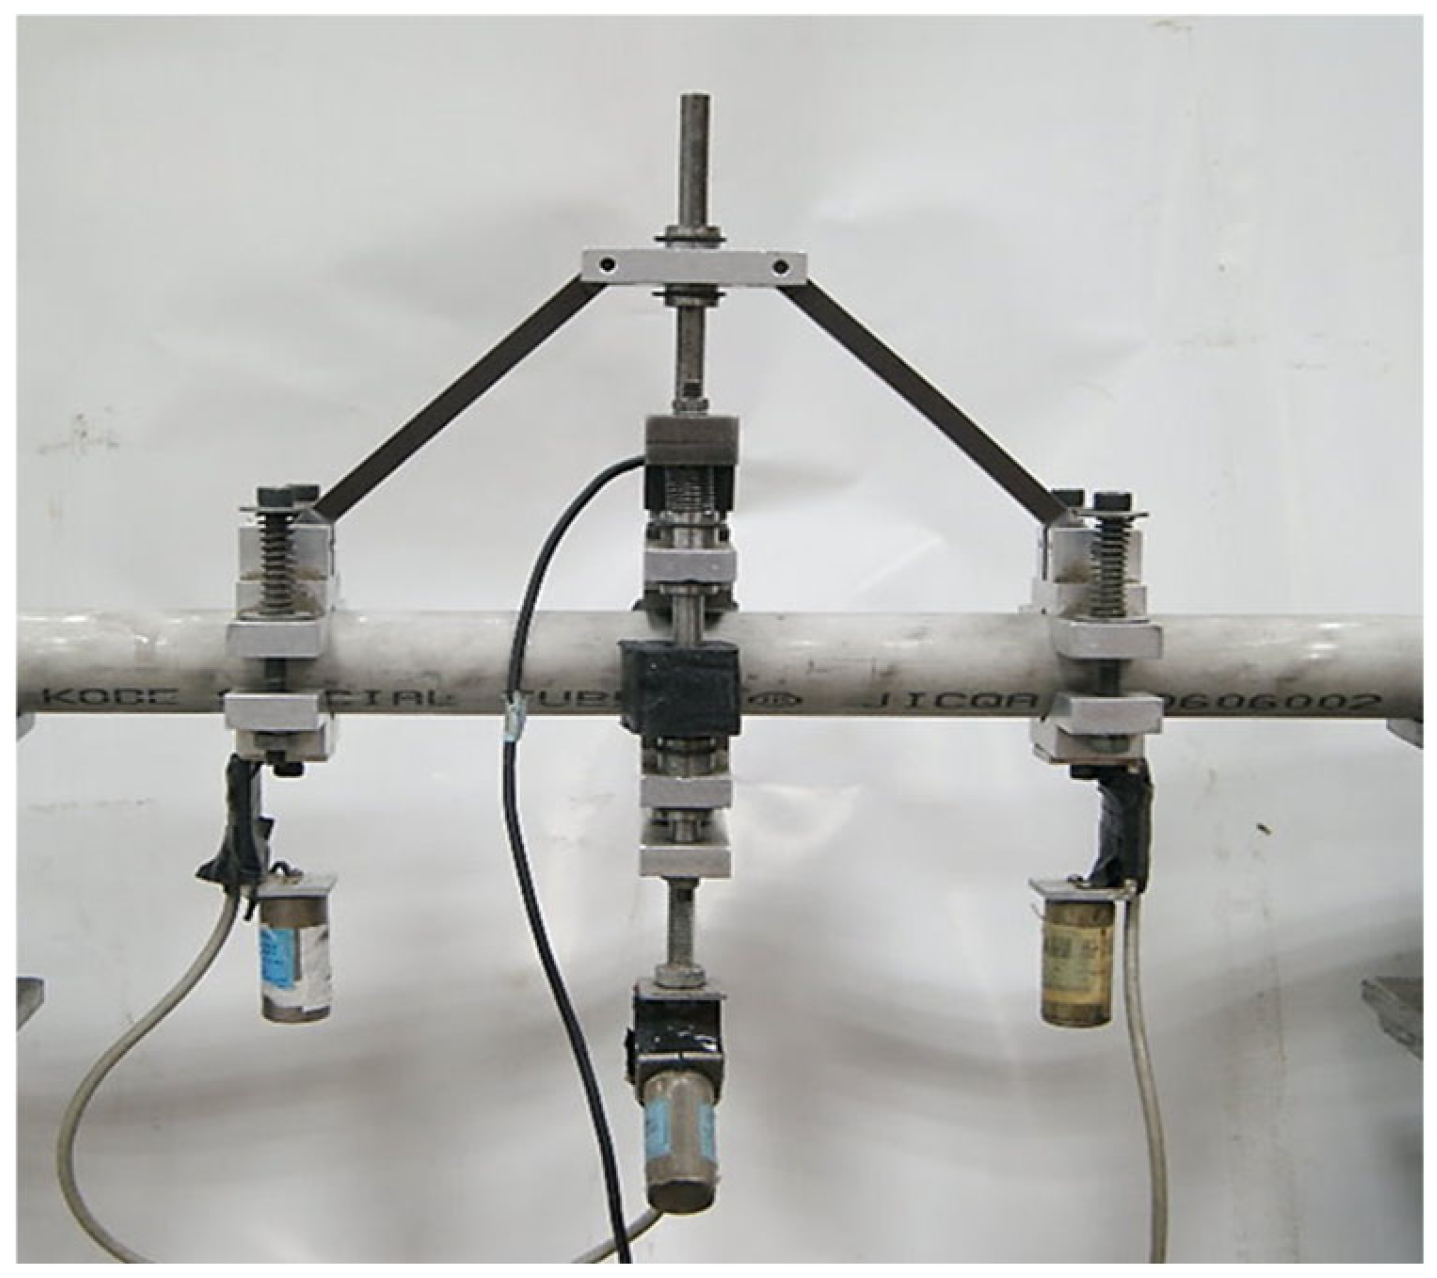
The curvature and cross-sectional ovalization were measured using the COMA system (Figure 6), as proposed by Pan et al. [17]. In this context, ovalization represents the ratio of outer diameter variation to the original diameter. Designed for minimal structural interference, the lightweight apparatus is secured at the tube’s mid-section. Curvature is calculated based on the fixed spacing and differential angular readings from two inclinometers. For cross-sectional tracking, the central magnetic sensor—originally intended for circular tube diameters—was reconfigured to accurately capture the progressive deformation of the outer minor axis during the cyclic bending of elliptical-square tubes. The COMA used in this study has a spatial resolution of 0.01 mm for minor-axis measurements, and curvature is measured with an angular resolution of 0.05°.
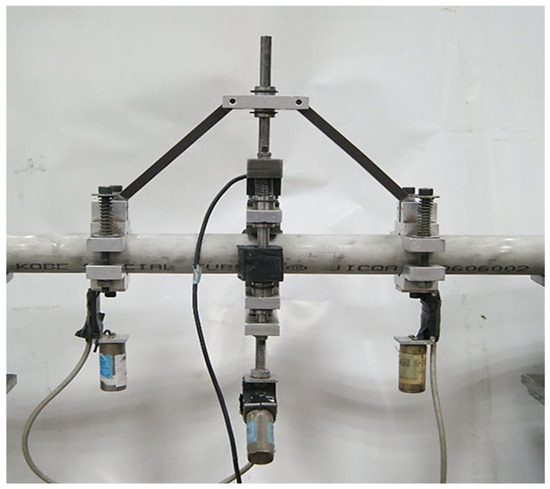
Figure 6.
Photo of the COMA.
2.3. Elliptical-Square Tubes
This study utilized 6063-T5 aluminum alloy elliptical-square tubes as the experimental material, selected for their superior machinability and consistent mechanical response. The chemical composition (wt.%) of the alloy is: 0.880 Mg, 0.652 Si, 0.118 Fe, 0.180 Cu, 0.071 Cr, 0.013 Mn, 0.010 Zn, and 0.010 Ti, with the balance being Al. Key mechanical properties include a Young’s modulus of 68.6 GPa, a Poisson’s ratio of 0.33, and an elongation at break of 9.4%. The ultimate tensile and compressive strengths were 186 MPa and 171 MPa, respectively, while the 0.2% offset yield strength was 160 MPa. Each specimen had a length of 500 mm and a uniform wall thickness of 1.0 mm. Figure 7 provides a schematic of the cross-sectional major and minor axes. Four distinct outer major-to-minor axis length ratios (ℓmaj/ℓmin) were investigated: 1.5, 2.0, 2.5, and 3.0, corresponding to the dimensions specified in Figure 8.
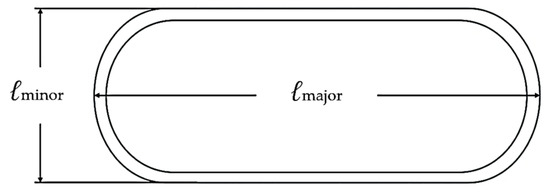
Figure 7.
Schematic cross-section of the elliptical-square tube defining the outer major axis (ℓmaj) and outer minor axis (ℓmin).
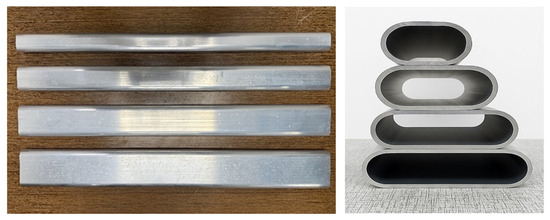
Figure 8.
6063-T5 aluminum alloy elliptical-square tubes with four different ℓmaj/ℓmin ratios.
The welded transition between the elliptical-square and circular sections may introduce local variations in stiffness or stress concentrations near the joint. However, these effects are confined to a small region adjacent to the weld and do not influence the mid-span of the tube, where the primary measurements of minor-axis evolution and curvature are taken. Therefore, the mid-span bending response analyzed in this study is not affected by the local transition effects.
2.4. Test Procedures
A curvature rate of 0.05 m−1s−1 was maintained throughout the curvature-controlled cyclic tests. The bending moment was imposed along the long-axis direction, representing the standard service load for such profiles (Figure 1). Loading protocols involved symmetric curvature limits ranging from −0.2 m−1 to +0.2 m−1. Data acquisition included the bending moment (M) from internal load cells and real-time tracking of curvature (κ) and changes in the outer minor axis length (Δℓ/ℓmin, where Δℓ represents the change in ℓmin) using the setup in Figure 6. These parameters, along with the cycle count (N), were recorded simultaneously to evaluate the fatigue behavior and structural stability of the tubes.
3. Results and Discussion
3.1. Relationship Between Changes in Outer Minor Axis Length (∆ℓ/ℓmin) and Curvature (κ)
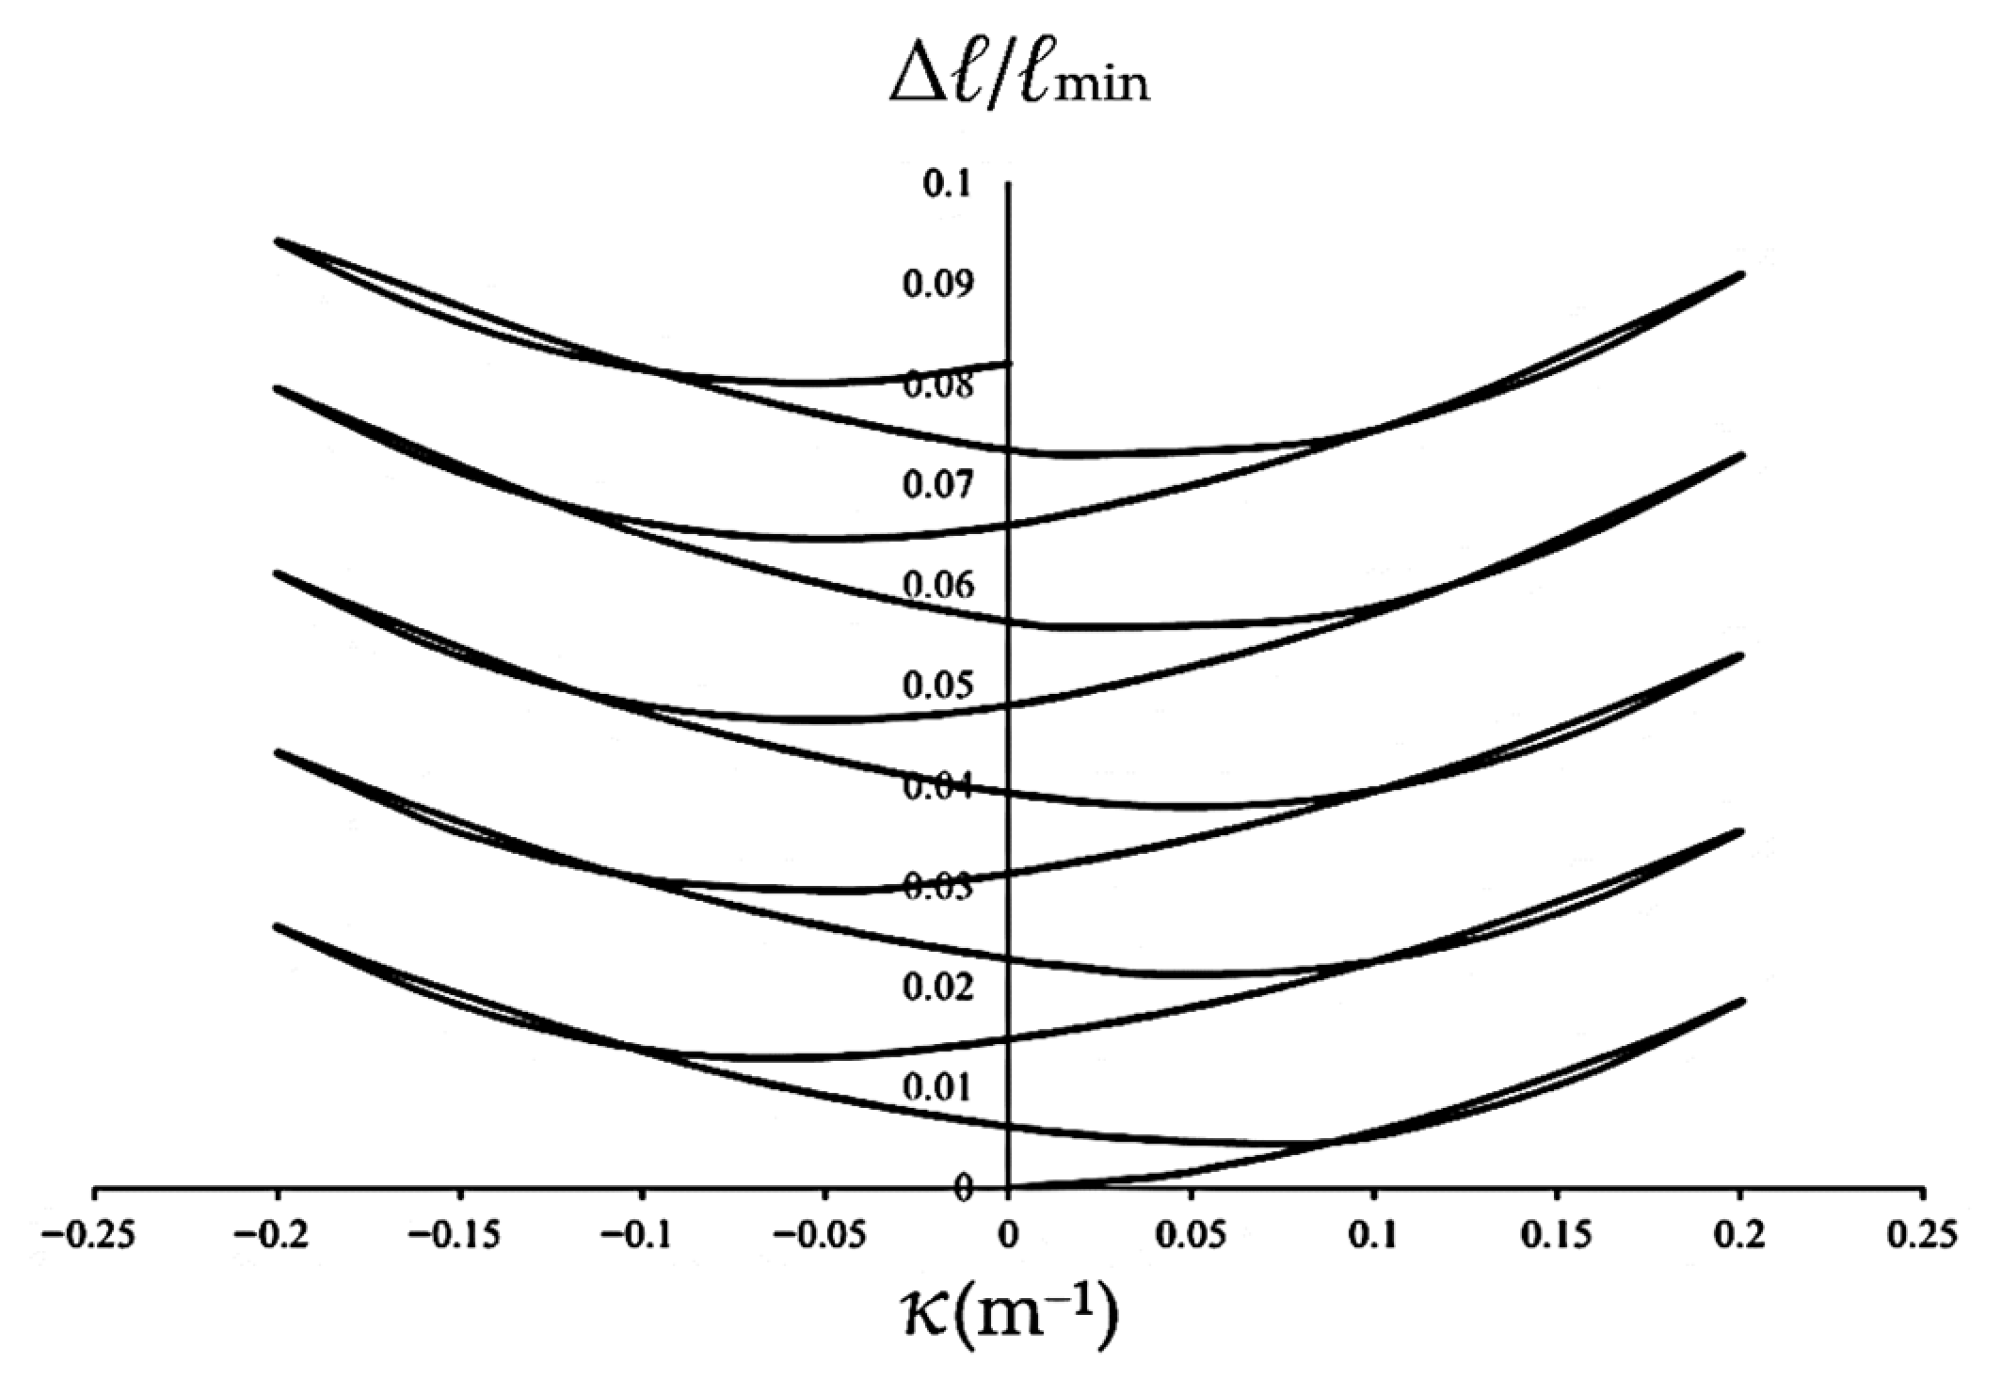
The evolution of Δℓ/ℓmin versus κ for ℓmaj/ℓmin = 1.5 is presented in Figure 9. The results reveal that Δℓ/ℓmin follows a nonlinear path that reflects the material’s hysteretic behavior. As curvature cycles between ±0.2 m−1, the minor axis undergoes continuous expansion, with the peaks at +0.2 m−1 becoming increasingly elevated with each cycle. This phenomenon characterizes the cyclic ratcheting of the cross-section, where plastic deformation fails to fully recover during unloading. The observed symmetry in the growth of Δℓ/ℓmin under both positive and negative bending suggests a stable but progressive degradation of the tube’s cross-sectional integrity. In addition, selected tests were repeated three times under identical loading conditions, showing variations within ±5% for Δℓ/ℓmin.

Figure 9.
Experimental Δℓ/ℓmin-κ relationship for 6063-T5 aluminum alloy elliptical-square tubes (ℓmaj/ℓmin = 1.5) under cyclic bending at a curvature range ±0.2 m−1.
3.2. Relationship Between Changes in Outer Minor Axis Length (Δℓ/ℓmin) and Number of Bending Cycles (N)
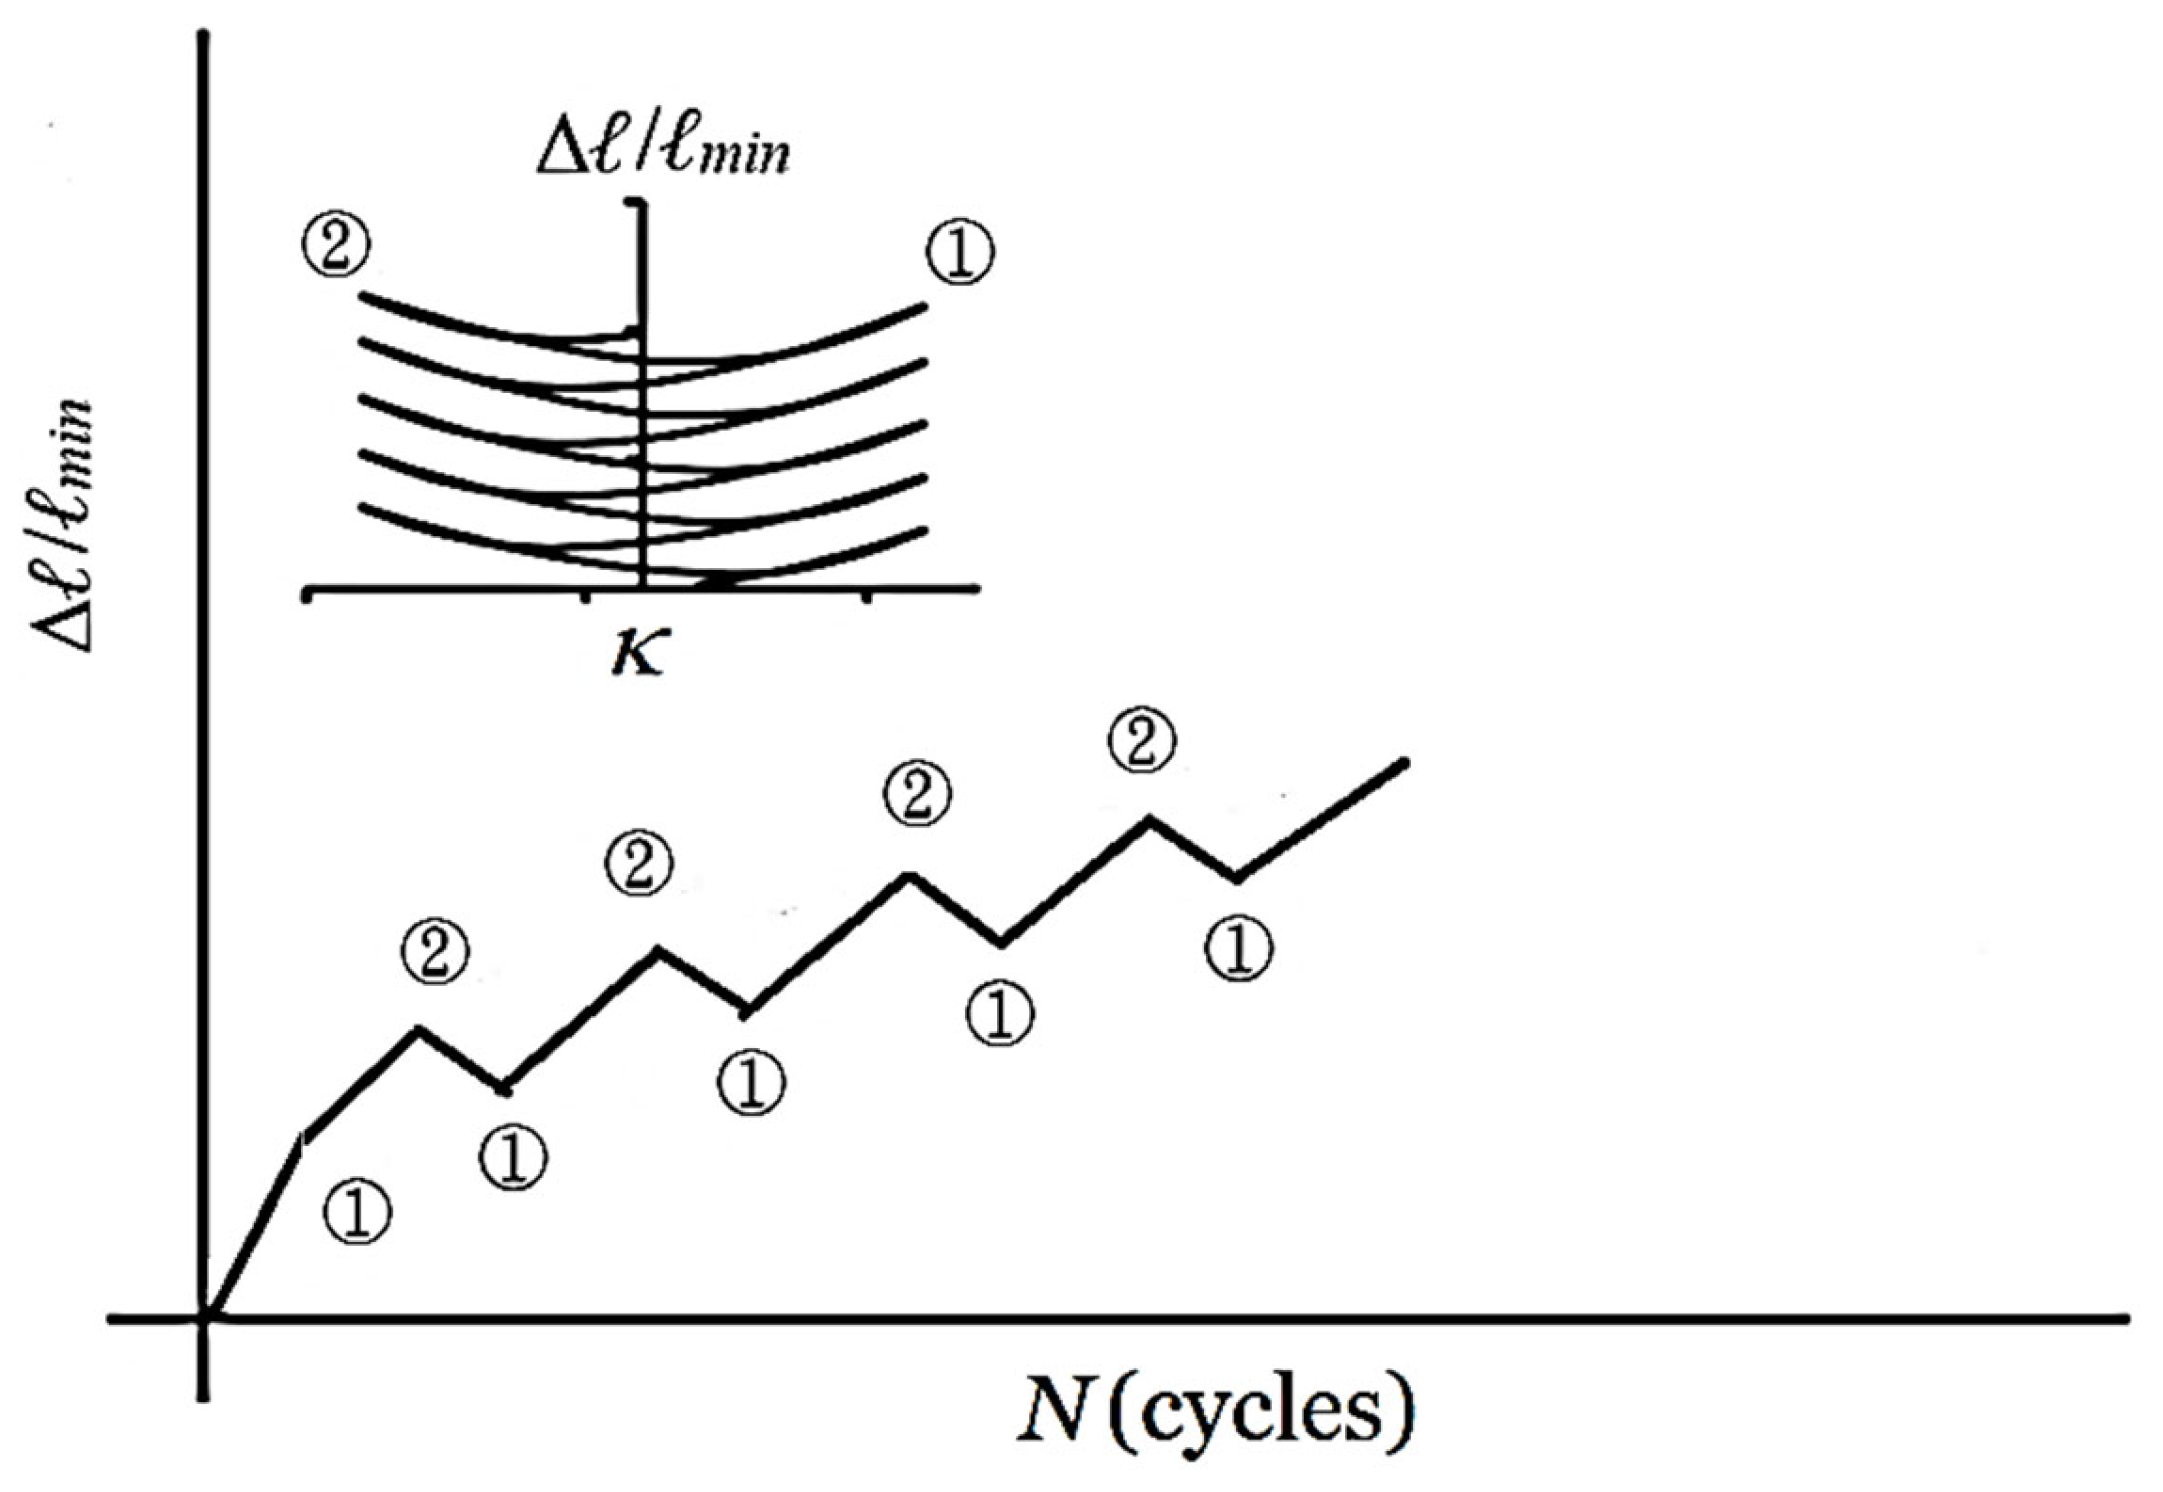
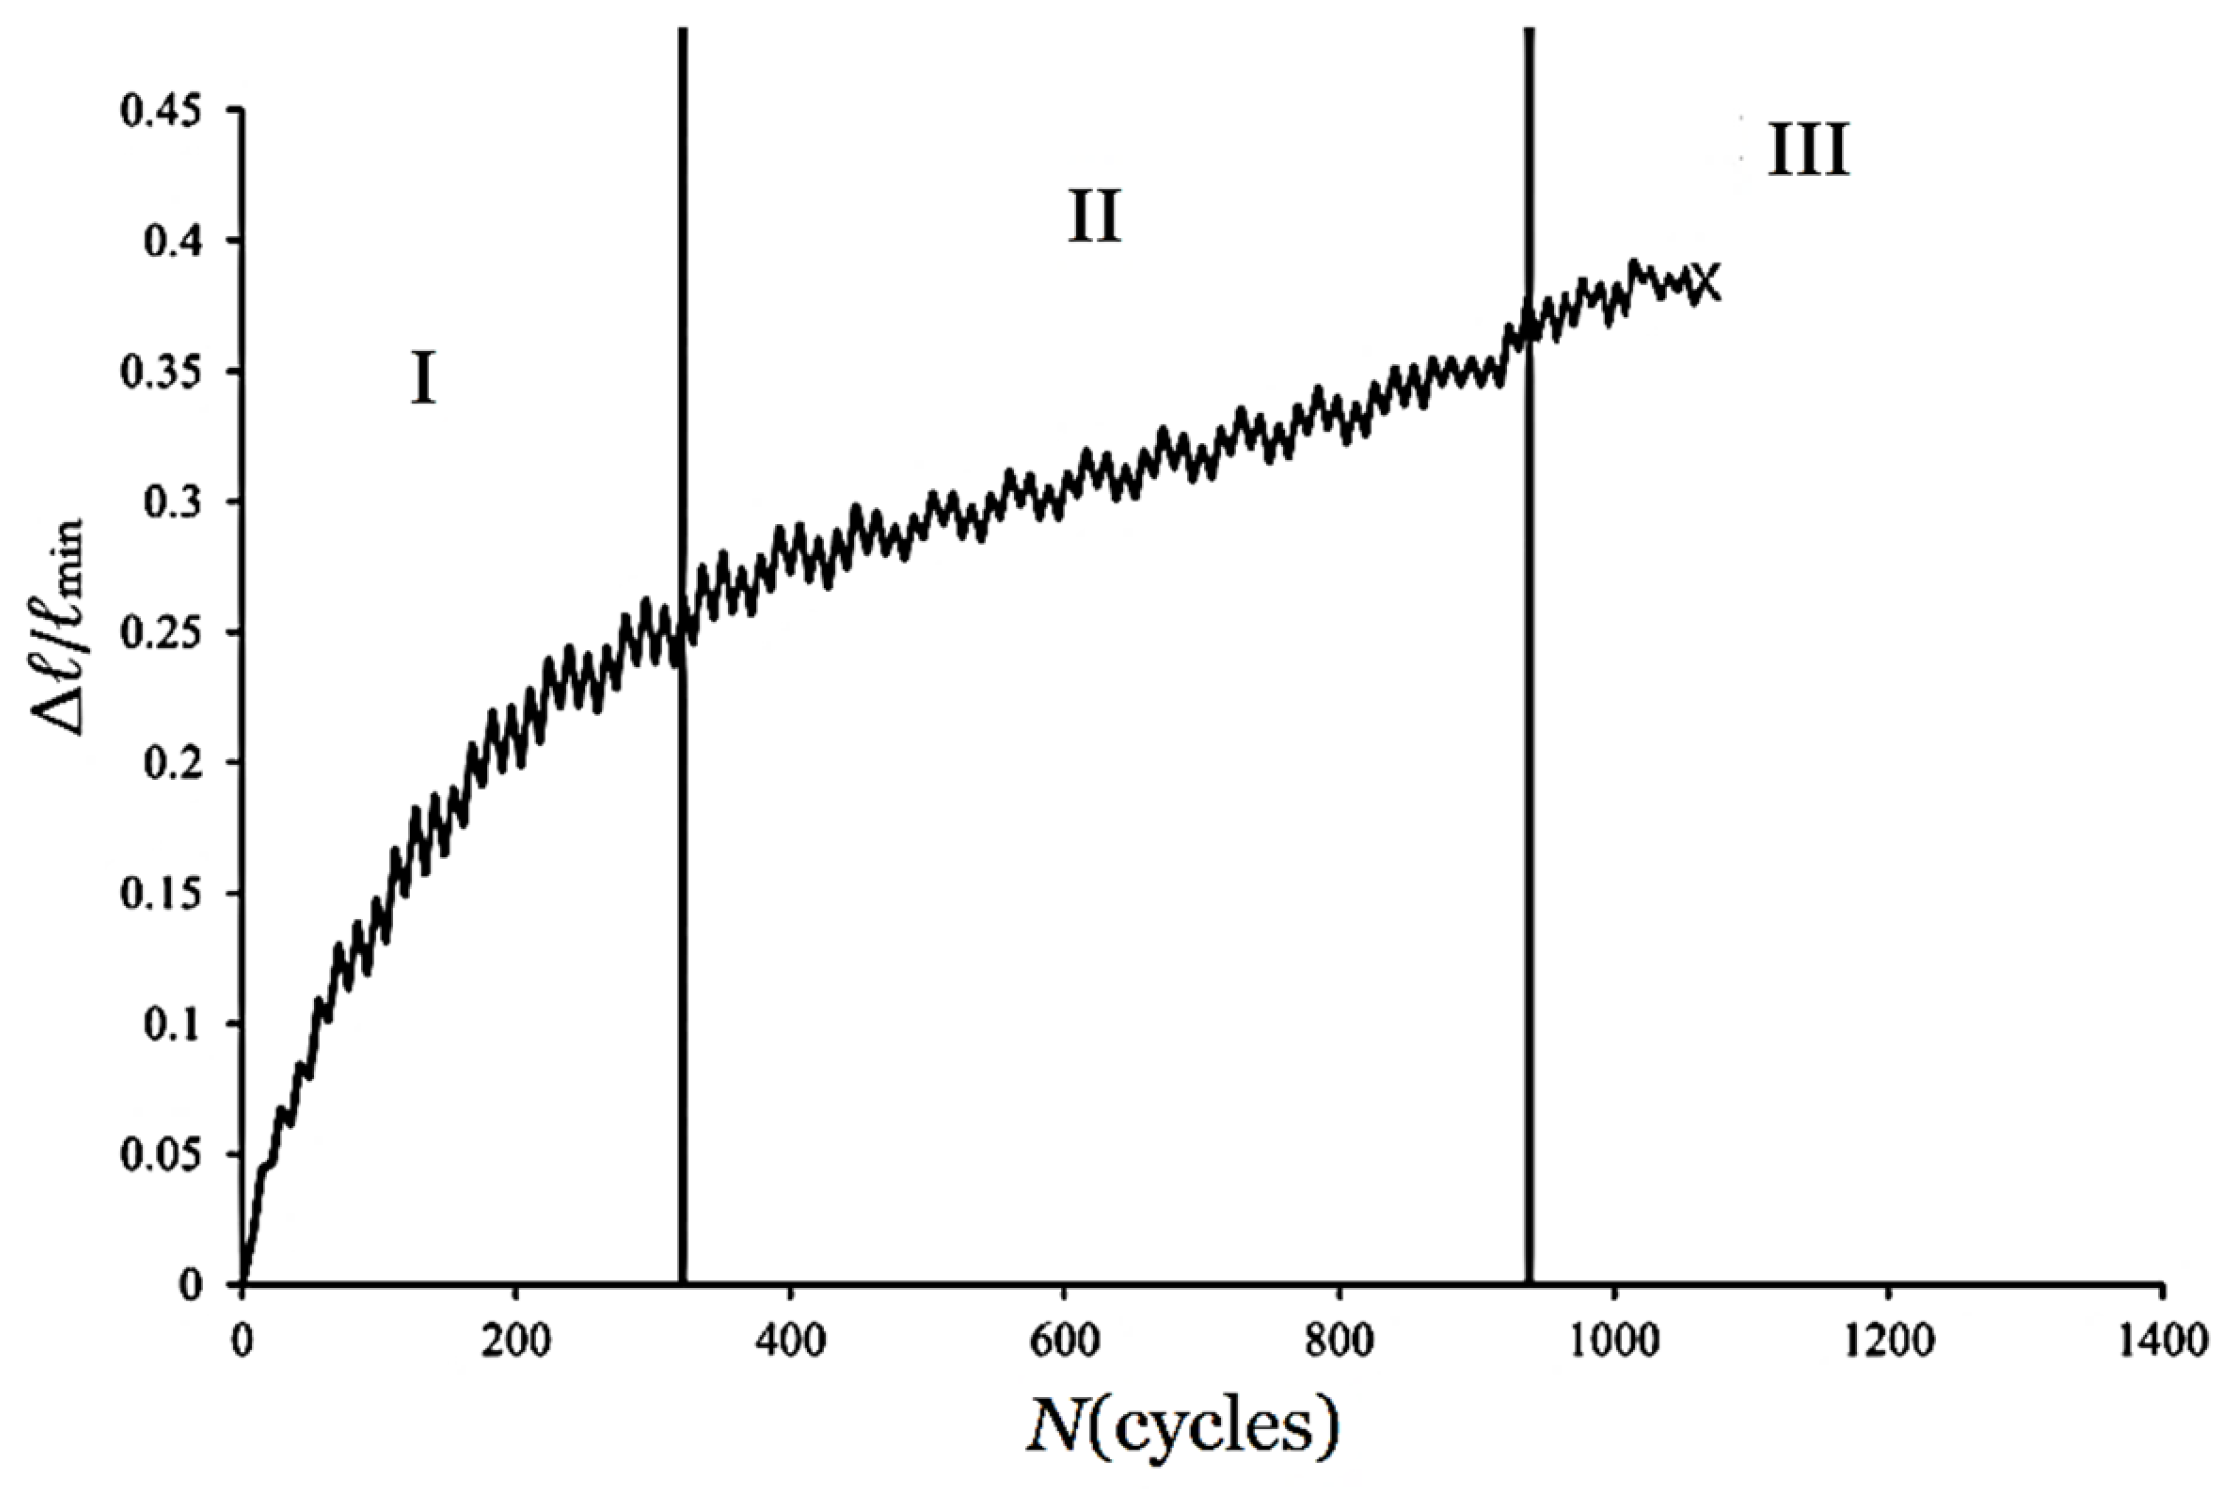
Figure 10 presents a schematic representation of the relationship between Δℓ/ℓmin at two extreme curvatures (±κ) and the number of cycles (N), where symbols ① and ② denote the positive and negative peaks, respectively. Figure 11 illustrates these relationships for 6063-T5 aluminum alloy elliptical-square tubes (ℓmaj/ℓmin = 1.5) under a curvature range of ±0.2 m−1. The failure point is marked by the symbol “×”. The deformation history can be categorized into three distinct phases: Stage I involves a rapid surge in Δℓ/ℓmin accompanied by localized surface denting (Figure 12a); Stage II exhibits a decelerated growth rate as micro-cracks initiate at the edges and propagate toward the center (Figure 12b); and Stage III represents a saturation phase where comprehensive crack propagation leads to ultimate failure (Figure 12c). Figure 13a–d further compare the (Δℓ/ℓmin)②-N curves across varying ℓmaj/ℓmin ratios (1.5 to 3.0). It is observed that (Δℓ/ℓmin)② increases significantly with either higher curvature limits or increased ℓmaj/ℓmin. Consequently, the cycle count required to reach the onset of Stage III diminishes sharply as loading intensity or geometric eccentricity increases.

Figure 10.
Schematic illustration of the relationship between Δℓ/ℓmin at extreme curvatures and the number of cycles (N).
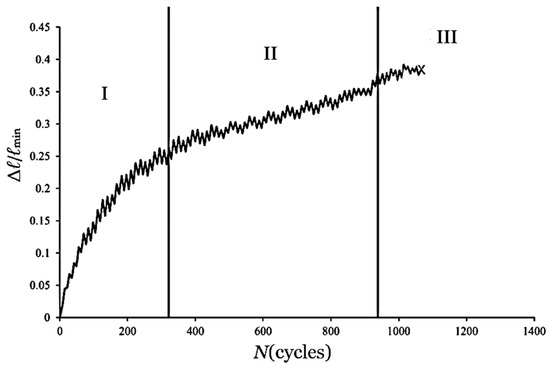
Figure 11.
Cyclic evolution of Δℓ/ℓmin at extreme curvature peaks for ℓmaj/ℓmin = 1.5, illustrating the failure point (x) and the three distinct stages of deformation.

Figure 12.
External appearance of 6063-T5 aluminum alloy elliptical-square tubes under cyclic bending in (a) stages I, (b) stage II, and (c) stage III.
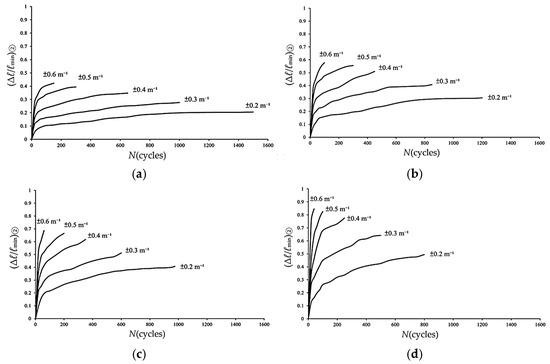
Figure 13.
Experimental data of (Δℓ/ℓmin)② versus N during Stages I and II for 6063-T5 aluminum alloy elliptical-square tube with ℓmaj/ℓmin = (a) 1.5, (b) 2.0, (c) 2.5, and (d) 3.0 under cyclic bending.
Because the (Δℓ/ℓmin)②-N relationships in Figure 13a–d resemble the ovalization-number of cycles of the sharp-notched 6061-T6 aluminum alloy tubes reported by Lee et al. [18], their empirical formulation was modified in this study as
where κc is the controlled curvature, C, m, and n are empirical parameters determined through regression analysis. Nonlinear fitting of experimental data in Figure 13a–d with ℓmaj/ℓmin ratios of 1.5, 2.0, 2.5, and 3.0 yielded corresponding C values of 0.2346, 0.3395, 0.4408, and 0.5890, respectively. The global fitting parameters were determined as m = 1.2718 and n = 0.2635.
(Δℓ/ℓmin)② = CκcmNn,
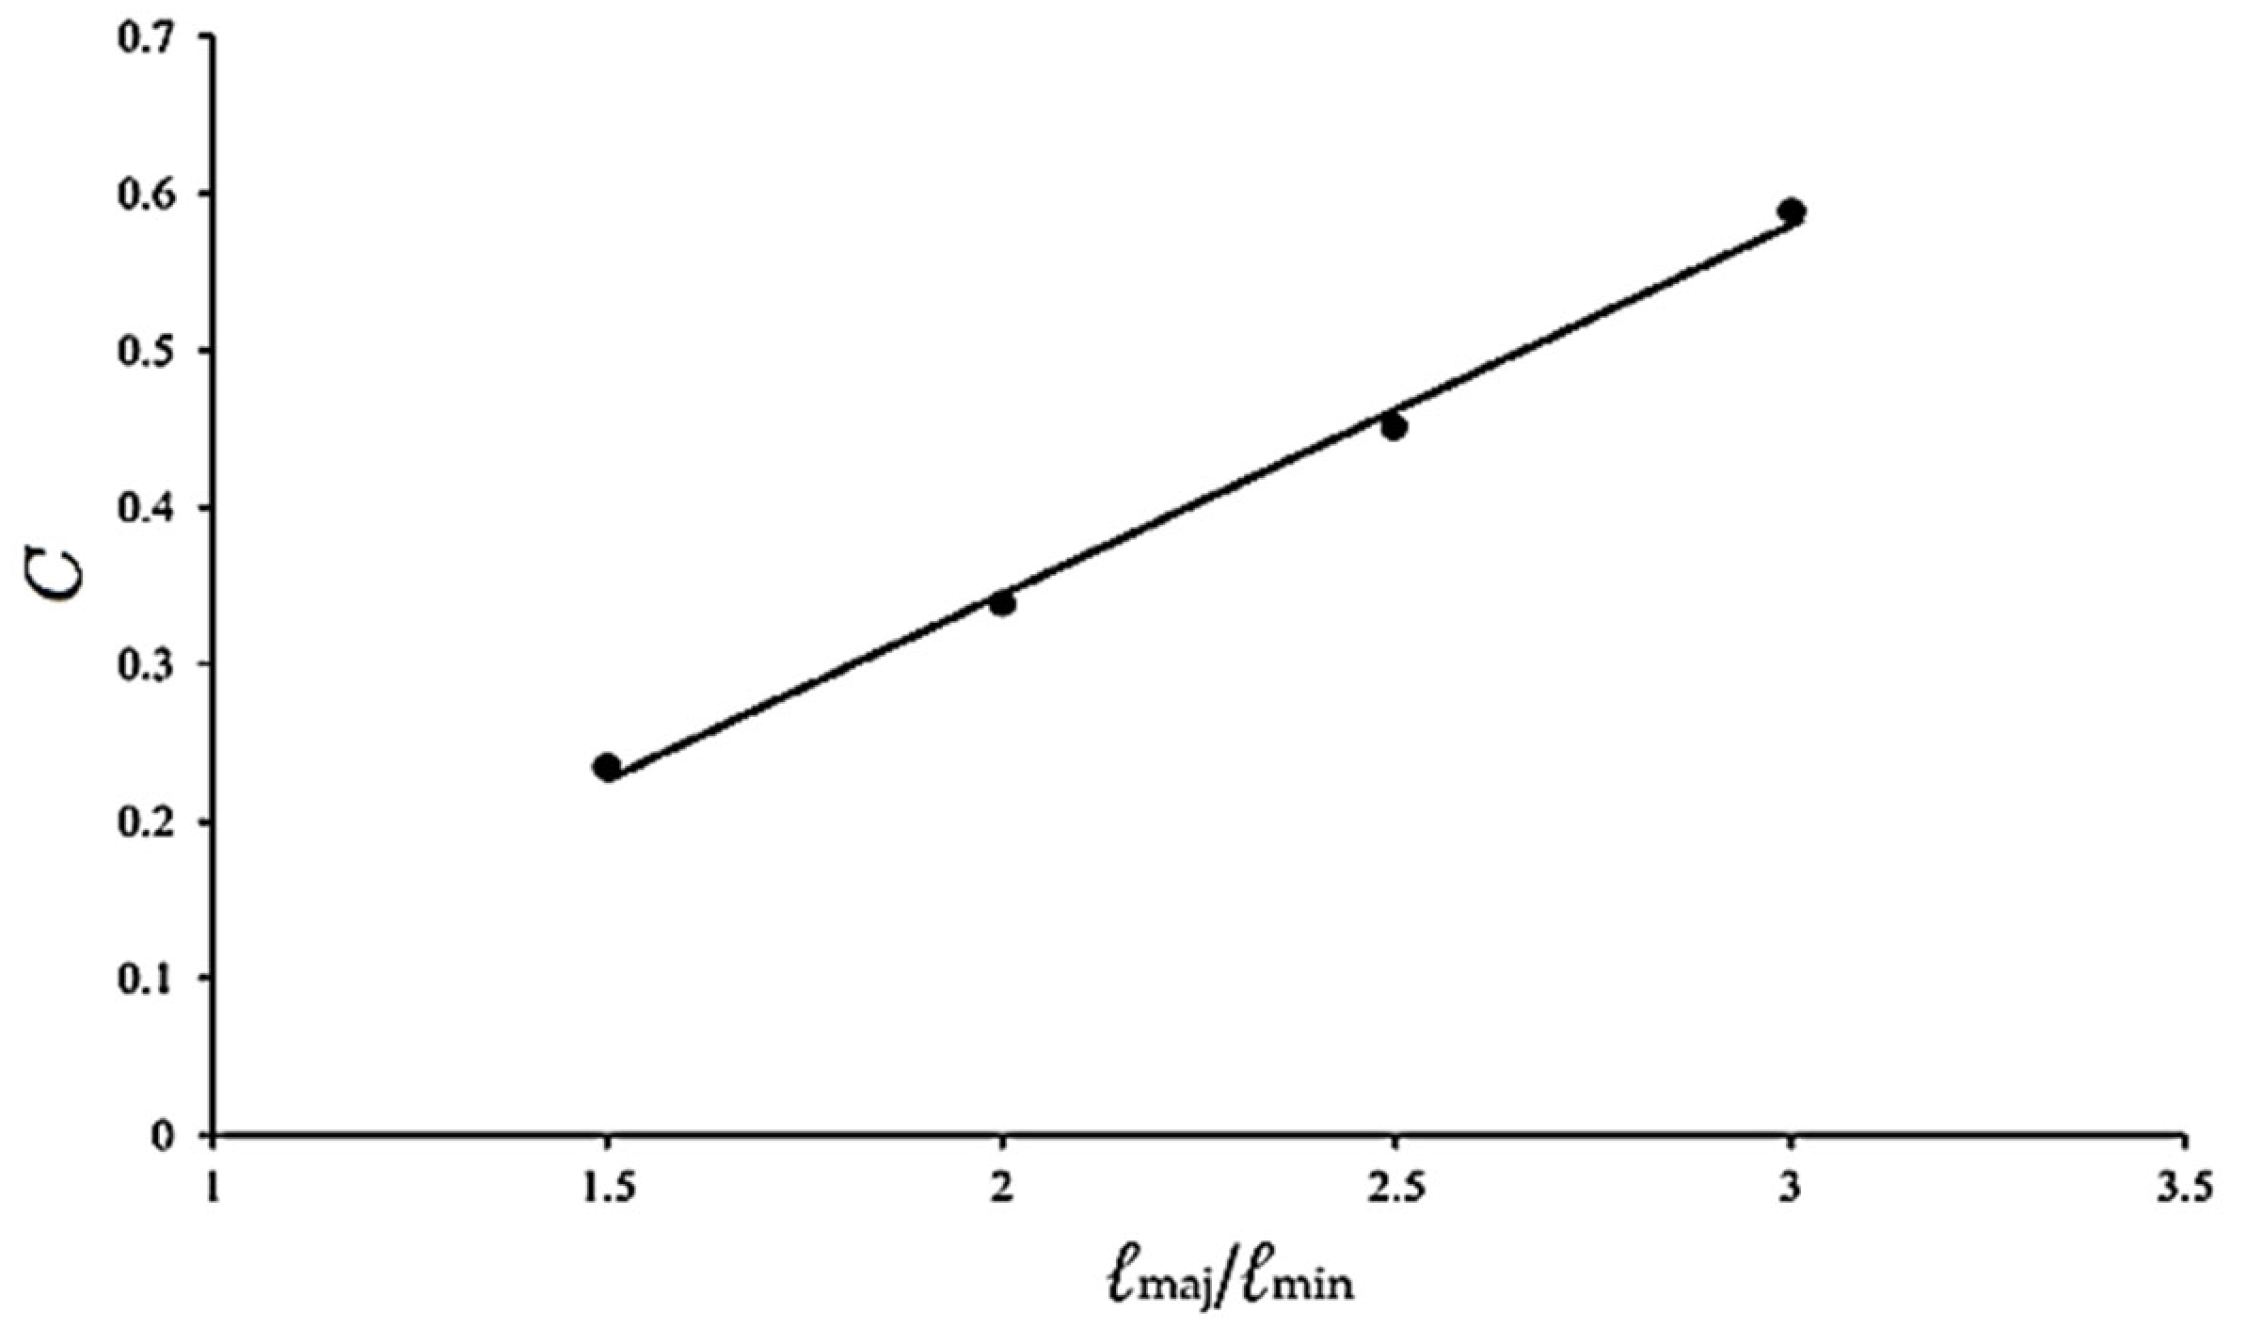
Further analysis revealed a clear linear relationship between C and ℓmaj/ℓmin, as shown in Figure 14. The regression result can be expressed by the following linear relationship as:
where c1 and c2 are the material parameters. The regression analysis yielded material parameters c1 = 0.2329 and c2 = −0.1230, as shown in Figure 14. Then, Equations (1) and (2) were then employed to characterize the (Δℓ/ℓmin)②-N relationships for 6063-T5 aluminum alloy elliptical-square tubes with ℓmaj/ℓmin ratios of 1.5, 2.0, 2.5, and 3.0. The predicted results, represented by dashed lines in Figure 15a–d, are compared against the experimental data. This comparison demonstrates that the proposed equations yield adequate and reasonable representations of the experimental trends across all investigated curvature levels in Stages I and II.
C = c1(ℓmaj/ℓmin) + c2,

Figure 14.
Relationship between C and ℓmaj/ℓmin.
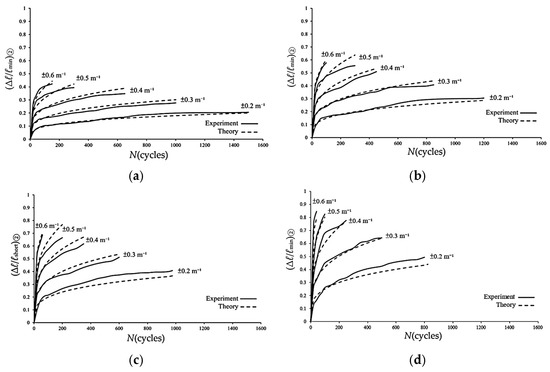
Figure 15.
Experimental and theoretical data of (Δℓ/ℓmin)② versus N during Stages I and II for 6063-T5 aluminum alloy elliptical-square tube with ℓmaj/ℓmin = (a) 1.5, (b) 2.0, (c) 2.5, and (d) 3.0 under cyclic bending.
3.3. Relationship Between Critical Changes in Outer Minor Axis Length ((Δℓ/ℓmin)②)c and Controlled Curvature (κc)
Based on the evolution of (Δℓ/ℓmin)②, the cyclic bending process in this study is divided into three stages (Stages I, II and III). Stage III corresponds to a condition in which the tube approaches failure, during which the bending moment resistance decreases sharply. Therefore, Stage III is excluded from subsequent analyses, and the present study focuses on Stages I and II.
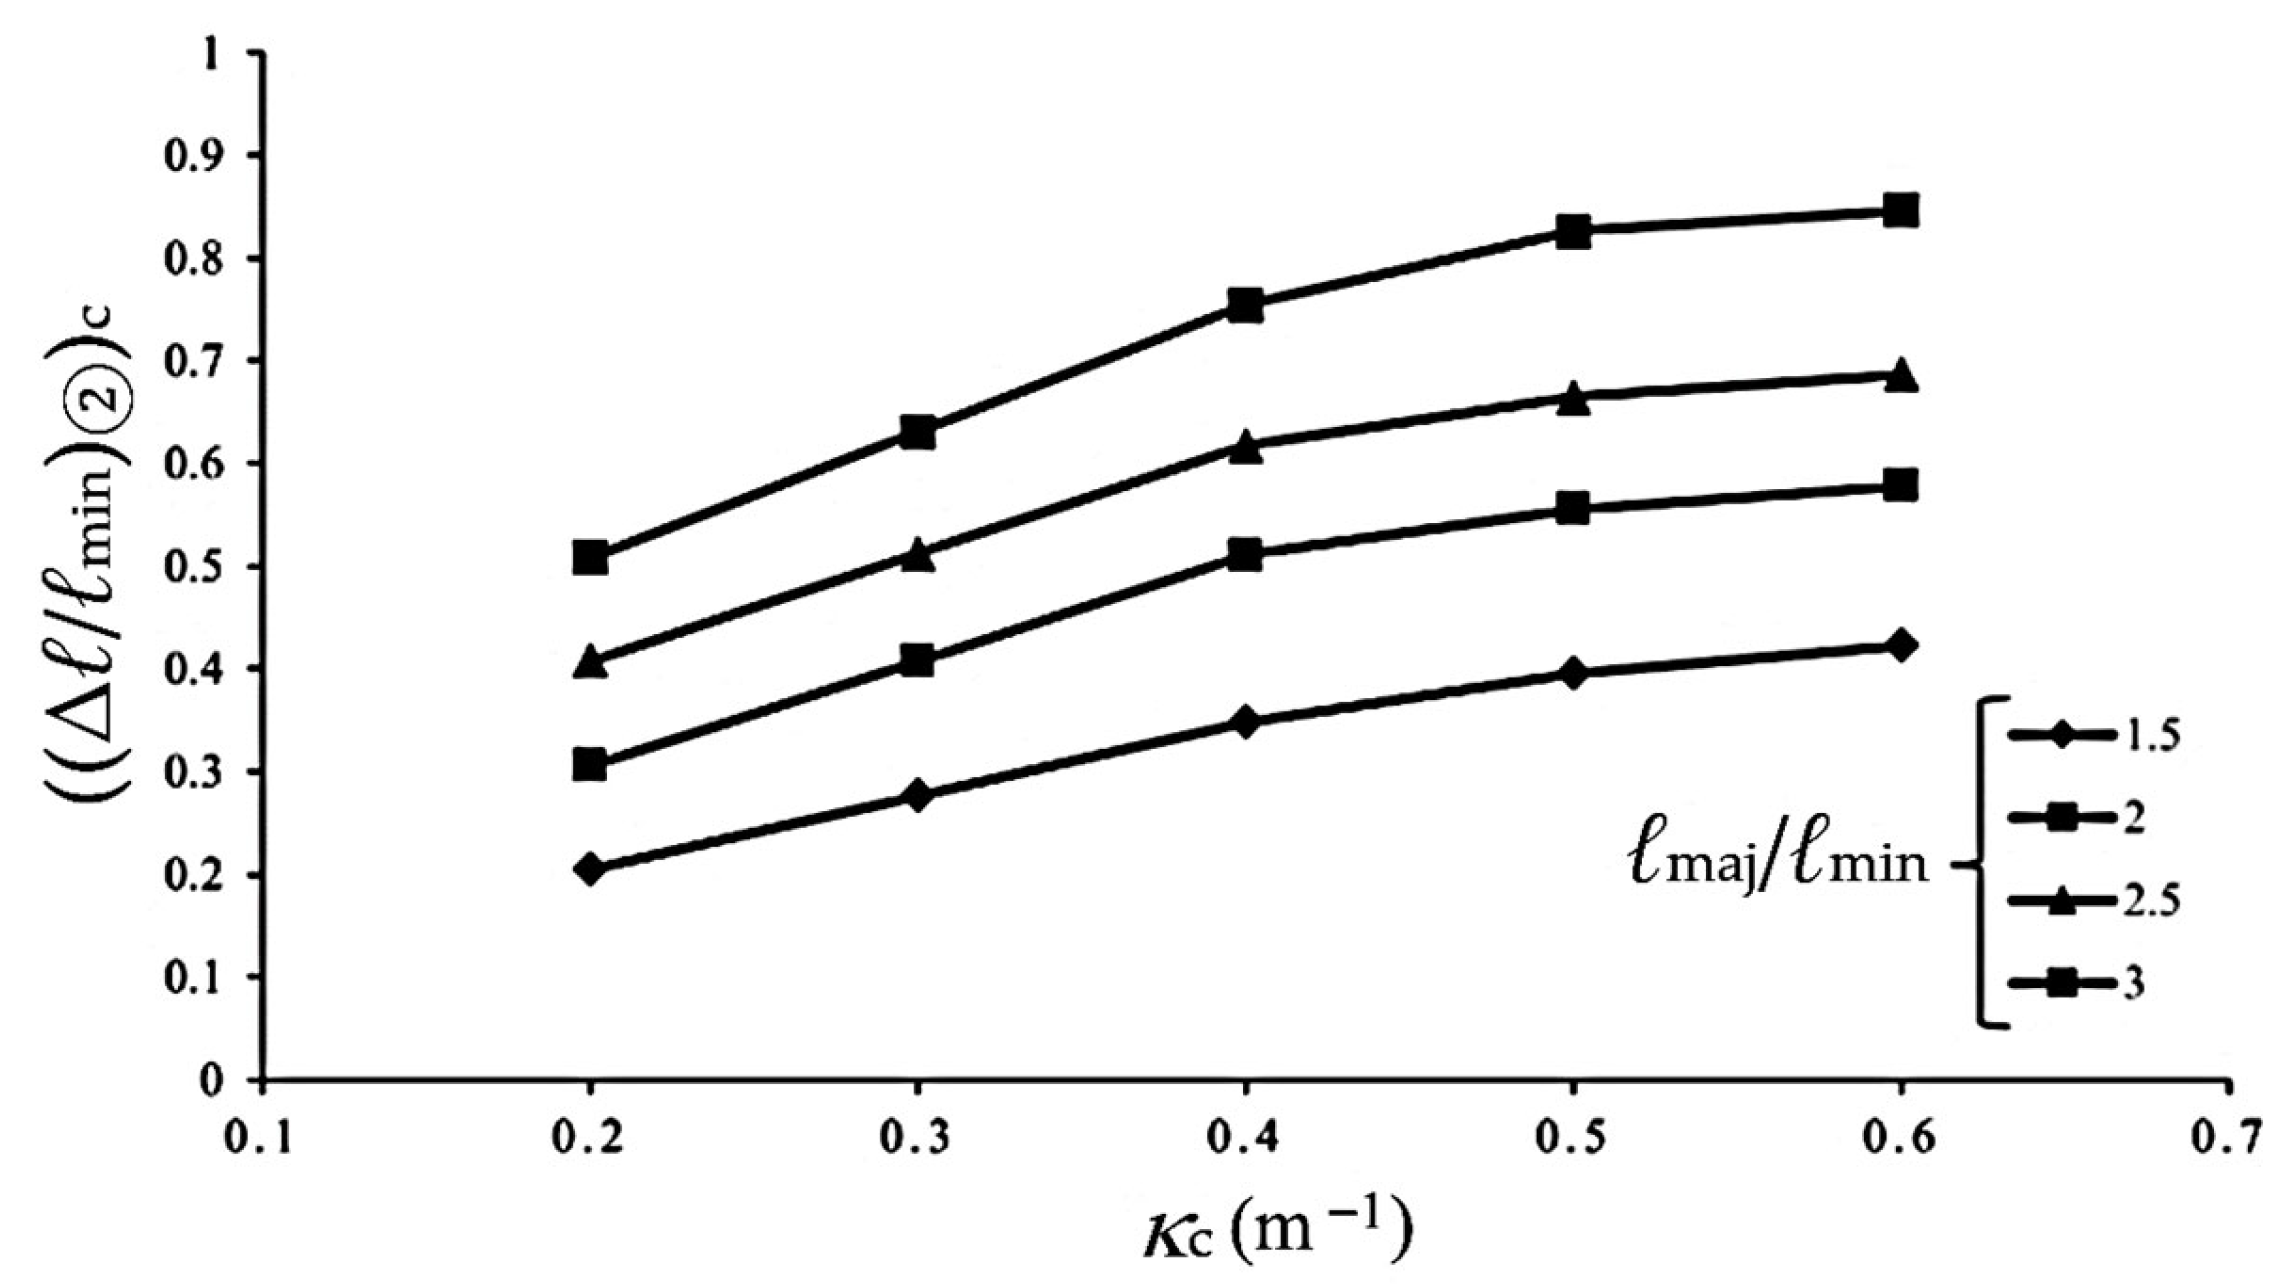
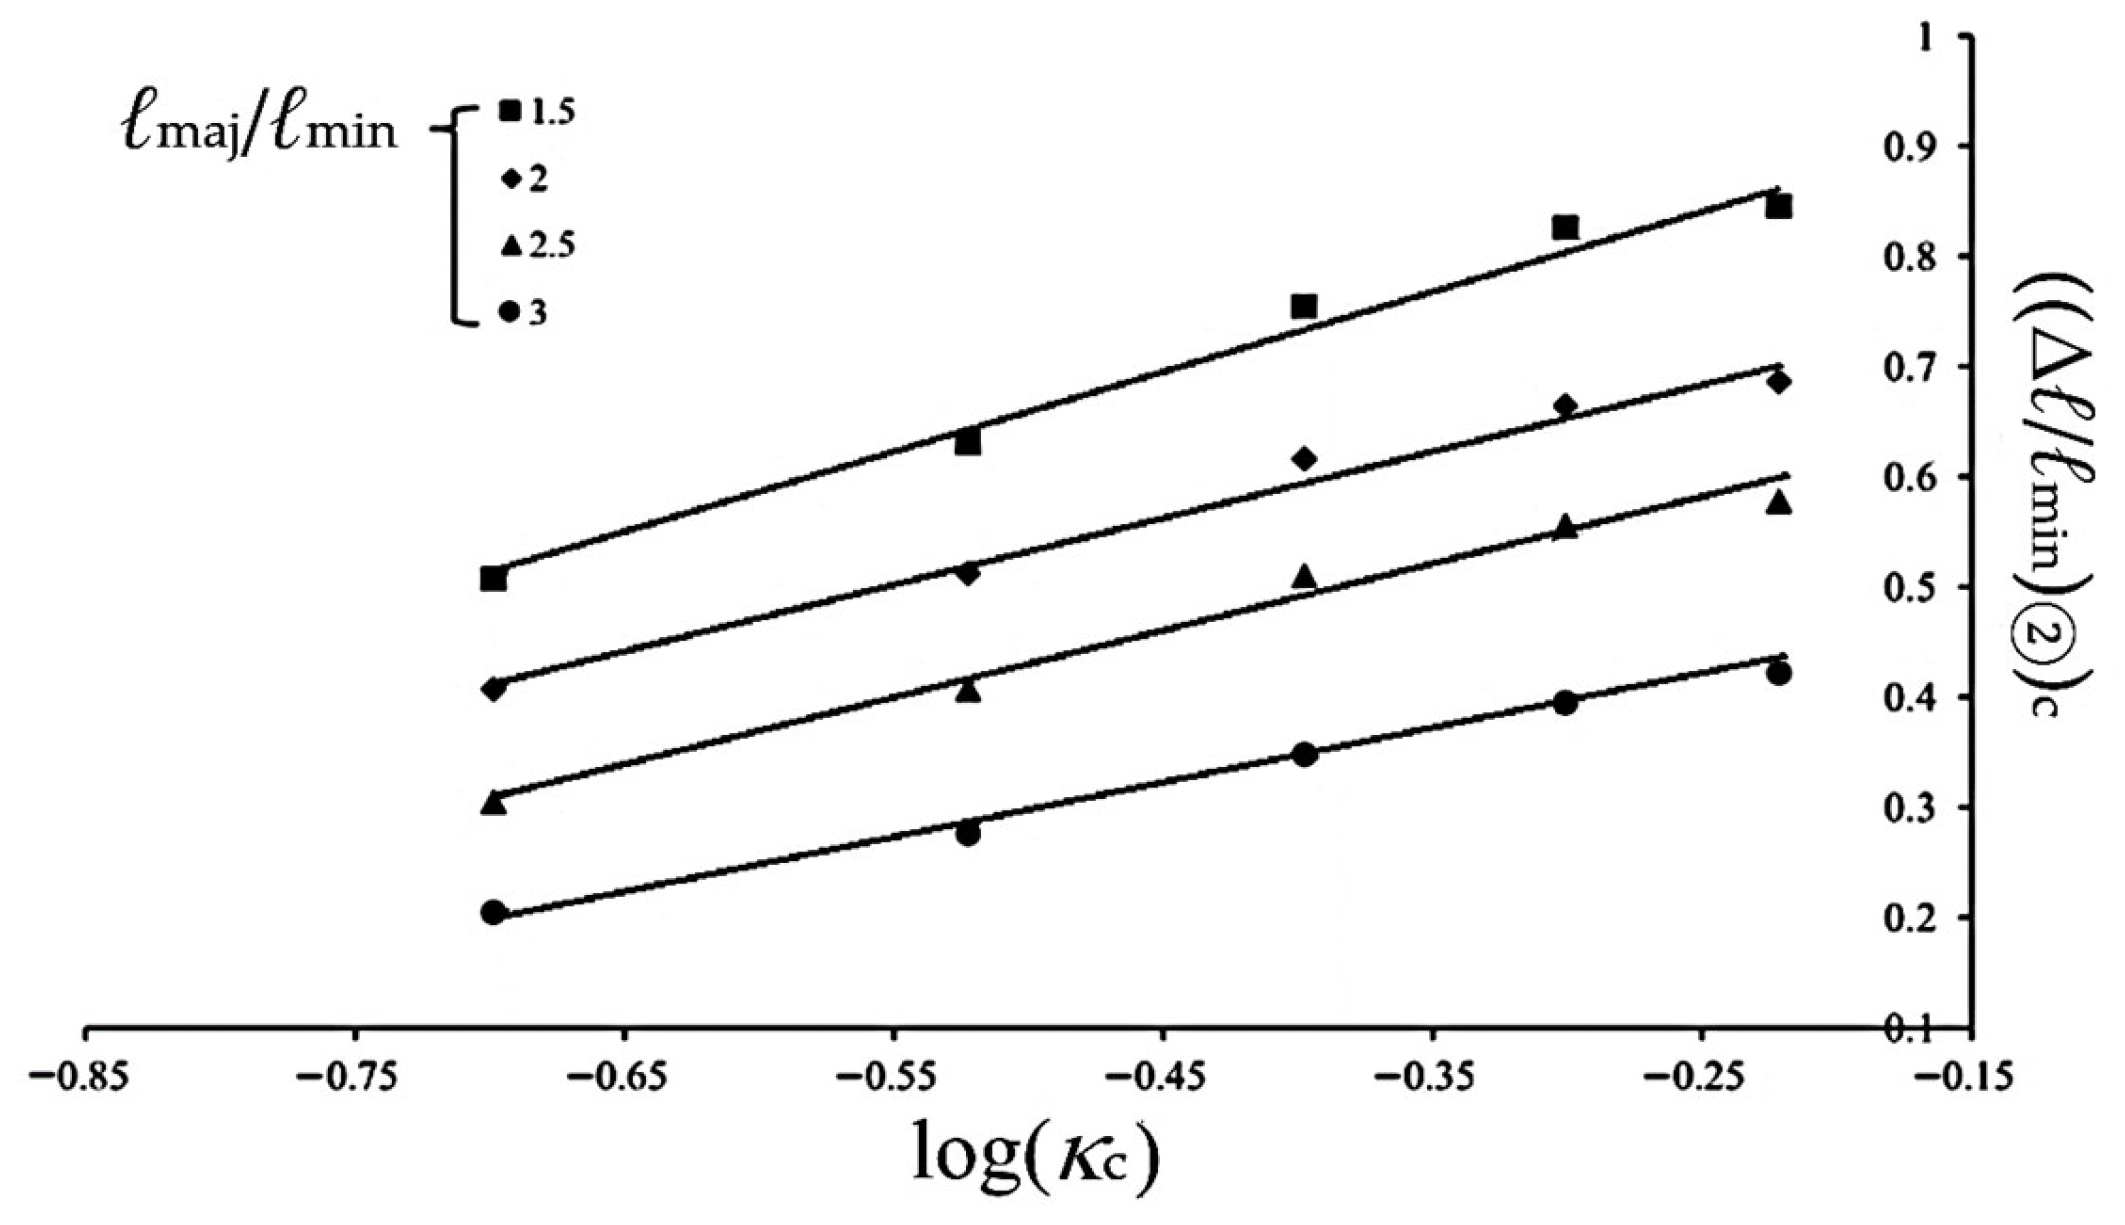
To define the critical condition for entering Stage III, the experimental value of ((Δℓ/ℓmin)②)c is taken as the last data point observed prior to the transition into Stage III. Figure 16 illustrates the relationship between ((Δℓ/ℓmin)②)c and κc for 6063-T5 aluminum alloy elliptical-square tubes with different ℓmaj/ℓmin ratios under cyclic bending. In this figure, each ℓmaj/ℓmin ratio corresponds to a distinct curve. In addition, a higher κc values or larger ℓmaj/ℓmin ratios result in larger ((Δℓ/ℓmin)②)c values. However, when considering the relationship between ((Δℓ/ℓmin)②)c and log(κc), four distinct straight lines corresponding to different ℓmaj/ℓmin ratios are obtained, as shown by the solid lines in Figure 17 through least-squares fitting. Based on this observation, the following empirical equation is proposed to describe the relationship between ((Δℓ/ℓmin)②)c and log(κc):
((Δℓ/ℓmin)②)c = d1log(κc) + d2
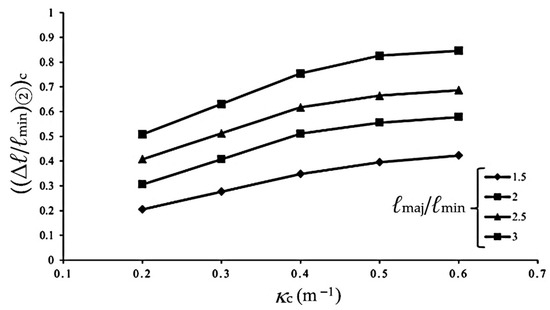
Figure 16.
Experimental ((Δℓ/ℓmin)②)c-κc relationship for 6063-T5 aluminum alloy elliptical-square tube with different ℓmaj/ℓmin under cyclic bending.

Figure 17.
Experimental ((Δℓ/ℓmin)②)c-log(κc) relationship for 6063-T5 aluminum alloy elliptical-square tube with different ℓmaj/ℓmin under cyclic bending.
Here, d1 and d2 are material parameters that vary with different ℓmaj/ℓmin ratio. The corresponding values are summarized in Table 1.

Table 1.
Values of d1 and d2 corresponding to different ℓmaj/ℓmin.
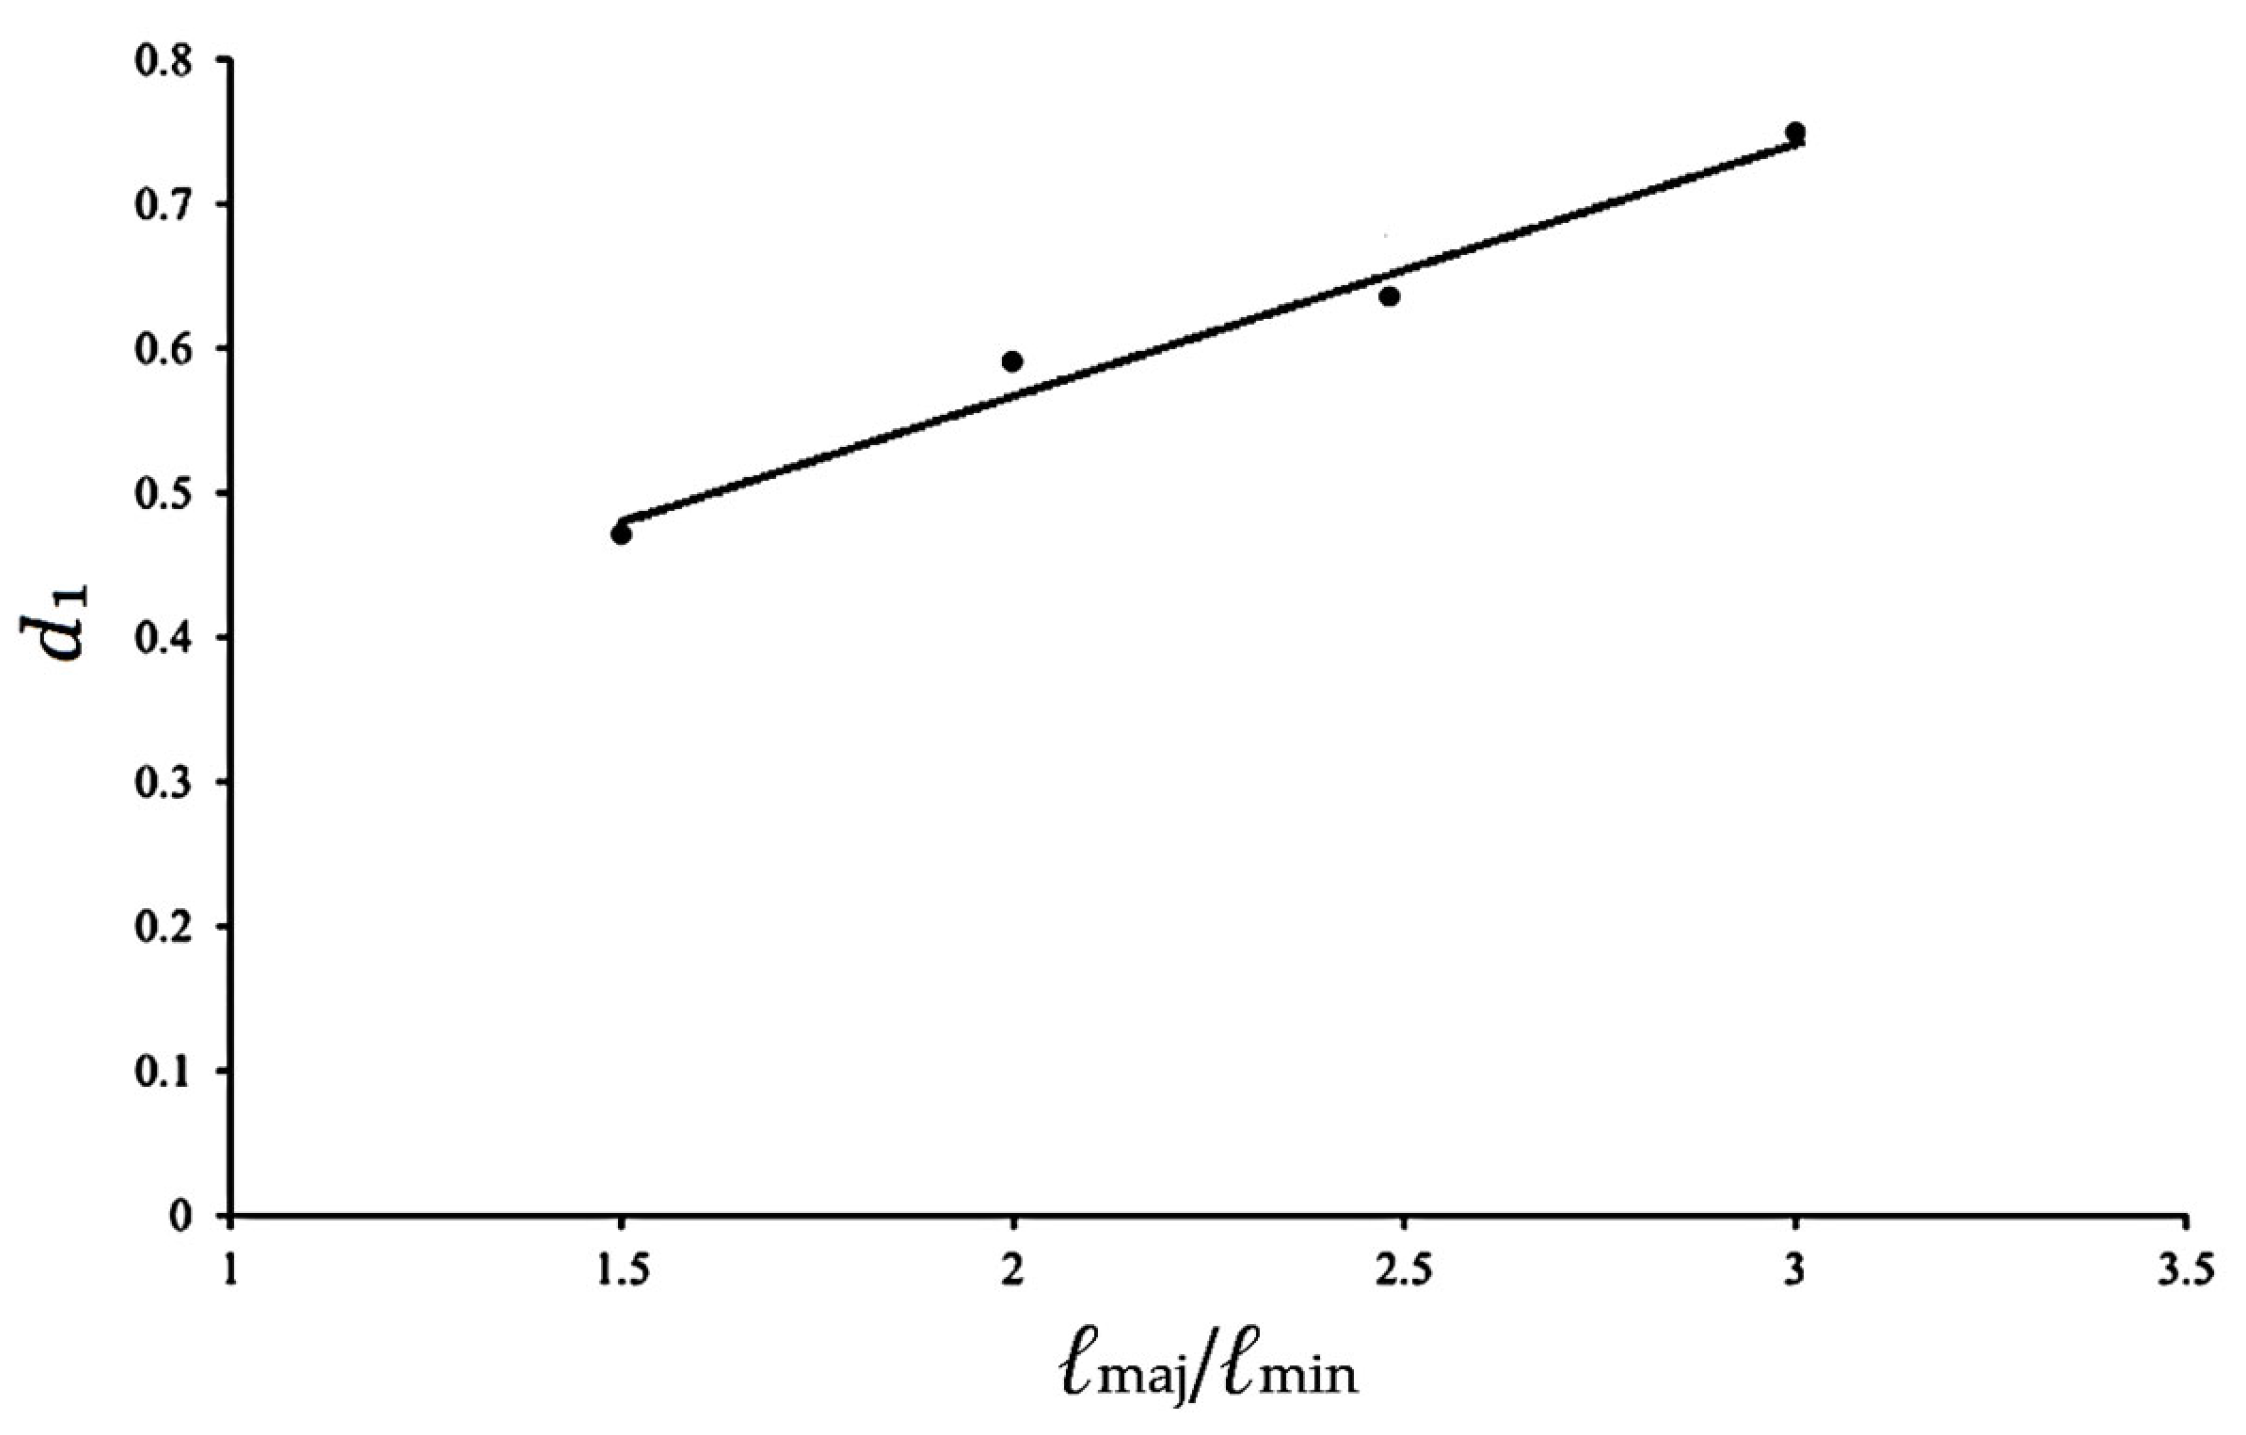
Further analysis of the relationships between d1 and ℓmaj/ℓmin, and between d2 and ℓmaj/ℓmin reveals a clear linear trend, as illustrated in Figure 18 and Figure 19. The corresponding linear equations are expressed as follows:
and
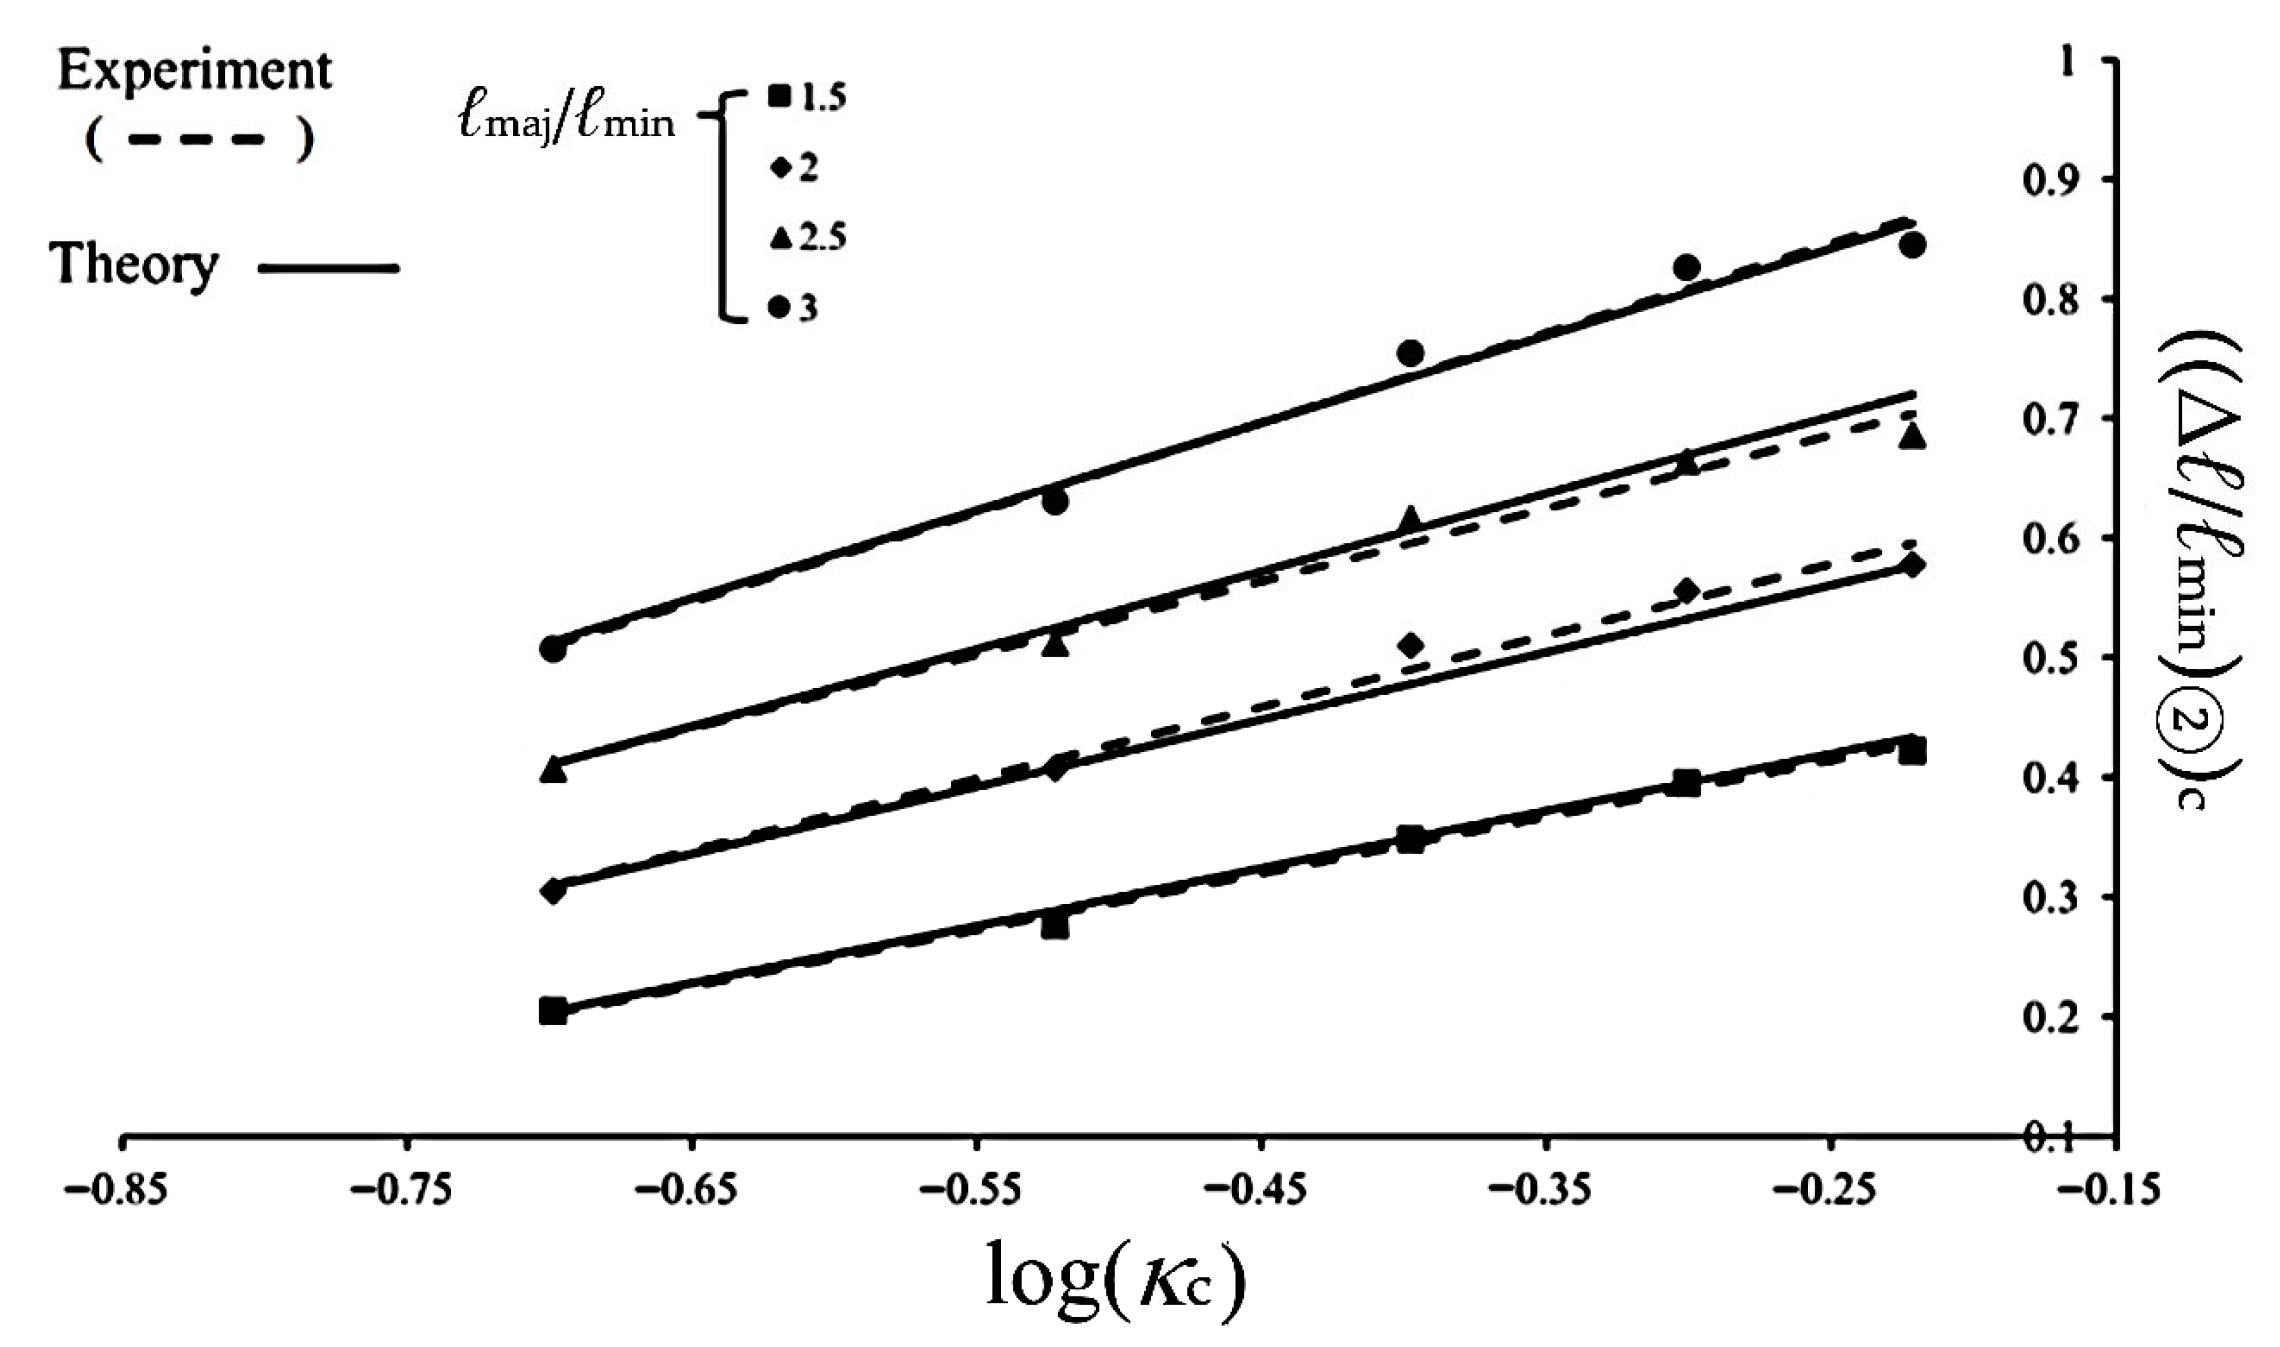
where δ1, δ2, δ3, and δ4 are material parameters that are determined to be 0.169, 0.255, 0.324, and 0.054 respectively. By combining Equations (3)–(5) and using the calculated δ1, δ2, δ3, and δ4, the ((Δℓ/ℓmin)②)c can be effectively predicted. A comparison between the calculated results and the experimental data in Figure 17, as plotted in Figure 20, demonstrates a high degree of correlation, confirming the applicability and accuracy of the proposed empirical model.
d1 = δ1 (ℓmaj/ℓmin) + δ2
d2 = δ3 (ℓmaj/ℓmin) + δ4,

Figure 18.
Relationship between d1 and ℓmaj/ℓmin.
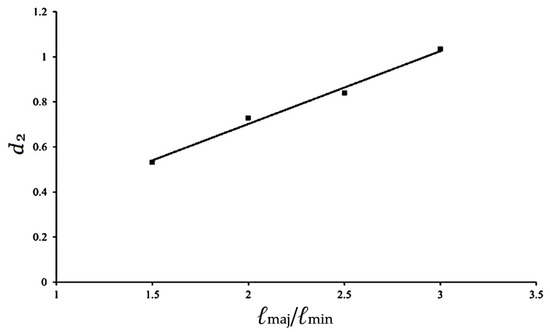
Figure 19.
Relationship between d2 and ℓmaj/ℓmin.
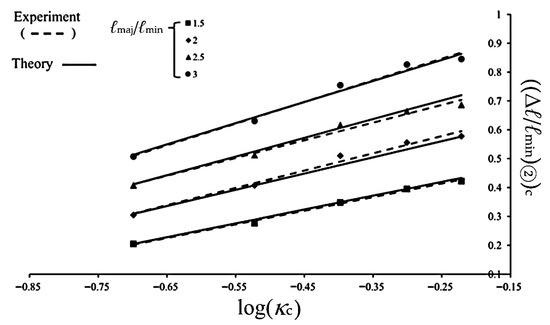
Figure 20.
Experimental and theoretical ((Δℓ/ℓmin)②)c-log(κc) relationship for 6063-T5 aluminum alloy elliptical-square tube with different ℓmaj/ℓmin under cyclic bending.
4. Conclusions
This study investigates the evolution of (Δℓ/ℓmin)②, and its critical value, (Δℓ/ℓmin)②)c, for 6063-T5 aluminum alloy elliptical-square tubes with a uniform wall thickness of 1.0 mm. Four distinct ℓmaj/ℓmin ratios (1.5, 2.0, 2.5, and 3.0) were examined under curvature-controlled symmetric cyclic pure bending. The main findings are summarized as follows:
- (1)
- The ∆ℓ/ℓmin-N response exhibits three stages: rapid growth with surface denting (Stage I), reduced growth with crack initiation and propagation (Stage II), and saturation leading to failure (Stage III).
- (2)
- Stage III can be neglected due to the small number of cycles and the negligible change in ∆ℓ/ℓmin. During Stages I and II, (Δℓ/ℓmin)② increases with increased controlled curvature and ℓmaj/ℓmin ratios, while the number of cycles required to reach Stage III decreases accordingly.
- (3)
- A modified empirical formulation based on Lee et al. [18] was employed to describe the (Δℓ/ℓmin)②-N relationships. By introducing a geometry-dependent material parameter C, the proposed framework accurately predicts the experimental trends during Stages I and II.
- (4)
- The critical value (Δℓ/ℓmin)②)c is defined as the last point prior to Stage III. Larger κc values or higher ℓmaj/ℓmin ratio lead to larger (Δℓ/ℓmin)②)c. Moreover, Linear relationships between (Δℓ/ℓmin)②)c and log(κc) are observed for each ℓmaj/ℓmin ratios.
- (5)
- Using Equation (3), the (Δℓ/ℓmin)②)c-log(κc) relationships were characterized, and strong linear correlations between parameters d1, d2, and ℓmaj/ℓmin ratios were established. These correlations enabled accurate prediction of critical deformation behavior, showing excellent agreement with experimental results.
Author Contributions
Conceptualization, J.-T.L. and W.-F.P.; methodology, J.-T.L. and W.-F.P.; software, W.-F.P.; validation, J.-T.L. and W.-F.P.; formal analysis, J.-T.L. and W.-F.P.; investigation, J.-T.L. and W.-F.P.; resources, J.-T.L. and W.-F.P.; data curation, J.-T.L. and W.-F.P.; writing—original draft preparation, W.-F.P.; writing—review and editing, W.-F.P. All authors have read and agreed to the published version of the manuscript.
Funding
This research was supported by the National Science and Technology Council (NSTC) under grant number 114-2221-E-006-155.
Data Availability Statement
The original contributions presented in this study are included in the article. Further inquiries can be directed to the corresponding author.
Acknowledgments
The authors would like to express their sincere appreciation to all individuals and organizations whose support and assistance made this research possible.
Conflicts of Interest
The authors declare no conflicts of interest.
References
- Kyriakides, S.; Shaw, P.K. Inelastic buckling of tubes under cyclic bending. J. Press. Vessel. Technol. 1987, 109, 169–178. [Google Scholar] [CrossRef]
- Corona, E.; Kyriakides, S. An experimental investigation of the degradation and buckling of circular tubes under cyclic bending and external pressure. Thin-Walled Struct. 1991, 12, 229–263. [Google Scholar] [CrossRef]
- Corona, E.; Kyriakides, S. Asymmetric collapse modes of pipes under combined bending and pressure. Int. J. Solids Struct. 2000, 24, 505–535. [Google Scholar] [CrossRef]
- Elchalakani, M.; Zhao, X.L.; Grzebieta, R.H. Plastic mechanism analysis of circular tubes under pure bending. Int. J. Mech. Sci. 2002, 44, 1117–1143. [Google Scholar] [CrossRef]
- Limam, A.; Lee, L.H.; Corana, E. Inelastic wrinkling and collapse of tubes under combined bending and internal pressure. Int. J. Mech. Sci. 2010, 52, 37–47. [Google Scholar] [CrossRef]
- Bechle, N.J.; Kyriakides, S. Localization of NiTi tubes under bending. Int. J. Solids Struct. 2014, 51, 967–980. [Google Scholar] [CrossRef]
- Jiang, D.; Kyriakides, S.; Bechle, N.J.; Landis, C.M. Bending of pseudoelastic NiTi tubes. Int. J. Solids Struct. 2017, 124, 192–214. [Google Scholar] [CrossRef]
- Li, P.; Wang, L. Nonlinear stability behavior of cable-stiffened single-layer latticed shells under earthquakes. Int. J. Struct. Stab. Dyn. 2018, 18, 1850117. [Google Scholar] [CrossRef]
- Chegeni, B.; Jayasuriya, S.; Das, S. Effect of corrosion on thin-walled pipes under combined internal pressure and bending. Thin-Walled Struct. 2019, 143, 106218. [Google Scholar] [CrossRef]
- Kazinakis, K.; Kyriakides, S.; Jiang, D.; Bechle, N.J.; Landis, C.M. Buckling and collapse of pseudoelastic NiTi tubes under bending. Int. J. Solids Struct. 2021, 221, 2–17. [Google Scholar] [CrossRef]
- Silveira, T.; Pinto, V.T.; Neufeld, J.P.S.; Pavlovic, A.; Rocha, L.A.O.; Santos, E.D.; Isoldi, L.A. Applicability evidence of constructal design in structural engineering: Case study of biaxial elasto-plastic buckling of square steel plates with elliptical cutout. J. Appl. Comput. Mech. 2021, 7, 922–934. [Google Scholar]
- He, Z.R.; Li, G.J.; Yang, J.C.; Guo, X.Z.; Duan, X.Y.; Guo, W.; Liu, X.; Deng, Y.Y.; Cheng, C. Insight into the deformation transition effect in free bending of tubes. Thin-Walled Struct. 2023, 348, 134673. [Google Scholar] [CrossRef]
- Wang, J.; Li, J.R.; Li, H.; Lv, L.Y. Behaviour of square concrete-filled steel tubes reinforced with internal latticed steel angles under bending. Structures 2023, 48, 1436–1454. [Google Scholar] [CrossRef]
- Liu, J.; Zhang, T.; Yu, W.Z.; Pan, Z.M.; Cao, G.H. Behavior of multicell concrete-filled round-ended steel tubes under bending. Steel Compos. Struct. 2024, 67, 106984. [Google Scholar] [CrossRef]
- Yang, M.; Xi, J.; Hu, H.; Qin, T.; Wang, Y. Mechanism and influence research on the bending and torsion damping of composite hollow tube. Int. J. Struct. Stab. Dyn. 2024, 24, 2450239. [Google Scholar] [CrossRef]
- Wang, H.; Wu, J.; Lin, Y.; Wu, W.; Wang, M.; Yang, Z.; Liu, L. Plastic buckling and wrinkling behavior of tubes under combined bending and torsion loads. Thin-Walled Struct. 2025, 209, 112912. [Google Scholar] [CrossRef]
- Pan, W.F.; Wang, T.R.; Hsu, C.M. A curvature-ovalization measurement apparatus for circular tubes under cyclic bending. Exp. Mech. 1998, 38, 99–102. [Google Scholar] [CrossRef]
- Lee, K.L.; Chung, C.C.; Pan, W.F. Growing and critical ovalization for sharp-notched 6061-T6 aluminum alloy tubes under cyclic bending. J. Chin. Inst. 2016, 39, 926–935. [Google Scholar] [CrossRef]
Disclaimer/Publisher’s Note: The statements, opinions and data contained in all publications are solely those of the individual author(s) and contributor(s) and not of MDPI and/or the editor(s). MDPI and/or the editor(s) disclaim responsibility for any injury to people or property resulting from any ideas, methods, instructions or products referred to in the content. |
© 2026 by the authors. Licensee MDPI, Basel, Switzerland. This article is an open access article distributed under the terms and conditions of the Creative Commons Attribution (CC BY) license.

