1. Introduction
To investigate the impact of electron beam irradiation on the mechanical properties of filled polypropylene, particularly focusing on micro-indentation tests, several relevant studies can be considered. Several studies have delved into the effects of irradiation on different types of composites and materials, shedding light on changes in hardness, damage creation, and micro-plasticity post irradiation.
The micro-indentation of crosslinked polypropylene composites is a crucial aspect in understanding the mechanical properties and behavior of these materials. By conducting nanoindentation and nano-scratching experiments on flax fiber-reinforced polypropylene composites, researchers have been able to analyze their tribo-mechanical properties at a specific contact scale [
1]. This approach allows for a detailed examination of the material’s response to mechanical forces at a nanoscale level, providing insights into the composite’s performance under different loading conditions.
Moreover, the synthesis of crosslinked polypropylene using novel routes with different precursors and annealing temperatures has been investigated, demonstrating the impact of crosslinking on the material’s properties [
2]. By employing dynamic micro-indentation methods, researchers have been able to evaluate the mechanical behavior of flowable resin composites, showcasing the utility of micro-indentation in assessing the performance of polymeric materials [
3].
In the context of shape memory polypropylene, ionically crosslinked syndiotactic polypropylene has been synthesized, showcasing the potential of crosslinking to induce shape memory effects in polymers [
4]. By utilizing micro-indentation techniques, researchers have been able to probe the mechanical properties of nanocomposites, providing valuable insights into the reinforcement mechanisms and material behavior at the nanoscale [
5].
Several studies have delved into the effects of irradiation on different types of composites and materials, shedding light on changes in hardness, damage creation, and micro-plasticity post irradiation. For instance, Parparita et al. [
6] investigated the behavior of polypropylene bio composites (isotactic polypropylene with 30 wt% lignocellulosic materials) under gamma irradiation, aiming to improve properties and study the effects of different irradiation doses on recyclability and environmental impact.
Moreover, the incorporation of nanodispersed iron into polypropylene fibers through irradiation methods has been studied by [
7], highlighting the oxidative destruction of organic pollutants on modified polypropylene fibers. This demonstrates the diverse applications of irradiation in enhancing the properties of polypropylene-based materials. Additionally, Chegdani et al. [
1] conducted experiments on natural fiber composites (polypropylene matrix 60 wt% with flax fibers 40 wt%) subjected to nanoindentation and nano-scratching, providing insights into the tribo-mechanical analysis of composites, showcasing the impact of contact scale on mechanical behavior.
In the realm of composite materials, studies such as those by Samat et al. [
8] and Fu et al. [
9] have investigated the effects of unconventional irradiation routes on the properties of polymer composites, emphasizing changes in dynamic mechanical properties and light absorptivity due to irradiation. These findings underscore the significance of irradiation in altering the characteristics of composite materials, including polypropylene composites.
Ovsik et al. [
10] demonstrated that irradiation at doses of 99 kGy led to a substantial increase of about 35% in the nano-mechanical properties of filled polyamide. This indicates that irradiation can positively impact the mechanical characteristics of polypropylene composites. Parparita et al. [
6] explored the impact of irradiation on polypropylene/biomass composites, aiming to enhance properties and study the effects of different irradiation doses on the materials. The study emphasized the importance of irradiation for improving properties and investigating the degradability of composites, which is essential for enhancing recyclability and reducing environmental impact.
Additionally, Bernardeau et al. [
11] studied the mechanical properties of polypropylene composites filled with waste thermoset material, highlighting the importance of filler loading rate, particle size distribution, and interfacial adhesion in determining the final mechanical properties of the composites. This underscores the intricate relationship between filler characteristics and mechanical performance in polypropylene composites.
Furthermore, the reinforcement of polypropylene with various materials such as microcrystalline cellulose, glass fibers, and biomass fillers has been extensively explored in the literature. Mubarak [
12] investigated the impact of microcrystalline cellulose on polypropylene composites, showing a significant enhancement in mechanical properties, particularly in Young’s modulus. The authors of [
13] evaluated the strength and morphological properties of glass fiber-reinforced polypropylene composites, emphasizing the importance of reinforcement in enhancing mechanical characteristics. These studies collectively demonstrate the diverse approaches to reinforcing polypropylene composites to improve their mechanical properties.
Moreover, Cantaragiu & Fetecau [
14] investigated the mechanical properties of polypropylene/carbon nanotube composites using the indentation technique, focusing on the indentation hardness and modulus derived from load–displacement curves. This study offers valuable information on how the addition of carbon nanotubes influences the mechanical characteristics of polypropylene at the microscale. Furthermore, Maizza et al. [
15] discussed the micro–macro relationship in a selective-electron-beam-melted Ti-6Al-4V alloy, emphasizing the utility of macro-instrumented indentation tests in additive manufacturing processes to control microscopic properties and assess product quality.
As can be seen from the literature review above, the issue of polypropylene irradiation has only been investigated in part, focusing on the measurement of mechanical and tribological properties in the surface layer only. However, to our knowledge, there are no publications that examine the micro-mechanical and tribological properties in different layers below the surface of the sample.
Radiation crosslinking has a positive effect on mechanical properties, tribological properties, temperature resistance, and chemical resistance. Thanks to these changes, these materials are widely used in the automotive industry and electromobility, electrical engineering, civil engineering, mechanical engineering, and medicine. Examples of their applications include fuel lines, pressure and suction lines, shrink tubes, seals, cables and wire insulation, tubing for medical technology, etc.
The aim of this work is to assess the effect of radiation crosslinking on the micro-mechanical and tribological properties of a polymer, specifically polypropylene filled with 25% glass fiber. To assess the micro-mechanical and tribological properties using the DSI method and its sufficient sensitivity to property changes, measurements were performed on polypropylene filled with 25% glass fiber modified by electron radiation both in the surface layer and at different depths below the surface. In the literature studied, no comparable results were found in terms of the range of measurements.
2. Materials and Methods
The presented study describes the results of extensive and systematic measurements of the macro- and micro-mechanical and tribological properties of polypropylene filled with 25% glass fibers, which was subsequently modified using electron radiation. The results were supplemented by gel test measurements, wide-angle X-ray diffraction, and microtome sections examined under a microscope, which indicate changes in morphology caused by crosslinking due to electron radiation. All parameters were measured at least 10 times and then statistically evaluated using the arithmetic mean and standard deviation.
2.1. Material
For this research, a 25% glass fiber-filled polypropylene with the trade name V-PTS-CREALEN-EP8G5HS*M0083 from PTS (Dumfries, Scotland, UK) was selected. Polypropylene was chosen because it is often used in engineering practice for parts that are mechanically stressed. In order for crosslinking to prevail over degradation when exposed to electron radiation, this material needs to be filled with a crosslinking agent. For the polypropylene tested, a crosslinking agent called TAIC (triallylisocyanurate) was used at 6 volume percent. The process of mixing the polymer with glass fibers and the treatment of the glass fibers themselves was carried out directly at the specialized company PTS to ensure the uniform dispersion of the fibers in the polymer matrix. This mixture was supplied in the form of a granulate containing 25% glass fibers and an additional 6% by volume of the crosslinking agent.
Polypropylene filled with 25% glass fibers was chosen because of its application potential; thanks to its properties, it is widely used in technical practice. Thanks to the addition of 25% glass fibers and further modification using electron radiation, the properties of this material shift it from commercial polymers to the field of much more expensive engineering polymers. The filler volume (25% glass fiber) was chosen because of its frequent use in practice. Using a higher filler volume would increase the mechanical and tribological properties, thereby improving the material’s application potential in practice.
2.2. Injection Molding of Test Samples
The test bodies with dimensions 10 × 4 × 80 mm (according to ČSN EN ISO 527-1 [
16]) were manufactured using the ARBURG ALLROUNDER 470 E 1000-290 injection molding machine from the manufacturer Arburg (Losburg, Germany). For mold tempering, a Regloplas 150 smart oil tempering unit from Regoplast (Gallen, Switzerland) was used.
The injection parameters of polypropylene filled with 25% glass fiber were set according to the bill of materials; the significant parameters are listed in
Table 1. The injection process parameters were selected according to the material manufacturer’s recommendations (the material data sheet) and also based on experience in optimizing injection in the injection molding machine so that the test samples were optimized in terms of dimensions and shape.
2.3. Electron Beam Irradiation
For the 25% glass fiber-filled polypropylene material, a crosslinking agent called TAIC, triallylisocyanurate, was used at 6 vol%. TAIC allows the individual free radicals of the polypropylene to chemically bond to the reagent during the irradiation of the base material to create a degree of crosslinking. The entire process of preparing the granulate with the crosslinking agent was carried out at the company PTS Plastic Technology Service (Horsham, UK). The prepared test bodies were irradiated with the following electron doses of 15, 33, 45, 66 and 99 kGy. The radiation doses were selected based on recommendations from BGS and the requirements of the field. The individual doses of 33 kGy, 66 kGy and 99 kGy were selected according to the standards used for irradiating thermoplastics, where one pass under the electron accelerator means a radiation dose of 33 kGy (each pass equals a dose of 33 kGy). Furthermore, to capture the behavior at lower radiation doses, doses of 15 kGy and 45 kGy were added, which are not standard in practical applications.
The irradiation of the test specimen was performed at BGS, Beta-Gamma Service (Wiehl, Germany). The source of the electron β-radiation was a high-voltage accelerator of the Rhodotron type.
2.4. Micro-Tribological Properties
Tribological properties were measured on the MicroCombi tester MCT3 from Anton Paar (Graz, Austria). The measurements were carried out using the micro-abrasion test, which is used to determine the coefficient of friction and abrasion resistance of the surfaces tested. The principle of the measurement is the insertion of a diamond cone (Rockwell cone, peak angle 120°, tip radius 100 μm) into the test body, where the indenter performs a straight-line motion under constant load. For this test, the tribological properties were tested at three different loads, namely 0.5 N, 1 N and 5 N, to assess the effect of the depth of measurement on the tribological properties. The measurement parameters are given in
Table 2. The applied loads for the tribological and mechanical properties were chosen based on the working range of the measuring equipment and experience from previous research. Loads of 0.5 N and 1 N were chosen to capture the properties in the surface layer of the test specimens (load 0.5 N—measurement depth approximately 15 µm, load 1 N—measurement depth approximately 25 µm), and a load of 5 N was chosen to capture properties in the deeper layers of the test specimens (load 5 N—measurement depth approximately 55 µm).
The indentation test was carried out as follows: Before the indenter itself penetrates the material, the indenter passes over the surface with a sensing force in order to initialize the measuring device. After the indenter enters the test specimen by normal force Fn, the material is deformed and a notch is formed. The sensor senses friction force Ft, which is proportional to the normal force, and the surface profile of the sample before indentation Pd (penetration depth, so-called prescan) and after indentation Rd (residual depth, so-called postscan) due to the relaxation of the polymer material. The difference in the Pd-Rd profile depths allows us to obtain valuable information about the elastic and viscoelastic properties of the material. The critical loads are very accurately determined through the acoustic emission, AE, and the friction coefficient, μ.
2.5. Micro-Mechanical Properties
The micro-mechanical properties were measured on a micro-combi tester (MCT
3) from Anton Paar (Graz, Austria). The instrumented hardness test was performed according to the DSI (Depth Sensing Indentation) method, and a four-sided diamond cone (Vickers indenter) with a peak angle of 136° was used as the indentation body.
Table 3 shows the measurement parameters at three loading force magnitudes of 0.5 N, 1 N and 5 N. Poisson’s ratio was chosen according to the findings of the authors in publication [
17].
The measurements were performed according to EN ISO 14577-1 and the obtained parameters such as indentation hardness (HIT), indentation modulus (EIT), indentation creep (CIT) and indentation depth (hmax) were evaluated according to the Oliver and Phaar method.
The indentation hardness, H
IT, is characterized as a measure of resistance to permanent deformation or damage. The indentation hardness,
HIT, is calculated as the maximum loading force,
Fmax, divided by the diameter of the contact area of the insert with the test specimen,
Ap [
18,
19,
20,
21,
22,
23].
Another important material property calculated by the Oliver and Phaar method is the modulus, which indicates the stiffness of the material being measured. The Oliver and Phaar method can be used to obtain the indentation modulus,
EIT, the reduced modulus,
Er and the complex modulus,
E*. Ideally, the indentation modulus has exactly the same meaning as the elastic (Young’s) modulus. The indentation modulus is calculated from the directive tangent of the relaxation curve. To calculate the indentation modulus, Poisson’s ratio,
νs, of the test body is required and is chosen to be 0.2 to 0.4 for metallic materials and 0.3 to 0.4 for polymeric materials, and
E* is the complex modulus [
18,
19,
20,
21,
22,
23].
The indentation creep (
CIT) is determined from the change in depth over a constant load, where
h1 is the indentation depth at time
t1 when the test load is reached, and
h2 is the indentation depth at time
t2 while holding at the maximum test load reached [
18,
19,
20,
21,
22,
23].
The micro-mechanical properties were measured both at different depths of the surface layer under loadings of 0.5 N, 1 N and 5 N and at different depths below the surface (through the cross-section) under loadings of 0.5 N. For the measurements at each depth of the specimen, the irradiated specimens were cut into segments, polished and polished.
A laboratory precision saw, IsoMet 4000, from Buehler (Leinfelden-Echterdingen, DE, Germany), using a diamond grinding wheel, was used to cut the individual sample segments. To ensure that the cut segments were not affected by temperature, the cutting site was cooled with cutting fluid. The saw speed was set at 1800 rpm.
The individual segments were cast under the student’s supervision into a 40 mm diameter mold using a gas chamber and subsequently cured. The resin used was from Buehler with the trade name EpoxiCure.
EcoMet 250 Pro with the AutoMet 250 rotating head from the Buehler company was used to grind off the individual layers and then polish the individual segments. The rotational speed of the head (40 rpm) and table (100 rpm) were set on the machine, as well as the clamping force (20 N) by which the samples were pressed against the grinding wheel. To improve the cooling effect and chip evacuation, water is supplied to the grinding point. The grinding was performed in several steps with grinding wheels of different grit sizes (P180, P320, P600 and finally P1200). A diamond suspension with particle sizes of 9 μm and 3 μm was used to coat the samples. The polishing was carried out without cooling supply.
2.6. Macro-Mechanical Properties—Tensile Test
A Zwick/Roell Z020 universal testing machine (Ulm, Germany) was used to test injection-molded test specimens with a measured length of 80 mm in accordance with ČSN EN ISO 527-1, 527-2 [
16,
24]. The specimens were tested at room temperature until failure at a test speed of 10 mm/min. The tensile strength, R
m, was derived from the stress–strain curves. In addition, the modulus of elasticity was evaluated using an external Zwick extensometer (measured length 20 mm) at a test speed of 1 mm/min. Ten samples were tested and the average values are given.
2.7. Structural Properties
The changes in the structure caused by the effect of electron radiation and subsequent crosslinking were investigated by the gel test, wide-angle X-ray diffraction and optic microscopy. These changes confirmed the observed results of mechanical and tribological properties.
2.7.1. Gel Test
To determine the degree of crosslinking, a gel test was performed according to EN ISO 579 [
25]. A weighed mass of 1 g of irradiated PP filled with 25% glass fiber was mixed with 200 mL of Xylol solvent, which dissolved the amorphous part of the polypropylene and not the crosslinked part. The mixture was extracted for 6 h and then the dissolved components were separated by filtration. The pure extract is dried for 8 h under reduced pressure in a vacuum oven at 100 °C. The dried residue is weighed again and compared with the original weight of the bulk, where the result is given as a percentage of the degree of crosslinking.
2.7.2. Wide-Angle X-Ray Diffraction
Wide-angle X-ray diffraction was used to observe the crystal structure both in the surface layer and in the center of the sample’s cross-section. The crystal structure was measured on an X’PERT PRO MPD (Multi-Purpose Diffractometer) from PANalytical (Malvern, UK). All measurements were controlled at 40 kV and 30 mA. The angle of incidence ranged from 10° to 30° with a step of 0.013° and monochromatic CuKα radiation and a nickel filter was used. Crystallinity fraction
Xc of the sample was calculated from the ratio of the area of the crystalline peaks (
Ac) to the area of the amorphous part (
Aa) (the total scattering area) after subtracting the medium.
2.7.3. Optical Microscopy—Microtome Cuts
Samples were prepared by slicing across 20 μm thick slices on a Leica RM 2255 rotary microtome (Deer Park, IL, USA). These sections were examined under a Carl Zeiss NU-2 optical microscope (Oberkochen, Germany) and an Olympus BX41 camera (Tokyo, Japan) to determine the change in structure throughout the cross-section of the test material.
3. Results
This paper is concerned with the in-depth characterization of the mechanical and tribological behavior of electron radiation-modified filled polypropylene. The tribological properties (frictional force, acoustic emission, friction coefficient and removal depth), micro-mechanical properties (indentation hardness, indentation modulus and indentation creep) and morphological properties (gel content and crystallinity) were measured on the surface and over the entire depth of the measured sample. Emphasis is placed on the mechanical properties and tribological behavior of the layers and their inter-relationship.
3.1. Micro-Tribological Properties—Scratch Test
A scratch tester from CSM Instruments was used to clarify the tribological behavior of the layers. Using the scratch tester, the tribological properties (frictional force, acoustics emission, frictional coefficient and removal depth) were measured at three loading forces (0.5 N, 1 N and 5 N). The tribological properties indicate that tribological resistance, i.e., the resistance of the surface to mechanical damage due to friction, is increased due to irradiation.
Table 4 and
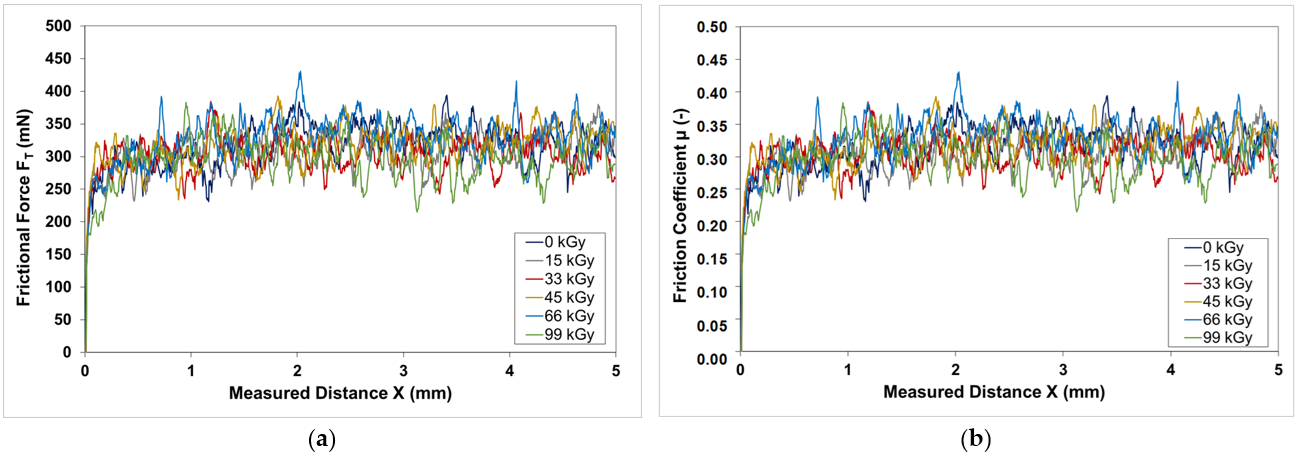
Figure 1 show the tribological properties (frictional force, acoustic emission, friction coefficient and layer removal) measured at a load of 0.5 N. When low load is applied, it can be observed that the tribological properties are affected by the surface quality of the tested specimens, which showed an oscillation of the values. Even so, it can be observed that an improvement in the observed tribological properties was detected due to the irradiation. For example, the coefficient of friction was measured at around 0.33 for an unirradiated sample, and with the application of radiation, an improvement in the coefficient of friction to a value of 0.30 was observed at a radiation dose of 45 kGy and 66 kGy. The application of radiation resulted in an improvement in tribological properties of up to 9%. The difference in the coefficient of friction between doses 45 kGy and 66 kGy is within the standard deviation, so we cannot conclude that there is a meaningful difference between the two doses that warrants further analysis. Further measurements confirm statistically significant differences and results.
As stated by Manas et al. [
26] in their research, ionizing beta radiation significantly improves the wettability of the material, which is characterized by a decrease in contact angles of wetting, resulting in an improvement in the coefficient of friction of the tested materials. With increasing radiation doses, the wettability of the material surface improves, which has a significant effect on improving the tribological properties (coefficient of friction) of the surface of the tested polypropylene.
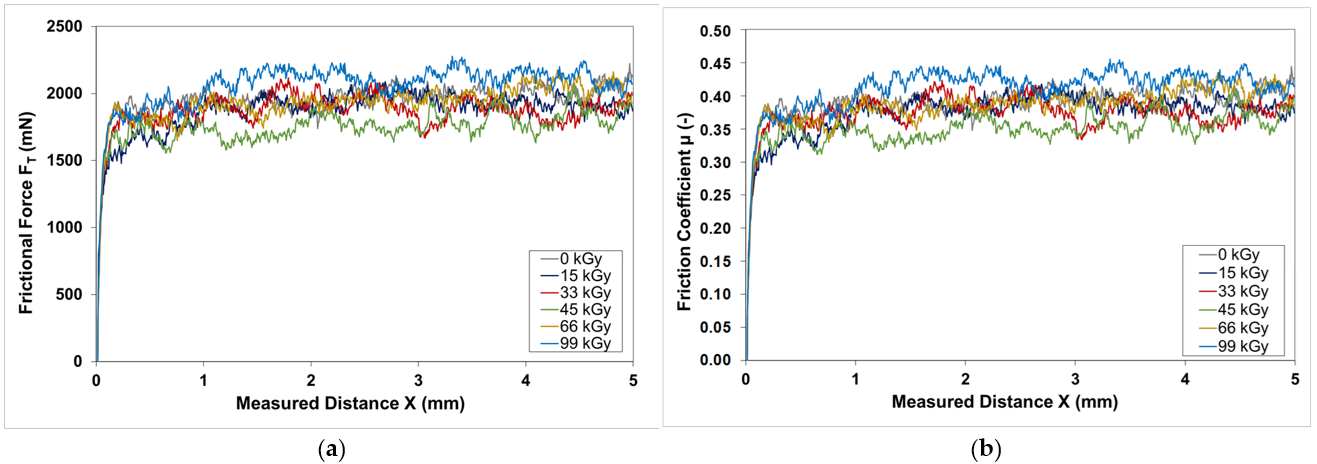
Table 5 and
Figure 2 show the tribological properties measured at a load of 1 N. From the measured results of the tribological properties, for all the variables monitored (friction force, acoustic emission, friction coefficient and layer removal), the highest values were found for the non-irradiated PP. On the other hand, due to the application of electron radiation, an improvement in tribological properties was detected. The filled PP irradiated with the 45 kGy radiation dose showed the best values of tribological properties. The main tribological variable was the coefficient of friction, which showed values of approximately 0.45 for the non-irradiated PP, and on the contrary, the coefficient of friction was 0.35 for the irradiated PP with a radiation dose of 45 kGy. The improvement in the friction coefficient between the non-irradiated and irradiated PP was 22%.
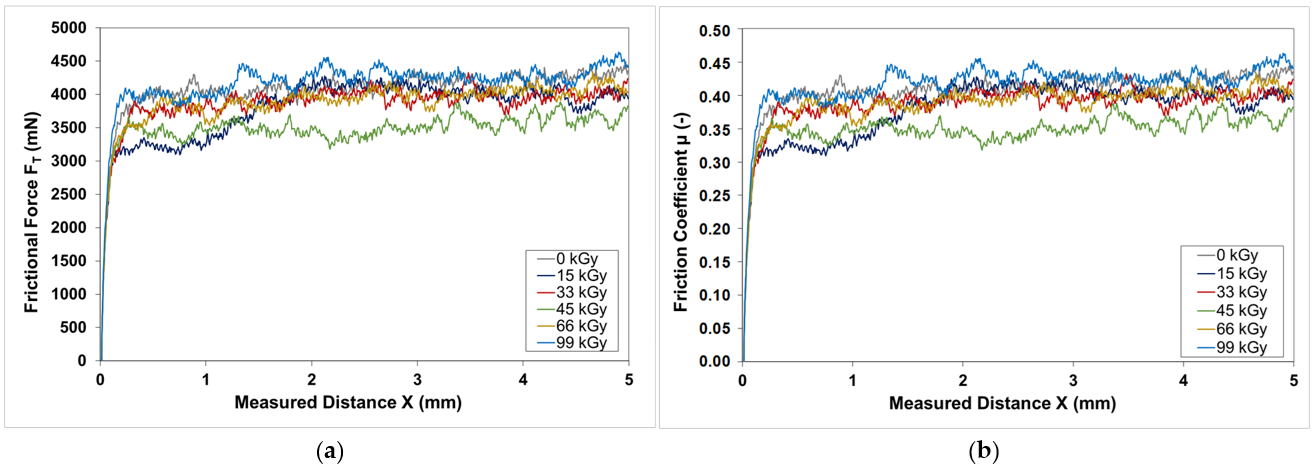
Using an applied load of 5 N (
Table 6 and
Figure 3), tribological properties were measured in similar tendencies as for a load of 1 N. The worst tribological properties (e.g., a friction coefficient of 0.42) were measured for the non-irradiated filled PP. Electron beam-modified PP showed an improvement in tribological properties for all applied doses. PP modified with 45 kGy showed the best tribological properties, with friction coefficient values of 0.35. The improvement in the coefficient of friction due to electron irradiation was 17%. Higher doses of radiation led to a deterioration in the tribological properties of the part starting to degrade.
When comparing the tribological properties at different loading force values, it can be concluded that the tribological properties improve with increasing indentation force. When applying a low load (0.5 N), the difference in tribological properties is small, which is due to the surface quality. Because of the low load, the surface quality affects the final measurement, which then does not show any significant differences, and the measured values fluctuate within considerable intervals. Based on the measured tribological properties, a higher measured load can be recommended to cancel out the effect of higher surface quality. When comparing the values measured at loads of 0.5 N and 5 N, the tribological properties improved by up to 9%.
Due to the modification of the PP, the tribological properties were improved, which was reflected in an increase in the resistance of the surface layer to mechanical damage. This improvement is due to the change in structure, which is also reflected in the change in micro-mechanical properties. This ensures that the surface of the component can be used even in demanding applications that require high surface resistance. It can be concluded that the results of the tribological properties coincide with the results of the micro-mechanical properties presented in
Section 3.2.
3.2. Micro-Mechanical Properties
The micro-mechanical properties were measured at three loading forces (0.5 N, 1 N and 5 N) and also in different layers below the sample surface to show the effect of radiation on the whole sample structure.
3.2.1. Micro-Mechanical Properties Under Different Loading Forces (0.5 N, 1 N and 5 N)
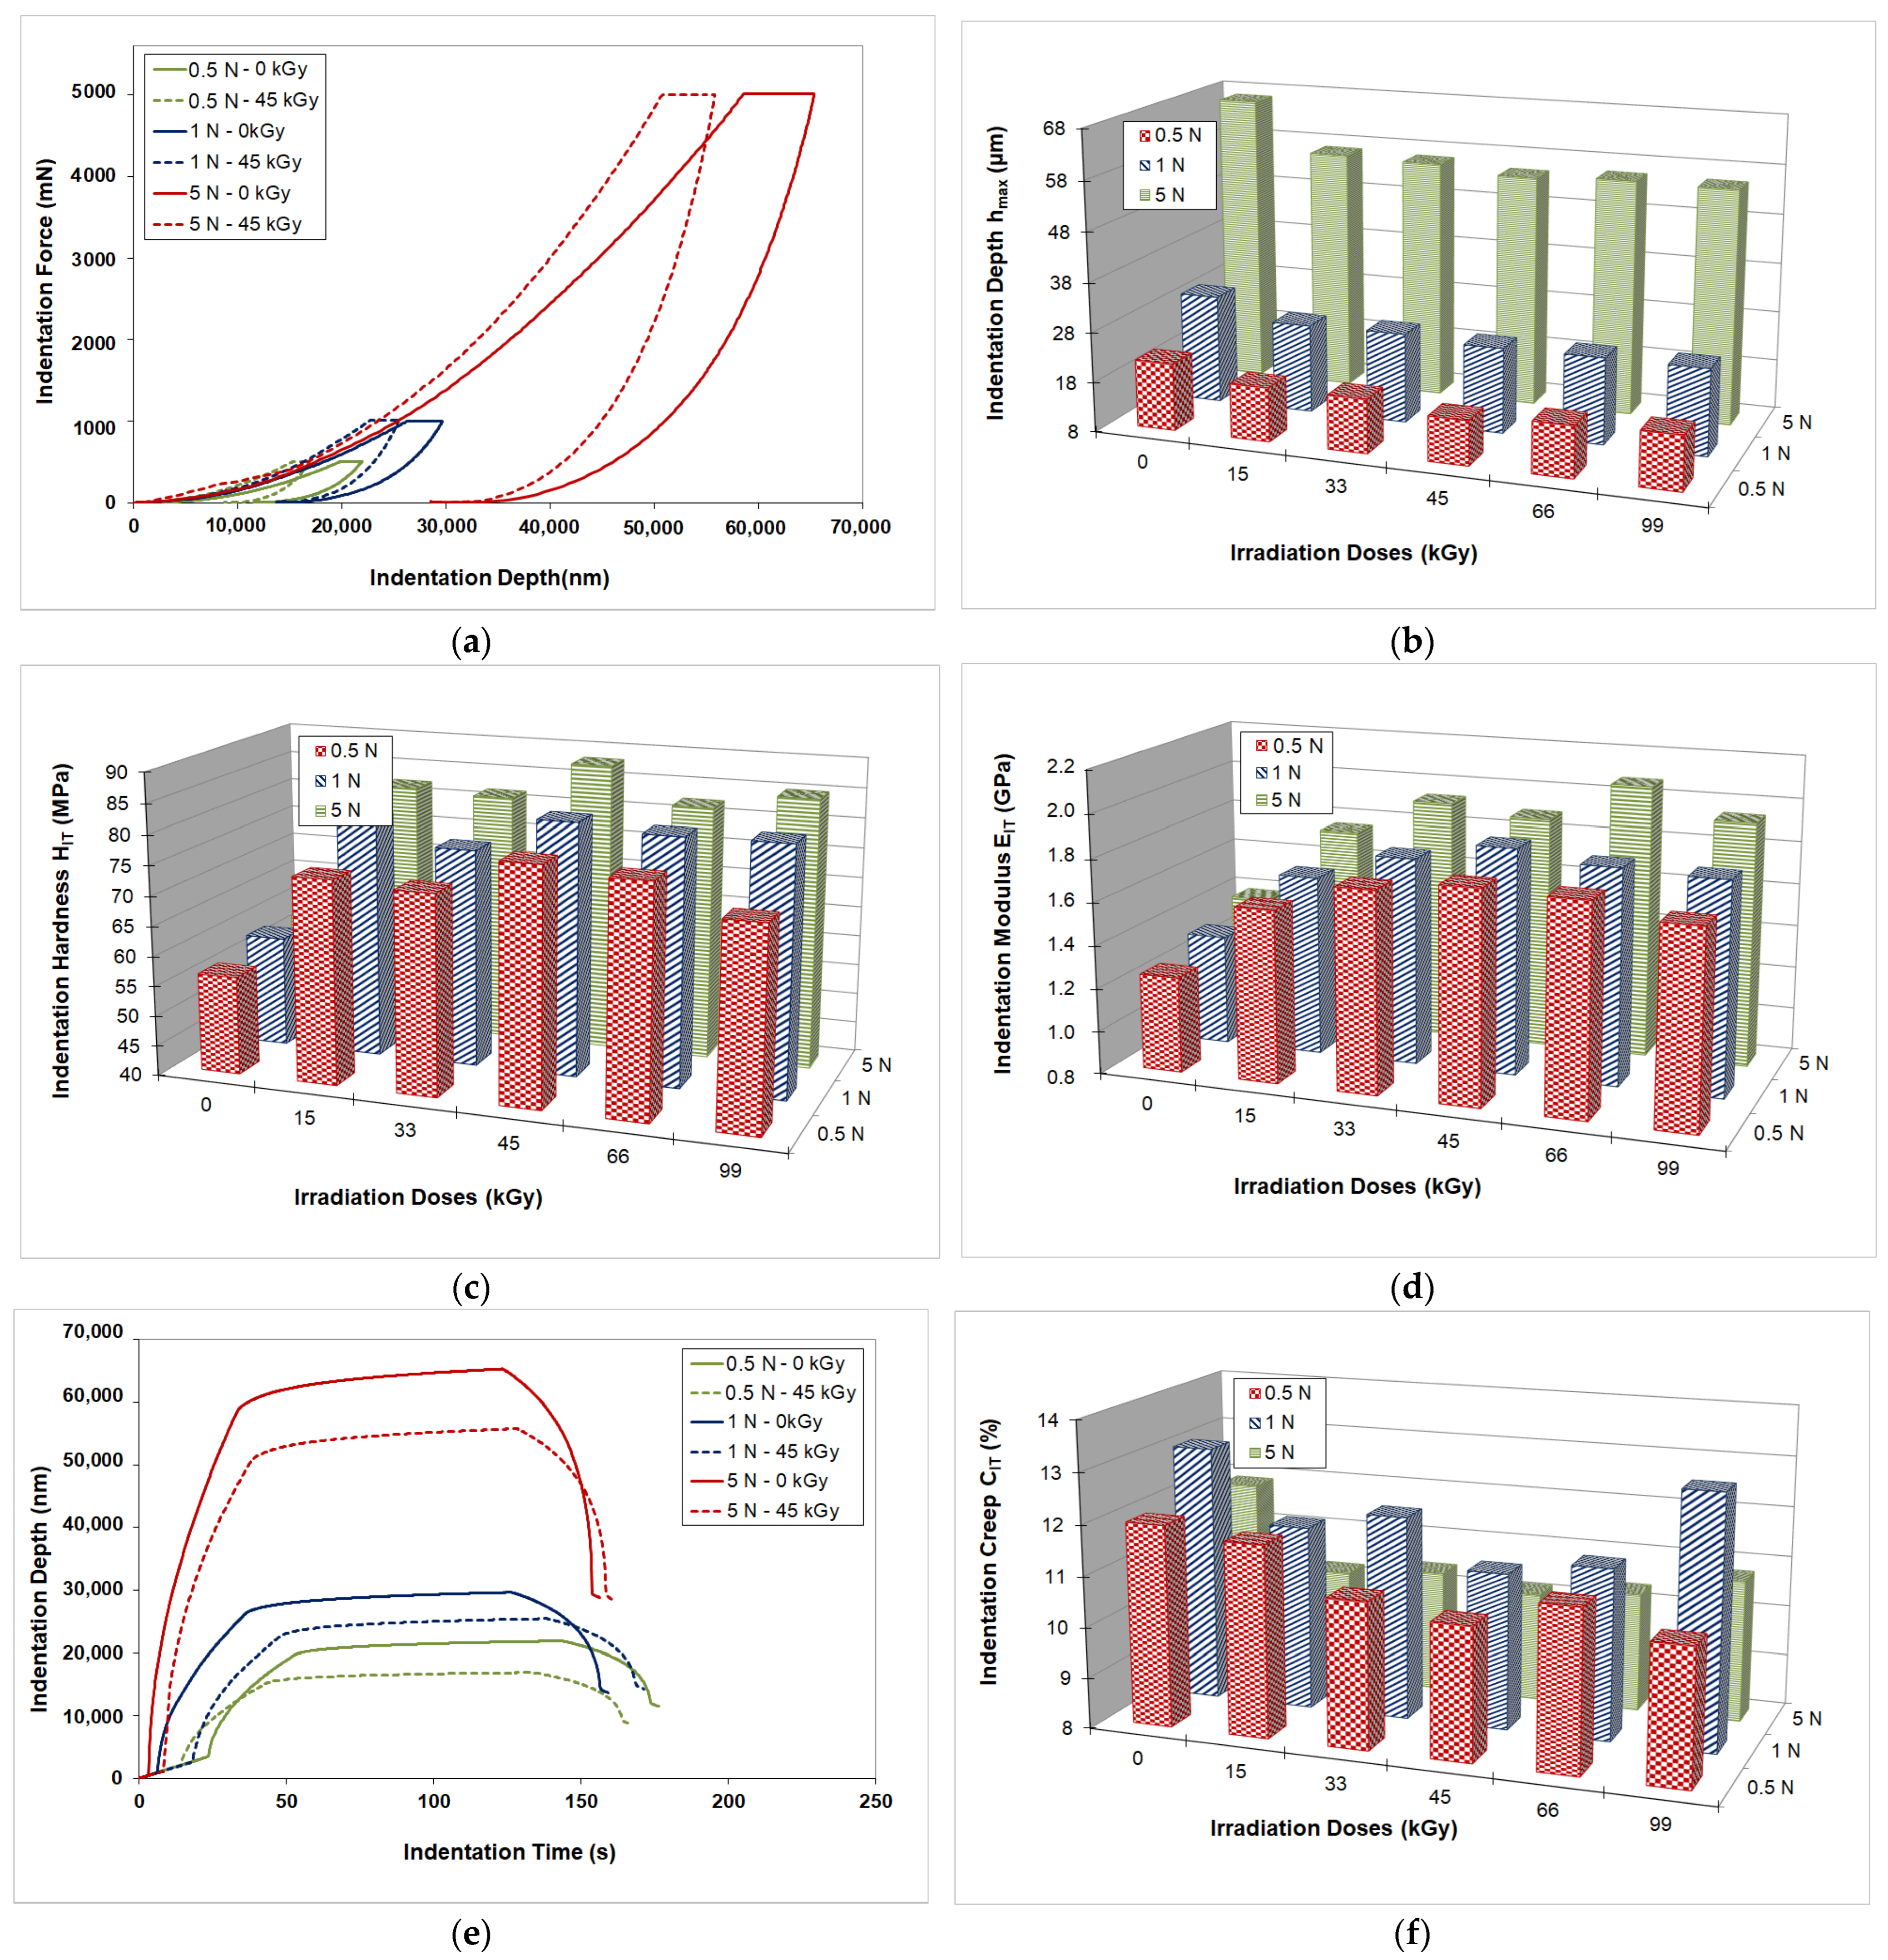
The micro-mechanical properties were measured at three loads (0.5 N, 1 N and 5 N) to investigate the effect of the passage of electron radiation through the measured sample on these properties. All the micro-mechanical properties investigated are calculated from the indentation characteristics, which are shown in
Figure 4a. The shape of the indentation curve is influenced by the response of the measured material to the indentation. The shape of the indentation curve is not only used to calculate the hardness and modulus of elasticity but is a source of very important information that manifests itself in a random discontinuous waveform.
Figure 4a plots the dependence of the load waveform on the depth of indenter penetration for three loads, and for each load, the non-irradiated and irradiated 45 kGy filled PP is plotted. The essence of the indentation measurement is the continuous recording of the load force, P, and the instantaneous tip position, h, and the graphical representation of this dependence is referred to as the indentation curve, sometimes also referred to as the load–displacement curve (P-h). At first glance, it is obvious that the material deformed plastically very easily even in the constant load region, i.e., significant creep was observed. The shape of the lightening part of the curve showed visco-plastic behavior as the material deformed further plastically as the load was reduced.
From the indentation characteristics, the maximum depth of indentation was found at all loads. As can be seen, at a load of 0.5 N, an indentation depth of 23 µm was measured, at a load of 1 N, a depth of 30 µm was measured, and at a maximum load of 5 N, a maximum indentation depth of 66 µm was measured. The maximum depth of indentation also varied with each radiation dose with the minimum value always at a radiation dose of 45 kGy, which corresponds to the maximum micro-mechanical properties observed.
A graphical evaluation of the measured results of the indentation hardness for filled PP as a function of different radiation doses and different loading forces is plotted in
Figure 4c. The indentation hardness values of the filled PP are significantly affected by the magnitude of the loading force. As the loading force increases, the values of the indentation hardness increase substantially. For all loads, the optimum radiation dose appears to be 45 kGy, where the maximum values of indentation hardness were achieved. As can be seen for the 0.5 N load, the non-irradiated polypropylene had an indentation hardness of 56 MPa, and when electron radiation was applied, the indentation hardness reached maximum values at the 45 kGy dose (79 MPa). The difference between the non-irradiated and irradiated filled polypropylene was 41%. At higher radiation doses, due to the predominance of degradation over crosslinking, the indentation hardness decreased to 73 MPa. Similar trends were measured at the 1 N load. For the non-irradiated sample, an indentation hardness of 58 MPa was measured, and with increasing dose, there was an increase in indentation hardness with the maximum value at a radiation dose of 45 kGy (82 MPa). This difference is 42%. A decrease in indentation hardness was observed with a higher radiation dose. At a load of 5 N, the non-irradiated filled polypropylene had an indentation hardness of 58 MPa, and with the application of electron radiation, a maximum value was measured at a radiation dose of 45 kGy (88 MPa). The application of radiation resulted in a 52% improvement in indentation hardness. Higher doses of radiation resulted in the material beginning to degrade and therefore a decrease in hardness. From the indentation hardness results, it can be seen that the application of higher loading forces will cause the indenter to penetrate at greater depths and thus change the indentation hardness, which is due to the crosslinking of the filled polypropylene by electron radiation. The difference in the indentation hardness when applying a load of 0.5 N and 5 N at a radiation dose of 45 kGy was 12%. This suggests that deeper below the surface of the sample, there is better crosslinking of the structure. These results correspond with the indentation hardness measurements at different distances from the sample surface (
Section 3.2.2), where all values also increased.
The imprint module versus radiation dose at different loading forces is shown in
Figure 4d. As can be seen, for almost all radiation doses with increasing loading force, there is an increase in the embossing modulus for PP filled with 25% glass fiber. When a load of 0.5 N was applied, the indentation modulus for the non-irradiated filled polypropylene was found to be 1.25 GPa, and with the application of electron radiation, there was an increase in the indentation modulus with the maximum value at a radiation dose of 45 kGy (1.78 GPa). With the application of radiation, there is a 42% improvement in the indentation modulus. Higher radiation doses again lead to the start of the degradation process. When a load of 1 N was applied, similar tendencies were measured. The indentation modulus was measured to be 1.31 GPa for non-irradiated filled PP and 1.85 GPa was measured for the irradiated dose of 45 kGy. The improvement in the indentation modulus due to electron irradiation was 41%. When the highest load (5 N) was applied, the indentation modulus of the non-irradiated filled PP was measured to be 1.39 GPa, and when electron radiation was applied, the maximum values were measured at a radiation dose of 66 kGy (2.07 GPa). The improvement in the indentation modulus was 49%. Higher radiation doses again led to a decrease in the indentation modulus due to the prevailing degradation processes. When comparing the individual loads, it can be noted that the difference between the 0.5 N load and the 5 N load is 16%. This suggests that at a greater depth below the surface of the tested polypropylene, a higher percentage of enhancement occurs due to electron radiation. These findings correspond with the results measured at different distances from the sample surface in
Section 3.2.2.
Figure 4e shows the indentation characteristics used to calculate creep behavior using Equation (6) as given in
Section 2.5. An important part of this characteristic is the endurance section at constant load, where the creep effect causes the indentation depth to increase without a change in load.
Figure 4f shows the indentation creep when three loads are applied for different radiation doses. The results of the indentation creep correspond with the results of the indentation hardness and modulus, with the filled polypropylene irradiated with an electron radiation dose of 45 kGy showing the best values of indentation creep. For example, at a load of 5 N, the non-irradiated PP showed creep values of 11.9%, and with the application of electron radiation, the creep value improved to 10.1%. The difference between non-irradiated and irradiated PP is 18%. When comparing the indentation creep at different loading forces of 0.5 N and 5 N, the creep behavior is 10%, where better creep behavior is exhibited by the loading of 5 N. Higher doses of radiation again show a deterioration in creep behavior, which is due to degradation processes.
3.2.2. Micro-Mechanical Properties in Different Layers Below the Surface
In order to confirm the results found in
Section 3.2.1, sections were cut at each depth and the micro-mechanical properties were measured here.
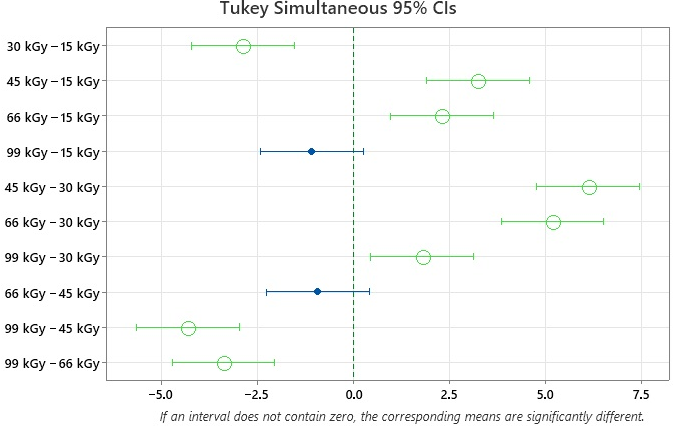
To verify whether the results of the micro-mechanical tests are significantly different to each other and whether the radiation dose influences their properties in a statistically significant way, a test was performed. The method chosen for this testing was a one-way ANOVA test with Tukey’s method to test all doses in pairings (
Figure 5).
The difference in micro-mechanical properties between doses 45 kGy and 66 kGy is within the standard deviation, so we cannot conclude that there is a meaningful difference between the two doses that warrants further analysis. Further measurements confirm statistically significant differences and results.
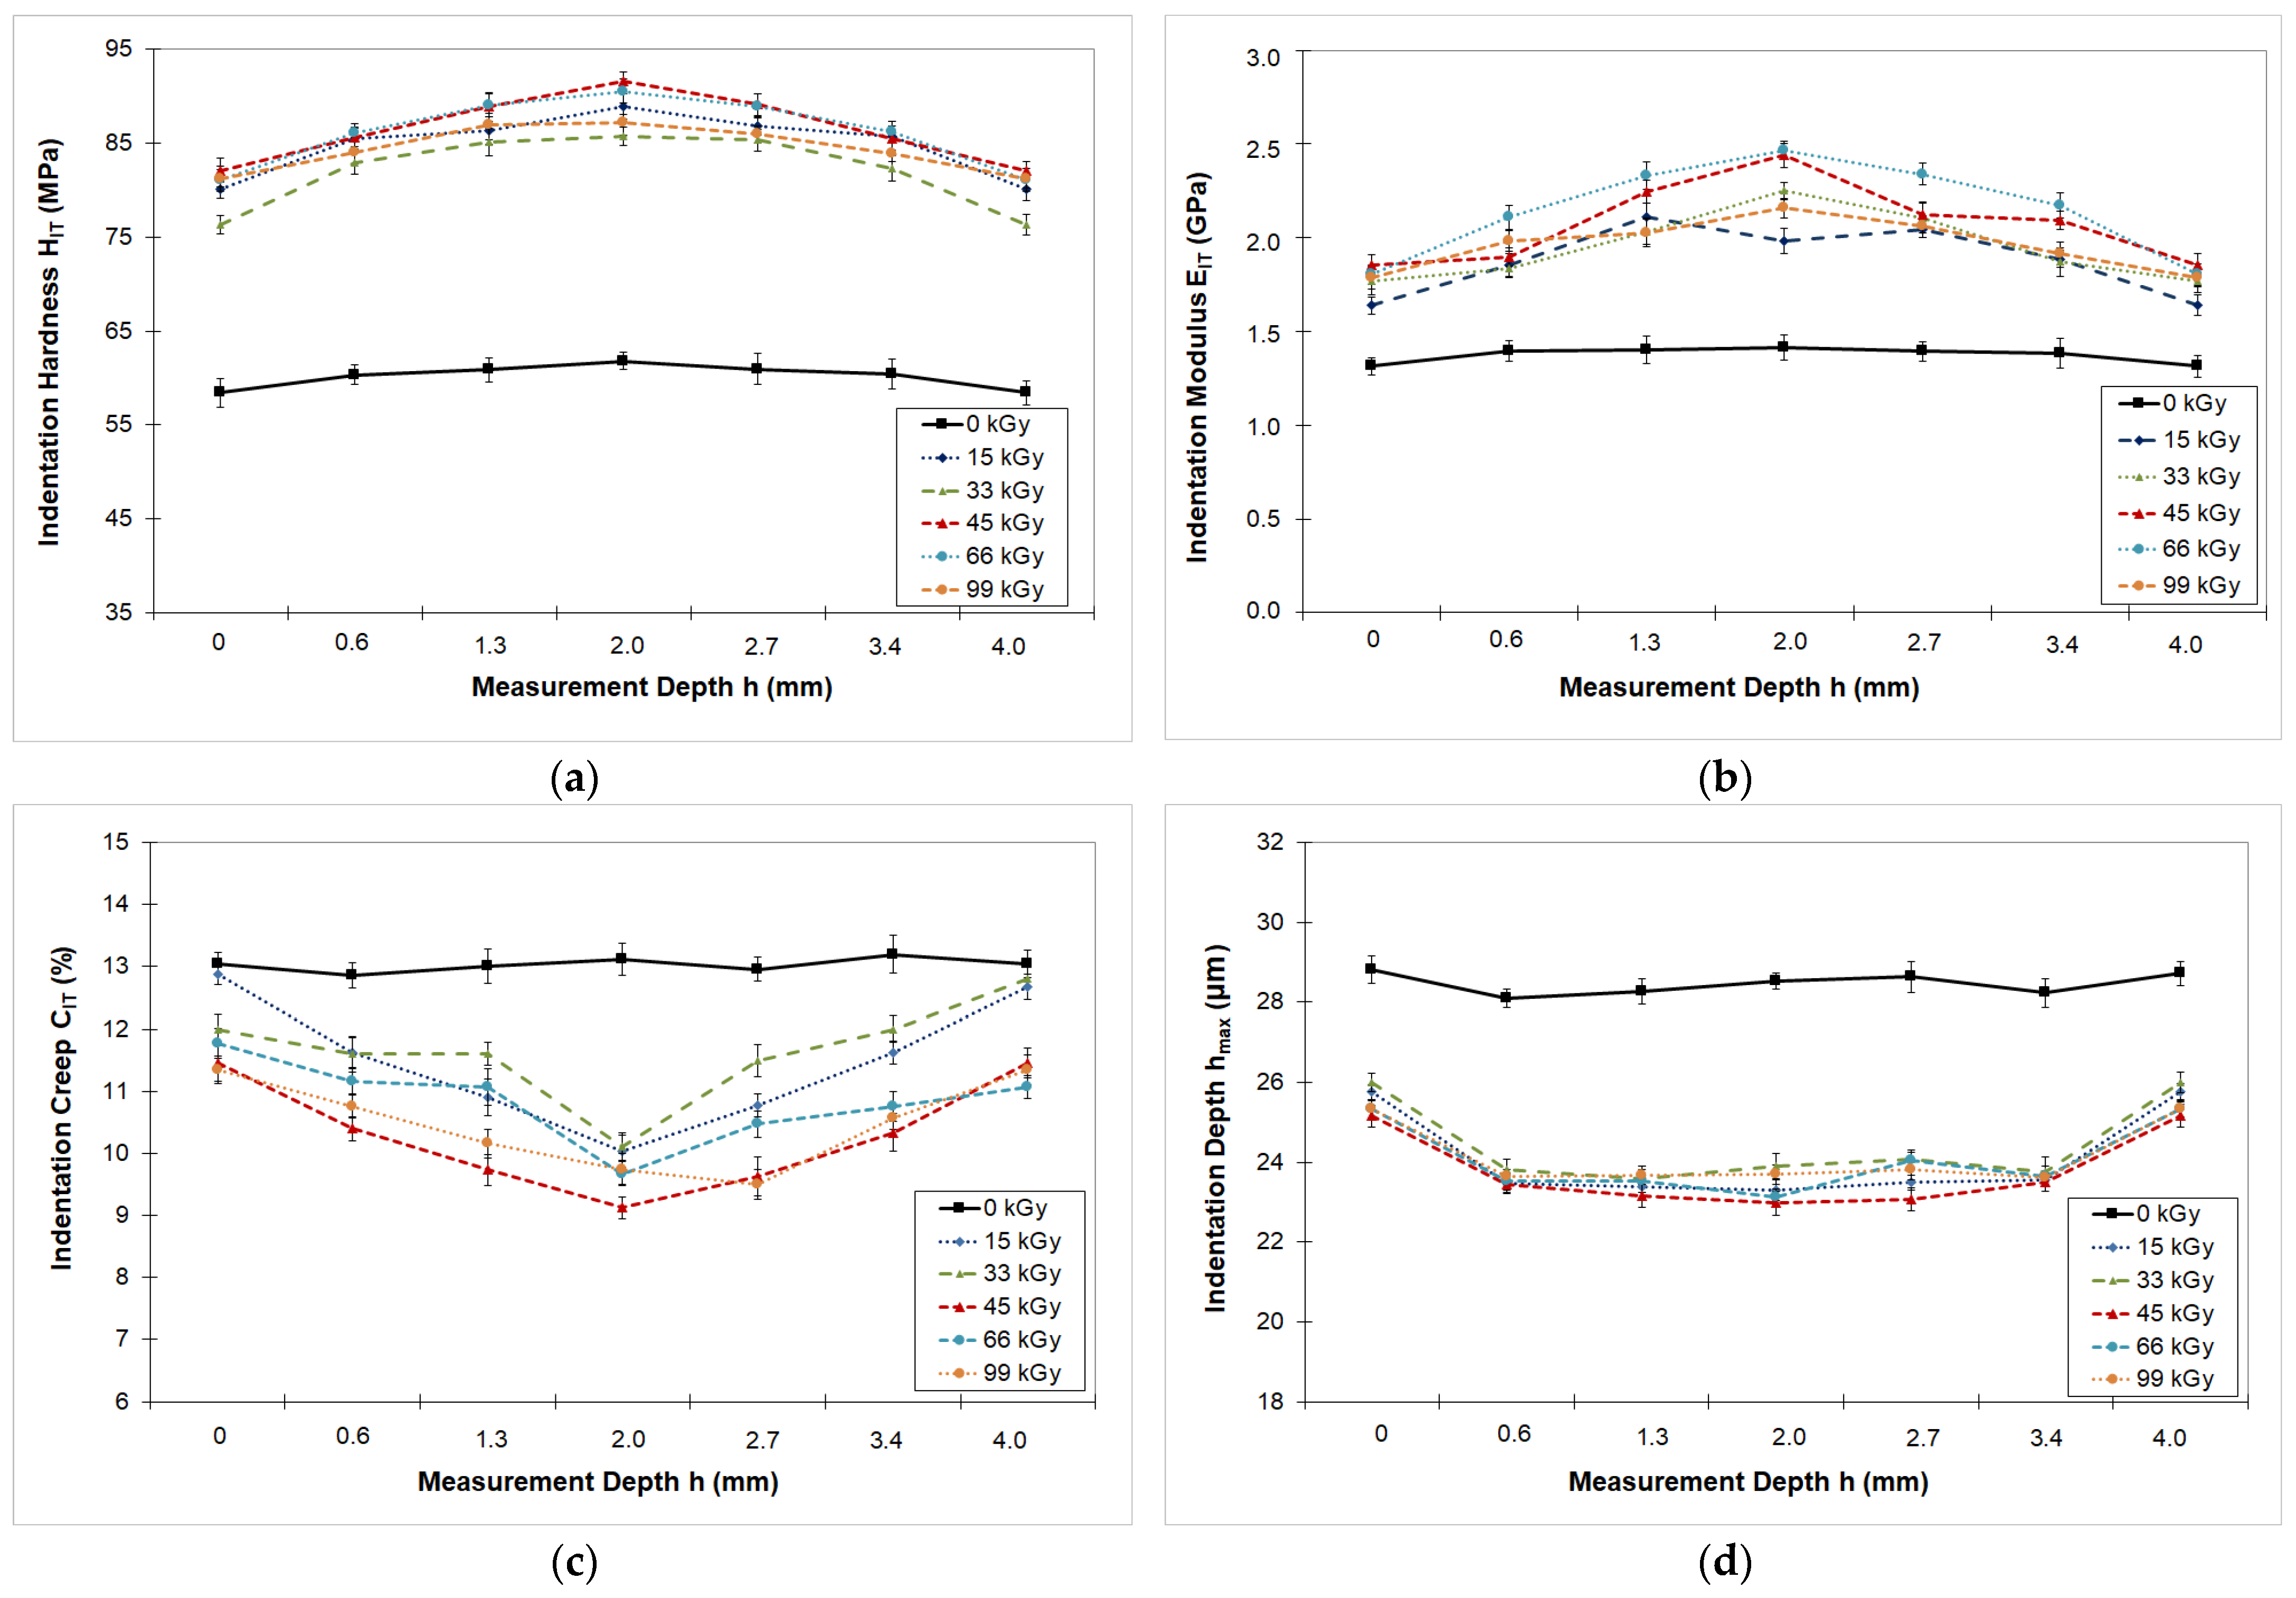
Comparisons of the measured values of the indentation hardness of non-irradiated and irradiated PP filled with 25% glass fiber as a function of different distances from the sample surface are shown in
Figure 6a. As can be seen from the figure, there is an increase in the indentation hardness with increasing distance from the sample surface (0 mm) towards the center of the sample (2 mm) for all irradiation doses. For the non-irradiated PP filled with 25% glass fiber, constant values of the indentation hardness (60 MPa) were measured over the entire cross-section of the sample. After the application of electron radiation, the indentation hardness increased towards the center of the sample for all radiation doses. The highest indentation hardness was exhibited by the 45 kGy radiation dose and by the measurements at the balance loading forces. For the 45 kGy radiation dose, a hardness of 82.1 MPa was measured at the sample surface and increased to 91.6 MPa towards the center of the sample. Between the surface and the center (distance of 2 mm) of the specimen, the increase in indentation hardness was about 12%. The other radiation doses showed the same trend with a similar increase in values.
Similar trends were measured for the indentation modulus (
Figure 6b) as for the indentation hardness measured across the entire cross-section of the polymer tested. For the non-irradiated body, the measured values of the indentation modulus across the width of the body are similar (1.4 GPa). When electron radiation was applied, an increase in the values of the indentation modulus was measured towards the center of the part. The radiation doses of 45 kGy and 66 kGy showed the highest values of the indentation modulus. The indentation module showed similar (maximum) values for both radiation doses, which correspond to other mechanical properties (e.g., indentation hardness). At the surface of the sample, the indentation modulus values were measured to be 1.85 GPa, and towards the center of the section (2 mm distance), the indentation modulus values were measured to be 2.44 GPa. When comparing the values measured at the surface of the sample and at the center of the sample, the difference was up to 32%. A similar trend was measured for the other radiation doses. At high doses of radiation (99 kGy), a slight decrease in the indentation modulus was measured due to incipient degradation.
Figure 6c shows the results of indentation creep measurements at different depths below the surface. Again, the non-irradiated filled PP showed consistent values of indentation creep across the entire cross-section (13%). On the other hand, with the application of electron irradiation, the indentation creep showed improved values towards the center of the part. The best results were measured with a radiation dose of 45 kGy. At the surface of the specimen, indentation creep values of 11.5% were measured, and towards the center of the section (distance of 2 mm), the improvement was 9.1%. The difference between the surface and the center of the specimen was 26%.
Figure 6d shows informative values for the maximum depth reached. These results correspond to previous measurements of the indentation hardness, indentation modulus and indentation creep. For non-irradiated PP, the indenter reached a maximum depth of 28 µm, and when electron irradiation was applied, the depth was around 23 µm.
The results of the micro-mechanical properties obtained by the indentation method at different loading forces and also across the cross-section of the specimen correspond with the structural measurements made by wide-angle X-ray diffraction and the microtome section images taken by the microscope presented in
Section 3.4. On the surface of the tested PP, lower values of micro-mechanical properties were measured compared to the center of the body, corresponding to the change in crystalline and amorphous content, gel content, etc.
As the measurement results show, the indentation method used is able to detect even very small changes in the mechanical properties of the tested polymers over the entire cross-section of their thickness. Almost all polymers showed an increase in hardness with respect to the center of the sample. Due to the high precision of the indenter and the measuring device, both small differences across the cross-section and quite significant differences could be observed.
The mechanical and tribological properties of composite polypropylene modified by electron radiation show significant changes, which confirms the findings of the authors in publications [
4,
27,
28]. As the authors state in their works, the influence of electron radiation causes a change in structure that affects the final properties of the part.
3.3. Macro-Mechanical Properties—Tensile Test
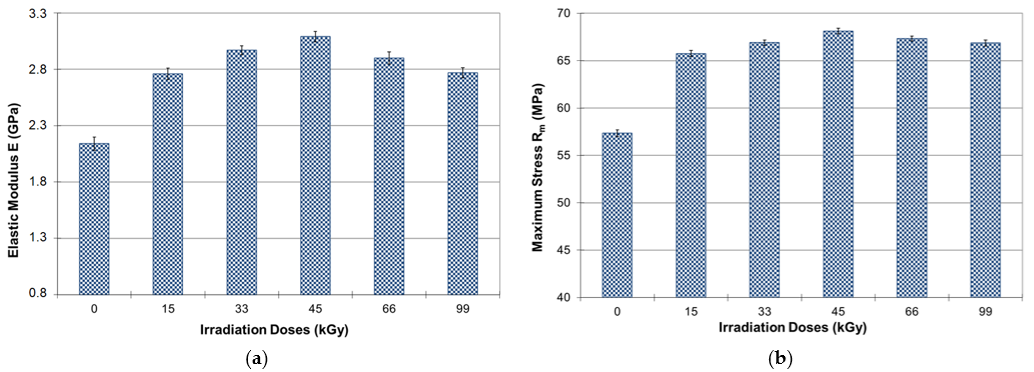
The macro-mechanical properties of modified filled polypropylene characterized by tensile testing showed very similar results to the micro-mechanical properties. The tensile test confirmed that the highest tensile strength (R
m) was found in polypropylene irradiated with a dose of 45 kGy (68 MPa), while the lowest value (57 MPa) was measured in non-irradiated polypropylene (
Figure 7a). This represents a 19% increase in tensile strength. The stiffness values expressed by the modulus of elasticity (E) showed the highest value of 3.09 GPa at an irradiation dose of 45 kGy, while the lowest stiffness value of 2.14 GPa was found in unirradiated polypropylene (
Figure 7b). The difference in the modulus of elasticity between unirradiated and irradiated filled polypropylene at a dose of 45 kGy was 44%. Changes in macro- and micro-mechanical properties were observed in both the micro- and macro-structures of the tested samples. These findings correlate with micro-mechanical and morphological properties.
The increase in tensile strength and stiffness was accompanied by an increase in crosslinking up to 68% at a radiation dose of 45 kGy due to the formation of a 3D lattice (
Section 3.4.1). The radiation that penetrated the samples and reacted with the crosslinking agent gradually created crosslinking (3D lattice), first in the surface layer and then in the total volume, which led to significant changes in the behavior of the sample. The 3D lattice, together with the crystalline phase, caused changes mainly in the surface layer, which led to a significant increase in the microhardness and microhardness of the surface layer. This resulted in higher resistance of the surface layer to wear, scratches, etc. The penetration of beta radiation through the entire volume caused an increase in macro-mechanical properties, as already mentioned (tensile strength, stiffness, and thermal resistance).
As Ovsík et al. state in their previous publication [
27], radiation crosslinking improves the micro-mechanical and tribological properties of non-filled polypropylene as well. For example, in terms of measured indentation hardness, the lowest value among all tested samples was measured for the virgin polymer (38 MPa), while the highest indentation hardness value was measured for PP irradiated with 45 kGy. Doses higher than 45 kGy led to a decrease in indentation hardness. The maximum indentation hardness (56 MPa) was measured in samples irradiated with 45 kGy. The difference in hardness between virgin PP and PP exposed to radiation was 47%. It has been shown that changes in micro-mechanical and tribological properties are closely correlated with changes in crystallinity. These results confirm the findings of this study, where polypropylene filled with 25% glass fibers showed similar trends in property growth due to electron irradiation to unfilled polypropylene.
3.4. Morphological Properties
To assess the effect of electron beam radiation on the filled polypropylene, morphological properties were measured (the gel test, wide-angle X-ray diffraction and microtome sections examined under a microscope). These results are used to confirm the changes in the structure that lead to changes in the micro-mechanical and tribological properties.
3.4.1. Gel Content
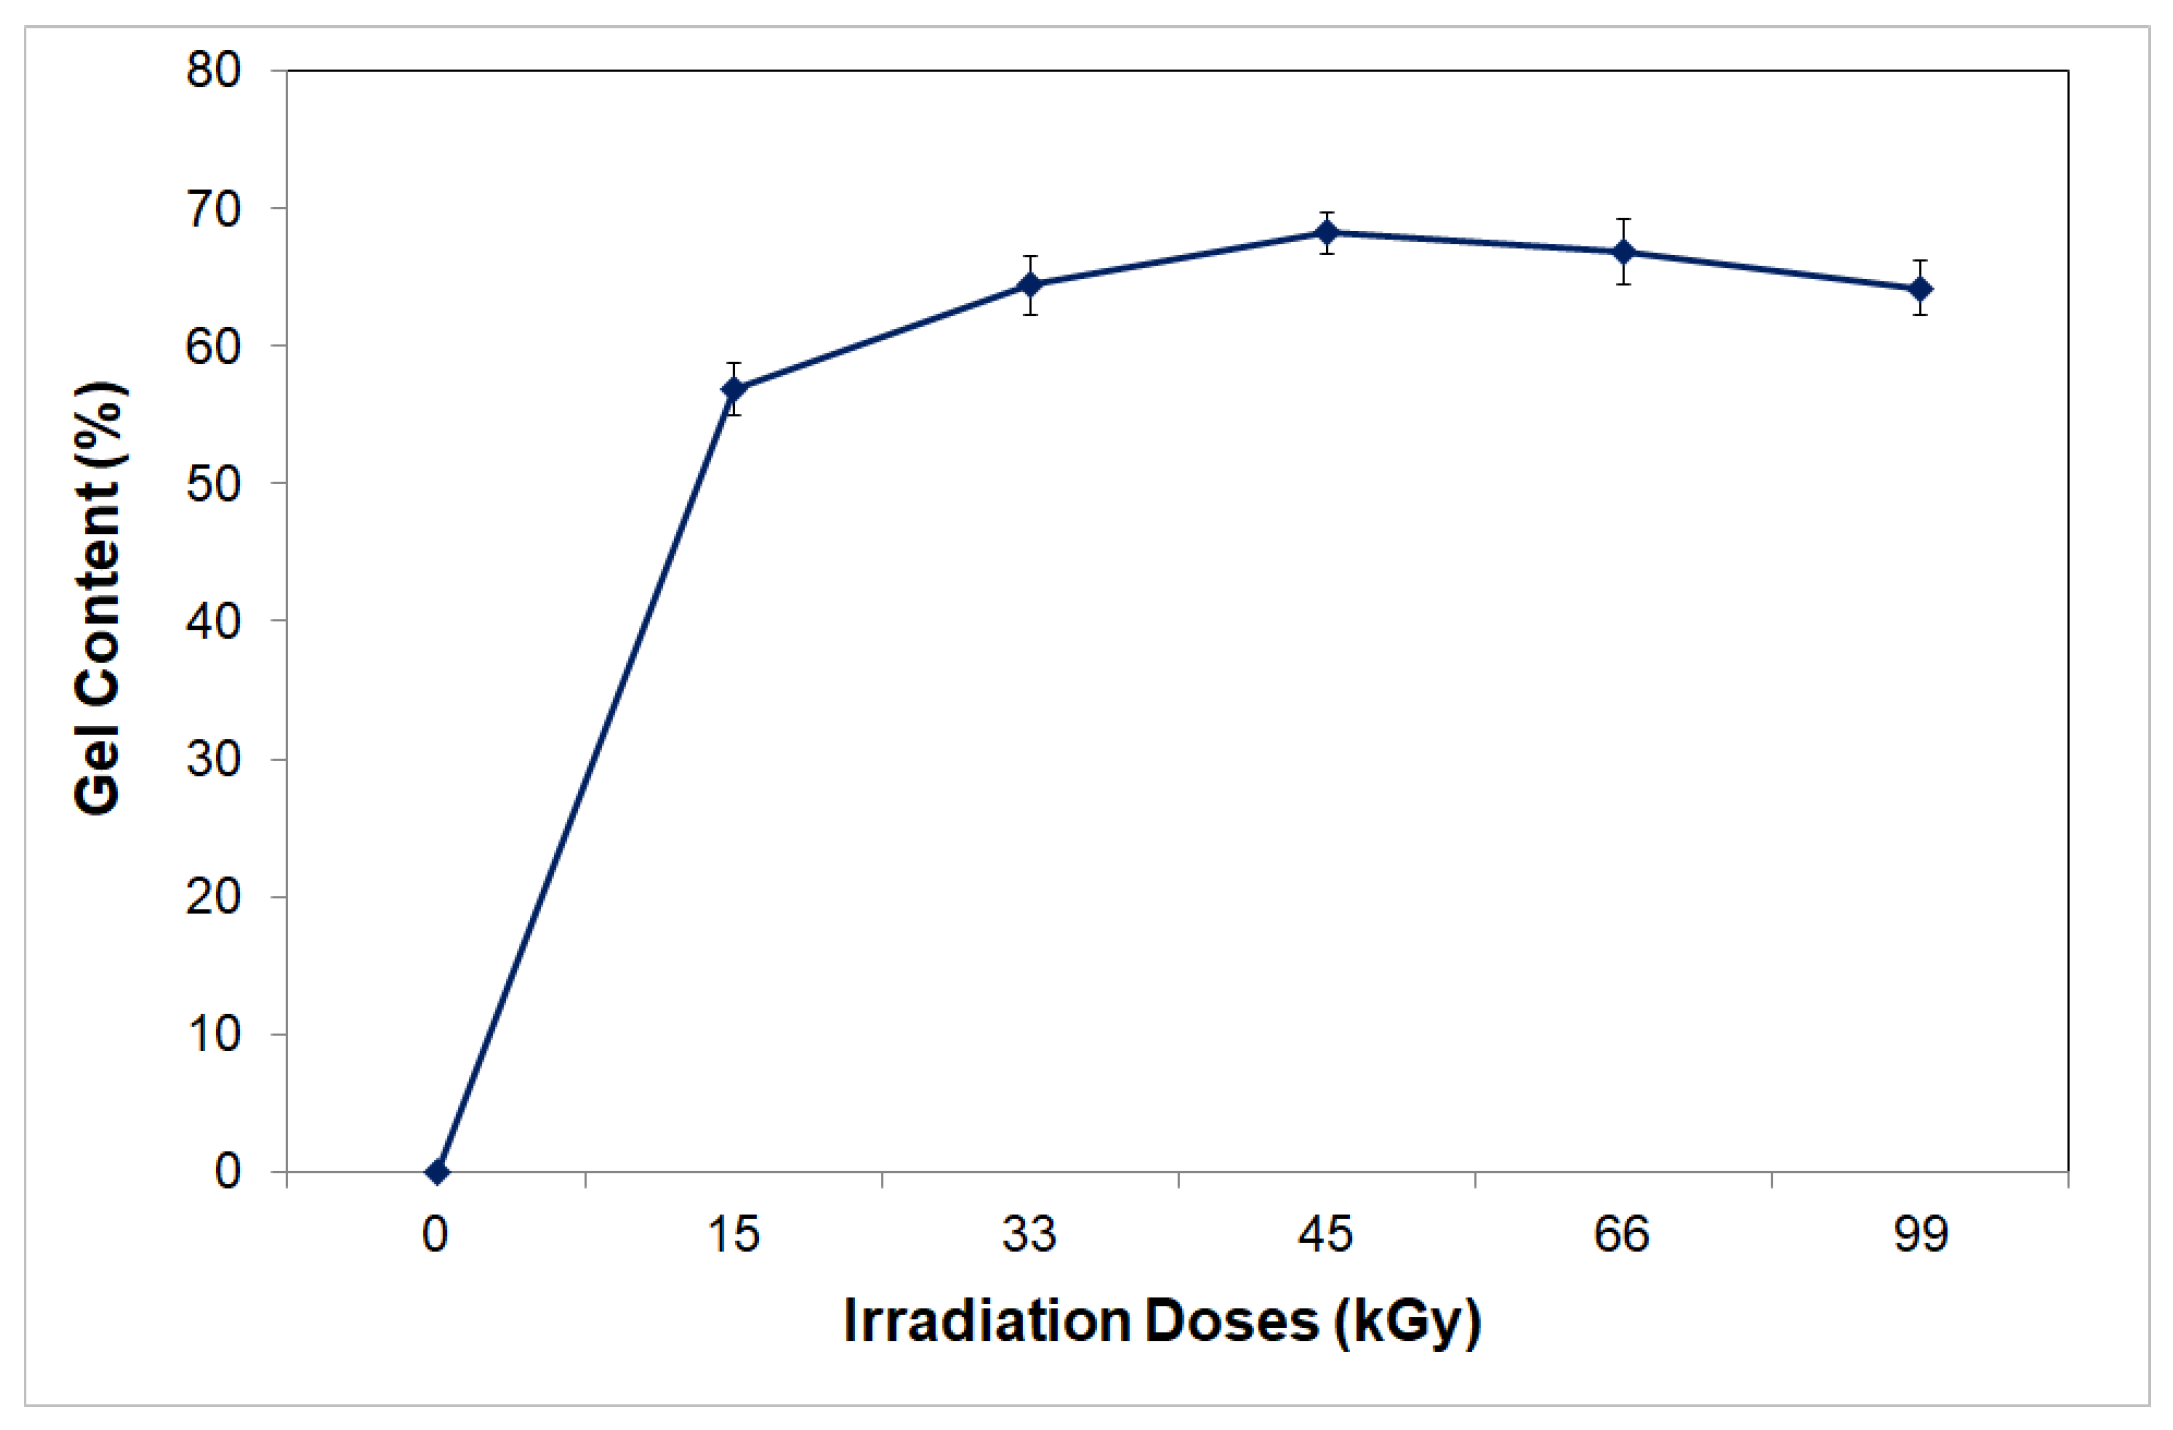
The gel test is used to determine the degree of crosslinking (gel content) in the filled polypropylene being tested. The dependence of the crosslinked phase content on the absorbed radiation dose of PP filled with 25% glass fiber is shown by the trend curves in
Figure 8. It is known from previous studies that crosslinking occurs mainly in the amorphous region. This suggests that as the content of the crosslinked phase (gel) increases, the fraction of the structural network forms predominantly in the amorphous region of the polymer due to irradiation increases. In the case of PP filled with 25% glass fiber, the highest crosslinked phase (gel) content was measured in the test bodies irradiated with a dose of 45 kGy (68%). As can be seen from the measurement results, the lowest dose (15 kGy) already results in a huge increase in gel content (57%). At higher radiation doses (66 and 99 kGy), the gel content of the filled PP decreases slightly (the decrease in gel content at doses of 66 and 99 kGy is only 6% compared to the dose of 45 kGy). This decrease is due to the incipient degradation processes caused by the high radiation dose. The gel content corresponds exactly with the results of the micro-mechanical and tribological property measurements.
3.4.2. Wide-Angle X-Ray Diffraction
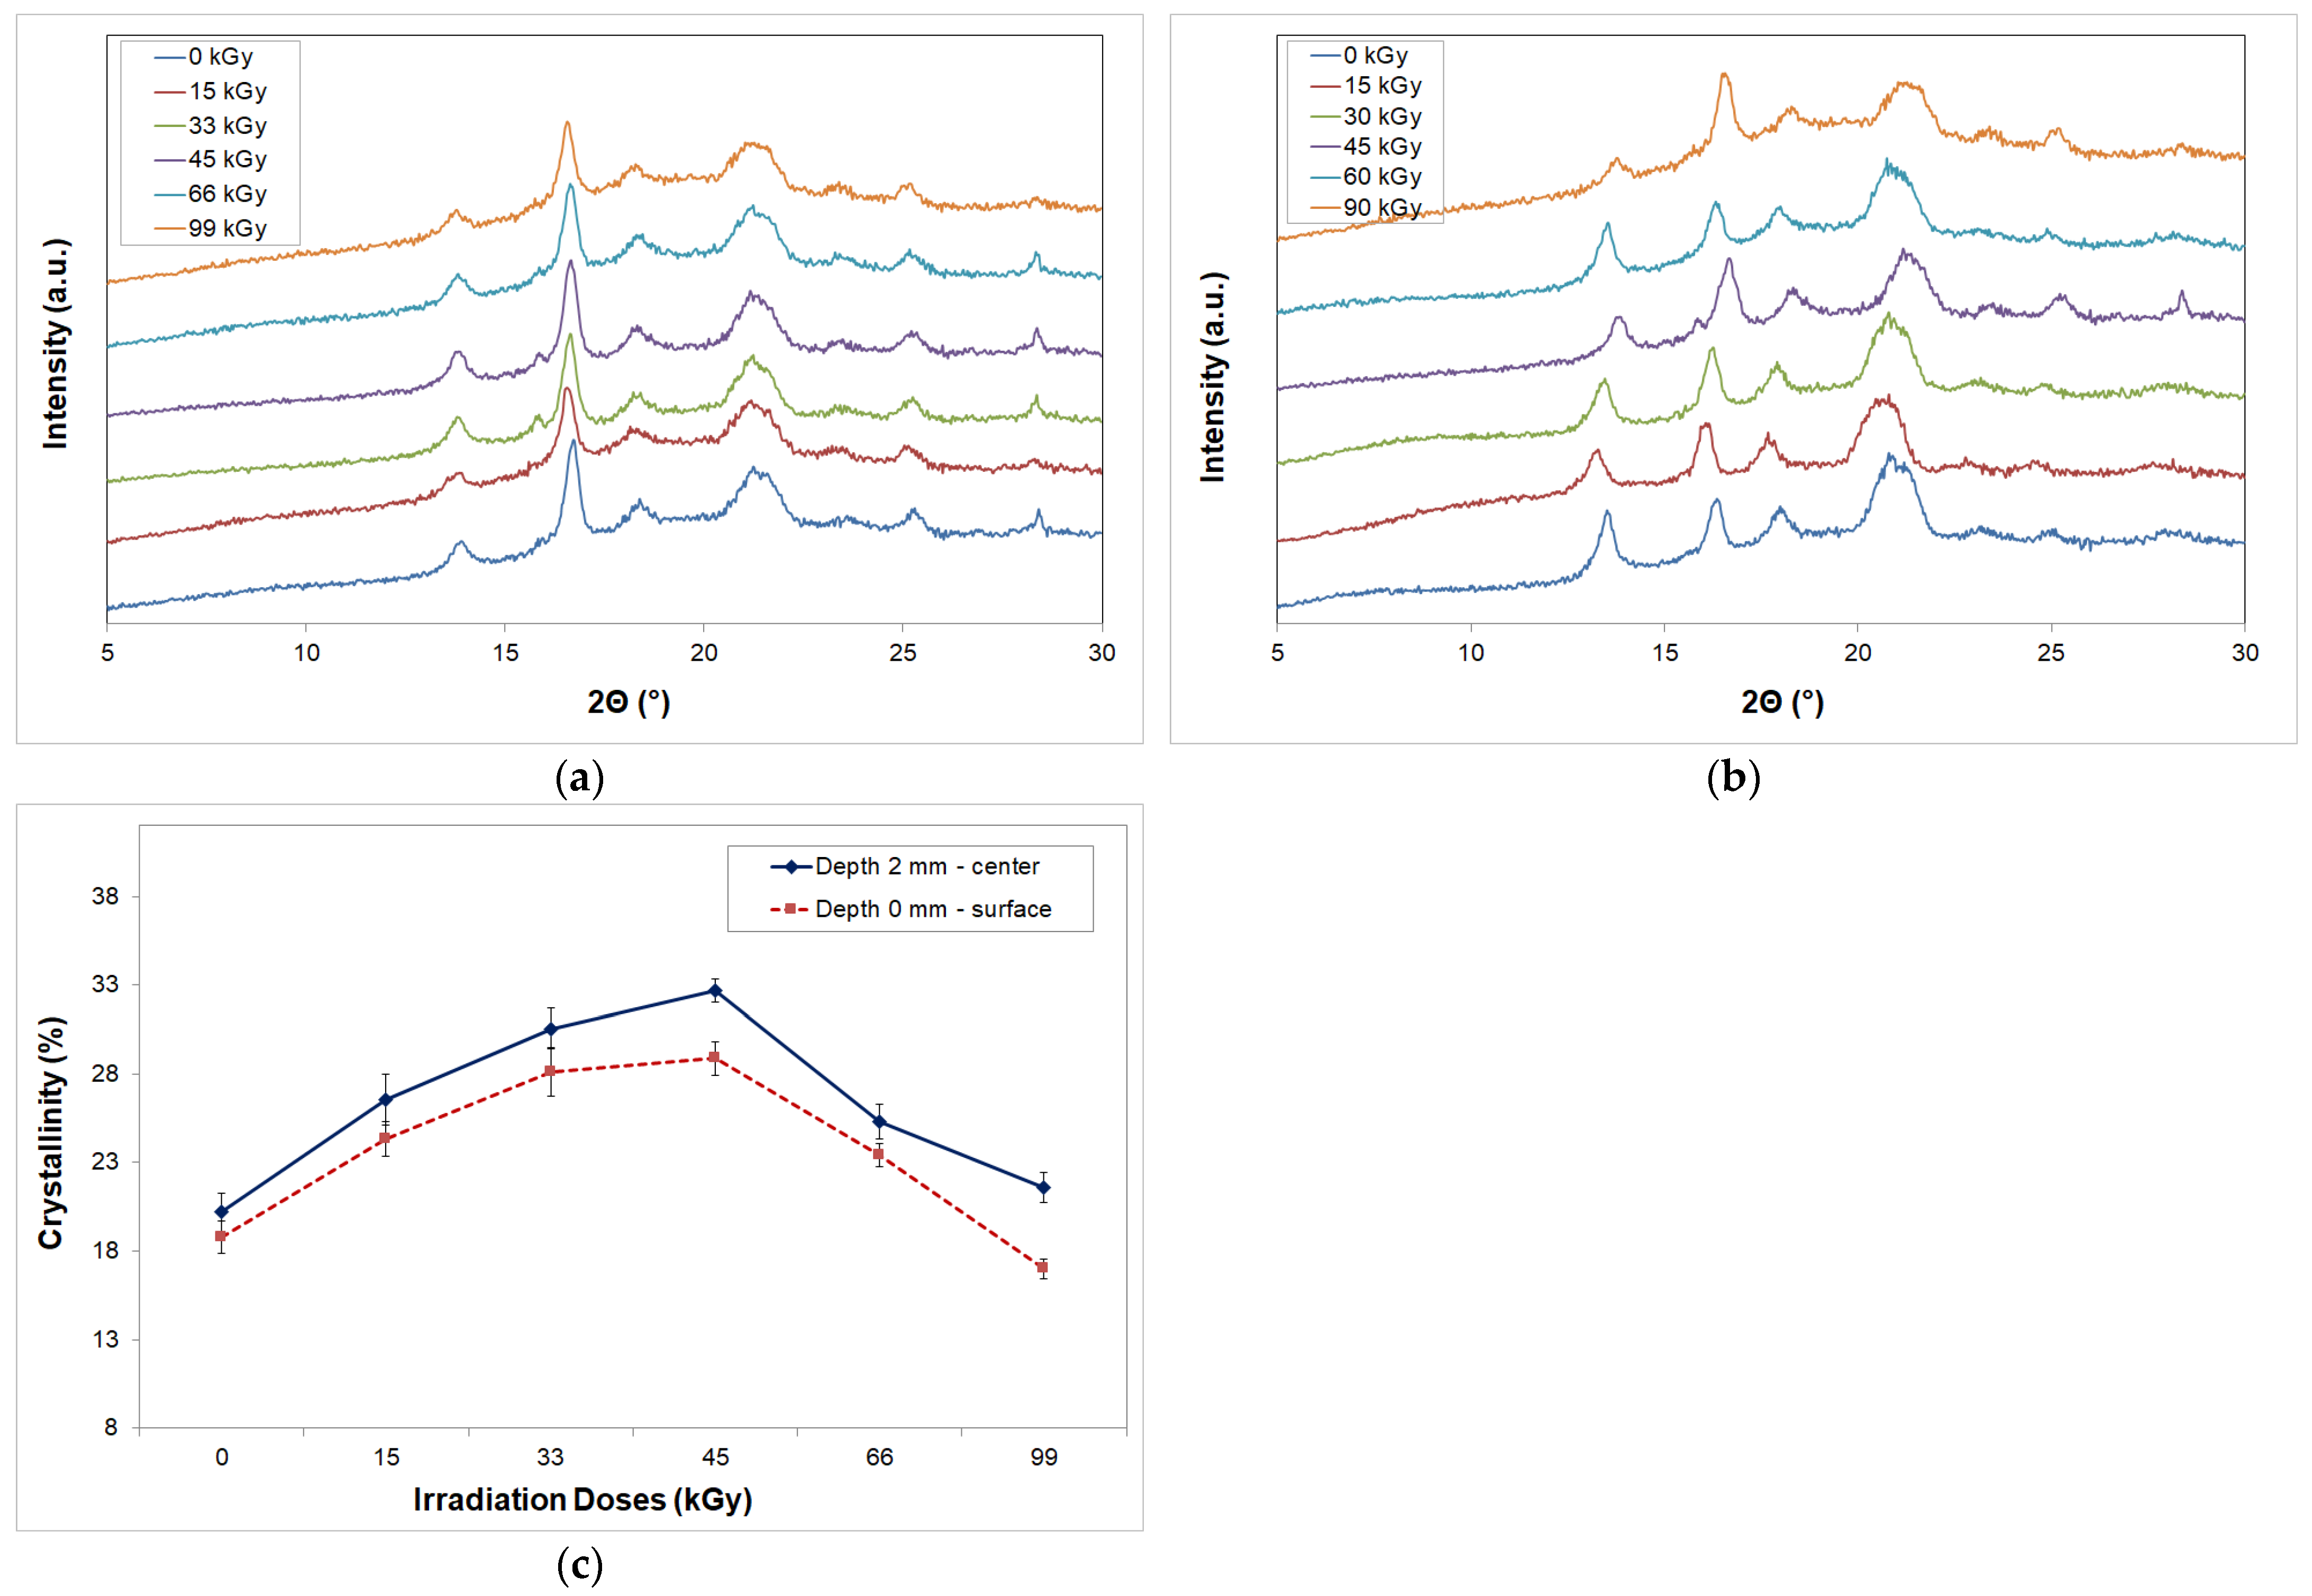
The change in crystalline and amorphous phase content was measured using wide-angle X-ray diffraction both on the surface of the polymer under test and in its center (2 mm distance from the sample surface), shown in
Figure 9.
As shown in
Figure 9 by wide-angle X-ray diffraction for PP filled with 25% glass fiber, it was determined that the highest amount of crystalline phase in the surface layer was found at a radiation dose of 45 kGy (crystallinity 29%), which also showed higher values of the micro-mechanical and tribological properties of the surface layer, while the lowest values of the crystalline phase were measured for the non-irradiated filled PP and PP irradiated with a dose of 99 kGy (crystallinity 17%). At higher radiation doses, a decrease in the amount of the crystalline phase was measured. As can be seen in the figure, the highest amount of the crystalline phase was measured in the center of the test sample (crystallinity was 31% for the 45 kGy dose) compared to the surface of the test sample. The difference between the surface and the center of the sample is 7%. This indicates that more crystallization occurs in the center of the sample than on the surface of the PP tested. As shown by the results of the gel content measurements (
Figure 8) and crystallinity measurements (
Figure 9), the proportion of the crystalline phase increases with increasing radiation dose, and the degree of crosslinking also increases. The highest proportion of the crystalline phase and gel content was measured at a radiation dose of 45 kGy. The increase in network density is not always proportional to the radiation dose, as degradation occurs simultaneously with crosslinking, which is reflected in a decrease in the degree of crosslinking and also in a decrease in crystallinity. This is also confirmed by the results of micro-mechanical and tribological properties in different layers.
The results of this study suggest that the crystallization process will vary from one cross-section to another. The content of the crystalline phase is higher on the surface of the test sample than in its center. The DSI method is able to record and quantify the changes in the mechanical behavior of the different layers of the tested polymer sample and correlate them with the structural results.
3.4.3. Microscope Images Taken on Microtome Sections
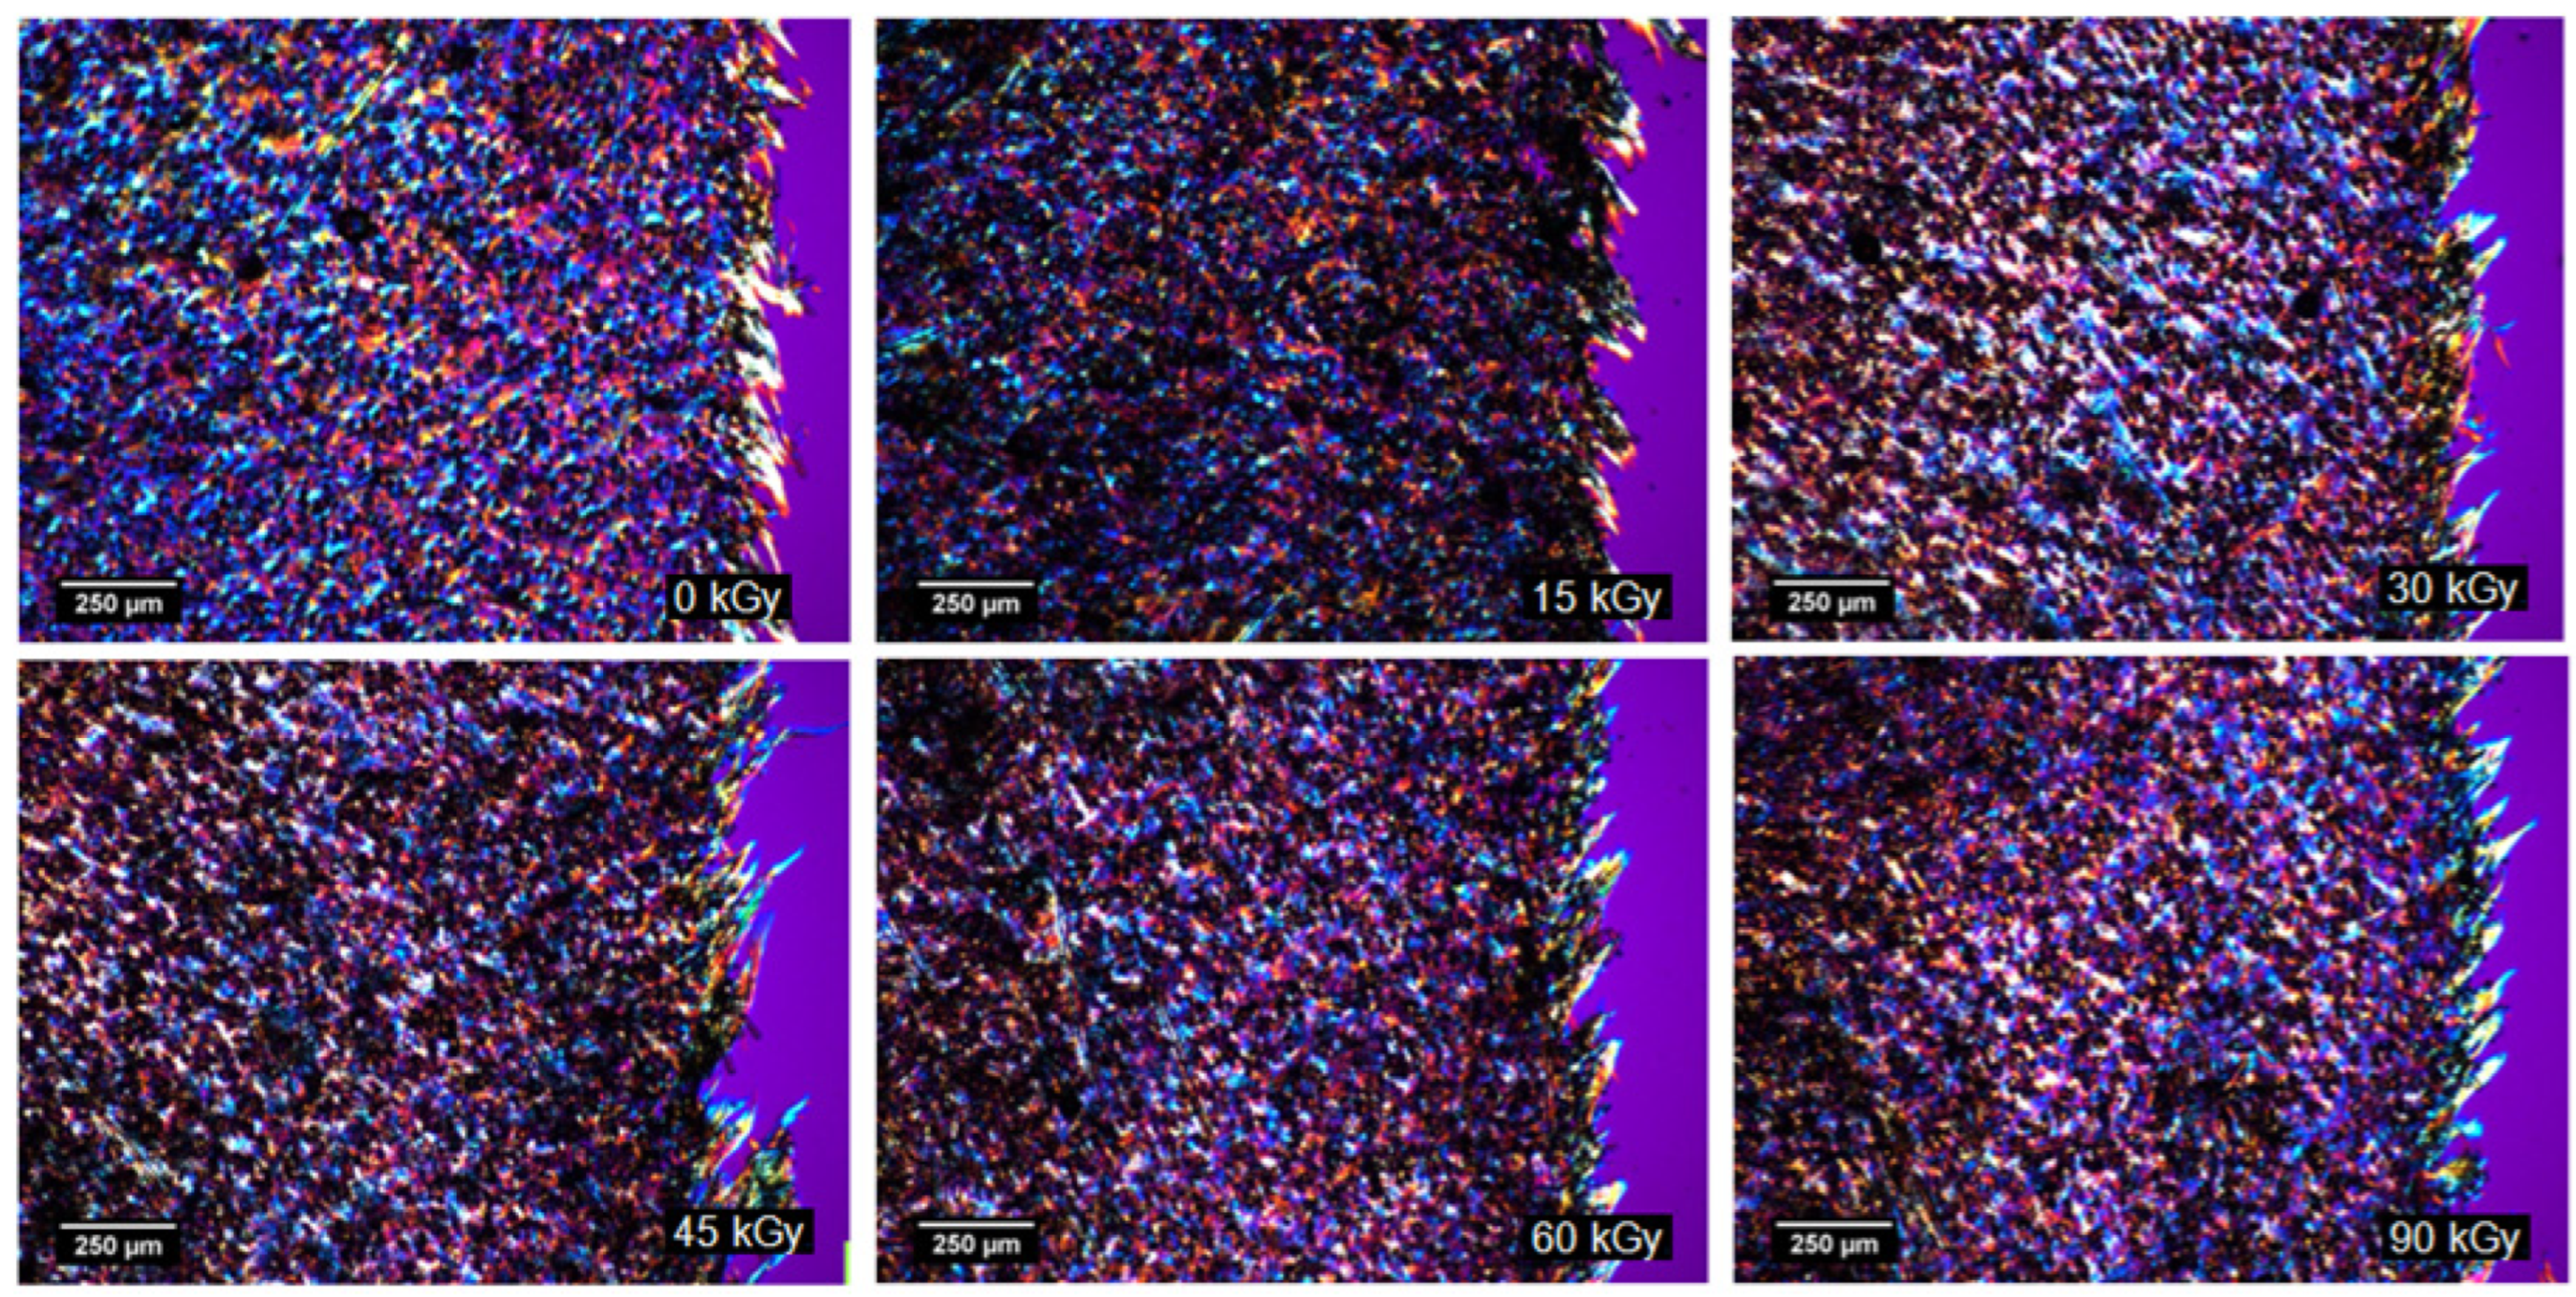
To confirm the results of micro-mechanical and tribological properties obtained by DSI, microtome sections were prepared and compared for each radiation dose. The results of the microtonal cuts (
Figure 10) did not show significant differences in the crystalline and amorphous areas with different radiation doses. This is due to the higher proportion of glass fibers.
As shown by the morphological properties, electron radiation caused a change in both the gel content and crystallinity of the filled PP, which was reflected in the change in macro- and micro-mechanical and tribological properties both on the surface and in the center of the sample. Also, the results indicated that higher doses of radiation lead to degradation processes that are manifested by a decrease in the observed properties. These results confirm the findings of other authors [
4,
28,
29].
Improvements in the mechanical properties of radiated PP on a micro- and macro-scale are also of great importance for industry. Modified filled polypropylene is moving into the group of materials with significantly better properties. Its macro- and micro-mechanical properties and tribological properties qualify filled PP for wide use in areas where higher wear resistance is required. Conventionally produced PP can hardly meet these criteria.
4. Conclusions
The presented paper deals with the effect of electron beta radiation on the macro- and micro-mechanical and tribological properties of filled PP with 25% glass fiber. These properties were measured both on the surface and in the deeper layers of the tested part. The tested filled polypropylene with 25% glass fiber was irradiated with electron beam doses of 15, 30, 45, 66 and 99 kGy. The micro-mechanical and tribological properties were measured by DSI (Depth Sensing Indentation) and were subsequently verified by structural measurements (crystalline phase changes, percent of crosslinking, etc.).
As the results show, electron radiation has a significant effect on the detected properties. Both micro-mechanical and tribological properties were improved by the application of electron radiation. The optimum dose of electron radiation appears to be 45 kGy, where an improvement of up to 52% was found with respect to non-irradiated PP. These changes were evident both on the surface of the sample when measured under 0.5 N, 1 N and 5 N loading and in the individual layers below the surface. An increase of up to 32% was measured between the surface and the center of the sample. The application of higher electron doses of 66 and 99 kGy led to a deterioration in micro-mechanical and tribological properties by up to 9%. This decrease is due to incipient degradation processes, which were confirmed by the morphological properties found. Both crosslinked phase volume and crystalline phase I volume showed maximum crosslinking at a radiation dose of 45 kGy, and with a higher radiation dose, a decrease in crosslinked phase I crystallinity was found. Also, towards the center of the cross-section of the tested PP, an increase in crystallinity was measured compared to the surface of the sample. These morphological changes indicate that there is an increase in the crystalline phase and percentage of crosslinking due to irradiation, which results in improved macro- and micro-mechanical and tribological properties. Conversely, higher doses of radiation are reflected by a decrease in crystallinity and the crosslinked phase, which is due to degradation processes.
However, from an application point of view, it is necessary to determine the most suitable radiation dose individually, considering the resulting requirements of the tested product and the economics of the whole process. By applying electron beam radiation, standard polymers such as PP can be improved to the level of more expensive structural polymers (such as PA 6). This improves the wear resistance of the surface as well as the stiffness of the overall material itself and can thus be used for applications that require surface resistance to tribological behavior.
