1. Introduction
The integrity of metallic structures, particularly steel vessels, can be severely compromised by hydrogen damage mechanisms such as HIC and SOHIC [
1,
2,
3,
4,
5,
6,
7]. These forms of damage lead to a significant reduction in the material’s mechanical properties, posing substantial safety, environmental, and financial risks.
Early detection, accurate characterization, and reliable assessment of these damage mechanisms are therefore important for ensuring continued safe operation and optimizing maintenance strategies in industrial plants.
This paper discusses the characteristics of HIC and SOHIC, highlights advanced Non-Destructive Evaluation (NDE) and monitoring techniques and outlines FFS [
6,
7] evaluation aiming towards the effective management of such damage mechanisms. The main contribution lies in demonstrating the synergistic and continuous monitoring methodology. This approach is the culmination of over 10 years of cumulative field experience in similar vessel damage, validated by the six-month continuous AE/PAUT testing campaign detailed in the case study [
8], and optimized through the development of powerful analysis tools. The necessity for a fast, reliable input into FFS assessments following this rigorous monitoring framework fueled the development of a novel software module that automates the analysis of complex PAUT data. This has been designed to perform rapid and robust clustering of HIC and SOHIC indications to derive critical geometric data for FFS assessments, which can be used either standalone or in conjunction with the AE monitoring system. This methodology focuses on the previously uninvestigated real-time correlation between AE activity and the progression of HIC/SOHIC damage.
2. HIC and SOHIC Mechanisms
HIC is a damage mechanism where hydrogen atoms trapped within a metallic structure, typically carbon steel, cause internal cracks that often manifest as in-plane stepwise cracking. HIC is a common problem in steel exposed to wet H
2S service [
1,
2,
3,
4,
5], such as in oil and gas vessels.
SOHIC is considered a more severe form of hydrogen damage. It develops when HIC cracks which typically initiate at internal blisters, assume a through-thickness stacked formation. These stacked cracks are then linked by other cracks that propagate perpendicular to and as a result of the main applied stress, leading to a significant through-thickness crack [
2,
3].
Equipment susceptible to HIC and SOHIC (
Figure 1) includes primarily carbon steel vessels operating in wet H
2S service with temperatures typically ranging from ambient to 150 °C. HIC is dependent on H
2S partial pressure, while SOHIC is critically influenced by stress levels, such as the triaxial stress state found in thick shells. HIC-resistant steel might not be immune to SOHIC, especially under severe hydrogen charging conditions [
9].
3. Inspection and Monitoring Strategies
Effective assessment and management of HIC/SOHIC damage relies on a combination of advanced NDE techniques and continuous monitoring. Early detection and characterization are critical for preventing catastrophic failures.
3.1. Automated and Phased Array Ultrasonic Testing (AUT/PAUT)
AUT and PAUT are indispensable tools for effectively detecting and characterizing HIC and SOHIC. While AUT (
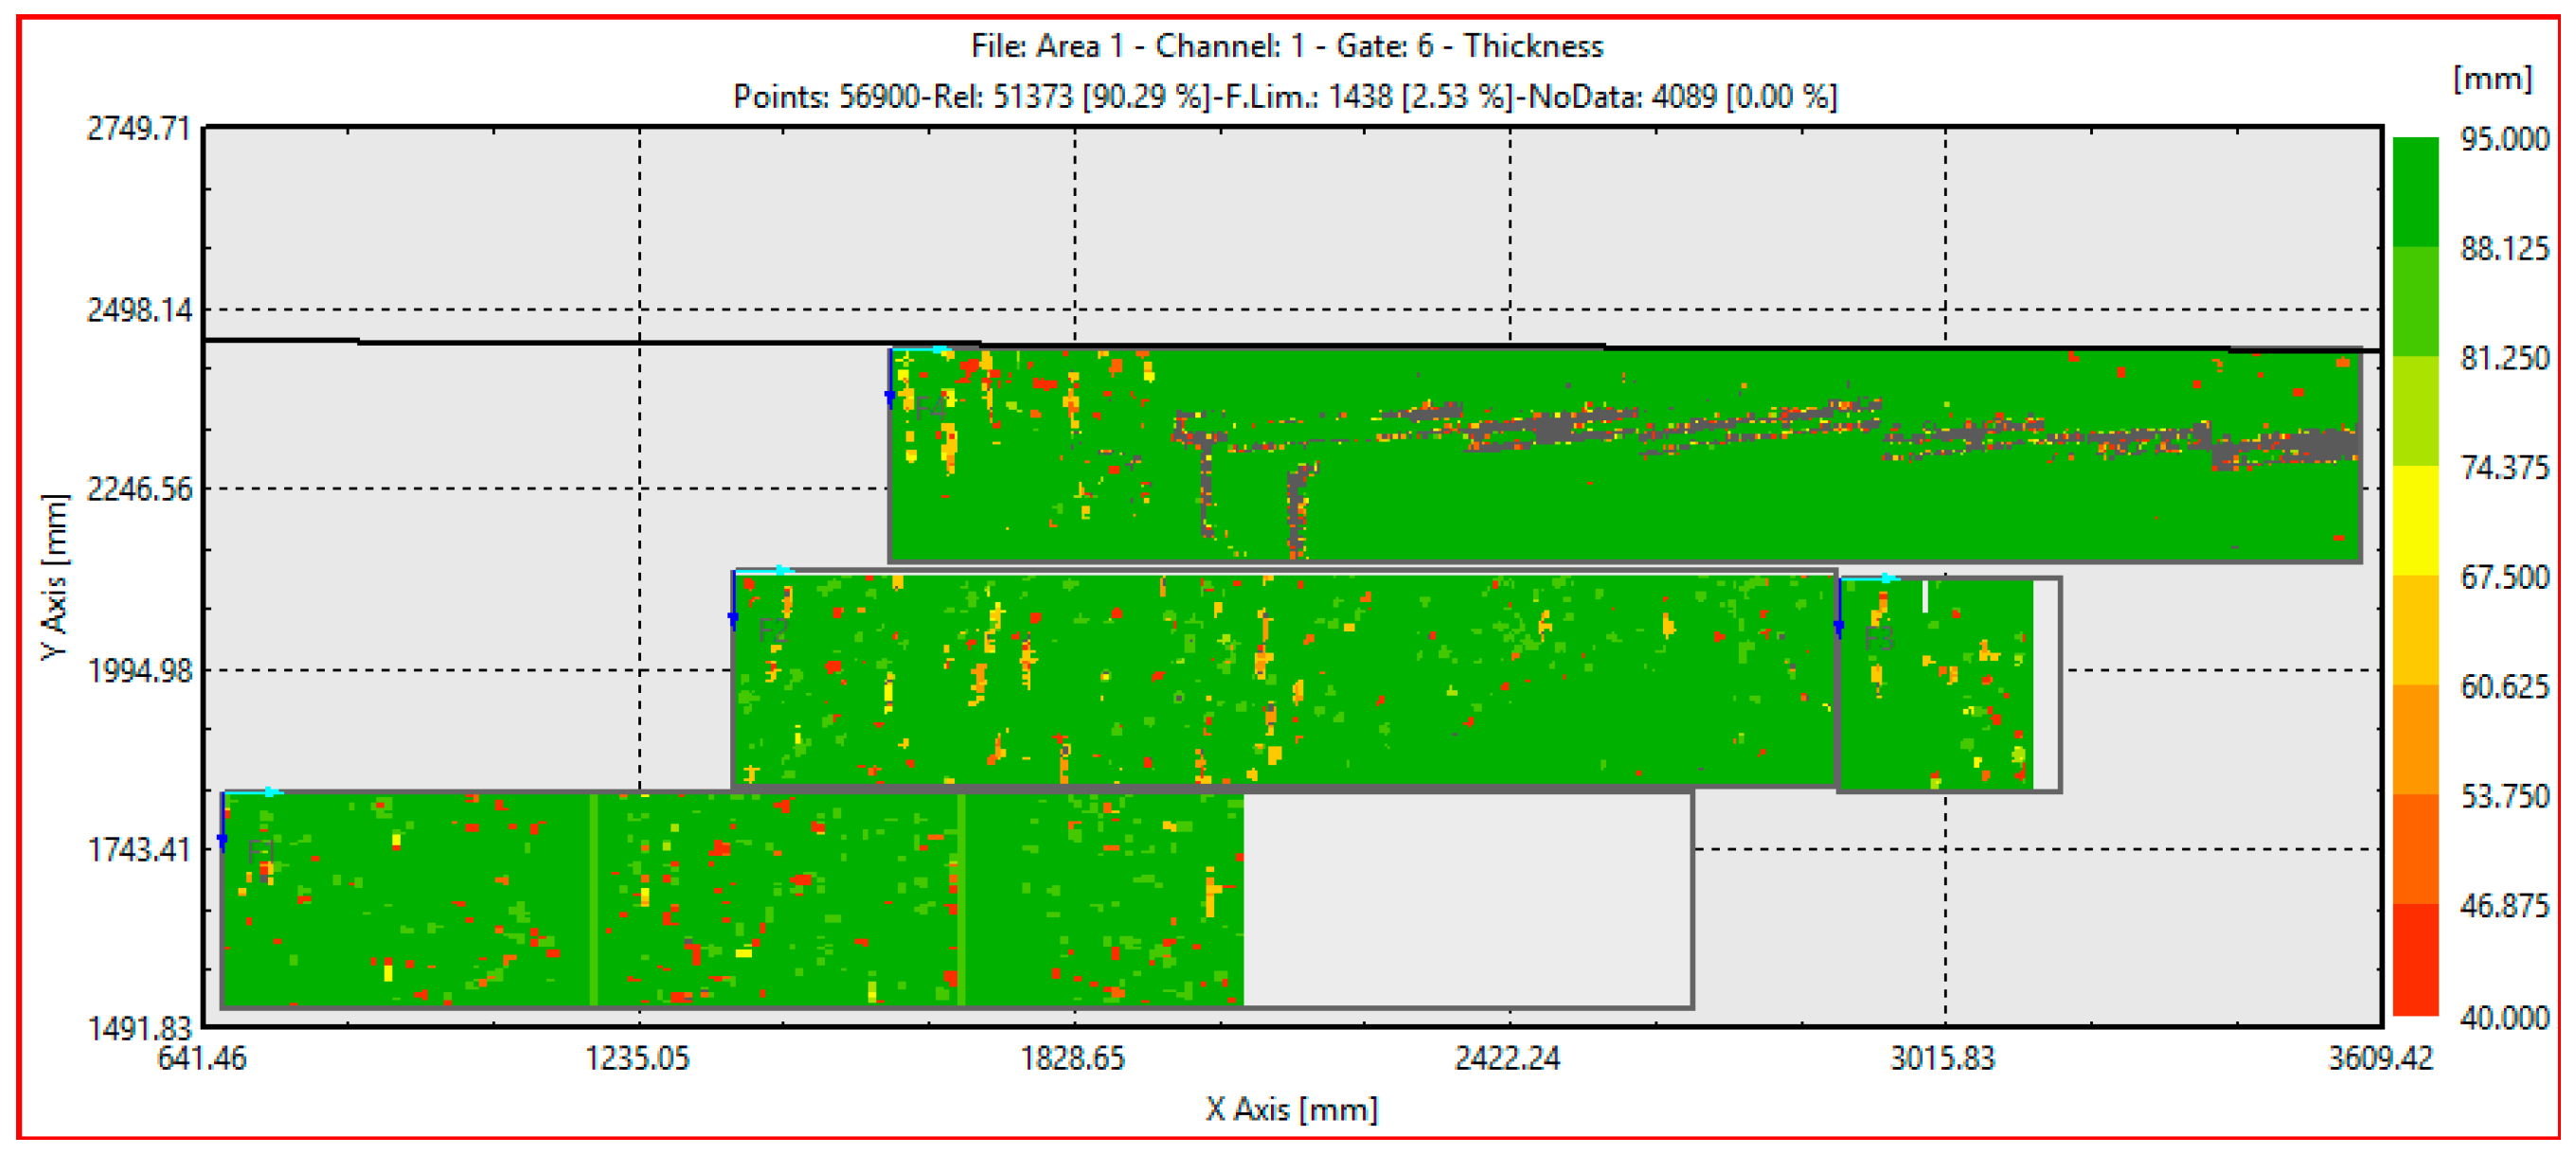
Figure 2) with a normal beam probe can identify areas of interest, PAUT is crucial for detailed characterization and sizing of these indications.
PAUT utilizes probes equipped with multiple piezocomposite elements that generate focused beams with precise steering capabilities. This allows for sectorial scans, maximizing the detectability of defects and significantly increasing scanning speed. The high resolution of PAUT provides fine and detailed visual information about detected indications, which is essential for subsequent FFS studies.
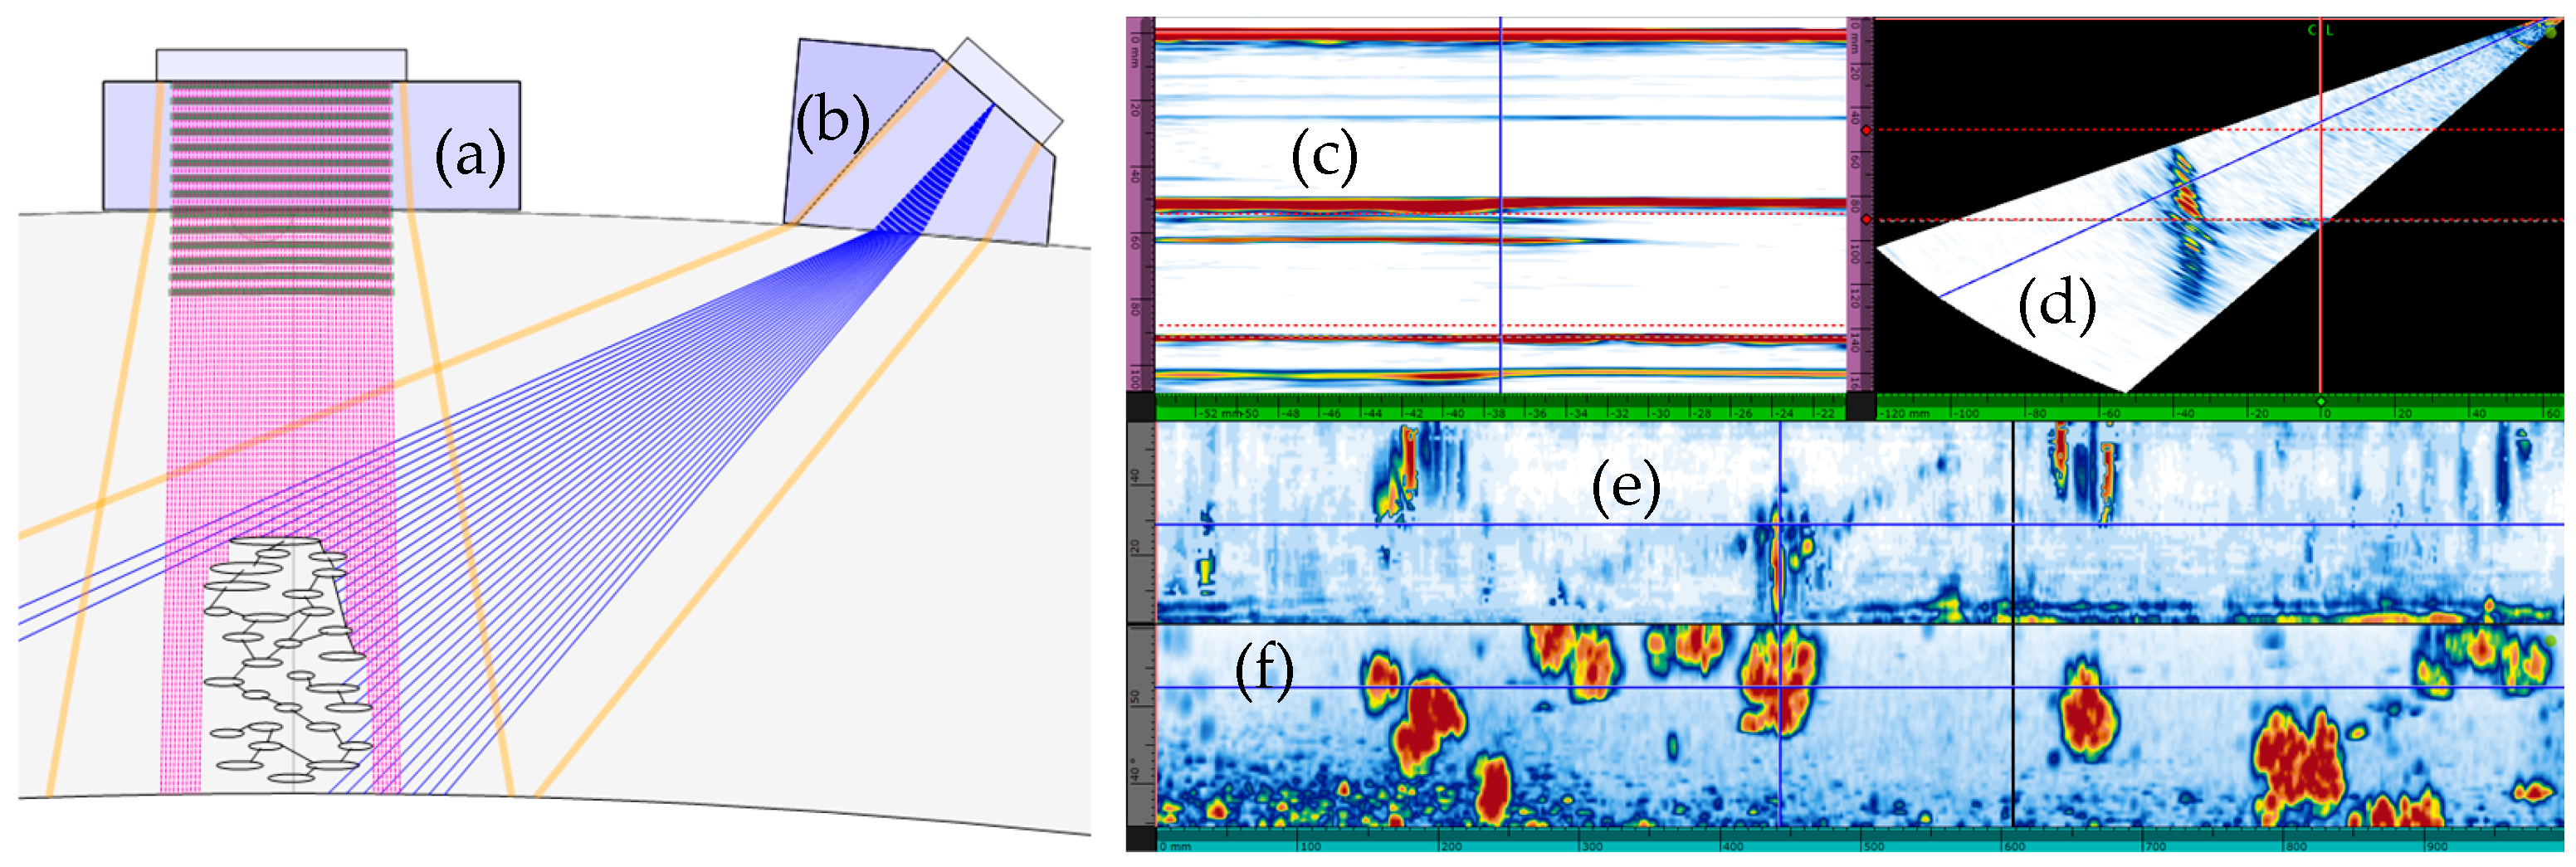
Standard PAUT techniques for HIC/SOHIC can reliably detect and characterize crack clusters down to approximately 1 mm in depth, depending on the signal-to-noise ratio and material attenuation. The through-thickness extent of HIC and SOHIC formations is precisely mapped (
Figure 3) using the high-resolution B- and C-Scans provided by the technique.
3.2. Acoustic Emission (AE) Testing
Acoustic Emission (AE) Testing (
Figure 4) provides a powerful and versatile tool for monitoring hydrogen damage and assessing the structural integrity of critical equipment. This technique offers 100% inspection of a vessel [
10,
11], often at a fraction of the time and cost compared to traditional methods, while effectively pinpointing areas requiring more detailed local inspection for follow-up NDT.
For hydrogen-related damage mechanisms like HIC and SOHIC, AE is effective because it can detect real-time, dynamic crack growth (active damage) and not direct geometric crack size, as it occurs under continuous operation [
12,
13,
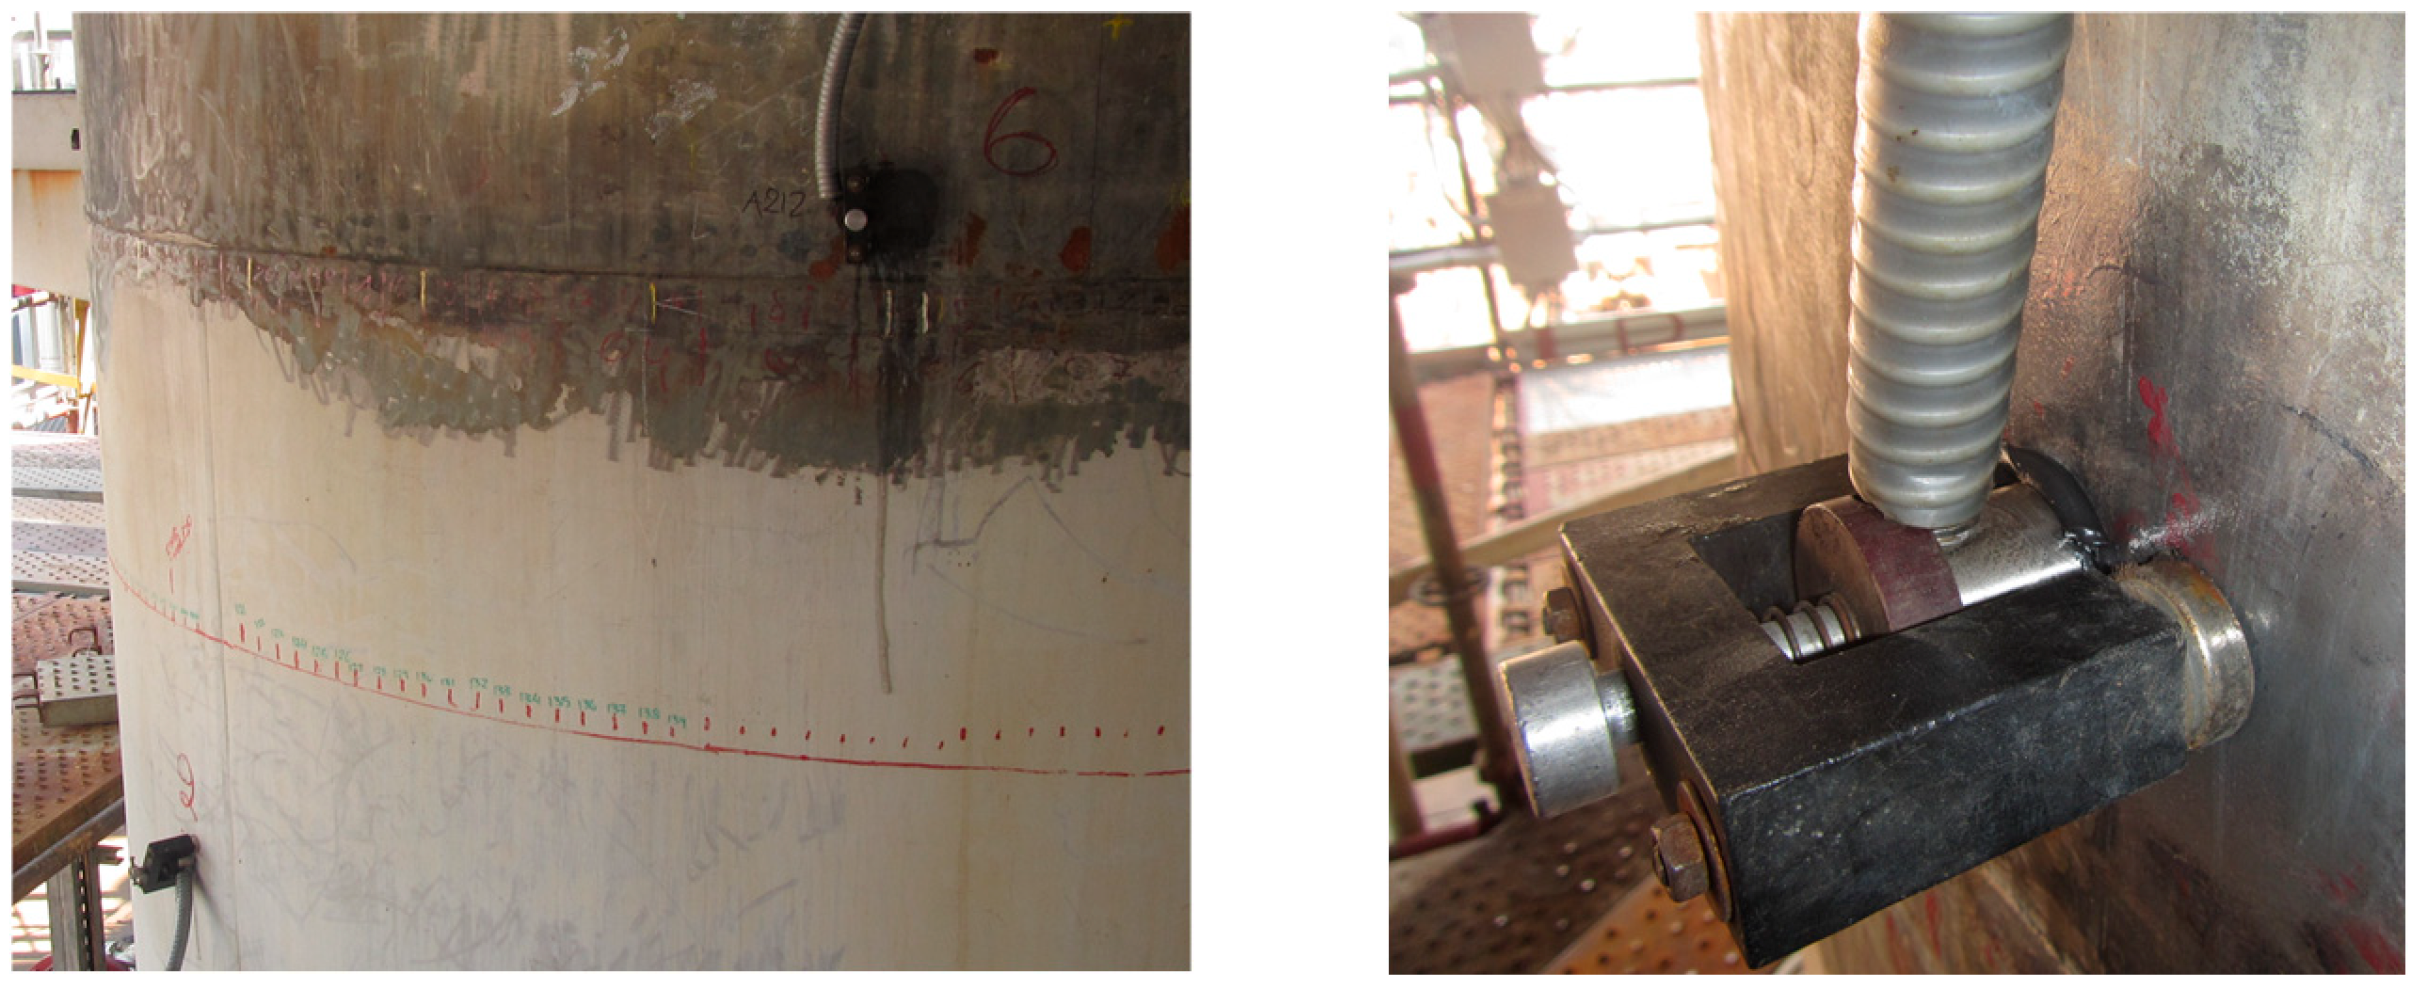
14]. This contrasts with traditional NDT methods, which provide a static snapshot. AE systems use sensors firmly mounted on the surface of the structure, often utilizing guard sensors to filter out operational noise. Standard sensors include models with 150 kHz resonant frequency (e.g., the R15i) and with 300 kHz resonant frequency (e.g., R30i) for noisy environments. Typical AE setups involve sensors mounted in a strategic arrangement (
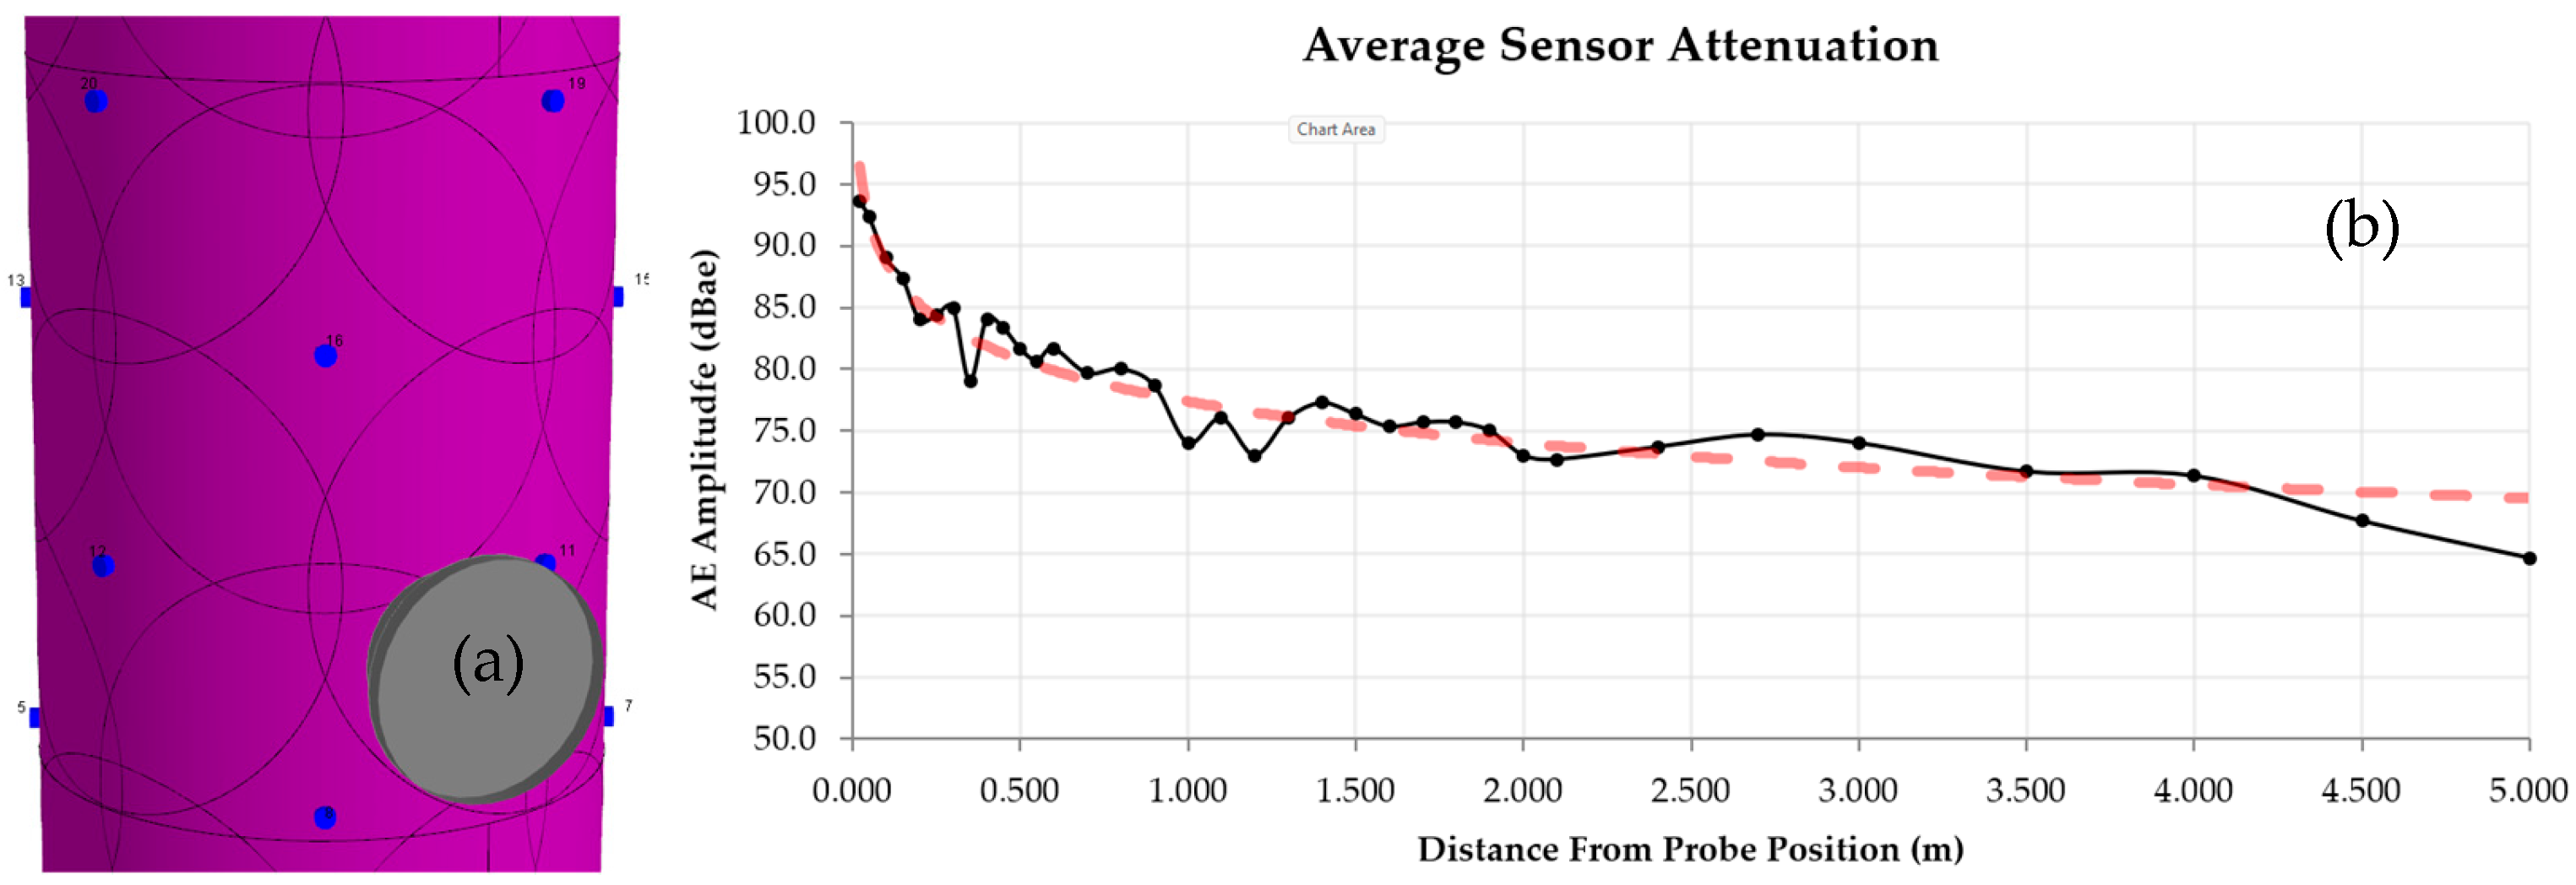
Figure 5a and
Figure 6), such as a triangular formation. Hsu-Nielsen (HN) sources (pencil breaks) [
15] are commonly employed to measure signal attenuation and velocity and to confirm location accuracy, achieving an effective spatial resolution for the setup (
Figure 5).
The AE activity-based detection is the essence of continuous monitoring. AE’s primary advantage in this context is its ability to deliver a dynamic integrity assessment. The focus on AE activity and correlated damage growth rate is paramount for predicting imminent failure and is therefore given heavier emphasis in the overall management strategy compared to discrete, static NDE.
4. FFS Assessments
FFS procedures provide a structured approach to assess the structural integrity of industrial equipment containing flaws or damage, such as HIC and SOHIC. The inputs for an FFS assessment include detailed NDT data on the flaw size and geometry, material properties, and operational parameters. The outputs determine whether the equipment can continue safe operation and under which potential restrictions (temperature, pressure, etc.), its remaining life, and any necessary mitigation or inspection requirements. Standards such as API 579/ASME FFS offer consensus methods for reliably evaluating equipment. FFS permits different levels of assessment (Level 1, Level 2, Level 3) depending on the severity of damage, with increasing complexity.
5. Example Case
This section details the integrated PAUT/AE strategy implemented on a refinery column operating in wet H2S service that exhibited hydrogen damage indications.
5.1. Integrated Monitoring Strategy
Initial inspections using Automated Ultrasonic Testing (AUT) for corrosion mapping identified areas of interest. Subsequent PAUT scans confirmed the presence of extensive stepwise and through-thickness damage, signaling an advanced state of HIC and SOHIC. This NDT data provided the initial crack geometry required for an FFS assessment and, critically, established the baseline condition and the specific location of known damage. To effectively manage this critical situation and enable continued operation while planning for long-term solutions, a comprehensive strategy involving continuous Acoustic Emission (AE) monitoring was implemented. This system deployed 24 sensors in a triangular formation around the affected course (
Figure 5a and
Figure 6).
The AE system operated remotely 24/7 to track crack growth by utilizing AE activity (Hits, Events) and identify additional active damaged areas using real-time location clustering with experience-based criteria (i.e., grouping of closely located AE Events meeting user-set “density” criteria).
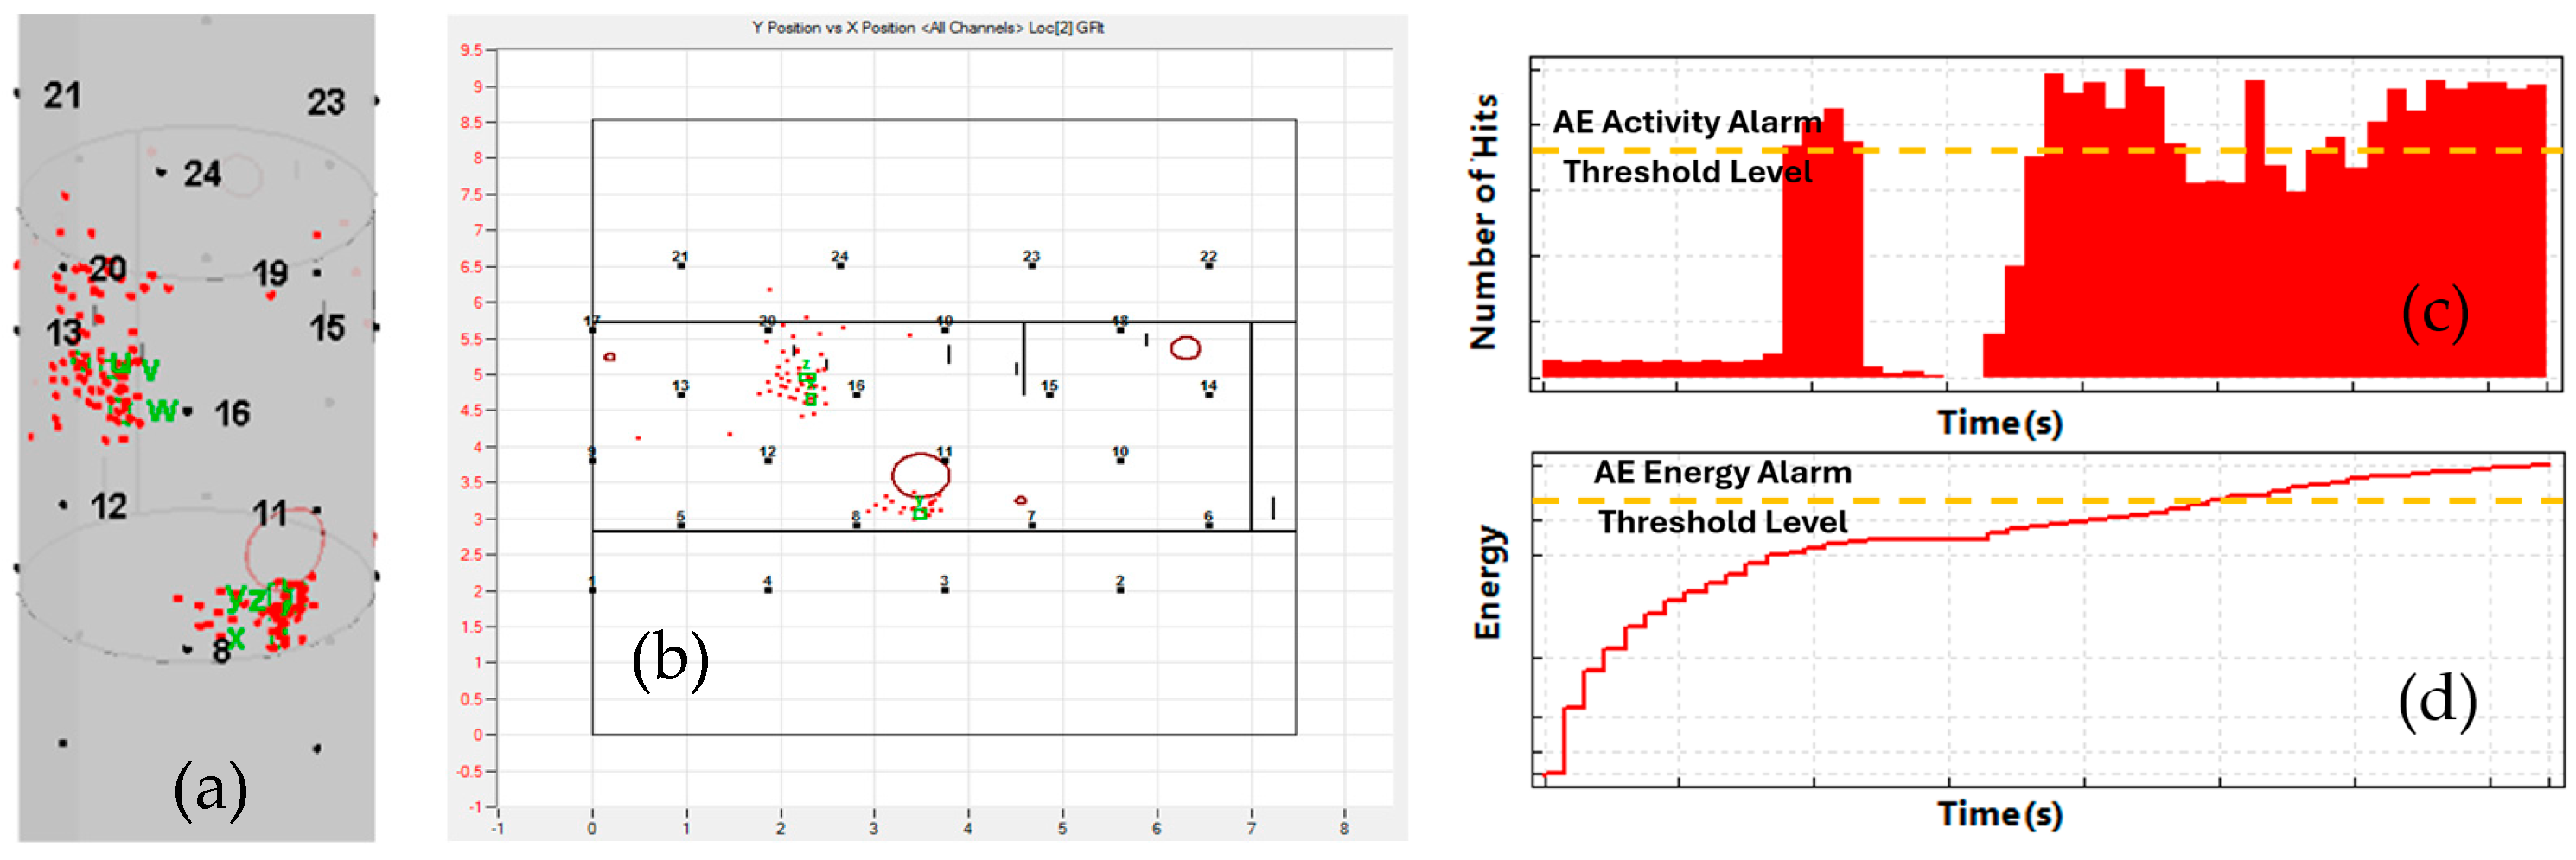
The data-acquisition system continuously performed real-time extraction of classical and extended AE Features for over a six-month period. Using the calculated features and extracted Time-of-Flight of incoming waveforms, the locations of actual AE Events were calculated (
Figure 7), and 2d or 3d damage clusters were estimated. In addition, Average Signal Level (ASL in dBae) measurements, AE temporal activity, AE Total and per Cluster Energies, along with many more waveform extracted feature metrics [
10] (
Figure 4b) were also continuously monitored, stored, and reviewed daily, in order to provide real-time alarms, clear indications of abrupt operational changes, damage evolution, and external noise awareness that could contaminate data (such as external works in the vicinity). This combined approach provided early warnings and enhanced operational safety, facilitating prolonged in-service operations.
The success of the strategy is published in reference [
8] and is mentioned here for the sake of completeness.
5.2. Refinement of Proprietary Criteria and Advanced Data Analysis
Following the 6-month monitoring period, and after a substantial field experience of similar inspections, the accrued data was subjected to a recent rigorous re-analysis utilizing data-parallel throughput of modern GPUs, to perform statistical analysis and refine the proprietary experience-based alarm criteria. This retrospective process focused on establishing a statistically robust correlation between the quantified Acoustic Emission (AE) parameters recorded over the operational lifespan of 6 months, and the corresponding measured crack growth, thereby validating and enhancing the reliability of the long-term structural health monitoring system.
The effective AE clustering areas were determined in the vicinity of monitored damage locations by utilizing correlations between three key data sets: the spatial distribution of detected AE Events (
Figure 7a and
Figure 8b,c), temporal variations in AE Feature metrics (e.g., amplitude, energy, counts), and the estimated Phased Array Ultrasonic Testing (PAUT)-sized crack growth (
Figure 8a).
6. Automated Effective Flaw Size for FFS
FFS assessments are essential for establishing safe operating limits for components with structural flaws like HIC/SOHIC damage, requiring substantial engineering analysis to inform preventative maintenance. The reliability of FFS relies on accurate geometric inputs characterizing the through-thickness shape and linkage of the damage. To achieve this, the latest development/key innovation is a C/GNU Octave software code developed for quantitative analysis of PAUT C-Scan data.
The method employs intensity-based segmentation and Connected Component Labeling with morphological filtration to delineate robust damage clusters within a specific amplitude range, registering their boundaries and centroids. Cluster centroids are used as nodes for Delaunay triangulation to establish a proximity-based adjacency matrix. The minimum boundary-to-boundary distance is computed for adjacent pairs to identify critical short-distance connections below a set threshold (
Figure 9). This integrated approach links cluster morphology to the required geometrical metrics for FFS analysis, specifically assessing flaw interaction and calculating the effective flaw size [
2].
7. Conclusions
HIC and SOHIC are critical damage mechanisms that demand vigilant assessment and management in industrial assets. To address this, a comprehensive approach is needed, combining advanced NDE techniques and robust FFS procedures. The synergistic and continuous application of PAUT and AE has been shown to be one of the most effective strategies for managing these time-dependent mechanisms. AE monitoring provides rapid, continuous information about the dynamic integrity of critical assets, while PAUT offers precision in geometric sizing.
Furthermore, the in-house automated clustering software was developed based on cumulative field experience and the need for rapid FFS input. This novel development enhances PAUT’s precision, allowing for the establishment of proactive predictive maintenance.
The experience-based classical AE clustering criteria, rigorously refined through advanced statistical analysis, provide a validated framework for integrity assessment. Permanent AE monitoring systems with remote access allow engineers to assess structural integrity over prolonged periods, promoting a proactive approach to prevent failures and optimize plant safety.
Author Contributions
Conceptualization, D.K.; Methodology, D.K., D.P. and A.A.; Data Curation, D.P. and A.A.; Writing—Original Draft Preparation, D.P. and A.A.; Writing—Review and Editing, D.K., D.P. and A.A.; Visualization, D.P.; Project Administration, D.K. All authors have read and agreed to the published version of the manuscript.
Funding
This research received no external funding.
Institutional Review Board Statement
Not applicable.
Informed Consent Statement
Not applicable.
Data Availability Statement
No new data were created or analyzed in this study. Data sharing is not applicable to this article.
Conflicts of Interest
Authors Dimitrios Kourousis, Dimitrios Papasalouros and Athanasios Anastasopoulos were employed by the company MISTRAS Group Hellas A.B.E.E. All authors declare that the research was conducted in the absence of any commercial or financial relationships that could be construed as a potential conflict of interest.
References
- Oil & Gas Journal. Available online: https://www.ogj.com/ (accessed on 6 September 2025).
- American Petroleum Institute. Assessment of Hydrogen Blisters and Hydrogen Damage Associated with HIC and SOHIC; API Publication 579, Part 7; American Petroleum Institute: Washington, DC, USA, 2016. [Google Scholar]
- American Petroleum Institute. Hydrogen-Induced Cracking and Stress-Oriented Hydrogen Induced Cracking in Hydrogen Sulfide Services (HIC/SOHIC-H2S), 1st ed.; API Publication 581; American Petroleum Institute: Washington, DC, USA, 2000. [Google Scholar]
- NACE. Methods and Controls to Prevent In-Service Environmental Cracking of Carbon Steel Weldments in Corrosive Petroleum Refining Environments; NACE RP 0472; NACE International: Houston, TX, USA, 2000. [Google Scholar]
- NACE. Guidelines for Detection, Repair, and Mitigation of Cracking of Existing Petroleum Refinery Pressure Vessels in Wet H2S Environments; NACE RP 0296; NACE International: Houston, TX, USA, 2004. [Google Scholar]
- American Petroleum Institute. FFS-1. API 571-1; American Petroleum Institute: Washington, DC, USA, 2016. [Google Scholar]
- American Petroleum Institute and The American Society of Mechanical Engineers. Fitness-For-Service Example Problem Manual; API 579-2/ASME FFS-2; American Petroleum Institute: Washington, DC, USA, 2009. [Google Scholar]
- Papasalouros, D.; Bollas, K.; Ladis, I.; Aerakis, E.; Anastasopoulos, A.; Kourousis, D. Novel AE monitoring of hydrogen induced damaged vessels and real time alarms. A case study. In Proceedings of the 33rd European Conference on Acoustic Emission Testing, Senlis, France, 12–14 September 2018. [Google Scholar]
- Haidemenopoulos, G.N.; Kamoutsi, H.; Polychronopoulou, K.; Papageorgiou, P.; Altanis, I.; Dimitriadis, P.; Stiakakis, M. Hydrogen Induced Cracking and Stress-Oriented Hydrogen Induced Cracking in an Amine Absorber Column. Metals 2018, 8, 663. [Google Scholar] [CrossRef]
- Pollock, A.A. Acoustic Emission Inspection. In Metals Handbook, 9th ed.; ASM International: Materials Park, OH, USA, 1989; Volume 17, pp. 278–294. [Google Scholar]
- Vahaviolos, S.J. Acoustic Emission: A new but sound NDE technique and not a panacea. In NDT; Van Hemelrijck, D., Anastasopoulos, A., Eds.; Balkema: London, UK, 1996; pp. 101–115. [Google Scholar]
- Fowler, T.J.; Blessing, J.A.; Conlisk, P.J.; Swanson, T.L. The MONPAC System. J. Acoust. Emiss. 1989, 8, 1–8. [Google Scholar]
- Anastasopoulos, A.; Tsimogiannis, A. Evaluation of Acoustic Emission Signals During Monitoring Of Thick-Wall Vessels Operating At Elevated Temperatures. J. Acoust. Emiss. 2004, 22, 59–70. [Google Scholar]
- Carlos, M.F.; Wang, D.; Vahaviolos, S.; Anastasopoulos, A. Advanced acoustic emission for on-stream inspection of petrochemical vessels. In Proceedings of the 3rd International Conference On Emerging Technologies in Non-Destructive Testing; Thessaloniki, Greece, 26–28 May 2003, Van Hemelrijck, D., Anastasopoulos, A., Melanitis, N., Eds.; A. A. Balkema: London, UK, 2003; pp. 167–172. [Google Scholar]
- ASTM International E976–15; Standard Guide for Determining the Reproducibility of Acoustic Emission Sensor Response. ASTM International: West Conshohocken, PA, USA, 2021.
Figure 1.
Internal surface blistering and HIC (a) and SOHIC (b).
Figure 1.
Internal surface blistering and HIC (a) and SOHIC (b).
Figure 2.
AUT Normal Probe C-Scan 2d spatial map (mm), HIC Indications spatial distribution with orange and red spots. Internal vessel attachments visible in gray.
Figure 2.
AUT Normal Probe C-Scan 2d spatial map (mm), HIC Indications spatial distribution with orange and red spots. Internal vessel attachments visible in gray.
Figure 3.
Combined (a) 0° degrees with (b) Multiangled Sectorial (S-Scan) Inspection and resulting data with indication detection and measurements. (c) 0° degrees B-Scan, (d) S-Scan, (e) C-Scan from 0° degrees, (f) C-Scan from a single scanning angled ultrasonic beam.
Figure 3.
Combined (a) 0° degrees with (b) Multiangled Sectorial (S-Scan) Inspection and resulting data with indication detection and measurements. (c) 0° degrees B-Scan, (d) S-Scan, (e) C-Scan from 0° degrees, (f) C-Scan from a single scanning angled ultrasonic beam.
Figure 4.
(a) AE general working principle, (b) real-time waveform extracted signal features. Stimulus is usually load/pressure, while AE source is discontinuity growth.
Figure 4.
(a) AE general working principle, (b) real-time waveform extracted signal features. Stimulus is usually load/pressure, while AE source is discontinuity growth.
Figure 5.
(a) Sensor mounting with minimum calculated distance sensitivity, (b) Average Sensor Attenuation calculated with HN sources (black actual, red curve fitted). Minimum attenuation curve amplitude should be larger than the minimum calculated amplitude needed for complete AE coverage.
Figure 5.
(a) Sensor mounting with minimum calculated distance sensitivity, (b) Average Sensor Attenuation calculated with HN sources (black actual, red curve fitted). Minimum attenuation curve amplitude should be larger than the minimum calculated amplitude needed for complete AE coverage.
Figure 6.
AE Sensor and cable routing.
Figure 6.
AE Sensor and cable routing.
Figure 7.
(a) AE Events (red dots) depicted in 3d Cylindrical Location graph (Height (m) vs. Angular Position (m)), (b) 2d Unwrapped View Location of AE Events (Height (m) vs. Angular Position (m)), (c,d) example of real time alarms based on processing and extraction of AE Features from incoming waveforms, (c) Temporal Distribution of AE Hit, (d) Temporal Cumulative Energy Distribution.
Figure 8.
(a) PAUT-sized Indication Measurements confirming the growth, (b) Unwrapped Planar Location of AE Event Clusters (Height (m) vs. Angular Position (m)), (c) Unwrapped Planar Location (density scatter plot) showing the spatial distribution of AE Events after a high number of statistically significant AE-located Events.
Figure 9.
PAUT C-Scan Spatial Amplitude XY Data (mm) processing for FFS Input, (a) Centroid Delaunay triangulation (yellow lines), (b) minimum-threshold neighboring boundary (green boundaries), Euclidean separation distance (cyan lines) for FFS effective flaw size estimation.
Figure 9.
PAUT C-Scan Spatial Amplitude XY Data (mm) processing for FFS Input, (a) Centroid Delaunay triangulation (yellow lines), (b) minimum-threshold neighboring boundary (green boundaries), Euclidean separation distance (cyan lines) for FFS effective flaw size estimation.
| Disclaimer/Publisher’s Note: The statements, opinions and data contained in all publications are solely those of the individual author(s) and contributor(s) and not of MDPI and/or the editor(s). MDPI and/or the editor(s) disclaim responsibility for any injury to people or property resulting from any ideas, methods, instructions or products referred to in the content. |
© 2025 by the authors. Licensee MDPI, Basel, Switzerland. This article is an open access article distributed under the terms and conditions of the Creative Commons Attribution (CC BY) license (https://creativecommons.org/licenses/by/4.0/).

