Abstract
This study presents a real-time system for detecting sheath damage in multicore wire production, addressing the limitations of conventional high-voltage testing. After evaluating multiple sensing techniques, laser-diffused reflection emerged as the most reliable, non-intrusive, and effective for continuous monitoring. A calibrated system combining a laser source and photodetector was implemented and tested on a live production line, achieving 83.75% detection accuracy. The system maintained consistent performance across wire colors and insulation conditions. This advancement offers a safer, more efficient alternative for in-process quality control. Future work aims to enhance robustness and incorporate intelligent algorithms to further optimize detection accuracy.
1. Introduction
Wires are essential components in electricity supply systems, serving as conductors for power transmission. They are typically made from copper or aluminum due to their high conductivity and mechanical strength. To ensure safe and reliable operation, wires are covered with insulation materials that prevent electrical leakage and protect against mechanical or environmental damage. The wire industry plays a vital role across sectors such as telecommunications, construction, automotive, robotics, and electronics [1,2,3], producing a range of cables from basic electrical wires to complex multi-core types. Common insulating materials include polyvinyl chloride (PVC), polyethylene, rubber, and fluoropolymers [4], each offering different levels of flexibility, thermal resistance, and chemical stability. Insulations can be classified structurally (solid, foam, or taped) or functionally (general-purpose, high-temperature, or fire-resistant). Maintaining insulation quality is critical, as defects in multicore cables can cause electrical failures, short circuits, and fire hazards. Traditional high-voltage testing methods are effective for detecting severe defects during final inspection, but pose safety risks and are unsuitable for continuous, in-process monitoring [5,6]. Continuous monitoring during production is necessary to detect and correct defects in real time, preventing defective products from advancing through manufacturing, which could result in costly recalls, compromised reliability, and safety hazards. Existing techniques, such as resistance measurement and dielectric strength testing, face limitations in sensitivity, safety, and applicability for continuous use [7,8,9,10]. While dielectric strength testing detects severe insulation damage, it is unsafe for ongoing monitoring.
Advanced techniques have been proposed to overcome these challenges. Partial discharge monitoring offers high defect detection accuracy but requires complex, costly equipment [11]. Infrared thermography enables real-time monitoring but is affected by ambient temperature variations, leading to possible false alarms [12]. Arman et al. [13] proposed surface wave reflectometry, a non-contact and non-invasive method for insulation damage detection. Zhang et al. [14] introduced impedance spectroscopy to improve detection sensitivity without damaging the cable. Leiyu Ni et al. [15] applied image processing with a watershed algorithm for automated defect identification. Zhimin Guo et al. [16] leveraged machine learning to enhance detection accuracy, while Rayhan et al. [17] implemented deep learning for high-accuracy surface damage detection with reduced false positives. Despite these advancements, each method has limitations. Surface wave reflectometry and impedance spectroscopy often require controlled conditions, limiting practical application in continuous production. Image processing techniques are sensitive to lighting, noise, and resolution variations, affecting reliability. Machine learning approaches depend on large, high-quality datasets and may struggle with unseen defect types, while deep learning methods demand high computational resources and careful training. Moreover, many techniques are difficult to integrate into real-time production environments, leaving the need for a reliable, safe, and continuously operable detection method unmet.
This study proposes a real-time sheath damage detection system tailored for cable production. Using a laser-diffused reflection approach, the system continuously and non-intrusively monitors insulation integrity, detecting even minor defects. The goal is to design a system that can be seamlessly integrated into existing production lines, improving safety, reducing downtime, and enhancing product quality. By addressing the shortcomings of existing methods, this research aims to establish a new standard for continuous insulation defect detection in the wire manufacturing industry.
2. Methods
To identify a reliable technique for continuous insulation defect detection, four sensing methods, color sensing, capacitive, passive infrared (PIR), and laser-diffused reflection, were evaluated for feasibility and effectiveness.
2.1. Color Sensing Method
The color sensing method uses light-to-frequency converters (e.g., TCS3200, manufactured by TAOS—Texas Advanced Optoelectronic Solutions, Plano, TX, USA) or light-to-digital converters (e.g., TCS3472, manufactured by ams-OSRAM, Premstaetten, Austria) to detect missing insulation by analyzing changes in surface color. A bright white light illuminates the wire, and two sensors are used in differential mode to reduce environmental interference [18]. The TCS3200 outputs frequency signals for high-resolution surface variation detection, while the TCS3472 provides precise digital color and brightness analysis for subtle defects. Both integrate easily with automated systems and enable non-contact, real-time monitoring. However, their effectiveness is limited for detecting subtle or internal damages, as they rely on visible surface changes.
2.2. Capacitive Method
The capacitive method was based on the hypothesis that changes in the dielectric properties between the plates of a parallel-plate capacitor (PPC) would indicate insulation damage. The sensor design focused on monitoring current through the PPC, with damage expected to manifest as an increase in capacitance. It requires precise current monitoring and is sensitive to environmental conditions, which can affect its accuracy [19].
In Method 01, the wire itself was used as one electrode, while the paired plates of the PPC served as the other electrode. The capacitance was measured using an inductance capacitance resistance (LCR) meter. The recorded capacitance was approximately 0.14 pF. However, even after introducing a 3 cm long insulation defect, no measurable change in capacitance was observed. This indicated that the capacitance remained within the femtofarad range and was insufficiently sensitive to detect the presence of insulation damage.
In Method 02, the setup was modified such that the two plates of the PPC were used as the sole electrodes, and the wire was placed between them. Capacitance values were again measured using an LCR meter. Without the wire, the capacitance was recorded as 1.92 pF, while the inclusion of the wire slightly decreased the value to 1.90 pF. Importantly, even after introducing insulation damage to the wire, the capacitance remained unchanged at 1.90 pF. The observed difference of 0.02 pF between the intact and damaged conditions remained in the femtofarad region, suggesting that this method also lacked the sensitivity necessary for reliable insulation defect detection.
2.3. Passive Infrared Method
The PIR Method uses infrared sensors to detect heat emitted by damaged insulation. This method relies on the fact that damaged areas may emit different infrared radiation compared to undamaged areas. However, it is not suitable for detecting all types of insulation damage and can be influenced by external thermal conditions [20].
2.4. Laser Reflection Method
Among the evaluated techniques, the laser-diffused reflection method proved most promising for insulation defect detection due to its high sensitivity, non-intrusive nature, and suitability for real-time monitoring. This method directs a laser beam onto the insulation surface and analyzes changes in the reflected light caused by defects such as abrasions or conductor exposure, detected precisely by a photodetector. Its key advantages include non-contact operation, preventing interference with the wire, and high resolution capable of detecting minor defects. Unlike capacitive methods, which showed negligible changes despite damage, and color sensing or PIR methods affected by ambient light or temperature, the laser approach provides reliable, consistent detection.
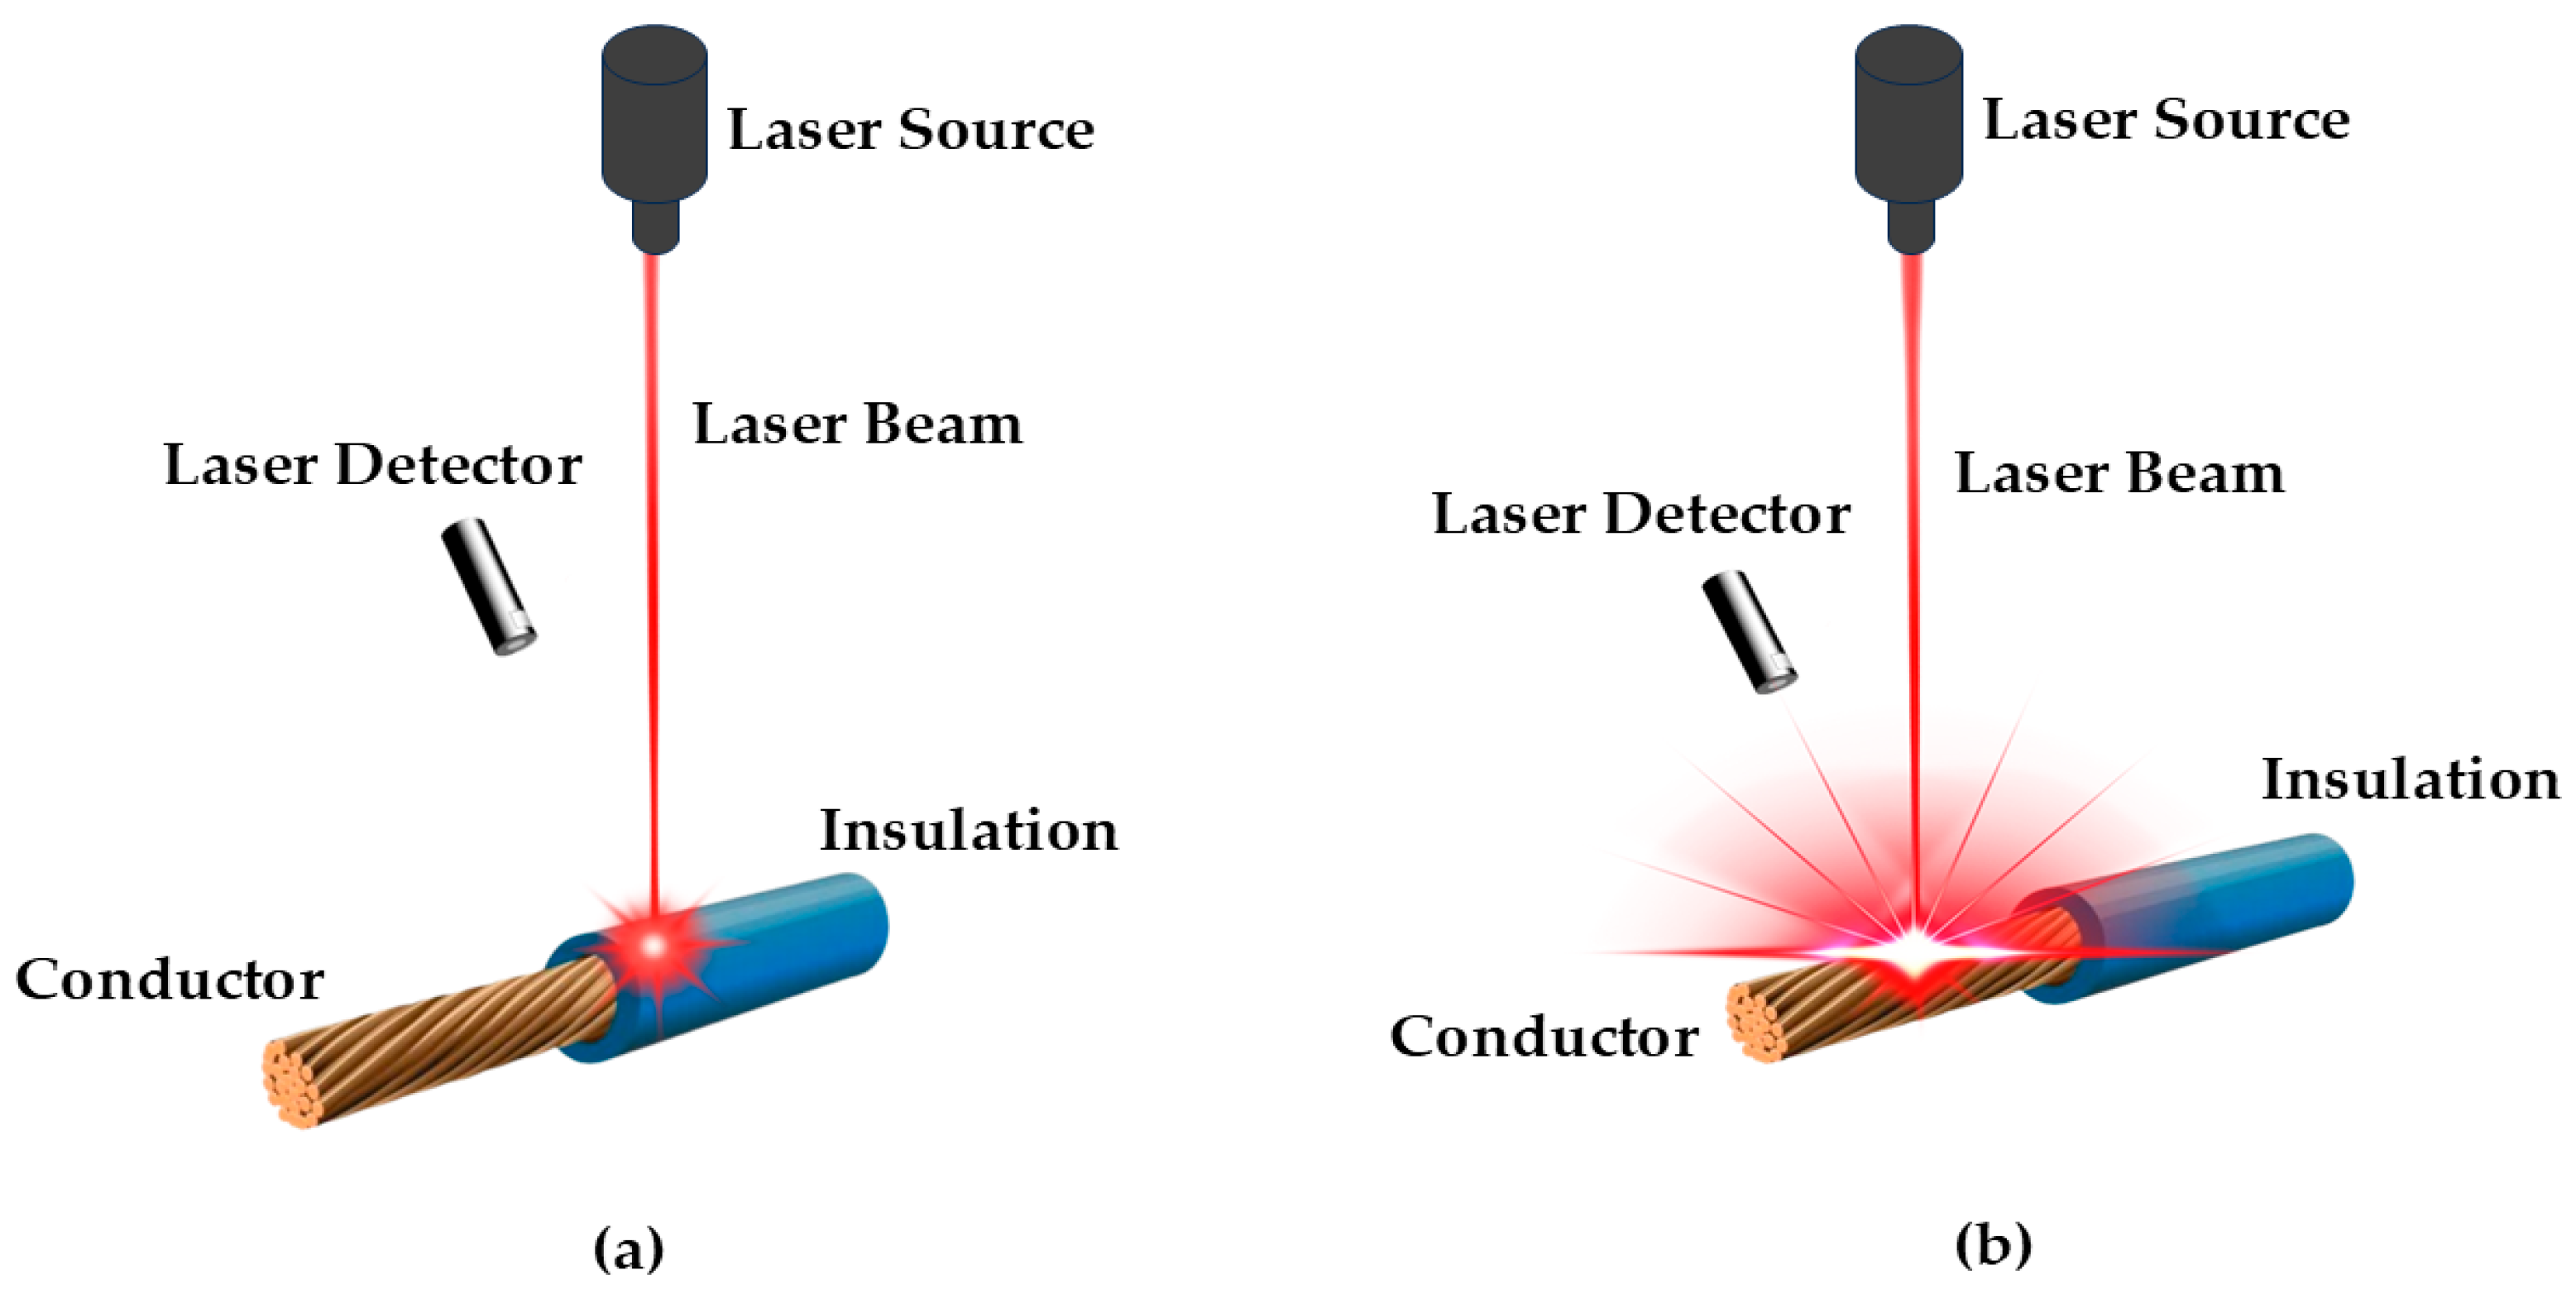
Based on this comparative assessment, the laser-diffused reflection method was selected as the primary detection technique for the proposed system. The implemented system utilizes a 650 nm wavelength laser diode emitting at 10 mW as the light source. The laser beam is directed toward the wire surface, and a laser detection diode captures the reflected signal. To process the signal, a phase shift oscillator—comprising an operational amplifier (OPAMP) and three resistance-capacitance (RC) branch feedback loops—was designed to generate a stable 7 kHz sine wave. This signal serves as both the modulation source for the laser and the demodulation reference for the reflected light signal. Figure 1 illustrates the detection system’s working principle: Figure 2 details the sensor unit’s architecture and operation, showing the stages of signal modulation, reflection, and detection.
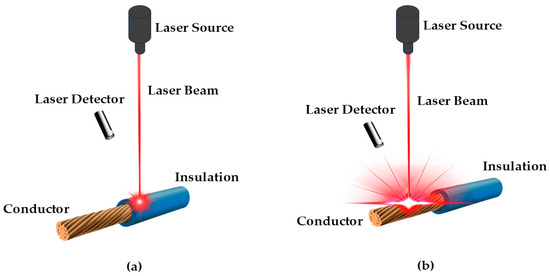
Figure 1.
Laser beam interaction in the detection system: (a) Schematic showing the interaction of the laser beam with the insulation and the detection process; (b) Illustration of how the laser beam contacts copper and how the laser detector detects the reflected signal.

Figure 2.
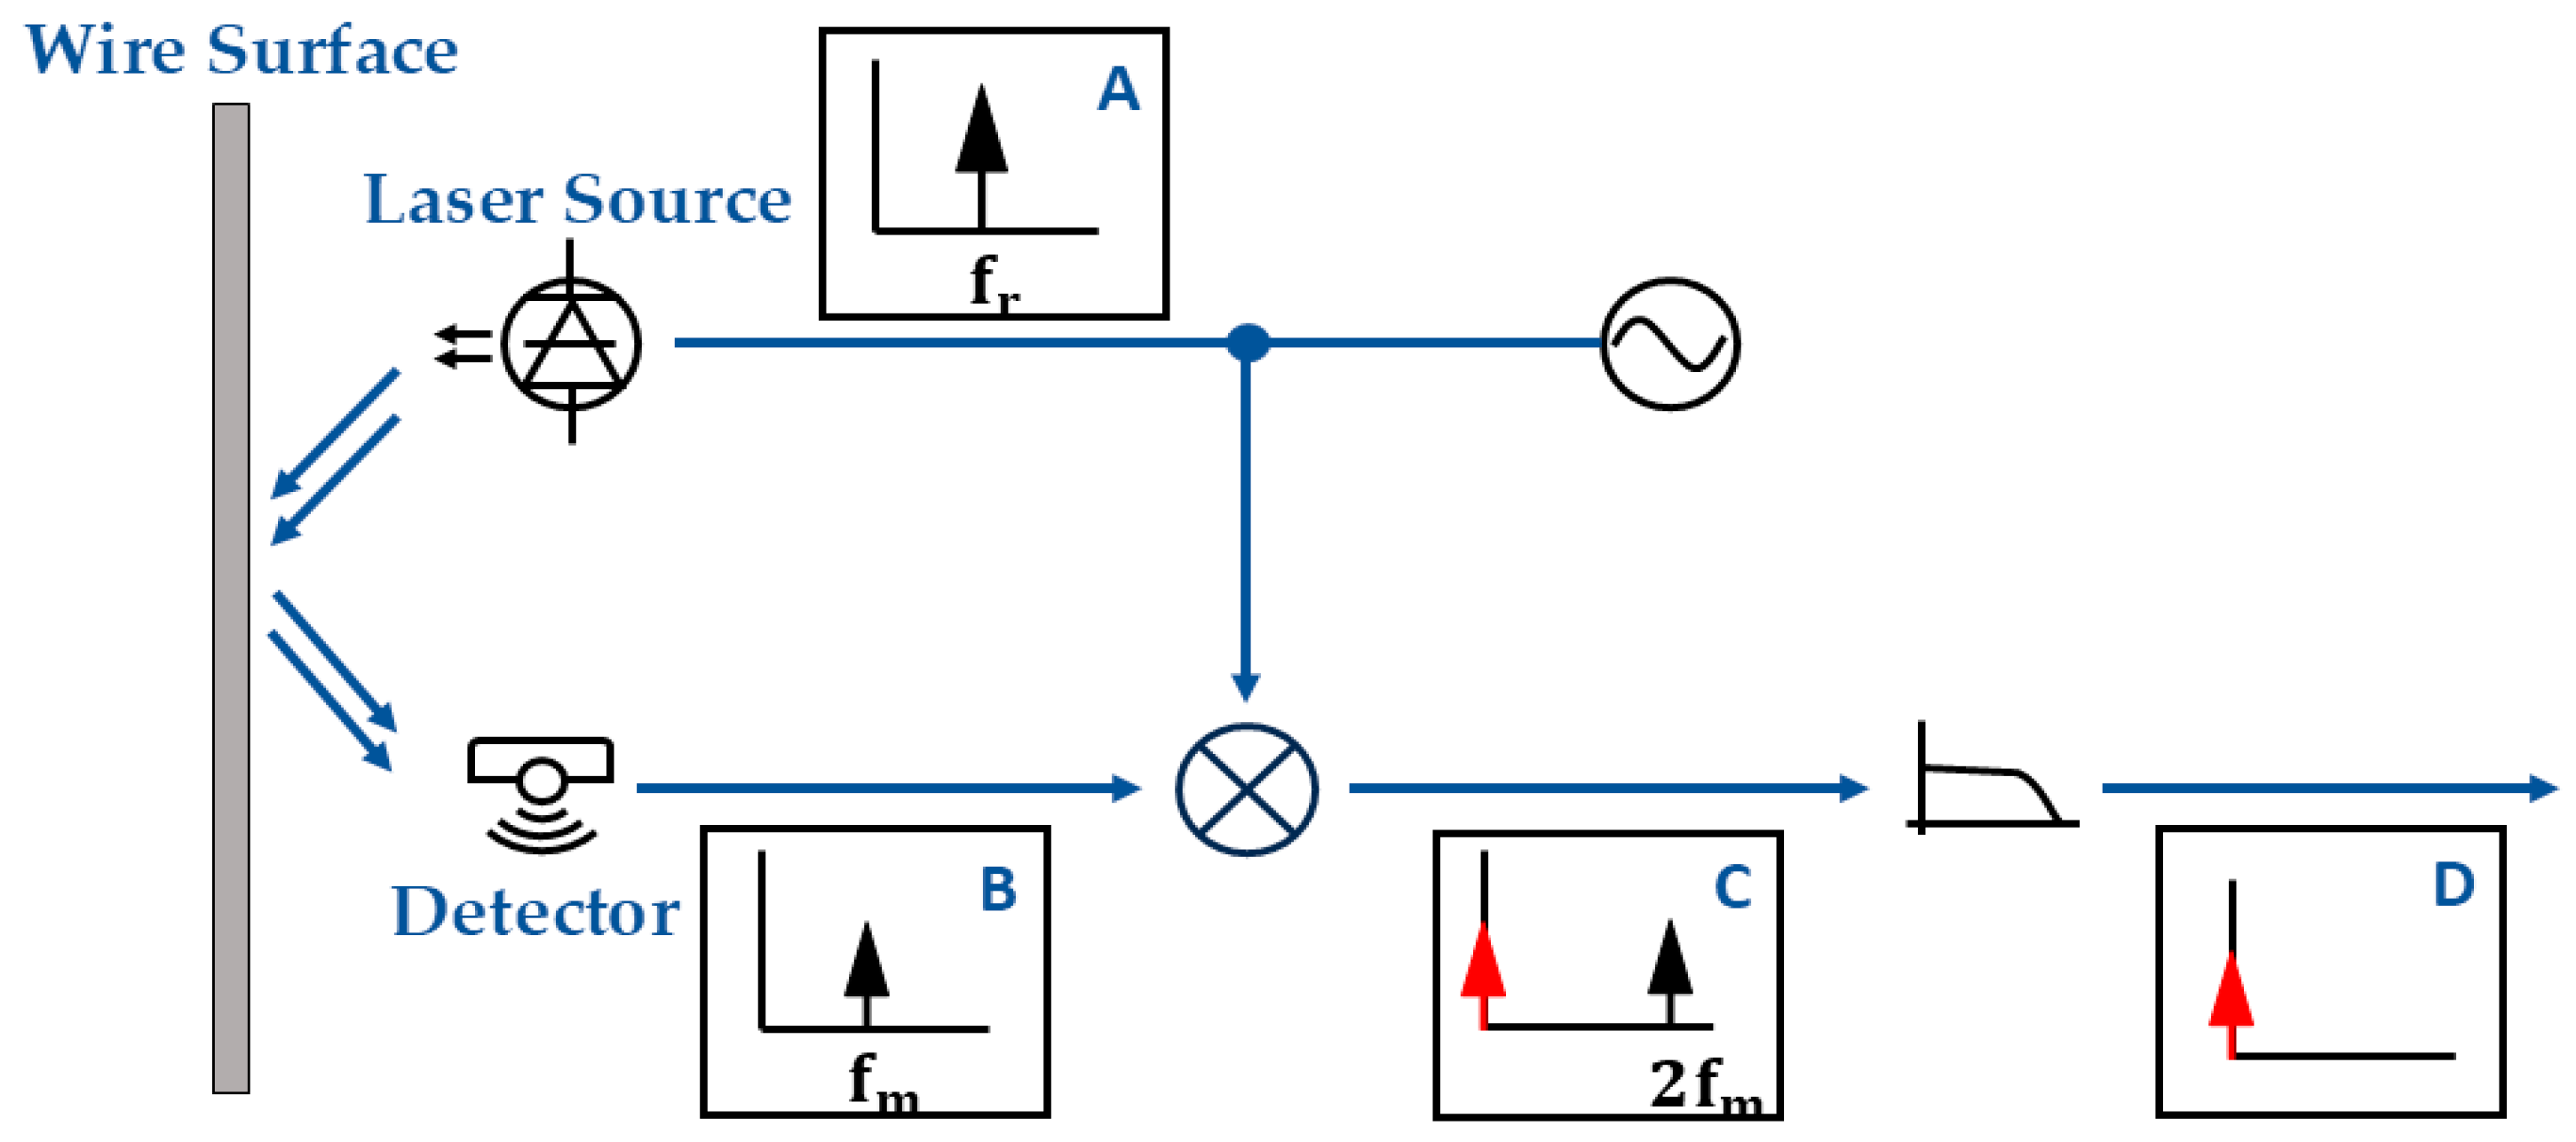
Working Principle of the Device’s Sensor Unit. A laser source emits a reference beam at frequency fr (A). The beam is directed onto the moving wire surface, and the scattered light is collected by a detector, producing a signal modulated at frequency fm due to surface variations (B). This signal is mixed with the reference beam to generate components at harmonic frequencies, with the defect-related component appearing at 2fm (C). A filter isolates the desired harmonic for further analysis (D), enabling detection and characterization of surface defects. Two blue lines indicate the laser beam path, single blue lines indicate signal paths, and red arrows indicate defect-related signal components.
In this system, a laser beam from a stable source operating at a reference frequency fr is directed onto the wire surface. Variations in the surface profile, such as defects or irregularities, modulate the reflected light at a frequency fm, which is proportional to the wire’s motion and the surface features. The scattered light is detected and converted into an electrical signal containing the modulation component. This signal is then mixed with the reference beam from the laser source, producing harmonic frequency components. The second harmonic at 2fm is particularly sensitive to defect-induced scattering and is extracted using appropriate filtering. By isolating and analyzing this harmonic, the system effectively distinguishes defect signals from background noise, enabling precise detection and characterization of surface imperfections.
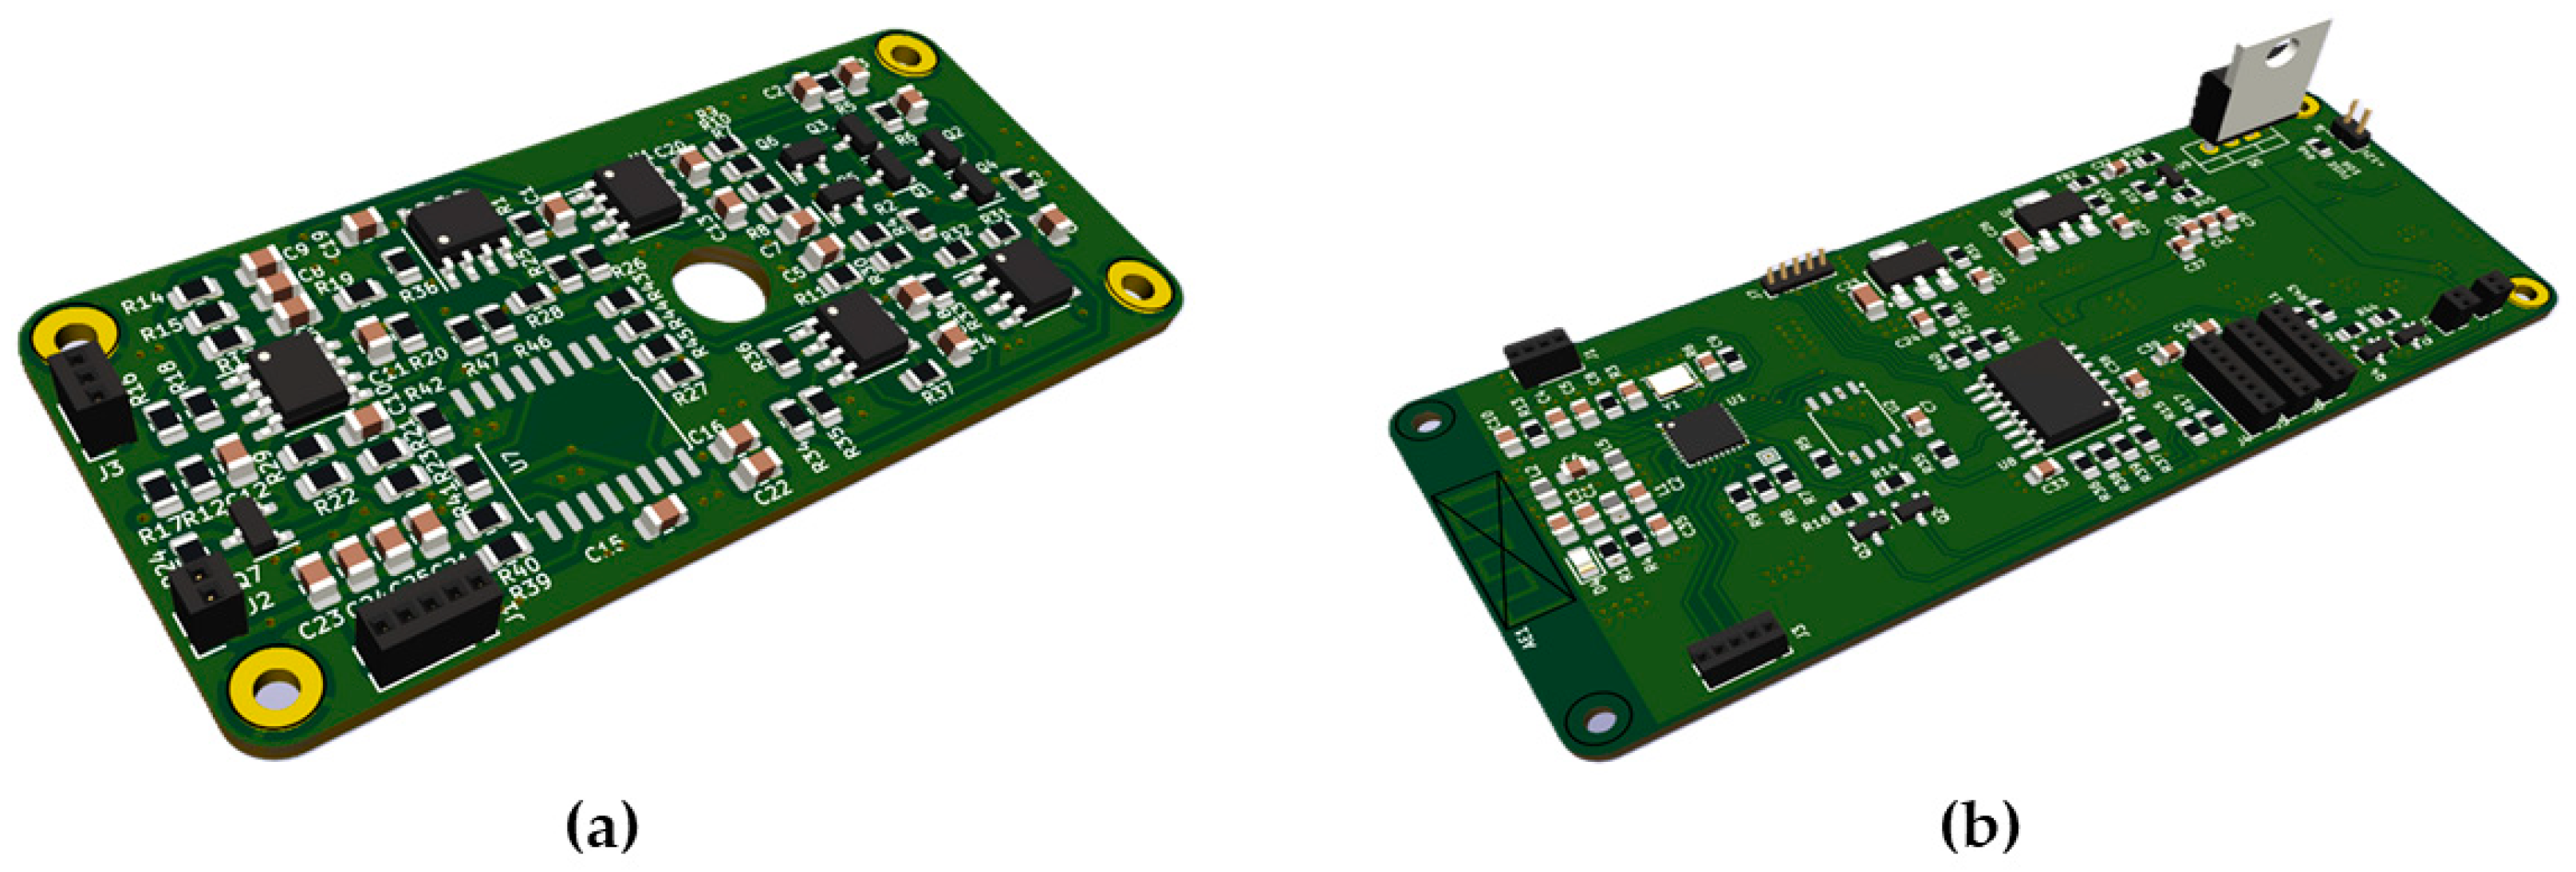
Figure 3a,b show the sensor printed circuit board (PCB) and the main PCB used for signal acquisition and system control. The microampere-level current generated by the laser light is amplified and converted to a 1–4 V voltage signal via a trans-impedance amplifier (TIA), an OPAMP-based front-end that converts photodiode current to voltage. To extract reflection data, the TIA output is demodulated using a synchronous demodulator combining a Gilbert cell and an instrumentation amplifier (INAMP). The Gilbert cell, built from discrete components, multiplies the TIA signal by the carrier, producing two signals—one in-phase and one 180° out-of-phase. The INAMP takes their difference, yielding a demodulated signal containing the carrier at a higher frequency. This carrier is removed by a resistance-capacitance active low-pass filter (ALPF), producing the reflection signal with a direct current (DC) offset. A digital-to-analog converter (DAC), interfaced via I2C with the microcontroller, generates a reference voltage. The filtered signal is compared against this reference to trigger a microcontroller interrupt when damage is detected. The complete circuit schematics are provided in the Supplementary Materials (Figures S1–S7), designed with KiCad EDA software (Version 7.0.9, Open-Source Software) [21].
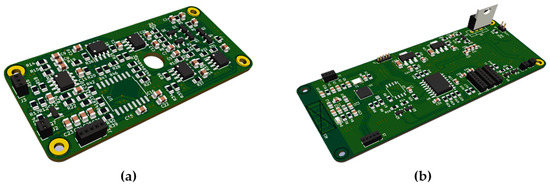
Figure 3.
(a) Sensor PCB of the detection system responsible for capturing optical signals; (b) Main PCB handling signal processing, including synchronous demodulation, filtering, and microcontroller control.
3. Results and Discussion
The color sensing method was initially tested to distinguish intact PVC insulation from exposed copper using a light-to-frequency (TCS3200) and light-to-digital (TCS3472) converter. It detected an average increase of ~150 units in the red color value when damage was present, showing potential. However, environmental light interference caused inconsistent readings, especially under variable lighting, and the method was insensitive to small or subtle damages. A dual-sensor differential setup was attempted to reduce interference, but yielded no consistent improvement. Thus, despite initial promise, color sensing proved unreliable for real-time industrial detection.
The capacitive method aimed to detect damage through capacitance changes due to altered dielectric properties. Experimental results showed minimal variations within the femtofarad range between intact and damaged insulation, easily masked by environmental fluctuations in the picofarad range. This sensitivity to external noise and the small signal changes rendered the method ineffective for accurate and consistent damage detection.
Experimental results from the Passive Infrared (PIR) method revealed that this approach was not effective for detecting insulation damage. Although it was initially expected that the infrared reflectivity differences between copper and PVC would be measurable, the actual variation in radiation levels was too small to be reliably detected. The sensor’s limited sensitivity prevented it from distinguishing between intact insulation and exposed copper, as the differences in reflected infrared signals were minimal. As a result, the PIR method failed to produce meaningful or consistent data, underscoring its impracticality for insulation damage detection and emphasizing the need for a more sensitive and accurate technique.
The developed system underwent thorough testing and validation within a live production environment. The laser-diffused reflection method demonstrated reliable detection of small insulation damages that were previously undetectable using conventional methods. The effectiveness of the method was evident in its consistent detection of minor damages without false positives. This reliability is critical for maintaining the integrity of the production process and ensuring that defective cables do not reach the final inspection stage. The average voltage values of the filtered and demodulated signal (sensor unit) for different colors of wires are measured, tabulated, and the average is calculated. The calculated averages are listed in Table 1.

Table 1.
Average voltage values of the filtered and demodulated sensor output for wires of different colors.
Multiple trial passes were carried out with a damaged wire to determine the accuracy of the damage detection. The results are tabulated in Table 2. The calculated accuracy is 83.75%.

Table 2.
Accuracy assessment of the device based on multiple trial passes with a damaged wire.
One of the key challenges addressed during the implementation was alignment precision. Accurate alignment is essential to ensure that the laser light correctly interacts with the cable insulation, and any misalignment could result in false readings. This issue was mitigated through careful system design and calibration. Additionally, environmental light interference, which could affect the accuracy of the detection system, was minimized by using appropriate shielding and filtering techniques.
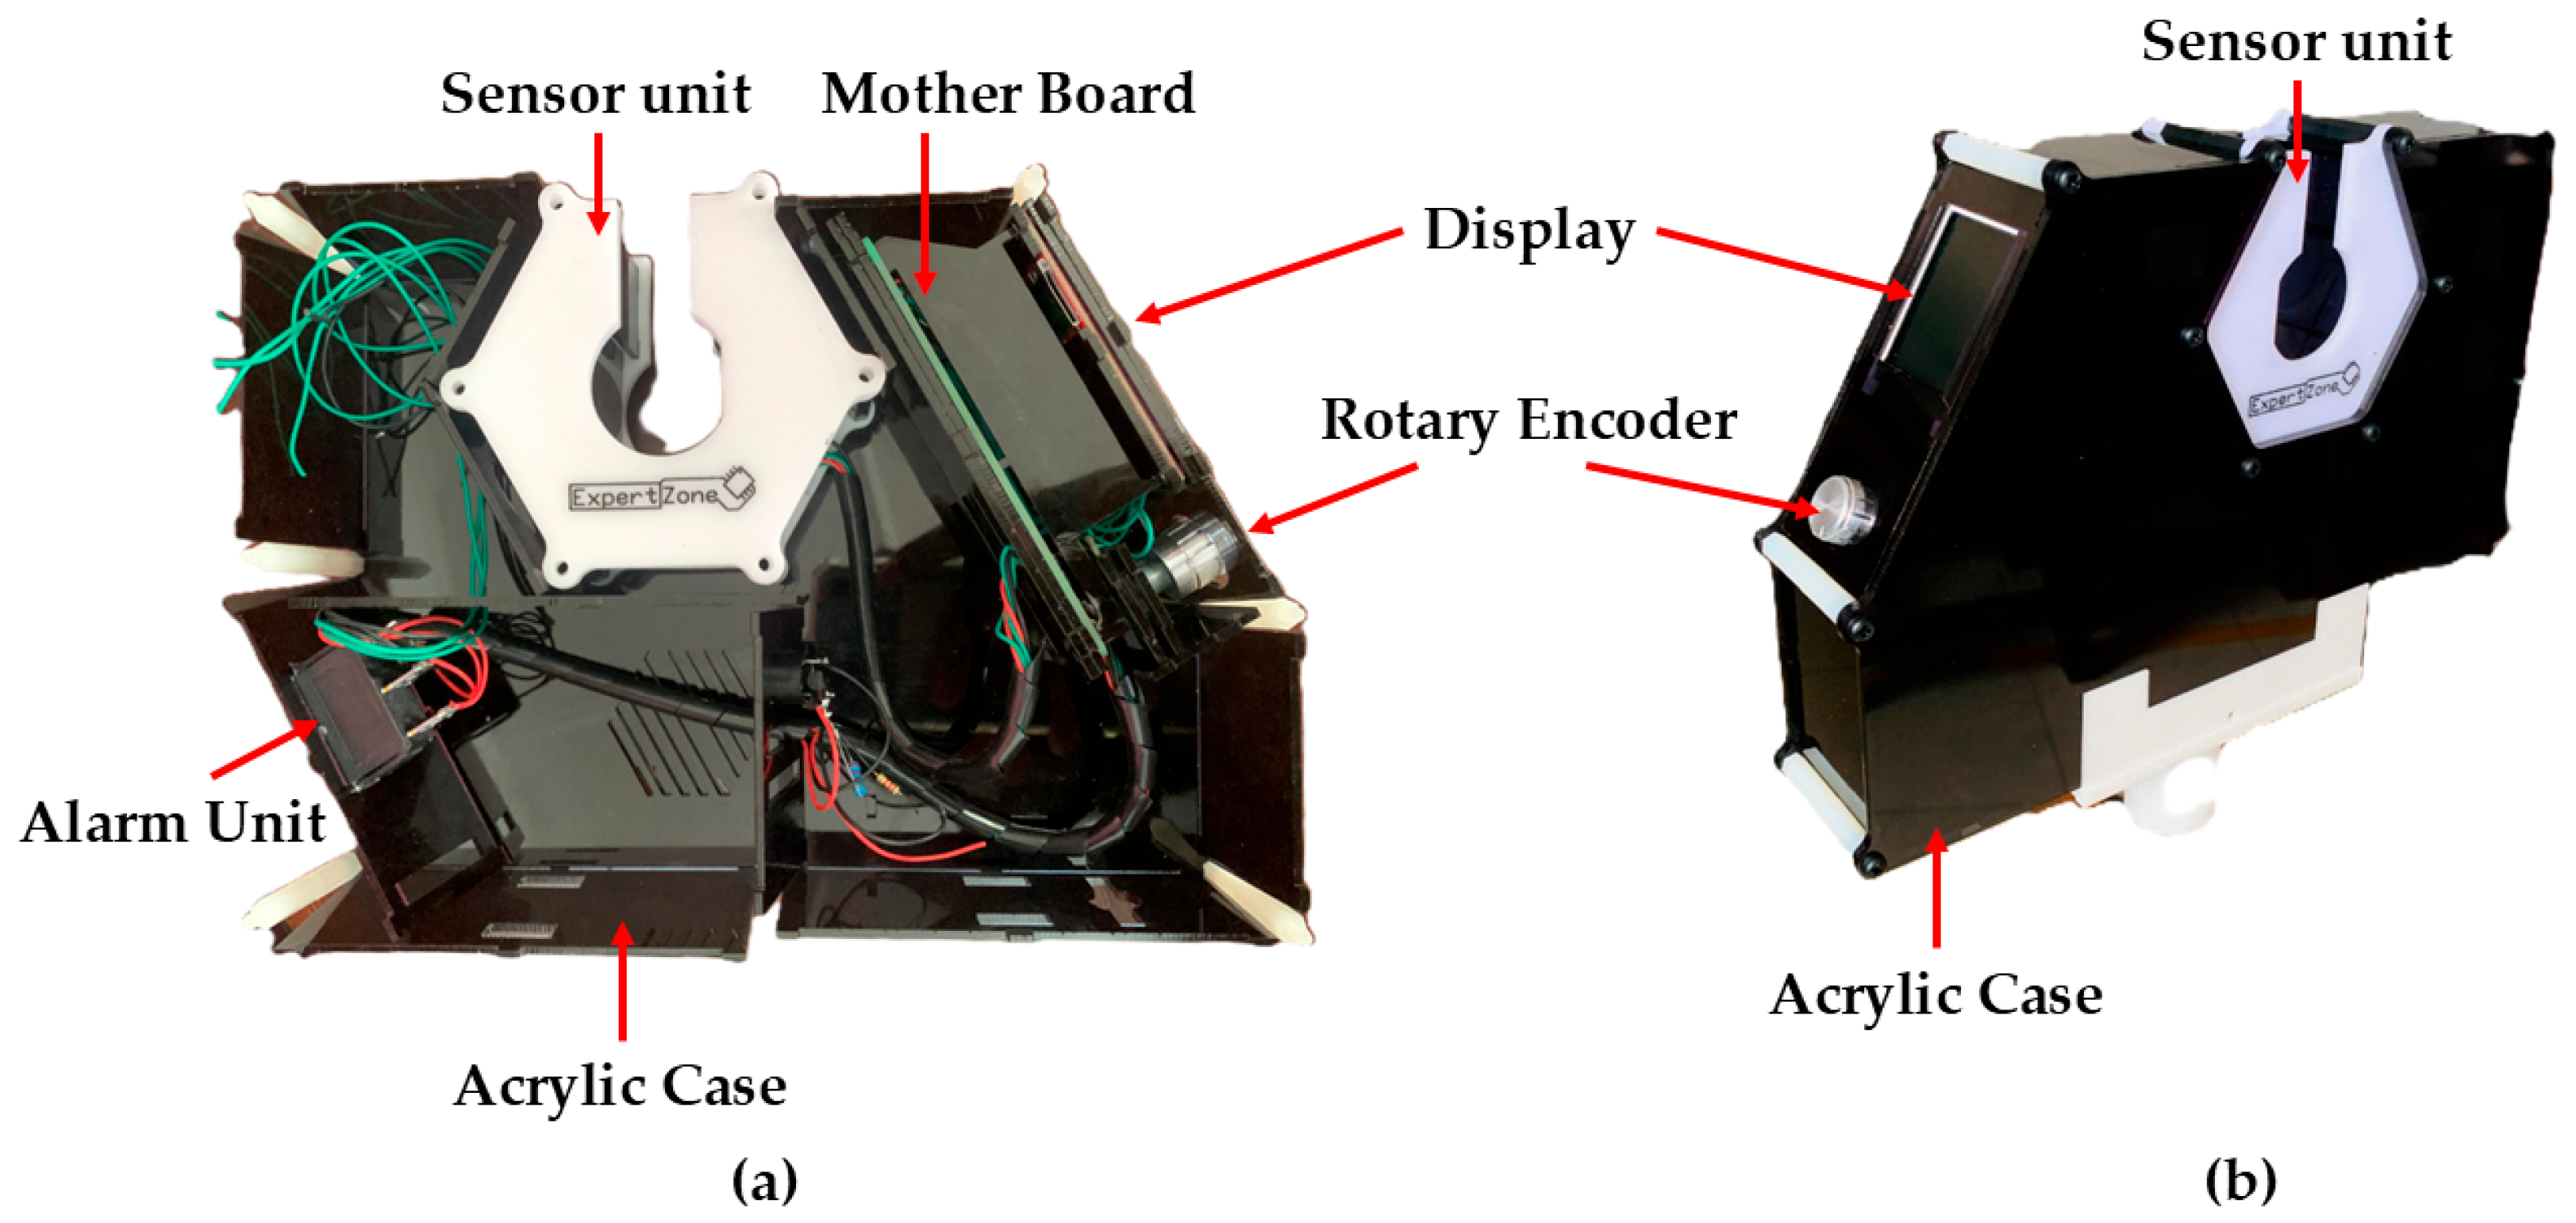
The impact of the new detection system on production was significant. Safety was greatly enhanced as the risk of undetected insulation defects was reduced. The ability to detect and rectify defects immediately also led to reduced downtime, as the production process did not need to be halted for lengthy inspections. This real-time detection capability contributed to lower maintenance costs and improved overall efficiency. Figure 4 illustrates the fully assembled wire sheath damage detection system, showcasing its integration of all components and readiness for deployment. The external design drawing of the wire sheath damage detection system is provided in the Supplementary Materials (Figure S8) to visually represent the device’s outer structure and layout.
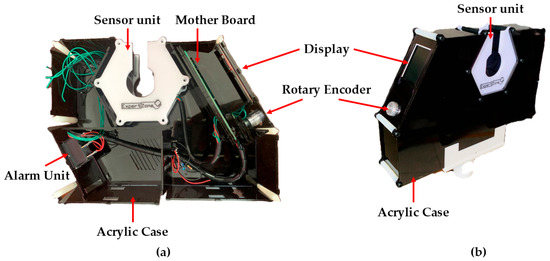
Figure 4.
Fully assembled wire sheath damage detection system. (a) Internal view (cross-section) showing the arrangement and labelling of major components. (b) External view of the complete system, illustrating its integration of all components.
4. Conclusions and Future Work
In this study, various methods for detecting sheath damage in wire production were examined, including color sensing, capacitive, PIR, and laser reflection methods. Each method was thoroughly tested and assessed for its effectiveness in identifying insulation damage. The color-sensing method encountered significant challenges due to environmental interference and inconsistencies, making it unreliable. The capacitive method did not show noticeable changes in capacitance in the presence of sheath damage, rendering it unsuitable. Similarly, the PIR method was ineffective, as it failed to differentiate between the minimal infrared reflection variations in the wire materials. Ultimately, the laser reflection method emerged as the most effective approach, demonstrating precise and consistent damage detection capabilities. Testing the system in a live production environment confirmed its reliability, with a total of 67 successful detections and 13 missed detections across 11 trials, achieving an overall detection accuracy of 83.75%. The system demonstrated stable performance across different wire colors, with a consistent voltage difference between sheath-covered wires and exposed copper (Table 1). This implementation overcomes limitations of conventional methods and enables robust continuous monitoring in cable production. Future work will enhance detection algorithms, improve environmental robustness, and extend applicability to other cable types, with potential integration of advanced calibration and artificial intelligence to further improve accuracy and efficiency.
Supplementary Materials
The following supporting information can be downloaded at: https://www.mdpi.com/article/10.3390/ECSA-12-26550/s1, Figure S1. Schematic diagram of the sensor circuit designed using KiCad EDA (Version 7.0.9). Figure S2. Schematic diagram of the motherboard circuit incorporating the ESP8266 module, flash memory, display interface, and related components, designed using KiCad EDA (Version 7.0.9). Figure S3. Schematic diagram of the motherboard circuit including the I/O expander, rotary encoder, external alarm, internal alarm, and associated interfaces, designed using KiCad EDA (Version 7.0.9). Figure S4. Schematic diagram of the motherboard circuit featuring crowbar protection, 3.3 V and 5 V power rails, and the 7 V power section, designed using KiCad EDA (Version 7.0.9). Figure S5. Schematic diagram of the 7 V power section dedicated to the laser power rail, designed using KiCad EDA (Version 7.0.9). Figure S6. Schematic diagram of the 3.3 V and 5 V regulated power rails, designed using KiCad EDA (Version 7.0.9). Figure S7. Schematic diagram of the crowbar protection circuit, designed using KiCad EDA (Version 7.0.9). Figure S8. External design of the wire sheath damage detection device created using AutoCAD 2020: (a) enclosure view 1; (b) enclosure view 2.
Author Contributions
Conceptualization, N.D. (Nishan Dharmaweera), N.R., M.J. and J.K.; methodology, N.D. (Nisala Damith), A.K. and T.G.; software, A.K. and T.G.; validation, N.D. (Nishan Dharmaweera), R.E.W., H.H. and N.D. (Nisala Damith); formal analysis, N.D. (Nisala Damith), T.G. and B.N.S.; investigation, N.D. (Nisala Damith), T.G. and M.J.; resources, N.D. (Nishan Dharmaweera), N.R. and N.D. (Nisala Damith); data curation, N.D. (Nisala Damith), A.K. and U.W.; writing—original draft preparation, N.D. (Nisala Damith) and A.K.; writing—review and editing, N.S.K., H.H. and N.D. (Nisala Damith); visualization, N.S.K., B.N.S., N.R. and N.D. (Nisala Damith); supervision, N.D. (Nishan Dharmaweera), N.R. and R.E.W.; project administration, N.D. (Nishan Dharmaweera), U.W. and N.R.; funding acquisition, U.W. and R.E.W. All authors have read and agreed to the published version of the manuscript.
Funding
This research was supported by the Science and Technology Human Resource Development Project, Ministry of Education, Sri Lanka, funded by the Asian Development Bank (Grant No. STHRD/CRG/R1/SJ/06), research grant funded by the University of Sri Jayewardenepura, Sri Lanka (Grant No: ASP/01/RE/ENG/2022/86), and research grants funded by the Sri Lanka Institute of Information Technology, Sri Lanka (Grant Nos. PVC(R\&D)RG/2024/13 and PVC(R\&D)RG/2024/16).
Institutional Review Board Statement
Not applicable.
Informed Consent Statement
Not applicable.
Data Availability Statement
Data is contained within the article or Supplementary Materials.
Conflicts of Interest
The authors declare no conflicts of interest.
References
- Dhanushka, S.; Hasaranga, C.; Kahatapitiya, N.S.; Wijesinghe, R.E.; Wijethunge, A. Efficient Battery Management and Workflow Optimization in Warehouse Robotics Through Advanced Localization and Communication Systems. Eng. Proc. 2024, 82, 50. [Google Scholar]
- Goyal, A.; Thakur, A. An Overview of Drive by Wire Technology for Automobiles. In Proceedings of the 2019 International Conference on Automation, Computational and Technology Management (ICACTM), London, UK, 24–26 April 2019; pp. 108–110. [Google Scholar]
- Abdhul Rahuman, M.A.; Kahatapitiya, N.S.; Amarakoon, V.N.; Wijenayake, U.; Silva, B.N.; Jeon, M.; Kim, J.; Ravichandran, N.K.; Wijesinghe, R.E. Recent Technological Progress of Fiber-Optical Sensors for Bio-Mechatronics Applications. Technologies 2023, 11, 157. [Google Scholar] [CrossRef]
- Zhang, Y.; Tang, K.; Liu, Z.; Chen, Y. Experimental Study on Thermal and Fire Behaviors of Energized PE-Insulated Wires under Overload Currents. J. Therm. Anal. Calorim. 2021, 145, 345–351. [Google Scholar] [CrossRef]
- Irwin, T.; Ryan, H.M. Insulation Co-Ordination for AC Transmission and Distribution Systems. In High Voltage Engineering and Testing; Ryan, H.M., Ed.; Institution of Engineering and Technology: London, UK, 2007; pp. 55–86. ISBN 978-0-85296-775-1. [Google Scholar]
- Maraaba, L.; Al-Soufi, K.; Ssennoga, T.; Memon, A.; Worku, M.; Alhems, L. Contamination Level Monitoring Techniques for High-Voltage Insulators: A Review. Energies 2022, 15, 7656. [Google Scholar] [CrossRef]
- Wang, L.; Tu, Y.; Cao, B.; Liu, Y.; Mei, H.; Liu, L.; Yin, F. Review of Nondestructive Testing Methods for Defects in Insulating Polymers. CSEE J. Power Energy Syst. 2025, 11, 1380–1397. [Google Scholar] [CrossRef]
- Morsalin, S.; Phung, T.B.; Danikas, M.; Mawad, D. Diagnostic Challenges in Dielectric Loss Assessment and Interpretation: A Review. IET Sci. Meas. Tech. 2019, 13, 767–782. [Google Scholar] [CrossRef]
- Tan, D.Q. Differentiation of Roughness and Surface Defect Impact on Dielectric Strength of Polymeric Thin Films. IET Nanodielectr. 2020, 3, 28–31. [Google Scholar] [CrossRef]
- Inês Silva, M.; Malitckii, E.; Santos, T.G.; Vilaça, P. Review of Conventional and Advanced Non-Destructive Testing Techniques for Detection and Characterization of Small-Scale Defects. Prog. Mater. Sci. 2023, 138, 101155. [Google Scholar] [CrossRef]
- Cruz, J.D.S.; Fruett, F.; Lopes, R.D.R.; Takaki, F.L.; Tambascia, C.D.A.; Lima, E.R.D.; Giesbrecht, M. Partial Discharges Monitoring for Electric Machines Diagnosis: A Review. Energies 2022, 15, 7966. [Google Scholar] [CrossRef]
- Hussain, G.A.; Hassan, W.; Mahmood, F.; Shafiq, M.; Rehman, H.; Kay, J.A. Review on Partial Discharge Diagnostic Techniques for High Voltage Equipment in Power Systems. IEEE Access 2023, 11, 51382–51394. [Google Scholar] [CrossRef]
- Arman, A.S.; Glass, S.W.; Fifield, L.S.; Ali, M. Non-Conductor-Contact Surface Wave Reflectometry for Cable Insulation Damage Detection. IEEE Sens. J. 2022, 22, 11065–11074. [Google Scholar] [CrossRef]
- Zhang, H.; Mu, H.; Zhang, D.; Lu, X.; Yu, P.; Zhang, G. A Novel Non-Destructive Diagnosis Method for Cable Insulation Defect Based on Broadband Impedance Spectroscopy. In Proceedings of the 2020 IEEE International Conference on High Voltage Engineering and Application (ICHVE), Beijing, China, 6–10 September 2020; pp. 1–4. [Google Scholar]
- Ni, L.; Ma, Y.; Lin, Q.; Yang, J.; Jin, L. Research on Insulator Defect Detection Method Based on Image Processing and Watershed Algorithm. In Proceedings of the 2021 International Conference on Advanced Electrical Equipment and Reliable Operation (AEERO), Beijing, China, 15–17 October 2021; pp. 1–6. [Google Scholar]
- Application of Machine Learning in Wire Damage Detection for Safety Procedure|Soft Computing. Available online: https://link.springer.com/article/10.1007/s00500-022-06747-z (accessed on 3 May 2025).
- Rayhan, K.M.; Roy, S.D.; Sadid, M.F.H.; Ahmed, K.F.; Shatil, A.H. Surface Damage Detection of Line Insulators Using Deep Learning Algorithms to Avoid Insulation Failure. In Proceedings of the 2023 3rd International Conference on Robotics, Electrical and Signal Processing Techniques (ICREST), Dhaka, Bangladesh, 7–8 January 2023; pp. 238–243. [Google Scholar]
- Panie, G.I.E.; Mutiara, A.B. Development of robotic arm for color-based goods sorter in factory using TCS3200 sensor with a web-based monitoring system. In Proceedings of the 2018 Third International Conference on Informatics and Computing (ICIC); IEEE: Palembang, Indonesia, 2018; pp. 1–6. [Google Scholar] [CrossRef]
- Sheldon, R.T.; Bowler, N. An Interdigital Capacitive Sensor for Nondestructive Evaluation of Wire Insulation. IEEE Sens. J. 2014, 14, 961–970. [Google Scholar] [CrossRef]
- Amuta, E.O.; Sobola, G.O.; Eseabasi, O.; Dike, H.N.; Matthew, S.; Agbetuyi, A.F.; Wara, S.T. Motion Detection System Using Passive Infrared Technology. IOP Conf. Ser. Earth Environ. Sci. 2024, 1342, 012001. [Google Scholar] [CrossRef]
- KiCad. Available online: https://www.kicad.org/ (accessed on 1 August 2025).
Disclaimer/Publisher’s Note: The statements, opinions and data contained in all publications are solely those of the individual author(s) and contributor(s) and not of MDPI and/or the editor(s). MDPI and/or the editor(s) disclaim responsibility for any injury to people or property resulting from any ideas, methods, instructions or products referred to in the content. |
© 2025 by the authors. Licensee MDPI, Basel, Switzerland. This article is an open access article distributed under the terms and conditions of the Creative Commons Attribution (CC BY) license (https://creativecommons.org/licenses/by/4.0/).

