1. Introduction
The rise of the 4.0 industrial revolution fostered the development of strategies to improve the quality of industrial processes. One of them is Tool Condition Monitoring (TCM), which is the analysis of machine tool health by, for example, extracting signals and identifying patterns that indicate possible anomalies that could prejudice the machining process. Acoustic Emissions (AE) are described as the phenomenon of acoustic wave propagation caused by the sudden release of stress within a material subjected to deformation, cutting, or fracturing [
1], and can be employed in TCM through its sensing. AE signals are widely used mainly because of their ability to allow the detection of large energy discharges during plastic deformation, supporting close monitoring of cuts made in materials in the milling process [
2]. In addition, the collected signals can also give information about the milling process, allowing the extraction of key performance indicators such as the surface finish quality of the fabricated products [
3]. Surface roughness is considered a critical factor in evaluating the milling process due to its inherent connection to factors such as functional performance, durability, and assembly compatibility of machined components [
4]. Therefore, evaluating real-time surface roughness is important to improve process quality, which is paramount in the Industry 4.0 context.
Approaches to analyze and estimate surface roughness were made by acquiring images and using them as inputs in Convolutional Neural Networks (CNNs) to predict surface roughness with a 3.6% mean error [
5] and also using sound signals transformed into Mel-Frequency Cepstral Coefficients (MFCCs) in machine learning algorithms such as CNNs, Temporal Convolutional Networks (TCNs), Random Forests (RFs), and Support Vector Machines (SVMs) to classify the MFCC representations into predefined roughness categories, with the developed models successfully delimiting discriminative patterns [
6]. Moreover, features extracted from real-time data acquired by a rotating dynamometer and an accelerometer were used to predict surface roughness. Real-time monitoring enhanced the surface roughness analysis accuracy by a mean of 2.53% [
7].
Hence, considering the feasibility of analyzing surface roughness with real-time monitoring, aligned with the effectiveness of AE signals in TCM, this research aims to develop a real-time AE-based metal roughness average (Ra) analysis method that could indirectly predict roughness through the AE signal processing and feature extraction. The experiments were conducted on a steel workpiece on which straight lines were milled with one of four distinct theoretical roughness levels (6 μm, 12 μm, 18 μm, and 24 μm), produced by predefined milling parameters. Moreover, the signal processing and algorithm were developed in the MATLAB R2025 a software, with classification of the four roughness levels achieved using features extracted from the AE signals of the milled lines, with the estimated Ra presenting an error lower than 10%. This work is innovative because it presents a method that analyzes signals collected from an IoT sensor that has not been broadly used in other research and does not use machine learning models to perform predictions, which reduces computational burden. It provides contributions to real-time roughness monitoring that align with Industry 4.0 requirements.
2. Methodology
2.1. Experimental Setup
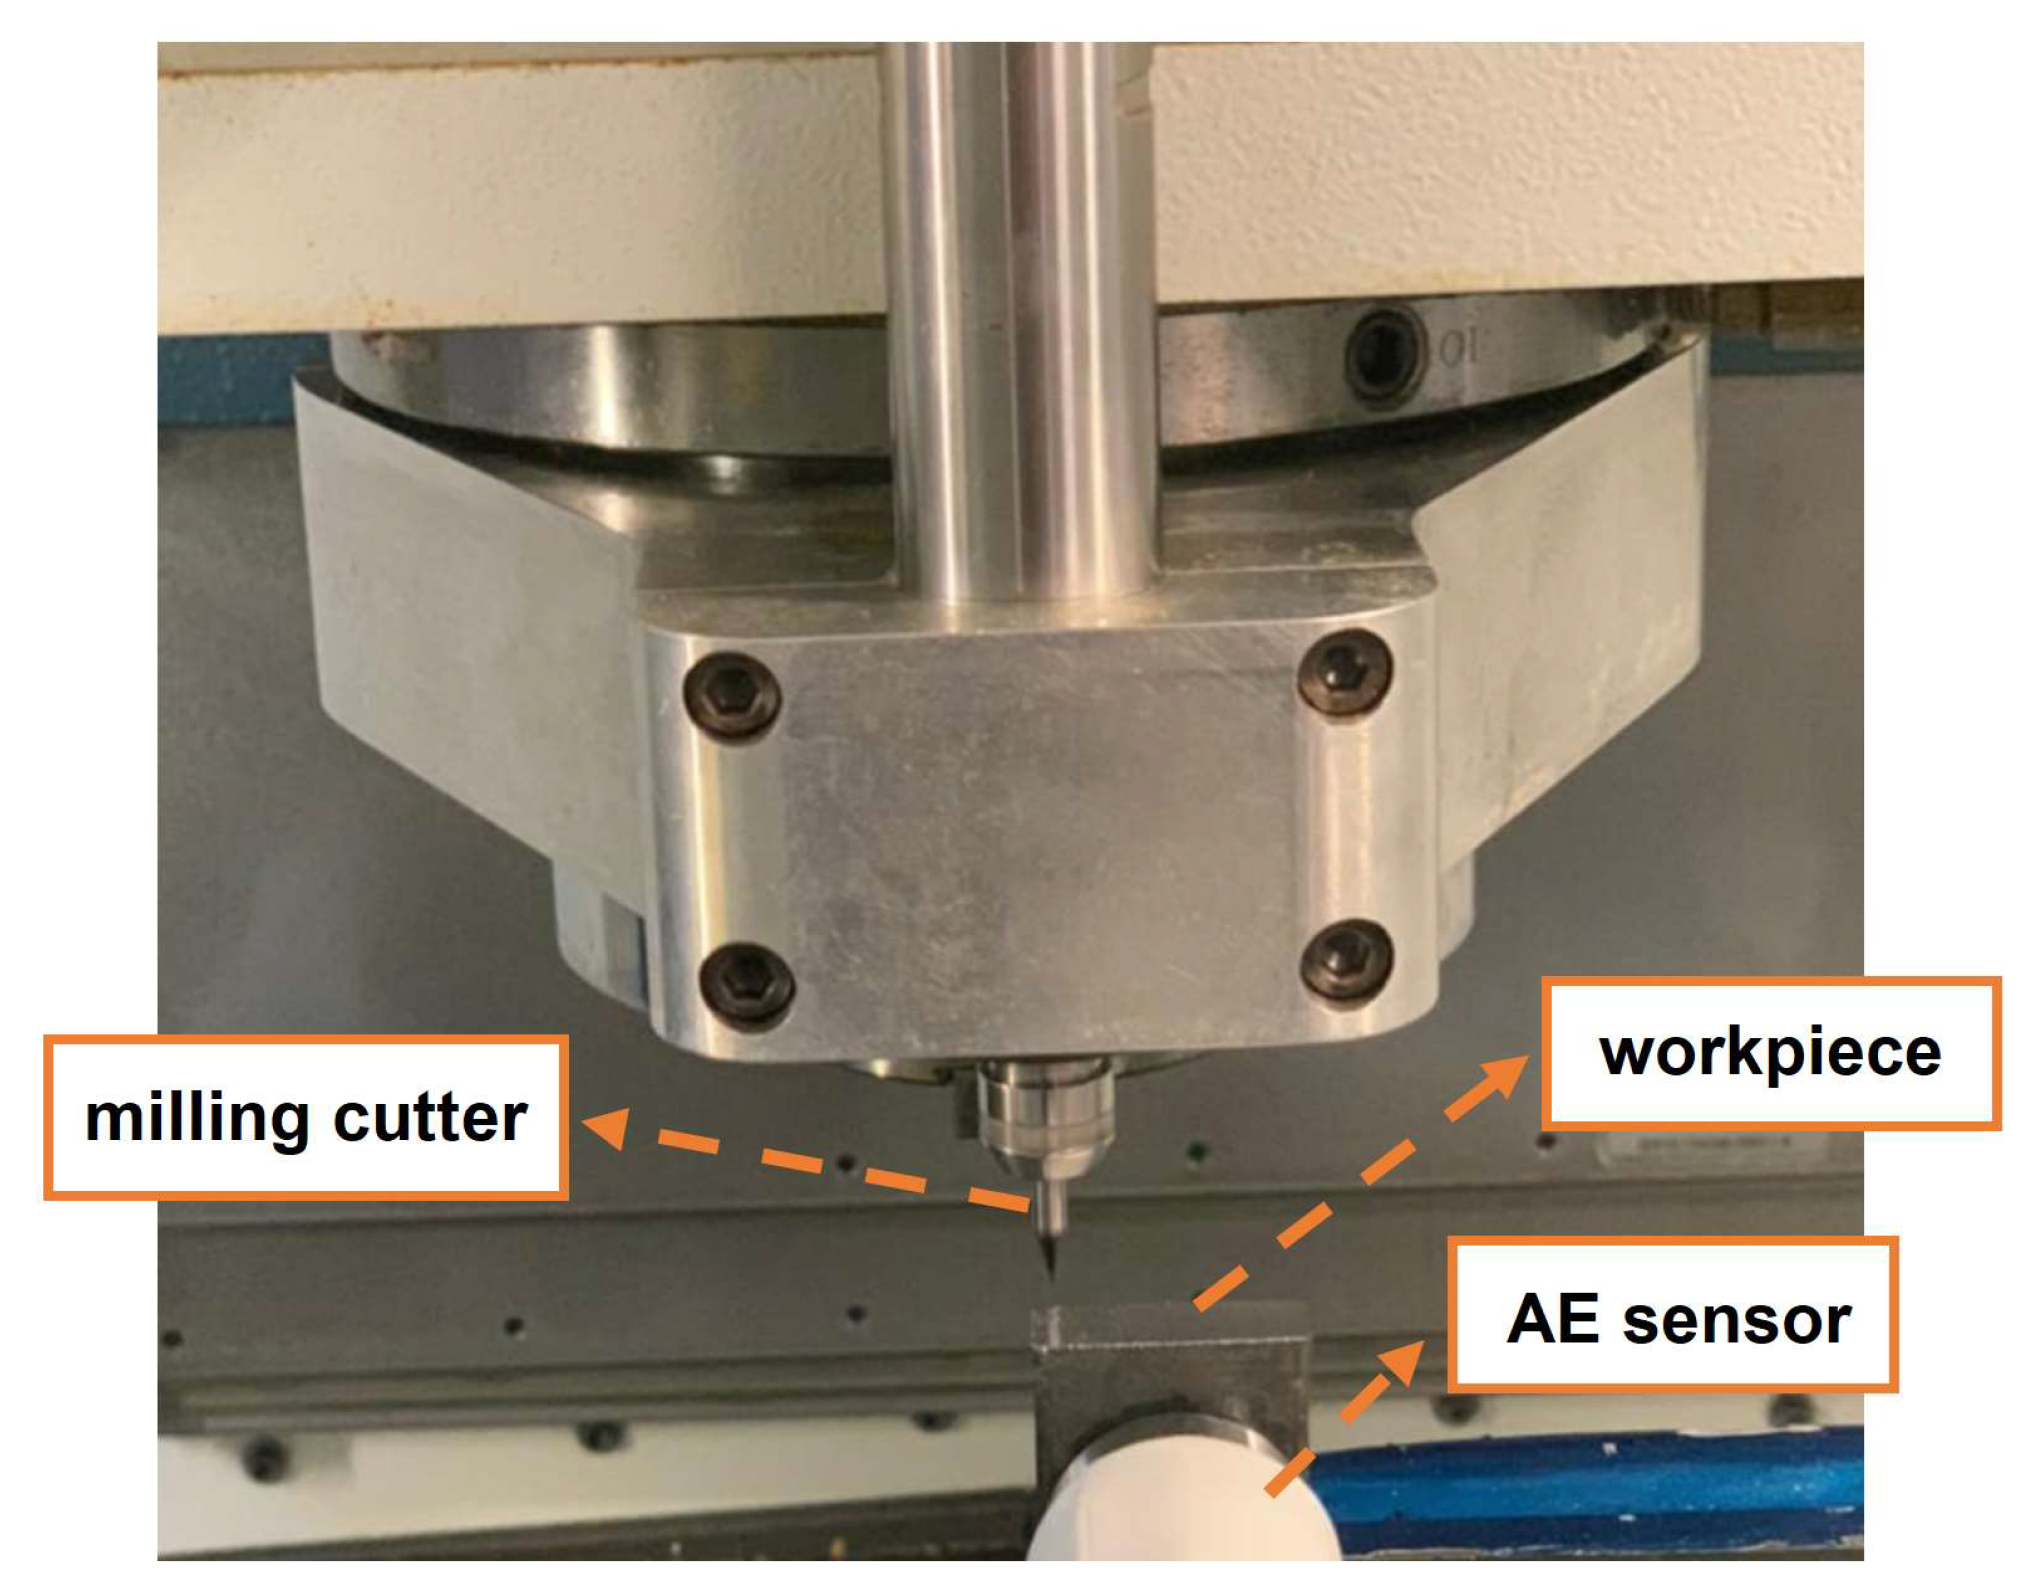
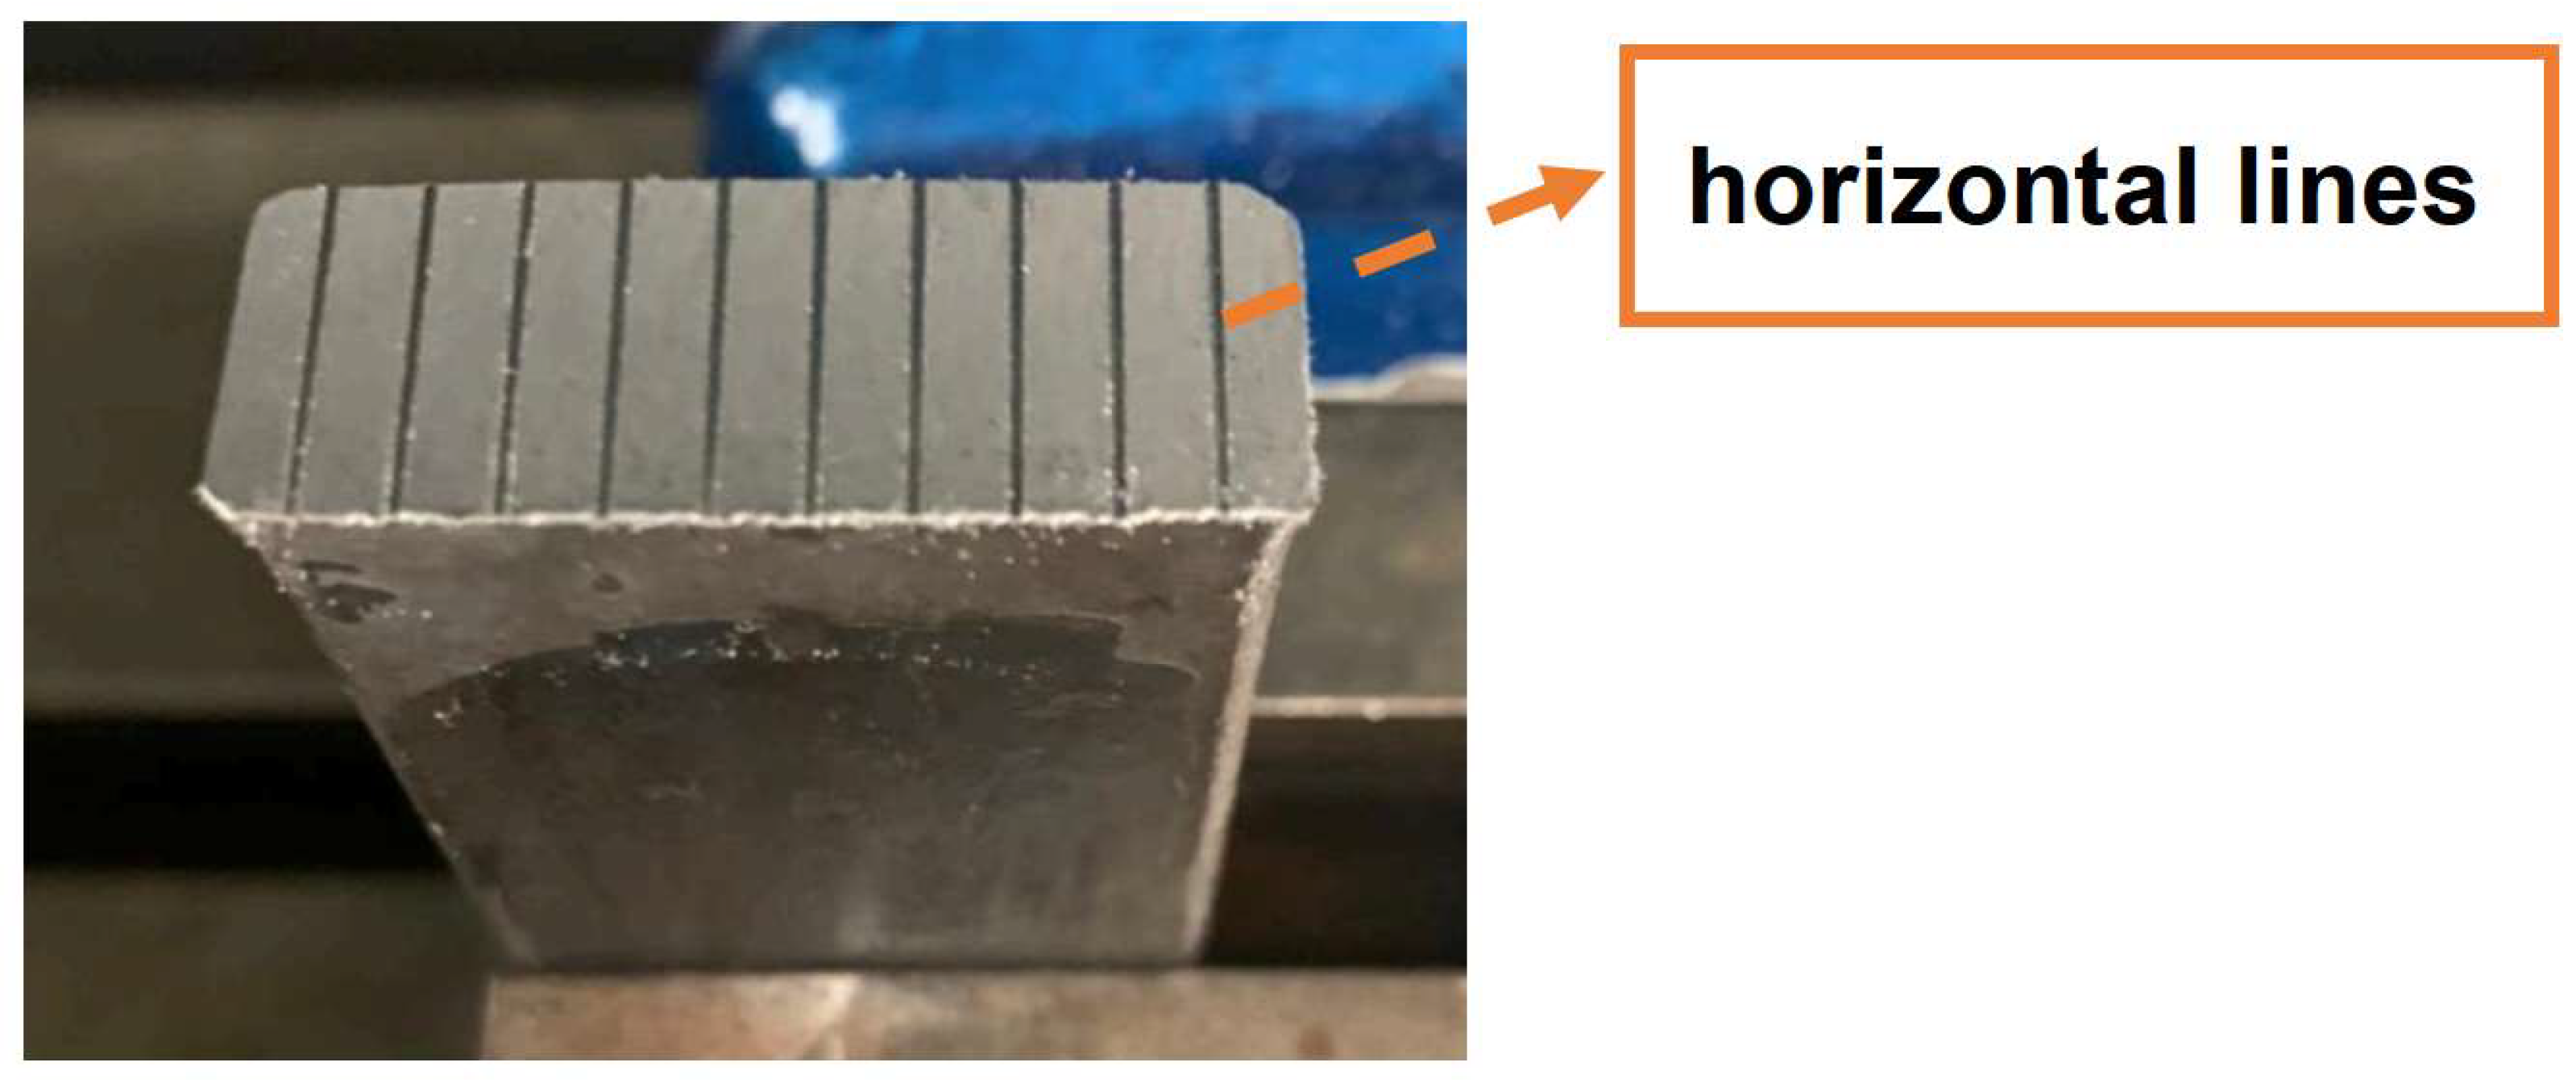
The micromilling tests were carried out on a ROMI vertical CNC machining center model D600. A high-speed spindle, NSK Nakanishi model NR3060S, with a maximum rotation speed of 60,000 rpm, was mounted on the machine tool, where a 500 μm diameter solid carbide TiNAl-coated two-cutting-edge helical-fluted end mill was attached. Straight lines were milled in a 6 mm-thick steel workpiece, while the data was sampled at 1.11 MHz through a piezoelectric wireless AE sensor, coupled to the side of the workpiece and perpendicular to the milling spindle, as in
Figure 1 and
Figure 2.
2.2. Theoretical Background
The roughness average of the surface in each line is dictated by either the end mill geometry or the process parameters, such as the milling feed rate, spindle speed, and cut depth [
8,
9]. By altering said parameters, it is possible to create different roughness values and AE responses, which may be processed and used as classification features [
10]. The theoretical values were calculated using Equations (1) and (2) [
11].
where
is the maximum roughness,
is the roughness average,
is the feed rate, and
is the secondary cutting edge angle.
2.3. Roughness Average Estimation Method with Acoustic Emissions
The IoT sensor stored the raw signal as vectors and then sent them to the computer via Wi-Fi, where they were converted into .mat files. In order to extract a characterizing feature, a PSD analysis was conducted through transforming the time-domain signal vector to the frequency domain using the Discrete Fourier Transform (DFT), followed by filtering with fifth-order bandpass Butterworth filters.
The chosen parameter to estimate roughness levels was the RMS within selected frequency bands. The criteria to select a band were that it must contain a concentrated amount of energy so that it has a larger signal-to-noise ratio and carries relevant information and also presents a distinct shape for each roughness level, enabling its identification. After several tests, it was noticed that the chosen parameter (band RMS) behaves as an S–curve as the theoretical surface roughness increases, as represented in
Figure 3.
The presented graphic in
Figure 3 refers to the RMS of the full-length signal vector; thus, in order to approach real-time condition monitoring, the next step was to analyze time sections of the signal and verify if they behave similarly. Each signal was then segmented into 50, 20, 10, 5, and 1 ms windows (with an overlap of consecutive windows of 5%), and the RMS of the 40–65 kHz band of each window was individually calculated.
3. Results and Discussion
The resulting filtered RMS of the windows was then organized into the graphics in
Figure 4 and the Normalized Root Mean Squared Error (NRMSE) in
Table 1. It was observed that the segments’ RMSs deviate around the RMS of the signal as a whole, and for larger windows, they are more similar to it. This behavior shows a trade-off between the estimation method’s accuracy, system burden, and the speed at which the information is updated, since larger windows increase accuracy but reduce the data refresh rate, whereas a higher sampling rate or a moving RMS window demands superior computational power. Also, it was noted that higher average roughness levels also produce greater NRMSE, suggesting that this technique may have limitations in non-micromilling operations.
4. Conclusions
This work presents a method for real-time metal roughness average analysis based on Acoustic Emission, aimed at Industry 4.0 IoT applications. The experimental setup was made on a vertical CNC machining center, where a steel workpiece was milled, and the operation’s acoustic waves were collected through a wireless sensor and sent for processing and PSD analysis in the MATLAB software. The results validate the method’s capability of accurately estimating a surface’s average roughness in real-time scenarios (less than 7% NRMSE in some setups), with the benefits of lower computational requirements when compared to machine learning methods and the modularity benefits of IoT devices.
The information presented in this article aims to corroborate Industry 4.0 development by contributing a less complex, modular, faster, and reliable approach that supports improved data collection and better decision-making, targeting more economically and environmentally viable solutions.
Researchers of similar worklines are encouraged to test different experimental setups, such as different machinery, workpiece materials and shapes, sensory systems, and in the presence of factory floor noise, and it is also suggested that a study of these methods’ optimization in factory applications be conducted.
Author Contributions
Conceptualization, F.R.L.D. and P.V.P.d.O.; methodology, P.V.P.d.O. and F.H.P.R.d.A.; software, P.V.P.d.O. and F.R.L.D.; validation, P.d.O.C.J. and A.R.R.; formal analysis, F.R.L.D. and P.V.P.d.O.; investigation, P.V.P.d.O. and F.H.P.R.d.A.; resources, A.R.R. and F.R.L.D.; data curation, F.R.L.D.; writing—original draft preparation, P.V.P.d.O., F.H.P.R.d.A. and C.B.M.; writing—review and editing, P.V.P.d.O., F.R.L.D., F.H.P.R.d.A. and C.B.M.; visualization, P.d.O.C.J. and A.R.R.; supervision, F.R.L.D.; project administration, F.R.L.D.; funding acquisition, F.R.L.D. All authors have read and agreed to the published version of the manuscript.
Funding
This research was funded by the Pro-Rectory of Research and Innovation of the University of São Paulo under grant #22.1.09345.01.2, and the São Paulo Research Foundation, under grant #2024/01374-6.
Institutional Review Board Statement
Not applicable.
Informed Consent Statement
Not applicable.
Data Availability Statement
The raw data supporting the conclusions of this article will be made available by the authors on request.
Acknowledgments
The authors would like to thank the University of São Paulo (USP) for the opportunity to carry out and publish the research.
Conflicts of Interest
The authors declare no conflicts of interest.
References
- Mohanraj, T.; Shankar, S.; Rajasekar, R.; Sakthivel, N.R.; Pramanik, A. Tool condition monitoring techniques in milling process—A review. J. Mater. Res. Technol. 2020, 9, 1032–1042. [Google Scholar] [CrossRef]
- Binali, R.; Kuntoğlu, M.; Pimenov, D.Y.; Usca, Ü.A.; Gupta, M.K.; Korkmaz, M.E. Advance monitoring of hole machining operations via intelligent measurement systems: A critical review and future trends. Measurement 2022, 201, 111757. [Google Scholar] [CrossRef]
- Zhao, C.; Tian, W.; Yan, Q.; Bai, Y. Prediction of surface roughness in milling additively manufactured high-strength maraging steel using broad learning system. Coatings 2025, 15, 566. [Google Scholar] [CrossRef]
- Palová, K.; Kelemenová, T.; Kelemen, M. Measuring procedures for evaluating the surface roughness of machined parts. Appl. Sci. 2023, 13, 9385. [Google Scholar] [CrossRef]
- Michelacci, F.D.; Han, G.; Kim, S. Autonomous process optimization of a tabletop CNC milling machine using computer vision and deep learning. CIRP J. Manuf. Sci. Technol. 2025, 60, 153–164. [Google Scholar] [CrossRef]
- Charalampous, P. Data-driven modeling and enhancement of surface quality in milling based on sound signals. J. Manuf. Mater. Process. 2025, 9, 231. [Google Scholar] [CrossRef]
- Wang, R.; Song, Q.; Peng, Y.; Liu, Z.; Ma, H.; Liu, Z.; Xu, X. Milling surface roughness monitoring using real-time tool wear data. Int. J. Mech. Sci. 2025, 285, 109821. [Google Scholar] [CrossRef]
- İşleyen, Ü.K.; Karamanoğlu, M. The influence of machining parameters on surface roughness of MDF in milling operation. BioResources 2019, 14, 3266–3277. [Google Scholar] [CrossRef]
- Çolak, O.; Kurbanoğlu, C.; Kayacan, M.C. Milling surface roughness prediction using evolutionary programming methods. Mater. Des. 2007, 28, 657–666. [Google Scholar] [CrossRef]
- Mokhtar, N.; Ismail, I.Y.; Asmelash, M.; Zohari, M.H.; Azhari, A. Analysis of acoustic emission on surface roughness during end milling. ARPN J. Eng. Appl. Sci. 2017, 12, 1324–1328. [Google Scholar]
- Davim, J.P. Surface Integrity in Machining; Springer: Warsaw, Poland, 2010; pp. 53–54. ISBN 978-1-84882-873-5. [Google Scholar]
| Disclaimer/Publisher’s Note: The statements, opinions and data contained in all publications are solely those of the individual author(s) and contributor(s) and not of MDPI and/or the editor(s). MDPI and/or the editor(s) disclaim responsibility for any injury to people or property resulting from any ideas, methods, instructions or products referred to in the content. |
© 2025 by the authors. Licensee MDPI, Basel, Switzerland. This article is an open access article distributed under the terms and conditions of the Creative Commons Attribution (CC BY) license (https://creativecommons.org/licenses/by/4.0/).


