1. Introduction
High-performance polymers (HPPs) are increasingly used in aerospace, automotive, oil and gas, and healthcare due to their thermal resistance, chemical stability, and mechanical strength [
1,
2,
3,
4]. They maintain structural integrity under high temperatures and aggressive environments, making them suitable for long-term, high-stress applications [
5].
HPPs offer several advantages over traditional metallic implants. In orthopedics, computed tomography (CT) is frequently used postoperatively to evaluate the bone-implant interface. However, metallic implants create severe imaging artifacts such as beam hardening and scatter, which obscure diagnostic evaluation [
6]. HPPs mitigate these issues because their radiolucency produces minimal distortion in CT and X-ray imaging, allowing clearer visualization of bone structures and more accurate image-guided treatment [
7,
8,
9,
10]. Moreover, the elastic modulus of HPPs more closely matches that of cortical and trabecular bone, reducing the risk of stress shielding—a phenomenon where excessive implant stiffness leads to bone resorption and aseptic loosening [
11,
12]. Their low density and limited thermal conductivity also enhance patient comfort [
13]. These advantages make HPPs attractive alternatives to metals for medical device applications.
Among HPPs, PAEKs are of particular interest because they combine excellent mechanical strength, thermal stability, and wear resistance [
3]. Within this family, polyetheretherketone (PEEK) is a biocompatible semi-crystalline thermoplastic with a long history of use in healthcare, particularly in spinal and orthopedic applications including intervertebral body fusion devices (IBFDs), vertebral body replacements (VBRs), and spinal fusion rods [
14,
15,
16,
17]. In spinal fusion, PEEK cages have demonstrated comparable fusion rates and a lower risk of implant subsidence compared to titanium cages [
18].
The evolution of additive manufacturing (AM), or 3D printing, has enabled the fabrication of patient-specific implants (PSIs) with complex geometries that are difficult to achieve using conventional manufacturing methods [
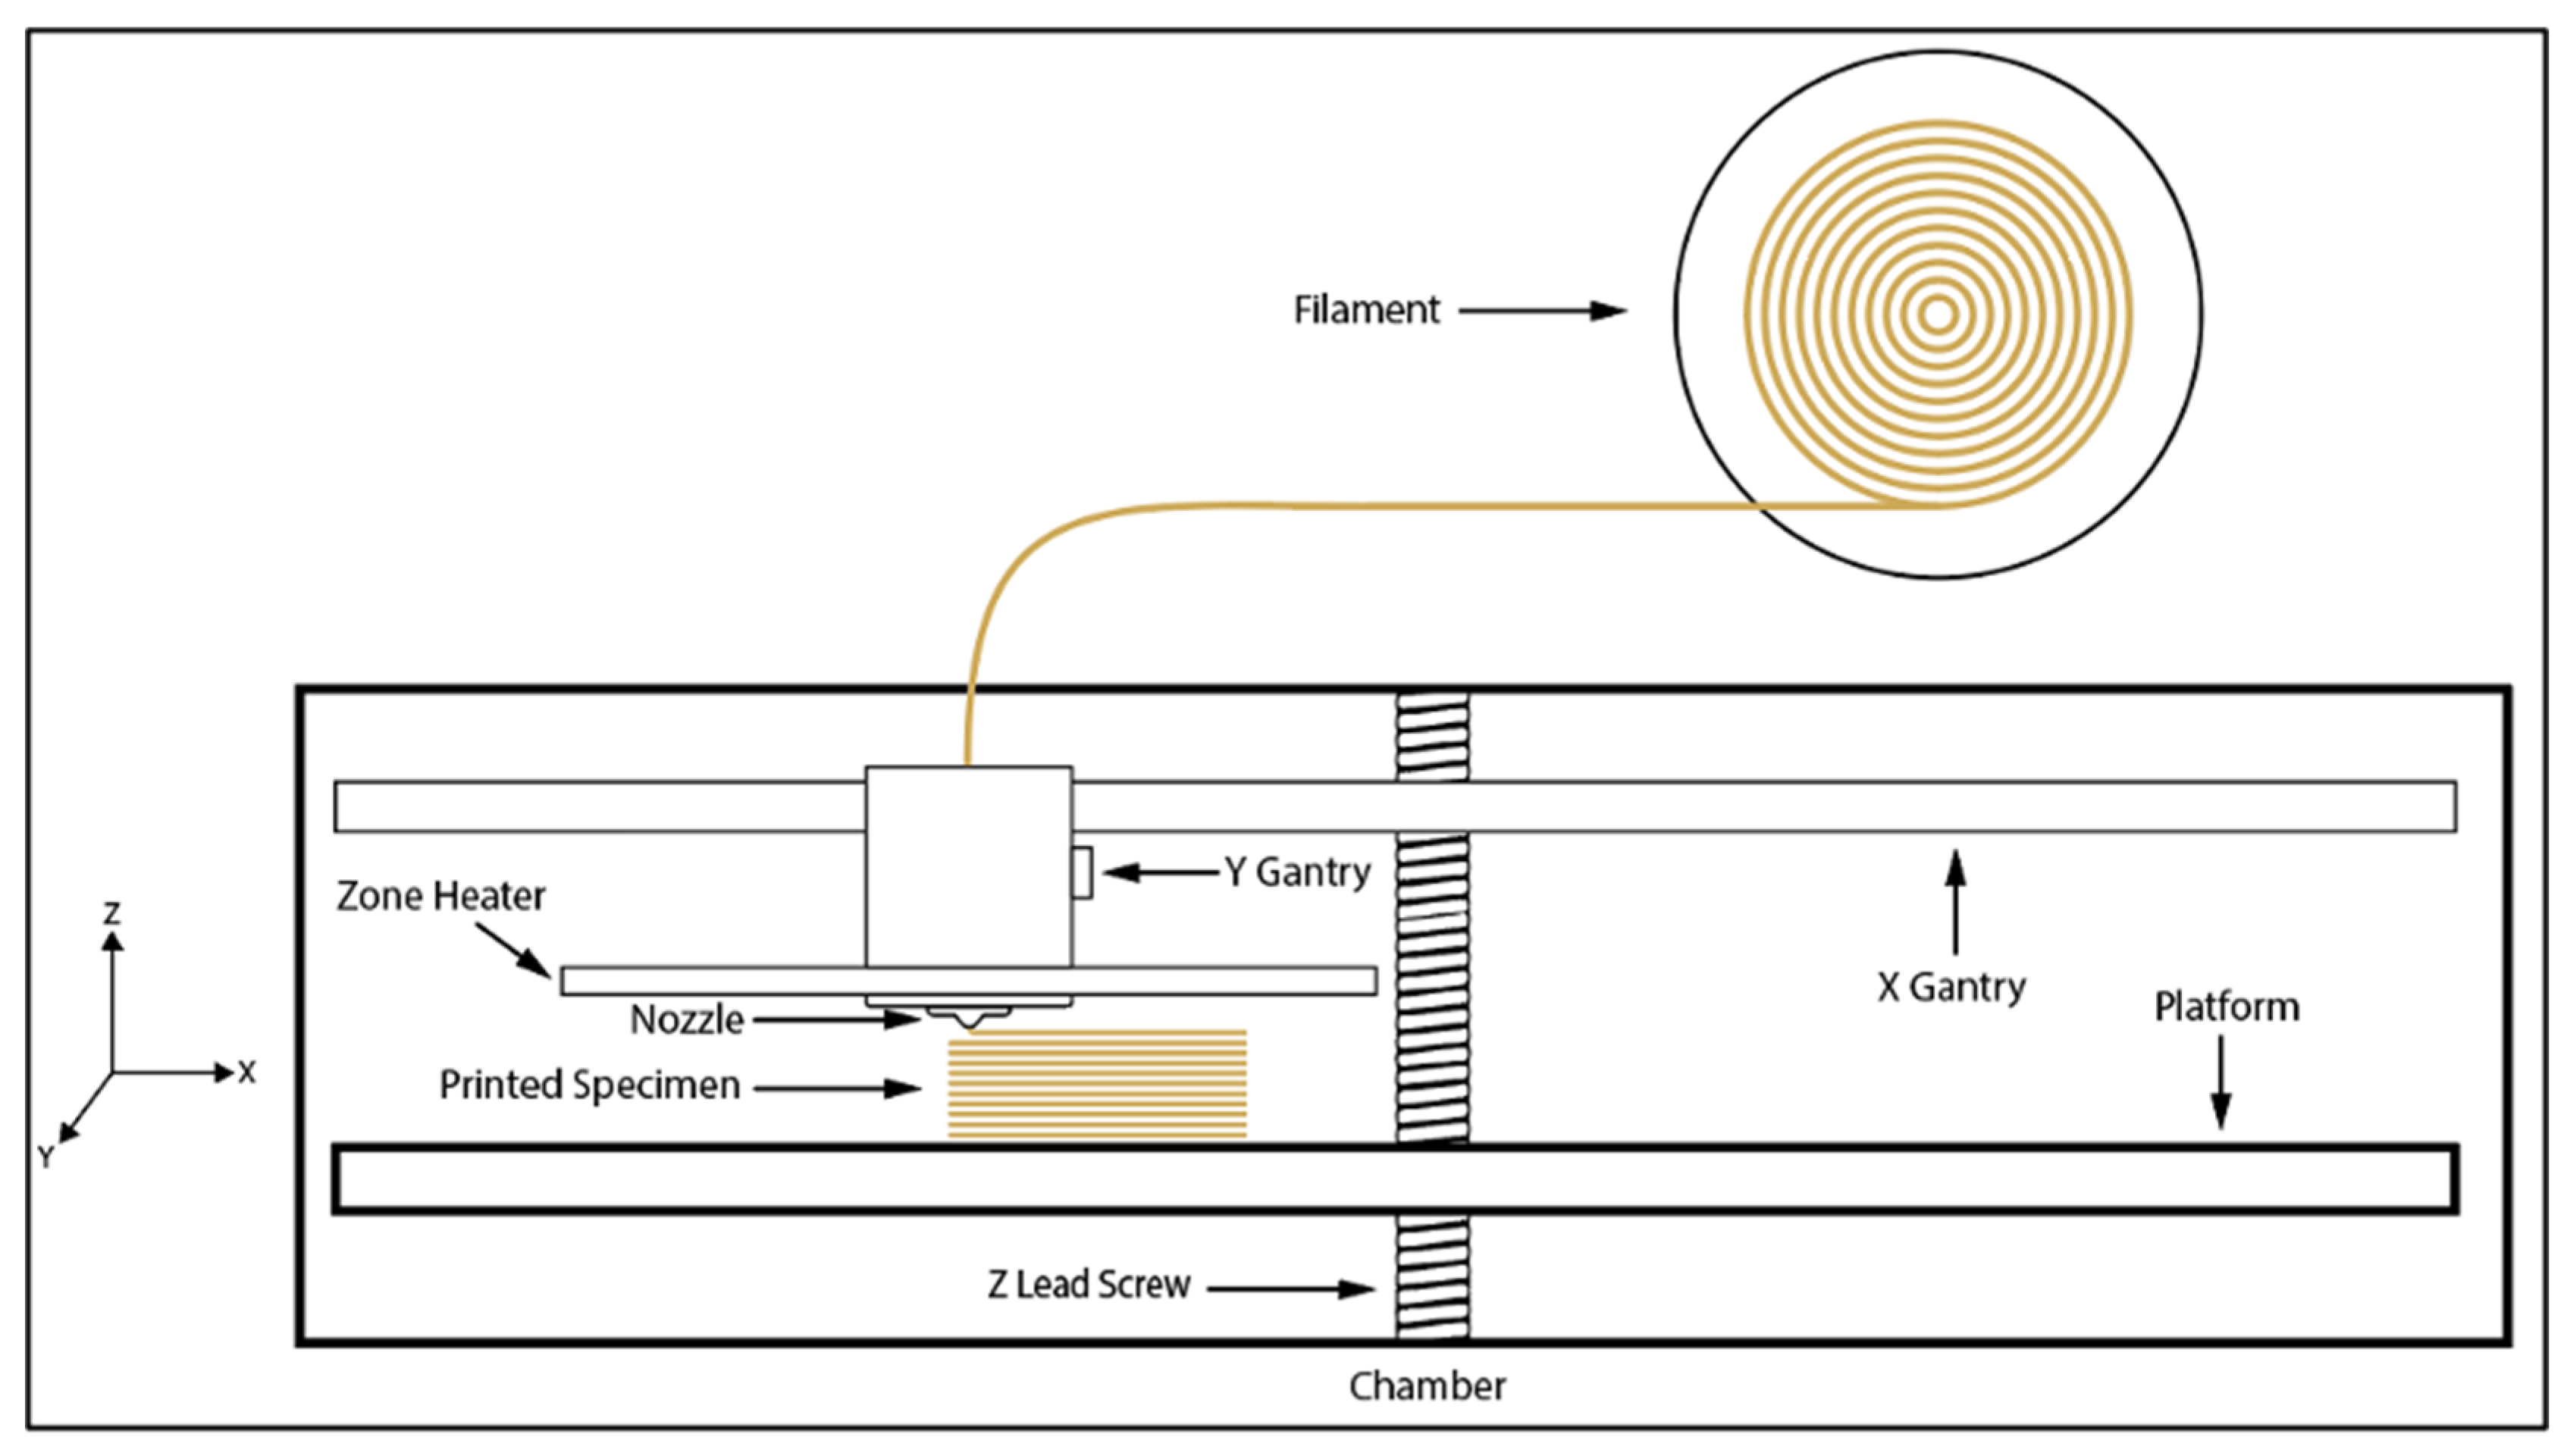
19]. For PEEK, the primary AM techniques are powder bed fusion (PBF) and fused filament fabrication (FFF) or fused deposition modeling (FDM). FDM is a process in which a thermoplastic filament is melted and extruded through a nozzle, as illustrated in
Figure 1. Although PBF can fabricate PEEK parts with reduced anisotropy and without support structures, FDM remains more accessible due to its lower equipment cost, simpler technological process, and broader availability [
20]. This is valuable in clinical settings, as in-house fabrication enables faster production of PSIs compared to industry-based manufacturing, which can lower surgical complications and hospital costs [
21]. AM has expanded the clinical potential of PEEK beyond spinal and orthopedic devices to include cranio-maxillofacial reconstruction, fixation plates, dental and prosthodontic components, chest wall implants, and even extravascular stents [
22,
23,
24,
25]. However, its broader clinical application remains limited by processing challenges, particularly when fabricating implants with diameters below 5 mm or with arbitrary geometries [
26,
27]. Smaller feature sizes in FDM make precise fabrication more difficult and increase the risk of defects [
28]. Although VAT photopolymerization (e.g., SLA or DLP) can achieve higher accuracy and finer feature resolution, it relies on cytotoxic resins and is incompatible with PEEK. These limitations restrict the application of FDM-printed PEEK in dental, cardiovascular, and small-scale orthopedic implants, as well as in pediatric and veterinary implants where miniaturized geometries are often required.
PEEK remains challenging to 3D print due to its high processing temperatures, and successful fabrication depends on precise control of process parameters [
29]. Parameters such as temperature, printing speed, layer dimensions, infill, and orientation have been examined in the literature for their effects on mechanical performance, tribological behavior, surface finish, and dimensional accuracy. The effects of these parameters reported in the literature are summarized in
Table 1. Even slight deviations in these parameters can lead to issues such as poor interlayer bonding, warping, or reduced mechanical strength in the final part. Composite printing further illustrates the importance of process optimization, as reinforcement additives alter thermal, rheological, and interfacial behaviors, requiring their own tailored parameter sets [
30,
31]. Additionally, recent work in 4D multi-material printing has shown that process parameters can directly govern functional performance, highlighting the broader significance of precise process control in AM [
32]. Therefore, optimizing the printing conditions is crucial to ensure that 3D-printed PEEK implants meet the stringent requirements of biomedical applications, particularly for small-scale devices.
Prior research has primarily focused on optimizing printing parameters to improve the mechanical properties of PEEK parts. Higher nozzle and chamber temperatures have generally been reported to enhance interlayer bonding and tensile strength, while lower layer heights and moderate print speeds improve density and surface quality [
34,
36,
37,
42,
43,
44,
48]. Adjustments in raster angle and orientation have also been shown to affect part anisotropy and porosity [
36,
52]. These findings underscore the importance of precise parameter control for achieving reliable mechanical performance in FDM-printed PEEK. However, most existing work emphasizes bulk mechanical behavior rather than dimensional accuracy or surface characteristics, which are crucial for small-scale medical components.
Surface roughness is a critical aspect of print quality that strongly depends on process parameters. Kumar et al. achieved a minimum surface roughness of 6.76 µm at higher nozzle temperatures and lower printing speeds [
44]. Higher nozzle temperatures are generally reported to result in lower surface roughness [
34,
41,
45]. An opposite trend is observed with layer height, where lower values (0.1–0.15 mm) result in smoother surfaces [
34,
41,
45,
49]. In contrast, P. Wang et al. observed stacking and nozzle squeezing at printing speeds of 5–10 mm/s and 20–25 mm/s, respectively, reporting an optimal speed of 15 mm/s [
40]. Lower infill densities and triangular infill patterns have also been reported to improve surface finish [
49,
50].
Slicer-based surface modifications, such as fuzzy skin and ironing, provide additional means of tailoring surface texture. Although fuzzy skin intentionally increases roughness, it may be beneficial in certain medical applications, having been shown to increase surface wettability by 228% and the coefficient of friction by nearly 85% compared to non-textured surfaces [
52]. Conversely, ironing reduces surface roughness; Neuhaus et al. demonstrated a 26.2% reduction for PEEK, from 3.058 µm to 2.257 µm [
53]. Although post-processing techniques such as chemical smoothing and abrasive polishing can achieve similar improvements, they are often costly and time intensive. Thus, achieving low surface roughness through process optimization remains a more desirable approach.
While previous studies have primarily examined PEEK FDM parameters for their influence on mechanical performance, limited research has addressed their effects on dimensional accuracy. Adarsh and Nagamadhu (2025) investigated the influence of nozzle temperature, layer height, platform temperature, and infill ratio on the warpage using a multi-objective optimization approach [
54]. They demonstrated that nozzle temperature and layer height had the greatest influence on deformation; however, their analysis was limited to corner warpage and did not evaluate overall dimensional deviation. Atatreh et al. examined the effect of annealing on dimensional accuracy, but the role of process parameters during printing was not considered [
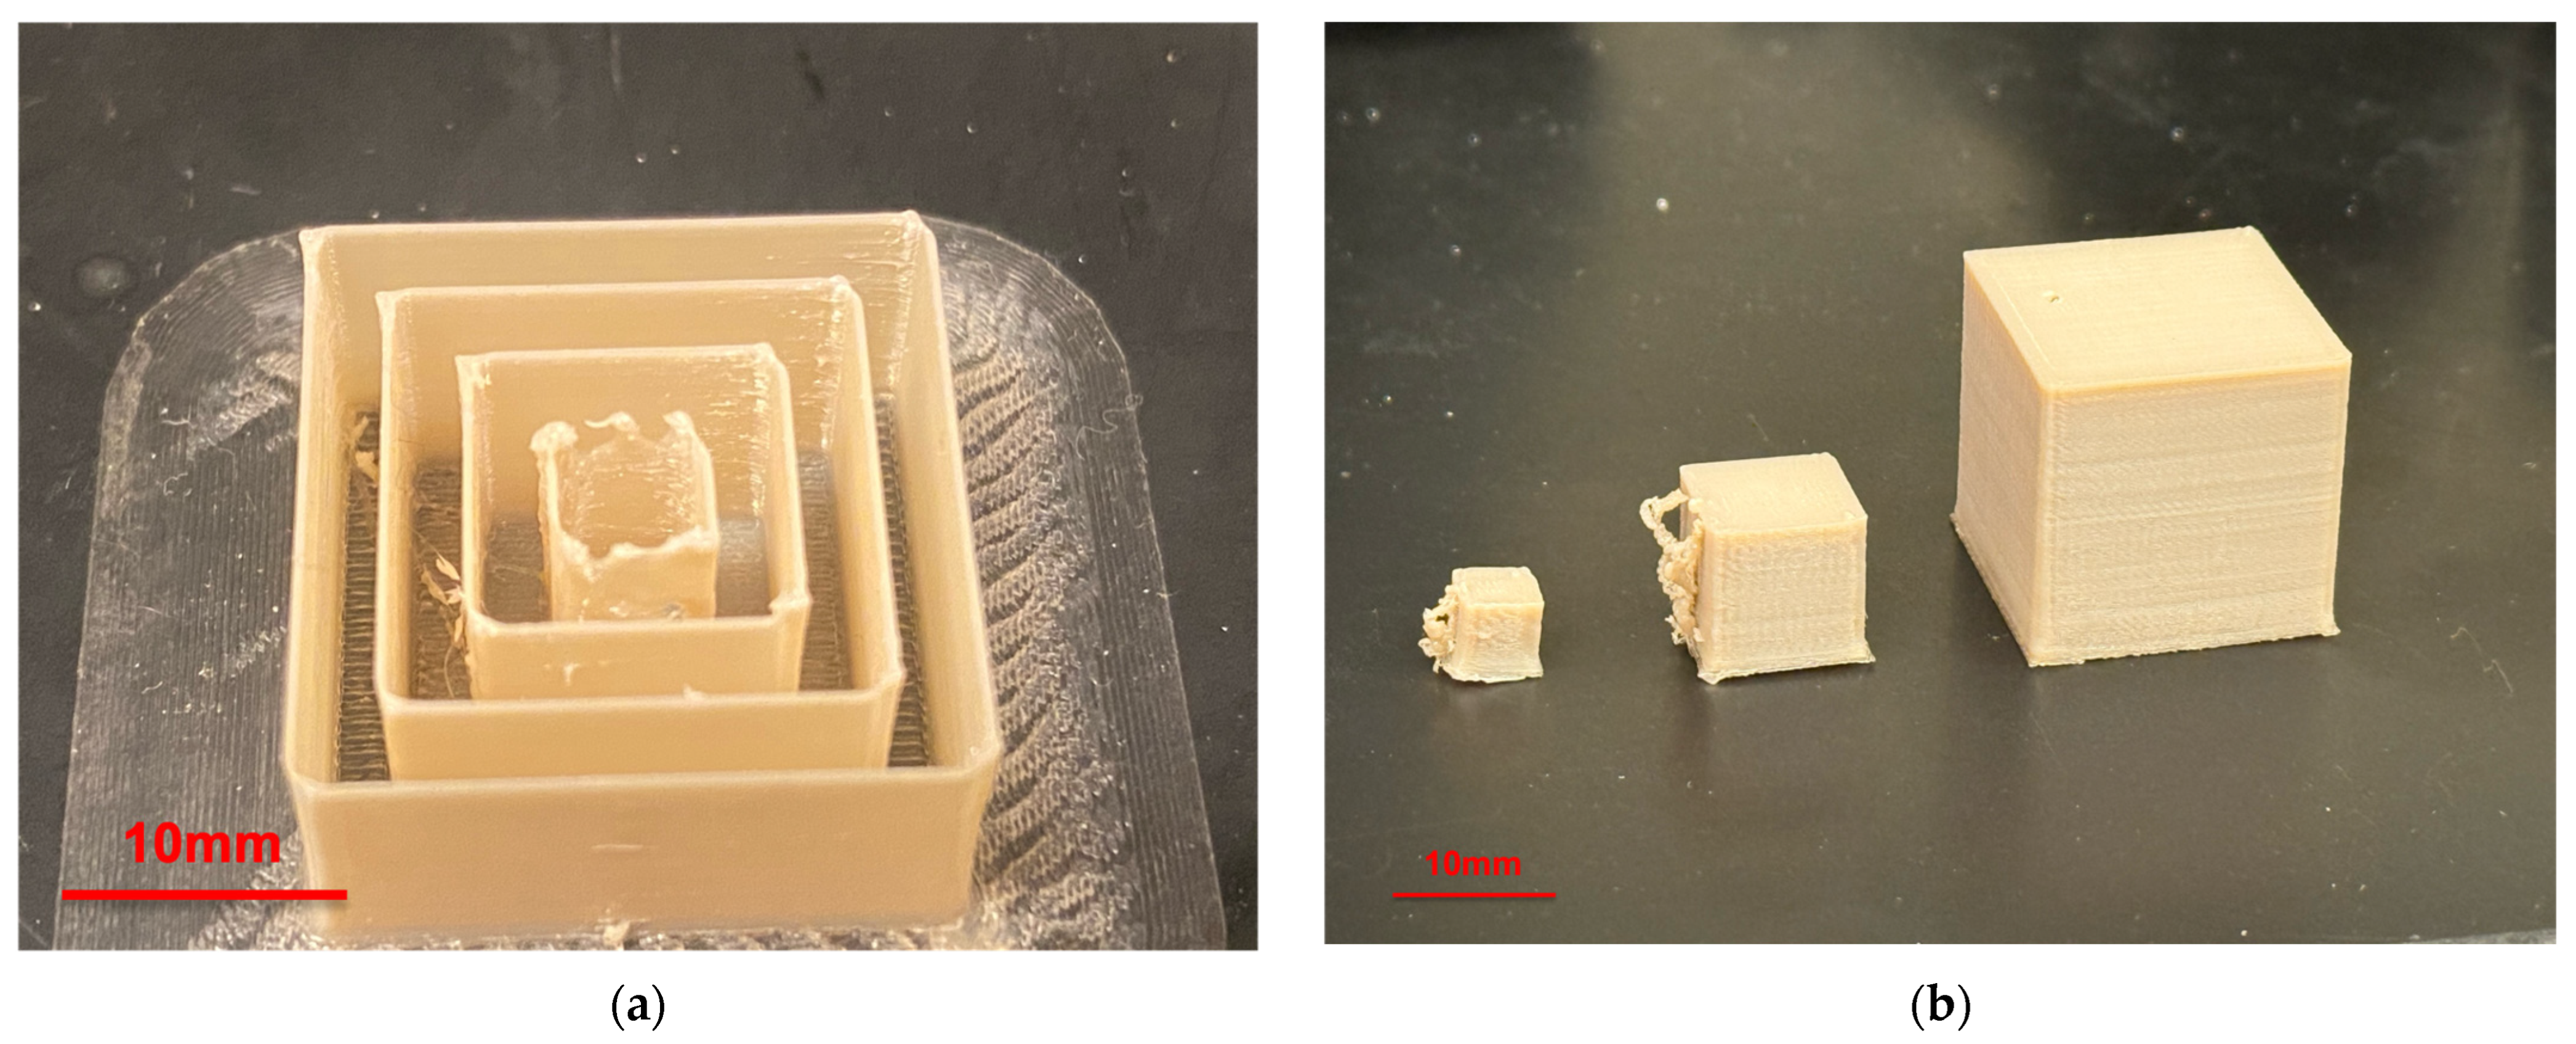
55]. Moreover, both studies focused on relatively large parts (>50 mm), which do not capture the challenges associated with small-scale features. In PEEK FDM printing, reducing the scale of printed geometry amplifies the effects of the material’s high viscosity and thermal expansion. These factors increase the likelihood of defects such as warping, over-extrusion, and dimensional deviation, making process optimization more challenging. This scale sensitivity is highlighted in
Figure 2a,b. Wang et al. (2020) demonstrated the feasibility of fabricating small PEEK dental implants (3.6 × 9.4 mm), reporting improved outcomes with a 0.15 mm diameter nozzle at 1.2× scale [
56]. However, their study did not investigate the influence of process parameters, and the implants had to be printed at an enlarged scale to mitigate defects observed at the original dimensions. Nevertheless, comprehensive studies linking process parameters to dimensional accuracy and surface quality in small-scale PEEK FDM remain limited.
This study was conducted in two stages to systematically investigate the influence of key FDM process parameters—nozzle temperature, layer height, printing speed, and extrusion width—on the dimensional accuracy and surface roughness of small-scale PEEK parts. In the first stage, a Taguchi L9 design of experiments (DoE) was applied to quantify the effect of each parameter on dimensional deviation using 5 × 5 × 5 mm3 cube specimens. In the second stage, the two best-performing parameter sets from the Taguchi analysis were used to fabricate a benchmark model containing sub-millimeter geometric features. The benchmark model served to validate the optimized parameters, and dimensional fidelity was evaluated using high-resolution micro-CT scanning.
2. Materials and Methods
PEEK filaments (PEEK 4000, Apium, Karlsruhe, Germany) with a diameter of 1.75 ± 0.05 mm were pre-dried in a filament furnace (F300, Apium, Karlsruhe, Germany) at 120 °C for 4 h. Following drying, the filaments were stored in the same furnace at a conditioned temperature of 80 °C and were fed to the printer through polytetrafluoroethylene (PTFE) tubing to minimize moisture absorption. The properties of the PEEK filament are summarized in
Table 2.
PEEK printing was performed using a commercial high-temperature FDM 3D printer (P220, Apium, Karlsruhe, Germany). The printing setup used for the experiments is shown in
Figure 3a. Standard FDM setup procedures were conducted prior to printing, such as bed leveling and bed calibration. Prior to each print, a fresh layer of adhesive (Dimafix, i3D Digital Media S.L., Almería, Spain) was applied to the build platform to ensure print adhesion to the surface and minimize warping.
Figure 3b shows the 3D printing process in progress. PEEK specimens were designed in CAD software (SolidWorks 2023, Dassault Systèmes SOLIDWORKS Corp., Waltham, MA, USA) and imported into an open-source slicer (PrusaSlicer 2.9.0, Prusa Research, Prague, Czech Republic) for parameter configuration.
Investigating the relationship between multiple printing parameters and performance outcomes requires a structured design of experiments (DoE). In this study, nozzle temperature, layer height, printing speed, and extrusion width were selected as key parameters, each evaluated at low, middle, and high levels, as shown in
Table 3. A full factorial design with four parameters at three levels would require 81 experimental runs, which is impractical in terms of time and resources. To address this, the Taguchi method was selected.
Although the Taguchi method has limitations in capturing interaction effects between parameters, it is effective in identifying main effects, enhancing process robustness, and is widely used in manufacturing optimization [
61,
62,
63]. In this experiment, a Taguchi L9 orthogonal array was used, allowing for the study of four parameters at three levels each in only nine experimental runs. This approach optimizes the DoE by selecting specific parameter combinations, represented as “−” for low, “0” for medium, and “+” for high levels, to evaluate their influence on dimensional accuracy, as shown in
Table 4.
The Taguchi method includes three mathematical models for evaluating performance characteristics, depending on whether the response is nominal, to be maximized, or to be minimized [
64]. To assess dimensional accuracy, deviation from the original CAD model was minimized using the “smaller-the-better” signal-to-noise (S/N) ratio, as defined in Equation (1) [
65].
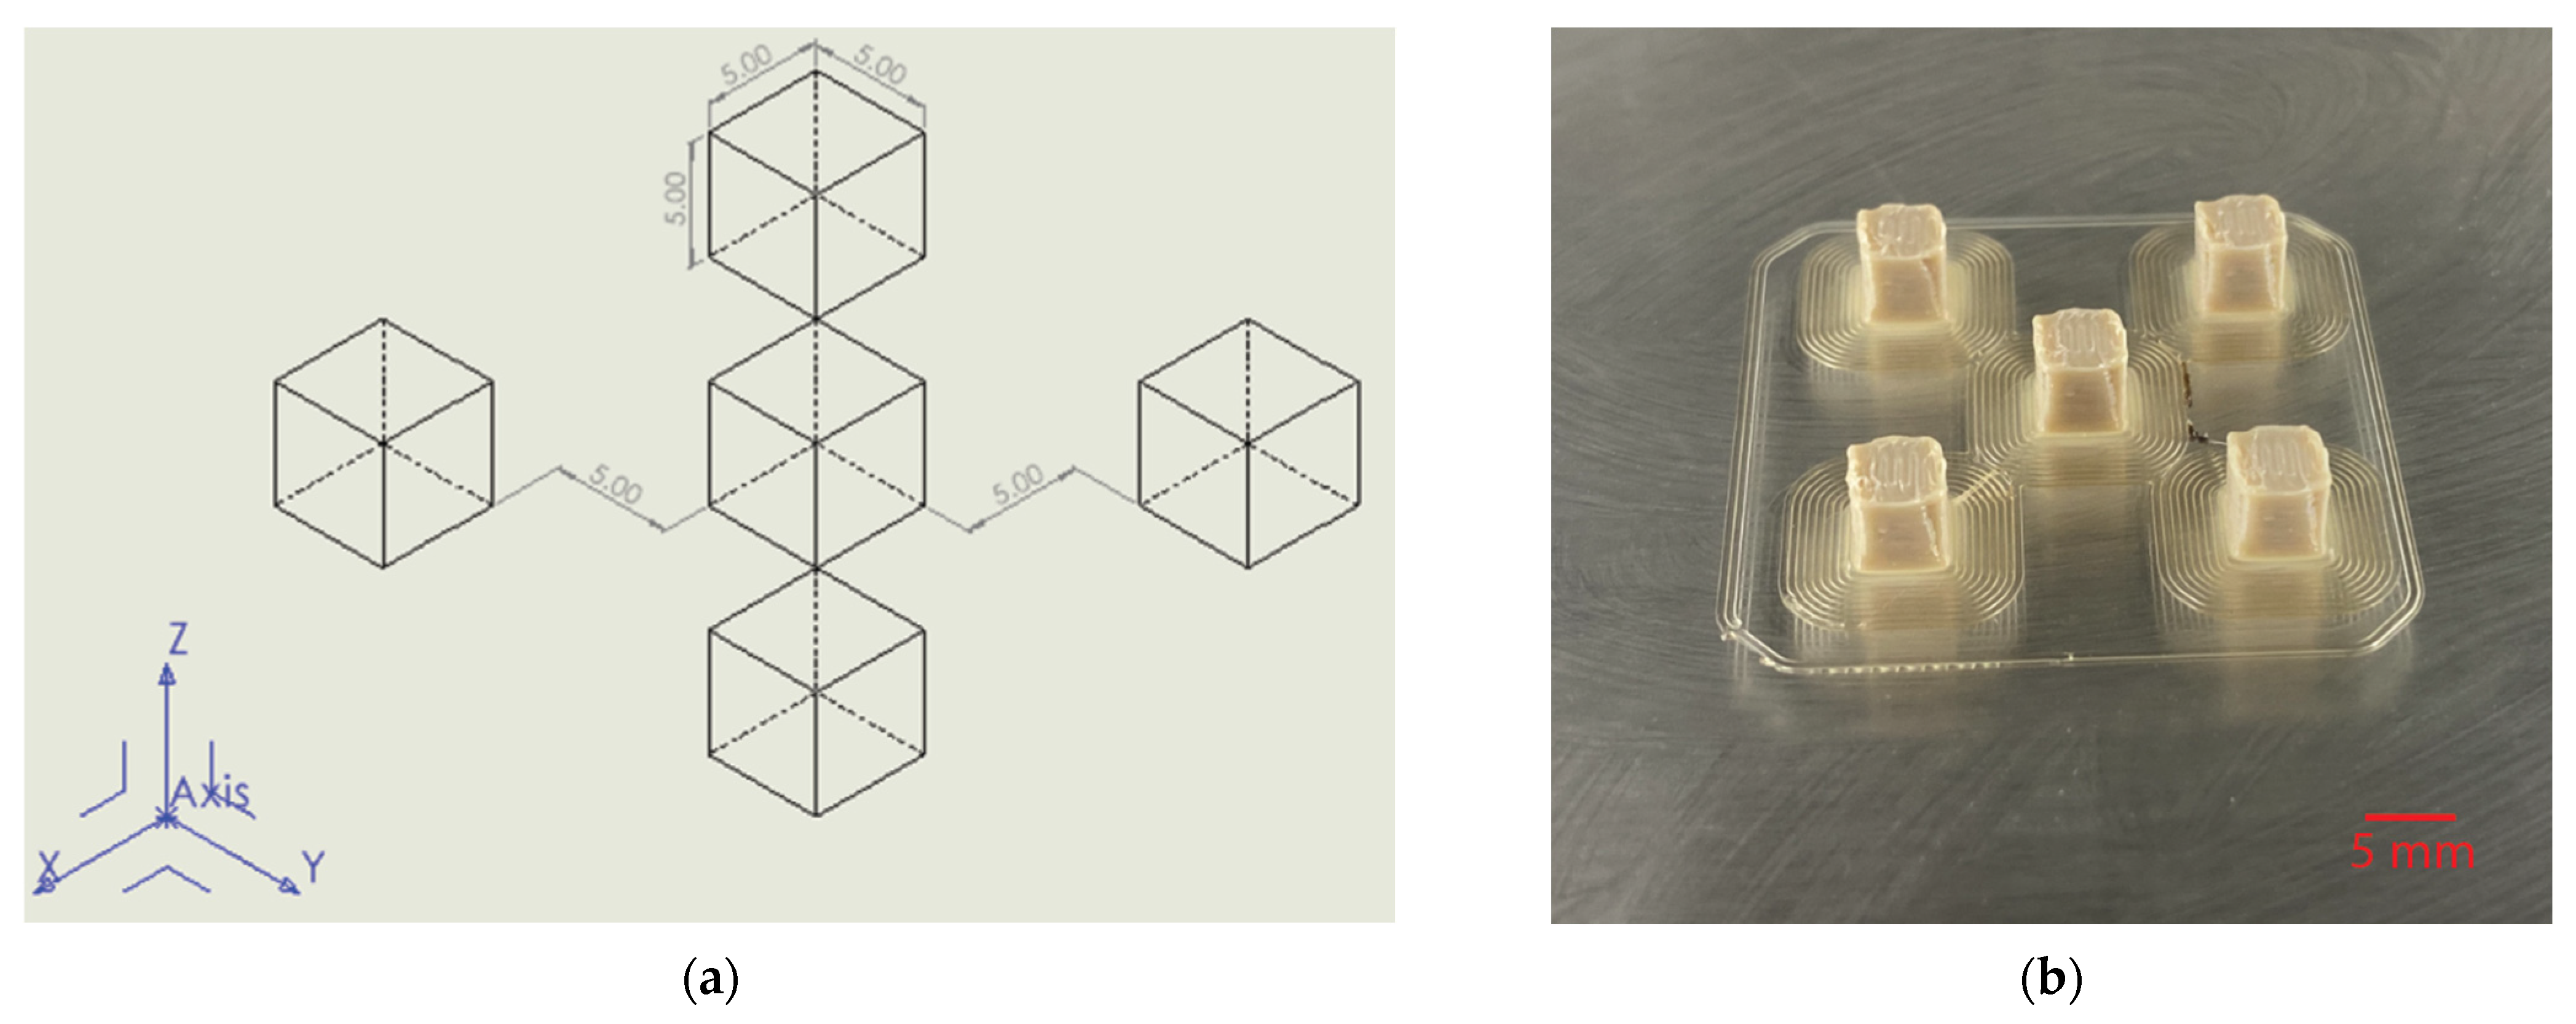
For each experimental run, five cube specimens measuring 5 × 5 × 5 mm were printed, evenly spaced on the build platform. The dimensions and spacing are depicted in
Figure 4a. The specimens were positioned at the center of the platform to ensure uniform thermal exposure and reduce any leveling-related variation. All process parameters were kept constant between runs, except for the specific parameters being tested.
Figure 4b shows a successful print of the CAD cube model. Based on the results from the cube experiments, the parameter combinations that produced the best dimensional accuracy in the XY and Z directions were selected for further testing using a benchmark model.
Each cube was measured using digital calipers (±0.01 mm) along the horizontal (X and Y) and vertical (Z) axes. For each axis, three measurements were taken at different locations on the surface, and the average was used to represent that dimension. These values were compared against the nominal 5.00 mm to compute absolute deviations, as shown in Equation (2). Uncertainty was mitigated by averaging multiple measurements across five specimens per run.
Surface roughness was measured using a surface roughness profiler (VTSYIQI, Hefei Vetus Electronic Technology Co., Ltd, Hefei, China) with a 5 μm stylus tip radius. Measurements followed ISO 11562 standards, using a Gaussian filter with a cut-off length of 0.25 mm [
66]. The scanning speed was 0.135 mm/s (with a return speed of 1 mm/s), and the instrument resolution was 0.04 μm within a measurement range of ±80 μm. The arithmetical mean (Ra) was calculated along the vertical face (Z-axis) of each cube, giving the mean surface roughness of each run.
To investigate significant differences of the results, statistical analyses of variance (ANOVA) were performed using JMP Pro 18.0.2 (JMP Statistical Discovery, Cary, NC, USA). ANOVA involves several key components, including degrees of freedom (DF), sum of squares (SS), mean square (MS), F-ratio, and
p-value, which together evaluate the contributions and significance of each factor. DF are the number of independent comparisons that can be made. For a factor, it is calculated as
, where
is the number of levels, while DF for error is calculated as
, where
is the total number of observations. SS quantifies the variation in the response. For a factor, the variation is calculated as shown in Equation (3), where
is the number of observations at level j,
is the mean of level j, and
is the overall mean. For error, it is defined as Equation (4), where
is the
-th observation in level j, and
is the level mean. MS represents the average variation of factor and error shown in Equations (5) and (6), respectively. The F-ratio is calculated as the ratio between the mean square of the factor and the mean square of the error, shown in Equation (7). The
p-value is calculated by finding the probability of getting an F-value equal to or greater than the one obtained, under the assumption that the null hypothesis is true. This probability comes from the F-distribution, using the degrees of freedom associated with the factor (numerator) and the error (denominator). The level of significance was set at
p < 0.05. The percentage contribution of each factor is calculated to assess its relative influence on the response variable, as shown in Equation (8).
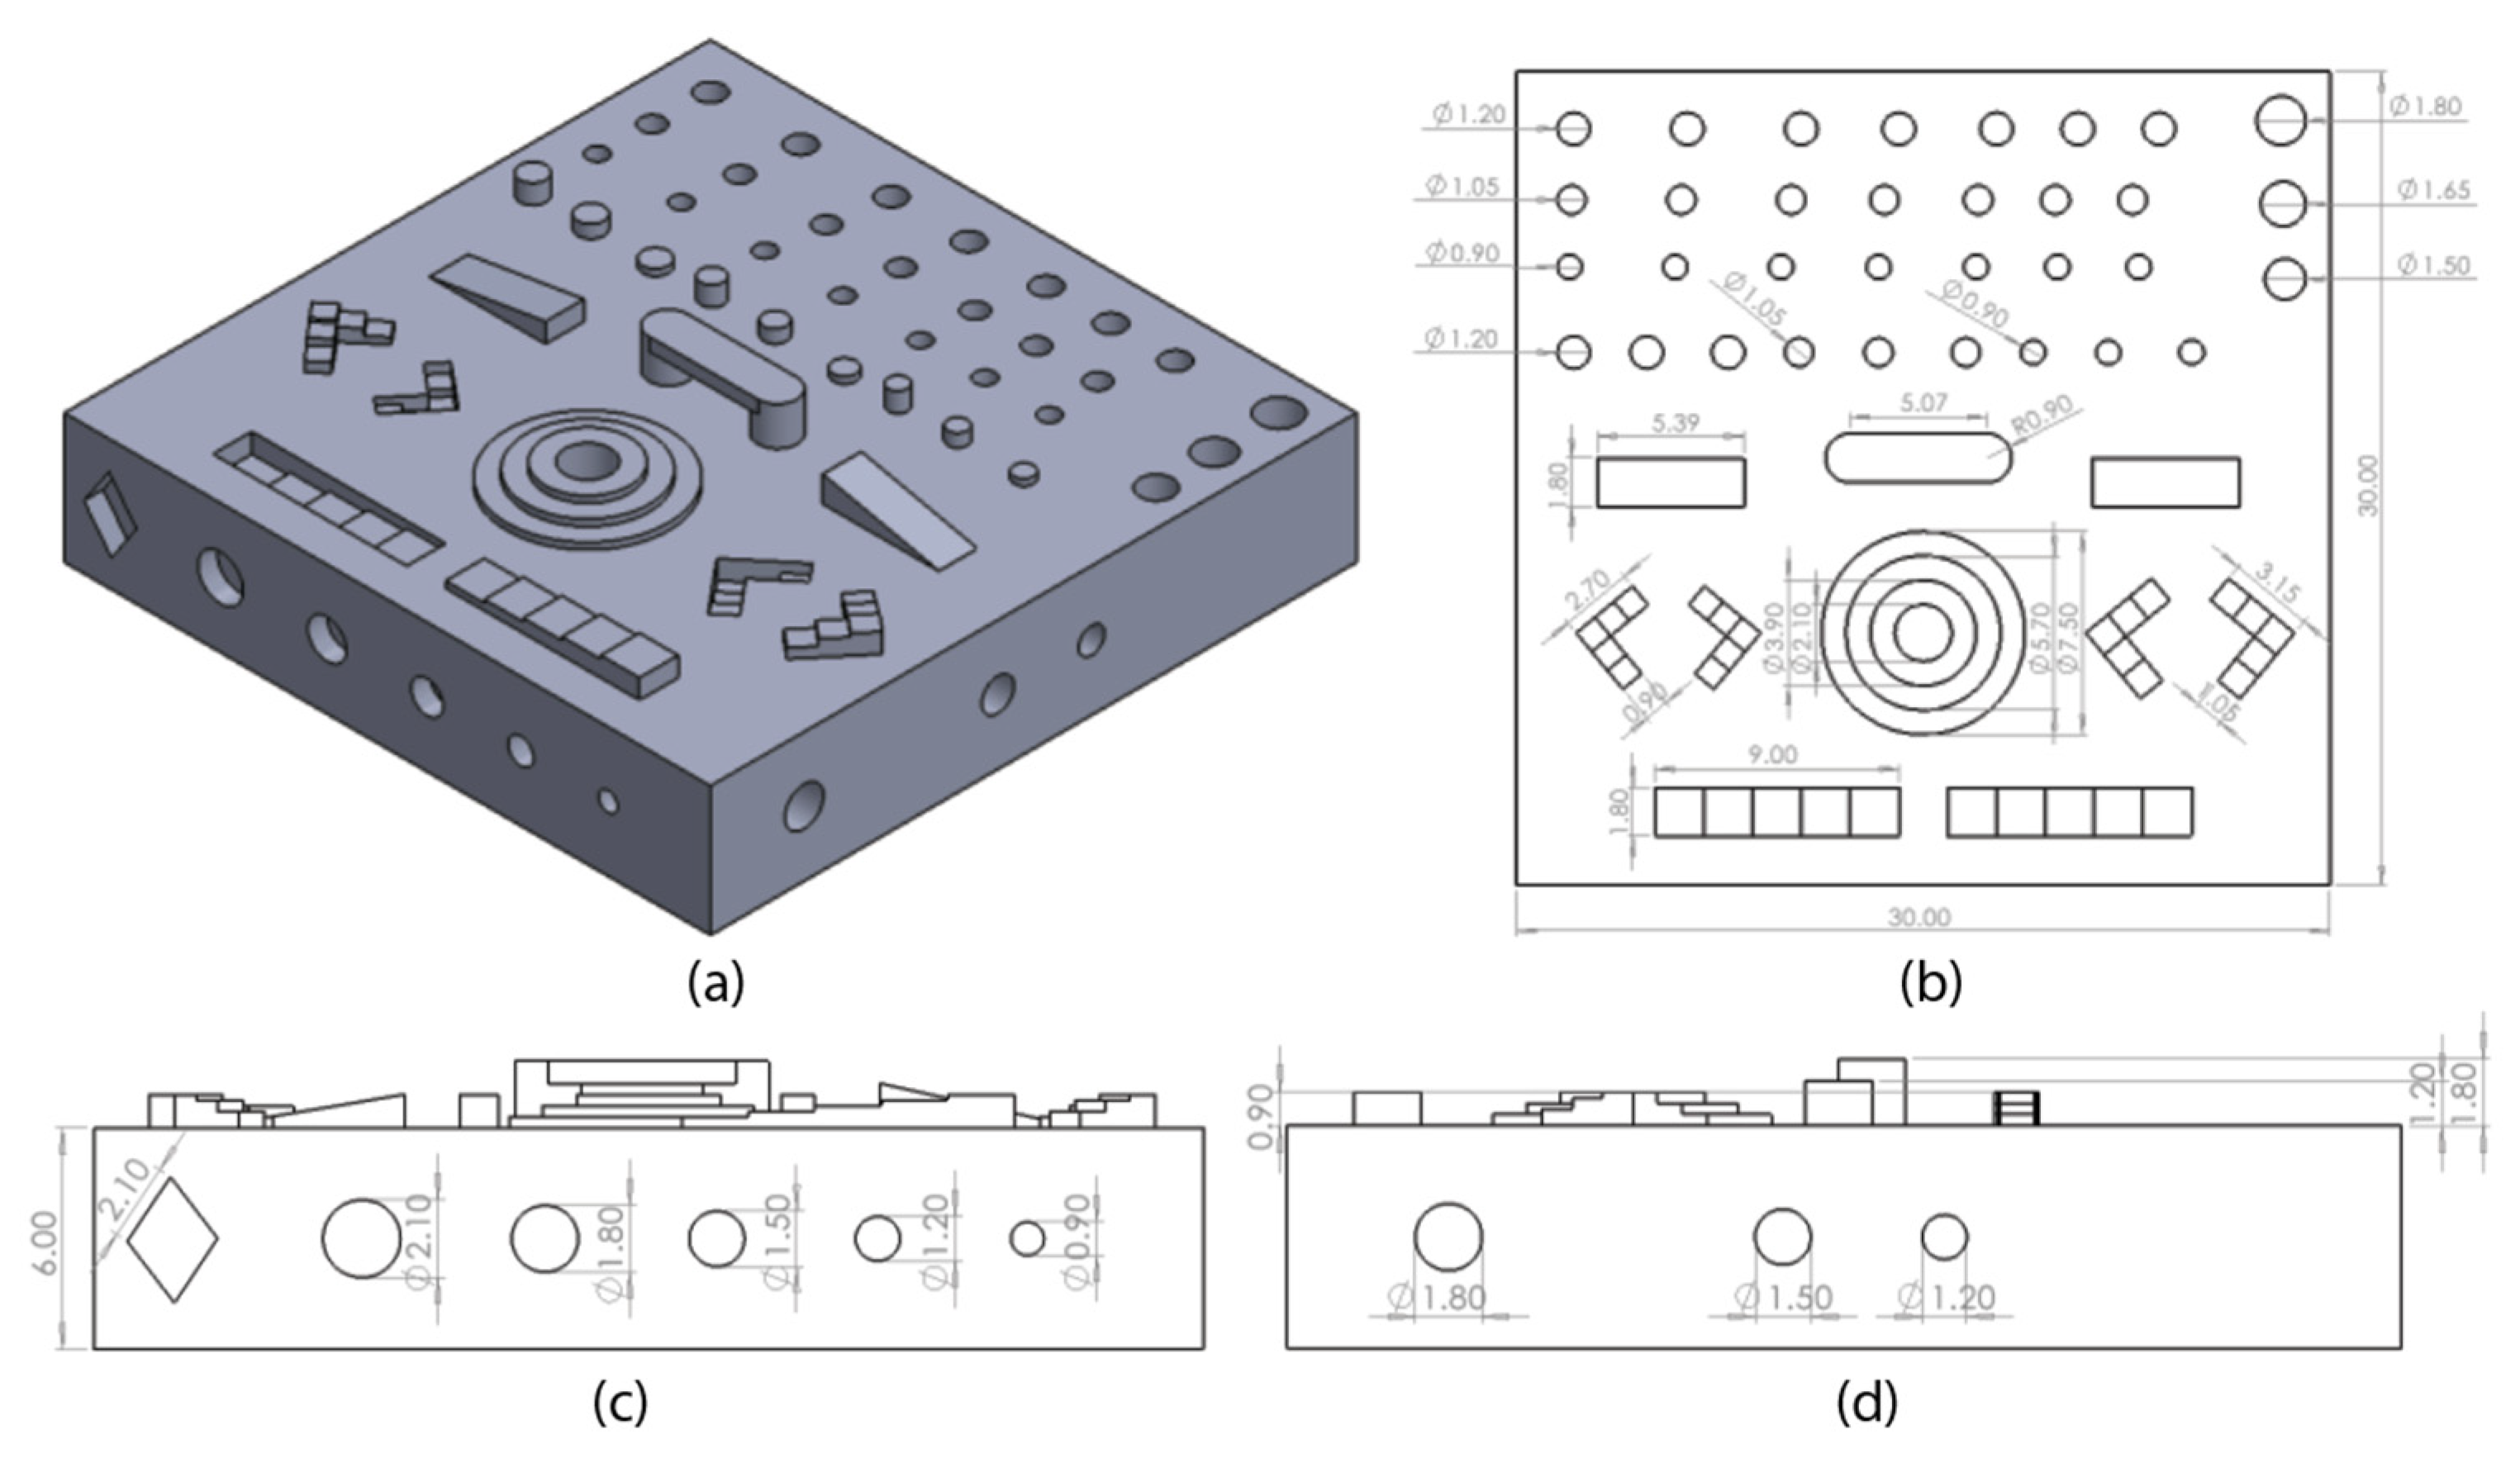
To validate the optimized parameters, a benchmark model was printed using the parameter combination corresponding to the lowest average deviation and highest S/N ratio. The benchmark model was designed by the authors, inspired by the NIST Additive Manufacturing Test Artifact [
67]. The model includes small geometric features tailored to the 0.4 mm nozzle diameter.
Figure 5a shows a 3D view of the benchmark model. These features included cylindrical pillars, through-holes (pores), stair-step structures, ramps, and a bridge, oriented along the horizontal, vertical, and diagonal axes.
Figure 5b shows the top view,
Figure 5c the front view, and
Figure 5d the side view of the benchmark model with annotated dimensions. This model was used to validate the optimized process parameters by assessing their effectiveness in producing small-scale and complex geometries with high dimensional accuracy.
A micro-computed tomography (micro-CT) scan was performed to validate the optimized parameters using an X-ray system (ZEISS Xradia 520 Versa, Carl Zeiss, Oberkochen, Germany). The two benchmark models were scanned to evaluate internal and surface morphology. The scanning parameters used for image acquisition were a voltage of 40.0 kV, power of 30.0 W, exposure time of 15.0 s, and filter LE1, with 1601 projections. A pixel size of 20.1838 µm was achieved using a 0.4× objective lens. Image analysis was performed using Dragonfly software (Dragonfly 2024.1, Object Research Systems, Montreal, QC, Canada). Iterative closest point algorithm (mesh registration) was performed to align the reference CAD model with the micro-CT 3D scan of the printed benchmark models. The algorithm minimizes the distance between each vertex in the scanned mesh and its nearest corresponding point on the reference mesh, iteratively refining the transformation to align both models. After alignment, signed distance function (signed distance mapping) was used to compute the shortest 3D Euclidean distance from each vertex on the scanned mesh to the reference, with the sign indicating whether the point lies inside or outside the reference [
68]. This enables both the magnitude and direction of geometric error to be evaluated for each point on the scanned surface, a method that has been applied to additively manufactured parts for visual and quantitative assessment of dimensional deviation [
69]. The mean, standard deviation, median, minimum, maximum, and root mean square error (RMSE) were calculated to compare dimensional deviations across prints and individual features. Since mean deviation can be misleading (positive and negative values may cancel each other out), RMSE was used to quantify the overall magnitude of deviation, as shown in Equation (9) [
70].
3. Results
Table 5 shows the measured average deviations and calculated S/N ratios for both horizontal (XY) and vertical (Z) axes, as well as the surface roughness of each run. The average deviation values determine the dimensional accuracy and robustness of each run, with lower average deviations indicating higher accuracy and higher S/N ratios reflecting greater resistance to variability. Run 2 demonstrated the lowest average deviation and highest S/N ratio in both horizontal and vertical axes, followed by Run 5. The worst dimensional accuracy was observed in Run 1 and Run 7, which exhibited the highest mean deviation and the lowest S/N ratio, respectively. Overall, the XY axes exhibited lower mean deviation and higher S/N ratios compared to the Z axis.
Figure 6a,b show the main effect plots for average deviation means and S/N ratios for XY orientation, respectively. All parameters showed an improvement from level 1 to level 2; however, only extrusion width continued to show a monotonic trend towards improvement at levels 2 and 3. Layer height showed the lowest mean deviation and highest S/N ratio at level 2 (0.06 mm). A layer height of 0.04 mm (level 1) resulted in the highest mean deviation, while the lowest mean deviation and highest S/N ratio was observed at 0.06 mm (level 2). Printing speed achieved both the lowest mean deviation and highest S/N ratio at 7.5 mm/s (level 2). On the other hand, extrusion width yielded optimal results at 0.42 mm (level 3). The relative influence of each parameter on dimensional accuracy was calculated by subtracting the minimum from the maximum S/N ratio for each factor. This analysis ranked the parameters in order of significance from highest to lowest: layer height, nozzle temperature, printing speed, and extrusion width. In
Table 6, ANOVA results indicated that layer height was the only statistically significant parameter influencing dimensional accuracy in the XY plane (
p = 0.0225) contributing to 71.8% of the variance.
In contrast to the XY axes, the Z axis exhibited higher mean deviation and lower S/N ratios, as shown in
Figure 7a,b, respectively. This indicates lower accuracy and consistency in the Z axis. As seen in
Table 6, Run 2 still outperformed other runs in terms of both mean deviation and S/N ratio, followed by Run 5. However, Run 8 exhibited the highest mean deviation and the lowest S/N ratio among all runs, indicating the poorest dimensional accuracy in the Z axis. In
Figure 7a, the overall highest mean deviation was observed at a printing speed of 5 mm/s (level 1), followed by a nozzle temperature of 470 °C (level 3), while the lowest mean deviation occurred at a printing speed of 10 mm/s (level 3), followed by nozzle temperature of 460 °C (level 2). This was reversed in
Figure 7b, where the highest S/N ratios were observed at a nozzle temperature of 460 °C (level 2) and a printing speed of 10 mm/s (level 3). A non-monotonic trend is observed for nozzle temperature and extrusion width, while mean deviation decreases consistently with increasing levels of layer height and printing speed. However, the trend for layer height becomes non-monotonic in
Figure 6b.
While printing speed showed continued improvement through level 3, other parameters such as nozzle temperature and extrusion width exhibited non-monotonic behavior with decreased deviation and increased S/N ratio at level 2 and then an opposite trend toward level 3. The lowest mean deviation and highest S/N ratio for nozzle temperature were observed at 460 °C (level 2), layer height of 0.06 mm (level 2), a printing speed of 10 mm/s (level 3), and an extrusion width of 0.4 mm (level 2). Nozzle temperature and layer height remained optimal at level 2, consistent with the results for the horizontal axis. However, printing speed increased to level 3, while extrusion width decreased to level 2, indicating a shift in optimal settings for the vertical axis. The differences between the maximum and minimum response values across factor levels indicate that printing speed had the greatest influence on dimensional accuracy, as shown in
Figure 7. This was followed by nozzle temperature, layer height, and extrusion width. Based on ANOVA results, dimensional accuracy in the Z plane was most influenced by printing speed, accounting for 50.3% of the contribution, although this was not statistically significant (
p = 0.1226), as shown in
Table 7.
Surface roughness main effects plots for means and S/N ratios are shown in
Figure 7a,b, respectively. In
Figure 8a, all parameters exhibited their highest mean surface roughness values at Level 3, indicating that the worst surface finish occurred at the highest levels of each factor. Among the parameters, nozzle temperature was the only parameter to demonstrate a monotonic trend, with surface roughness increasing consistently across all levels. In
Figure 8b, the highest S/N ratio for nozzle temperature was observed at Level 1, suggesting lowest surface roughness, while Level 2 exhibited the highest S/N ratios for layer height, printing speed, and extrusion width. The factors were ranked in order of influence from greatest to least: layer height, nozzle temperature, extrusion width, and printing speed. Surface roughness was primarily influenced by layer height, which accounted for the highest contribution at 35.06%; however, this was not statistically significant (
p = 0.2739), as calculated in
Table 8. Nozzle temperature and extrusion width also contributed to surface roughness variability, at 25.32% and 24.02%, respectively, while printing speed had the lowest impact at 15.61%.
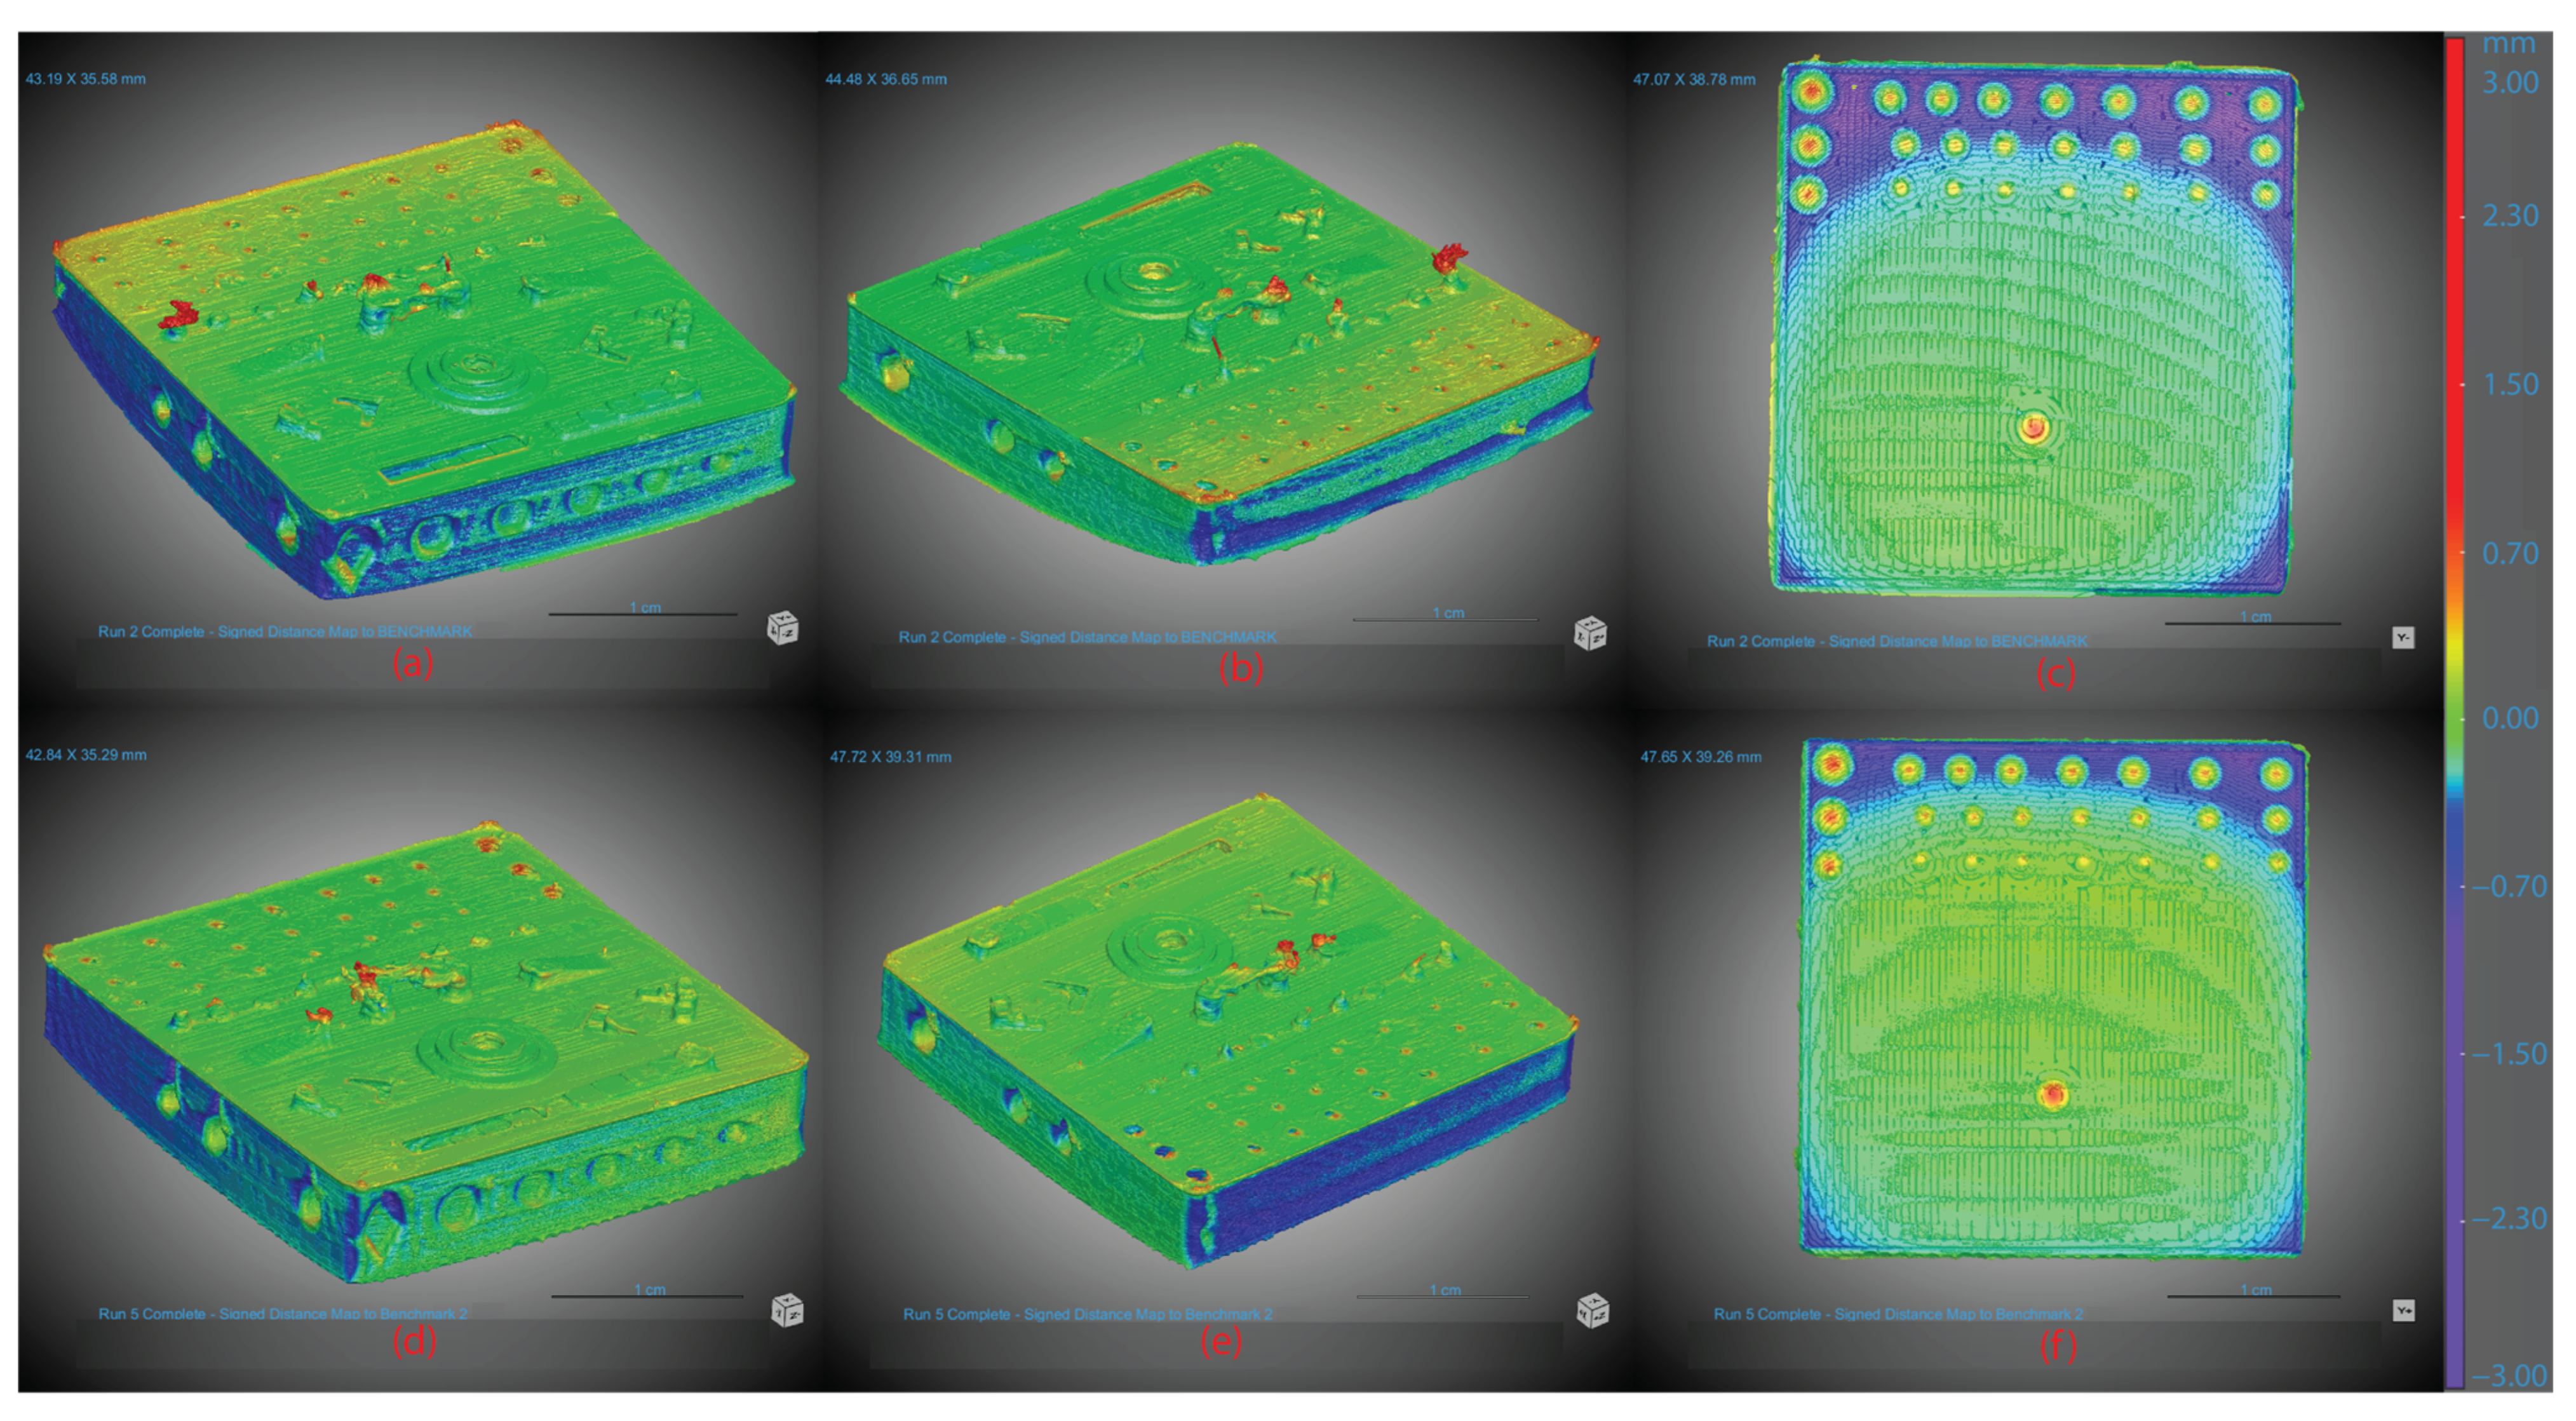
The optimal parameter combinations from Run 2 and Run 5 were selected for fabricating benchmark specimens, denoted as Run 2b and Run5b, respectively. The signed distance maps captured by micro-CT are presented in
Figure 9. Both runs exhibited a combination of positive and negative deviations relative to the CAD model. Negative deviations were concentrated along the sidewalls, whereas positive deviations were primarily observed on the top layers and feature corners.
As summarized in
Table 9, both runs exhibited net undersizing, with mean deviations of −0.1415 mm (Run 2b) and −0.1623 mm (Run 5b), indicating slightly greater overall shrinkage in Run 5b. However, Run 2b showed substantially larger extrema (min = −2.6006 mm, max = 1.6447 mm), consistent with the severe warping and top-surface over-extrusion observed in
Figure 9. Run 5b exhibited lower variability (SD = 0.2827 mm vs. 0.3102 mm), and its lower overall RMSE (0.3259 vs. 0.3410 mm) indicates higher global dimensional fidelity. Feature-level analysis revealed geometry-specific trends. Although Run 5b had a mean deviation near zero for the 0.9 mm pores, it exhibited a much higher standard deviation (0.2206 vs. 0.1658 mm) and a higher RMSE (0.2208 vs. 0.1732 mm). This indicates that pores printed in Run 2b were more consistent and more accurate despite a small systematic offset. In contrast, the 0.9 mm cylinders were oversized in both runs, but Run 5b achieved substantially lower RMSE (0.1520 vs. 0.2490 mm). Notably, Run 2b exhibited a high maximum deviation of 1.0529 mm for the 0.9 mm cylinders. The 0.9 mm diagonal step features showed minimal differences between runs, with similar mean deviation and RMSE values. Overall, these results indicate that Run 5b provides better global dimensional accuracy and improved accuracy for cylindrical features, whereas Run 2b yields more accurate 0.9 mm pores.
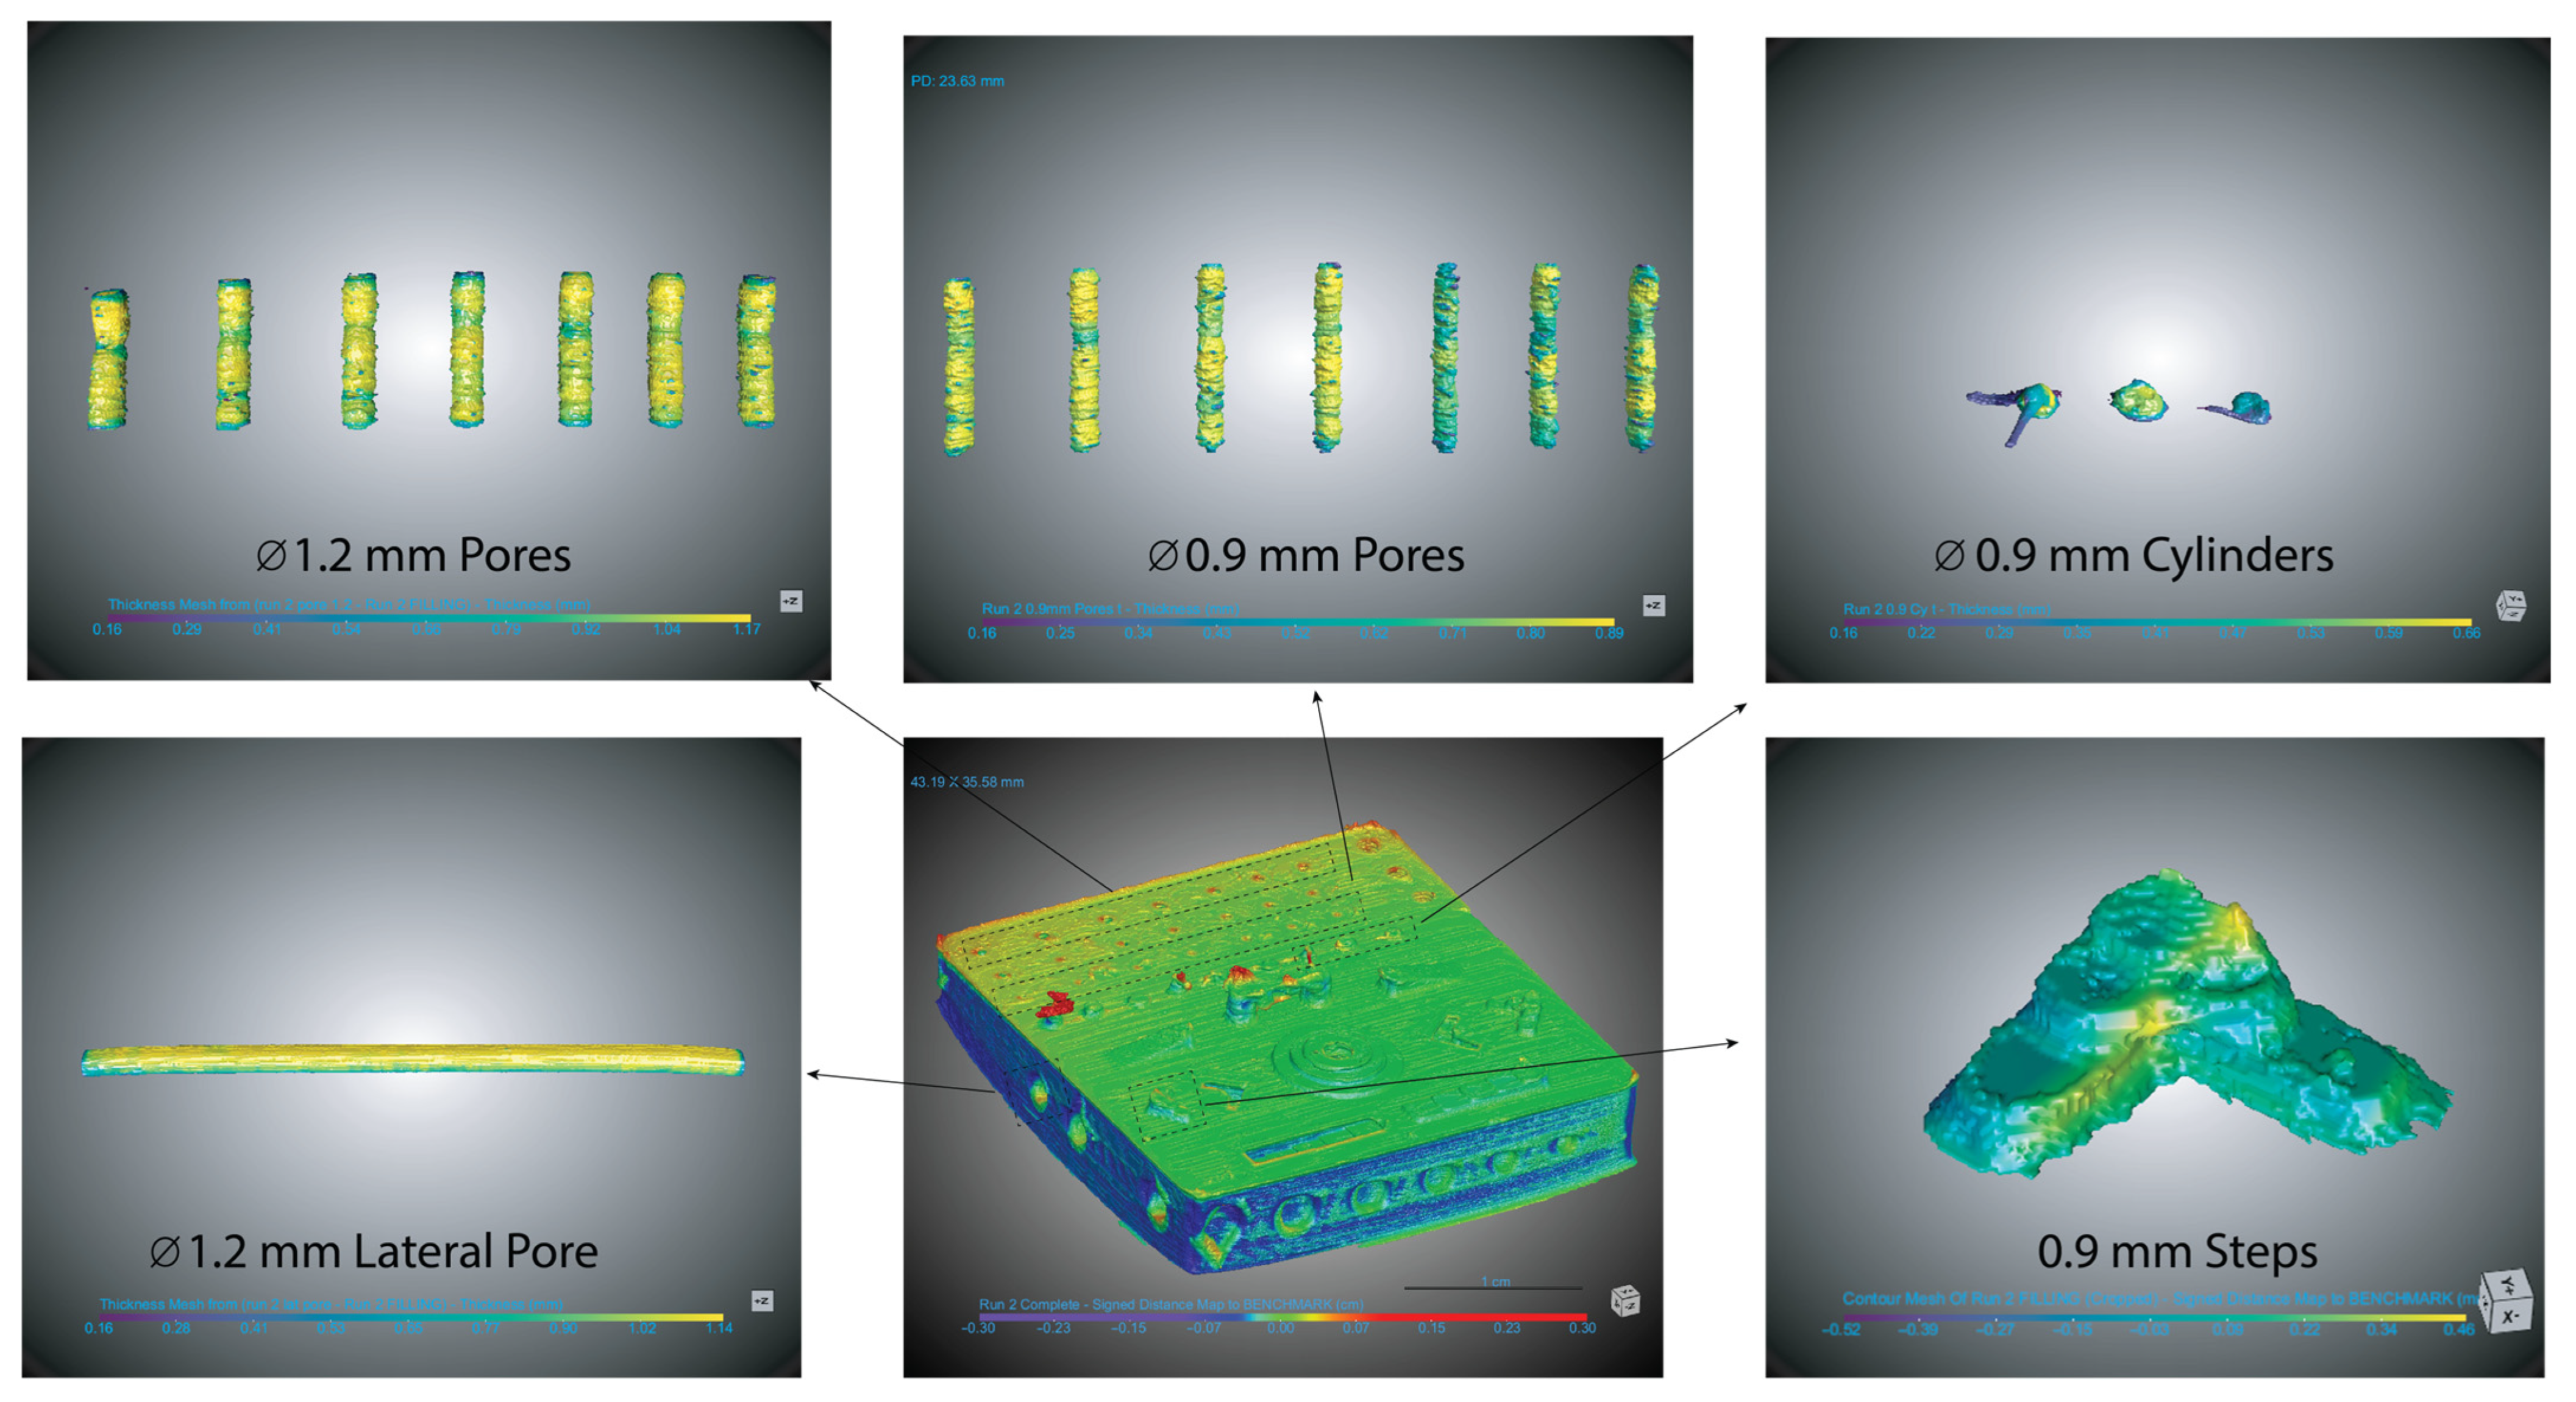
The feature-specific dimensional analysis for Run 2b is illustrated in
Figure 10, which shows the deviation maps for individual geometries. These include vertical and lateral pores, extruded cylinders, and diagonal steps, allowing localized assessment of how process parameters influenced accuracy across different geometric features and size.
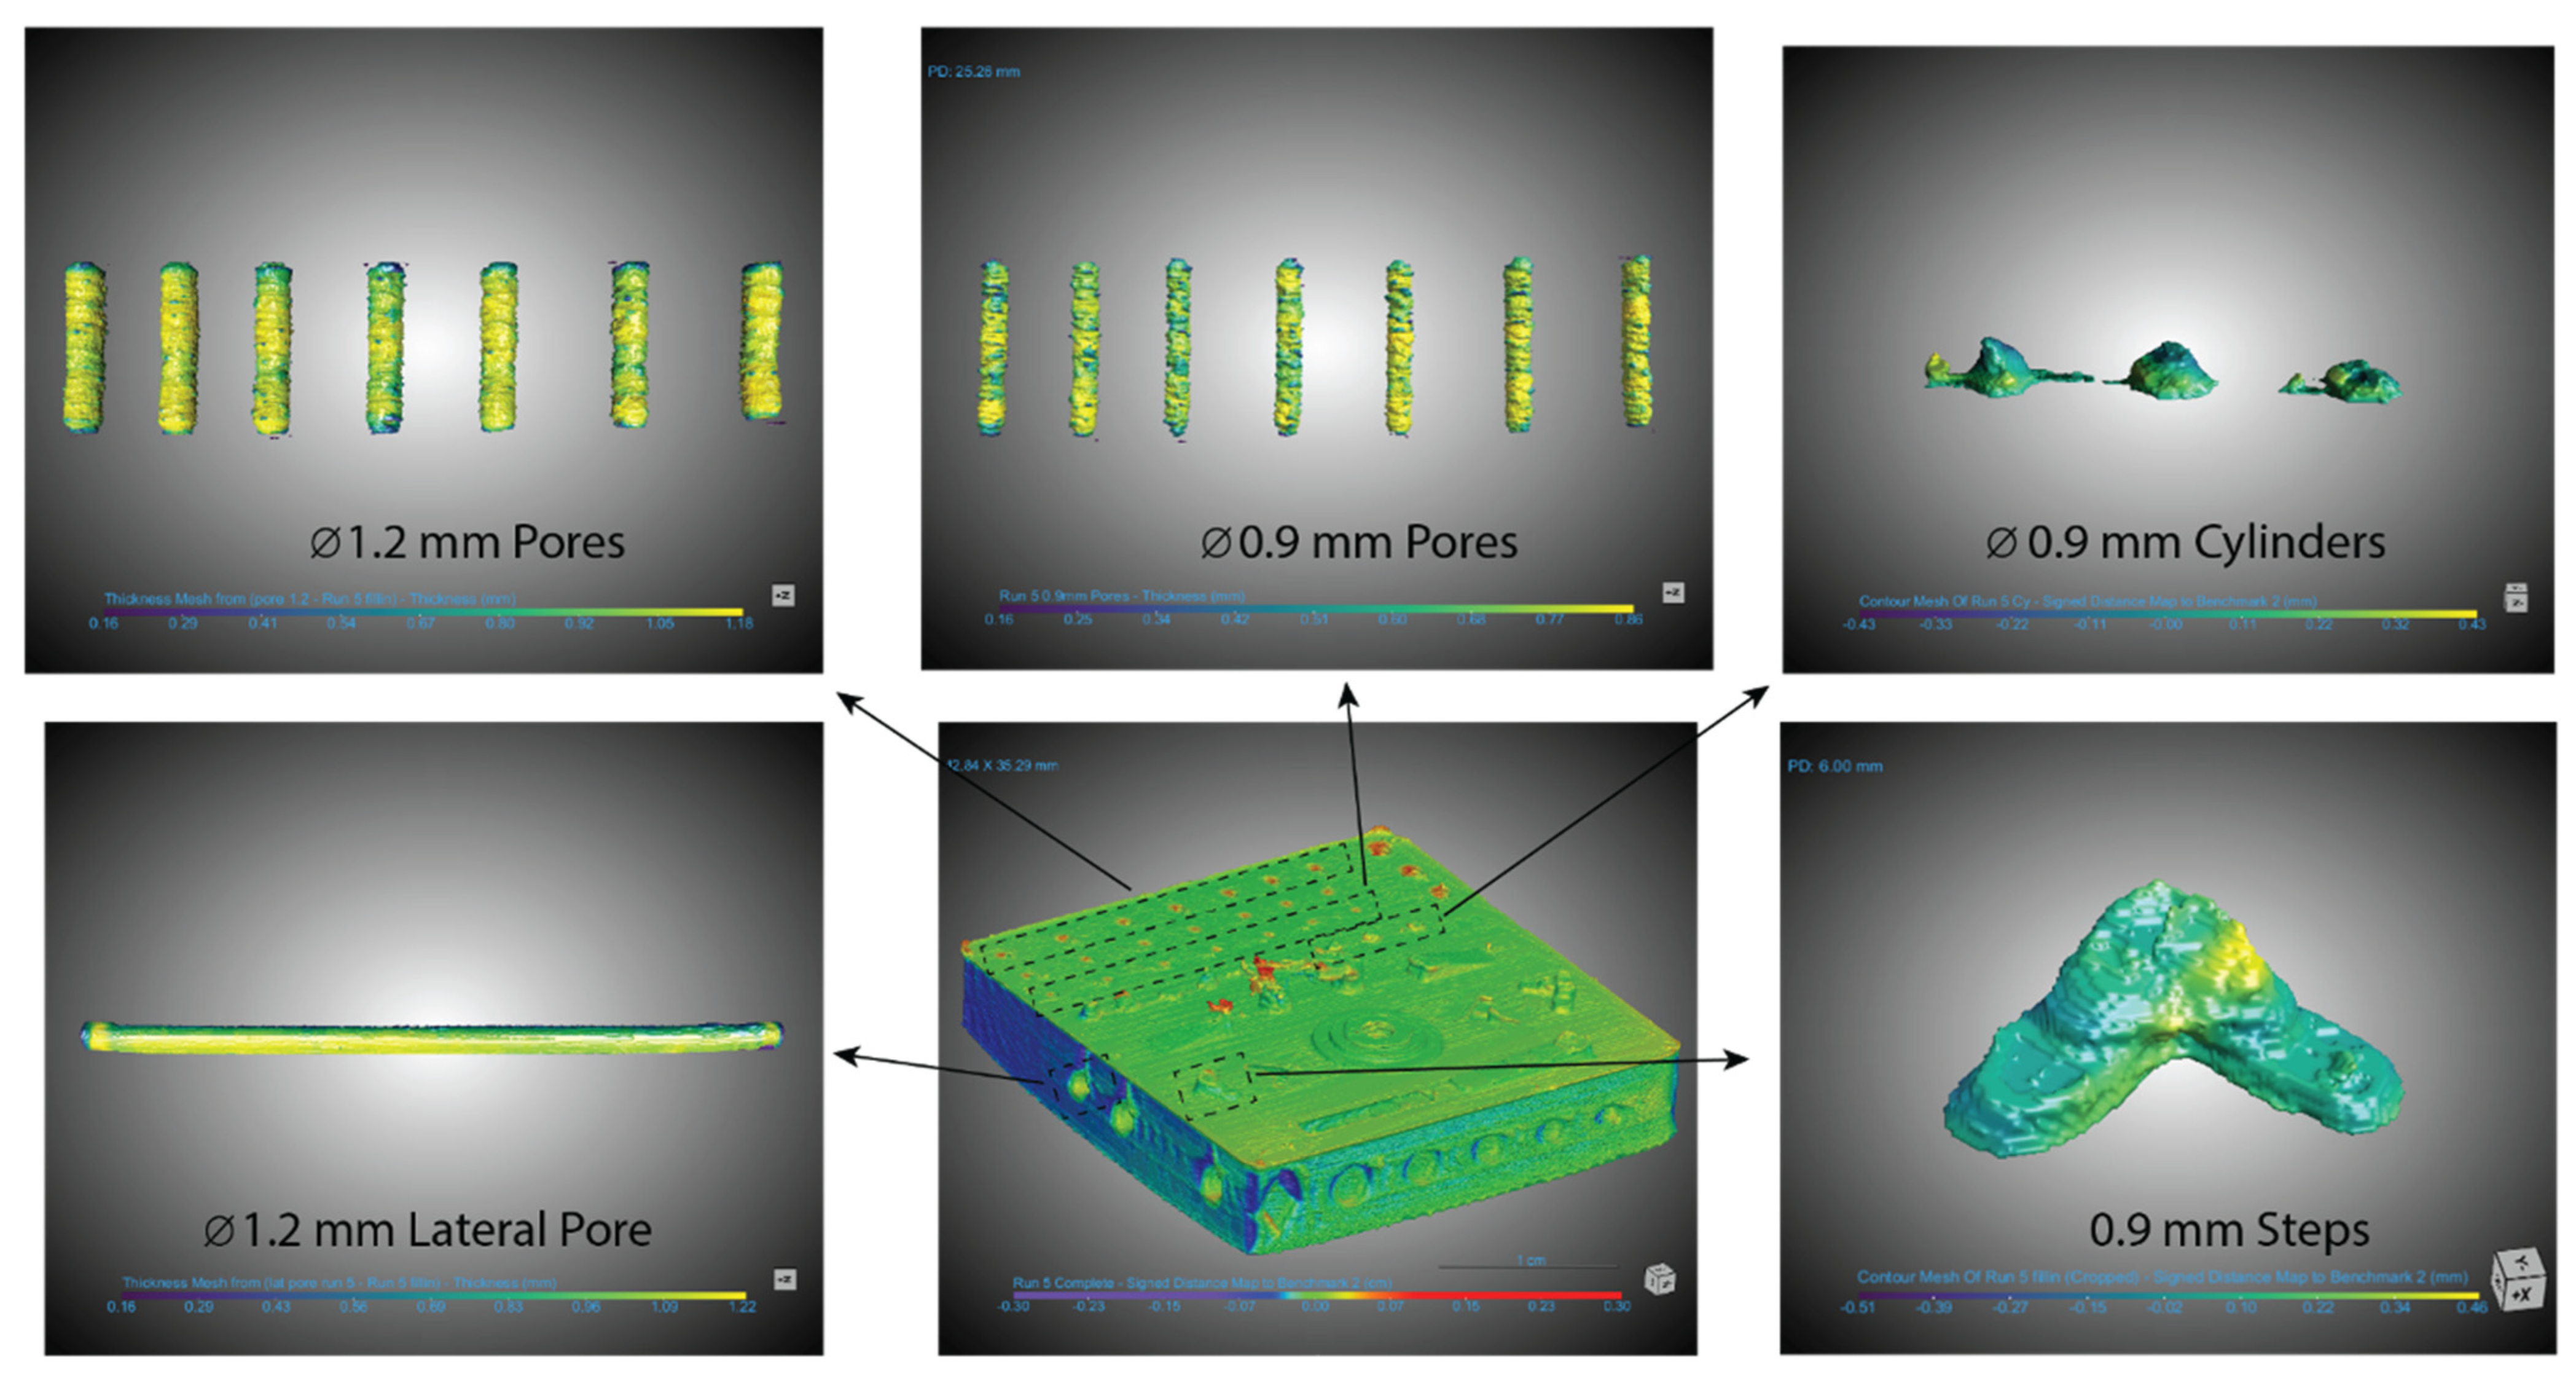
Figure 11 shows the feature-level analysis for Run 5b. The exact locations of positive and negative deviations on each feature can be measured from the deviation maps.
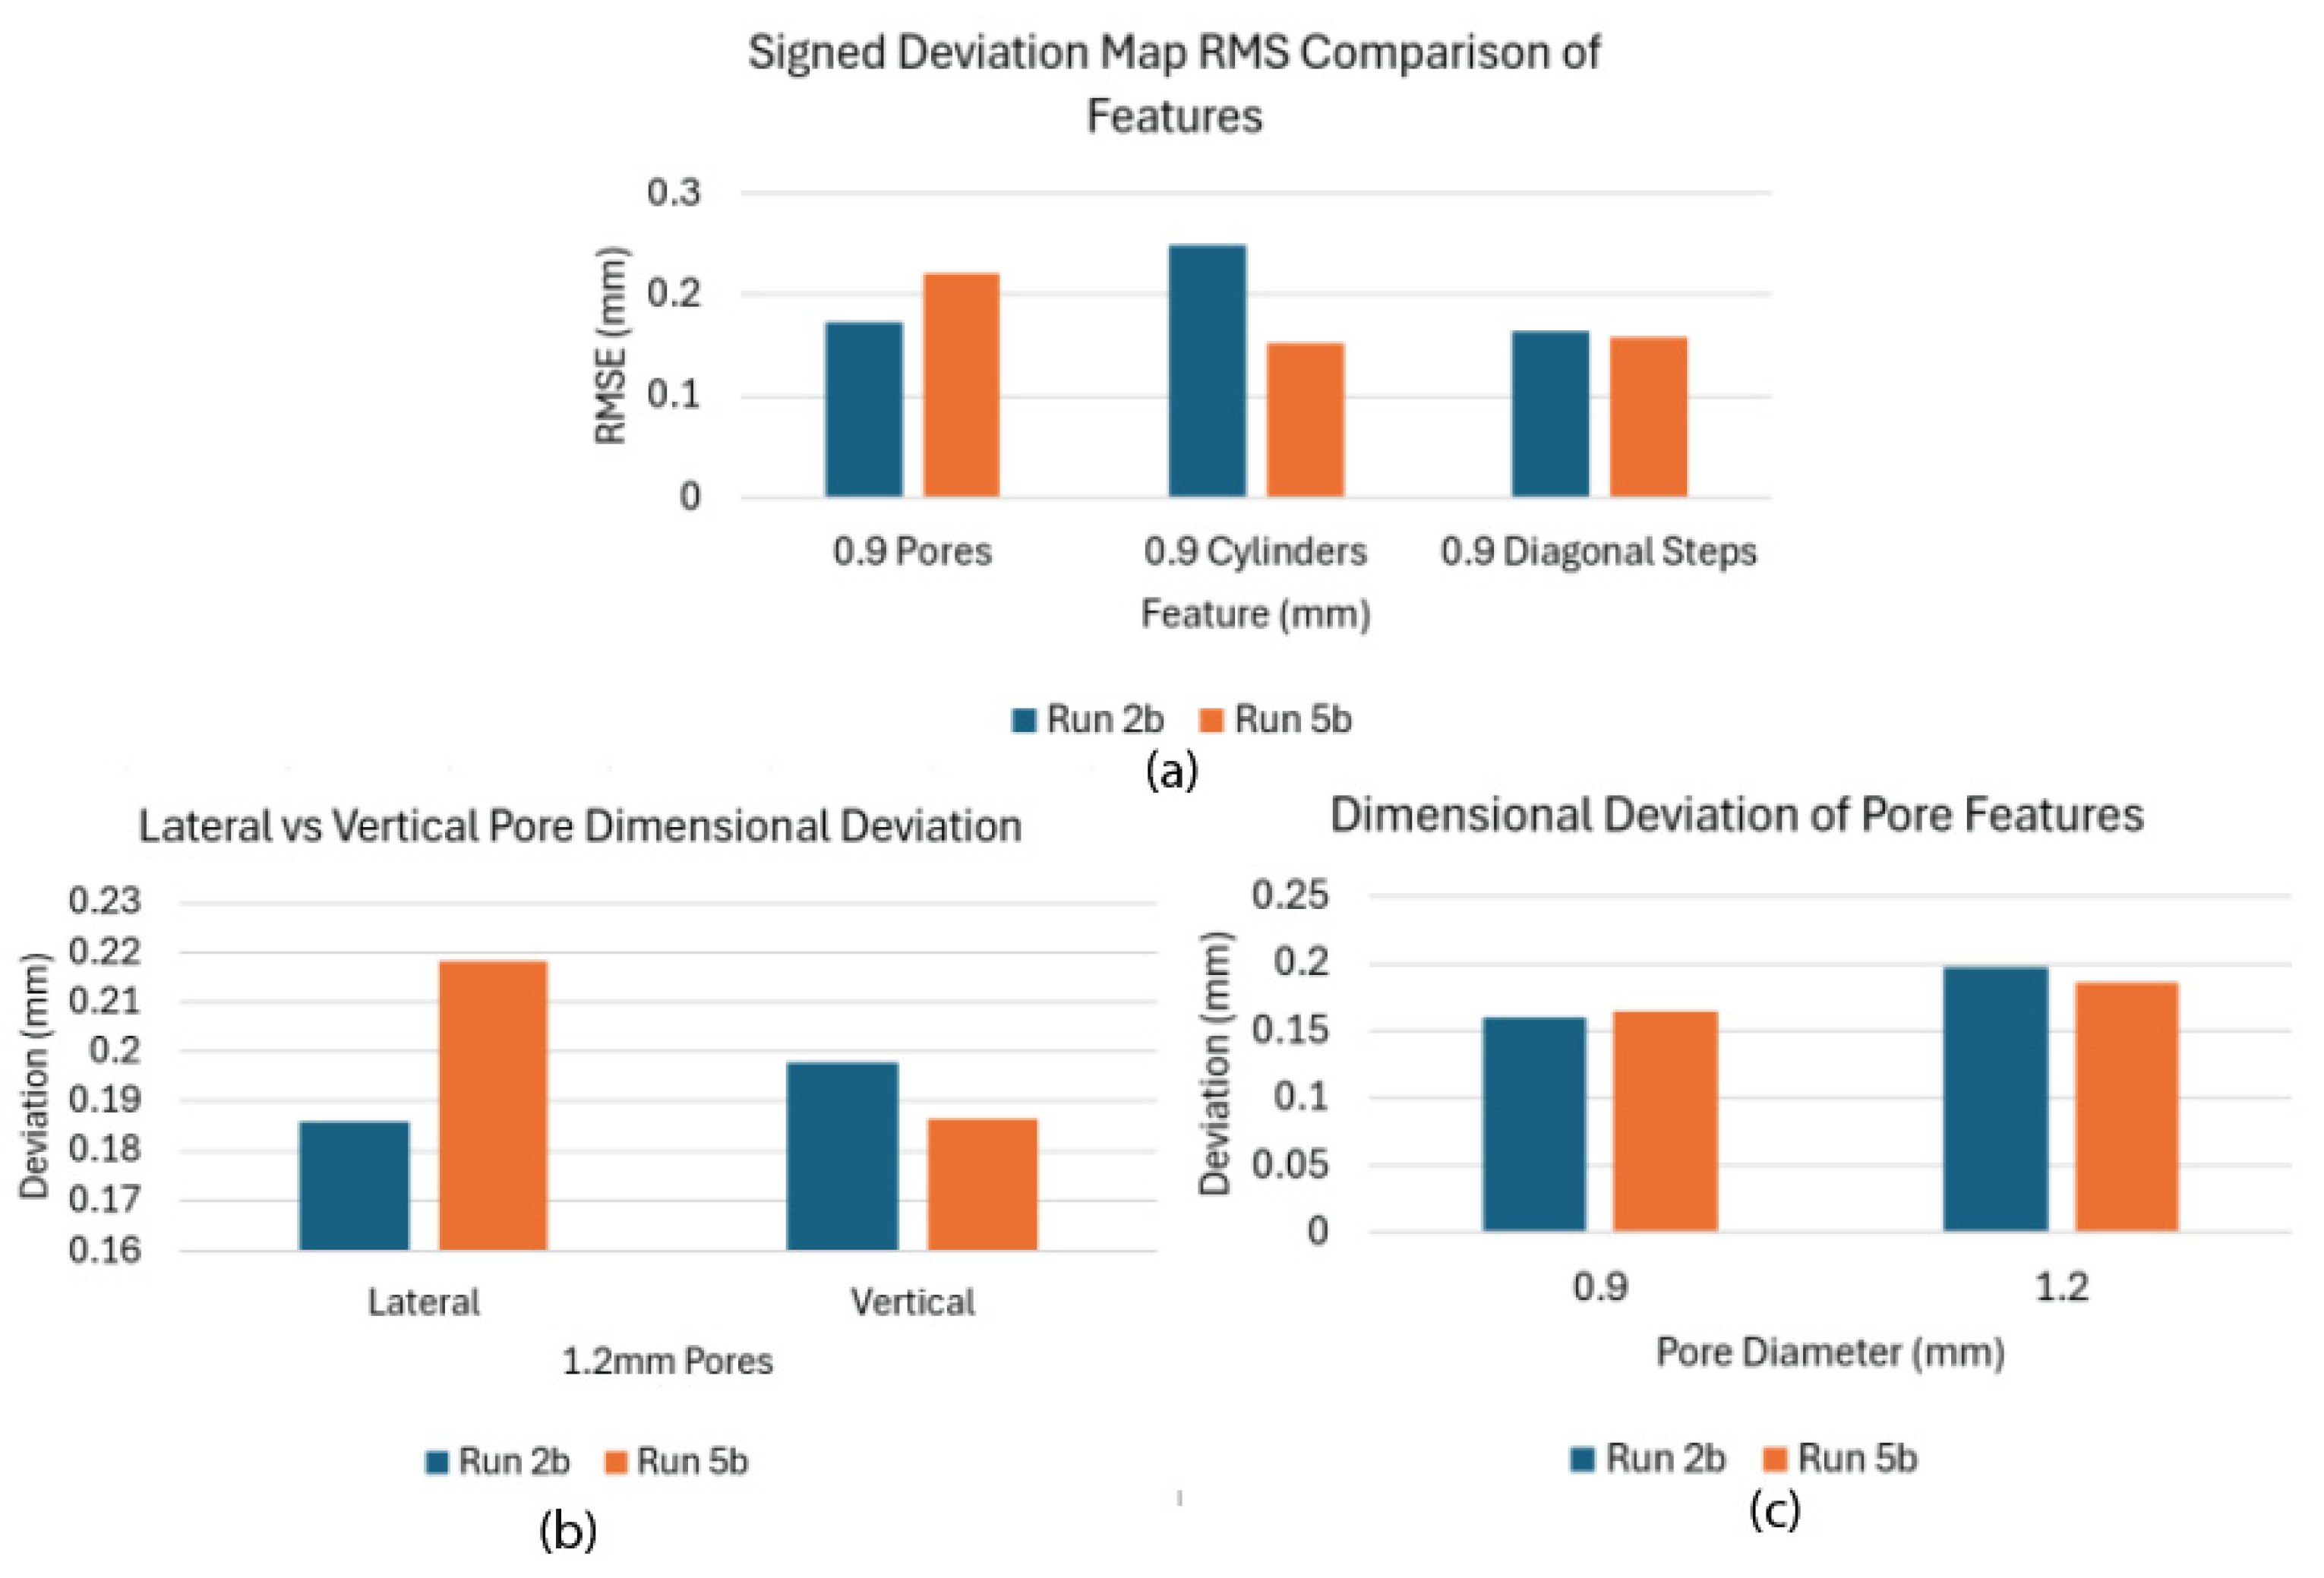
The feature-level comparisons between runs are summarized in
Figure 12. As shown in
Figure 12a, Run 2b exhibited higher RMSE values for the 0.9 mm cylinder and diagonal-step features, while Run 5b demonstrated lower values for these geometries.
Figure 12b compares the dimensional deviations of the lateral and vertical 1.2 mm pores; Run 5b showed a larger deviation in the lateral pore, whereas Run 2b showed greater deviation in the vertical pore. The effect of pore size is illustrated in
Figure 12c, where both runs followed similar trends across the 0.9 mm and 1.2 mm pores, with Run 5b showing slightly higher deviation in 0.9 mm pores.
4. Discussion
The optimization results reveal that process parameters significantly influence the dimensional accuracy of small-scale PEEK components fabricated by FDM. Layer height and printing speed had the most pronounced effects on average dimensional deviation in the horizontal and vertical directions, respectively, with deviations lower in the horizontal than along the vertical. This directional difference is characteristic of AM methods, which exhibit inherent anisotropy due to their layer-by-layer fabrication process [
71,
72,
73]. As the nozzle extrudes molten filament along the print path, both the nozzle and the deposited material transfer heat to the previously printed layers through thermal conduction. This creates uneven temperature distributions within the print model, with corners cooling more rapidly than inner regions [
74]. These thermal gradients generate localized stress concentrations at the corners, consistent with FEM-based analyses [
75]. The resulting differential shrinkage leads to corner lifting and higher deviation along the vertical plan. Additionally, the small size of the cube models restricted heat dissipation, causing localized temperature buildup that delayed filament solidification. This effect can be visualized through thermal imaging, which shows heat accumulation from both the nozzle and build platform [
76]. Subsequent nozzle passes displaced the softened material, resulting in dimensional deviations. These findings align with prior studies identifying thermal distortion and polymer shrinkage during cooling as the primary sources of inaccuracy in FDM [
77,
78].
In the horizontal plane, layer height was the most significant parameter affecting dimensional accuracy (
p = 0.0225). Layer height plays a critical role in determining print resolution and interlayer bonding, directly influencing overall print quality, mechanical performance, warping tendency, and printing time. Lower layer height values reduce the stair-stepping effect and the visibility of layer lines, allowing finer features to be accurately printed. The mid-level layer height of 0.06 mm yielded the highest S/N ratio, likely due to the balance between extrusion pressure and melt viscosity of PEEK. The low layer height of 0.04 mm likely increased the backpressure within the nozzle due to the reduced gap between the nozzle and previous layer, leading to lateral material squeezing and over-extrusion horizontally. Prior studies on PEEK FDM have typically employed layer heights between 0.1–0.3 mm for a 0.4 mm diameter nozzle, whereas investigations using other thermoplastics have examined the dimensional accuracy of much smaller layer heights. Wu et al. investigated layer heights ranging 0.02–0.40 mm in FDM printing of PLA using a 0.4 mm nozzle and observed that increasing the layer height resulted in greater dimensional errors (from 2% to 8%), but shorter printing times [
79]. Similarly, Bintara et al. achieved a minimum surface roughness of 9.04 µm at a 0.05 mm layer height, though this required significantly longer printing times of 465 min compared to 97 min at 0.25 mm layer height [
80]. This study extends previous research by examining finer layer heights in PEEK FDM printing to assess their impact on dimensional accuracy and surface roughness.
Printing speed exhibited the greatest influence on dimensional accuracy in the vertical plane. The S/N ratio increased with higher printing speeds, with the optimum value observed at 10 mm/s, indicating improved dimensional stability at this condition. This improvement can be attributed to reduced thermal exposure per layer, which limited reheating of previously deposited material. At lower speeds, prolonged nozzle dwell time reheats the underlying layers, softening the material and increasing the likelihood of dragging or deformation as the nozzle passes. Similar findings have been reported by Wang et al., who observed stacking and over-extrusion on top surfaces at slower printing speeds due to excessive heat accumulation [
40].
The surface roughness of the sidewalls was also influenced by the process parameters; however, the percentage contributions were relatively close. This suggests that the parameters acted concurrently to determine surface finish. In this study, smoother wall surfaces were obtained at a lower nozzle temperature (450 °C) and moderate layer height (0.06 mm), printing speed (7.5 mm/s), and extrusion width (0.40 mm). These conditions likely promoted more stable extrusion and uniform filament deposition, while preventing excessive melt flow and distortions associated with higher nozzle temperatures. FDM technology has an inherent layer “staircase effect” that can theoretically be reduced with smaller layer heights, leading to lower surface roughness. However, excessively small layers increase melt residence time and local heat accumulation, which delay solidification and degrade surface quality. Wang et al. reported a minimum sidewall roughness of 7.8 µm using a nozzle temperature of 440 °C, a 0.1 mm layer height, and a printing speed of 20 mm/s [
37]. In comparison, a lower surface roughness of 4.01 µm was achieved in this study under optimized conditions. This demonstrates that layer heights below 0.1 mm can effectively produce smoother wall surfaces in PEEK FDM printing.
The benchmark models enabled validation of geometric fidelity across multiple feature types using micro-CT analysis. As shown in
Figure 9, both runs exhibited negative deviations along the sidewalls, indicative of inward warping and shrinkage during cooling. Run 2b showed more pronounced deviation, suggesting greater residual thermal stress and lower dimensional stability. This behavior stems from PEEK’s high coefficient of thermal expansion and steep temperature gradients within the part. Despite maintaining an enclosed chamber and heated build platform (130 °C), cooling-induced contraction caused the walls to deform inward. Run 5b exhibited less warping, likely due to its higher nozzle temperature (460 °C), which improved interlayer bonding and reduced internal stress accumulation. Similar findings were reported by Ding et al. [
41], who observed reduced warping at nozzle temperatures above 390 °C. Maintaining elevated platform and chamber temperatures has also been widely recognized as an effective strategy to minimize warping in PEEK FDM [
35,
40,
41,
45,
46].
The severe warping in Run 2b also impaired local feature fidelity. Corner lifting led to intermittent nozzle collisions, causing material buildup and surface irregularities on the top layers. These defects correspond to the larger extrema observed in
Table 9, where Run 2b showed maximum deviations up to 46% higher than Run 5b. Consistent with these trends, Run 5b achieved a lower overall RMSE (0.3259 mm vs. 0.3410 mm), indicating improved global dimensional accuracy.
Small geometric features generally reproduced the CAD model well, although the magnitude and direction of deviation varied by feature type. Pores printed systematically smaller than nominal dimensions due to partial closure driven by PEEK’s high melt viscosity and contraction during cooling. Micro-CT measurements showed average diameters of 0.7396 mm (Run 2b) and 0.7354 mm (Run 5b) for 0.9 mm pores, and 1.0022 mm and 1.0137 mm for the 1.2 mm pores, confirming systematic undersizing. Increasing pore size from 0.9 to 1.2 mm increased deviations in both runs, with larger errors observed in Run 2b. This is likely because the 1.2 mm pores were located near the part edges, where warping was more severe. Although Run 2b produced more accurate sub-millimeter vertical pores, its cylindrical features exhibited larger distortions, likely caused by nozzle interference with warped surfaces that dragged or displaced semi-molten filament during deposition. This warping propagated upward through the part, distorting the top layers and contributing to the large maximum deviation observed in the cylindrical features in
Table 9.
Run 5b, by contrast, exhibited lower overall variability and a lower overall RMSE, reflecting more uniform dimensional fidelity. However, its higher nozzle temperature (460 °C) and printing speed (10 mm/s) led to greater deviation in the lateral pores, likely due to increased melt flow and sagging in unsupported horizontal regions. Cylindrical pillars were oversized in both runs, but Run 5b achieved lower RMSE (0.1520 vs. 0.2490 mm), consistent with its reduced warping and smoother deposition. The differences between runs were smaller for the diagonal step features, indicating that square and linear geometries are less sensitive to the process variations than curved features. Linear features such as ramps and stair steps showed lower deviations, consistent with findings by Wang et al., who also reported greater inaccuracies in curved features [
46]. Bridge structures showed the poorest fidelity overall, as PEEK’s high viscosity and low thermal conductivity delay solidification and promote sagging across unsupported spans.
Overall, the comparison between runs indicates a trade-off: higher nozzle temperature improved interlayer bonding and reduced global distortion, but it was detrimental to certain sub-millimeter features due to increased melt flow. These findings highlight the need for balancing nozzle temperature and thermal management. Precise miniature features require tighter thermal control through the chamber and build platform to minimize gradients and prevent localized deformation.
Despite the promising results, several limitations should be acknowledged. The dimensional measurements of the cube specimens were based on digital calipers, which may introduce uncertainty. Higher-precision methods such as coordinate-measuring machine (CMM) could improve measurement accuracy. Although the Taguchi method provided an efficient approach to identify optimal process parameters, it does not account for complex parameter interactions. Future studies could employ response surface methodology (RSM) or machine-learning based optimization. Furthermore, the optimization approach was limited to a single specimen size, and future studies should investigate how part size influences surface roughness. It is recommended that the chamber and build platform temperatures be maintained above 130 °C to minimize warping when using nozzle temperatures of 450 °C or lower.
5. Conclusions
The process parameters of small-scale additively manufactured PEEK were investigated for their effect on dimensional accuracy and surface roughness. This study systematically optimizes FDM process parameters for small-scale PEEK parts, addressing the challenges of miniaturization. The Taguchi method was employed to obtain the main effects and optimal parameters for nozzle temperature, layer height, printing speed, and extrusion width. The experimental results provided the optimal runs for horizontal and vertical axes, which were then validated with a custom benchmark model. Taguchi analysis identified distinct optimal parameters between the horizontal and vertical axes. Nozzle temperature (460 °C) and layer height (0.06 mm) were consistent across both, while optimal printing speed and extrusion width differed—7.5 mm/s and 0.42 mm for the horizontal axis, and 10 mm/s and 0.40 mm for the vertical. The optimized parameter set reduced average dimensional deviation by 51% in the XY-plane and 69% along the Z-axis compared to baseline conditions, while surface roughness improved by approximately 20%. A surface roughness of 4.01 µm was achieved using a layer height of 0.06 mm, demonstrating that further reduction below the conventional 0.1 mm threshold can significantly enhance wall smoothness in FDM-printed PEEK.
These findings demonstrate the potential of FDM-printed PEEK for producing high-precision, small-scale biomedical components. Because FDM systems are accessible, cost-effective, and capable of processing biocompatible materials with minimal post-processing, their ability to fabricate sub-millimeter parts expands opportunities for patient-specific applications in dentistry, small orthopedic fixation devices, and veterinary implants. Although the optimized parameters improved dimensional accuracy, sub-millimeter features still exhibited average deviations of approximately 0.25 mm, underscoring the remaining challenges of achieving true dimensional fidelity in miniaturized PEEK FDM components. Future work should focus on refining thermal management and using smaller nozzle diameters to further reduce these deviations and enable reliable fabrication of clinically relevant geometries such as maxillofacial implants, fixation screws, and dental implants.
