Abstract
The use of the welding process on an industrial scale has become significant over the years and is currently among the main processes for joining metallic materials. Along the weld, structural changes occur in the vicinity of the joint. These thermal stresses and geometric distortions are mostly undesirable and are complex to predict with precision. Using S235JR steel as the base material, laboratory experiments were carried out using the multipass GMAW process, with the aim of investigating the influence of the welding direction on angular distortion. To measure the distortions, a methodology was applied using equipment to identify the coordinates in the operational space with metrological precision. Through metrological and statistical analyses, we found that the orientation factor significantly influenced the final distortions and that the alternated orientation sequence resulted in less distortions.
Keywords:
welding distortion; welding sequence; residual stress; welding; GMAW; multipass; butt joint 1. Introduction
One of the chosen joining processes in the assembly and manufacture of many types of components is welding, and the main reasons for this choice are the velocity and reliability of the welding processes. In addition, the economic feasibility of the various types of welding compared to other manufacturing processes is another important motivation for its choice [1,2]. Gas Metal Arc Welding (GMAW) is a versatile welding method that is used in semi-automatic and fully automatic modes. It is the most utilized and preferred welding technique in the industry owing to its advantages, such as the capability of all position welding and good quality welds [3,4].
Despite the many advantages of welding processes, one important drawback is that it frequently can lead to inadmissible levels of imperfections, such as distortion and shrinkage [5]. Distortions in the welding process are caused by the non-uniform expansion and contraction of the weld and the surrounding areas [6]. These defects appear because of the high temperature of the weld area and its thermal expansion restrained by the surrounding areas with metal at a lower temperature, which leads to compressive stress [7]. One of the great challenges caused by distortions is to find strategies to control its appearance in complex structures.
In some cases, distortions can result in an increase of the production cost and time, when their amount exceeds the acceptable limits and it is necessary to correct the defects or rework the operation [8]. In order to avoid losses and maintain the mechanical properties of welded components, is essential to predict and minimize distortions during the welding processes [3]. With the aim of minimizing the residual stresses and distortion effects, it is necessary to consider some parameters and manufacturing conditions [9], namely material specifications, the level of heat input, joint shapes, stiffener arrangements, welding type and continuity, heat treatments before and after the welding process, initial distortions, and welding sequences [10,11].
As reported by D. Radaj [12] and T. Schenk [13], high residual stresses emerge when the deformations are restricted, and low residual stresses occur when the deformations are not restricted. Figure 1 correlates the residual stresses and the distortions according to the clamping degree [14].
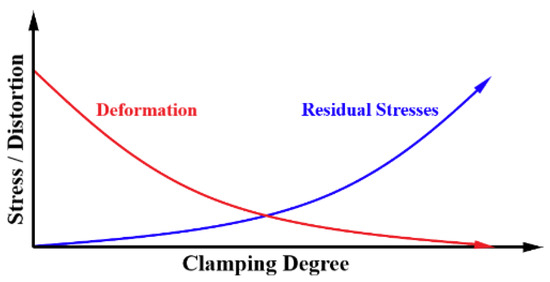
Figure 1.
Relationship between the clamping degree and the level of distortion as well as the effect on residual stresses.
In butt-welded plates, angular distortion is the major problem and the most pronounced type of distortion [15]. It consists of a rotation of the structure around the welding line [13]. This distortion occurs in a butt joint when the transverse shrinkage is not uniform in the thickness direction [15,16]. When the angular distortion occurs, the welded component is distorted in angular directions around the weld interface [17,18], as sketched in Figure 2.

Figure 2.
Angular distortion of a butt weld.
The application of subsequent welds causes the previous welds to be heated and melted in the context of multipass welding. In each pass, a thermal cycle is applied on the base metal, and the material in this area can experience multiple-phase transformations that cause, under the same parameters, different changes to the structures of the welded area and the heat-affected zone. These differences result in multiple states of stresses and strains in the heat-affected zone and surroundings [19].
Some factors, such as the increase in the number of tack welds and step welding techniques, were proven to increase the angular distortion, according to Tomkow et al. [20]. Lohate M.S. and Dr. Damale A.V. concluded that the number of passes significantly influences the distortions, while the feed rate and time gap between the passes directly affects the distortions [21].
Kumar P. [22] and Kumar A. [23] performed different research about the influence on joint gap distortions, the number of passes, and the time gap between passes. Both experiments concluded that the distortion increases with the increase of joint gap and number of passes and yet decreases with the increase of the time gap between the passes.
In this work, we investigate the influence of the welding sequence in butt joint welds in the emergence of distortion when changing the pass orientation in GMAW multipass in steel plates. As we could see in the presented brief review, previous studies have investigated the effect of welding parameters, such as the voltage, current, welding velocity, feed rate, gas flow, torch tilt angle, length of electrode, number of passes, time gap between the passes, rise of angle of the V groove, plate length, and electrode diameter, in distortions. As the present work had the objective to evaluate the effect of welding orientation, which is a novelty, we considered that these comparisons would be between very distinct aspects.
2. Materials and Methods
The equipment used to carry out the experiments was a welding machine model MIG 453 Modular, brand Electrex, and, to assure the precision of the welding, a numerical controlling equipment (Figure 3) developed in the Instituto Politécnico de Bragança was also used. This equipment is capable of moving the torch with three degrees of freedom and automatically operates the trigger of the welding machine by Code G programming in Grbl Controller 3.6.1 software.
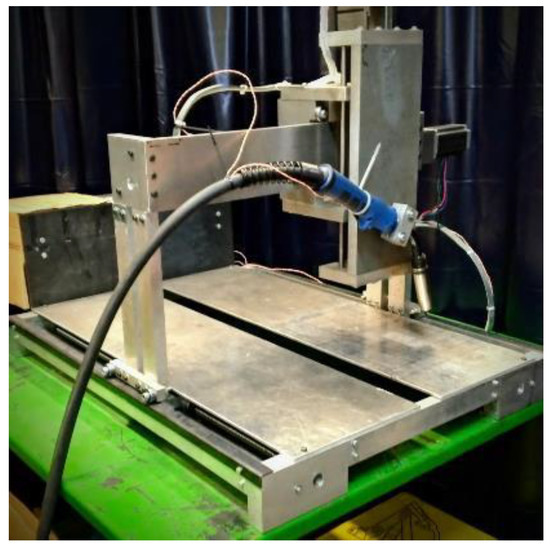
Figure 3.
CNC equipment with an adaptation for a welding torch.
The base metal used for the experiments was carbon steel S235JR (EN10025 with the chemical composition C: 0.17–0.22%, Mn ≤ 1.40%, p ≤ 0.035%, and Si ≤ 0.035%) and the weld metal was an electrode wire M/SG 2 manufactured by Eurotrod, identified as 14341-A G3Sil by ISO Standard and ER70S-6 by AWS (Chemical composition C: 0.06–0.14%, Si: 0.80–1.00%, Mn: 1.40–1.60%, p ≤ 0.025%, and Si 0.025%). This electrode is constituted of steel and coated in copper. In order to avoid contamination by the external environment and promote better mechanical proprieties, a mixture of 82% Argon and 18% Carbon Dioxide (ISO 14175–M21–ArC–18) was used as the protection gas. The mechanical properties of the materials used are presented in Table 1.

Table 1.
Mechanical properties for the base metal and electrode.
Given that the desired investigation is the analysis of the influence of the welding sequence, all the samples were prepared following the same procedure and using the same welding parameters. With the aim to improve the investigation precision, each welding sequence was made in triplicate, to ensure the non-interference of possible imperfections of the materials and human or machine failure during the execution of the whole experiment.
For the purpose of obtaining thermal uniformity, at the beginning of each weld bead, the welding of all the samples was made alternately, and, after the end of each weld bead, the respective sample was submitted to uniform air cooling, without restriction or acceleration [24].
The parameters used for the welding process are shown in Table 2. These parameters were selected following the range recommended by the electrode’s manufacturer and in order to provide the arc stability.

Table 2.
Parameters used for multipass welding.
The welding sequences performed were divided into two groups.:
- M[s]: Single orientation.
- M[a]: Alternated orientation.
Figure 4 shows the sequences, indicating the orientation and order of each pass to be made, with Figure 4a showing the multipass welding with single orientation and Figure 4b showing the multipass welding with alternated orientation.
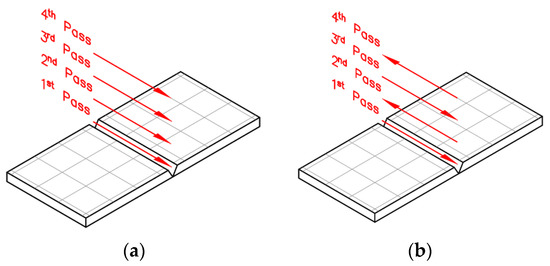
Figure 4.
Multipass welding sequence: (a) single orientation and (b) alternated orientation.
The base metal, even before the welding process, shows geometrical discontinuities. To obtain better control of the distortions caused by the process, the measurements were performed before and after the welding. Thus, the distortions already existing before the welding were considered and properly compensated.
The flowchart of Figure 5 shows, schematically, the order of the used methodology. The measurements of the distortions were performed using a methodology with computerized equipment to identify the coordinates in the operational space with metrological precision.
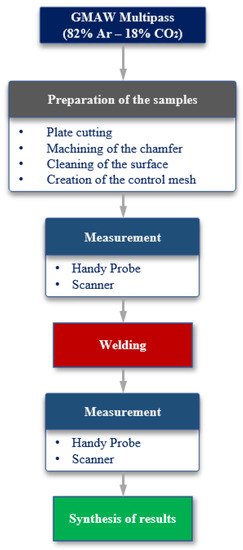
Figure 5.
Methodology flowchart.
For this laboratory experiment, six pairs of S235JR steel sheets with dimensions of 110 × 100 × 10 mm were obtained with a V-groove as shown in Figure 6. For the analysis of distortions, a 30 × 30 mm control grid (Figure 7) with 32 nodes (measurement points) was created.
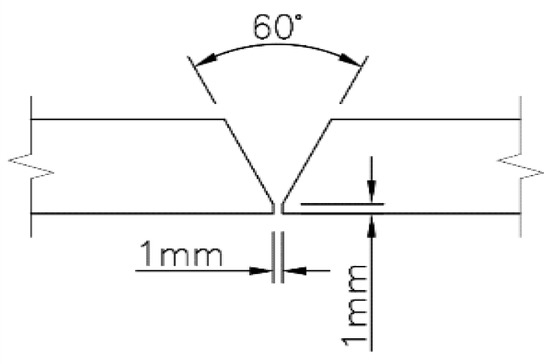
Figure 6.
Geometric characterization of the V-groove.

Figure 7.
Control grid created on the samples, (a) schematic illustration and (b) real sample.
As cited by D. Radaj [12] and T. Schenk [13], high residual stresses arise when deformations are restricted. In this way, we chose laboratory experiments as it is not necessary to fix the samples during the welding procedures, and consequently these experiments did not restrict the deformations at any time.
The welding was performed in flat position (1G) with the pulling technique and the parameters, and the arrangement of the strands for filling the V-groove was defined to obtain a uniform distribution of the stands and to guarantee a better structural and visual aspect of the whole weld. Thus, in Figure 8, there is a schematic illustration of the result of the arrangement of the weld beads deposited at the time of welding.
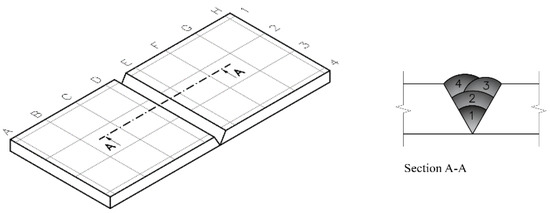
Figure 8.
Weld bead arrangement for filling the chamfer with the indicated cutting direction.
For data acquisition, was used the C-Track (Figure 9a) coordinate measurement equipment interconnected with HandyPROBE using the Metrolog X4 and VXelements. The arrangement for sample positioning to acquire data is shown in Figure 9b. Three support cylinders and four optical reflectors were placed on a granite surface plate following all the recommendations in the manufacturer’s manual.
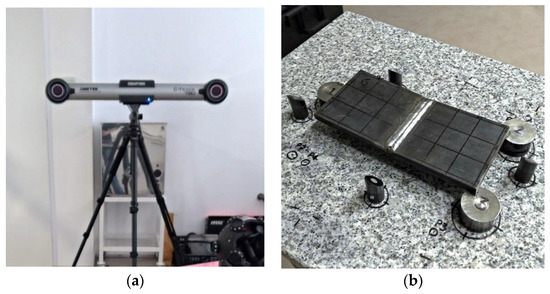
Figure 9.
(a) C-Track measurement equipment and (b) arrangement positioning for data acquisition.
3. Results
The graphical representation of the vertical displacement averages of three samples of each sequence can be seen in Figure 10. Figure 10, with (a) the multipass sequence with single orientation, M[s], and (b) the multipass sequence with alternated orientation, M[a]. It is also possible to see, in Figure 10, the positioning of the sections A–H and 1–4 of the control grid of the steel sheets.
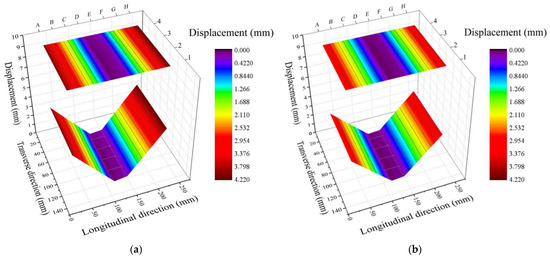
Figure 10.
(a) The deformation graph for multipass with a single orientation (M[s]); (b) the deformation graph for multipass with alternated orientation (M[a]).
In Figure 11, sections A to H are indicated, and in Figure 12 are the averages of sections 1, 2, 3, and 4, since the standard deviation between the values obtained from the cross sections were less than or equal to 0.03 mm. The comparative graphs of M[s] × M[a] enabled analysis of the deformation patterns and the amplitudes of the displacements caused by the welding process by comparing the sections, with the continuous lines referring to the welding sequence in the single orientation and the dashed line referring to the alternated orientation.
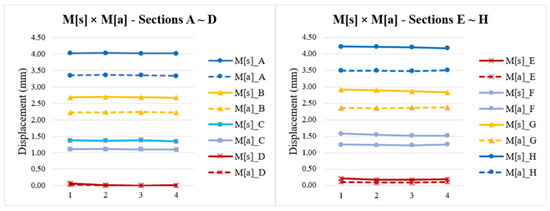
Figure 11.
M[s] × M[a] Scatter plot—Sections A–H.
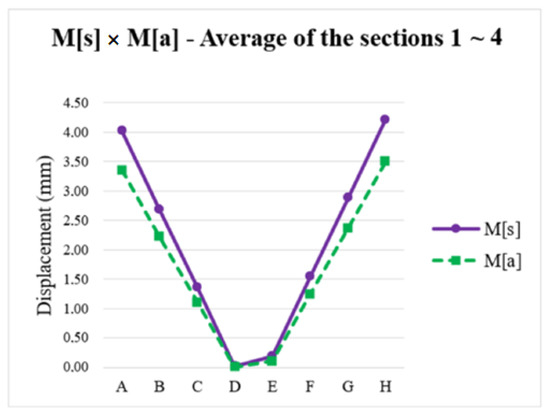
Figure 12.
M[s] × M[a] Scatter plot—Sections 1–4.
In both welding sequences, the maximum mean vertical displacement occurred in Section H, with M[s] an average displacement 20.1% greater than in M[a] in this section. All the vertical displacements measured were summed and transformed in one only variable for each sample (Table 3).

Table 3.
Summation of the sample distortions in multipass welding.
ANOVA was used to obtain the true null hypothesis as a result (p < 0.05) for the welding orientation factor. Therefore, we concluded that the orientation of multipass welding had a significant effect on the final distortion of the samples and that, in general, the specimens of multipass welding with alternated orientation had an average vertical displacement 17.8% lower when compared to the sequence of multipass with single orientation (Table 4). It also verified the decreasing of displacement average of M[a] comparing with M[s], as can be seen in Figure 13.

Table 4.
ANOVA analysis between the orientation and direction of multipass welding.
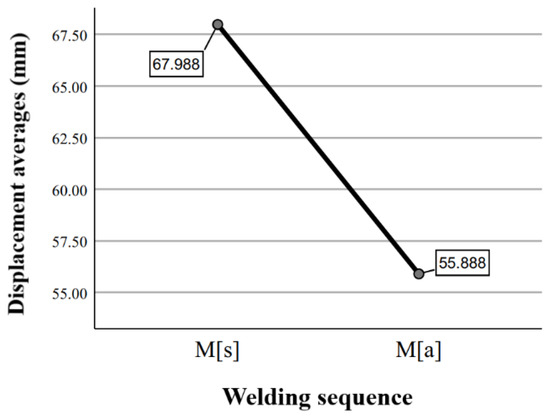
Figure 13.
Displacement averages of M[s] and M[a] sequences.
4. Conclusions
Understanding the mechanisms and parameters that influence distortions proved to be essential for the prevention, control, and correction of deformations caused during the welding process for any type of joining pieces. Thus, within the experimental and theoretical conditions of the present work, it was possible to conclude that:
- The transverse distortions in all specimens were negligible, with a maximum standard deviation of 0.03 mm in each cross section. However, the longitudinal distortions were significant, and, in all specimens, the highest peak occurred in section H, with the average displacement in M[s] 20.1% greater than in M[a] in this section.
- The ANOVA statistical analysis indicated that there was a statistically significant difference in displacement between the single orientation and alternated orientation of multipass welding sequences. Through the average of the sum of the displacements of each sequence, we found that M[a] resulted in a vertical displacement that was 17.8% less than M[s].
Author Contributions
Conceptualization, L.M.G. and J.R.; methodology, L.M.G.; software, L.M.G.; validation, L.M.G. and V.T.N.; formal analysis, J.R.; investigation, L.M.G.; resources, J.R.; data curation, L.M.G.; writing—original draft preparation, L.M.G.; writing—review and editing, V.T.N.; visualization, L.M.G.; supervision, J.R.; funding acquisition, J.R. All authors have read and agreed to the published version of the manuscript.
Funding
This work has been supported by FCT—Fundação para a Ciência e Tecnologia within the R&D Units Project Scope: CIMO (UIDB/00690/2020).
Data Availability Statement
Not applicable.
Conflicts of Interest
The authors declare no conflict of interest.
References
- Ahmed, Z.I.; Saadoon, A.M. Optimization Process Parameters of Submerged Arc Welding Using Taguchi Method. Int. J. Eng. Adv. Technol. 2015, 5, 149–152. [Google Scholar]
- Daniyan, I.; Mpofu, K.; Adeodu, A.; Rominiyi, O. Investigation of Distortion, Stress and Temperature Distribution during Assembly of the Suspension System of a Rail Car. Procedia Manuf. 2019, 38, 1792–1800. [Google Scholar] [CrossRef]
- Pandit, M.; Sood, S.; Mishra, P.; Khanna, P. Mathematical analysis of the effect of process parameters on angular distortion of MIG welded stainless steel 202 plates by using the technique of response surface Methodology. Mater. Today Proc. 2021, 41, 1045–1054. [Google Scholar] [CrossRef]
- Sehrawat, A. Mathematical Modelling for Prediction of Angular Distortion in MIG Welding of Stainless Steel 301. Int. J. Res. Appl. Sci. Eng. Technol. 2020, 8, 884–890. [Google Scholar] [CrossRef]
- Mochizuki, M.; Okano, S. Effect of Welding Process Conditions on Angular Distortion Induced by Bead-on-plate Welding. ISIJ Int. 2018, 58, 153–158. [Google Scholar] [CrossRef]
- Deng, D.; Murakawa, H. Prediction of welding distortion and residual stress in a thin plate butt-welded joint. Comput. Mater. Sci. 2008, 43, 353–365. [Google Scholar] [CrossRef]
- Costa, S.; Souza, M.S.; César, M.B.; Gonçalves, J.; Ribeiro, J.E.; Construct-Lese, F. Experimental and numerical study to minimize the residual stresses in welding of 6082-T6 aluminum alloy. AIMS Mater. Sci. 2021, 8, 271–282. [Google Scholar] [CrossRef]
- Soni, S.; Aggarwal, N. Optimization of Distortion in Welding. Int. J. Enhanc. Res. Sci. Technol. Eng. 2015, 4, 128–133. [Google Scholar]
- Mounika, S.; Rao, D.V. Effect of Weld Pass Sequencing on Temperature Distribution and Residual Stresses in Gmaw. J. Therm. Energy Syst. 2019, 4, 23–40. [Google Scholar]
- Podder, D.; Gupta, O.P.; Das, S.; Mandal, N.R. Experimental and numerical investigation of effect of welding sequence on distortion of stiffened panels. Weld. World 2019, 63, 1275–1289. [Google Scholar] [CrossRef]
- Gannon, L.; Liu, Y.; Pegg, N.; Smith, M. Effect of welding sequence on residual stress and distortion in flat-bar stiffened plates. Mar. Struct. 2010, 23, 385–404. [Google Scholar] [CrossRef]
- Radaj, D. Welding Residual Stresses and Distortion: Calculation and Measurement; DVS-Verlag: Düsseldorf, Germany, 2003. [Google Scholar]
- Schenk, T. Modelling of Welding Distortion the Influence of Clamping and Sequencing. Ph.D. Thesis, Albert Ludwig Universtität Freiburg, Freiburg im Breisgau, Germany, 30 June 2011. [Google Scholar]
- Messler, R. Principles of Welding: Processes, Physics, Chemistry and Metallurgy; Wiley: Weinheim, Germany, 2004. [Google Scholar]
- Irfan, Y.; Memduh, K.; Ezgi, D. Angular Distortion in Butt Arc Welding. Int. J. Eng. Sci. Appl. 2018, 2, 1–8. [Google Scholar]
- Adamczuk, P.C.; Machado, I.G.; Mazzaferro, J.A.E. Methodology for predicting the angular distortion in multi-pass butt-joint welding. J. Mater. Process. Technol. 2017, 240, 305–313. [Google Scholar] [CrossRef]
- Vel Murugan, B.V.; Gunaraj, V. Effects of Process Parameters on Angular Distortion of Gas Metal Arc Welded Structural Steel Plates. Weld. J. 2005, 84, 165s–171s. [Google Scholar]
- Jenney, C.; O’Brien, A. Welding Handbook, 9th ed.; American Welding Society: Miami, FL, USA, 2001; Volume 1. [Google Scholar]
- Winczek, J. Modeling of Temperature Field during Multi-Pass GMAW Surfacing or Rebuilding of Steel Elements Taking into Account the Heat of the Deposit Metal. Appl. Sci. 2016, 7, 6. [Google Scholar] [CrossRef]
- Tomków, J.; Sobota, K.; Krajewski, S. Influence of tack welds distribution and welding sequence on the angular distortion of tig welded joint. Facta Univ. Ser. Mech. Eng. 2020, 18, 611–621. [Google Scholar] [CrossRef]
- Lohate, M.S.; Damale, A.V. Fuzzy Based Prediction of Angular Distortion of Gas Metal Arc Welded Structural Steel Plates. Int. J. Innov. Eng. Res. Technol. 2015, 2, 1–10. [Google Scholar]
- Kumar, P. Parametric Optimization of Angular Distortion on Mild Steel by Using MIG Welding. Int. J. Adv. Eng. Technol. 2015, 6, 41–46. [Google Scholar]
- Noh, J.; Whitcomb, J. Effect of Various Parameters on the Effective Properties of a Cracked Ply. J. Compos. Mater. 2001, 35, 689–712. [Google Scholar] [CrossRef]
- Izeda, A.E.; Pascoal, A.; Simonato, G.; Mineiro, N.; Gonçalves, J.; Ribeiro, J.E. Optimization of Robotized Welding in Aluminum Alloys with Pulsed Transfer Mode Using the Taguchi Method. Proceedings 2018, 2, 426. [Google Scholar] [CrossRef]
Publisher’s Note: MDPI stays neutral with regard to jurisdictional claims in published maps and institutional affiliations. |
© 2021 by the authors. Licensee MDPI, Basel, Switzerland. This article is an open access article distributed under the terms and conditions of the Creative Commons Attribution (CC BY) license (https://creativecommons.org/licenses/by/4.0/).