1. Introduction
Bridges are critical links of modern transportation networks, requiring effective operation and maintenance based on accurate understanding of current conditions. During bridge condition assessment, various structural components are identified and assessed, and the results should be recorded in an organized manner that can be referred to experts later [
1]. To support this process, the concept of geometric digital twinning is often employed, where accurate as-built digital representations of the bridge structure are developed as a platform for assessment and data management [
2,
3,
4,
5,
6]. Effective integration of such geometric digital twins to the bridge condition assessment workflow is desired to enhance the efficiency and reliability of the life-cycle management of bridge assets.
Photogrammetric 3D reconstruction is a key step in geometric digital twinning [
6,
7,
8]. During the process, UAVs equipped with cameras are often employed to collect images of the target structure and their structural components with an appropriate distance and overlap ratio, followed by the application of Structure-from-Motion (SfM) algorithm to reconstruct the 3D shapes and their textures on those shapes. The reconstructed model contains rich geometric and semantic information, and can be used to assess the as-built structural dimensions compared with as-designed dimensions [
9], develop and update Building Information Modeling (BIM) or structural analysis models [
8,
10,
11,
12], register observed damage and other findings from visual inspections to specific structural components [
13], etc. The data collection process is known to be efficient, with many well-proven software applications to define and execute missions using Global Navigation Satellite System (GNSS) coordinates. Those hardware and software platforms enable the automation of major parts of the data collection process, including mission planning and basic verification, UAV flight and image capture, image post-processing (3D reconstruction), and extraction and registration of damage information [
14].
Despite the efficiency of 3D reconstruction by the UAV-based photogrammetry, the data collection step often faces challenges when the technique is applied to tasks requiring high accuracy and level of detail. Compared to the data collection using terrestrial laser scanner (TLS), where the accuracy of the data can be directly controlled by device selection and measurement planning, understanding and incorporating the level of detail and geometric accuracy of the reconstructed models within the inspection context is not straightforward. The operational limits of the UAVs, such as the ones in controlling the UAV and camera poses under the environmental conditions of the bridge site, may change the view of the captured images from the desired views. The error in SfM process may also pose a challenge when highly accurate geometric measurements need to be performed. The quality of the data may need to be assessed depending on the types of measurements performed (e.g., 3D reconstruction data that is accurate enough for the measurement of global dimensions may not have enough detail to measure the extent of local structural damage). Practical insights into the effects of different methodologies and configurations of UAV-based image collection and photogrammetric 3D reconstruction on the resulting quality of the reconstructed data need to be established.
Existing research has attempted to relate data-collection methodologies and configurations to the resulting quality of 3D reconstruction and geometric measurements. For example, data quality at various stages of UAV-based photogrammetry has been investigated in the remote-sensing context [
15]. In many such studies, errors from different sources, such as navigational sensor measurements, feature detection and matching, and SfM-based 3D reconstruction, are analyzed in isolation (often as a function of GSD) to enable rigorous statistical characterization. Ref. [
16] employed these insights to design and develop UAV-based aerial photogrammetry-aided workflow to the monitoring of the subsidence of structures, including bridges. Ref. [
17] compared different GNSS-based point georeferencing approaches in UAV aerial photogrammetry, presenting centimeter-level accuracy compared with traditional indirect georeferencing with ground control points (GCPs) and aided indirect georeferencing. In the context of construction reality capture, Ref. [
18] classified the major sources of errors into (1) the systematic error due to camera factors, and (2) the systematic error due to poor planning of camera network geometry. Based on the classification, experiments were designed for a sidewalk slab (flat surface), a concrete retaining wall (moderately curved surface), and a storage building (flat side surfaces of a cubic shape), each with different manual image capturing configurations (equipment, number of photos, and scale bar placements). Accuracy of distance measurements using the reconstructed model is then discussed, clarifying millimeter-level accuracy (less than 1% errors in most of the distance measurements performed), as well as special patterns of distance measurement accuracy for different scale bar placements. Ref. [
19] focused on the point cloud registration step and discussed the impact of algorithmic configurations on the resulting accuracy of aligning bridge point-cloud data (a consistent TLS-based data collection was performed to isolate the error arising from point cloud alignment). These quality assessments provide fundamental insight into the individual technical components of bridge reality capture using UAV-based photogrammetry. However, synthesizing these component-level insights to estimate and control the quality of the final outcomes of bridge reality capture is not straightforward; the overall quality depends on many interacting factors, including the geometric and textural characteristics of the target structures, the operational and environmental conditions during field data collection, and the intended application of the reality capture data (e.g., what kinds of information will be extracted from the resulting model).
Existing research has also investigated more direct relationships between data collection methodologies and the quality of 3D reconstruction at the workflow level. Ref. [
20] compared point-to-point distances between point clouds obtained from UAV-based photogrammetry and TLS as part of a bridge case study. Ref. [
21] proposed an optimal path-planning approach based on a geometric model of the target structure and, as part of its validation, compared UAV-based photogrammetric point clouds acquired with the optimized path against TLS data in terms of point-to-point distances and deck length measurements. Ref. [
22] assessed the quality of bridge point-cloud data obtained by UAV-based photogrammetry from multiple aspects, including data coverage, point distribution, outlier patterns, and measurement accuracy of arch dimensions. Assessments include qualitative assessments, as well as quantitative assessments using TLS data as a reference. During the assessments, point clouds of a single arch span are reconstructed using subsets of collected images with two different distance levels. Ref. [
23] evaluated the accuracy of 3D reconstruction by comparing the coordinates of the GCPs with corresponding points on the reconstructed model. They showed the reconstruction accuracy for different software and different numbers of GCPs for seismically damaged buildings, demonstrating the potential of using the reconstructed data for the observation of key dimensions relevant to structural deformation. In the context of building reality capture combining TLS data and UAV-based photogrammetry data, Ref. [
24] investigated the registration error, scan overlap ratio, point reconstruction error, and coverage rate, wherein methods for combining these two modes of measurements were the parameters for comparisons (a single UAV measurement case was considered, which was combined with other data sources). To enhance the flexibility of such workflow-level assessments, some researchers simulated the data collection plans in photo-realistic synthetic environments and compared the measurement results with the ground truth data available in the simulation environments [
25,
26,
27,
28]. These evaluations offer comprehensive views of data quality for various collection plans, but the findings may not carry over to real-world settings as is. Overall, the relationships between the steps of the bridge reality capture workflow in the field and the data quality aspects relevant to inspection tasks are still not fully understood.
In practice, UAV-based image collection is typically planned using simplified metrics that are known to correlate with overall point-cloud quality. Ref. [
29] proposed to use redundancy of the observation as a quality metric to guide the measurement planning. Other metrics, such as visibility, GSD, and view angle have also been proposed to indicate the resulting quality of the reconstruction data [
14]. These evaluation metrics provide useful insights into the validity of the mission during the preplanning stage, describing the minimum requirement for data collection. However, such approaches face the following challenges when the required accuracy and level of detail are relatively high: (1) these minimum requirements are generally insufficient to achieve the desired data quality (e.g., errors other than pixel discretization are often significant, and the planned and actual GSDs may differ), and (2) these metrics are most closely related to the coordinate-estimation accuracy of individual points and to local point density, which may not directly align with the objectives of reality capture or geometric digital-twin modeling (e.g., capturing images of a certain part of the structure from specific viewpoints may be critically important in applications like [
30]).
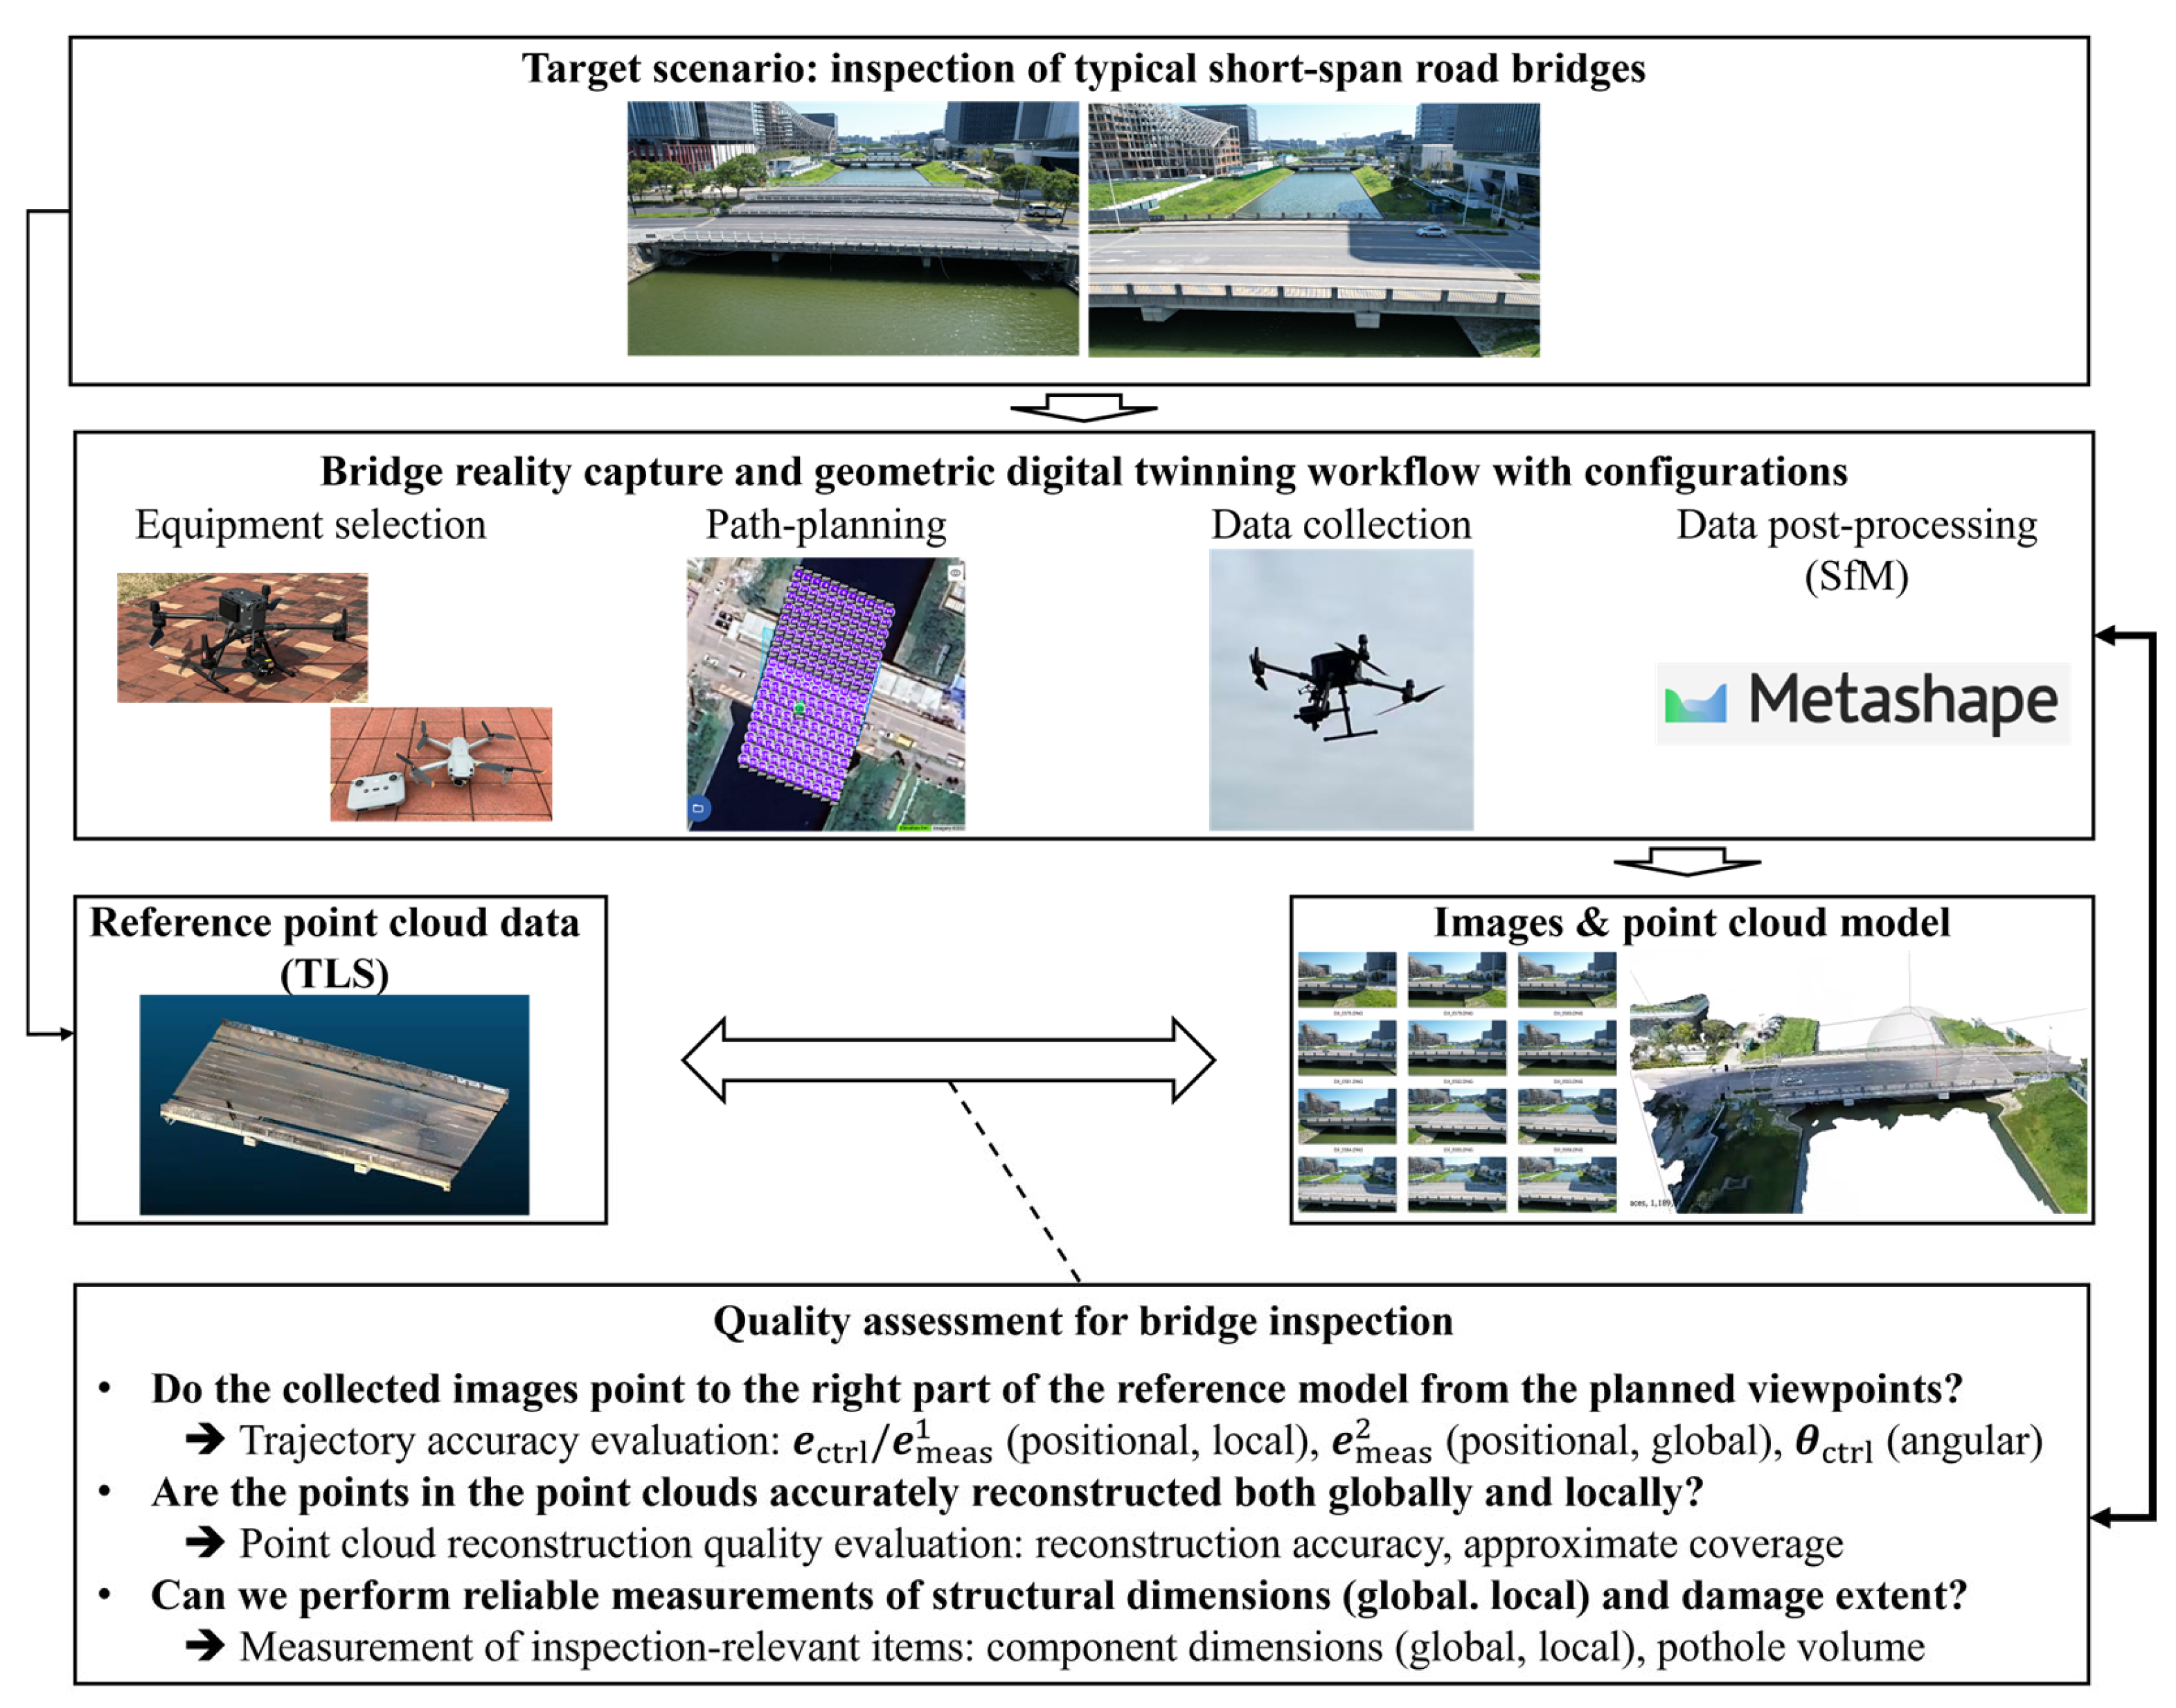
This research investigates an approach for quantitatively evaluating the impact of different methodologies and configurations of UAV-based image collection on the quality of the resulting data (collected images and 3D reconstructions). Data quality assessment in three key aspects relevant to bridge inspection are developed and combined: trajectory accuracy, point-cloud reconstruction quality, and accuracy of geometric measurements relevant to inspection tasks.
Trajectory accuracy evaluates how accurately the UAV camera follows the plan of pointing to a specific part of the structure. The assessment does not isolate, for example, errors in UAV flight control or camera gimbal control under ideal conditions. Instead, it evaluates the combined error arising from a commonly adopted practical image-acquisition workflow, including equipment selection, path-planning, GPS localization, and flight control in typical bridge inspection environments.
Point-cloud reconstruction quality evaluates characteristic error patterns for typical short-span bridges, arising from different image-acquisition methodologies and configurations commonly used in bridge inspection. These error patterns are visualized at the global structure scale and also analyzed statistically using probability density function (PDF) and cumulative distribution function (CDF). The error patterns can provide insights into which geometric dimensions can be measured reliably and which cannot.
Geometric measurements relevant to inspection tasks are incorporated into the quality assessment process to align the assessment results with many bridge inspection scenarios. In the context of bridge inspection, raw reconstruction results may not be the final product, but the accuracy of specific measurements performed using the reconstructed model is of interest. This assessment can provide insights into how the accuracy of those scenario-specific measurement outcomes changes and can possibly be controlled.
Combining these three evaluations, the proposed approach can characterize data quality aspects relevant to bridge inspection scenarios in the field at the workflow level. The approach is demonstrated through the case study of typical short-span road bridges in Shanghai. For different UAV platforms, an industry-grade UAV and a consumer-grade UAV, paths for image collection from different Ground Sampling Distance (GSD) and image overlap ratios are considered, yielding insights into the change in the data quality caused by different measurement methodologies and configurations. Overall, this research develops a pipeline to assess measurement methodologies and to provide practical insights into controlling 3D reconstruction data quality in the context of bridge inspection and geometric digital twinning.
Compared with existing workflow-level studies that compare or combine point clouds from UAV-based photogrammetry and TLS (e.g., [
20,
21,
31,
32]), this study (1) examines the effects of multiple aspects of the reality-capture workflow (e.g., equipment, path-planning, and SfM settings) on the overall quality of the reality-capture results, (2) develops a multidimensional quality assessment scheme (trajectory accuracy, point-cloud reconstruction quality, and geometric measurements relevant to inspection tasks) aligned with common needs of bridge inspection, and (3) reports detailed data and insights on these quality metrics obtained from typical short-span road bridges in the field.
This article is organized as follows:
Section 2 discusses the methodologies of this research, including design and implementation of different measurement configurations, as well as the methodology for quantifying errors in different steps of photogrammetric 3D reconstruction.
Section 3 provides a case study, demonstrating the data quality evaluation and discussing insights obtained from the evaluation.
Section 4 concludes this research and discusses future work.
3. Case Study
3.1. Bridge Descriptions
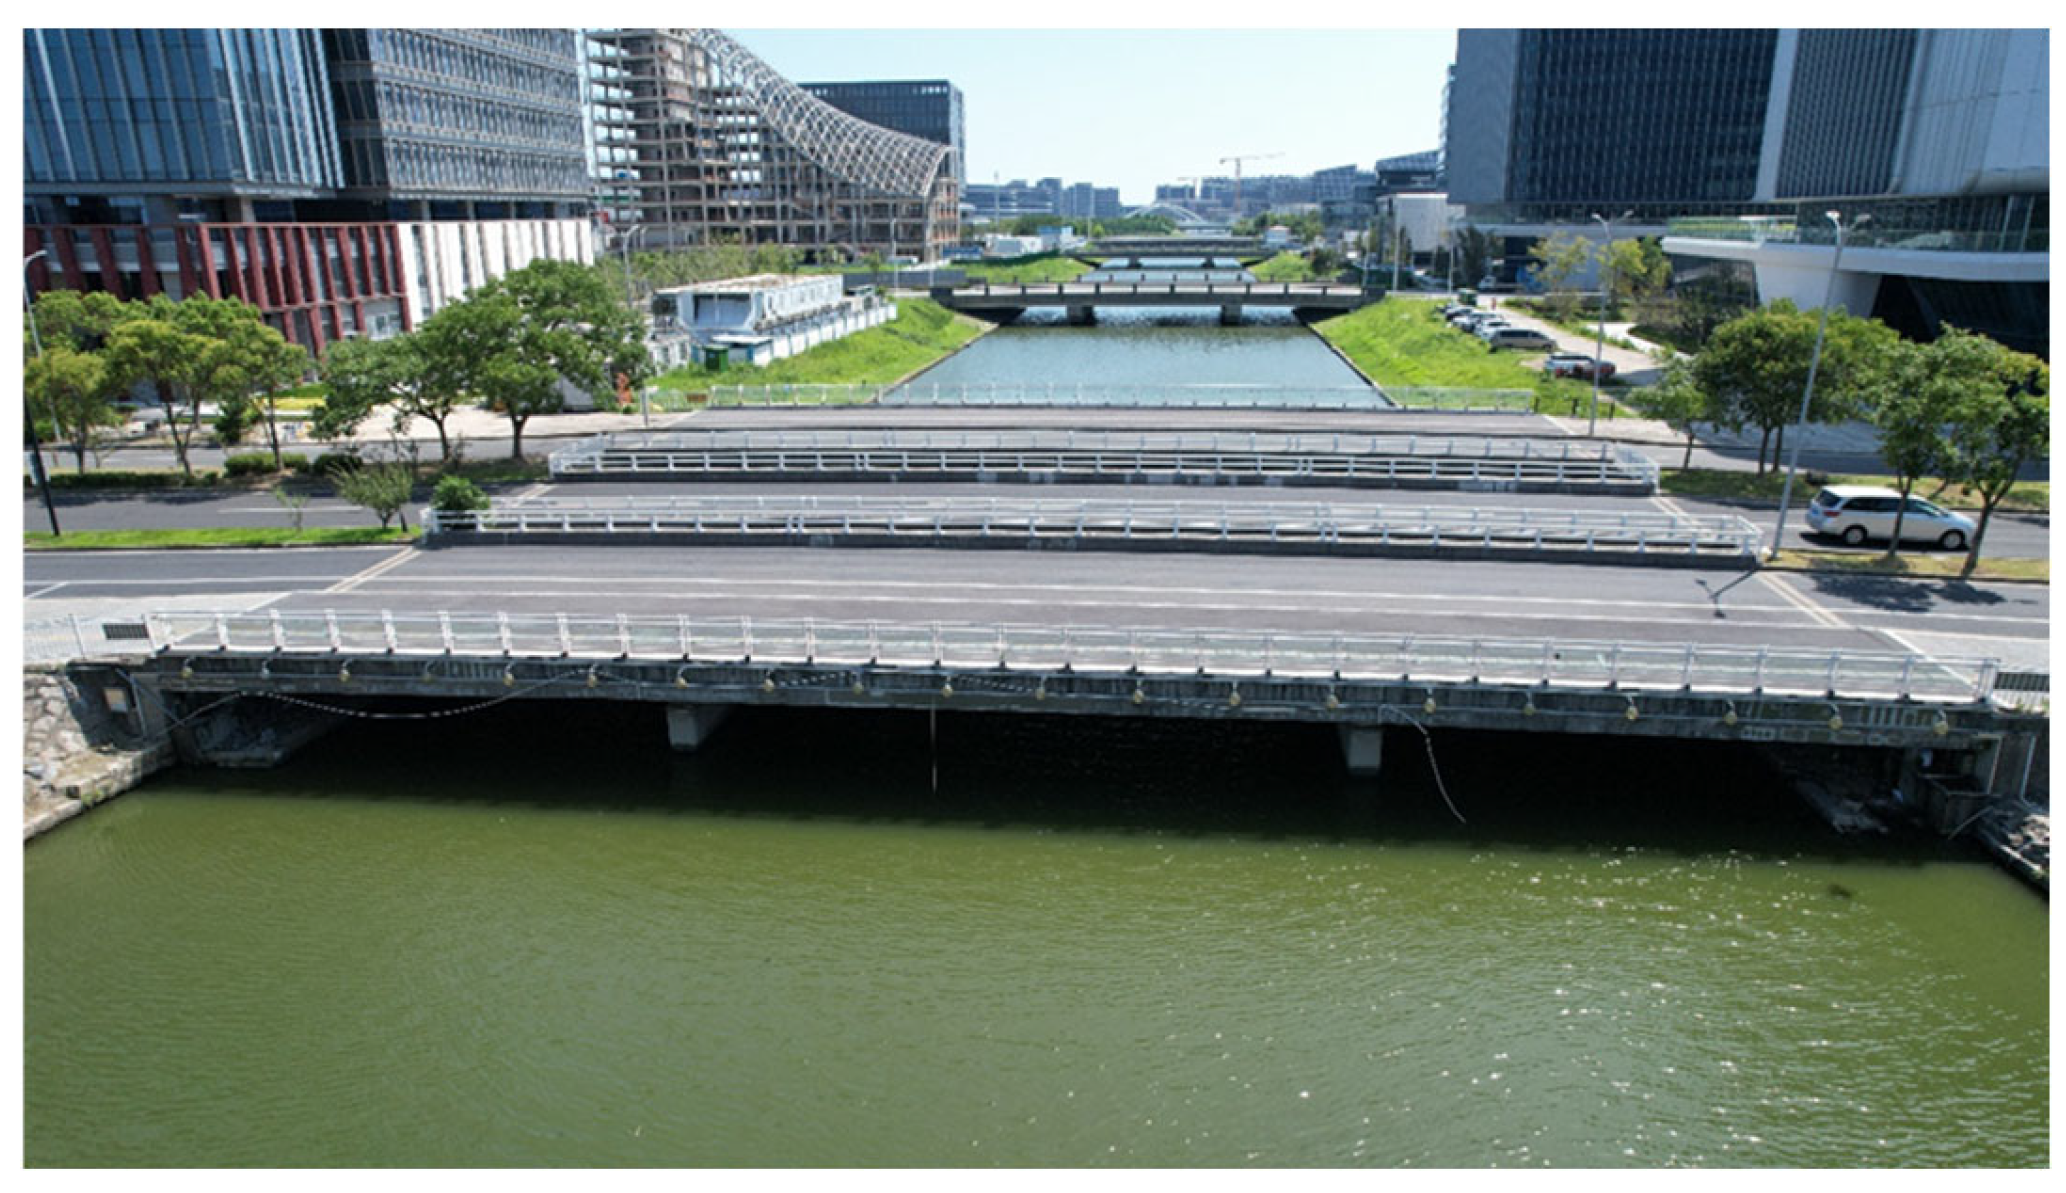
This research selected two short-span road bridges for the testbed for the case studies. The first Chenghegang Bridge is in Huanhu South first Road in Pudong New Area, Shanghai, spanning Chenghe Port. The bridge is a three-span, cast-in-place reinforced concrete continuous box girder bridge, with a total length of 45.0 m and (18 m main span and 13.5 m side span in each side). The total width of the bridge deck is 43.0 m. The overview of the first Chenghegang Bridge is shown in
Figure 8.
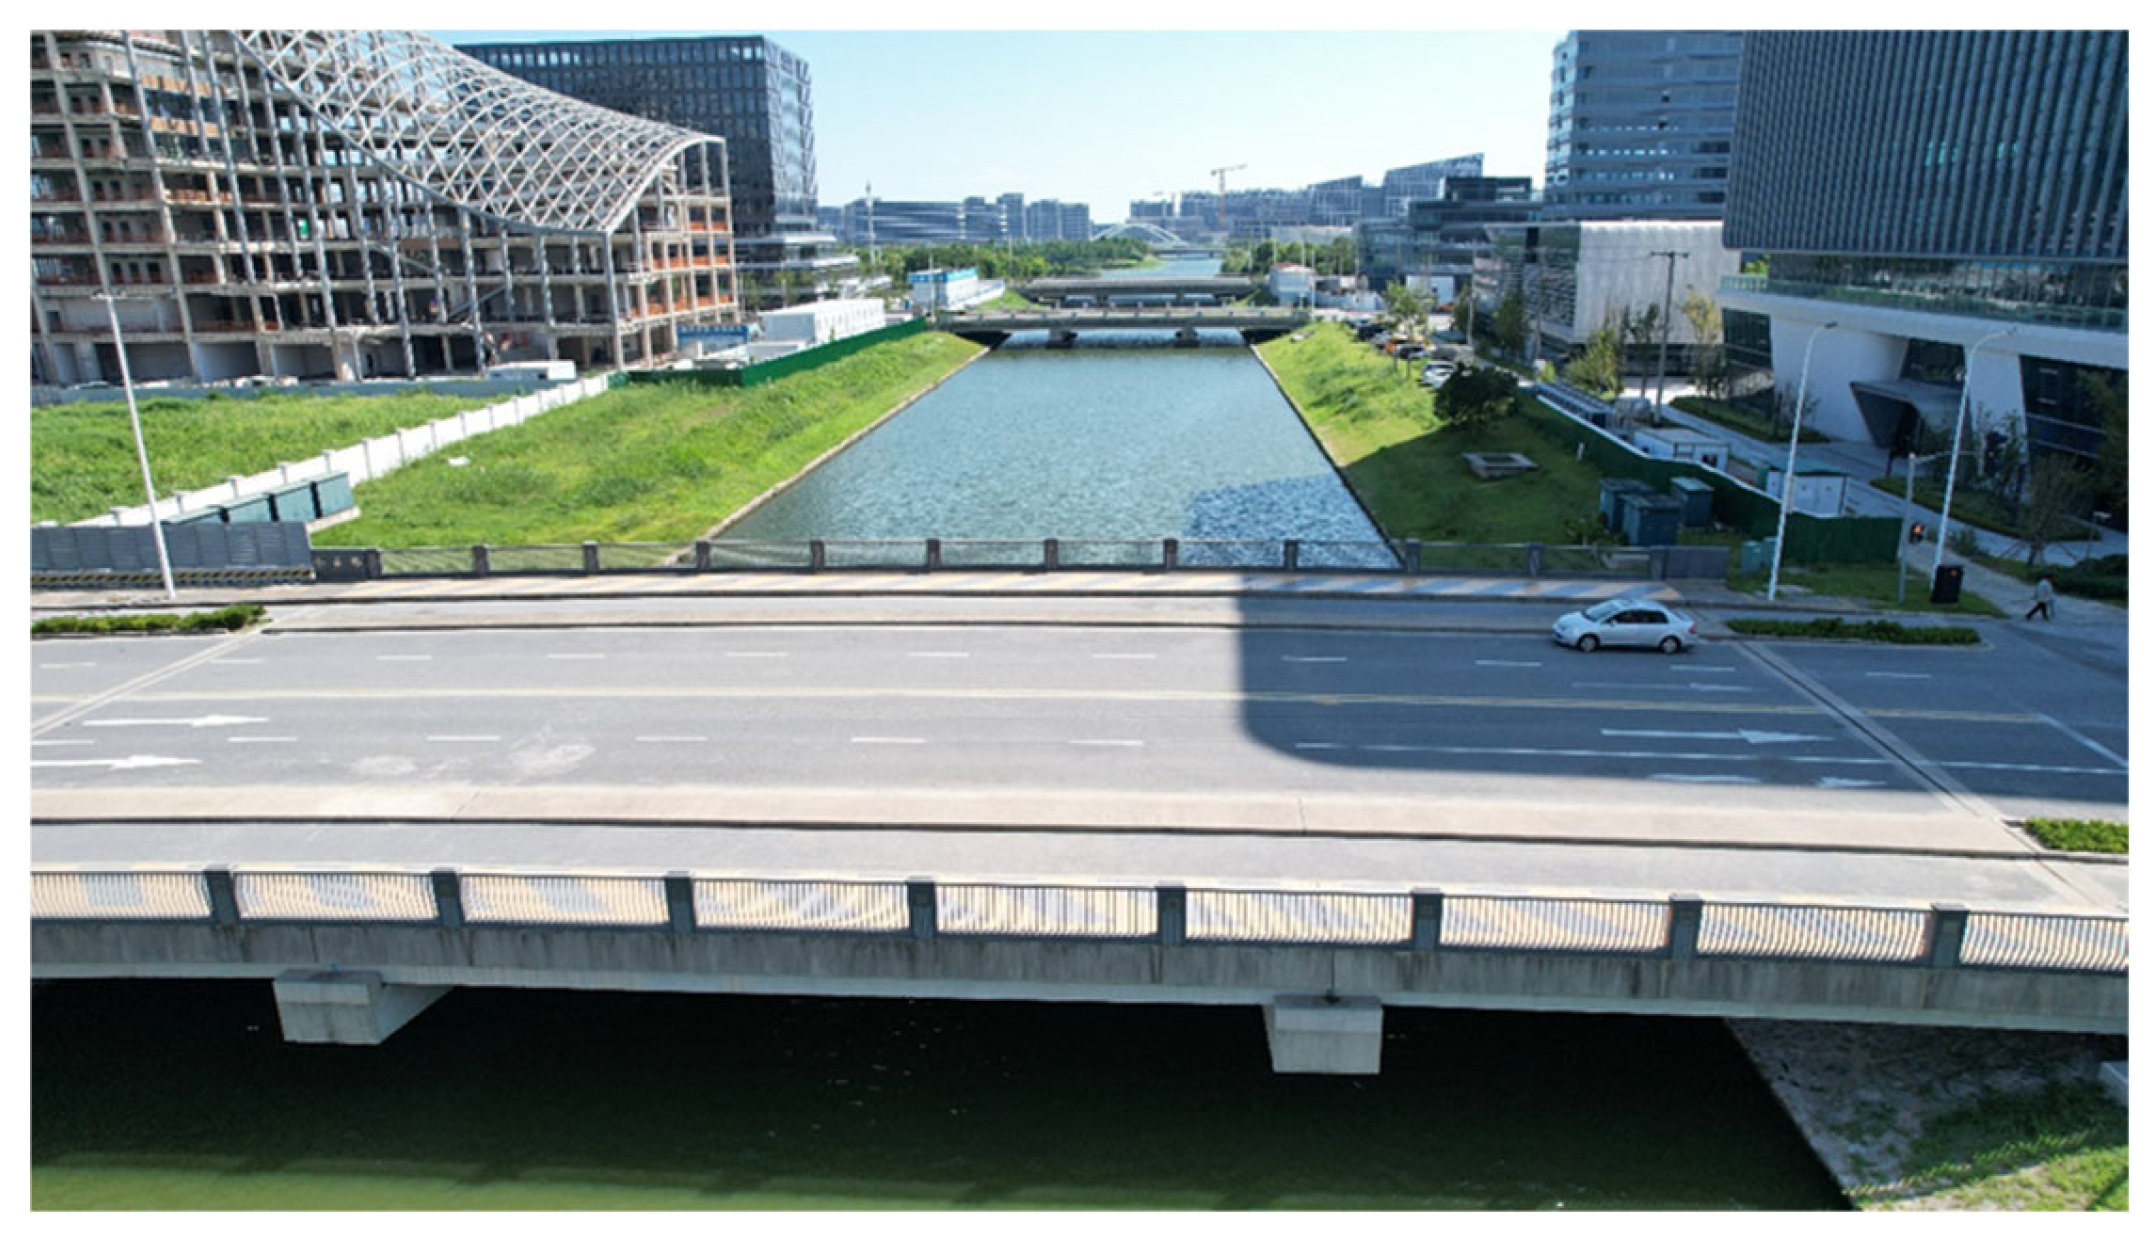
The second Chenghegang Bridge is located on Shuiyun Road in Pudong New Area, Shanghai. The second Chenghegang Bridge is a three-span cast-in-place reinforced concrete beam bridge. The total length of the bridge is 52.0 m (20.0 m main span and 16.0 m side span in each side). The total width of the bridge deck is 28.8 m. The overview of the second Chenghegang Bridge is shown in
Figure 9.
Both bridges were in good condition, and no significant structural damage was observed. Therefore, in the later quality evaluation, we considered measurements of deck spacing (local dimensions,
Figure 10a) and minor potholes on the pavement (local volume,
Figure 10b,c), as well as bridge global dimensions, such as geometric measurements similar to those performed during actual inspection activities.
3.2. UAV-Based Image Collection and 3D Reconstruction
Following the steps discussed in
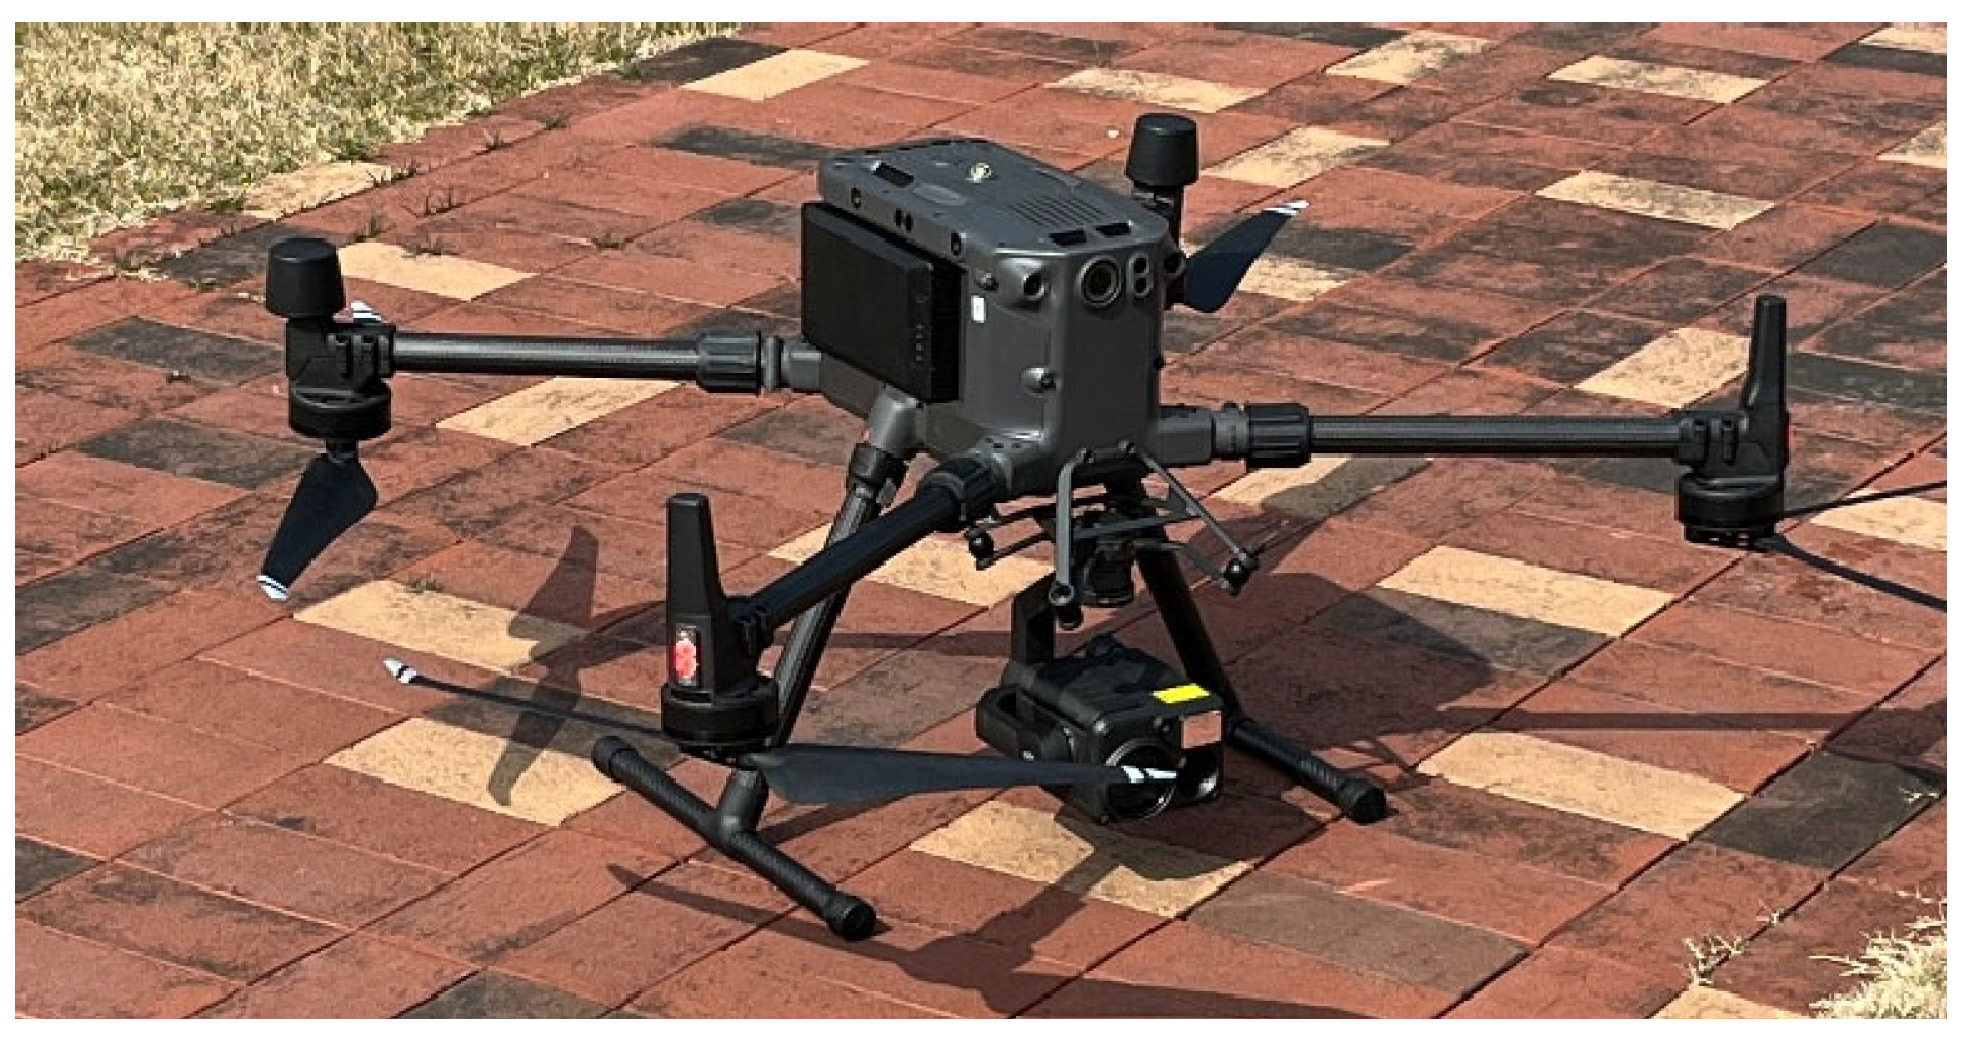
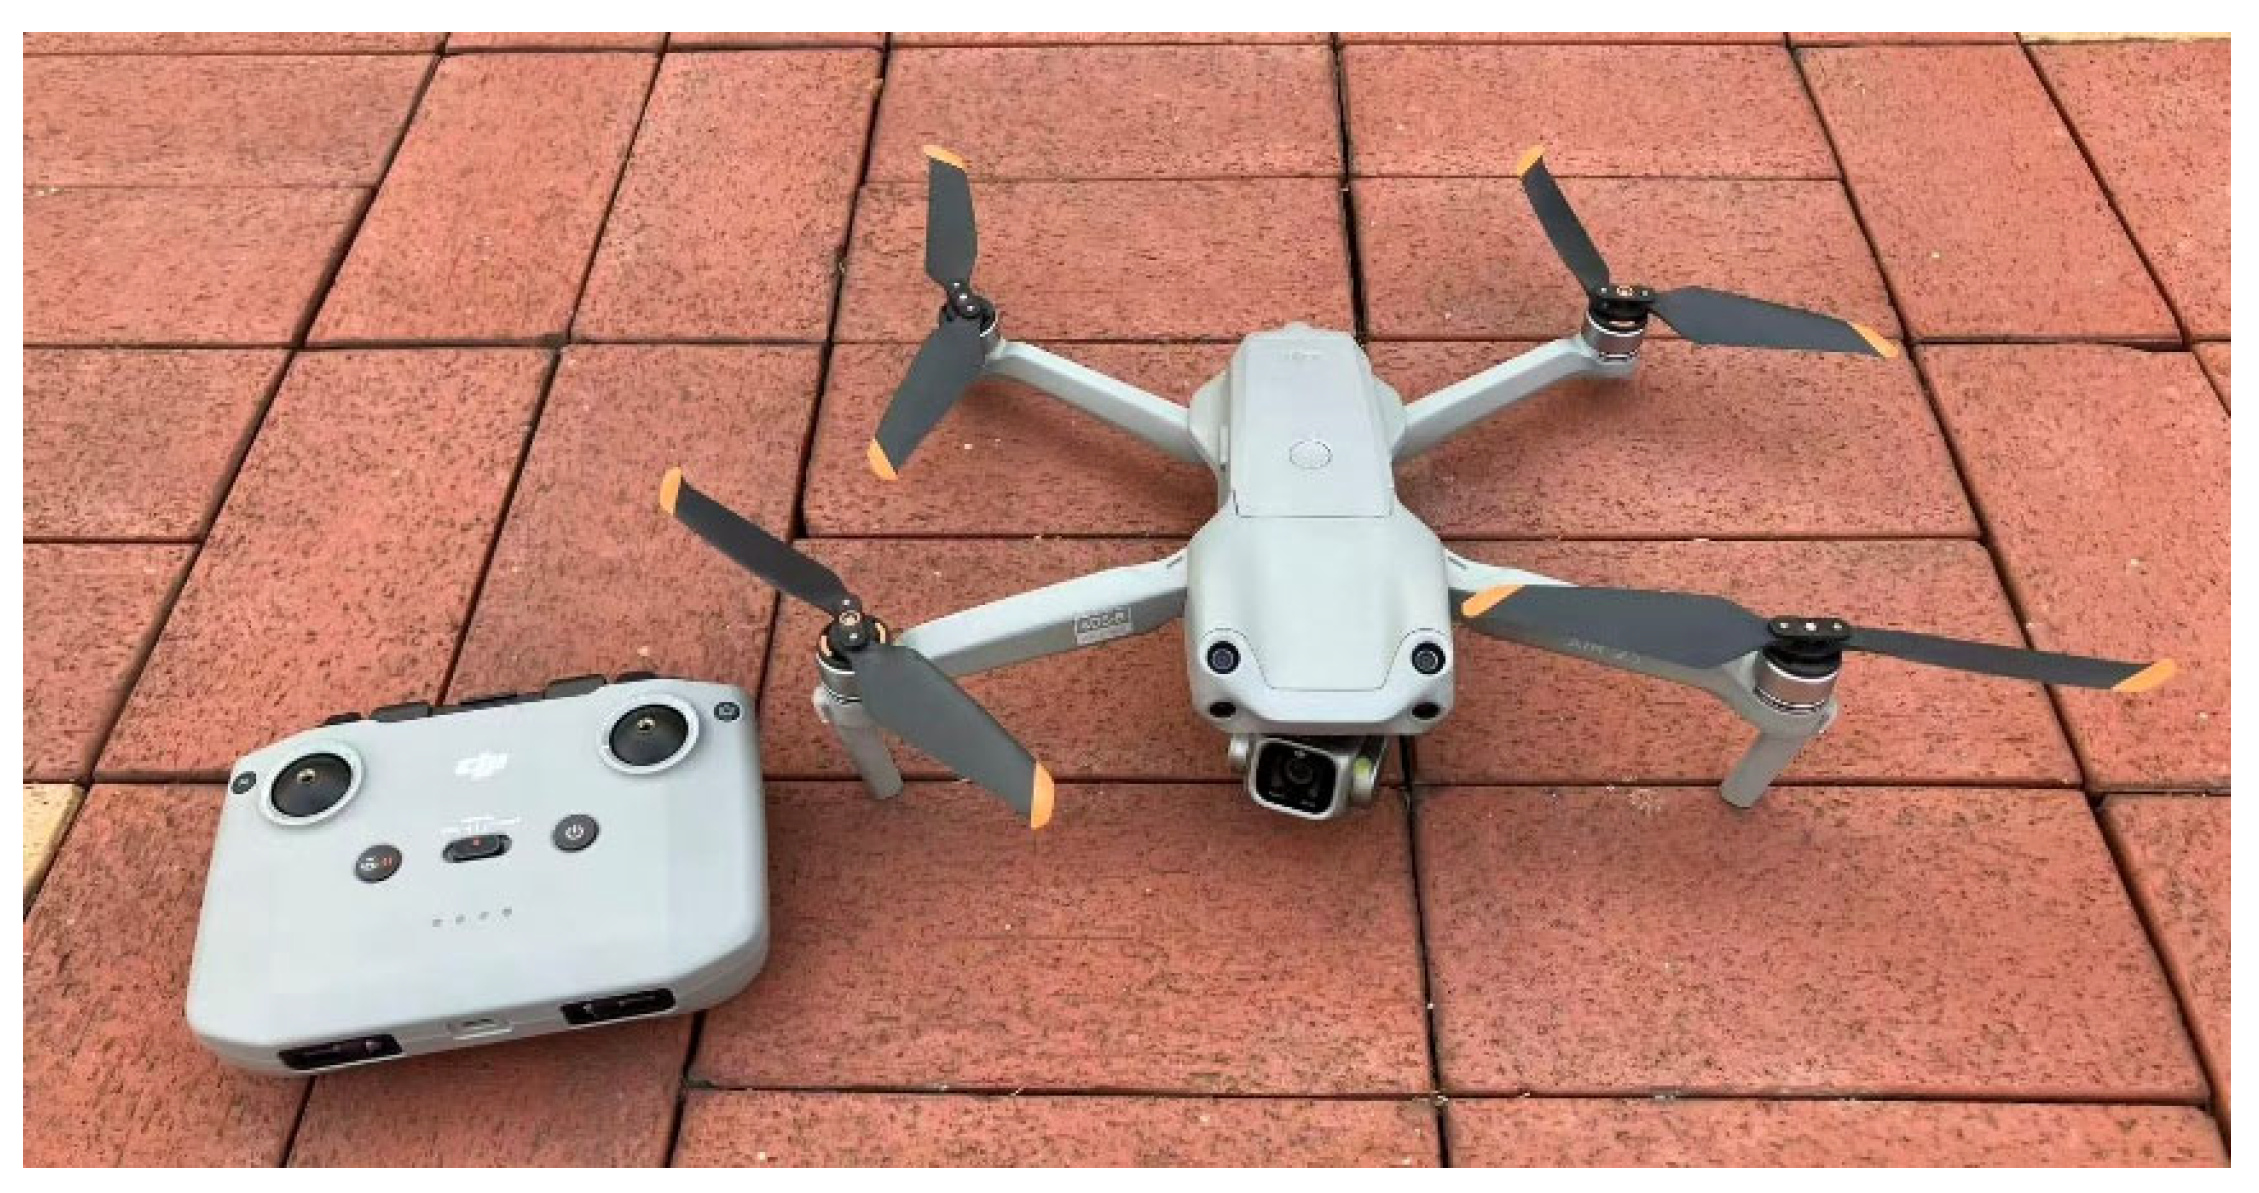
Section 2, two UAVs, DJI M300 and DJI Air 2S, are used to collect images of the two bridges. The values of key parameters discussed in
Section 2.3, height offset
and
, GSD for the side
, and overlap ratio
, are shown in
Table 2. For both bridges,
was fixed to 15 [m], considering the need for ensuring sufficient vertical clearance from the bridge top surface. Because
was fixed, GSD of the top was determined by
For the equipment selected for this research,
is 5.17 mm/pixel for DJI M300 and 4.30 mm/pixel for DJI Air 2S. For the scanning of the sides of the bridges, GSD was controlled and set to 5 [mm] and 8 [mm] (corresponding to the horizontal distance of 14.38 [m] and 23.14 [m] for M300, 17.34 [m] and 27.86 [m] for Air 2S). We also planned to perform the missions with
; however, we did not end up executing the mission because we assessed that the UAVs (particularly M300 collecting images with its wide-angle camera) go too close to the bridge. Finally, image overlap ratio,
, is generally set to 0.9, considering that lower overlap cases can be obtained by sampling images from the set of images collected with
. For the top side of the first Chenghegang Bridge, the overlap ratio in the bridge lateral direction was set to 0.8, because the number of images for
reached about 500 images for the top side only. For both bridges,
and
are fixed due to the operational constraint, and therefore, the data for the top side was collected once for the case with
, and reused for cases with other values of
(UAV paths for different values of
are similar for the top surface, according to the process described in
Section 2.3). In total, missions are planned for two UAVs and two values of
, with cases augmented for different values of
by sampling collected images. We performed data collection on 5–6 August 2025. Both days were sunny days with moderate winds.
The datasets are referred to with the bridge name, UAV name,
, and spatial downsampling ratio that controls image overlaps. For example,
Bridge1_M300_GSD5 refers to the dataset of the first Chenghegang Bridge, collected with DJI M300 UAV with
and overlap ratio listed in
Table 2.
Bridge2_Air2S_GSD8_DS2 refers to the dataset of the second Chenghegang Bridge, collected with DJI Air2S UAV with
and with spatial downsampling in the bridge longitudinal direction by a factor of 2 (effective overlaps in the longitudinal direction reduces from 0.9 to 0.8, or from 0.8 to 0.6). In this paper, we also call these effective overlaps “overlaps”, and use
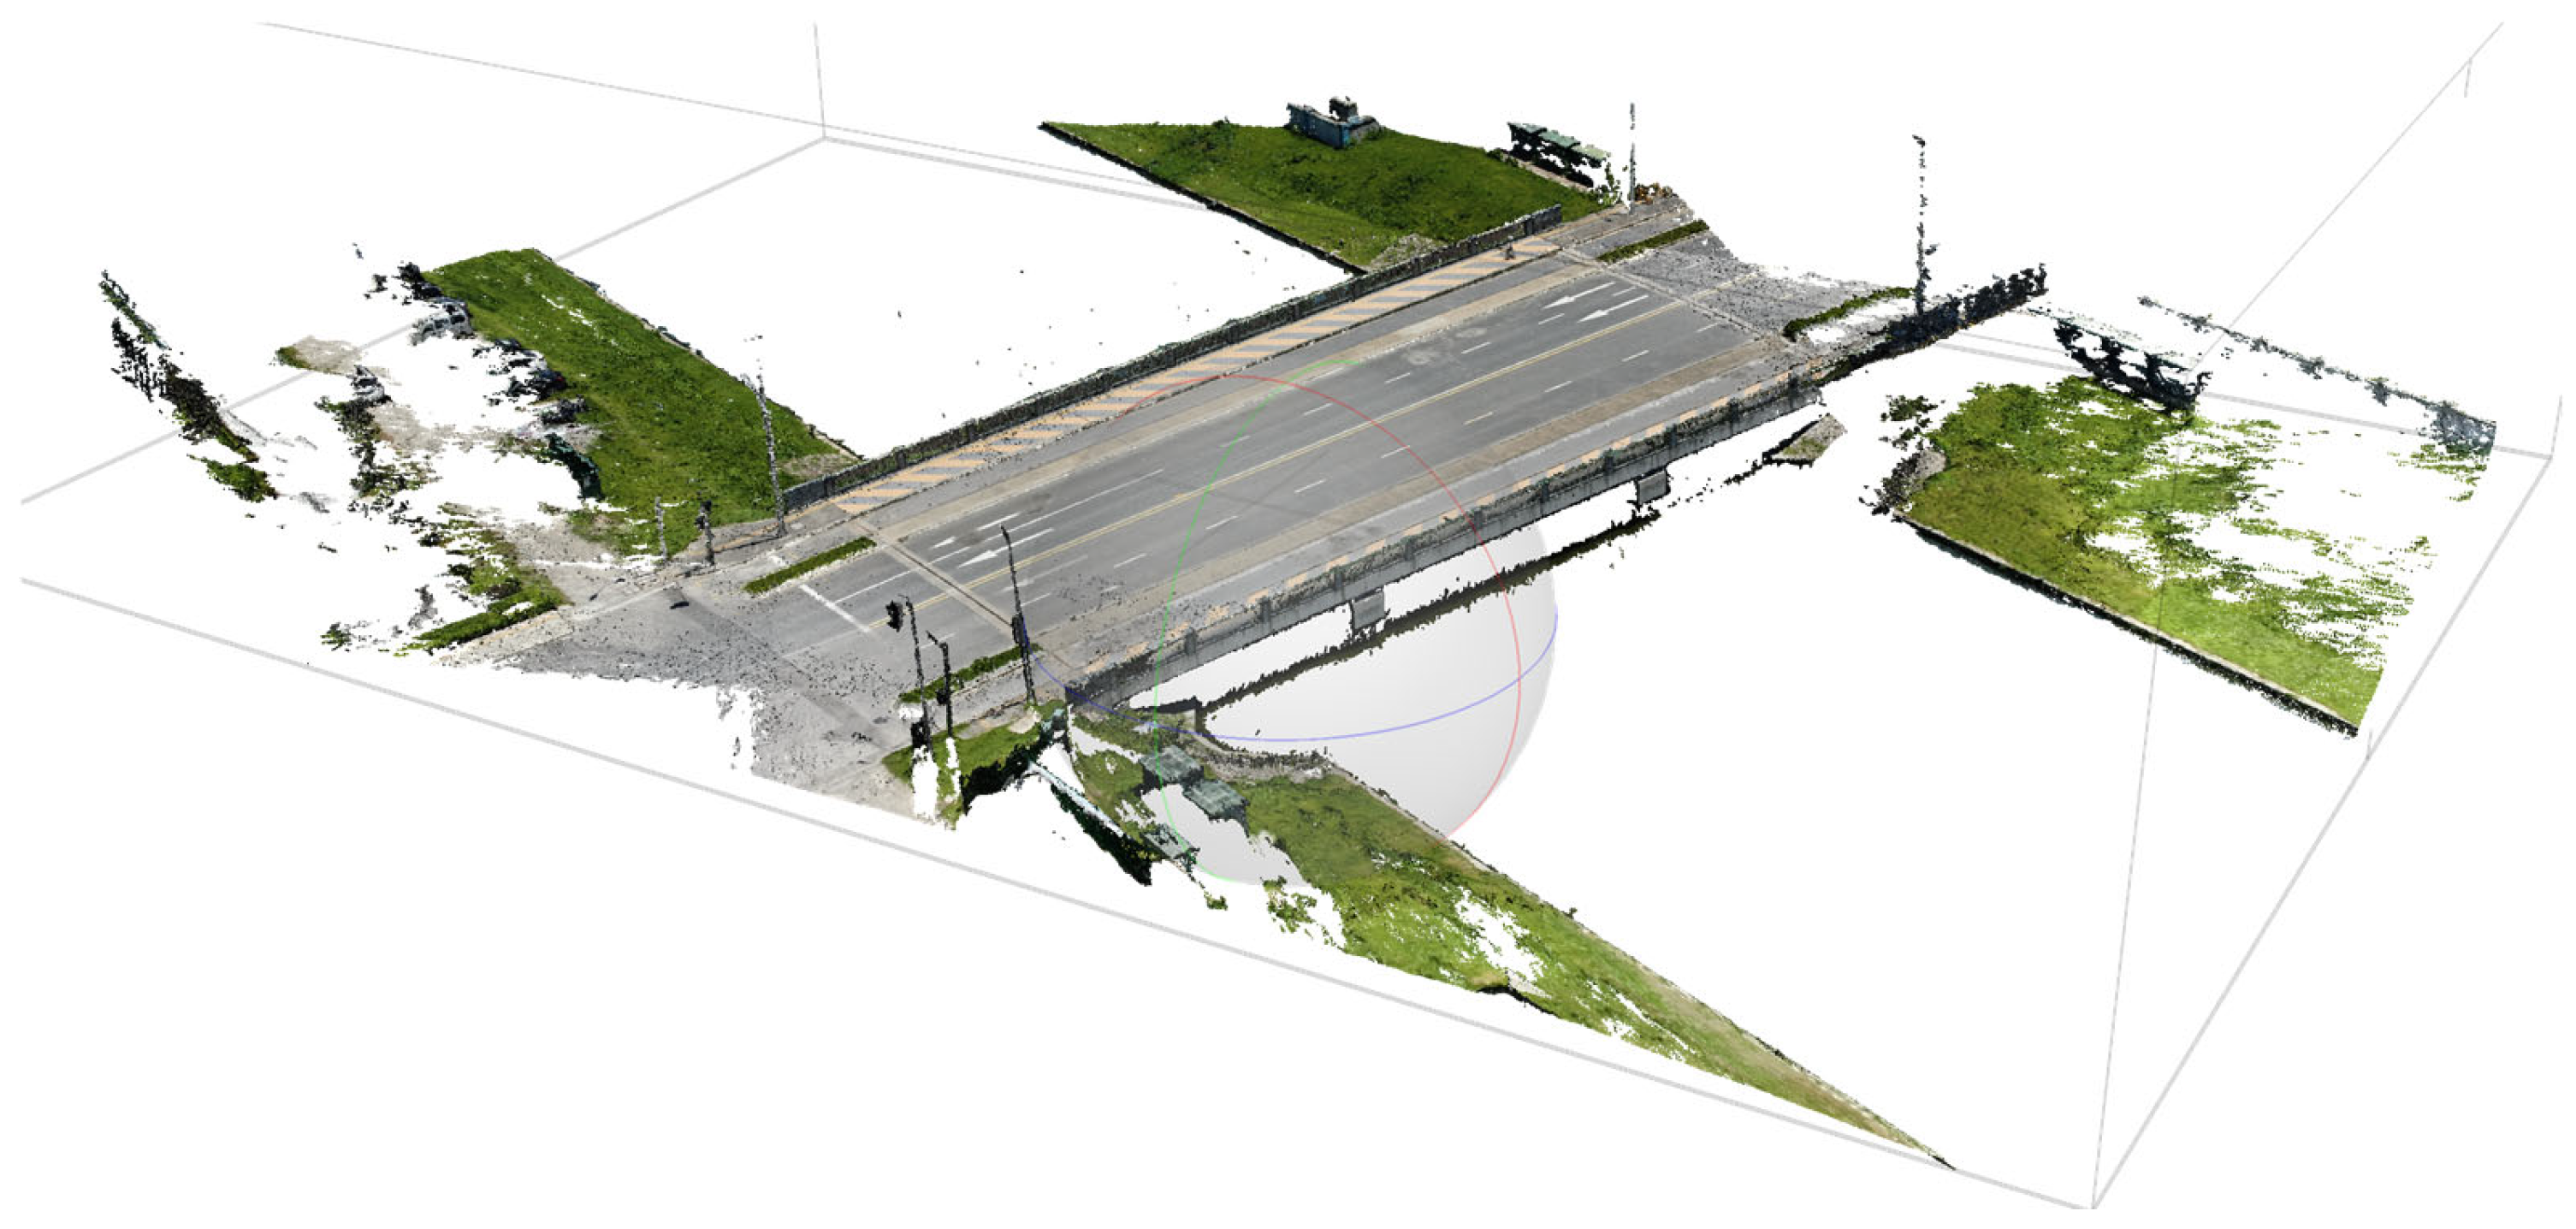
to denote the parameter. A representative raw point-cloud data obtained as a result of SfM is shown in
Figure 11.
Based on the collected images, 3D reconstruction was performed using Metashape Software, followed by post-processing discussed in
Section 2.4. A total of 6 reconstructions listed in
Table 2, as well as 12 additional reconstructions with reduced longitudinal image overlap ratios (DS2 and DS3), were performed. Moreover, two more reconstructions were performed with different configurations of the SfM algorithm (Metashape software in this research), as discussed in
Section 2.4. Choosing
Bridge2_M300_GSD5 as a representative case, the alignment accuracy was changed from “High accuracy” to “Highest accuracy” (
Bridge2_M300_GSD5_HighestAlign), or the depth-map quality was changed from “High quality” to “Ultra High quality” (
Bridge2_M300_GSD5_UHDepth). These algorithm configurations change the computational load of the workflow significantly. For example, using a computer with Intel(R) Core(TM) i9-10900K CPU @ 3.70 GHz, 64.0 GB RAM, NVIDIA GeForce RTX 3090 (24 GB), and NVIDIA GeForce RTX 4090 (24 GB),
Bridge2_M300_GSD5,
Bridge2_M300_GSD5_HighestAlign, and
Bridge2_M300_GSD5_UHDepth took 1.80 h, 1.87 h, and 26.0 h, respectively (bottleneck was the step to build a dense point cloud from depth-maps). Increasing the depth-map resolution by a factor of two in both horizontal and vertical directions resulted in a computation time increase much greater than the corresponding fourfold increase in pixel count, limiting the practicality of that configuration or increasing the need for smart selection of reconstruction regions.
3.3. Data Quality Evaluation
In this section, data quality of the 18 reconstruction results is evaluated by the steps discussed in
Section 2.5 to clarify and quantify the influence of different measurement configurations.
3.3.1. Trajectory Accuracy Evaluation Results
The errors for UAV and camera pose control,
, are shown in
Figure 12 and
Figure 13. For each data collection case, the measured GNSS coordinates are different up to about
, with systematic errors particularly evident in the small consumer-grade UAV. The mission can only be conveniently defined for above-ground level height. Along with the inherent uncertainty of the altitude measurement, the error in the direction of the height shows more significant variation. The histogram for the angular error for UAV and camera control,
, collected for entire cases for industry-grade and consumer-grade UAVs, are shown in
Figure 14. The industry-grade UAV, M300, can almost always achieve errors less than 10 degrees, while a larger proportion of errors at 10 degrees or higher was observed for the Air 2S UAV. This level of error should be accommodated when the data collection plan is made.
The first GNSS error metric,
, is evaluated for each case and shown in
Figure 15. For all cases, the positional correction of up to
m has been made by the SfM process, indicating the accuracy of the GPS measurement relative to the reconstructed model (note that geometric reconstruction error and other sources of error from the data recording process also propagates to this error). This error indicates that, when the plan is perfectly executed in terms of flight and camera pose control, the camera locations are altered by this amount by the SfM process, based on either measurement error or the SfM reconstruction error. When the observation in images is registered to the reconstructed model, this level of error should be taken into account.
These error metrics,
and
, are also evaluated for different configurations of the SfM algorithm (
Bridge2_M300_GSD5_HighestAlign and
Bridge2_M300_GSD5_UHDepth).
Figure 16 shows comparisons of those error metrics related to planned vs. actual camera poses. Shapes of distributions do not show significant difference. The mean and standard deviation of
were −0.889 and 2.169 for
Bridge2_M300_GSD5, −0.888 and 2.167 for
Bridge2_M300_GSD5_HighestAlign, and −0.910 and 1.998 for
Bridge2_M300_GSD5_UHDepth. For
, the mean and standard deviation were 5.193 and 5.926 for
Bridge2_M300_GSD5, 5.290 and 6.279 for
Bridge2_M300_GSD5_HighestAlign, and 5.193 and 5.926 for
Bridge2_M300_GSD5_UHDepth. The results indicate that the major factors affecting these errors are not in the SfM algorithm but in other components of the workflow (e.g., equipment). However, these algorithm factors do matter if the target application requires the images to be taken at precise poses (e.g., detailed inspection of a small component with limited visibility).
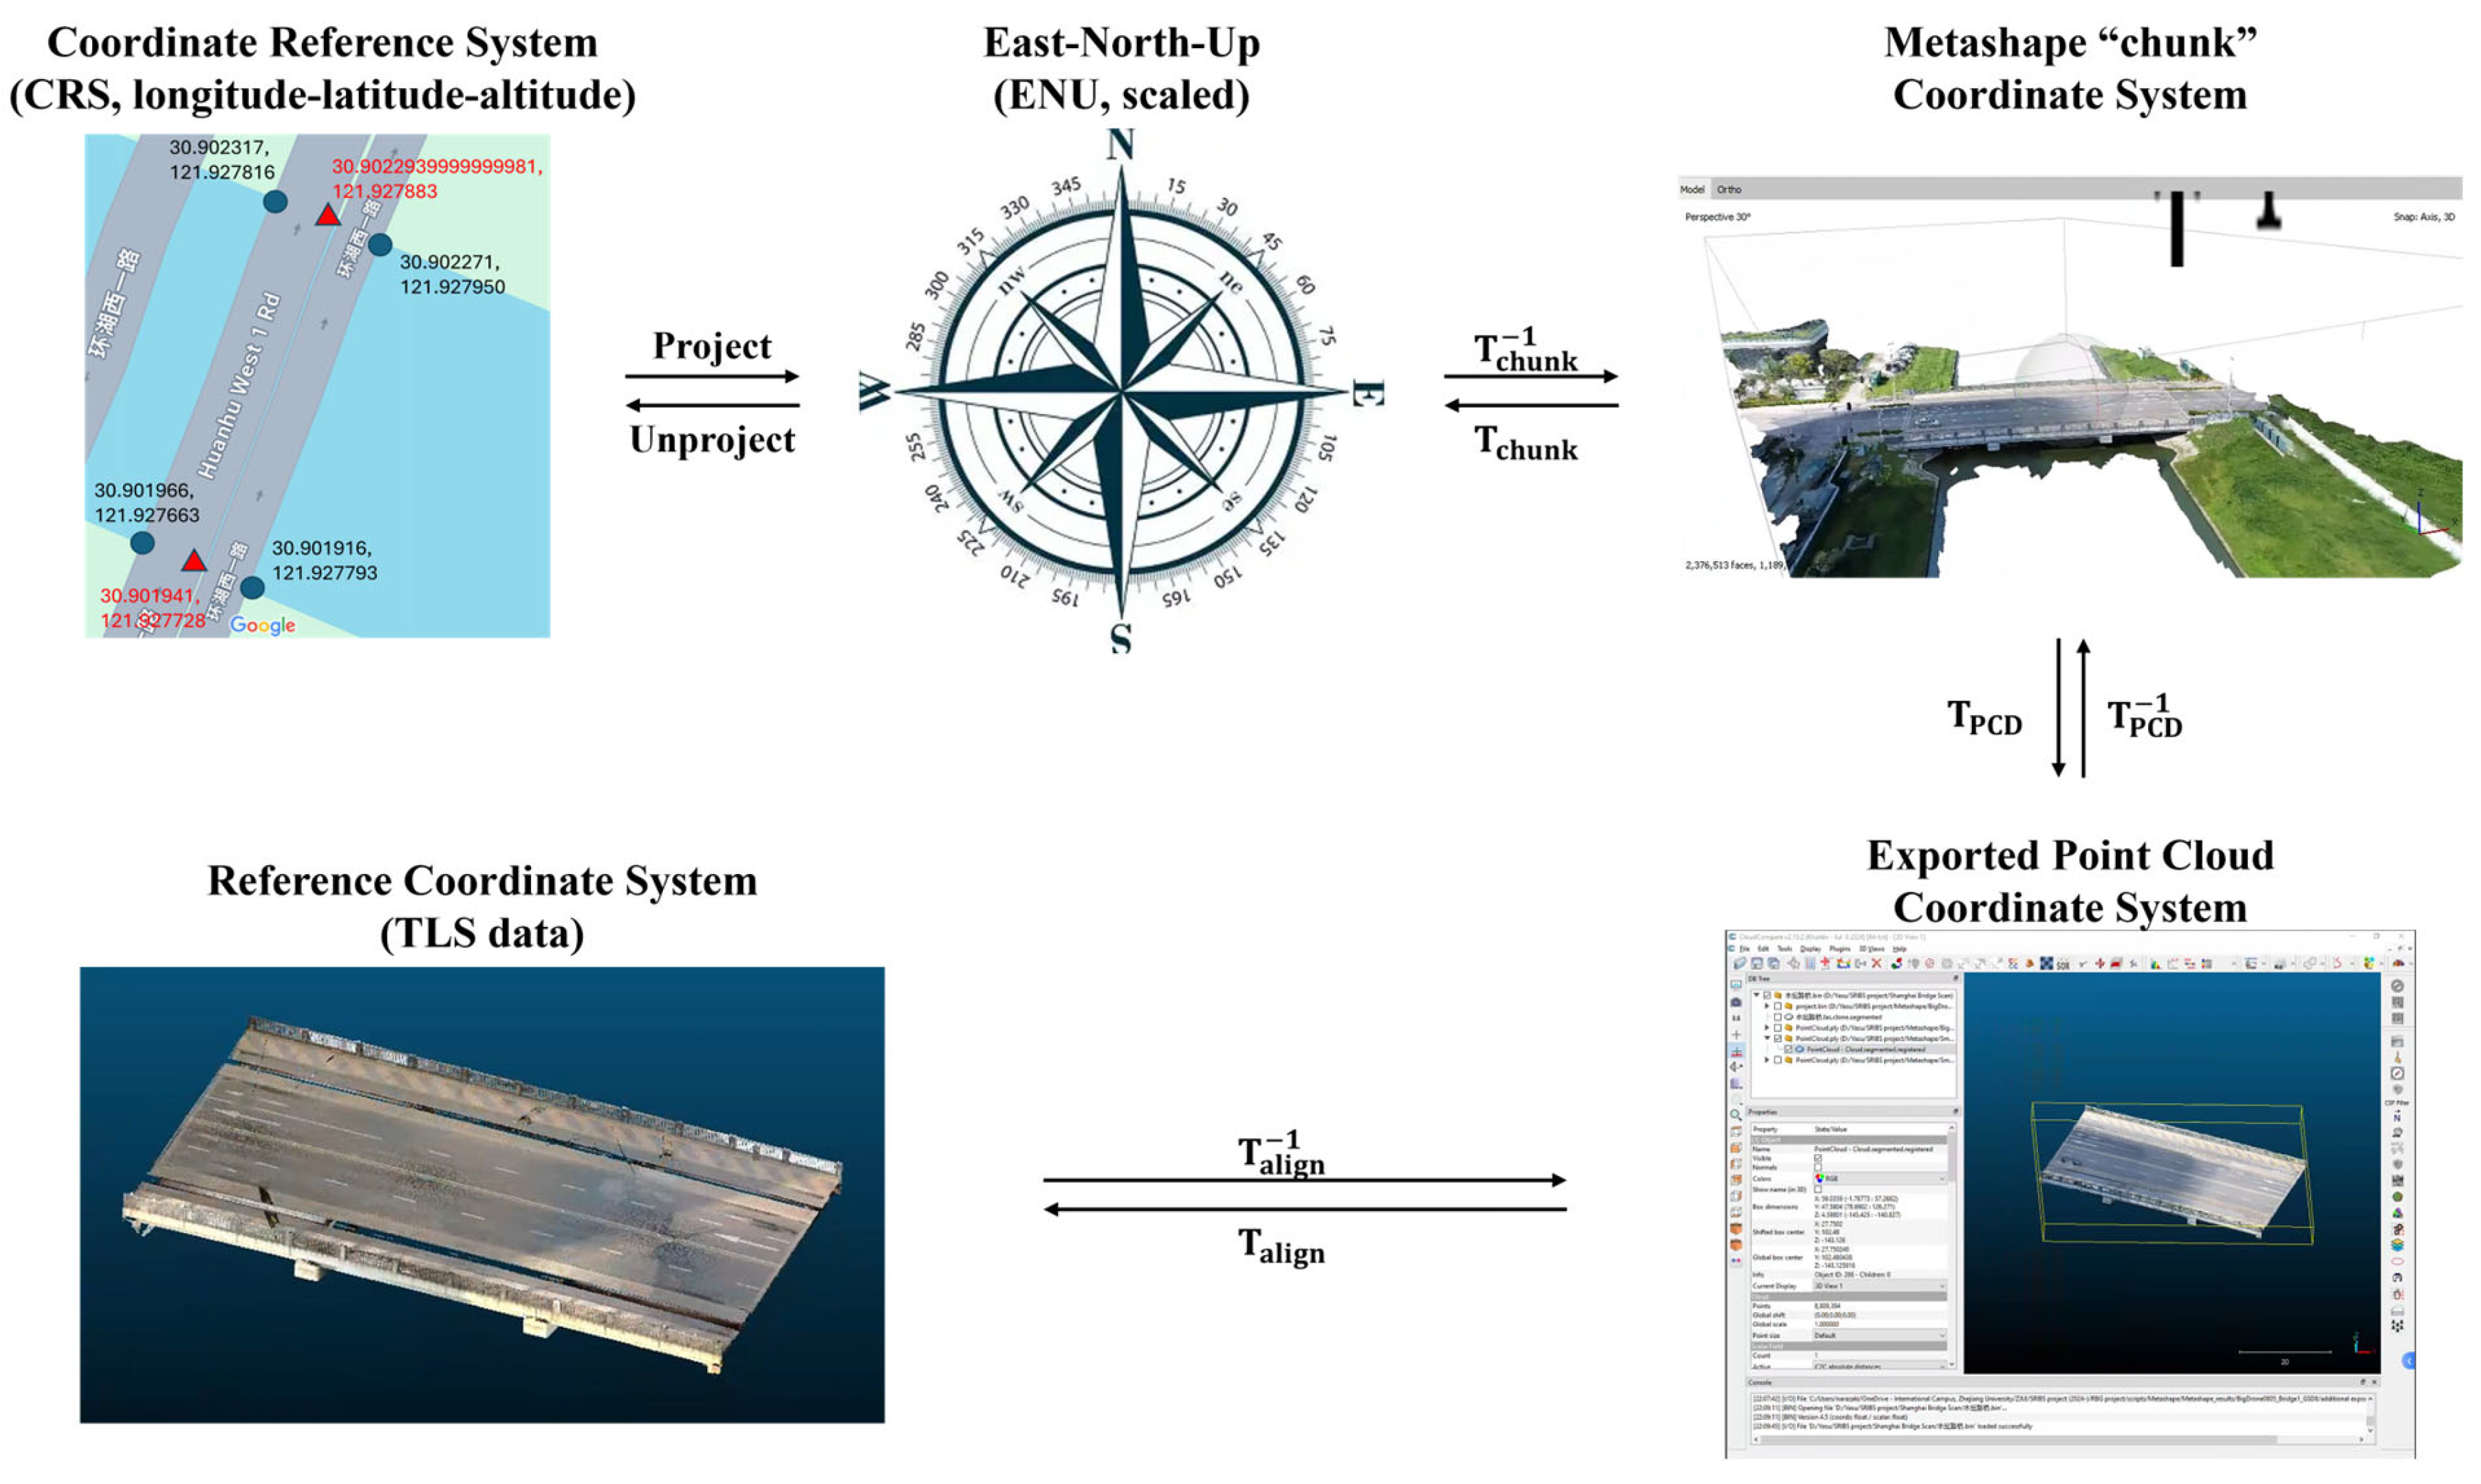
The systematic errors for transforming the recorded GNSS coordinates into the reference coordinate system are investigated using the metric
discussed in
Section 2.5.1. In this analysis, two cases were selected,
Bridge2_M300_GSD5 (data was collected on 5 August 2025) and
Bridge2_Air2S_GSD5 (data was collected on 6 August 2025). For each case, the original GNSS coordinates, the planned waypoint coordinates for
Bridge2_M300_GSD5, are transformed by
and
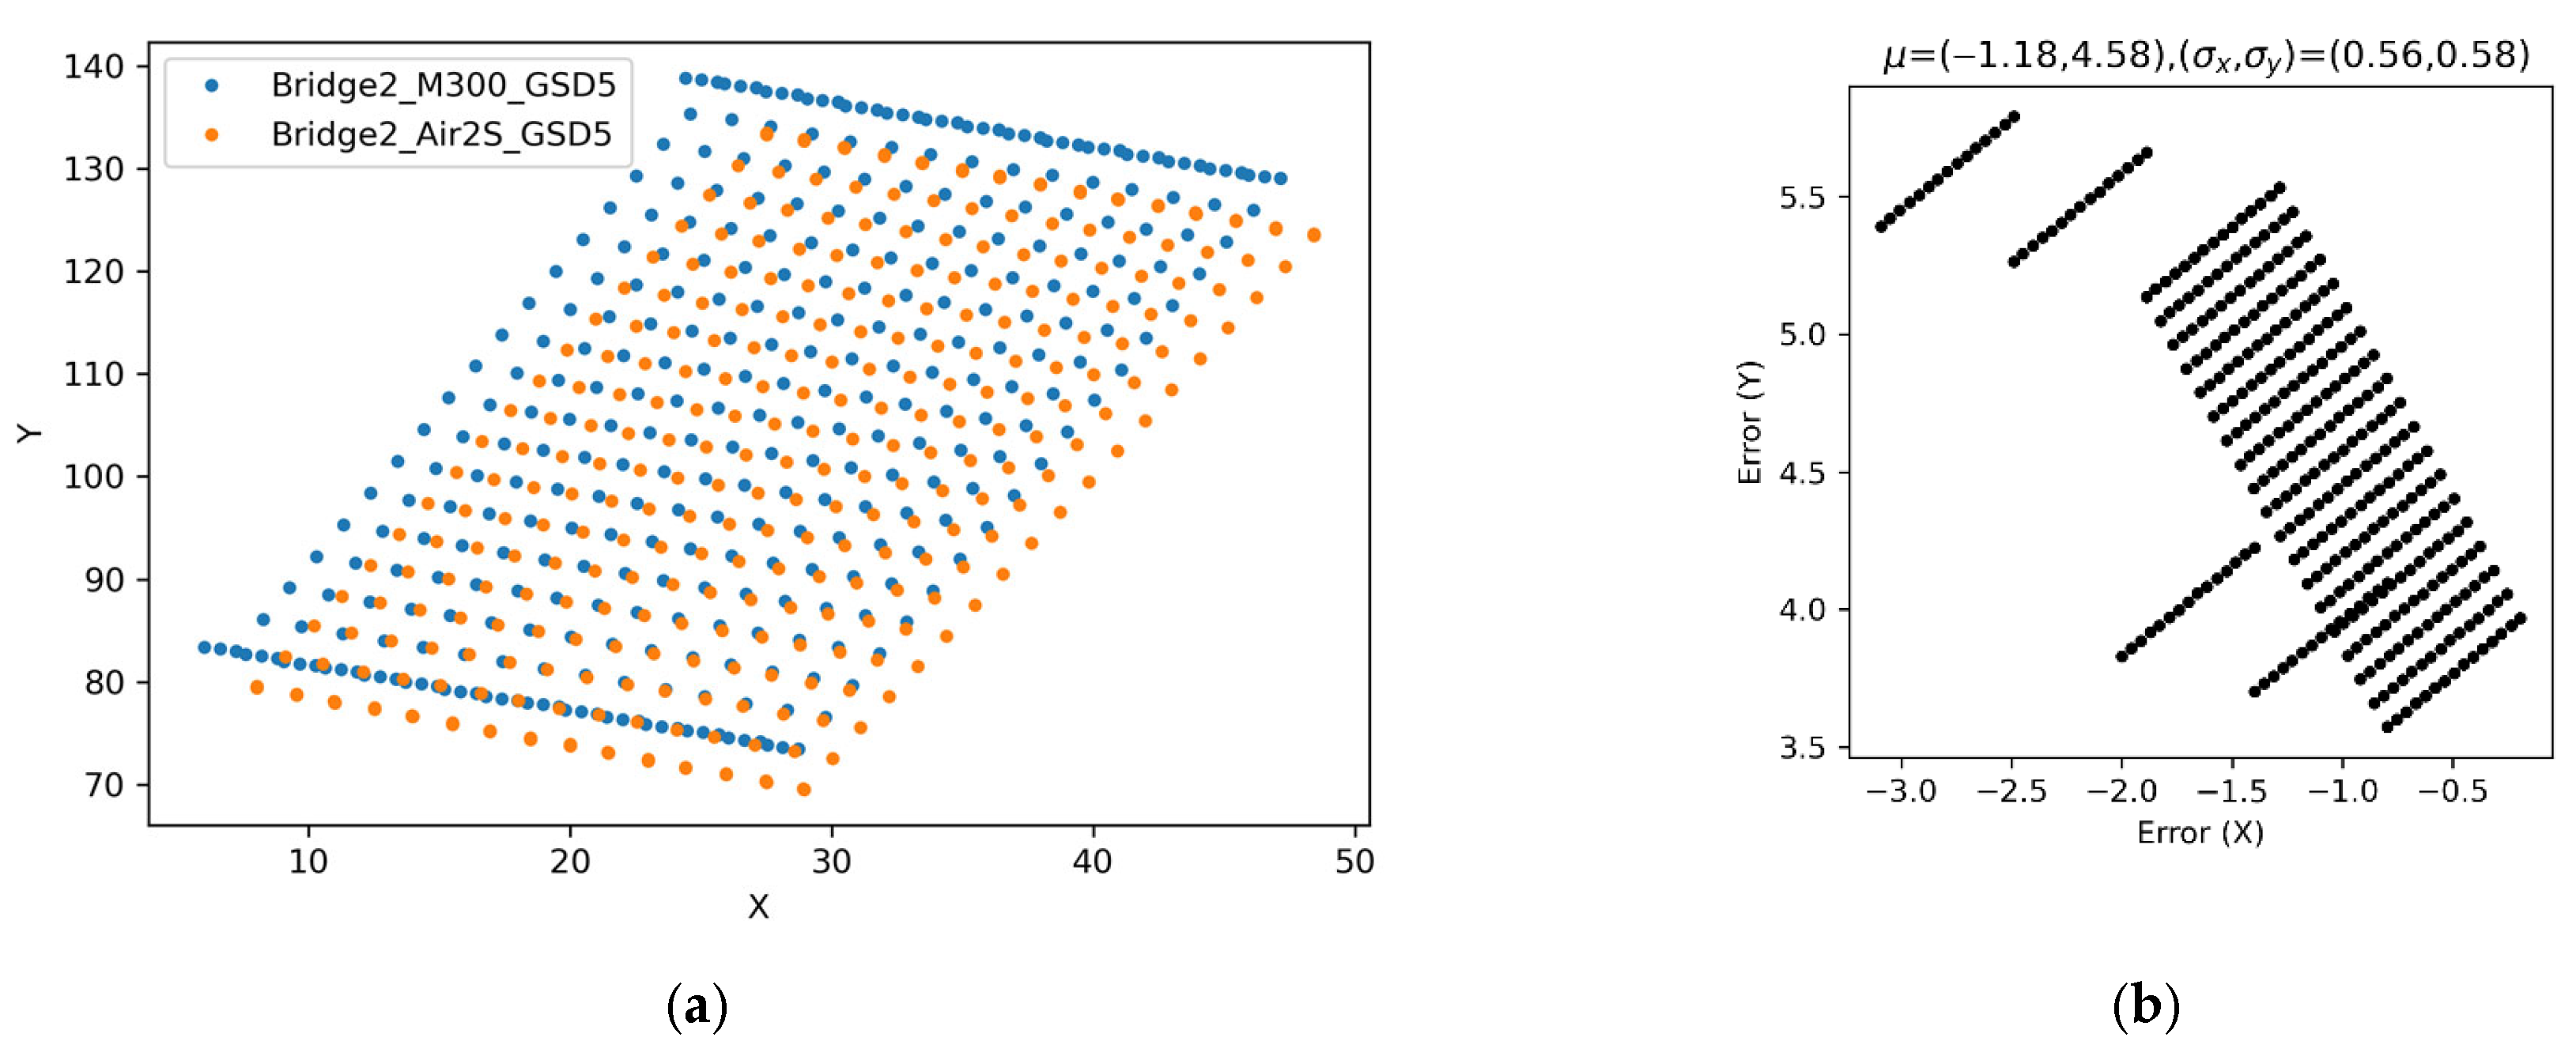
. The resulting waypoint coordinates (horizontal components) expressed in the reference coordinate system are shown in
Figure 17a, and the difference in those two transformed coordinates are shown in
Figure 17b. The two transforms,
and
, do not match exactly, leading to the systematic error observed in
Figure 17. This error indicates the effect of measured GNSS coordinate variability in two different times (with two devices, RTK-GPS and regular GPS). The effect propagates to the relative locations of those waypoints in the reference coordinates, in which up to about 5.5 m error may be possible. Note again that this error is the composition of pure GPS measurement error and additional error caused by the equipment factors (e.g., GNSS receivers), 3D reconstruction quality, and model alignment algorithm. By performing further extensive tests by isolating these factors, this metric
would enable comprehensive characterization of GNSS systematic error patterns and systematic error patterns from other sources in bridge inspection environments.
The statistical distributions of these error metrics, such as , , and , can be propagated (either analytically or computationally) to obtain the distribution of the image-plane offset of an object that is planned to be captured at the center of the image. When the distance to the target object is small, errors in camera location cause larger offsets in images. The negative impact of , decreases as the distance to the target object increases, but the impact of remains. The direct way to apply this statistical characterization is to sample camera projection matrices using the error statistics and project a certain point in a plan using these matrices to observe the distribution of the projected point. When the impact of the error is large, this evaluation provides the probability of capturing the target object in a certain frame in the data collection plan.
3.3.2. Point-Cloud Reconstruction Quality Evaluation Results
This section discusses the geometric reconstruction quality of point-cloud data following the steps discussed in
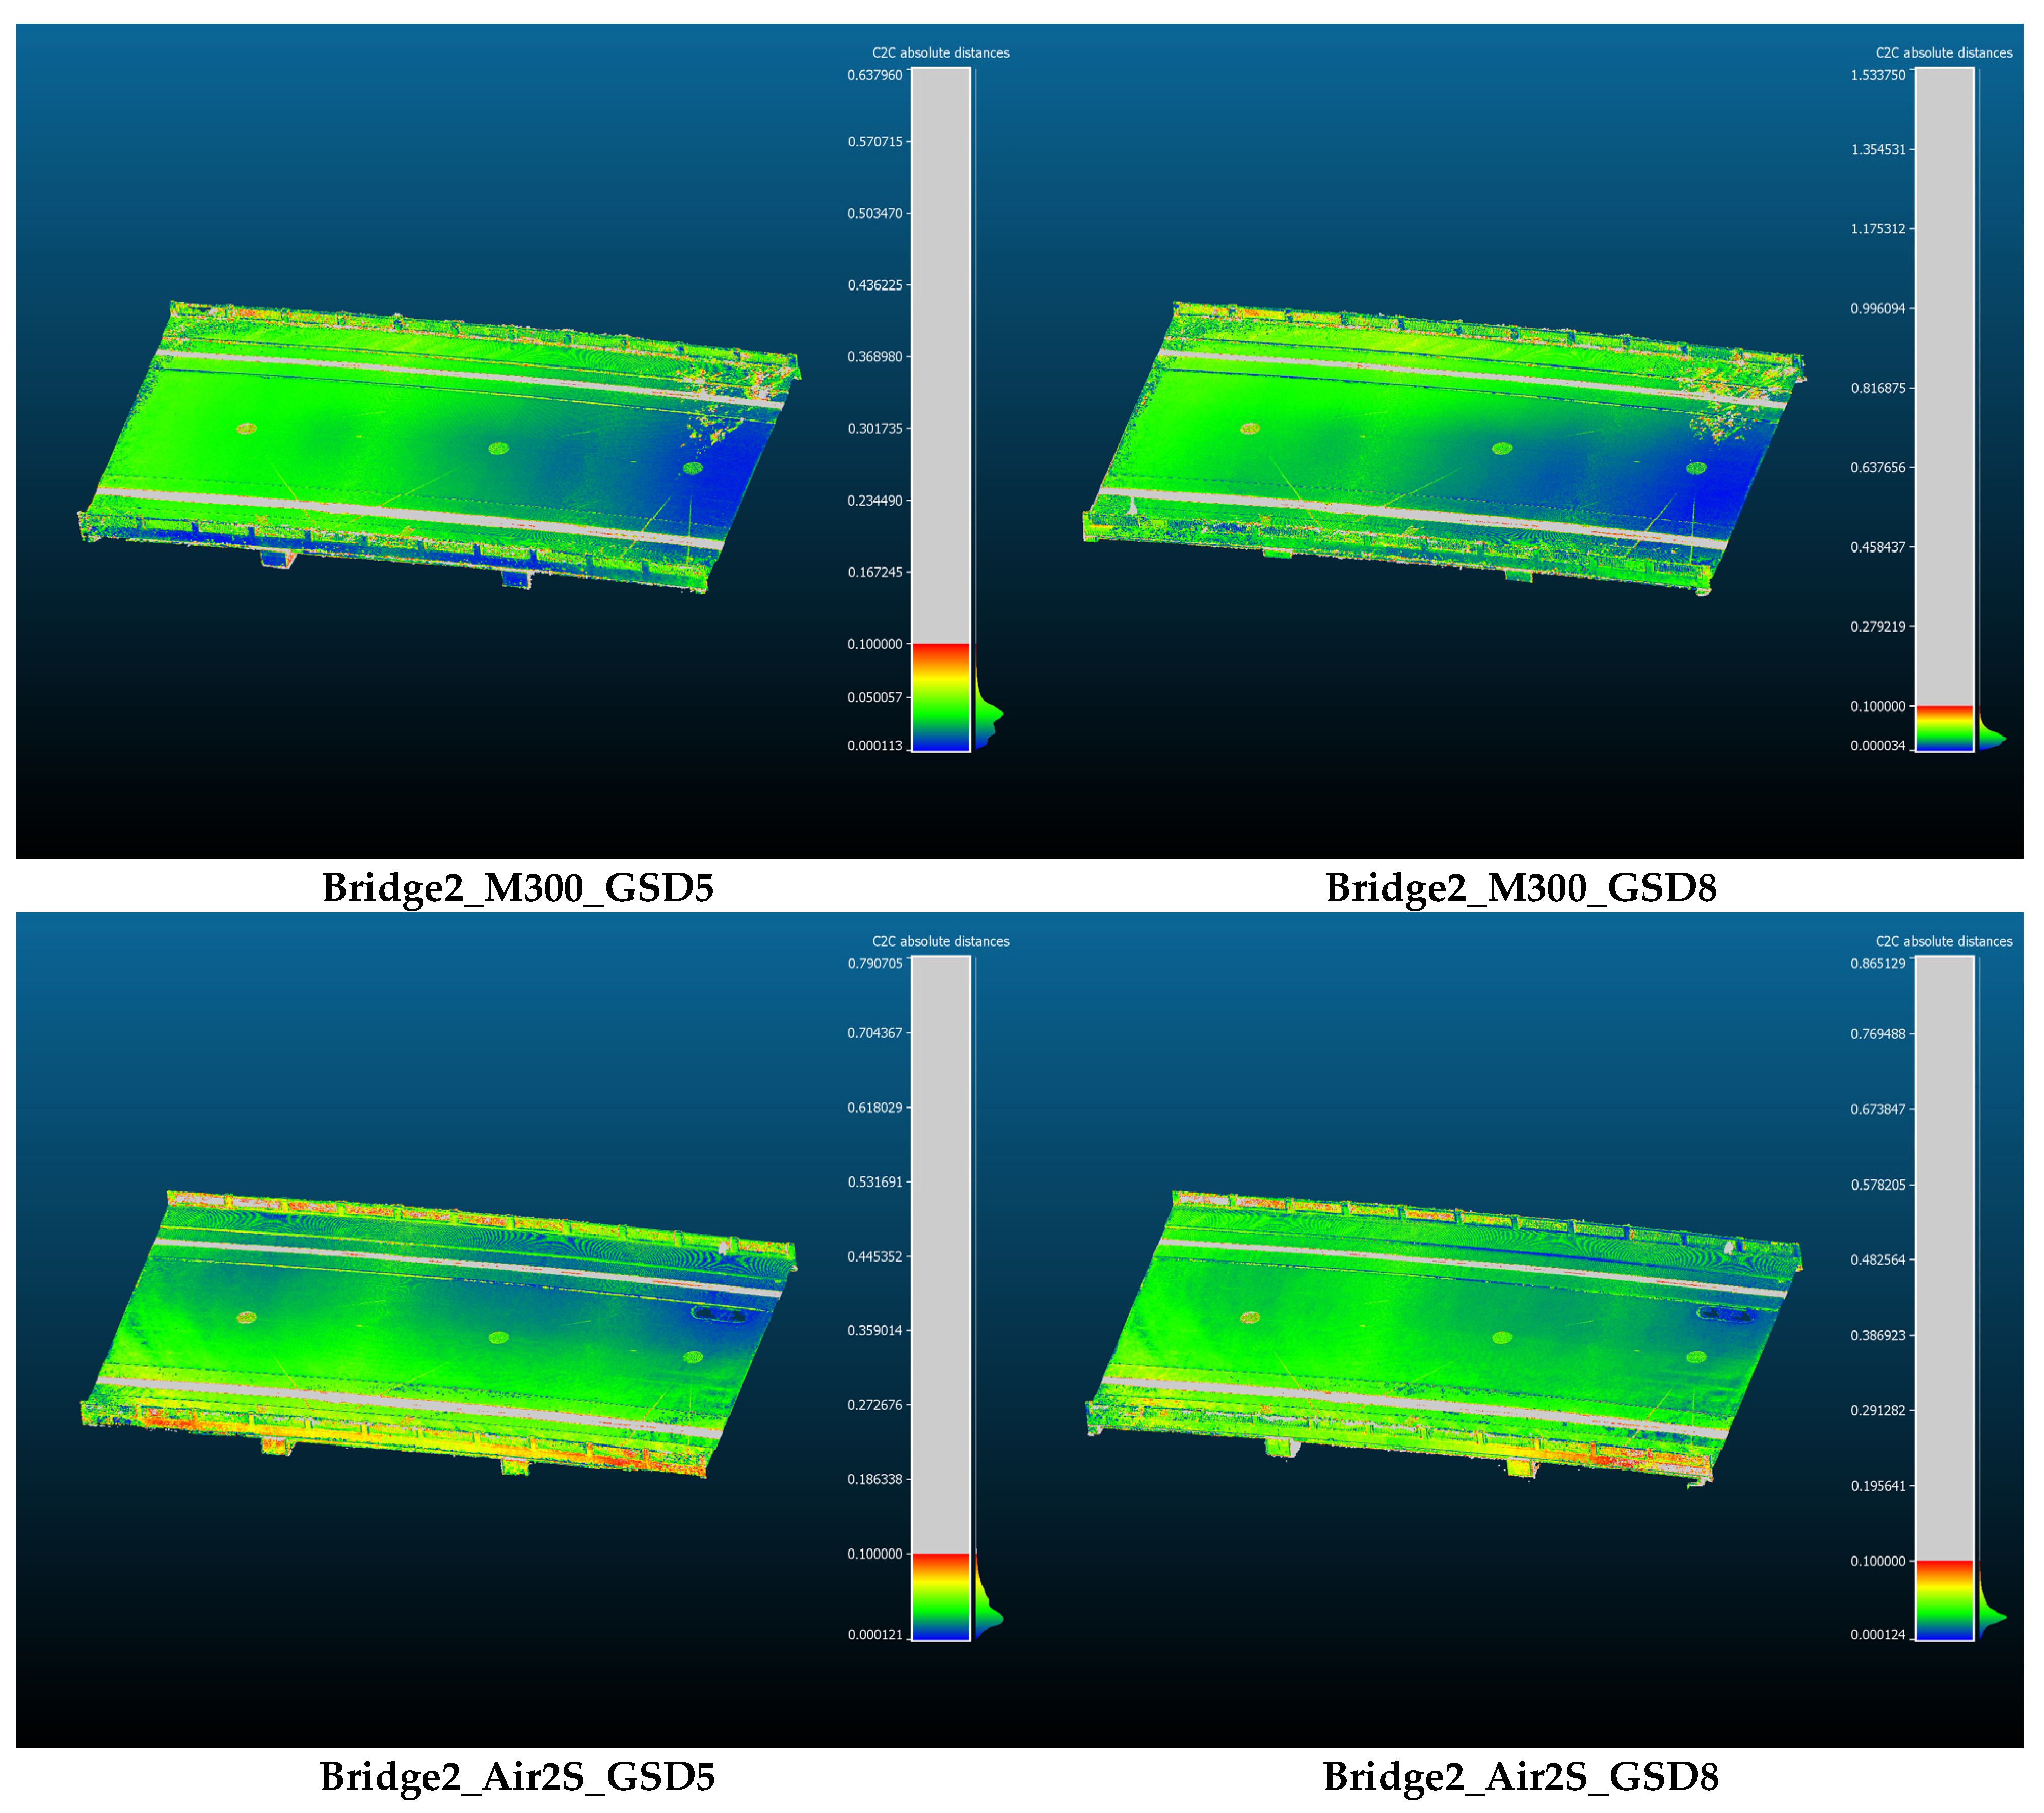
Section 2.5.2. An overview of reconstruction accuracy for different measurement configurations is shown in
Figure 18. For the M300 UAV, the part where the
affects directly (side faces) has better reconstruction quality for the cases with
, and the error reduces to approximately 1 mm for such a part. The global shape of the deck was captured with the shortest distance ranging from approximately 1 mm to 5 cm. The Air 2S results show a similar tendency, although the impact of GSD on the side is less clear. Error patterns at the global structural scale also exist with similar ranges. These global patterns are consistent across cases for each UAV, while the parts closely related to the change in the measurement configuration improve locally.
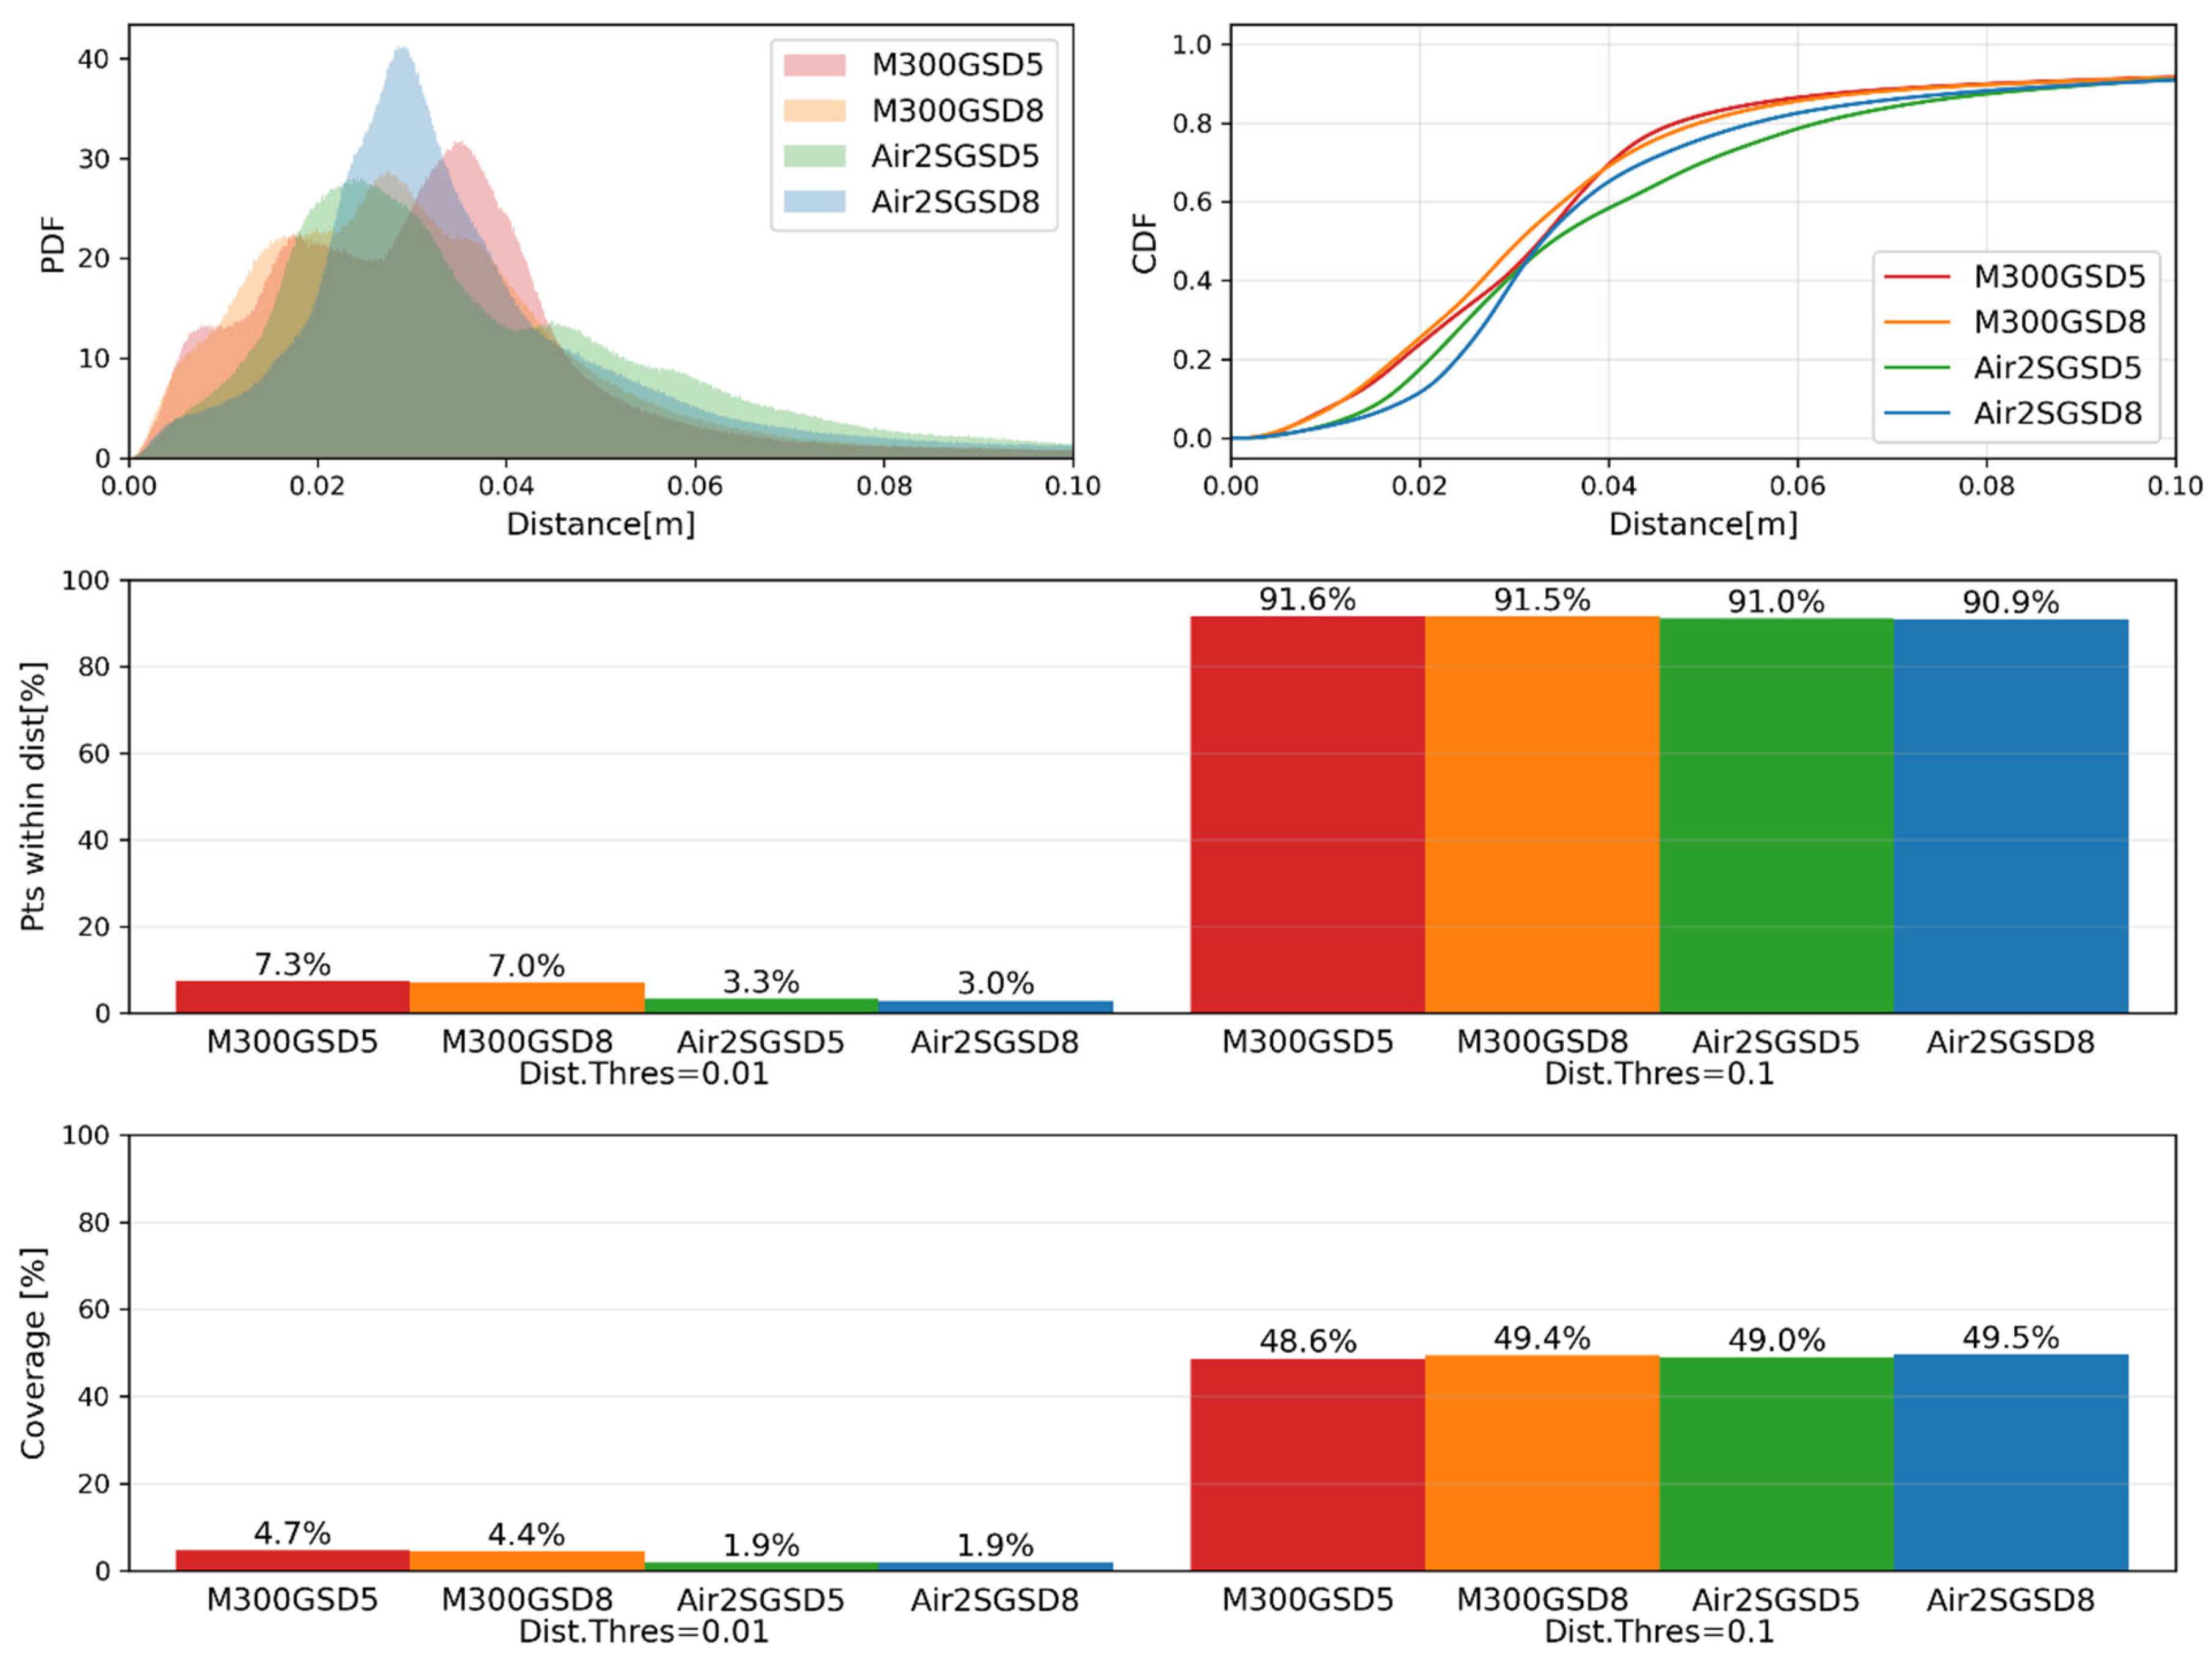
The PDF and CDF of the error are shown in the first row of
Figure 19, and the percentage of points in the reconstructed model within threshold values (1 cm and 10 cm) are shown in the second row of the figure. At the global level, the accuracy showed incremental improvements as the GSD decreases and when we used a professional camera in M300 UAV. At the same time, the shapes of the CDFs and PDFs change significantly; for the M300_GSD5 case, as an example, there are multiple peaks in the small distance regions of the PDF, indicating the existence of local parts with high accuracy. Compared with M300_GSD8, the M300_GSD5 case shows more pronounced and more widely separated local peaks in the PDF. This indicates that points with small errors cluster closer to zero, while points with large errors deviate further (i.e., accurate points are more accurate, whereas inaccurate points are less accurate). For the Air 2S cases, a similar tendency can be observed, but the distribution is considerably smoother, with much less pronounced local peaks. From the visualization of reconstruction accuracy in
Figure 18, we can observe accurately reconstructed local regions (blue) in the small-GSD cases (e.g., the side surfaces in the M300-based models and parts of the pavement in the Air 2S-based models). However, errors at larger scales sometimes increase in these small-GSD cases, as indicated by more green points on the deck of the M300-based models and more yellow than red points on the sides of the Air 2S-based models. These observations indicate that a lower GSD improves reconstruction accuracy at the local scale, but does not necessarily enhance global shape reconstruction accuracy; the average accuracy over the entire point cloud changes only marginally (4.75 cm for M300_GSD5, 4.74 cm for M300_GSD5, 5.31 cm for Air2S_GSD5, 5.20 cm for Air2S_GSD8). The choice of equipment (camera) also has a strong influence at the local scale, whereas consumer-grade equipment can still achieve comparable accuracy in terms of the global average and percentage of points within distance thresholds (second row of
Figure 19). The approximate coverage metric follows a similar trend, where M300 can achieve highly accurate local parts, while at the global level, there are slight (marginal) improvements as the GSD gets smaller (third row of
Figure 19). The percentage of approximate coverage is significantly smaller than the percentage satisfying the same reconstruction-accuracy threshold (second row of
Figure 19). This reduction is mainly due to the limited space beneath the deck, which makes UAV-based data collection extremely challenging. Overall, both UAV platforms can achieve comparable accuracy levels at the global level, and major differences exist at the local level.
The assessment of geometric reconstruction quality can also be extended to different SfM algorithm configurations (
Bridge2_M300_GSD5_HighestAlign and
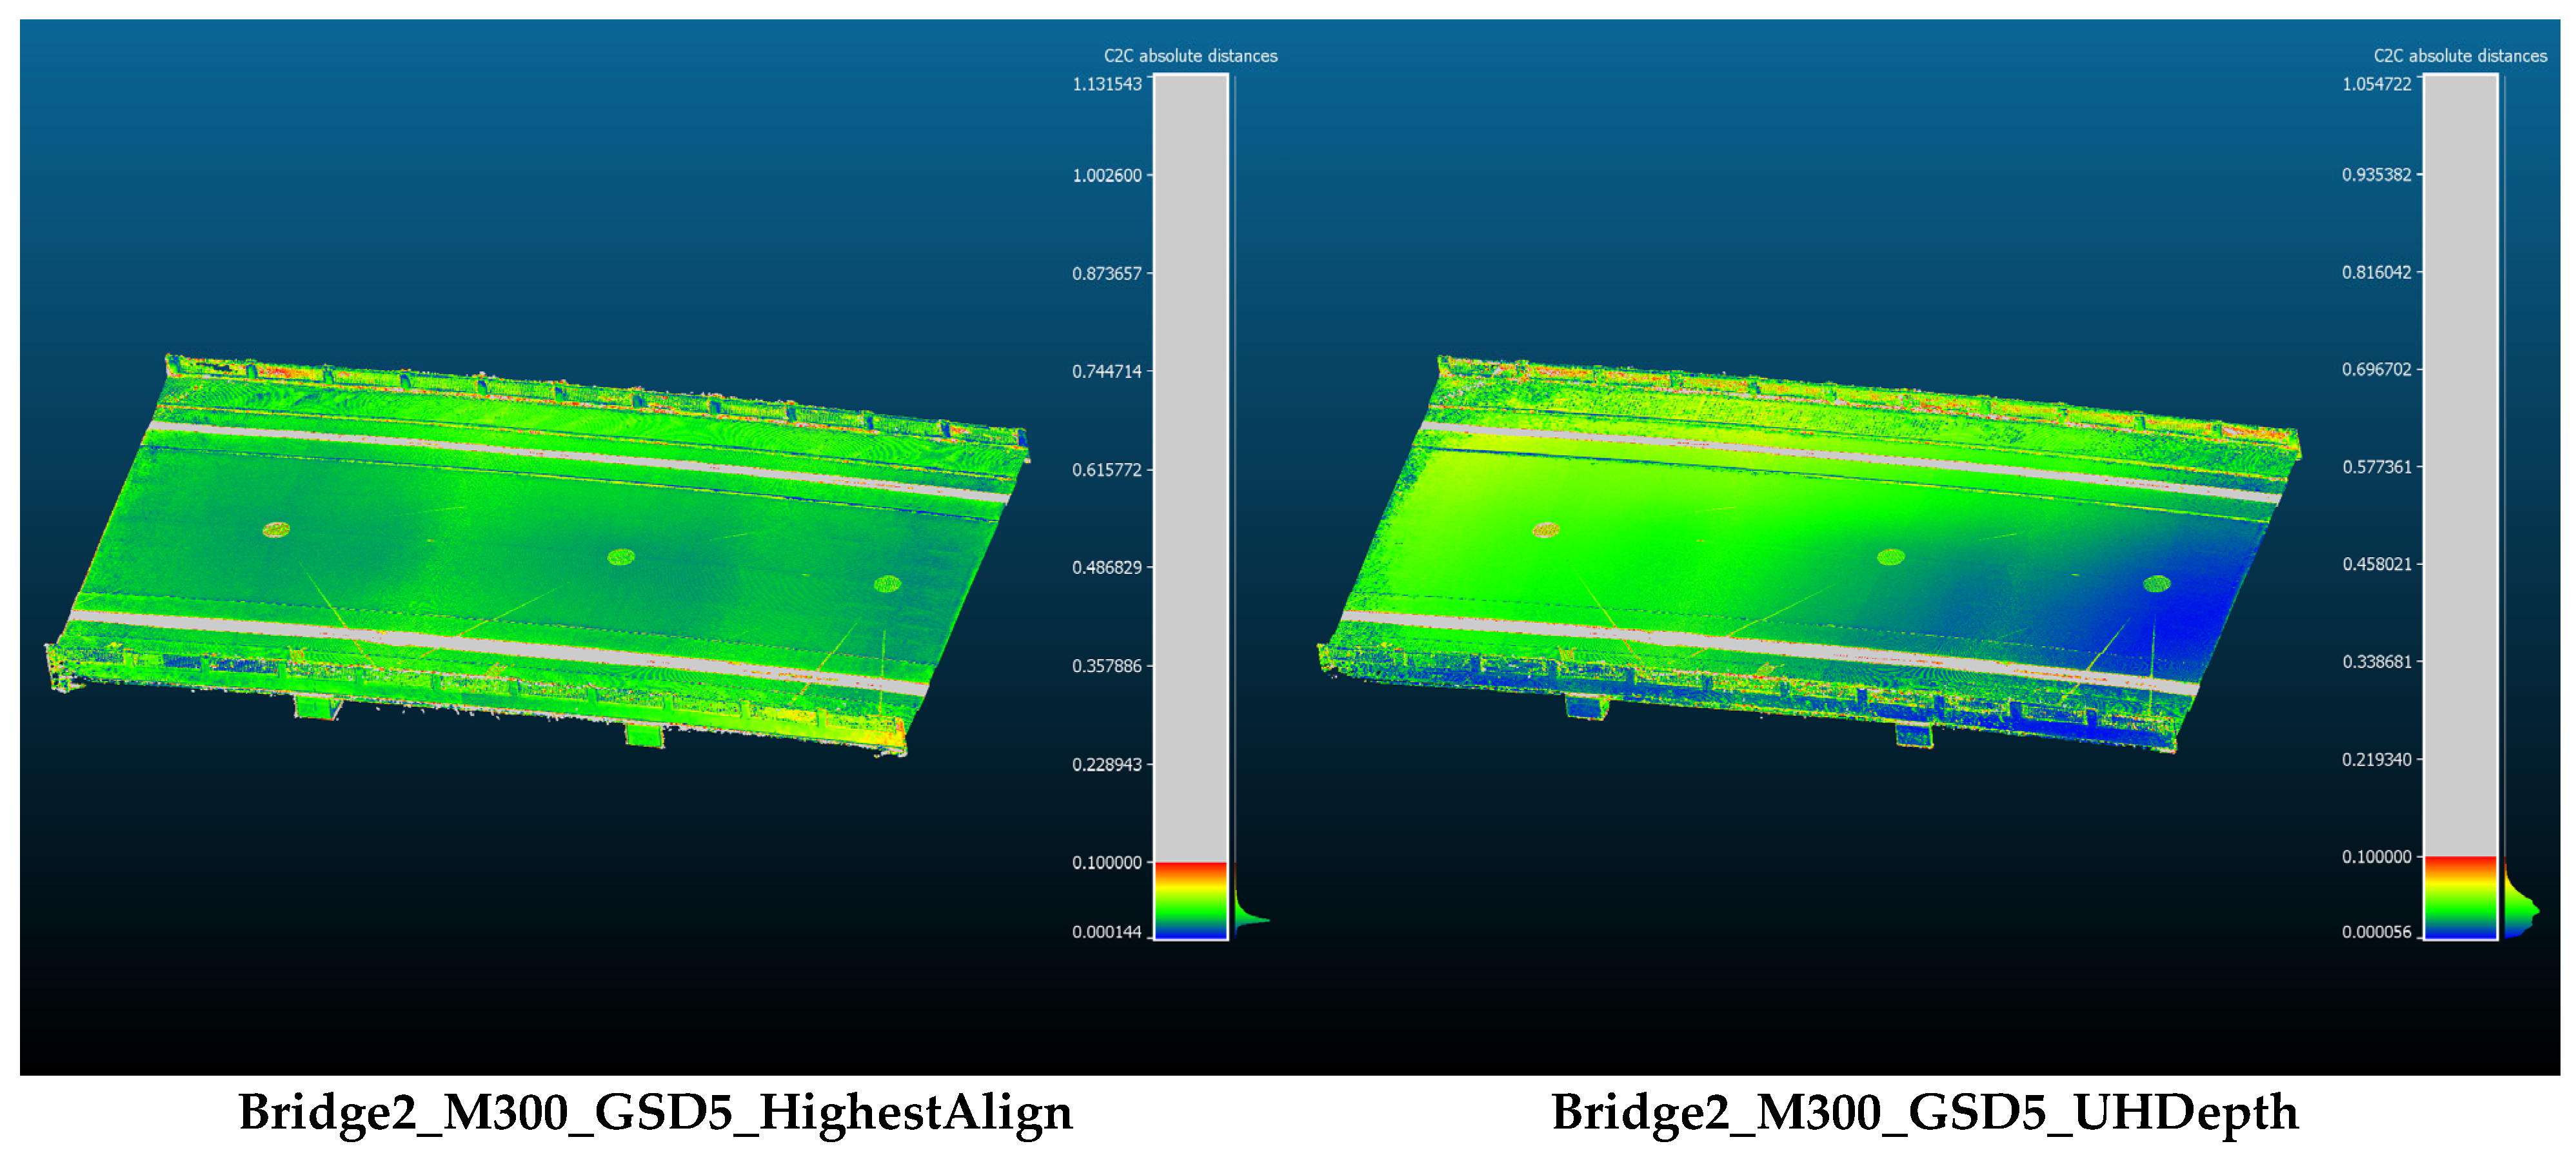
Bridge2_M300_GSD5_UHDepth). An overview of the reconstruction accuracy for these additional cases is shown in
Figure 20. For
Bridge2_M300_GSD5_HighestAlign, the most noticeable improvement is in the global accuracy pattern, where accurate (blue) parts exist relatively uniformly compared to the original
Bridge2_M300_GSD5. Improved point determination accuracy during feature detection and matching brings positive impact on global optimization (bundle adjustment), while the local accuracy patterns may be controlled more by image quality itself. For
Bridge2_M300_GSD5_UHDepth, the global pattern of the geometric reconstruction accuracy is similar to
Bridge2_M300_GSD5 shown in
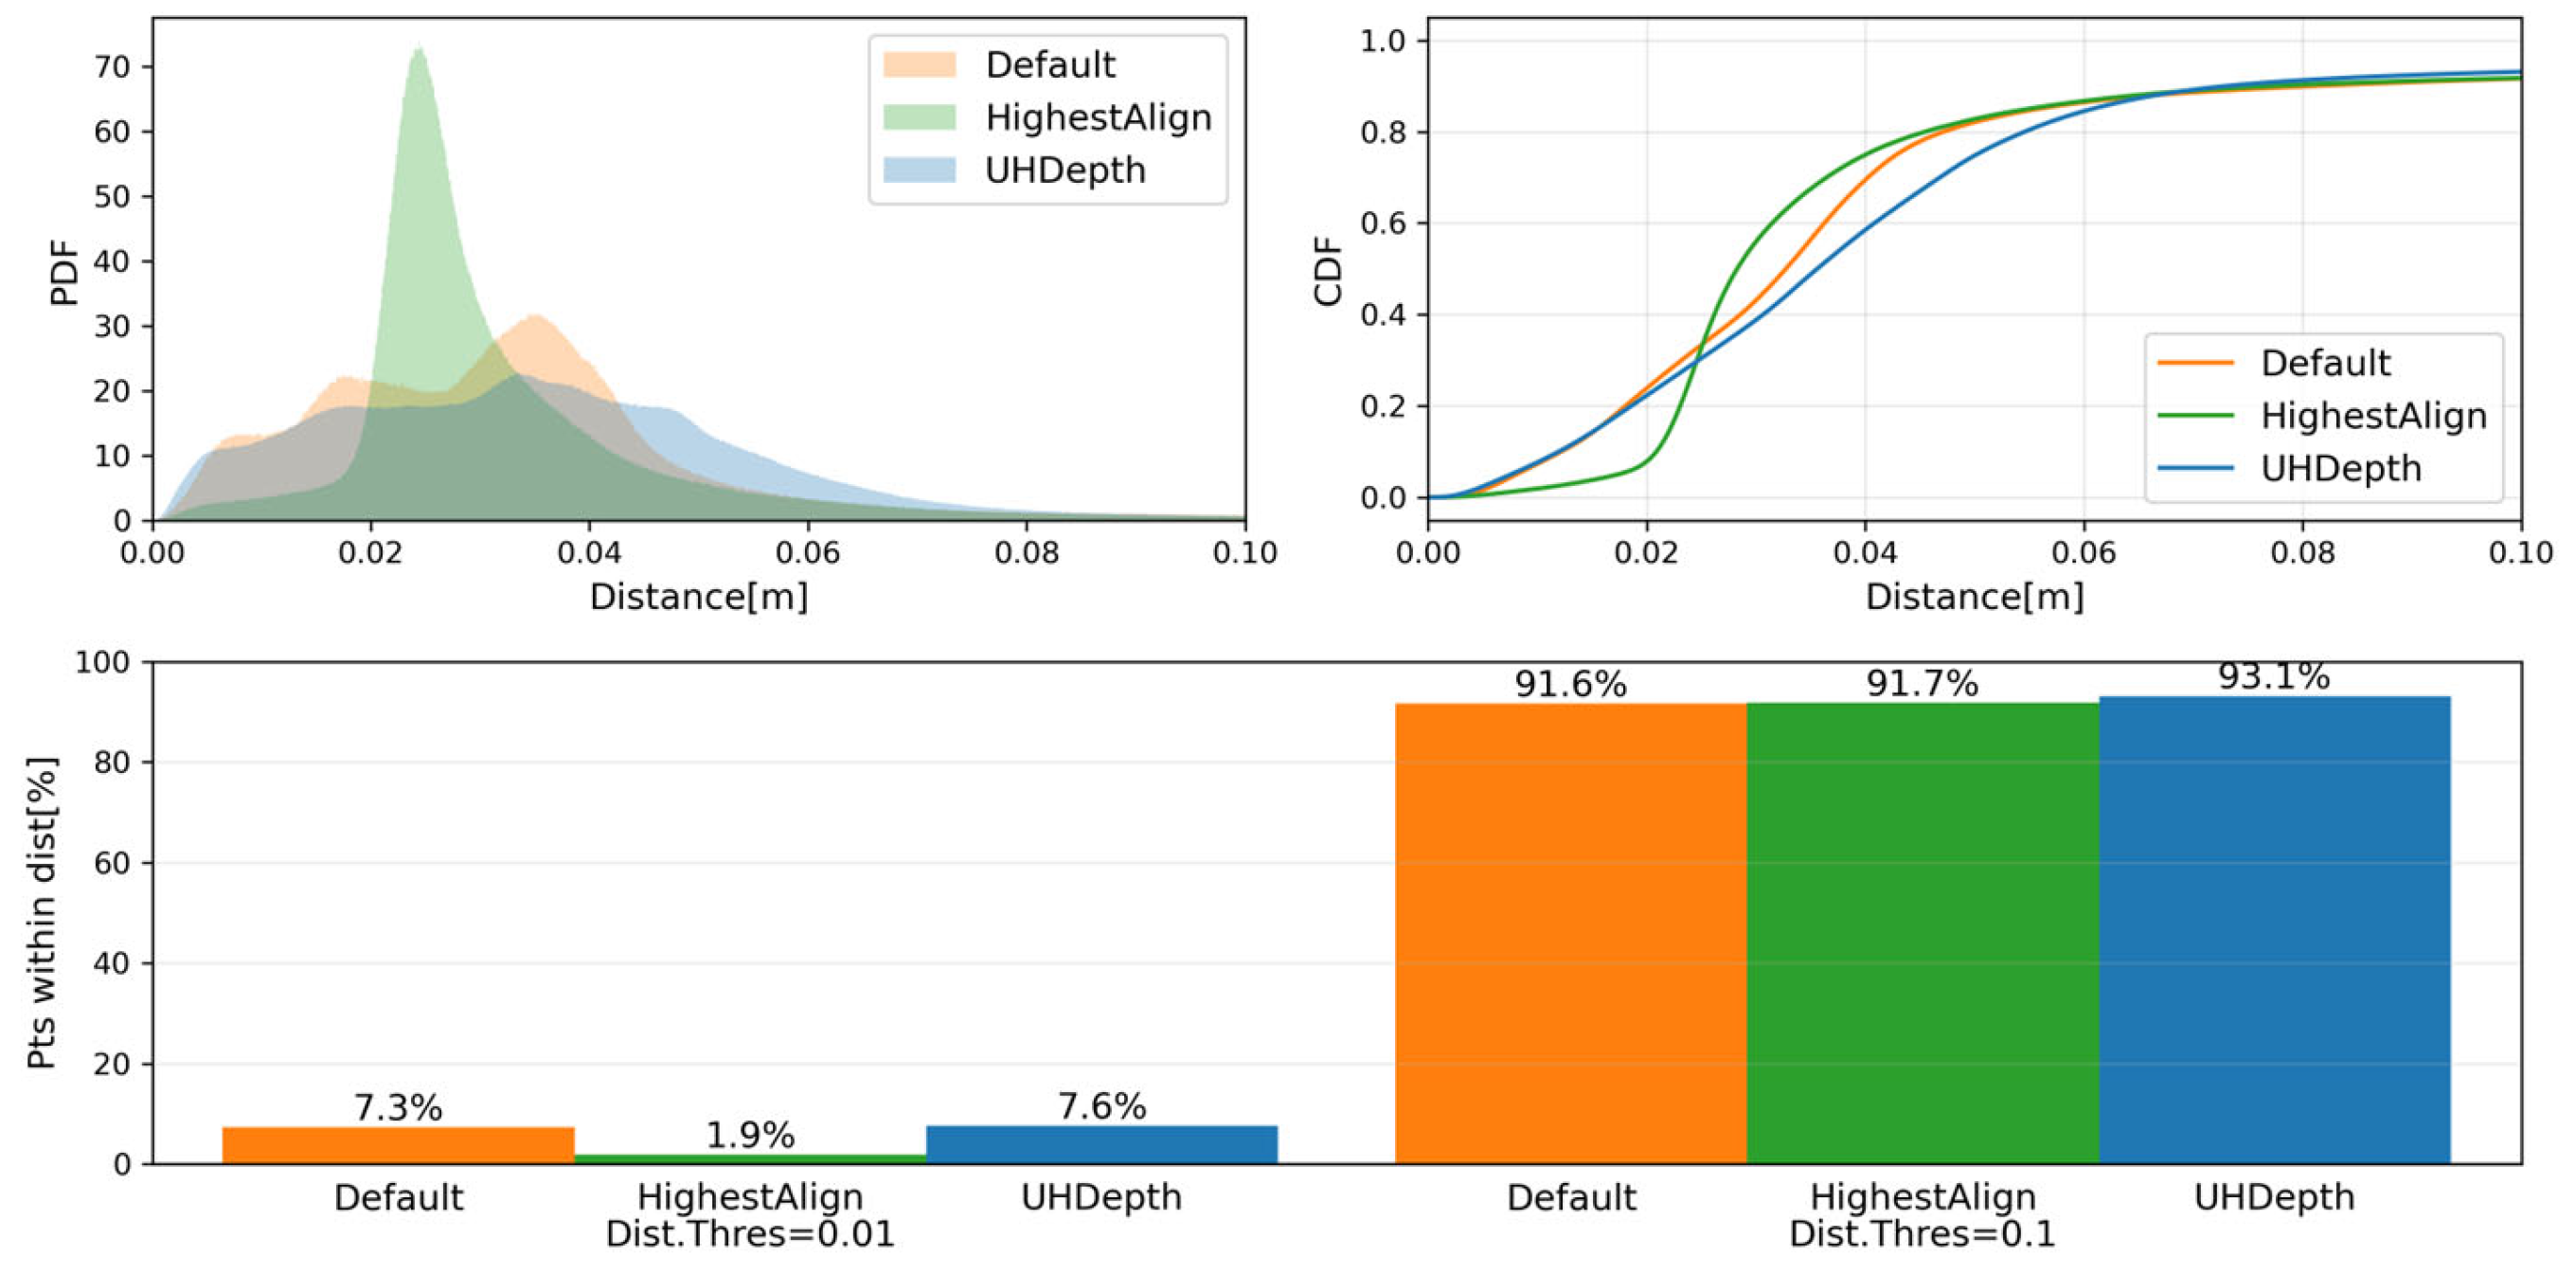
Figure 18. The global average of the reconstruction error (shortest distance to the reference point cloud) is 0.0475 m for
Bridge2_M300_GSD5, 0.0480 for
Bridge2_M300_GSD5_HighestAlign, and 0.0488 for
Bridge2_M300_GSD5_UHDepth. In this aspect, the “highest accuracy” alignment and “ultra high quality” depth-map computation do not (necessarily) improve the quality, even with the extensive computation. This observation could be explained by the fact that alignment error cannot be easily reduced above this level; if we have noisy or low-quality parts in the reconstruction model and do not eliminate those parts perfectly, such local inaccuracy propagates to the global alignment error by the ICP based on the error metric affected by those noisy parts.
The statistics of the geometric reconstruction error for different SfM algorithm configurations are shown in
Figure 21. Compared to the default configuration (
Bridge2_M300_GSD5),
Bridge2_M300_GSD5_HighestAlign distributes the error more uniformly across the structure (single high narrow peak of the PDF). On the other hand, as the depth-maps are computed in more detail, the PDF becomes more prominently separated, indicating that accurate parts become even more accurate, while error also becomes prominent in some parts. Because the input data is the same, the error levels are similar in the global average sense (as discussed previously), but the local characteristics of the error change significantly, motivating hybrid use of different SfM configurations for tasks requiring high accuracy and level of detail.
These results can be contextualized by referring to Level of Accuracy (LOA) defined by U.S. Institute of Building Documentation (USBID) [
40]. In the context of building documentation, LOA20 and LOA30 are defined as the error upper range of 50 [mm] and 15 [mm]. Comparing these values with the error statistics obtained from the bridges in Shanghai, we can consider applying the UAV photogrammetry data to the scenario with LOA20 requirements and potentially target scenarios with LOA30 requirements.
3.3.3. Measurement Results of Component Dimensions and Damage Extent
The results for measuring bridge global dimensions (deck length and deck width), local dimensions (deck spacing), and local volume (pothole volume) are measured following the steps described in
Section 2.5.3, and the results are shown in
Table 3. The table shows the values measured from the point-cloud data exported from Metashape Software (scale was inferred based on the GNSS data), as well as the results of adjusting the point cloud scale using the identified transform from raw exported data to the reference coordinate system (
). For the global dimension (deck length), the SfM measurement shows more than 2 m (
3.85%) errors in some cases, while the measurement accuracy was comparable after applying the scale adjustment (the error is less than 20 cm, or 0.385%, for five out of eight cases considered, including downsampled and high-GSD cases). This confirms the observation from
Figure 18 and
Figure 19 that the reconstruction quality is less affected at the global level than at the local level. For the local dimension (deck spacing), the accuracy decreases significantly as the overlap ratio is reduced. This was caused by the reduction in the detailed structure of the point cloud for lower overlap cases. Finally, the advantage of M300 UAV with professional UAV and camera platforms is evident for the localized volume measurement (pothole volume). The point cloud obtained by Air2S-based image collection had less accurate surface geometric patterns than those obtained by M300 platform. The results indicate that high-quality texture imaging enabled by the better camera sensor is useful in reconstructing detailed surface geometric patterns, even though the image resolution is not larger than that of the camera on Air 2S.
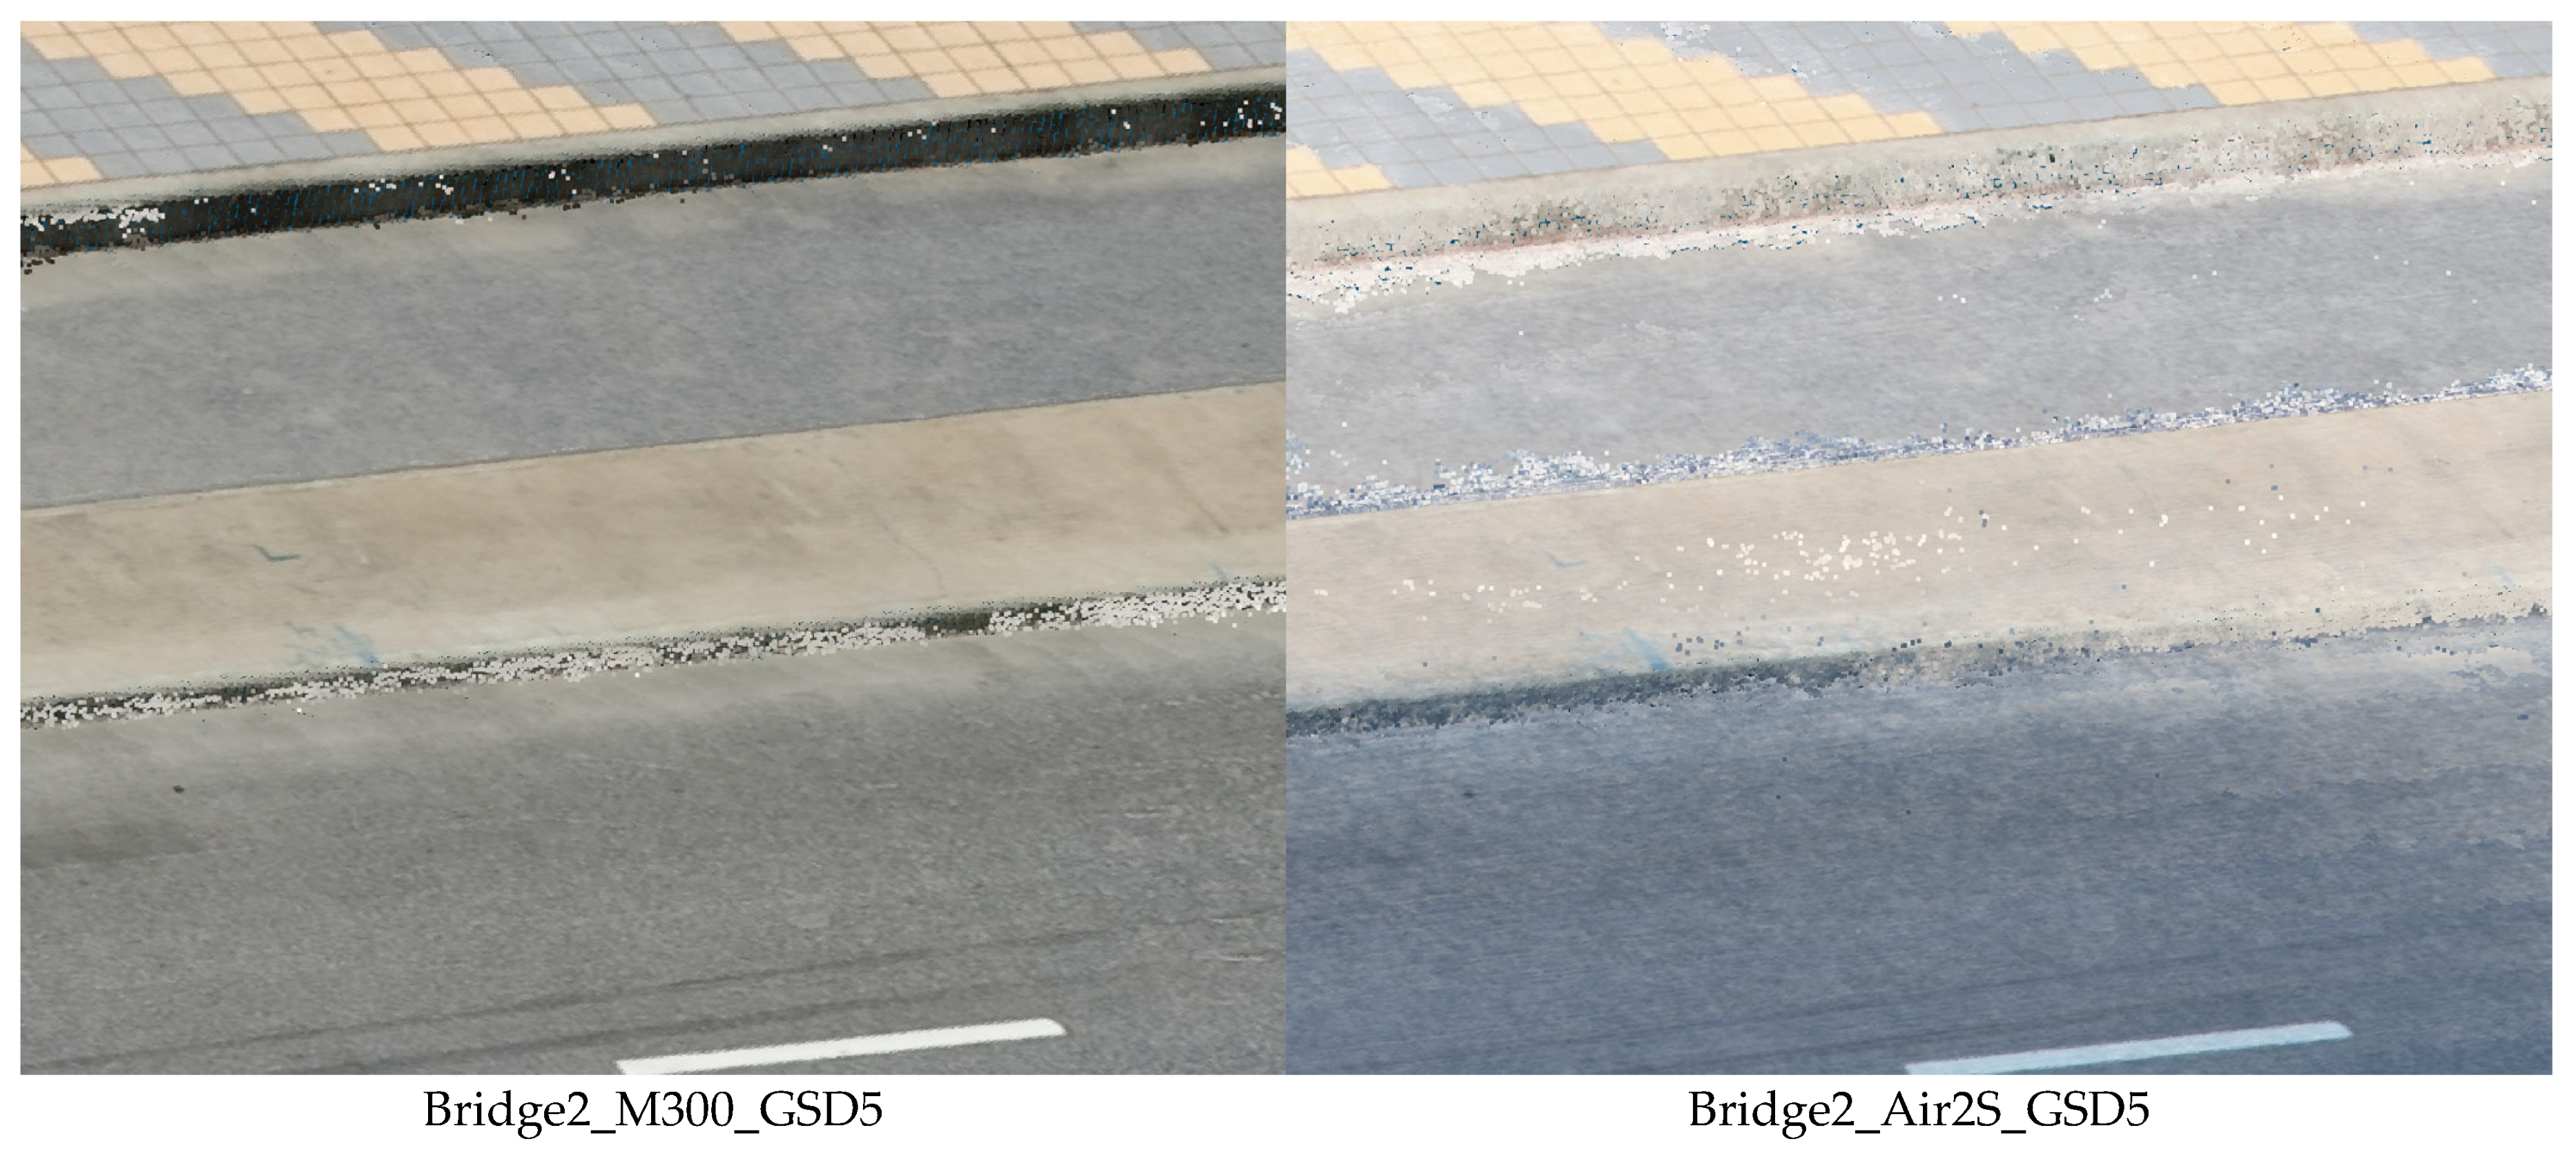
To gain further insight into the differences in pothole volume measurement accuracy,
Figure 22 compares close-up views of the point clouds for
Bridge2_M300_GSD5 and
Bridge2_Air2S_GSD5.
Bridge2_M300_GSD5 shows clearer geometric patterns, particularly near the edges.
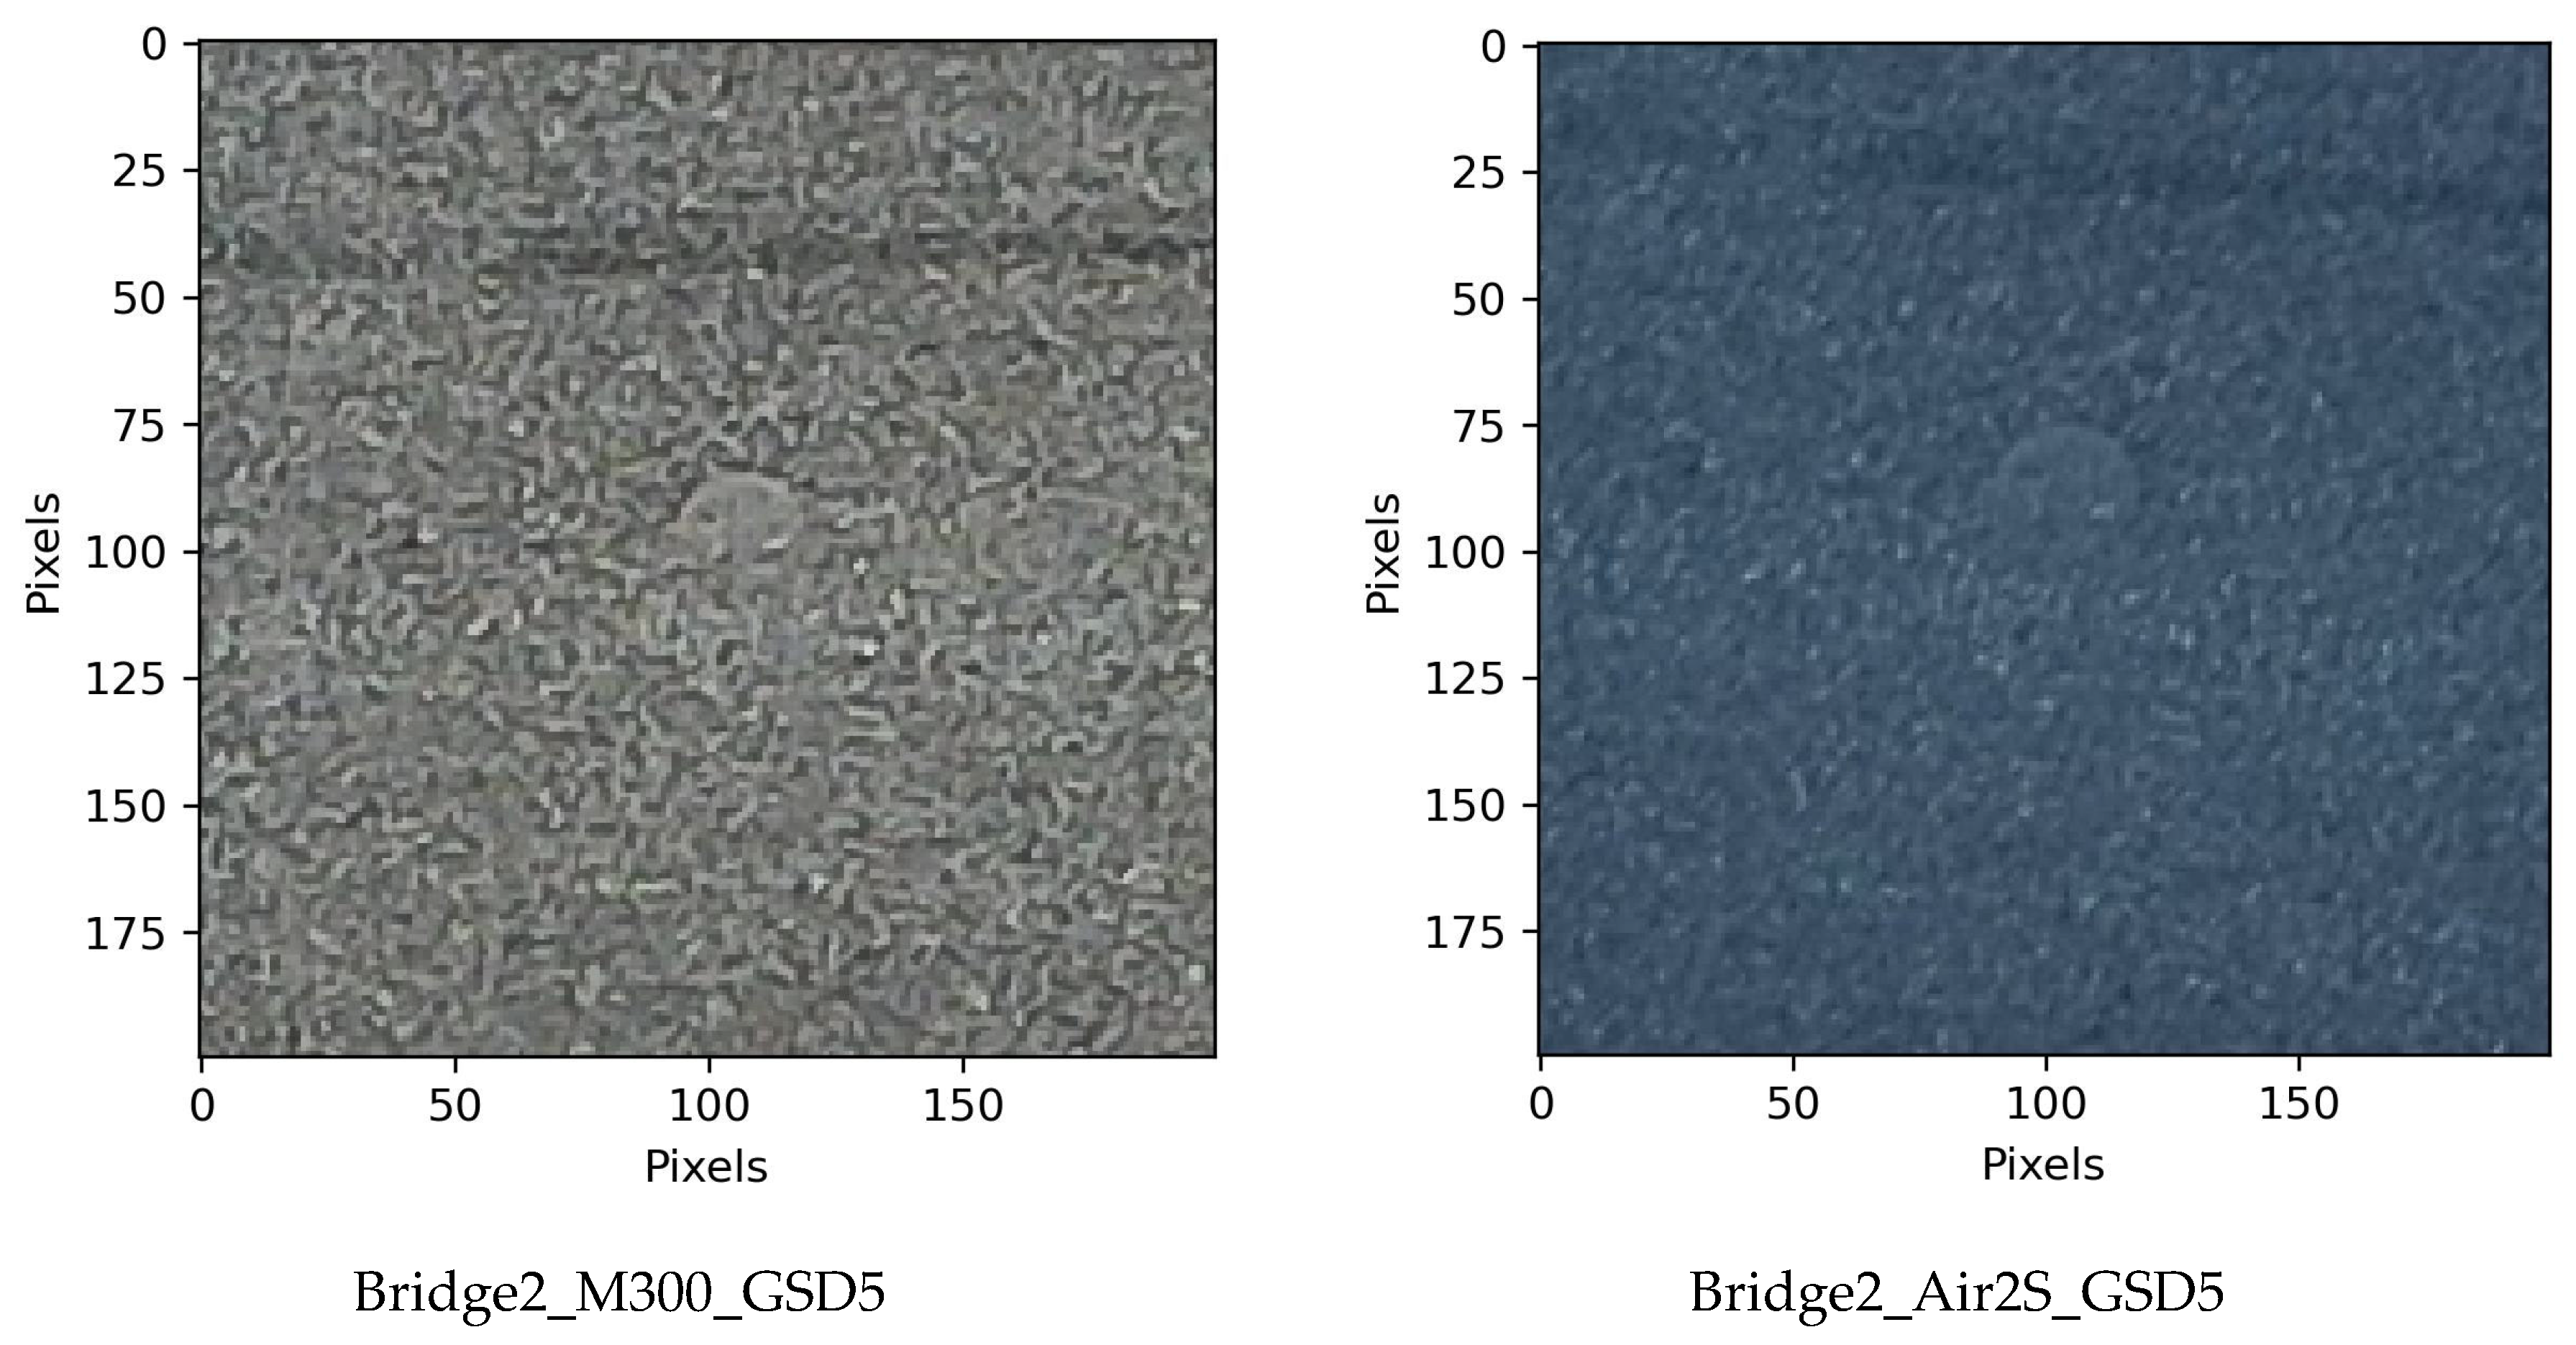
Bridge2_Air2S_GSD5, on the other hand, shows smoother local geometric patterns with less color contrast. The reason can be partially observed from the comparisons of images from similar viewpoints shown in
Figure 23. While resolutions of raw images are higher in
Bridge2_Air2S_GSD5 (5472 × 3078) than
Bridge2_M300_GSD5 (4056 × 3040),
Bridge2_M300_GSD5 captures fine patterns better with higher color contrast. While this comparison is local and specific to this part of the structure (e.g.,
Table 3 shows that the Air 2S results are not always as problematic as in this case), the risk of smoothed reconstructed geometry suggests that the M300 should be chosen for this type of local volumetric measurement.
The assessment of component dimensions and damage extent was also extended to different SfM algorithm configurations (
Bridge2_M300_GSD5_HighestAlign and
Bridge2_M300_GSD5_UHDepth discussed in
Section 3.3.1).
Table 4 shows that the global measurement maintains high accuracy, exploiting the full potential of the data input. Local measurement maintains the accuracy level but does not show noticeable improvement. This is because the measurement of this scale is strongly influenced by the point density (which is set to 0.1 for all cases). Increasing the value may lead to better local measurements but at the expense of significantly increased computational resources. Pothole volume was similarly estimated with HighestAlign configuration. In contrast, for UHDepth configuration, the pothole was clearly visible in the point-cloud data and the volume was also identified, but its accuracy was not (necessarily) higher. Algorithm factors tend to change the shape patterns and distributions of errors, but overall accuracy is strongly dependent on the data given to the algorithm.
These results are interpreted by reference to established bridge inspection and inventory guidelines. For example, during inspection and cost estimation, deck lengths need to be estimated within the tolerance of 0.1 [m] [
41]. For deck spacing, TM 5-600 “Bridge Inspection, Maintenance, and Repair” by US Army Corps [
42] specifies that local bearing configuration should be measured to the accuracy of 3 [mm], which can be targeted by the measurement configurations considered in this case study. For potholes, U.S. Federal Highway Administration (FHWA) defines that the potholes with diameter larger than 150 [mm] can be classified into low severity (less than 25 [mm] deep), medium severity (25–50 [mm] deep), and high severity (more than 50 [mm] deep). The pothole with 728.55 [
] volume can be categorized into low severity. The industry-grade UAV with the professional inspection camera has good potential to monitor potholes from their early stages.
3.4. Practical and Educational Lessons Learned
In this research, multiple field tests using UAV platforms were conducted by a group of students at Zhejiang University/University of Illinois Urbana-Champaign Institute (ZJU-UIUC Institute), Zhejiang University. During the mission planning and execution, the group encountered various practical and operational challenges, from which lessons (including educational ones) were learned. This section summarizes those lessons.
Safety of initial navigation (M300): For the DJI RTK300 drone, the flight speed during the initial travel phase (from takeoff to the first waypoint) is fixed at 5 m/s. This default speed may pose a risk when flying in areas with obstacles such as streetlights or flagpoles. To address this issue, this research also planned the path to reach the first waypoint to collect an image of the bridge. In our approach, the first waypoint was set directly above the takeoff position, from which the UAV can navigate safely to the first point to collect an image by a straight path. In this way, the UAV only needs to ascend vertically before entering the mission flight path, where we can specify the desired flight speed.
Need for pausing at each waypoint (M300): In the data collection plans with dense waypoints (like the ones set in this research), images should often be taken after pausing at each waypoint (e.g., for 1 s). The DJI RTK300 with Zenmuse H20T camera requires sufficient time to capture and store multiple images (high-resolution wide-angle image, high-resolution zoom image, and thermal image). When the mission was run without pausing at each waypoint, images were not captured at many waypoints or the images were captured at very different intervals from the planned intervals, compromising the data collection requirements.
Map accuracy issue and need for on-site path re-planning: Our mission planner generates flight paths based on geographic coordinates (latitude and longitude). However, coordinates from online maps often differ from real-world positions, and real-world environments may also change over time (e.g., flight safety issues arose due to the vegetation growth). We should establish a workflow to enable flexible on-site path re-planning and adjustment (useful features of existing software can be actively explored prior to the data collection, assuming the need).
Issue in flying over water surfaces: Since many bridges span rivers, it is often unavoidable for the drone to fly over water during data collection. The M300’s vision-based obstacle avoidance system can sometimes be triggered by water surface reflections. Our team encountered this issue while collecting data at the bridge site around 3–4 p.m., where the light reflection is strong. These times may be better avoided if possible.
Wind conditions: We should choose clear and windless days to ensure high-quality data acquisition. In windy conditions, M300 automatically stabilizes itself, which may cause the captured images to deviate slightly from the intended shooting angles.
High temperature: In Zhejiang Province, the temperature is high during the daytime in summer. When the temperature approached 40 degrees Celsius, we started encountering heat issues, causing sudden interruption of the mission (including malfunction of smartphone devices controlling the UAV). We should pay attention to avoid putting devices (UAV, controller, etc.) under the direct sunlight as much as possible, and also develop flexible time plans to accommodate occasional halt of the mission due to this problem.
While these lessons might be well-known by experts in operating UAVs, these issues were actually encountered by the team of students, leading to mission failure (including UAV crash) and data re-collections. From an educational perspective, these points were identified and reiterated as critical points that need to be taught carefully before going to the site.
4. Conclusions
This research investigated an approach for quantitatively evaluating the impact of different methodologies and configurations of UAV-based image collection on the quality of the collected images and 3D reconstruction data. This research considered the combinations of two UAV platforms, an industry-grade UAV and a consumer-grade UAV, key parameters for UAV path-planning, Ground Sampling Distance (GSD) and image overlap ratios, and SfM algorithm configurations, alignment accuracy and depth-map quality. This research developed an approach for evaluating these measurement methodologies and configurations quantitatively, focusing on trajectory accuracy, point-cloud reconstruction quality, and accuracy of different kinds of geometric measurements relevant to inspection tasks. The trajectory accuracy assessment includes the evaluation of UAV and camera pose control (location and angle), as well as random and systematic errors of GNSS-based camera localization relative to the fixed reference model. Reconstruction quality assessment is based on the shortest distance between the reconstructed and reference point-cloud data, providing insights into the geometric reconstruction accuracy, degree of coverage, and their spatial patterns. For geometric measurements related to inspection tasks, global dimensional measurement, local dimensional measurement, and local volumetric measurement are selected as benchmarks to provide insights into inspection applications. Combining these quality assessments, the proposed approach can provide direct insights into the effects of different UAV-based image collection methodologies on the bridge reality capture process.
The proposed approach is demonstrated through a case study on short-span road bridges in Shanghai. The results indicate that, for the global dimensional measurements (PDF/CDF of reconstruction accuracy and deck length measurement), small consumer-grade UAV can work nearly as well as large industry-grade UAV with different GSDs when the scales are adjusted appropriately. However, the geometric reconstruction accuracy and local measurement accuracy changes significantly depending on the selected hardware and path-planning parameters. For example, M300 UAV was particularly advantageous for the tasks requiring accurate and detailed 3D reconstruction of the local patterns, including pothole volume measurements. The insights into data quality and error assessments at different stages of photogrammetric 3D reconstruction will guide our future planning of reality capture to satisfy the data quality requirements.
Future work includes the establishment of methodologies to estimate and control quality metrics discussed in this research to produce feasible plans that lead to 3D reconstruction data with sufficient quality. Moreover, assessment should be extended to take into account different environmental conditions, tighter flight constraints, more parameters in measurement planning (e.g., zoom camera in M300 was not considered in this research), and more data to ensure generalizability of the findings. Major directions of future investigations along this line include (1) comprehensive characterization of GNSS errors in bridge inspection environments (e.g., dependence on geometry of and proximity to the structure), and (2) establishment of measurement planning or data post-processing methods to minimize the effect of occlusions (maximizing the coverage). The proposed approach can even be extended to other types of infrastructure, such as tunnels and dams, to clarify unique reality capture quality patterns in their domains. These extensions will enhance the applicability and practicality of UAV-based as-built geometric reconstruction as a key step in a broad range of digital-twinning workflows for bridge inspection.
