Article

Experimental and Numerical Analysis of a Test Rig for Structural Testing of a Full-Scale Aircraft Wing

1
Centre for Aeronautics, Cranfield University, Cranfield MK43 0AL, UK
2
Rolls-Royce Plc, B-2, Moor Lane, Derby DE24 8BJ, UK
*
Author to whom correspondence should be addressed.
Aerospace 2026, 13(1), 6; https://doi.org/10.3390/aerospace13010006
Submission received: 13 November 2025 / Revised: 17 December 2025 / Accepted: 18 December 2025 / Published: 22 December 2025
(This article belongs to the Special Issue Advanced Aircraft Structural Design and Applications)

Abstract

Complexities are involved in testing an aircraft structure, including its size, which is essential for determining cost and feasibility. This paper focuses on the novelty of investigating the use of a scaled-down version of a full-scale aircraft wing and a test rig to predict the test rig’s structural response to the wing’s loading condition, thereby improving design and modelling techniques for the test rig. This paper also presents a methodology for sizing the test rig and the aircraft wing to perform structural tests on the wing. Numerical and experimental models subjected to various load cases are compared. This study begins by justifying the use of finite element analysis (FEA) for relevant parts of the test rig. A detailed explanation of the sizing method and its overall effect on the test rig is also provided. The results indicate a substantial similarity between the numerical and experimental models with respect to the stresses and deformation of the test specimen.

1. Introduction

Designing and certifying a large and complex structure, such as an aircraft or its components, can be challenging. The requirements for conducting structural tests on these structures can be complex, particularly in designing a suitable testing facility or test rig. Some associated complexities include high costs and a significant lead time [1]. To overcome these difficulties, different studies [2,3,4,5,6,7,8,9] have represented the prototype (full-scale) structure using a scaled model of the structure. An essential step in product design is the experimentation stage, which validates the theoretical and numerical models [10]. There is an upper limit to applying numerical and theoretical models; thus, an experimental model is required [11]. Hamit and Oktay [11] outlined significant reasons for performing experiments, including verifying numerical models and determining realistic responses to complex loading criteria.
For a scaled model to be considered sufficiently similar to the prototype (original model), certain similarity conditions must be met. These conditions are mathematical relationships between the model and the prototype, describing some properties, such as material properties and dimensions [1]. The similitude theory has been applied across various fields to reduce the cost of experimental verification without compromising the experimental results. Ungbhakorn [12] implemented the similitude method in investigating cross-ply laminate plates subjected to buckling load. The results showed good agreement between predictions based on the similitude theorem and the prototype. The results also showed that, for isotropic models, different materials could be incorporated into the similitude method with high accuracy in predicting the prototype’s response.
Singhatanadgid [13] reported similar results in a study that used the similitude theorem to predict structural behaviour. This study focused on the applicability of scaling to study the response of plates and beams subjected to various static and dynamic load cases and support conditions. The study results showed that the predicted responses from the scaled models precisely matched those of the prototype models. Rezaeepazhand and Yazdi [14] investigated the similarity requirements for composite plates to predict flutter effects. The analytically based study showed that the scaled models could predict the prototype flutter behaviour with high accuracy, matching the results obtained by Singhatanadgid [13].
Rezaeepazhand and Simitses [2] investigate the problem associated with the design of a scaled model to understand scaling laws and the factors that affect its accuracy. The results showed that scaled models can predict the prototype’s behaviour with high accuracy. The results also indicated that scaling laws based on structural similitude for the elastic response can govern the design of small-scale models.
The Buckingham Pi theorem states that the number of independent dimensionless groups equals the difference between the number of variables that make them up and the number of individual dimensions involved [11]. The Buckingham Pi theorem states that the number of dimensionless groups to define a problem equals the number of variables minus the fundamental dimensions [15].
  • List the parameters in the problem and count the total number of parameters.
  • List the primary dimensions for each of the parameters.
  • Set the reduction as the number of primary dimensions and calculate the expected number of pi.
  • Choose the repeating parameters.
  • Create the calculated number of pi.
  • Write the final functional relationship and confirm accuracy.
Another study performed by Jha et al. [16] investigated similarity using validated analytical and experimental models. The results indicated that the use of scaled models could be beneficial in terms of convenience, cost-effectiveness, and time savings. The results also showed that using the Buckingham Pi theorem and similarity conditions yields a strong correlation between the prototype and scaled models for both the numerical and experimental cases. The results also showed that obtaining complete similarity for dynamic tests is difficult. Balawi et al. [9] obtained a similar result in a study investigating scaling laws for beams and plates under static and impact loading. The results showed that the scaled model accurately predicted the prototype behaviour in both the numerical analysis and the experimental test. The results also showed that the prediction accuracy depended on the range of scaling variables used.
The Buckingham Pi theorem was also used by Shehadeh et al. [17] to develop the relationship between the scaled model and the prototype. This study selected the scaled model using three independent scale factors: mass, length, and time. The study results showed that the scaled model accurately predicted the prototype response under static loading.
Adams et al. [8] proposed a scaling law to predict the response of a thin plate structure subjected to vibrations. The method used a sensitivity-based scaling law, such as the Buckingham Pi theorem, without requiring prior knowledge of scaling theory. The results showed good accuracy in comparing the behaviour of the scaled model with that of the prototype. The excellent accuracy was attributed to the model and prototype being in similitude, and to the model remaining a thin-plate structure.
Very little work has been carried out on designing and testing a suitable test rig for testing aircraft components. Despite the test rig’s critical role in the test’s overall accuracy and its limitations, as Kim et al. [18] outlined, most studies do not focus on the test rig. Kim et al. [18] and Ramly et al. [19] also explained the importance of preventing the test rig from deforming during the testing process to maintain accuracy. Jin and Li [20] described the challenges of creating a full-scale crane test rig for experimenting with various loading conditions and discussed the benefits of utilising a scaled model.
This study investigates the possibility of using scaled-down models to enhance the design process for a suitable test rig to study the structural response of a wing. This study will also examine the feasibility of using scaled-down models to predict the structural response of the A320 wing under static and modal loads. Therefore, this study will focus on the impact of scaling on result accuracy by comparing predictions with the finite element analysis (FEA) results. This study will also compare the computational and manufacturing costs to highlight the potential.

2. Methodology

2.1. Dimensional Analysis

The method of repeating variables is applied to scale the test rig and wing, following the steps outlined by Yunus et al. [21]. This involves first selecting the parameters and listing their primary dimensions. Table 1 presents the selected parameters and their primary dimensions. Based on the chosen parameters, the number of primary dimensions (reduction value) equals 3 and 3 repeating parameters were selected. Using the Buckingham-Pi theorem, the number of Π s is, therefore, 4. The repeating parameters are highlighted in Table 1. The final Π s are shown in Equation (1), with Equation (2) to Equation (7) illustrating how the Π s are calculated using the Π 1 as an example.
From Equation (1), which expresses the four Buckingham Pi expressions, Π 4 , it is noticed that displacement and dimensions, such as geometric length, width, and thickness, have a linear relationship. The prototype was uniformly scaled by modifying its geometry by a factor between 100% and 1%, and the analysis was performed under linear-elastic and static loading. These assumptions are defined based on small deformations in the model.
Therefore, the dimension and displacement will be linearly proportional to the scale factor. In this study, stress was held constant for both the prototype and the models. This allows for the use of Π 1 to determine the applied load in the models, keeping the stress constant to study the scaling effect. The applied force exhibits a non-linear relationship with the scale factor. The prototype’s finite element analysis (FEA) was performed to determine specific parameters, including stress and displacement, used in repeated variables methods. The first Buckingham Pi group compares the applied static load to the material’s stiffness, while the second group measures the distribution of mass relative to the structure’s geometric scale. The third group provides a ratio of the applied load to the stress level experienced in the structure. The fourth group provides a geometric ratio.
f F E δ 2 , I δ 5 ρ , F σ δ 2 , δ b
δ a I c F d E e = L a M c L 2 c M d L d T 2 d M e L e T 2 e
L :   a + 2 c + d e = 0
M : c + d + e = 0
T : 2 d 2 e = 0
a = 2 ; c = 0 ; d = 1 ; e = 1
Π 1 = F E δ 2
where F is force, δ is displacement, E is Young’s modulus and L, M, T are mathematical inputs.

2.2. Finite Element Model

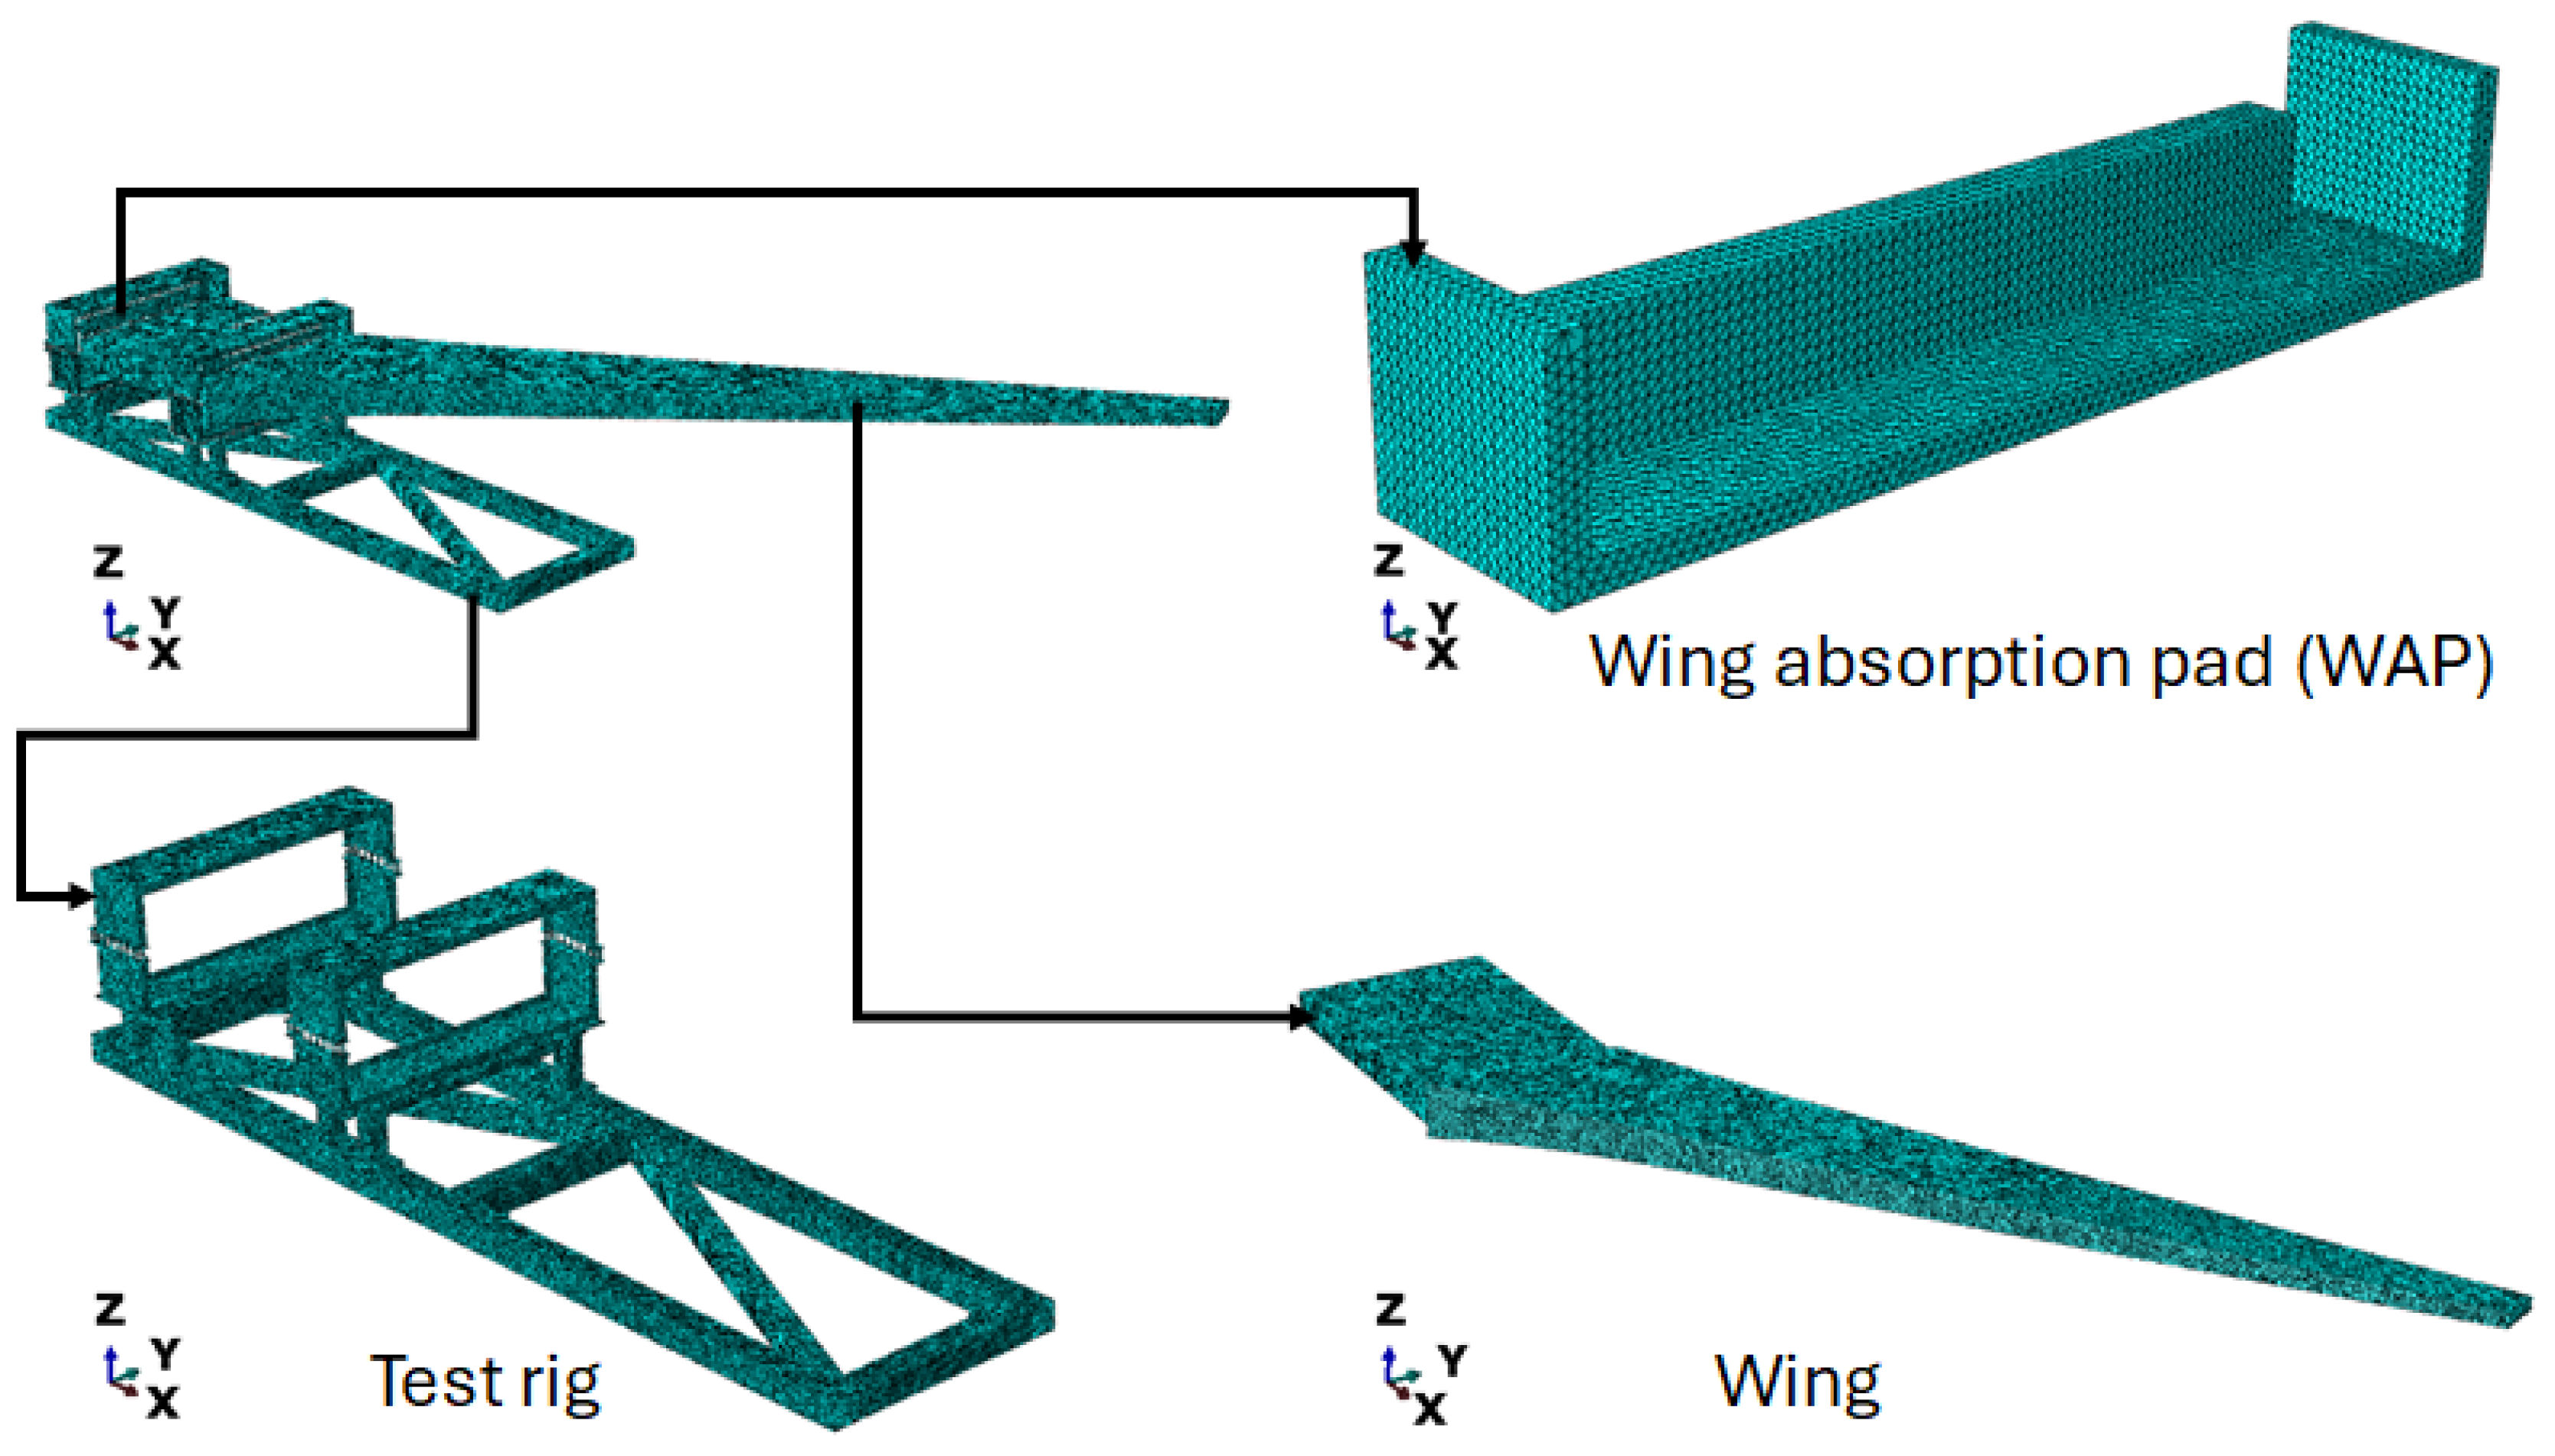
Figure 1 shows an assembly of the test setup, highlighting the different parts, while Figure 2 presents the meshed assembly, highlighting the different parts. The finite element analysis (FEA) model comprises three components (Figure 1): the test rig, the wing, and the wing absorption pad (WAP). The analysis was performed using ABAQUS CAE. The test rig holds the wing in place during the experiment, thereby defining the boundary condition locations shown in Figure 1. The WAP protects the wing at the interface between the wing and the test rig. The load is applied as a concentrated load on the wing, as shown in Figure 1. The material properties of steel (Table 2) were used for the test rig, aluminium (Table 3) for the wing, and plywood (Table 4) for the WAP. For this study, the nonlinear behaviour of the structures is ignored; therefore, only the linear material properties are implemented.
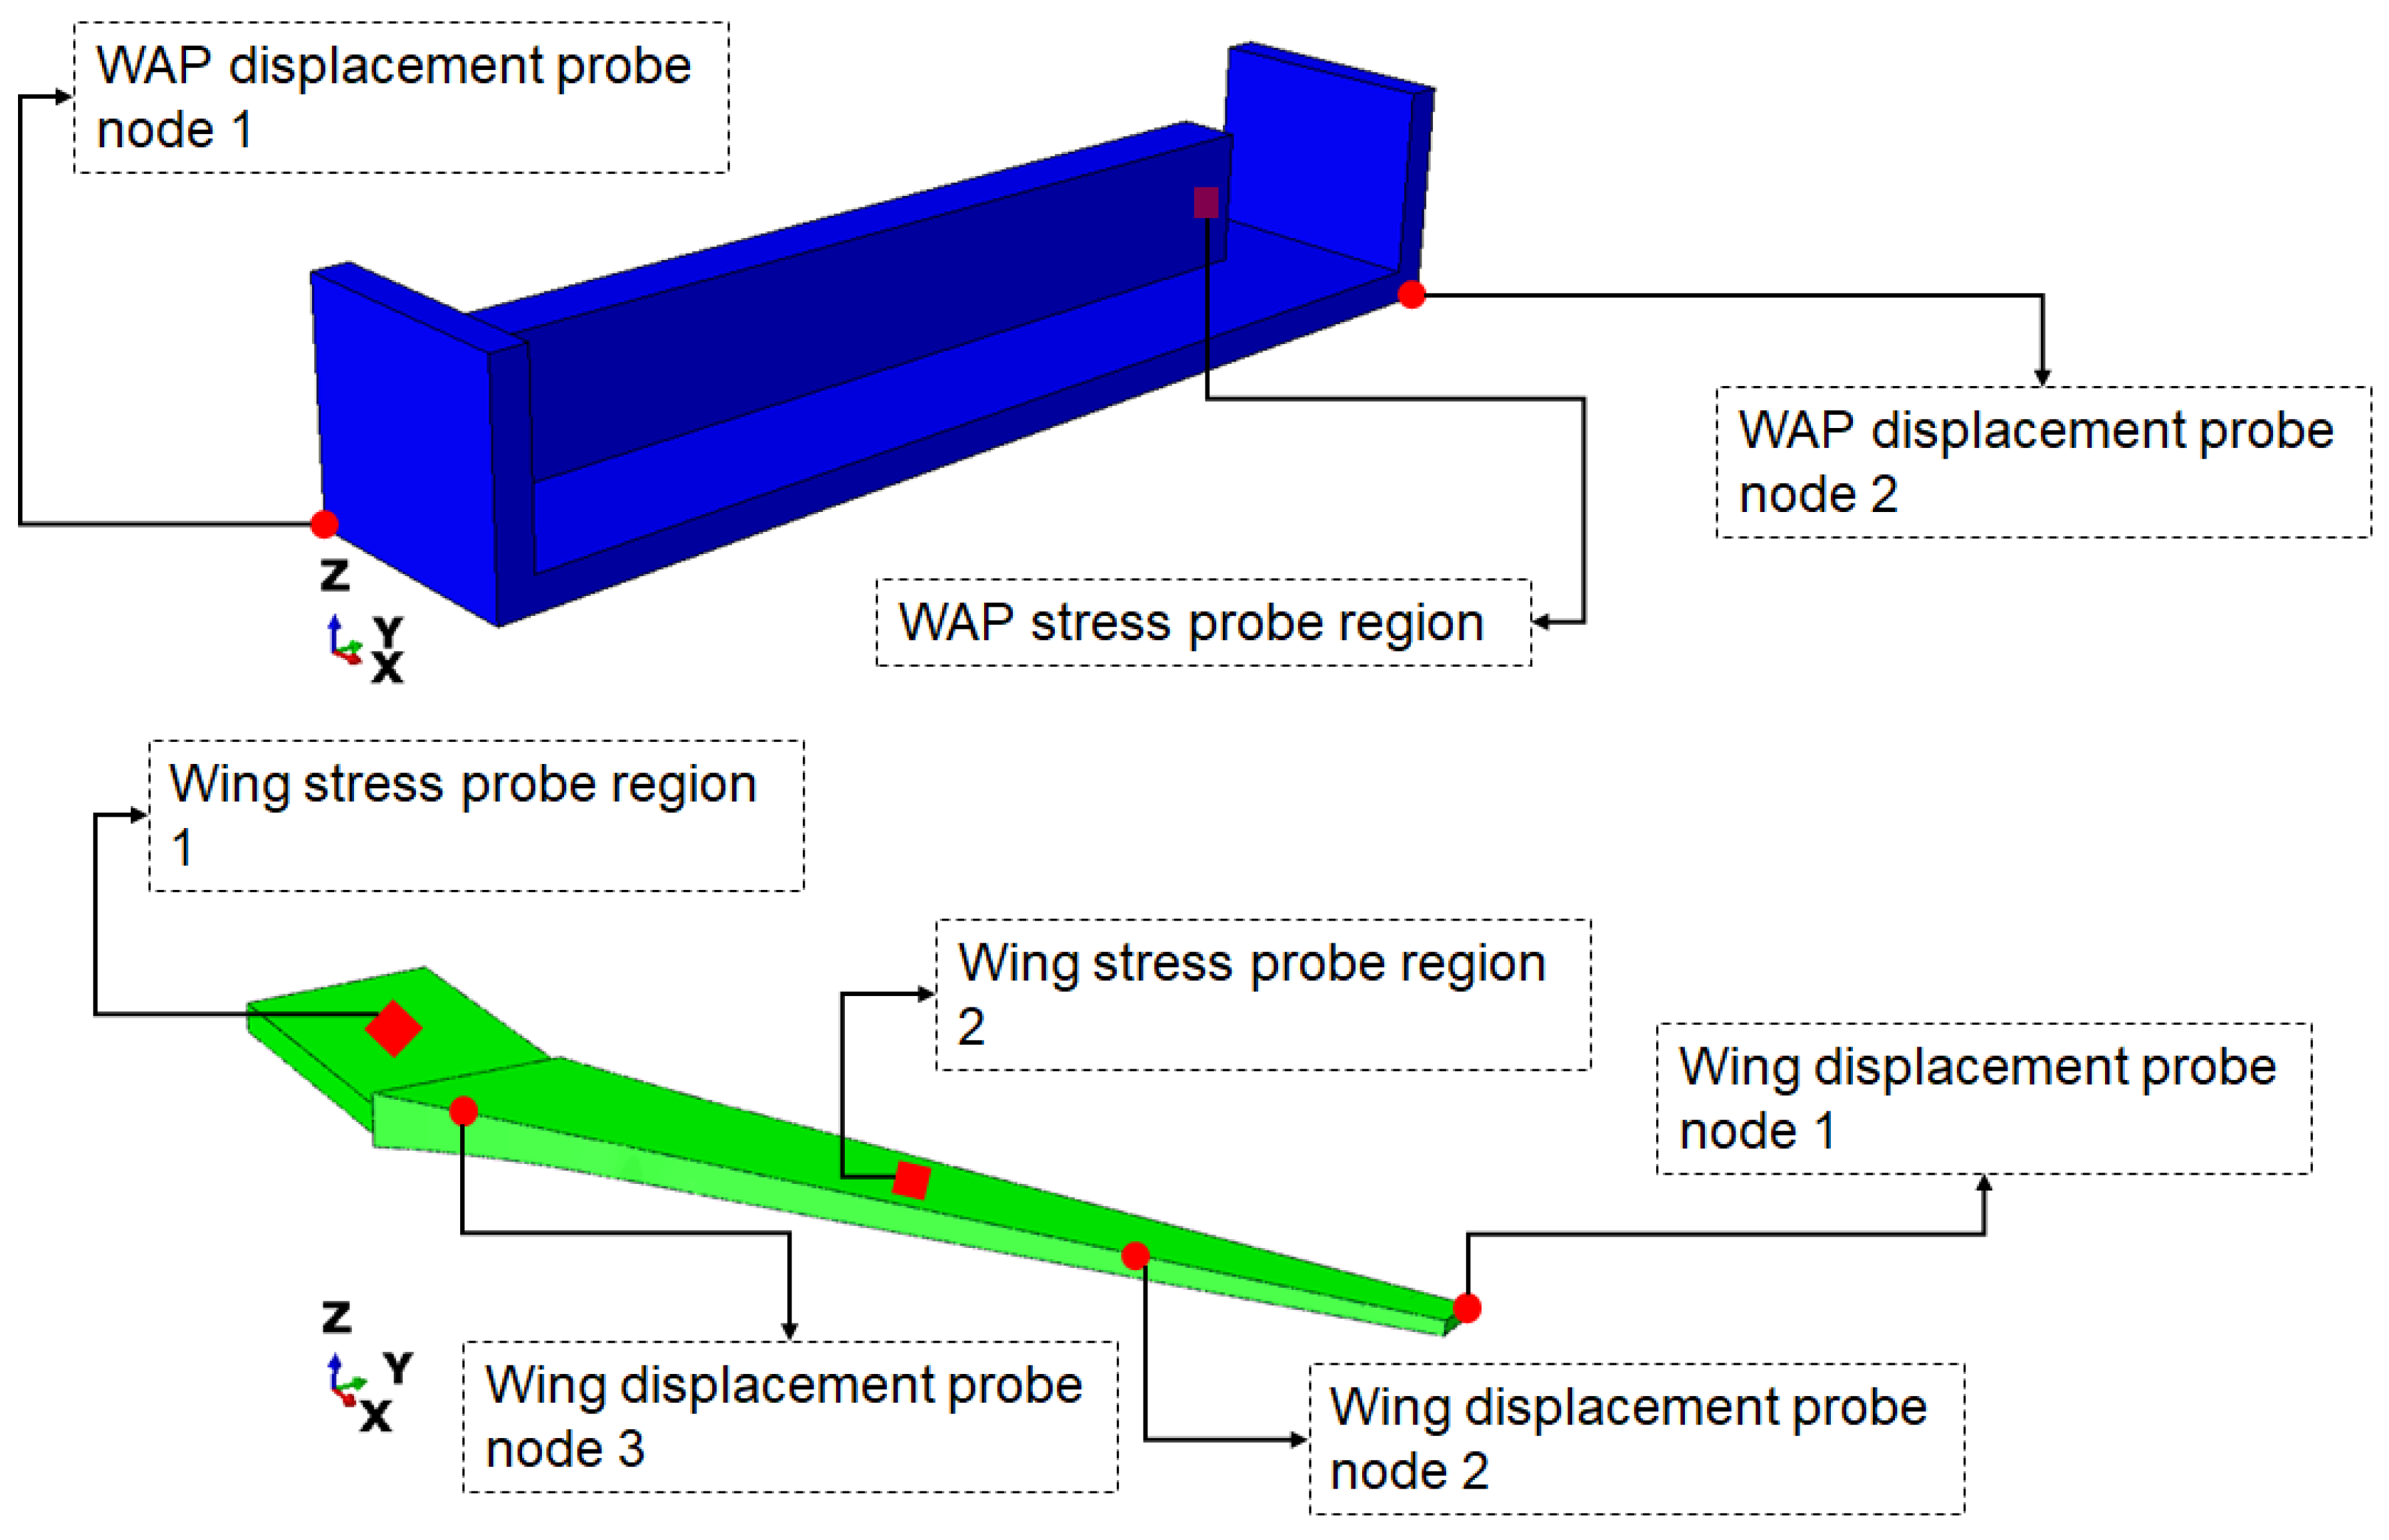
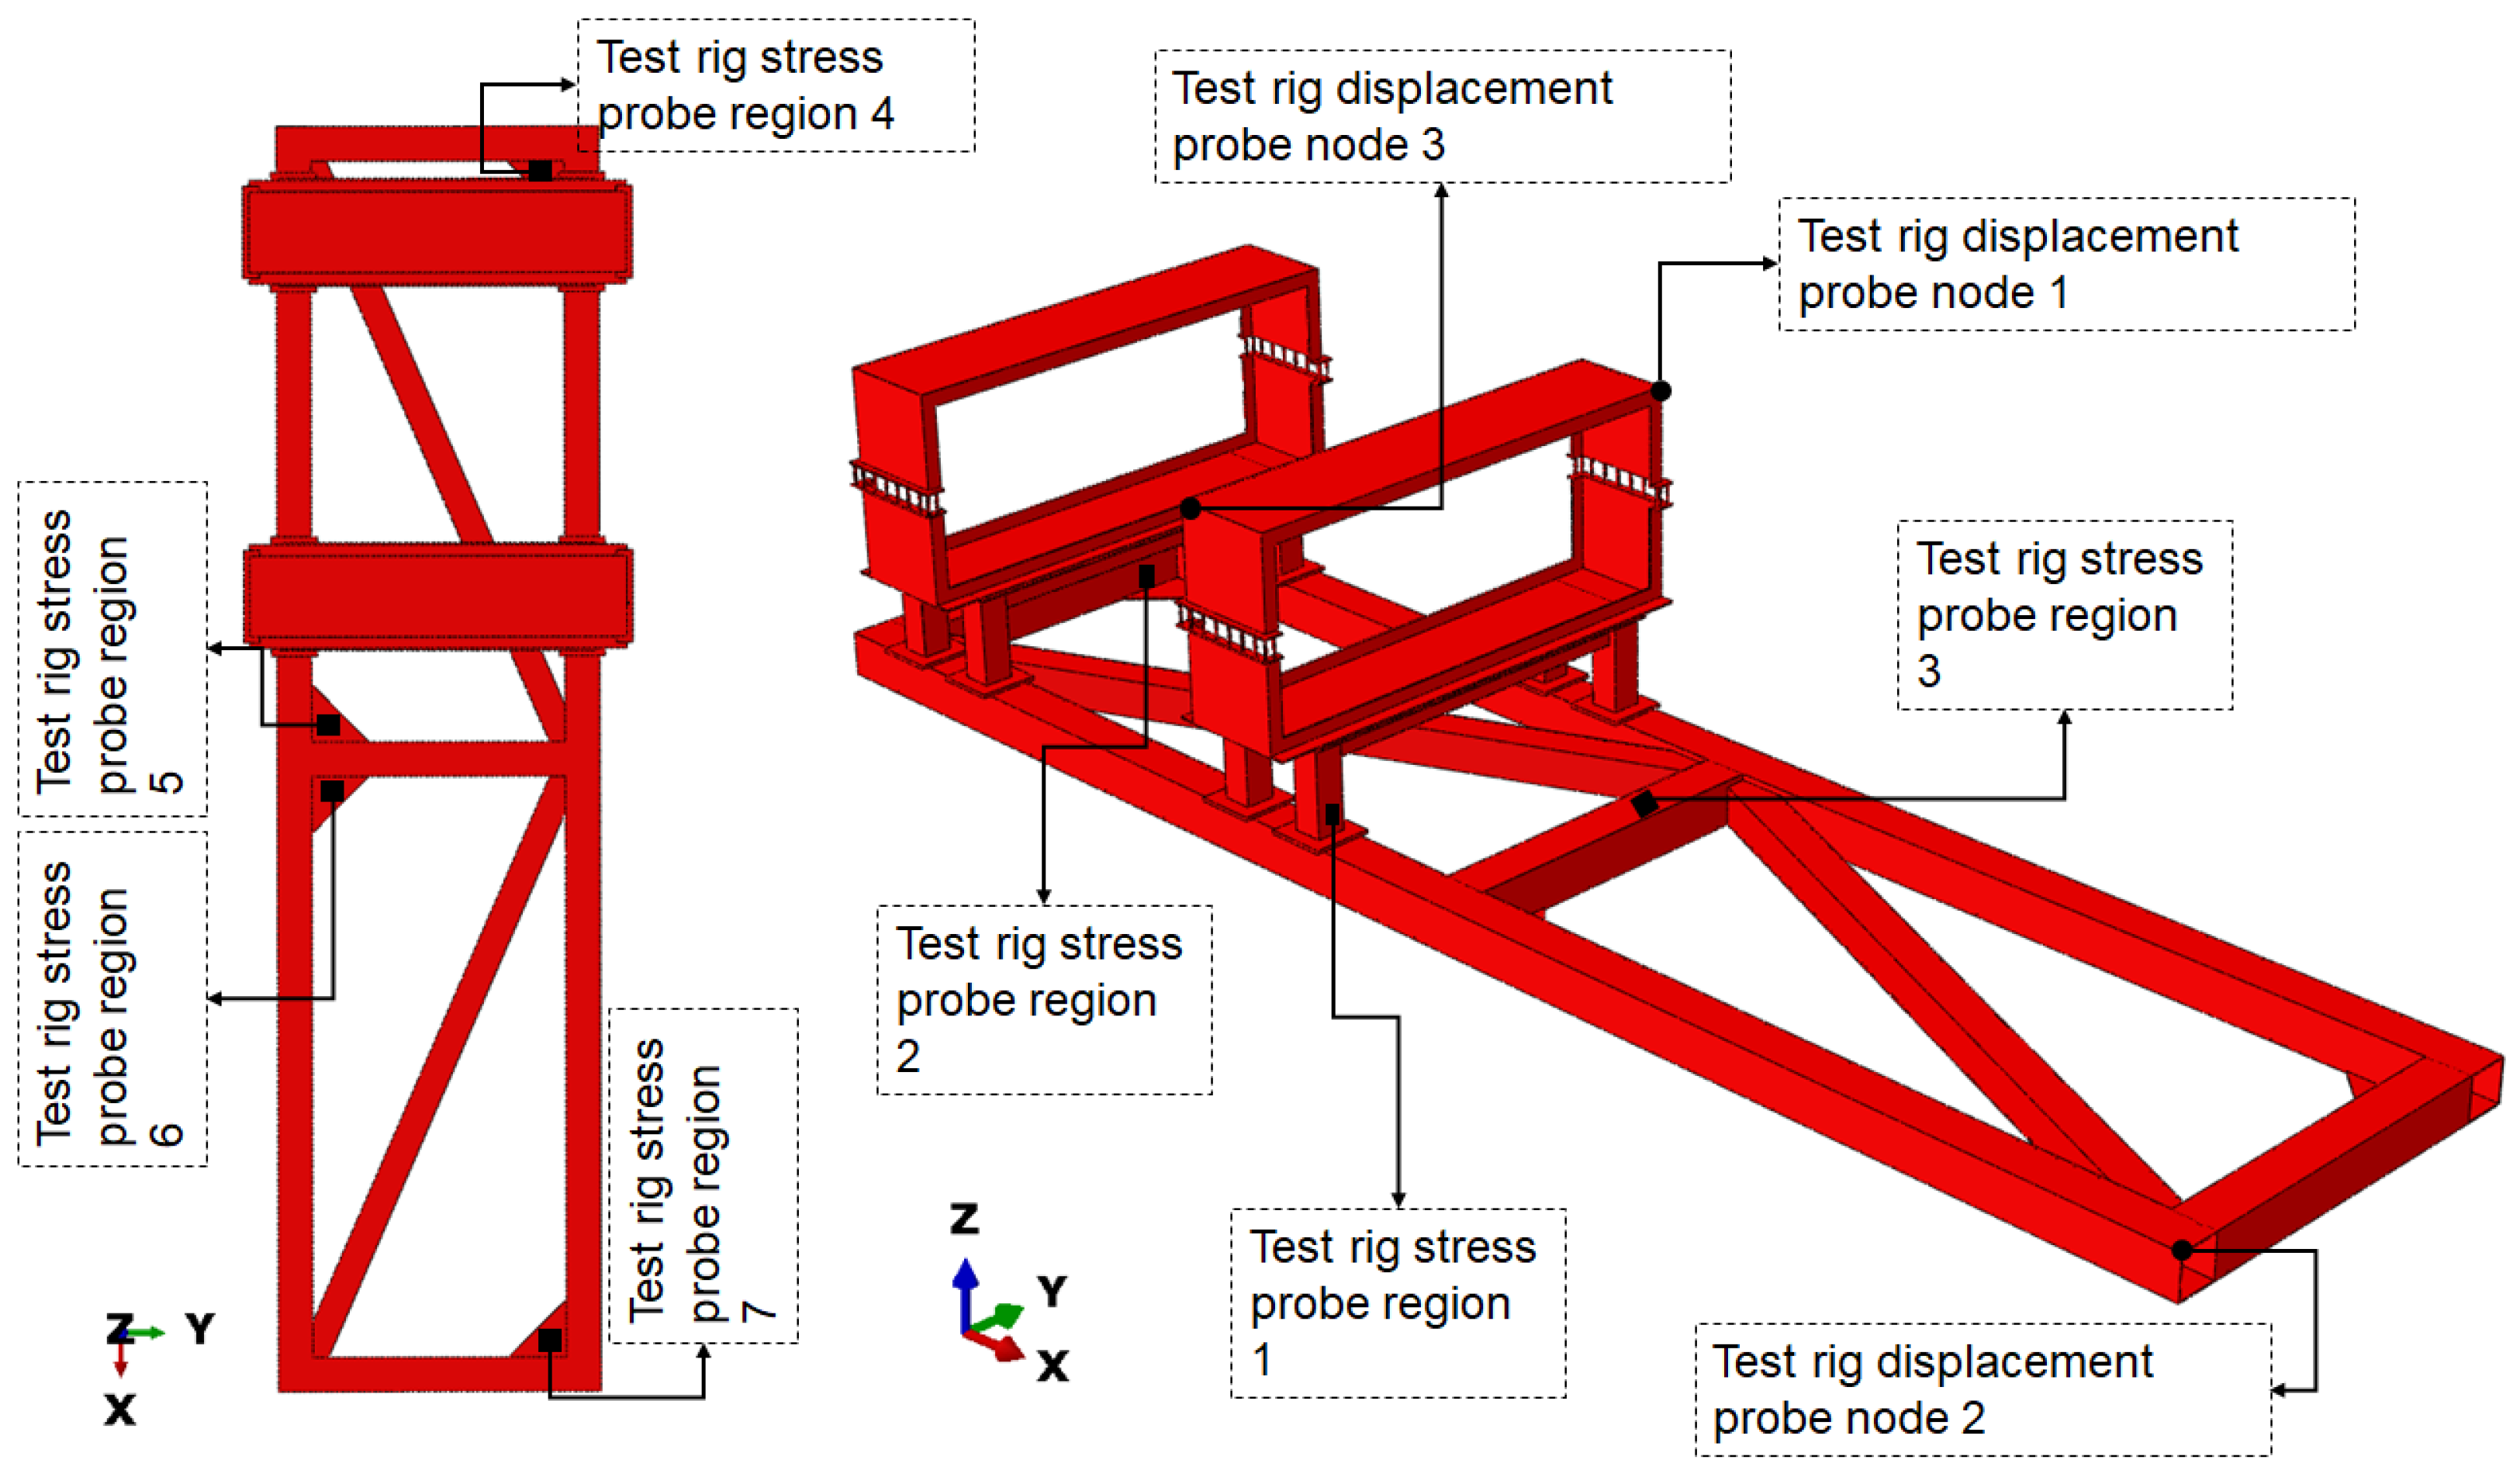
The tie constraint was implemented to simulate perfect bonding between the WAP and the test rig of the test specimen. A frictionless tangential behaviour was used to simulate the contact interaction between the wing and the WAP, as well as between the wing and the test rig [22,23,24]. The element type of C3D10 was used and the mesh size was selected based on the results of a mesh sensitivity test. The mesh sensitivity test was performed by first reducing the mesh size only on the WAP and then probing the stress values and displacements at specific locations on the test specimen. This process was repeated twice, modifying the mesh size of the test rig and the wing, respectively, to investigate the effect of mesh size on the measured stress and displacement. A mesh size of 30 mm was used for the stress values across the test specimen. Based on this, a mesh size of 40 mm was selected for the WAP, and 30 mm was chosen for the test rig. Figure 3 and Figure 4 show the locations probed for stress and displacement for this study, respectively. The stress-probe regions were partition surfaces, whereas the displacement-probe regions were nodes.
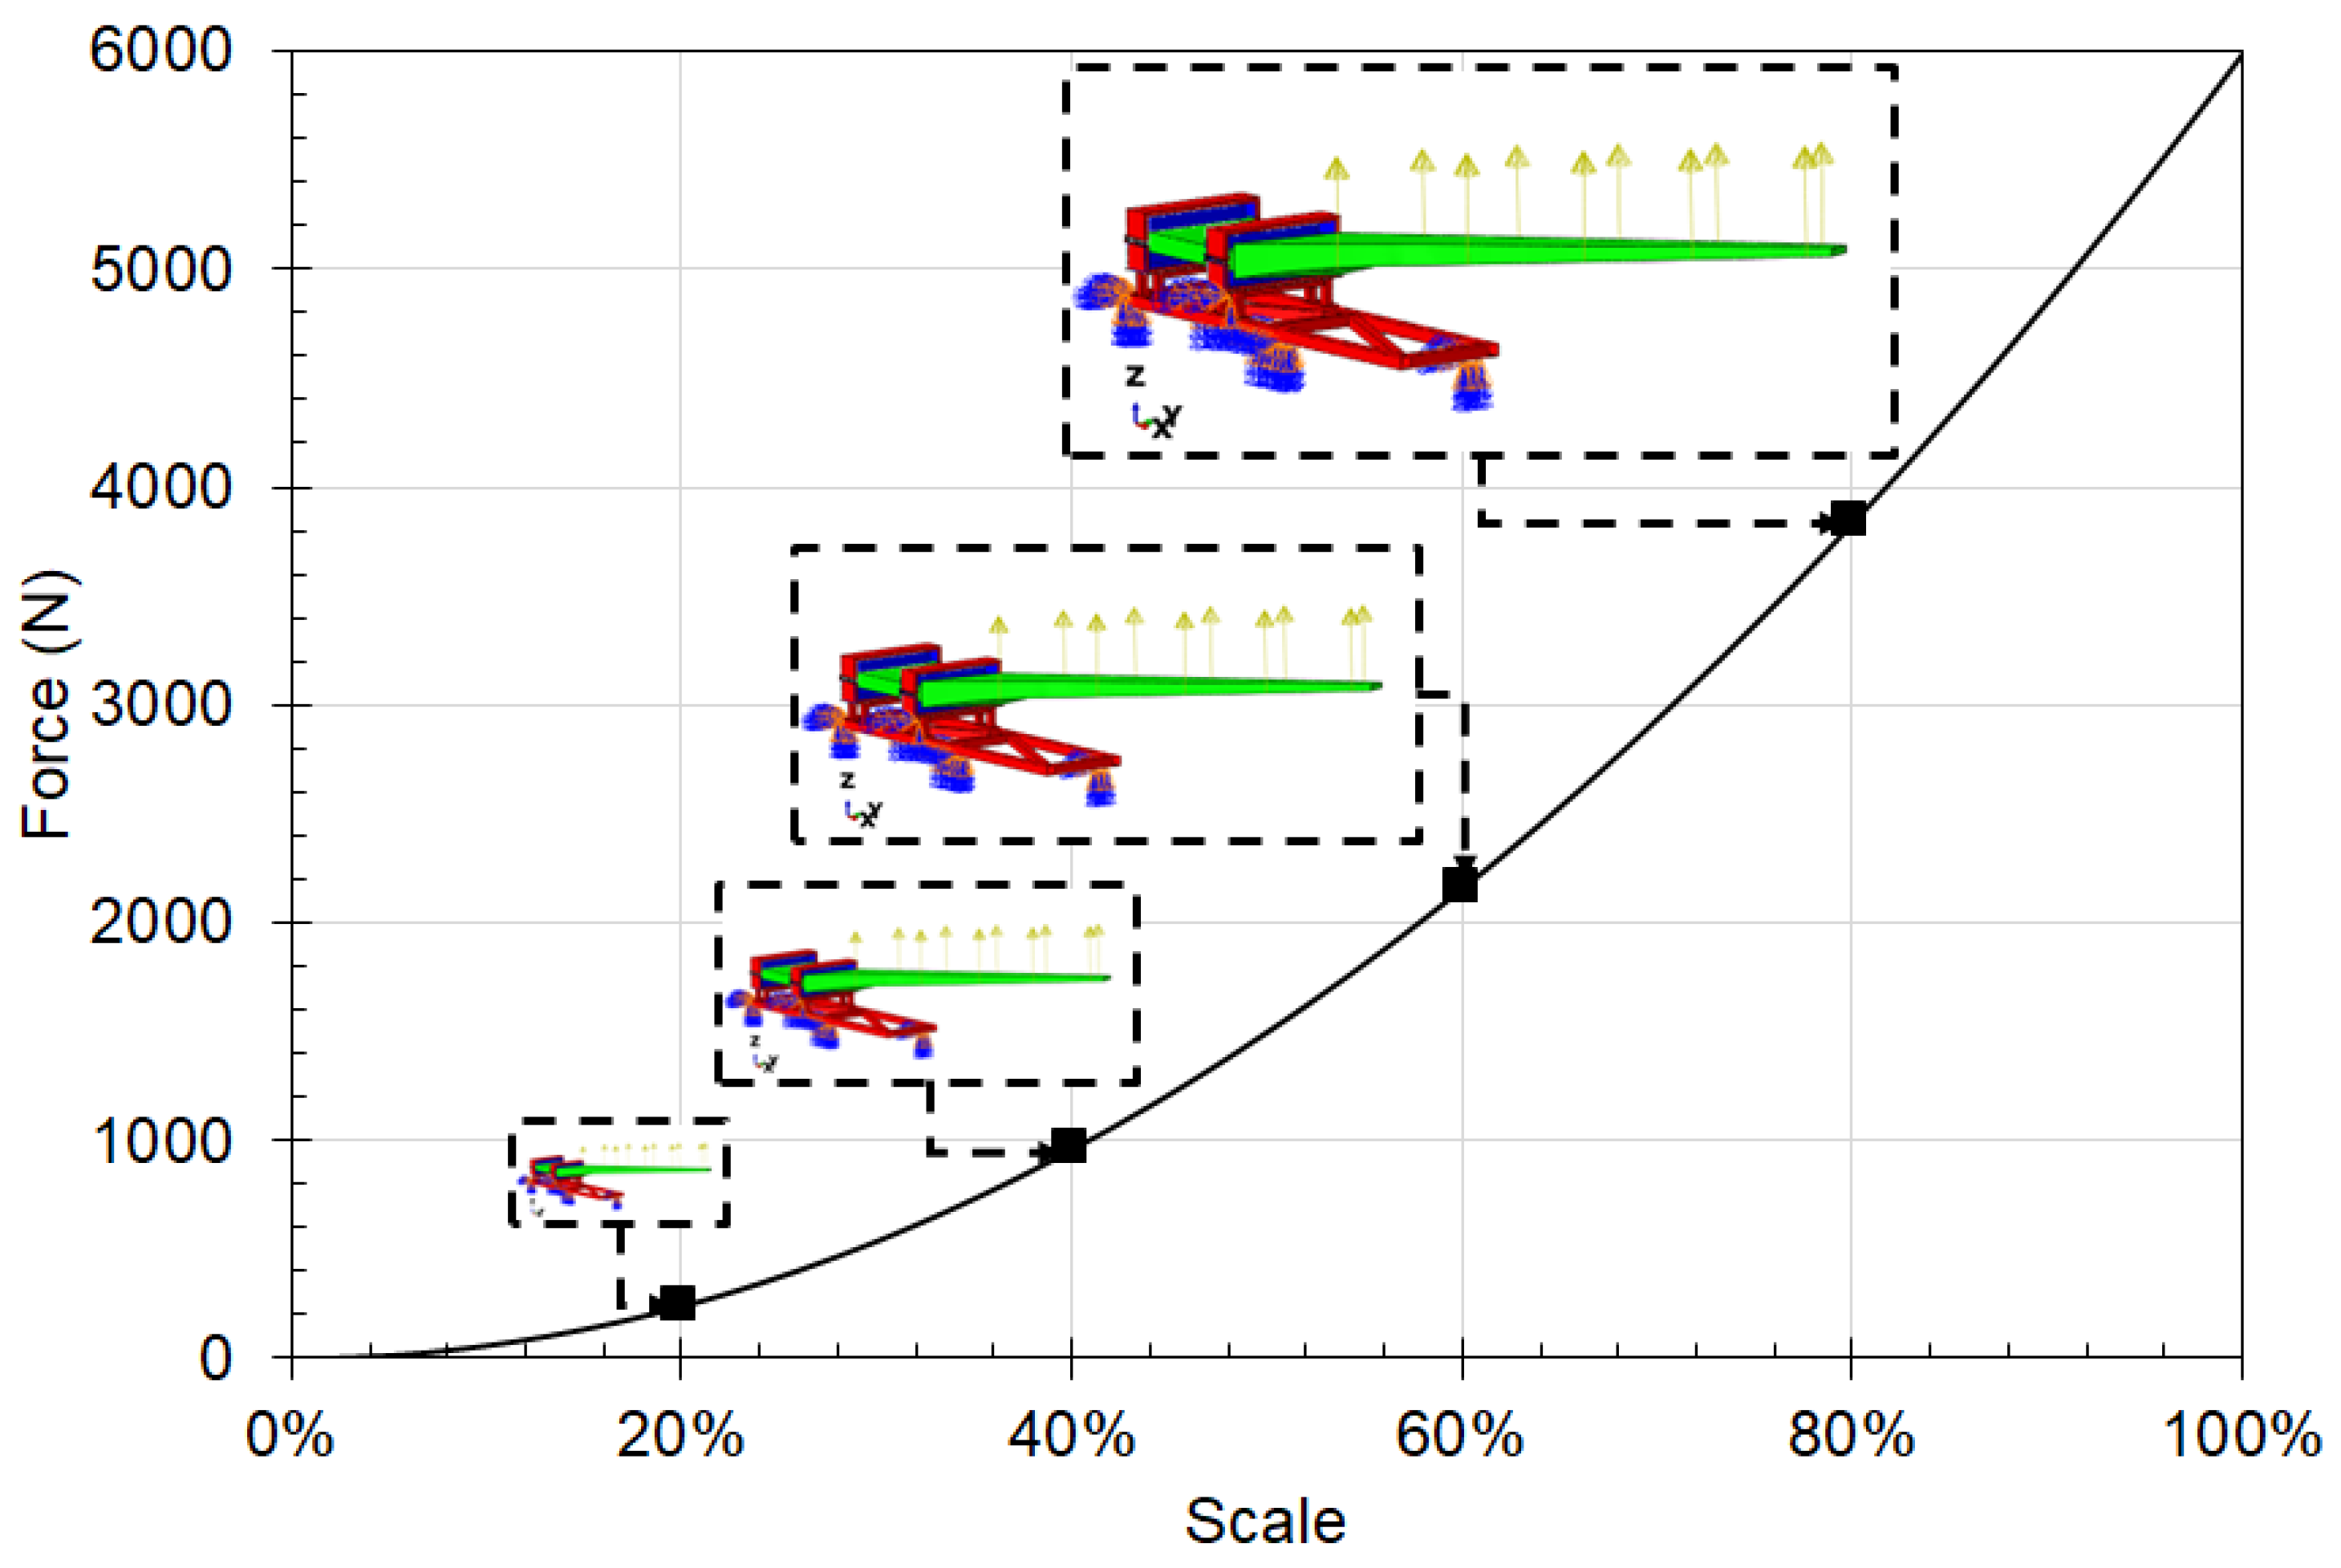
For the prototype load application, a random 6 kN force was applied at the load locations, as shown in Figure 1 for the static test. This load was modified using the Buckingham-Pi groups formulated for the scaled models. A graph illustrating the relationship between the applied load and the scale size is shown in Figure 5. These force values ensure that the stress on the test specimen remains constant for the different scale sizes. A fixed boundary condition was applied to the base of the test rig in the regions. Figure 1 shows the boundary location region for both the static and modal tests.

3. Results

3.1. Mesh Sensitivity Test

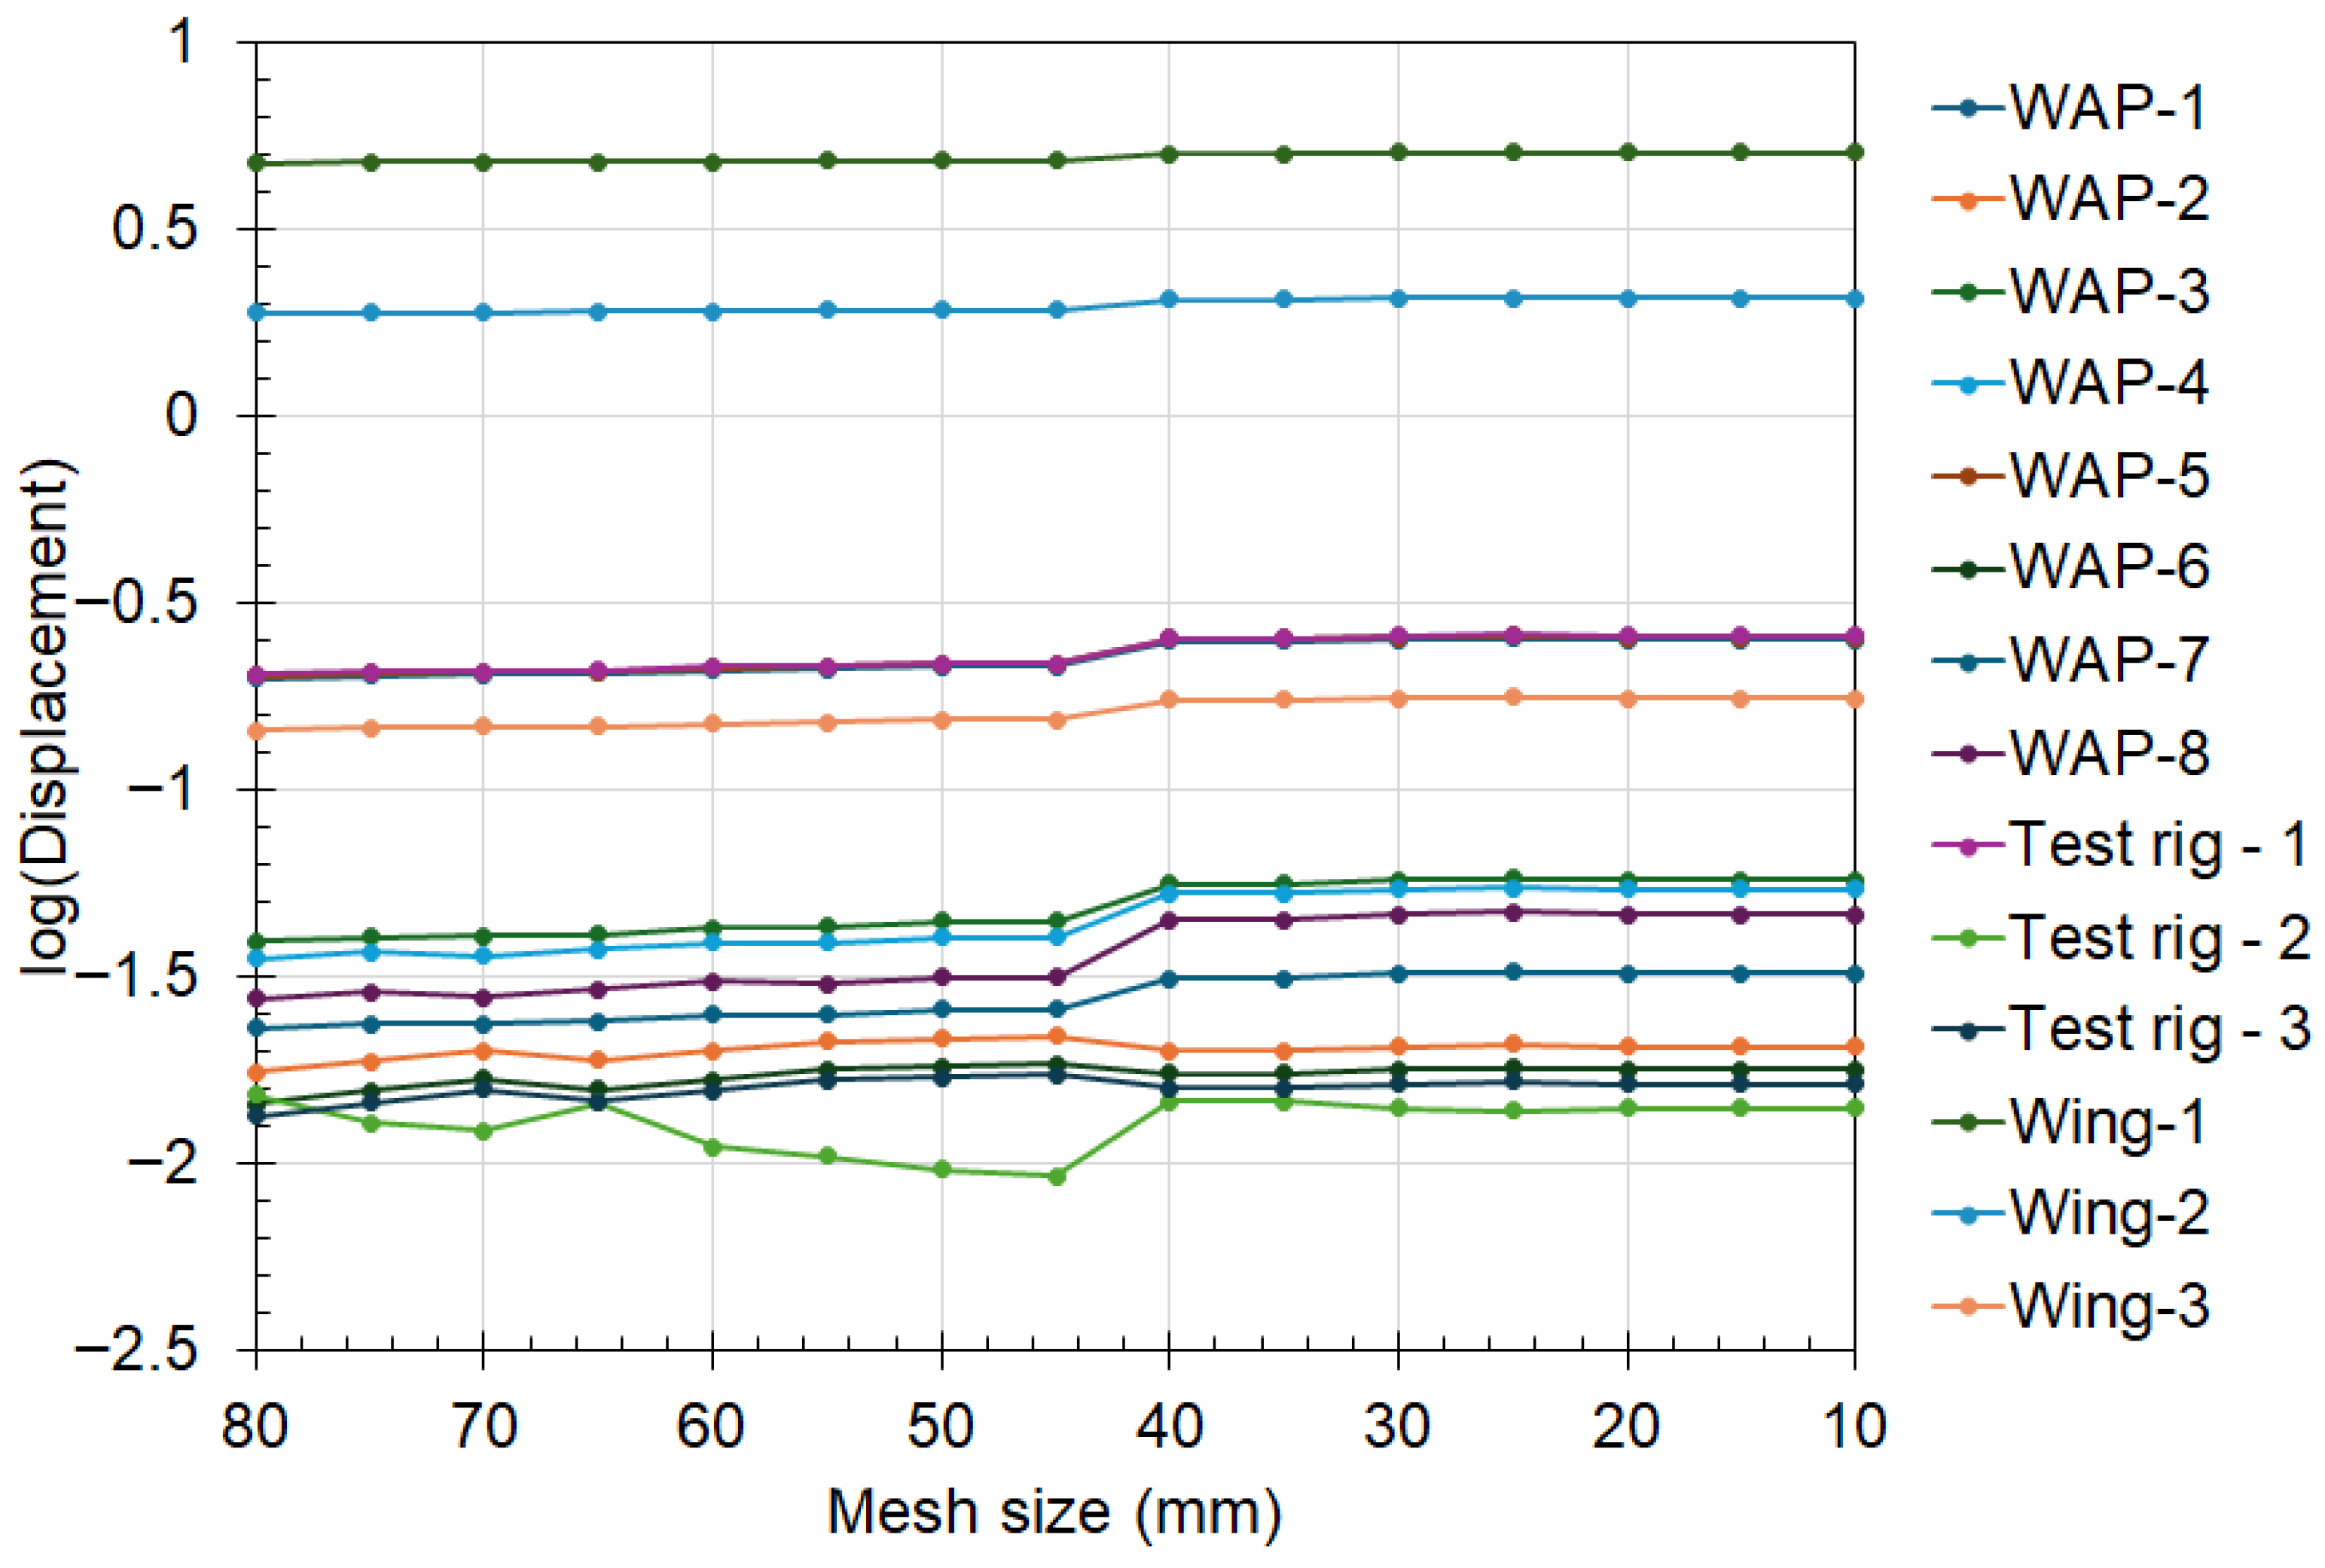
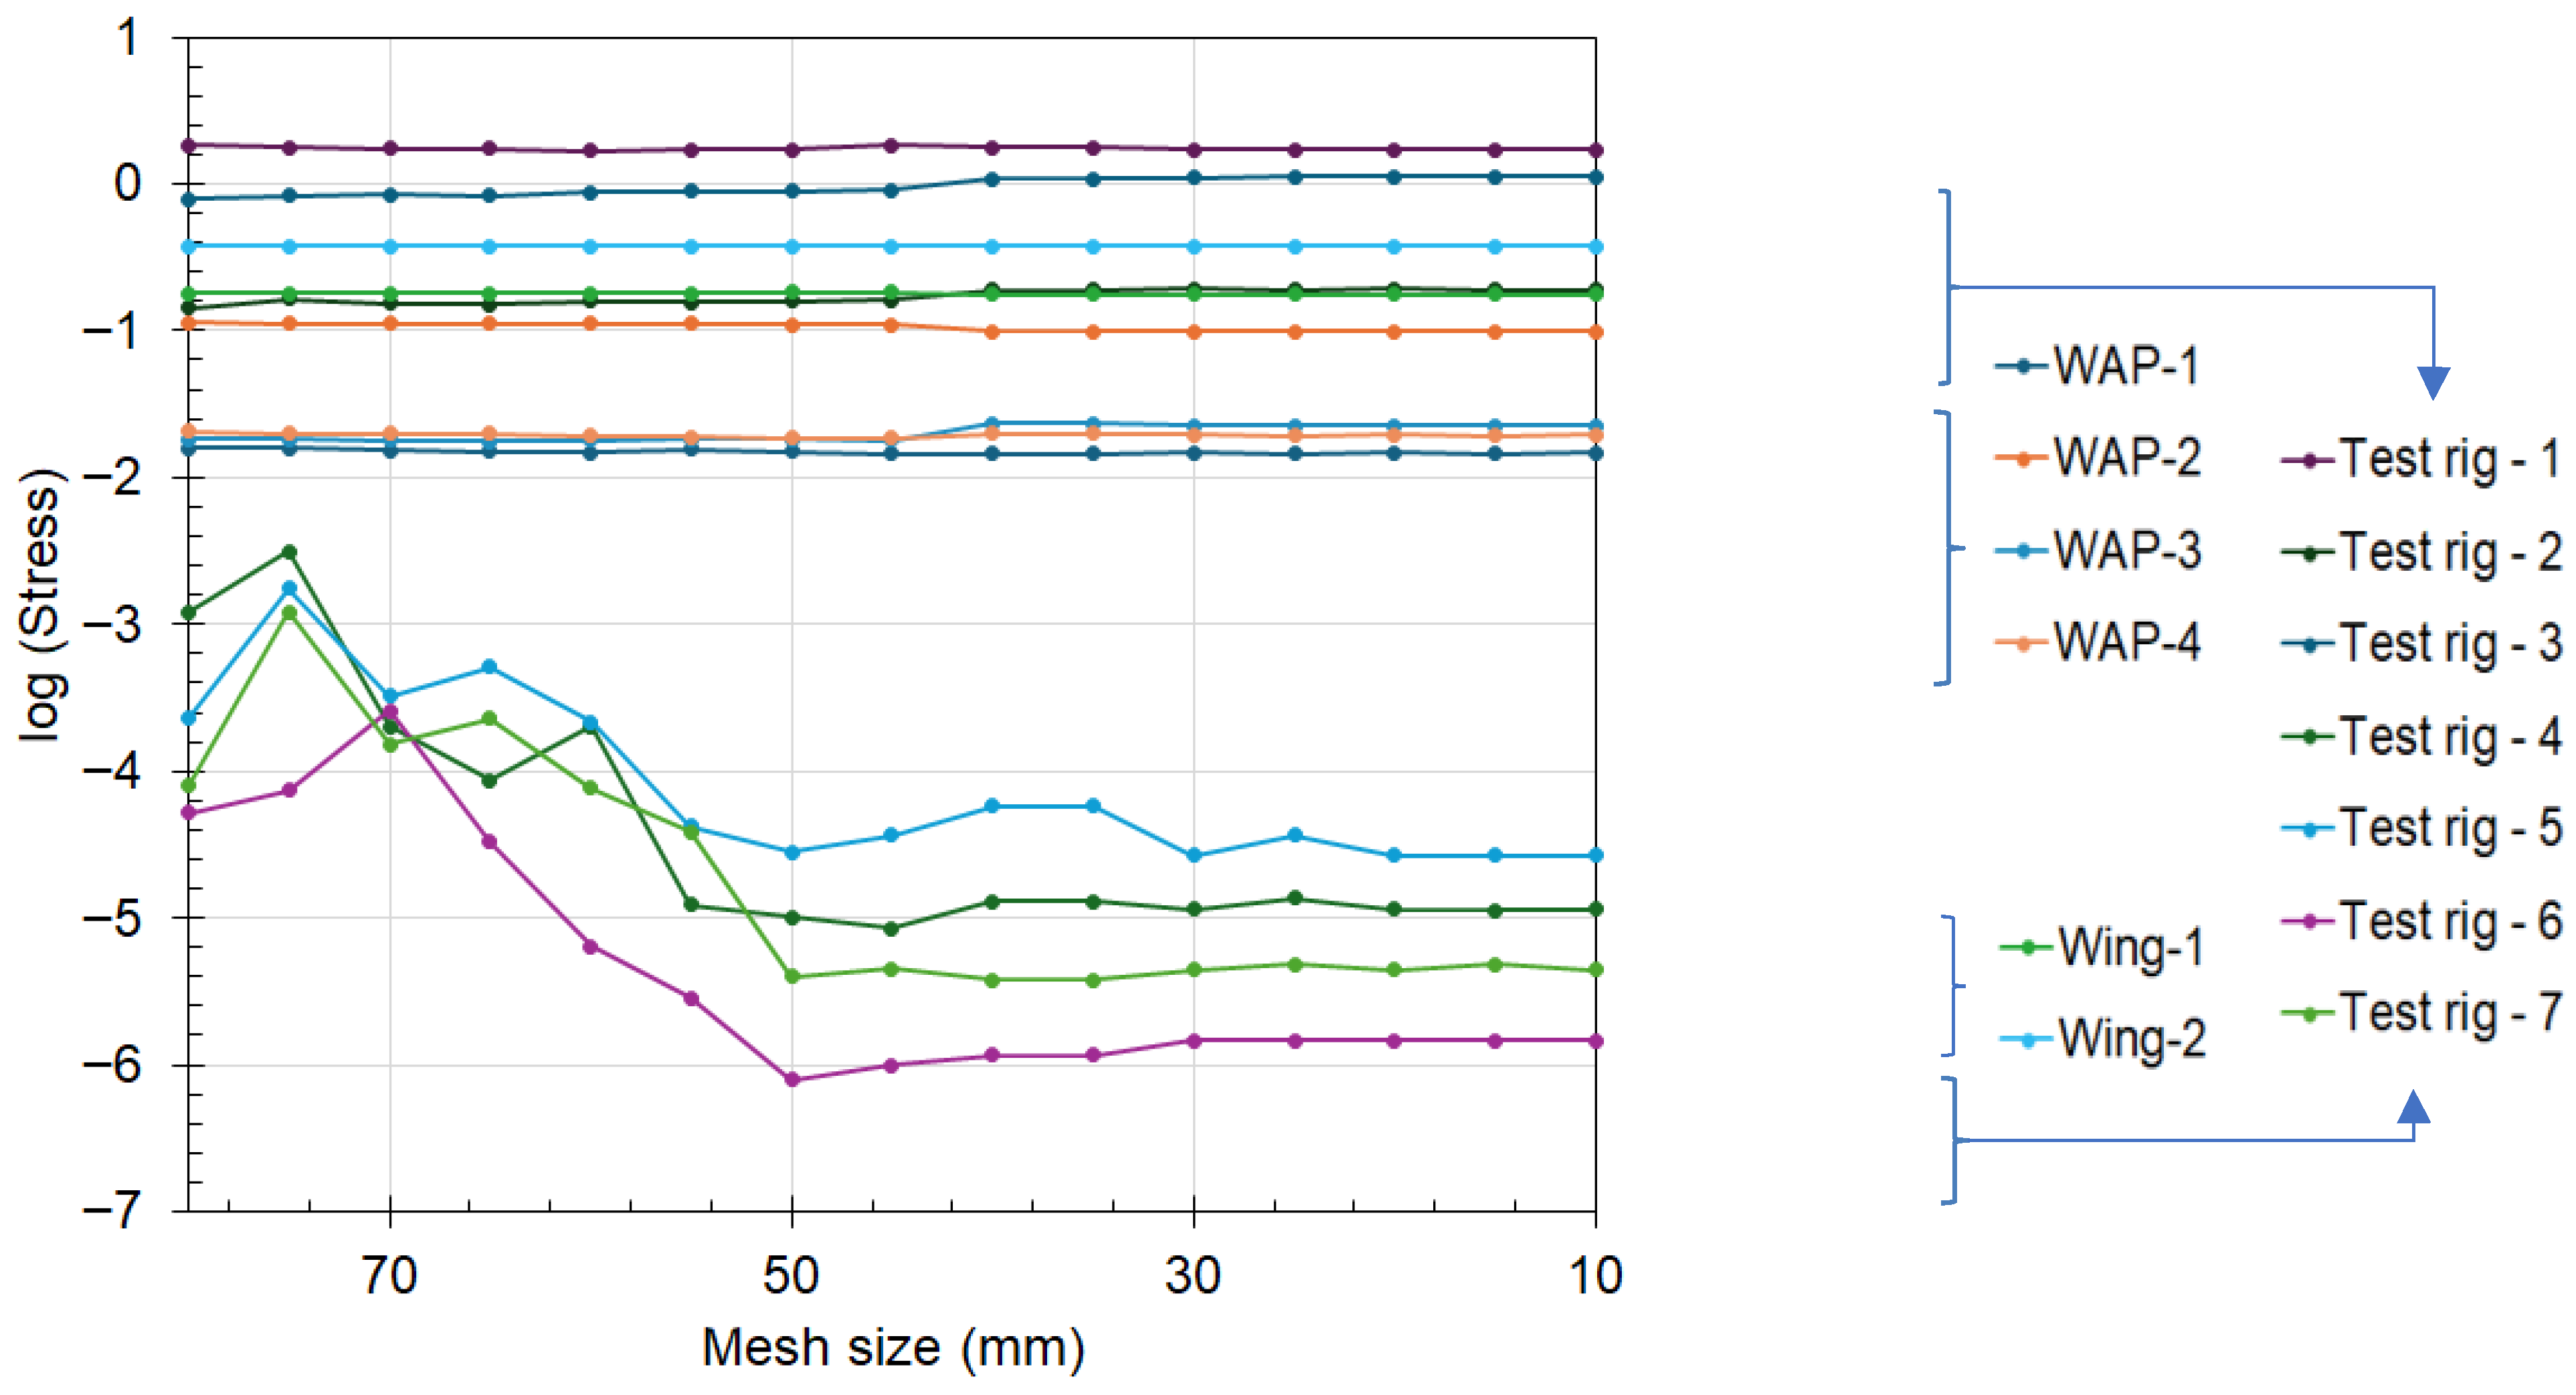
The effect of the mesh on the FEA results was analysed first to accurately select the appropriate mesh size for the different parts of the test specimen. The results showed that the WAP’s mesh size had little to no effect on the results. The results (shown in Figure 6) also indicate that the displacement of the test specimen converged towards a constant value as the mesh size approached 40 mm and below for the test rig. This convergence was noticed at a mesh size of 30 mm for the stress values across the test specimen (see Figure 7). Based on this, a mesh size of 40 mm was selected for the WAP, and 30 mm was chosen for the test rig. For this study, convergence was achieved when the difference was less than 2% across successive mesh sizes, and the mesh generation was random based on the selected geometry.
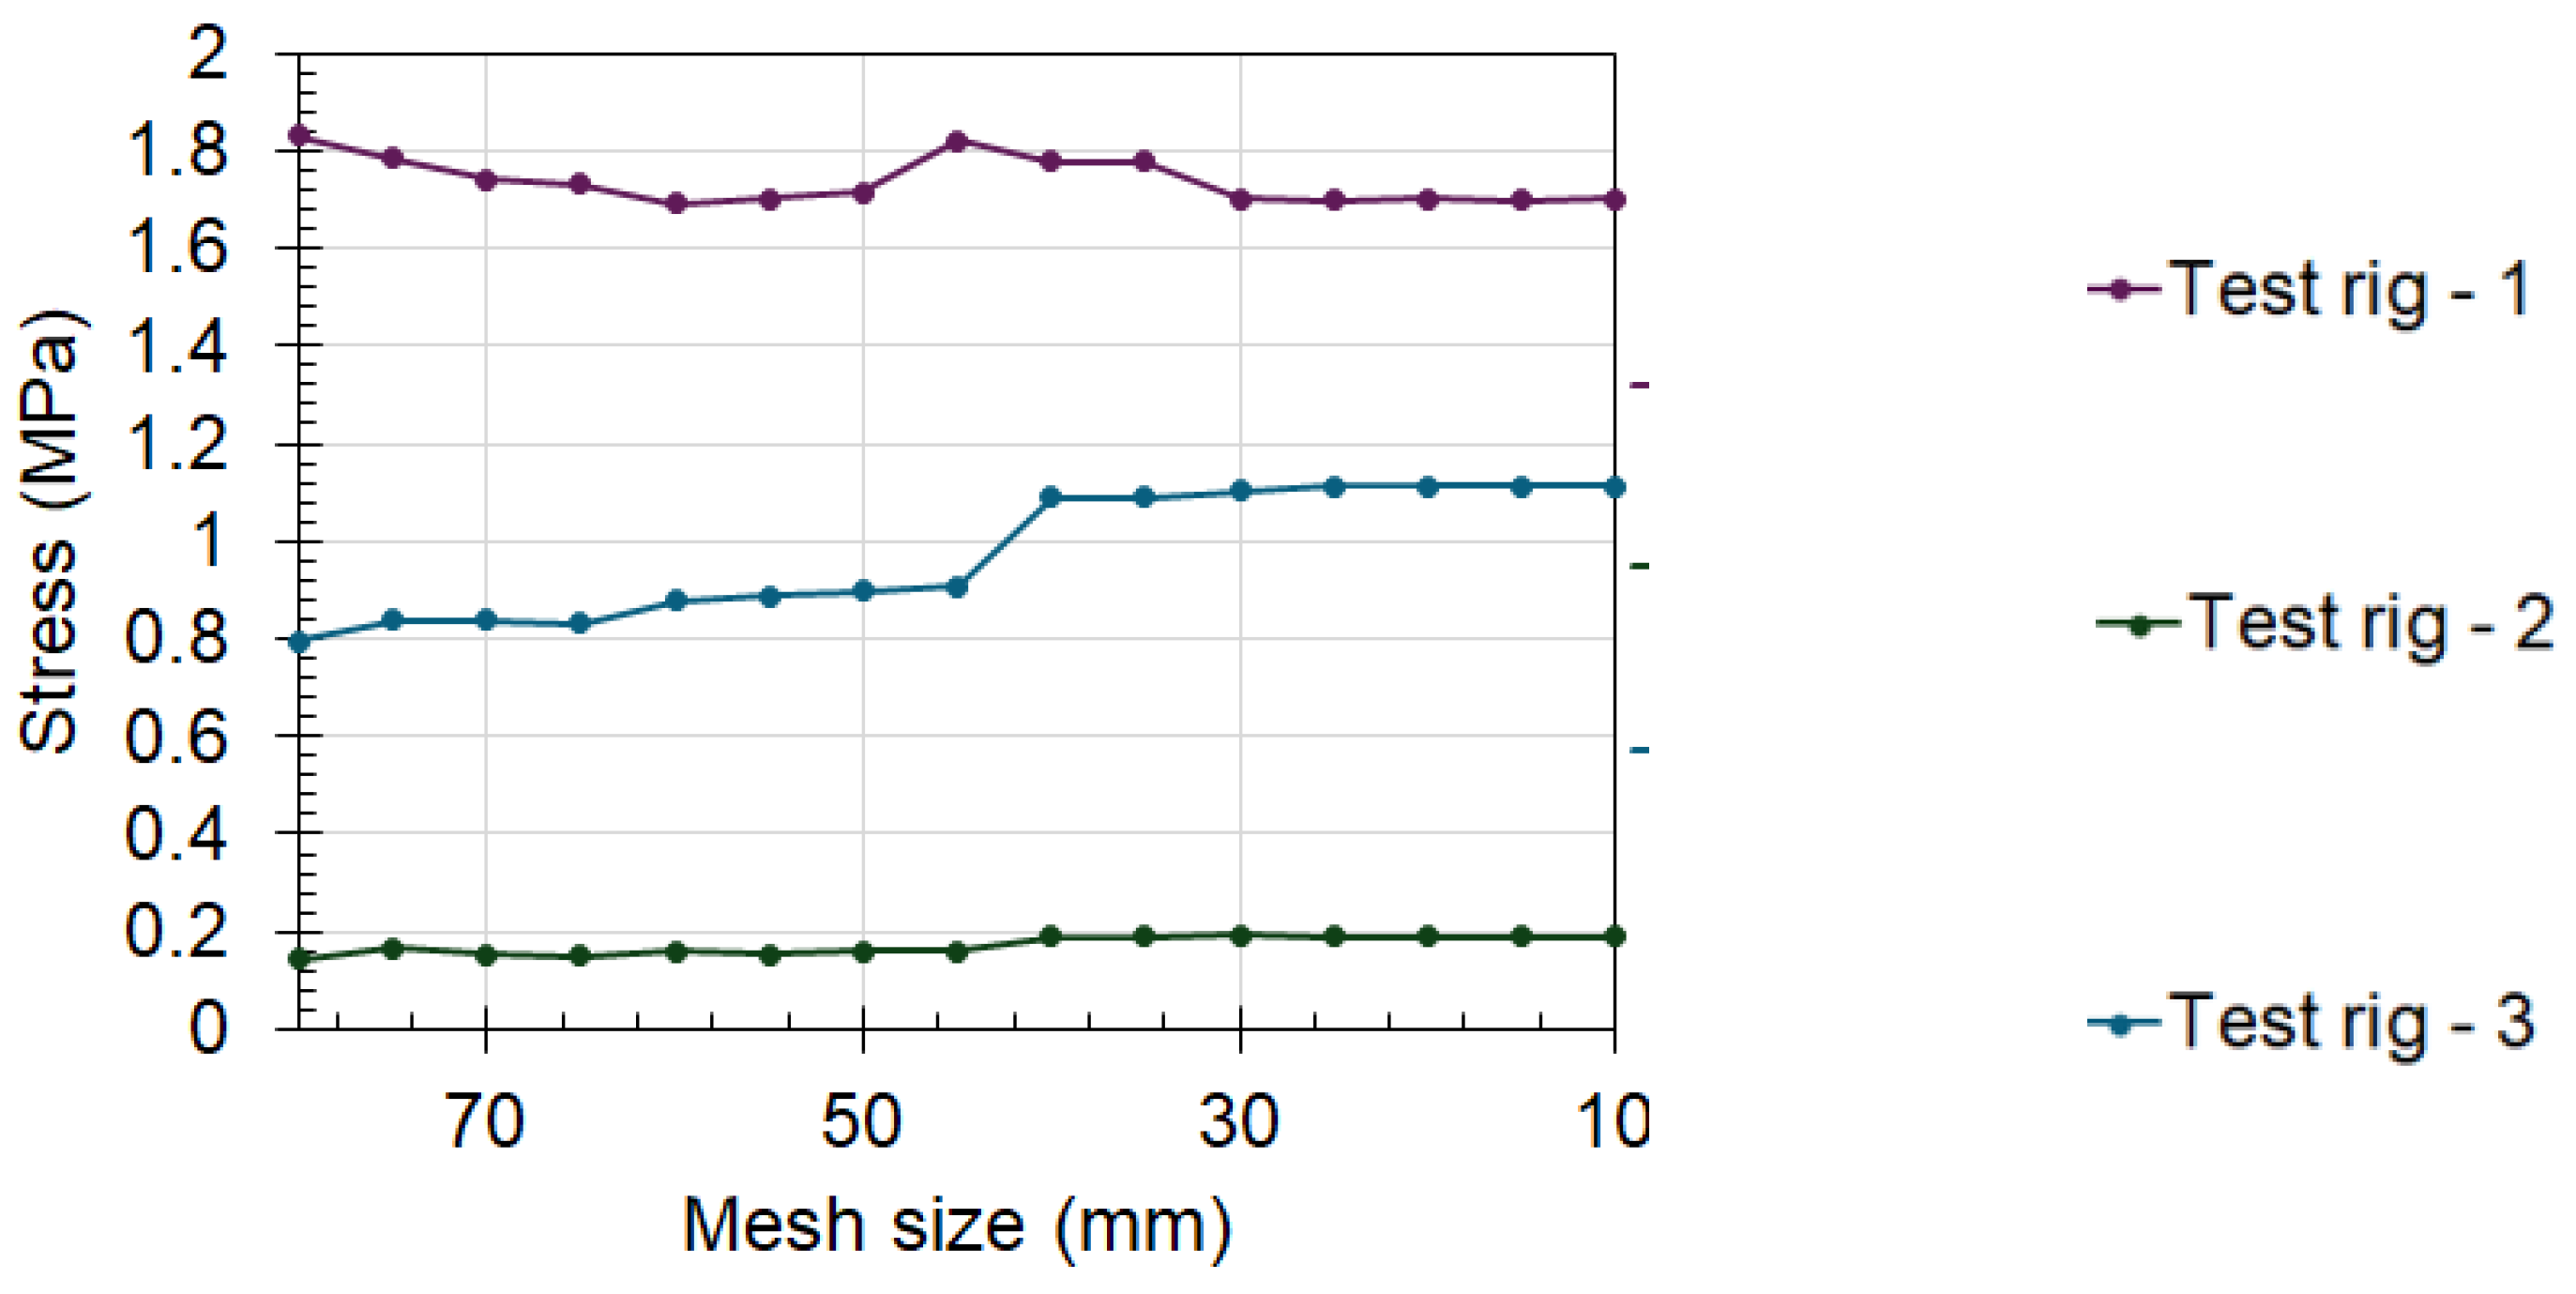
The mesh study was repeated on the wing, and the results showed that the modification affects only the wing’s stresses and deformations. That is, modifying the wing mesh size did not affect the results (probed displacement and stress values) obtained for the WAP and the test rig. The mesh size for the wing was selected as 200 mm, at which point the wing’s probe values converged. These mesh sizes are scaled uniformly with respect to the test specimen geometry throughout this study. This resulted in maintaining the problem size and, thus, keeping the computational cost similar (see Figure 7 and Figure 8).

3.2. Modal Analysis Experimental Validation

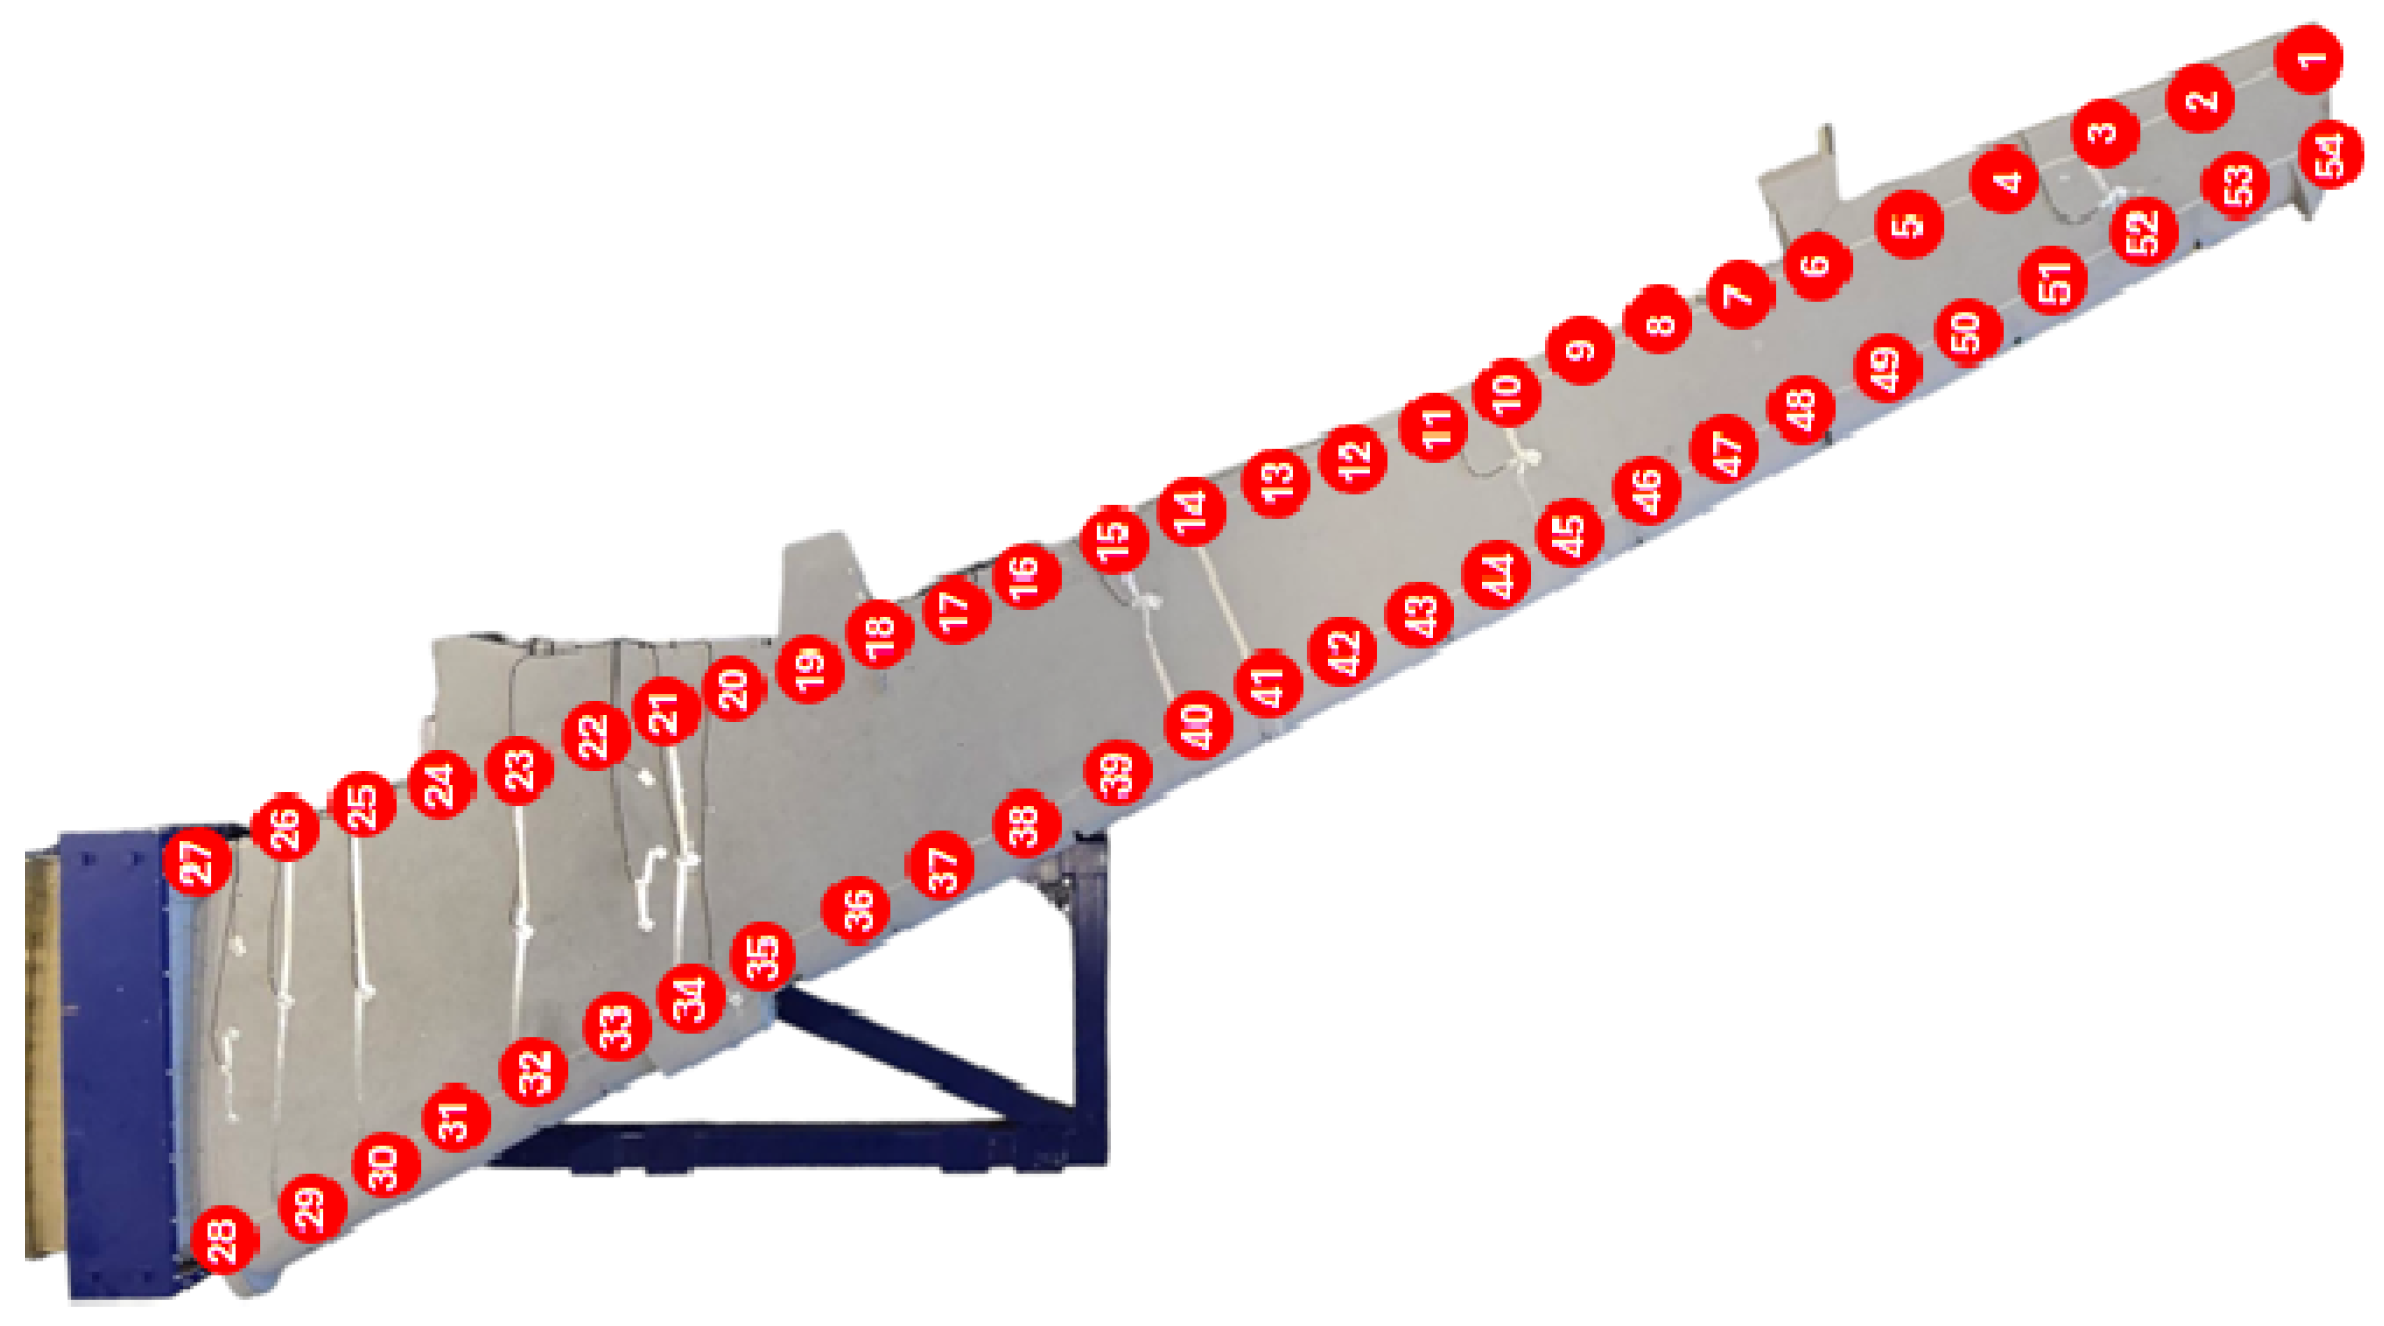
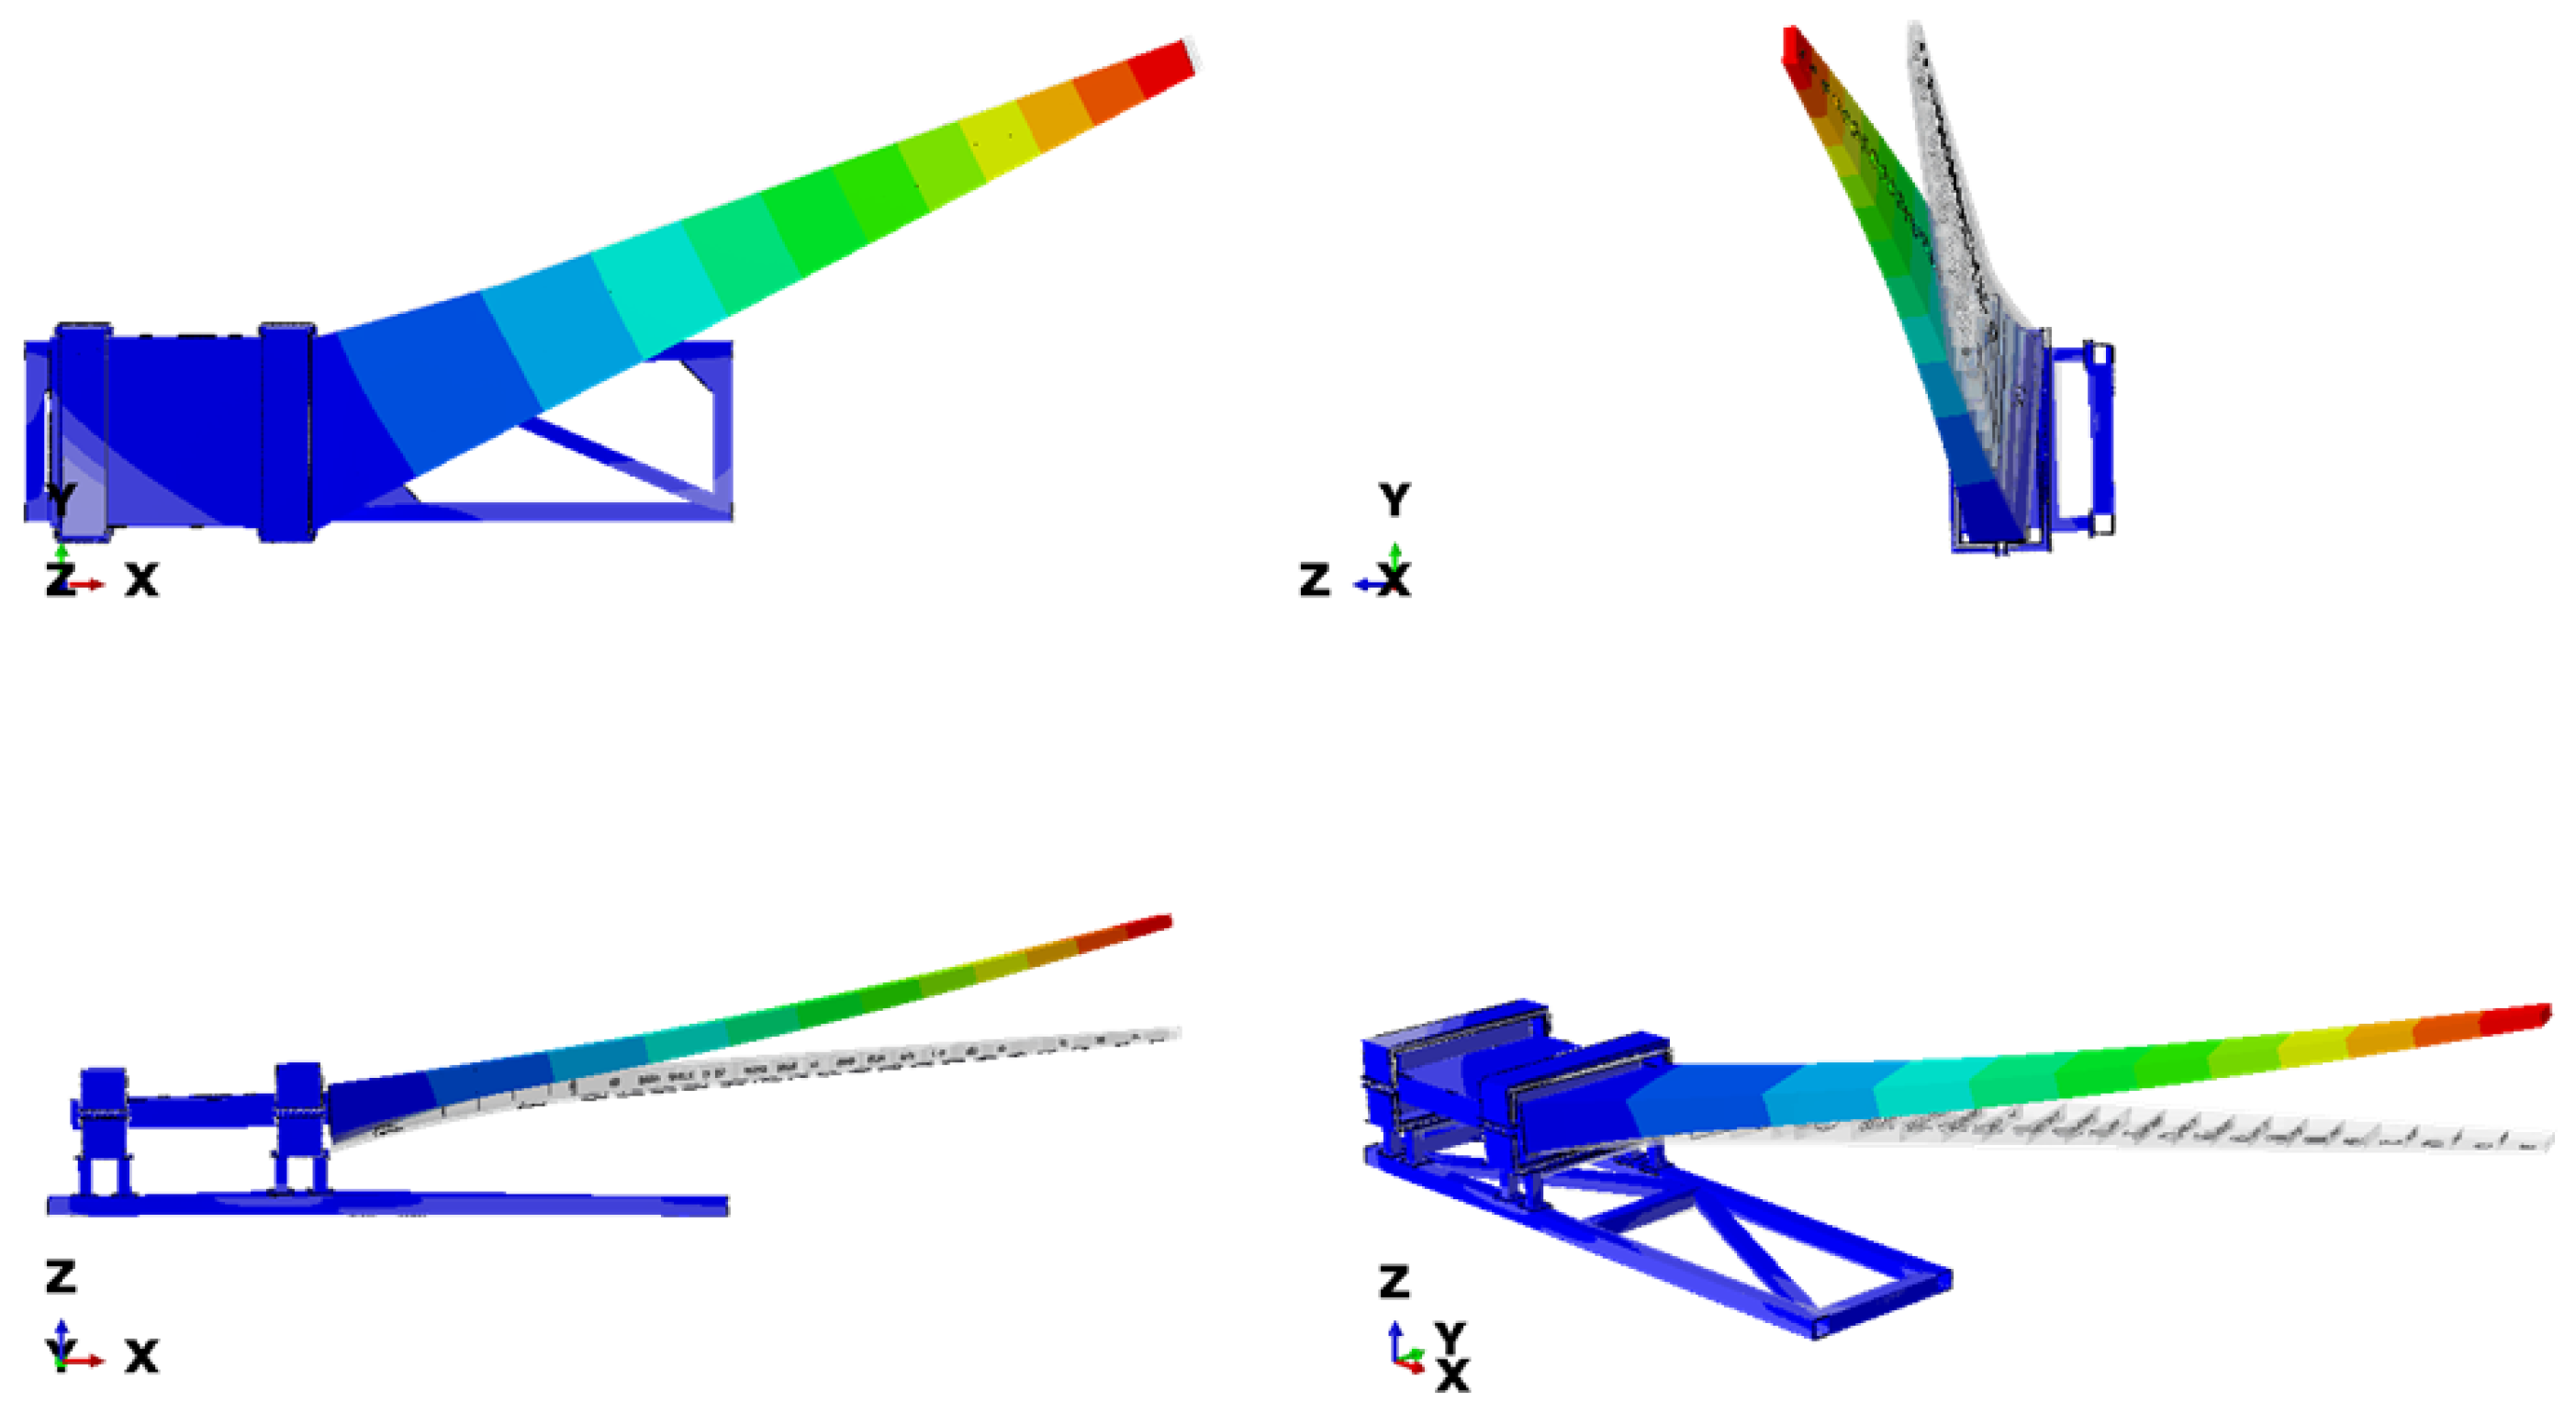
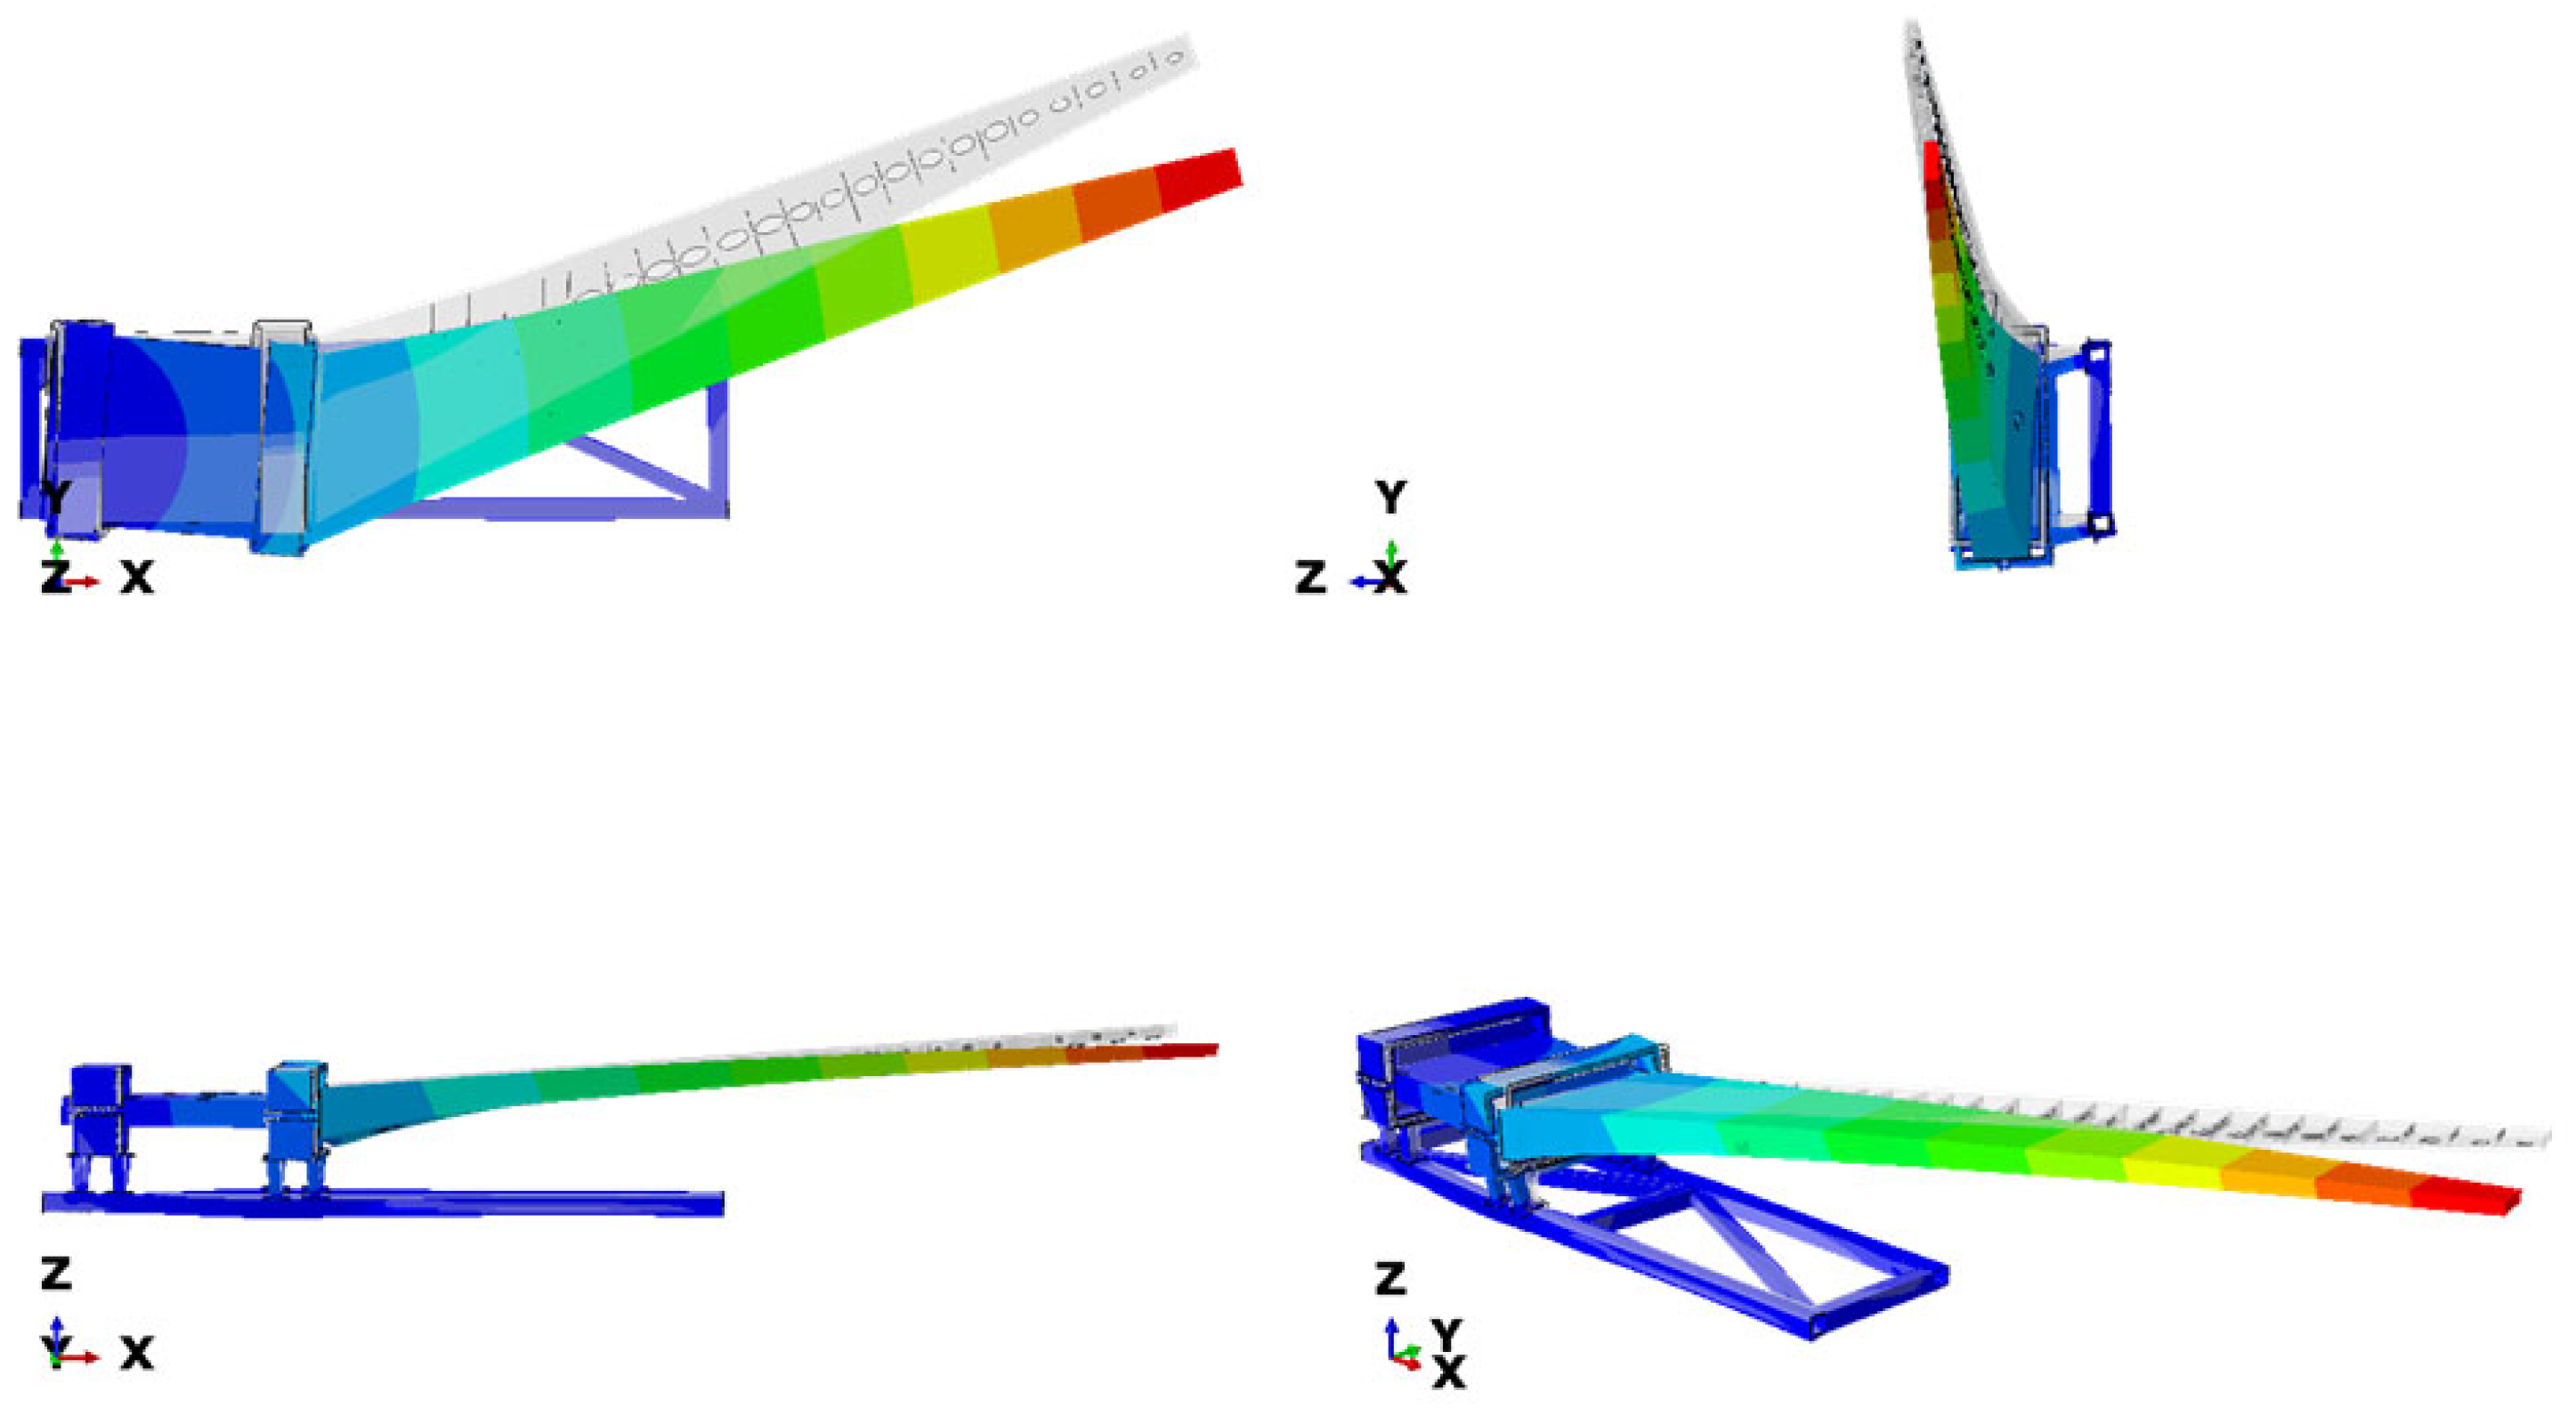
Modal analysis was performed on the test specimen to validate the FEA model. For the modal test, the constraint and test setup described in Section 2.2 were maintained. The test was performed using tri-axial accelerometers placed at 54 locations, offering 162 degrees of freedom. An electrodynamic excitation shaker was used to excite the test specimen. The accelerometer locations are shown in Figure 9. The modal test was performed to determine the wing’s modal shapes over a frequency range of up to 20 Hz. Table 5 and Table 6 compares the experimental and FEA results, showing good agreement. The FEA results slightly overestimated the natural frequencies for the different modes. This overestimation could be attributed to the use of a simplified wing model for the analysis. Figure 10 and Figure 11 present the mode shapes 1 and 2, respectively.
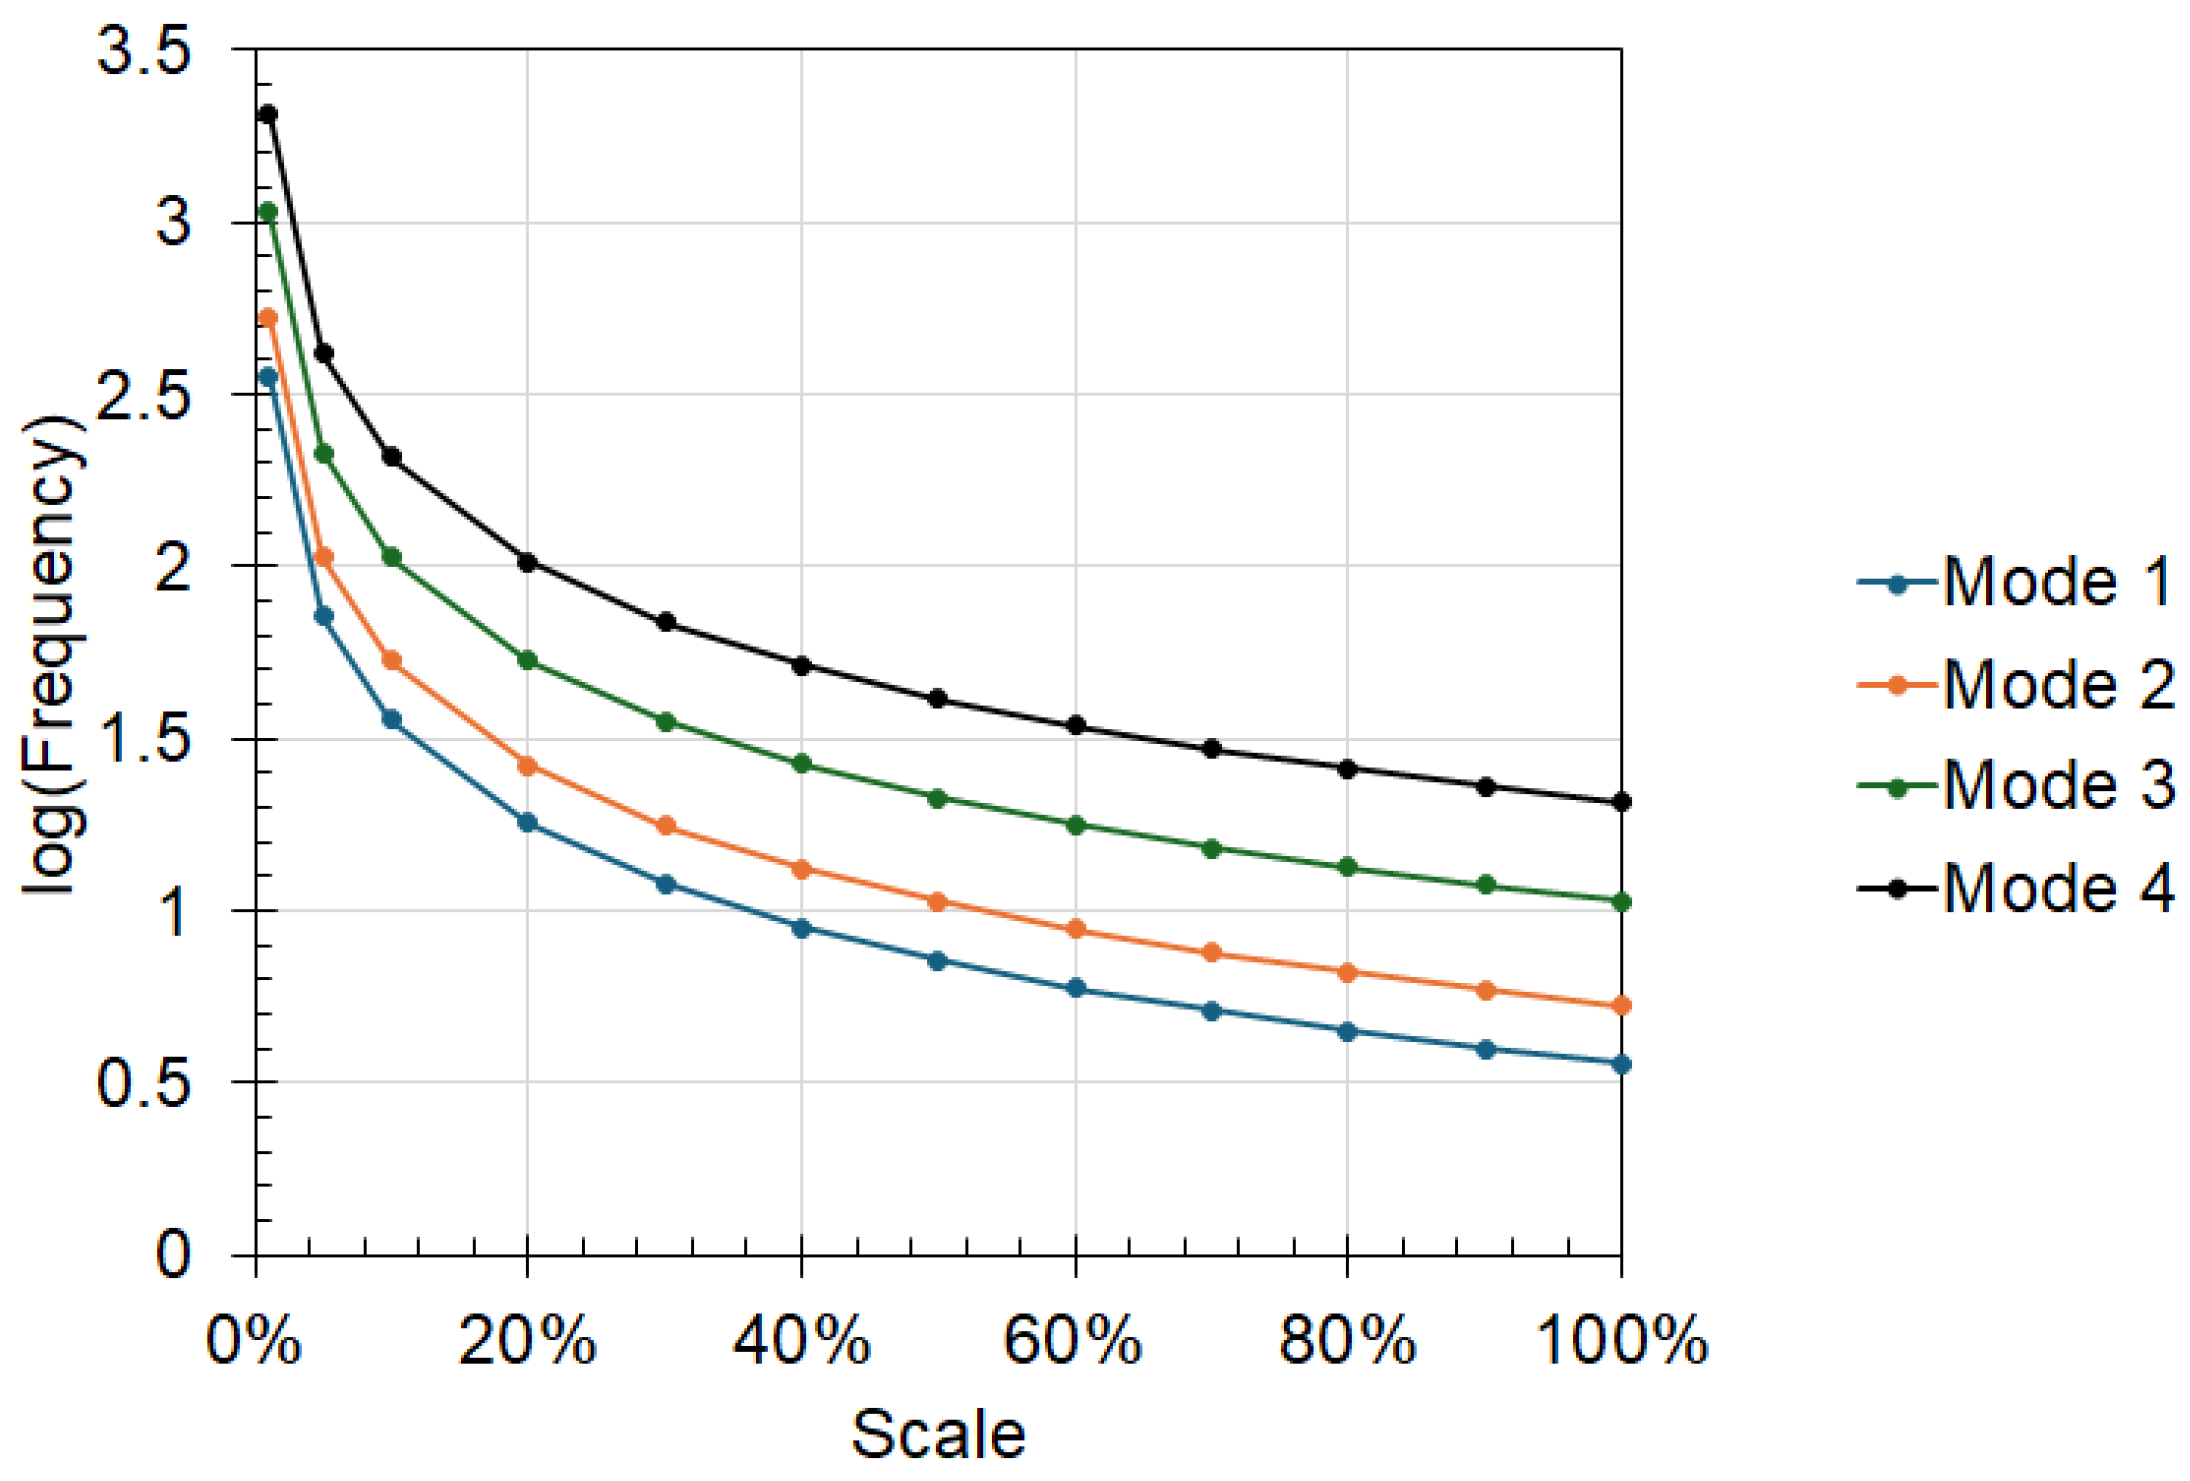
Modal analysis was performed on the prototype and models to determine the effect of scaling on the modal response of the test specimen. The results show that the natural frequencies for the different modes increased as the test specimen was reduced (see Figure 12). This is consistent with the results reported by Shahab et al. [25], which showed that the scaled-down model’s natural frequency value increased compared to the prototype.

3.3. Effect of Scaling on Static Analysis

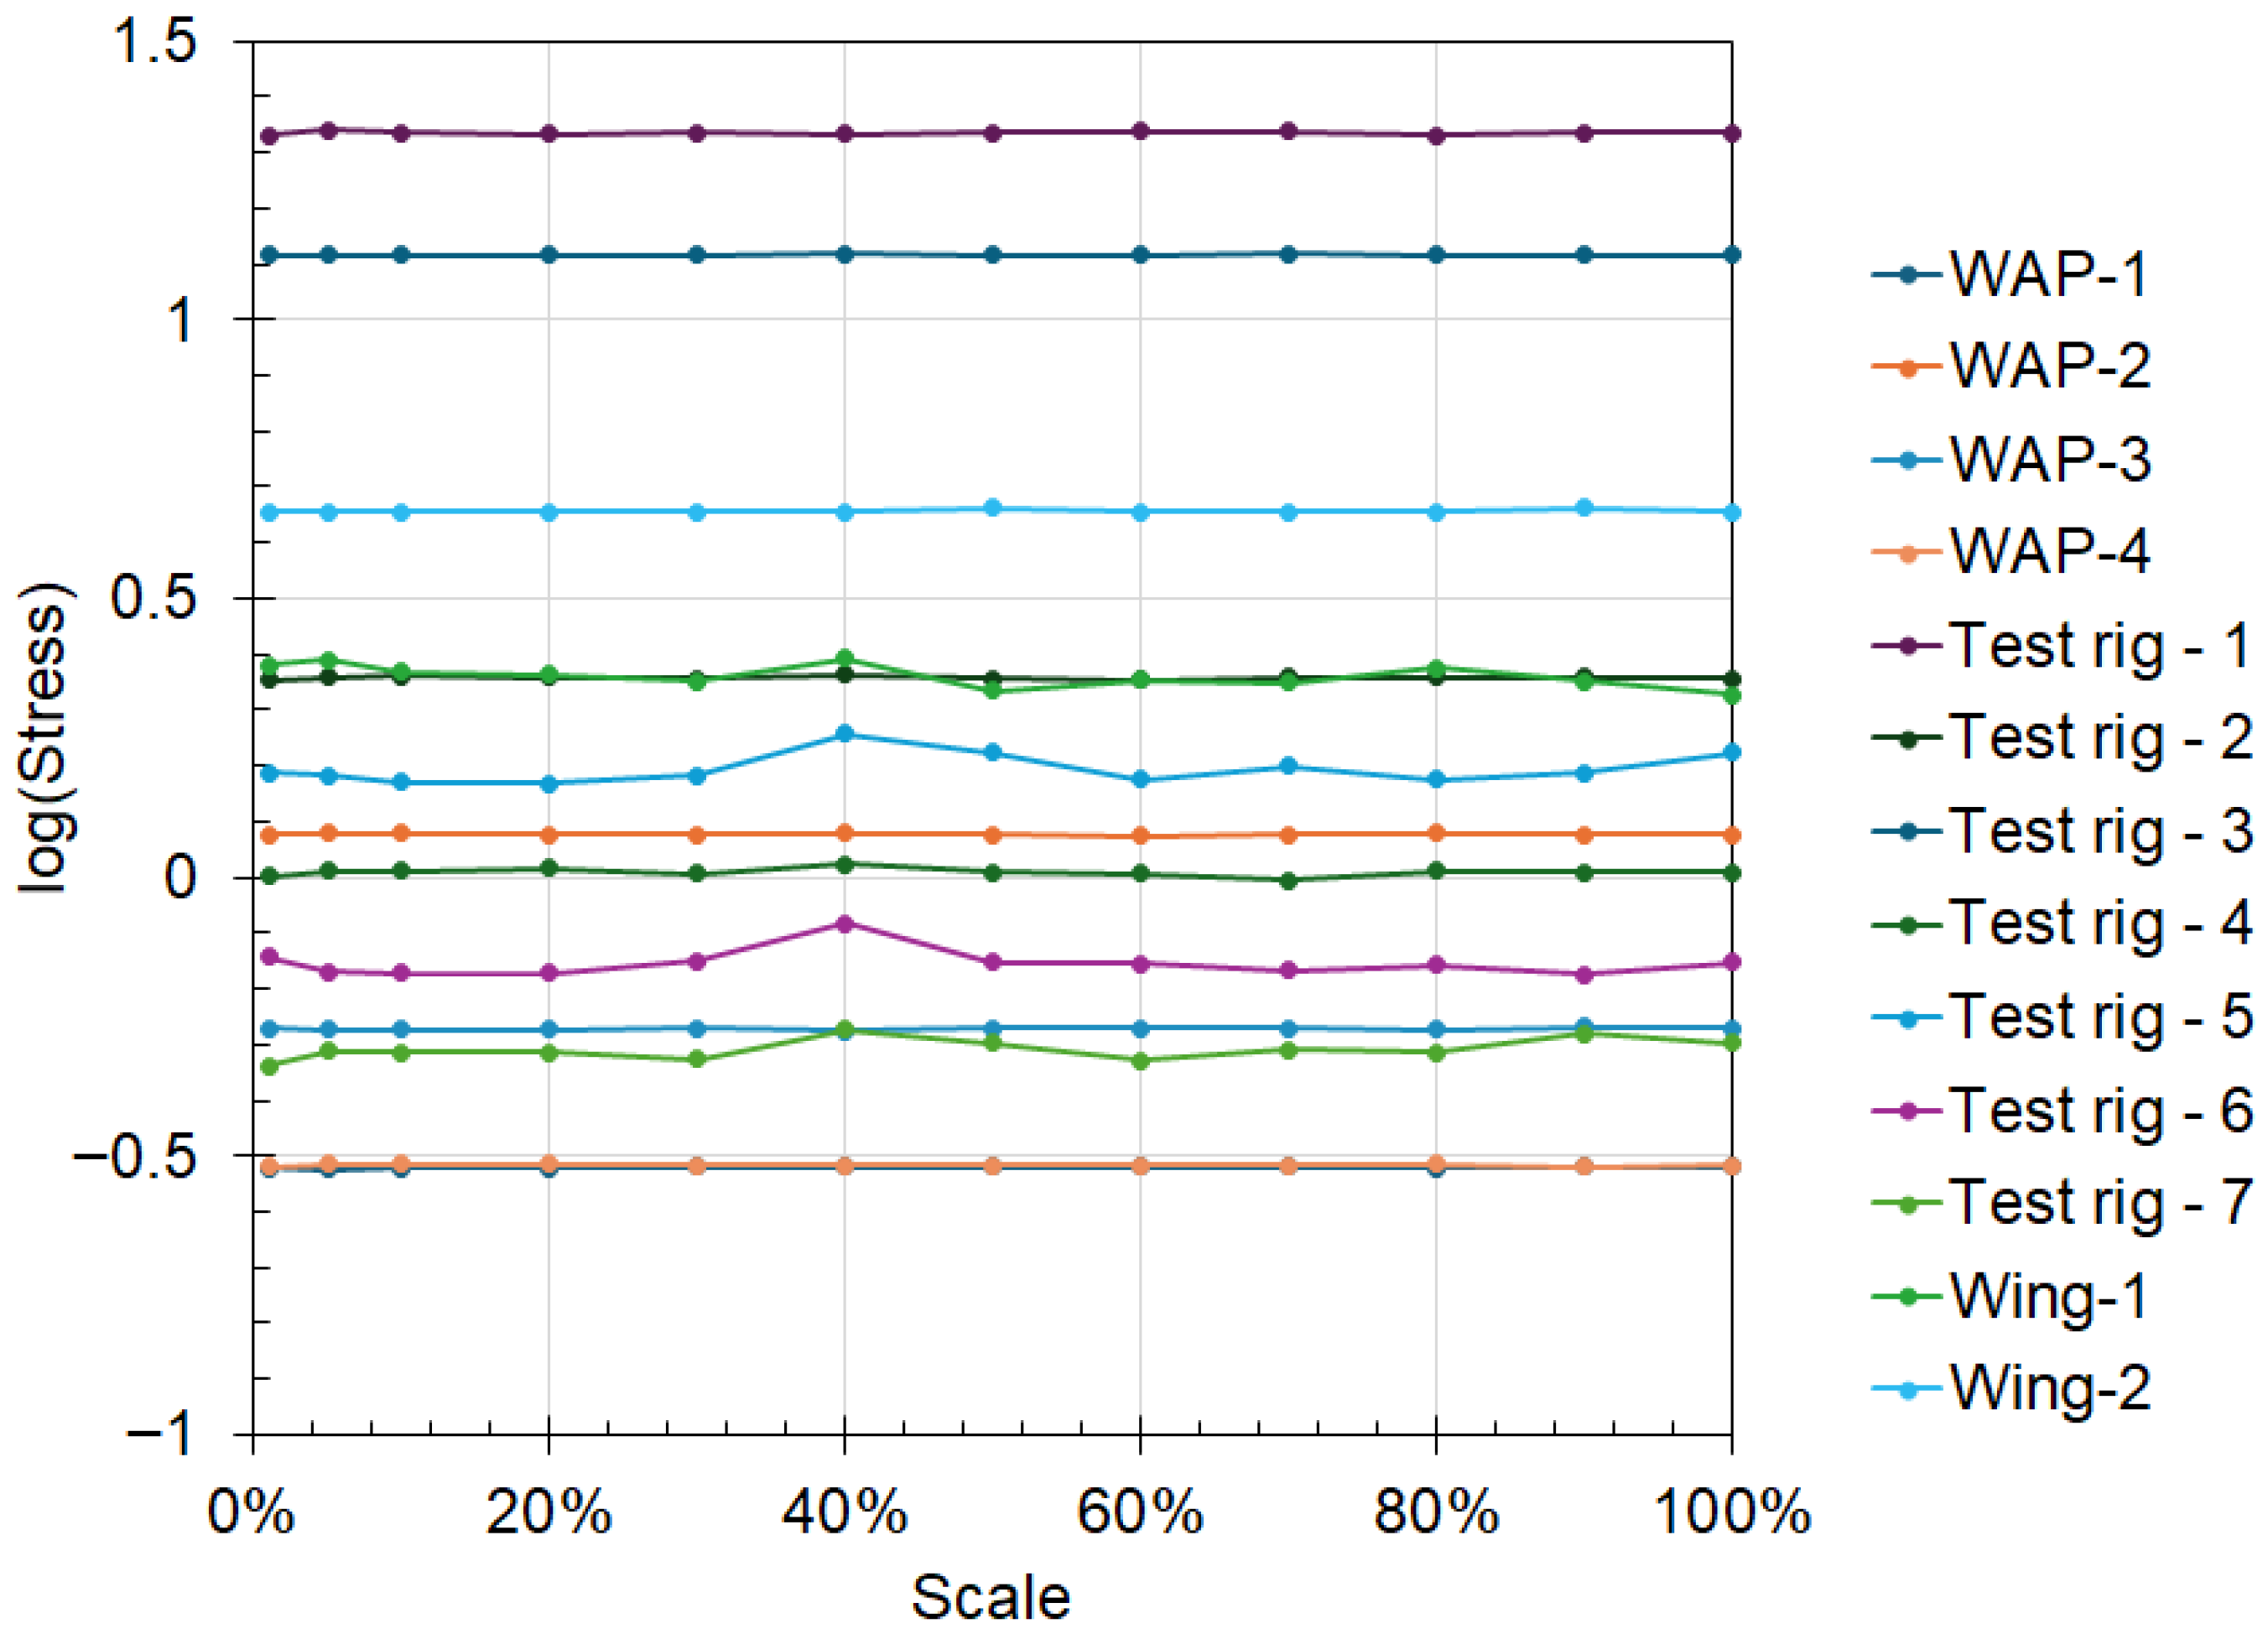
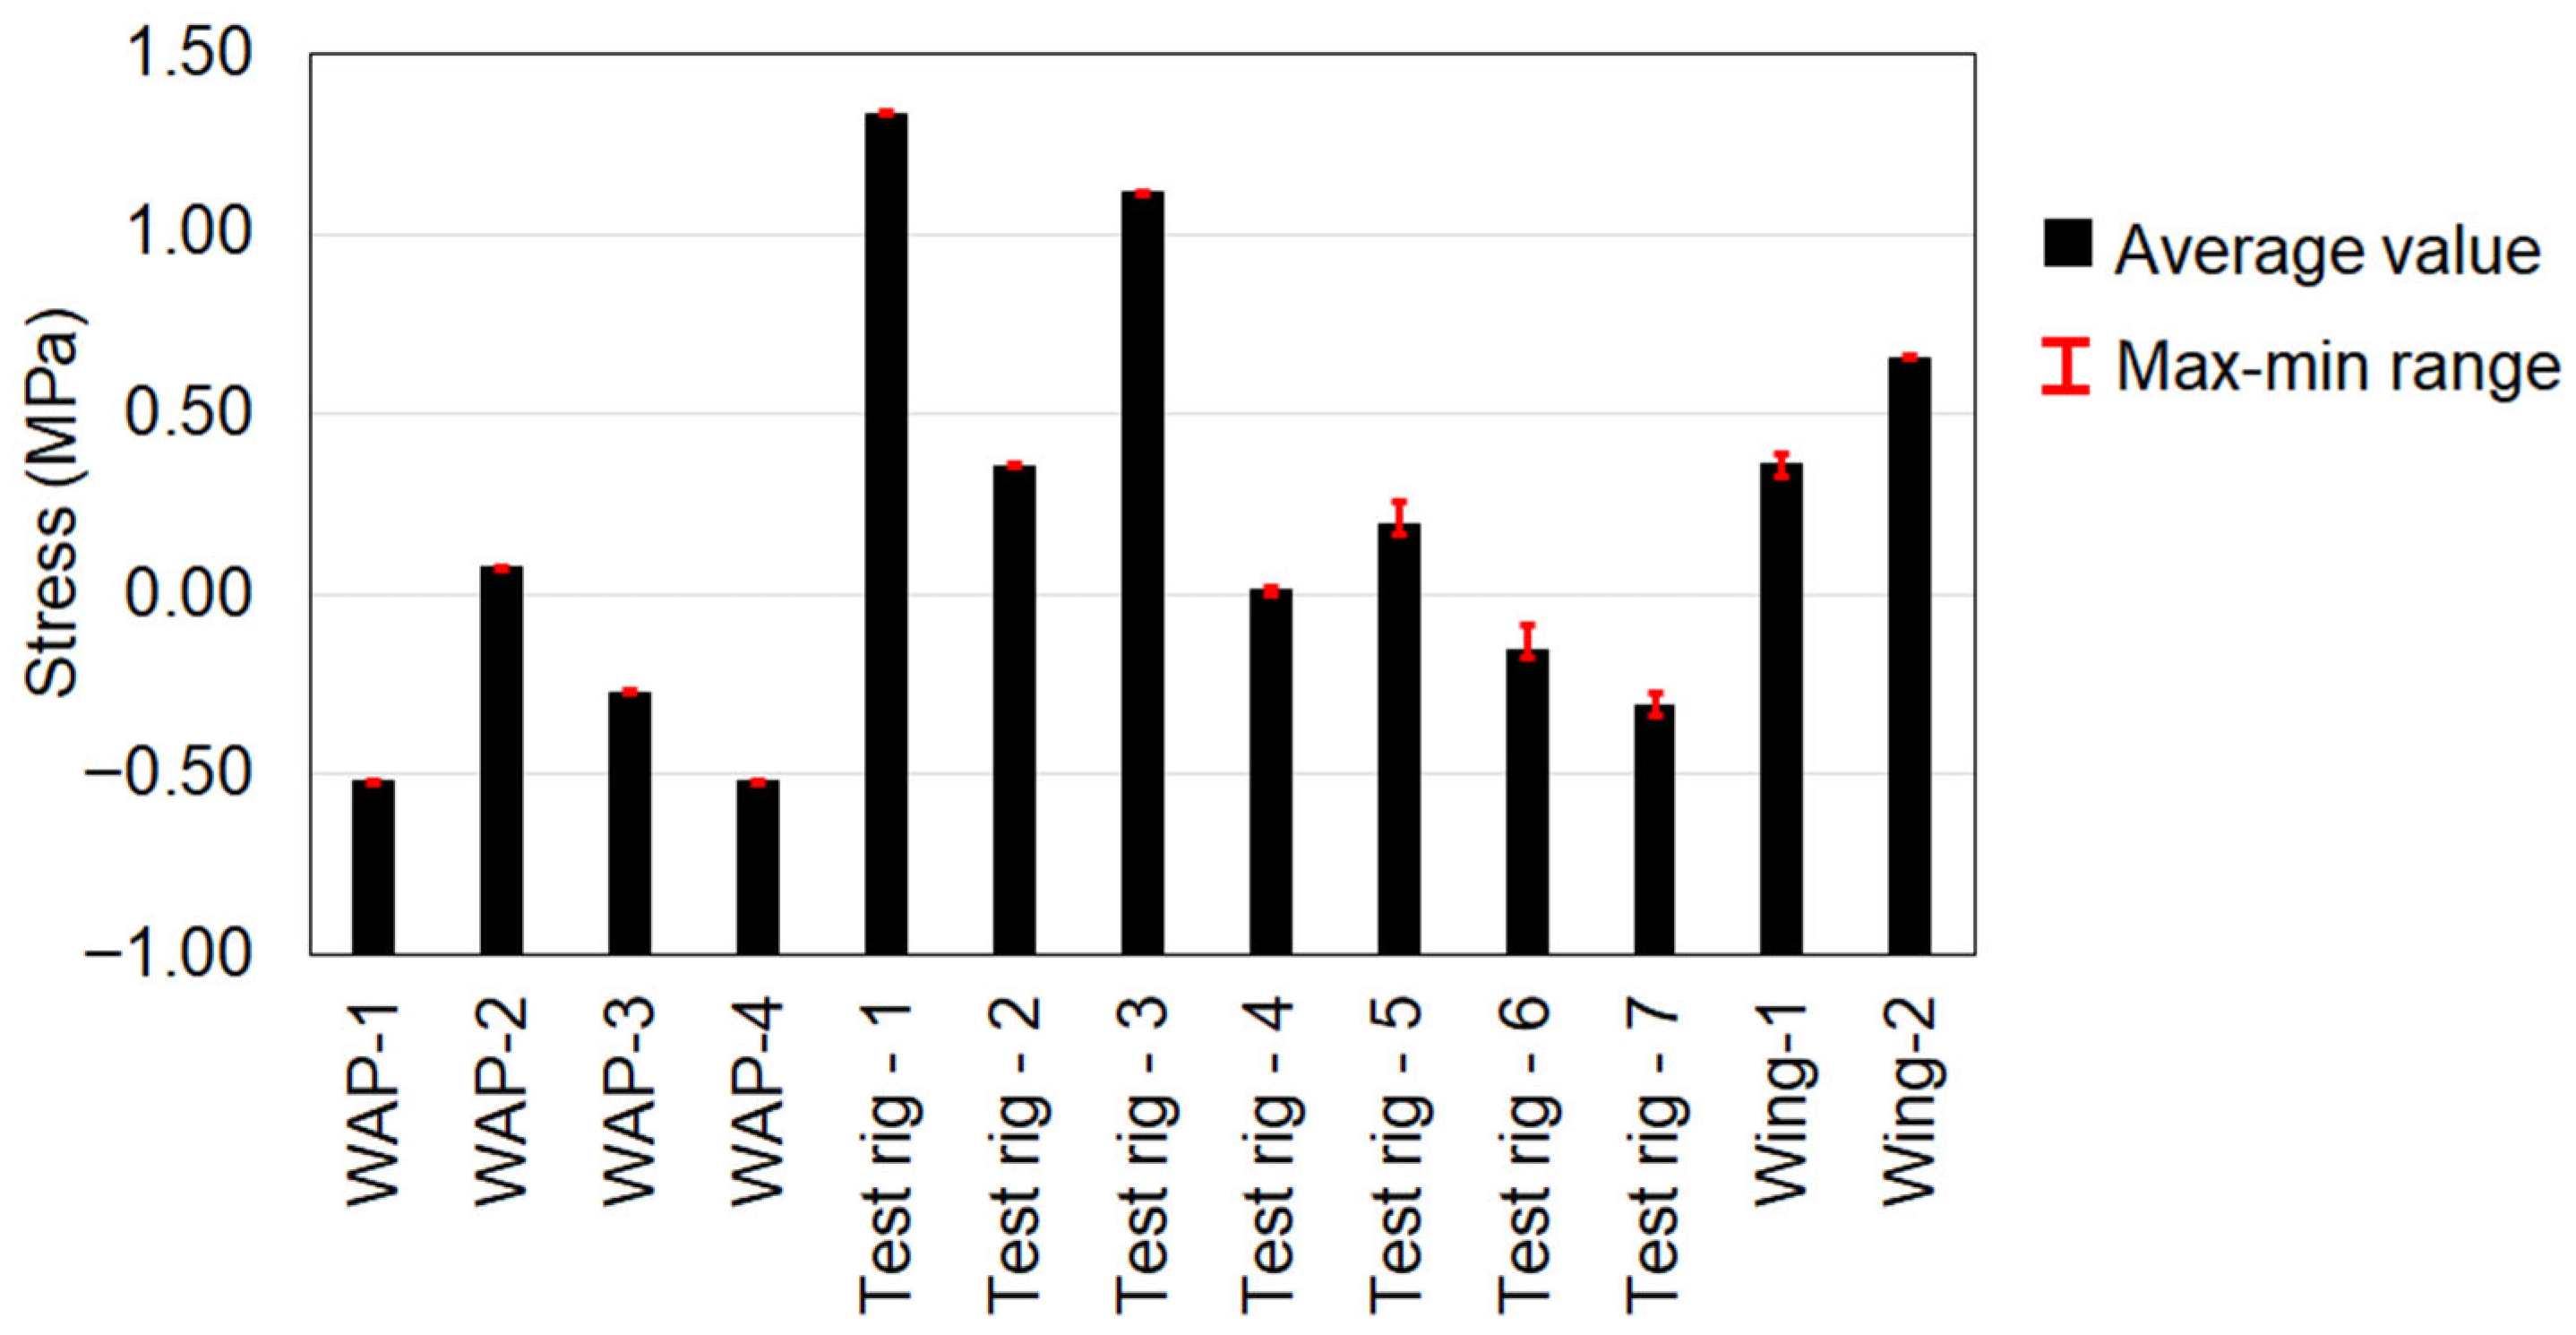
In solving the Buckingham-Pi groups, the goal was to maintain the stress contact across the scaled models. The FEA results show that stresses were approximately constant across the different stress-probe locations on the test specimen (see Figure 13). The prediction struggled to achieve accuracy in mesh-concentration regions, such as test-rig stress-probe region 5. Although these locations also fluctuated about a fixed value, they exhibited the highest differences (Figure 14). This highlights the accuracy of the proposed method in predicting the prototype’s behaviour from a scaled model. Overall, the results indicate that the Pi groups can expect the prototype’s stress values.
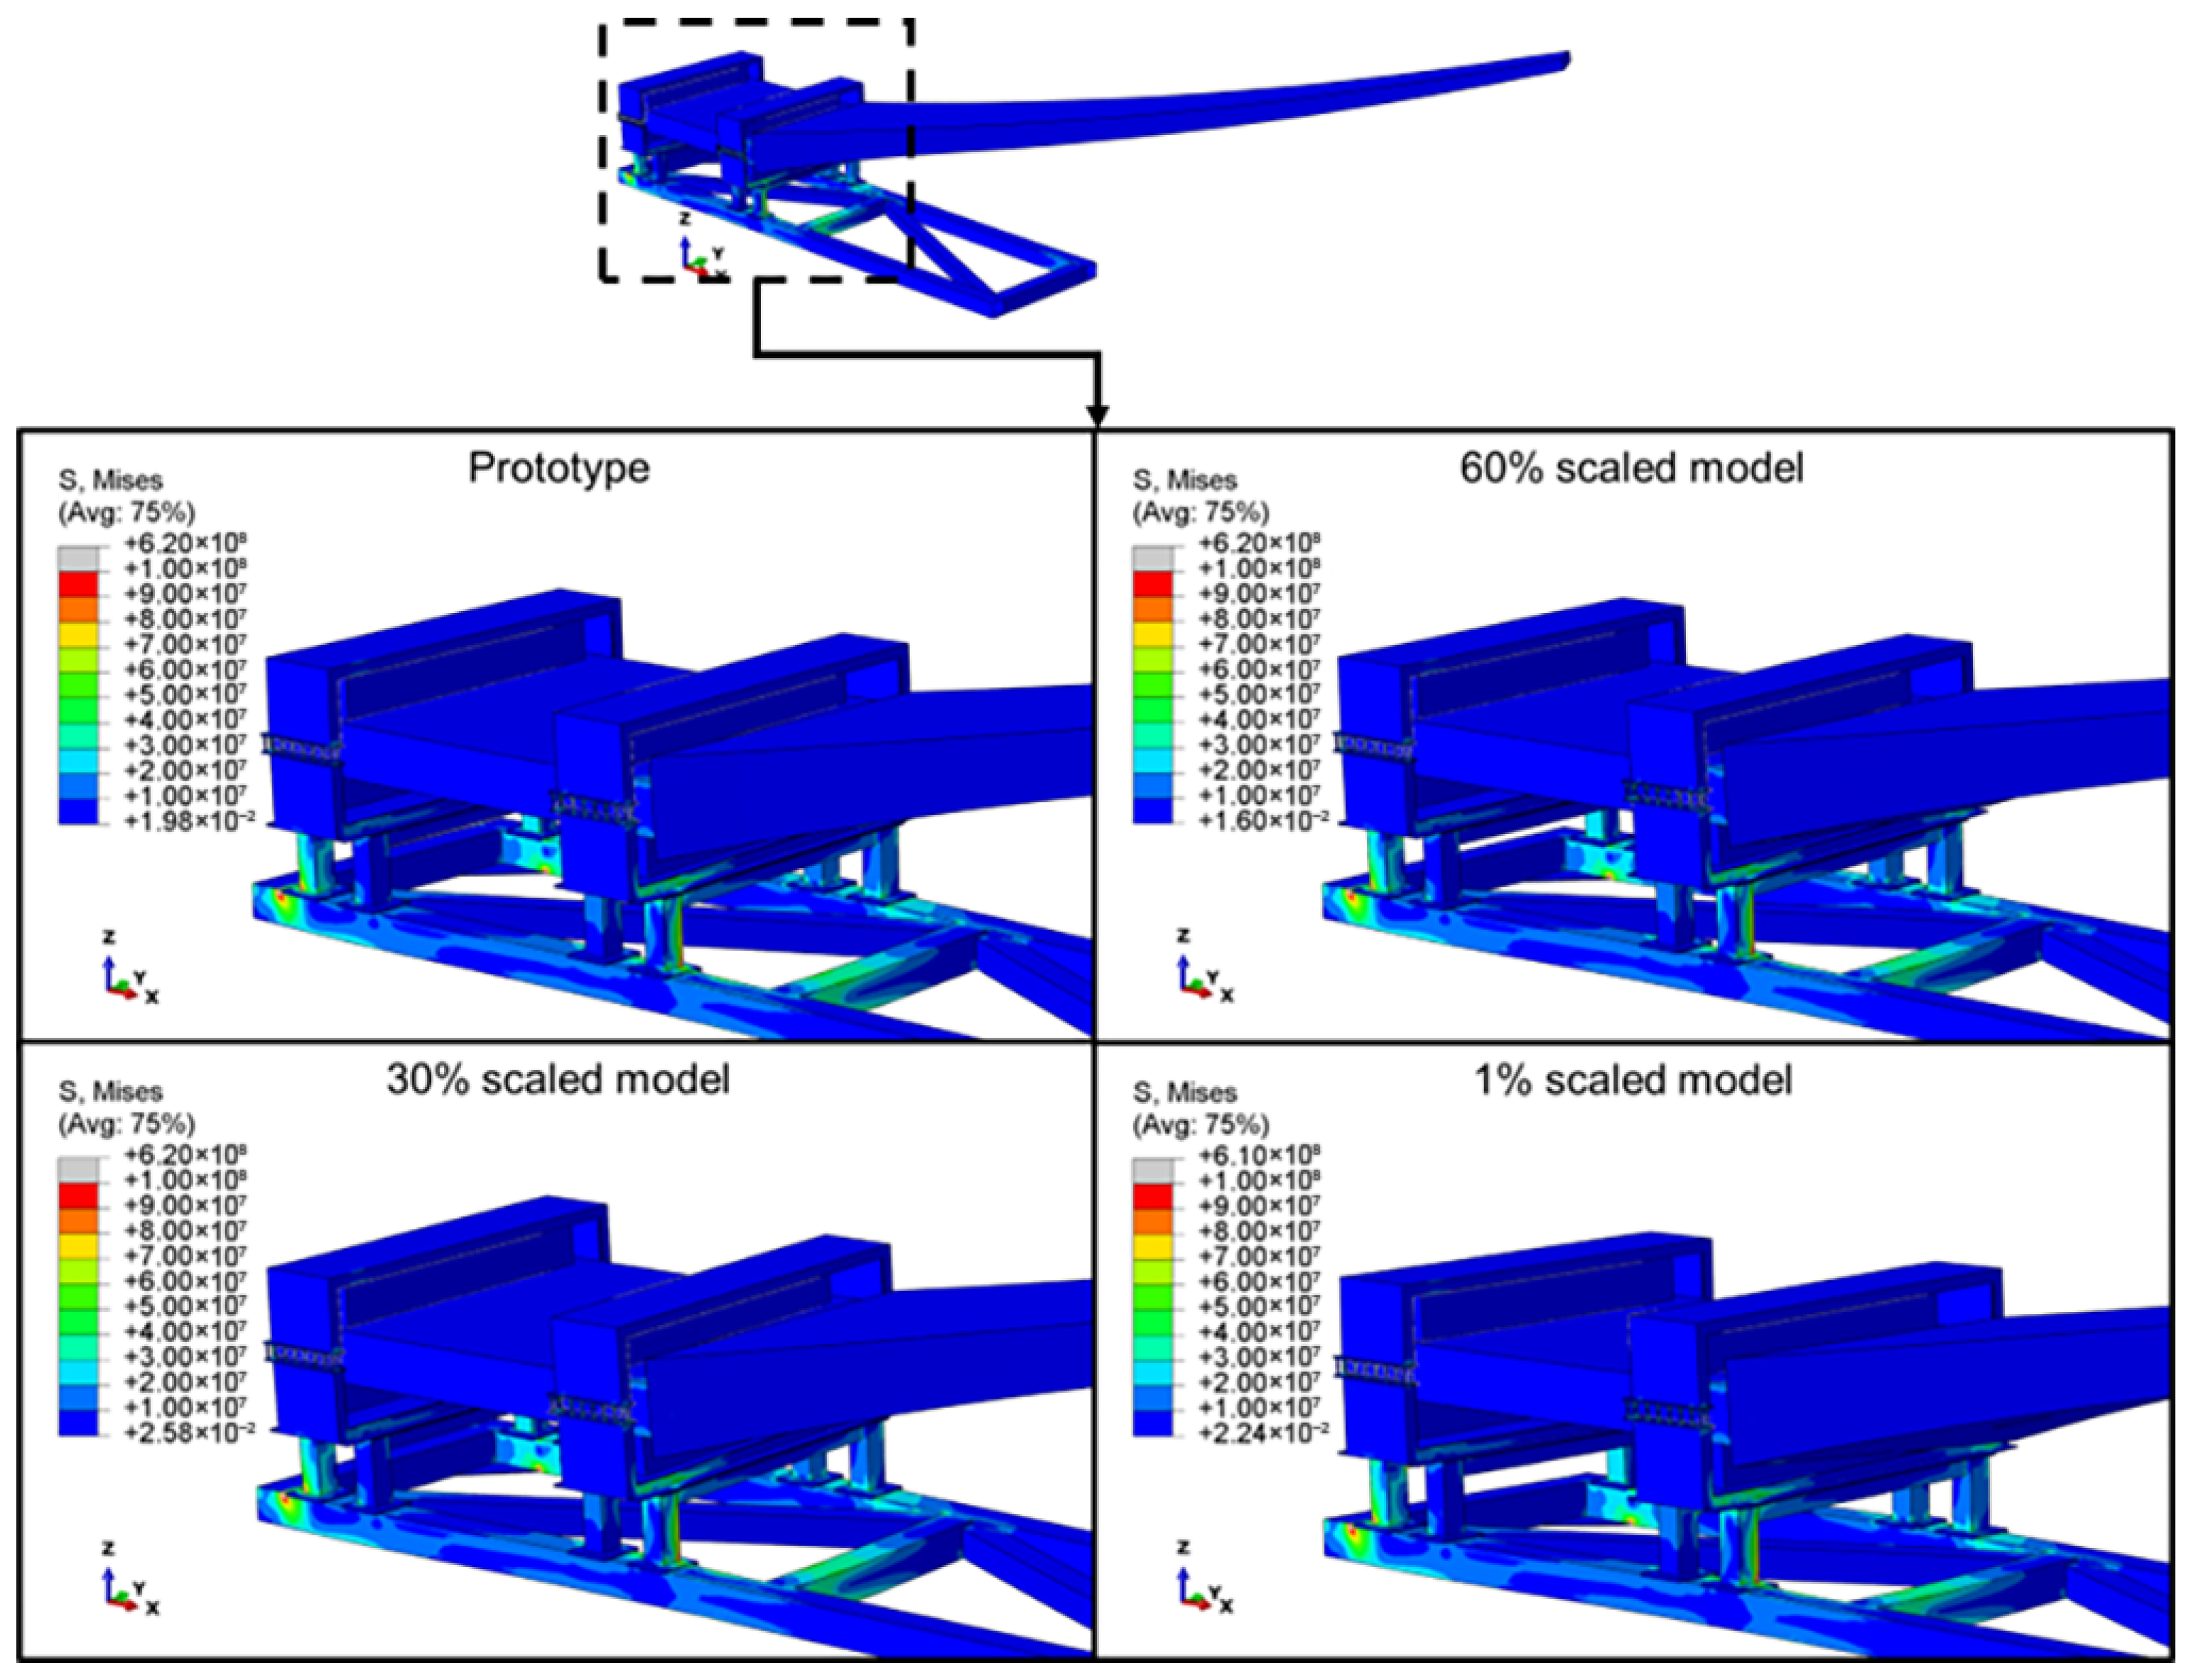
Figure 15 compares stress contours for different scaled models. The result shows similar stress contours and values between the scaled models and the prototype. This further demonstrates that modifying the model with the scaling factor did not alter the specimen’s stress concentration areas or its response to the applied load. Therefore, the specimen’s structural response to the applied load is identical between the prototypes and the models. This highlights the potential of using scaled-down models to predict the prototype’s response with high accuracy (see Table 5).
Table 5. Effect of scaling on the stresses acting on the probed stress regions.
Stress ProbePrediction (MPa)Finite Element Analysis
Maximum Value (MPa)Average Value (MPa)Minimum Value (MPa)
WAP-10.300.300.300.30
WAP-21.191.201.191.19
WAP-30.540.540.540.53
WAP-40.300.310.300.30
Test rig-121.6621.8621.6121.35
Test rig-22.272.302.282.26
Test rig-313.0813.1013.0813.06
Test rig-41.021.051.020.99
Test rig-51.681.811.571.48
Test rig-60.700.830.700.67
Test rig-70.510.530.490.46
Wing-12.132.472.302.13
Wing-24.524.594.544.52
Table 6. Comparison of the modal frequencies of the wing.
ExperimentFEA
Mode NumberFrequency (Hz)Error (%)
1 (1st vertical bending)3.003.5916.43
2 (1st lateral bending)4.865.328.65
3 (2nd vertical bending)10.2310.694.30
4 (3rd vertical bending)17.2120.7316.98
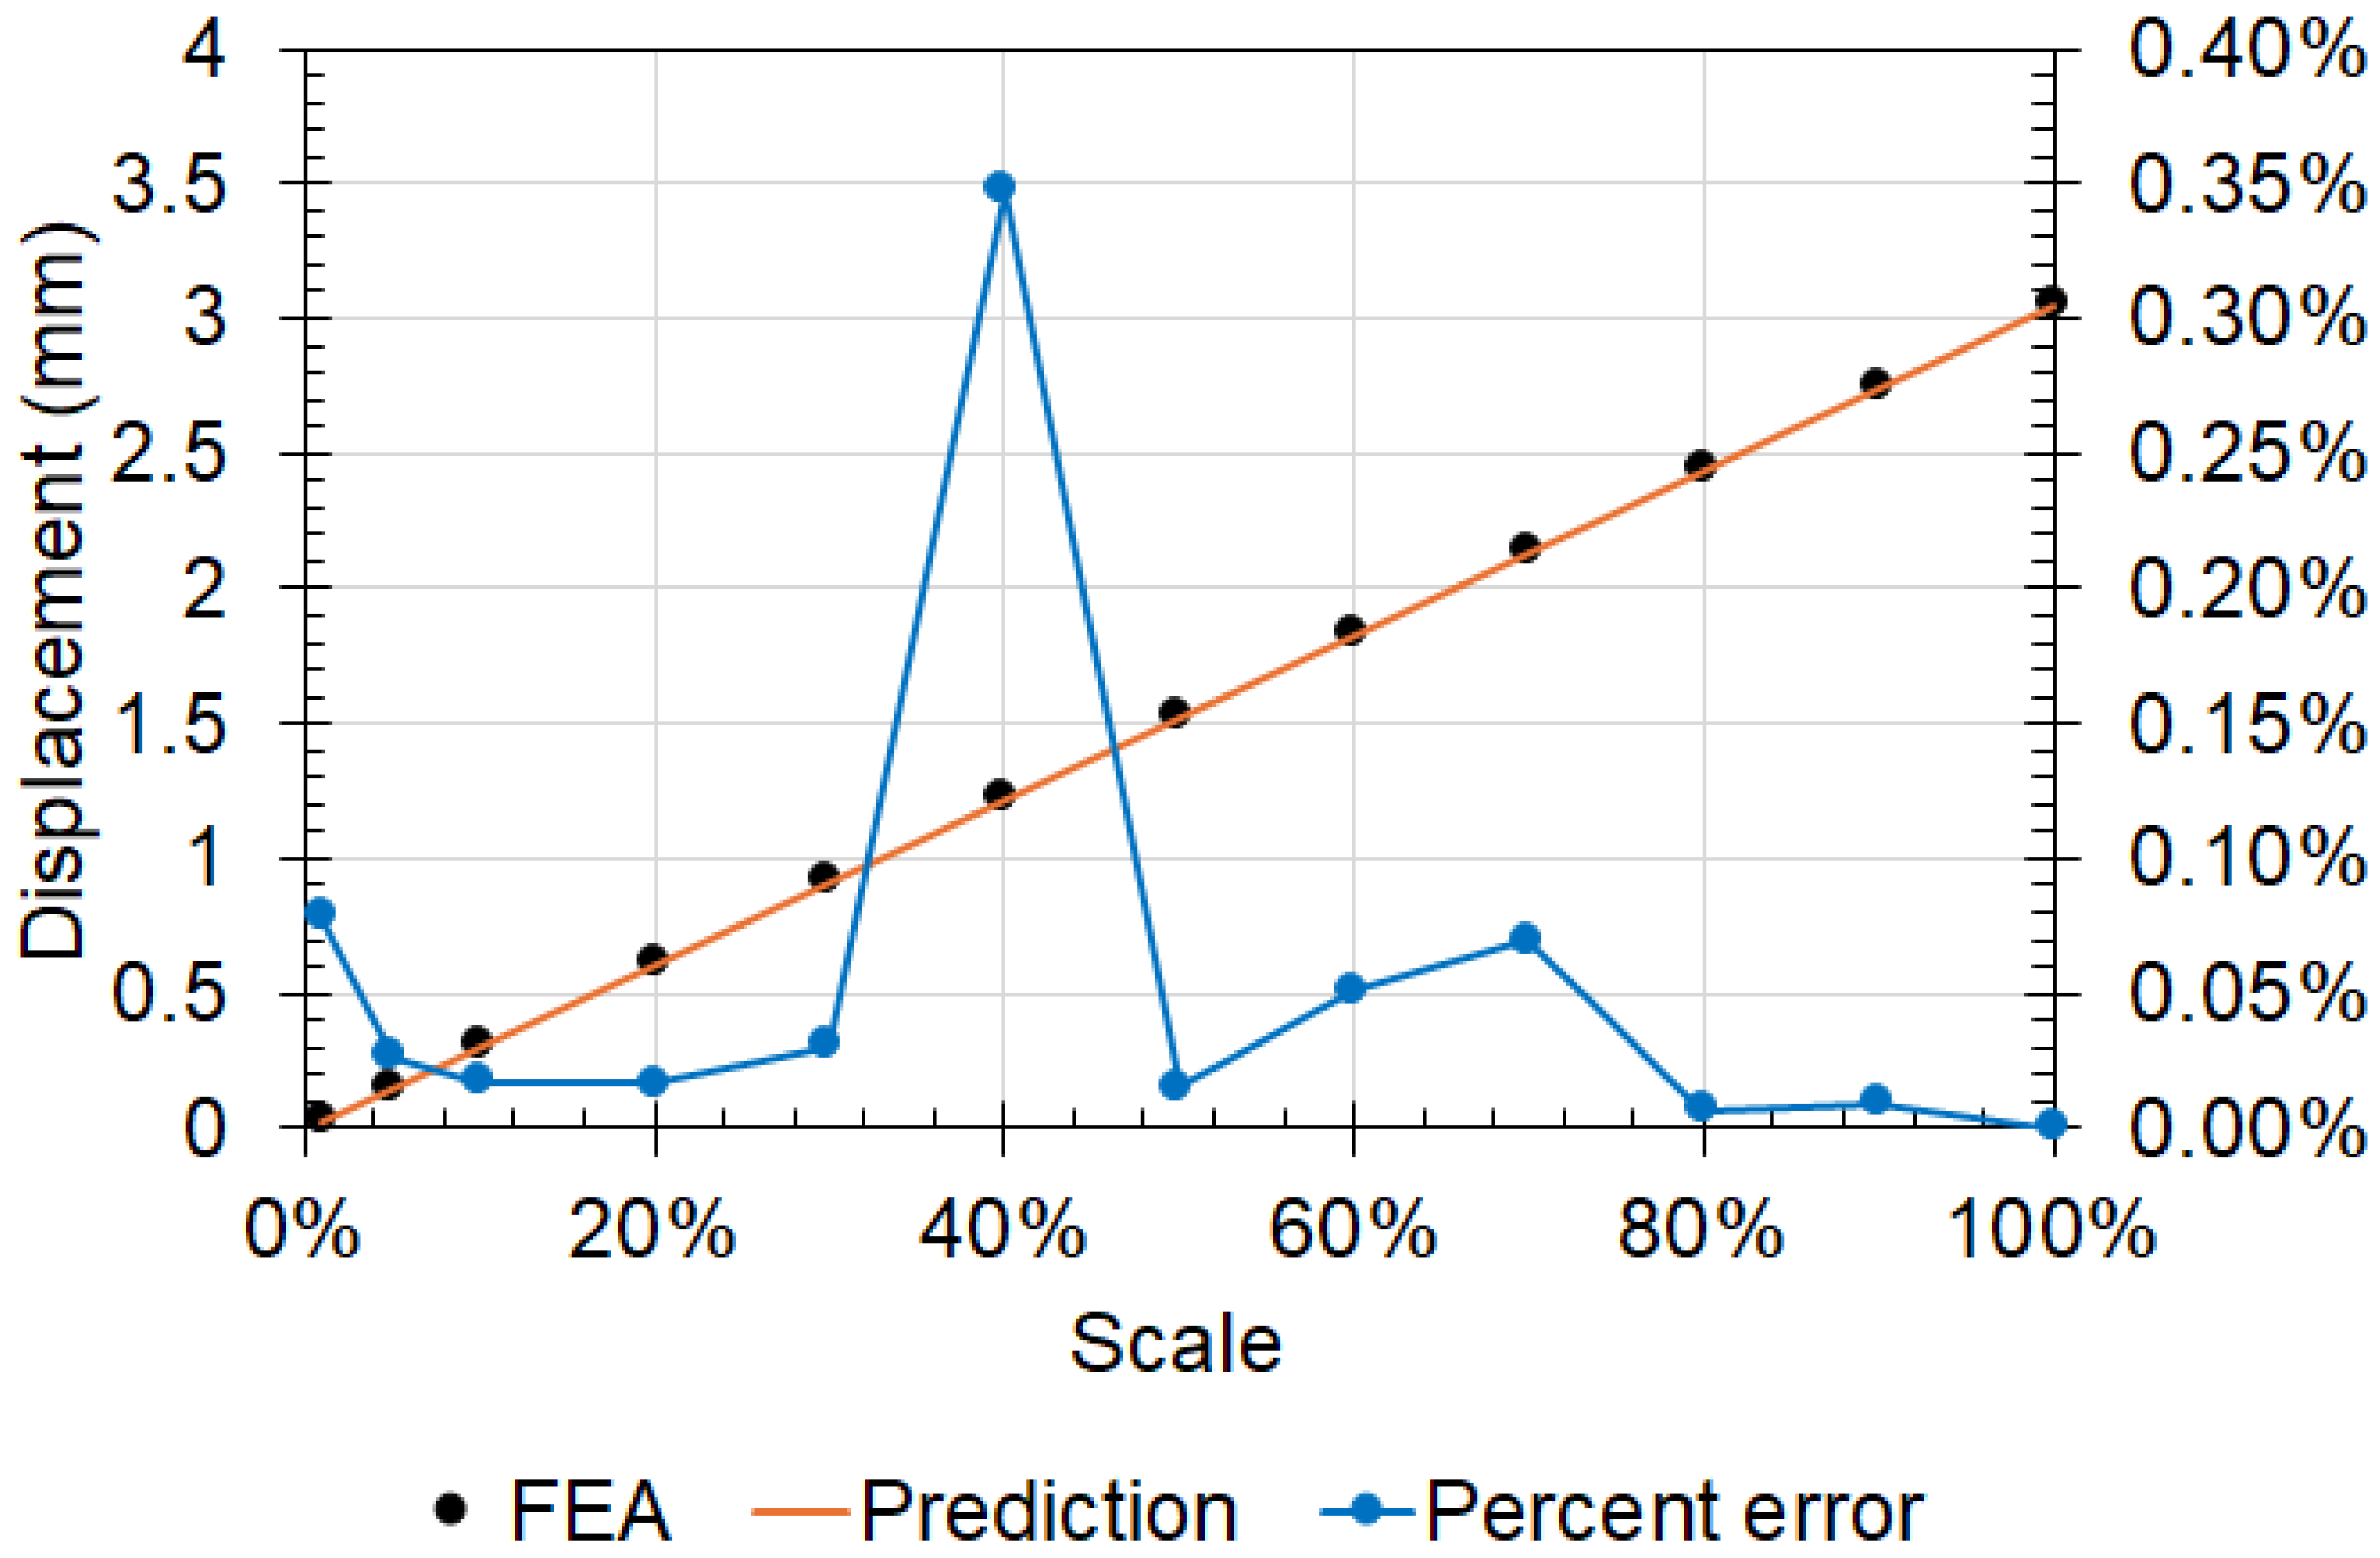
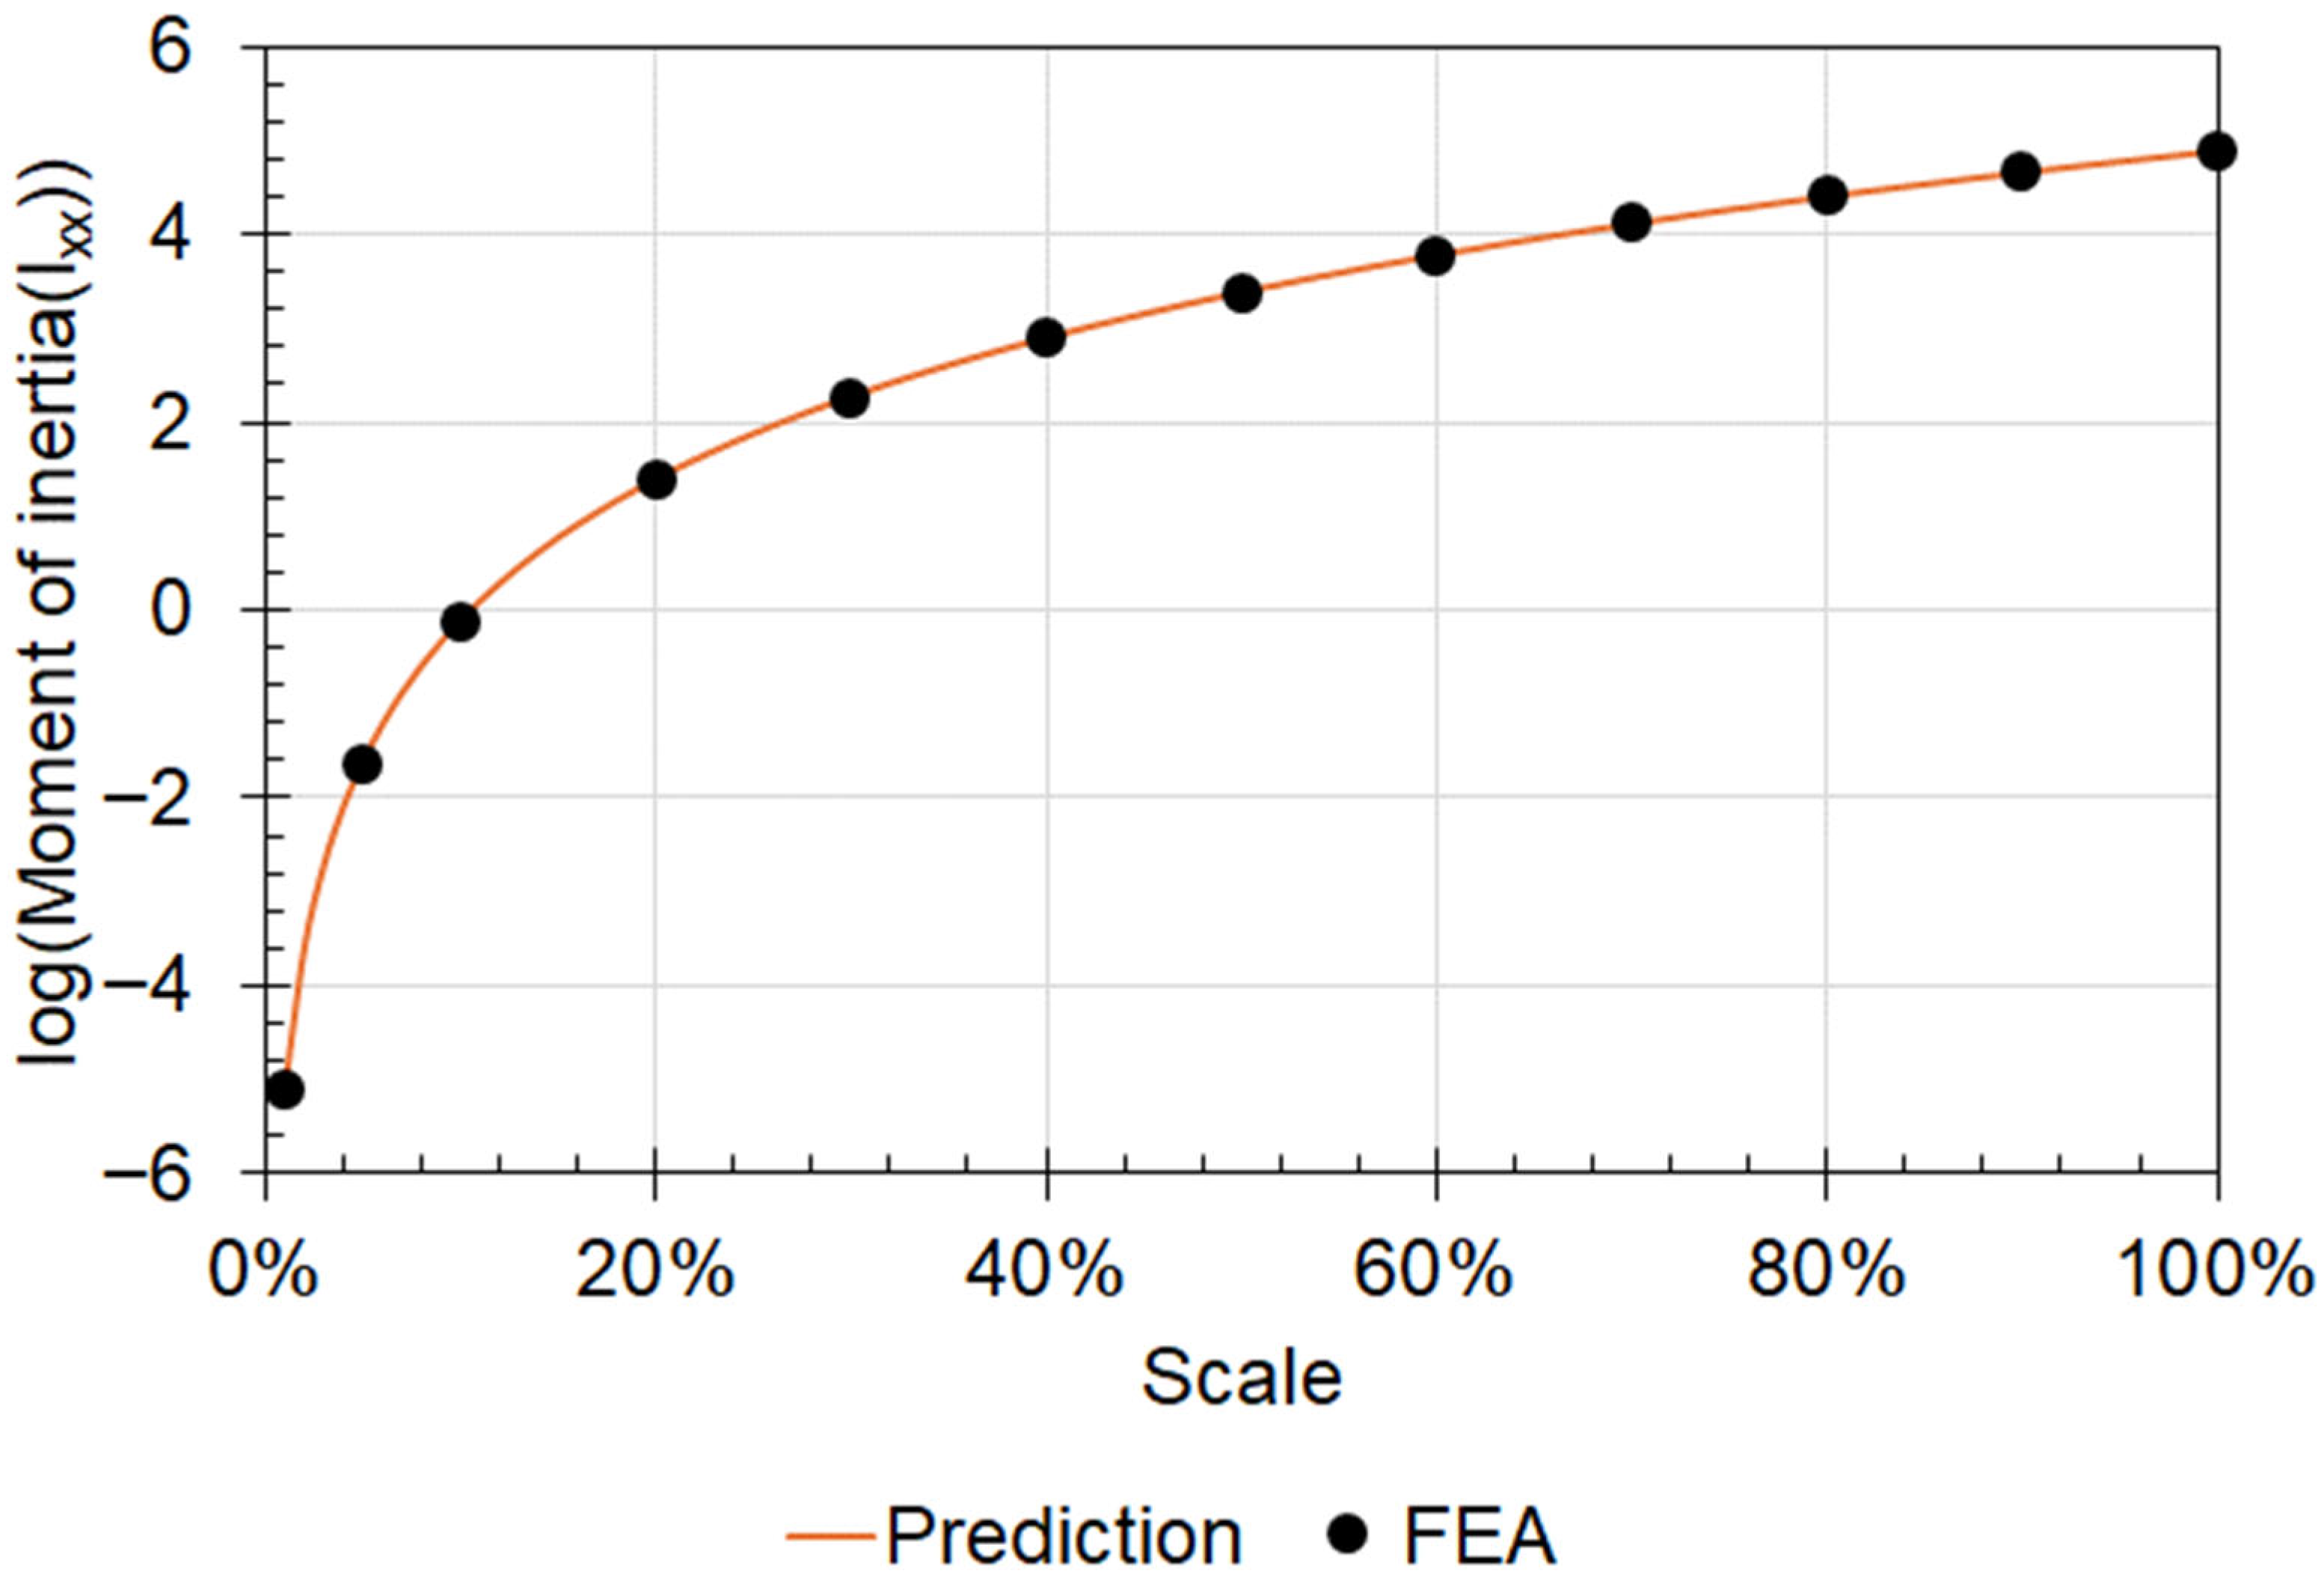
The results show a linear relationship between the deformation and the scaling factor, matching the predictions made using the Buckingham-Pi groups. The measured displacement values closely matched the projections (see Figure 16), further highlighting the potential of testing with a scaled model. Comparing the results obtained from the FEA with the Buckingham Pi prediction shows that more than 58% of the predicted values differed by less than 3% from the maximum FEA results. A similar response was observed at the other displacement-probed locations, with the FEA results matching the predictions with high accuracy, thereby validating the Buckingham Pi groups. The mass moment of inertia, which was included in the Buckingham Pi groups, also accurately matched the actual values obtained from the FEA model (see Figure 17).

4. Conclusions

In conclusion, this study provides insights into the feasibility of employing scaled models to design and analyse test rigs, particularly in understanding their predictive accuracy. The results obtained show the potential of scaled models to capture the overall behaviour of the test rig, with commendable accuracy. However, the manufacturability of the smaller components in the scaled model (less than 8% of the prototype) was limited by their thin-walled geometry. Overall, the results indicate the feasibility of testing scaled-down models to assess the specimen’s response. This could help reduce testing costs for large aerospace structures. Implementing scaled-down models could also reduce the risk associated with prototype testing and the time required to manufacture the specimen and complete the test, thereby enabling repetitive testing.
Finite element analysis was performed to validate the predictions made using the Buckingham-Pi groups. The results were consistent with the projections, proving that a scaled model can predict a prototype’s static response. For the FEA models under static loading, the scaled models accurately predicted the deformation and stresses acting on the test specimen. The finite element model was validated experimentally by performing modal analysis on the test specimen. This further allowed for examination of the effect of scaling on the modal shapes and frequencies. The results showed that the mode shapes remained constant, but the frequencies exhibited an inversely proportional relationship with the scaled (geometric size).
For this study, the force was selected to maintain a constant stress on the test specimen irrespective of the scale. The proposed Buckingham Pi groups can be modified to make a different property drive the other parameters. For example, the force could scale linearly with the structure’s dimensions, resulting in a nonlinear stress response. Accordingly, the parameters can be set to meet the test requirements, thereby highlighting the versatility of the proposed method. In future work, scaling is explored for a single rig/wing architecture and material combination, and extrapolation is performed to different configurations.

Author Contributions

Conceptualization, E.G.A. and H.G.; Methodology, E.G.A.; Software, E.G.A.; Validation, E.G.A. and J.B.; Formal analysis, E.G.A. and J.B.; Investigation, E.G.A. and H.G.; Resources, E.G.A. and H.G.; Data curation, E.G.A. and H.G.; Writing—original draft, E.G.A.; Writing—review & editing, H.G., Y.X., R.H., F.S. and J.G.; Supervision, H.G., Y.X., R.H., I.H. and F.S.; Project administration, H.G., I.D. and Y.X.; Funding acquisition, H.G., F.S. and J.G. All authors have read and agreed to the published version of the manuscript.

Funding

This publication has received funding from the European Union’s Horizon Europe research and innovation program under grant agreement No. 101102004.

Institutional Review Board Statement

The study did not require ethical approval.

Informed Consent Statement

Informed consent was obtained from all subjects involved in the study.

Data Availability Statement

Data will be available on reasonable request.

Acknowledgments

This research was carried out in collaboration with Rolls-Royce Plc and sponsored by the European Union’s Horizon Europe research and innovation program and UKRI. All funding resources are acknowledged.

Conflicts of Interest

Authors F. Stanely and J. Gaskell were employed by the company Rolls-Royce Plc. The remaining authors declare that the research was conducted in the absence of any commercial or financial relationships that could be construed as a potential conflict of interest.

References

  1. You, C.; Yasaee, M.; Dayyani, I. Structural similitude design for a scaled composite wing box based on optimised stacking sequence. Compos. Struct. 2019, 226, 111255. [Google Scholar] [CrossRef]
  2. Rezaeepazhand, J.; Simitses, G.J. Design of scaled down models for predicting shell vibration response. J. Sound Vib. 1996, 195, 301–311. [Google Scholar] [CrossRef]
  3. Luo, Z.; Zhu, Y.P.; Zhao, X.Y.; Wang, D.Y. Determination method of dynamic distorted scaling laws and applicable structure size intervals of a rotating thin-wall short cylindrical shell. Proc. Inst. Mech. Eng. Part C J. Mech. Eng. Sci. 2015, 229, 806–817. [Google Scholar] [CrossRef]
  4. Luo, Z.; Zhu, Y.; Liu, H.; Wang, D. Dynamic similitude design method of the distorted model on variable thickness cantilever plates. Appl. Sci. 2016, 6, 228. [Google Scholar] [CrossRef]
  5. Oshiro, R.E.; Alves, M. Predicting the behaviour of structures under impact loads using geometrically distorted scaled models. J. Mech. Phys. Solids 2012, 60, 1330–1349. [Google Scholar] [CrossRef]
  6. Rezaeepazhand, J.; Simitses, G.J.; Starnes, J.H. Scale models for laminated cylindrical shells subjected to axial compression. Compos. Struct. 1996, 34, 371–379. [Google Scholar] [CrossRef]
  7. Kasivitamnuay, J.; Singhatanadgid, P. Scaling laws for displacement of elastic beam by energy method. Int. J. Mech. Sci. 2017, 128–129, 361–367. [Google Scholar] [CrossRef]
  8. Adams, C.; Bös, J.; Slomski, E.M.; Melz, T. Scaling laws obtained from a sensitivity analysis and applied to thin vibrating structures. Mechanical Systems and Signal Processing. Mech. Syst. Signal Process. 2018, 110, 590–610. [Google Scholar] [CrossRef]
  9. Balawi, S.; Shahid, O.; Al Mulla, M. Similitude and Scaling Laws—Static and Dynamic Behaviour Beams and Plates. Procedia Eng. 2015, 114, 330–337. [Google Scholar] [CrossRef]
  10. Casaburo, A.; Petrone, G.; Franco, F.; De Rosa, S. A Review of Similitude Methods for Structural Engineering. Appl. Mech. Rev. 2019, 71, 030802. [Google Scholar] [CrossRef]
  11. Kenan, H.; Azeloğlu, O. Design of scaled down model of a tower crane mast by using similitude theory. Eng. Struct. 2020, 220, 110985. [Google Scholar] [CrossRef]
  12. Ungbhakorn, V. A New Approach for Establishing Structural Similitude for Buckling of Symmetric Cross-Ply Laminated Plates Subjected to Combined Loading. Thammasat Int. J. Sci. Technol. 2001, 6, 55–60. [Google Scholar]
  13. Singhatanadgid, P. Application of an Energy Theorem to Derive a Scaling Law for Structural Behaviors. 2005. Available online: https://www.researchgate.net/publication/304382031 (accessed on 13 November 2025).
  14. Rezaeepazhand, J.; Yazdi, A.A. Similitude requirements and scaling laws for flutter prediction of angle-ply composite plates. Compos. Part B Eng. 2011, 42, 51–56. [Google Scholar] [CrossRef]
  15. Gupta, G.S.; Sarkar, S.; Chychko, A.; Teng, L.D.; Nzotta, M.; Seetharaman, S. Process Concept for Scaling-Up and Plant Studies. Treatise Process Met. 2014, 3, 1100–1144. [Google Scholar] [CrossRef]
  16. Jha, A.; Sedaghati, R.; Bhat, R. Dynamic Testing of Structures Using Scale Models. In Collection of Technical Papers—AIAA/ASME/ASCE/AHS/ASC Structures, Structural Dynamics and Materials Conference; American Institute of Aeronautics and Astronautics (AIAA): Reston, VA, USA, 2005; pp. 5731–5744. [Google Scholar] [CrossRef]
  17. Shehadeh, M.; Shennawy, Y.; El-Gamal, H. Similitude and scaling of large structural elements: Case study. Alex. Eng. J. 2015, 54, 147–154. [Google Scholar] [CrossRef]
  18. Kim, D.-H.; Kim, Y.-C.; Kim, S.-W.; Kim, H.-G.; Kim, S. Structural Safety Evaluation of Test Fixture for Static Load Test of External Fuel Tank for Fixed-Wing Aircraft. Int. J. Aeronaut. Space Sci. 2022, 23, 52–65. [Google Scholar] [CrossRef]
  19. Ramly, R.; Kuntjoro, W.; Wisnoe, W.; Mohd Nasir, R.E. Design and Analysis for Development of a Wing Box Static Test Rig. In Proceedings of the 2010 International Conference on Science and Social Research (CSSR 2010), Kuala Lumpur, Malaysia, 5–7 December 2010; IEEE: Piscataway, NJ, USA, 2010; pp. 113–117. [Google Scholar] [CrossRef]
  20. Jin, Y.L.; Li, Z.G. Theoretical design and experimental verification of a 1/50 scale model of a quayside container crane. Proc. Inst. Mech. Eng. Part C J. Mech. Eng. Sci. 2012, 226, 1644–1662. [Google Scholar] [CrossRef]
  21. Cengel, A.Y.; Cimbala, J.M. Dimensional Analysis and Modeling. In Fluid Mechanics, 1st ed.; McGraw-Hill Science: New York, NY, USA, 2004; pp. 269–320. [Google Scholar]
  22. Eurocode Applied. Table of Design Material Properties for Structural Steel. Available online: https://eurocodeapplied.com/design/en1993/steel-design-properties (accessed on 25 September 2024).
  23. ASM Aerospace Specification Metals. Aluminum 2024-T4; 2024-T351. Available online: https://asm.matweb.com/search/SpecificMaterial.asp?bassnum=MA2024T4 (accessed on 25 September 2024).
  24. The Engineering Toolbox. Wood, Panel and Structural Timber Products—Mechanical Properties. 2011. Available online: https://www.engineeringtoolbox.com/timber-mechanical-properties-d_1789.html (accessed on 25 September 2024).
  25. Torkamani, S.; Jafari, A.; Toosi, K.N. Scaled Down Models for Free Vibration Analysis of Orthogonally Stiffened Cylindrical Shells Using Similitude Theory. In Proceedings of the ICAS 2008 26th International Congress of the Aeronautical Sciences, Anchorage, AK, USA, 14–19 September 2008. [Google Scholar]
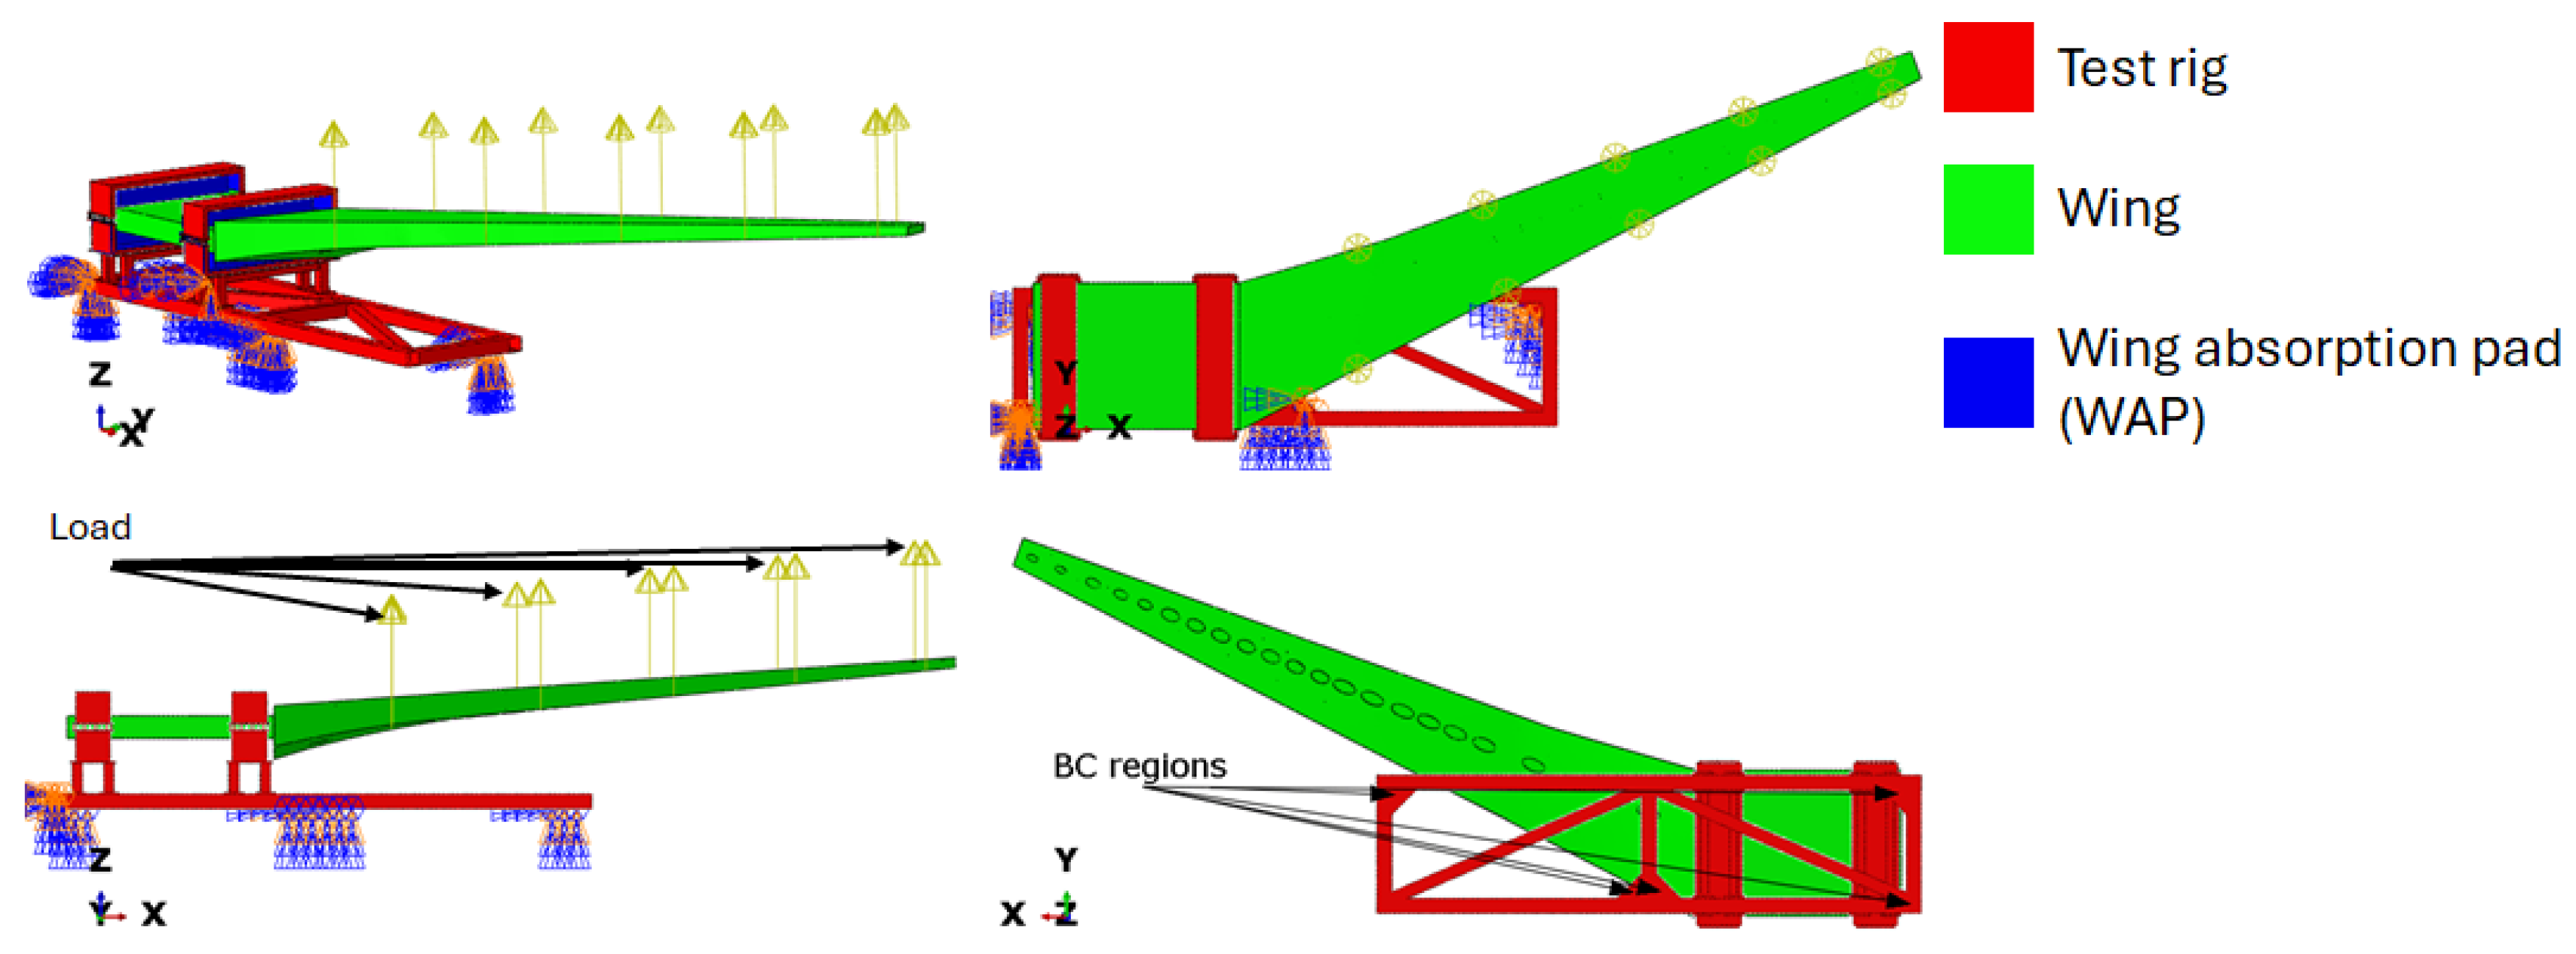
Figure 1. Assembled test specimen, test rig, wing and WAP.
Aerospace 13 00006 g001
Figure 2. Mesh of the test specimen, highlighting its various components.
Aerospace 13 00006 g002
Figure 3. Stress and displacement probe locations on the WAP and wing.
Aerospace 13 00006 g003
Figure 4. Stress and displacement probe locations on the test rig.
Aerospace 13 00006 g004
Figure 5. Buckingham Pi relationship for the applied load and a scaled model of constant stress for each stress-probe location on the test-rig specimen.
Aerospace 13 00006 g005
Figure 6. Effect of test rig mesh size on the deformation of the test specimen.
Aerospace 13 00006 g006
Figure 7. Effect of mesh size on the stress values of the test specimen.
Aerospace 13 00006 g007
Figure 8. Effect of mesh size on the high-stress probed regions on the test rig.
Aerospace 13 00006 g008
Figure 9. Location of accelerometers on the wing for the modal test experiment.
Aerospace 13 00006 g009
Figure 10. Mode 1 (1st vertical bending) FEA modal analysis results.
Aerospace 13 00006 g010
Figure 11. Mode 2 (1st lateral bending) FEA modal analysis results.
Aerospace 13 00006 g011
Figure 12. Effect of scaling on natural frequency for different mode shapes for the finite element model.
Aerospace 13 00006 g012
Figure 13. Effect of the scaling on the stress values from the finite element analysis.
Aerospace 13 00006 g013
Figure 14. Validation/error quantification of the probed stress values.
Aerospace 13 00006 g014
Figure 15. Similarity of stress contours for the prototype and different scaled models.
Aerospace 13 00006 g015
Figure 16. Comparison of Buckingham Pi predictions and actual displacements from FEA at test rig displacement probe 1 location.
Aerospace 13 00006 g016
Figure 17. Effect of the scaling on the moment of inertia about the centre of mass (Ixx).
Aerospace 13 00006 g017
Table 1. List of the selected parameters.
ParameterSymbolPrimary Dimension
Force F M L T 2
Young’s modulus E M L 1 T 2
Mass moment of inertia I M L 2
Density ρ M L 3
Stress σ M L 1 T 2
Displacement δ L
Dimension b L
Table 2. Material properties of steel [22].
ParameterValue
Young modulus 210   GPa
Poisson’s ratio 0.3
Density 7850   k g m 3
Table 3. Material properties of aluminium 2024-T351 [23].
ParameterValue
Young modulus 73.1   G P a
Poisson’s ratio 0.33
Density 2780   k g m 3
Table 4. Material properties of plywood [24].
ParameterValue
Young modulus 10   G P a
Poisson’s ratio 0.3
Density 520   k g m 3
Disclaimer/Publisher’s Note: The statements, opinions and data contained in all publications are solely those of the individual author(s) and contributor(s) and not of MDPI and/or the editor(s). MDPI and/or the editor(s) disclaim responsibility for any injury to people or property resulting from any ideas, methods, instructions or products referred to in the content.