Featured Application
The test rig can simulate real service conditions to obtain the friction and wear evolution of the bushing under high temperature and complex loading conditions, providing important experimental methods for material optimization, structural design improvements, and service life prediction of the bushing.
Abstract
The Variable Stator Vane (VSV) system is a critical component in aircraft engines, with its bushing providing structural support and lubrication. Under high temperatures, complex loads, and periodic motions, the bushing is prone to wear, which can affect system performance. In this study, a friction and wear test rig was designed to simulate realistic VSV bushing operating conditions. The rig is equipped with a programmable reciprocating drive, adjustable radial and bending moment loading, and a closed-loop temperature control system, allowing the wear process to be reproduced under high-temperature and complex loading conditions. Friction torque is measured using a torque sensor, while the equivalent wear volume is calculated from real-time data collected by two position sensors. Six samples were tested under 250 °C, 300 °C, and 350 °C, with bending moments of 1.5 Nm and 3 Nm, and a radial load of 30 KN, for 15,000 cycles. The results show that friction and wear evolve in two distinct stages: in the initial stage, friction torque and wear increase rapidly, followed by a slower growth rate during the stable stage. Higher temperatures and larger loads result in greater peak friction torque and more severe early wear. This study provides experimental methods to support VSV bushing material optimization, structural improvements, and lifetime prediction.
1. Introduction
The Variable Stator Vane (VSV) system is a critical component that enables high pressure ratio and high thrust-to-weight ratio operation in modern aero-engines. By continuously adjusting the stagger angle of stator vanes, the VSV mechanism improves the aerodynamic matching and operational stability of the compressor [1,2]. Within this mechanism, the bearing bush provides structural support and sliding lubrication for the vane shaft, playing a decisive role in actuation flexibility and angle control accuracy [3,4]. However, under long-term high-temperature exposure and complex cyclic loading, continuous friction and wear occur between the bush and the vane journal. This process leads to increased clearance and angular deviation, resulting in actuation hysteresis, sticking, or even jamming, thereby degrading engine efficiency and operational reliability [1,5,6].
Extensive research has been conducted to investigate friction and wear mechanisms of sliding pairs. Some studies have examined the influence of surface morphology on friction and wear behavior [7,8,9,10,11,12], while others have focused on tribological characteristics, material properties, and lubrication effects [13,14,15]. Numerical simulation approaches have also been widely adopted to predict wear behavior, leading to the development of numerous wear models [15,16,17,18,19,20,21]. These studies have significantly advanced the understanding of material-level mechanisms and wear modeling, providing a theoretical basis for exploring the failure mechanisms of sliding contact interfaces.
Despite these developments, most experimental studies rely on standardized friction and wear testers [22,23,24,25], which cannot reproduce the actual service conditions of VSV bushes. In real operation, VSV bushes experience periodic start–stop cycles, alternating mechanical loads, thermally induced deformation, and complex changes in attitude. Therefore, analyses based solely on material mechanisms or numerical simulations often fall short of accurately capturing the real wear evolution. The lack of experimental data that closely reflects actual service environments has become a major bottleneck restricting the reliability assessment and life prediction of VSV mechanisms.
To address this issue, several studies have explored dedicated testing platforms for VSV bush tribology. Some prototype-level testers based on real VSV mechanisms can reproduce certain load features but fail to account for temperature effects [26,27]. Chen et al. developed a reciprocating friction test rig capable of simulating the coupling effects of radial load and temperature, using bushing wear depth to characterize wear; however, the posture changes in the bushing under bending moments were not considered [5]. Wollmann et al. constructed a planar bearing test system that could apply complex loads and account for bending moments, but wear evolution was characterized solely by deflection angle, neglecting the translational motion of the bushing under radial loads, and thus failing to reflect the true overall wear morphology of the bushing [28].
To address these limitations, this study designed and built a single-bushing friction-wear test rig that reproduces the realistic loading and motion conditions of a certain type of aircraft engine VSV system. The rig is equipped with reciprocating rotational drive, adjustable compound loading, and high-temperature control systems. Friction torque is measured by a torque sensor, and the equivalent wear volume is derived from the synchronous measurements of two position sensors through geometric relationships. Due to the complexity of forces on non-metallic bushings and their temperature sensitivity, the bushing may expand to grip the shaft, deform during wear, and experience adhesive wear, making it difficult to accurately quantify wear via weight measurement or coordinate measuring methods. Therefore, the evolution of equivalent wear volume is used here to characterize the bushing failure process. This approach provides a more physically meaningful representation than traditional methods based solely on wear depth or deflection angle. The proposed methodology offers a new experimental tool and quantitative evaluation approach for analyzing the friction-wear behavior of VSV bushings under high-temperature and complex loading conditions, providing valuable guidance for subsequent material optimization and lifetime prediction.
2. Materials and Methods
2.1. Test Specimens and Performance Specifications of the Testing Apparatus
The test specimen in this study is a polyimide-based bushing used in the stator blades of a certain type of aircraft engine. Its main function is to provide support and lubrication for the blades, ensuring the stable adjustment of the stator blades in the Variable Stator Vanes (VSV) system, which is crucial for the efficient operation of the engine under various operating conditions. The bushing is connected to other components of the engine through the stator blade, and the performance of the bushing directly influences the vibration, adjustment accuracy, overall system reliability, and service life of the engine.
The bushing material is a composite, primarily composed of polyimide, with graphite added as a lubricant. Its heat deformation temperature exceeds 430 °C, and the material’s friction coefficient is 0.29. The inner diameter of the bushing is 9.8 mm, its length is 15.2 mm, and the clearance between the bushing and the shaft at room temperature is 0.02 mm.
During actual service, the load borne by the bushing mainly originates from the aerodynamic forces acting on the stator blades. Specifically, the aerodynamic load is converted at the root of the blade into radial force and bending moment , which are then transmitted through the blade’s journal to the bushing. Figure 1 shows the structure of the bushing and the effects of radial force and bending moments on the bushing. The radial force causes a displacement of the center position of the bushing, while the bending moment results in the inclination of the bushing. The interaction of these two loads leads to complex deformations of the bushing during blade operation, which in turn affects the contact state between the bushing and the journal, ultimately influencing the wear behavior of the bushing.
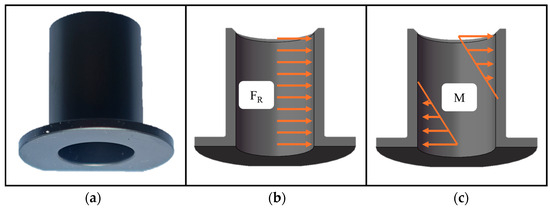
Figure 1.
(a) Test sample; (b) bushing reaction due to radial load ; (c) bushing reaction due to bending moment .
With increasing temperature, the contact between the bushing and the journal gradually becomes a surface contact state. In this process, the blade shaft undergoes low-speed reciprocating rotational motion within the bushing. This motion generates relative slide between the bushing and the journal, leading to friction and wear. To simulate the working environment of the bushing during actual service, the test platform must replicate high temperatures, combined loads, and reciprocating motion. This ensures accurate assessment of the bushing’s friction and wear characteristics and long-term performance. Table 1 presents the main performance specifications of the test platform that meets the experimental conditions for bushing.

Table 1.
Main performance specifications of the test apparatus.
2.2. Testing Apparatus
The test apparatus consists of four main subsystems: the drive system, loading system, temperature control system, and measurement system, with the overall mechanical structure shown in Figure 2.
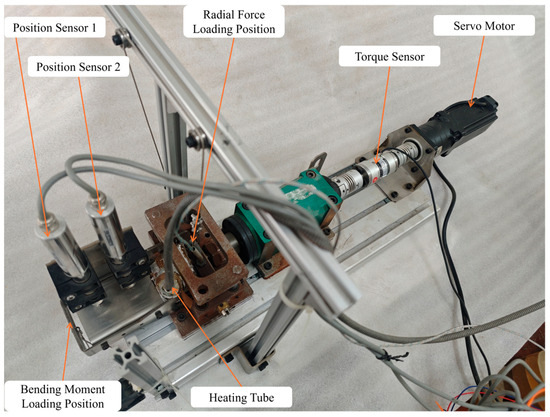
Figure 2.
Test apparatus.
The drive system utilizes a programmable servo motor as the power source to drive the blade shaft in a reciprocating oscillation. This system allows for precise control of the oscillation angle, speed, and frequency, simulating the actual oscillation characteristics of the stator vane in a VSV system under various operating conditions. This ensures that the motion of the bushing aligns with the dynamic response experienced in real-world engine operation.
The bushing is mounted in a specialized fixture, with its installation method consistent with that used in the engine casing. The fixture restricts the axial movement and rotational freedom of the bushing, ensuring that the loading conditions during the experiment match those encountered in actual service. As shown in Figure 3, the fixture design ensures that the bushing’s degrees of freedom are controlled, accurately replicating the mechanical state in real operational environments.
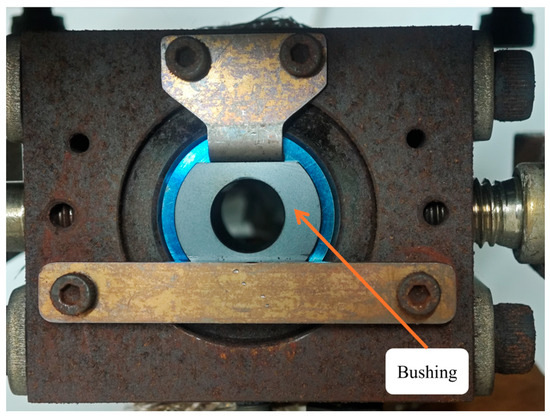
Figure 3.
Bushing installation method.
In service, the bushing is subjected to both radial and bending loads. As wear occurs, minor positional changes arise along the load direction. To replicate this in the test setup, two degrees of freedom are provided for bushing: one for radial movement and another for rotational movement due to the bending moment. Weights are applied in these two directions to simulate the bushing’s loading conditions in actual service, as depicted in Figure 4. This load application system enables precise control of the applied forces, effectively replicating the real-world operational load conditions.
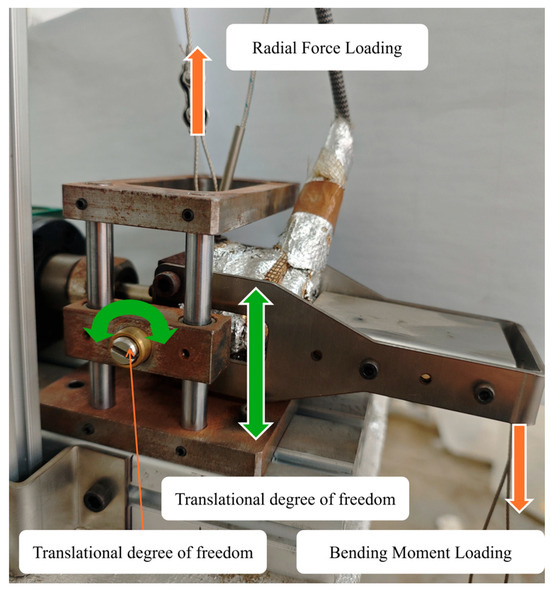
Figure 4.
Loading system.
The temperature control system uses heating coils embedded within the fixture to regulate the bushing’s temperature, with PID control ensuring precise temperature adjustment. Thermocouple signals provide feedback to maintain stable and accurate temperature control. The outer layer of the fixture is covered with ceramic fiber to reduce heat conduction losses, while the outermost layer is coated with aluminum foil to minimize heat radiation losses, thereby maintaining the bushing temperature at a stable set point. This thermal regulation system ensures accurate testing under high-temperature conditions, providing a reliable environment for studying the bushing’s friction and wear behavior at elevated temperatures.
The measurement system consists of a torque sensor and two position sensors, with data collected and stored in real time by a data acquisition card. The torque sensor is installed between the motor and the blade shaft, connected via a coupling, to measure the frictional torque during the operation of the bushing. The torque sensor has a range of 10 Nm with a measurement error of ±0.002 Nm, and the position sensors have a range of 5 mm with a measurement error of ±0.005 mm. The two position sensors are placed on either side of the bushing’s axial extension to monitor the bushing’s attitude changes during the wear process. By calculating the displacement difference between the two sensors, the inclination angle and axial position changes in the bushing can be determined. These data, combined with a geometric conversion model, are used to calculate the equivalent wear volume of the bushing. This measurement approach enables precise evaluation of the geometric evolution of the bushing during wear, providing crucial data for subsequent wear analysis.
2.3. Experimental Procedure
Since material from the bushing adheres to the shaft after each test, the shaft must first be cleaned to remove the adhered material. The bush is then fixed in the fixture and correctly assembled with the blade shaft. Weights are hung according to the set loading conditions to simulate the radial force and bending moment under actual operating conditions. The temperature control system is activated and heated to the target temperature. Once the temperature reaches the set value, it is maintained for a period to ensure the thermal stability of the entire system.
During the experiment, the equipment operates in a reciprocating oscillation pattern at a preset angle, while real-time data from the friction torque and displacement sensors are recorded. After the experiment is completed, the equipment is allowed to cool naturally to a safe temperature, and the test components are disassembled, and the contact surfaces are cleaned. The collected sensor data will be used for subsequent analysis of friction torque and wear variation patterns.
To systematically evaluate the performance of the apparatus and the effects of temperature and load on the friction and wear behavior of the bush, a total of 6 test samples were produced and tested in this study. The experiment uses the same radial load , and a combination of three temperature settings () and two bending moment levels () to create different working conditions. The experimental conditions for each sample are shown in Table 2. All experiments were conducted at the same reciprocating frequency, with a frequency of 1.4 Hz and an oscillation angle of 60 degrees. Sensor data from the first 15,000 cycles were selected for analysis. Samples 3–6 share identical experimental conditions, and four repeated tests were conducted to verify the repeatability of the experiment and the stability of the apparatus.

Table 2.
Test sample number and experimental conditions.
2.4. Sensor Data Processing Method
During the experiment, the friction torque data was collected in real-time through a torque sensor in the test apparatus. Due to factors such as the periodic oscillation of the blade and manufacturing assembly errors of the equipment, the friction torque is characterized by the maximum torque value of a single cycle obtained from the sensor. This method effectively reflects the variation in the friction torque of the bushing under different load and temperature conditions.
The equivalent wear volume of the bushing is calculated from the data of two position sensors through geometric relations, as shown in Figure 5. The average value of the sensor data from each cycle was extracted for calculation.
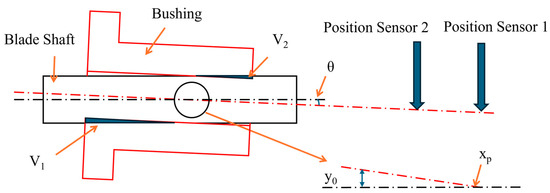
Figure 5.
Bushing equivalent wear volume calculation based on data from two position sensors.
To estimate the wear, the inclination angle of the bushing is first calculated, and the contact center position is then derived. The tangent of the contact surface inclination angle is calculated from the displacement difference between the two sensors and the distance between the sensors:
where and are the positions of the two sensors, and and are the displacement values measured by the sensors. The baseline offset , representing the displacement of the bushing due to wear, is calculated as
The contact center position is determined from the baseline offset and the inclination angle :
To ensure that the contact center position does not exceed the half-length of the bushing, the contact center position is constrained as follows:
where ensures the consistency of the contact center with the wear direction.
The wear volume consists of the volumes on both sides of the contact surface. The volume on each side is calculated by the following formulas:
Finally, the total wear volume is the sum of the volumes on both sides:
where
is the diameter of the shaft (in mm);
is the half-length of the bushing (in mm);
is the contact center position (in mm);
is the contact surface inclination angle (in degrees).
This method effectively estimates the equivalent wear volume of the bushing during the wear process, providing support for wear assessment and material lifespan prediction.
3. Result and Discussion
3.1. Surface Morphology Analysis
Figure 6 compares the surface morphology of the shaft and bushing under 250 °C, 300 °C, and 350 °C conditions. It is evident from the figure that the surface morphology of both the shaft and the bushing undergo significant changes with increasing temperature. As the temperature rises, the area of bushing material adhered to the shaft increases, and the thickness of the transfer layer becomes larger. The surface morphology of the bushing exhibits typical features of abrasive wear and adhesive wear, and both types of wear become progressively more severe at higher temperatures.
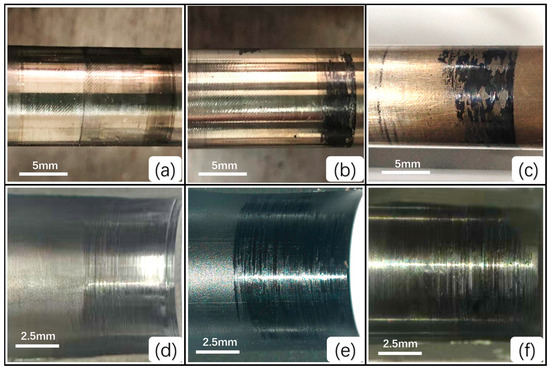
Figure 6.
(a) The surface morphology of the shaft at 250 °C; (b) the surface morphology of the shaft at 300 °C; (c) the surface morphology of the shaft at 350 °C; (d) the surface morphology of the bushing at 250 °C; (e) the surface morphology of the bushing at 300 °C; (f) the surface morphology of the bushing at 350 °C.
Figure 7 shows the optical microscope images of the bushing before the experiment and after the experiment at 250 °C, 300 °C, and 350 °C. In Figure 7a, the machining marks left by the bushing’s turning process are clearly visible.
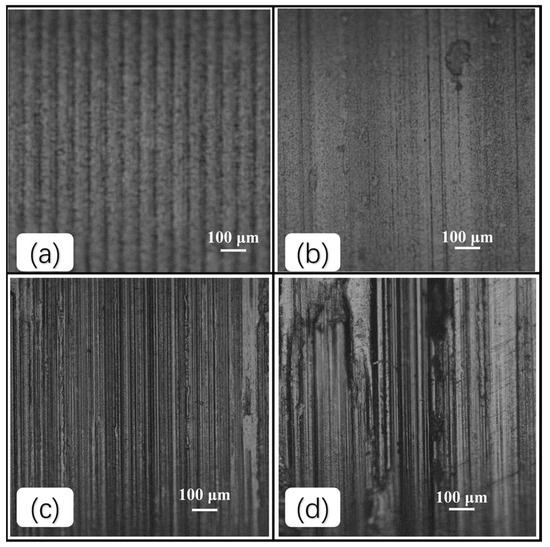
Figure 7.
(a) The optical microscope image of the bushing surface before the experiment; (b) The optical microscope image of the bushing surface at 250 °C; (c) The optical microscope image of the bushing surface at 300 °C; (d) The optical microscope image of the bushing surface at 350 °C.
The optical microscope images further illustrate the evolution of the bushing surface morphology. As shown in Figure 7b, at 250 °C the bushing surface appears smooth, with the original turning marks worn away. Only slight abrasive wear traces and minor material detachment caused by mild adhesive wear are observed. In Figure 7c, at 300 °C the abrasive wear marks become deeper, accompanied by more pronounced adhesive wear regions. Figure 7d shows that at 350 °C, deeper abrasive grooves and extensive material delamination are evident, indicating a significantly intensified wear process.
These observations suggest that temperature not only directly affects the material’s hardness and strength but also significantly alters the energy distribution and stress concentration at the contact interface. As the temperature increases, the contact interface between the bushing and shaft transitions from a boundary lubrication state to a more severe adhesive wear state, accelerating material migration and surface degradation. Under high-temperature conditions, the increased plasticity of the material leads to significant changes in the wear rate and wear type, highlighting the crucial role of temperature as a key factor in the friction and wear process.
3.2. Evolution of Friction Torque
Figure 8 illustrates the variation in frictional torque with cycle count for six test specimens. Overall, the frictional torque exhibits two distinct stages, following a highly consistent evolutionary pattern. The first stage primarily occurs before approximately 1500 cycles, where the torque rapidly increases to its peak and then quickly decreases. The second stage shows a gradual reduction in frictional torque, followed by oscillations within a narrow range.
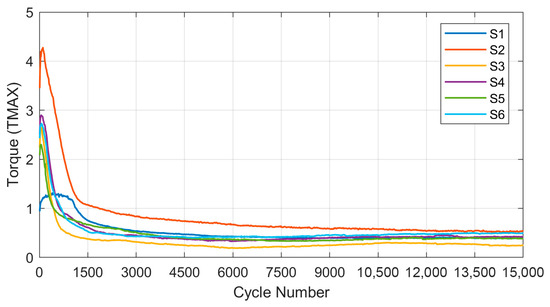
Figure 8.
Friction torque vs. cycle number for six test specimens.
The rapid rise and subsequent sharp decline of friction torque in the first stage result from the combined effects of multiple mechanisms. First, thermal expansion causes the bushing to clamp the shaft more tightly, significantly increasing the contact pressure and leading to a steep initial increase in friction torque. Second, machining marks and surface roughness at the initial contact interface, together with the absence of a fully developed lubrication film, place the system in a boundary lubrication regime, further contributing to the torque rise. As the number of cycles increases, continuous wear reduces the contact pressure, while the lubrication film gradually forms and stabilizes. These factors collectively improve the interfacial sliding conditions, causing the friction torque to drop rapidly after reaching its peak and transition into the stable stage.
Under identical temperature and load conditions, the frictional torque curves for Samples 3–6, which are repeated four times, show excellent consistency. The peak torque position, peak magnitude, and the fluctuations after reaching the stable stage exhibit high repeatability, indicating that the test apparatus demonstrates good driving precision, loading stability, and temperature control reliability. Table 3 presents the peak torque values and their corresponding positions. The average peak torque of the four samples is 2.65, with a standard deviation of 0.22 and a coefficient variation of 8.27%, indicating low dispersion and good repeatability.

Table 3.
The peak torque of Samples 3–6.
Under varying temperatures but the same load conditions, comparing Sample 1 with Samples 3–6 reveals a significant temperature effect: higher temperatures result in a faster rise to the peak torque, and the peak value itself is noticeably higher. This is mainly attributed to the softening of the polyimide bushing material at elevated temperatures, which increases the contact pressure and enhances the interface adhesion. Moreover, under high-temperature conditions, the transition from the peak torque to the stable stage occurs more rapidly, reflecting faster interface morphology reconstruction and shorter time required for lubricating film formation under higher thermal loads.
When comparing Sample 2 with Samples 3–6 under varying temperatures and loads, the coupling effect of temperature and load becomes apparent. Although Sample 2 reaches its peak torque later, its peak value is significantly higher, indicating that under the current conditions, the influence of load on the friction torque is greater than that of temperature.
In the second stage, the differences in frictional torque among the test specimens gradually diminish. The curves for all conditions stabilize, suggesting that the interface characteristics become highly consistent once the bushing reaches the stable wear phase. Due to the limited sample size, the current study is unable to make more definitive statistical conclusions about the subtle differences between conditions in the second stage.
3.3. Evolution of Equivalent Wear Volume
Figure 9 illustrates the variation in equivalent wear volume of the bushing with cycle count under different temperature and load conditions. The overall trend shows two distinct stages, exhibiting similar characteristic patterns to those of the frictional torque. The first stage occurs primarily before approximately 1500 cycles, during which the equivalent wear volume increases rapidly. This rapid increase is primarily due to thermal expansion, which causes the bushing to grip the shaft more tightly, resulting in a significant rise in contact pressure and consequently accelerating wear. As the number of cycles increases, the contact pressure decreases to a stable level due to wear, and the growth of the wear volume transitions from the rapid phase to the second stage of steady wear, which is characterized by a more gradual linear increase.
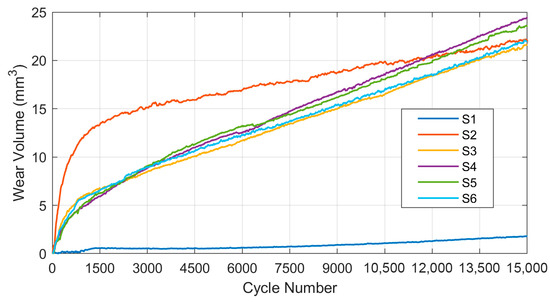
Figure 9.
Equivalent wear volume vs. cycle number for six test specimens.
Under identical temperature and load conditions, the equivalent wear volume curves of Samples 3–6, repeated four times, show excellent consistency, indicating that the test apparatus operates stably, and the wear volume data has good repeatability. The wear volumes per 1000 cycles for Samples 3–6 in the steady wear stage are 0.581 mm3, 0.54 mm3, 0.504 mm3, and 0.569 mm3, respectively. The average wear volume of the four samples is 0.5485 mm3, with a standard deviation of 0.0297 mm3 and a coefficient of variation of 5.42%. These results indicate low dispersion and good repeatability. The consistent wear volume trends across different specimens further confirm the stability and precision of the experimental setup.
Under varying temperatures but identical loads, comparing Sample 1 with Samples 3–6 reveals a significant temperature effect: the wear rate in both stages increases significantly with higher temperatures. In the first stage, two main factors dominate the wear behavior. Higher temperatures lead to greater thermal expansion, which increases the contact pressure and thus results in a higher wear rate; additionally, elevated temperatures reduce the material hardness of the bushing, further accelerating the wear rate. In the second stage, as wear progresses, the contact pressure caused by thermal expansion gradually diminishes, and the dominant factor becomes the reduction in material hardness.
Under different temperature and load conditions, comparing Sample 2 with Samples 3–6 shows that Sample 2 exhibits a significantly higher wear rate in the first stage, indicating that under the current experimental conditions, the contribution of bending-moment loading to the wear rate is stronger than that of temperature. In the second stage, the wear rate of Sample 2 becomes lower than that of Samples 3–6, suggesting that under the current experimental conditions, temperature contributes more than the bending moment to the wear rate in the steady wear phase.
4. Conclusions and Outlook
4.1. Conclusions
This study investigates the friction and wear behavior of the VSV bushing in aero-engine stator assemblies under high-temperature and combined mechanical loading. A single-bushing friction–wear test rig capable of reproducing typical service conditions was designed and constructed. Temperature, mechanical loads, and oscillatory motion were stably controlled throughout the tests, and repeated trials showed excellent consistency, confirming the reliability and repeatability of the apparatus. The developed rig provides an effective platform for VSV bushing material optimization, structural improvement, and service-life prediction.
A new method for determining the equivalent wear volume was proposed based on displacement measurements from two position sensors. Using a geometric conversion model, the attitude variation in the bushing was quantitatively transformed into an equivalent wear volume. This approach offers a more physically meaningful representation of wear evolution than conventional indicators such as wear depth or deflection angle.
Experiments were conducted on six specimens at temperatures of 250 °C, 300 °C, and 350 °C, with applied bending moments of 1.5 Nm and 3 Nm, a radial load of 30 KN, and a total of 15,000 loading cycles. Surface morphology observations reveal that abrasive wear and adhesive wear are the dominant mechanisms, and both peak friction torque and surface damage intensify with increasing temperature and load.
Both friction torque and equivalent wear volume exhibit a distinct two-stage evolutionary behavior. In the first stage (within approximately the first 1500 cycles), friction torque rapidly rises to a peak and then quickly drops, while the wear volume increases sharply. This stage is mainly governed by thermal expansion of the bushing, which significantly increases the contact pressure, as well as the initially rough surface with machining marks, leading to a higher wear coefficient. In the second stage, wear reduces the contact pressure to a stable level, the contact interface becomes stable, friction torque fluctuates within a narrow range, and the wear volume grows linearly.
4.2. Outlook
At present, due to the inability to accurately measure the mass and geometric dimensions of the bushing before and after wear, the deviation between the equivalent wear volume and the actual wear volume cannot be quantitatively assessed. In addition, the limited number of samples prevents a comprehensive statistical analysis of the effects of various temperatures and loads. Future work will involve more extensive and repeated experiments using the developed rig to establish a systematic database of temperature–load–wear evolution, thereby supporting the development of predictive models for bushing service life.
Author Contributions
S.L. and L.X. contributed individually to the research design, data analysis, investigation, and manuscript preparation. All authors have read and agreed to the published version of the manuscript.
Funding
This research received no external funding.
Institutional Review Board Statement
Not applicable.
Informed Consent Statement
Not applicable.
Data Availability Statement
The original contributions presented in this study are included in the article. Further inquiries can be directed to the corresponding author.
Conflicts of Interest
The authors declare no conflicts of interest.
References
- Janssen, J.; Pohl, D.; Jeschke, P.; Halcoussis, A.; Hain, R.; Fuchs, T. Effect of an Axially Tilted Variable Stator Vane Platform on Penny Cavity and Main Flow. J. Turbomach 2022, 144, 021010. [Google Scholar] [CrossRef]
- Zhang, H.; Liu, M.; Zeng, H.; Luo, Z.; Han, Q. Dynamics of Variable Stator Vane Adjustment Mechanism Considering the Flexibility of Linkage. Int. J. Aerosp. Eng. 2025, 2025, 7302080. [Google Scholar] [CrossRef]
- Fan, J.; Xu, H.; Meng, Q.; Xu, S. A Multi-Layer Kriging Surrogate Model for the Reliability Analysis of Variable Stator Vanes in Aero Engines. Aeronaut. J. 2025, 129, 123–143. [Google Scholar] [CrossRef]
- Zhang, H.; Song, L.K.; Bai, G.C.; Li, X.Q. Active Extremum Kriging-Based Multi-Level Linkage Reliability Analysis and Its Application in Aeroengine Mechanism Systems. Aerosp. Sci. Technol. 2022, 131, 107968. [Google Scholar] [CrossRef]
- Chen, S.; Yin, N.; Yu, Q.; Zhang, Z. A Novel Tribometer for Investigating Bushing Wear. Wear 2019, 430–431, 263–271. [Google Scholar] [CrossRef]
- Zhang, Y.; Chen, S.; Liu, Y.; Wang, S. Numerical Investigation of a Variable Stator Vane with Nonuniform Partial Radial Gaps in an Annular Compressor Cascade. Int. J. Turbo Jet Engines 2024, 40, s315–s324. [Google Scholar] [CrossRef]
- Xie, W.; Liu, C.; Huang, G.; Qin, Z.; Zong, K.; Jiang, D. Trans-Scale Rough Surface Contact Model Based on Molecular Dynamics Method: Simulation, Modeling and Experimental Verification. Eur. J. Mech. A Solids 2023, 100, 105021. [Google Scholar] [CrossRef]
- Yu, X.; Sun, Y.; Wu, S. Multi-Stage Contact Model between Fractal Rough Surfaces Based on Multi-Scale Asperity Deformation. Appl. Math. Model. 2022, 109, 229–250. [Google Scholar] [CrossRef]
- Zong, K.; Qin, Z.; Chu, F. Modeling of Frictional Stick-Slip of Contact Interfaces Considering Normal Fractal Contact. J. Appl. Mech. 2022, 89, 031003. [Google Scholar] [CrossRef]
- Jeng, Y.R.; Lin, Z.W.; Shyu, S.H. Changes of Surface Topography During Running-In Process. J. Tribol. 2004, 126, 620–625. [Google Scholar] [CrossRef]
- Zhang, G.; Liu, X.; Lu, W. Comprehensive Evaluation of Surface Topography in Running-in Wear Process. In Proceedings of the Sixth International Symposium on Precision Mechanical Measurements, Guiyang, China, 8–12 August 2013; Volume 8916, pp. 1112–1117. [Google Scholar]
- Zambrano, O.A.; Muñoz, E.C.; Rodríguez, S.A.; Coronado, J.J. Running-in Period for the Abrasive Wear of Austenitic Steels. Wear 2020, 452–453, 203298. [Google Scholar] [CrossRef]
- Liu, Y.; Li, B.; He, Y.; Dong, Y.; Wang, S. Effect of Silane Coating Surface Treatment on Friction and Wear Properties of Carbon Fiber/PI Composites. Mater. Sci. 2022, 40, 214–222. [Google Scholar] [CrossRef]
- Zheng, F.; Lv, M.; Wang, Q.; Wang, T. Effect of Temperature on Friction and Wear Behaviors of Polyimide (PI)-Based Solid-Liquid Lubricating Materials. Polym. Adv. Technol. 2015, 26, 988–993. [Google Scholar] [CrossRef]
- Milojević, S.; Savić, S.; Mitrović, S.; Marić, D.; Krstić, B.; Stojanović, B.; Popović, V. Solving the Problem of Friction and Wear in Auxiliary Devices of Internal Combustion Engines on the Example of Reciprocating Air Compressor for Vehicles. Tech. Gaz. 2023, 30, 122–130. [Google Scholar] [CrossRef]
- Regis, A.; Linares, J.M.; Arroyave-Tobon, S.; Mermoz, E. Numerical Model to Predict Wear of Dynamically Loaded Plain Bearings. Wear 2022, 508–509, 204467. [Google Scholar] [CrossRef]
- Cheng, S.; Meng, X.; Li, R.; Liu, R.; Zhang, R.; Sun, K.; Ye, W.; Zhao, F. Rough Surface Damping Contact Model and Its Space Mechanism Application. Int. J. Mech. Sci. 2022, 214, 106899. [Google Scholar] [CrossRef]
- Harnafi, M.; Guidault, P.A.; Boucard, P.A.; Paleczny, C. A Simplified Model for the Wear Prediction of Plain Bearings in the Variable Stator Vane System. Tribol. Int. 2024, 196, 109667. [Google Scholar] [CrossRef]
- Schmidt, A.A.; Schmidt, T.; Grabherr, O.; Bartel, D. Transient Wear Simulation Based on Three-Dimensional Finite Element Analysis for a Dry Running Tilted Shaft-Bushing Bearing. Wear 2018, 408–409, 171–179. [Google Scholar] [CrossRef]
- Zhang, H.; Luo, Z.; Pang, C.; Xu, C.; Yao, S. A New Contact Force Model for Revolute Joints Considering Elastic Layer Characteristics Effects. J. Sound Vib. 2025, 596, 118743. [Google Scholar] [CrossRef]
- Hegadekatte, V.; Kurzenhäuser, S.; Huber, N.; Kraft, O. A Predictive Modeling Scheme for Wear in Tribometers. Tribol. Int. 2008, 41, 1020–1031. [Google Scholar] [CrossRef]
- Colbert, R.S.; Alvarez, L.A.; Hamilton, M.A.; Steffens, J.G.; Ziegert, J.C.; Burris, D.L.; Sawyer, W.G. Edges, Clearances, and Wear: Little Things That Make Big Differences in Bushing Friction. Wear 2010, 268, 41–49. [Google Scholar] [CrossRef]
- He, K.; Ma, Y.; Zhang, Z. Tribo-Informatics Approach to Investigate the Friction and Wear of Bushings in the Variable Stator Vane System. J. Tribol. 2023, 145, 121704. [Google Scholar] [CrossRef]
- Kurdi, A.; Kan, W.H.; Chang, L. Tribological Behaviour of High Performance Polymers and Polymer Composites at Elevated Temperature. Tribol. Int. 2019, 130, 94–105. [Google Scholar] [CrossRef]
- Lv, M.; Zheng, F.; Wang, Q.; Wang, T.; Liang, Y. Friction and Wear Behaviors of Carbon and Aramid Fibers Reinforced Polyimide Composites in Simulated Space Environment. Tribol. Int. 2015, 92, 246–254. [Google Scholar] [CrossRef]
- Chang, J.; Luo, Z.; Wang, Y.; Han, Q.; Han, F.; Zhang, H. Characterization of Joint Contact Model Considering Friction of Variable Stator Vane Mechanism and Application to Principle-Level Mechanism. Int. J. Non-Linear Mech. 2023, 156, 104511. [Google Scholar] [CrossRef]
- Chang, J.; Luo, Z.; Wei, K.; Han, Q.; Han, F. Investigation of Spatial Plane Joint Characteristic for Dynamic Analysis of VSV Mechanism Based on Similarity Scaling Technique. Int. J. Non-Linear Mech. 2023, 148, 104300. [Google Scholar] [CrossRef]
- Wollmann, T.; Nitschke, S.; Klauke, T.; Behnisch, T.; Ebert, C.; Füßel, R.; Modler, N.; Gude, M. Investigating the Friction, Wear and Damage Behaviour of Plain Bearing Bushes of the Variable Stator Vane System. Tribol. Int. 2022, 165, 107280. [Google Scholar] [CrossRef]
Disclaimer/Publisher’s Note: The statements, opinions and data contained in all publications are solely those of the individual author(s) and contributor(s) and not of MDPI and/or the editor(s). MDPI and/or the editor(s) disclaim responsibility for any injury to people or property resulting from any ideas, methods, instructions or products referred to in the content. |
© 2025 by the authors. Licensee MDPI, Basel, Switzerland. This article is an open access article distributed under the terms and conditions of the Creative Commons Attribution (CC BY) license (https://creativecommons.org/licenses/by/4.0/).