Abstract
The processing performance of deep narrow grooves by electrical discharge machining (EDM) needs to be further improved, mainly reflected in the serious electrode wear and low processing efficiency. This study firstly conducted a single-factor experiment on electrical parameters to analyze the influence of electrical parameters on electrode length wear and electrode sharp corner wear, respectively. It was found that the increase in pulse width and duty cycle could reduce electrode length wear, but at the same time led to an increase in electrode sharp corner wear. The reason is that bubbles and debris tend to accumulate at the sharp corner of the electrode. It causes short circuits and arcing phenomena, intensifying the sharp corner wear of the electrode. To address this issue, it is proposed to use a rounded corner electrode to facilitate the exclusion of bubbles and debris from the machining gap, reduce the occurrence of short circuits and arcing phenomena, thereby lowering the electrode length and sharp corner wear, and enhancing processing efficiency. Through the simulation of the flow field in the machining gap, it is theoretically proven that the rounded corner electrode can promote the movement of bubbles and debris towards the outlet of the machining gap and slow down the accumulation of bubbles and debris. Through the EDM of deep narrow groove, it is proven that the electrode wear and processing efficiency of the rounded corner electrode are both superior to those of the sharp corner electrode, and the electrode wear and processing efficiency increase with the increase in the rounded corner radius of the electrode. The research results have contributed to improving the performance of deep narrow grooves by EDM.
1. Introduction
In industries such as aerospace, electronics, medical devices, and mold manufacturing, deep, narrow grooves are essential structural features. However, their high depth-to-width ratio and the exceptional hardness of the materials from which they are fabricated pose significant machining challenges [1]. Electrical discharge machining (EDM) offers distinct advantages for processing such geometries, as it is not constrained by material hardness, induces no macroscopic cutting forces, and achieves high processing accuracy [2]. Nevertheless, during EDM of deep, narrow grooves, the accumulation of bubbles and debris within the machining gap frequently leads to arcing, short circuits, elevated electrode wear, and reduced machining efficiency. Consequently, implementing strategies to enhance process performance is imperative for maintaining stability and productivity in EDM of deep narrow groove operations.
In terms of electrode wear in deep, narrow grooves by EDM, Flaño, O et al. [3,4] effectively enhanced machining stability and reduced secondary discharges by machining deep, narrow grooves on thin electrode sheets and applying resin coatings on side walls to minimize electrode wear. Tang et al. [5] introduced a method using a rotating disk electrode for deep narrow groove machining and observed that increasing spindle speed reduced electrode wear and improved surface quality. Li et al. [6] developed a new foil electrode EDM technology for narrow slots and simulated the flow field model of the discharge gap under different injection methods. They conducted insulation treatment experiments targeting the lateral discharge phenomenon of the foil electrode observed during the experiments, which indicated that insulation treatment avoids lateral discharge of the electrode to a certain extent and improves the quality of the grooves.
In addition to the research on deep narrow groove processing by EDM, other studies on electrode wear in EDM objects also have reference value. Pellegrini et al. [7] proposed a mechanical method to measure the electrode geometry by touching a sharp target while varying the spindle rotation angle and Z-axis depth. The results demonstrated that this method is capable of detecting changes in the electrode tip shape under different conditions. Selvarajan, L. et al. [8] integrated a cryogenic cooling system with copper electrodes, which significantly reduced the material removal rate (MRR), electrode wear rate (EWR), and machining time. The results indicated that the cryogenic method has the potential to enhance EDM. It was found that current was the most important factor affecting MRR and EWR. Aghdeab, S. H. et al. [9] achieved the minimum EWR when machining AISI M6 tool steel using a copper electrode with a fixed diameter of 10 mm under the influence of machining parameters. Notably, the spark gap (SG) exerts a significant influence on electrode beam energy wear. As the spark gap increases, the EWR decreases accordingly. Zhang et al. [10] proposed a multi-performance parameter optimization method for micro-electrical discharge machining (micro-EDM) based on Grey Relational Analysis. Taking machining time, as well as axial and radial electrode wear amounts during micro-groove machining as evaluation indicators, the method aims to shorten the machining time and reduce electrode wear. Huu, P.N. et al. [11] conducted an in-depth study on the application of carbon-coated tool electrodes in micro-electrical discharge machining (μEDM). They elucidated the influence of these electrodes on key machining parameters such as the tool wear rate (TWR) during μEDM processing. Chen, B. et al. [12] developed a novel horizontal ultrasonic-assisted electrical discharge machining system for deep and small holes by integrating the characteristics of EDM and ultrasonic-assisted machining. The system was applied to practical machining, and the results demonstrated that the horizontal ultrasonic vibration of the workpiece can enhance EDM efficiency and machining depth, as well as mitigate electrode wear and improve the inner surface roughness of small holes. Pham, H.V. et al. [13,14] reduced electrode wear of Micro-EDM by using coated electrodes and studying parameters such as voltage, capacitance, and spindle speed.
The above research has contributed to reducing the electrode wear in EDM. However, the existing literature mainly evaluates electrode wear by measuring the reduction in electrode length or the reduction in electrode mass. In fact, the wear of electrodes mainly manifests in length wear and sharp corner wear. Reducing the length wear of electrodes or lowering the overall mass wear of electrodes through electrical parameters does not mean that the sharp corner wear of electrodes has been reduced. Therefore, a comprehensive evaluation of electrode length and sharp corner wear is necessary to reflect the influence of electrical parameters on electrode wear.
In terms of the processing efficiency of deep narrow grooves by EDM, Li et al. [15] developed a multi-objective optimization model for machining parameters through process experiments, support vector machines, and genetic algorithms, formulating an efficient variable-parameter machining strategy. However, it has become very difficult to make further breakthroughs by optimizing process parameters. Chu et al. [16,17] demonstrated that high-speed tool retraction not only enhances machining efficiency but also increases machining depth, significantly improving debris removal capability in deep, narrow grooves. However, this operation can only be carried out after a consecutive discharge process is completed. However, it has little effect on the removal of bubbles and processing debris during the continuous discharge process. Uhlmann, E et al. [18] machined deep, narrow grooves in the nickel-based superalloy MAR-M247 and employed ultrasonic assistance to enhance debris evacuation during processing. But the ultrasonic vibration method not only increases the equipment cost, but also its debris removal effect will be greatly reduced as the processing depth increases. Zhang et al. [19,20,21] found that a vertically downward machining posture effectively improved both machining efficiency and discharge environment stability. However, dynamic adjustment makes the equipment more complex and raises the equipment cost. At the same time, immersion processing also becomes a problem, such as in horizontal and inverted posture processing.
Not only does the specialized research on deep narrow groove processing by EDM deserve attention, but other studies focusing on the machining efficiency of various types of EDM workpieces also hold notable reference significance. Jiang et al. [22] analyzed the surface quality and machining efficiency by quantifying the surface roughness and MRR. They found that the use of Cu-Ni electrodes and graphene suspended in the dielectric can significantly enhance the machining efficiency and quality of Polycrystalline Diamond in EDM. However, this method is mainly applicable to materials with weak electrical conductivity. For those with high electrical conductivity (e.g., Cr12 die steel), the addition of conductive particles may exacerbate abnormal discharges. Wang et al. [23] proposed a method combining high-pressure flushing of the medium inside the pipe with high-speed flushing of the medium outside the pipe. Considering different hole depths, the influences of multiple factors such as internal punching pressure, external punching speed, angle, and combined punching on the electrical discharge machining process were studied, which improved the processing efficiency. However, this liquid flushing method is difficult to apply in the deep, narrow groove processing of EDM.
In conclusion, the deep and narrow groove processing by EDM still needs further improvement in terms of electrode wear and processing efficiency. This study first investigates the influence of electrical parameters on both electrode length wear and sharp corner wear. It then proposes the use of rounded corner electrodes to improve the evacuation of debris and bubbles from the machining gap, thereby reducing short-circuiting and arcing phenomena, which in turn mitigates electrode length wear and corner wear, and enhances processing efficiency. Flow field simulations of the machining gap during consecutive discharges and electrode jump in deep narrow groove EDM were carried out to demonstrate the advantages of rounded corner electrodes. Finally, experimental EDM of deep narrow grooves was performed using both sharp corner electrodes and rounded corner electrodes with different rounded corner radii. The results confirm that rounded corner electrodes outperform sharp corner electrodes in terms of reduced electrode wear and higher processing efficiency, and clarify the influence of rounded corner radius on wear behavior and efficiency.
This study demonstrates that the utilization of rounded corner electrodes markedly improves EDM performance in machining deep, narrow through grooves, as their geometry introduces no detrimental effects on the final groove profile. For deep, narrow non-through grooves, the adoption of rounded corner electrodes during rough machining, followed by a sharp corner electrode in finishing, guarantees the precise formation of a sharp corner in the final product. The implementation of rounded corner electrodes significantly shortens roughing time, thereby enhancing overall process efficiency. Furthermore, owing to reduced electrode wear, the grooves produced in the roughing stage achieve superior geometric accuracy. This consequently reduces the machining allowance, decreases finishing duration, and lowers electrode consumption in the finishing stage.
2. Processing Performance in EDM of Deep, Narrow Grooves via Sharp Corner Electrode
2.1. Experimental Design
2.1.1. Electrode Preparation
To ensure the accuracy of the electrode shapes used, all the electrodes employed in this study were processed on a low-speed wire-cutting electrical discharge machining (EDM-LW) machine. At the same time, in order to reduce positioning errors, when processing electrodes through EDM-LW, a 3R positioning system is used to position and clamp the electrodes. After the electrode processing is completed, the 3R fixture and the electrode as a whole are removed and installed on the electrical discharge forming machine tool that is also equipped with a 3R positioning system. Figure 1 shows the processed sharp corner electrode, in which the electrode is cut into a thin sheet by electrical discharge wire cutting, and the unprocessed part of the electrode is held by a 3R fixture. A sharp corner electrode remains approximately at a sharp corner even when magnified 50 times under a microscope. The electrode material is red copper, with a cross-sectional dimension of 1 mm × 10 mm and a length of 15 mm. The workpiece material is made of die steel Cr12, with dimensions of 10 mm × 70 mm × 100 mm.
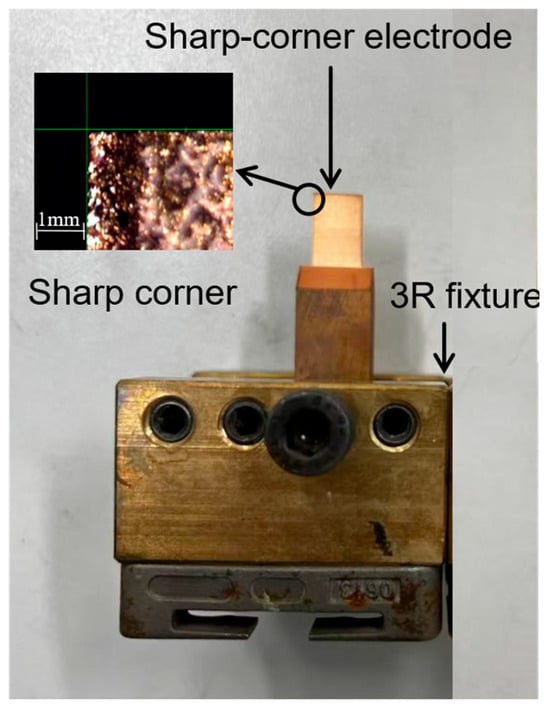
Figure 1.
The sharp corner electrode.
2.1.2. Evaluation of Electrode Wear
As shown in Figure 2, it is a schematic diagram of electrode wear. The electrode length wear is represented by the relative wear of the electrode length , where the is calculated based on experimental data through Formula (1).
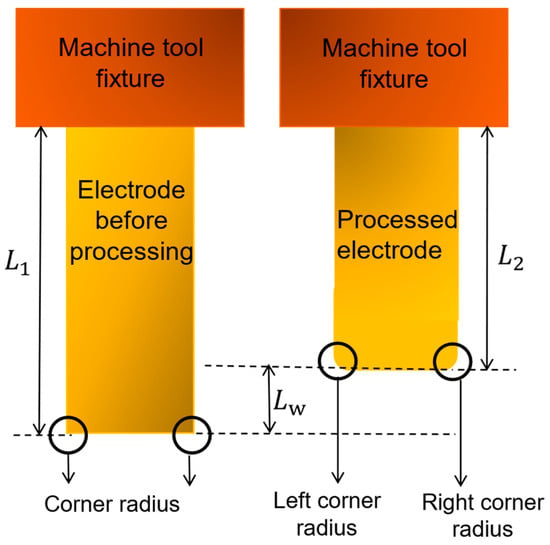
Figure 2.
Electrode diagrams before and after processing.
In the formula: is the processing depth (mm) set for the machine tool; is the absolute wear of electrode length (mm); is the length of the electrode before processing (mm); is the length of the electrode after processing (mm); The parameter represents the discharge gap, measured in millimeters (mm), between the end face of the electrode and the bottom surface of the groove. The measurement method is to manually pause the processing during consecutive discharges, record the current Z-axis coordinate at , slowly lift the machine tool spindle, clean the electrode and workpiece, and then slowly lower the machine tool spindle until the contact sensing is triggered. Record the Z-axis coordinate value at this time, and the absolute value of the difference between and is the bottom clearance.
The rounded corner wear of the electrode is calculated as the difference between the radius of the electrode’s rounded corner after processing and the sharp corner radius before processing. It is noteworthy that for each electrode, the radii of the left and right rounded corners typically show considerable variation after machining; therefore, the larger value is selected for calculating the electrode’s rounded corner wear. Additionally, for sharp corner electrodes, the initial corner radius before processing is considered zero.
2.1.3. Experimental Parameter
This study employed a single-factor experimental approach to investigate the influence of pulse width, duty cycle, and peak current on electrode wear and processing efficiency. The specific values of the electrical parameters used are provided in Table 1. Additionally, Table 2 outlines the recommended electrical parameters for rough machining supplied by the machine tool manufacturer. In these parameters, the term “high voltage” refers to the open-circuit voltage and the voltage during the breakdown delay phase. After the breakdown occurs, the power supply switches to “low voltage”. The single-factor experiments in this work were designed and conducted based on this set of recommended electrical parameters. All deep narrow groove machining experiments were performed at a depth of 15 mm, under negative polarity conditions, meaning the workpiece was connected to the negative terminal of the pulse power supply.

Table 1.
The settings of each electrical parameter.

Table 2.
Recommended electrical parameters for rough machining.
2.2. Experimental Results and Discussion
2.2.1. The Influence of Pulse Width
The pulse duration was set to the values specified in Table 1, while other electrical parameters remained consistent with those listed in Table 2. The experimental results are presented in Figure 3. As shown in Figure 3a, the machining efficiency initially increases with longer pulse duration, but begins to decline after the pulse width exceeds 210 μs. This improvement in efficiency is attributed to the enhanced discharge energy associated with wider pulses. However, excessively long pulses lead to a higher incidence of arcing and short-circuiting phenomena, as illustrated in Figure 4, which consequently reduces machining efficiency.
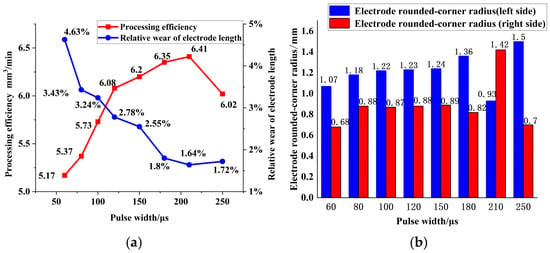
Figure 3.
The influence of pulse width on the processing performance in EDM of deep narrow grooves: (a) Processing efficiency and relative wear of electrode length, and (b) electrode sharp corner wear.
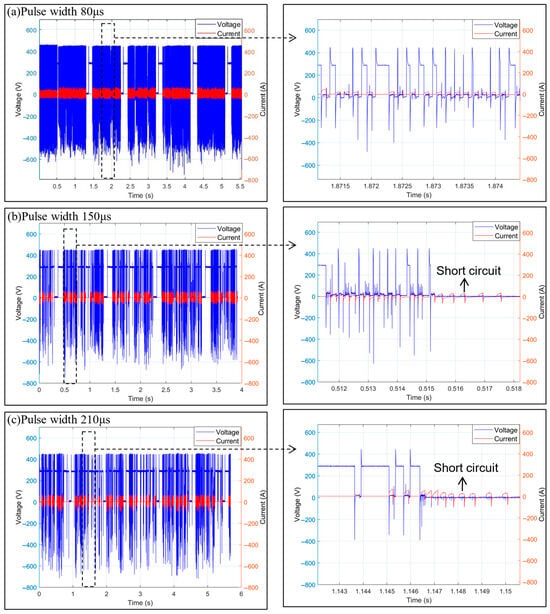
Figure 4.
The voltage and current waveform under pulse widths of 80 μs, 150 μs, and 210 μs.
The relative wear of the electrode length decreases continuously with increasing pulse width until it reaches 250 μs. This occurs mainly because a larger pulse width promotes carbon deposition on the electrode surface, which protects the electrode and reduces length wear. However, when the pulse width becomes excessively large (250 μs), it leads to frequent arc discharges and short circuits, resulting in increased electrode wear even in the presence of a carbon layer.
The influence of pulse width on the wear of sharp corner electrodes differs significantly from its effect on the relative wear of electrode length. As illustrated in Figure 3b, the sharp corner wear of the electrodes exhibits an increasing trend with larger pulse widths. This occurs because, during the machining of sharp corner electrodes, the flow field within the machining gap becomes turbulent near the sharp corner regions, leading to the accumulation of bubbles and debris. Additionally, the electric field intensity is notably higher at these sharp corners, making the site prone to short circuits and arcing. Under these conditions, the erosive effect on the electrode’s sharp corner surpasses any protective benefit provided by the carbon layer. Consequently, severe wear occurs at the sharp corner, ultimately resulting in its transformation into an arc-shaped profile.
2.2.2. The Influence of Duty Cycle
With the pulse width fixed at 210 μs and the duty cycle varied according to Table 1 (other parameters as per Table 2), the results in Figure 5 indicate that the machining efficiency and the relative wear of electrode length exhibited a continuous decrease with increasing duty cycle, whereas the sharp corner wear increased. This can be attributed to the shorter pulse intervals hindering the deionization process, which raises the probability of arc discharge and short circuits—particularly at the corner of the machining gap. These phenomena lead to reduced machining efficiency and elevated sharp corner wear. Meanwhile, the decrease in relative length wear is due to the enhanced protective effect from the carbon layer, which becomes more obvious at higher duty cycles [24,25].
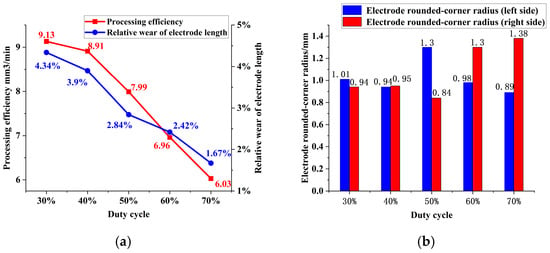
Figure 5.
Influence of the duty cycle ratio with a pulse width of 210 μs on the EDM of deep narrow groove machining process: (a) Processing efficiency and relative wear of electrode length, and (b) electrode sharp corner wear.
2.2.3. Influence of Peak Current
As the peak current progressively increases, the processing efficiency and the relative wear of the electrode length both exhibit an obvious increasing trend, as illustrated in Figure 6. This enhancement in processing efficiency is primarily attributable to the elevated discharge energy associated with higher peak currents, which leads to a greater material removal rate per unit time. Conversely, the increase in peak current also diminishes the protective effect of the carbon layer, thereby contributing to higher electrode wear.
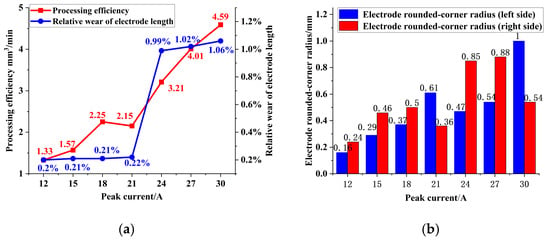
Figure 6.
The influence of peak current on processing performance in EDM of deep narrow groove: (a) Processing efficiency and Relative wear of electrode length; (b) electrode sharp corner wear.
3. EDM of Deep Narrow Groove Using Rounded Corner Electrode
Based on the experimental results from the deep and narrow groove EDM process, it is evident that electrode wear is an inherent phenomenon, leading to the blunting of electrode sharp corners. This wear is particularly severe during the rough machining stage of deep and narrow grooves. Although increasing the pulse width and duty cycle can reduce lengthwise electrode wear, it simultaneously exacerbates sharp corner wear. The adoption of rounded corner electrodes (as illustrated in Figure 7) facilitates more effective removal of bubbles and debris from the machining gap, thereby reducing the occurrence of arcing and short-circuiting. This contributes to lower overall electrode wear and higher processing efficiency. Furthermore, such rounded corner electrodes can be readily fabricated via electrical discharge wire cutting (EDWC), with a manufacturing process no more complex than that of sharp corner electrodes. Therefore, this study first evaluated the feasibility of using rounded corner electrodes to enhance the expulsion of bubbles and debris through flow field simulation within the deep, narrow groove EDM gap. Subsequently, the machining performance of rounded corner electrodes was experimentally assessed in the context of deep and narrow groove EDM.
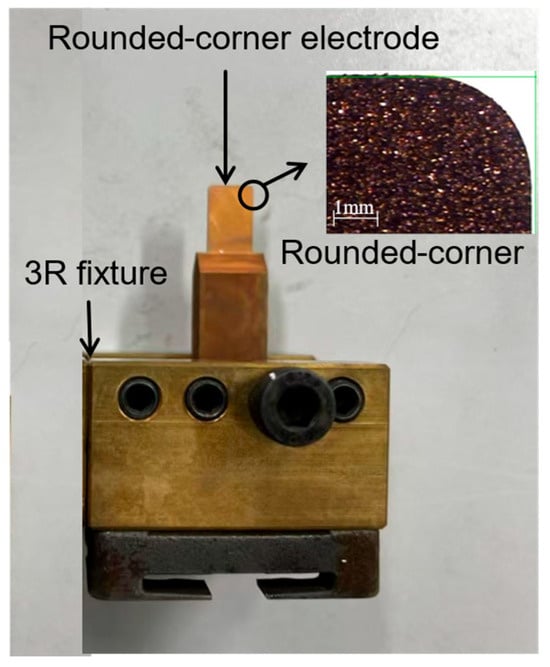
Figure 7.
The rounded corner electrode with a radius of 0.8 mm.
3.1. Flow Field Simulation in EDM of Deep Narrow Groove
In this study, simulation models of the flow field in consecutive discharges and electrode jump were established according to the research [26,27], respectively, in a 2D manner. The electrical parameters selected are the electrical parameters with the least wear on the sharp corner electrode length, that is, when the pulse width is 210 μs, the duty cycle is 60%, and the peak current is 21 A, the EDM of deep narrow groove processing is taken as the simulation object. The volume of the bubble generated by the single-pulse discharge in the steady-state state used in the simulation modeling is observed by a high-speed camera, and the result is 0.524 mm3. The number of debris produced by single-pulse discharge is obtained by weighing the reduction in workpiece mass before and after processing and dividing it by the number of effective discharges, and the result is 64.
3.1.1. Geometric Model of the Flow Field
Taking the EDM of deep narrow grooves with a pulse width of 210 μs, a peak current of 21 A, a duty cycle of 60%, and a machining depth of 15 mm as the research object, the flow field simulation modeling of the inter-electrode gap was carried out using Ansys Fluent. The machining depth is set to 15 mm. The side gap, determined by measuring the width of the machined groove and subtracting the electrode width, was found to be 160 μm. The bottom gap, obtained using the discharge gap measurement technique described in Section 2.1.2 (Electrode Wear Evaluation), was measured to be 40 μm. Simulations of the flow field were performed for both sharp corner and rounded corner electrodes, enabling a comparative analysis of the transport behavior of bubbles and debris within the machining gap. The geometric model of the simulation is illustrated in Figure 8. A 2D geometric model was constructed using SpaceClaim software (ANSYS 2022R1), and mesh discretization was performed via the Mesh module. Considering the initial size characteristics of bubbles in EDM, the mesh edge length was set to 0.01 mm to ensure computational accuracy, which guarantees that the mesh resolution can accurately capture flow field details and bubble evolution features. The boundary conditions are set as shown in Figure 8: the reflux boundary was defined with a total temperature of 300 K, the Discrete Phase Model (DPM) adopted the escape boundary condition, and the reflux direction was set to be normal to the boundary; the flow field outlet was designated as a pressure outlet; the wall boundaries include the inner and outer walls of the side gap as well as the inner and outer walls of the bottom gap, all defined in accordance with the physical constraints of actual machining scenarios. The convergence criteria are specified as follows: the residual convergence criterion for the continuity equation is 1 × 10⁻³, the residual convergence criteria for the velocity equations in the x and y directions are 1 × 10⁻³, and the residual convergence criterion for the energy equation is 1 × 10⁻⁶, so as to ensure the stability and reliability of the simulation results.
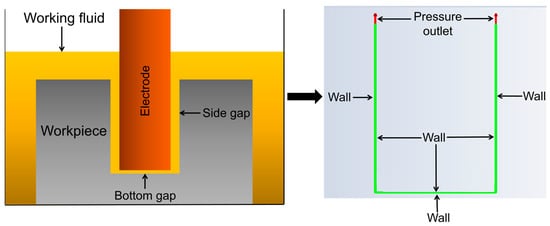
Figure 8.
Schematic diagram of deep, narrow groove machining by EDM and geometric model of the 2D machining gap flow field.
Two high-pressure bubbles were defined near the corners of the bottom gap in the flow field simulation model via the Patch function to simulate the expansion and contraction motion of bubbles generated by electrical discharge in the flow field. The initial pressure of the bubbles was set to 2.1 × 10¹¹ Pa, and their initial diameter was 0.04 mm. Machining debris was injected into the gap using the discrete phase function of Fluent, with the following parameter configurations: the debris material was Cr12 die steel (the workpiece material employed in the deep, narrow grooves experiments of this study), and its radius was 3 μm.
3.1.2. Simulation Results
Figure 9 presents simulation results of bubble movement within the machining gap during consecutive discharges. In the illustration, the red areas represent the kerosene dielectric fluid, while the blue areas indicate bubbles. As observed in Figure 9a, when a sharp corner electrode is used, the bubbles are trapped near the electrode’s sharp corner and are unable to enter the side gap effectively. In contrast, when a rounded corner electrode is employed, a significant portion of bubbles is able to migrate into the side gap, as clearly depicted in Figure 9b.
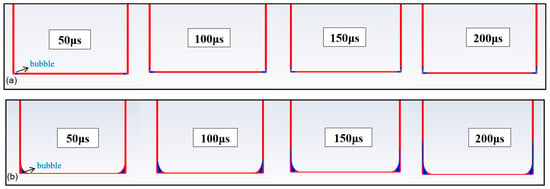
Figure 9.
Simulation of bubble movement in consecutive pulse discharge process: (a) Simulation of bubble movement in machining gap with sharp corner electrodes; (b) simulation of bubble movement in machining gap with rounded corner electrodes.
Figure 10 illustrates the movement of debris within the machining gap during consecutive discharges, with each colored line representing the trajectory of an individual debris particle. As shown in Figure 10a, when using a sharp corner electrode, the debris exhibits limited upward migration from the bottom of the side gap, moving approximately 6 mm over the given time period. In contrast, under the rounded corner electrode condition (Figure 10b), debris displacement is significantly enhanced: between 50 μs and 200 μs, particles travel upward by roughly 13 mm from the same starting position. This marked difference demonstrates that the flow field generated by the rounded corner electrode promotes more effective debris removal from the machining gap.
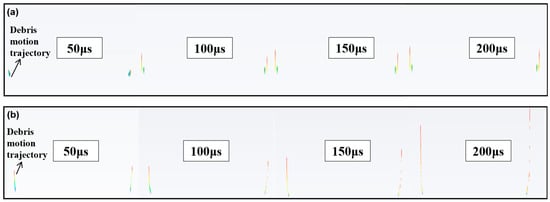
Figure 10.
Simulation of the movement trajectory of debris: (a) Simulation of the debris movement trajectory of sharp corner electrodes; (b) simulation of debris movement trajectory in processing with rounded corner electrodes.
Figure 11 illustrates the simulated bubble movement within the machining gap during the electrode jump. As observed in Figure 11a, when using a sharp corner electrode, upon completion of a full tool retraction, the bubbles originally accumulated near the electrode’s sharp corner remain largely trapped and fail to enter the side gap. In contrast, when a rounded corner electrode is employed (Figure 11b), a significant portion of the bubbles is successfully expelled into the side gap by the end of the electrode jump cycle.
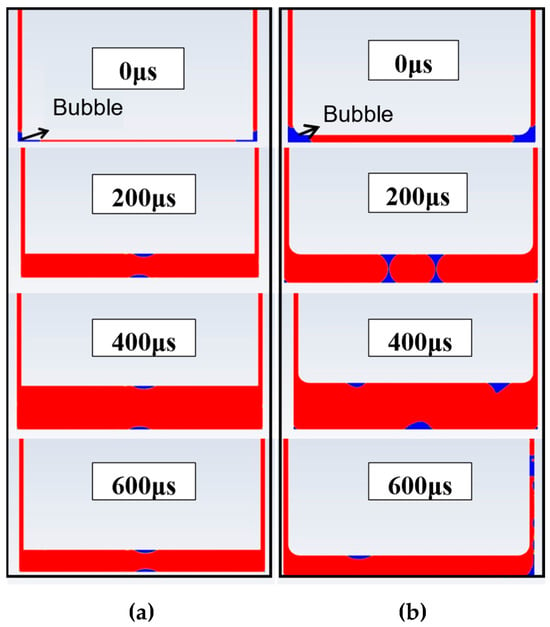
Figure 11.
Simulation of bubble movement during the electrode jump: (a) Simulation of bubble movement in sharp corner electrodes; (b) simulation of bubble movement in rounded corner electrodes.
Figure 12 illustrates the simulated movement of debris within the machining gap during the electrode jump, with the colored regions representing the distribution of debris. Prior to the electrode jump, a significant accumulation of debris is observed at the sharp corner of the electrode. As shown in Figure 12a, when a sharp corner electrode is used, a vortex forms in the flow field near the electrode’s sharp corner during electrode jump. This vortex entrains a substantial portion of the machining debris, causing it to circulate locally rather than enter the side gap. In contrast, when a rounded corner electrode is employed (Figure 12b), no vortex is generated at the electrode corner during electrode jump. As a result, a large amount of debris is effectively transported into the side machining gap along with the upward motion of the tool.
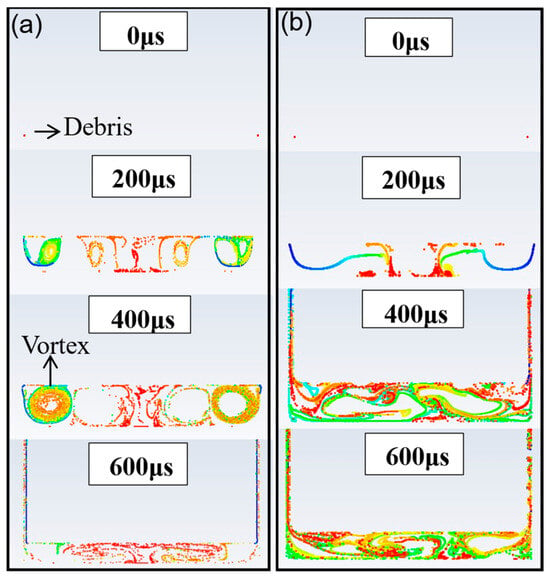
Figure 12.
Simulation of debris movement during electrode jump: (a) Simulation of debris movement in processing with sharp corner electrodes; (b) simulation of debris movement in processing with rounded corner electrodes.
3.2. Experimental Verification
The machining performance of the rounded corner electrode was validated through deep narrow groove EDM experiments, comparing it with sharp corner electrodes. The electrical parameters applied in the experiment were selected based on single-factor tests of the parameters listed in Table 1. An orthogonal experimental design was employed to identify the set of parameters that minimized the length wear of the sharp corner electrode, specifically a pulse width of 210 μs, a duty cycle of 60%, and a peak current of 21 A. The electrodes used included sharp corner types and rounded corner types with radii of 0.2 mm, 0.4 mm, and 0.8 mm. Two electrodes of each type were prepared to ensure repeatability. Physical images of the electrodes before and after processing are presented in Figure 13, and the measured results of the electrode corner wear are shown in Figure 14a,b. The absolute wear of the electrode length is illustrated in Figure 14c. As observed in Figure 14a,b, the sharp corner electrode exhibited the most significant wear, whereas the rounded corner electrodes showed substantially less corner wear, which decreased with increasing initial rounded radius. The electrode with a 0.8 mm rounded radius demonstrated the lowest corner wear. From Figure 14c, it can be seen that the difference in length wear between the sharp corner and rounded corner electrodes was relatively small.
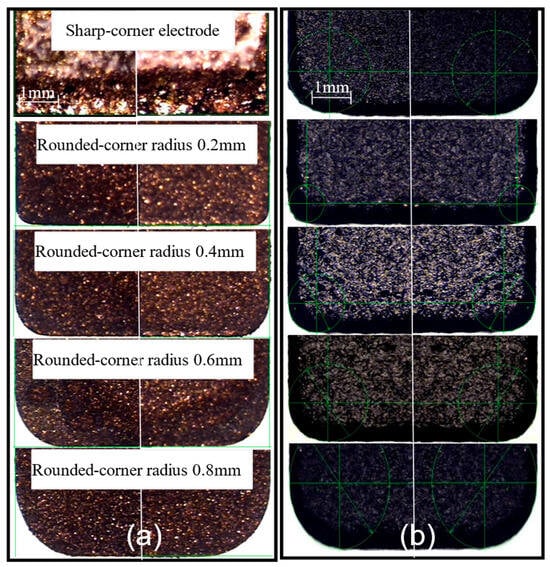
Figure 13.
Physical pictures before and after processing with rounded corner electrodes: (a) Electrode pictures before EDM of deep, narrow groove; (b) electrode pictures after EDM of deep, narrow groove.
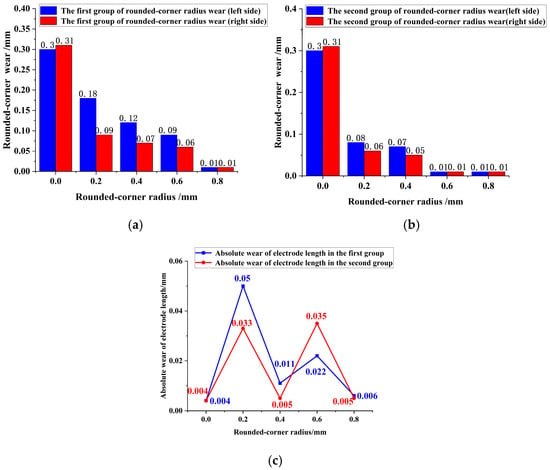
Figure 14.
Experimental result diagram of the rounded corner strategy: (a) Rounded corner wear of the first group of electrodes; (b) rounded corner wear of the second group of electrodes; (c) absolute wear of electrode length.
Owing to the significantly reduced electrode wear achieved with the rounded corner electrode, the deep, narrow grooves machined using this method exhibit high shape consistency with the new fabricated electrode, particularly at the corners. This results in clearly defined groove geometries, which facilitate the determination of the electrode feed amount during the finishing stage. Moreover, the corner contour at the bottom of grooves produced with the rounded corner electrode more closely approximates the ideal sharp corner profile (Figure 15). As a result, a smaller machining allowance is required in the finishing stage, which contributes to reduced machining time and lower electrode wear in final processing.

Figure 15.
Contrast of the corner contour of the processed groove: (a) Processed groove by the sharp corner electrode; (b) processed groove by the rounded corner electrode with radius of 0.8 mm; (c) corner profile comparison diagram.
Figure 16 illustrates the processing efficiency under different electrode configurations. As shown in Figure 16a, the sharp corner electrode exhibits the lowest processing efficiency. In contrast, the processing efficiency increases with the increase in the rounded corner radius of the newly fabricated electrode and reaches the maximum value when the rounded corner radius is 0.8 mm. Figure 16b presents a comparative curve of processing time versus depth for both the sharp corner electrode and the rounded corner electrode (0.8 mm radius). At machining depths less than 5 mm, the processing efficiencies of the two electrode types are comparable. However, beyond 5 mm, the rounded corner electrode demonstrates significantly higher efficiency. This divergence arises because, at shallow depths, the accumulation of bubbles and debris caused by the sharp corner electrode is not obvious. With increasing depth, however, bubbles and debris accumulate near the sharp corner, leading to abnormal discharge phenomena and frequent retraction adjustments of the machine tool, which consequently reduce processing efficiency. The experimental results confirm that the rounded corner electrode not only significantly reduces corner wear but also maintains low length wear, while simultaneously improving overall processing efficiency.
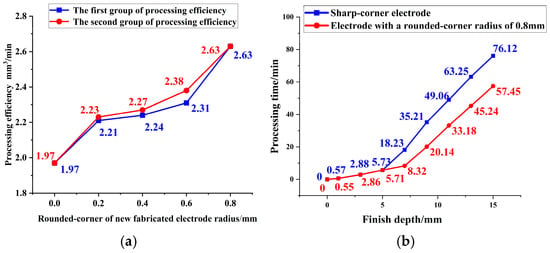
Figure 16.
Processing efficiency: (a) Processing efficiency by rounded corner electrode of new fabricated one; (b) comparison of processing depth and processing time between the sharp corner electrode and the electrode with a rounded corner radius of 0.8 mm.
4. Conclusions
This study investigated the effects of electrical parameters on both electrode length wear and sharp corner wear during the EDM of deep, narrow grooves, and proposed the use of rounded corner electrodes as a means to reduce electrode wear and improve machining efficiency. The feasibility of this approach was validated through numerical simulations and experimental tests. Based on the range of process parameters examined in this work, the following conclusions can be drawn:
(1) When machining with sharp corner electrodes, wear at the electrode’s corners is inevitable and notably severe. As the pulse width and duty cycle increase, the wear along the electrode length decreases, while the wear at the rounded corners becomes more obvious. Although larger pulse widths and higher peak currents contribute to improved processing efficiency, they simultaneously exacerbate sharp corner wear. The influence of electrical parameters on electrode length wear, corner wear, and processing efficiency often presents contradictory outcomes. Consequently, further enhancement of processing efficiency cannot be achieved solely through adjustment of electrical parameters. It should be noted that these preliminary findings require further validation via long-term research involving larger datasets, expanded samples, and rigorous statistical analysis.
(2) When machining with sharp corner electrodes, bubbles and debris generated during continuous electrical discharge tend to accumulate around the sharp corner. Additionally, vortices formed near these sharp corners during electrode jump further hinder the effective removal of bubbles and debris. In contrast, the adoption of rounded corner electrodes significantly improves the evacuation of bubbles and debris during both consecutive discharges and electrode jumps.
(3) The rounded corner electrode exhibits exceptionally low wear at the rounded corner while maintaining relatively low wear along its length. The magnitude of corner wear decreases as the radius of the electrode’s rounded corner increases. Compared with sharp corner electrodes, the deep, narrow grooves machined using rounded corner electrodes more closely match the geometry of a newly fabricated electrode, and the material allowance requiring removal in subsequent finishing is reduced. These characteristics are of considerable practical significance for the finishing process, as they facilitate a clearer determination of machining allowance, shorten finishing time, and reduce electrode wear. It should be pointed out that subsequent systematic process experiments are required to further clarify the applicability and effectiveness of this approach.
Author Contributions
J.W. (First Author) (Corresponding Author): Conceptualization, Data Curation, Formal Analysis, Investigation, Methodology, Software, Visualization, Writing—Original Draft, Writing—Review and Editing; C.Q.: Data Curation, Methodology, Software, Visualization, Writing—Original Draft, Writing—Review and Editing; K.M.: Methodology, Supervision; H.H.: Conceptualization, Funding Acquisition, Resources, Supervision, Validation, Writing—Original Draft, Writing—Review and Editing; Z.J.: Data Curation, Investigation. All authors have read and agreed to the published version of the manuscript.
Funding
The present work was supported by the National Natural Science Foundation of China (Nos. 52275400).
Institutional Review Board Statement
Not applicable.
Informed Consent Statement
Not applicable.
Data Availability Statement
The original contributions presented in this study are included in the article. Further inquiries can be directed to the corresponding author.
Conflicts of Interest
Author Hu He was employed by the company Beijing Institute of Electro-machining Co., Ltd. The remaining authors declare that the research was conducted in the absence of any commercial or financial relationships that could be construed as a potential conflict of interest.
References
- Bai, Y.Y.; Lu, M.; Li, W.B.; Liang, G.X.; Guo, J.Y. Research review and prospect of narrow deep groove processing technology. Manuf. Technol. Mach. Tool 2014, 10, 45–49. [Google Scholar]
- Cao, F.G. Electrical Discharge Machining; Chemical Industry Press: Beijing, China, 2014. [Google Scholar]
- Flaño, O.; Zhao, Y.H.; Kunieda, M.; Abe, K. Approaches for improvement of EDM performance of SiC with foil electrode. Precis. Eng. 2017, 49, 33–40. [Google Scholar]
- Flaño, O.; Ayesta, I. Improvement of EDM performance in high-aspect ratio slot machining using multi-holed electrodes. Precis. Eng. 2018, 51, 223–231. [Google Scholar]
- Tang, J.J.; Yang, X.D. Deep narrow slot electrical discharge machining method based on high-speed rotating disc electrode. Electr. Mach. Die Mould 2014, 1, 1–4. [Google Scholar]
- Li, J.; Su, G.; Chen, X.; Liu, G.; Zhang, Y. Study of electrical discharge machining of narrow grooves with foil tool electrode. Int. J. Adv. Manuf. Technol. 2023, 128, 5405–5423. [Google Scholar] [CrossRef]
- Pellegrini, G.; Ravasio, C. Investigation on electrode wear in micro-EDM drilling. MM Sci. J. 2024. [Google Scholar] [CrossRef]
- Selvarajan, L.; Elango, T.; Kannan, P.R.; Perumal, K.P.; Arun, C.; Sadhishkumar, S.; Kannan, S. Investigation of electrical Discharge machining efficiency with cryogenic copper electrodes for AISI D2 Steel: Enhancing material removal rate, reducing electrode wear rate, and minimizing machining time. J. Mater. Eng. Perform. 2025, 34, 11334–11348. [Google Scholar]
- Aghdeab, S.H.; Hasan, M.M.; Makhrib, G.A. Study impact of gap distance on electrode wear rate in electrical discharge machining (EDM). AIP Conf. Proc. 2024, 2885, 070003. [Google Scholar] [CrossRef]
- Zhang, X.; Li, Y.; Yu, P.; Gao, Y.; Dong, S. High-quality and efficiency machining of micro-EDM. In Proceedings of the IEEE International Conference on Manipulation, Manufacturing and Measurement on the Nanoscale, Zhongshan, China, 29 July–2 August 2024; IEEE: Piscataway, NJ, USA, 2024; pp. 105–110. [Google Scholar]
- Huu, P.N.; Shirguppikar, S.; Duc, T.N. Optimizing micro-EDM with carbon-coated electrodes: A multi-criteria approach. Int. J. Mod. Phys. B 2024, 38, 2440019. [Google Scholar] [CrossRef]
- Che, B.; Tao, M.; Luo, Z. Effect of ultrasonic assisted EDM based on horizontal vibration on deep and small hole machining. Sci. Rep. 2024, 14, 28146. [Google Scholar] [CrossRef]
- Pham, H.V.; Nguyen, H.P.; Shailesh, S.; Nguyen, D.T.; Bui, N.T. Investigating technological parameters and TiN-coated electrodes for enhanced efficiency in Ti-6Al-4V micro-EDM machining. Metals 2024, 14, 162. [Google Scholar] [CrossRef]
- Pham, H.V.; Nguyen, H.P.; Shailesh, S.; Nguyen, D.T.; Bui, N.T. Improving Micro-EDM machining efficiency for titanium alloy fabrication with advanced coated electrodes. Micromachines 2024, 15, 692. [Google Scholar] [CrossRef]
- Li, W.T. Experimental Research on High-Efficiency and Low-Loss Electrical Discharge Machining Technology for Deep Narrow Grooves. Master’s Thesis, Harbin Institute of Technology, Harbin, China, 2018. [Google Scholar]
- Chu, Z.; Zhao, W.; Gu, L. Effect of electrode jump motion on machining debris concentration. J. Mech. Eng. 2013, 49, 185–192. [Google Scholar] [CrossRef]
- Chu, Z.L. Research on Electrode Tool Lifting Motion and Electrical Discharge Machining Performance. Master’s Thesis, Shanghai Jiao Tong University, Shanghai, China, 2013. [Google Scholar]
- Uhlmann, E.; Domingos, D.C. Investigation on vibration-assisted EDM-maching of seal slot in high-temperature resistant materials for turbin components-part II. Procedia CIRP 2016, 42, 334–339. [Google Scholar] [CrossRef]
- Zhang, R.X. Study on dynamically variable attitude EDM machining method of deep narrow slots. Int. J. Adv. Manuf. Technol. 2022, 121, 4601–4623. [Google Scholar] [CrossRef]
- Zhang, R.X. Influence of electrode feed directions on EDM machining efficiency of deep narrow slots. Int. J. Adv. Manuf. Technol. 2021, 117, 3415–3429. [Google Scholar] [CrossRef]
- Zhang, R.X. Study on particle size distribution of debris in electrical discharge machining of deep narrow slots. Procedia CIRP 2020, 95, 476–481. [Google Scholar] [CrossRef]
- Jiang, M.; Li, L.; Sun, X.; Wang, W.; Liu, Z. Research on the mechanism and process of polycrystalline diamond by EDM. Int. J. Adv. Manuf. Technol. 2023, 125, 819–830. [Google Scholar] [CrossRef]
- Wang, Z.; Tong, H.; Li, Y.; Li, C. Dielectric flushing optimization of fast hole EDM drilling based on debris status analysis. Int. J. Adv. Manuf. Technol. 2018, 97, 2409–2417. [Google Scholar] [CrossRef]
- Wang, J.Y. Research on the Realization of Current Control Affecting the Thickness of Electrode Carbon Deposit Layer. Master’s Thesis, East China Jiaotong University, Nanchang, China, 2008. [Google Scholar]
- Maradia, U.; Knaak, R.; Dal Busco, W.; Boccadoro, M.; Wegener, K. A strategy for low electrode wear in meso–micro-EDM. Precis. Eng. 2015, 42, 302–310. [Google Scholar] [CrossRef]
- Huang, Q.Y. Simulation Study on the Distribution State of Etched Materials and Bubbles in the Gap by Electrical Discharge Machining. Master’s Thesis, Harbin Institute of Technology, Harbin, China, 2017. [Google Scholar]
- Wang, J.; Han, F.Z. Simulation model of debris and bubble movement in electrode jump of electrical discharge machining. Int. J. Adv. Manuf. Technol. 2014, 74, 591–598. [Google Scholar] [CrossRef]
Disclaimer/Publisher’s Note: The statements, opinions and data contained in all publications are solely those of the individual author(s) and contributor(s) and not of MDPI and/or the editor(s). MDPI and/or the editor(s) disclaim responsibility for any injury to people or property resulting from any ideas, methods, instructions or products referred to in the content. |
© 2025 by the authors. Licensee MDPI, Basel, Switzerland. This article is an open access article distributed under the terms and conditions of the Creative Commons Attribution (CC BY) license (https://creativecommons.org/licenses/by/4.0/).