Abstract
Operation time and variability in structural, thermal, and environmental loads are important factors affecting the operational safety of power plant structures. Although conventional testing techniques are usually used to assess the level of damage introduced to a structure due to prolonged service, most of them are destructive and time- and cost-intensive. Therefore, in this paper, a novel approach consisting of Rayleigh optic strain sensors for deformation monitoring under creep conditions is proposed. The suitability of this methodology was assessed during quasi-static loading tests at room temperature, as well as during a long-term creep test at 540 °C under constant stress of 130 MPa, which was performed on a specimen made of 13HMF power engineering steel. The sensor attached to the specimen’s surface was used to monitor strain evolution during 678 days of high-temperature exposure under creep conditions. It was confirmed that the methodology proposed could be successfully used to monitor strain changes under quasi-static and creep conditions, as an excellent agreement between the fiber optic strain sensors and conventional strain recorders was achieved.
1. Introduction
Creep is the inelastic, irreversible deformation of structures over time and it is a common process observed in power plants throughout their operation. It leads to microstructural changes resulting in phase transformations, development of cavities and their subsequent nucleation at grain boundaries and within the matrix at carbides and inclusions, which in turn results in coalescence of cavities and microcracks formation. Operation time, and variability of structural, thermal, and environmental loads are important factors affecting the operational safety of power plant structures involving boiler tubes, headers, main steam pipes, high and low-pressure cylinders and rotors [1]. In order to ensure the safe operation of those components, proper structural health monitoring should be performed after specific periods of their service [2]. Therefore, condition monitoring is extremely important in power stations since timely inspections enable earlier detection of damaged elements thus required maintenance and repairs could be performed before their failure [1,2]. Surface replication is a widely used technique for assessing damage due to creep, particularly in relation to cavities. This technique has been standardized for field examination, as outlined in the ASTM standard E1351 [3]. During such non-destructive testing, a solvent-softened acetate film is applied onto a polished and etched piping surface. The evaporation of the solvent leads to the emergence of the surface microstructure negative image. Such micrograph is then analyzed using a light or electron microscope to determine cavity densities. This method could be successfully applied during on-site examination due to its non-destructive nature and quick preparation time. The information obtained from analyzing cavity density is crucial in estimating remaining service life, as there is a direct correlation between cavity density and creep strain. The destructive estimation of the service life could be examined during conventional creep tests (ASTM E139) during which creep deformation is measured under uniaxial tension, constant load and isothermal conditions as a function of time [4]. The strain changes are monitored by using extensometers with specific inertia. Their application affects the actual recordings from strain measurements, thus the material behavior is not well represented. Therefore, strain gauges are usually used to measure strain in a material. They are one of the most widely used tools for creep monitoring due to their simplicity and effectiveness. Conventional creep monitoring methods provide a comprehensive approach to assessing material behavior under prolonged stress and temperature conditions. The choice of method depends on various factors, including the specific application, material type, environmental conditions, and required accuracy. While conventional methods offer robust solutions, advancements in technology continue to enhance creep monitoring capabilities, integrating modern techniques such miniaturized creep tests [5], impression creep tests [6], small ring creep tests [7], digital image correlation-assisted creep tests [8,9], macro-pillar creep testing [10] and potential drop technique [11,12]. One should mention that the application of Fiber Bragg grating (FBG) sensors and linear sensors based on the Rayleigh scattering provides nowadays an attractive tool for the online determination of stress and strain changes in steel elements of the power line support structures [13,14]. Guo et al. [13] used FBG based quasi-distributed bolt force sensor with torque resistance for bolt force state measurement. A micro-bearing-based torque-resistant structural allows the sensor to have a low torque response. It was found that the sensor has excellent performance for long bolts with non-uniform strain distribution and the presence of torque. Singh et al. [14] presented in-depth literature review on applications of fiber Bragg grating sensors for monitoring geotechnical structures. The review highlighted different types of optical fiber with a special emphasis on the calibration methodology and advantages of FBG sensors over other conventionally used sensors. Tran and Seo [15] studied the short-term creep effect on strain transfer from fiber-reinforced polymer strips to FBG sensors. The authors found that the optical sensors could be successfully used for strain monitoring on the length up to 80 mm. Matveenko et al. [16] presented a novel strain measurement technique by using FBG-based sensors embedded in various materials manufactured by different technological processes. He et al. [17] used quartz optical fiber for creep deformation measurement of welding joints of 15CrMo and HK40 subjected to temperature equal to 850 °C for a period of 90 h. The local strains were successfully determined by measuring the variety of relative distances between two spots. Yazdizadeh et al. [18] effectively monitored concrete creep using FBG sensors during 28-day constant load exposure. Chen et al. [19] presented fiber Bragg grating setup to long-term creep monitoring of a composite wing leading edge used in an actual airplane for 710 h. Hampshire and Adeli [20] proposed simple setup for monitoring the behavior of steel structures using distributed optical fiber sensors. However, the authors highlight methodological concerns: proper fiber attachment to steel members requires specialized expertise; insufficient protection leaves fibers vulnerable to minor damage; and, unlike controlled laboratory conditions, field measurements are highly sensitive to vibration and temperature-induced strain. One should highlight that fiber optic sensors are currently investigated and expose strong potential for monitoring creep in steel structures. Its ability to provide continuous, distributed strain measurements along structural members enables the detection of long-term deformation processes with high resolution, which conventional point-based sensors cannot capture effectively [21]. This makes them a valuable tool for assessing time-dependent strain accumulation in steel under sustained loads, thereby supporting early detection of serviceability issues and improving the long-term safety of critical infrastructure [22].
Although, some preliminary reports and reviews confirmed the suitability of FBG sensors for strain measurement under creep conditions [23,24,25], none of them evaluated their applicability at high temperature for prolonged service time. While the use of Rayleigh-based optical fiber sensors is not novel in itself, their application in continuous, long-duration creep monitoring under real service temperatures (540 °C) has received limited attention. Although previous studies have explored short-term creep using FBG sensors; however, these are typically limited by thermal degradation and spatial resolution constraints.
Therefore, the main aim of this research was to propose a non-destructive measurement system containing Rayleigh backscattering and single mod gold-coated fiber optic strain sensor for the experimental determination of strain changes in the elements subjected to creep at elevated temperature [26]. Investigating the thermal effects during creep is of paramount importance for industries and applications where materials are subjected to high temperature. This research directly contributes to the reliability, safety, and efficiency of systems operating under extreme conditions since the effective methodology was presented.
2. Materials and Methods
2.1. Calibration of Experimental Setups
Based on the current state of research and application, two types of Rayleigh-based linear fiber optic sensors were employed in this study: a linear strain sensor (Type G657, LFOS-ST/-II/PLM, BITNER Sp. z o.o., Trzyciąż, Poland) and a linear temperature sensor (Type G657, LFOS-T/-II/PLM, BITNER Sp. z o.o., Trzyciąż, Poland). The successful integration of these sensors into the structural specimens requires careful consideration of several factors. These include thorough surface cleaning and preparation, appropriate selection and application of adhesives, and effective insulation to ensure sensor protection. Furthermore, measures must be taken to guard against corrosion and to route the power optical fibers securely along structural components toward watertight enclosures, thereby preventing unauthorized access and environmental degradation.
The experimental program utilized the OBR4600 reflectometer (Luna Innovations, Roanoke, VA, USA) and the Sylex FBG-Scan 800 system (SYLEX Fiber Optics, Bratislava, Slovakia), integrated with a data acquisition computer. Calibration of the sensing system was initially conducted under static tension–compression conditions using a tower-leg structural element fabricated from 75 × 75 × 6 mm hot-rolled angle sections. The core methodology involved strategically positioning both Rayleigh and fiber Bragg grating (FBG) sensors at critical points along the tower structure. The entire fiber optic system, designated for strain and stress field measurements, was thoroughly calibrated.
To facilitate accurate FBG sensor placement, custom-designed grips were fabricated to mount the SC-01 strain sensor (SYLEX Fiber Optics, Bratislava, Slovakia). Based on preliminary tests, a gauge length of L = 1000 mm was adopted for the SC-01. The FBG sensor axis was aligned with the centroidal axis of the tower leg’s angle section to ensure accurate strain capture. Each FBG strain sensor contained a Bragg grating inscribed within the optical fiber at a specific wavelength, serving as the active sensing element. To mitigate temperature-induced measurement errors, each FBG strain sensor was equipped with an additional Bragg grating dedicated to temperature compensation.
For accurate interrogation, a minimum wavelength separation of 10 nm between individual Bragg gratings was maintained, as required by the optical interrogator specifications. Any mechanical strain in the monitored structural component—such as the tower leg—resulted in a corresponding shift in the Bragg grating’s reflected wavelength. Two critical parameters influenced the measurements: strain magnitude and temperature variation [27]. The relationship between temperature and Bragg wavelength shift can be expressed by the following equation:
where T [°C] is temperature, λT,act [nm] is current temperature wavelength, λT,ref [nm] is reference temperature wavelength, TS1 [°C] is temperature sensitivity 1, TS2 [°C] is temperature sensitivity 2, and TS3 [°C] is temperature sensitivity 3. Equation (1) relates the observed wavelength shift to the reference wavelength and the fiber’s temperature sensitivity coefficients. This equation accounts for two contributions: the thermal expansion of the fiber, and the temperature-induced change in the refractive index. To separate the mechanical strain contribution, Equation (2) is applied. It expresses the strain increment Δε as the difference between the measured strain-related wavelength shift and the reference value, while correcting for temperature variations using calibration coefficients (A, B, CTE) and the anchoring geometry of the fiber. In this way, the two equations jointly allow for the accurate determination of strain history under varying thermal conditions.
in which
where Δε [µε] is strain increment, λact,strain [nm] is current strain wavelength, λ0,inst,strain [nm] is initial strain wavelength, Tact [°C] is current temperature, T0,inst [°C] is initial temperature, lFAL [m] is anchoring length, lFFL [m] is free fiber length, and A, B, and CTE are calibration parameters. These are the calibration coefficients of Bragg grating sensors, determined in the laboratory by the sensor manufacturer, provided on the specification sheet, and individually assigned to each FBG sensor. Equations (1) and (2) describe the fundamental principles behind how fiber optic sensors—specifically those using Bragg gratings—measure temperature and strain. These equations are essential for interpreting the data collected from the sensors during long-term high-temperature creep monitoring. Equation (1) relates to temperature measurement, and is based on the fact that the Bragg wavelength of an optical fiber shifts in response to changes in temperature. The equation uses the current wavelength (λT,act) and the reference or initial wavelength (λT,ref), along with specific calibration coefficients (TS1, TS2, and TS3) that describe how sensitive the fiber is to temperature. As the temperature changes, it causes both physical expansion of the fiber and changes in its refractive index, which together result in a shift in the reflected wavelength. The equation captures this relationship and allows for the accurate determination of the fiber’s temperature environment at any given time by calculating the temperature that corresponds to the observed wavelength shift. Equation (2) deals with strain measurement and is more complex because it must distinguish between wavelength shifts caused by mechanical strain and those caused by temperature. The equation calculates the strain increment (Δε) using the difference between the current strain-related wavelength (λact,strain) and the initial reference wavelength (λ0,inst,strain). However, since temperature also affects wavelength, the equation incorporates both the current and initial temperatures (Tact and T0,inst), along with the calibration parameters AA, BB, and the coefficient of thermal expansion (CTE). These parameters are determined through laboratory calibration, and are unique to each sensor. Additionally, the equation includes terms for the anchoring length (lFAL) and free fiber length (lFFL), which reflect how the fiber is attached to the specimen and how strain is transferred to it. Together, these equations enable the fiber optic sensing system to accurately measure both temperature and mechanical strain over time, even under extreme conditions, such as prolonged exposure to high temperatures. By compensating for temperature effects, the strain measurements remain precise, making this method highly suitable for monitoring creep in power plant components or other high-stress, high-temperature environments.
The fundamental distinction between FBG- and Rayleigh-based sensing lies in how the optical signals are generated and interpreted. FBG sensors operate using discrete, periodic gratings inscribed along the fiber [28,29]. These gratings reflect a narrow, well-defined wavelength of light (the Bragg wavelength), which shifts proportionally in response to strain or temperature. The system detects changes in this reflected peak, allowing for high-precision, point-wise measurements. However, FBG sensors are limited in spatial resolution because each grating only provides information from its specific location, and more extensive coverage requires complex multiplexing.
In contrast, OBR with Rayleigh scattering leverages the naturally occurring random inhomogeneities in the refractive index of the optical fiber core. These microscopic irregularities scatter light in all directions, including back toward the source. In an OBR system, this backscattered signal is analyzed using swept-wavelength interferometry, producing a high-resolution spectral fingerprint of the fiber. As the fiber undergoes strain or temperature changes, the relative positions of these scatter-induced features shift along the spectrum. By measuring the spectral shift across the fiber, the system can infer distributed strain or temperature profiles with spatial resolutions down to millimeters or even microns.
In practical terms, while both FBG and Rayleigh-based techniques detect spectral shifts, the FBG system tracks changes in predefined, engineered reflection peaks, whereas the Rayleigh system analyzes the shift in the continuous backscattering profile. This means that Rayleigh-based sensing can monitor strain and temperature variations continuously along the entire fiber length, making it especially suitable for capturing localized deformation or damage—such as those caused by creep—over long structural spans.
In this study, the measured Rayleigh signal shifts directly reflect the cumulative strain imposed on the fiber by the creeping material beneath. As the steel specimen elongates over time due to high-temperature creep, the fiber bonded to its surface stretches correspondingly, shifting the spectral fingerprint of the Rayleigh backscatter. Because of the high spatial resolution of the technique, these shifts not only quantify the average strain, but also reveal spatial variations—such as strain gradients or hotspots—that are indicative of underlying microstructural degradation, cavity formation, or material inhomogeneity.
Therefore, while the analytical expressions provided for FBG sensors help clarify the general principles of wavelength-based strain and temperature sensing, the Rayleigh OBR method offers superior distributed sensing capabilities. This allows for a more comprehensive and detailed characterization of creep behavior over both time and space, aligning with the primary objective of the research to monitor long-term deformation in power engineering materials with high fidelity.
An important consideration in the experimental setup was the precise adjustment of the sensor’s initial tensile preload. This preload was finely tuned using precision right- and left-hand threaded nuts. It was essential to set the initial tensile strain in the Fiber Bragg Grating (FBG) sensor so that its operational range began approximately at the midpoint of its measurement capability, thereby maximizing measurement accuracy and reliability.
The complete measurement system comprised dedicated optical fiber strain sensors, a 1 Hz FBG-Scan 800 optical interrogator (Sylex, Bratislava, Slovakia), data acquisition hardware, dedicated control software, and a telecommunications-grade patch cord. The integrated Rayleigh and FBG-based optical fiber sensing system was specifically developed for strain measurements in the legs of a lattice tower structure, and was first validated under controlled laboratory conditions.
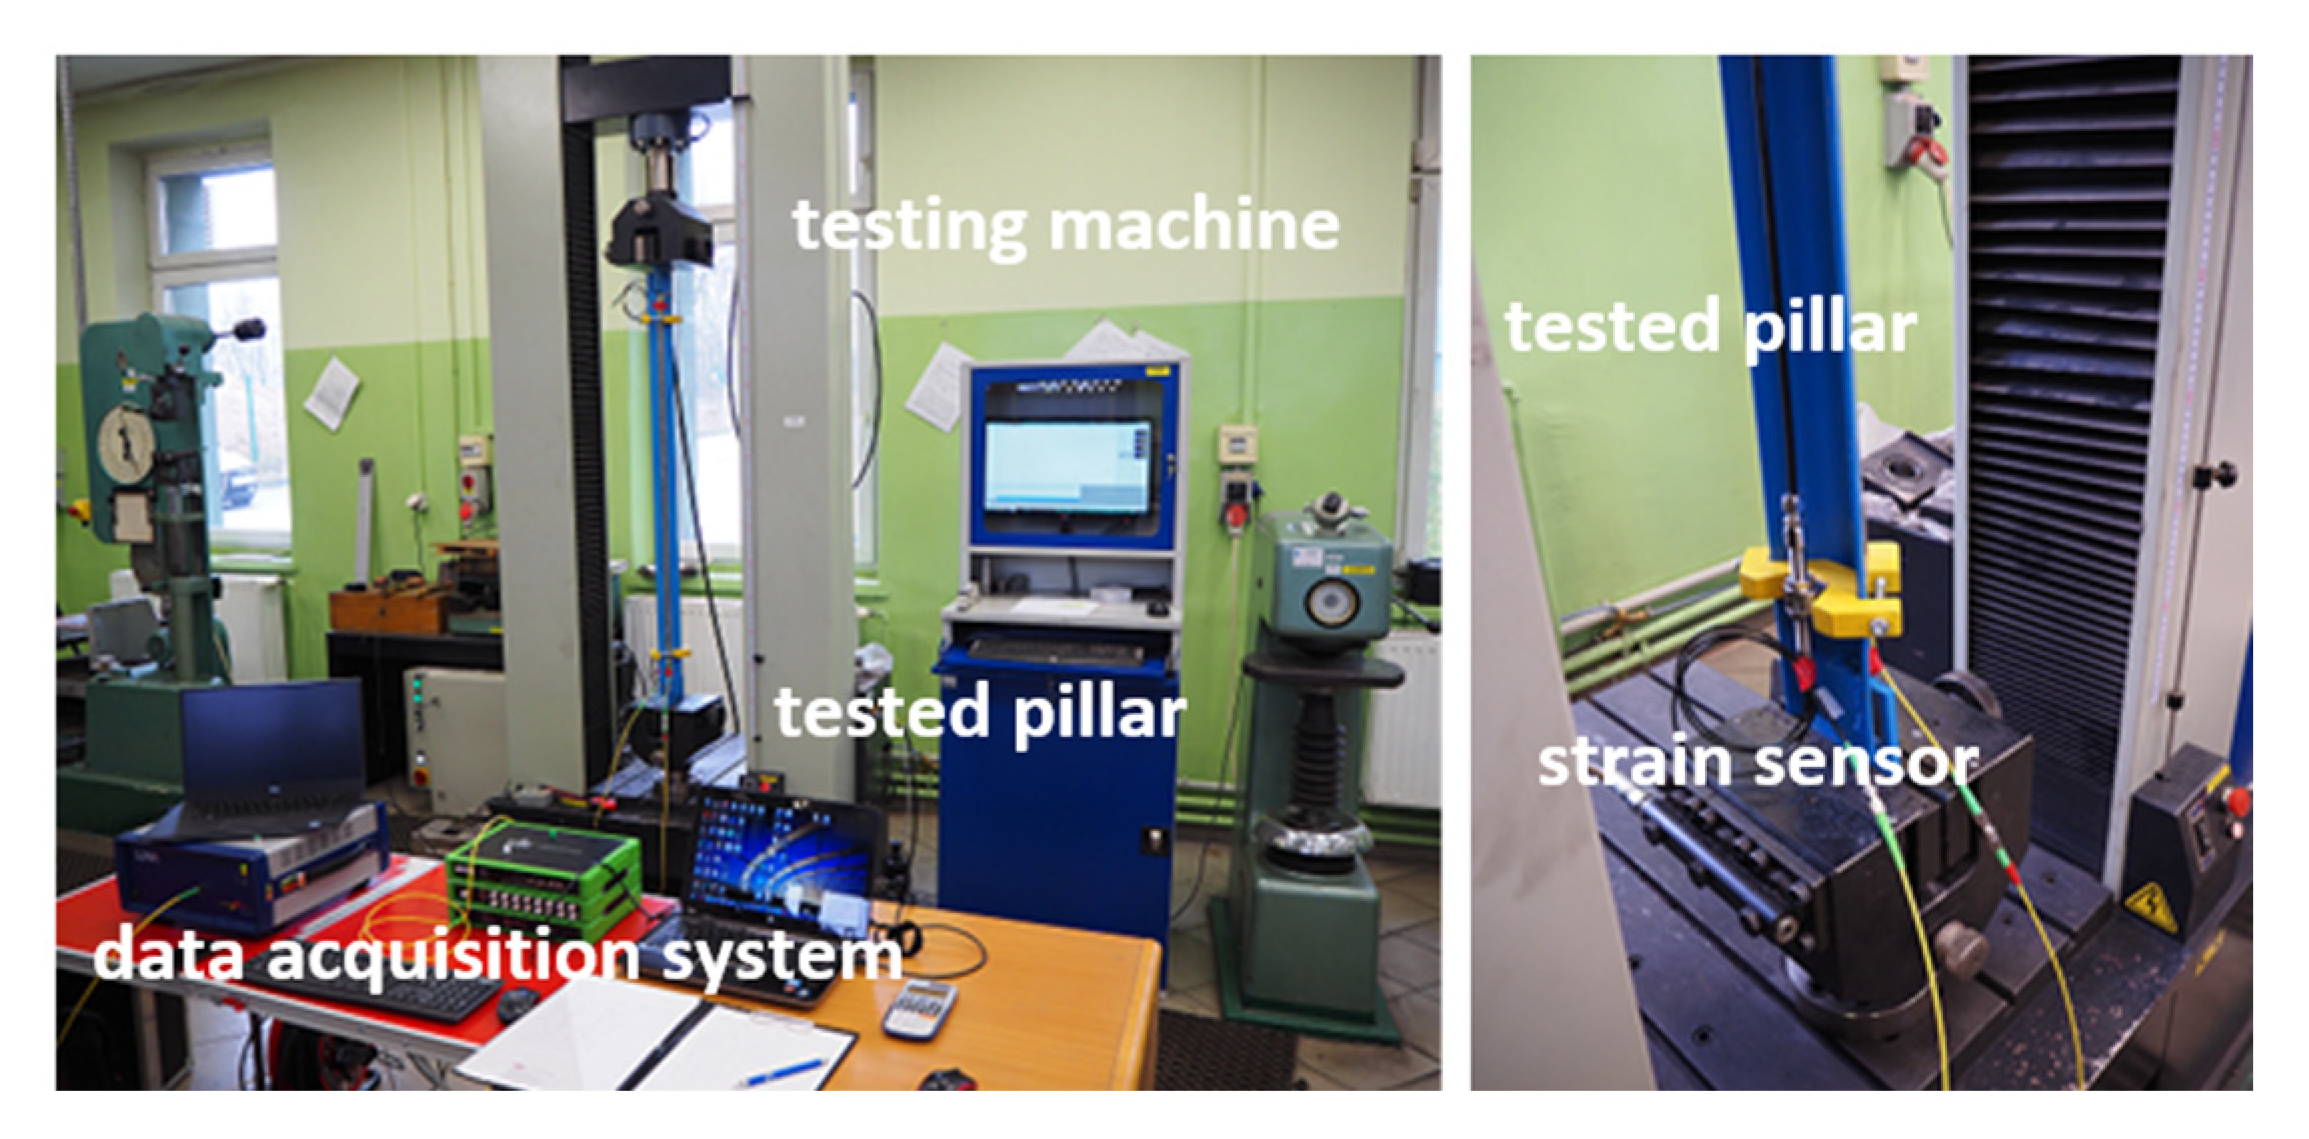
The laboratory validation involved subjecting a representative section of the tower leg to known axial loads, while the Rayleigh and FBG sensors were securely mounted on its surface. The sensor installation methodology ensured that the mechanical response closely replicated the behavior of the actual structural element in situ. The tests were conducted using a strength-testing machine with an Accuracy Class of 0.5, located at the Research and Supervisory Center of Underground Mining. Figure 1 provides a general view of the testing apparatus. Custom grips were engineered to clamp the angular section securely within the machine’s jaws while permitting buckling in the plane associated with the minimum second moment of inertia, thereby replicating realistic structural failure modes.
Figure 1.
Laboratory testing stand for the calibration of the strain measuring system. Special brackets individually designed for the SC-01 strain sensor.
The system calibration was performed using a tower leg specimen consisting of a 75 × 75 × 6 mm angle section. A custom gripping fixture was designed to securely mount the FBG SC-01 strain sensor while allowing for precise adjustments of the initial pre-tension. Additionally, a Rayleigh-based fiber optic strain sensor was adhesively bonded along the entire outer surface of the angle section.
Calibration involved applying tensile loads in 10 kN increments using a universal testing machine (TesT GmbH, Solingen, Germany), during which strain values were recorded simultaneously using both the FBG SC-01 and Rayleigh sensors (SYLEX Fiber Optics, Bratislava, Slovakia). The optical interrogation system used for Rayleigh-based measurements had a resolution of 1 µε.
The Rayleigh sensing technique relies on measuring spectral shifts in the backscattered Rayleigh signal along the optical fiber via swept-wavelength interferometry. These spectral shifts are then converted to strain or temperature changes. To accurately calibrate this measurement system, the strain and temperature sensitivity coefficients of the specific fiber type must be established. This is achieved by recording the spectral shift under known mechanical or thermal loading conditions.
To determine the strain coefficient of the fiber under test (FUT), a precision translation stage mounted on an aluminum rail with integrated fiber clamping was employed. The fiber was subjected to incremental elongation steps of 50 µm, ranging from 0 to 200 µm. The corresponding strain values were calculated using the standard relation, Δε = ΔL/L, where Δε is the change in strain, ΔL is the change in length in microns, and L is the original length in meters. Table 1 shows the computed strain values and corresponding spectra shift for the various tensile load values applied to the fiber. Temperature compensation was achieved by placing a second sensor in parallel, dedicated solely to measuring temperature variations in the object on which the strain sensor is installed. The temperature sensor must not be physically bonded to the tested surface to ensure that the temperature measurement remains undisturbed.
Table 1.
Calibration data for the Rayleigh sensor measurements for L (m) = 0.3136.
The gauge length between the specimen grips was 40 mm, while the total length of the installed fiber optic sensor was 55 mm. During the 678-day creep test, a spatial sampling resolution of 1 mm was employed. For the daily strain change reported in this study, the maximum strain value from all recorded measurement points along the gauge length was considered.
2.2. Material and Mechanical Testing
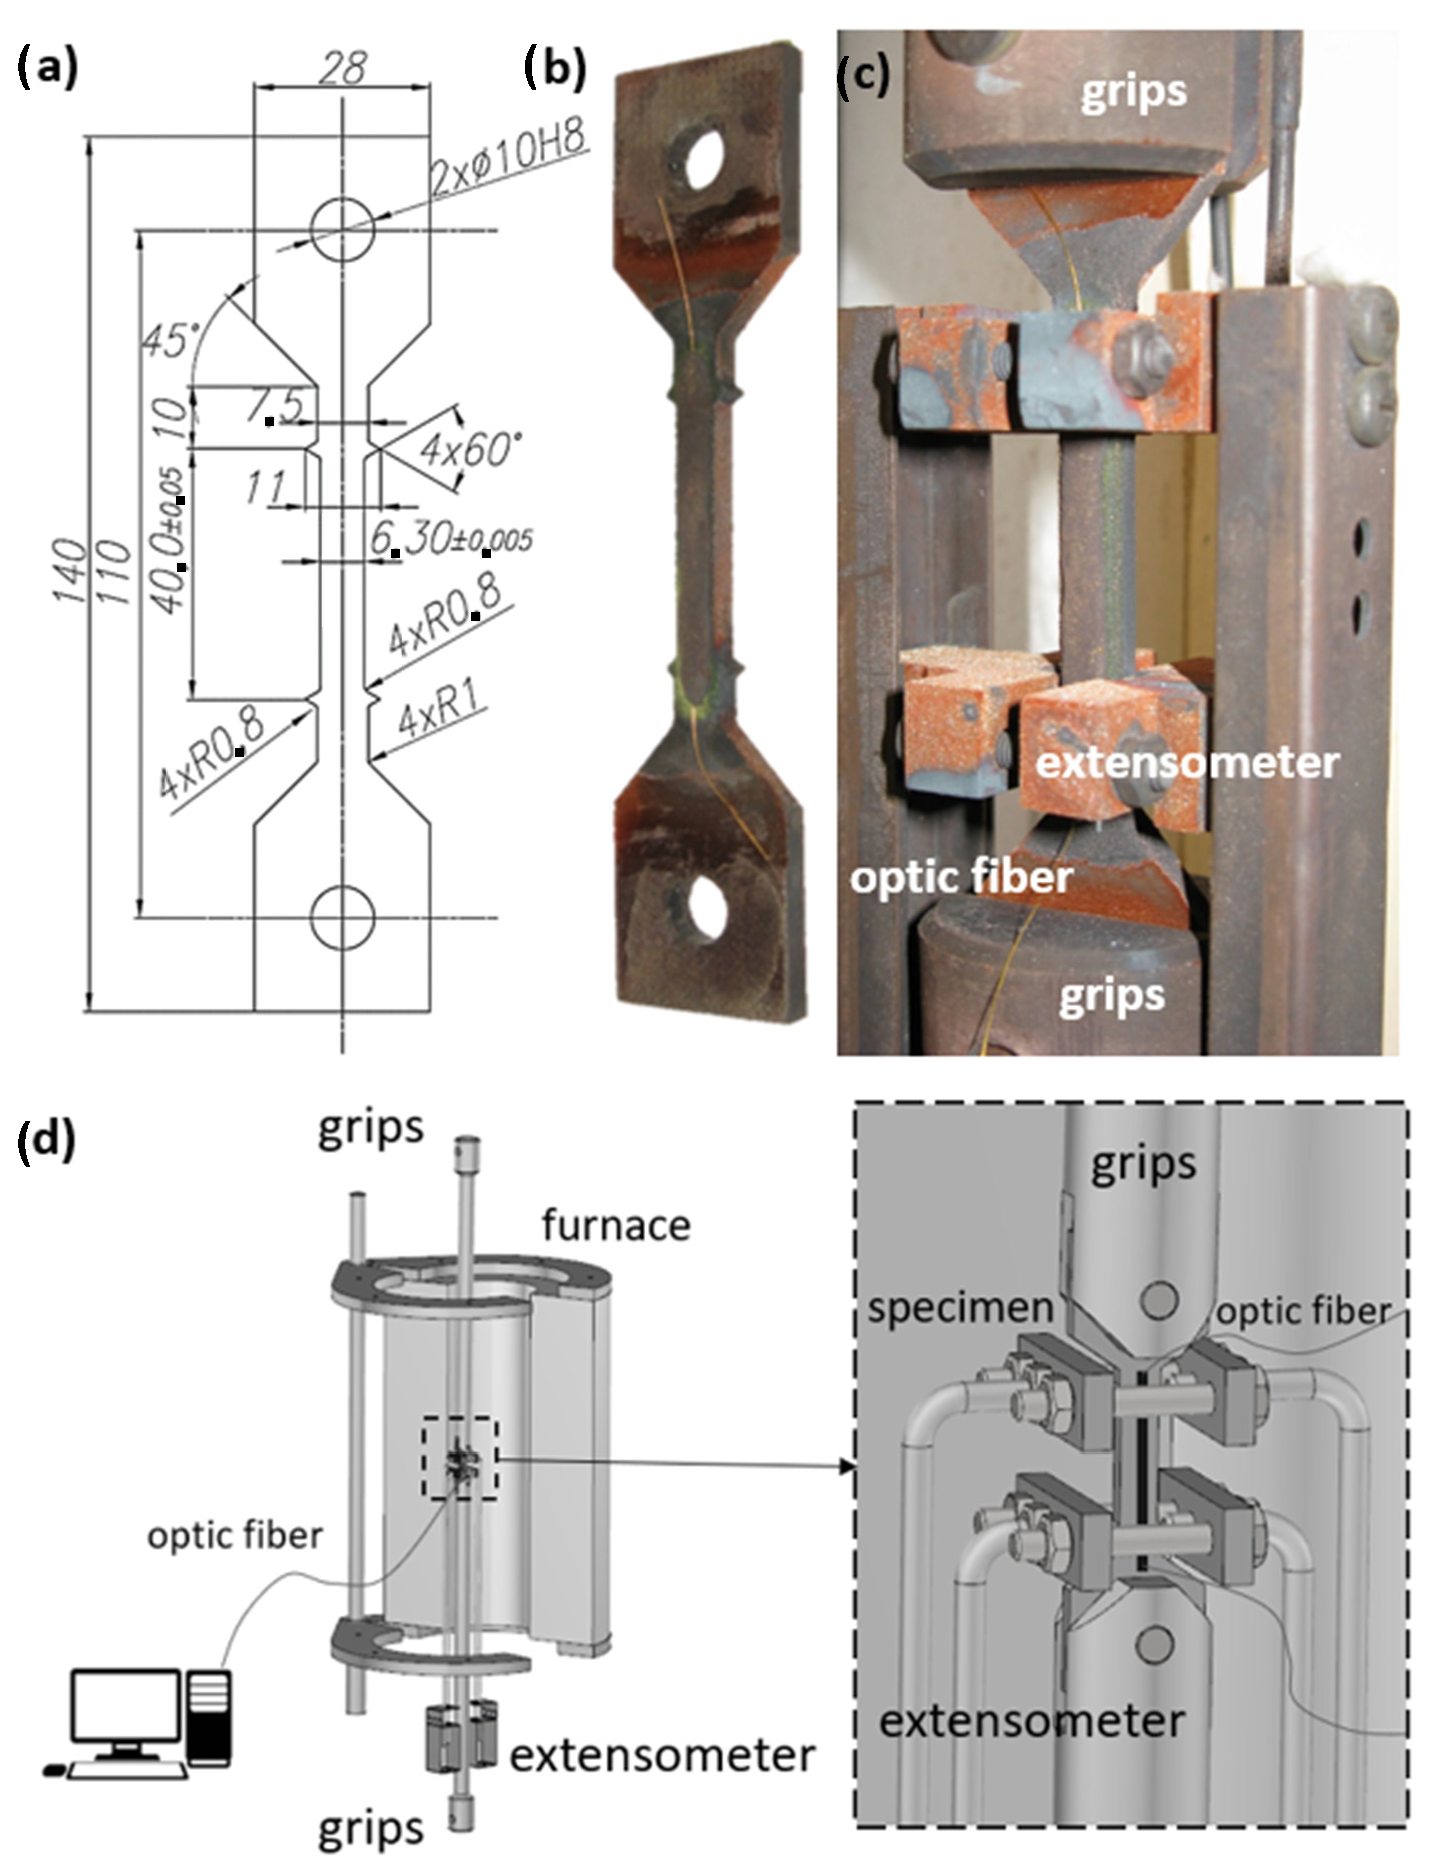
In this research, 13HMF power engineering steel was used as reference material. The geometry of the specimen is shown in Figure 2a. Once the specimen was machined to the geometry required, a long-term creep test for 678 days under stress of 130 MPa at a temperature equal to 540 °C was executed on specimens of 40 mm gauge length and 5 mm × 7 mm cross-section dimensions. The general view of the specimen fixed in the testing machine grips is presented in Figure 2b,c while a schematic drawing of the setup is presented in Figure 2d. The temperature was monitored using a set of three thermocouples located at the top, middle, and bottom sections of the furnace attached to the creep testing machine. The differences in temperature recordings did not exceed ±3 °C during the entire creep test. The specimen used for the creep test is made from the same material as the power plant structures. Also, the testing temperature was selected to be equal to the actual service temperature.
Figure 2.
The geometry of the creep specimen (a); the general view of the specimen with mounted sensor (b) and the same specimen fixed in the testing machine grips (c); schematic drawing of the experimental setup (d).
To evaluate the mechanical influence of the optical fiber on the experiment, the authors performed baseline tensile tests. The ultimate tensile strength (UTS) of the optical fiber was measured at approximately 35 N, while the yield strength of the test material (13HMF steel) was approximately 8000 N, nearly 230 times higher. This significant disparity confirms that the optical fiber is mechanically decoupled from the structural performance of the steel specimen. Due to its extremely low stiffness and mass, the fiber itself does not meaningfully participate in load-bearing or contribute to creep deformation of the specimen. Thus, any potential creep in the fiber is negligible compared to the magnitude of strain measured in the steel, and its effect can be confidently excluded. On the other hand, the adhesive mixture used to bond the optical fiber—composed of a fine iron/magnesium powder suspended in an aqueous sodium hydroxide solution—poses a more nuanced challenge. While direct mechanical testing of this adhesive was impractical due to its fragile nature, several factors support the conclusion that its influence on strain measurements is minimal. First, the bonding layer is extremely thin, with the adhesive primarily serving to anchor the fiber without transferring significant stress. Second, no time-dependent strain drift attributable to the adhesive layer was observed in control tests or in areas outside the gauge section of the specimen. Third, and most importantly, the massless and non-intrusive nature of the fiber optic system eliminates external loading effects that would otherwise interact with adhesive behavior. Traditional extensometry systems, especially clip-on types, have masses ranging from 100 to 500 g. Such systems can introduce significant gravitational and inertial loads, affecting long-term strain measurements in sensitive creep regimes. In contrast, fiber optic sensors are nearly massless and require only minimal contact, dramatically reducing the risk of measurement artifacts due to system interaction. This minimally invasive bonding strategy, combined with the negligible mechanical contribution of both fiber and adhesive, ensures that the observed creep behavior originates from the steel specimen itself, not from auxiliary components.
2.3. Specimens Surface Preparation and Sensor Mounting
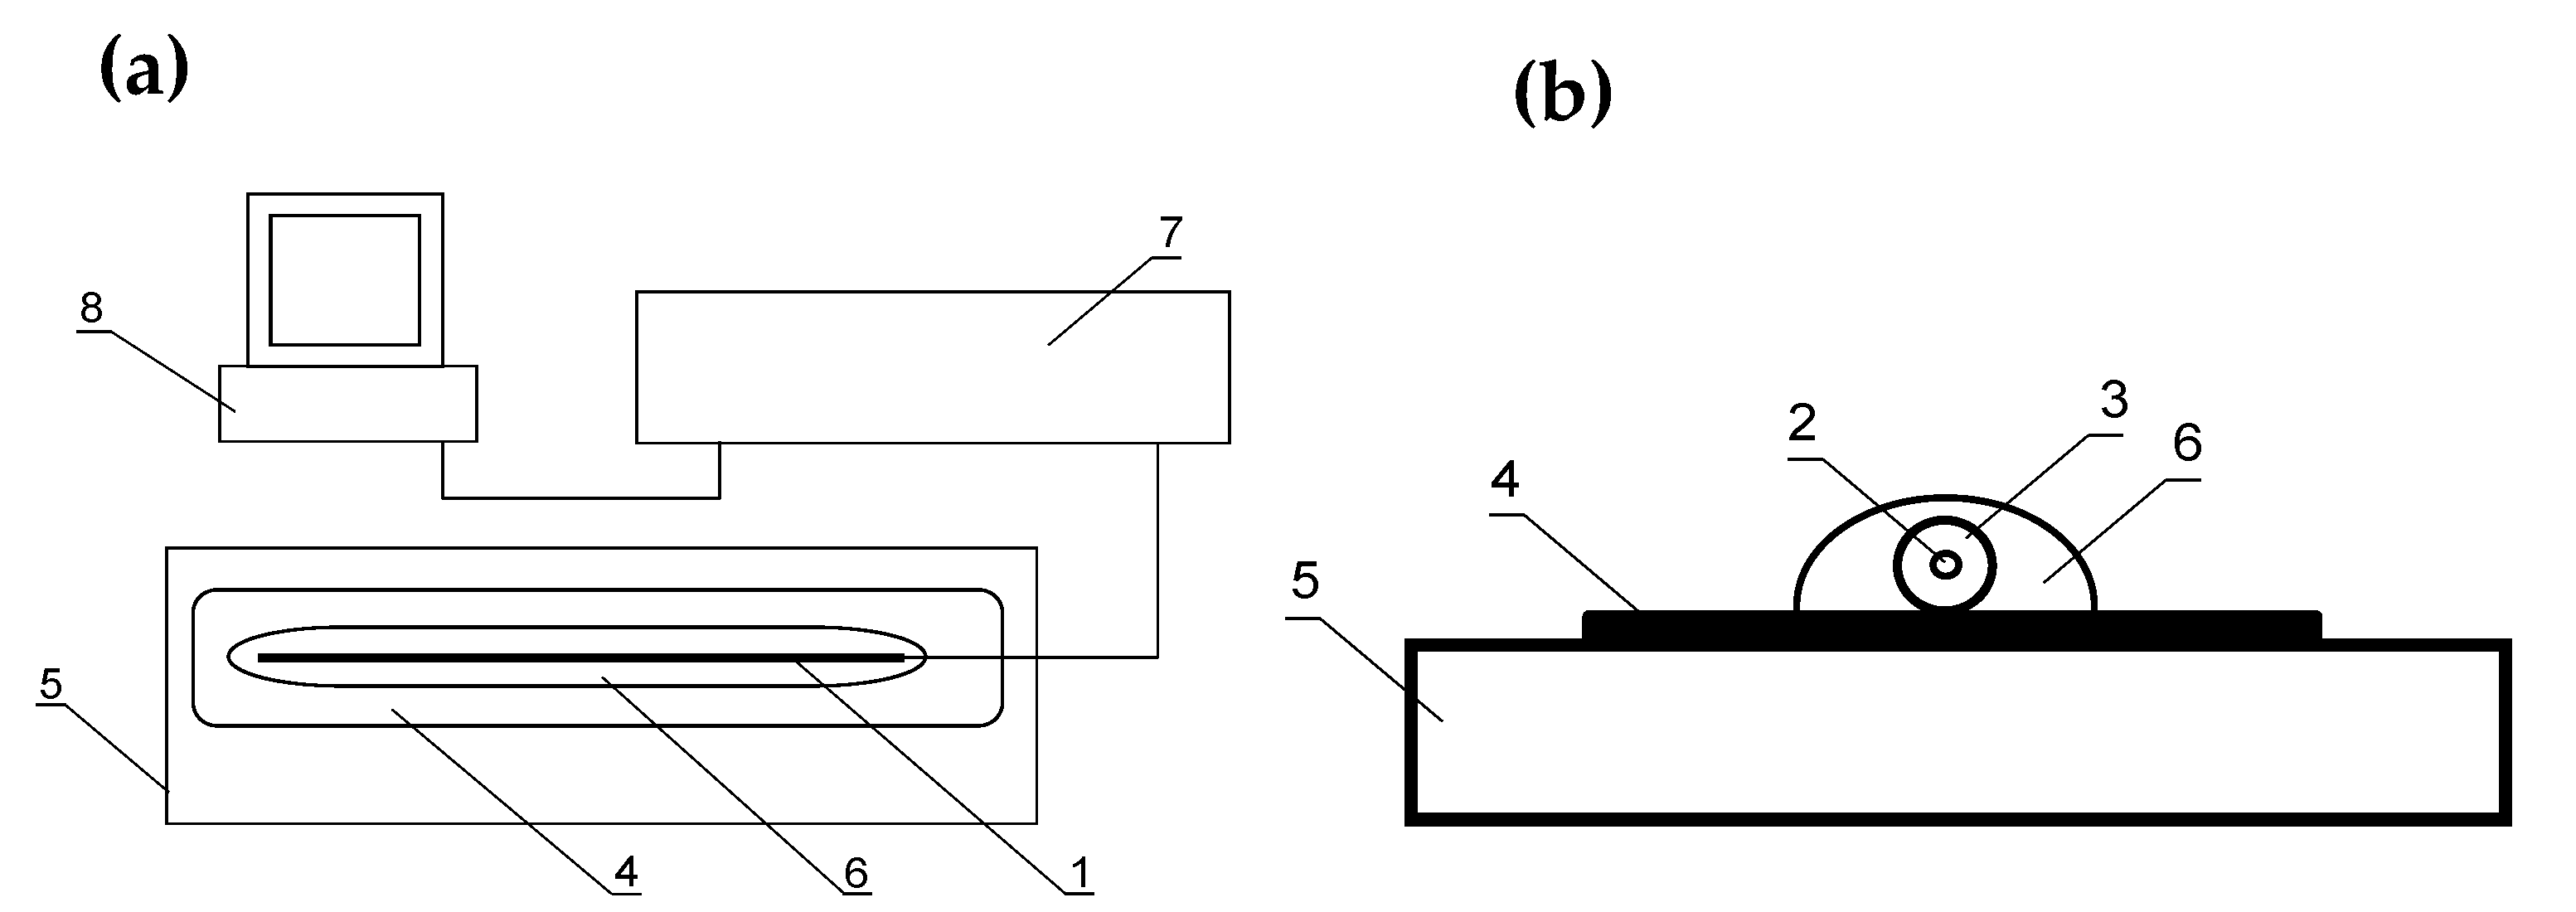
Firstly, the surface was subjected to abrasive blasting with electro-corundum to achieve roughness up to 120 µm. It was then cleaned and prepared for the application of a coating that prevents oxide formation. The system for measuring strain changes at elevated temperatures (schematically shown in Figure 3) comprises a fiber optic strain sensor (1), consisting of a single-mode optical fiber (2) with a core diameter of 9 µm and a cladding diameter of 125 µm. The fiber buffer (3) is made of gold and has a diameter of 164 µm. The fiber optic strain sensor (1) is positioned on a pre-prepared surface (4) of the test specimen (5). The sensor (1) is affixed to the test specimen along its entire length using a surrounding layer of high-temperature adhesive (6). The fiber optic strain sensor (1) is connected to a Rayleigh optical backscatter reflectometer (7) via a single-mode optical fiber link, while the reflectometer (7) is interfaced with its control computer (8) via a USB connection. In the present embodiment, the Rayleigh optical spectrum analyzer used is the OBR4600 interrogator manufactured by Luna Innovations. The procedure for attaching the fiber optic strain sensor to the test surface involves the following steps:
Figure 3.
The schema of experimental setup (a) with cross-sectional view of specimen with mounted optic fiber (b).
- Surface Preparation: Cleaning of the surface of the test specimen.
- Sensor Placement: Aligning the fiber optic strain sensor along the axis of symmetry of the test specimen.
- Adhesive Preparation: A high-temperature two-component adhesive was used for bonding the optical fiber. The adhesive mixture was prepared by combining 100 parts by the weight of component A with 40 parts by the weight of component B. Component A comprises 50 wt% powdered iron, 20 wt% chromium, 8 wt% alkali hexafluorosilicates, 10 wt% magnesium, 10 wt% nickel, and 2 wt% molybdenum. Component B is an aqueous solution of sodium hydroxide at a concentration of 2.5 wt%. The composition of the adhesive was selected to ensure both chemical and mechanical stability at 540 °C. Chromium and nickel provided oxidation resistance, while iron and molybdenum improved structural rigidity at elevated temperature. Magnesium enhanced fiber–substrate bonding, and alkali hexafluorosilicates acted as fluxing agents promoting interfacial adhesion. The aqueous NaOH solution (Component B) acted as an activator, enabling the metallic powders to form a durable matrix.
- Application of Adhesive: The prepared adhesive mixture was applied over the entire length of the fiber optic strain sensor situated on the surface designated for strain measurements.
- Curing Process: The adhesive bond was cured at a temperature of 20 °C for 12 h.
After the curing period at ambient temperature, the fiber optic strain sensor is ready for connection to the measurement system and initiation of strain measurements on the test surface.
The coefficient of thermal expansion (CTE) of 13HMF steel was assumed to be 11 × 10−6 K−1 for temperatures between 0 and 120 °C. A reduction factor was applied with increasing temperature, resulting in an effective CTE of approximately 4.5–5 × 10⁻⁶ K−1 at 450–500 °C. The adhesive manufacturer reported a CTE of 5.5 × 10⁻⁶ K−1 at 1000 °C. Based on this similarity, it was assumed that the adhesive material behaves comparably to the specimen material, and, therefore, no correction for differential thermal expansion was applied to the strain measurements. After two years of creep testing, no debonding of the adhesive was observed, supporting the validity of this assumption. Regarding the influence of adhesive layer thickness, only one thickness was investigated due to the limited availability of test stands and the long duration of the experiment.
3. Results
3.1. Strain Monitoring
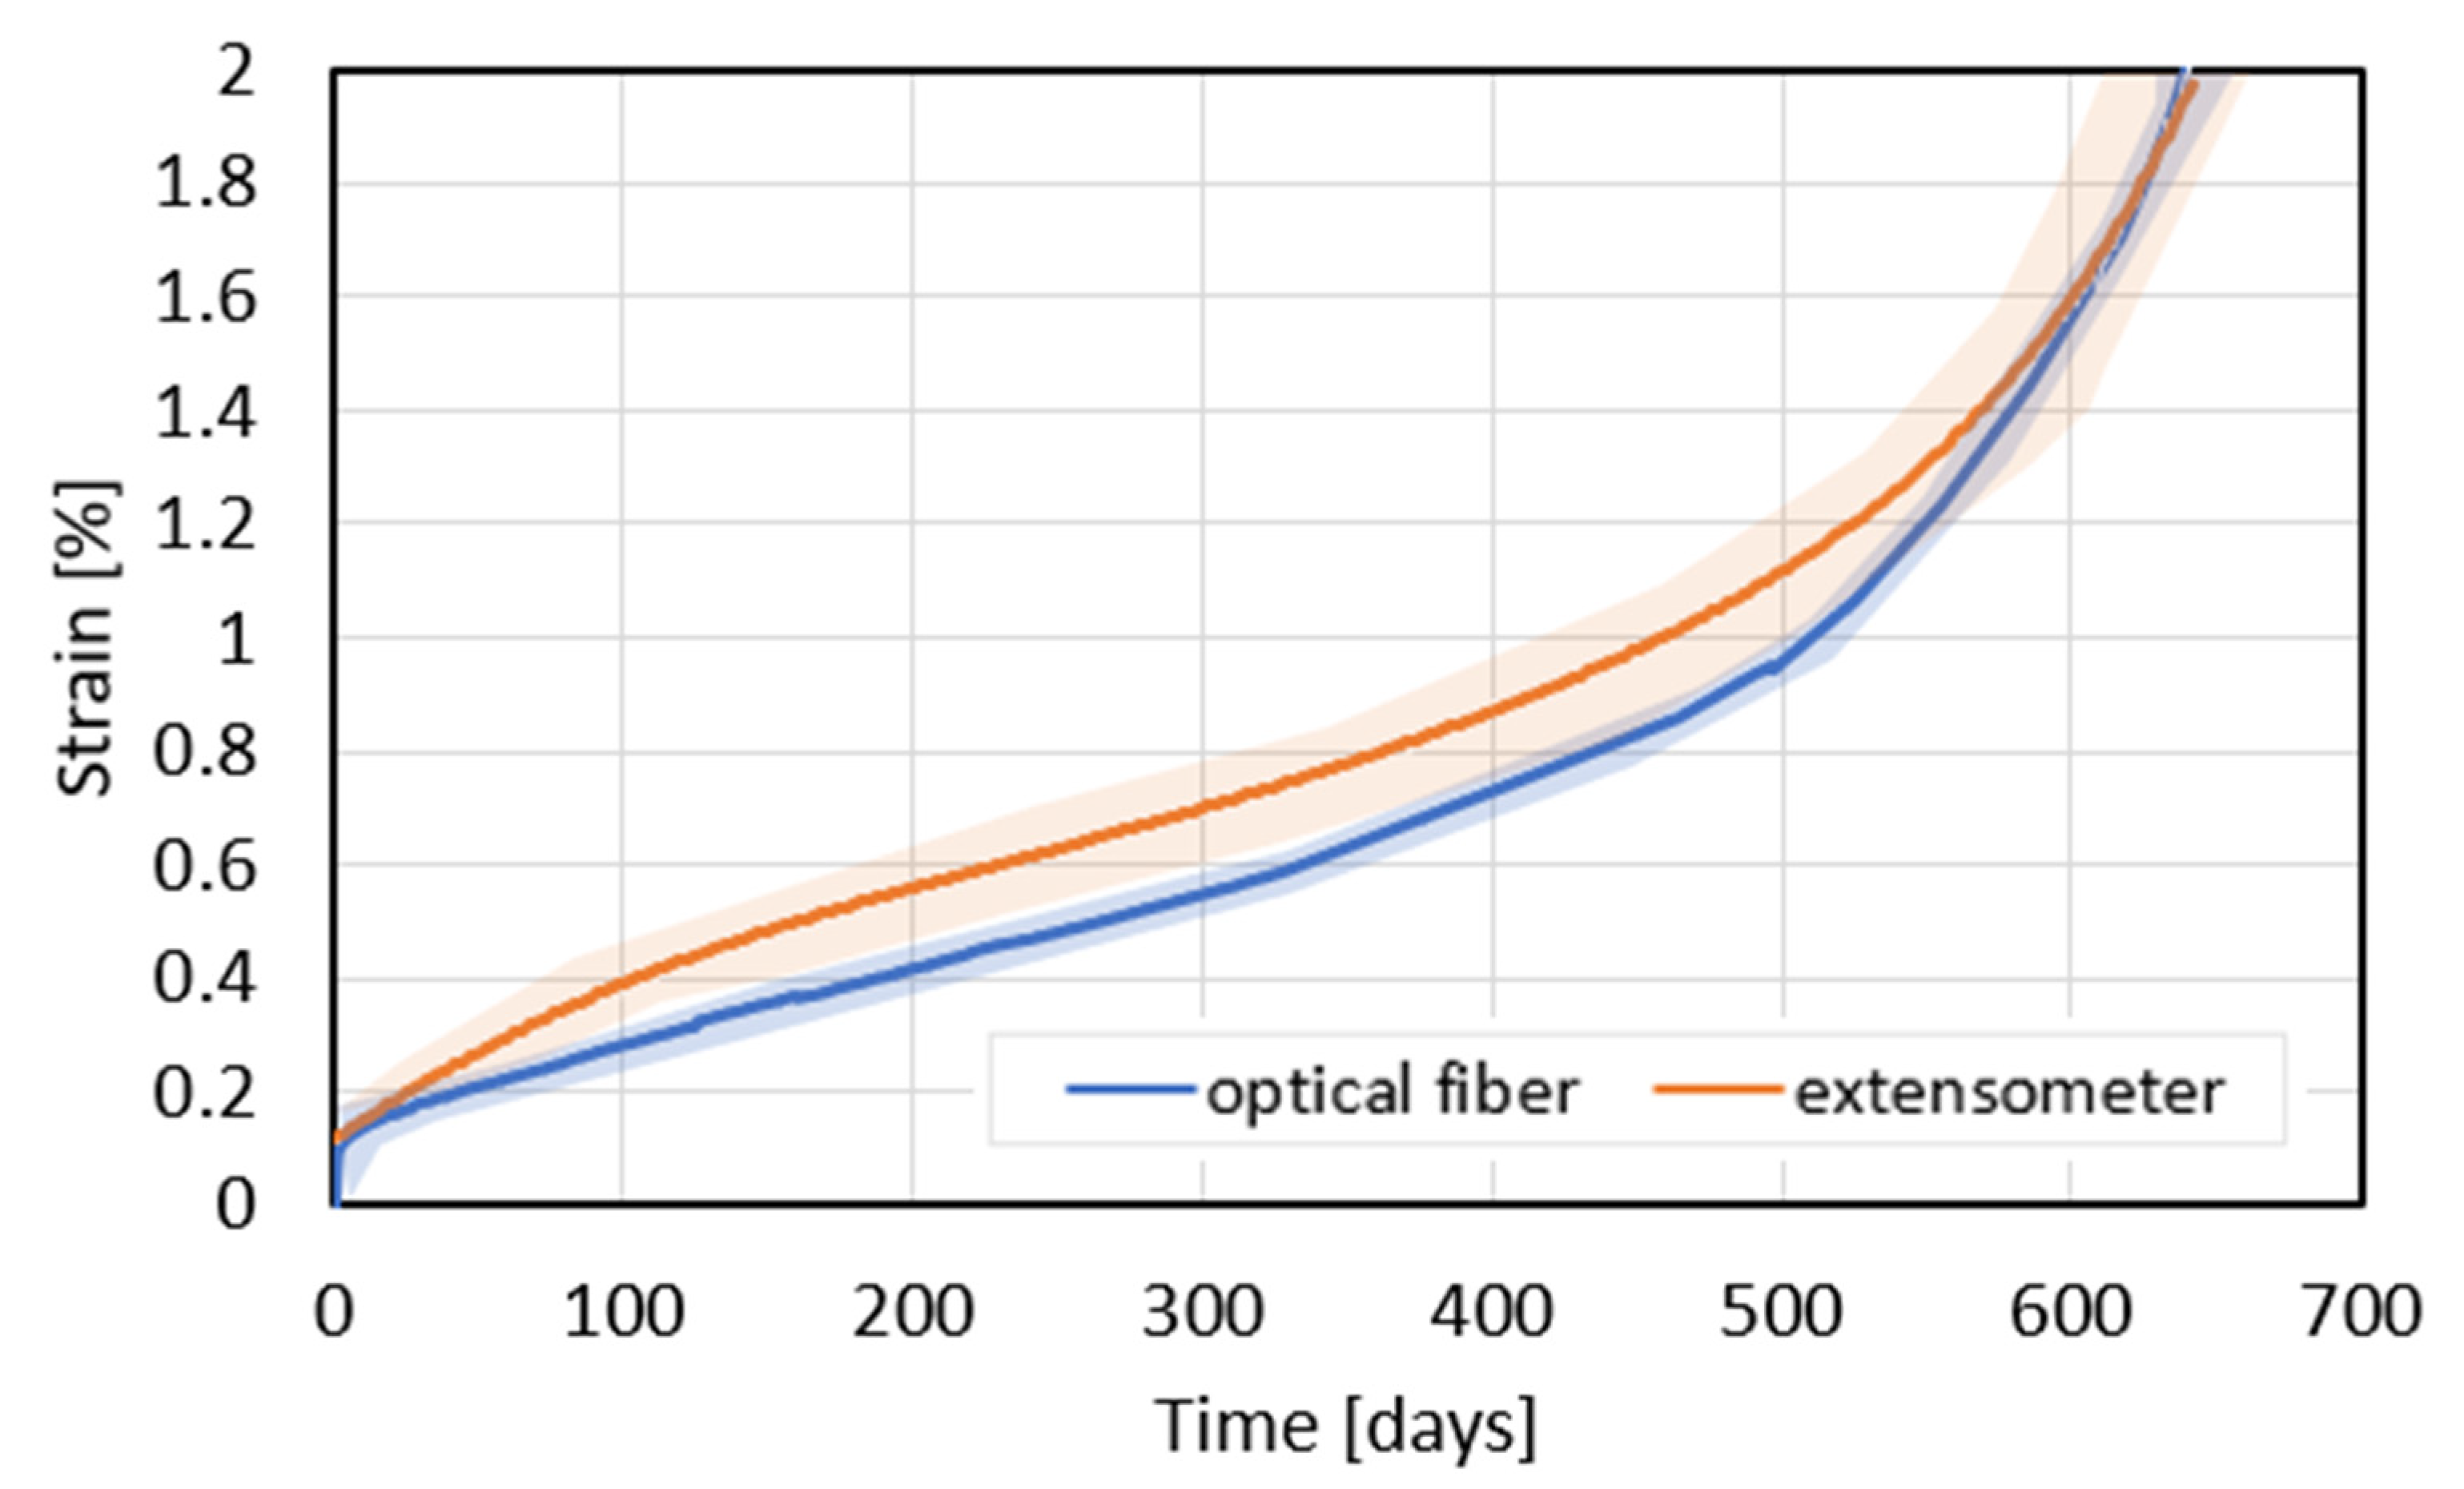
Figure 4 presents a comparison between results obtained from a conventional mechanical extensometer and an optical fiber sensor. It can be observed that the agreement between these two methods is notable. The strain evolution recorded using optical fiber in every stage of creep damage development corresponds to the results obtained from the extensometer. One should stress that the process parameters used to attach the optical fiber to the specimen’s surface were successfully applied, since the curves overlap themselves during the whole testing time of over 2 years until specimen fracture.
Figure 4.
The comparison of total strain evolution of 13HMF subjected to creep at 540 °C monitored using optical fiber (blue line) and an extensometer (orange line).
The results of laboratory tests prove that the Rayleigh optic strain sensor and the method of sensor-fixing enabled the correct measurements of strains arising in the specimen due to creep. It was observed that the constant increase in load led to the constant increase in strain. Regarding the advantages of measurements based on linear sensors and Rayleigh backscatter, it is worth mentioning linear measurements with resolutions starting from 10 µm, with the possibility of measuring up to 1000 points on one meter of optical fiber and temperature measurements up to 900 °C. On the contrary, the disadvantages include quasi-static measurement with a frequency of 1 Hz, as well as the high price of the Rayleigh spectrum analyzer. In order to verify the laboratory test data reported in this work, it is necessary to elaborate on the measurement installations and mount them on a real object. However, it could be concluded that such methodology enables the precise measurement of deformation changes due to creep under long-term operating conditions up to 2% of the installed measurement system state at temperature up to 700 °C, as most power engineering structures work at these temperatures. Furthermore, it could be considered as a powerful tool in the stress and strain analysis of power plant structures, since it enables the accurate prediction of the elements’ service life, allowing for the timely repair or replacement of damaged structural elements before their failure. While conventional strain gauges are cost-effective and suitable for short-term or low-temperature tests, they lack spatial resolution and degrade in long-term high-temperature exposure. The necessity of Rayleigh-based fiber sensors becomes apparent in applications requiring distributed strain monitoring along complex geometries or where long-duration real-time structural health monitoring is essential, such as in boiler tubes, turbine casings, and pressure vessels.
It should be emphasized that, while conventional strain gauges and extensometers provide accurate strain data in laboratory conditions, their application is limited during long-term high-temperature exposition due to adhesive degradation, oxidation, and point-wise measurement constraints. The Rayleigh optic strain sensor overcomes these limitations by enabling distributed, high-resolution strain monitoring over extended periods, with negligible influence on specimen behavior. This capability makes such sensors particularly valuable for in situ monitoring power plant components such as boiler tubes and turbine casings, where continuous and spatially resolved strain data are critical for the early detection of creep damage.
3.2. Microstructural Analysis
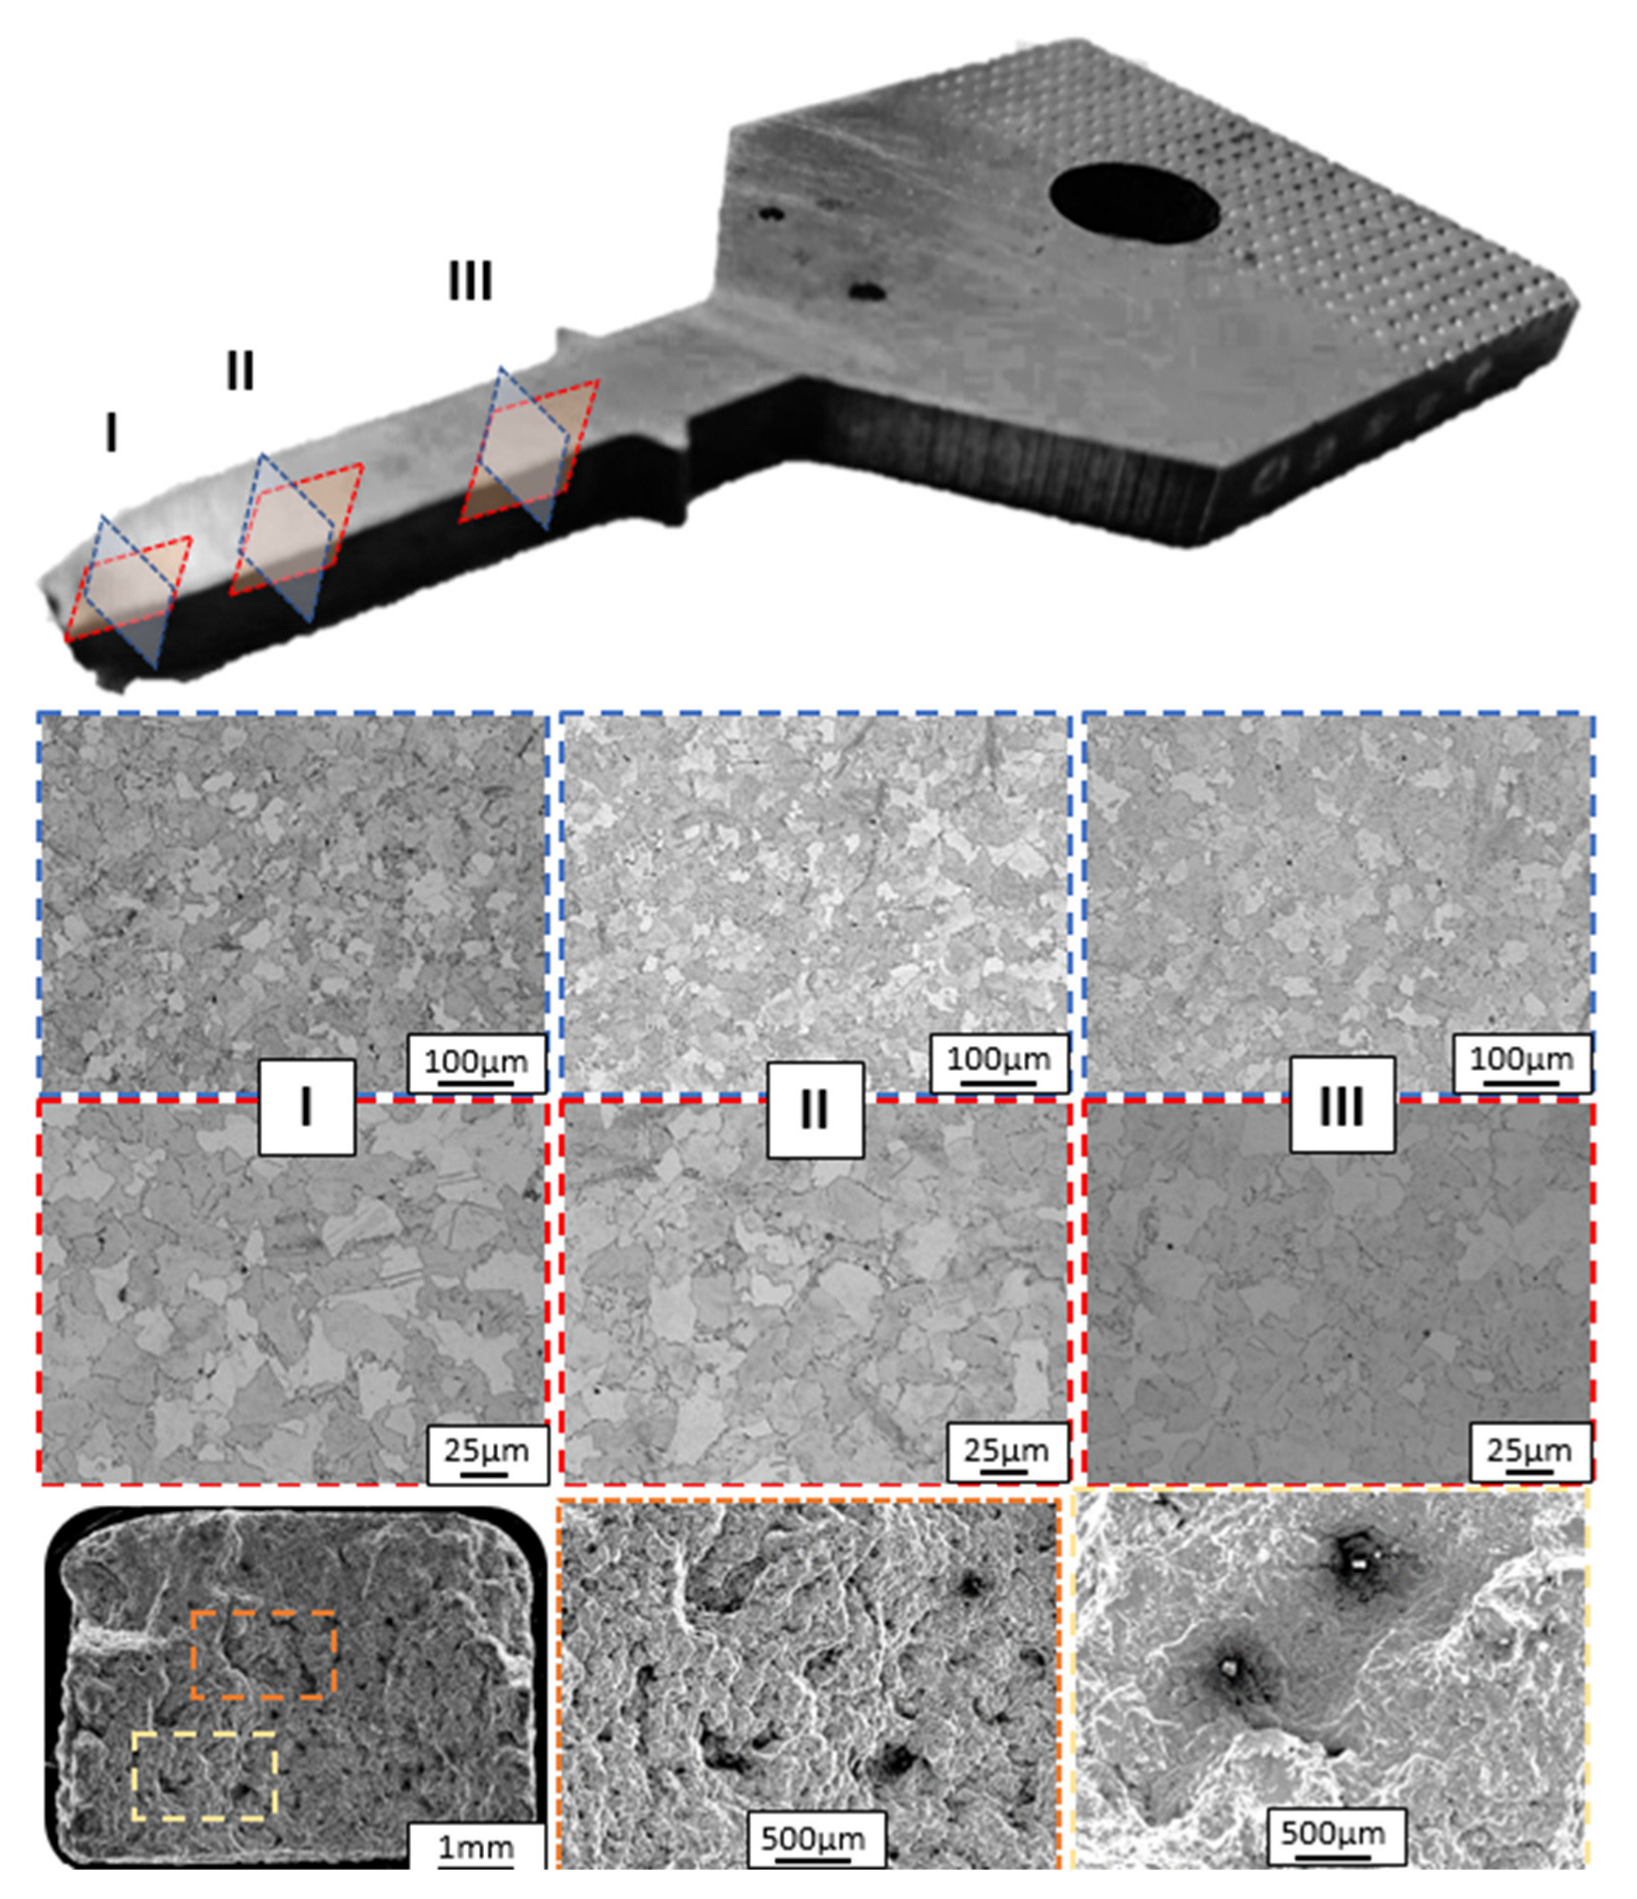
The optical strain measurements presented in this study were intended not only to quantify overall creep deformation, but also to provide insight into the spatial distribution of strain along the specimen. To evaluate how well these measurements reflect underlying material degradation, microstructural analysis was performed on different regions (I-III) of the specimen after failure. These observations were performed longitudinally (red square) and transversely (blue square) to the direction of the applied force. Additionally, the fracture location was examined in two different areas (orange and yellow square).
This analysis helped validate the distributed nature of the strain response captured by the Rayleigh-based optical sensor and supports the interpretation of localized creep damage. The Rayleigh optic system used in this study offers a spatial resolution on the order of millimeters, allowing for continuous strain tracking along the gauge length. While the current work presents an aggregate strain curve for clarity (Figure 3), the sensor’s underlying capabilities enable the segmentation of strain measurements at high spatial densities. This is particularly relevant in long-term creep tests, where damage tends to localize and evolve heterogeneously over time.
Microstructural observations were carried out in three key regions: near the fracture surface (Region I), mid-gauge (Region II), and close to the gripping ends (Region III), in directions both parallel and perpendicular to the loading axis (Figure 5). All regions showed a consistent ferritic–pearlitic matrix, but with varying cavity densities. Region I, adjacent to the fracture, exhibited a significantly higher density of cavities and microvoids, consistent with severe localized creep damage. The density was significantly greater than that in Region II. Region II (mid-gauge) showed a moderate density of cavities, reflecting distributed but less severe creep deformation. Region III, close to the grips, contained only a low density of cavities, confirming minimal local damage. This gradient aligns well with the distributed strain data: localized strain accumulation corresponded with regions of elevated cavity density, whereas areas of low strain correlated with minimal microstructural degradation. This demonstrates the sensor’s ability to capture not only global strain evolution, but also spatial differences in creep damage.
Figure 5.
The examination of the 13HMF power engineering steel microstructure performed in different locations in two perpendicular directions, and fractographic images after specimen failure.
4. Discussion
This study investigates the application of Rayleigh backscattering-based fiber optic sensors for long-term creep monitoring of 13HMF power engineering steel under elevated temperature conditions, and the findings are supported by detailed microstructural observations. A single-mode gold-coated optical fiber, bonded to the specimen surface with a custom-formulated adhesive, was used to monitor strain evolution during a 678-day creep test conducted at 540 °C under a constant stress of 130 MPa. The results demonstrate that the Rayleigh optic strain sensor provided highly accurate and stable strain measurements throughout the prolonged testing period. Notably, the strain evolution data collected from the optical fiber sensor closely matched those obtained using a conventional mechanical extensometer, with the curves nearly overlapping throughout the entire duration of the test. This level of agreement validates the reliability of the optical method and confirms its capability to track creep deformation over long time spans. The advantages of the Rayleigh sensor approach are significant. The system offered high spatial resolution, with the ability to resolve strain at intervals as small as 10 µm and to record up to 1000 discrete points per meter of optical fiber. Such detailed strain profiling is particularly useful for capturing localized deformation phenomena that may not be detected using conventional single-point sensors. Additionally, the sensor system proved durable, maintaining strong adhesion and measurement accuracy over nearly two years of continuous high-temperature exposure. However, some limitations are acknowledged, including the quasi-static measurement frequency of 1 Hz and the high cost of the Rayleigh spectrum analyzer, which could restrict wider adoption in some industrial applications. Complementing the fiber-based measurements, microstructural analysis was performed to evaluate the material’s condition at different locations along the specimen’s length. These regions included areas close to the fracture (area I), mid-gauge (area II), and near the gripping ends (area III), examined in planes both parallel and perpendicular to the loading direction. The base microstructure of the steel, consisting of a ferritic–pearlitic matrix, remained consistent across all sampled regions, suggesting that the applied load was uniformly distributed along the gauge section. The primary difference observed between regions was the variation in cavity density, which increased significantly near the fracture zone. This aligns with the typical progression of creep damage, where cavity nucleation and growth occur preferentially at grain boundaries and around non-metallic inclusions, eventually coalescing into microcracks that lead to failure. Fractographic examination of the broken specimen further confirmed a ductile failure mode, with evidence of dimpled rupture surfaces and enlarged craters around inclusions. These inclusions likely acted as stress concentrators, promoting localized deformation and void formation in their vicinity. The correlation between increased cavity density and strain accumulation measured using the optical sensor strongly supports the conclusion that the Rayleigh-based fiber optic sensing system effectively captured the mechanical response and underlying damage mechanisms during creep. One should highlight that the integration of fiber-based strain monitoring and microstructural analysis provides a comprehensive understanding of creep behavior in 13HMF steel. The precise and long-term measurement capability of the Rayleigh sensor, validated against traditional methods and supported by metallographic evidence, highlights its potential as a powerful tool for structural health monitoring in high-temperature service environments.
One should highlight that, when placed in the broader context of creep monitoring techniques, this method addresses several of the limitations inherent in conventional and alternative sensor systems, while also introducing unique benefits in terms of spatial resolution, temperature tolerance, and long-term stability. Traditional creep tests often rely on mechanical extensometers or resistive strain gauges to track strain evolution under load. While these tools are well-established and relatively inexpensive, they are limited by point measurements, potential mechanical inertia, and sensitivity to environmental conditions such as thermal drift or oxidation. These limitations may compromise the accuracy of creep measurements, especially over prolonged periods or under high-temperature conditions. In contrast, the Rayleigh-based fiber optic sensor enables continuous, distributed strain monitoring over the entire gauge length of the specimen, with excellent agreement to extensometer data and no moving parts susceptible to mechanical degradation. On the other hand, Fiber Bragg Grating (FBG) sensors represent a popular class of optical sensing technology previously applied in creep studies. Works by Guo et al. [13] and Yazdizadeh et al. [18] have shown the applicability of FBG sensors in monitoring strain and stress states in structural materials, including concrete and bolted joints, under various loading and environmental conditions. FBG sensors are typically used for quasi-distributed sensing and require complex multiplexing to cover large areas. Additionally, FBGs tend to be more sensitive to localized strain discontinuities and are limited in spatial resolution by the discrete nature of their grating patterns. In contrast, the Rayleigh-based approach offers truly distributed sensing capabilities, with measurement points possible at millimeter-scale intervals along the fiber. This enables higher spatial granularity without the need for complex sensor arrays or multiplexing units. Moreover, the Rayleigh sensor used in this study demonstrated robust operation at elevated temperatures (up to 540 °C), outperforming typical polymer-coated FBGs, which can degrade or delaminate under similar thermal conditions, unless specially packaged. Additionally, the Rayleigh sensor method described in the paper is completely non-destructive and enables real-time monitoring over long periods without interrupting service. Its application directly on full-scale components, including those in service, enhances its value for in situ structural health monitoring, which many miniaturized techniques cannot provide due to sample removal or preparation constraints. Potential drop methods and acoustic or ultrasonic techniques have also been employed to assess creep damage, particularly in regions with high stress concentration or cracks [12]. These methods are sensitive to changes in electrical resistance or acoustic wave velocity, which correlate with damage evolution. However, they often require direct contact, complex calibration, and can be sensitive to surface condition or environmental noise. The Rayleigh backscattering-based approach avoids these pitfalls by relying on optical interrogation, which is immune to electromagnetic interference, does not require electrical power at the sensing point, and is less affected by surface oxidation or corrosion—common issues in high-temperature environments.
As the effectiveness of Rayleigh optic strain sensors for long-term creep monitoring is proved in this study, several broader implications and directions for further development may be considered. One should highlight that the accuracy and stability of the measurement over nearly two years demonstrate its readiness for integration into predictive maintenance frameworks, where real-time distributed strain data could significantly enhance early failure detection and optimize service intervals in high-temperature environments. It should be stressed that the Rayleigh-based approach provides a non-destructive, full-scale monitoring solution with superior spatial resolution, allowing for the continuous tracking of deformation along entire structural elements. It already demonstrated durability at 540 °C, which opens its application opportunities for ultra-supercritical power plants, aerospace propulsion systems, and other environments characterized by extreme thermal and mechanical loading. Furthermore, next steps should focus on transferring this methodology from controlled laboratory conditions to full-scale field applications, such as live monitoring of boiler tubes, turbine casings, and pressure vessels, to validate performance under real service stresses, vibrations, and corrosive atmospheres. Parallel research could investigate advanced protective coatings and improved bonding techniques to extend sensor life at even higher temperatures or under chemically aggressive environments. Additionally, developing cost-effective interrogators and enhancing data acquisition frequency would make the technology more practical for widespread industrial use. Integrating Rayleigh-based sensing with digital twins and predictive modeling platforms could also provide a powerful decision-making tool for asset management, enabling not only condition monitoring, but also forecasting of remaining service life. Finally, extending applications beyond the power sector—such as monitoring bridges, tunnels, pipelines, and aerospace structures—would broaden the impact of this technology, positioning it as a versatile solution for ensuring long-term structural safety across multiple industries.
5. Conclusions
In this paper, the suitability of a novel approach for creep monitoring using a Rayleigh optic strain sensor was confirmed during a long-term creep test of 13HMF power engineering steel at 540 °C under a constant load of 130 MPa. The sensor attached to the specimen’s surface successfully and accurately monitored strain evolution during 678 days of high-temperature exposure under creep conditions, since its recordings match the conventional extensometer. It was confirmed that the methodology proposed could be successfully used to monitor strain changes due to creep, as excellent agreement between the Rayleigh optic strain sensor and mechanical extensometer’s indications was found. The effective application of the Rayleigh sensor for creep monitoring on the laboratory scale should be further confirmed using real-time strain measurements on power plant structures operating at service conditions.
Author Contributions
Conceptualization A.G. (Arkadiusz Grzywa) and Z.L.K.; Data curation M.K., I.M. and A.G. (Arkadiusz Grzywa); Formal analysis M.K.; Investigation M.K., I.M., A.G. (Aleksandra Gontarczyk) and A.G. (Arkadiusz Grzywa); Methodology M.K., I.M., A.G. (Aleksandra Gontarczyk) and A.G. (Arkadiusz Grzywa); Project administration Z.L.K. and A.G. (Arkadiusz Grzywa); Supervision Z.L.K.; Validation M.K., Z.L.K. and A.G. (Arkadiusz Grzywa); Visualization M.K.; Roles/Writing—original draft M.K.; Writing—review and editing Z.L.K. All authors have read and agreed to the published version of the manuscript.
Funding
The paper was written as a result of the project financed by the National Center for Research and Development. Grant application number: POIR.01.01.01-00-0305/17.
Institutional Review Board Statement
Not applicable.
Informed Consent Statement
Not applicable.
Data Availability Statement
The raw data supporting the conclusions of this article will be made available by the authors on request.
Acknowledgments
The authors would like to express their gratitude to A. Myczka for his kind help during the experimental part of this work.
Conflicts of Interest
Authors Arkadiusz Grzywa and Aleksandra Gontarczyk were employed by the company Alioth Logistics Sp. Z o.o., The remaining authors declare that the research was con-ducted in the absence of any commercial or financial relationships that could be construed as a potential conflict of interest.
References
- Kopec, M. The analysis of strain response for as-received and exploited 10H2M power engineering steel subjected to low cycle fatigue in plastic regime. Int. J. Press. Vessel. Pip. 2024, 207, 105110. [Google Scholar] [CrossRef]
- Kopec, M.; Kukla, D.; Brodecki, A.; Kowalewski, Z.L. Effect of high temperature exposure on the fatigue damage development of X10CrMoVNb9-1 steel for power plant pipes. Int. J. Press. Vessel. Pip. 2021, 189, 104282. [Google Scholar] [CrossRef]
- ASTM E1351-01; Standard Practice for Production and Evaluation of Field Metallographic Replicas. ASTM International: West Conshohocken, PA, USA, 2012.
- ASTM E139-11; Standard Test Methods for Conducting Creep, Creep-Rupture, and Stress-Rupture Tests of Metallic Materials. ASTM International: West Conshohocken, PA, USA, 2018.
- Sun, W.; Li, S.; Zhou, G.-Y.; Li, M.; Wen, Z.-X.; Yue, Z.-F.; Tu, S.T. Interpretation of non-conventional miniaturized creep test: Derivation of equivalent gauge length. J. Mater. Res. Technol. 2023, 24, 4390–4404. [Google Scholar] [CrossRef]
- Morris, A.; Cacciapuoti, B.; Sun, W. The role of hardness on condition monitoring and lifing for high temperature power plant structural risk management. Measurement 2019, 131, 501–512. [Google Scholar] [CrossRef]
- Kazakeviciute, J.; Rouse, J.P.; De Focatiis, D.S.A.; Hyde, C.J. The development of a novel technique for small ring specimen tensile testing. Theor. Appl. Fract. Mech. 2019, 99, 131–139. [Google Scholar] [CrossRef]
- Sakanashi, Y.; Gungor, S.; Forsey, A. Measurement of Creep Deformation across Welds in 316H Stainless Steel Using Digital Image Correlation. Exp. Mech. 2017, 57, 231–244. [Google Scholar] [CrossRef]
- van Rooyen, M.; Becker, T.H.; Westraadt, J.E.; Marx, G. Measurement of creep deformation of ex-service 12% Cr steel using digital image correlation. J. Strain Anal. Eng. Des. 2020, 55, 71–85. [Google Scholar] [CrossRef]
- Zhang, X.; Chen, G.; Wang, W.; Zhong, J.; Wang, Q.; Xu, T.; Guan, K. Evaluation of residual creep life of steels using macro-pillar creep testing and Omega method. Measurement 2021, 174, 108991. [Google Scholar] [CrossRef]
- Omprakash, C.M.; Kumar, A.; Kamaraj, M.; Srivathsa, B.; Satyanarayana, D.V.V. Measurement of local creep strain in the notch region using AC potential drop technique. Measurement 2019, 145, 500–502. [Google Scholar] [CrossRef]
- Corcoran, J.; Hooper, P.; Davies, C.; Nagy, P.B.; Cawley, P. Creep strain measurement using a potential drop technique. Int. J. Mech. Sci. 2016, 110, 190–200. [Google Scholar] [CrossRef]
- Guo, Y.; Hu, Z.; Xiong, L.; Zhou, X.; Zhu, P. Fiber Bragg grating based quasi-distributed bolt force sensor with torque resistance. Measurement 2022, 195, 111063. [Google Scholar] [CrossRef]
- Singh, M.J.; Choudhary, S.; Chen, W.B.; Wu, P.C.; Goyal, M.K.; Rajput, A.; Borana, L. Applications of fibre Bragg grating sensors for monitoring geotechnical structures: A comprehensive review. Measurement 2023, 218, 113171. [Google Scholar] [CrossRef]
- Tran, H.V.; Seo, S.Y. Short-Term Creep Effect on Strain Transfer from Fiber-Reinforced Polymer Strips to Fiber Bragg Grating-Optical Fiber Sensors. Sensors 2023, 23, 1628. [Google Scholar] [CrossRef]
- Matveenko, V.P.; Kosheleva, N.A.; Serovaev, G.S. Strain measurements by FBG-based sensors embedded in various materials manufactured by different technological processes. Procedia Struct. Integr. 2022, 37, 508–516. [Google Scholar] [CrossRef]
- He, X.Y.; Xia, J.; Quan, C.; Tay, C.J.; Tu, S.D. Creep deformation measurement using quartz optical fiber. Opt. Commun. 2001, 190, 79–86. [Google Scholar] [CrossRef]
- Yazdizadeh, Z.; Marzouk, H.; Hadianfard, M.A. Monitoring of concrete shrinkage and creep using Fiber Bragg Grating sensors. Constr. Build. Mater. 2017, 137, 505–512. [Google Scholar] [CrossRef]
- Chen, C.; Wu, Q.; Zhang, Z.; Liu, Z.; Xiong, K. Long-term creep monitoring of composite wing leading edge using embedded fiber Bragg grating. Struct. Health Monit. 2023, 23, 2001–2012. [Google Scholar] [CrossRef]
- Hampshire, T.A.; Adeli, H. Monitoring the behavior of steel structures using distributed optical fiber sensors. J. Constr. Steel Res. 2000, 53, 267–281. [Google Scholar] [CrossRef]
- Zdanowicz, K.; Gebauer, D.; Koschemann, M.; Speck, K.; Steinbock, O.; Beckmann, B.; Marx, S. Distributed fiber optic sensors for measuring strains of concrete, steel, and textile reinforcement: Possible fields of application. Struct. Concr. 2022, 23, 3367–3382. [Google Scholar] [CrossRef]
- Howiacki, T.; Sieńko, R.; Bednarski, Ł.; Zuziak, K. Structural monitoring of concrete, steel, and composite bridges in Poland with distributed fibre optic sensors. Struct. Infrastruct. Eng. 2023, 20, 1213–1229. [Google Scholar] [CrossRef]
- Bado, M.F.; Casas, J.R. A Review of Recent Distributed Optical Fiber Sensors Applications for Civil Engineering Structural Health Monitoring. Sensors 2021, 21, 1818. [Google Scholar] [CrossRef] [PubMed]
- Berrocal, C.G.; Fernandez, I.; Rempling, R. Crack monitoring in reinforced concrete beams by distributed optical fiber sensors. Struct. Infrastruct. Eng. 2021, 17, 124–139. [Google Scholar] [CrossRef]
- Herbers, M.; Richter, B.; Marx, S. Rayleigh-based crack monitoring with distributed fiber optic sensors: Experimental study on the interaction of spatial resolution and sensor type. J. Civ. Struct. Health Monit. 2025, 15, 1439–1463. [Google Scholar] [CrossRef]
- Grzywa, A. High-Temperature Strain Change Measurement System and the Method of Fixing the Strain Sensor to the Tested Surface When Measuring High-Temperature Strain Change. Patent No. 244901, 25 March 2024. [Google Scholar]
- Alias, M.A.; Ahmad, H.; Zaini, M.K.A.; Samion, M.Z.; Sa’ad, M.S.M.; Sing, L.K.; Grattan, K.T.V.; Rahman, B.M.A.; Brambilla, G.; Reduan, S.A.; et al. Optical fiber Bragg grating (FBG)-based strain sensor embedded in different 3D-printed materials: A comparison of performance. Measurement 2024, 225, 114060. [Google Scholar] [CrossRef]
- Riza, M.A.; Go, Y.I.; Harun, S.W.; Maier, R.R.J. FBG Sensors for Environmental and Biochemical Applications—A Review. IEEE Sens. J. 2020, 20, 7614–7627. [Google Scholar] [CrossRef]
- Yassin, M.H.; Farhat, M.H.; Soleimanpour, R.; Nahas, M. Fiber Bragg grating (FBG)-based sensors: A review of technology and recent applications in structural health monitoring (SHM) of civil engineering structures. Discov. Civ. Eng. 2024, 1, 151. [Google Scholar] [CrossRef]
Disclaimer/Publisher’s Note: The statements, opinions and data contained in all publications are solely those of the individual author(s) and contributor(s) and not of MDPI and/or the editor(s). MDPI and/or the editor(s) disclaim responsibility for any injury to people or property resulting from any ideas, methods, instructions or products referred to in the content. |
© 2025 by the authors. Licensee MDPI, Basel, Switzerland. This article is an open access article distributed under the terms and conditions of the Creative Commons Attribution (CC BY) license (https://creativecommons.org/licenses/by/4.0/).