Abstract
The complex analysis of fractures of high-strength titanium alloy VT23 was performed at the macro- and microlevels, and the basic patterns of fracture under static stretching and after the realization of dynamic non-equilibrium processes caused by impact-oscillatory loading and subsequent static stretching were revealed. The morphological regularities in the formation of dimples of tearing and alloy stratification at the macro level were established with the help of 3-D profilometry. The micromechanisms of fracture were numerically characterized by the methods of optical-digital analysis, in particular, by highlighting the bound areas, which are the objects of interest—the dimples of tearing. The analysis of the surface of ductile tearing under different loading conditions at the microlevel was performed by analyzing the parameter distribution patterns of the dimples found on it.
1. Introduction
It is known that the realization of dynamic non-equilibrium processes (DNP) due to impact-oscillatory loading allows to significantly improve the plastic properties of two-phase high-strength titanium alloys at room temperature [1,2]. However, choosing the optimal conditions of subjecting the material to the action of force pulses is important for such mechanical tests. It is known that during subsequent loading, DNP causes changes in plastic deformation, impact strength, and crack resistance in a fairly wide range [3]. A significant change in the mechanical properties of materials after the DNP can be explained within a multilevel approach. It allows considering the processes of plastic deformation, formation of structural inhomogeneities, defects and fracture processes of materials at various scale levels [4,5,6]. In addition, its use makes it possible to offer physically adequate models of deformation and fracture of materials under the DNP. It is now well established that impact-oscillatory loading affects the structure and substructure of the grains of two-phase high-strength titanium alloys and changes the distribution of internal stresses within grains and on grain boundaries [1,2,7]. This, as a rule, causes the plasticization of titanium alloys. However, the nature of this effect is rather complicated due to a broad variation of structural parameters in two-phase high-strength titanium alloys depending on the heat treatment modes and requires further study and systematization of physicomechanical effects. One of the promising methods in this regard is the fractographic analysis, which allows linking the dimensions of the dimples of ductile tearing to the loading conditions of the material and the fracture surface morphology [8,9]. Despite certain simplifications inherent in this approach, it is fully consistent with the existing theoretical concepts and known practical results. In addition, the obtained regularities can be used for the development of numerical methods of modeling dynamic non-equilibrium processes, as well as for their physical and mechanical interpretation [10]. Their development creates the basis for developing the methods of fractographic control of fractures of long-operated structures [11,12,13].
The objective of this research is to study the morphology of the fracture surface of the titanium alloy VT23 under static stretching and after the DNP caused by impact-oscillatory loading and subsequent static deformation.
2. Research Technique
The high-strength two-phase sheet titanium alloy VT23 was investigated, which by the type of its structure is the (α + β) alloy. Mechanical tests were carried out on specimens (Figure 1) with a thickness of 3 mm. Specimens from titanium alloys were made by liquid cutting under high pressure. The strain measurement base was 16 mm.
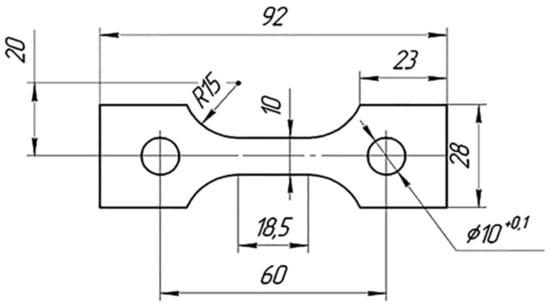
Figure 1.
Test specimen, units: mm.
Mechanical properties of alloys in the initial state are given in Table 1.

Table 1.
Mechanical properties of titanium alloy VT23.
The microhardness of the specimen surface was measured on the device “PMT-3” (LOMO Inc., St. Peterburg, Russia) by the method of point pressing [14,15] with an effort of 100 g. Five measurements were made at a point, then the results were averaged. Profilograms of fracture surfaces were taken using the white light optical interference profiler New View 6200 (Zygo Corporation, Middlefield, CT, USA).
When evaluating the effect of impact-oscillatory loading on the improvement of the plastic properties of the titanium alloy VT23, the following variant of controlling the impulse introduction of energy into the titanium alloy under impact-oscillatory loading was used [1]. In particular, a series of specimens was loaded statically to an increasing strain level of 0.025 to 0.4%. Next, the specimens were subjected to the additional force pulse loading within a narrow range of 120 ± 5 kN. It was found that sudden increments of strain by the value εimp = 3.0%–3.5% during the impulse introduction of energy increase significantly the plastic deformation of the titanium alloy VT23 [1,3]. With repeated static stretching, strain increases by 30%–35%. The preliminary static deformation and the deformation caused by the impulse introduction of energy in such cases of complex loading were not taken into account under the repeated static stretching in order to ensure the “purity” of the experiment [1,2,16].
In this research, specimens of titanium alloy VT23 were studied under standard static stretching (SS) and complex loading mode (SS-DNP-SS). In Table 2, loading modes of the alloy are generalized, and the specific values of the mechanical properties are given after the realization of these loading modes.

Table 2.
Loading modes of alloy VT23 and its mechanical properties.
3. Metallographic Analysis and Hardness Measurement
The metallographic analysis of the specimen surface was performed at different distances from the specimen fracture surface (in the photo from right to left). The results of metallography and preconducted diffractometry studies have shown that in the titanium alloy VT23, β-phase is 43% by weight, and the α-phase is 57% by weight, respectively. Interestingly, both of the phase components in the specimens have a texture along the crystallographic direction (002) [3]. This may be due to the rolling technology of specimens or other mechanical effects, to which they are exposed. The formation of a single-oriented structure is also noticeable from the data of metallographic research, Figure 2 and is known from the literature [16,17].
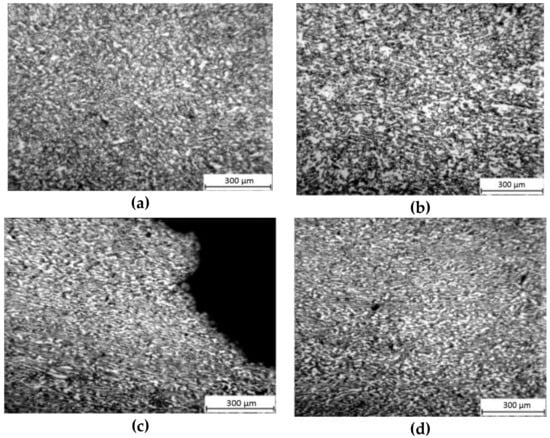
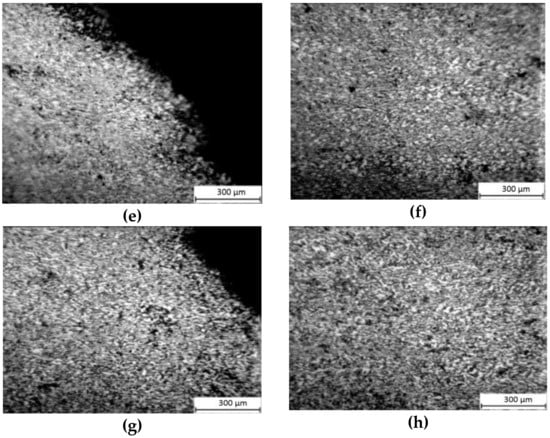
Figure 2.
Microstructure of specimens from alloy VT23 in the initial state (a,b), under static stretching (c,d), DNP1 (e,f), and (DNP2) (g,h).
Microhardness was measured in the vicinity of the fracture, from the edge of the specimens in the transverse direction. In the case of specimens from nondeformed material, measurements were made in the working area of the specimen. The length of the measurement line (L) ranged from 0 to 5.5 mm. It was found that deformation processes occurring in the alloy VT23 under different loading patterns cause both hardening and softening of specimens in local zones, Figure 3.
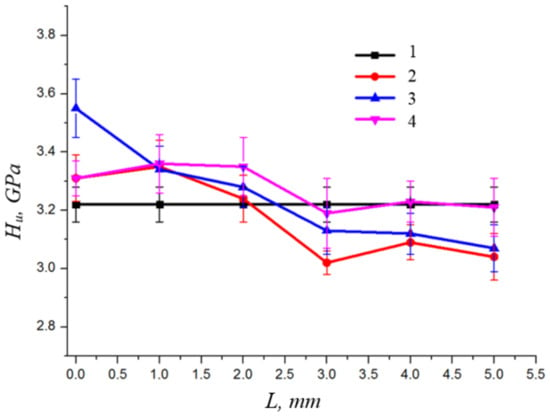
Figure 3.
Microhardness measurements of investigated specimens from alloy VT23 in the initial state initial state (1), under static stretching (2), DNP1 (3), and DNP2 (4).
The deformation hardening of the alloy is associated, in our opinion, with an increase in the density of dislocations, and softening—with the formation of local deformed zones with microdefects [1,2,16].
4. Microanalysis of Specimen Fractures
Fracture microanalysis of specimens from titanium alloy VT23 at different loading conditions was performed using 3-D profilometry methods. In this case, the general formation morphology of the dimples of tearing was estimated in fractions of a millimeter. The roughness of the tearing surface was estimated as well. Examples showing the fracture surface analysis for one of the specimen edges and for the middle section of fracture are shown in Figure 4. It should be noted that the main objects of the analysis were discontinuities on the surface (tears-out), which can be considered as the final result of the deformation and fracture of the alloy at a given loading mode. The analysis of surface areas (up to 30) for each specimen allowed estimating the profile of the formed surfaces and height differences between the adjacent texturized sections of fracture.
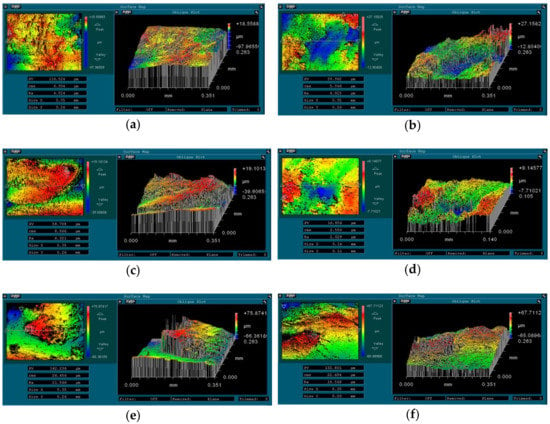
Figure 4.
3D-profilometry of the fracture surface of alloy VT23 under static deformation (a,b), DNP1 (c,d), and DNP2 (e,f).
In the case of SS, the geometry of tears-out formed on the surface suggests that there is not only a spatial nonuniformity in the specimen fracture, but also a certain dispersion within a single mechanism, which is detected along the width of the specimen, as well as in the transverse direction. A complex relief, which is noticeable also in Figure 4, indicates a significant influence of local deformation processes and the need for their in-depth study, Figure 4a,b.
In the case of DNP1, multiple tears-out and “hills” were found on the fracture surface, especially in the central part of specimens. Their presence indicates a change in the stress-strain state of specimens during fracture. Such mechanisms manifest themselves in fractions of a millimeter, and the processes causing them include localized deformation and fracture of the material, which occur at the stage of the specimen fracture due to the stress gradient on its cross-section.
In the case of DNP2, the redistribution of stresses and strains manifested itself on the analyzed sections of the fracture surface (first of all, in the difference between the heights of the relief). Not only did it cause macro-discontinuities on the surface, but also changed the morphology of fracture micromechanisms, in particular, the shape of dimples of ductile tearing due to the orderly mechanisms of damage accumulation and fracture of the specimen material.
5. Algorithm for Optical-Digital Image Analysis
The input data for the automated algorithm of fractogram analysis [18,19] is a half-tone image of the fracture surface of the titanium alloy VT23, obtained using the electron microscope REM 106-I (Figure 5a–c). The algorithm is constructed using two parts of information on fracture surfaces - basic and analytical. The purpose of the basic part is to identify areas of the image that correspond to the dimples of tearing. The analytical part of the algorithm is designed to calculate the quantitative parameters of the found dimples.
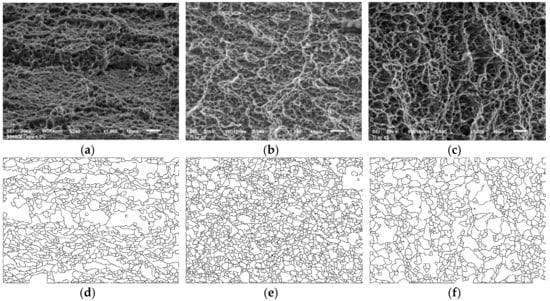
Figure 5.
Initial images of fracture surfaces of the titanium alloy VT23 under SS (a), DNP1 (b), DNP2 (c), and the result of detecting the edges of dimples (d–f), respectively.
The fractographic image of the surface of tearing of the specimen (Figure 5a–c) can be considered as a surface described by the image intensity function i0 (x, y). Topologically, on the surface described by the function i0 (x, y), the dimples of ductile tearing correspond to the “attenuations” of the pixel intensity, and the edges of the dimples correspond to the “ridges” surrounding them.
A method based on the detection of dimple edges was used to highlight the dimples of ductile tearing in the image. For this purpose, intensity differences were calculated for different parts of the image. Initially, in order to eliminate the emission of the function i0 (x, y), its smoothing was performed by applying the Gaussian filter.
The edges of the dimples correspond to the minima of the second derivative function i (x, y). To improve the detection of elevations of the function i (x, y) and to reduce the impact of local features of the image, partial derivatives at the point (x, y) were calculated based on pixels with size (2k + 1) × (2k + 1). Also, in order to reduce the computational cost, the division operation by the distance between the pixels was removed from the calculation of partial derivatives:
In practice, elevations of the function i (x, y) were detected from expressions (1) by means of convolution of the initial image with filters, the kernels of which are shown in Figure 6. The images obtained after the application of both filters were added. As a result of the described transformations, we obtain the image iL (x, y), the brightest parts of which correspond to the edges of the dimples.
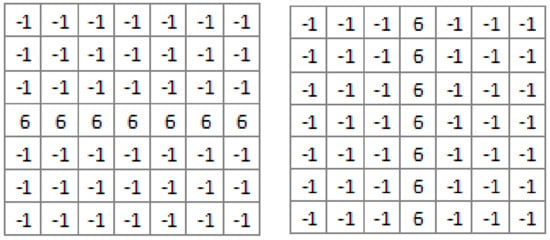
Figure 6.
Filter kernels to highlight image areas that correspond to elevations of the function i (x, y).
For the segmentation of the edges of dimples, we performed thresholding of image iL and skeletalization of the resulting edges. The skeletal image is was obtained by multipath overlay of the templates for removal of the boundary pixels on the resulting binary image [20]. As a result of skeletalization, we obtain a set of points that describe the division lines between the dimples. To expand this boundary, a morphological transformation of dilation with a structural element of 3 × 3 pixels was applied to the skeleton.
The result of finding the edges of dimples is shown in Figure 5d–f. After that, the connected areas of pixels surrounded by previously found edges were highlighted. Each of these connected areas represents an individual object found—a dimple. Next, the following parameters were calculated for each object: the equivalent diameter de and the relative visual depth ti. The area si was calculated as the sum of the pixels that are part of the object. The equivalent diameter de was calculated as the diameter of a circle, the area of which is equal to the area of the object. The relative visual depth ti was calculated as difference between average pixels intensity of edges and of the object (dimple) [21,22,23].
For each dimple, we found the angle of inclination α of the axis, along which the dimple is elongated (Figure 7a). For static deformation, one can notice that the largest groups of dimples have inclination α ∈ [0, 40°] and α ∈ [140°, 180°]. In our opinion, these dimples of ductile tearing were formed by the mechanism of tearing and partly by the mechanism of “shear + tearing” [20,21].
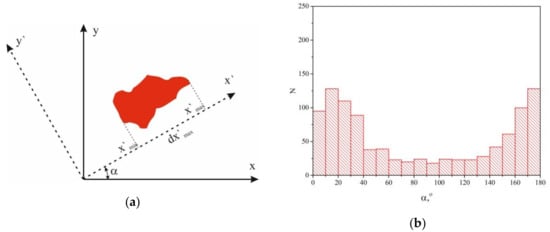
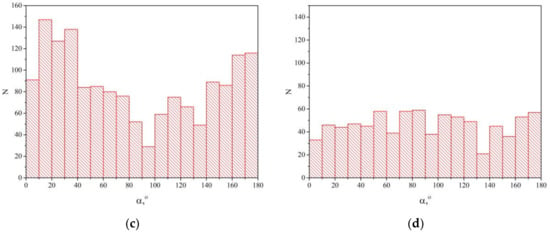
Figure 7.
The scheme of measuring the orientation in the horizontal plane of the elementary dimple of tearing (a), and the distributions of this parameter for static deformation (b), DNP1 (c), and (DNP2) (d).
For DNP1, the distribution of the orientation angles of dimples is similar, but the boundaries between different groups of dimples are more “blurred”; this, in our opinion, is the result of the greater influence of shear mechanisms of fracture.
For DNP2, dimples can be represented by a single orientational array, which is due to the shear mechanism of their formation. Their identical orientation results from “stretching” the dimple in the direction of shear [22,23].
Numerically, the loading diagram is shown to be crucial for estimating the orientation of the dimples. It is clear that in the case when there is a clear orientation—the stress-strain state of the specimen is more homogeneous [24].
When analyzing these and previously obtained results of fractographic studies [24,25], we can assume that the quantitative parameters and the dimensions of dimples on the specimen fracture surface are a “reflection” of the nonuniform distribution of properties in the ensemble of point-type defects, followed by the formation of their conglomerates and the formation of pores [26]. With large degrees of deformation, these defects merge and dimples are formed after fracture, Figure 8.
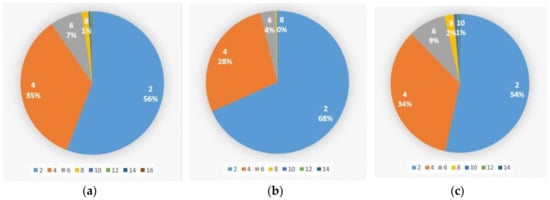
Figure 8.
Distribution of dimples by their equivalent diameters: 2—from 0 to 2 μm; 4—from 2 to 4 μm; 6—from 4 to 6 μm; 8—from 6 to 8 μm; and 10—from 8 to 10 μm for static deformation (a), DNP1 (b), and (DNP2) (c).
Thus, the parameters of dimples of tearing, their number, shape and mutual location are the generalization of fractographic information. For considered cases, the prevailing group is represented by dimples up to 2 μm (54–68%). The number of dimples sized 2 to 4 μm makes up 28% to 35% of the total number of dimples; the number of dimples sized 4 to 6 μm makes up 4% to 9% of the total number of dimples (see Table 3). Dimples >6 μm in size are the smallest in number.

Table 3.
Scale levels of deformation and fracture mechanisms of the alloy VT23.
6. Parameters of Dimples of Tearing as an Integral Indicator of the Alloy Ductility
To calculate the visual depth of object , we calculated the average intensity of the edge of the object and the average intensity of the dimple-object :
is the number of pixels that form the edge of the object; is the number of pixels that are part of the object.
Then the visual depth of the object in units of image intensity is
For the images with different depths of color, the relative visual depth is more informative:
where is the maximum possible for the depth image showing the value of the pixel intensity.
Very small objects and objects, for which the visual depth was very low, were eliminated from further analysis: and .
The shape and depth of the dimples can be compared (with identical test and image acquisition schemes) to the ductility of the material. It is known that deep conical dimples are inherent in the fracture of very plastic materials. Therefore, the authors assumed that an increase in crack resistance was accompanied by an increase in the depth of the dimples on the fracture surface [27,28]. Figure 9 shows distribution histograms of the visual depth of the dimples for images shown in Figure 8.

Figure 9.
Histogram of the number of dimples with different levels of relative depth for the alloy VT23 under static deformation (a), DNP1 (b), and DNP2 (c).
For the SS, the maximum array of dimples Nmax = 350 pcs. is represented by the dimples with from 0.1 to 0.15 for the general range of 0 ≤ ≤ 0.30. This indicates the similarity in the depth of the large and small dimples in the sample.
For the DNP1, the maximum array of dimples Nmax = 450 pcs. is represented by the dimples with from 0.1 to 0.15 for the general range of 0 ≤ ≤ 0.40. This indicates that these dimples had a different shape than the previous ones.
For the DNP2, the maximum array of dimples Nmax = 275 pcs. is represented by the dimples with from 0.1 to 0.15 for the general range of 0 ≤ ≤ 0.45.
In general, it should be emphasized that the analyzed fractures are formed by small, extremely dispersed dimples, which are separated by the regions of relaxation with the microdimple structure.
7. Discussion of Results
A new method of digital analysis of fracture morphology and identification of dimple parameters caused by fracture, developed in this article, allows us to analyze large data arrays and set quantitative parameters of dimples caused by fracture, as shown above. In this article, the method of analysis is supplemented by the definition of an additional parameter that characterizes the geometric shape of dimples—the angle of inclination of the axis (α), along which the projection of the dimple has a maximum length. To calculate α, the initial coordinate system was rotated from 0 to 180° with a step of 1°, and the projection of the dimple on the x-axis was calculated. After that, the value of the angle, at which the projection is maximal, was recorded. The orientation of the dimple relative to the loading plane allows us to evaluate the stress–strain state in the fracture zone. This creates prerequisites for the creation, in the future, of online services of fractographic control, the test examples of which are described in a number of papers [29,30].
At the same time, the study of the fracture surface parameters exclusively at the microlevel does not allow us to fully understand the nature of fracture of real structures. Therefore, an integrated approach to the analysis of fracture mechanisms is applied in this article [31,32,33,34], as recommended by the “classical” works in this area of research [17,35,36].
The multilevel approach is implemented using the principles of mesomechanics [31,32,33,34], that is, taking into account the structure. This makes it possible to use the proposed methods for analyzing the dimples of tearing as an integral part of modern practical and engineering applications that take into account the multilevel, hierarchical organization of materials and structures, which allows for a deeper understanding of the causes and physicomechanical mechanisms of structural failure [37,38].
Let us consider the results obtained using the concept of scale levels of deformation and fracture. The decisive feature of this approach is the possibility to consider deformation as a set of self-organized processes at the micro-, meso-, and macrolevels, and the possibility to consider the formation of the specimen fracture process as the attainment of the ultimate state of the material due to the coalescence and rupture of pore conglomerates.
Macrolevel. Deformation processes of the investigated specimens were determined by the loading conditions, the redistribution of stresses and the localization of strains in the alloy. Within the fracture area, these processes are represented by a difference in the heights of adjacent sections, the presence of tears-out and elevations. During the analysis of the mechanisms of mechanisms of the alloy VT23 macroscale refers to the surface observed and not to the order of magnitude of the elevations.
Mesolevel. On the boundaries of the groups of grain conglomerates there is a localization of strains, the formation of necking, nucleation, and merging of pore conglomerates. Within the fracture area, these phenomena affect the activation of shear processes that are responsible for the destruction of the interstices between grain conglomerates.
Microlevel. Deformation of the material grains leads to the generation, accumulation, annihilation, and merging of point defects, as well as the nucleation and accumulation of pores. At the same time, the main relaxation processes in the material occur due to the thinning of the interstices between the pores and in the presence of microshear deformations.
Table 3 summarizes the data on the macro- and micromechanisms of deformation and fracture of the alloy VT23 under different loading conditions.
The proposed approaches allow revealing common features and differences in fractures of specimens from the titanium alloy VT23 obtained under different loading conditions. For the first time results were obtained that show the effect of DNP on changes in the fractographic features of the fracture surface of specimens from the titanium alloy. This makes it possible to predict changes in the mechanical properties of titanium alloys modified by the impact-oscillatory loading using the results of fractographic analysis [39,40].
8. Conclusions
The complex analysis of fractures of high-strength titanium alloy VT 23 was conducted, and the basic regularities in the fracture of these materials were revealed under static loading and after different modes of DNP. At the macro level, 3-D profilometry methods were used to establish the morphological features of the formation of tears-out and stratifications of the material.
The automated method for analyzing the shape and size of dimples of ductile tearing formed during fracture was developed based on the image topology. The boundaries between the dimples were identified as a result of clustering and highlighting of the connected image areas that represent the objects of interest—dimples. Smoothing of the initial fractographic image; its convolution with a filter, which allows identifying topological crests; and thresholding with subsequent skeletalization were performed in advance.
The morphology of dimples of different physical nature was analyzed and their quantitative characteristics were calculated, such as the area, coefficient of roundness, visual depth in units of image intensity, and orientation. This allowed establishing and proving numerically that the main mechanism of the dimple formation under static stretching is a ductile tearing, and under impact loading—a shear.
Author Contributions
Conceptualization, P.M.; Formal analysis, I.K. and I.V.; Investigation, I.K., M.C., A.P., I.V., P.M., O.P., S.P., I.V.; Methodology, I.K. and S.P.; Project administration, S.P.; Validation, I.K., M.C., A.P., I.V., P.M., O.P., S.P., I.V.; Visualization, O.P.; Writing—original draft, P.M. and S.P.; Writing—review & editing, O.P.
Acknowledgments
The authors express their gratitude to the reviewers for their comments and valuable suggestions.
Conflicts of Interest
The authors declare no conflicts of interest.
References
- Chausov, M.G.; Maruschak, P.O.; Hutsaylyuk, V.; Śnieżek, L.; Pylypenko, A.P. Effect of complex combined loading mode on the fracture toughness of titanium alloys. Vacuum 2018, 147, 51–57. [Google Scholar] [CrossRef]
- Chausov, M.; Maruschak, P.; Pylypenko, A.; Markashova, L. Enhancing plasticity of high-strength titanium alloys VT 22 under impact-oscillatory loading. Philos. Mag. 2017, 97, 389–399. [Google Scholar] [CrossRef]
- Chausov, M.; Maruschak, P.; Prentkovskis, O.; Karpets, M. Risks associated with the use of high-strength titanium alloys in transportation systems. In Reliability and Statistics in Transportation and Communication; Kabashkin, I., Yatskiv, I., Prentkovskis, O., Eds.; Springer International Publishing: New York, NY, USA, 2018; pp. 213–222. [Google Scholar]
- Romanova, V.A.; Balokhonov, R.R.; Schmauder, S. A comparative analysis of the mesoscale stress–strain state in two- and three-dimensional polycrystalline specimens. Phys. Mesomech. 2010, 13, 178–183. [Google Scholar] [CrossRef]
- Romanova, V.A.; Balokhonov, R.R.; Schmauder, S. Numerical study of mesoscale surface roughening in aluminum polycrystals under tension. Mat. Sci. Eng. A. 2013, 564, 255–263. [Google Scholar] [CrossRef]
- Romanova, V.A.; Balokhonov, R.R.; Schmauder, S. Three-dimensional analysis of mesoscale deformation phenomena in welded low-carbon steel. Mat. Sci. Eng. A. 2011, 528, 5271–5277. [Google Scholar] [CrossRef]
- Chausov, M.; Pylypenko, A.; Berezin, V.; Volyanska, K.; Maruschak, P.; Hutsaylyuk, V.; Markashova, L.; Nedoseka, S.; Menou, A. Influence of dynamic non-equilibrium processes on strength and plasticity of materials of transportation systems. Transport 2018, 33, 231–241. [Google Scholar] [CrossRef]
- Kosarevych, R.Y.; Student, O.Z.; Svirs’ka, L.M.; Rusyn, B.P.; Nykyforchyn, H.M. Computer analysis of characteristic elements of fractographic images. Mat. Sci. 2013, 48, 474–481. [Google Scholar] [CrossRef]
- Zhu, Y.; Zeng, W.; Z, Y. Influence of deformation parameters on fracture mechanism of Ti40 titanium alloy. Rare Metal Mater. Eng. 2017, 46, 1207–1213. [Google Scholar]
- Sabirov, I.; Valiev, R.Z.; Pippan, R. About application of three dimensional analyses of fracture surfaces in fracture study on nanostructured titanium. Comput. Mat. Sci. 2013, 76, 72–79. [Google Scholar] [CrossRef]
- Thompson, A.W. Fractography and its role in fracture interpretation. Fatigue Fract. Eng. Mat. Struct. 1996, 19, 1307–1316. [Google Scholar] [CrossRef]
- Wouters, R.; Froyen, L. Scanning electron microscope fractography in failure analysis of steels. Mater. Charact. 1996, 36, 357–364. [Google Scholar] [CrossRef]
- Strnadel, B.; Jonšta, Z. Distribution of dimple sizes on the fracture surface of spheroidized steel in the transition region. Eng. Fract. Mech. 1994, 48, 863–871. [Google Scholar] [CrossRef]
- You, C.P.; Thompson, A.W.; Bernstein, I.M. Ductile fracture processes in 7075 aluminum. Metall. Mater. Trans. A 1995, 26, 407–415. [Google Scholar] [CrossRef]
- Marushchak, P.O.; Konovalenko, I.V. Computer evaluation of the depth of thermomechanical fatigue cracks according to their length. Mat. Sci. 2012, 48, 54–64. [Google Scholar] [CrossRef]
- Chausov, M.G.; Maruschak, P.O.; Pylypenko, A.P.; Berezin, V.B. Features of Deformation and Fracture of Plastic Materials under Impact-Oscillatory Loading; Ternopil: Terno-Graf, Ukraine, 2018; 288p. (In Ukrainian) [Google Scholar]
- Colangelo, V.J.; Heiser, F.A. Analysis of metallurgical failures, 2nd ed.; Wiley-Interscience: New York, NY, USA, 1987. [Google Scholar]
- Konovalenko, I.; Maruschak, P.; Prentkovskis, O. Automated method for fractographic analysis of shape and size of dimples on fracture surface of high-strength titanium alloys. Metals 2018, 8, 161. [Google Scholar] [CrossRef]
- Konovalenko, I.; Maruschak, P.; Chausov, M.; Prentkovskis, O. Fuzzy logic analysis of parameters of dimples of ductile tearing on the digital image of fracture surface. Proc. Eng. 2017, 187, 229–234. [Google Scholar] [CrossRef]
- Sun, J. Effect of stress triaxiality on micro-mechanisms of void coalescence and micro-fracture ductility of materials. Eng. Fract. Mech. 1991, 39, 799–805. [Google Scholar] [CrossRef]
- Wilsdorf, H.G.F. The ductile fracture of metals: A microstructural viewpoint. Mat. Sci. Eng. 1983, 59, 1–39. [Google Scholar] [CrossRef]
- Hure, J.; Barrioz, P.O. Theoretical estimates for flat voids coalescence by internal necking. Eur. J. Mech. A. Solids 2016, 60, 217–226. [Google Scholar] [CrossRef]
- Šebek, F.; Petruška, J.; Kubík, P. Lode dependent plasticity coupled with nonlinear damage accumulation for ductile fracture of aluminium alloy. Mater. Des. 2018, 137, 90–107. [Google Scholar] [CrossRef]
- Maruschak, P.; Konovalenko, I.; Prentkovskis, O.; Chausov, M.; Pylypenko, A. Methods and some results of automated analysis of ductile failure mechanisms of titanium alloy VT-22. Proc. Eng. 2016, 134, 475–480. [Google Scholar] [CrossRef]
- Yasniy, P.; Maruschak, P.; Bishchak, R.; Hlado, V.; Pylypenko, A. Damage and fracture of heat resistance steel under cyclic thermal loading. Theor. Appl. Fract. Mech. 2009, 52, 22–25. [Google Scholar] [CrossRef]
- Rajanna, K.; Pathiraj, B.; Kolster, B.H. X-ray fractography studies on austenitic stainless steels. Eng. Fract. Mech. 1996, 54, 155–166. [Google Scholar] [CrossRef]
- Konovalenko, I.V.; Marushchak, P.O.; Bishchak, R.T. Automated estimation of damage to the surface of gas main by corrosion pittings. Mat. Sci. 2014, 49, 493–500. [Google Scholar] [CrossRef]
- Ruggiero, C.; Ross, A.; Porter, R. Segmentation and learning in the quantitative analysis of microscopy images. Image Process: Mach. Vision Appl. 2015, 94050L. [Google Scholar] [CrossRef]
- Konovalenko, I.V.; Maruschak, P.O.; Bilous, I.V.; Maliuk, A.R. Development of network technologies for the analysis of fractographic images. In Proceedings of the 5-th Scientific and Technical Conference “Information Models, Systems and Technologies”, Ternopil, Ukraine, 1–2 February 2018. [Google Scholar]
- Bilous, I.V.; Maliuk, A.R. Creation of web application and algorithm for automated calculation of fractographic image parameters. Master Thesis, Ternopil Ivan Pul’uj National Technical University, Ternopil, Ukraine, 2018. [Google Scholar]
- Panin, V.E. Physical Mesomechanics of Heterogeneous Media and Computer Aided Design of Materials; Cambridge International Science Publishing: Cambridge, UK, 1998. [Google Scholar]
- Panin, V.E. Overview on mesomechanics of plastic deformation and fracture of solids. Theor. Appl. Fract. Mech. 1998, 30, 1–11. [Google Scholar] [CrossRef]
- Panin, V.E. Plastic deformation and fracture of solids at the mesoscale level. Mater. Sci. Eng. A 1997, 234, 944–948. [Google Scholar] [CrossRef]
- Panin, V.E.; Egorushkin, V.E. Curvature solitons as generalized wave structural carriers of plastic deformation and fracture. Phys. Mesomech. 2013, 16, 267–286. [Google Scholar] [CrossRef]
- Das, A.K. Metallurgy of Failure Analysis; McGraw-Hill, Inc.: New York, NY, USA, 1997; 354p. [Google Scholar]
- Hull, D. Fractography: Observing, Measuring and Interpreting Fracture Surface Topography; Cambridge University Press: Cambridge, UK, 1999; 366p. [Google Scholar]
- Chausov, M.G.; Pylypenko, A.P.; Maruschak, P.O. A Method for the Improvement of Plastic Properties of Sheet Two-Phase High-Strength Titanium Alloys Caused by Impact-Oscillatory Loading: Scientific and Methodical Recommendations for the Ukrainian Plants for the Design of Production of Agricultural Equipment; FOP V. A. Palyanytsya: Ternopil, Ukraine, 2017; 48p. (In Ukrainian) [Google Scholar]
- Chausov, M.; Hutsaylyuk, V.; Maruschak, P.; Pylypenko, A. Selection of the main controlling parameters of impact-oscillatory loading for maximum improvement of plastic properties of two-phase high-strength titanium alloys. In Proceedings of the 12-th Int. Sci. Conference ”Intelligent Technologies in Logistics and Mechatronics Systems”, Panevėžys, Lithuania, 26–27 April 2018. [Google Scholar]
- Moiseenko, D.; Maruschak, P.; Panin, S.; Maksimov, P.; Vlasov, I.; Berto, F.; Schmauder, S.; Vinogradov, A. Effect of structural heterogeneity of 17Mn1Si steel on the temperature dependence of impact deformation and fracture. Metals 2017, 7, 280. [Google Scholar] [CrossRef]
- Maruschak, P.; Konovalenko, I.; Prentkovskis, O.; Tsyrulnyk, O. Digital analysis of shape and size of dimples of ductile tearing on fracture surface of long-operated steel. Proc. Eng. 2016, 134, 437–442. [Google Scholar] [CrossRef]
© 2018 by the authors. Licensee MDPI, Basel, Switzerland. This article is an open access article distributed under the terms and conditions of the Creative Commons Attribution (CC BY) license (http://creativecommons.org/licenses/by/4.0/).