You are currently viewing a new version of our website. To view the old version click .
Lubricants
  • Article
  • Open Access

10 December 2025

Optimization of Laser Surface Texturing Parameters for Improving Friction and Wear Resistance of GCr15 Bearing Steel Sliding Pairs

,
,
,
,
,
and
1
Shenyang China-Deutschland Institute, Shenyang Polytechnic College, Shenyang 110045, China
2
School of Mechanical Engineering, Shenyang Polytechnic College, Shenyang 110045, China
3
Shandong Zhangqiu Blower Co., Ltd., Jinan 250200, China
4
Equipment Reliability Institute, Shenyang University of Chemical Technology, Shenyang 110142, China

Abstract

GCr15 bearing steel sliding friction pairs, as key components in mechanical engineering applications, often undergo severe friction and wear under starved lubrication, which restricts their service life and reliability significantly. To solve this problem, this study investigates the effect of laser surface texturing on the tribological performance of GCr15 bearing steel under starved lubrication conditions. A laser marking machine is used to fabricate pit textures on GCr15 sliding surfaces, exploring the effects of processing speed, laser power, and frequency on texture integrity. Friction and wear tests under starved lubrication conditions are conducted using a vertical universal tester, and worn surfaces are characterized using a 3D surface profiler. The results show that high-integrity flat-bottom pits form at 200 mm/s, 10 W, and 80 kHz. These textures collect debris, retain lubricant, and provide secondary lubrication. At a depth-to-diameter ratio of 0.083 and area ratio of 14.9%, the friction coefficient (0.076) and wear loss (2.27 mg) decrease by 27.6% and 63.7%, respectively, compared to those of smooth samples (0.105, 6.25 mg). This study clarifies the regulatory mechanisms and provides references for improving key components’ lifespan and reliability.

1. Introduction

Tribology is the study of friction, lubrication, and wear between two interacting surfaces during relative motion, and involves exploring the relationships among these three factors and their practical applications [1]. Global losses caused by friction account for approximately 40% of the national energy consumption, and 80% of mechanical component failures are due to various forms of wear, resulting in economic losses amounting to hundreds of billions [2]. As a result, the reduction in wear between mechanical components to extend their service life and improve energy efficiency has gained increasing attention from scholars worldwide. Traditional methods to control wear include rational pairing of frictional materials, addition of lubricants, material modification, and the application of surface-coating technologies [3,4]. The inspiration for surface texturing comes from the development of biomimetic tribology, where it was discovered that plants form complex and diverse surface structures to adapt to their environment, exhibiting excellent tribological performance [5,6].
Surface texturing technology is used to create microstructures with specific shapes, sizes, arrangements, and distributions on the surface of friction materials. This aims to reduce the wear generated during the relative motion of friction pairs, achieving anti-wear effects. Laser texturing alters a specimen’s surface hardness, thereby changing its friction and wear performance under dry friction conditions [7]. Under boundary lubrication conditions, textured surfaces provide good anti-wear and friction-reducing effects [8]. It has been found that, when the load is 10 N and the sliding speed is 0.05 m/s, the friction coefficient of a textured GCr15 steel ball-PTFE plate friction pair is 0.03, and the wear rate of the PTFE plate is 7.223 × 10⁻⁸ m3/(N·m), decreasing by 85% and 44%, respectively, compared to a non-textured GCr15 steel ball [9]. Under conditions of 100 N and 5 Hz, the wear scar diameter on the indented surface of EC-CNT + RO is 44.4% and 34.9% smaller than that on flat and indented surfaces, respectively [10]. Circular textures with a pitch of 0.3 mm may exhibit better friction-reducing effects within a shorter sliding time [11,12]. The friction and wear performance of circular hole textured surfaces is significantly better than that of square and triangular hole textured surfaces [13]. The improvement in the wear resistance of GCr15 bearing steel with surface texturing mainly depends on the competition between stress concentration and trapping effects or dynamic water pressure effects under dry friction or oil lubrication [14]. Textured multi-layer samples using the SMLA method show good oil storage performance and ability to capture wear debris [15,16]. USRP textured samples have been found to have lower friction coefficients and wear rates than base material samples [17]. Nano-lubricating oil shows significantly improved performance under harsh conditions of 500 r/min and 45 N, with better performance at 0.4 wt% PTFE content [18,19].
In summary, the aforementioned studies primarily focus on relatively low sliding speeds (9–400 mm/s), low loads (2–50 N), and small pit diameters (150 μm) [20]. There is limited research on the effects of optimal pit texture parameters on the friction and wear performance of GCr15 bearing steel under higher rotational speeds, larger loads, larger pit diameters, and more severe conditions. Therefore, based on the current state of research, this study investigates the friction and wear performance of GCr15 bearing steel under high sliding speeds, high loads, and starved lubrication conditions, using pits with different sizes, including larger pit diameters, various depth-to-diameter ratios, and different area ratios. The experiments are conducted on textured specimens using the MMW-1A vertical universal friction and wear testing machine. The study aims to explore the impact of different depth-to-diameter ratios and area ratios of pit textures on the friction and wear performance of GCr15 bearing steel surfaces. This research will provide optimal surface texture parameters for the study of friction and wear in key mechanical components, helping to achieve time and cost savings in the field of mechanical engineering.

2. Materials and Methods

2.1. Friction and Wear Test Procedure

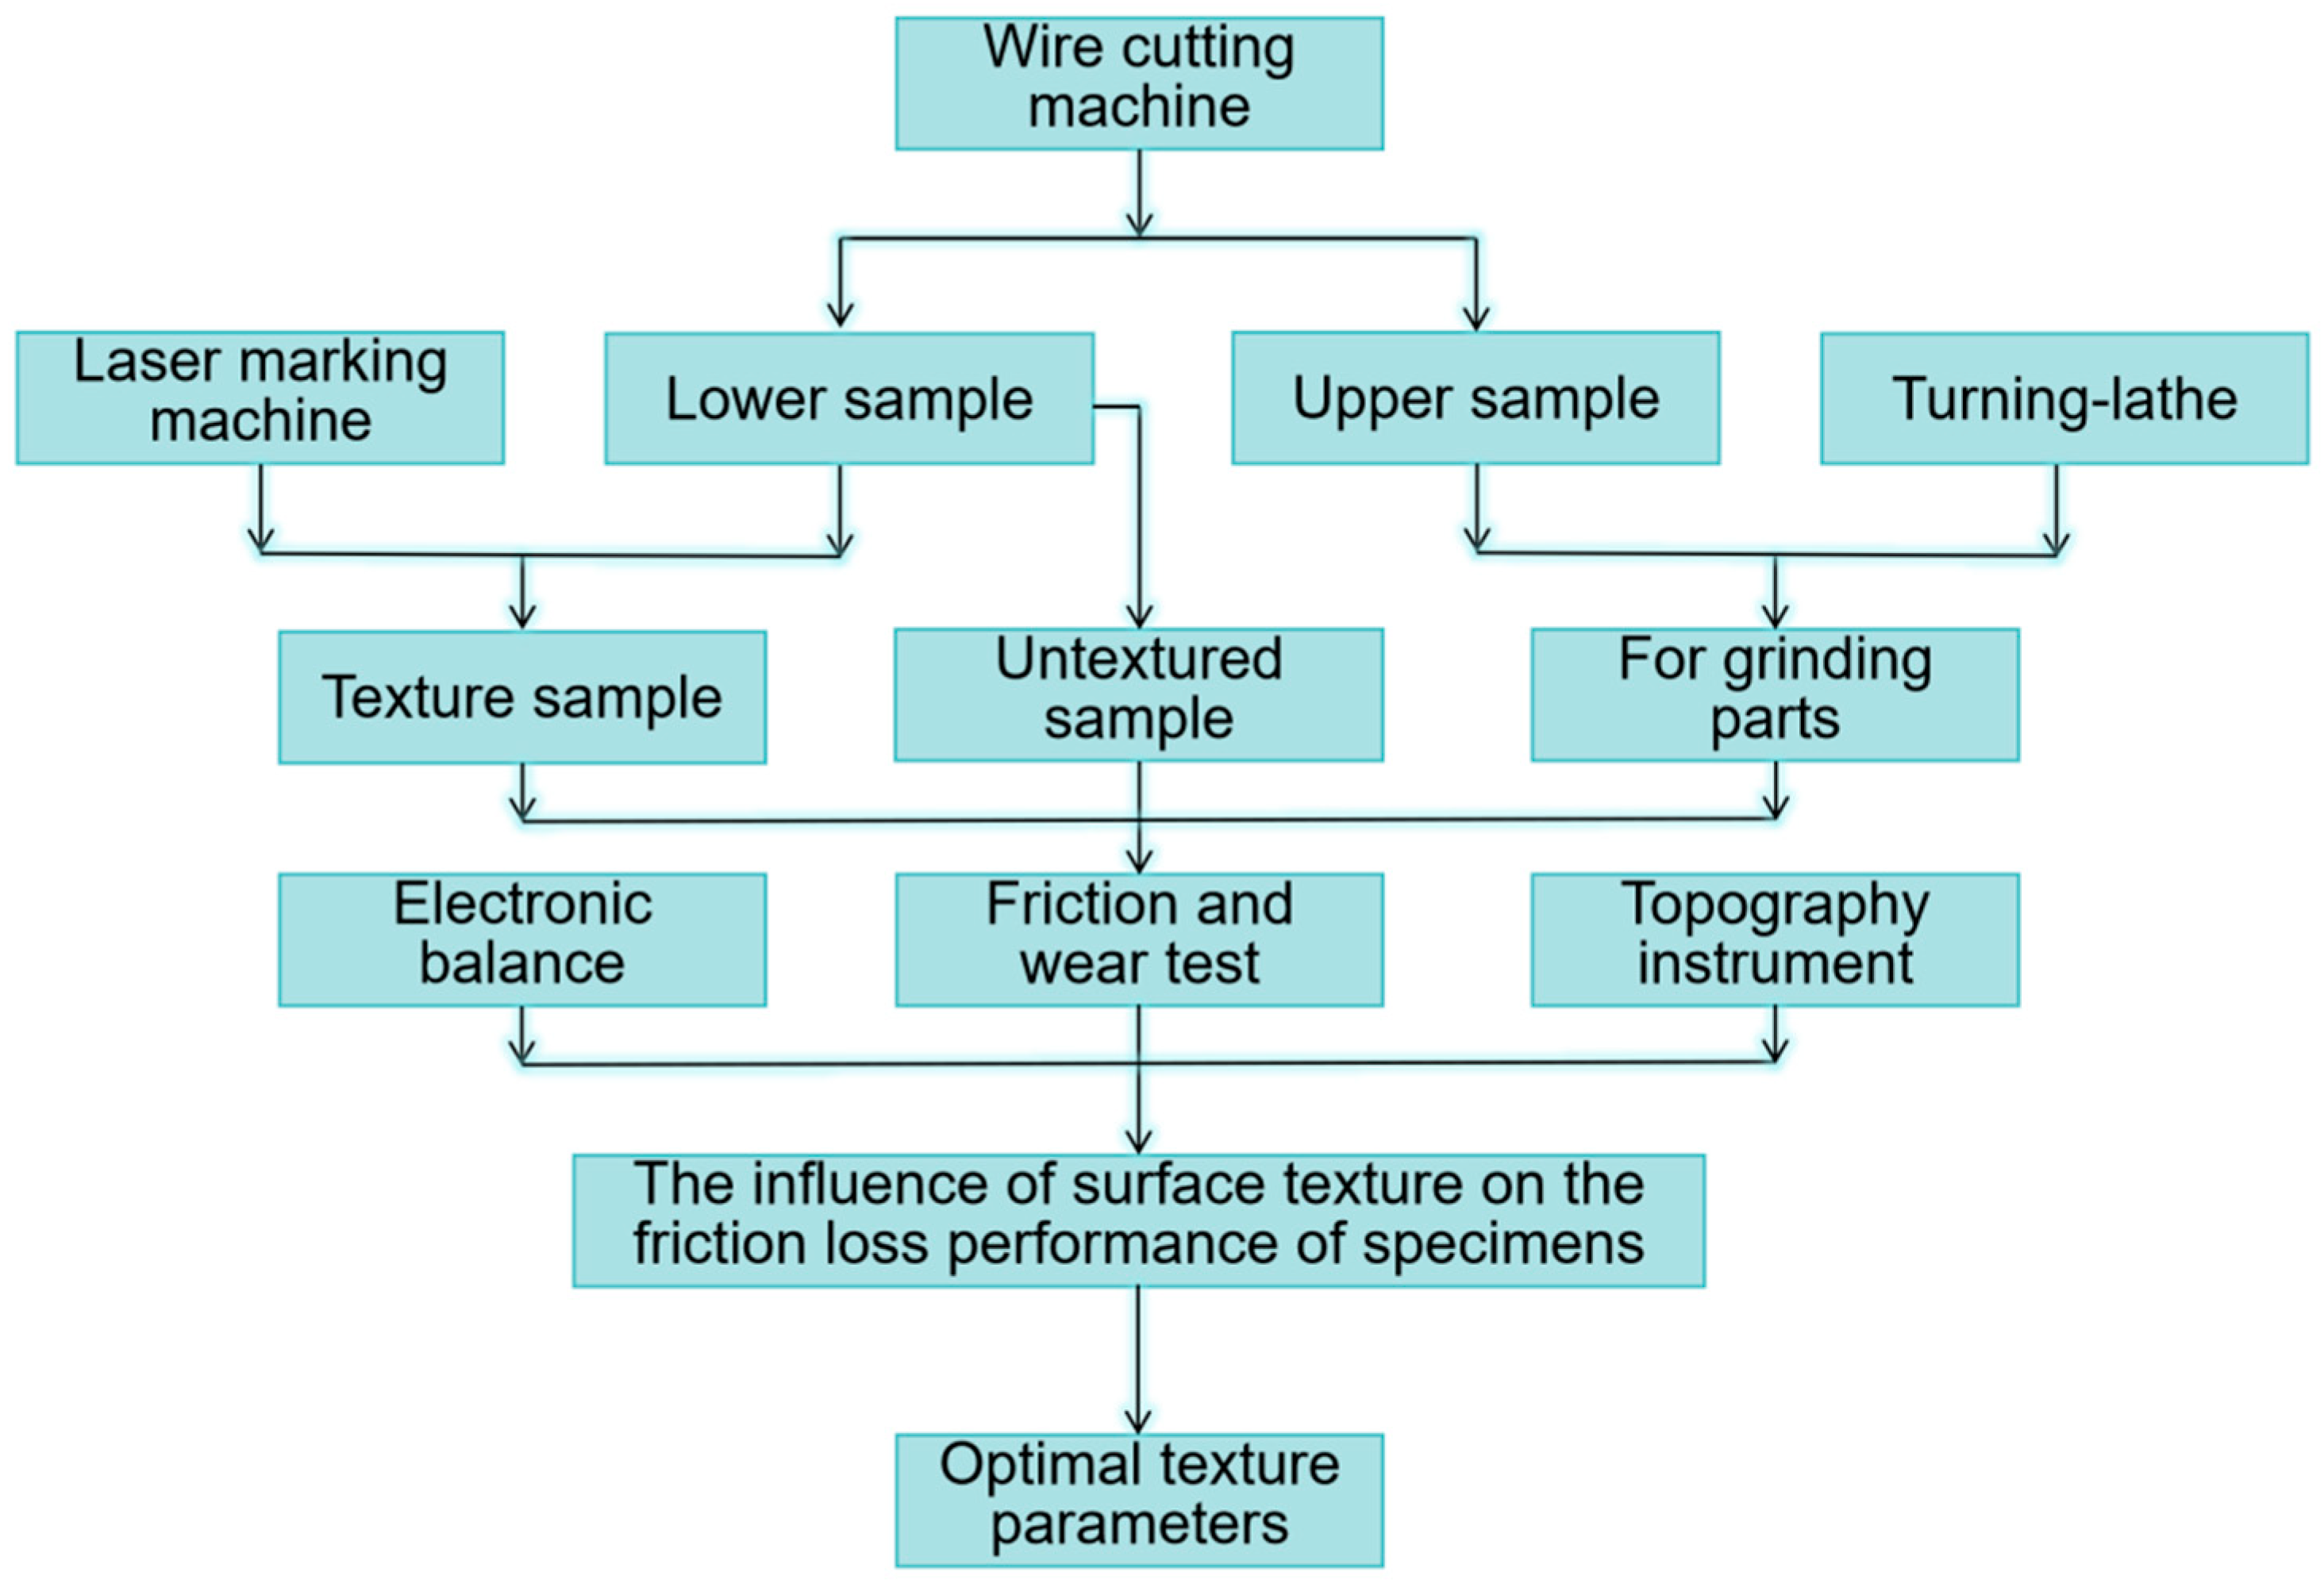
In order to investigate the effect of laser surface texturing on the friction and wear performance of GCr15 bearing steel in sliding contact pairs, an overall procedure for the friction and wear tests was established (Figure 1).
Figure 1. General flowchart of friction and wear testing.
High-carbon chromium GCr15 bearing steel exhibits good overall performance, is relatively inexpensive, and has excellent hot workability. After heat treatment, it exhibits high hardness and a uniform microstructure, with high wear resistance and fatigue strength, as well as good mechanical properties. It is primarily used in the manufacture of internal combustion engines; lathes; bearing rings; drilling machines; and steel balls, rollers, and other components used in rotating shafts. In this experiment, both the upper and lower test specimens were made of annealed GCr15 steel bars with a diameter of φ = 100 mm. The chemical composition of the material is shown in Table 1.
Table 1. Chemical composition of GCr15 bearing steel (mass fraction, %).

2.2. Preparation of Upper and Lower Samples

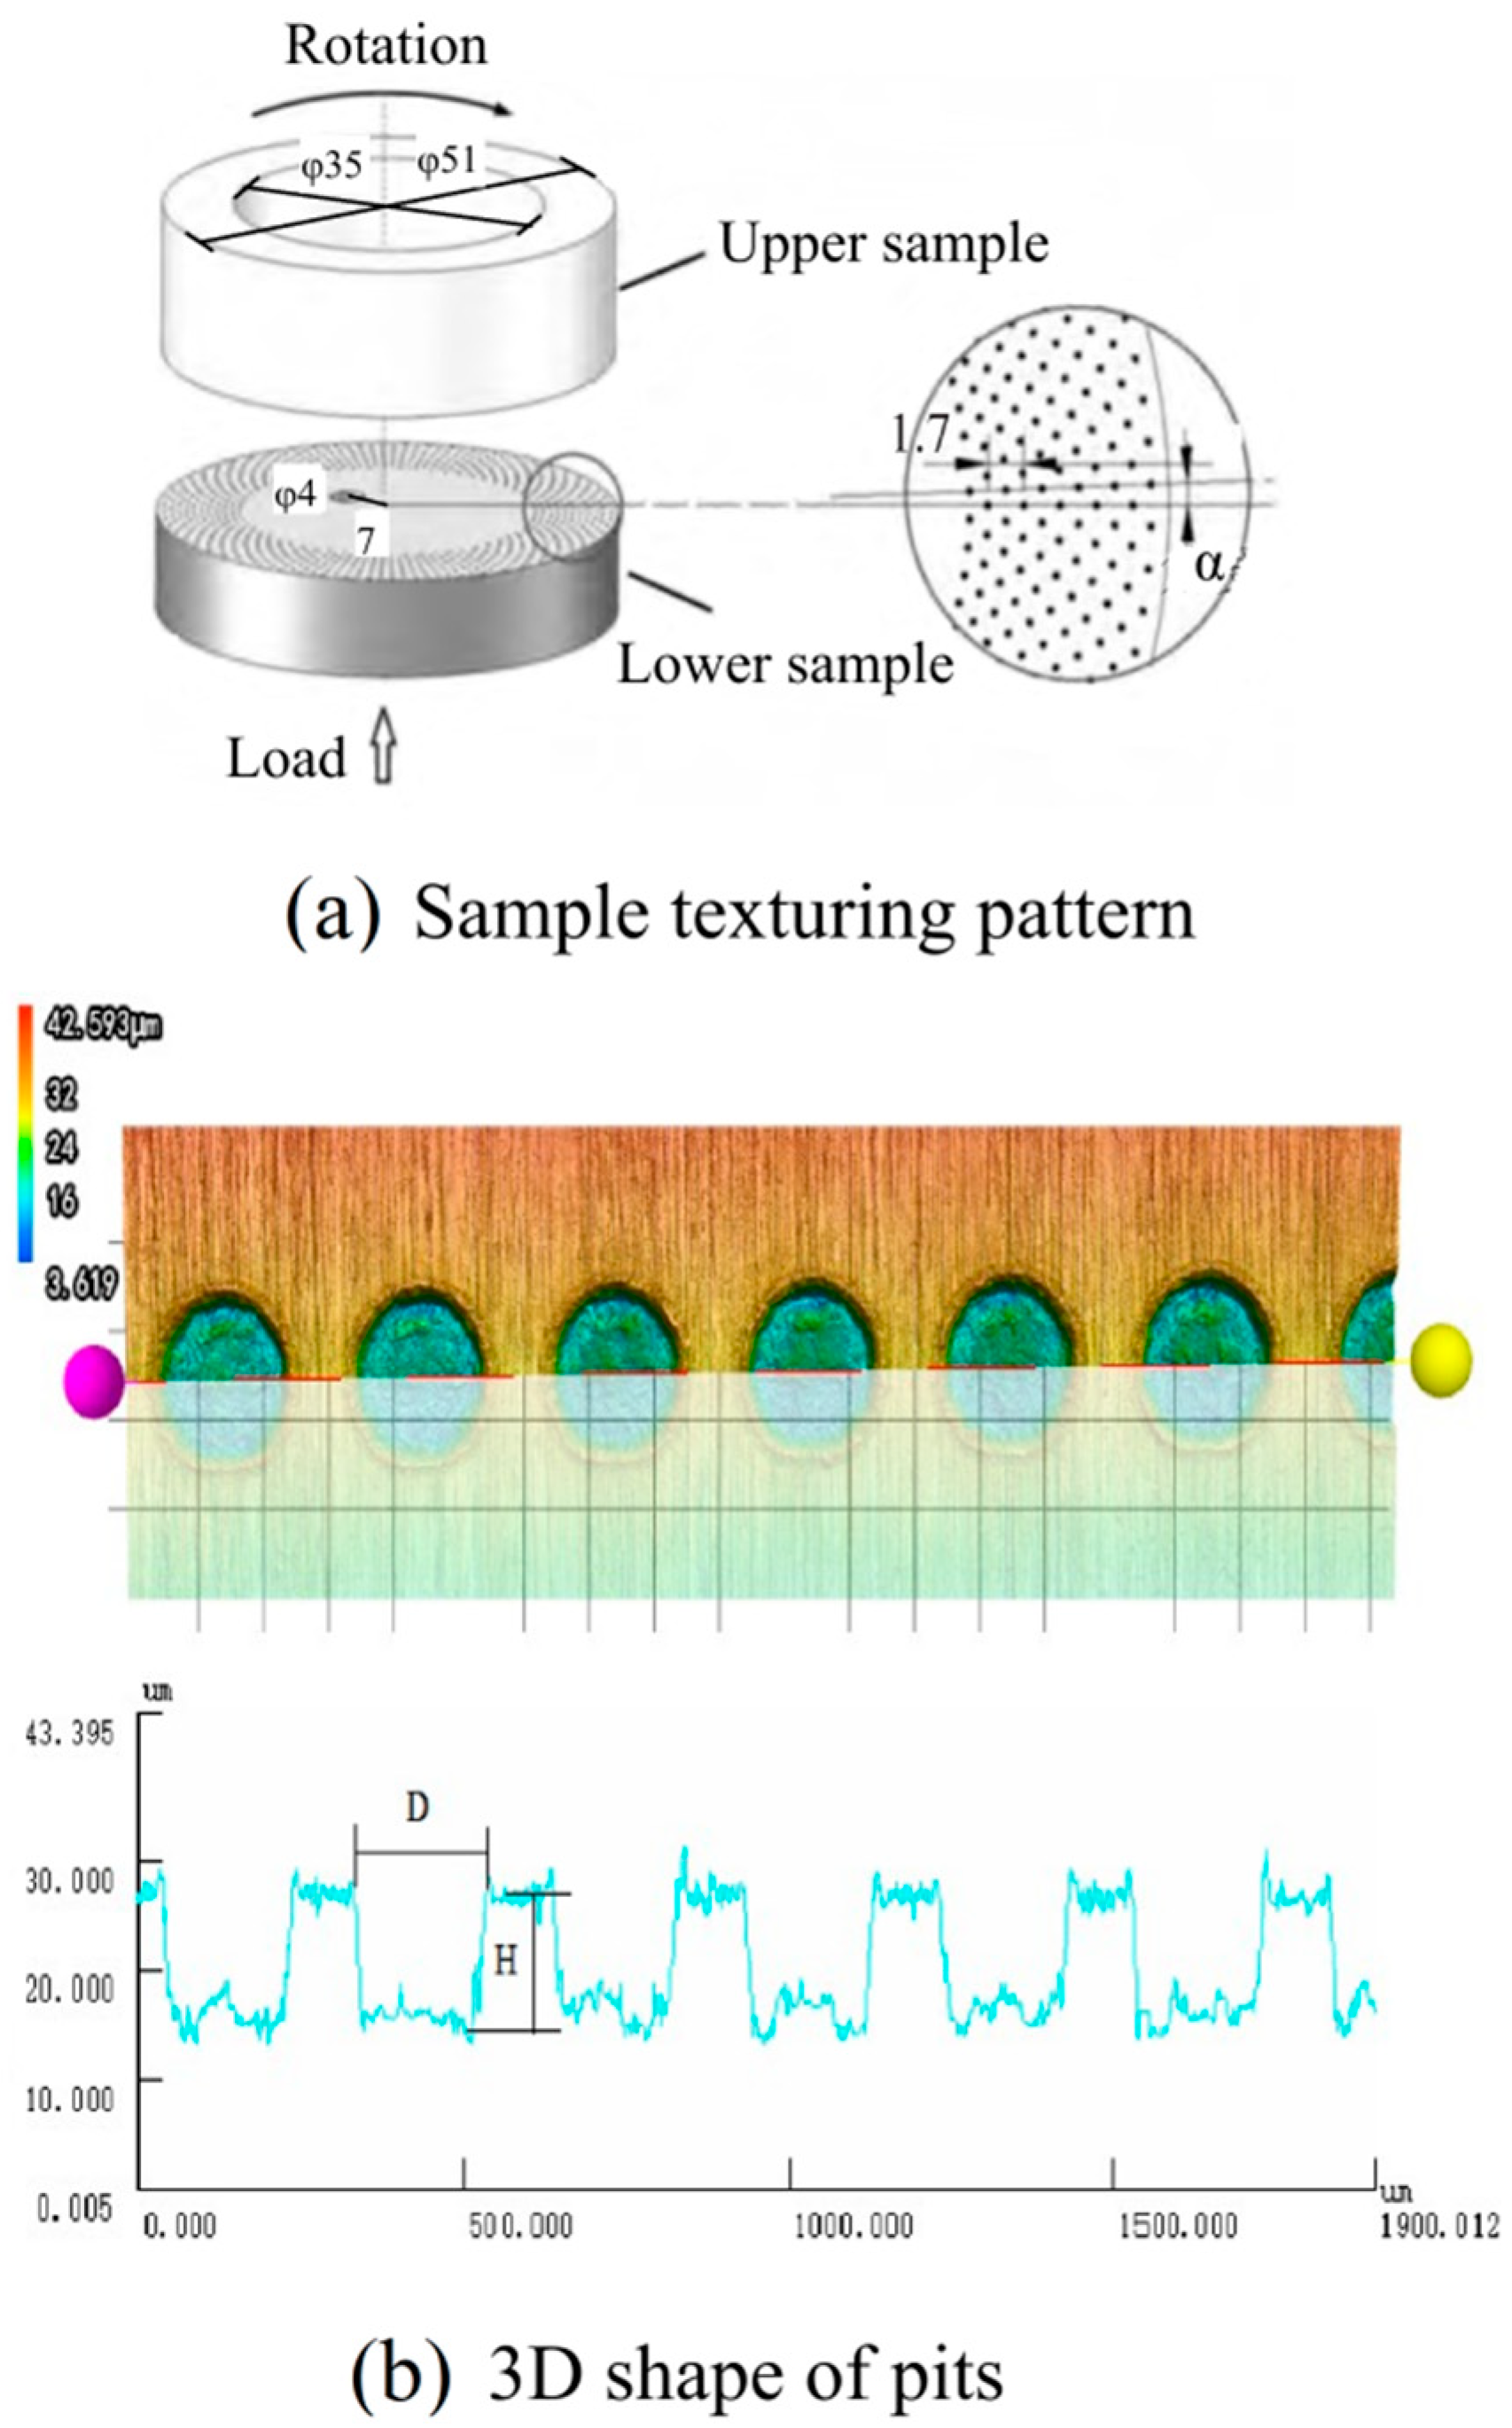
Before the friction and wear tests, the textured components for the lower test samples and the counter specimens for the upper samples were prepared, with dimensions shown in Figure 2. An SX2-4-13 box-type resistance furnace (Yuzhuo Instrument Co., Ltd., Shanghai, China) was used to perform the quenching treatment on both the upper and lower samples. The quenching temperature was set at 840 °C, and after holding for 40 min, the samples were oil-quenched and then cooled in air. The hardness of the heat-treated samples was measured using an HR-150C Rockwell hardness tester (Wowei Technology Co., Ltd., Beijing, China), with a hardness of approximately 60 HRC.
Figure 2. The texture and 3D shape of the sample’s pits.
After the heat treatment process, an MP-2 metallographic polishing machine (Huaxing Testing Instrument Co., Ltd., Laizhou, China) was used to sequentially grind and polish the specimens with 80, 120, 180, 500, 1000, 1500, and 2000 grit sandpapers. This ensured that all sample surfaces achieved the same roughness level, avoiding any influence of surface roughness on the test results.
Finally, laser texturing was applied to the lower sample. Laser surface texturing technology utilizes high-energy, high-density laser beams, such as nanosecond, picosecond, or femtosecond lasers, which are focused on the surface of the workpiece. The concentrated laser beams generate high temperatures, causing the surface to undergo rapid changes such as melting, burning, and vaporization. As a result, the desired texture patterns can be fabricated on the surface. In this study, a PL100-30W laser marking machine (Sepbase, Shenyang, China) was used to create the texture on the sliding contact surface of the lower sample.

2.3. Friction Wear Test

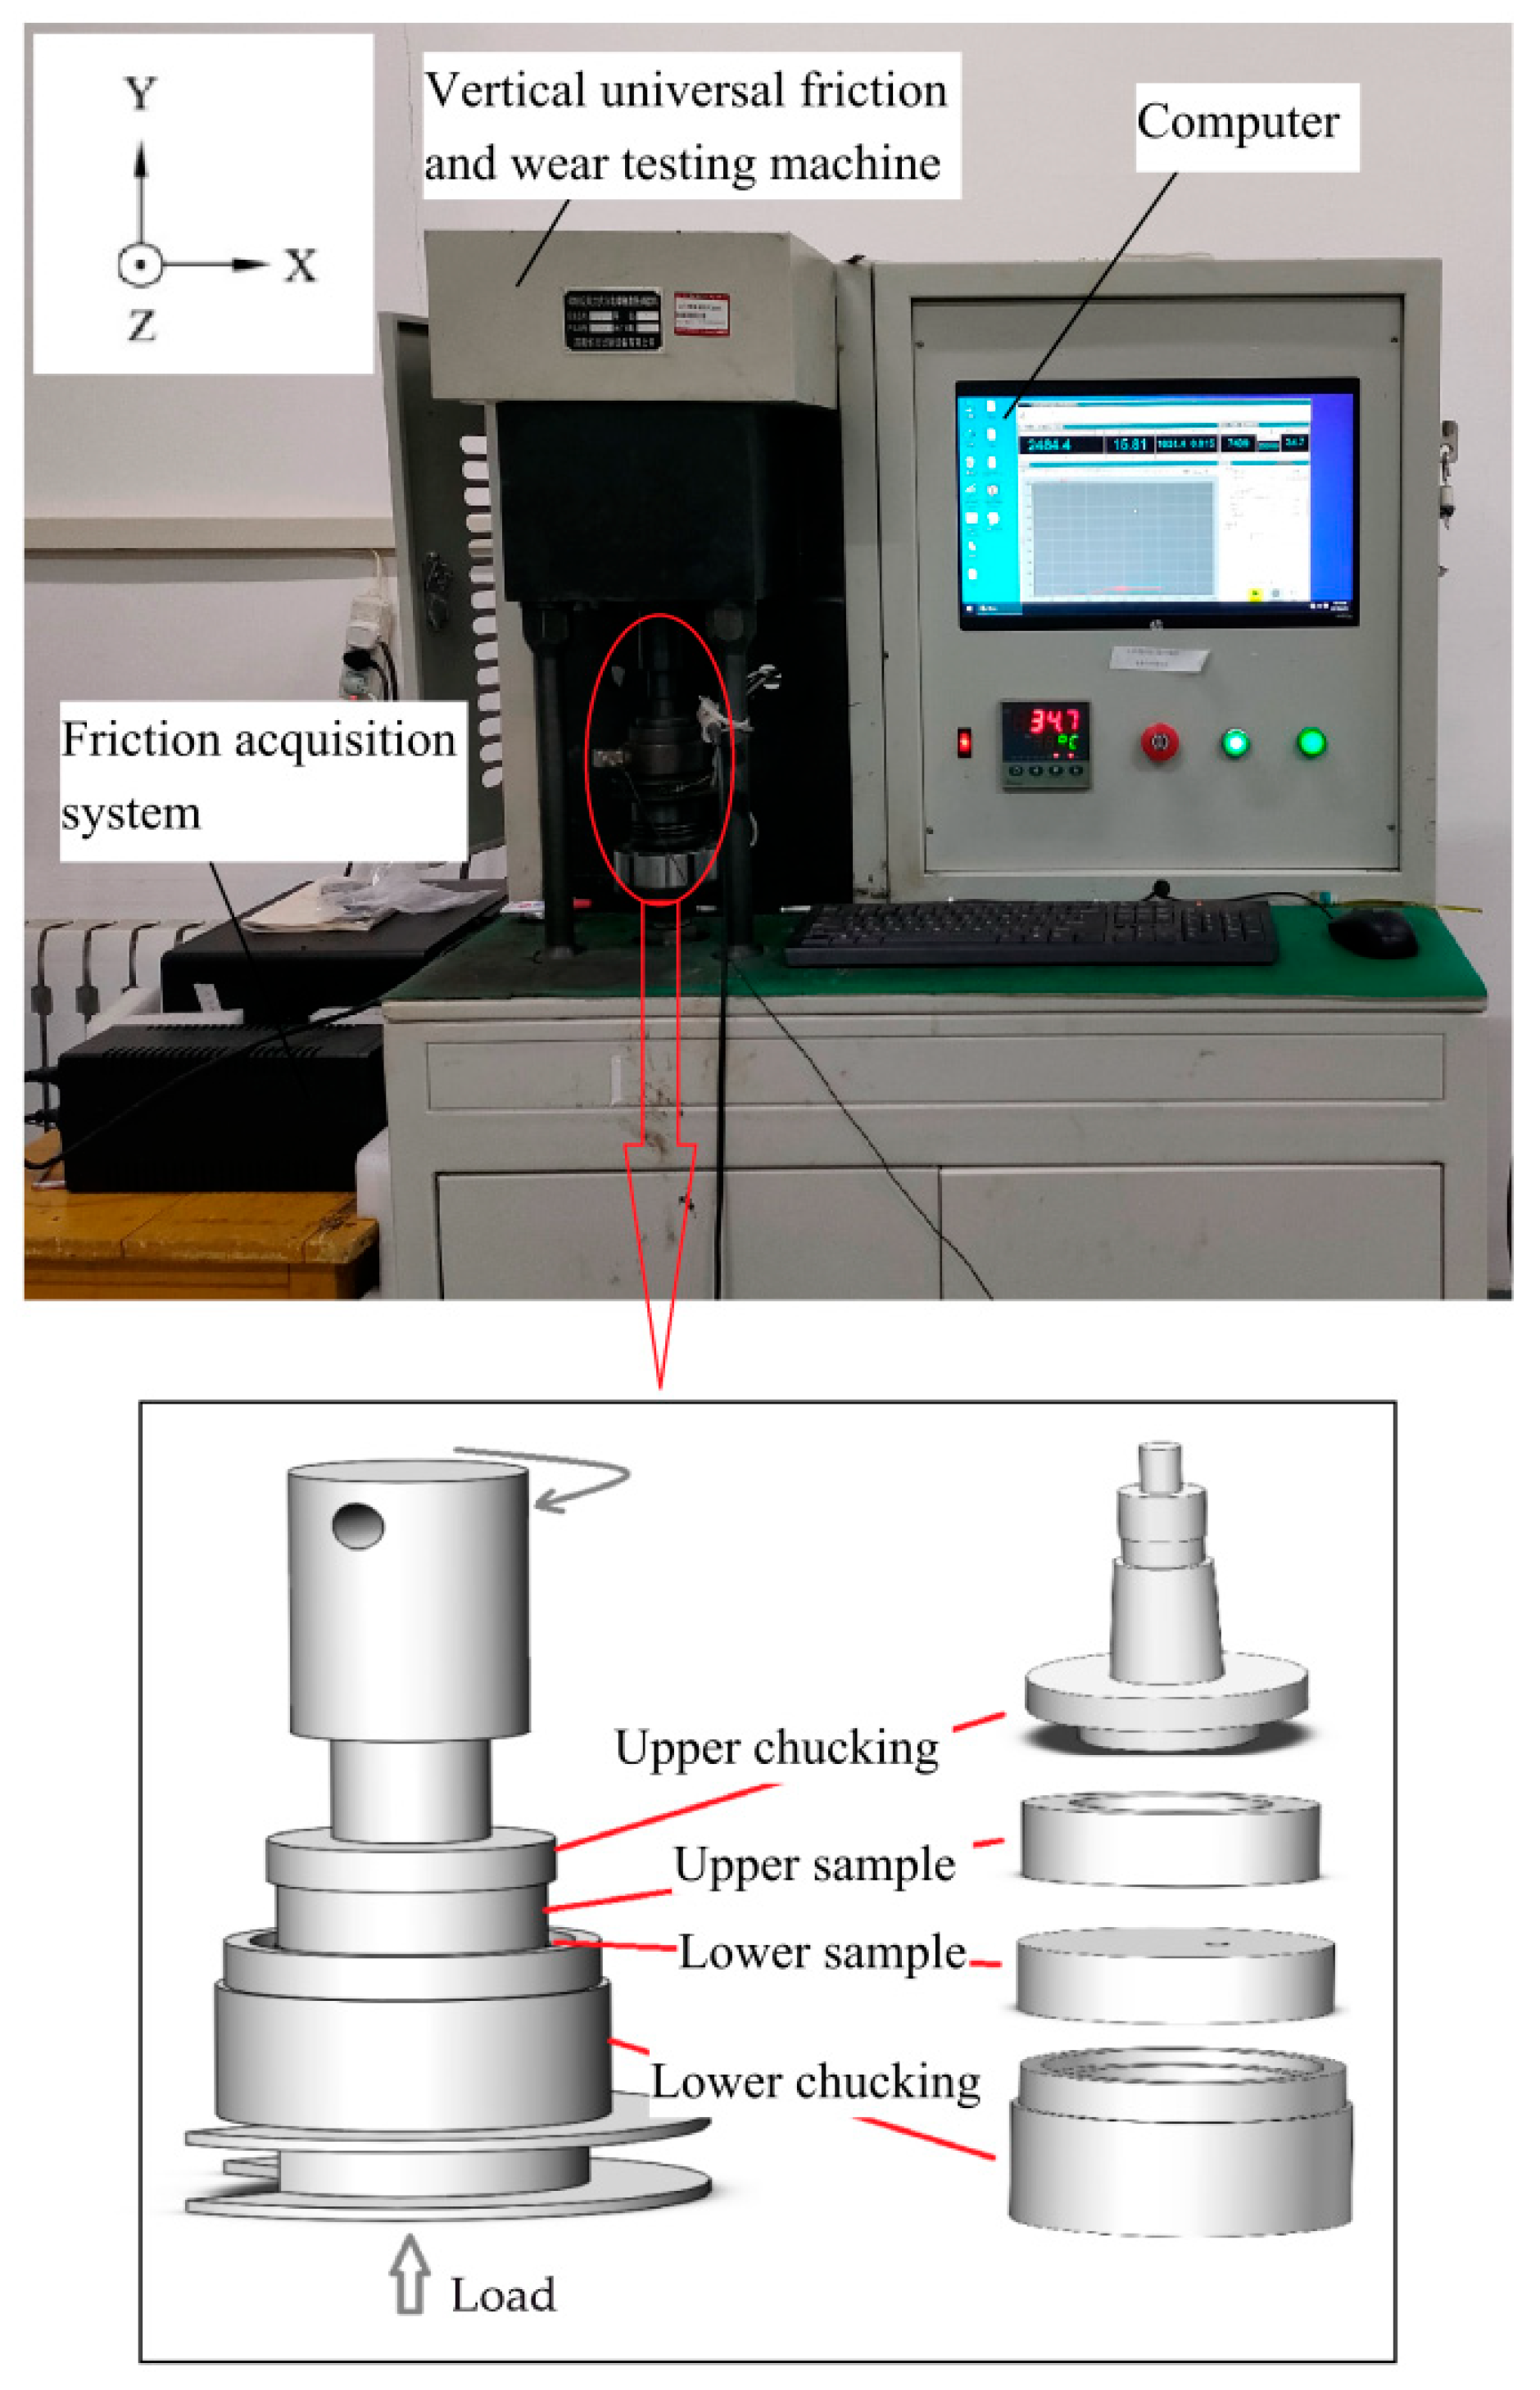
An MMW-1A vertical universal friction and wear testing machine was used to conduct a circumferential sliding test on the GCr15 bearing steel friction pair with surface pit textures, as shown in Figure 3. This testing machine primarily consisted of an electric control panel, spindle drive system, servo cylinder loading system, testing force and friction torque measurement system, embedded computer testing system (including LCD display, computer host, acquisition module, control board, etc.), friction pair, and specialized fixtures. All tests were conducted for a duration of 1200 s under an axial load of 1000 N and rotational speed of 400 r/min, with 4.6 mg of quantitative lubricating oil, and at room temperature (20 ± 2 °C). The wear volume of the specimens was determined by the mass difference before and after ultrasonic cleaning and drying with a blow dryer. To eliminate potential random factors during testing, each sample was repeated three times under the same conditions, and the final result is the arithmetic mean of the three test data.
Figure 3. Schematic of the test apparatus and structure of friction pair.
A 3D profilometer (VK-X 1050, Keynes, Osaka, Japan) was used to characterize the surface of the specimens after the friction wear test. The equipment, through its “laser light source” and “white light source,” provided full-focus color images, laser full-focus images, high–low images, and the necessary information regarding color, light intensity, and height. It enabled quantitative analysis of material properties, high aspect ratio analysis, surface roughness measurement, and comparative wear analysis.

3. Results and Analysis

3.1. Determination of Laser Pit Texturing Parameters

Surface texturing was performed using a PL100-30W laser marking machine, and the texture dimensions and morphology were observed using a 3D profilometer. Through controlling the variables, the effects of the laser power, processing speed, and laser frequency parameters on the depth and diameter of the circular pit textures were studied. To ensure the accuracy and repeatability of the laser texturing experiments and subsequent tribological tests, the following precautions were strictly observed: Parameter Control: The laser processing system was preheated for 30 min before the experiment to stabilize the output power and frequency. The processing speed was calibrated using the system’s built-in displacement sensor (error ≤ ±0.5 mm/s). Sample Consistency: All test samples were sourced from the same GCr15 bearing steel rod and were pre-cleaned with ethanol to remove surface oil and dust before processing. Environmental Control: The tests were conducted in a room-temperature environment (20 ± 2 °C) to avoid any effects of temperature on laser energy absorption and material properties. Three Replicates: Each combination of laser texturing parameters was applied to three identical samples (i.e., three repeated treatments). Each treated sample underwent three repeated tribological tests. The laser texturing experimental setup is shown in Table 2.
Table 2. Test plan for laser texture processing.

3.1.1. Effect of Processing Speed on Texture Parameters

Under the condition of fixed surface texture dimensions, laser power, laser frequency, and processing frequency, five different processing speed parameters were selected for surface texturing. The experimental parameters were set as follows: laser power of 10 W, laser frequency of 80 kHz, and processing frequency set to one pass. The processing speeds were set at 50 mm/s, 100 mm/s, 150 mm/s, 200 mm/s, and 250 mm/s. The geometric dimension was set to a diameter of 300 μm. After the surface texturing of the lower specimen, the texture dimensions were measured using a 3D surface profiler (VK-X 1050, Keynes, Osaka, Japan). The final results show the processing speed’s effect on the diameter and depth of the surface texture, as shown in Figure 4.
Figure 4. Effect of processing speed on surface texture dimensions.
As shown in Figure 4, the diameter of the surface texture was primarily determined by the CAD 2020 drawing software. The pit diameter fluctuated around 300 μm, and was observed to increase as the processing speed decreased. This is because, as the processing speed decreases, the laser beam remains on the surface for a longer time, exposing the specimen to be exposed to heat for a longer duration. This results in an increased material loss range, and the cumulative error causes the surface texture diameter to increase. From Figure 4, it can be seen that as the processing speed increases, the pit depth decreases from 8 μm to 1.8 μm. This is because the slower the processing speed, the longer the laser beam stays at the texture location, generating more energy, and thus creating a deeper pit. At both very high and very low processing speeds, the texture formation quality is poor. Therefore, the processing speed was generally set within the range of 100–200 mm/s.

3.1.2. Effect of Power on Texture Parameters

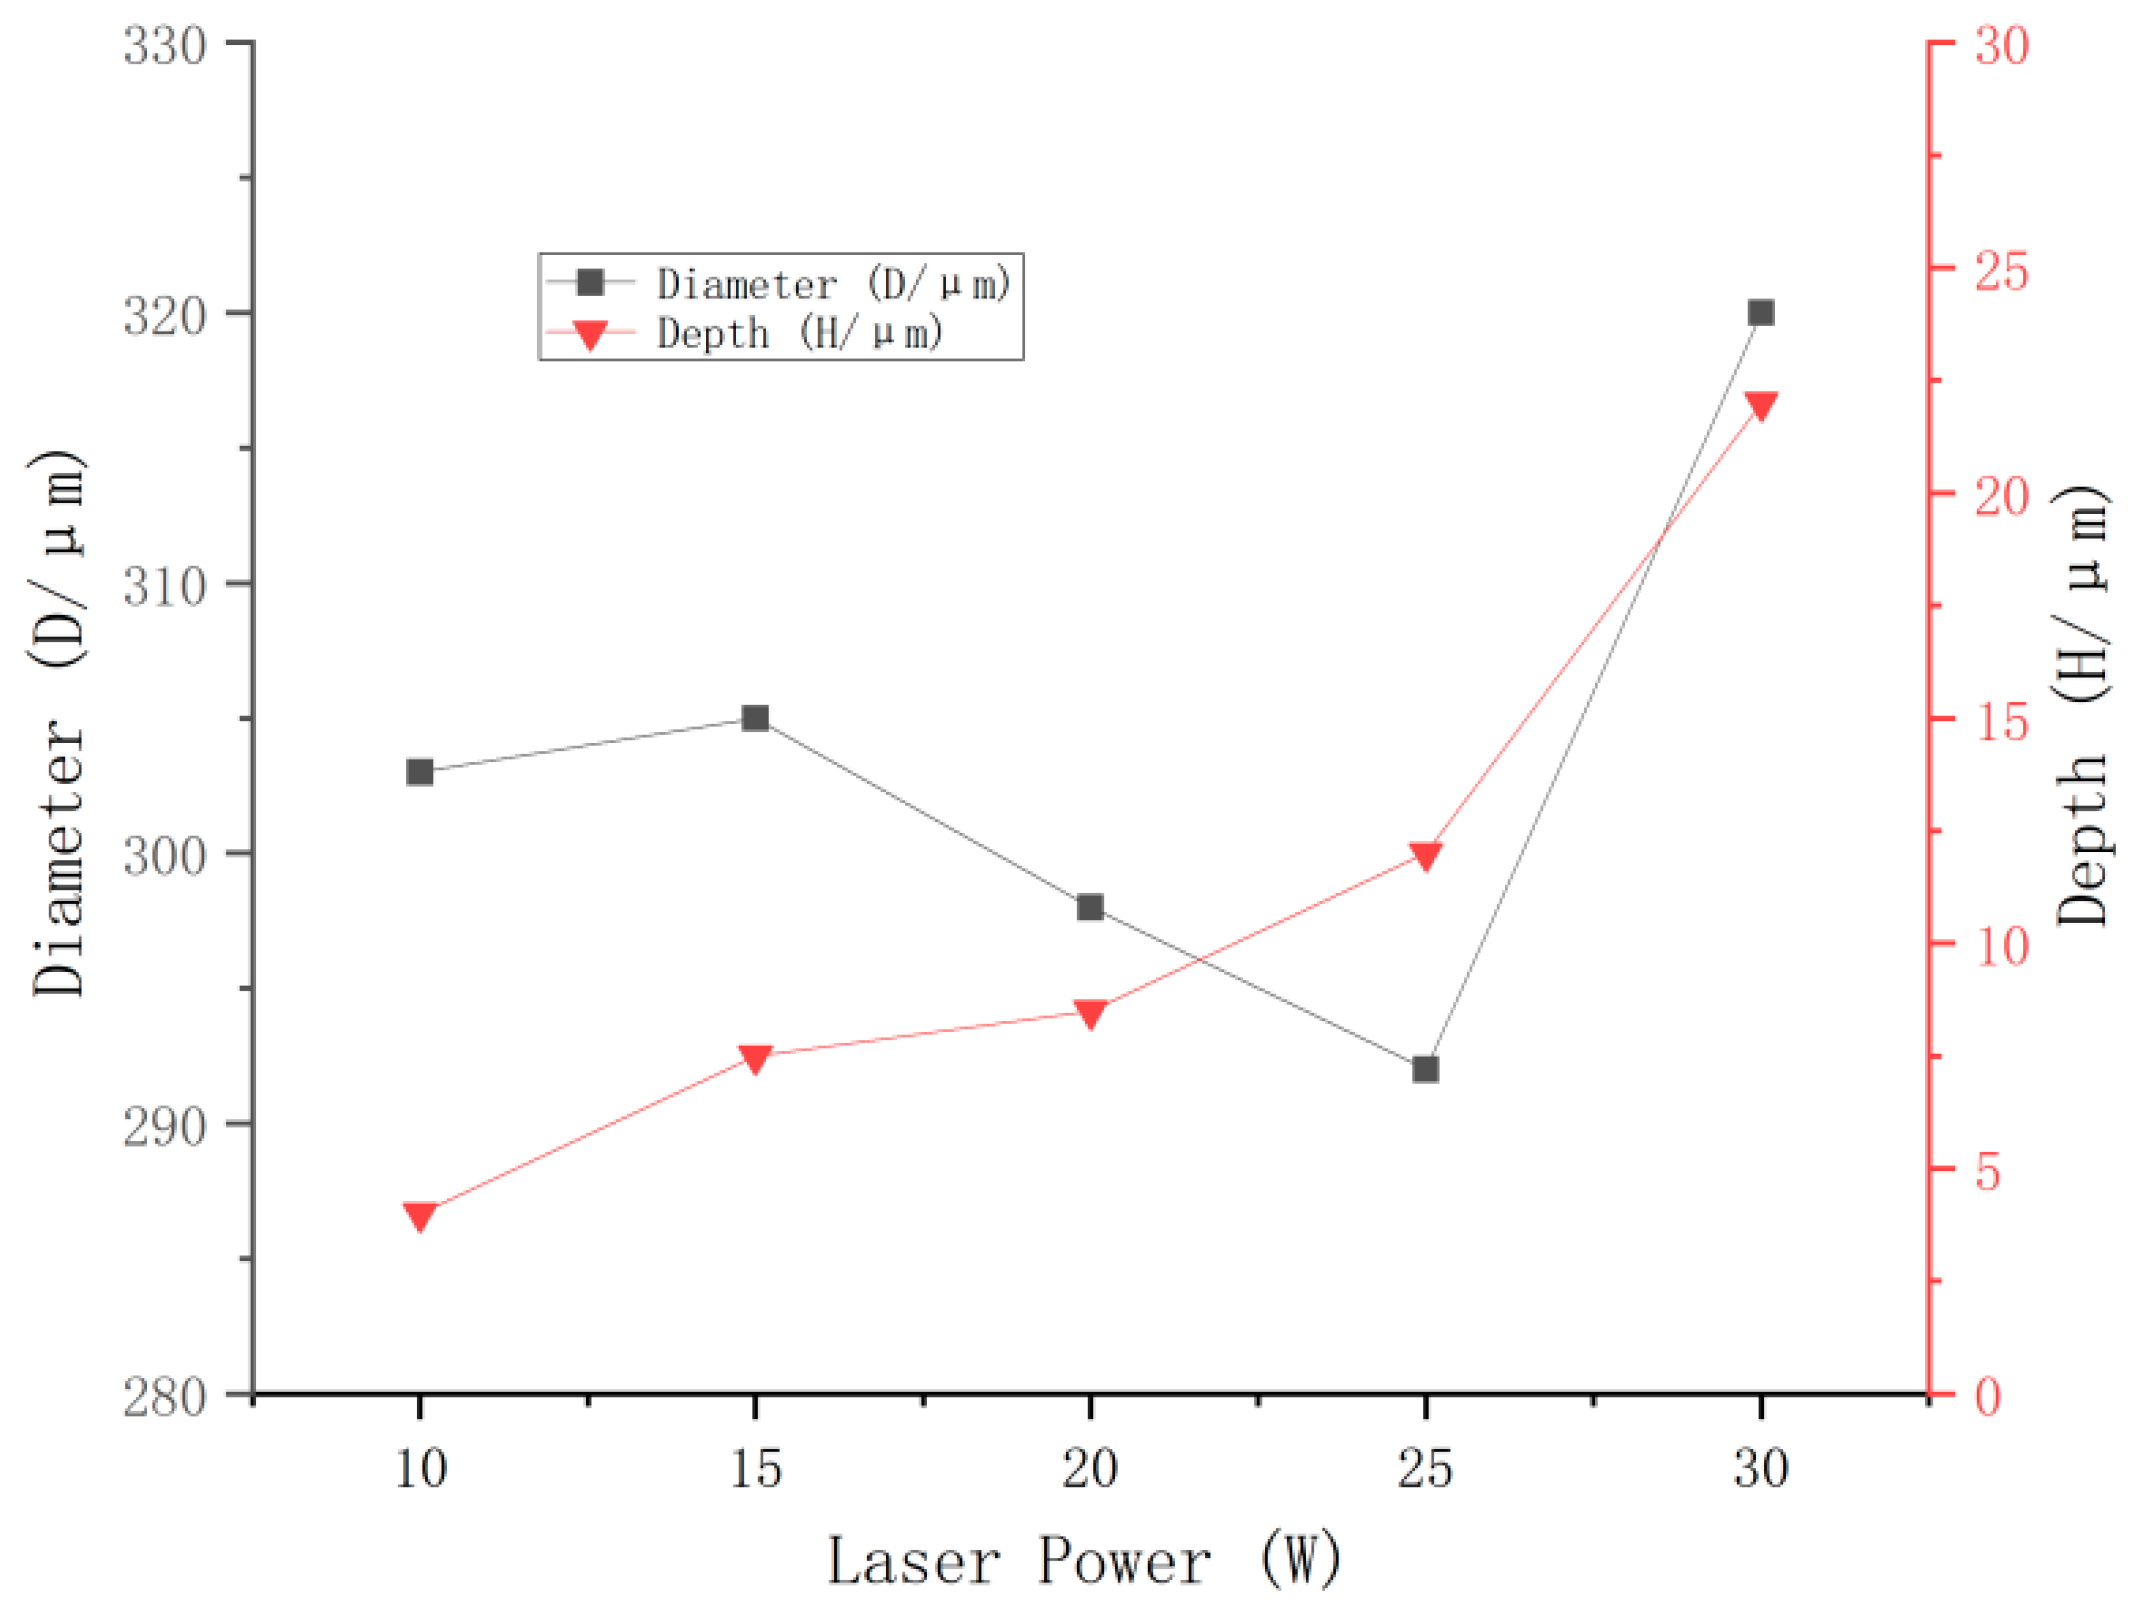
Under the condition of fixed surface texture dimensions, processing speed, and laser frequency, five different laser power levels were selected for surface texturing. The experimental parameters were set as follows: processing speed of 200 mm/s, laser frequency of 80 kHz, and one pass of processing. The laser power was set at 10 W, 15 W, 20 W, 25 W, and 30 W and the geometric dimension was set to a diameter of 300 μm. After performing surface texturing according to the above laser texturing equipment parameters, the texture dimensions were measured using a 3D surface profiler. The final results show the effect of laser power on the diameter and depth of the surface texture, as shown in Figure 5.
Figure 5. Effect of laser power on surface texture dimensions.
As shown in Figure 5, when the laser power is less than 20 W, the texture diameter fluctuates between 290 and 310 μm, indicating that the laser power has little effect on the texture diameter. This is because the diameter of the surface texture is primarily determined by the CAD drawing software. However, when the power increased to 30 W, the diameter reached 320 μm, indicating that the increase in power significantly influences the texture. This is due to the fact that a higher laser power results in a greater energy density, which in turn has a greater effect on the surface texture size. As shown in Figure 5, the depth of the surface texture increases with increased power, which is also due to the reasons mentioned above. When creating textures with laser powers of 20 W and 30 W, severe material surface burning occurs, leading to a significant decline in processing quality and an increase in the amount of residue. Therefore, when performing texture processing, the laser power should be set within the range of 10–20 W.

3.1.3. Effect of Frequency on Texture Parameters

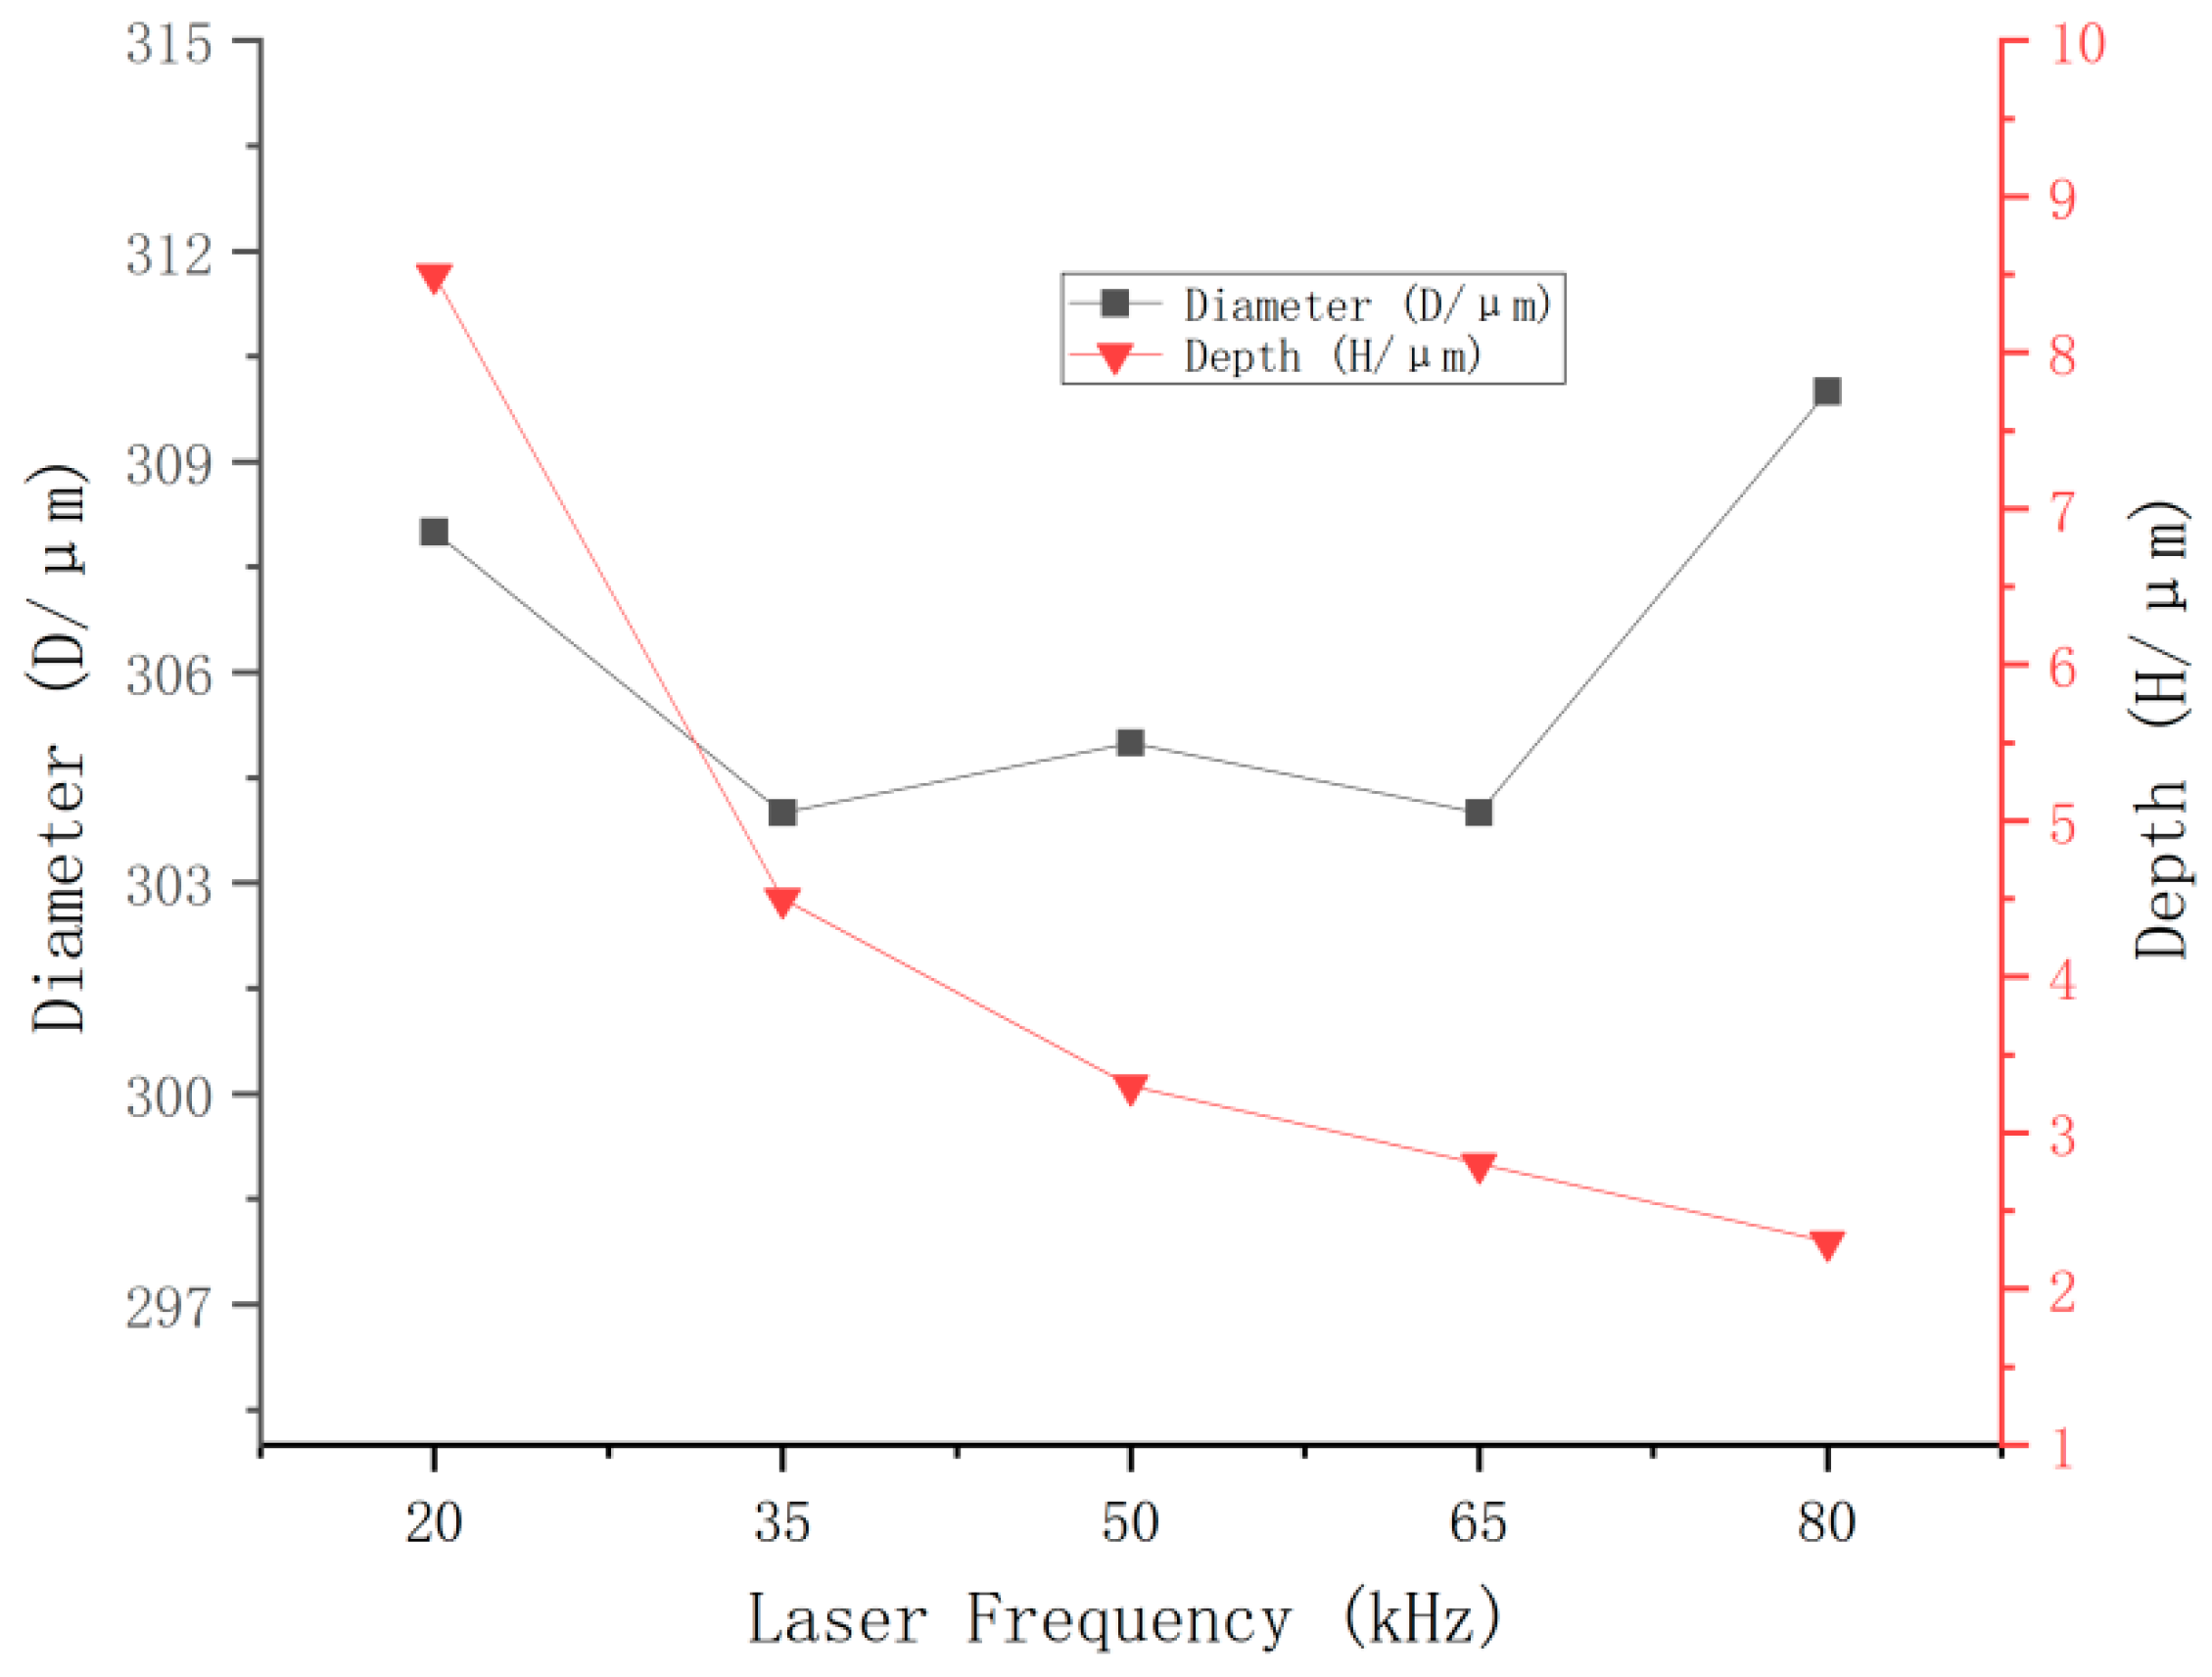
Under the condition of fixed surface texture dimensions, laser power, processing speed, and processing frequency, five different laser frequency parameters were selected for surface texturing. The experimental parameters were set as follows: processing speed of 200 mm/s, laser power of 10 W, and one pass of processing. The laser frequencies were set at 20 kHz, 35 kHz, 50 kHz, 65 kHz, and 80 kHz and the geometric dimension was set to a diameter of 300 μm. After performing surface texturing according to the above laser texturing equipment parameters, the texture dimensions were measured using a 3D surface profiler. The final results show the effect of laser frequency on the diameter and depth of the surface texture, as shown in Figure 6.
Figure 6. Effect of frequency on surface texture dimensions.
As shown in Figure 6, with the increase in laser frequency, the texture diameter fluctuates within the range 300–310 μm, with little variation. This indicates that changes in laser frequency have minimal effect on the surface texture diameter, which is instead determined by the CAD drawing software. As shown in Figure 6, as the laser frequency increases, the surface texture depth gradually decreases from 8.6 μm to 2.2 μm, which is because the surface texture depth is primarily influenced by the laser energy. With the increase in frequency, the number of laser beam impacts on the texture surface per unit time increases. However, the energy generated by each laser pulse decreases, and the energy produced by a single laser pulse has a dominant effect on the texture depth. As a result, the overall effect of the laser beam on the texture surface decreases, causing the depth to also gradually decrease. Since the laser frequency has little effect on the texture diameter and a frequency that is too low leads to poor texture formation, the frequency is generally selected within the range of 35–80 kHz.
In summary, the laser marking machine texture parameters were determined as follows: processing speed of 200 mm/s, laser power of 10 W, and laser frequency of 80 kHz. After determining the pit diameter as 300 μm, to achieve different depth-to-diameter ratios and area ratios, the number of laser pulses was varied to 7, 10, 13, and 16 times, resulting in different pit depths of 15 μm, 20 μm, 25 μm, and 30 μm, respectively, yielding depth-to-diameter ratios of 0.050, 0.067, 0.083, and 0.100. By changing the pit spacing angles to 1.5°, 2°, 2.5°, and 3°, different area ratios of 14.9%, 11.2%, 8.9%, and 7.4% are obtained. Finally, the surface pit texture sample groups and their corresponding numbers are shown in Table 3.
Table 3. Sample numbering and grouping of surface pit textures.

3.2. Effect of Depth-to-Diameter Ratio on the Friction and Wear Performance of the Sample Surface

3.2.1. Effect of Depth-to-Diameter Ratio on the Friction Coefficient of the Sample Surface

Four textured specimens with different depth-to-diameter ratios and non-textured specimens were selected for friction and wear tests. Figure 7 shows the curves of the friction coefficient of GCr15 bearing steel as influenced by these different depth-to-diameter ratios. It can be observed that the pit textures with different depth-to-diameter ratios have a significant impact on the samples’ friction coefficients. The friction coefficient curves exhibit different trends over time; among them, the friction coefficient of S8 increases over time, showing an overall rising trend with significant fluctuations. In the later stages of the test, these fluctuations become more pronounced, and peaks appear at various points during the test. Around 1150s in the later phase of the test, the friction coefficient reaches its maximum value of approximately 0.175. For S1 and S4, the friction coefficients initially decrease and then increase over time. The depth-to-diameter ratio of S1 shows significant fluctuations in the latter half of the test, with the friction coefficient reaching its maximum value of about 0.16 at 1200s. The trend observed in the S1 (shallow texture) end zone confirms that insufficient depth reduces texture durability—shallow pits are prone to wear and degradation, losing their tribological improvement effects. At the same time, in the later stages of the test, the friction coefficients of these two specimens are higher than those of S2 and S3. The friction coefficients of S2 and S3, on the other hand, show a general trend of decreasing initially and then stabilizing, with smaller fluctuations. Among them, the friction coefficient of S3 is the lowest, reaching approximately 0.08 at 1200s.
Figure 7. Effect of different depth-to-diameter ratios on the friction coefficient of GCr15 steel.
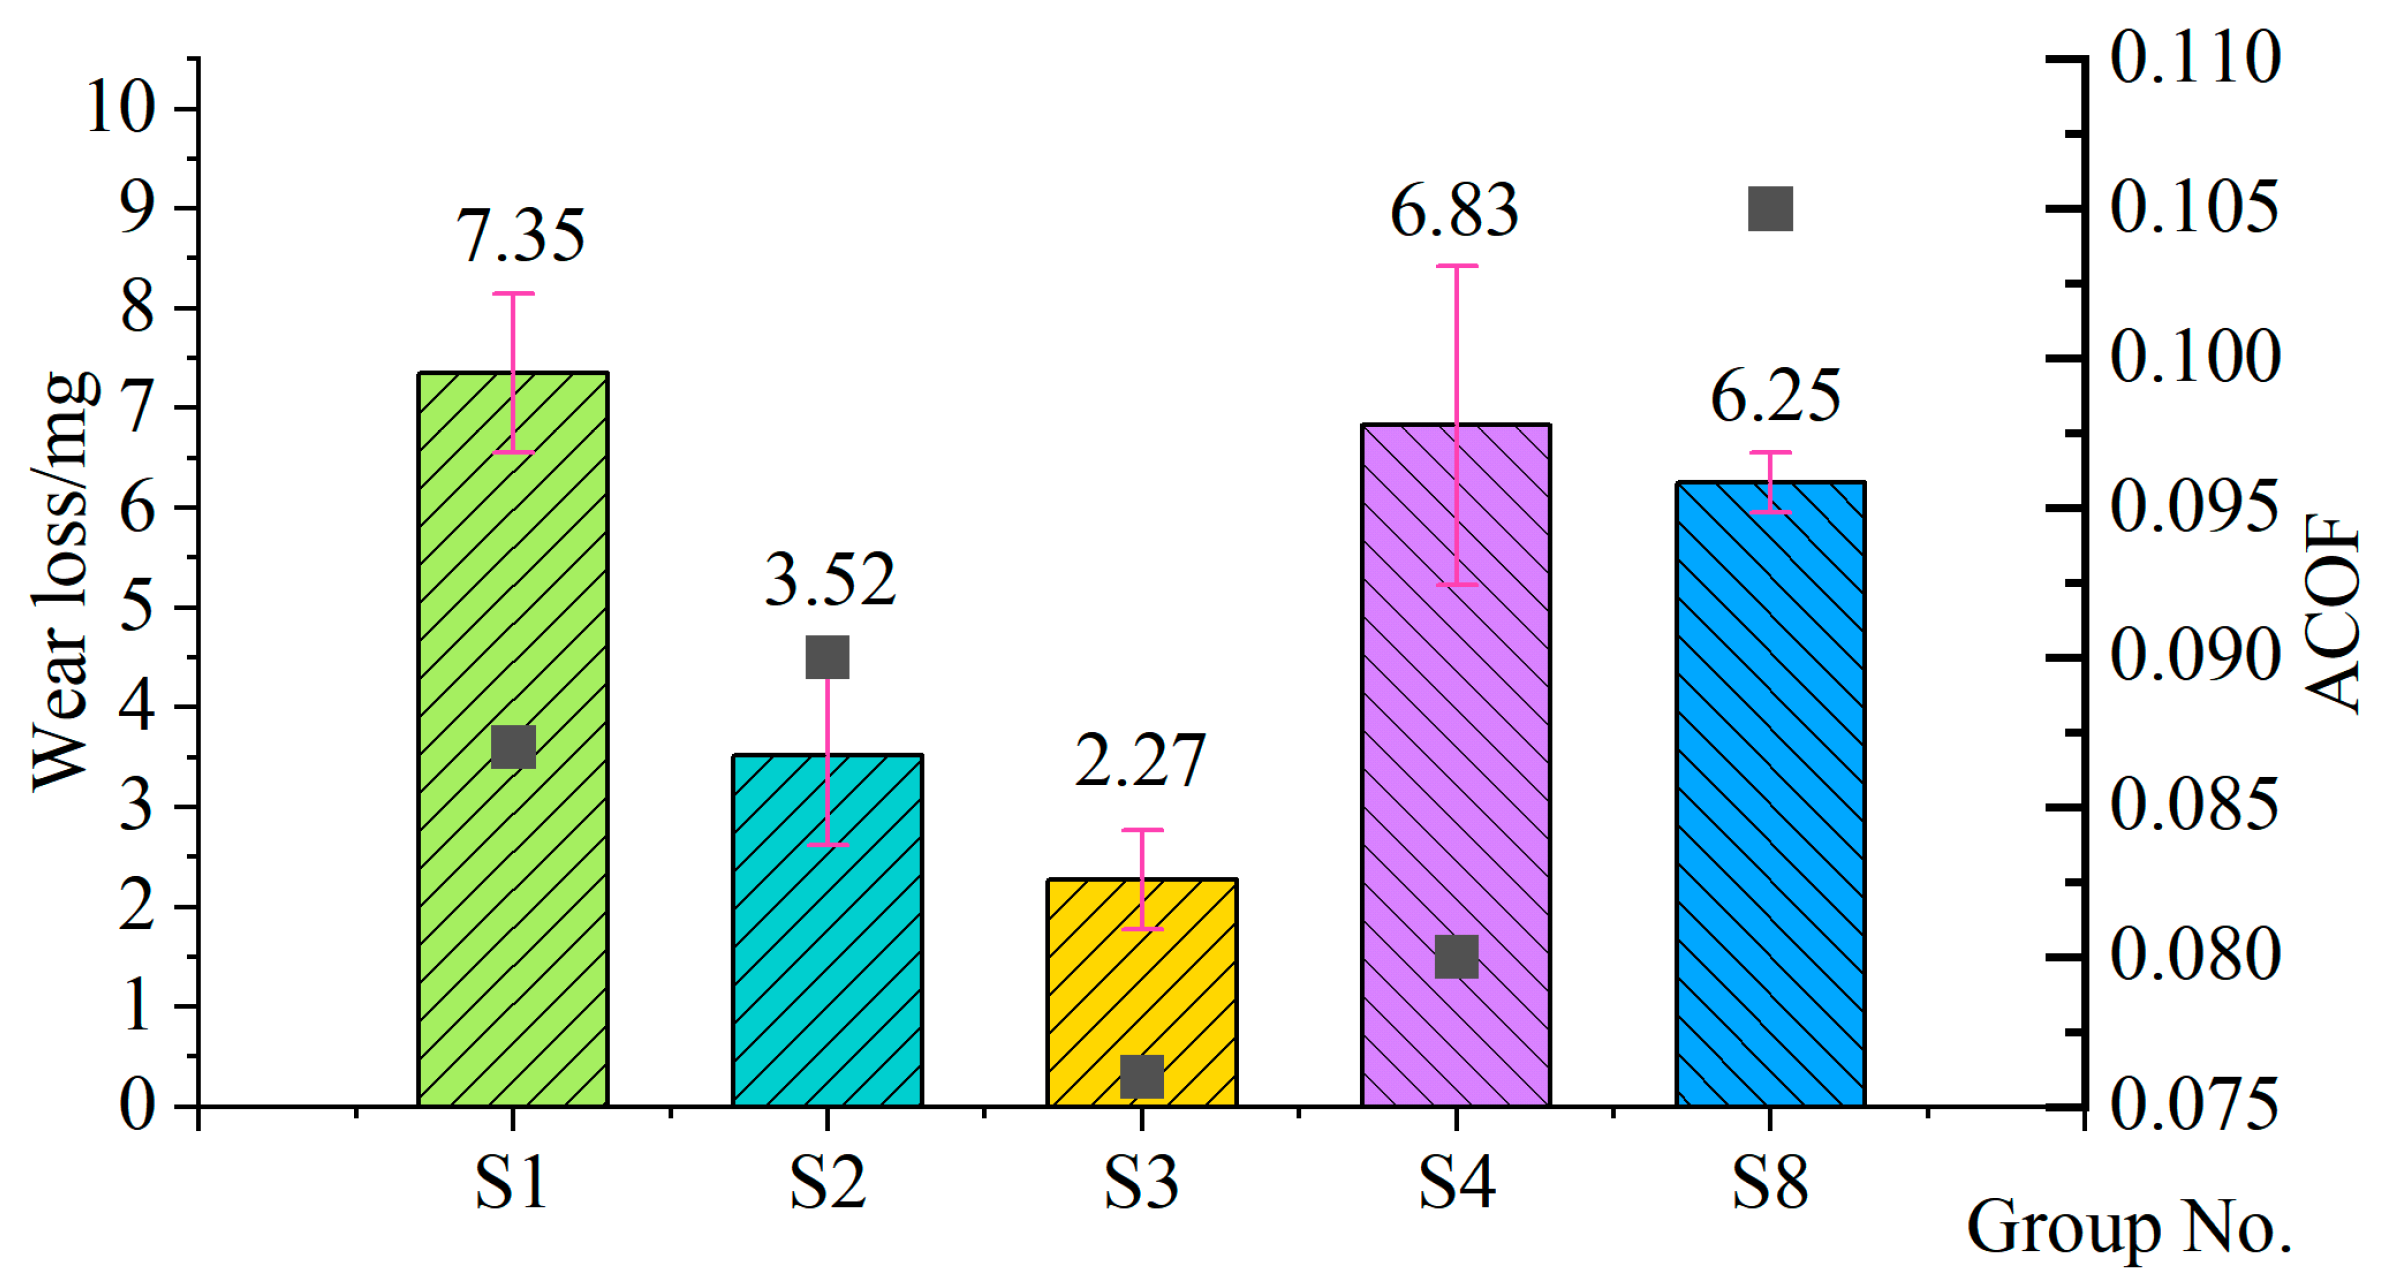
Figure 8 shows the average friction coefficient and wear loss of GCr15 bearing steel under different depth-to-diameter ratios. It can be observed from the figure that surface texturing significantly affects the average friction coefficient of the material, and surface texturing plays a positive role in reducing friction. The average friction coefficients of the textured specimens are clearly lower than those of the smooth specimens. Among the four different depth-to-diameter ratio specimens, S2 has the highest average friction coefficient of 0.090, which is 14.3% lower than that of S8. On the other hand, S3 has the lowest average friction coefficient of 0.076, which is 27.6% lower than that of S8.
Figure 8. Wear loss and average friction coefficient of GCr15 bearing steel under different depth-to-diameter ratios. Black square represent the average coefficient of friction of the sample.

3.2.2. Effect of Depth-to-Diameter Ratio on the Wear Loss of the Specimens

From Figure 8, it can be seen that pit textures with different depth-to-diameter ratios significantly affect the wear loss of GCr15 steel, and not all textures play a positive role in reducing wear on the material’s surface. Among the specimens, the wear loss of S1 and S4 is greater than that of S8, with S1 having the highest wear loss of 7.35 mg, which is 1.1 mg more than that of S8. The wear loss of S2 and S3 are both smaller than that of S8, with S3 having the lowest wear loss of 2.27 mg, which is a 63.7% reduction compared to S8. When comparing the wear loss of the four textured specimens, the specimens with the largest and smallest depth-to-diameter ratios exhibit higher wear loss, while the specimens with intermediate depth-to-diameter ratios show lower wear loss and better wear resistance.
Analyzing the above results indicates that surface texturing has a positive effect on reducing the friction and wear of GCr15 bearing steel under starved lubrication conditions, and this effect is closely related to the depth-to-diameter ratio. Under starved lubrication conditions, the frictional heat generated during sliding causes some of the lubricating oil to evaporate and degrade, which easily destroys the lubricating oil film on the surface of the friction pair. At the same time, due to centrifugal force, the oil on the surface of the friction pair is easily expelled, causing the contact surface to transition from a lubricated state to one of dry friction in a very short period, leading to a continuous increase in the friction coefficient. The surface pits on the textured specimens can store lubricating oil, and during the sliding process, due to the compression between the friction pairs, the lubricating oil stored in the pits can be replenished to the sliding surface, resulting in secondary lubrication. Moreover, as the friction process continues, wear debris is generated on the surface of the friction pair, which accelerates the wear process by increasing surface interaction and material removal. However, pit textures effectively trap and retain wear debris, which not only minimizes further surface damage but also reduces the friction coefficient and wear loss. This collection of debris enhances lubrication between the contact surfaces and helps stabilize the friction coefficient over time [21,22,23]. The friction and wear resistance of S3 is better than that of S1 and S4 because when the depth-to-diameter ratio is too small, the pits are shallow and have weak oil storage capacity, making effective secondary lubrication difficult. Conversely, when the depth-to-diameter ratio is too large, the pits are deep, creating a sealing effect and making it difficult to effectively release the lubricating oil onto the friction surface and form efficient secondary lubrication. Therefore, the friction and wear resistance is poor.

3.2.3. Morphological Analysis of Surface Wear of Specimens with Different Depth-to-Diameter Ratios

Figure 9 shows the wear surface morphology of smooth specimens and specimens with textures with different depth-to-diameter ratios. From the figure, it is evident that the surface wear on S1 and S4 is more severe than that on S8, while the surface wear on S2 and S3 is less severe than that on S8. As shown in Figure 9, the surface of S8 exhibits severe wear, with significant material deformation in the wear track and relatively large wear track width and depth values. In S1, due to the shallowness of the pits and the small amount of oil supply, it is difficult for the friction surface to form a continuous and effective lubrication film, resulting in severe surface wear. This leads to typical adhesive wear and deeper plowing grooves. In S2 and S3, with increasing pit depth-to-diameter ratios and enhanced oil supply, the friction surface is able to form better secondary lubrication; thus, the pit morphology remains more intact and the wear is less severe. In contrast, in S4, due to the deeper pits, lubricating oil is not easily released from the pits during sliding, preventing the formation of an effective oil film and resulting in severe adhesive wear and deeper wear tracks. Comparing the textured and the smooth specimens reveals that the wear on specimens with depths of 15 μm and 30 μm is higher than that on the smooth specimen, indicating that not all texture designs provide a friction-reducing effect. However, when the pit depth is 25 μm, corresponding to a depth-to-diameter ratio of 0.083 (S3), the texture exhibits the best friction-reducing effect.
Figure 9. Wear surface morphology of GCr15 steel under different depth-to-diameter ratios.
By comparing the friction coefficients, average friction coefficients, wear volumes, and wear surface morphologies of four specimens with different depth-to-diameter ratios and the smooth specimen, it is found that pits with a depth-to-diameter ratio of 0.083 (S3) provide the best friction and wear reduction effect. Therefore, this depth-to-diameter ratio was maintained, and specimens with different pit area distribution rates were prepared to explore the effect of the pit area ratio on the surface friction and wear performance of the specimens.

3.3. Effect of Area Ratio on the Surface Friction and Wear Performance of Specimens

3.3.1. Effect of Area Ratio on the Friction Coefficient of Specimens’ Surfaces

The optimal pit depth-to-diameter ratio of 0.083, according to previous tests, was selected to study the effect of different area ratios on the friction coefficient of the GCr15 bearing steel friction pair. Figure 10 shows the friction coefficient of GCr15 bearing steel with different area ratios when the depth-to-diameter ratio is 0.083. It can be observed that different area ratios of the pit texture significantly affects the specimen’s friction coefficient. The friction coefficient curves exhibit different trends over time. Among them, the friction coefficient of S7 is generally higher than that of S8, while the friction coefficients of the other three textured specimens are significantly lower than that of S8. The sharp increase in S7 (low area ratio) indicates that an excessively low texture coverage cannot provide sustained load/support lubrication, leading to sudden friction deterioration after texture failure. In contrast, S8 (smooth sample) lacks the protection provided by texture during the test, resulting in continuously high and unstable friction. The friction coefficient curve of S7 exhibits significant fluctuations and spikes, the core reason for this behavior being the interaction between its surface texture (H = 25 μm, A = 7.4%) and the dynamic contact behavior of the friction pair. The dynamic process of “wear particle generation, detachment, and filling” occurs during friction, where wear particles accumulate or detach instantaneously. The pits in the texture are prone to capturing wear particles, temporarily reducing the friction coefficient. If the wear particles are suddenly extruded or detached, the friction pair will re-engage with the rough surface, causing a sharp increase in friction force and forming a spike. The texture area ratio of S7 (A = 7.4%) is the lowest among similar samples (S3: A = 14.9%, S5: A = 11.2%, S6: A = 8.9%). During sliding, the contact state of the friction pair switches more frequently between the “smooth areas” and the “textured areas,” leading to greater fluctuations in the friction coefficient. The dispersed texture is more prone to “local overload wear,” which exacerbates the unevenness of the surface topography and further amplifies the fluctuation of the friction coefficient. Additionally, except for S3, where the friction coefficient decreases with time, the friction coefficients of the other four specimens generally increase over time. Specifically, the friction coefficient of S7 reaches its peak at around 900 s, approximately 0.158, while the friction coefficient of S8 peaks at around 1100 s, approximately 0.175. Both of these specimens exhibit more significant fluctuations in their friction coefficient during the test compared to the other three specimens. Throughout the entire test, the friction coefficient of S3 is relatively low, and its friction coefficient curve is smoother.
Figure 10. Effect of different area ratios on the friction coefficient of GCr15 steel.
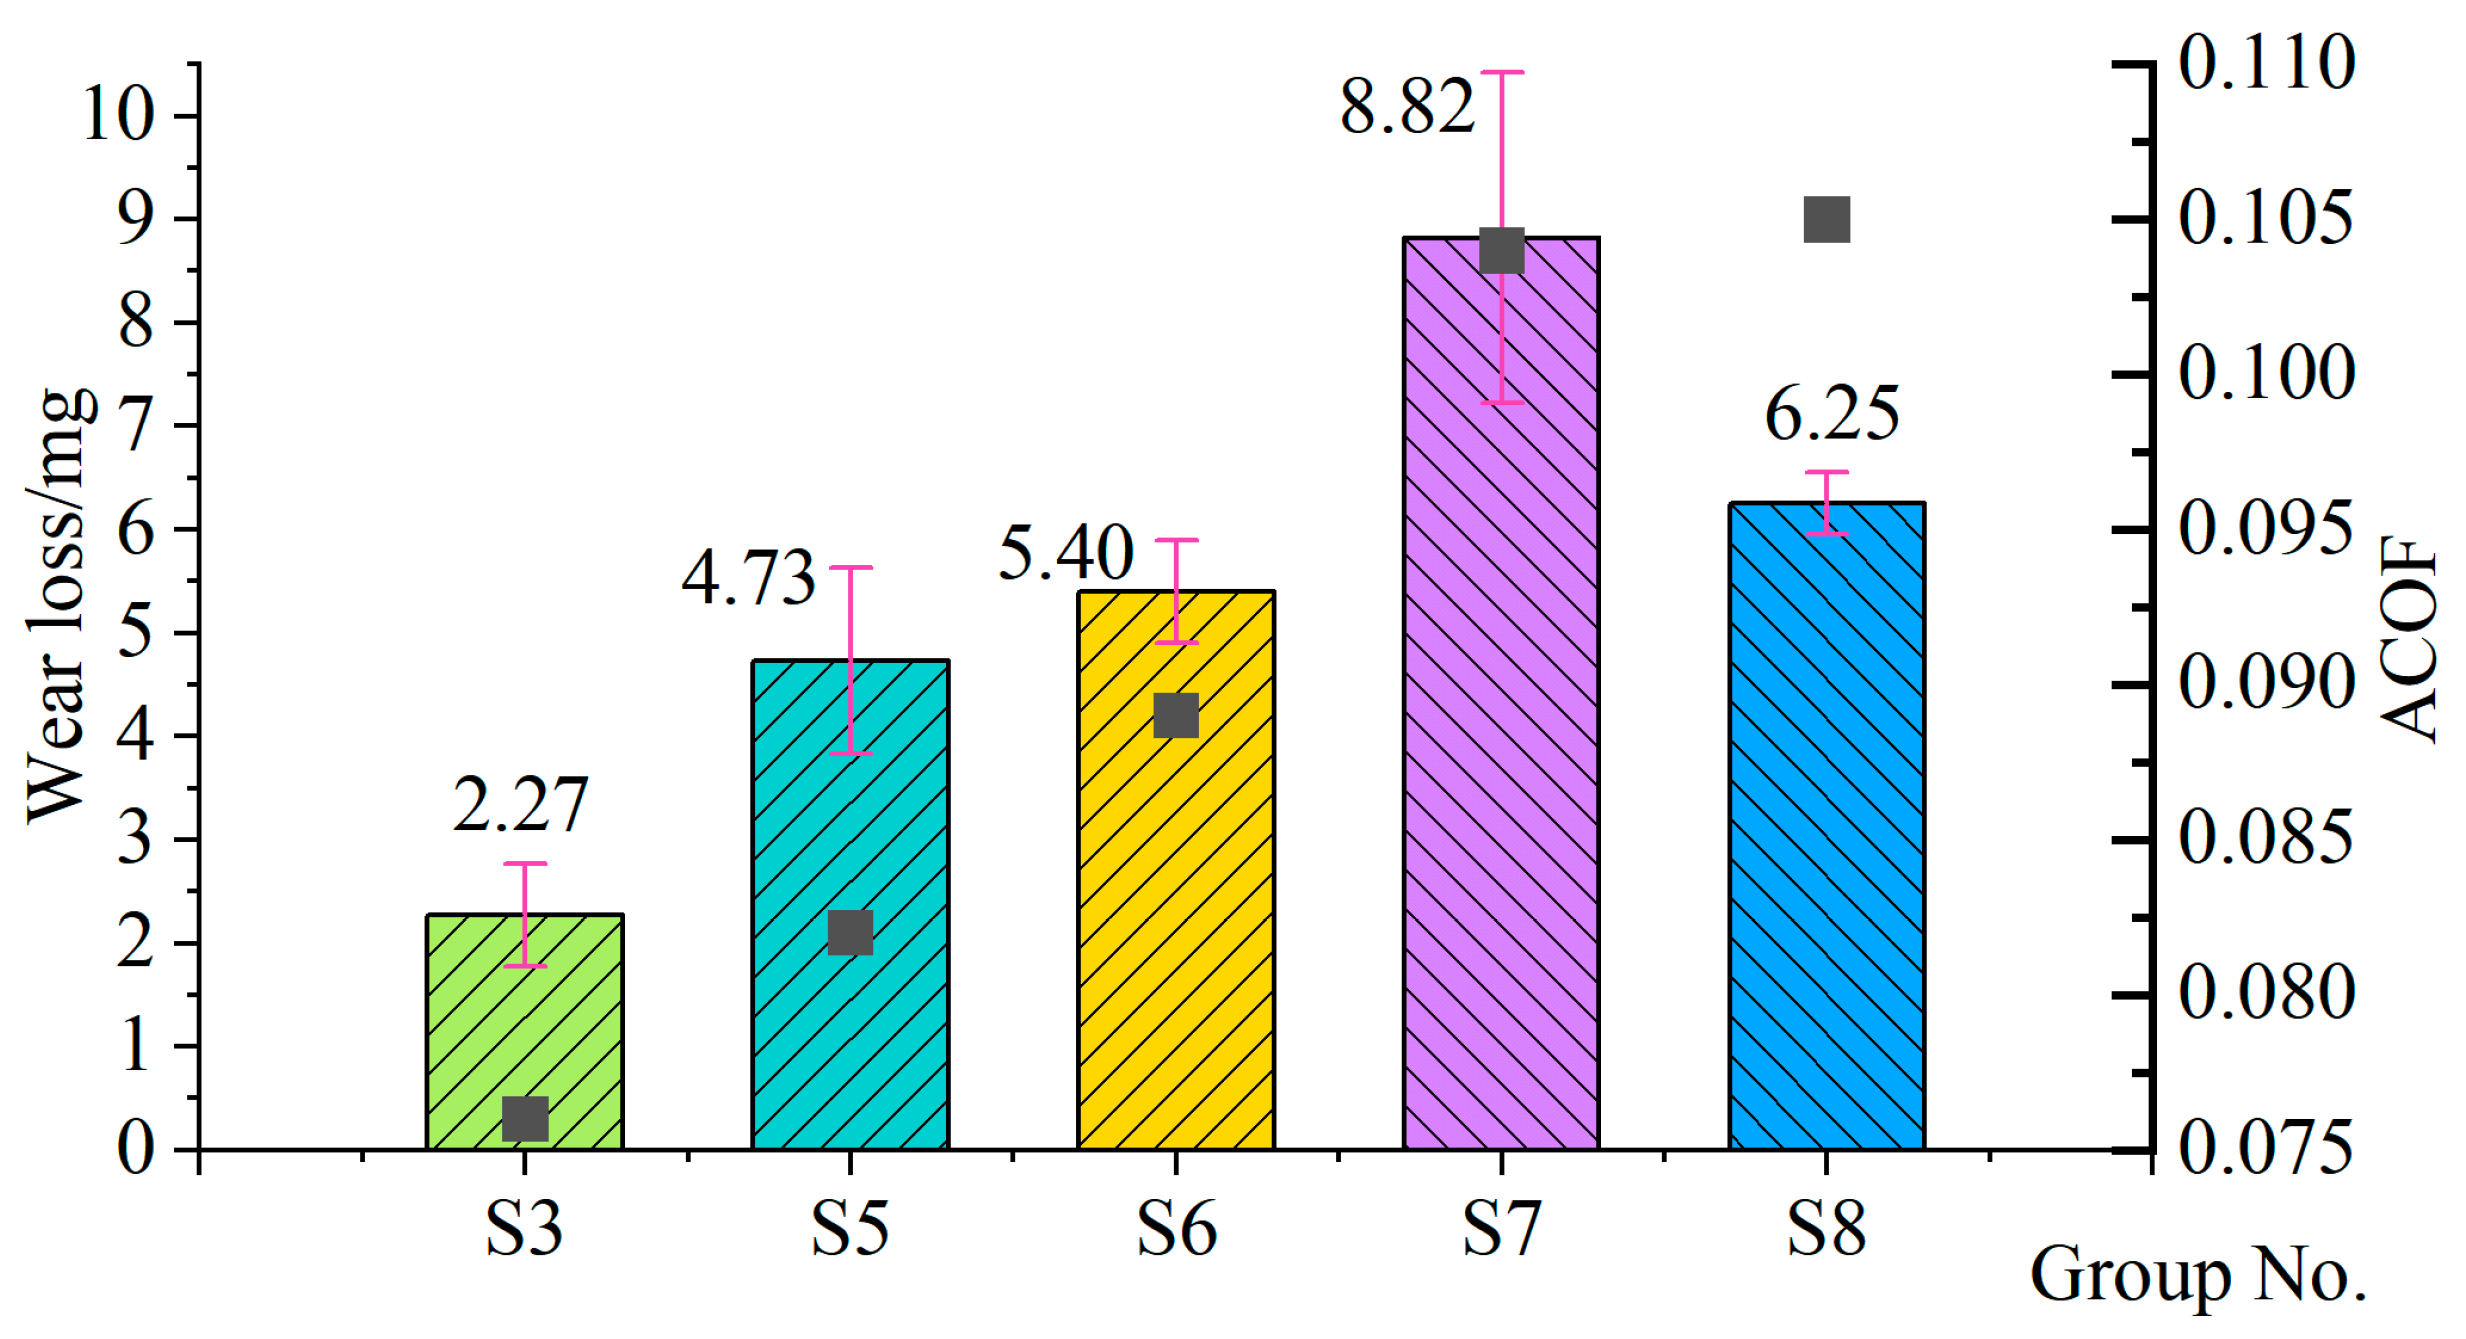
Figure 11 allows for a more intuitive comparison of the friction-reducing effects of different area ratio textures on the material surface. It can be seen that different pit texture area ratios significantly affect the average friction coefficient of GCr15 steel. Among the specimens, S7 has the highest average friction coefficient of 0.104, which is slightly higher than that of S8. In contrast, the average friction coefficients of the other three textured specimens are lower than that of S8, with S3 having the lowest average friction coefficient of 0.076, which is 0.029 lower than that of S8. A comparison of the average friction coefficients of the four specimens with different area ratios shows that the average friction coefficient decreases gradually as the area ratio decreases.
Figure 11. Wear loss and average friction coefficient of GCr15 bearing steel under different area ratios. Black square represent the average coefficient of friction of the sample.

3.3.2. Effect of Area Ratio on the Wear Loss of Specimens

From Figure 11, it can be seen that the wear degree of the textured surface is closely related to the area ratio, with different area ratios significantly affecting the wear loss of the textured surface. Not all textures provide wear resistance to the material surface. Among the specimens, S7 exhibits the highest wear loss of 8.82 mg, which is 2.57 mg higher than that of S8. In contrast, S3 has the smallest wear loss of 2.27 mg, which is a 63.7% reduction compared to S8. Observing the four specimens with different area ratio textures shows that the wear loss increases as the area ratio decreases.
Based on the analysis of the above results, it is clear that surface texturing has a positive effect on friction and wear reduction under starved lubrication conditions, and this effect is closely related to the area ratio. Under starved lubrication conditions, the area ratio parameters significantly impact the friction-reducing effect; for example, a reasonable pit area ratio can achieve better friction reduction. Furthermore, within a certain range, a larger area ratio is more beneficial for friction reduction because when the area ratio is too small, the oil film pressure difference becomes larger, leading to large microscopic disturbances during sliding. As a result, it becomes difficult to form a continuous oil film, which is unfavorable for the development of fluid dynamic pressure effects. Additionally, when the area ratio is too small, the number of pits is reduced, which means less oil is stored, shortening the time for secondary lubrication formation and exposing the friction pair to dry friction conditions sooner. The reduced number of pits also increases the contact area of the friction pair, weakening the ability of the pits to capture wear debris, which leads to a higher friction coefficient and greater wear loss. On the other hand, as the area ratio increases, the fluid dynamic pressure effect is enhanced to varying degrees, making it easier to form a continuous oil film. The increased number of pits allows for more lubrication oil and wear debris to be stored, resulting in more long-lasting secondary lubrication effects; therefore, the friction coefficient and wear loss are reduced.

3.3.3. Surface Wear Morphology Analysis of Specimens with Different Area Ratios

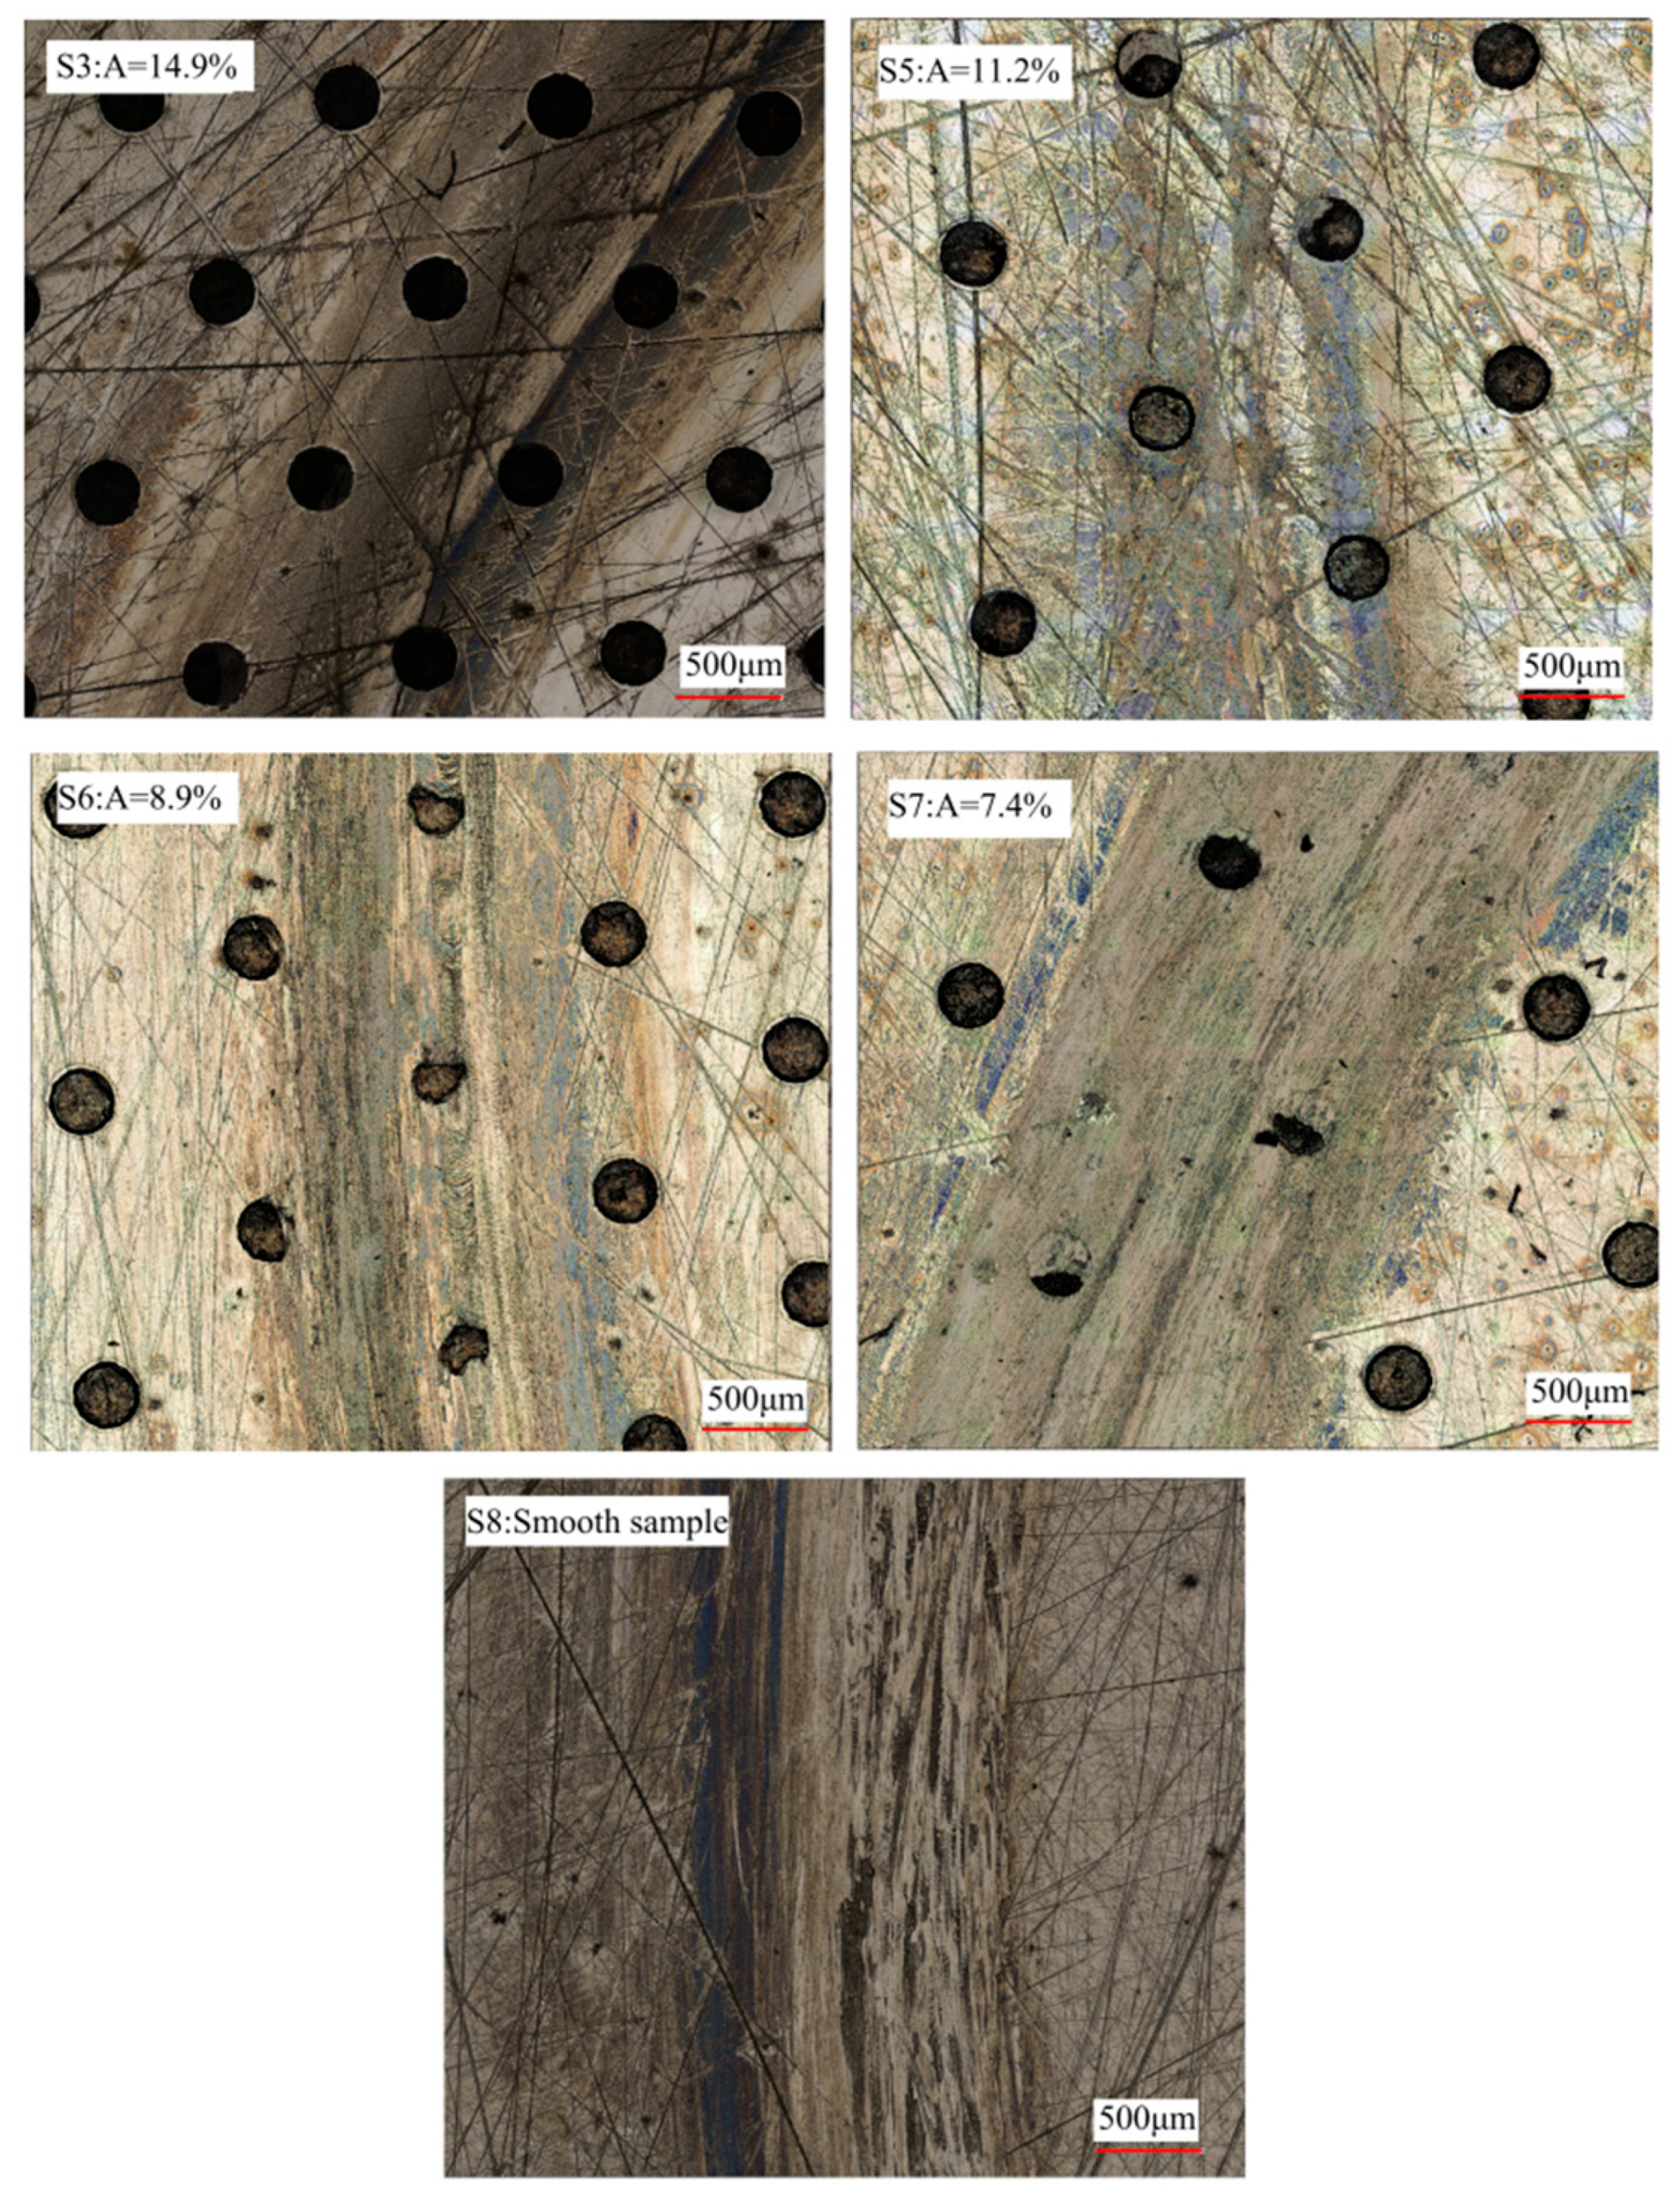
Figure 12 shows the wear surface morphology of smooth specimens and specimens with textures with different area ratios. During the wear process of the GCr15 bearing steel friction pair, material transfer occurs. In the sliding wear process for this pair, the contact interface undergoes material transfer from one surface to another due to mechanisms such as adhesive wear and abrasive wear. This results in the formation of a “transfer film” in the contact area. The transferred material is not a single component but a mixed system consisting of the GCr15 base material, wear particles, oxides, and potentially products of the lubrication medium. It can be seen that the surface wear of S8 is severe, exhibiting typical adhesive wear and abrasive wear with deep wear tracks. S7 shows the most significant wear, with the pit texture clearly damaged: some pits are flattened, showing severe adhesive wear and abrasive wear. As the area ratio increases, the degree of wear on the sliding surface gradually decreases. S3 exhibits the least wear, with the pit texture remaining intact and no obvious damage. This is because a smaller area ratio corresponds to fewer pits, limiting the capacity for storing lubrication oil and the ability to capture wear debris during the friction process. Additionally, the greater distance between pits makes the development of fluid dynamic pressure effects more difficult and hinders the formation of an oil film. On the other hand, a larger area ratio is more favorable for the formation of a fluid dynamic pressure effect, resulting in a continuous oil film. The increased number of pits allows for better capture of wear debris and greater storage of lubrication oil, facilitating secondary lubrication. This enables the sliding surface to maintain a sufficiently thick oil film for longer, delaying the onset of dry friction and providing better protection to the sliding surface, thus reducing wear. Therefore, S3 exhibits the best friction-reducing effect.
Figure 12. Wear surface morphology of GCr15 steel at different area ratios.
By comparing the friction coefficient, average friction coefficient, wear loss, and wear surface morphology of smooth specimens and four specimens with different area ratios, it is observed that when the depth-to-diameter ratio is 0.083, pits with an area ratio of 14.9% provide the best friction and wear reduction performance. Therefore, it is concluded that when the pit diameter is 300 μm, the depth-to-diameter ratio is 0.083, and the area ratio is 14.9%, the surface texture exhibits the best friction and wear reduction effect.

4. Conclusions

This study investigates the effect of pit surface texture with different geometric parameters on the friction and wear characteristics of specimens under starved lubrication conditions. Friction and wear reduction mechanisms are also explored and the optimal pit geometric parameters are selected through comparison. Additionally, the influence of load on friction and wear performance is analyzed under varying load conditions. The following conclusions are drawn:
(1)
When creating surface pit textures, the processing speed, laser power, and laser frequency significantly affect the integrity of the pit texture. When the laser parameters are set to a processing speed of 200 mm/s, laser power of 10 W, and laser frequency of 80 kHz, the pit texture integrity is high, with clear edges and a smooth bottom, resulting in good pit texture morphology.
(2)
Surface pit textures can effectively collect and store wear debris. Compared to smooth specimens, the centrifugal force during high-speed rotation significantly reduces the amount of abrasive particles remaining on the sliding contact surface. As the test progresses, the lubrication oil on the sliding friction pair is gradually depleted, and the oil that is stored in the pit is expelled, extending the lubrication of the friction pair. The pit texture can store excess lubrication oil and provide secondary lubrication to the system when the friction pair is not lubricated.
(3)
The depth-to-diameter ratio and area ratio of the pit texture on the contact surface significantly influence the friction and wear performance of GCr15 bearing steel sliding friction pairs. When the pit texture has a depth-to-diameter ratio β = 0.083 and an area ratio A = 14.9%, the friction coefficient and wear loss are 0.076 and 2.27 mg, respectively, which are reduced by 27.6% and 63.7% compared to the smooth specimen values of 0.105 and 6.25 mg. The specimen with this surface pit texture exhibits the best friction- and wear-reducing effect.

Author Contributions

Y.W., X.W., F.H., R.L., T.L., K.T. and X.Z. conceived the idea, carried out the experiments, and analyzed the results. Y.W. wrote and revised the manuscript. All authors have read and agreed to the published version of the manuscript.

Funding

This research was supported by the Key Laboratory of Industrial Product Testing Technology and Intelligent Testing Equipment of Shenyang City (Project Titles: Research on Friction and Wear of GCr15 Steel Friction Pairs Based on Surface Topography Detection Technology, Project Number: JC2504); the 2024 Scientific Research Project of the Education Department of Liaoning Province (Project Numbers: LJ212412594011 and LJ212412594013), and the Natural Science Foundation of Liaoning Province (Project Number: 2023-MS-234); the Key Laboratory of Industrial Product Testing Technology and Intelligent Testing Equipment of Shenyang City (Project Title: Research on Key Technologies of Multi-modal Signal Processing and 3D Visualization for Ultrasonic Non-destructive Testing of Complex Components, Project Number: JC2502; Project Title: Research on Digital Inspection Technology of Aviation Components Based on 3D Laser Scanning, Project Number: JC2507; Project Title: Construction of an Industry-University-Research-Application Collaborative Innovation Service Platform for Intelligent Non-destructive Testing Technology and Equipment, Project Number: JC2501).

Data Availability Statement

The original data used to support the findings of this study are available from the corresponding author upon request.

Conflicts of Interest

Author Fushun Hou was employed by Shandong Zhangqiu Blower Co., Ltd. The remaining authors declare that the research was conducted in the absence of any commercial or financial relationships that could be construed as a potential conflict of interest.

References

  1. Wen, S.; Huang, P.; Tian, Y.; Ma, L. Tribological Principles, 5th ed.; Tsinghua University Press: Beijing, China, 2018. [Google Scholar]
  2. El-Thalji, I.; Jantunen, E. Dynamic modelling of wear evolution in rolling bearings. Tribol. Int. 2015, 84, 90–99. [Google Scholar] [CrossRef]
  3. Maldonado-Cortés, D.; Peña-Parás, L.; Martínez, N.R.; Leal, M.P.; Correa, D.I.Q. Tribological characterization of different geometries generated with laser surface texturing for tooling applications. Wear 2021, 477, 203856. [Google Scholar] [CrossRef]
  4. Senatore, A.; Risitano, G.; Scappaticci, L.; D’andrea, D. Investigation of the Tribological Properties of Different Textured Lead Bronze Coatings Under Severe Load Conditions. Lubricants 2021, 9, 34. [Google Scholar] [CrossRef]
  5. Li, D.; Yang, X.; Wang, S.; Liu, W.; Wang, Z.; Xia, G. Research Status and Progress of Micro/Nano Texture on Workpiece Surface. J. Mech. Strength 2020, 42, 1348–1355. [Google Scholar] [CrossRef]
  6. Zhong, B.; Xing, Z.; Wang, H.; Lv, X.; Huang, Y.; Guo, W.; Zhang, Z. Research progress on Tribological properties of textured surfaces. Mater. Rev. 2020, 34, 23171–23178. [Google Scholar] [CrossRef]
  7. Chang, Q.; Qi, Y.; Wang, B.; Qi, J. Influence of laser surface texture on dry Friction properties of 45 steel. J. Mech. Eng. 2017, 53, 148–154. [Google Scholar] [CrossRef]
  8. Liu, S.; Sai, Q.; Wang, S.; Williams, J. Effects of Laser Surface Texturing and Lubrication on the Vibrational and Tribological Performance of Sliding Contact. Lubricants 2022, 10, 10. [Google Scholar] [CrossRef]
  9. Sun, T.; Zheng, S.; Yao, J.; Qiu, J.; Zhao, Y. The influence of laser texturing on the surface of GCr15 steel on its tribological properties. Electroplat. Finish. 2020, 44, 70–80. [Google Scholar] [CrossRef]
  10. Opia, A.C.; Abdul Hamid, M.K.; Daud, Z.H.; Syahrullail, S.; Johnson, C.N.; Izmi, M.I.; Rahim, A.B. Effect of Surface Texturing on Organic Carbon Nanotubes Tribological Performance on Sliding Contact Lubrication. In Lecture Notes in Mechanical Engineering, Proceedings of the 3rd Malaysian International Tribology Conference, Langkawi, Malaysia, 28–30 September 2022; Springer: Berlin/Heidelberg, Germany, 2022. [Google Scholar] [CrossRef]
  11. Chen, S.; Wang, W.; Cong, J.; Yuan, W.; Guo, Q.; Zhu, S.; Yu, J. Research on Friction Modification Method of GCr15 Surface Coating and Fabric Composite. Mod. Manuf. Eng. 2023, 5, 1–5. [Google Scholar] [CrossRef]
  12. Zhao, J. Research on Tribological Properties of Surface Texture of Sliding Bearing Friction Pairs. Master’s Thesis, Lanzhou Jiaotong University, Lanzhou, China, 2022. [Google Scholar] [CrossRef]
  13. Li, S. Test on Friction and Wear Performance of Laser Textured GCr15 Steel Lubricated with oil. Lab. Res. Explor. 2020, 39, 35–40. [Google Scholar]
  14. Guo, D.; Zhang, P.; Jiang, Y.; Song, C.; Tan, D.; Yu, D. Effects of surface texturing and laminar plasma jet surface hardening on the tribological behaviors of GCr15 bearing steel. Tribol. Int. 2022, 169, 107465. [Google Scholar] [CrossRef]
  15. Lai, F.; Cao, C.; Chen, H.; Lin, C.; Song, C.; Lei, K.; Lin, Y.; Wu, Z. Influence of micro-groove surface texture on the lubrication tribological properties of GCr15 bearing steel. Proc. Inst. Mech. Eng. Part J J. Eng. Tribol. 2025, 239, 1337–1354. [Google Scholar] [CrossRef]
  16. Wang, W.; Yuan, W.; Guo, Q.; Wang, N.; Chi, B.; Yu, J. Effect of picosecond laser surface texturing under Babbitt coating mask on friction and wear properties of GCr15 bearing steel surface. Eng. Fail. Anal. 2024, 157, 107878. [Google Scholar] [CrossRef]
  17. Wu, J.; Deng, J.; Lu, Y.; Zhang, Z.; Meng, Y.; Wang, R.; Sun, Q. Effect of textures fabricated by ultrasonic surface rolling on dry friction and wear properties of GCr15 steel. J. Manuf. Process. 2022, 84, 798–814. [Google Scholar] [CrossRef]
  18. Opia, A.C.; Kadirgama, K.; Mamah, S.C.; Ghazali, M.F.; Harun, W.S.W.; Adeboye, O.J.; Agi, A.; Alibi, S. Electric Vehicles as a Promising Trend: A Review on Adaptation, Lubrication Challenges, and Future Work. Lubricants 2025, 13, 474. [Google Scholar] [CrossRef]
  19. Opia, A.C.; Abdollah, M.F.; Amiruddin, H.; Abdul Hamid, M.K.; Mohd Zawawi, F. Assessment on tribological responsiveness of different polymers on AISI 52100 steel using a sensitive reciprocating tribometer. Tribol.—Mater. Surf. Interfaces 2024, 18, 20–30. [Google Scholar] [CrossRef]
  20. Liu, D. Experimental Study on the Influence of Surface Texture Treatment on the Tribological Properties of Polymer-Metal Pairs. Master’s Thesis, Yanshan University, Qinhuangdao, China, 2016. [Google Scholar]
  21. Bhardwaj, V.; Pandey, R.K.; Agarwal, V.K. Performance studies of textured race ball bearing. Ind. Lubr. Tribol. 2019, 71, 1116–1123. [Google Scholar] [CrossRef]
  22. Rosenkranz, A.; Grützmacher, P.G.; Gachot, C.; Costa, H.L. Surface Texturing in Machine Elements—A Critical Discussion for Rolling and Sliding Contacts. Adv. Eng. Mater. 2019, 21, 1900194. [Google Scholar] [CrossRef]
  23. Wang, Y.; Zhang, Y.; Long, R. Influence of Pits on the Tribological Properties and Friction-Induced Vibration Noise of Textured Tapered Roller Bearings. Tribol. Trans. 2023, 66, 399–412. [Google Scholar] [CrossRef]
Disclaimer/Publisher’s Note: The statements, opinions and data contained in all publications are solely those of the individual author(s) and contributor(s) and not of MDPI and/or the editor(s). MDPI and/or the editor(s) disclaim responsibility for any injury to people or property resulting from any ideas, methods, instructions or products referred to in the content.

Article Metrics

Citations

Article Access Statistics

Multiple requests from the same IP address are counted as one view.