Article

Influence of Counter Surface Roughness and Lay on the Tribological Behaviour of Self-Lubricating Bearing Materials in Dry Sliding Conditions at High Contact Pressures

1
Division of Machine Elements, Luleå University of Technology, SE-971 87 Luleå, Sweden
2
Division of Fluid and Experimental Mechanics, Luleå University of Technology, SE-971 87 Luleå, Sweden
3
ALS Laboratory Group, ALS Scandinavia AB, SE-977 75 Luleå, Sweden
*
Author to whom correspondence should be addressed.
Lubricants 2022, 10(8), 167; https://doi.org/10.3390/lubricants10080167
Submission received: 11 June 2022 / Revised: 10 July 2022 / Accepted: 13 July 2022 / Published: 22 July 2022
(This article belongs to the Special Issue Tribological Characteristics of Bearing System)

Abstract

:
In Kaplan turbines, the most critical components are the self-lubricating polymer composite bearings used to control the guide vanes and the turbine blades. Reducing the sliding wear and friction of these bearings can benefit both the economy and the environment, including longer useful life, lower operational costs, and higher efficiency. In this study, the influence of stainless-steel counter surface roughness and lay on the tribological behaviour of three bearing materials used in hydropower applications were investigated using a linear reciprocating flat-on-flat configuration under high contact pressure and low sliding speed. The surface roughness was measured using white light interferometry. SEM and EDS analysis were used to investigate the worn surfaces. Results from this study show that overly smooth surfaces result in higher friction and wear of the counter surface, while rougher surfaces have a negative effect on the wear of the polymers. Highest surface coverage using protective transfer layers is found on the steel surfaces with the perpendicular lay and is accompanied with a lower coefficient of friction compared to the parallel lay. The dominant wear mechanism of the bearing materials changes from delamination wear to abrasive wear between the lowest and the intermediate roughness for steel surfaces with the parallel lay. It can be concluded that counter surface topography has a significant influence on the tribological behaviour of these bearing materials and that the effect differs between the self-lubricating polymer composites.

1. Introduction

The use of renewable energy sources has dramatically increased in recent years, mainly driven by legislation and an increased will to take action to combat the global climate crisis. Today, hydropower is the largest renewable energy source, providing almost half of the low-carbon electricity generation worldwide, and plays a key role in providing flexibility and security in electricity systems [1]. This is because electricity production from other renewable sources such as wind and solar photovoltaics is strongly influenced by the weather, the time of day, or the season. Hence, the rapid integration of these sources into the electricity systems requires active control of the power output to compensate for fluctuations in supply. Meanwhile, the hydropower plants can very rapidly ramp their electricity generation up and down and can be stopped and restarted relatively smoothly [1], therefore shouldering a large portion of the regulation and balancing duty in many power systems [2]. These new requirements for the hydropower have shown to have a negative effect on the service life of the turbines [3,4,5,6] and can lead to reduced productivity and, in the worst case, turbine failure [4].
The self-lubricating polymer composite bearings used for adjustments of the guide vanes and the turbine blades are critical components that are negatively affected by a higher number of start/stop cycles and a significantly higher number of load cycles with small sliding amplitudes [3]. Therefore, it is of great interest to investigate how the operating conditions for these bearings can be optimized in order to obtain lower friction and wear. An important aspect to investigate is the effect of the stainless-steel counter surface topography on friction and wear.
Lloyd and Noel [7] reported increased friction and wear with increased counter surface roughness for ultrahigh-molecular-weight polyethylene (UHMWPE) sliding against stainless steel (Ra 0.1–1.0 µm). In contrast to these findings, a decrease in the coefficient of friction with increased counter surface roughness was reported in [8] for elastomers sliding against steel (Ra 0.15–0.7 µm), as well as in [9] for various conventional polymer composite materials sliding against grey cast iron (Rq 0.094 µm and 2.16 µm). Nunez and Polycarpou [9] attributed this behaviour to a higher number of contact spots when the surface is smoother, contributing to a higher shear traction needed to slide against the polymer. Zsidai et al. [10] also observed a reduction in friction for most of the tested engineering thermoplastics sliding against a rougher steel surface (Ra 0.1–0.3 µm) compared to a smoother (Ra 0.02–0.08 µm) hardened and tempered 40CrMnNiMo8 steel surface. This was explained by a decreased influence of adhesion on friction with increased counter surface roughness. Golchin et al. [11] investigated the effect of counter surface topography on the performance of polyphenylene sulfide (PPS) composites sliding against Inconel 625 with a surface finish of Ra 0.08–0.55 µm and, irrespective of the surface lay orientation, observed a lower friction for the roughest counter surfaces. Pooley and Tabor [12] demonstrated that the coefficient of friction of polytetrafluoroethylene (PTFE) is marginally affected by the nature of the counter surface as long as it is smooth (Ra below 0.1 µm).
Zsidai et al. [10] and Quaglini et al. [13] suggested that an optimal counter surface roughness exists for any polymer, resulting in minimum friction. Quaglini et al. [13] proposed that it depends on the bulk properties of the polymer and that softer polymers with a lower modulus of elasticity exhibit improved sliding performance on very smooth surfaces (Ra 0.05–0.10 µm), whereas the high-modulus polymers display the lowest friction with rougher polished counter surfaces (Ra 0.10–0.30 µm).
According to Zsidai et al. [10], two mechanisms contribute to the friction force between a thermoplastic and steel: adhesion in the contact zone and deformation in the polymer. In case of sliding against rough surfaces, the deformation component increases, while the adhesion becomes more important for smooth counter surfaces. The terms “smooth” and “rough” are commonly used to describe the surfaces; nevertheless, according to Quaglini et al. [13], these terms are used in a qualitative sense and the corresponding values have not yet been defined.
The counter surface roughness can also affect the wear behaviour of polymers. Lower wear against smooth surfaces compared to rougher surfaced was observed for most of the tested engineering thermoplastics in [10]. However, there is a lack of explanations for this behaviour. Giltrow and Lancaster [14] suggested that transfer layers reduce the surface roughness of the counter surface by filling the surface valleys. This reduces the magnitude of the local stresses on fibres at the polymer composite surface. The reduced stress levels can also improve the fatigue behaviour, as reported in [14,15], contributing to lower wear rates. A critical surface roughness was proposed, above which the transfer layers can struggle to mask the highest asperity peaks [14]. In that case, an abrasive (cutting) component of wear can be prevalent, even after the establishment of the transfer layers.
Information on the influence of counter surface lay on the tribological performance is scarce in the open literature. A lower coefficient of friction for perpendicular lay compared to the parallel lay is described in [11] for PPS composites sliding against Inconel 625 (Ra 0.08–0.55 µm). However, the influence on the wear rate differs between the various composite materials, where some experience lower wear rates for the perpendicular lay and others experience a higher wear rate of up to two orders of magnitude compared to the parallel lay. The formation of transfer layers is also affected by the surface lay where the perpendicular lay results in improved coverage compared to parallel [11,16,17].
It is clear that both counter surface roughness and lay have a significant influence on the tribological performance of various polymers, but the friction and wear response are highly material-dependent. Hence, it is of great importance to investigate the influence of counter surface topography on friction and wear of selected self-lubricating bearing materials under operating conditions relevant for hydropower applications.
To bridge this gap, the present study aims to systematically investigate the influence of stainless-steel counter surface roughness and lay on the tribological behaviour of three self-lubricating polymer composite bearing materials.

2. Materials and Methods

In the following section, the experimental materials and methods used for material characterization, tribological characterization, and surface analysis are described.

2.1. Experimental Materials and Sample Preparation

In this study, three selected self-lubricating polymer composite bearing materials were investigated, namely deva.tex® 552 (Deva), Orkot® TXM Marine (Orkot), and Thordon ThorPlas Blue (ThorPlas). These bearing materials are used for many different applications such as hydropower, marine, and offshore. Deva (Federal-Mogul Deva GmbH, Stadtallendorf, Germany) consists of two layers: the outer sliding layer and the inner support layer. In this study, the polymer pins were made from only the sliding layer. This layer is made of a special type of reinforcement fibres, consisting of several polyester filaments oriented along the fibre and containing solid lubricants in the form of PTFE particles that are spun into the polyester filaments [18]. The fibres are embedded in an epoxy resin matrix with graphite as an additional solid lubricant [19]. Orkot (Trelleborg Sealing Solutions Rotherham, Rotherham, UK) is a fabric-reinforced thermoset with PTFE fibres as the transverse weft and polyester fibres as the longitudinal warp. The warp is embedded in a polyester-based thermoset matrix that contains PTFE and MoS2 particles as solid lubricants and additional calcium carbonate (CaCO3) particles as filler in the material [20]. ThorPlas (Thordon Bearings Inc., Burlington, ON, Canada) is a homogeneous thermoplastic alloy containing evenly dispersed and spherically shaped PTFE inclusions and silicone-based additives as solid lubricants [20]. Representative optical images of the load-carrying surface of the three unworn materials are presented in Figure S1 and the material properties are listed in Table S1.
A more detailed material characterization of the fabric-reinforced thermoset (Orkot) and the thermoplastic (ThorPlas) with respect to microstructure and chemical composition is presented in [20]. Similar material characterization of the fibre-reinforced thermoset (Deva) is not available in the open literature and is therefore provided in the Supplementary Material. The microstructure of the fibre-reinforced thermoset material is presented in Figures S2–S4 as well as Videos S1–S4. The volume fractions of the quantified internal phases are summarised in Table S2. The volume distribution of pores and higher density particles (impurities) is shown in Figures S5–S8. EDS analysis of an unworn fibre-reinforced thermoset pin surface is presented in Figure S9. The average concentrations of inorganic constituents in the fibre-reinforced thermoset are presented in Table S3. A comparison of the microstructure and composition between the three bearing materials is discussed in the Supplementary Material. For the tribological tests, cubic pins with dimensions 4 × 4 × 4 mm3 (l × w × h) were machined from the three bearing materials. The edges of the load-carrying side of the pins were manually ground using SiC abrasive paper (grit size #600) in order to remove machining marks and protruding fibres and to minimize the edge effect. The pins were thereafter cleaned with ethanol in an ultrasonic bath for three minutes and dried in air prior to the experiments.
Austenitic stainless steel (SS 2333) was used as the counter surface for the tribological tests, the chemical composition of which is shown in Table S4. Plates were laser-cut from a cold rolled sheet to dimensions 60 × 30 × 3 mm3 (l × w × h) with its surface lay parallel to the sliding direction. Additional plates were laser-cut with its surface lay perpendicular to the sliding direction. The measured hardness of the as-received plates was 205 ± 5 HV0.1.
In total, nine different combinations of surface roughness and lay of the stainless-steel plates were prepared for the tribological tests. The surface topographies are illustrated in Figure 1 and the measured surface roughness given in Table 1. In order to obtain the isotropic surface lay, the stainless-steel plates were ground using a semiautomatic Buehler Phoenix 4000 (Buehler® Ltd., Lake Bluff, IL, USA) polishing machine. For the Sa = 0.3 µm surface roughness (Figure 1c), waterproof SiC papers (Struers) from grit number P60 (average grit size 269 µm) down to P240 (average grit size 58.5 µm) were used. For the Sa = 0.08 µm surface roughness (Figure 1b), SiC papers down to P800 (average grit size 21.8 µm) were used. For the mirror-polished surfaces (Figure 1a), SiC papers down to grit number P4000 (average grit size 5 µm) were used followed by a polishing process using Struers LaboPol-20 (Struers, Cleveland, OH, USA) polishing machine together with 1 µm liquid diamond type WX XStr (Kemet, Maidstone, Kent, UK). For the Sa = 0.3 µm surface roughness and parallel surface lay (Figure 1d), the stainless-steel plates were used in as-received condition after being laser-cut from the cold rolled sheet with its surface lay parallel to the sliding direction. For the perpendicular surface lay, the plates were cut in the same way but with its lay perpendicular to the sliding direction (Figure 1e). In order to obtain the Sa = 0.7 µm surface roughness (Figure 1f,g), the stainless-steel plates were manually ground using SiC paper with grit number P120 parallel and perpendicular to the sliding direction, respectively. Finally, SiC papers with grit number P60 were used to obtain the Sa = 1.1 µm surface roughness (Figure 1h,i). Prior to the experiments, the plates were all ultrasonically cleaned with ethanol for seven minutes to remove contaminants on surfaces and dried in air before testing.

2.2. Material Characterization

Material characterization of the fibre-reinforced thermoset was carried out using the same methods as for the thermoplastic and the fabric-reinforced thermoset in [20]. X-ray microtomography (XMT) was used in order to study the microstructure, and inductively coupled plasma sector field mass spectrometry (ICP-SFMS) was used to determine the chemical composition of the fibre-reinforced thermoset with respect to the inorganic elements. More details regarding the methods used are provided in the Supplementary Material.

2.3. Experimental Setup and Test Conditions

The tribological tests were carried out using a linear reciprocating tribometer (Plint-TE77, Phoenix Tribology Ltd., Newbury, UK) with a flat-on-flat configuration. The polymer bearing material pin was mounted in the upper reciprocating pin holder and the stainless-steel plate was fixed in the lower stationary specimen holder. A schematic diagram of the flat-on-flat test configuration is illustrated in Figure S10. The load was applied to the upper pin holder using a spring-loaded lever system. The reciprocating motion is provided by an electrical motor, which drives a crank mechanism via a gearbox.
The wear depth of the polymer pin was continuously measured using a linear variable differential transformer (LVDT) displacement sensor with a ±2.5 mm measurement range connected to the upper pin holder. The wear data were collected with a sampling frequency of 1 Hz and the specific wear rates were calculated based on the interval between one hour of sliding and the end of the test.
The friction force was continuously measured by a piezo-electric force transducer, located at the lower stationary specimen holder, using 1 kHz sampling frequency. However, due to the long test duration, friction data were collected at the beginning of the test, after 5 min, 10 min, 15 min, and 30 min, and thereafter with 30 min intervals until the end of the test over the last 15 load cycles. The average coefficient of friction was calculated based on the average over the same time interval as for the calculated wear rates, i.e., between one hour and the end of the test.
The normalized average coefficient of friction and the specific wear rate as a function of the counter surface roughness and lay were calculated by dividing them with the highest obtained average values with respect to the coefficient of friction and the specific wear rate, respectively, for each bearing material.
The tribological tests were carried out under dry reciprocating sliding and ambient conditions. The test parameters are given in Table 2. The selected sliding velocity and contact pressure are in the range of typical operating conditions for self-lubricating bearings in Kaplan turbines and were selected based on the findings from a previous study [20]. In total, nine combinations of stainless-steel counter surface roughness and lay (Table 1) were tested for each bearing material, with at least two repetition tests.

2.4. Surface Analysis

Optical images of the stainless-steel plates and the load-carrying surfaces of the polymer pins before and after the reciprocating tests were obtained using a digital camera Nikon D90 (Nikon, Tokyo, Japan) equipped with a Nikon AF-s 60/2,8 G ED Macro lens (Nikon, Tokyo, Japan). After the tests, loose wear debris accumulated at the edges of the wear track on the stainless steel, especially at the reversal points (Figure S11a). These wear particles were carefully removed using pressurised air (Figure S11b) prior to further surface analysis.
A 3D optical surface profilometer, Zygo NewView 7300 (Middlefield, CT, USA), was used for the surface topography measurements. The stainless-steel plates were measured before and after the tests using a magnification of 5× (objective: 10× and field of view: 0.5×), between the same reference points, as illustrated in Figure S11. The polymer pins could not be measured prior to experiments due to the poor reflectivity of these materials. However, the worn polymer pins were measured successfully using a magnification of 25× (objective: 50× and field of view: 0.5×).
The worn polymer pins and wear tracks on the stainless-steel counter surfaces were examined using a JEOL JSM-IT300 LV (Peabody, MA, USA) scanning electron microscope (SEM) equipped with an energy-dispersive X-ray spectrometer (EDS) in order to investigate the friction and wear mechanism as well as the transfer layers. The polymer pins were sputtered with a 15.1 ± 0.1 nm layer of gold (Au) or platinum (Pt) to reduce the charging effect in the SEM and increase the reflection of the light during the 3D optical surface profilometry measurements.

3. Results and Discussion

In the following section, results obtained from the tribological experiments and the analysis of worn surfaces are presented and discussed.

3.1. Ground Surfaces with Isotropic Lay

3.1.1. Friction and Wear

The average friction coefficients and specific wear rates as a function of counter surface roughness for the tested bearing materials sliding against the ground and the polished stainless-steel plates with the isotropic surface lay are presented in Figure 2. The average coefficients of friction (Figure 2a) show good repeatability with standard deviations up to 10%, except for the fibre-reinforced thermoset at the lowest and highest surface roughness with standard deviations up to 16%. The higher deviation is explained by the random presence of larger pores and impurities between the different pin specimens.
The friction levels at the lowest initial counter surface roughness (Sa = 0.006 µm) are similar between the three bearing materials (Figure 2a) and decrease with increasing roughness. The friction is also similar between the thermoset materials at the intermediate and highest initial counter surface roughness, while the thermoplastic shows the highest friction. The reduction in friction between the smoothest (Sa = 0.006 µm) and the roughest counter surface (Sa = 0.3 µm) is highest for the fibre-reinforced thermoset (88%) and lowest for the thermoplastic (44%).
A lower coefficient of friction for rougher counter surfaces has been reported for elastomers [8] and engineering thermoplastics [10] sliding against steel with surface finish of Ra 0.15–0.7 µm. This was attributed to a decreased influence of adhesion on friction with increased counter surface roughness [10]. A reduction in friction sliding against rougher counter surfaces compared to smoother has also been reported for PPS composites sliding against Inconel 625 [11] and various conventional polymer composite materials sliding against grey cast iron [9]. This was explained by a higher number of contact spots for the smoother surface, which contributes to a higher shear traction (i.e., adhesion) needed to slide against the polymer surface [9].
The average specific wear rates (Figure 2b) show very good repeatability between tests at the intermediate surface roughness (Sa = 0.08 µm) with standard deviations up to 4%. However, the standard deviations up to 18% are the lowest (Sa = 0.006 µm) and highest (Sa = 0.3 µm) initial surface roughness.
The effect of initial counter surface roughness on the specific wear rate differs between the three bearing materials. Similar to the coefficient of friction, the specific wear rates at the lowest (Sa = 0.006 µm) and highest (Sa = 0.3 µm) initial counter surface roughness are similar between the thermoset materials. However, at the intermediate initial counter surface roughness (Sa = 0.08 µm), the specific wear rate is the lowest for the fibre-reinforced thermoset, while it is highest for the fabric-reinforced thermoset. It is interesting that the specific wear rate is more than 50% higher for the fabric-reinforced thermoset compared to the fibre-reinforced thermoset at the intermediate surface roughness, despite showing similar coefficients of friction.
For the fibre-reinforced thermoset, the specific wear rate decreased by 34% between the lowest (Sa = 0.006 µm) and the intermediate (Sa = 0.08 µm) surface roughness (Figure 2b). The specific wear rate then increases by 15% between the intermediate and the highest surface roughness (Sa = 0.3 µm). This indicates a transition in wear mechanisms. Ovaert and Cheng [21] reported similar behaviour for unfilled PEEK and carbon fibre-reinforced polyetheretherketone (PEEK) sliding against mild steel, showing the lowest wear for counter surface roughness RMS of 0.15 µm and 0.25 µm, respectively. This was explained by a change from the high cycle fatigue and delamination wear to the low cycle fatigue and abrasive wear.
The fabric-reinforced thermoset shows opposite behaviour compared to the fibre-reinforced thermoset with an initial increase (11%) in specific wear rate between the lowest and the intermediate initial counter surface roughness. Thereafter, a decrease (40%) between the intermediate and the highest surface roughness occurs. The higher wear rates for the fabric-reinforced thermoset sliding against smoother counter surfaces are explained by the roughening of the counter surface by the abrasive reinforcement fibres, which leads to increased abrasive wear of the polymer composite. Similar findings have been reported by Vishwanath et al. [22] for increasing cast iron counter surface roughness with up to 100% after sliding against fabric-reinforced polymer composites with glass fibres or carbon fibres.
In case of the thermoplastic, the specific wear rate increases with increased surface roughness. Similar behaviour has been reported in [10] for most of the tested engineering thermoplastics sliding against steel. However, there is a lack of general explanations for this behaviour. The increased wear rate for the thermoplastic is slightly higher between the lowest and the intermediate roughness (37%) compared to between the intermediate and highest surface roughness (30%). Opposite behaviour is seen for the specific wear rate compared to the coefficient of friction. Hence, the influence of surface roughness is a trade-off between the low friction and wear for the thermoplastic material.

3.1.2. Friction and Wear Mechanisms

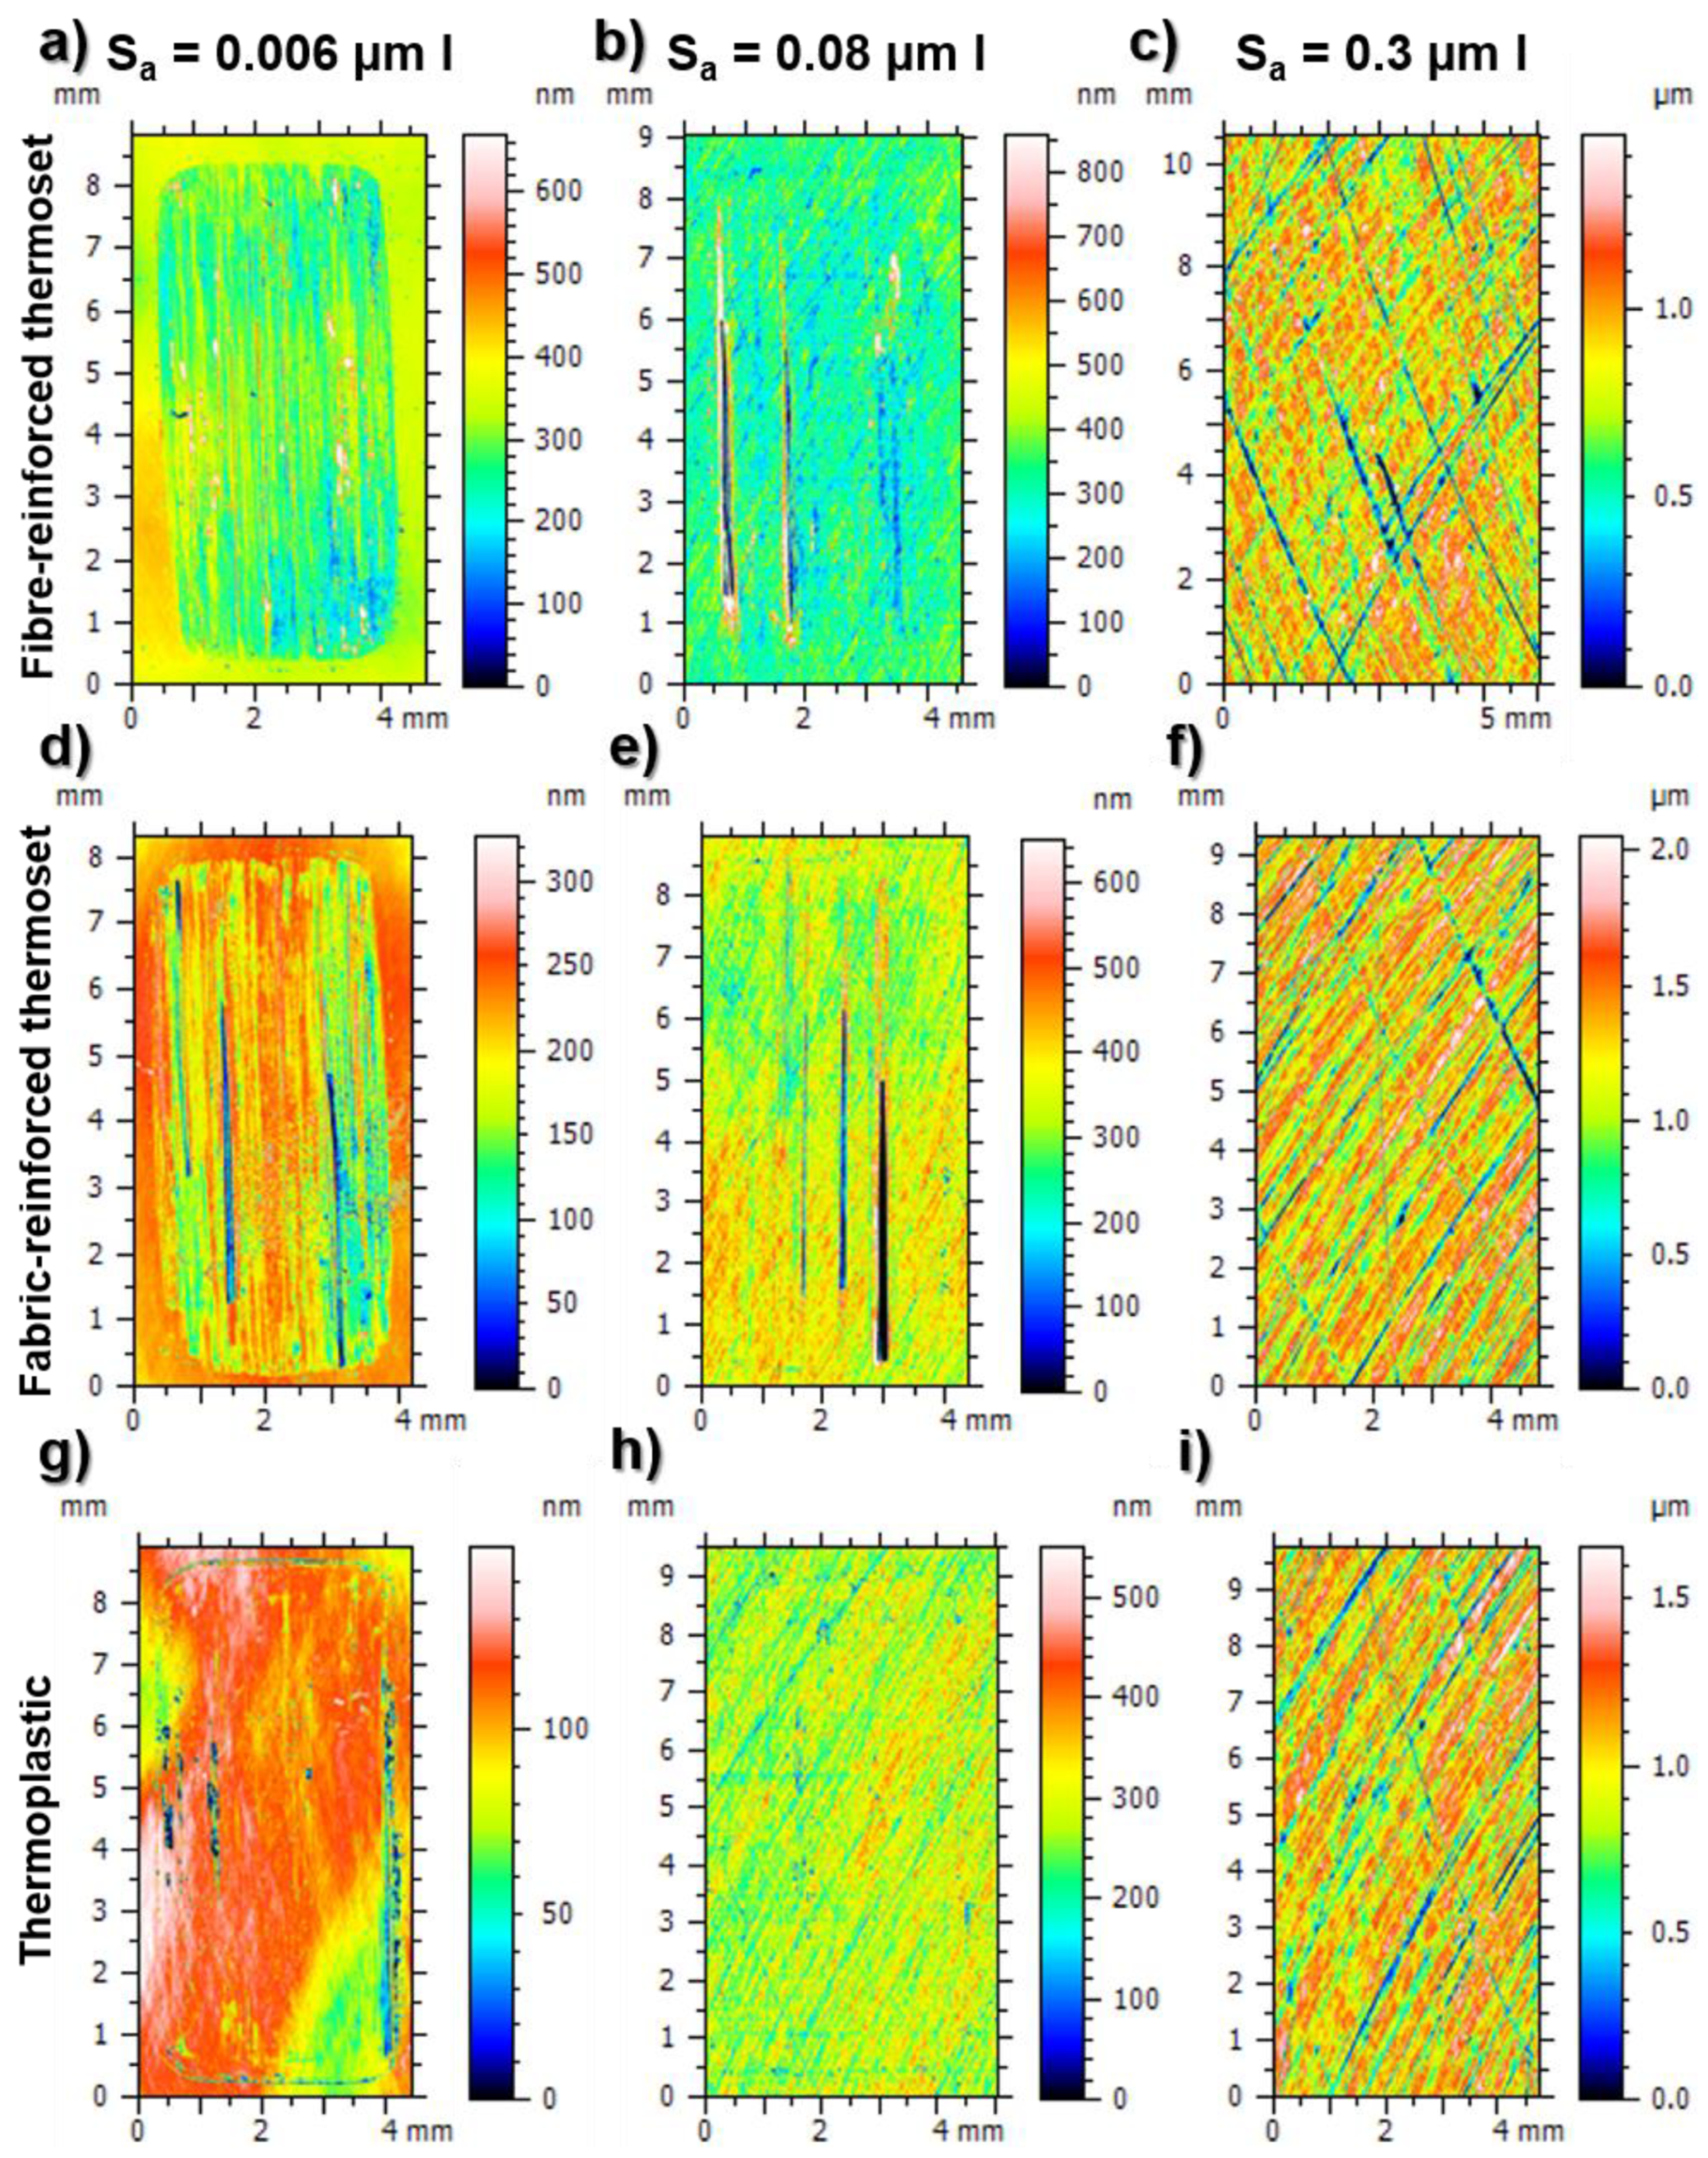
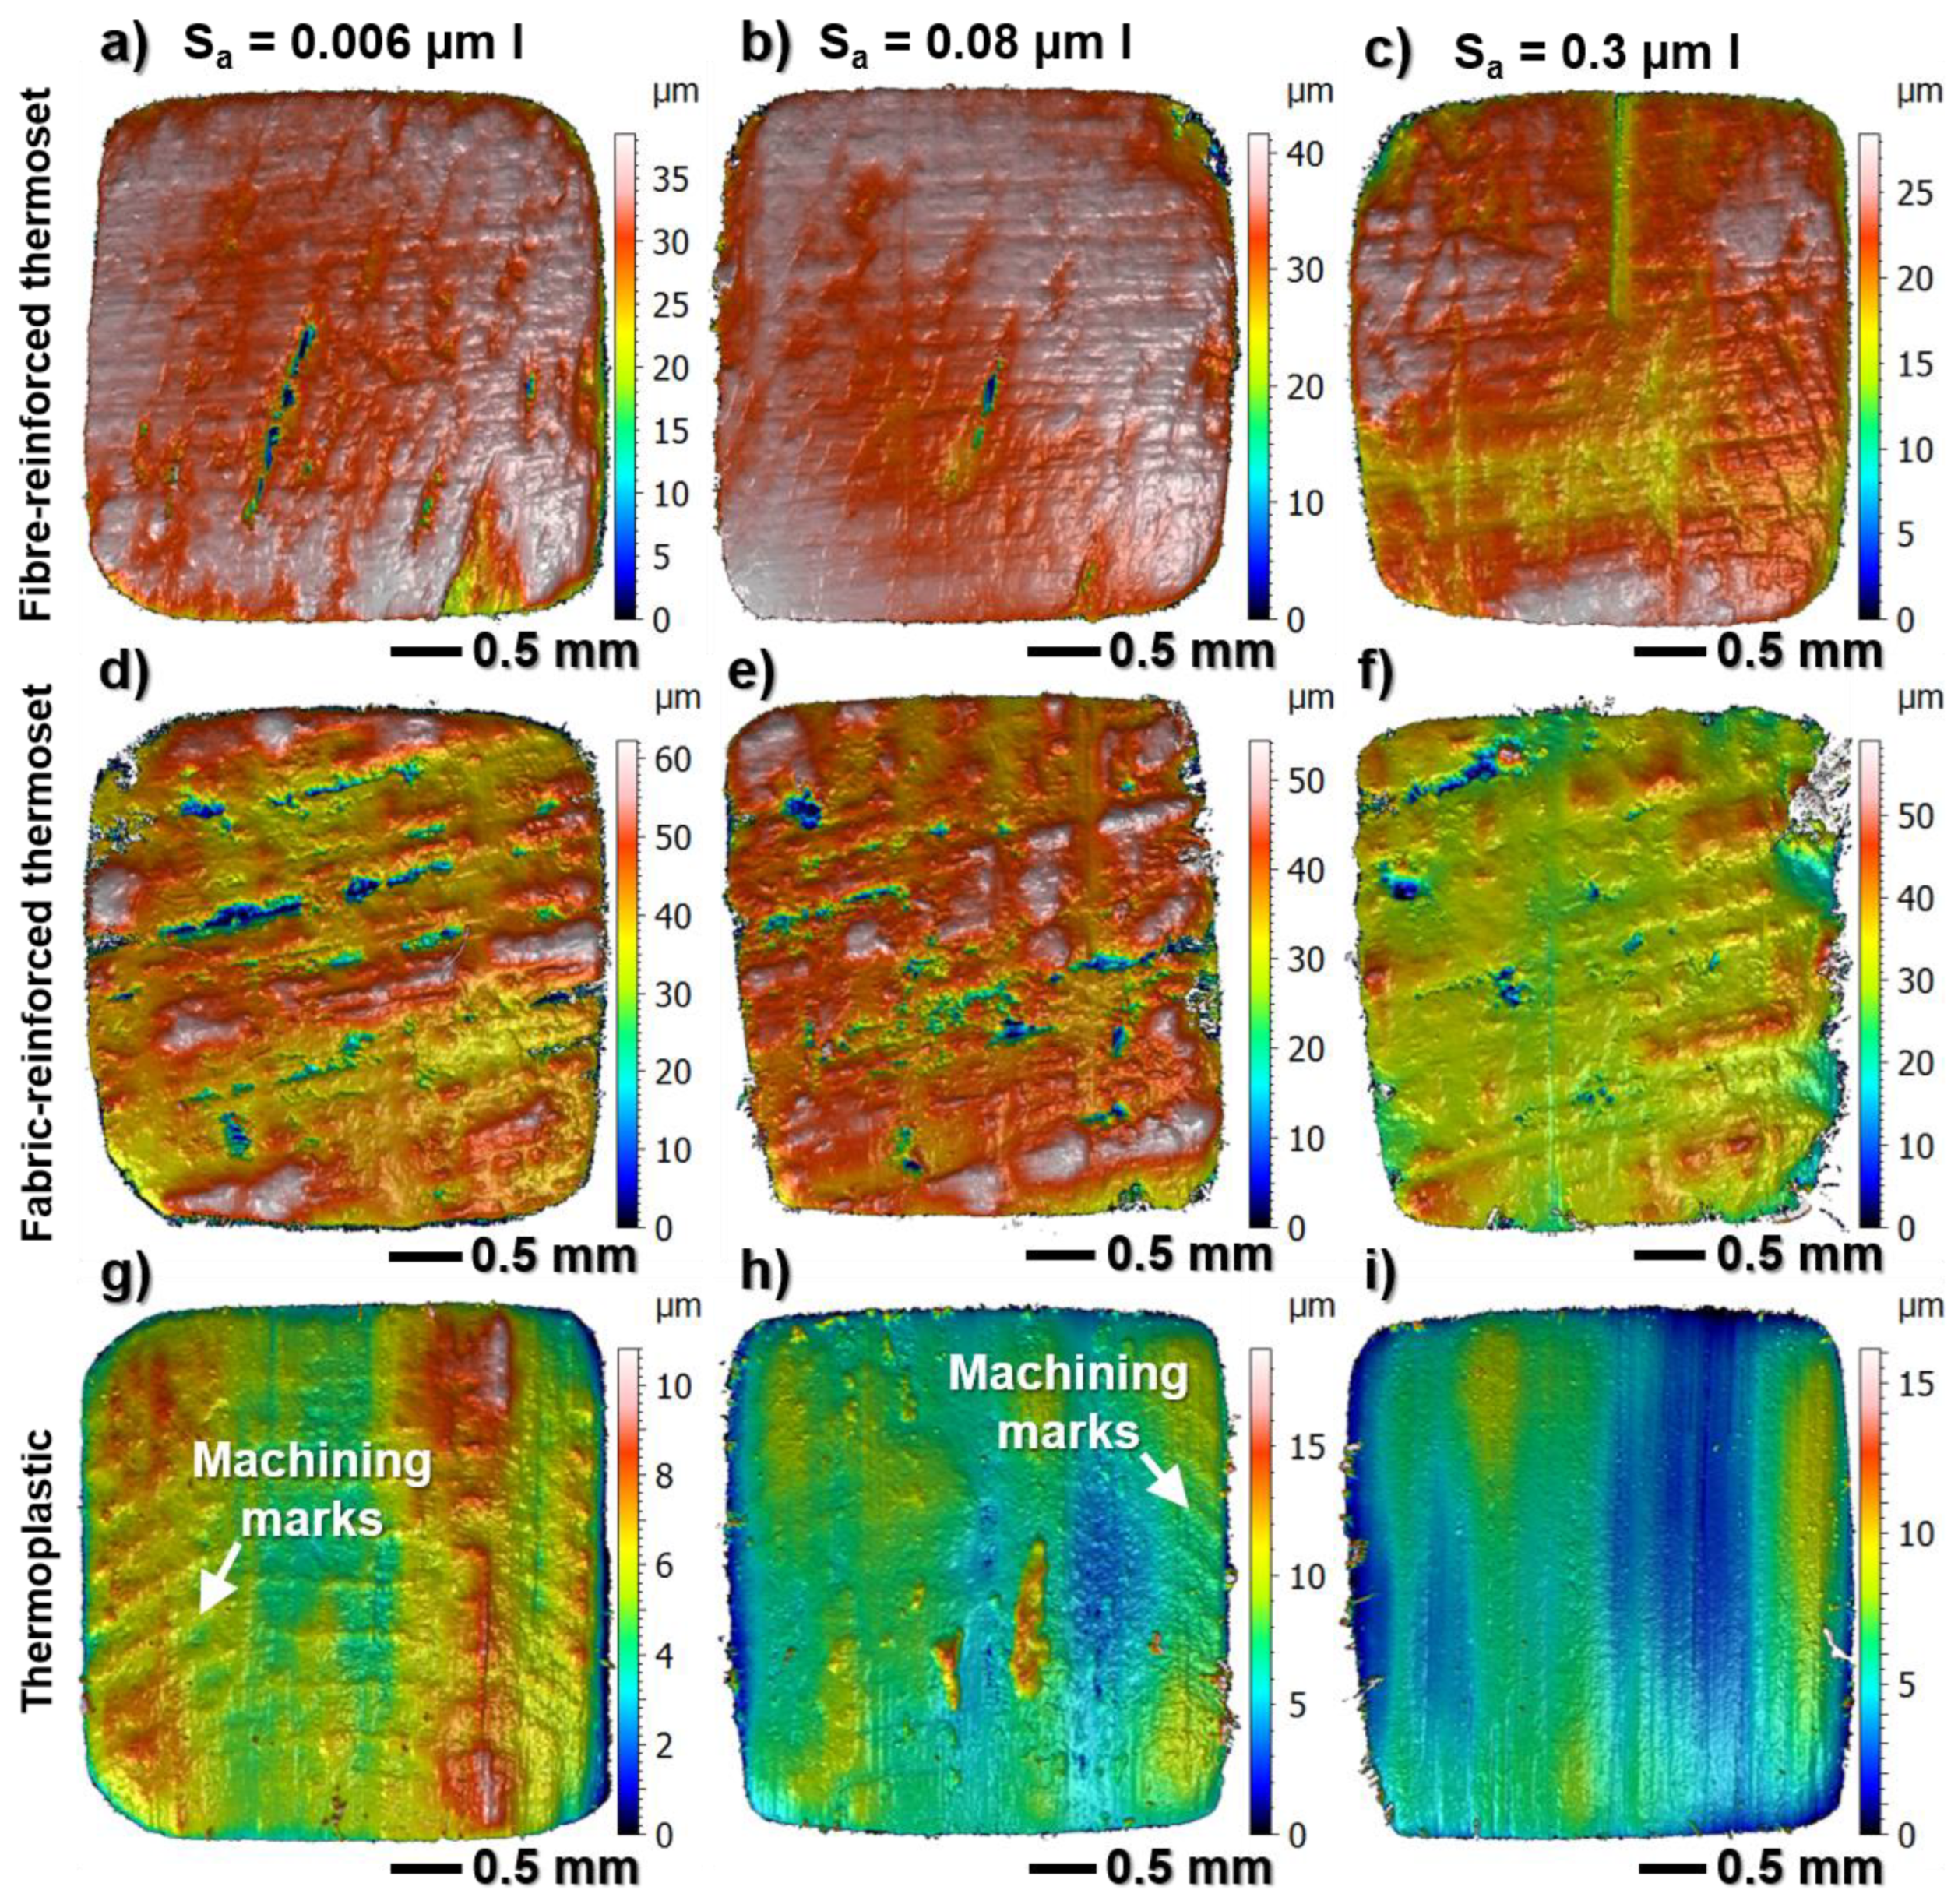
The surface topography of the worn stainless-steel plates with the isotropic lay and different initial surface roughness is shown in Figure 3 after sliding against the three bearing materials. The valleys in the figures correspond to abrasive wear grooves and the protruding areas to transfer layers. It should be noted that the black regions with irregular shape in Figure 3g are missing data points due to poor reflectivity of thick transfer layers in these regions.
Despite showing a similar coefficient of friction for all bearing materials at Sa = 0.006 µm, the wear tracks on the stainless steel are very different (Figure 3a,d,g). The smooth stainless-steel surface is significantly less worn after sliding against the thermoplastic compared to the thermoset materials. This is mainly attributed to the abrasive action by the reinforcement fibres in the two thermosets, as seen previously for fibre- or fabric-reinforced polymer composites [11,14,20,22,23,24]. The stainless-steel surface is subjected to a higher degree of abrasive wear after sliding against the fibre-reinforced thermoset (Figure 3a) compared to the fabric-reinforced thermoset (Figure 3d).
The stainless-steel surface with the intermediate initial surface roughness (Sa = 0.08 µm) is significantly less worn after sliding against the three bearing materials (Figure 3b,e,h) compared to the lowest initial surface roughness. However, the grooves are deeper on the intermediate roughness surface after sliding against the thermoset materials compared to the one with lowest roughness. The wear of the stainless-steel surface is further decreased for the surfaces with highest initial surface roughness (Sa = 0.3 µm) for all bearing materials (Figure 3c,f,i). The abrasive grooves are barely visible in the topography measurements, except for some single locations after sliding against the thermoset materials. This shows that the abrasive wear of the stainless-steel surface decreases with increased initial counter surface roughness for all tested bearing materials. Hence, the decreasing coefficient of friction with increased initial counter surface roughness (Figure 2a) can be partly explained by decreased ploughing into the stainless steel in addition to the previously discussed decreased adhesion.
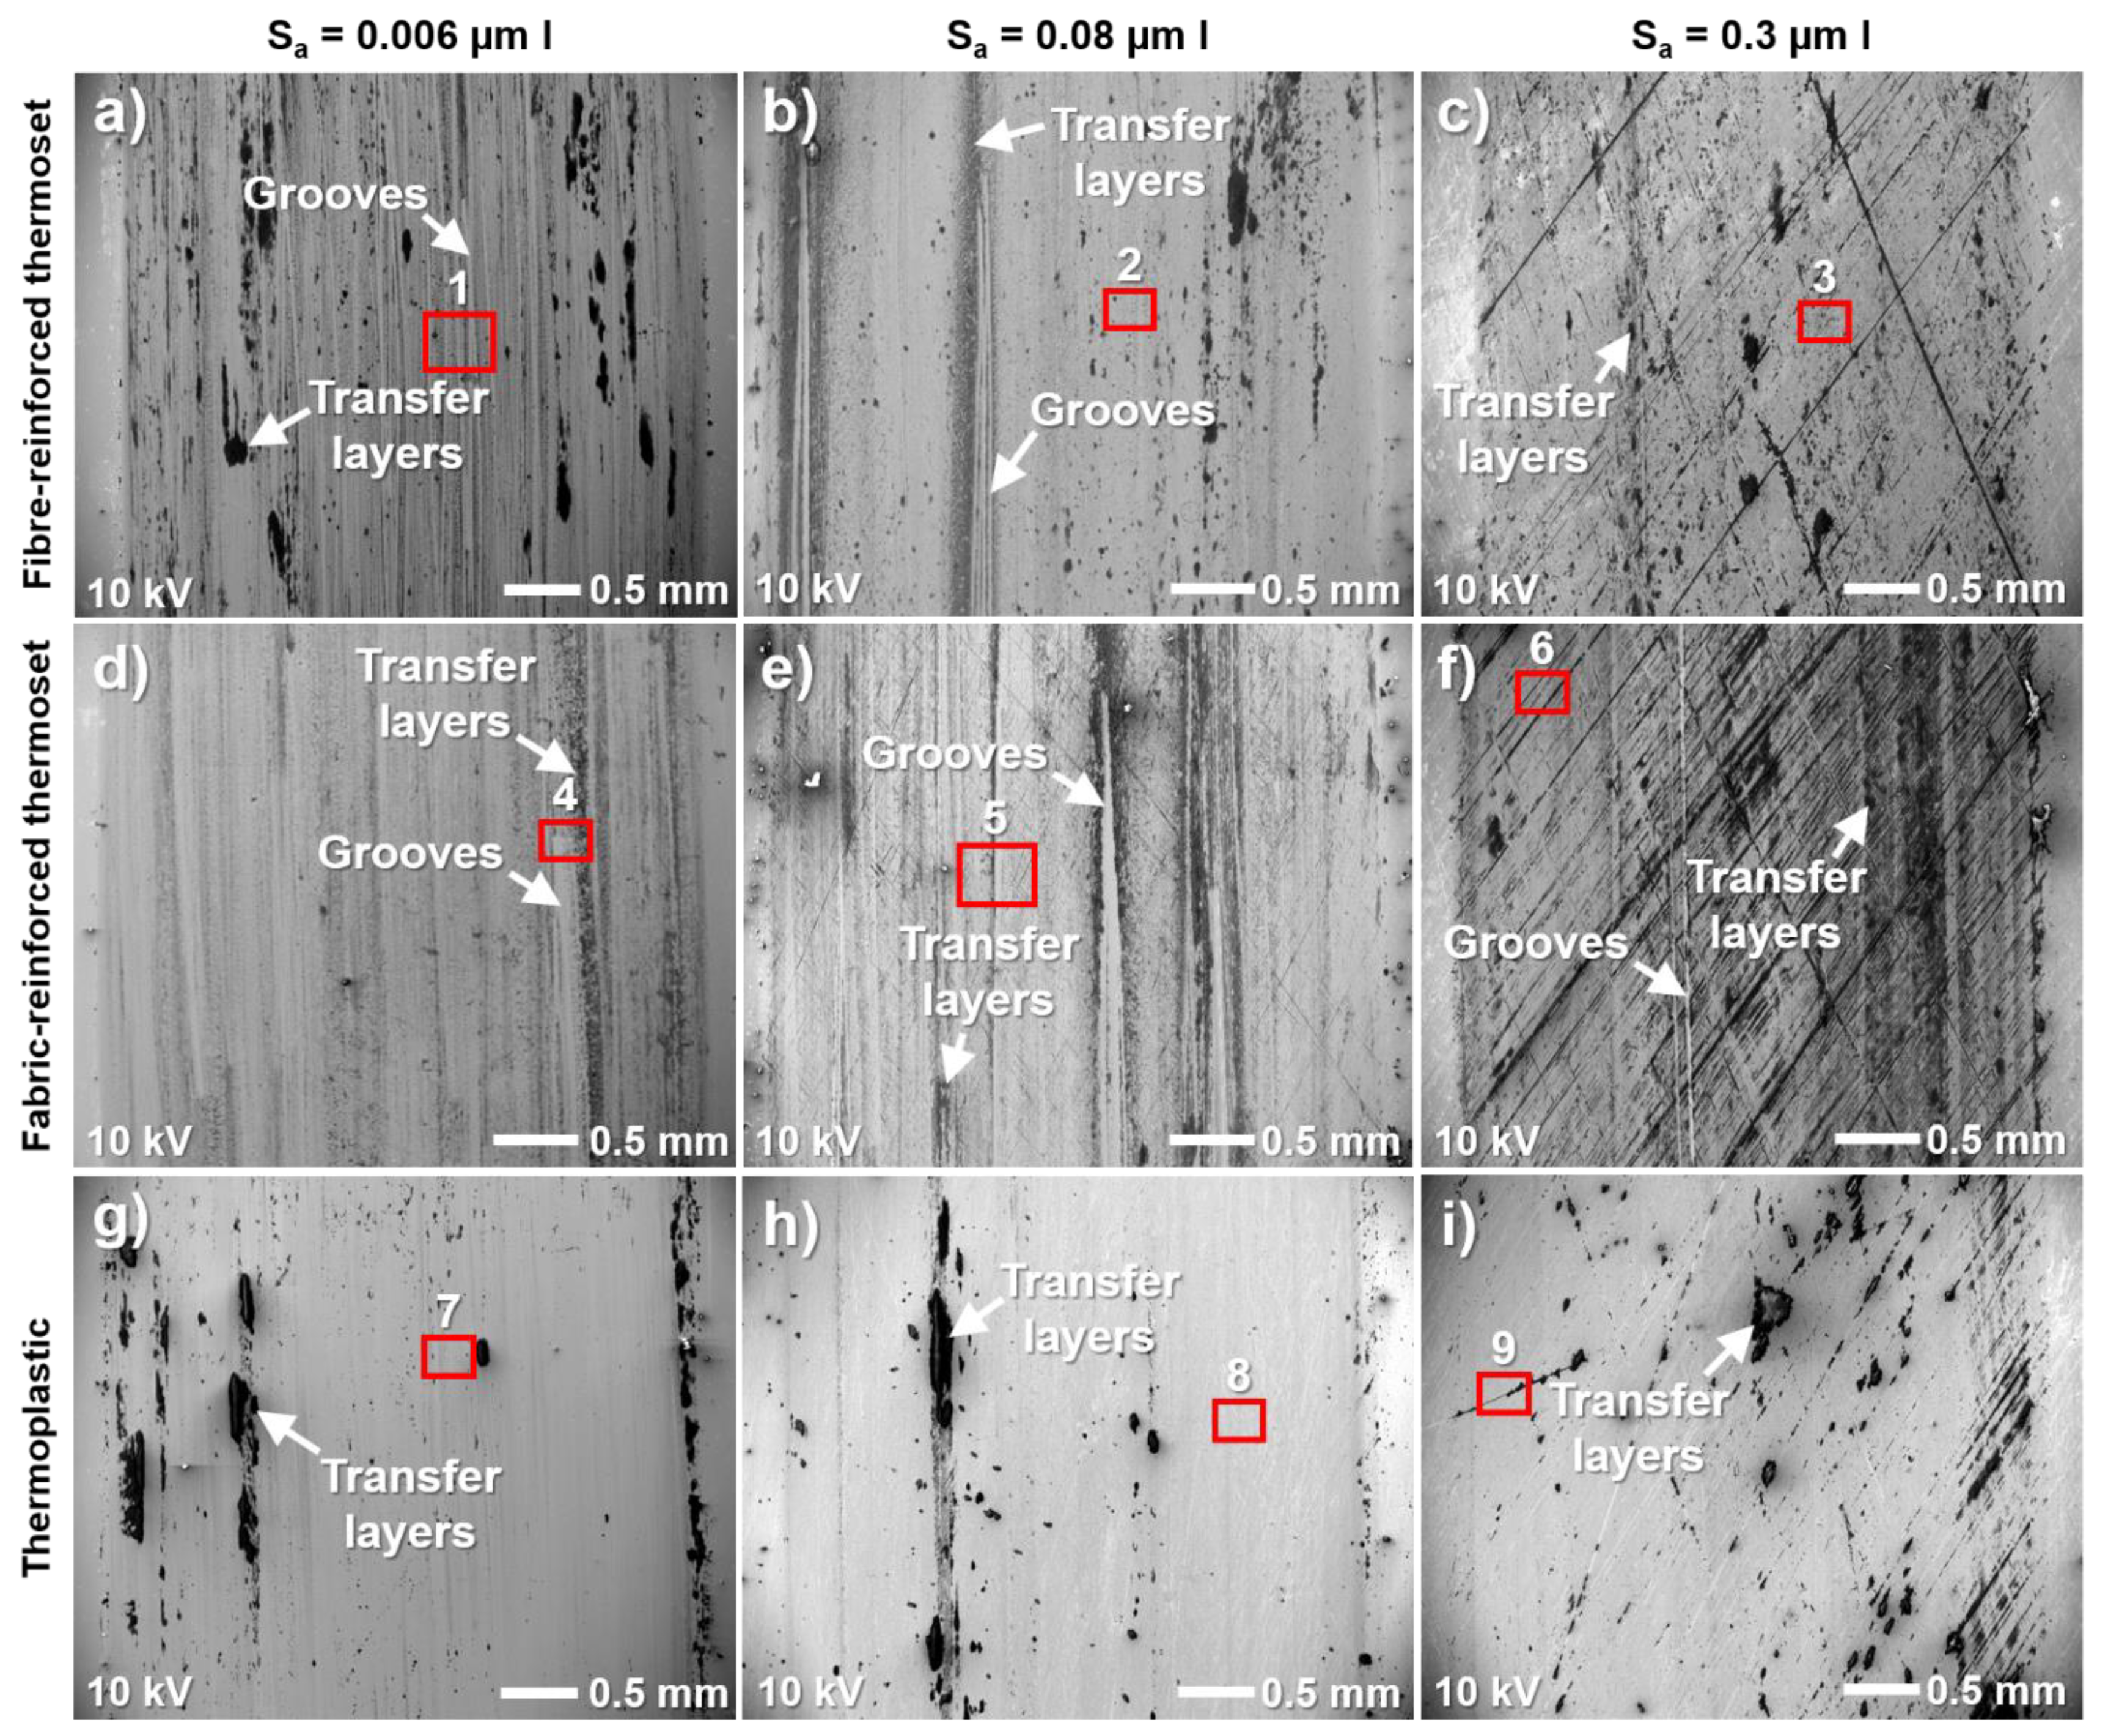
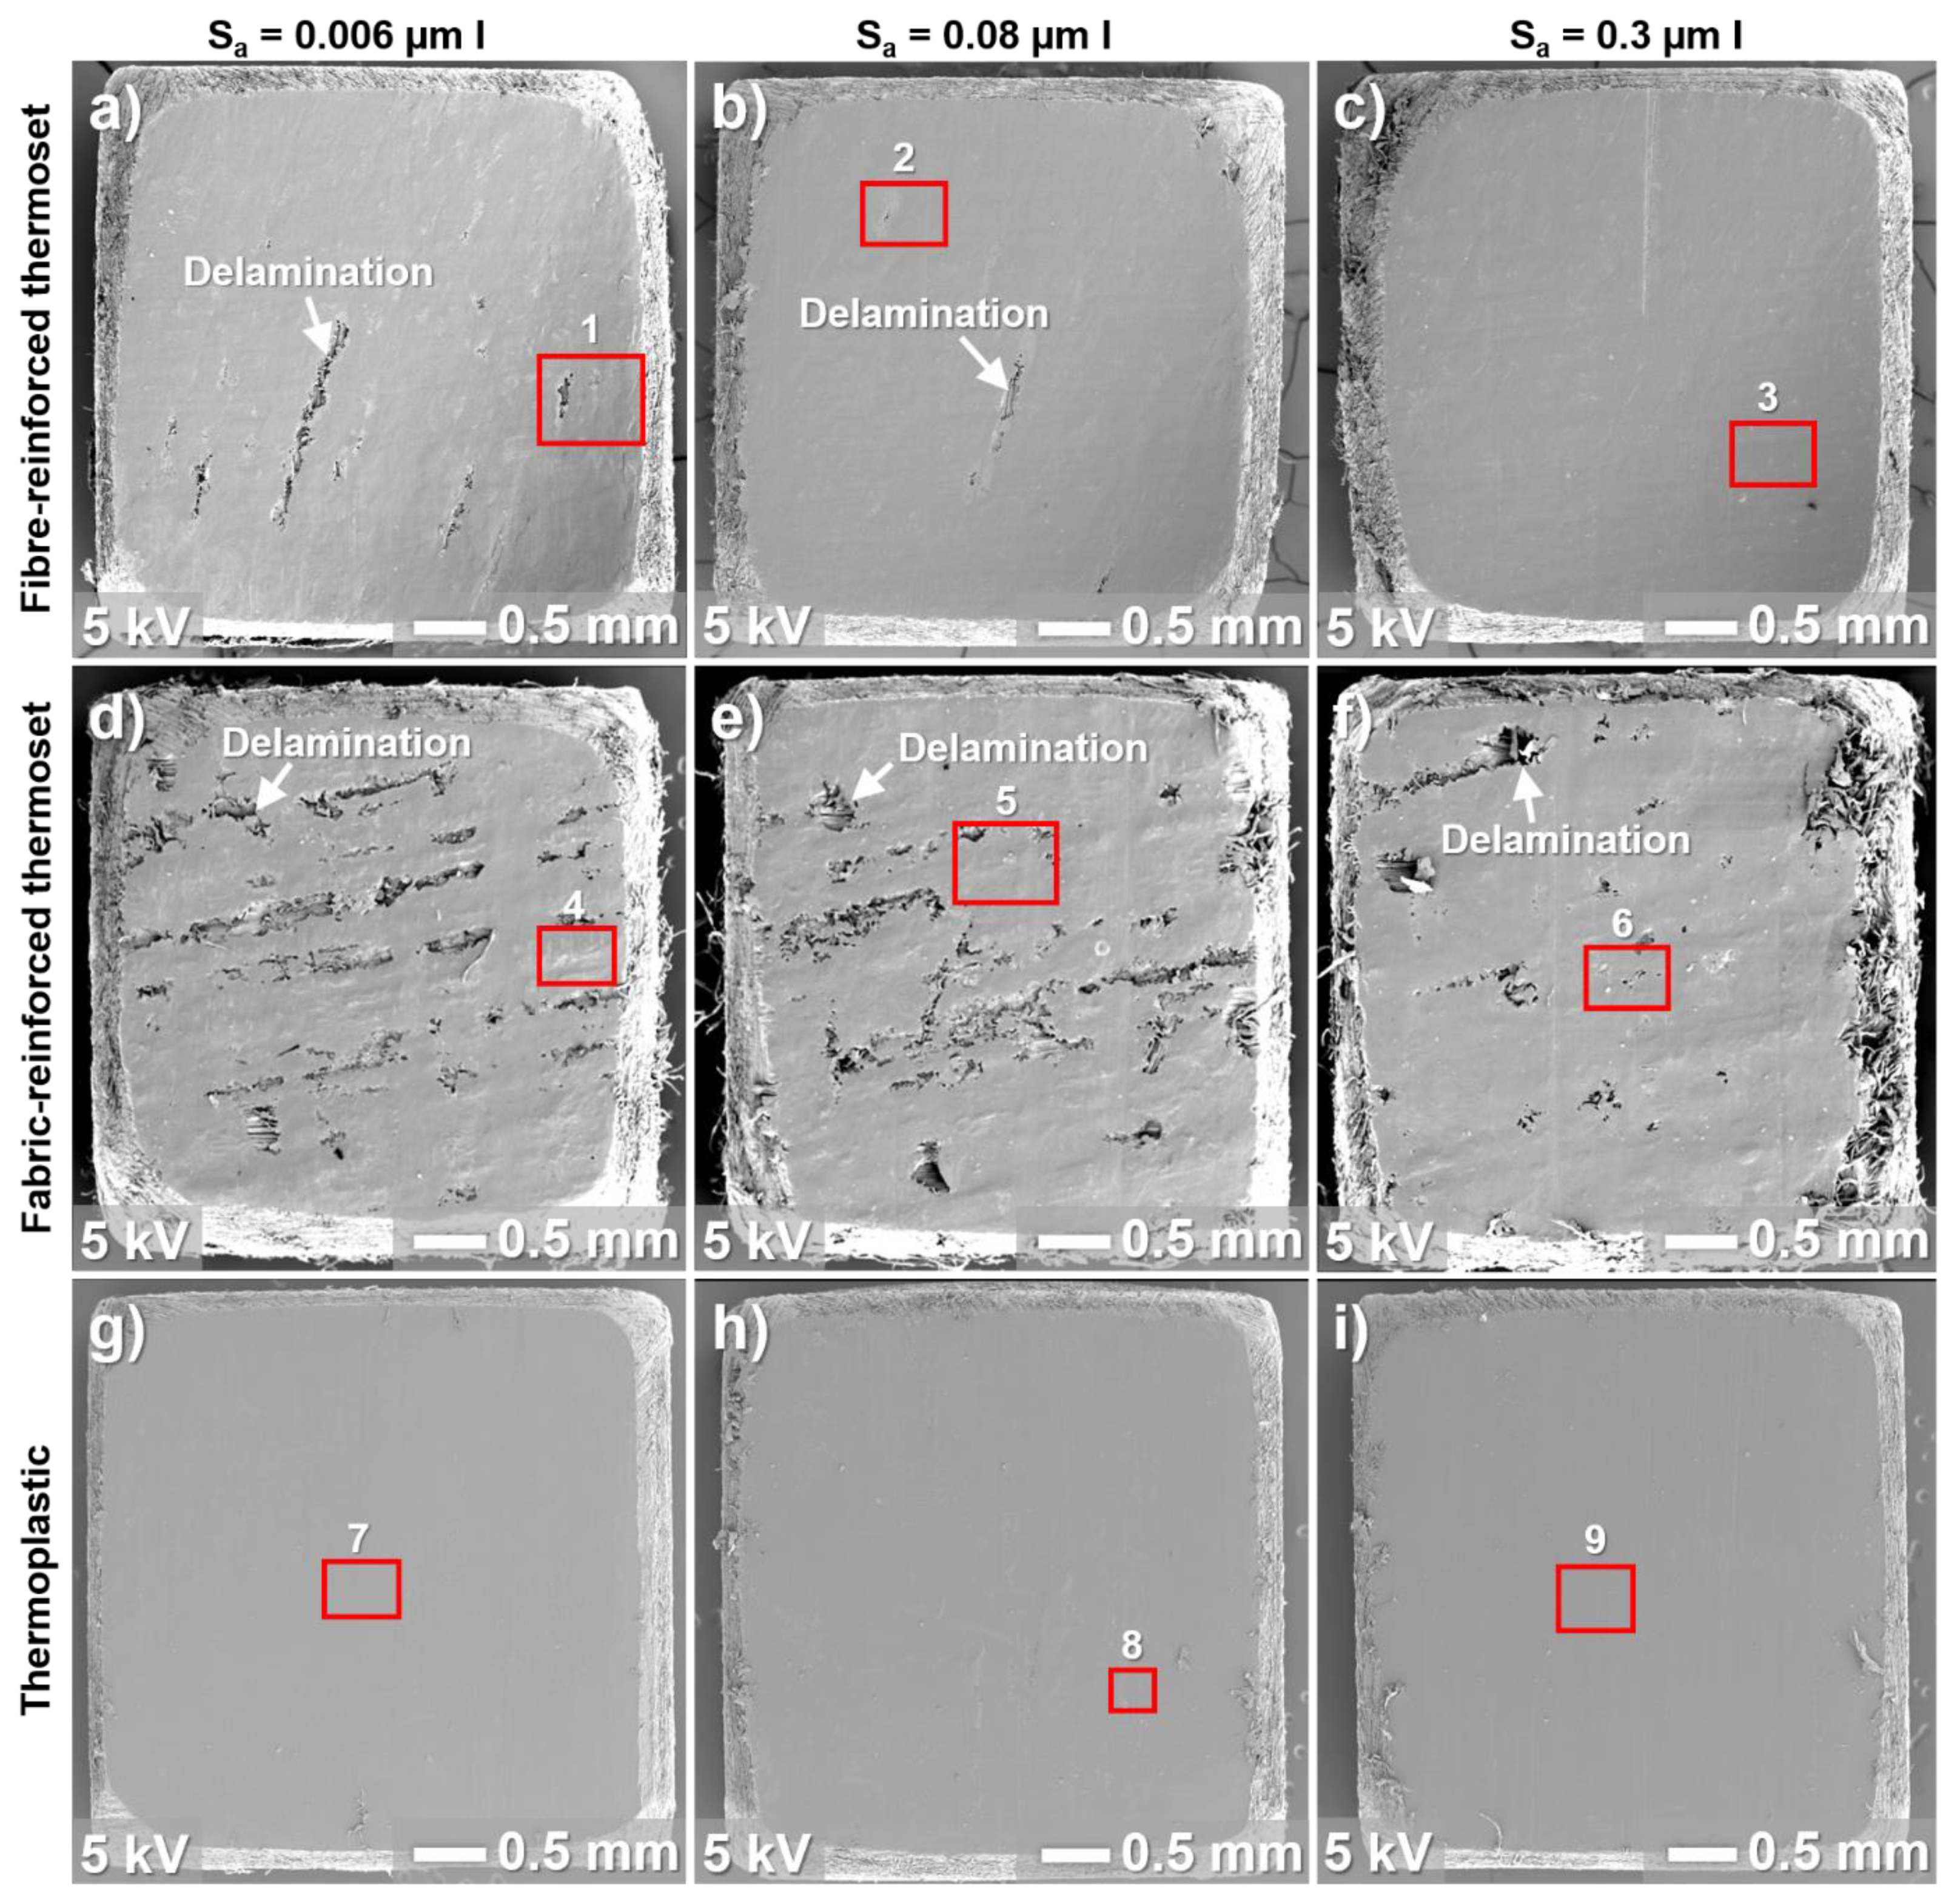
SEM micrographs of the centre of the wear tracks on the stainless-steel surfaces are shown in Figure 4. SEM micrographs at a higher magnification of the highlighted regions in Figure 4 are shown in Figure 5. The darker features in the SEM micrographs correspond to transfer layers and the brighter features correspond to the stainless-steel surface. At the lowest initial surface roughness (Sa = 0.006 µm), the highest surface coverage by thicker transfer layers on the stainless-steel surface is seen after sliding against the fibre-reinforced thermoset (Figure 4a). The thickest transfer layers are also more protruding (Figure 3a) compared to the ones after sliding against the fabric-reinforced thermoset (Figure 3d). After sliding against the thermoplastic, thicker transfer layer patches are formed, but to a lesser extent than for the thermosets (Figure 4g).
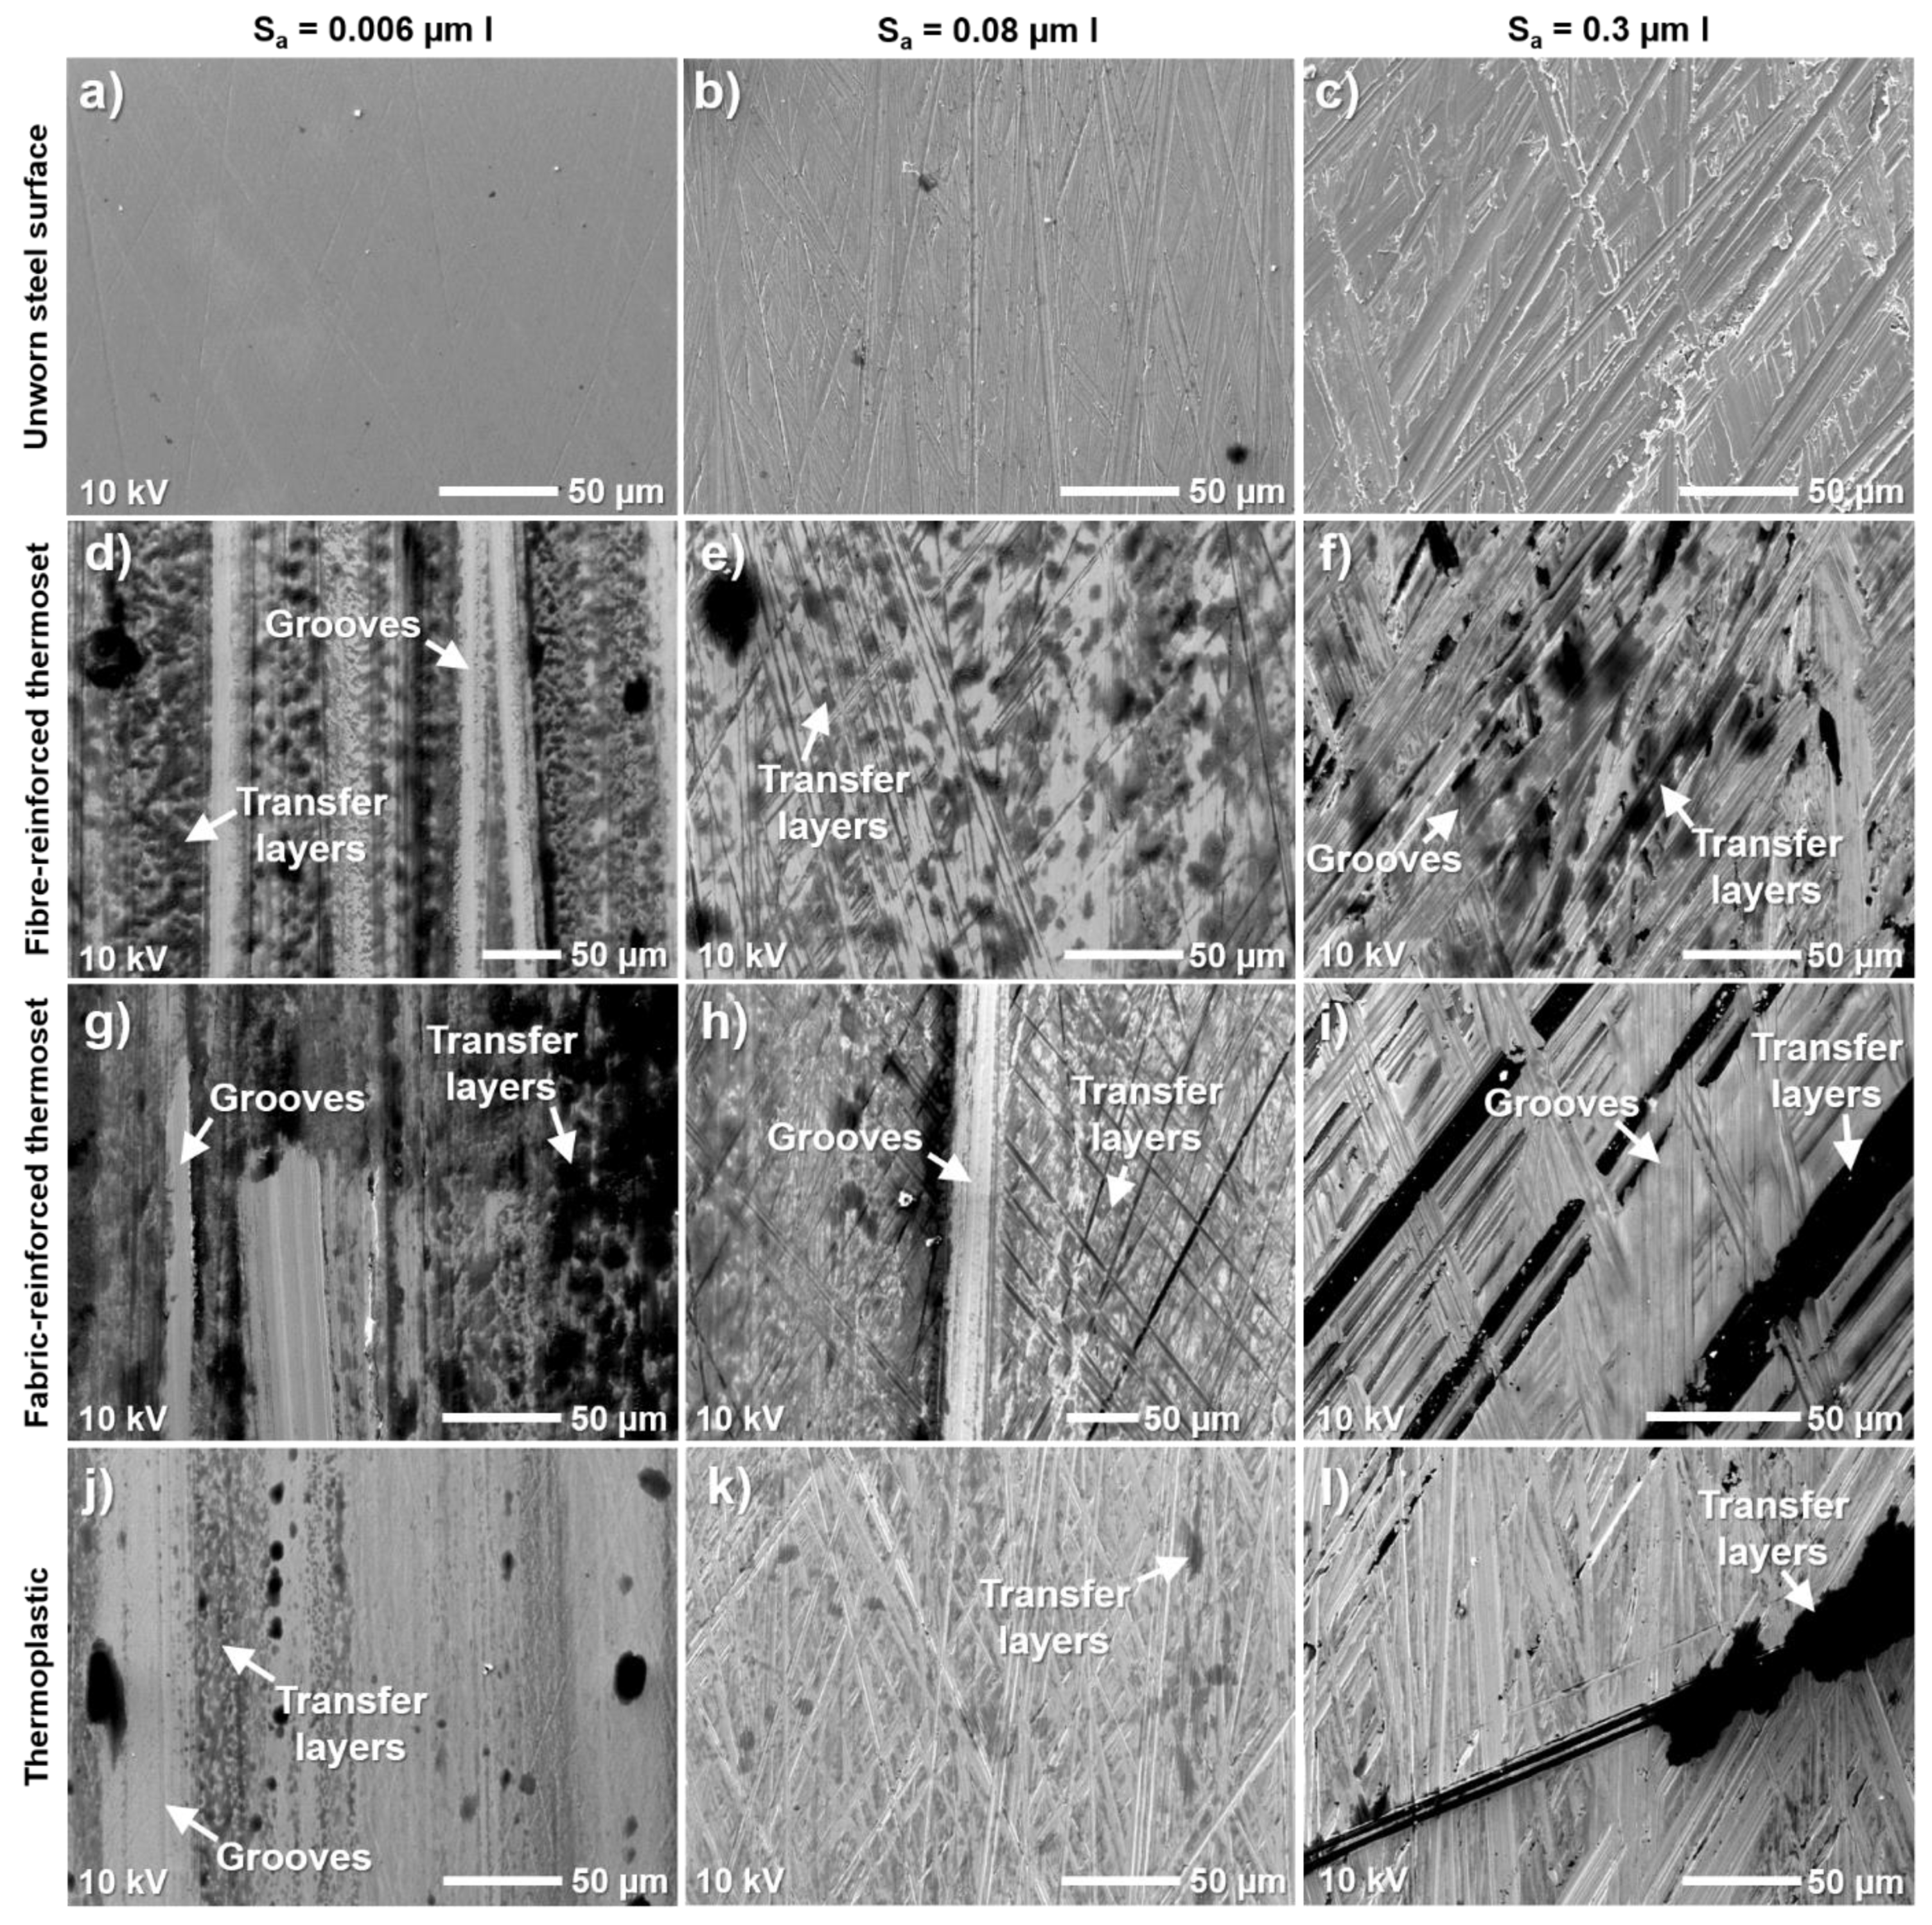
The higher magnification SEM micrographs reveal a higher surface coverage by thinner transfer layers (Figure 5d,g,j), which are not clearly visible in the overview SEM micrographs (Figure 4a,d,g). The lowest surface coverage is seen after sliding against the thermoplastic and the transfer layers are overall thinner compared to the thermosets. Compared with the unworn steel surface (Figure 5a), traces from the polishing grooves can still be seen at several locations after sliding against the thermoplastic (Figure 5j) unlike for the fibre- (Figure 5d) and fabric-reinforced (Figure 5g) thermosets where these grooves have been worn away.
Less surface coverage by thicker transfer layers is seen when the initial surface roughness increases to Sa = 0.08 µm after sliding against the fibre-reinforced thermoset (Figure 4b) and the thermoplastic (Figure 4h). It is slightly increased after sliding against the fabric-reinforced thermoset (Figure 4e). The higher magnification SEM micrographs show that the surface coverage by thinner transfer layers decreases after sliding against all bearing materials (Figure 5e,h,k) and that these transfer layers are thinner compared to the lowest initial surface roughness (Figure 5d,g,j). The polishing grooves (Figure 5b) are still clearly visible on the worn surfaces (Figure 5e,h,k), due to reduced wear of the stainless-steel surface with increased initial surface roughness. After sliding against the fabric-reinforced thermoset, the polishing grooves are filled with transferred material at several locations (Figure 5h). When the initial surface roughness increases to Sa = 0.3 µm, this mechanism is also seen for the fibre-reinforced thermoset and the thermoplastic.
At the highest surface roughness (Sa = 0.3 µm), the coverage by thicker transfer layers is significantly increased (Figure 4c,f,i) compared to the intermediate surface roughness. It is also higher compared to the lowest initial surface roughness (Sa = 0.006 µm) after sliding against the fabric-reinforced thermoset and the thermoplastic. It is similar or slightly lower after sliding against the fibre-reinforced thermoset. The polishing/grinding grooves for the highest initial surface roughness Sa = 0.3 µm (Figure 5c) are also clearly visible after sliding against the three bearing materials. Both overview (Figure 4) and higher magnification (Figure 5) SEM micrographs confirm that the wear of the stainless-steel surface decreases. This is partially attributed to the increased amount of protective transfer layers with increased initial surface roughness.
The most significant reduction in the abrasive wear of the stainless-steel surface, between the lowest and highest initial counter surface roughness, was found for the fibre-reinforced thermoset. This explains the largest reduction in the friction coefficient with increased initial counter surface roughness for that material due to the reduced ploughing component of friction, as previously discussed. The same mechanism occurs for the fabric-reinforced thermoset.
A significant decrease in the coefficient of friction for the thermoplastic (Figure 2a) between the lower initial counter surface roughness (Sa = 0.006 µm and 0.08 µm) and the highest (Sa = 0.3 µm) is attributed to the increased surface coverage by thicker transfer layers (Figure 4i). At the lower initial surface roughness, the stainless-steel surface is very smooth and, due to lack of sufficient transfer layers, the adhesive component of friction is higher [10].
Similar to the thermoplastic, a decrease in the coefficient of friction for the fabric-reinforced thermoset with increasing counter surface roughness is also attributed to a significantly increased coverage by transfer layers. The transfer layers contain solid lubricants, contributing to a lower friction, and they also protect the contacting surfaces from abrasive wear by covering sharp asperities.
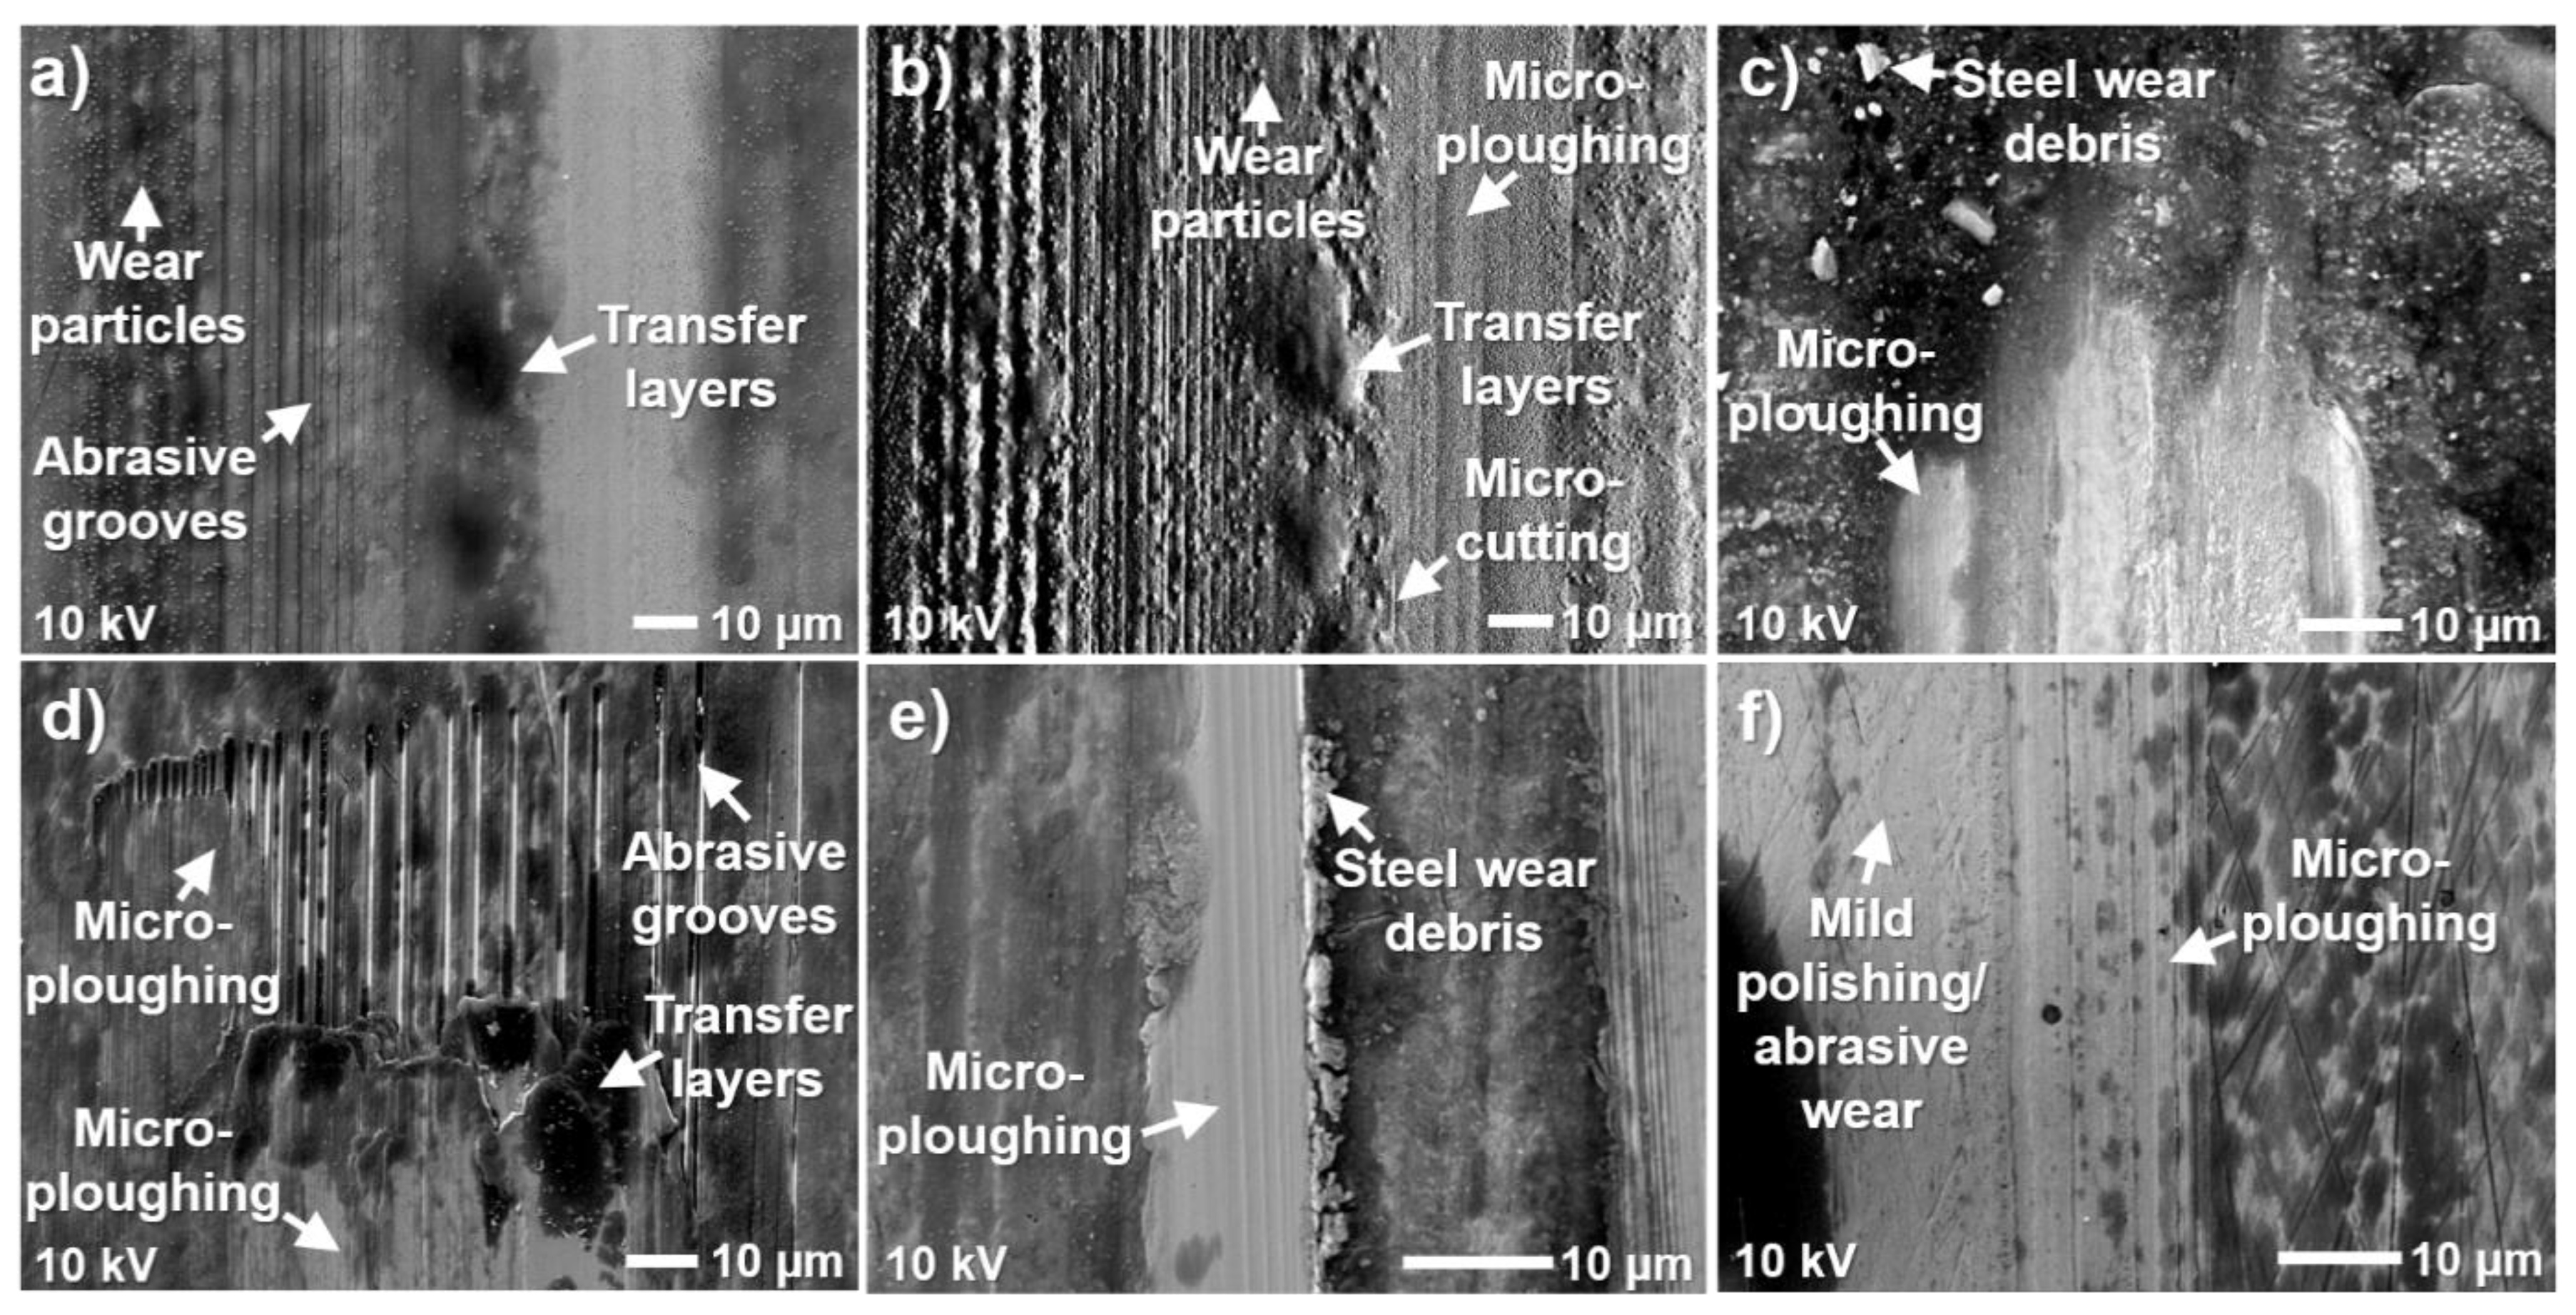
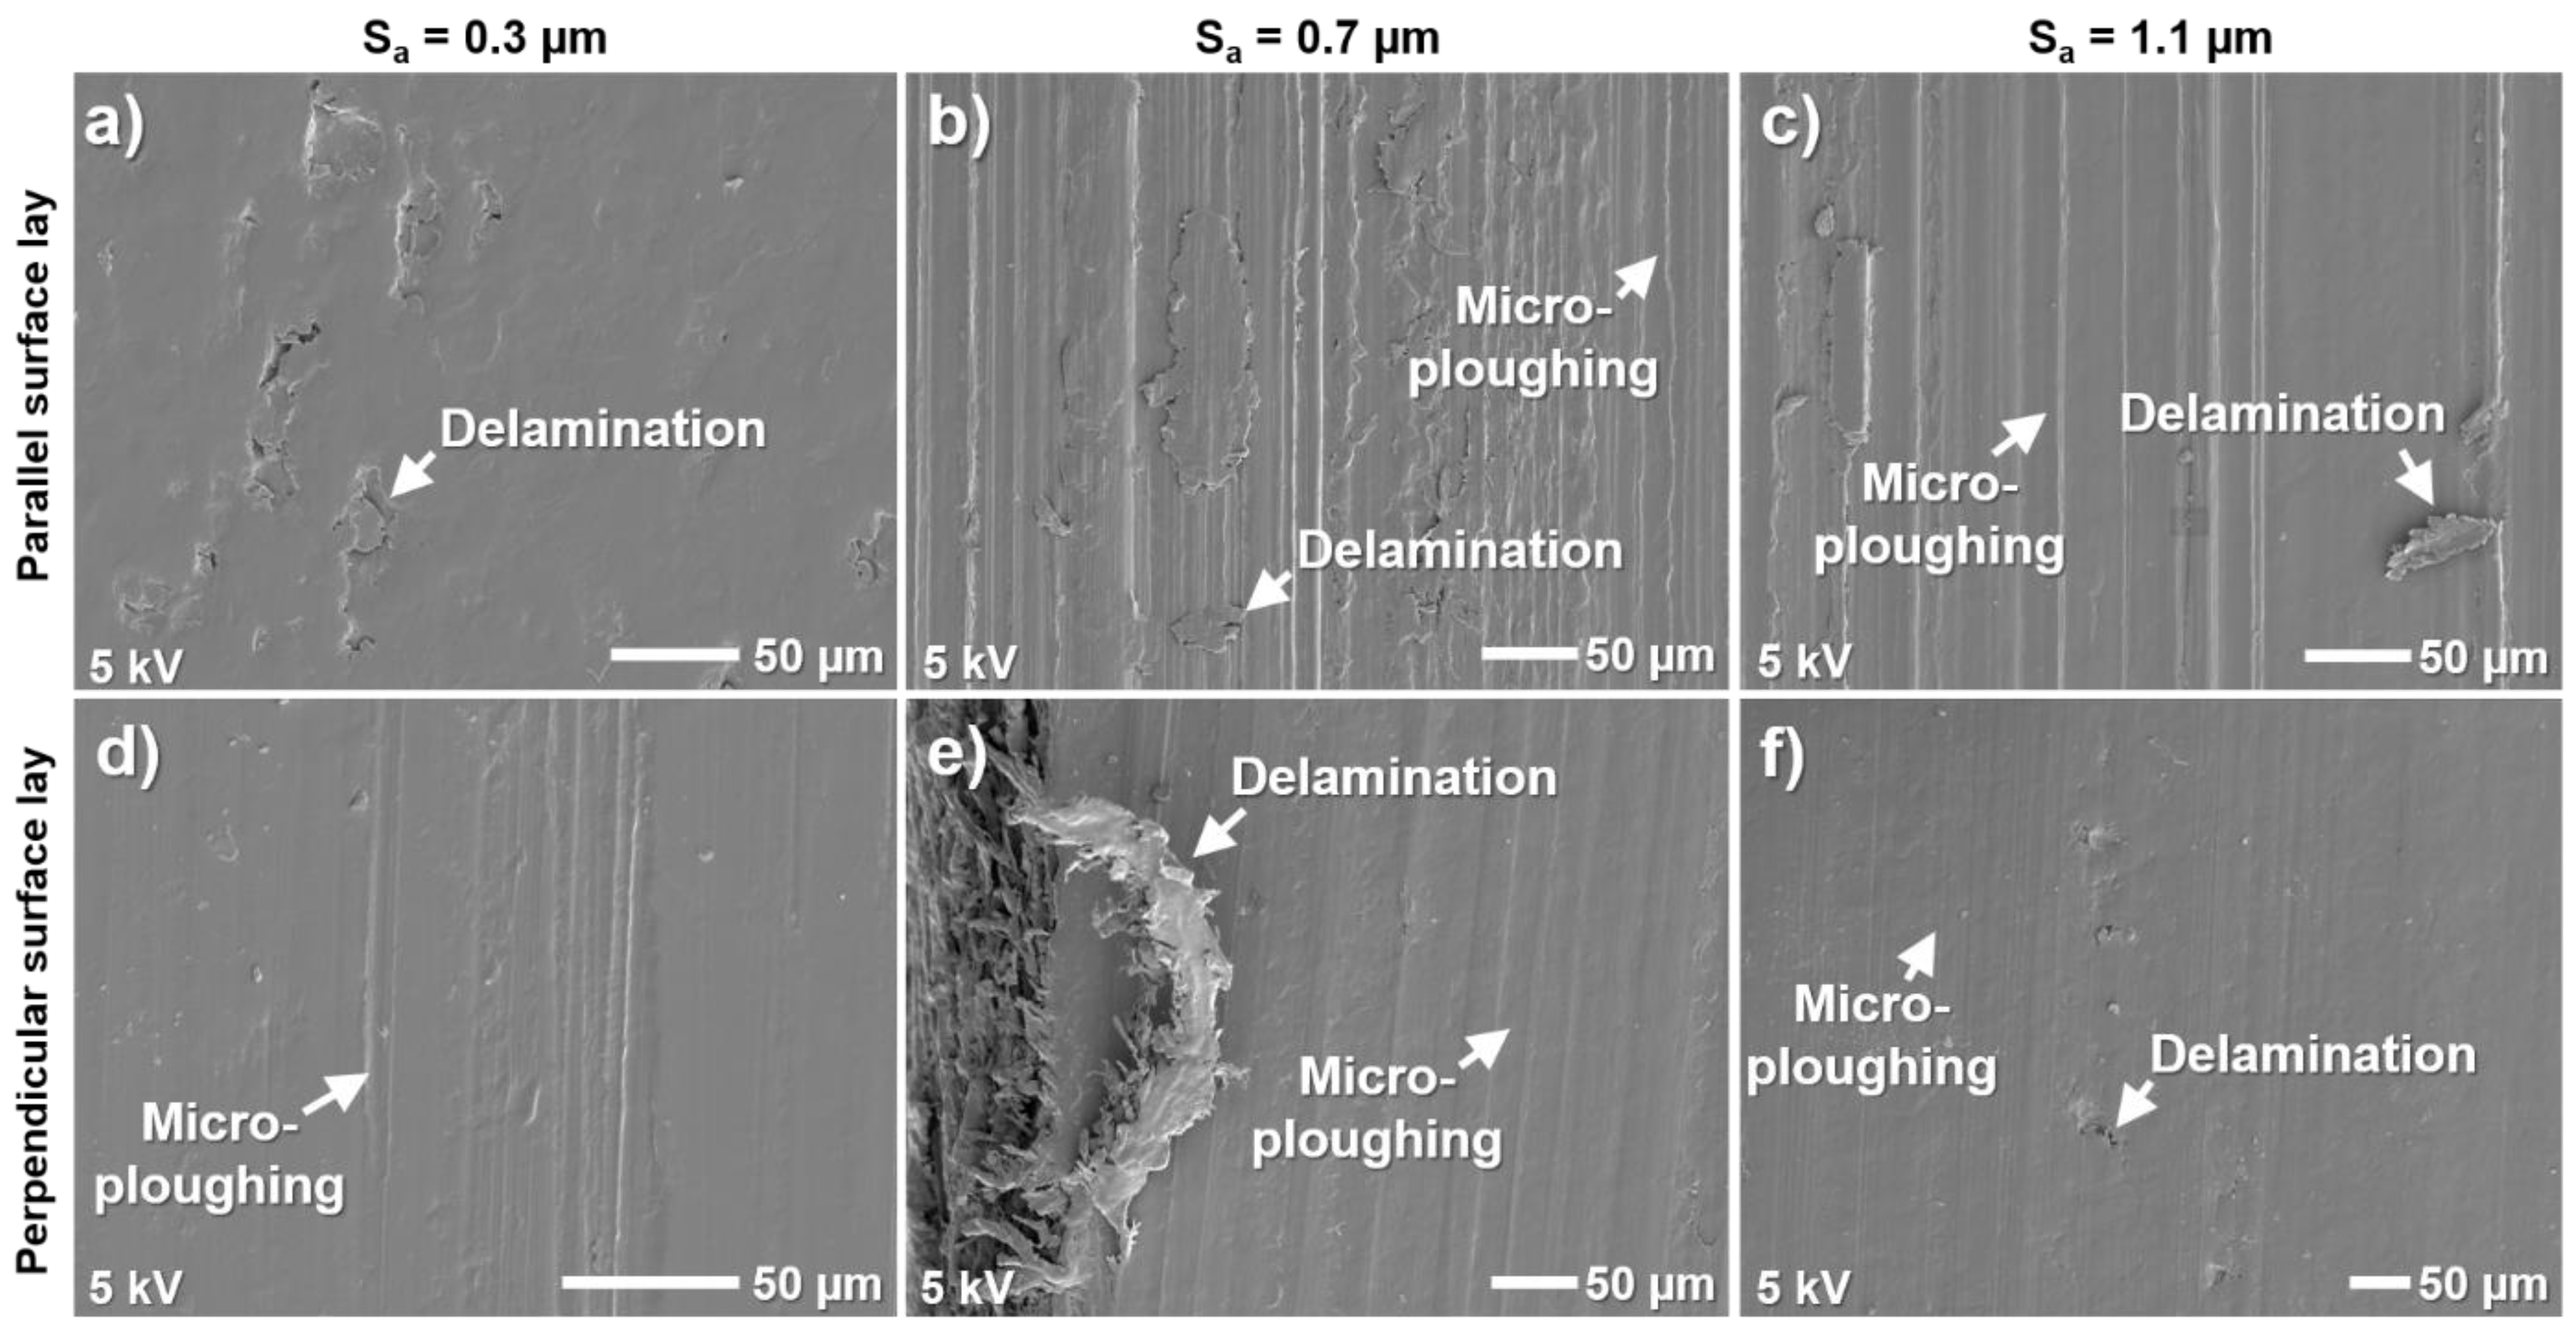
Comparing the SEM micrographs of the unworn stainless-steel surfaces at different initial surface roughness (Figure 5a–c) with the worn surfaces (Figure 6), it is clear that abrasive wear is the dominant wear mechanism of the stainless steel. The dominant micro-mechanism is micro-ploughing and subsequent micro-fatigue (Figure 6). This is partially caused by the reinforcement fibres, fillers, and impurities in the thermosets, which are harder than the polymer matrix. Another contributor is the steel wear debris generated during the wear process, as seen in Figure 6c,e. These wear debris will accumulate in the transfer layers as well as adhere to the polymer surface, thus accelerating the abrasive wear of the stainless-steel surface and also contribute to increased friction as a result of the increased ploughing component of friction. In Figure 6a,b,d, abrasive grooves are shown, which are initiated by a combination of micro-cutting and micro-ploughing caused by the abrasive reinforcement fibres protruding from the polymer surface. The sidewalls of the grooves are thin; hence, the local contact pressures at these points will be relatively high, which leads to plastic deformation and eventually fracture of the walls. The reinforcement fibres will be worn down and become blunt over time, changing the wear mechanism to micro-ploughing, as seen in Figure 6a,b,d.
Micro-ploughing is also prevalent for the stainless-steel surface after sliding against the thermoplastic (Figure 6f). However, the dominant wear mechanism is mild polishing and/or abrasive wear. It has previously been reported that the thermoplastic contains nano-sized reinforcement particles [23]. These particles, together with the work-hardened and oxidized steel wear debris, will initiate the abrasive wear of the stainless-steel surface, which will then propagate over time due to the high number of stress cycles.
The surface topography of the worn polymer pins, after sliding against the stainless-steel plates with the isotropic lay and different initial surface roughness, is shown in Figure 7 and the corresponding SEM micrographs in Figure 8. SEM micrographs at higher magnification of the highlighted regions in Figure 8 are shown in Figure 9. Compared to the thermoplastic, the thermoset materials are subjected to a higher degree of material delamination, especially at lower initial counter surface roughness. This is attributed to the varying E-moduli of the matrix components in the two thermoset materials, i.e., softer bulk material, rigid fibres, and CaCO3 and MoS2 fillers, which will cause micro-scale stiffness variances. Due to the cyclic loading of the polymer surface, the rigid fibres and filler materials will act as stress concentrators and eventually lead to micro cracking of the softer bulk material, as shown in Figure 9. The larger pores and higher volume fraction of pores in the two thermoset materials is another contributor to the higher degree of material delamination compared to the thermoplastic. The larger pores create weak points in the materials due to the lack of support from the polymer matrix during cyclic loading and shearing.
The degree of material delamination decreases with increased initial counter surface roughness for the two thermoset materials (Figure 7 and Figure 8). Similar behaviour is seen for the thermoplastic between the intermediate and highest roughness. This behaviour is attributed to the decreasing coefficient of friction with increased initial counter surface roughness leading to reduced shear stresses acting on the polymer surface and hence less material delamination.
Initial machining marks are still visible after sliding against stainless steel with a low initial surface roughness Sa = 0.006 µm and 0.08 µm (Figure 7g,h). The machining marks are completely worn away after sliding against the steel with highest initial counter surface roughness (Sa = 0.3 µm), as seen in Figure 7i. The increased wear of the thermoplastic with increasing initial counter surface roughness is in agreement with the measured specific wear rates (Figure 2b). The lower wear of the thermoplastic at low initial counter surface roughness contributes to a lower amount of available wear debris that can form transfer layers on the steel surface and a lower amount of solid lubricants in the sliding interface that are friction-reducing. This explains the higher coefficient of friction for the thermoplastic at a low initial counter surface roughness (Sa = 0.006 µm and 0.08 µm) compared to the highest (Sa = 0.3 µm).
The thermoplastic surfaces are significantly less worn after sliding against the counter surfaces with low initial surface roughness (Sa = 0.006 µm and 0.08 µm) in comparison to the thermoset materials, especially at the lowest surface roughness (Figure 7 and Figure 8). This is in agreement with the lower specific wear rates of the thermoplastic compared to the thermoset materials at the corresponding initial surface roughness (Figure 2b). This behaviour is attributed to two main mechanisms. The first is the higher wear of the stainless-steel surface after sliding against the thermoset materials compared to the thermoplastic at a low initial counter surface roughness (Figure 3 and Figure 4). This will roughen the stainless-steel surface and also generate more steel debris that will contribute to more abrasive wear of both sliding surfaces. The second mechanism is the delamination wear of the thermoset materials containing reinforcement fibres, rigid fillers, and impurities. Wear debris with these more rigid components will become trapped between the sliding surfaces, causing abrasive wear of both surfaces, or attachment to one of the sliding surfaces and cause wear of the other. In both mechanisms, the generation of hard wear debris will contribute to a higher material removal rate from the surfaces.
The pin specimens for all three bearing materials also show concentrated wear along the edges parallel to the sliding direction (Figure 7 and Figure 8). This is explained by the contact pressure distribution along the surface with significantly higher contact pressures at the edges of a flat-on-flat contact where one of the surfaces has slightly rounded edges, as in the case of the bearing material pins [25]. This behaviour is especially prominent for the fabric-reinforced thermoset, particularly after sliding against the counter surfaces with higher initial surface roughness. The fabric-reinforced thermoset is reinforced with PTFE fibres in the direction perpendicular to the sliding direction and polyester fibres in the direction parallel to the sliding direction. The PTFE fibres are used for their friction-reducing properties and they are weaker than the polyester fibres. The fabric-reinforced thermoset is therefore more easily worn in the direction of the PTFE-fibres, which explains the higher wear along the edges parallel to the sliding direction where the contact pressure is higher.
The dominant wear mechanism of the thermoset materials is delamination wear after sliding against the stainless-steel surface with the isotropic lay at all initial surface roughness (Figure 8 and Figure 9). A similar wear mechanism has been reported for unfilled and fibre-reinforced PEEK after sliding against smooth steel surfaces [21]. The delamination wear is caused by the cyclic loading of the polymer surface and plastic shear deformation of the material [22] with a constant change in direction due to the reciprocating motion. This eventually leads to wedge formation and micro-cracks in the matrix as well as the wedges. The cracks propagate as a result of the reciprocating motion and lead to material detachment from the polymer surface in the form of small flakes with varying sizes. This behaviour can be seen in Figure 9, particularly Figure 9a where large micro-cracks are visible around the edges of a wedge formation and the upper part of the wedge has already detached from the surface and the part below is about to detach. Next to this wedge, a large wedge is detached. The wedge formation seen on the worn fibre-reinforced thermoset (Figure 9c) after sliding against the highest initial counter surface roughness has a different appearance in comparison to the other surface roughness and materials. The wedges are wave-shaped perpendicular to the sliding direction. The wedges indicate stick-slip behaviour with alternating high and low friction. This behaviour is attributed to the accumulation of wear debris in the grinding grooves, resulting in thicker transfer layers (Figure 4c and Figure 5f) followed by regions where there is less coverage by transfer layers. Hence, when the polymer surface slides over the stainless-steel surface, there will be local variations in the coefficients of friction during one stroke.
The fabric-reinforced thermoset is subjected to a higher degree of material delamination compared to the fibre-reinforced thermoset and the widths of these areas are larger. This explains the broader abrasive grooves seen on the stainless-steel surface with the lowest initial surface roughness after sliding against the fabric-reinforced thermoset (Figure 4d) compared to the fibre-reinforced thermoset (Figure 4a). When a large sheet is detached from the polymer surface, fresh polyester fibres are exposed and can cause abrasive wear of the stainless-steel surface, as seen in Figure 6d. Since the widths of the detached areas are larger for the fabric-reinforced thermoset, more fibres protrude in these regions, causing wider abrasive grooves on the stainless-steel surface.
Abrasive wear is also present on the thermoset materials. Both micro-cutting and micro-ploughing are active, but the latter is more dominant. The amount of abrasive wear increases with increased initial counter surface roughness and especially between the intermediate and highest surface roughness. This is attributed to higher wear of the softer polymer by the larger asperities on the harder steel surface. At low initial counter surface roughness, the abrasive wear is mainly caused by work-hardened and oxidized stainless-steel wear debris, worn reinforcement and filler debris, as well as impurities that are adhered to the transfer layers. The worn fabric-reinforced thermoset after sliding against the stainless steel with the lowest initial surface roughness shows shorter micro-ploughing grooves over the entire surface (Figure 9d). These shorter grooves indicate that the polymer surface has been in contact with abrasive particles for a shorter sliding distance, as explained by abrasion caused by larger loose stainless-steel wear debris that is attached to the edges of the wear grooves on the stainless steel (as seen in Figure 6e) or the transfer layers (as seen in Figure 6c).
The protruding regions seen in the surface topography of the worn fabric-reinforced thermoset pins (Figure 7d–f) correspond to locations of the PTFE weft, as previously reported in [20,23]. These regions are less worn compared to the regions in-between the PTFE weft due to the higher availability of solid lubricants. In these regions, the dominant wear mechanism is delamination wear. The material is removed through wedge formation, micro-cracks, and finally through the detachment of material from the polymer surface (Figure 9d,e).
Protruding regions are also seen in the surface topography of the worn thermoplastic pins (Figure 7g–i). The majority of these regions correspond to locations where thicker transfer layers are seen on the worn stainless-steel surface (Figure 3 and Figure 4g–i). Delamination wear is the dominant wear mechanism in these regions (Figure 9g,h). This is attributed to less interaction with the abrasive asperities on the steel surface due to protective transfer layers and a higher availability of solid lubricants, combined with higher local contact pressures at the protruding regions that contribute to higher shear stresses within the material, eventually leading to material delamination [23].
Delamination wear is the dominant wear mechanism of the thermoplastic at lower initial counter surface roughness towards the middle of the pin. Towards the edges, perpendicular to the sliding direction, both delamination wear and abrasive wear are prevalent, and it is hard to estimate which one is more dominant. The thermoplastic is subjected to a higher degree of abrasive wear compared to the thermoset materials. The amount of abrasive wear increases with increased initial counter surface roughness and, after sliding against the roughest counter surface, both delamination wear and abrasive wear are dominant mechanisms in different regions. Abrasive wear is more dominant in the valleys (Figure 9i) and delamination wear at the protruding regions. The abrasive wear at the edges is a combination of micro-cutting and micro-ploughing, while micro-ploughing is dominant towards the middle of the pin.

3.2. Ground Surfaces with Oriented Lay

3.2.1. Friction and Wear

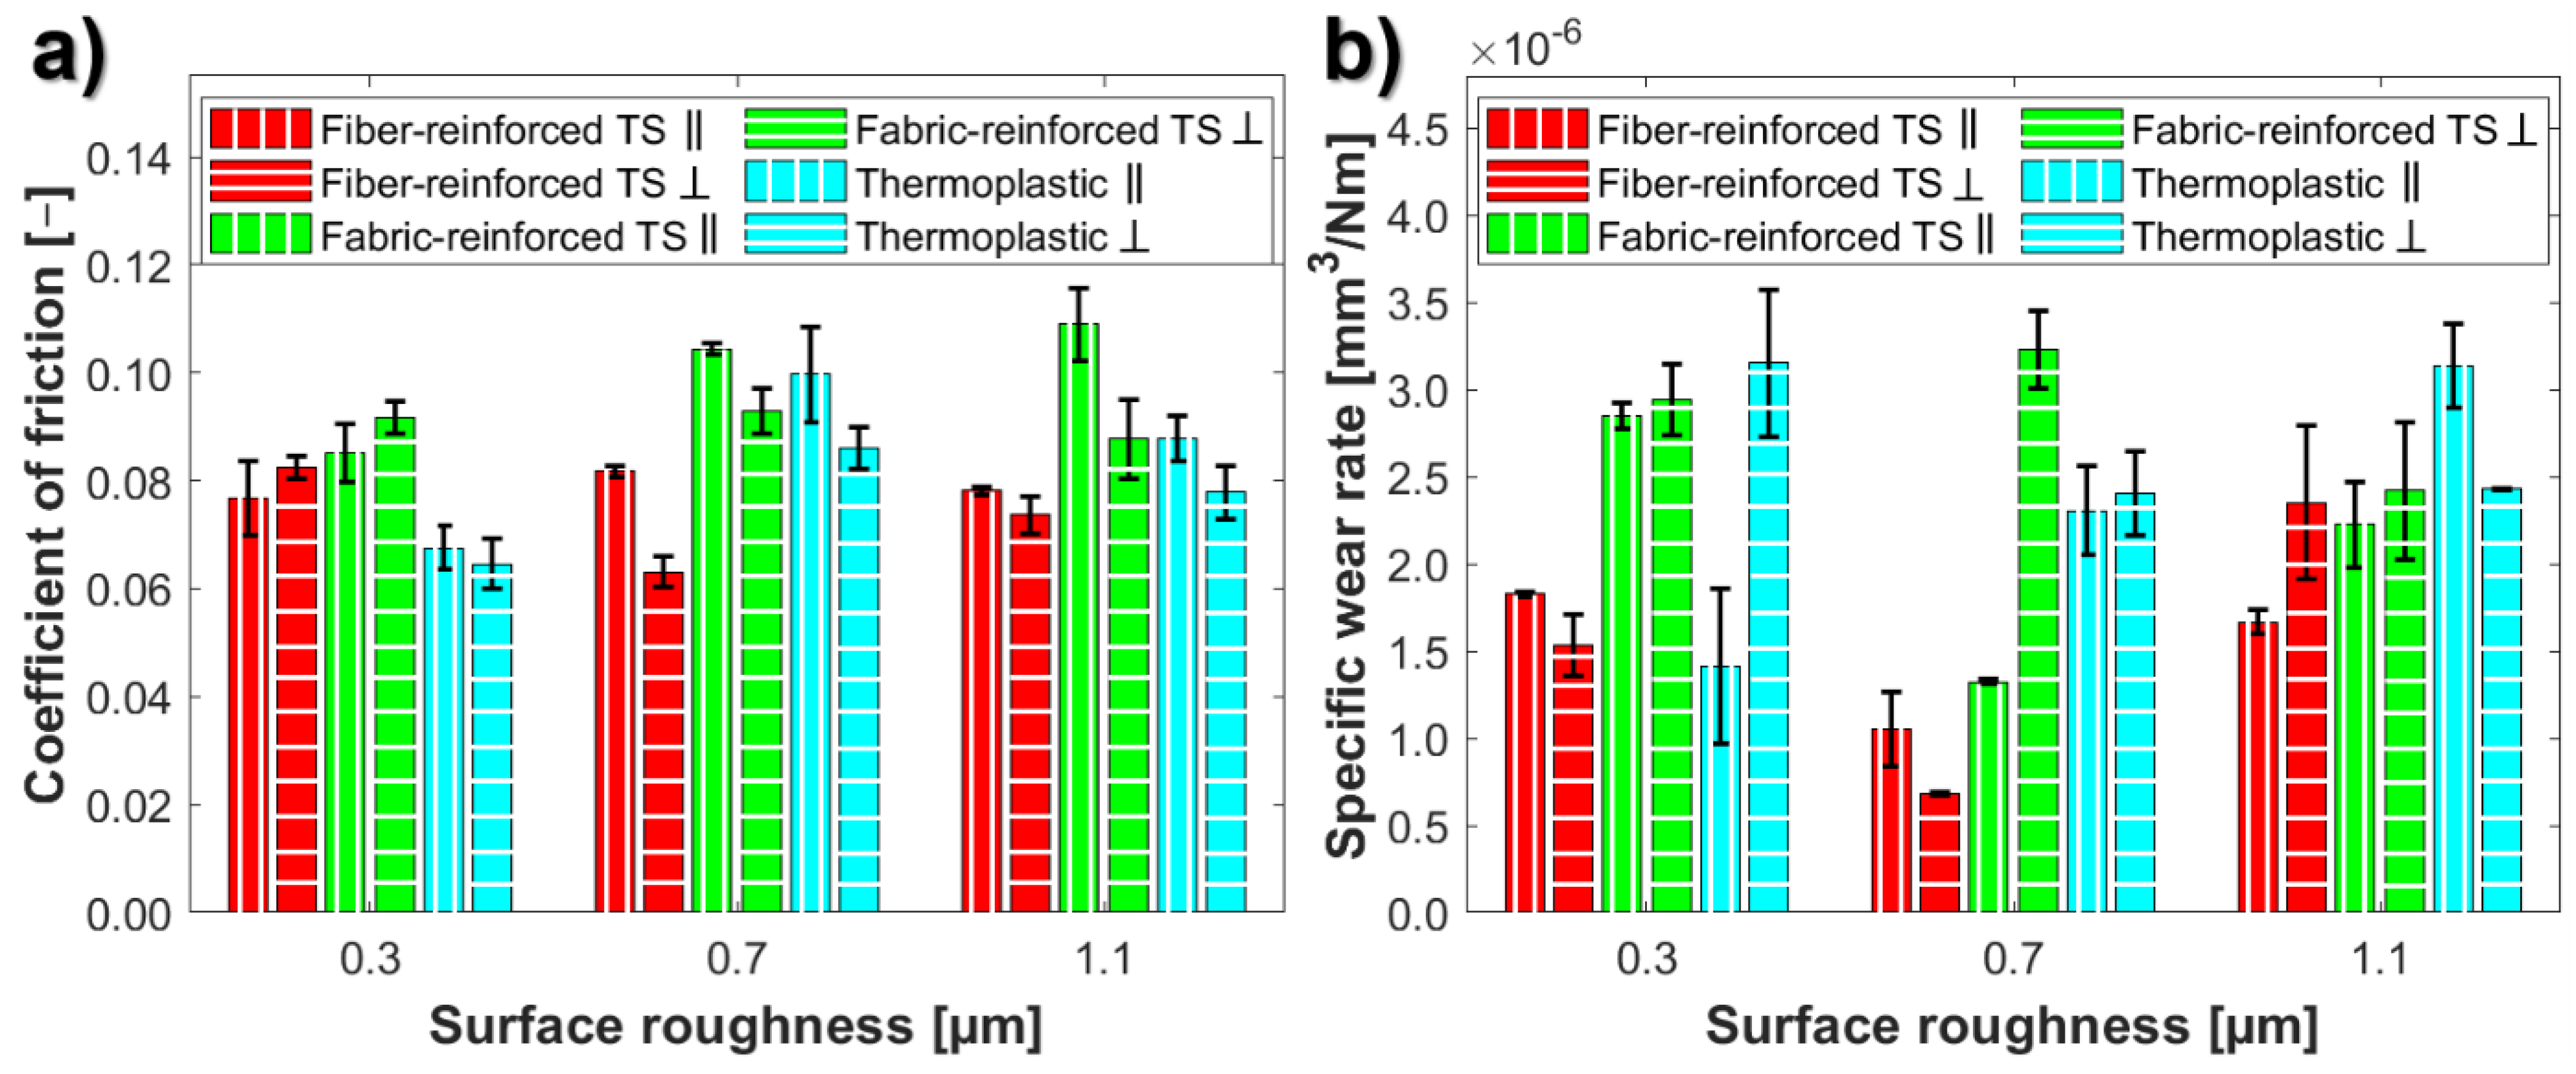
The average friction coefficients and specific wear rates as a function of counter surface roughness and lay are presented in Figure 10 for the three bearing materials sliding against ground stainless-steel plates with parallel and perpendicular surface lays, respectively. For easier comparison, the effect of initial counter surface roughness and lay on friction and wear is illustrated as normalized average coefficients of friction and specific wear rates for each bearing material (Figure 11).
The average coefficients of friction (Figure 10a) show good repeatability with standard deviations up to 9%. The specific wear rates (Figure 10b) show standard deviations of 11% or lower for the majority of the tested combinations. However, the standard deviation is higher (13–20%) for four of the tested combinations. The highest standard deviation of 32% is seen for the thermoplastic sliding against stainless steel with the parallel lay Sa = 0.3 µm. Deviations in the coefficients of friction and specific wear rates are attributed to variations in initial counter surface roughness (Sa) between the ground stainless-steel plates with standard deviations up to 10% (Table 1). Another contributing factor is the inherent deviation between the thermoset material pins due to the complex structure of the materials with some variations in content and appearance [24]. However, the highest deviation in the specific wear rate is seen for the thermoplastic, which is a homogeneous material; hence, the deviations between the polymer pins are small. The standard deviation for the average specific wear rate for the thermoplastic sliding against stainless steel with the isotropic lay and Sa = 0.3 µm is 18% (Figure 2b), which was the highest deviation in the specific wear rate for the surfaces with the isotropic lay.
After comparing the coefficients of friction for the parallel and perpendicular lays (Sa = 0.3 µm) in Figure 10a with the ones for the corresponding surface roughness and the isotropic lay (Figure 2a), the thermoset materials show an increase in friction for the parallel and perpendicular lays. The fibre-reinforced thermoset shows a 39% higher coefficient of friction for the parallel lay and 49% higher for the perpendicular lay compared to the isotropic lay. The fabric-reinforced thermoset shows similar behaviour with a 46% increase for the parallel lay and 57% for the perpendicular lay. In contrast to the thermosets, the thermoplastic shows lower friction for the parallel and perpendicular lays with decreases of 6% and 11%, respectively.
At the lowest initial counter surface roughness (Sa = 0.3 µm), the obtained coefficients of friction for each bearing material are similar between the parallel and perpendicular surface lays (Figure 10a). Hence, the influence of lay is small (below 8% difference) on the coefficient of friction at the lowest initial counter surface roughness. At the lowest surface roughness, irrespective of the lay orientation, the thermoplastic shows the lowest friction and the fabric-reinforced thermoset shows the highest (Figure 10a).
For the fibre-reinforced thermoset, the coefficient of friction increases for the parallel lay and decreases for the perpendicular lay when the initial counter surface roughness increases from Sa = 0.3 µm to 0.7 µm. Opposite behaviour is seen when the initial counter surface roughness increases from Sa = 0.7 µm to 1.1 µm. The influence of initial counter surface roughness on the coefficient of friction is also higher for the perpendicular lay compared to the parallel. The highest coefficient of friction for the parallel lay at the intermediate initial counter surface roughness (Sa = 0.7 µm) is attributed to the lowest specific wear rate compared to the lowest and highest surface roughness. The lower wear rate will contribute to less available polymer wear debris that can form transfer layers and also lower the amount of solid lubricants in the sliding interface. Interestingly, opposite behaviour is seen for the perpendicular surface lay at the same initial surface roughness where both the friction and specific wear rate reach its minimum. The lowest friction is obtained after sliding against the perpendicular lay and an intermediate initial counter surface roughness Sa = 0.7 µm (Figure 11a).
In the case of the fabric-reinforced thermoset, the coefficient of friction increases with increased initial counter surface roughness for the parallel lay (Figure 11b). The increase is higher between the lowest initial surface roughness and the intermediate (18%) compared to between the intermediate and the highest (4%) (Figure 10a). Increased friction with increased counter surface roughness has previously been reported for UHMWPE sliding against stainless steel with surface finish of Ra 0.1–1.0 µm [7]. The coefficient of friction for the counter surfaces with the perpendicular lay (Figure 11b) shows stable behaviour and is not influenced by changes in surface roughness. The lowest friction is obtained after sliding against the parallel lay and the lowest initial counter surface roughness of Sa = 0.3 µm (Figure 11b).
The influence of surface roughness on friction for the thermoplastic is similar between the two surface lays (Figure 11c). Slightly higher friction values (up to 14%) are seen for the parallel lay at higher initial surface roughness (Sa = 0.7 and 1.1 µm), similar to the thermoset materials. The thermoplastic shows the lowest friction for counter surfaces with the lowest initial surface roughness (Sa = 0.3 µm) and highest friction for intermediate roughness (Sa = 0.7 µm), irrespective of the lay orientation (Figure 11c).
For the fabric-reinforced thermoset, the specific wear rates follow the same trend as friction when comparing parallel and perpendicular lay to isotropic lay at Sa = 0.3 µm (Figure 2b and Figure 10b). The wear is 71% higher for the parallel lay and 76% for the perpendicular lay compared to the isotropic lay. For the thermoplastic, wear is also higher for the perpendicular lay (64%) but 36% lower for the parallel lay compared to the isotropic lay. For the fibre-reinforced thermoset, the specific wear rates are similar for the parallel and isotropic lay, while they are 18% lower for the perpendicular lay compared to the isotropic lay. Similar to the friction, the influence of counter surface lay is also small on the specific wear rates (Figure 10b) for the fabric-reinforced thermoset at the lowest initial counter surface roughness (3%). The surface lay shows more influence on the specific wear rate for the fibre-reinforced thermoset with a 16% difference for the perpendicular lay compared to the parallel lay. The specific wear rate is more than double (123% higher) for the thermoplastic sliding against a perpendicular lay compared to the parallel lay, despite showing similar coefficients of friction. With the parallel lay, the specific wear rate (Figure 10b) is the lowest for the thermoplastic and highest for the fabric-reinforced thermoset. For the perpendicular lay, the specific wear rate is the lowest for the fibre-reinforced thermoset and highest for the thermoplastic.
When the initial counter surface increases from Sa 0.3 µm to 0.7 µm, the specific wear rates for the fibre-reinforced thermoset decrease significantly (74–126%) for both surface lays (Figure 10b). On the contrary, they increase when the initial counter surface increases from Sa = 0.7 µm to 1.1 µm (37–71%). This indicates a transition in wear mechanisms occurring between Sa = 0.3 µm and 1.1 µm. The influence of surface roughness is significantly higher for the perpendicular lay compared to the parallel. At the lower surface roughness (Sa = 0.3 µm and 0.7 µm), the wear rate is lower for the perpendicular lay compared to the parallel. Similar behaviour has been reported in [17,26] for neat and glass fibre-reinforced PEEK sliding against steel with an initial surface roughness Ra of 0.06–1.45 µm, as well as for UHMWPE sliding against hardened stainless steel with a surface roughness Ra of 0.3 µm [16]. This was explained by the quick formation of uniform and coherent transfer layers on the counter surface with the perpendicular lay, while only patchy transfer layers with a slow growth rate were seen after sliding against the parallel lay [16]. The formation of thicker transfer layers for the perpendicular counter surface lay was mainly attributed to the entrapment of wear debris aiding polymer build-up on the steel surface.
For the fabric-reinforced thermoset, the influence of surface roughness is significantly more pronounced on the specific wear rate compared to the coefficient of friction. At the lowest (Sa = 0.3 µm) and highest (Sa = 1.1 µm) initial counter surface roughness, the specific wear rates are similar between the parallel and perpendicular counter surface lay (Figure 11b). Meanwhile, the specific wear rate at Sa = 0.7 µm and the perpendicular lay is 144% higher compared to the parallel lay (Figure 10b). Higher wear rates for the perpendicular lay compared to the parallel lay have previously been reported for POM composites sliding against tool steel with surface finish Ra 0.015–0.7 µm [27] and for carbon fibre-reinforced PEEK sliding against steel with an initial surface roughness Ra of 0.06–1.45 µm [26]. Similar behaviour has also been seen for PPS composites sliding against Inconel 625 with a surface finish Ra of 0.55 µm [11], while the wear rates were similar or slightly higher for Ra 0.16 µm.
The specific wear rate shows a linear increase with increased surface roughness for the thermoplastic sliding against steel with the parallel lay. Similar behaviour was also seen for the thermoplastic sliding against surfaces with the isotropic lay (Figure 2b). An increasing wear rate with increased surface roughness has also been reported for neat and fibre-reinforced PEEK [26], engineering thermoplastics [10], and UHMWPE [7] sliding against steel with Ra = 0.02–1.45, as well as some of the PPS composites sliding against Inconel 625 with a surface finish Ra of 0.08–0.55 µm [11]. Opposite behaviour is seen for the thermoplastic sliding against steel with the perpendicular surface lay (Figure 11c), with a 31% decrease in the specific wear rate between the lowest and intermediate surface roughness rates. The specific wear rates are similar between the intermediate and highest surface roughness rates.
It is clear from Figure 11 that the changes in the initial counter surface topography have a bigger influence on wear than friction for the three bearing materials. For the reinforced thermosets, the parallel lay shows the opposite behaviour for friction and wear. In other words, there is a trade-off between friction and wear when optimising surface topography. Similar behaviour is also seen for the thermoplastic; however, only for perpendicular lay.
Zsidai et al. [10] and Quaglini et al. [13] suggested that an optimal counter surface roughness exists for any polymer where minimum friction can be obtained. This should reasonably also apply to wear. However, due to the trade-off between friction and wear mentioned above the optimal counter surface roughness for a bearing material can differ for minimum friction and minimum wear. This is the case for the fabric-reinforced thermoset for which the lowest friction is obtained after sliding against parallel lay and the lowest initial counter surface roughness Sa = 0.3 µm (Figure 11b), while the lowest specific wear rate is obtained for the same lay but an intermediate initial counter surface roughness Sa = 0.7 µm. Sa = 0.7 µm with the parallel lay appears to be optimal for the tribological performance. For the fibre-reinforced thermoset, the lowest friction and specific wear rate is obtained after sliding against the perpendicular lay and an intermediate initial counter surface roughness Sa = 0.7 µm (Figure 11a). This is the same initial surface roughness for the fabric-reinforced thermoset, but with an opposite counter surface lay. For the thermoplastic, the optimal counter surface roughness is Sa = 0.3 µm with the parallel lay.
For an initial counter surface roughness of Sa = 0.3 µm, the thermoset materials benefit from the isotropic lay with respect to both friction and wear, while for the thermoplastic, a parallel counter surface lay improves the tribological performance (Figure 11c). On the contrary, for the highest surface roughness (Sa = 1.1 µm), a perpendicular lay is better for the thermoplastic and the fabric-reinforced thermoset, while a parallel lay is better for the fibre-reinforced thermoset.

3.2.2. Friction and Wear Mechanisms

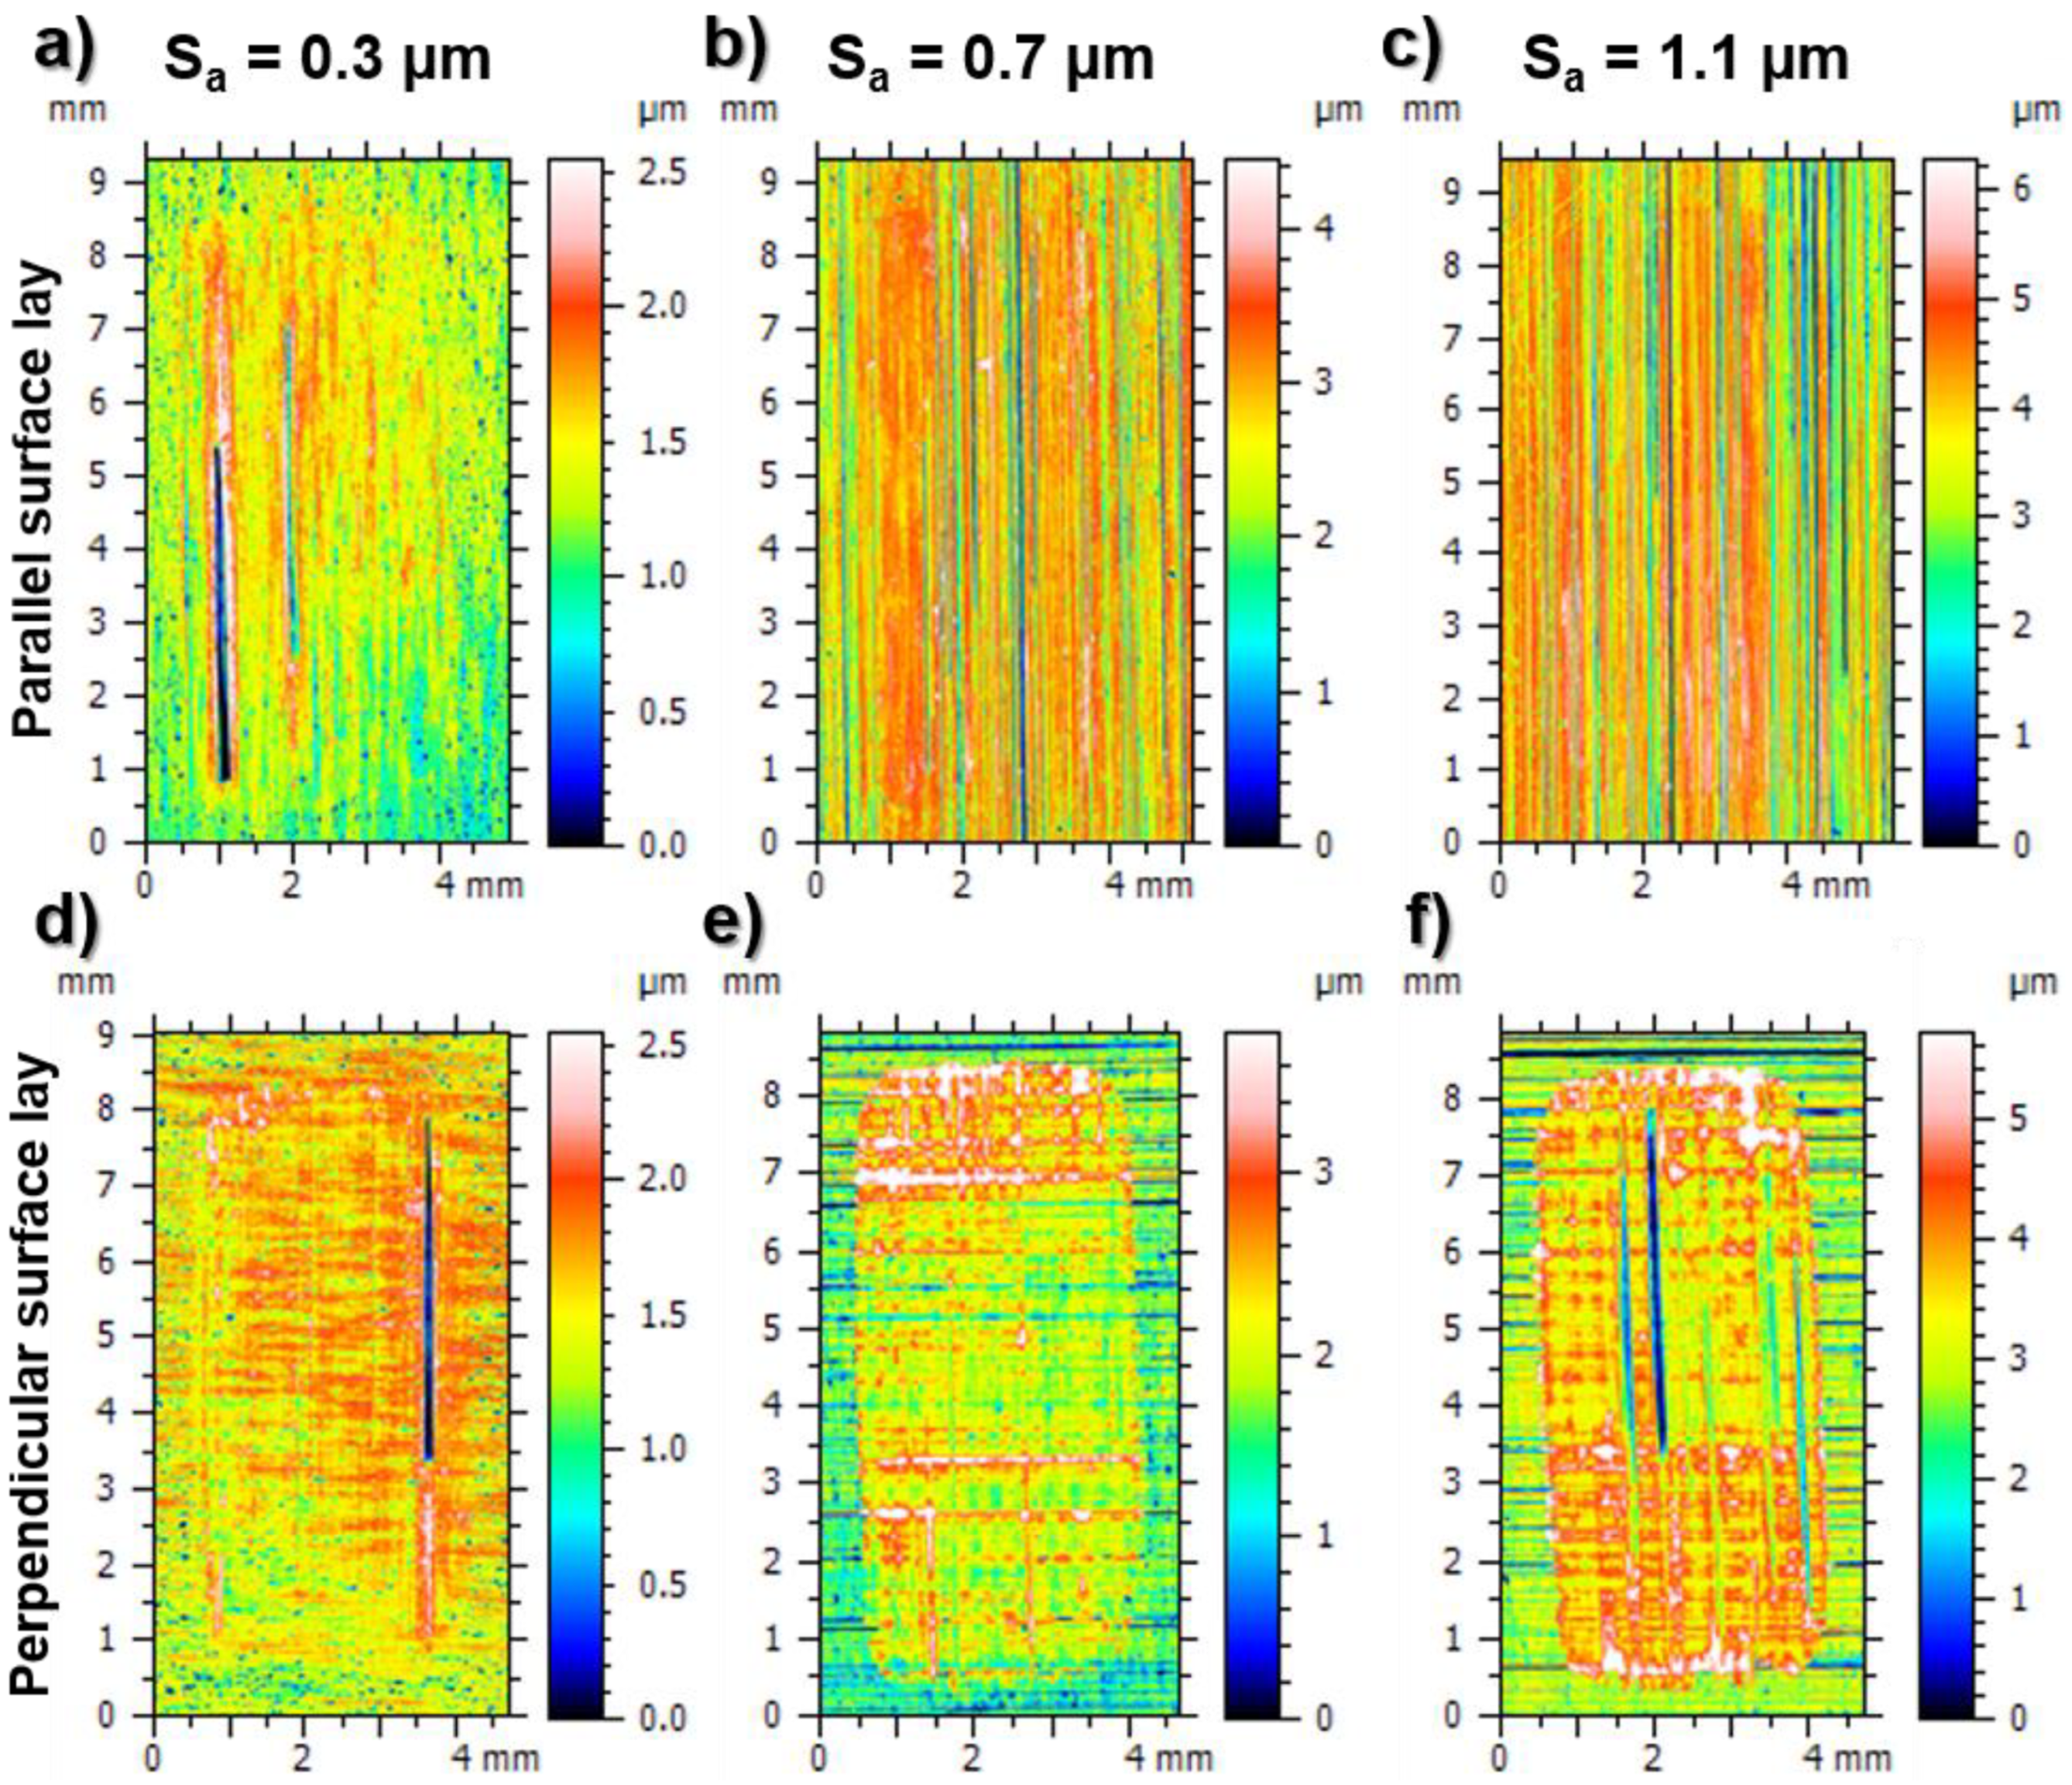
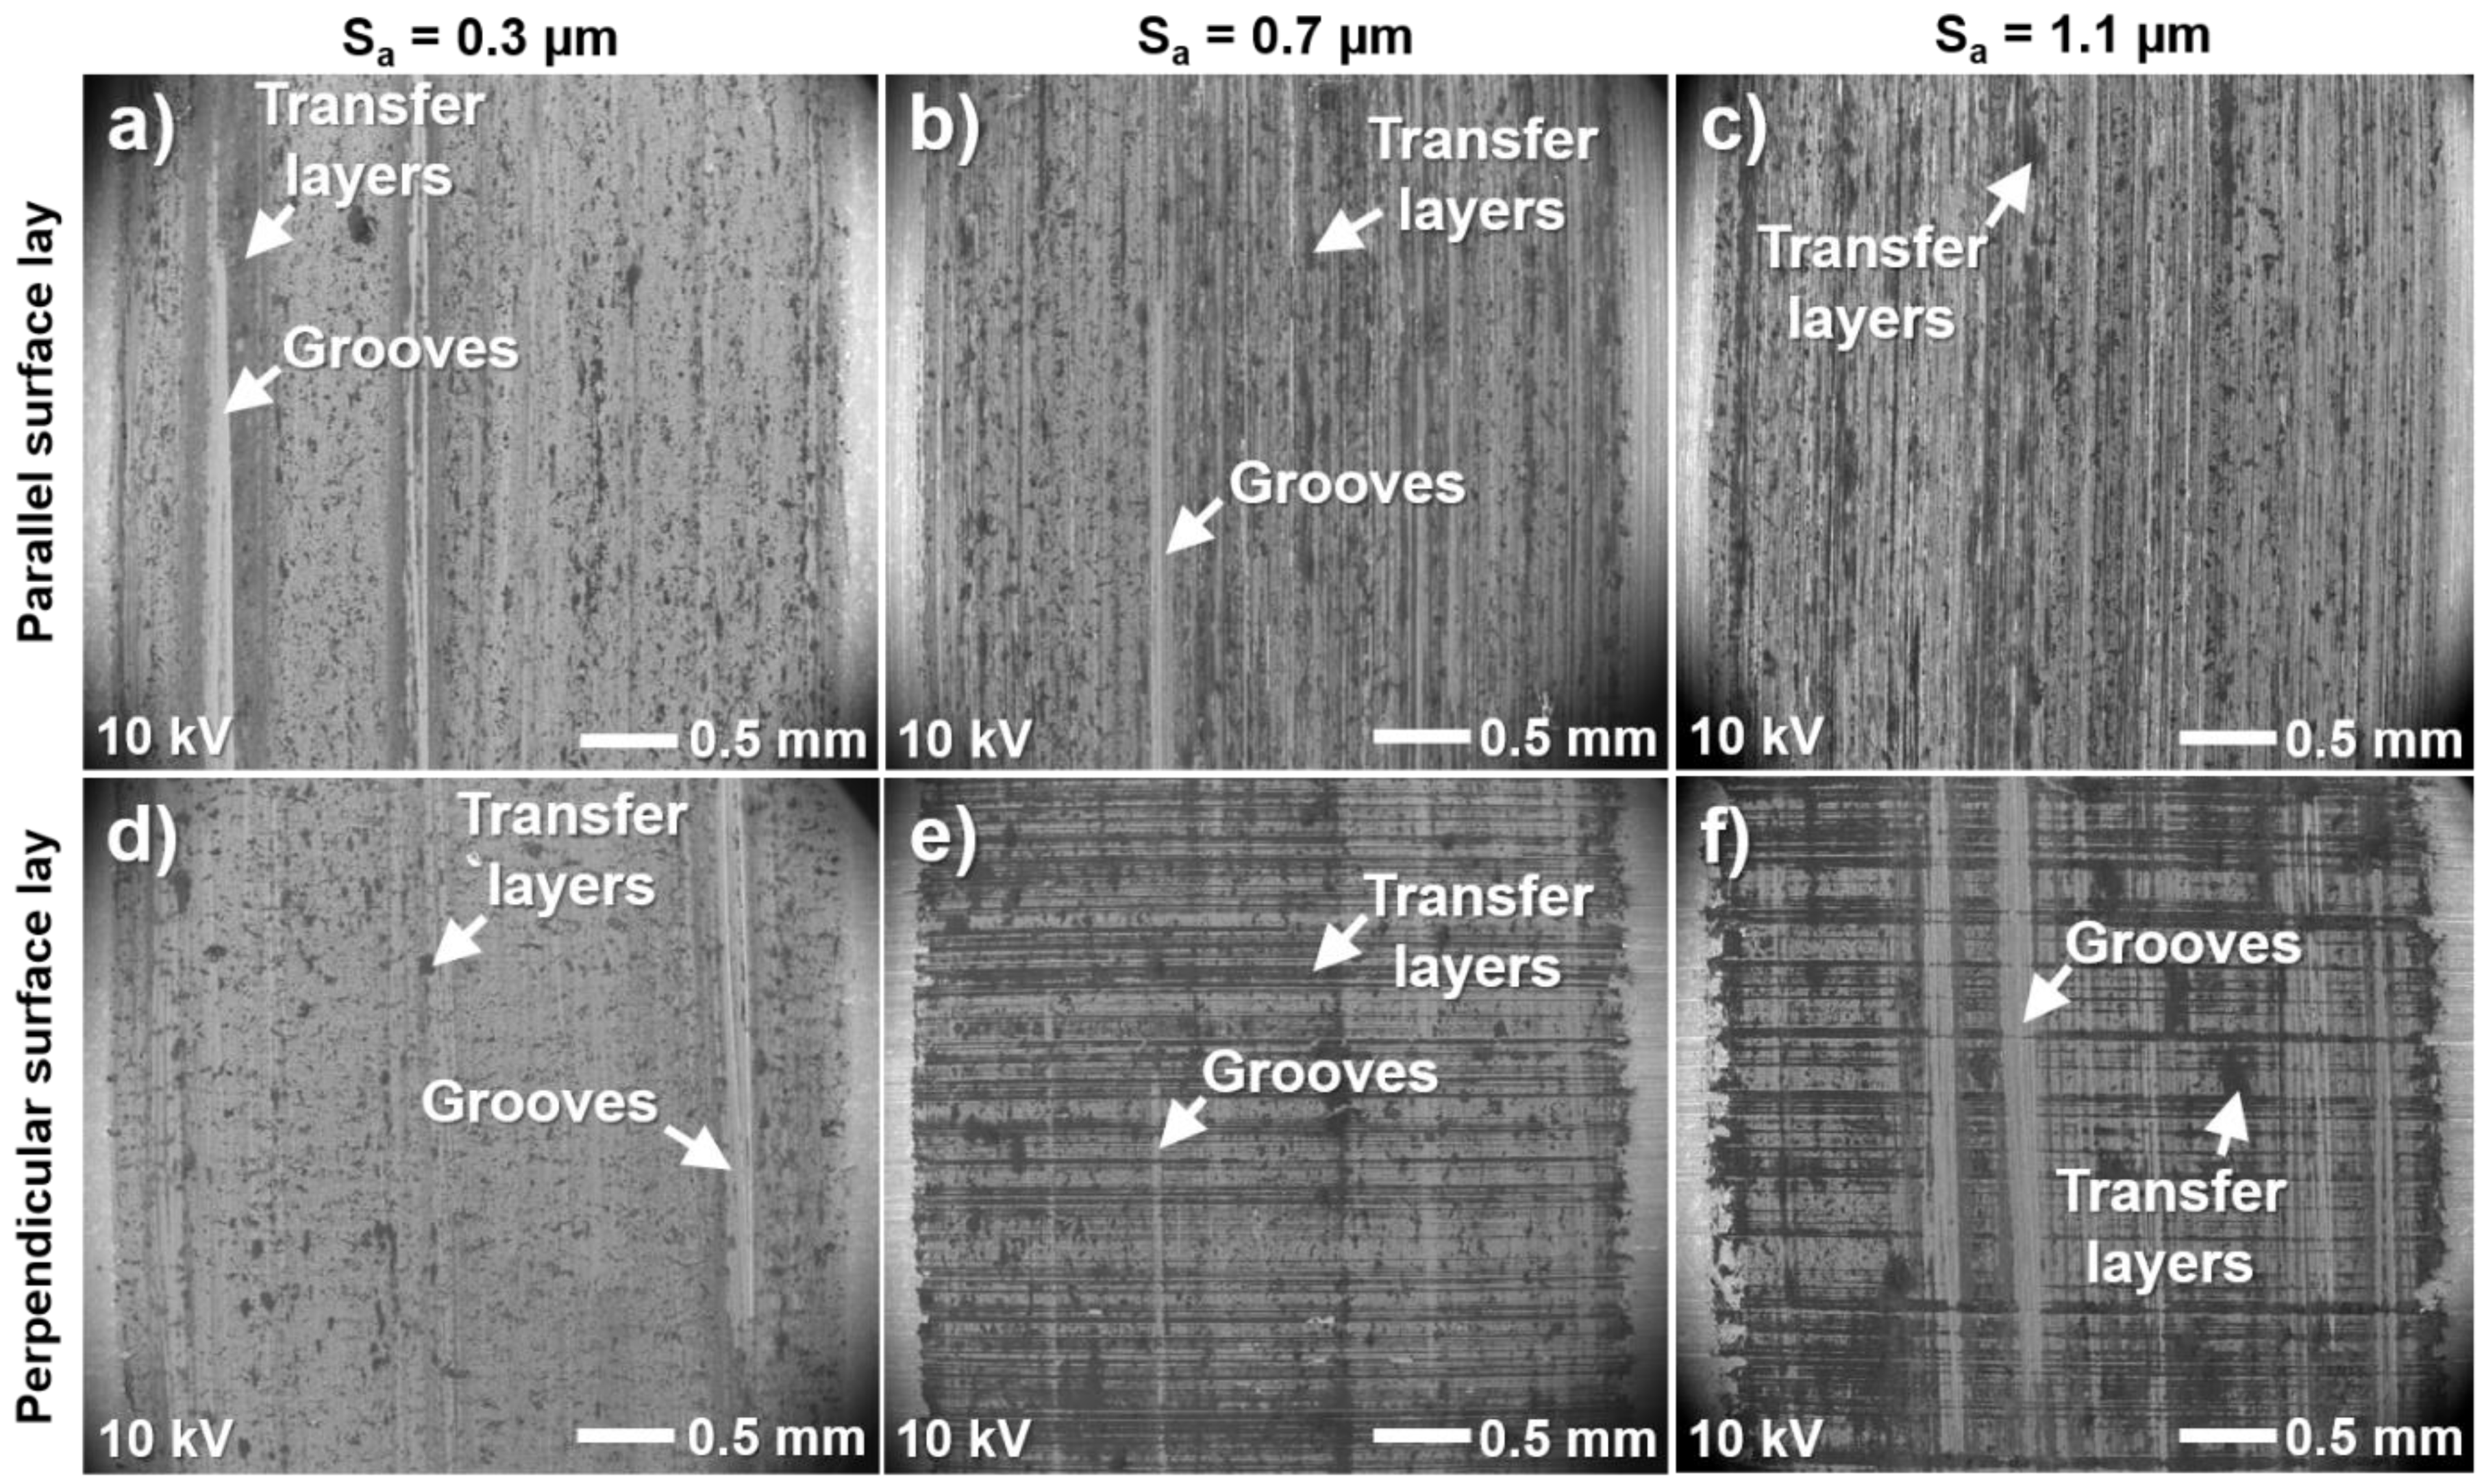
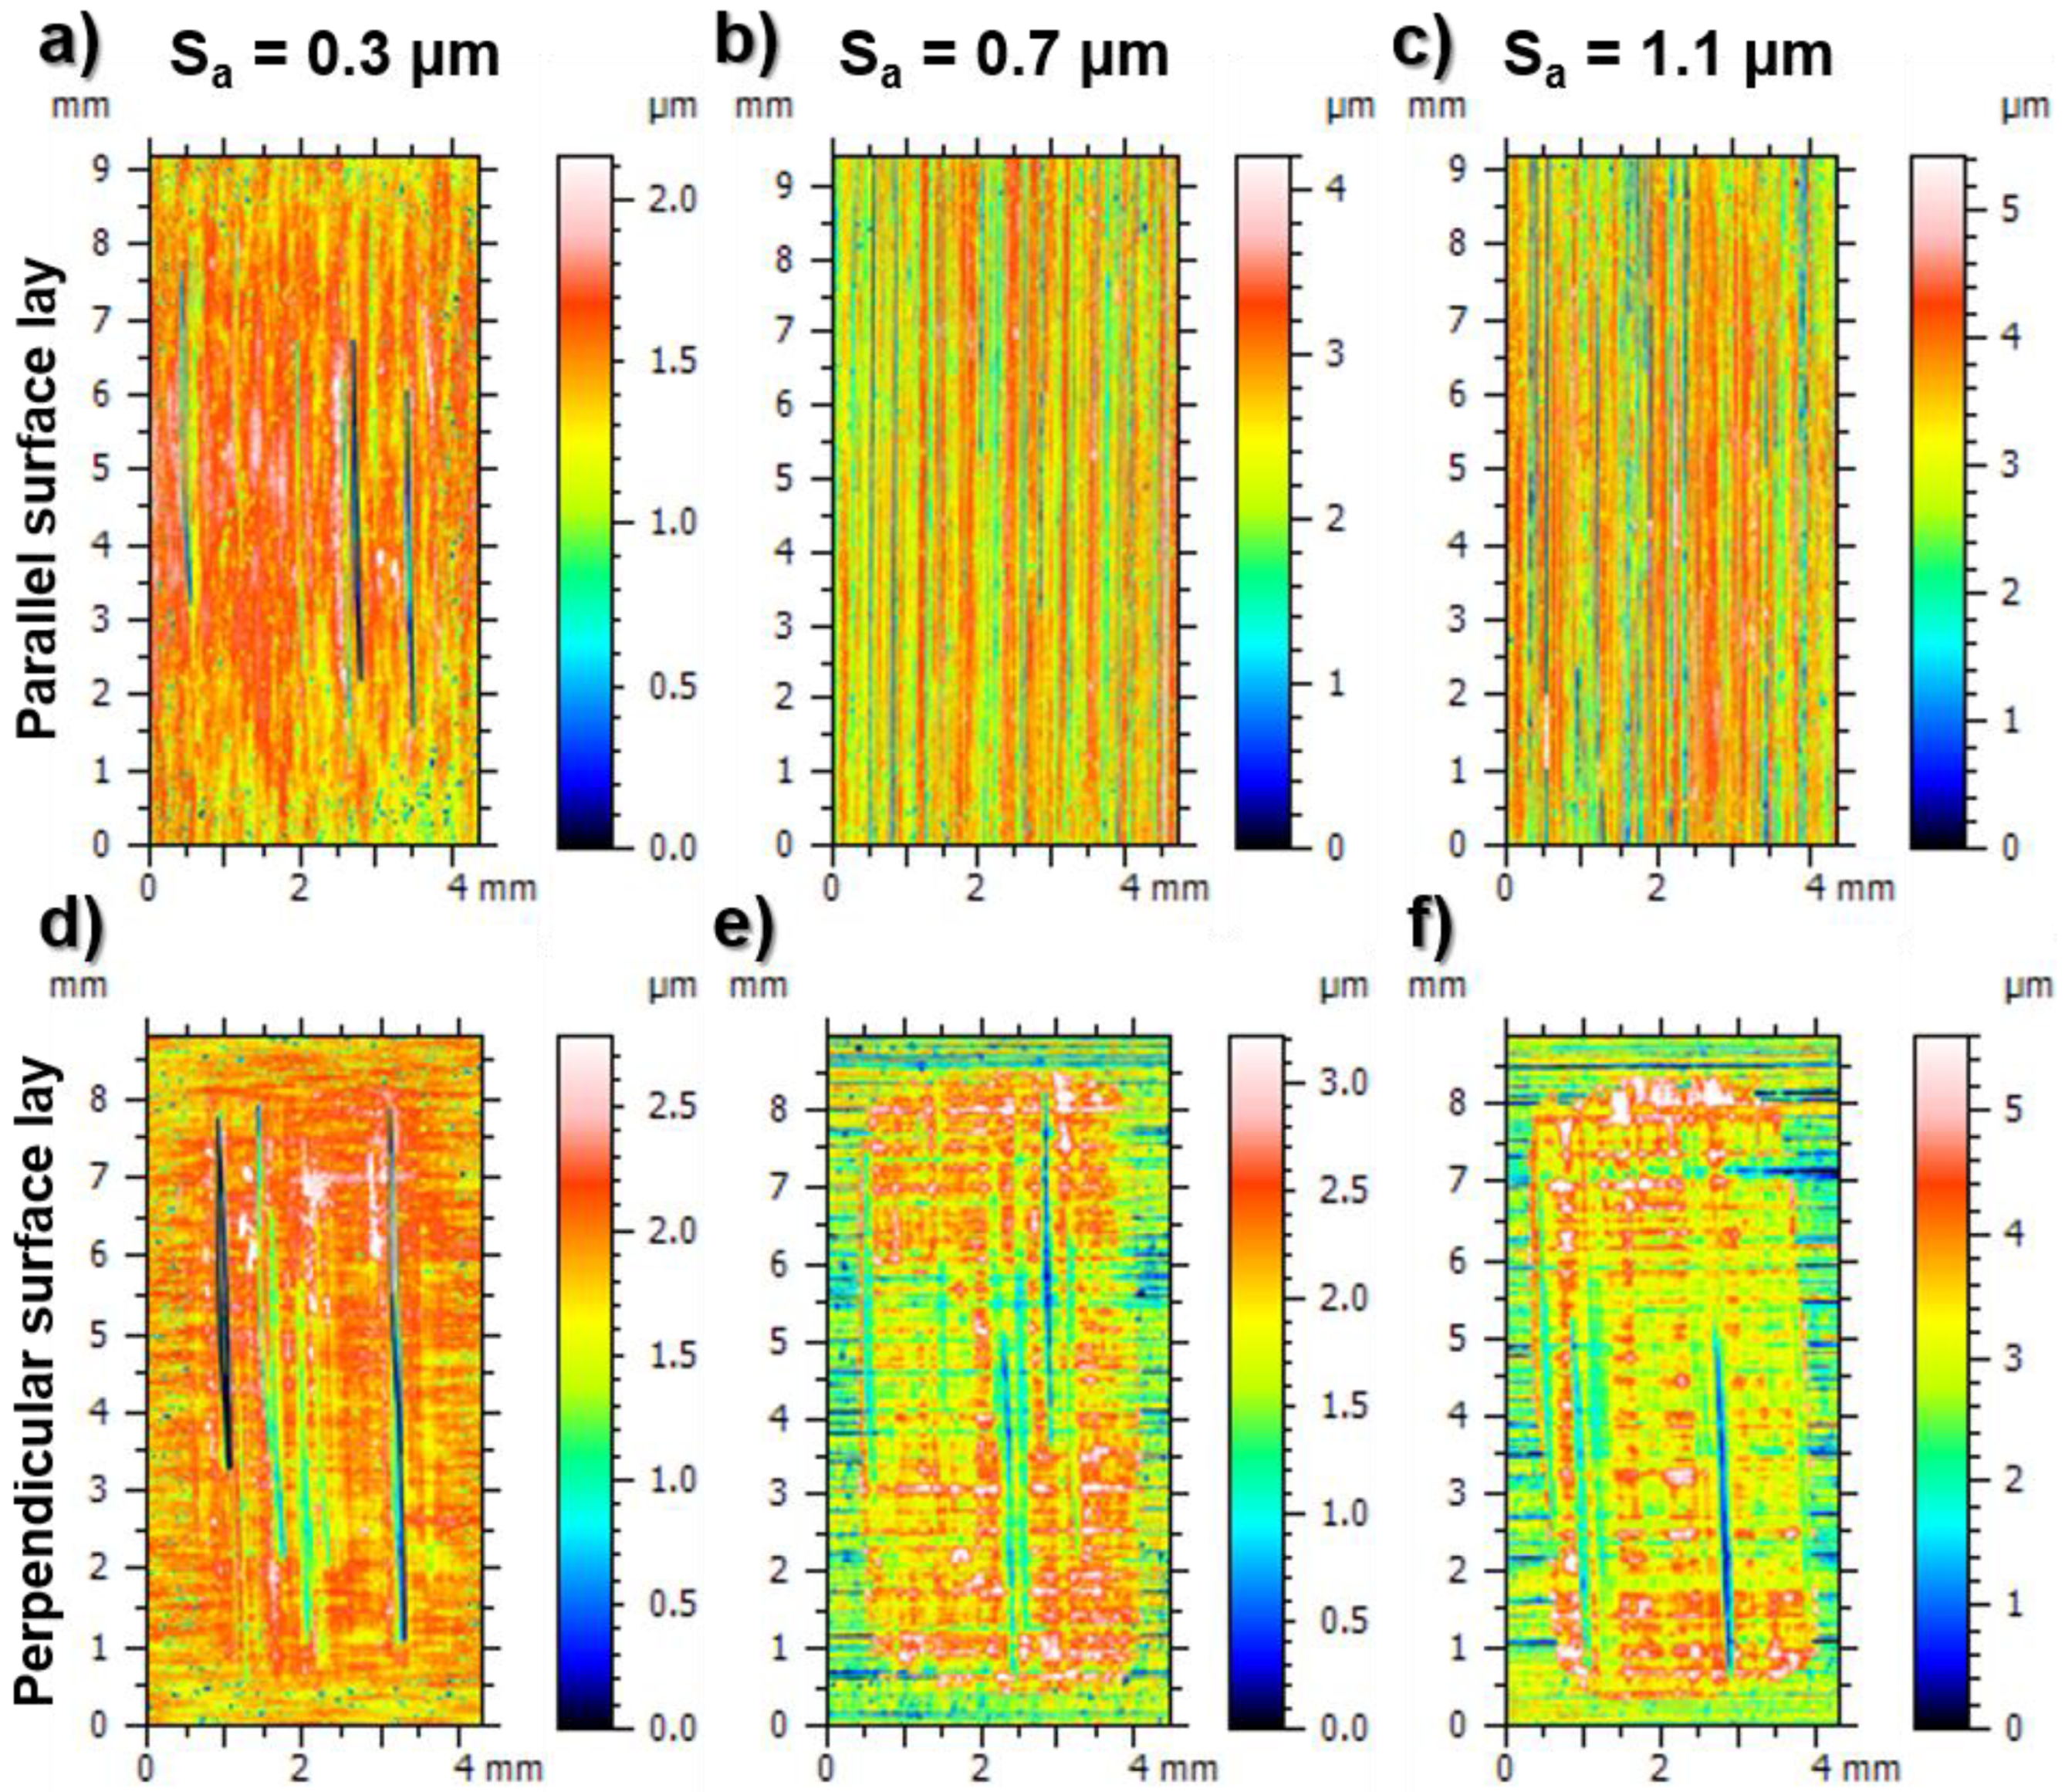
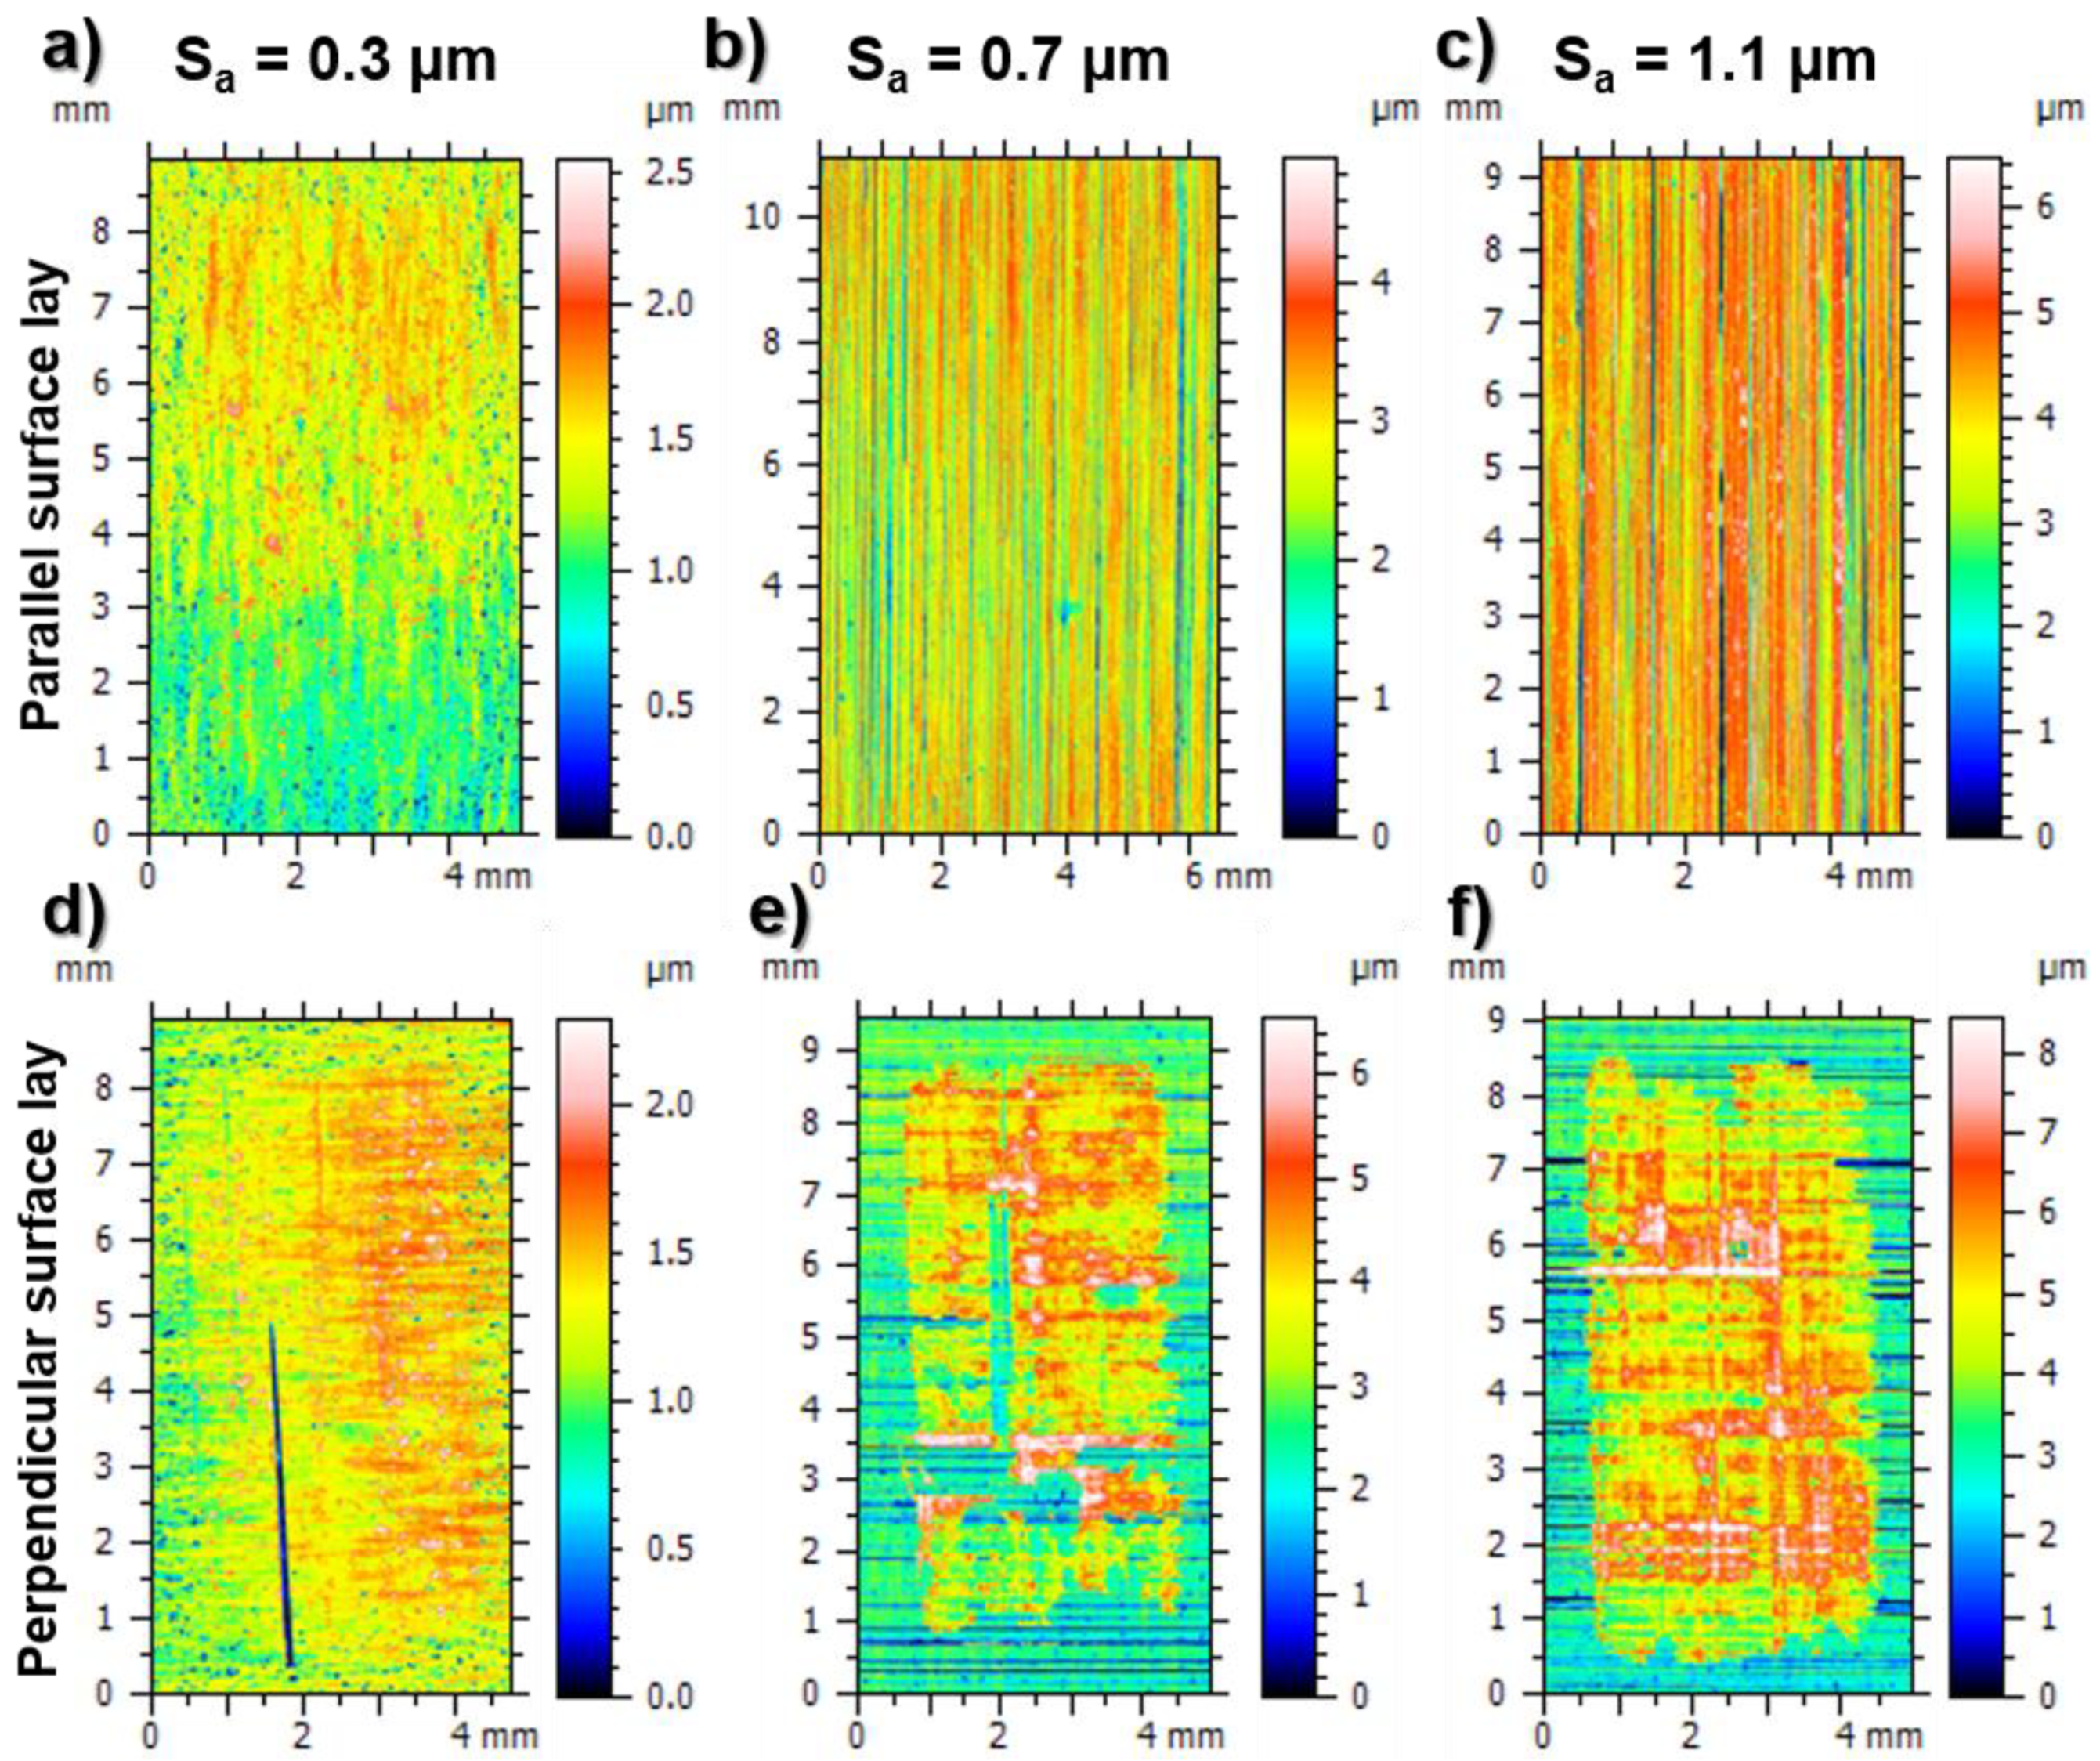
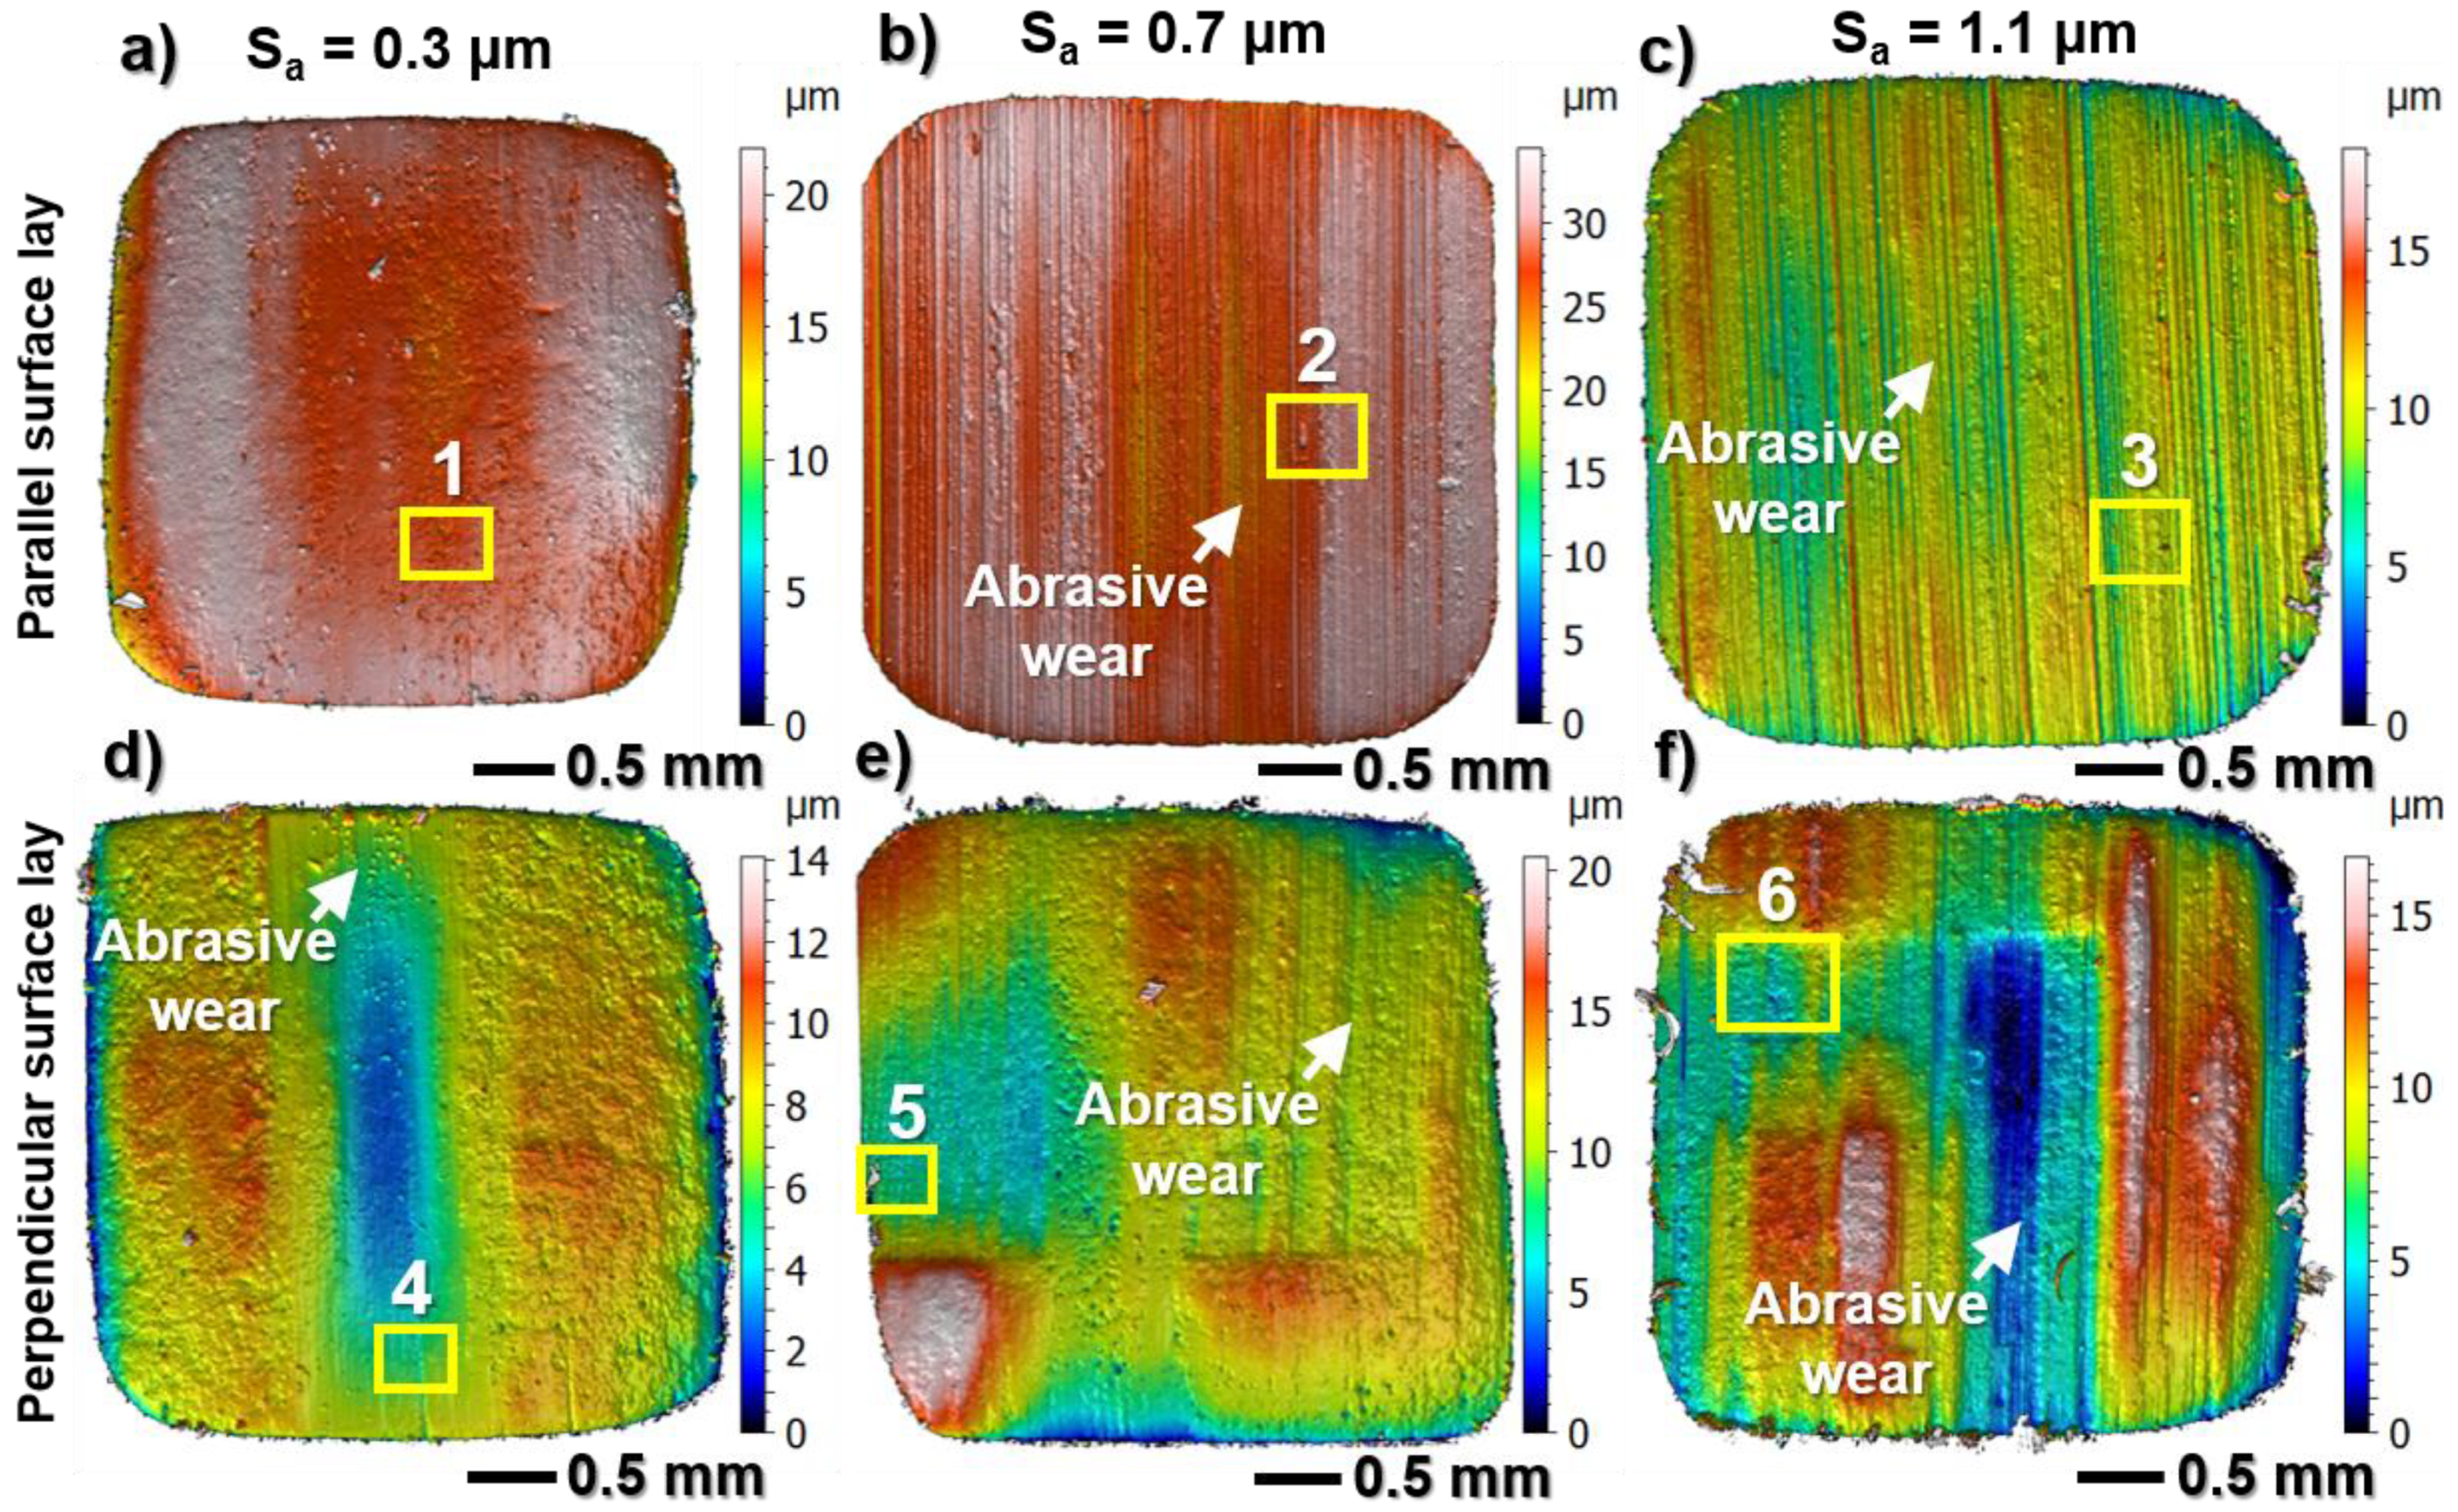
The surface topography of the worn stainless-steel plates with oriented lay and different initial surface roughness is shown in Figure 12 after sliding against the fibre-reinforced thermoset. Corresponding SEM micrographs of the centre of the wear tracks are shown in Figure 13. At the lowest initial counter surface roughness (Sa = 0.3 µm), grooves are seen on the stainless-steel plates with both parallel lay (Figure 12a and Figure 13a) and perpendicular lay (Figure 12d and Figure 13d). Along the edges of the grooves, thick transfer layers are formed (Figure 13a) as a result of accumulated wear debris from both the polymer pin and stainless steel. EDS analysis of the contact surfaces of the fibre-reinforced thermoset pins (Figure S12a) shows a higher Fe concentration on the polymer pin after sliding against the steel with the parallel lay compared to perpendicular lay. This is a result of more abrasive wear induced on the stainless-steel surface by the fibres in the thermoset. Comparing to the isotropic lay with an initial surface roughness of Sa = 0.3 µm (Figure 3c and Figure 4c), the stainless-steel surface is more worn after sliding against the parallel and perpendicular lay. This contributes to a higher coefficient of friction for the oriented lays (Figure 10a) compared to the isotropic lay (Figure 2a).
At the lowest initial roughness (Sa = 0.3 µm), the overall surface coverage by transfer layers on the steel surface is higher for the parallel lay (Figure 13a) than the perpendicular lay (Figure 13d). EDS analysis of the worn pins (Figure S12b) also reveals a higher concentration of PTFE on the surface after sliding against steel with the parallel lay. More transfer layers and a higher concentration of solid lubricants contribute to the similar friction for the parallel lay compared to the perpendicular lay (Figure 11a), despite showing a higher wear of the steel surface. The transfer layers for the parallel lay (Figure 13a) grow in the sliding direction, while (Figure 13d) the transfer layers grow perpendicular to the sliding direction for the perpendicular lay. This is attributed to the accumulation of wear debris in the irregularities formed on the as-delivered steel surface during the cold rolling process. For the perpendicular lay, some of the transfer layers also grow in the sliding direction, but this is limited to the regions where grooves have been formed on the steel surface.
The stainless-steel plates with intermediate initial counter surface roughness (Sa = 0.7 µm) are less worn compared to the lowest roughness for both the parallel and perpendicular lays after sliding against the fibre-reinforced thermoset (Figure 12 and Figure 13). This is also confirmed by a lower concentration of Fe on the worn polymer pins (Figure S12a). Less grooves are seen for the perpendicular lay and this behaviour is explained by significantly higher surface coverage by thicker transfer layers compared to the parallel lay. This also contributes to the lower friction and wear for the perpendicular lay (Figure 11a). The lower wear rate seen for the parallel lay highlights that the ability of the counter surface to accumulate wear debris and rapidly form transfer layers is critical for wear reduction. Higher surface coverage by transfer layers is also seen for the parallel lay at the intermediate roughness compared to the lowest, which contributes to a reduction in the specific wear rate.
At the highest initial counter surface roughness (Sa = 1.1 µm), the perpendicular lay results in a higher surface coverage by more coherent and thicker transfer layers (Figure 12e) compared to the parallel lay, which has more patchy transfer layers (Figure 12c). This behaviour is seen for all three bearing materials at the intermediate and the highest roughness and contributes to the lower coefficient of friction for the perpendicular lay (Figure 10a). These results are in line with earlier reported findings for PPS composites sliding against Inconel 625 [11] and UHMWPE sliding against stainless steel [16].
After sliding against the fibre-reinforced thermoset, the stainless-steel plate with the parallel lay is less worn at the highest roughness (Figure 12c) compared to the intermediate. This is also confirmed by a decreased concentration of Fe on the worn polymer pins with increased initial surface roughness (Figure S12a). The lower wear of the steel surface also contributes to the lower coefficient of friction for the highest roughness compared to the intermediate (Figure 11a). In contrast, the wear of the steel surface with the perpendicular lay is significantly higher at the highest roughness (Figure 12f) compared to the intermediate. This is also evident from the highest concentration of Fe on the worn pin compared to any other surface topography combination (Figure S12a). This contributes to the higher coefficient of friction at the highest roughness for the perpendicular lay (Figure 11a) due to a higher ploughing component of friction. The increased abrasive wear on the stainless steel is attributed to more reinforcement fibres protruding from the polymer surface and presence of impurities (Figure S2 and Table S2) as a result of continuous wear.
Similar to the isotropic lay, abrasive wear is the dominant wear mechanism of the stainless-steel plates with parallel and perpendicular lays after sliding against the three bearing materials. Micro-ploughing and subsequent micro-fatigue are the dominant micro-mechanisms associated with similar behaviour, as illustrated in Figure 6 for the isotropic lay. The abrasive wear is caused by reinforcement fibres, fillers, and impurities in the bearing materials, as well as the generated steel debris during the wear process (Figure 6c,e). In some areas, abrasive grooves initiated by a combination of micro-cutting and micro-ploughing are also prevalent on the steel surface after sliding against the reinforced thermoset materials, as shown in Figure 6a,b,d.
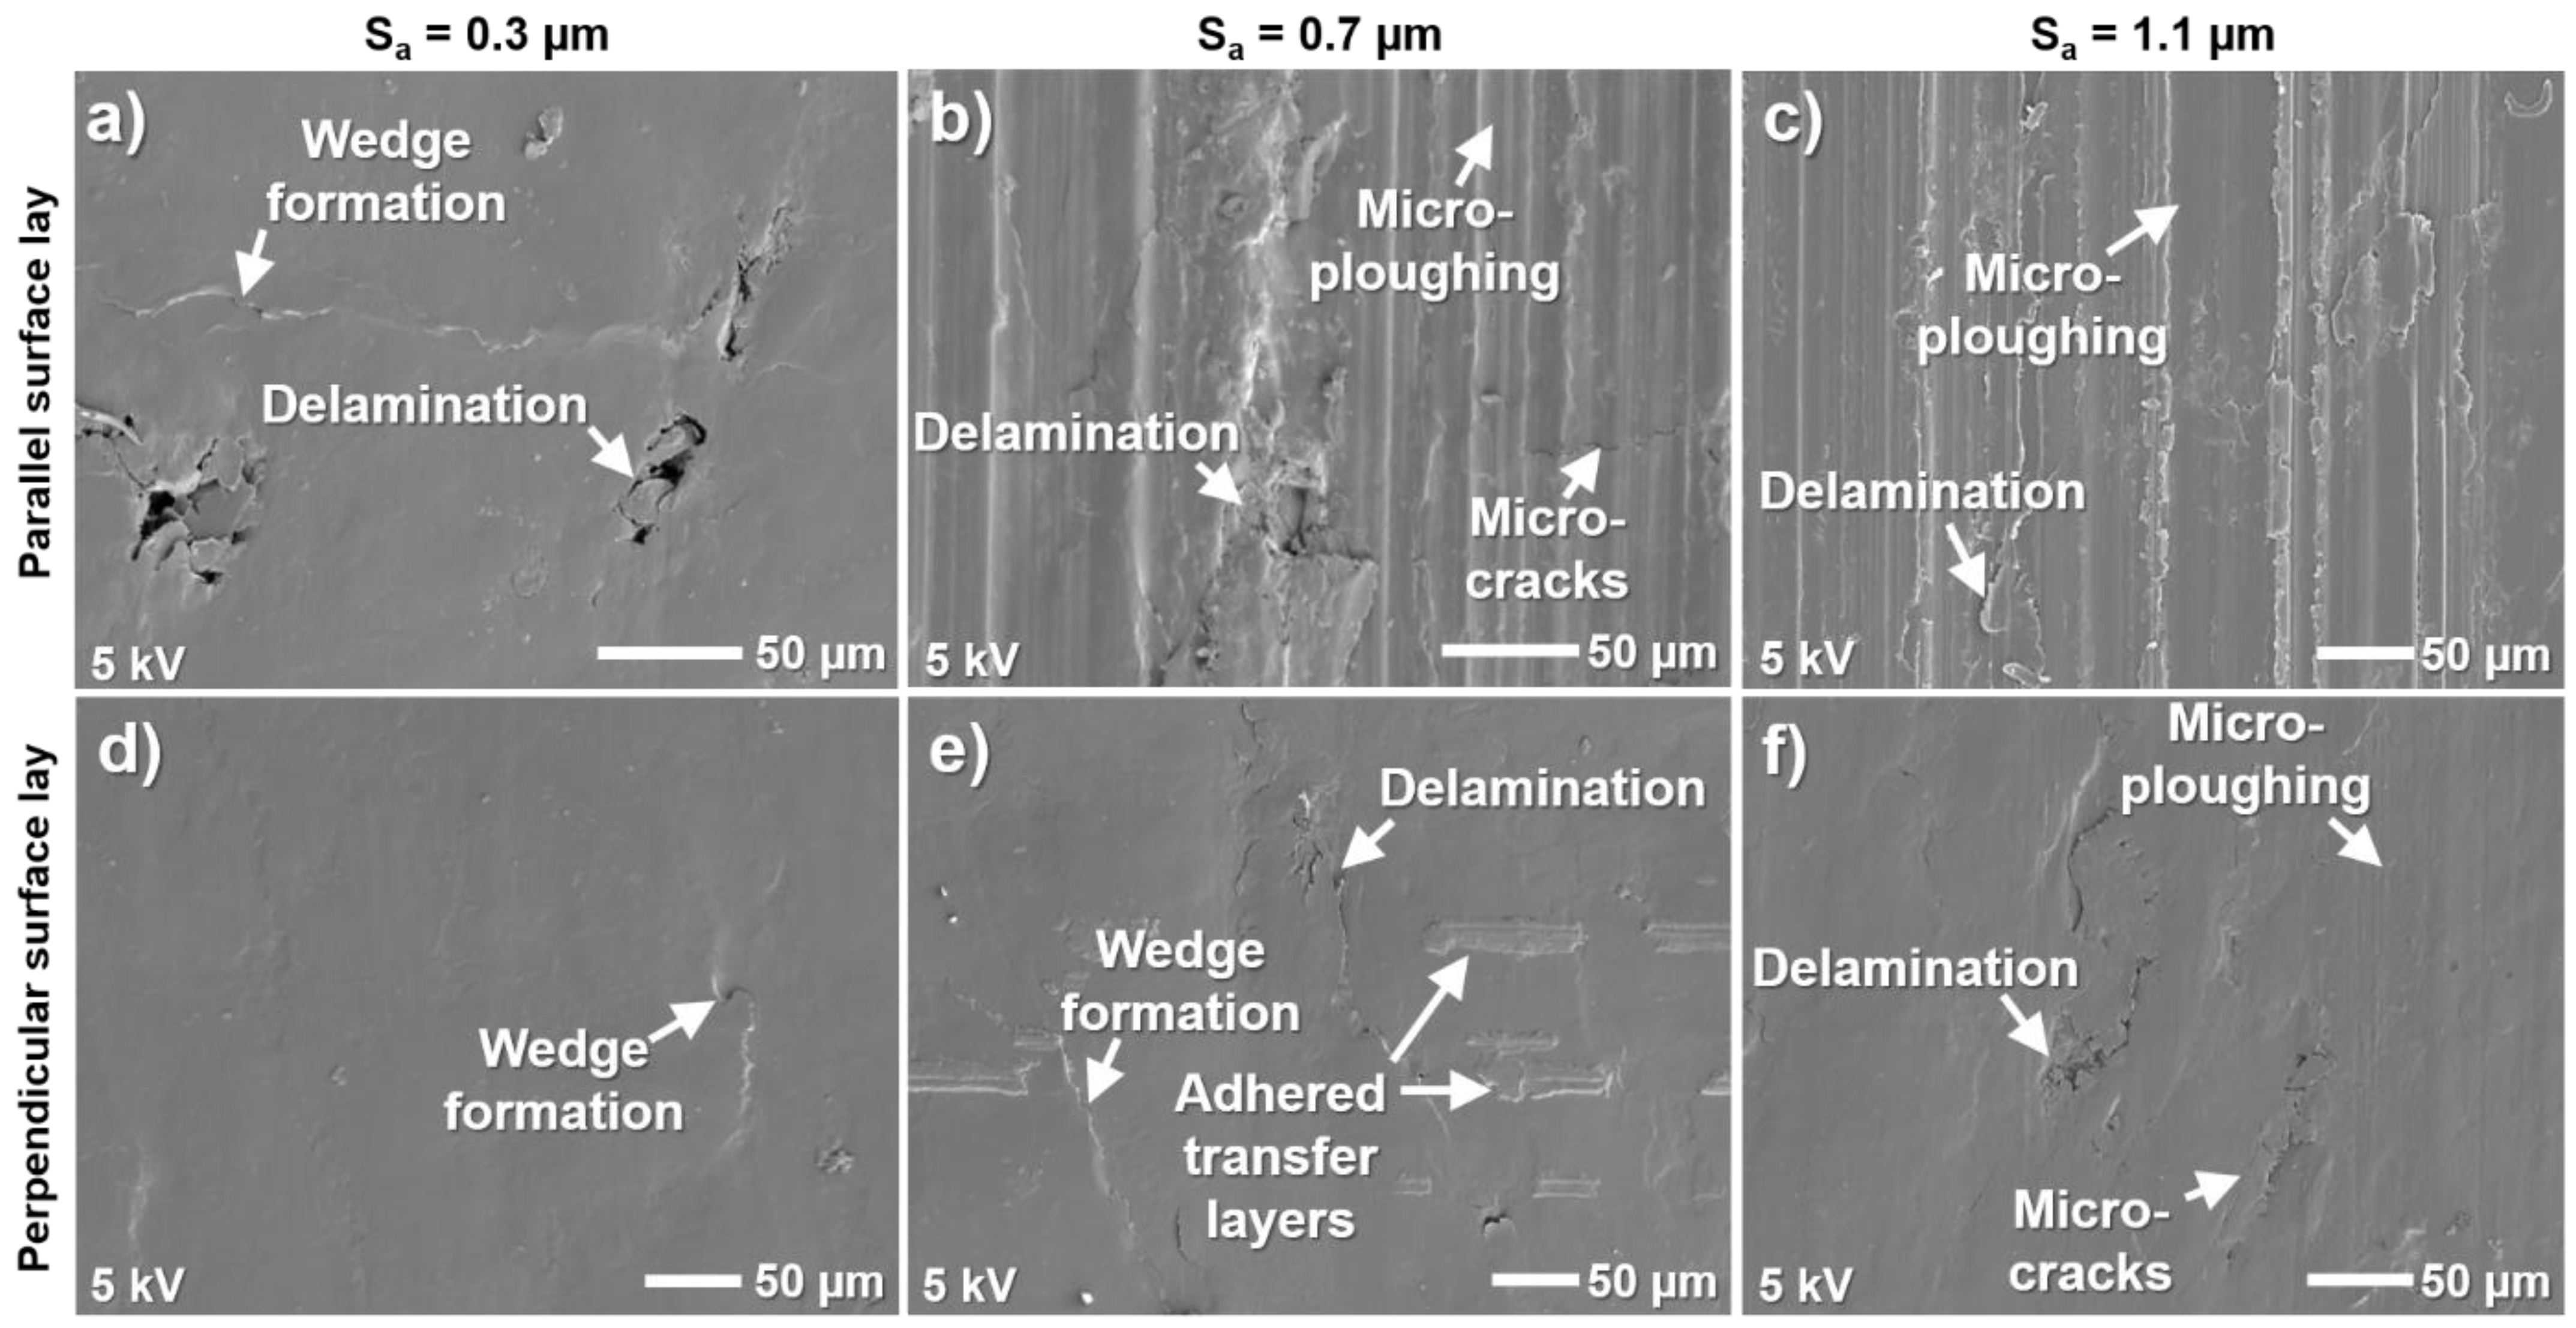
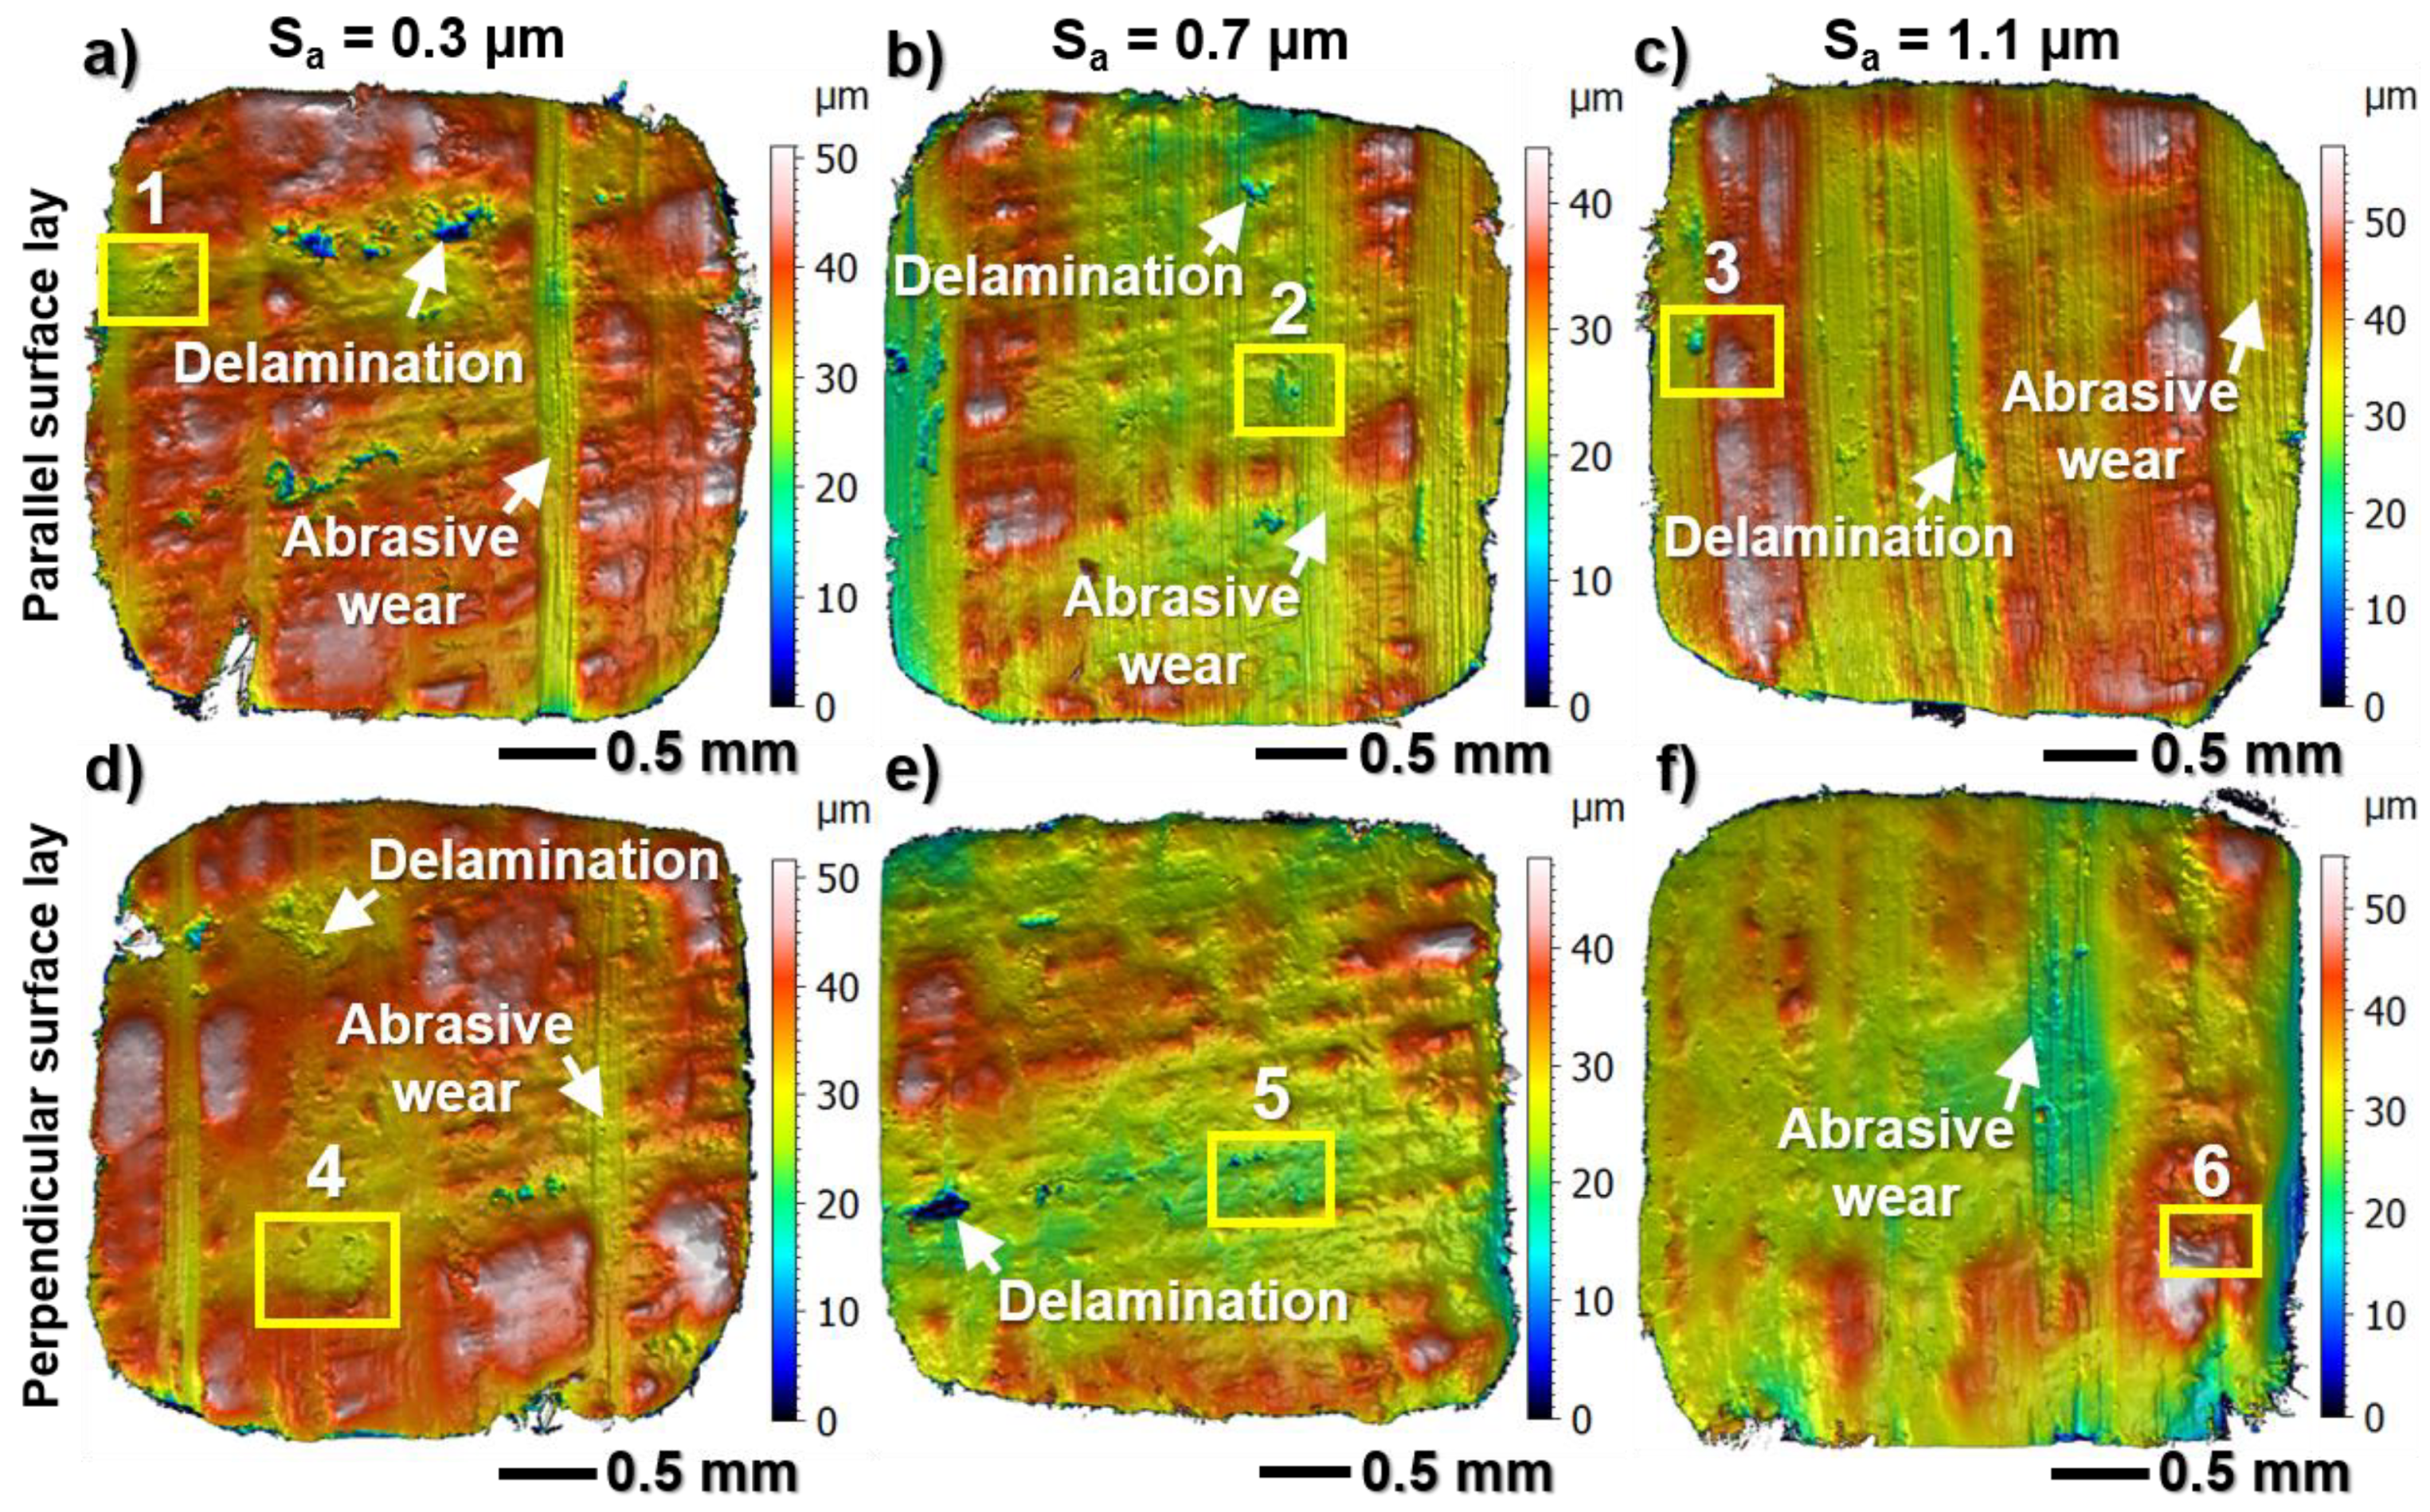
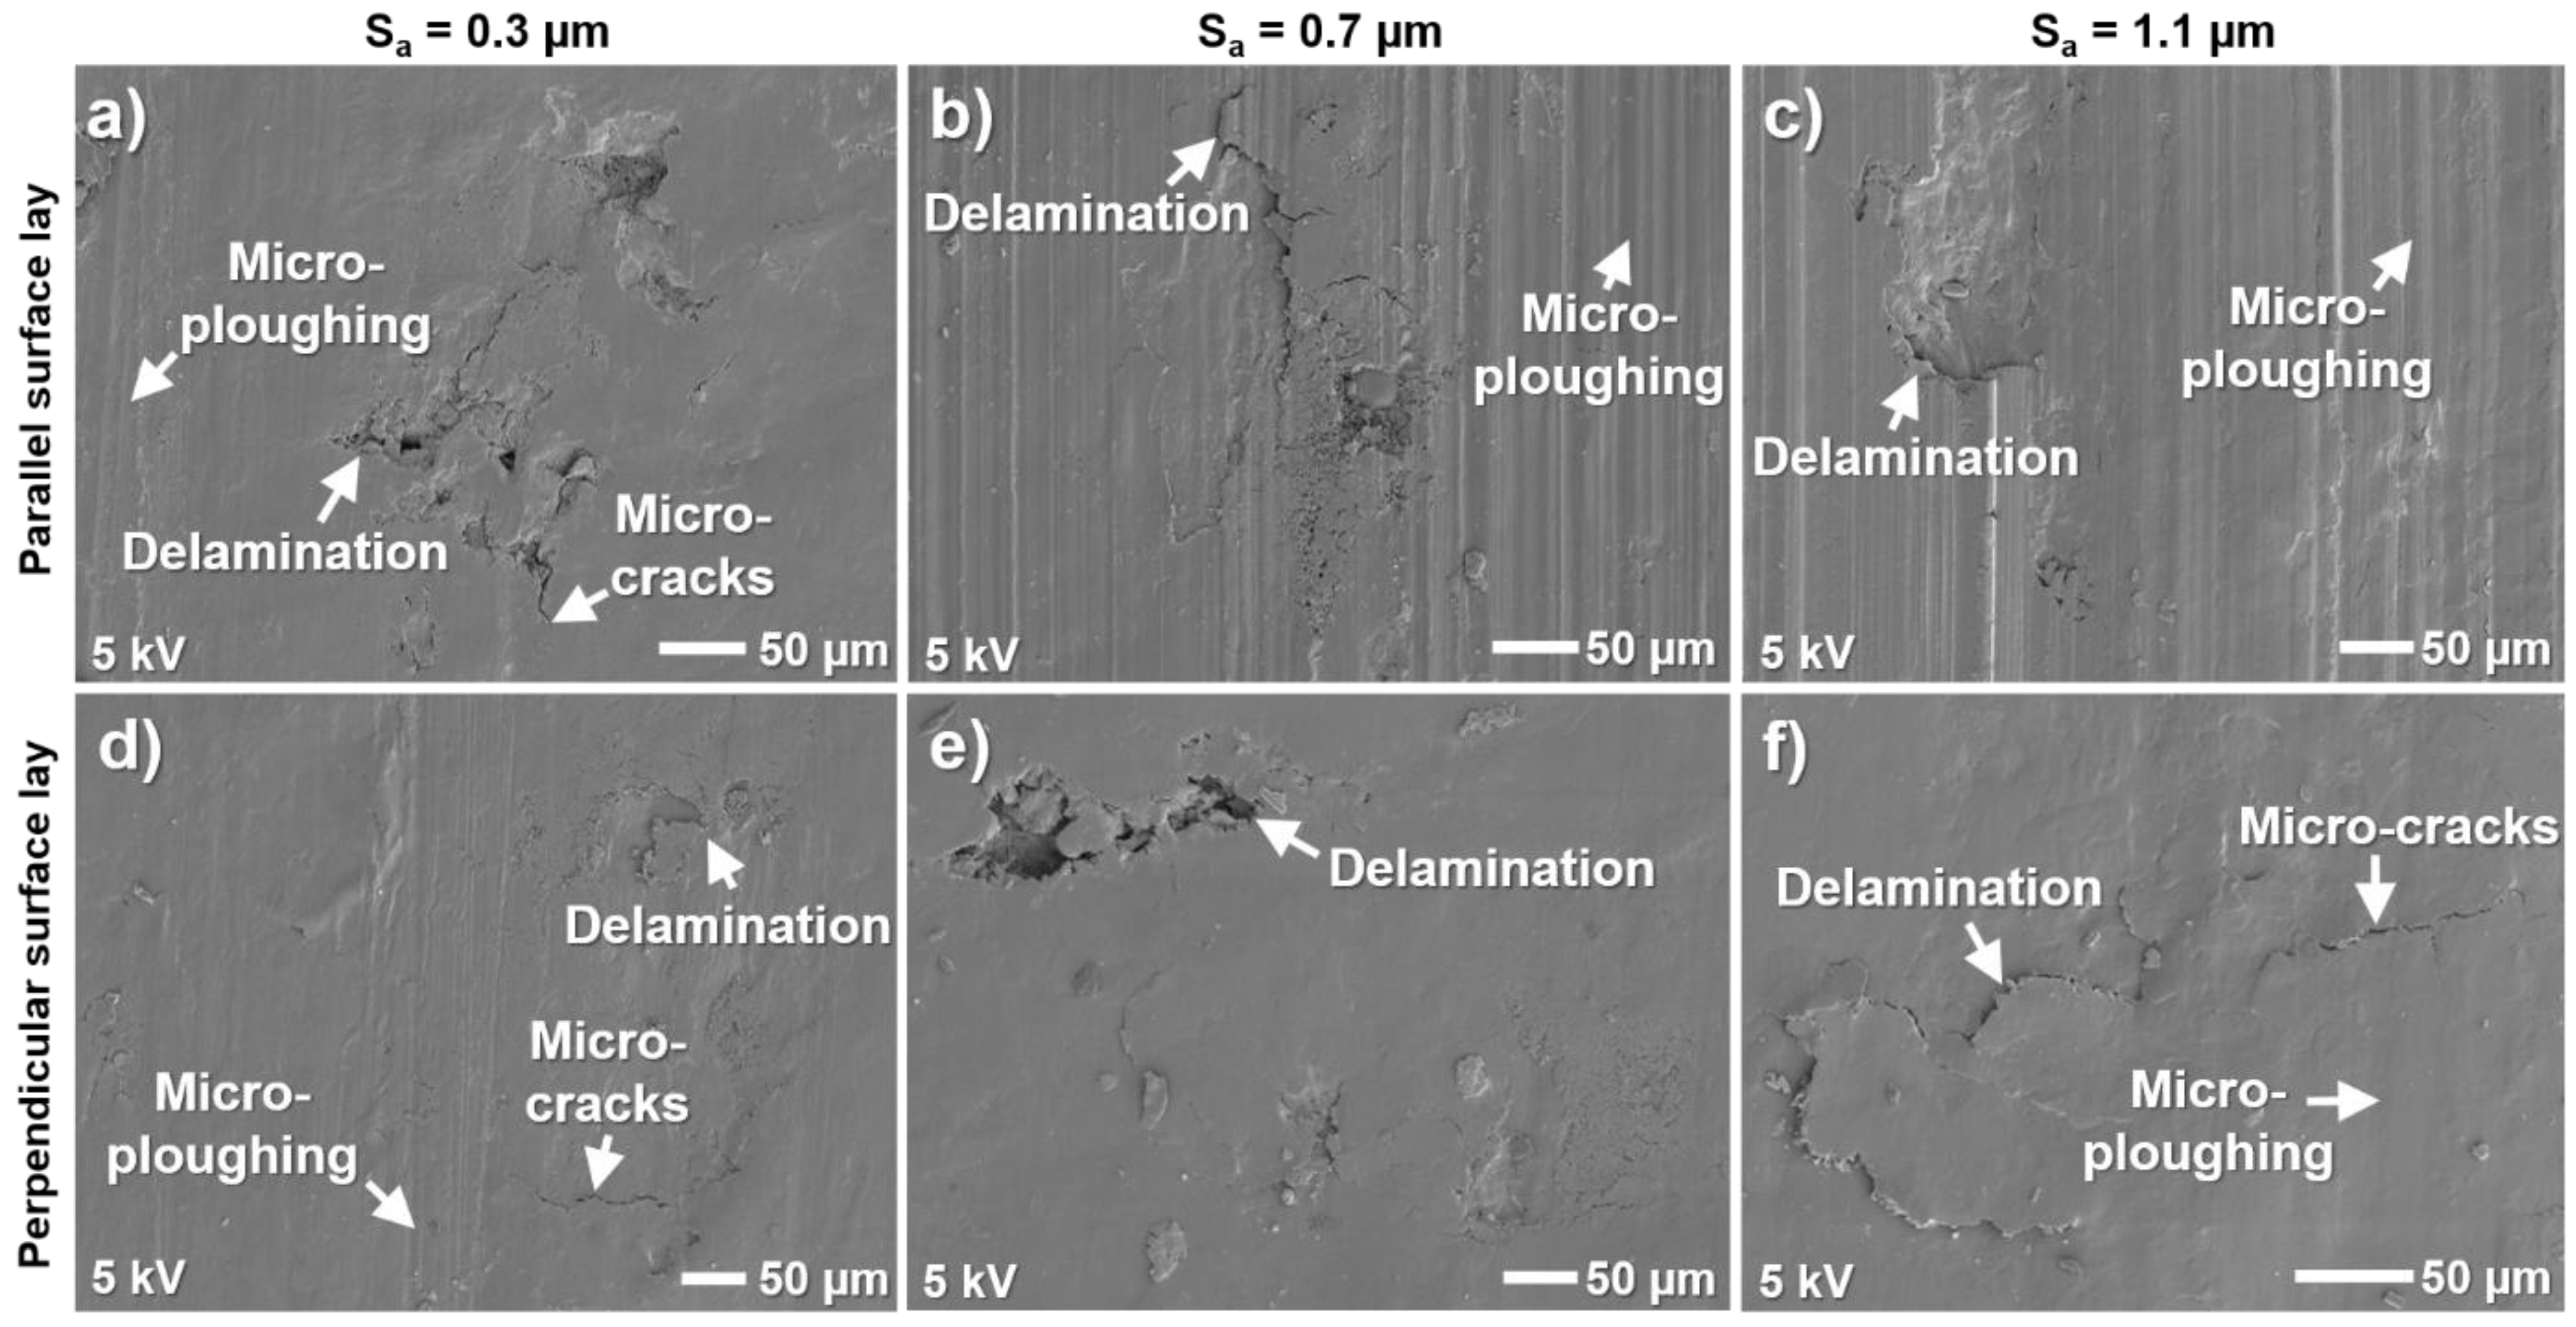
The surface topography of the worn fibre-reinforced thermoset pins is shown in Figure 14. The SEM micrographs of the highlighted regions in Figure 14 are shown in Figure 15. At the lowest initial counter surface roughness (Sa = 0.3 µm), the contact surface of the pin is more homogenously worn for the parallel lay (Figure 14a) compared to the perpendicular lay (Figure 14d). In the latter case, the centre of the pin is more worn and surrounded by protruding regions. This is attributed to the accumulation of wear debris around the area that has been subjected to a higher degree of wear. The protruding regions are load-carrying and will hence protect the remaining surface from severe wear. This explains the lower wear rate (Figure 11a) for the perpendicular lay compared to the parallel lay at the lowest surface roughness.
The polymer surface is subjected to more material delamination after sliding against the steel surface with the lowest roughness and parallel lay (Figure 14a and Figure 15a) compared to the perpendicular lay (Figure 14d and Figure 15d). However, both lays have more areas subjected to larger fragments delaminated from the surface compared to the isotropic lay (Figure 8c). For the parallel lay, there is also a higher amount of wedge formation (Figure 15a) on the polymer surface, while the surface is overall smoother for the perpendicular lay (Figure 15d). Delamination wear is the dominant wear mechanism for both lays at the lowest initial roughness. Limited abrasive wear is prevalent for both lays caused by micro-ploughing and micro-cutting, where the former is more frequent. The abrasive wear of the fibre-reinforced thermoset is caused by the same mechanisms used for the isotropic lay, i.e., hard asperities on the steel surface in combination with wear debris of steel, reinforcement fibres, and impurities adhered to the transfer layers on the steel surface.
More abrasive wear and reduced delamination is seen on the fibre-reinforced thermoset after sliding against the surface with Sa = 0.7 µm and parallel lay. The worn polymer pin (Figure 14b) shows a mirrored topography of the steel surface (Figure 12b). Similar behaviour is also seen for the highest surface roughness (Figure 12c and Figure 14c). This is attributed to abrasive wear caused by the hard asperities on the steel surface. Giltrow and Lancaster [14] proposed that there is a critical surface roughness for a polymer composite material, above which the transfer layers are unable to mask the highest asperity peaks on the counter surface, leaving an abrasive component of wear prevalent after the establishment of transfer layers. Hence, for the fibre-reinforced thermoset, the critical counter surface roughness is somewhere between Sa = 0.3 and0.7 µm for the parallel lay. Micro-ploughing is the dominant abrasive wear mechanism of the fibre-reinforced thermoset at the end of the test and the degree of abrasive wear increases with increased initial counter surface roughness (Figure 14a–c).
In the case of perpendicular lay with intermediate and high roughness, abrasive wear is not the dominant wear mechanism of the fibre-reinforced thermoset (Figure 14e,f). Similar to the lowest surface roughness, the dominant wear mechanism of the fibre-reinforced thermoset sliding against the perpendicular lay is the delamination wear at the intermediate and the highest counter surface roughness (Figure 15e,f). This is due to the resilient transfer layers that are formed on the steel surface which are thick enough to cover the majority of the asperities and hence protect the polymer surface from severe wear. The presence of adhered patches is seen on the worn fibre-reinforced thermoset (Figure 15e). These correspond to detached transfer layers from the steel surface when the test has been stopped, highlighting that the adhesion between the polymer surface and the transfer layers is higher than between the transfer layers and the steel surface.
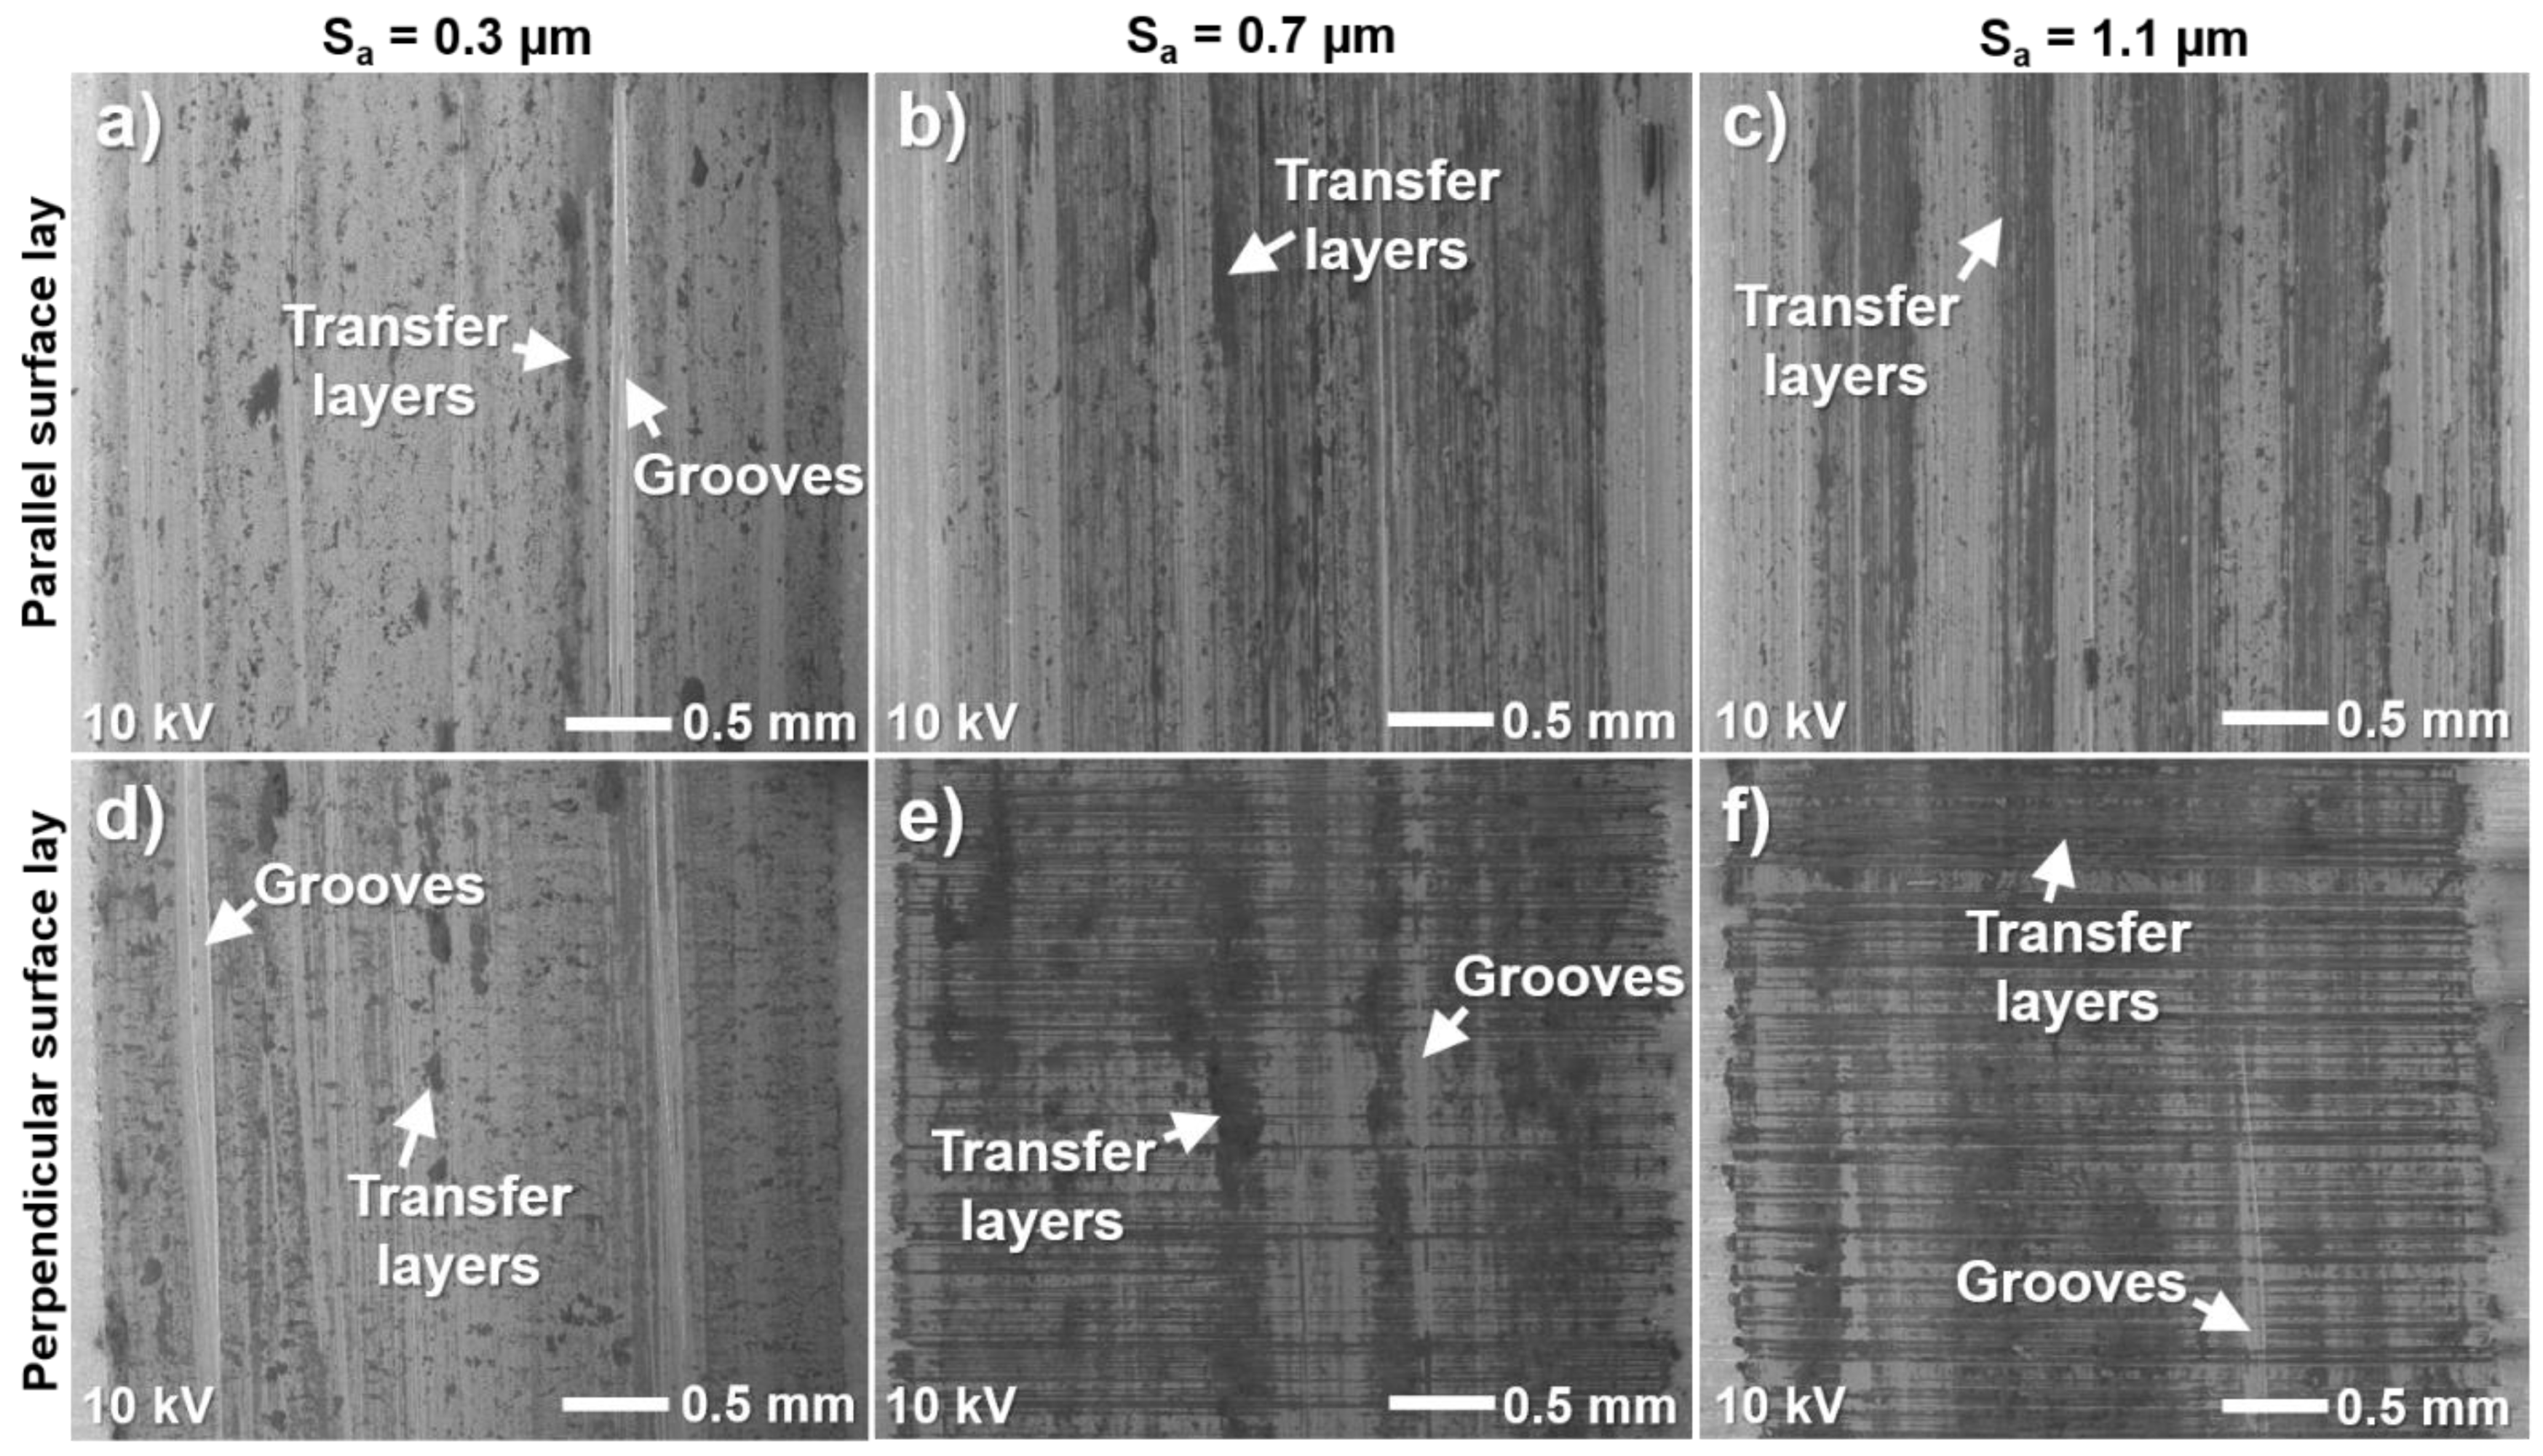
The surface topography of the worn stainless-steel plates after sliding against the fabric-reinforced thermoset is shown in Figure 16. The corresponding SEM micrographs of the centre of the wear tracks are shown in Figure 17. Compared to the fibre-reinforced thermoset, more deep grooves are seen on the steel surface after sliding against the fabric-reinforced thermoset, especially for the perpendicular lay. Additionally, less surface coverage by thick transfer layers is seen (Figure 16 and Figure 17). This contributes to the higher coefficients of friction and the specific wear rates for the fabric-reinforced thermoset compared to the fibre-reinforced thermoset (Figure 10).
The majority of abrasive wear is seen on the steel surface with the lowest initial roughness (Sa = 0.3 µm) for both surface lays (Figure 16). The wear of the steel is higher for the surface with the perpendicular lay (Figure 16d), which is also confirmed by the higher concentration of Fe on the worn polymer surface (Figure S12a). Compared to the isotropic lay, the steel surface is more worn and has a lower surface coverage by protective transfer layers after sliding against parallel and perpendicular lays. This contributes to the higher coefficient of friction for the oriented surface lays.
The amount of wear on the steel surface after sliding against the fabric-reinforced thermoset decreases with increased surface roughness for both lays but a comparative higher degree of wear is seen for the perpendicular lay (Figure 16).
The transfer layers on the steel with lowest initial roughness (Sa = 0.3 µm) mainly consists of patches for both lays (Figure 17a,d) and the worn surface has a similar appearance. This is due to the abrading action by the protruding fibres coupled with a similar material removal rate from the polymer matrix, which enables transfer layer formation. Slightly more patchy transfer layers are seen for the perpendicular lay, which is also confirmed by a higher concentration of PTFE on the polymer surface (Figure S12b). However, the higher amount of abrasive wear for the perpendicular lay contributes to a similar friction between the two lays.
At the intermediate surface roughness (Sa = 0.7 µm) and parallel lay, a higher surface coverage by transfer layers (Figure 17b) is seen compared to the lowest roughness. This correlates with the lower specific wear rate (Figure 11b). However, this is not accompanied by lower friction (Figure 11b) which indicates an insufficient amount of solid lubricants at the sliding interface. This is also confirmed by EDS analysis of the worn polymer surface (Figure S12b). This is explained by the lower specific wear rate of the polymer pin, which contributes to lower availability of wear debris containing solid lubricants. SEM micrographs show that there are regions with very thin, or the complete absence of, protective transfer layers on the steel surface (Figure 17b). When the initial roughness increases to Sa = 1.1 µm, the surface coverage by transfer layers decreases and becomes concentrated in four broader regions along the sliding direction (Figure 17c). This correlates with the higher friction and wear (Figure 11b). The higher specific wear rate is also attributed to the requirement of a higher amount of polymer wear debris needed to fill the surface valleys when the roughness increases due to larger asperities.
Similar to the fibre-reinforced thermoset, a significantly higher surface coverage by transfer layers is seen on the steel surface with the perpendicular lay compared to the parallel lay at higher roughness after sliding against the fabric-reinforced thermoset (Figure 17e,f). The surface coverage is highest at the intermediate roughness for the perpendicular lay, but the specific wear rate of the polymer pin is simultaneously the highest (Figure 11b). Friedrich et al. [26] reported similar findings for carbon fibre-reinforced PEEK sliding against steel with an initial surface roughness of Ra 0.06–1.45 µm, which was attributed to more pronounced formation of transfer layers on the steel surface for the perpendicular lay. Franklin and Kraker [27] also reported higher wear rates for the perpendicular lay; however, this was associated with low surface coverage by transfer layers while a higher surface coverage with high concentrations of PTFE was seen for surfaces with the parallel lay. Another contributor to the higher wear rates of the fabric-reinforced thermoset at the intermediate roughness for the perpendicular lay is the abrasive wear of the steel surface (Figure 12e) which can generate steel wear debris in the transfer layers and contribute to a higher wear of the polymer pin. At the highest initial surface roughness (Sa = 1.1 µm), the wear of the steel surface and coverage by transfer layers (Figure 17f) decreases along with the specific wear rate of the polymer pin. This behaviour is opposite to that of the fibre-reinforced thermoset, which showed the lowest wear of the polymer pin and steel surface for the perpendicular lay and intermediate roughness. This is explained by the rapid running-in wear process of the fibre-reinforced thermoset with a high initial wear, which contributes to the high availability of polymer wear debris and hence the quick formation of thick transfer layers on the steel surface. The protective transfer layers contribute to a low steady-state wear of the polymer, resulting in a slow increase in wear. Meanwhile, the fabric-reinforced thermoset showed a longer running-in process and a higher continuous increase in the wear throughout the test.
The worn surface topography of the fabric-reinforced thermoset pins are shown in Figure 18 and SEM micrographs of the highlighted regions in Figure 18 are shown in Figure 19. The protruding regions in the surface topography measurements correspond to locations of the PTFE fibres (Figure S1b), which is confirmed by EDS, as illustrated in Figure S13. These regions are less worn compared to the polymer matrix and the polyester fibres despite having higher localized stresses due to higher local contact pressures in load-carrying regions. The higher availability of PTFE can reduce the local shear stresses and hence induce less surface damage. More transfer layers are also found on the steel surface in the regions that slide against the PTFE fibres (Figure 17). This is especially clear for the parallel lay at the highest roughness (Figure 17c) where four broad regions of transfer layers are seen along the sliding direction corresponding to the four protruding regions (PTFE) on the polymer surface (Figure 18c).
At the lowest initial counter surface roughness (Sa = 0.3 µm), the wear mechanisms of the fabric-reinforced thermoset in the end of the test are similar between the two surface lays (Figure 18a,d) and the isotropic lay. Delamination wear is the dominant wear mechanism (Figure 19a,d) and more regions with larger fragments delaminated from the surface are seen on the polymer surface after sliding against the steel with the parallel lay (Figure 18a). In some regions, abrasive wear (micro-ploughing) is caused by transfer layers that are reinforced with steel particles (Figure 6c,e) from the abrasive wear of the steel surface asperities (Figure 16a,d).
As the surface roughness increases, abrasive wear becomes dominant in the case of the parallel lay (Figure 18b and Figure 19b). It can be seen that the degree of abrasive wear increases with increased counter surface roughness, while the degree of delamination wear decreases (Figure 18 and Figure 19). The abrasive grooves on the polymer surface are subjected to high cyclic stresses which lead to propagation of micro cracks and eventually detachment of fragments from the polymer surface due to fatigue, which is clearly visible in Figure 19c. Hence, delamination wear also occurs in regions that are subjected to abrasive wear. The lowest specific wear rate for the parallel lay occurs at the intermediate roughness. This shows that a combination of mild abrasive wear and reduced delamination wear is more favourable for the fabric-reinforced thermoset.
For the perpendicular lay, the dominant wear mechanism of the fabric-reinforced thermoset is the delamination wear for all tested counter surface roughness (Figure 19d–f), similar to the fibre-reinforced thermoset. In contrast to the parallel lay, abrasive wear resulting from micro-ploughing is only found in some regions at the intermediate and highest surface roughness for the perpendicular lay. This shows that the transfer layers on the steel surface form fast enough, due to the high initial wear rate, and are thick enough to protect the polymer surface from the hard asperities on the steel surface. Similar behaviour was reported by Friedrich et al. [26] for carbon fibre-reinforced PEEK sliding against steel and was also associated with higher specific wear rates. The specific wear rate is the highest at the intermediate roughness for the perpendicular lay. This is attributed to the high amount of transfer layers seen on the stainless-steel surface resulting from the high initial wear of the polymer pin and the subsequent increased delamination due to higher adhesion between the thick transfer layer and the polymer matrix.
The worn surface topography of the stainless-steel plates after sliding against the thermoplastic is shown in Figure 20 and SEM micrographs of the centre of the wear tracks are shown in Figure 21. Compared to the reinforced thermosets, the stainless-steel is subjected to significantly less wear with only single grooves seen for the perpendicular lay at the lowest and intermediate roughness. Surface coverage by transfer layers on the steel surface is significantly higher after sliding against the thermoplastic compared to the reinforced thermosets at the lowest surface roughness for the parallel lay and all three roughness levels for the perpendicular lay. The transfer layers are also overall thicker for the thermoplastic except for the parallel lay at the intermediate and highest roughness where a similar or smaller amount of transfer layers are seen compared to the thermoset materials. A higher deviation in the specific wear rate of the thermoplastic sliding against steel surface with Sa = 0.3 µm compared to the thermoset materials is explained by more and thicker transfer layer islands. These are more easily removed during sliding than thinner transfer layers and contribute to less stable transfer layers compared to the thermoset materials.
At Sa = 0.3 µm, thicker transfer layers are seen for the parallel (Figure 21a) and perpendicular lays (Figure 21d) compared to the isotropic lay. This contributes to a lower coefficient of friction for the oriented lays (Figure 10a). The transfer layers are thicker overall and have a higher surface coverage for the perpendicular lay than for the parallel lay. This contributes to the slightly lower coefficient of friction but significantly higher specific wear rate (Figure 11c). SEM micrographs reveal a higher concentration of thicker transfer layer patches in the regions that are initially more protruding (load bearing) on the steel surface for both lays.
For the parallel lay, the surface coverage and thickness of transfer layers significantly decrease when the initial counter surface roughness increases from the lowest to the intermediate and highest roughness (Figure 21b,c). This explains the increased friction and wear at the intermediate and highest roughness (Figure 11c) due to less solid lubricants and protective layers in the sliding interface. The main reason for the reduced friction at the highest roughness is the increased wear rate of the polymer pin, which contributes to a higher availability of wear debris and solid lubricants in the sliding interface.
In case of the perpendicular lay and increasing roughness, the transfer layers change from patchy to coherent (Figure 21e). The transfer layers are also significantly thicker at the intermediate and highest roughness compared to the lowest (Figure 21d–f). However, the coefficient of friction is higher for the intermediate and highest initial roughness compared to the lowest (Figure 11c). This shows that overly thick transfer layers are not beneficial from a frictional point of view for the thermoplastic. The thick coherent transfer layers contribute to a smoother counter surface, leading to a higher real area of contact and hence a high interfacial shear strength. In contrast, the specific wear rates at the intermediate and highest roughness levels are similar and lower compared to the lowest roughness. This shows that the thick transfer layers can protect the thermoplastic from wear. The slightly lower friction at the highest roughness compared to the intermediate (Figure 11c) is attributed to the faster establishment of a transfer layer, due to the high initial wear of the polymer pin, thereby reducing the ploughing component of friction.
The worn topography of the thermoplastic pins is shown in Figure 22 and SEM micrographs of the highlighted regions in Figure 22 are shown in Figure 23. At the lowest initial counter surface roughness (Sa = 0.3 µm), the dominant steady-state wear mechanism of the thermoplastic is the delamination wear for both lays, similar to the thermoset materials. The middle of the pin is more worn, especially for the perpendicular lay (Figure 22d). This is attributed to a lower amount of protective transfer layers on the steel surface in the middle region, as seen in Figure 21b. Initial abrasion of the polymer pin by the hard asperities on the steel surface with the perpendicular lay contributes to the overall higher wear. A significantly less amount of abrasive wear is seen on the thermoplastic after sliding against steel with the parallel lay where it is mostly concentrated towards the edges perpendicular to the sliding direction. However, the amount of abrasive wear for both oriented lays is significantly less compared to the isotropic lay (Figure 7i). Micro-ploughing is the dominant abrasive wear mechanism of the thermoplastic sliding against steel with oriented lays, but in some regions micro-cutting is also prevalent.
Similar to the reinforced thermoset materials, the dominant wear mechanism of the thermoplastic changes from delamination wear to abrasive wear with increasing counter surface roughness with the parallel lay (Figure 22b and Figure 23b). The thermoplastic is more homogeneously worn at the higher surface roughness with the parallel lay compared to the thermoset materials and subjected to a lower degree of material delamination. This is explained by the lack of reinforcement fibres in the thermoplastic material, and hence limited abrasion of the steel surface, along with insufficient formation of protective transfer layers that both lead to the abrasion of the polymer pin. This contributes to a higher specific wear rate of the thermoplastic compared to the thermoset materials at the highest roughness for the parallel lay (Figure 10b).
The worn thermoplastic pins after sliding against steel with the perpendicular lay and higher roughness are subjected to a combination of abrasive wear and delamination (Figure 22e,f). The dominant wear mechanism is micro-ploughing (Figure 23e,f), resulting from detachment of the thick transfer layers in corresponding regions on the steel surface (Figure 20e,f) and exposing underlying asperities. Delamination wear mainly occurs where sliding against thicker transfer layers takes place.
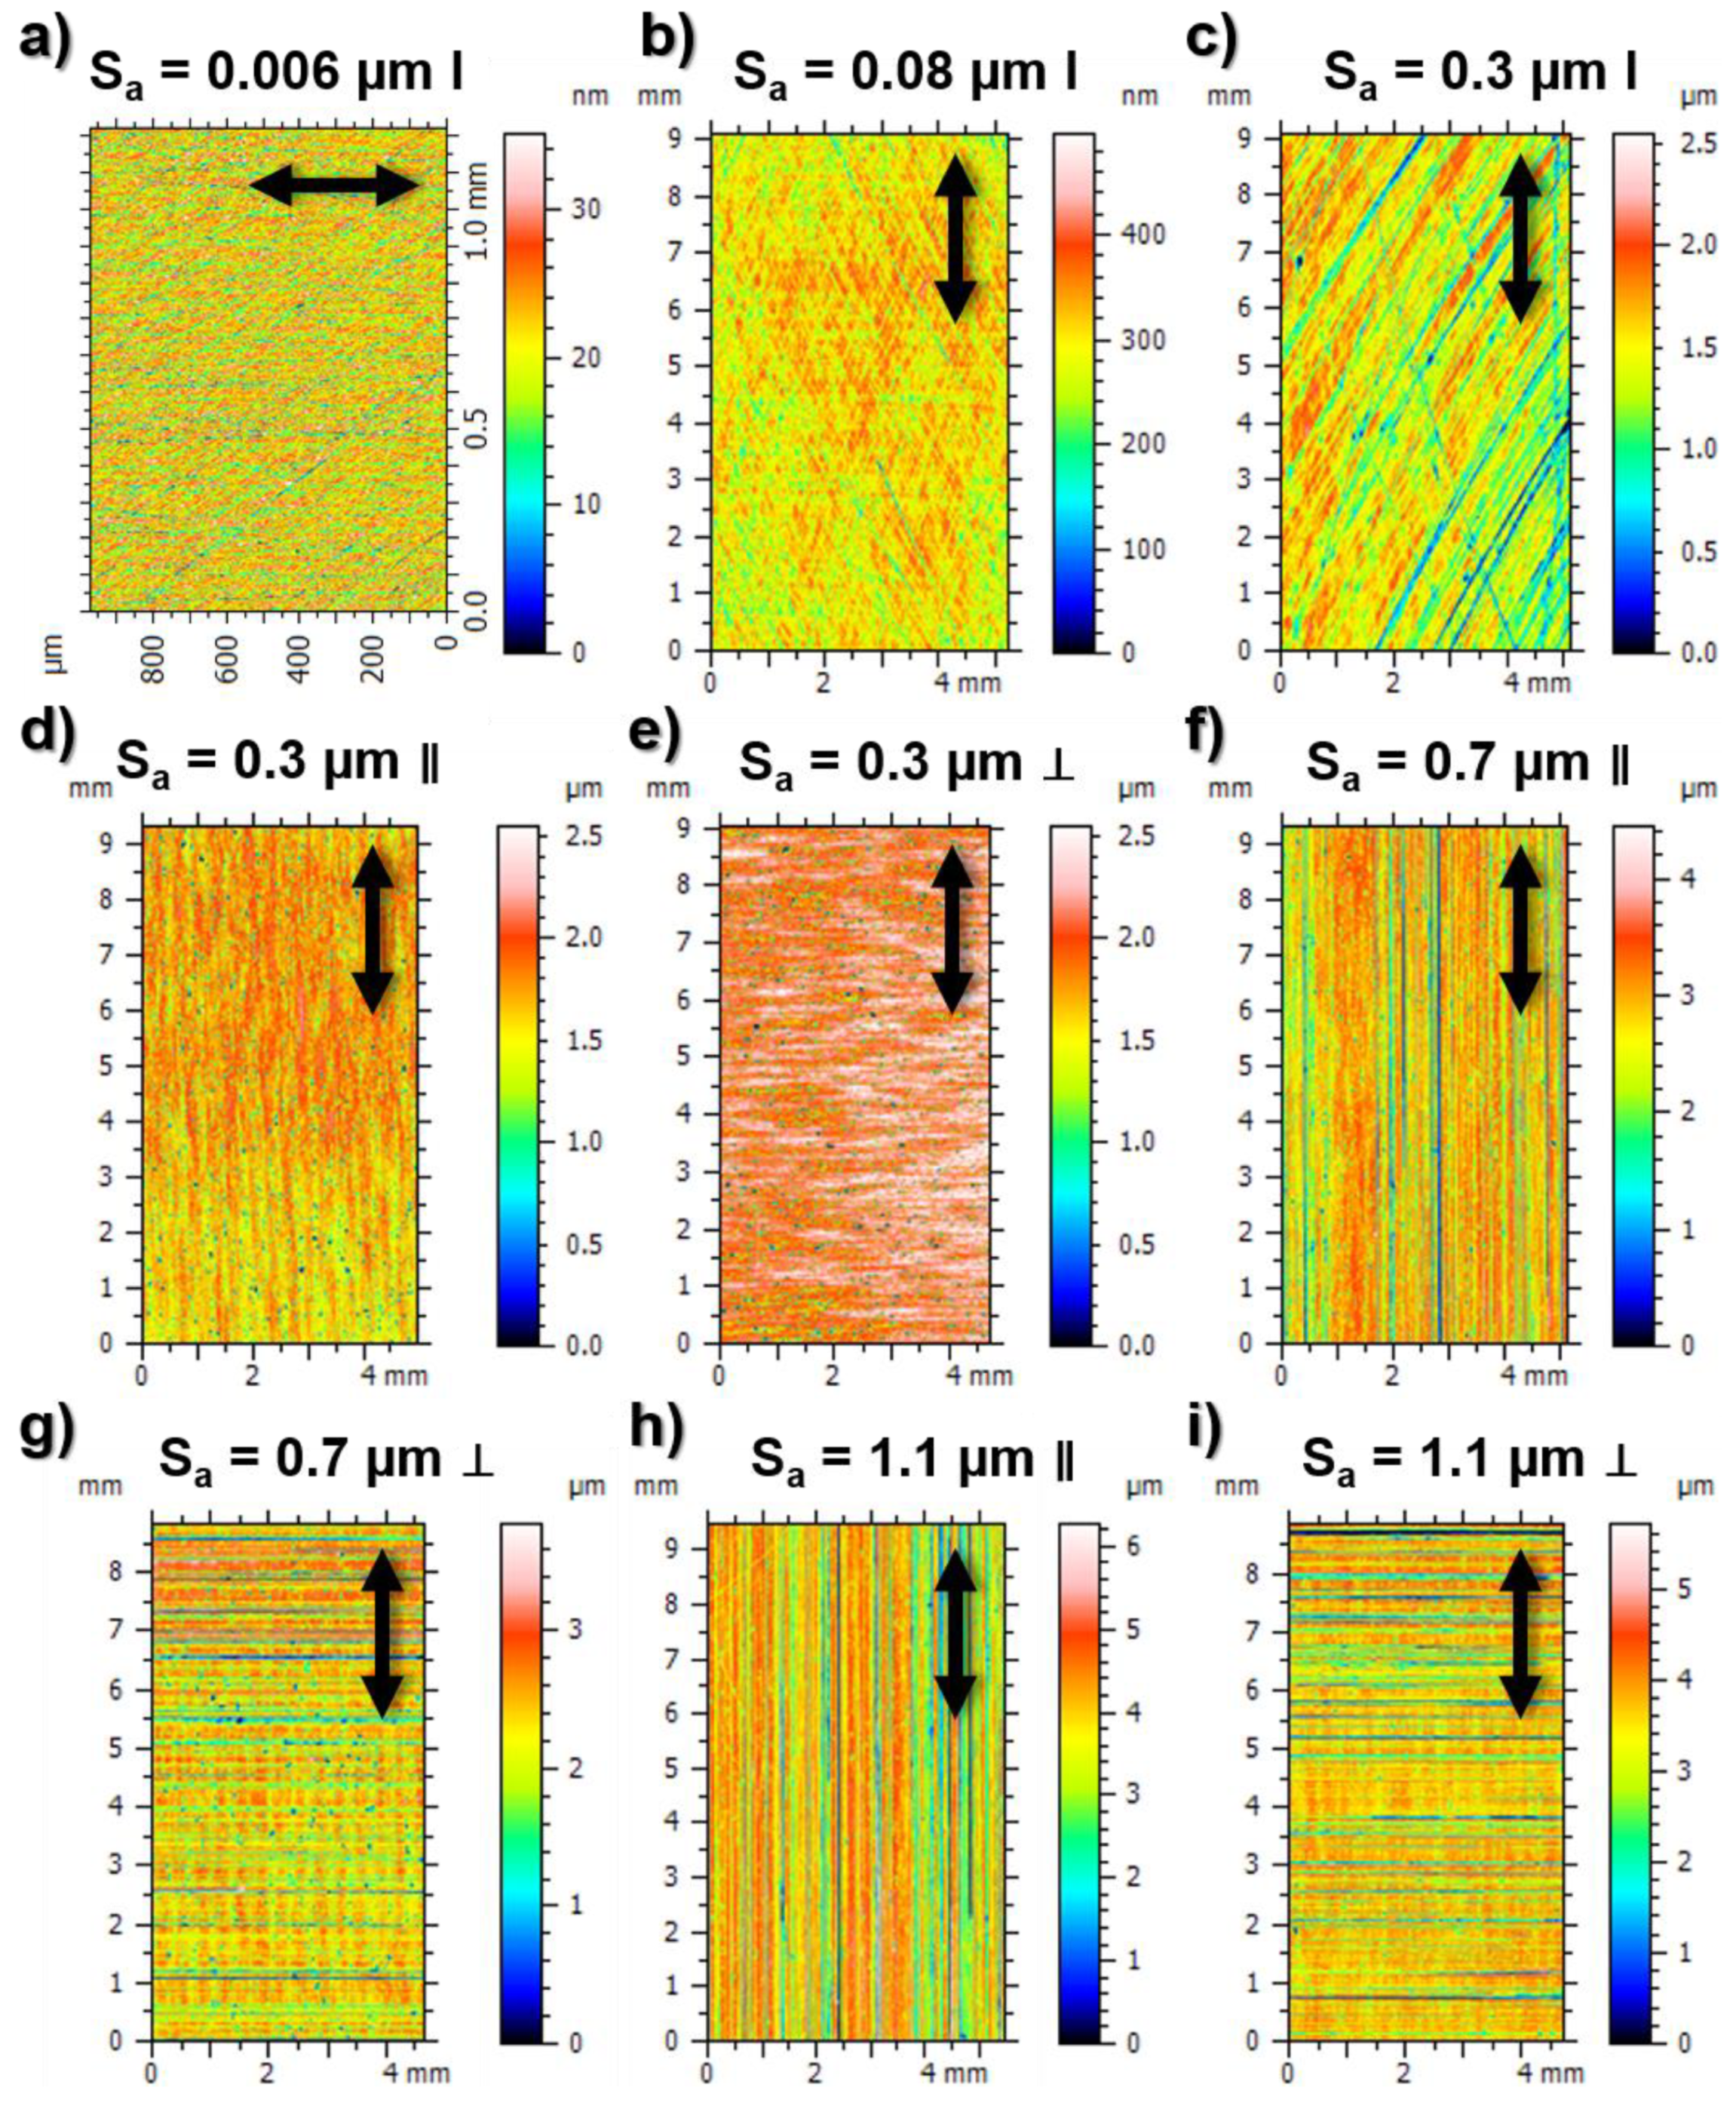
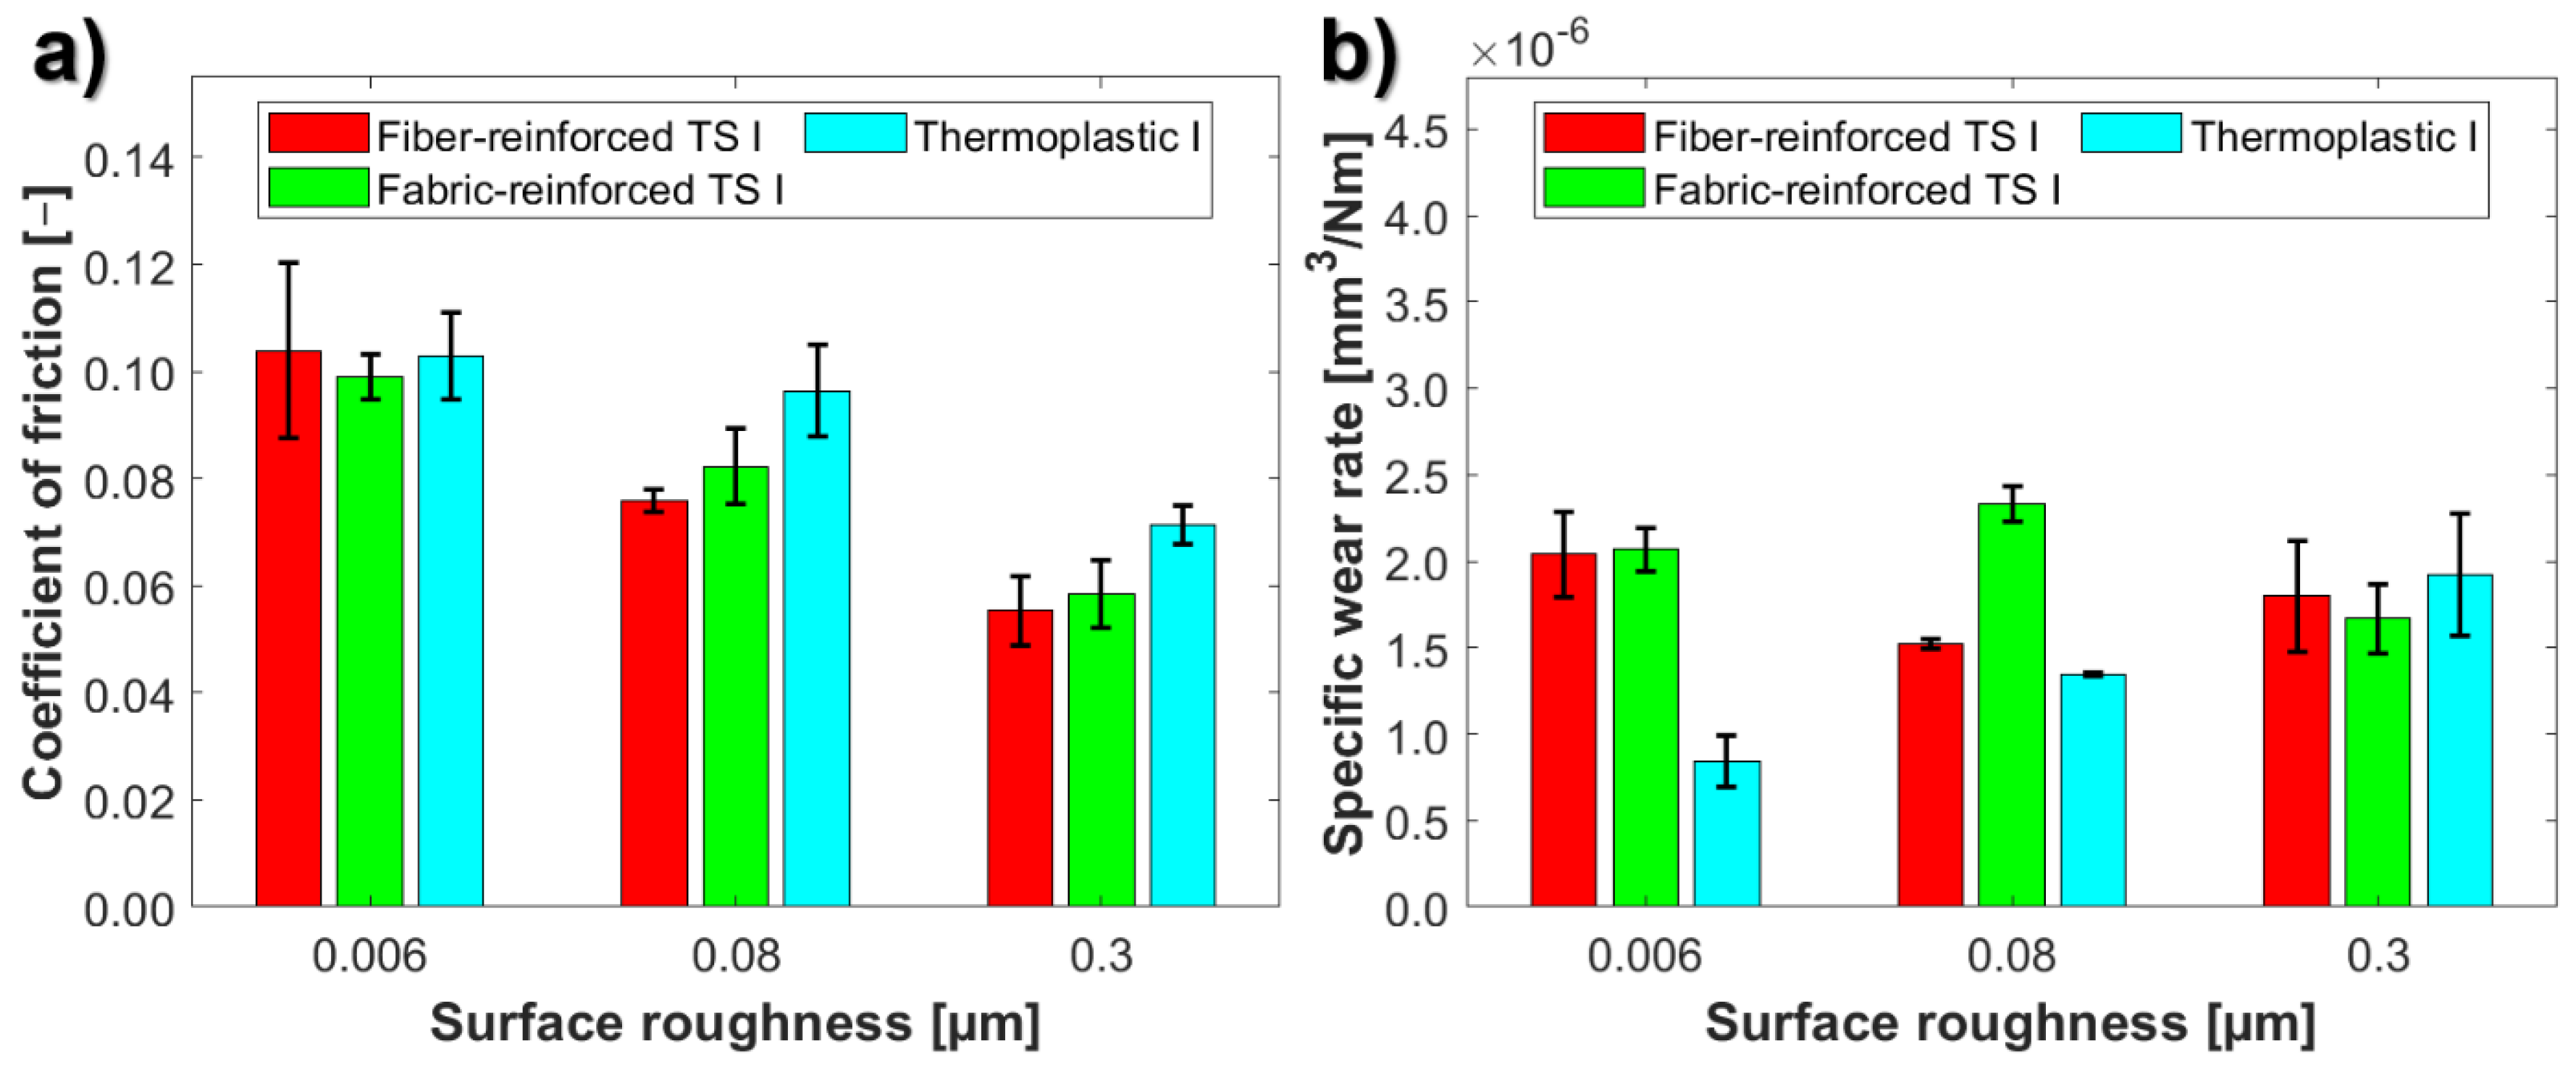
4. Conclusions

The effect of surface roughness and lay of a stainless-steel counter surface on the tribological performance and its governing mechanisms when sliding against three self-lubricating polymer composites was investigated. The main conclusions are as follows:
  • For the stainless-steel surfaces with isotropic lay, the coefficient of friction decreases with an increased initial surface roughness for all tested bearing materials. This is mainly attributed to decreased wear of the stainless-steel surface, which contributes to decreased ploughing component of friction, and reduced adhesion with increased initial surface roughness due to decreased real area of contact.
  • Material delamination is the dominant wear mechanism of the fibre- and fabric-reinforced thermoset after sliding against stainless-steel surfaces with the isotropic lay. However, the amount of abrasive wear increases with increased initial counter surface roughness.
  • The thermoplastic is subjected to a higher degree of abrasive wear compared to the thermoset materials; however, at low initial counter surface roughness, material delamination is also the dominant wear mechanism of the thermoplastic.
  • The effect of surface lay on friction depends on the surface roughness level. For a surface roughness Sa = 0.7 and 1.1 µm, the coefficient of friction is lower for the perpendicular lay compared to the parallel lay. This is attributed to a higher surface coverage using thicker transfer layers.
  • With the parallel lay, the dominant wear mechanism changes from delamination wear to abrasive wear between the lowest and intermediate surface roughness. This is attributed to formation of patchy transfer layers on the steel surface with low surface coverage, which is insufficient to protect the polymer surface from the hard asperities on the steel surface.
  • Test results show that it is possible to reduce the coefficient of friction and specific wear rates by up to 32% and 144%, respectively, by optimizing the counter surface topography of the ground surfaces with oriented lay. Thermoplastic is a better choice for low surface roughness (Sa = 0.3 µm), while the reinforced thermosets perform better at the intermediate roughness (Sa = 0.7 µm).

Supplementary Materials

The following supporting information can be downloaded at: https://www.mdpi.com/article/10.3390/lubricants10080167/s1. Figure S1: Optical images of the load-carrying surface of the unworn bearing material pins used for the tribological tests: (a) fibre-reinforced thermoset (Deva), (b) fabric-reinforced thermoset (Orkot), and (c) thermoplastic (ThorPlas). The intended sliding direction in the figures is parallel to the vertical axis. Figure S2: Microstructure in grey scale of the fibre-reinforced thermoset material obtained using XMT with the contact surface marked and double-headed arrows indicating the sliding direction. A cross-section of the full tomographic reconstruction using higher-resolution (20×) objective, showing the different constituents in the material: (a) parallel to the sliding direction and (b) perpendicular to the sliding direction. Three-dimensional visualization of the material from the tomographic scans, with segmented pores and a part of the whole structure visible, using: (c) 20× objective scans of a cylinder with a diameter of 0.55 mm (pores are purple) and (d) 4× objective scans of the whole polymer pin (4 × 4 × 4 mm3) (pores are black). Figure S3: Macrostructure in grey scale of the fibre-reinforced thermoset obtained using low-resolution (4×) objective illustrating: (a) the full tomographic reconstruction with locations marked for the cross sections. Cross sections of the full tomographic reconstruction in: (b) X–Y plane, (c) X–Z plane, and (d) Y–Z plane. Double-headed arrows indicate the sliding direction. Figure S4: 3D visualization of the segmented higher density particles (impurities) in the fibre-reinforced thermoset, from the higher-resolution (20×) scans. Figure S5: Volume distribution of pores in the fibre-reinforced thermoset material using 20× objective. Figure S6: Volume distribution of high density particles (impurities) in the fibre-reinforced thermoset material using 20× objective. Figure S7: Volume distribution of pores in the fibre-reinforced thermoset material using 4× objective. Figure S8: Volume distribution of high density particles in the fibre-reinforced thermoset material using 4× objective. Figure S9: SEM micrograph of: (a) the perpendicular surface to the sliding direction of the unworn fibre-reinforced thermoset pin and corresponding compositional map of: (b) carbon (C), (c) fluorine (F), (d) aluminium (Al), (e) iron (Fe), (f) magnesium (Mg), (g) silicon (Si), and (h) titanium (Ti). The polymer pin is sputtered with a 15.3 nm layer of platinum (Pt). Arrows indicate the sliding direction. Figure S10: Schematic representation of the flat-on-flat test configuration used for the reciprocating sliding tests. Figure S11: Wear tracks formed on the ground stainless steel with a surface roughness of Sa = 0.7 µm and perpendicular lay after sliding against the fabric-reinforced thermoset: (a) directly after test with wear debris accumulated around the edges of the wear track, and (b) after removal of the accumulated wear debris around the edges using pressurized air. The reference points in the figures are for the 3D profilometry measurements. Figure S12: EDS analysis of the contact surface on the worn fibre-reinforced and fabric-reinforced thermoset pins showing the influence of counter surface roughness and lay on the concentration of: (a) iron (Fe) and (b) fluorine (F). TS = thermoset, ∥ = parallel and ⊥ = perpendicular surface lay to the sliding direction. The EDS analysis is performed by mapping on a 3.2 × 2.4 mm area. Figure S13: Worn fabric-reinforced thermoset after sliding against stainless steel with parallel lay and highest surface roughness (Sa = 1.1 µm) illustrating: (a) surface topography of the sliding surface, (b) SEM micrograph of the highlighted region in figure (a), and corresponding compositional map of (c) fluorine (F). Table S1: Material properties of the self-lubricating polymer composite bearing materials. Table S2: Volume fraction of the internal phases in the fibre-reinforced thermoset measured using XMT with two different objectives. Table S3: Concentration of inorganic constituents in the fibre-reinforced thermoset. Table S4: Chemical composition of the stainless steel (SS 2333) in wt.%, Fe makes up the balance [28]. Video S1: 3D visualization of the microstructure of the fibre-reinforced thermoset material, reconstructed from XMT imaging using the 20× objective. Video S2: 3D visualization of the segmented pores (purple) in the fibre-reinforced thermoset material, reconstructed from XMT imaging using 20× objective. Video S3: 3D visualization of the segmented high density particles (impurities) seen as white/light features and structure of the segmented PTFE particles seen as black features, reconstructed from XMT imaging using the 20× objective. Video S4: 3D visualization of the macrostructure of the fibre-reinforced thermoset material, reconstructed from XMT imaging using 4× objective. References [18,28,29,30,31,32,33,34,35,36,37,38,39,40,41,42,43,44,45,46,47,48] are cited in the Supplementary Materials.

Author Contributions

M.R. conceived, designed and performed the experiments in addition to analysing the data and writing the paper; F.F. contributed the X-ray tomography scans and analysis of obtained data; I.R. performed ICP-SFMS analysis; K.B. and J.H. have contributed with supervision of the study and revision of the paper. All authors have read and agreed to the published version of the manuscript.

Funding

This research received no external funding.

Institutional Review Board Statement

Not applicable.

Informed Consent Statement

Not applicable.

Data Availability Statement

The data presented in this study are available on request from the corresponding author.

Acknowledgments

The research presented was carried out as a part of Swedish Hydropower Centre (SVC). SVC was established by the Swedish Energy Agency, Energiforsk and Svenska Kraftnät together with Luleå University of Technology, KTH Royal Institute of Technology, Chalmers University of Technology, and Uppsala University. The authors would like to thank the bearing supplier Duwel Sweden AB (Örnsköldsvik, Sweden) and bearing manufacturers Federal-Mogul Deva GmbH (Stadtallendorf, Germany) and Trelleborg Sealing Solutions Rotherham (Rotherham, UK) for supplying the bearing materials, providing technical support, offering feedback on the findings, and revising the paper.

Conflicts of Interest

The authors declare no conflict of interest.

References

  1. IEA. Hydropower Special Market Report; IEA: Paris, France, 2021; Available online: https://www.iea.org/reports/hydropower-special-market-report (accessed on 6 December 2021).
  2. Yang, W.; Norrlund, P.; Saarinen, L.; Witt, A.; Smith, B.; Yang, J.; Lundin, U. Burden on hydropower units for short-term balancing of renewable power systems. Nat. Commun. 2018, 9, 2633. [Google Scholar] [CrossRef] [PubMed] [Green Version]
  3. Pereira, P.; Riahi, K.L.; Barreto, W. Analysis on the impact of grid regulation on the lifetime and reliability of water turbine distributor mechanism self-lubricating bearings. In Proceedings of the HydroVision International, Charlotte, NC, USA, 26–28 June 2018. [Google Scholar]
  4. Vigil, B.; Chen, L.; Ort, T.; Lima, L. Frequency sensitive control mode and fatigue assessment for Kaplan and Bulb turbine runners. In Proceedings of the HydroVision International, Charlotte, NC, USA, 25–28 June 2018. [Google Scholar]
  5. March, P.; Moore, W.; Nesbitt, M. Flexible operation of hydroelectric turbines and generators. In Proceedings of the HydroVision International, Charlotte, NC, USA, 25–28 June 2018. [Google Scholar]
  6. Texeira, I. Risks and benefits of reducing the technical minimum in Kaplan hydropower turbines to increase frequency control capabilities. In Proceedings of the 2018 IEEE 9th Power, Instrumentation and Measurement Meeting (EPIM), Salto, Uruguay, 14–16 November 2018. [Google Scholar]
  7. Lloyd, A.I.G.; Noël, R.E.J. The effect of counterface surface roughness on the wear of UHMWPE in water and oil-in-water emulsion. Tribol. Int. 1988, 21, 83–88. [Google Scholar] [CrossRef]
  8. Mofidi, M.; Prakash, B. Influence of counterface topography on sliding friction and wear of some elastomers under dry sliding conditions. Proc. IMechE J—J. Eng. Tribol. 2008, 222, 667–673. [Google Scholar] [CrossRef]
  9. Nunez, E.E.; Polycarpou, A.A. The effect of surface roughness on the transfer of polymer films under unlubricated testing conditions. Wear 2015, 326–327, 74–83. [Google Scholar] [CrossRef]
  10. Zsidai, L.; de Baets, P.; Samyn, P.; Kalacska, G.; van Parys, A.P. The tribological behaviour of engineering plastics during sliding friction investigated with small-scale specimens. Wear 2002, 253, 673–688. [Google Scholar] [CrossRef]
  11. Golchin, A.; Friedrich, K.; Noll, A.; Prakash, B. Influence of Counter Surface Topography on the Tribological Behaviour of Carbon-filled PPS Composites in Water. Tribol. Int. 2015, 88, 209–217. [Google Scholar] [CrossRef]
  12. Pooley, C.M.; Tabor, D. Friction and molecular structure: The behaviour of some thermoplastics. Proc. R. Soc. Lond. A 1972, 329, 251–274. [Google Scholar] [CrossRef]
  13. Quaglini, V.; Dubini, P.; Ferroni, D.; Poggi, C. Influence of counterface roughness on friction properties of engineering plastics for bearing applications. Mater. Des. 2009, 30, 1650–1658. [Google Scholar] [CrossRef]
  14. Giltrow, J.P.; Lancaster, J.K. The role of the counterface in the friction and wear of carbon fibre reinforced thermosetting resins. Wear 1970, 16, 359–374. [Google Scholar] [CrossRef]
  15. Song, J.; Liu, X.; Zhao, G.; Ding, Q.; Qiu, J. Effect of surface roughness and reciprocating time on the tribological properties of the polyimide composites. Polym. Eng. Sci. 2019, 59, 483–489. [Google Scholar] [CrossRef]
  16. Marcus, K.; Ball, A.; Allen, C. The effect of grinding direction on the nature of the transfer film formed during the sliding wear of ultrahigh molecular weight polyethylene against stainless steel. Wear 1991, 151, 323–336. [Google Scholar] [CrossRef]
  17. Placette, M.D.; Roy, S.; White, D.; Sundararajan, S.; Schwartz, C.J. The effect of surface roughness orientation on PEEK (polyetheretherketone) transfer film volume in multi-directional and linear sliding. Wear 2019, 426–427, 1345–1353. [Google Scholar] [CrossRef]
  18. Roos, U.; Riahi, K.L.; Linker, A. Plastic Glide Layer and Sliding Element with Such. U.S. Patent No. 8,357,622, 22 January 2013. U.S. Patent and Trademark Office. Available online: https://patents.justia.com/patent/8357622 (accessed on 6 December 2021).
  19. deva.tex® Sliding Bearings: Maintenance-Free, Self-Lubricating. Available online: http://deva.de/en/manuals (accessed on 26 October 2021).
  20. Rodiouchkina, M.; Berglund, K.; Mouzon, J.; Forsberg, F.; Shah, F.U.; Rodushkin, I.; Larsson, R. Material characterization and influence of sliding speed and pressure on friction and wear behavior of self-Lubricating bearing materials for hydropower applications. Lubricants 2018, 6, 39. [Google Scholar] [CrossRef] [Green Version]
  21. Ovaert, T.C.; Cheng, H.S. Counterface topographical effects on the wear of polyetheretherketone and a polyetheretherketone-carbon fiber composite. Wear 1991, 150, 275–287. [Google Scholar] [CrossRef]
  22. Vishwanath, B.; Verrna, A.P.; Kameswara Rao, C.V.S. Effect of reinforcement on friction and wear of fabric reinforced polymer composites. Wear 1993, 167, 93–99. [Google Scholar] [CrossRef]
  23. Rodiouchkina, M.; Lind, J.; Pelcastre, L.; Berglund, K.; Rudolphi, Å.K.; Hardell, J. Tribological behaviour and transfer layer development of self-lubricating polymer composite bearing materials under long duration dry sliding against stainless steel. Wear 2021, 484–485, 204027. [Google Scholar] [CrossRef]
  24. Berglund, K.; Rodiouchkina, M.; Hardell, J.; Kalliorinne, K.; Johansson, J. A Novel Reciprocating Tribometer for Friction and Wear Measurements with High Contact Pressure and Large Area Contact Configurations. Lubricants 2021, 9, 123. [Google Scholar] [CrossRef]
  25. Dhaka, P.; Prakash, R.V. Effect of Contact Geometry on the Contact Stresses in a Flat with Round Edge Contact. Frat. Ed Integrità Strutt. 2019, 48, 630–638. [Google Scholar] [CrossRef]
  26. Friedrich, K.; Karger-Kocsis, J.; Lu, Z. Effects of steel counterface roughness and temperature on the friction and wear of PE(E)K composites under dry sliding conditions. Wear 1991, 148, 235–247. [Google Scholar] [CrossRef]
  27. Franklin, S.E.; de Kraker, A. Investigation of counterface surface topography effects on the wear and transfer behaviour of a POM–20% PTFE composite. Wear 2003, 255, 766–773. [Google Scholar] [CrossRef]
  28. Material Data Sheet W87.00 deva.tex®. Edition 17.08.2021. Received from Federal-Mogul Deva GmbH. Available online: https://pdf.directindustry.com/pdf/federal-mogul-deva-gmbh/devatex-technical-handbbok/13698-326819.html (accessed on 27 October 2021).
  29. Steel Grade SS 2333 Chemical Information, Mechanical Properties. Available online: http://www.steel-grades.com/Steel-Grades/Special-Alloy/68/4552/SS_SS_2333.pdf (accessed on 27 October 2021).
  30. Orkot® TLM & TXM Marine Bearings. Available online: http://www.orkot.com/-/media/tss-media-repository/orkot/pdfs/marine_txmm__tlmm_brochure.pdf (accessed on 26 October 2021).
  31. ThorPlas Bearings Engineering Manual, Version: TP 2019.1. Available online: https://thordonbearings.com/docs/default-source/design/thorplas_engineering_manual.pdf?sfvrsn=f6c5c09a_42 (accessed on 26 October 2021).
  32. Zhang, G.; Cheng, J.; Shi, L.; Lin, X.; Zhang, J. Study on curing kinetics of diallyl-bearing epoxy resin using sulfur as curing agent. Thermochim. Acta 2012, 538, 36–42. [Google Scholar] [CrossRef]
  33. Shao, Z.B.; Tang, Z.C.; Lin, X.Z.; Jin, J.; Li, Z.Y.; Deng, C. Phosphorus/sulfur-containing aliphatic polyamide curing agent endowing epoxy resin with well-balanced flame safety, transparency and refractive index. Mater. Des. 2020, 187, 108417. [Google Scholar] [CrossRef]
  34. Xu, M.; Zhao, W.; Li, B.; Yang, K.; Lin, L. Synthesis of a phosphorus and sulfur-containing aromatic diamine curing agent and its application in flame retarded epoxy resins. Fire Mater. 2014, 39, 518–532. [Google Scholar] [CrossRef]
  35. Borkar, S.P.; Kumar, V.S.; Mantha, S.S. Effect of silica and calcium carbonate fillers on the properties of woven glass fibre composites. Indian J. Fibre Text. Res. 2007, 32, 251–253. [Google Scholar]
  36. Akram, W.; Chaturvedi, S.K.; Ali, S.M. Comparative study of mechanical properties of E-glass/epoxy composite materials with Al2O3, CaCO3, SiO2 and PBO fillers. Int. J. Eng. Res. Technol. 2013, 2, 1029–1034. [Google Scholar]
  37. Anjum, N.; Prasad, S.L.A.; Suresha, B. Role of Silicon Dioxide Filler on Mechanical and Dry Sliding Wear Behaviour of Glass-Epoxy Composites. Adv. Tribol. 2013, 2013, 324952. [Google Scholar] [CrossRef]
  38. Chruściel, J.J.; Leśniak, E. Modification of epoxy resins with functional silanes, polysiloxanes, silsesquioxanes, silica and silicates. Prog. Polym. Sci. 2015, 41, 67–121. [Google Scholar] [CrossRef]
  39. Ma, S.; Liu, W.; Yu, D.; Wang, Z. Modification of Epoxy Resin with Polyether-grafted-Polysiloxane and Epoxy-Miscible Polysiloxane Particles. Macromol. Res. 2010, 18, 22–28. [Google Scholar] [CrossRef]
  40. Kim, S.; Shin, E.; Chung, J. Determination of antimony (Sb) in polymers using high performance asher and inductively coupled plasma atomic emission spectrometry (ICPAES). In Proceedings of the European Winter Conference on Plasma Spectrochemistry 2009, Graz, Austria, 15–20 February 2009. [Google Scholar]
  41. Carraher, C.E. Antimony-containing polymers. In Inorganic and Organometallic Macromolecules: Design and Applications; Abd-El-Aziz, A.S., Carraher, C.E., Pittman, C.U., Zeldin, M., Eds.; Springer: New York, NY, USA, 2008; pp. 405–419. [Google Scholar] [CrossRef]
  42. Lancaster, J.K. Polymer-based bearing materials: The role of fillers and fibre reinforcement. Tribology 1972, 5, 249–255. [Google Scholar] [CrossRef]
  43. Watanabe, M.; Narukawa, A. Determination of impurity elements in high purity graphite by inductively coupled plasma atomic emission spectrometry after microwave decomposition. Analyst 2000, 125, 1189–1191. [Google Scholar] [CrossRef]
  44. Ambrosi, A.; Chee, S.Y.; Khezri, B.; Webster, R.D.; Sofer, Z.; Pumera, M. Metallic Impurities in Graphenes Prepared from Graphite Can Dramatically Influence Their Properties. Angew. Chem. Int. Ed. 2011, 51, 500–503. [Google Scholar] [CrossRef] [PubMed]
  45. Ambrosi, A.; Chua, C.K.; Khezri, B.; Sofer, Z.; Webster, R.D.; Pumera, M. Chemically reduced graphene contains inherent metallic impurities present in parent natural and synthetic graphite. Proc. Natl. Acad. Sci. USA 2012, 109, 12899–12904. [Google Scholar] [CrossRef] [PubMed] [Green Version]
  46. Miyatani, T.; Suzuki, H.; Yoshimoto, O. Quantitative Analysis of Trace Amounts of Impurities Contaminating Pure Graphite with ICP-MS and Metal Atomizer FLAAS (IAEA-TECDOC–690); International Atomic Energy Agency (IAEA): Vienna, Austria, 1993; pp. 304–308. [Google Scholar]
  47. Fisli, A.; Mustika, D.; Sudirman; Torowati; Mulyaningsih, T.R.; Dimyati, A.; Joni, I.M. Determination of Elements in Acid Leaching of Graphite Using Instrumental Neutron Activation Analysis. Int. J. Chem. 2020, 12, 89–98. [Google Scholar] [CrossRef]
  48. Mustika, D.; Torowati; Sudirman; Dimyati, A.; Fisli, A.; Joni, I.M.; Langenati, R. Current Status of Purification of Indonesian Natural Graphite as a Candidate for Nuclear Fuel Matrix by Hydrometallurgy and Pyrometallurgy Methods. J. Phys.—Conf. Ser. 2021, 2048, 012021. [Google Scholar] [CrossRef]
Figure 1. Surface topography obtained from 3D profilometry measurements of the ground and polished stainless-steel plates illustrating: (a) mirror-polished surface (Sa = 0.006 µm) and isotropic lay, (b) isotropic lay with Sa = 0.08 µm, (c) isotropic lay with Sa = 0.3 µm, (d) as-received with parallel surface lay to the sliding direction, (e) as-received with perpendicular surface lay to the sliding direction, (f) parallel surface lay with Sa = 0.7 µm, (g) perpendicular surface lay with Sa = 0.7 µm, (h) parallel surface lay with Sa = 1.1 µm, (i) perpendicular surface lay with Sa = 1.1 µm. Objective: 10×, field of view: 0.5×. I = isotropic, ∥ = parallel, ⊥ = perpendicular. Arrows indicate the sliding direction.
Lubricants 10 00167 g001
Figure 2. Variation of the average: (a) coefficient of friction and (b) specific wear rate as a function of counter surface roughness for the tested bearing materials sliding against ground stainless-steel plates with isotropic surface lay. TS = thermoset, I = isotropic surface lay.
Lubricants 10 00167 g002
Figure 3. Surface topography of the polished stainless-steel plates with isotropic lay. After sliding against the fibre-reinforced thermoset with an initial surface roughness Sa of: (a) 0.006 µm, (b) 0.08 µm, and (c) 0.3 µm. After sliding against the fabric-reinforced thermoset with an initial surface roughness Sa of: (d) 0.006 µm, (e) 0.08 µm, and (f) 0.3 µm. After sliding against the thermoplastic with an initial surface roughness Sa of: (g) 0.006 µm, (h) 0.08 µm, and (i) 0.3 µm. Objective: 10×, field of view: 0.5×. I = isotropic surface lay. The sliding direction in the figures is parallel to the vertical axis.
Lubricants 10 00167 g003
Figure 4. SEM micrographs of the transfer layers formed on the stainless-steel surface closer to the centre of the wear track. After sliding against the fibre-reinforced thermoset with an initial surface roughness Sa of: (a) 0.006 µm, (b) 0.08 µm, and (c) 0.3 µm. After sliding against the fabric-reinforced thermoset with an initial surface roughness Sa of: (d) 0.006 µm, (e) 0.08 µm, and (f) 0.3 µm. After sliding against the thermoplastic with an initial surface roughness Sa of: (g) 0.006 µm, (h) 0.08 µm, and (i) 0.3 µm. Regions 1 to 9 show locations for higher magnification SEM analysis. I = isotropic surface lay. The sliding direction in the figures is parallel to the vertical axis.
Lubricants 10 00167 g004
Figure 5. SEM micrographs of the stainless-steel surfaces before test with an initial surface roughness Sa of: (a) 0.006 µm, (b) 0.08 µm, and (c) 0.3 µm. SEM micrographs of the worn stainless-steel surfaces at higher magnification, marked in Figure 4 with number: (d) 1 (fibre-reinforced thermoset Sa = 0.006 µm), (e) 2 (fibre-reinforced thermoset Sa = 0.08 µm), (f) 3 (fibre-reinforced thermoset Sa = 0.3 µm), (g) 4 (fabric-reinforced thermoset Sa = 0.006 µm), (h) 5 (fabric-reinforced thermoset Sa = 0.08 µm), (i) 6 (fabric-reinforced thermoset Sa = 0.3 µm), (j) 7 (thermoplastic Sa = 0.006 µm), (k) 8 (thermoplastic Sa = 0.08 µm), and (l) 9 (thermoplastic Sa = 0.3 µm). I = isotropic surface lay. The sliding direction in the figures is parallel to the vertical axis.
Lubricants 10 00167 g005
Figure 6. SEM micrographs of the worn stainless-steel surfaces with isotropic lay illustrating the dominant wear mechanisms. After sliding against the fibre-reinforced thermoset with an initial steel surface roughness Sa of: (a) 0.006 µm, closer to the reversal point on the wear track; (b) the same location as in figure (a), using backscattered electron detector with topography mode (BED-T); (c) 0.08 µm, closer to the middle of the wear track. After sliding against the fabric-reinforced thermoset with an initial steel surface roughness Sa of: (d) 0.006 µm, closer to the reversal point; (e) 0.006 µm, closer to the middle of the wear track. After sliding against the thermoplastic with an initial steel surface roughness Sa of: (f) 0.006 µm, closer to the middle of the wear track. The sliding direction in the figures is parallel to the vertical axis.
Lubricants 10 00167 g006
Figure 7. Surface topography of the load-carrying surface of the worn polymer pins after sliding against stainless surfaces with isotropic lay and an initial surface roughness Sa of: (a) 0.006 µm (fibre-reinforced thermoset), (b) 0.08 µm (fibre-reinforced thermoset), (c) 0.3 µm (fibre-reinforced thermoset), (d) 0.006 µm (fabric-reinforced thermoset), (e) 0.08 µm (fabric-reinforced thermoset), (f) 0.3 µm (fabric-reinforced thermoset), (g) 0.006 µm (thermoplastic), (h) 0.08 µm (thermoplastic), and (i) 0.3 µm (thermoplastic). Objective: 10×, field of view: 1×. I = isotropic surface lay. The sliding direction in the figures is parallel to the vertical axis.
Lubricants 10 00167 g007
Figure 8. SEM micrographs of the load-carrying surface of the worn polymer pins after sliding against stainless surfaces with isotropic lay and an initial surface roughness Sa of: (a) 0.006 µm (fibre-reinforced thermoset), (b) 0.08 µm (fibre-reinforced thermoset), (c) 0.3 µm (fibre-reinforced thermoset), (d) 0.006 µm (fabric-reinforced thermoset), (e) 0.08 µm (fabric-reinforced thermoset), (f) 0.3 µm (fabric-reinforced thermoset), (g) 0.006 µm (thermoplastic), (h) 0.08 µm (thermoplastic), and (i) 0.3 µm (thermoplastic). Regions 1 to 9 show locations for higher magnification SEM analysis. I = isotropic surface lay. The sliding direction in the figures is parallel to the vertical axis. The polymer pins are sputtered with platinum (Pt).
Lubricants 10 00167 g008
Figure 9. SEM micrographs of the worn polymer pins at higher magnification, of the areas marked in Figure 8 with number: (a) 1 (fibre-reinforced thermoset Sa = 0.006 µm), (b) 2 (fibre-reinforced thermoset Sa = 0.08 µm), (c) 3 (fibre-reinforced thermoset Sa = 0.3 µm), (d) 4 (fabric-reinforced thermoset Sa = 0.006 µm), (e) 5 (fabric-reinforced thermoset Sa = 0.08 µm), (f) 6 (fabric-reinforced thermoset Sa = 0.3 µm), (g) 7 (thermoplastic Sa = 0.006 µm), (h) 8 (thermoplastic Sa = 0.08 µm), and (i) 9 (thermoplastic Sa = 0.3 µm). I = isotropic surface lay. The sliding direction in the figures is parallel to the vertical axis. The polymer pins are sputtered with platinum (Pt).
Lubricants 10 00167 g009
Figure 10. Variation of the average: (a) coefficient of friction and (b) specific wear rate as a function of counter surface roughness and lay for the tested bearing materials. TS = thermoset, ∥ = parallel, and ⊥ = perpendicular surface lay to the sliding direction.
Lubricants 10 00167 g010
Figure 11. Normalized average coefficients of friction and specific wear rates as a function of counter surface roughness and orientation for: (a) the fibre-reinforced thermoset, (b) the fabric-reinforced thermoset, and (c) the thermoplastic. ∥ = parallel and ⊥ = perpendicular surface lay to the sliding direction.
Lubricants 10 00167 g011
Figure 12. Surface topography of the ground stainless-steel plates after sliding against the fibre-reinforced thermoset. The initial surface roughness and lay is: (a) Sa = 0.3 µm ∥, (b) Sa = 0.7 µm ∥, (c) Sa = 1.1 µm ∥, (d) Sa = 0.3 µm ⊥, (e) Sa = 0.7 µm ⊥, and (f) Sa = 1.1 µm ⊥. Objective: 10×, field of view: 0.5X. ∥ = parallel and ⊥ = perpendicular surface lay to the sliding direction. The sliding direction in the figures is parallel to the vertical axis.
Lubricants 10 00167 g012
Figure 13. SEM micrographs of the transfer layers formed on the ground stainless steel closer to the centre of the wear track after sliding against the fibre-reinforced thermoset. The initial surface roughness and lay is: (a) Sa = 0.3 µm ∥, (b) Sa = 0.7 µm ∥, (c) Sa = 1.1 µm ∥, (d) Sa = 0.3 µm ⊥, (e) Sa = 0.7 µm ⊥, and (f) Sa = 1.1 µm ⊥. ∥ = parallel and ⊥ = perpendicular surface lay to the sliding direction. The sliding direction in the figures is parallel to the vertical axis.
Lubricants 10 00167 g013
Figure 14. Surface topography of the load-carrying surface of the fibre-reinforced thermoset after sliding against stainless steel with initial surface roughness and lay of: (a) Sa = 0.3 µm ∥, (b) Sa = 0.7 µm ∥, (c) Sa = 1.1 µm ∥, (d) Sa = 0.3 µm ⊥, (e) Sa = 0.7 µm ⊥, and (f) Sa = 1.1 µm ⊥. Objective: 50×, field of view: 0.5×. ∥ = parallel and ⊥ = perpendicular surface lay to the sliding direction. Regions 1 to 6 show locations for SEM analysis. The sliding direction in the figures is parallel to the vertical axis.
Lubricants 10 00167 g014
Figure 15. SEM micrographs of the worn fibre-reinforced thermoset pins of the areas marked in Figure 14 with number: (a) 1 (Sa = 0.3 µm ∥), (b) 2 (Sa = 0.7 µm ∥), (c) 3 (Sa = 1.1 µm ∥), (d) 4 (Sa = 0.3 µm ⊥), (e) 5 (Sa = 0.7 µm ⊥), and (f) 6 (Sa = 1.1 µm ⊥). ∥ = parallel and ⊥ = perpendicular surface lay to the sliding direction. The sliding direction in the figures is parallel to the vertical axis. The polymer pins are sputtered with gold (Au).
Lubricants 10 00167 g015
Figure 16. Surface topography of the ground stainless-steel plates after sliding against the fabric-reinforced thermoset. The initial surface roughness and lay is: (a) Sa = 0.3 µm ∥, (b) Sa = 0.7 µm ∥, (c) Sa = 1.1 µm ∥, (d) Sa = 0.3 µm ⊥, (e) Sa = 0.7 µm ⊥, and (f) Sa = 1.1 µm ⊥. Objective: 10×, field of view: 0.5×. ∥ = parallel and ⊥ = perpendicular surface lay to the sliding direction. The sliding direction in the figures is parallel to the vertical axis.
Lubricants 10 00167 g016
Figure 17. SEM micrographs of the transfer layers formed on the ground stainless steel closer to the centre of the wear track after sliding against the fabric-reinforced thermoset. The initial surface roughness and lay is: (a) Sa = 0.3 µm ∥, (b) Sa = 0.7 µm ∥, (c) Sa = 1.1 µm ∥, (d) Sa = 0.3 µm ⊥, (e) Sa = 0.7 µm ⊥, and (f) Sa = 1.1 µm ⊥. ∥ = parallel and ⊥ = perpendicular surface lay to the sliding direction. The sliding direction in the figures is parallel to the vertical axis.
Lubricants 10 00167 g017
Figure 18. Surface topography of the load-carrying surface of the fabric-reinforced thermoset after sliding against stainless steel with initial surface roughness and lay of: (a) Sa = 0.3 µm ∥, (b) Sa = 0.7 µm ∥, (c) Sa = 1.1 µm ∥, (d) Sa = 0.3 µm ⊥, (e) Sa = 0.7 µm ⊥, and (f) Sa = 1.1 µm ⊥. Objective: 50×, field of view: 0.5×. ∥ = parallel and ⊥ = perpendicular surface lay to the sliding direction. Regions 1 to 6 show locations for SEM analysis. The sliding direction in the figures is parallel to the vertical axis.
Lubricants 10 00167 g018
Figure 19. SEM micrographs of the worn fabric-reinforced thermoset pins of the areas marked in Figure 18 with number: (a) 1 (Sa = 0.3 µm ∥), (b) 2 (Sa = 0.7 µm ∥), (c) 3 (Sa = 1.1 µm ∥), (d) 4 (Sa = 0.3 µm ⊥), (e) 5 (Sa = 0.7 µm ⊥), and (f) 6 (Sa = 1.1 µm ⊥). ∥ = parallel and ⊥ = perpendicular surface lay to the sliding direction. The sliding direction in the figures is parallel to the vertical axis. The polymer pins are sputtered with gold (Au).
Lubricants 10 00167 g019
Figure 20. Surface topography of the ground stainless-steel plates after sliding against the thermoplastic. The initial surface roughness and lay is: (a) Sa = 0.3 µm ∥, (b) Sa = 0.7 µm ∥, (c) Sa = 1.1 µm ∥, (d) Sa = 0.3 µm ⊥, (e) Sa = 0.7 µm ⊥, and (f) Sa = 1.1 µm ⊥. Objective: 10×, field of view: 0.5×. ∥ = parallel and ⊥ = perpendicular surface lay to the sliding direction. The sliding direction in the figures is parallel to the vertical axis.
Lubricants 10 00167 g020
Figure 21. SEM micrographs of the transfer layers formed on the ground stainless-steel closer to the centre of the wear track after sliding against the thermoplastic. The initial surface roughness and lay is: (a) Sa = 0.3 µm ∥, (b) Sa = 0.7 µm ∥, (c) Sa = 1.1 µm ∥, (d) Sa = 0.3 µm ⊥, (e) Sa = 0.7 µm ⊥, and (f) Sa = 1.1 µm ⊥. ∥ = parallel and ⊥ = perpendicular surface lay to the sliding direction. The sliding direction in the figures is parallel to the vertical axis.
Lubricants 10 00167 g021
Figure 22. Surface topography of the load-carrying surface of the thermoplastic after sliding against stainless steel with initial surface roughness and lay of: (a) Sa = 0.3 µm ∥, (b) Sa = 0.7 µm ∥, (c) Sa = 1.1 µm ∥, (d) Sa = 0.3 µm ⊥, (e) Sa = 0.7 µm ⊥, and (f) Sa = 1.1 µm ⊥. Objective: 50×, field of view: 0.5×. ∥ = parallel and ⊥ = perpendicular surface lay to the sliding direction. Regions 1 to 6 show locations for SEM analysis. The sliding direction in the figures is parallel to the vertical axis.
Lubricants 10 00167 g022
Figure 23. SEM micrographs of the worn thermoplastic pins of the areas marked in Figure 22 with number: (a) 1 (Sa = 0.3 µm ∥), (b) 2 (Sa = 0.7 µm ∥), (c) 3 (Sa = 1.1 µm ∥), (d) 4 (Sa = 0.3 µm ⊥), (e) 5 (Sa = 0.7 µm ⊥), and (f) 6 (Sa = 1.1 µm ⊥). ∥ = parallel and ⊥ = perpendicular surface lay to the sliding direction. The sliding direction in the figures is parallel to the vertical axis. The polymer pins are sputtered with gold (Au).
Lubricants 10 00167 g023
Table 1. Average surface roughness for the ground stainless-steel plates measured using 3D profilometry.
Surface Roughness, Sa [µm]Surface LayGrinding Method
0.006 ± 0.001IsotropicMirror-polished
0.082 ± 0.003IsotropicSemiautomatic polishing machine, down to #P800
0.332 ± 0.035IsotropicSemiautomatic polishing machine, down to #P240
0.310 ± 0.020ParallelAs-received (cold rolled)
0.310 ± 0.020PerpendicularAs-received (cold rolled)
0.749 ± 0.073ParallelManually, #P120
0.676 ± 0.055PerpendicularManually, #P120
1.076 ± 0.085ParallelManually, #P60
1.051 ± 0.033PerpendicularManually, #P60
Table 2. Experimental conditions used for the tribological tests.
Test ParameterValue
Normal load450 N
Nominal contact pressure28 MPa
Reciprocating frequency0.64 Hz
Stroke length5 mm
Sliding velocity6.4 mm/s
Test duration20 h
Total sliding distance461 m
Temperature (initial)23.7 ± 0.9 °C
Relative humidity14.4 ± 8.3%
Publisher’s Note: MDPI stays neutral with regard to jurisdictional claims in published maps and institutional affiliations.