1. Introduction
Traditional strategies for 3D printing utilize planar slicing to prepare models for production, integrating support structures to enable overhanging geometries. Support structures create additional material which require removal in post processing. While methods have been developed to analyze overhangs and minimize supports during the design process [
1], the use of support structures remains a common method of producing overhanging geometry. In WAAM, the removal of metal support structures is difficult to accomplish due to the strength of steel and limiting reach of tools. To overcome this challenge, this research develops strategies for the production of unsupported overhanging geometries through the use of non-parallel and non-planar slicing. This approach develops Wire Arc Additive Manufacturing (WAAM) strategies for printing with variable layer heights, where the material is deposited by adjusting the process parameters and the torch angles so they remain normal to the non-orthogonal orientation of the layer.
The molten nature of material deposition in WAAM requires the optimization of process parameters to achieve the desired quality in regards to geometry and structural performance [
2,
3]. There are a wide range of interrelated parameters that contribute to the outcome of WAAM-produced parts. To improve the production, systematic methods are required to control parameters and document the process. In the case of this research, an ideal method for the customization of process control and recording of real time data needs to be modular to enable extension and correlated with regards to the collection of data between the robot, welding power source, and sensors. Modular extension of the parameter control system enables access to the data model so new devices are easily integrated. The correlated collection of data enables the synchronization of information according to the timestamp and tool position, so the state of the production can be analyzed at any given point in the process. An accessible, extendable, synchronized solution to this challenge, tailored for WAAM production, is created during this research.
To accomplish this goal, the following research develops IoT-enabled, distributed communication protocols for setting parameters, and creates a WAAM Information Model (WIM) to enable a database capable of collecting process information. The WIM collates these data into a query-able structure in a format that can be used for post-process analysis, visualization, optimization, and adaptation. This paper documents research and development in variable layer height production, IoT-enabled parameter customization, and the creation of WAAM Information Models.
In
Section 2, the state of the art is explored to understand the foundation upon which this research builds, introducing a geometry and parameter set to be used for testing while highlighting the novel aspects of this approach.
Section 3 details the reference geometry selected for this research.
Section 4, Distributed Communication Protocol for Device and Process Parameter Control, documents a novel control system utilized to enable the mass customization of robot programming, through Internet of Things (IoT)-enabled devices and the parametric setting of process parameters.
Section 5, Variable Layer Height Parameters, documents strategies for achieving variations in WAAM geometry and details the parameter tests undertaken to establish baseline outcomes in simple printed structures before applying this information to the production of more complex structures.
Section 6, WAAM Information Models (WIMs), details the development of the structured database, explaining the underlying architecture and identifying collected information ranging from pre-planning parameters, to in-process data and post-process analysis.
Section 7, Conclusion and Outlook, highlights the future direction for applying variable layer height approaches to non-parallel and non-planar WAAM geometries planar and envisions how the next iteration of the WIM will integrate further devices and approaches to process optimization.
2. State of the Art
The following section briefly examines the state of the art to establish a foundation upon which this research builds novel approaches to variable layer heights and information models in WAAM.
Wire Arc Additive Manufacturing (WAAM) is an innovative, well-researched method for the rapid production of metal parts [
4,
5,
6,
7]. The process integrates welding technology with control systems, such as robotic arms, to enable the mass customization of individualized geometries. This allows for the production of low lot sizes without the increased cost of bespoke molds or tooling setups. Success in this production process requires an intelligent approach to welding.
There are a variety of approaches for path planning in WAAM [
8,
9]. In planar slicing, a CAD model is oriented on a build surface, and the plane of the surface is moved vertically in series according to the layer thickness parameter. The series of moved planes is then intersected with the CAD model to create perimeter geometry for path planning. If infill geometry is required, these perimeter curves are used to generate patterns for interior structures. A key aspect of planar slicing is that the deposition tool remains in a perpendicular orientation to the layer. This is a constraint of three-axis printing machines. In robotic welding, the six axes of the arm eliminate the kinematic constraint on the tool position. Still, the planar approach is often used for WAAM, as this orientation is ideal for molten material deposition since gravity works to hold the liquid state of the weld in the desired position.
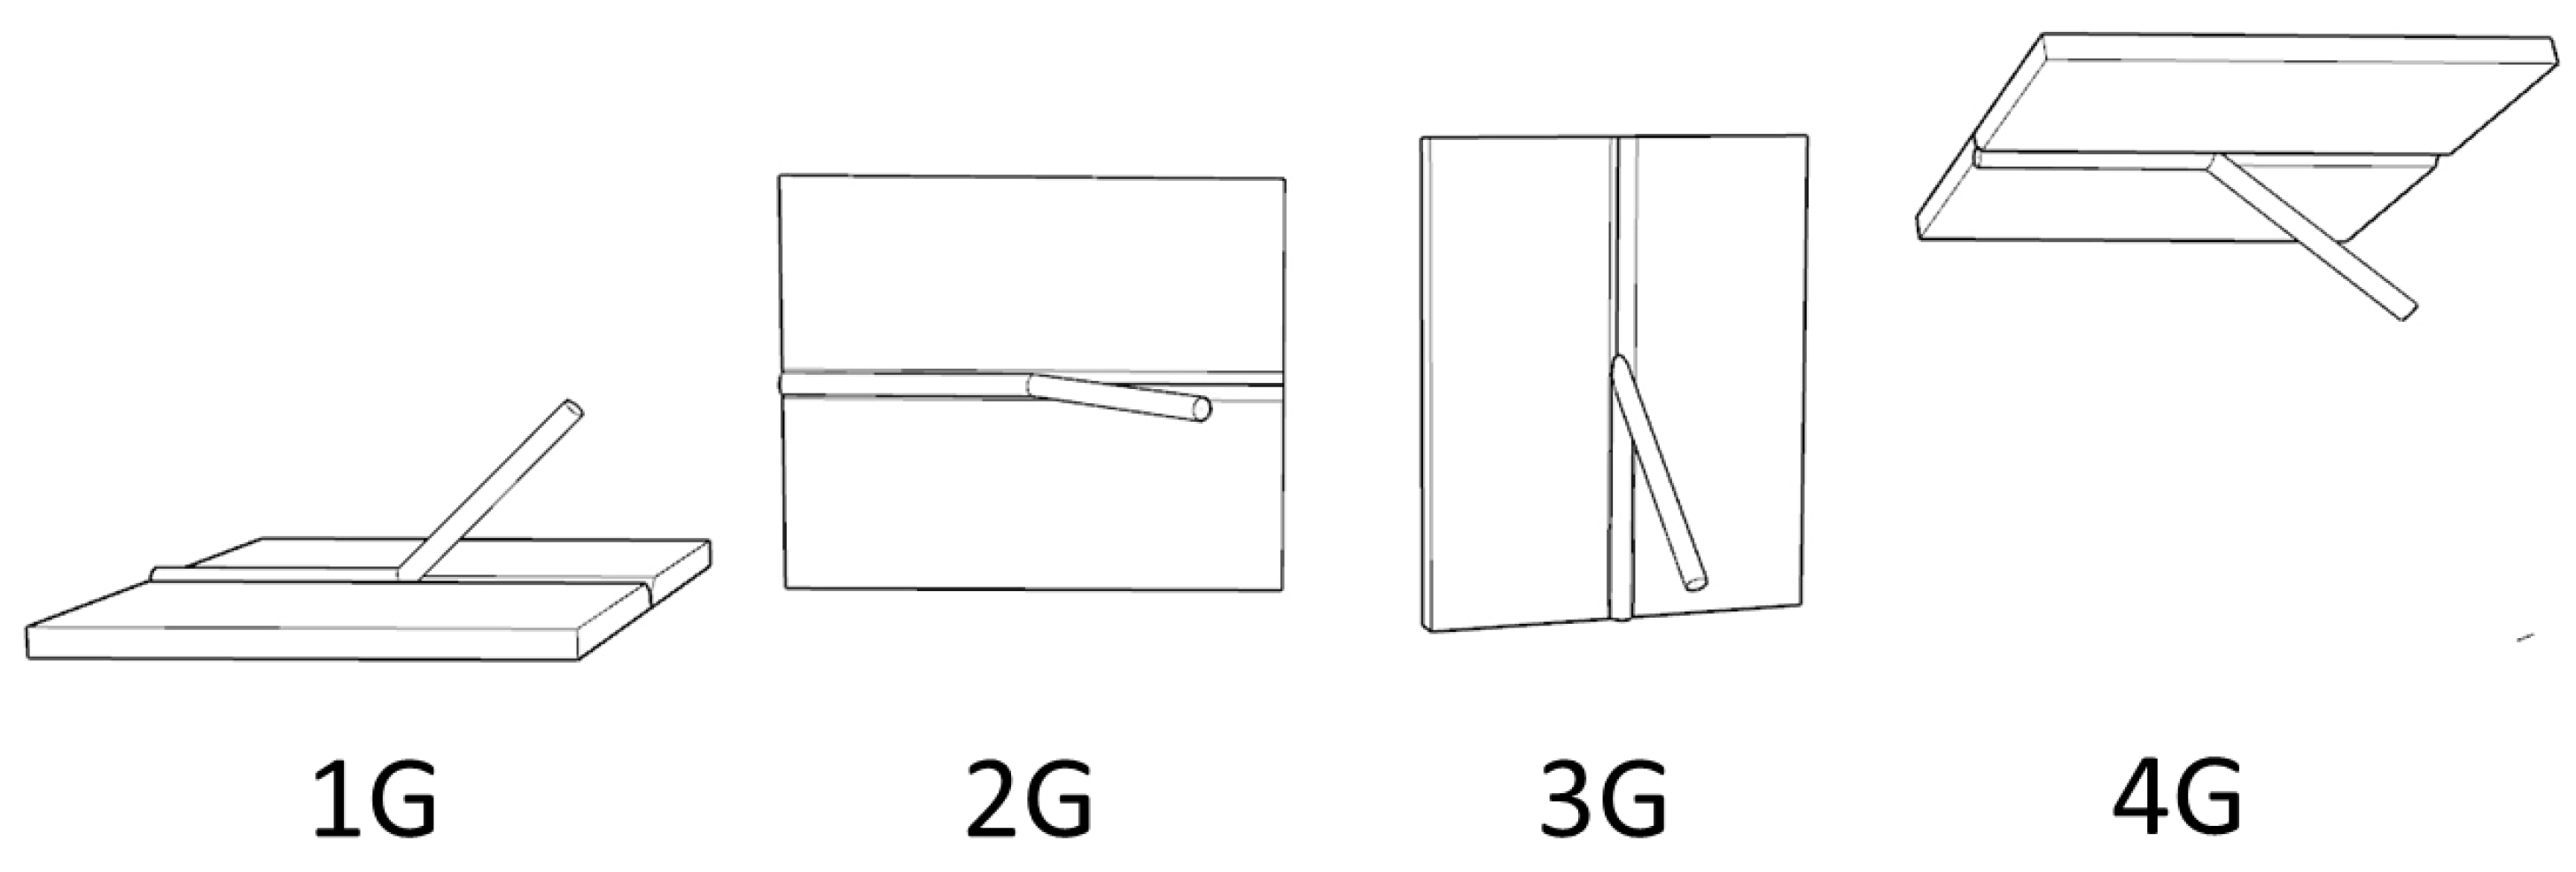
The planar approach utilizes a 1G welding position (AWS A3.0/AWS D1.1). In 1G, the weld joint is horizontal, and the torch is positioned above the metal. The orientation of the torch is perpendicular in relation to the surface of the material. As the weld is deposited on the horizontal plane, gravity pulls the molten metal downwards as shown in
Figure 1. Alternative positions are classified according to the increasing impact which gravity has on the welding process; 2G positions represent horizontal welds, 3G positions represent vertical upward welds, and 4G positions represent overhead welding [
10]. Each welding position requires different process parameters. The majority of WAAM production utilizes the 1G position to increase the standardization of parameters and minimize the impact of gravity on material deposition.
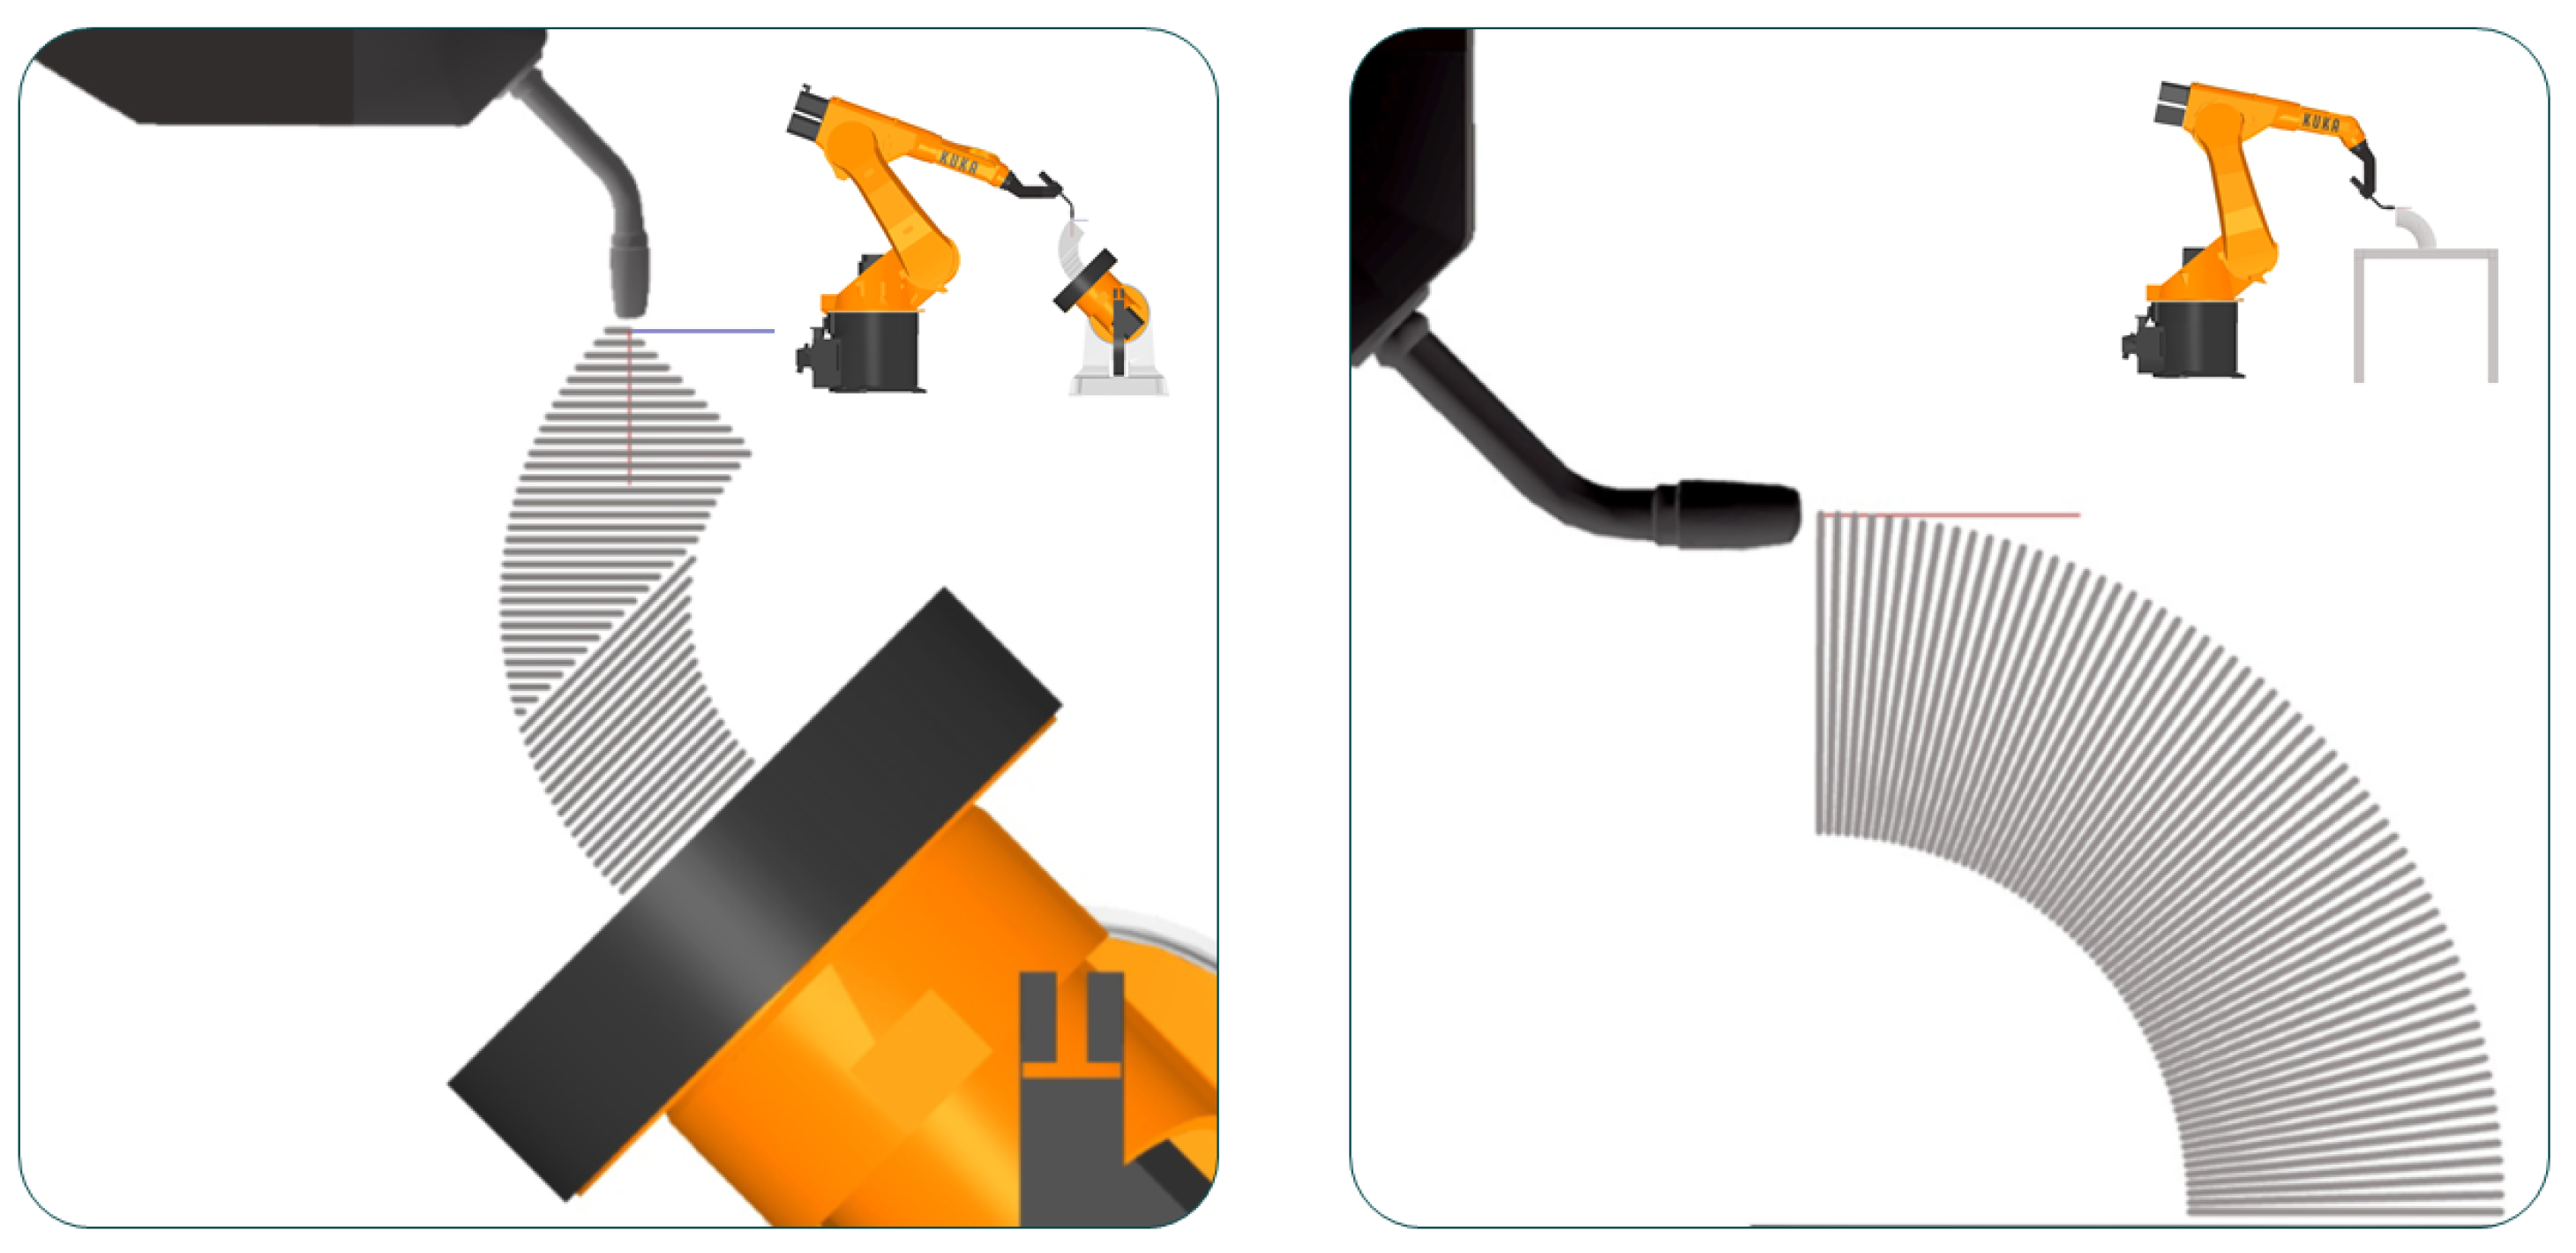
While planar slicing and the 1G torch position is the typical implementation, it is not ideal for unsupported overhanging geometries. To build these structures with planar slicing, robotic cells integrate additional positioning axes for rotating the workpiece to custom orientations. Additional planar layers are then printed in the 1G welding position [
11] as shown in
Figure 2. One limitation of this approach is the constraint of the build area that comes with the additional positioning axes, as the workpiece is reoriented between printed sections. This constraint is defined by the bounding area of layers able to be printed in a specific orientation before repositioning. If layers exceed this boundary, they are split to create a new planar area when the workpiece is reoriented with an external axis. This split in the direction of the printed grain of the structure introduces a change in the material properties, as the microstructure direction and cooling rates change at this area, leading to incongruous material properties and potential points of failure such as voids or cracking between metal layers.
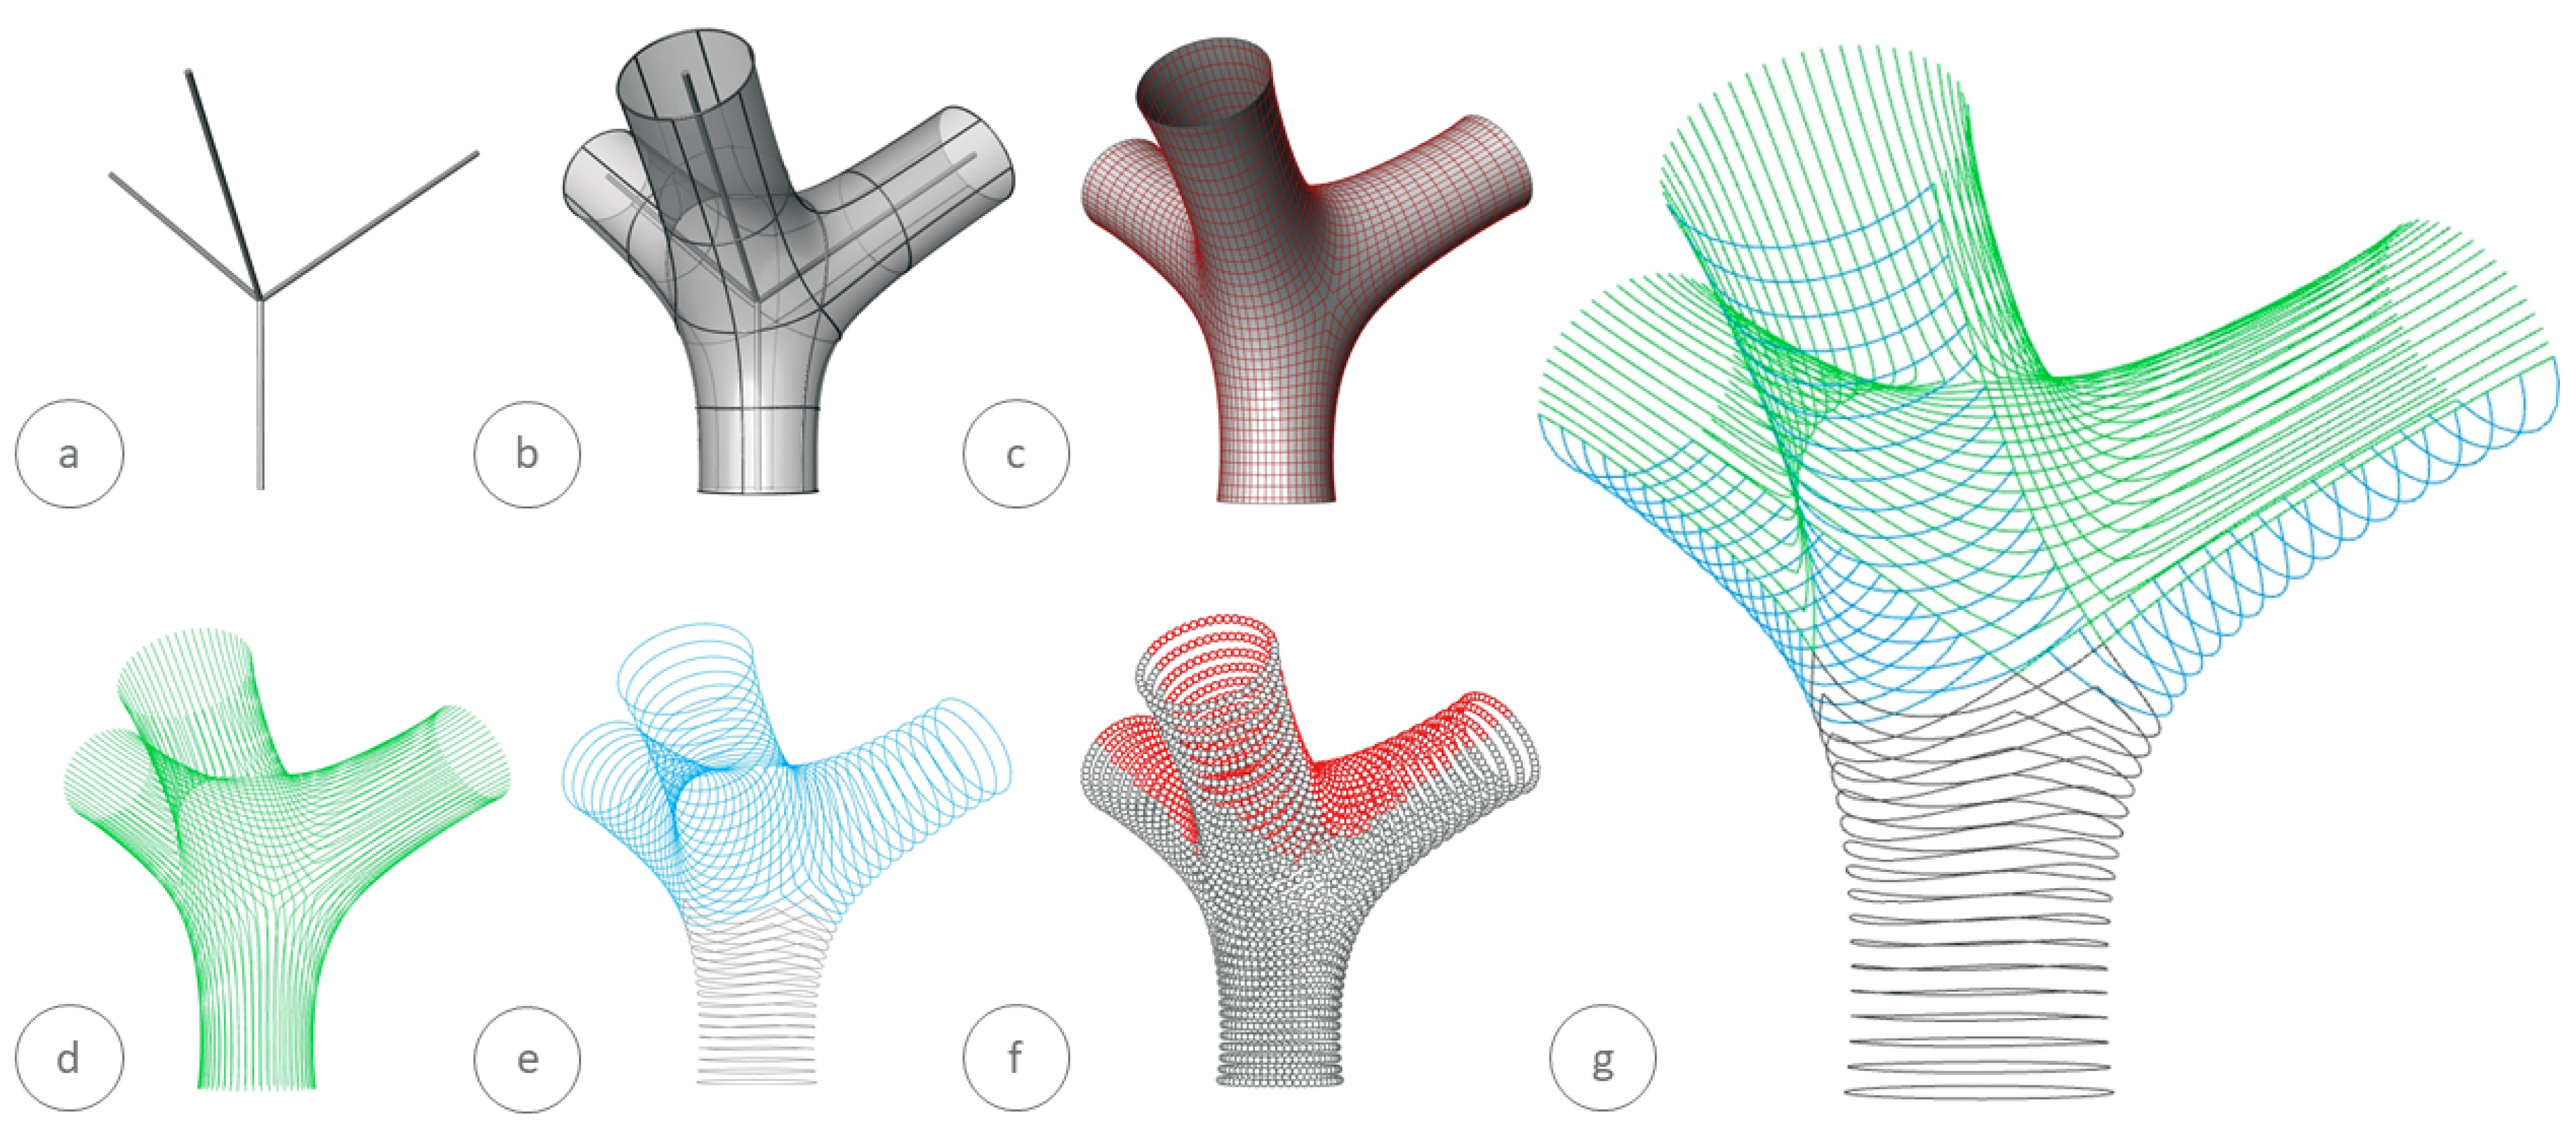
An alternative approach is to integrate variable layer heights for non-parallel and non-planar 3D printing. An increased capability to print unsupported overhanging geometries is achieved by varying the layer height according to the growth direction of the surface orientation. While limitations remain, this approach enables the printed object to grow in non-orthogonal directions without the use of an external axis. This is beneficial when the print is too large for repositioning, in the case of massive structures or on-site construction. In variable layer height production, each point on the layer is printed with the torch at a normal orientation to the frame of the tool path. Deviation from the 1G position requires custom WAAM parameters to ensure the required variations in height are built up while retaining a high quality of welding. This research develops intelligent welding strategies for achieving this goal.
3. Reference Geometry
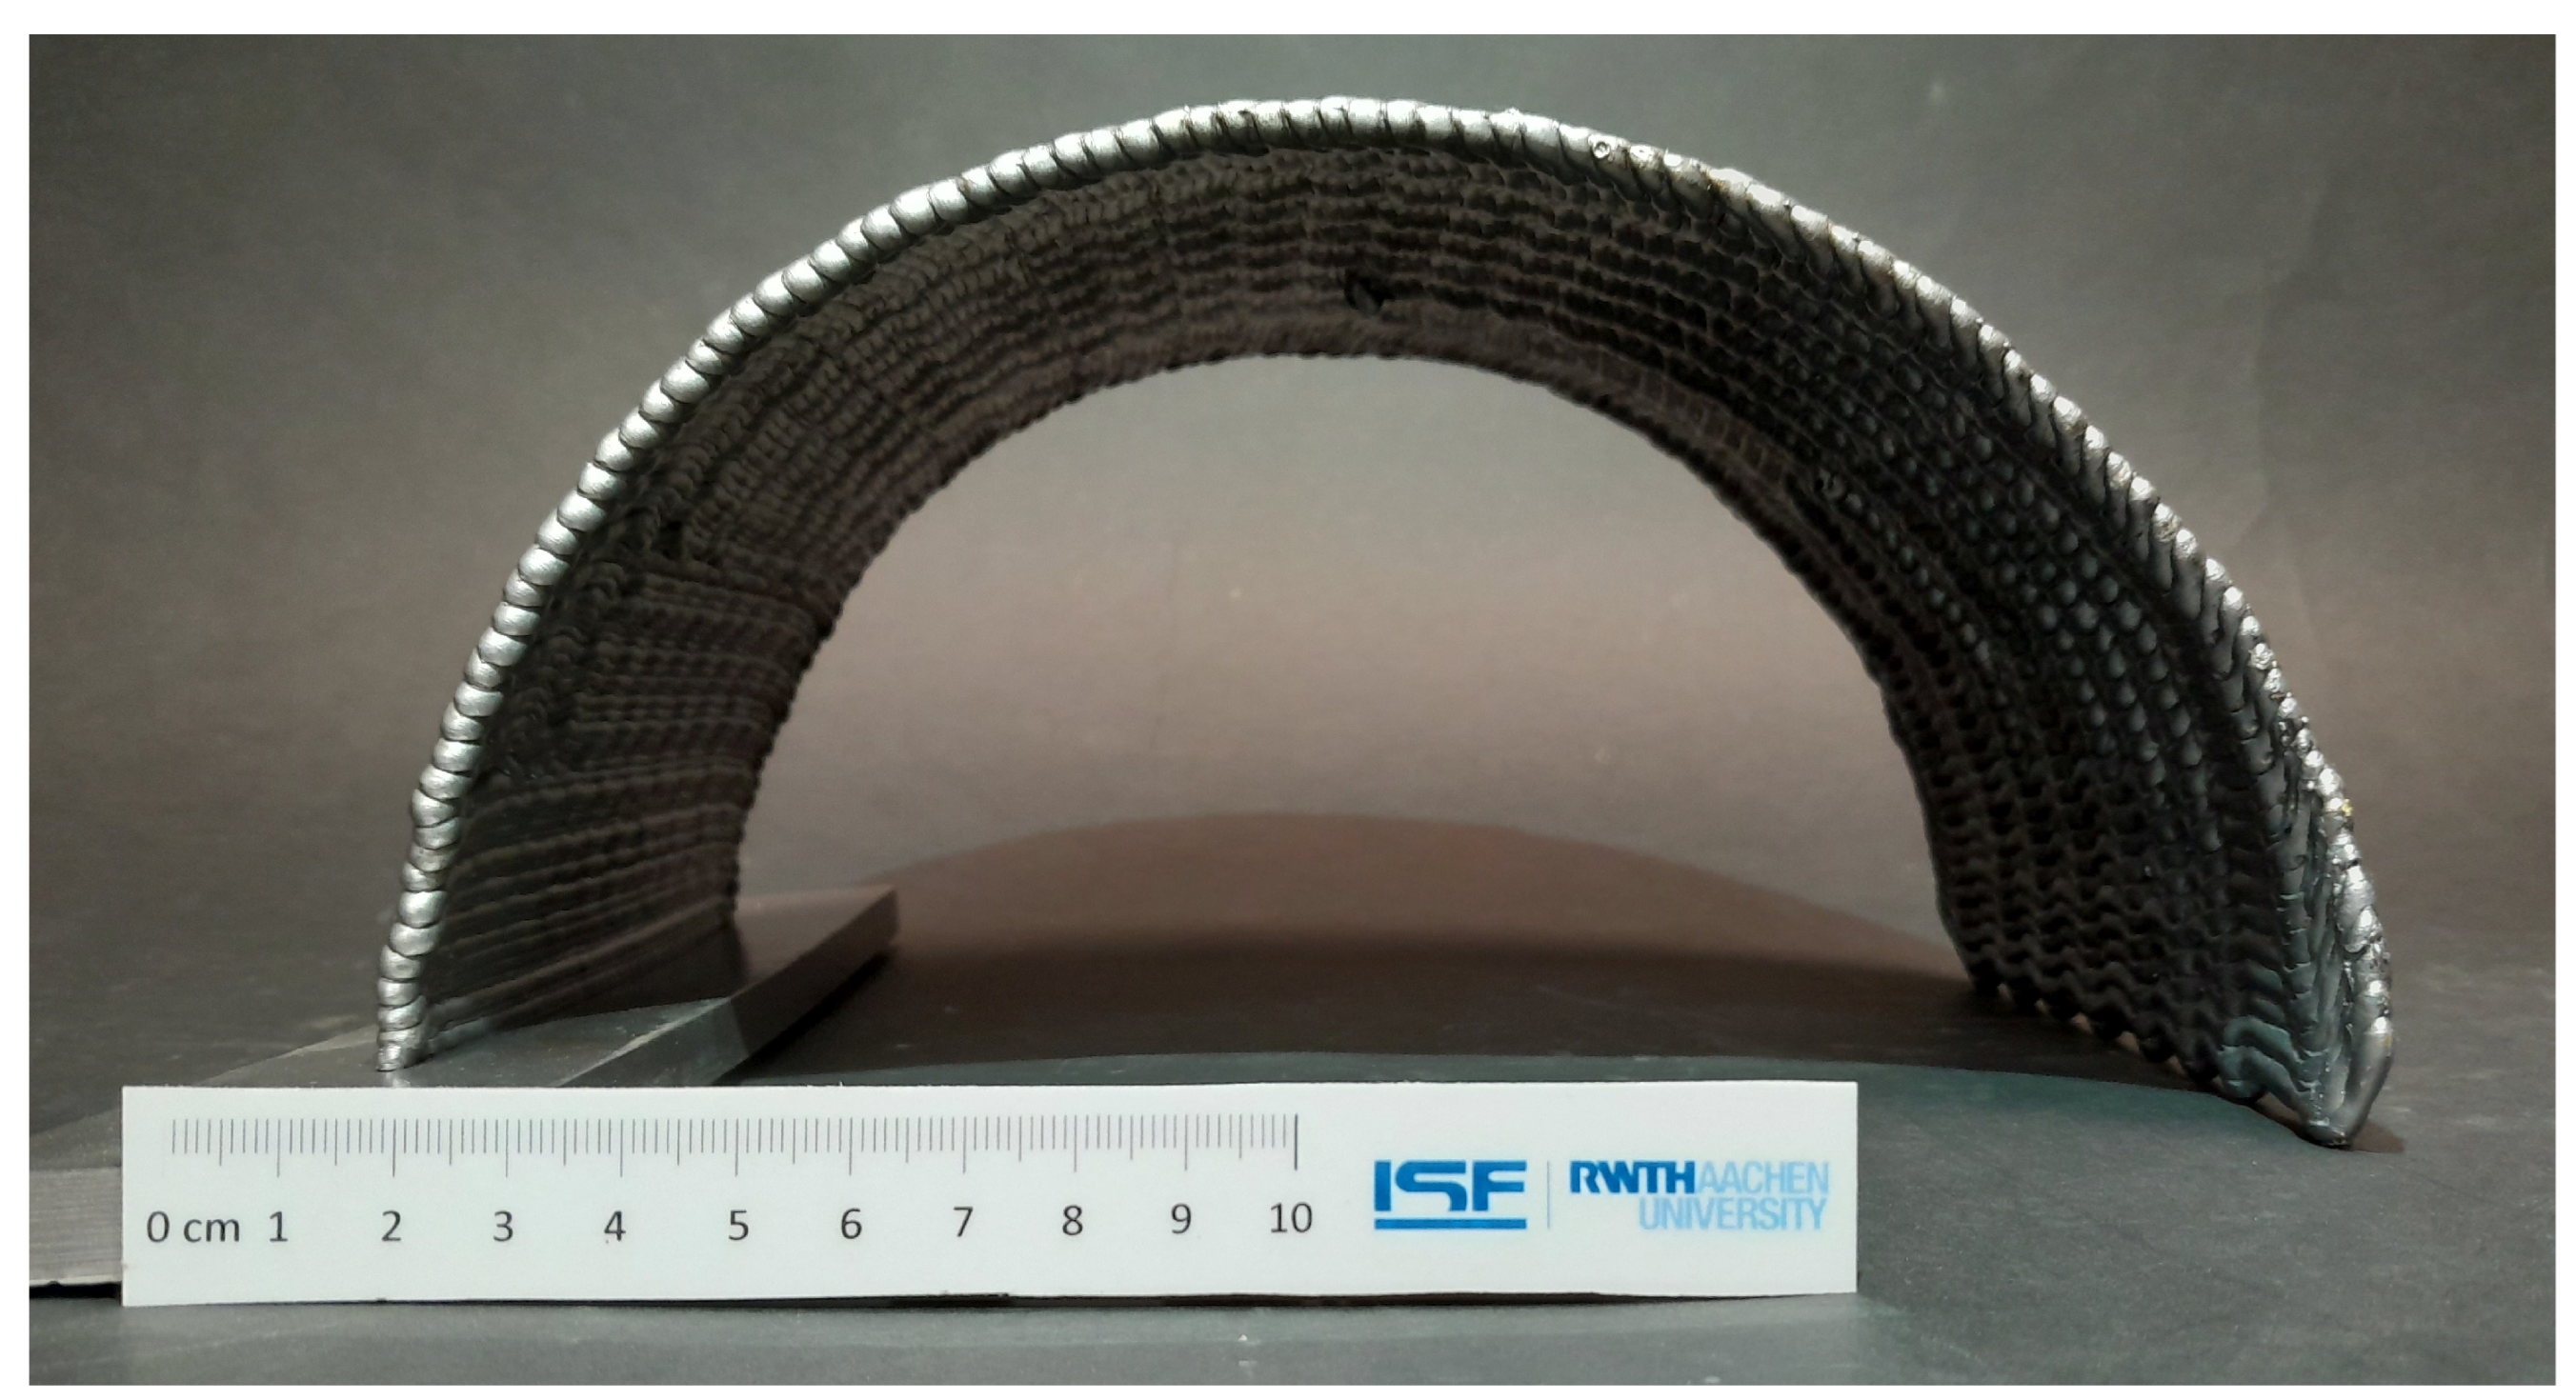
A curved tube is utilized as a reference geometry for testing parameters and printing approaches to achieve variable layer heights. A parametric model is created to generate a reference geometry, where a circular section is extruded along a 180-degree arc and sliced with variations in layer height ranging from 2 to 4 mm on the outside and 1 to 2 mm on the inside, thereby enabling the testing of different layer heights and deposition angles.
In the research by Rauch et al. [
12] and Nguyen [
13], a similar curved geometry is used for a reference model to examine the printing of variable layer heights in WAAM. The study by Rauch et al. developed and tested external axis-based approaches as described in ’A Novel Method for Additive Manufacturing of Complex Shape Curved Parts by Using Variable Height Layers’ [
12]. In their research, parameter tests are conducted to assess the impact of the robot speed on the bead height. The resulting values of minimum and maximum achievable speed-based heights are used to inform the slicing of the reference geometry with the constraint that the torch position should remain in the 1G orientation. Once the overhang of the geometry exceeds the possibilities of the parameter set, an external axis adjusts the position of the workpiece before the printing continues. A similar strategy is utilized in a dissertation research by Nguyen on WAAM tool path planning [
13].
In comparison to the approach of Rauch et al. and Nguyen, the research presented in this paper develops the production of similar reference geometry without the use of external axes while also digitizing the collection of process parameters and sensor data. To accomplish this, parameter tests are first conducted to establish the relationship between process variables and the resulting height and width of the weld. These studies informed the parametric design to fabrication workflow for the production of the reference geometry.
After reviewing the state of the art in WAAM research, it was determined that robot speed and wire feed speed would be tested, as they combine to determine the rate of material deposition. To apply an additional factor of control to the resulting weld bead, arc length parameters were also selected for testing. In combination, these parameters determine the height and width of the resulting weld geometry. To test the impact of each factor, a series of plates were welded with incremental changes to each of the individual parameters. The interactions between multiple processing parameters were investigated through iterative tests of various parameter ranges. A selection of these tests are presented in this paper. The calculation of heat input when conducting experiments with different wire feed speeds and robot speeds as shown in
Section 5.1 is as follows:
To track this results of the parameter space testing and the geometric outcome of the welds, a WAAM Information Model (WIM) collects information in a database for detailed analysis and optimization. Scans of the resulting welding geometry are integrated into the WIM to enable the precise measurement of the 3D-printed production and comparison between the ideal digital model and the actual physical production.
The printing of variable layer heights requires customized path planning and intelligent approaches to setting weld parameters. A distributed communication protocol which enables the mass customization of robot programming and algorithmic setting of process parameters is used to integrate this level of control.
4. Distributed Communication Protocol for Device and Process Parameter Control
The following section further explains the distributed communication protocol.
WAAM production is based on the integration of a welding torch and a kinematic system. Such systems range from a linear axis to automated cells with increasing levels of axis movement capability, such as three-axis CNC machines or more commonly utilized six-axis robot arms, where necessary additional rotary or linear axes can be used to extend the reach of the robotic arm. The robot cell used in this research consists of a KUKA KR 30-3 F six-axis robot, and a LORCH Robo-MicorMIG 350 welding power source for Gas Metal Arc Welding (GMAW). The welding filler wire used was G3Si1 according to the EN ISO 14341-A [
14], with a diameter of 1.0 mm, which led to an all-weld metal chemical composition of 0.08% C, 1.2% Mn, 0.8% Si. The shielding gas was ISO 14175:M21-ArC-18 (82% argon and 18% carbon dioxide). Additional devices included an active mist-based cooling system, a Keyence LJ-X8400 Line Scanner, and a Optris Xi 400 thermal camera. The design-to-production path planning utilized Rhino 3D CAD modeling software,
[Version 7 SR 34, by Robert McNeel & Associates; Seattle, WA, USA] and Grasshopper, its associated visual programming environment for parametric modeling. To add robotic programming capabilities to the software, the KUKA|prc, Parametric Robot Control software
[Version 2022-01-21, by Association for Robots in Architecture, Salzburg, Austria], was integrated into the design environment.
The challenge of controlling process parameters in synchronization with robot commands must be considered during WAAM production. Traditional robot cells integrate end effectors (such as a welding power source) using control systems integrated into the robot Programmable Logic Computer (PLC). These integration’s typically rely on Ethernet/IP, PROFINET, DeviceNet, Modbus, or CAN BUS-style systems that are added to the control boards of the robot and activated through the digital inputs and outputs of the robot. These systems are complicated to install and configure. They require specialized hardware to integrate, especially when considering the integration of sensors with unique data types. This research leverages a novel software framework which integrates an IoT-enabled, distributed communication protocol into parametric robot control processes.
This research extends upon the KUKA|prc software developed by the Association for Robots in Architecture, co-founded by Univ.-Prof. Dr. techn. Sigrid Brell-Cokcan and Univ.-Prof. Dipl.-Ing Johannes Braumann [
15]. The prc.IoT extension was developed by Dr.-Ing. Sven Stumm and the team of Robots in Architecture Research. This framework allows robots and devices to communicate via a cloud-based (networked) protocol, enabling the wireless integration of robots, auxiliary machines, end effectors, and sensors. By distributing communication between these devices over the prc.IoT network, each device receives synchronized signals for movement or activation via a standardized JavaScript Object Notation (JSON) format sent over a local Message Queuing Telemetry Transport (MQTT)-based network. The prc.IoT system comprises three main aspects: Grasshopper components for integrating the distributed communication commands into the parametric model of the robot movement, the Main Control Unit (MCU) for distributing commands, and the Robot/Device Control Units (RCU/DCU) that allow hardware to receive control signals and publish state information back to the network.
The prc.IoT framework was briefly described in previous research by the authors [
16], with the following research going into further detail on its application in WAAM. Prc.IoT leverages the MxAutomation libraries to establish a connection between the command source (MCU) and the robot, with data sent at four-millisecond intervals. The prc.IoT framework leverages control loops through a local intranet, as delays caused by the data streams being processed through the internet are variable based on location. The processing of MQTT messages does not add significantly to the four-millisecond time frame of the MxAutomation data exchange. This fast, reliable connection between the design source and robot allows for distributed communication between machines including the robot, welding power source, line scanner, and sensors. This integration brings advantages to the WAAM process, as a greater level of real-world data can ensure quality control and process optimization.
Further additional detail on the Cloud Remote Control system, which forms the foundation of the prc.IoT protocol, can be found in the chapter on Robot-assisted welding-distributed production technology for dynamic automation in the book on IoC—Internet of Construction [
17].
4.1. Device Synchronization
The following section describes key aspects of the distributed communication framework of prc.IoT and its utilization in this research.
A distributed communication protocol is utilized to manage device synchronization in this variable layer height research. The standard method of connecting devices to an automated cell is to route all signals through the control box of the robot. In prc.IoT, Machine-to-Machine (M2M) communication is distributed over a local network. Given this decentralized approach, it is important that each asset in the automated cell is accurately synchronized. To precisely sequence messages, prc.IoT implements a Main Control Unit (MCU) to distribute commands according to a system of sync flags. These messages are received by Robot Control Units (RCU) and Device Control Units (DCU). When a command message is received, the robot or associated device takes action and publishes its state data, including busy or idle states. When a robot or device is waiting for commands, it publishes the idle state. When a robot or device is executing a command, it publishes the busy state. When the process is completed, the published state is changed from busy to idle. The sync flag is a Boolean value set by the user in the robotic programming aspect of the parametric model. This information is stored in the metadata of the command. It informs the MCU to wait until this switch of state, from busy to idle, to send the next command. This enables the synchronization of robot and devices. If the sync flag is set to False, the MCU will not wait for a state switch from busy to idle, and the command will be sent immediately, irrespective of whether the execution of the current command has been completed. Synchronization ensures that the sequence of robot and auxiliary devices such as the cooler, welding power source, and scanner are activated in the right order.
In the WAAM process, synchronization ensures the proper ordering of fabrication processes. As the process combines robot movement with material deposition, the speed of movement is also an important consideration. While prc.IoT enables Machine-to-Machine coordination, the relationship between program synchronization and methods for managing the robot speed presents specific challenges.
4.2. Robot Interpolation
The following section briefly details robot interpolation strategies for distributed communication in WAAM.
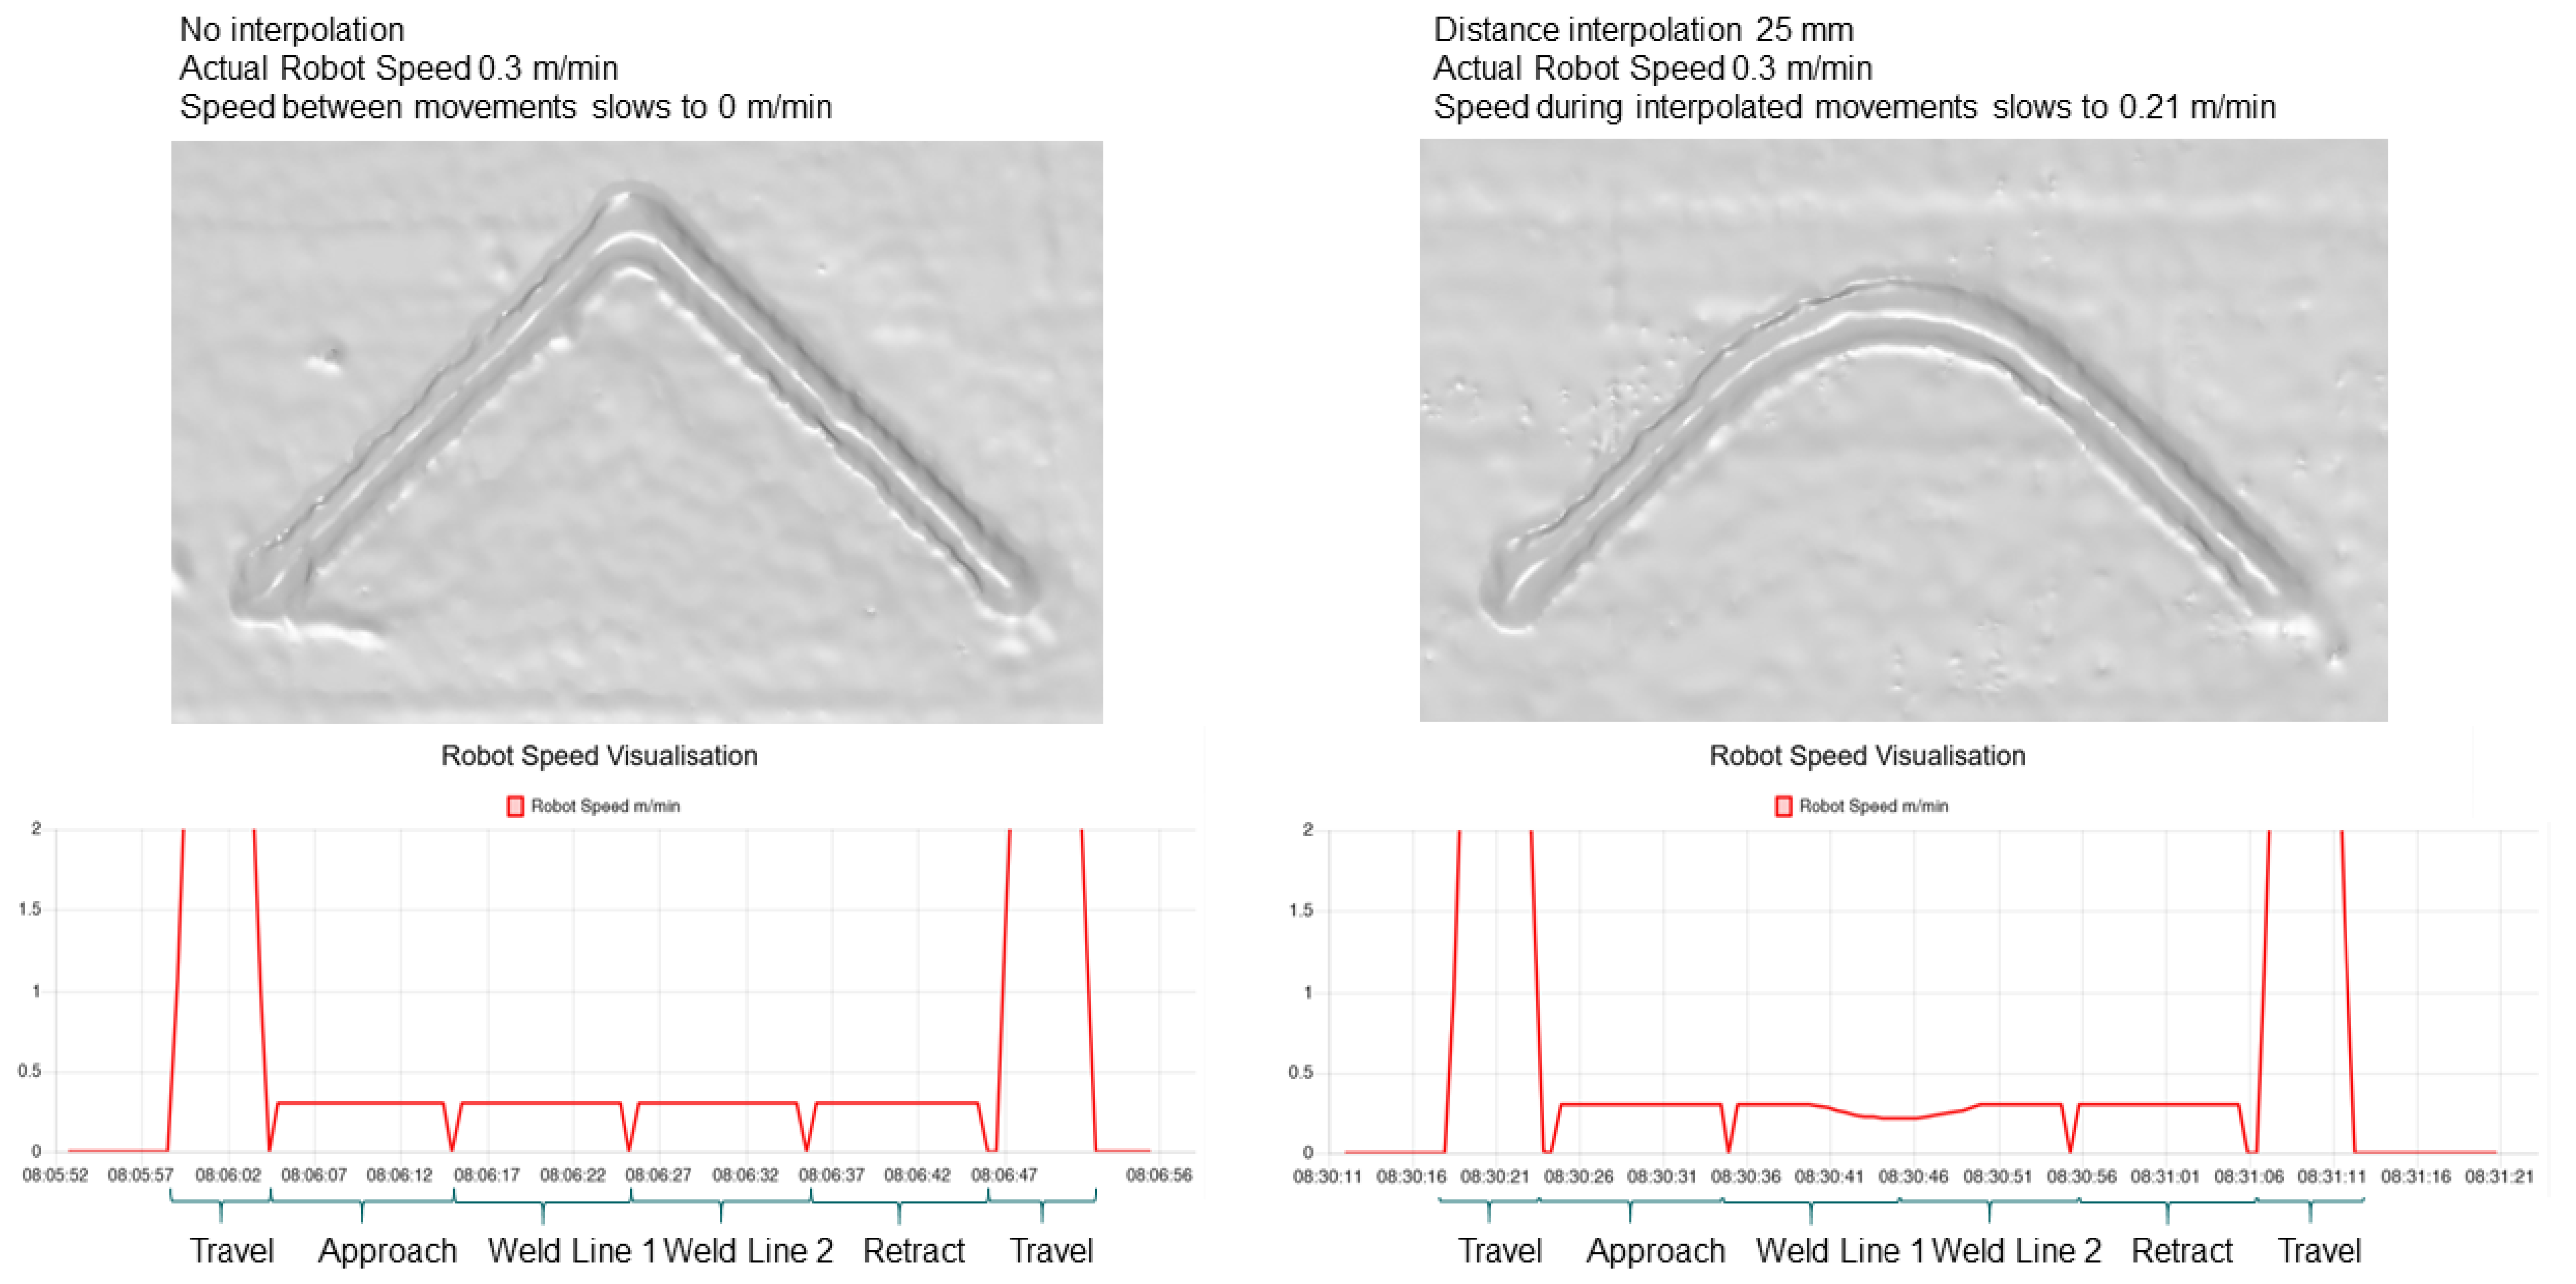
In the case of the KUKA robot, interpolation is a term used to describe strategies for controlling the speed of the robot’s Tool Center Point (TCP) movement and kinematic motion between target frames (planes). To illustrate the effect of interpolation, the following example details how a robot moves between three frames. With no interpolation set, the robot starts at frame 1 and ramps up to speed, travels at the set speed until ramping down in speed to momentarily stop at frame 2, repeating this process between each frame of motion. The speed of this movement is shown in the graph on the left in
Figure 3. This results in a staggered motion for the robot. This momentary stop may not affect some fabrication processes. However, in WAAM, given a consistent wire feed speed, these changes in robot speed lead to material accumulation as the robot slows and momentarily stops between motions. This humping, a term used to describe additional build-up in the weld [
18], negatively affects the quality of the 3D print.
Interpolation provides a solution to this challenge, as it mediates the ramping of the robot speed by exchanging accuracy in motion for a more consistent speed of actuation [
19]. Interpolation settings available through the KUKA|prc software include interpolation by distance, orientation, velocity and point-to-point interpolation. Distance interpolation commands the robot to move from Frame 1 to Frame 2 but at a defined distance to deviate from the precise tool path and move towards Frame 3 in order to maintain a more consistent speed as shown on the right in
Figure 3. In WAAM, this reduces excess material deposition at the interpolated frames. As WAAM is a near net manufacturing method where parts are often built slightly larger than required for later machining to finish, some limited deviation in path planning may be acceptable depending on the part being produced.
Interpolation requires the batching of commands to be sent to the robot for path planning. To synchronize an interpolated series of movements, the first and last command have sync Booleans set to True, while the intermediate commands in the batch have sync values set to False. This instructs the MCU to publish the entire batch of commands to the robot and wait for the last interpolated command to be executed before continuing with the automated process.
Although interpolated motions improve consistency of the material deposition, they also challenge the IoT-enabled process utilized in this research. The MCU cannot send additional synchronized commands during interpolated motions. If the robot is executing an interpolated linear motion comprised of a set number of robot target frames, the MCU cannot send an update to the welding power source in any of the frames within this group of interpolated commands. The integration of synchronized process parameter updates to the auxiliary machinery within the batched commands cannot be coordinated without breaking the communication structure of the interpolated motions. To solve this challenge, an additional software was developed which enables sub devices. This sub device software keeps track of the unique IDs of the commands and enables the secondary sending of distributed commands to devices. The developed middleware software enabled the synchronization of process parameter updates during the communication of interpolated commands.
5. Variable Layer Height Parameters
The following section details the approaches to achieving variable layer heights in WAAM, documenting parameter tests used to inform more complex printing of unsupported overhanging structures.
This research initially assesses the effect of different parameters on the weld cross-section geometry of a single printed layer. Subsequent tests evaluate the buildup of five printed layers. Multiple layers are used to evaluate the height and width of the 3D-printed weld, as initial base layers form differently than subsequent printed layers due to thermal interaction with the substrate [
20]. In this research, the parameters to be investigated include wire feed speed (WFS), robot speed (RS), and arc length correction (AL). The wire feed speed is determined by the rate at which the material is extruded from the welding torch. The robot speed is in reference to how fast the Tool Center Point (TCP) of the robot is moving in space. Arc length is a measurement of the distance between the tapered end of the welding wire (electrode) to the top of the molten pool created by the material deposition [
21]. Arc length correction adjusts this distance to optimize the voltage of the weld. Each parameter affects the material build-up and the resulting width and height of the weld.
5.1. Robot Speed and Wire Feed Speed
The following sections detail the parameter tests undertaken to document the impact of these settings upon the WAAM process.
Material deposition rates are defined by the relationship between welding parameters such as robot speed, and wire feed speed (WFS). While there are complex factors that affect the deposition rate of the WAAM process [
22], a simplified value can be calculated as the amount of material deposited onto the printing layer measured in units of time, for example,
or kg/h. The rate of material deposition affects the width and layer height of the weld in relationship to the rate of the movement and the speed of the wire extrusion. If the WFS increases and the robot speed remains constant, the deposition rate increases, and the build-up of the layer will grow larger. Similarly, if the WFS stays consistent and the robot speed slows, the material deposition increases, and the build-up of the layer will grow larger.
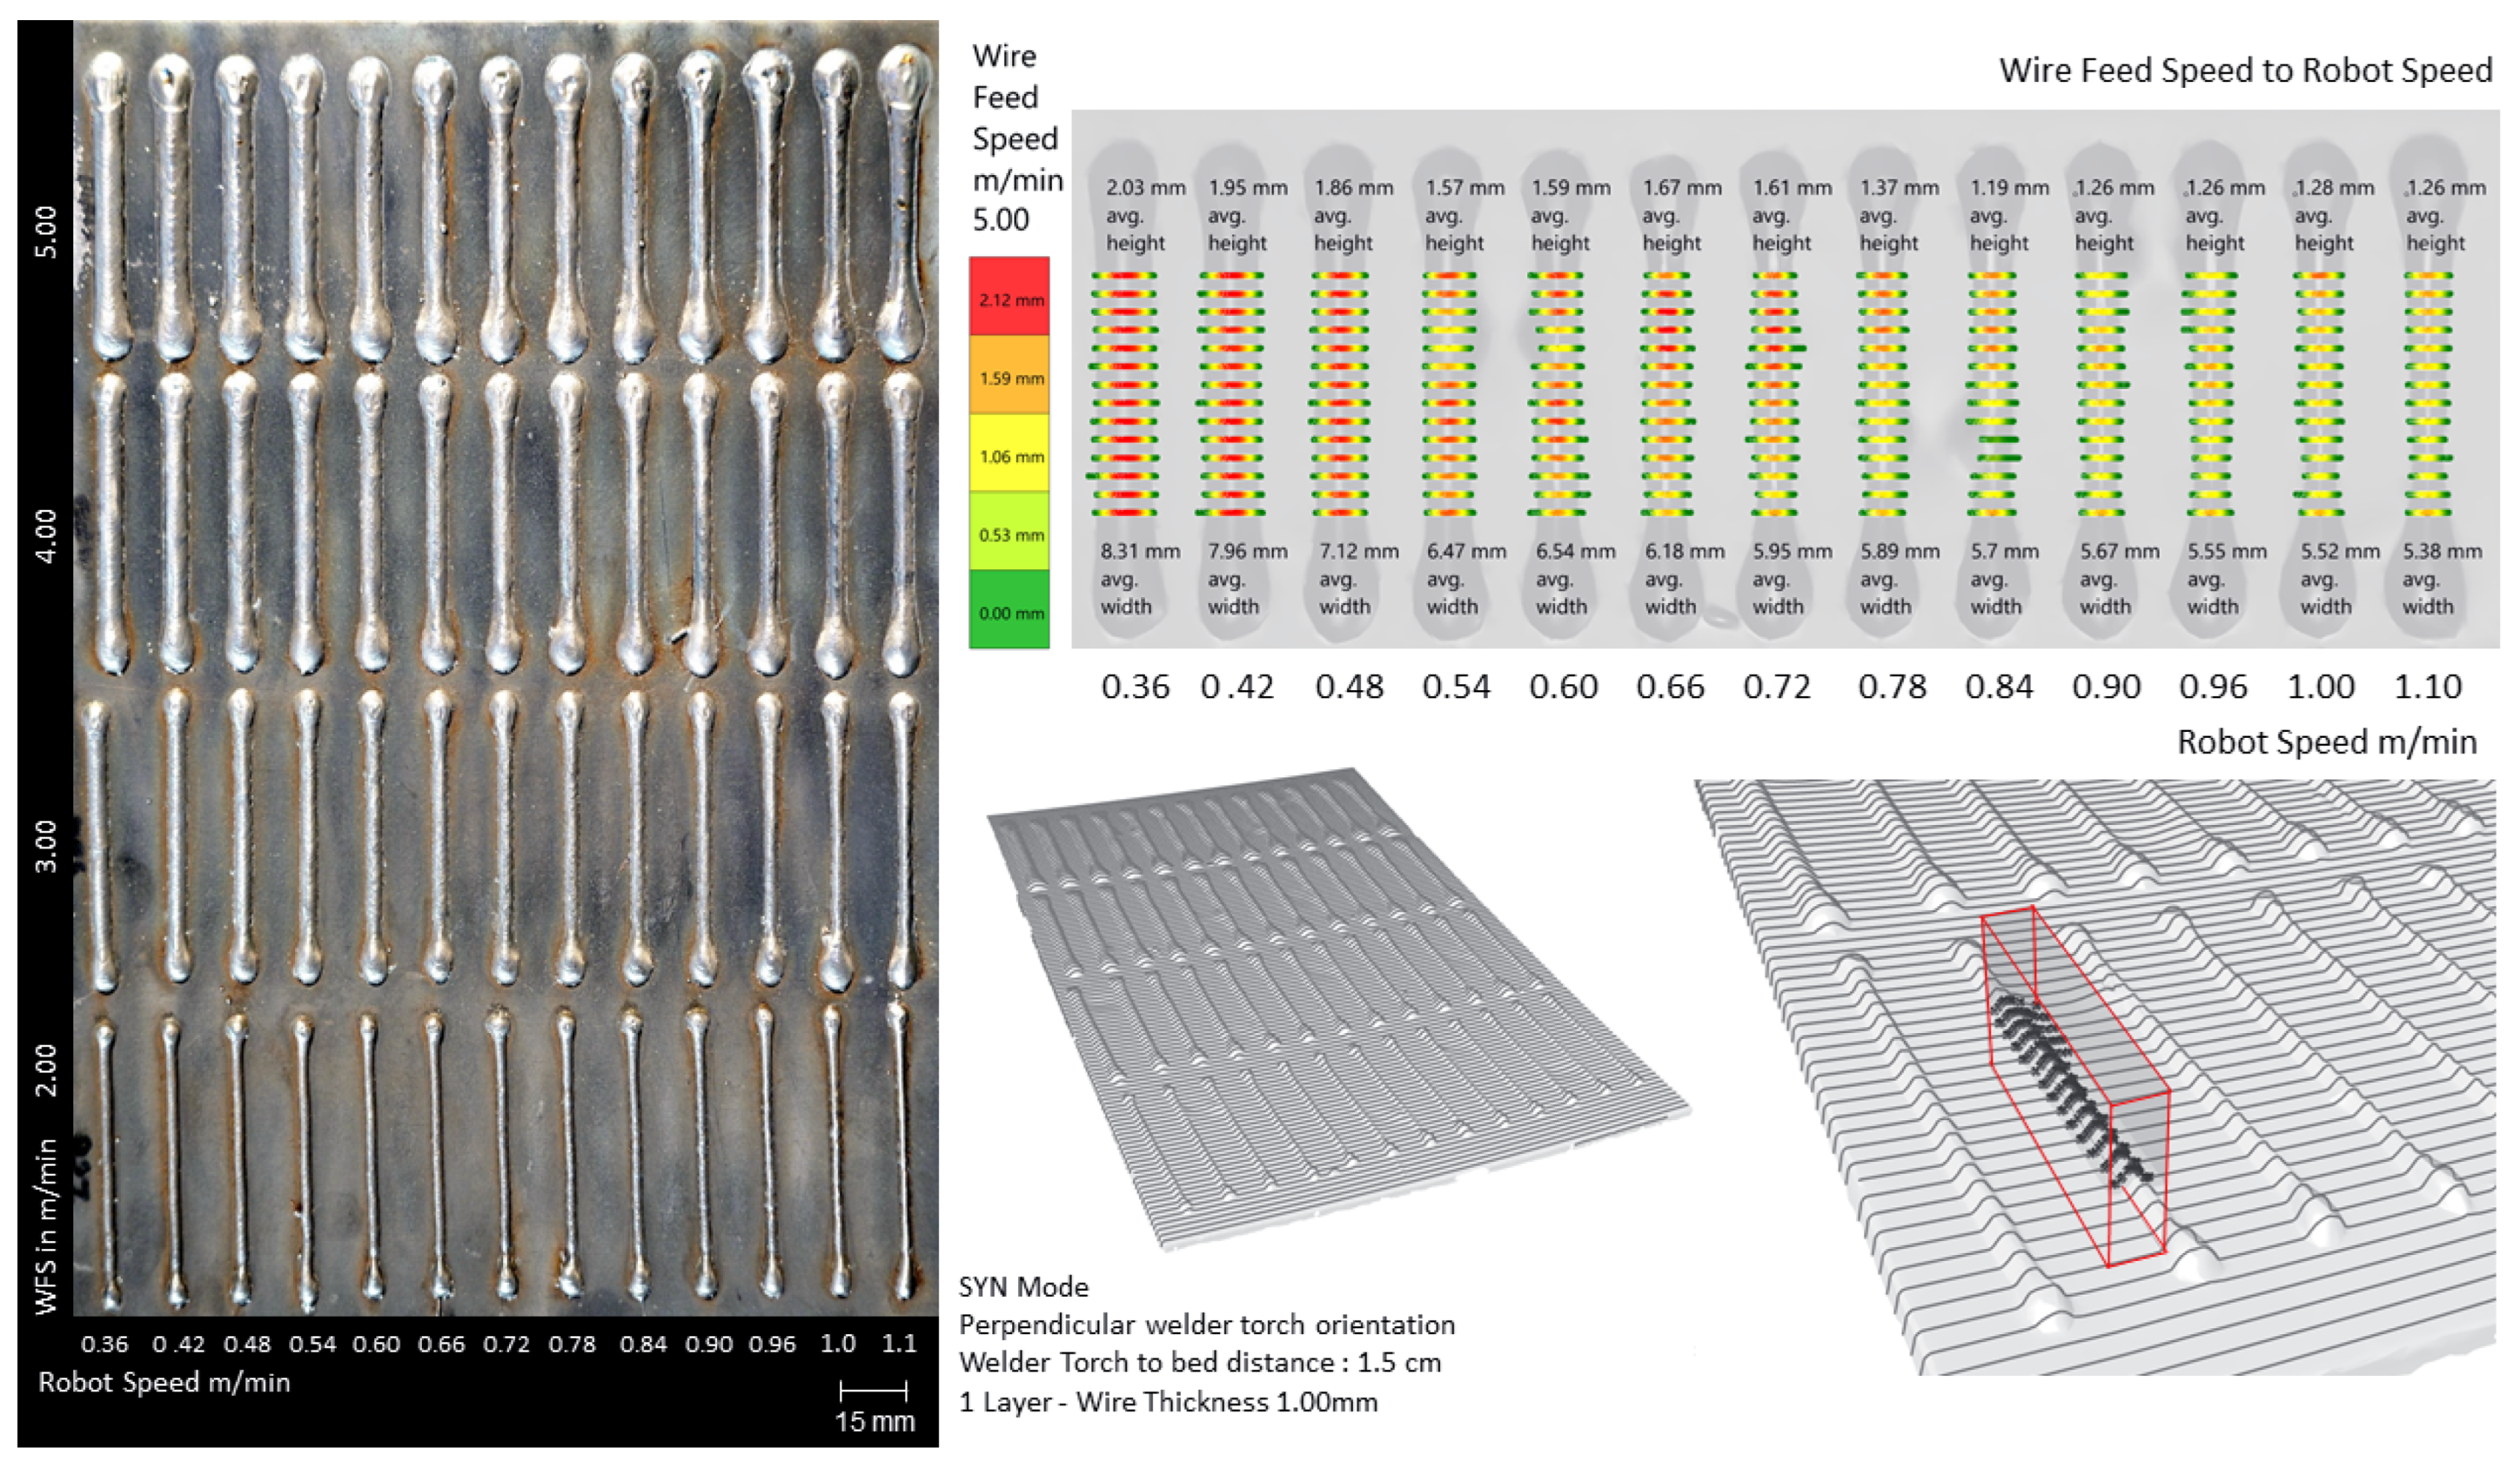
Many advanced welding power sources come with a synergy mode setting that links the wire feed speed to the arc voltage, with the ratio depending on the thickness of the material to be welded so that a higher WFS creates a more powerful arc. The welding source used in this research provides a reference table to help the user adjust the WFS, and the power setting is adjusted accordingly. Heat accumulation must be considered, as increasing the deposition rate can lead to an excess of heat input and cause distortion in the print or the molten pool to drop from the effect of gravity. To understand the effect of wire feed speed, multiple tests with variations of each parameter were conducted, first with single-layer prints as shown in
Figure 4, then proceeding to parameter tests with five layers as shown in
Figure 5. The printed layers were scanned manually using a handheld point cloud scanner, and an average resulting outcome was calculated for each parameter set. This was determined by intersecting the scanned mesh with digital planes to extract contours, and splitting the curves at discontinuity points where the weld connects to the substrate. The start and end of the weld were not included in the sample, as the ramping speed of the robot at start and stop affect material deposition. The split curves that represent the sample of the weld were measured with bounding boxes to determine height and width, with the average of these amounts being calculated. The test in
Figure 4 shows a single layer of weld at four different wire feed speeds, ranging from 2 to 5 m/min, and 13 different robot speeds, ranging from 0.36 m/min to 1.08 m/min. The resulting welds in the top row of
Figure 4 document a WFS of 5.00 m/min and result in a range of average heights from 2.03 mm (left) to 1.26 mm (right) and average widths ranging from 8.31 mm (left) to 5.38 mm (right).
The test in
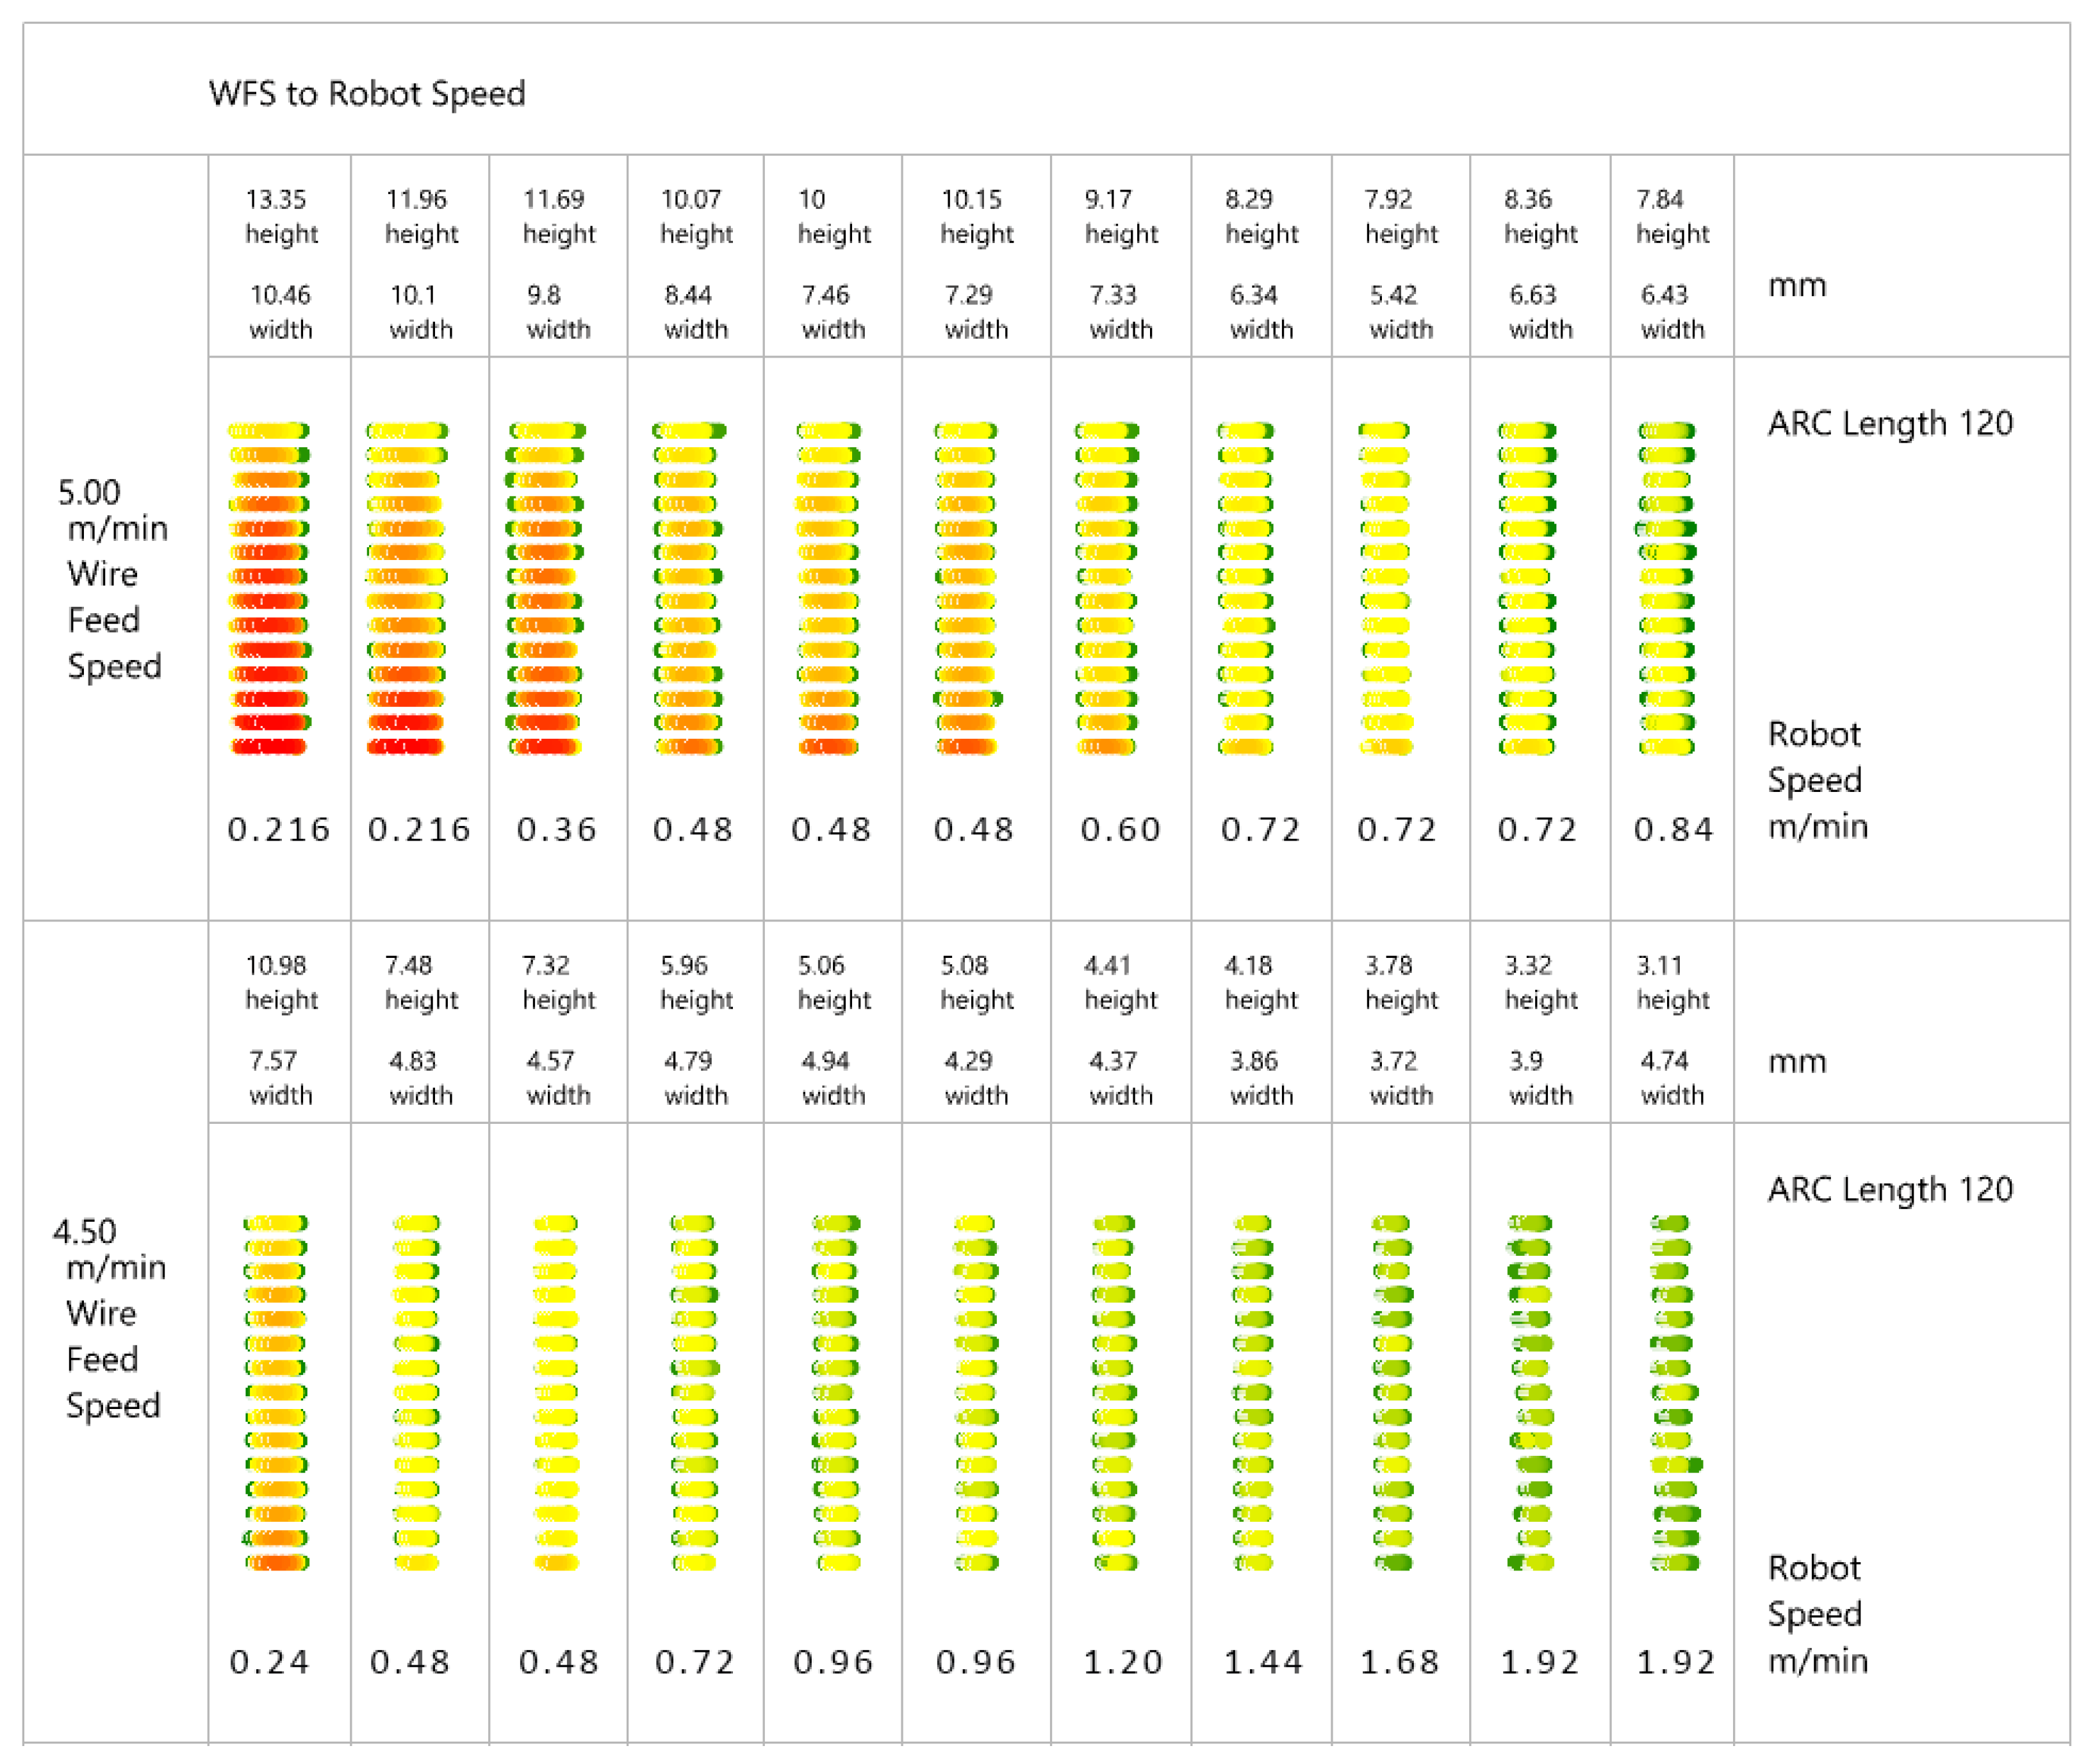
Figure 5 documents a selection of tests where five layers of welds were printed at different wire feed speeds. The shown tests ranging from 4.50 to 5.00 m/min, with eleven iterations of robot speeds ranging from 0.216 m/min to 1.92 m/min. Some speeds are repeated to further test the settings variation across different welds. Water cooling is utilized between printed layers aiming to reduce print times, heat accumulation, and plate warping. The resulting welds of
Figure 5 range from average heights of 13.35 mm to 3.11 mm and average widths ranging from 10.46 mm to 4.74 mm. Additional tests were conducted that are not included in this paper but were collected in the WAAM information model to inform further printing. The colors shown in
Figure 5 represent the height of the weld with red being the taller areas and green representing lower material build ups. The resulting height and width are calculated as the average of the weld cross sections shown.
5.2. Robot Speed
The speed of the robot is affected by the inverse kinematic solvers calculations for moving the axes to achieve the programmed tool path. Since individual axis motions may take different times to complete, the actual TCP speed may vary between movements. The speed set from the parametric model does not, therefore, accurately determine the actual speed of the TCP, as the orientation and configuration of the robot position affect the consistency of the movement. This has less of an affect on planar layer slicing, where the torch orientation remains normal to the build plate. However, in variable layer height-based approaches, the impact of varying tool orientations may lead to differences in robot TCP speeds. As an alternative means of robot speed control, this research investigated the oscillation of tool path frames to control the rate of TCP motion (see
Figure 6). This strategy was developed to vary material deposition through oscillation of the torch’s orientation while keeping the TCP in the same location. Increased oscillation creates slower TCP speeds, resulting in higher material build-up. However, it also leads to thicker material deposition. Inversely, a smaller degree of oscillation angle results in a lower layer height and a thinner width of weld.
Parameter tests were conducted to evaluate the geometric outcome of oscillation.
Figure 7 shows a sample of these tests, ranging oscillation angles of 0 to 9 degrees and robot speeds ranging from 15 m/min to 1.6 m/min, resulting in average heights ranging from 1.5 mm to 3.09 mm and average widths ranging from 5.06 mm to 10.78 mm. The below tests were conducted with a WFS of 3.0 m/min and the printing of one weld layer. The height gradient visualization, shows the color red as the taller areas and green indicating the point where the weld transitions to the build plate. The cross section of the weld is shown above this visualization.
5.3. Wire Feed Speed
The integration of WFS into the parametric path planning model is a method for adjusting layer heights. Interest in a more adaptive control of wire feed speed (WFS) grew from the observation of excess material deposition at the start and end of welds. In these positions, where the welding power source is activated but the robot requires time to ramp up to full speed, extra material is deposited. To mediate this effect, a dynamic approach to controlling WFS based on the robot speed allowed for a factored remapping of the WFS values, to avoid humping, and control variations in layer height. In this method, a dynamic middleware mediates the wire feed speed by monitoring the robot speed and sending parameter commands to the welding power source to update the wire feed speed in proportion to the TCP rate of motion. Through the integration of this dynamic wire feed speed filter, the welding power source process parameters adapt to the published state of the robot, extracting the TCP speed through the distributed communication protocol of prc.IoT. While this method shows potential for dynamically adjusting WFS according to robot speed, the proportional equation requires refinement before this method is integrated into further tests.
5.4. Arc Length
The following parameter tests examine how variations in arc length correction can be utilized to create different bead geometry and layer height build-up [
23]. Given a consistent robot speed and wire feed speed, a high arc voltage will create a wider, flatter weld, while a lower arc voltage will result in a narrower taller weld bead as shown in
Figure 8.
Among the parameters which can be customized to the welding power source is the ability to set the arc length correction, thereby adjusting the electrode extension by fine tuning the voltage within the relationship range of the synergy mode. A lower arc length is created through a lower voltage, and the inverse holds true, with a longer arc length created through a higher voltage [
24]. The arc length is investigated in this research as a means of attaining variable layer heights by controlling the resulting bead geometry. Tests were conducted to document the geometric effect of the arc length correction parameter.
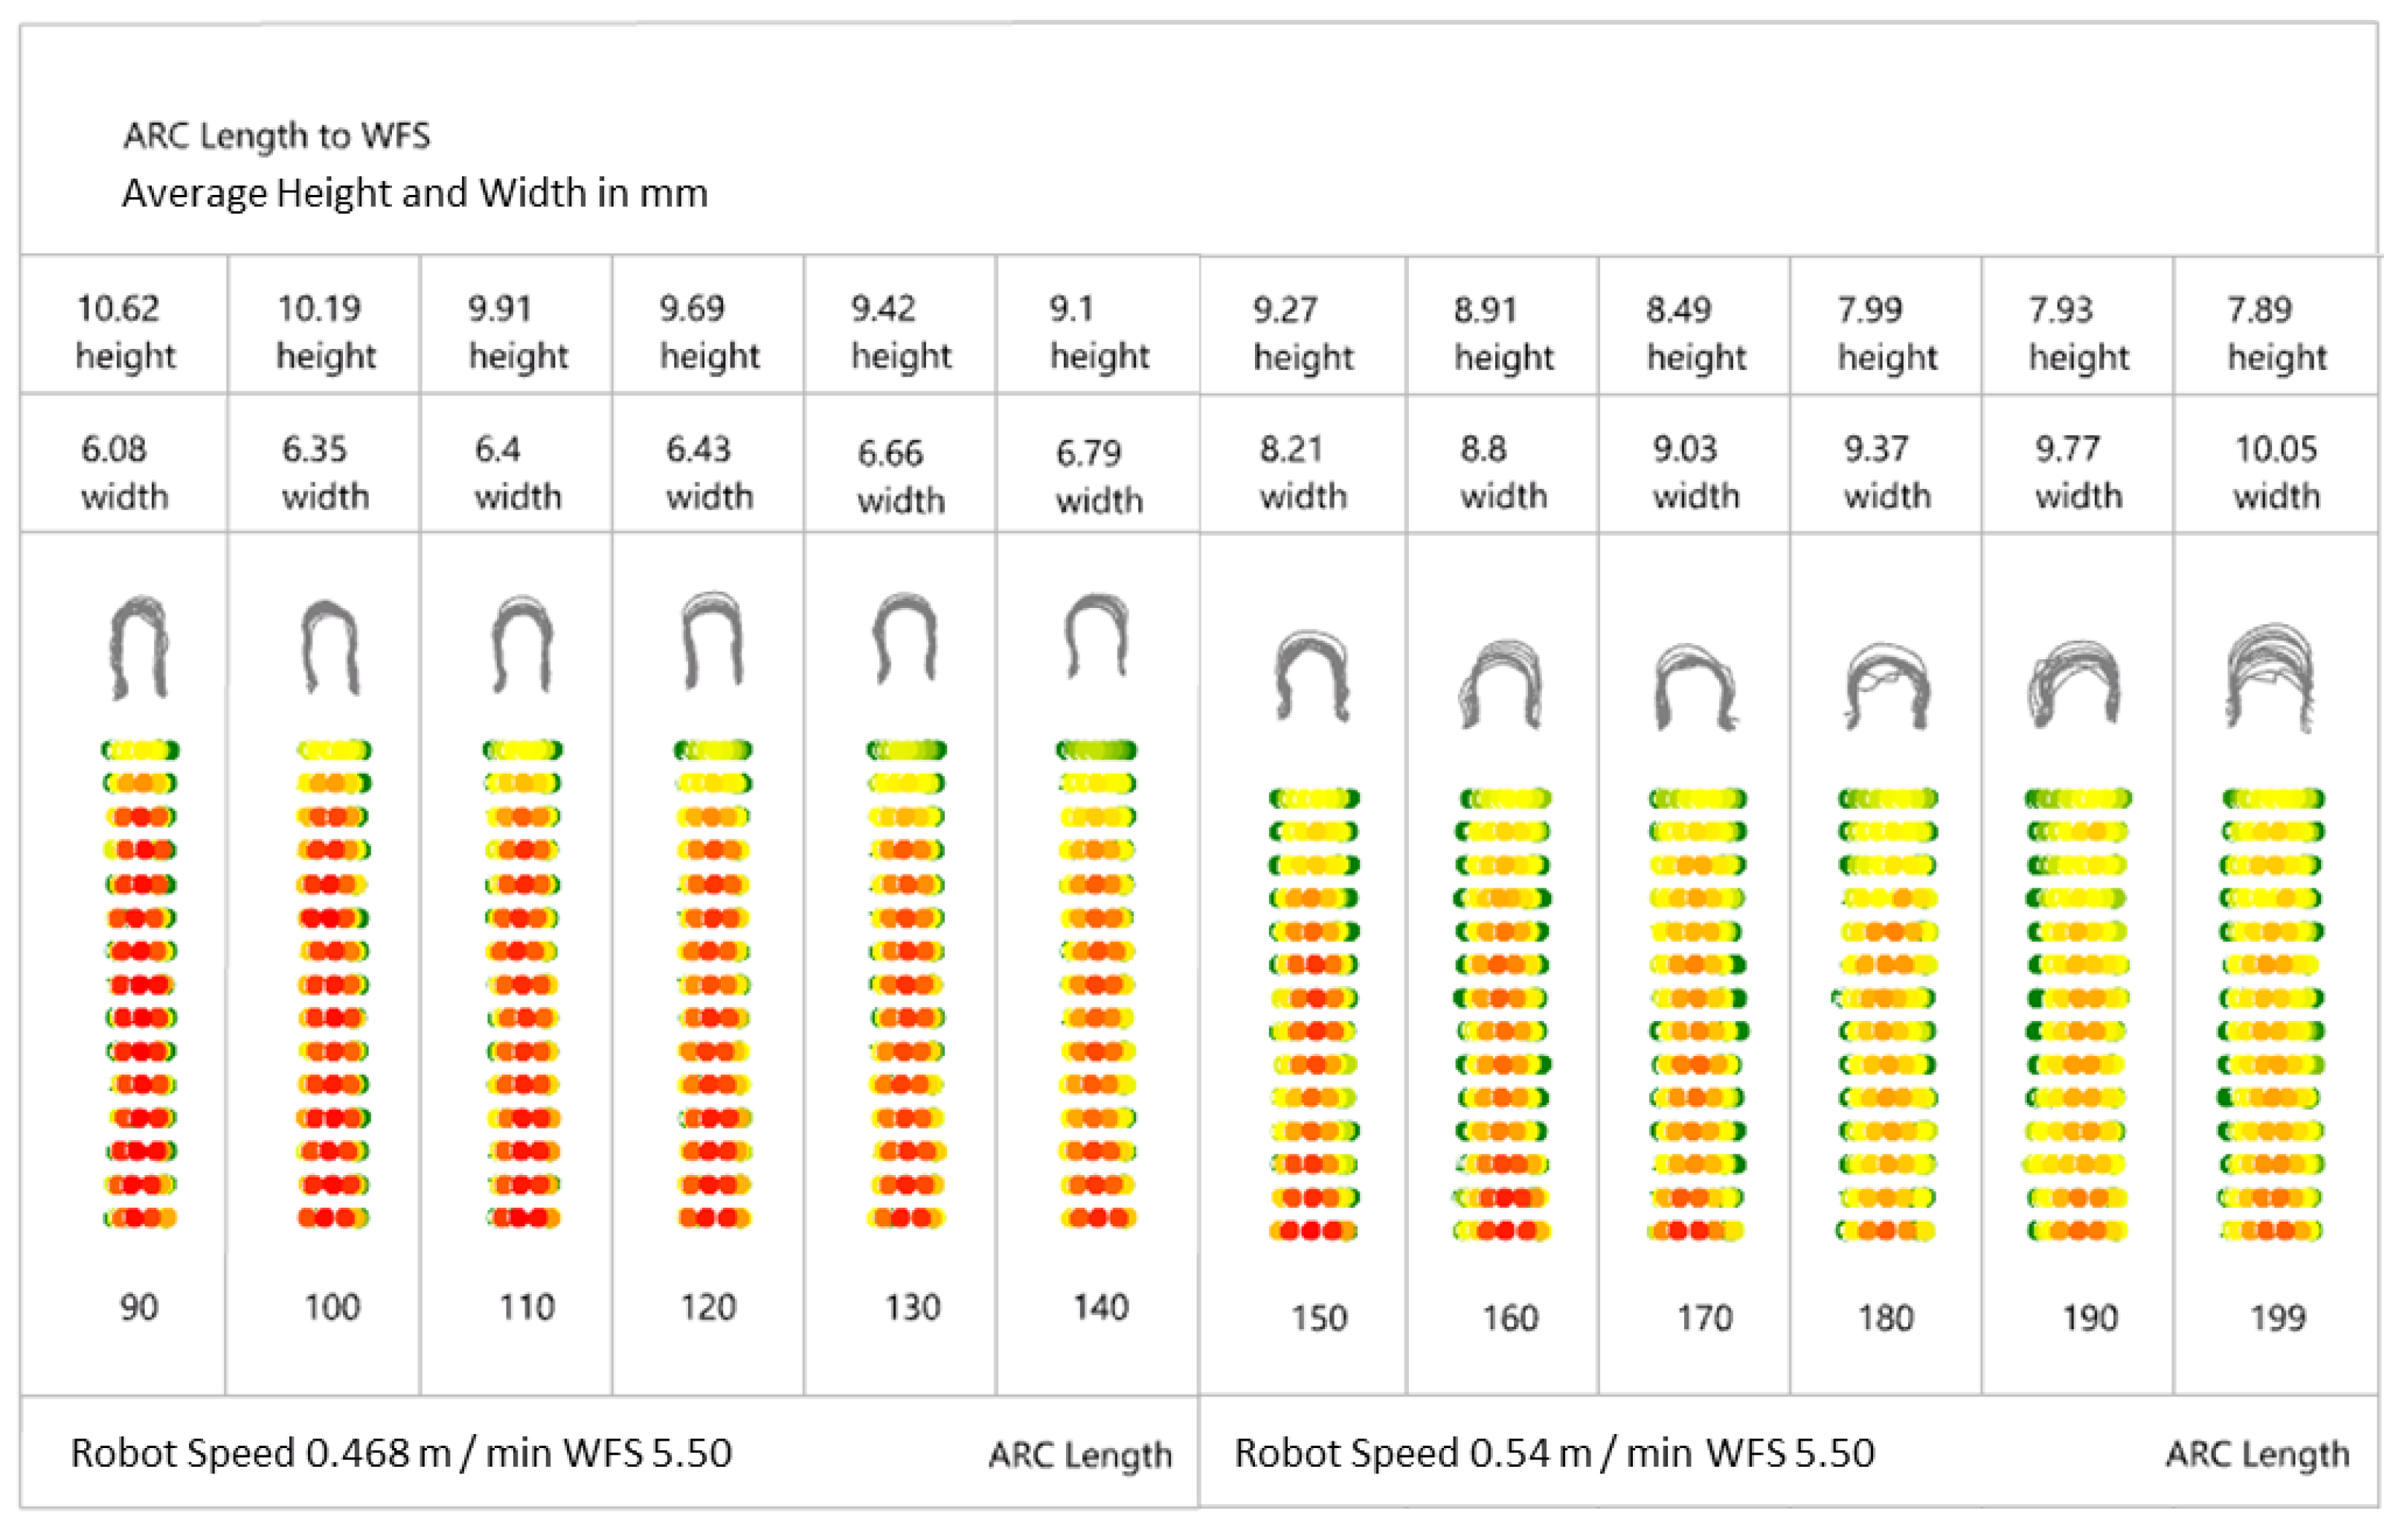
Figure 9 shows a series of welds, five layers high with process parameters ranging from arc lengths of 90 to 140, tested with a robot speed of 0.468 m/min and WFS of 5.50 m/min and a second test of arc lengths of 150 to 199 tested with a robot speed of 0.54 m/min and WFS of 5.50 m/min. The results produce average heights ranging from 10.62 mm to 7.89 mm and average widths ranging from 6.08 mm to 10.05 mm. In
Figure 9, the color red indicates the highest areas of the printed geometry and green indicating the point where the weld transitions to the build plate. The resulting height and width are calculated as the average of the weld cross sections shown.
The evaluated parameter tests shown in this paper are a sample of the parameter tests conducted with the resulting figures documented in a database for later use in parameter tests of more complicated geometry. These data are utilized to inform the path planning for variable layer height slicing of the curved tube reference geometry.
5.5. Reference Geometry
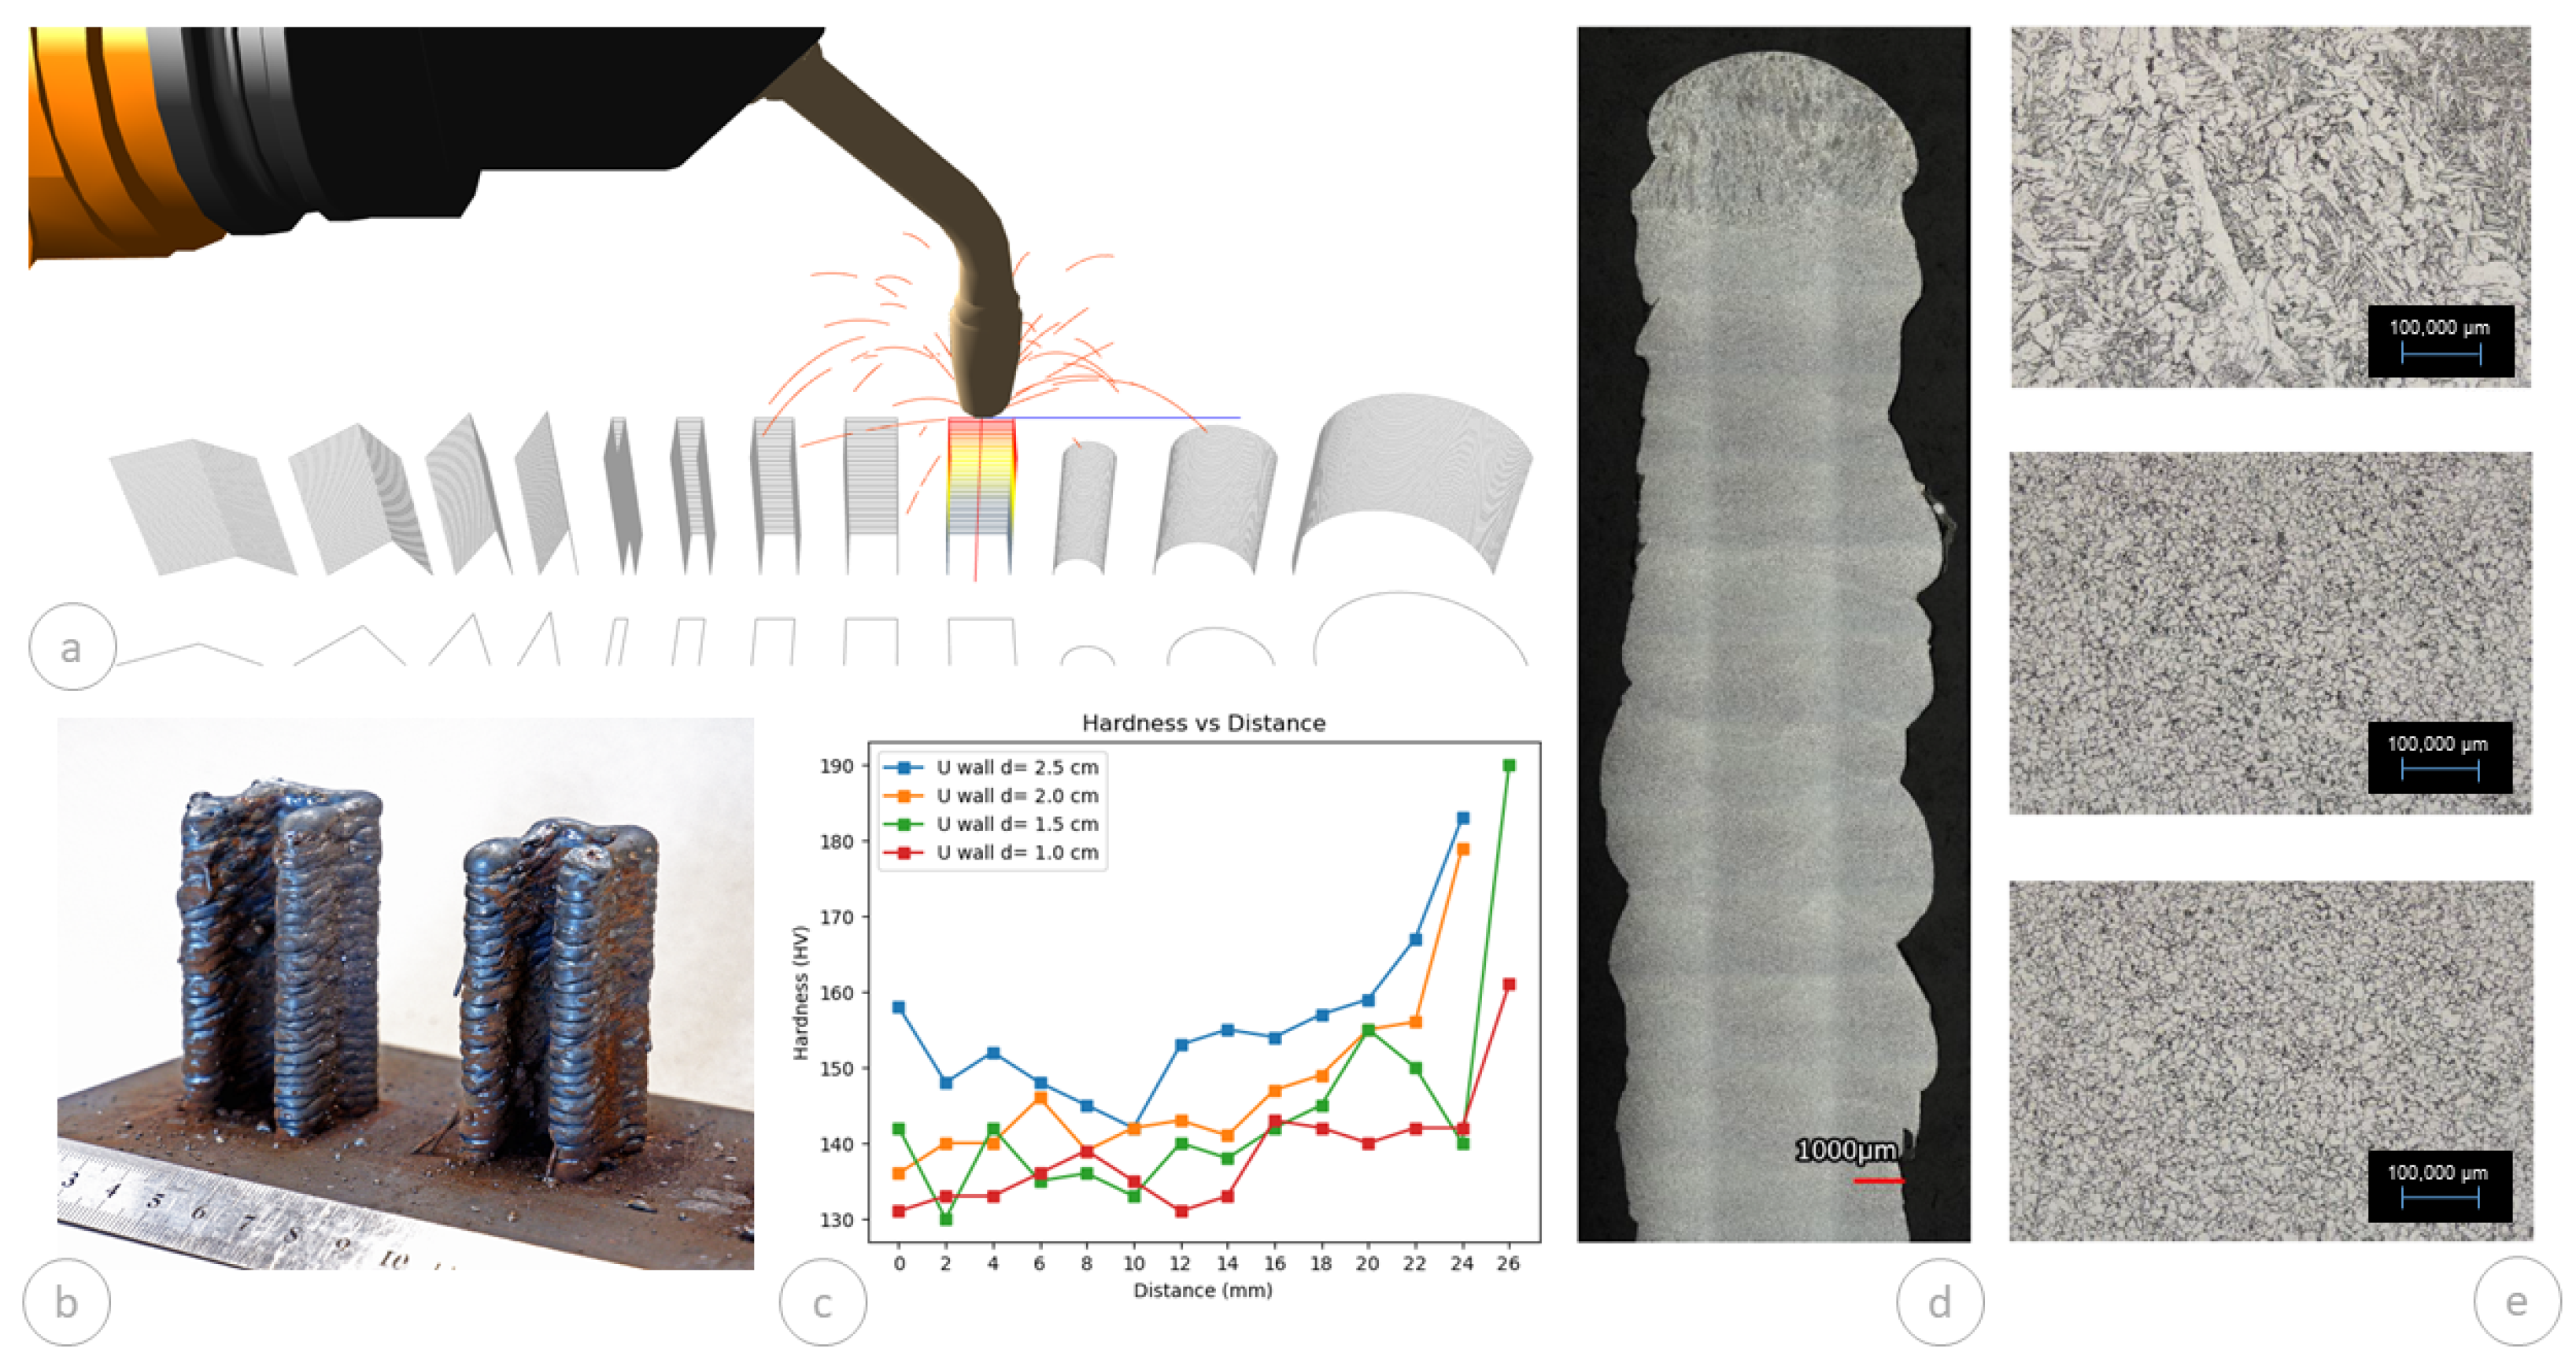
To test the results with different geometries, a series of parameter tests printed 50 layers of each geometry shown in
Figure 10a. These geometries were monitored for thermal state and tested with destructive analysis, being cut open for microstructure evaluation. Analysis of these data reveals a trend: larger gaps between sample walls correspond to higher average hardness (see
Figure 10c). This correlation is likely due to sample size, which affects the cooling rates and metal microstructure. Larger samples have more surface area exposed to the air, which accelerates heat transfer by radiation and convection, resulting in faster cooling rates. This increased cooling rate reduces atomic diffusion within crystals, slowing nucleation and limiting grain growth. The result is smaller grains, which are typically associated with higher hardness. In addition, faster cooling rates can promote the formation of harder metal phases, further increasing the hardness of the sample. The cross-section cut of the U sample geometry with a space of 2.0 cm between the walls of the shape is shown in (see
Figure 10d) with more microscopic views shown in (see
Figure 10e).
The path planning for the reference geometry and customization of welding power source settings (
Figure 11) is informed by the process parameters tests (
Figure 9). Each of the parameter tests explored different methods for adjusting the weld geometries in height and width. An inverse relationship is documented, showing that where the weld is taller, it is narrower in width, and where the weld is lower in height, it is wider in width. In pursuit of variations in layer heights, the process is shown to be accompanied by undesired variations in wall thickness. To manage this, a path planning solution was implemented to introduce oscillation, this time in the plane (
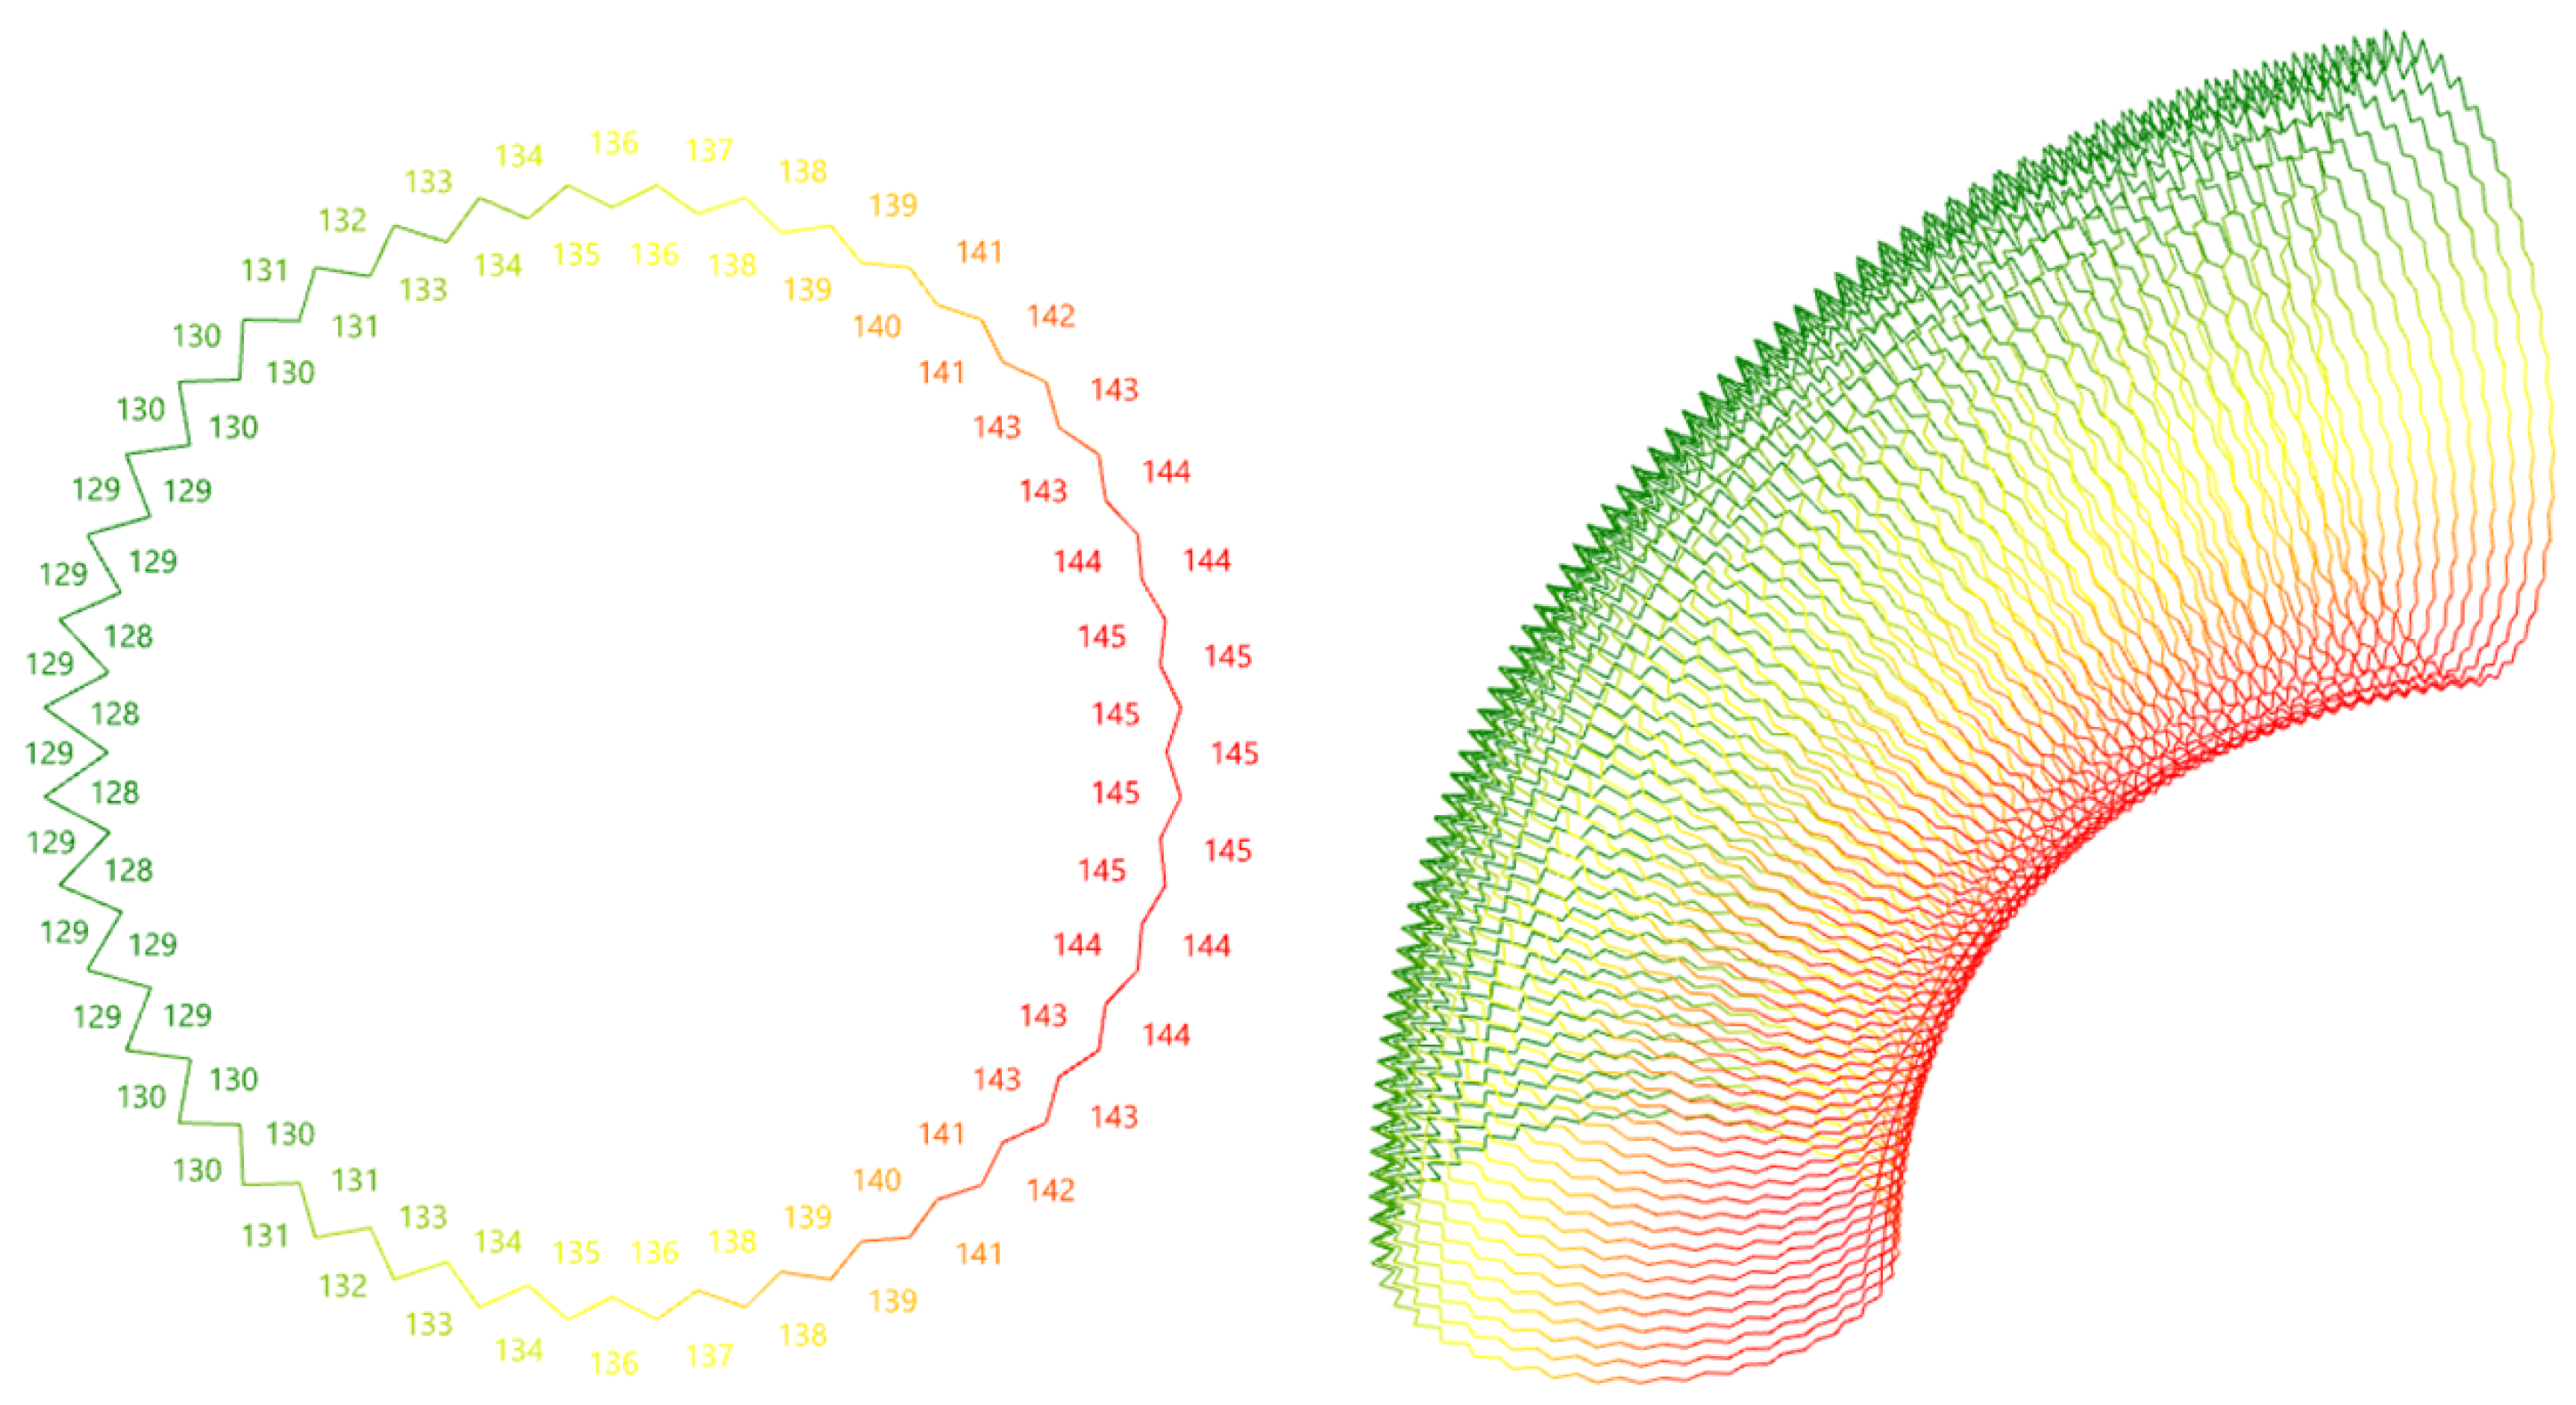
Figure 11), as opposed to the previous test which utilized oscillation in the orientation. This welding strategy created a zig-zag motion to compensate for the non-uniform wall thickness. The following diagram shows one example where this is applied. In this test, changes in the arc length affect the control of the layer height incrementally throughout the print, and the polyline adjusts to compensate for the variations in wall thickness.
In
Figure 11, the longer (more zig-zag) curve segments add wall thickness where the arc length is low, resulting in higher, narrower weld geometries. These longer curve segments are shown on the left side of the geometry (green) and are annotated with their associated arc length correction parameter adjusted to a minimum of 128% of the arc distance. The shorter (less zig-zag) curve segments rely on wall thickness from the high arc length correction parameter, which results in a lower, wider weld geometries. These shorter curve segments are shown on the right side of the geometry (red) and are annotated with their associated arc length correction parameter adjusted to a maximum of 145% of the arc distance. In the path planning shown in
Figure 11, 60 layers were welded with layer heights ranging from 2 mm on the outside radius (green) to 1 mm on the inside radius (red).
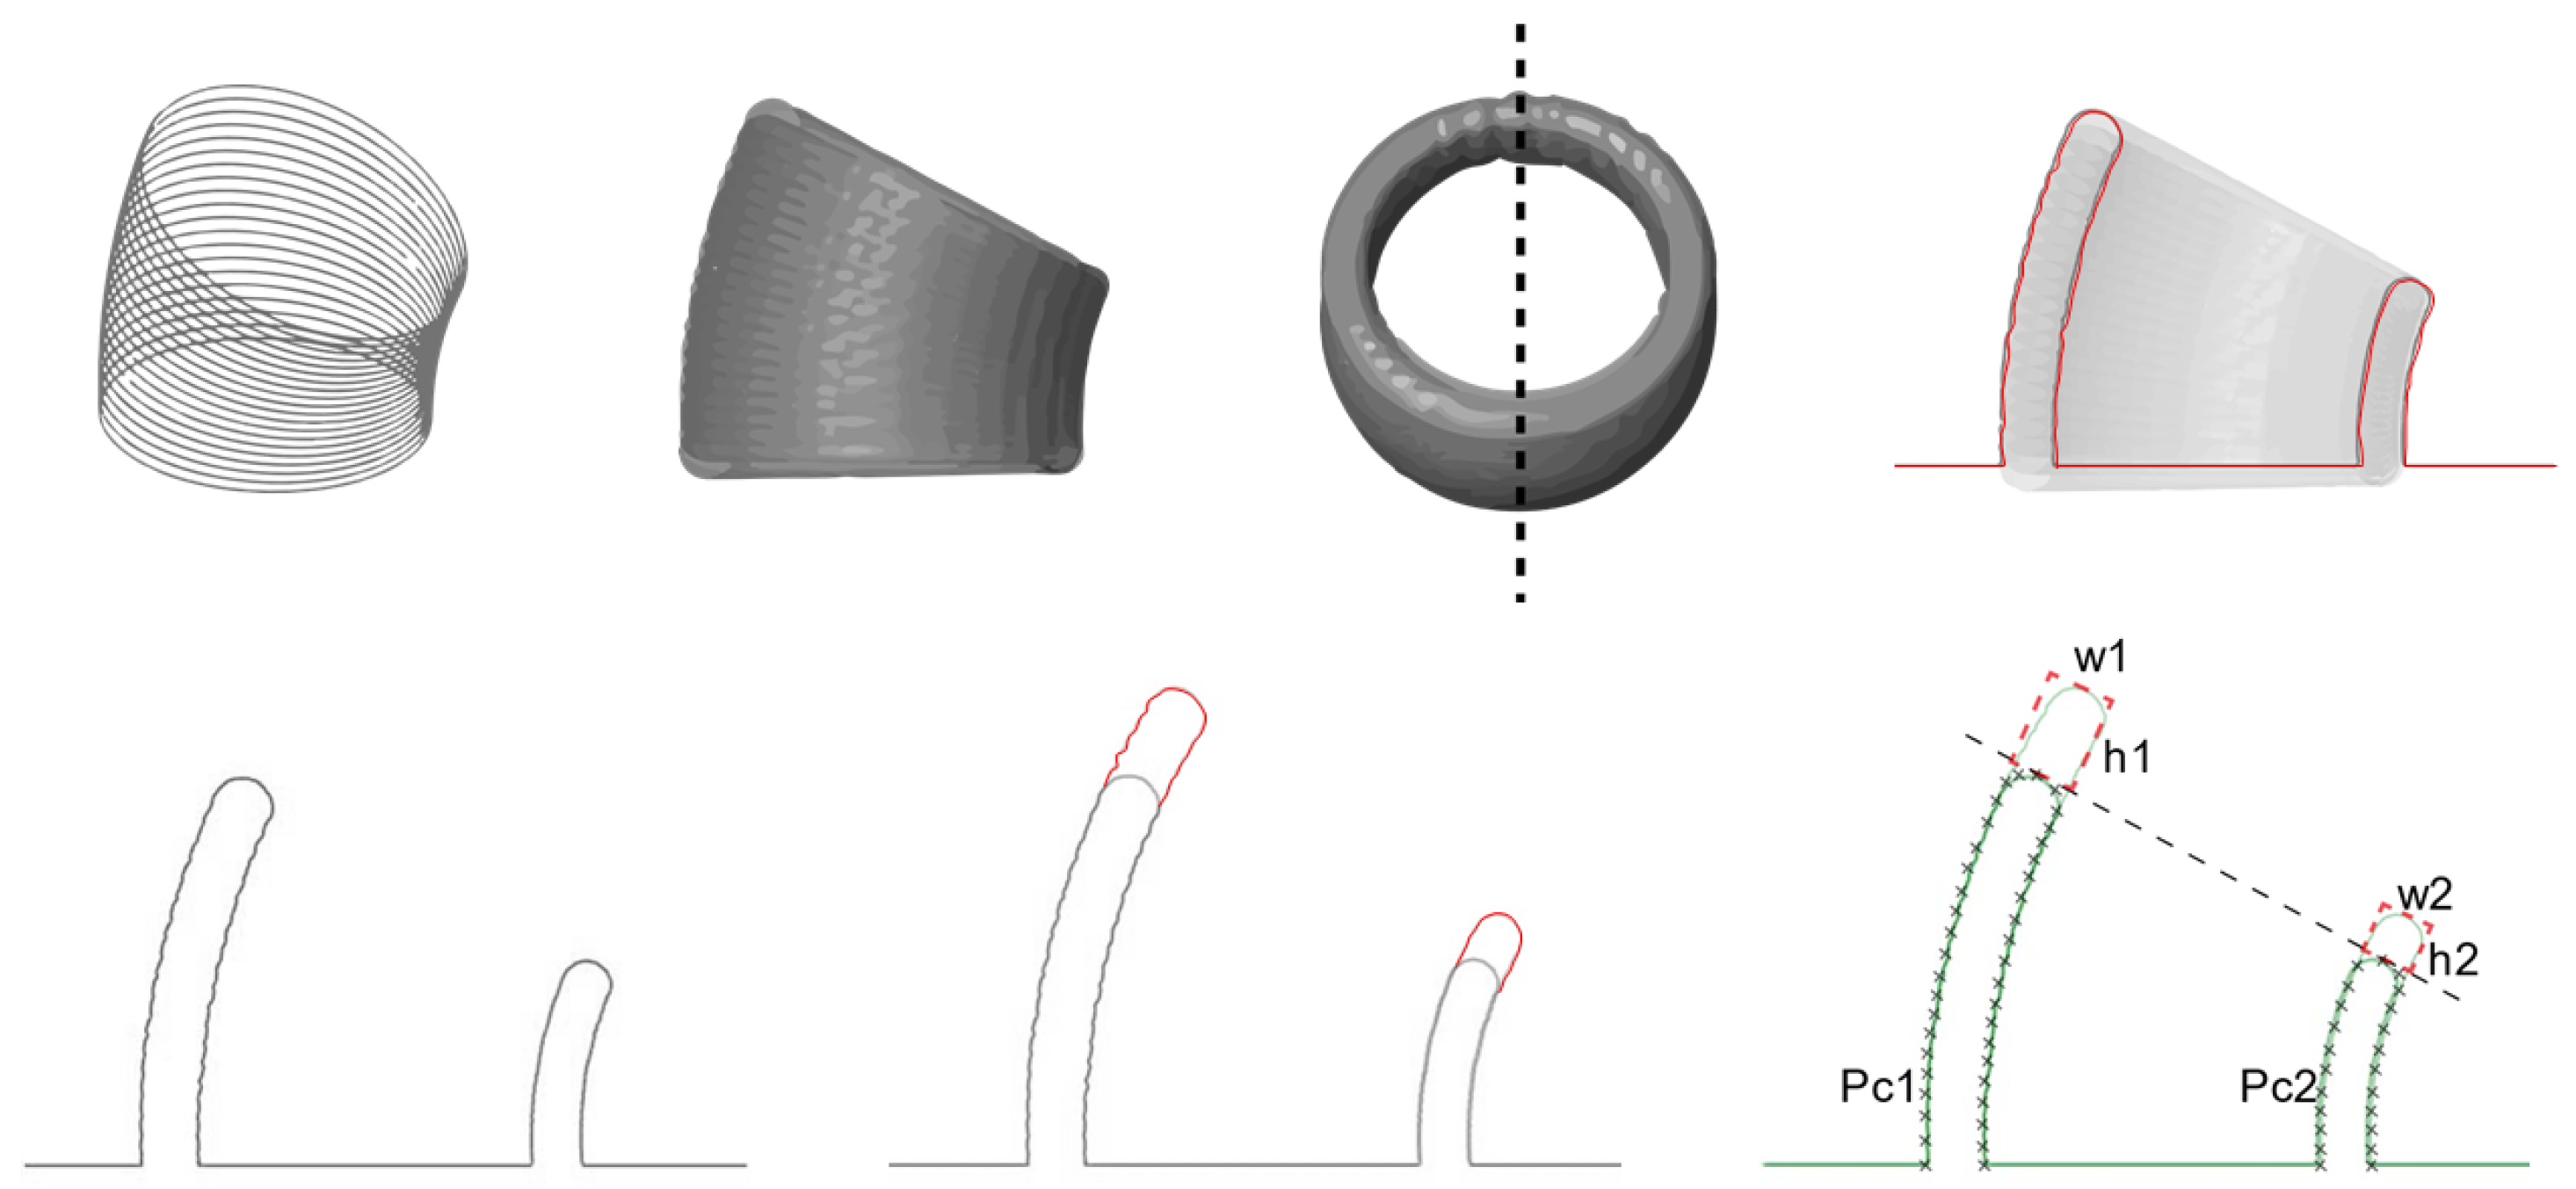
To evaluate the performance of the parameters at non-parallel layers where the torch deviates from the 1G position, the reference geometry was printed and scanned between deposited layers. A custom algorithm was developed to analyze the layer height and record deviations between the digital model and the actual print so that future stages of research can integrate adaptive approaches to mediating this difference. To evaluate the estimated height and width of each layer, the path planning curves were given a digital volume in order to determine a digital section of the weld geometry as shown in
Figure 12. Two approaches were tested for adding thickness to the curve center lines, by piping with uniform thickness or through metaballs, which create custom material thickness according to the non-uniform distribution of curve division points. While the metaball method is more accurate, the process is computationally heavier, and so the piping with uniform thickness was utilized. The ideal cross section of the geometry is created at preset layer increments depending on the frequency of scans to be actually taken. To match the multilayer parameter tests, this research scanned at every five printed layers, as the difference between individual layers was too small to ensure proper algorithmic calculation of the height and width during actual scans of the printed geometry.
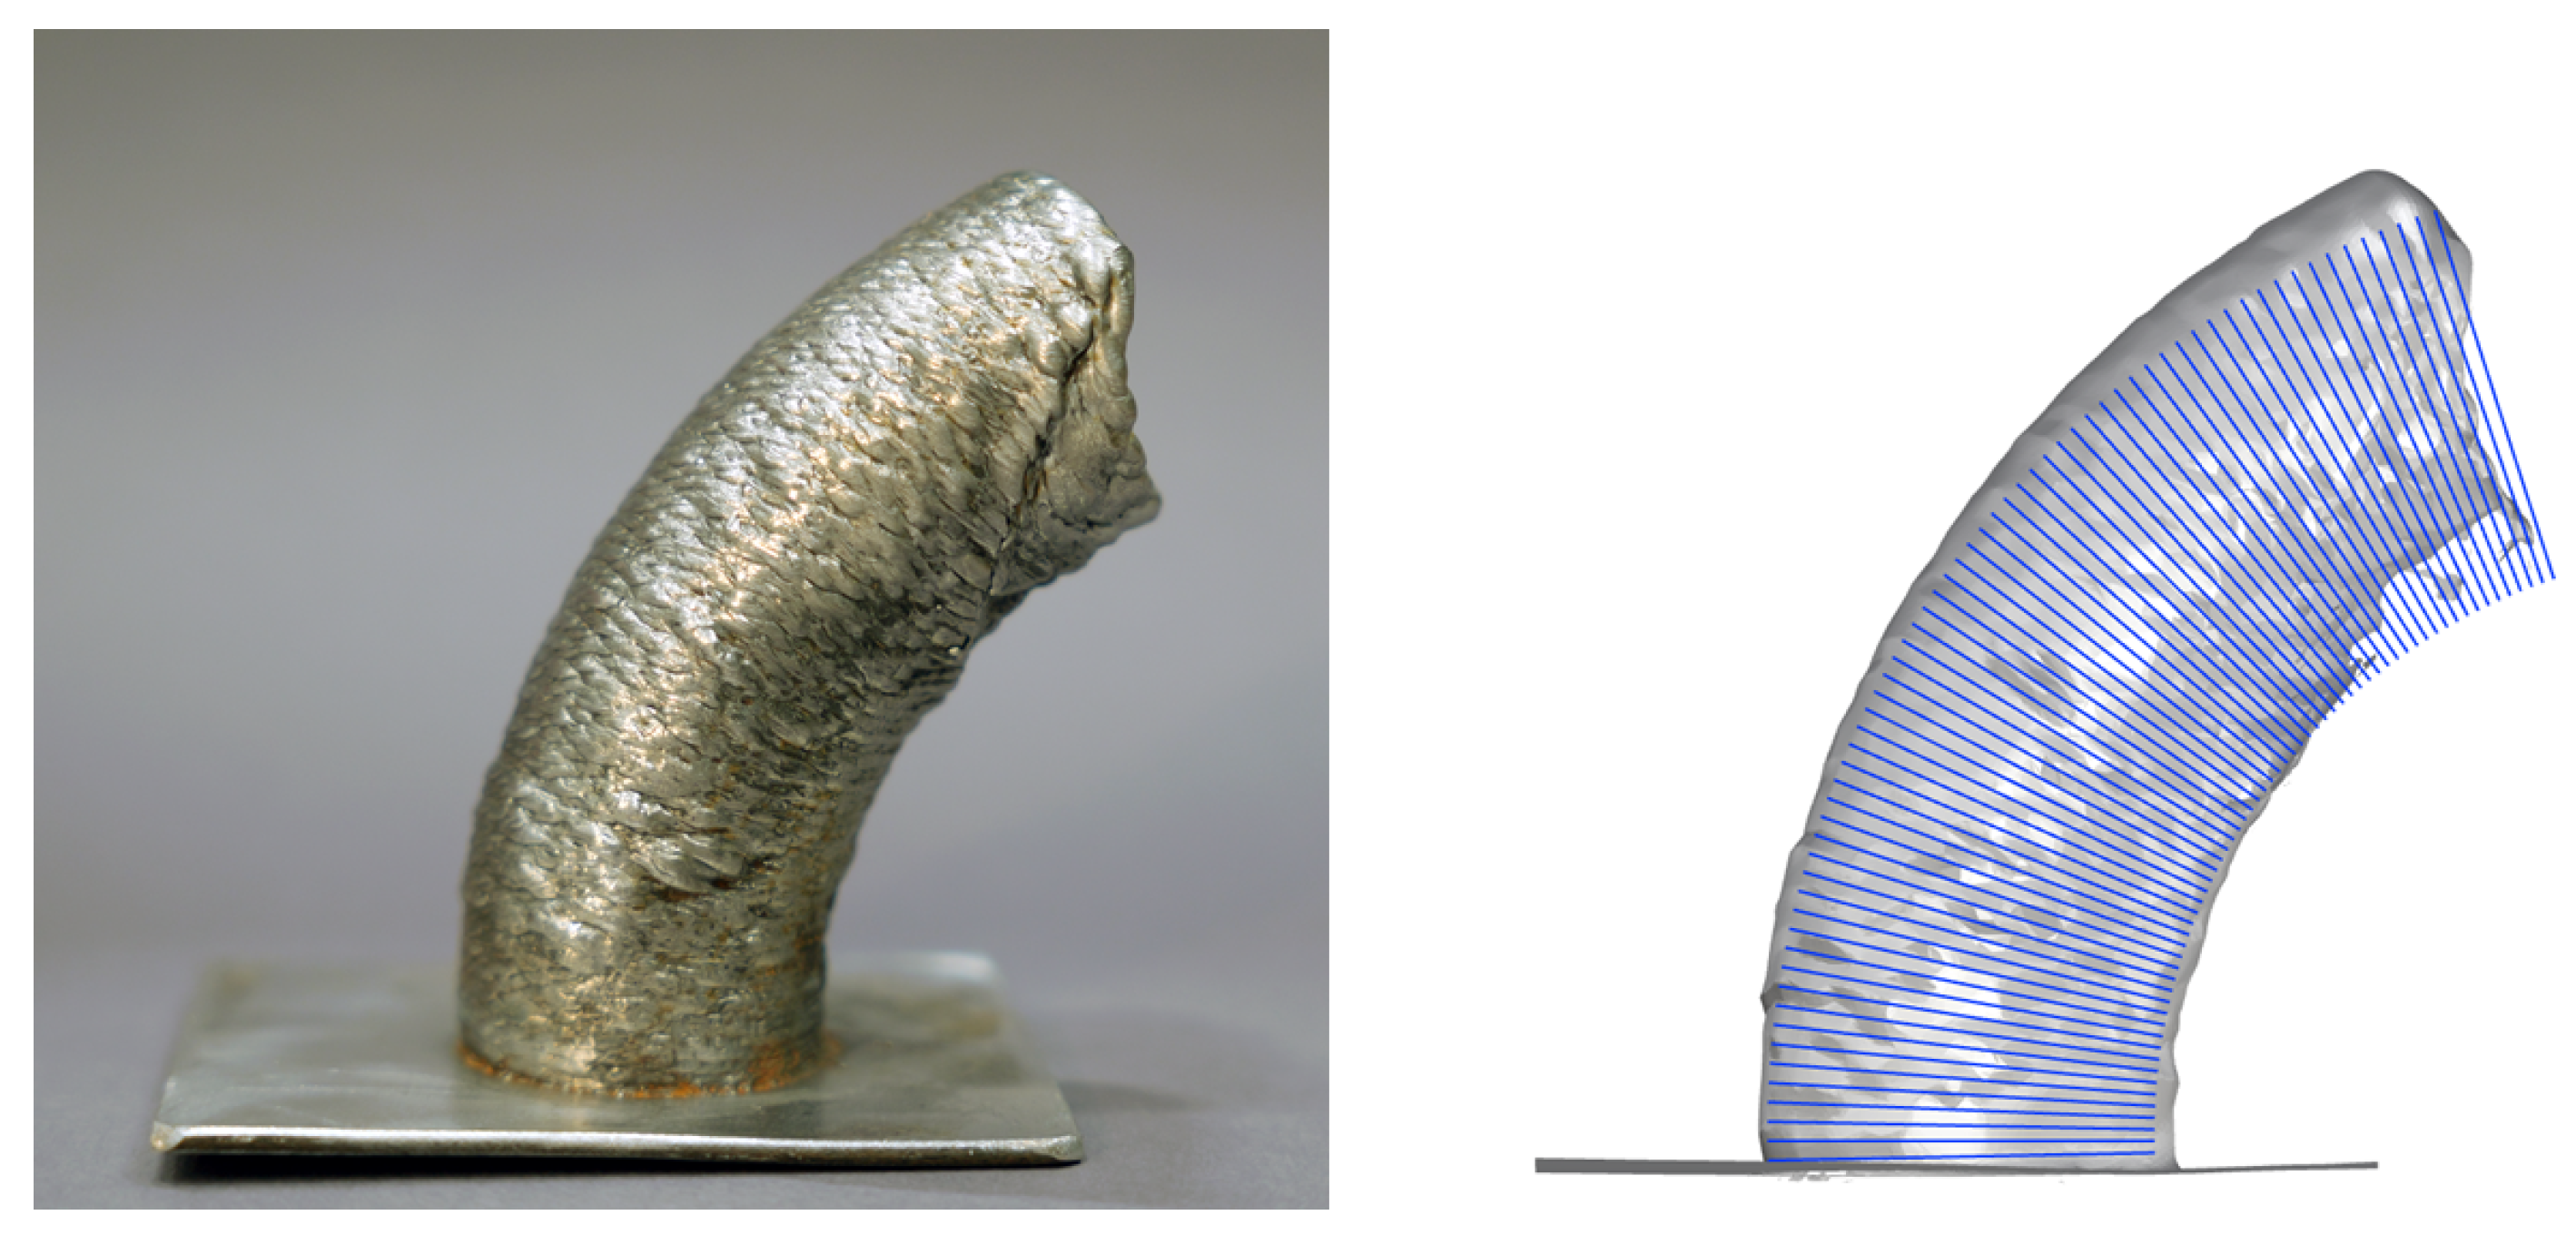
With the ideal determination of height and width for every five layers saved, the same calculation was performed on scans of the actual printed geometry as shown in
Figure 13. The algorithm that imports data from the actual scan to calculate the height and width of the five welded layers is programmed in Python as a middleware existing between the path panning model and IoT-enabled infrastructure. The legend in
Figure 13 shows the calculated data from this process. This includes an estimation of scanned build plate (blue), the tangent for welding tips to calculate the angle of the non orthogonal layer (red line), and the orientation of the growth direction (red and green arrows). The software calculates the new layers deposited since the last scan and outlines the new layer data in red (New Layer Data Weld 2) and green (New Layer Data Weld 1). The weld area is calculated to further inform the process. As an IoT-enabled device, the software is a service able to be activated or called from the path planning model similar to turning on the welding power source or cooling system. However, this software as a device relies on information drawn from the parametric path planning model. Data such as the slicing plane location and orientation, the test ID, and layer ID, as well as the bounding box of the five layers printed, are all required to extract height and width information from the scan data. To store and communicate this information, a WAAM Information Model (WIM) was developed. The WIM enables the tracking of process parameter information and acts as a platform for the exchange of data as in the case of the welding scan analysis process.
The parameter tests and printing of reference geometry create a wealth of data that, in the beginning of this research, were recorded manually. To automate the workflow for capturing design data, in-process parameters, and post-process inspection information, this research creates a WAAM Information Model.
6. WAAM Information Models
The following section details the design of this database and details its use for capturing and communication data, as well as creating interactive visualizations.
In the initial stages of this research, the numerous iterations of algorithms and parameter tests were recorded in notebooks and Excel sheets. The results of the printing were then manually measured with calipers. This manual method of process documentation ingrained a gap in the digitization of the WAAM process so that ideas for planned automated adaptation and optimization proved challenging to implement. As the research progressed, incremental efforts were made to digitize the documentation. Initially, this involved having process parameters automatically exported to Excel. In a second phase, an IoT-enabled thermal camera and line scanner were integrated to more accurately measure the process outcomes. However, the data were still being gathered in a piecemeal and disjointed manner, with each device and process utilizing a semi-automated and unconnected data collection process. To bridge this gap in information collection, a database was created, where process parameters and sensor measurements can be automatically recorded. This section documents the process of the WAAM Information Model (WIM) development.
The implementation of a WIM is enabled by the distributed communication protocol of prc.IoT. The transfer of data from the design to fabrication and scanning process is accomplished via JSON-structured messages sent over a local MQTT network. These data can be mined for analysis and later optimization.
The following section provides a detailed explanation of the WIM process, including an overview of the database structure, user interfaces, and custom programs that facilitate the documentation of the prc.IoT communication structure and the subsequent data analysis.
The WIM data flow is depicted in
Figure 14, which illustrates the process of collating data from various sources to create granular information on the process. Further clarification regarding the data structure for distributed communication in Dynamic WAAM can be found in the article by the authors [
16].
The collection of data in an organized and scalable format can be accomplished through the Structured Query Language (SQL). This format allows for the customization of information structures within networked systems. A similar implementation of SQL for tracking process parameters in a structured database was used by Thien et al. [
25]. SQL is a robust framework that enables the gathering of data from both path planning and parameter customization, as well as the recording of data from the live welding process. Moreover, it facilitates the extraction of data for analysis and optimization through the transmission of queries. As an illustration, one optimization process is the adaptation of layer heights. The planned layer information is imported from the design model into the WIM, while the scanned layer information is transmitted by the scanner to the WIM. A middleware Python script extracts both sets of information to compare them and subsequently writes the results to the WIM. The path planner then retrieves the information on the next adaptive layer from the WIM.
The Grasshopper plugin GGamagi is employed to generate the SQL commands necessary to initialize the database. These commands are then copied into the MySQL program and utilized to establish the structure of the database.
Once the SQL structure has been established, the WAAM Information Model collects data from pre-planning models and from in-process data sources. Therefore, each device is able to add or query the WIM, communicating through the MQTT network via a series of custom Python scripts that use SQL syntax to interact with the data. The WIM is designed to be extendable, allowing for an increasing amount of process parameters to be captured, including additional sensor information, serialized data, such as meshes, point clouds, images, and more. For the purpose of correlation of data across tables, each table is connected by shared data such as timestamps, layer ID, test ID, and scan ID. This table is employed to store the general information pertaining to a single test, including the test ID, the geometry of the tool path, the number of layers, the layer heights, and data regarding the robot base and the tools utilized. Additional tables are utilized to store information related to the line scanner and the welding process parameters.
Pre-planning data sets include information defined once before the print occurs. These tables include the “testgeneraltb”, parameters that are constant throughout the print; “layerstb”, parameters that are constant throughout the layer; and “commandtb”, which records the commands as well as the metadata being sent to the robot and devices. More details about the specific parameters that are stored in each of the tables can be found in
Appendix A of this paper. The in-process related tables are described in the section below.
The Grasshopper design-to-production algorithm includes an export to the WIM. The user can set custom parameters such as unique ID and override speed, while other settings are extracted directly from the parametric buildup of the geometry and toolpath. With the help of the Slingshot! plugin, it is possible to convert the geometry into a XML (Extensible Markup Language) string, enabling the encoding of geometric data in the WIM. The visual coding environment contains a user-friendly way to delete propagated test data in case the information for the test needs to be rewritten. This ensures data consistency, as useless data can be deleted right away. The user can customize and amend metadata in the parametric model in order to pass through additional process information that should be tracked by the WIM. As an extendable method, this allows for additional parameters to be tied to command data and collected in the database. For example, robot commands have metadata appended with layer information, used later to visualize robot speed or custom welding settings at specific sections of the print. While the layer information is not needed by the robot, the WIM collects these data to create a more informed record of the robot’s production. Similarly, the process timestamp can be merged with sensor data to add more details about the production process to the Information Model. WIM tests can be combined so that several tests on the same sample can be collated into one data source.
In-process information is recorded during the printing process in the “testdatatb”. This is the most granular level of information, with data being recorded at 3 Hz. Information stored in this table includes variable speed information, tcp data, thermal information, and welding power source process parameters from set to actual. Process information from the Keyence line scanner is recorded in the “scantb” table. New structures are easy to implement so that as ideas for experimentation grow, they are quick to document. The extendable WIM data structure can be combined with the easy integration of new devices and sensors that prc.IoT enables. They communicate data over an MQTT-based network so that data collection from real devices is easy to capture.
The welding power source used in this WAAM research is a key demonstration of this approach.The welding power source’s control system is customized with IoT-enabled communication, allowing a Python script to receive commands and publish states using MQTT. Welding commands are when to turn on and off, and how to set parameters. The welding power source state contains metadata about the actual current and voltage, as well as the set wire feed speed and arc length. The actual current and voltage can be compared to the set current and voltage to estimate the distance between the torch and material. A separate script is employed to consolidate multiple states into a unified topic. This aggregated topic, designated as “waam/state”, permits the concurrent collection of robot state, welding power source state, and temperature state data. A Python script serves as a conduit for waam/state, de-serializing the JSON string to write the data in the designated table within the WIM. The code incorporates fallback logic to ensure that the table is populated with default data in the event that expected values are not available, such as when a device is not publishing.
Similar to the welding power source, each device has unique metadata that are recorded in the WIM. The robot sends data about the speed, actual TCP position, and axis values. The actual TCP position can be compared to the command position in order to assess deviation due to interpolation, as this is not possible to evaluate in simulation. In order to collate the collection of this information, timestamps are added to the data. Next to this device information, process data from sensors are also saved. The WIM receives data from sensors such as a Keyence line scanner and an Optris Xi400 thermal camera. The line scanner sends metadata regarding the point cloud scan, the relative TCP transformation, and the time taken to process the Iterative Closest Point calculation of the data. The thermal camera sends thermal pictures and publishes metadata about the defined thermal points. The location and the temperature are sent for every point measured in the thermal cameras perspective. All these data, monitored over the whole process, are beneficial, allowing the production team to assess which aspect of the weld requires further inspection or repair, and qualitatively determine if WAAM-based parts meet the production specifications.
