Abstract
In this work, an innovative manufacturing approach that includes a fully linked and integrated manufacturing system consisting of a laser-based directed energy deposition (DED-LB/M) module and a forming press is presented. The alternating additive manufacturing (AM) process is based on a combination of a DED-LB/M process using a laser power of 600 W and a feed rate of 400 mm/min and a subsequent forming process, in which the structure is upset with a hydraulic press using a constant forming force of 500 kN in order to smooth the surface and influence the accuracy of the components. For the generation of a fundamental process understanding, a cuboid, basic shape was chosen as geometry for the investigations. The aim is to improve part properties by applying the process steps to generate part properties, which are superior to solely additive manufactured material. It is shown that the geometry of additive manufactured structures can be adapted, and the top surface can be smoothed due to the forming operation. The mean roughness value Rz decreases up to 50% after the forming operation. The hardness can be increased by work hardening. Of special interest is that the higher hardness can be kept up even though a further DED-LB/M process step and forming operation are applied to the additively manufactured and formed structure again. Finally, an analysis of the new manufacturing approach regarding its potential is given.
1. Introduction
1.1. Motivation
In recent years, additive manufacturing (AM) for metal components has become more important in industry by using new materials [1], since the technology offers several beneficial opportunities compared to conventional manufacturing processes such as forming. For example, by additive manufacturing processes such as directed energy deposition using a laser beam (DED-LB/M), which is also known as laser metal deposition (LMD) or laser-engineered net shaping, AM structures can be built on a curved surface, powder materials can be mixed during the process by in situ alloying, and grain structure can be adapted by controlling the heat input through process parameter adjustment. However, the structural precision is relatively low [2] and surface roughness is high compared to other additive manufacturing processes such as powder bed fusion (PBF-LB/M) [3] or conventional manufacturing technologies such as forming operations. On the contrary, forming offers the possibility of mass production at low costs and short cycle times to manufacture parts with low surface roughness, increase in strength by work hardening, and geometric precision. However, the geometry of formed parts depends mainly on the shape of the forming tool and the materials’ formability. Since both technologies have specific opportunities and limitations, the combination of additive manufacturing and forming in a process chain seems promising to utilize the potential of both processing technologies while also overcoming their respective limitations. For example, material can be applied on a substrate by additive manufacturing, which is formed to the final part shape with higher geometric precision and smoother surfaces than after AM. By AM, material can be built where necessary for forming in a way of near net shape parts in high geometric freedom. The combination of both technologies offers a wide range of possibilities for part and process design. However, the interaction of both technologies in a single manufacturing system under alternating application of the process steps is widely unknown. Therefore, a broad process understanding is needed to evaluate the opportunities of the process approach and to exploit its potential to improve part properties as geometry or mechanical properties. A novel approach of hybrid processing of additive manufacturing by DED-LB/M and forming is investigated within this work. In this context, a fully integrated manufacturing system consisting of a DED-LB/M process cell, a forming press, and a handling system for automated part transfer is presented.
1.2. State of the Art
DED-LB/M is an AM process using a high-power laser system and powder material for the layer-wise fabrication of three-dimensional geometries. Powder material is supplied by a powder nozzle positioned coaxially or laterally to the laser beam. The material is transferred by a carrier gas stream toward the processing, where it is locally fused in the melt pool at the surface of the workpiece. By continuously supplying, melting, and solidifying the material to the substrate, three-dimensional structures are generated.
In contrast to powder-bed-based AM processes such as PBF-LB/M, DED-LB/M is characterized by higher build rates as well as less resolution of these structures [3]. Due to the reduced accuracy of the structures, which results from agglomerated particles at the surface and larger melt pools, surface finishing is typically required for achieving the desired geometry. According to Amine et al. [4], cooling rates of up to 103 K/s occur during DED-LB/M of stainless steel 316L. This leads to a potentially finer microstructure, resulting in superior material properties compared to conventional manufacturing processes such as casting or forging. In recent years, the processing of stainless steels 316L by means of DED-LB/M has been investigated. Nearly defect-free specimens could be fabricated for a laser power of 360 W, feed rate of 510 mm/min, and powder mass stream of 5.4 g/min [5]. These samples are typically characterized by an increased porosity in regions closer to the substrate. Mechanical testing showed a microhardness of 227 HV in the center of the specimen. However, due to decreased solidification rates at the edges of the part, hardness decreased to 209 HV in boundary regions. In [6], the influence of different powders and mass flow rates on resulting material hardness for additively manufactured 316L stainless-steel specimens was investigated. As expected, an increase in layer height was found for increasing mass flow rates. Furthermore, hardness varied between 175 HV and 210 HV depending on the shape of powder and mass flow rate, whereby a larger mass flow rate supported elevated hardness for spherical particles. In [7], processing parameters for DED-LB/M of 316L stainless steel using a design of experiment approach are found. Laser power was set to 645 W for all experiments, while feed rate and powder mass flow were varied between 127 and 1143 mm/min and between 0.9 and 28.8 g/min, respectively. It was observed that the highest average (227 ± 9 HV and 229 ± 11 HV) hardness could be determined for medium feed rates in the range from 508 mm/min to 762 mm/min. Porosity in the manufactured samples was found to be below 1.1% in the specimen. In their work, Anime et al. [4] found that hardness of 316L structures generated by means of DED-LB/M was lower in the deposited layer compared to the heat-affected zone. This can be attributed to the process-specific intrinsic heat treatment due to continuous heating of lower and surrounding material. Furthermore, hardness tended to fall with increasing build height as cooling rates dropped due to heat accumulation in additively generated regions. The process parameters and mechanical properties for 316L are established, indicating good process ability.
The process combination and application of AM and forming or further manufacturing processes is investigated in different contexts. The combination of the two technologies is advantageous to compensate for the disadvantages of additive manufacturing and, conversely, those of forming technology. For example, the combination could represent an approach to achieve higher surface qualities, which are a process limit, in the manufacture of additive nickel–titanium implants [8]. In the following, different approaches to combine AM and a further manufacturing process are presented. Regarding additive manufacturing and forming, an overview of processing hot work tool steels using laser additive manufacturing and its potential for application in industry is given by Klocke et al. [9]. In order to influence the mechanical properties of tools, Teli et al. [10] investigated the influence of Nb as an alloying element introduced to the melt pool of H11 hot work tool steel during DED-LB/M. The use of this approach leads to an adaptation of metallographic structure with hardness of about 510 HV, which is required for hot-working application. Junker et al. [11] presented investigations for realizing tools manufactured by DED-LB/M, where hot work tool steel 1.2709 is qualified as an appropriate material for a forging tool. In this context, a surface hardness of about 530 HV is achieved. Regarding hybrid tools consisting of a conventional substrate material and additively manufactured 1.2343 tool steel deposited by DED-LB/M, Junker et al. [11] analyzed the linkage zone between the AM part and conventional basis by tensile tests and proved that the linkage zone does not weaken the material. Hölker-Jäger and Tekkaya [12] investigated the approach of additively manufacturing a tool geometry, which could only be fabricated by AM and built on a conventionally manufactured component. The use of AM enables the production of inlaying cooling channels, resulting in a higher tool performance by controlling temperature, compared to conventionally manufactured tools. These tools could be used, for example, for forging. Furthermore, tools made of additively built structures built on a conventionally manufactured tool component could also be used for extrusion processes as investigated by Hölker et al. [13]. In comparison to a conventional tool without cooling structures, these tools can be used for production of aluminum extrusion products. The approach results in parts with higher surface quality because of effective cooling. Hafenecker et al. [14] investigated the process chain consisting of PBF-LB/M and a subsequent deep drawing process. Through the additive manufactured elements, the stresses and strains increase compared to forming conventional sheet metal. Another approach in conjunction with the process combination of AM and forming is the process chain of wire arc additive manufacturing (WAAM), milling, and incremental forming, which was investigated by Pragana et al. [15]. In this work, a U-shaped structure of single weld beads was additively manufactured. Afterwards, the U-shaped structure was milled to receive the geometry for subsequent incremental forming of the cup geometry. In comparison to a conventional manufacturing approach of singular additive manufacturing, the approach is less costly and time consuming. A further combination of additive manufacturing and forming are components manufactured by AM and formed subsequently. Rosenthal et al. [16] investigated the additive manufacturing of semi-finished products, which are formed in a final step, and compared this process chain with singular additive manufacturing of the final part geometry. In this case, the build time in AM is reduced by approximately 50% for this geometry. Manufacturing of Ti-6Al-4V pre-forms by WAAM for subsequent forging was studied by Sizova et al. [17]. The pre-forms can be used for the manufacturing of turbine blades, which would be manufactured conventionally in several consecutive forging operations. By additive manufacturing of net-shape pre-forms, the number of processing steps can be reduced, and the part properties are similar to the ones of conventionally forged products. Gu et al. [18] combined rolling and WAAM. Through the inter-layer rolling step after each layer of WAAM, in addition to improving the mechanical properties, a reduction in size and number of micropores is obtained. The process steps additive manufacturing and forming can also be applied to produce parts consisting of a semi-finished sheet metal product, onto which additively manufactured elements are built. Early investigations in this field focus on sheet metal forming combined with PBF LB/M of Ti-6Al-4V, in which the sheet metal body is formed before or after additive manufacturing [19]. Regarding the layer-wise recoating process, the manufacturing of functional elements on a curved sheet metal surface is more challenging than on a flat sheet metal surface [20]. Limitations such as these can be overcome by DED-LB/M, as the powder is supplied by the powder nozzle, which can be moved flexibly over the substrates’ surface. This is shown, for example, in [21], in which a deep drawn cup was reinforced by applying additional material using laser metal deposition. As a result, the maximum load on the cup bottom was increased significantly compared to the cup without reinforcement. Moreover, Bambach [22] presented a process chain of bending and additive manufacturing by laser metal deposition in comparison to forging and subsequent milling for manufacturing a three-dimensional part geometry with stringers to increase stiffness. In contrast to forming and milling the entire part, expensive forming tools for manufacturing different stages of the part, which are economical at large-scale production, can be reduced to a minimum by applying the process combination. In this context, cost advantages are identified when using additive manufacturing and forming because of time and energy reduction. Therefore, the approach is especially beneficial for small series. Additive manufacturing can also be used for accumulating material on a conventional material to meet challenges in forming such as high strains. Hirtler et al. [23] investigated the combination of WAAM and forging for manufacturing a T-section rip structure. Such components are forged in a conventional process chain of forming operations. However, it is challenging to manufacture components with a large aspect ratio of height to width in forming operations, due to high tool wear and increasing probability of forging defects. To overcome this limitation, only the base geometry of T-section is forged, whereas the rip structure is manufactured by WAAM. Additional flexibility of forming can be increased by incremental sheet metal forming. A method and device for the combined production by means of incremental forming and DED-LB/M is suggested in [24]. For example, the device can be implemented in a commercially available hybrid machine from DMG Mori. Regarding bulk metal forming, an approach for a process and plant for combined additive and forming production is presented in [25]. A concept for manufacturing a body layer-wise by melting wire or powder is suggested, whereby a forming operation takes place during production to smooth the surface roughness resulting from additive manufacturing. These strategies demonstrate the high potential of combined forming and additive manufacturing. Hence, an alternating application of additive manufacturing and bulk forming in an integrated machine offers the opportunity to improve part properties. As has been shown, approaches to alternating additive manufacturing and forming already exist. However, the interactions between the two processes have not yet been sufficiently investigated.
1.3. Proposal and Aim of Work
The aim of this work is to develop a process understanding of the novel approach of alternating additive manufacturing by DED-LB/M and bulk metal forming in a fully linked manufacturing system. Through the study, first fundamental relationships and interactions in iterative, alternating manufacturing of hybrid additive structures are derived. In this context, the potential of process control and the impact on part properties is investigated. Therefore, the resulting geometry, topography, surface roughness, hardness, and metallographic structure should be analyzed.
1.4. Approach of Investigations
To investigate the effect of an alternating application of DED-LB/M and forming on part properties, a comparison with the as-built condition after DED-LB/M without forming is made. For the generation of a fundamental process understanding, a cuboid, basic shape was chosen as geometry for the investigations. The area of the shape is quadratic with a length of 15 mm. Depending on the number of layers, the height of the cuboid specimen differs. The parameters being varied are, besides the number of layers manufactured by DED-LB/M, the number of forming steps. This includes additive manufacturing of several layers with and without alternating DED-LB/M and forming. The properties being analyzed are the resulting geometry, topography roughness, hardness, and metallographic structure to investigate the material flow. The contents of the experimental investigations are illustrated in Figure 1.
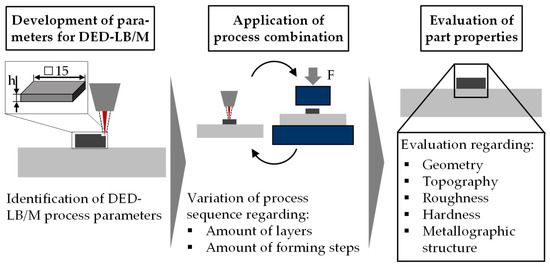
Figure 1.
Approach of experimental investigations.
2. System Technology, Methodical Approach, and Experimental Approach
In the following, the system technology for alternating application of additive manufacturing and forming is presented. The machine is used for experimental studies on analyzing the impact of the process steps on part properties. The approach of the experimental work is described in the section on the methodical approach.
2.1. System Technology
In this section, the manufacturing machine is presented. The machine consists of the main components of a DED-LB/M cell, a transfer unit, and a press (Figure 2).
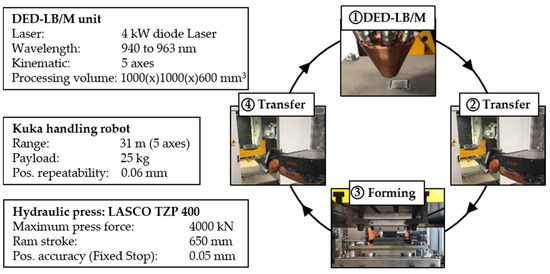
Figure 2.
Fully linked manufacturing system.
The complete setup is controlled by a higher-level control unit with which the individual components can communicate with each other. The DED-LB/M laser protection cabin made by ERLAS GmbH (Erlangen, Germany) houses a diode laser with a peak power of 4 kW and a wavelength of 940 to 963 nm. It can be moved in space using three linear axes. Additionally, the laser cell has a sample holder with two rotary or swivel axes. In this way, free-form surfaces can be realized. Two powder feeders can be used to process two different materials separately or mixed. The transport unit consists of a Kuka five-axis robot. It has a maximum load capacity of 150 kg, a maximum payload of 25 kg, and a range of 3.1 m. The robot is designed to transfer the components between the DED-LB/M cell and the forming press. The hydraulic press of type TZP 400 from Lasco has a press force that is infinitely adjustable between 400 kN and 4000 kN. The ram stroke is also continuously adjustable up to 650 mm with a positioning accuracy of ±0.05 mm when using fixed stops.
The data flow during the alternating AM process is shown in detail in Figure 3. At the beginning of the process, the process parameters required for the DED-LB/M process as well as for the hydraulic press are defined in the higher-level control unit.
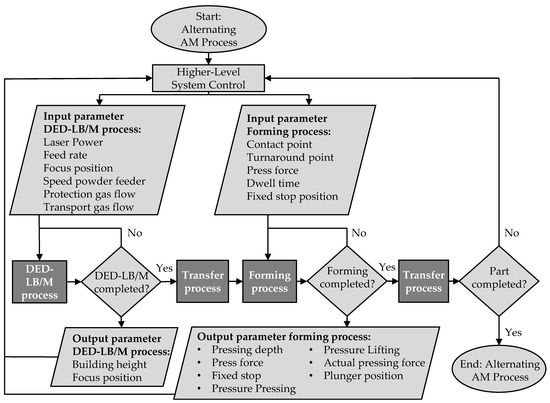
Figure 3.
Process data flow chart of linked manufacturing system for DED-LB/M and forming.
This way, it is possible to control the frequency with which the DED-LB/M process is interrupted for forming in the press. Besides the process control, the output of parameters both after DED-LB/M and forming is possible, which can be used as database for the next manufacturing steps. With this novel machine concept, in which the individual system components are completely interlinked, it is possible to investigate the interactions of the DED-LB/M and forming processes and their effects on the subsequent component quality in detail.
2.2. Methodical Approach
The methodical approach consists of several steps including the identification of appropriate parameters for processing 316L stainless steel in DED-LB/M, the manufacturing of specimens, the application of alternating process steps, and the analysis of resulting part properties. For developing process parameters, single weld beads, single layers, and multilayer specimens with four and ten layers are built. After identifying parameters regarding high relative density based on single weld beads and single layers, specimens of four and ten layers are used as the reference state for part properties after DED-LB/M. Alternating processing of DED-LB/M and forming is applied to specimens of four and ten layers. The forming operation is force controlled, since the resulting specimen height varies with the number of layers. Resulting part properties after alternating processing are compared to the corresponding reference state. In a first step, the geometry is analyzed to compare the remaining specimen height and the shape of the top surface as well as the side wall. Roughness and topography measurements are conducted before and after alternating application of process steps in order to analyze the smoothing of the surface. Finally, the mechanical properties are analyzed by hardness measurements on cross-sections of each specimen. By metallographic preparation, the material flow is investigated to understand the change in hardness.
2.3. Experimental Procedure
The determination of a suitable parameter combination for processing of 316L stainless steel by means of DED-LB/M was divided into three different steps: single weld tracks, single-layer, and multilayer specimens. The tool steel 1.2343 with a thickness of 12 mm and a hardness of 198.3 HV0.5 serves as substrate material. Parameters varied within these experiments were laser power PL, feed rate vs, and powder mass flow mP. Laser power and feed rate were varied in steps of 100 W and 200 mm/min, respectively. The set of investigated process parameters and their corresponding range is listed in Table 1. Working distance D and laser spot size dLaser were set constant to 11.5 mm and 1.5 mm, respectively. The protection gas stream was chosen at 4 L/min, and the transport gas stream was adjusted to 4 L/min. Argon was used in both cases.

Table 1.
Varied process parameters used for generation of single weld tracks and cuboid-like specimens.
First, single weld tracks were manufactured using different parameter combinations. The aspect ratio was determined by examining the ratio of width and height of these structures. For further investigations, aspect ratios between 5 and 8 were selected. Second, single cuboid-shaped layers with a defined hatch distance, which was determined based on the width of the corresponding weld track, were manufactured. Each layer consisted of 19 weld seams, and overlap of these seams was set at 50%. For build-up, a meander type strategy was selected. By measuring the height of these specimens, increment for z-height adjustment was determined for multilayered structures. Finally, specimens with up to 10 layers were manufactured. All specimens were embedded for analyzing relative part density and microstructure on cross-sections. The most promising parameter combinations, characterized by a nearly fully dense microstructure, were used for further investigations. This applies for single weld tracks as well as volumetric cuboid structures.
For analyzing the impact of alternating manufacturing, a comparison of part properties to the as-built condition was conducted. In this context, the factors being changed are the number of layers and the number of forming steps. The number of layers (four or ten) was changed to influence the volume available for forming. In the case of forming after DED-LB/M, the forming operation was applied after four or ten layers. To investigate the impact of alternating DED-LB/M and forming in one specimen, two further parameter combinations included each process step twice. This resulted in a process chain of DED-LB/M, forming, DED-LB/M, and forming after four and ten layers, respectively. The forming force was kept constant at 500 kN, which was selected regarding the cross-section area of the material and the initial yield strength of 316L stainless steel manufactured in DED-LB/M (350 MPa–410 MPa, [5]) to ensure material flow. The variation of factors being changed resulted in a set of eight parameters, presented in Figure 4.
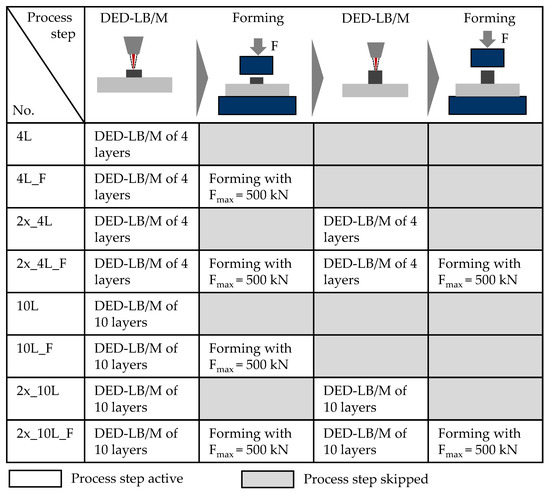
Figure 4.
Parameter combinations.
For each combination, the overall surface topography on the top surface was investigated by a laser scanning microscope VK X200 (Keyence, Osaka, Japan). Based on the results, the impact of forming could be evaluated and compared to the as-built surface. To quantify the smoothing of the surface due to forming, tactile roughness measurements were conducted using a Perthometer (Mahr GmbH, Göttingen, Germany), and the arithmetic average roughness Ra and the mean surface roughness Rz were derived. To evaluate the overall parts geometry, each specimen was measured by an optical measuring system based on stripe light projection ATOS Core (Carl Zeiss GOM Metrology GmbH, Braunschweig, Germany). The geometry was analyzed regarding the overall shape and the top surface. Based on this analysis, the reduction in height and the geometry of the top surface were investigated. Besides analyzing geometric properties on different scales, hardness measurements were conducted to consider the impact of the alternating process chain on mechanical properties. The mechanical hardness measurement was performed on polished (1 µm) cross-sections using a semiautomatic hardness testing device of type KB 30S (KB Prüftechnik GmbH, Hochdorf-Assenheim, Germany). Material hardness was determined according to Vickers, and HV0.5 was used as a testing load. Both the application time and the duration of the force reduction were 10 s, with a holding time of 5 s. To analyze material flow and metallographic structure, each specimen was investigated by a light microscope from Leica after etching the polished cross-section with V2A-etchent. For the development of the process parameters for DED-LB/M, the relative part density was measured on polished cross-sections using a binarization approach. Through this binarization, a differentiation between pores (black) and full material (bright) is possible.
3. Results
In this section, the results gained from the experimental study are presented and discussed. The first part consists of the identification of process parameters for DED-LB/M, based on single weld tracks, single layers, and multilayer specimens. The second part focuses on resulting part properties such as geometry, topography, roughness, mechanical properties, and metallographic structure.
3.1. Developing of Process Parameters for DED-LB/M
In the first step, the width and height of all single weld tracks were measured based on analyzing cross-sections after etching. The lowest aspect ratio identified within the considered parameter set was 5.8, resulting from a width of 1.4 mm and a height of AM material of 0.24 mm above the substrate plate. A low aspect ratio results from a high height in combination with a low width, which is beneficial for a high build rate. This results from the lowest feed rate of 400 mm/min and the maximum powder mass flow of 3.94 g/min considered in this study. The etched cross-section of the track is presented in Figure 5.
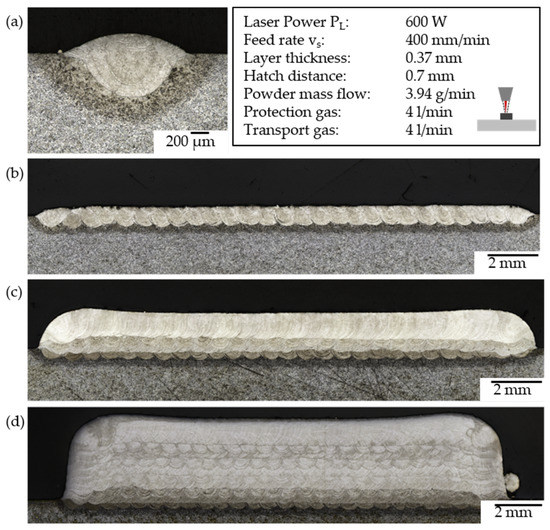
Figure 5.
Etched cross-sections and processing parameters for (a) single weld track, (b) 25 weld tracks, (c) 4 layers, and (d) 10 layers of 25 weld tracks.
Based on the width of 1.4 mm, a hatch distance of 0.7 mm (50% of weld track width) was selected for manufacturing a single layer consisting of 25 weld beads, resulting in a cross-section width of almost 20 mm (Figure 5b). The height of the single layer was 0.45 mm, which was used, in turn, as the layer thickness and z-direction interval for manufacturing a specimen of four layers (Figure 5c). The resulting height of four layers was 1.48 mm, which resulted in an average layer thickness of 0.37 mm. This layer thickness was applied to manufacture a 10-layer specimen (Figure 5d). The received height of the specimen was 3.52 mm. Hence, the average layer thickness was 0.35 mm. All specimens, independent from the layer number, showed a relative density of >99.7%.
3.2. Influence of Alternating Processing on Geometry
The geometry of the specimens manufactured by additive manufacturing and forming was analyzed for the parameter combinations given in Figure 4. It was evaluated regarding the height of the specimens, the geometry at the top surface, and the overall shape. The three-dimensional geometry from stripe light projection of the specimens of four layers and ten layers and the geometry of sections through the middle plane of the specimens are presented in Figure 6 and Figure 7.
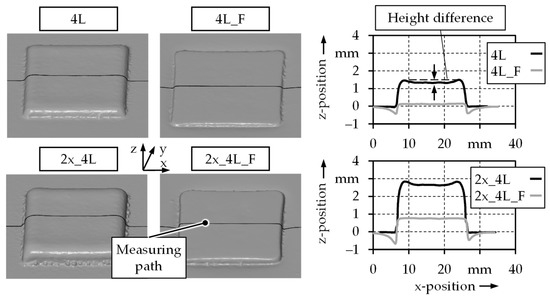
Figure 6.
Evaluation of geometry by stripe light projection for specimens of four layers.
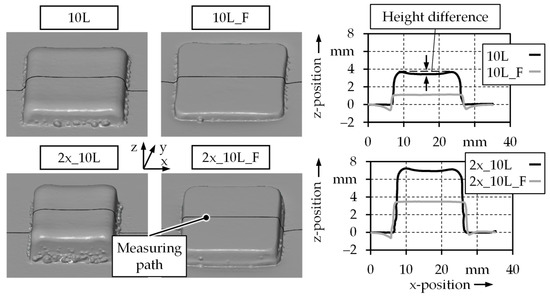
Figure 7.
Evaluation of geometry by stripe light projection for specimens of 10 layers.
Based on the section, a comparison of geometries was conducted. Three main differences could be identified: an accumulation of material was present at the edges in the as-built condition, the height of the specimen was reduced, and material flow at the surface of the substrate plate took place due to forming. The accumulation of material at the edges resulted from the DED-LB/M process when manufacturing the contour of the specimen. Reasons for this could be blown powder particles or different thermal profiles due to a faster cooling at the edges of the part. It led to a height difference from the edge to the z-position in the middle of the section. The height difference increased for DED-LB/M of four layers from 0.18 mm to 0.22 mm for two times DED-LB/M of four layers. This indicates an increasing accumulation of material the higher the number of layers. However, the accumulation of material at the edges was not present after forming, which could be seen for both combinations two times DED-LB/M of four layers and two times DED-LB/M of four layers and forming. Due to the forming operation, the surface was leveled. This shows that forming can be used to adjust the geometry at the surface. The resultant height after forming varies. For DED-LB/M of four layers, the resultant height was 0.12 mm, whereas for two times DED-LB/M of four layers a height of 0.76 mm was reached. Hence, the specimen height after forming depends on the number of layers, since the double number does not result in a double value of specimen height after forming. At the surface of the substrate plate, material flow is present, which is represented by the contour in negative z-direction. Since the x-position and thus the area of the formed component is almost identical compared to the as-built condition, it is concluded that the AM material is pressed into the substrate. The geometric features described above are also present for specimens of 10 layers (Figure 7).
A difference in height from the edges to the top surface layer, its leveling, and material flow due to forming can be identified. A comparison of height difference to four-layer specimens indicates that the effect further increases as illustrated in Figure 8. After manufacturing of ten layers in DED-LB/M, a height difference of 0.25 mm was present, and after two times ten layers the difference was 0.30 mm. However, as already investigated for four-layer specimens, the specimens of ten layers also can be formed to an even shape. The resultant height further increased from 1.1 mm to 3.5 mm for two times ten layers and alternating forming. The material flow at the surface of the substrate plate was present for 10 layers, which will be investigated in detail in Section 3.5.
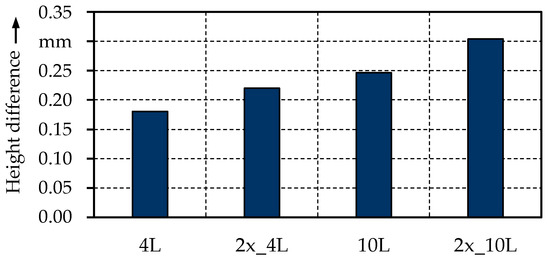
Figure 8.
Height difference along measuring path at the top layer for specimens in the as-built condition.
Topographic measurements of the components (Figure 9) show the differences in height at the top surface. Without a subsequent upsetting step, the top surface is lower in the middle and increases in height toward the corners and edges, resulting in an uneven surface. With increasing layers applied, this effect becomes more present, which is common for DED-LB/M processes without special process control equipment. It is least visible for four layers and best seen for two times ten layers. The forming process evens the surface such that the topographies of the four formed specimens look similar. The subsequent upsetting to create functional surfaces enhances the rather uneven surface created by DED-LB/M.
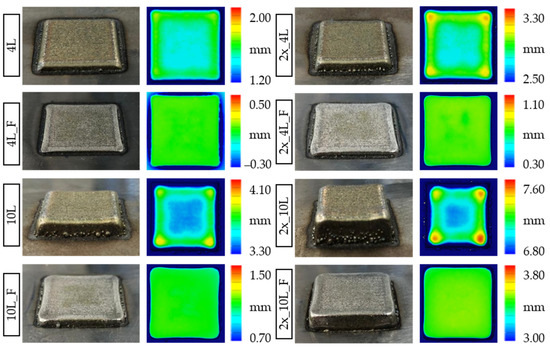
Figure 9.
Topographic analysis of specimens based on light stripe projection.
Since it is indicated that the effect of height reduction depends on the number of layers being built, a comparison of resulting height after DED-LB/M and alternating application of DED-LB/M and forming is presented. The comparison is shown in Figure 10.
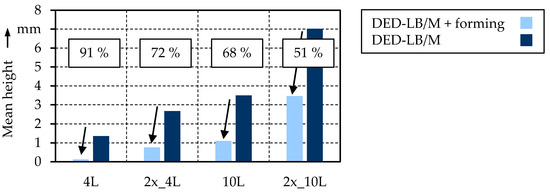
Figure 10.
Mean built height after DED-LB/M and alternating DED-LB/M and forming.
The percentual reduction in height decreases with increasing number of layers. In the case of four layers, the reduction in height is 91%, whereas it drops to 51% after alternating DED-LB/M and forming of two times ten layers. This indicates that due to the material flow at the substrate plate surface, the height is mainly reduced for fewer layers in terms of the percentage proportion. The reason for this is the forming force, which is set constant for every parameter combination. In Section 3.4 and Section 3.5, the hardness and material flow will be discussed based on metallographic analysis, aiming to explain this behavior.
3.3. Impact of Alternating Forming on Surface Roughness
It is expected that the forming operation changes not only the geometry, but also the roughness on the top surface. The results for roughness measurement are presented in Figure 11.

Figure 11.
Roughness values Ra and Rz after DED-LB/M and alternating DED-LB/M and forming.
For each specimen, five surface measurements were performed, and the roughness values Ra and Rz were derived. In both cases, the roughness was higher after solely applying AM compared to AM and forming. The subsequent forming process smooths the surface. Regarding Ra, the mean values drop by 15% for DED-LB/M of four layers and by 33% for two times DED-LB/M of four layers after forming. In the case of a second forming operation, the difference in Ra for DED-LB/M of four layers and two times DED-LB/M of four layers is significant, since the standard deviation does not overlap. A drop in Rz is also present after forming. This indicates that surface peaks, which are considered especially in Rz, are smoothed. Regarding the standard deviation, the differences of Rz for DED-LB/M of four layers to DED-LB/M of four layers and forming and two times DED-LB/M of four layers to two times DED-LB/M of four layers and forming are significant. The mean values decrease by 41% (DED-LB/M of four layers and forming) and 50% (two times DED-LB/M of four layers and forming). The smoothing effect could be beneficial for manufacturing functional surfaces, where high surface quality is necessary. Since the differences in height as presented in Figure 6 for the specimens made of ten and two times ten layers are too high, the measurements cannot be performed for these because the maximum elongation of the tactile measurement device is exceeded. However, comparing the roughness values for four-layered cuboid-shaped specimens with and without forming shows the smoothing effect, which increases with the number of layers. In contrast, the surface roughness of the specimens that are not formed afterwards tends to increase with the number of layers. The comparison between the surface roughness for a one- or two-layered building process shows no clear difference. In order to analyze the surface in a broader context, the results from laser scanning microscope (LSM) measurements are presented in Figure 12.
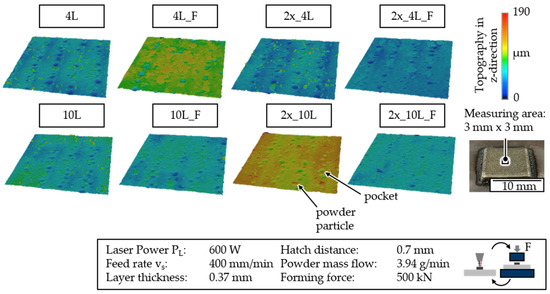
Figure 12.
LSM measurement of specimens after DED-LB/M and additive manufacturing and forming.
The measurement is conducted in the middle area of each specimen’s top surface, resulting in an area of 3 mm by 3 mm. Two main aspects of changing the surface topography by forming after DED-LB/M can be identified. When comparing the as-built surface with any post-formed surface, it can be seen that small pockets in the surface are present in the as-built specimens. These result from the melting and solidification of the metal in the DED-LB/M process. After forming, these pockets still exist but seem to be less than after DED-LB/M. This indicates that the pockets can be closed by the forming operation based on the material flow. This can be used for reduction in the surface roughness due to forming. Hence, the top surface can fulfill requirements of functional surfaces due to higher surface quality.
Additionally, in the as-built state, the surfaces still show some powder particles on the top surface, which seem to be not molten but sintered on the surface. These particles are pressed into the surface by forming, which results in a more even surface. Hence, the flat forming punch leads to flattening of the surface, which in turn indicates that other forming tool geometries with adapted surfaces could be used to receive a defined surface of the additively manufactured material. This indicates that the forming operation has the potential to manipulate the top surface layer of the AM specimen. The effect of smoothing is present for all parameter combinations with subsequent forming; the impact of the number of layers cannot be identified.
3.4. Mechanical Properties
In order to consider mechanical properties besides the geometry, hardness measurements on cross-sections were conducted. The results are based on a grid of measurement points with a resolution of 0.5 mm in the built direction (z-level) and 3 mm in the x-direction, where the deviation of values is comparatively small. In the x-direction, six lines of measurement points are aligned next to each other. Length in the z-direction is adapted to the remaining specimen height, and the measurement starts at the top layer. The results and the schematic alignment of the measurement points are shown in Figure 13.
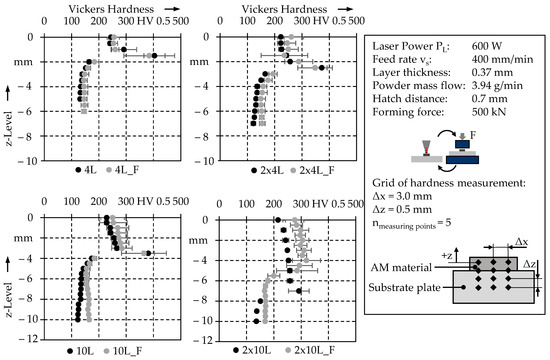
Figure 13.
Hardness after DED-LB/M and alternating application of DED-LB/M and forming.
When comparing the hardness values in the as-built condition, representing the reference state, a gradient of hardness over substrate, heat-affected zone and additively manufactured material exists, which is typical after DED-LB/M. The minimum hardness in the substrate material ranges from 120 HV0.5 to 136 HV0.5, which is reached for all specimens at the end of the measurement length. The hardness of the substrate material decreases compared to the initial hardness of 198.3 HV0.5. For increasing z-levels, the hardness increases. This indicates that the heat input from the DED-LB/M process results in a temperature gradient over the substrate thickness, which leads to a difference in hardness over the substrate material due to metallographic changes. The maximum hardness is measured in the interaction zone for all specimens in the as-built condition. Manufacturing of four layers (DED-LB/M of four layers) results in the highest hardness of 404 ± 39 HV0.5. For the other parameter combinations, the highest hardness is also reached in the interaction zone (two times DED-LB/M of four layers: 372 ± 20 HV0.5, DED-LB/M of ten layers: 381 ± 22 HV0.5 and two times DED-LB/M of ten layers: 292 ± 38 HV0.5). However, compared to DED-LB/M of four layers, the hardness in this area tends to decrease with increasing number of layers. However, due to the high standard deviation, a significant difference can only be identified for DED-LB/M of four layers and two times DED-LB/M of ten layers, where standard deviations do not overlap. The dependence of hardness from the number of layers could be due to increasing heat input in DED-LB/M, which results in softening of the material. The increase in hardness in the heat-affected zone compared to the substrate material is in accordance with the state of the art, which can be explained by high cooling rates at the surface of the substrate material [4]. In the interaction zone, the highest deviation of hardness values is measured. This indicates inhomogeneous cooling conditions during the manufacturing process. In the additively manufactured material, the hardness received is in accordance with investigations in the state of the art, where values of 209 HV to 227 HV [4] are measured. Comparing the lowest values of hardness in the as-built condition, which are achieved at the top layer of the specimen, a Vickers hardness of 227 ± 10 HV0.5 is measured over all as-built specimens.
For all specimens, the hardness in the AM material and the substrate plate tends to increase due to forming. This can be explained by work hardening through the forming operation [26]. The forming leads to a distortion of the grains, thus inducing dislocations. However, the gradient of hardness over the substrate material, heat-affected zone, and additively manufactured material remains even after forming. When comparing the standard deviations of hardness before and after forming, only in the case of two times DED-LB/M of ten layers and two times DED-LB/M of ten layers and forming can a significant difference be identified. After forming (two times DED-LB/M of ten layers and forming) in the additively manufactured material, at all locations of measurements, with the exception of the heat-affected zone where standard deviations overlap, the hardness is higher than in the as-built condition (two times DED-LB/M of ten layers). Comparing the mean hardness values for two times DED-LB/M of ten layers and forming between z = −4 mm and z = 0 mm with the as-built condition (two times DED-LB/M of ten layers), an increase in mean hardness values between 21 and 22% can be identified. Even the hardness in the substrate material increases due to forming. This indicates that work hardening also takes place in the substrate and the additive manufactured material. Of further interest is that the hardness in the AM material tends to increase again after a second forming step, since the hardness tends to be higher for two times DED-LB/M of four layers and forming and also for two times DED-LB/M of ten layers and forming compared to the corresponding single application of DED-LB/M and forming. This is of special interest, since this indicates that the increase in hardness due to forming can be kept up even though a second heat input is applied to the material due to the DED-LB/M process.
3.5. Formability and Material Flow
The metallographic structure and the material flow were investigated by etching cross-sections after hardness measurements. The results are presented in Figure 14.
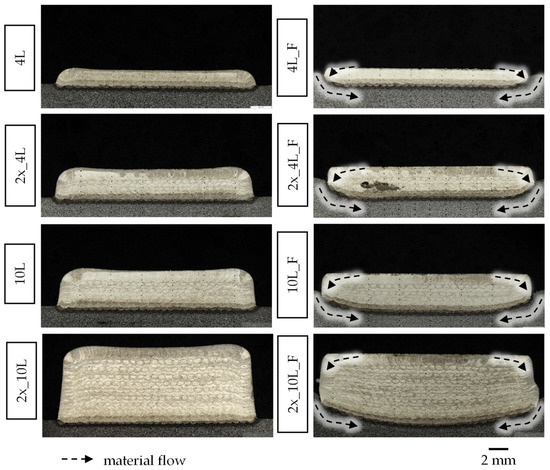
Figure 14.
Metallographic analysis of cross-sections of specimens.
Even though points of hardness measurement are visible, it can be seen that the specimens have a high relative density, which is independent from the number of layers. As shown in Section 3.2, the top surface is smoothed by the forming operation. However, by analyzing the cross-sections, it becomes clear that the intermediate flattening of the top surface is not absolutely necessary to improve the parts’ relative density. The investigation of the cross-sections shows that the smoothing effect of the surface results mainly from the material flow, as indicated in Figure 14. The material flow at the top surface takes place at the corners. This results in an even surface, which is visible for all specimens after forming (DED-LB/M of four layers and forming, two times DED-LB/M of four layers and forming, DED-LB/M of ten layers and forming, two times DED-LB/M of ten layers and forming). In comparison to the state before forming (DED-LB/M of four layers, two times DED-LB/M of four layers, DED-LB/M of ten layers, two times DED-LB/M of ten layers), the weld tracks at the top layer are formed into a sharp edge. That forming of the top-layer weld tracks occurs can be explained by the hardness of this layer. Considering the hardness values in the built direction, in Figure 13 it can be seen that the lowest hardness in the AM material is present at the top layer. This indicates that the material starts to flow predominantly in this area before the forming of layers of higher hardness begins.
Severe material flow also takes place in the substrate plate, which can be identified by displacement of the heat-affected zone relative to the top surface of the substrate plate. The material flow in the substrate is more pronounced in the center of the component than at the edge, which leads to deflection of the specimen. The reason for the more pronounced material flow in the center is the surrounding additive material, which, due to its higher hardness compared to the substrate, inhibits the material flow to the edge of the component. To evaluate the compression of the AM material due to forming in detail and to analyze the material flow in the substrate plate, in Figure 15 geometric relations of the material above and below the substrate plate surface are illustrated.
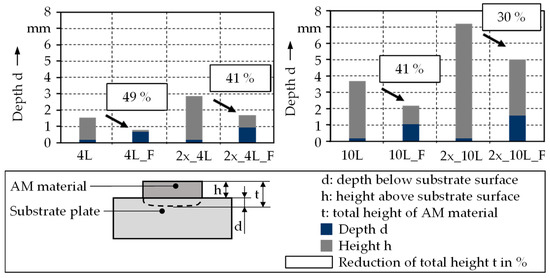
Figure 15.
Evaluation of geometric relations.
The sum of the distances is regarded as the total height of the AM material. When comparing the depth d (blue bars in Figure 15), which is derived from the etched cross-sections in Figure 14, it can be seen that before forming for all specimens (DED-LB/M of four layers, two times DED-LB/M of four layers, DED-LB/M of ten layers, two times DED-LB/M of ten layers), the weld track depth in the substrate is 0.2 mm. After forming, the depth d, which is measured at the lowest point of the heat-affected zone in the substrate, increases. This indicates that material flow takes place in the substrate. An analysis of depth d after forming shows that the values are higher the more layers are built on the substrate. Hence, a constant forming force of 500 kN leads to different material flow in the substrate, which depends on the number of layers being built on. The increase in depth d due to forming also results from the change of shape of the heat-affected zone (Figure 14), which becomes more curved for higher numbers of layers. A deeper analysis of the values of depth d shows that material flow in the substrate also takes place after a second forming operation, since for both combinations of layers the values increase again—in the case of DED-LB/M of four layers and forming from 0.67 mm to 0.93 mm, and for two times DED-LB/M of four layers and forming from 1.07 mm (DED-LB/M of ten layers and forming) to 1.58 mm (two times DED-LB/M of ten layers and forming). This indicates that not only the first forming step results in material flow in the substrate plate but also the second forming step.
Therefore, work hardening of the AM material is possible even though the material is pressed into the substrate plate. Based on the analysis of the total height t of the specimens after the second forming step, a further reduction and compression of the AM material can be identified. The total height t after forming is reduced by 49% for DED-LB/M of four layers and forming and 41% for two times DED-LB/M of four layers and forming regarding the initial total height in the as-built condition. This indicates that the compression of the AM material in a second forming step decreases. This is also the case for 10-layer specimens, where the total height t is reduced by 41% for DED-LB/M of 10 layers and forming and 30% for two times DED-LB/M of 10 layers and forming. Even though the percentage reduction in total height t decreases in the second forming step, further increase in hardness identified in Figure 13 can be explained by the additional forming of the AM material.
4. Discussion and Evaluation of the Novel Manufacturing Approach
Based on the results regarding geometry and mechanical properties, it can be seen that the new process chain results in part properties superior to the as-built condition after DED-LB/M. Regarding the geometry of cuboid-like specimens investigated in this work, the top surface becomes more uneven with increasing number of layers. The evaluation of the geometry shows that the top surface is smoothed in a way that waviness and pilling of material at the edges is flattened by forming. Hence, the forming operation can be used to receive a certain specimen geometry, which is defined by the forming tool, but could have any shape other than a flat punch. Therefore, by an adaptation of the forming tool geometry, the additive manufactured material could be formed to a certain shape to realize a functional part. In this context, the AM process could be used to accumulate material on a substrate, which is formed to a functional part. As already analyzed in the state of the art, the application of additive manufacturing as a process of material deposition has potential of energy savings and cost reduction. Regarding the alternating process order of DED-LB/M after forming, the forming operation could be used to reduce pilling at the edges of the specimen and ensure a certain specimen height, which could increase process stability in DED-LB/M. The remaining specimen height could be used as a start height for further application of layers in DED-LB/M on the formed specimen surface. Coupled machine and closed process data flow enables the use of output data after the forming operation for adjusting the z-level for the next DED-LB/M process step. Besides the geometry, the surface roughness is influenced by forming. Since the surface roughness drops significantly due to the forming operation after DED-LB/M for Ra and Rz, it is shown that functional surfaces of AM material with higher surface quality can be manufactured by the presented manufacturing approach. Even though roughness peaks, which result from the powder-based welding process, are smoothed since the value of Rz decreases severely, pockets in the surface from the DED-LB/M process remain. A higher forming force could result in a closure of pockets in the surface, which would enable an adaptation of the surface by forming additionally to the AM process where an adjustment of parameters could also result in a smoother surface. This could also be used for reduction in the porosity of additively manufactured specimens, which is not the content of this work, since the specimens are built with parameters leading to high density. However, the approach enables the possibility of manufacturing specimens by DED-LB/M with higher process velocity, where deposition of material in a short time is more important than high density. A major finding is that, due to the process chain, the manufacturing of surfaces with lower surface roughness is possible. This opens up the potential to manufacture functional surfaces by applying the new manufacturing approach. Hence, functional components that provide a geometry, which is realized by additive manufacturing, and additionally possess surfaces of high quality, which are received by forming, could be manufactured.
Regarding the mechanical properties, the potential of increasing hardness due to forming is shown. The hardness received after the DED-LB/M process is in accordance with the state of the art. For all specimens and process combinations of alternating additive manufacturing and forming, an increase in hardness in the AM material and also the substrate material is shown. The increase in hardness results from material flow, which is identified by metallographic analysis. Based on this, a material flow of the AM material and also the substrate material takes place, which explains the higher hardness after forming compared to the as-built condition. Even though a wide range of approaches exists to affect mechanical properties and metallographic structure by DED-LB/M, this opens up the potential to influence the mechanical properties within the process chain of additive manufacturing and forming. This potential could be used for manufacturing graded or tailored mechanical properties within an additively manufactured component—for example, by adapting the forming parameter as the forming depth, the force, or the tool itself.
Regarding these results on geometry and mechanical properties by the novel manufacturing process, part properties superior to solely additively manufactured material can be received. Hence, the new process approach enables the manufacturing of parts by exploiting the possibilities of both additive manufacturing and forming.
5. Summary and Outlook
In this work, a novel manufacturing approach of DED-LB/M and forming in an alternating process order is presented. In this context, a new fully coupled manufacturing system consisting of a DED-LB/M cell and a forming press, which are linked by a five-axis handling robot, is described in detail. After developing appropriate process parameters for DED-LB/M of 316L stainless steel, using a laser power of 600 W, a feed rate of 400 mm/min, and a powder mass flow of 3.94 g/min, cubical specimens were manufactured under variation of the number of layers and the number of process steps of DED-LB/M and forming in alternating process order. To evaluate the impact of the process chain on the resulting part properties, a comparison to the as-built condition was conducted. The evaluation of part properties was based on geometry and mechanical properties, including overall shape, roughness, topography, hardness, and metallographic structure, to analyze the material flow. It was shown that by forming, the surface was smoothed and the hardness could be increased due to work hardening. The surface roughness could be significantly reduced by forming compared to the as-built condition. This enables the manufacturing of functional surfaces of additively manufactured specimens due to forming. Moreover, these findings can be applied to other part geometries, since the flat forming punch is used to flatten the surface and also form the geometry of the AM material. Transferred to other geometries, it should be possible to receive a part geometry dependent on the shape of the forming tool. In this context, the AM process has the potential to realize a near net shape geometry, where the final shape is realized by a subsequent forming operation. The results presented in this work also indicate that besides the part geometry, the surface also can be influenced by the forming operation. This offers the opportunity to manufacture locally adapted surfaces within one part by applying subsequent forming.
Regarding the influence on mechanical properties, of special interest is that the increase in hardness could be maintained or even further increased after a second application of DED-LB/M and forming. This indicates that even though the DED-LB/M process induces elevated temperatures due to process heat, the hardness increase strongly depends on the forming operation. However, a detailed analysis of metallographic changes during the single manufacturing steps is needed. The results regarding the influence on the hardness offer the opportunity to use the process combination to realize locally adapted mechanical properties. In this context, parts could be processed that have areas where the hardness is increased by forming and areas where the hardness results from the AM process. Hence, to use this knowledge, investigations on parts manufactured by the alternating application of additive manufacturing and forming should take other materials into account to adjust the hardness locally.
Future investigation will focus on the analysis of mechanical properties after each process step to identify interactions between DED-LB/M and forming and to evaluate the impact on the part properties for each single process step. Since part properties strongly depend on material flow and also the substrate material is formed, the impact of the hardness of the substrate will be taken into account, which was not the content of this work. A higher hardness of the substrate material could result in a more effective work hardening of the AM material and, with that, higher increase in the hardness of the AM material. A correlation of the resulting specimen geometry with process parameters in DED-LB/M and forming will be derived to enable a controlled process order. Besides the forming force, certain forming depths will be investigated since the press module is charged with variable adjustable full stoppers to realize a defined part height. In this context, an analysis of interactions between the process steps of additive manufacturing and forming will be conducted. Furthermore, by forming after additive manufacturing, porosity could be decreased, which results from the DED-LB/M process. This has the potential to close pores in the AM material and improve part properties. Regarding the DED-LB/M process, a higher process velocity could be achieved when selecting parameters for higher process velocity, resulting in lower density. Through the shown iterative approach, the production of load-adapted products is possible.
Author Contributions
Conceptualization, T.P., J.H., D.R., O.H. and D.B.; methodology, T.P., J.H., D.R., O.H. and D.B.; formal analysis, T.P., J.H., D.R., O.H. and D.B.; investigation, T.P., J.H., D.R. and R.M.; resources, M.S. and M.M.; data curation, T.P., J.H. and D.R.; writing—original draft preparation, T.P., J.H., D.R. and R.M.; writing—review and editing, T.P., J.H., D.R., R.M., M.S. and M.M.; visualization, T.P., J.H., D.R. and R.M.; supervision, M.S. and M.M.; project administration, M.S. and M.M.; funding acquisition, M.S. and M.M. All authors have read and agreed to the published version of the manuscript.
Funding
This work was funded by the Deutsche Forschungsgemeinschaft (DFG, German Research Foundation) within the scope of Leibniz Price DFG ME2043/38-1.
Data Availability Statement
The data presented in this study are available on request from the corresponding author.
Conflicts of Interest
The authors declare no conflict of interest. The funders had no role in the design of the study; in the collection, analyses, or interpretation of data; in the writing of the manuscript; or in the decision to publish the results.
References
- Li, N.; Huang, S.; Zhang, G.; Qin, R.; Liu, W.; Xiong, H.; Shi, G.; Blackburn, J. Progress in additive manufacturing on new materials: A review. J. Mater. Sci. Technol. 2018, 35, 242–269. [Google Scholar] [CrossRef]
- Gasser, A.; Backes, G.; Kelbassa, I.; Weisheit, A.; Wissenbach, K. Laser Additive Manufacturing. Laser Tech. J. 2010, 7, 58–63. [Google Scholar] [CrossRef]
- Townsend, A.; Senin, N.; Blunt, L.; Leach, R.K.; Taylor, J.S. Surface texture metrology for metal additive manufacturing: A review. Precis. Eng. 2016, 46, 34–47. [Google Scholar] [CrossRef]
- Amine, T.; Newkirk, J.W.; Liou, F. An investigation of the effect of direct metal deposition parameters on the characteristics of the deposited layers. Case Stud. Therm. Eng. 2014, 3, 21–34. [Google Scholar] [CrossRef]
- Yadollahi, A.; Shamsaei, N.; Thompson, S.M.; Seely, D.W. Effects of process time interval and heat treatment on the mechanical and microstructural properties of direct laser deposited 316L stainless steel. Mater. Sci. Eng. A 2015, 644, 171–183. [Google Scholar] [CrossRef]
- Mahmood, K.; Pinkerton, A. Direct laser deposition with different types of 316L steel particle: A comparative study of final part properties. Proc. Inst. Mech. Eng. Part B J. Eng. Manuf. 2013, 227, 520–531. [Google Scholar] [CrossRef]
- Sciammarella, F.M.; Najafabadi, B.S. Processing Parameter DOE for 316L Using Directed Energy Deposition. J. Manuf. Mater. Process. 2018, 2, 61. [Google Scholar] [CrossRef]
- Safavi, M.S.; Bordbar-Khiabani, A.; Khalil-Allafi, J.; Mozafari, M.; Visai, L. Additive Manufacturing: An Opportunity for the Fabrication of Near-Net-Shape NiTi Implants. J. Manuf. Mater. Process. 2022, 6, 65. [Google Scholar] [CrossRef]
- Klocke, F.; Arntz, K.; Teli, M.; Winands, K.; Wegener, M.; Oliari, S. State-of-the-art Laser Additive Manufacturing for Hot-work Tool Steels. Procedia CIRP 2017, 63, 58–63. [Google Scholar] [CrossRef]
- Teli, M.; Klocke, F.; Arntz, K.; Winands, K. Effect of niobium on microstructure-property relationship in H11 hot-work tool steel via wire- and powder-based laser metal deposition. Int. J. Mechatron. Manuf. Syst. 2018, 11, 135. [Google Scholar] [CrossRef]
- Junker, D.; Fedorov, A.; Hentschel, O.; Schmidt, M.; Merklein, M. Connection Strength of Additive Manufactured Tool Elements to the Substrate. Met. Form. 2016, 716, 389–394. [Google Scholar] [CrossRef]
- Hölker-Jäger, R.; Tekkaya, A. Additive manufacture of tools and dies for metal forming. In Laser Additive Manufacturing; Woodhead Publishing: Sawston, UK, 2017; pp. 439–464. [Google Scholar] [CrossRef]
- Hölker, R.; Jäger, A.; Ben Khalifa, N.; Tekkaya, A.E. Controlling heat balance in hot aluminum extrusion by additive manufactured extrusion dies with conformal cooling channels. Int. J. Precis. Eng. Manuf. 2013, 14, 1487–1493. [Google Scholar] [CrossRef]
- Hafenecker, J.; Merklein, M. Investigations on sheet metal forming of hybrid parts in different stress states. Prod. Eng. Res. Dev. 2022, 1–18. [Google Scholar] [CrossRef]
- Pragana, J.P.M.; Cristino, V.A.M.; Bragança, I.M.F.; Silva, C.M.A.; Martins, P.A.F. Integration of Forming Operations on Hybrid Additive Manufacturing Systems Based on Fusion Welding. Int. J. Precis. Eng. Manuf.-Green Tech. 2019, 7, 595–607. [Google Scholar] [CrossRef]
- Rosenthal, S.; Platt, S.; Hölker-Jäger, R.; Gies, S.; Kleszczynski, S.; Tekkaya, A.E.; Witt, G. Forming properties of additively manufactured monolithic Hastelloy X sheets. Mater. Sci. Eng. A 2019, 753, 300–316. [Google Scholar] [CrossRef]
- Sizova, I.; Hirtler, M.; Günther, M.; Bambach, M. Wire-arc additive manufacturing of pre-forms for forging of a Ti–6Al–4V turbine blade. AIP Conf. Proc. 2019, 2113, 150017. [Google Scholar] [CrossRef]
- Gu, J.; Ding, J.; Williams, S.W.; Gu, H.; Bai, J.; Zhai, Y.; Ma, P. The strengthening effect of inter-layer cold working and post-deposition heat treatment on the additively manufactured Al–6.3Cu alloy. Mater. Sci. Eng. A 2016, 651, 18–26. [Google Scholar] [CrossRef]
- Schaub, A.; Ahuja, B.; Karg, M.; Schmidt, M.; Merklein, M. Fabrication and Characterization of Laser Beam Melted Ti-6Al-4V Geometries on Sheet Metal. In Proceedings of the DDMC 2014 Fraunhofer Direct Digital Manufacturing Conference. DDMC 2014 Fraunhofer Direct Digital Manufacturing Conference, Berlin, Germany, 12–13 March 2013. [Google Scholar]
- Schaub, A. Grundlagenwissenschaftliche Untersuchung der Kombinierten Prozesskette aus Umformen und Additive Fertigung; FAU University Press: Boca Raton, FL, USA, 2019. [Google Scholar]
- Bambach, M.; Sviridov, A.; Weisheit, A.; Schleifenbaum, J.H. Case Studies on Local Reinforcement of Sheet Metal Components by Laser Additive Manufacturing. Metals 2017, 7, 113. [Google Scholar] [CrossRef]
- Bambach, M. Recent trends in metal forming: From process simulation and microstructure control in classical forming processes to hybrid combinations between forming and additive manufacturing. J. Mach. Eng. 2016, 16, 5–17. [Google Scholar]
- Hirtler, M.; Jedynak, A.; Sydow, B.; Sviridov, A.; Bambach, M. Investigation of microstructure and hardness of a rib geometry produced by metal forming and wire-arc additive manufacturing. MATEC Web Conf. 2018, 190, 02005. [Google Scholar] [CrossRef]
- Hölker, R.; Khalifa, N.B.; Tekkaya, A.E. Method and Device for the Combined Production of Components by Means of Incre-Mental Sheet Metal Forming and Additive Processes in One Setting. Patent DE102014014202A1, 24 March 2016. [Google Scholar]
- Bambach, M.; Fischer, G.; Röhrich, T. Process and Plant for Combined Additive and Forming Production. Patent DE102016111047B3, 26 October 2017. [Google Scholar]
- Klocke, F. Manufacturing Processes 4; Springer: Berlin, Germany, 2013. [Google Scholar]
Disclaimer/Publisher’s Note: The statements, opinions and data contained in all publications are solely those of the individual author(s) and contributor(s) and not of MDPI and/or the editor(s). MDPI and/or the editor(s) disclaim responsibility for any injury to people or property resulting from any ideas, methods, instructions or products referred to in the content. |
© 2023 by the authors. Licensee MDPI, Basel, Switzerland. This article is an open access article distributed under the terms and conditions of the Creative Commons Attribution (CC BY) license (https://creativecommons.org/licenses/by/4.0/).
