Article

Experimental and Numerical Investigation of the Structural Behavior of Steel Cylindrical Shells Under Lateral Load Considering Fixed and Frictional Boundary Conditions

1
Department of Marine Design Convergence Engineering, Pukyong National University, Busan 48513, Republic of Korea
2
Department of Naval Architecture and Marine Systems Engineering, Pukyong National University, Busan 48513, Republic of Korea
3
Department of Marine Environment and Engineering, National Sun Yat-sen University, Kaohsiung 80424, Taiwan
*
Authors to whom correspondence should be addressed.
J. Mar. Sci. Eng. 2025, 13(11), 2179; https://doi.org/10.3390/jmse13112179
Submission received: 13 October 2025 / Revised: 7 November 2025 / Accepted: 12 November 2025 / Published: 17 November 2025

Abstract

Wind turbine tower structures composed of slender steel cylindrical shells mainly serve as primary load-bearing components and can be particularly susceptible to buckling due to their thin walls. Ensuring the structural safety of wind turbines therefore requires a clear understanding of the behavior of slender cylindrical shells, which is influenced by material properties, boundary conditions, and loading scenarios. This study experimentally investigates the structural responses of scaled cylindrical structures representing wind turbine towers beyond the proportional limit including the ultimate and post-ultimate strength depending on boundary conditions (fully and frictionally supported). Lateral loads were applied at the top of the specimens to simulate concentrated loads transferred from wind forces on the blades. Furthermore, a numerical model was developed to analyze the structural behavior of the tower validated against the experimental test results. The results provide valuable insights into optimizing the structural design of both onshore and offshore wind turbine towers, contributing to enhanced safety and performance under varying load conditions.

1. Introduction

Global energy demand continues to grow rapidly, and the capacity of renewable energy is also expanding rapidly as shown in Figure 1 (left) [1]. In particular, wind energy accounted for the second-largest share of renewable electricity generation in 2024, with a rapid growth rate every year as illustrated in Figure 1 (right). The wind turbine tower is a key structural component that supports the self-weight and operational loads of the entire system, which must be designed to withstand both static and dynamic loading. Buckling and collapse accidents involving wind turbine towers have been reported frequently, and the continuous trend toward larger turbines suggests that structural failures of tower structures may lead to more severe consequences than other types of accidents [2]. Most towers are currently designed using the allowable stress design method, which applies safety factors to keep stresses below the material yield strength. However, due to the very thin shells of wind turbine towers relative to their height and diameter, structural failure may occur at loads below the yield strength due to buckling and localized stress concentrations. Therefore, to ensure a safer tower design, it is essential to understand the structural behavior of the slender steel cylindrical shell, including buckling and ultimate strength, under the relevant loading conditions.
Wind turbine towers are subjected to typical loading conditions, including self-weight (e.g., the weight of the rotor, nacelle, and tower), load on rotor (e.g., lateral concentrated load from wind acting on the rotor), aerodynamic wind load (e.g., lateral distributed load from wind acting on the tower), and torque (e.g., torsional load at the top of the tower caused by blade rotation). Among these, the lateral concentrated load, particularly under extreme environmental conditions, is considered a primary factor influencing buckling and collapse. Accordingly, several numerical studies have been conducted to develop analytical methods for predicting the ultimate behavior of towers under such loading conditions. Lee et al. [3] proposed a nonlinear finite element modelling approach that accounts for the ultimate limit state (ULS) under various loading conditions, including concentrated loads acting on the rotor, for an actual tower structure with openings. Santos et al. [4] evaluated the ultimate strength of a 10 MW steel tower with a door opening and collar stiffeners, considering variations in the initial imperfection ratio.
To ensure the reliability of finite element analysis (FEA) methods, experimental studies have been conducted using scaled steel cylindrical shells representing wind turbine towers. Four representative studies were identified, and the scaled specimen dimensions and test conditions in each study are summarized in Table 1 to highlight the characteristics of scaled testing. These tests were conducted to examine lateral loading and the combined effects of bending and compression resulting from it.
Although significant progress has been made, experimental and numerical studies addressing the ultimate behavior of cylindrical structures associated with wind turbine towers remain scarce, especially in exploring the global response of complete steel shell subjected to loads applied at higher elevations. In contrast to previous works, this study adopts scaled models with a deliberately slender configuration, achieving a high L/D ratio that more accurately captures the thin-walled characteristics of real wind turbine towers. Moreover, while longer models are often tested in a horizontal orientation for practical reasons, our experiments were conducted with the models erected vertically, faithfully replicating the actual tower condition.
As summarized in Table 1, previous studies have primarily adopted fully supported boundary conditions. However, in practice, the tower–foundation interface cannot be regarded as an ideal fully clamped joint. Bolts, grout, and contact friction collectively render the connection semi-rigid rather than perfectly fixed. In particular, several previous studies have highlighted friction as a primary load-bearing mechanism between shells in monopile structures and tower connections. Veljkovic et al. [9] proposed a slip joint using friction connections with long open slotted holes instead of separate flanges and experimentally validated its structural performance. Subsequently, Heistermann et al. [10] evaluated the influence of execution tolerances on the structural reliability of such slip joints through FEA. Additionally, in the context of offshore wind turbines, frictional slip at the grouted joint connecting the tower and the monopile structure is a critical factor influencing structural reliability [11]. In this regard, Islam [12,13] proposed a pile-in-pile (PIP) slip joint as an alternative to conventional tubular connections and discussed its structural advantages. Considering these studies, understanding the ultimate structural behavior of shells subjected to friction is essential.
Previous studies [9,10] investigated frictional behavior between joined structural components, where friction served as the main mechanism transferring loads across the connection interface. In contrast, the present study focuses on the frictional restraint acting at the support (bottom) of a single slender cylindrical shell which governs the global deformation and buckling behavior of the entire structure. This distinction highlights that, while earlier research emphasized interfacial friction between structures, our work experimentally quantifies how boundary friction within a single structural system influences its ultimate and post-buckling responses. By observing the structural behavior as it approaches the ultimate response under frictional resistance, the study provides fundamental insight into friction-induced deformation and strength characteristics, which can further support localized analyses of frictional slip and contact performance in actual tower connections.
Thus, this study experimentally investigated the buckling and ultimate behavior of a slender steel cylindrical shell structure representing a wind turbine tower under lateral concentrated loading at the upper part, highlighting the influence of boundary conditions. The two types of boundary conditions used in the experiments are as follows. The first condition is a fully supported configuration, in which the bottom of the specimen was completely welded to the lower plate. The second condition is a friction-supported configuration, which allows for the investigation of frictional slip effects. By comparing these two cases, the study evaluated both the ultimate response under idealized full fixation and the post-elastic behavior where friction governs the load transfer mechanism.
Based on the experimental results, the structural behavior was numerically analyzed using the finite element (FE) software ANSYS 2025 R1 [14], leading to the development and validation of a nonlinear FEA technique applicable to actual tower conditions. Additionally, numerical analyses were conducted to investigate the effects of loading type, friction coefficient and contact area, and initial geometric imperfection, providing further insight into the governing factors that influence the global response and ultimate strength of the structure. Through this combined experimental and numerical approach, the study aims to enhance the safety and reliability of wind turbine tower design and provide a foundation for the practical application of nonlinear FEA techniques.

2. Target Structure and Test Scenarios

This study used a cylindrical structure which can represent the wind turbine tower as the target structure. Because commercially available cylindrical structures have a much smaller ratio of the diameter to the thickness (D/t) compared to existing wind turbines, the test specimen, shown in Figure 2, was manufactured by roll forming and welding from a flat plate of carbon steel, the properties of which are listed in Table 2. To minimize geometric imperfections (e.g., out-of-roundness), the roll forming process was performed multiple times.
The dimensions of the scaled specimens were determined by considering the limitations of the test facility, including the maximum actuator load and stroke capacity. Under these constraints, it was not feasible to simultaneously match the L/D and D/t ratios of full-scale wind turbine towers. Increasing L/D by reducing the diameter would have produced unrealistically small D/t values, while increasing D/t by using thinner plates would have caused welding difficulties, and large initial imperfections such as deflection and residual stress. To balance these competing factors, preliminary FEA was carried out to select an appropriate combination of diameter and thickness capable of reproducing the representative global buckling and post-ultimate behavior within the capacity of the test setup.
Main dimensions and test scenarios are presented in Table 3. Roundness represents the deviation from a perfect circle and is quantified by the difference between the largest and smallest diameters. As noted in Section 1, two support conditions were considered, fully and frictionally supported, which were implemented by welding (W) and jigs (J), respectively.

3. Test Setup

Before setting up a test facility, preliminary analyses using analytical and numerical approaches were concisely performed to determine the minimum required load that can demonstrate the post-ultimate behavior of the specimen. Consequently, an MTS actuator system with a maximum load capacity of 250 kN and displacement of 100 mm was selected. While wind loads typically fluctuate, a static loading condition was adopted to examine the structural ultimate behavior and post-buckling characteristics under extreme load scenarios. Figure 3 illustrates the test setup and its schematic view. The actuator applied a lateral force at the top of the specimen to simulate the wind load transferred to the tower top in the form of a concentrated force. The specimen was tested under two support conditions: fully supported by welding and frictionally supported by jigs, as shown in Figure 4. In the frictional support case, the jigs were firmly clamped to ensure adequate frictional resistance, thereby allowing the effects of friction and slip to be investigated. Although this setup does not fully reproduce the actual contact condition of a tower base, it enables investigation of how frictional restraint influences deformation and ultimate capacity. Load and displacement were measured using the actuator’s built-in load cell and a Linear Variable Differential Transformer (LVDT). For the fully supported condition, displacement-controlled loading was applied at a rate of 1 mm/min up to the ultimate strength and 5 mm/min thereafter, while for the frictionally supported condition, a loading rate of 3 mm/min was applied.
Considering the 5 mm gage length, the corresponding strain rates were approximately 0.0033/s (fully supported) and 0.01/s (frictionally supported), which fall within the static to quasi-static range. The slower rate for the fully supported case enabled a clearer observation of deformation and post-buckling behavior, whereas the slightly higher rate for the frictionally supported case helped maintain stable loading by reducing slip-induced fluctuations at the contact surface. Under these conditions, strain-rate sensitivity of the steel is negligible, and no noticeable frictional heating occurs, since such thermal effects are known to develop only when the relative sliding velocity exceeds approximately 1 mm/s (60 mm/min). Hence, both rate-dependent and friction-induced thermal effects were ignored in this study.

4. Results of Experimental Test

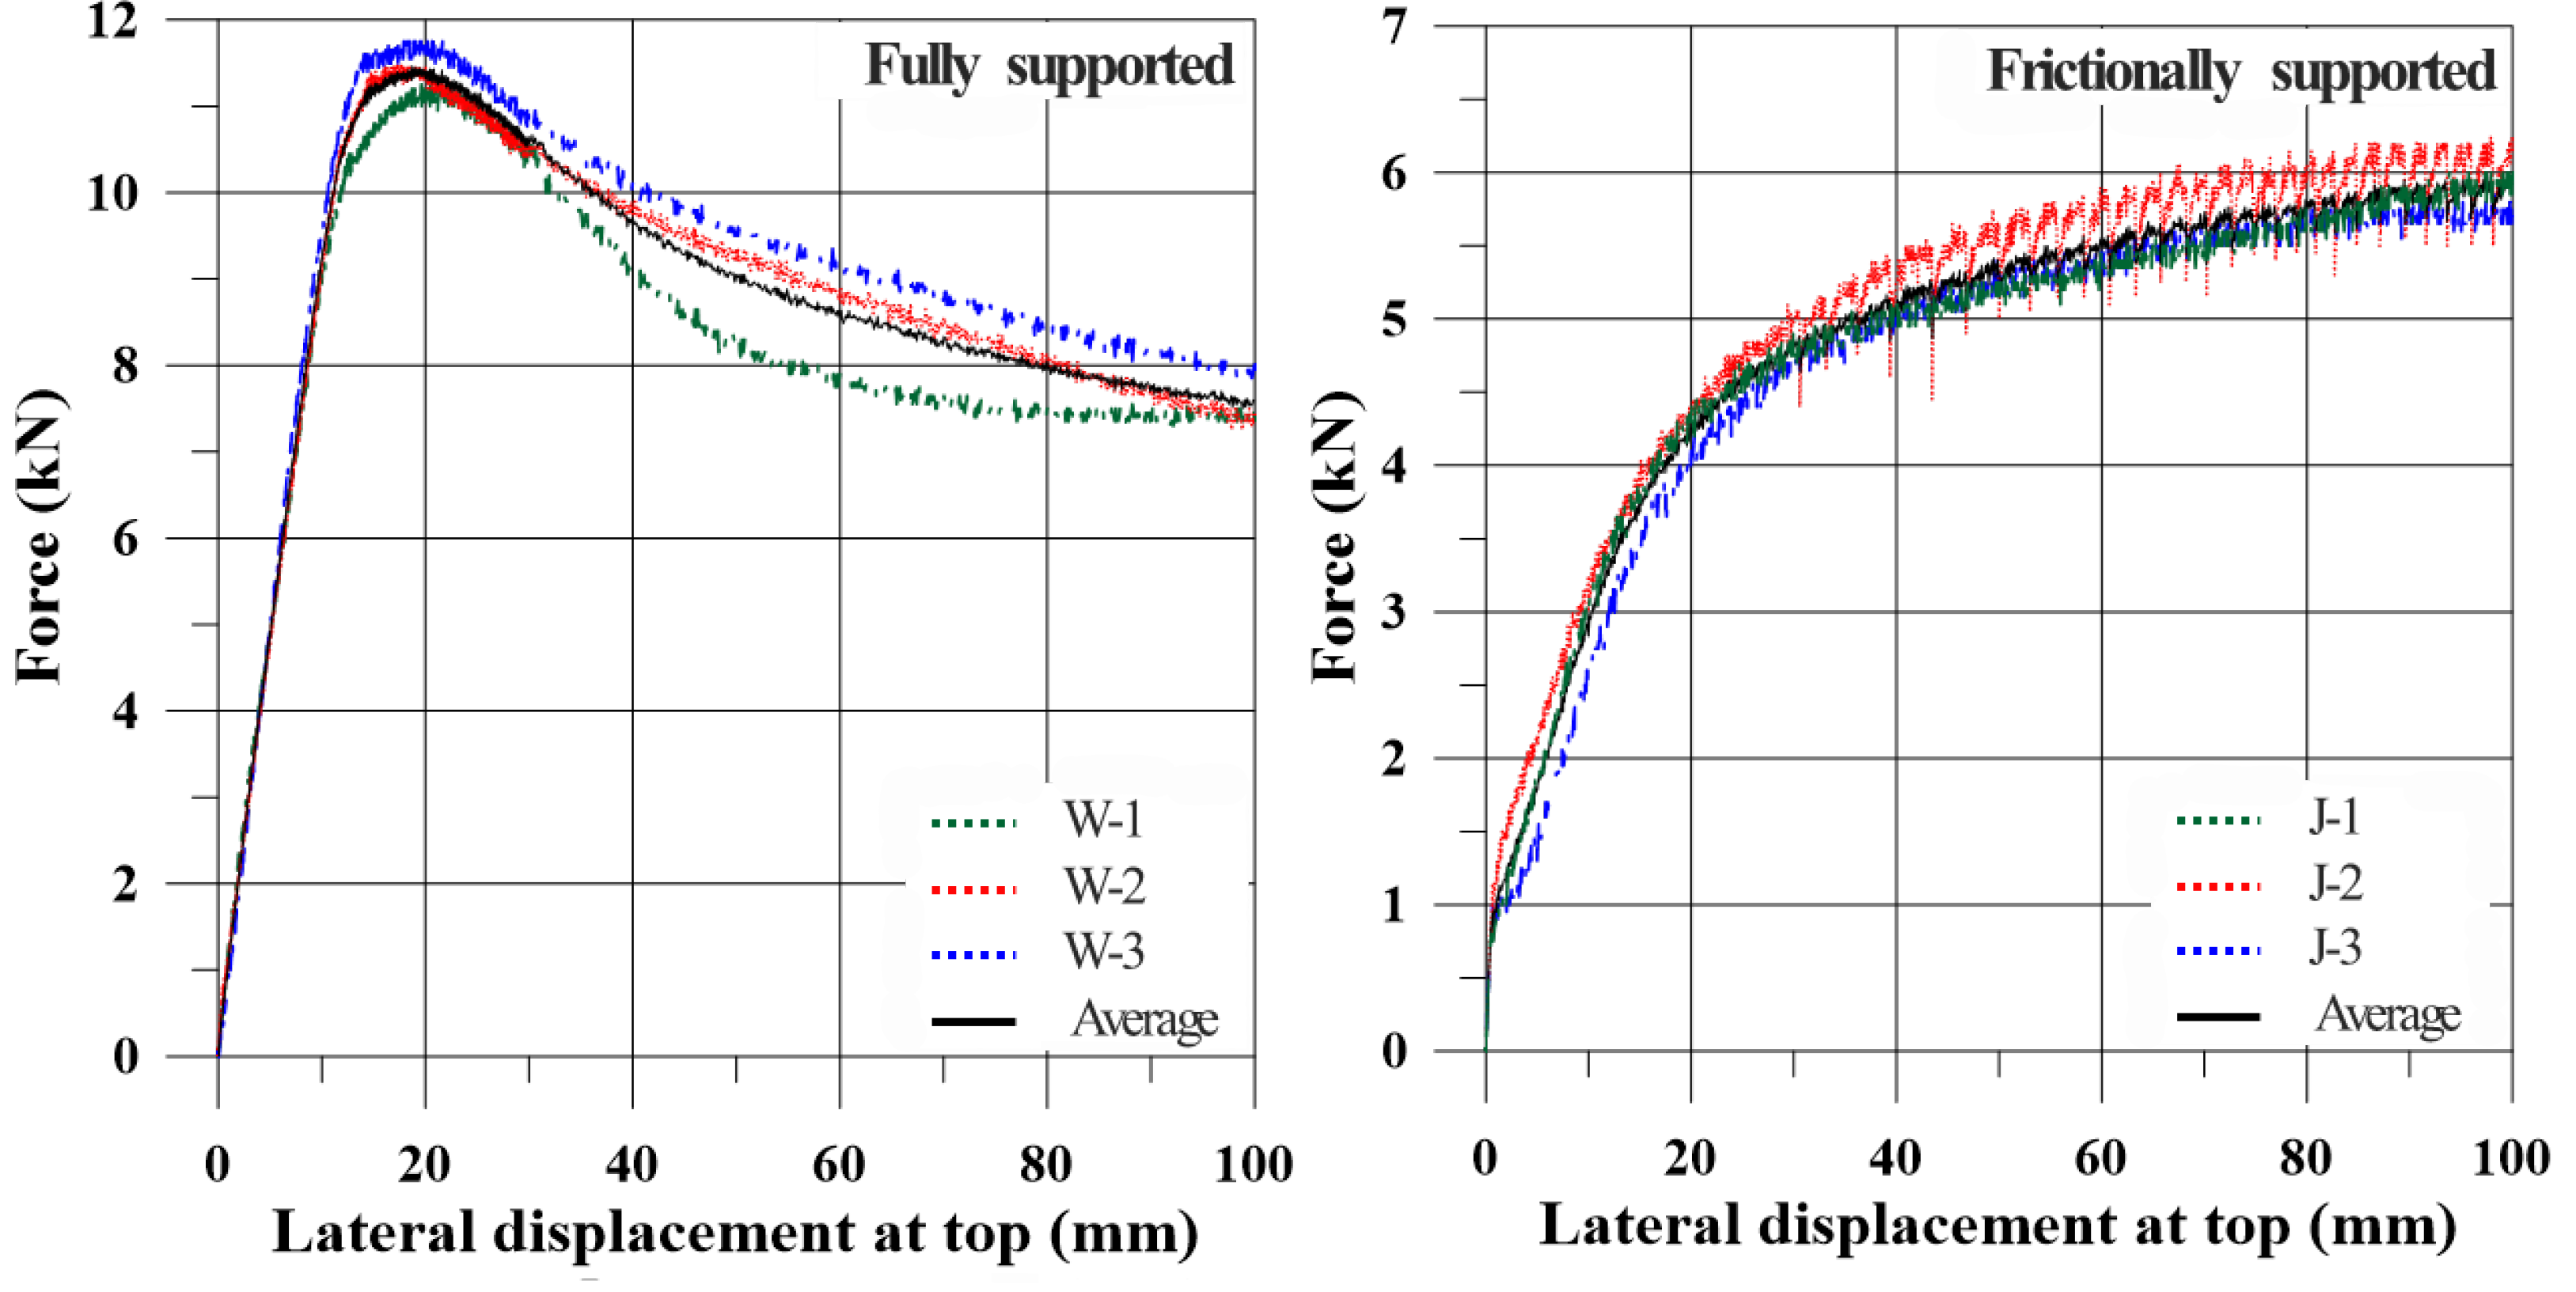
Figure 5 presents the experimentally obtained structural responses of the cylindrical shell specimens under fully and frictionally supported conditions. The data were recorded at a rate of 1 Hz, providing sufficient resolution to capture both the ultimate and post-ultimate behavior. As shown in Figure 5 (left), the fully supported specimens exhibited a distinct ultimate strength point followed by pronounced post-ultimate behavior. In contrast, the frictionally supported specimens showed a more gradual load–displacement response without a clearly defined ultimate point. Moreover, their peak load was significantly lower than that of the fully supported specimens (Figure 5 (right)).
The sharper post-ultimate softening observed for specimen W-1 compared with W-2 and W-3 can be explained by slight variations introduced during fabrication. Although all specimens shared the same nominal geometry, they were manufactured from flat steel plates that were roll-formed and welded, which may have produced initial geometric imperfections near the weld seam. Moreover, differences in weld quality and local stiffness could have affected the stress redistribution and post-buckling stiffness.
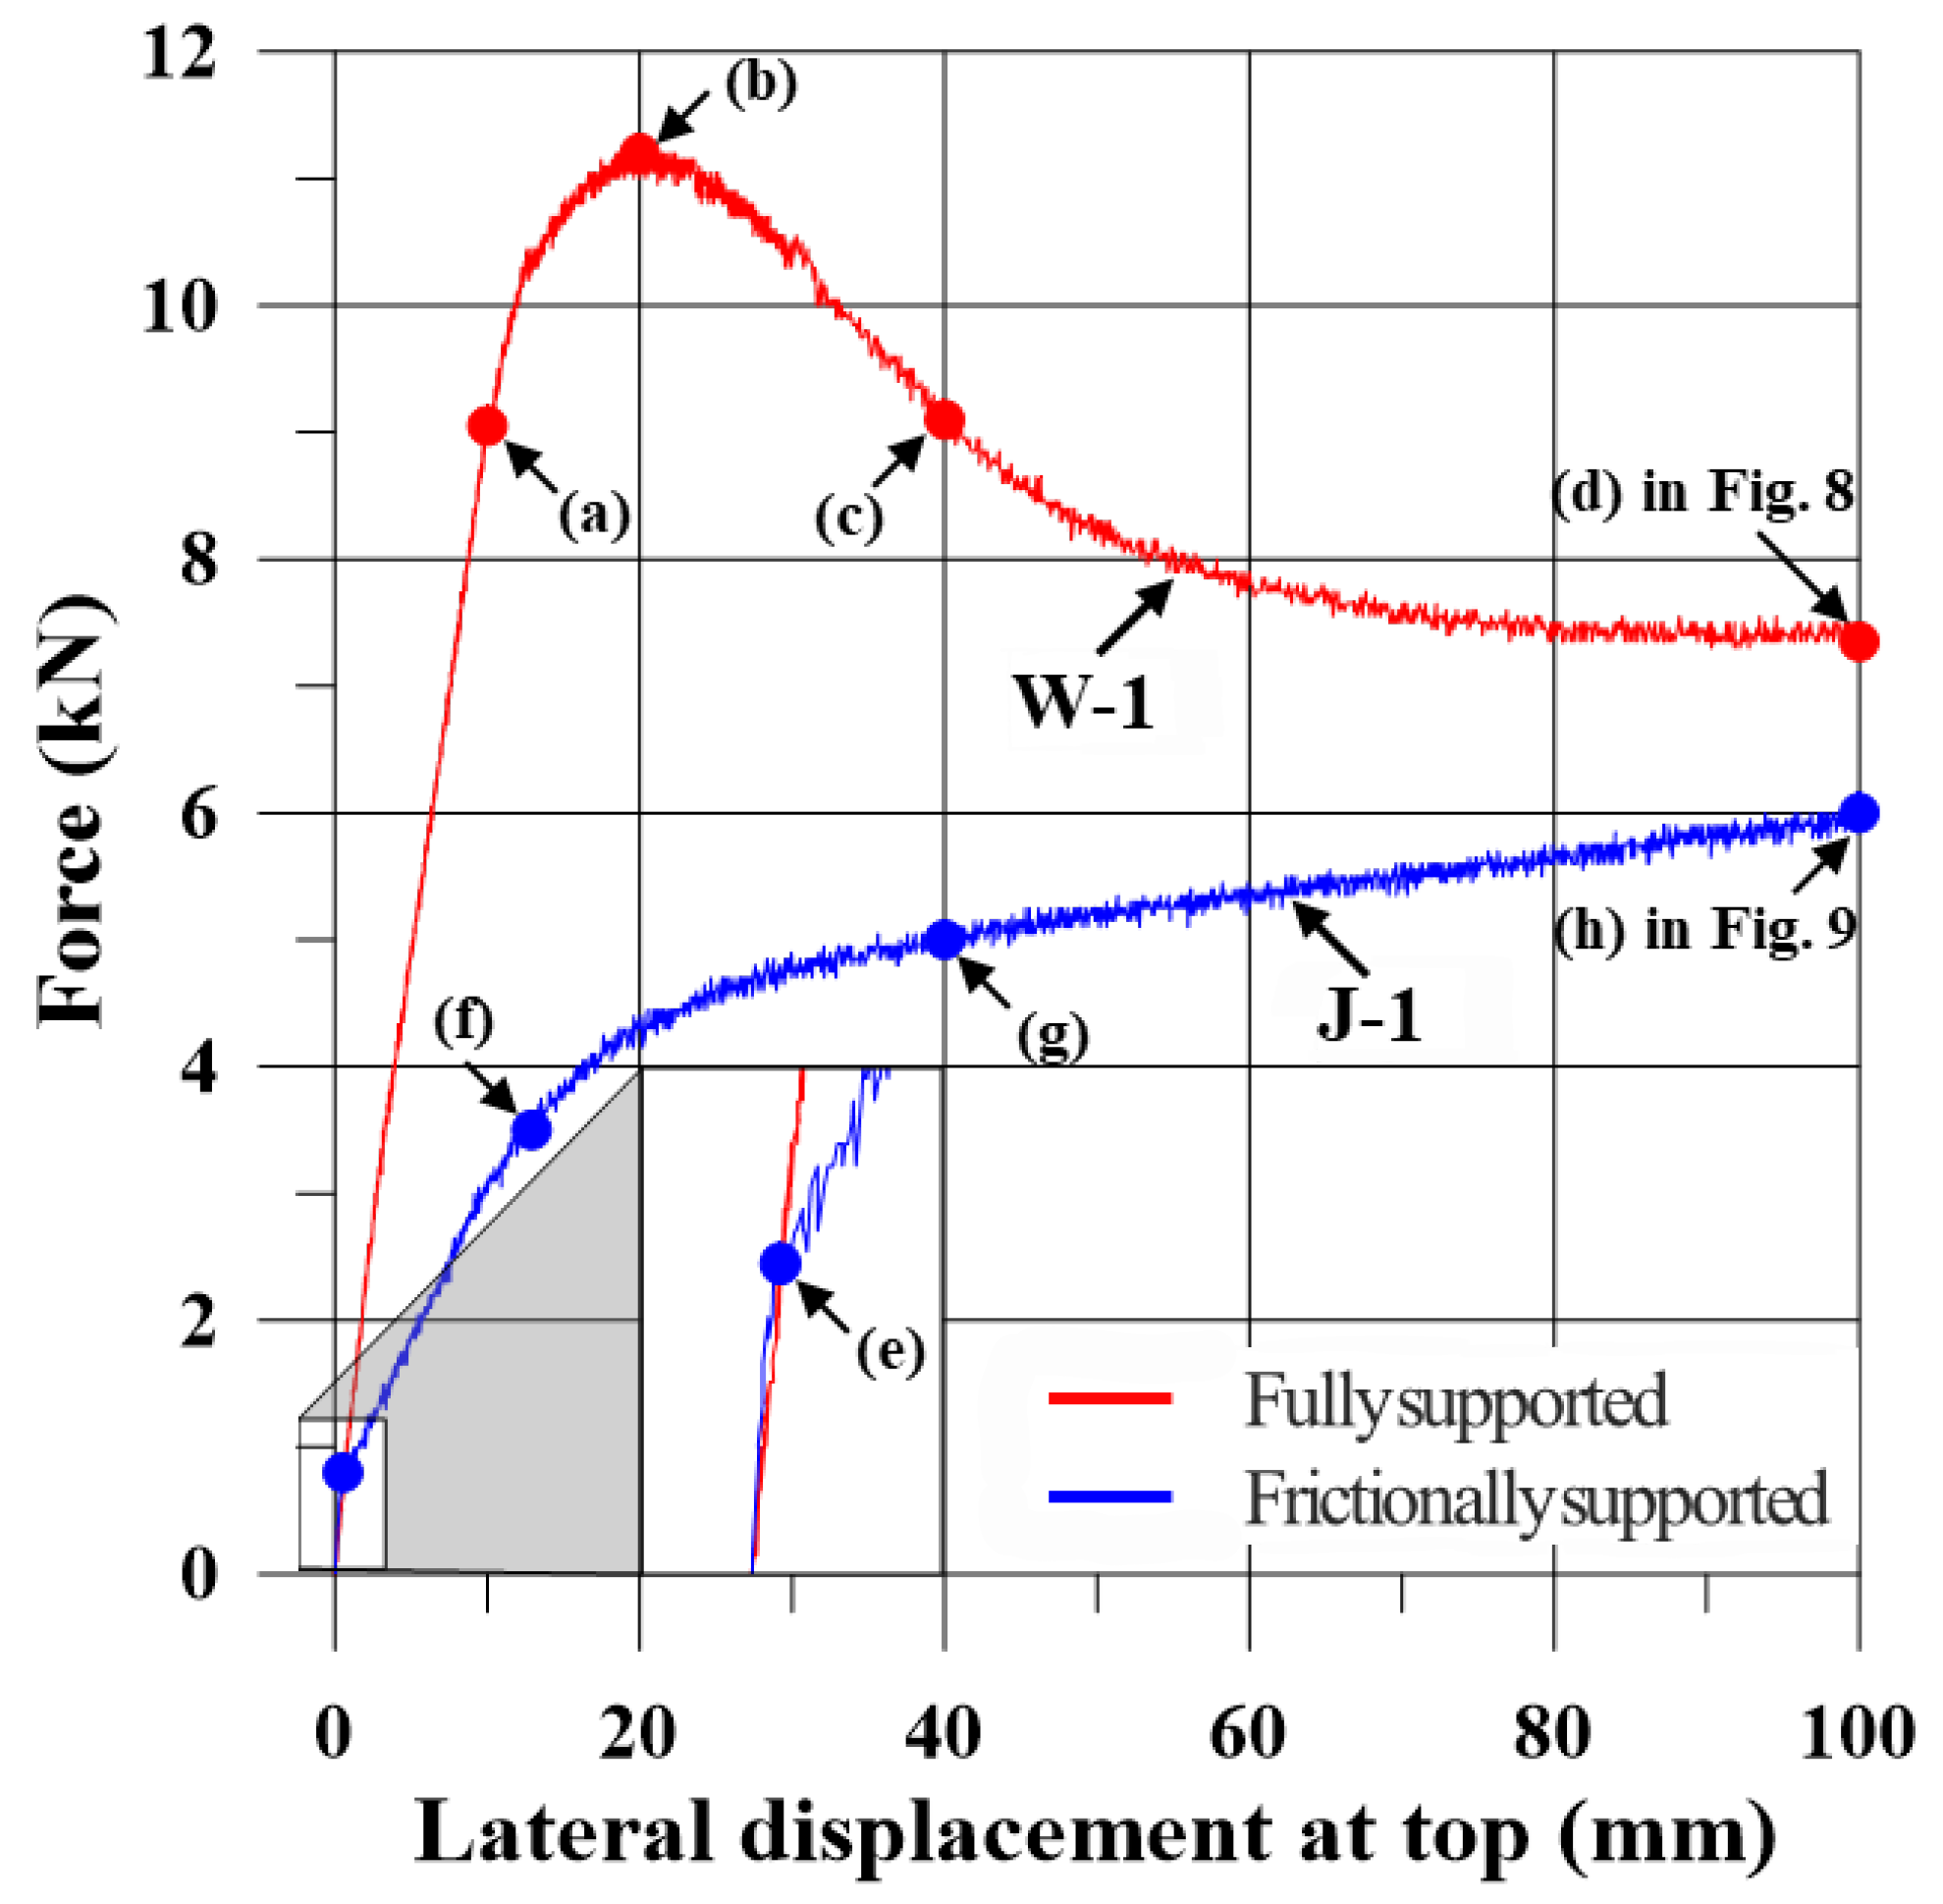
The influence of boundary conditions on the structural response was explicitly observed by comparing the behaviors shown in Figure 6, Figure 7 and Figure 8. Figure 6 presents the force–displacement relationships of specimens supported by welding and jig. Additionally, Figure 7 and Figure 8 present global displacements at specific loading conditions indicated in Figure 6, while the specific local bucking regions are provided in Figure 9. The states of each marked point were defined as follows.
-
For the welded specimen (fully supported):
  • (a) Proportional limit;
  • (b) Ultimate strength;
  • (c) Post-ultimate state;
  • (d) End of the test.
-
For the jig-supported specimen (frictionally supported):
  • (e) Onset of sliding (static friction limit exceeded);
  • (f) Maximum frictional resistance (transition to sliding-dominated behavior);
  • (g) Nearly constant, low tangent stiffness due to slipping, accompanied by progressive localized buckling near the jig contact area;
  • (h) The end of the test.
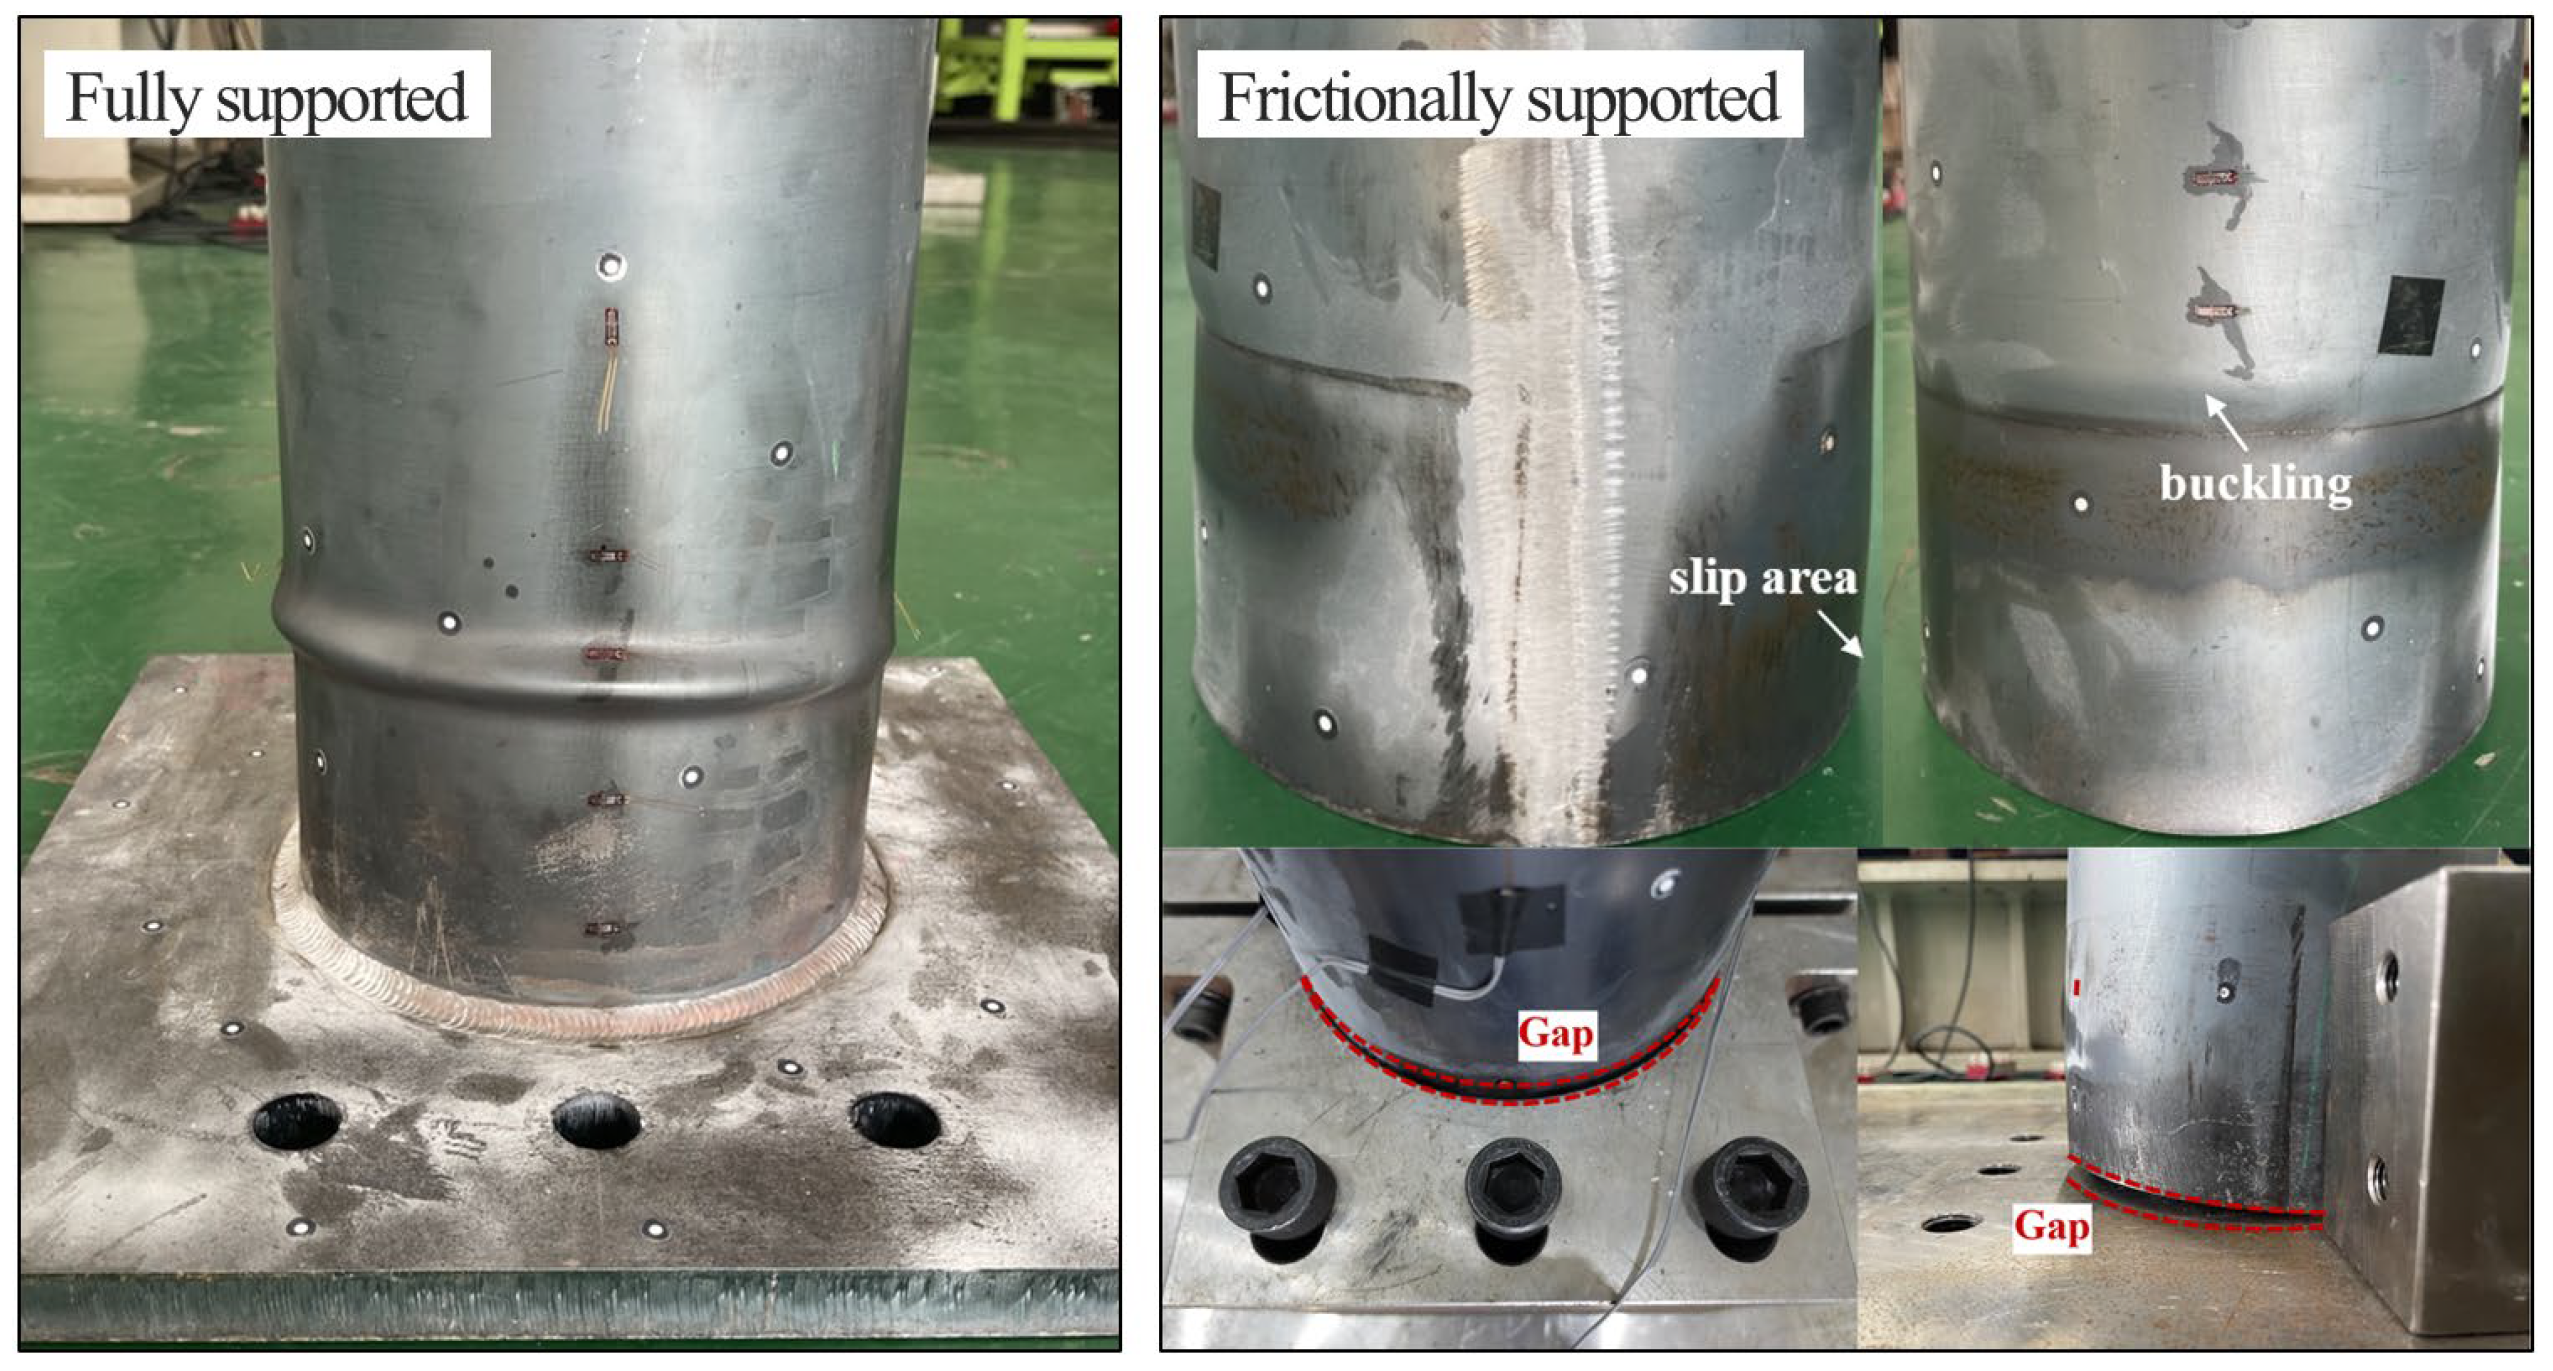
At a displacement of 20 mm, the W-1 specimen reached an ultimate strength of 11.2 kN at point (b) and then experienced a decrease in load. At the same displacement, the J-1 specimen reached 4.4 kN after transitioning to sliding-dominated behavior between points (f) and (g). In the friction-supported model, the structural response can vary depending on the clamping force and the resulting frictional resistance generated by the bolts between the jig and the specimen. In this study, a 100 mm-high jig was installed from the bottom of the specimen to ensure experimental safety and to examine the effect of sufficient frictional resistance. As a result, an approximately 61% difference in strength was observed between the two support conditions, which is attributed to different deformation mechanisms. In the fully supported model, large deformation from buckling that induces nonlinear structural behavior developed. In contrast, in the friction-supported model, gradual plastic deformation occurred at the contact surface with the jig and large deformation caused by buckling was rarely observed. Furthermore, the load increase beyond point (g) may have resulted from the combined influence of changes in frictional contact area due to slip and the vertical compressive force transmitted through the lower contact between the model and the base plate. This implies that the strength of the frictionally supported specimen depends on the effective frictional contact area, since a larger contact area provides greater frictional resistance while a smaller area reduces it. Figure 9 shows the final deformed shapes of the specimens after testing, rather than the instantaneous deformation at the onset of buckling. In the fully supported specimen, pronounced buckling developed near the lower region. In contrast, the frictionally supported specimen exhibited slip marks and progressive localized buckling near the jig contact, accompanied by a visible gap formation at the base.
Table 4 compares the maximum load-carrying capacity and the corresponding top displacement of the specimens. Both support conditions were tested up to the displacement limit of 100 mm imposed by the facility. In the fully supported specimens, a distinct ultimate load was reached followed by load reduction, whereas in the frictionally supported specimens, the maximum load was attained at the displacement limit without a clearly defined ultimate point. The measured maximum loading capacity showed minimal variation, with coefficients of variation (COVs) of 2.17% for the fully supported case and 3.85% for the frictionally supported case, confirming the reliability of the experimental results.

5. Development of Finite Element Model

5.1. Material Properties and Geometric Information

This section describes the nonlinear FEA performed to examine the structural response of the tower model under two distinct boundary conditions: a fully supported condition and a frictionally supported condition. A common modeling framework was applied to both boundary-condition models, in which identical material properties, mesh density, and geometric details were used to ensure that the effect of boundary interaction could be independently assessed.
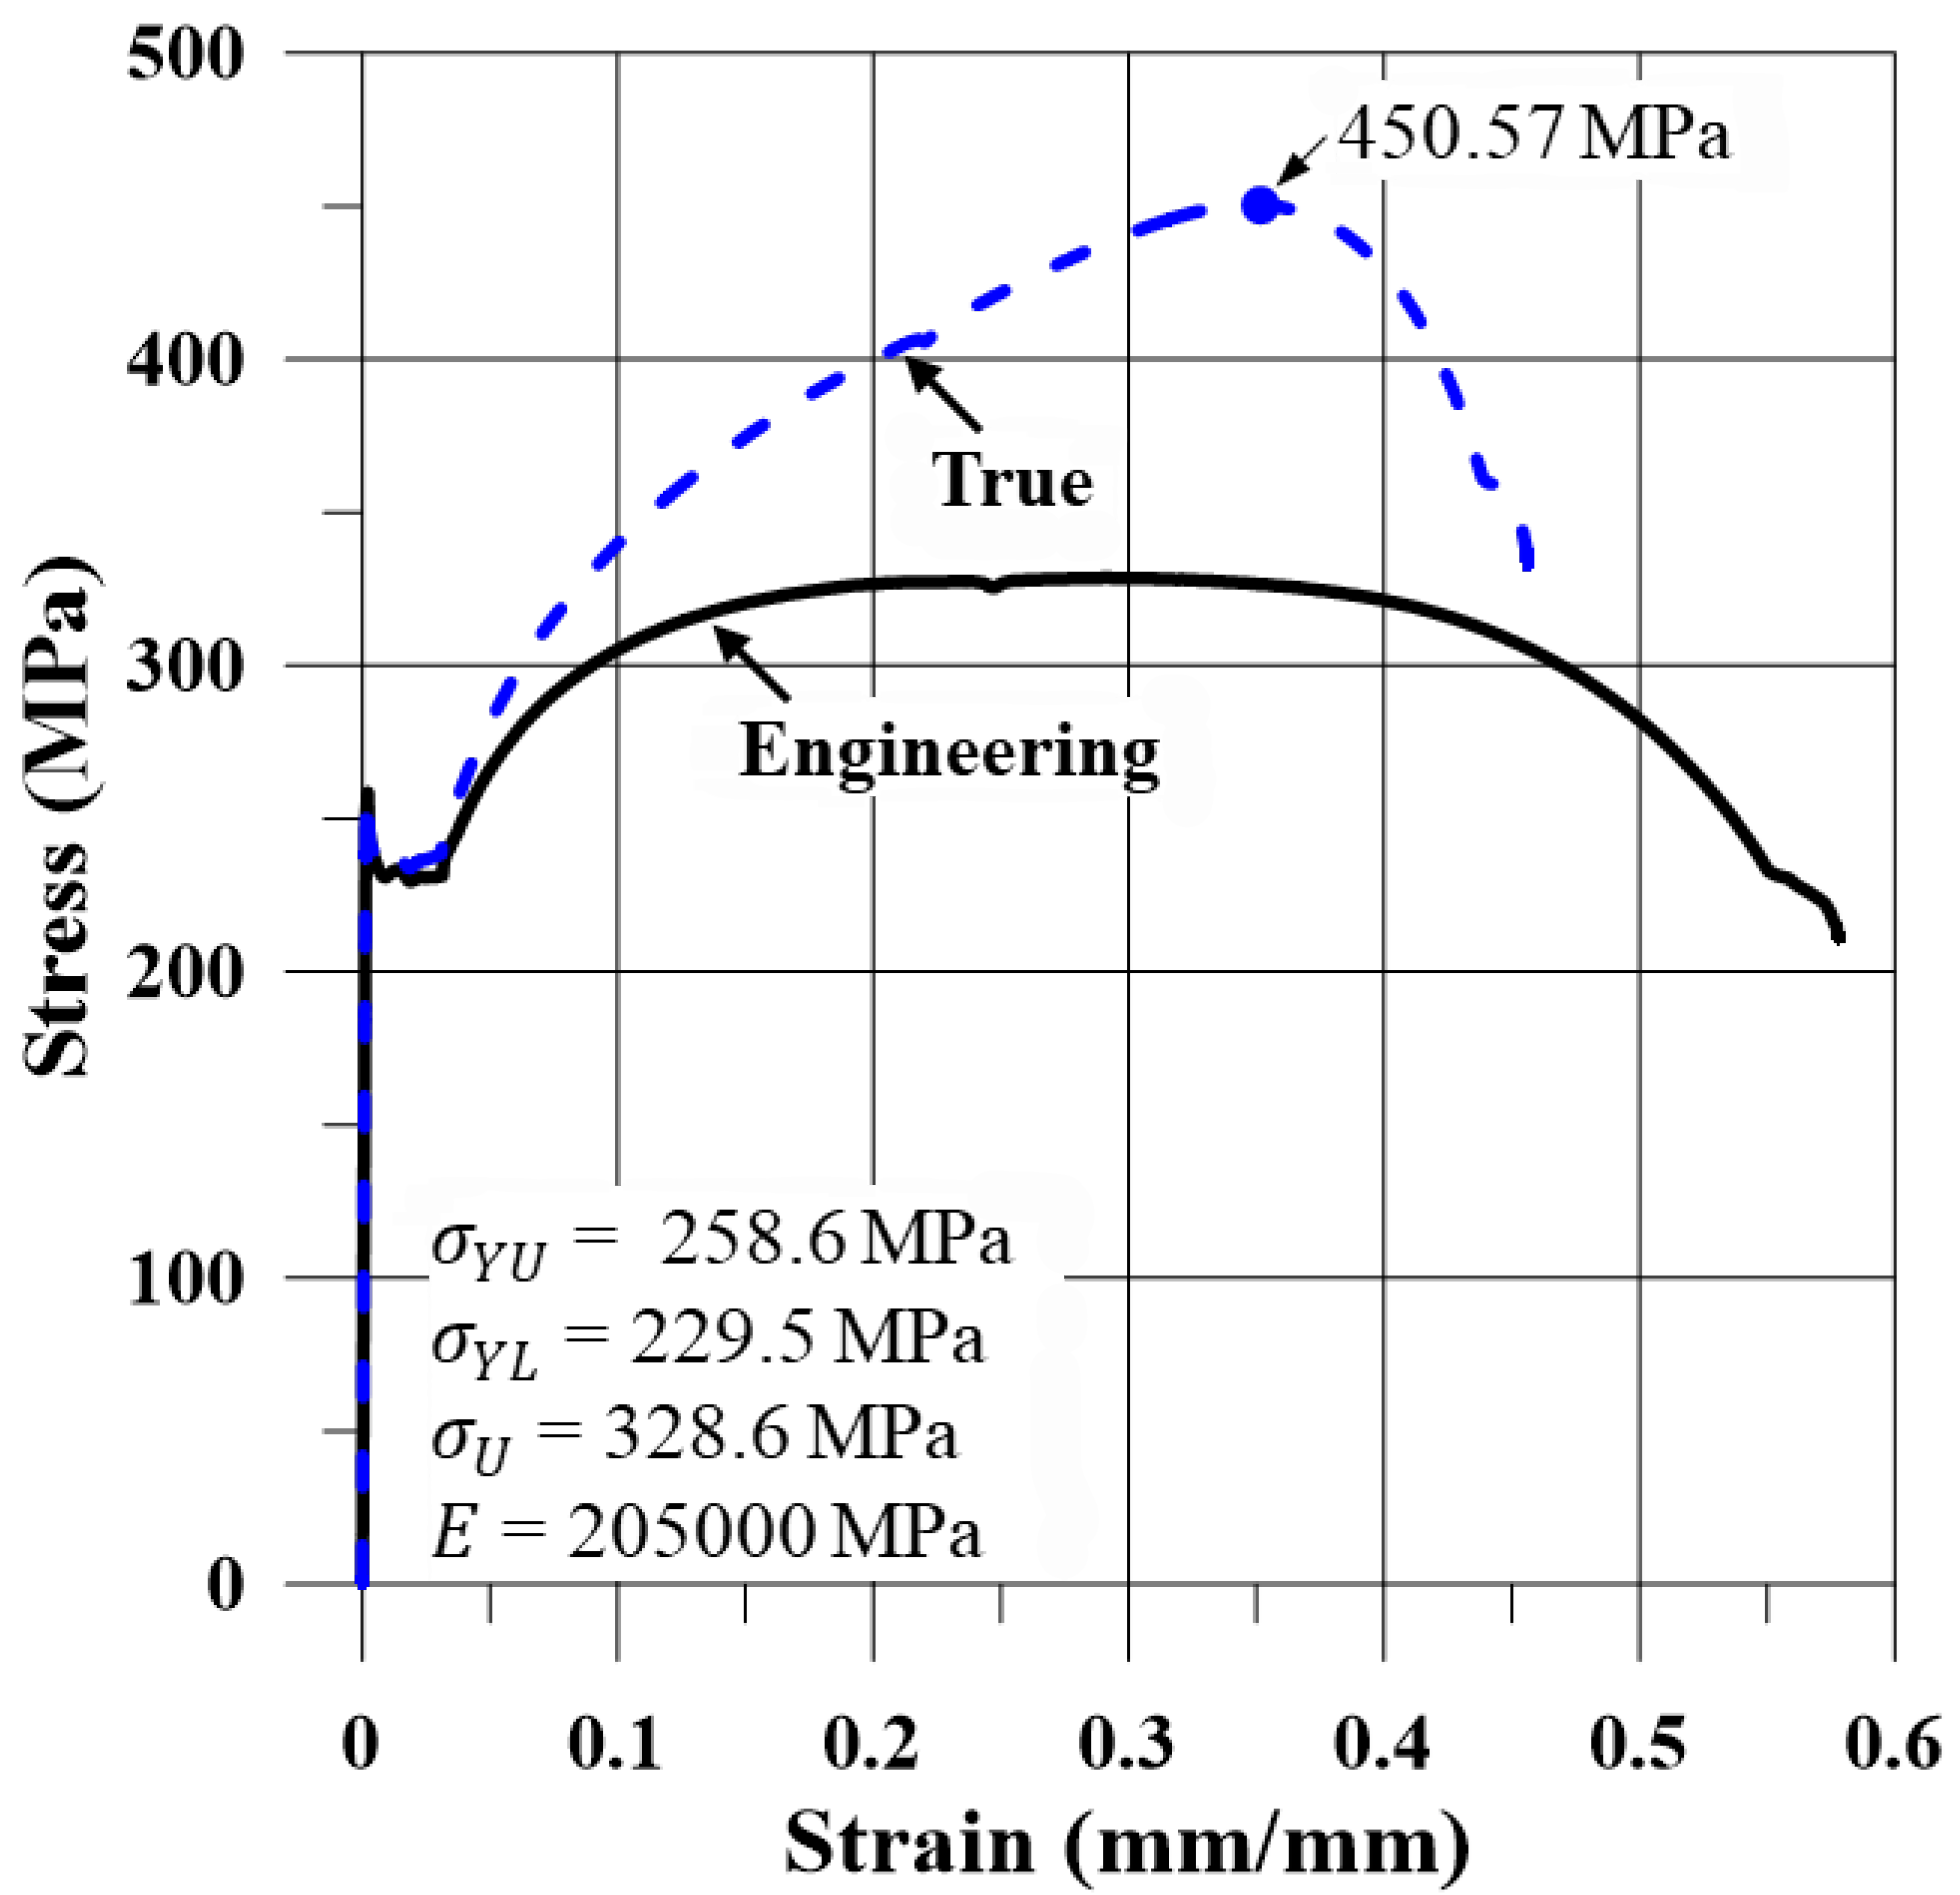
To enhance the material modeling accuracy, a tensile test specimen was extracted from the same plate material that was used to fabricate the cylindrical structures. The main material properties are summarized in Table 2. A multi-linear elasto-plastic material model was defined using the true stress–strain curve obtained from the tensile coupon test (shown in Figure 10), and the von-Mises yield criterion with isotropic hardening was adopted to represent the post-yield response.
In addition, the geometry of the specimens was directly constructed from 3D surface scans to incorporate the as-built dimensional features and fabrication-induced imperfections of the actual models. As illustrated in Figure 11, 3D scanning was performed to capture the precise geometry of the specimen, and the data were used to evaluate the circularity deviation of the cylindrical surface. This scanning was conducted prior to the experimental tests to capture pretest geometric imperfections.
Based on the scanned geometry, a FE model reflecting the measured imperfection was generated and subsequently applied to the FE analysis. The model employed four-node shell elements capable of large-deflection analysis (Shell 181 formulation in ANSYS 2025 R1) [14], while the supporting jigs and plate were defined as rigid bodies. The detailed boundary conditions for each model are as follows:
-
Fully supported model:
  • Bonded contact between the specimen and the welding plate, and between the welding plate and the top of the floor;
  • Rigid condition for the welding line, instead of using solid elements;
  • Fixed conditions at the bottom line of the floor.
-
Frictionally supported model:
  • Bonded contact between the jigs and the top of the floor;
  • Surface-to-surface contact between the jigs and the specimen.

5.2. Mesh Convergence Study

In the mesh convergence study, a fully supported structure was used to reduce uncertainties from other factors (e.g., slipping) under lateral loads. To capture both global and local responses, not only the convergence of ultimate loading capacity but also the local buckling behavior was investigated. As shown in Figure 12, the model with fewer than 32 elements in the circular direction could not accurately depict local deformation. Based on the results of the mesh convergence study in Figure 12 and Table 5, the model with 128 elements in the circular direction was selected for validating the FE model.

5.3. FE Model for Fully Supported Condition

5.3.1. Influence of Initial Geometric Imperfection

To assess the sensitivity of the structural response to initial geometric imperfections, finite element analyses were performed using idealized geometries with artificially introduced deviations. Following Fajuyitan and Sadowski [15], imperfection amplitudes (δo) were defined relative to the shell thickness (t), and several cases within the range of 0.25 < δo/t ≤ 1.0 were examined to represent both minor and severe imperfection levels. This analysis aimed to determine how the assumed geometric deviation influences global stiffness, ultimate strength, and deformation patterns. Figure 13 shows the first eigen (buckling) mode obtained from the eigenvalue analysis under the lateral load. The first mode was subsequently applied to the FE model to present geometric imperfections, with the imperfection amplitudes scaled according to the parameter δo/t.
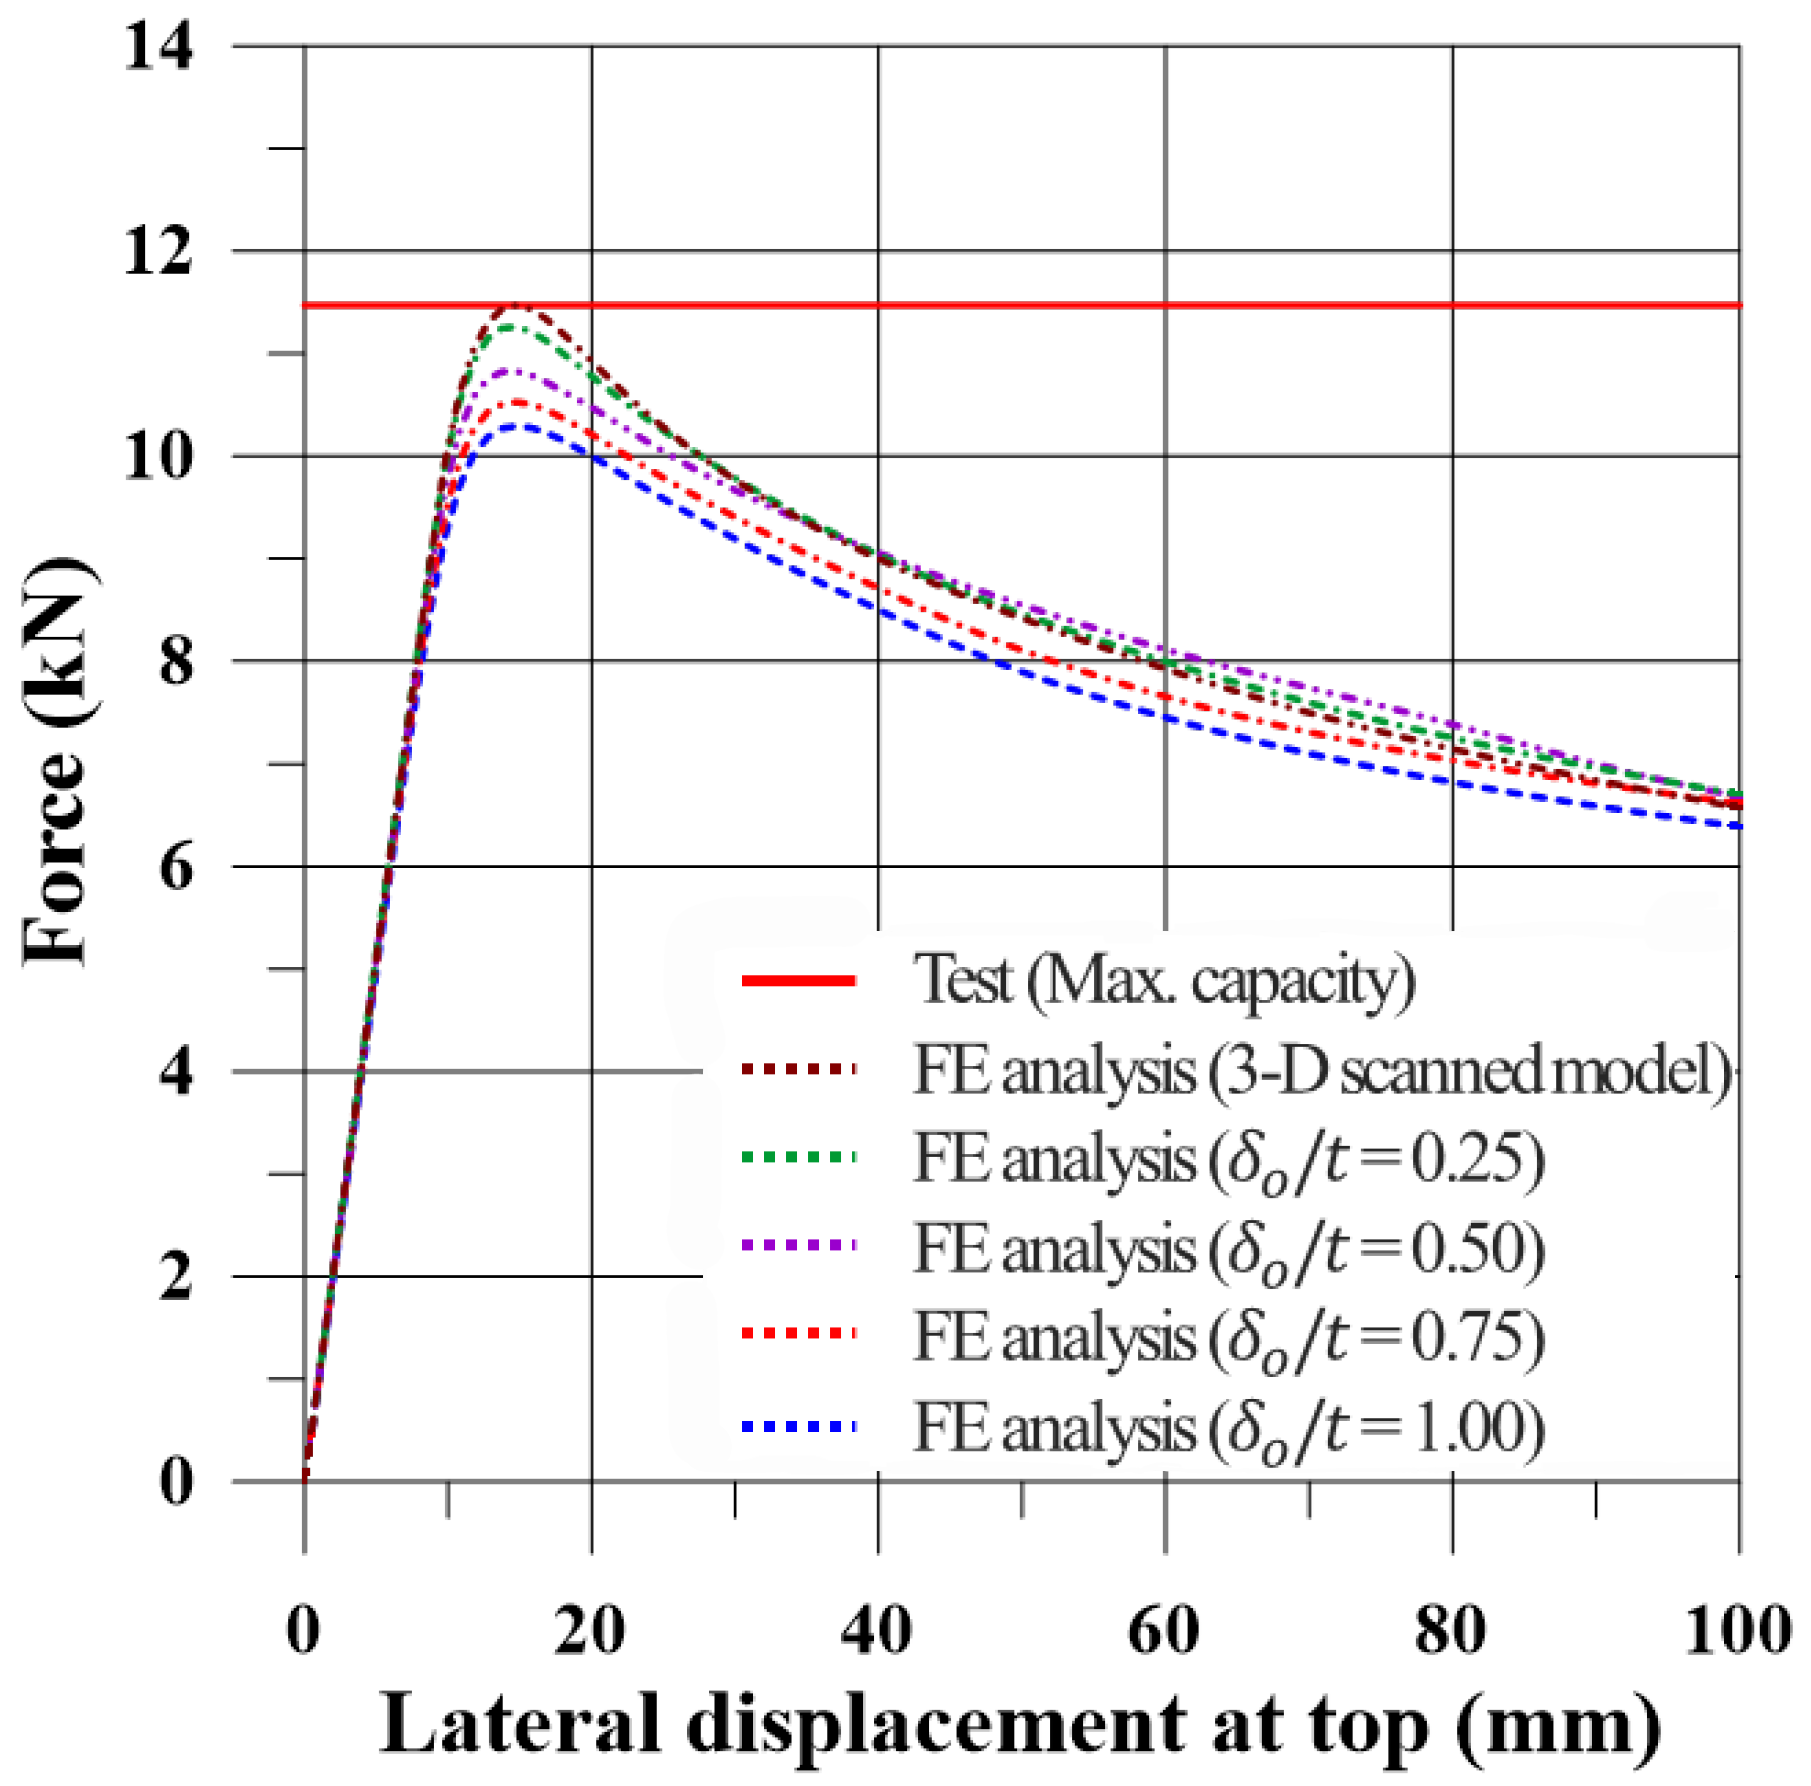
Figure 14 compares the experimental and numerical global responses for various imperfection amplitudes and for the 3D-scanned model. As the imperfection amplitude increased, both the initial stiffness and peak load decreased, indicating a clear sensitivity to geometric imperfections. The case with δo/t = 0.25 showed close agreement with the experiment up to the ultimate load, whereas larger imperfections led to a gradual reduction in strength and stiffness. The 3D-scanned model reproduced the experimental behavior most accurately; therefore, it was adopted as the reference geometry for the subsequent analyses.

5.3.2. Influence of Applied Loading Condition

Figure 15 illustrates the boundary and applied loading approaches in the FE model for investigating the influence of approaches. In the fully supported model, the bottom region was assumed rigid because of the welded connection, and all degrees of freedom were constrained along the bottom line of the floor plate.
At the top of the specimen, three alternative boundary configurations were initially examined to identify a condition that could best reproduce the experimental loading setup:
(i)
Explicit modeling of the top jig as a rigid body;
(ii)
Distributed load at the elements corresponding to the top jig location;
(iii)
Coupling of the central line of the loading area with a virtual reference node to apply the displacement-controlled loading.
Since a 3D-scanned geometry included minor geometric imperfections, slight interference or clearance could occur between the top rigid jig and the specimen. To replicate the pre-tightening effect of the bolted connection, a small interference of about 0.1–0.2 mm was applied as an additional load step. The contact between the specimen and the jig was modeled as frictional with a coefficient of 0.3, as detailed in Section 5.4.1. For efficiency and practicality, the loading condition was simplified to surface and line loadings applied along the centerline of the loading area.
As shown in Figure 16, the overall structural stiffness and deformation behavior were similar regardless of the loading condition. Based on this observation, the top edge of the specimen was fully coupled so that all nodes on the cross-section shared identical displacement, ensuring a uniform loading distribution. The geometry of the top line was aligned with the centerline of the loading jig to accurately reproduce the experimental setup. Therefore, the simplified line loading condition, derived from this aligned configuration, was adopted as a practical representation of the actual loading in the FE model.

5.4. FE Model for Frictionally Supported Condition

The FEA for the frictionally supported condition followed the same modeling framework presented in the previous section to ensure direct comparability with the fully supported condition. Identical mesh size, element formulation, and loading configuration were used to maintain modeling consistency.
In contrast to the fully constrained model, this analysis focused on accurately representing the frictional interaction at the bottom support region, as the main difference lay in the allowance of slip between the specimen and the jig. The key parameters defining the frictional contact, namely the friction coefficient and the effective contact area, were carefully considered.

5.4.1. Influence of Frictional Coefficients

The friction coefficient is highly dependent on surface conditions, contact pressure, and lubrication state, and therefore cannot be regarded as an intrinsic material property. Blau [16] highlighted that nominal friction coefficients reported in literature or handbooks should not be directly adopted without accounting for the actual tribological environment, since the effective frictional response is highly sensitive to local contact conditions and operating history. According to ASM Handbook data [17], the static coefficient of friction for steel-on-steel contact varies notably with environmental conditions. Under vacuum, it can reach approximately 0.78 but decreases to about 0.39 in air due to the natural formation of surface films. When oxide films are present, the coefficient further drops to around 0.27. Under sliding conditions, the dynamic coefficient of friction for mild steel on medium steel has been reported to be approximately 0.57.
In this study, the frictional interaction between the specimen and the supporting jig was modeled as a dry steel-on-steel contact without surface films, reflecting the experimental conditions at room temperature and under bolt-induced pre-compression. Numerical analyses were conducted with friction coefficients from 0.2 to 0.5, covering the typical range for bare steel. As shown in Figure 17, both the load and stiffness increased with higher friction coefficients, and the simulation with μ = 0.3 showed the best agreement with the experimental average maximum load of about 6 kN. Thus, a friction coefficient of 0.3 was adopted as the representative value for modeling the contact behavior.

5.4.2. Influence of Frictional Contact Area

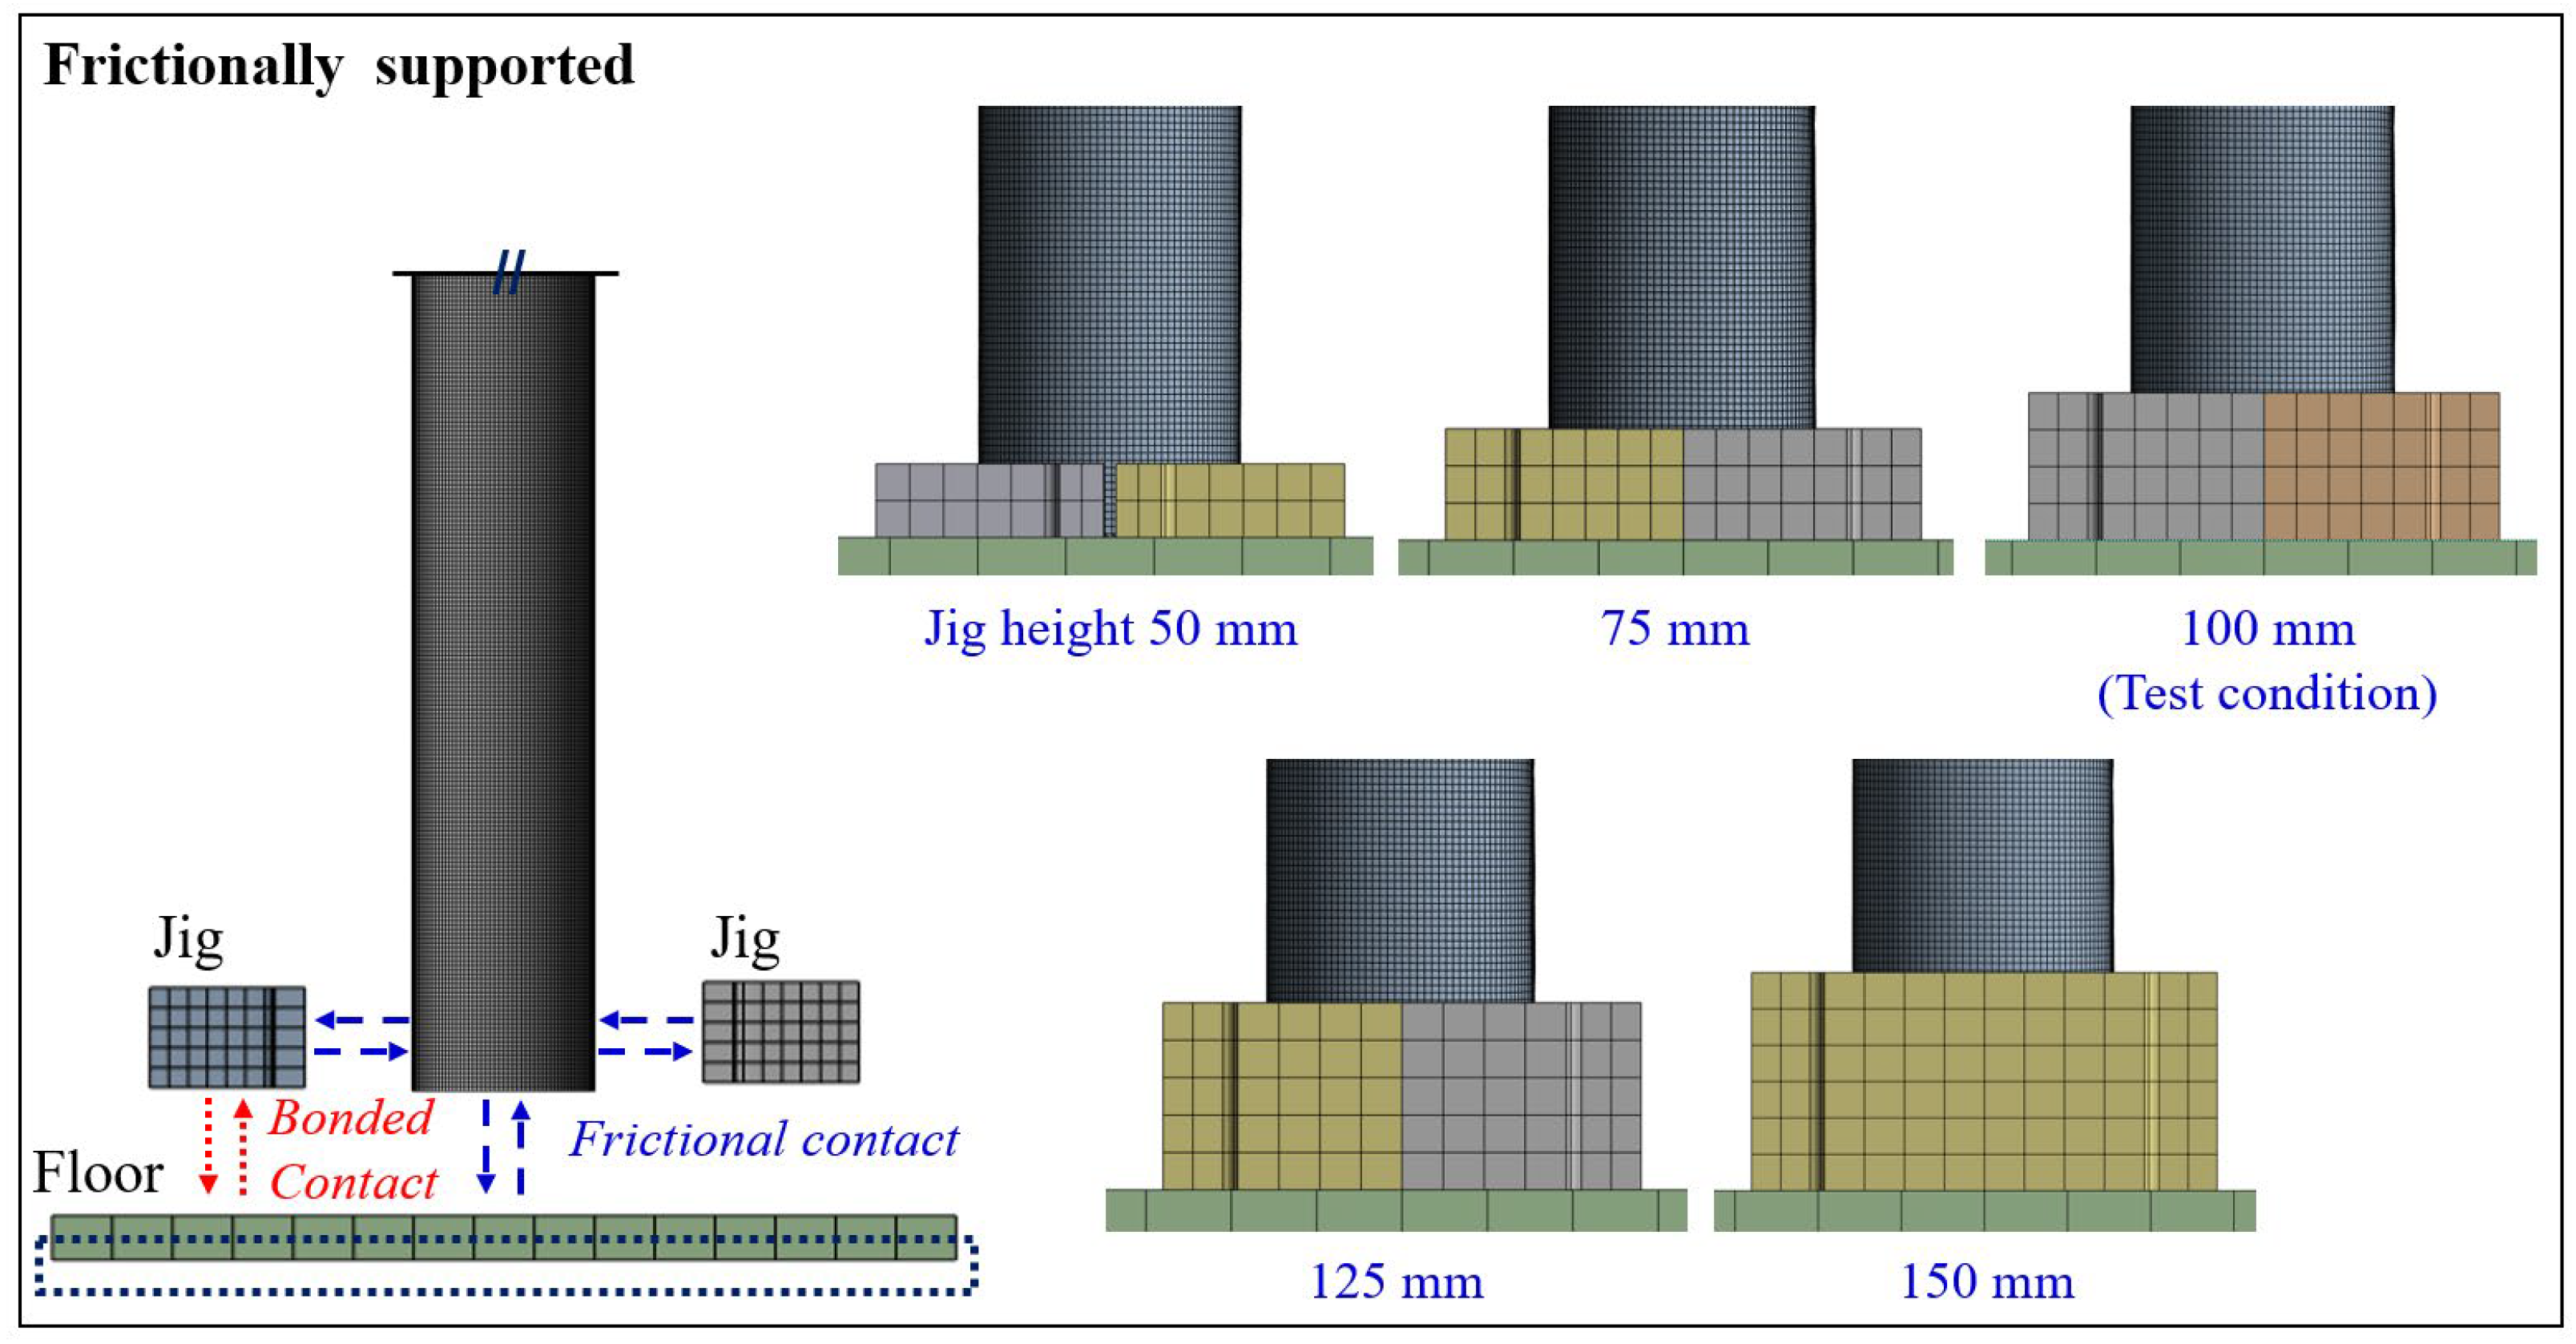
Although the jig height was fixed based on the experimental setup, it was additionally examined as a potential variable to evaluate its possible influence on the global deformation and load transfer behavior. The detailed configuration of the frictionally supported model is shown in Figure 18.
As frictional resistance depends not only on the coefficient of friction but also on the size of the contact area, additional analyses were conducted to investigate the effect of the supporting jig height on structural behavior. Figure 19 illustrates the effect of bottom jig height on the global structural behavior with 0.3 of the frictional coefficient. As the jig height increased, both the maximum strength and structural stiffness increased significantly. This trend occurred because a taller bottom jig provided a larger contact area, resulting in greater frictional resistance. In contrast, a shorter jig may have offered insufficient resistance due to its smaller contact surface. These confirm that the frictional contact area provided by the supporting jig has a considerable influence on the overall structural behavior. Notably, as the jig height increased by 25 mm, adding an equivalent contact area each time, the maximum load at a displacement of 100 mm increased consistently by approximately 2 kN, indicating that the load-carrying capacity was almost proportional to the frictional contact area.

6. Numerical Validation of the Finite Element Model

The comparison aims to evaluate how accurately the developed numerical model can reproduce the overall load–displacement behavior, stiffness degradation, and post-buckling response observed in the experiments. Figure 20 compares the global structural response obtained from numerical analysis and experimental tests. The results indicate that the FE model, considering both fully and frictionally supported conditions, shows good agreement with the experimental results.
For the fully supported model, the FE model slightly underestimated the post-ultimate behavior compared to the experiments. This discrepancy is mainly attributed to the local stiffening effect induced by the welding at the bottom rim. In the experiments, the welded joint and bead formation increased the local thickness and stiffness near the boundary, which was not fully represented in the simplified FE model that employed a rigid constraint at the base without explicitly modeling the weld bead geometry. Nevertheless, stiffness and ultimate strength, as essential characteristics of the ultimate behavior, were accurately captured by the FE model. By contrast, in the frictional contact case, a slight deviation in initial stiffness was observed at the beginning of loading. This discrepancy may be attributed to the bolted connection between the jig and the specimen in the experiment, which could have required a slightly higher load to initiate slipping compared to the idealized numerical model (as indicated at point (e) in Figure 6).
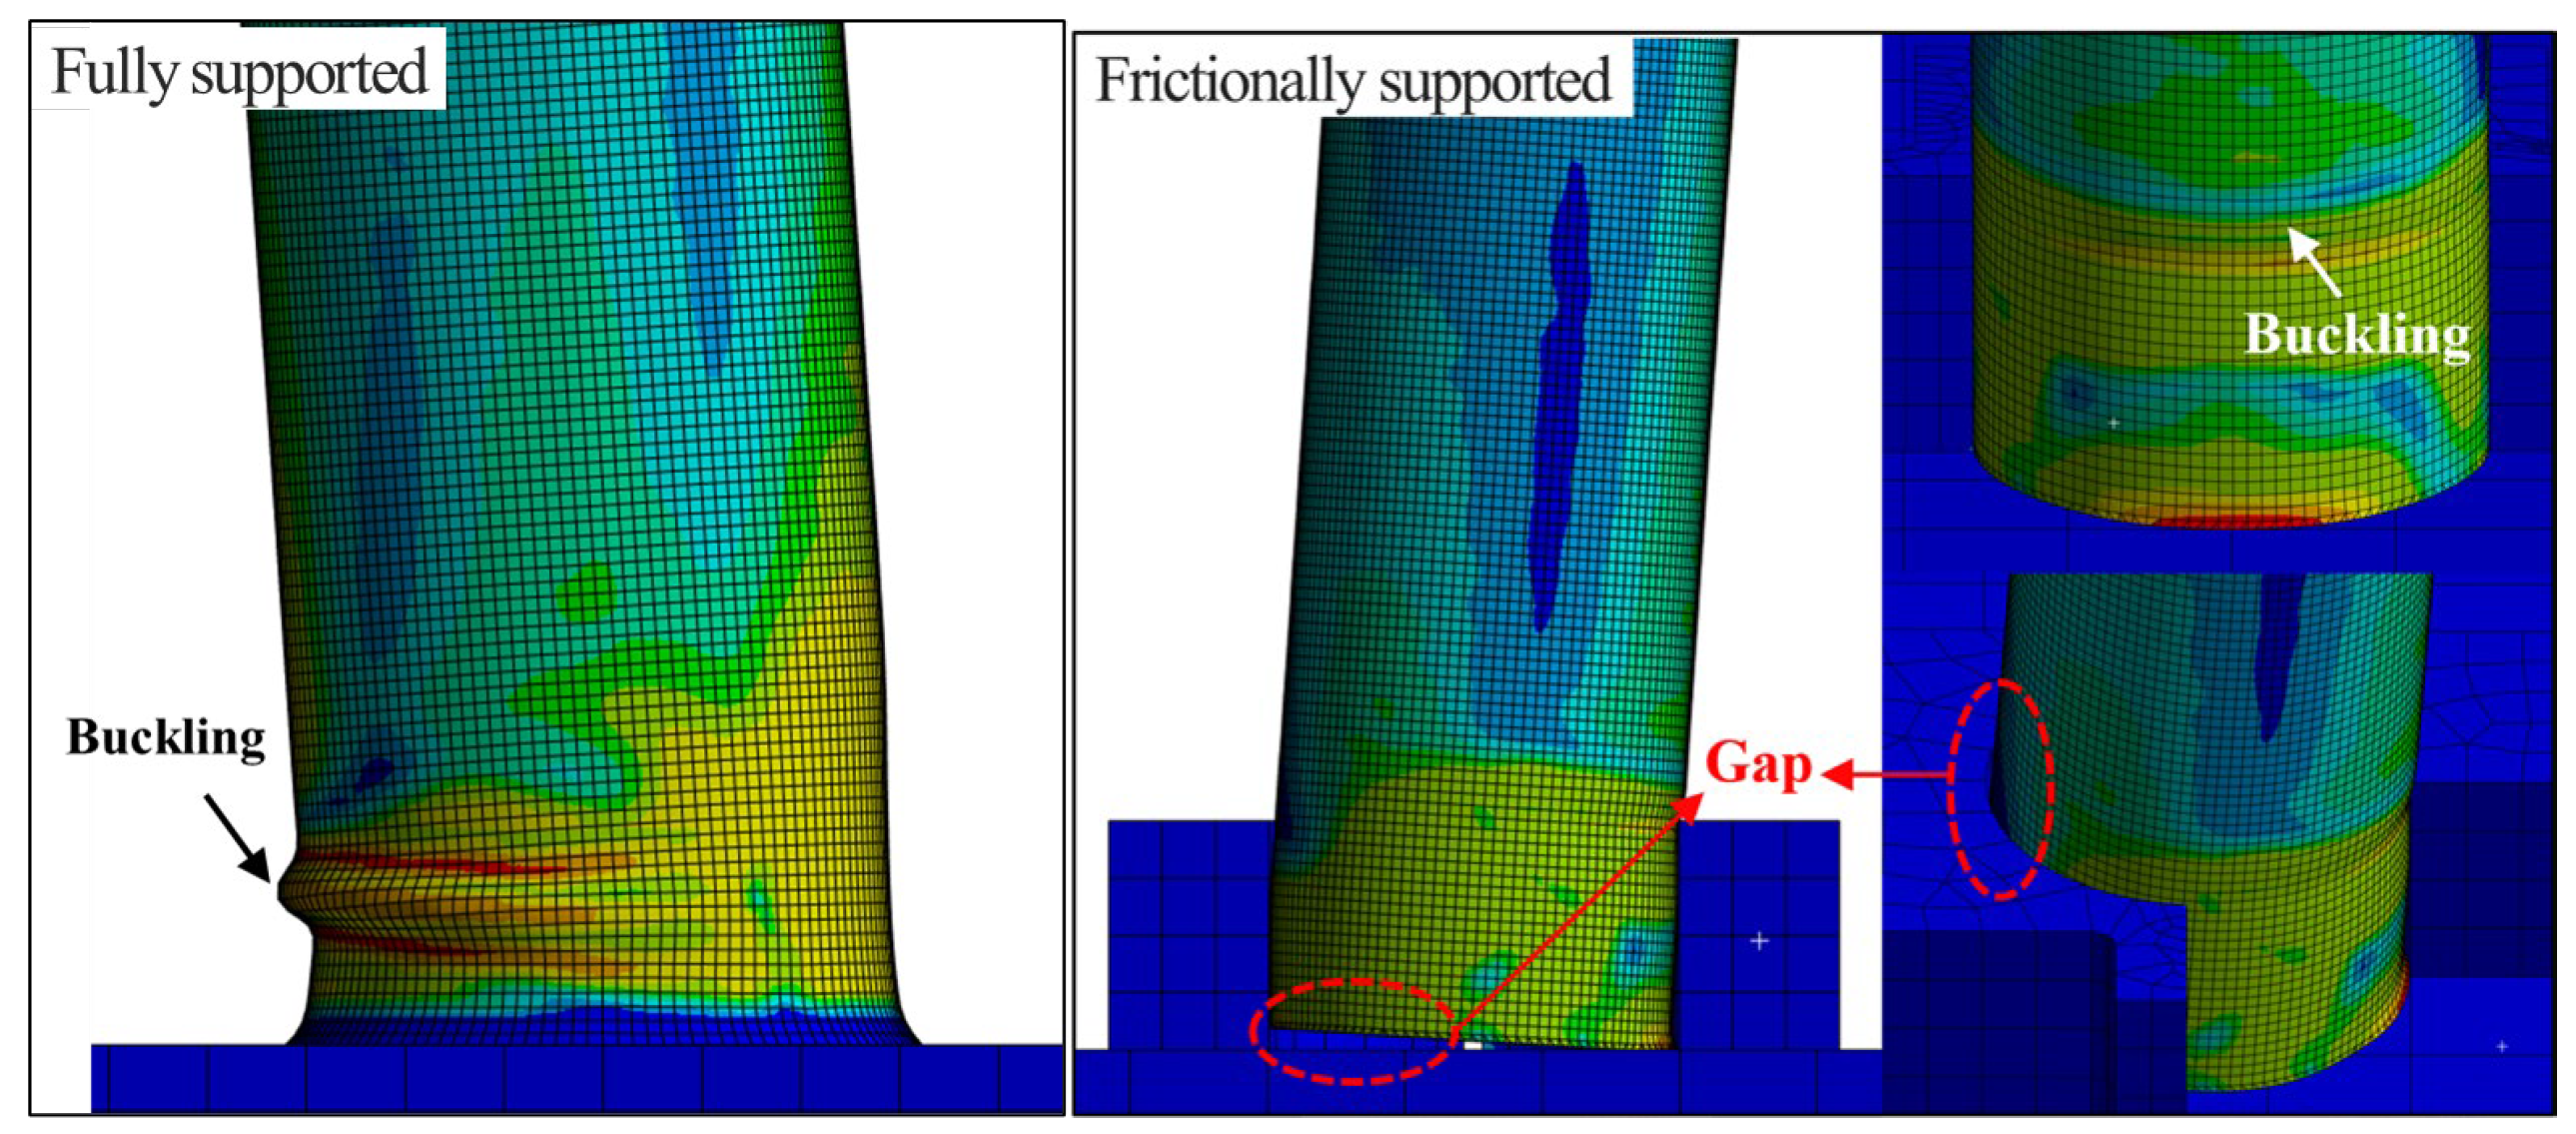
Figure 21 illustrates the local structural response from the FE analysis. A comparison with the experimental results (shown in Figure 9) confirms that the developed FE model accurately reproduces the local behavior, particularly around the buckling region and the lower boundary of the structure. Furthermore, the numerical results showed close quantitative agreement with the experimental measurements, demonstrating the reliability of the FE model in capturing the local response characteristics.

7. Conclusions

The main aim of this study was to experimentally investigate the effect of boundary conditions, fully and frictionally supported, on the structural behavior of a cylindrical structure representative of a wind turbine tower under lateral concentrated loads that simulate wind loads on blades. In the numerical part of the study, FE modelling techniques were developed and validated against experimental tests. During this process, the effects of loading type, friction coefficient, contact area, and initial geometric imperfection were examined to achieve deeper understanding of the structural response. The main findings are summarized as follows:
  • Under the fully supported condition, the ultimate strength of the target structure (L = 1500 mm, D = 180 mm, t = 2 mm) reached an average load of 11.47 kN, after which the load-carrying capacity gradually decreased. In contrast, under the frictionally supported condition, the load at the same displacement was approximately 61% lower due to slip at the contact interface, and the structure showed a continuous increase in resistance without a distinct ultimate load point.
  • In the fully supported model, the FE framework was systematically validated. The material model employed the true stress–strain curve obtained from the tensile test, and mesh convergence studies confirmed the numerical stability and accuracy of the results. The 3D-scanned geometry showed the closest agreement with the experimental results, corresponding to the behavior of the model with the smallest imperfection amplitude. Moreover, the comparison of different loading types (surface, line, and rigid jig) demonstrated that the simplified line loading accurately reproduced the experimental response.
  • In the frictional support model, the nonlinear static analysis verified that a friction coefficient of 0.3 accurately represented the dry steel-on-steel contact conditions between the specimen and the jig. Increasing the frictional contact area led to higher structural stiffness and maximum strength, demonstrating that the frictional resistance was nearly proportional to the contact area and should be properly accounted for in the evaluation of frictional behavior.
The developed FE technique showed good agreement with the results of the experimental tests, with coefficients of variation (COVs) of 2.2% for the fully supported case and 3.9% for the frictionally supported case. The technique might be useful to capture the structural behavior of wind turbine tower structures, including the ultimate strength, slipping point, etc., for further research.

Author Contributions

W.S.C.: Investigation, Fabrication, Experiment, Data analysis, FE analysis, Visualization. J.M.S.: Methodology, Writing—reviewing & editing, Supervision. S.J.K.: Conceptualization, Visualization, Writing—original draft & editing, Funding acquisition. All authors have read and agreed to the published version of the manuscript.

Funding

This work was financially supported by the National Science and Technology Council (NSTC), Taiwan (No. NSTC 113-2221-E-110-068) and 2024 BK21 FOUR Program of Pukyong National University.

Data Availability Statement

The data that support the findings of this study are available from the corresponding author upon request.

Acknowledgments

Parts of this work (experimental study) were presented at 37th Asian-Pacific Technical Exchange and Advisory Meeting on Marine Structures (TEAM 2024) on 25–28 September 2024, and the Annual Autumn Meeting of Society of Naval Architects of Korea on 14–15 November.

Conflicts of Interest

The authors declare no conflicts of interest.

Abbreviations

J-1 to 4Frictionally supported boundary condition with jigs
W-1 to 4Fully supported boundary condition by welding
Notations
EYoung’s modulus of material
DDiameter of structure
FForce
LLength (height) of structure
tThickness of structure
δDisplacement
σUUltimate tensile stress of material
σYLLower yield stress of material
σYUUpper yield stress of material
μ Frictional coefficient
δ e Initial geometric imperfection amplitude

References

  1. Ember. Yearly Electricity Data. Available online: https://ember-energy.org/data/yearly-electricity-data (accessed on 13 October 2025).
  2. Wang, Y.; Xue, C.; He, Y.; Zhao, Y. Review of the typical damage and damage-detection methods of large wind turbine blades. Energies 2022, 15, 5672. [Google Scholar] [CrossRef]
  3. Lee, S.E.; Sahin, S.; Rigo, P.; Park, M.; Paik, J.K. Ultimate strength of cylindrical shells with cutouts. Ships Offshore Struct. 2017, 12, S153–S173. [Google Scholar] [CrossRef]
  4. Santos, R.R.; Cho, S.J.; Park, J.S. Ultimate strength of 10 MW wind turbine tower considering opening, stiffener, and initial imperfection. Int. J. Steel Struct. 2018, 18, 1318–1324. [Google Scholar] [CrossRef]
  5. Dimopoulos, C.A.; Gantes, C.J. Experimental investigation of buckling of wind turbine tower cylindrical shells with opening and stiffening under bending. Thin-Walled Struct. 2012, 54, 140–155. [Google Scholar] [CrossRef]
  6. Yeter, B.; Garbatov, Y.; Guedes Soares, C. Numerical and experimental study of the ultimate strength of a monopile structure. Eng. Struct. 2019, 194, 290–299. [Google Scholar] [CrossRef]
  7. Ren, W.; Zhou, X.H.; Fu, Z.L.; Cao, Y.Q.; Wang, Y.H.; Deng, R.; Pu, H.N.; Zhang, J. Static behavior of large-diameter stiffened steel tubes for wind turbine towers under combined compression-bending-torsion load. Thin-Walled Struct. 2022, 175, 109272. [Google Scholar] [CrossRef]
  8. Zhou, K.M.; Wang, F.W. Experimental and numerical analysis of compression bending of wind turbine tower. J. Struct. Eng. 2025, 151, 04025060. [Google Scholar] [CrossRef]
  9. Veljkovic, M.; Feldmann, M.; Naumes, J.; Pak, D.; Rebelo, C.; da Silva, L.S. Friction connection in tubular towers for a wind turbine. Stahlbau 2010, 79, 660–668. [Google Scholar] [CrossRef]
  10. Heistermann, C.; Pavlović, M.; Veljković, M.; Pak, D.; Feldmann, M.; Rebelo, C.; da Silva, L.S. Influence of execution tolerances for friction connections in circular and polygonal towers for wind converters. Adv. Steel Constr. 2017, 13, 343–360. [Google Scholar] [CrossRef]
  11. Dallyn, P.; El-Hamalawi, A.; Palmeri, A.; Knight, R. Experimental investigation on the development of wear in grouted connections for offshore wind turbine generators. Eng. Struct. 2016, 113, 89–102. [Google Scholar] [CrossRef]
  12. Islam, M.A.; Ali, S.; Park, H.; Lee, D. Behavior of PIP slip joint in the offshore wind monopile under combined load considering local buckling. J. Mar. Sci. Eng. 2024, 12, 1423. [Google Scholar] [CrossRef]
  13. Islam, M.A.; Ali, S.; Park, H.; Lee, D. Economic superiority of PIP slip joint compared to conventional tubular joints. Appl. Sci. 2025, 15, 6464. [Google Scholar] [CrossRef]
  14. ANSYS. Available online: https://www.ansys.com/products/ansys-workbench (accessed on 13 October 2025).
  15. Fajuyitan, O.K.; Sadowski, A.J. Imperfection sensitivity in cylindrical shells under uniform bending. Adv. Struct. Eng. 2018, 21, 2433–2453. [Google Scholar] [CrossRef]
  16. Blau, P.J. The significance and use of the friction coefficient. Tribol. Int. 2001, 34, 585–591. [Google Scholar] [CrossRef]
  17. Castelli, V.R. Friction. In Mark’s Standard Handbook for Mechanical Engineers, 10th ed.; Avallone, E.A., Baumeister, T., III, Eds.; McGraw-Hill: New York, NY, USA, 1996; pp. 134–142. ISBN 0-07-004997-1. [Google Scholar]
Figure 1. Global electricity generation (left) and share of renewable energy sources (right) from 2000 to 2024 [1].
Jmse 13 02179 g001
Figure 2. Manufactured test specimen.
Jmse 13 02179 g002
Figure 3. Experimental test setup (left) and its schematic view (right).
Jmse 13 02179 g003
Figure 4. Boundary conditions for fully (left) and frictionally (right) supported cases.
Jmse 13 02179 g004
Figure 5. Experimentally obtained structural behavior under fully (left) and frictionally (right) supported conditions.
Jmse 13 02179 g005
Figure 6. Comparison of the behavior depending on support conditions.
Jmse 13 02179 g006
Figure 7. Global displacement of W-1 depending on specific loading conditions.
Jmse 13 02179 g007
Figure 8. Global displacement of J-1 depending on specific loading conditions.
Jmse 13 02179 g008
Figure 9. Local deformation at buckling area and bottom of structure with fully (left) and frictionally supported conditions (right) after the test.
Jmse 13 02179 g009
Figure 10. Strain—stress curve obtained from the tensile test.
Jmse 13 02179 g010
Figure 11. Example of 3D scanning operation (left) and scanned geometry (right).
Jmse 13 02179 g011
Figure 12. Ultimate capacity and local deformation depending on number of elements.
Jmse 13 02179 g012
Figure 13. The first eigen mode and example of applied imperfection.
Jmse 13 02179 g013
Figure 14. Effect of initial imperfection on the global response.
Jmse 13 02179 g014
Figure 15. Boundary and loading conditions of fully supported model.
Jmse 13 02179 g015
Figure 16. Effect of applied loading approach in FE model on the global structural response.
Jmse 13 02179 g016
Figure 17. Effect of frictional coefficient on the global response.
Jmse 13 02179 g017
Figure 18. Boundary conditions for frictionally supported model.
Jmse 13 02179 g018
Figure 19. Effect of jig height in FE model on the global response.
Jmse 13 02179 g019
Figure 20. Comparison of global structural behaviors obtained from experiments and FE analysis.
Jmse 13 02179 g020
Figure 21. Local structural response obtained from FE analysis (fully supported: left, frictionally supported: right).
Jmse 13 02179 g021
Table 1. Literature review of experimental tests on cylindrical structures related to wind turbine towers.
Test ModelStructural Dimension (mm)Loading TypeBoundary ConditionMaterialStiffenerOpeningRef.
LDtL/D
Jmse 13 02179 i00125954004.06.5Lateral loadCantileveredSteelOO[5]
Jmse 13 02179 i002480Ave.
112.5
2.04.3Lateral loadCantileveredSteelXX[6]
Jmse 13 02179 i003N/A400–5002.0–3.5-Compression-Bending-Torsion loadTwo-ends fixedSteelOX[7]
Jmse 13 02179 i0049007003.01.3Compression-Bending loadTwo-ends fixedSteelXX[8]
Table 2. Material properties of target structure.
Young’s ModulusUpper Yield StressLower Yield StressUltimate Tensile Stress
205 GPa258.6 MPa229.5 MPa328.6 MPa
Table 3. Geometrical information and boundary conditions of test specimen.
NotationL (mm)D (mm)L/Dt (mm)L/tRoundness (%)Boundary Condition
W-115001808.32.07500.65Fully supported
W-20.49Fully supported
W-30.60Fully supported
J-10.63Frictionally supported
J-20.67Frictionally supported
J-30.63Frictionally supported
Table 4. Maximum loading capacity (kN), and displacement (mm) at top of specimen.
CasesW-1W-2W-3Ave. WJ-1J-2J-3Ave. J
Load11.2511.7511.5011.476.005.706.155.95
Displacement19.5819.6017.2918.74100100100100
Table 5. Results of mesh convergence study.
No. of Elements In Circular DirectionElement Size
(mm)
Ultimate Capacity
(kN)
Local Buckling
870.6911.935No
1635.3412.054No
3217.6711.749Yes
648.8411.552Yes
1284.4211.471Yes
Disclaimer/Publisher’s Note: The statements, opinions and data contained in all publications are solely those of the individual author(s) and contributor(s) and not of MDPI and/or the editor(s). MDPI and/or the editor(s) disclaim responsibility for any injury to people or property resulting from any ideas, methods, instructions or products referred to in the content.