Article

A Novel Electromechanical Apparatus for Intermediate Strain-Rate Testing and Validation on Polycarbonate

Department of Civil and Mechanical Engineering, University of Cassino and Southern Lazio, 03043 Cassino, Italy
*
Author to whom correspondence should be addressed.
Appl. Sci. 2025, 15(23), 12797; https://doi.org/10.3390/app152312797
Submission received: 3 November 2025 / Revised: 20 November 2025 / Accepted: 27 November 2025 / Published: 3 December 2025
(This article belongs to the Section Materials Science and Engineering)

Abstract

The characterization of material behavior under intermediate deformation rates remains a major challenge, since conventional testing devices are mainly developed for either quasi-static or high strain-rate conditions. Nonetheless, understanding material response in this regime is essential in several applications, such as crashworthiness, bird strike resistance, or metal forming, as well as for the development of reliable constitutive models. In this work, the design and validation of a novel electromechanical apparatus for intermediate strain-rate testing (∼1–102 s−1) of various materials is presented. One of the novelties of the proposed system is the integration of high-performance electromechanical actuators capable of reaching velocities up to 3 m/s, with 16,000 m/s2 acceleration, and impact forces up to 24 kN. During testing, one specimen end is impacted by a striker while the other is in contact with a 14.5 m transmitter bar. Upon impact, the sample deforms, and a compressive stress wave propagates in the transmitter bar. Strain gauges are employed to measure its deformation and, therefore, the force transmitted to the sample. The velocity and displacement of the impact head are instead recorded with high temporal resolution and accuracy by integrating Photon Doppler Velocimetry (PDV) into the system. Validation tests performed on polycarbonate confirmed the accuracy, repeatability, and overall effectiveness of the apparatus.

1. Introduction

The mechanical response of many classes of materials is strongly influenced by the speed at which the load is applied, as the strain rate can significantly affect both the strength and the ability of a material to accommodate further deformation. When characterizing the rate-dependent stress vs. strain response of materials, tests are typically conducted over a broad range of strain rates, from low strain rates (∼ 10 4 –10−1 s−1) to high strain rates (∼ 10 2 –104 s−1), using different experimental apparatuses. At low deformation rates, servohydraulic or screw-driven universal testing machines are commonly employed. Tests are generally referred to as quasi-static, since both the specimen and the load-chain components can be assumed in static equilibrium throughout the test. At higher deformation rates, the Split Hopkinson Pressure Bar (SHPB), introduced by Kolsky in 1949 [1], becomes the most widely used device for dynamic characterization. Over the years, several modifications of the original setup have been developed to allow for testing under different loading states [2,3,4]. The operating principle of the Split Hopkinson Pressure Bar (SHPB) is based on the propagation of an adequately shaped stress wave along an incident bar. Upon reaching the specimen, a portion of the incident wave is reflected at the incident bar–specimen interface due to mechanical impedance mismatch, while the remaining part is transmitted through the specimen into the transmitter bar. From the analysis of the elastic deformation of the incident and transmitter bars, the stress–strain response of the sample during testing can be evaluated. At even higher deformation rates, typically above 104 s−1, plate-impact experiments are employed for material characterization. However, in these regimes, the deformation state transitions from uniaxial stress to uniaxial strain, and stress-wave propagation phenomena govern the material response [5,6]. While wave propagation is also relevant in SHPB testing, the fundamental assumption is that the specimen length is short enough to ensure nearly uniform deformation throughout the test, and inertial effects can generally be neglected, except during the initial transient phase when the stress wave first enters the specimen. In fact, it should be noted that when the testing strain rate exceeds ∼1 s−1, two major factors must be carefully considered in the analysis of data. First, the assumption of isothermal deformation is no longer valid, and this effect becomes increasingly significant at higher strain rates [7]. Second, inertial effects become non-negligible, and both the design of testing devices and the interpretation of experimental data must take into account these dynamic forces. As also reported by Gilat et al. [8], the direct application of traditional quasi-static testing apparatuses to intermediate strain-rate testing, as well as the possibility of performing SHPB experiments at lower strain rates, is not adequate. In the former case, the specimen would deform under non-equilibrium conditions, with a strong influence of inertial effects and inevitable signal ringing. In the latter, a trade-off must be established between the desired deformation rate and the maximum achievable strain before the reflected wave from the end of the transmitter bar propagates back into the specimen. Over the years, several experimental configurations have been developed to allow for material characterization within the intermediate strain-rate regime, either through modifications of existing quasi-static and dynamic testing apparatuses or by designing novel dedicated devices. As reported in [9], traditional servohydraulic systems have been expanded to achieve testing in intermediate strain-rate regimes by different manufacturers. Some modifications, to improve the quality and reliability of the force signal, regarded the introduction of a second load cell, closer to the sample, to reduce noise effects, or the reduction in the masses involved to increase the natural frequency of the load chain and to reduce the signal oscillations [10,11,12,13]. Othman et al. [14] compared the force measured by piezoelectric sensors with that obtained using a Hopkinson-bar-inspired approach implemented on a servohydraulic testing machine. In this latter configuration, an additional bar was mounted on the machine crosshead and instrumented with strain gauges to record its deformation and, consequently, the transmitted force. This method resulted in smoother, less oscillatory force signals compared to the conventional measurement approach. This setup, first proposed by LeBlanc et al. [15], is basically a hybrid approach that combines the load application capabilities of servohydraulic devices and the measuring principles of the SHPB. Drop tower tests have also been employed for intermediate strain-rate testing [16,17]. A notable example is the “Drop-Hopkinson bar”, designed by Song et al. [18], in which a drop table was used to generate a long and stable impact, while the load history was measured in an SHPB fashion. Characterization tests at strain rates up to 103 s−1 have also been performed using flywheel-based devices, whose operating principle relies on converting the kinetic energy stored in a rotating component into deformation energy, transmitted to the specimen during the impact under tension [19], compression [20], and torsion [21] loadings. There has been much work into the adaptation of the SHPB principle for intermediate testing. To be able to achieve long test durations (hence, higher final strains) at lower deformation rates, separation wave methods have been employed in classical SHPB testing to virtually separate elastic waves propagating in opposing directions inside the bars [22,23]. Whittington et al. [24] proposed a novel SHPB configuration in which the transmitter bar features a serpentine design, obtained by machining a solid bar housed within several concentric tubes with matched mechanical impedance that minimize wave reflections and enable a more compact output bar setup (∼1 m in length) compared to conventional SHPB. Gilat et al. [8] substituted the long input bar with a fast hydraulic actuator that directly impacts the sample, for both tensile and compressive loadings. However, to achieve a maximum test duration of approximately 15 ms, an extremely long output bar (40 m) was employed. Jakkula et al. [25] developed a similar system, in which the hydraulic actuator was substituted by a pneumatic accelerated mass. Roth et al. [26] expanded the Load Inversion Device originally proposed by Dunand et al. [27] to enable intermediate to high strain-rate testing of metallic sheets under tension. They developed a compact configuration in which the input bar, that presents a compression-to-tension inversion before the stress wave reaches the specimen, is positioned below the output bar. Therefore, with a total system length comparable to that of a conventional SHPB, this configuration allows for higher final strains at lower strain rates. He et al. [28] chose PMMA for the transmitter bar material, whose relatively low impedance slows down wave propagation, thereby extending the test duration and enabling testing of soft materials at large strains. The device presented in this work is inspired by the design developed by Gilat et al. [8], but employs a shorter output bar (14.5 m), for a test duration of approximately 5.6 ms. One of the novelties of the proposed system is the implementation of electric actuators to generate the compressive pulse on the specimen instead of traditional hydraulic strikers. Even though the latter still offer higher power densities and force capacities for similar motor weights, the differences between the two technologies are gradually decreasing, and, for comparable output, electric actuators are faster and more responsive [29]. This is related to the direct control of the actuator motion, which also ensures smoother, more repeatable movements, velocities, and accelerations, without the delays and uncertainties associated with valve operation and fluid compressibility [30], which is essential for the reliability of the experimental results. Furthermore, this choice favors environmental sustainability [31], compared to hydraulic systems, with overall reduced power consumption, lower setup complexity, and fewer additional components required [30]. The selected linear actuator system allows for a maximum nominal output velocity of 3 m/s, with extremely high accelerations (up to 16,000 m/s2), and a maximum continuous load of 24 kN. Another novelty is the introduction of Photon Doppler Velocimetry (PDV) for the evaluation of displacements, which, compared to traditional high-rate imaging and optical techniques, is a simpler and more convenient solution. The following sections present the layout of the proposed device, together with the complete experimental setup and validation tests conducted on polycarbonate (PC), given its widespread use in various industrial sectors where dynamic response plays a crucial role [32,33,34].

2. Experimental Setup

2.1. Description of the Device

The proposed configuration, illustrated in Figure 1, consists of an actuation unit and a transmitter bar designed to operate within the elastic regime during testing. The actuation unit is composed of two parallel-mounted linear electric motors (SL2-P250M, SEW Eurodrive, Bruchsal, Germany), which transmit linear motion to a striker of approximately 10 kg. Each motor includes two components: the primary, a stationary assembly that houses the stator and electromagnetic windings, and the secondary, on which the striker is mounted to prevent any impact-induced damage to the primary. During operation, the electromagnetic field generated by the primary drives the secondary along precision linear guides, directly converting electrical energy into translational motion.
The striker is supported by two sets of four ball-recirculating linear guides mounted on two parallel rails, which guarantee a smooth and stable linear translation and provide a maximum stroke of approximately 250 mm. The acceleration profile is controlled through a current–velocity law, allowing the striker to reach the prescribed velocity before impacting the specimen. During the initial impact phase, the feedback control system uses the velocity values provided by two drivers, one for each electric motor, to regulate the current supplied to the primaries, limiting the striker’s loss of velocity upon contact. Once the target compression level is achieved, the drive system reverses the current in the primaries to decelerate and stop the carriage. In this phase, a maximum deceleration of approximately 40 m s−2 can be reached. Unlike hydraulic systems, which are characterized by longer response times, since the hydraulic pump is driven by a rotary electric motor, and by greater setup complexity due to the large number of components involved, the choice to adopt linear actuators was driven by their responsiveness and ease of control. This aspect is extremely important to provide a more precise and repeatable load pulse during testing.
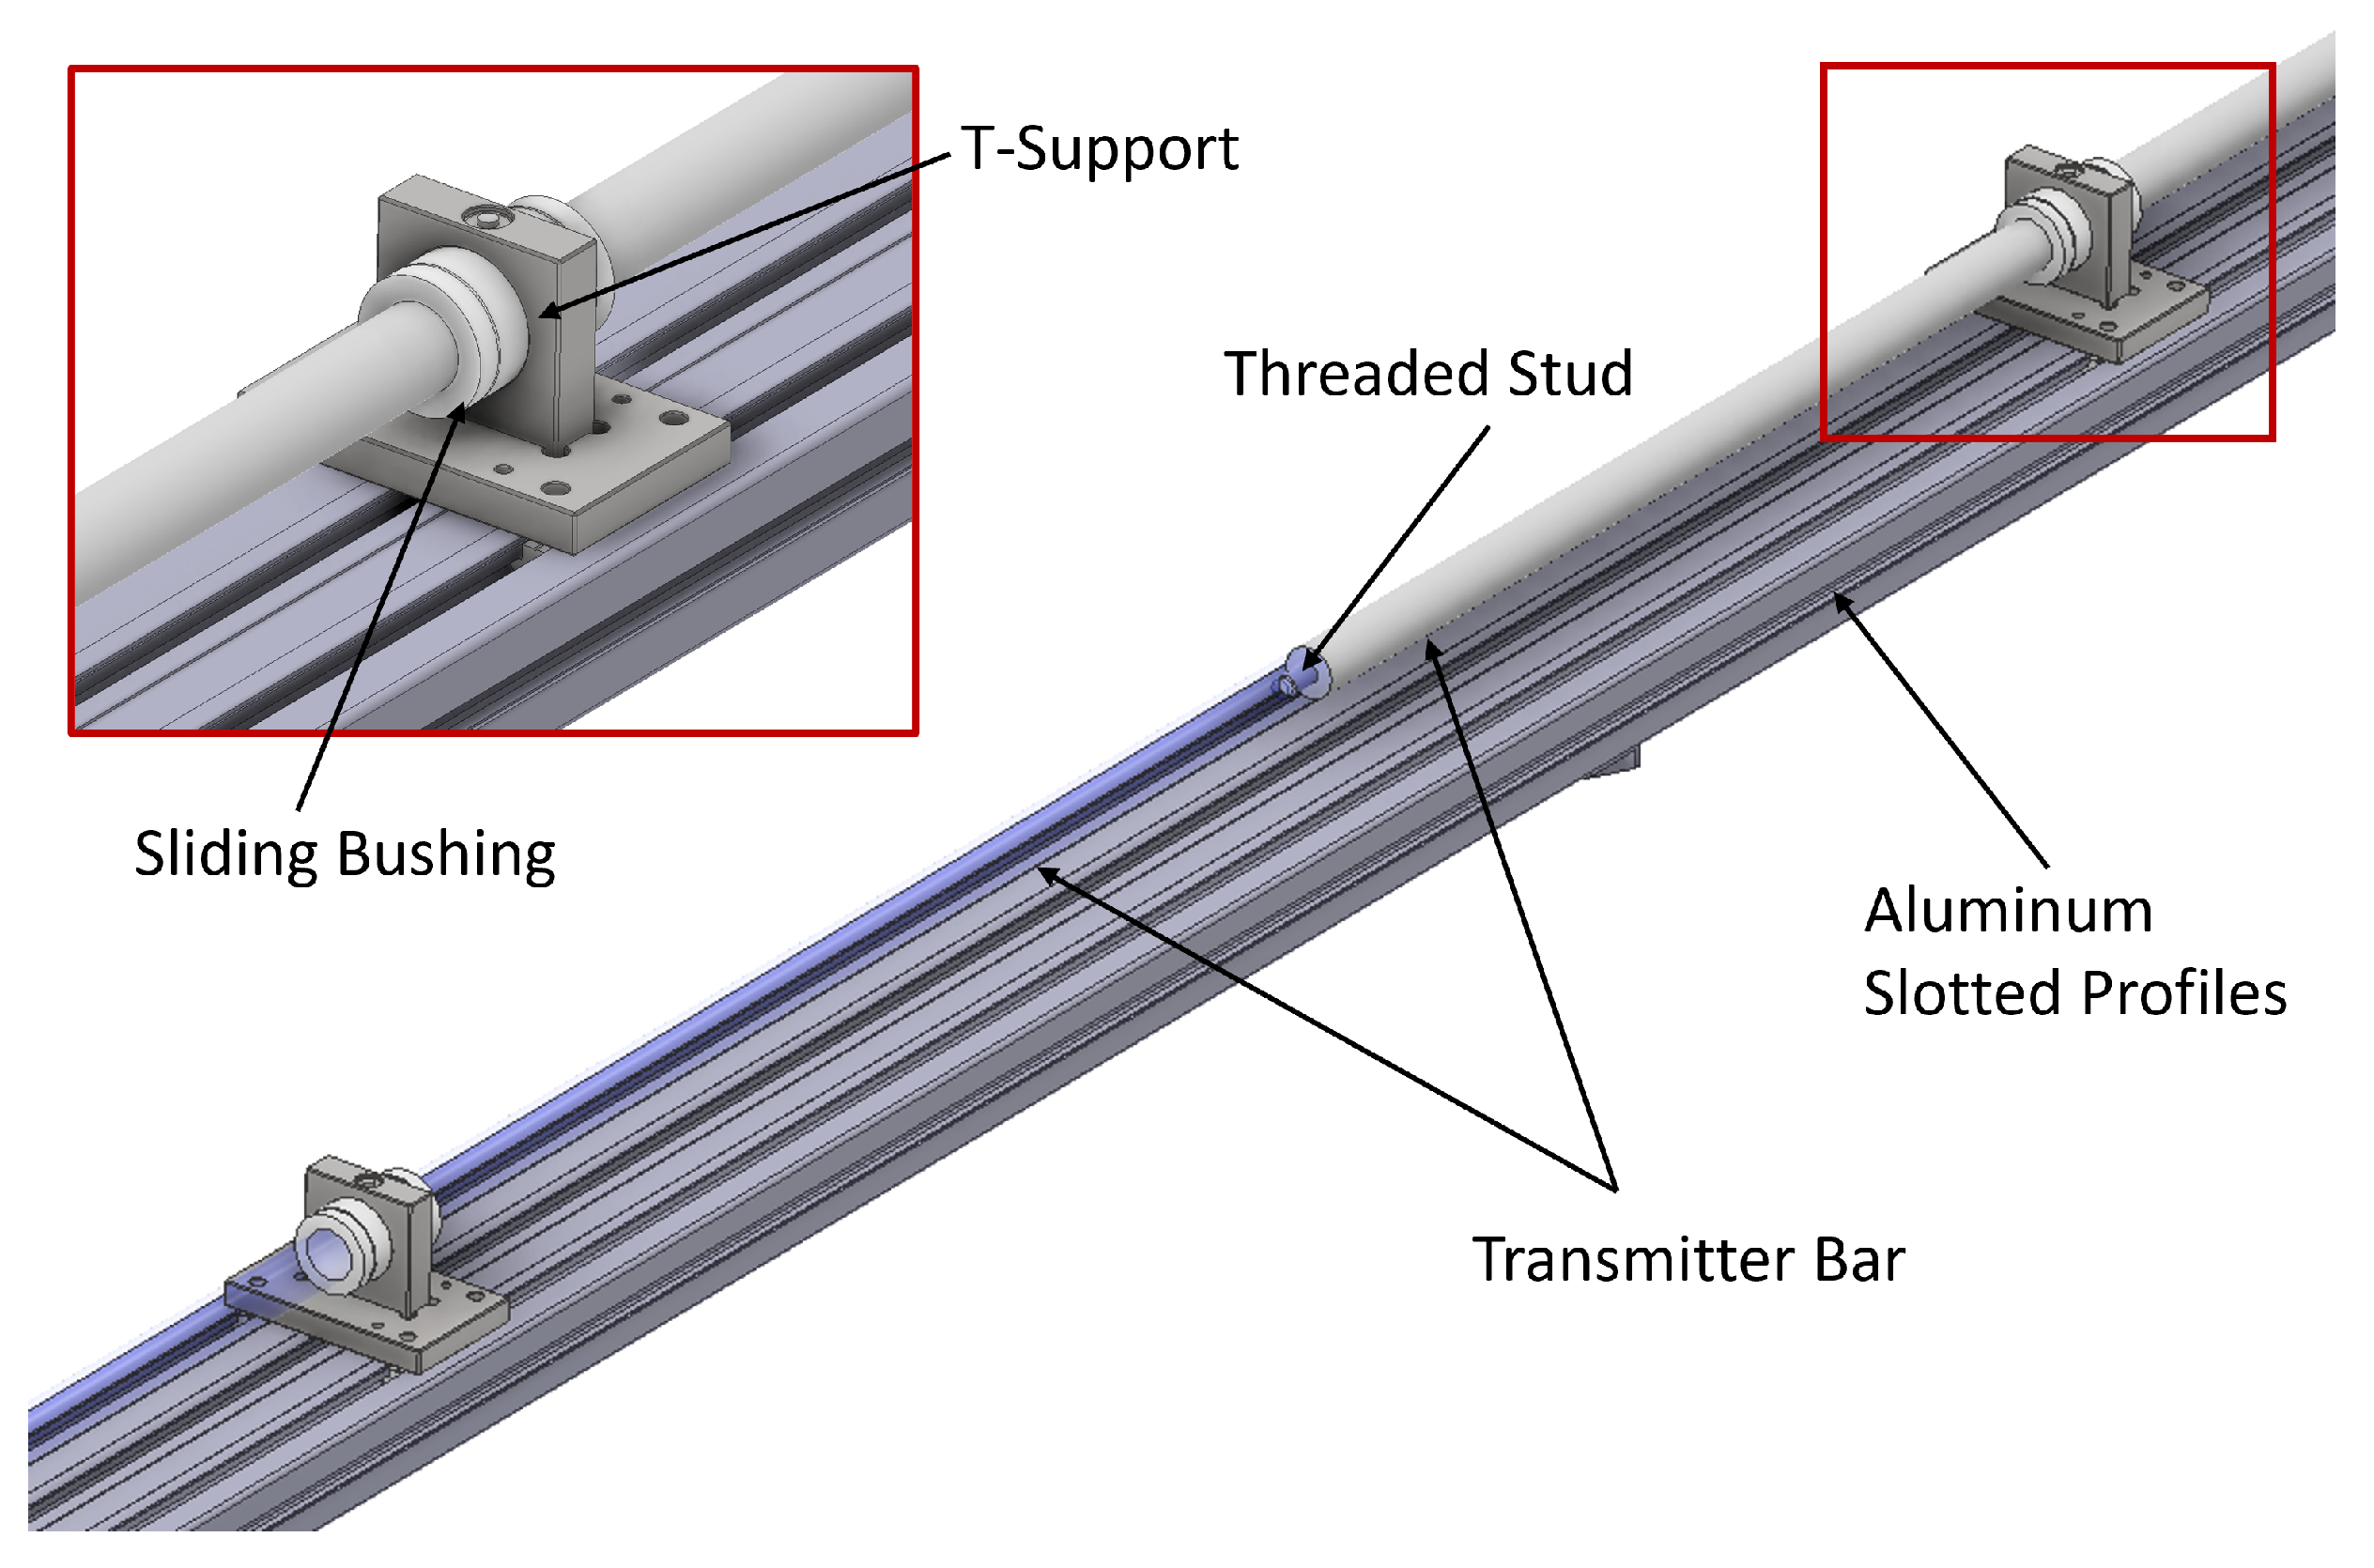
Both the striker and the transmitter bar are made of 316L stainless steel and have a diameter of 60 mm and 30 mm, respectively. The transmitter bar is 14.5 m long and, considering an elastic modulus, E, of 200 GPa and a density, ρ of 7850 kg/m3, the time, Δ t , for the elastic compressive wave to travel along the length of the transmitter bar and get reflected back to the sample is approximately 5.75 ms, computed from the equation Δ t = C / 2 L , where C is the longitudinal sound speed wave of the material ( C = E / ρ ). However, strain gauges are positioned 350 mm from the sample, which reduces the test duration to approximately ∼5.6 ms. The bar is composed of shorter 3 m bars, connected, as illustrated in Figure 2, by a threaded stud to guarantee proper contact between the normal surfaces of adjacent sections, thus preventing the generation of unwanted release waves caused by discontinuities [8]. The bars are supported by ten T-shaped supports positioned at approximately 1.5 m each. As shown in Figure 2, each support houses a sliding bushing to minimize friction, favoring the free axial movement of the bar during testing. The supports are mounted on aluminium slotted profiles (Bosch-Rexroth, Lohr am Main, Germany), which provide high flexural stiffness and high straightness and allow for the easy positioning and precise alignment of the bar.
The design presented above was derived from a virtual optimization process carried out with the Explicit FE software LS-DYNA 2025, which guided both the dimensioning and material selection for the transmitted bar, with the objective of maximizing and verifying the overall performance of the apparatus. The aim of this analysis was to evaluate the achievable strain rates, the required impact forces, and the resulting deformation levels in the transmitter bar. A 2D axisymmetric finite-element model was developed to replicate the experimental configuration, including the striker, specimen, and transmitter bar, described with fully integrated four-node elements. The bars were modeled as linear elastic, while the specimen, a cylindrical sample with a 1:1 aspect ratio, was described with an elasto-plastic constitutive behavior. To assess the system ability to test different materials with dissimilar mechanical properties, simulations were carried out using representative constitutive parameters for three classes of metals:
  • A soft metal (Cu), characterized by low yield stress and large plastic deformation;
  • A medium-strength alloy (Hardened Steel), with moderate strength and ductility;
  • A high-strength alloy (Ti6Al4V), with yield stresses over 0.9 GPa.
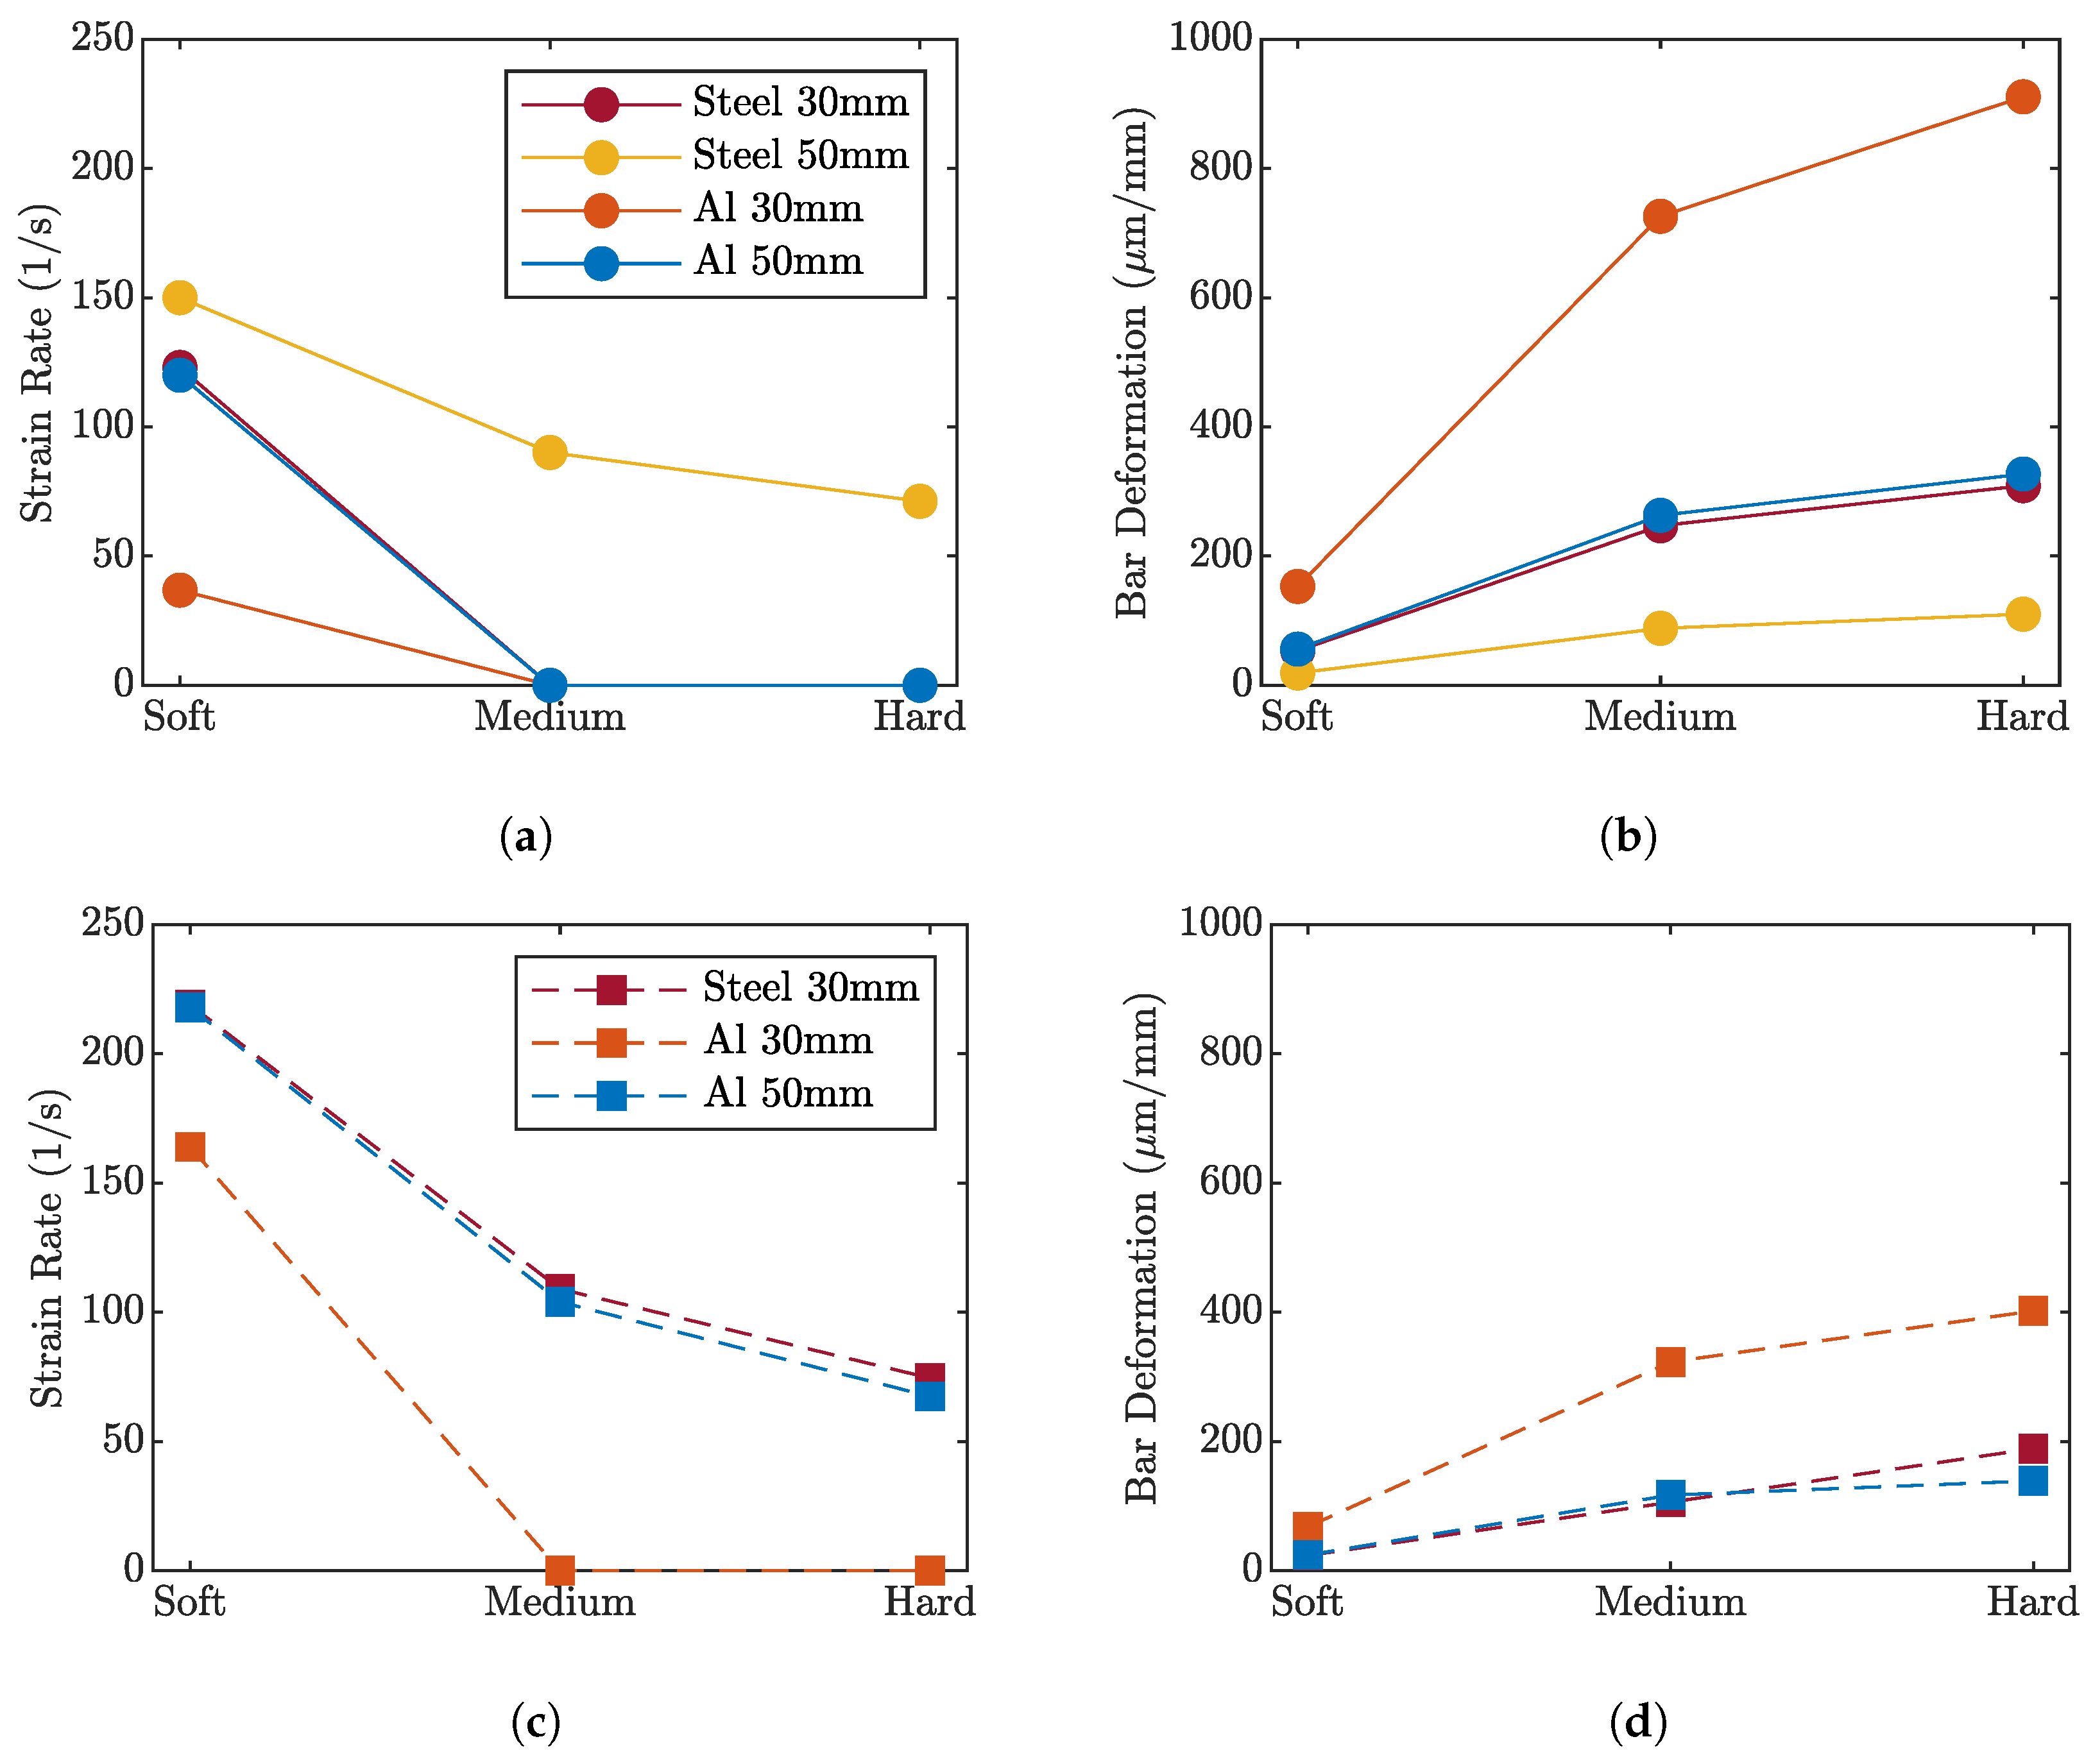
Different materials, diameters, and configurations were also investigated for both the transmitter and striker bars. For instance, the possibility of employing aluminum instead of steel, typically selected for these applications [8,25], was evaluated for two main reasons. First, aluminum provides a similar longitudinal wave velocity while being significantly lighter. Second, its lower stiffness results in greater elastic deformation, thereby amplifying the strain signal measured by the gauges on the transmitter bar. However, this greater compliance may limit the range of materials that can be effectively tested, especially those with particularly high yield strengths. As an illustrative example, Figure 3 reports the simulation results in terms of achieved strain rate and strain measured on the transmitter bar for a striker mass of approximately 10 kg impacting at 1 m/s. Four configurations were analyzed, combining aluminum and steel transmitter bars with diameters of 30 and 50 mm. From the results, it can be observed that the 30 mm aluminum bar, which provides the highest measurable strain on the transmitter side, is suitable only for testing soft materials, such as copper. One solution could be to increase the bar diameter or adopt a stiffer material, such as steel, which allows for testing higher resistance materials (Figure 3c). In fact, reducing the compliance of the bar resulted in lower axial sliding and a longer time before the striker and the transmitting bar reached the same speed, increasing the test time. The comparison in Figure 3 shows that a 30 mm steel bar and a 50 mm aluminum bar yield similar results in terms of specimen strain rate and measurable bar deformation. Nevertheless, this configuration remains limited when testing high-strength materials using 6 mm diameter samples. A possible alternative is the use of a 50 mm steel bar, which, as evident from Figure 3a, allows for the characterization of both soft and hard materials while still achieving acceptable strain-rate levels. The main drawback, however, is the requirement for higher impact forces: for example, testing 6 mm Ti6Al4V specimens with a 50 mm steel bar required a compressive load of about 60 kN. By reducing the specimen diameter to 4 mm, the same material could instead be tested using a 30 mm steel bar, with the corresponding peak load at approximately 20 kN.

2.2. Test Configuration

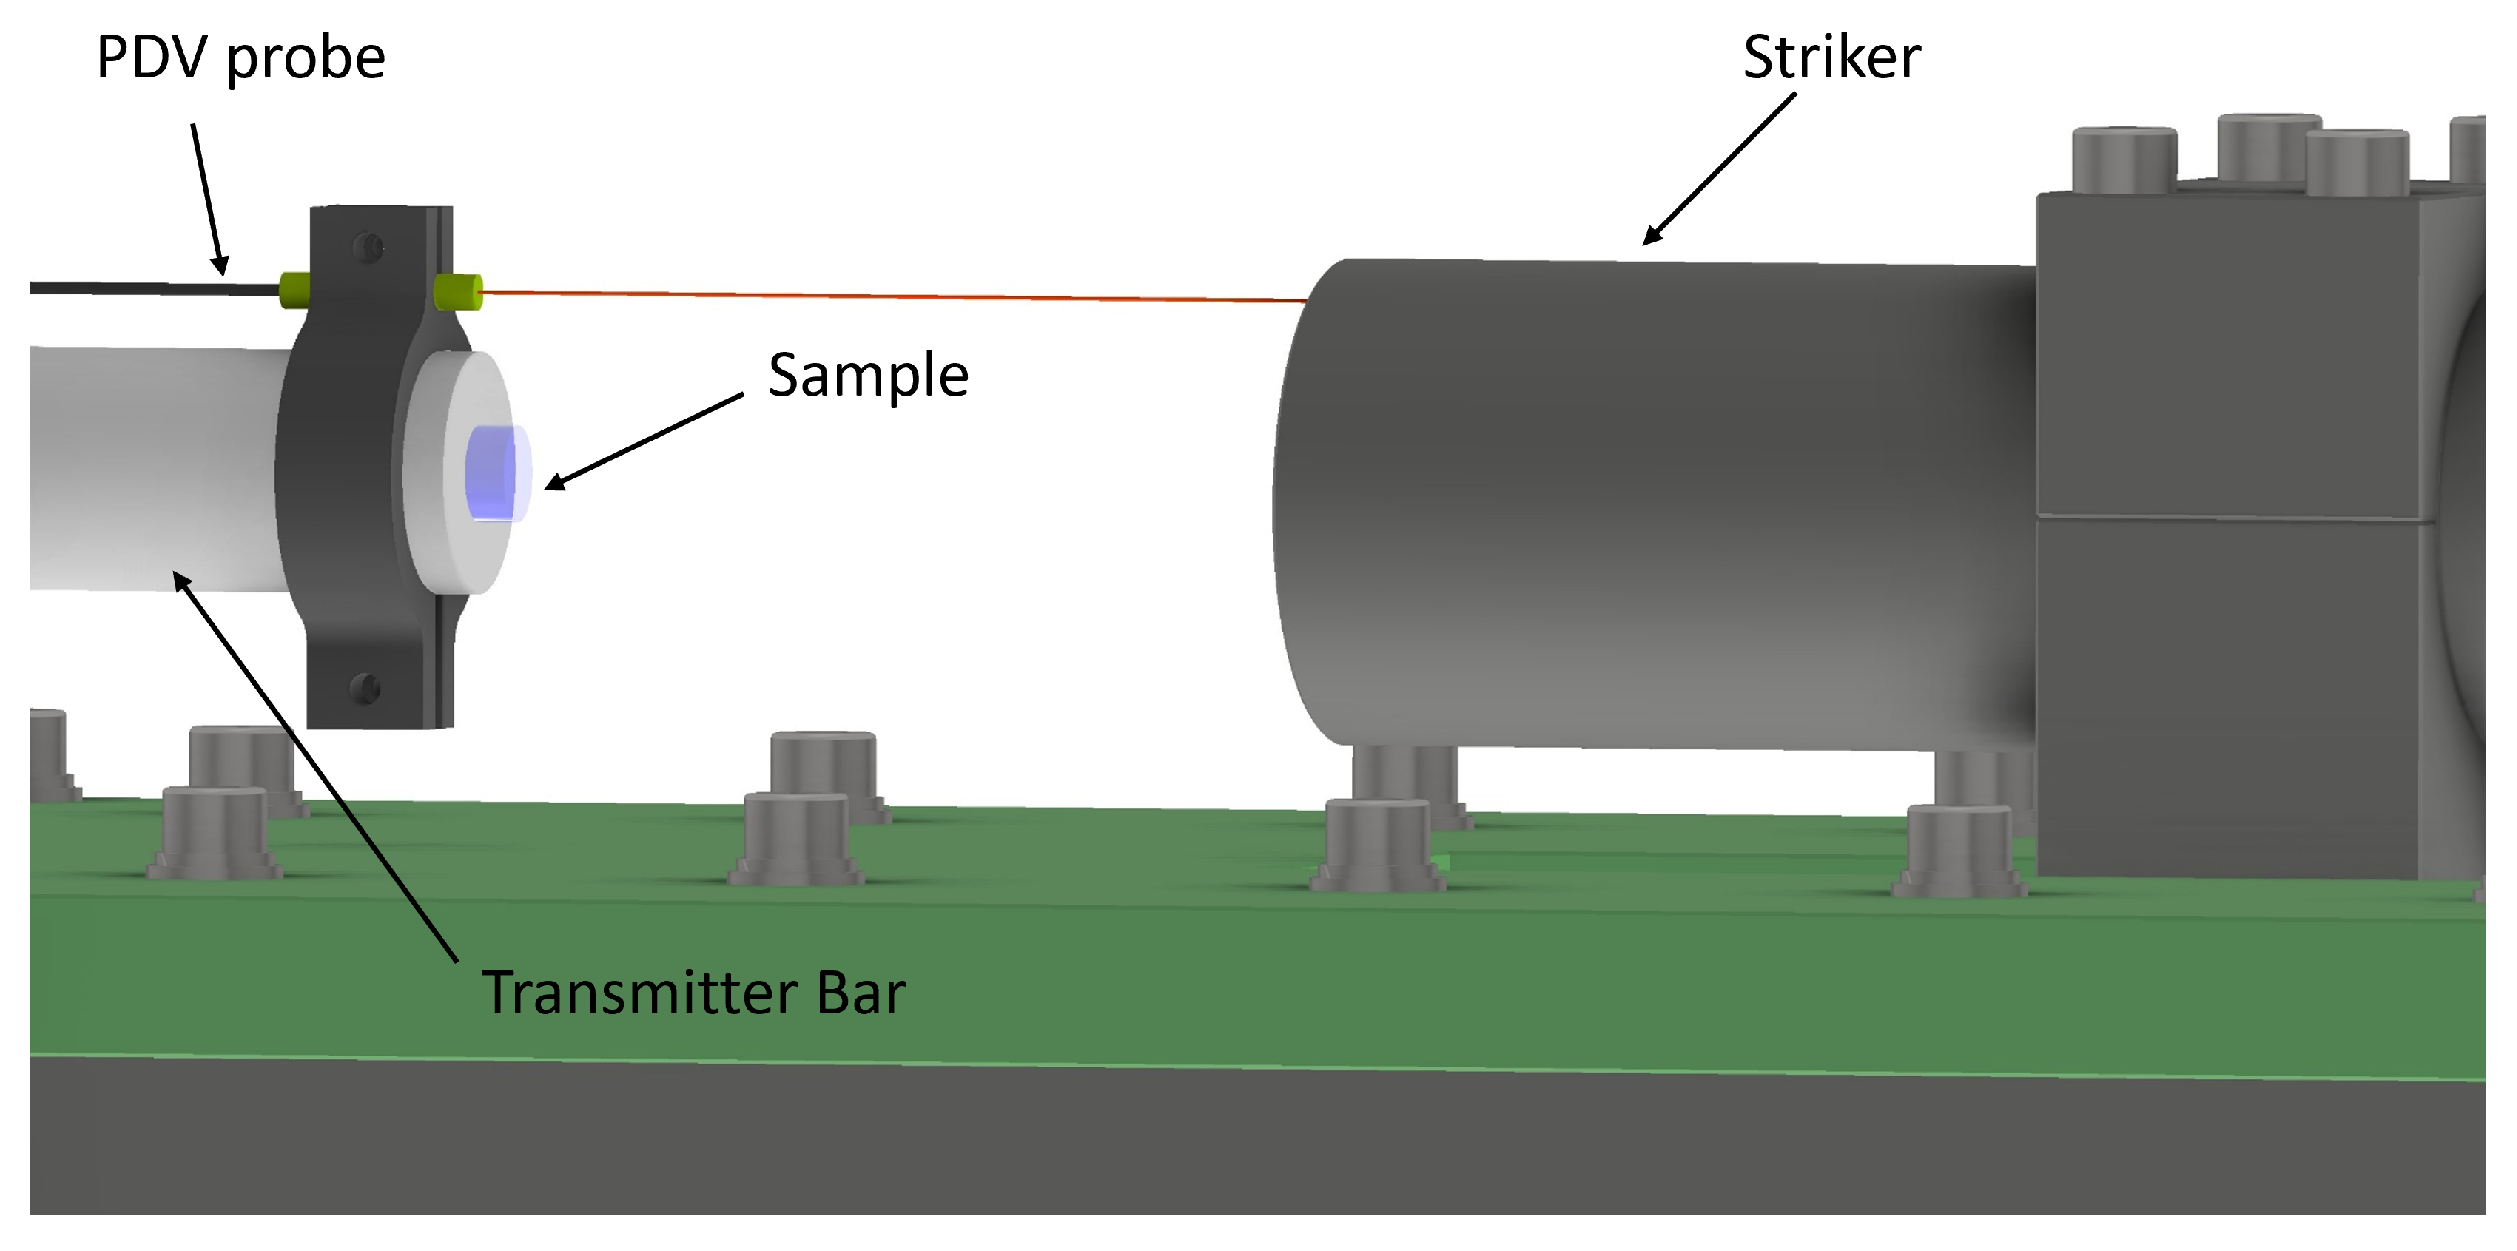
The specimen, as schematically illustrated in Figure 4, is mounted between the actuator impact surface and the end of the transmitter bar using a lithium-based grease typically employed in bearing applications. During testing, the striker is positioned at a predetermined distance from the specimen to achieve the prescribed velocity prior to impact. The PDV probe is rigidly mounted on the transmitter bar with a custom-designed 3D-printed PLA support. By evaluating the frequency shifts of the reflected light (Doppler effect), this configuration allows for direct measurement of the relative velocity between the transmitter and the incident bars during the test. This signal is then used to obtain the compression velocity of the specimen, which, when integrated over time, provides the corresponding displacement and, consequently, the deformation of the specimen with high temporal resolution. The VeloreX PDV system by OZM (Hrochuv Tynec, Czech Republic) was employed, which consists of four 1550 n m narrow-bandwidth laser channels with an output power of 80 m W . The PDV signals were analyzed using the Matlab Toolbox SIRHEN 1.0 [35].
The system is configured via a custom-built software interface by setting the desired speed and initial distance from the sample, allowing the actuator to reach constant velocity prior to impact. During operation, the actuator directly strikes the free end of the specimen, producing a controlled compression event. The stress wave generated in the specimen propagates through the transmitter bar, whose deformation is recorded by resistive strain gauges positioned at 350 mm from the sample in a half-bridge configuration, with the two active gauges installed on the opposite sides of the bar. This configuration is not only insensitive to possible bending effects induced by the striker impact but also improves the signal quality by reducing noise. Since the two active gauges occupy opposite sides of the Wheatstone bridge, the bridge unbalance is twice that of a single active gauge. Consequently, the amplifier gain can be reduced, which further decreases the noise level in the recorded signal. The strain gauges were connected to DAQP-STG-D signal conditioners (DEWETRON, Grambach, Austria), and no noise filtering was applied on the gauge signals. For this application, isoelastic foil strain gauges were used, characterized by a gauge factor of 3.2, higher than that of conventional constantan foils (gauge factor of 2). With this setup, the amplifier gain could be reduced by approximately a factor of 3.2. According to elastic wave theory, the deformation of the transmitter bar, ε T ( t ) , is directly related to the stress level within the specimen, σ S ( t ) , which can be calculated from the following relationship:
σ S ( t ) = E B A B A S ε T ( t )
assuming that force equilibrium is satisfied within the specimen, where E B and A B are the Young’s modulus and area of the transmitter bar, respectively, whereas A S is the net resisting area of the sample.
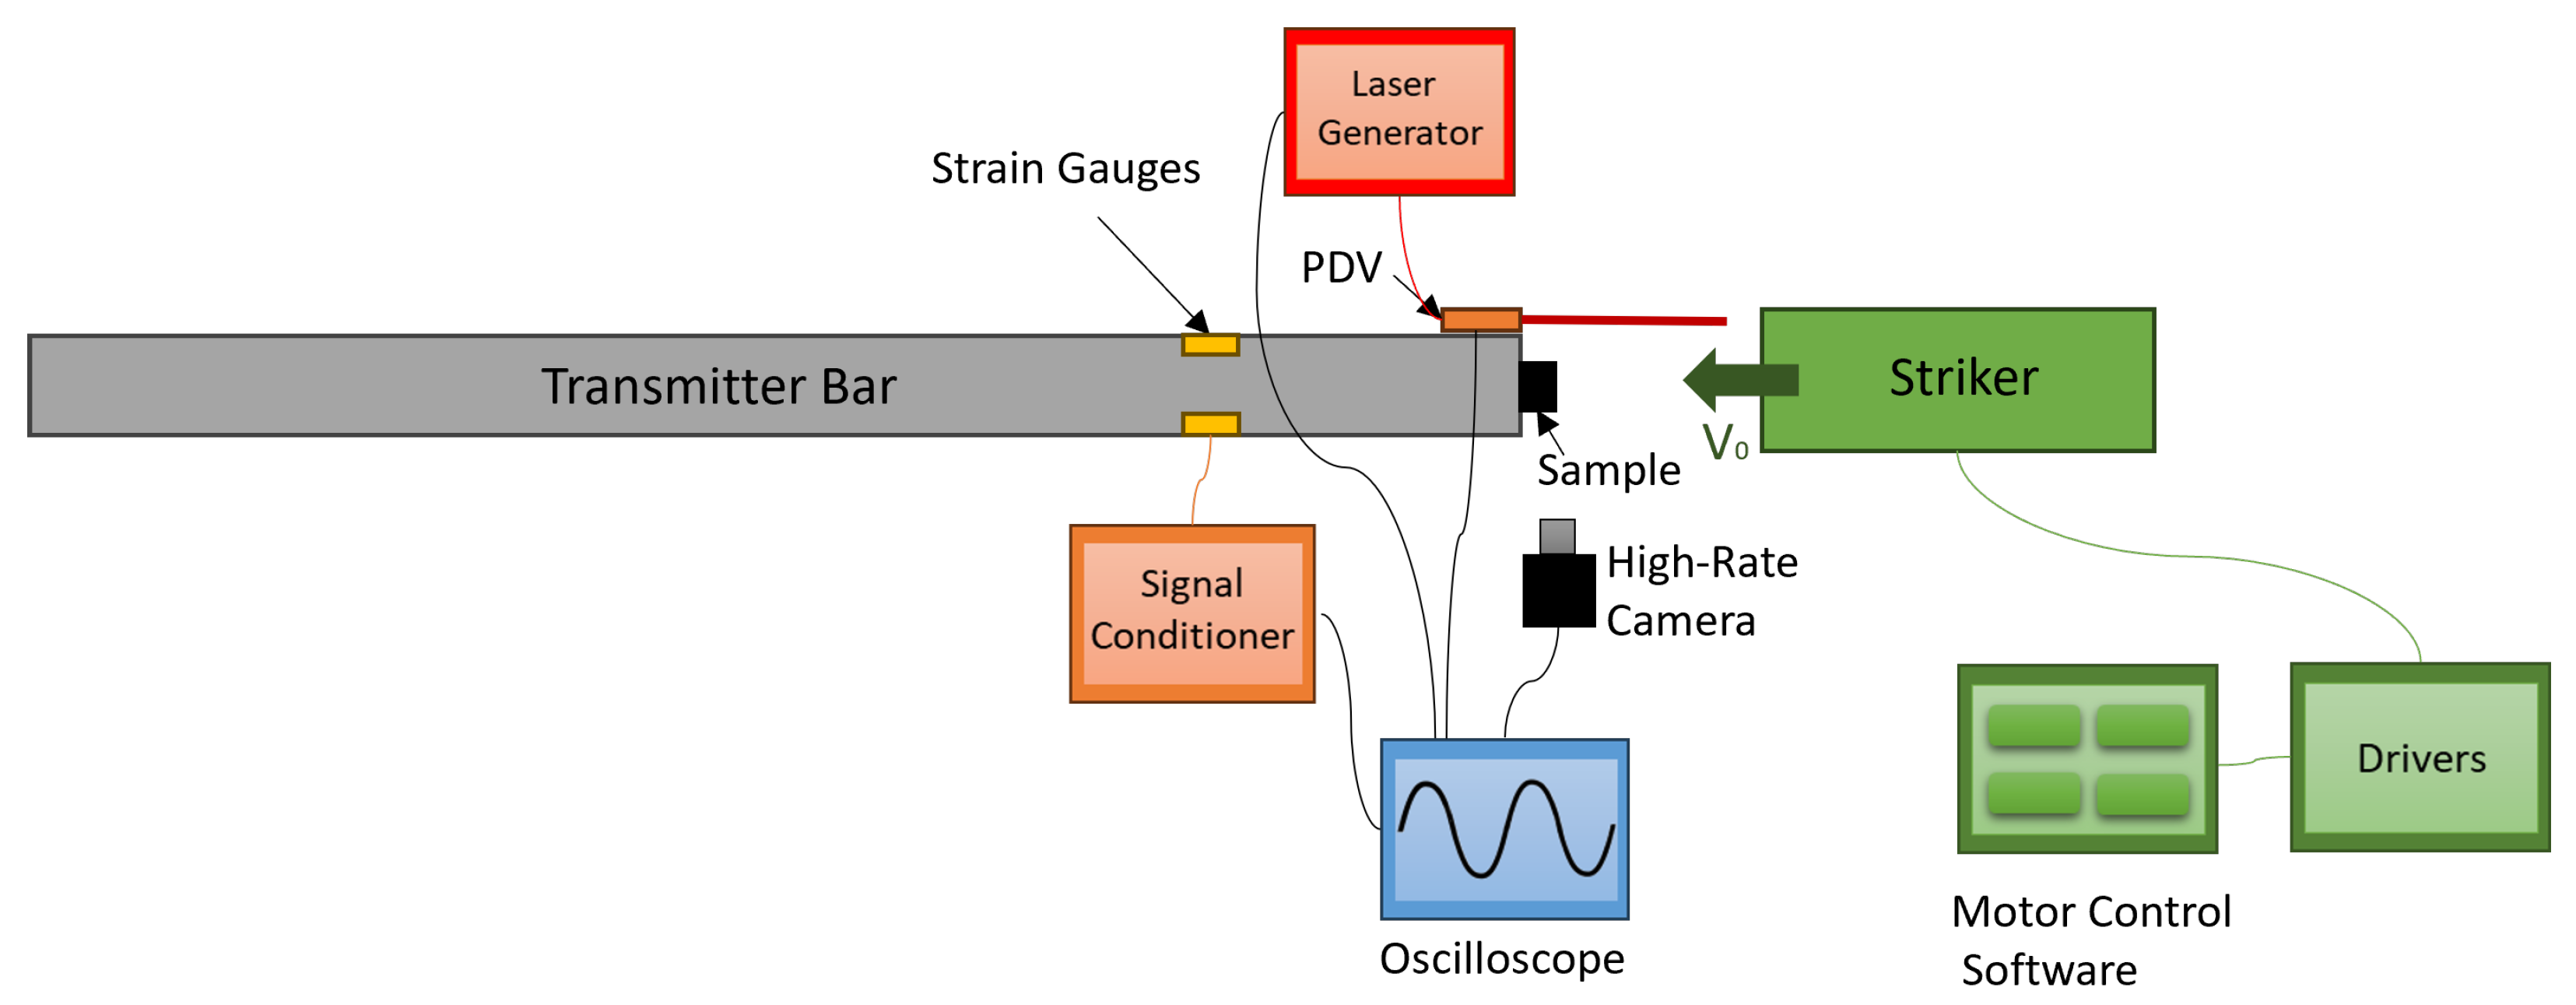
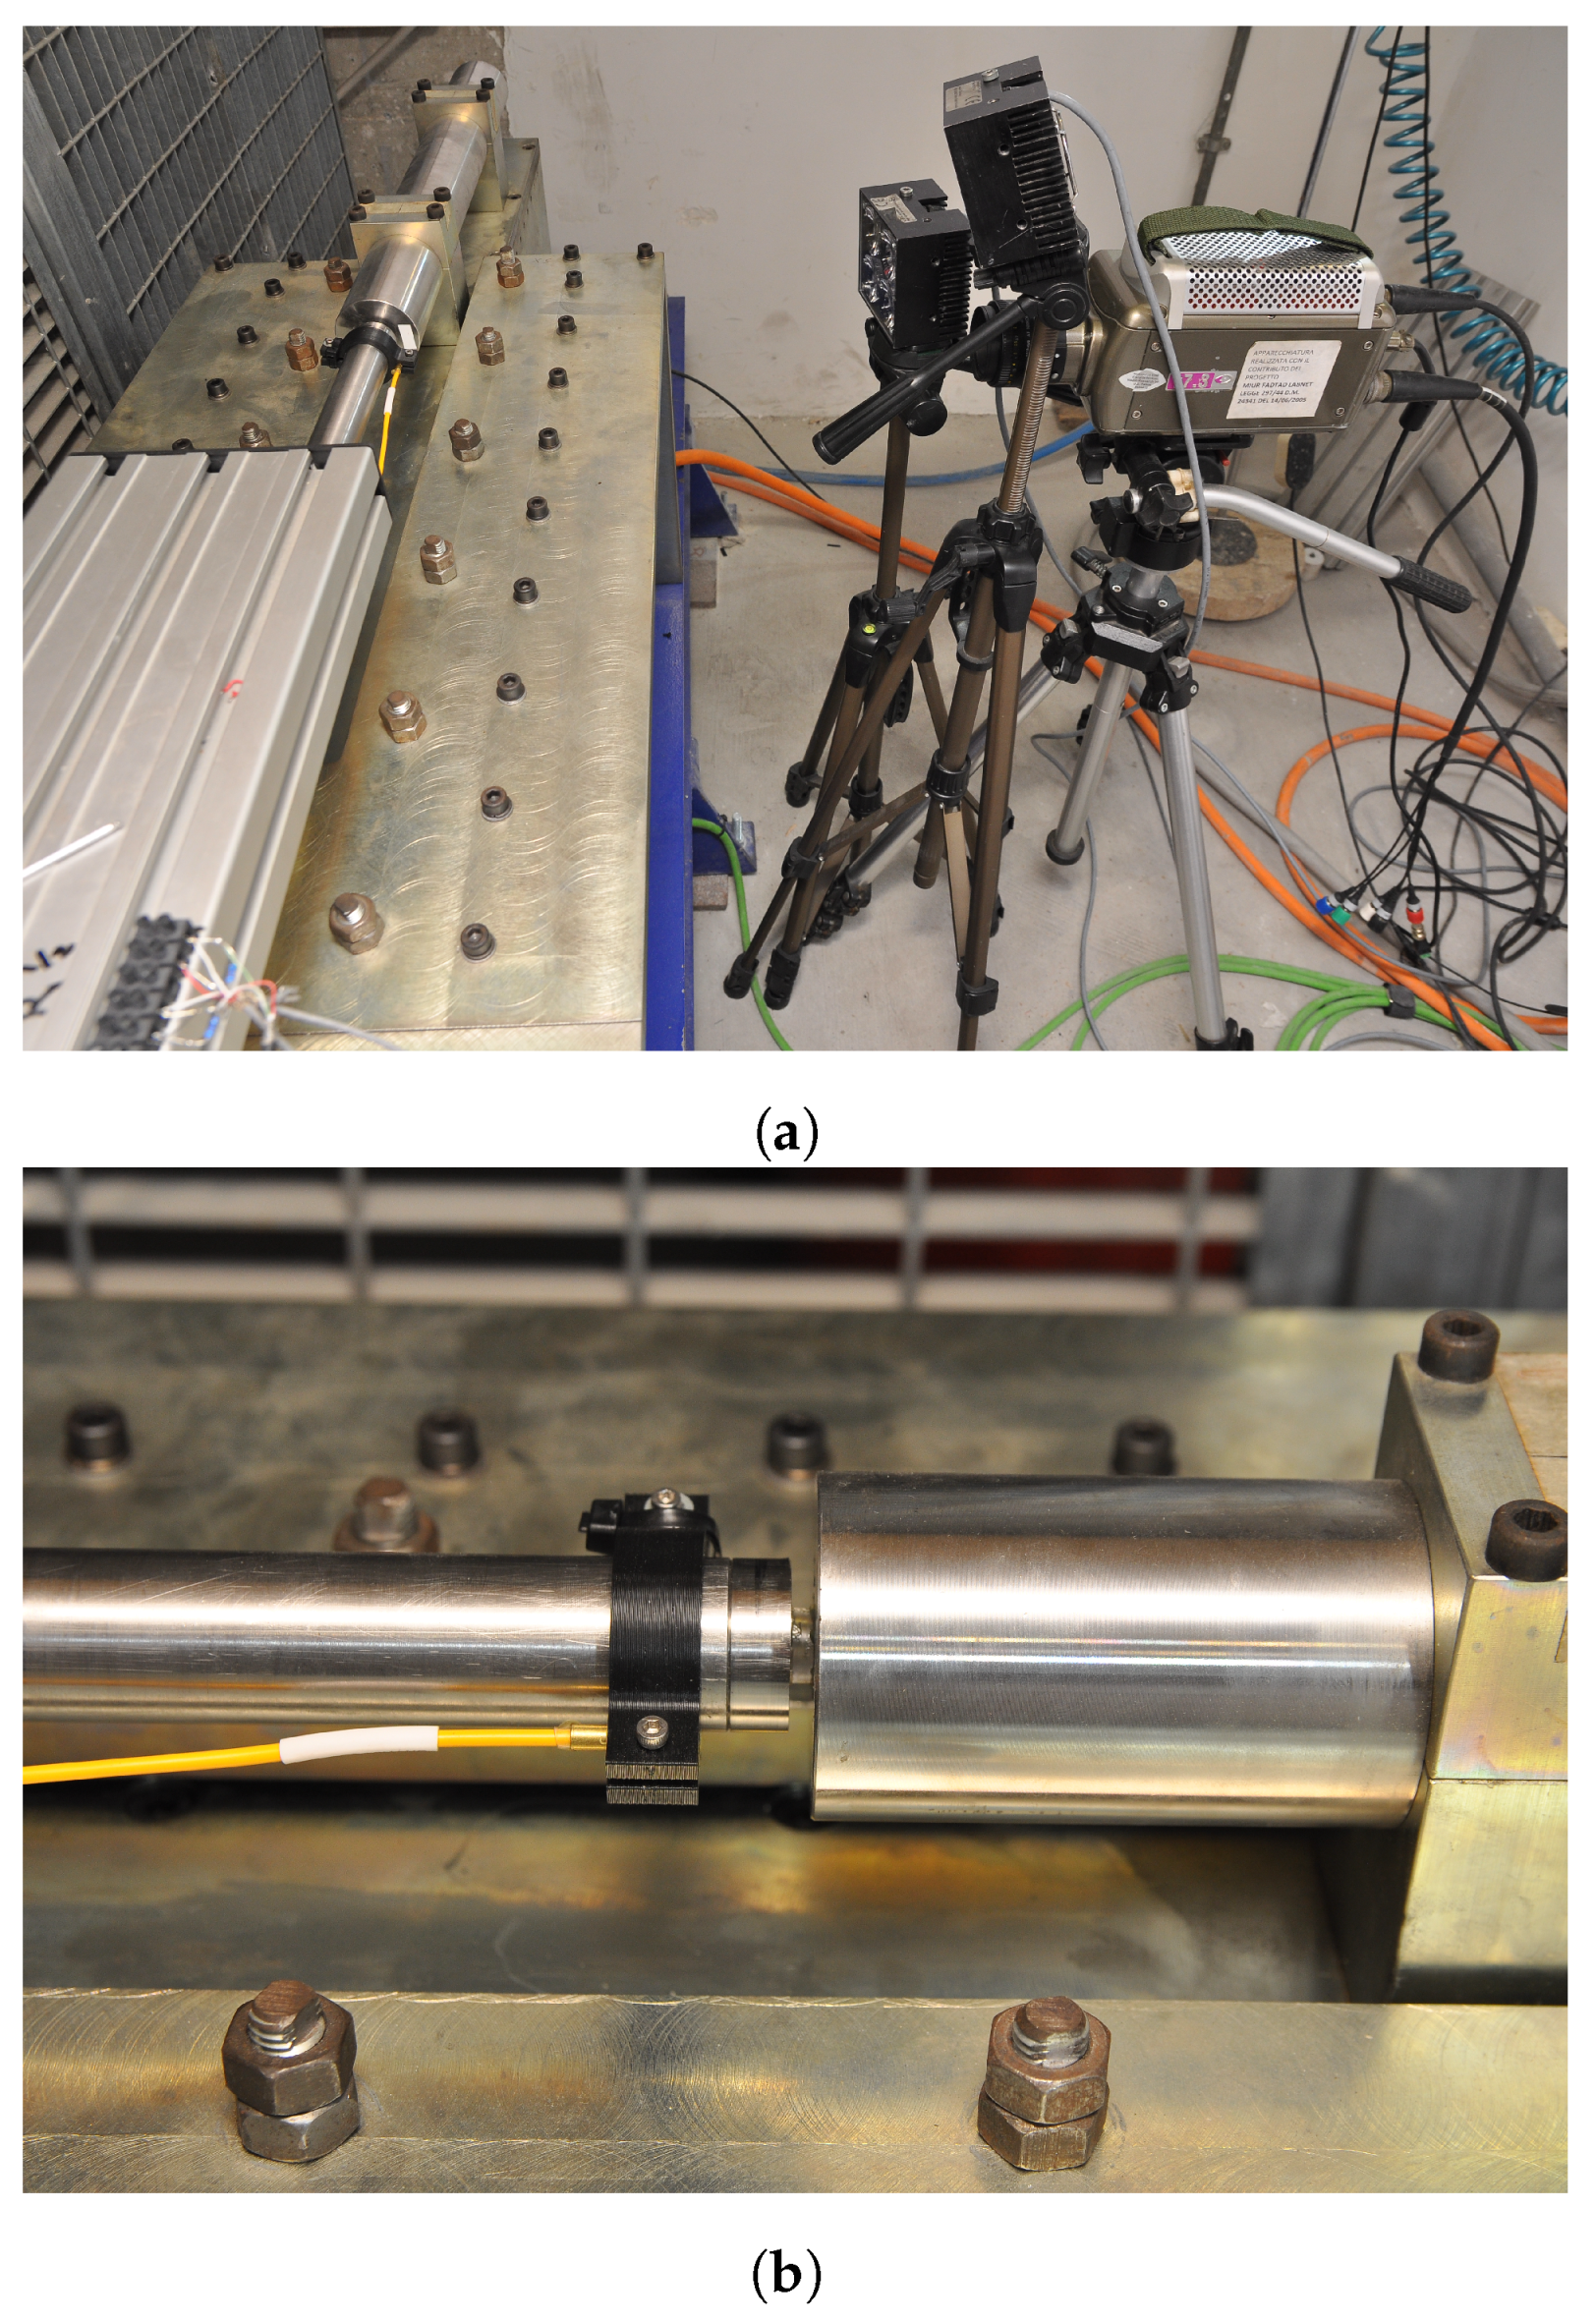
The different steps of deformation were recorded using a Phantom v7.3 high-speed camera (Vision Research, Wayne, NJ, USA), operating at a frame rate of 40,000 fps and a spatial resolution of 512 × 128 pixel. As illustrated in Figure 5, which reports a schematics of the experimental setup, all measurement and acquisition systems were connected to a SDS7404A oscilloscope (Siglent Technologies, Shenzhen, China), having a bandwidth up to 4 GHz and a sample rate up to 20 GSa/s, which provided the trigger signal for data acquisition when the transmitted strain pulse reached the strain gauge installed on the bar. The experimental setup is shown in Figure 6.

3. Experimental Tests on Polycarbonate

To investigate the through-thickness response, Makrolon AR PC cylinders with a diameter of 13 mm were machined from a 4 mm thick plate. The same specimen geometry was also used for quasi-static tests performed at a deformation rate of 10−3 s−1 on a servohydraulic Instron 5582 (Instron Structural Testing, Darmstadt, Germany) testing machine equipped with a ±100 k N load cell, for comparison with the dynamic results.

3.1. Analysis of Acquired Data

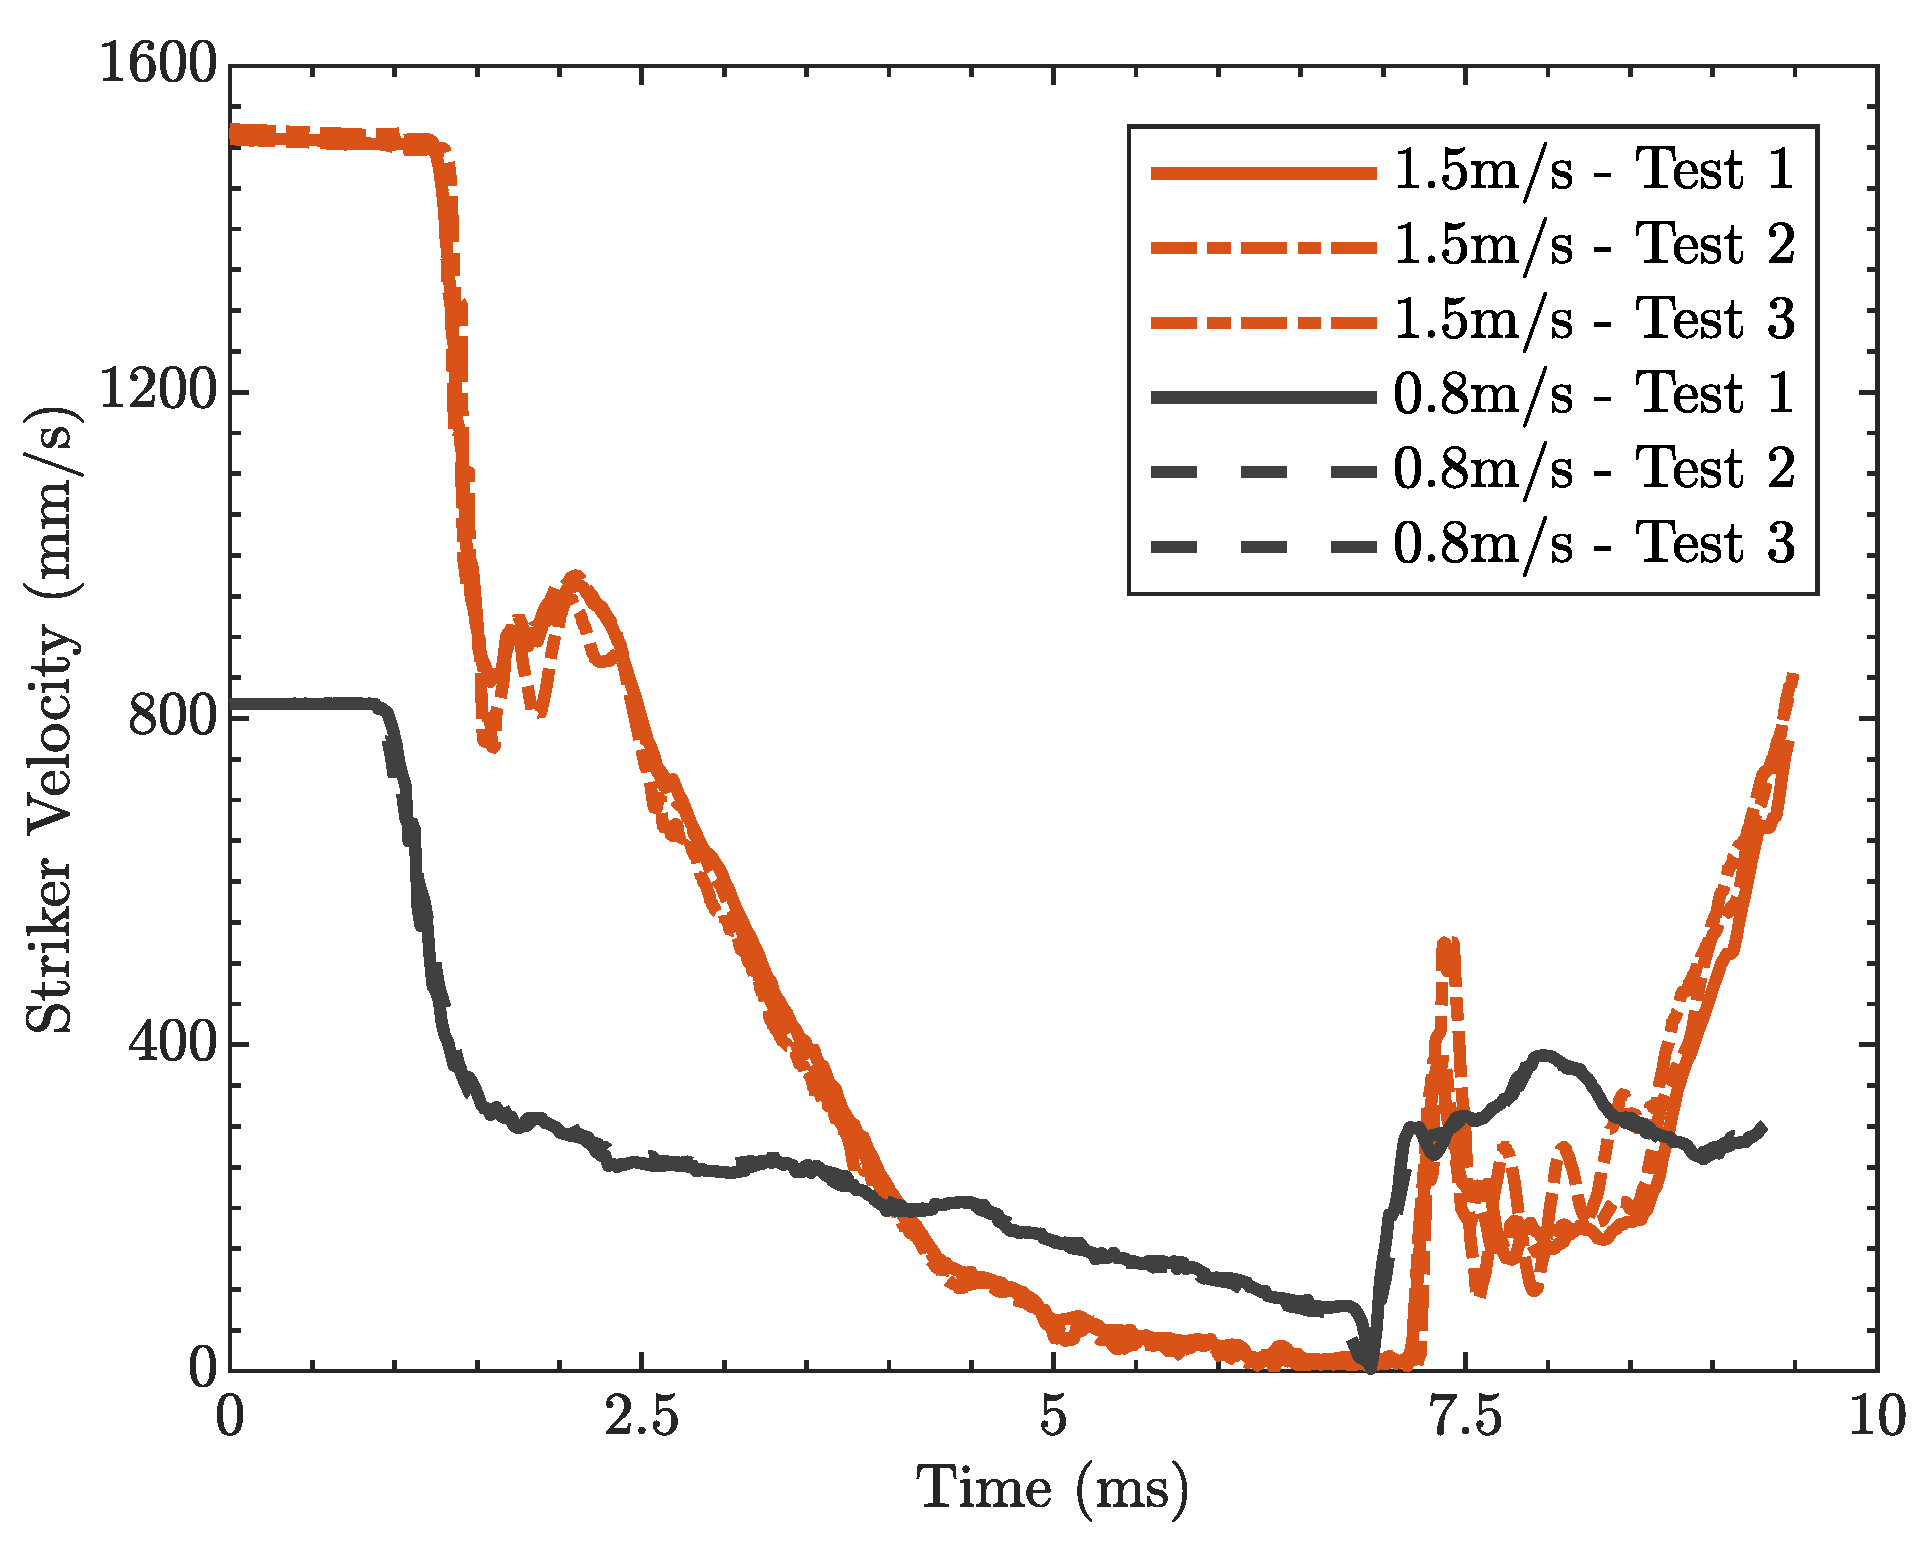
Intermediate strain-rate tests were carried out at two different striking velocities, 800 m m s−1 and 1500 m m s−1. For each velocity, three repetitions were performed to assess the repeatability and control precision of the device. Figure 7 presents the Short-Time Fourier Transform (STFT) signal from two representative tests at the different velocities, while the corresponding velocity profiles are shown in Figure 8. The striker reaches a steady velocity before impacting the sample, and upon impact, the relative velocity between the striker and the transmitter bar progressively decreases as the specimen deforms, reaching a plateau region, which is more pronounced in the low-velocity test. The velocity drop and oscillations observed in the signal at ∼5.8–6 m s after impact mark the end of the test, when the stress wave, reflected from the free end of the transmitter bar, returned back to the sample–bar interface. Figure 8 also compares the velocity profiles measured in different tests conducted at the same impact velocity, demonstrating minimal and negligible deviation and thus validating the choice of an electromechanical actuator for its precise control and high repeatability in pulse generation.
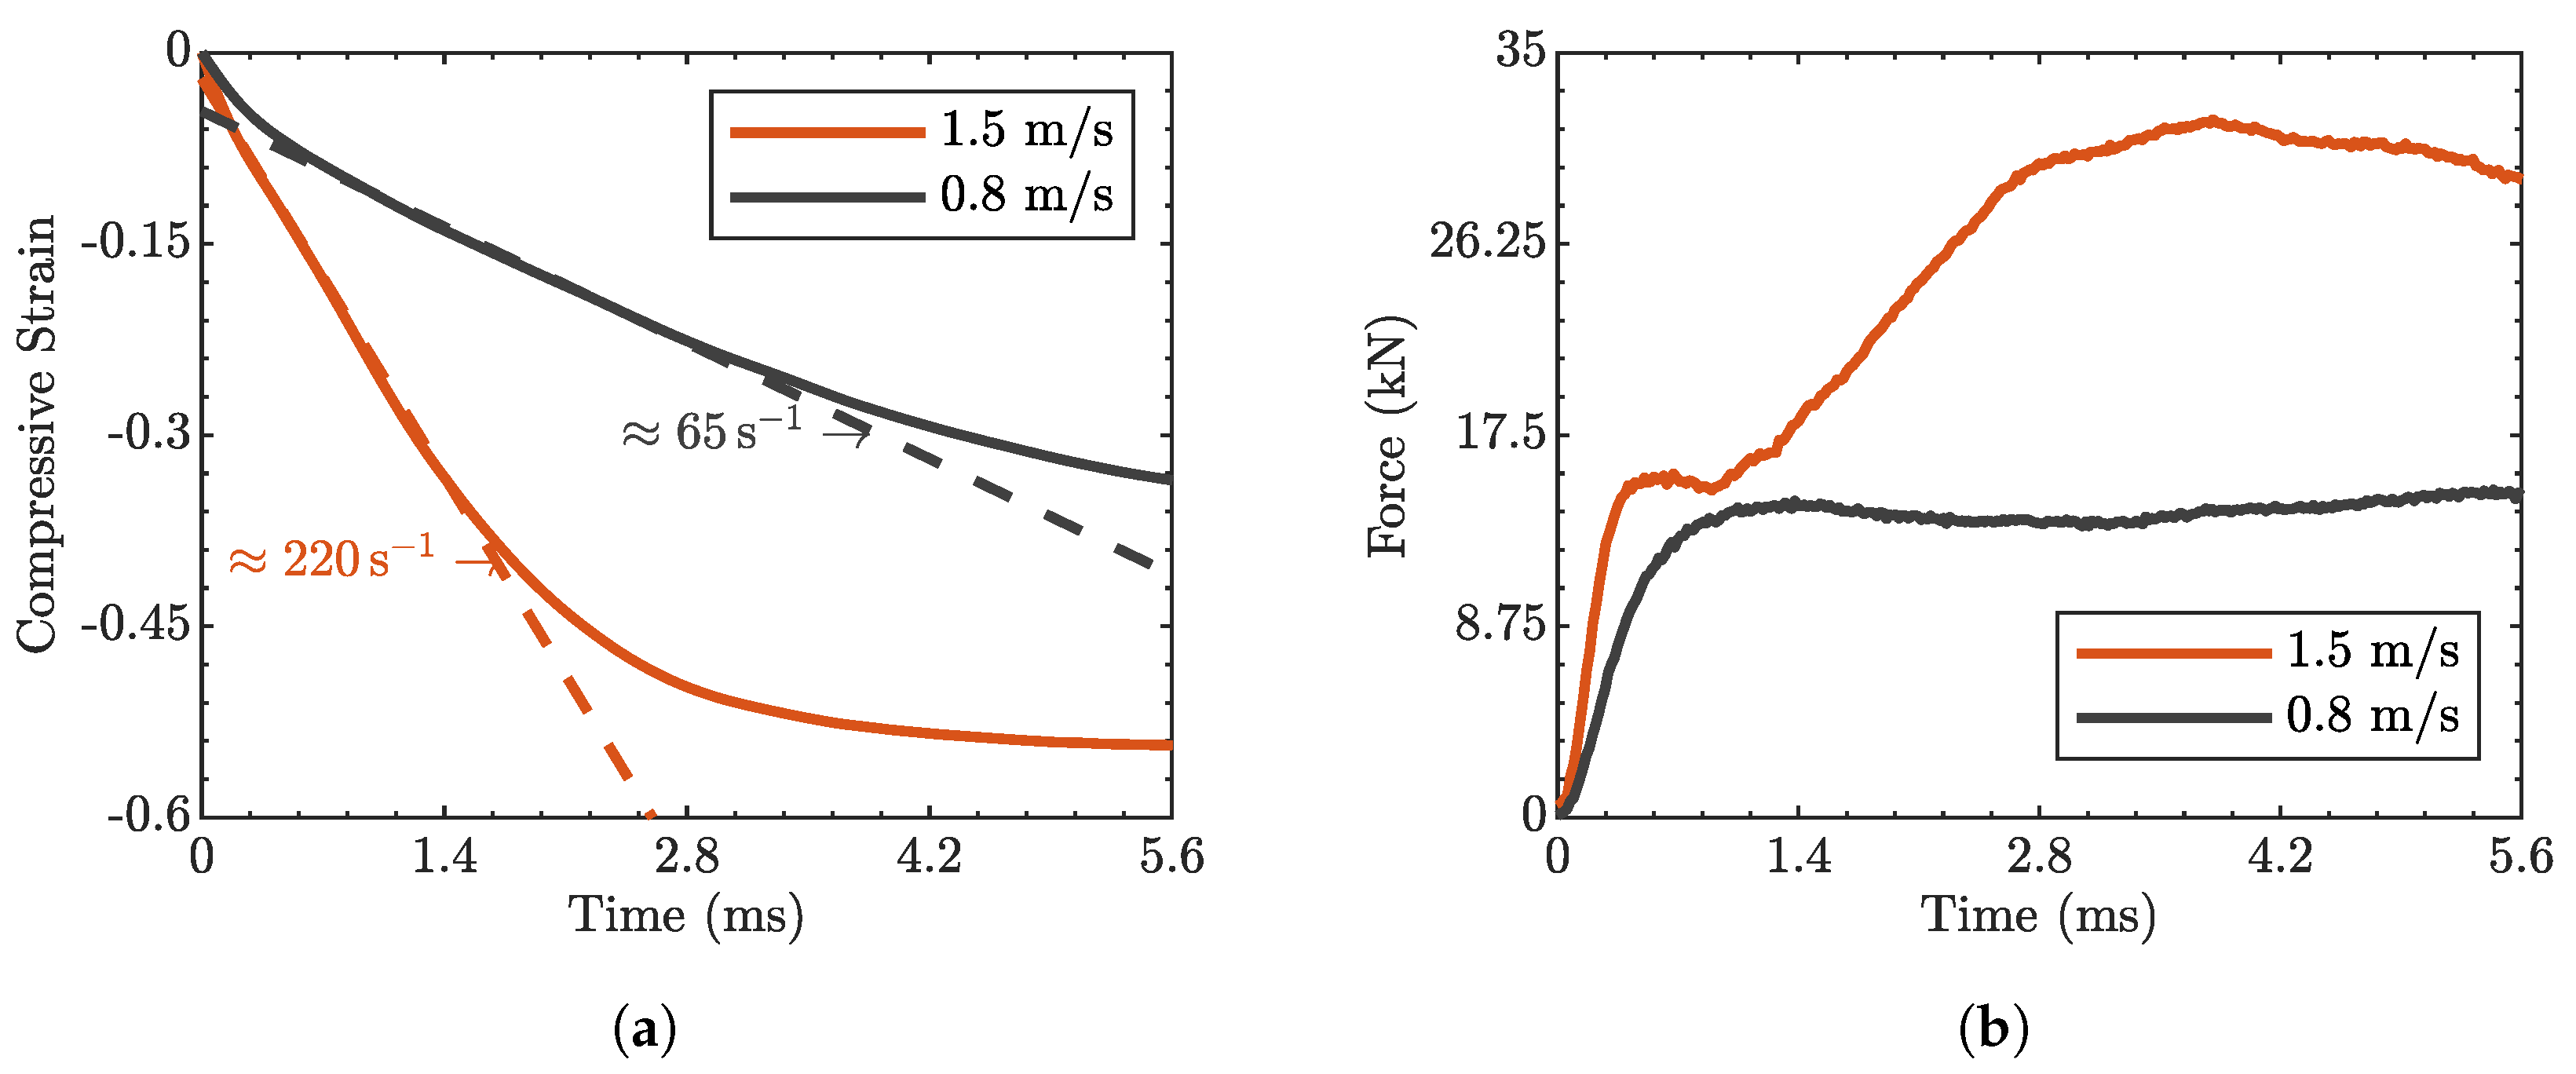
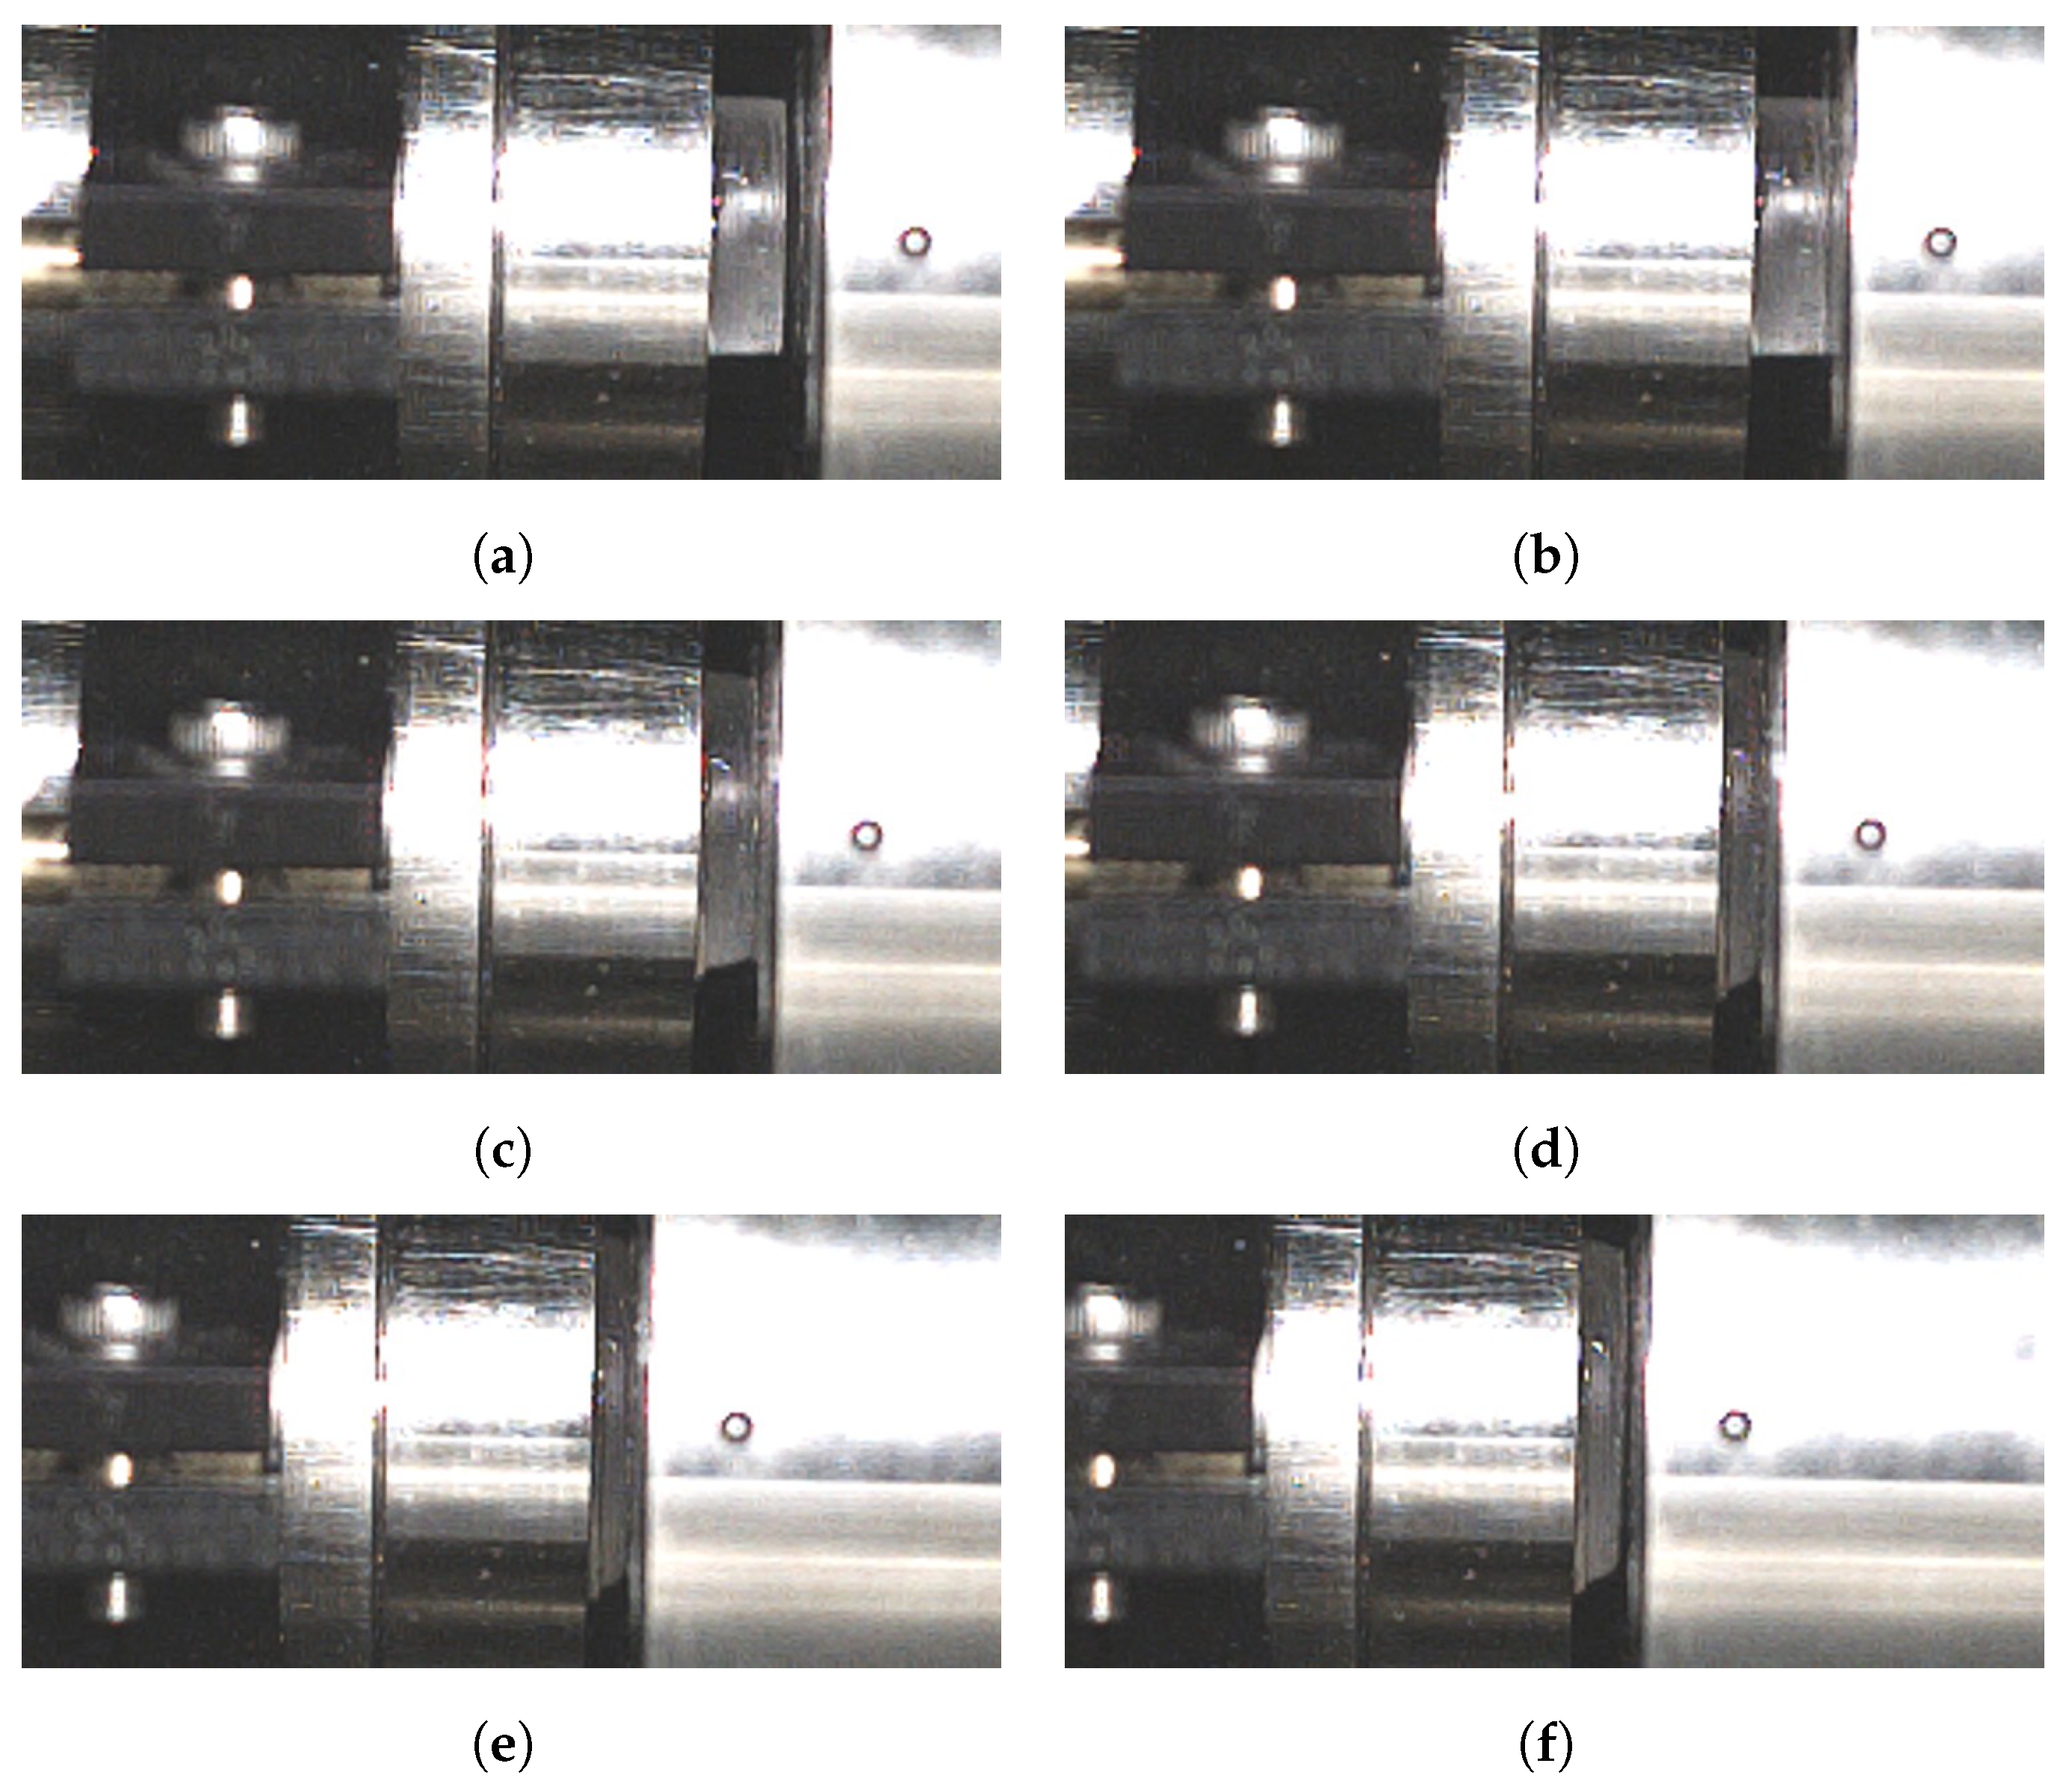
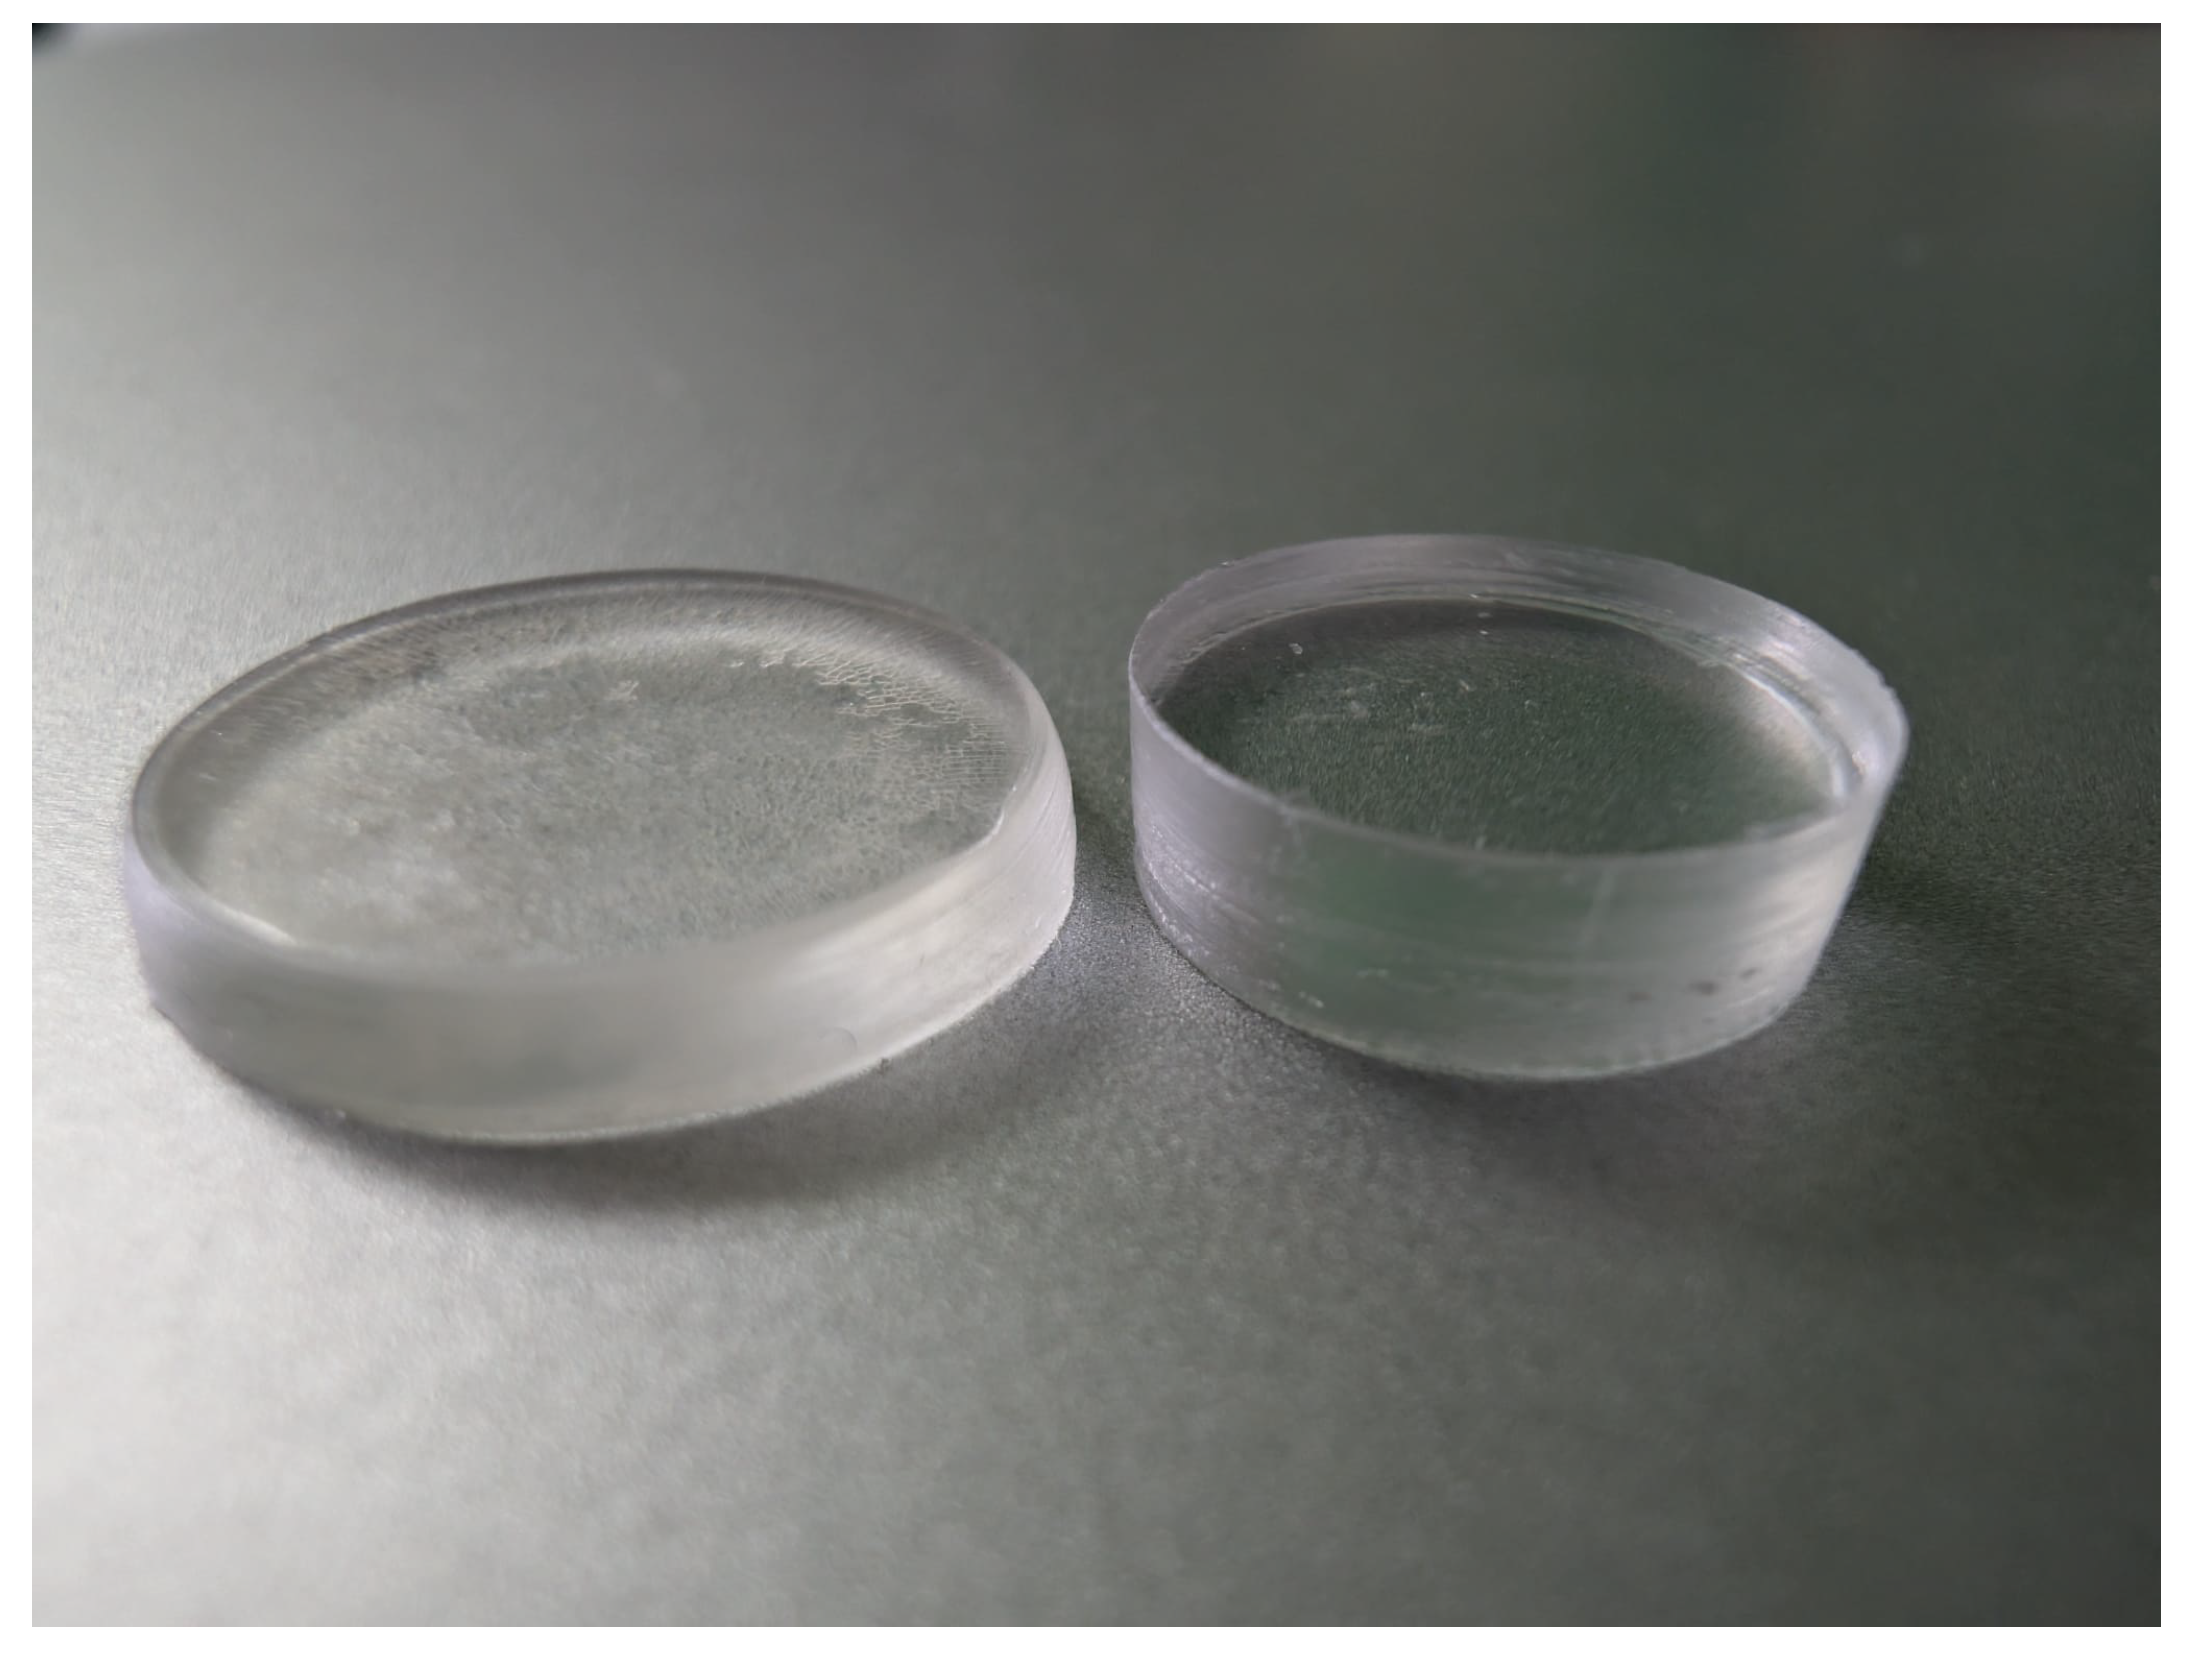
The strain evolution within the specimen, obtained by integrating the velocity profiles, is shown in Figure 9a. The strain vs. time response exhibits a parabolic trend, with a central region in which the strain increases linearly at an approximately constant rate of 220 s−1 and 65 s−1 for the high- and low-velocity impacts, respectively. The data were synchronized with the force measurements, reported in Figure 9b, which were computed from the strain signals acquired by the gauges mounted on the transmitter bar. No oscillations were found in the strain gauge data, indicating that the stress wave is not subjected to significant reflections at the specimen–transmitter bar interface. For the lower test velocity, the sharp rise in force after impact is followed by a plateau region, associated with the gradual reduction in the relative velocity between the two bars over time (Figure 8). At 1.5 m s−1, this plateau is significantly shorter and the load increases significantly, reaching a peak value in ∼4 ms, after which the load starts to drop. In this case, the higher force applied by the striker and the corresponding increase in velocity of the transmitter bar result in a substantial reduction in relative velocity between the two [8], as visible in Figure 8. Consequently, the increase in strain, following the initial linear part, (Figure 9a) is significantly reduced. Figure 10 shows a sequence of high-speed images captured during the impact test at 1.5 m s−1, which illustrate the initial configuration prior to loading (Figure 10a), the instant of impact (Figure 10b), the progressive specimen compression (Figure 10c,d), the significant sliding of the transmitter bar (Figure 10e), and the subsequent separation between the striker and the specimen (Figure 10f). Figure 11 presents a comparison between the undeformed and deformed specimens, showing a uniform reduction in thickness.

3.2. Response of Polycarbonate

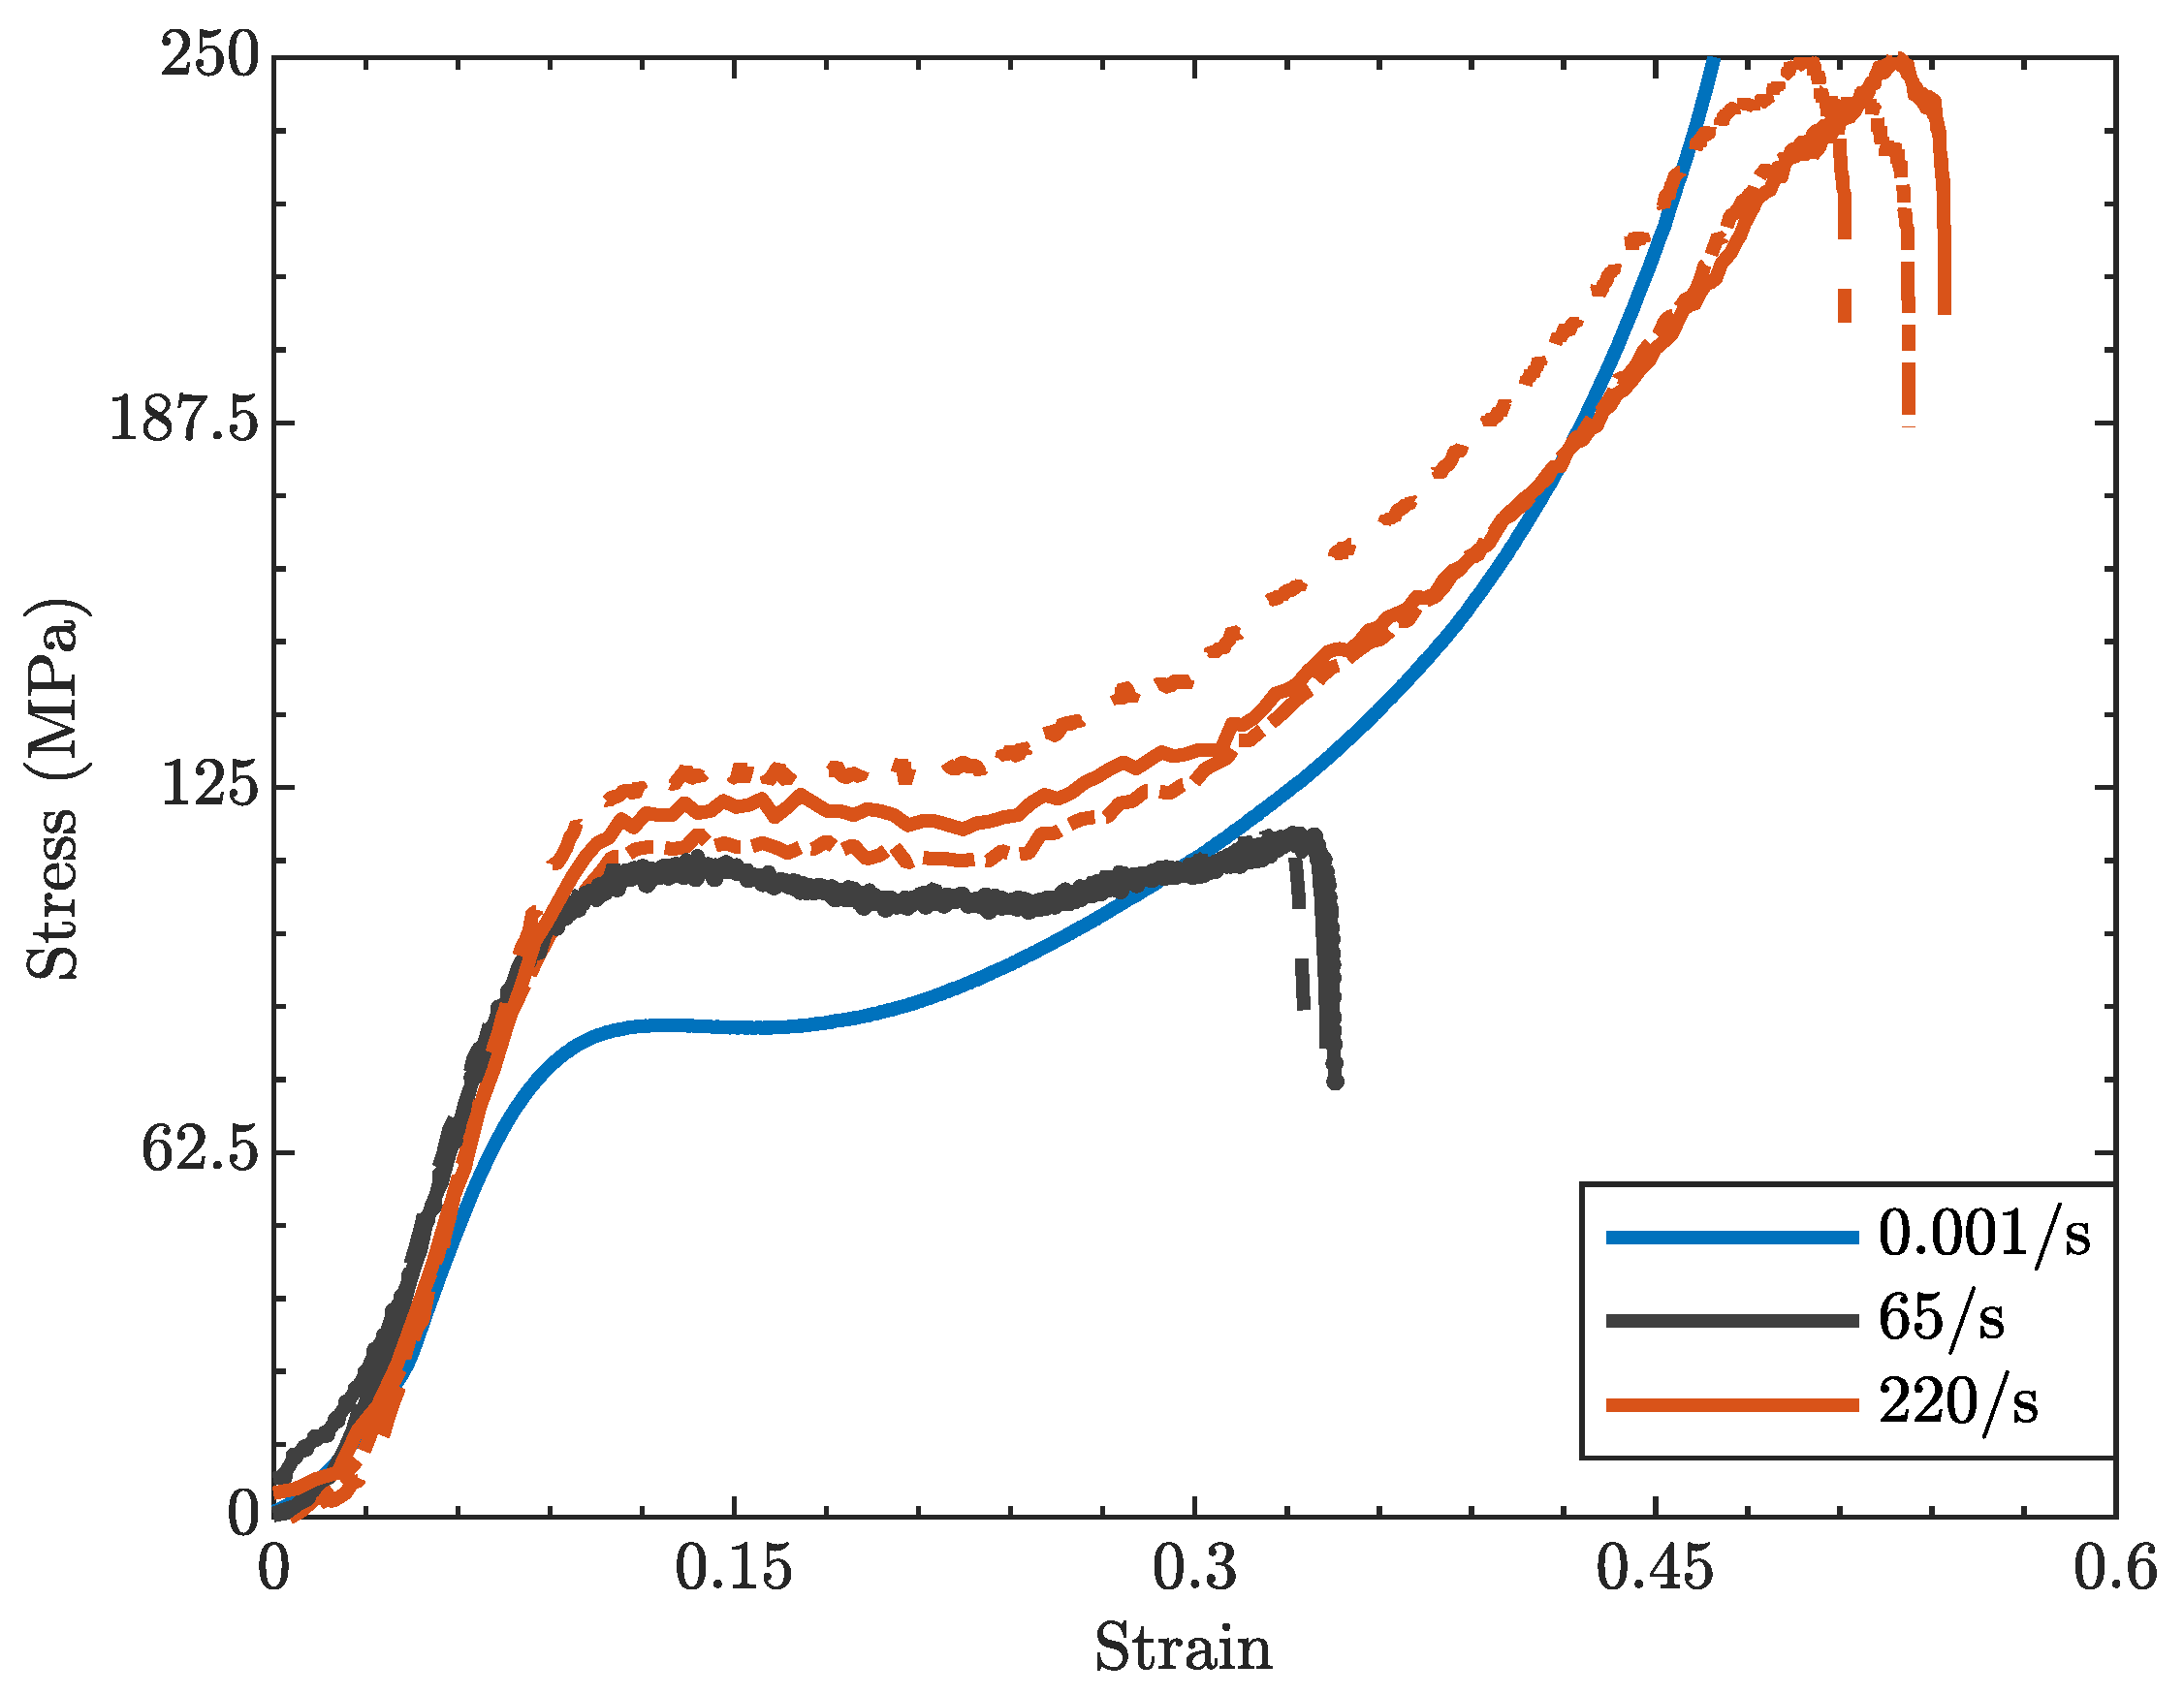
The stress–strain response of PC at different strain rates is reported in Figure 12. At all investigated rates, the material exhibits the characteristic sequence of deformation stages [36,37,38,39]: an initial linear elastic region, followed by yielding, strain softening, and a final strain-hardening stage. Due to the short duration of dynamic loading, the curves at 65 s−1 do not exhibit a pronounced post-yield hardening phase. In contrast, at the highest deformation rate, the short plateau is followed by a marked strain-hardening phase. In this regime, the large strain response of PC may be influenced by the thermal softening effects associated with the conversion of plastic work into heat [40]. This effect was not analyzed here, as it lies beyond the intended scope of the study. The material rate hardening response is clearly visible, as confirmed by the increase in yield stress, computed as the local maximum in the region around the transition from linear to nonlinear behavior, of ∼40% and ∼54% at 65 s−1 and 220 s−1, respectively, if compared to the quasi-static value, together with an increase in the strain at yielding, as also reported by [41]. Cao et al. [36] investigated PC mechanical response from 0.001 s−1 to 1700 s−1, at temperatures ranging from −60 °C to room temperature, finding that yield strength and strain at yield increase substantially at higher deformation rates, whereas temperature has an opposite effect. A strong rate sensitivity of PC behavior was also reported by [32] under tensile loadings between 0.001 s−1 and 1750 s−1. Indeed, the yield response of PC is a thermally activated phenomenon, influenced by both temperature and deformation rate [32,37,41,42], and it is strongly dependent on its molecular structure. Dar et al. [43] attributed this dependence to the reduced molecular mobility of the stiffer polymeric chains at higher deformation rates, a phenomenon also triggered by decreasing temperature. According to Song et al. [40], the β-transition plays a key role in the rate-dependent strengthening of the viscoelastic response of polycarbonate, becoming particularly relevant in the intermediate strain-rate range, where inhibition of the β-relaxation can strongly influence material response. Safari et al. [44] reported a transition strain rate of approximately 169 s−1 in the investigated polycarbonate, indicating the onset of the β -process, whereas, at much higher strain rates, the γ -process was also found to contribute significantly.
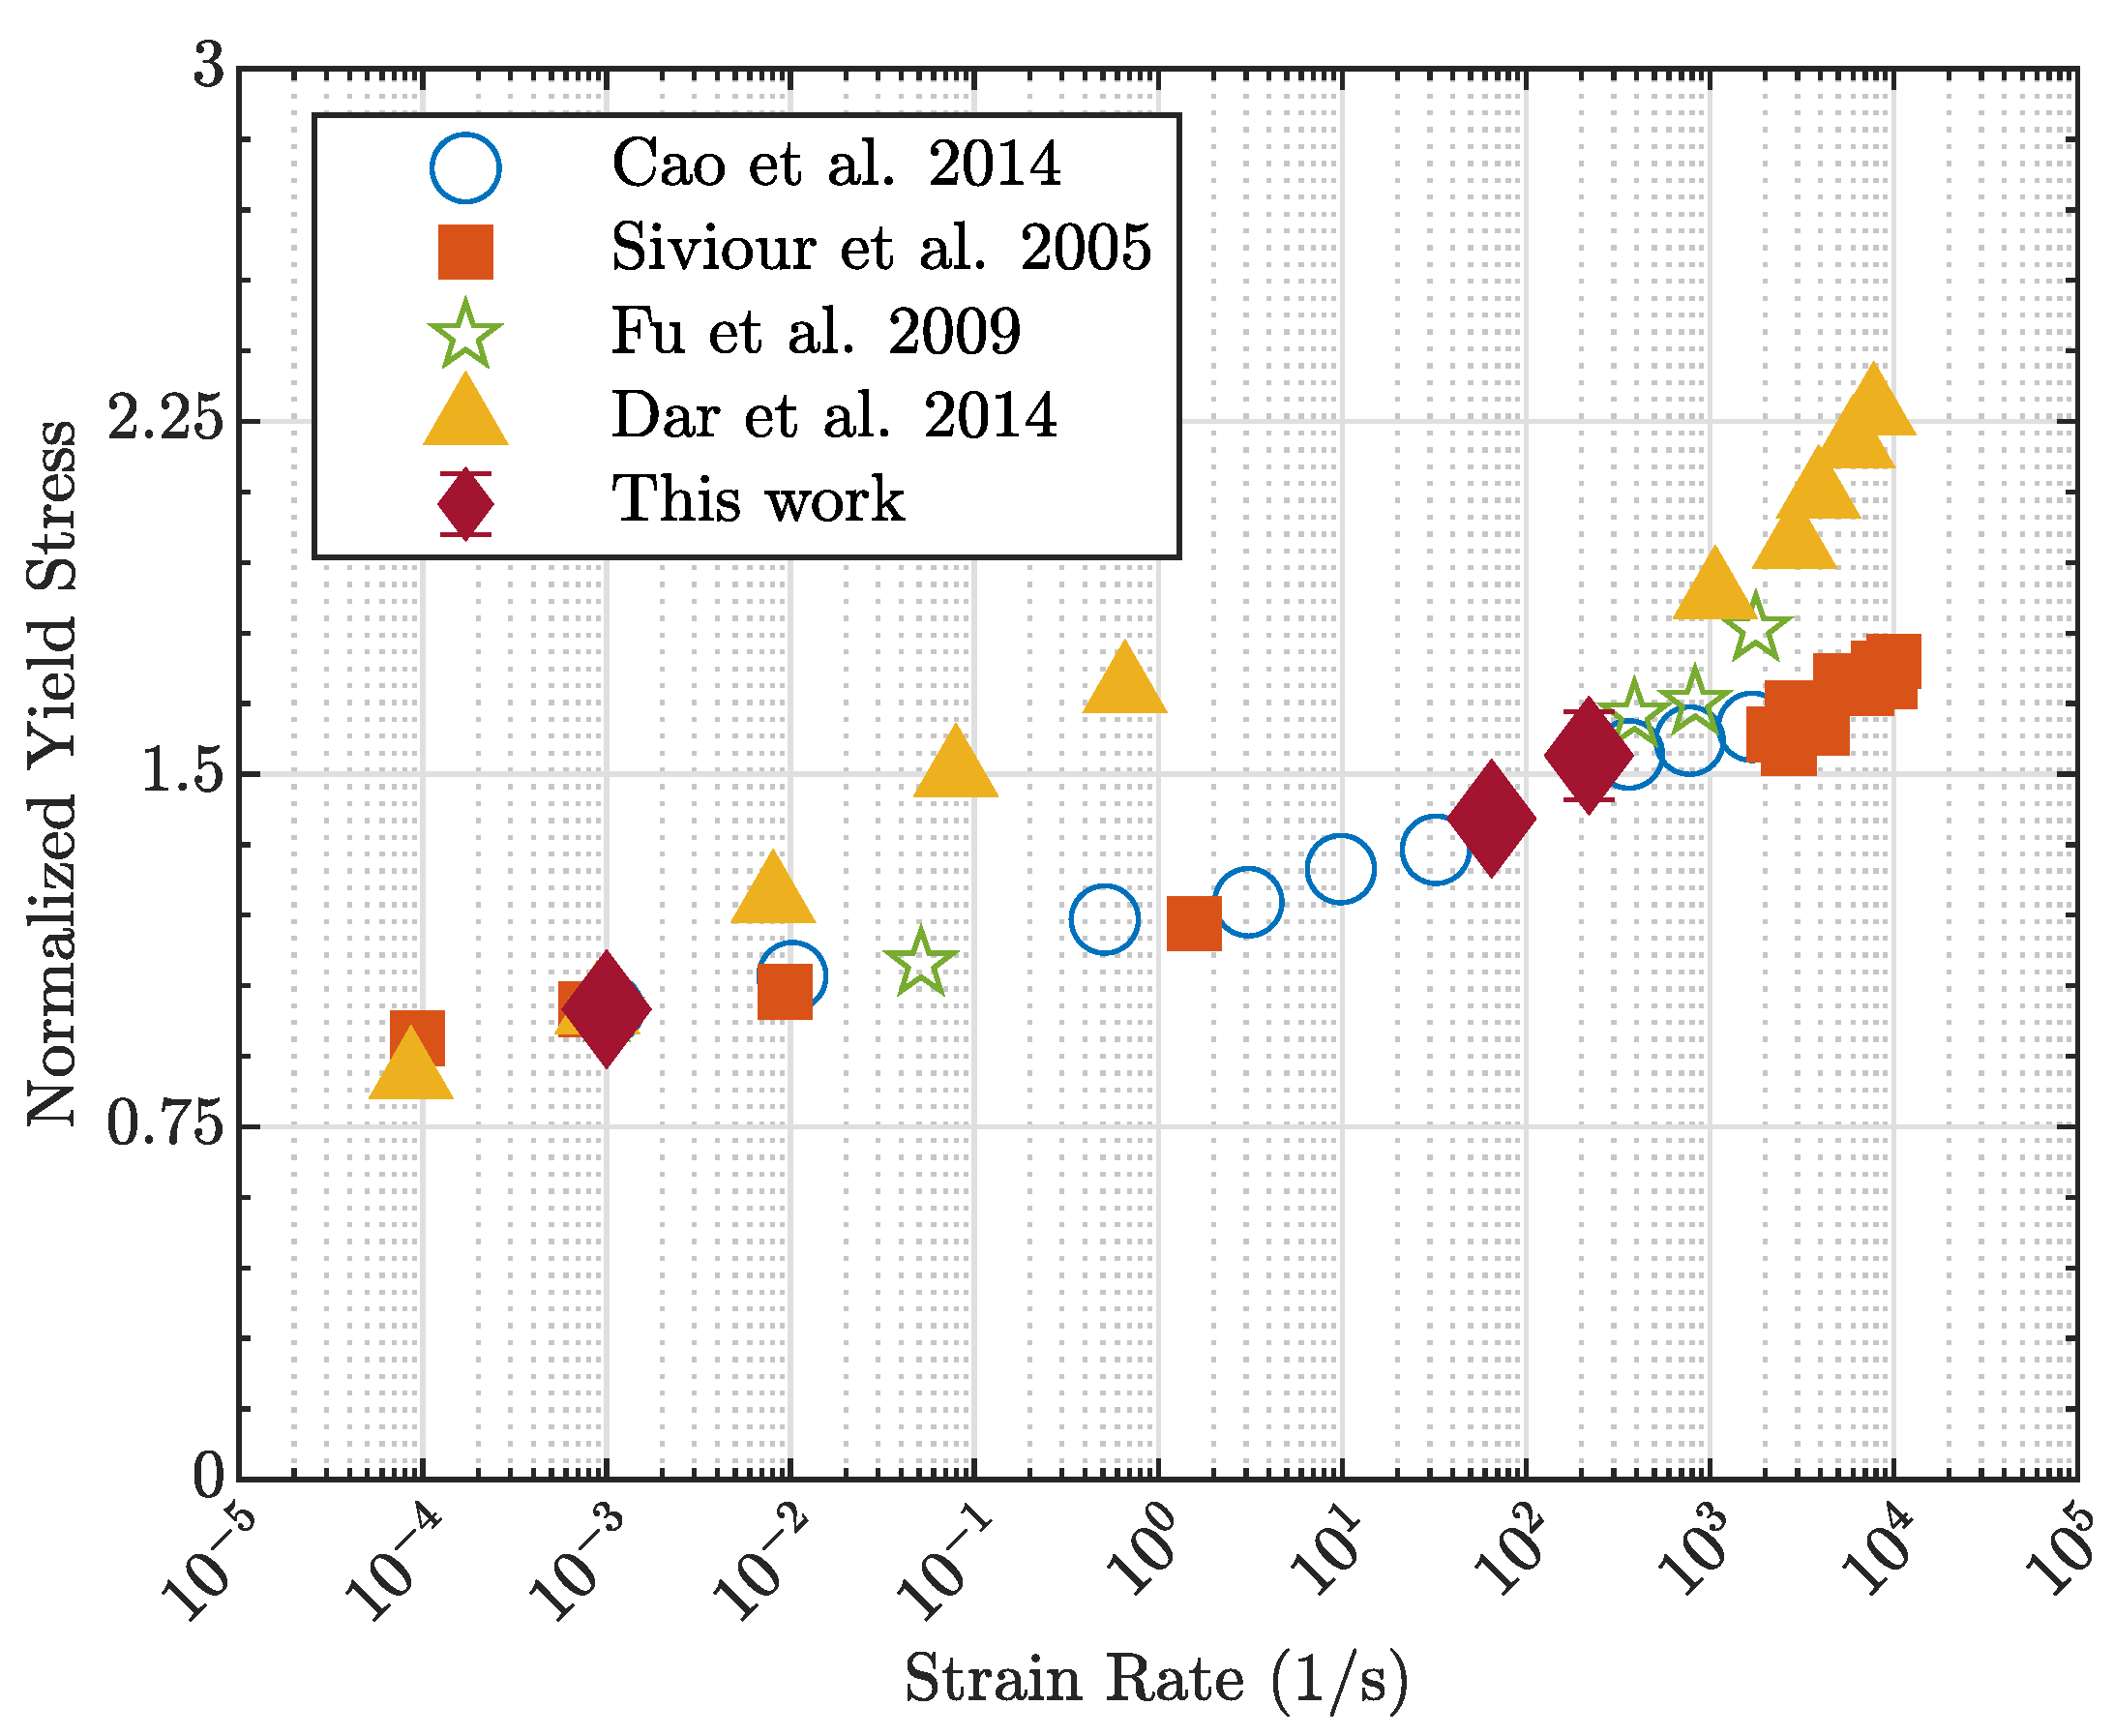
Figure 13 compares the normalized yield stress measured in this work with the literature data [32,36,37,43]. The results confirm the strain-rate sensitivity of the material and align well with those reported by Cao et al. [36] for intermediate strain-rate conditions.

4. Conclusions

In this work, a novel electromechanical apparatus for material characterization within the intermediate strain-rate regime (1 s−1–102 s−1) was developed and validated through a series of tests on polycarbonate specimens. The device is based on the SHPB operating principle and is inspired by the design proposed by Gilat et al. [8]. One of the principal novelties is the introduction of linear electromechanical actuators, which, compared to conventional hydraulic solutions, provide higher control precision and repeatability, significantly reducing the complexity of the experimental setup. The proposed system integrates two high-performance linear motors, which can accelerate the striker bar up to 3 m/s and apply continuous forces up to 24 kN, and a 14.5   m transmitter bar and introduces Photon Doppler Velocimetry for strain measurements. The experimental tests were carried out on polycarbonate, with impact velocities of 0.8 m/s and 1.5 m/s, resulting in strain rates of 65 s−1 and 220 s−1, respectively, demonstrating the reliability and repeatability of the testing apparatus. The results obtained confirmed a clear strain-rate sensitivity, with both the yield stress and the overall stiffness of the material increasing with the deformation rate, if compared to quasi-static results, consistent with previous findings in the literature. Overall, the new testing system provides a robust and versatile platform for the dynamic characterization of different classes of materials, as confirmed by numerical simulations employed for the device optimization, bridging the experimental gap between quasi-static and high strain-rate testing. This can be extremely important when introducing and evaluating the mechanical properties of new materials or manufacturing methods, from high-entropy to additively manufactured materials, which are gaining increasing interest and whose unique macro- and micrstructural features might result in peculiar mechanical properties [45,46,47,48,49,50,51,52]. In fact, although validated here on polycarbonate, the proposed apparatus is suitable for a wide range of industrially relevant materials whose performances depend on intermediate strain rates, such as materials used in automotive and protective equipment [53,54], additively manufactured metals employed in lightweight structures [55,56], and architected or metamaterial systems where deformation mechanisms are rate-sensitive [57,58].

Author Contributions

Conceptualization, G.I. and A.R.; methodology, G.I.; software, S.R. and A.C.; validation, S.R., A.C., and G.I.; formal analysis, S.R.; investigation, G.I. and A.C.; resources, G.T.; data curation, A.C. and G.T.; writing—original draft preparation, S.R.; writing—review and editing, G.I.; visualization, G.I.; supervision, A.R. and N.B.; project administration, G.T. and G.I.; funding acquisition, N.B. All authors have read and agreed to the published version of the manuscript.

Funding

This work was funded by the POR FESR LAZIO 2014/2020—“Progetti Strategici 2019” CUP E86J20000420005 “Realizzazione di un dispositivo di prova innovativo per la progettazione “crashworthiness” di aeromobili”—and the “3D ECO CORE” project of MICS—Made in Italy Circolare e Sostenibile, an Extended Partnership between Universities, Research Centers, and Enterprises financed by MUR—Ministero dell’Università e della Ricerca, thanks to funds by the European Union under the NextGenerationEU (PNRR) program.

Data Availability Statement

The original contributions presented in this study are included in the article. Further inquiries can be directed to the corresponding author.

Acknowledgments

The authors would like to thank the AIAS (Società Scientifica Italiana di Progettazione Meccanica e Costruzione di Macchine) topical group Xtrema, and in particular Luca Landi, for providing polycarbonate samples. We would also like to thank Luigi Marrandino and Eduardo Aurino from the Caserta Sew Eurodrive Drive Center for their support in choosing the motors and in configuring the drivers.

Conflicts of Interest

The authors declare no conflicts of interest. The founders had no role in the design of the study; in the collection, analyses, or interpretation of data; in the writing of the manuscript; or in the decision to publish the results.

References

  1. Kolsky, H. An investigation of the mechanical properties of materials at very high rates of loading. Proc. Phys. Soc. Sect. B 1949, 62, 676–700. [Google Scholar] [CrossRef]
  2. Al-Mousawi, M.M.; Reid, S.R.; Deans, W.F. The use of the split Hopkinson pressure bar techniques in high strain rate materials testing. Proc. Inst. Mech. Eng. Part C J. Mech. Eng. Sci. 1997, 211, 273–292. [Google Scholar] [CrossRef]
  3. Thomas, M.R.; Govender, R.A.; Cloete, T.J. A Novel Striker Configuration for Tensile Split Hopkinson Bar Testing with Dynamic Specimen Recovery. J. Dyn. Behav. Mater. 2025, 11, 369–386. [Google Scholar] [CrossRef]
  4. Sasso, M.; Mancini, E.; Chiappini, G.; Utzeri, M.; Amodio, D. A 90-meter Split Hopkinson Tension–Torsion Bar: Design, Construction and First Tests. J. Dyn. Behav. Mater. 2025, 11, 86–105. [Google Scholar] [CrossRef]
  5. Meyers, M.A.; Taylor Aimone, C. Dynamic fracture (spalling) of metals. Prog. Mater. Sci. 1983, 28, 1–96. [Google Scholar] [CrossRef]
  6. Chevrier, P.; Klepaczko, J.R. Spall fracture: Mechanical and microstructural aspects. Eng. Fract. Mech. 1999, 63, 273–294. [Google Scholar] [CrossRef]
  7. Smith, J.L.; Seidt, J.D.; Fietek, C.J.; Gilat, A. Taylor-Quinney coefficient determination from simultaneous strain and temperature measurements of uniform and localized deformation in tensile tests. J. Mech. Phys. Solids 2025, 199, 106099. [Google Scholar] [CrossRef]
  8. Gilat, A.; Seidt, J.D.; Matrka, T.A.; Gardner, K.A. A New Device for Tensile and Compressive Testing at Intermediate Strain Rates. Exp. Mech. 2019, 59, 725–731. [Google Scholar] [CrossRef]
  9. Bhujangrao, T.; Froustey, C.; Iriondo, E.; Veiga, F.; Darnis, P.; Mata, F.G. Review of intermediate strain rate testing devices. Metals 2020, 10, 894. [Google Scholar] [CrossRef]
  10. Kopp, R.; Luce, R.; Leisten, B.; Wolske, M.; Tschirnich, M.; Rehrmann, T.; Volles, R. Flow stress measuring by use of cylindrical compression test and special application to metal forming processes. Steel Res. 2001, 72, 394–401. [Google Scholar] [CrossRef]
  11. Diot, S.; Guines, D.; Gavrus, A.; Ragneau, E. Two-step procedure for identification of metal behavior from dynamic compression tests. Int. J. Impact Eng. 2007, 34, 1163–1184. [Google Scholar] [CrossRef]
  12. Boyce, B.L.; Dilmore, M.F. The dynamic tensile behavior of tough, ultrahigh-strength steels at strain-rates from 0.0002 s−1 to 200 s−1. Int. J. Impact Eng. 2009, 36, 263–271. [Google Scholar] [CrossRef]
  13. Huh, H.; Lim, J.H.; Park, S.H. High speed tensile test of steel sheets for the stress-strain curve at the intermediate strain rate. Int. J. Automot. Technol. 2009, 10, 195–204. [Google Scholar] [CrossRef]
  14. Othman, R.; Guégan, P.; Challita, G.; Pasco, F.; LeBreton, D. A modified servo-hydraulic machine for testing at intermediate strain rates. Int. J. Impact Eng. 2009, 36, 460–467. [Google Scholar] [CrossRef]
  15. LeBlanc, M.M.; Lassila, D.H. A hybrid technique for compression testing at intermediate strain rates. Exp. Tech. 1996, 20, 21–24. [Google Scholar] [CrossRef]
  16. Petiteau, J.C.; Othman, R.; Guégan, P.; Le Sourne, H.; Verron, E. A drop-bar setup for the compressive testing of rubber-like materials in the intermediate strain rate range. Strain 2014, 50, 555–562. [Google Scholar] [CrossRef]
  17. Perogamvros, N.; Mitropoulos, T.; Lampeas, G. Drop Tower Adaptation for Medium Strain Rate Tensile Testing. Exp. Mech. 2016, 56, 419–436. [Google Scholar] [CrossRef]
  18. Song, B.; Sanborn, B.; Heister, J.D.; Everett, R.L.; Martinez, T.L.; Groves, G.E.; Johnson, E.P.; Kenney, D.J.; Knight, M.E.; Spletzer, M.A.; et al. An Apparatus for Tensile Characterization of Materials within the Upper Intermediate Strain Rate Regime. Exp. Mech. 2019, 59, 941–951. [Google Scholar] [CrossRef]
  19. Quinlan, M.F.; Hillery, M.T. High-strain-rate testing of beryllium copper at elevated temperatures. J. Mater. Process. Technol. 2004, 153–154, 1051–1057. [Google Scholar] [CrossRef]
  20. Viot, P.; Beani, F. Polypropylene foam behavior under compressive loading at high strain rate. In Structures Under Shock and Impact VIII; WIT Press: Southampton, UK, 2004; Volume 15, pp. 507–516. [Google Scholar]
  21. Bhujangrao, T.; Froustey, C.; Darnis, P.; Veiga, F.; Guérard, S.; Mata, F.G. Design and Validation of New Torsion Test Bench for Intermediate Strain Rate Testing. Exp. Mech. 2023, 63, 3–13. [Google Scholar] [CrossRef]
  22. Zhao, H.; Gary, G. A new method for the separation of waves. Application to the SHPB technique for an unlimited duration of measurement. J. Mech. Phys. Solids 1997, 45, 1185–1202. [Google Scholar] [CrossRef]
  23. Othman, R.; Gary, G. Testing aluminum alloy from quasi-static to dynamic strain-rates with a modified Split Hopkinson Bar method. Exp. Mech. 2007, 47, 295–299. [Google Scholar] [CrossRef]
  24. Whittington, W.R.; Oppedal, A.L.; Francis, D.K.; Horstemeyer, M.F. A novel intermediate strain rate testing device: The serpentine transmitted bar. Int. J. Impact Eng. 2015, 81, 1–7. [Google Scholar] [CrossRef]
  25. Jakkula, P.; Ganzenmüller, G.; Hiermaier, S. A Direct Impact Tension Bar setup for testing low-impedance materials at intermediate rates of strain. Mater. Lett. 2023, 352, 24–26. [Google Scholar] [CrossRef]
  26. Roth, C.C.; Gary, G.; Mohr, D. Compact SHPB System for Intermediate and High Strain Rate Plasticity and Fracture Testing of Sheet Metal. Exp. Mech. 2015, 55, 1803–1811. [Google Scholar] [CrossRef]
  27. Dunand, M.; Gary, G.; Mohr, D. Load-Inversion Device for the High Strain Rate Tensile Testing of Sheet Materials with Hopkinson Pressure Bars. Exp. Mech. 2013, 53, 1177–1188. [Google Scholar] [CrossRef]
  28. He, H.; Deng, Q.; Wang, C.X.; Li, J.; Weng, K.X.; Miao, Y.G. A novel methodology for large strain under intermediate strain rate loading. Polym. Test. 2021, 97, 107142. [Google Scholar] [CrossRef]
  29. Sakama, S.; Tanaka, Y.; Kamimura, A. Characteristics of Hydraulic and Electric Servo Motors. Actuators 2022, 11, 11. [Google Scholar] [CrossRef]
  30. Pustavrh, J.; Hočevar, M.; Podržaj, P.; Trajkovski, A.; Majdič, F. Comparison of hydraulic, pneumatic and electric linear actuation systems. Sci. Rep. 2023, 13, 20938. [Google Scholar] [CrossRef]
  31. Testa, G.; Bonora, N.; Esposito, L.; Iannitti, G. Design of an Electromechanical Testing Machine for Elastomers’ Fatigue Characterization. Eng. Proc. 2025, 85, 21. [Google Scholar] [CrossRef]
  32. Fu, S.; Wang, Y.; Wang, Y. Tension testing of polycarbonate at high strain rates. Polym. Test. 2009, 28, 724–729. [Google Scholar] [CrossRef]
  33. Stecconi, A.; Landi, L. Finite element analysis for impact tests on polycarbonate safety guards: Comparison with experimental data and statistical dispersion of ballistic limit. ASCE-ASME J. Risk Uncertain. Eng. Syst. Part B Mech. Eng. 2020, 6, 041004. [Google Scholar] [CrossRef]
  34. Uhlmann, E.; Polte, M.; Bergström, N.; Burattini, L.; Landi, L. Comparison of a Normal and Logistic Probability Distribution for the Determination of the Impact Resistance of Polycarbonate Vision Panels. In Proceedings of the 33rd European Safety and Reliability Conference, Southampton, UK, 3–7 September 2023; pp. 3198–3204. [Google Scholar] [CrossRef]
  35. Dolan, D.H.; Ao, T.; Grant, S.C. The Sandia Matlab AnalysiS Hierarchy (SMASH) Toolbox; Technical Report; Sandia National Lab.: Albuquerque, MN, USA, 2016. [CrossRef]
  36. Cao, K.; Wang, Y.; Wang, Y. Experimental investigation and modeling of the tension behavior of polycarbonate with temperature effects from low to high strain rates. Int. J. Solids Struct. 2014, 51, 2539–2548. [Google Scholar] [CrossRef]
  37. Siviour, C.R.; Walley, S.M.; Proud, W.G.; Field, J.E. The high strain rate compressive behaviour of polycarbonate and polyvinylidene difluoride. Polymer 2005, 46, 12546–12555. [Google Scholar] [CrossRef]
  38. Barbagallo, R.; Mirone, G.; Landi, L.; Bua, G. Tensile behavior of polycarbonate: Key aspects for accurate constitutive modelling and simulation. Appl. Eng. Sci. 2024, 18, 100183. [Google Scholar] [CrossRef]
  39. Mirone, G.; Barbagallo, R.; Bua, G. Experimental characterization and plastic modeling of polycarbonate at static and dynamic rates. Int. J. Impact Eng. 2025, 203, 105329. [Google Scholar] [CrossRef]
  40. Song, P.; Trivedi, A.R.; Siviour, C.R. Mechanical response of four polycarbonates at a wide range of strain rates and temperatures. Polym. Test. 2023, 121, 107986. [Google Scholar] [CrossRef]
  41. Cao, K.; Wang, Y.; Wang, Y. Effects of strain rate and temperature on the tension behavior of polycarbonate. Mater. Des. 2012, 38, 53–58. [Google Scholar] [CrossRef]
  42. Cao, K.; Ma, X.; Zhang, B.; Wang, Y.; Wang, Y. Tensile behavior of polycarbonate over a wide range of strain rates. Mater. Sci. Eng. A 2010, 527, 4056–4061. [Google Scholar] [CrossRef]
  43. Dar, U.A.; Zhang, W.; Xu, Y.; Wang, J. Thermal and strain rate sensitive compressive behavior of polycarbonate polymer—Experimental and constitutive analysis. J. Polym. Res. 2014, 21, 519. [Google Scholar] [CrossRef]
  44. Safari, K.H.; Zamani, J.; Ferreira, F.J.; Guedes, R.M. Constitutive Modeling of Polycarbonate During High Strain Rate Deformation. Polym. Eng. Sci. 2013, 53, 752–761. [Google Scholar] [CrossRef]
  45. Goh, G.D.; Yap, Y.L.; Tan, H.K.; Sing, S.L.; Goh, G.L.; Yeong, W.Y. Process–Structure–Properties in Polymer Additive Manufacturing via Material Extrusion: A Review. Crit. Rev. Solid State Mater. Sci. 2020, 45, 113–133. [Google Scholar] [CrossRef]
  46. Ricci, S.; Zucca, G.; Iannitti, G.; Ruggiero, A.; Sgambetterra, M.; Rizzi, G.; Bonora, N.; Testa, G. Characterization of Asymmetric and Anisotropic Plastic Flow of L-PBF AlSi10Mg. Exp. Mech. 2023, 63, 1409–1425. [Google Scholar] [CrossRef]
  47. Cognigni, F.; Sgambetterra, M.; Zucca, G.; Gentile, D.; Ricci, S.; Testa, G.; Rizzi, G.; Rossi, M. Multimodal and multiscale investigation for the optimization of AlSi10Mg components made by powder bed fusion-laser beam. Discov. Mater. 2023, 3, 21. [Google Scholar] [CrossRef]
  48. Wu, Y.; Liaw, P.K.; Li, R.; Zhang, W.; Geng, G.; Yan, X.; Liu, G.; Zhang, Y. Relationship between the unique microstructures and behaviors of high-entropy alloys. Int. J. Miner. Metall. Mater. 2024, 31, 1350–1363. [Google Scholar] [CrossRef]
  49. Ricci, S.; Iannitti, G. Mechanical Behavior of Additive Manufacturing (AM) and Wrought Ti6Al4V with a Martensitic Microstructure. Metals 2024, 14, 1028. [Google Scholar] [CrossRef]
  50. Ricci, S.; Iannitti, G.; Testa, G.; Sgambetterra, M.; Zucca, G.; Ruggiero, A.; Gentile, D.; Bonora, N. High-Rate Characterization of L-PBF AlSi10Mg under Impact Conditions. J. Dyn. Behav. Mater. 2025, 11, 106–118. [Google Scholar] [CrossRef]
  51. Chen, H.; He, Y.; Dash, S.S.; Zou, Y. Additive manufacturing of metals and alloys to achieve heterogeneous microstructures for exceptional mechanical properties. Mater. Res. Lett. 2024, 12, 149–171. [Google Scholar] [CrossRef]
  52. Ricci, S.; Pagano, A.; Ceccacci, A.; Iannitti, G.; Bonora, N. An Investigation of the Monotonic and Cyclic Behavior of Additively Manufactured TPU. Eng. Proc. 2025, 85, 18. [Google Scholar] [CrossRef]
  53. Jacob, G.C.; Fellers, J.F.; Simunovic, S.; Starbuck, J.M. Energy Absorption in Polymer Composites for Automotive Crashworthiness. J. Compos. Mater. 2002, 36, 813–850. [Google Scholar] [CrossRef]
  54. Kim, D.H.; Kang, S.Y.; Kim, H.J.; Kim, H.S. Strain rate dependent mechanical behavior of glass fiber reinforced polypropylene composites and its effect on the performance of automotive bumper beam structure. Compos. Part B Eng. 2019, 166, 483–496. [Google Scholar] [CrossRef]
  55. Tancogne-Dejean, T.; Li, X.; Diamantopoulou, M.; Roth, C.C.; Mohr, D. High Strain Rate Response of Additively-Manufactured Plate-Lattices: Experiments and Modeling. J. Dyn. Behav. Mater. 2019, 5, 361–375. [Google Scholar] [CrossRef]
  56. Alkhatib, S.E.; Sercombe, T.B. High strain-rate response of additively manufactured light metal alloys. Mater. Des. 2022, 217, 110664. [Google Scholar] [CrossRef]
  57. Janbaz, S.; Narooei, K.; Manen, T.V.; Zadpoor, A.A. Strain rate—Dependent mechanical metamaterials. Sci. Adv. 2020, 6, eaba0616. [Google Scholar] [CrossRef]
  58. MacNider, B.; Dattelbaum, D.M.; Boechler, N.; Cady, C.; Derby, B.K.; Fensin, S.; Lee, K.S.; Kim, J.; Nakarmi, S.; Daphalapurkar, N. Influence of strain-rate on the response of elastomeric architected materials. Extrem. Mech. Lett. 2025, 79, 102389. [Google Scholar] [CrossRef]
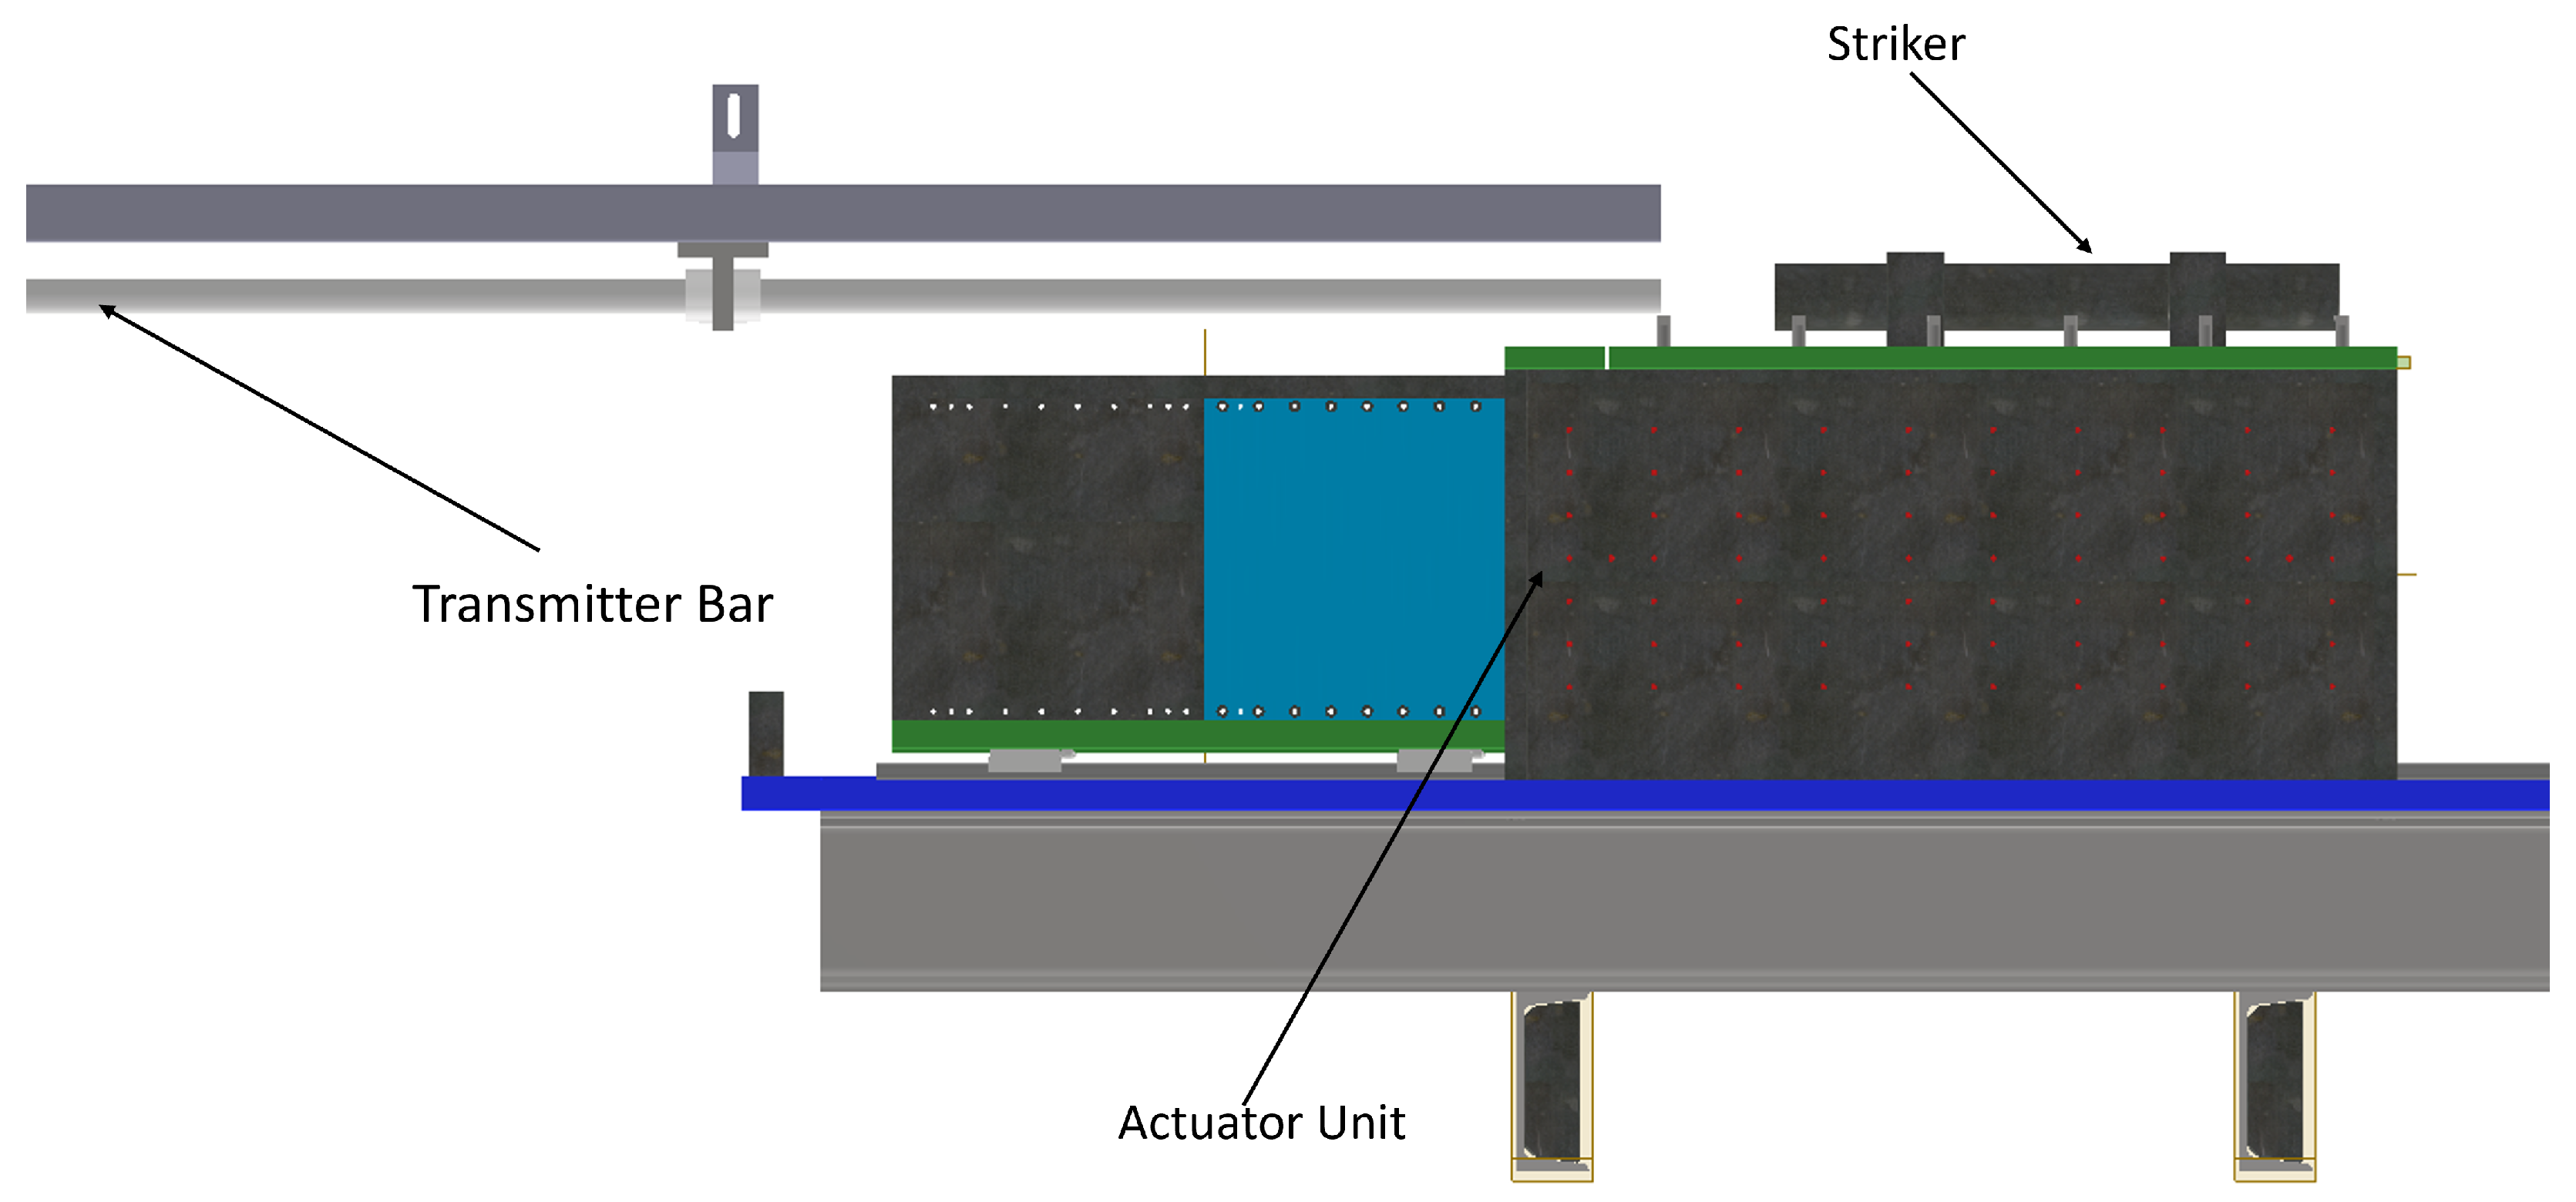
Figure 1. Overview of the device.
Applsci 15 12797 g001
Figure 2. Detail of transmitter bar support.
Applsci 15 12797 g002
Figure 3. Example of results extracted during the numerical optimization of the device, considering different bar diameters and materials, after the impact of a 10 kg striker at 1 m/s. (a,b) Average strain rate and transmitter bar deformation achieved for a 6 mm cylindrical sample made of different materials (soft = copper; medium = Hardened Steel; and hard = Ti6Al4V) (c,d) and for a 4 mm cylindrical sample.
Applsci 15 12797 g003
Figure 4. Schematic representation of the testing configuration showing the striker, specimen, and transmitter bar. The PDV probe is aligned with the transmitter bar axis.
Applsci 15 12797 g004
Figure 5. Schematic overview of the components of the testing apparatus.
Applsci 15 12797 g005
Figure 6. Experimental apparatus: (a) overview and (b) detail of sample positioning.
Applsci 15 12797 g006
Figure 7. STFT maps of the PDV velocity signal for two impact velocities: (a) 0.8 m s−1 and (b) 1.5 m s−1.
Applsci 15 12797 g007
Figure 8. Data extracted during testing: velocity history.
Applsci 15 12797 g008
Figure 9. Data extracted during testing: (a) strain history and (b) load evolution. Only one representative curve for testing velocity was selected, given the repeatability of the measured data. The dashed lines represent the fitted lines in the regions of deformation at a constant strain rate.
Applsci 15 12797 g009
Figure 10. High-speed camera frames recorded during impact at 1.5 m s−1. (a) Initial configuration before testing. (b) Moment of impact (t = 0 m s ). (c) t 1 m s after impact. (d) t 2.4 m s after impact. (e) t 5.7 m s , significant transmitter bar sliding. (f) t 8.2 m s , separation between the striker and the specimen.
Applsci 15 12797 g010
Figure 11. Comparison of underformed (right) and deformed (left) samples.
Applsci 15 12797 g011
Figure 12. Engineering stress vs. engineering strain curves for PC at different deformation rates. Solid and dashed curves of the same color correspond to repeated tests conducted at the same impact velocity.
Applsci 15 12797 g012
Figure 13. Influence of strain rate on the yield stress of PC. Stress values are normalized with respect to the corresponding yield stress at 0.001 s−1. Comparison between the results of this work and the literature data [32,36,37,43]. Open and filled symbols refer to tensile and compressive testing, respectively.
Applsci 15 12797 g013
Disclaimer/Publisher’s Note: The statements, opinions and data contained in all publications are solely those of the individual author(s) and contributor(s) and not of MDPI and/or the editor(s). MDPI and/or the editor(s) disclaim responsibility for any injury to people or property resulting from any ideas, methods, instructions or products referred to in the content.