Featured Application
The findings demonstrate the potential application of PAUT-based inspection to ensure the structural reliability of additively manufactured components for critical infrastructure, such as bridges, rail systems, and aerospace structures, where defect detection and quality assurance are essential.
Abstract
Welding-based manufacturing and joining processes are extensively used in various areas of industrial production. While welding has been used as a primary method of joining in many applications, its capability to fabricate metal components such as the Wire Arc Additive Manufacturing (WAAM) method should not be undermined. WAAM is a promising method for producing large metal parts, but it is still prone to defects such as porosity that can reduce structural reliability. To ensure these defects are found and measured in a consistent way, inspection methods must be tied directly to code-based acceptance limits. In this work, a three-pass WAAM joint specimen was made in a welded-joint configuration using robotic GMAW-based deposition. This setup provided a stable surface for Phased Array Ultrasonic Testing (PAUT) while still preserving WAAM process conditions. The specimen, which was intentionally seeded with porosity, was divided into five zones and inspected using the 6 dB drop method for defect length and amplitude-based classification, with AWS D1.5 serving as the reference code. The results showed that porosity was not uniform across the bead. Zones 1 and 3 contained the longest clusters (15 mm and 16.5 mm in length) and exceeded AWS length thresholds, while amplitude-based classification suggested they were less critical than other regions. This difference shows the risk of relying on only one criterion. By embedding these results in a DMAIC (Define–Measure–Analyze–Improve–Control) workflow, the inspection outcomes were linked to likely causes such as unstable shielding and cooling effects. Overall, the study demonstrates a code-referenced, dual-criteria approach that can strengthen quality control for WAAM.
1. Introduction
Additive manufacturing (AM) is one of the most innovative contributions to modern manufacturing technology. It utilizes advanced technologies such as CAD modeling, material processing, and process control together for the fabrication of complex products by depositing material layer by layer. AM makes the production of complex geometries easy, which are very hard to make with conventional manufacturing processes such as CNC machining, casting, and forging. Furthermore, critical design features such as undercuts, variable wall thicknesses, or deep channels which are essential for functional performance are difficult to achieve using conventional approaches [1].
Wire Arc Additive Manufacturing (WAAM) is derived from conventional arc welding processes, specifically Gas Metal Arc Welding (GMAW), and is adapted for additive manufacturing through robotic control and layer-by-layer deposition just like FDM 3D printing process. In this process, an electric arc melts a continuously fed wire to build up material, a principle that can also be applied for component repair or joining. Ogino et al. [2] explored this relationship by adapting a GMAW weld pool model to simulate WAAM deposition. Their model was successfully predicted bead geometry with an accuracy of 10% compared to experimental measurements. Wu et al. [3] noted that WAAM carries both the advantages and the common defect types of welding like porosity, cracks, and lack of fusion. More recently, Israr et al. [4] classified WAAM as a Directed Energy Deposition process and reported that power-controlled deposition reduced thermal distortion by ~30% and achieved geometric accuracy with height deviations below 1 mm, further reinforcing its welding heritage. Mohebbi et al. [5] used thermos-capillary gravity modeling to show that, unlike conventional welding where heat spreads in multiple directions across the joint, WAAM primarily dissipates heat in one direction into the substrate (Figure 1). This distinctive thermal behavior allows WAAM to be used not only for repair and joining like traditional welding but also for building entirely new geometries in a way similar to other additive manufacturing processes, which gives it a unique versatility among arc-based techniques.
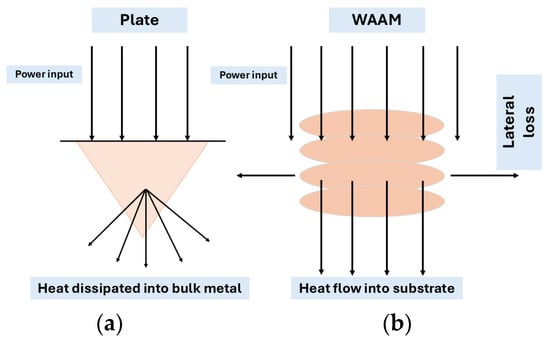
Figure 1.
Schematic of heat transfer in (a) conventional joint welding, (b) WAAM.
WAAM has progressed from path-planning research to full-scale structures. Early work optimized deposition patterns for complex junctions (e.g., T-crossing features), showing that a toolpath strategy governs material distribution and geometric fidelity in WAAM builds [6]. Parameter studies then linked process settings to outcomes: Liberini et al. reported arc-based deposition rates on the order of 50–130 g/min and documented vertical microstructural gradients with limited variation in bulk mechanical properties under the tested conditions [7]. Beyond laboratory walls, WAAM has been evaluated for large naval components, confirming feasibility at meter-scale dimensions [8]. Its scalability was further demonstrated by the MX3D stainless-steel bridge, where material characterization and structural tests supported initial verification of a 3D-printed bridge fabricated by WAAM [9]. In addition, WAAM has been applied to Al-alloy systems; for Al–Si, Al–Mg–Si, and Al–Mg–Mn, studies report porosity of ~0.29–3.88% (pore size ~50–220 µm), near-uniform microhardness (HV0.1 ≈ 62–92), and longitudinal anisotropy (UTS +15–17%; yield-strength differences ~39/32/14%), underscoring WAAM’s versatility beyond steels [10]. Moreover, WAAM can be used to join components, similar to conventional arc-welding processes. Josten et al. reinforced 0.7 mm zinc-coated automotive body panels using a WAAM process and evaluated bending stiffness by three-point bending; the tests showed a 50–90% increase in bending stiffness relative to the base metal [11].
Because WAAM inherits the physics of arc welding, its defect population is characteristically weld-like [3]. Metallurgical defects include gas/oxide porosity (often spherical or interlayer) and solidification cracking (hot cracking) along bead interfaces and fusion boundaries, together with microstructural banding, columnar grain growth, and HAZ coarsening that underpin directional properties [3,12,13]. Fusion-related defects comprise inter-pass/sidewall lack of fusion and lack of penetration at starts, stops, and overlaps [3,14]. Geometry- and flow-driven surface defects such as undercut, overlap/overfill, spatter, and pronounced layer waviness/height variability are also routinely observed under arc and travel-speed extremes [3,13,15]. Residual-stress-induced distortion and anisotropic strength/ductility complete the defect set [13,16], reflecting the combined effects of heat input, travel speed, interpass temperature, shielding conditions, wire feed, and path strategy intrinsic to WAAM [3,13,15,17].
Defective parts can create life safety risks and property damage. In WAAM Ti 6Al 4V, internal gas pores sharply reduce fatigue life, and the largest pores, especially when they are near the surface, tend to control failure, consistent with a notch fatigue factor of about 1.5 and a notch sensitivity of about 0.5 [18]. For WAAM Alloy 718 with crack-like planar defects, the apparent fracture toughness becomes directional, where a notch perpendicular to the defect planes is comparable to wrought material whereas a notch parallel to the planes drops to roughly one half of the wrought value [19]. In practical terms, the size, position, and orientation of the defects can lower fatigue and fracture margins to levels that threaten structural integrity and safety. Therefore, ensuring in-process quality and investigating the root cause of defects should be primary requirements for WAAM parts, with quality controls applied during production, quantitative inspection of any indications, and corrective actions to ensure the final product meets requirements. DMAIC (Define, Measure, Analyze, Improve, and Control) is a suitable method to ensure defect-free production of WAAM manufactured parts. In a case study, Nallusamy et al. showed that DMAIC can turn NDE (non-destructive evaluation) data into process improvement by organizing ultrasonic and radiographic findings into severity and frequency charts to prioritize issues, as shown in Figure 2. Detailed process mapping then identified the source of the defects, after which the problematic part was replaced with a redesigned component. Finally, continued NDE verified that production remained free of defects [20].
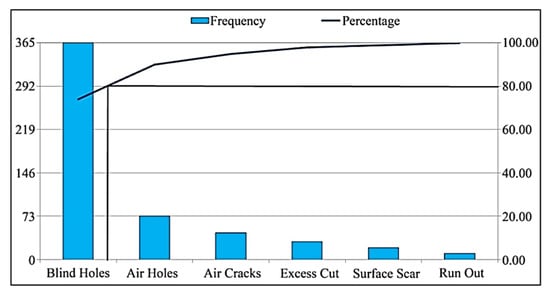
Figure 2.
Pareto chart of defects based on historical data [21].
In order to monitor the process parameters and detect anomalies, NDE is considered the most suitable and economically viable method. Nallusamy et al. described how NDE testing like ultrasound and radiographic testing can be utilized to gather data to define the severity of the defects and act based on that so that proper measures can be taken to repair the parts [20]. Conventional Ultrasonic testing can be used to monitor the process to flag process inconsistencies and conduct root cause analysis. Hossain et al. demonstrated an ultrasonic system that collects feedback during the WAAM process to assess how changes in process parameters affect build quality [21]. Compared to Conventional Ultrasonic testing, Phased Array Ultrasonic Testing (PAUT) is superior to detecting and characterizing flaws because of its higher number of elements. Taheri et al. conducted a comparison analysis between single-element UT (Ultrasonic testing) and PAUT across different thickness and defect sizes and showed that PAUT results were more consistent in detecting defects at lower electrical gain levels and also offered nearly double the signal-to-noise ratio when detecting small flaws at 0.8 mm [22]. Williams et al. conducted PAUT on structural steel welds and showed that PAUT-detected flaws were consistent with mechanical property degradation as tensile testing revealed up to 12% reduction in strength in flawed regions, which proves the PAUT’s reliability of detecting process-created anomalies [23]. Not only is the proper detection of defects important but following proper codes of manufacturing and characterizing defects is also important. The American Welding Society (AWS) has proper guidelines of the welding processes, defect characterization, classification of the defects based on the severity, and acceptance rejection criteria. Since WAAM is an automated version of the conventional welding process and the main principle of WAAM is mainly identical to GMAW [24], AWS D 1.5 welding protocols [25] offer a suitable basis for interpreting indications and making acceptance decisions. Irtiza et al. showed the effectiveness of PAUT for detecting and sizing volumetric defects in GMAW such as clustered porosity in the 1 to 3 mm range and classifying the indications as accepted or rejected under AWS D1.5 [26].
Until now, no prior study has integrated both PAUT and AWS D 1.5 within a DMAIC workflow specially for WAAM to produce code-based, decision-ready outputs. This work addresses the gap by embedding PAUT in a DMAIC process so that measured indication lengths and depths are translated into clear accept or repair decisions under AWS D 1.5, thereby strengthening quality control and improving the reliability of WAAM parts.
In this article, WAAM joint denotes a welded-joint geometry produced by robotic WAAM using GMAW-based deposition; this configuration is adopted to enable stable PAUT coupling while preserving WAAM process conditions and defect mechanisms relevant to WAAM.
2. Materials and Methods
2.1. DMAIC Integration (Overview)
In order to ensure defect-free production and to connect inspection with quality inspections, this study embeds PAUT NDE testing within a lean DMAIC workflow for WAAM-life defects. The define stage sets the critical to quality (CTQ) limits of defect acceptance based on sensitivity and size by utilizing AWS D 1.5 codes as the basis. During the WAAM joint, representative discontinuities were intentionally introduced by safely deviating from the AWS good-practice parameters. In the measure stage, calibrated sectorial PAUT scans were conducted, indications were detected, and data was stored. In the analyze stage, the results were compared with limits to produce pass/repair calls and related to process settings. In improve and control, corrective actions such as local repair or parameter adjustments was identified for any out of tolerance zone and a control plan was defined with sampling thresholds, decision triggers, and procedures for ongoing monitoring. The process flowchart of the DMAIC integration is summarized in Figure 3.
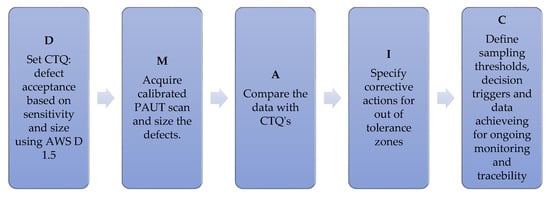
Figure 3.
DMAIC process flow integrating PAUT inspection for WAAM defect detection and control.
2.2. Testing Specimen Fabrication and Intentional Defect Seeding
To fabricate an intentionally defective specimen, a three-pass (root, hot, cap) WAAM bead was deposited in a welded-joint configuration using a robotic GMAW-based WAAM system to join two 6.36 mm-thick mild steel plates. This configuration was selected because it provides a practical PAUT scan path, allowing stable probe coupling on either plate. Although the geometry resembles a conventional weld, the fabrication was carried out under WAAM process conditions [24]. To deliberately seed discontinuities, several AWS-recommended practices for defect-free GMAW—including shielding gas protection, base metal surface preparation, preheating (e.g., for A-36 at ~6 mm with solid wire, ≥100 °F is typical), and controlled travel speed—were intentionally omitted [25].
Welding without shielding gas exposed the molten pool to oxygen, nitrogen, and water vapor, leading to pore formation during solidification. In addition, the plates were left uncleaned and interpass cooling was accelerated, which promoted gas entrapment and interdendritic porosity. A KUKA robotic WAAM system was used to carry out the three passes. The completed specimen therefore represents a WAAM-fabricated joint intentionally flawed for PAUT inspection and AWS D1.5-based evaluation.
Table 1 summarizes the input parameters (voltage, current, wire feed speed, and travel speed) for each pass, and Table 2 lists the overall conditions applied in producing the intentionally flawed specimen.

Table 1.
Process parameters (voltage, current, wire feed speed, and travel speed) for each pass in WAAM joint, fabrication, documented for reproducibility.

Table 2.
Overall printing conditions applied to intentionally seed defects in the WAAM specimen.
Figure 4 shows the 2D sketch of the offset V groove joint and the prepared plates for joining.
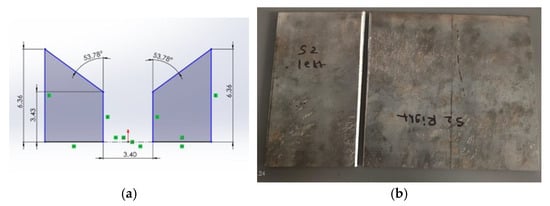
Figure 4.
Joint geometry used for WAAM specimen fabrication: (a) offset V-groove design and (b) prepared A36 plates. This welded-joint configuration enabled stable PAUT scanning while maintaining WAAM process conditions.
2.3. PAUT Inspection Plan Setup
To accurately scan and characterize porosity defects using PAUT, a 2.25L-32-A-32 probe was selected. This probe is commonly used for GMAW/GTAW weld inspection and is therefore well suited for GMAW-based WAAM joints [27]. It is effective for detecting volumetric flaws such as porosity and slag inclusions. The probe was paired with an SA-32-N60L wedge, which generates a nominal 60° shear wave, enhancing sensitivity to clustered porosity. Sectorial scanning was performed from 3° to 89° with a focal depth of 14 mm. Although the specimen thickness was 6.36 mm, a deeper focal depth was required because, in the pulse-echo configuration, the sound path exceeds twice the thickness. The full probe characteristics, wave velocity input, angle range, and number of active elements are summarized below Table 3.

Table 3.
PAUT inspection setup summary to scan WAAM printed specimen.
Prior to inspecting the WAAM specimen, the repeatability of the PAUT system was verified using a calibration block (Figure 5) which was fabricated by following AWS D 1.5 guidelines. The block contained side-drilled holes of 1.5 mm in diameter at multiple depths from the scan surface. Each hole was scanned and sized three times to collect the required mean dB gain so that standard deviation analysis could be calculated to verify the system’s reliability and repeatability for defect inspection. The technical details of the calibration block are demonstrated in Table 4 below.

Figure 5.
Calibration block fabricated to AWS D1.5 specifications with side-drilled holes at multiple depths, used to establish sensitivity levels and verify PAUT repeatability.

Table 4.
Technical details of the calibration block fabricated by following AWS D 1.5 protocols.
2.4. Defect Evaluation and Acceptance Criteria by Following AWS D 1.5
The evaluation of discontinuities in the WAAM-fabricated parts was carried out using the ultrasonic testing provisions of AWS D1.5:2020 Bridge Welding Code. Under this framework, discontinuities were sized using the amplitude-drop method, and acceptance thresholds were applied for both volumetric and planar flaws to determine compliance.
- Defect sizing by amplitude-drop methods
For evaluating defect length across the weld, AWS D1.5 specifies the 6 dB drop method as the primary sizing technique [25]. In this approach, the maximum signal amplitude is first located and set as the reference; the defect boundaries are defined at probe positions where the amplitude falls by 6 dB (approximately half the reference). For depth measurement, the same principle is applied along the sound path, with the −6 dB points marking the vertical extent of the defect [25].
- Acceptance criteria for porosity
According to AWS D1.5 Clause 8.26, surface porosity should not exceed one pore per 100 mm of weld length or six pores in any 1200 mm segment, and the maximum pore diameter should not exceed 2.4 mm. For subsurface porosity, the cumulative pore diameter must not exceed 10 mm within any 25 mm segment. If pores are clustered, they are counted as a single indication and evaluated accordingly [25].
In addition to dimensional limits, AWS also evaluates the severity of volumetric discontinuities using an amplitude comparison method. Signal amplitudes are classified relative to three reference levels: the Standard Sensitivity Level (SSL), the Automatic Rejection Level (ARL), and the Disregard Level (DRL). The SSL is established during calibration using side-drilled holes in the reference block, recorded at an 80% amplitude threshold. Discontinuities below SSL (requiring up to +6 dB additional gain) are classified as DRL and considered non-critical, while responses above SSL (equivalent to a −5 dB reduction) are classified as ARL and treated as Class A rejectable flaws. Table 5 summarizes this classification scheme [25].

Table 5.
AWS amplitude-based classification of discontinuities to categorize PAUT indications [26].
For detecting and characterizing flaws in the test specimen, the process began by inspecting the SDHs of the calibration block. These were used to establish a reference for amplitude percentage and dB gain at which the SDHs reached the 80% amplitude threshold. On top of that, the calibration block was used to calibrate the machine for proper time of flight (TOF), wedge delay, and signal consistency.
The WAAM specimen measured 180 mm in the build direction and was divided into five zones of 36 mm each to ensure complete coverage during inspection. Zone-wise division was adopted because porosity in WAAM is often spatially non-uniform due to arc start–stop effects and local thermal gradients and because AWS D1.5 acceptance rules are applied over contiguous 25 mm segments. Within each zone, porosity length was measured using the 6 dB drop method: the probe was positioned at the maximum reflection (midpoint), then moved left and right to locate the −6 dB points, which defined the defect boundaries. The total porosity length in that zone was obtained from the distance between these boundaries.
To evaluate the severity and depth of porosity distribution in a specific zone, the defects were first sized using both the A-scan and S-scan windows, and the dB gain required to reach the 80% amplitude threshold was recorded. Afterwards, these data were compared against the reference dB gain obtained from the calibration block. A lower dB gain requirement means that the defect produced a stronger reflection, as the 80% amplitude threshold was reached with minimal signal adjustment. Such defects are considered critical. On the other hand, a higher dB gain requirement means that the reflected signal was weaker and required additional adjustment to reach the 80% threshold, which suggests that the measured defect is less critical.
Furthermore, the actual amplitude percentage of the measured flaw was calculated using Equation (1) [28].
where A2 = Actual amplitude percentage of the measured flaw, and A1 = Amplitude percentage threshold = 80%.
Finally, the measured porosity lengths (determined by 6 dB drop method) and the zone-wise dB gain adjustments (required to reach the 80% amplitude threshold) were compared with the AWS D.15 acceptance limits. For length evaluation, Clause 8.19.7 specifies that any indication exceeding the maximum allowable size, when measured by 6 dB drop method, must be rejected regardless of its amplitude response. For amplitude evaluation, the recorded dB gain was compared against the calibration block reference.
Lower gain values meant stronger reflections and thus higher severity, while higher gain values reflected weaker signals and lower severity. Following the AWS amplitude comparison chart, discontinuities were classified into rejectable (Class A), intermediate (Class B and C), or non-critical (Class D).
By combining length-based sizing with amplitude-based severity classification, this method provided a dual-criteria framework that accounts for both physical extent and reflectivity of the porosity. This ensured repeatable, code-compliant decisions for acceptance or repair of WAAM components in line with AWS D 1.5. Figure 6 summarizes the defect evaluation flowchart methodology below.
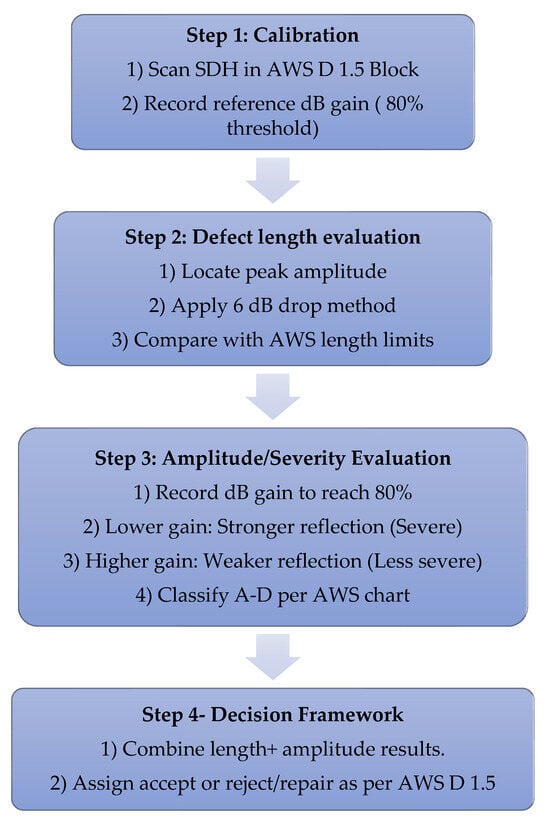
Figure 6.
Defect evaluation methodology: integration of PAUT inspection with AWS D1.5 acceptance criteria within a DMAIC framework to produce decision-ready outcomes.
3. Results
3.1. Fabricated Specimen Visual Inspection
Pores were observed after the root pass (Figure 7), particularly near the mid-length of the specimen. These formed due to the absence of shielding gas and surface contamination, which promoted gas entrapment and poor pool wetting. Following the hot and cap passes, additional surface porosity developed, with clusters concentrated at the start and end of the cap bead. While the mid-sections appeared smoother on the surface, subsurface porosity was still likely present in the cap region. These observations confirm that intentional deviations from AWS-recommended parameters successfully introduced porosity and bead irregularities.
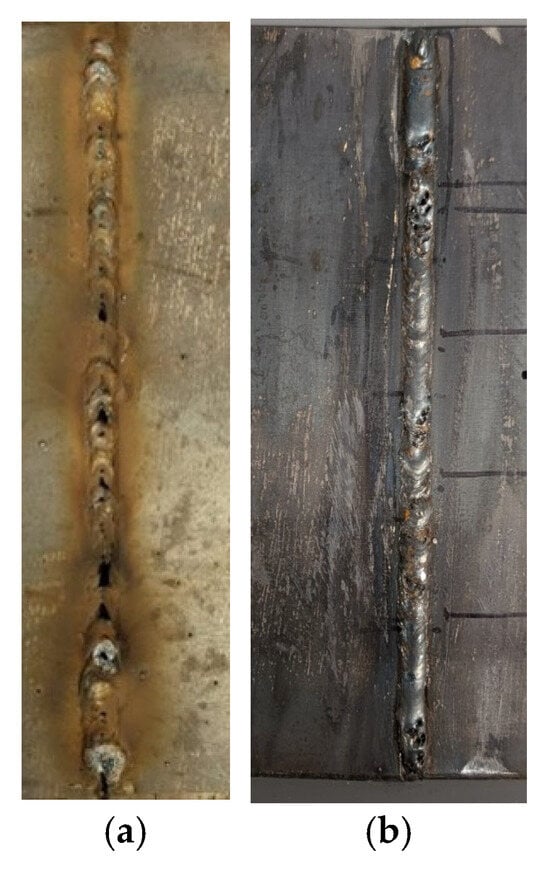
Figure 7.
Visual inspection of the WAAM specimen: (a) after root pass, showing early pore formation, and (b) after three passes, with visible porosity clusters confirming successful defect seeding.
To study how porosity was distributed along the 180 mm WAAM specimen, the bead was split into five zones of about 36 mm each (Z1–Z5, Figure 8). Porosity in WAAM is rarely uniform; start–stop points of the arc and changes in heat flow can make some regions worse than others. The five-zone approach also follows the AWS D1.5 requirement to check 25 mm segments for acceptance. During visual inspection, pores appeared more concentrated in certain areas of the bead, so looking at localized sections gave a clearer picture of this variability.
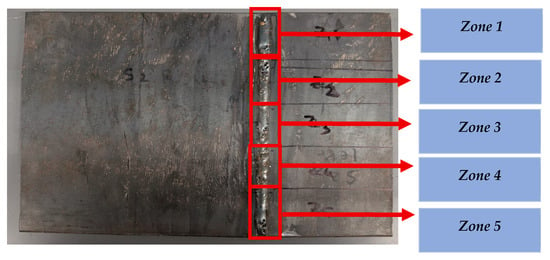
Figure 8.
Division of the WAAM specimen into five inspection zones (Z1–Z5), enabling localized porosity sizing consistent with AWS 25 mm segment acceptance rules.
3.2. Evaluation of Repeatability and Amplitude Consistency of PAUT and TFM Inspection Setup
The PAUT inspection setup, which was set to detect and characterize porosity, showed excellent repeatability and system stability across different depths. The mean electrical gain ranged from 32.5 dB to 40.2 dB for detecting holes situated across various depths with a standard deviation of ±0.16 dB (Table 6). Slightly higher gain was required for detecting holes located deeper from the inspection surface, but this is normal behavior in ultrasound testing.

Table 6.
Mean gain and standard deviation from repeated PAUT scans of calibration block side-drilled holes, demonstrating system stability and repeatability.
3.3. Zone-Wise Porosity Length Evaluation
In Zone 1 (0–36 mm) (Figure 9), the strongest porosity reflection was recorded 27.5 mm from the corner, requiring 33 dB gain to reach the 80% amplitude threshold. From this point, the probe was moved left and right to identify the 6 dB drop positions. At 20 mm from the corner (Figure 9), the porosity was detected at 38 dB gain, about 5 dB higher than the peak. No further reliable signals were observed on the left side, so this location was taken as the start of the porosity distribution. On the right side, at 35 mm from the corner, the porosity was detected at 40 dB gain (Figure 9). Based on these boundaries, the total porosity length in Zone 1 was measured as 15 mm.
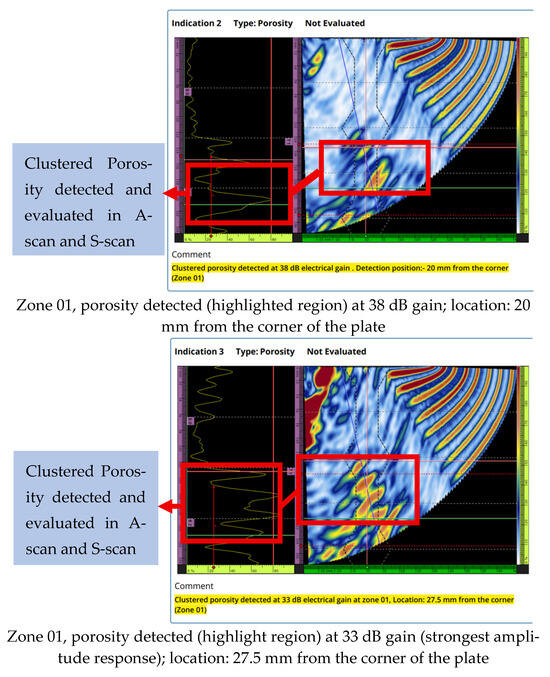
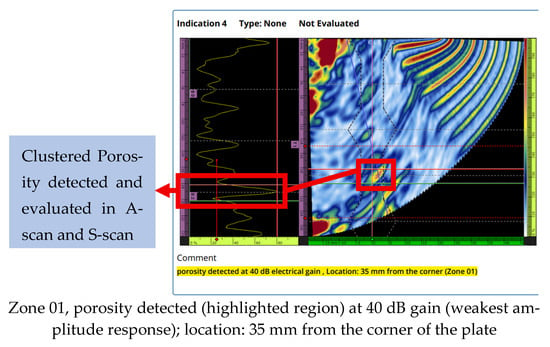
Figure 9.
Representative PAUT responses for Zone 01: clustered porosity detected at varying gain settings, with a total porosity distribution length of 15 mm determined using the 6 dB drop method.
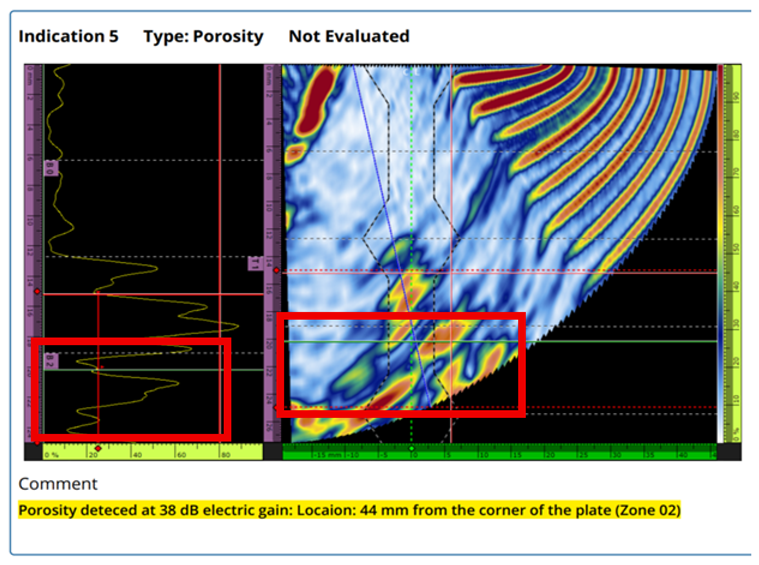
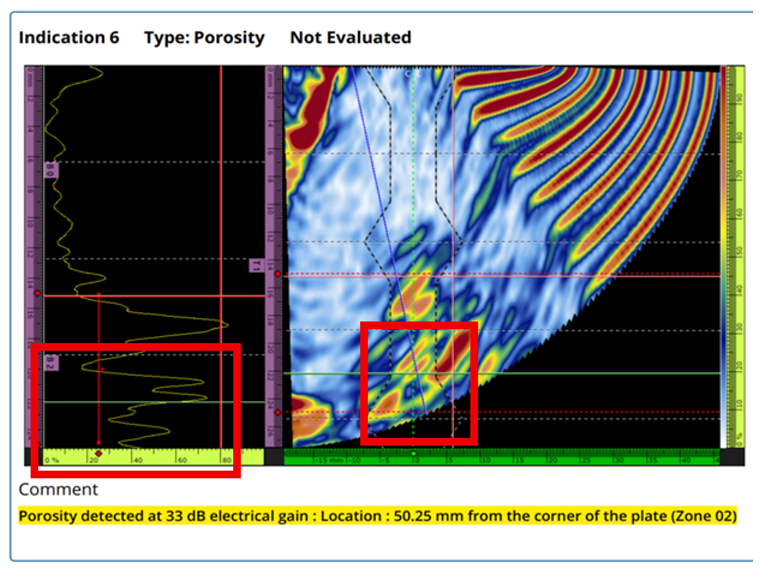
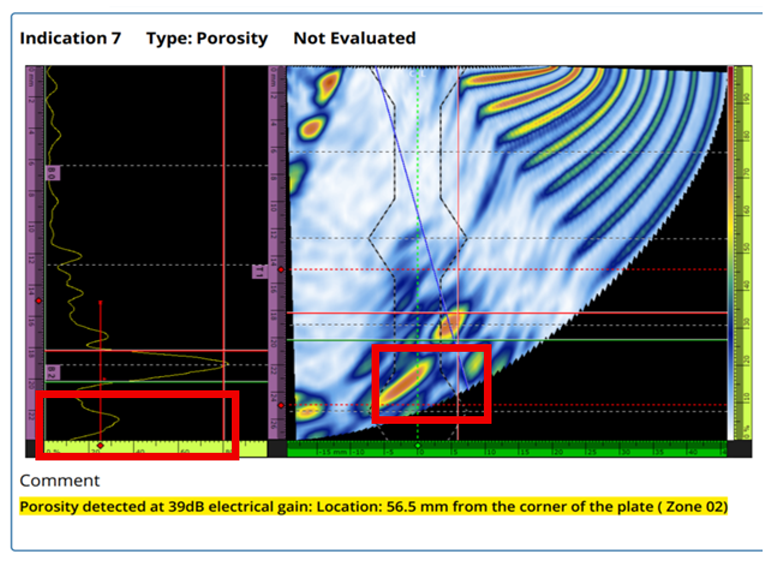
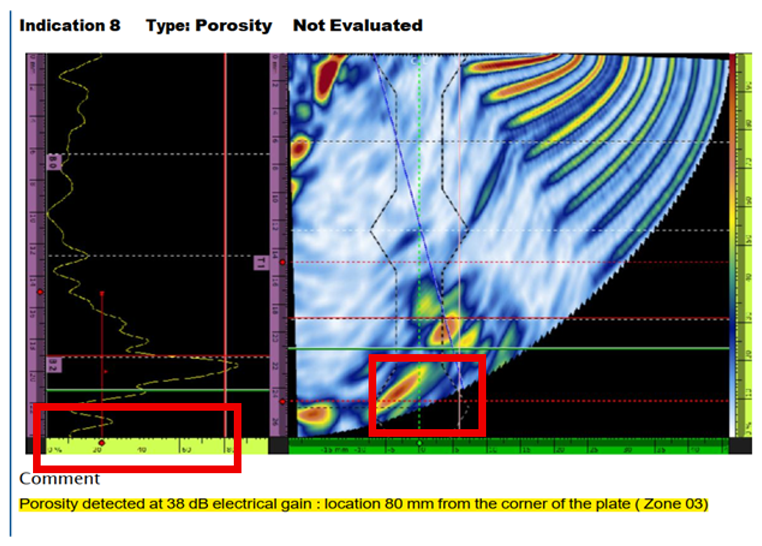
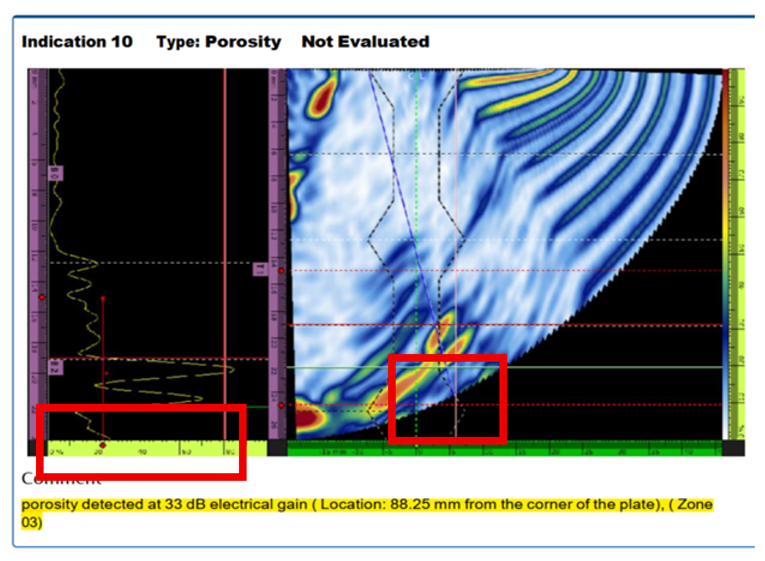
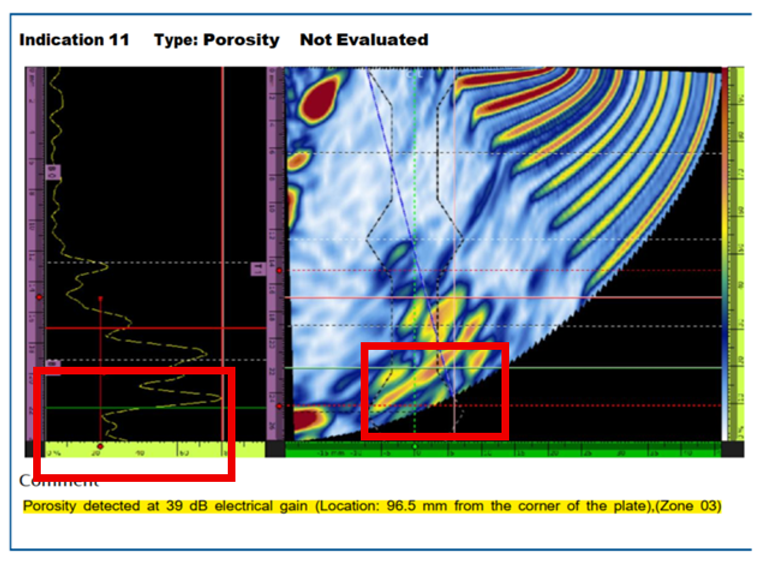
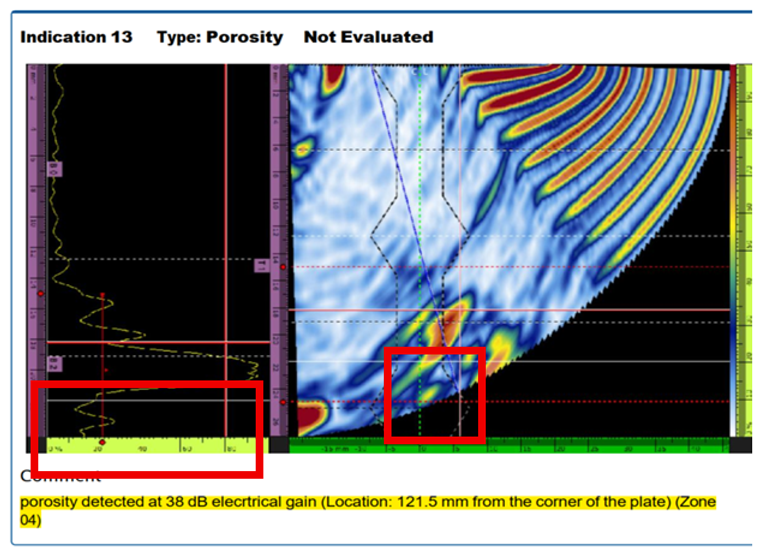
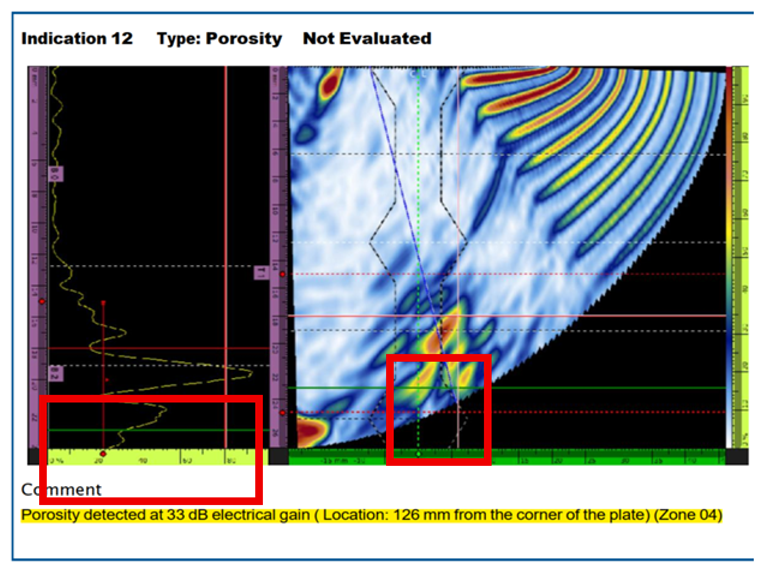
The same method of PAUT scan and 6 dB drop sizing for porosity length distribution evaluation was applied across the remaining zones (Z2–Z5). A summary of the porosity lengths and dB gain required to reach amplitude threshold 80% is shown in Table 7 below.

Table 7.
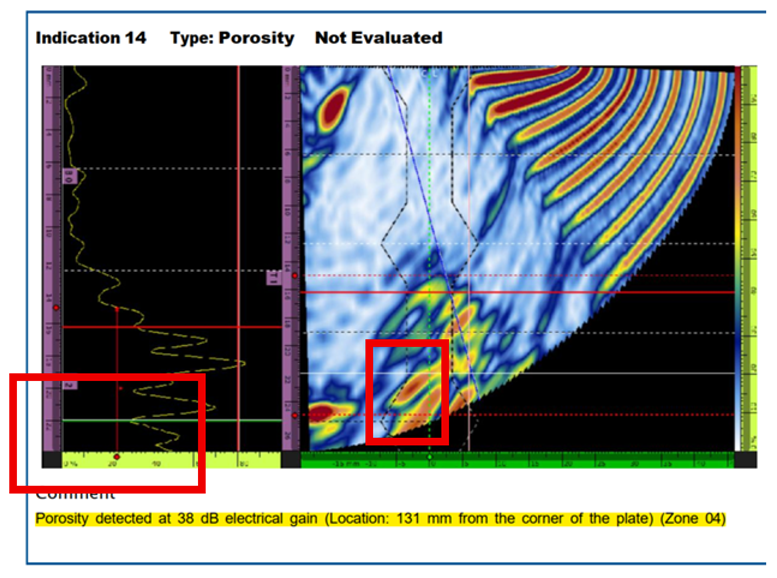
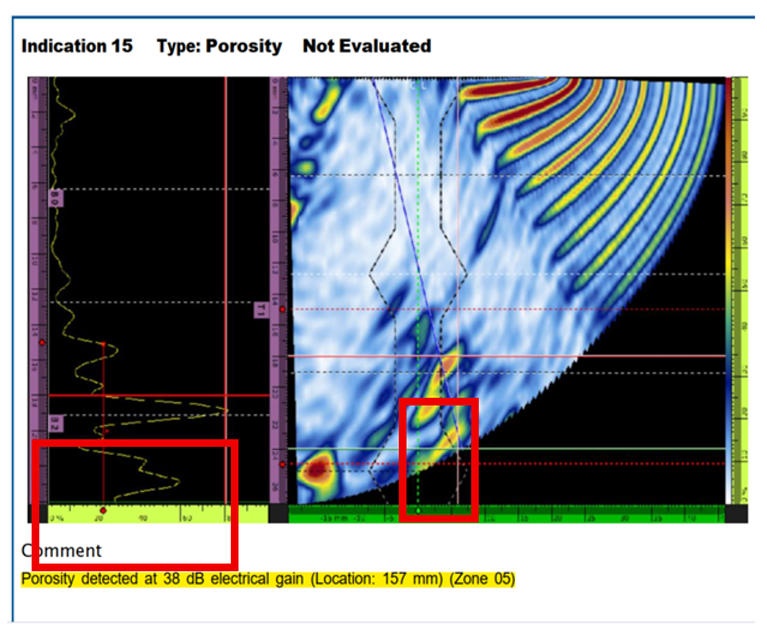
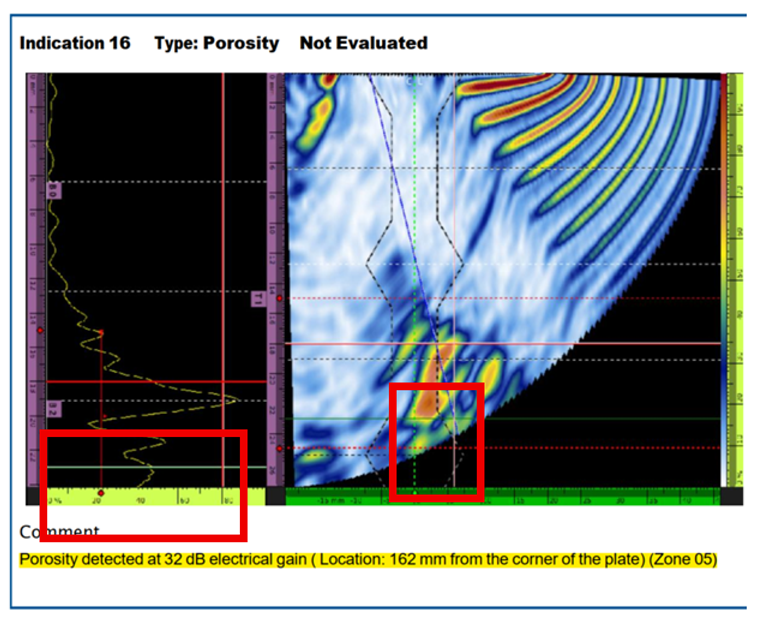
Zone-wise porosity length measurements using the 6 dB drop method, providing localized defect sizing along the WAAM bead. Red highlighted regions indicate porosity clusters (porosity evaluation marked by red box in A-scan and S-scan).
3.4. Zone-Wise Porosity Severity Evaluation
The porosity severity in each inspection zone (Z1–Z5) was quantified based on the dB gain required to raise the signal to the 80% amplitude threshold. For each zone, three measurements were recorded at the left, middle, and right positions along the length of the WAAM print. The mean value of these three measurements was then calculated to represent the overall response of the zone.
After obtaining the mean gain values for each zone, these were compared with the reference gain from the calibration block. Although the defects were distributed throughout the weld, the maximum reflection point (middle point of the defect; depth wise) of each defect was consistently measured at approximately 5 mm from the scanning surface. For this reason, the side-drilled hole (SDH) located at 5 mm depth in the calibration block was selected as the reference. The mean dB gain required to detect this SDH was 32.5 dB, and this value was used as the baseline for comparison with the zone-wise porosity measurements. The difference between the mean gain of each zone and the reference value was then calculated. Using this gain difference and Equation (1), the actual amplitude percentage of each porosity indication was determined. This approach provided a consistent measure of porosity severity across the specimen.
The results are shown in Table 8 below, which demonstrates mean gain, gain difference, and calculated amplitude percentage for each zone. These values establish baseline severity distribution and classification in compliance with AWS D1.5 acceptance criteria.

Table 8.
Zone-wise porosity severity evaluation based on amplitude response relative to calibration reference, classified according to AWS D1.5 acceptance levels.
4. Discussion
- Defect acceptance/rejection as per AWS D 1.5
When assessed zone by zone, porosity distribution was found to be non-uniform along the WAAM bead, despite identical deposition parameters. The largest porosity indication was measured in Zone 3 (16.5 mm), followed by Zone 1 (15 mm) and Zone 2 (12.5 mm), while Zones 4 and 5 exhibited shorter distributions (9.5 mm and 10.5 mm, respectively). This variability is consistent with WAAM thermal behavior, where arc start–stop effects and local heatsinking promote clustering in certain regions. According to AWS D1.5, porosity length must be determined by the 6 dB drop method, and the cumulative pore length must not exceed 10 mm in any 25 mm gauge length of weld which is 40% of the length of 25 mm [26]. With 36 mm inspection zones in this study, porosity lengths in Zones 1 and 3 (41.6% and 45.8% of the zone length) exceeded the threshold, while Zones 2, 4, and 5 remained within limits.
However, acceptance is ultimately determined across the entire weld length, not only individual zones. Under AWS D1.5 rules, no 25 mm segment may exceed the allowable porosity length [25]. When considered globally, the extended porosity clusters in Zones 1 and 3 become decisive, leading to classification of the full 180 mm bead as rejectable.
A parallel evaluation was carried out using amplitude-based classification. In this case, Zones 4 and 5 needed the least gain adjustment to reach the 80% threshold, which gave stronger reflections and placed them in Classes B and C. By comparison, Zones 1 and 3 needed more gain to achieve the same level which meant the responses were weaker and closer to Class D or non-critical. This difference shows a clear mismatch: the same zones that failed the length requirement looked less severe when only amplitude was considered.
Taken together, the results make two points. First, porosity in WAAM does not spread evenly, even when all passes are made under identical parameters. Second, AWS acceptance still depends on the worst local segment, not the average across the bead. What matters from the zone-wise assessment is that Zones 1 and 3 went over the limits, which forced the full specimen to be rejected. This makes the case for looking at both length-based and amplitude-based criteria side by side. Table 9 lists the zone-by-zone results, and Table 10 shows the final global outcome.

Table 9.
Combined zone-wise porosity assessment (length and amplitude) in the WAAM bead, benchmarked against AWS D1.5 acceptance criteria.

Table 10.
Global assessment of the WAAM bead porosity under AWS D 1.5 acceptance rules [25].
The divergence observed between length-based and amplitude-based evaluations can be explained by the scattering nature of clustered porosity. Length sizing captures the cumulative spatial extent of multiple small pores, whereas amplitude classification depends on signal reflectivity, which tends to remain low because individual gas-filled pores are small and act as inefficient scatterers. As a result, extended porosity clusters (Zones 1 and 3) were classified as rejectable by length criteria, even though their amplitude responses were weak (Class D). This shows a cruicial limitation of amplitude-only assessments and demonstrates the importance of AWS D1.5′s dual reliance on both dimensional and reflective criteria. By combining these, underestimation of defect severity can be avoided.
- Improve and control the process parameters
Beyond detection and classification, the present framework also addresses the improve and control stages of DMAIC. By identifying the start and central regions (Zone 1 and Zone 3) where porosity exceeded AWS thresholds, the analysis points directly to process deviations such as unstable sheilding and localized cooling at the root because of not following recommended AWS guidelines for better print. In the improve stage, these findings guide tagreted actions which includes process parameter adjustment, improved shielding gas strategies, and localized repair. In the control stage, PAUT inspections by following the AWS D 1.5 provide an ongoing monitoring plan, where defined sampling intervals and decision thresholds serve as triggers for preventive measures to ensure defect-free production. This ensures that inspection is not an endpoint but an important part of a continuous quality loop, embedding defect monitoring into WAAM process qualification and production control.
- Comparison with published works
The distribution of porosity in the printed WAAM part has similarity with previous WAAM research studies. Wu et al. [3] and Arana et al. [13] reported similar cluster porosity near depsotion boundaries due to unstable shielding and rapid cooling, although their primary study were based on metallographic or X-ray/CT methods rather than code-referenced ultrasonic inspection. Javadi et. al. [29] embedded tungsten inclusions in WAAM steel specimens to detect and size with PAUT inspection, but their study did not introduce any acceptance or rejection thresholds, which limits the ability to classify defects by severity. Compared to that, current research studies beyond defect detection along with applying AWS D 1.5 criteria, which enables standardized accept or reject thresholds.
This study applies PAUT to realistic WAAM defects and introduces a dual-criteria approach that combines length sizing with amplitude-based classification, which helps to avoid underestimating defect severity. When placed within the DMAIC quality framework, the findings are tied directly to likely root causes and to the corrective actions that address them, which is essential in the improve stage. In addition, using AWS-based PAUT inspection as a regular verification step creates a practical pathway for the control stage, making sure that corrective measures remain effective and porosity stays within code limits in future builds.
5. Conclusions
This study demonstrated the integration of PAUT inspection with AWS D 1.5 acceptance thresholds within a DMAIC framework for evaluating volumetric defects like porosity in WAAM joints. The fabricated defective specimen showed non-uniform distributions where Zone 1 and Zone 3 surpassed AWS acceptance criteria for length-wise evaluation, which results in full-weld rejection under clause 8.26.2.4. However, amplitude-based classification did not align with length-based results. Zone 1 and Zone 3 showed weak amplitude responses and were classified as Class D. Compared to that, Zones 2, 4, and 5 showed relatively strong reflections. The outcomes demonstrate that length-based and amplitude-based evaluations provide different but complementary insights. When they are used together, they offer a more comprehensive framework for assessing defects in WAAM joints. This study also showed that length-based sizing and amplitude-based classification do not always align. In paarticular, extended clusters of small gas pores exceeded AWS D 1.5 length limits but produced weak amplitude responses. This confirms that relying on amplitude alone may underestimate defect severity, while length-based criteria remain decisive for acceptance. Therefore, AWS D 1.5′s dual-criteria framework is validated as it ensures that both dimensional extent and reflectivity are considered for robust defect evaluation.
The key contribution of this works are as follows:
- (1)
- Dual-criteria assessment (length sizing + amplitude classification) which ensured robust severity evaluation and reduced the risk of underestimating porosity.
- (2)
- Code reference classification by utilizing AWS D 1.5 accept/reject decisions which solved the issue of WAAM defect detection blindly without following any established compliance.
- (3)
- DMAIC integration extended inspection outcomes into improve and control stages, linking detected porosity to shielding gas absence and cooling rate deviations and positioning PAUT as a reliable monitoring tool for sustainable quality assurance.
Compared to the previous studies which either relied on mettalography, CT or conventional UT without acceptance benchmarking, the present work embeds advanced NDE in a lean quality framework. This positions PAUT not only as a defect detection tool but as a driver for process optimization and continuous control.
While the current research limited to only A-36 mild steel and on a simple WAAM joint geometry, the methodology is scalable to other alloys and geometries. Future work will focus on extending this framework on high-porus materials such as aluminum and titanum. PAUT in WAAM joints faces limitations due to heterogeneous microstructure, where columner grains and fusion boundaries can scatter sound and reduce sensitivity to fine subsurface pores. Clustered porosity may also produced merged echoes, complicating sizing using the 6 dB drop method. While the dual criteria approach in this study mitigates these issues, future work should consider utilizing more advanced NDE like Total Focusing method (TFM) or complementary methods like X-ray CT for improved near-surface resolution and validating scalability for large WAAM structures. Finally, this study applied PAUT as a post-process tool; however, the DMAIC framework is adaptable to near-line or in-line monitoring, which will be explored in future studies by developing high-temperature coupling strategies and improved probe and wedge designs to address WAAM surface roughness challenges. This work therefore serves as a stepping stone toward real-time, standards-based quality assurance in WAAM. In summary, this work establishes a decision-ready, code-compliant, and quality-integrated approach for WAAM inspection which provides a foundation for defect-tolerant and standards-based adoptation of WAAM in safety-critical industries.
Author Contributions
Conceptualization, H.T. and C.M.I.; methodology, C.M.I. and K.K.; formal analysis, C.M.I.; investigation, C.M.I.; resources, B.S.; data curation, C.M.I.; writing—original draft preparation, C.M.I.; writing—review and editing, K.K., B.S. and H.T.; visualization, C.M.I. and H.T.; supervision, H.T. and K.K.; project administration, H.T. All authors have read and agreed to the published version of the manuscript.
Funding
This research received no external funding.
Data Availability Statement
PAUT data are available upon request.
Acknowledgments
We thank LANDTIE Research lab’s students and collaborators on assisting with the sample preparation and the College of Engineering and Computing at Georgia Southern University for the assistance on PAUT unit and probe acquisition.
Conflicts of Interest
The authors declare no conflicts of interest.
Abbreviations
The following abbreviations are used in this manuscript:
| NDT | Nondestructive Testing |
| PAUT | Phased Array Ultrasonic Testing |
| WAAM | Wire Arc Additive Manufacturing |
| AWS | American Welding Society |
| AM | Additive Manufacturing |
| CAD | Computed Aided Design |
| CNC | Computer Numerical Control |
| GMAW | Gas Metal Arc Welding |
| HAZ | Heat Affected Zone |
| NDE | Non-Destructive Evaluation |
| UT | Ultrasonic Testing |
| CTQ | Critical To Quality |
| WPS | Welding Procedure Specification |
| GTAW | Gas Tungsten Arc. Welding |
| SSL | Standard Sensitivity Level |
| ARL | Automatic Rejection Level |
| DRL | Disregard Level |
| SDH | Side Drilled Hole |
References
- Atzeni, E.; Salmi, A. Economics of additive manufacturing for end-usable metal parts. Int. J. Adv. Manuf. Technol. 2012, 62, 1147–1155. [Google Scholar] [CrossRef]
- Ogino, Y.; Asai, S.; Hirata, Y. Numerical simulation of WAAM process by a GMAW weld pool model. Weld. World 2018, 62, 393–401. [Google Scholar] [CrossRef]
- Wu, B.; Pan, Z.; Ding, D.; Cuiuri, D.; Li, H.; Xu, J.; Norrish, J. A review of the wire arc additive manufacturing of metals: Properties, defects and quality improvement. J. Manuf. Process. 2018, 35, 127–139. [Google Scholar] [CrossRef]
- Israr, R.; Johannes, B.; Markus, B. A study on power-controlled wire-arc additive manufacturing using a data-driven surrogate model. Int. J. Adv. Manuf. Technol. 2021, 117, 2133–2147. [Google Scholar] [CrossRef]
- Mohebbi, M.S.; Kühl, M.; Ploshikhin, V. A thermo-capillary-gravity model for geometrical analysis of single-bead wire and arc additive manufacturing (WAAM). Int. J. Adv. Manuf. Technol. 2020, 109, 877–891. [Google Scholar] [CrossRef]
- Venturini, G.; Montevecchi, F.; Scippa, A.; Campatelli, G. Optimization of WAAM deposition patterns for T-crossing features. In Proceedings of the 5th CIRP Global Web Conference Research and Innovation for Future Production, Patras, Greece, 4–6 October 2016; Volume 55, pp. 95–100. [Google Scholar]
- Liberini, M.; Astarita, A.; Campatelli, G.; Scippa, A.; Montevecchi, F.; Venturini, G.; Durante, M.; Boccarusso, L.; Minutolo, F.M.C.; Squillace, A. Selection of optimal process parameters for wire arc additive manufacturing. In Proceedings of the 10th CIRP Conference on Intelligent Computation in Manufacturing Engineering—CIRP ICME’16, Ischia, Italy, 20–22 July 2016. [Google Scholar]
- Queguineur, A.; Rückert, G.; Cortial, F.; Hascoët, J.Y. Evaluation of wire arc additive manufacturing for large-sized components in naval applications. Weld. World 2018, 62, 259–266. [Google Scholar] [CrossRef]
- Gardner, L.; Kyvelou, P.; Herbert, G.; Buchanan, C. Testing and initial verification of the world’s first metal 3D printed bridge. J. Constr. Steel Res. 2020, 172, 106233. [Google Scholar] [CrossRef]
- Panchenko, O.; Zhabrev, L.; Popovich, A. Macrostructure and Mechanical Properties of Al-Si, Al-Mg and Al-Mn Aluminum alloys Produced by Electric Arc Additive Growth. Met. Sci. Heat Treat. 2019, 60, 11–12. [Google Scholar] [CrossRef]
- Hofemann, A.; Josten, M. Arc-welding based additive manufacturing for body reinforcement in automotive engineering. Weld. World 2020, 64, 1449–1458. [Google Scholar] [CrossRef]
- Ghaffari, M.; Nemani, A.V.; Rafieazad, M.; Nasiri, A. Effect of Solidification Defects and HAZ Softening on the Anisotropic Mechanical Properties of a Wire Arc Additive-Manufactured Low-Carbon Low-Alloy Steel Part. J. Miner. Met. Mater. Soc. (TMS) 2019, 71, 4215–4224. [Google Scholar] [CrossRef]
- Arana, M.; Ukar, E.; Rodriguez, I.; Iturrioz, A.; Alvarez, P. Strategies to Reduce Porosity in Al-Mg WAAM Parts and Their Impact on Mechanical Properties. Metals 2021, 11, 524. [Google Scholar] [CrossRef]
- Jovanovic, M.; Grum, J.; Uran, M. Influence of Lack-of-Fusion Defects on Load Capacity of MAG Welded Joints. In Proceedings of the 17th World Conference on Nondestructive Testing (WCNDT), Shanghai, China, 25–28 October 2008. [Google Scholar]
- Fu, R.; Tang, S.; Lu, J.; Cui, Y.; Li, Z.; Zhang, H.; Xu, T.; Chen, Z.; Liu, C. Hot-wire arc additive manufacturing of aluminum alloy with reduced porosity and high deposition rate. Mater. Des. 2021, 199, 109370. [Google Scholar] [CrossRef]
- Wu, B.; Pan, Z.; Chen, G.; Ding, D.; Yuan, L.; Cuiuri, D.; Li, H. Mitigation of Thermal Distortion in Wire Arc Additively Manufactured Ti-6Al-4V Part Using Active Interpass Cooling. Sci. Technol. Weld. Join. 2019, 24, 484–494. [Google Scholar] [CrossRef]
- Derekar, K.; Lawrence, J.; Melton, G.; Addison, A.; Zhang, X.; Xu, L. Influence of Interpass Temperature on Wire Arc Additive Manufacturing (WAAM) of Aluminium Alloy Components. In MATEC Web of Conferences 269; EDP Sciences: Les Ulis, France, 2019. [Google Scholar]
- Biswal, R.; Zhang, X.; Syed, A.K.; Awd, M.; Ding, J.; Walther, F.; Williams, S. Criticality of porosity defects on the fatigue performance of wire + arc additive manufactured titanium alloy. Int. J. Fatigue 2019, 122, 208–217. [Google Scholar] [CrossRef]
- Seow, C.E.; Zhang, J.; Coules, H.E.; Wu, G.; Jones, C.; Ding, J.; Williams, S. Effect of crack-like defects on the fracture behaviour of Wire + Arc Additively Manufactured nickel-base Alloy 718. Addit. Manuf. 2020, 36, 101578. [Google Scholar] [CrossRef]
- Nallusamy, S.; Chakraborty, P.; Rao, G.P. Reduction Analysis of Welding Defects using Lean Six Sigma and DMAIC application-A case Study. Int. J. Mech. Eng. 2023, 10, 13–20. [Google Scholar]
- Hossain, S.; Taheri, H.; Pudasaini, N.; Reichenbach, A.; Silwal, B. Ultrasonic Nondestructive Testing for In-Line Monitoring of Wire-Arc Additive Manufacturing (WAAM). In Proceedings of the ASME 2020 International Mechanical Engineering Congress and Exposition, Online, 16–19 November 2020. [Google Scholar]
- Taheri, H.; Ladd, K.M.; Delfanian, F.; Du, J. Phased Array Ultrasonic Technique Parametric Evaluation for Composite Materials. In Proceedings of the International Mechanical Congress & Exposition, Montreal, QC, Canada, 13–19 November 2015. [Google Scholar]
- Williams, C.; Lappin, E.; Taheri, H. Assessment of Process Induced Welding Flaws in Structural Steel Members Using Phased Array Ultrasonic Nondestructive Testing. In Proceedings of the ASME 2024 International Mechanical Engineering Congress and Exposition, Portland, OR, USA, 17–21 November 2024. [Google Scholar]
- Rodrigues, T.; Duarte, V.; Miranda, R.; Santos, T.; Oliveira, J. Current Status and Perspectives on Wire and Arc Additive Manufacturing (WAAM). Materials 2019, 12, 1121. [Google Scholar] [CrossRef] [PubMed]
- Society, A.W. Bridge Welding Code; American Welding Society: Miami, FL, USA, 2020. [Google Scholar]
- Irtiza, C.M.; Taheri, H. Phased Array Ultrasonic Testing and Characterization of Flaws in Structural Welding in Compliance with AWS D1. 5. In Proceedings of the GS4 Georgia Southern Student Scholars Symposium, 165, Statesboro, GA, USA, 24 April 2025. [Google Scholar]
- Evident-Weld Series Probes. Evident. Available online: https://ims.evidentscientific.com/en/probes/phased-array/weld-series (accessed on 1 September 2020).
- Kishoni, D.; Workman, G.L. Nondestructive Testing Handbook; ASNT: Columbus, OH, USA, 2007. [Google Scholar]
- Javadi, Y.; MacLeod, C.N.; Pierce, S.G.; Gachagan, A.; Lines, D.; Mineo, C.; Ding, J.; Williams, S.; Vasilev, M.; Mohseni, E.; et al. Ultrasonic phased array inspection of a WAAM sample with intentionally embedded defects. Insight 2019, 61, 144–148. [Google Scholar] [CrossRef]
Disclaimer/Publisher’s Note: The statements, opinions and data contained in all publications are solely those of the individual author(s) and contributor(s) and not of MDPI and/or the editor(s). MDPI and/or the editor(s) disclaim responsibility for any injury to people or property resulting from any ideas, methods, instructions or products referred to in the content. |
© 2025 by the authors. Licensee MDPI, Basel, Switzerland. This article is an open access article distributed under the terms and conditions of the Creative Commons Attribution (CC BY) license (https://creativecommons.org/licenses/by/4.0/).
