Abstract
Due to Inconel 718’s high mechanical properties, even at higher temperatures, tendency to work-harden, and low thermal conductivity, this alloy is considered hard to machine. The machining of this alloy causes high amounts of tool wear, leading to its premature failure. There seems to be a gap in the literature, particularly regarding milling and finishing operations applied to Inconel 718 parts. In the present study, the wear behavior of multilayered PVD HiPIMS (High-power impulse magnetron sputtering)-coated TiN/TiAlN end-mills used for finishing operations on Inconel 718 is evaluated, aiming to establish/expand the understanding of the wear behavior of coated tools when machining these alloys. Different machining parameters, such as cutting speed, cutting length, and feed per tooth, are tested, evaluating the influence of these parameters’ variations on tool wear. The sustained wear was evaluated using SEM (Scanning electron microscope) analysis, characterizing the tools’ wear and identifying the predominant wear mechanisms. The machined surface was also evaluated after each machining test, establishing a relationship between the tools’ wear and production quality. It was noticed that the feed rate parameter exerted the most influence on the tools’ production quality, while the cutting speed mostly impacted the tools’ wear. The main wear mechanisms identified were abrasion, material adhesion, cratering, and adhesive wear. The findings of this study might prove useful for future research conducted on this topic, either optimization studies or studies on the simulation of the milling of Inconel alloys, such as the one presented here.
1. Introduction
Inconel 718 nickel superalloys are well known for their superior mechanical properties, retaining them even at elevated temperatures of up to 650 °C [1]. In addition to nickel, these alloys also contain chromium, iron, and traces of niobium, molybdenum, titanium, and aluminum. These elements are dispersed through the nickel γ matrix with a face-centered cubic (FCC) lattice structure [2]. These Inconel alloys exhibit high strength, resistance to thermal creep deformation, and high resistance to corrosion and oxidation phenomena. Because of this, these alloys are applied in a wide variety of industries, such as defense, food processing, automotive, and the aeronautical and aerospace industries [2]. They are heavily employed in the latter industries, particularly to produce aircraft engine components (mainly components that are subject to high service temperatures), making up for about 50% of the total weight of these components in aircraft [3], or even as explosive fasters for space shuttles [4].
Indeed, Inconel 718 has excellent mechanical properties at high temperatures when compared with other types of alloys, even other nickel-based alloys [5]. However, these high values at high temperatures, coupled with other properties, such as low thermal conductivity and work hardening, make this alloy incredibly hard to process through machining, which is the primary process used to produce engine parts and aircraft components [6]. Furthermore, the final metallurgical structure of Inconel 718 contains a significant number of hard carbides, mainly TiC and NbC, being responsible for the high abrasive behavior registered during machining, causing severe tool wear [7]. This fact, coupled with the tendency of Inconel 718 to adhere to the surface of cutting tools, only make the machining of this alloy even more challenging. The machining of this alloy generates high cutting forces and temperatures, with estimated mechanical stresses reaching peaks of 450 MPa and temperatures of up to 1100 °C, as reported by Agmell et al. [8]. These issues, coupled with high abrasive damage and material adhesion to the tools’ surfaces, cause the cutting tools to fail quickly, suffering considerable damage after a reduced machining time or distance.
Machining remains a very relevant process, especially for the production of high-precision and quality parts [9]. Over the years, researchers have encountered processing problems when machining various types of materials, with this process suffering constant evolution regarding the production of new tool technologies that can attenuate these problems faced when machining hard-to-cut materials, such as (but not exclusively) Inconel 718. There have been various studies performed on the influence of machining parameters (for various cutting processes, such as drilling, turning, or milling) [9,10]. These studies have focused on the determination of the optimal parameters to produce various parts, analyzing the produced machined surface’s quality, and the tool wear sustained by the employed tools in various processes [11,12]. By analyzing these factors, conclusions can be drawn regarding the best set of parameters to machine certain hard-to-cut materials, offering a basis for future works and investigation into the processing of these materials. Another important aspect when it comes to machining process control is the assessment of the cutting forces developed during this process, as these forces provide valuable information regarding the machining process’s performance and stability, offering some insight into tool wear and even the machined surface’s quality [13,14]. Although these empirical studies offer this basis, they are quite expensive and time-consuming. However, they offer the opportunity to develop prediction methodologies for these processes. For example, in the following study conducted by Zhao et al. [15], the authors studied the influence of cutting parameters on the milling performance of C45E. They focused on the tools’ edge optimization for reducing the developed cutting forces and sustained tool wear during machining. The authors performed a simulation using DEFORM V13.0 software to predict the developed cutting forces and tool wear during the machining of this material. Practical tests were also conducted to validate the obtained results. The authors reported satisfactory results, obtaining a deviation in the measured cutting forces from the simulations performed of about 20%. They also determined the influence of the machining parameters, namely the spindle speed and feed rate, on the developed cutting forces and sustained tool wear. These simulations are quite useful, providing valuable information in a faster and more cost-efficient manner when compared with empirical tests. However, special attention is needed when employing these methods, as the configuration of these simulations is quite difficult and depends on previously acquired knowledge [16].
Regarding the mitigation of problems faced when machining hard-to-cut materials, tool coatings or even novel tool geometries can be employed to reduce these problems [10,17]. Hard coatings offer many advantages in improving the wear resistance of various surfaces, being employed not only on cutting tools, but also on other surfaces, such as injection molds [18,19]. As such, cutting tools are no different, heavily benefiting from these hard coatings. These coatings are usually obtained by CVD (chemical vapor deposition) or PVD (physical vapor deposition), conferring different properties based on the coating structure or even deposition method [17]. A recent deposition method shows some promise, which is PVD HiPIMS (High-Power Impulse Magnetron Sputtering), in which the produced coating structure is more compact and possesses improved mechanical properties. Moreover, this deposition method confers the tools a degree of compressive residual stress, which has a positive impact on the machining performance of the coated tools [20]. This happens mainly because these stresses confer the tools’ edges higher strength, producing an overall better-machined surface quality. However, this makes the tools’ edges more prone to wear. These novel coatings might prove useful when machining Inconel 718, as they not only confer the tool increased wear resistance and improved mechanical properties, but can also contribute to better surface roughness production. There are studies that have employed these tool coatings in the machining of Inconel 718, both PVD and CVD, as well as uncoated tools. The use of uncoated tools for machining Inconel alloys (namely Inconel 718) is not advised, especially at higher cutting speeds [21]. The main wear mechanisms that these uncoated (WC-Co) tools present are adhesive and abrasive wear, which are considerably higher when compared with those of coated tools tested at higher feed values [22]. Akhtar et al. [23] evaluated the effect of machining parameters on surface integrity in the high-speed milling of Inconel 718. In this study, the authors tested coated and uncoated tools, more precisely, uncoated SiC whisker-reinforced tools and PVD TiAlN-coated carbide tools. Despite the uncoated tools presenting overall lower wear, it was observed that the produced surface roughness for the coated tools was lower, even suggesting that the roughing operations could be conducted using these uncoated tools. This can be attributed to the fine cutting edges commonly produced by the PVD-coating process, as well as the use of TiAlN coatings, which are usually employed for high-speed machining applications [17].
Despite the use of various tool coatings and tool materials, there are still a lot of challenges related to high wear when machining Inconel 718. De Bartolomeis et al. [24] presented a review article in which there was a collection of information regarding the most desired properties for cutting tools when machining Inconel 718. These tools are preferred to have high hardness under elevated temperatures, high strength and toughness, high thermo-chemical stability, high wear resistance, and high thermal shock resistance. There is high importance regarding the thermal properties of these cutting tools, as this alloy has very low thermal conductivity. This usually results in very high cutting temperatures in small punctual areas, primarily at the tool–chip interface [25]. As such, there are some tool materials that show promising behavior when machining these types of alloys, for example, cubic boron nitrides (CBNs), ceramic materials and coatings, such as TiC, TiAlN, or ceramic tools, such as the ones presented in [23], and carbides. However, there are some disadvantages associated with the use of each of these tool materials, such as abrasion and changes in tool geometry for fine edges, or even diffusion phenomena when machining with carbides [26]. These phenomena can be attenuated by introducing a coating layer, such as AlTiN or TiAlN, to act as a chemical/thermal barrier [27]. Indeed, TiAlN-based coatings have proven to be quite promising when machining Inconel 718, as the use of these coatings under high-speed machining conditions can lead to the formation of protective Al2O3 films between the coating and the Inconel 718, as reported in the study by Grzesik et al. [28]. In short, due to the high mechanical strength and elevated temperatures developed in the machining of INCONEL® alloys, the main wear mechanism reported so far is abrasion. However, when the cutting edges are very sharp, the breakage of these edges commonly occurs, dragging the coatings with it, as the fracture occurs essentially through the substrate. Coatings that lead to the formation of oxides on the surface tend to improve chip flow, thereby reducing wear phenomena. Some studies, as previously mentioned, have shown that TiAlN coatings lead to the formation of an Al2O3 film on the surface, which has been proven to be beneficial for reducing wear phenomena.
Another important aspect to improve the machining process of Inconel 718 and the machining processes is the analysis of tool wear and wear mechanisms. The analysis of the tools’ sustained wear after machining can yield relevant information regarding the process’s productivity, for instance [29], which provides useful information on machining parameter adjustment and, of course, on the quality/suitability of the employed cutting tool [30,31] and even coatings [10,17]. The analysis of the tools’ cutting behavior and wear enable researchers to develop new strategies to machine these difficult-to-cut alloys; for example, in the study by Fox-Rabinovich et al. [32], the authors proposed the use of a novel AlTiN/Cu coating to improve the machinability of Inconel 718 superalloy. As previously mentioned, machining tools used to cut Inconel 718 are subject to severe wear, primarily abrasive wear, resulting in early tool failure. This novel tool coating had good self-lubricating properties and reduced thermal conductivity, which resulted in an increase in tool life. The authors assessed not only the tool life and wear behavior, but also analyzed chip formation in the various studied tools. They compared the chips formed with coated and uncoated tools, verifying that the undersurface of the chips created by the coated tools exhibited a very smooth surface, indicating minimal abrasive wear. This information, obtained from analyzing the machining process using different approaches, can be used to create prediction models about tool wear, cutting forces, and even machined surface quality [33]. The configuration of these models is quite difficult and relies on practical/empirical data, either by validation after implementation or by creating a database containing information previously acquired by performing practical tests. There is a lack of these models for milling operations, particularly when considering the machining of Inconel 718 [24].
The machining of Inconel 718 is quite a relevant and popular topic, with most of the studies being performed on the turning of these alloys. However, there have been few studies regarding the milling of these alloys, particularly for finishing operations [24]. Therefore, in the present manuscript, a comparative study on the production quality of TiN/TiAlN-coated tools using different machining parameters is presented. The influence of these parameters on the sustained tool wear and machined surface quality will be assessed. Furthermore, the developed tool-wear mechanisms will be analyzed for each of the devised test conditions. This coating was chosen due to the TiN sublayer that confers high coating adhesion strength [17], which is commonly associated with improved wear behavior [34]. Furthermore, these sublayers highly contribute to the coating’s crack resistance [35] and, thus, to its wear resistance. Introducing layers such as these also contributes to the coating’s oxidation resistance [36,37], which is important, given that the machining of Inconel 718 causes high cutting temperatures in small areas, thus contributing to coating and tool degradation [17,38]. Test results for uncoated tools will not be presented in this study, as the use of a coated tool to machine this type of alloy is advised and is well documented in the literature. Inconel 718 tends to adhere to uncoated tools’ surfaces, causing severe abrasive and adhesive wear; therefore, the authors have opted to study the mentioned tool coating.
Therefore, in this study, the authors hope that the presented findings will be used as a basis for the optimization of the milling processes of Inconel 718, particularly finishing operations. Furthermore, the findings reported in this study can be used for simulation and predictive model configuration. Although this is considered quite difficult for the milling process, as it is a very dynamic machining process, a considerable lack of studies have been conducted on this theme [24]. Moreover, the milling of Inconel 718 alloy has not been heavily explored in the recent literature, especially on finishing operations and conditions [24]. Therefore, this study aims to help fill this gap in the recent literature, as well as provide insight into the milling (finishing) operations of these alloys. Studies such as these have proven to be quite useful when assessing the machinability of various alloys, helping to adjust machining parameters and develop new strategies or even tools and tool coatings [39,40]. As mentioned, the basis to develop simulations about the milling of Inconel will prove to be quite useful. If they are properly calibrated, the simulations can yield interesting and valuable results regarding the generated cutting forces, temperature, and developed tool wear (even providing useful information regarding tool life). However, to calibrate these simulations, studies such as this one are very important as they serve as an experimental basis for these calibrations.
This paper will be divided into three main sections. The following section will be the materials and methods, where the used materials will be presented, as well as the analyses performed and the equipment used for them. Then, in Section 3, the results of the conducted tests will be presented, showing the machined surface quality results followed by the presentation of the wear sustained by the machining tools. This wear analysis will be quantitative and qualitative, showing wear measurements (regarding flank wear) as well as characterizing the sustained wear mechanisms. In Section 3, the obtained results will be discussed based on the current literature. Finally, in Section 4, the conclusions of this work will be presented.
2. Materials and Methods
In this section, the various materials and methods used for the conduction of this work will be presented, starting with the presentation of the machining tools and workpiece material. The adopted methods regarding sample preparation and analyses will also be presented.
2.1. Materials
2.1.1. Machining Tools
The employed tools are end-mills (INOVATOOLS, S.A., Leiria, Portugal) their substrate is a cemented carbide WC-Co, grade 6110. The substrate presents an average grain size of about 0.3 µm and uses 6% Co (percentual mass fraction) as a binder. Figure 1a depicts the tools’ shape.
The tools’ substrates (INOVATOOLS, S.A., Leiria, Portugal) were supplied with the tools’ final dimensions and geometry, as they were commercial tools sold by the supplier. However, these tools were then coated with a coating developed in the laboratory. The tools were coated with a TiN/TiAlN multilayer coating. After the machining of the tools’ substrates, they were subjected to a cleaning operation and then coated. The tool coating was obtained using PVD CemeCom CC800/HiPIMS equipment (CemeCon, Wuerselen, Germany) with four target holders. The adopted deposition parameters can be observed in Table 1.

Table 1.
Deposition parameters for the TiN/TiAlN tool coatings.
Coating deposition started with the opening of the shutters of the two pure titanium targets, enabling the deposition of the first thin layer of TiN onto the tools’ substrates. After this initial deposition, these shutters closed and the ones for the TiAl targets opened, thus enabling the deposition of the outer TiAlN layer, which was thicker than the former. These deposition parameters were selected based on previously conducted experiments on similar substrates. After coating deposition, the tools were carefully packed, avoiding the handling of the cutting area.
2.1.2. Workpiece Material
The selected workpiece material (Paris Saint Denis Aero Portugal, Grândola, Portugal) was an austenitic nickel–chromium-based superalloy, Inconel 718. The workpiece material was supplied as a round bar, having a 158 mm diameter. Regarding heat treatments, the material underwent a solution annealing process at 970 °C, followed by rapid cooling by water quenching. Then, it underwent precipitation hardening at 718 °C for 8 h before being cooled in a furnace until 621 °C. This temperature was maintained for 8 h, with the material then being removed from the furnace and left to cool in air. The material’s mechanical properties are presented in Table 2, and its respective chemical composition (%wt) is shown in Table 3.

Table 2.
Workpiece material’s (Inconel 718) mechanical properties determined at room temperature.

Table 3.
Workpiece material’s (Inconel 718) chemical composition (%wt).
2.2. Methods
2.2.1. Sample Preparation
To characterize the tool-coating thickness and the sustained tool wear after machining, the tools were subject to a preparation procedure. The mentioned analyses were performed using SEM (FEI QUANTA 400 FEG, Field Electron and Ion Company, FEI, Hillsboro, OR, USA). Regarding the tool coating analysis, firstly, an unused tool was cut (cross-section) in a coated area using a STRUERS MINITOM (Struers, Inc., Cleveland, OH, USA) disc saw equipped with a thin disc with electroplated diamond particles in its cutting area. After cutting, the sample was mounted in thermoset resin and placed in a STRUERS PEDOPRESS hot press (Struers, Inc., Cleveland, OH, USA). This mounting step was performed to enable the sample’s preparation for SEM analysis. This preparation consisted of subjecting the mounted sample to grinding and polishing processes using silicon carbide (SiC) sandpaper with different grits in the following sequence: 220, 550, 800, and 1200 grit. After the grinding process, the sample was rotated 90° to reduce undesirable abrasion marks. Following the grinding process, the samples were subject to a polishing stage using two types of diamond slurry, one with an average particle size of 3 µm and another with an average particle size of 1 µm. Each polishing step was performed for about 15 min to reduce the abrasion marks on the samples’ surfaces. A total of three samples for coating analysis were produced in this manner.
The tools used in the machining tests were additionally prepared to enable the sustained wear analysis, also using SEM. After machining, the tools were cut using the same STRUERS MINITOM (Struers, Inc., Cleveland, OH, USA) disc saw equipment, this time cutting the tools in an uncoated area. All the tools were cut in the same area, guaranteeing that all samples had the same length; moreover, during the cutting of the samples, the protection of the cutting area was ensured, preventing possible damage that would negatively impact the subsequent analysis of the tool wear and wear mechanisms. This cutting procedure enabled a more detailed analysis of the top of the tools in the SEM equipment. After cutting, all of the tools were subject to a cleaning procedure, more specifically, an ultrasonic bath using acetone for 5 min.
2.2.2. Coating Thickness Analysis
Coating thickness was assessed by analyzing cross-sections obtained (using the process described in Section 2.2.1) from the coated end mills. Thickness was measured using an FEI QUANTA 400 FEG (Field Electron and Ion Company, FEI, Hillboro, OR, USA) scanning electron microscope, provided with an EDAX Genesys Energy Dispersive X-ray Spectroscopy microanalysis system (Edax Ametak, Mahwah, NJ, USA). The mounted samples were analyzed in different areas of the cutting area, the coating thickness was measured, and its average value was determined. The same range of magnifications was used for all images obtained from the SEM analyses, allowing a better comparison between samples. EDS analyses were also carried out to assess the coating’s chemical composition (this analysis does not provide fully accurate values; however, its accuracy is sufficient to be used to ascertain the chemical composition of these coatings, avoiding the use of more expensive and time-consuming technologies). EDS analyses were performed using a beam potential of 15 kV, which was sporadically reduced to 10 kV, to decrease the interaction volume, thus reducing the noise in the obtained spectra.
2.2.3. Machining Tests
The tests were performed using a milling center—HAAS VF-2 CNC machining center (HAAS Automation, Oxnard, CA, USA)—with a maximum speed of 10,000 rpm and a maximum power of 20 kW. Because the workpiece material was supplied as a round bar with a 158 mm diameter, a strategy was selected in which the tool would machine the material’s surface in a spiral motion. The initial bar had a considerable height (of about 1 m); as such, it was necessary to cut this bar into sections so as to enable a stiffer machining process. The bar was cut using a bandsaw, creating sections with a height of 32 mm. These sections were then face-milled, guaranteeing a constant height of 30 mm (due to possible deviations in height created by the bar’s cutting process).
Further, regarding the machining strategy, it was concluded that the best solution would be for the tool to perform an initial plunge at the round bar’s center, then machining from the center to the bar’s periphery. By adopting this strategy, the selected radial depth of the cut would be kept constant from the beginning of the test to its end, thus preventing undesired wear phenomena related to the change in this parameter throughout the test.
The machining tests were performed using cutting fluid (water-miscible) that was projected externally (5% oil in water) relative to the tool. The machining parameters were selected based on the tool’s substrate manufacturer (INOVATOOLS). The choice was made based on the optimal parameters for optimal surface roughness production. The machining tests were designed using a full factorial experiment design. The final selected machining parameters can be observed in Table 4. In this table, the values for the cutting speed (Vc), feed per tooth (fz), cutting length (Cut. Length), axial depth of cut (ap), and radial depth of cut (ae), as well as the respective tool reference for each tested condition are shown. A total of three tools per test condition were used to improve the quality of the obtained results regarding the performance and wear sustained by the tested tools.

Table 4.
Selected machining parameters for the conducted tests.
Two cutting lengths were selected to observe how the tool wear would progress throughout the machining of the workpiece, which were 5 and 15 m. Two cutting speeds were also selected, 100 and 125 m/min, to evaluate the influence of this parameter on tool wear and production quality (machined surface roughness). Regarding feed per tooth, this parameter is also known to have an influence on tool wear and production quality; therefore, three values were tested, with the center value (100%) being 0.0700 mm/tooth. As observed in Table 4, the values for ap and ae were kept constant, with the selected ae value being 75% of the tool’s cutting diameter (tool diameter was 6 mm).
2.2.4. Machined Surface Roughness Analysis
The analysis of the machined surface roughness provides valuable information regarding machining tool performance, which can be related to tool wear and optimal machining conditions to obtain the best possible surface quality. For this analysis, a Mahr Perthometer M1 profilometer (Mahr, Gottingen, Germany) was used. This equipment was used to determine the surface roughness parameters according to the ISO 21920-1:2021 standard [41]. Each test was performed with a cut-off value of 0.8 mm and a measurement length of 5.6 mm, which was seven times the cut-off value. The first and the last measurement segments of 0.8 mm were not considered due to errors resulting from the probe acceleration and deceleration at the time of measurement. The machined material’s surface roughness was evaluated in the tangential and radial directions (in relation to the machining direction). This was performed to evaluate the machining stability, as a considerable difference between these values would indicate an unstable machining process. Furthermore, surface roughness assessment was performed in various areas of the workpiece’s surface, namely in the center and periphery, again to evaluate the stability of the cutting process.
Due to the workpiece’s dimensions and equipment availability, it was not possible to perform surface roughness area analyses (using profilometers). As such, only the mentioned equipment was used for surface roughness assessment.
2.2.5. Tool Wear Analysis
After being used for machining the workpiece, the tool wear sustained by the machining tools was assessed by performing SEM analysis, identifying the main wear mechanisms as well as performing wear measurements on the tools’ top views (flank wear, VB), more precisely, VB3 according to the standard ISO 8688-2:1986 [42]. This was performed in this way due to the selected machining parameters. In fact, these caused primarily localized flank wear near the tools’ chamfer. EDS analyses were also carried out during tool wear assessment to characterize phenomena related to material adhesion to the tools’ surfaces. The tools’ rake and clearance faces were also analyzed, characterizing and comparing the sustained wear for all tested tools. Furthermore, the amount of lost tool material was assessed by comparing the change in tool geometry with that of a tool that had not been used for machining (new tool). In Figure 1, the reference for tool tooth/face identification is displayed, showing the top view of an unused end-mill, as well as the scheme used for measurement according to the standard [42].
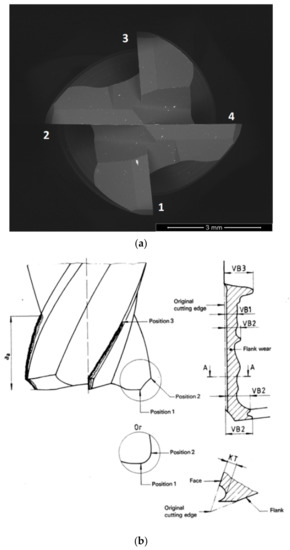
Figure 1.
Reference used for tool wear evaluation during SEM analysis (a); types of wear on end-milling cutters according to ISO 8688-2:1989 (en) (b) [42].
Figure 1.
Reference used for tool wear evaluation during SEM analysis (a); types of wear on end-milling cutters according to ISO 8688-2:1989 (en) (b) [42].
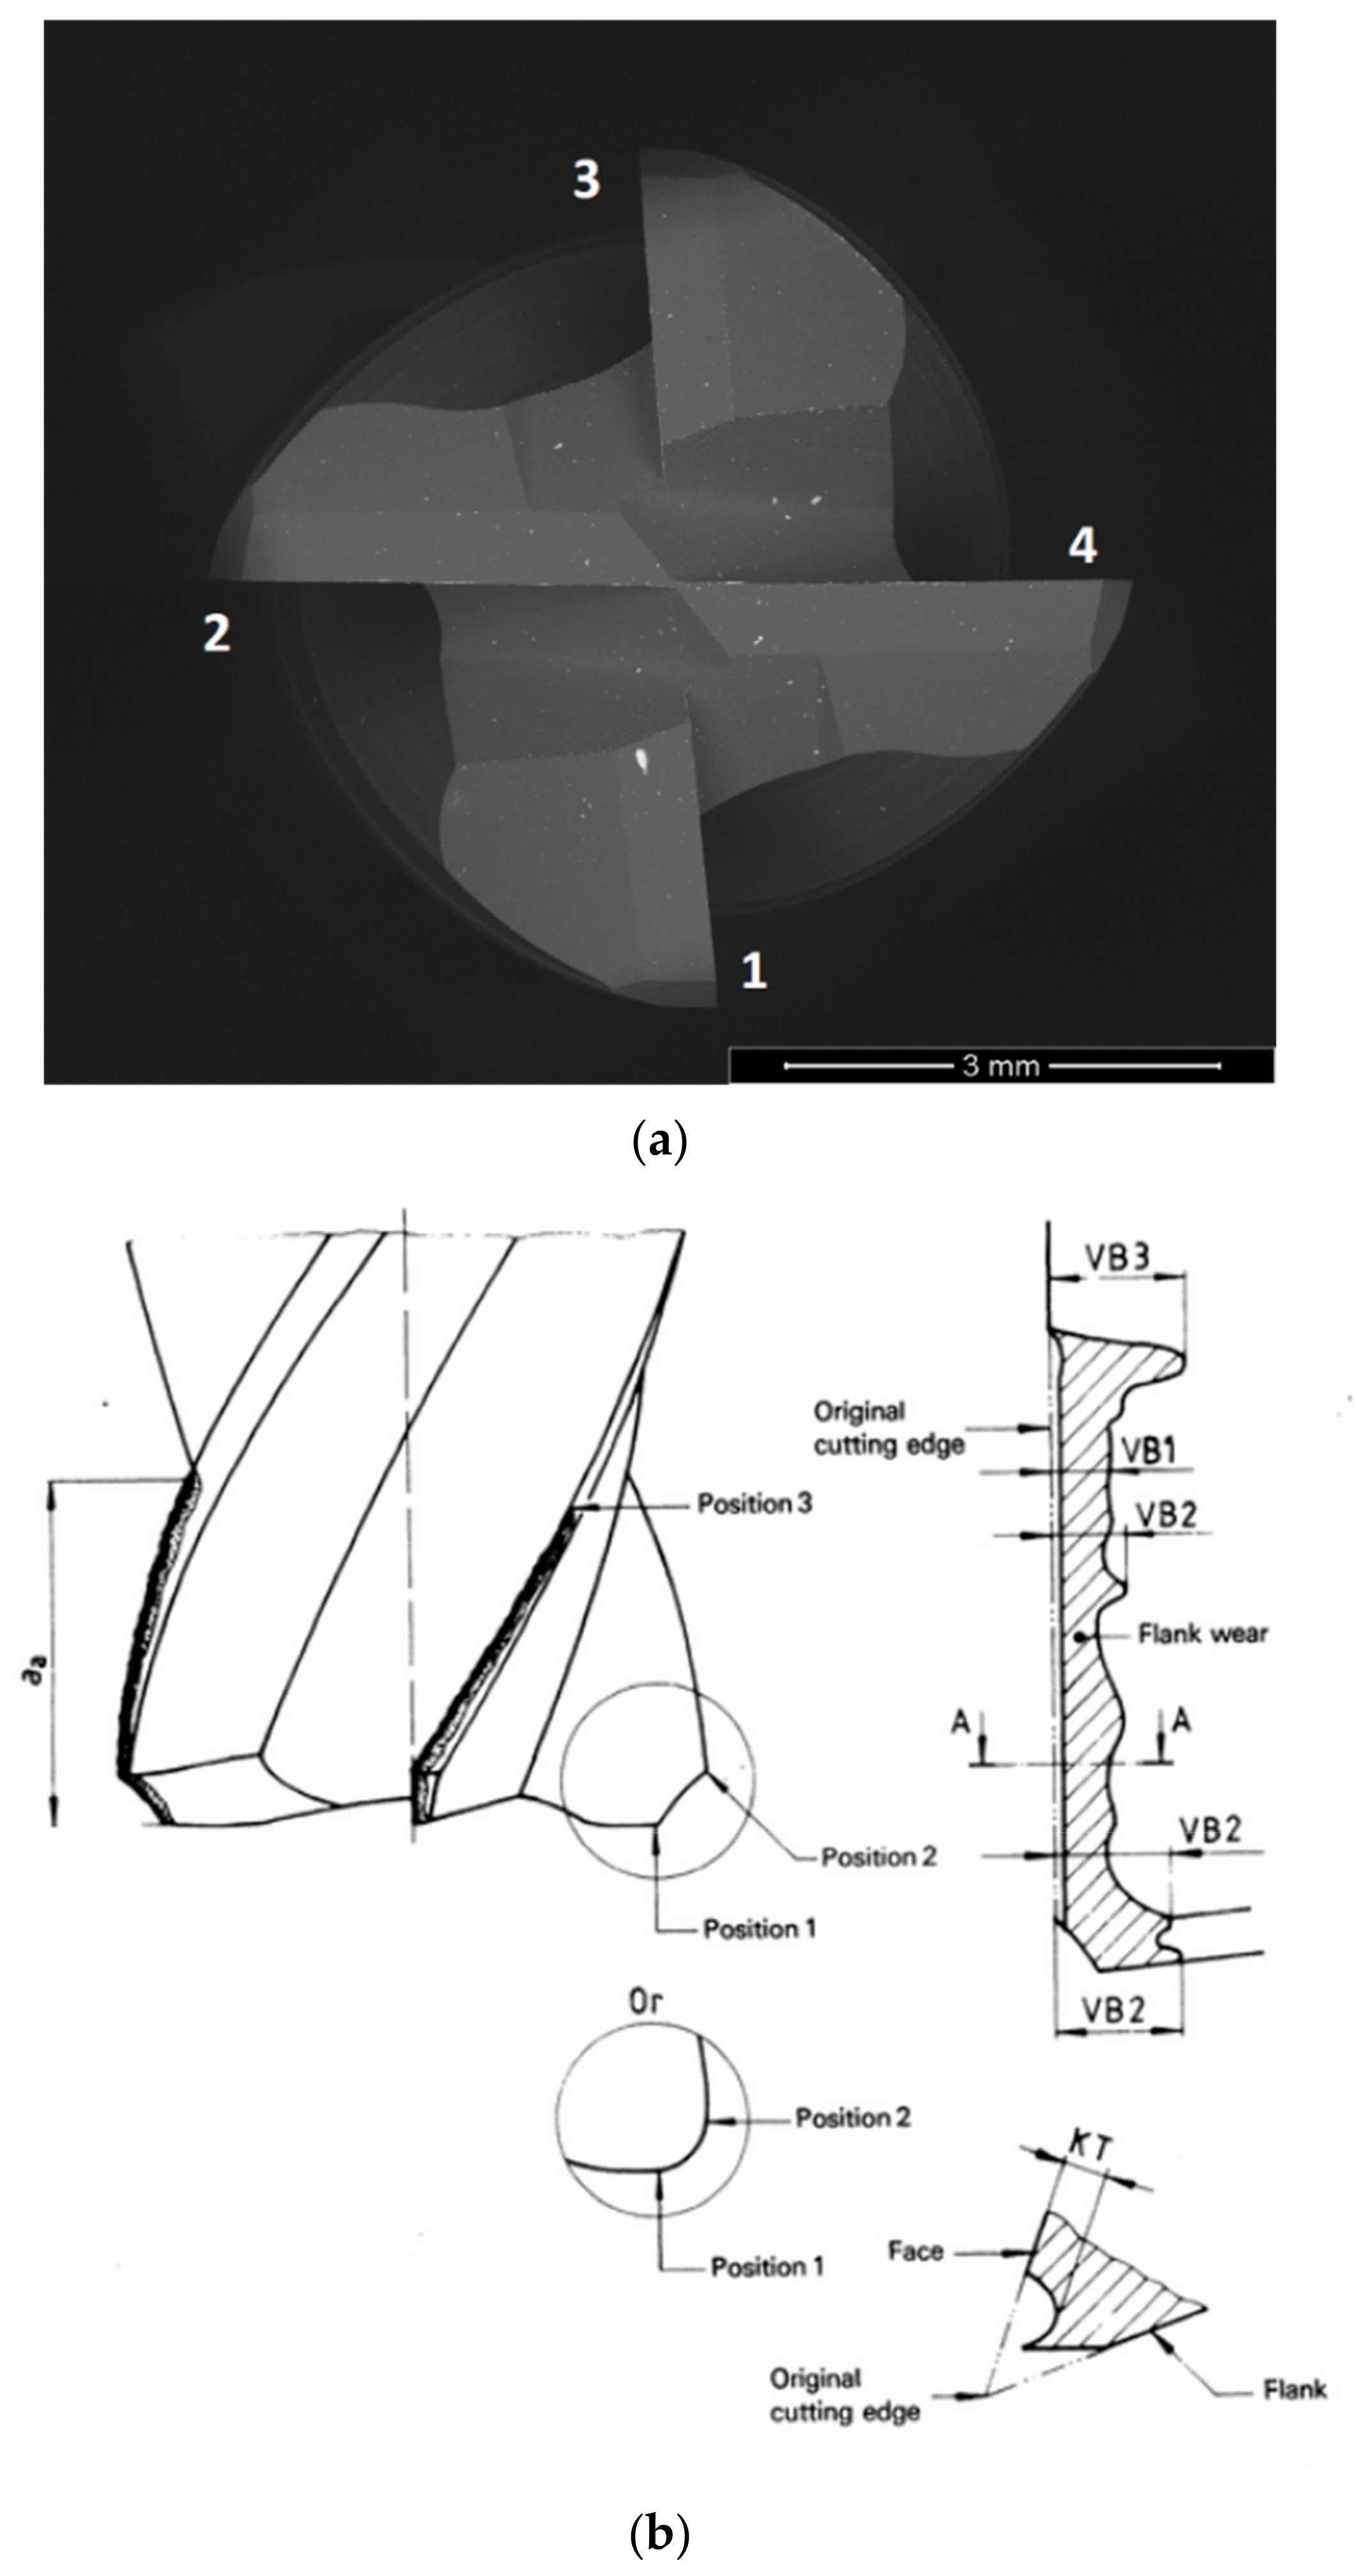
As seen in Figure 1a, the numbers depicted are used to identify the tools’ rake face (RF) and clearance face (CF). As mentioned, the numbers refer to the tools’ teeth. Additionally, as three tools per test condition were used, an identification number ranging from 01 to 03 was added to the end of each image reference. As previously mentioned, the selected machining parameters caused a high amount of localized flank wear (VB3) and, as such, the tool wear was assessed according to the standard [42]. The wear measurements were performed in “Position 1”, depicted in Figure 1b.
After each machining test, every tool was subjected to a preparation procedure to enable its analysis using the SEM equipment; this procedure was performed as described in Section 2.2.1.
3. Results and Discussion
3.1. Coating Characterization
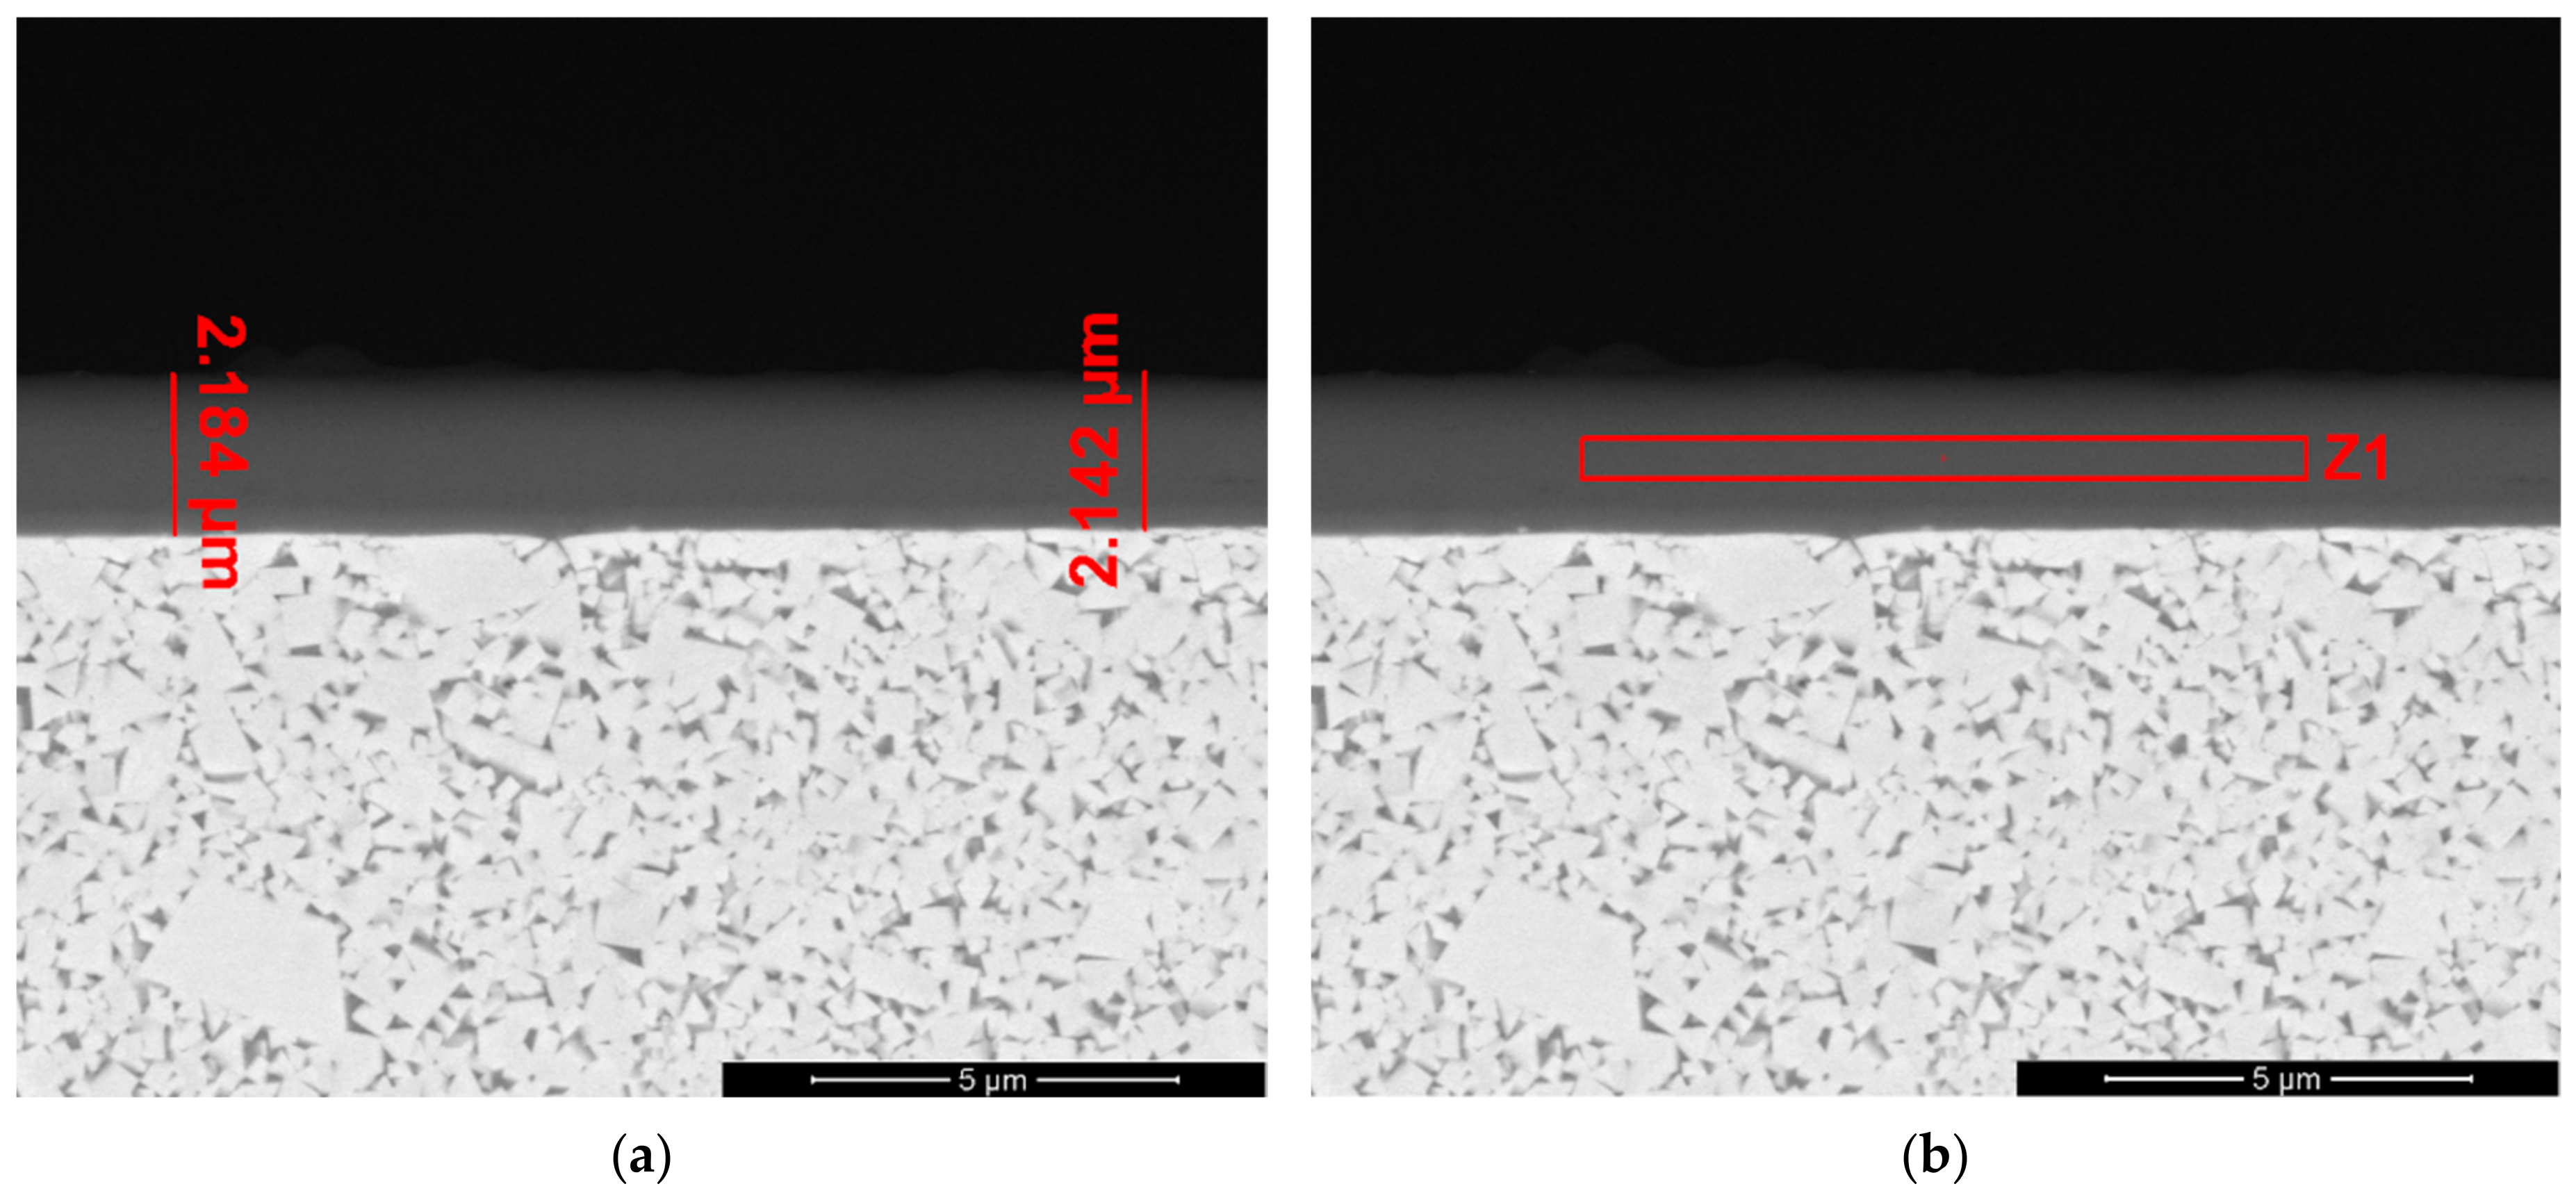
In Figure 2, the coating’s constitution can be observed, as well as the measurements performed to evaluate the total coating thickness.

Figure 2.
(a) Coating SEM analysis: thickness measurements performed on the tool’s cross-section; (b) Z1 corresponds to the EDS evaluation zone to characterize overall coating composition.
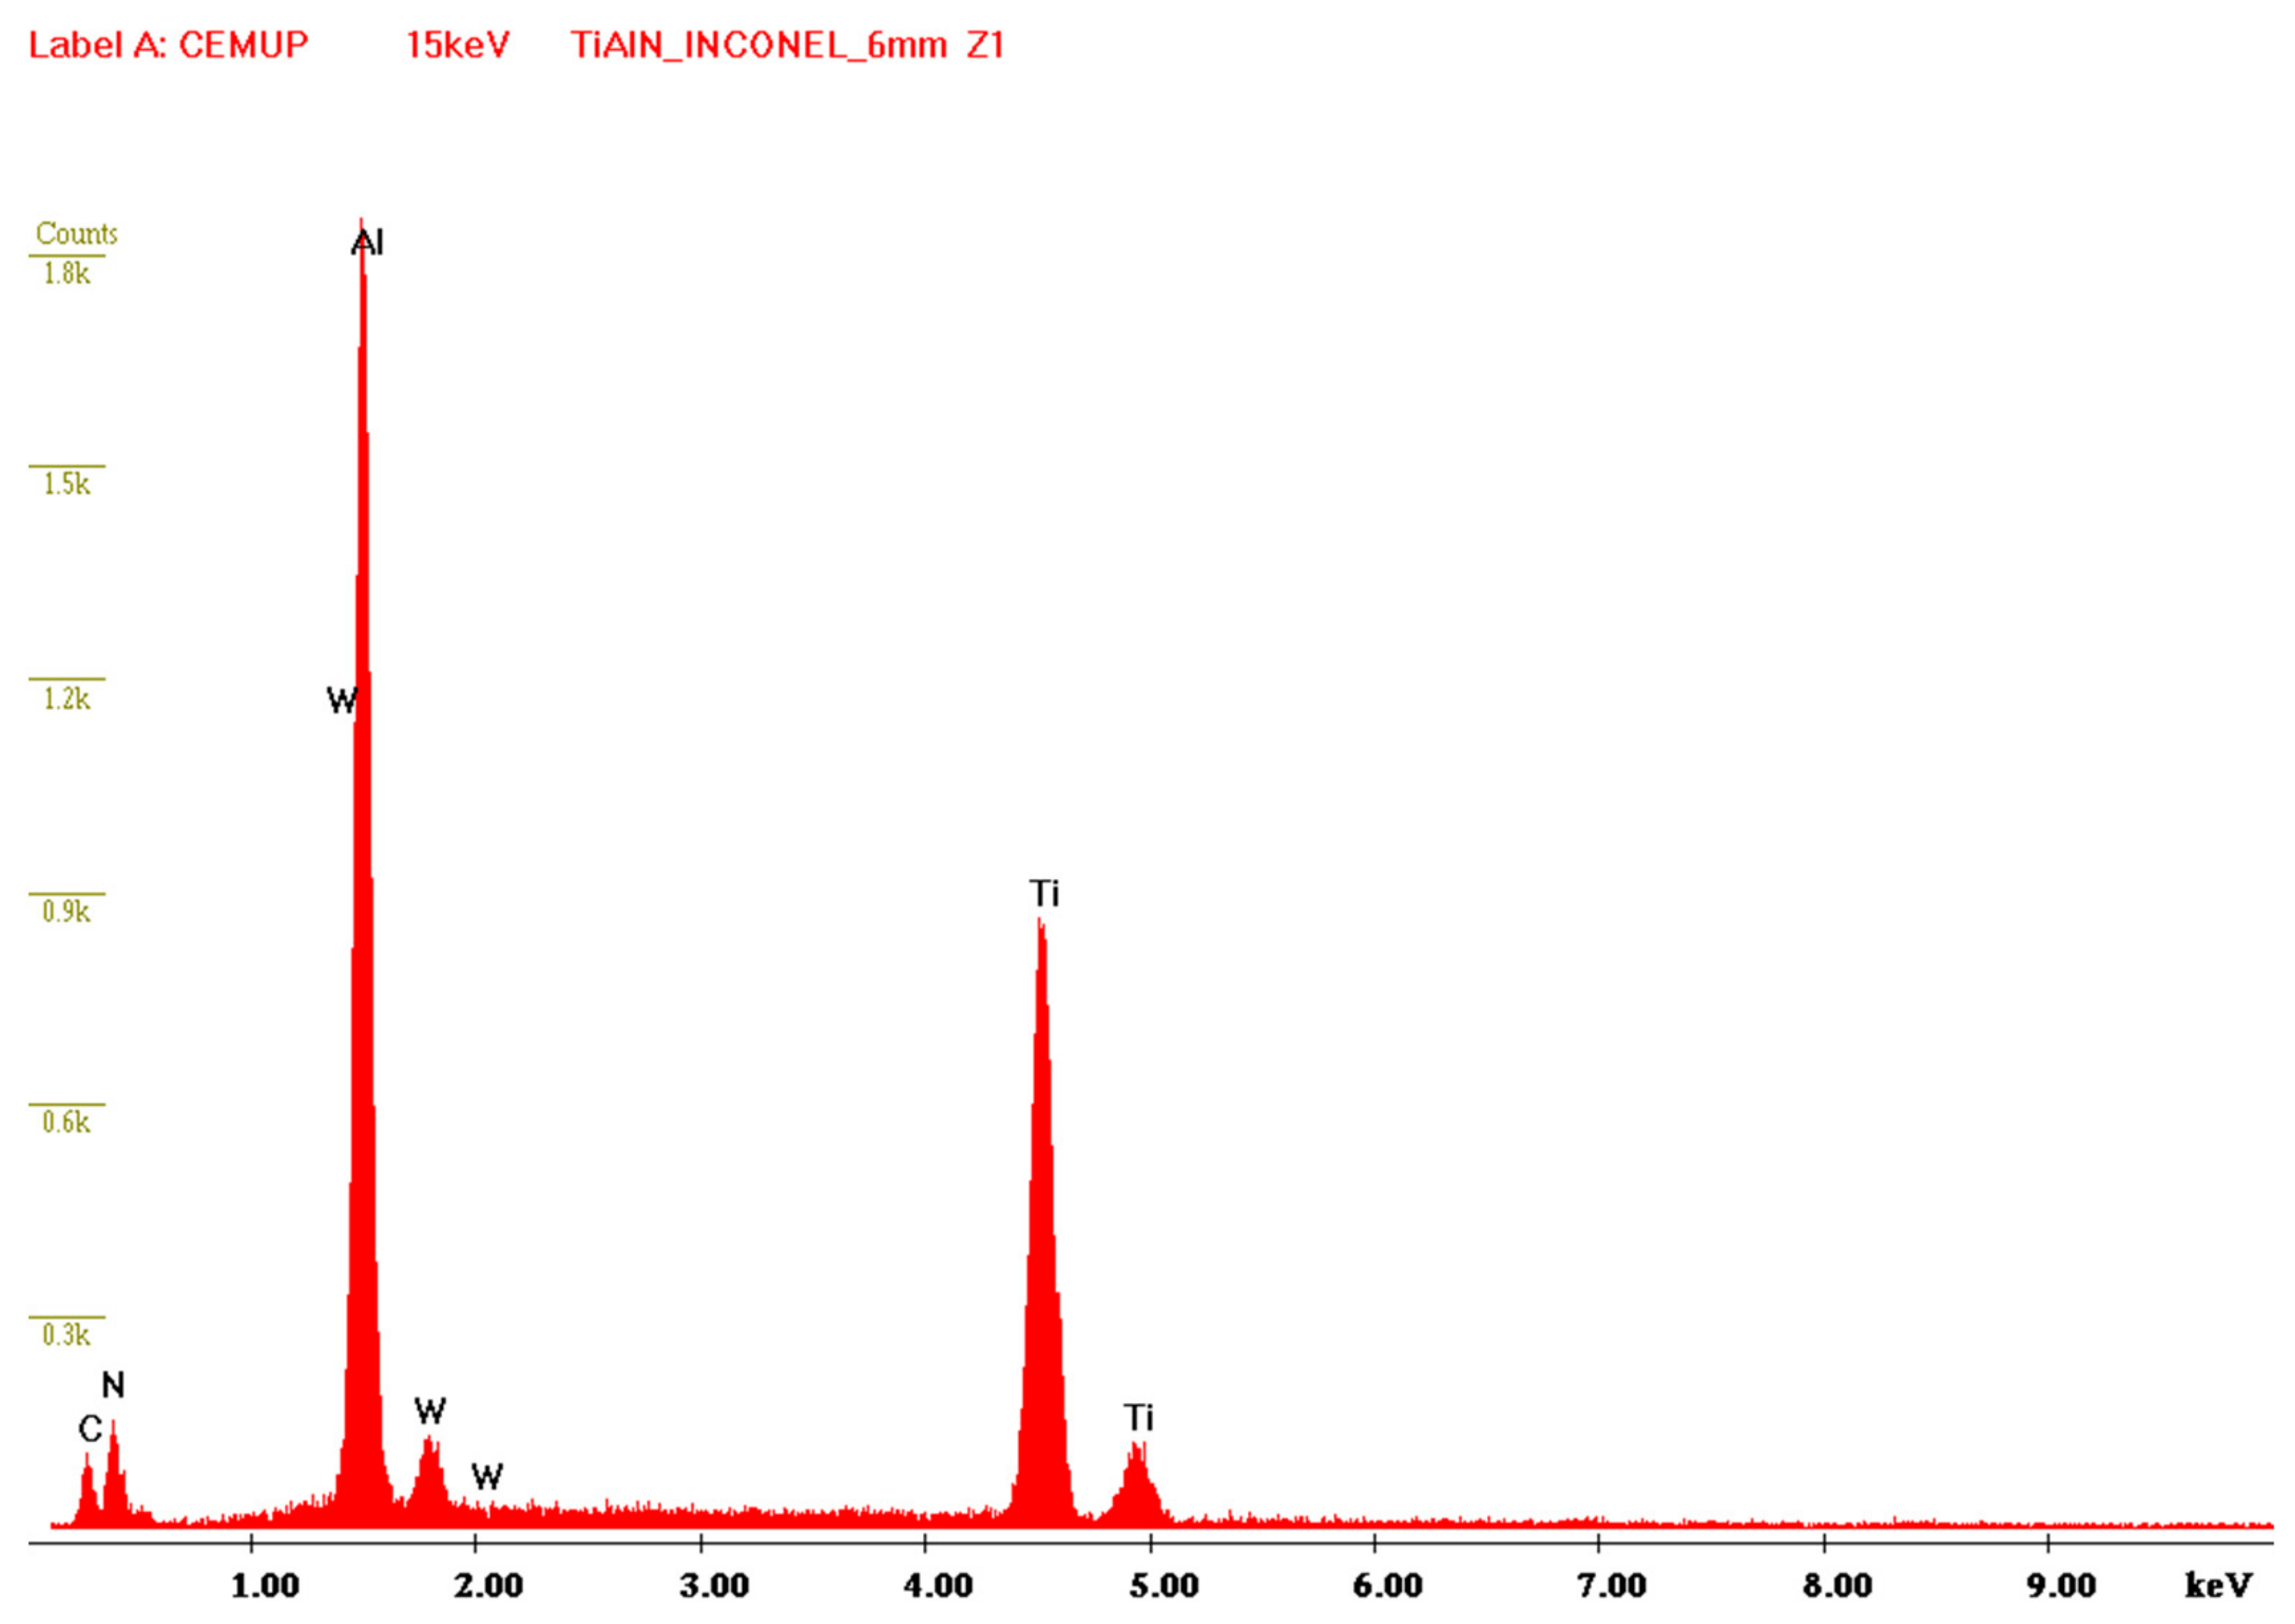
EDS analysis was performed to confirm the coating’s chemical composition in the area indicated in Figure 2b. The spectrum obtained from this analysis can be observed in Figure 3.

Figure 3.
EDS spectrum obtained from the tool coating analysis.
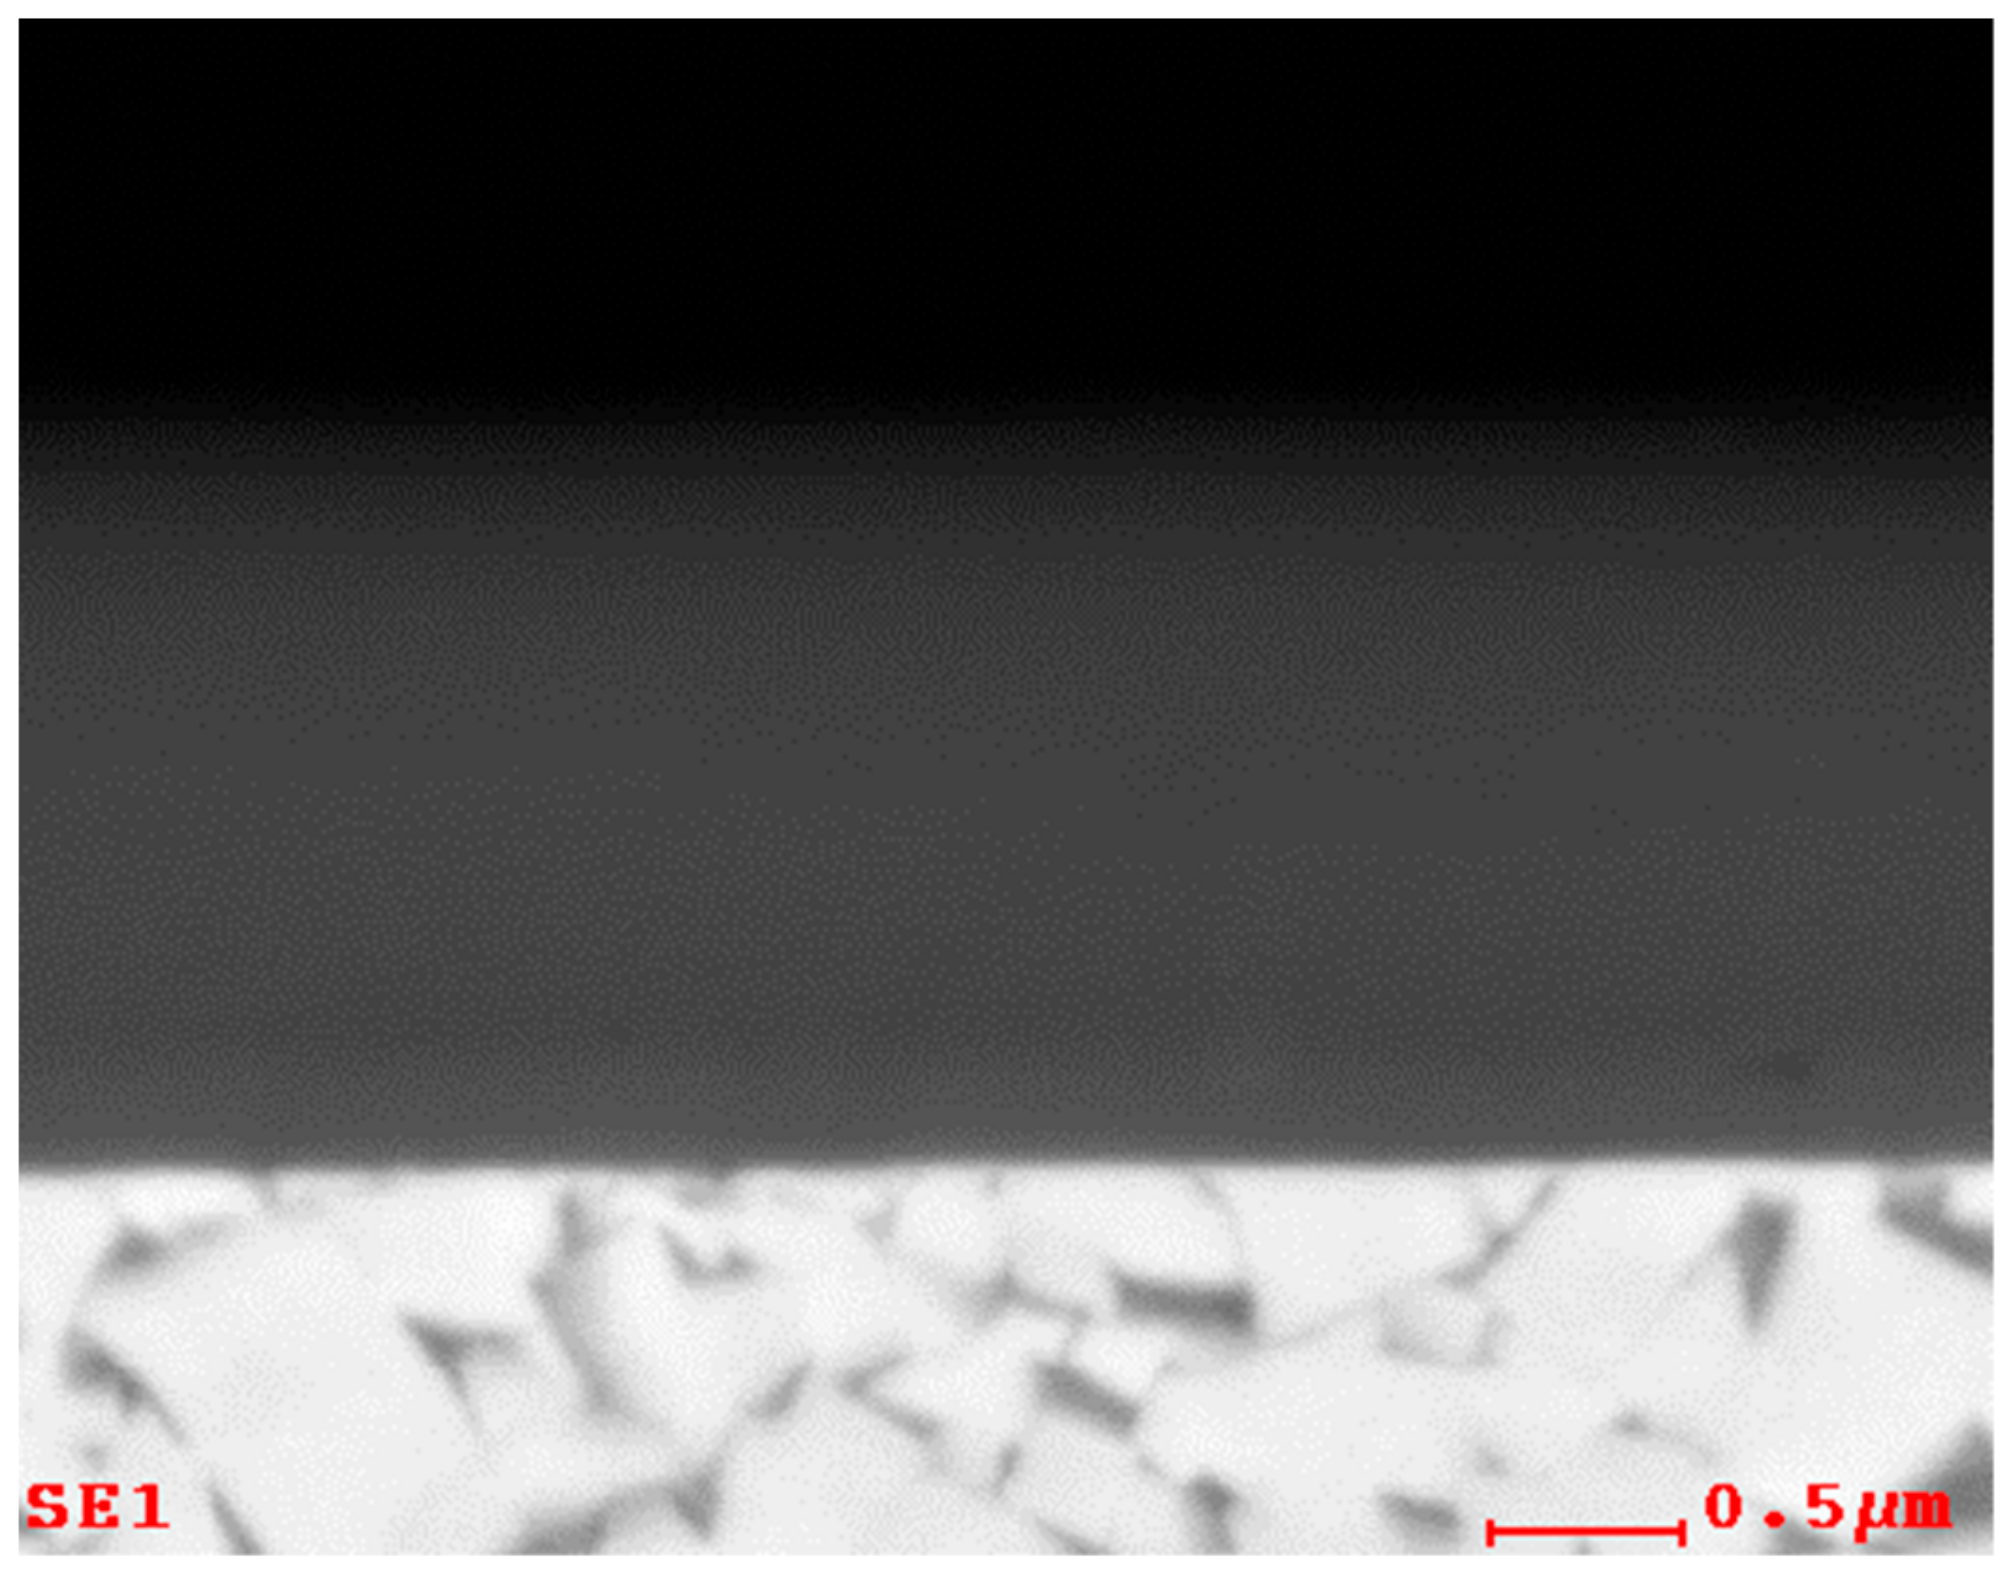
Observing Figure 2, it can be noticed that there was a zone with a lighter tone near the tool’s substrate material. This is the TiN layer deposited close to the substrate, with a view to improving its adhesion and facilitating the deposition of further layers. However, in Figure 2, this layer is not clearly perceptible, and its composition could not be assessed by direct EDS analysis due to the interaction of the surrounding elements with the ones in this thin layer. As such, elemental mapping of the coated samples was performed, determining that this layer was in fact, the TiN layer. The base image used for the element mapping can be observed in Figure 4, while the element mapping that was performed can be observed in Figure 5.

Figure 4.
Base image of the coating’s cross-section used for element mapping.
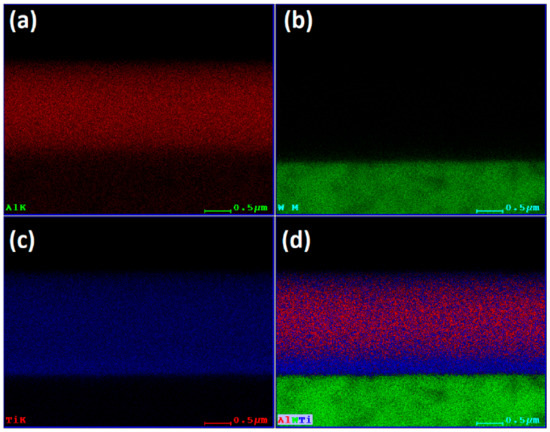
Figure 5.
Element mapping performed on the tool coating: (a) Al distribution, (b) W distribution, (c) Ti distribution, and (d) Al, W, and Ti distribution overlapped.
As observed in Figure 5c, there seems to be a line near the substrate that has a higher content of Ti when compared with the remaining coating. This is also evident in Figure 5d, where the Al seems to be present mainly on the coating’s top layer, while the bottom layer (near the substrate) is mainly composed of Ti. As such, it was determined that this was the layer composed of TiN.
Regarding the coating thickness, measurements were performed in various coated areas of the mounted tool samples, enabling the determination of the average coating thickness. These values are presented in Table 5, showing the average total coating thickness, as well as the average TiAlN and TiN layer thicknesses.

Table 5.
Average thickness values for the complete TiAlN/TiN coating and its layers.
As seen from the figures presented in this subsection, this is a multilayer coating. The TiN sublayer promoted the adhesion of the coating to the substrate, thus improving its wear resistance and behavior when machining the workpiece. The method of employing a sublayer (not exclusively TiN) brings many advantages related to tool wear behavior improvement, as reported by many authors [43,44]. This sublayer, and in multilayered coatings overall, confers the coatings improved crack resistance and adhesion strength. This increases the coatings’ wear behaviors, causing overall less sustained wear [10,17]. Not only are these sublayers related to an improvement regarding the tools’ wear behavior, as they confer the tools improved oxidation resistance, which might prove useful when machining certain alloys, such as Inconel 718, as its cutting generates high punctual cutting temperature [37,38], but also they result in a high temperature concentrated in a very small zone in the tool–chip interface. The sustained tool wear and wear mechanisms will be assessed in detail in Section 3.3 of the present paper.
3.2. Machined Surface Roughness Analysis
The average Ra values obtained for the performed tests can be observed in Table 6.

Table 6.
Average mean surface roughness values (Ra) for the performed machining tests.
As shown in Table 6, the machined surface roughness values were considerably higher for tests conducted at higher values of cutting length. This was expected, as Inconel 718 induces high levels of tool wear over a relatively low cutting length. As such, this tool wear negatively impacted the surface roughness values obtained. Regarding the performed measurements, it was noticed that, in the workpiece’s periphery, the values were slightly higher than those at its center. This can be attributed, once again, to an increase in tool wear throughout the test, which was lower at the start of the machining path and, consequently, higher at its periphery (end of the toolpath). This variation was observed to be more significant for tools that exhibited higher tool wear (consequently, this variation induced higher standard deviation values).
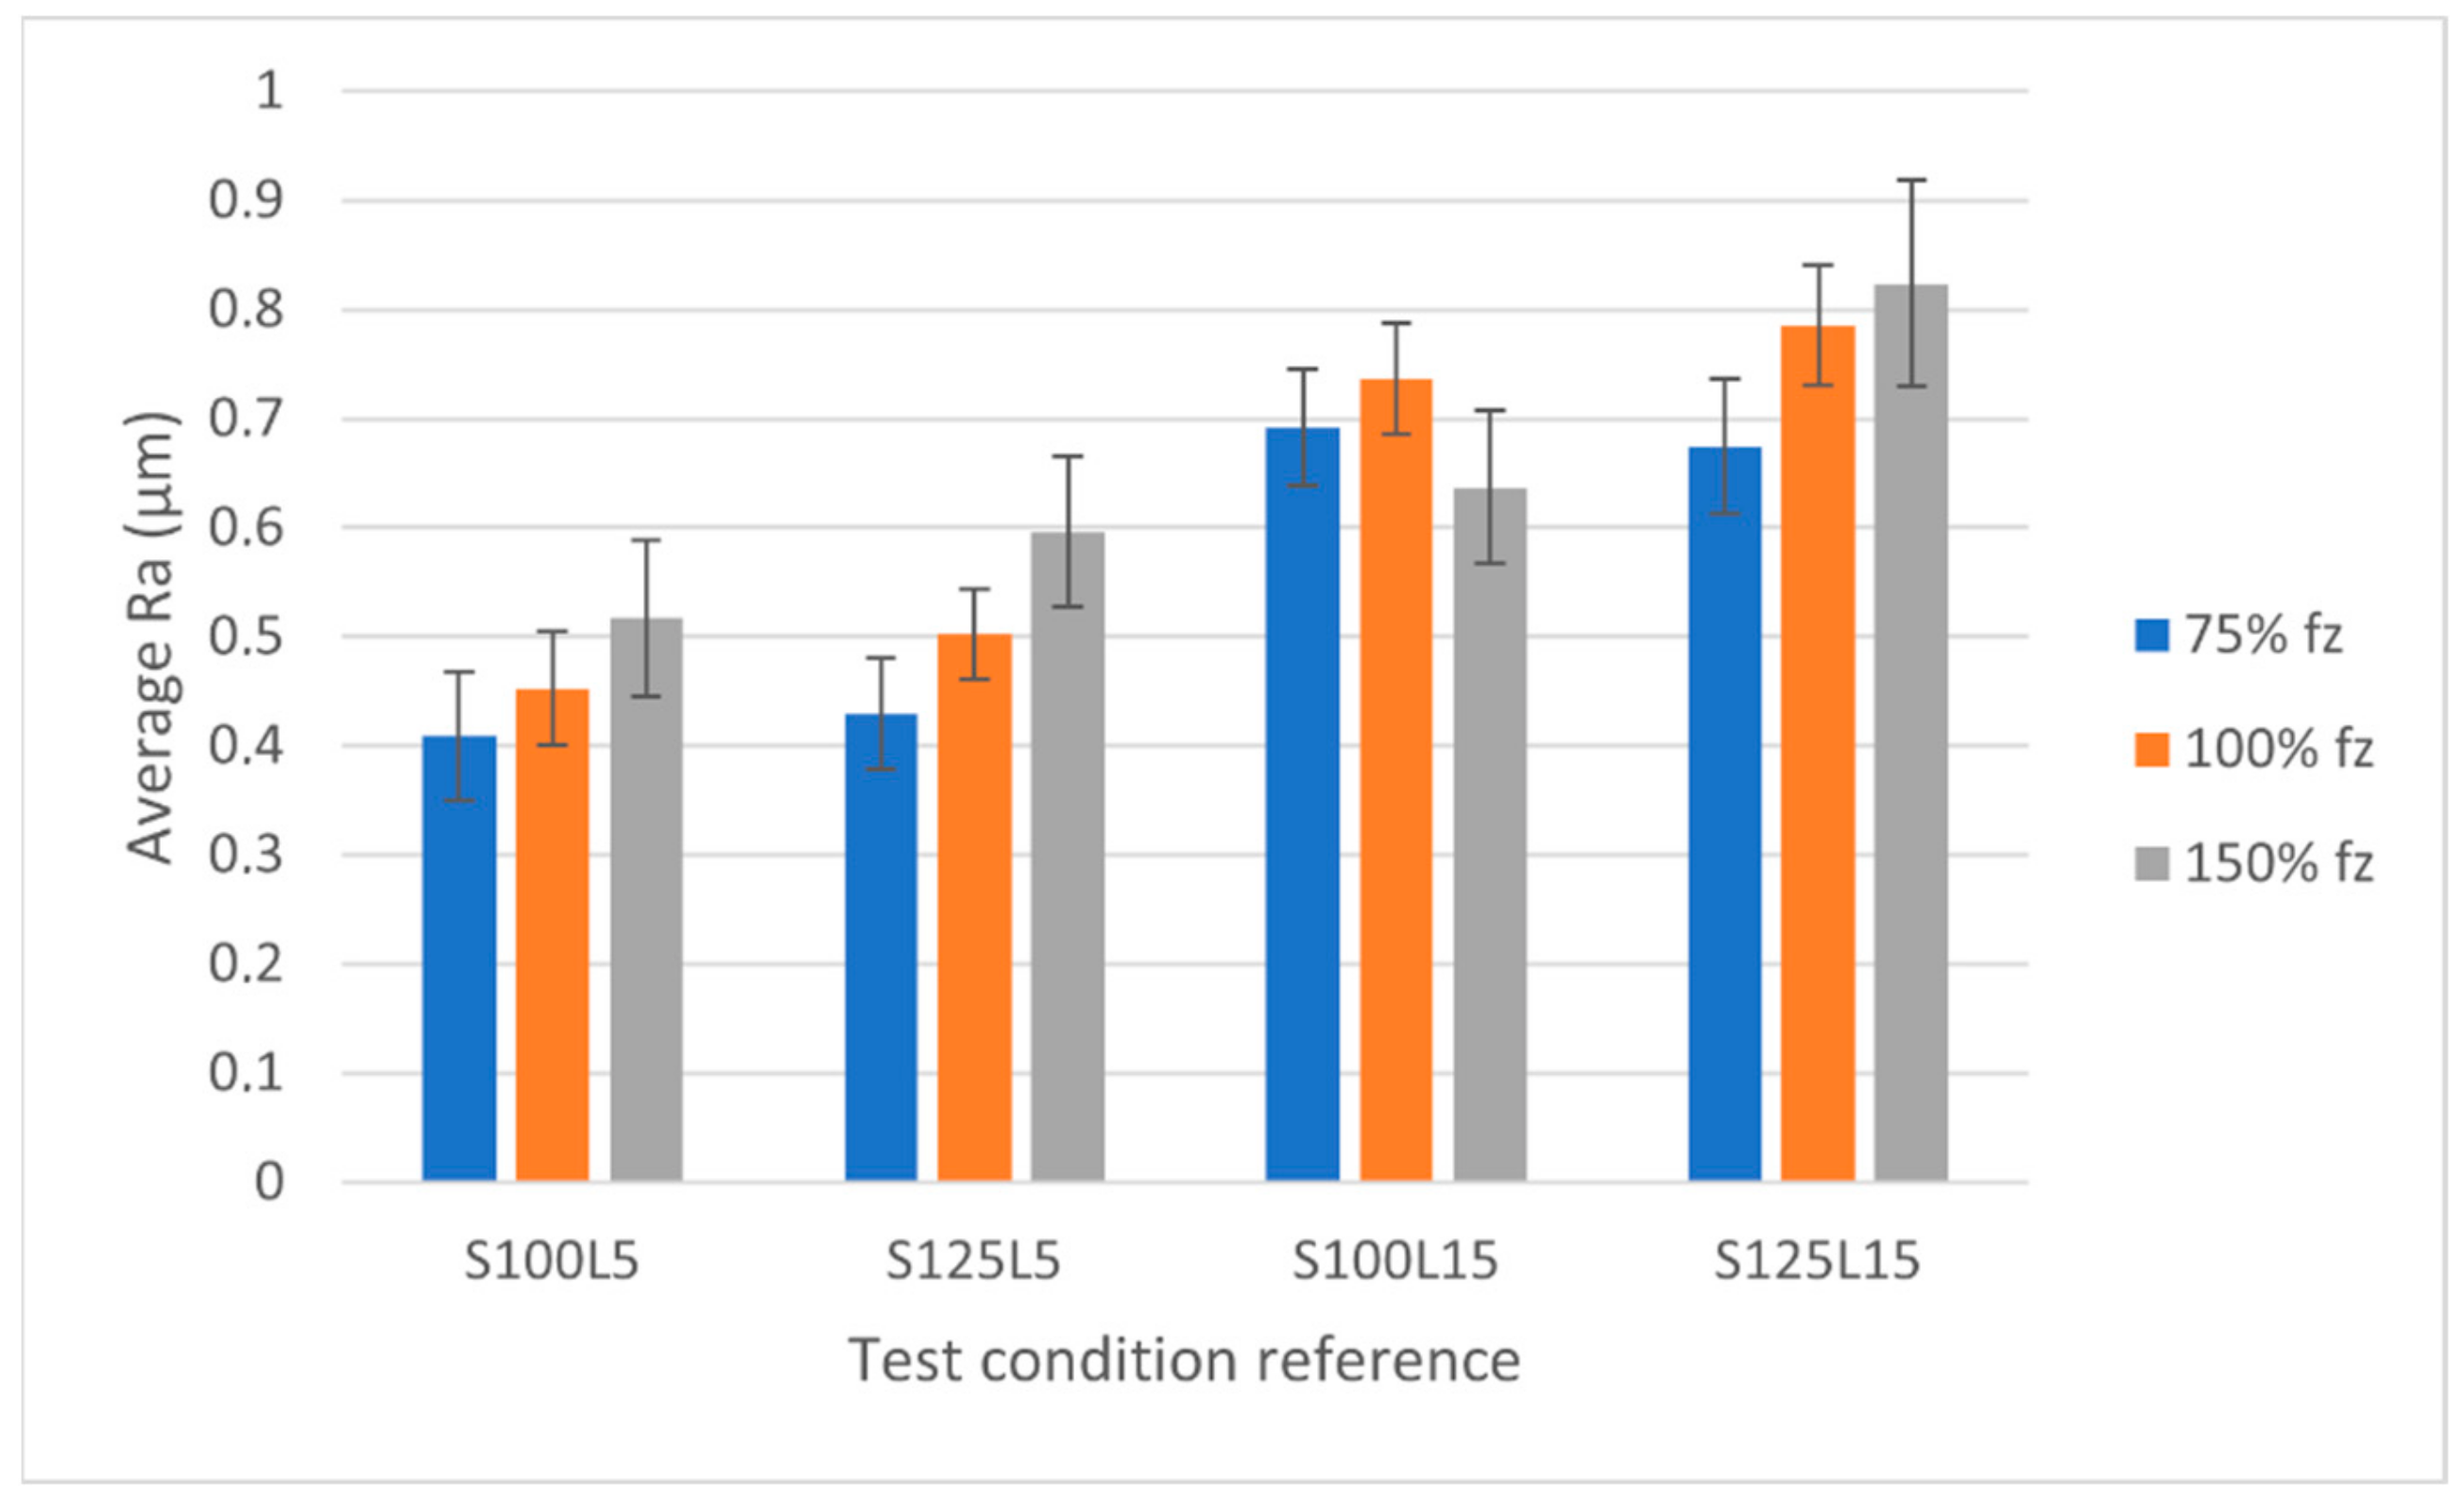
Apart from tool wear, it was noticed that machining parameters clearly influenced the machined surface’s quality, especially the feed per tooth (fz) parameter [45]. In Figure 6, the obtained results regarding the machined surface roughness for the various test parameters can be observed.
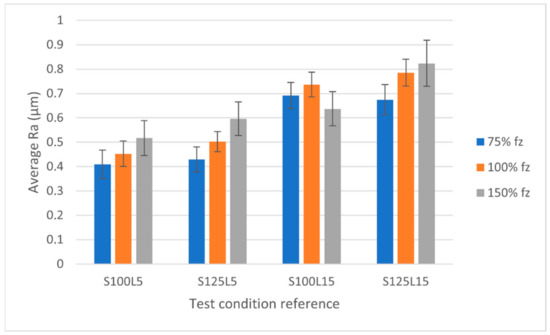
Figure 6.
Comparison of surface roughness values for all test conditions (divided into three series based on the selected fz parameter).
As shown in Figure 6, there was a common tendency for machined surface roughness variation with the feed-per-tooth value. Usually, at lower values of this parameter, the machined surface quality is better than that obtained at higher values of feed per tooth [45,46]. This tendency was observed for both 100 m/min and 125 m/min in the tests conducted at a 5 m cutting length. However, concerning the tests conducted at a 15 m cutting length (L15), the tendency was slightly different for the case of the machined surface quality produced by tools machining at a 100 m/min cutting speed. Indeed, there was an increase in surface roughness from 75% to 100% feed per tooth in the tests conducted at a 100 m/min cutting speed. This value, however, decreased slightly from 100% to 150% feed per tooth.
In the tests conducted at a 125 m/min cutting speed and 15 m cutting length, the tendency was the same as that registered for the tests with a 5 m cutting length. This means that the machined surface quality deteriorated as the feed-per-tooth value increased. However, the machined surface roughness values obtained at a 125 m/min cutting speed tended to be slightly higher than those obtained at a 100 m/min cutting speed. This is not commonly observed, as cutting speed tends to produce a slightly better machined surface quality (although the feed per tooth is a more influential parameter in the machined surface quality) [47]. This is probably related to the fact that the tools’ wear, in this case, was higher than that registered at a 100 m/min cutting speed (this will be explained in more detail in Section 3.3).
The fz parameter had a clear influence on the produced machined surface’s roughness. Higher feed-per-tooth values produced higher Ra values, except in the case of S100L15 tools tested at 150% fz, which produced a better surface quality than that registered at 75% fz, which was the indicated value to obtain lower values of machined surface roughness. Regarding the cutting speed, as previously mentioned, a decrease in the surface roughness value commonly occurs when the cutting speed value increases. However, this was not the case for what was observed. This was probably due to the amount of tool-wear sustained by the tools at this cutting speed [48].
It is also worth noting that the values for the 75% fz produced at 100 m/min and 125 m/min were quite similar, only having a noticeable difference at 150% fz. Regarding the standard deviation registered for all surface roughness measurements, it seems that the value was higher for tests conducted at 150% fz, especially at 125 m/min. This was probably due to higher sustained tool wear, which resulted in a greater difference in the registered Ra from the center of the workpiece to its periphery (where the tool wear would be higher) [49,50].
3.3. Tool Wear Analysis
In the present section, the results regarding the tool wear analysis will be presented. This section is divided into two subsections, one focusing on the wear measurements performed according to the descriptions in Section 2, as well as the characterization of the wear sustained on the tools’ rake and clearance faces. In the other subsection, the analysis of the wear mechanisms identified in the analyzed tools will be presented. The obtained results will be discussed and related to the machined surface quality achieved with the tested tools in an attempt to relate the tools’ wear to these results. Furthermore, the influence of the machining parameters on the tools’ wear will be discussed.
3.3.1. Wear Measurements and Characterization
As previously mentioned, the results obtained from the performed wear measurements will be described here, starting with the flank wear measurements conducted during SEM analysis on the tools’ top surfaces (localized flank wear, VB3, according to [40]). These results can be observed in Table 7.

Table 7.
Average flank wear (VB) values measured on the tools’ top surfaces during SEM analysis.
According to the values displayed in Table 7, the values of VB3 (maximum localized flank wear) were higher for a longer cutting length. This was to be expected; however, the increase was quite significant, meaning that after only a short distance, the tools suffered a lot of flank wear. This was due to the properties of Inconel 718 causing high abrasive damage that led to tool chipping [51]. Additionally, the values that were obtained for tests conducted at 100 m/min were slightly lower than those obtained at a 125 m/min cutting speed. This indicates that an increase in cutting speed also caused an increase in the VB values.
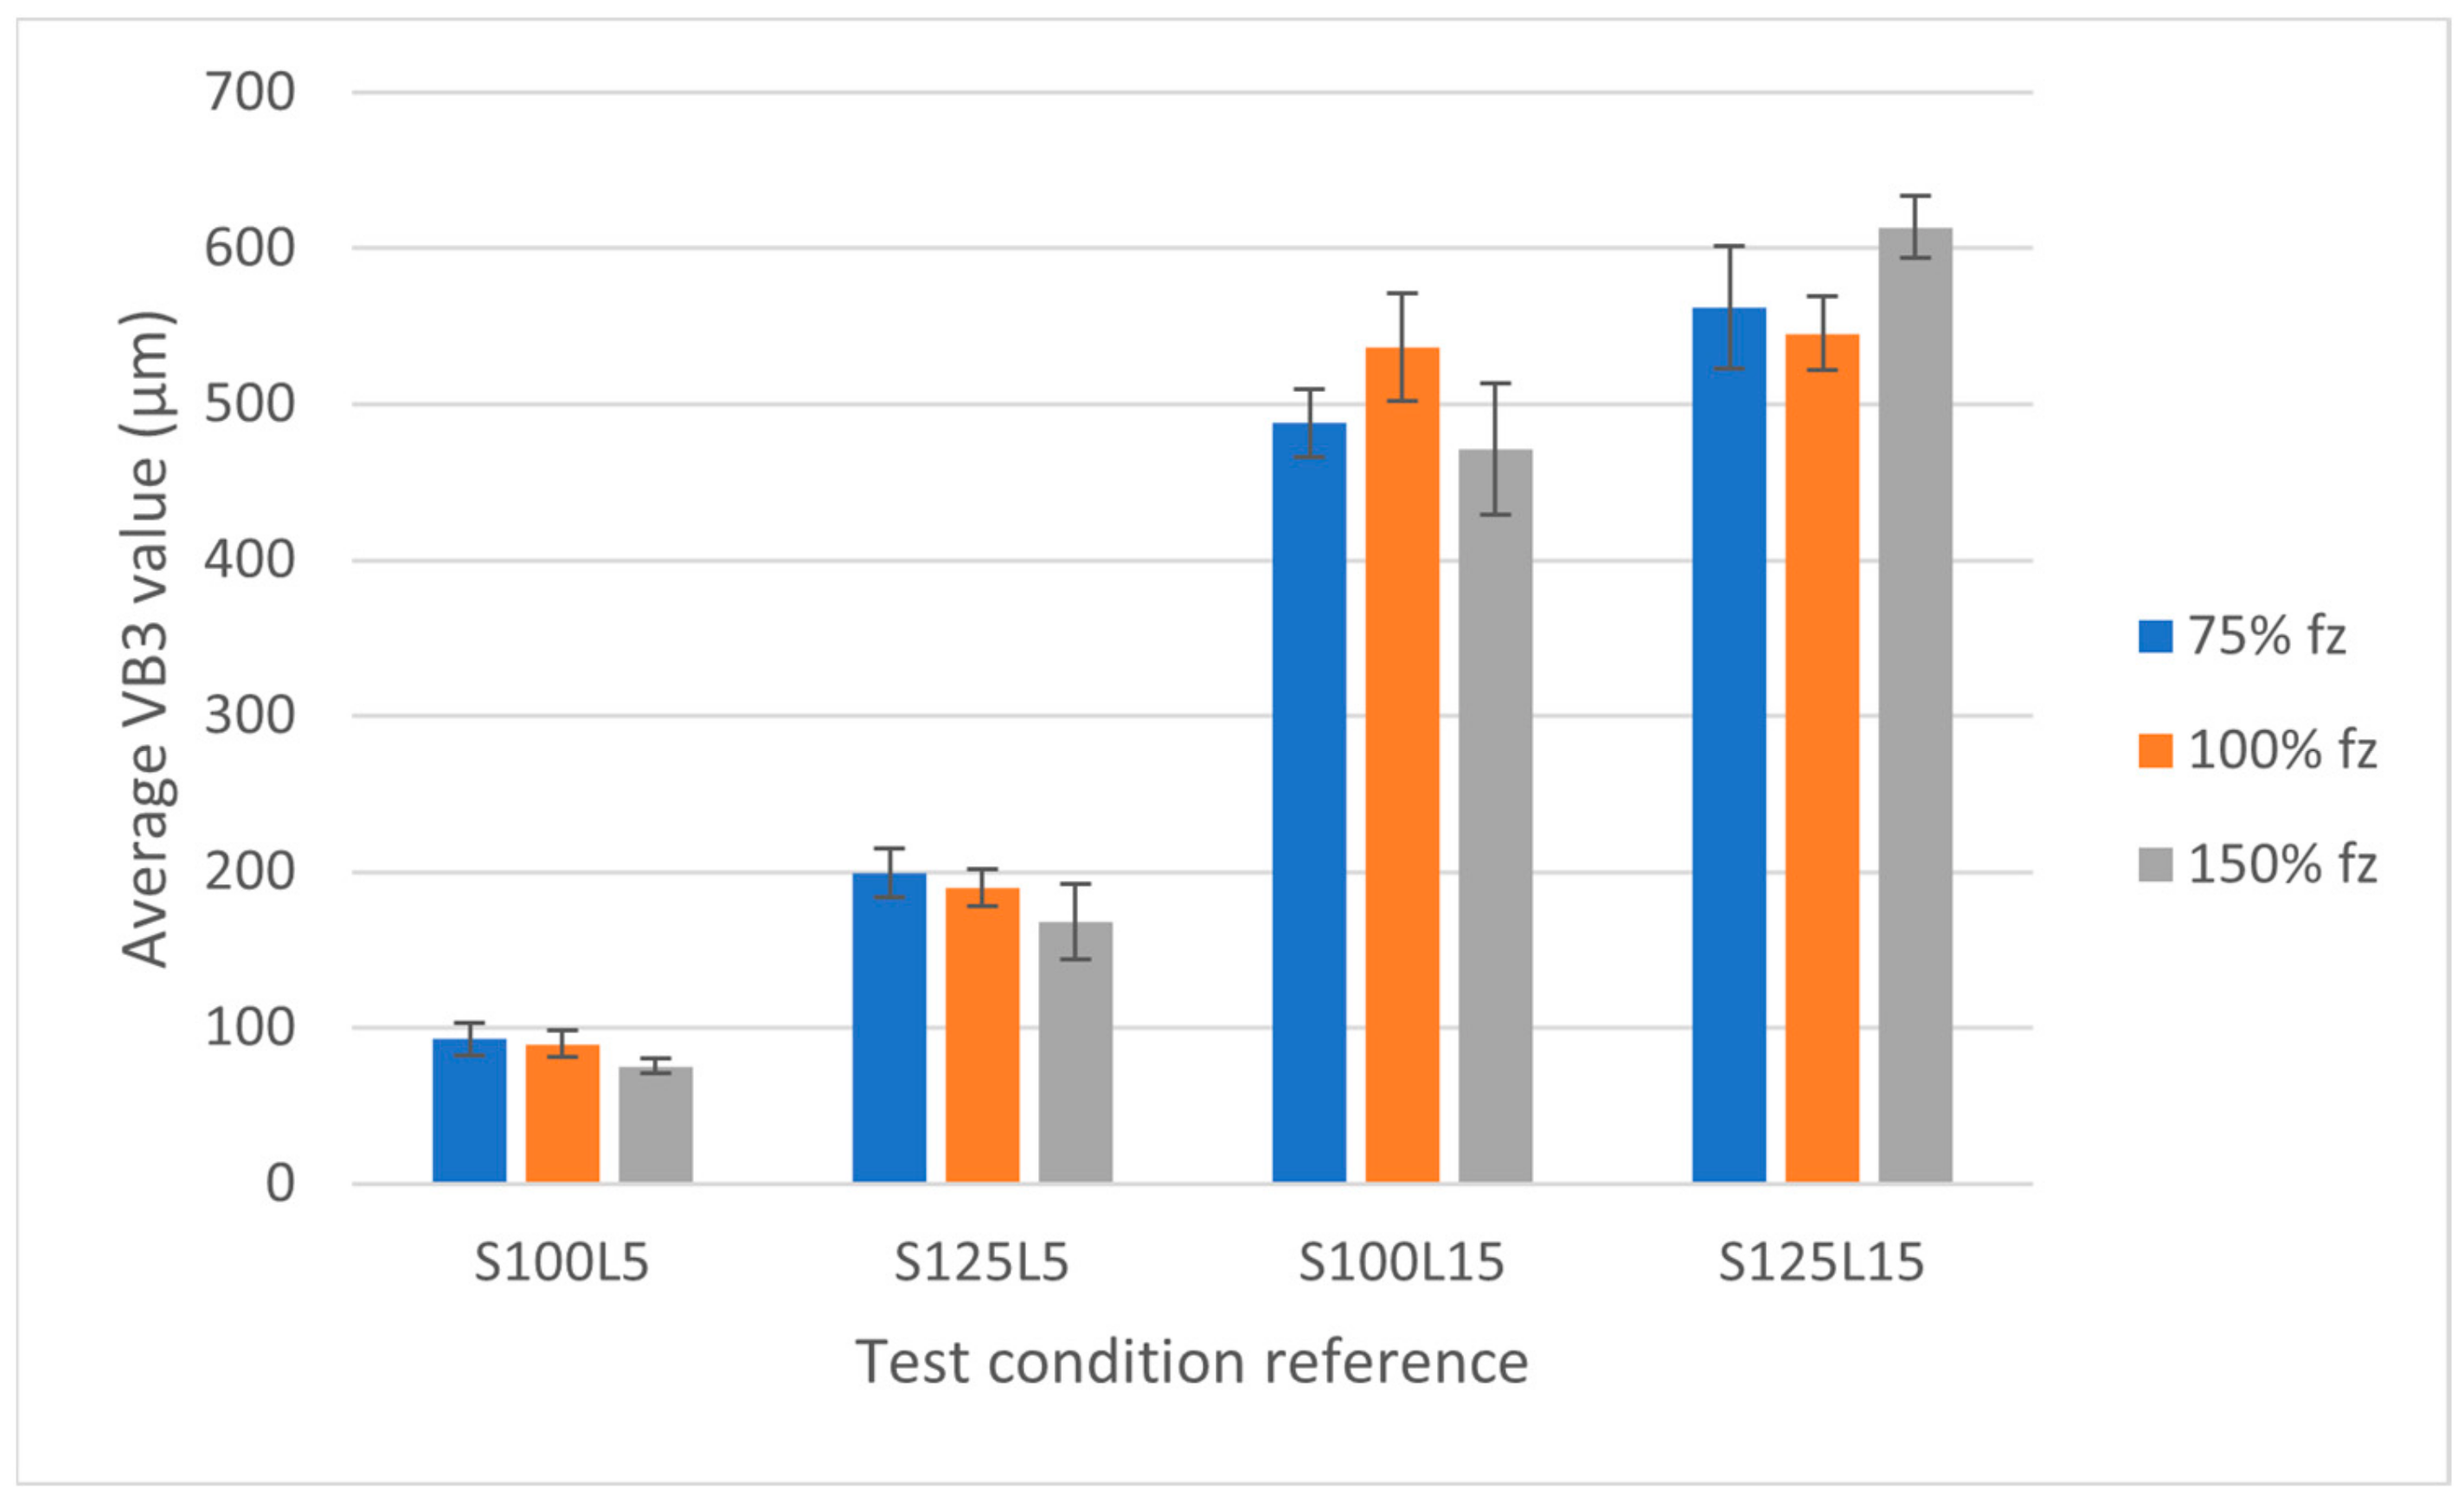
As with the previous section, graphs displaying the values presented in Table 7 are provided for ease of comparison. As seen in Figure 7, there was a significant increase in the VB value from the tests conducted at a 5 m cutting length to those conducted at a 15 m cutting length, with the value of the latter being almost five times higher than that of the former [8]. Regarding the tests conducted at a 5 m cutting length, a common trend was identified: the VB values seemed to be higher for cutting tests carried out at 75% feed per tooth, and this value decreased with an increase in the feed per tooth parameter. This trend was identified for tests conducted at both 100 m/min and 125 m/min cutting speeds. As for the tests conducted at a 15 m cutting length, no clear trend could be identified. However, the flank wear seemed to be more intense for the tests conducted at higher feed-per-tooth values.

Figure 7.
Comparison of flank wear (VB) values for all the test conditions (divided into three series regarding the selected fz parameter).
From Figure 7, it can be observed that the cutting length (as mentioned above) and cutting speed exerted clear influences. As previously mentioned, the feed per tooth parameter exerted an influence in the tests conducted at a 5 m cutting length. Regarding the influence of cutting speed on the registered flank wear values, it seems that an increase in cutting speed resulted in a more severe level of flank wear. When comparing the tests conducted at 5 m and 15 m cutting lengths, the tests carried out at 125 m/min produced higher values of flank wear. Regarding the tests conducted at a 15 m cutting length, there seemed to be no clear influence of cutting speed on the sustained flank wear. In the case of the tools tested at a 125 m/min cutting speed, the highest amount of wear was identified for the 150% fz condition, whereas in the case of the tests conducted at 100 m/min, it seems that the worst case of flank occurred under the 100% fz condition. Although an increase in cutting speed usually promotes a smoother cutting behavior for the cutting tools, it can be observed that, in this case, it produced a more accentuated flank wear.
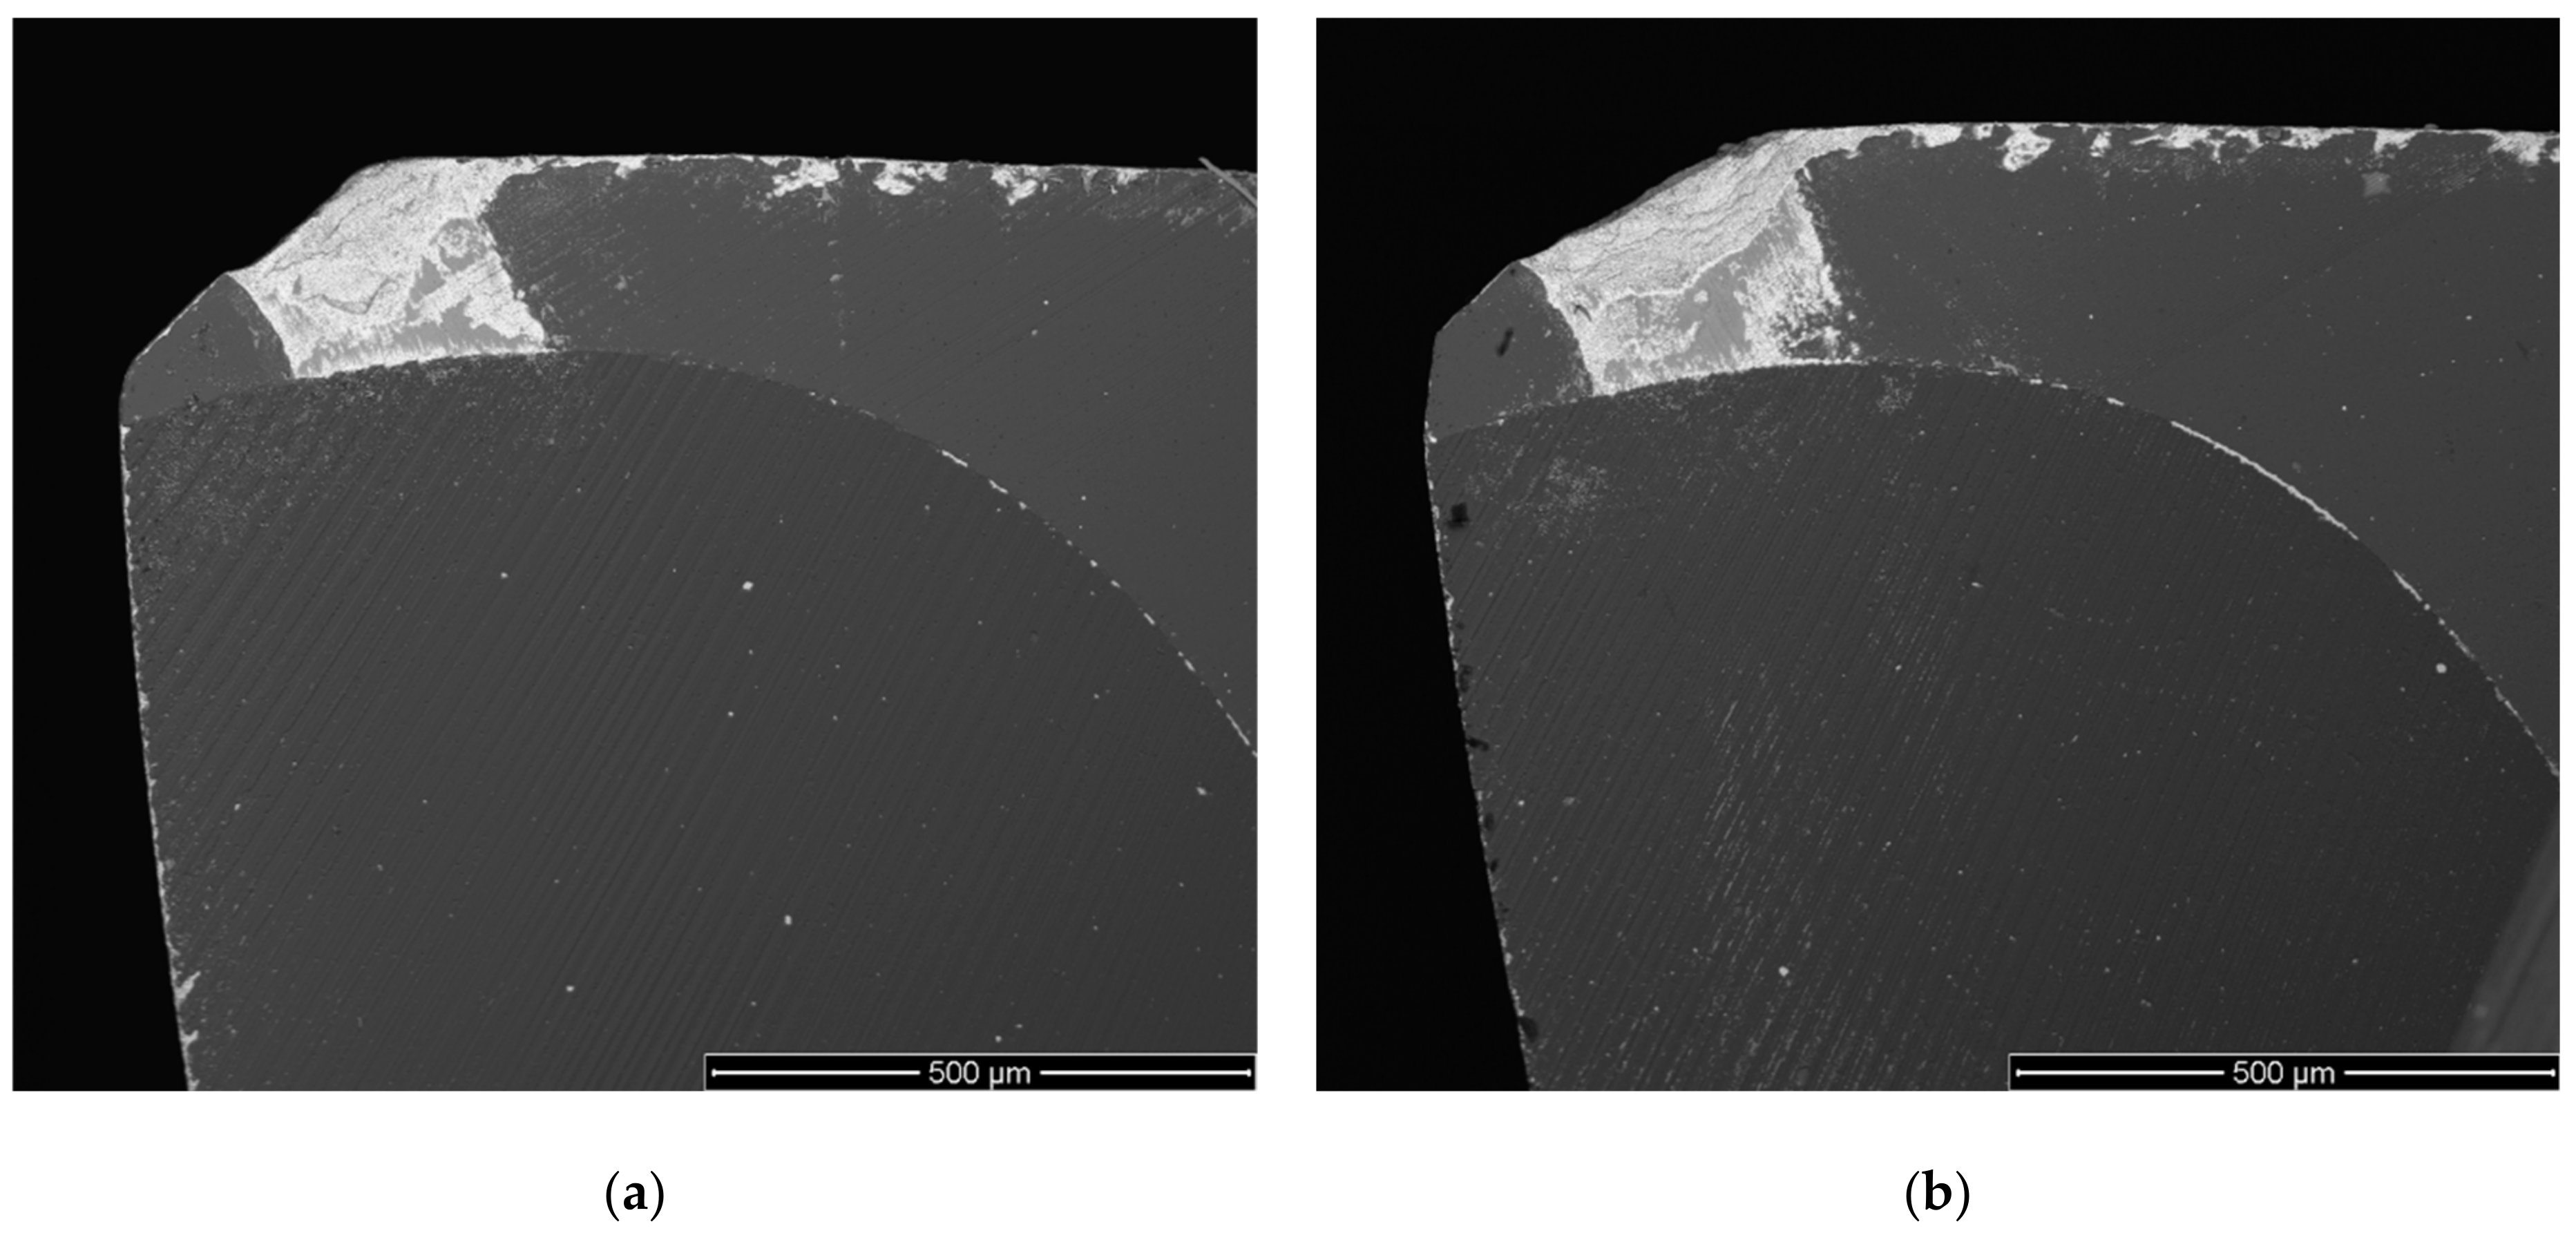
Regarding the type of flank wear identified for tools tested at 100 m/min and 125 m/min, although the maximum localized flank wear was less intense in the case of tests conducted at 100 m/min, the wear mark was considerably wider. In this case, the sustained wear had a more prominent area than that in the tests conducted at 125 m/min. For these tested tools, the wear appeared to be more localized. An example can be observed in Figure 8 and Figure 9, where a top view and a rake face view can be observed for tools tested at 100 m/min and 125 m/min.
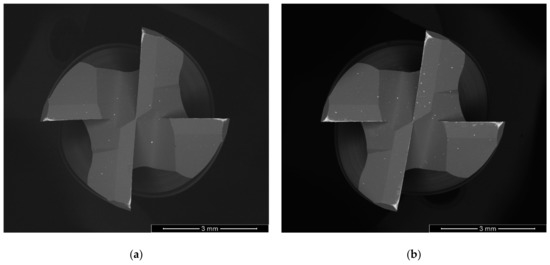
Figure 8.
Top view of tools tested at S100F100L5 (a) and S125F100L5 (b).
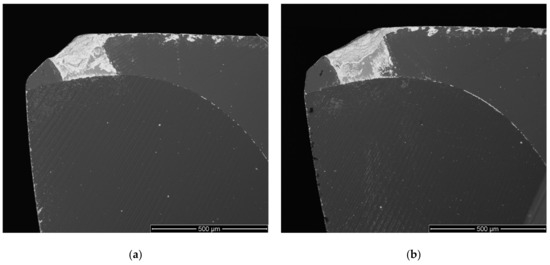
Figure 9.
Rake face view (RF1) of the tools tested at S100F100L5 (a) and S125F100L5 (b).
In Figure 8, two images obtained through SEM analysis of two tools’ top surfaces are displayed. In Figure 8a, a tool that was tested at 100 m/min with a 5 m cutting length and 0.07 mm/tooth (100% fz) is displayed. In Figure 8b, a tool that was tested at 125 m/min is shown (with the remaining machining parameters staying the same as those for the tool depicted in Figure 8a). In the case of Figure 8b, the wear is slightly more accentuated when compared with Figure 8a.
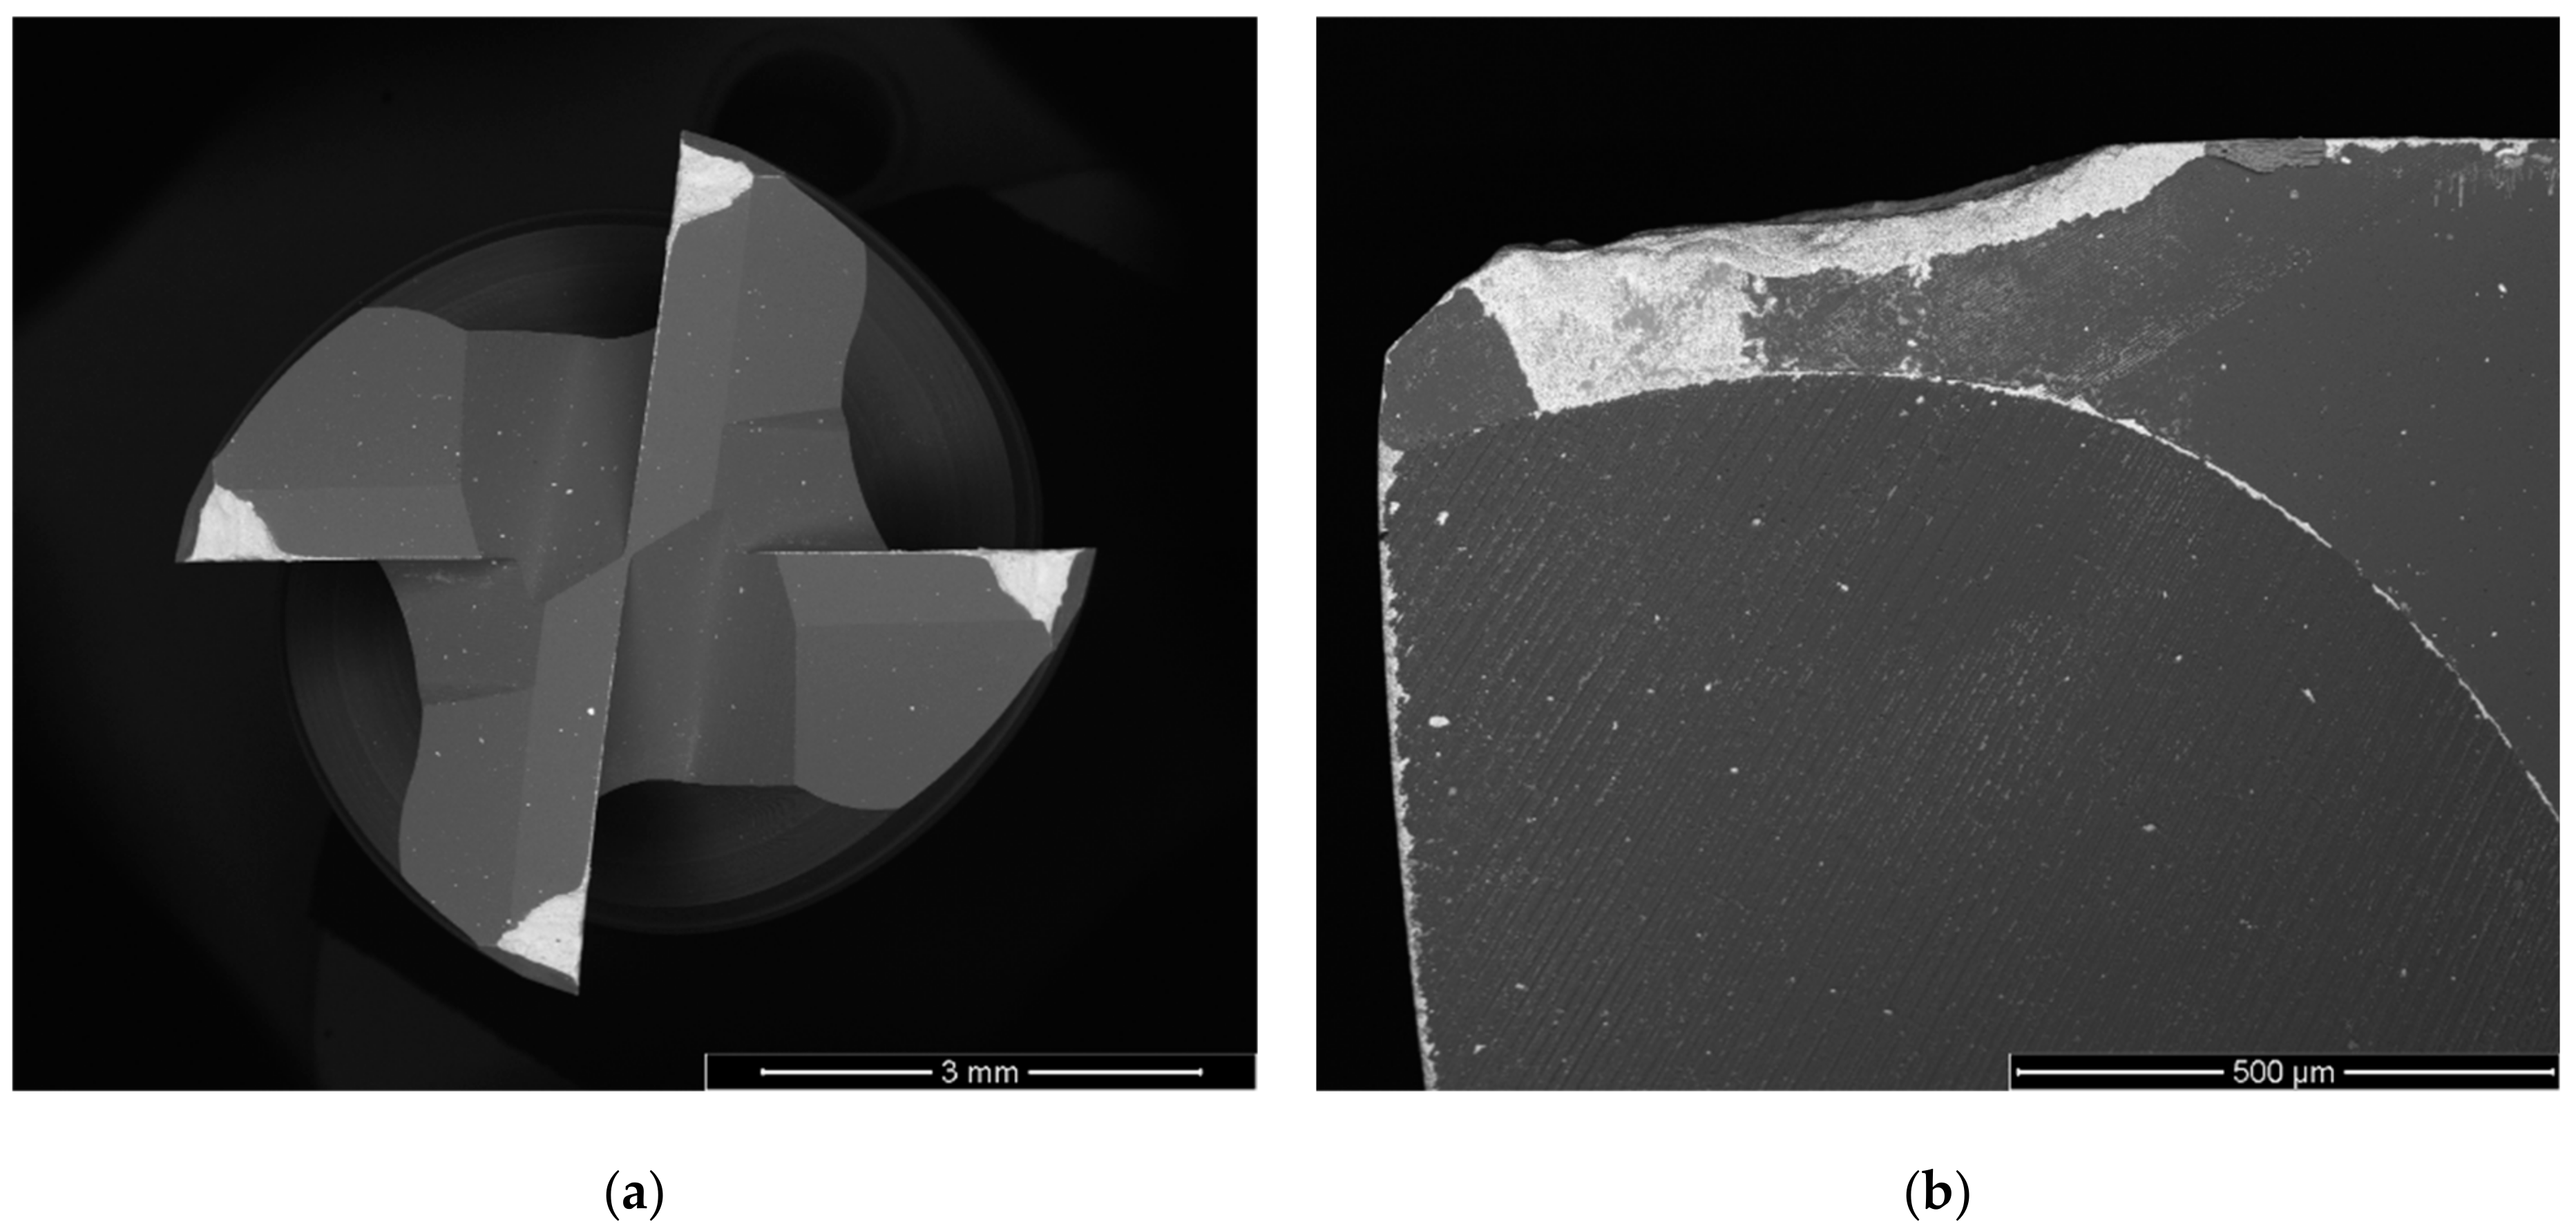
Figure 9 displays two rake faces of tools tested under the same conditions as those shown in Figure 8. Although the wear is quite similar, it seems that the rake face wear sustained by the tools tested at 125 m/min was more intense. Of course, these are the tools tested at a 5 m cutting length. As previously mentioned, the impact of the cutting length seemed to increase the wear significantly. This is shown in Figure 10 (15 m cutting length), where the tools’ top views (Figure 10a) and rake faces (Figure 10b) are shown.
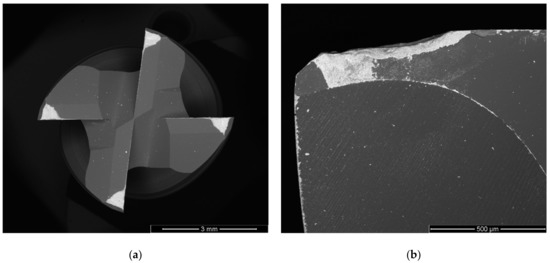
Figure 10.
Top view of tools tested at S100F100L15 (a); rake face view (RF1) of tools tested at S100F100L15 (b).
Figure 10 clearly shows the impact of cutting length on tool wear. Longer cutting lengths contributed to higher levels of tool wear, which was mainly because the tools would machine more material and be subject to adverse cutting conditions for longer periods of time (when compared with shorter cutting lengths). It was observed that the wear mark was wider for tools tested at lower feed rates and cutting speed values, and deeper for tools tested at higher feed rates and cutting speeds. This was because the tool was subjected to higher attrition wear at lower cutting speeds and feed-per-tooth values, causing more severe wear and altering the tools’ geometry. This, in turn, promoted a different chip formation mechanism that seemed to accentuate the tool wear even more.
Regarding the influence of tool wear on the machined surface’s quality, it seems that the tools with more severe wear produced lower machined surface quality. However, this was particularly observed for the tools tested at 125 m/min and tested at a 15 m cutting length, although the value of fz usually influenced the machined surface quality, with a higher value resulting in worse machined surface quality and better results in terms of tool wear (measured flank wear). However, this tendency was only observed for tools tested at a 5 m cutting length, with the fz parameter not greatly influencing the measured tool wear.
3.3.2. Tool Wear Mechanism Analysis
In this subsection, the identified wear mechanisms will be presented, evaluated, and discussed. They were common for all tested tools, with the ones tested at a 15 m cutting length having more severe levels of these mechanisms and overall wear (as expected) [8]. However, these wear mechanisms, as mentioned, were the same for all tested conditions.
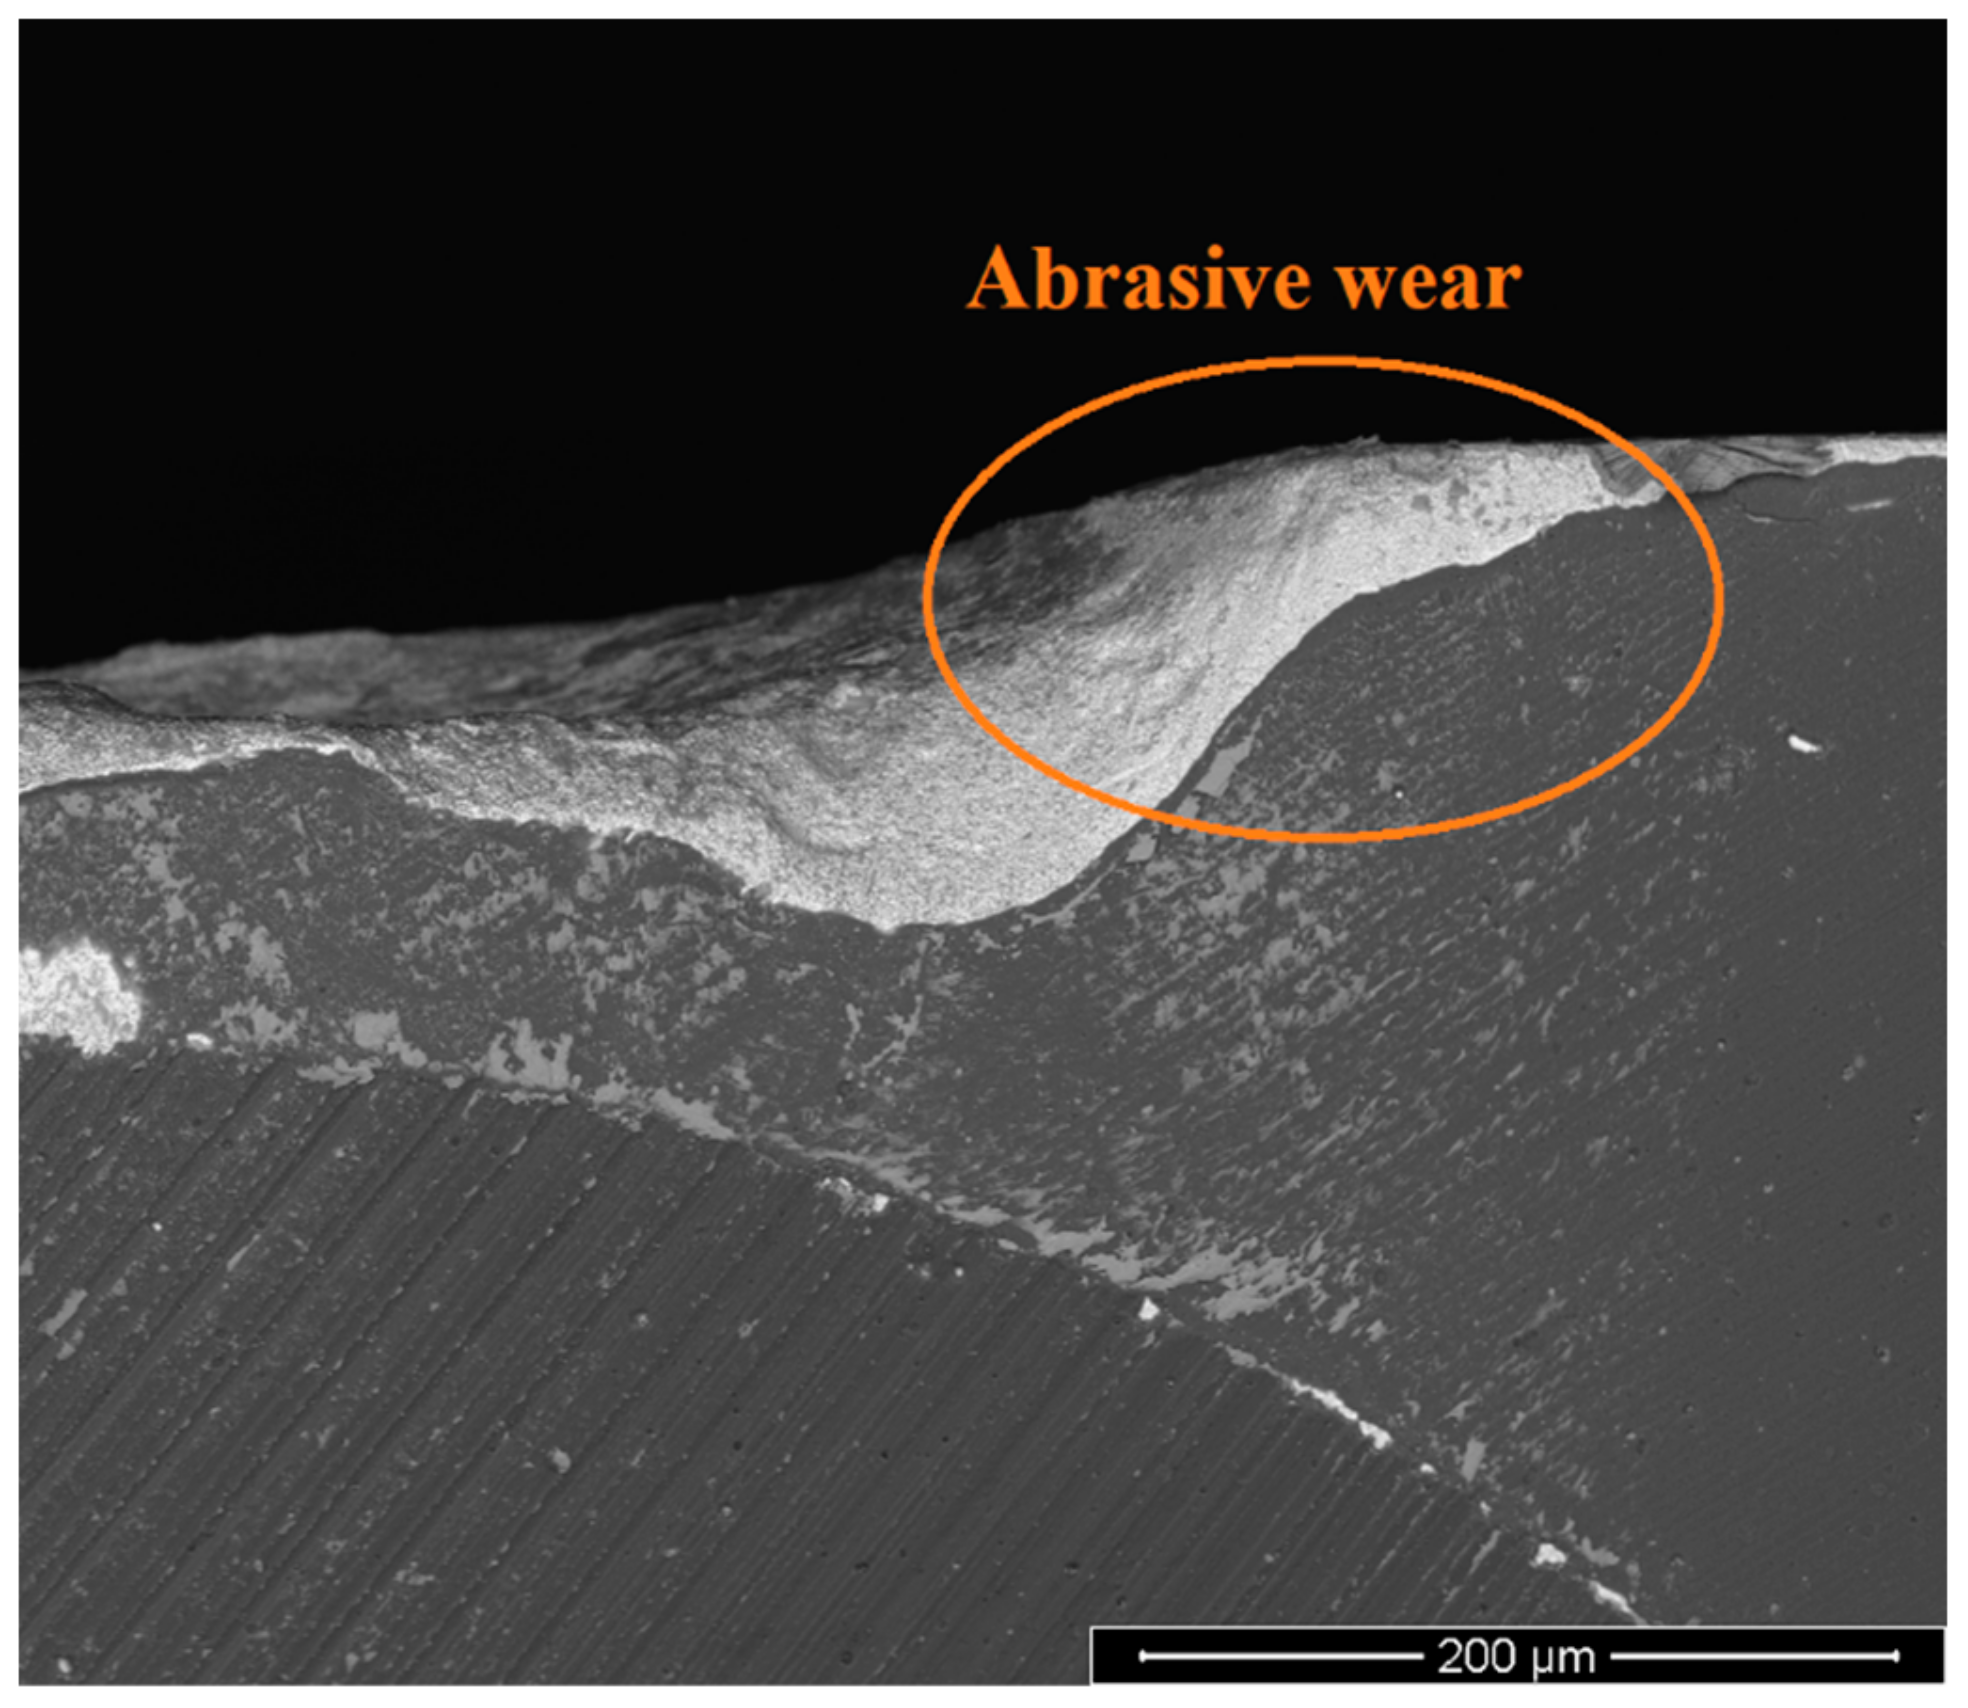
The predominant wear mechanism was abrasion; in Figure 11, this wear is evident due to the smooth appearance caused by material abrasion on the tool’s surface. Abrasive wear is also evident in Figure 10, where the loss of material caused by Inconel 718 abrasion during testing can be seen. Abrasive wear usually leads to the loss of tool material, even causing some alterations regarding geometry. This can also be seen in the tools’ coating, as presented later in the manuscript. Abrasive wear is usually observed when machining Inconel 718 [7], which was observed in all the tested tools, albeit at different intensities. As previously mentioned, the tools tested at a 15 m cutting length exhibited considerably higher levels of wear than those tested at 5 m. The former tools exhibited more evidence of abrasive wear, as can be observed in Figure 11.

Figure 11.
Rake face (RF2) of a tested S125F100L15 tool exhibiting abrasive wear.
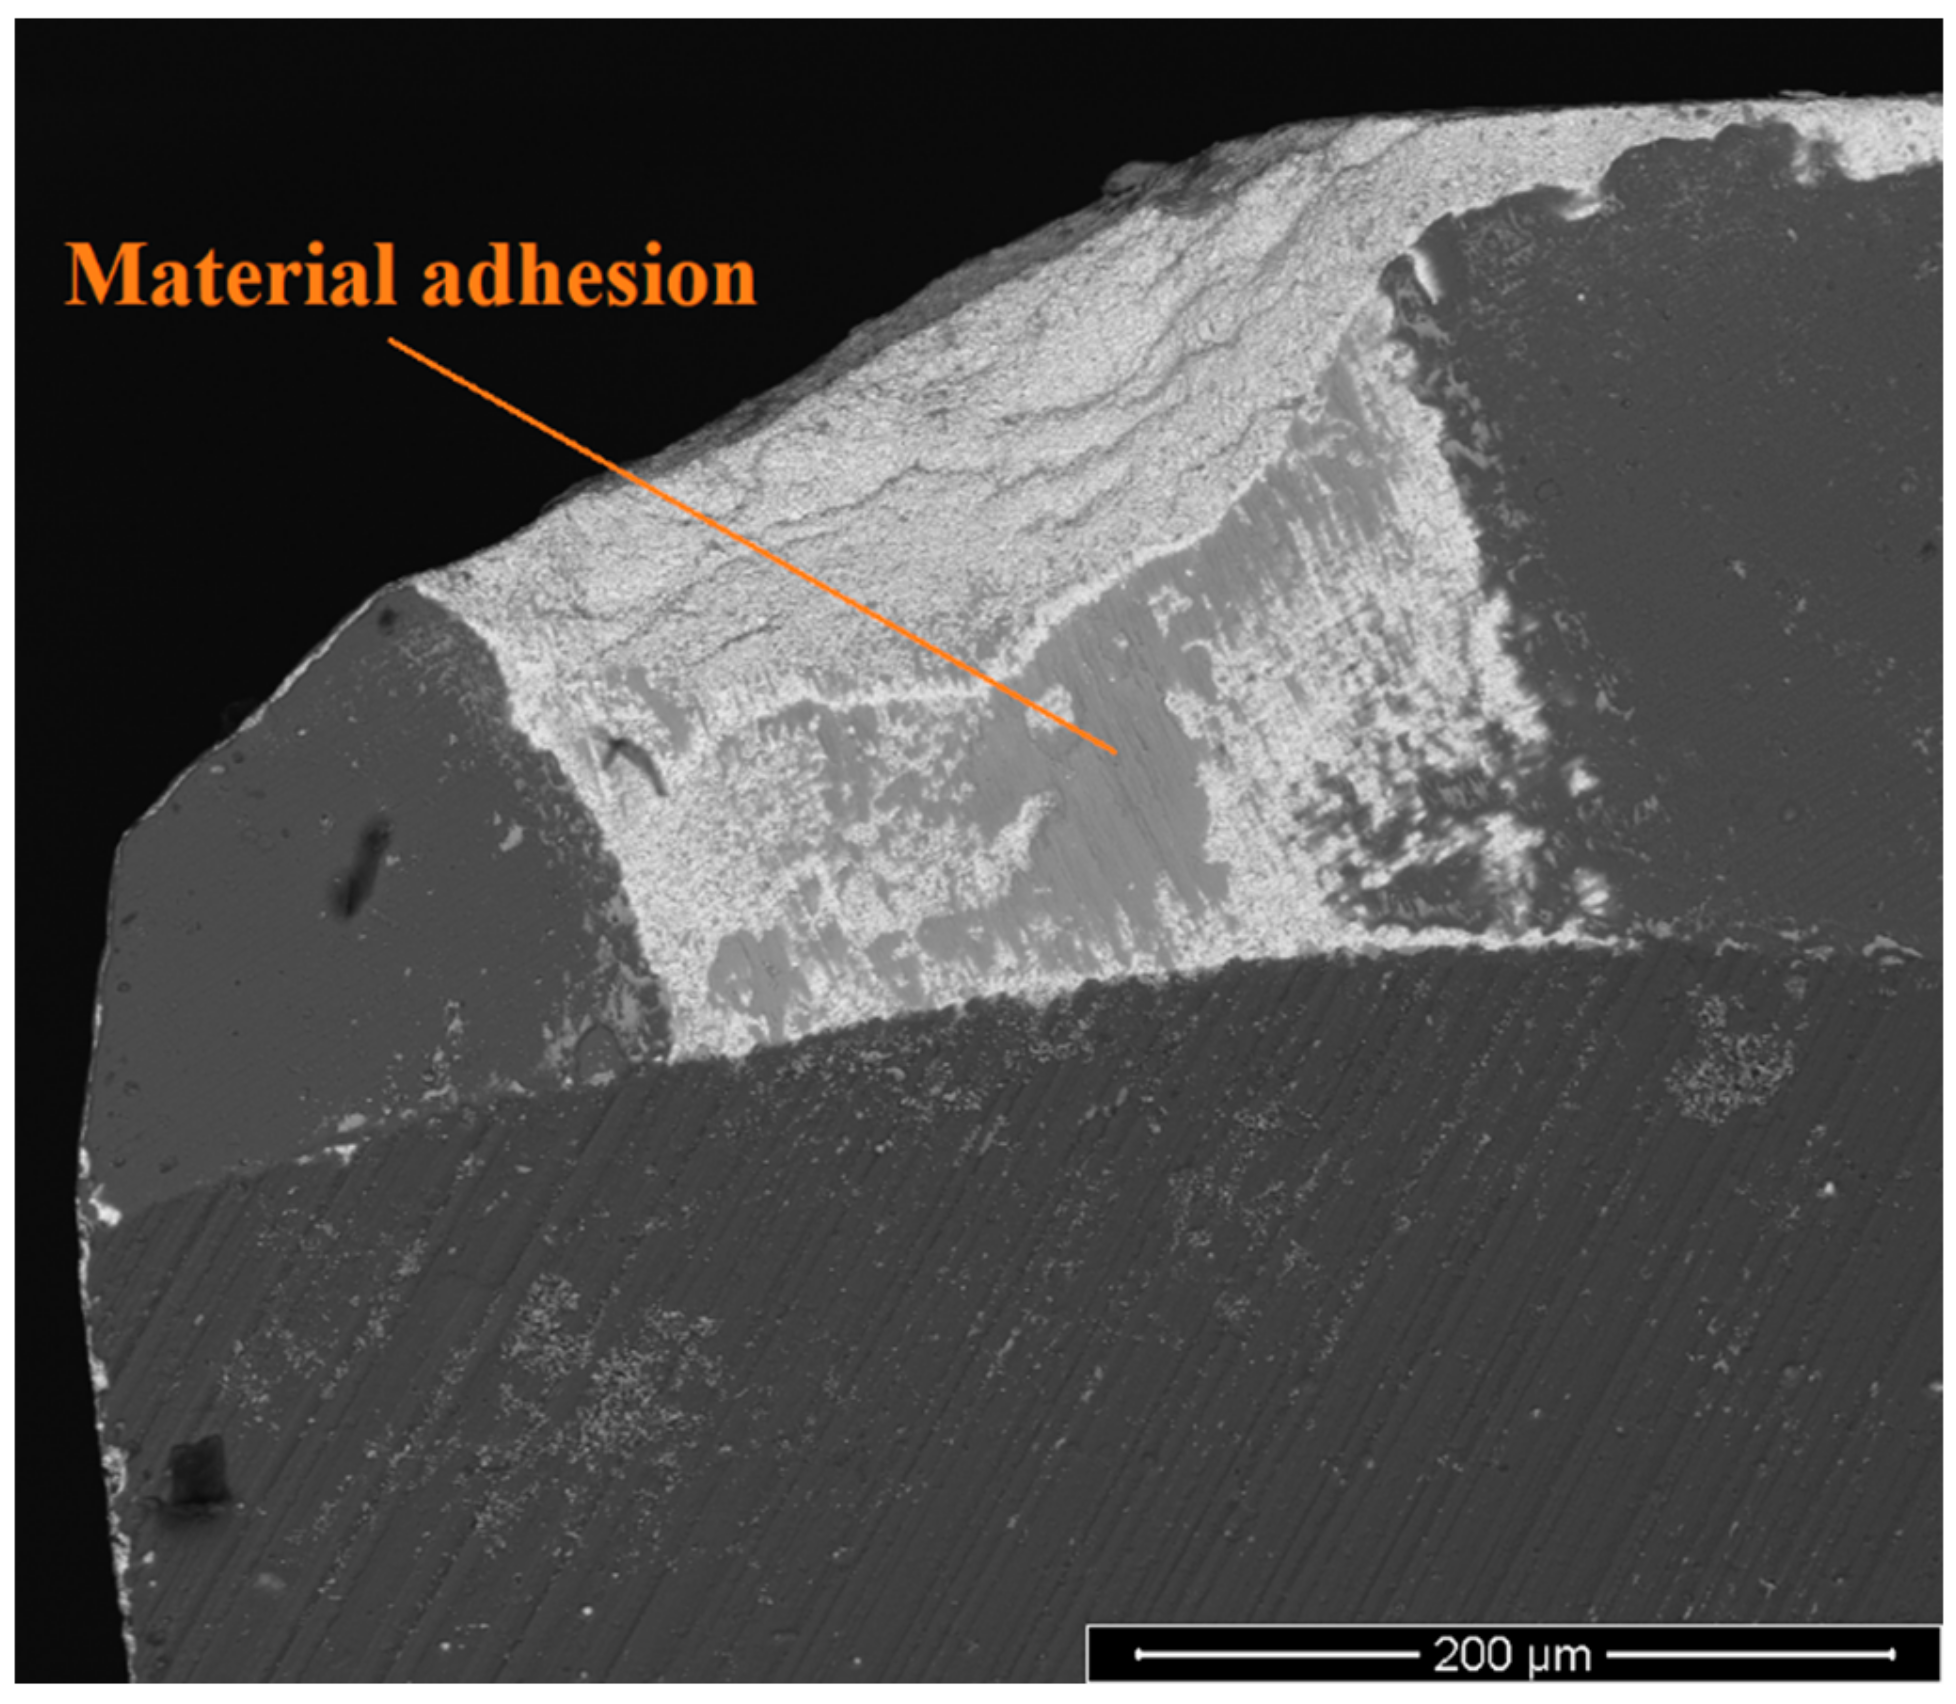
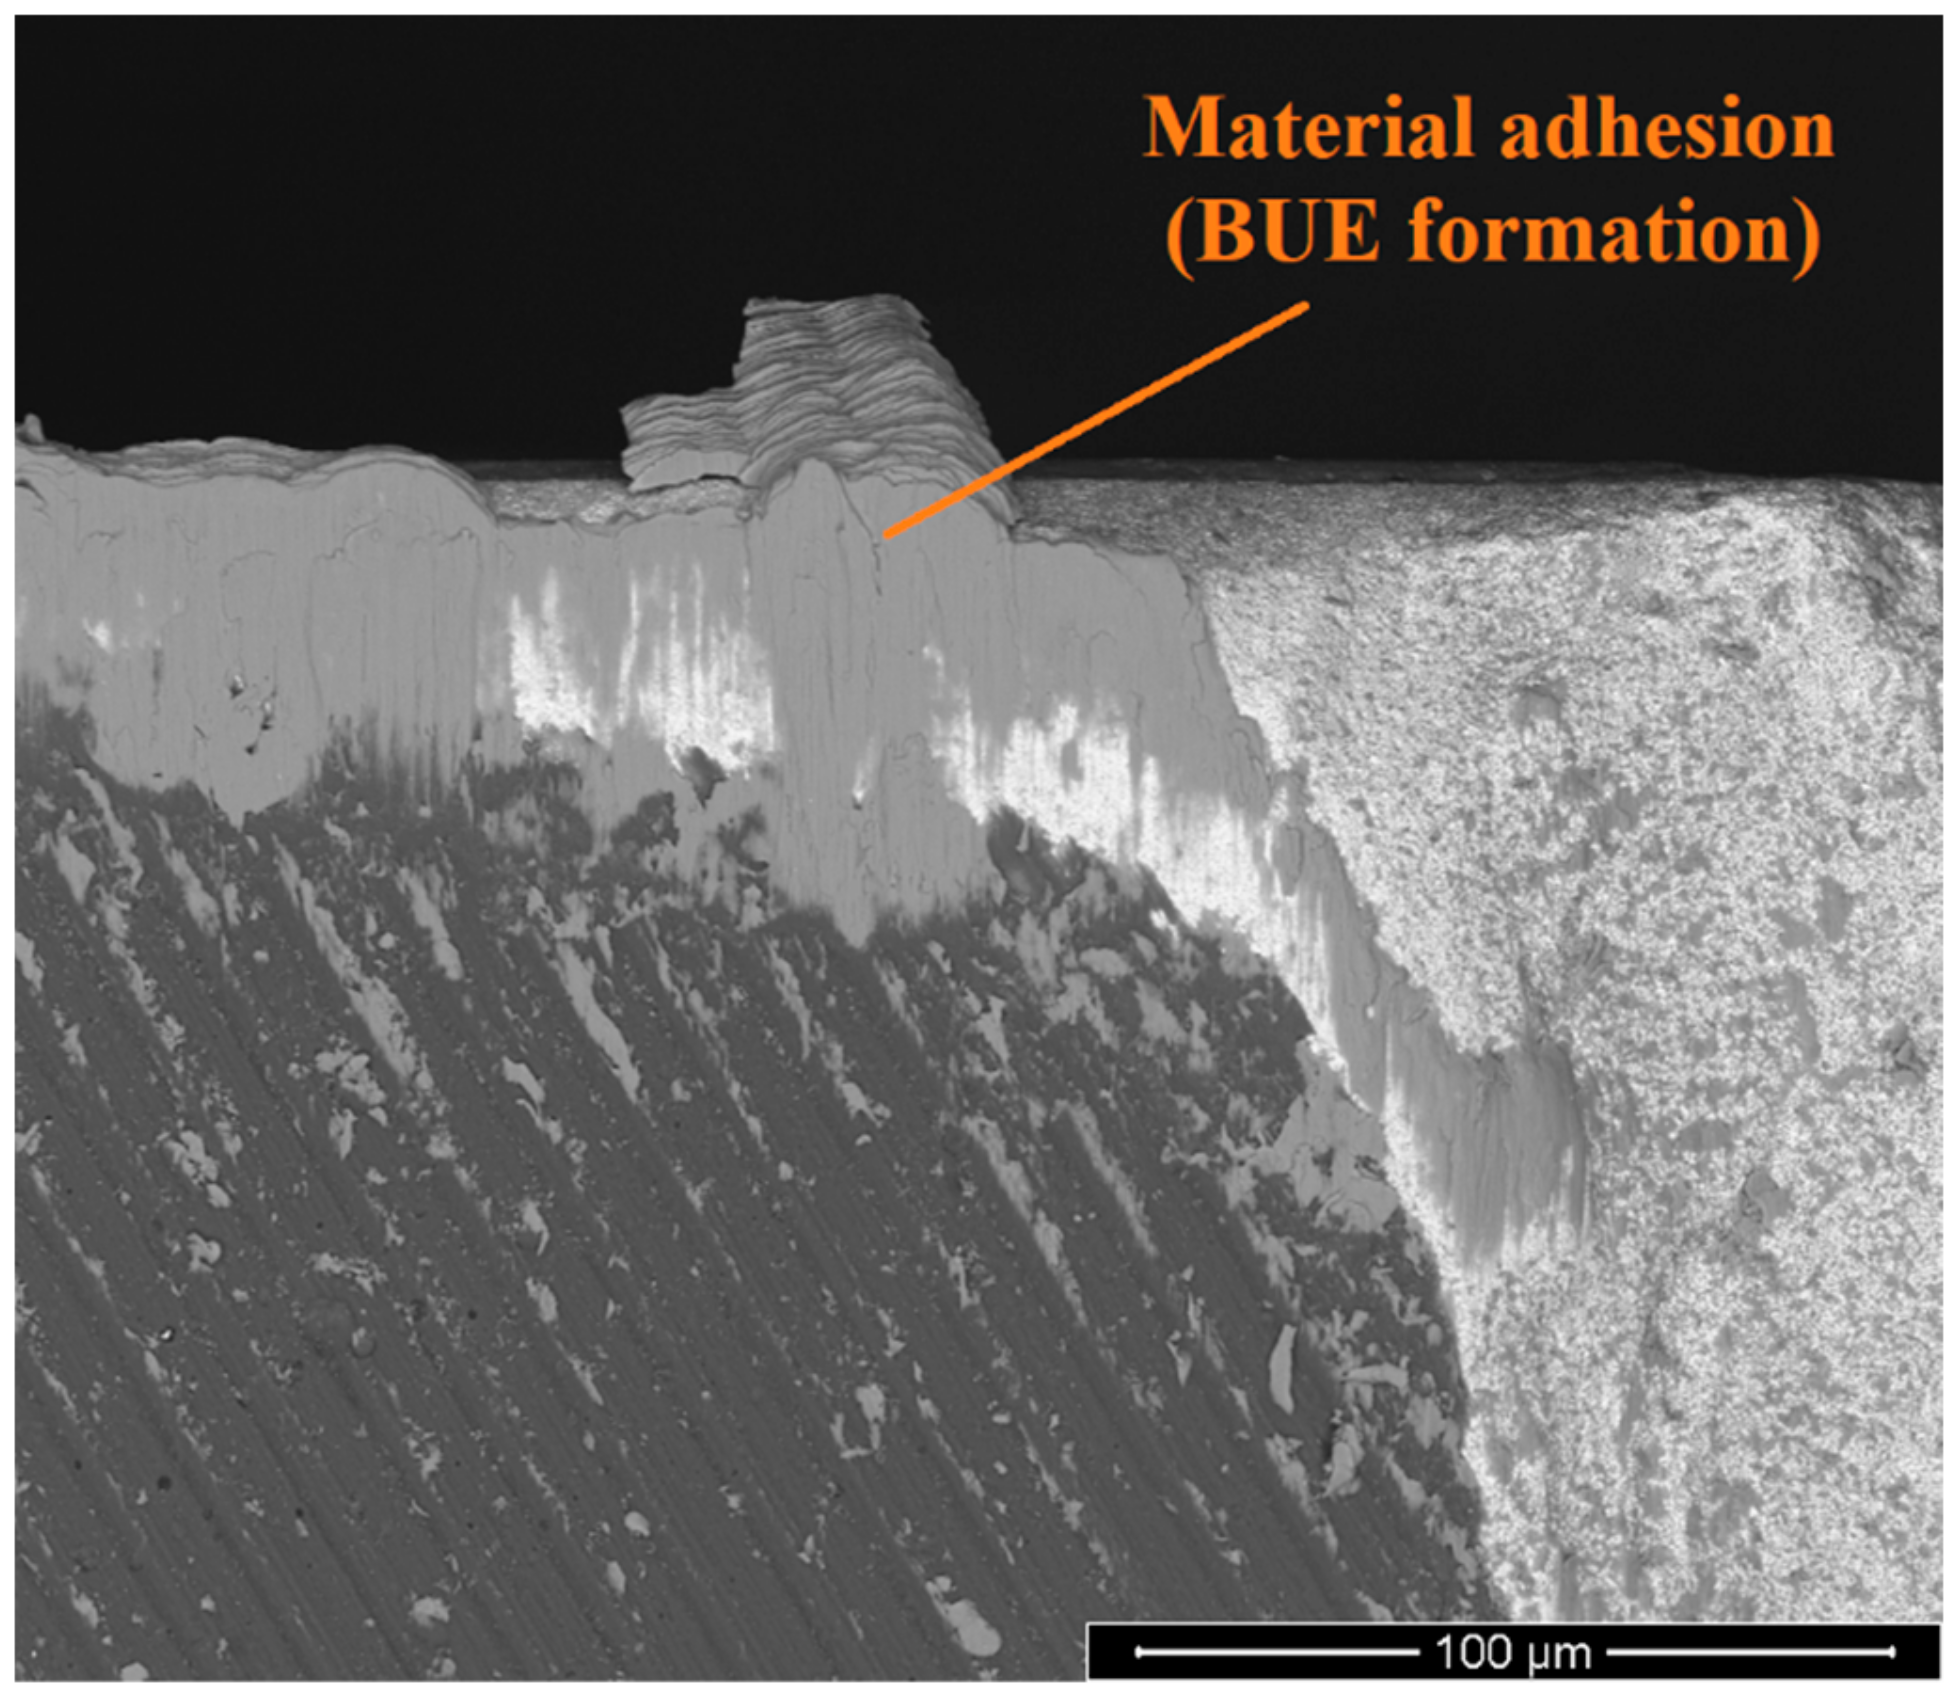
Although Inconel 718 is known to adhere to cutting tools [23], the registered material adhesion was not abundant. That is, light workpiece material adhesion was registered on the tools’ flanks, edges, and rake faces, as shown in Figure 12. Furthermore, there seemed to be a higher level of adhesion to the tools’ uncoated areas (substrate) than to the tool coatings themselves (as shown in the marked area of Figure 12). Further, regarding material adhesion, the formation of a built-up edge was also registered, albeit in a primordial stage (not developed), which can be observed in Figure 13.
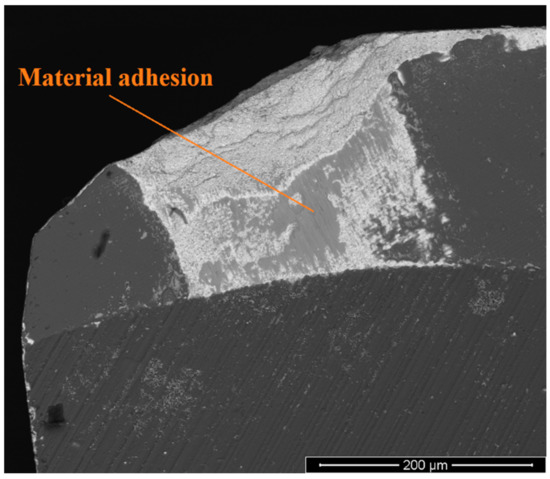
Figure 12.
Material adhesion on the rake face surface (RF1) of a tested S125F100L5 tool.

Figure 13.
Initiation of the formation of a built-up edge (BUE) on a tool’s top surface, exhibiting material adhesion on the exposed substrate (shown on a tested S100F75L15 tool).
The adhered material’s composition was assessed by performing EDS analyses, proving that it was indeed Inconel 718. This adhesion may eventually lead to adhesive wear. It was detected on some of the tools’ faces, such as the rake face depicted in Figure 12. Adhesive wear can lead to premature tool failure, as it promotes the removal of tool coatings and substrates, with are removed with the adhered material on the tools’ surface.
A considerable amount of chipping, mainly of the tools’ substrate was registered in the tested tools, particularly those tested at a 15 m cutting length (as seen in Figure 10). Indeed, machining Inconel 718 can be quite aggressive to the cutting tools, promoting high levels of wear [7,24]. This chipping hinders the production quality that can be achieved with these tools, as well as negatively impacts the overall machining performance [10,17]. This is due to the change in the cutting tools’ geometry, altering the chip formation mechanism and, thus, promoting a higher amount of wear, cutting forces, and machined surface roughness values [9,10].
The tool coatings seemed to hold quite well. The TiN layer improved the coatings’ crack resistance and, as such, no major cracking was identified in the tested coated tools [17]. Furthermore, the coating’s adhesion was deemed to be quite good, as there was no major evidence of coating delamination, with the main coating wear mechanism being abrasion, as shown in Figure 14. As shown in Figure 11, the abrasion smoothed out and marked the tool’s surface. In this case, the coating was eroded due to the machined material being “dragged” across the tools’ surface.
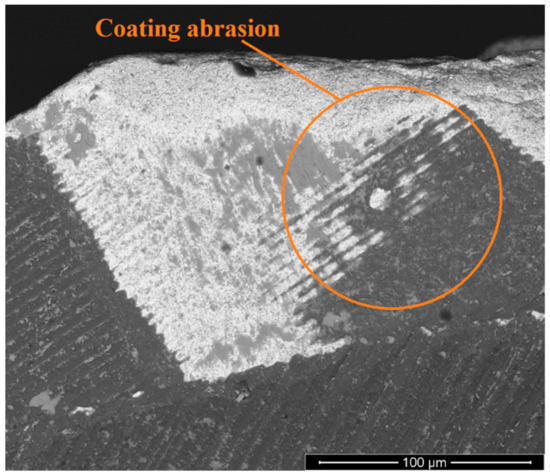
Figure 14.
Coating abrasion shown on a tested S100F75L15 tool rake face (RF1).
4. Conclusions
The present work presents a comparative study of coating end-mills used to machine Inconel 718 alloy, known for its low machinability and excellent mechanical properties. These cause elevated levels of tool wear, even after only a few meters of cutting.
From the conducted and presented study, the following conclusions can be drawn:
- The machining parameters have an effect on the machined surface’s quality, particularly the feed per tooth parameter;
- The optimal machined surface roughness value is obtained for the S100F75L5 test conditions;
- Tool wear impacted the machined surface’s quality, however, this was mostly noticeable for longer cutting lengths due to the tools machining a higher amount of material;
- Less flank wear was observed for the S100F150L5 test conditions, with a decrease in the fz value increasing the amount of registered tool wear, although only slightly;
- An increase in cutting speed promoted an increase in tool wear. However, the most impactful parameter on tool wear was indeed the cutting length, as expected;
- Regarding the tool wear mechanisms, the predominant one was the abrasive wear mechanism, followed by tool chipping (substrate) and slight material adhesion to the tools’ surfaces;
- Material adhesion was found to be more common in uncoated areas of the tested tool; furthermore, the uncoated regions were subject to more considerable abrasive wear;
- The resistance to cracking and high adhesive strength of the tool coating could be attributed to the TiN sublayer, which enhanced the coatings’ crack resistance and adhesion to the substrate materials;
- The obtained results, in terms of machined surface roughness, can be considered quite satisfactory, even when tool wear is quite high. However, the tools’ coatings suffered a considerable amount of wear only after a few meters of cutting, not being recommended for longer operations that require many meters of cutting.
These results highlight the advantages of using TiAlN coatings to obtain a satisfactory surface roughness quality for finishing operations applied to Inconel 718. Furthermore, the inclusion of coating sublayers can bring many advantages regarding the wear behavior of the cutting tools, especially when machining a material such as Inconel 718, known for its low machinability and capability of inducing high levels of wear on cutting tools. These results can be used as a basis for future work, especially when aiming to optimize/improve the outcomes of finishing operations applied to Inconel 718, particularly for milling applications.
Author Contributions
Investigation, V.F.C.S. and F.J.G.S.; Conceptualization, F.J.G.S. and F.F.; Supervision, F.J.G.S., F.F. and R.C.M.S.-C.; Data collection, V.F.C.S., R.C.M.S.-C., F.F. and N.S.; Formal analysis, F.J.G.S., F.F., R.C.M.S.-C., N.S. and R.D.F.S.C.; Methodology, V.F.C.S., R.C.M.S.-C. and N.S.; Visualization, R.C.M.S.-C., R.D.F.S.C., F.F. and N.S.; Data curation: F.J.G.S., N.S. and R.D.F.S.C.; Writing—draft, V.F.C.S. and F.J.G.S.; Writing—reviewing, R.C.M.S.-C., R.D.F.S.C., F.F. and N.S.; Resources, V.F.C.S., F.J.G.S. and R.C.M.S.-C.; Main research, V.F.C.S. All authors have read and agreed to the published version of the manuscript.
Funding
This research received no external funding.
Data Availability Statement
Not applicable.
Acknowledgments
The authors would like to thank Rui Rocha from CEMUP for his crucial collaboration in taking SEM pictures and commenting on some phenomena. The authors would also like to thank CETRIB/INEGI/LAETA, namely Jorge Seabra and Carlos Fernandes, for their continuing support in experimental activities and work dissemination. Moreover, Luís Durão and Victor Moreira from Mechanical Technology Lab of ISEP are acknowledged for their commitment and support in all machining experiments.
Conflicts of Interest
The authors declare no conflict of interest.
References
- Thakur, A.; Gangopadhyay, S. State-of-the-art in surface integrity in machining of nickel-based super alloys. Int. J. Mach. Tools Manuf. 2016, 100, 25–54. [Google Scholar] [CrossRef]
- Buddaraju, K.M.; Sastry, G.R.K.; Kosaraju, S. A review on turning of Inconel alloys. Mater. Today Proc. 2021, 44, 2645–2652. [Google Scholar] [CrossRef]
- Ulutan, D.; Ozel, T. Machining induced surface integrity in titanium and nickel alloys: A review. Int. J. Mach. Tools Manuf. 2011, 51, 250–280. [Google Scholar] [CrossRef]
- Asala, G.; Andersson, J.; Ojo, O.A. A study of the dynamic impact behaviour of IN 718 and ATI 718Plus® superalloys. Philos. Mag. 2019, 99, 419–437. [Google Scholar] [CrossRef]
- Hong, S.J.; Chen, W.P.; Wang, T.W. A diffraction study of the γ″ phase in Inconel 718 superalloy. Metall. Mater. Trans. A 2001, 32, 1887–1901. [Google Scholar] [CrossRef]
- Paturi, U.M.R.; Darshini, B.V.; Reddy, N.S. Progress of machinability on the machining of Inconel 718: A comprehensive review on the perception of cleaner machining. Clean. Eng. Technol. 2021, 5, 100323. [Google Scholar] [CrossRef]
- Zhou, J.; Bushlya, V.; Avdovic, P.; Ståhl, J. Study of surface quality in high-speed turning of Inconel 718 with uncoated and coated CBN tools. Int. J. Adv. Manuf. Technol. 2012, 58, 141–151. [Google Scholar] [CrossRef]
- Agmell, M.; Bushlya, V.; M’Saoubi, R.; Gutnichenko, O.; Zaporozhets, O.; Laakso, S.V.A.; Ståhl, J. Investigation of mechanical and thermal loads in pcBN tooling during machining of Inconel 718. Int. J. Adv. Manuf. Technol. 2020, 107, 1451–1462. [Google Scholar] [CrossRef]
- Sousa, V.F.C.; Silva, F.J.G. Recent Advances in Turning Processes Using Coated Tools—A Comprehensive Review. Metals 2020, 10, 170. [Google Scholar] [CrossRef]
- Sousa, V.F.C.; Silva, F.J.G. Recent Advances on Coated Milling Tool Technology—A Comprehensive Review. Coatings 2020, 10, 235. [Google Scholar] [CrossRef]
- Silva, F.J.G.; Martinho, R.P.; Martins, C.; Lopes, H.; Gouveia, R.M. Machining GX2CrNiMoN26-7-4 DSS Alloy: Wear Analysis of TiAlN and TiCN/Al2O3/TiN Coated Carbide Tools Behavior in Rough End Milling Operations. Coatings 2019, 9, 392. [Google Scholar] [CrossRef]
- Gouveia, R.M.; Silva, F.J.G.; Reis, P.; Baptista, A.P.M. Machining Duplex Stainless Steel: Comparative Study Regarding End Mill Coated Tools. Coatings 2016, 6, 51. [Google Scholar] [CrossRef]
- Sousa, V.F.C.; Silva, F.J.G.; Fecheira, J.S.; Lopes, H.M.; Martinho, R.P.; Casais, R.B.; Ferreira, L.P. Cutting Forces Assessment in CNC Machining Processes: A Critical Review. Sensors 2020, 20, 4536. [Google Scholar] [CrossRef]
- Sousa, V.F.C.; Silva, F.J.G.; Alexandre, R.; Fecheira, J.S.; Silva, F.P.N. Study of the wear behaviour of TiAlSiN and TiAlN PVD coated tools on milling operations of pre-hardened tool steel. Wear 2021, 476, 203695. [Google Scholar] [CrossRef]
- Zhao, X.; Qin, H.; Feng, Z. Influence of tool edge form factor and cutting parameters on milling performance. Adv. Mech. Eng. 2021, 13, 1–12. [Google Scholar] [CrossRef]
- Niyas, S.; Jappes, J.T.W.; Adamkhan, M.; Brintha, N.C. An effective approach to predict the minimum tool wear of machining process of Inconel 718. Mater. Today Proc. 2022, 60, 1819–1834. [Google Scholar] [CrossRef]
- Sousa, V.F.C.; Silva, F.J.G.; Pinto, G.F.; Baptista, A.; Alexandre, R. Characteristics and Wear Mechanisms of TiAlN-Based Coatings for Machining Applications: A Comprehensive Review. Metals 2021, 11, 260. [Google Scholar] [CrossRef]
- Silva, F.; Martinho, R.; Andradre, M.; Baptista, A.; Alexandre, R. Improving the Wear Resistance of Moulds for the Injection of Glass Fibre–Reinforced Plastics Using PVD Coatings: A Comparative Study. Coatings 2017, 7, 28. [Google Scholar] [CrossRef]
- Nunes, V.; Silva, F.J.G.; Andrade, M.F.; Alexandre, R.; Baptista, A.P.M. Increasing the lifespan of high-pressure die cast molds subjected to severe wear. Surf. Coat. Technol. 2017, 332, 319–331. [Google Scholar] [CrossRef]
- Sousa, V.F.C.; Silva, F.J.G.; Lopes, H.; Casais, R.C.B.; Baptista, A.; Pinto, G.; Alexandre, R. Wear Behavior and Machining Performance of TiAlSiN-Coated Tools Obtained by dc MS and HiPIMS: A Comparative Study. Materials 2021, 14, 5122. [Google Scholar] [CrossRef]
- Luo, M.; Li, H. On the Machinability and Surface Finish of Superalloy GH909 Under Dry Cutting Conditions. Mater. Res. 2019, 21, e20171086. [Google Scholar] [CrossRef]
- Bhatt, A.; Attia, H.; Vargas, R.; Thomson, V. Wear mechanisms of WC coated and uncoated tools in finish turning of Inconel 718. Tribol. Int. 2010, 43, 1113–1121. [Google Scholar] [CrossRef]
- Akhtar, W.; Sun, J.; Chen, W. Effect of Machining Parameters on Surface Integrity in High Speed Milling of Super Alloy GH4169/Inconel 718. Mater. Manuf. Process. 2016, 31, 620–627. [Google Scholar] [CrossRef]
- De Bartolomeis, A.; Newman, S.T.; Jawahir, I.S.; Biermann, D.; Shokrani, A. Future research directions in the machining of Inconel 718. J. Mater. Process. Technol. 2021, 297, 117260. [Google Scholar] [CrossRef]
- Astakhov, V.P. Tribology of Cutting Tools. In Tribology in Manufacturing Technology; Springer: Berlin/Heidelberg, Germany, 2012; pp. 1–66. [Google Scholar] [CrossRef]
- Grzesik, W.; Niestony, P.; Habrat, W.; Sieniawasky, J.; Laskowski, P. Investigation of tool wear in the turning of Inconel 718 superalloy in terms of process performance and productivity enhancement. Tribol. Int. 2018, 118, 337–346. [Google Scholar] [CrossRef]
- Kim, E.J.; Lee, C.M. A Study on the Optimal Machining Parameters of the Induction Assisted Milling with Inconel 718. Materials 2019, 12, 233. [Google Scholar] [CrossRef]
- Grzesik, W.; Malecka, J.; Kwasny, W. Identification of oxidation process of TiALN coatings versus heat resistant aerospace alloys based on diffusion couples and tool wear tests. CIRP Ann. 2020, 69, 41–44. [Google Scholar] [CrossRef]
- Gueli, M.; Ma, J.; Cococcetta, N.; Pearl, D.; Jahan, M.P. Experimental investigation into tool wear, cutting forces, and resulting surface finish during dry and flood coolant slot milling of Inconel 718. Procedia Manuf. 2021, 53, 236–245. [Google Scholar] [CrossRef]
- Finkeldei, D.; Sexauer, M.; Bleicher, F. End milling of Inconel 718 using solid Si3N4 ceramic cutting tools. Procedia CIRP 2019, 81, 1131–1135. [Google Scholar] [CrossRef]
- Li, H.Z.; Zeng, H.; Chen, X.Q. An experimental study of tool wear and cutting force variation in the end milling of Inconel 718 with coated carbide inserts. J. Mater. Process. Technol. 2006, 180, 296–304. [Google Scholar] [CrossRef]
- Fox-Rabinovich, G.S.; Yamamoto, K.; Aguirre, M.H.; Cahill, D.G.; Veldhuis, S.C.; Biksa, A.; Dosbaeva, G.; Shuster, L.S. Multi-functional nano-multilayered AlTiN/Cu PVD coating for machining of Inconel 718 superalloy. Surf. Coat. Technol. 2010, 204, 2465–2471. [Google Scholar] [CrossRef]
- Ducroux, E.; Fromentin, G.; Viprey, F.; Prat, D.; D’Acunto, A. New mechanistic cutting force model for milling additive manufactured Inconel 718 considering effects of tool wear evolution and actual tool geometry. J. Manuf. Process. 2021, 64, 67–80. [Google Scholar] [CrossRef]
- Ruan, H.; Wang, Z.; Wang, L.; Sun, L.; Peng, H.; Ke, P.; Wang, A. Designed Ti/TiN sub-layers suppressing the crack and erosion of TiAlN coatings. Surf. Coat. Technol. 2022, 438, 128419. [Google Scholar] [CrossRef]
- Shuai, J.; Zuo, X.; Wang, Z.; Guo, P.; Xu, B.; Zhou, J.; Wang, A.; Ke, P. Comparative study on crack resistance of TiAlN monolithic and Ti/TiAlN multilayer coatings. Ceram. Int. 2020, 46, 6672–6681. [Google Scholar] [CrossRef]
- Çomakli, O. Improved structural, mechanical, corrosion and tribocorrosion properties of Ti45Nb alloys by TiN, TiAlN monolayers, and TiAlN/TiN multilayer ceramic films. Ceram. Int. 2021, 47, 4149–4156. [Google Scholar] [CrossRef]
- Ananthakumar, R.; Subramanian, B.; Kobayashi, A.; Jayachandran, M. Electrochemical corrosion and materials properties of reactively sputtered TiN/TiAlN multilayer coatings. Ceram. Int. 2012, 38, 477–485. [Google Scholar] [CrossRef]
- Zhang, M.; Cheng, Y.; Xin, L.; Su, J.; Li, Y.; Zhu, S.; Wang, F. Cyclic oxidation behaviour of Ti/TiAlN composite multilayer coatings deposited on titanium alloy. Corros. Sci. 2020, 166, 108476. [Google Scholar] [CrossRef]
- Sousa, V.F.C.; Castanheira, J.; Silva, F.J.G.; Fecheira, J.S.; Pinto, G.; Baptista, A. Wear Behavior of Uncoated and Coated Tools in Milling Operations of AMPCO (Cu-Be) Alloy. Appl. Sci. 2021, 11, 7762. [Google Scholar] [CrossRef]
- Byrghardt, A.; Szybicki, D.; Kurc, K.; Muszynska, M.; Mucha, J. Experimental Study of Inconel 718 Surface Treatment by Edge of Robotic Deburring with Force Control. Strength Mater. 2017, 49, 594–604. [Google Scholar] [CrossRef]
- ISO 21920-1:2021; Geometrical Product Specifications (GPS)—Surface Texture: Profile Part 1: Indication of Surface Texture. International Organization for Standardization: Geneva, Switzerland, 2021.
- ISO 8688-2:1986; Tool Life Testing in Milling—Part 2: End Milling. International Organization for Standardization: Geneva, Switzerland, 1986.
- Silva, F.J.G.; Fernandes, A.J.S.; Costa, F.M.; Baptista, A.P.M.; Pereira, E. A new interlayer approach for CVD diamond coating of steel substrates. Diam. Relat. Mater. 2004, 13, 828–833. [Google Scholar] [CrossRef]
- Silva, F.J.G.; Fernandes, A.J.S.; Costa, F.M.; Teixeira, V.; Baptista, A.P.M.; Pereira, E. Tribological behaviour of CVD diamond films on steel substrates. Wear 2003, 255, 846–853. [Google Scholar] [CrossRef]
- Marakini, V.; Pai, S.P.; Bhat, U.K.; Thakur, D.S.; Achar, B.P. High-speed face milling of AZ91 Mg alloy: Surface integrity investigations. Int. J. Lightweight Mater. Manuf. 2022, 5, 528–542. [Google Scholar] [CrossRef]
- Kumar, S.; Saravanan, I.; Patnaik, L. Optimization of surface roughness and material removal rate in milling of AISI 1005 carbon steel using Taguchi approach. Mater. Today Proc. 2019, 22, 654–658. [Google Scholar] [CrossRef]
- Korkut, I.; Donertas, M.A. The influence of feed rate and cutting speed on the cutting forces, surface roughness and tool-chip contact length during face milling. Mater. Des. 2007, 28, 308–312. [Google Scholar] [CrossRef]
- Natasha, A.R.; Ghani, J.A.; Haron, C.H.C.; Syarif, J. The influence of machining condition and cutting tool wear on surface roughness of AISI 4340 steel. IOP Conf. Ser. Mater. Sci. Eng. 2017, 290, 012017. [Google Scholar] [CrossRef]
- Liang, X.; Liu, Z. Tool wear behaviors and corresponding machined surface topography during high-speed machining of Ti-6Al-4V with fine grain tools. Tribol. Int. 2018, 121, 321–332. [Google Scholar] [CrossRef]
- Usca, U.A.; Uzun, M.; Sap, S.; Kuntoglu, M.; Giasin, K.; Pimenov, D.Y.; Wojciechowski, S. Tool wear, surface roughness, cutting temperature and chips morphology evaluation of Al/TiN coated carbide cutting tools in milling of Cu–B–CrC based ceramic matrix composites. J. Mater. Res. Technol. 2022, 16, 1243–1259. [Google Scholar] [CrossRef]
- Zimmermann, R.; Welling, D.; Venek, T.; Ganser, P.; Bergs, T. Tool wear progression of SiAlON ceramic end mills in five-axis high-feed rough machining of an Inconel 718 BLISK. Procedia CIRP 2021, 101, 13–16. [Google Scholar] [CrossRef]
Disclaimer/Publisher’s Note: The statements, opinions and data contained in all publications are solely those of the individual author(s) and contributor(s) and not of MDPI and/or the editor(s). MDPI and/or the editor(s) disclaim responsibility for any injury to people or property resulting from any ideas, methods, instructions or products referred to in the content. |
© 2023 by the authors. Licensee MDPI, Basel, Switzerland. This article is an open access article distributed under the terms and conditions of the Creative Commons Attribution (CC BY) license (https://creativecommons.org/licenses/by/4.0/).

