Article

The Interaction between the Sheet/Tool Surface Texture and the Friction/Galling Behaviour on Aluminium Deep Drawing Operations

1
Mechanics and Industrial Production, Faculty of Engineering, Mondragon Unibertsitatea, Loramendi 4, 20500 Mondragon, Spain
2
Sarclad Limited, Unit 3-4 Evolution, Advanced Manufacturing Park, Whittle Way, Rotherham S60 5BL, UK
*
Author to whom correspondence should be addressed.
Metals 2021, 11(6), 979; https://doi.org/10.3390/met11060979
Submission received: 15 May 2021 / Revised: 8 June 2021 / Accepted: 14 June 2021 / Published: 19 June 2021
(This article belongs to the Special Issue Forming of Aluminium Alloys)

Abstract

:
The increasing demands for lightweight design in the transport industry have led to an extensive use of lightweight materials such as aluminium alloys. The forming of aluminium sheets however presents significant challenges due to the low formability and the increased susceptibility to galling. The use of tailored workpieces and controlled die roughness surfaces are common strategies to improve the tribological behaviour, whilst galling is still not well understood. This work is aimed at analysing the interplay between the sheet and tool surface roughness on the friction and galling performance. Different degrees of Electro Discharge Texturing (EDT) textures were generated in AA1050 material strips, and tooling presenting different polishing degrees were prepared. Strip drawing tests were carried out to model the tribological condition and results were corroborated through cup drawing tests. A new galling severity index (GSI) is presented for a quick and quantitative determination of both galling occurrence and severity. The present study underlines the key role of die topography and the potential of die surface functionalization for galling prevention.

1. Introduction

Today’s manufacturing industry has to cope with increasing demands for lightweight design, especially in the transport industry [1]. Accordingly, an extensive use of lightweight materials, including aluminium, magnesium and titanium alloys, is emerging [2]. Aluminium alloys provide several advantages, including high strength to mass ratio and high corrosion resistance, and thus attracts large attention in engineering applications, such as automotive [3] and packaging [4]. Sheet metal forming covers a broad range of processes, all designed to mechanically deform sheet material into a shape without material removal [5]. Among them, deep-drawing [6] is one of the most commonly used forming processes in automotive and packaging applications, since it allows cost-effective mass production of sheet components.
Tribological phenomena between tool and workpiece can significantly influence metal forming processes [7]. Friction at the sheet metal–die interface affects the material flow in the manufacturing process, and wear on the tool surfaces could lead to changes in the boundary conditions of the process, greatly influencing productivity and product quality. The forming of aluminium sheets presents a significant challenge due to the low formability compared to steel and the materials’ vulnerability to undergo galling with the forming tools [8,9]. Galling is a severe adhesive wear mechanism, often seen in sheet metal stamping, which develops gradually as an adhesion of work material on the tool surface, which may change the tool geometry, increase the friction force, cause tearing, and lead to workpiece rejection [10]. Galling has a direct and negative influence on the surface quality of the products, and eventually, expensive tool maintenance is required in order to continue production. This has a dramatic impact on the forming processes, accounting for up to 71 % of the cost of die maintenance [11].
Different strategies have been adopted in order to improve the wear and tribological properties of forming tools, mainly focused on the application of hard coatings in the tool [12,13], and/or the proper surface engineering of the surfaces [14]. The use of tailored workpiece surfaces in sheet metal forming is a common strategy to improve tribological properties. In industrial mass production applications, tailored sheet surfaces are made by skin-pass rolling in the final rolling step, using large roughened rolls that transfer textures to the sheet [15]. Several deterministic and stochastic processes are available [16], however, electrical discharge texturing (EDT) [17] is the most popular one. EDT texturing generates connecting isolated craters in the surface. The production of regular cavities on a surface gives as results anti-wear and friction reducing mechanisms, which are dependent on the lubrication regime and texture geometry [18]. Surface texture may act as lubricant reservoir [19] (providing lubricant to the contact in cases of starved lubrication), entrap wear debris [20] (minimizing third-body abrasion), and generate a hydrodynamic lift effect [21] (providing load carrying capacity).
Tool texturing has also been explored to promote better lubrication in metal forming and decrease galling and friction. A great number of surface texturing techniques are available for hard tool materials, such as rolling ball indentation [22], hammer peening [23], and laser radiation [24] among others. However, manual polishing after milling of deep drawing dies is the conventional and most used preparation technique for tool surface preparation [25].
In general, there is a consensus that the surface roughness of the frictional pair has an impact on the tribological properties of the system. It has been widely accepted that EDT improves the forming behaviour of aluminium sheets due to better friction behaviour [26]. Several researches demonstrated the improved performance of EDT surfaces against non-textured mill finish (MF) surfaces [27,28,29,30]. On the other hand, although the patterned tool texturing has provided promising results [22,31], it is widely accepted that the work material adhesion and galling risk increases with tool roughness [32] and therefore, appropriate polishing should be applied [33,34]. Whilst galling is still not comprehensively understood, research efforts continue, and some points still need to be addressed. Although the interplay between the tool and the workpiece texture seems to be presumable, it has not been investigated. Previous researches generally omitted tool surface roughness data [27,28,29,30,35]. Similarly, a broad range of roughness values are reported under EDT textured sheet definition, ranging from Ra 0.2 to 1.7 [27,29,30], or quantitative data on the EDT texture was omitted [35,36]. Additionally, the effect of the EDT texturing degree has not been previously studied.
The present work is built in this context, aiming at analysing the interplay between the EDT sheet texture and tool polishing degree. For the first time, different degrees of EDT textures were analysed against different die surface topographies in order to test the influence of the EDT and die roughness degree on friction and galling performance. To that end, different degrees of EDT texturing were generated in AA1050 material strips by means of an ad-hoc skin pass texturing mill, and tooling presenting different polishing degrees were prepared following industrial procedures. First, strip drawing tests were carried out with different tool material roughness in order to evaluate the impact of the texture pairs (strip and tool) on the friction coefficient and the galling resistance at different pressures. Afterwards, a benchmark cup-drawing test was carried out with the best solution and the main conclusions are drawn. Additionally, a new galling severity index (GSI) is presented, which is directly computed form the friction curve and provides a quick and quantitative determination of both galling occurrence and severity.

2. Materials and Methods

2.1. Sheet Material

Commercial-grade aluminium AA1050 alloy sheets with mill finish surfaces and 1 mm thickness have been used for the study. Mechanical properties were tested, and the results are shown in Table 1.

2.2. Sheet Texturing

Sheet texturing was conducted with an ad-hoc skin-pass rig, constituting of two parallel 50 mm diameter work rolls actuated by electrical motors (see Figure 1a). During the skin-pass process, work roll surface texture is transferred precisely onto the strip surface when pressing the strip between the rolls. The work rolls were textured by EDT industrial process (courtesy of Sarclad Ltd., Rotherham, United Kingdom) and 300 mm length and 100 mm width aluminium sheet samples were textured for the study.
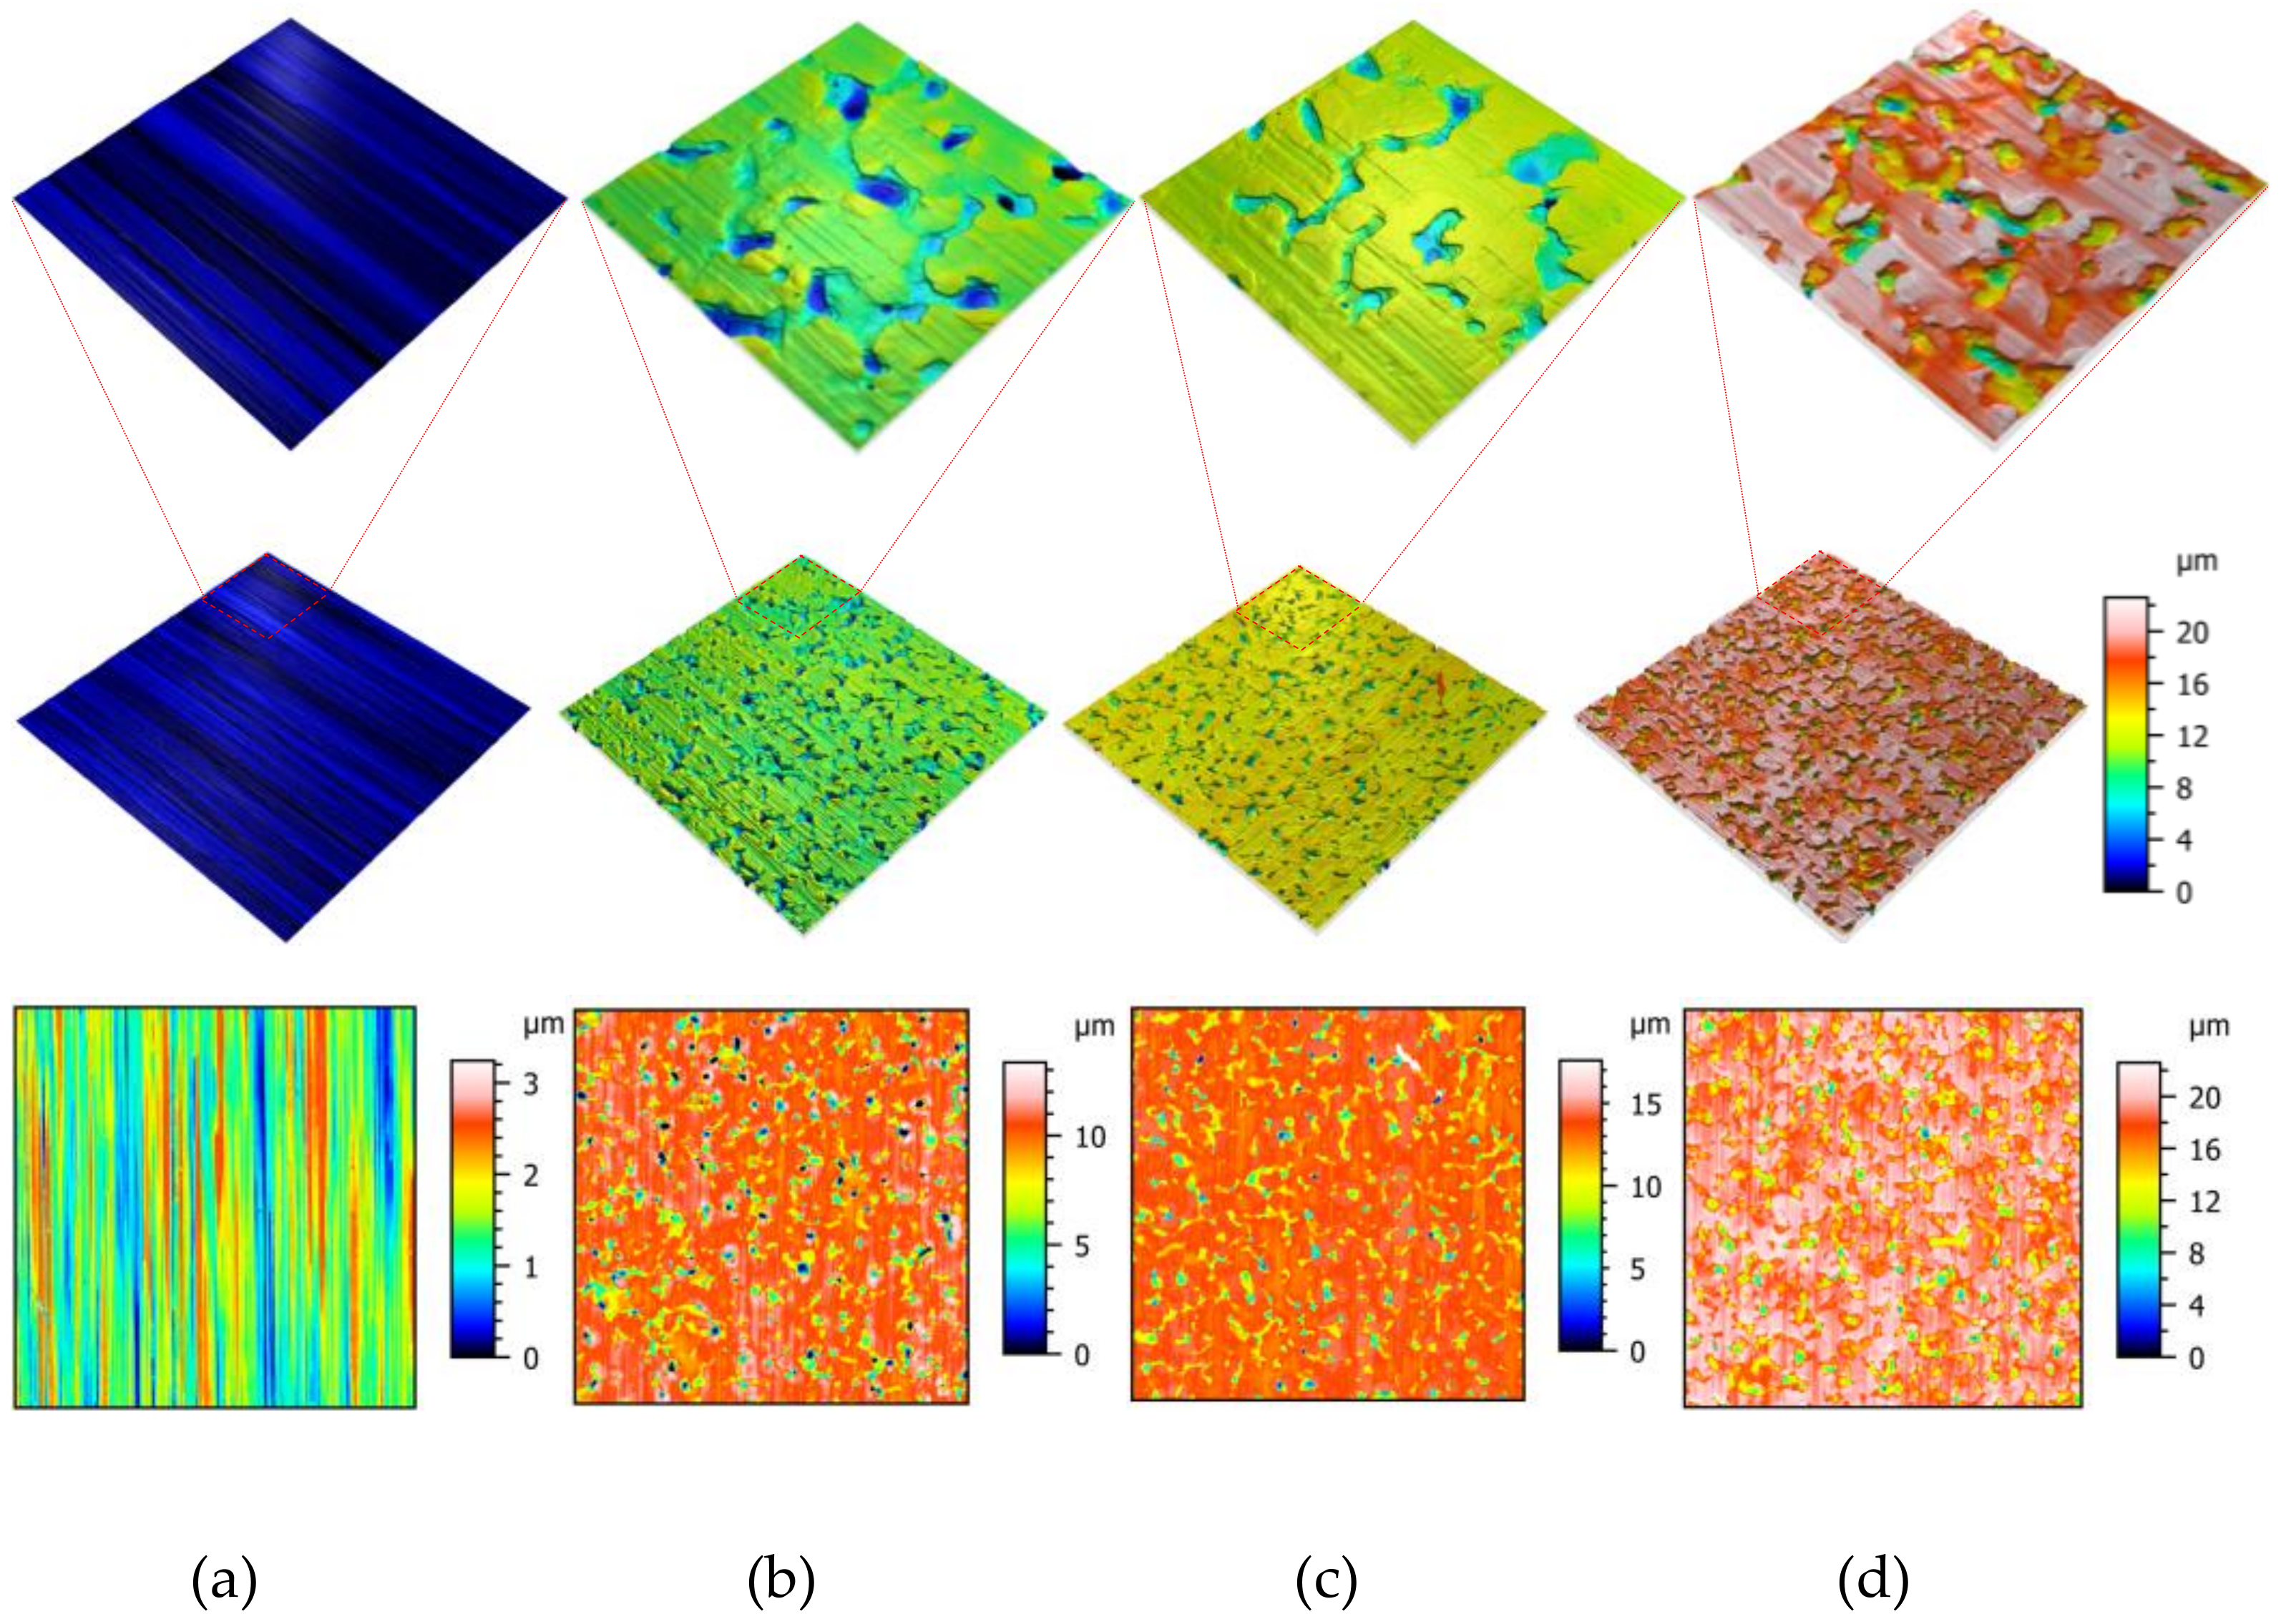
Different sheet surface EDT texture grades were generated using three levels of reduction percentages (difference between the work roll gap with respect to the sheet thickness), named as low, medium, and high textured surfaces (reference non-textured mill finish sheets were also included in the study as control). Surface textures were measured with Sensofar S-NEOX (Sensofar, Barcelona, Spain) optical profilometer using interferometry technique (20x DI objective) over a 3 mm × 3 mm acquisition area and characterized with the metrology software Mountains Premium calculating the topographical parameters in the primary surface following ISO 25178 standard. Work roll and sheet surface images are shown in Figure 1b and Figure 2, respectively, while numerical values are summarised in Table 2 (2D Ra values are also included for reference).

2.3. Strip Drawing Test

The friction characterization was carried out using the flat strip drawing test, which models the tribological conditions of the conformal contacts in a conventional deep drawing process [37]. This test enables direct determination of friction coefficients and resembles the open tribological system of a deep drawing process, at which new sheet material is transferred constantly into the contact area.
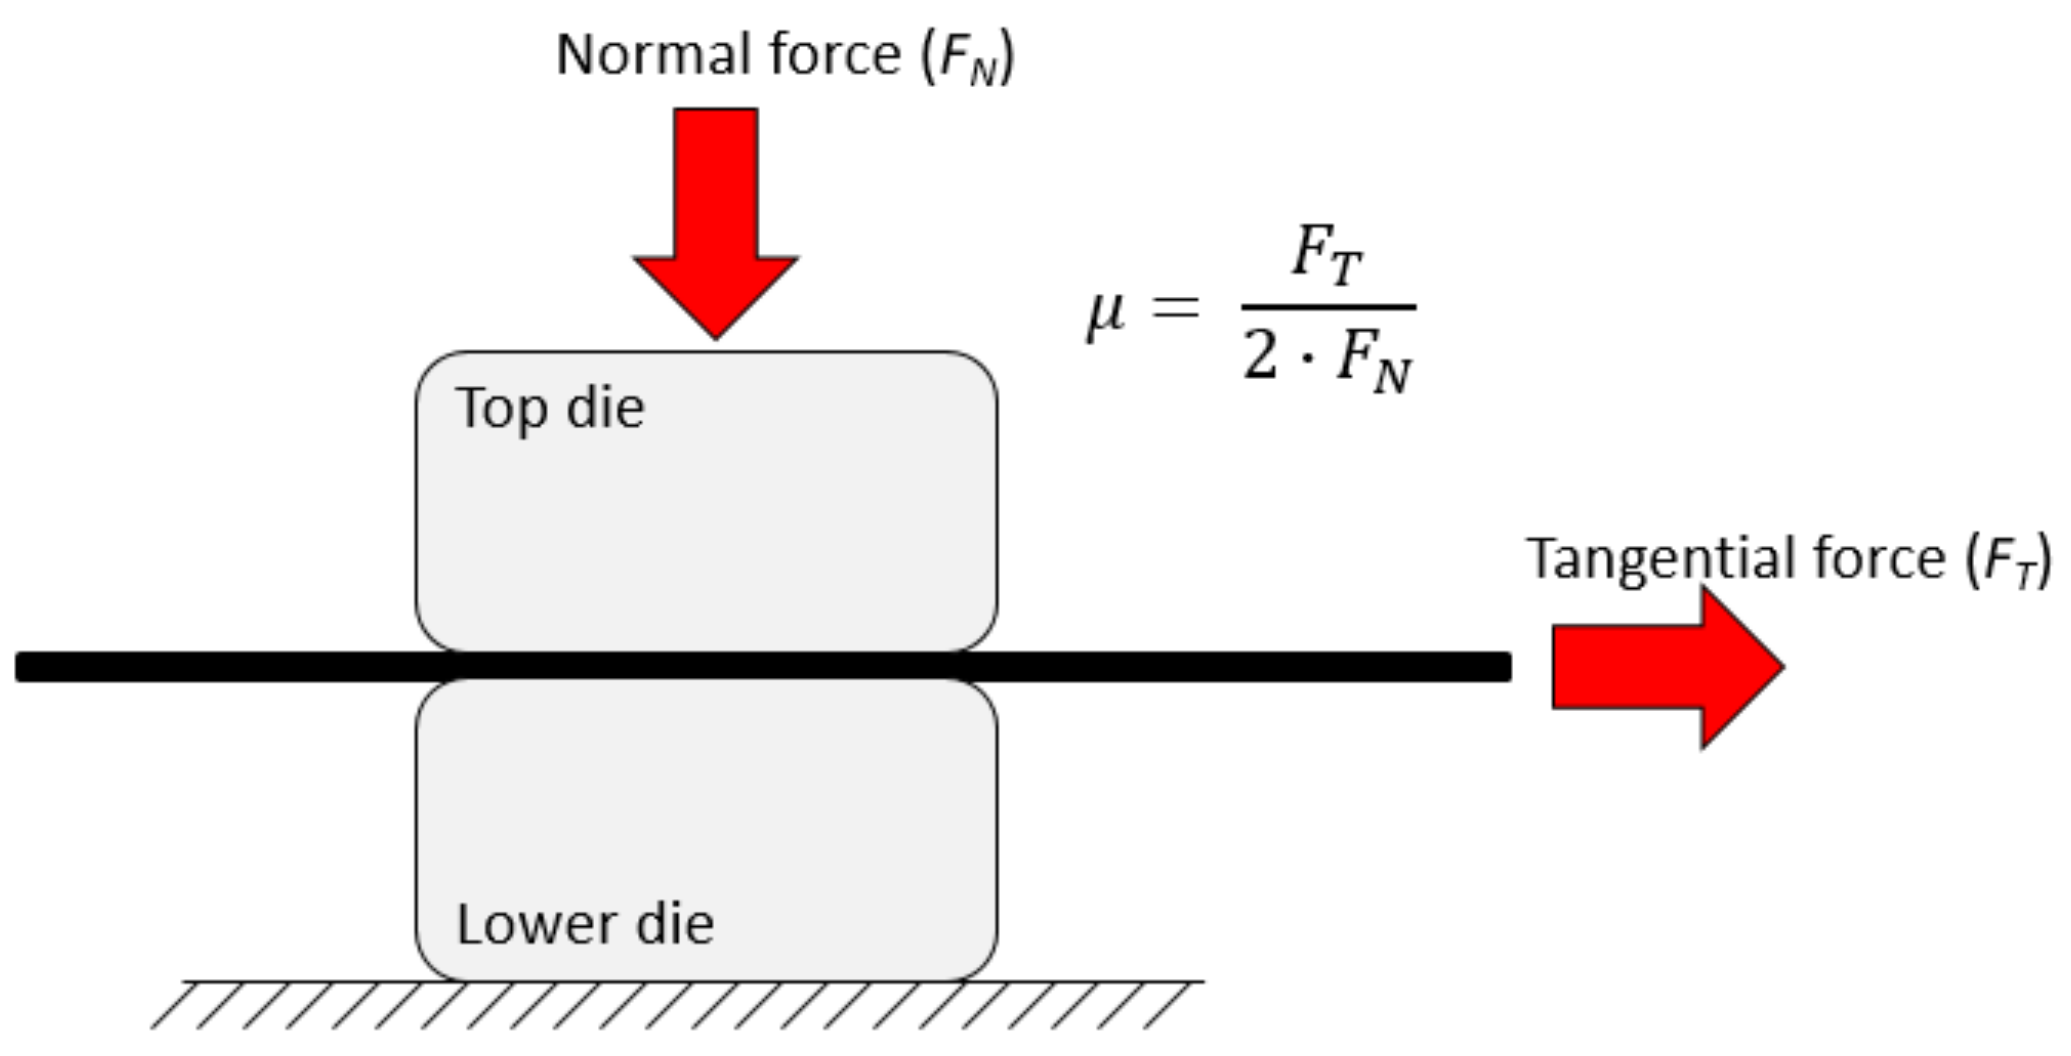
The tests were conducted using two of the axes of a 25-t hydraulic biaxial testing machine. Each axis measures the force, normal force, and tangential force, by means of a load cell. The schematic setup is shown in Figure 3.
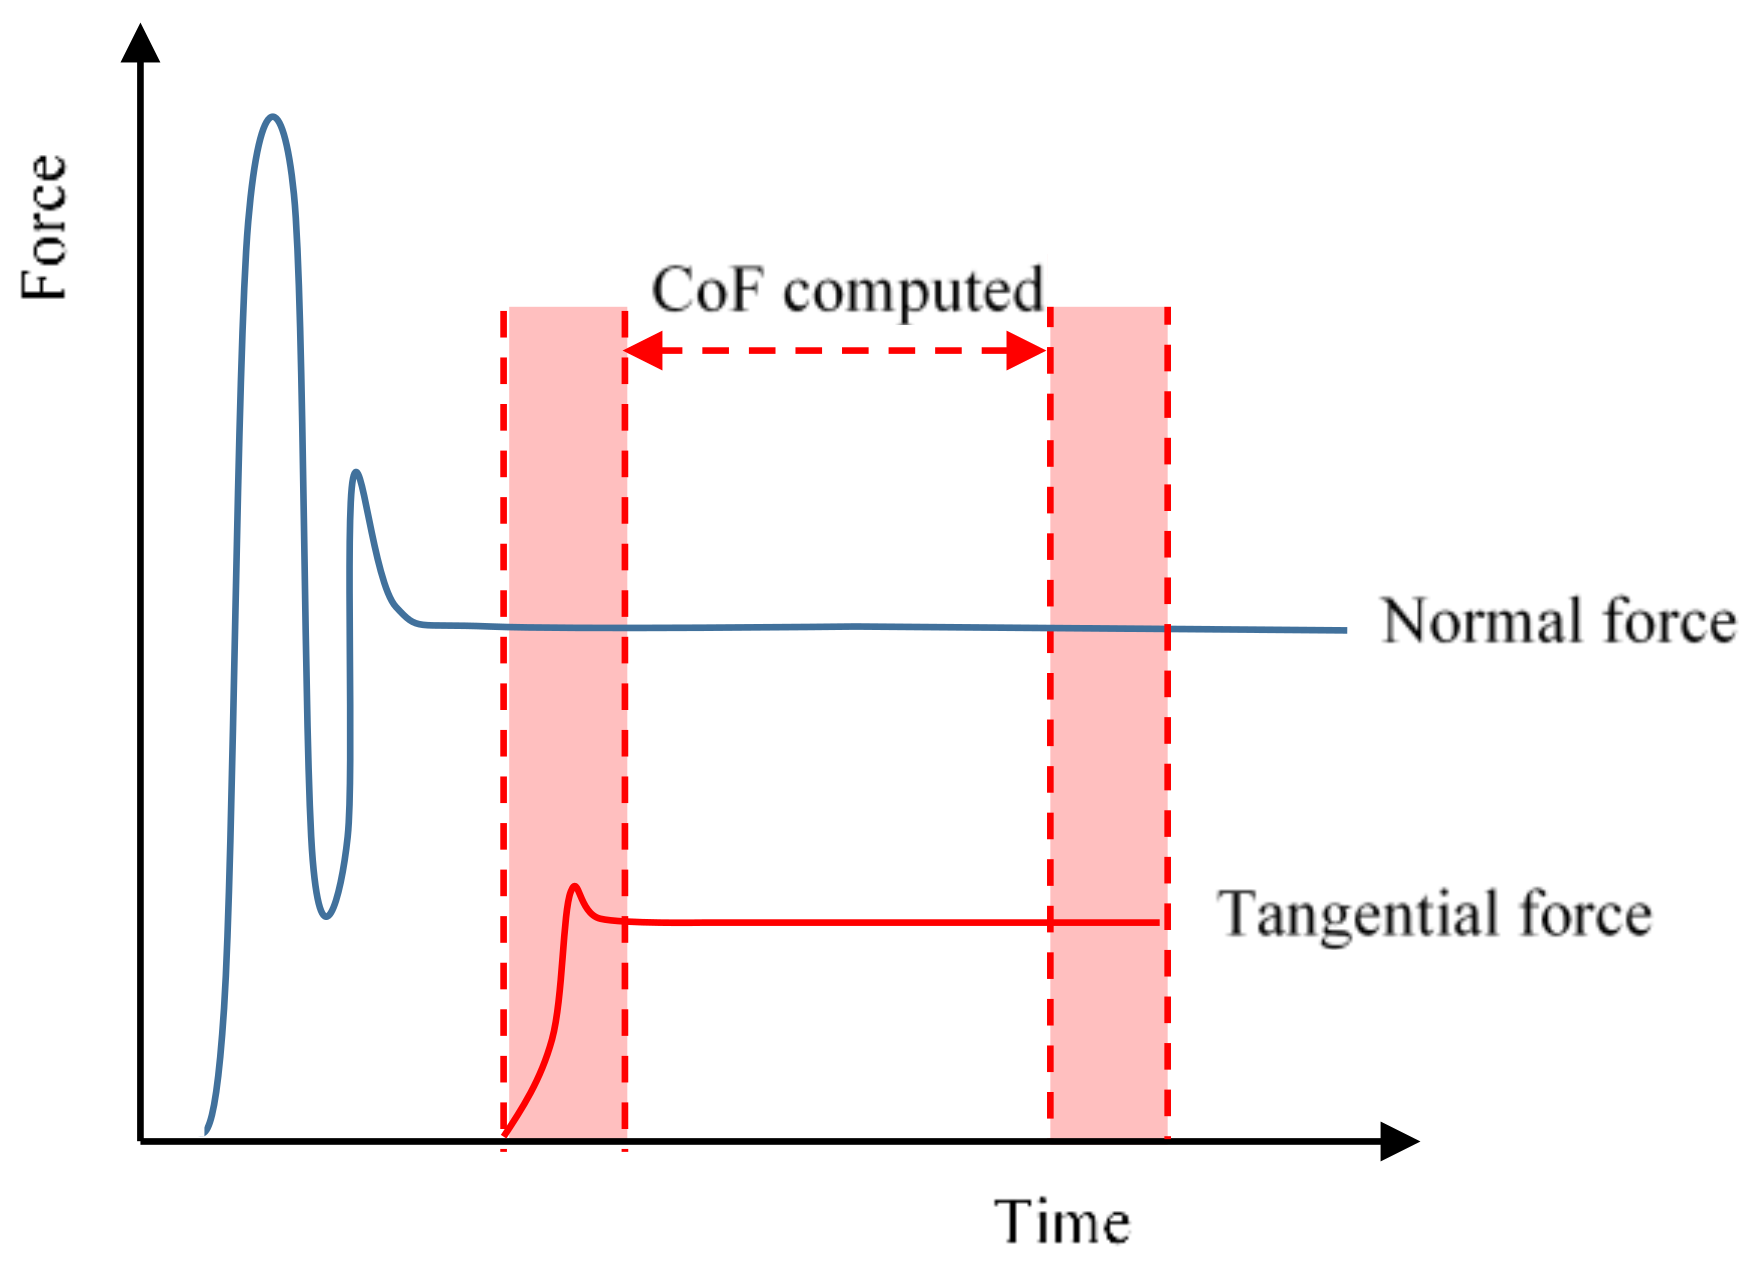
The metal strip is positioned between the upper movable and lower fixed dies. First, a defined normal force FN is applied by moving the movable die with one of the hydraulic cylinders. Afterwards, another hydraulic cylinder clamps the strip and draws it through the die inserts with a constant velocity v (see Figure 4). Both the normal and the tangential force are recorded over a drawing length of 100 mm.
The measured tangential force corresponds to the sum of the upper and lower die interface friction forces. Accordingly, half of the friction force needs to be considered for determining CoF, and can be computed following the Coulomb friction law (1) [38]
μ = F T 2 F N
In order to analyse stable conditions, the evaluation area is set removing 10% from the initial and final part of the friction force curve. Tempered grey cast iron GGG70 die inserts were used for the testing, with a surface hardness of 62 HRc. The contact surface of the die blocks (see Figure 3) was 52 mm length and 26 mm width. In order to evaluate the influence of varying die surface topographies, two polishing levels were prepared following industrial hand polishing procedures, corresponding to Ra values of 0.2 and 0.4 µm, respectively. Figure 5 and Table 3 presents the representative images and topographical parameter values (measured following the same procedure as described in Section 2.2) of the two polishing levels, named as Ra0.2-Die and Ra0.4-Die.
Before the strip drawing tests, strips and die surfaces were cleaned with acetone. Once cleaned, the strips were lubricated using ALUBVSD05 (ZEPF, Konstans, Germany) metal forming lubricant (viscosity at 40 °C = 85 cSt), usually applied in aluminium sheet forming processes. One brush stroke of lubricant was carefully applied on each side of the aluminium strip, and the remaining lubricant present over the peaks was gently removed by a lint free wipe. This way, the valleys of the surface were filled with lubricant. The lubricant quantity was measured by gravimetry using ten measuring replicates per texture condition (see Table 4).
The Strip Drawing tests were performed at a constant drawing velocity of 10 mm/s for all tests, at five contact pressures ranging from 1 to 15 MPa (1, 2, 5, 10, 15 MPa) to resemble typical contact pressures in aluminium alloy drawing operations [39]. For each parameter combination, three strips were drawn to ensure a statistical representativeness.

2.4. Galling Analysis

Qualitative visual assessment on tooling and sheet parts remains the most ubiquitous method for characterising and identifying the occurrence of galling wear. According to the most used standards [40,41] galling is said to have occurred when at least one of the contacting surfaces exhibits torn metal to the unaided eye. Accordingly, in the classical applications of those methods, specimens are either “galled” or “not galled” which does not allow to set the severity of the occurred galling phenomena and is based on the subjective nature of visual assessment. Given this, it is important to identify a quantifiable measure of galling wear in order to set an objective quantitative method to rank the damage severity. There is an increasing use of profile-2D [42,43] or areal-3D [44,45,46,47,48,49] surface measurement quantifications in order to set a numerical ranking that provides a quantifiable output of the variability and severity of the damage. Although they provide numerical data on the severity that allows ranking the behaviour, it should be considered that the quantification relies on a localised position of the surfaces at which the measurements are carried out, and therefore difficulties with repeatability and application over large surface areas remain. Other authors characterize the average critical sliding distance to galling, providing quantitative data for galling resistance, but not galling severity [50]. Galling severity has been characterized by means of induced plasma mass spectrometry (ICP) quantifying the adhered material in the tool after pickling from the surface in [51].
A rather practical approach is proposed and adopted in the present paper, based on the gradient of the tangential force increment associated with the galling phenomena. A linear fitting of the tangential force curve is calculated in the representative part of the curve (excluding 20% from the initial and final part), and the slope of the fitted line is computed as an indicator of galling severity, coined as galling severity index (GSI). The threshold to define the galling occurrence was set based on the visual inspection of all the test surfaces. Table 5 indicates the summary of all the test conditions indicating the occurrence or not of galling and the corresponding GSI.
The galling severity index threshold was set as the mean value between the minimum GSI of the galled tests (0.45, corresponding to the Not textured sheet/Ra0.4-Die 5 MPa test) and the maximum GSI of all the non-galled tests (0.3, corresponding to the Medium textured sheet/Ra0.2-Die 5 MPa test), resulting in a GSI threshold of 0.375. Accordingly, a GSI > 0.375 is associated with galling occurrence, being the GSI value a relative severity indicator. Figure 6 presents an example of three tangential force curves presenting different galling severities.
Additionally, chemical composition analysis of the galled surfaces was performed using a FEI Nova NANOSEM 450 Scanning Electron Microscopy (SEM) through X-ray dispersive spectroscopy (EDX) at a voltage of 20 KV (FEI, Madrid, Spain).

2.5. Benchmark: Cup Drawing Test

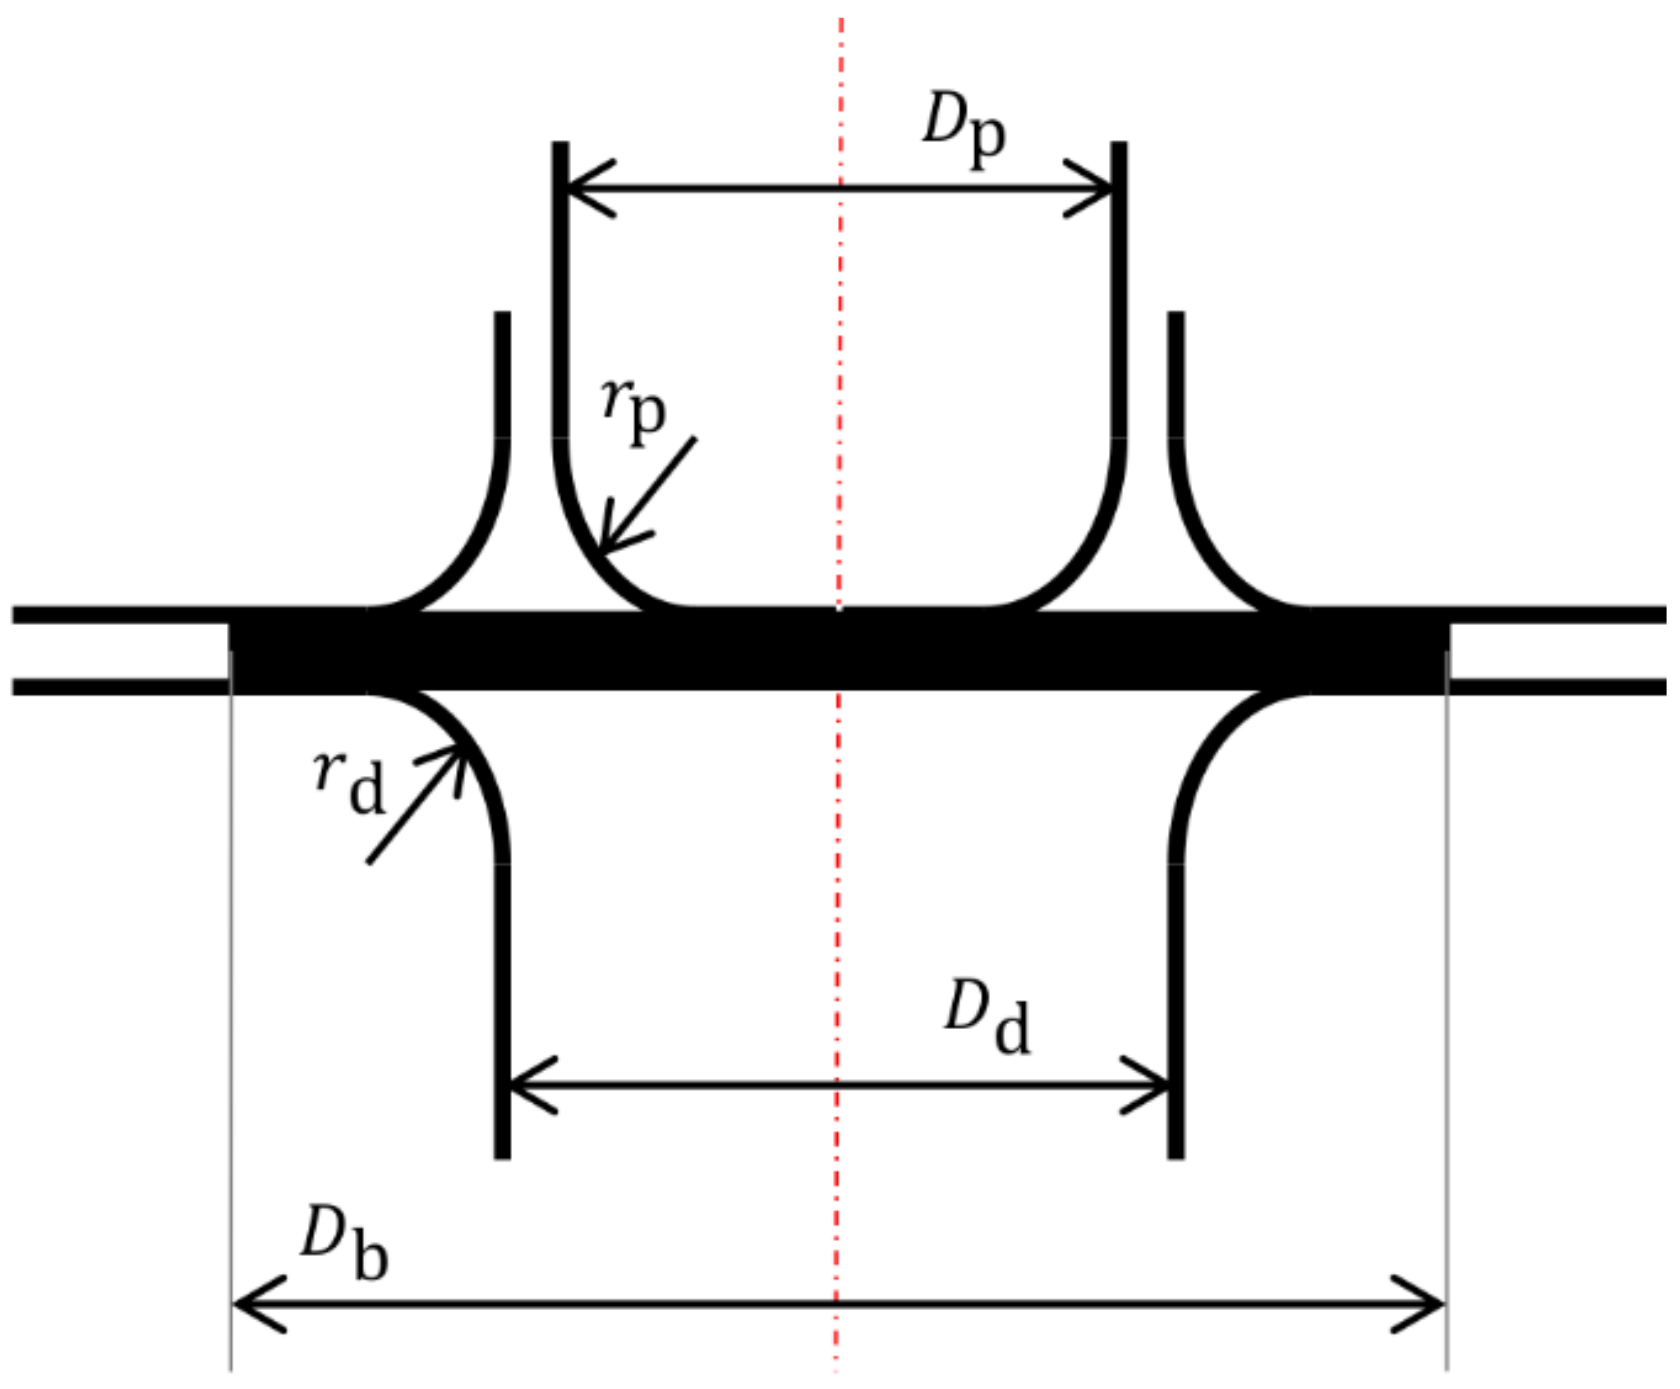
Cup drawing tests of the aluminium alloy have been carried out in order to evaluate the impact of the surface roughness on forming operations. Figure 7 shows schematically the tooling used for the cup drawing experiments and the dimensions are shown in Table 6. The roughness of the tooling surface is Ra = 0.4 µm, which corresponds to the polishing level named as Ra0.4-Die in the strip drawing test experiments, and the gap between the punch and the die is 2 mm, avoiding any ironing of the sheets during the drawing operation.
The drawing samples were prepared following the next methodology. Circular disks of 90 mm in diameter were cut by wire electrical discharge machining (EDM, AgiecharMilles, Barcelona, Spain). The disks were cut out from 100 mm width sheets textured under the same levels of reduction percentages as explained previously, generating 3 textured levels (see Table 2). Non-textured sheets were also included in the study as control for these experiments. Six circular disks for each condition were cut and drawn to have a representative number of specimens.
As in the case of the strip drawing tests, each disk was cleaned with acetone and then lubricated using ALUBVSD05 metal forming lubricant (viscosity at 40 °C = 85 cSt). The application procedure was the same as in the case of strip drawing tests, making sure that the quantity applied for each of the texturing conditions was similar (values given in Table 4).
The cup drawing tests were carried out in an instrumented 100 kN compression machine Zwick at a drawing speed of 8.33 mm/s. The disks were completely drawn, and the force-displacement curve was recorded for each of the experiments. The force-displacement curves were used for performance comparison since the drawing force is related to the friction during the drawing operation [52]. The maximum drawing force (Fdmax) for each of the texturing conditions was also extracted.
After the drawing of the disks, the thickness of the cup wall was measured at a height of 15 mm from the base of the cup. Eight different equidistant thickness measurements at every 45° were taken for each drawn cup. The average thickness (taveg) and the thickness deviation values (Δt) are reported in the results section.

3. Results

3.1. Surface Topography Analysis

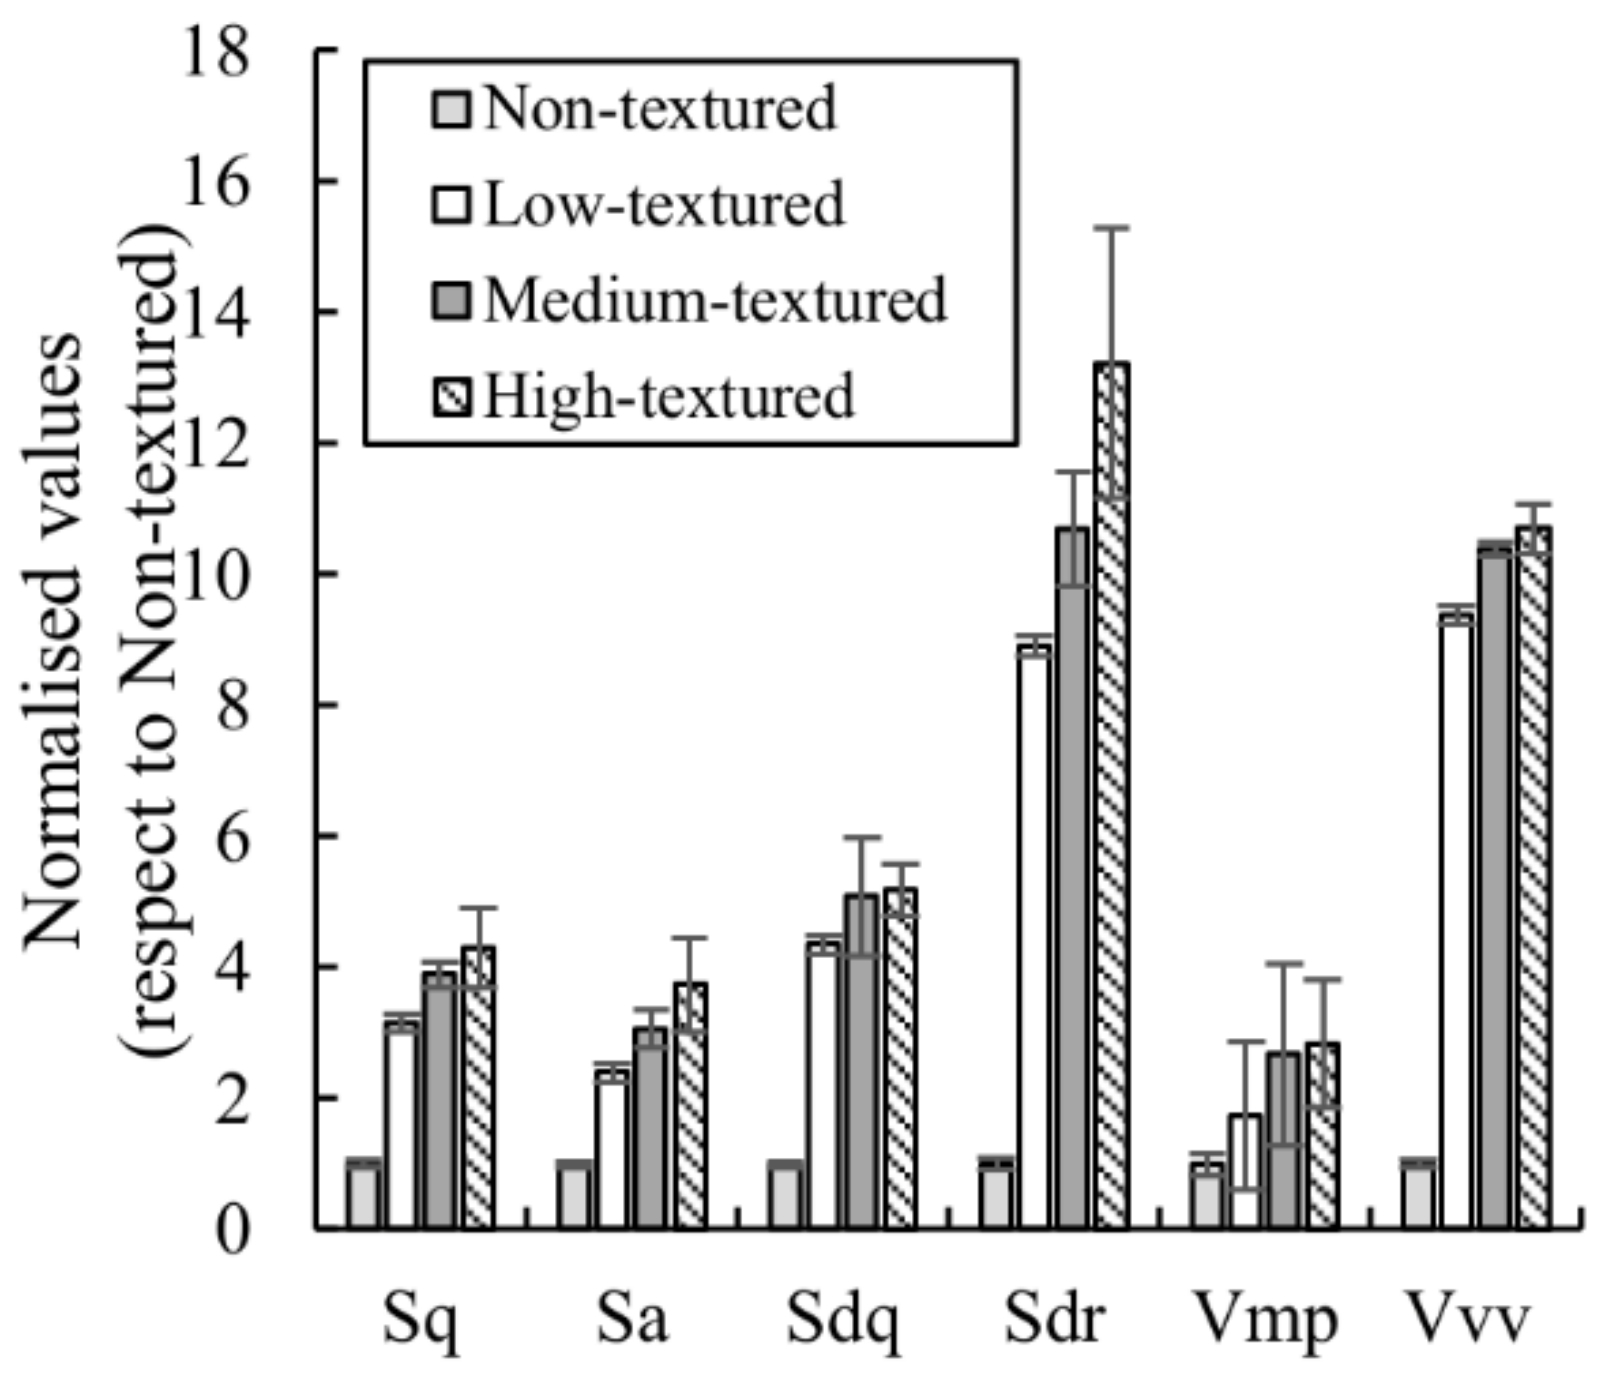
Sheet surfaces presented differing topography values (see Table 2). The Str parameter indicates the presence of lay in any direction of the surface, indicating if the surface is anisotropic (Str close to 0) or isotropic (Str = 1) topography. It can be observed that the non-textured surface presents a typically oriented surface topography corresponding to a mill finish (Str = 0.028); after the EDT texturing of the samples, an isotropic EDT texture is embossed on the surface (Str ~ 0.9). Non-textured mill finish surfaces presented a predominance of peaks on the surface (Ssk > 0) that changed to negative skewness values after the texturing (Ssk < 0), indicating a shift to an increased predominance of valleys on the surface. Figure 8 presents the rest of the topographical parameters normalised with respect to the non-textured sample values for comparison.
It can be observed that all parameters significantly increased their value after EDT texturing, although to a different extent. Both height parameters (average roughness Sa and root mean square roughness Sq) present a regular increase in the value as the texturing degree increases. The hybrid Sdq parameter, indicating the root mean square slope of the surface, presented similar values for the medium-textured and high-textured degree samples, indicating that the mean slopes encountered in both surfaces are similar. The parameter most sensitive to the texturing degree was the developed interfacial areal ratio, Sdr. This parameter expresses the percentage of the additional surface area contributed by the texture, as compared to an ideal plane. Sdr presented clear differences between the three textured degrees, confirming that the increasing texturing degree generated more complex surfaces. Finally, the functional parameters indicate the material volume in the peak area (Vmp) and the void volume in the valley zone (Vvv), enclosed in the material ratio in the ranges 0–5% and 80–100%, respectively. Both functional parameters presented similar differences as discussed for the Sdq value, at which the medium-textured and high-textured samples presented alike values.
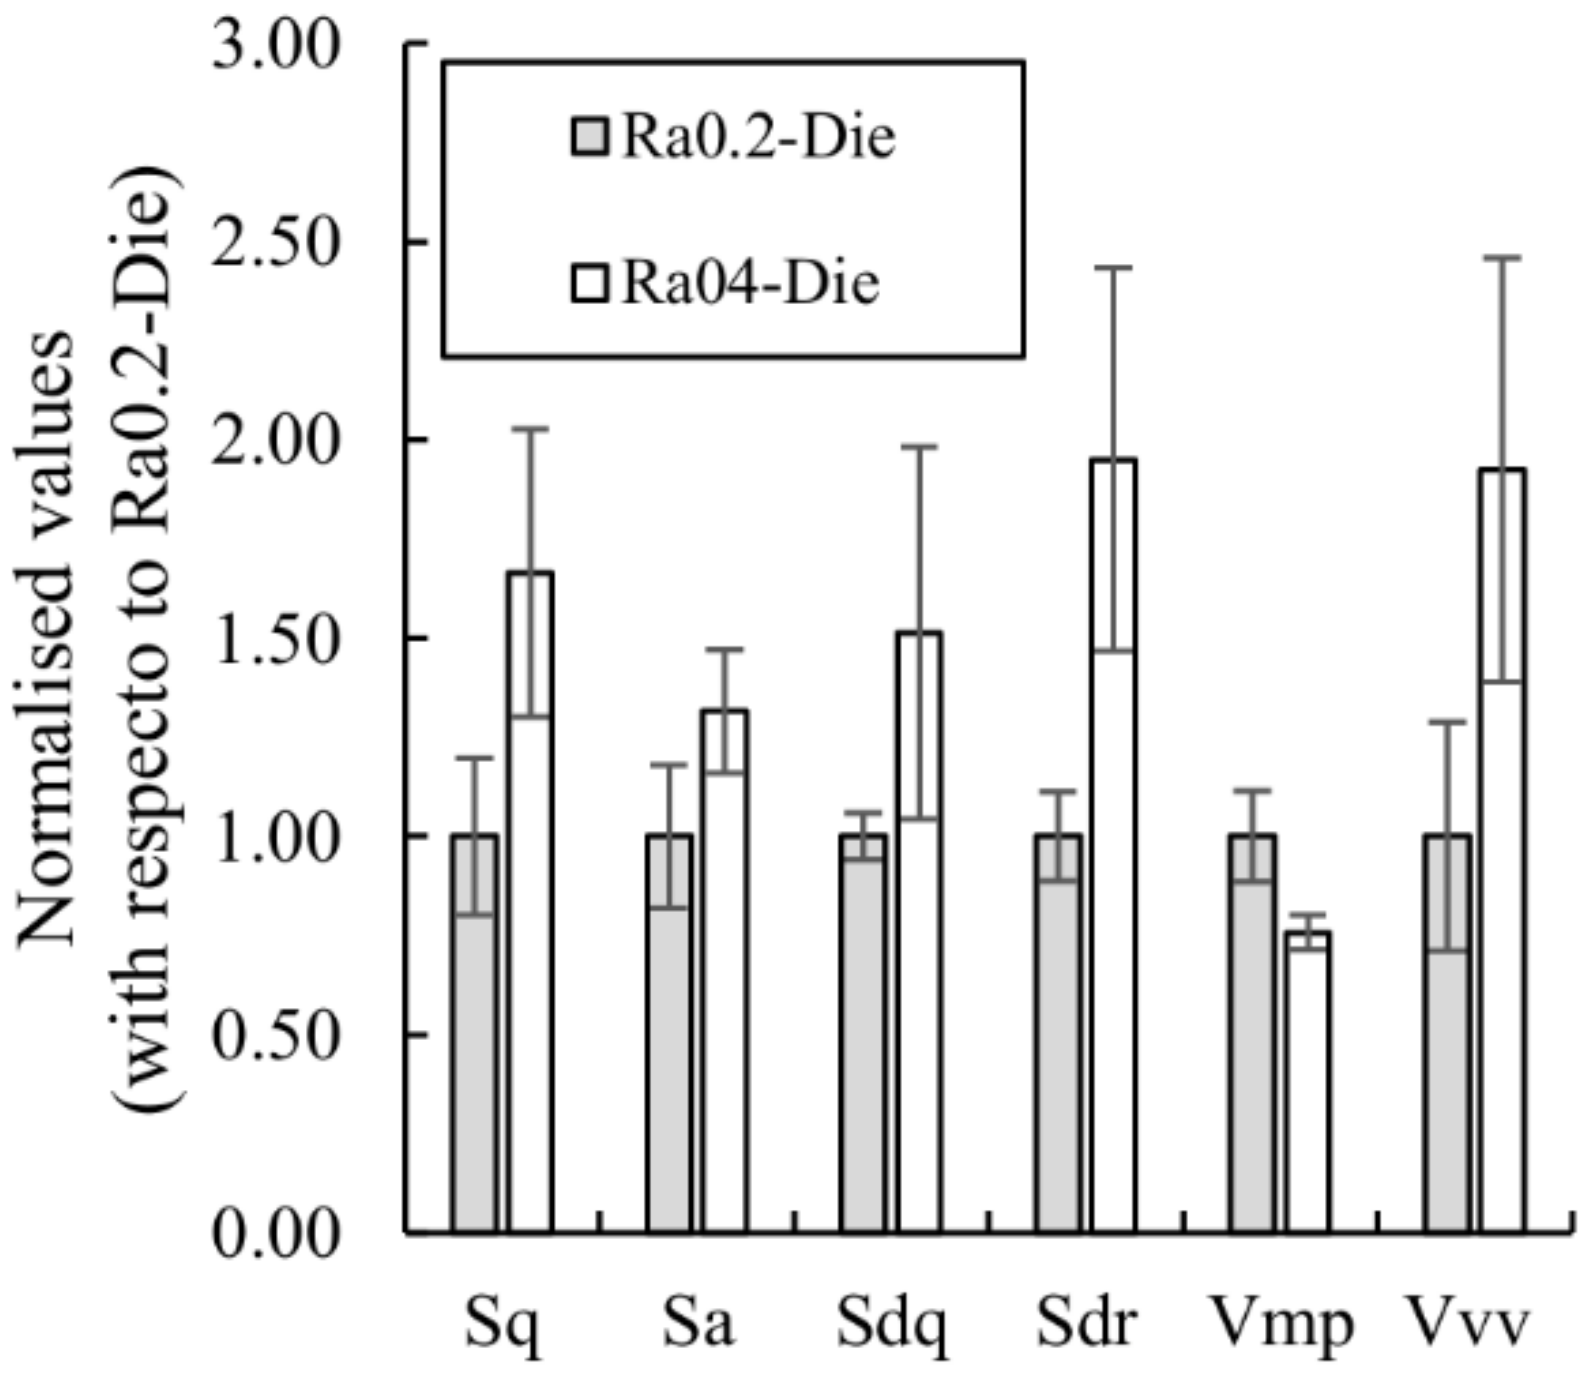
The same topographic parameters were computed to describe the two grades of tool surface topography, named as Ra0.2-Die and Ra0.4-Die (see Table 3). Both surfaces presented oriented anisotropic surfaces (Str~0) and negatively skewed surfaces, indicating a preference of valleys. It should be highlighted, however, that the Ra0.4-Die surface presented a much more negative skewness value, indicating that the valley preference is significantly stronger. Figure 9 presents the rest of the parameters normalised with respect to the Ra0.2-Die surface.
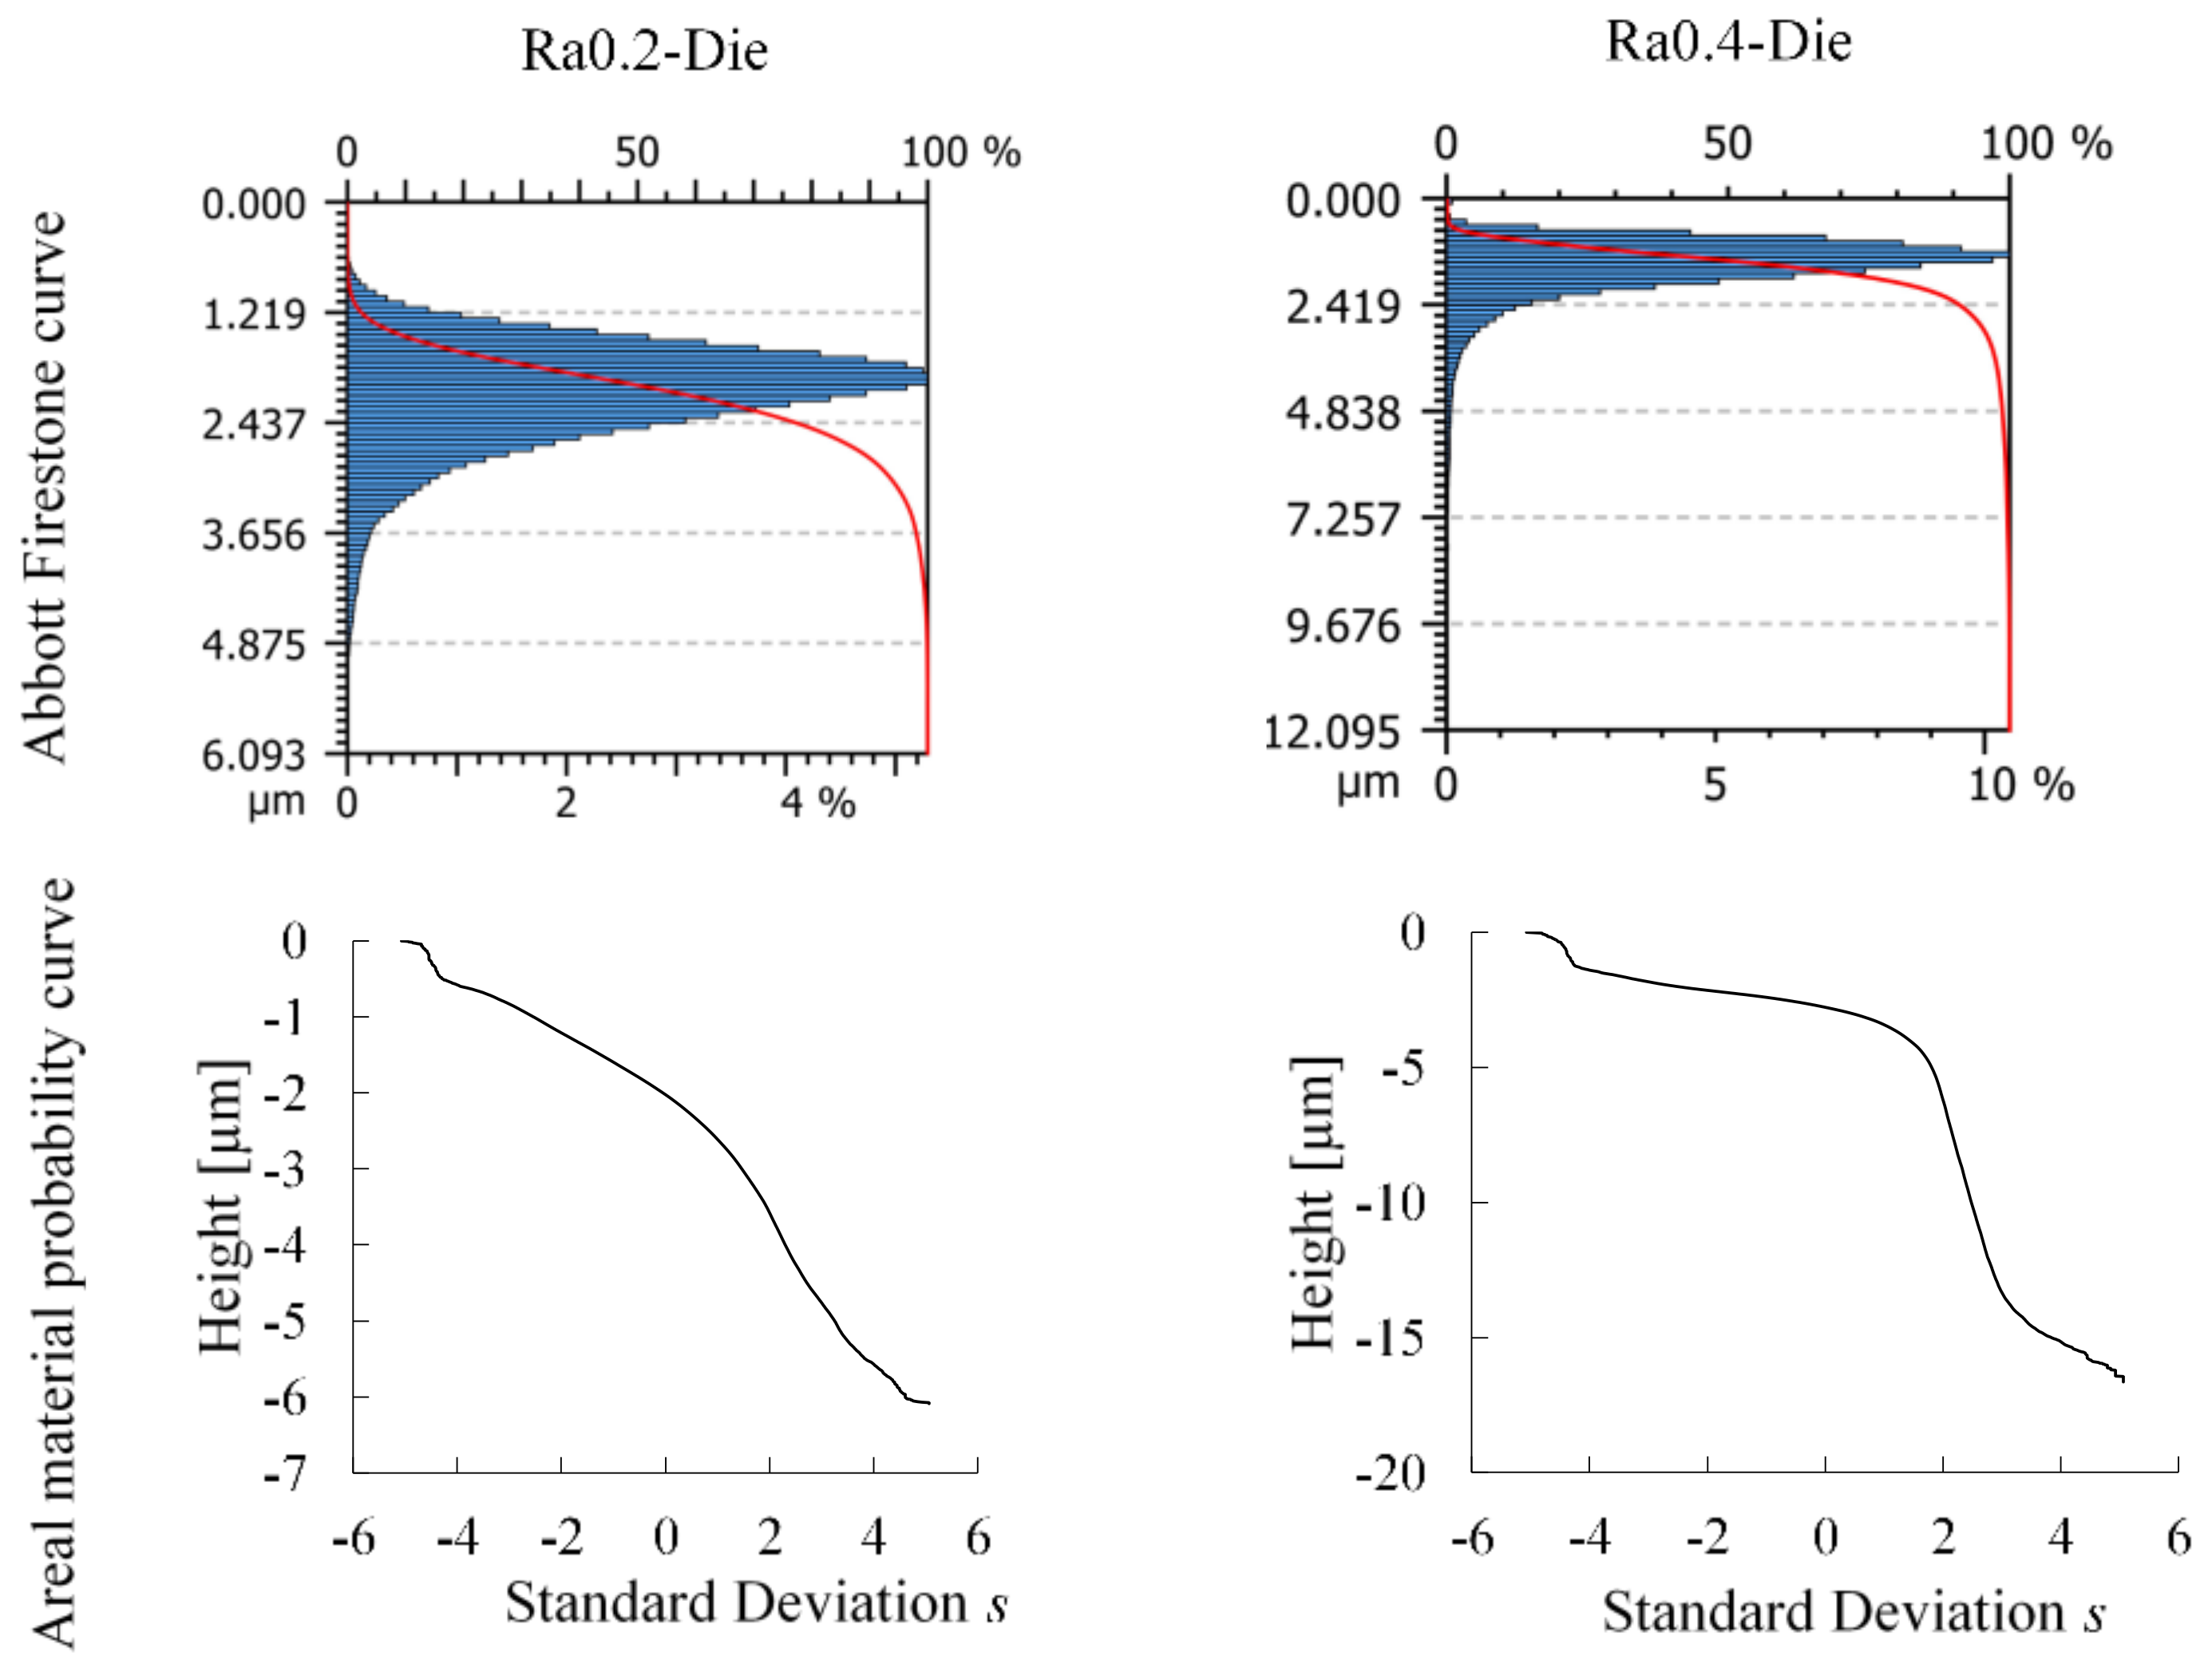
It can be observed that all the parameters increase for the Ra0.4-Die surface, except the functional Vmp parameter, which presents a lower value, indicating that less material volume is present in the peak area. The most sensitive parameters were Sdr and Vvv, indicating that the developed area and the void volume in the valleys are significantly larger for the Ra0.4-Die surface. In order to better understand the different trends in the Vmp functional parameter, a deeper study was conducted. Figure 10 shows the Abbott- Firestone curve (also known as the bearing area curve or the areal material ratio curve) of both surfaces, which graphically describes the distribution of material along the surface height, showing significant differences between the two die surfaces. The representation of the areal material probability curve (where the Abbott Firestone curve is expressed as Gaussian probability in standard deviation values) allows assessment of the type of distribution of the surface heights. It can be observed that in this scale, the areal material ratio curve of the Ra0.2-Die approximates a straight line, which indicates an almost Gaussian distribution of the heights [53]. Conversely, the Ra0.4-Die surface is composed by two linear regions, indicating two Gaussian distributions, typical of stratified surfaces.
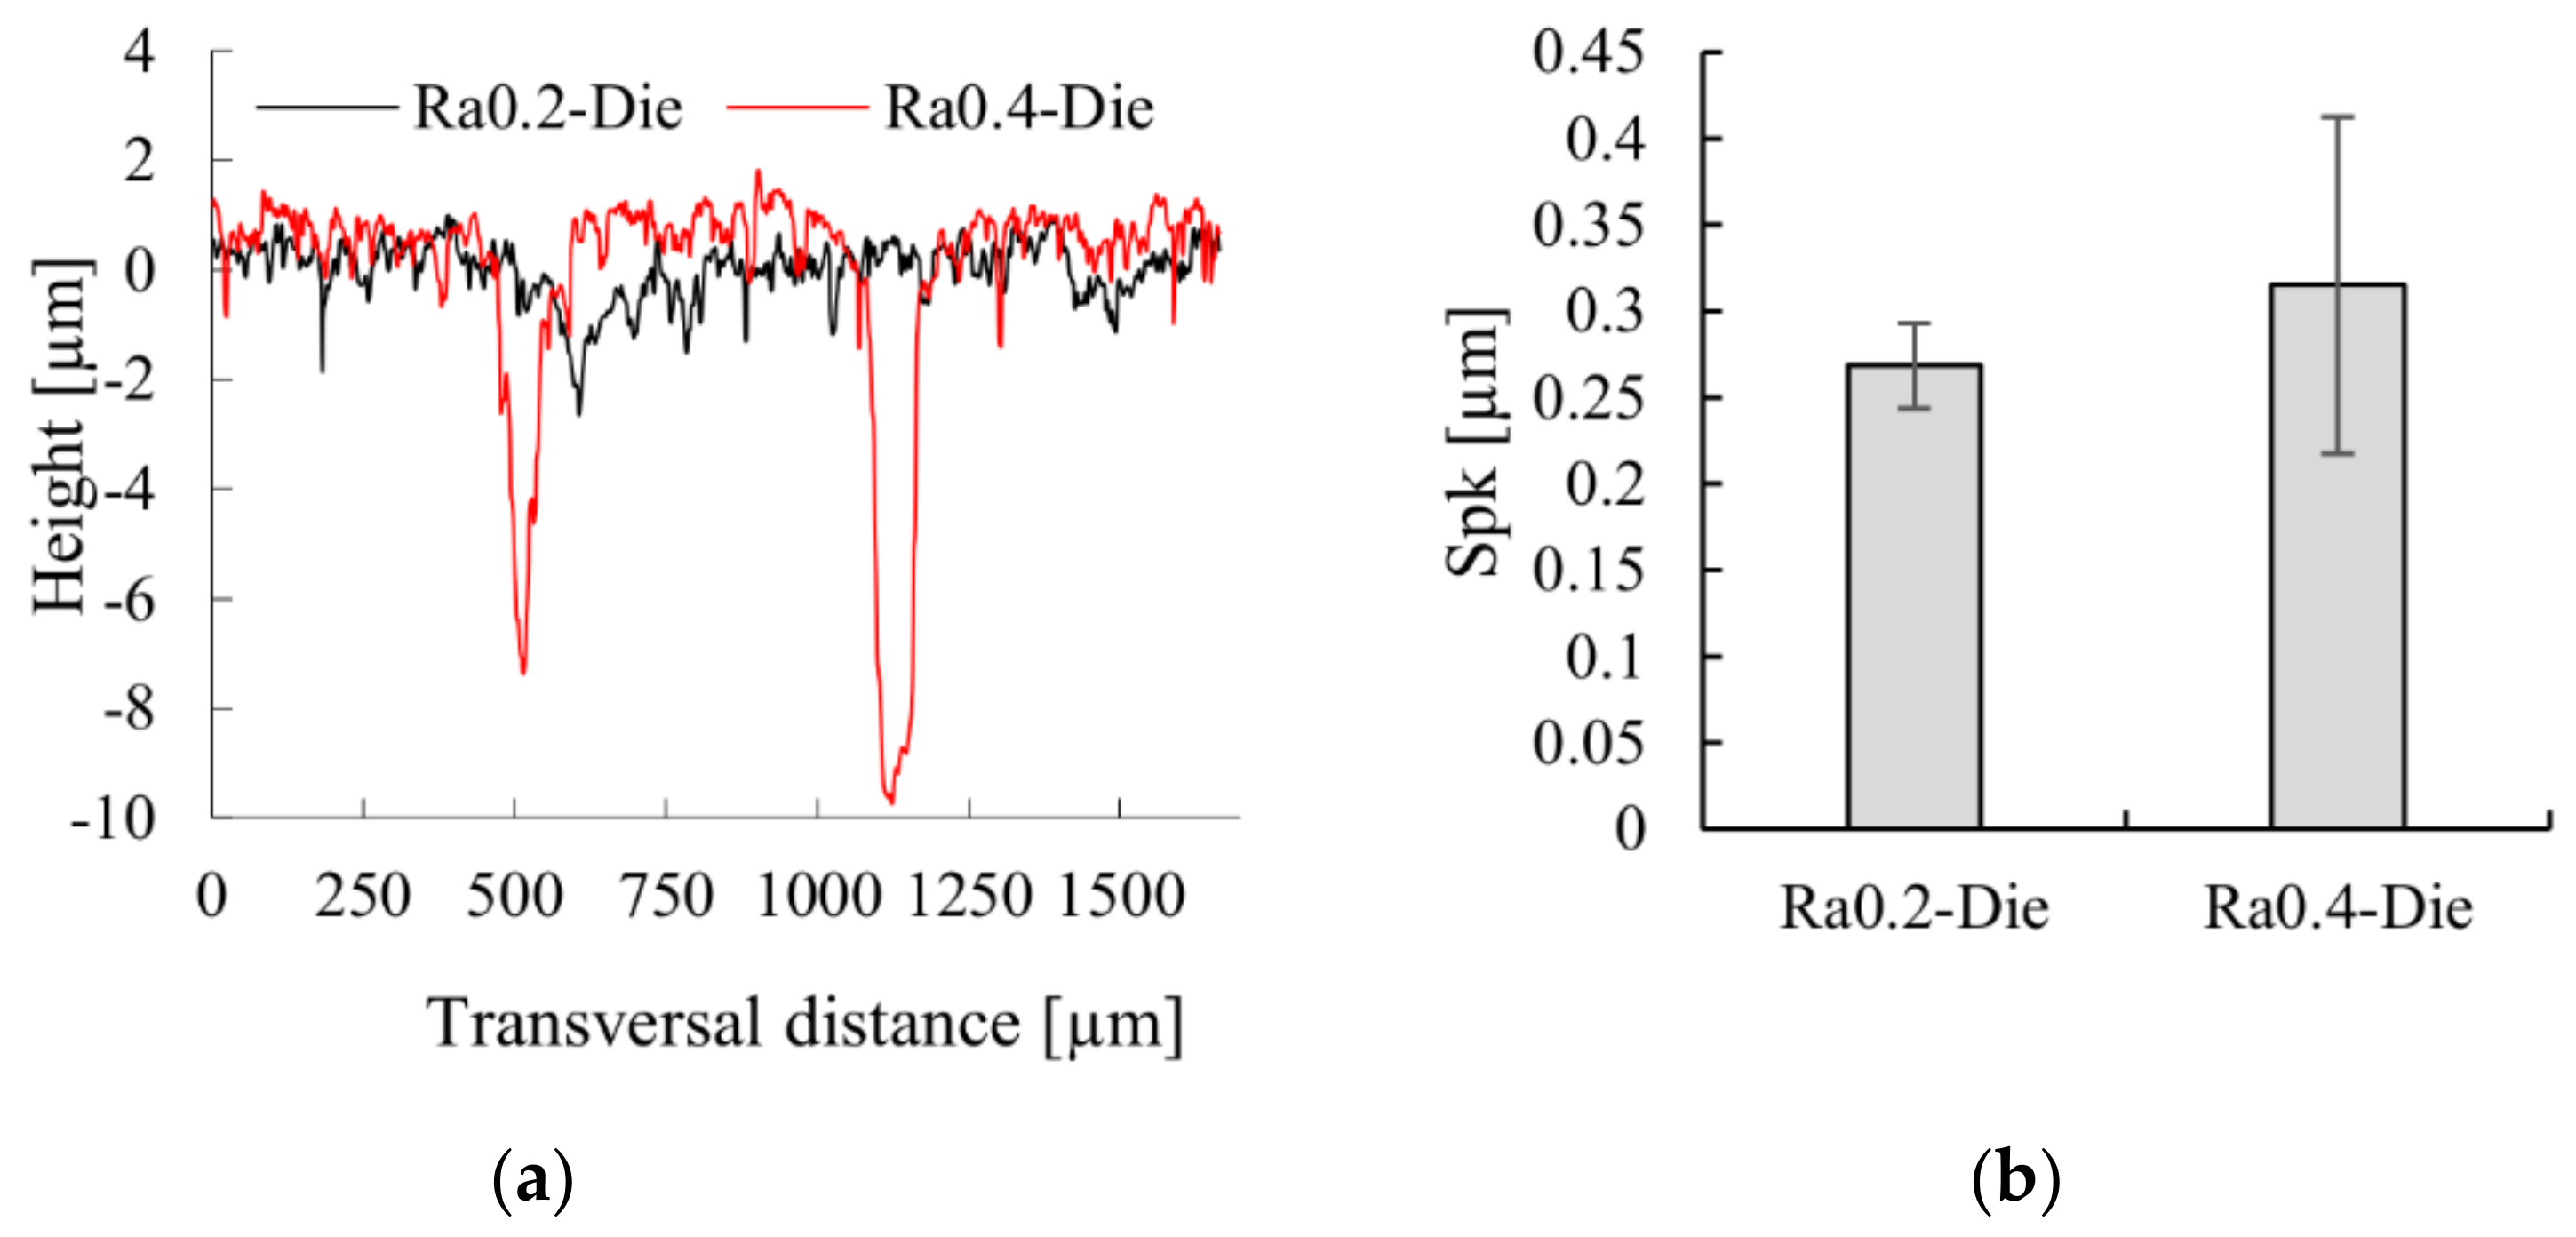
Figure 11a shows the profiles of both die surfaces at which the presence of two distributions is clearly seen on the Ra0.4-Die surface, with a top part corresponding to a typical polished surface (very similar compared to the Ra0.2-Die surface), combined with big valleys due to the presence of pores on the surface (see Figure 5). In order to analyse the roughness of the bearing surfaces interacting during the drawing process (the polished area), the areal parameter for stratified functional surfaces, Spk, was computed. The Spk parameter is the three-dimensional analogue of the bidimensional Rpk parameter described in ISO 13565-2 [53] (known as reduced peak height). Spk is a measure of the peak height above the core roughness and represents the nominal height of the material that may be removed during a running-in operation. It can be observed from the results (see Figure 11b) that the Ra0.4-Die presents a slightly larger Spk value, compared with the Ra0.2-Die surface.

3.2. Galling

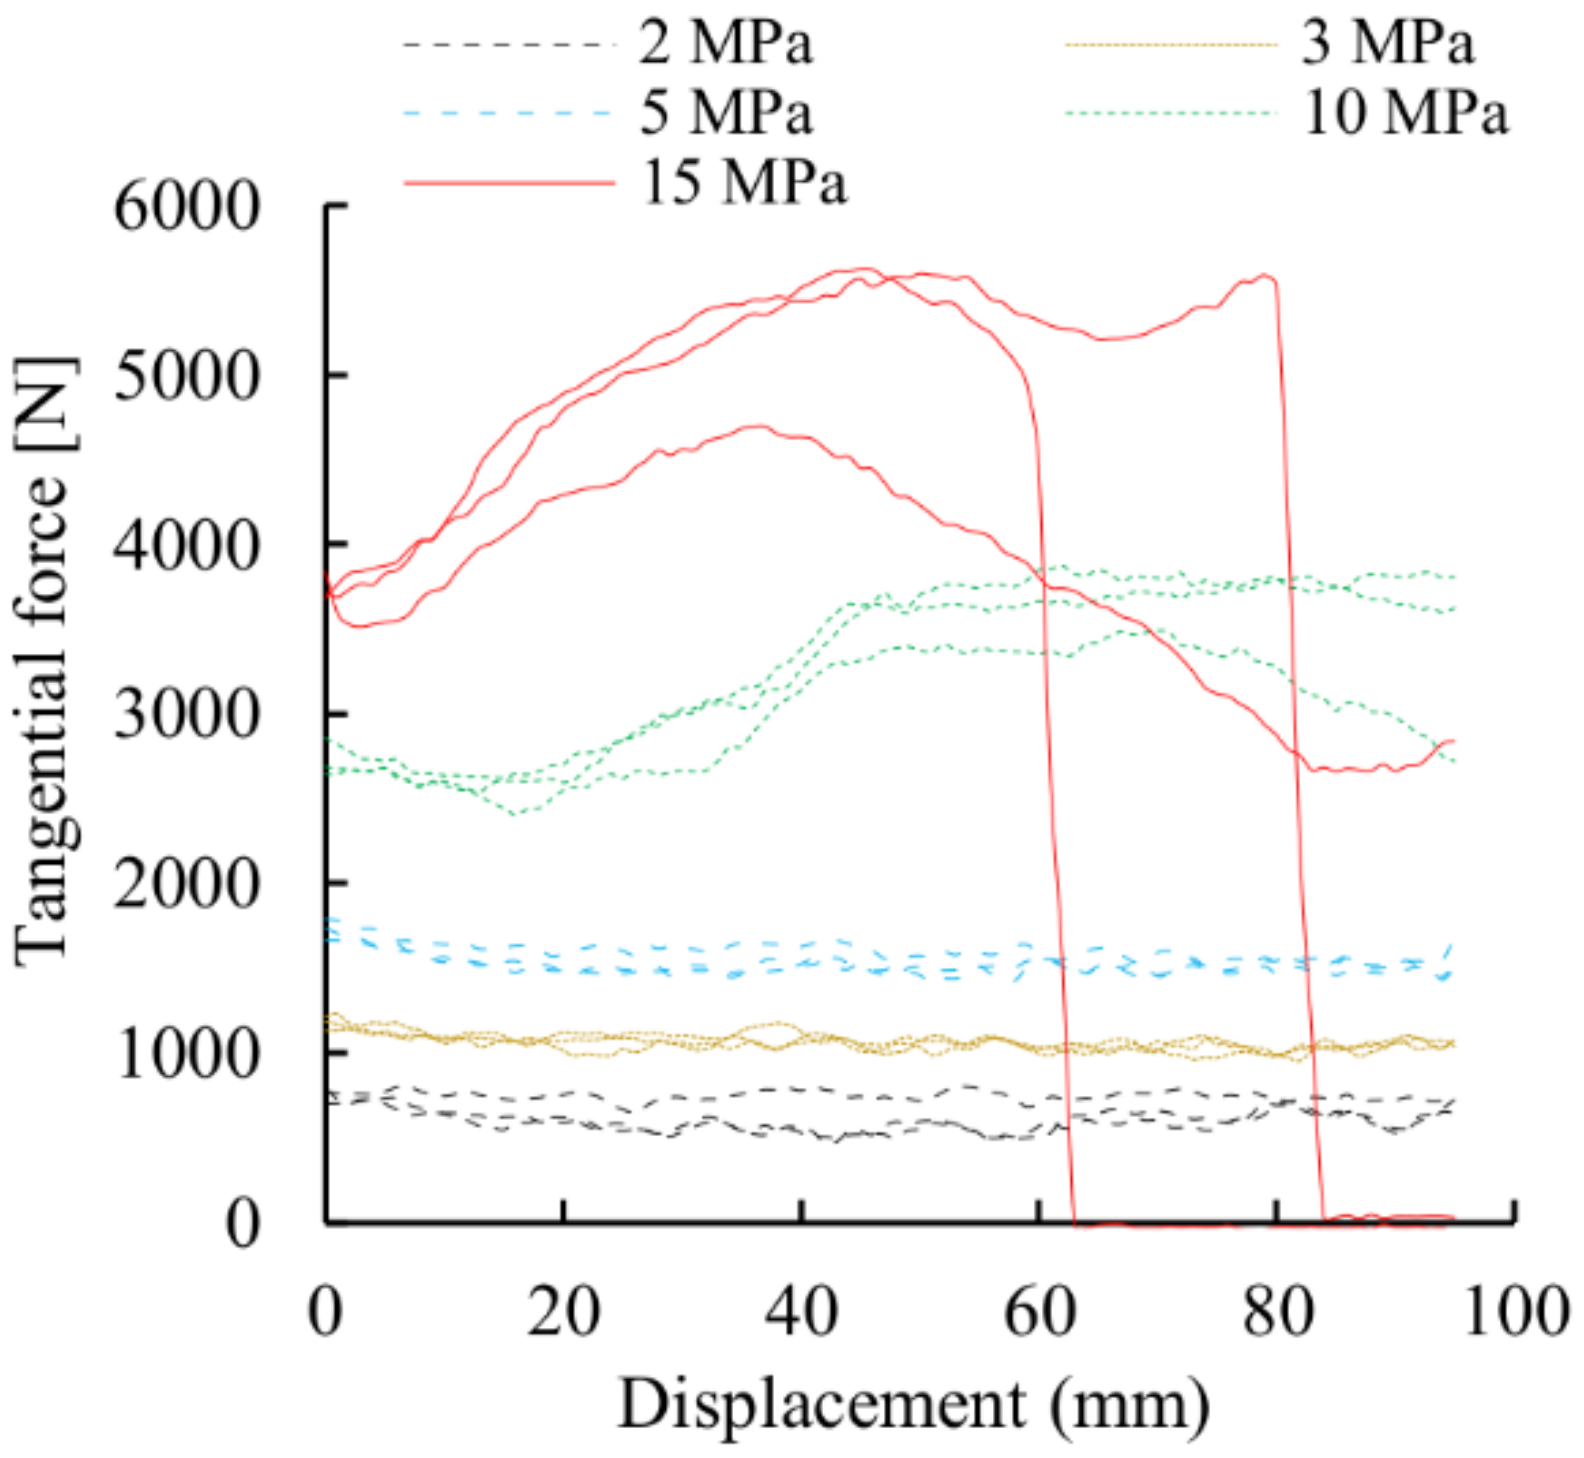
The three replicates of each test presented good overall reproducibility. As representative, Figure 12 shows the tangential force evolution, along with the sliding distance for all the tests corresponding to high textured sheet and Ra0.2 die under the five pressure conditions under study (2, 3, 5, 10 and 15 Mpa).
As expected, the tangential force increased as the contact pressure increased. As mentioned previously, galling is associated with a severe adhesion phenomenon, at which the friction force increases considerably. It can be observed that in cases in which strong galling occurred (Figure 12, 15 MPa curve), the sheet broke down and, consequently, the tangential force decayed at 40 mm of displacement. Conversely, the tests that did not present any galling phenomena (2, 3 and 5 MPa tests) presented a homogeneous tangential force evolution during the test.
Some galled situations presented different stages. The first stage was characterized by stable friction and, subsequently, friction started to increase (Figure 12, 10 MPa test). Other galled situations, however, did not present this first stage and the tangential force started increasing from the beginning of the test (Figure 12, 15 Mpa).
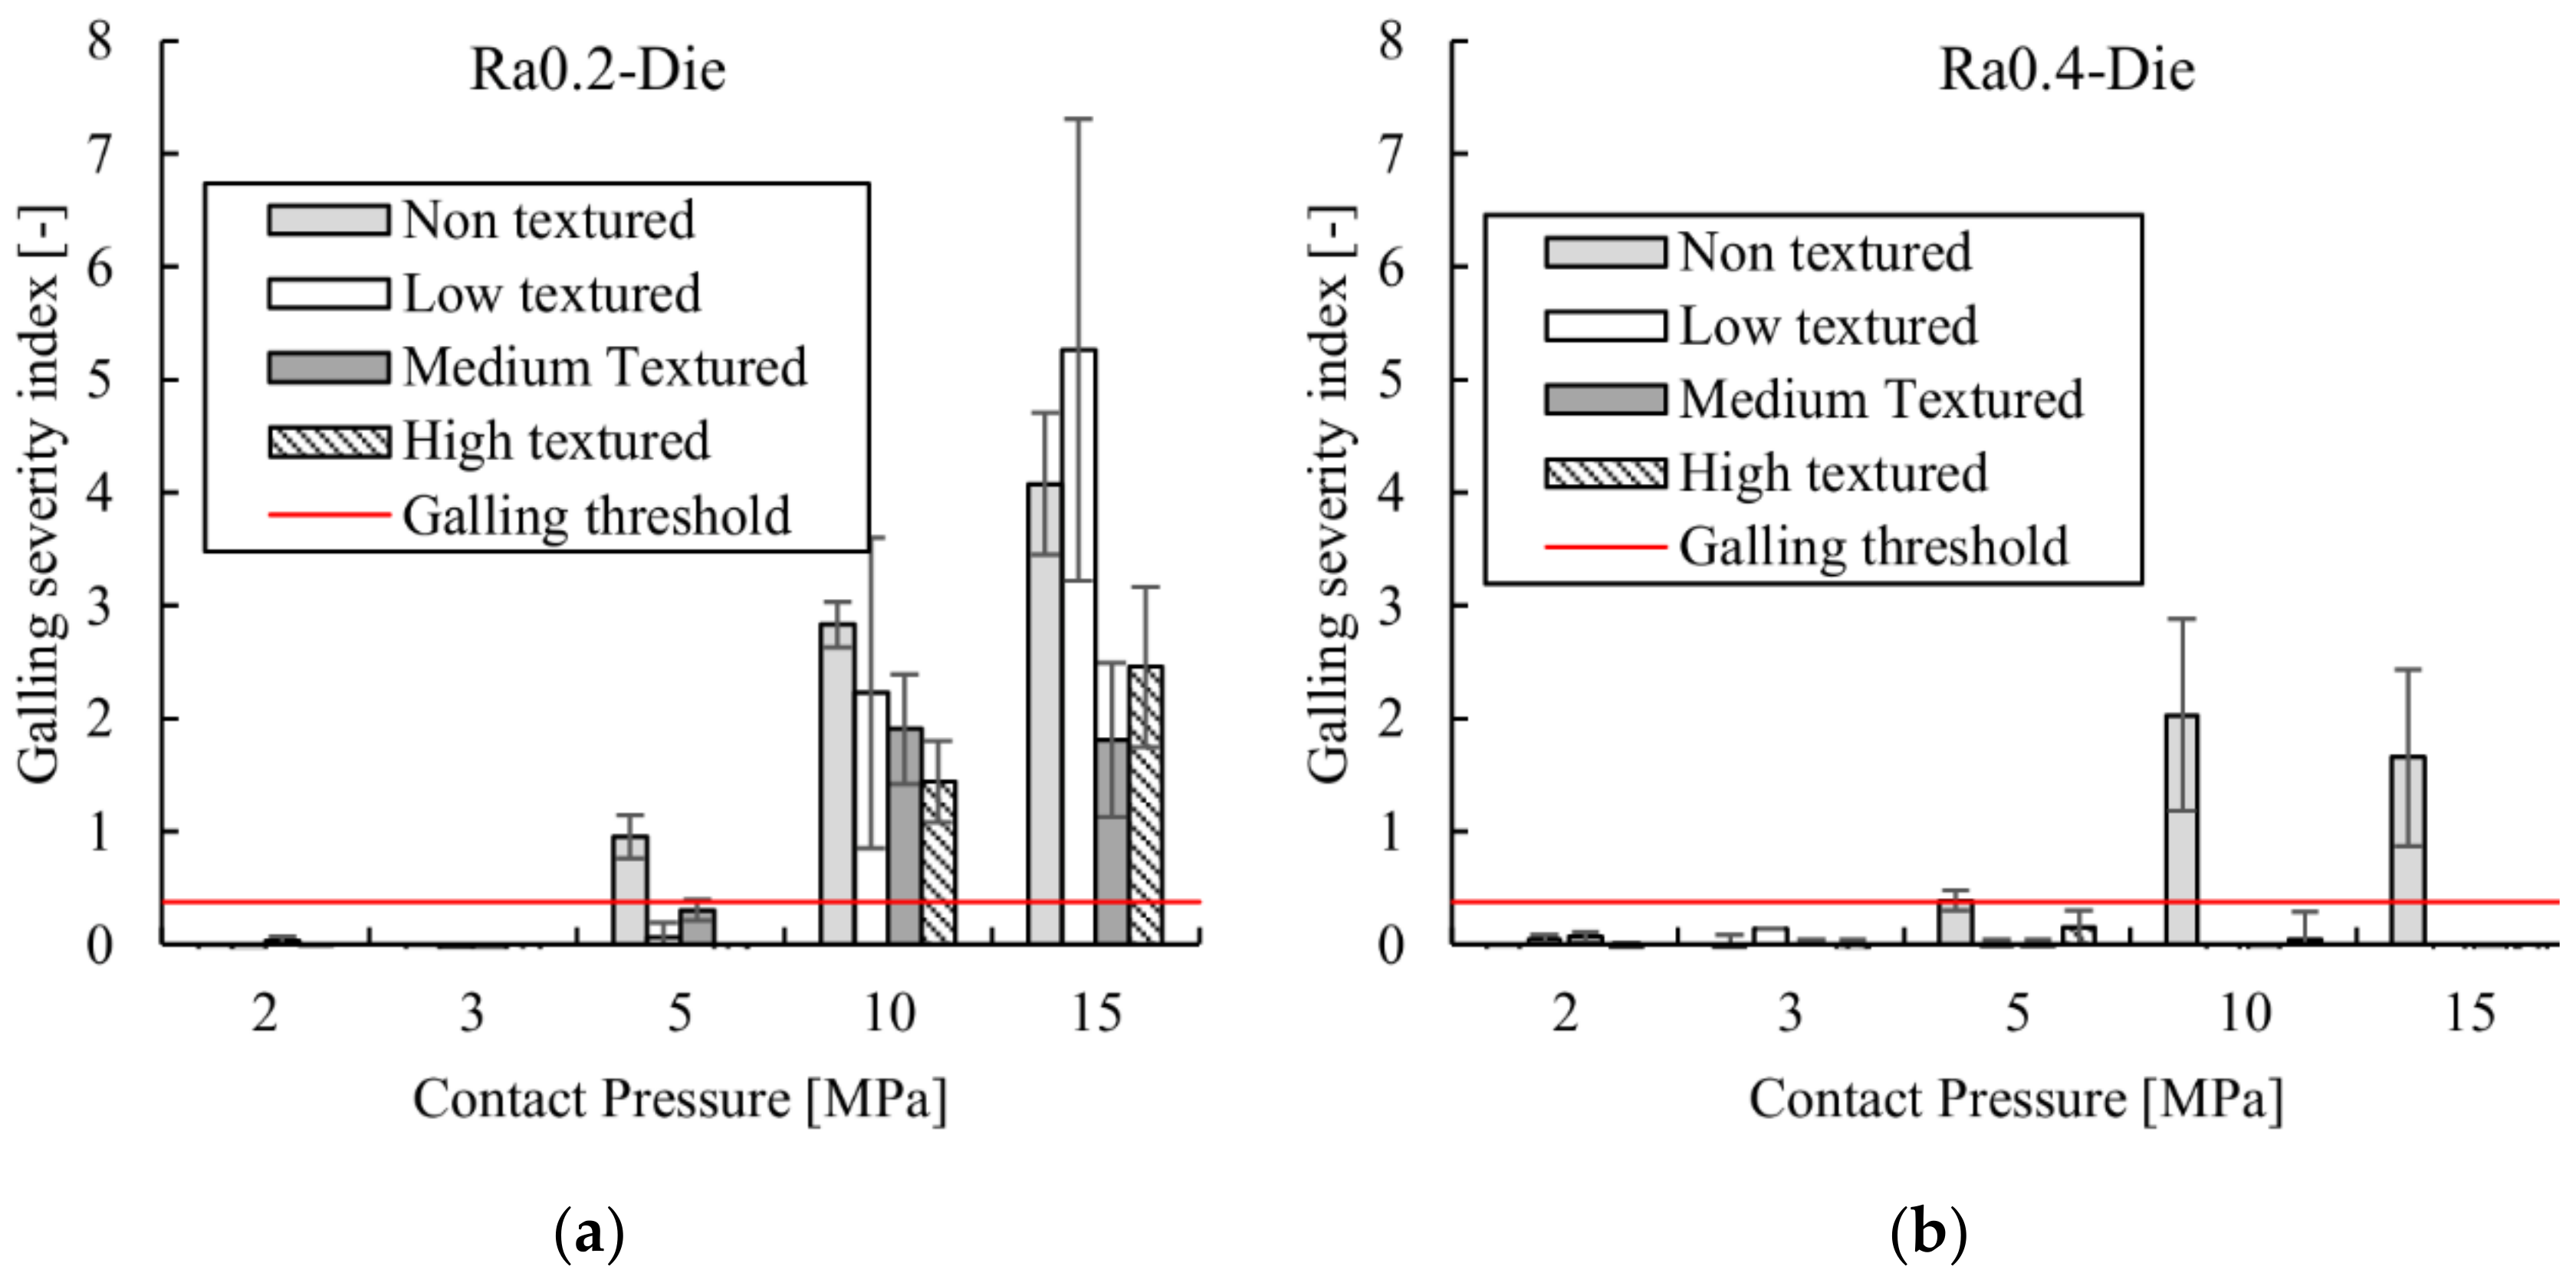
In order to quantitatively analyse both the occurrence and the severity of galling, the galling severity index (GSI) was computed according to the previously described procedure. Figure 13 presents the galling severity index corresponding to all sheet textures under study against both die surfaces (see Supplementary Materials).
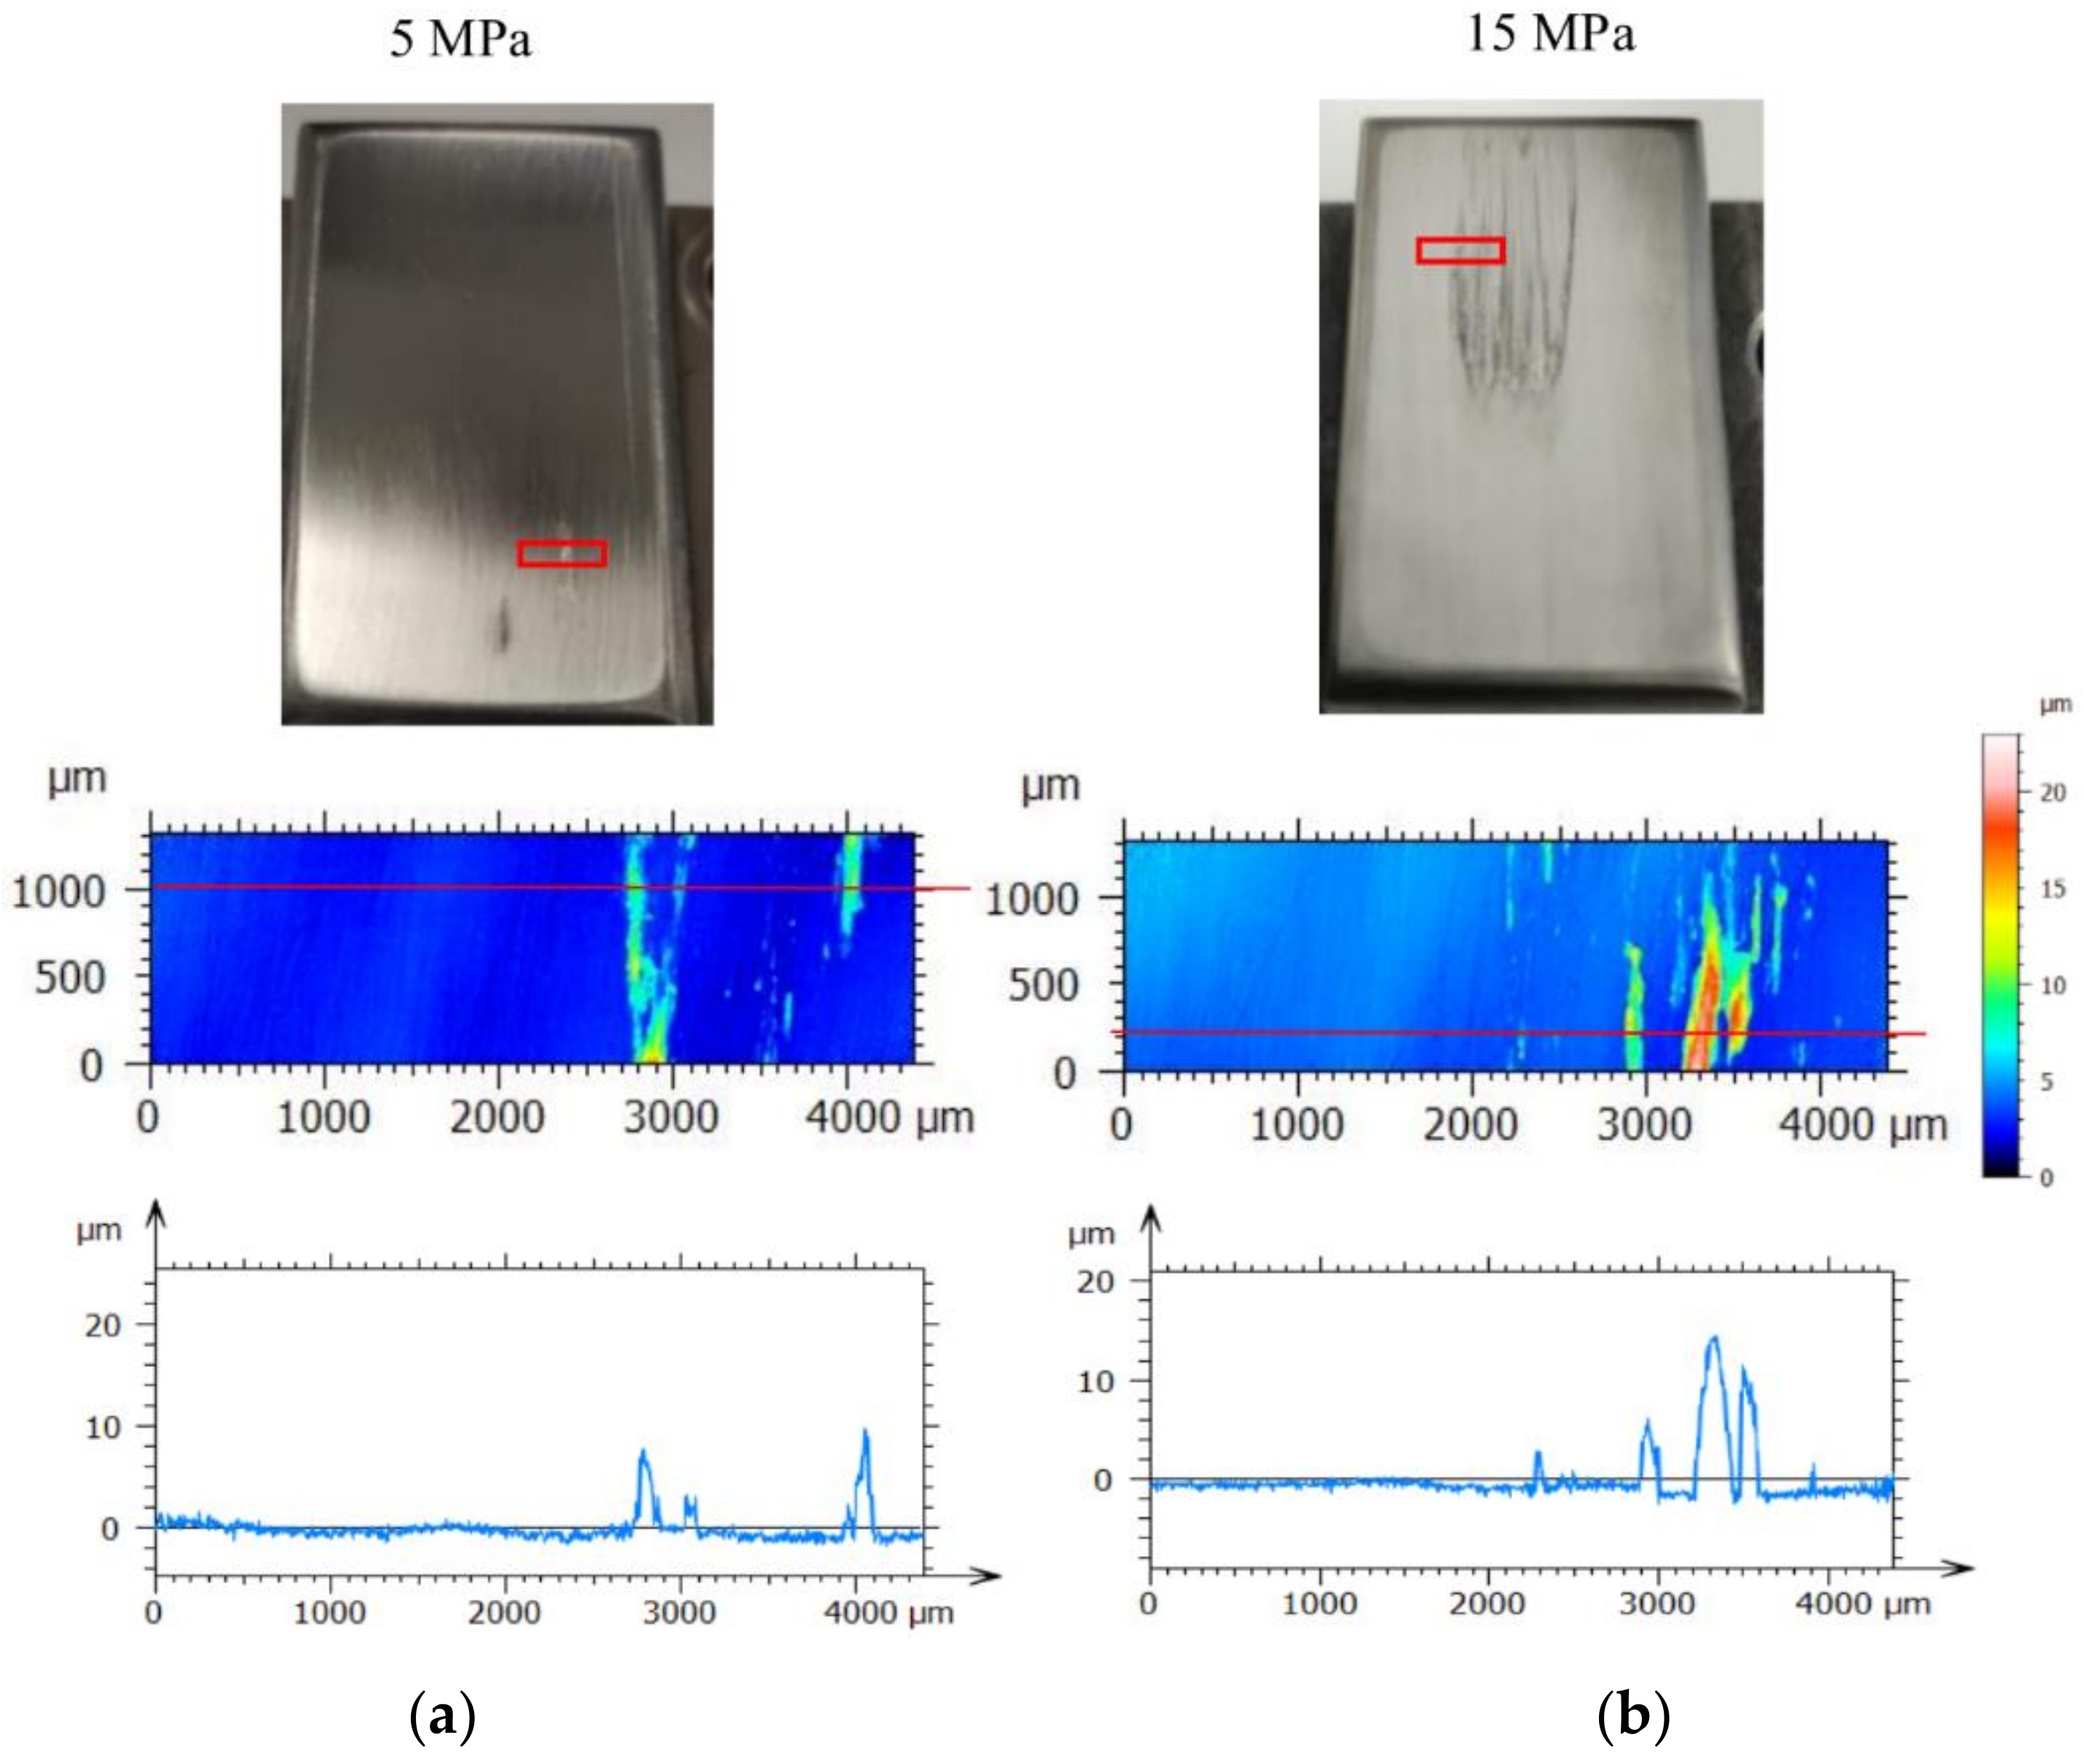
Clear differences in galling performance can be observed according to the die roughness degree. As can be observed, Ra0.2-Die set presented early galling for non-textured samples already at 5 MPa and galling for all the textured sheets for 10 and 15 Mpa. Figure 14 shows the image of the galled surfaces at 5 MPa and 15 Mpa, at which a different amount of protuberances can be observed on the surfaces. Elemental mapping was carried out by Electron energy X-ray dispersive spectroscopy, corroborating that the protuberances correspond to adhered aluminium (see Figure 15).
Conversely, the Ra0.4-Die set only galled for the non-textured sheets at 5, 10 and 15 Mpa, the galling severity being significantly lower compared to the Ra0.2-Die set. Regarding the influence of the sheet texture on the galling, it can be concluded from Figure 13 that the increase of EDT texture degree considerably improved the performance, decreasing both the occurrence and also the severity of the galling. As expected, overall, the galling severity is increased as the contact pressure increases. Table 5 summarises the value of pressure at which galling starts to occur on the strip drawing tests for all the sheet textures under study.

3.3. Coefficient of Friction

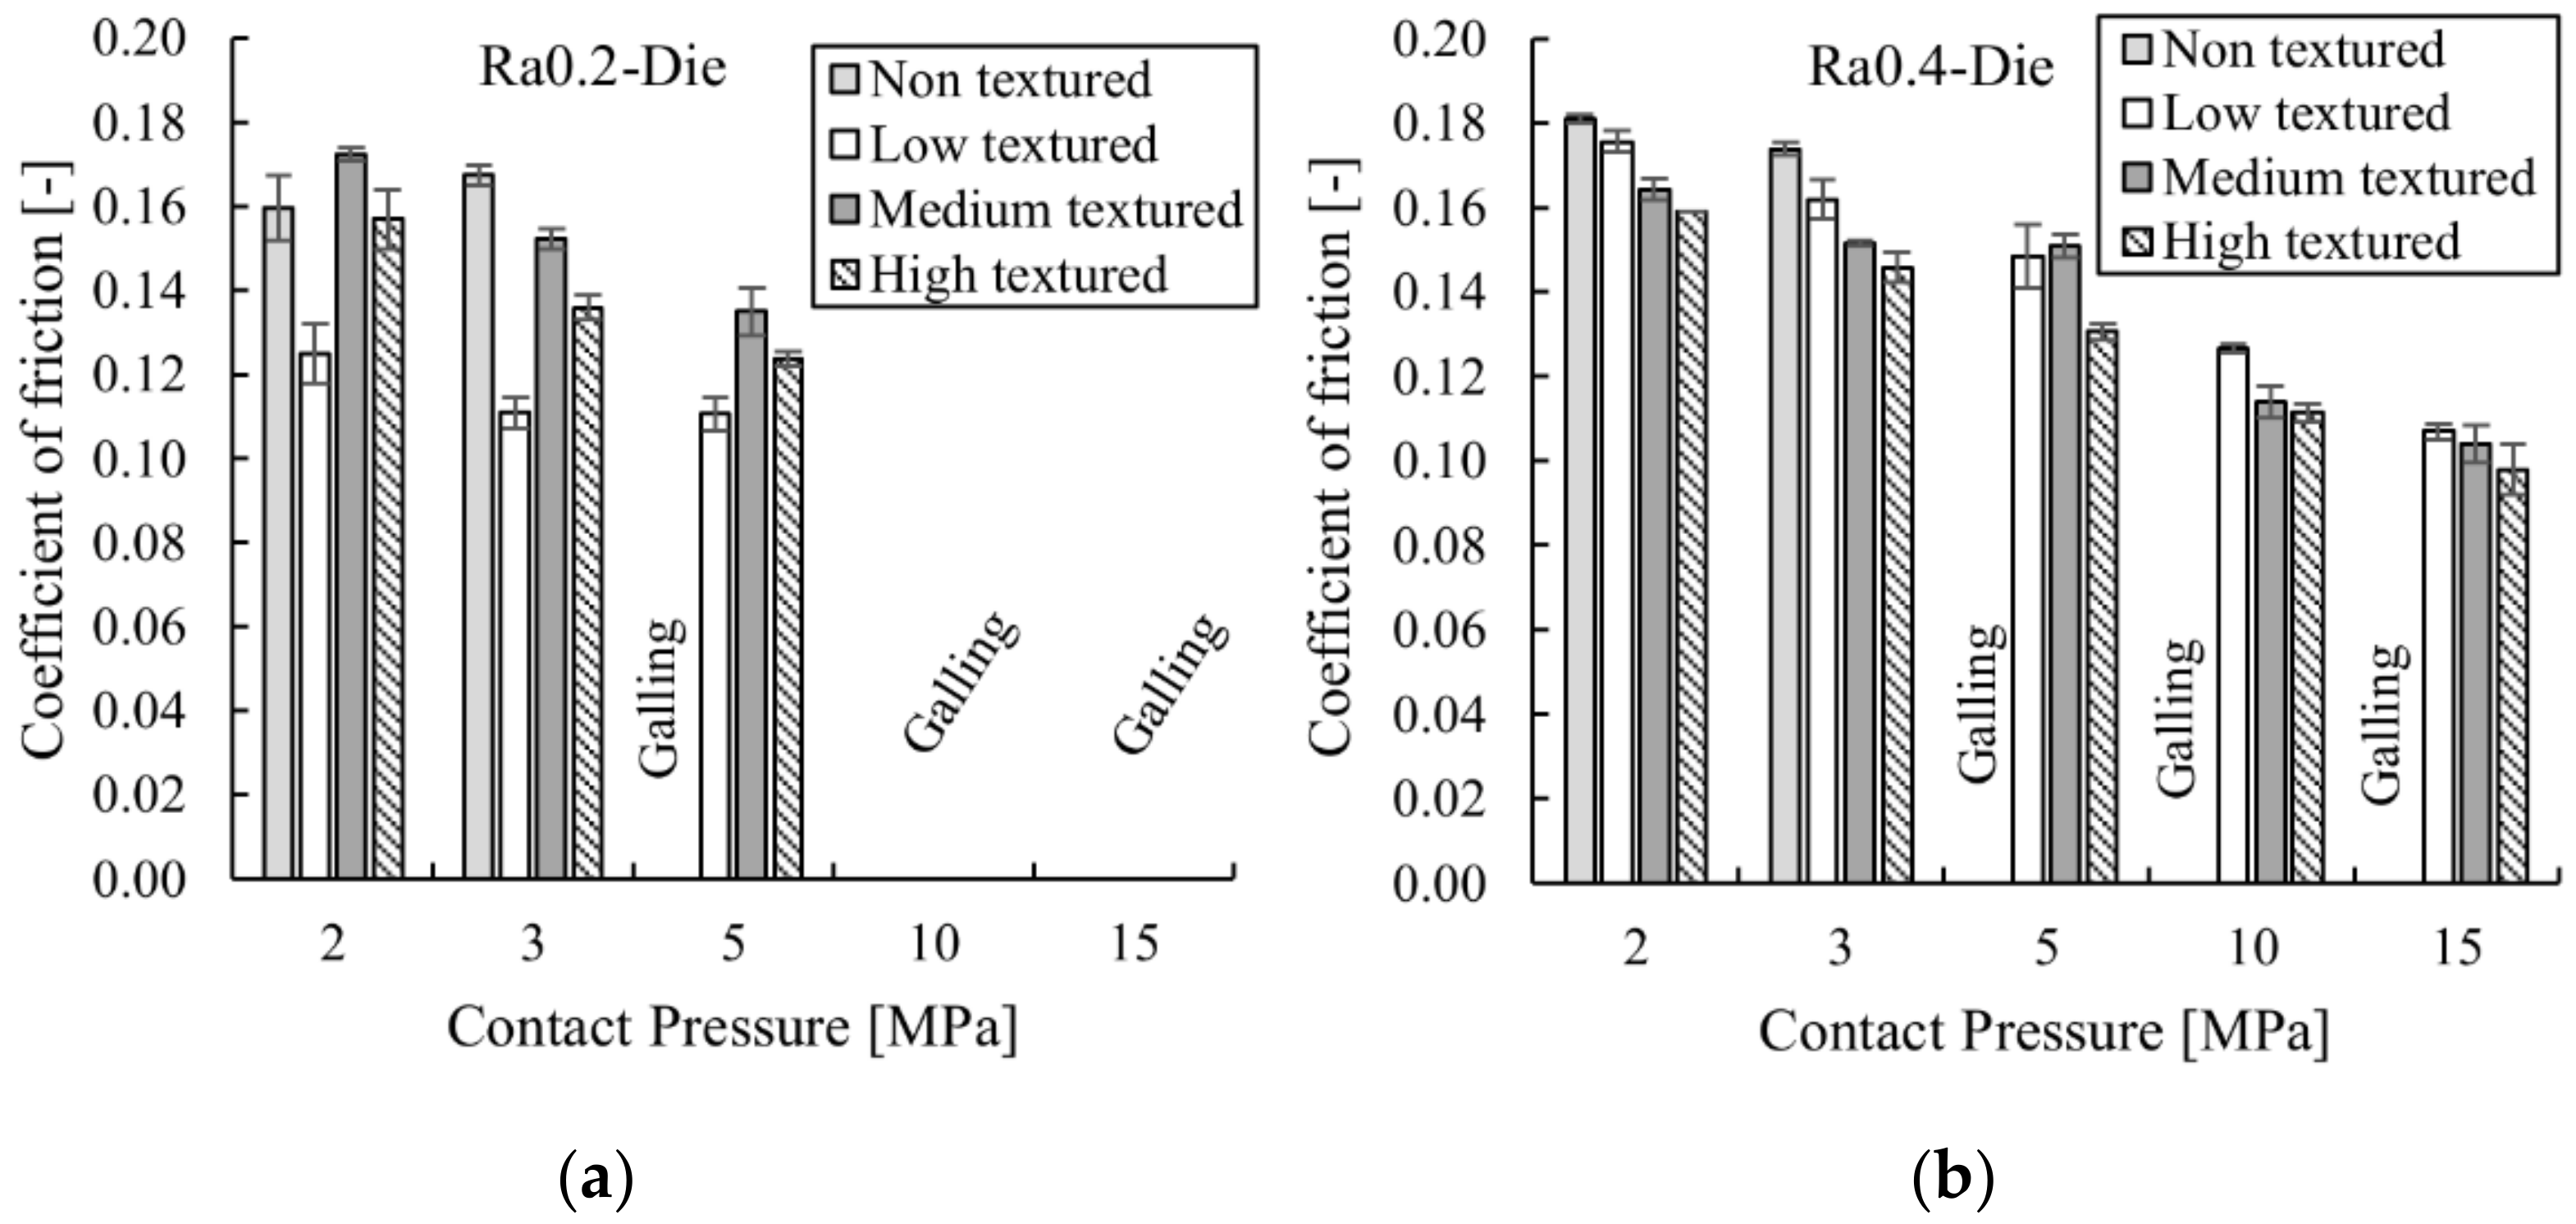
Figure 16 represents the coefficient of friction of all the sets that did not present galling (see Supplementary Materials).
A clear dependency of the contact pressure on the friction coefficient can be observed in both die-set tests, at which the friction coefficient decreases when increasing the contact pressure for all textures under analysis. On the other hand, the increase in sheet surface texture decreased the coefficient of friction for all pressure conditions, except for the low textured sheet with the Ra0.2 die, which disclosed the lower coefficient value. As far as the die roughness influence is concerned, it can be observed that the Ra0.2 die set tests reported lower friction values compared to the Ra0.4 die set at each analogous sheet texture and pressure condition, however, it should be noted that it also presented a worse galling performance.

3.4. Cup Drawing Benchmark

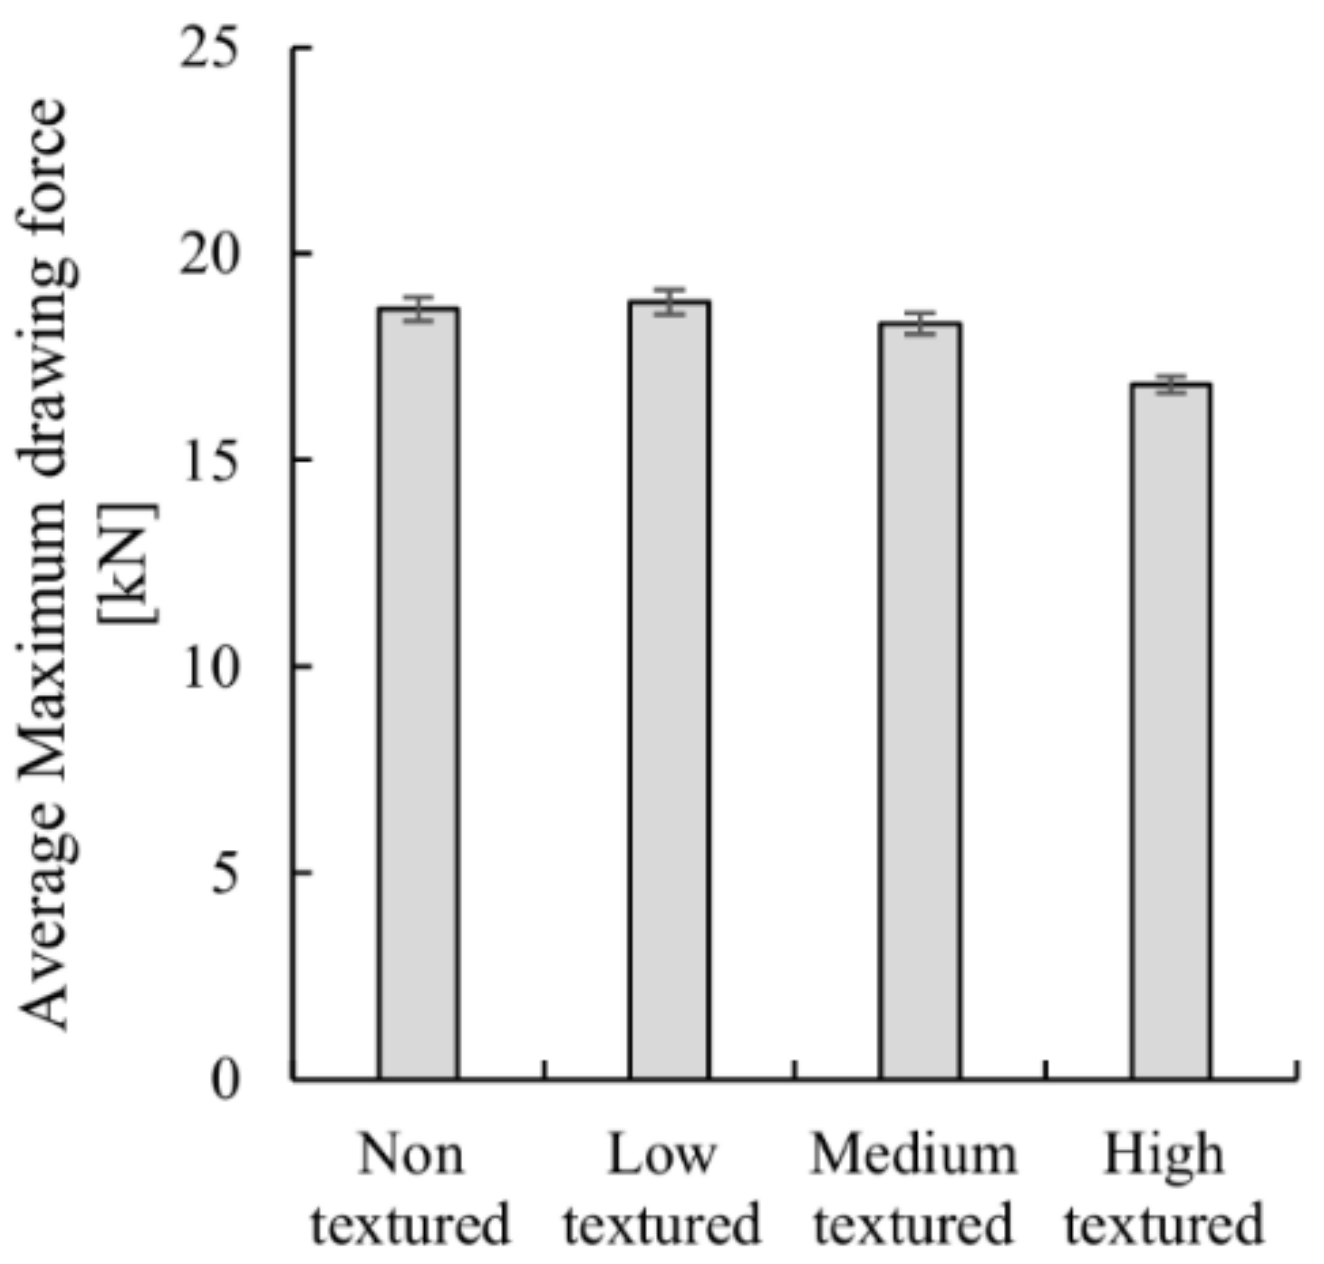
Figure 17 shows the average maximum drawing force for the different roughness materials (see Supplementary Materials).
The resulting drawing forces follow the same trend shown in Figure 15b (Ra0.4-Die). where a decrease in the friction coefficient occurred when increasing the sheet roughness. When increasing the texture, the friction coefficient decreases and therefore less restraining force is applied on the blank holder area during the drawing. Moreover, the reduction in restraining force leads to an increase in material flow and a reduction in the drawing forces.
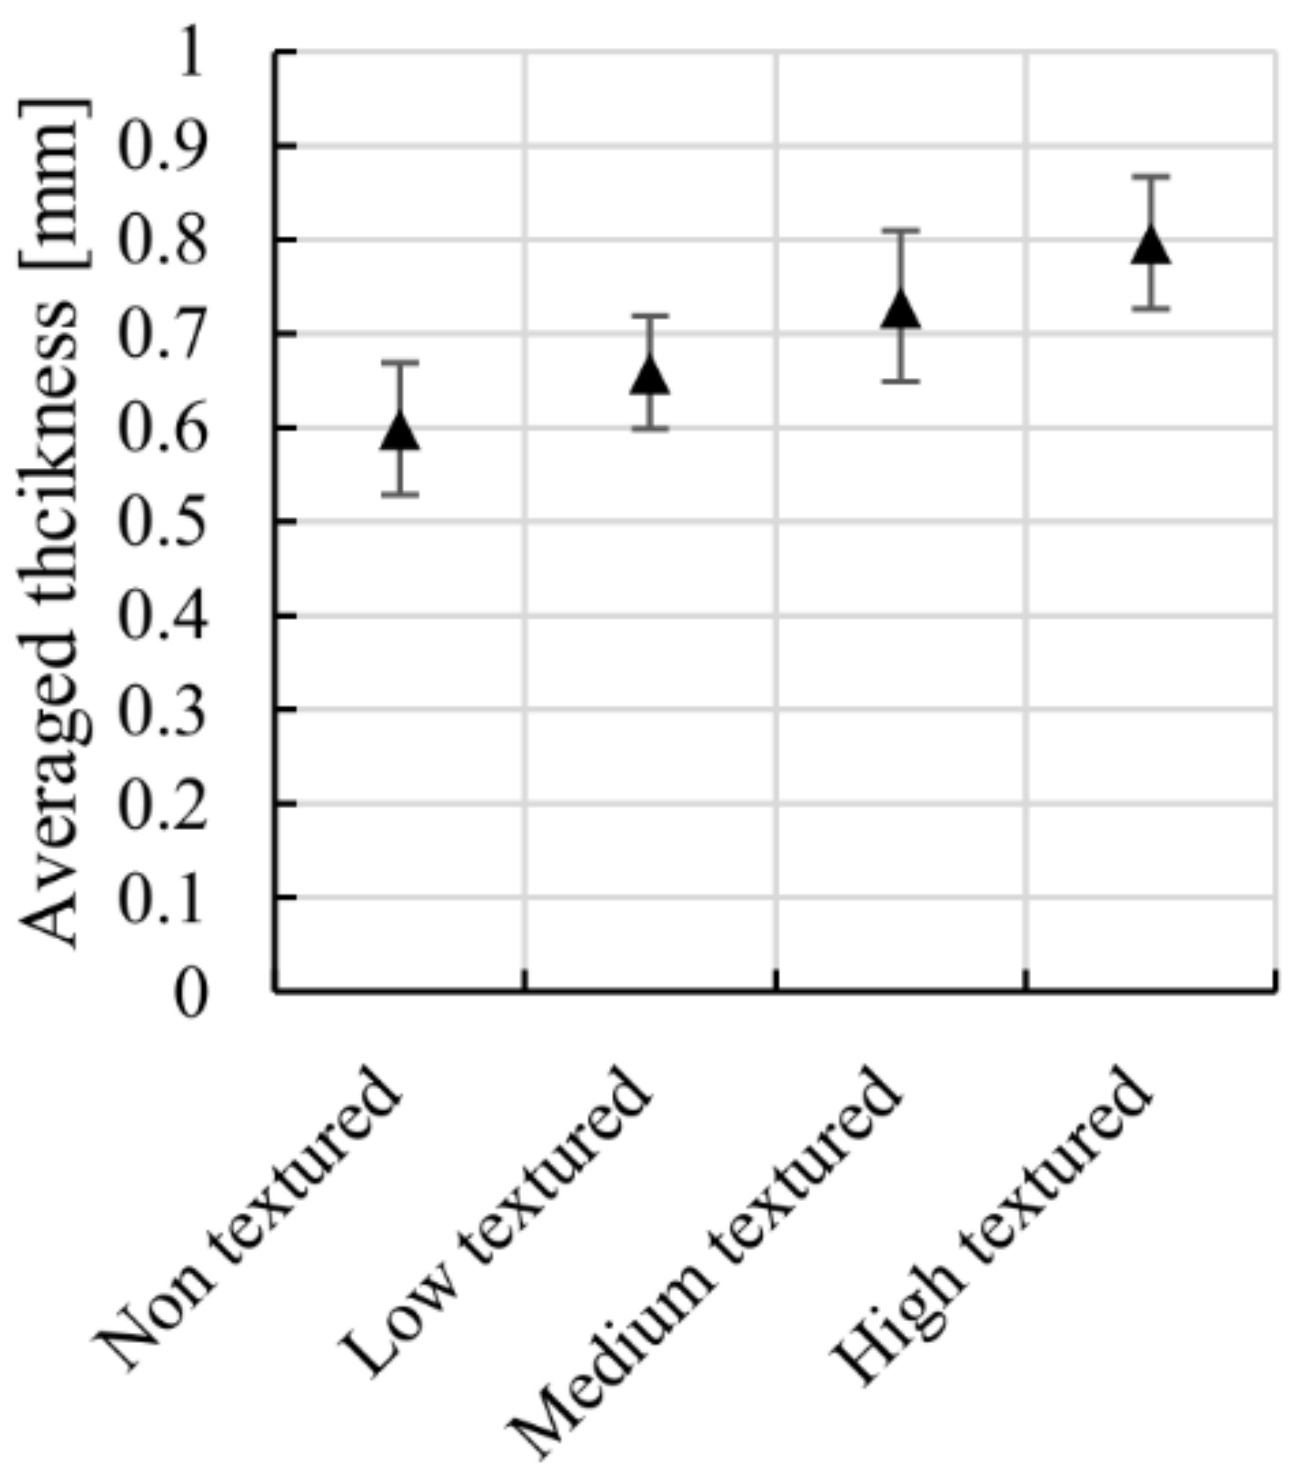
The reduction in the restraining force on the blank holder area also leads to higher draw-in values and so reduces the material stretching. This has a clear impact on the material thickness, as shown in Figure 18 (see Supplementary Materials).
Having an original material thickness of 1 mm, the drawing operation led to an average reduction ranging from 20 (High textured sheet) to 40% (non-textured sheet).

4. Discussion

The influence of the sheet and die surface texture on the galling wear and friction performance has been studied. To that end, different degrees of EDT sheet texturing have been generated by means of an ad hoc texturing rig (generating 3 texture degrees) and two die sets have been polished through industrial procedures at two different Ra values of 0.2 and 0.4 µm, termed as Ra0.2-Die and Ra0.4-Die, respectively. The forming condition has been simulated through a flat strip drawing test, using 5 pressure levels and a final validation performing cup drawing test has been conducted.
The widely accepted tribological performance superiority of EDT texture over mill-finish [54] was corroborated, and increased knowledge regarding the role of the EDT texture degree and the die roughness interaction was generated.
As mentioned in the introduction, previous works analysing the influence of EDT texture on aluminium forming reported EDT roughness values ranging from Ra 0.2 to 1.7, while others did not provide any topographical data (reader is referred to the introduction section for references). On the other hand, although the positive effect of polished die surfaces over rough surfaces is widely accepted [55,56], the effect of the interplay between sheet die surfaces reminds unknown.
In this work, for the first time, different degrees of EDT textures were analysed in order to test the influence of the EDT roughness degree on friction and galling performance. The obtained results suggest that the friction reduction benefit from EDT is larger as the roughness degree is more pronounced. This effect is probably attributable to the greater ability to retain lubricant in the pockets (see Table 4), due to the increase in the void volume parameter, Vvv, as the EDT texture degree increases (see Figure 8). The importance of the functional volume Vvv parameter has also been previously discussed by Ruimin et al. [57].
Regarding the galling behaviour, a new galling severity index (GSI) was presented. This index is directly computed from the friction force curve, providing a quick and quantitative determination of the presence and the relative severity of galling occurrence in the test. This index allowed the comparison of galling sensitivity of the different tribosystems. This study demonstrated the dominant factor of die surface topography on galling performance. The Ra0.2 die set, which disclosed lower CoF values, presented increased galling occurrence and severity (see Figure 13). This finding is in accordance with the study performed by Heide et al. [42], which concluded that a low initial friction coefficient is not a guarantee of good galling prevention.
It should be noted at this point that the two die surfaces were polished following industrial procedures to generate two different roughness degrees, corresponding to Ra 0.2 and 0.4 µm, respectively. A thorough surface topography study disclosed that the Ra0.4-Die surface presented a porous surface. The presence of those pores increased the overall Ra value and all of the three-dimensional parameters computed, except Vmp, the functional peak material volume parameter. Vmp decreased, indicating that less material volume was presented in the peak region of the Ra0.4-Die surface. The stratified functional surface parameter Spk reported that the average height of the protruding peaks above the core surface was similar in both dies, which implies that the polishing degree was also similar. It comes from this analysis that the presence of the pores on the Ra0.4-Die set was the predominant differential factor that improved the performance in terms of galling resistance. The presence of pores implies, on the one hand, to have less real contact area, and on the other hand, may act as oil reservoirs and to trap wear particles and contaminants, evacuating them from the surface. The limitations of the Ra parameter to describe the functionality are demonstrated in the present work, as discussed previously [58]. The use of functional parameters describing the material volume of the peak (Vmp) and valley (Vvv) regions, as well as the functional stratified parameter Spk, is suggested for a good understanding of surface functionality.
Concerning the effect of the EDT texture on the galling resistance, the benefit of EDT texture over non-textured (mill finished) sheet is indisputable. It should be noted that, as stated in the Table 4, the obtained lubricant quantity for each texture degree differs, being bigger as the texture degree increases. It was observed, however, that the increased EDT texture degree (and therefore the lubrication amount) does not provide any additional benefit to galling resistance, since all the textured samples presented the same galling prevalence. Nevertheless, the galling severity was decreased for increased EDT roughness strips for the Ra0.2 die sets, which is probably related to the increase of sheet texture and the increased amount of retained lubricant. However, when comparing results from Ra0.2 and Ra0.4 die surfaces for the same sheet textures, clear differences on galling severity and occurrence can be observed. As the lubricant amount for each texture degree was the same, this result suggests that the dominant factor for the galling occurrence and severity decrease comes from the die surface. This study suggests that a minimum EDT texture on the aluminium strip is required for galling prevention, and evidence that the die surface topography is the dominant factor controlling galling in forming processes.
The results were corroborated by benchmark cup-drawing tests. The decrease in friction when increasing the sheet surface texture (Figure 16b) led to a higher draw-in during cup-drawing, which resulted in lower drawing force (Figure 17) and a reduction in the material stretching and thinning (Figure 18). The changes in the drawing force were less significant compared to the observed variation in thickness due to the low hardening degree of the material (see Table 1).
This study underlines the necessity of a minimum texture of the sheet to prevent galling, and the potential of functional die surfaces to improve galling resistance. The generation of stratified surfaces containing high polish degrees on the bearing surface, combined with retention pockets are promising, although more studies and the implementation of industry suitable processes that allow the production of those surfaces in real dies are required.

5. Conclusions

In this work, for the first time, different degrees of EDT textures were analysed against different die surface topographies, in order to test the influence of the EDT and die roughness degree on friction and galling performance. The following conclusions can be drawn from the present study:
  • Friction is reduced as the EDT texture degree is increased. This effect is probably attributable to the greater ability to retain lubricant in the pockets.
  • Low initial friction is not a guarantee for good galling prevention.
  • A new galling severity index (GSI) is presented, which is directly computed from the friction curve and provides a quick and quantitative determination of both galling occurrence and severity.
  • A minimum EDT texture on the aluminium strip is required for galling prevention, but the die surface topography is the dominant factor controlling galling in forming process.
  • Ra is not a good performance indicator. The use of functional 3D parameters from ISO 25178 is suggested for a good understanding of the surface functionality: Vmp, Vvv, Spk.
  • Findings were corroborated by a cup-drawing benchmark study.
The present study underlines the key role of die topography and the potential of die surface functionalization for galling prevention. The generation of stratified surfaces with high polish degrees on the bearing surface combined with retention pockets are promising. Future studies are required for the implementation of industry suitable processes that allows introducing those surfaces in real dies.

Supplementary Materials

The following are available online at https://www.mdpi.com/article/10.3390/met11060979/s1: Numerical data from Figure 13, Figure 16, Figure 17 and Figure 18.

Author Contributions

Conceptualization, A.Z., L.G. and E.S.d.A.; Data curation, A.Z., J.M. and E.S.d.A.; Formal analysis, A.Z., J.M. and E.S.d.A.; Methodology, A.Z., J.M. and E.S.d.A.; Project administration, A.Z. and E.S.d.A.; Resources, L.G. and C.C.; Supervision, A.Z., J.M. and E.S.d.A.; Visualization, A.Z., I.L., A.A. and J.M.; Writing—original draft, A.Z., J.M. and E.S.d.A.; Writing—review & editing, A.Z., L.G., C.C., I.L., A.A., J.M. and E.S.d.A. All authors have read and agreed to the published version of the manuscript.

Funding

This research was funded by the Spanish Government with the project ALUTOOL funded on FEDER/ Ministerio de Ciencia, Innovación y Universidades—Agencia Estatal de Investigación/ Proyecto (RTC-2017-6245-4). This project has received funding from the ERASMUS+program of the European Union.

Acknowledgments

The authors want to acknowledge technical support provided by Fabien Bruggeman.

Conflicts of Interest

The authors declare no conflict of interest.

References

  1. Hirsch, J. Aluminium in innovative light-weight car design. Mater. Trans. 2011, 52, 818–824. [Google Scholar] [CrossRef] [Green Version]
  2. Blanco, D.; Rubio, E.M.; Marín, M.M.; Davim, J.P. Advanced materials and multi-materials applied in aeronautical and automotive fields: A systematic review approach. Procedia CIRP 2021, 99, 196–201. [Google Scholar] [CrossRef]
  3. Peppas, A.; Kollias, K.; Dragatogiannis, D.A.; Charitidis, C.A. Sustainability analysis of aluminium hot forming and quenching technology for lightweight vehicles manufacturing. Int. J. Thermofluids 2021, 10, 100082. [Google Scholar] [CrossRef]
  4. Van der Aa, H.C.E.; Van der Aa, M.A.H.; Schreurs, P.J.G.; Baaijens, F.P.T.; Van Veenen, W.J. An experimental and numerical study of the wall ironing process of polymer coated sheet metal. Mech. Mater. 2000, 32, 423–443. [Google Scholar] [CrossRef]
  5. Jeswiet, J.; Geiger, M.; Engel, U.; Kleiner, M.; Schikorra, M.; Duflou, J.; Neugebauer, R.; Bariani, P.; Bruschi, S. Metal forming progress since 2000. CIRP J. Manuf. Sci. Technol. 2008, 1, 2–17. [Google Scholar] [CrossRef]
  6. Hetz, P.; Suttner, S.; Merklein, M. Investigation of the Springback Behaviour of High-strength Aluminium Alloys Based on Cross Profile Deep Drawing Tests. Procedia Manuf. 2020, 47, 1223–1229. [Google Scholar] [CrossRef]
  7. Makhkamov, A. Tribology in Sheet Metal Forming; Universidad de Porto: Porto, Portugal, 2017. [Google Scholar]
  8. Heinrichs, J.; Olsson, M.; Jacobson, S. Mechanisms of material transfer studied in situ in the SEM: Explanations to the success of DLC coated tools in aluminium forming. Wear 2012, 292–293, 49–60. [Google Scholar] [CrossRef]
  9. D’Amato, C.; Buhagiar, J.; Betts, J.C. Tribological characteristics of an A356 aluminium alloy laser surface alloyed with nickel and Ni–Ti–C. Appl. Surf. Sci. 2014, 313, 720–729. [Google Scholar] [CrossRef]
  10. Button, S.T. Tribology in Manufacturing Technology; Springer: Berlin, Germany, 2013; pp. 103–120. [Google Scholar]
  11. Hou, Y.-K.; Yu, Z.-Q.; Li, S.-H. Galling failure analysis in sheet metal forming process. J. Shanghai Jiaotong Univ. 2010, 15, 245–249. [Google Scholar] [CrossRef]
  12. Clarysse, F.; Lauwerens, W.; Vermeulen, M. Tribological properties of PVD tool coatings in forming operations of steel sheet. Wear 2008, 264, 400–404. [Google Scholar] [CrossRef]
  13. Daure, J.L.; Carrington, M.J.; Shipway, P.H.; McCartney, D.G.; Stewart, D.A. A comparison of the galling wear behaviour of PVD Cr and electroplated hard Cr thin films. Surf. Coat. Technol. 2018, 350, 40–47. [Google Scholar] [CrossRef]
  14. Costa, H.L.; Hutchings, I.M. Effects of die surface patterning on lubrication in strip drawing. J. Mater. Process. Technol. 2009, 209, 1175–1180. [Google Scholar] [CrossRef]
  15. Kijima, H.; Bay, N. Skin-pass rolling I—Studies on roughness transfer and elongation under pure normal loading. Int. J. Mach. Tools Manuf. 2008, 48, 1313–1317. [Google Scholar] [CrossRef]
  16. Gorbunov, A.V.; Belov, V.K.; Begletsov, D.O. Texturing of rollers for the production of auto-industry sheet. Steel Transl. 2009, 39, 696–699. [Google Scholar] [CrossRef]
  17. Aspinwall, D.K.; Wise, M.L.H.; Stout, K.J.; Goh, T.H.A.; Zhao, F.L.; El-Menshawy, M.F. Electrical discharge texturing. Int. J. Mach. Tools Manuf. 1992, 32, 183–193. [Google Scholar] [CrossRef]
  18. Vorholt, J.; Shimizu, T.; Kobayashi, H.; Heinrich, L.; Flosky, H.; Vollertsen, F.; Yang, M. In-situ observation of lubricant flow on laser textured die surface in sheet metal forming. Procedia Eng. 2017, 207, 2209–2214. [Google Scholar] [CrossRef]
  19. Wakuda, M.; Yamauchi, Y.; Kanzaki, S.; Yasuda, Y. Effect of surface texturing on friction reduction between ceramic and steel materials under lubricated sliding contact. Wear 2003, 254, 356–363. [Google Scholar] [CrossRef]
  20. Varenberg, M.; Halperin, G.; Etsion, I. Different aspects of the role of wear debris in fretting wear. Wear 2002, 252, 902–910. [Google Scholar] [CrossRef]
  21. Gropper, D.; Wang, L.; Harvey, T.J. Hydrodynamic lubrication of textured surfaces: A review of modeling techniques and key findings. Tribol. Int. 2016, 94, 509–529. [Google Scholar] [CrossRef] [Green Version]
  22. Franzen, V.; Witulski, J.; Brosius, A.; Trompeter, M.; Tekkaya, A.E. Textured surfaces for deep drawing tools by rolling. Int. J. Mach. Tools Manuf. 2010, 50, 969–976. [Google Scholar] [CrossRef]
  23. Steitz, M.; Stein, P.; Groche, P. Influence of Hammer-Peened Surface Textures on Friction Behavior. Tribol. Lett. 2015, 58, 1–8. [Google Scholar] [CrossRef]
  24. Šugár, P.; Šugárová, J.; Frnčík, M. Laser surface texturing of tool steel: Textured surfaces quality evaluation. Open Eng. 2016, 6, 90–97. [Google Scholar] [CrossRef]
  25. Brecher, C. Hochglanzende Freiformflaächen auf Stahlw- erkzeugen. VDI-Z Werkzeug-/Formenba 2010, 16–19. [Google Scholar]
  26. Miller, W.S.; Zhuang, L.; Bottema, J.; Wittebrood, A.J.; De Smet, P.; Haszler, A.; Vieregge, A. Recent development in aluminium alloys for the automotive industry. Mater. Sci. Eng. A 2000, 280, 37–49. [Google Scholar] [CrossRef]
  27. Xu, W.; Gao, X.; Zhang, B.; Yang, L.; Du, C.; Zhou, D.; Rawya, B.; Szymanski, M. Study on Frictional Behavior of AA 6XXX with Three Lube Conditions in Sheet Metal Forming. SAE Tech. Pap. 2018, 2018, 1–7. [Google Scholar] [CrossRef]
  28. Liewald, M.; Wagner, S.; Becker, D. Influence of surface topography on the tribological behaviour of aluminium alloy 5182 with EDT surface. Tribol. Lett. 2010, 39, 135–142. [Google Scholar] [CrossRef]
  29. Ju, L.; Mao, T.; Malpica, J.; Altan, T. Evaluation of lubricants for stamping of Al 5182-O aluminum sheet using cup drawing test. J. Manuf. Sci. Eng. 2015, 137, 1–8. [Google Scholar] [CrossRef]
  30. Batalha, G.F.; Stipkovic Filho, M. Quantitative characterization of the surface topography of cold rolled sheets—New approaches and possibilities. J. Mater. Process. Technol. 2001, 113, 732–738. [Google Scholar] [CrossRef]
  31. Sulaima, M.H.B. Development and Testing of Tailored Tool Surfaces for Sheet Metal Forming. Ph.D. Thesis, Technical University of Denmark, Lyngby, Denmark, 2017. [Google Scholar]
  32. Schedin, E. Galling mechanisms in sheet forming operations. Wear 1994, 179, 123–128. [Google Scholar] [CrossRef]
  33. Hanson, M.; Hogmark, S.; Jacobson, S. Influence from tool roughness on the risk of work material adhesion and transfer. Mater. Manuf. Process. 2009, 24, 913–917. [Google Scholar] [CrossRef]
  34. Podgornik, B.; Hogmark, S. Surface modification to improve friction and galling properties of forming tools. J. Mater. Process. Technol. 2006, 174, 334–341. [Google Scholar] [CrossRef]
  35. Han, L.; Thornton, M.; Boomer, D.; Shergold, M. Effect of aluminium sheet surface conditions on feasibility and quality of resistance spot welding. J. Mater. Process. Technol. 2010, 210, 1076–1082. [Google Scholar] [CrossRef] [Green Version]
  36. Scholz, P.; Börner, R.; Kühn, R.; Müller, R.; Schubert, A. Dry forming of aluminium sheet metal: Influence of different types of forming tool microstructures on the coefficient of friction. Key Eng. Mater. 2015, 651, 516–521. [Google Scholar] [CrossRef]
  37. Merklein, M.; Zöller, F.; Sturm, V. Experimental and numerical investigations on frictional behaviour under consideration of varying tribological conditions. Adv. Mater. Res. 2014, 966–967, 270–278. [Google Scholar] [CrossRef]
  38. Popov, V.L. Coulomb’s Law of Friction. In Contact Mechanics and Friction; Springer: Berlin/Heidelberg, Germany, 2010. [Google Scholar]
  39. Cillaurren, J.; Galdos, L.; Sanchez, M.; Zabala, A.; Saenz de Argandoña, E.; Mendiguren, J. Contact pressure and sliding velocity ranges in sheet metal forming simulations. In Proceedings of the ESAFORM 2021 24th International Conference on Material Forming, Belgium 14–16 April 2021. [Google Scholar]
  40. ASTM. ASTM G98-17 Standard Test Method for Galling Resistance of Materials; ASTM: West Conshohocken, PA, USA, 2017. [Google Scholar]
  41. ASTM. ASTM G 196-Standard Test Method for Galling Resistance of Material Couples; ASTM: West Conshohocken, PA, USA, 2021. [Google Scholar]
  42. Van der Heide, E.; Huis, A.J.; Schipper, D.J. The effect of lubricant selection on galling in a model wear test. Wear 2001, 251, 973–979. [Google Scholar] [CrossRef]
  43. Andreasen, J.L.; Bay, N.; De Chiffre, L. Quantification of galling in sheet metal forming by surface topography characterisation. Int. J. Mach. Tools Manuf. 1998, 38, 503–510. [Google Scholar] [CrossRef]
  44. Deng, L.; Pelcastre, L.; Hardell, J.; Prakash, B.; Oldenburg, M. Experimental Evaluation of Galling Under Press Hardening Conditions. Tribol. Lett. 2018, 66, 1–11. [Google Scholar] [CrossRef] [Green Version]
  45. Hu, Y.R.; Gharbi, M.M.; Liang, V.; Zheng, Y.; Politis, D.J.; Wang, L.L. The galling behavior of advanced coating contacts with aluminium alloy during sliding wear. Key Eng. Mater. 2018, 767, 117–123. [Google Scholar] [CrossRef]
  46. Podgornik, B.; Kafexhiu, F.; Kosec, T.; Jerina, J.; Kalin, M. Friction and anti-galling properties of hexagonal boron nitride (h-BN) in aluminium forming. Wear 2017, 388–389, 2–8. [Google Scholar] [CrossRef]
  47. Harsha, A.P.; Limaye, P.K.; Tyagi, R.; Gupta, A. Development of tribological test equipment and measurement of galling resistance of various grades of stainless steel. J. Tribol. 2016, 138, 024501. [Google Scholar] [CrossRef]
  48. Siefert, J.A.; Babu, S.S. Experimental observations of wear in specimens tested to ASTM G98. Wear 2014, 320, 111–119. [Google Scholar] [CrossRef]
  49. Voss, B.M.; Pereira, M.P.; Rolfe, B.F.M.; Doolan, M.C. A new methodology for measuring galling wear severity in high strength steels. Wear 2017, 390–391, 334–345. [Google Scholar] [CrossRef] [Green Version]
  50. Karlsson, P.; Gåård, A.; Krakhmalev, P.; Bergström, J. Galling resistance and wear mechanisms for cold-work tool steels in lubricated sliding against high strength stainless steel sheets. Wear 2012, 286–287, 92–97. [Google Scholar] [CrossRef]
  51. Giedenbacher, J.; Raab, A.E.; Walch, C.; Huskic, A. The quantification of galling in forming operations of hot dip galvanized sheet metal under laboratory conditions. Mater. Sci. Forum 2017, 879, 607–612. [Google Scholar] [CrossRef]
  52. Grüner, M.; Merklein, M. Determination of friction coefficients in deep drawing by modification of Siebel’s formula for calculation of ideal drawing force. Prod. Eng. 2014, 8, 577–584. [Google Scholar] [CrossRef]
  53. ISO. ISO 13565-3:1998 Geometrical Product Specifications (GPS)—Surface Texture: Profile Method; Surfaces Having Stratified Functional Properties—Part 3: Height Characterization Using the Material Probability Curve; ISO: Geneva, Switzerland, 1998. [Google Scholar]
  54. Zhou, R.; Cao, J.; Wang, Q.J.; Meng, F.; Zimowski, K.; Xia, Z.C. Effect of EDT surface texturing on tribological behavior of aluminum sheet. J. Mater. Process. Technol. 2011, 211, 1643–1649. [Google Scholar] [CrossRef]
  55. Decrozant-Triquenaux, J.; Pelcastre, L.; Courbon, C.; Prakash, B.; Hardell, J. Effect of Surface Engineered Tool Steel and Lubrication on Aluminium Transfer at High Temperature. Wear 2021, 203879. [Google Scholar] [CrossRef]
  56. Dohda, K.; Yamamoto, M.; Hu, C.; Dubar, L.; Ehmann, K.F. Galling phenomena in metal forming. Friction 2021, 9, 664–685. [Google Scholar] [CrossRef]
  57. Shi, R.; Wang, B.; Yan, Z.; Wang, Z.; Dong, L. Effect of Surface Topography Parameters on Friction and Wear of Random Rough Surface. Materials 2019, 12, 2762. [Google Scholar] [CrossRef] [Green Version]
  58. Zabala, A.; Blunt, L.; Tato, W.; Aginagalde, A.; Gomez, X.; Llavori, I. The use of areal surface topography characterisation in relation to fatigue performance. MATEC Web Conf. 2018, 165, 14013. [Google Scholar] [CrossRef] [Green Version]
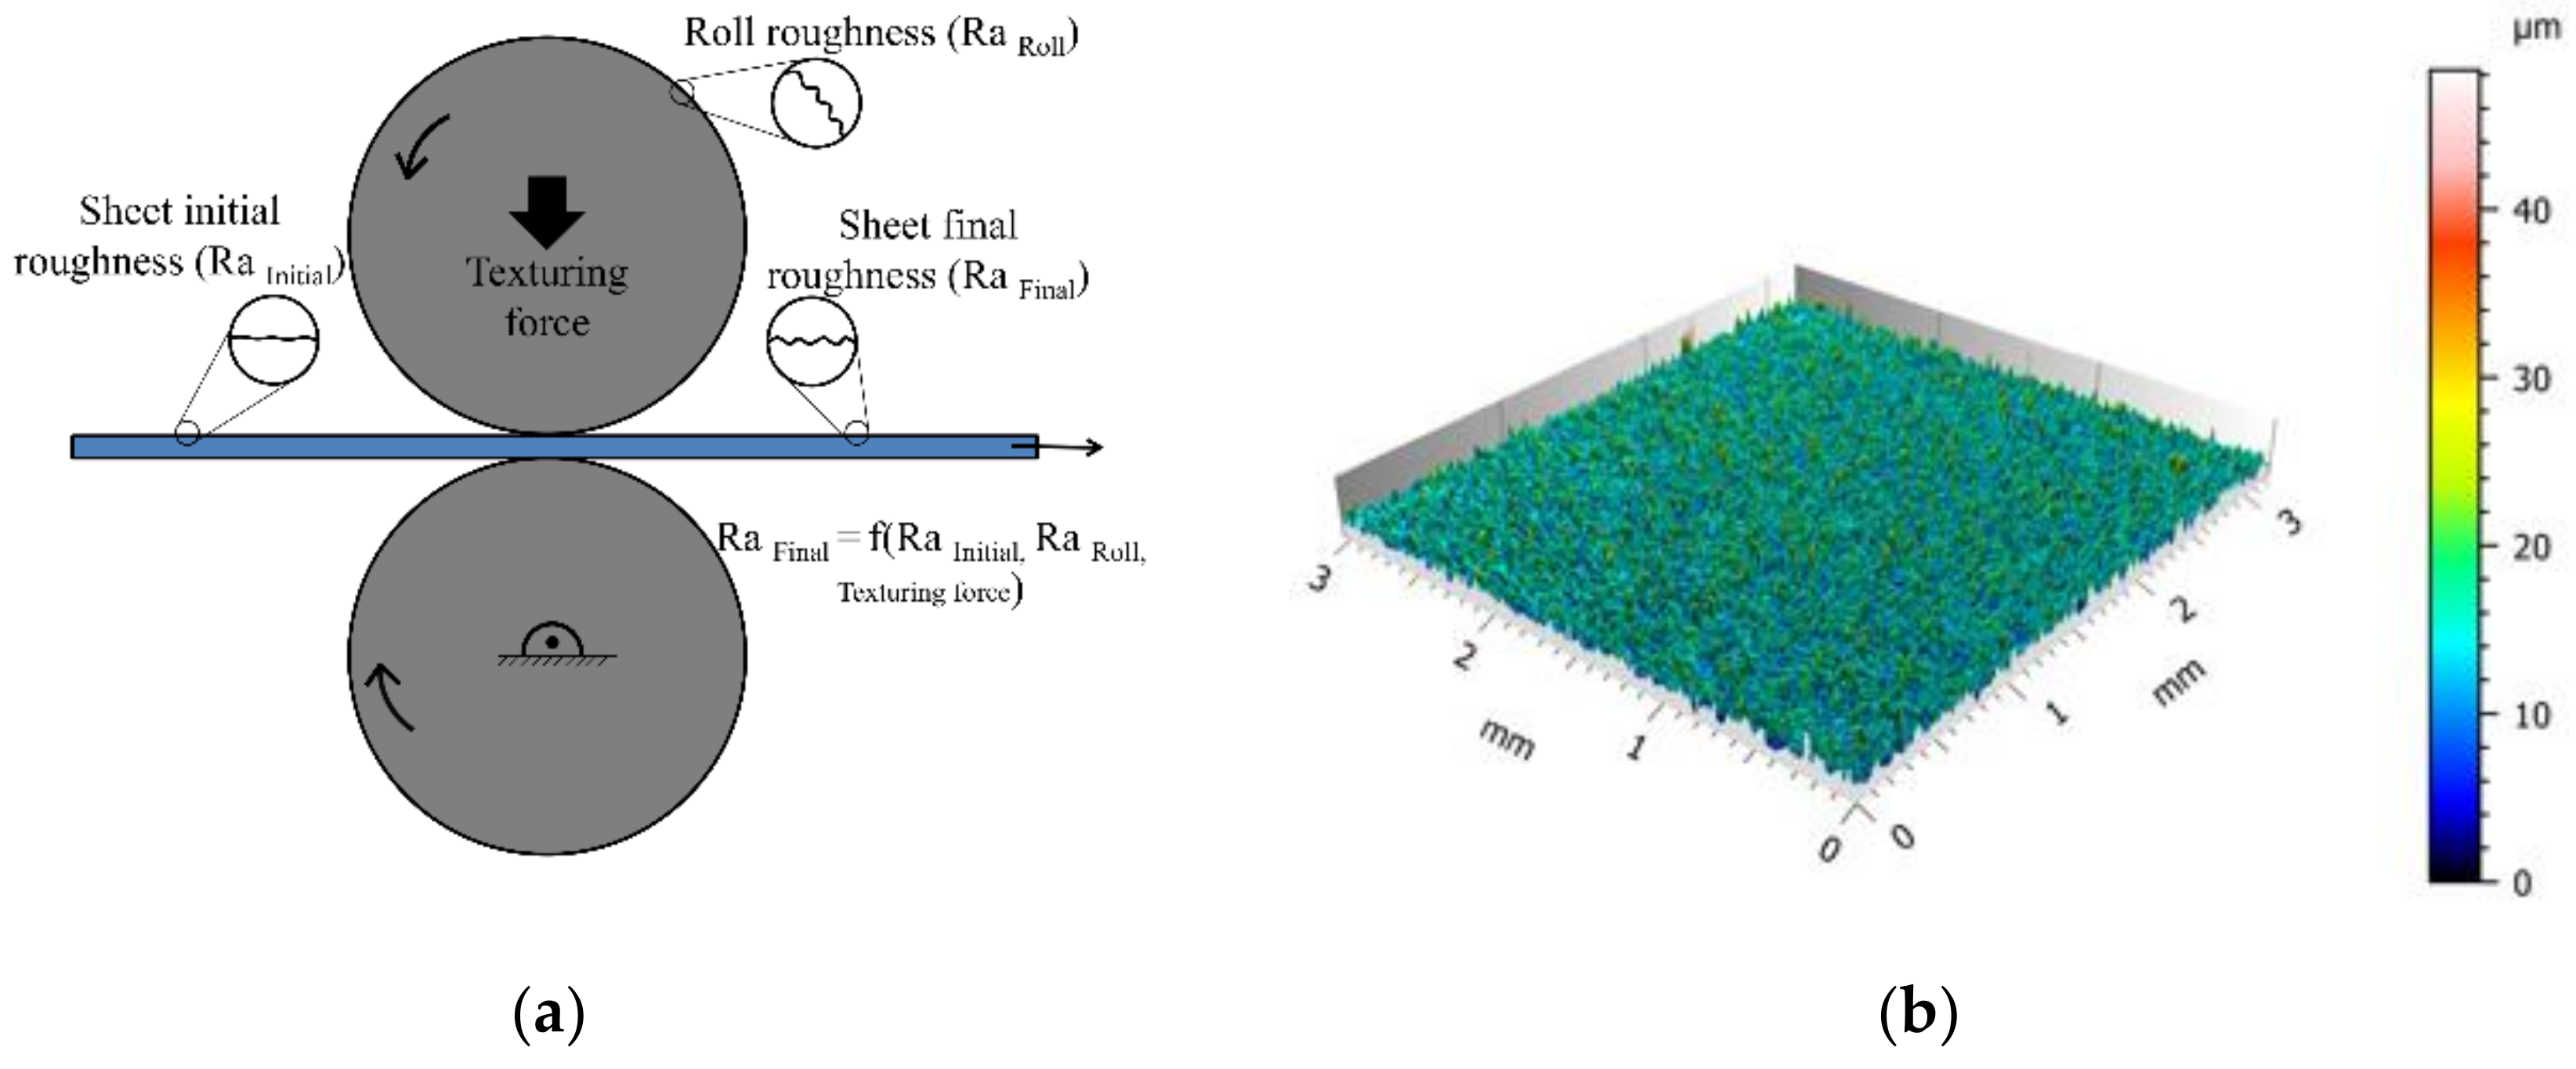
Figure 1. Aluminium texturing set-up: (a) skin-pass set up, in which the sheet is pushed between two EDT rolls and the texture is embossed into the surface of the material and (b) representative texture of the EDT rolls.
Metals 11 00979 g001
Figure 2. Representative axonometric (above, imposed scale) and two-dimensional (below, free scale) projections of the surface textures corresponding to the: (a) non-textured (as received); (b) low textured; (c) medium textured and (d) high textured samples rolls.
Metals 11 00979 g002
Figure 3. Schematic representation of the strip drawing test set up.
Metals 11 00979 g003
Figure 4. Idealized progress of the normal (blue) and tangential (red) force curves measured during the strip drawing test. The friction coefficient is evaluated removing 10% from the initial and final part to analyse stable conditions.
Metals 11 00979 g004
Figure 5. Representative axonometric (above, imposed scale) and two-dimensional (below, free scale) projections of the tool material surfaces: (a) Ra02-Die and (b) Ra04-Die conditions.
Metals 11 00979 g005
Figure 6. Example tangential force curves with the associated regression lines and Galling Severity Index (GSI) values (galling threshold: GSI = 0.375).
Metals 11 00979 g006
Figure 7. Schematic view of the cylindrical cup drawing test.
Metals 11 00979 g007
Figure 8. 3D Sheet surfaces topography characterization: topographic parameters belonging to height (Sq, Sa, Ssk), hybrid (Sdr) and functional (Vvv) properties of the textured sheets normalised with respect to the non-textured samples.
Metals 11 00979 g008
Figure 9. Die surfaces topography characterization: topographic parameters belonging to height (Sq, Sa, Ssk), hybrid (Sdr) and functional (Vvv) properties of the two die sets (Ra 0.2-Die, Ra 0.4-Die) normalised with respect to the Ra0.2-Die set.
Metals 11 00979 g009
Figure 10. Abbott Firestone and areal material probability curves of the two die surfaces.
Metals 11 00979 g010
Figure 11. Profile representations of the two die surfaces (a) and the corresponding reduced peak height (Spk) values (b).
Metals 11 00979 g011
Figure 12. Evolution of the tangential force during strip drawing test, three replicates of the high textured sheet and Ra0.2 die for the five pressure conditions under study (2, 3, 5, 10 and 15 Mpa).
Metals 11 00979 g012
Figure 13. Galling identification on the conducted strip drawing test experiments for the Ra0.2-Die (a) and the Ra0.4-Die (b) die sets for the four sheet textures under study.
Metals 11 00979 g013
Figure 14. Galled die surfaces morphological characterization. Non-textured sample/ Ra 0.2 die at 5 MPa (a) and 15 MPa (b).
Metals 11 00979 g014
Figure 15. SEM image and EDX elemental map of galled die surface (Non-textured sample/ Ra 0.2 die at 15 Mpa.
Metals 11 00979 g015
Figure 16. Strip drawing test friction results corresponding to all the sheet roughness values against the Ra0.2 (a) and Ra0.4 (b) die sets. Coefficient of friction has not been computed in the galled tests.
Metals 11 00979 g016
Figure 17. Averaged maximum drawing force for the different roughness samples.
Metals 11 00979 g017
Figure 18. Averaged thickness and thickness deviation on the cup perimeter. The material had an original thickness of 1 mm.
Metals 11 00979 g018
Table 1. Mechanical properties of tested material AA 1050.
PropertySymbolUnitValue
Yield strengthRp0.2MPa127.29
Tensile strengthRmMPa135.79
Strain hardening exponentn-0.0403
Total elongationA%3.49
Anisotropy factor (RD/45/TD)r-0.338/0.612/0.969
Table 2. Studied EDT work roll and aluminium material strip surface textures.
Sheet Textures
Work Roll Not TexturedLow TexturedMedium TexturedHigh Textured
Ra [µm] 0.140 ± 0.0230.920 ± 0.0721.230 ± 0.0661.710 ± 0.144
Sq [µm]3.498 ± 0.070.511 ± 0.0291.611 ± 0.0661.987 ± 0.0962.200 ± 0.310
Sa [µm]2.713 ± 0.050.417 ± 0.0200.999 ± 0.0551.276 ± 0.1191.562 ± 0.300
Ssk [-]0.719 ± 0.010.271 ± 0.088−2.934 ± 0.331−2.276 ± 0.224−2.029 ± 0.366
Str [-]0.959 ± 0.0050.028 ± 7.5 × 10−40.910 ± 0.010.871 ± 0.120.873 ± 0.03
Sdq [°]0.893 ± 0.0320.128 ± 0.0060.559 ± 0.0170.653 ± 0.110.666 ± 0.05
Sdr [%]18.516 ± 1.0260.758 ± 0.0666.749 ± 0.1118.108 ± 0.66910.022 ± 1.564
Vmp × 10−2
[µm3/ µm2]
24.300 ± 0.5251.369 ± 0.2302.376± 1.5343.656 ± 1.9153.891 ± 1.345
Vvv × 10−2
[µm3/ µm2]
30.100± 1.50046.500 ± 0.32943.600 ±0. 6648.300 ± 0.5.2649.800 ± 0.1.8
Table 3. Tool material surface textures.
SurfaceRa0.2-DieRa0.4-Die
Sq [µm]0.545 ± 0.1080.907 ± 0.197
Sa [µm]0.401 ± 0.0730.527 ± 0.062
Ssk [-]−1.424 ± 0.317−4.229 ± 0.668
Str [-]0.130 ± 0.050.250 ± 0.110
Sdq [°]0.121 ± 0.070.184 ± 0.011
Sdr [%]0.670 ± 0.0751.307 ± 0.137
Vmp × 10−02 [µm3/ µm2]1.620 ± 0.1861.230± 0.071
Vvv × 10−02 [µm3/ µm2]9.470 ± 2.74018.200± 5.050
Table 4. Obtained lubricant quantity for each sample with the used methodology.
SurfaceAverage
Quantity [g/m2]
Lubricant
Thickness [µm]
Standard Deviation
[g/m2]
Min Quantity [g/m2]Max Quantity [g/m2]
Not textured1.741.890.21781.482.00
Low textured2.262.450.18902.002.40
Medium textured2.803.040.32002.483.12
High textured2.903.150.44122.483.32
Table 5. Summary of the galling severity index (GSI) of all test conditions. Maximum GSI value of all tests and in brackets the pressure in which the galling occurred: NG: No Galled; G* Galled at 5 MPa; G**: Galled at 10 MPa.
SurfaceNot TexturedLow TexturedMedium TexturedHigh Textured
Ra0.2-Die0.95 (G*)2.22 (G**)1.9 (G**)1.4 (G**)
Ra0.4-Die0.45 (G*)0.13 (NG)0.06 (NG)0.15 (NG)
Table 6. Dimensions of the cup drawing test tool (unit: mm).
D b D d D p r d r p
9054506.56.5
Publisher’s Note: MDPI stays neutral with regard to jurisdictional claims in published maps and institutional affiliations.