Article

Investigation on White Layer Formation in Dry High-Speed Milling of Nickel-Based Superalloy GH4169

1
School of Mechanical Engineering, Qilu University of Technology (Shandong Academy of Sciences), Jinan 250300, China
2
Shandong Institute of Mechanical Design and Research, Jinan 250300, China
*
Author to whom correspondence should be addressed.
Machines 2023, 11(3), 406; https://doi.org/10.3390/machines11030406
Submission received: 25 February 2023 / Revised: 10 March 2023 / Accepted: 16 March 2023 / Published: 21 March 2023
(This article belongs to the Topic Advanced Manufacturing and Surface Technology)

Abstract

:
To investigate the formation mechanism of the white layer on the machined surface during high-speed milling of nickel-based superalloy GH4169, several cutting parameters were selected for milling experiments. Energy dispersive spectroscopy (EDS), X-ray diffraction (XRD), and electron backscattered diffraction (EBSD) were employed to characterize element distribution, phase transformation, and microstructure changes in the machined surface of the superalloy and then reveal the formation mechanism of the white layer on the machined surface. The results show that the white layer appears on the machined surface of GH4169, which is dense and has no obvious structural features. The total amount of elements in the white layer remains unchanged, but the distribution of elements such as C, N, O, Fe, and Ni changes due to phase change. The formation mechanism of the white layer is due to the dynamic recovery and dynamic recrystallization caused by the heat–force coupling effect, which leads to the grain refinement of the material and thus forms the white layer. This investigation can provide theoretical support to improve the service life of the parts in actual machining.

1. Introduction

Nickel-based superalloy GH4169 is widely used to manufacture the hottest parts of aero-engines and various gas turbines due to its high strength at high temperatures, good oxidation resistance, corrosion resistance, fatigue resistance, and other comprehensive properties [1]. However, nickel-based superalloys are typically difficult to machine because of their low thermal conductivity, high hardness, and severe work hardening. Therefore, when machining nickel-based superalloy GH4169, there are usually present high cutting forces, high cutting temperatures and severe tool wear, poor machined surface quality and the appearance of white layer on the machined surface, large residual stresses, and other defects in the machined surface [2]. High-speed cutting is currently an effective way to solve the problem of the difficult machining of superalloy. It can also be used to improve machining efficiency and surface quality [3,4]. However, in the process of high-speed cutting, there is a multi-field coupling effect of thermal–mechanical–chemical, resulting in high temperature, high stress, high strain, and high strain rates, which will lead to drastic changes in the microstructure of the workpiece machining surface, resulting in the appearance of a metamorphic layer on the machining surface—the most obvious effect is the white layer. Griffiths [5] first introduced the concept of the white layer in 1987; white layer is a generic term for a hard layer that exists under different conditions on the surface or subsurface of a metallic material, which has no characteristic morphology and appears white under a light microscope after etching with metallographic reagents. It has two characteristics: (1) higher hardness than the matrix; (2) no characteristic histological form. The physical and mechanical properties of the white layer are also quite different from the matrix material and are usually harder and more brittle than the matrix [2], and lead to the development and extension of fatigue cracks, thus reducing the fatigue life and wear resistance of the workpiece [6].
Based on the current research on the mechanism of white layer formation on the surface of high-speed cutting superalloys, it is generally believed that there are three formation mechanisms of white layer [7], namely: (a) the plastic deformation mechanism—through plastic deformation resulting in grain refinement, the machined surface produces an inhomogeneous structure or has a very fine grain structure; (b) rapid heating and quenching to produce transformation, i.e., the phase-change mechanism; (c) the mechanism of a chemical reaction between the cutting surface and elements such as carbon, nitrogen, and oxygen, etc. in the air. The (a) and (b) mechanisms are difficult to separate and may depend on each other, for example, the phase-transition temperature may be affected by plastic strain or strain rate. Among the different mechanisms, the austenite-to-martensite conversion due to rapid heating and quenching is seen as the main reason for the formation of white layer on the machined surfaces of hardened steels [8]. However, for the nickel-based superalloy GH4169, the austenitic structure of the matrix remains stable from room temperature to melting [9]; therefore, the austenite-martensite transformation mechanism is not suitable for the white layer formation mechanism of GH4169.
With the profound study of white layer on the machined surfaces of superalloys, the formation mechanism of the white layer is now generally considered to be caused by continuous dynamic recrystallization (DRX) at high strain rates, while DRX and grain refinement due to severe plastic deformation are considered to be the formation mechanism of white layer [10,11,12]. However, many views attribute the formation of the white layer to the heat concentration near the surface area and the low thermal conductivity of the nickel-based superalloy [13,14]. The main reason is that there are a large number of thermal, force, and chemical interactions in the formation of the white layer, which are difficult to distinguish, so there is a lot of debate about the formation mechanism of the white layer.
It was found that the white layer on the machined surface of superalloys is not a simple recrystallization layer, but a combination of a transition layer and a recrystallization layer consisting of low-angle grain boundaries and sub-grain. A transition layer with low-angular grain boundaries and sub-grains was formed below the recrystallization layer, while larger grains were mainly in the matrix [15]. During machining, high stresses and high cutting heat lead to severe plastic deformation of the workpiece, resulting in grain deformation and grain refinement of the material, especially when machining superalloys, which have high mechanical properties (i.e., high yield rate and ultimate tensile strength, hardness) and generate high cutting forces and tool wear rates during machining [16], which deforms the surface and subsurface layer [17]. In this case, the slip of dislocations within the crystal causes the deformation of the grain, while the grain boundaries are difficult to form new dislocations due to the strengthening effect of dislocations [18,19]. Thus, the high dislocation density inside the grain and the accumulation of dislocations at the grain boundaries not only lead to plastic deformation of the material but also induce the fusion of low-angle grain boundaries to form low-angle grain boundaries and recrystallization, which in turn leads to the generation of white layer. The change in cutting parameters has an important influence on the formation of white layer, among which the cutting speed and depth of cut have the greatest influence. Firstly, changes in cutting parameters can lead to changes in surface integrity, including surface roughness, residual stresses, and metamorphic layers. It was found that the white layer formation was greatly influenced by cutting parameters, mainly in the effect of changing cutting parameters on cutting forces and cutting temperatures [20]. Li et al. [21] found that the effect of cutting force on the thickness of the white layer was mainly due to the plastic deformation generated by the machining refining the grains on the machined surface and creating a high density of dislocations within it, thus affecting the phase transformation temperature of austenite and martensite in the tissue and promoting the generation of the white layer. Du et al. [22] analyzed the performance and mechanism of white layer formation on the surface of nickel-based superalloy FGH95 machined at different cutting speeds and found that when the cutting speed was less than 2000 m/min, the increase in cutting speed led to an increase in the thickness of the white layer. When other cutting parameters were kept constant, the thickness of the white layer decreased with the increase in cutting speed when the cutting speed was greater than 2000 m/min.
Variations in cutting temperature at different cutting parameters also have a significant effect on the formation of the white layer. For example, the use of cutting fluids during machining plays a greater role in reducing the thickness of the white layer [23]. Lo’pez de Lacalle et al. [24] found that the application of PAM (Plasma Assisted Milling) reduced the cutting temperature and increased productivity when machining 718. Saoubi et al. [25] found that, compared with traditional oil-based coolant, milling Inconel-718 with low-temperature machining significantly reduced the process temperature in the cutting zone, reduced tool wear, improved surface quality, and reduced the thickness of white layer. It has also been found [26] that the white layer is formed as a result of thermal concentration in the sub-surface portions of the material due to machining, and that the low thermal conductivity of nickel-based superalloys enhances this effect, while the increase in cutting temperature produces high strain rates. This combined effect leads to an increase in the thickness of the heat-affected layer and plastic deformation zone, resulting in work hardening of the superalloy [27,28].
As mentioned above, it is found that the current research on white layer formation during superalloy machining is mainly focused on the grain refinement mechanism. Most of the studies have shown the existence of dynamic recrystallization structure in the white layer, but the mechanism of dynamic recrystallization and grain refinement still needs further in-depth study. The research on the influence of cutting parameters on the white layer is also limited to the research on the influence of the thickness of the white layer, the research on the mechanism of the formation of the white layer is not quite perfect, and the mechanism of the formation of the white layer is still more controversial. Therefore, to study the formation mechanism of the white layer, to find out the changes in the material during the cutting process, to reduce the thickness of the white layer, to reduce the generation of the white layer, to study the role played by different cutting parameters during the cutting process, and to find out the different effects of different cutting parameters on the formation of the white layer, this paper analyzes the overall microstructure of the white layer on the surface of GH4169 after high-speed milling and investigates the different effects of cutting parameters during the cutting process on the formation of the white layer and the physical and mechanical properties of the white layer. The formation mechanism of white layer formation was analyzed through the change in material microstructure, which provides a theoretical basis for reducing the generation of white layer and improving the service life of parts.

2. Experimental Procedures

2.1. Material

The workpiece material for this experiment is GH4169, a nickel-based superalloy with a hardness of 43–45 HRC, whose main components are shown in Table 1. The heat treatment method is as follows: solution treatment at 960 °C for 1 h and then air-cooling to room temperature, followed by heating to 720 °C for 8 h; then cooling to 620 °C in the furnace at 50 °C/h, holding for 8 h, and cooling to room temperature. After heat treatment, GH4169 material is mainly composed of matrix γ, reinforced γ′, and γ″ and precipitated δ. The γ″ is the main strengthening phase, which is dispersion co-lattice precipitation in the matrix, and the co-lattice strain between the γ″ and the γ forms a large mismatch to achieve the strengthening effect of the γ″. The γ′ is a secondary strengthening phase which is spherical and diffusely precipitated in the matrix with nanometer size, and has a co-grid strain strengthening effect. The material size of the workpiece was chosen as 50 mm × 30 mm × 3 mm and mounted on a special fixture.
The machine tool used for the cutting experiments is a CNC vertical machining center Doosan DNM-415 (Korea) with a maximum speed of 12,000 r/min and power of 15 KW. The cutting tool employed in this experiment was a face milling cutter supplied by KENNAMETAL INC, which can approximate orthogonal cutting. The cutting inserts were SNHX12L5PZTNGP KC725M with TiAlN-PVD-coated. Before each test cutting, the insert was changed to a fresh one in order to eliminate the influence of tool wear on the machined surface integrity.

2.2. Milling Experiments

The cutting speeds were 500, 600, 700, 800, 900, and 1000 m/min, the radial depths of cut were 0.1, 0.2, and 0.3 mm, and the feeds were kept constant at 0.02 mm/r, total of 18 sets of cutting tests. The cutting tests were conducted under dry cutting conditions. The milling experimental setup is shown in Figure 1a. The cutting force and cutting temperature were collected during the cutting process, the force-measuring device was Kistler-9129AA three-way dynamic-cutting-force-measuring instrument; the cutting-force-measuring direction is shown in Figure 1a. The cutting temperature testing device was a FlirA315 infrared thermal imager from the USA.

2.3. Microstructure Characterization

The specimens were cut by EDM machine ZJK 7532A after each cutting process, and a 10 mm × 10 mm × 3 mm rectangular specimen was cut out of the part of the machined specimen containing the machined surface to obtain the cross-section containing the white layer, and the specimens were inlaid with metallographic thermal inlay material in the inlay machine to ensure a flat surface for subsequent grinding and polishing. After grinding and polishing the specimens to obtain a mirror image of the scratch-free surface, etching treatment was carried out with an etching solution of 2.5% copper chloride, 48.8% hydrochloric acid, and 48.7% ethanol, and the etching time was about 25 s. The surface of the specimens was then rinsed with running water and an alcohol solution.
The metallographic changes on the machined surface were observed using an ultra-deep field 3D viewing microscope and a Scanning Electron Microscope (SEM). The measurement points for both white layer and metamorphic layer thickness were selected at an angle of 45° to the tool feed direction. An EDS spectrometer was used to analyze the distribution and elements contained in the white layer. The phases in the white layer of the machined surface were analyzed by XRD using Cu-Ka radiation at 40 kV and 150 mA with a 2θ scan range of 30° to 90° and a scan increment of 0.02°. Grain size and orientation changes in the surface layer were measured using EBSD. EBSD measurements were performed at an accelerating voltage of 20 kV with a tilt angle of 70° and a step size of 0.2 mm, and the experimental results of EBSD were analyzed using Channel 5 software. Vickers microhardness tester was used to measure the change in hardness of the machined surface of the workpiece. The test area of the experiment is shown in Figure 1b.

3. Results and Discussion

3.1. Results

3.1.1. Microstructure Analysis

The images of the inlaid metallographic specimens after corrosion treatment are shown in Figure 2. From Figure 2a, the microstructure and grain boundaries of the matrix of GH4169 alloy block are visible, and the machined surface is covered with a thin layer of a significantly different color from the matrix, which is bright white under the optical microscope, it is the “white layer”. The microstructure of the white layer under SEM is shown in Figure 2b, and this layer exhibits a significantly different microstructure from that of the substrate material, being dense and without obvious crystal features. From Figure 2a, it can be seen that there is a dark region at the transition to the substrate below the white layer, called the transition zone or plastic flow layer [29], where there is a strong plastic deformation flow along the cutting direction, and there are obvious slip lines on the machined surface and significant elongation of the surface grains, indicating that plastic flow occurs along the cutting direction during the cutting process, resulting in significant plastic deformation [8].
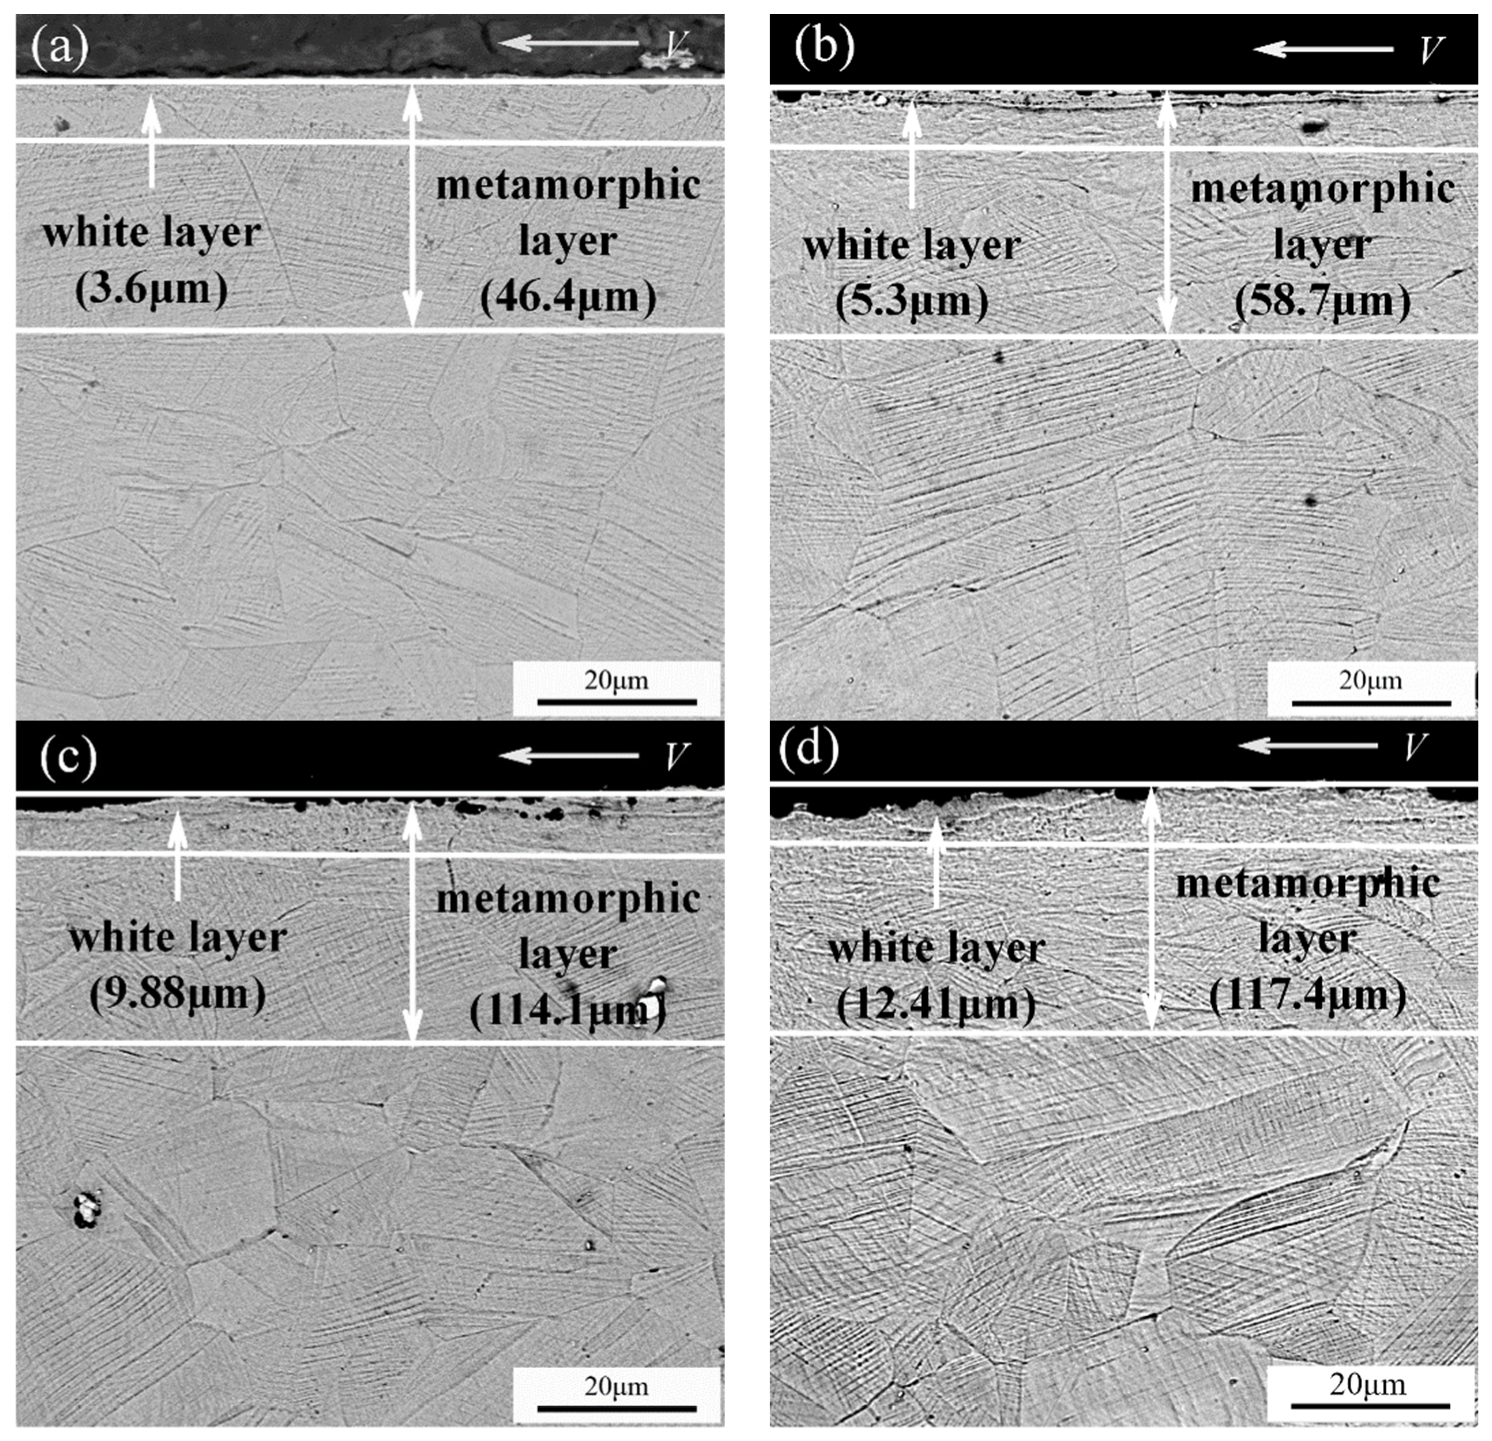
The presence of white layer can be observed in the workpiece samples after milling under all cutting parameters. Four representative groups of parameters were selected for analysis, and their measured cutting forces and cutting temperatures are shown in Table 2.
It is obvious from Figure 3 that the white layer produced by machining under all parameters shows the characteristics of dense, no obvious crystal features; the plastic deformation area of the machined surface shows obvious grain tilting, pore elongation and compression, and slip lines; and the machined surface has shear flow, and the appearance of slip lines is due to the slip of crystals resulting in the surface of the specimen after polishing with varying heights. After corrosion, the presence of slip lines can be seen in the metallographic image, which also proves from the side that strong plastic deformation leads to grain slip.

3.1.2. EDS Analysis

The variation in elemental content and distribution in the white layer can provide a reliable basis for the analysis of the phase change in the workpiece. The changes in the content of the main elements in the white layer and the matrix material were analyzed by EDS and the results are shown in Table 3. It can be seen that the content of major elements such as Ni, Cr, and Fe in the white layer is significantly lower compared to the matrix, while the content of elements such as C and O at the boundary is significantly higher. At the same time, the elemental content of Mo, Ti, and Nb in the white layer is higher and that of Cr and Co is lower. In GH4169, Nb and Mo elements are mainly distributed in the γ′, γ′′, and δ phases. It is inferred that as the content of Ti and Nb elements increases after machining, the content of the strengthening phase γ′ also increases, with an increase of 8–15%, while Cr and Co elements are mainly concentrated in γ, indicating that γ′ appears to be diffusely precipitated during the machining process. In addition, the C and O content in the white layer increases more obviously, which can be inferred from the fact that the oxide and carbide content in the white layer increases due to the chemical reaction between the workpiece material and air under high temperature and pressure during the machining process.
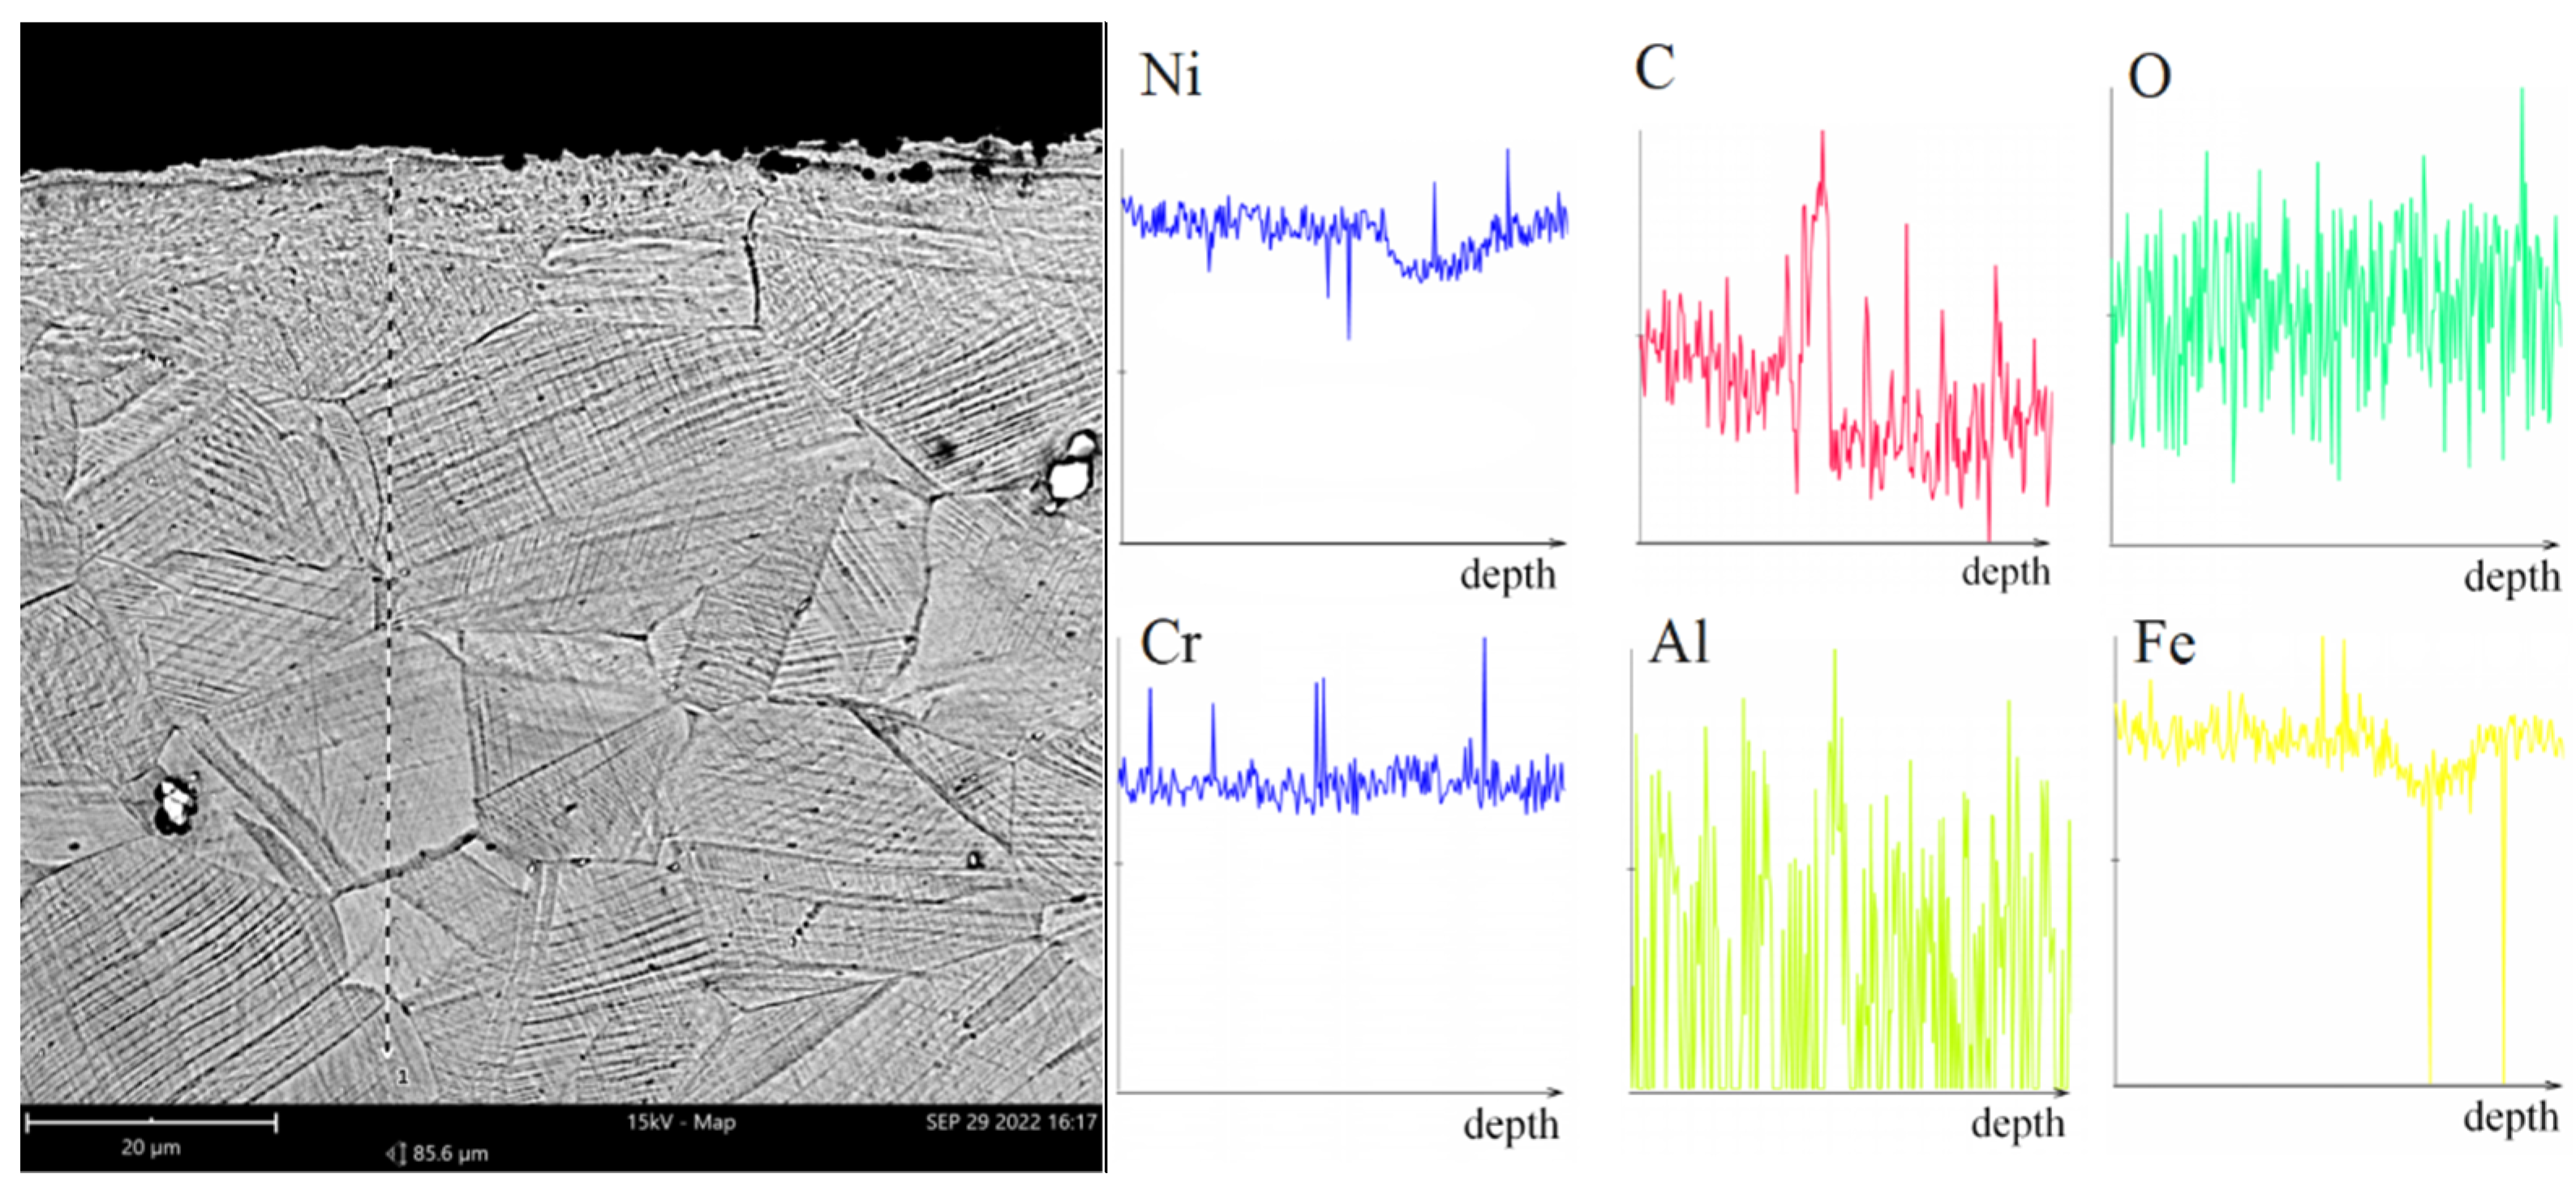
The EDS analysis of the machined surface of GH4169 along the depth of cut direction is shown in Figure 4, with different color fluorescence maps indicating different elemental distributions. The EDS line analysis of the elements on the machined surface and the base material is shown in Figure 5.
According to the EDS elemental analysis, the composition and content of the elements in the metamorphic layer basically did not change, but the content of the elements in the white layer microstructure changed significantly; the content of carbon and oxygen elements especially increased significantly, according to the analysis of previous research, in the process of high-speed cutting due to strong plastic deformation and high cutting heat, which prompted the material oxidation reaction and carburizing, resulting in the aggregation of oxygen and carbon elements in the material. The clustering of C and O can also be seen in the fluorescence map in Figure 4, which indicates that the transfer of elements occurred during processing.
As can be seen in Figure 5, the total content of the elements is the same in the workpiece matrix and machined surface, i.e., in the white layer, the metamorphic layer, and the matrix, but if there are pores or cracks present, there are fluctuations or vacancies in the element content at the pores or cracks. Combined with the fluorogram analysis, C and O appear to be clustered, and the line sweep also indicates that a change in the elemental distribution has occurred. This proves that there is no chemical change in the material during processing—only a change in the location of the element distribution.

3.1.3. XRD Analysis

The XRD analysis of the matrix and machined surface of the GH4169 superalloy was carried out to analyze the effect of the cutting process on the microstructure of the workpiece. The diffraction spectra of the matrix and machined surface are shown in Figure 6.
The XRD patterns of the GH4169 matrix and white layer show five peaks with diffraction angles 2θ of 43.80°, 45.75°, 46.37°, 50.99°, and 74.81°, respectively. By matching the standard PDF cards of the phases with MDI Jade software, the corresponding phases were measured as γ (Ni, Fe), γ′ Ni3(Al, Ti), γ″ (Ni3Nb), and δ (Ni3Nb). From Figure 6, it can be observed that the XRD peaks of the processed surface white layer have lower peak heights and wider peak shapes than those of the base material. Fully crystallized crystals have larger grains, so the diffraction peaks are stronger, sharper, and symmetrical, while less crystalline crystals tend to have internal defects such as dislocations and finer grains, so the diffraction peaks are wider and less intense [22]. Therefore, it shows that the white layer is less crystalline and has smaller grains than the matrix material, which proves that grain refinement occurs in the white layer.
Combined with the EDS elemental analysis, the content of Ni, Fe, etc. decreased and the content of Ti and Nb increased, while the diffraction peak of the white layer was shifted, as seen in the enlarged figure; this proved that the content of γ in the white layer decreased while the content of γ′ increased, thus indicating that a phase change occurred during the white layer formation.

3.1.4. EBSD Analysis

The specimens with V = 800 m/min and ap = 0.2 mm were selected for EBSD analysis, and the inverse polar diagram (IPF), Kernel Average Misorientation (KAM), and grain orientation spread (GOS) plots were obtained as shown below, in which grain boundaries of different sizes were plotted with different color lines, with low-angle grain boundaries defined as 2°~10° and high-angle grain boundaries defined as more than 10°.
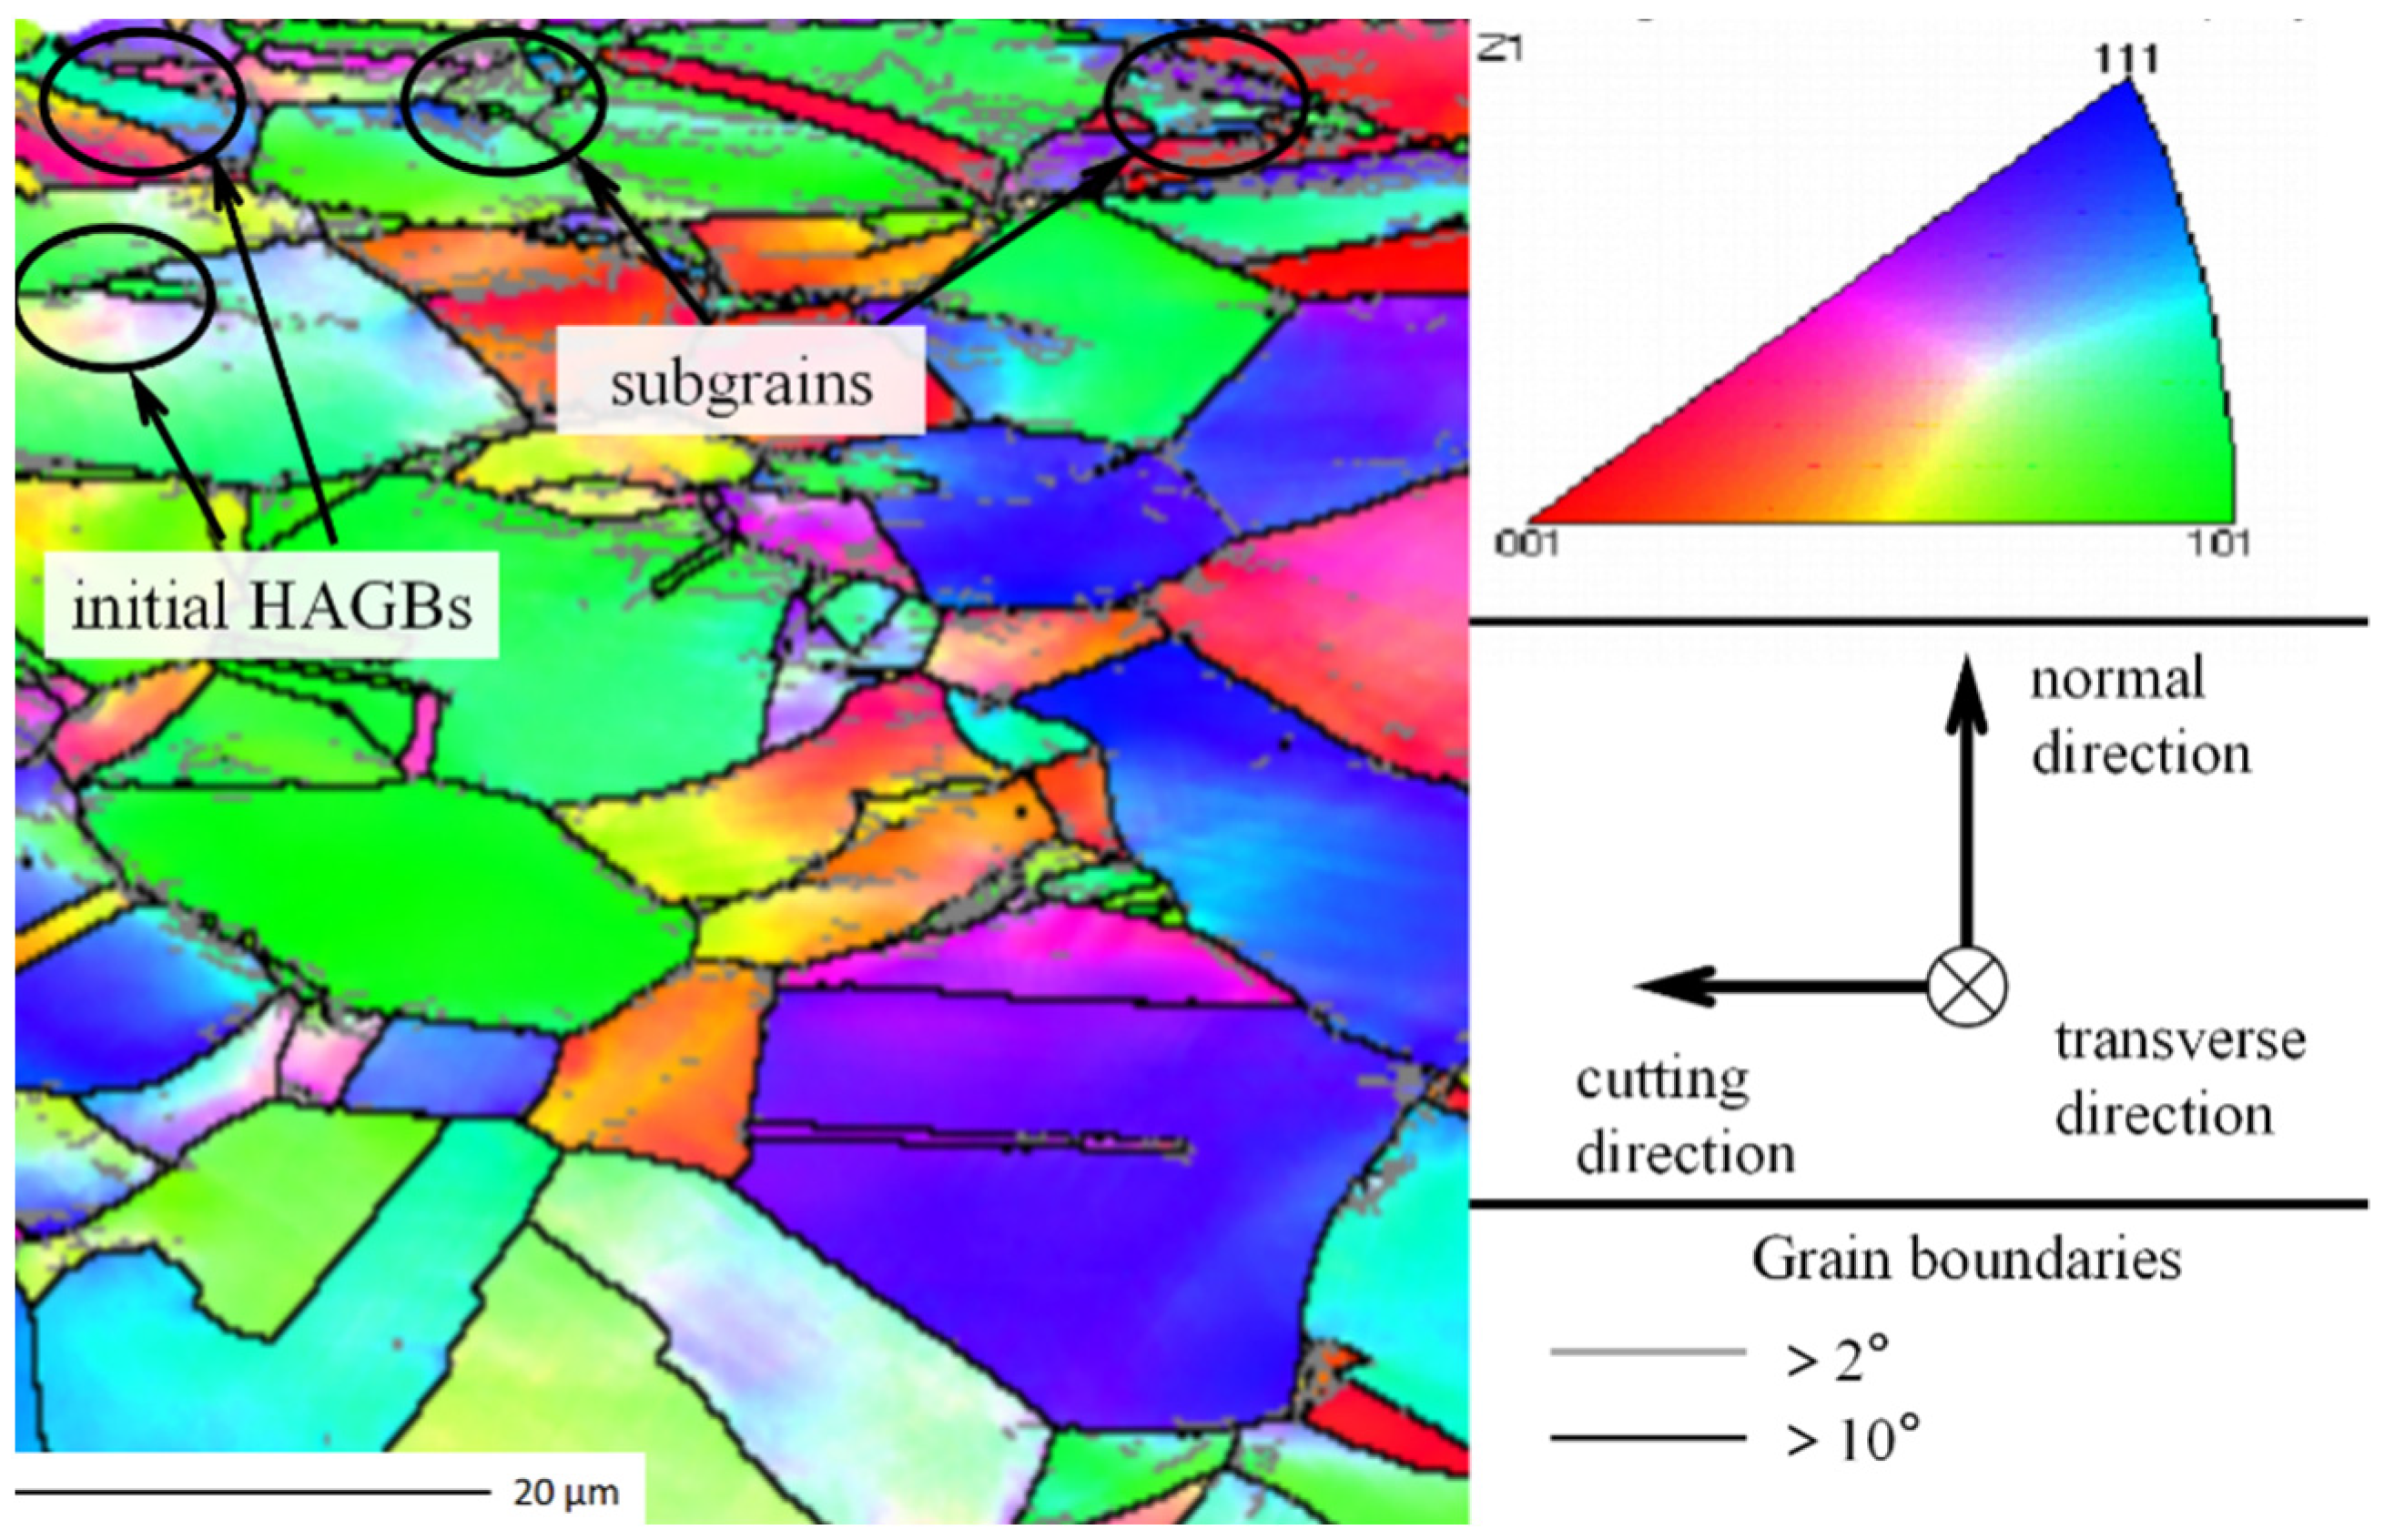
As shown in the IPF of Figure 7, compared to the inside of the deformed grains, low-angular grain boundaries formed by recrystallization appear at the surface grain boundaries of the machined surface in addition to the initially formed high angular grain boundaries, while there is no significant change in the grain size of the plastically deformed layer compared to that of the matrix. A clear refinement of the grains is observed in the most superficial layer, with elongated grains at the white layer and a large number of low-angle grain boundaries (LAGBs) appearing inside the high-angle grain boundaries (HAGBs). The sub-grain formation due to dynamic recovery can be clearly seen in Figure 7 [11]. The initial formation of HAGB fragments can be observed in the subsurface layer, which is surrounded by dense LAGBs with LAGBs also attached at the ends.
To specifically analyze the changes in recrystallization within the white layer, the EBSD orientation results were water-averaged along the depth direction by the sub-subset function of the channel 5 software to extract the proportion of LAGBs and HAGBs at different depths; the results are shown in Figure 8. It can be seen from Figure 8 that the proportion of LAGBs is higher the closer to the machined surface, and the proportion of LAGBs increases from 86.5% to 98.1% from the inside of the material to the plastic deformation zone, and the proportion of HAGBs gradually decreases from 13.5% to 1.9%. This result indicates that the grains in the transition zone are extruded, elongated, bent, etc. during the cutting process, resulting in a large number of dislocations inside the grains, which are driven by the combination of deformation and high temperature to form LAGBs, resulting in a significant increase in the proportion of LAGBs. At the white layer region, the percentage of LAGBs decreased to 97.2%, and the percentage of HAGBs increased from 1.9% to 2.8%, which proved that during the cutting process, LAGBs fused to form HAGBs, and the degree of grain recrystallization inside the white layer increased to form HAGBs, which made the percentage of HAGBs increase.
To further analyze the variation in grains and the extent of dislocations in the metamorphic layer region, the analysis of the KAM was carried out, as shown in Figure 9. The KAM can represent the average orientation difference distribution at each point inside the grains. From Figure 9, it can be seen that the degree of grain deformation gradually increases from the inside of the material to the plastic deformation layer, and the dislocation density also gradually increases. The dislocation density at the grain junction is significantly higher than that inside the grain, indicating that the grain produces an uneven deformation, resulting in a higher degree of strain at the grain boundary than inside the grain. The high strain and high strain rate generated during the milling process lead to the formation of high-density dislocations, and the dislocation density increases further with the further increase in strain rate and strain. In contrast, the presence of a grain refinement layer on the surface and a significant decrease in the dislocation density inside the grains suggest that the grains on the surface may nucleate by accommodating dislocations from highly deformed grains under strain and high temperature, producing equiaxed grains with well-defined boundaries [30], referred to as DRX, resulting in a reduction in dislocations on the surface.
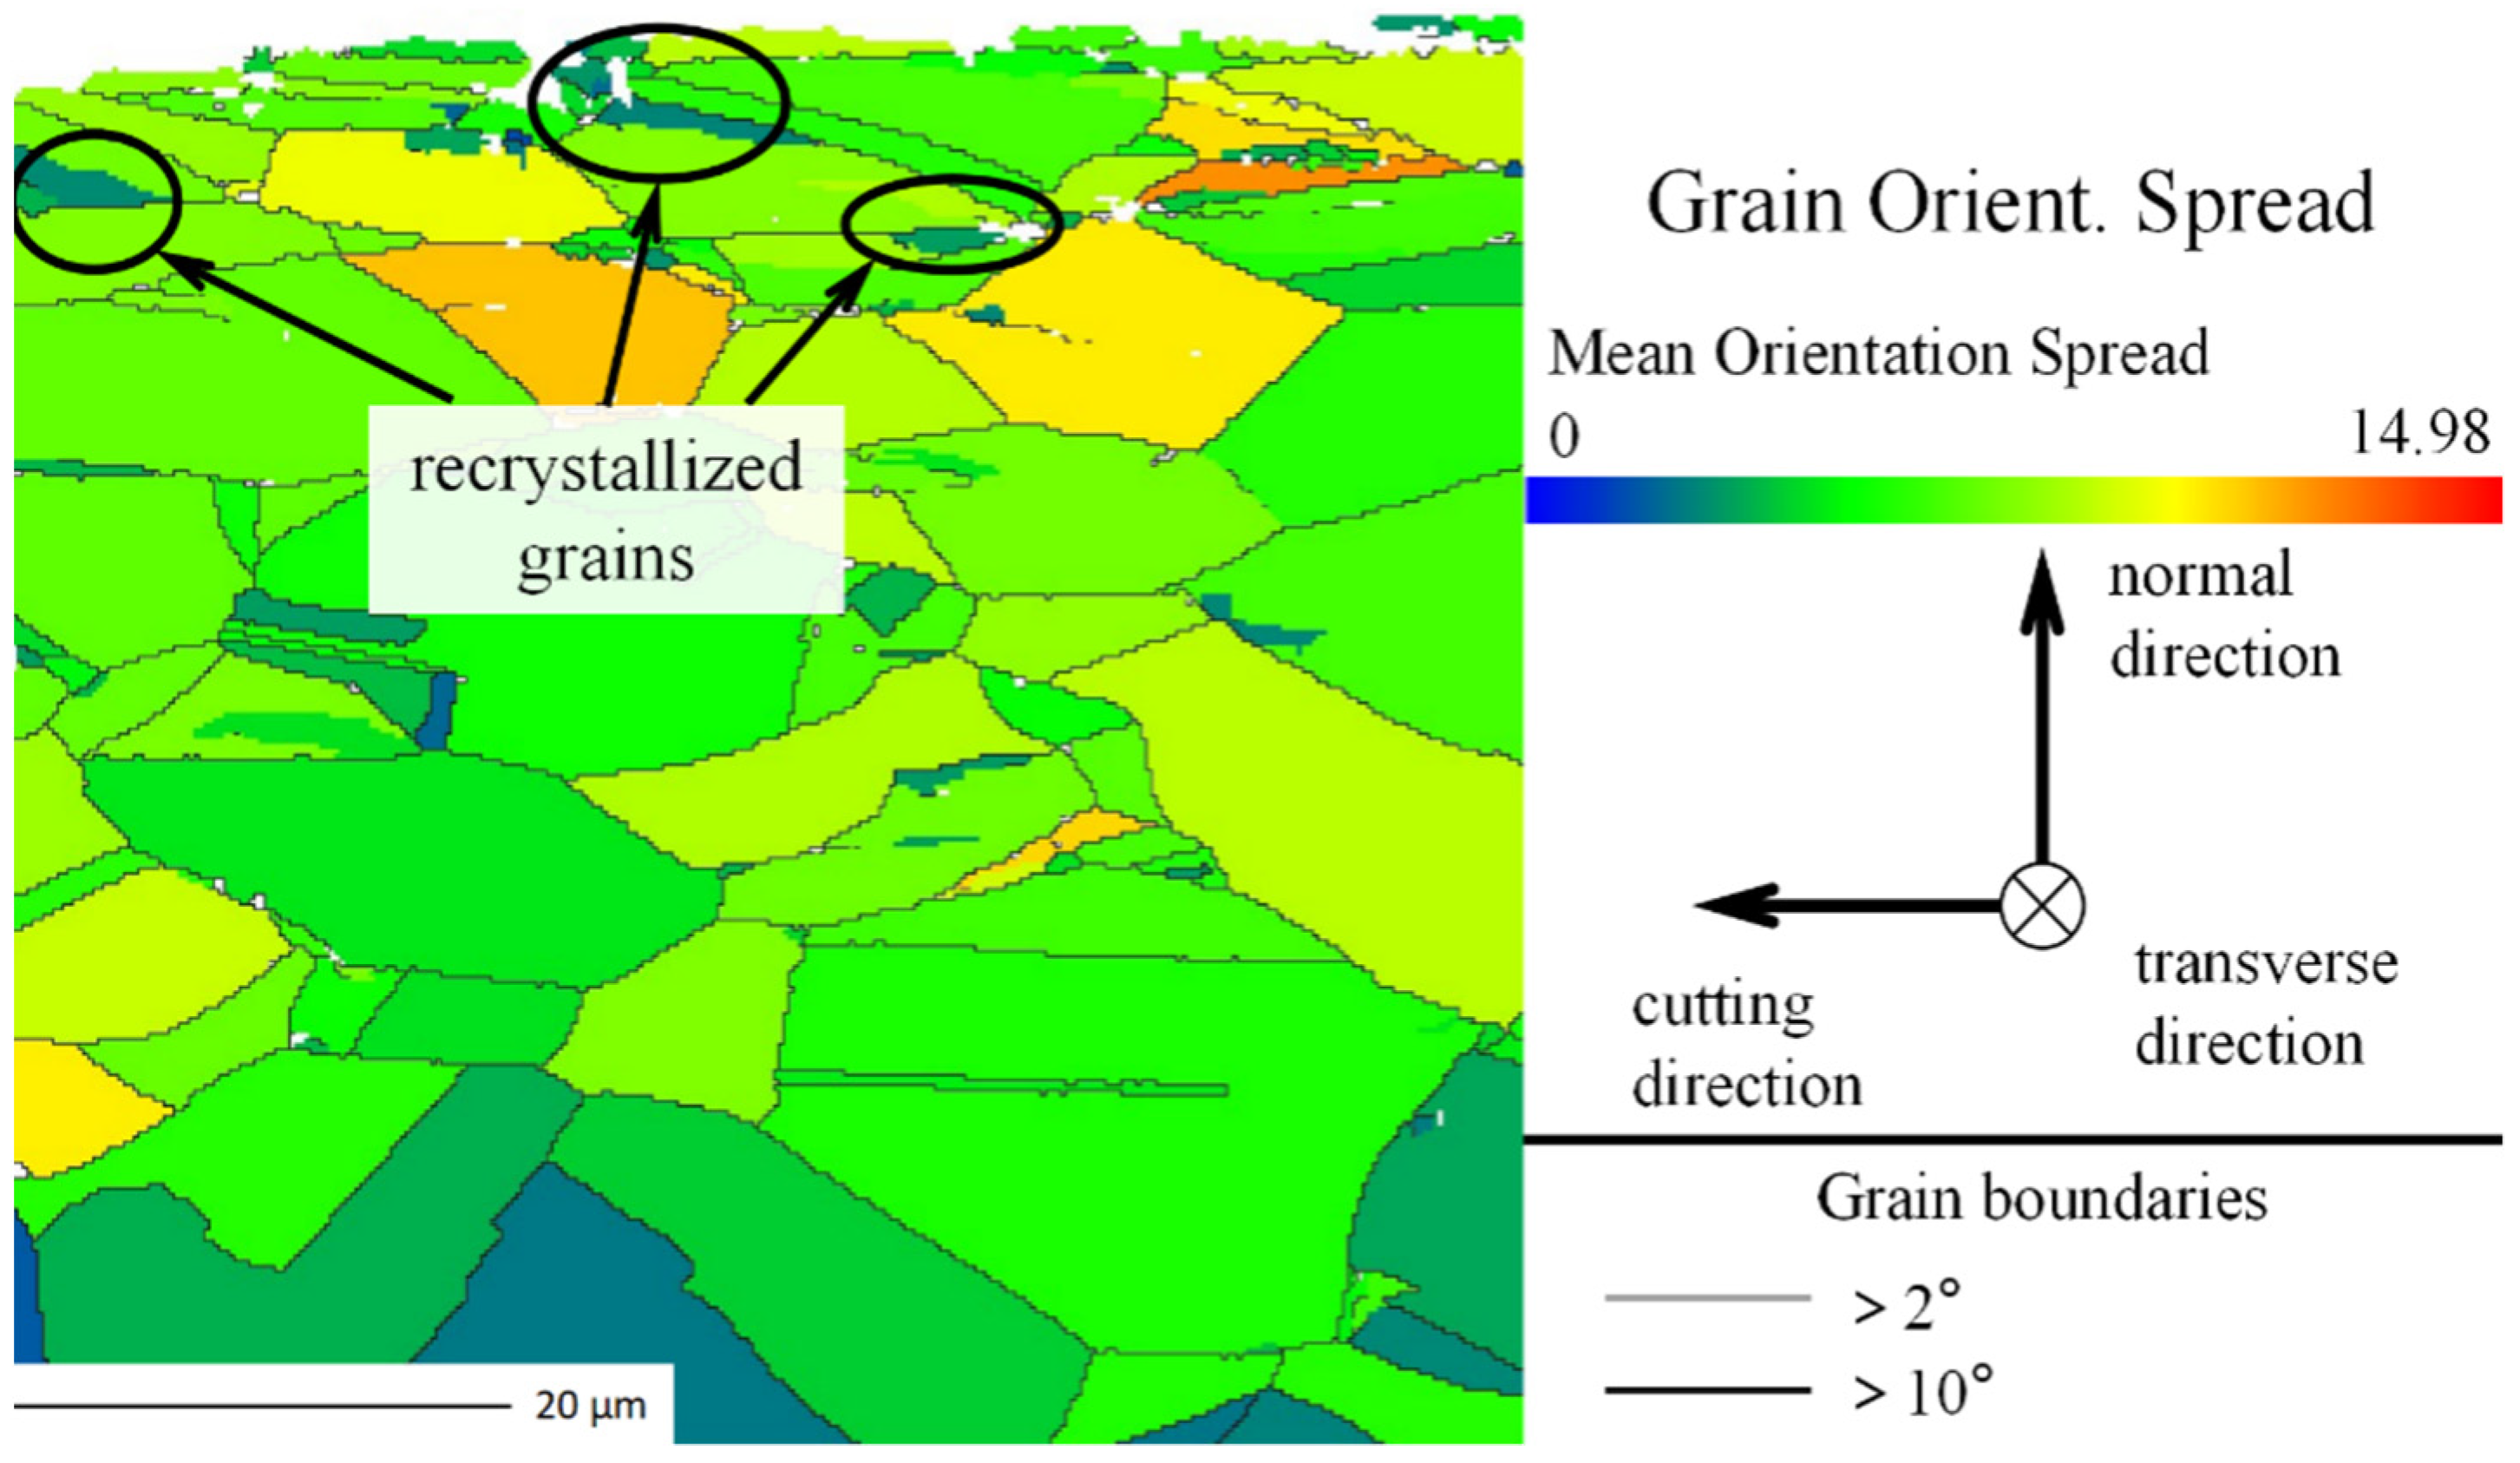
Figure 10 shows the GOS, which is one of the methods to distinguish dynamically recrystallized grains from deformed substrates; a larger GOS value means a larger degree of lattice distortion and a higher dislocation density. The threshold value of GOS for recrystallized grains is generally chosen as 2°, i.e., a GOS value less than 2° is considered as a recrystallized grain. As can be seen in Figure 10, there is a small number of fine recrystallized grains in the white layer region, at the grain boundaries in the plastic deformation zone, and inside the grains.

3.2. Discussion

Through analyzing EDS, XRD, and EBSD, it can be seen that there is obvious phase transformation and recrystallization in the sub-surface. The white layer zone is inferred from the decrease in Al elements and γ′ phase content that the γ′ phase dissolved in the white layer. The dissolution of γ′ phase and the fragmentation and refinement of δ phase make the white layer more homogeneous and change the physical and mechanical properties of the material. Compared with the workpiece, the lattice mismatch of γ and γ′′ phases on the processed surface is reduced [31]. This means that the strain and strain energy at the interface is reduced, which reduces the yield strength, increases the stability, and increases the hardness of the white layer.
With the assistance of EBSD analysis, it can be seen from the IPF diagram that the proportion of LAGB in the white layer is much larger than that in the matrix, and the proportion of LAGB gradually decreases from the white layer region to the plastic deformation region; meanwhile, combined with the KAM and GOS diagrams, it can be seen that LAGB is mainly formed in the region of higher dislocation density, dividing the large grains into many sub-grains, which proves that the material undergoes dynamic recovery (DRV).
DRX can be classified as discontinuous dynamic recrystallization (DDRX), continuous dynamic recrystallization (CDRX), and geometric dynamic recrystallization. K. Huang [32] pointed out that the identification of the DRX mechanism concerns whether the HAGBs formed after severe plastic deformation was transformed from LAGBs, micro shear, deformation bands, or pristine HAGBs. To determine whether DRX was generated, as shown in Figure 9, more LAGBs and sub-grains were formed near the grain boundaries relative to the interior of the deformed grains, and it can be observed that the initially formed HAGB fragments were surrounded by dense LAGBs with LAGBs also attached at the ends, indicating that the HAGBs were transformed from LAGBs, which is evidence that DRX occurred in the most superficial region.
At the same time, elongated grains are formed in the white layer region, and the internal crystal defects are reduced. DRV and DRX absorb the dislocations and reduce the defect density, resulting in a dense white layer [15]. In the plastic deformation zone, the dislocation density is reduced and mainly concentrated at the intersection of grain boundaries because the stress and strain in the subsurface layer gradually decrease and the transferred cutting heat also gradually decreases; thus, the dynamic recrystallization cannot be produced in the plastic deformation zone, therefore the proportion of HAGB gradually increases and the grains are mainly subjected to plastic deformation by extrusion, elongation, and bending. The effect of material anisotropy on cutting forces can be explained and quantified by the means of crystal and grain morphology effects with the help of pole diagrams [33]. Due to the decrease in temperature and strain, DRX occurs mainly in the outermost layer driven by dislocations, and only plastic deformation occurs in the subsurface layer, which also indicates that the white layer is produced by DRX due to high temperature and strong strain [32,34].

4. Conclusions

In this paper, the high-speed milling of nickel-based superalloy GH4169 was carried out via different machining parameters to investigate the formation mechanism of white layer during machining; additionally, the effects of cutting speeds and depths of cut on the physical and mechanical properties of the workpiece were analyzed. The main conclusions are as follows:
1. White layer is formed on the machined surface of GH4169 superalloy, with the microstructure characteristics greatly different from the matrix, and showing no obvious crystal features.
2. The total amount of elements in the white layer remains unchanged, but the distribution of elements such as C, N, O, Fe, and Ni changes due to phase change, and the crystallinity of the white layer is observed to be poorer and finer than that of the matrix material, which proves that grain refinement occurs in the white layer.
3. White layer shows no obvious crystal features due to the occurrence of dynamic recovery and dynamic recrystallization, absorption of dislocations, and reduction in surface defects. The mechanism of white layer formation is continuous dynamic recrystallization due to the thermal coupling effect, which makes the LAGBs increase to produce white layer.

Author Contributions

J.Z.: Conceptualization; Resources; Writing—Original Draft; Writing—Review and Editing; J.D.: Conceptualization; Resources; Writing—Original Draft; Writing—Review and Editing; Oversight and leadership; Project administration; B.L.: Conceptualization; Resources; Writing—Review and Editing; Oversight and leadership; Project administration; G.S.: Conceptualization; Resources; Writing—Review and Editing; Oversight and leadership; Project administration. All authors have read and agreed to the published version of the manuscript.

Funding

This research was funded by the National Natural Science Foundation of China (52275438, 51675289), the Natural Science Foundation of Shandong Province (ZR2020ME160, ZR2021QE230) and the Basic research project of pilot project of integration of science, education and production (Qi-lu University of Technology (Shandong Academy of Sciences)) (2022PY007).

Data Availability Statement

The datasets generated and/or analyzed during the current study are available from the corresponding author upon reasonable request.

Conflicts of Interest

The authors declare that they have no competing interests.

References

  1. Akhtar, W.; Sun, J.F.; Chen, W.Y. Effect of Machining Parameters on Surface Integrity in High Speed Milling of Super Alloy GH4169/Inconel 718. Mater. Manuf. Process. 2016, 31, 620–627. [Google Scholar] [CrossRef]
  2. Yin, Q.; Liu, Z.; Wang, B.; Song, Q.; Cai, Y. Recent progress of machinability and surface integrity for mechanical machining Inconel 718: A review. J. Adv. Manuf. Technol. 2020, 109, 215–245. [Google Scholar] [CrossRef]
  3. Mohsan, A.U.H.; Liu, Z.Q.; Padhy, G.K. A review on the progress towards improvement in surface integrity of Inconel 718 under high pressure and flood cooling conditions. Int. J. Adv. Manuf. Technol. 2017, 91, 107–125. [Google Scholar] [CrossRef]
  4. Segreto, T.; D’Addona, D.; Teti, R. Tool wear estimation in turning of Inconel 718 based on wavelet sensor signal analysis and machine learning paradigms. Prod. Eng. 2020, 14, 693–705. [Google Scholar] [CrossRef]
  5. Griffiths, B.J. White layer formations at machined surfaces and their relationship to white layer formations at worn surfaces. J. Tribol. 1985, 107, 165–171. [Google Scholar] [CrossRef]
  6. Liang, X.; Liu, Z.; Wang, B. State-of-the-art of surface integrity induced by tool wear effects in machining process of titanium and nickel alloys: A review. Measurement 2019, 132, 150–181. [Google Scholar] [CrossRef]
  7. Zhang, F.Y.; Duan, C.Z.; Sun, W.; Ju, K. Influence of White Layer and Residual Stress Induced by Hard Cutting on Wear Resistance During Sliding Friction. J. Mater. Eng. Perform. 2019, 28, 7649–7662. [Google Scholar]
  8. Zeng, H.H.; Yan, R.; Hu, T.T.; Du, P.L.; Wang, W.; Peng, F.Y. Analytical Modeling of White Layer Formation in Orthogonal Cutting of AerMet100 Steel Based on Phase Transformation Mechanism. J. Manuf. Sci. Eng. 2019, 141, 1087–1357. [Google Scholar] [CrossRef]
  9. Cherdyntsev, V.V.; Pustov, L.Y.; Kaloshkin, S.D.; Tomilin, I.A.; Shelekhov, E.V.; Estrin, E.I. Phase transformations in powder iron-nickel alloys produced by mechanical alloying. Phys. Met. Metallogr. 2009, 107, 466–477. [Google Scholar] [CrossRef]
  10. Herbert, C.; Axinte, D.; Hardy, M.; Brown, P.D. Investigation into the characteristics of white layers produced in a nickel-based superalloy from drilling operations. Mach. Sci. Technol. 2012, 16, 40–52. [Google Scholar] [CrossRef]
  11. Agmell, M.; Ahadi, A.; Zhou, J.M.; Peng, R.L.; Bushlya, V.; Stahl, J.E. Modeling subsurface deformation induced by machining of Inconel 718. Mach. Sci. Technol. 2017, 21, 103–120. [Google Scholar] [CrossRef]
  12. Imran, M.; Mativenga, P.T.; Gholinia, A.; Withers, P.J. Assessment of surface integrity of Ni superalloy after electrical discharge, laser, and mechanical micro-drilling processes. Int. J. Adv. Manuf. Technol. 2015, 79, 1303–1311. [Google Scholar] [CrossRef]
  13. Herbert, C.R.J.; Kwong, J.; Kong, M.C.; Axinte, D.A.; Hardy, M.C.; Withers, P.J. An evaluation of the evolution of workpiece surface integrity in hole-making operations for a nickel-based superalloy. J. Mater. Process. Technol. 2012, 212, 1723–1730. [Google Scholar] [CrossRef]
  14. Thakur, A.; Mohanty, A.; Gangopadhyay, S. Comparative study of surface integrity aspects of Incoloy 825 during machining with uncoated and CVD multilayer coated inserts. Appl. Surf. Sci. 2014, 320, 829–837. [Google Scholar] [CrossRef]
  15. Liao, Z.R.; Polyakov, M.; Diaz, O.G.; Axinte, D.; Mohanty, G.; Maeder, X. Grain refinement mechanism of nickel-based superalloy by severe plastic deformation—Mechanical machining case. Acta Mater. 2019, 180, 2–14. [Google Scholar] [CrossRef]
  16. Liao, Z.R.; Gao, D.; Lu, Y.; Lv, Z.K. Multi-scale hybrid HMM for tool wear condition monitoring. Int. J. Adv. Manuf. Technol. 2016, 84, 2437–2448. [Google Scholar] [CrossRef]
  17. Ding, R.; Knaggs, C.; Li, H.; Li, Y.G.; Bowen, P. Characterization of plastic deformation induced by machining in a Ni-based superalloy. Mater. Sci. Eng. A 2020, 778, 139104. [Google Scholar] [CrossRef]
  18. Jia, P.; Rong, Y.; Huang, Y. Condition monitoring of the feed drive system of a machine tool based on long-term operational modal analysis. Int. J. Mach. Tools Manuf. 2019, 146, 103454. [Google Scholar] [CrossRef]
  19. Shaikh, V.A.; Scharf, T.W.; Boubekri, N. Microlubrication machining of 1018 steel: The effect of a biodegradable lubricant on the microstructural integrity. Lubr. Sci. 2017, 29, 357–376. [Google Scholar] [CrossRef]
  20. Thirumalai, R.; Techato, K.; Chandrasekaran, M.; Venkatapathy, K.; Seenivasan, M. Experimental investigation during turning process of titanium material for surface roughness. Mater. Today Proc. 2021, 45, 1423–1426. [Google Scholar] [CrossRef]
  21. Li, L.; Lai, D.; Ji, Q.; Huang, J.; Lin, Y.; Pan, M. Influence of tool characteristics on white layer produced by cutting hardened steel and prediction of white layer thickness. Int. J. Adv. Manuf. Technol. 2021, 113, 1215–1228. [Google Scholar] [CrossRef]
  22. Du, J.; Liu, Z.; Lv, S. Deformation-phase transformation coupling mechanism of white layer formation in high-speed machining of FGH95 Ni-based superalloy. Appl. Surf. Sci. 2014, 292, 197–203. [Google Scholar] [CrossRef]
  23. Paturi, U.M.R.; Reddy, N.S. Progress of machinability on the machining of Inconel 718: A comprehensive review on the perception of cleaner machining. Clean. Technol. Environ. Policy 2021, 5, 100323. [Google Scholar] [CrossRef]
  24. De Lacalle, L.N.L.; Sanchez, J.A.; Lamikiz, A.; Celaya, A. Plasma assisted milling of heat-resistant superalloys. J. Manuf. Sci. Eng. 2004, 126, 274–285. [Google Scholar] [CrossRef]
  25. M’Saoubi, R.; Axinte, D.; Soo, S.L.; Nobel, C.; Attia, H.; Kappmeyer, G. High-performance cutting of advanced aerospace alloys and composite materials. CIRP Ann. 2015, 64, 557–580. [Google Scholar] [CrossRef]
  26. Chaize, E.; Dumont, F.; Truffart, B.; Girinon, M.; Brosse, A.; Dorlin, T. Influence of lubrication mode onto residual stress generation in turning. Procedia CIRP 2022, 108, 390–393. [Google Scholar] [CrossRef]
  27. Sharman, A.R.C.; Hughes, J.I.; Ridgway, K. Workpiece surface integrity and tool life issues when turning inconel 718™ nickel-based superalloy. Mach. Sci. Technol. 2004, 8, 399–414. [Google Scholar] [CrossRef]
  28. Sharman, A.R.C.; Hughes, J.I.; Ridgway, K. Surface integrity and tool life when turning Inconel 718 using ultra-high pressure and flood coolant systems. Proc. Inst. Mech. Eng. Part B-J. Eng. Manuf. 2008, 222, 653–664. [Google Scholar] [CrossRef]
  29. Jin, D.; Liu, Z. Damage of the machined surface and subsurface in orthogonal milling of FGH95 superalloy. Int. J. Adv. Manuf. Technol. 2013, 68, 1573–1581. [Google Scholar] [CrossRef]
  30. La Monaca, A.; Murray, J.W.; Liao, Z.; Speidel, A.; Robles-Linares, J.A.; Axinte, D.A. Surface integrity in metal machining—Part II: Functional performance. Int. J. Mach. Tools Manuf. 2021, 164, 103718. [Google Scholar] [CrossRef]
  31. Kruk, A.; Wusatowska-Sarnek, A.M.; Ziętara, M.; Jemielniak, K.; Siemiątkowski, Z.; Czyrska-Filemonowicz, A. Characterization on White Etching Layer Formed During Ceramic Milling of Inconel 718. Met. Mater. Int. 2018, 24, 1036–1045. [Google Scholar] [CrossRef]
  32. Huang, K.; Logé, R.E. A review of dynamic recrystallization phenomena in metallic materials. Mater. Des. 2016, 111, 548–574. [Google Scholar] [CrossRef]
  33. Pérez-Ruiz, J.D.; de Lacalle, L.N.L.; Urbikain, G.; Pereira, O.; Martínez, S.; Bris, J. On the relationship between cutting forces and anisotropy features in the milling of LPBF Inconel 718 for near net shape parts. Int. J. Mach. Tools Manuf. 2021, 170, 103801. [Google Scholar] [CrossRef]
  34. Zhang, H.; Zhang, K.; Jiang, S.; Zhou, H.; Zhao, C.; Yang, X. Dynamic recrystallization behavior of a γ′-hardened nickel-based superalloy during hot deformation. J. Alloys Compd. 2015, 623, 374–385. [Google Scholar] [CrossRef]
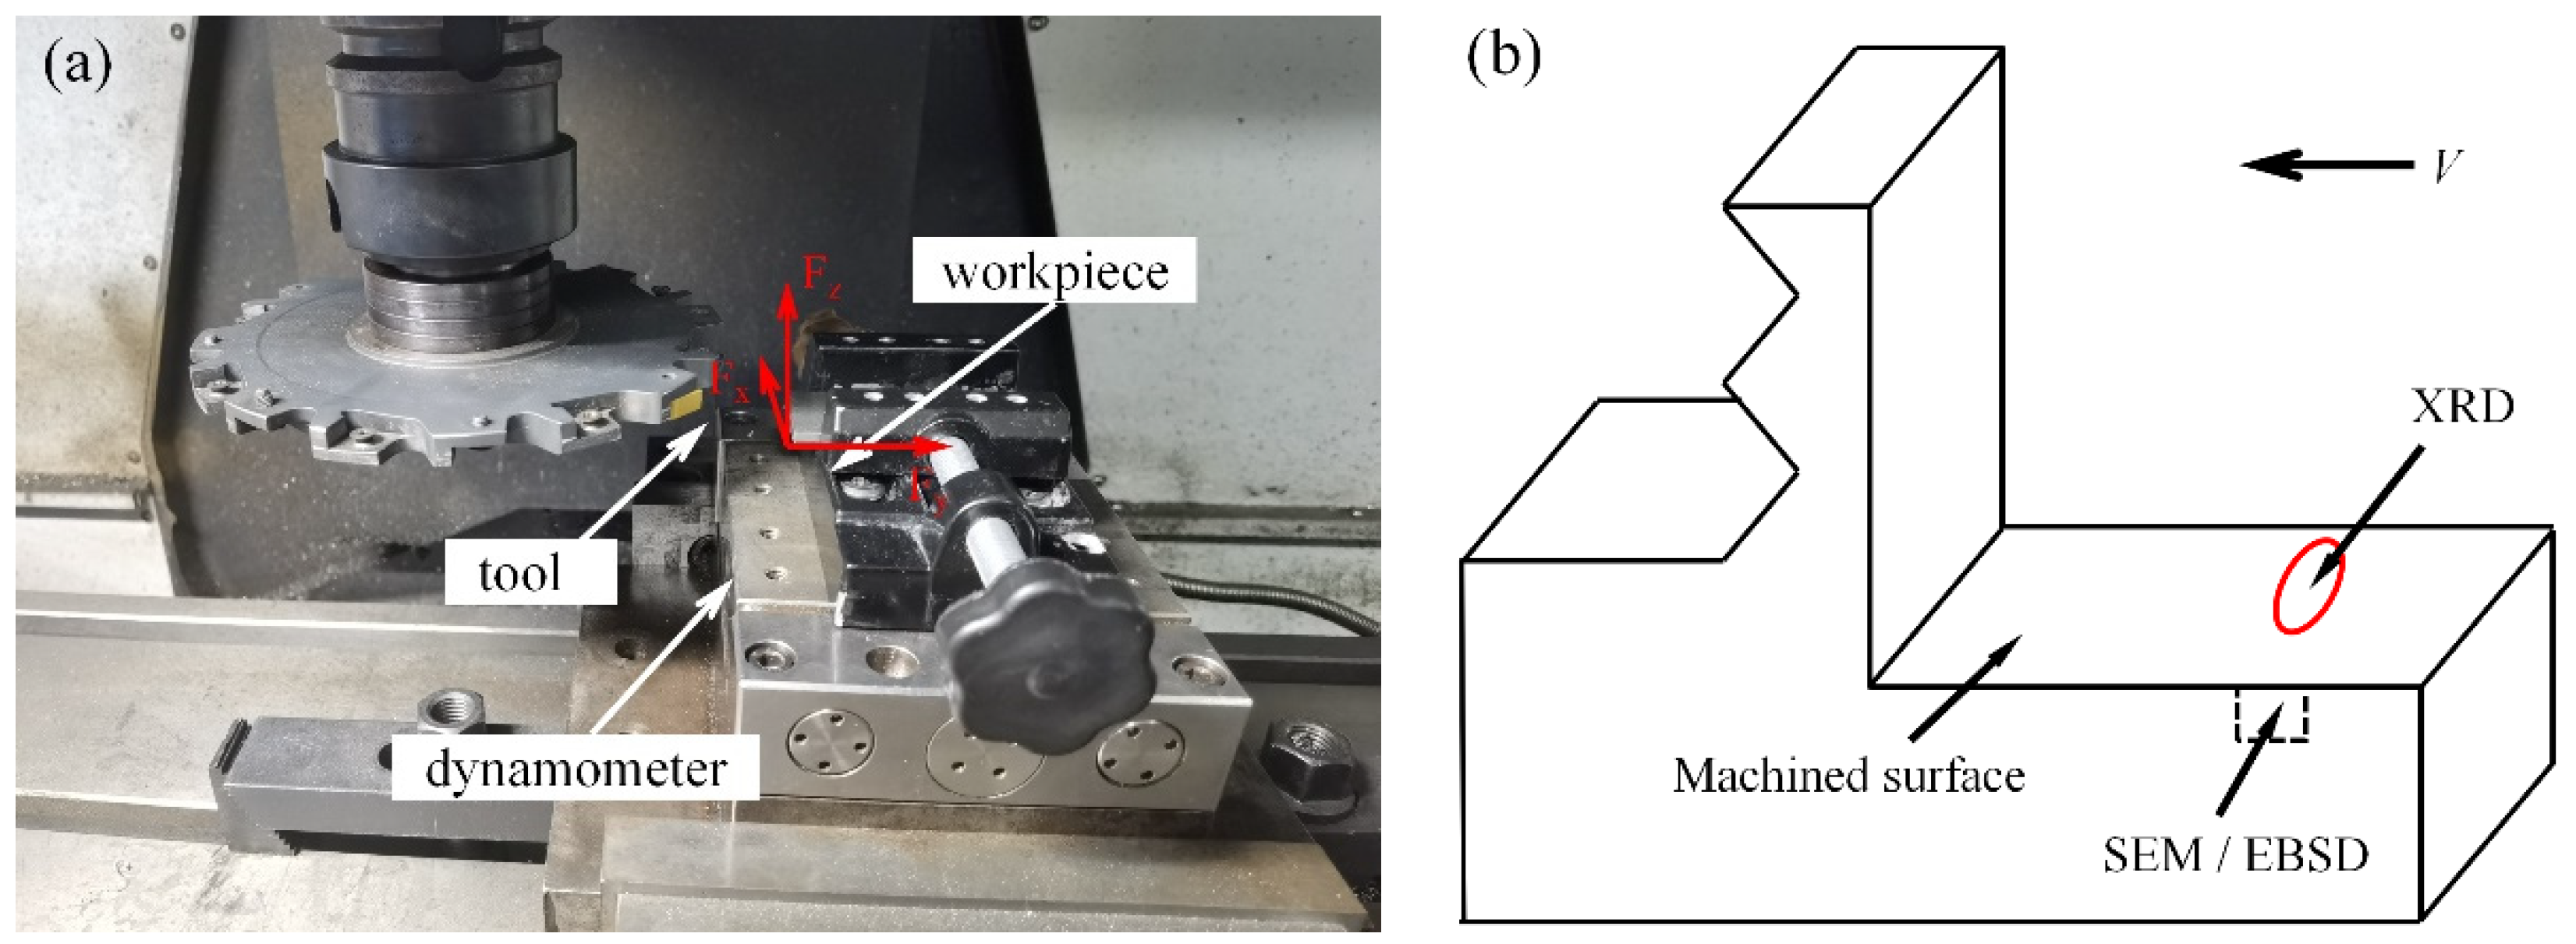
Figure 1. Experimental procedures: (a) Schematic diagram of the milling process; (b) schematic diagram of test areas of SEM XRD and EBSD.
Machines 11 00406 g001
Figure 2. The etched transverse section under the cutting condition of V = 800 m/min, ap = 0.2 mm: (a) white layer under a microscope; (b) white layer under SEM.
Machines 11 00406 g002
Figure 3. Microscopic morphology of the material under different processing parameters: (a) V = 500 m/min, ap = 0.1 mm; (b) V = 700 m/min, ap = 0.1 mm; (c) V = 800 m/min, ap = 0.3 mm; (d) V = 1000 m/min, ap = 0.3 mm.
Machines 11 00406 g003
Figure 4. EDS surface scan of white layer.
Machines 11 00406 g004
Figure 5. EDS line sweep.
Machines 11 00406 g005
Figure 6. XRD analysis of white layer and matrix.
Machines 11 00406 g006
Figure 7. Inverse pole figure (IPF).
Machines 11 00406 g007
Figure 8. Distribution of high-/low-angle grain boundaries in the surface layer of the milling process.
Machines 11 00406 g008
Figure 9. Kernel average misorientation (KAM).
Machines 11 00406 g009
Figure 10. Grain orientation spread (GOS).
Machines 11 00406 g010
Table 1. Main chemical composition of superalloy GH4169 (wt.%).
CCrCoMoMnALNbCuFeNi
2.8017.600.752.950.220.444.960.3216.28Bal
Table 2. Variation in cutting force and cutting temperature under different cutting parameters.
Cutting Speed (r/min)Cutting Depth (mm)Cutting Force (N)Cutting Temperature (°C)
5000.1265.3493.3
7000.1246.8560.9
8000.3298.6655.7
10000.3287.8798.5
Table 3. The main element’s content in the matrix and white layer (wt.%).
NiCrFeNbMoTiCO
MatrixBal.17.6116.284.262.950.682.803.20
White layerBal.13.5313.084.943.010.7812.689.09
Disclaimer/Publisher’s Note: The statements, opinions and data contained in all publications are solely those of the individual author(s) and contributor(s) and not of MDPI and/or the editor(s). MDPI and/or the editor(s) disclaim responsibility for any injury to people or property resulting from any ideas, methods, instructions or products referred to in the content.