Abstract
Wire Arc Additive Manufacturing (WAAM) is one of the most appropriate additive manufacturing techniques for producing large-scale metal components with a high deposition rate and low cost. Recently, the manufacture of nickel-based alloy (IN718) using WAAM technology has received increased attention due to its wide application in industry. However, insufficient information is available on the mechanical properties of WAAM IN718 alloy, for example in high-temperature testing. In this paper, the mechanical properties of IN718 specimens manufactured by the WAAM technique have been investigated by tensile tests and hardness measurements. The specific comparison is also made with the wrought IN718 alloy, while the microstructure was assessed by scanning electron microscopy and X-ray diffraction analysis. Fractographic studies were carried out on the specimens to understand the fracture behavior. It was shown that the yield strength and hardness of WAAM IN718 alloy is higher than that of the wrought alloy IN718, while the ultimate tensile strength of the WAAM alloys is difficult to assess at lower temperatures. The microstructure analysis shows the presence of precipitates (laves phase) in WAAM IN718 alloy. Finally, the effect of precipitation on the mechanical properties of the WAAM IN718 alloy was discussed in detail.
1. Introduction
IN718 is a nickel-based superalloy used extensively in many sectors such as aerospace, automotive, marine, shipbuilding, petrochemical and energy for the manufacture of complex parts in which the material is subjected to an aggressive environment. However, the manufacture of this material is difficult using traditional machining processes as it requires extensive machining and is also more expensive [1]. Additive Manufacturing (AM) is capable of generating intricate designs and 3D structures that are impossible or substantially expensive for conventional processes.
Wire Arc Additive Manufacturing (WAAM) uses the arc as a heat source to fuse the wires, using a layer-by-layer method. It is an economical method of rapid forming for the manufacture of high-quality metal parts. It is based on three-dimensional data of the part and is manufactured by depositing the material without the use of tools or molds [2]. The deposition of IN718 in WAAM techniques has been studied using metal inert gas (MIG) [3], tungsten inert gas (TIG) [4], cold metal transfer (CMT) [5], Arctig system by the Fronius technology [6] and plasma arc welding (PAW) [7]. Plasma Arc Welding (PAW) is a high energy density process. Due to its high deposition rate strategy, this method is most suitable for manufacturing large parts. In the present study, IN718 alloy is manufactured by using PAW-based WAAM technology.
WAAM IN718 has a dendritic microstructure decorated with laves phase and metals carbides [8,9,10]. The laves phase is generally deemed detrimental for mechanical properties, as its formation depletes the matrix of Nb and its presence may have an embrittling effect on the material [11]. However, there is still a lack of information available on the effect of laves phase on the mechanical properties of WAAM IN718. While previous research on WAAM processes has mainly focused on processing parameters and methodologies, including toolpath planning, single or multi-layer structure, and more [12,13,14], relatively little attention has been paid to the critical correlated properties achieved at the end of the additive process.
The mechanical properties of WAAM materials at high temperatures are particularly important for IN718, as this material is most often used for high-temperature applications. While the tensile properties of WAAM IN718 at room temperature were found to be comparable to those of the wrought material [15], the properties at elevated temperature remain largely unknown. Hence, in this paper, the effect of temperature on the mechanical properties of the WAAM IN718 alloy in comparison with the reference wrought IN718 has been investigated. In addition, the microstructure, yield strength, tensile strength and fractography are studied, and the effect of precipitation (laves phase) on the mechanical properties of IN718 is also discussed.
2. Materials and Methods
Experimental Procedure
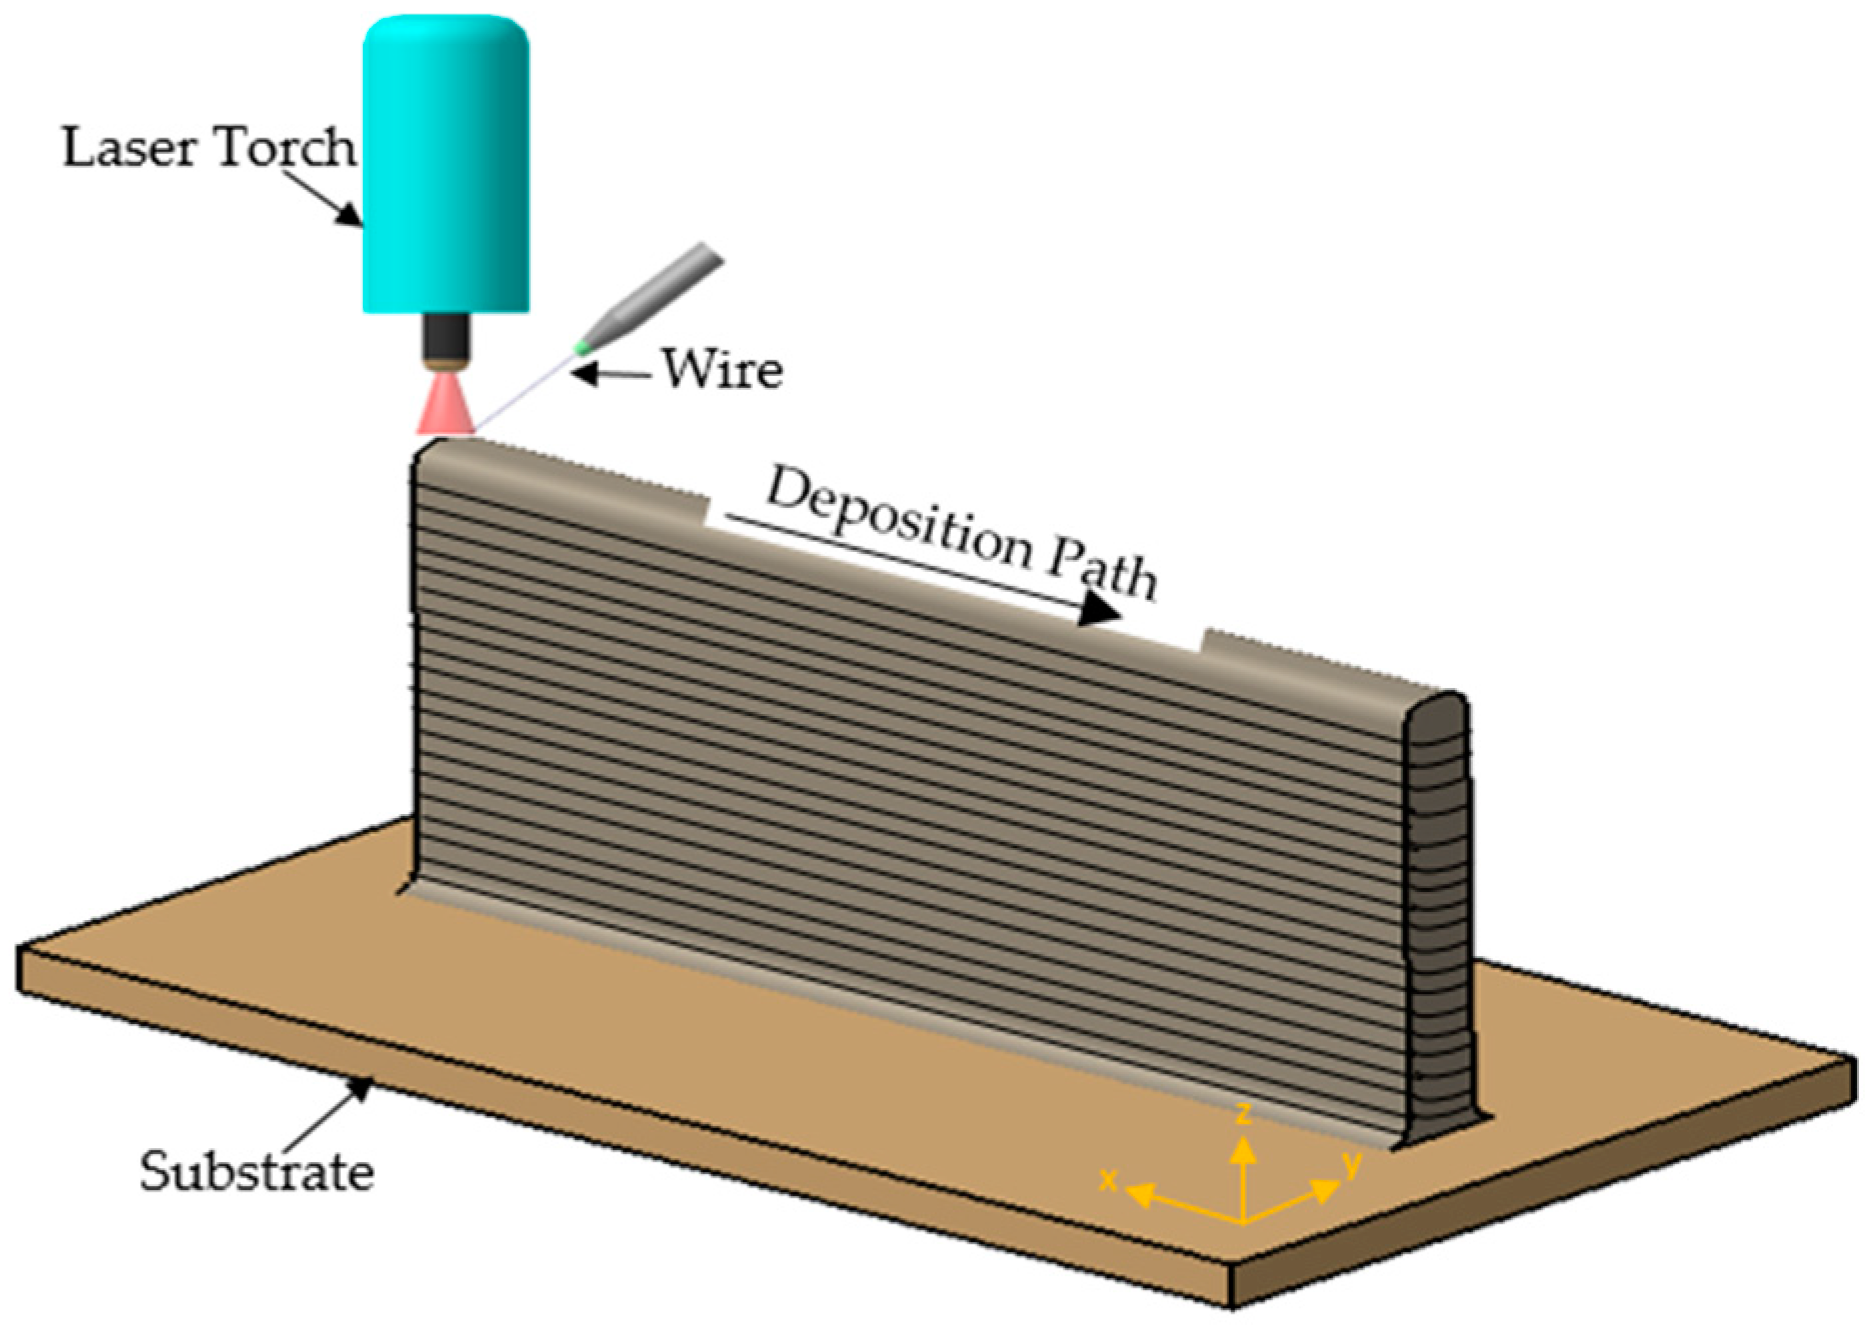
The WAAM IN718 wall is manufactured by using a Plasma arc welding system; it consists of gantry machine (Tetrix 552 AC/DC) Synergic Plasma EWM AG (Mündersbach, Germany) and provides a current up to 420 A; the direct flow of the plasm is generated through plasma torch. An experiment test was performed on a substrate (10 mm thick base material) attached to the welding table. The manufacturing procedure is similar to that used by the authors in [16,17]. The graphical representation of the WAAM process is given in Figure 1. The wire used for this study was 1.2 mm of IN718. The base plate used in this study was an extruded IN718 alloy plate.
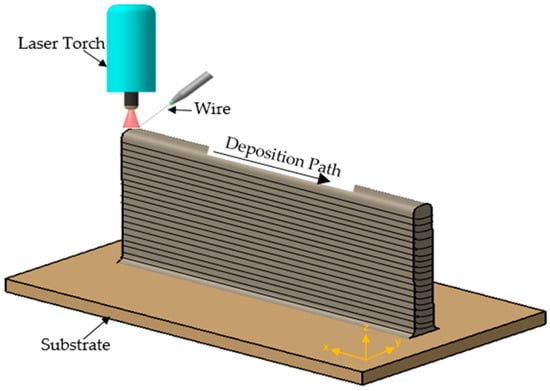
Figure 1.
Graphical representation of the Wire Arc Additive Manufacturing (WAAM) process.
The welding started by depositing the number of layers in the normal way, layer by layer. The wire feed speed remains constant for all layers. Argon gas was used as plasma and shielding gas, a flow rate of 12 L/min was used to protect the material from the outside environment, while the oxygen level was controlled below 100 ppm. The plasma gas flow rate was 1.5 L/min. The welding process parameters included a wire feed rate of 2.5 m/min, an electrical current of 180 A, a voltage 24 V, and a torch travel speed 230 mm/min. The chemical composition of WAAM IN718 wire and wrought IN718 also used as a substrate plate are shown in Table 1, where it clearly reveals that both alloys have very similar chemical composition. It is also verified by the EDS (Energy-dispersive X-ray spectroscopy) analysis.

Table 1.
Chemical compositions (wt.%) of WAAM and reference wrought IN718 alloy.
In order to observe the microstructural changes that took place during the WAAM process, the samples were cut from the central area, and the cross-section of the WAAM wall was observed using a scanning optical and electron microscope (JEOL (Tokyo, Japan) and EDS analysis using JSM-5910LV with an Oxford EDX INCA X-act detector to study the chemical composition of the material. The metallographic samples were polished according to the standard procedure and etched with 40 ml hydrochloric acid and 3 ml H2O2. XRD (X-ray diffraction) analysis is performed to identify precipitates in the WAAM IN718 samples. The diffractometer used in this study is a Bruker D8 Advanced with Bragg-Brentano configuration with Cu-Kα radiation. Finally, the microhardness test (Vickers hardness) was conducted on both WAAM and wrought IN718 alloy at room temperature using a Struers Duramin A-300 machine (Struers, Ballerup, Denmark).
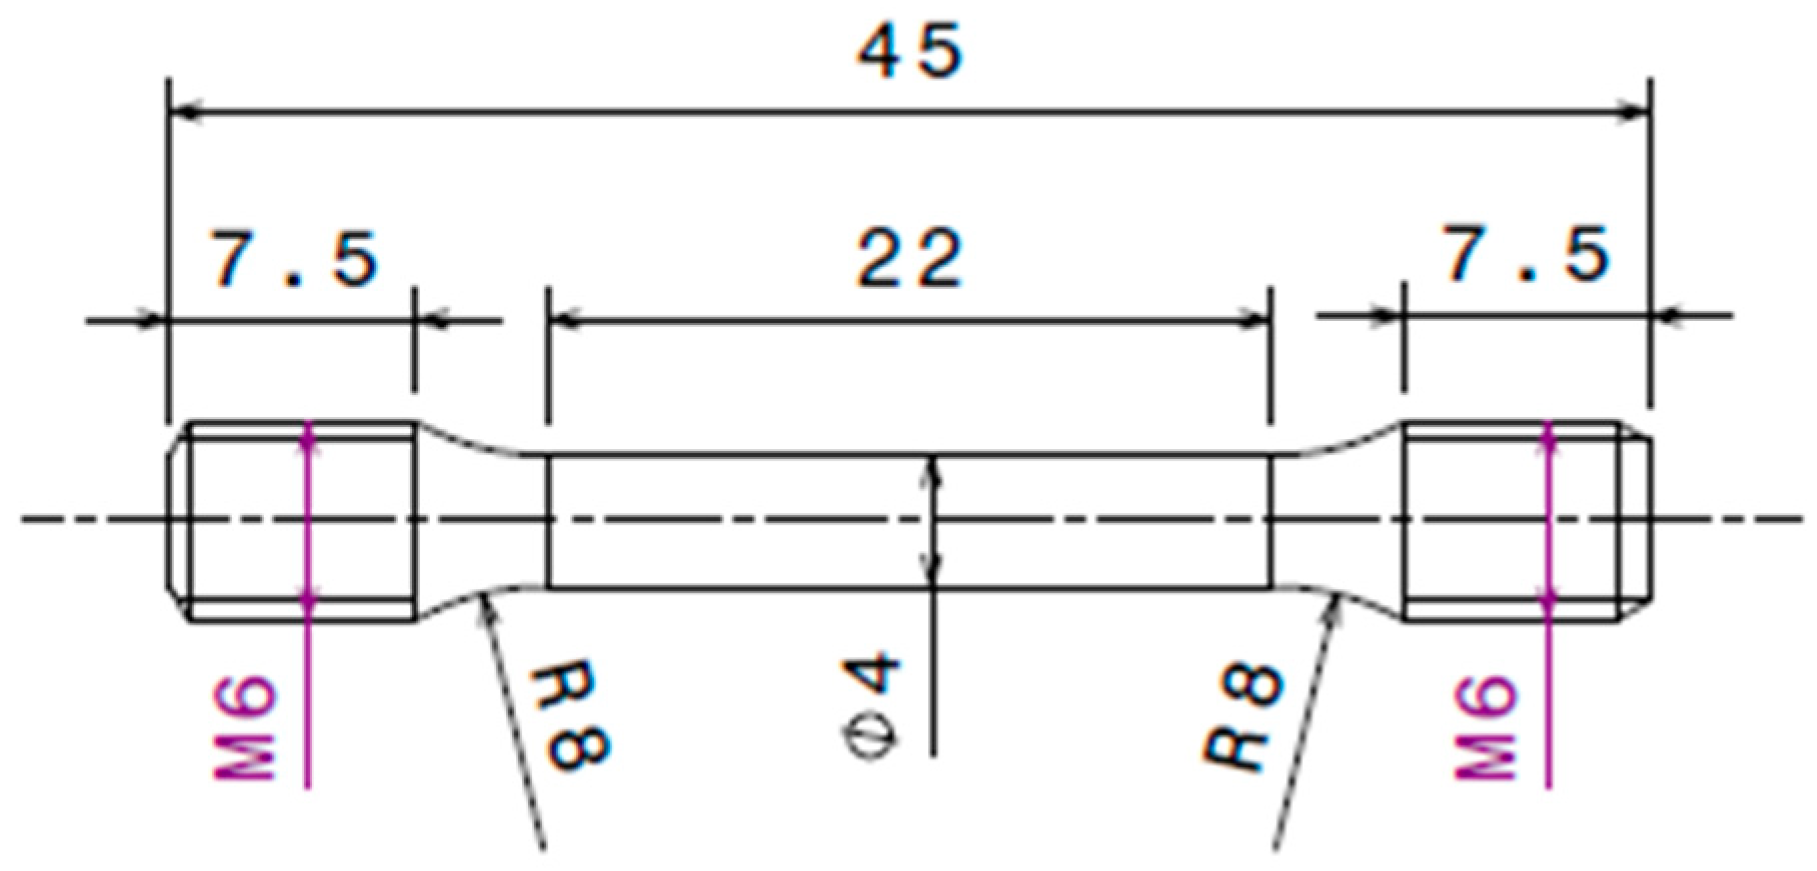
To study the tensile behavior of the material, a cylindrical specimen of 4 mm in diameter and 22 mm in gauge length (ASTM E8 standard) were extracted from the WAAM wall in the horizontal direction (HD) and in vertical direction (VD). The specimens are also extracted from wrought IN718 plate. The dimension of the specimen is shown in Figure 2. The wrought plate used in these studies is not the same the base plate used for manufacturing of WAAM wall. However, both plates come from the same batch of the material. Therefore, the material properties of the base plate and wrought plate are similar.
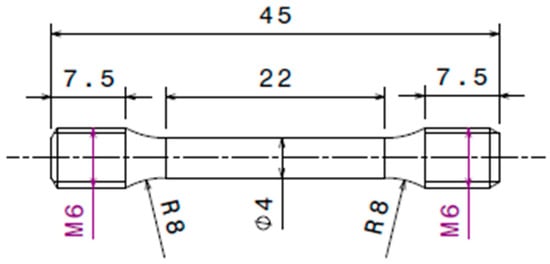
Figure 2.
Dimensions of the test specimen extracted from the WAAM IN718 wall and from wrought material.
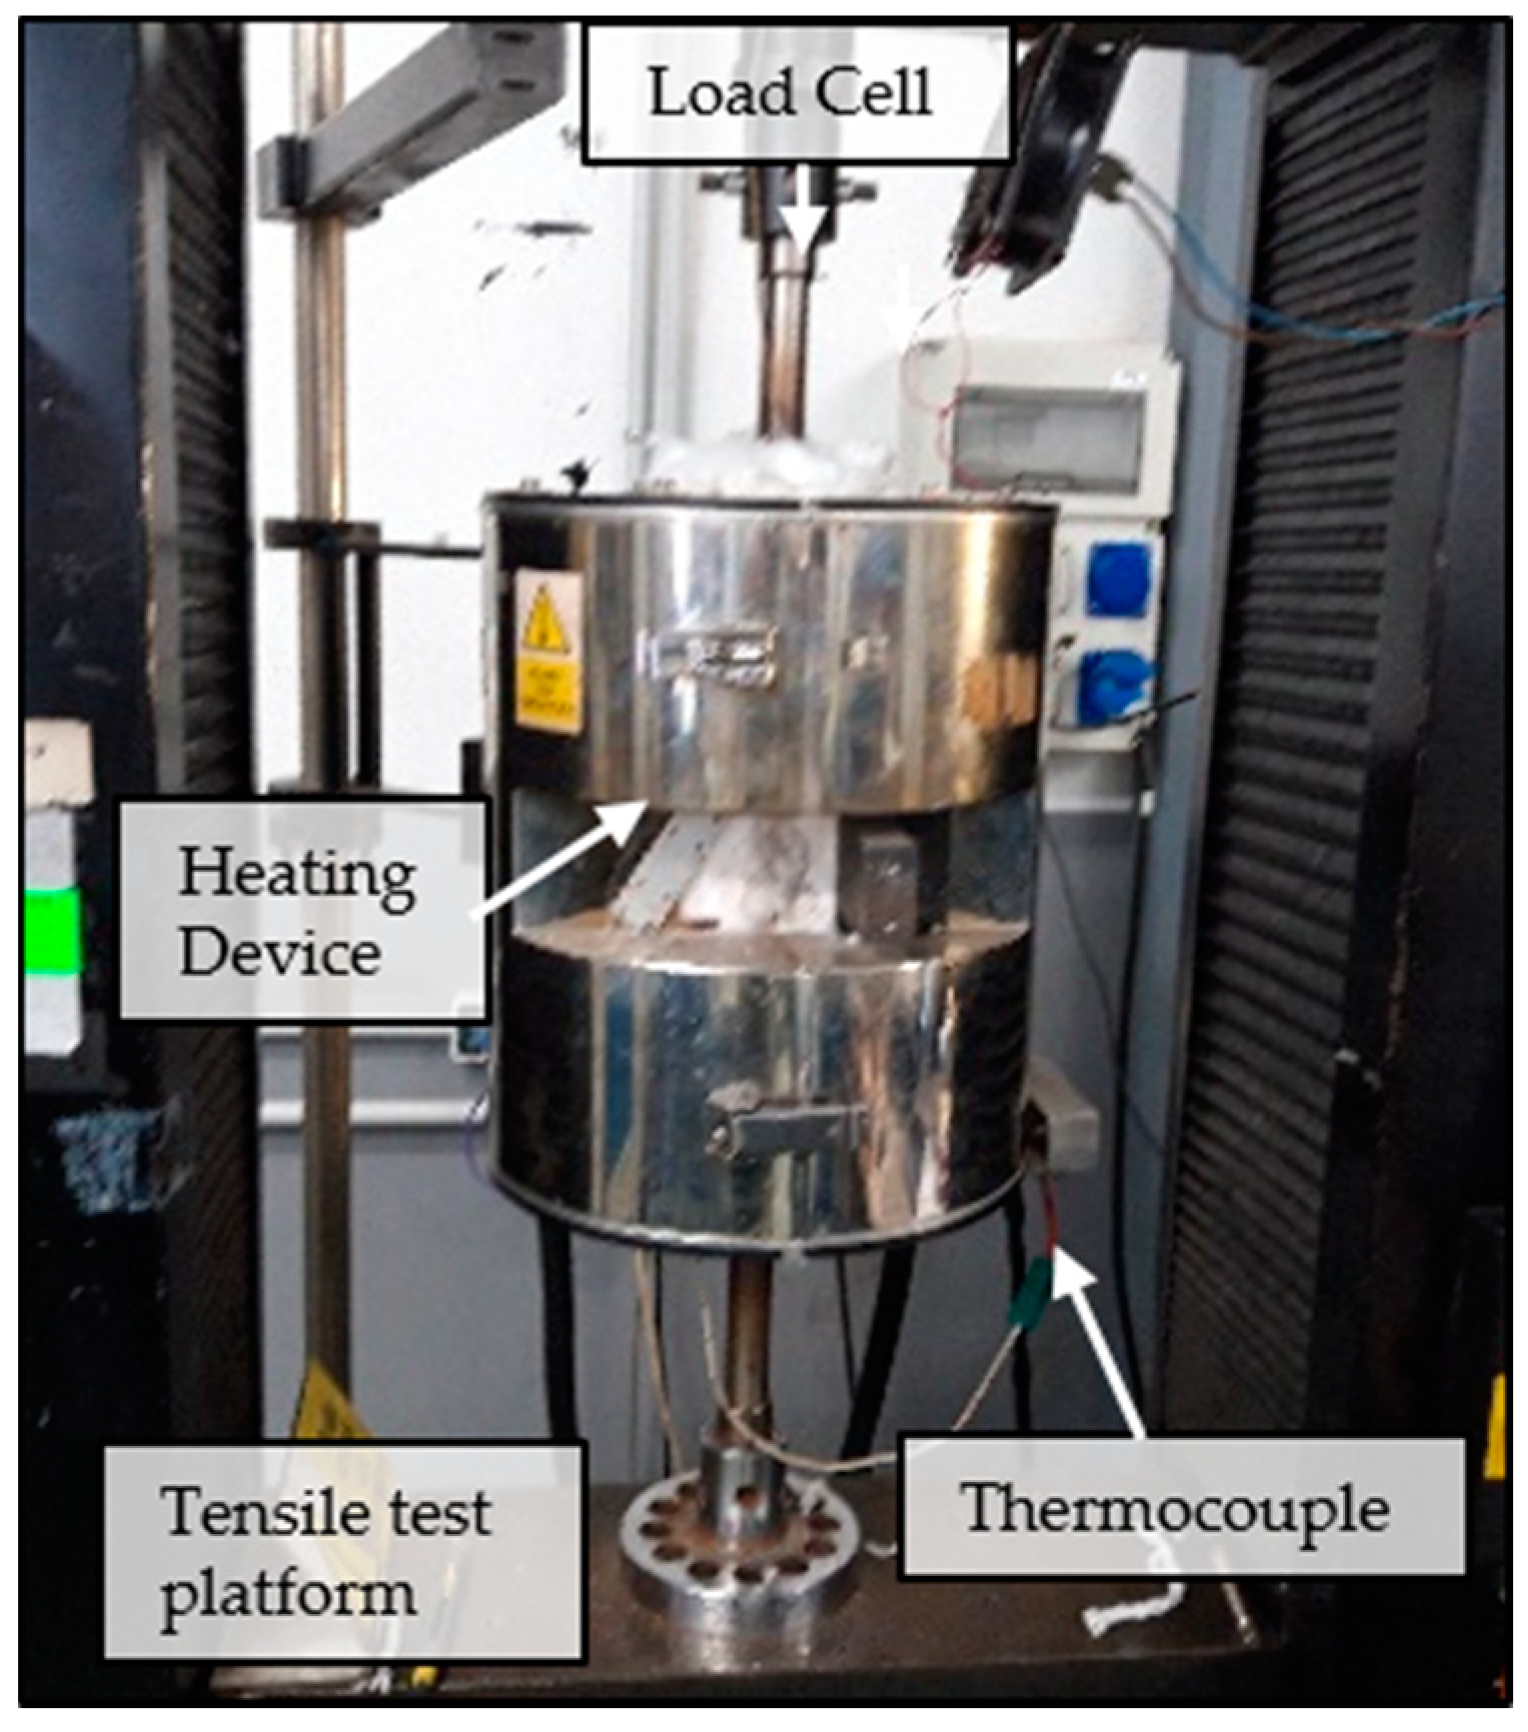
The tensile test was carried out using the Instron testing machine equipped with a load cell of 100 kN. The speed of the crosshead is chosen according to ASTM standards and maintained constant for each test. However, this speed can be selected as required. Nearly 20 tests are performed in order to maintain the repeatability of test results. The heating device is mounted on the testing machine to perform the test at a high temperature (the heating device range is up to 1400 °C) as shown in Figure 3. The tests were conducted at temperatures of 20 °C (room temperature), 650 °C (0.4*Tm) and 1200 °C (007*Tm). The specimens were heated at a rate of 5 °C/s to the desired deformation temperature and were held for 300 seconds at that temperature to achieve homogeneous temperature distribution throughout the sample. The temperature is accurately controlled by a K-type thermocouple attached to the surface of the specimen.
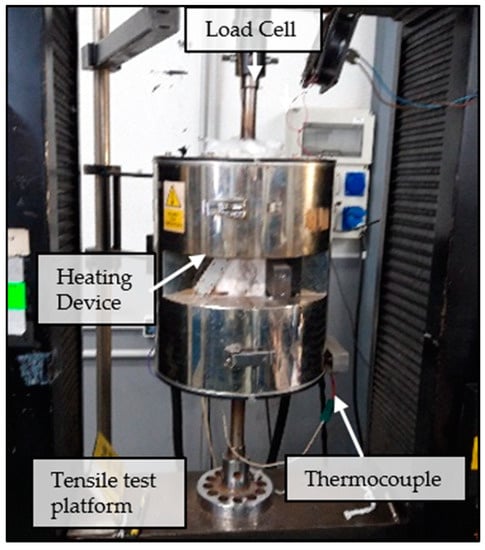
Figure 3.
Experimental setup and heating device.
3. Results and Discussion
3.1. Microstructure Analysis
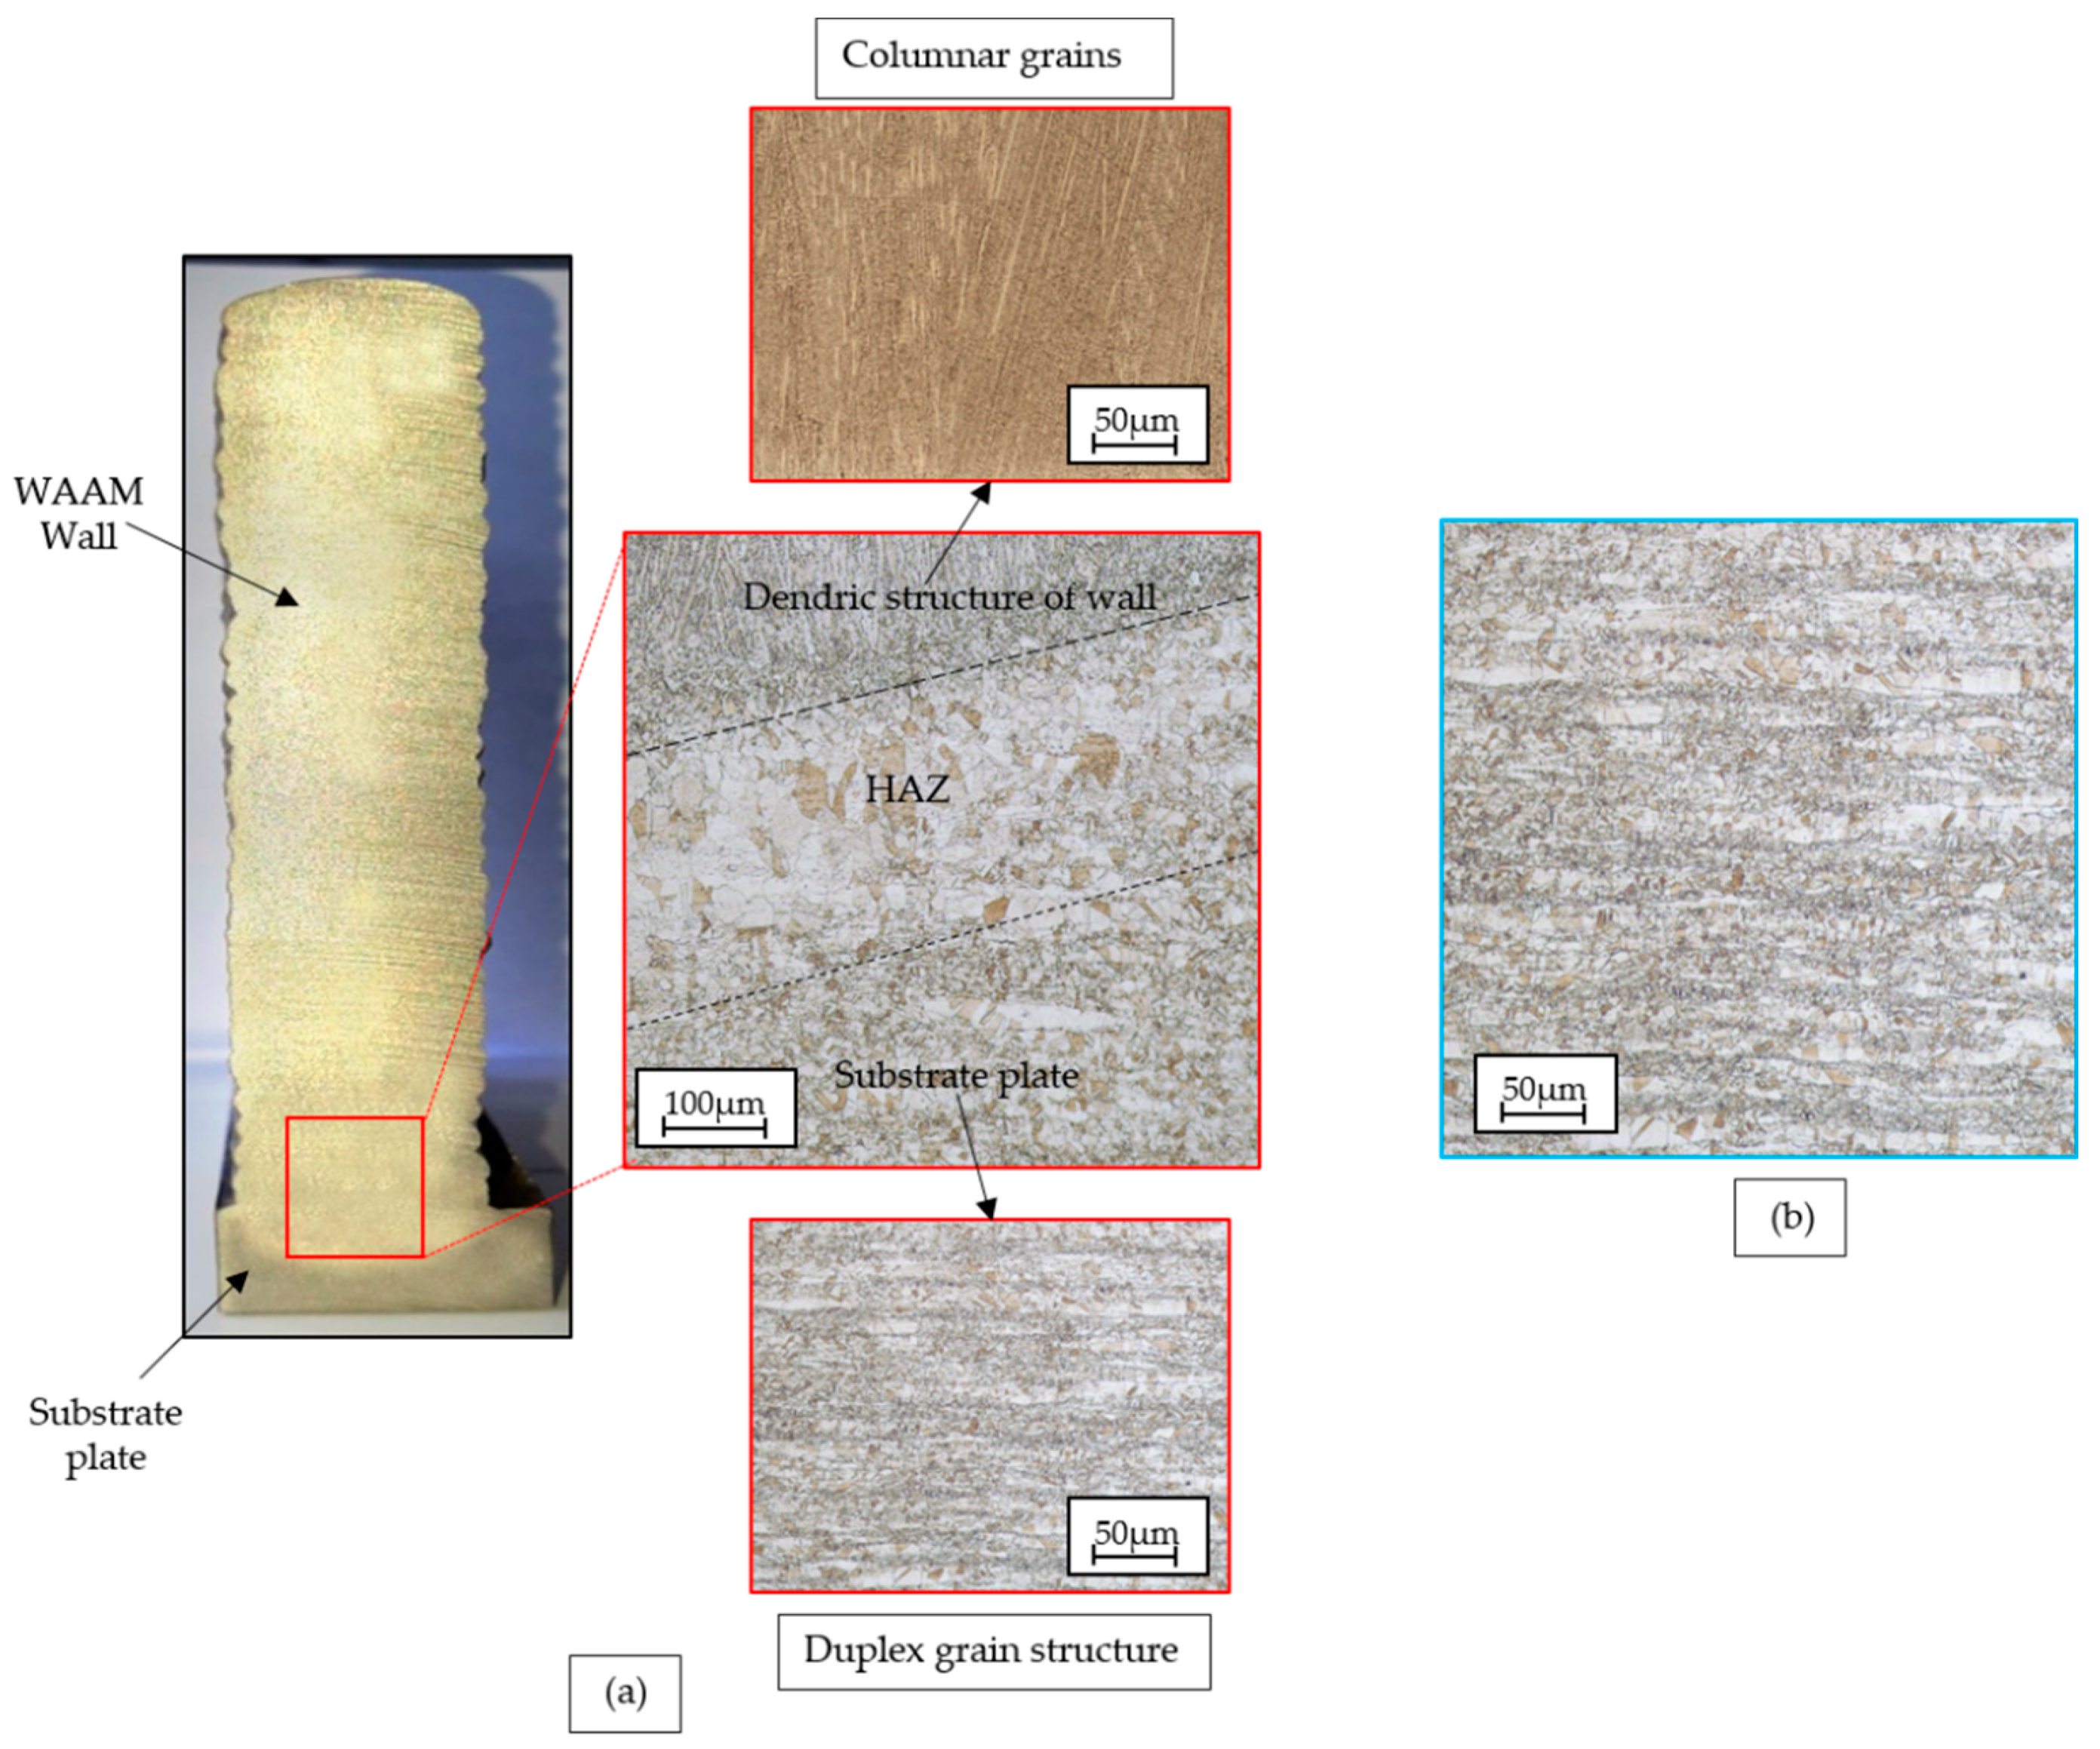
The initial microstructure of the wrought and WAAM IN718 wall is shown in Figure 4. The grains in the wrought alloy develop from conventional castings, and possess much bigger starting grains compared to the WAAM.

Figure 4.
(a) The representation of the WAAM wall and its typical microstructure (b) wrought IN718 by using optical microscopy.
The microstructure of the WAAM wall at the cross section (YZ plane) shows the transition of the grain structure between the wall and substrate, see Figure 4b. The initial grain structure of the substrate plate has a duplex grain. The heat-affected zone (HAZ) between the wall and substrate plate has a larger grain. It can be observed that the HAZ is partially migrated to the WAAM Wall. The columnar grain of the wall in clearly identified above the HAZ. This dendrite growth from the substrate plate is in line with the build direction, indicating that the thermal gradient is the largest in this direction.
SEM analysis:
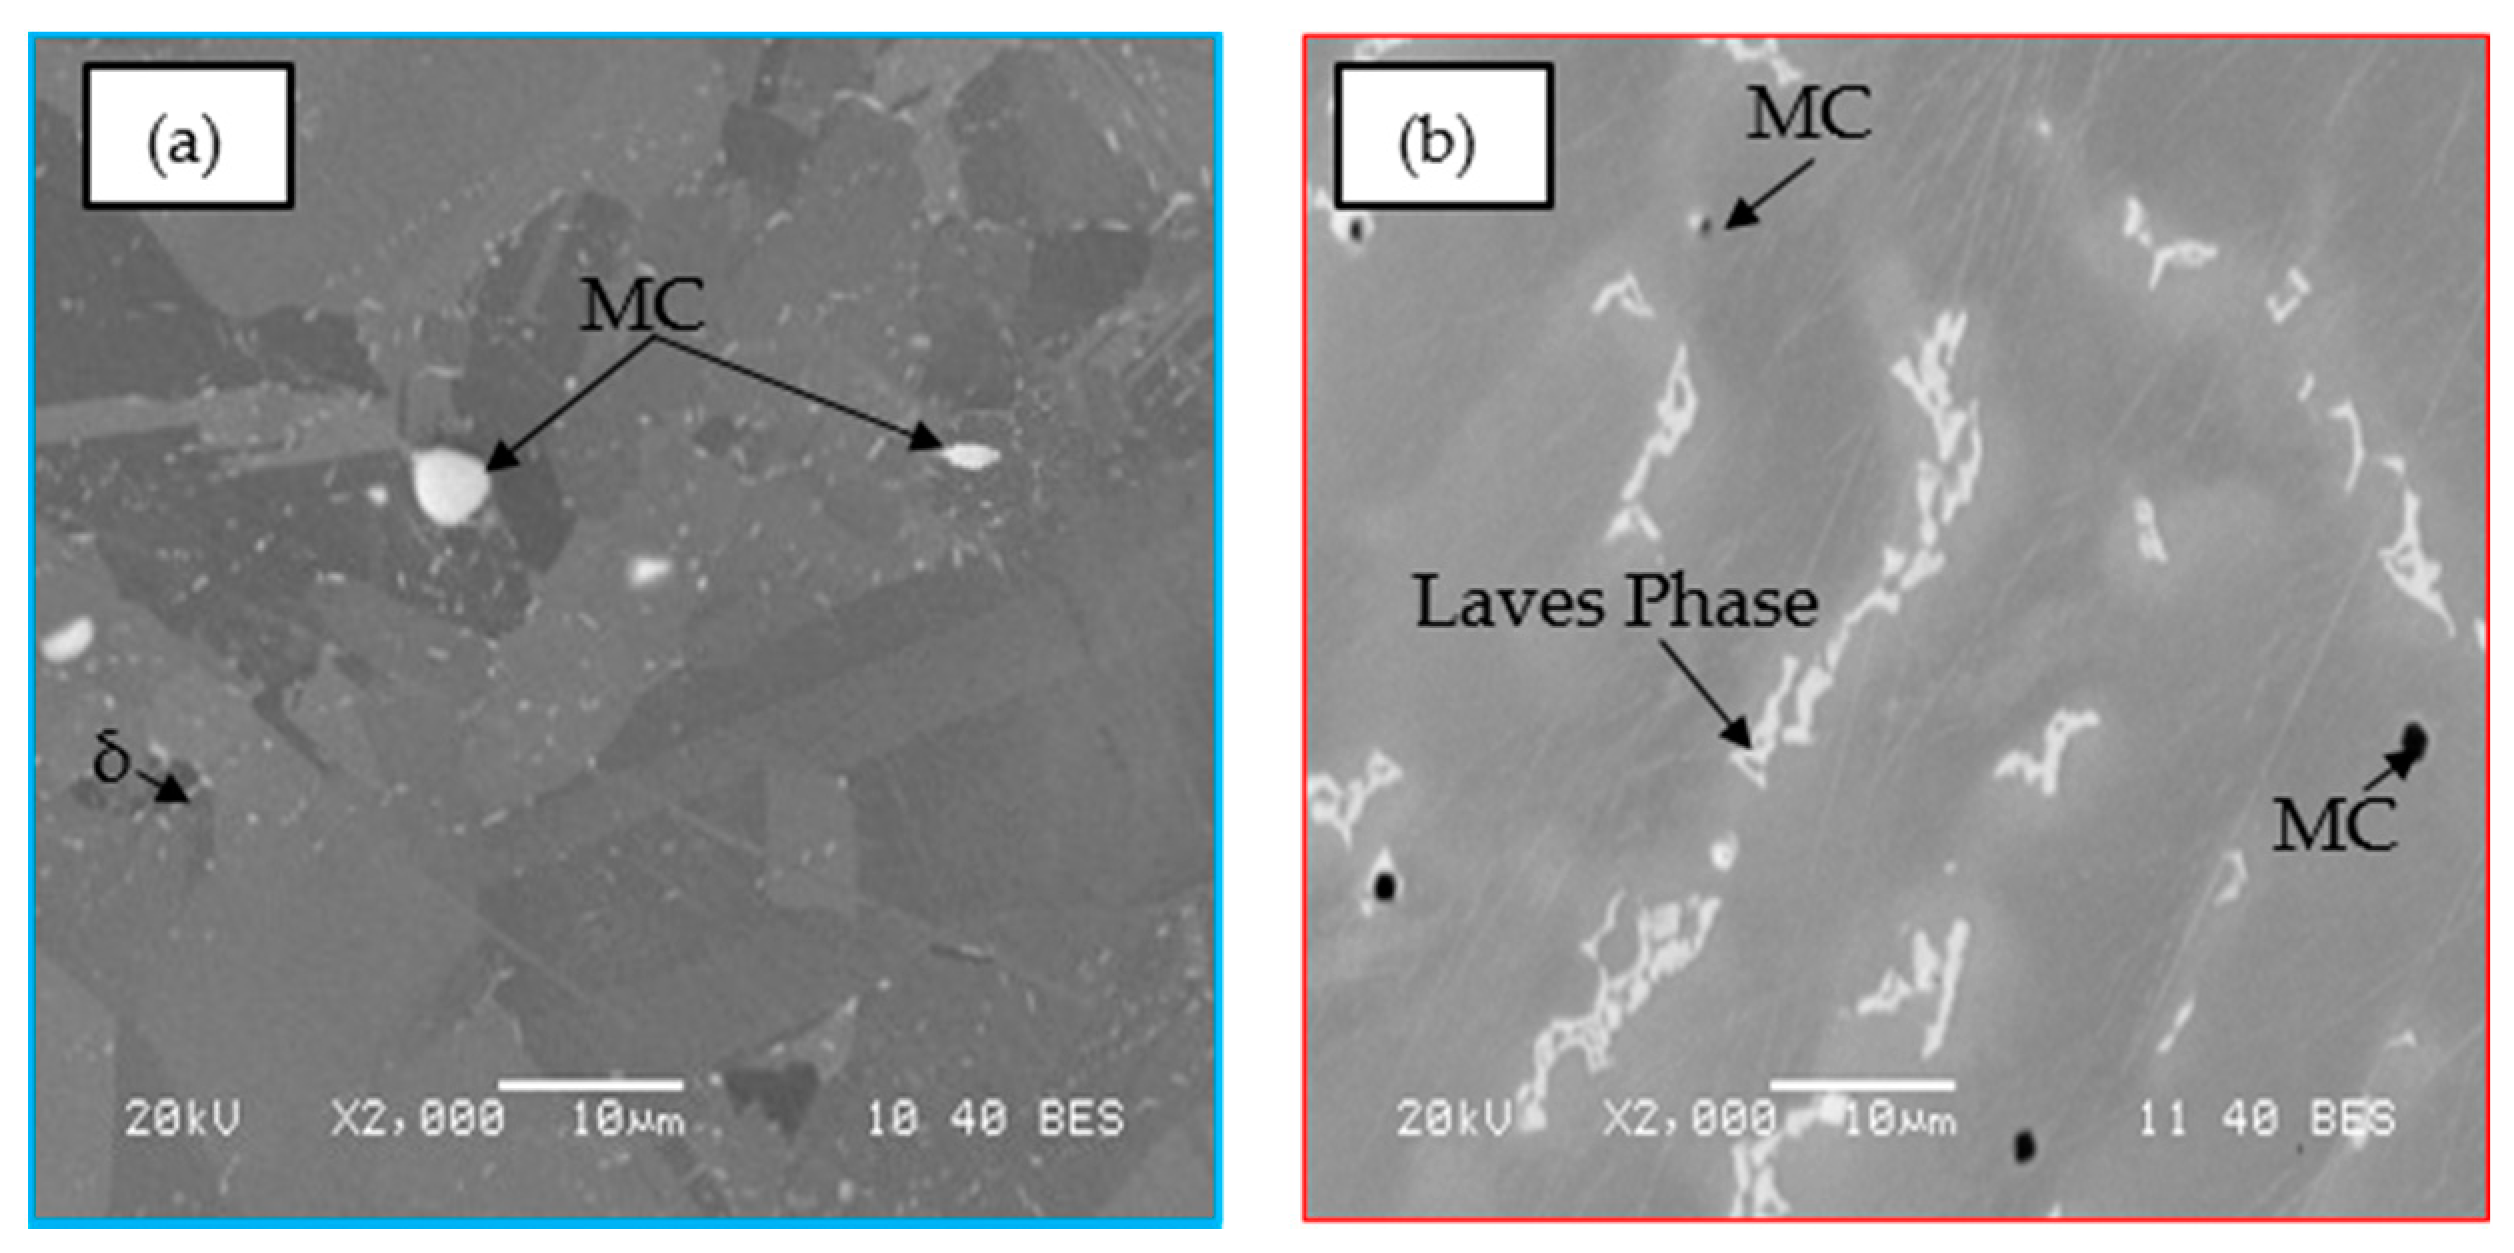
Figure 5 demonstrates the SEM graphs of the precipitated phases appearing in the as-deposited microstructure of the wrought and WAAM IN718 alloy. The EDS analysis shows the similar chemical composition observed as given in the Table 1. The microstructure of wrought IN718 consists of light gray blocks and fine lenticular and lamellar particles distributed in the grain boundaries. These particles can be the metal carbides (MC) and δ phase (Ni3Nb), respectively [18]. Carbides are an important constituent of superalloys. Carbides may provide some degree of matrix strength. In WAAM IN718 alloy, a large number of irregular shape phases (white island) and some small blocky particles were precipitated in the interdendritic regions, as shown in Figure 5b. The two kinds of phases are identified as laves phase and MC particles. The formation of the laves phase and MC carbides is due to the segregation of refractory elements Nb and Mo in the non-equilibrium solidification conditions during the WAAM process [14]. To verify the presence of these precipitates in the WAAM and wrought material, the XRD analysis is performed.
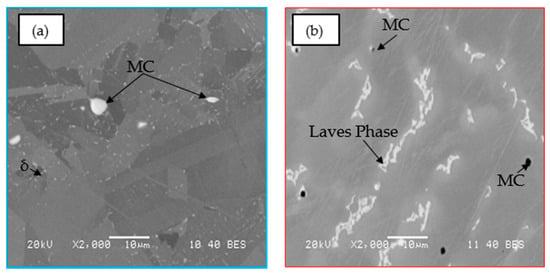
Figure 5.
Precipitates in (a) Wrought and (b) WAAM IN718.
XRD analysis:
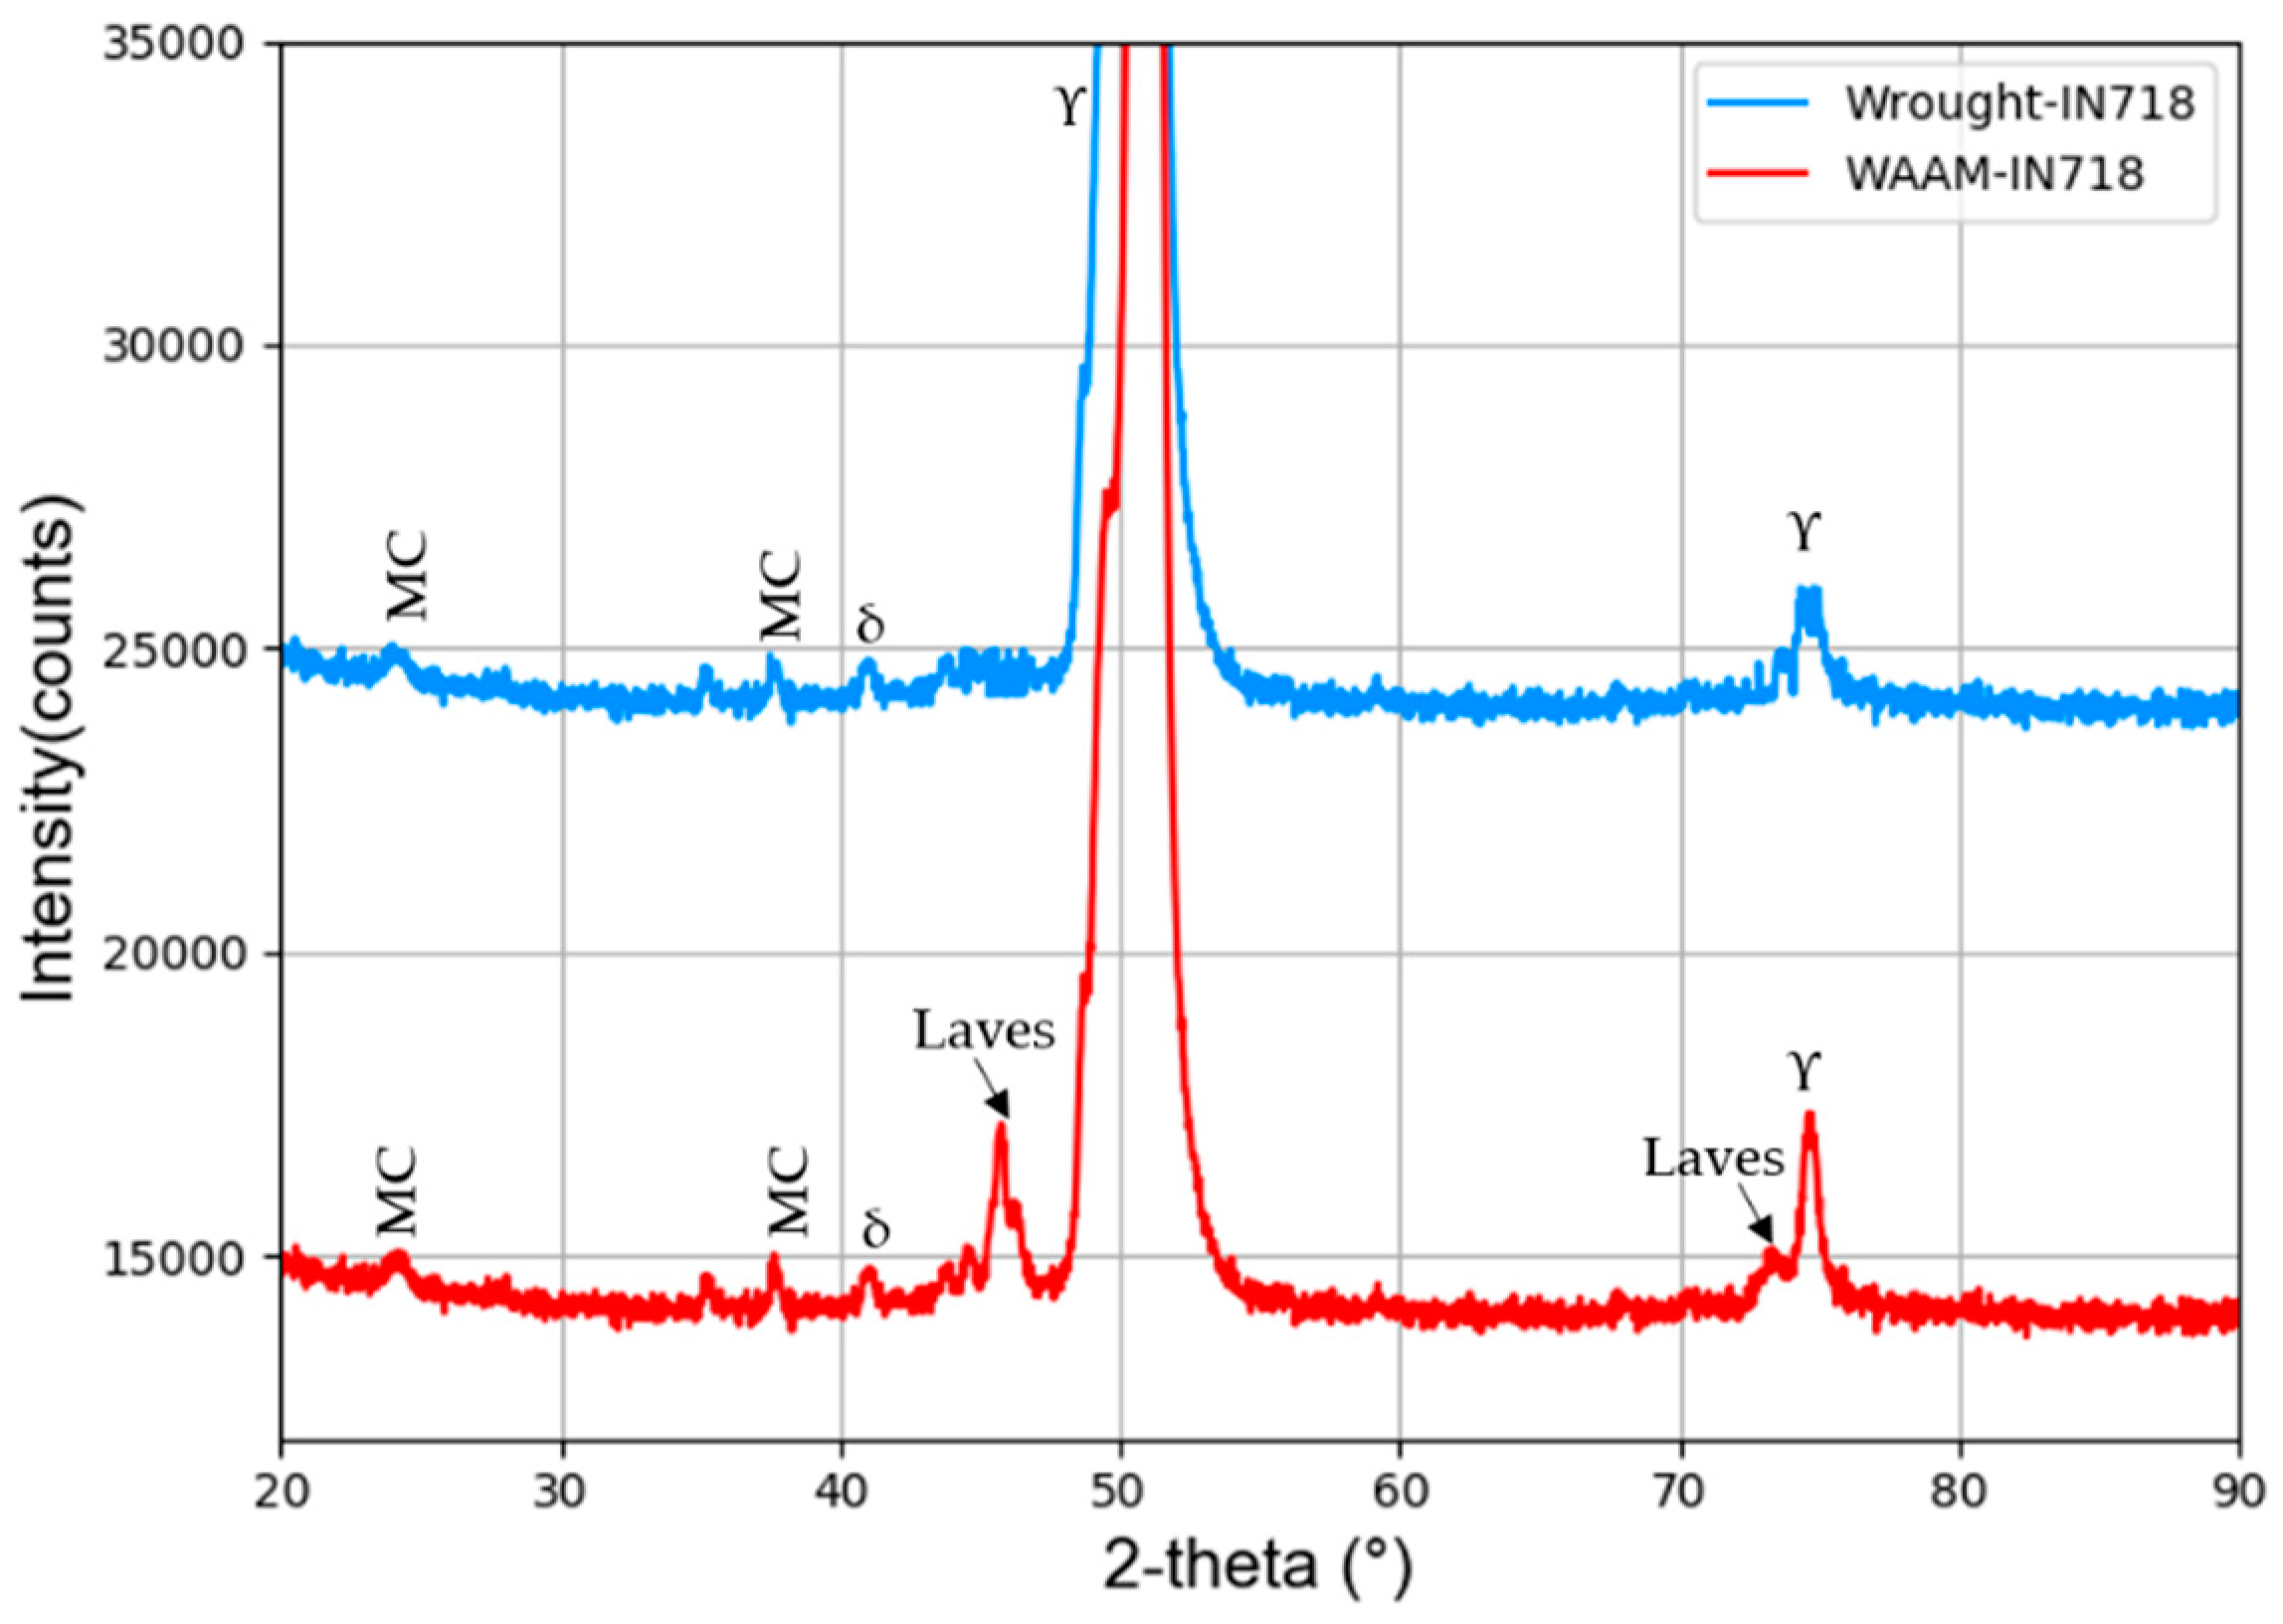
The XRD (X-ray diffraction) analysis is performed to identify the precipitates. All the standard parameters are set, the scan is performed with continuous scan mode, with locked coupled type, the step size is selected at 0.02, the voltage as 30 kV and current 10 mA. Figure 6 shows the X-ray diffraction patterns and the phase index results of the IN718 produced by WAAM and wrought process. In the XRD of WAAM IN718 demonstrates that the presence of the matrix γ, the lavas phase and the metal carbides, the laves phase occurs at 2theta-47.82° and 76.56° with the lattice cell parameter of a = 0.478 mm, c = 0.795 nm and the matrix γ with 2theta-51.89° and a = 0.358 nm. However, due to the low volume fraction of the laves phase and metal carbides (MC) compared to the γ matrix, its diffraction peak is very low. Another reason for lower peaks may be the lower flux setting. In addition, the wrought IN718 does not show any the presence of laves phase. Moreover, the diffraction peak of MC carbide and δ phase is too weak; it is assumed that it is drowning in the basal peak. However, in the case of the wrought IN718 alloy, the presence of the laves phase is absent, it seems that strengthening precipitates such as γ’ and γ’’ exists in the peak of the γ matrix. Hence, it is concluded that the XRD analysis allows us to identify the different precipitates in both WAAM and wrought IN718 alloy.
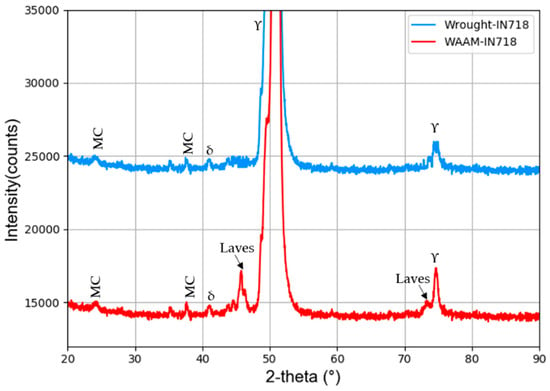
Figure 6.
X-ray diffraction patterns of IN718 produced by WAAM and Wrought.
3.2. Mechanical Characterization
3.2.1. Microhardness
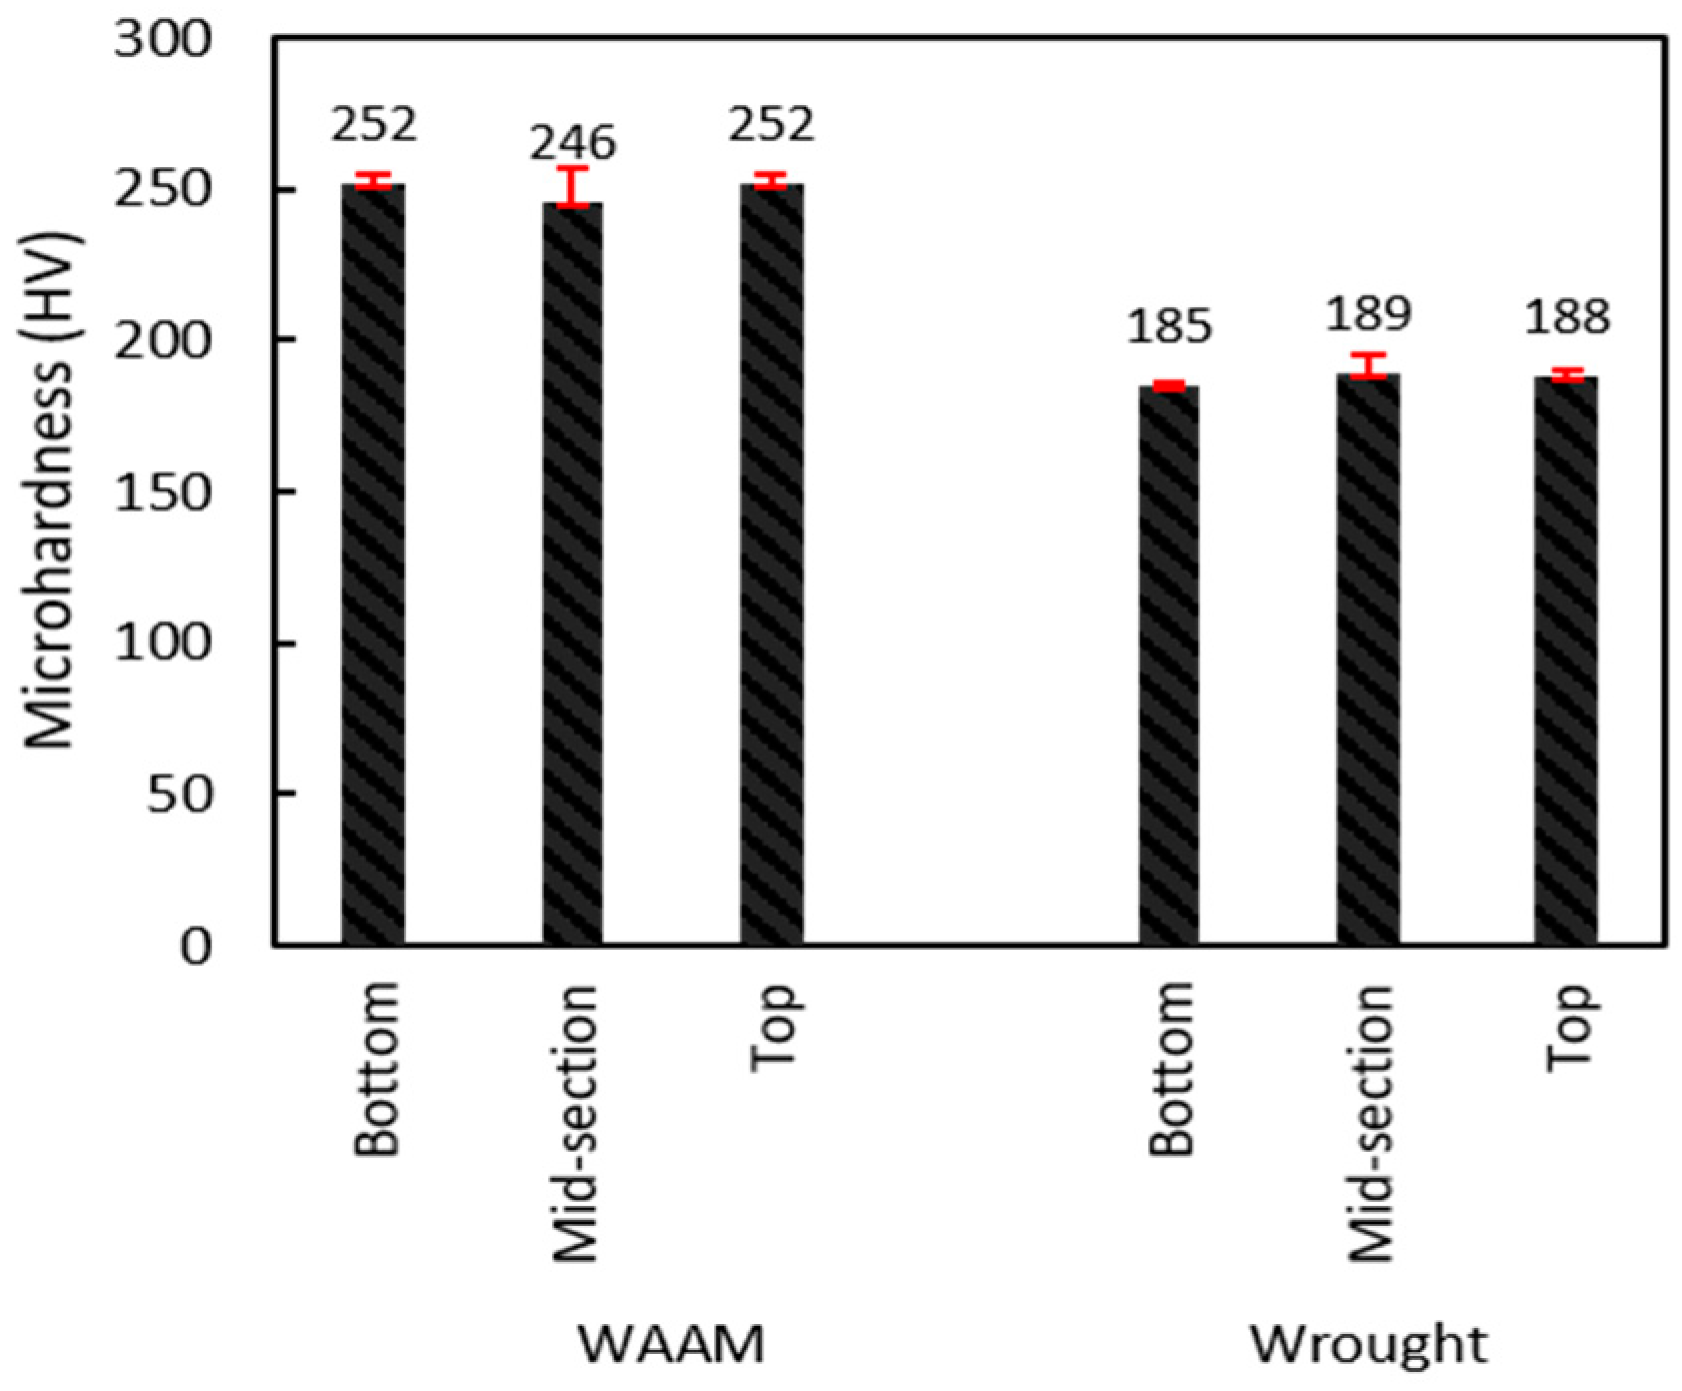
Micro-hardness measurements were carried out on the WAAM and wrought IN718 samples. The series of points were measured in a straight line from bottom to the upper part of the samples in three different sections. The reported values correspond to the average of all measurements taken from the bottom, mid-section and at the top of the sample, as shown in Figure 7. It is observed that the hardness value is higher in the HAZ region (Bottom) and at the top of the WAAM wall. At the mid-section it shows lower microhardness, which is due to the reheating effect induced by the layer stacking. The microhardness of the WAAM IN718 shows the higher microhardness compare to wrought alloy. This means the WAAM processes significantly increases the hardness of the material; it is assumed that it is because of formation of phase particles during the WAAM process or it may be due to its material structure, the number of layers and processing parameter used for building up the WAAM wall [19].
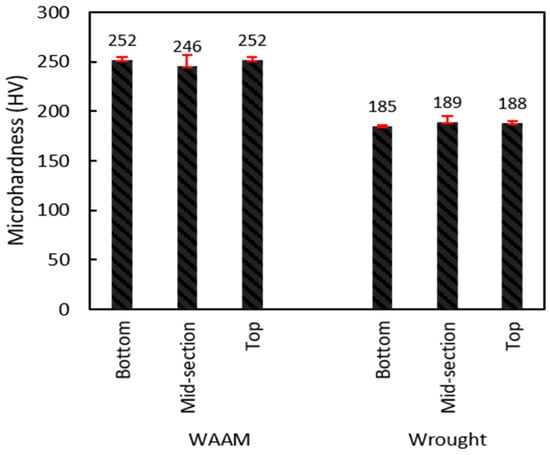
Figure 7.
Microhardness test results of the samples.
3.2.2. Tensile Behavior
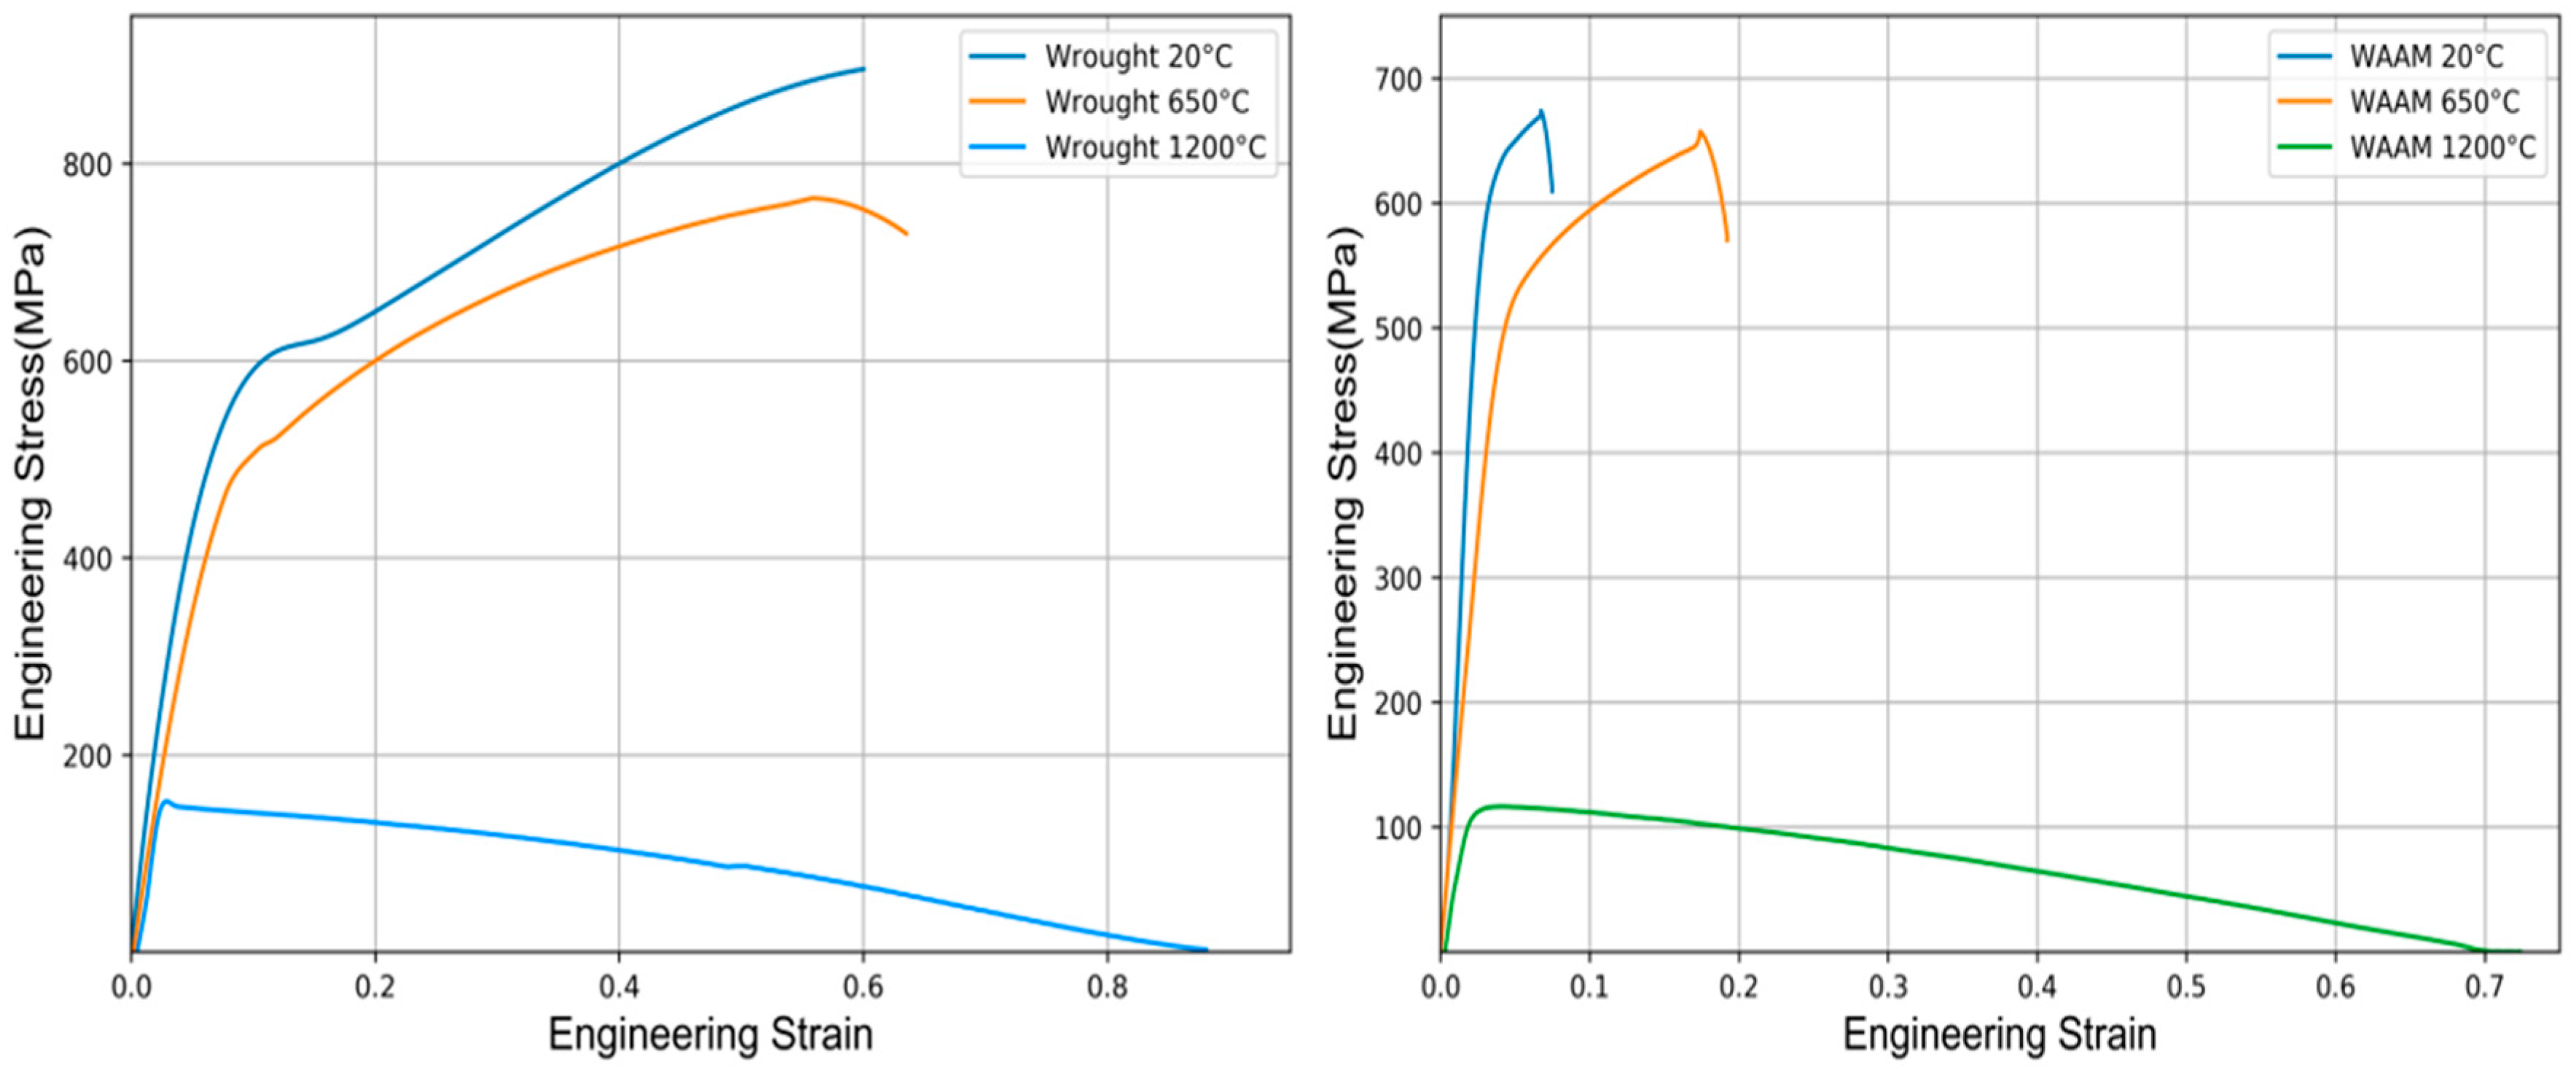
The engineering stress vs. strain curves of WAAM and wrought IN718 alloy at a different temperature from 20 °C to 1200 °C are plotted and shown in Figure 8. It can be observed from the graph that, as the temperature is increased, the strength of the material decreases. It is clear that the flow stress behavior is strongly influenced by temperature, especially at room temperature and below 650 °C in both alloys. The strain-hardening behavior was observed at 20 °C and 650 °C, and it increases continuously after yielding in both cases, whereas a sudden drop in yield stress followed by a steady state was observed in the samples tested at 1200 °C, which corresponds to 0.7*Tm (Tm = melting temperature of alloy IN718).
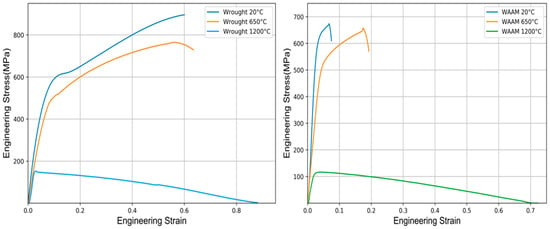
Figure 8.
Engineering stress- strain curves of (a) Wrought (b) WAAM IN718 at elevated temperature.
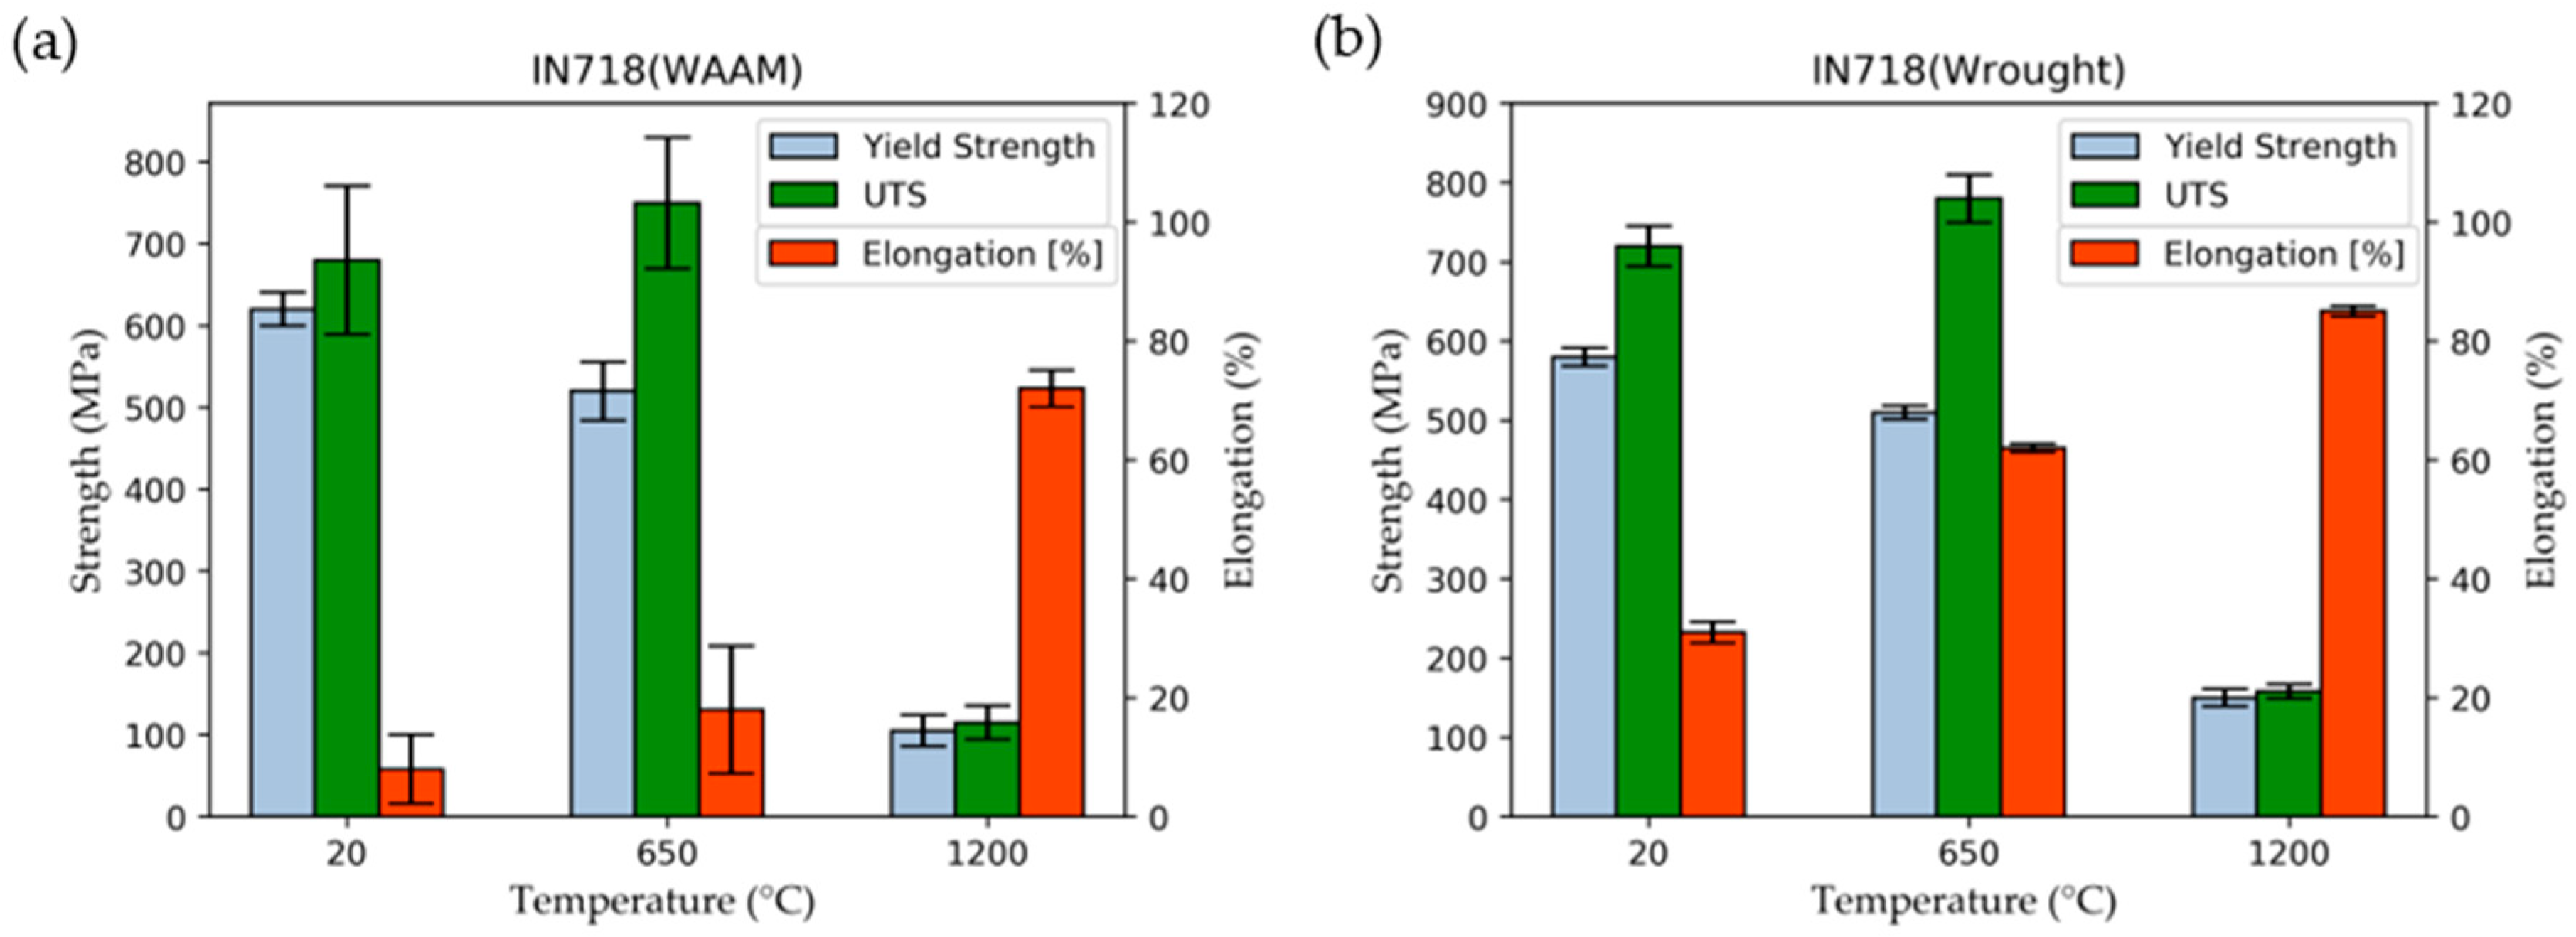
A detailed comparison of the tensile test results of WAAM IN718 alloy and the wrought alloy is given in Table 2 and the bar graph in Figure 9. Several tests are carried out on WAAM IN718 specimens, where the specimens are extracted from the WAAM wall in the horizontal (HD) and vertical (VD) direction in order to study the mechanical behavior in the different directions, and it is concluded that the mechanical properties appear to be similar, as shown in Table 2.

Table 2.
Statistical analysis on tensile results of WAAM and Wrought IN718 alloy.

Figure 9.
Mechanical properties of (a) WAAM (b) Wrought IN718 alloy at various temperatures.
Figure 9 shows the bar plot of the average value of WAAM and wrought IN718 alloy. For wrought material, at 20 °C, it shows that the yield strength of 580 MPa with UTS of 720 MPa. At 650 °C, the yield strength of 510 MPa and UTS of 780 MPa and at 1200 °C, the yield strength of 150 MPa and UTS of 158 MPa. The downward trend in yield strength observed with increasing temperature. As a result, ductility has also increased. The elongation in the wrought alloy is increase from 31% to 85%. For WAAM IN718 alloy, at 20 °C and 650 °C, the average yield strength is 621 MPa and 551 MPa respectively, comparatively higher than that of the wrought alloy. Whereas at 1200 °C, the average yield strength of the WAAM IN718 alloy exhibit lower yield strength of 106.5MPa. The UTS values of WAAM specimen at 20 °C and 650 °C the shows the higher error values. This means that the specimens are broken at different value of UTS. Hence, the ultimate strength of the WAAM IN718 alloy was difficult to evaluate. However, at 1200 °C, the error bar is smaller and shows more consistence average UTS of 117 MPa. In addition, the plastic elongation significantly decreased in the WAAM alloy that in the wrought alloy at 20 °C and 650 °C, from 31% to 6.5% and from 62% to 16.5% respectively. Whereas at 1200 °C for both alloys exhibit larger elongation is almost >70%.
At higher temperatures, it is assumed that the precipitates might be dissolved in the ϒ matrix [20], hence it undergoes higher deformation. It is also explained in the Section 3.2.4. The absence of the precipitates offers unrestricted motion to the dislocations resulting in the decrease in the flow strength of the material at a higher temperature. At a temperature below 650 °C, the precipitates are not completely dissolved, and fracture occurred before enough deformation of the specimen. At 1200 °C, the material is seen to have undergone a softening mechanism during the deformation process characterized by a decrease in the flow stress after a strain of around 0.02 and after it attains steady state [21,22,23,24].
3.2.3. Fractography
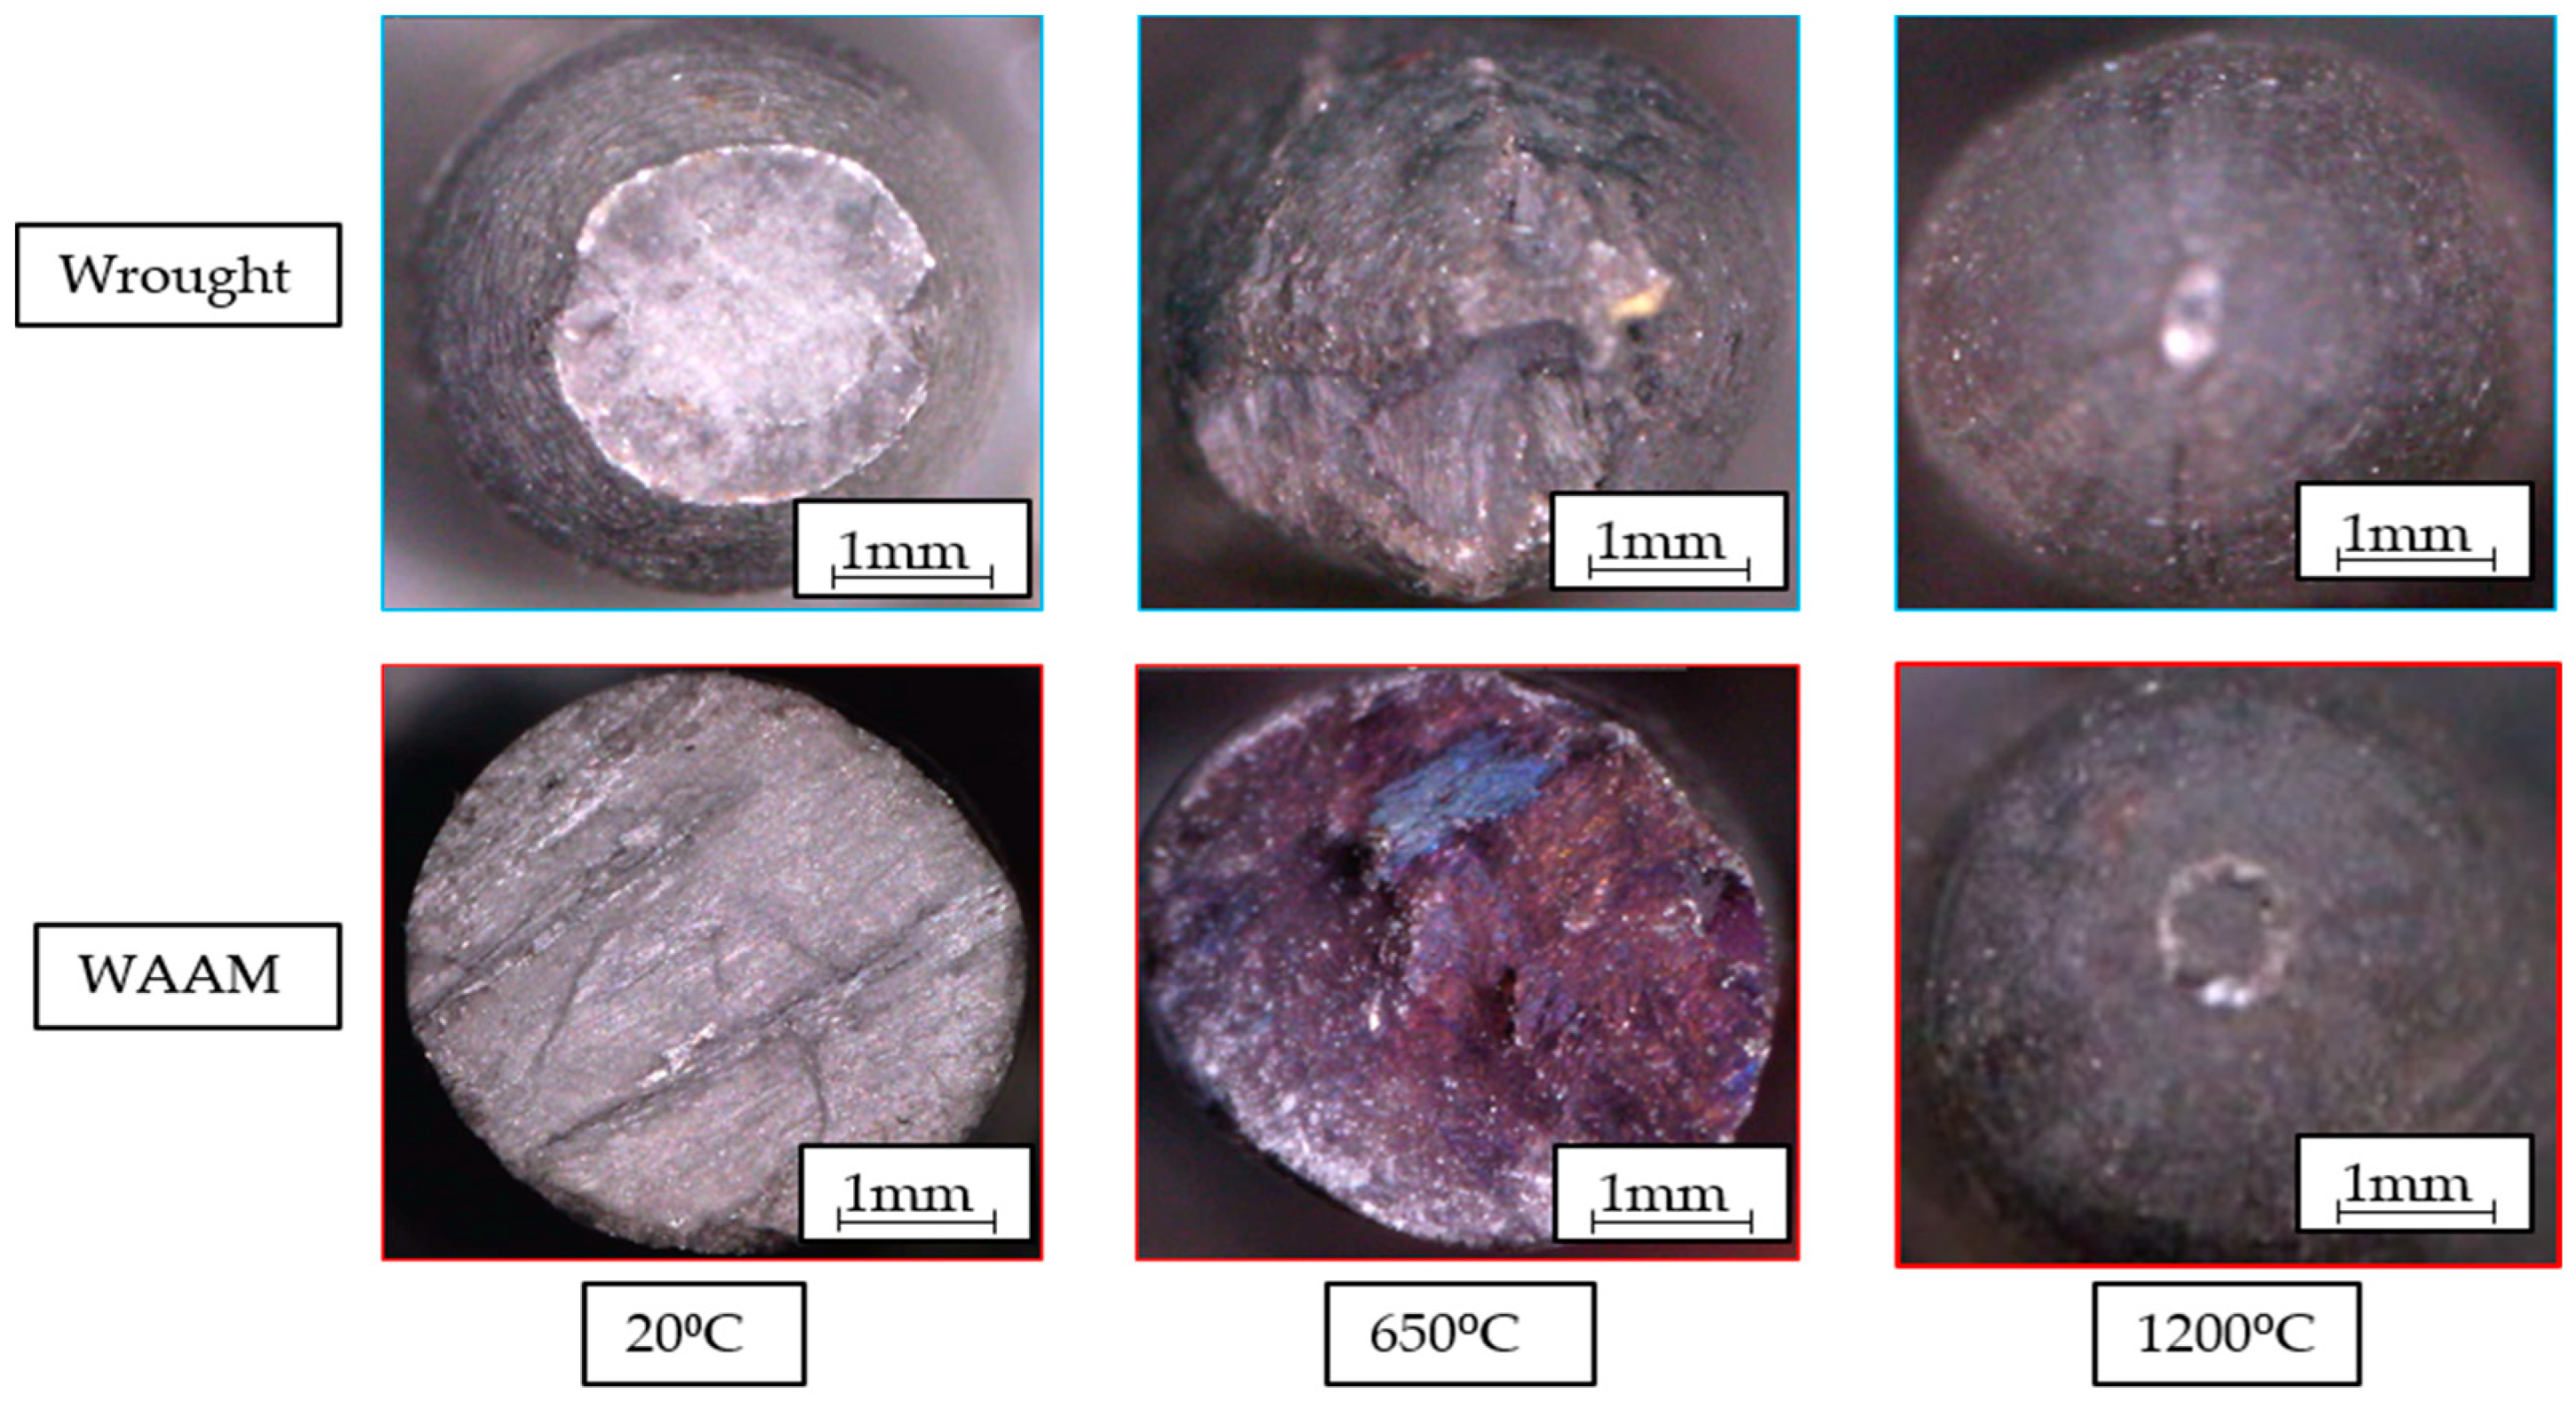
The fracture morphology of the samples tested up to failure at elevated temperature is shown in Figure 10. A typical fracture surface of a wrought sample shows the increase in shrinkage of the gauge section of the sample with increasing temperature. At room temperature, the wrought IN718 sample shows a slight necking at the gauge section and the area is reduced by nearly 30%, while for the WAAM, the sample is fractured before any shrinkage, it also shows the crack on the fracture surface. At 650 °C, the necking increases, and the area of the gauge section is reduced by almost 60% from its initial state, whereas in the WAAM sample, it reduced to only 15%. At 1200 °C, both samples show a 95% reduction in the area, which shows that the WAAM and wrought samples behave similarly.
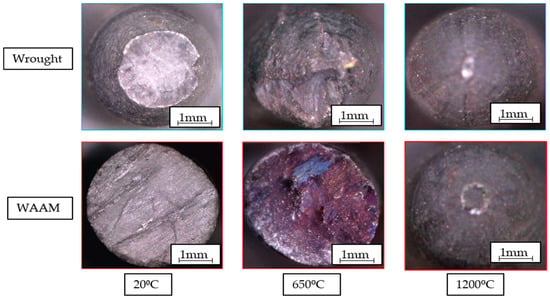
Figure 10.
Typical optical microscopic (OM) images of fracture surfaces after the tensile test conducted at various temperature for WAAM and Wrought IN718 alloy.
3.2.4. Effect of Precipitation
The Wrought IN718 is a precipitate hardening alloy classified among the ϒ-ϒ´-ϒ´´ nickel-based superalloys. Thus, it is composed of a Ni-Cr matrix, the ϒ phase, and two main precipitates, ϒ’ and ϒ’’, as well as δ phase precipitates. The presence of the δ precipitates at the grain boundaries makes it possible to control the grain size by limiting their coarseness [25]. The presence of the laves phase in the wrought alloy is very low. However, there is a great amount of work already published showing that laves phase reduces the mechanical properties of the material on wrought, casting, etc., in particular the ductility of IN718 [26,27,28,29], and it can be noted that around 1000 °C, all precipitates start to dissolve. For example, the dissolution of strengthening precipitates like ϒ’ and ϒ’’ allows the softening to the IN718 alloy and it becomes a single-phase material with additional elements in solid solution [30,31]. However, IN718 alloy manufactured by the WAAM process generally has a different microstructure than wrought or cast alloy due to its inherently different thermal history. In addition, the formation of these strengthening precipitates (γ′ and γ") has not been commonly reported when solidifying IN718 alloy during the WAAM process. The presence of these precipitates is very low in the WAAM IN718 alloy. Thus, in the WAAM IN718 alloy, these precipitates do not play a major role in its mechanical properties [7,10]. During the WAAM process, there are other diverse phases that precipitate and distribute themselves, such as the laves phase, the metal carbides and the δ phase. These precipitates significantly affect the mechanical properties of the IN718 alloy, so it is interesting to study the effect of these precipitates in high-temperature testing.
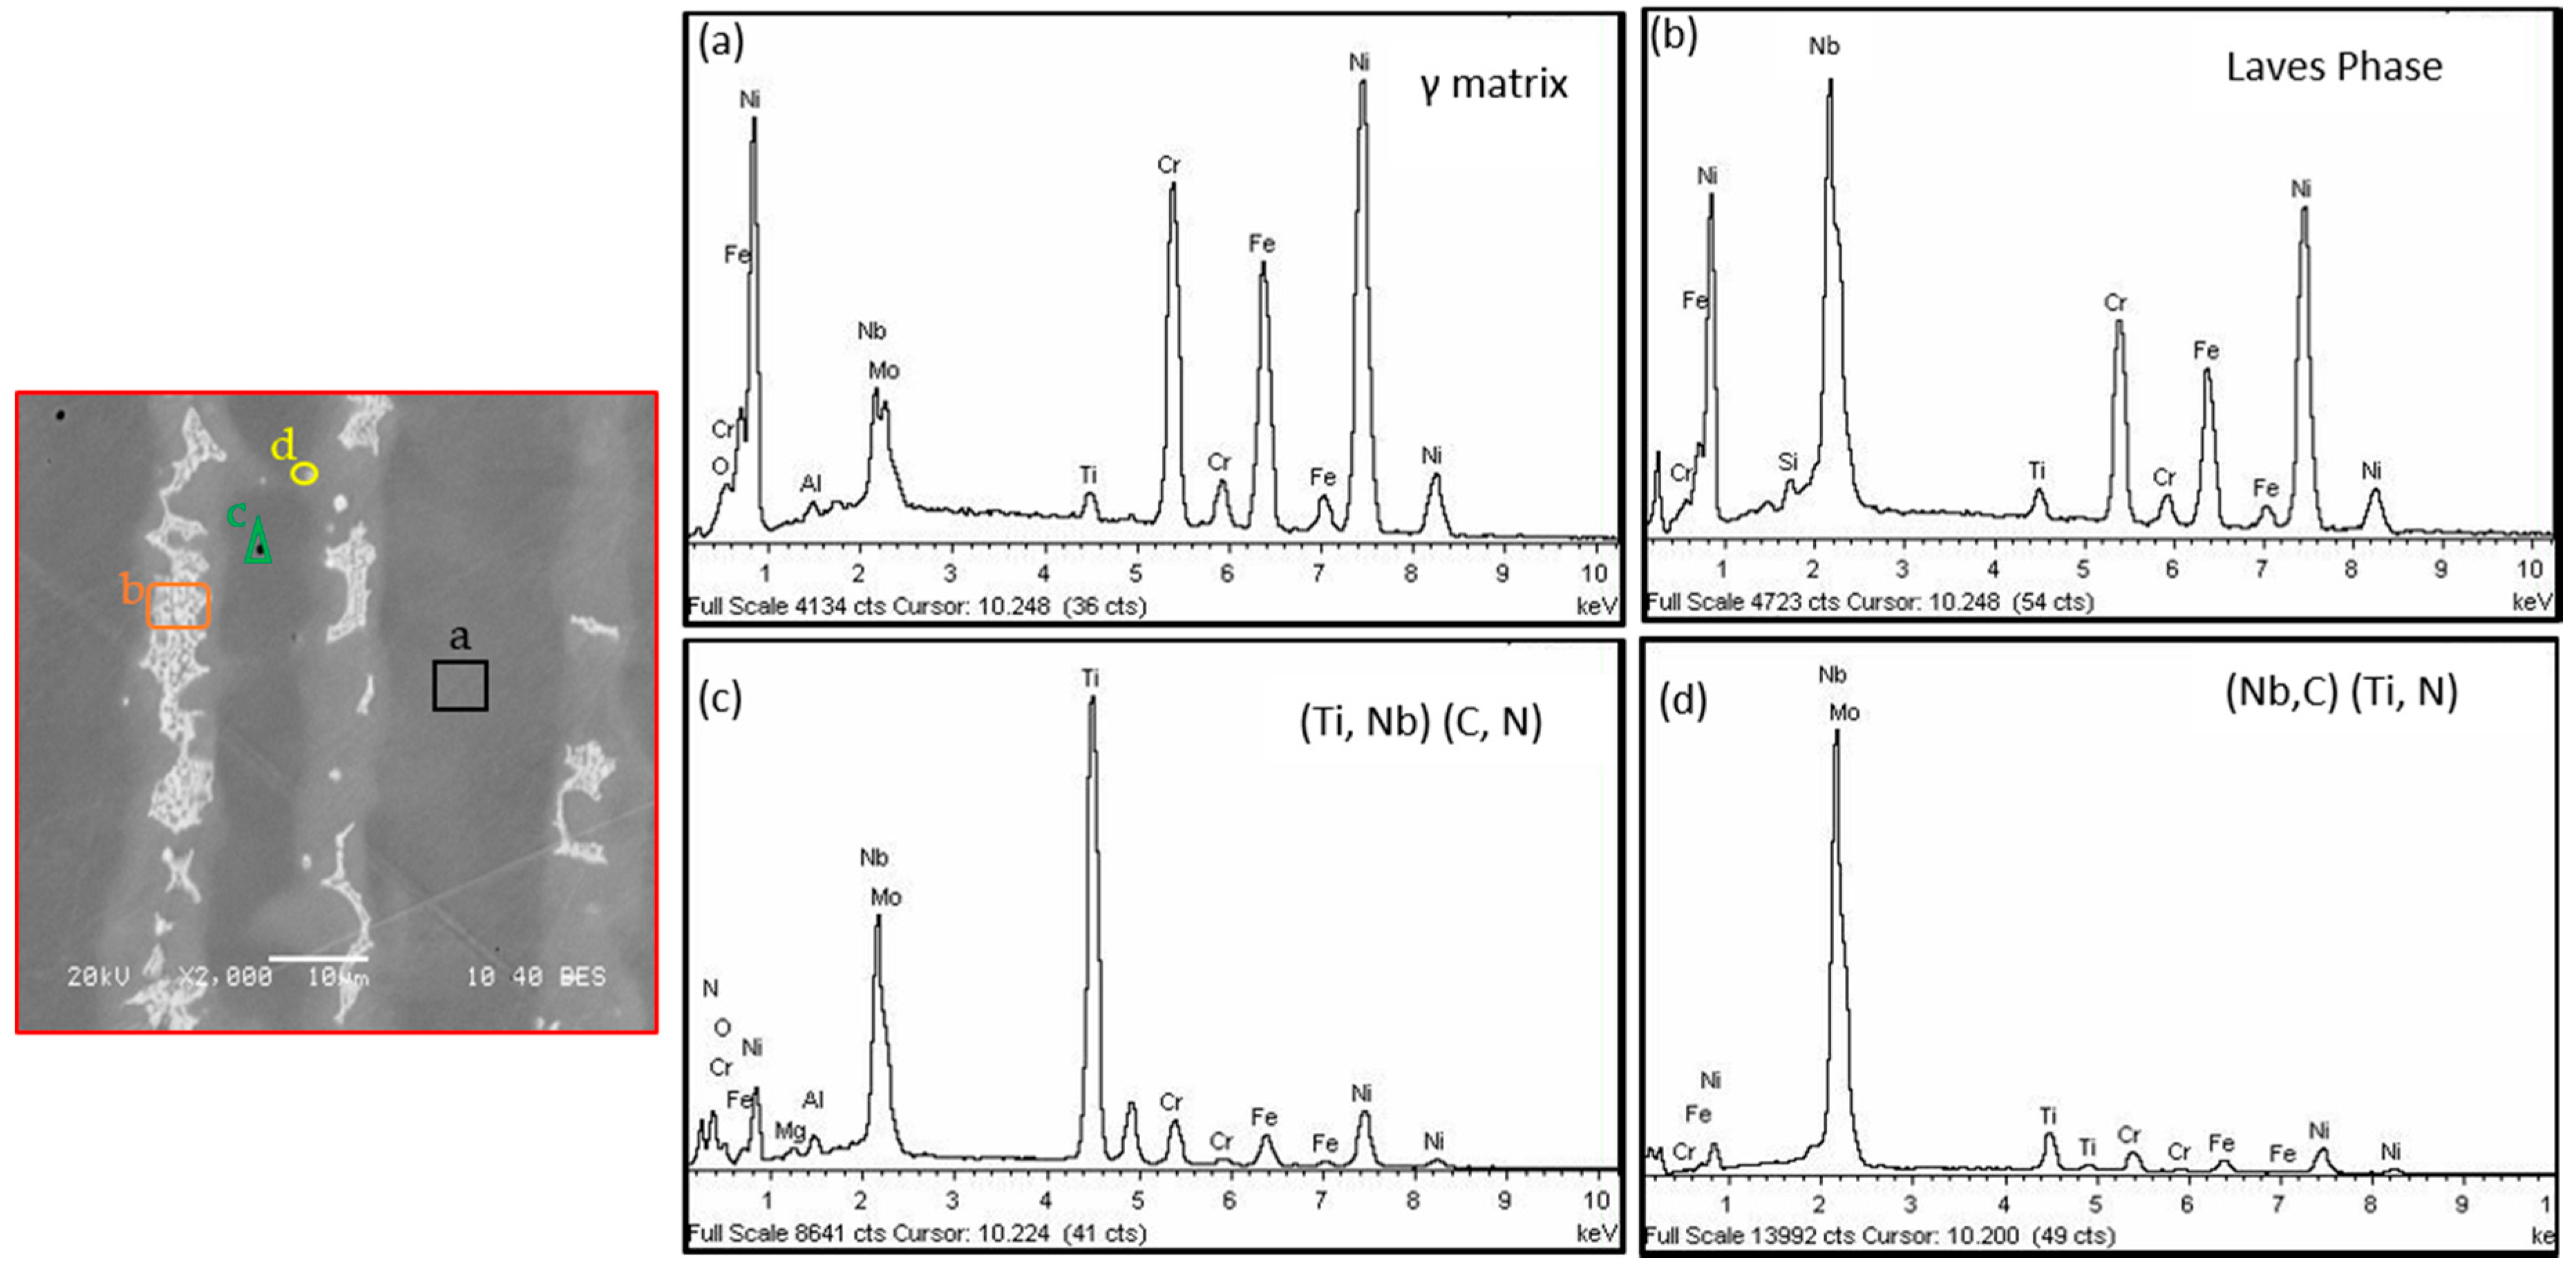
In the WAAM process, the solidification of the Inconel 718 alloy starts with the first liquid matrix γ, causing the accumulation of elements such as Mo, Nb, Ti and C in the interdendritic liquid and grain boundaries. Thus, the laves phase and metal carbides (including NbC and TiC) precipitate in these regions. The resulting liquid eutectic reaction γ + NbC then consume most of the available carbon until another eutectic reaction γ + laves occurs [32,33]. The laves phase is an inevitable final solidification phase in Inconel 718 alloy. However, the solidification conditions can strongly influence the extent of niobium segregation and the amount of laves phase [34]. The EDS analysis of the as-deposited WAAM IN718 alloy is given in Figure 11. EDX spectrum, Figure 11b, the precipitates with substructure is rich in Nb while the Figure 11c,d contains Nb, Ti in rich, and lighter elements, such as C and N. According to the literature, the microstructure of IN718 is governed by the FCC lattice structure of the ϒ matrix. This EDS spectrum analysis clearly shows the presence of major phases in the WAAM IN718.
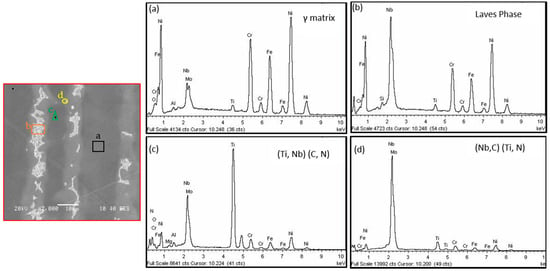
Figure 11.
Energy-dispersive X-ray spectroscopy (EDS) image (on the left) and EDS spectrums (on the right) taken from major phases that appear in the as-deposited microstructure of WAAM IN718 alloy (a) ϒ solid solution matrix; (b) Laves phase particle (c) Titanium carbides and (d) Niobium carbides.
Among the various phases that present in WAAM IN718, the laves phase has been generally accepted as being detrimental to the mechanical properties of the alloy. In the early stages of process development, the laves were associated with a reduction in tensile strength and ductility. Laves phase can reduce the mechanical properties of IN718 through several mechanisms with the most dominant probably being brittle fracture of the phase. However, the behavior of laves phase on mechanical properties of WAAM material at elevated temperature is studied yet. Hence, the SEM analysis was performed on the fractured WAAM samples in order to understand the effect of this precipitation with respect to elevated temperature, as shown in Figure 12.

Figure 12.
SEM analysis on the facture sections of the WAAM samples at various temperature (a) Room temperature 20 °C; (b) 650 °C; (c) 1200 °C.
From Figure 12, it is clearly seen that the laves phase (white island particles) are present as the continuous manner in the dendritic microstructure at room temperature and at 650 °C. In addition, there are several cracks observed; the cracks are initiated and propagated in the white island (laves phase) during loading and lead to the fracture of the specimen without the necking of the specimen that is observed in Figure 10. At 1200 °C, it shows that the laves phases are present in a discontinuous manner without any crack in the inner region of microstructure and also laves phases are not densely populated. Hence, it is assumed that the laves phases begin to dissolve at very high temperatures, which allows larger elongation in the specimen.
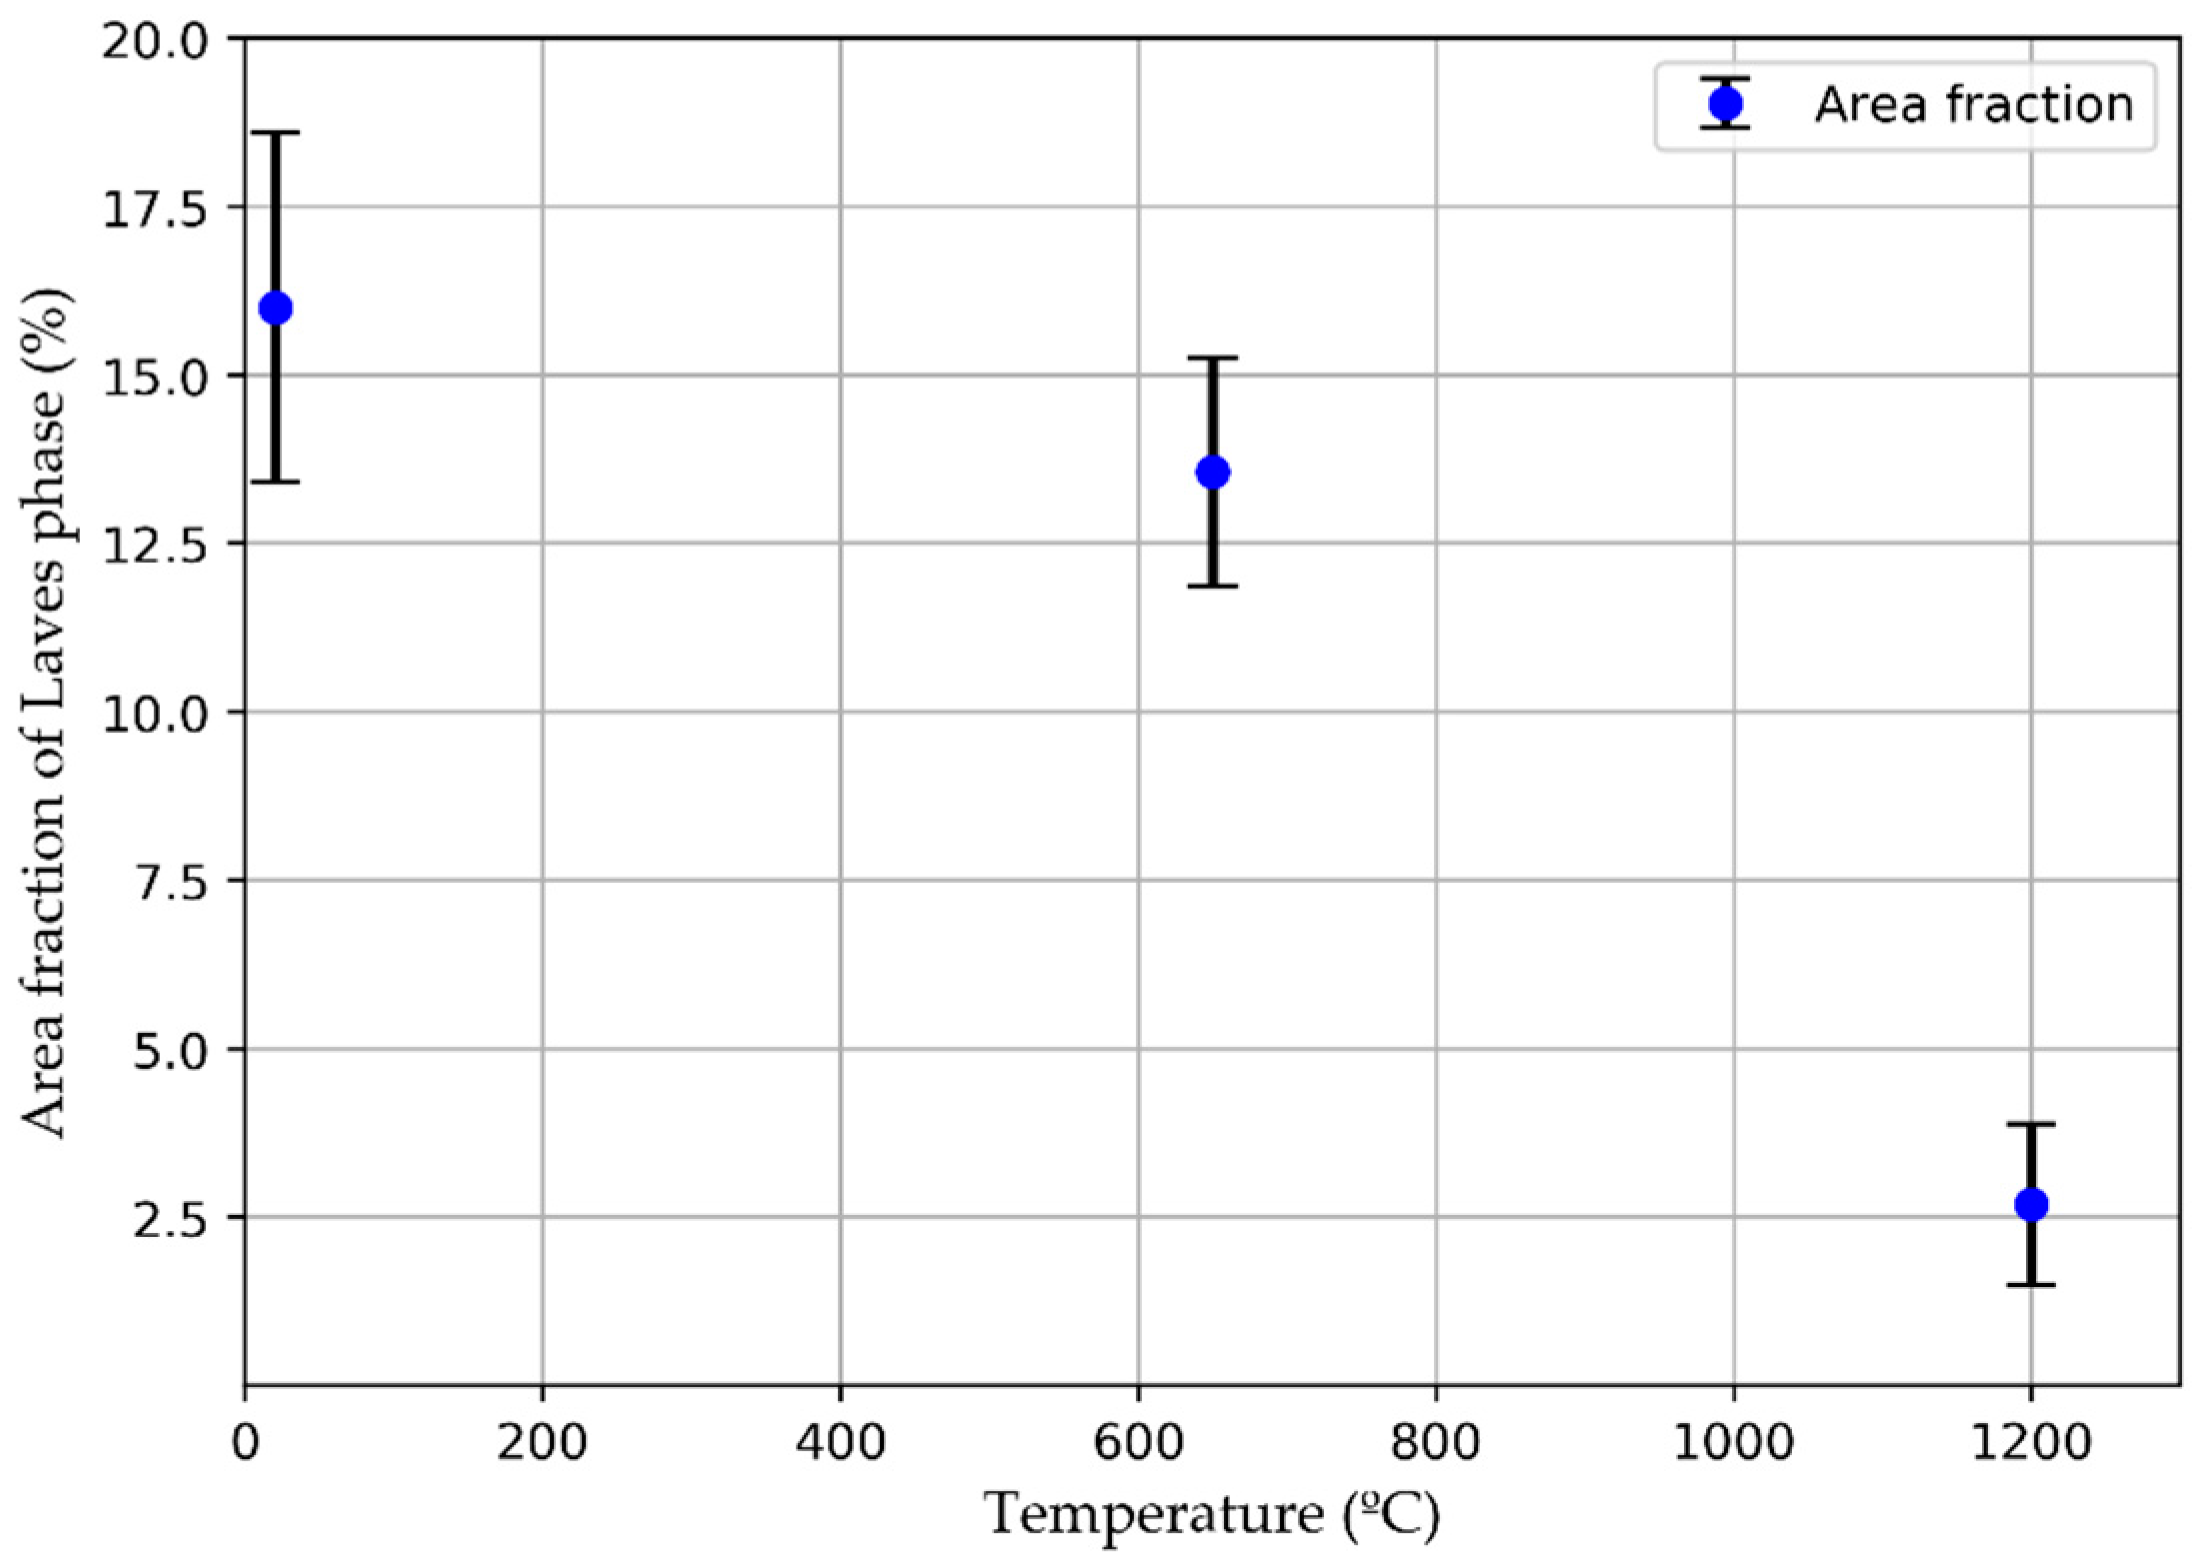
The area fraction of the laves phase particles are a measure for all the SEM images with the same magnification of 10 µm at elevated temperature for the similar observed area using an ImageJ software. All measurements were repeated five times to reduce errors. Figure 13 shows that the area fraction of laves phase precipitates was higher at room temperature in the sample (16.43% ± 2.13%), at 650 °C it becomes 13.56% ± 1.93%, whereas at 1200 °C the area fraction of the laves phase is significantly reduced to 2.60% ± 1.2%.
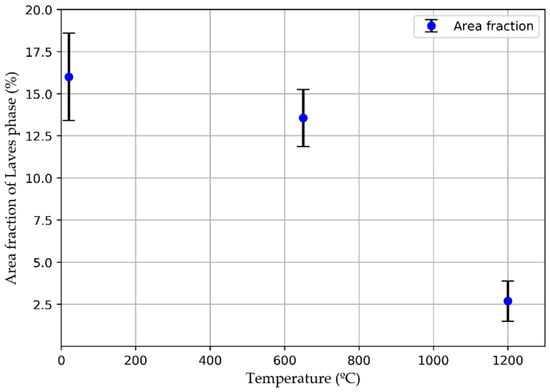
Figure 13.
Area fraction of the laves phase with respect to the temperature.
4. Conclusions
An experimental investigation conducted to obtain insight into the mechanical behavior of WAAM IN718 material in comparison with the wrought IN718 alloy. For the initial microstructure, SEM analysis were performed, and mechanical properties were determined by means of tensile testing at elevated temperature. The following are some of the conclusions:
The initial SEM and XRD analysis show the precipitated phases appearing in the as-deposited microstructure of the wrought and WAAM IN718 alloy. In particular, in the case of the WAAM IN718 alloy, the presence of laves phases is more significant.
It has been shown that the values of YS and UTS decreased with an increase in temperature in both alloys. However, the yield strength of the WAAM IN718 alloy is much higher than that of the wrought alloy, while the UTS of the WAAM alloys is difficult to assess at lower temperatures. In addition, microhardness analysis shows that WAAM IN718 alloy has a higher hardness than the wrought IN718 alloy.
High temperature testing revels that the stress hardening takes place up to about 650 °C and above this temperature (at 1200 °C) the mechanical behavior is almost plastic for both alloys. For both alloys, the plastic elongation is almost 55%.
Fractographic analysis of the specimens shows that at low temperature, the fracture surface of the WAAM specimen does not exhibit any necking compared to the wrought alloy. This means the specimen fractures early. However, at a higher temperature, both alloys behave similarly, the improvement in sample ductility results in a smaller reduction in mechanical properties, with elongation at break (tensile and stress fracture) showing the greatest reduction in gauge section area.
The SEM analysis of the fracture surface reveals that the laves phase occurs as a continuous or discontinuous network in WAAM IN718 at different temperatures and can lead to significant reductions in mechanical properties, particularly at room temperature and 650 °C. This is due to the very brittle behavior of the laves phase, which acts as a preferred fracture path. The area fraction analysis indicates that with an increase of temperature (around 0.7*Tm) the area fraction of laves phase starts to decrease. It is therefore suggested that the laves phases are almost dissolved at very high temperature and allow a greater elongation of the specimen.
Author Contributions
Conceptualization, T.B. and F.V.; Data curation, T.B. and F.V.; Investigation, T.B., A.S. and F.V.; Methodology, T.B. and A.S.; Project administration, F.V.; Supervision, E.I. and F.G.M.; Validation, T.B.; Writing—original draft, T.B.; F.V.; Review & editing, A.S.; E.I. and F.G.M. All authors have read and agreed to the published version of the manuscript.
Funding
This project received funding from the European Union’s Marie Skłodowska–Curie Actions (MSCA) Innovative Training Networks (ITN) H2020-MSCA-ITN-2017 under the grant agreement No. 764979 and Basque Government QUALYFAM project, ELKARTEK 2020 program (KK-2020/00042) and HARIPLUS project, HAZITEK 2019 program (ZL-2019/00352).
Acknowledgments
The authors want to thanks to Ivan Tabernero for helping in experiment, support and expertise on additive manufacturing.
Conflicts of Interest
The authors declare no conflict of interest.
References
- Ford, S.; Despeisse, M. Additive manufacturing and sustainability: An exploratory study of the advantages and challenges. J. Clean. Prod. 2016, 137, 1573–1587. [Google Scholar] [CrossRef]
- Thivillon, L.; Bertrand, P.; Laget, B.; Smurov, I. Potential of direct metal deposition technology for manufacturing thick functionally graded coatings and parts for reactors components. J. Nucl. Mater. 2009, 385, 236–241. [Google Scholar] [CrossRef]
- Knezović, N.; Topić, A. Wire and Arc Additive Manufacturing (WAAM)—A New Advance in Manufacturing. In Lecture Notes in Networks and Systems; Springer Nature Switzerland AG: Cham, Switzerland, 2019; Volume 42, pp. 65–71. [Google Scholar]
- Manikandan, S.G.; Sivakumar, D.; Kamaraj, M.; Rao, K.P. Laves phase control in Inconel 718 weldments. Mater. Sci. Forum 2012, 710, 614–619. [Google Scholar] [CrossRef]
- Antonsson, T.; Fredriksson, H. The effect of cooling rate on the solidification of INCONEL 718. Metall. Mater. Trans. B 2005, 36, 85–96. [Google Scholar] [CrossRef]
- Fronius International GmbH, “Arctig Stainless Steel PIPE 10 mm”. 2019. Available online: https://www.fronius.com/en/welding-technology/info-centre/magazine/2018/well-cooled-at-maximum-power (accessed on 9 May 2018).
- Ling, L.; Han, Y.; Zhou, W.; Gao, H.; Shu, D.; Wang, J.; Kang, M.; Sun, B. Study of Microsegregation and Laves Phase in INCONEL718 Superalloy Regarding Cooling Rate During Solidification. Metall. Mater. Trans. A 2015, 46, 354–361. [Google Scholar] [CrossRef]
- Clark, D.; Bache, M.R.; Whittaker, M.T. Shaped metal deposition of a nickel alloy for aero engine applications. J. Mater. Process. Technol. 2008, 203, 439–448. [Google Scholar] [CrossRef]
- Clark, D.; Bache, M.R.; Whittaker, M.T. Erratum: Microstructural characterization of a polycrystalline nickel-based superalloy processed via tungsten-inert-gas-shaped metal deposition. Metall. Mater. Trans. B Process Metall. Mater. Process. Sci. 2010, 41, 1346–1353. [Google Scholar] [CrossRef]
- Baufeld, B. Mechanical properties of INCONEL 718 parts manufactured by shaped metal deposition (SMD). J. Mater. Eng. Perform. 2012, 21, 1416–1421. [Google Scholar] [CrossRef]
- Asala, G.; Khan, A.K.; Andersson, J.; Ojo, O.A. Microstructural Analyses of ATI 718Plus® Produced by Wire-ARC Additive Manufacturing Process. Metall. Mater. Trans. A Phys. Metall. Mater. Sci. 2017, 48, 4211–4228. [Google Scholar] [CrossRef]
- Rodrigues, T.A.; Duarte, V.; Miranda, R.M.; Santos, T.G.; Oliveira, J.P. Current status and perspectives on wire and arc additive manufacturing (WAAM). Materials 2019, 12, 1121. [Google Scholar] [CrossRef]
- Derekar, K.S. A review of wire arc additive manufacturing and advances in wire arc additive manufacturing of aluminium. Mater. Sci. Technol. 2018, 34, 895–916. [Google Scholar] [CrossRef]
- Artaza, T.; Bhujangrao, T.; Suárez, A.; Veiga, F.; Lamikiz, A. Influence of heat input on the formation of laves phases and hot cracking in plasma arc welding (PAW) additive manufacturing of inconel 718. Metals 2020, 10, 771. [Google Scholar] [CrossRef]
- Xu, X.; Ding, J.; Ganguly, S.; Williams, S. Investigation of process factors affecting mechanical properties of INCONEL 718 superalloy in wire + arc additive manufacture process. J. Mater. Process. Technol. 2019, 265, 201–209. [Google Scholar] [CrossRef]
- Veiga, F.; del Val, A.G.; Suárez, A.; Alonso, U. Analysis of the machining process of titanium Ti6Al-4V parts manufactured by wire arc additive manufacturing (WAAM). Materials 2020, 13, 766. [Google Scholar] [CrossRef]
- Alonso, U.; Veiga, F.; Suárez, A.; Artaza, T. Experimental investigation of the influence of wire arc additive manufacturing on the machinability of titanium parts. Metals 2020, 10, 24. [Google Scholar] [CrossRef]
- Belan, J. High frequency fatigue test of in 718 alloy—microstructure and fractography evaluation. Metalurgija 2015, 54, 59–62. [Google Scholar]
- Gierth, M.; Henckell, P.; Ali, Y.; Scholl, J.; Bergmann, J.P. Wire Arc Additive Manufacturing (WAAM) of Aluminum Alloy AlMg5Mn with Energy-Reduced Gas Metal Arc Welding (GMAW). Materials 2020, 13, 2671. [Google Scholar] [CrossRef]
- Li, R.B.; Yao, M.; Liu, W.C.; He, X.C. Isolation and determination for δ, γ′ and γ″ phases in Inconel 718 alloy. Scr. Mater. 2002, 46, 635–638. [Google Scholar] [CrossRef]
- Azarbarmas, M.; Aghaie-Khafri, M.; Cabrera, J.M.; Calvo, J. Dynamic recrystallization mechanisms and twining evolution during hot deformation of Inconel 718. Mater. Sci. Eng. A 2016, 678, 137–152. [Google Scholar] [CrossRef]
- Chen, F.; Liu, J.; Ou, H.; Lu, B.; Cui, Z.; Long, H. Flow characteristics and intrinsic workability of IN718 superalloy. Mater. Sci. Eng. A 2015, 642, 279–287. [Google Scholar] [CrossRef]
- Momeni, A.; Abbasi, S.M.; Morakabati, M.; Badri, H. A Comparative Study on the Hot Working Behavior of Inconel 718 and ALLVAC 718 Plus. Metall. Mater. Trans. A Phys. Metall. Mater. Sci. 2017, 48, 1216–1229. [Google Scholar] [CrossRef]
- Wang, Y.; Shao, W.Z.; Zhen, L.; Zhang, X.M. Microstructure evolution during dynamic recrystallization of hot deformed superalloy 718. Mater. Sci. Eng. A 2008, 486, 321–332. [Google Scholar] [CrossRef]
- Jambor, M.; Bokůvka, O.; Nový, F.; Trško, L.; Belan, J. Phase transformations in nickel base superalloy INCONEL 718 during cyclic loading at high temperature. Prod. Eng. Arch. 2017, 15, 15–18. [Google Scholar] [CrossRef]
- Schirra, J.J.; Caless, R.H.; Hatala, R.W. The Effect of Laves Phase on the Mechanical Properties of Wrought and Cast + HIP Inconel. Superalloys 2012, 718, 375–388. [Google Scholar] [CrossRef]
- Campo, E.; Turco, C.; Fiat, G.R. The correlation between heat treatment, structure and mechanical characteristics in Inconel 718. Metall. Sci. Tecnol. 2013, 3, 5. [Google Scholar]
- James, B.Y.L.A. Fatigue-Crack Growth in Inconel 718 Weldments at Elevated Temperatures. Weld. J. Res. Suppl. 1978, 57, 17s–23s. [Google Scholar]
- Bouse, G.K.; Dunham, R.A.; Lane, J. Mechnical Properties of Fine-Grain Microcast-X Alloy 718 investment Casting for SSME, Gas Turbine Engine, and Airframe Components. Miner. Met. Mater. Soc.-Superalloys 1997, 301, 5559. [Google Scholar]
- Azadian, S. Aspects of Precipitation in the Alloy Inconel 718; Luleå University of Technology: Luleå, Sweden, 2004. [Google Scholar]
- De Jaeger, J.; Solas, D.; Fandeur, O.; Schmitt, J.H.; Rey, C. 3D numerical modeling of dynamic recrystallization under hot working: Application to Inconel 718. Mater. Sci. Eng. A 2015, 646, 33–44. [Google Scholar] [CrossRef]
- Wang, H.; Ikeuchi, K.; Takahashi, M.; Ikeda, A. Microstructures of Inconel 718 alloy subjected to rapid thermal and stress cycle - joint performance and its controlling factors in friction welding of Inconel 718 alloy. Weld. Int. 2009, 23, 662–669. [Google Scholar] [CrossRef]
- Ram, G.D.J.; Reddy, A.V.; Rao, K.P. Improvement in stress rupture properties of Inconel 718 gas tungsten arc welds using current pulsing. J. Mater. Sci. 2005, 40, 1497–1500. [Google Scholar] [CrossRef]
- Madhusudhan, G.; Srinivasa, C.; Srinivas, K. Improvement of mechanical properties of Inconel 718 electron beam welds-influence of welding techniques and post weld heat treatment. Int. J. Adv. Manuf. Technol. 2009, 43, 671–680. [Google Scholar] [CrossRef]
© 2020 by the authors. Licensee MDPI, Basel, Switzerland. This article is an open access article distributed under the terms and conditions of the Creative Commons Attribution (CC BY) license (http://creativecommons.org/licenses/by/4.0/).

