1. Introduction
Metal additive manufacturing (AM) processes are increasingly adopted across various industrial sectors such as the energy, naval, aeronautical, and automotive industries for both manufacturing and repair applications [
1,
2,
3]. The global metal additive manufacturing market has experienced rapid growth in recent years, expanding from USD 5.29 billion in 2024 to USD 6.11 billion in 2025, and by 2029 it is projected to grow to USD 11.49 billion [
4].
Due to increasing competition, customer demand, and the European Union’s directives for green manufacturing and extended product lifecycle, cost- and resource-efficient Directed Energy Deposition (DED) processes are increasingly adopted over the previously more widely used Powder Bed Fusion (PBF) in industrial applications [
5]. The more mature DED processes include powder DED-LB, wire arc AM (WAAM), and wire DED-LB. The latter offers a compelling balance between advantages and disadvantages of the other two. Using wire as feedstock offers a higher deposition rate than powder, along with cheaper feedstock and reduced equipment/recurrent costs, while using a laser as the heat source offers better accuracy than wire arc.
Despite its advantageous features, the wire DED-LB process is prone to instabilities [
6,
7,
8]. Firstly, the use of wire as feedstock renders the process very sensitive to working distance deviations. The working distance determines the amount of heat influx generated by the lasers that is transferred either to the wire or to the underlying surface. This balance determines the temperature field of the heat-affected zone (HAZ), and as such, the melt pool geometry. Additionally, as the distance from the substrate, which acts as a heat sink, increases, the accumulated heat may reach a critical level where the temperature of the layers below the deposited one remains high, close to the liquidus temperature. When the liquidus temperature is reached, material remelting occurs, leading to surface waviness, balling, and poor mechanical properties [
9,
10]. Part geometry, path-planning strategy, and manipulator kinematics may also affect process stability.
Developing strategies that control process variables during deposition is mandatory to stabilize process conditions and thus create quality parts [
11]. However, achieving this is not a trivial task. Process and inspection data must be collected and linked with the developed critical process phenomena identified. A comprehensive overview of the in situ monitoring systems investigated for DED-LB applications is summarized in the literature [
7,
8,
9,
12,
13,
14]. As documented, camera systems are most commonly used. Vision cameras are used to provide insights about the achieved melt pool geometry, while thermal cameras are used when temperature data are the main focus,. For quality inspection, both Non-Destructive (NDT) and Destructive Testing (DT) methods are applied [
15]. The former aims to capture the final part geometry through either reverse engineering from point clouds generated by 3D scanners or using more expensive Computed Tomography (CT) scans [
7]. The latter can also provide information regarding pores and cracks close to the part surface. DT techniques, including tensile and microhardness testing, are mostly used for assessing the part’s mechanical properties [
16,
17].
Despite the variety of collected monitoring and inspection data, efforts to correlate them face significant challenges, the most important being the lack of generalized information. Data from part development are often not transferable due to heterogeneity in AM systems, developed geometries, feedstock types and materials, and process parameter combinations. As such, the establishment of consistent guidelines or predictive models is hindered. Finally, a gap exists between research and industrial implementation. Insights derived from R&D environments fail to translate effectively to production settings, where variability and constraints are far more complex.
This work aims to present a workflow to achieve part quality optimization through process control and defect detection, in order to enhance the industrial adoption of wire DED-LB. First, the methodology for correlating process phenomena, features from the captured signals from the monitoring devices, and part quality metrics will be presented. Then, experimental work will be conducted to define the influence of key process variables on the critical process phenomena, as well as thresholds linking selected metrics with process status and defect formation. Finally, control strategies will be designed, and their effect on the part’s shape and microstructure will be evaluated.
2. Experimental Setup
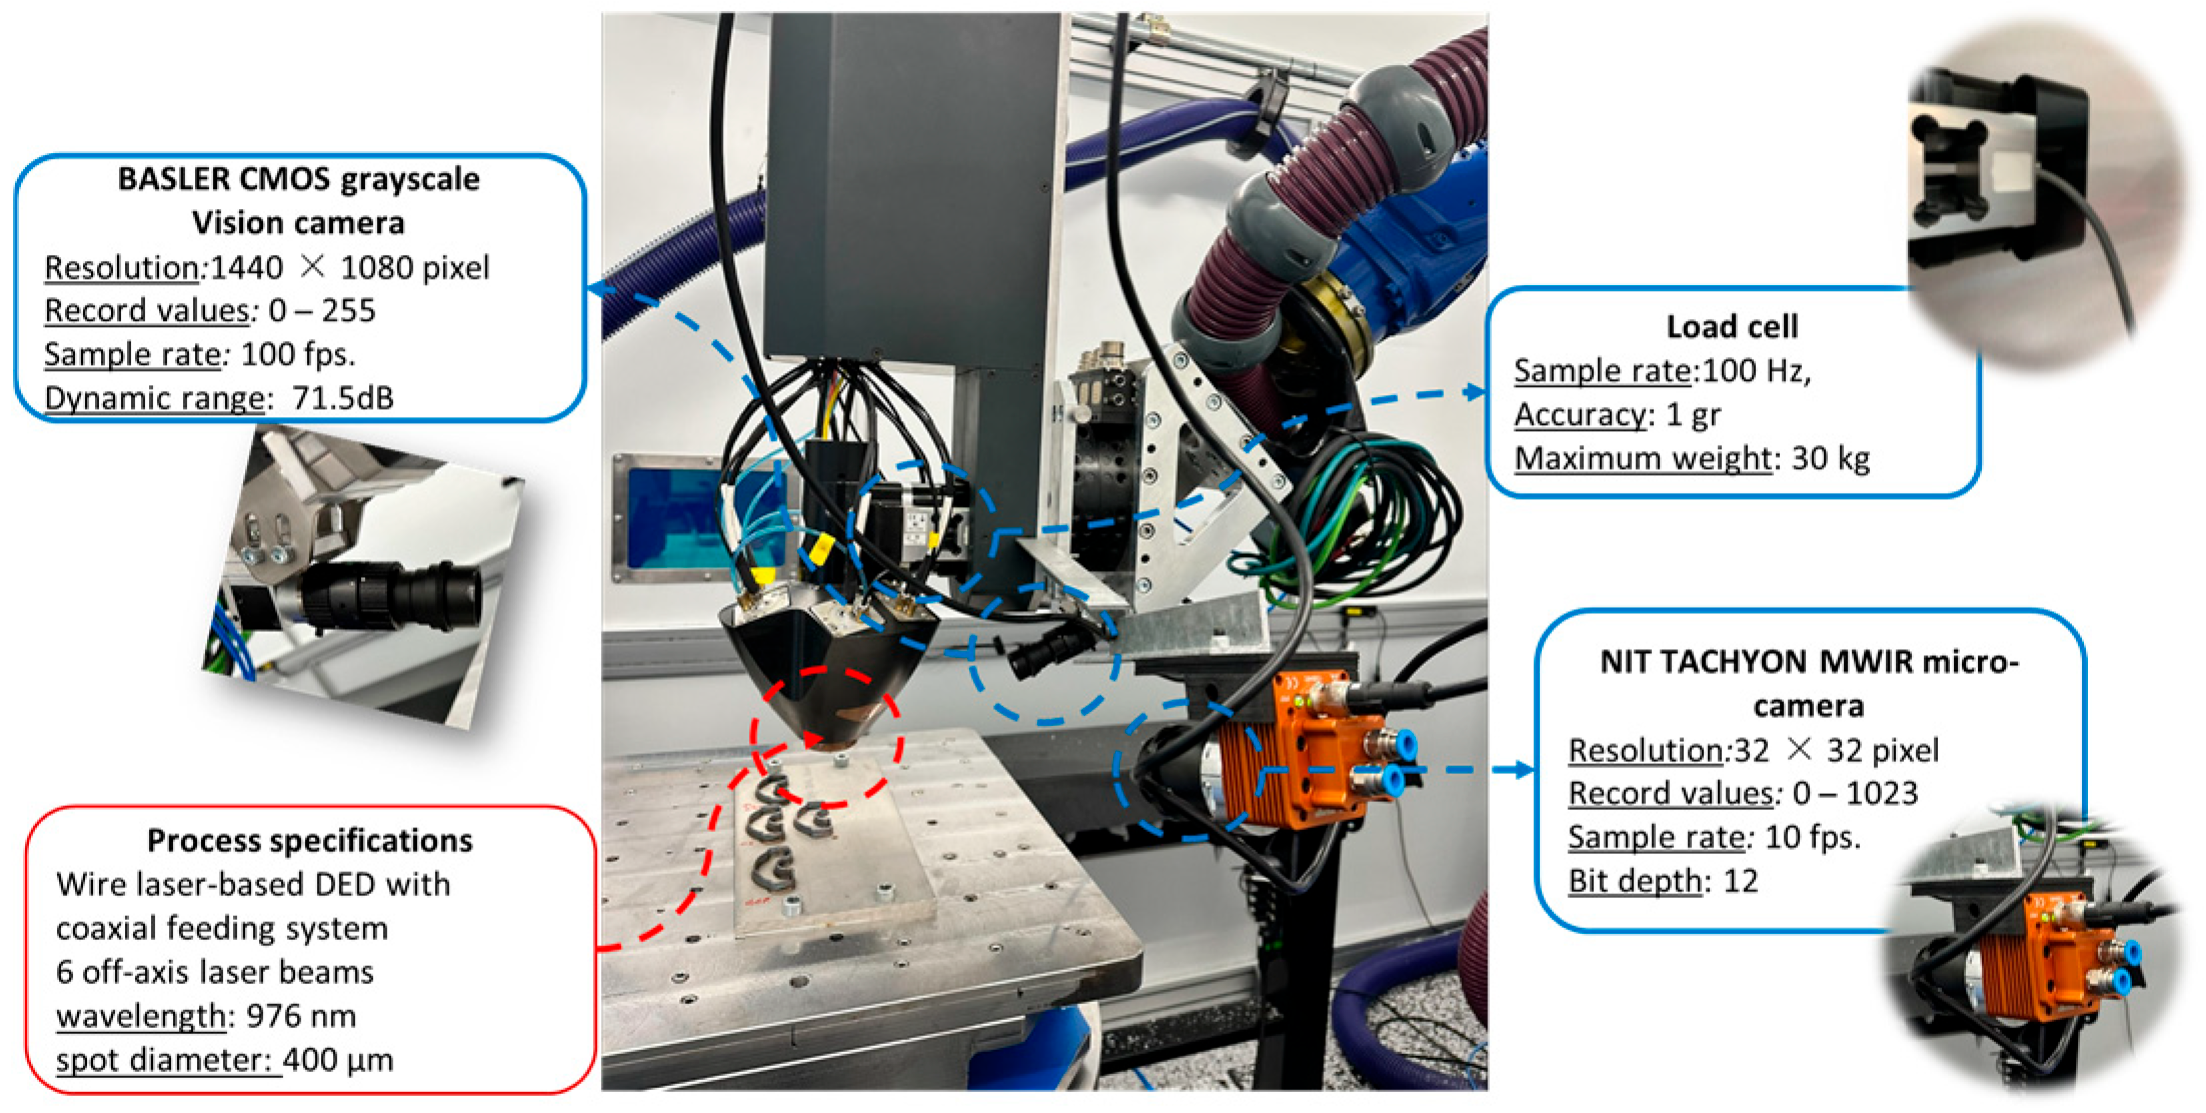
For the current work, a MELTIO (Linares, Spain) wire DED-LB head (head integration in a robotic arm) with a coaxial wire feeding system and six off-axis infrared (976 nm) laser beams with a surface-spot diameter 400 μm at Stand-off Distance (SoD) 6 mm was used (
Figure 1). Both the working and the substrate material are AISI 316 L stainless steel. The wire diameter, measured at various points, is 1 mm, the substrate thickness is 10 mm, and argon is used as the inert gas with a constant flow of 8 L/min. All experiments were conducted on a non-heated table.
The process monitoring setup comprises a BASLER (Ahrensburg, Germany) Complementary Metal-Oxide-Semiconductor (CMOS) grayscale vision camera (10 fps, 1440 × 1080-pixel resolution, 71.5 dB dynamic range, 0–255 range of values) and an NIT (Madrid, Spain) TACHYON 1024 infrared thermal micro-camera (10 fps, 32 × 32-pixel resolution, 12-bit depth, 0–1023 range of values), which uses a low-pass filter to cut off laser reflections, both retrofitted off-axis. The vision camera is connected via a USB 3.0 port, and a Python PyPylon library (version 4.4.2) is used to acquire real-time images of the melt pool. Apart from the cameras, a side-mount bending beam load-cell embedded in the deposition head by the machine manufacturer was utilized as introduced in [
7]. The load-cell logs, the process parameter data, the robot positioning, and the timestamps are synchronized (sampling frequency 10 Hz) and combined into a .csv file by a custom Python-based software to assist in the interpretation of outputs and to keep track of the process history.
3. Approach
To ensure the manufacturing of geometrically accurate and mechanically reliable parts with predictable quality characteristics while simultaneously recording process history, an inverse Data Information Knowledge Wisdom (DIKW) pyramid framework is adopted. At the top of the DIKW pyramid lies application-based Wisdom in the field of wire DED-LB. The main focus is to use the existing knowledge and all the available tools so as to map the effect of process variables on different designs and materials, thereby achieving process control that cam adapt to various part quality requirements. To achieve this, several steps should be followed, the first being the validation of correlations between process phenomena, sensor data, and part quality indicators in order to ensure process stability, predictable part geometry, and consistent material properties across part height. Designing such a framework will render the process from operator-reliant supervision to model-driven, repeatable manufacturing. To this end, in the Knowledge tier, the process signatures should be fused with the metrology outputs to reveal cause–effect relationships. The process status is defined by establishing thresholds on the features captured by the process monitoring devices. Linking these thresholds with inspection data will allow the detection of defects and the prediction of quality. In wire DED-LB, the two critical process phenomena are working distance deviation and excessive heat accumulation. Reduced working distance creates over-heating of the part surface, causing the un-melted wire to collide with it and resulting in poor inter-layer fusion. Conversely, increased working distance causes the wire to melt prematurely, again achieving poor bonding. Severe deviations may initiate wire oscillation or balling. An increase in working distance can also be a result of excessive heat accumulation. Already-deposited material remelts and flows laterally, resulting in cross-sectional instabilities. Heat accumulation is regulated by the thermal gradient and the solidification velocity, which defines the grain morphology that determines mechanical properties. By stabilizing the heat input, the microstructure is stabilized [
18].
To quantify the evolution of the aforementioned phenomena, the next tier, Information, involves the preprocessing and transformation of raw data—the base layer of the pyramid—into interpretable process signatures. The feature extracted from the vision camera is the melt pool area, defined by counting pixels above a defined grayscale threshold (127), while for the thermal camera, the feature is the maximum unitless temperature recorded in each frame (IRMax) [
6]. Even though temperature readings can be captured by the IR camera, in this work the input is treated as unitless temperature because we are interested in the correlation of temperature, as an indicator of heat accumulation, with process stability. By comparing IRMax with melt pool area across layers, a strong correlation was found [
6], indicating that the cheaper vision camera can solely be used to monitor heat accumulation within the part by tracking the dimensions of the melt pool area. For the load-cell, because its signal is univariate, only statistical analysis was performed, where it was proven that the median was best corelated with the working distance deviations.
5. Results and Discussion
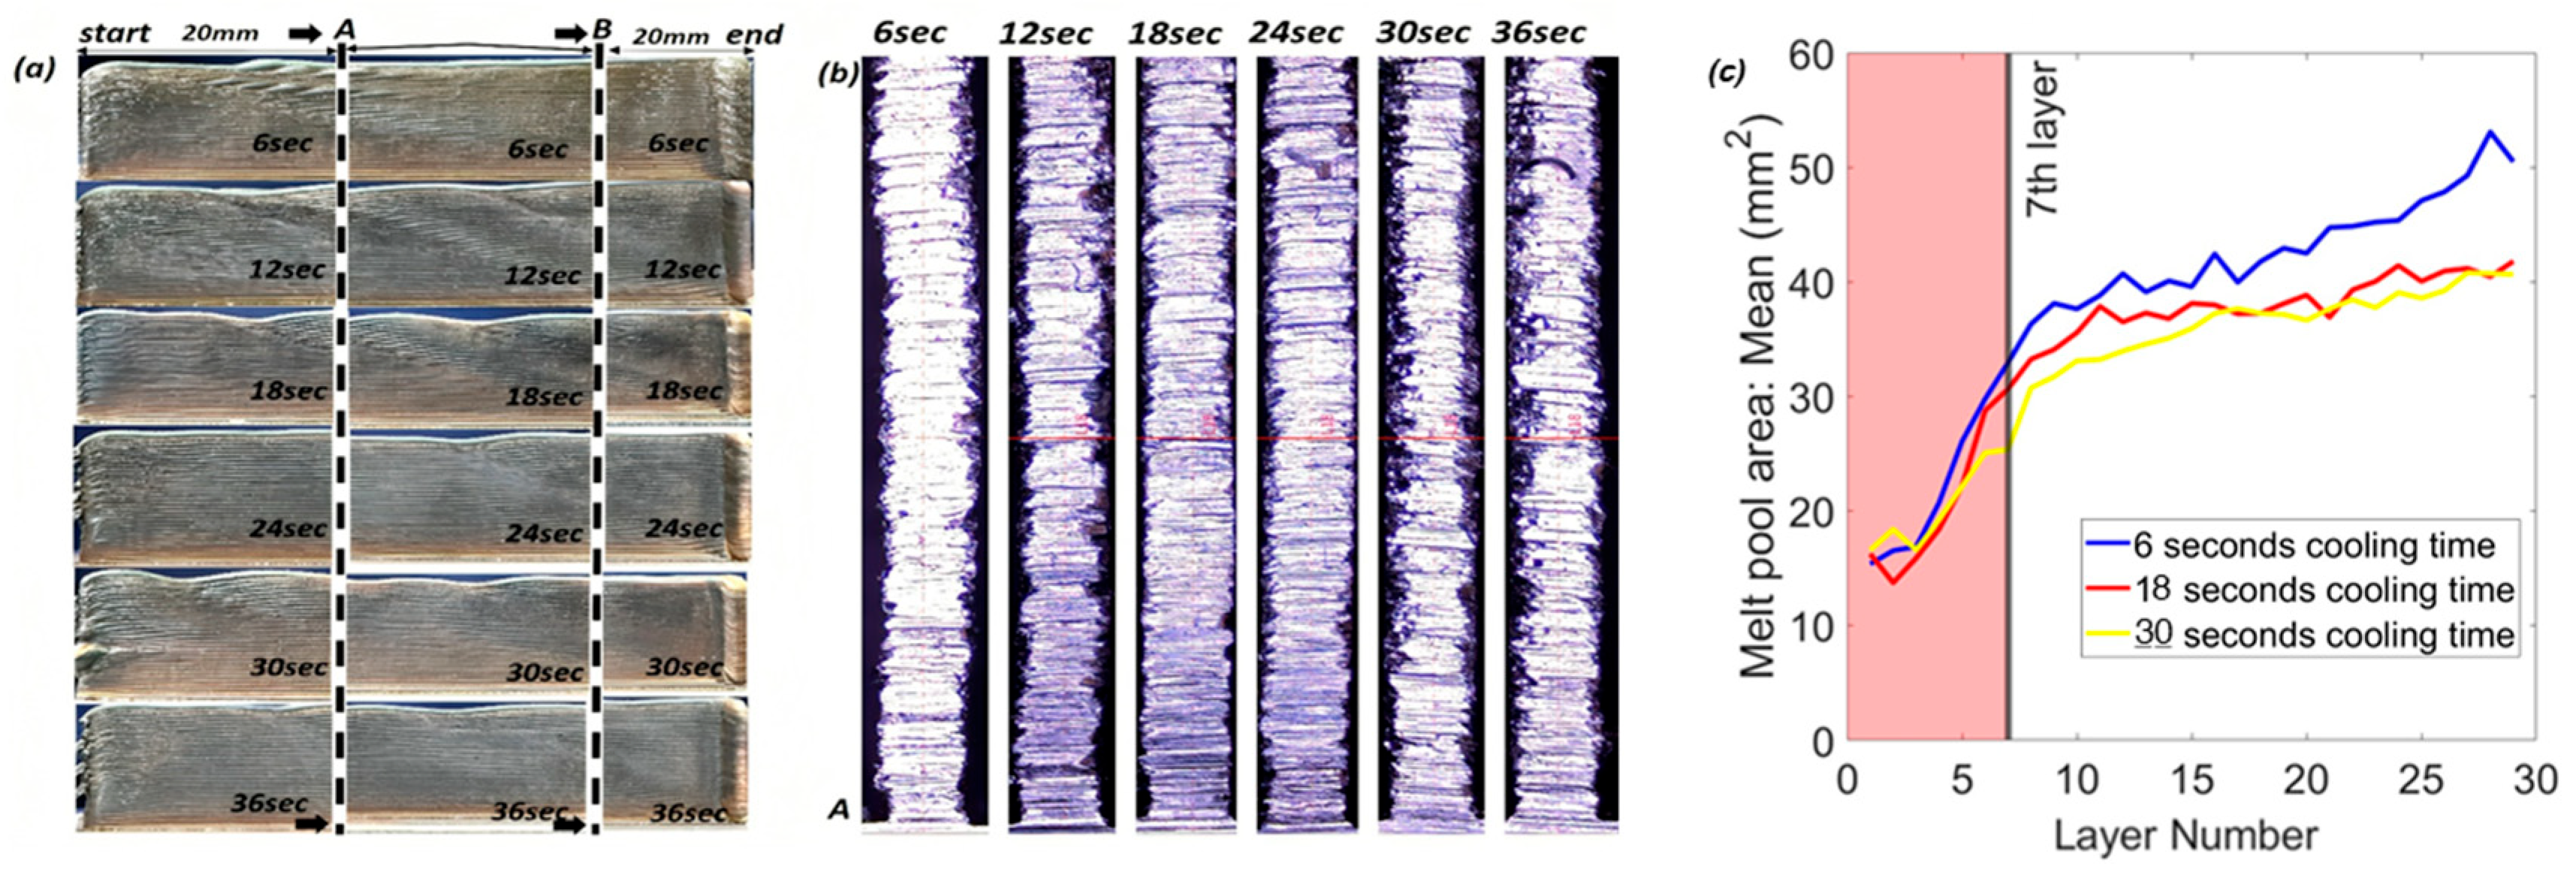
Figure 2a depicts the front view of the built parts created for the first experiment and the positions of the cuts where cross-sectional stability was measured (
Figure 2b). Evaluation of width and height reveals deviations, especially in the top layers. This phenomenon is attributed to the constant laser power value used across height, which causes heat to accumulate. Above a critical height, material remelts and flows laterally, leading to local variations in layer height. After measuring cross-sectional width for all samples, this phenomenon was found to be more intense in experiments with cooling times less than 18 s. This indicates that only after a cooling time (deposition + dwell) of 24 s has the part cooled enough to prevent intense surface remelting.
Figure 2c presents the mean melt pool area for three indicative cooling times. Until layer 7, values remain consistent across all cases, indicating minor influence of cooling time. Albeit, after layer 10, the mean melt pool area increases. The shorter the cooling time, the more pronounced the increase is. By combining the aforementioned results, the mean melt pool area can be used to assess part quality. To create a geometry-independent threshold for quality evaluation, more complex geometries were created with the same process parameters. The average mean melt pool areas of the three geometries at the critical seventh layer, 23.5 mm
2, is defined as the target value, and the threshold where extreme heat is accumulated is set to 30.7 mm
2.
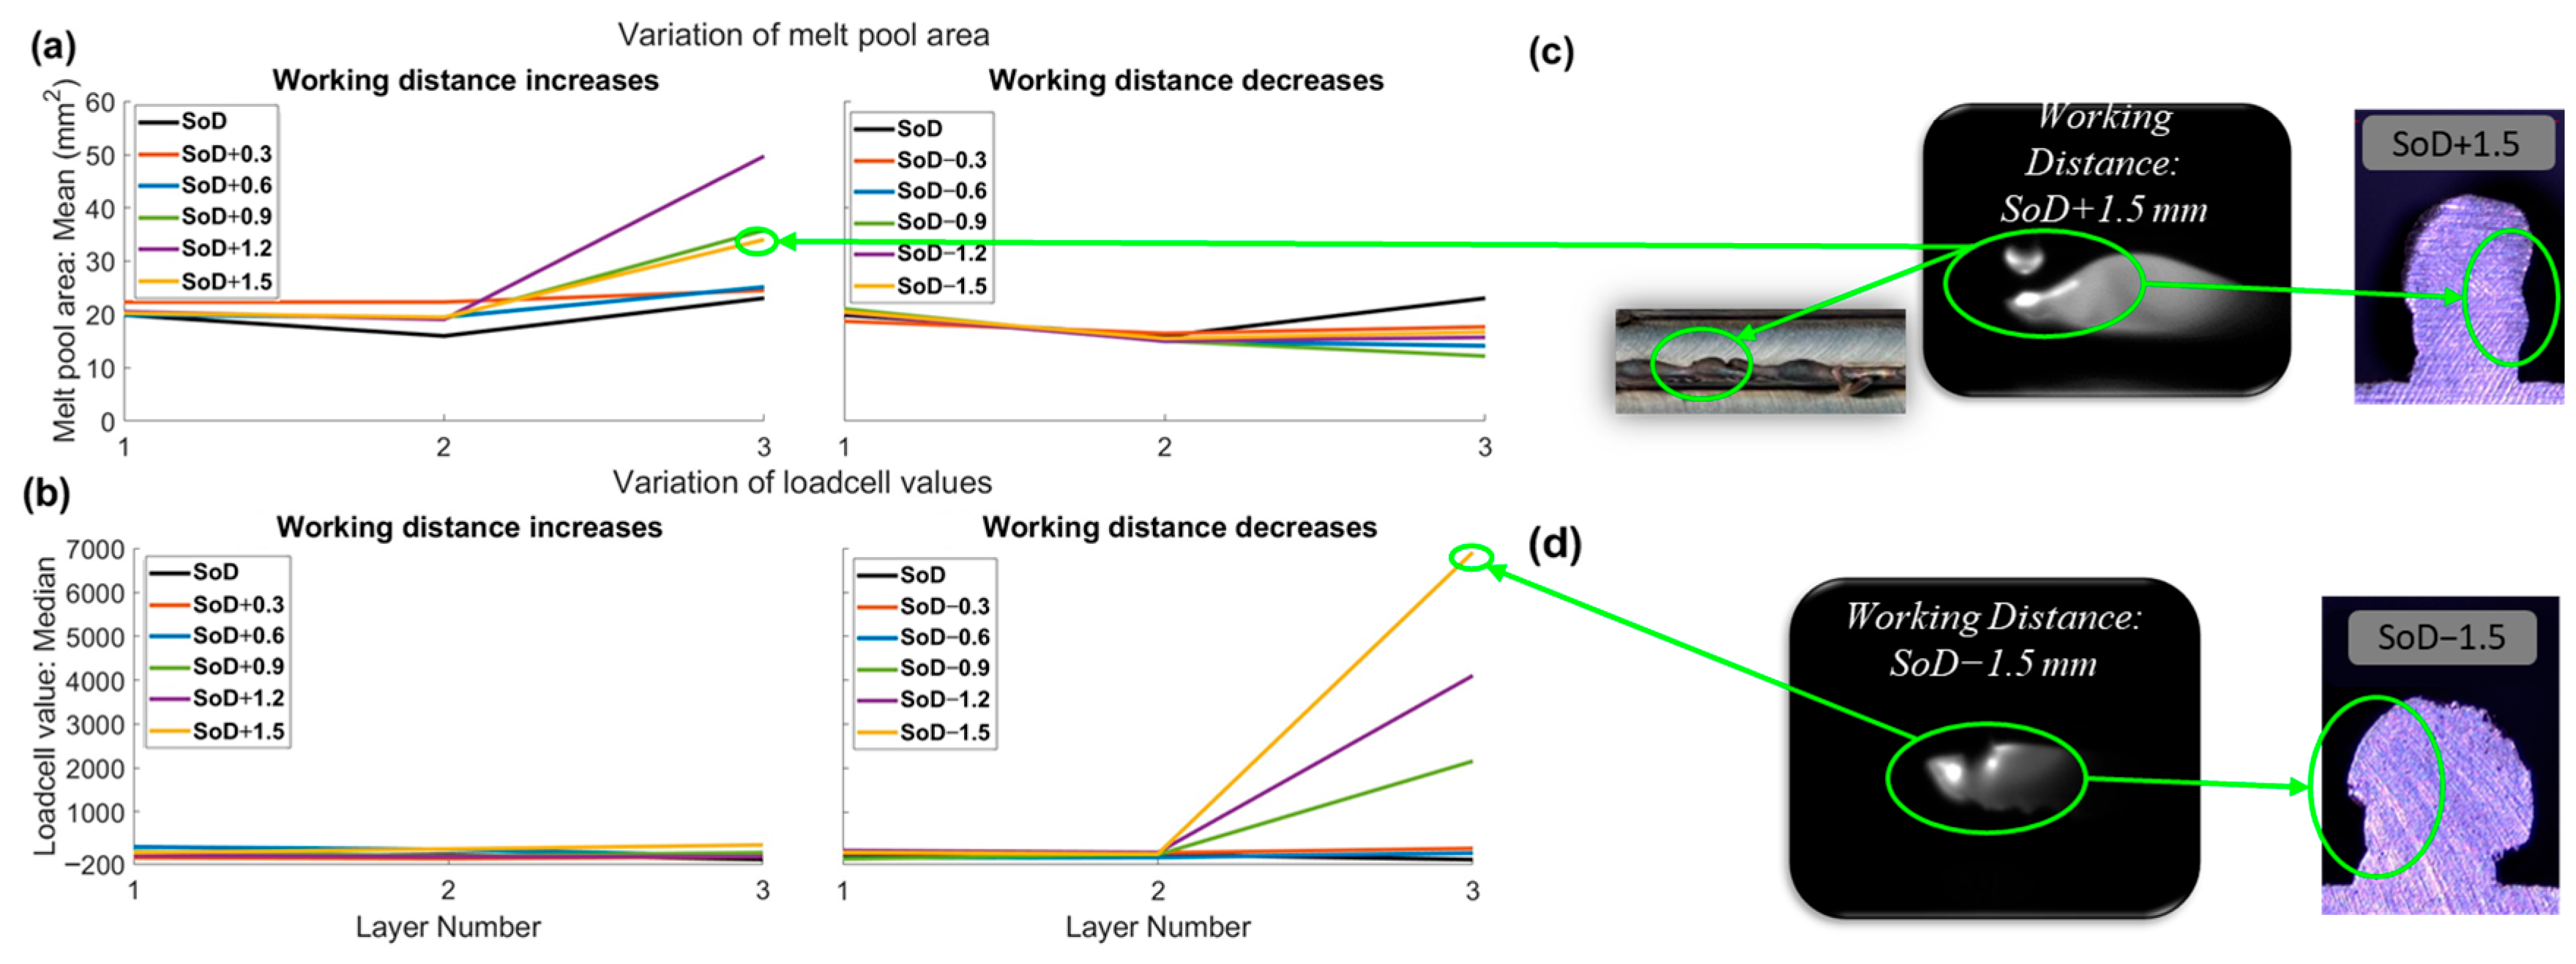
Figure 3a depicts the melt pool area evolution from the captured signals during Experiments 2 and 3, while
Figure 3b shows the corresponding load-cell signals. Additionally, some critical frames of the melt pool and images of the cross-section of the final parts with the largest SoD deviations are depicted in
Figure 3c,d.
For the case of reduced working distance,
Figure 3a indicates that the mean melt pool area feature remains unaffected despite evident process instabilities. This suggests that it does not reliably capture working distance reduction. However, the camera frame in
Figure 3d reveals wire entering the melt pool in solid state. Such frames can be used to train ML algorithms, which based on image recognition will detect the formation of defects. In contrast, the median load-cell values increases significantly when the reduction exceeds 0.6 mm, reflecting wire contact with the surface due to insufficient heating. This increase is nearly linear, offering potential for estimating the level of working distance reduction in a real manufacturing scenario. For increased working distance,
Figure 3b shows that load-cell values remain almost constant despite SoD variations, whereas the mean melt pool area increases after SoD is increased by more than 0.6 mm. Interestingly, this increase does not exhibit consistent trend. This is attributed to the balling defect: when a molten ball forms and detaches, the wire loses contact, reducing visible melt pool area (
Figure 3c). Finally, after visually inspecting the manufactured parts’ cross-sections, it was found that the bead width remains consistent within SoD ± 0.6 mm, whereas larger deviations lead to pronounced surface irregularities (
Figure 3c,d).
Based on the identified thresholds, a control strategy was developed using laser power as the tunable parameter, since cooling time showed less influence on heat accumulation. First, this control strategy was applied to thin-wall geometries. Three variations were tested at low-, medium-, and high-heat in thin-wall geometries based on the target melt pool area. The laser power and the melt pool area values for all cases are depicted in
Figure 4a–d. All samples were sectioned and Vickers microhardness tests were performed according to DIN EN ISO 6507 [
19] to examine mechanical properties. Their evolution across layers is depicted in
Figure 4e.
Cross-section width remained consistent among all strategies until layer 7, aligning with the results of the first experimental campaign. Nevertheless, significant differences were detected at the top layers. The no-control case exhibited the greatest deviation (0.18 mm) and asymmetry around the build axis, while the low-heat strategy (
Figure 4f) achieved the most consistent bead thickness after layer 7 and the lowest deviation (0.12 mm). The medium- and high-heat strategies also achieved stabilized bead shape. As regards the achieved mean melt pool area, in all cases where laser power control was applied, it was stabilized around 30 mm
2. These outputs demonstrated the effect of laser power control on the bead width across the part height and validated the conjunction between the mean melt pool area and the bead thickness. Microhardness results indicated a drop proportional to the decrease in the cooling rate [
20,
21]. The highest and most consistent microhardness values were observed in the low-heat strategy, indicating that consistent mechanical properties can be achieved when applying control strategies.
This finding is crucial also for the development of solid parts, indicating that the stabilization of heat input–output can lead to consistent microstructure and grain morphology, being directly related to the cooling rate. However, the control strategies for the formation of multi-track parts should be developed in accordance with the tool path strategy, following a track-by-track process control instead of the layer-by-layer control of the thin-wall geometries. To accomplish this, the laser power parameter is tuned based on the deposition sequence in the appropriate track.
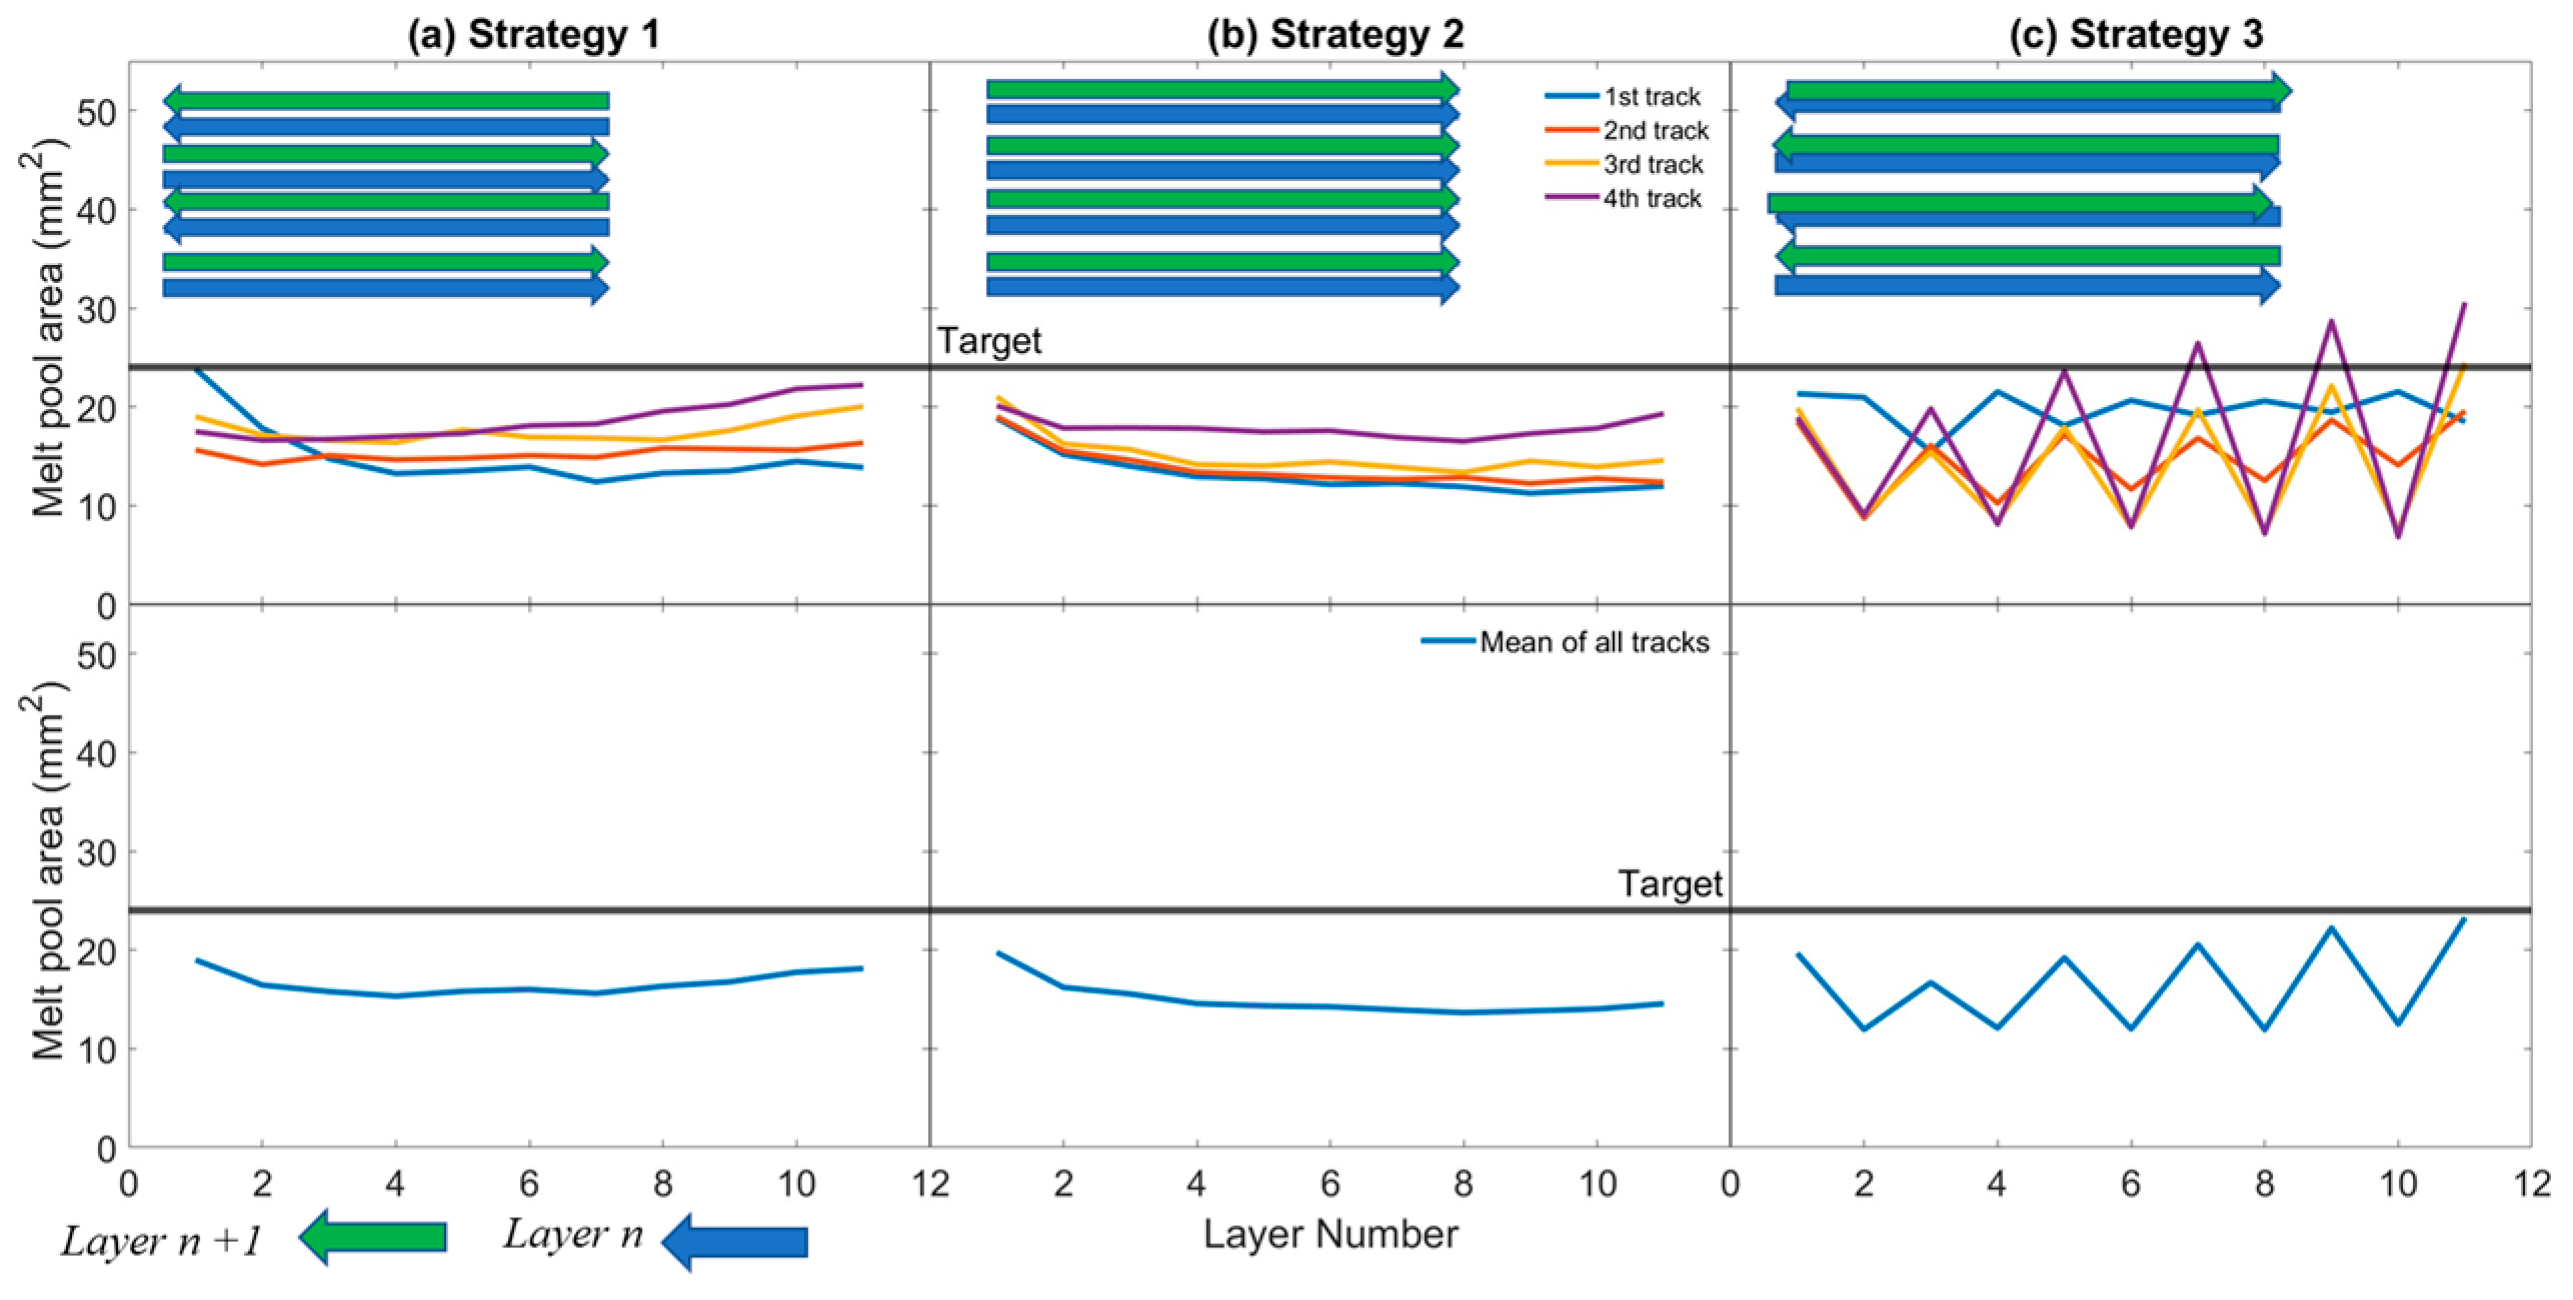
Figure 5 shows the mean melt pool area per track and the mean melt pool area per layer for three variations in infill strategies. For the first strategy, each track is deposited in the opposite direction of the previous one, while for the second strategy, all tracks have the same direction. To study the effect of the track sequence, the third strategy was designed whereby the sequence of tracks is inverted every two layers. Four tracks are deposited in each layer.
By observing the mean melt pool area per track, oscillatory behavior is detected in the melt pool area of the third strategy. This is attributed to the difference in the sequence of deposition, which results in different heat profiles of the same track number in different layers. Additionally, because the relative position of the camera to the working area remains the same, changes in the sequence of deposition affect the captured camera frames. Even though this behavior is detected also by the mean melt pool area per layer, accurate insights into the process status cannot be drawn, thus highlighting the need for a sophisticated control strategy that relies on the study of each track separately. In the case that the sequence of depositing the tracks in each layer is inverted, the control strategy should consider the mean value of every two layers, addressing any uncertainties linked with the clarity of information captured by the camera.
6. Conclusions and Future Work
This work presents a framework for enhancing part quality of wire DED-LB parts through process monitoring. By acquiring and analyzing end-to-end data, the goal was to build tools for defect detection, process control, and process data history acquisition. First, the most indicative features for the two critical process phenomena developed in wire DED-LB processes, namely excessive heat accumulation and deviation from the working distance, were selected. The evolution of the first was captured by the mean melt pool area, whereas the evolution of the second was captured from the median of the load-cell values and the melt pool camera frames. Through structured experimental work, the influence of key process variables was mapped, both on the aforementioned metrics and on part quality. After identifying thresholds defining process stability and defect formation, layer-by-layer laser power control strategies were explored. Consistent cross-sectional width and microhardness were achieved across the part height in thin-wall geometries, whereas track-by-track control was needed in solid geometries in the case of varying track sequence across layers. Future work aims to expand the developed control strategies, rendering them more sophisticated and geometry-agnostic. Additionally, focus will be directed toward evaluating the penetration depth under varying control strategies, guided by the surface melt pool area. These strategies will aim to improve bonding quality through the examination of the microstructure in terms of grain size. To achieve the aforementioned, mechanical testing will be performed in solid parts with and without control to evaluate the effect of pores on overall strength.


