Abstract
To reduce mold costs in composite forming, multi-point tooling technology has been integrated into the hot diaphragm forming process. However, this approach still faces several challenges, including time-consuming prepreg layup, high energy consumption, and poor surface quality. This study proposes a heating pad-assisted multi-point thermoforming process: the prepreg is embedded in the thermal functional layers, placed on the lower mold, and formed via the downward movement of the upper mold to accomplish mold closure. Instead of the conventional rectangular array, this study adopted multi-point tooling with a hexagonal pin arrangement. Compared to traditional configurations, this hexagonal layout increases the punch support area by 9.8%, while its dense punch arrangement improves the accuracy of the molded curved surface. Taking a saddle-shaped surface as the target, a prototype part was fabricated. Subsequent analysis of the part’s surface quality identified three defects: dimples, fiber distortion, and ridge protrusions. The surface dimples were eliminated by adjusting the distance between the upper and lower molds. Notably, ridge protrusion is a defect unique to the hexagonal pin arrangement. We conducted a detailed analysis of its causes and solutions, finding that this defect arises from the combined effect of the pin arrangement and the saddle-shaped surface. Through a series of height compensation experiments, the maximum deviation at the ridges was reduced from 0.46 mm to approximately 0.35 mm, which is consistent with the deviation of defect-free areas. This work demonstrates that the multi-point hot-pressing process provides a potential, efficient, and low-cost method for manufacturing double-curvature composite components, whose effectiveness has been verified through the saddle-shaped case study.
1. Introduction
In sectors like aerospace, the use of multi-material assemblies is growing increasingly common [1,2], with composites emerging as a key alternative to metals. Thermoset composites are widely used in aerospace due to their light weight and high strength [3,4], yet their widespread application is limited by high costs, stemming from two main aspects. First, energy costs: mainstream autoclave curing for thermoset parts consumes a great deal of energy, and manufacturing larger parts requires bigger autoclave equipment, pushing up expenses significantly. Second, mold costs: this is especially true in the aircraft industry, where composite usage is high. The low-volume, high-variety nature of parts leads to low tooling utilization rates, forcing manufacturers to customize dedicated molds for each part configuration. These molds not only take up considerable storage space but also need regular maintenance, which together drives up production costs. To reduce energy consumption in composite curing, several alternative methods have been developed as alternatives to autoclave curing. Walczyk et al. [5] designed aluminum molds with embedded resistive heaters, which achieved a ±1 °C surface temperature uniformity for compression-molded composites. The same team later conducted a study [6] applying 3.0 MeV electron beam curing to epoxy-acrylate resin as a replacement for thermal curing; this approach significantly shortened cycle times while eliminating high-temperature energy consumption. Gu et al. [7] developed two rapid-heating solutions through epoxy resin modifications: these included silicone rubber heaters with embedded resistive wires and an internal heating method that leverages carbon fiber conductivity to fabricate carbon fiber laminates. To address mold cost challenges, multi-point tooling technology [8,9,10] provides unique advantages. It enables flexible surface reconfiguration by adjusting pin heights, thereby theoretically materializing the “universal mold” concept that has been successfully applied in metal forming fields, such as ship hull plates [11], aircraft wing skins [12], and titanium alloy cranial prostheses [13].
Current composite forming processes compatible with multi-point tooling mainly include hot diaphragm forming, autoclave molding, and compression molding. Matthias S.J. et al. [14] vacuum-adsorbed elastic interpolators onto multi-point tooling and fabricated carbon fiber reinforced composites via the hot diaphragm process, establishing correlations between interpolator thickness and the surface quality of formed parts. Walczyk et al. [15] developed an actively controlled multi-point tooling system, which achieved intelligent forming process control by dynamically adjusting the height of tooling pins during molding. Peng’s team [16,17] realized warm compression molding by transferring preheated Corian sheets to multi-point tooling, producing spherical and saddle-shaped parts with high dimensional accuracy. They also investigated the effects of forming temperature, pressure, pin count, and curvature radius on the formability of polycarbonate sheets formed by multi-point tooling. Two viable approaches to reducing the manufacturing costs of thermoset composites are low-energy curing processes that replace autoclave technology and multi-point tooling that substitutes for solid molds. Multi-point tooling has been extensively researched and applied in hot diaphragm forming and autoclave processes, proving its feasibility for composite manufacturing. Integrating multi-point tooling into alternative forming processes can further reduce costs. Compression molding offers distinct advantages such as high efficiency, dimensional precision, and excellent surface quality. Process parameters for composite compression molding (preheating temperature, molding temperature, pressure) have been thoroughly studied [18,19]. Therefore, combining compression molding with a feasible heating method has significant potential to reduce both equipment investment and mold costs simultaneously, making it a promising route for cost-effective, high-efficiency manufacturing of thermoset composites. It should be noted that thermoset resins undergo softening-rubbery-glassy state transitions during curing, requiring highly uniform temperature fields [20]. This places strict requirements on the design of heating systems for multi-point compression molding [21]. For large hydraulic equipment with integrated heating functions, thermal input typically relies on cartridge heaters embedded in the mold base. However, such heating elements are inevitably fixed to immovable mold bases or peripheral frame areas. If heating elements were integrated into multi-point tooling, the substantial displacement range required for pins would result in excessively long and geometrically complex heat conduction paths from heat sources to the prepreg surface. This would cause significant spatial temperature gradients and severe thermal losses, indicating that conventional embedded heating elements cannot meet the thermal uniformity requirements essential for resin curing.
Surface quality research for composite parts covers a wide range of aspects, mainly including buckling [22,23], wrinkling [24,25,26], thickness variations [27], surface roughness [28] and localized resin starvation [29,30]. For composites formed by multi-point tooling, surface dimples represent an additional critical research focus. Spatially discrete pins inherently create inter-pin voids, which limit the manufacturable curvature complexity and forming accuracy of free-form surfaces. To maximize surface quality in multi-point tooling compression molding, optimizing pin arrangement is critical [14]. Hexagonal pin-array tooling (HPT) addresses this issue by increasing pin density, which reduces void area and enhances tool-to-prepreg contact. This improves forming uniformity, especially in central zones. Current research focuses solely on square pin-array tooling (SPT) for parameter studies, whereas the HPT has only been proposed theoretically and not yet validated experimentally for composite manufacturing. At present, most multi-point mold pins adopt a square pin array arrangement. These multi-point molds have been applied in composite forming, but their limited support area leads to surface defects on formed parts during the forming process. Although HPT can theoretically improve support density and forming accuracy, researchers have not verified their practical application effects, nor have they explored their unique defects or corresponding solutions.
Building on existing research, this study proposes a flexible heating-assisted multi-point thermoforming process. This process uses flexible heating pads to directly heat the silicone pads in contact with the prepreg surface and combines externally applied insulating foam layers to ensure favorable curing of the resin. The study makes three core contributions. First, it proposes and validates the feasibility of this heating pad-assisted hexagonal array multi-point thermoforming process for manufacturing double-curvature composite components. Second, it systematically analyzes the causes of the edge ridge protrusion defect. This defect is unique to HPT when fabricating saddle-shaped curved parts. The study also develops a suppression strategy that combines forming orientation selection and pin height compensation. Third, it identifies the optimal mold closing displacement parameters to eliminate surface dimples. Additionally, the study provides a novel, low-cost, and high-quality solution for manufacturing double-curvature thermoset composite components. This solution has been preliminarily validated through the successful fabrication of a saddle-shaped part.
2. Materials and Thermoforming Process Development
2.1. Materials
Experimental materials included a unidirectional thermoset carbon fiber prepreg with hot-melt yarn, with a ply thickness of 0.21 mm and an areal density of 250 g/m2 (supplied by Jilin Chemical Fiber Group , Jilin City, China). Silicone rubber cushions and foam pads of various thicknesses were obtained from commercial sources.
The curing behavior of the prepreg was characterized using dynamic differential scanning calorimetry (DSC). DSC analysis was performed using a NETZSCH STA series instrument (NETZSCH-Gerätebau GmbH, Selb, Germany). A 5–10 mg sample was placed into a crucible, and non-isothermal DSC curves were measured at heating rates of 5 °C/min, 10 °C/min, and 15 °C/min, over a temperature range of 30–600 °C. All experiments were conducted under an argon (Ar) atmosphere with a gas flow rate of 50 mL/min.
The DSC results are shown in Figure 1a. As the temperature increased, an exothermic peak corresponding to the curing reaction was observed in the curve. With increasing heating rate, this peak gradually shifted toward the lower right of the plot. The onset temperature, peak temperature, and end temperature corresponding to this peak are listed in Table 1. Since these three characteristic temperatures varied with different heating rates, a T–β extrapolation method was used to estimate the appropriate molding temperature range; the optimal process parameters were then determined experimentally. Linear fitting of Ti, Tp and Tf was performed as shown in Figure 1b, yielding values of Ti (123 °C), Tp (133 °C), and Tf (141 °C) at a heating rate of 0 °C/min. Based on these results, the molding temperature range for this prepreg was determined to be 110–150 °C.

Figure 1.
(a) DSC curves at different heating rates; (b) Relationship between temperature (T) and heating rate (β); (c) TGA curves at different heating rates.

Table 1.
Characteristic Temperatures T at Different Heating Rates β.
Thermogravimetric analysis (TGA) was carried out using a NETZSCH STA thermogravimetric analyzer. A 5–10 mg sample was placed in a ceramic crucible and tested at heating rates of 5 °C/min, 10 °C/min, and 15 °C/min, over a temperature range of 30–600 °C.
The results (Figure 1c) show that no significant thermal degradation occurred below 300 °C. Within this temperature range, the prepreg samples exhibited a mass loss of approximately 0.6%, which was primarily attributed to devolatilization. As the temperature increased further, the epoxy resin decomposed gradually. Taking the sample tested at 5 °C/min as an example, the mass decreased by 31.43% during this stage. When the temperature reached 600 °C, the mass loss further increased to 37.81%, indicating that resin decomposition was essentially complete. Beyond this temperature, further heating would cause thermal decomposition of the carbon fibers.
In summary, the prepreg exhibits good thermal stability, which meets the temperature requirements of the forming process.
2.2. Experimental Equipment
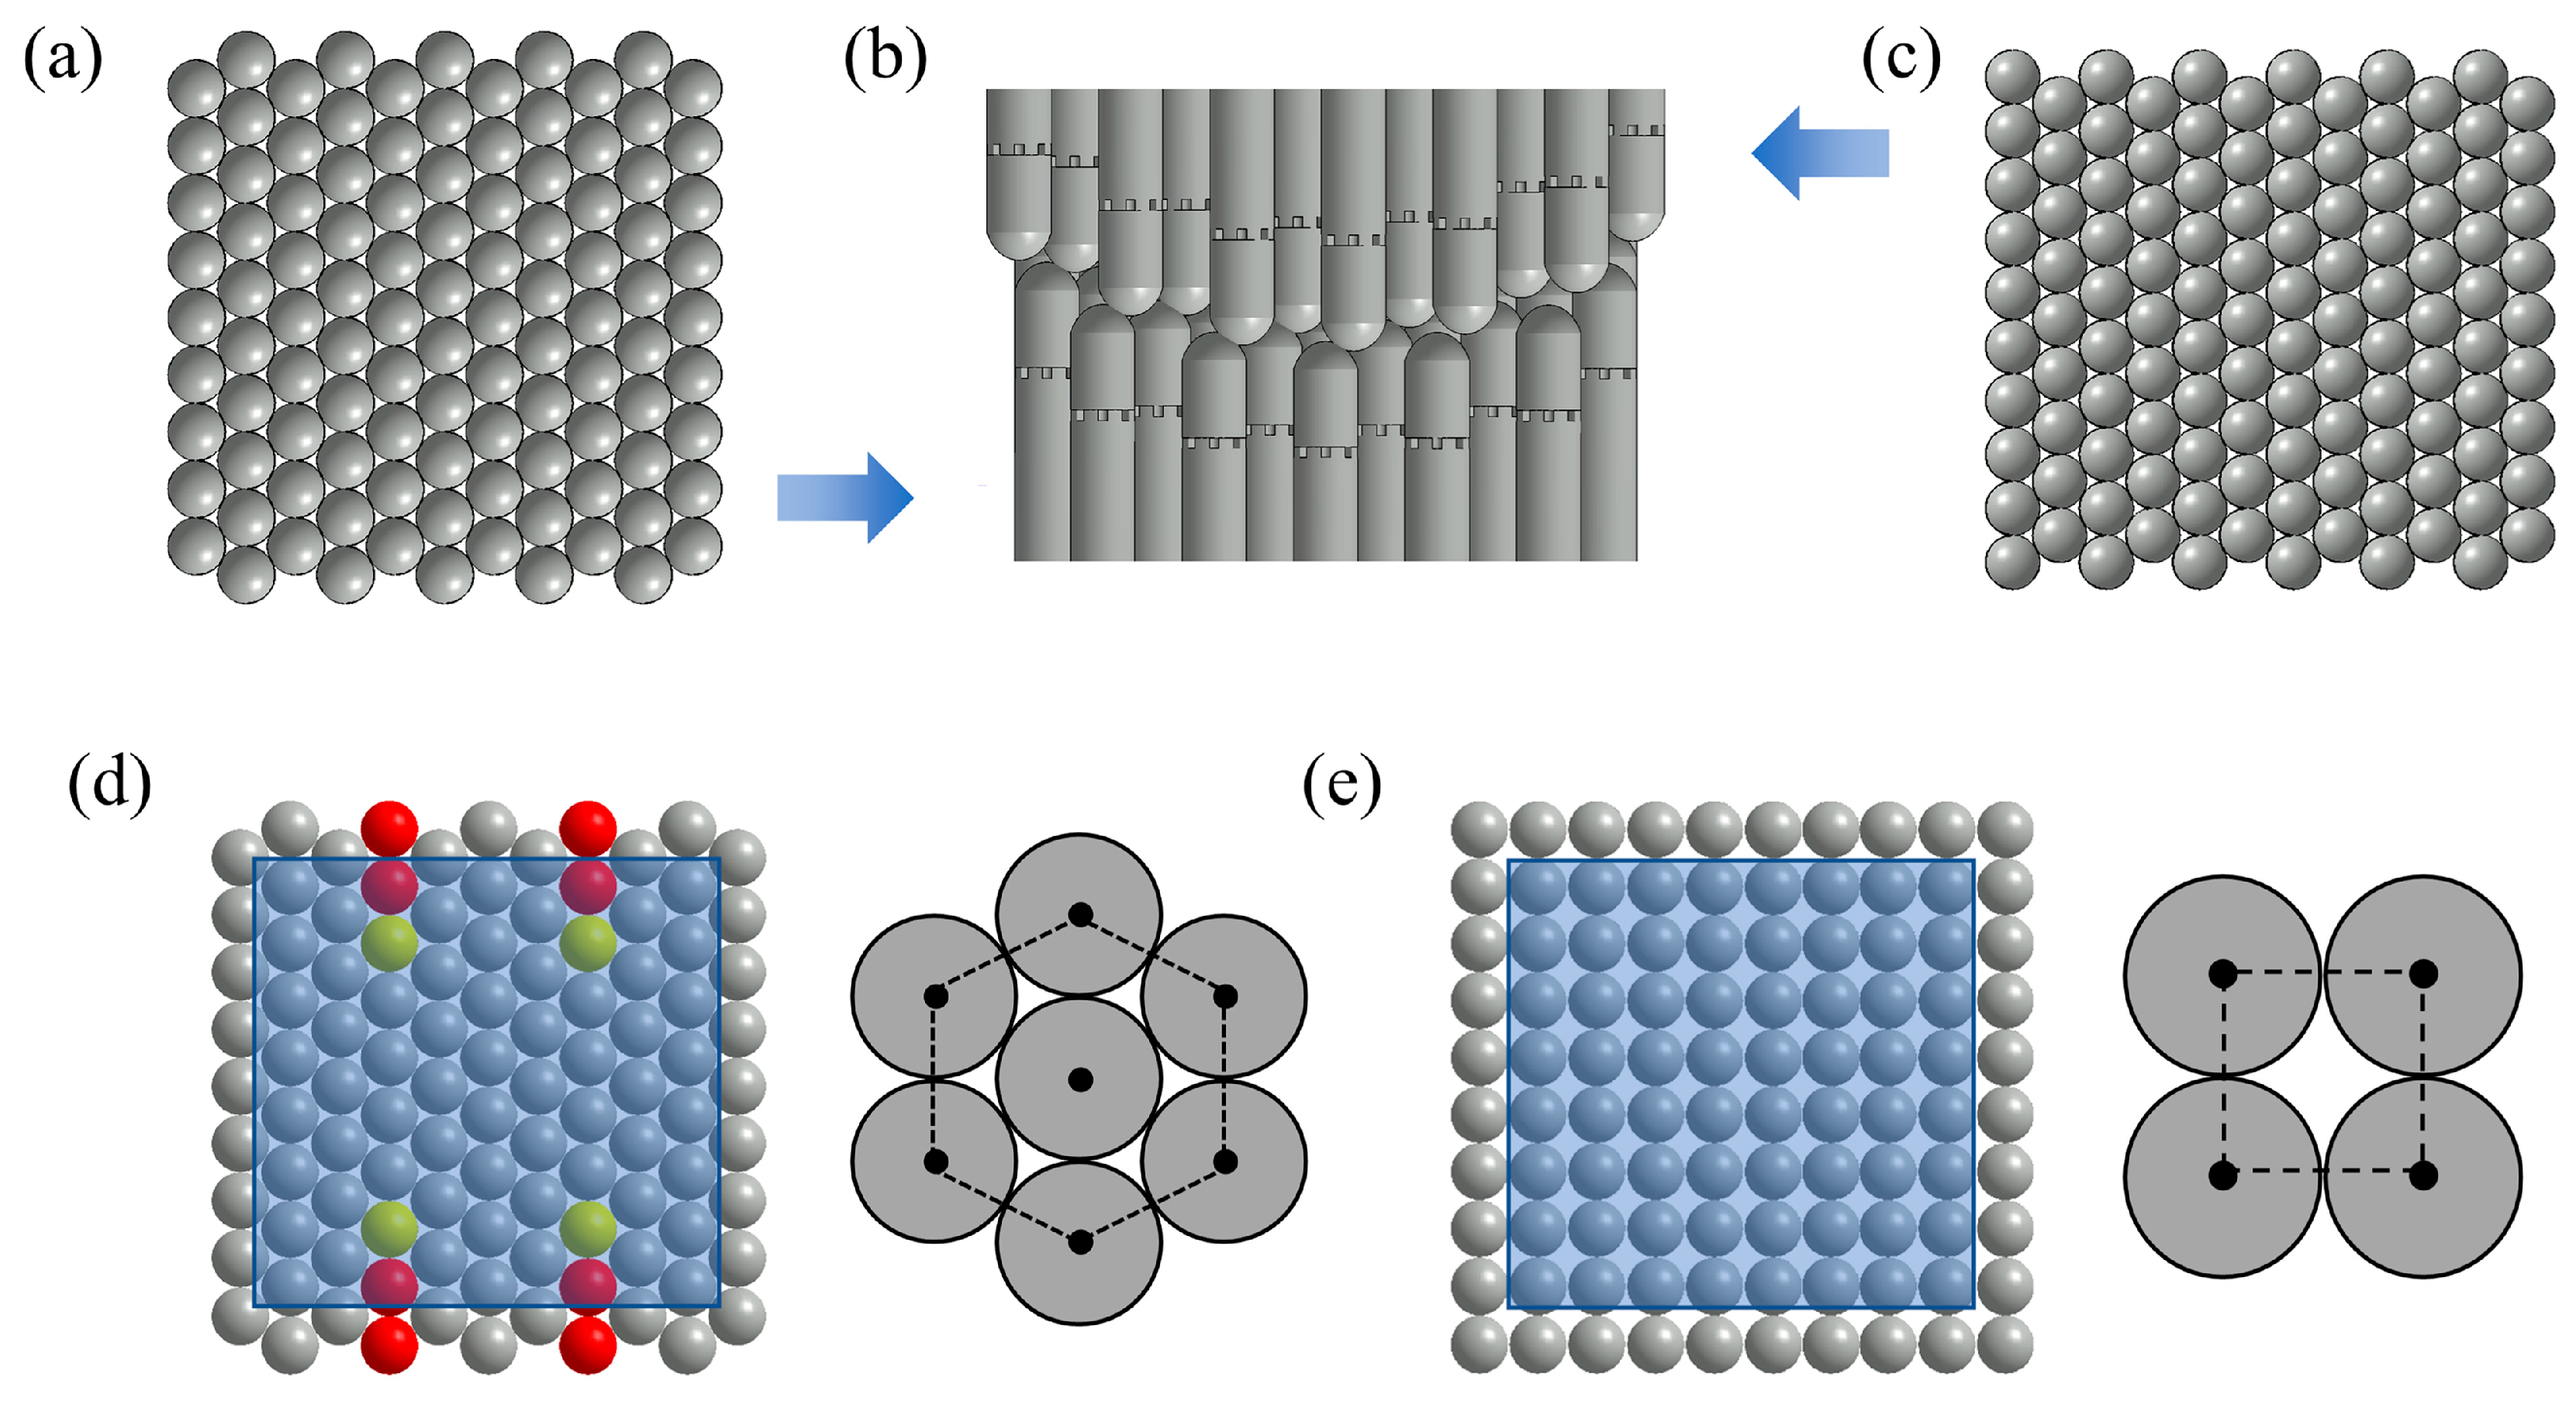
The experimental multi-point tooling consists of upper and lower dies with a 300 × 300 mm working area. Each pin unit terminates in a hemispherical punch (30 mm in diameter) and provides a maximum adjustable stroke of 90 mm. The lower die (Figure 2a) has 104 pin units arranged in 11 rows, with alternating rows containing 10 and 9 pin units respectively. The upper die (Figure 2c) comprises 114 pin units allocated to 12 rows following the same distribution pattern. A staggered press-fit method was adopted for mold closure (Figure 2b). Two standard tiling patterns were used in the experiments: square and hexagonal layouts (Figure 2d,e). When processing a 240 × 240 mm square region, the HPT engages 72 punches in direct contact with the prepreg, while SPT uses 64 punches. For flat sheet forming, the SPT provides a 5652 mm2 smaller punch contact area than the HPT. The hexagonal arrangement increases the effective support area from 78.5% to 88.3%. It creates distributed force-transfer paths through edge contacts and optimizes load distribution during thermoforming. Currently, all commercially available multi-point tooling systems adopt square-pattern arrangements; no commercial systems utilize a hexagonal arrangement. To achieve a denser pin layout, we designed the HPT and fabricated composite parts using this tooling.
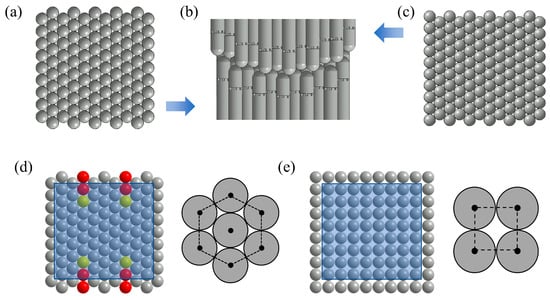
Figure 2.
(a) Lower die of multi-point tooling; (b) Upper/lower die closure; (c) Upper die of multi-point tooling; (d) Hexagonal pin arrangement pattern; (e) Square pin arrangement pattern.
The multi-point tooling allows forming from a planar state to the target surface by adjusting the upward displacement of the pins. First, Rhinoceros software (7.38.24338.17001) calculates the required height for each pin unit, converts the data into motor rotation cycles, and imports the converted data into the robotic arm control software. Subsequently, the robotic arm automatically completes the shape adjustment of all pin units according to the preset program.
2.3. Contact-Based Heating System and Thermal Uniformity Verification
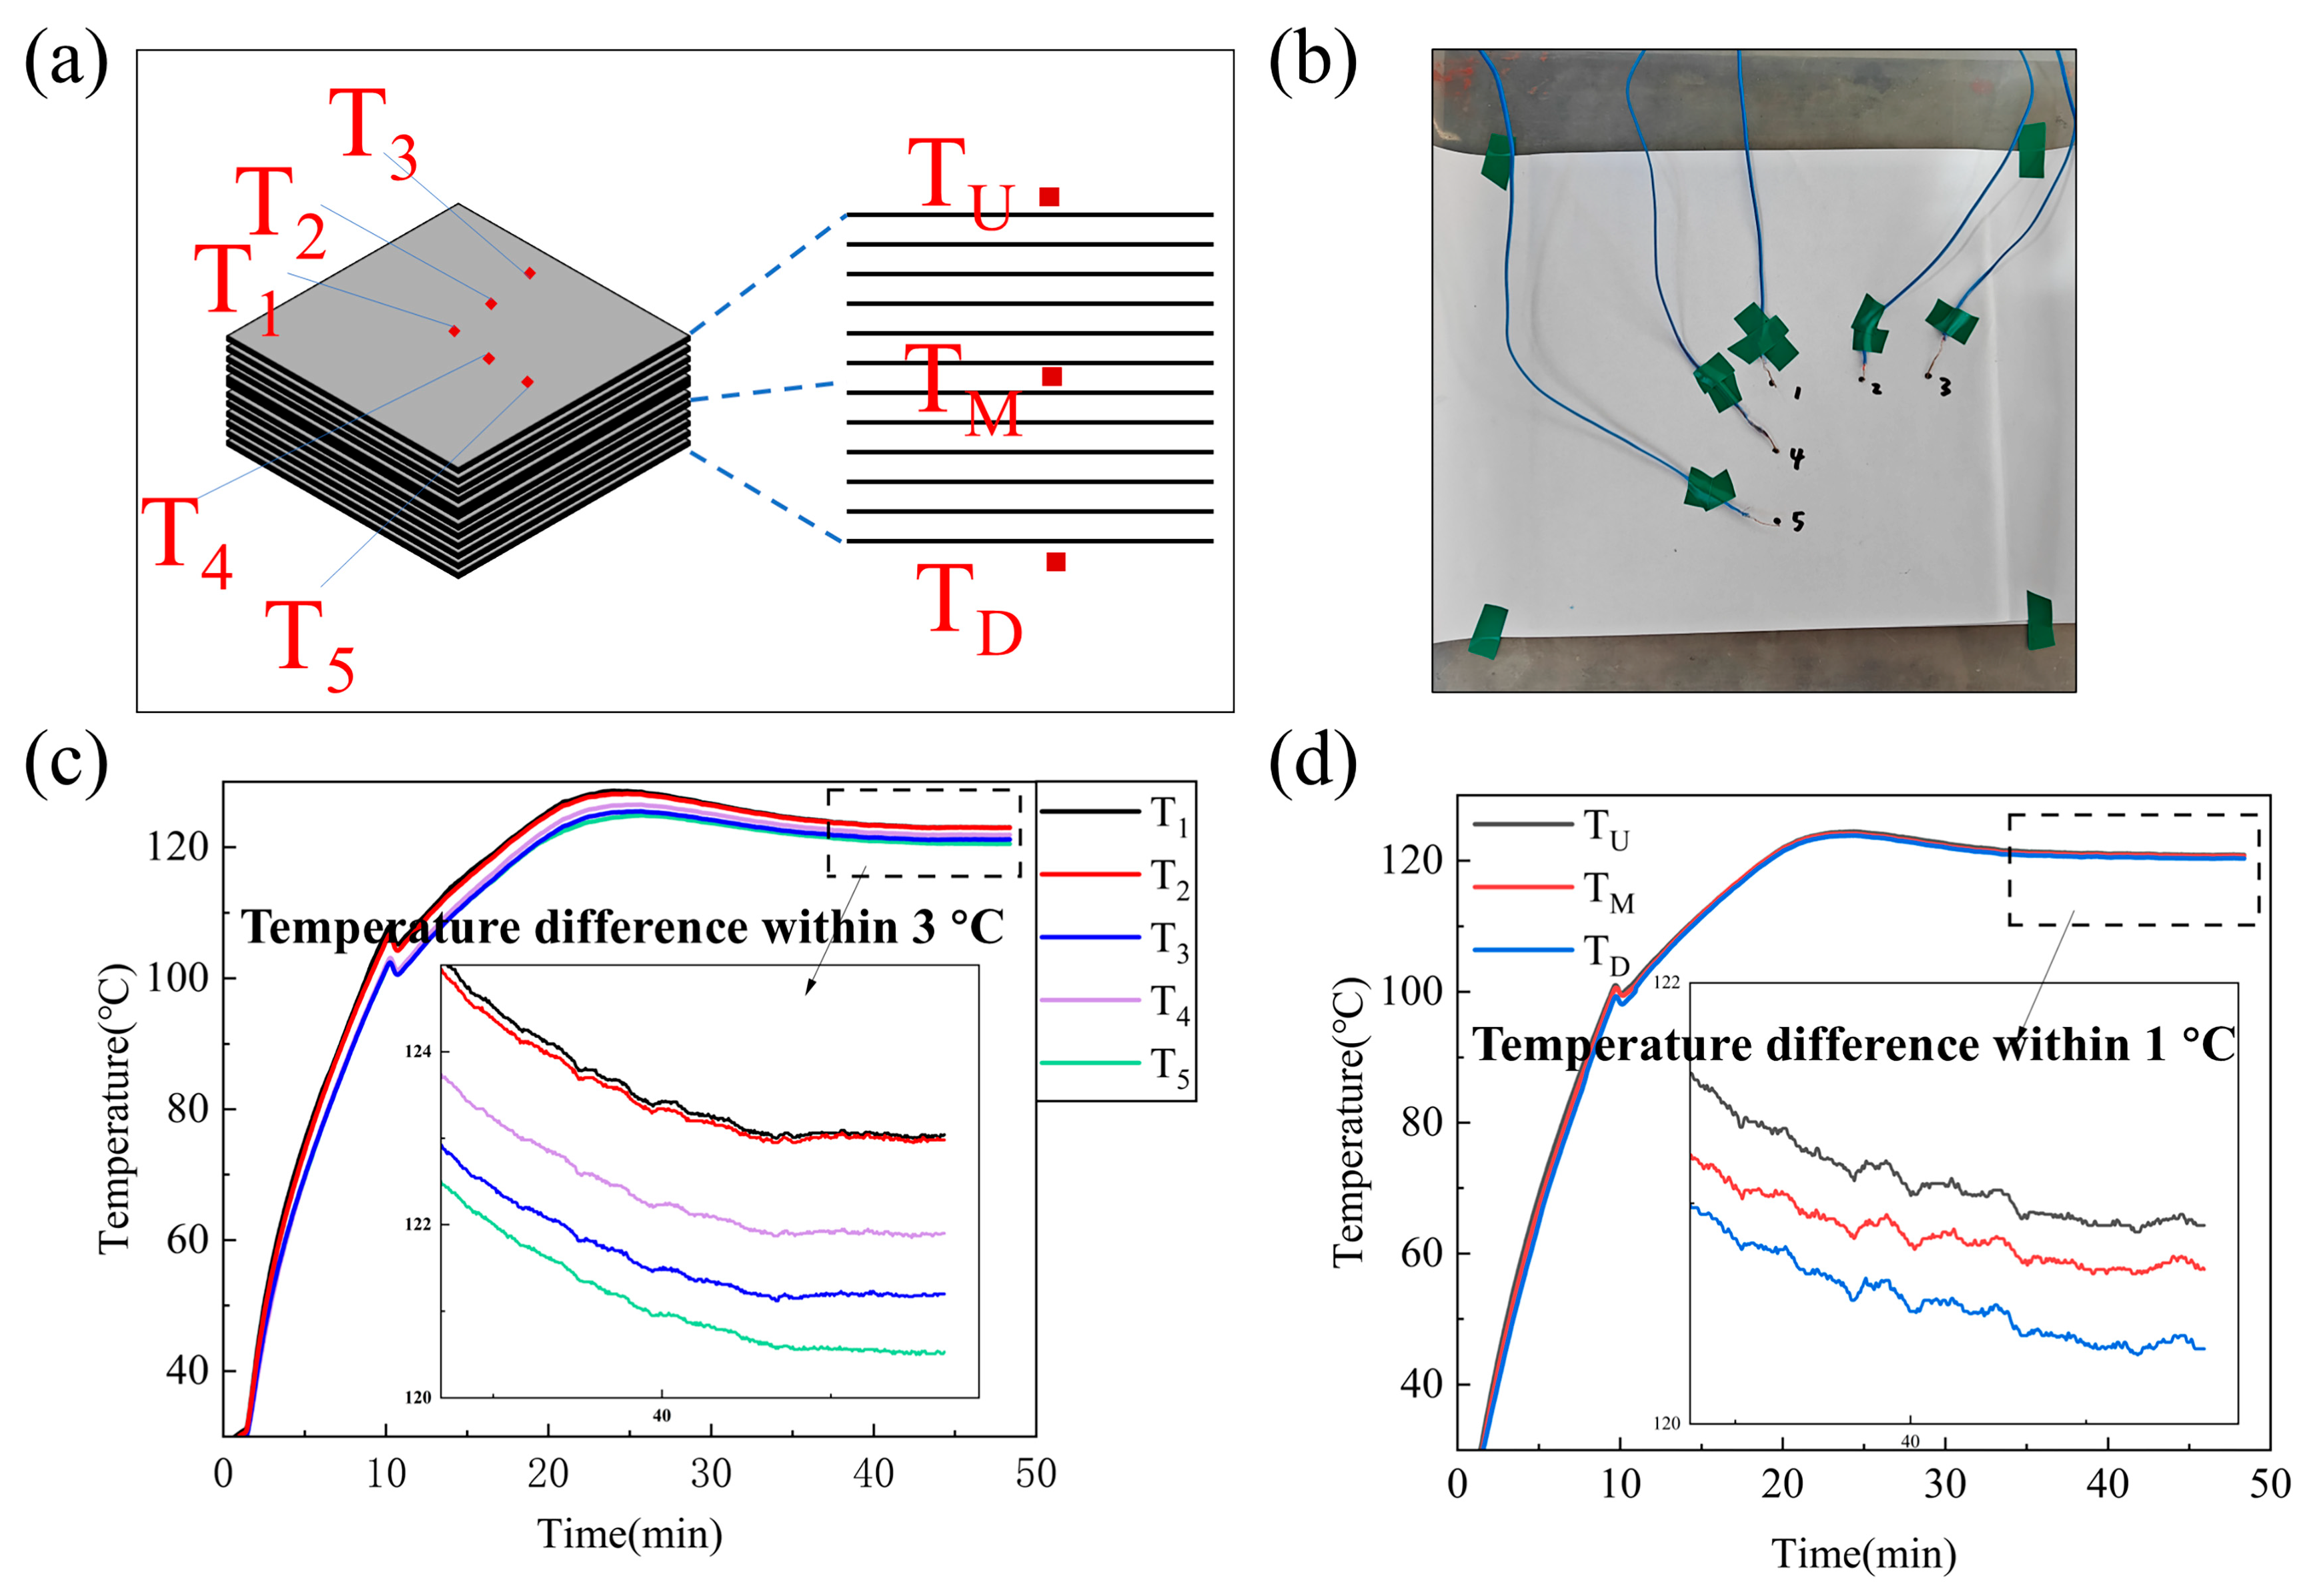
To verify the feasibility of the heating method, thermocouples were embedded on the prepreg surface and between its layers to monitor real-time temperatures at multiple locations. The temperature measurement setup is illustrated in Figure 3. Temperature data was recorded by a six-channel data logger (Smarei Technology Co., Ltd., Beijing, China), covering the range from room temperature to 130 °C. The layout of the flexible pad functional layers during temperature measurement was consistent with that in the forming experiment.

Figure 3.
Schematic of the temperature measurement procedure.
The center of the first prepreg layer was designated as the origin (measuring point T1), with additional points positioned along the horizontal and vertical axes. Test 1 included six measurement points: the origin T1, points T2 and T3 located 50 mm and 100 mm from the origin along the x-axis, and points T4 and T5 placed 50 mm and 100 mm from the origin along the y-axis. This test focused on measuring the temperature distribution in the horizontal direction, as shown on the left side of Figure 4a. Test 2 aimed to measure the temperature distribution in the vertical direction, displayed on the right side of Figure 4a. Centered at point T1, additional points TU, TM, and TD were added along the z-axis. Point T1 coincided with TU, and TU, TM, and TD corresponded to the top, middle, and bottom layers of the prepreg. Figure 4b is the actual schematic diagram of the temperature measurement process.

Figure 4.
(a) Schematics of Test 1 and Test 2; (b) Test 1 experimental process; (c) Temperature uniformity test in the horizontal direction; (d) Temperature uniformity test in the vertical direction.
Figure 4c presents the results of Test 1. Due to faster heat dissipation from edge exposure, peripheral points T3 and T5 reached 120 °C three minutes later than T1. The maximum temperature difference occurred during heating. T5 exhibited a peak deviation of 6 °C from T1, while T2 and T4 remained within 3 °C of the center temperature. When all five points stabilized at 120 °C, the temperature difference consistently stayed below 3 °C. Figure 4d shows the results of Test 2. The three vertical points displayed nearly identical temperature curves. After reaching 120 °C, their temperature difference stabilized within 1 °C. This demonstrates that heating the prepreg via the flexible heating pad effectively meets the temperature uniformity requirements for resin curing.
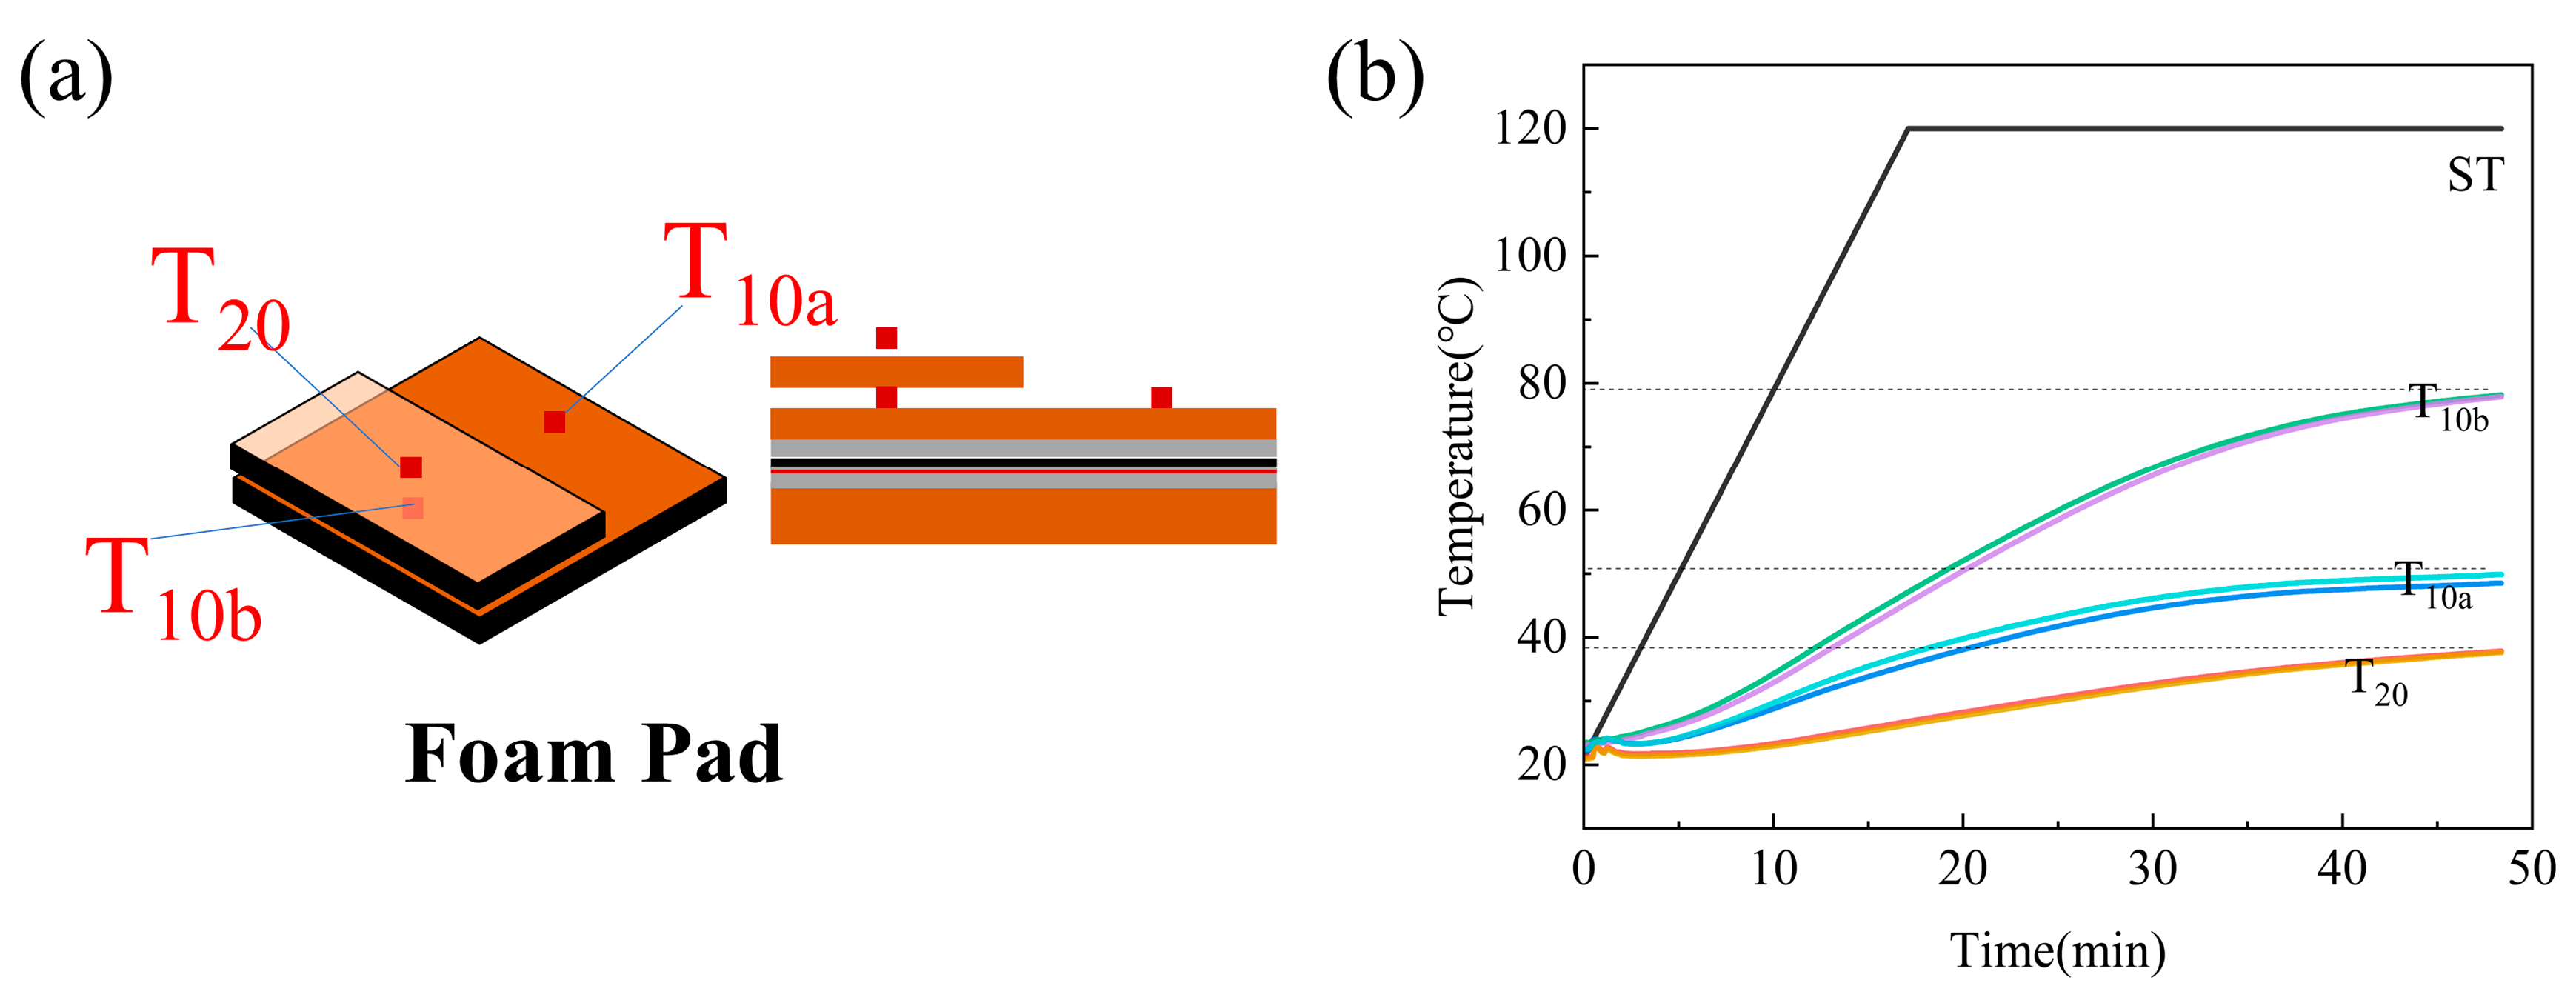
A preliminary selection of the foam pad thickness was conducted. Test 3, illustrated in Figure 5a, included two trials: one using 10 mm foam pads and the other using 20 mm foam pads. The temperatures at the center of the upper foam pad surface during heating were recorded as T10a and T20, respectively. For direct comparison, the 20 mm pad was replaced with two stacked 10 mm pads, and the interface temperature was recorded as T10b. The results of Test 3, shown in Figure 5b, revealed consistent trends across both trials. The outer surface temperature of the 20 mm foam pad increased more slowly. Thirty-five minutes after the prepreg surface reached the set temperature, this surface measured approximately 38 °C, creating a 14 °C difference from the 24 °C ambient temperature. By contrast, the surface temperature of the 10 mm foam pad reached 80 °C at the same timepoint, resulting in a 56 °C differential. According to Newton’s law of cooling, thermal dissipation efficiency is proportional to the temperature difference. Consequently, compared to the 10 mm pad configuration, the 20 mm pad reduced the overall heat dissipation capacity by approximately 70%. Simultaneously, the 30 °C differential between T10a and T10b confirmed that the 20 mm foam pad provided significantly enhanced insulation performance during heating.
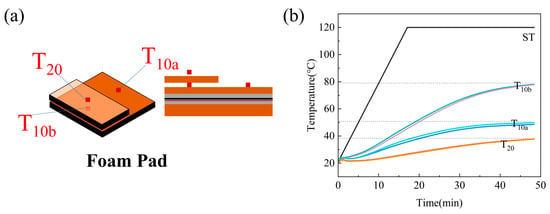
Figure 5.
(a) Schematic of Test 3; (b) Effect of thermal insulation pad thickness on temperature uniformity.
This heating method is more energy-efficient than oven heating. Taking the forming of a 25 cm × 25 cm component as an example, a 2-h heating process was implemented. The heating pad used in this study has a power density of 0.4 W/cm2 and an area of 900 cm2, consuming 0.72 kWh of energy. When using oven-based forming, the mold dimensions must be taken into account. For an oven with an internal volume of 50 m3 and a rated power of 1.5 kW, the total energy consumption is 3.0 kWh. The oven indirectly heats the mold and component by warming the air inside the chamber through thermal convection and radiation. In contrast, the heating pad directly contacts the prepreg via its electrical heating elements, transferring heat to the composite through conduction. Almost all the generated heat is used to heat the product itself.
2.4. Experimental Design for Defect Control
After confirming the feasibility of the thermal conditions, the specific process of the multi-point hot-pressing forming is illustrated in Figure 6. Twelve plies of prepreg were stacked in a (0°/90°)6 sequence to prepare a 240 mm × 240 mm laminate preform. The preform was then placed on a silicone pad coated with a release agent. The elastic stack structure, from bottom to top, consists of a 20 mm foam pad, a 6 mm silicone rubber pad, a 1.75 mm heating pad, a 1.5 mm silicone rubber pad, a 2.5 mm carbon fiber prepreg, a 7.5 mm silicone rubber pad, and a 20 mm foam pad, with a total thickness of 59.25 mm. After mold closure, the temperature control system was activated to execute the following curing cycle: heating from room temperature to 80 °C within 30 min and holding at 80 °C for 60 min; heating to 120 °C within 30 min and holding at 120 °C for 90 min; finally cooling to room temperature inside the furnace. The forming target was a saddle-shaped surface, defined by Equation (1):

Figure 6.
Multi-Point Thermoforming Process Flowchart.
Due to the compressibility of the foam, significant downward displacement remained achievable during mold closure. To address the dimples, preliminary experiments were first conducted to explore the influence of mold closure displacement on dimple severity. During forming, the downward displacement of the upper mold was set to 18 mm, 12 mm, and 9 mm sequentially. The results of repeated experiments showed that reducing the closure displacement effectively alleviated dimples. To further establish a quantitative relationship between process parameters and forming quality, and to optimize this key parameter, a central composite design based on response surface methodology was adopted, aiming to simultaneously optimize two key quality indicators. In this design, the mold closure displacement was the sole independent variable. Based on the preliminary experimental results, five levels were set: low level (9 mm), high level (18 mm), low axial point (6 mm), high axial point (21 mm), and center point (13.5 mm). In the actual molding process, precise control over the press displacement proves challenging, so the specified downward displacement of 13.5 mm was adjusted to 14.00 mm.
To comprehensively evaluate the forming quality, two dependent variables were defined: First, surface uniformity: Nine measurement points were equally spaced along the centerline of the curved surface. Thickness was measured using a vernier caliper (Keda E-Commerce Co., Ltd., Nanjing, China) with an accuracy of 0.01 mm, and the standard deviation was calculated. A smaller value indicates more uniform thickness distribution and less severe dimple defects. Second, macroscopic shape accuracy: A non-contact 3D optical scanner (Northern Digital Inc., Waterloo, ON, Canada) was used to obtain point cloud data of the formed part. The profile along the surface centerline was extracted, and its standard deviation from the theoretical model was calculated using software. A smaller value indicates better conformity of the overall shape to the target surface and higher macroscopic shape accuracy.
In addition to the common dimple defects, slight protrusions were observed at the edges of the formed parts. These defects are directly related to the layout of the hexagonal mold units. To study their influence, two different mold-shaping orientations (denoted as Method A and Method B) were adopted. For the abnormal mold units that caused ridges under a specific orientation, their heights were adjusted according to the compensation strategy detailed in Section 3.3. The compensation effect was quantitatively evaluated via 3D scanning: cross-sectional profiles of the ridge area were extracted from the point cloud data, and the maximum positive deviation from the theoretical model was calculated to precisely characterize the degree of protrusion.
3. Results and Discussion
Inspection of the mold surface and the fabricated saddle-shaped part reveals three categories of surface quality defects: (1) dimples induced by the discrete nature of the multi-point tooling; (2) surface fiber distortion; (3) edge protrusions with distinct peripheral ridges.
The first defect is an inherent limitation of multi-point forming, for which established solutions have been reported. The main approach to address it is introducing natural rubber or chlorinated rubber interpolators to smooth discontinuities between adjacent pins [31,32]. The second defect arises from fiber flow within the prepreg during compression. In this process, the prepreg’s initial state of non-conformity with the mold intensifies fiber distortion. The third defect is unique to the HPT, and the causes of this defect are analyzed below.
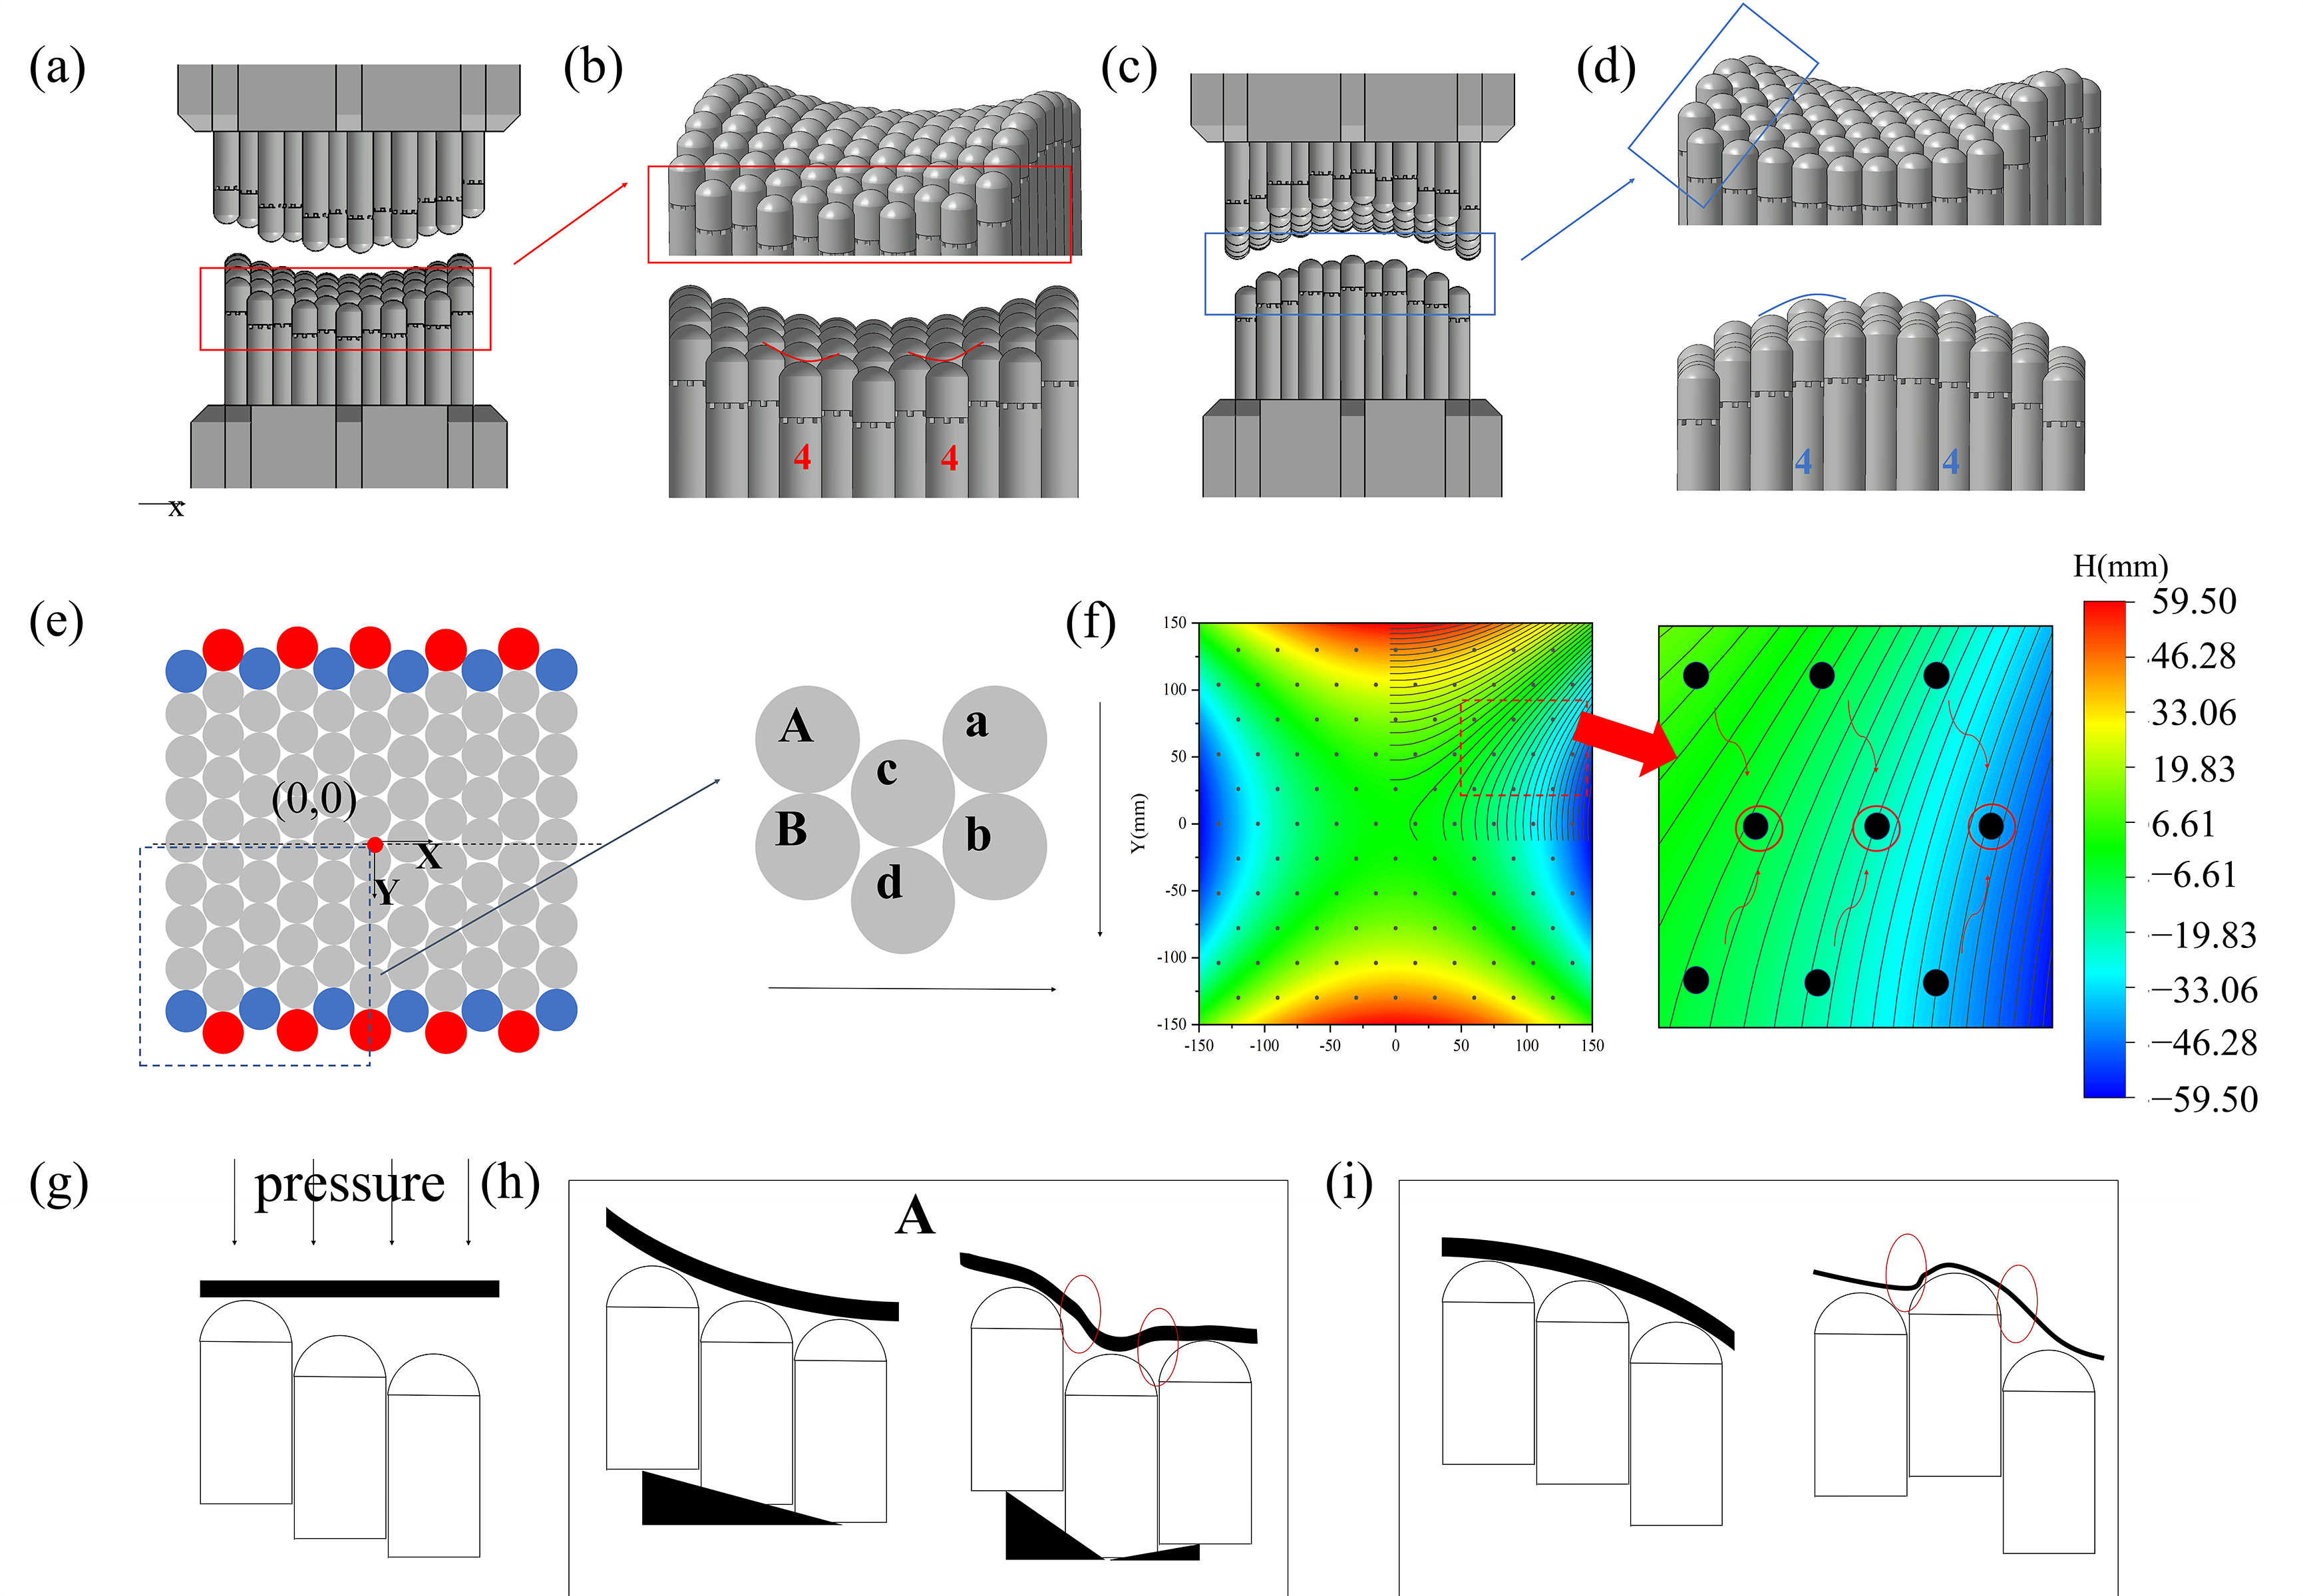
The analysis begins with the planar tooling (Figure 7e), whose rows and columns form a distinct hexagonal pattern. This tooling consists of 11 columns, where each even-numbered column has one more pin than each odd-numbered column. When pins with the same x-coordinate are grouped into rows, a total of 19 rows are formed: odd rows contain 5 pins each, even rows contain 6 pins each, and the spacing between adjacent pins within each row is maintained at 22 mm. This configuration exhibits directional asymmetry along orthogonal axes.
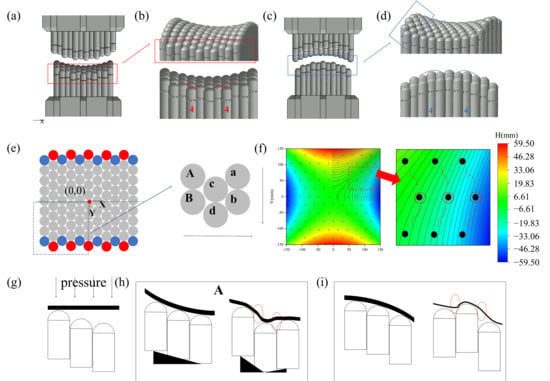
Figure 7.
(a) Mold contour under Approach A; (b) Groove formation at mold edge; (c) Mold contour under Approach B; (d) Ridge formation at mold edge; (e) Schematic of defect generation mechanism; (f) Contour map of vertical distance from center on target surface; (g) Schematic of pressure distribution during forming; (h) Prepreg deformation during forming under Approach A; (i) Prepreg deformation during forming under Approach B.
For the saddle-shaped target surface (Figure 7a,c), the orientation illustrated in Figure 5a is designated Approach A. In contrast, Figure 7c depicts Approach B, which is obtained by rotating the tooling 90° relative to Approach A. Visually, Approach A orients the saddle’s low-curvature region along the y-direction, while Approach B aligns its high-curvature region with the y-direction. Under the combined influence of the saddle surface curvature and the hexagonal pin arrangement, each approach results in distinct surface defects. Specifically, in Approach A, concave grooves form at the positions of the 4th column pins due to insufficient pin height (Figure 7b). In Approach B, however, protrusions occur at the 4th column pins because these pins are higher than their adjacent counterparts (Figure 7d).
Figure 7e illustrates the defect formation mechanism under Approach A. When the tooling surface is configured into a saddle shape, the curvature variation in the surface gradually intensifies from the center of the tooling outward. Based on central symmetry, six pins in the third quadrant (satisfying A > B; a > b; c > d) were selected as the analysis area. In this region, the pin height decreases monotonically as the y-coordinate decreases (A > B; a > b; c > d), while the pin height decreases as the x-coordinate increases (A > a; B > b). During the forming process, adjacent pins jointly support the sheet material. Pins A, c, and a collectively maintain the continuity in the x-direction, which requires satisfying the condition A > c > a. Since the x-coordinate of pin c is smaller than that of pin a, as the y-coordinate decreases, the height of pin c decreases more significantly than that of pin a. When the y-coordinate of pin A is relatively large, the condition c > a holds. However, as the y-coordinate continues to decrease, this relationship is eventually reversed. By the edge of the saddle-shaped surface, the height of pin c becomes lower than that of pin a (c < a).
Figure 7f presents a contour map of the vertical distance from the center, with an inset magnifying an anomalous region (black dots represent pin positions, and arrows indicate the gradient from higher to lower values). When the pin heights of the tooling form a continuous surface, three pins in Column 4 are lower than the adjacent pins in Columns 3 and 5, resulting in concave grooves on the tooling surface. These pins are defined as “anomalous pins”. Similarly, in Approach B, two pins in Column 4 are higher than the adjacent pins in Columns 3 and 5, and they are also classified as “anomalous pins”
Figure 7g presents a simplified forming schematic, where the black strips represent the elastomer-prepreg composite. Figure 7h and Figure 7i illustrate the schematics of the two forming approaches, respectively. Height differences exist between adjacent pins in multi-point tooling. Although this issue is common to all multi-point tooling systems, the hexagonal pin arrangement significantly exacerbates it. Multi-point forming processes typically use elastomeric pads to compensate for these height differences between adjacent pins. As shown in Figure 7h, in the SPT, adjacent pins form minor steps due to existing height variations. These low-profile steps can be fully compensated by the elastomeric pads, leaving no impact on the surface quality of the formed parts. In contrast, the height difference between adjacent pins in the HPT is significantly larger (Figure 7i), resulting in excessively high steps with directional reversals. The elastomeric pads cannot fully fill these oversized gaps, which adversely affects the surface quality of the formed parts. During the forming process, the increase in processing temperature causes the molten resin to flow toward the lower regions of the prepreg. This leads to “depression-protrusion” deformation in the cured components, which manifests as distinct linear protrusions within circular areas.
3.1. Dimple Elimination via Displacement Control
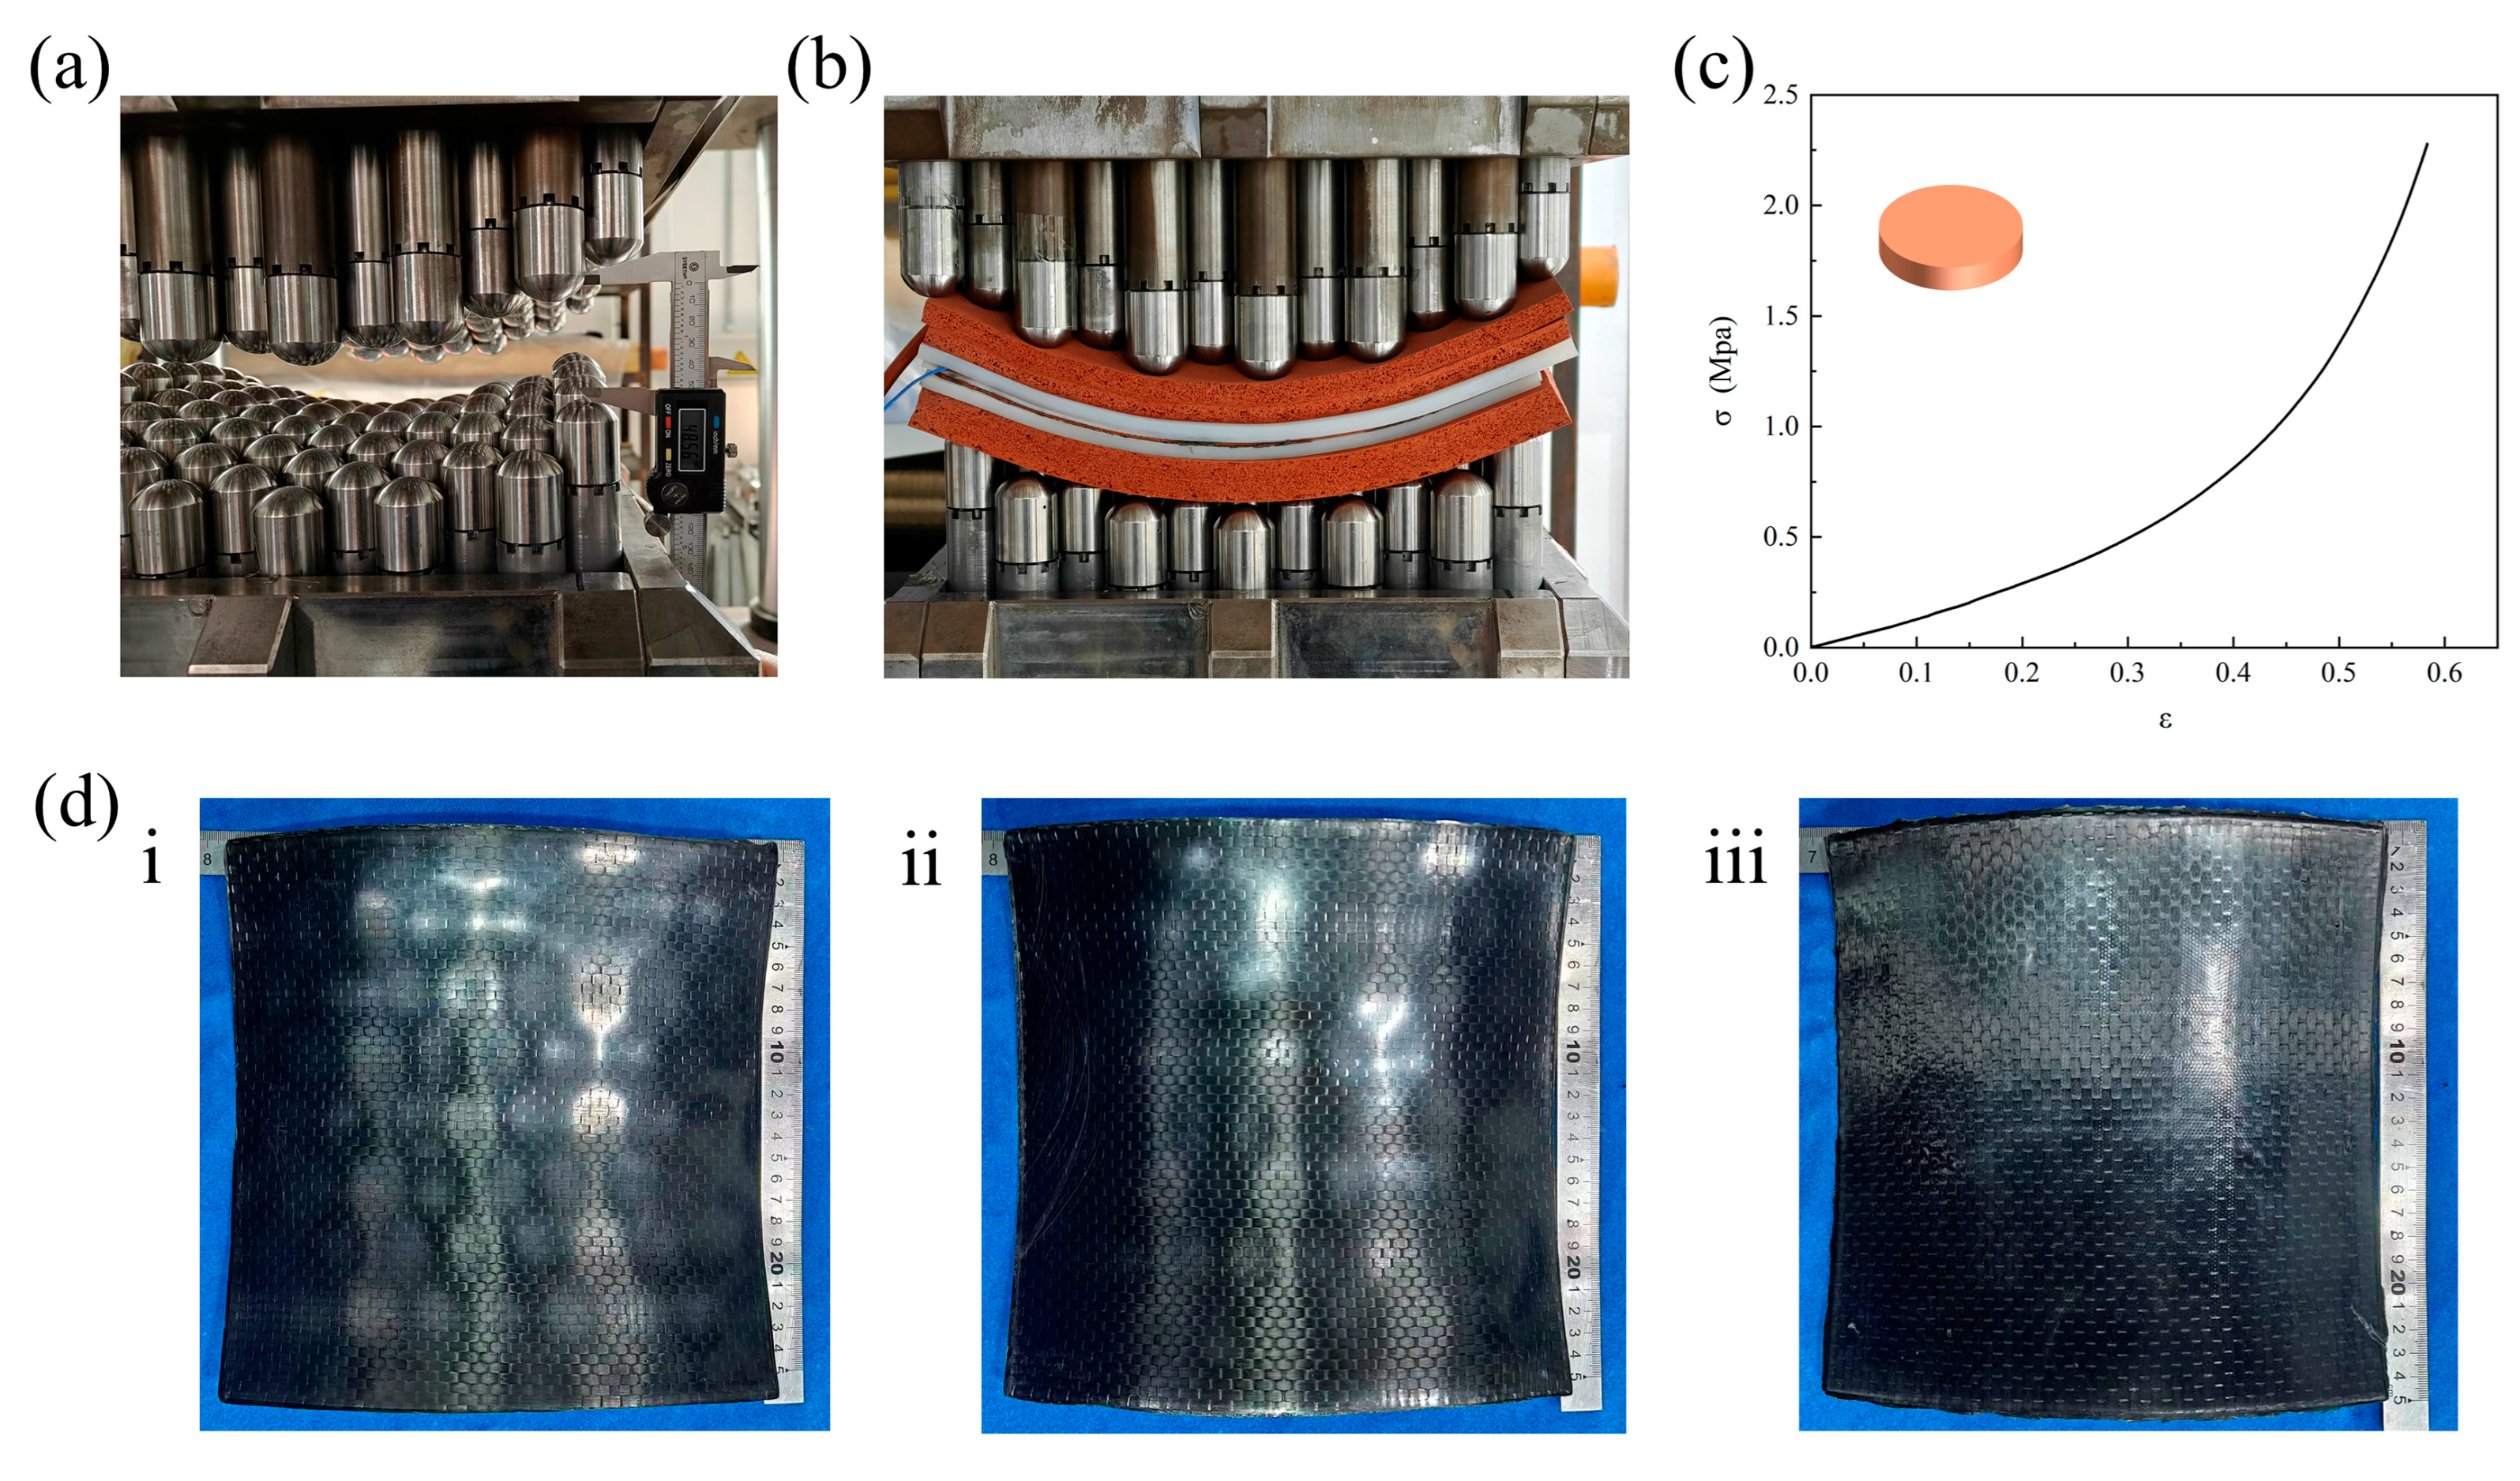
Figure 8a illustrates the method of controlling downward displacement with height limiters following height measurement, while Figure 8b presents a schematic of the mold closure state; Figure 8c shows the compression test data for cylindrical foam specimens (12 mm thickness × 37.5 mm diameter) in accordance with ASTM D1056, revealing two deformation stages: when the strain is below 0.3, the deformation corresponds to low-modulus compression dominated by pore collapse, and when the strain exceeds 0.3, the deformation enters a densification stage governed by matrix deformation. Figure 8d displays the formed parts at downward displacements of 18 mm (Figure 8(di)), 12 mm (Figure 8(dii)) and 9 mm (Figure 8(diii)); dimples gradually diminished as the displacement decreased, with complete elimination observed at a displacement of 9 mm under standard lighting conditions. Based on the quantitative experimental data presented in Table 2, this study established predictive models between the downward displacement (D) and key quality metrics: the thickness standard deviation model (σ1 = 0.053700 + 0.032233D − 0.000218D2) exhibits a monotonically increasing relationship with displacement, indicating that within the experimental range, the severity of dimpling intensifies continuously as the displacement increases, with no extremum observed; the accuracy standard deviation model (σ2 = 2.609214 − 0.357142D + 0.013701D2) shows a convex parabolic relationship with displacement, reflecting a non-monotonic influence where excessively small displacement results in poor conformity between the mold and prepreg, compromising accuracy, and excessively large displacement induces shape distortion due to severe dimpling, which also impairs accuracy. These models demonstrate that there is a clear trade-off between surface quality and dimensional accuracy during process optimization; multi-objective analysis indicates that when the mold closing displacement is in the range of 9–14 mm, the thickness standard deviation can be maintained within the range of 0.31–0.46 mm, while the accuracy standard deviation ranges from 0.29–0.35 mm, and through comprehensive consideration, a downward displacement of 9 mm is selected as the optimal parameter, corresponding to a mold spacing of 50.25 mm.
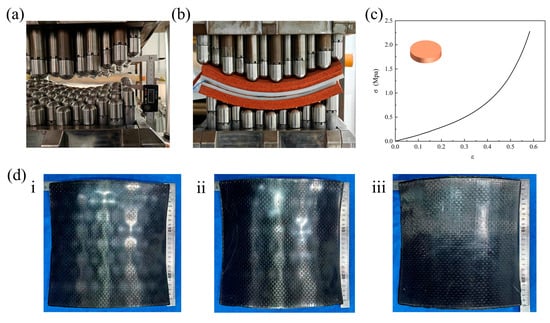
Figure 8.
(a) Displacement control method via height-limiting blocks; (b) Mold closure status during forming; (c) Compression response curve of foam pad; (d) (i) Formed parts at a downward displacement of 18 mm; (d) (ii) Formed parts at a downward displacement of 12 mm; (d) (iii) Formed parts at a downward displacement of 9 mm..

Table 2.
Experimental results of molding quality based on the Response Surface Methodology.
3.2. Surface Fiber Distortion
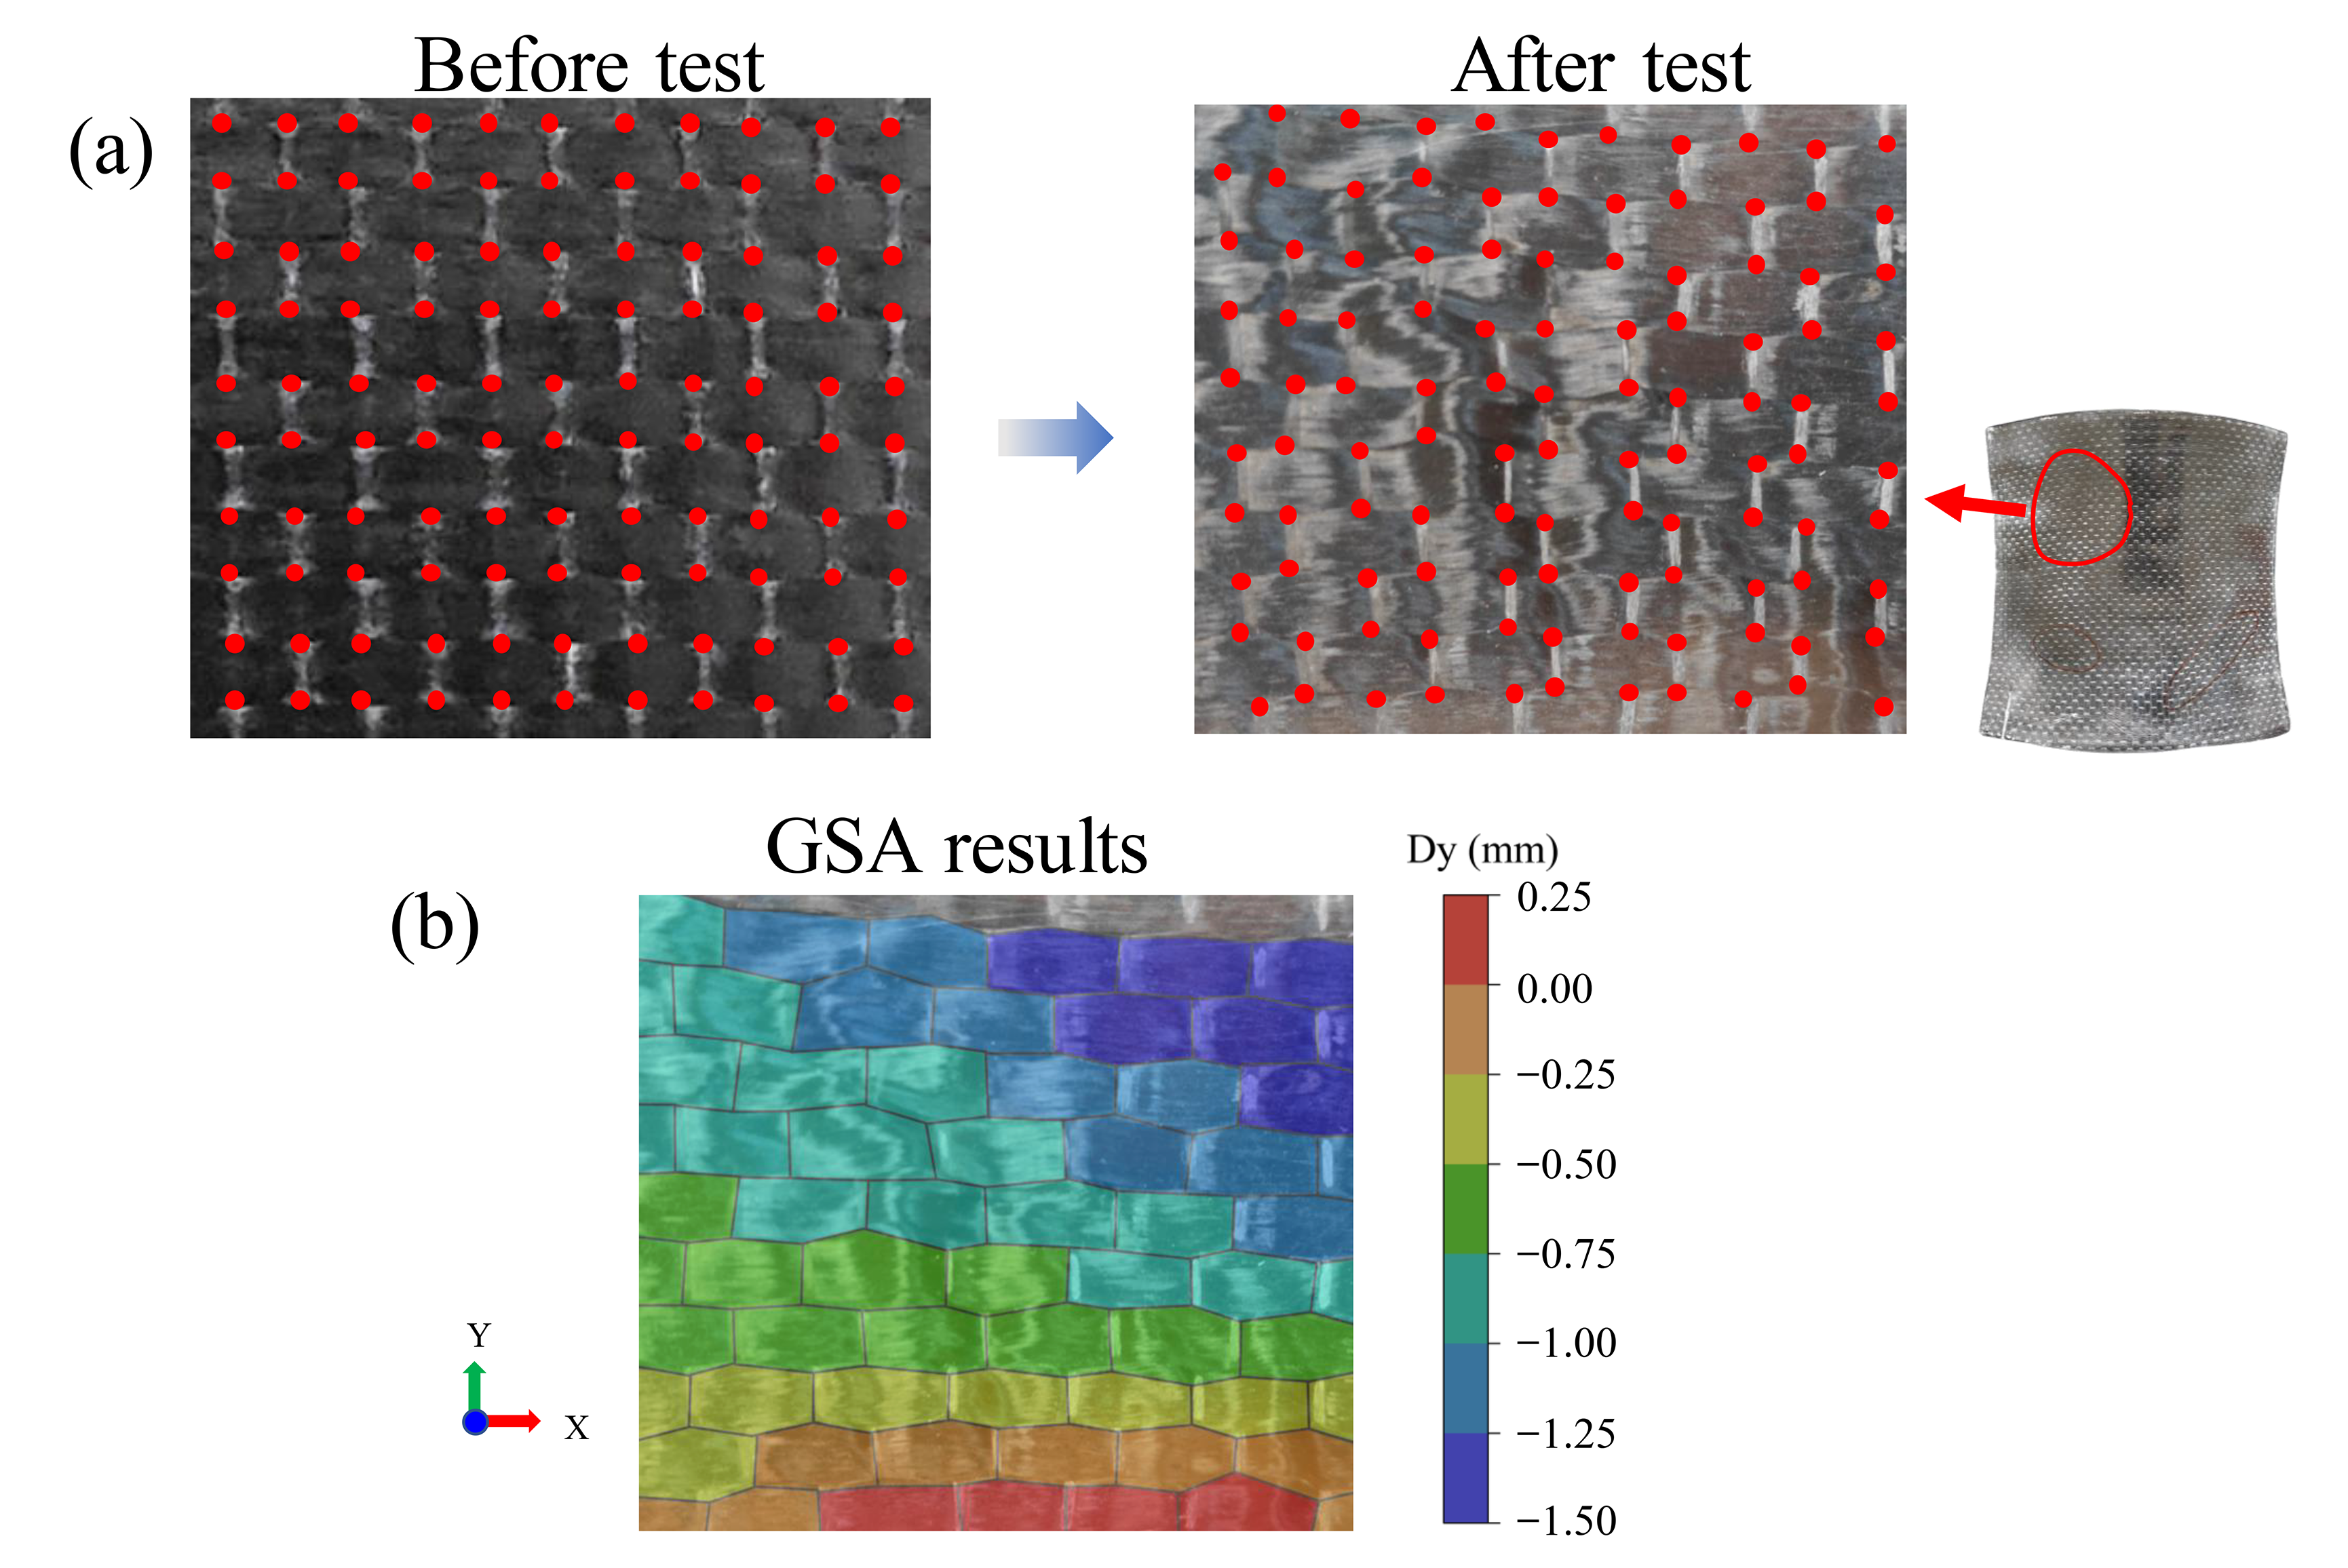
Conventional composite forming involves direct manual or automated prepreg layup onto molds. In this process, prepreg blanks are positioned between silicone elastomeric pads, and material conformity to the tooling geometry is achieved via draw-forming induced by press closure. However, transforming prepregs from planar into 3D double-curvature geometries inherently causes dimensional and orientational alterations in surface fiber bundles, owing to in-plane shear deformation. Data processing was performed according to the methods described in the literature [33]. A grid strain analysis (GSA) methodology was used to quantify the level of fiber tow distortion and deformation in the prepreg. Photographs of the prepreg-side of the specimen were taken before and after the test. Corners and intersections of fiber tows in the photograph were picked as nodes of the grid and their coordinates were recorded and tracked (Figure 9a,b). The color contours in Figure 9b represent the mean deviation magnitude of the woven prepreg along the Y fiber direction, calculated via GSA. Fibers flow to conform to the mold shape, and the overall flow trend matches the component geometry. Compared with the mirror-symmetrical upper-right region of the formed surface, the upper-left region exhibits more disordered fiber deformation. Given that consistent pressure and temperature were maintained during forming, this phenomenon is speculated to stem from differences in the surface roughness of the silicone pads in direct contact with the prepreg, with higher roughness impeding fiber flow. After repeatedly cleaning the silicone pads and applying a higher-concentration release agent, the changes in fiber orientation became more uniform, and the disordered regions were eliminated.
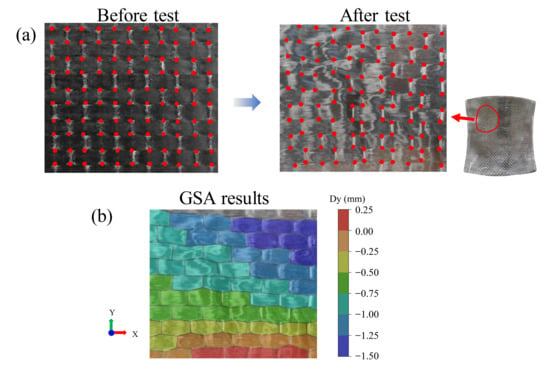
Figure 9.
(a) Example of nodes for GSA before and after the test. (b) strain results in second fiber direction (Dy) from GSA.
3.3. Edge Ridge Suppression
This height adjustment method modulates the height of anomalous pin units to establish a height increment relationship with adjacent pins. As such defects do not occur in the SPT, the pin heights at the corresponding anomalous regions in the SPT are used as ideal height benchmarks.
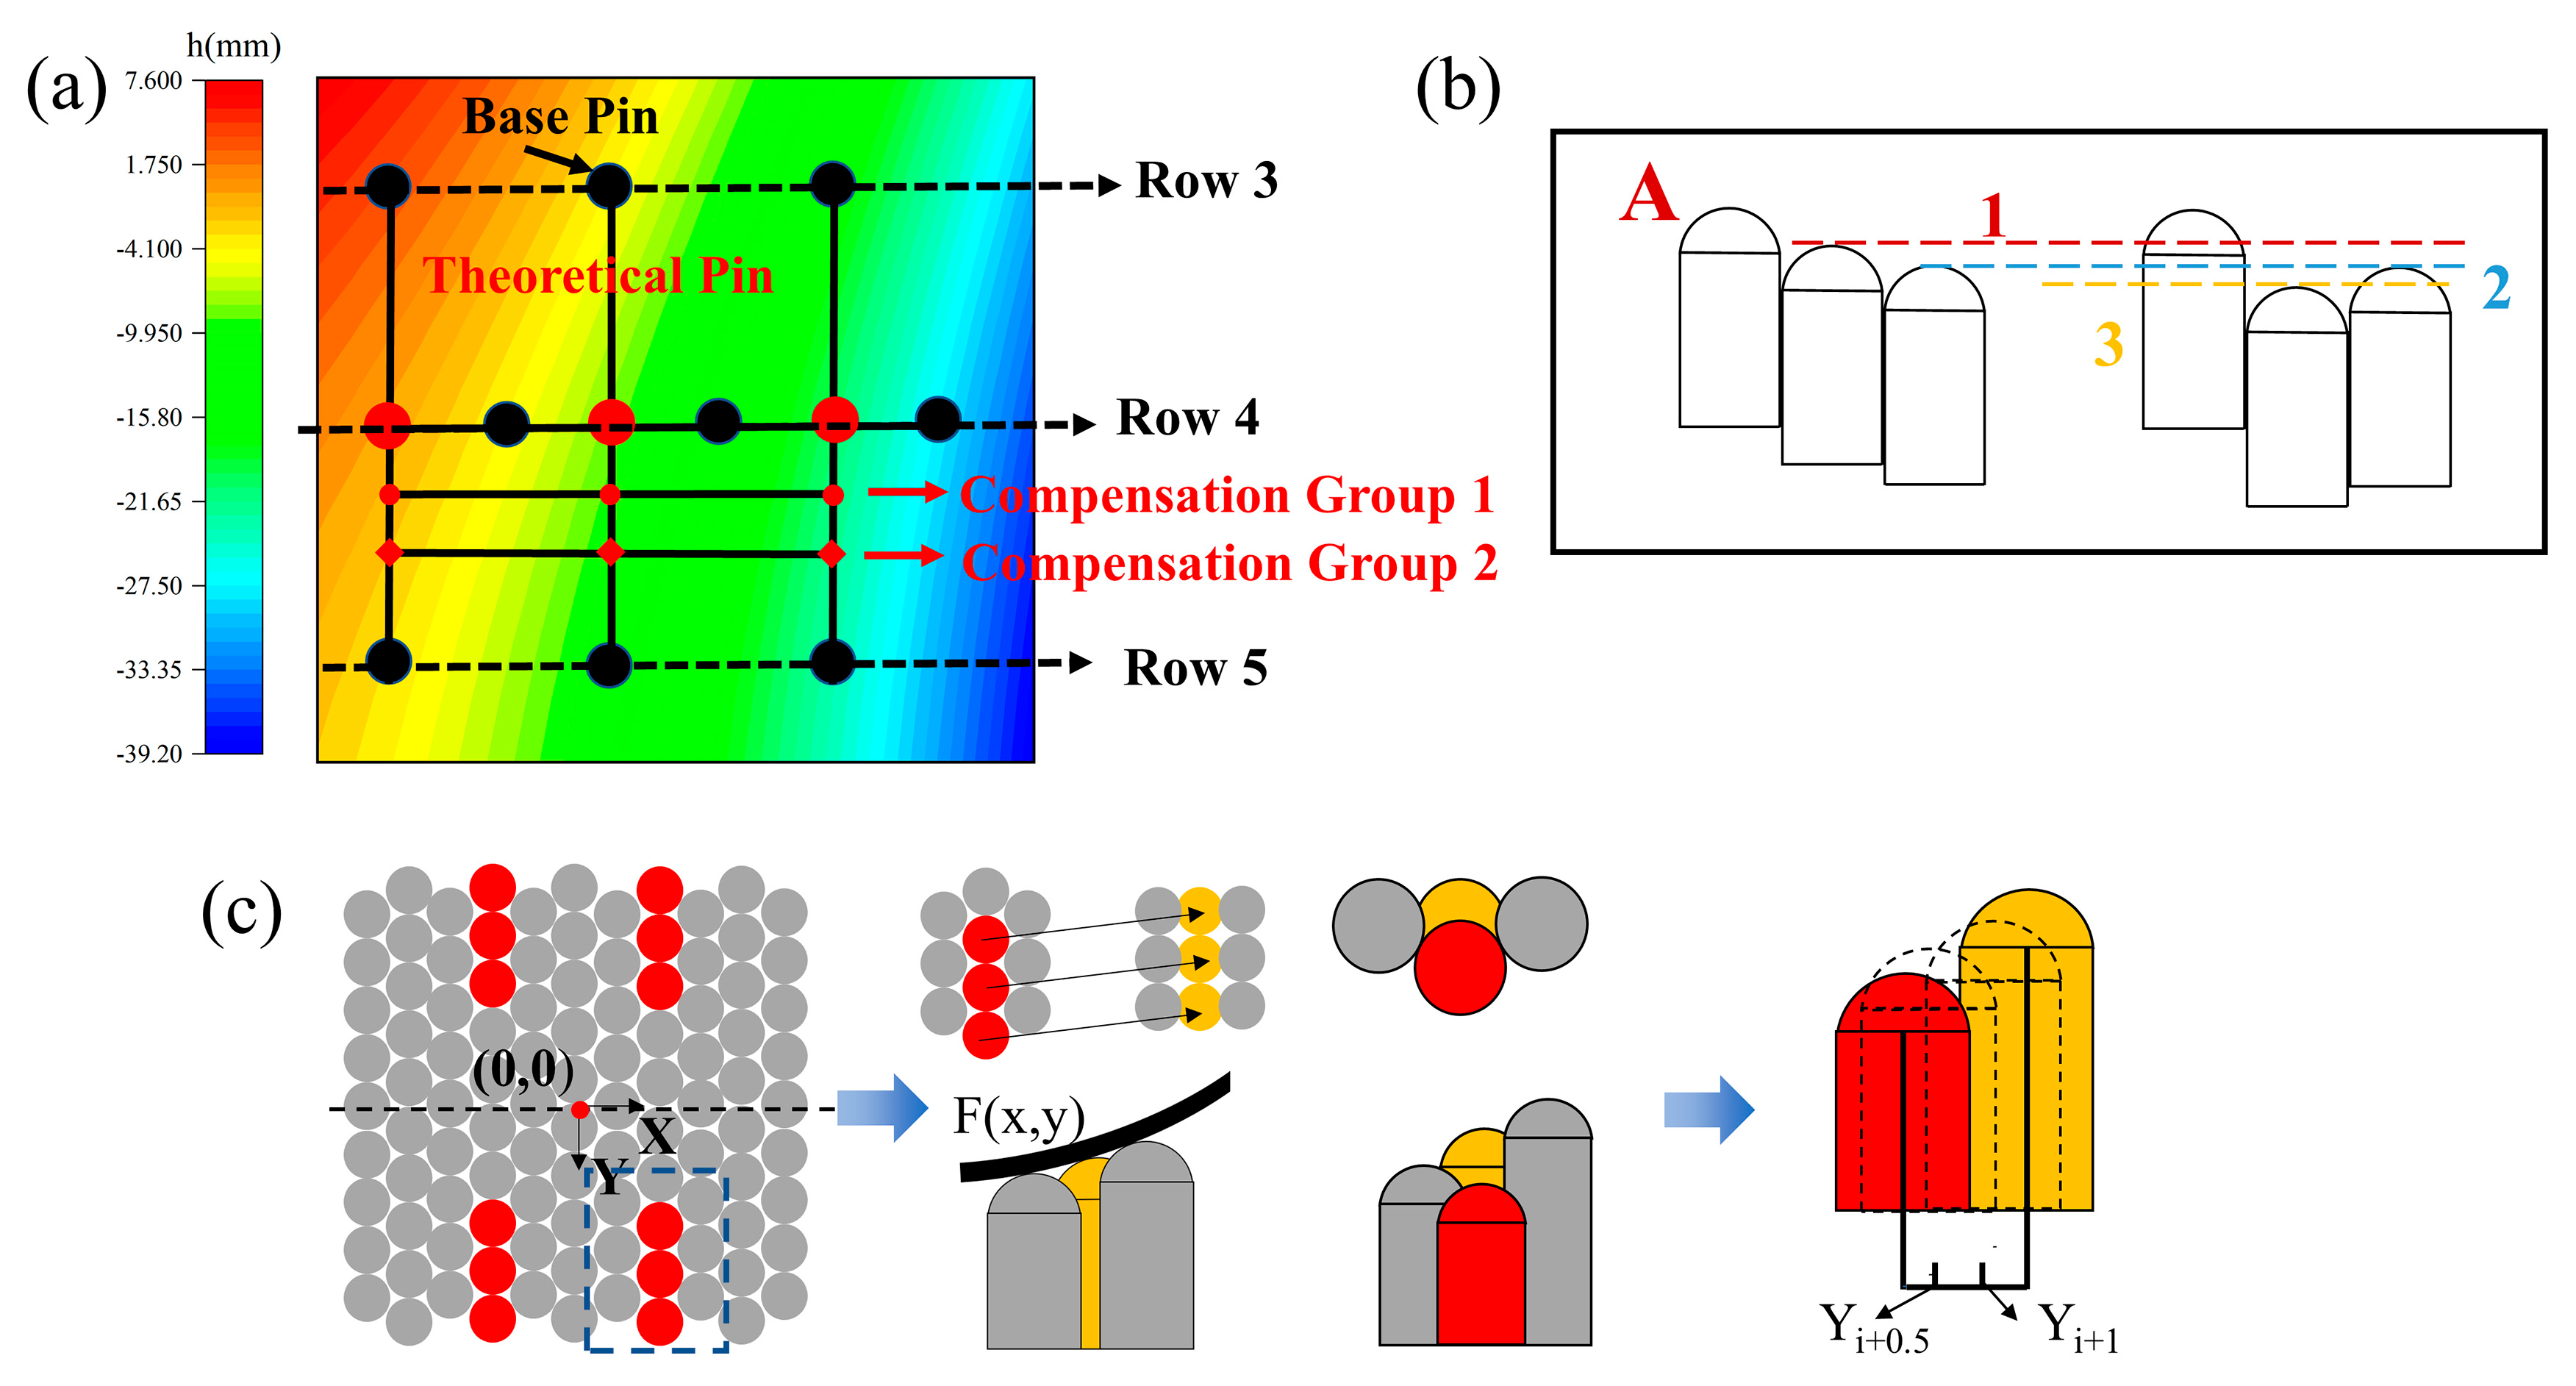
Figure 10a illustrates the height adjustment method for Approach A: connect the corresponding pins in Row 3 and Row 5 to draw a reference line, then connect the transverse line of Row 4 pins. The intersection of these two lines serves as the ideal position of Row 4 pins in the SPT. As the actual pin positions are offset to the right relative to this ideal arrangement, the value at this red point is the maximum adjustable height parameter for the corresponding anomalous pins. Figure 10b is a 2D simplified schematic comparing the pin height relationships between the SPT (left) and the HPT (right). The adjusted anomalous pins must lie between Boundary Line 1 and Boundary Line 3; meanwhile, maintaining a monotonic decrease in pin height requires confining them between Boundary Line 1 and Boundary Line 2. The height compensation tests consist of two groups, with specific values provided in Table 3 and Table 4. The adjustment procedure for anomalous pins in Approach B is identical to that in Approach A, and the control groups for both approaches adopt the unadjusted molding scheme.
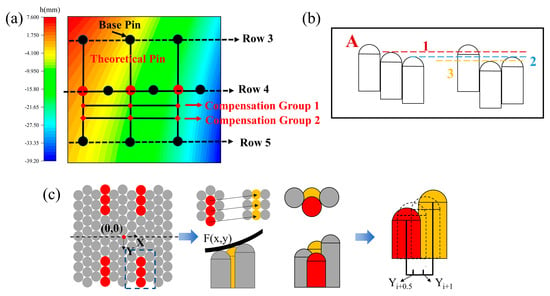
Figure 10.
(a) Pin height adjustment methodology; (b) Height adjustment range; (c) Procedure of the height compensation method.

Table 3.
Heights (mm) of abnormal region units in approach A.

Table 4.
Heights (mm) of abnormal region units in approach B.
In summary, this study implements the method in three steps (Figure 10c):
First, locate the anomalous pin unit: determine its coordinates (x, y) and mark it as red point b.
Next, simulate a virtual square-array pin unit: set its coordinates as (x, y + 1.5), mark it as yellow point d in the figure, and calculate the z-coordinate of this yellow unit.
Finally, determine the adjustment range: the height of the yellow unit d serves as the maximum adjustable value. Adjust the height of the anomalous unit to satisfy the condition a < b < c. Since b and d differ only in the y-coordinate, the height values at (x, y + 0.5) and (x, y + 1) are used as the compensation reference.
In the actual adjustment of the mold surface, the actual height of a pin unit is affected by several factors, including its maximum allowable extension, the thickness of auxiliary materials, the compression ratio of the elastic cushion, and the reference plane. The height data of the mold used in this study are provided as Supplementary Material.
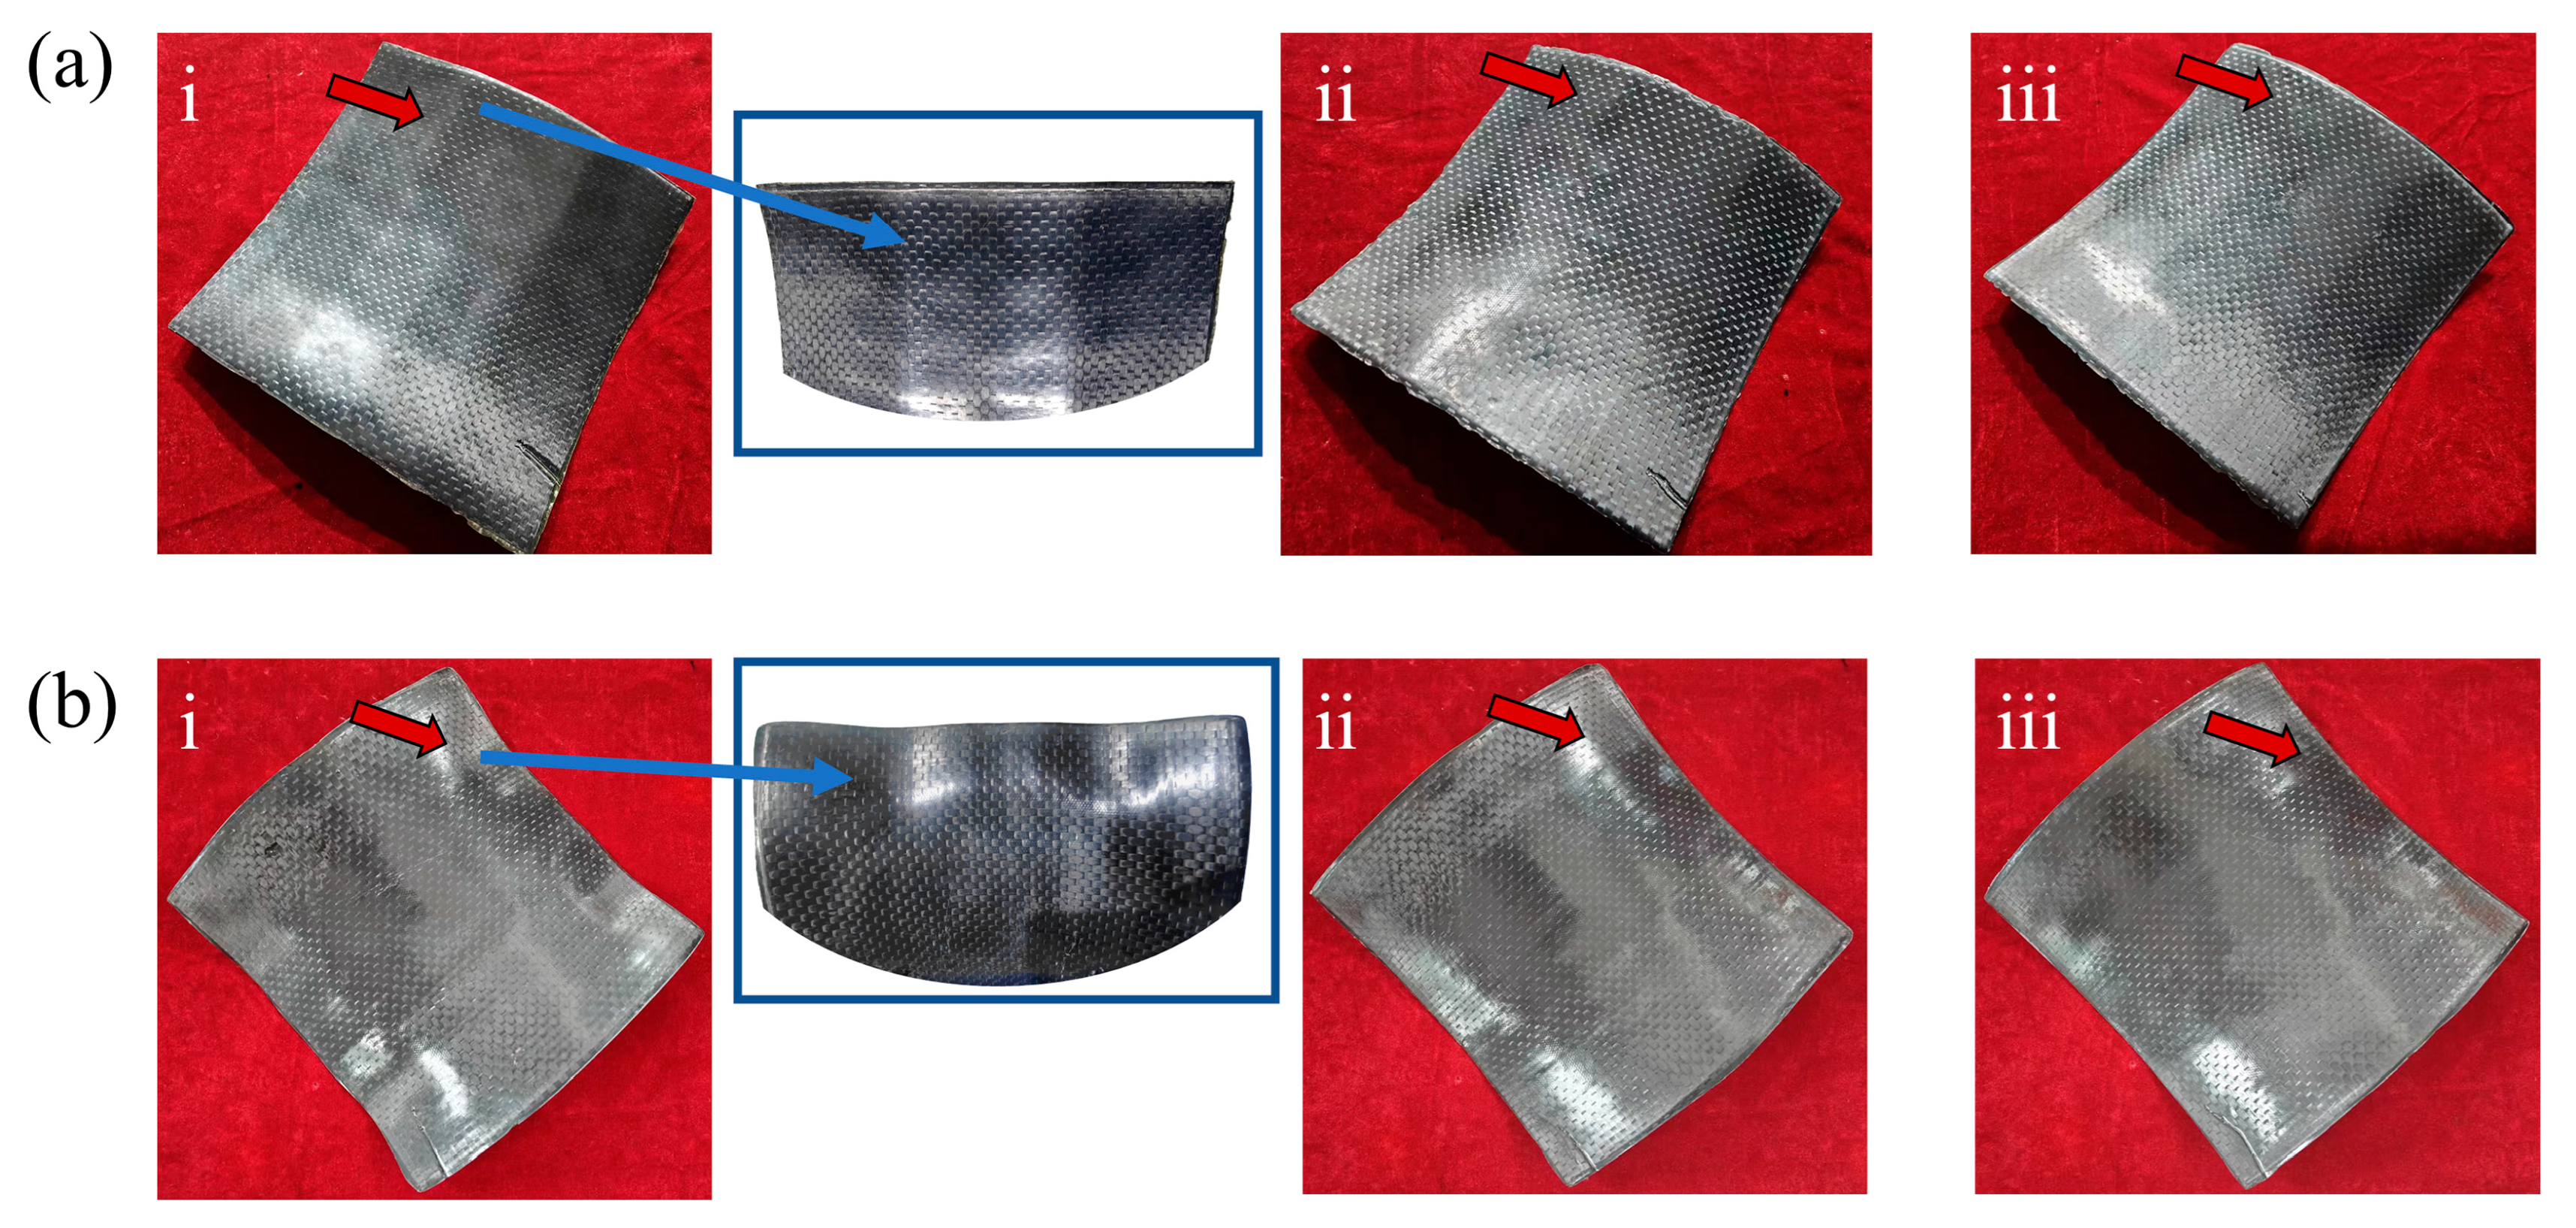
The forming results are presented in Figure 11, where Figure 11a depicts parts fabricated using Approach A and Figure 11b shows those fabricated using Approach B. For Approach A, distinct ridges are observed in the uncompensated control group, and these ridges correlate directly with the pin depression phenomenon in the fourth row as illustrated in Figure 7b. As the compensation height increases, the severity of the ridges decreases progressively: Compensation Group 1 successfully eliminates the ridges but leaves minor protrusions, while Compensation Group 2 achieves complete elimination of protrusions and produces smooth curved surfaces. In the case of Approach B, localized protrusions appear in the uncompensated control group but disappear entirely in both Compensation Groups 1 and 2. A comparative analysis demonstrates that Approach B exhibits superior performance for uncompensated saddle forming, with its control group achieving surface quality comparable to that of Compensation Group 1 under Approach A. Under compensated conditions, Compensation Group 2 of Approach A as well as Compensation Groups 1 and 2 of Approach B can effectively eliminate localized protrusions.
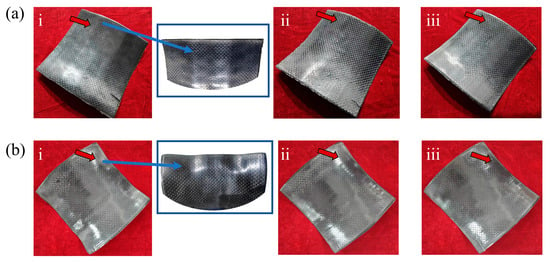
Figure 11.
(a) (i) Results for the Control Group under Approach A; (a) (ii) Results for the Compensation Group 1 under Approach A; (a) (iii) Results for the Compensation Group 2 under Approach A; (b) (i) Results for the Control Group under Approach B; (b) (ii) Results for the Compensation Group 1 under Approach B; (b) (iii) Results for the Compensation Group 2 under Approach B.
With respect to pin adjustment strategies: Approach A involves raising pins from their original lower positions, which mainly serves to fill the gaps between adjacent pin rows while causing minimal alterations to the overall mold contour. In contrast, Approach B entails lowering pins from their original elevated positions, resulting in significant modifications to the mold geometry. This fundamental difference in adjustment strategies leads to larger dimensional deviations in parts formed by Approach B, in comparison with the minimal-contour-adjustment methodology adopted by Approach A.
3.4. Precision Inspection of Parts
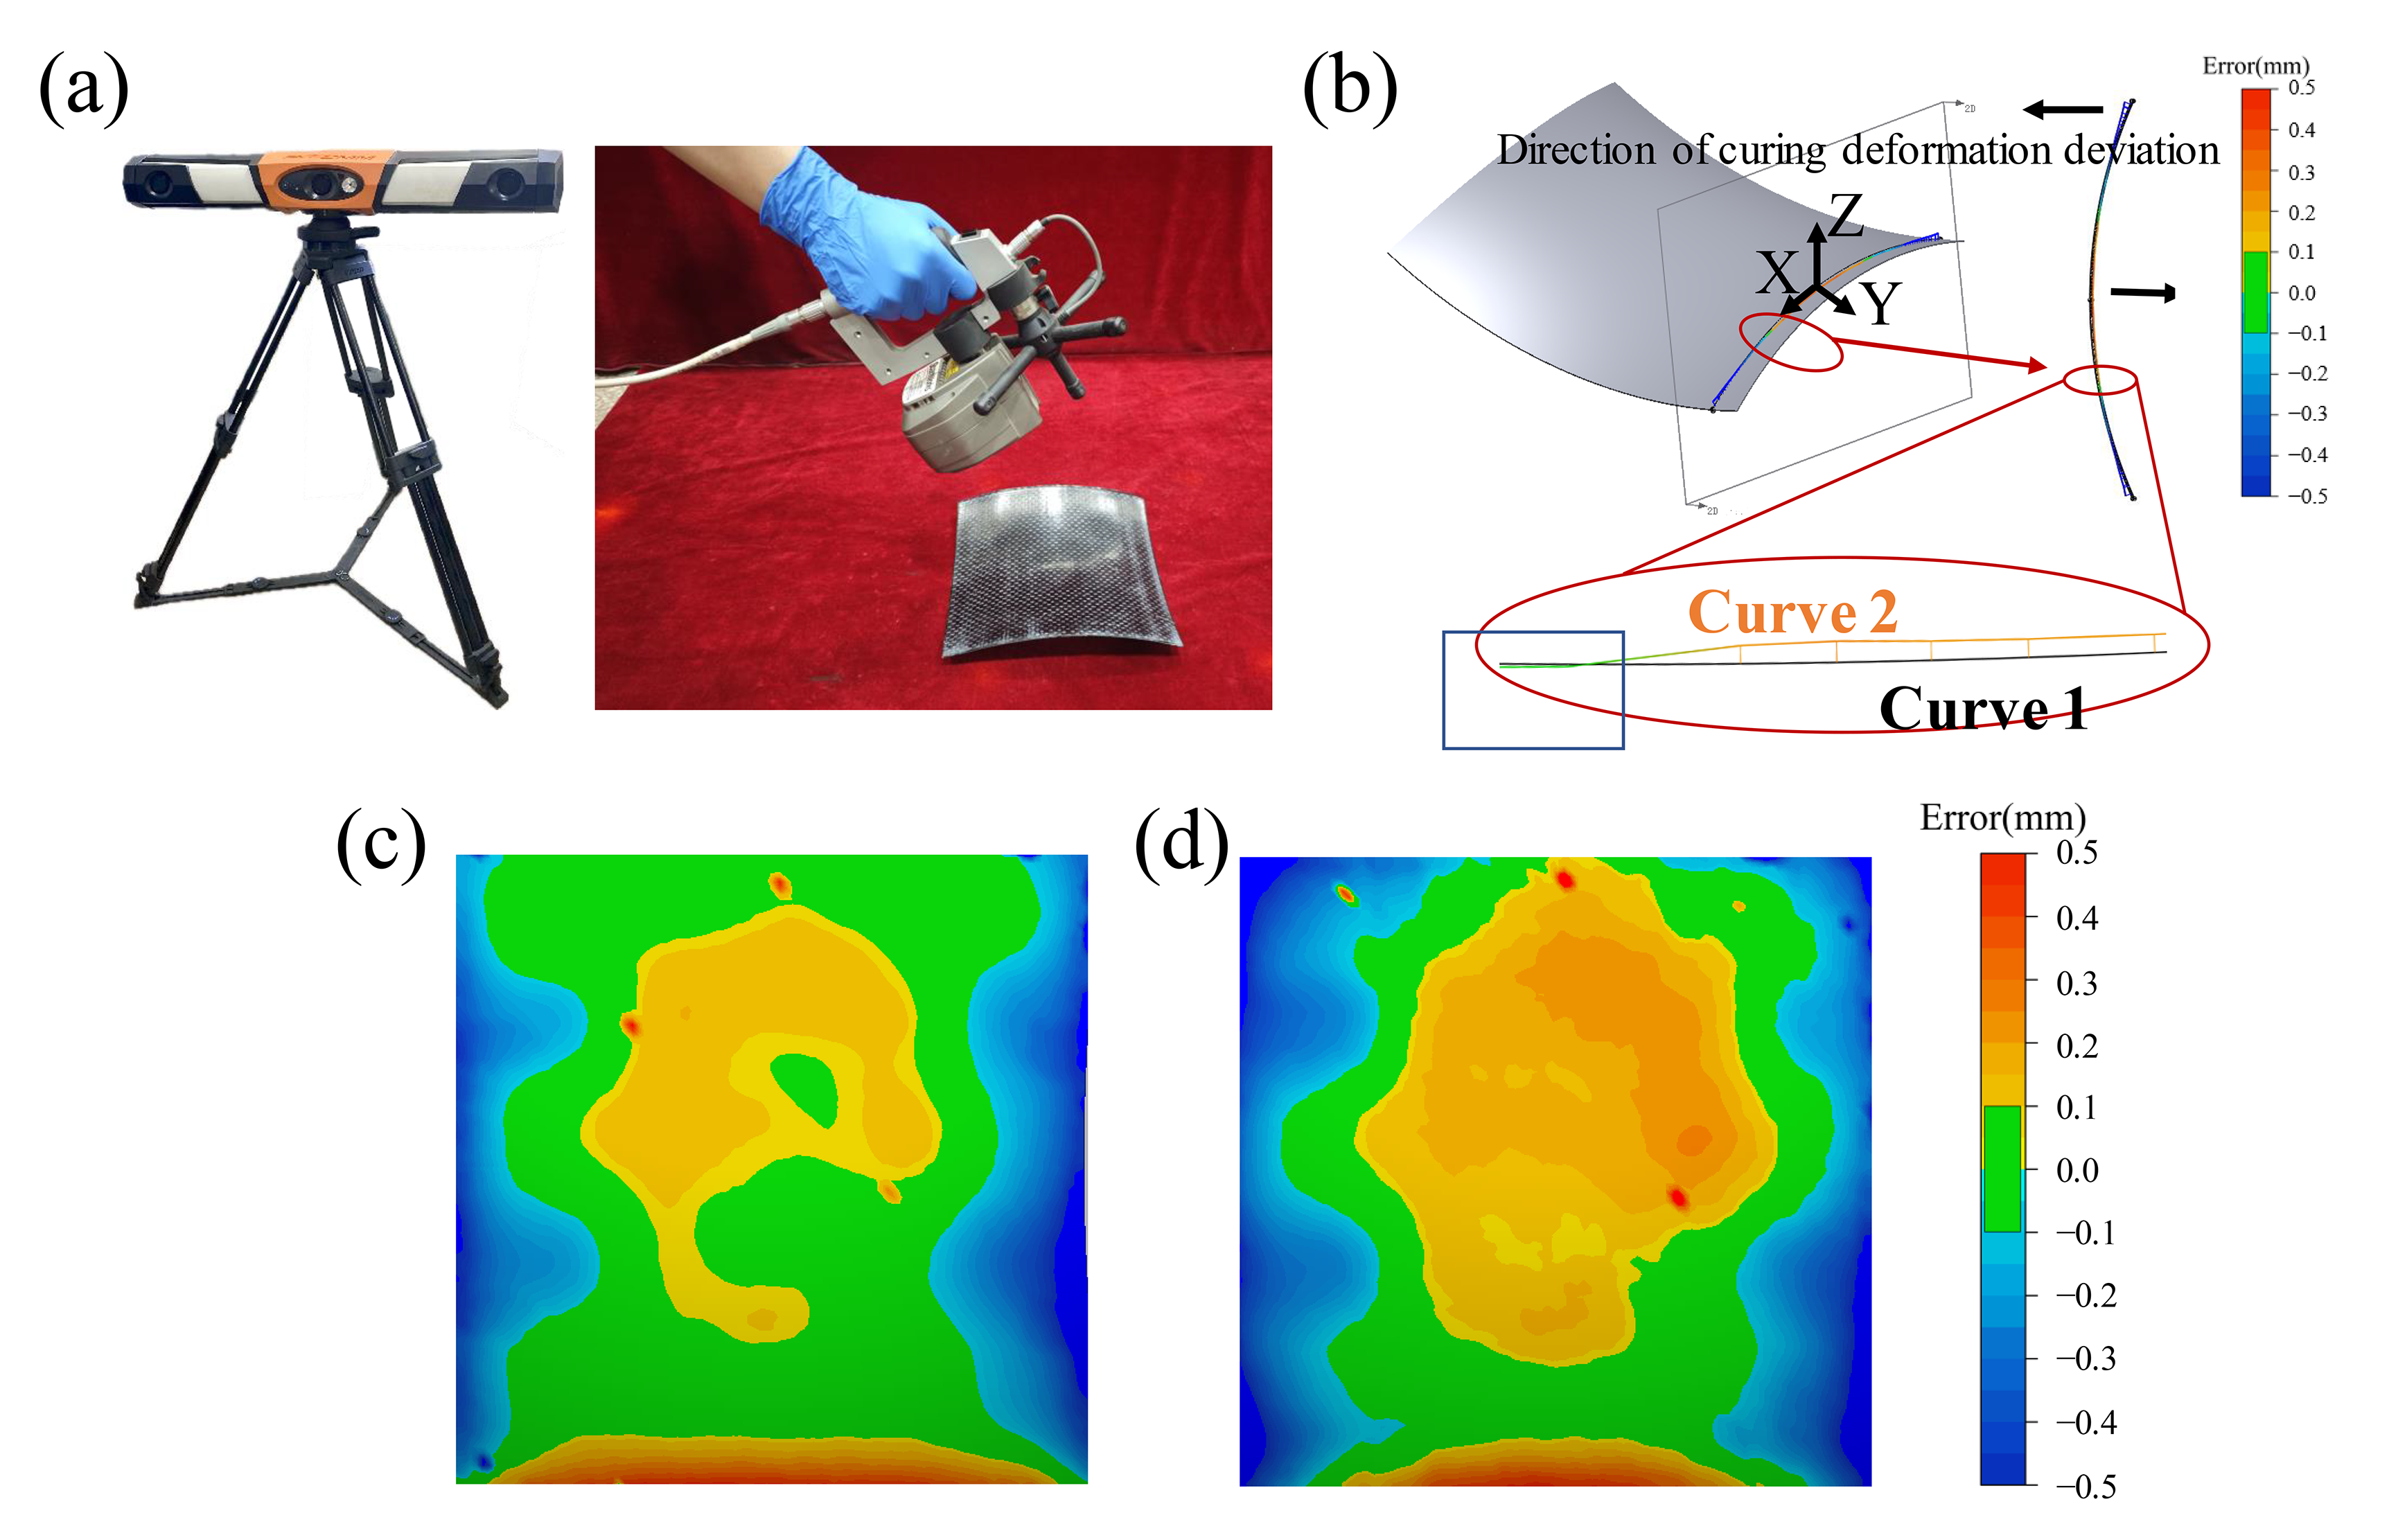
In order to quantify the ridge protrusions on the formed parts under six experimental conditions, the NDI PRO CMM3500 non-contact 3D optical scanner (Figure 12a) was used to capture point cloud data from the scanned parts, with a resolution of 0.024 mm. The acquired point clouds were preprocessed to remove disconnected and isolated points before being imported into Geomagic Control software (17.0.6.17532). Within the software, shape deviations between the scanned data and the target geometry were compared to evaluate part accuracy. Based on the locations of abnormal units identified in Approaches A and B, a cross-section located 50 mm from the edge of the formed part was selected for 2D curve deviation analysis between the as-formed surface and the target surface. The analyzed region was centered 60 mm from the origin in the X-direction and spanned 30 mm in length, corresponding to the position and size of the abnormal units.
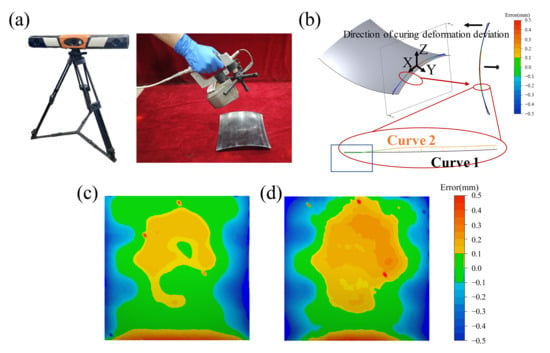
Figure 12.
(a) Non-contact 3D optical scanner; (b) Curve deviation in the ridge region; (c) Accuracy cloud plot for Approach A Compensation Group 2; (d) Accuracy cloud plot for Approach B Compensation Group 2.
Figure 12b illustrates the curve deviation results, where the red area denotes the selected region, Curve 1 represents the ideal surface profile, and Curve 2 corresponds to the actual measured profile. As shown in the figure, owing to curing deformation of the composite material, the center of this cross-section lies in the negative Z-axis region, while the edges are located in the positive Z-axis region, with the deviation magnitude increasing as the distance from the origin increases. However, an upward protruding segment is observed within the blue rectangular area, which is inconsistent with the behavior observed in other cross-sections of the curved part and corresponds to the ridge line. Under the same experimental conditions, the curing-induced deformation was assumed to be uniform. The maximum deviation value of this curve segment was used as an indicator to quantify the ridge protrusion. A ridge is considered prominent when the maximum deviation occurs near the center of the curve, and insignificant when it occurs near the ends.
In Control Group A, Compensation Group 1 of Approach A, and Control Group B, the maximum deviation values were located in the central region of the curve, measuring 0.46 mm, 0.38 mm, and 0.40 mm, respectively, indicating noticeable ridge lines on the surface. In contrast, for Compensation Group 2 of Approach A, Compensation Group 1 of Approach B, and Compensation Group 2 of Approach B, the maximum deviation values were found at the ends of the curve, measuring 0.36 mm, 0.34 mm, and 0.36 mm, respectively. These values correspond to surfaces free of ridge lines.
Figure 12c and Figure 12d respectively display comparative shape error distributions for Approach A Compensation Group 2 and Approach B Compensation Group 1 relative to the target surface. Generally speaking, in engineering applications, the error within ±0.1 mm can be regarded as acceptable. Green zones indicate regions where deviations fall within the ±0.1 mm tolerance threshold, demonstrating Approach A Compensation Group 2’s superior dimensional accuracy compared to Approach B. The results are in line with the predictions in Section 3.3. These results confirm the feasibility of manufacturing thermoset composite saddle parts with defect-free, high-quality surfaces through the multi-point thermoforming process.
3.5. Characterization of Internal Defects and Mechanical Properties
To verify the consistency of internal quality and mechanical properties between components fabricated by the proposed process and conventional methods, this study fabricated flat panels via hot pressing and oven curing, with the same layup structure and thickness as the curved components. The forming process was conducted under constant pressure and temperature conditions throughout. Subsequently, ultrasonic C-scan inspection and three-point bending tests were performed on these flat panels to evaluate their internal quality and mechanical properties.
Figure 13 presents the ultrasonic C-scan results of components fabricated via different processes. The C-scan tests were carried out using the BSN-C0505 testing system supplied by Beijing Beiji Xingchen Technology Co., Ltd., with the scanning area set at 20 × 20 mm. In the C-scan images, regions containing defects reflect echo signals that differ significantly from well-formed areas. Thus, red regions in the images correspond to pore defects, while green regions indicate well-formed areas; darker shades represent larger defect sizes.

Figure 13.
(a) C-scan equipment; (b) Ultrasonic C-scan image of the hot-pressed component; (c) Ultrasonic C-scan image of the oven-cured component.
Analysis using the supporting software yielded the following results: for hot-pressed components, the maximum color scale value of defect regions reached 86.72%, with an average of 18.75%. For oven-cured components, the corresponding maximum and average values were 80.47% and 15.63%, respectively. For components manufactured using two different processes, their porosities are comparable.
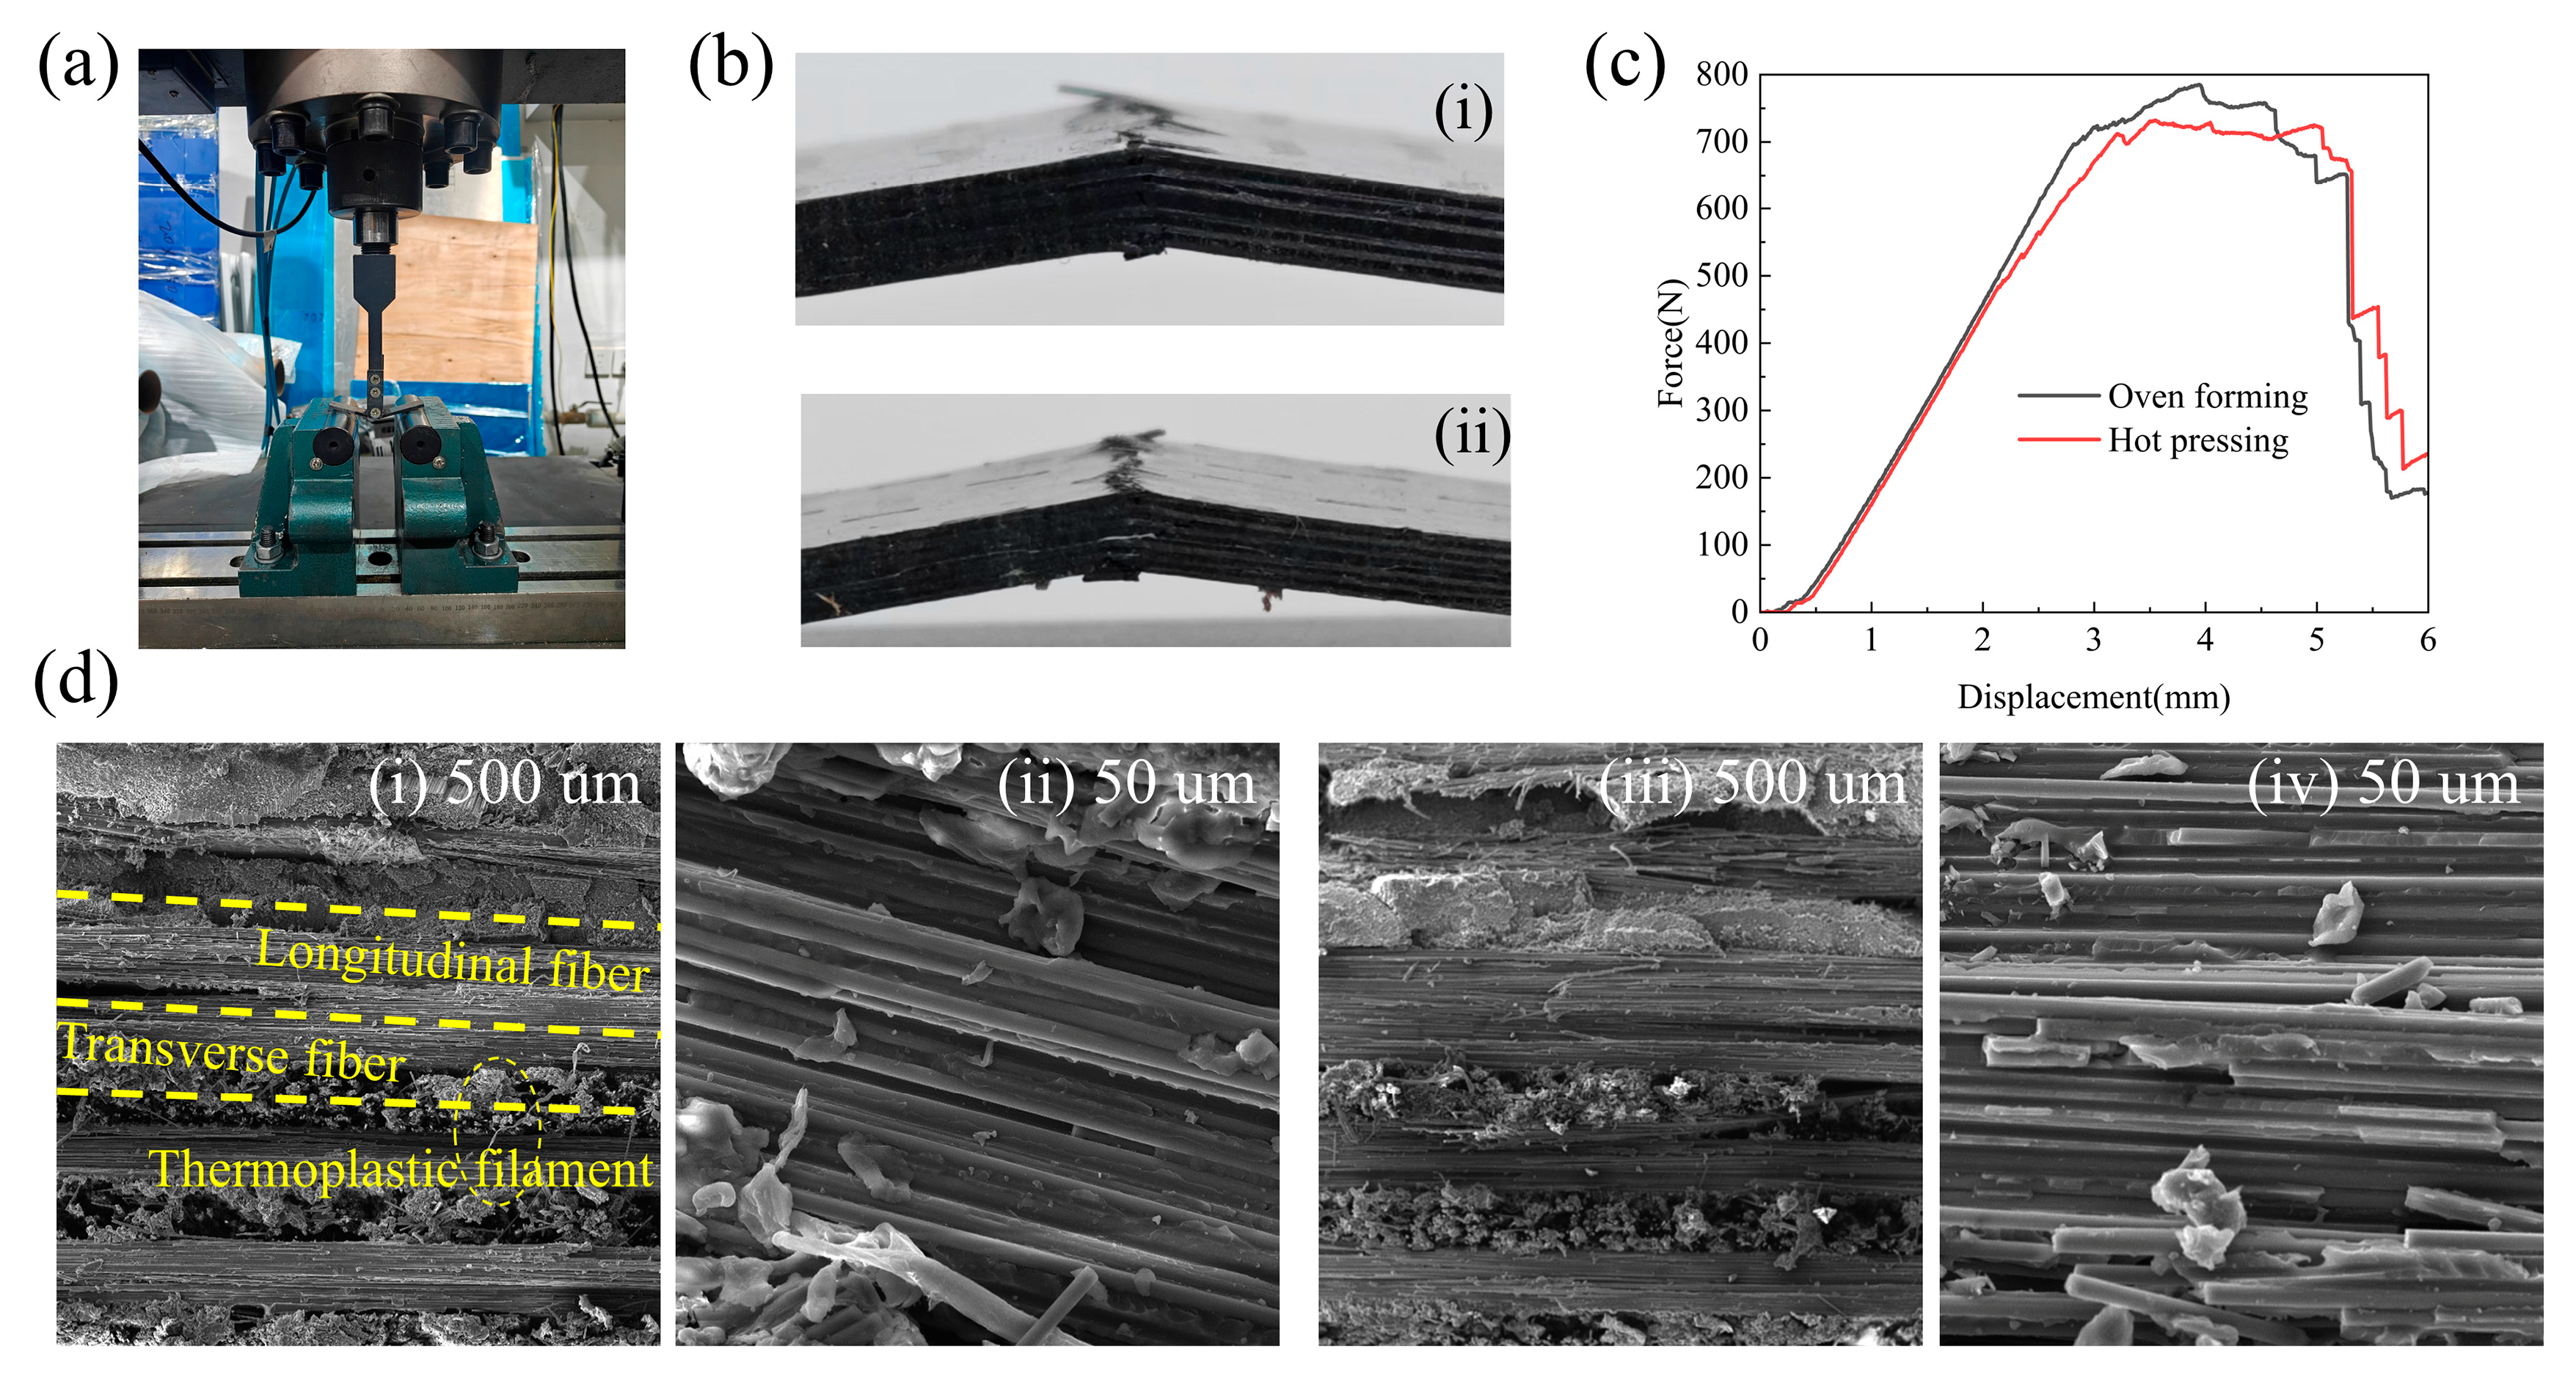
Three-point bending tests were performed on a WDW-200 universal testing machine (Figure 14a) in accordance with the Chinese standard GB/T 1449-2005. Three specimens were tested per group, with dimensions: length L = 80 mm, width b = 15 mm, and thickness h = 2.4 mm. The support span was set to 65 mm and the loading rate to 5 mm/min.
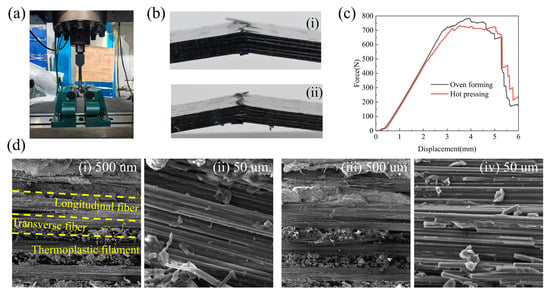
Figure 14.
(a) WDW-200 universal testing machine; (b) Photograph after the bending test: (i) oven-cured component (ii) hot-pressed component; (c) Force-displacement curves; (d) SEM images of the fracture surfaces of flexural specimens fabricated by different forming processes: (i,ii) hot-pressing; (iii,iv) oven-forming.
The load–displacement curves of the two processes are shown in Figure 14c. The curves first exhibit a linear elastic stage. When micro-cracks initiate, their propagation is hindered by the thermoplastic filaments within the prepreg. These ductile filaments are stretched between the crack surfaces, continue to carry part of the load, and thereby retard rapid crack opening and extension. Based on the data analysis, the oven-cured specimens show a flexural strength of 885.7 MPa and a flexural modulus of 94.0 GPa, whereas the hot-pressed specimens exhibit a flexural strength of 858.5 MPa and a flexural modulus of 97.6 GPa. The differences in both flexural strength and modulus are approximately 3%, which is within the 5% variability range typically accepted in engineering practice. Hence, it can be concluded that the components produced by the hot-pressing and oven-forming processes possess equivalent mechanical properties.
Figure 14d shows SEM images of the fracture surfaces after bending. Subfigures d(i) and d(ii) correspond to the oven-cured component, while d(iii) and d(iv) correspond to the hot-pressed component. The results reveal varying degrees of fiber pull-out and matrix debonding in the resin-matrix composites upon fracture, as well as the rupture of thermoplastic filaments. The image magnified 1000× demonstrates good bonding between the resin and the fibers
4. Conclusions
Building on previous research on thermosetting carbon fiber prepreg molding, this study proposes a novel multi-point thermoforming process. Using this method, high-surface-quality double-curvature saddle-shaped CFRP components were successfully fabricated. The main innovations of this work are summarized below:
First, we propose a novel forming process and verify the feasibility of its integrated heating method. We have provided specific data regarding the thickness and layup of heating pads, insulation pads, and silicone pads. This ensures controllable and uniform thermal conditions when flexible heating blankets are used as the heat source for composite curing. Ultrasonic C-scan and three-point bending tests show no significant differences in internal defect characterization and mechanical properties between components made by this process and those by oven forming. This process eliminates the need for embedded heating elements in traditional mold designs, reduces both manufacturing costs and technical complexity, and therefore exhibits significant potential for practical application.
Second, the optimal mold closing displacement was determined. It can prevent dimple formation while ensuring the best dimensional accuracy. A hexagonal pin-array multi-point tooling was used to fabricate composite components. The pin arrangement of this tooling improves forming accuracy, but also introduces a unique defect. Since there are no previous studies on this specific multi-point tooling configuration, this defect is reported for the first time in this study. The causes of the defect were systematically investigated. Two forming orientations and corresponding height compensation strategies are proposed, ultimately achieving a smooth component surface. This study confirms that the pin arrangement in multi-point tooling significantly affects the curved surface forming result. For complex geometric components that are difficult to form using traditional multi-point tooling, the findings indicate that optimizing the pin arrangement strategy can offer a viable approach to enhancing formability and surface quality in future applications.
Supplementary Materials
The following supporting information can be downloaded at: https://www.mdpi.com/article/10.3390/eng7020069/s1.
Author Contributions
S.H.: Writing—Original draft, Validation, Methodology, investigation, Formal analysis, Data Curation. W.W.: Formal analysis. X.W.: Validation. J.Y.: Investigation. R.D.: Data Curation. X.C.: Methodology. H.S.: Methodology. Q.H.: Writing—review & editing, Supervision. All authors have read and agreed to the published version of the manuscript.
Funding
This work was financially supported by the National Key R&D Program of China (2021YFF0500103), the pre-production and industrialization projects of Scientific and Technological Achievements of Jilin University (23GNZ24), and Program for the Central University Youth Innovation Team (419021423505).
Institutional Review Board Statement
Not applicable.
Informed Consent Statement
Not applicable.
Data Availability Statement
The original contributions presented in this study are included in the article/Supplementary Material. Further inquiries can be directed to the corresponding author(s).
Conflicts of Interest
The authors declare that they have no known competing financial interests or personal relationships that could have appeared to influence the work reported in this paper.
References
- Anyfantis, K.; Stavropoulos, P.; Foteinopoulos, P.; Chryssolouris, G. An approach for the design of multi-material mechanical components. Proc. Inst. Mech. Eng. Part B-J. Eng. Manuf. 2019, 233, 960–974. [Google Scholar] [CrossRef]
- Ortiz, M.; Liébana, F.; Etayo, J.M.; Zubia, A.; Papaioannou, C.; Bikas, H.; Stavropoulos, P.; Ares, F.; Modi, V. A simulation-based thermal process control method for multi-material laser-joining operations. Int. J. Comput. Integr. Manuf. 2025. [Google Scholar] [CrossRef]
- Parveez, B.; Kittur, M.; Badruddin, I.A.; Kamangar, S.; Hussien, M.; Umarfarooq, M.A. Scientific Advancements in Composite Materials for Aircraft Applications: A Review. Polymers 2022, 14, 5007. [Google Scholar] [CrossRef] [PubMed]
- Rajak, D.K.; Pagar, D.D.; Menezes, P.L.; Linul, E. Fiber-Reinforced Polymer Composites: Manufacturing, Properties, and Applications. Polymers 2019, 11, 1667. [Google Scholar] [CrossRef]
- Walczyk, D.; Kuppers, J.; Hoffman, C. Curing and Consolidation of Advanced Thermoset Composite Laminate Parts by Pressing Between a Heated Mold and Customized Rubber-Faced Mold. J. Manuf. Sci. Eng.-Trans. Asme 2011, 133, 011002. [Google Scholar] [CrossRef]
- Rizzolo, R.H.; Walczyk, D.F.; Montoney, D.; Simacek, P.; Mahbub, M.R. A High-Consolidation Electron Beam-Curing Process for Manufacturing Three-Dimensional Advanced Thermoset Composites. J. Manuf. Sci. Eng. 2022, 144, 121001. [Google Scholar] [CrossRef]
- Gu, Y.Z.; Qin, X.; Li, M.; Zhang, K.M.; Zhang, Z.G. Temperature Distribution and Curing Behaviour of Carbon Fibre/Epoxy Composite during Vacuum Assisted Resin Infusion Moulding using Rapid Heating Methods. Polym. Polym. Compos. 2015, 23, 11–19. [Google Scholar] [CrossRef]
- Cai, Z.Y.; Li, M.Z. Optimum path forming technique for sheet metal and its realization in multi-point forming. J. Mater. Process. Technol. 2001, 110, 136–141. [Google Scholar] [CrossRef]
- Li, M.Z.; Liu, Y.H.; Su, S.Z.; Li, G.Q. Multi-point forming: A flexible manufacturing method for a 3-d surface sheet. J. Mater. Process. Technol. 1999, 87, 277–280. [Google Scholar] [CrossRef]
- Yasar, M.; Korkmaz, Z.; Gavas, M. Forming sheet metals by means of multi-point deep drawing method. Mater. Des. 2007, 28, 2647–2653. [Google Scholar] [CrossRef]
- Jia, B.B.; Shen, Y.; Gu, Y.X. Influence of the deformation sequence on the shape accuracy of multi-point forming. Int. J. Mater. Form. 2023, 16, 66. [Google Scholar] [CrossRef]
- Im, Y.-T.; Walczyk, D.F.; Schwarz, R.C.; Papazian, J.M. A Comparison of Pin Actuation Schemes for Large-Scale Discrete Dies. J. Manuf. Process. 2000, 2, 247–257. [Google Scholar] [CrossRef]
- Tan, F.X.; Li, M.Z.; Cai, Z.Y. Research on the process of multi-point forming for the customized titanium alloy cranial prosthesis. J. Mater. Process. Technol. 2007, 187–188, 453–457. [Google Scholar] [CrossRef]
- Wimmer, M.S.J.; Lušić, M.; Maurer, C. Vacuum Assisted Multipoint Moulding—A Reconfigurable Tooling Technology for Producing Spatially Curved Single-item CFRP Panels. Procedia CIRP 2016, 57, 368–373. [Google Scholar] [CrossRef]
- Walczyk, D.F.; Hosford, J.F.; Papazian, J.M. Using reconfigurable tooling and surface heating for incremental forming of composite aircraft parts. J. Manuf. Sci. Eng.-Trans. Asme 2003, 125, 333–343. [Google Scholar] [CrossRef]
- Peng, H.; Li, M.; Li, Z.; Li, X. Surface quality and shape accuracy of multi-point warm press forming Corian sheets. Int. J. Adv. Manuf. Technol. 2019, 104, 4727–4733. [Google Scholar] [CrossRef]
- Peng, H.; Li, M.; Liu, C.; Cao, J. Study of multi-point forming for polycarbonate sheet. Int. J. Adv. Manuf. Technol. 2013, 67, 2811–2817. [Google Scholar] [CrossRef]
- Xie, J.M.; Wang, S.Y.; Cui, Z.B.; Wu, J. Process Optimization for Compression Molding of Carbon Fiber-Reinforced Thermosetting Polymer. Materials 2019, 12, 2430. [Google Scholar] [CrossRef] [PubMed]
- Kim, H.H.; Lee, M.S.; Kang, C.G. The Fabrication of a Hybrid Material Using the Technique of Hot-Press Molding. Mater. Manuf. Process. 2013, 28, 892–898. [Google Scholar] [CrossRef]
- Sun, J.; Gu, Y.Z.; Li, M.; Ma, X.X.; Zhang, Z.G. Effect of forming temperature on the quality of hot diaphragm formed C-shaped thermosetting composite laminates. J. Reinf. Plast. Compos. 2012, 31, 1074–1087. [Google Scholar] [CrossRef]
- Lušić, M.; Hausleider, S.; Hornfeck, R.; Lušić, M. Flexible Attachment Designs for Rapid Tooling: A Contribution to Greater Design Freedom within Pin-type Moulding, Spatially Curved CFRP Panels. Procedia CIRP 2016, 50, 396–401. [Google Scholar] [CrossRef]
- Andrianov, I.V.; Kalamkarov, A.L.; Weichert, D. Buckling of fibers in fiber-reinforced composites. Compos. Part B Eng. 2012, 43, 2058–2062. [Google Scholar] [CrossRef]
- Yıldırım, H. The post-buckling analysis of cylindrical polymer fiber-reinforced composite tubes subjected to axial loading fabricated by filament winding technology. Polym. Compos. 2024, 45, 13434–13450. [Google Scholar] [CrossRef]
- Thor, M.; Sause, M.G.R.; Hinterhölzl, R.M. Mechanisms of Origin and Classification of Out-of-Plane Fiber Waviness in Composite Materials—A Review. J. Compos. Sci. 2020, 4, 130. [Google Scholar] [CrossRef]
- Nartey, M.; Zhang, T.; Gong, B.; Wang, J.; Peng, S.; Wang, H.; Peng, H.-X. Understanding the impact of fibre wrinkle architectures on composite laminates through tailored gaps and overlaps. Compos. Part B Eng. 2020, 196, 108097. [Google Scholar] [CrossRef]
- Huang, J.; Boisse, P.; Hamila, N.; Zhu, Y. Simulation of Wrinkling during Bending of Composite Reinforcement Laminates. Materials 2020, 13, 2374. [Google Scholar] [CrossRef]
- Jensen, E.M.; Leonhardt, D.A.; Fertig, R.S. Effects of thickness and fiber volume fraction variations on strain field inhomogeneity. Compos. Part A Appl. Sci. Manuf. 2015, 69, 178–185. [Google Scholar] [CrossRef]
- Ulker, O. Surface Roughness of Composite Panels as a Quality Control Tool. Materials 2018, 11, 407. [Google Scholar] [CrossRef]
- Dehghanian, A.; Khedmati, M.R.; Ghassemi, H. Practical Approaches of Inducing Controlled Simulated Resin Starvation Areas into Vacuum Infusion Processed Sandwich Composites Used for Characterisation of the Surface Defects and their Outcomes. Lat. Am. J. Solids Struct. 2017, 14, 1170–1182. [Google Scholar] [CrossRef]
- Fu, Y.; Yao, X. A review on manufacturing defects and their detection of fiber reinforced resin matrix composites. Compos. Part C Open Access 2022, 8, 100276. [Google Scholar] [CrossRef]
- Quan, G.-Z.; Ku, T.-W.; Kang, B.-S. Improvement of formability for multi-point bending process of AZ31B sheet material using elastic cushion. Int. J. Precis. Eng. Manuf. 2011, 12, 1023–1030. [Google Scholar] [CrossRef]
- Abebe, M.; Lee, K.; Kang, B.-S. Surrogate-based multi-point forming process optimization for dimpling and wrinkling reduction. Int. J. Adv. Manuf. Technol. 2015, 85, 391–403. [Google Scholar] [CrossRef]
- Corbridge, D.M.; Harper, L.T.; De Focatiis, D.S.A.; Warrior, N.A. Compression moulding of composites with hybrid fibre architectures. Compos. Part A Appl. Sci. Manuf. 2017, 95, 87–99. [Google Scholar] [CrossRef]
Disclaimer/Publisher’s Note: The statements, opinions and data contained in all publications are solely those of the individual author(s) and contributor(s) and not of MDPI and/or the editor(s). MDPI and/or the editor(s) disclaim responsibility for any injury to people or property resulting from any ideas, methods, instructions or products referred to in the content. |
© 2026 by the authors. Licensee MDPI, Basel, Switzerland. This article is an open access article distributed under the terms and conditions of the Creative Commons Attribution (CC BY) license.


