Article

Extending the Operating Life of Thermoplastic Components via On-Demand Patching and Repair Using Fused Filament Fabrication

1
Department of Aerospace Engineering, University of Illinois at Urbana-Champaign, Urbana, IL 61801, USA
2
Department of Mechanical Science and Engineering, University of Illinois at Urbana-Champaign, Urbana, IL 61801, USA
3
Daniel Guggenheim School of Aerospace Engineering, Georgia Institute of Technology, Atlanta, GA 30332, USA
4
Department of Industrial and Enterprise Systems Engineering, University of Illinois at Urbana-Champaign, Urbana, IL 61801, USA
5
Faculty of Manufacturing and Mechanical Engineering Technology, Department of Engineering Technology and Industrial Distribution, Texas A&M University, College Station, TX 77843, USA
6
J. Mike Walker ’66 Department of Mechanical Engineering, Texas A&M University, College Station, TX 77843, USA
*
Author to whom correspondence should be addressed.
J. Manuf. Mater. Process. 2022, 6(5), 103; https://doi.org/10.3390/jmmp6050103
Submission received: 12 August 2022 / Revised: 10 September 2022 / Accepted: 13 September 2022 / Published: 16 September 2022
(This article belongs to the Special Issue Manufacturing and Processing of Recycled Plastics)

Abstract

:
Polymer-based engineering materials (plastics, polymer matrix composites, and similar) are becoming more widely used for the design and construction of consumer products and systems. While providing a host of design benefits, these materials also can have a large detrimental effect on the environment when not handled properly. One of the best ways to increase the sustainability of systems created using these materials is to extend their operating life as much as possible. Additive manufacturing (AM) technologies offer a powerful tool for this, as they allow easy repair of damaged or worn components in an automated or semi-automated way. This article explores the use of the fused filament fabrication (FFF) process as a tool for repairing high-value (i.e., difficult or expensive to replace) thermoplastic parts. The major design opportunities and restrictions are presented, as well as an evaluation of the types of repair jobs for which this process could be suitable and effective. Advice and ideas for future implementations and improvements are provided as well. A detailed case study is presented, where cracked ABS bars were repaired using FFF-deposited patches while varying the print parameters using a factorial designed experiment. The repaired bars were tested against the baseline and in most cases were found to be as good as or better than the original bars under a bending load. This case study demonstrates the concepts and explores how this repair approach could be realistically employed in practice.

1. Introduction

Polymer-based materials (plastics, polymer matrix composites, and others) possess high specific strength (high strength-to-weight ratio) and corrosion resistance and can easily be manufactured into complicated shapes [1]. These properties, along with their relatively low cost and stability over time, are desirable material characteristics for many engineering applications and consumer products. Much research has gone into understanding and improving the quality and durability of these materials since their use became widespread throughout the world in the 1960s and 1970s [2,3,4]. As a result, they have been steadily replacing traditional metals, wood, and ceramics for many applications over the past few decades and are expected to increase in production exponentially in the next few years [5,6]. While many applications are for throw-away products (e.g., packaging, children’s toys, or disposable eating and drinking utensils), there are also many cases where high-value parts need to be made from polymer-based materials. These products are especially common in the aerospace, automotive, biomedical, and packaging industries. BMW’s bumper structure, the transverse support beam in Porsche cars, protective covers, cab interior parts, and cockpit components are a few examples of such high-value parts [7,8,9,10,11,12,13].
In spite of the many advantages offered by polymer-based materials for engineering and consumer product applications, there are some serious and concerning drawbacks. One of the largest disadvantage is also the largest advantage of these materials from a product design perspective: these materials are extremely durable and do not easily degrade over time. Most polymer-based materials are not biodegradable or particularly cost-effective to recycle, and the few that are require specific conditions for degradation, which are not readily available in the natural environment [14,15,16]. As a result, when not disposed of properly, these materials end up in landfills and water bodies, damaging the environment for a long period of time [14,17]. This concern has increased the drive to implement a material circular economy (CE) for polymers to reduce polymeric waste. Traditionally, the linear economy (shown in Figure 1) is used in a production cycle in which raw material is transformed into products and disposed. On the other hand, the circular economy aims to reduce waste and pollution by circulating the products and materials at their highest value for a long time. Figure 1 depicts the difference between a typical linear and a circular economy. For the circular economy, the disposal phase involves breaking the product down into components or scrap, some of which are then waste and some of which are reused in other systems (i.e., reused parts) or a new raw materials (i.e., shredded thermoplastic or scrap metal) to be used again in the production of new products.
In addition to the need for polymer-based materials for user products and engineering applications and the need to reduce the environmental impact of these materials, a third major consideration exists for using plastic parts in large systems: the potential extension of the system lifecycle to delay replacing or refurbishment of the system. A demonstration is shown in Figure 2. Examples of large systems where this could be very impactful are aircraft [18,19], robotic manufacturing systems [20,21], power grids [22,23], sensor networks [24,25], and heating, ventilating, and air-conditioning (HVAC) systems used in large buildings [26,27]. One of the most impactful and practical ways to increase the sustainability of a system is to increase its lifespan (i.e., the time it is functional from deployment to retirement) [28,29,30]. Perhaps the easiest way to do this is to design the system so that it is easy to maintain by making the parts likely to fail, wear out, or become obsolete easy to replace or repair [31,32,33,34]. This allows easy repair and offers the possibility of upgrading the individual components of the system as needed. Within these systems, components will have different utilities or “values” based on both their cost to acquire and cost to replace and the reliance of the system on their function. In some existing systems, many legacy parts are used, which may be difficult or impossible to replace or reproduce. Therefore, a class of “high-value” components (made from all materials, including engineering plastics) must exist for which a repair method is needed for times when it is difficult or impossible to replace within the needed time frame.
Given the fact that high-value polymer-based parts exist and need to be used in the systems that the modern world relies on, it is necessary to accept that they will be used in spite of the potential environmental impact of the materials. This effect can be offset greatly by a system design strategy that allows the easy replacement and repair of the parts, since they will be used longer and fewer of them will be needed. However, in some cases, it will be impossible or impractical to simply replace parts since many systems are at least partially integrated and not fully modular. Therefore, a method for effectively repairing broken, cracked, or defective plastic parts needs to be developed. While glued patches and epoxies exist for temporary manual repair, an automated method, as proposed in this article, will be far more useful and effective.
Fused filament fabrication (FFF) is an additive manufacturing (AM) process that extrudes thermoplastics to build up geometry in layers via automatic control from a computer. This article explores the use of FFF as a feasible repair process for high-value thermoplastic parts. If feasible for this task, an FFF-based repair process will address all three of the motivating factors (functionality, sustainability, and system lifecycle extension) discussed previously. This article is divided into five major sections: First, a literature review on AM-based repair techniques is presented in Section 2. This is followed in Section 3 by a discussion of high-value thermoplastic components and criteria for their repair using FFF. An in-depth case study is explored in Section 4, followed by a discussion in Section 5 and conclusions in Section 6. The case study presented in this article focuses on obtaining high adhesive strength between the damaged component and the added material. It is essential to obtain a high adhesive strength between the material added using FFF and the damaged component to transfer higher loads to the material added across the interface. High adhesive strength (also termed interfacial stress) will prevent premature failure at the interface of the two materials and result in better confidence in the performance of the repaired component.

2. Component Repair Using AM: Brief Review

A large number of AM processes exist, and several have been used successfully for repair tasks. These processes can be broadly classified into seven families: vat photopolymerization, powder bed fusion (PBF), binder jetting (BJ), material jetting (MJ), material extrusion (ME), sheet lamination (SL), and direct energy deposition (DED). FFF is one of the several processes in the ME family. Previous research has shown that the inclusion of different AM processes in maintenance, repair, and overhaul strategies for systems and individual parts can improve the sustainability of the supply chain process [35]. The benefits of using AM in the supply chain process include that it can be used for a wide variety of materials, reduces the time required to acquire spare parts and the cost to maintain inventory, and provides freedom to customize the parts [36,37,38]. These advantages of AM can be attributed to its ability to add material in a layer-by-layer fashion, in contrast to removing material, as in subtractive manufacturing. Due to its ability to add material, AM can also be used as a compelling candidate to repair the parts in conjunction with traditional machining by adding material in the damaged area, which can then be machined to its final shape.
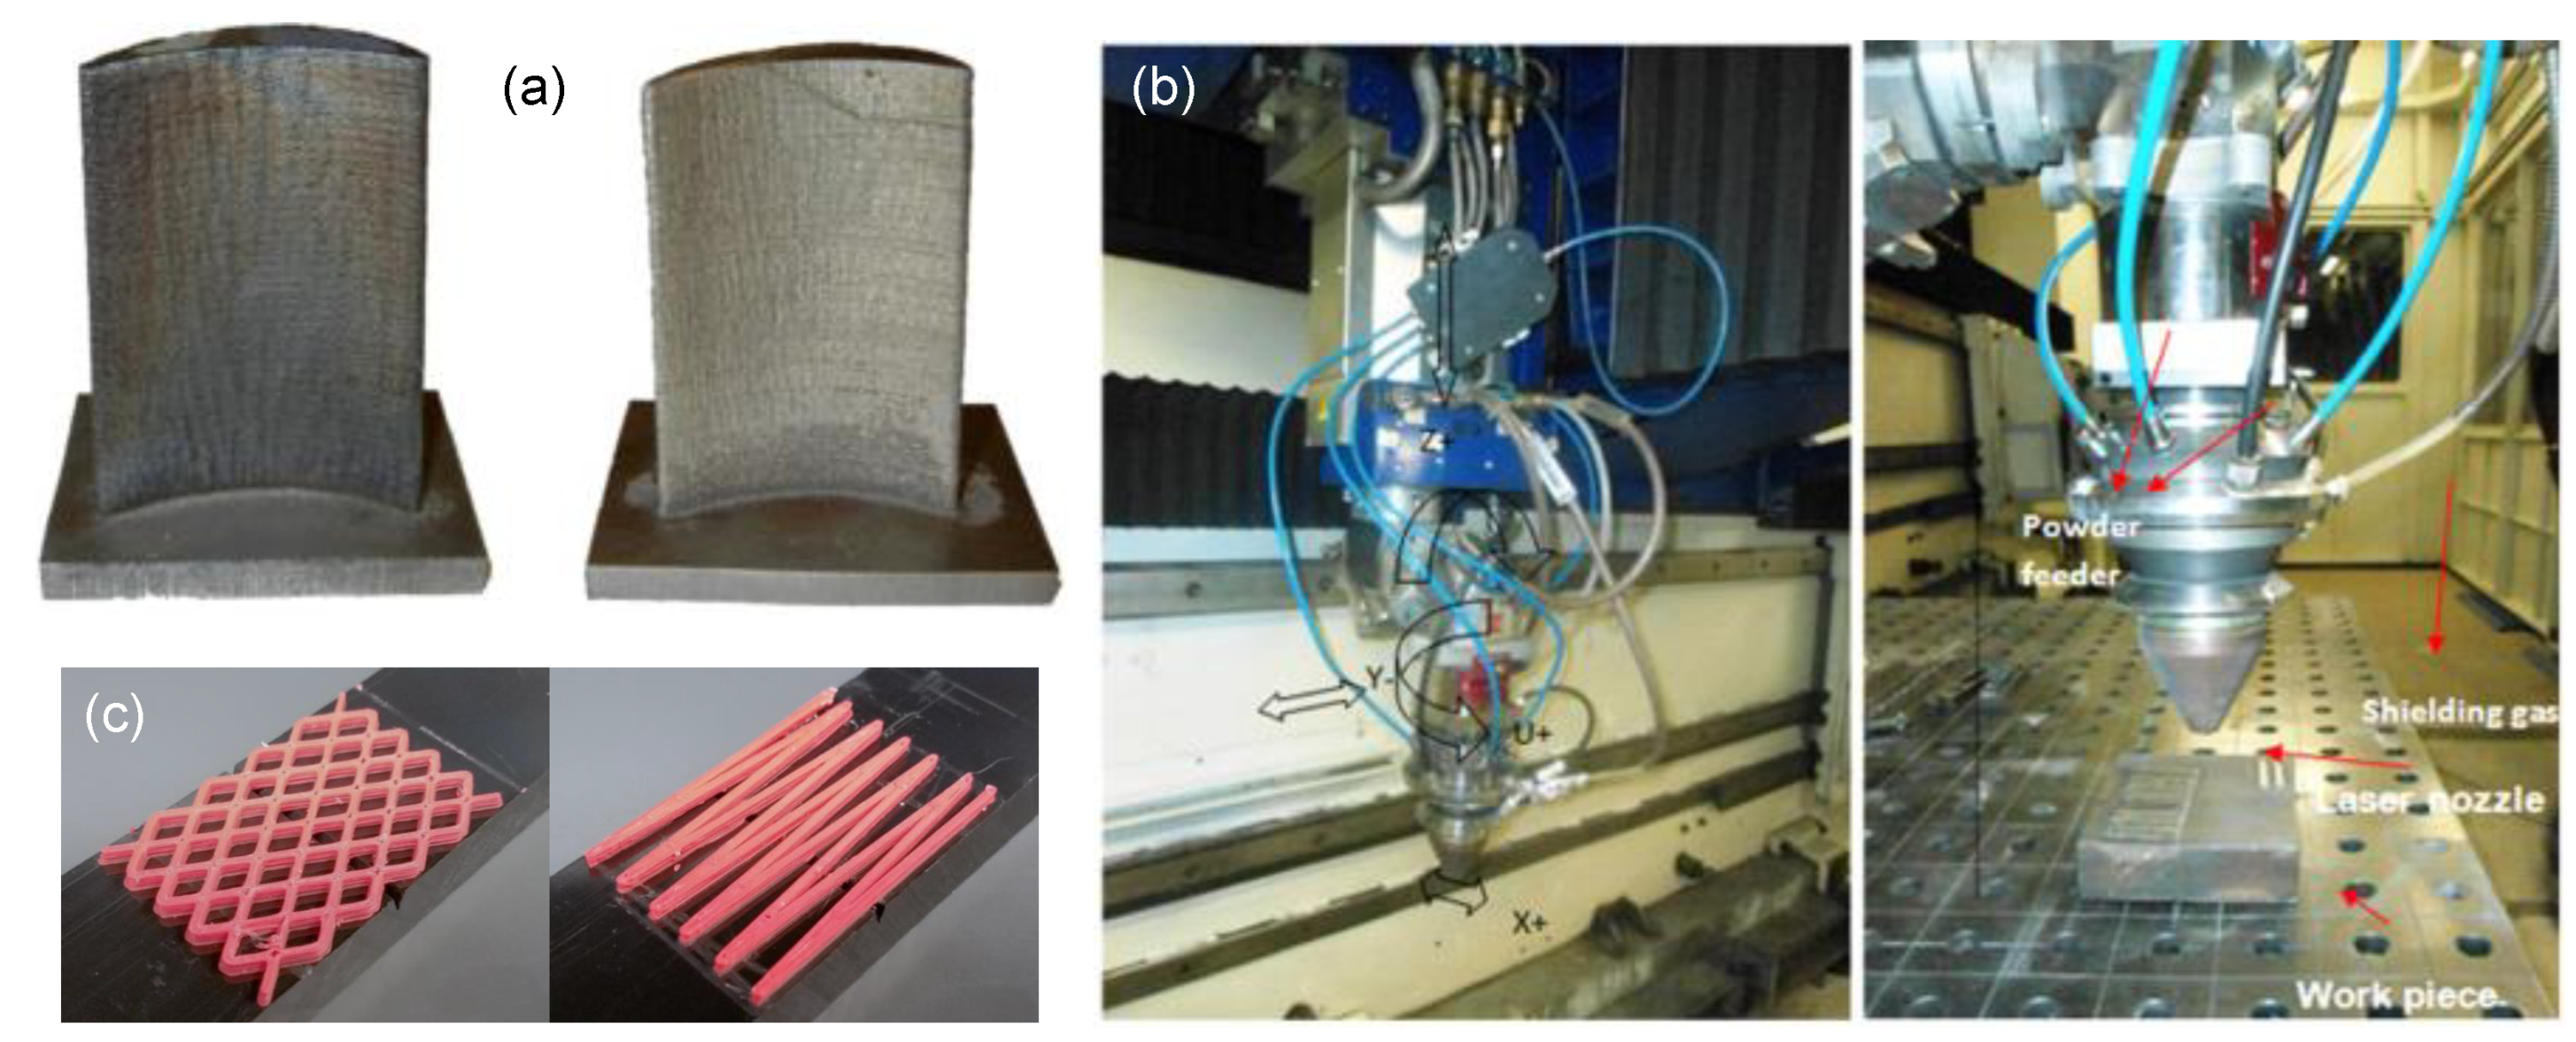
Different AM techniques have been used to repair metallic parts for aerospace engines and equipment [39,40,41], marine engines [42,43], turbines [44] (Figure 3a), components for railways [45], and tools [46,47] (Figure 3b). For example, Fraunhofer Institute has successfully certified repair processes for 15 standard aerospace components using laser metal deposition (LMD) [40]. Siemens repaired burner tips using selective laser melting (SLM) and demonstrated that the new repair process required 10% of the standard repair time, significantly reducing manufacturing and inspection time. Similarly, Mudge and Wald [48] showed that metals made from titanium alloys, stainless steel, tool steel, nickel alloys, and cobalt alloys could be repaired using laser engineered net shaping (LENS).
In the case of polymers, Wits et al. [35] and Chadha et al. [49] discussed the application of FFF in repair and overhaul strategies and simple patching (Figure 3c). Richter et al. [50] explored the effect of surface preparation and nozzle distance when ABS and polypropene (PP) were directly deposited on the respective molded sheets using FFF. They concluded that decreasing the distance of the nozzle from the surface during deposition improves the bonding between the deposited material and molded surface. In contrast, surface preparation has a minimum effect on adhesion. AM has also been used to directly deposit polymeric material on top of metallic materials [51,52]. This process is usually known as “addjoining” in the literature. Additionally, the application of AM in joining two polymeric parts has also been extensively studied [53]. However, in these studies, both adherents and adhesives are produced in a single print job [54,55,56,57], or epoxy is used to join different parts [58,59]. When the epoxy is used, the bonding strength between adherents and adhesives can be improved by changing the geometry of the adherents (pieces being joined) [58,59] or by changing the printing parameters during AM [56,57]. These factors improve the surface area and its properties, leading to a better adhesion to the epoxy.
Based on this literature review, it can be concluded that AM can be used as a viable candidate to repair components. However, the impact of the printing parameters on the adhesive strength of the repair has not been studied extensively in the case of FFF. It is essential to develop a strong adhesive strength for the repair process so that the deposited material adheres to the existing component and enables load distribution across the interface.

3. Defect and Crack Repair with FFF

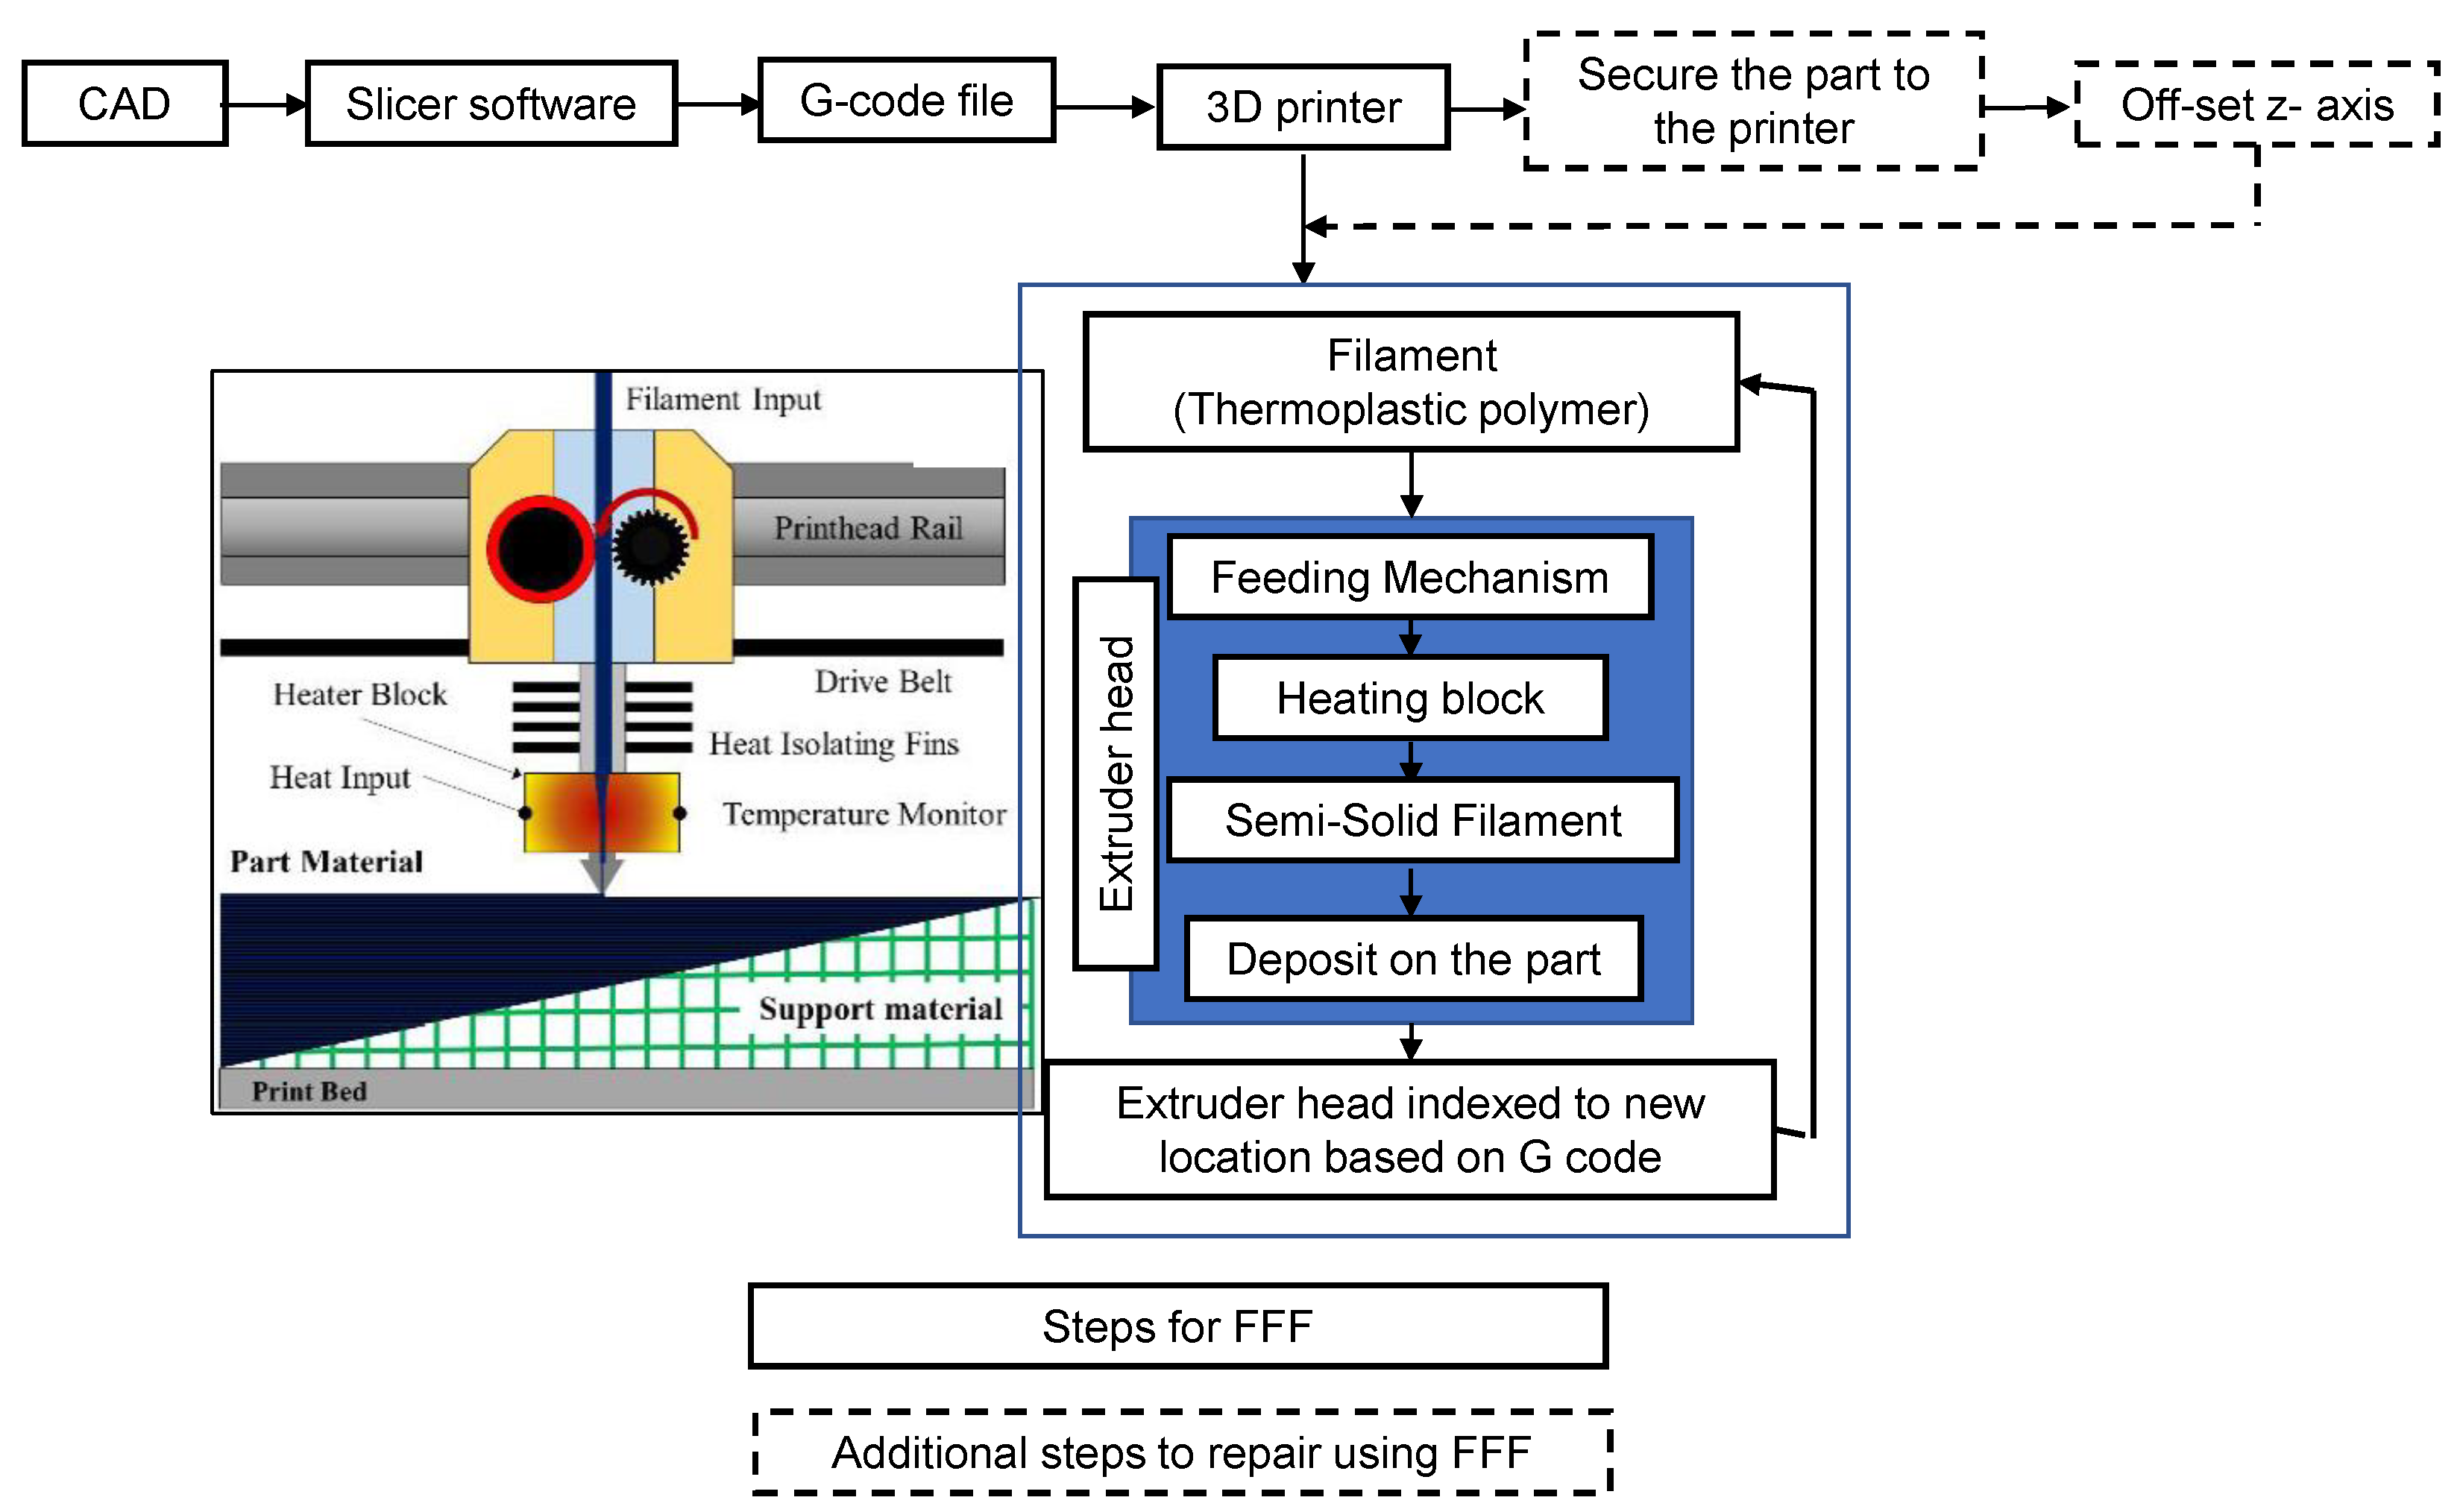
FFF works by selectively depositing elements of molten or semi-molten thermoplastic material (or composites with a thermoplastic matrix), as shown in Figure 4. These elements can be modeled as beams, with the set of elements for each layer acting as a truss. When the printing conditions are good, the layer adhesion is generally good. This layer adhesion is key to the success of the process and allows it to build functional 2.5D and 3D parts in layers. As such, it is potentially feasible for repairing or patching surface damage or cracks in thermoplastic parts and others for which the deposited material will join well with the surface as it does with a previous layer in regular FFF. In addition, it is computer controlled, so the repair will be far more precise than would be expected from a plastic weld or simple patch using a non-AM method. The exact mechanics of FFF are well described in the literature [37,49,60,61,62,63], so they will not be reproduced here. Beginning from the basic principles of the process, it follows that any potential repair task using FFF should be evaluated on three points to ensure it is feasible and has a good chance of success:
1.
The damaged part or parts should be classified as “must replace” versus “possible to repair”. If the part falls into the “must replace” category, no further analysis is needed. The engineering literature gives some potential examples of “must replace” versus “possible to repair” (for example, severe impact damage versus small cracks and surface dents), but this categorization will require judgment on behalf of the user in each individual case.
2.
The damage on the part (or each part in a set) that is classified as “possible to repair” should be appraised as to its feasibility of repair. In some cases, the damage may be simply cosmetic and not require any major intervention. On the other hand, the damage may be more severe than originally thought, become worse since the original evaluation (for example, from corrosion or fatigue), or appear superficial upon the first analysis, but severely affect its function (for example, a worn shaft or cracked gear tooth). At this point, even if the part is repairable (and repair is necessary or desirable), AM-based repair may not be the best choice.
3.
Finally, FFF should be evaluated as a feasible option for repairing any parts not rejected for repair in the first two steps. The best way to do this is to develop a checklist for the individual scenario. While each checklist will be unique, FFF repair should have at least five major considerations:
(a)
The nozzle must have access to the repair surface. Many different FFF machines exist with different degrees of freedom, so the repair needs to be evaluated in terms of the available printer. This constraint can be evaluated similarly to the tool reach for a machining process.
(b)
The required depth of repair. Many FFF machines will be limited to patching and surface-level repair.
(c)
How well the deposited material will bond with the material being repaired. If both are thermoplastic, this is usually not a major concern; however, careful surface preparation around the repair site may be required and should be planned.
(d)
Appropriate control of the printing parameters for the needed repair job.
(e)
The level of potential residual stress introduced into the base material and repair during printing.
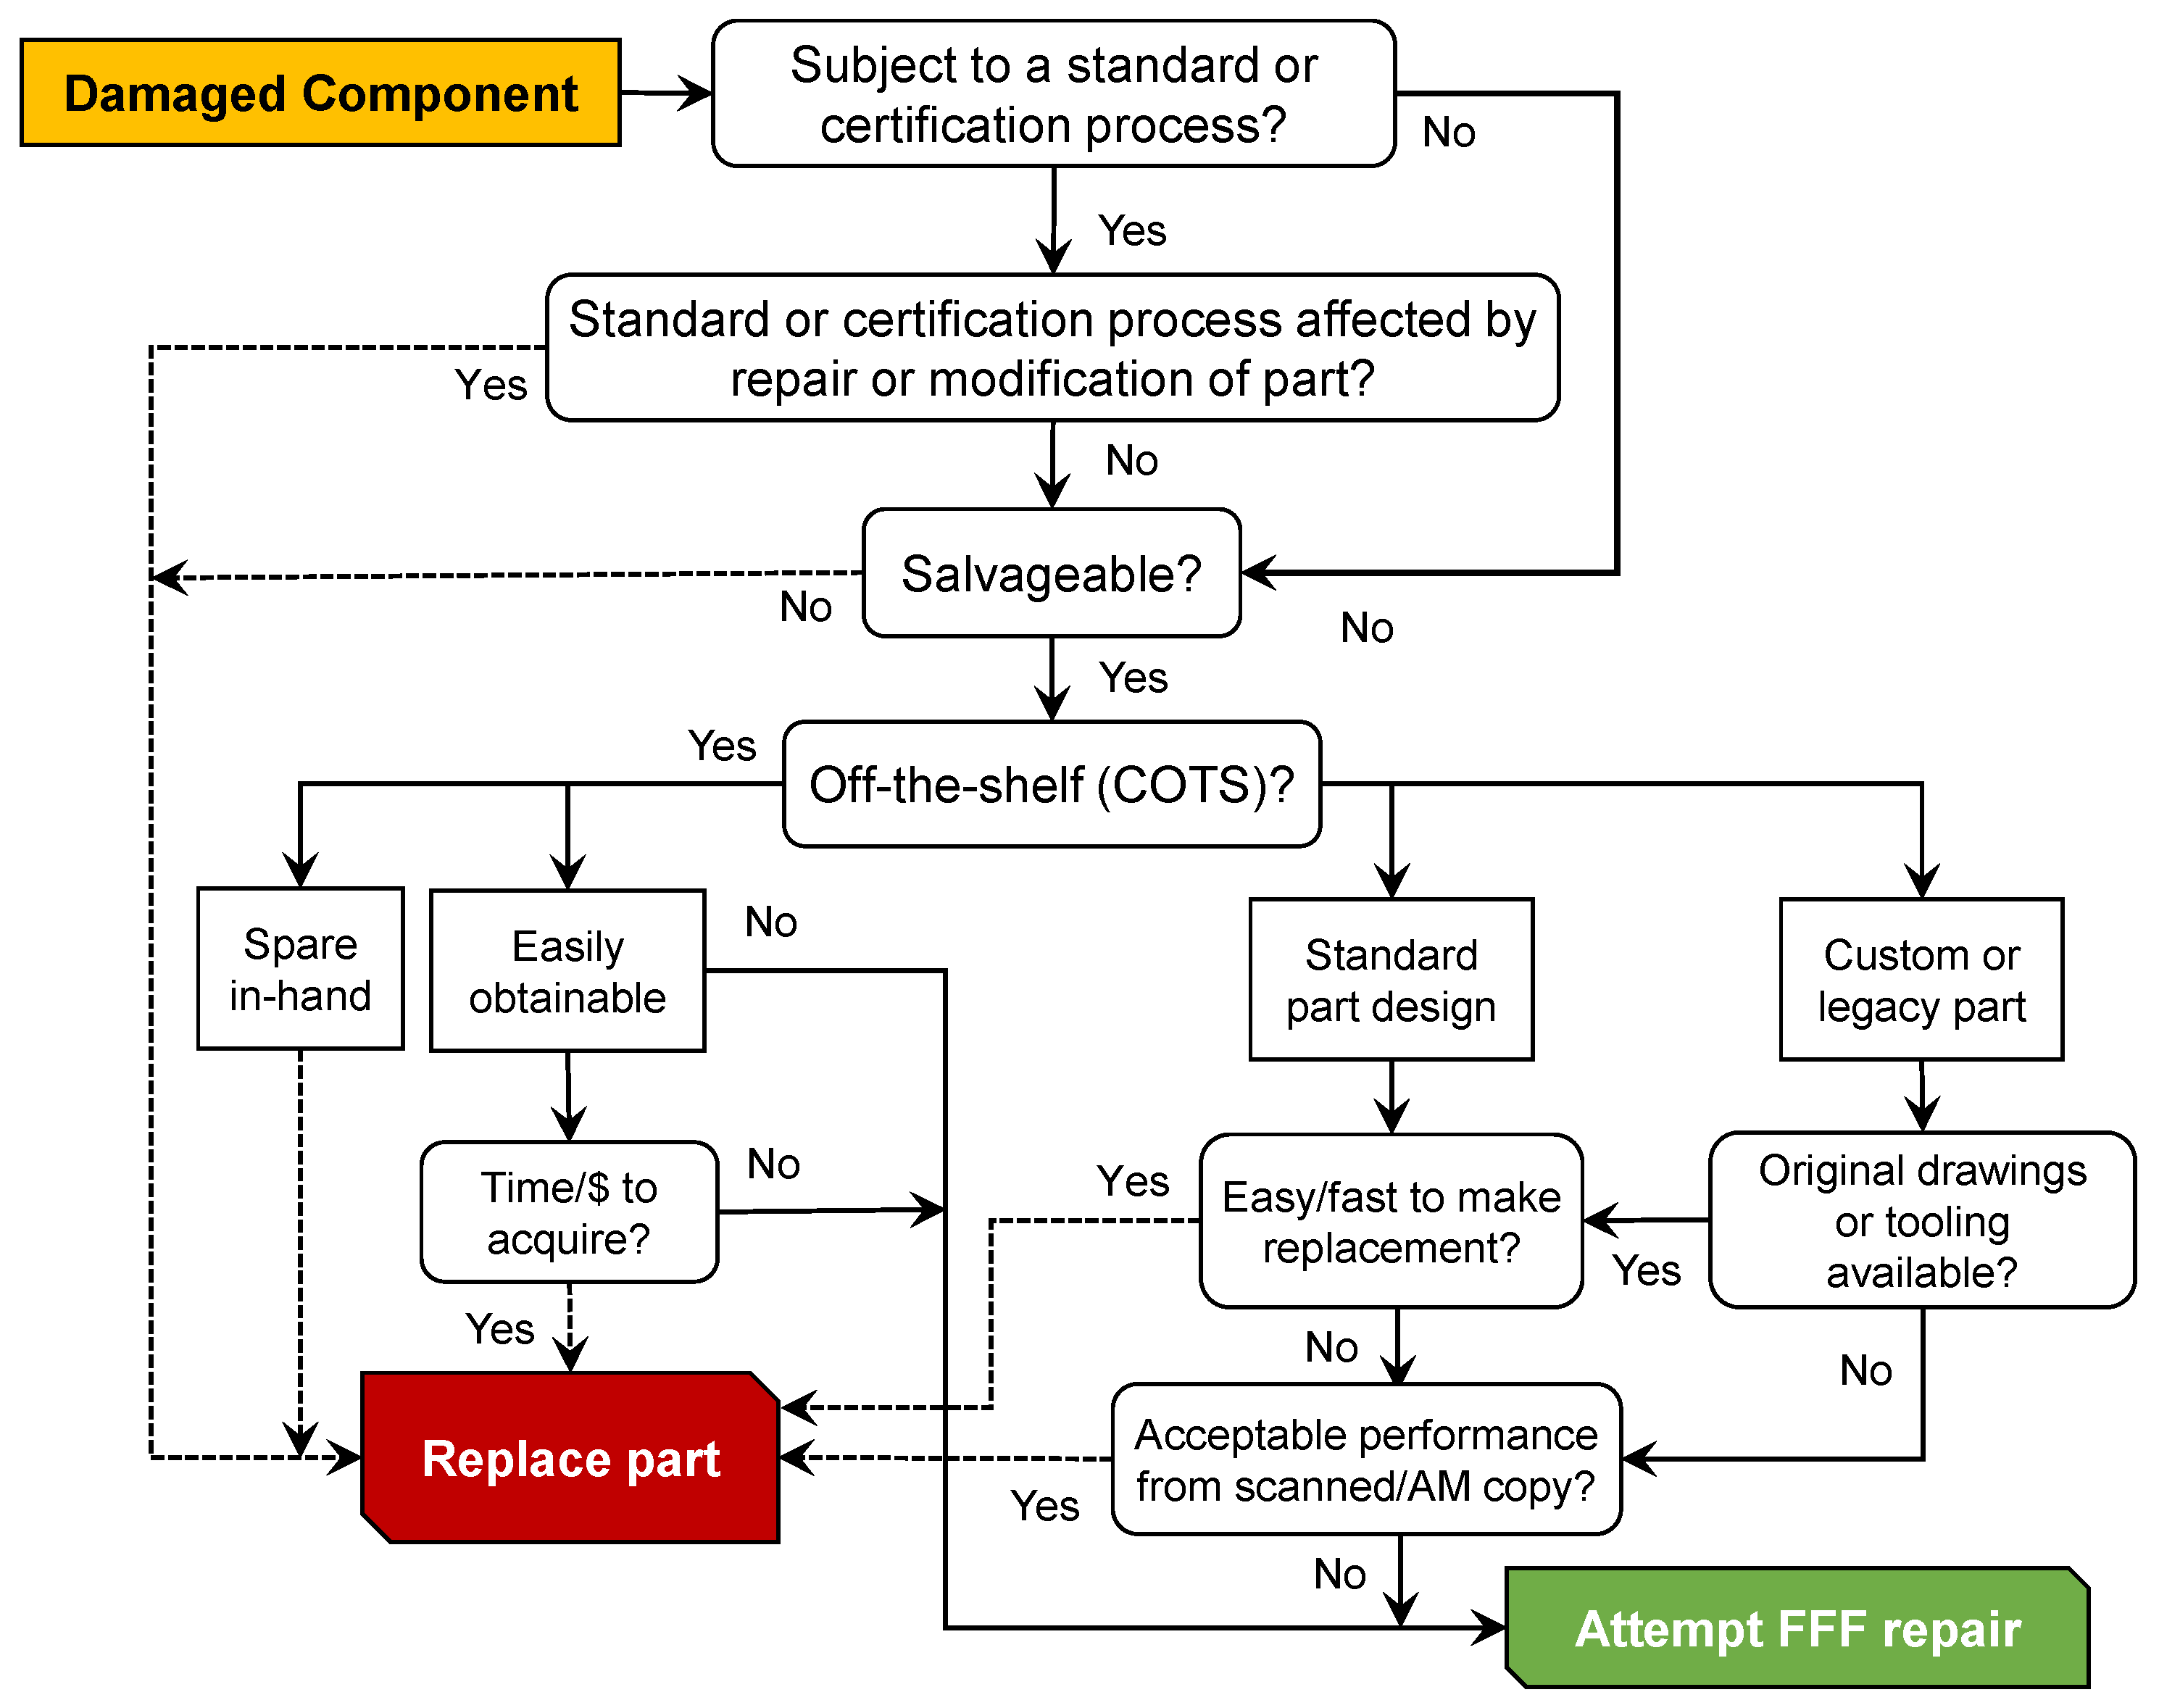
Once a damaged plastic component has been identified, it is necessary to establish whether it is both feasible and desirable to attempt a repair versus simply replacing the part. Figure 5 shows a good decision-making process for determining this. This is a general framework and could be more complex and have additional levels of analysis in specific applications. The first task is to determine if the part needs to be made and used in accordance with any standards or certification processes that may be negatively affected by repairing it. If so, it is usually best to replace the part unless it is an emergency and the repair is meant to be a stop-gap until a new part arrives. If the part is not required to be certified and it is not a total loss (e.q., clearly irreparable), the next step should be to determine if the part is commercial-off-the-shelf (COTS), for which an exact replacement can be ordered or simply purchased within the time frame and cost acceptable to the stakeholders making the decision. If yes, even a feasible repair is likely not worth the cost in terms of resources and time. If the part is a custom-designed part, it should be examined for complexity and size; if it has an easily reproduced geometry or can be scanned and effectively 3D printed fully, it might be the best choice to build a new one instead of trying to repair the old one. The size of the part is an important consideration here, as a small part that can be transported, scanned, or removed from the system is easier to replace in many cases. However, if the part is large or is in a place that is difficult to access (assuming that the printer head can access it), repairing it is perhaps more efficient. The final recommended consideration, if the part cannot be easily replaced with a COTS version or easily reproduced, is to determine if it is a legacy part (for example, an aircraft part made by a company no longer doing business) for which the specifications and manufacturing information are no longer available. In this case, repairing it might be the only feasible option until a functionally equivalent replacement can be re-designed and manufactured.
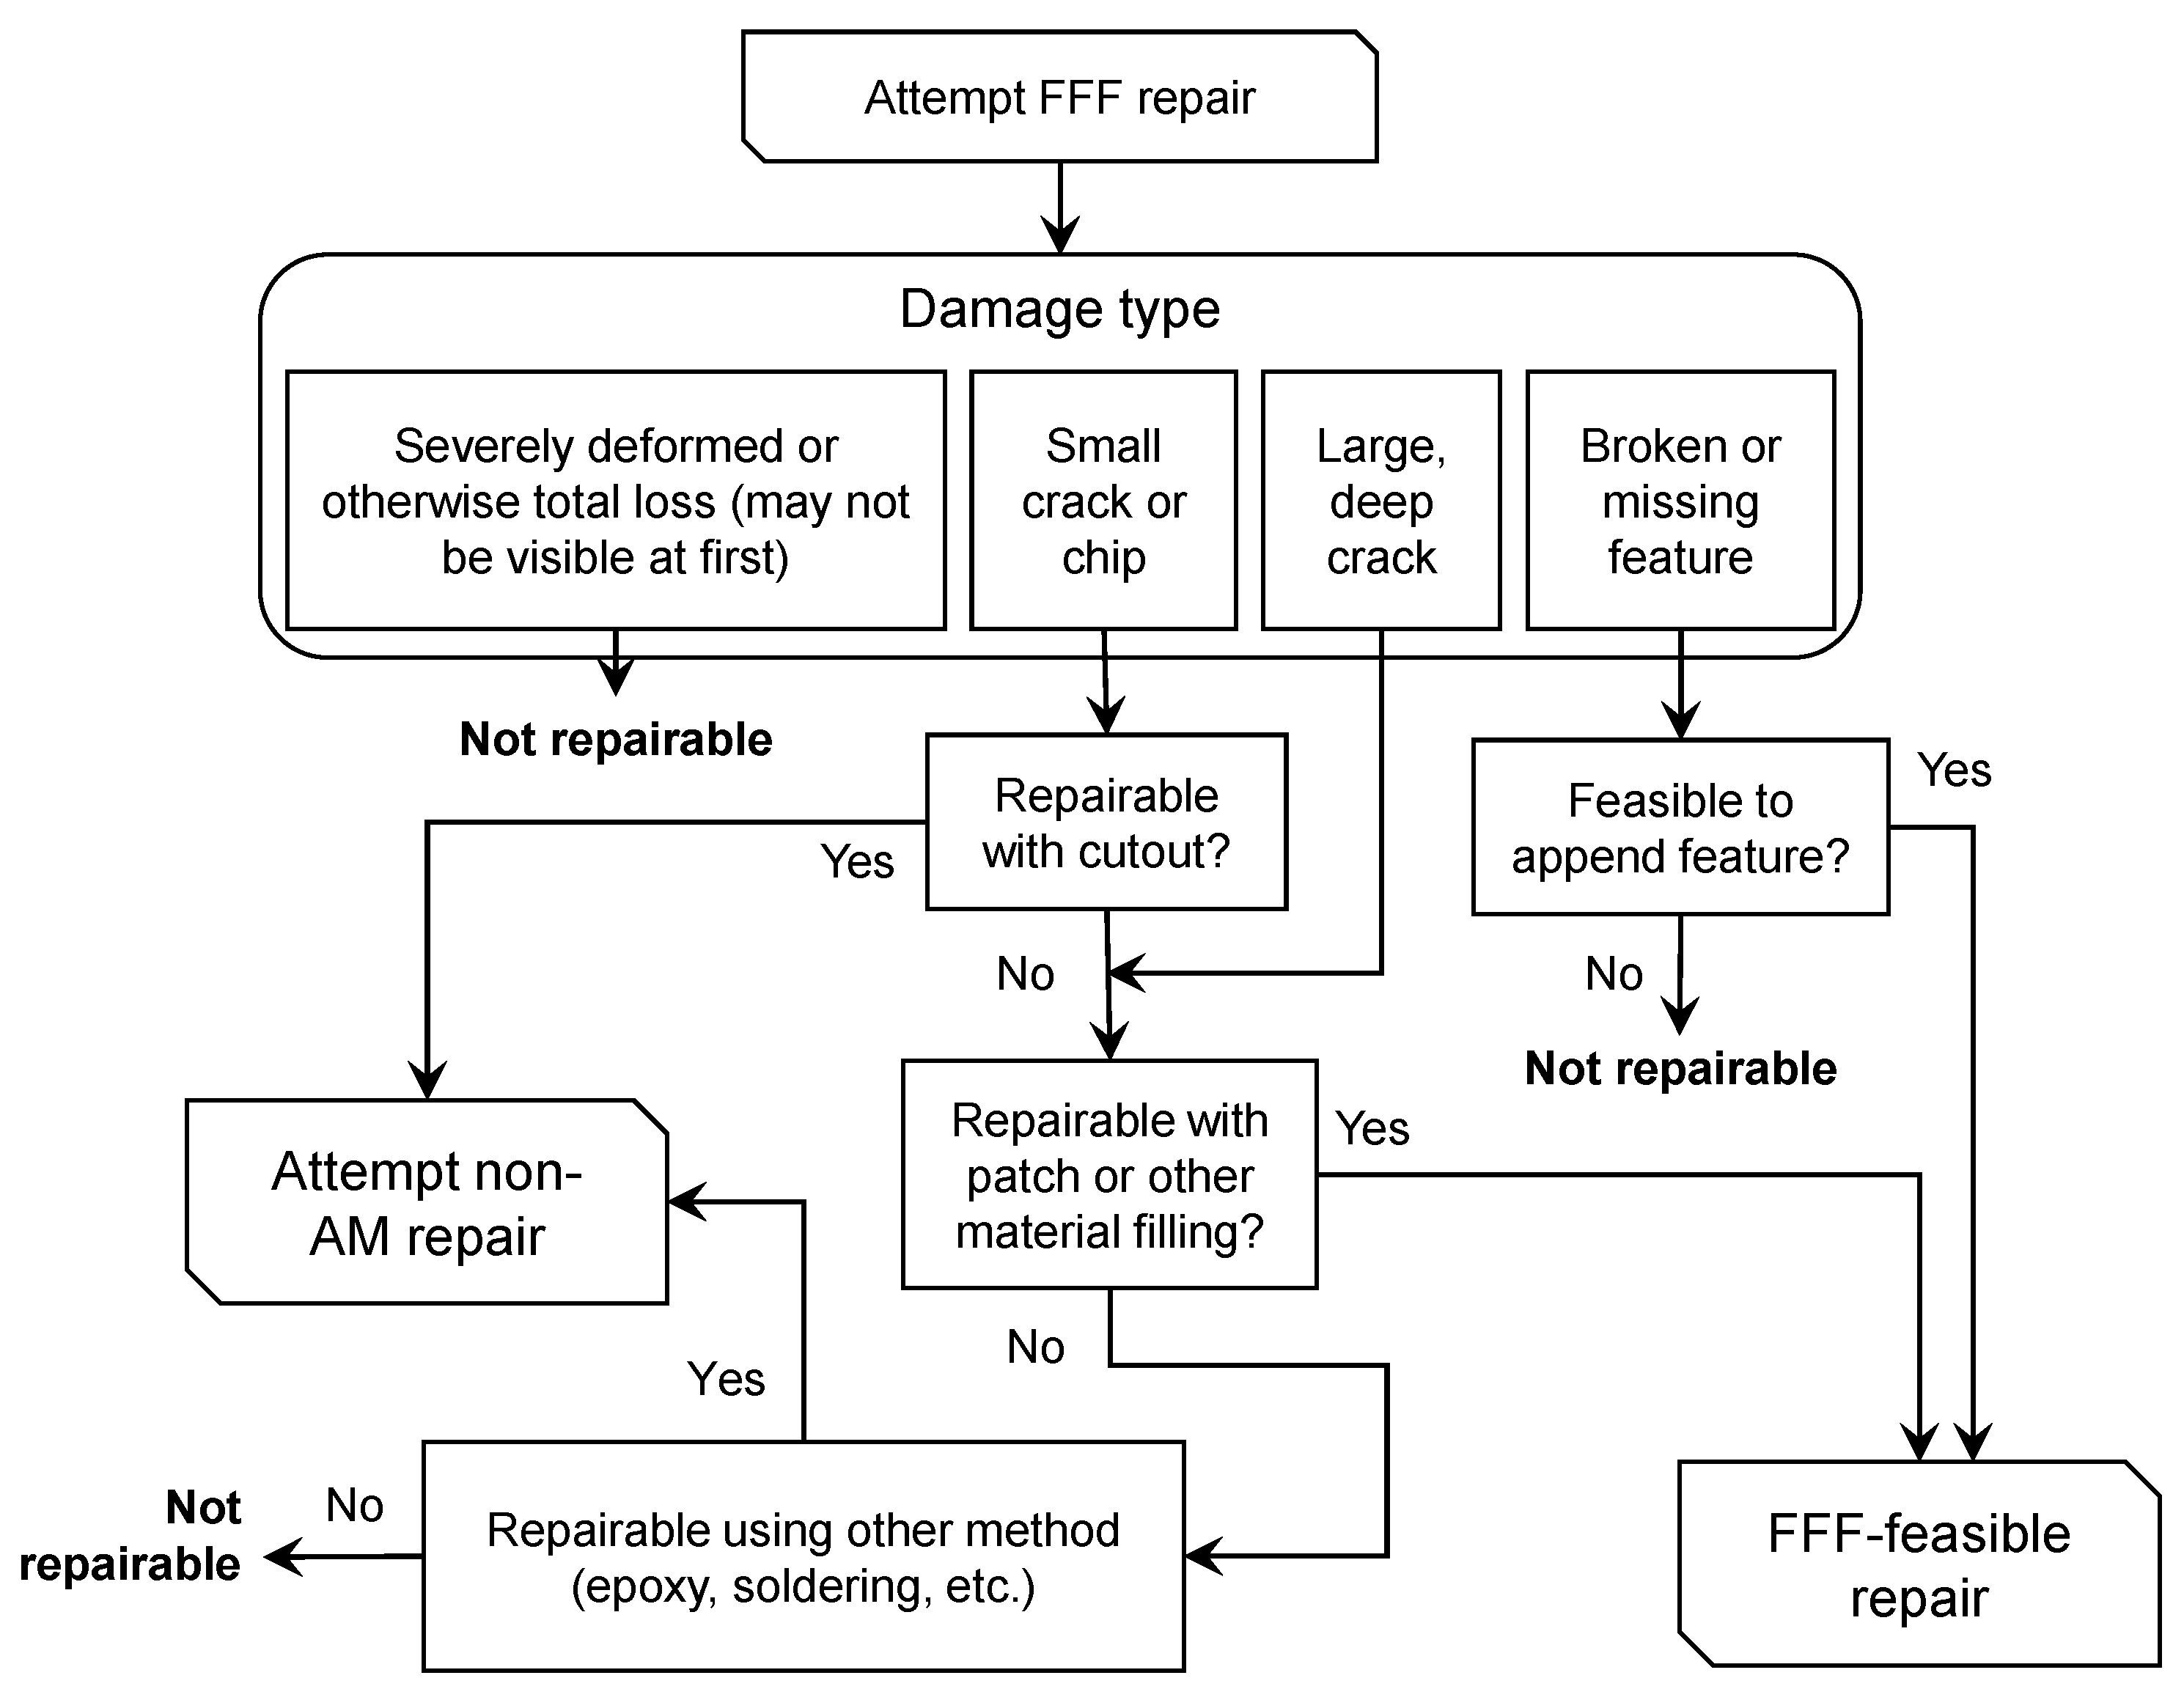
Once it has been established that the damaged plastic component is a repair candidate, it should be further analyzed to ensure that FFF is a good option. Obviously, the part to be repaired must be a thermoplastic (with a similar or lower glass transition temperature than the deposited material) or have a surface or coating to which a molten thermoplastic will adhere well. The type of damage seen on the part is also an important consideration; an example decision-making process for this level of repair is shown in Figure 6. The damage can be categorized into four basic types:
1.
Severe damage that destroys the part or makes it irreparable. While this kind of damage will often be detected before reaching this far in the repair procedure, there are cases where it might not. Cases where the damage has become worse since the original inspection or damage that is internal could be such cases.
2.
Small cracks and chips. Such damage usually does not put the part out of commission, but could lead to greater problems and system failure later on and so must be addressed.
3.
Larger or deep cracks.
4.
Broken or missing features.
Clearly, FFF repair is not an option for severe damage for which the part is a total loss. For the other three, FFF does offer options for repair, as long as the added mass and geometry of the repair will not interfere with the function or reliability of the repaired part. In many cases, some post-processing to grind or machine off excess material may be needed. For each application FFF repair is being considered for, this point needs to be discussed. In the case of small cracks and chips near the surface, FFF could be used to fill them and re-establish the original surface and dimensions after post-processing. The damage could also be repaired using a cutout to remove the stress concentration that started the crack. A large deep crack may be repaired with a patch if the geometry of the part allows this. Finally, broken and missing features may be able to be printed onto the part surfaces, as shown by Chadha et al. [49] and others. Even in these cases, it is sometimes preferable to use a more traditional method such as plastic welding or adhesives. However, these do not give the control and automated processing offered by FFF.
As plastic and polymer matrix composite (PMC) components become more sophisticated and widely used, both because of the need for lightweight designs and improvements in polymer technology, a category of “high-value” components naturally emerges. While the majority of (or most, depending on the context) plastic components made from standard materials are easily replaceable using original equipment manufacturer (OEM) spares or full-AM replacements, this is certainly not always the case. Therefore, a formal definition is needed for high-value plastic components to distinguish them from the standard or easily replaceable plastic components. While a “high-value” component could be simply defined as one that is difficult or costly to replace, a more formal definition is needed. As described by Chadha et al. [49], a part or component is high-value if it has one or more of the following characteristics:
  • It is essential to the system’s operation (with or without a spare on-hand), and the system would not be able to function within the established parameters without it.
  • It would be very difficult, expensive, or time-consuming to reproduce or replace.
  • Specialized tooling or a manufacturing process is required to produce it (and may no longer exist or be available).
  • It must be made from a specialized or unavailable material, such as a specially created blend of metal powder or chopped carbon fibers in a polymer matrix.
While the designation as high-value does not automatically ensure that it is worth a repair attempt, it does help to screen out the plastic components that are not worth the cost of repair. Note that, according to the definition offered here, which components in the system are high-value is context-dependent and may be different for each system studied and for each set of stakeholders. Legacy components (those in old or obsolete systems that are no longer supported) for which original drawings or tooling no longer exist may be considered to be automatically high-value, but they should still be evaluated to ensure that they meet the criteria set by the stakeholders for a worthwhile repair. Furthermore, note that a standard, low-value plastic component may become a high-value component temporarily if it fails or is at risk of failing and a replacement is not immediately available.
While FFF repair is technically feasible in many cases, especially for high-value parts, an objection could arise that many good repair processes already exist for thermoplastic parts, and so, applying FFF as a repair method may not be worth the cost and effort to develop this application. It could also be said that the application space for FFF as a repair method is rather small compared to general (unrestricted) methods such as epoxy and other adhesives. While it is true that it would not be efficient or cost-effective for many simple consumer products, FFF-driven repair offers several major benefits not offered by other existing processes, the pursuit of which certainly motivates the development of FFF-driven repair:
1.
FFF repair is fully automated and computer-driven.
2.
FFF repairs are extremely precise relative to other thermoplastic repair processes.
3.
Repair materials can be changed on-demand.
4.
The repair settings can be modified nearly infinitely, allowing them to be optimized for the repair job and even be changed on-the-fly if a repair plan is proving unsuccessful.
5.
No direct human interaction is needed during the repair, allowing it to be useful in dangerous or inaccessible repair jobs.
6.
Since the raw material is driven (filament, screw, or plunger) and not dropped or sprayed onto the printed surface, it is possible to perform repairs on angled and even upside-down surfaces if the settings are tuned properly.
7.
FFF can be integrated with a camera and other sensors, which can automatically detect and repair cracks and other problems within its capability without the need for direct human intervention.
To further explore the feasibility of FFF-driven repair of thermoplastic parts, a rigorous case study was developed and completed; it is described in the next section. Many of the practical considerations, issues, and potential problems that could be encountered were explored in this case study. It also gives useful guidance on how to implement a practical FFF repair method.

4. Case Study—Repair of Cracked Beams under Three-Point Load

4.1. Purpose and Goals

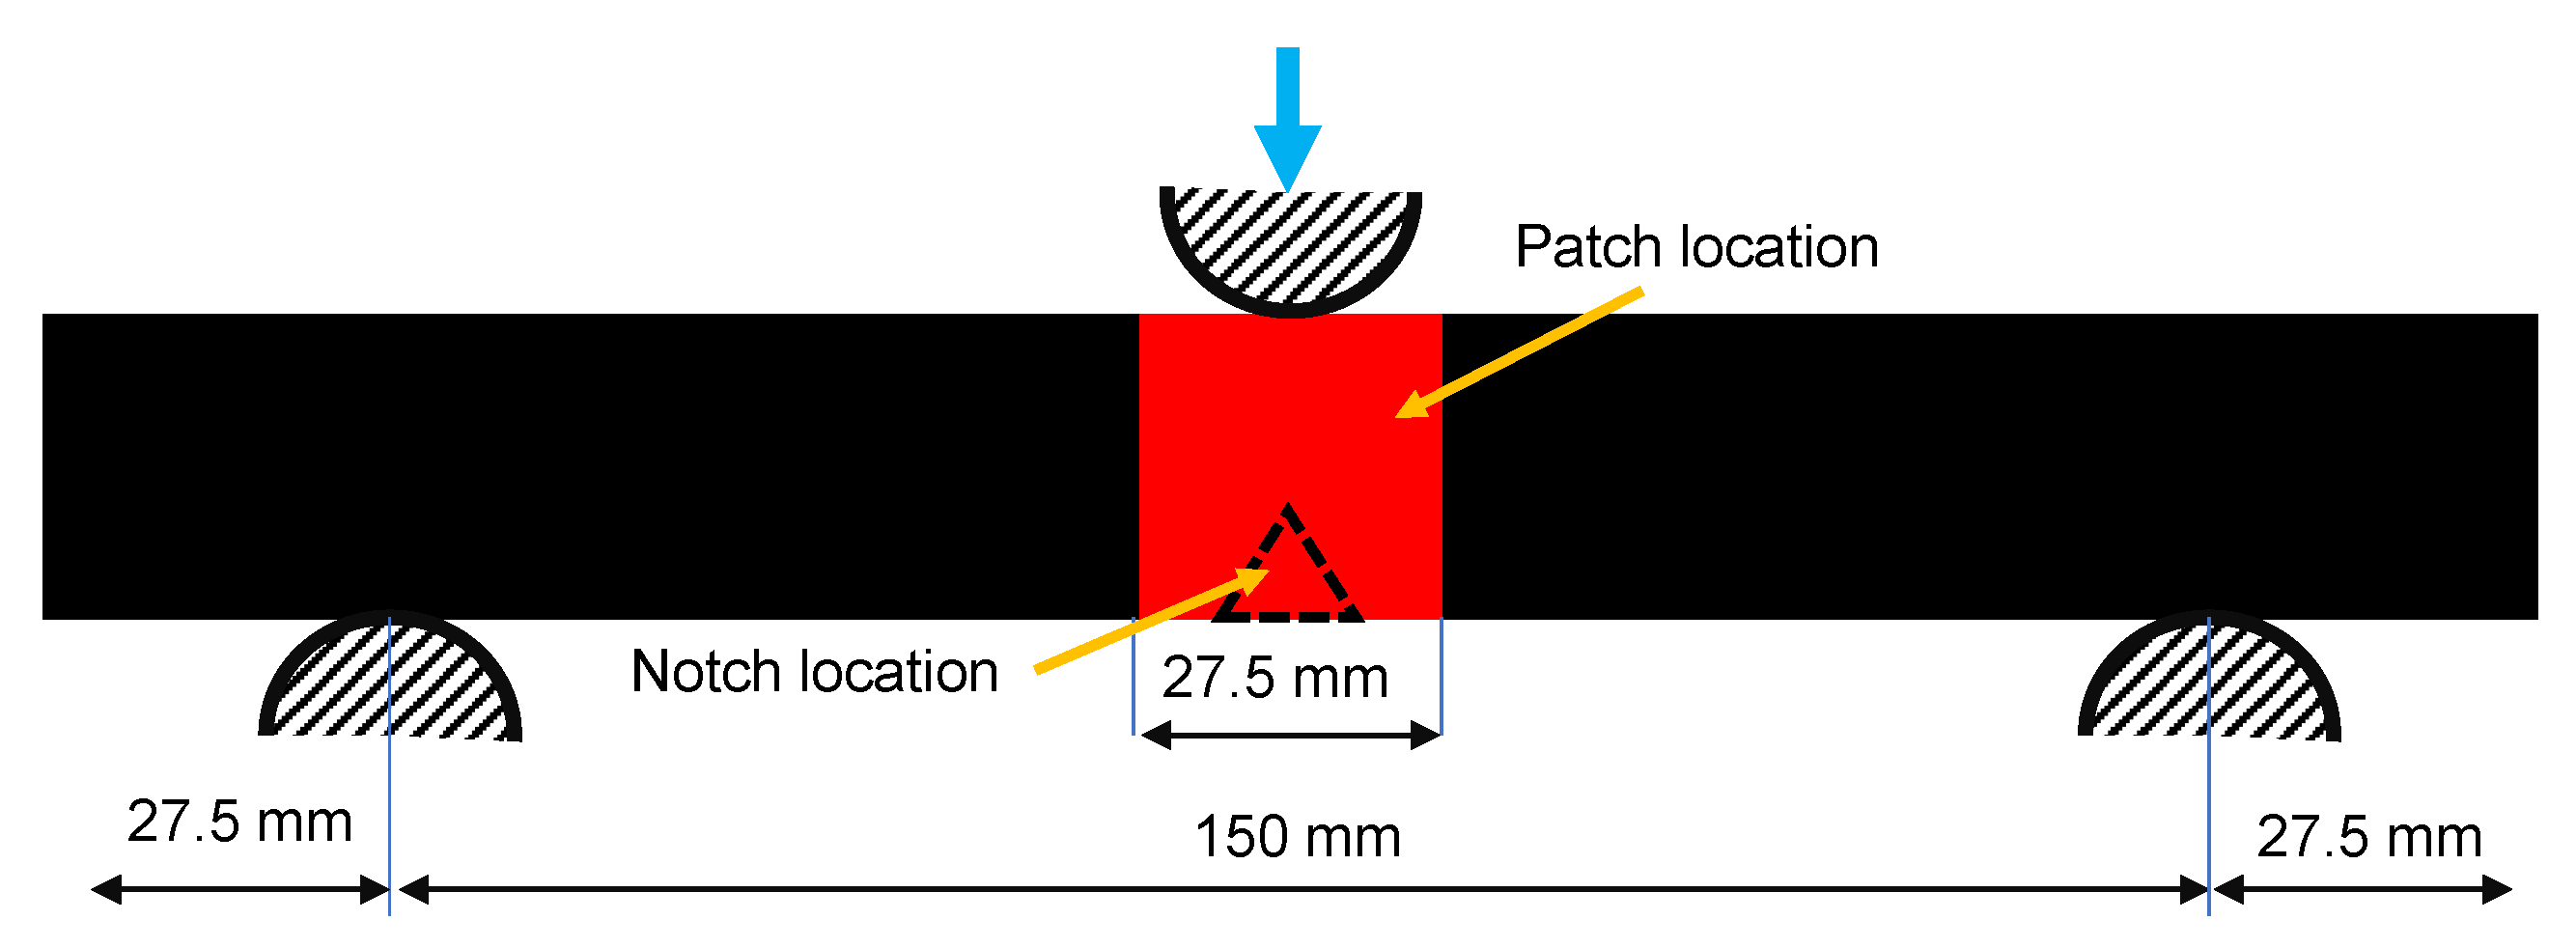
In this case study, beams made from molded acrylonitrile butadiene styrene (ABS) were subjected to a three-point structural load (Figure 7). As with many AM-related experiments, no specific testing standard was found to be useful for this work. Given the geometry and setup, ASTM D5045 was used as a guide to preparing the samples before patching. The beams cracked under the center load (the crack represented by a pre-cracked machined notch) and needed to be repaired to avoid structural collapse. The purpose of the repair was to prevent the cracks from becoming worse and to restore the structural integrity of the beams under the original loading. The main criterion for success was for the patched beams to be able to hold at least the load of a non-cracked beam. To do so, a strong adhesive bond should be present at the interface (as described in Section 1). As a result, the effect of three printing parameters (print speed, print temperature, and raster angle) on the adhesive strength of the base material was also studied. These parameters are described in detail in the following section. Though many printing parameters can affect adhesive strength, these three parameters were chosen as they are the most common parameters that are varied and can easily be controlled during 3D printing (which can play an important role during the repair automation process). No epoxy or post-processing can be used on the repairs, only the basic FFF process with ABS filler material. Given the direction of the loading, the patches needed to be applied to the sides of the beams, both to allow the interface to be parallel to the loading and because there was enough room on the sides for the patches to not interfere with the function of the beams.

4.2. Materials and Methods

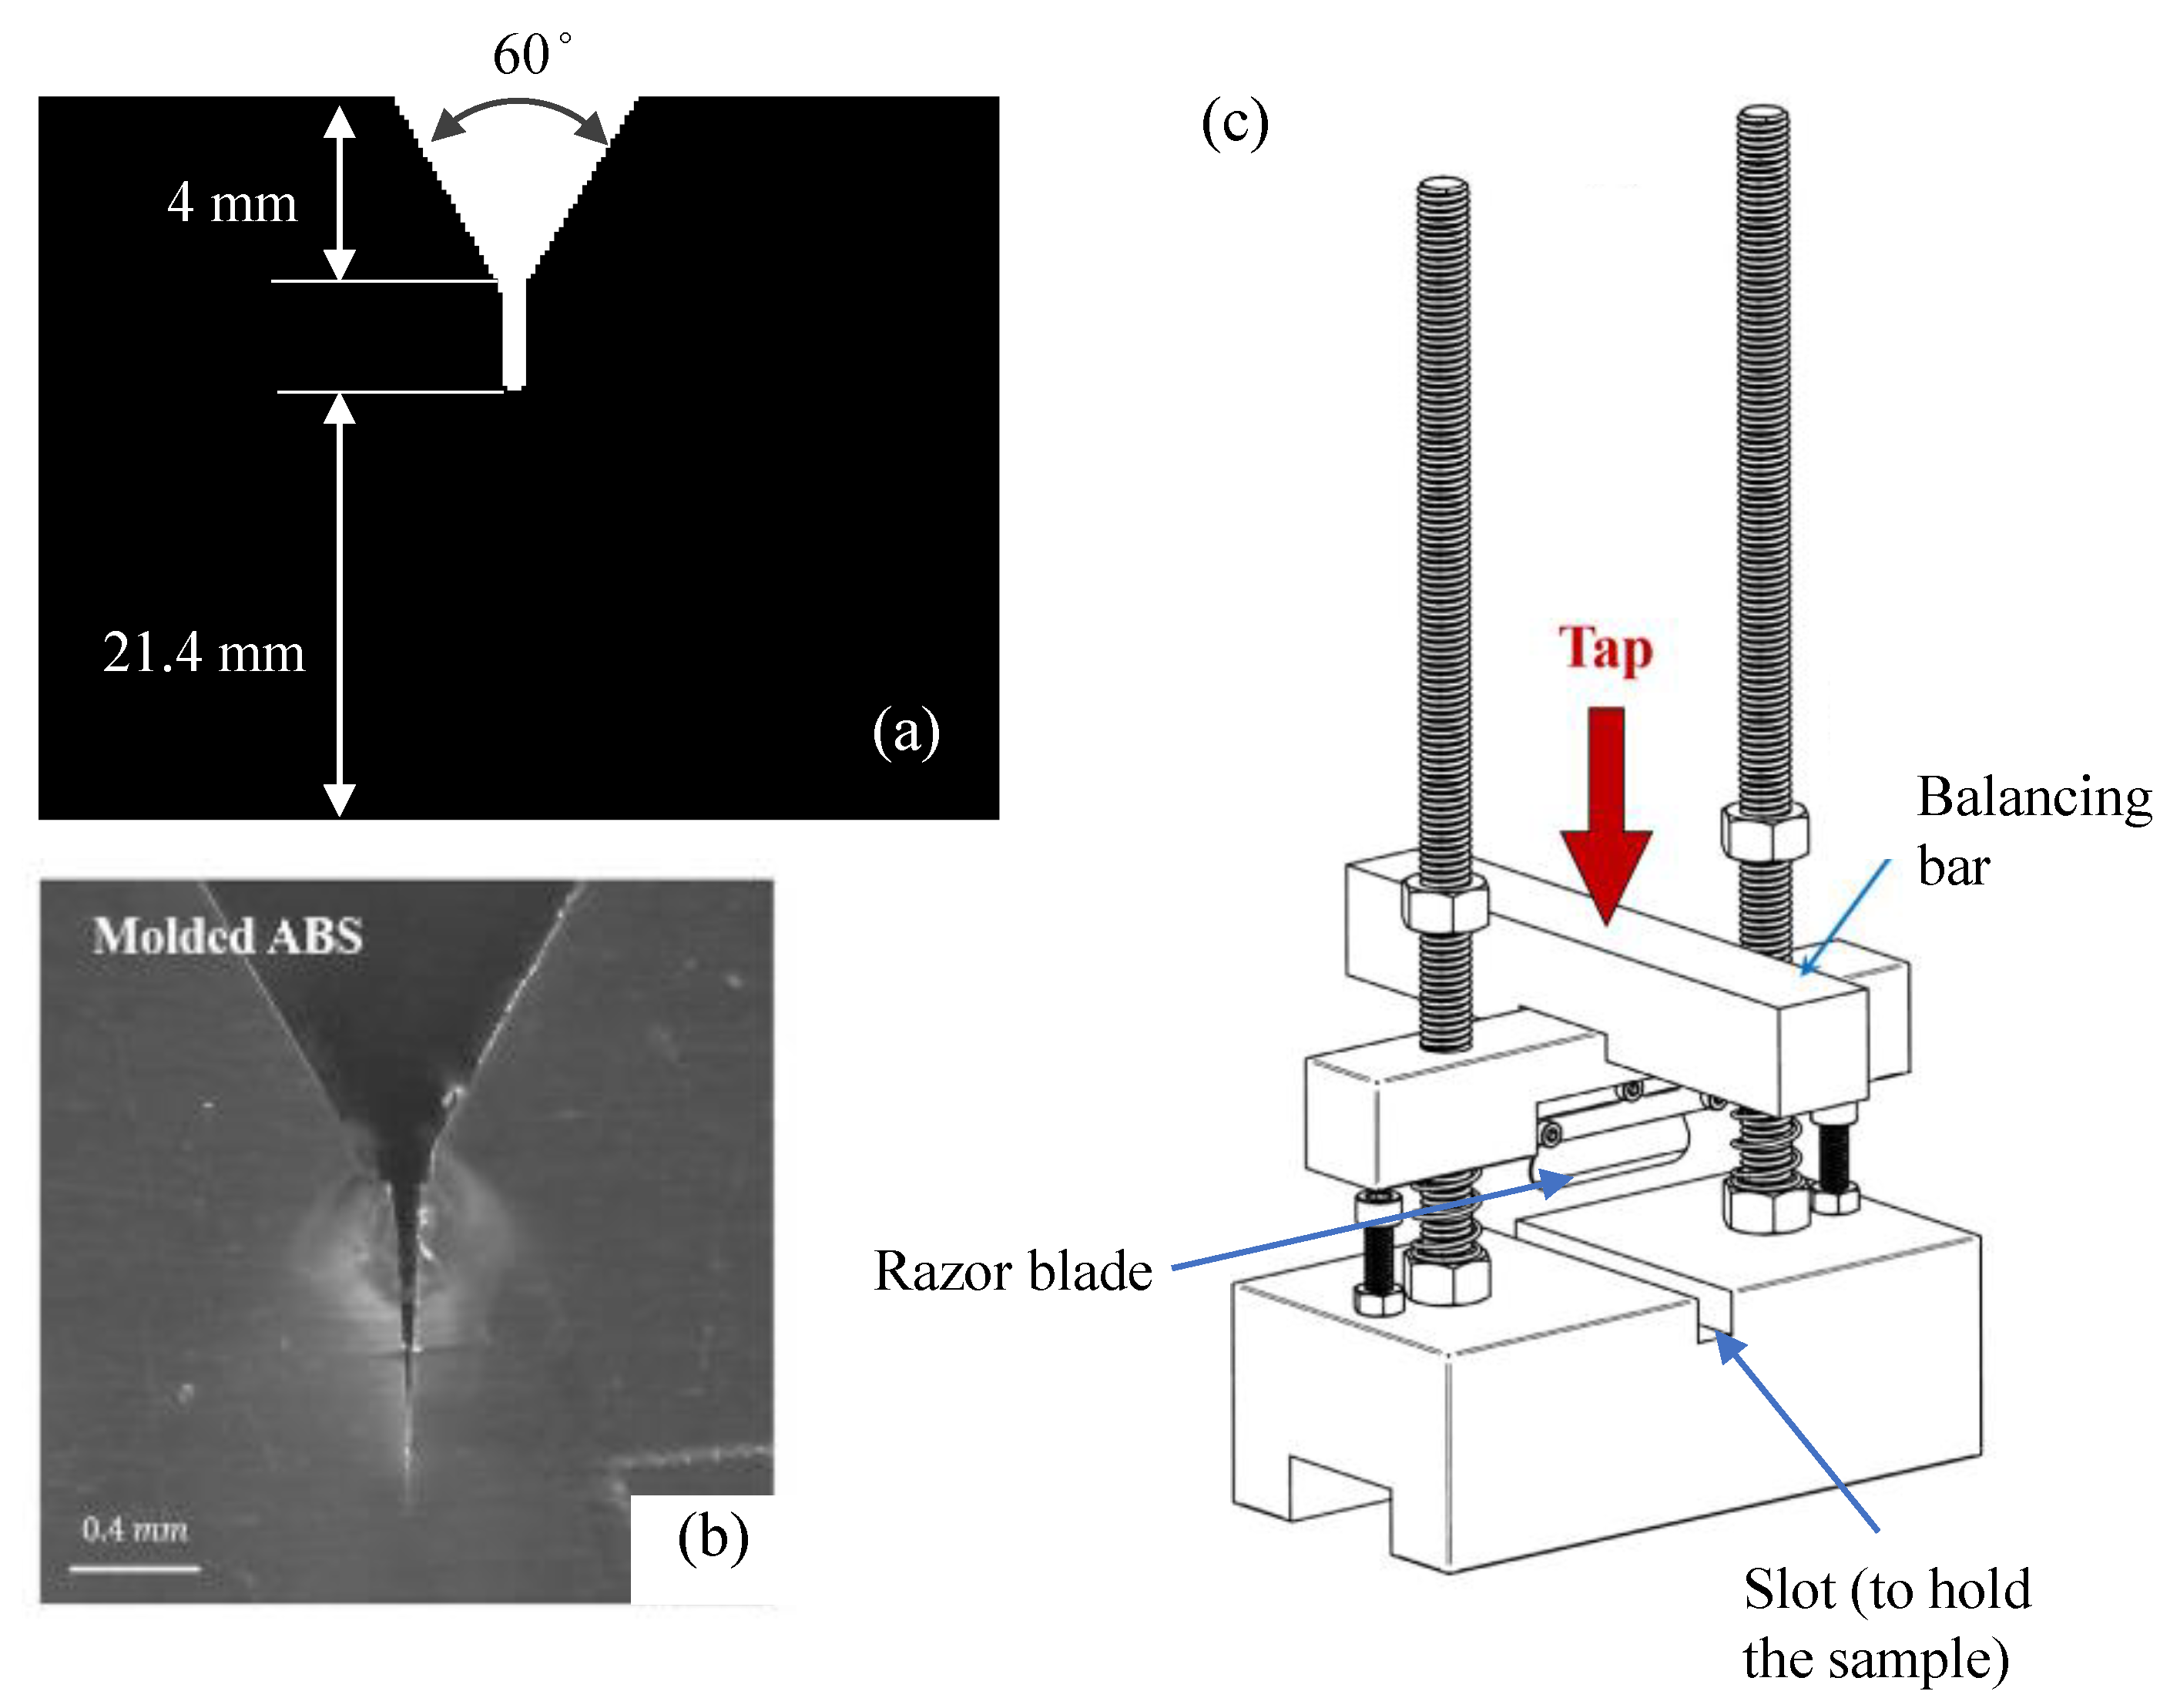
Pre-manufactured ABS bars (molded and cut to size from a sheet with a table saw, supplied by McMaster Carr) 8 inches (203 mm) long, 3/8 inches (9.5 mm) thick, and 1 inch (25.4 mm) wide were used in the study. A 4 mm-deep notch was milled at the center of the bar using a 60 degree router bit with a 0.2 mm tip, as shown in Figure 8a. A sharp pre-crack (Figure 8b) was then introduced to the bars using a desktop pre-cracking device developed by Patterson et al. [64], as shown in Figure 8c.
To pre-crack the samples, the samples obtained after milling the notches were secured in the slot provided at the base of the test rig. The relative location of the sample and the blade holder was adjusted to ensure that the razor blade aligned with the valley of the milled notch (the desired location of the pre-crack). The end stops were then adjusted to the desired length. Finally, the balancing weight was aligned on the blade holder and tapped by the dead blow hammer. The end stops prevented the movement of the blade holder, which restricted the crack length. The razor blade was changed after every 15 samples to ensure only sharp-edged blades were used to create the cracks. Only one tap was used to develop a pre-crack to prevent crazing and surface hardening of the material around the crack by the pressure, heat, or multiple hits. The length of the pre-cracks was measured using calipers under a low-resolution microscope. The length of material present in front of the pre-crack for all the bars was within 1% error, as required in ISO 13586:2018. Detailed process repeatability and dimensional accuracy analysis for this device can be seen in [64].
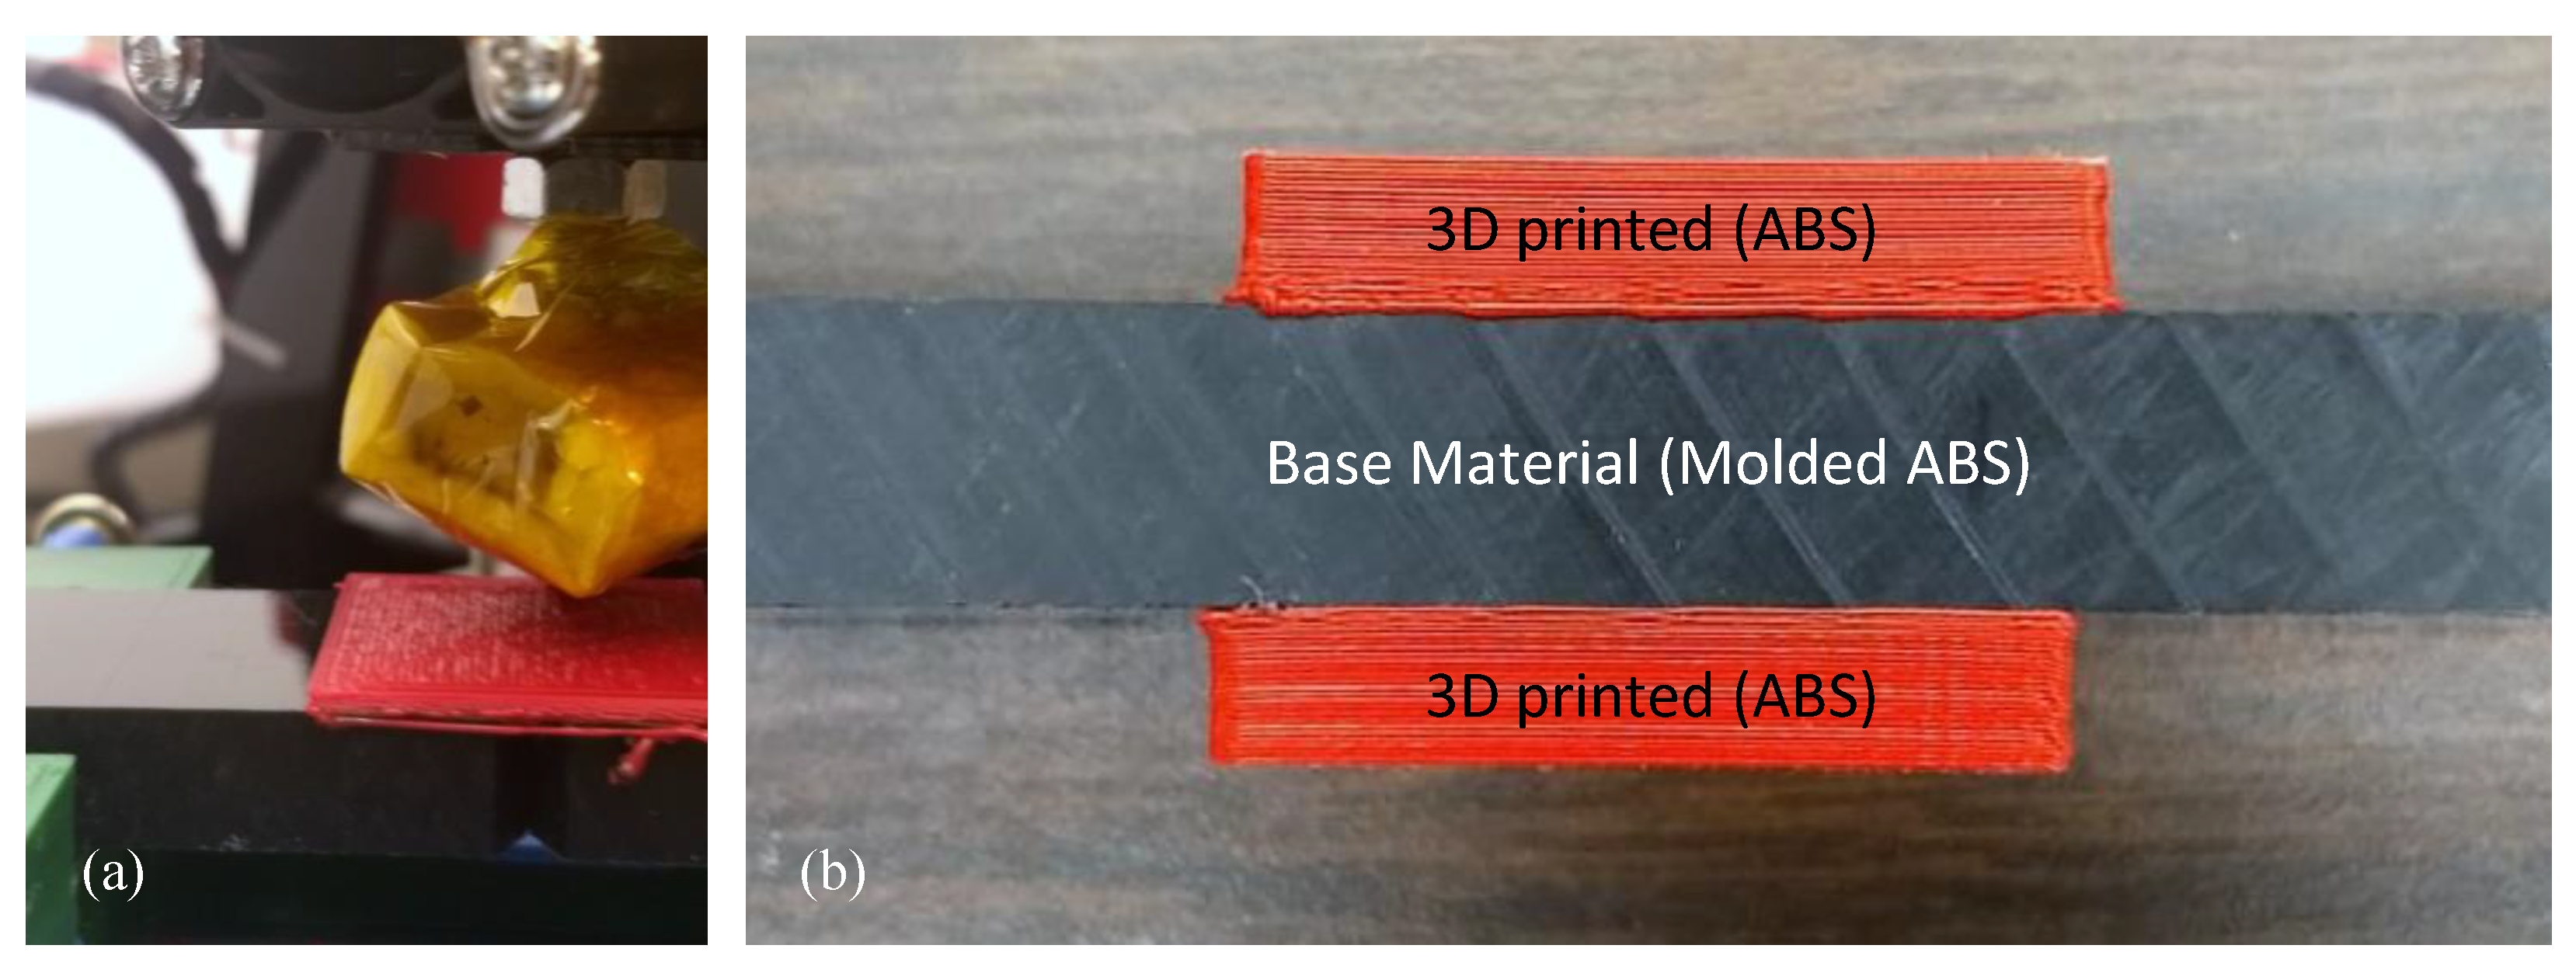
To repair the cracked specimens, patches of dimensions 25.4 mm × 25.4 mm × 5 mm were printed directly on top of the damaged material on both sides, as shown in Figure 9. The dimensions of the patches were kept constant across all samples so that the load at the failure (and, in turn, the adhesive strength) could be directly compared to determine the role played by varying the parameters. Ultimaker® Cura® was used as the pre-processing and slicing software. The printing parameters can affect the material properties of the 3D-printed product, as described in the literature [61,65,66,67]. Three parameters: print speed, raster angle, and printing temperature, were identified as the parameters that should affect the cohesive strength and the adhesive bonding at the interface formed between the pre-cracked material (base) and the 3D-printed material (printed directly on top of the base material). The print temperature is the temperature at which the material is heated before being deposited. The print speed is the speed of the extruder head, which controls the speed at which the material is deposited. The raster angle is the direction in which the material is deposited. A two-level full-factorial design of experiments (DOE) was followed for this study, as shown in Table 1 and Table 2. Apart from the chosen parameters, several other printing parameters can also affect the adhesive strength (such as layer height, material width, pre-heating of the sample, and enclosure temperature). However, these parameters were kept constant for this study to generate a full-factorial DOE of a manageable size.

4.3. Sample Preparation

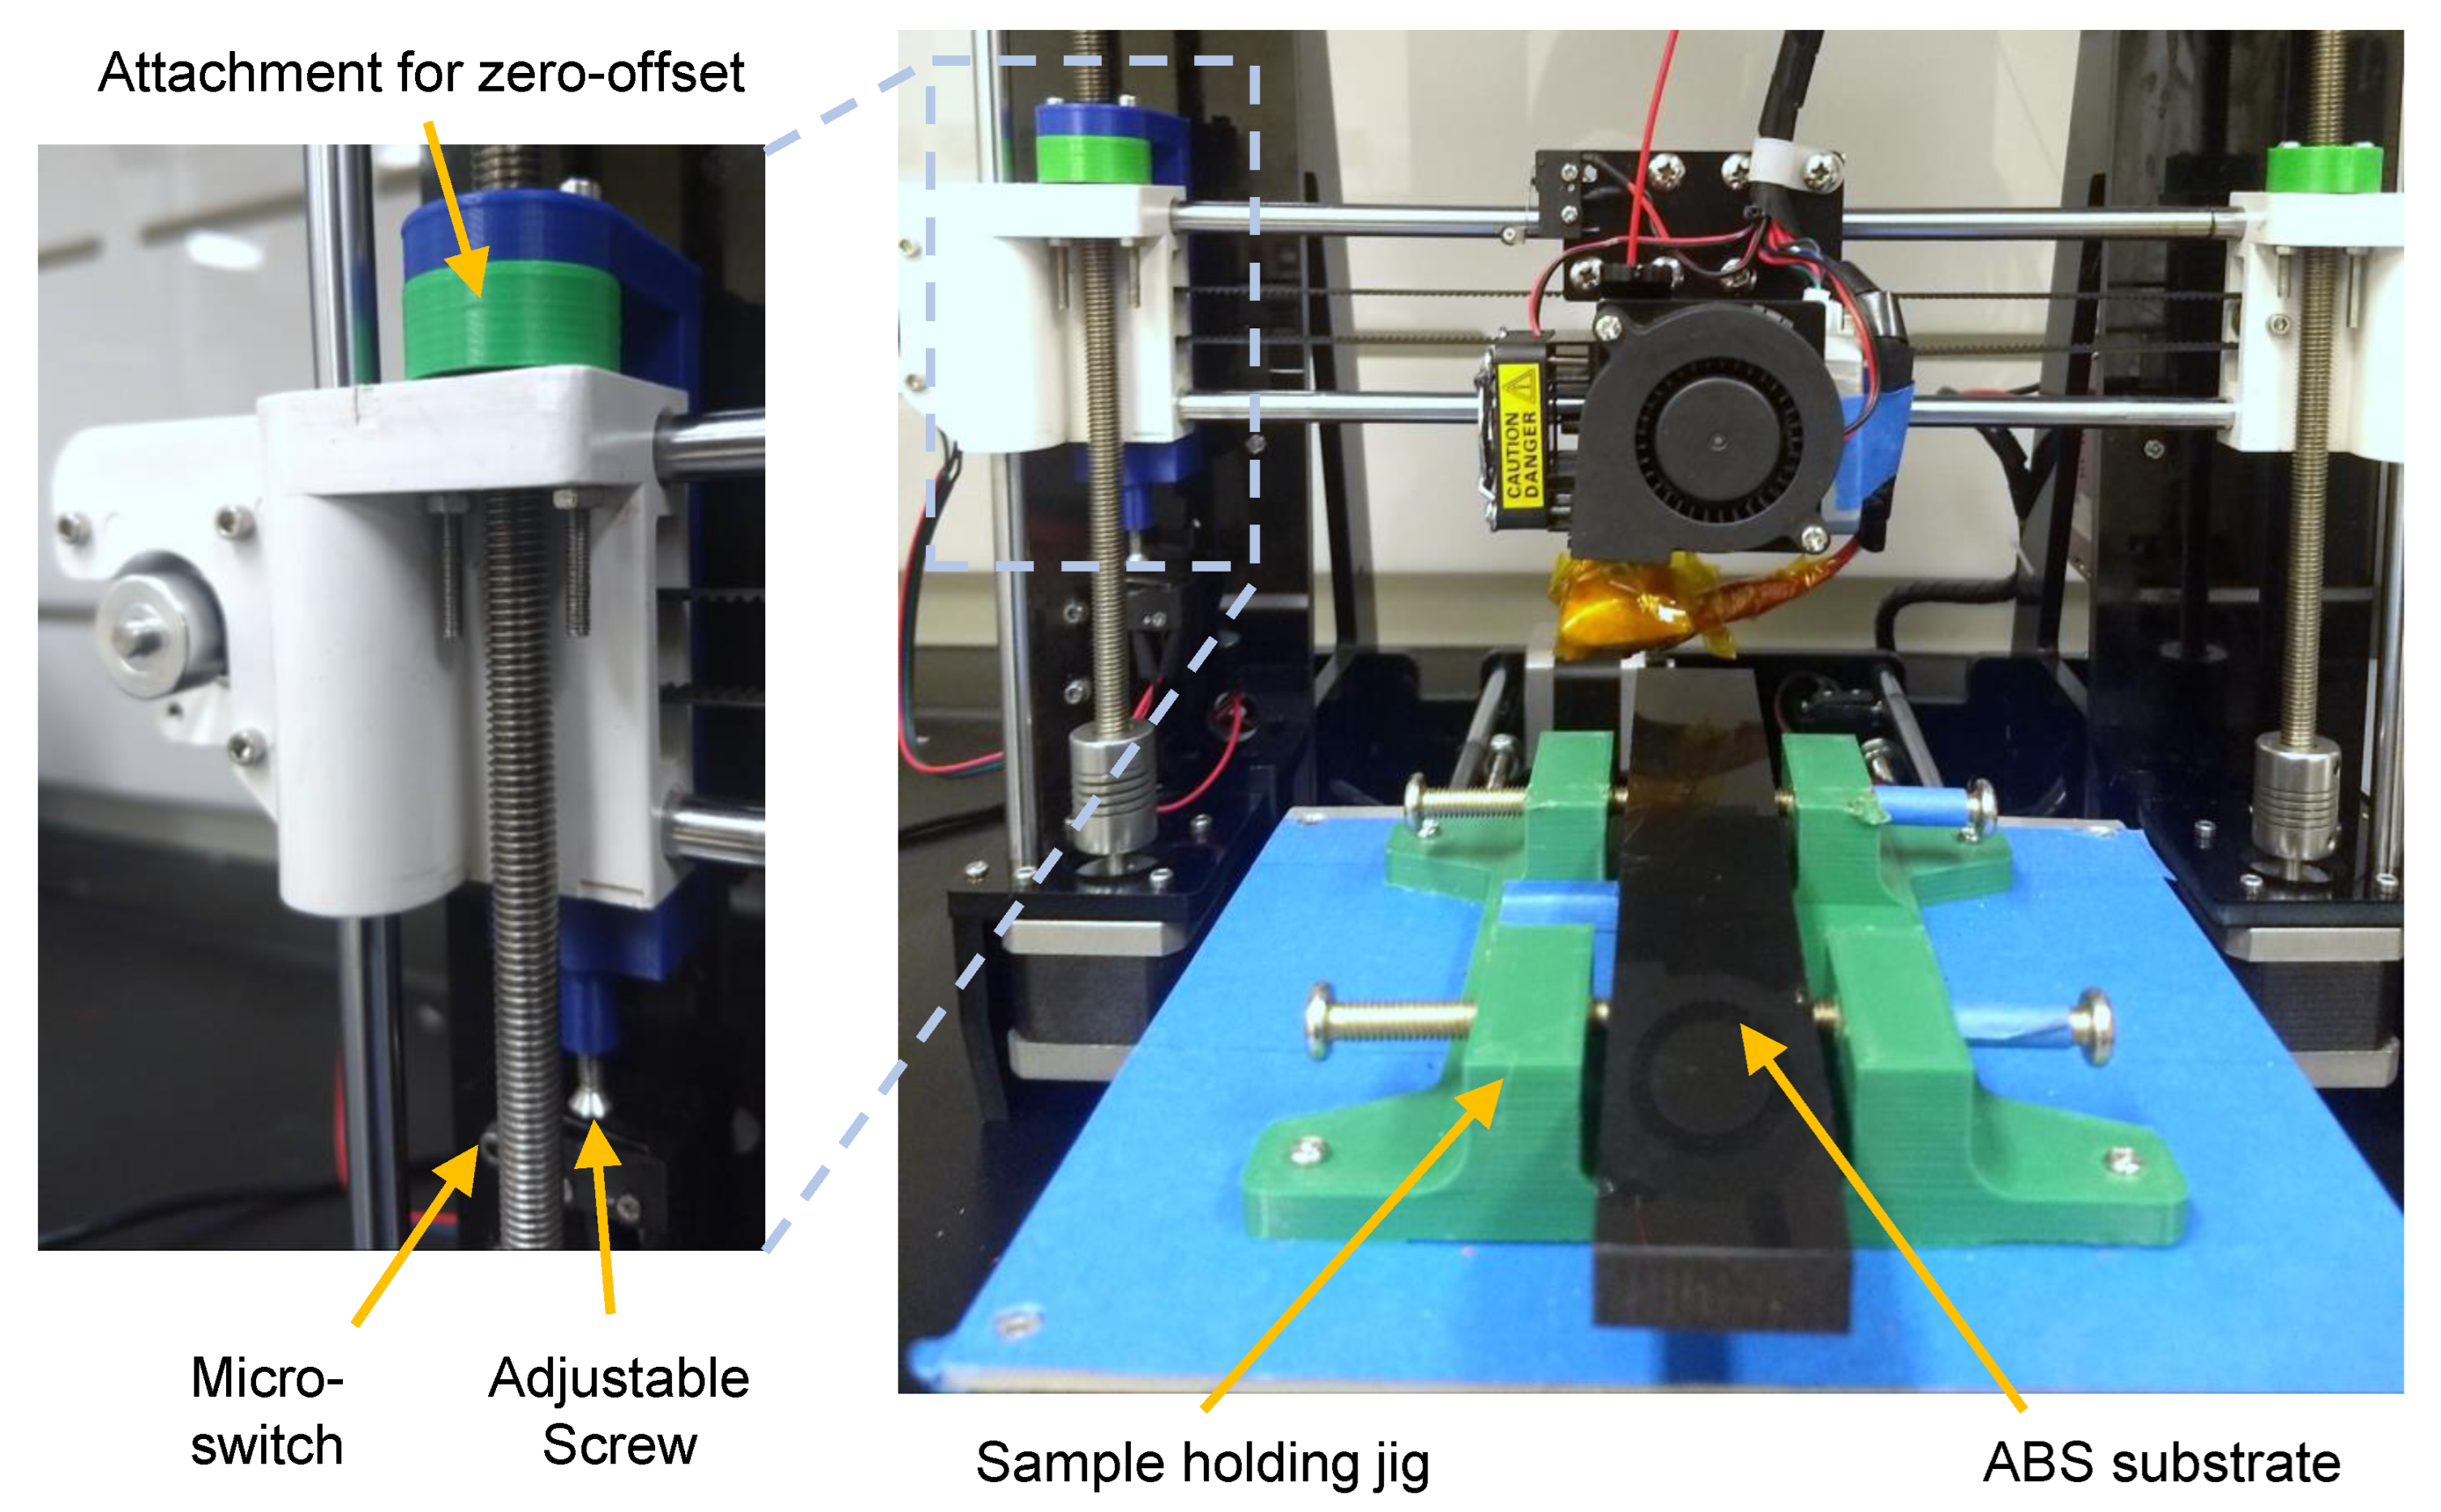
To print the patches above an existing surface, two precautions need to be taken. Firstly, the bar needs to be secured firmly at the desired location on the print bed such that it does not move during the printing process. Secondly, the z-axis (axis perpendicular to the plane of the print bed) should be offset to ensure that the origin referred to in the G-code lies above the print surface. In this study, a jig was designed and used to secure the ABS bars during the printing operation. The jig was fixed on top of the print bed using nuts and bolts, as shown in Figure 10. An additional attachment was designed and attached to the rails of the 3D printer to offset the z-axis. The attachment consisted of two parts: a rigid body and an extendable flat head screw. The rigid body was designed such that it could be secured on the rails of the printer. The extendable screw was then placed at the bottom of the body. When this screw came in contact with the micro-switch, it signaled the printer that it had reached z = 0, thereby offsetting it to the printing surface rather than the top of the print bed. The extension of the screw protruding outside the body could be controlled by simple rotation, giving the flexibility to adjust the z-offset so the distance between the surface and the printer nozzle could be adjusted very precisely. Slight variations in the bars (9.5 mm + 0.1 mm) were observed due to the tolerance in the manufacturing conditions of the purchased bars. Thus, the extension of the screw was adjusted for each sample to ensure that at the z = 0 plane, the tip of the print nozzle barely touched the bar’s surface. This allowed the substrate to be heated by the nozzle as it scanned to print the patch, causing the deposited material to be able to penetrate slightly into the bar surface as the surface melted and make a strong bond with it. In future works, an automatic bed level switch could be used for this purpose as well. After securing the pre-cracked bar and offsetting the z-axis for each sample, the bars were cleaned with 95% pure isopropyl alcohol using a gauze pad. Once the isopropyl alcohol evaporated, the G-code generated by Cura® was loaded to the printer, and the patch was printed as any regular 3D printing would be performed.

4.4. Experimental Setup and Results

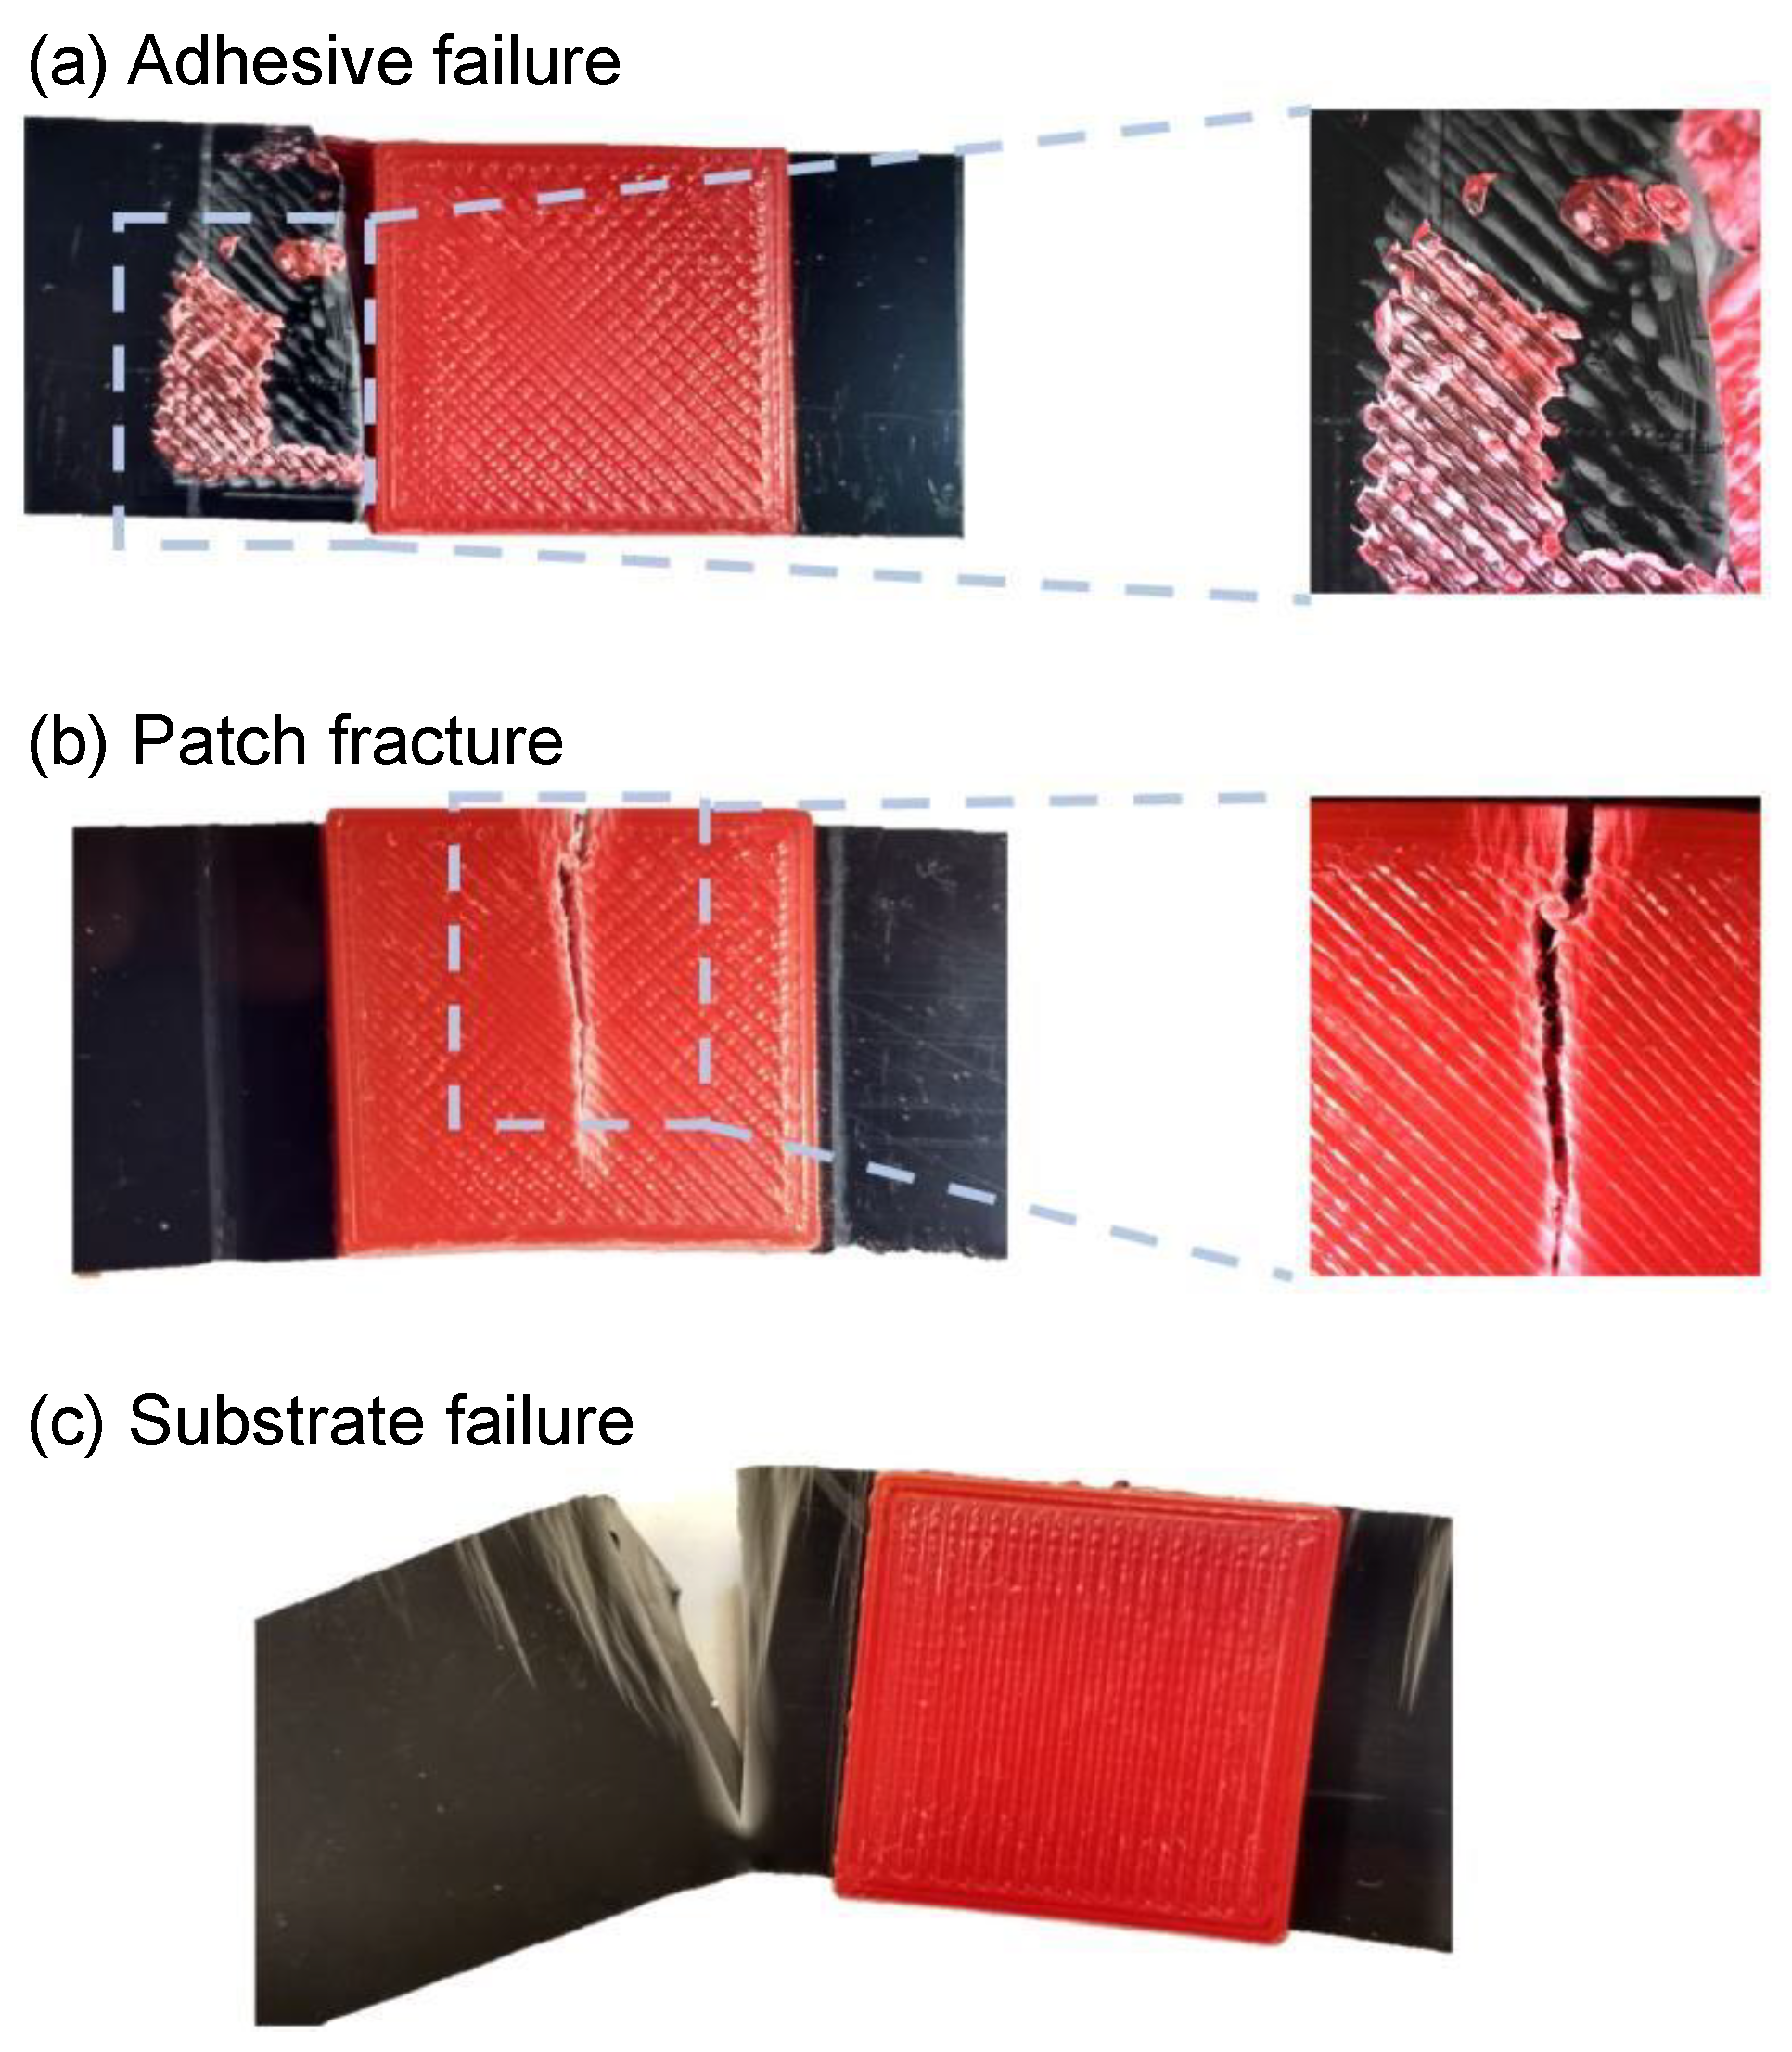
After printing the patches on both sides, the samples were subjected to a three-point bending test using an Instron Model 4483 universal testing machine. The load was applied at a rate of 2 mm/min. The force–deflection curves, maximum load at failure, and maximum deflection for each sample were recorded and compared. The experiment was replicated twice, for a total of 16 runs. Apart from the cases mentioned in Table 3, three un-notched samples and three notched samples without the printed patches were also tested to identify the baseline and determine if the patches were successful. The collected force–deflection curves are shown in Figure 11, while the collected data are shown in Table 3. The failure mode of each set of runs was also recorded. Figure 12 shows the modes that were observed; in some cases, the patch itself broke off during testing (adhesive failure, Figure 12a); in some, the patch fractured (patch fracture, Figure 12b); in some, the bar itself broke (substrate failure, Figure 12c) before the patch failed. Note that all of the runs improved the strength of the cracked bar, while six of the eight factor combinations resulted in performance that was superior to the raw, undamaged ABS bars. The experiments were quite consistent between runs, with a small standard error between replications.

4.5. Statistical Analysis

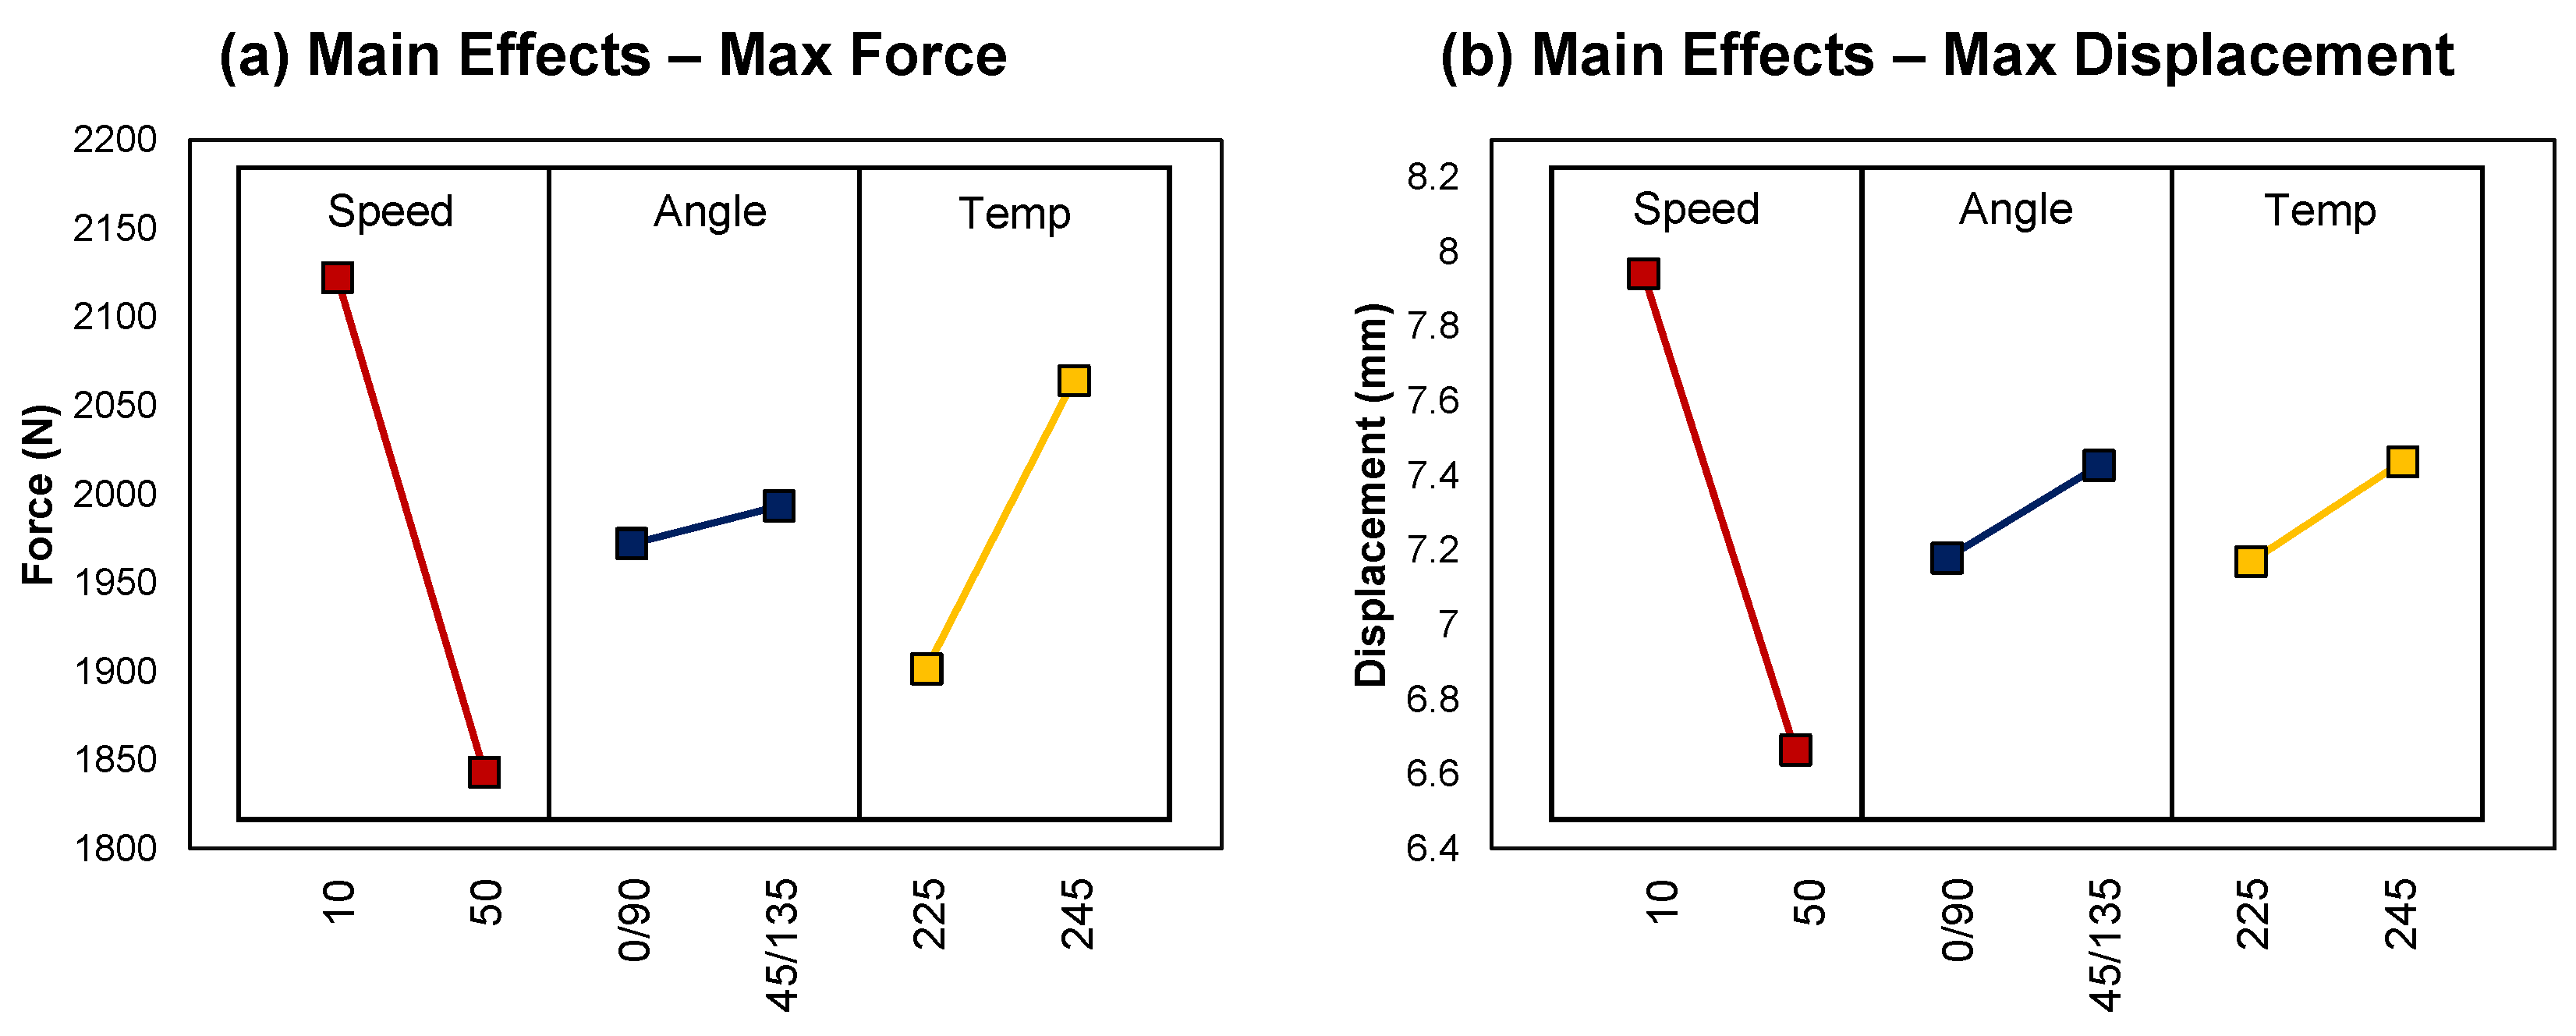
After collecting the experimental data from the patch tests, the printing factors (print speed, raster angle, and printing temperature) were analyzed statistically for their impact on the two responses (maximum force and displacement). The results are shown in Table 4. Minitab was used to complete an analysis of variance (ANOVA) on the collected data. In order to establish the validity of the ANOVA conclusions, an Anderson–Darling test was performed on each response to test the normality of the residuals. An optimal Box–Cox transform was used as part of the analysis, allowing valid p-values to be calculated even if the data were normal within statistical significance, but skewed in some way. Since the AD test for both responses gave p-values > 0.05, normality was established. It was found that the print speed had a statistically significant ( α = 0.05 ) impact on both responses, but neither of the other factors did. In order to explore this further than simple statistical significance, a main effects plot was prepared for each of the responses; these are shown in Figure 13. These plots suggest that the force was actually influenced by temperature, but that this influence was not statistically significant; in future work, a larger difference between temperatures should be used to explore this conclusion.

4.6. Finite Element Analysis

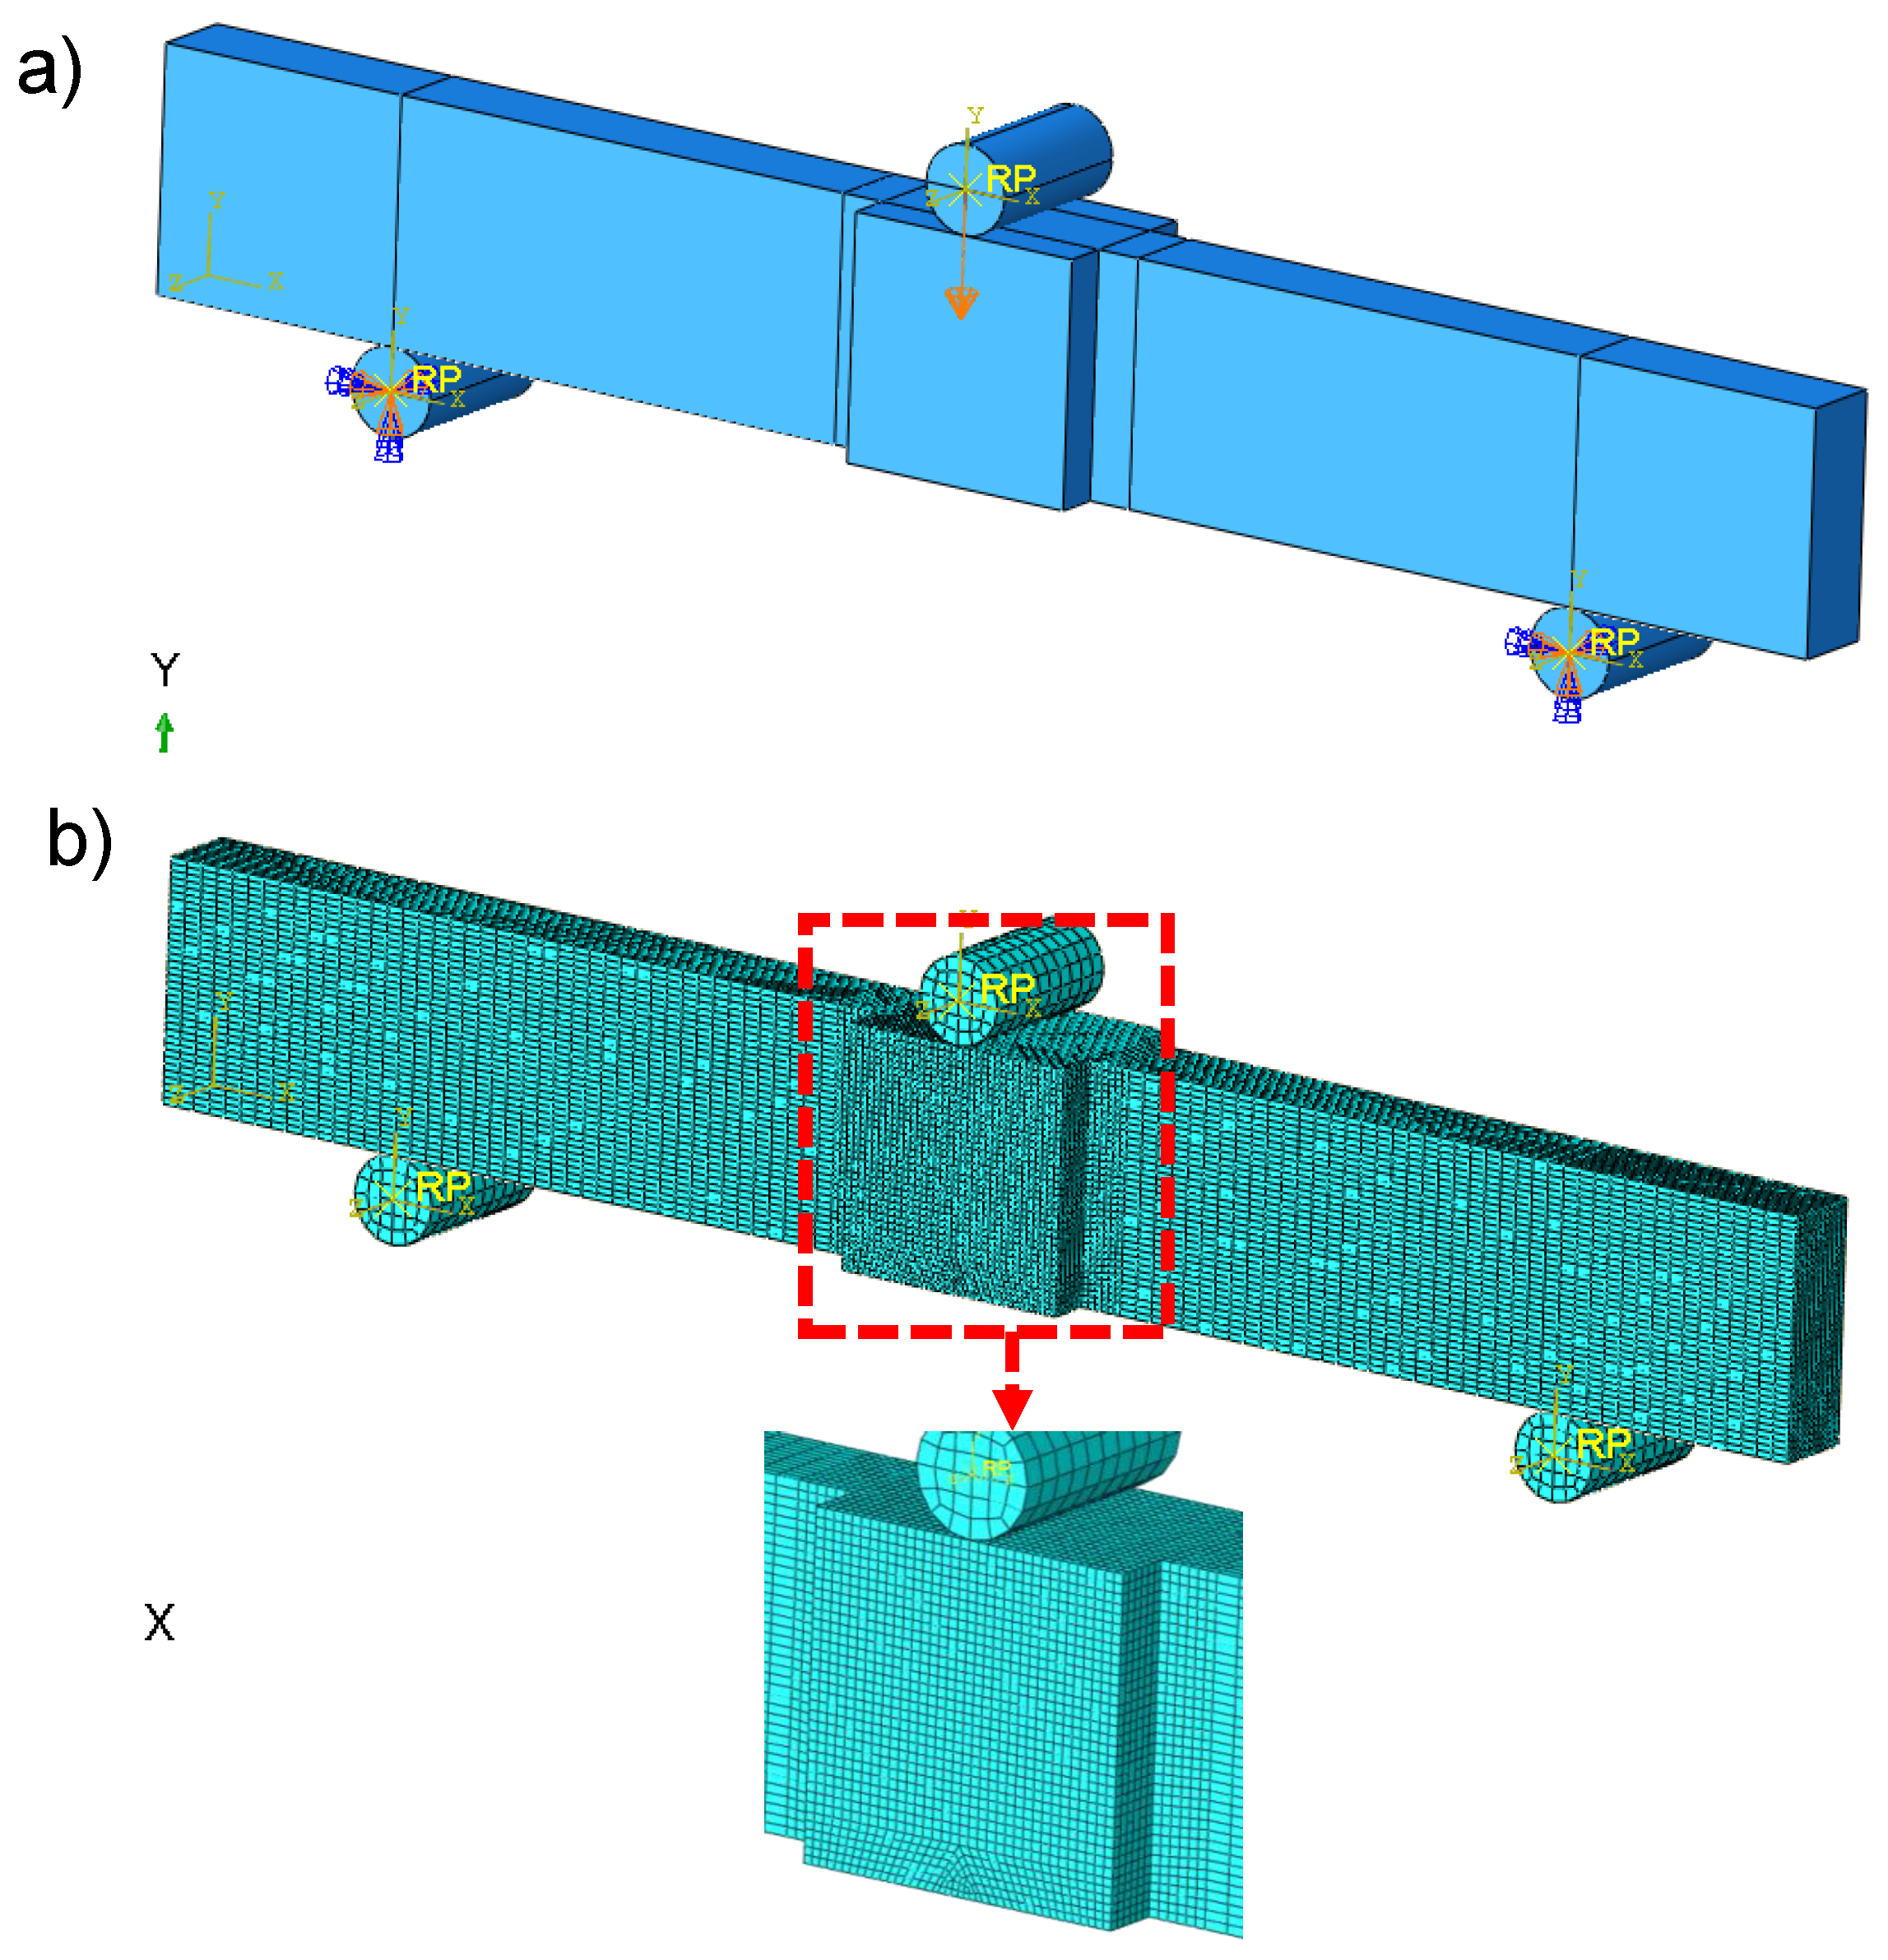
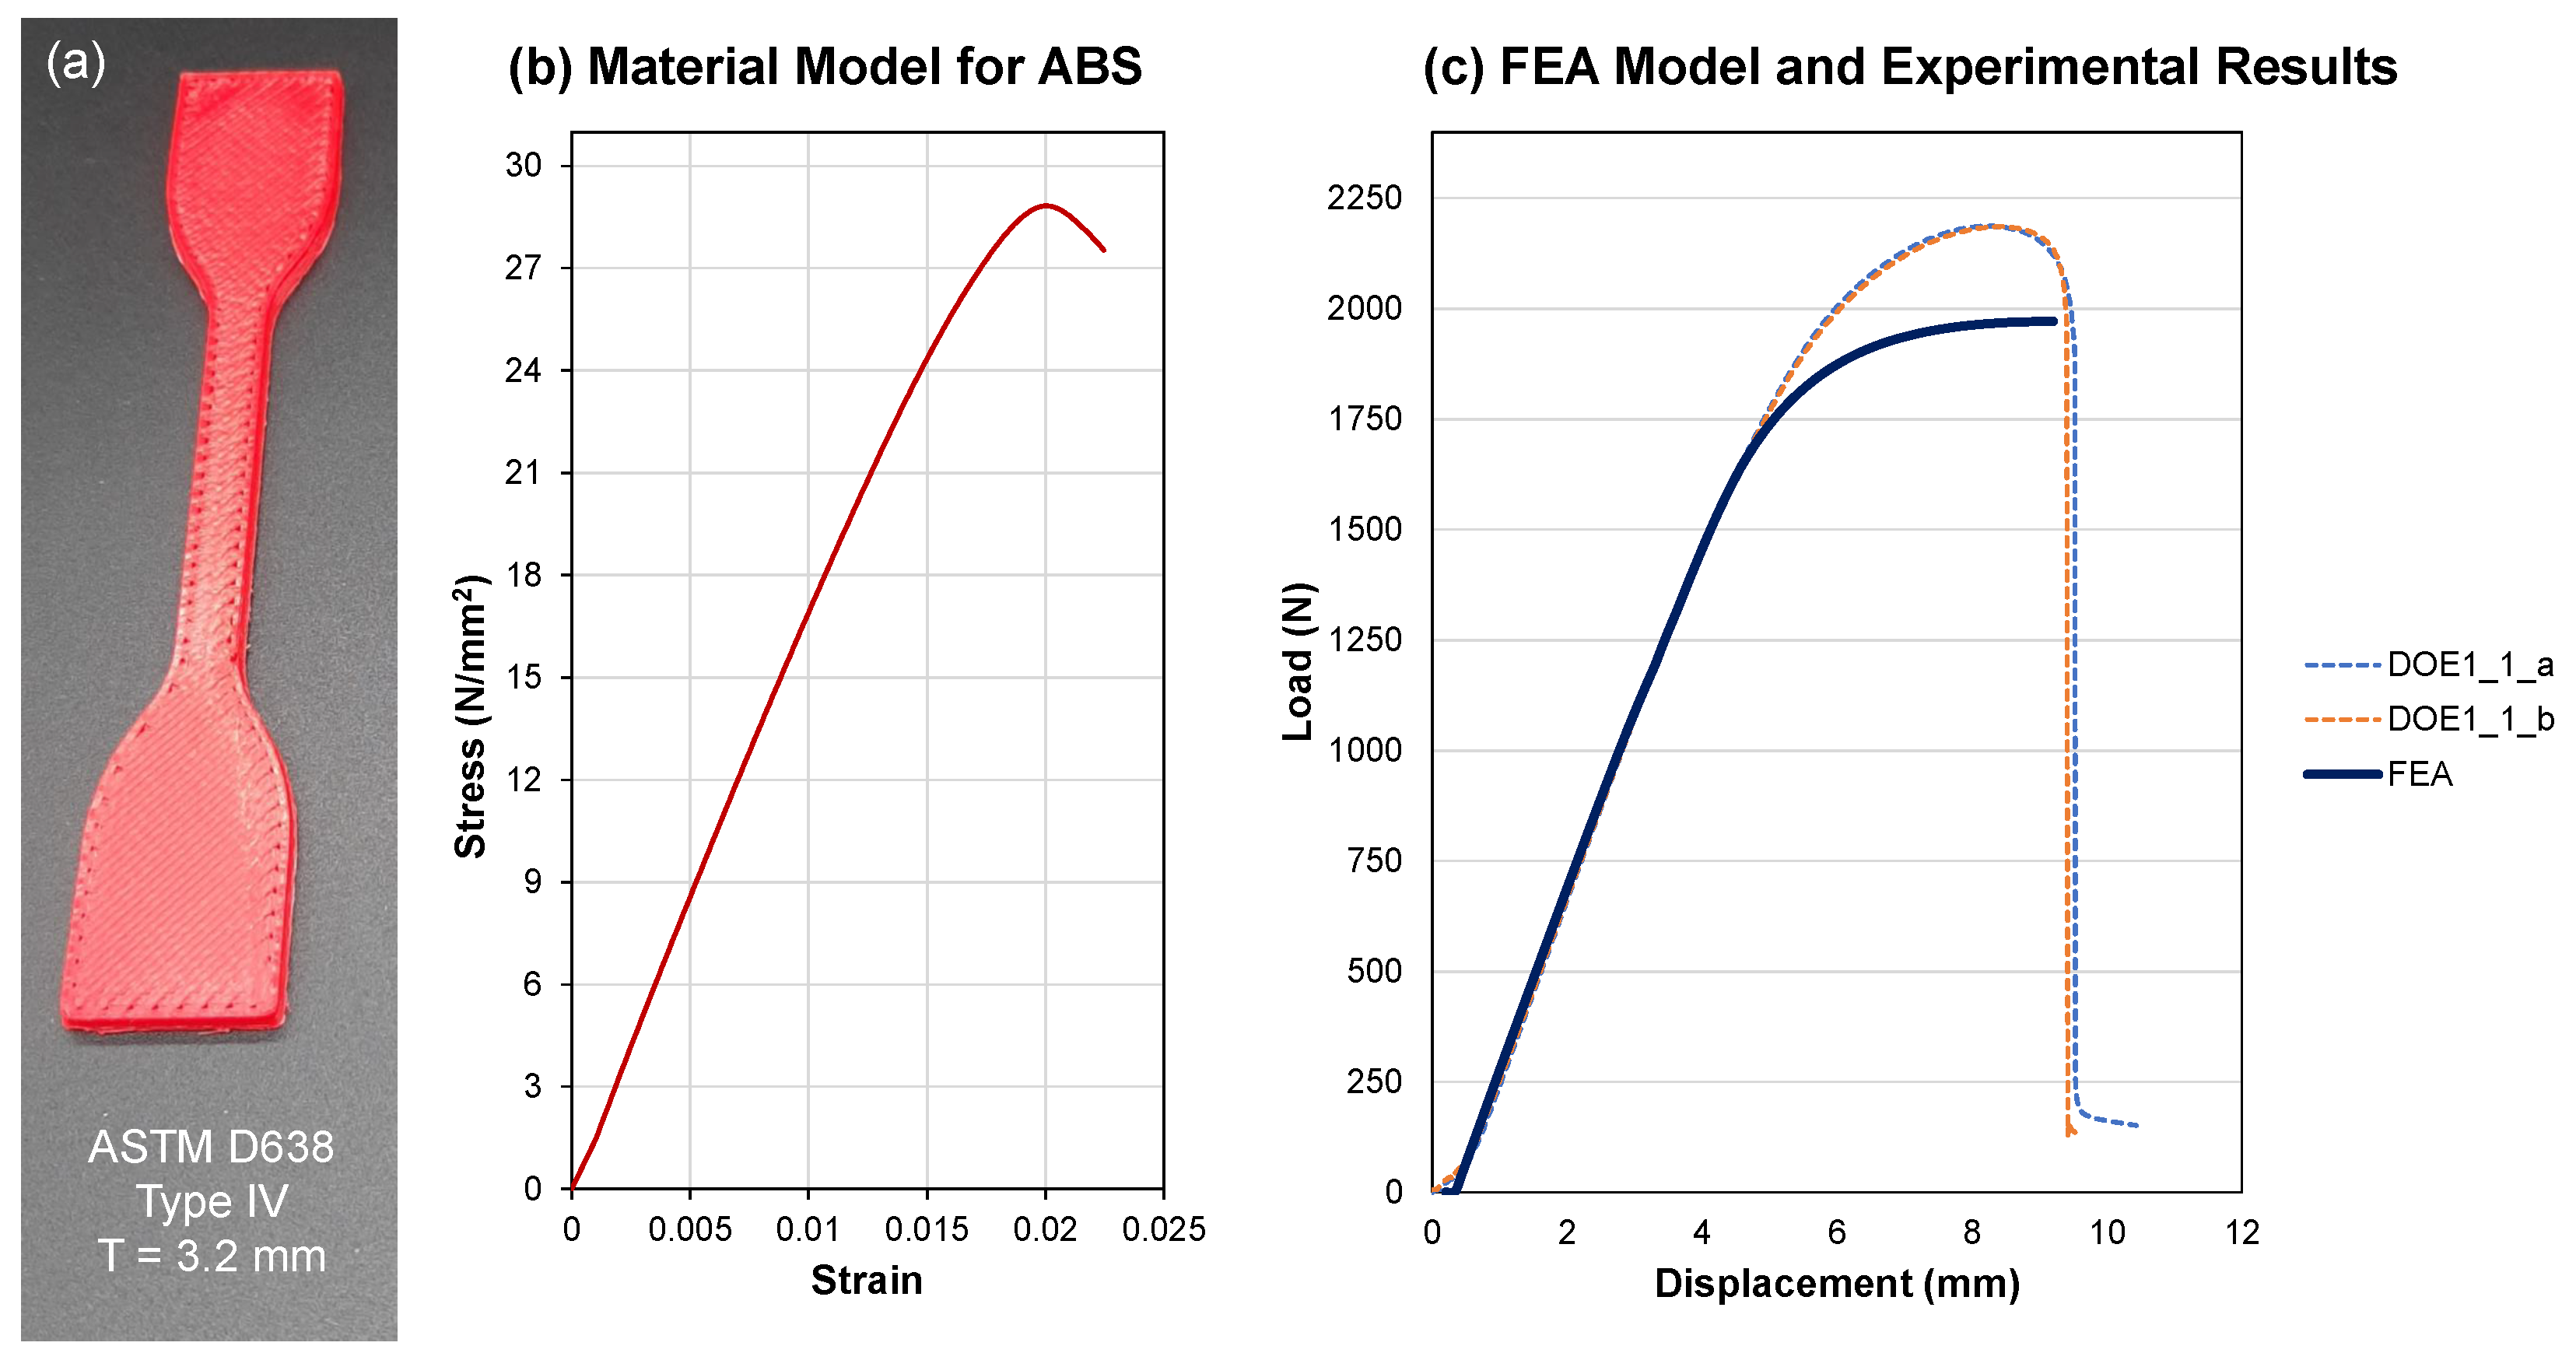
To further explore the results from the experiments and attempt to model them, a simple finite element analysis (FEA) was completed for the basic case (Case 1). As shown in Figure 14, the FEA model was used to computationally model the stress distribution in the repaired bar under three-point bending using the Abaqus-implicit solver. The patches and the bar were modeled as a deformable geometry using C3D8R-type elements. The interface between the pre-cracked bar and patches was assumed to be fully bonded. The rollers used in the case of the three-point bending were modeled as a rigid non-deformable geometry. A surface-to-surface contact with a frictional coefficient of 0.2 in the tangential direction and a hard contact in the normal direction were applied between the rollers and patches. The two rollers at the bottom were fixed in all degrees of freedom. A displacement of 8 mm was applied on the roller at the top (as shown in Figure 14). Elastic–plastic material properties were used to simulate the material behavior for the ABS bars and patches. The material behavior model was derived from tensile tests undertaken on FFF-printed dog bone samples tested according to ASTM D638. Material properties obtained from FFF-printed dog bone samples were applied to both patches, and ABS bars as the material properties of 3D-printed samples are generally assumed to be weaker than their injection-molded counterparts. The samples were printed inside of an enclosure from ABS using a 0.4 mm brass extrusion nozzle at a temperature of 230 ° C, a bed temperature of 100 ° C, and a print speed of 60 mm/s. The tensile testing speed was 5 mm/minute via the ASTM D638 standard. All the dimensions used were those specified for a Type IV specimen in the ASTM D638 standard, including a sample thickness of T = 3.2 mm. The dog bone samples and the corresponding stress–strain curve obtained from tensile testing (average of five runs) are shown in Figure 15a,b, respectively. A mesh convergence study was used to refine the mesh size in the vicinity of the patches. Based on the study, an element size of 0.1 was used to model the area surrounding the patches, as shown in Figure 14b.
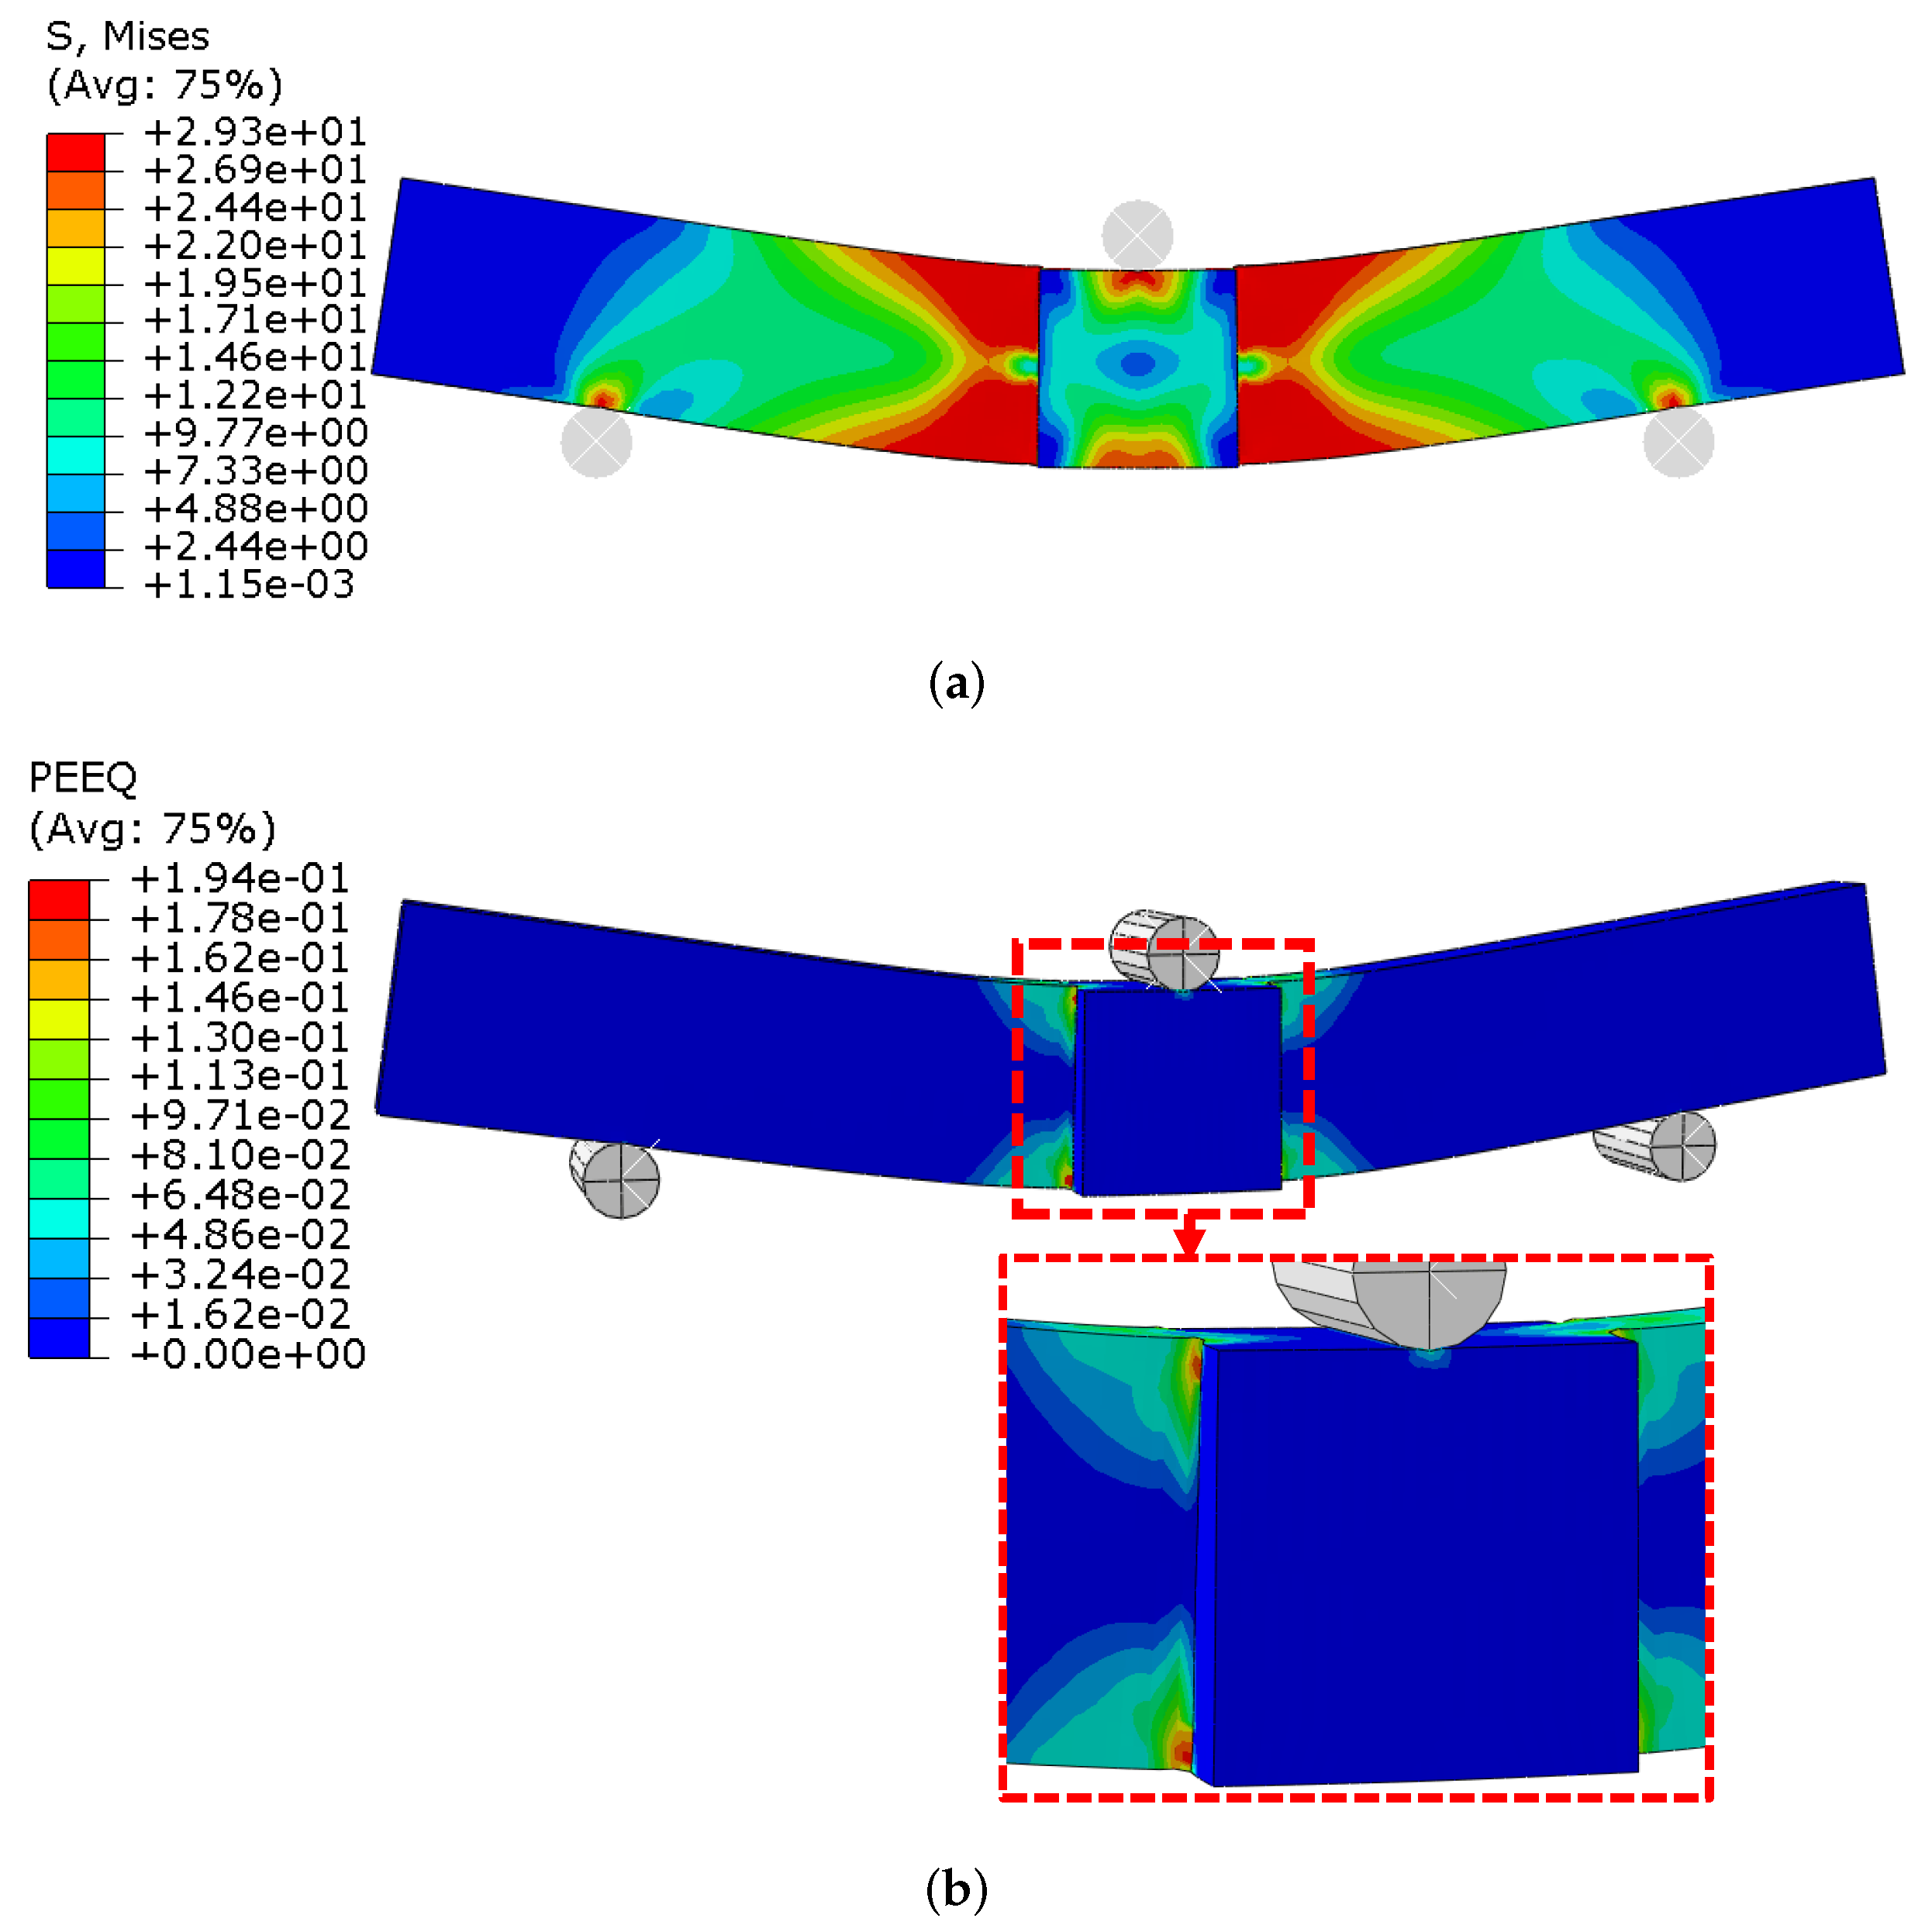
The load–displacement curve shown in Figure 15c was obtained from the FEA results. This curve was in good agreement with the load–displacement curve obtained experimentally when patches do not delaminate, as in Case 1. When the load–displacement curve obtained using FEA is superimposed on the load displacement curve obtained from Case 1, the curves overlap in the case of the elastic region. However, the curve deviates from the experimental data after yielding. This can be attributed to the fact that molded ABS bars have a higher yield strength compared to 3D-printed ABS. Future work will need to focus on integrating these two cases together for a better match. The von Misses stress distribution and plastic strain at the displacement of 8 mm obtained from the FEA is shown in Figure 16. From the figure, it can be noted that the patches help to re-distribute the load around the pre-cracked region present in the ABS bar. Instead, a new crack location should be initiated adjacent to the patch boundary. This observation is consistent with the substrate failure observed during experiments. Thus, based on the FEA analysis, it can be concluded that in the case of substrate failure, complete bonding is observed at the interface and a simplified FEA model can be used to predict the behavior of the repaired component provided the interface is printed at low speeds.

5. Discussion

When loaded under three-point bending, the samples in the case study failed in one of three ways: adhesive failure, failure in the patch, and substrate failure. The adhesive failure was noticed at the high print speeds (50 mm/s). In this case, the patches were delaminated from the base material and the crack continued to propagate from the pre-crack after delamination. In contrast, at lower speeds (10 mm/s), the patches did not delaminate, and the material failed at the corner of the patch, resulting in substrate failure. Based on this observation, it appears that the 3D-printed patch and the base material acted as a single material at lower speeds. When both materials worked as a single material, the patch’s corner served as the location for stress concentration, initiating a new crack. This result was not initially anticipated. In the two cases involving high temperature and high print speed, though the patch did not delaminate, it failed at the location of the pre-crack. In all the cases, when the patches were printed over the pre-crack, they sustained a higher load than when no patches were present. Thus, it can be concluded from this case study that 3D-printed patches can greatly improve the operating life (and even performance) of these base materials.
After careful analysis, it was observed that the results obtained from the three-point bending experiments aligned with Wool and O’Connor’s proposed polymer healing theory [68,69]. According to this theory (based on the reptation model developed by De Gennes [70]), when two surfaces of the same amorphous polymers are brought into contact with each other above the glass transition temperature, the polymer chains present at the surface gradually cross the interface. With time, the number of chains crossing the interface and polymer chain entanglement with the base material increase, resulting in higher fracture strength. When the interface is kept above the glass transition temperature for a long time (reptation time, also called the molecular relaxation time), the randomization process of polymer chains is completed and the full fracture strength of the bulk polymer is reached. At this stage, the polymer is said to be healed entirely [68,69]. The complete healing of the polymer generally undergoes five steps: surface rearrangement, surface approach, wetting, diffusion, and randomization. Wool and O’Connor [68] proposed a general expression for the healing process as:
R ( σ , t ) = R 0 + K t 1 / 4 σ Ψ ( t ) ϕ ˙ ( t )
where t is the time that the interface is kept above the glass transition temperature, R is the recovery ratio of stress compared to the virgin material, and R 0 is the ratio of yield stress due to the attraction of the wetting surface ( σ 0 ) and the yield stress of the virgin material ( σ ). K is a constant; Ψ ( t ) is the diffusion initiation function; ϕ ( t ) is the wetting distribution function. In the case of fracture stress, the above equation can be simplified to:
σ = σ 0 + K t 1 / 4
This simplified form assumes instantaneous diffusion of polymer chains (i.e., Ψ ( t ) = 1 ). In the case of FFF, when molten material is deposited on previously deposited fiber (or polymeric surface in this case), an interface is created whose strength can be determined by the polymer healing theory. This theory has been applied to assess inter-layer and intra-layer strengths; based on the results discussed in the literature, the temperature profile plays a critical role in determining the interfacial strength during FFF [61,62,63]. Both wetting and diffusion processes are integral parts of the polymer healing process in FFF [60,61,62,63]. In the case of ABS, studies have found that the interfacial temperature should be above 200 ° C for the wetting process to continue after material deposition [61,71]. Complete polymer healing will not occur if the interfacial temperature reduces below 200 ° C before the reptation time is reached. Since it is difficult to maintain the interface temperature above 200 ° C for a long duration and the material is unstable at very high temperatures, it was concluded that complete polymer healing is difficult to achieve in FFF [71]. However, even a possibly partial healing proved to be more than effective for repair, as shown in this study.
During the FFF process, the temperature at the interface can be controlled by factors such as the print speed, nozzle temperature, and environmental temperature. At a low print speed, the heat from the nozzle is transferred to the deposited material. As a result, the material cools down slowly, enabling greater bond strength to develop at the interface. This theory is backed by the results obtained during the three-point bending and ANOVA. However, it was surprising that a new path for crack propagation was formed at a low print speed, indicating a complete polymer healing or nearly complete healing can be obtained at low print speeds. This result contradicts the assumptions made in the literature that complete polymer healing cannot be achieved during FFF. This result gives credibility to FFF as a useful repair process as the print speed of the bottom of the patch (which can be easily adjusted in Cura®) can be reduced to produce high interfacial strength between the base and deposited material.
Since the temperature profile plays a vital role in determining the bond strength, intuitively, the higher nozzle temperature should produce greater interfacial strength. However, this intuition is not backed by the results obtained by the case study in this article. This observation can be explained by the results reported by Sun et al. [62]. They observed that the nozzle/liquefier temperature does not play a critical role in determining the bond strength even at the higher nozzle temperatures because the interface remains at the peak temperature for a relatively low time. They noted that the additional heat supplied by the increased nozzle temperature dissipated quickly after the hot extrusion tip moved past the deposited material. The raster angle plays a vital role in determining the strength of material along a direction due to anisotropy in the 3D-printed material. In this experiment, however, since the crack did not propagate through the 3D-printed patch (except in two cases), the raster angle did not play a critical role in affecting the bond strength. Thus, it can be successfully concluded that the deposition strategy has a negligible effect on the interfacial strength formed between the base material and the deposited material.

6. Conclusions and Future Work

In this work, the use of FFF as a repair process for thermoplastics was argued and supported by an extensive case study and analysis. The main outcomes of this work were:
  • FFF-based damage repair was shown to be feasible from both a theoretical perspective (i.e., from polymer healing theory) and experimentally.
  • Restrictions and assumptions related to FFF repair were explored in detail, including a set of definitions for identifying high-value parts.
  • A detailed decision-making process for screening and then repairing candidate parts was developed and described.
  • The usefulness of FFF-based repair (and AM-based repair in general) was shown to have the potential to extend the life of parts and promote a circular engineering materials economy.
While there are some restrictions to the range of use of FFF for this application (many of the same restrictions encountered for any surface-based repair process), there are many potential benefits, and the feasibility was well established by the experimental results. Developing FFF as a repair method will offer interesting alternatives to existing thermoplastic repair processes, allowing the repair to be automated and selectively applied.
This technique can easily be integrated with sensors and cameras to build a system to seek out and address cracks and other issues autonomously or semi-autonomously. FFF-based repair does not require any special materials and, in most cases, no special surface preparation. While this study did show feasibility, there is more work to be performed on this problem before it can be fully applied as a repair process. The case study showed that some of the parameters most readily associated with repair (such as temperature) did not have a significant influence, but it is not clear if this is true for other materials and material combinations. ABS-on-ABS repairs were shown to be as good or better (depending on the parameters used), but other materials may or may not show the same results; this is a major area where more research is needed for this question. Any needed special sensors or control software needed for different repair problems are also yet to be developed and properly integrated. Finally, methods for identifying areas to be repaired and modeling the patch or fill material are needed.

Author Contributions

Conceptualization, all authors; case study, C.C. and A.E.P.; supervision and guidance, I.M.J. and K.J.; initial manuscript draft, C.C.; figures, C.C. and A.E.P. All authors have read and agreed to the published version of the manuscript.

Funding

This research was partially supported (C.C. and I.M.J.) by the U.S. National Science Foundation grant MOM-1926353.

Data Availability Statement

Any experimental data associated with this work may be obtained upon reasonable request from the corresponding author.

Conflicts of Interest

No conflict of interest exist for any of the authors related to the conduction or publication of this work. All stated opinions and conclusions are solely those of the authors. Portions of Section 3 were derived and further developed from previous work by the authors published as a conference paper under a CC-BY license; see [49].

References

  1. Andrady, A.L.; Neal, M.A. Applications and societal benefits of plastics. Philos. Trans. R. Soc. B Biol. Sci. 2009, 364, 1977–1984. [Google Scholar] [CrossRef]
  2. Fisher, T. A World of colour and bright shining surfaces: Experiences of plastics after the second world war. J. Des. Hist. 2013, 26, 285–303. [Google Scholar] [CrossRef]
  3. Millet, H.; Vangheluwe, P.; Block, C.; Sevenster, A.; Garcia, L.; Antonopoulos, R. The nature of plastics and their societal usage. In Issues in Environmental Science and Technology; Royal Society of Chemistry: London, UK, 2018; pp. 1–20. [Google Scholar] [CrossRef]
  4. Geyer, R. A brief history of plastics. In Mare Plasticum—The Plastic Sea: Combatting Plastic Pollution through Science and Art; Streit-Bianchi, M., Cimadevila, M., Trettnak, W., Eds.; Springer International Publishing: Cham, Switzerland, 2020; pp. 31–47. [Google Scholar] [CrossRef]
  5. PlasticsEurope. Production of Plastics Worldwide from 1950 to 2020 (in Million Metric Tons). Statista. 2020. Available online: https://www.statista.com/statistics/282732/global-production-of-plastics-since-1950/ (accessed on 15 April 2022).
  6. Guglielmi, G. In the next 30 years, we’ll make four times more plastic waste than we ever have. Science 2017. [Google Scholar] [CrossRef]
  7. Patil, A.; Patel, A.; Purohit, R. An overview of polymeric materials for automotive applications. Mater. Today Proc. 2017, 4, 3807–3815. [Google Scholar] [CrossRef]
  8. Friedrich, K.; Almajid, A.A. Manufacturing aspects of advanced polymer composites for automotive applications. Appl. Compos. Mater. 2012, 20, 107–128. [Google Scholar] [CrossRef]
  9. Schiller, G.J. Additive manufacturing for aerospace. In Proceedings of the 2015 IEEE Aerospace Conference, Big Sky, MT, USA, 7–14 March 2015. [Google Scholar] [CrossRef]
  10. Shapiro, A.A.; Borgonia, J.P.; Chen, Q.N.; Dillon, R.P.; McEnerney, B.; Polit-Casillas, R.; Soloway, L. Additive manufacturing for aerospace flight applications. J. Spacecr. Rocket. 2016, 53, 952–959. [Google Scholar] [CrossRef]
  11. Thornton, P.; Harwood, J.; Beardmore, P. Fiber-reinforced plastic composites for energy absorption purposes. Compos. Sci. Technol. 1985, 24, 275–298. [Google Scholar] [CrossRef]
  12. Soutis, C. Introduction. In Polymer Composites in the Aerospace Industry; Elsevier: Amsterdam, The Netherlands, 2015; pp. 1–18. [Google Scholar] [CrossRef]
  13. Saurabh, S. Direct Numerical Simulation of Human Phonation. Ph.D. Thesis, University of Illinois at Urbana-Champaign, Urbana, IL, USA, 2017. Available online: http://hdl.handle.net/2142/99180 (accessed on 15 April 2022).
  14. Geyer, R.; Jambeck, J.R.; Law, K.L. Production, use, and fate of all plastics ever made. Sci. Adv. 2017, 3, e1700782. [Google Scholar] [CrossRef]
  15. Datta, J.; Kopczyńska, P. From polymer waste to potential main industrial products: Actual state of recycling and recovering. Crit. Rev. Environ. Sci. Technol. 2016, 46, 905–946. [Google Scholar] [CrossRef]
  16. Tokiwa, Y.; Calabia, B.; Ugwu, C.; Aiba, S. Biodegradability of plastics. Int. J. Mol. Sci. 2009, 10, 3722–3742. [Google Scholar] [CrossRef]
  17. Barnes, D.K.A.; Galgani, F.; Thompson, R.C.; Barlaz, M. Accumulation and fragmentation of plastic debris in global environments. Philos. Trans. R. Soc. B Biol. Sci. 2009, 364, 1985–1998. [Google Scholar] [CrossRef] [PubMed]
  18. Weisshaar, T.A. Morphing Aircraft Systems: Historical Perspectives and Future Challenges. J. Aircr. 2013, 50, 337–353. [Google Scholar] [CrossRef]
  19. Ramírez, I.S.; Marugán, A.P.; Márquez, F.P.G. Remotely piloted aircraft system and engineering management: A real case study. In Proceedings of the Twelfth International Conference on Management Science and Engineering Management, Toronto, ON, Canada, 5–8 August 2019; Xu, J., Cooke, F.L., Gen, M., Ahmed, S.E., Eds.; Springer International Publishing: Cham, Switzerland, 2019; pp. 1173–1185. [Google Scholar]
  20. Qian, J.; Zi, B.; Wang, D.; Ma, Y.; Zhang, D. The design and sevelopment of an omni-directional mobile robot oriented to an intelligent manufacturing system. Sensors 2017, 17, 2073. [Google Scholar] [CrossRef] [PubMed]
  21. Urhal, P.; Weightman, A.; Diver, C.; Bartolo, P. Robot assisted additive manufacturing: A review. Robot. Comput.-Integr. Manuf. 2019, 59, 335–345. [Google Scholar] [CrossRef]
  22. Fang, X.; Misra, S.; Xue, G.; Yang, D. Smart grid—The new and improved power grid: A survey. IEEE Commun. Surv. Tutor. 2012, 14, 944–980. [Google Scholar] [CrossRef]
  23. Sun, C.C.; Liu, C.C.; Xie, J. Cyber-physical system security of a power grid: State-of-the-art. Electronics 2016, 5, 40. [Google Scholar] [CrossRef] [Green Version]
  24. Karray, F.; Jmal, M.W.; Garcia-Ortiz, A.; Abid, M.; Obeid, A.M. A comprehensive survey on wireless sensor node hardware platforms. Comput. Netw. 2018, 144, 89–110. [Google Scholar] [CrossRef]
  25. Puccinelli, D.; Haenggi, M. Wireless sensor networks: Applications and challenges of ubiquitous sensing. IEEE Circuits Syst. Mag. 2005, 5, 19–31. [Google Scholar] [CrossRef]
  26. Ellis, M.; Mathews, E. Needs and trends in building and HVAC system design tools. Build. Environ. 2002, 37, 461–470. [Google Scholar] [CrossRef]
  27. Reena, K.M.; Mathew, A.T.; Jacob, L. A flexible control strategy for energy and comfort aware HVAC in large buildings. Build. Environ. 2018, 145, 330–342. [Google Scholar] [CrossRef]
  28. Onat, N.; Kucukvar, M.; Halog, A.; Cloutier, S. Systems thinking for life cycle sustainability assessment: A review of recent developments, applications, and future perspectives. Sustainability 2017, 9, 706. [Google Scholar] [CrossRef]
  29. Bi, Z. Revisiting system paradigms from the viewpoint of manufacturing sustainability. Sustainability 2011, 3, 1323–1340. [Google Scholar] [CrossRef]
  30. Guillén-Gosálbez, G.; You, F.; Galán-Martín, Á; Pozo, C.; Grossmann, I.E. Process systems engineering thinking and tools applied to sustainability problems: Current landscape and future opportunities. Curr. Opin. Chem. Eng. 2019, 26, 170–179. [Google Scholar] [CrossRef]
  31. Andrews, J.; Fecarotti, C. System design and maintenance modelling for safety in extended life operation. Reliab. Eng. Syst. Saf. 2017, 163, 95–108. [Google Scholar] [CrossRef]
  32. Monga, A.; Zuo, M.J. Optimal system design considering maintenance and warranty. Comput. Oper. Res. 1998, 25, 691–705. [Google Scholar] [CrossRef]
  33. Guo, Z.; Zhou, D.; Chen, J.; Geng, J.; Lv, C.; Zeng, S. Using virtual reality to support the product’s maintainability design: Immersive maintainability verification and evaluation system. Comput. Ind. 2018, 101, 41–50. [Google Scholar] [CrossRef]
  34. Availability and Maintainability in Engineering Design. Handbook of Reliability, Availability, Maintainability and Safety in Engineering Design; Springer: London, UK, 2009; pp. 295–527. [Google Scholar] [CrossRef]
  35. Wits, W.W.; García, J.R.R.; Becker, J.M.J. How additive manufacturing enables more sustainable end-user maintenance, repair and overhaul (MRO) strategies. Procedia CIRP 2016, 40, 693–698. [Google Scholar] [CrossRef]
  36. Khajavi, S.H.; Partanen, J.; Holmström, J. Additive manufacturing in the spare parts supply chain. Comput. Ind. 2014, 65, 50–63. [Google Scholar] [CrossRef]
  37. Guo, N.; Leu, M.C. Additive manufacturing: Technology, applications and research needs. Front. Mech. Eng. 2013, 8, 215–243. [Google Scholar] [CrossRef]
  38. Ngo, T.D.; Kashani, A.; Imbalzano, G.; Nguyen, K.T.; Hui, D. Additive manufacturing (3D printing): A review of materials, methods, applications and challenges. Compos. Part B Eng. 2018, 143, 172–196. [Google Scholar] [CrossRef]
  39. Kelbassa, I.; Albus, P.; Dietrich, J.; Wilkes, J. Manufacture and repair of aero engine components using laser technology. In Proceedings of the Pacific International Conference on Applications of Lasers and Optics, Beijing, China, 16–18 April 2008; Laser Institute of America: Laser Institute of America: Orlando, FL, USA, 2008. [Google Scholar] [CrossRef]
  40. Gasser, A.; Backes, G.; Kelbassa, I.; Weisheit, A.; Wissenbach, K. Laser additive manufacturing. Laser Tech. J. 2010, 7, 58–63. [Google Scholar] [CrossRef]
  41. Portolés, L.; Jordá, O.; Jordá, L.; Uriondo, A.; Esperon-Miguez, M.; Perinpanayagam, S. A qualification procedure to manufacture and repair aerospace parts with electron beam melting. J. Manuf. Syst. 2016, 41, 65–75. [Google Scholar] [CrossRef]
  42. Koehler, H.; Partes, K.; Seefeld, T.; Vollertsen, F. Influence of laser reconditioning on fatigue properties of crankshafts. Phys. Procedia 2011, 12, 512–518. [Google Scholar] [CrossRef]
  43. Liu, Z.; Jiang, Q.; Li, T.; Dong, S.; Yan, S.; Zhang, H.; Xu, B. Environmental benefits of remanufacturing: A case study of cylinder heads remanufactured through laser cladding. J. Clean. Prod. 2016, 133, 1027–1033. [Google Scholar] [CrossRef]
  44. Wilson, J.M.; Piya, C.; Shin, Y.C.; Zhao, F.; Ramani, K. Remanufacturing of turbine blades by laser direct deposition with its energy and environmental impact analysis. J. Clean. Prod. 2014, 80, 170–178. [Google Scholar] [CrossRef]
  45. Lewis, S.; Lewis, R.; Fletcher, D. Assessment of laser cladding as an option for repairing/enhancing rails. Wear 2015, 330–331, 581–591. [Google Scholar] [CrossRef]
  46. Kattire, P.; Paul, S.; Singh, R.; Yan, W. Experimental characterization of laser cladding of CPM 9V on H13 tool steel for die repair applications. J. Manuf. Process. 2015, 20, 492–499. [Google Scholar] [CrossRef]
  47. Brooks, R. Researchers Developing 3D Printing for Die Repair. Foundry Management & Technology. 25 March 2013. Available online: https://www.foundrymag.com/materials/article/21927804/researchers-developing-3d-printing-for-die-repair (accessed on 15 April 2022).
  48. Mudge, R.; Wald, N. Laser engineered net shaping advances additive manufacturing and repair. Weld. J. 2007, 86, 44–48. [Google Scholar]
  49. Chadha, C.; Patterson, A.; Allison, J.; James, K.; Jasiuk, I. Repair of high-value plastic components using fused deposition modeling. In Proceedings of the 2019 Solid Freeform Fabrication Symposium—An Additive Manufacturing Conference Symposium, Austin, TX, USA, 12–14 August 2019; pp. 1732–1755. [Google Scholar]
  50. Richter, A.; Kessing, D.; Fischer, F.; Pelzer, L.; Dilger, K. Print-on strategies to bond injection molded parts with structures produced by fused-deposition-modeling. Proc. Des. Soc. Int. Conf. Eng. Des. 2019, 1, 819–828. [Google Scholar] [CrossRef]
  51. Falck, R.; Goushegir, S.; dos Santos, J.; Amancio-Filho, S. AddJoining: A novel additive manufacturing approach for layered metal-polymer hybrid structures. Mater. Lett. 2018, 217, 211–214. [Google Scholar] [CrossRef]
  52. Falck, R.; dos Santos, J.F.; Amancio-Filho, S.T. Microstructure and mechanical performance of additively manufactured aluminum 2024-T3/acrylonitrile butadiene styrene hybrid joints using an AddJoining technique. Materials 2019, 12, 864. [Google Scholar] [CrossRef] [PubMed]
  53. Frascio, M.; de Sousa Marques, E.A.; Carbas, R.J.C.; da Silva, L.F.M.; Monti, M.; Avalle, M. Review of tailoring methods for joints with additively manufactured adherends and adhesives. Materials 2020, 13, 3949. [Google Scholar] [CrossRef] [PubMed]
  54. Kumar, S.; Wardle, B.L.; Arif, M.F.; Ubaid, J. Stress reduction of 3D printed compliance-tailored multilayers. Adv. Eng. Mater. 2017, 20, 1700883. [Google Scholar] [CrossRef]
  55. Ubaid, J.; Wardle, B.L.; Kumar, S. Strength and performance enhancement of multilayers by spatial tailoring of adherend compliance and morphology via multimaterial jetting additive manufacturing. Sci. Rep. 2018, 8, 13592. [Google Scholar] [CrossRef]
  56. Kovan, V.; Altan, G.; Topal, E.S. Effect of layer thickness and print orientation on strength of 3D printed and adhesively bonded single lap joints. J. Mech. Sci. Technol. 2017, 31, 2197–2201. [Google Scholar] [CrossRef]
  57. Spaggiari, A.; Denti, F. Mechanical strength of adhesively bonded joints using polymeric additive manufacturing. Proc. Inst. Mech. Eng. Part C J. Mech. Eng. Sci. 2019, 235, 1851–1859. [Google Scholar] [CrossRef]
  58. Garcia, R.; Prabhakar, P. Bond interface design for single lap joints using polymeric additive manufacturing. Compos. Struct. 2017, 176, 547–555. [Google Scholar] [CrossRef]
  59. Alfano, M.; Morano, C.; Bruno, L.; Muzzupappa, M.; Pagnotta, L. Analysis of debonding in bio-inspired interfaces obtained by additive manufacturing. Procedia Struct. Integr. 2018, 8, 604–609. [Google Scholar] [CrossRef]
  60. Turner, B.N.; Strong, R.; Gold, S.A. A review of melt extrusion additive manufacturing processes: I. Process design and modeling. Rapid Prototyp. J. 2014, 20, 192–204. [Google Scholar] [CrossRef]
  61. Bellehumeur, C.; Li, L.; Sun, Q.; Gu, P. Modeling of bond formation between polymer filaments in the fused deposition modeling process. J. Manuf. Process. 2004, 6, 170–178. [Google Scholar] [CrossRef]
  62. Sun, Q.; Rizvi, G.; Bellehumeur, C.; Gu, P. Effect of processing conditions on the bonding quality of FDM polymer filaments. Rapid Prototyp. J. 2008, 14, 72–80. [Google Scholar] [CrossRef]
  63. Coogan, T.J.; Kazmer, D.O. Bond and part strength in fused deposition modeling. Rapid Prototyp. J. 2017, 23, 414–422. [Google Scholar] [CrossRef]
  64. Patterson, A.E.; Chadha, C.; Jasiuk, I.M.; Allison, J.T. Design and repeatability analysis of desktop tool for rapid pre-cracking of notched ductile plastic fracture specimens. Eng. Fract. Mech. 2019, 217, 106536. [Google Scholar] [CrossRef]
  65. Abbott, A.; Tandon, G.; Bradford, R.; Koerner, H.; Baur, J. Process-structure-property effects on ABS bond strength in fused filament fabrication. Addit. Manuf. 2018, 19, 29–38. [Google Scholar] [CrossRef]
  66. Lee, B.; Abdullah, J.; Khan, Z. Optimization of rapid prototyping parameters for production of flexible ABS object. J. Mater. Process. Technol. 2005, 169, 54–61. [Google Scholar] [CrossRef]
  67. Rezayat, H.; Zhou, W.; Siriruk, A.; Penumadu, D.; Babu, S.S. Structure–mechanical property relationship in fused deposition modelling. Mater. Sci. Technol. 2015, 31, 895–903. [Google Scholar] [CrossRef]
  68. Wool, R.P.; O’Connor, K.M. A theory crack healing in polymers. J. Appl. Phys. 1981, 52, 5953–5963. [Google Scholar] [CrossRef]
  69. Wool, R.P.; O’Connor, K.M. Time dependence of crack healing. J. Polym. Sci. Polym. Lett. Ed. 1982, 20, 7–16. [Google Scholar] [CrossRef]
  70. de Gennes, P.G. Reptation of a polymer chain in the presence of fixed obstacles. J. Chem. Phys. 1971, 55, 572–579. [Google Scholar] [CrossRef]
  71. Li, L.; Sun, Q.; Bellehumeur, C.; Gu, P. Investigation of bond formation in FDM process. In Proceedings of the 2002 Solid Freeform Fabrication Symposium—An Additive Manufacturing Conference Symposium, Austin, TX, USA, 5–7 August 2002; pp. 400–407. [Google Scholar]
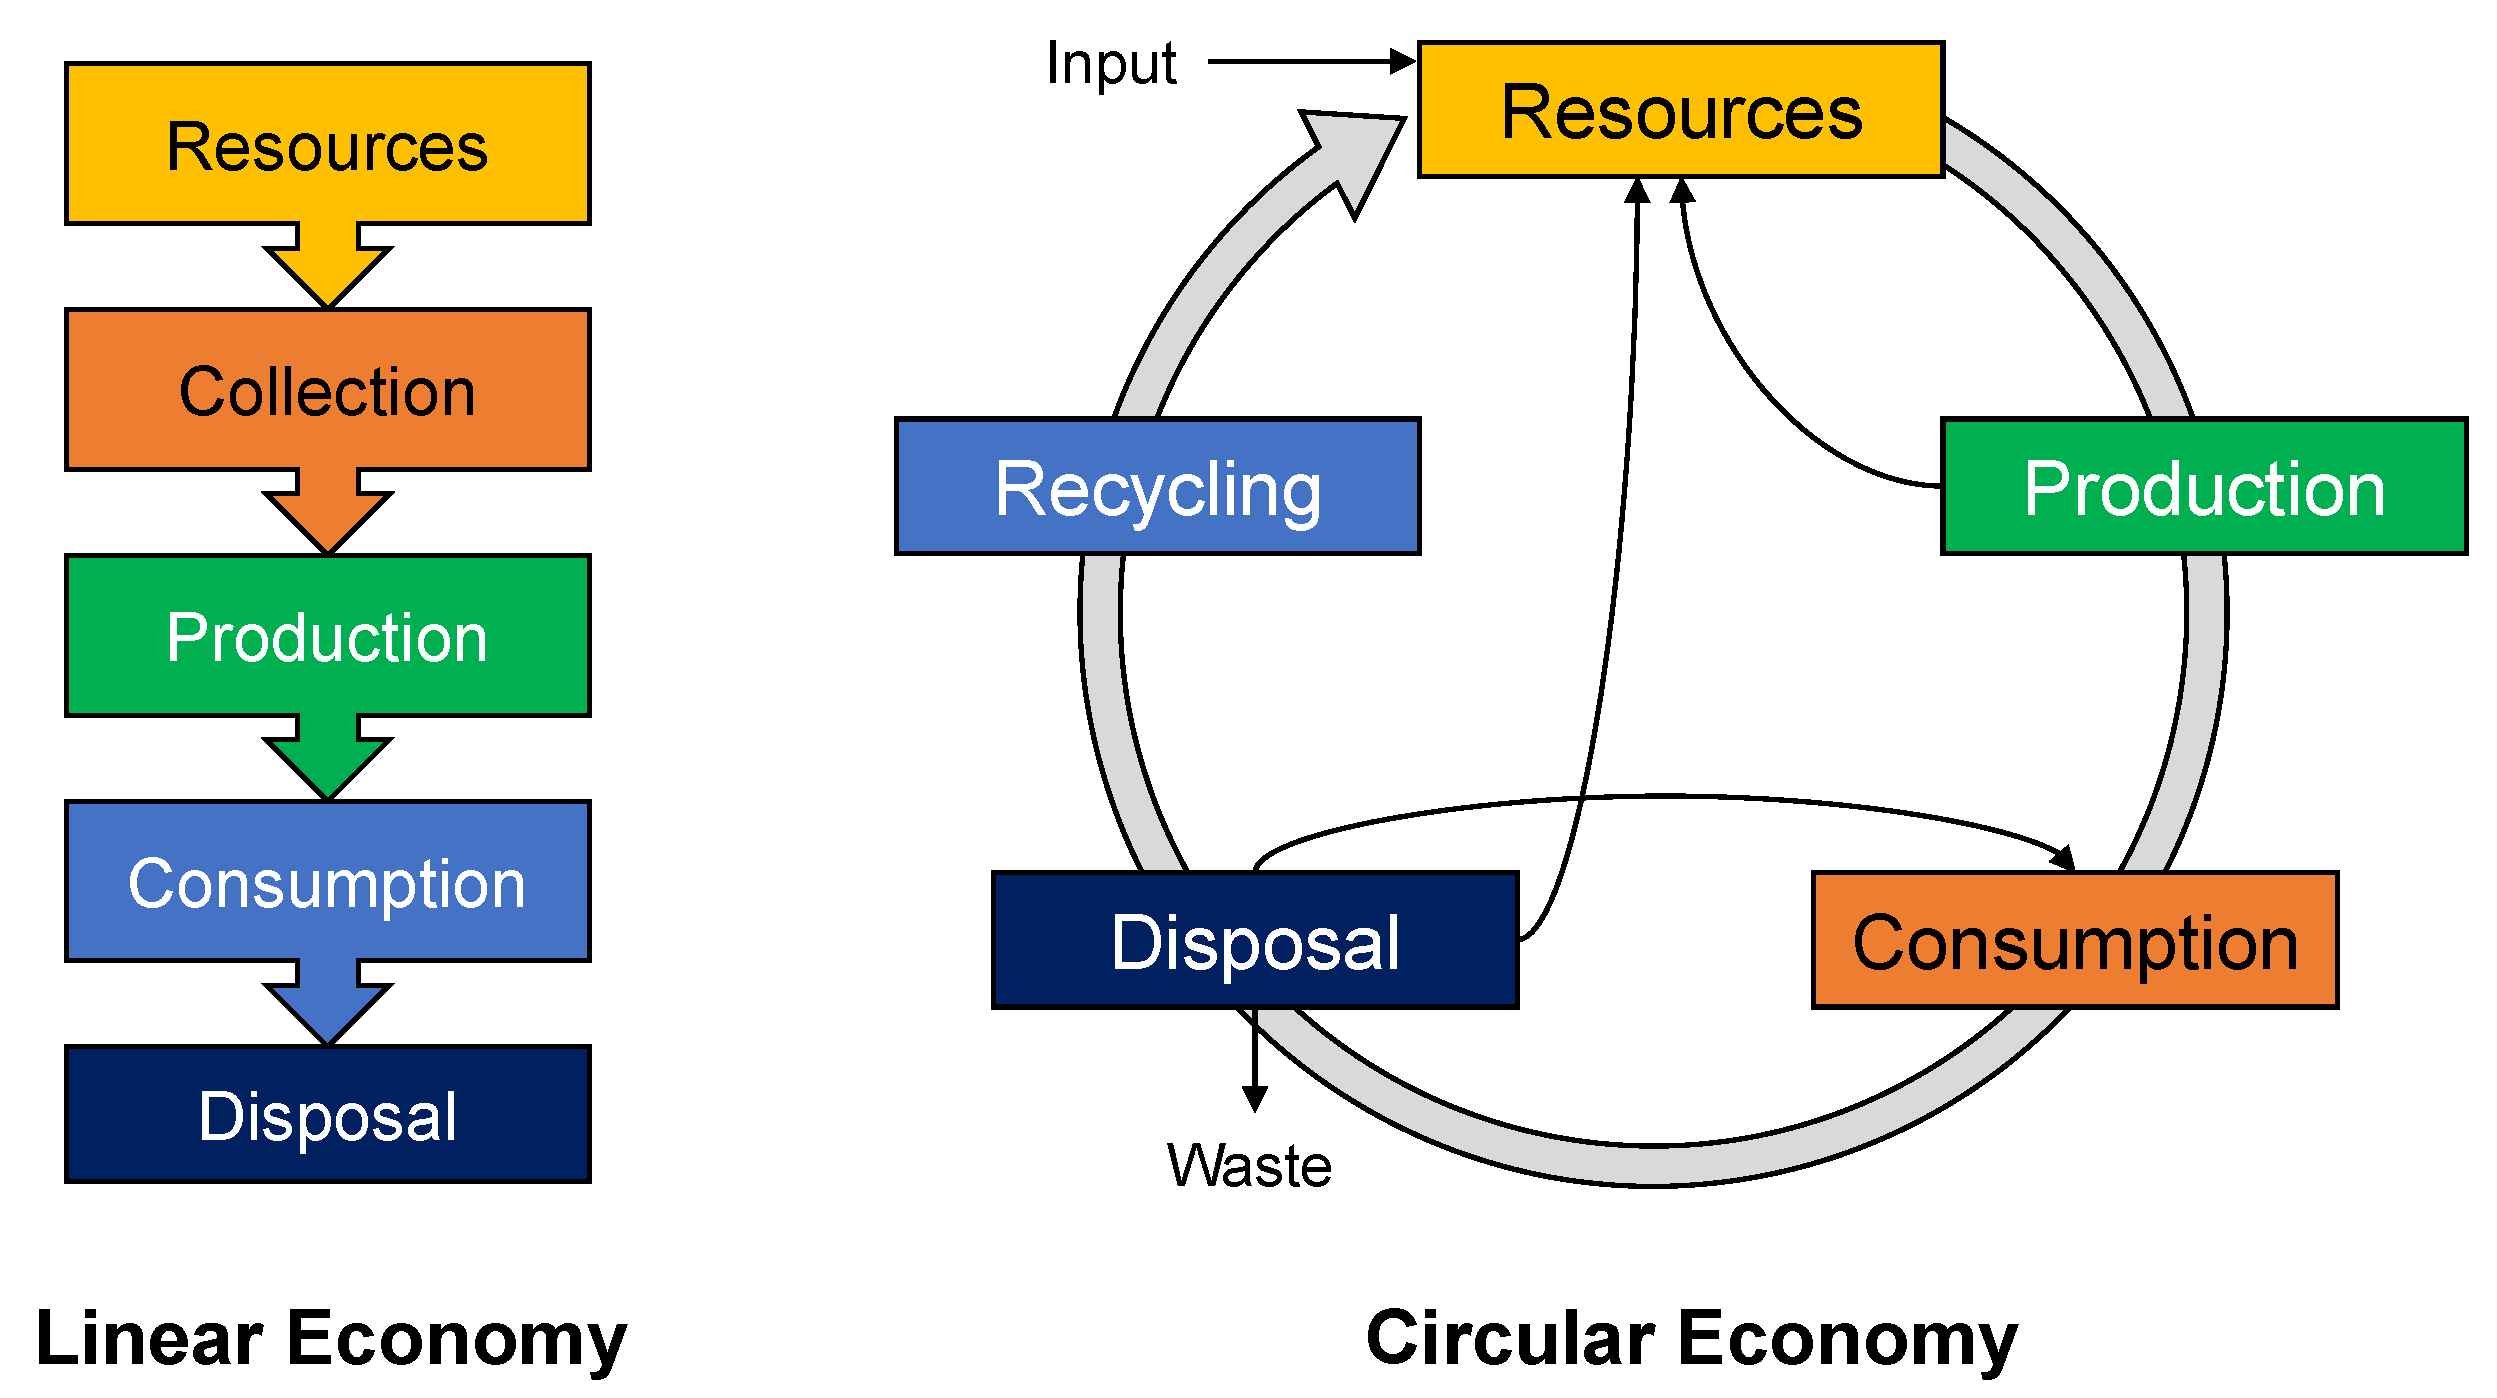
Figure 1. Example linear and circular economy models.
Jmmp 06 00103 g001
Figure 2. Example system lifecycle diagram from the NASA Systems Engineering Handbook. U.S. Government document, not subject to copyright.
Jmmp 06 00103 g002
Figure 3. (a) Examples of damaged turbine blades repaired using laser engineered net shaping (LENS) [44], (b) example LENS repair setup [46], and (c) FFF-printed patches [49]. Panels (a,b) © Elsevier B.V., reproduced with permission. Panel (c) reproduced under the terms of a CC-BY license.
Jmmp 06 00103 g003
Figure 4. Steps to print a part using FFF and modification required to the traditional FFF process to repair a given part using FFF [49]. Figure reproduced under the terms of a CC-BY license.
Jmmp 06 00103 g004
Figure 5. Decision-making process to establish potential FFF repair candidates.
Jmmp 06 00103 g005
Figure 6. Decision-making process for FFF repair after screening candidates.
Jmmp 06 00103 g006
Figure 7. Three-point bending test setup.
Jmmp 06 00103 g007
Figure 8. (a) Pre-cracking device, (b) design for the notch and pre-crack, and (c) notch and pre-crack as observed under an optical microscope [64]. Figures © Elsevier B.V., reproduced with permission.
Jmmp 06 00103 g008
Figure 9. (a) Patch printing, with detail (b) shown on completed patch.
Jmmp 06 00103 g009
Figure 10. Sample printing setup, including the modifications to the 3D printer to accommodate the samples.
Jmmp 06 00103 g010
Figure 11. Force–deflection curves from the three-point bending test for both replications of the experiment, divided into two plots for clarity. Runs 1–4 are shown in (a). Runs 5–8 are shown in (b). The plot legend indicates [Sample, Replication] in each case.
Jmmp 06 00103 g011
Figure 12. Failure modes (a) between the patch and the substrate, (b) within the patch, and (c) within the substrate.
Jmmp 06 00103 g012
Figure 13. Main effects plots for (a) force at failure and (b) deflection at failure.
Jmmp 06 00103 g013
Figure 14. (a) FEA model setup and (b) mesh used.
Jmmp 06 00103 g014
Figure 15. (a) Tested sample for material model, (b) the material model used for the FEA, and (c) Comparison of FEA and experimental results.
Jmmp 06 00103 g015
Figure 16. (a) Stress and (b) deformation plots for the FEA.
Jmmp 06 00103 g016
Table 1. Experimental factors and levels.
FactorLow Level (−)High Level (+)
A: Print speed (mm/s)1050
B: Raster angle ( ° )0/9045/135
C: Deposition temperature ( ° C)220240
Table 2. Case study design of experiments (DOE) table. This case study used a full-factorial 2 3 design.
SampleCombFactor AFactor BFactor C
10100/90220
2a500/90220
3b1045/135220
4ab5045/135220
5c100/90240
6ac500/90240
7bc1045/135240
8abc5045/135240
Table 3. Experimental responses. See Table 2 for factor levels and combinations. SE = σ / n .
SampleForce at Failure (N)Max Displacement (mm)Failure Mode
Rep 1Rep 2SERep 1Rep 2SE
1218721860.58.338.700.19Substrate failure
21677161332.06.205.320.49Adhesive failure
32136216012.08.858.170.34Substrate failure
41553170073.55.686.200.26Adhesive failure
52050207713.57.207.350.08Substrate failure
61984200410.07.187.250.04Patch fracture
72036214856.07.327.620.15Substrate failure
82134208126.57.957.630.16Patch fracture
Control 11859Mean for n = 3No damage or patch before testing
Control 2953Mean for n = 3Damage, but no patch before testing
Table 4. Results from the statistical analysis. p-values based on ANOVA with optimal Box–Cox transformation using λ = 6 (calculated by Minitab). Level of significance α = 0.05 .
FactorMax ForceMax DisplacementConclusions
Anderson–Darling testp = 0.224p = 0.066Both sets have normally distributed residuals, and therefore, an ANOVA is valid.
A: Print speedp = 0.004p = 0.013Print speed has a statistically significant impact on both the max force and max displacement.
B: Raster anglep = 0.687p = 0.585Raster angle does not have a statistically significant impact on either response.
C: Deposition tempp = 0.209p = 0.748Raster angle does not have a statistically significant impact on either response.
Publisher’s Note: MDPI stays neutral with regard to jurisdictional claims in published maps and institutional affiliations.