You are currently viewing a new version of our website. To view the old version click .
Journal of Marine Science and Engineering
  • Review
  • Open Access

10 December 2025

Acoustic Emission and Electromagnetic Radiation Caused by Compression and Bending Destruction of Ice

Arctic Technology Department, The University Centre in Svalbard, P.O. Box 156, N-9171 Longyearbyen, Norway
J. Mar. Sci. Eng.2025, 13(12), 2352;https://doi.org/10.3390/jmse13122352 
(registering DOI)
This article belongs to the Section Ocean Engineering

Abstract

Acoustic emission (AE) and electromagnetic radiation (EMR) arise because of material destruction and are used for the monitoring of materials and structures. This article presents an overview of AE and EMI studies related to physical processes in ice and their relationship to practically significant problems of ice mechanics and remote sensing. The paper provides a review of the properties of AE and EMI in experiments on compression and bending of ice, as well as original materials in tests of beams with fixed ends, carried out in laboratory and natural conditions. Methods and results of AE and EMR measurements in rock and ice failure processes are compared and discussed in the paper. It was found that the EMI signal spectra measured in the 0.5–10 MHz range in laboratory tests with fixed-end beams were in a higher frequency range compared to the EMR properties measured in earlier uniaxial compression tests. The obtained EMR spectra correspond to eigen frequencies of Rayleigh waves trapped near ice cracks with diameter of ~1 mm and smaller.

1. Introduction

Compression is a major factor in the overall strength and deformation of Arctic sea ice. Sea ice compression can be caused by converging winds and currents as well as by the restriction of ice drift by the coast, islands, and offshore structures. Ice compression can occur both over large areas and in smaller locations of stress concentration. The compressive strength of sea ice is much greater than its tensile strength, meaning it resists being pushed together more effectively than it resists being pulled apart. The compression strength of ice determines the level of maximal stresses. At the same time, compressive stresses applied to the ice for a sufficiently large time influence gradual development of creep deformations, dislocations, and cracks. In this sense, ice compression is always associated with ice destruction effects. The compression strength and yield stress of ice are included in numerous standards for the calculation of ice loads [1] and models of sea ice dynamics [2].
Bending deformations in floating ice occur due to wave propagation from the open ocean in ice-covered regions. Shrinking of Arctic sea ice [3] makes this process more significant and visible over large ocean areas [4]. The low-frequency component of swell propagates across long distances, causing bending oscillations of Arctic pack ice without ice failure and with very little damping. Measurements of swell in Arctic pack ice have been made in the Beaufort Sea and in the Central Arctic [5]. Waves may break up ice over a large ocean area in a relatively short time, which in turn will affect sea ice dynamics [6].
Remote monitoring of ice characteristics is based on satellite data on ice structure (thickness and surface concentration), motion (trajectories and drift velocities), and deformations (https://www.iceye.com/sar-data/use-cases/sea-ice-monitoring, accessed on 5 December 2025). SAR data are used for planning navigation, shipping, rescue operations, climate modeling, and for the solution of different local problems in coastal regions of frozen seas. SAR data for sea ice monitoring use a range of microwave frequencies, including C-band (3.8–7.5 cm) for all-season monitoring, and L-band (15–30 cm) and X-band (2.4–3.8 cm) for specific applications related to the study of ice structure or new ice forms. LANCE-MODIS can provide near-real-time optical and infrared data sampled by Aqua and Terra [7]. True-color or pseudo-color images can be generated by choosing different spectrometer bands. Methods for remote monitoring of ice stresses and ice failure are not developed. The possibility of passive aircraft monitoring of compressed areas of sea ice subjected to ice failure processes in the radio frequency range was discussed in [8] but was not developed further.
Acoustic emission is a process of generation of elastic waves in a material during its deformation with the formation of dislocations and cracks. Measurement of AE helps to detect locations of material destruction and to describe the failure properties of materials. Acoustic emission is frequently accompanied by the radiation of electromagnetic waves at specific frequencies emitted due to the changes in the polarization of material in the vicinity of cracks and places with large gradients of deformations and stresses.
Ice can be a significant source of sound, especially during periods of formation, cracking, ridging, and deformation. These processes generate transient noises across a wide range of frequencies [9,10,11]. Under calm conditions with a solid ice cover, the sound levels can be very low. The study of links between acoustic emission caused by ice failure and underwater acoustics is useful for the remote detection and monitoring of ice processes from the water in parallel to the measurements of electrical signals in the air.
Remote detection of ice stresses and failure can be very useful in preventing incidents of transport units and cargo stored on ice falling through floating ice [12]. Information on acoustic emission is useful when acoustic transducers are deployed on the ice in close proximity to a potential incident. Strong attenuation of short elastic waves in ice leads to the loss of AE signals at more than 1 m distance from the AE source [13]. In this case, signals of electromagnetic radiation caused by ice failure can be more valuable for the remote detection of ice failure since they propagate in the air.
Acoustic emission (AE) and electromagnetic radiation (EMR) are both caused by ice destruction processes. This paper presents a review of AE and EMR studies related to physical processes in ice. The aim of the paper is to establish a connection between the results of the study of purely physical processes in ice at the micro- and nanoscale and practically significant problems of ice mechanics and remote sensing. The AE and EMR methods for monitoring of materials are discussed in Section 2 and Section 3 of the paper. Reviews of AE and EMR properties in ice experiments are given in Section 4 and Section 5 for the tests on ice compression and tests with fixed-end beams simulating ice failure by a load placed on floating ice. Original materials in the tests with fixed-end beams are discussed in Section 4.3 and Section 5.2. Potential problems and plans for future research are discussed in Section 6. Short conclusions are formulated in the last section.

2. Acoustic Emission Method for Monitoring of Materials

Acoustic emission (AE) is the phenomenon of radiation of acoustic (elastic) waves in solids that occurs when a material undergoes irreversible changes in its internal structure, for example because of crack formation (CF) and plastic deformation (PD) due to different reasons. AE is measured using piezoelectric sensors (AE sensors) attached to the surface of the material being tested (Figure 1a). AE sensors respond to material destruction and PD by generating electric signals of AE. When measuring AE, the piezoelectric sensors usually respond to the normal displacement of the surface caused by elastic waves. Special lubrication (shear wave couplant) is needed for the registration of shear displacements (https://ims.evidentscientific.com/en/thickness-gauges/transducers/single-element, accessed on 5 December 2025). The elastic waves originate from CF and PD localization in a material, where a portion of the locally accumulated energy is released in the form of the transient elastic waves reaching AE sensors.
Figure 1. (a) The schematic of AE measurements by the AE sensor attached to the material surface, (b) the AE signal at the point of origin, and (c) the electrical signal recorded by the AE sensor.
AE sensors can be divided into two types: resonant (narrow-band), which have high sensitivity at a specific frequency, and broadband, which have constant sensitivity over a wide frequency range. The choice of model depends on the application. The mechanical resonance of the piezoelectric element is used to obtain high sensitivity. These types of sensors have resonant frequencies in the range of 30 kHz to 1 MHz. The number (N) and amplitude (A) of the recorded AE electrical signals are the most significant information obtained as a result of measurements using resonant models of AE sensors. The frequency and shape of the recorded AE electrical signals also become physically significant parameters when using bandpass sensors with a flat frequency response [14].
A preamplifier is used to amplify acoustic emission (AE) signals, which are very weak in nature, and filters are used to eliminate noise signals. The center frequency of the resonance piezoelectric sensor ( f c ) is the frequency at which it is most sensitive and most efficiently converts mechanical energy into electrical energy (or vice versa). This resonance occurs at the eigen frequencies of the sensor, where it responds with maximum amplitude. Operating below the center frequency, the sensor behaves like a capacitor, with displacement proportional to the stored charge and a more predictable phase relationship. Exposing the sensor to frequencies above its resonance frequency may result in a decrease in its response.
Khan et al. [15] developed a model and numerically simulated the response of resonance AE sensors to incoming AE signals of model shapes. It was shown that the shape of the electrical signals recorded by the AE system (wave forms) differs from the shape of the original AE signal propagating in the material from the point of origin to the point of detection over a distance r (Figure 1a). The wave form frequencies are close to the center frequency of the AE sensor. The wave form lengths (DAE) are shorter than the length of the original signal (D) due to the energy losses. The wave form amplitude decreases as the distance r between the sensor and the point of origin of the AE signal increases. The rise time of the wave form (RAE) increases as the distance between the sensor and the point of origin of the AE signal increases. These properties are illustrated in Figure 1b,c.
According to the Gutenberg–Richter law [16], large cracks leading to high-amplitude AE occur due to the merger of several small cracks emitting lower-amplitude AE. Thus, at any given time, one would expect more small cracks to propagate than large ones, which in turn would result in a smaller AE amplitude rather than a large amplitude. Similar behavior should be observed where failure occurs due to crack propagation with self-similar crack length distribution [17]. The cumulative number of hits, plotted as a function of hit amplitude, is close to a straight line, the slope of which is known as the b -value. The b-values change as the material properties change. Higher b -values indicate greater ratios of low-amplitude hits to high-amplitude hits. The b -values are expected to decrease during sustained loading, as more small cracks coalesce into larger ones. The b -value is calculated with the formula
log 10 N ( A ) = a b   log 10 ( A / A r e f ) .
In Equation (1), N ( A ) is the number of AE hits with an amplitude greater than or equal to A r e f , constant a is the ordinate intercept, and constant b is the slope. Constant b is also known as the b -value of the line that relates A r e f and log 10 N ( A ) . The b -value is usually close to 1.0 in seismically active regions.
Resonance models of piezoelectric sensors with a center frequency in the range of 150 kHz–200 kHz [18,19,20,21], 370 kHz [22], 500 kHz [23,24], and 600 kHz [13] were used for the measurement of AE in ice. Weiss and Grasso [25] reported on the use of a piezoelectric transducer with a frequency bandwidth of 100–1000 kHz for the measurement of AE in single crystals of ice. Lishman et al. [23] used PZT-5H compressional crystal sensors (Boston Piezo-Optics inc., 15 mm diameter, 5 mm thickness, 500 kHz center frequency) operating on the Vallen AMSY-5 system (https://www.vallen.de/zdownload/pdf/y5sd0911.pdf, accessed on 5 December 2025). The PZT-5H piezoelectric sensor is primarily a resonant sensor by nature, but its effective operating frequency range can be extended through clever design to lower the resonant frequency or combine multiple resonators to achieve a wide bandwidth for practical applications. Resonant AE sensors PK15a [20] and PK15I [21] operating on Mistras acquisition units have a resonant frequency of 150 kHz expressed in decibels relative to a reference voltage per microbar. Their operational ranges are specified as 50–400 kHz and 100–450 kHz, respectively. The calibration protocols are available on the web (https://www.physicalacoustics.com/, accessed on 5 December 2025).
In cases where measurements are made based on arbitrarily specified signal thresholds and the relative time of wave arrivals, and the obtained information is used to identify types of material failure associated with plastic deformations and fracture of specimens, calibration of AE sensors is not required [26]. Acoustic sensors needed to be calibrated for the measurement of the speeds of p- and s-waves. Absolute calibration of AE sensors allows comparison of results from different researchers and drawing quantitative conclusions about the physical sources of AE, useful for nondestructive testing of materials and structures. Most of the AE measurements in ice deformation processes were carried out at different times using different AE sensors and recording devices, while the p-wave velocity measurements were carried out mainly using calibrated sensors designed for this kind of measurement [27,28,29,30,31].

3. Electromagnetic Radiation Method for Monitoring of Materials

A comprehensive review on deformation-induced electromagnetic radiation (EMR) detection from materials was published by Sharma et al. [32]. The EMR emitted during crack propagation electrifies newly formed cracks and change polarization of their faces due to the rupture of atomic bonds. Unlike AE, the EMR signals have also been detected in the elastic deformation regime of materials caused due to the electro-mechanical effect. There is no unique theory explaining the mechanical and electrical dynamics of charge movement that leads to EMR generation. EMR sensors/antennas detect the electromagnetic radiation emitted due to spatial movement of electrical charges and dipoles in a wide range of frequencies.
The EMR from materials was studied for the monitoring of crack propagation [33], earthquake prognosis [34], snow avalanche prediction [35], stress-state monitoring in coal mines [36] and predicting rock burst [37]. A model of fracture-induced EMR considered in the papers [38,39,40] assumes that EMR is emitted from the crack surface oscillating with the Rayleigh wave frequency. Thus, the EMR frequency is equal to f = v R / λ , where v R is the Rayleigh wave speed and the wavelength λ is equal to the half crack width or smaller. Song et al. [41] derived the formula to calculate the frequency f from the material characteristics:
f = 1 L 1 32 2 4 0.87 + 1.12   ν ( 1 ν ) ( 1 + ν ) 5 E 3 σ c ρ ,
where E and ν are the elastic modulus and Poisson’s ratio, ρ is the density, σ c is the yield stress, and L is the crack length.
The AE and EMR are related both to crack nucleation and development. At the same time, AE sensors detect surface deformations of a material transferred by elastic waves, while the EMR is emitted due to the Rayleigh waves at the crack surface according to [38,39,40]. The Rayleigh wave energy decays exponentially with the distance from the crack surface. Assuming v R = 1.8 km/s (the speed of Rayleigh waves in ice), we find that f = 1.8 MHz at λ = 1 mm and f = 180 kHz at λ = 1 cm according to the formula f = v R / λ . This frequency is higher than the resonant frequency of AE sensors PK15a and PK15I f c = 150 kHz. The length of elastic p-waves with the frequency f c is about 2.5 cm when the wave speed is 3.5–4 km/s (the speed of p-waves in ice). Thus, the EMR frequency can be higher than the AE frequency. The relationship between EMR and AE was discussed and simulated in [42].
EMR can be attributed to the flexoelectric effect in dielectric materials [43]. Bending deformations of ice crystals influence strain gradients which in turn lead to the migration of the L-D defects in water ice. Stress concentration near crack tips also influences the migration of D-defects from the crack tip. The electromechanical coupling between strain gradients and polarization influences the flexoelectric effect. The flexoelectric effect is weak in bulk materials, because strain gradients are usually small. Larger strain gradients are possible, and polarizations comparable to those of ferroelectric materials can be achieved at the nanoscale. Wang et al. [44] demonstrated that flexoelectricity may influence the processes of crack formation and propagation in strontium titanate (SrTiO3) crystals. The flexoelectric effect at the grain boundaries of oxide ceramics is discussed in [45]. Daigle [46] described the structure of the electrical double layer at the ice–water interface. Experiments by Wen et al. [47] demonstrated that water ice is flexoelectric. It is electromechanically active at all temperatures and can electrify any natural process involving mechanical deformations of ice and ice-like interfacial water. Wen et al. [48] found that the flexoelectric effect was enhanced in saline ice due to the bending-induced streaming current along ice grain boundaries.

4. Acoustic Emission in Ice Experiments

4.1. Uniaxial Compression of Ice Specimens

Results of laboratory tests on uniaxial compression of polycrystalline ice specimens of cylindrical shape with measurements of the load, displacements, and AE were described in [18]. The diameter and height of the specimens were equal to 50.8 mm and 127 mm, respectively. The specimens had a mean grain diameter of about 1.2 mm and a density of 917 kg/m3. The c-axis of ice crystals was randomly oriented. Gas bubbles represented a very small volume fraction of the ice specimens. Two AE sensors were fixed on the side wall of ice specimens in the tests. The recording system consisted of commercially available equipment.
The number of acoustic events during each test was recorded as a function of time. Both constant strain rate tests and constant load tests showed that the total AE event curves are smooth and monotonically increasing functions of time. The number of AE hits per unit volume ( N ) and axial strain ( ε ) are shown in Figure 2a versus time for an ice specimen subjected to 2 MPa stress. The forms of both the AE response and strain response are typical for all tests carried out with a constant load. Three important features of the creep curve are an incubation period that can be identified as an upward-facing concavity (1), a region of constantly decreasing strain rate (primary creep) (2), and a region of constantly increasing strain rate (tertiary creep) (3) beginning at about 3 · 10 3 s in this particular test. The secondary creep stage with constant strain rate was not observed in the tests. The AE response was characterized by (1) a rapid increase in the number of AE hits recorded after load application and (2) a sharp decrease in the rate of AE hits recorded before the end of primary creep (generally between 0.2% and 0.7% strain). The main features of the AE response are shown in Figure 2b. The maximum rate of AE hits ( d N / d ε m a x ) always occurred after the initial maximum of the strain rate and before the end of primary creep. As tertiary creep develops, the AE hit rate becomes very low.
Figure 2. (a) The number of AE hits versus time and axial strain versus time for an ice specimen subjected to 2 MPa stress; (b) the AE hit rate with respect to strain for an ice specimen subjected to 2 MPa stress; (c) log–linear plot of AE hits versus strain for eight test samples subjected to stress from 0.8 to 3.67 MPa. (Adopted from Lawrence and Cole [18]).
Figure 2c shows the logarithm of the AE hits per unit volume versus strain. The tests were performed at −5 °C ice temperature. The initial stress values ranged from 0.8 to 3.67 MPa. It can be observed that the AE response is a well-behaved function of stress. The total number of AE hits at a given strain increases with increasing stress.
Lawrence and Cole [18] concluded that the AE response is an excellent indicator that deformation is compensated by local failure. The AE records can be used to determine the region of dislocation creep with cracking. The observed fractures are closely related to the presence of grain boundaries and intergranular cracks. When developing equations to describe the AE response, the number of AE hits was related to the deformation of the sample. It was concluded that the AE hits are a consequence of the flow process, and the initiated fracture acting as a sink for dislocations leads to the observed behavior N ε .
Li and Du [20] performed uniaxial compression tests with cylindrical fresh ice specimens of 150 mm diameter and 300 mm length. In three conducted tests, the compression stresses were equal to 2.7 MPa, 3.0 MPa, and 2.6 MPa. Two PK15a sensors were fixed on the opposite sides of specimens in the tests to record AE with a two-channel Mistras 2001 data acquisition system. The threshold magnitude of the AE acquisition system was set to 45 dB to avoid acquisition of noise signals, and the sampling frequency was set to 3 MSPS. The test duration was approximately 150 s. The ice specimens failed at the end of each test. The number of AE hits recorded in the tests was about 250 at the load drop time and increased to 532–652 during the failure process. The high AE hit rates were measured a few seconds after the load was applied and after the load release because of ice failure. The AE hit rate was very small compared to these two events in most test cases. The center frequency of recorded wave forms decreased during the tests approximately from 170–220 kHz during the compression to 140–170 kHz during the failure process. The peak frequencies appeared in three frequency bands of 10–20 kHz, 30–50 kHz, and 160–180 kHz. The b-values decreased from 1.2 at the beginning of the loading to 0.5–0.6 at the time of ice failure. This decrease indicates that at the end of the tests, the cracks expand rapidly, and different interconnected cracks caused serious damage to the specimen. The changes in the b -value effectively reflected the failure process of ice specimens.
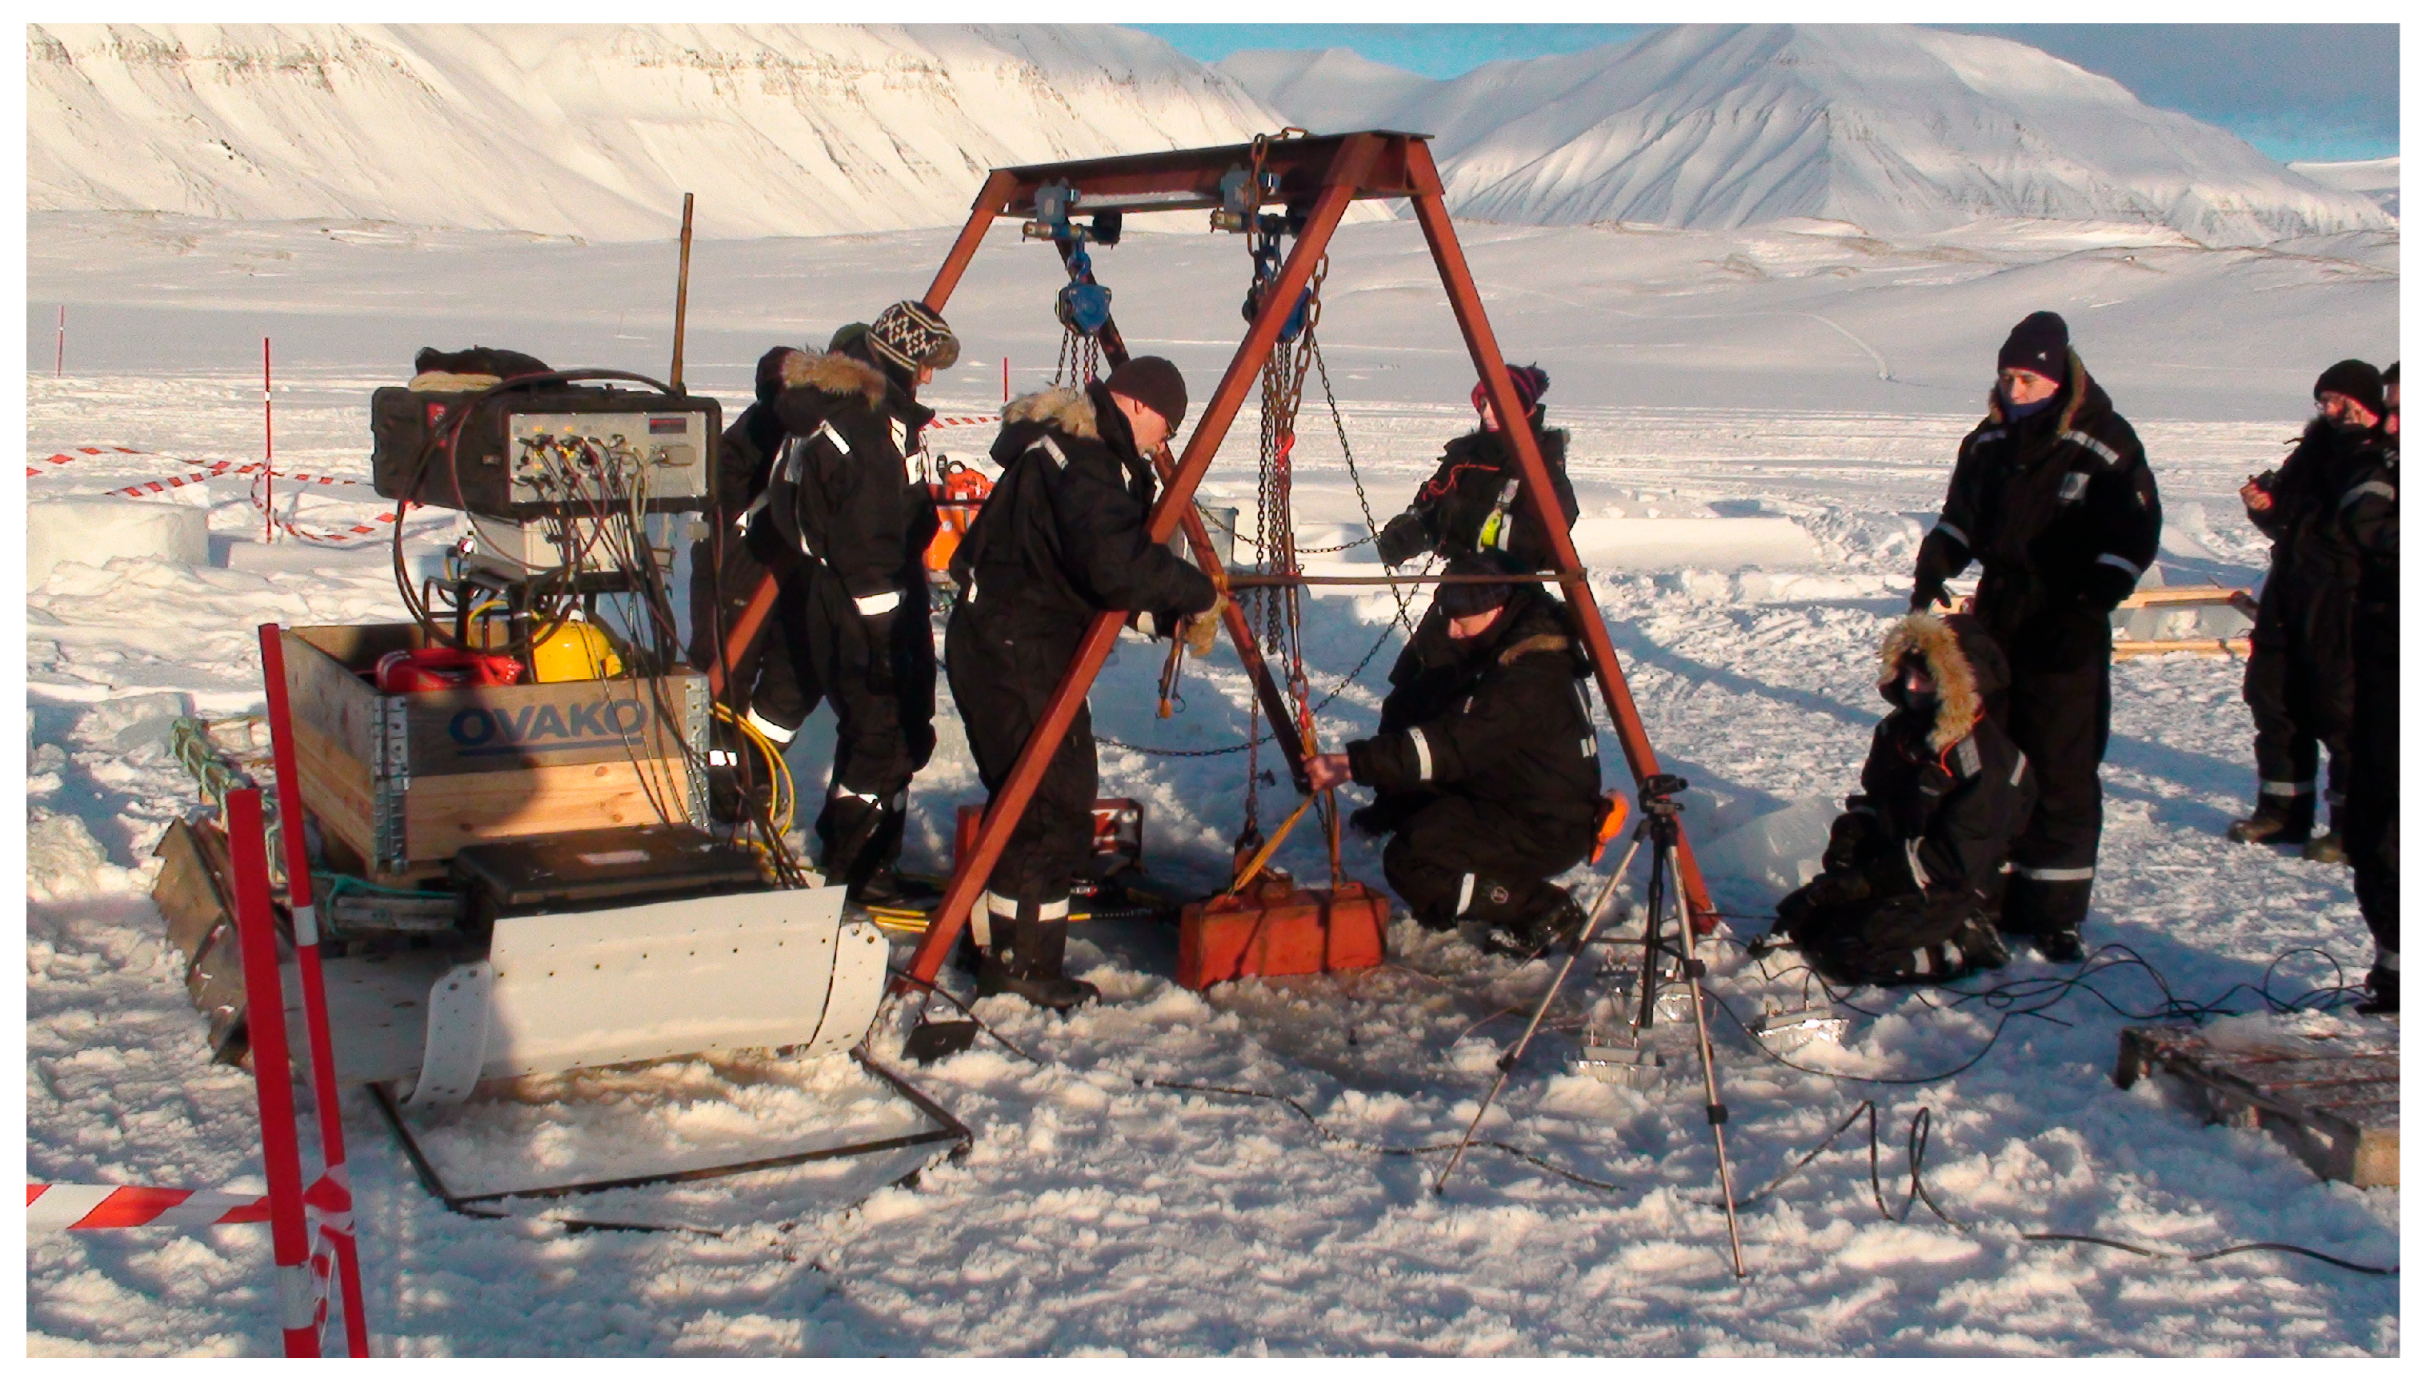
Field tests on uniaxial compression of columnar sea ice with measurements of the load, displacements, and AE were conducted in the Van Mijen Fjord of Spitsbergen with the original hydraulic rig [23,49,50]. The organizing of a full-scale test with a short cantilever beam is shown in Figure 3. The load was applied to a short cantilever beam cut in floating ice of 60 cm thickness. The beam length was 1 m, and the beam width was 63 cm. The mean ice temperature and salinity averaged over the thickness were −2.4 °C and 4.4 ppt, respectively. The load was applied horizontally to the beam end by a metal plate of 60 cm width and 80 cm height. The metal plate was pressed against the ice by two hydraulic cylinders with a maximum capacity 30 t each. The hydraulic cylinders were attached to two identical vertical metal plates. One plate was fixed near an ice edge, and the other plate was in contact with the end of a cantilever beam. The cylinders were suspended on an A-shaped metal frame. The displacement rate of the cylinders was 1 mm/s. The strain rate and peak compressive stress were calculated as approximately 1 · 10 3 s−1 and 1 MPa, respectively.
Figure 3. Full-scale test on compression strength of a short cantilever beam on land fast ice in the Van Mijen Fjord of Spitsbergen, 8 March 2016.
Acoustic emissions were recorded by four AE transducers: the AE1 was the closest to the plate, the AE2 was furthest from the plate, and the AE3 and the AE4 were off-center on the ice near the beam edges, as indicated in Figure 4. The AE1 was 240 mm from the plate, and the AE2 was 1050 mm from the plate. Loading was applied over two separate intervals, separated by nearly ten minutes (during this gap, the loading actuator positions were adjusted to ensure symmetric loading). The loading interval duration was approximately 60 s. Photographs of the cantilever beam before and after the first loading interval are shown, respectively, in Figure 4a,b. Photographs of the cantilever beam before and after the second loading interval are shown, respectively, in Figure 4c,d. The dependences of the cylinder displacement and the force on time are shown, respectively, in Figure 5 and Figure 6 by solid lines. The AE records during these periods are shown in the same figures for every transducer.
Figure 4. The schematic of the full-scale uniaxial compression test and locations of four acoustic transducers AE1, AE2, AE3, and AE4 frozen to the cantilever beam surface AE sensors (a). Distances are given in mm. Photographs of the ice beam before (b) and after (c) the first loading interval, and before (d) and after (e) the second loading interval.
Figure 5. Run 1. The displacement (a,c,e,g) and the force (b,d,f,h) versus time during the first loading interval. Amplitude of the AE hits recorded by transducers 1 (a,b), 2 (c,d), 3 (e,f), and 4 (g,h). Blue markers show hits which were fully recorded, green markers show hits where only the amplitude was recorded (Adopted from Lishman et al. [23]).
Figure 6. Run 2. The displacement (a,c,e,g) and the force (b,d,f,h) versus time during the second loading interval. Amplitude of the AE hits recorded by transducers 1 (a,b), 2 (c,d), 3 (e,f), and 4 (g,h). Blue markers show hits which were fully recorded, green markers show hits where only the amplitude was recorded (Adopted from Lishman et al. [23]).
The AE was recorded using the Vallen AMSY5 system (https://www.vallen.de/zdownload/pdf/y5sd0911.pdf, accessed on 5 December 2025). Compressional crystal sensors PZT-5H (Boston Piezo-Optics Inc., 15 mm diameter, 5 mm thickness, 500 kHz center frequency) potted in Epoxy were used in the experiment. These AE transducers were then placed into shallow drilled holes (~20 mm deep) in the ice surface and allowed to freeze. The AMSY5 unit records the sound wave for 400 μs, at a sampling rate of 5 MS s−1. For each hit, the following characteristics were determined: the time of arrival (at the piezo sensor), amplitude, duration, and rise time. In post-processing, the frequency content of the recorded hits was calculated using FFT, and from this the peak frequencies were determined. Signals with peak frequencies greater 180 kHz were considered as a noise and filtered out of the results. The system had a low-frequency cutoff at 100 kHz, so all signals shown here represent emissions with a central frequency in the range 100–180 kHz.
Acoustic measurements and load/displacement measurements were recorded on separate systems, without a calibration signal, and so the time calibration between them was only accurate to ±1 s. The sound wave speed in the ice was calculated to be 3300 ms−1 from separate experiments using a pulser and receiver. The frequency range of our measurements (100–180 kHz) corresponded to p-waves with lengths from 18 mm to 33 mm. Background acoustic noise levels can be seen at the start of each set of experimental data: these were non-zero but small compared to acoustic signal levels during loading. The level of acoustic noise in natural sea ice depends on changes in air and ice temperature and measurement location [51,52].
On the AE plots in Figure 5 and Figure 6, blue markers show hits which were fully recorded, while green markers show hits where only the amplitude was recorded. The second category of recording, where only an amplitude is recorded (and no transient), tends to occur during periods of high loading and high levels of AE, and is associated with saturation in the AE equipment.
Figure 5 shows the results from the first loading interval of the compression test (Run 1). One can see that the displacement increased with constant rate for approximately 50 s. During this time, the force increased monotonically, except for one event at t 25 s, when the displacement increased sharply and the force dropped sharply. This event is clearly visible in the records of AE2–4 in Figure 5c–h. The beam was unloaded at t > 50 s. During unloading, the displacement rate was negative. Figure 5b shows that the force dropped significantly at t 45 s, when the displacement rate was zero. Figure 5b shows that AE1 recorded high-energy AE (100 dB) up to t 50 s, i.e., until the moment when the displacement rate became negative and for ~ 5 s after the force was released. The A2 transducer recorded high-energy AE events (100 dB) for the longest time, until t = 65 s (Figure 5c,d). Records of transducers AE3 and AE4 placed near the beam edges look similar and less energetic. Their amplitude reached a maximum at t 35 s after the force rate became smaller.
Figure 6 shows the results from the second loading interval of the compression test (Run 2). One can see that the displacement increased at a constant rate for approximately 58 s. The force increased monotonically for approximately 24 s and then decreased non-monotonically. There are two local maxima of the force, F = 409 kN at t 25 s and F = 343 kN at t 34 s, and one local minimum of the force, F = 300 kN at t 29 s. The longest high-energy AE (100 dB) was recorded for 26 s by the AE2 transducer installed near the beam root, while the AE1 transducer installed near the beam end recorded high-energy AE (100 dB) for a shorter time of ~ 12 s. The AE1 and AE2 amplitudes dropped monotonically from 100 dB to 30 dB in ~ 5 s and ~ 20 s, respectively. The results for AE4 were similar to those for AE1. The results for AE3 show high-energy AE (90 dB) at 40 < t < 44 s. This is explained by the formation of a longitudinal crack at the left side of the beam during the second loading interval. The crack formation is indicated by the rotation of the metal plate visible in Figure 4d.
The study showed that higher forces corresponded to increased hit amplitudes and greater numbers of hits similarly to the laboratory uniaxial compression tests (Figure 2c). Before the loading, the AE showed very few hits, probably corresponding to background noise. As the load begins to rise, the maximum amplitudes of acoustic emissions also begin to rise until saturation occurs. After the load is removed, AE signals remain elevated and decay over >100 s. A similar fall-off in AE rate after loading is described by a power law in [17]. Mansurov [53] attributes post-failure AE in rocks to “stress redistribution”.
The cumulative number of AE hits recorded by each channel was about 104. The b-values calculated for the period with no load vary in the range of 2 to 3.5. The b-values calculated for the end of the loading periods were around 1.8. After the unloading, the b-values increased again to 2. The decrease in the b-values was not as significant as in the above-described tests of Li and Du [20]. Note that the experiments by Li and Du [20] and Lishman et al. [23] were conducted with very different types of ice and at different scales.
Lishman et al. [23] measured AE in the full-scale indentation test. A vertical cylindrical indenter of 15 cm diameter and 80 cm length was pushed by the hydraulic rig through sea ice of 60 cm thickness. The hydraulic rig was placed in the water pool (~80 × 150 cm) cut in the sea ice. Two AE sensors were fixed on the ice surface in the front of the indenter and in the perpendicular direction at 1 m distance from the indenter. The third AE sensor was fixed at the distance of 0.7 m from the indenter at 45° to the direction of indentation. The indentation load varied around 0.4 MN, resulting in a mean nominal pressure of 5 MPa. The interaction of the indenter with ice was accompanied by the oscillations in the load and stroke with a period of about 30 s. These oscillations were clearly visible in the AE data. The heat amplitudes varied synchronously with the same periods. The b-value calculated from the indentation test was equal to 1.53.

4.2. Bending Tests

Langhorne and Haskell [19] measured AE in two tests with cyclically loaded floating cantilever beams. The beams were cut from the first-year Antarctic land fast ice of 2 m thickness near McMurdo Sound range. The beam lengths were 10 am and 12 m, and the beam width was equal to 1 m. The beams were loaded with a hydraulic rig by sinusoidal force with a period of 8 s in the middle of the beam at a distance of ~0.5 m from the free end of the beam. The mean temperature of the ice was −10 °C, the mean ice salinity was 5–6 ppt. One AE sensor was fixed on the ice surface on the beam axis at a distance of 0.5 m from the beam root; the other AE sensor was fixed outside the beam at a distance of 0.5 m from the beam root on a line prolonging the beam axis. The data were sampled at a frequency of 0.5 MHz. The storing rate allowed 2 s data series (wave forms) to be captured every 1 min. The number of acoustic events recorded by each AE sensor was about 50 in one test. In the other test, the data logger was transferring data only during the failure cycle, and the number of recorded acoustic events was about 10. The authors assumed that the acoustic energy is transmitted by the Rayleigh waves. Speeds of Rayleigh waves were estimated from the ice properties, and measurements were slightly different. The b-value calculated for the beam failure cycle was equal to 0.8.
Li and Du [20] measured AE in three three-point bending tests with the rate of central displacement of 2 mm/min. The length, height, and width of fresh ice specimens were equal to 35 cm, 10 cm, and 5 cm, respectively. The duration of the tests was about 40 s, and the maximal load reached 2 kN at the ice failure. The cumulative number of AE hits was about 200 at the load drop time and increased to 250 during the ice failure. During the bending of the experiments before the failure, the b-values were higher than 1.1. During the failure process, the b-values dropped to 0.5–0.6. The center frequency of recorded wave forms decreased during the tests approximately from 240–280 kHz during the bending to 180–220 kHz during the failure process. The peak frequencies appeared in three frequency bands of 30–50 kHz, 150–180 kHz, and 240–250 kHz. The authors concluded that they correspond to three different types of ice damage in the tests.
The AE measurements were carried out on the surface of floating ice bent by regular waves propagating below floating ice in an HSVA ice model basin [54]. The AE was recorded with the Vallen AMSY5 system used in the above-described full-scale tests on ice compression and indentation. The artificial columnar ice made in the HSVA basin had a thickness of 5 cm, a salinity of ~2–3 ppt, and a temperature of ~−0.6 °C. The ice sheet was 60 m long and 10 m wide. The wave heights varied from 5 mm to 15 mm, and the wave frequencies varied from 0.5 Hz to 1 Hz in the experiments. The effective elastic modulus of ice measured by the quasi-static point load method changed from 46 to 378 MPa. Four AE sensors (1–4) were fixed on the ice surface at 5 m from the ice edge, and another four AE sensors (5–8) were fixed on the ice surface at 38 m from the ice edge. The peak frequency of the wave form spectra recorded in the tests was around 160 kHz. Wave forms with frequencies above 170 kHz were considered as noise and, therefore, filtered. The wave form spectra obtained from AE measurements conducted during flexural strength tests using floating cantilever beams also had a peak frequency of approximately 160 kHz.
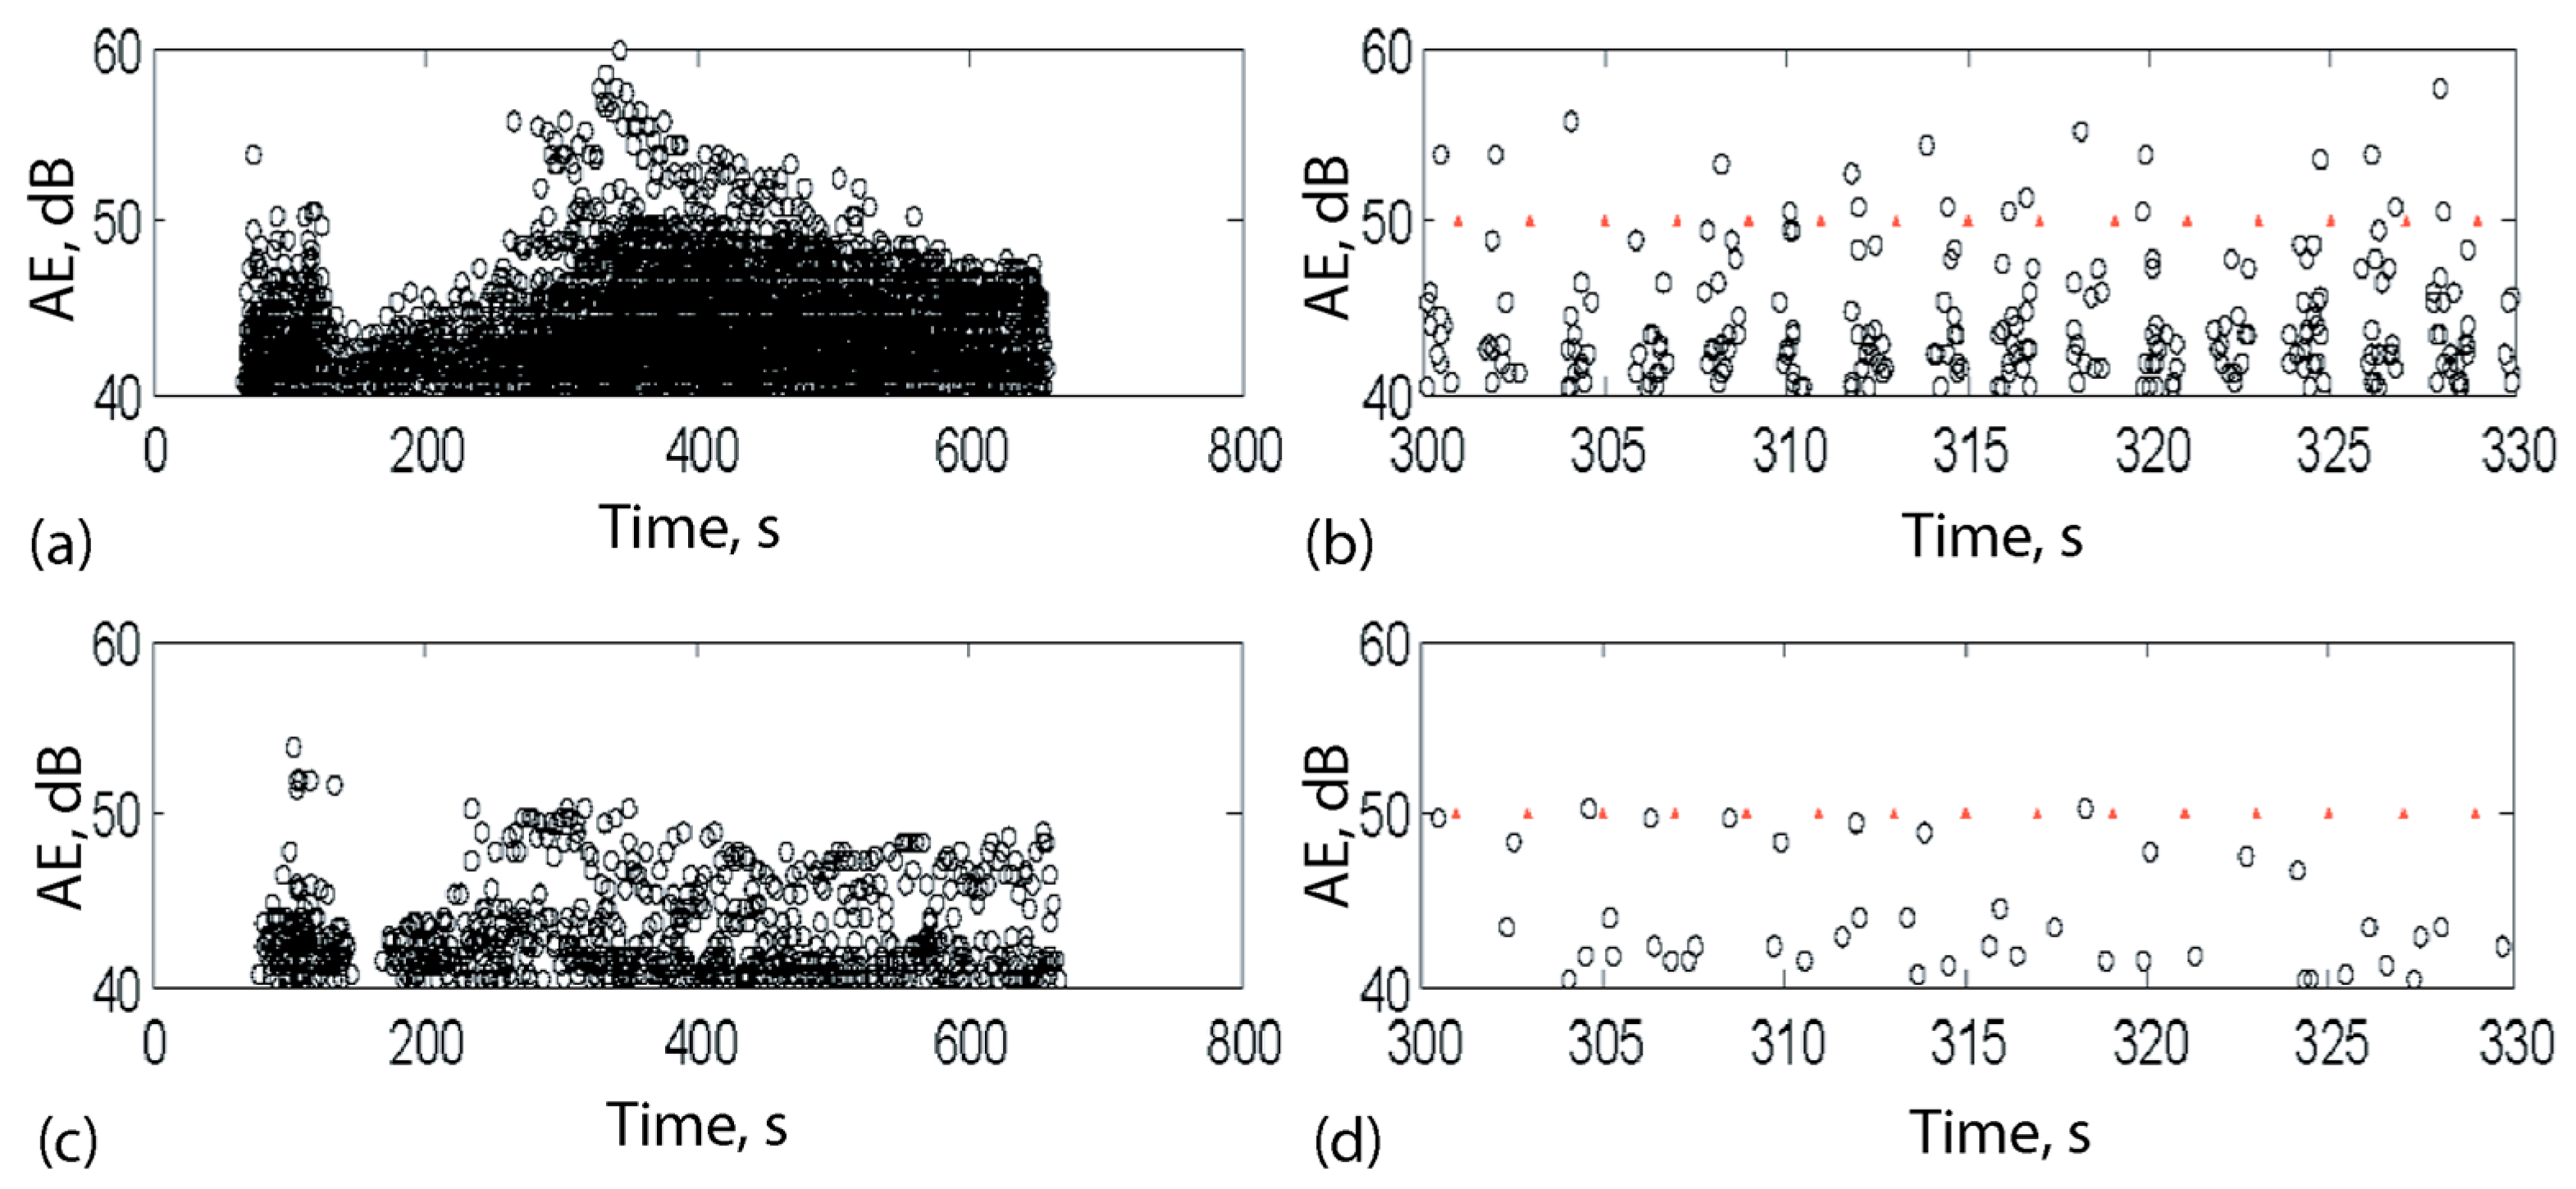
Figure 7 demonstrates AE records of AE sensors 1 and 5 in the test with a wave frequency of 0.5 Hz and a wave height of 10 mm. Figure 7a,c demonstrate decreasing AE amplitudes with the distance from the ice edge due to the wave attenuation. Figure 7b,c demonstrate the emission of acoustic hits with the wave periodicity. There is a strong signal after the wavemaker starts decaying after the first ~30 s. This means higher acoustic activity immediately after the ice starts to deform. The acoustic activity decreases with continued deformation caused by wave actions and then increases again due to local cracking near the sensors.
Figure 7. Hit amplitude vs. time, for AE sensor 1 (a,b) and AE sensor 5 (c,d), shown for the entire experiment (a,c): the wavemaker runs from about 60 s to 660 s, and the start and end of the waves can be clearly seen, and over a 30 s window (b,d). Red markers are shown at the frequency of the experimental waves (0.5 Hz) (Adopted from Marchenko et al. [54]).
To demonstrate the influence of under-ice turbulence on the wave damping, the experiments were carried out with fixed ice and moving ice. The ice sheet was moved manually along the tank back and forward cyclically with a period varied within 40–60 s. Figure 8a shows AE amplitudes recorded by the sensors 1–3 in fixed ice. Figure 8b clearly shows a reduction in AE amplitudes recorded by sensors 1–3 in the moving ice due to a reduction in the wave amplitudes.
Figure 8. Hit amplitudes as a function of time, across three channels, for the tests with fixed (a) and moving (b) ice (Adopted from Marchenko et al. [54]).

4.3. Fixed-End Beam Tests

Sodhi [55,56] proposed a fixed-end beam (FEB) test to investigate the wedging action, which is activated after the formation of radial cracks around a vertical load on a floating ice sheet. In the FEB test, a beam with fixed ends is vertically loaded by force F applied at the center of the beam surface (Figure 9a). The typical scenario of beam failure includes two stages. At the first stage (I), three cracks are formed in the center (Cr1) and on the sides of the beam (Cr2 and Cr3). The cracks do not pass through the entire thickness of the beam and stop near the compression zones. Three compression zones are formed near the crack tips and extend to the upper beam surface near Cr1 and to the bottom beam surface near Cr2 and Cr3. The compression zones are marked in grey in Figure 9a. From the momentum balance, it follows
F L 2 σ c w ( h δ ) ,
where L , h , and w are the beam length, thickness, and width; δ is a displacement of the beam center; and σ c is the longitudinal compression stress in the compression zone near the central crack Cr1. Obviously, the stress σ c increases as the displacement δ approaches the beam thickness h . Finally, at the second stage (II), the FEB fails in compression. The coefficient β characterizes the depth ( 1 β ) h of the central crack Cr1 and the size of compression zone β h (Figure 9a).
Figure 9. (a) Beam with fixed ends loaded by a vertical force F . (b) Typical dependence of the load on time in the FEB test with constant displacement rate.
The FEB tests can be conducted either with constant load or prescribed displacement rate. Figure 9b shows typical dependence of the load in FEB tests with relatively high constant displacement rate. In such tests the absolute maximum of the load F m a x is reached at t = t m a x , and smaller local maxima of the load are related to the crack formations in the end of the stage I at t t c < t m a x . In FEB tests with low displacement rate the maximum force F m a x at t = t m a x can be lower the peak values of the load around t = t c due to stress relaxation [57]. The beam fails at t = t f > t m a x , when the vertical displacement of the beam center becomes close to the beam thickness δ h .
Further, we consider the FEB test with a constant load of 35 kg (Figure 10). The load was created by a canister with water attached to the center of the beam. The sea ice beam was frozen into the metal caps. The beam length between the caps was L = 44 cm. The beam thickness and width were h = 4.9 cm and w = 3.9 cm, respectively. The ice salinity was 4.6 ppt. The experiment was conducted at −10 °C. The displacement sensors measured vertical displacement at 15 cm from the left end of the beam. The AE sensor PK15I was attached to the beam surface near the right end of the beam at a distance of 9 cm from the end of the beam (Figure 8). The AE data were recorded with Mistras Micro-SHM (Structural Health Monitoring System) with default settings (threshold magnitude—40 dB; operating frequency range—20 kHz–1 MHz; sample frequency—5000 kSPS). Vertical non-through cracks formed occasionally near the left end of the beam before the load was applied.
Figure 10. A FEB test with constant load.
The beam failed in compression for approximately 1 h. The displacement curve in Figure 11a indicates that the displacement sensor lost contact with the beam surface due to the stroke limit of 10 mm before the beam failure. The number of AE hits increased monotonically with time (yellow line in Figure 11a) similar to the displacement (blue line in Figure 11a). Variations in the hit rates were much stronger than the variations in the displacement rate. Figure 11b shows nonlinear dependence of the AE hits from the displacement during the test.
Figure 11. (a) The displacement (blue line) and the number of AE hits (yellow line) versus time; (b) the number of AE hits versus the displacement.
Figure 12a shows the AE hit rate versus time during the entire test. The highest hit rates were observed when the second and the third cracks formed in the beam at 800 < t < 900 s and at the end of the test when the beam failed. Figure 12b shows that the highest hit rates occurred synchronously with highest displacement rates at t 813 s and t 828 s. An increased AE activity persisted for approximately 20 s after the formation of the third crack. The b-value calculated for entire test is equal to 0.66. This value is close to the b -values of 0.5–0.6 calculated from the laboratory tests of Li and Do [20] on ice compression and bending at the ice failure. Spectral analysis of wave forms was not carried out in this and other tests where AE was measured with Mistras Micro-SHM.
Figure 12. The AE hit rate depending on time during the entire test (a) and in the time interval when bending cracks formed in the beam (b). The blue line shows the displacement rate (DR), and the yellow line shows the AE hit rate (HR).
Two field tests with FEBs were performed in March of 2020 in the Van-Mijen Fjord of Spitsbergen. The ice thickness at the research site had a variation from 80 cm to 1 m. Two tests with fixed-end beams were performed on 6 March and 10 March. The preparation time for each test was about two days. Details of the field works are described in [21]. Table 1 lists dimensions of the FEBs and the mean values of ice salinity and temperature averaged over the ice thickness measured during tests. The ice temperature was measured with temperature strings placed in the non-through holes (2 cm diameter) near the beams. Ice cores were taken from different depths of ice to measure the ice salinity. Sea ice was columnar with a horizontal column size of 1–3 cm. The ice at the research site was columnar of S3 type because of the influence of tidal current of the alongshore direction. Photographs of the thin sections of sea ice taken from different depths are shown in Figure 13. Optical axes of ice columns were aligned alongshore according to the tidal current direction, and ice grains were elongated in the onshore direction. The first fixed-end beam was cut in the perpendicular direction to the shoreline, and the second fixed-end beam was cut in the alongshore direction.
Table 1. Dimensions of the beams and the mean values of ice salinity and temperature in Tests 1 and 2.
Figure 13. Photographs of horizontal thin sections of sea ice taken from different depths labeled in the figure. Different colors mark grain crystals with different directions of the optical axis.
Schematic of the FEB loading in the tests is shown in Figure 14a. The load was applied in the perpendicular direction to the beam axis by the hydraulic rig used in the field tests on uniaxial compression [51]. Two vertical metal plates of 80 cm height and 60 cm width attached to two hydraulic cylinders of 30 t power each were moved into the pool cut in the land fast ice near the beam center. One metal plate had contact with the land fast ice edge in the pool. The other metal plate had contact with the FEB edge via two vertical metal pipes with square horizontal cross-sections of 6 × 6 cm. The metal pipes were used to avoid direct contact of the base plate with the ice beam within the compression zone. The piston motion of the hydraulic cylinders caused the load on the beam center in normal direction to the beam axis.
Figure 14. (a) The schematic of the beam loading with hydraulic indenter. Locations of pressure cells p1 and p2 and AE sensors AE1 and AE2 in Test 1. (b) Photograph of the FEB before the start of Test 1.
In Test 1, the ice pressure along the beam axis was measured with Agisco hydraulic pressure cells of square shape (150 mm × 150 mm) (www.agisco.it, accessed on 5 December 2025). The maximum pressure measured by the cells was limited to 10 bar. Locations of pressure cells and AE sensors are shown in Figure 14a. Two pressure cells were frozen in the top layer of ice in the middle of the FEB (p1) and at the distance L / 4 from the beam root (p2). Pressure cell p1 was installed to measure the ice pressure in the center of the compression zone near Cr1 at ~20 cm from the beam edge. The sampling frequency was set to 100 Hz. Mistras Micro-SHM (Structural Health Monitoring System) was used to measure acoustic emission in Tests 1 and Test 2. Two PK15I acoustic transducers were frozen and screwed to the ice surface in two locations, shown in Figure 14a by the red circles AE1 and AE2. Sensor AE1 was fixed 5 cm from the beam edge and near the line perpendicular to the beam axis and crossing the beam center. Sensor AE2 was fixed ~20 cm from another edge near pressure cell p1. The pressure cells were not installed in Test 2. The acoustic sensors AE1 and AE2 were installed in the middle of the beam as it is shown in Figure 14a.
Figure 15a,c show that the dependence of the displacements (the mean stroke of hydraulic cylinders) on time was practically linear in both Test 1 and Test 2. The displacement rates were δ ˙ = 1 mm/s (Test 1) and δ ˙ = 1.5 mm/s (Test 2). The maximum displacements (18 cm in Test 1 and 28 cm in Test 2) were smaller than the beam widths in both tests. The beams did not fail completely in the tests because of the stroke limit of 30 cm and the lack of wide gaps of free water on the sides of the FEBs. Compression strain rates in the compression zone in the FEB center before and after the crack formation were calculated with the formulas ε ˙ I = 3   h δ ˙ / L 2 and ε ˙ I I = 8 h δ ˙ / L 2 [21]. Their values are given in Table 2 for Tests 1 and 2. The blue lines in Figure 15b,d show the applied force depending on time. The coefficients β (see Figure 6a) calculated based on the measurements of the length of the central cracks in Test 1 and Test 2 are given in Table 2.
Figure 15. The mean stroke versus time in Test 1 (a) and Test 2 (c). The total force versus time is shown by the blue lines in Test 1 (b) and Test 2 (d). The ice pressures versus time measured in Test 1 by the pressure cells p1 and p2 are shown by the yellow and green lines, respectively (b). In Test 2, the pressure sensors were not installed.
Table 2. Compressive strain rates and β in Tests 1 and 2 at stages I and II.
Local peaks of the force at t = t c < 50 s mark times of the formation of cracks Cr1, Cr2, and Cr3 in Figure 15b,d. The applied forces reached maximum values at t = t m a x 50 s in both tests. Figure 15b shows that in Test 1 the ice pressure measured by the pressure cell p2 reached absolute maximum at t = 130 s. The pressure cell p1 reached the threshold pressure of 10 bar at t = 70 s and did not measure actual pressure after that. It is obvious that pressure p1 reached maximum much later than applied force reached maximum at t 50 s.
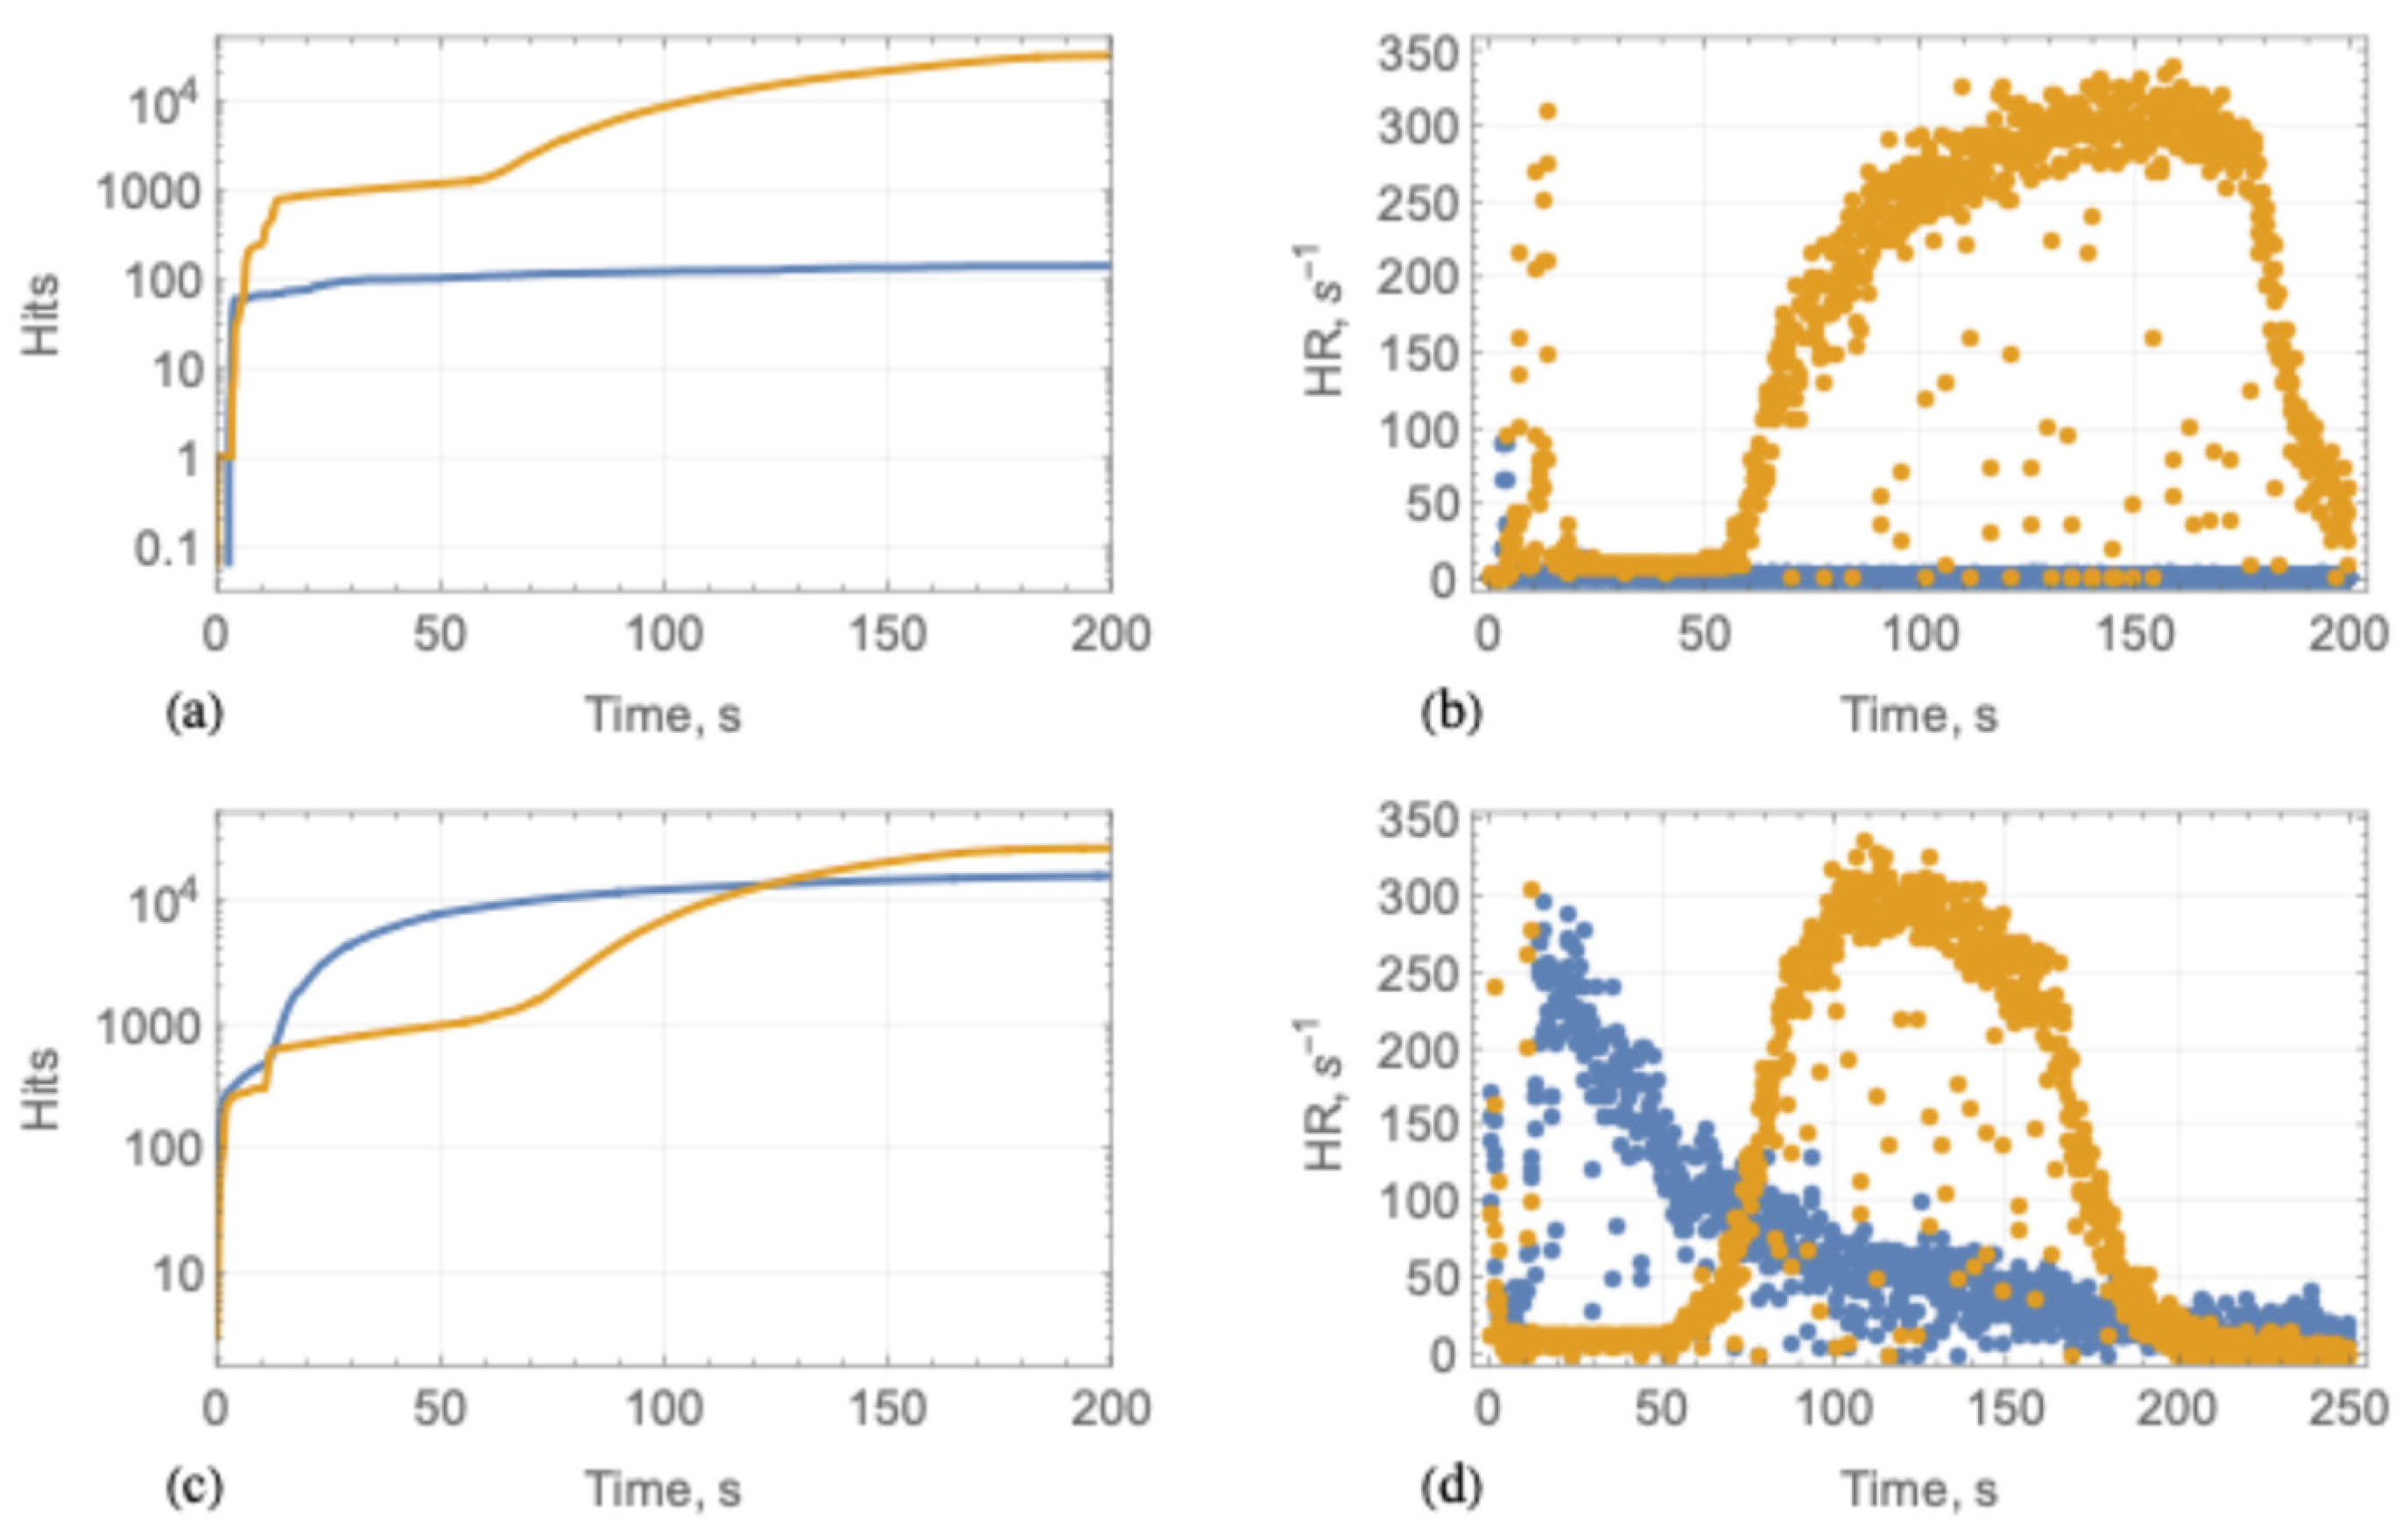
Results of AE measurements are shown in Figure 16. Transducer AE1 recorded most of the hits during the formation of the central crack at stage I in both tests. The final number of AE hits recorded by AE1 was less than the number of AE hits recorded by AE2 (Figure 16a,c). Figure 16b,d show the AE hit rates in Tests 1 and Test 2. The sharp increase in the AE1 and AE2 hit rates at t < 50 s corresponds to the events of the crack formation. In Test 1, the maximum hit rates were registered at t ( 130 , 170 ) s. The maximum pressures were recorded by the pressure cell p2 at that time. Transducers AE2 recorded most of the hits during ice deformation in the compression zones. The difference between the AE1 records in Test 1 and Test 2 can be explained by the loss of contact between AE1 sensor and ice after the crack formation or by the shielding of AE1 from the compression zone by the central crack in Test 1. In Test 2 m the shape of the central crack was different, and the AE1 sensor received better acoustic signals from the compression zone.
Figure 16. The number of AE hits measured by transducers AE1 (blue lines) and AE2 (yellow lines) in Test 1 (a) and Test 2 (c). The AE1 hit rates in Test 1 (b) and Test 2 (d) recorded by transducers AE1 (blue points) and AE2 (yellow points).
Figure 17 shows the number of AE hits versus their amplitude measured by transducers AE1 and AE2 in Tests 1 and 2. The b-values calculated with the AE1 data were 0.8 (Test 1) and 2.5 (Test 2). The b-values calculated with the AE2 data were 0.5 (Test 1) and 0.52 (Test 2). The b-value calculated from Test 1 is the same as it was calculated from the field test with a cantilever beam of similar length by Langhorne and Haskell [19]. The beam was bent downward [19], and the acoustic transducer was frozen to the upper surface of the beam near the root, i.e., in a position similar to AE1 (Figure 14a and Figure 18).
Figure 17. The number of AE hits versus their amplitude measured by transducers AE1 (blue points) and AE2 (yellow points) in Test 1 (a) and Test 2 (b).
Figure 18. Video frames of Test 1 at different time moments. Thin lines show the central crack at different times.
Video frames in Figure 18 and Figure 19 are related to, respectively, the initial state of the ice before Tests 1 and 2, the time when the central cracks Cr1 became visible, the time when the applied load reached maxima F m a x at t 50 s, and the time when ice pressures and AE2 hit rates reached maxima ( t = 130 s). In the compression zones, the ice turns white because of the formation of numerous micro-cracks, while there are no visible changes in ice color at t 50 s. Photographs in Figure 20 show the ice surface in the middle of the beams after the end of Test 1 (a) and Test 2 (b). The central crack Cr1 starts at a free face of the beams in the perpendicular direction to the beam axis. The crack changes direction by 90° as it approaches the compression zone. The crack Cr1 splits into two branches going around the compression zone in parallel direction to the beam axis.
Figure 19. Video frames of Test 2 captured at different time moments.
Figure 20. The final configuration of crack CR1 in Tests 1 (a) and Test 2 (b). Thin lines show thin cracks.

5. Electromagnetic Radiation in Ice Experiments

5.1. Uniaxial Compression of Ice Specimens

Evtushenko et al. [58] described the effect of electric polarization of ice obtained in an experiment with a vibrating ice plate 15 mm long, 8 mm wide, and 0.9 mm thick. Petrenko and Whitworth [59] explored the electrical currents associated with the motion of the dislocations contained in the ice. Fifolt et al. [60,61] tested freshwater columnar ice samples of rectangular shape (10 cm × 5 cm × 2 cm) in uniaxial compression in the perpendicular direction to the c-axis. Tests were conducted at −10 °C, −20 °C, and −33 °C. Electromagnetic radiation was detected using two aluminum electrodes placed near the two opposite faces of the ice plates. The electrodes were connected to the oscilloscope via a preamplifier. Ice placed between the electrodes acted as a dielectric medium. During crack propagation, the motion of charged dislocations and charged point defects [62] has been described as the possible source of observed emissions. Petrenko [63] also referenced Pennino et al.’s [64] description of electrical signals from thermal cracks in mono- and polycrystalline ice. The ordering of the electric dipoles at the ice surface was considered as the possible origin of EMR considered in [39,65]. Thiel [66] and O’Keefe and Thiel [67] prepared ice samples using water and sodium chloride with varying concentration and detected EMR during compression fracture of ice samples. According to their observations, EMR was found to be conductivity-dependent. They have proposed that charge generation during crack propagation may be the possible cause of the EMR.
Shibkov et al. [68] conducted a comprehensive study of EMR and AE produced under the motion of single slip bands formed by the concentrated motion of dislocations along specific crystallographic planes and micro-cracks. In this study, specimens of monocrystalline and polycrystalline ice samples measuring 12 × 18 × 30 mm3 were subjected to uniaxial compression in a soft testing machine with a constant stress rate of 5∙10–3 MPa/s at a temperature of −23 °C. Samples were cut with a wire saw from blocks of freshwater (river) ice with an average grain size of 1 to 100 mm. Single-crystal samples were cut from large grains. They were deformed in the basal slip system: the c-axis formed an angle of ~40–50° with the compression axis. To study the influence of grain boundaries on the formation and immobilization of dislocations and cracks, bicrystals were prepared: samples composed of two grains, i.e., having one grain boundary. The grain size in the polycrystalline samples ranged from 2 to 4.5 mm. During the deformation of the sample, video recording was carried out in transmitted polarized light to record the moments of formation of slip bands and cracks based on the evolution of their photoelastic pattern. The potential of the nonstationary electric field (EMR signal) was measured using a plane capacitance sensor 20 × 30 mm2 in size, located at a distance of 5 mm from the specimen surface. The bandwidth of the measurement channel was selected in the range from 1 Hz to 3 MHz. A piezoelectric sensor mounted in the bottom support of specimens recorded AE synchronously with measurement of the EMR signal.
The typical shape of EMR signals measured in the experiments of Fifolt et al. [61,62] and Shibkov et al. [68] is shown in Figure 18. In the experiments of Fifolt et al. [61,62], signals had an amplitude φ m from 4 to 70 mV, lasted from τ d 1.5 · 10 4 s to τ d 10 2 s, and had an exponentially decaying shape with a very small front width t f r . The signal, caused by the development of small cracks, either split a single ice grain or was located at a single intergranular boundary. Oscillating sinusoidal signals with a period of about 5 μs were characteristics of large cracks that split multiple single-crystal grains or columns. The frequencies of periodic signals were in the range of several hundred kHz (Figure 21).
Figure 21. Typical shape of electrical signal of a microcrack in freshwater columnar ice subjected to compression [61,62,68].
Shibkov et al. [68] found that the process of plastic deformation in single crystals and polycrystalline ice specimens is accompanied by the generation of discrete EMR and AE signals. At all stages of deformation, AE signals had the form of damped harmonics, the shape of which corresponded to the ballistic response of the machine–sample system. For this reason, the identification of dynamic processes of structural relaxation from the shape of AE signals encounters significant difficulties, which limits the application of the AE method in physical research. At the same time, recorded EMR signals were very diverse in form. Synchronous video recording in polarized light and measurement of plastic deformation using a highly sensitive displacement sensor made it possible to identify abrupt processes of plastic deformation and fracture by EMR signals. Despite the wide variety of EMR signal shapes, they can be represented as a sequence of pulses of almost triangular shape, shown in Figure 18, where the decay time τ d is comparable to the Maxwellian relaxation time of ice and similar to the τ d found in [61,62]. An album of EMR maps was compiled, which allows in situ identification of the most important events in a plastically deformed ice crystal, associated with dislocation pile-ups and cracks. Depending on the value of t f r , the EMR pulses were subdivided in two groups: (i) pulses of type I with t f r ~   3   ms 0.6   s , which were accompanied by the generation of an AE signal but without appearance of visible microcracks, and (ii) pulses of type II with t f r ~   10   μ s 0.3   ms caused by the formation and propagation of cracks with sizes greater than ~ 100   μ m .
Based on obtained experimental results, Shibkov et al. [69] analyzed the behavior of shear strains depending on strain rates for EMR signals of type I having different frontal shape. Signals with frontal shape described by the power function t 1 / m were related to the dynamics of conservative charged dislocation pile-ups [70]. Signals with sigmoid frontal shape were related to the thermally activated nucleation and the development of dislocation pile-ups from Frank–Read sources [71]. Shibkov and Kazakov [72] conducted statistical analysis of EMR signals of type I reflecting the dynamics of dislocation avalanches at the initial stage of ice deformations with strains below 2% and at the stage with strains changed from 6% to 9% when the fracture occurs. The power-law statistic distribution of EMR amplitudes was characterized by a b-value of 1.16 for the fracture stage. The b-value for EMR signals of type II was found to be 1.437. This suggests the presence of long-term correlations in the dynamics of multiple cracks preceding the development of a main crack over a period of time significantly exceeding the duration of single events. The authors concluded that EMR signals of type II reflect the kinetics of ductile-to-brittle transition at a critical strain rate of 2 · 10 4 s−1 [73].

5.2. Fixed-End Beam Tests

In the experiments of Fifolt et al. [60,61], synthane end caps were used to isolate the ice sample electrically from the mechanical test system. An aluminum enclosure around the sample was required to shield from ambient electrical noise. Analysis and filtering of EMR ambient electrical noise can be a problem in laboratory and field measurements. This problem is eliminated if the EMR recording is triggered by an AE signal from an acoustic transducer connected to the sample. The EMR and AE signals are synchronized by connecting the EMR antenna and the acoustic transducer to the same measuring device (oscilloscope). This measurement scheme was implemented to measure AE and EMR during FEB tests in the UNIS cold laboratory.
Figure 22 and Figure 23 show installation of equipment in an FEB test conducted with AE and EMR measurements. The EMR antenna consisted of two plates (8 × 12 cm) made of aluminum foil. The antenna was connected to Channel 1 of the oscilloscope Tektronix MDO4104C with the passive probe Tektronix P2220 200 MHz/6 MHz with 1×/10× attenuation, 200 MHz bandwidth, and 1.5 m length. The AE1 transducer PK15I was connected to Channel 2 of the same oscilloscope and fixed on the beam surface at a distance of 16 cm from the left end of the beam in Figure 22a. The vertical displacement of the beam and applied load were measured with a displacement sensor and load cell for tension (HBM). The load cell and displacement sensor were connected to the amplifier Somat MX840B-R. The oscilloscope and the amplifier were connected to the computer via the web and ethernet cable, respectively. The oscilloscope transmitted data via the web to a computer using KickStart 2.10.1 software (https://www.tek.com/en/products/keithley/keithley-control-software-bench-instruments/kickstart, accessed on 5 December 2025). The AE2 transducer PK15I fixed on the beam surface at a distance of 11 cm from the right end of the beam in Figure 22a was connected to the Mistras-HSM unit, which in turn was connected to another computer.
Figure 22. (a) Photograph of the FEB test with AE and EMR measurement. The EMR antenna and the acoustic transducer AE1 are connected to the oscilloscope. The acoustic transducer AE2 is connected to the Mistras-HSM unit. The displacement sensors DS and load cell (not visible in the photo) are connected to the Somat amplifier. (b) Central crack Cr1 at the beam bottom below the applied load.
Figure 23. The oscilloscope Tektronix MDO4104C inside insulated box, cables to EMR antenna and AE1 transducer (PK15I), power source for PK16I, load cell HBM 5 t (LC).
The oscilloscope trigger was linked to the AE1 sensor. The oscilloscope recorded data if the AE amplitude measured by the AE1 sensor was larger than 2 mV. We recorded stable and synchronized signals of AE and EMR, when the repetition time and the sampling rate of the oscilloscope were set to 40 ms and 4 ns, respectively. The data fluxes might influence the rate of AE and EMR recording. Some wave forms may have been lost due to insufficient communication speed between the computer and the two measuring units (oscilloscope and amplifier), especially when the amplifier sampling frequency was set to 20 kHz for acceleration measurements.
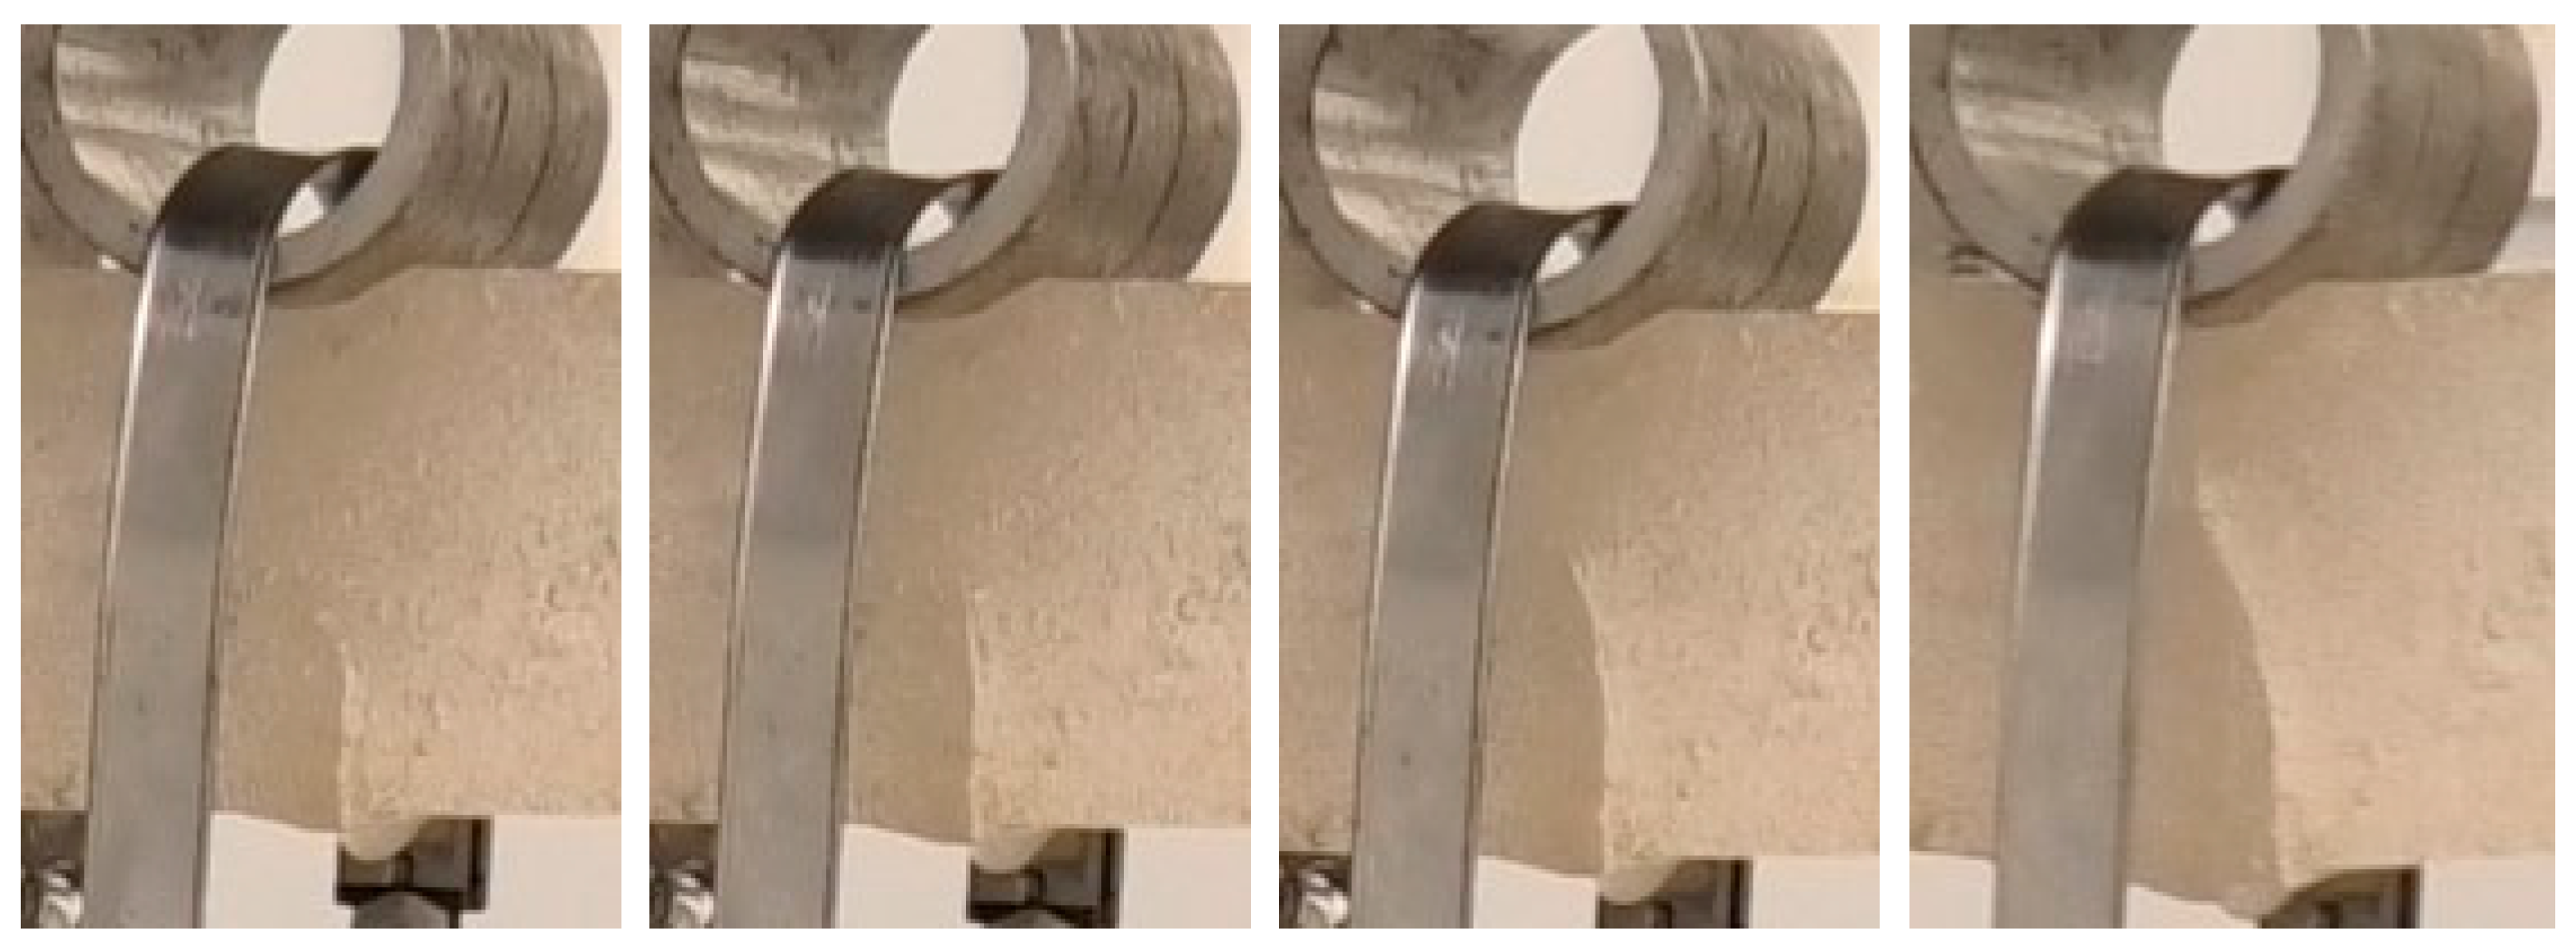
It was difficult to predict when the beams would fail during testing. Some tests lasted several hours, while others were completed in just ten minutes. The development of the central crack Cr1 was observed using video recordings (Figure 22b and Figure 24). The crack nucleation was always accompanied by AE and EMR signals recorded by both Mistras SHM and the oscilloscope.
Figure 24. Successive stages of development of the central crack Cr1.
Further, we show some results of a long-term FEB test lasting 7.5 h. The beam length was L = 44.5 cm, and the width and thickness were equal to h = w = 5 cm. The ice salinity was 11 ppt, and the ice temperature was −10 °C. The beam was made of land fast ice. The vertical and horizontal thin sections are shown in Figure 25. Ice columns were vertical when the beam was fixed in the caps. The diameters of grains and gas bubbles changed from fractions of a millimeter to centimeters. In Figure 25a, some elongation of grains in the vertical direction is visible compared to Figure 25b, but columns several centimeters long are absent.
Figure 25. Vertical (a) and horizontal (b) sections of sea ice. Different colors mark grain crystals with different directions of the optical axis.
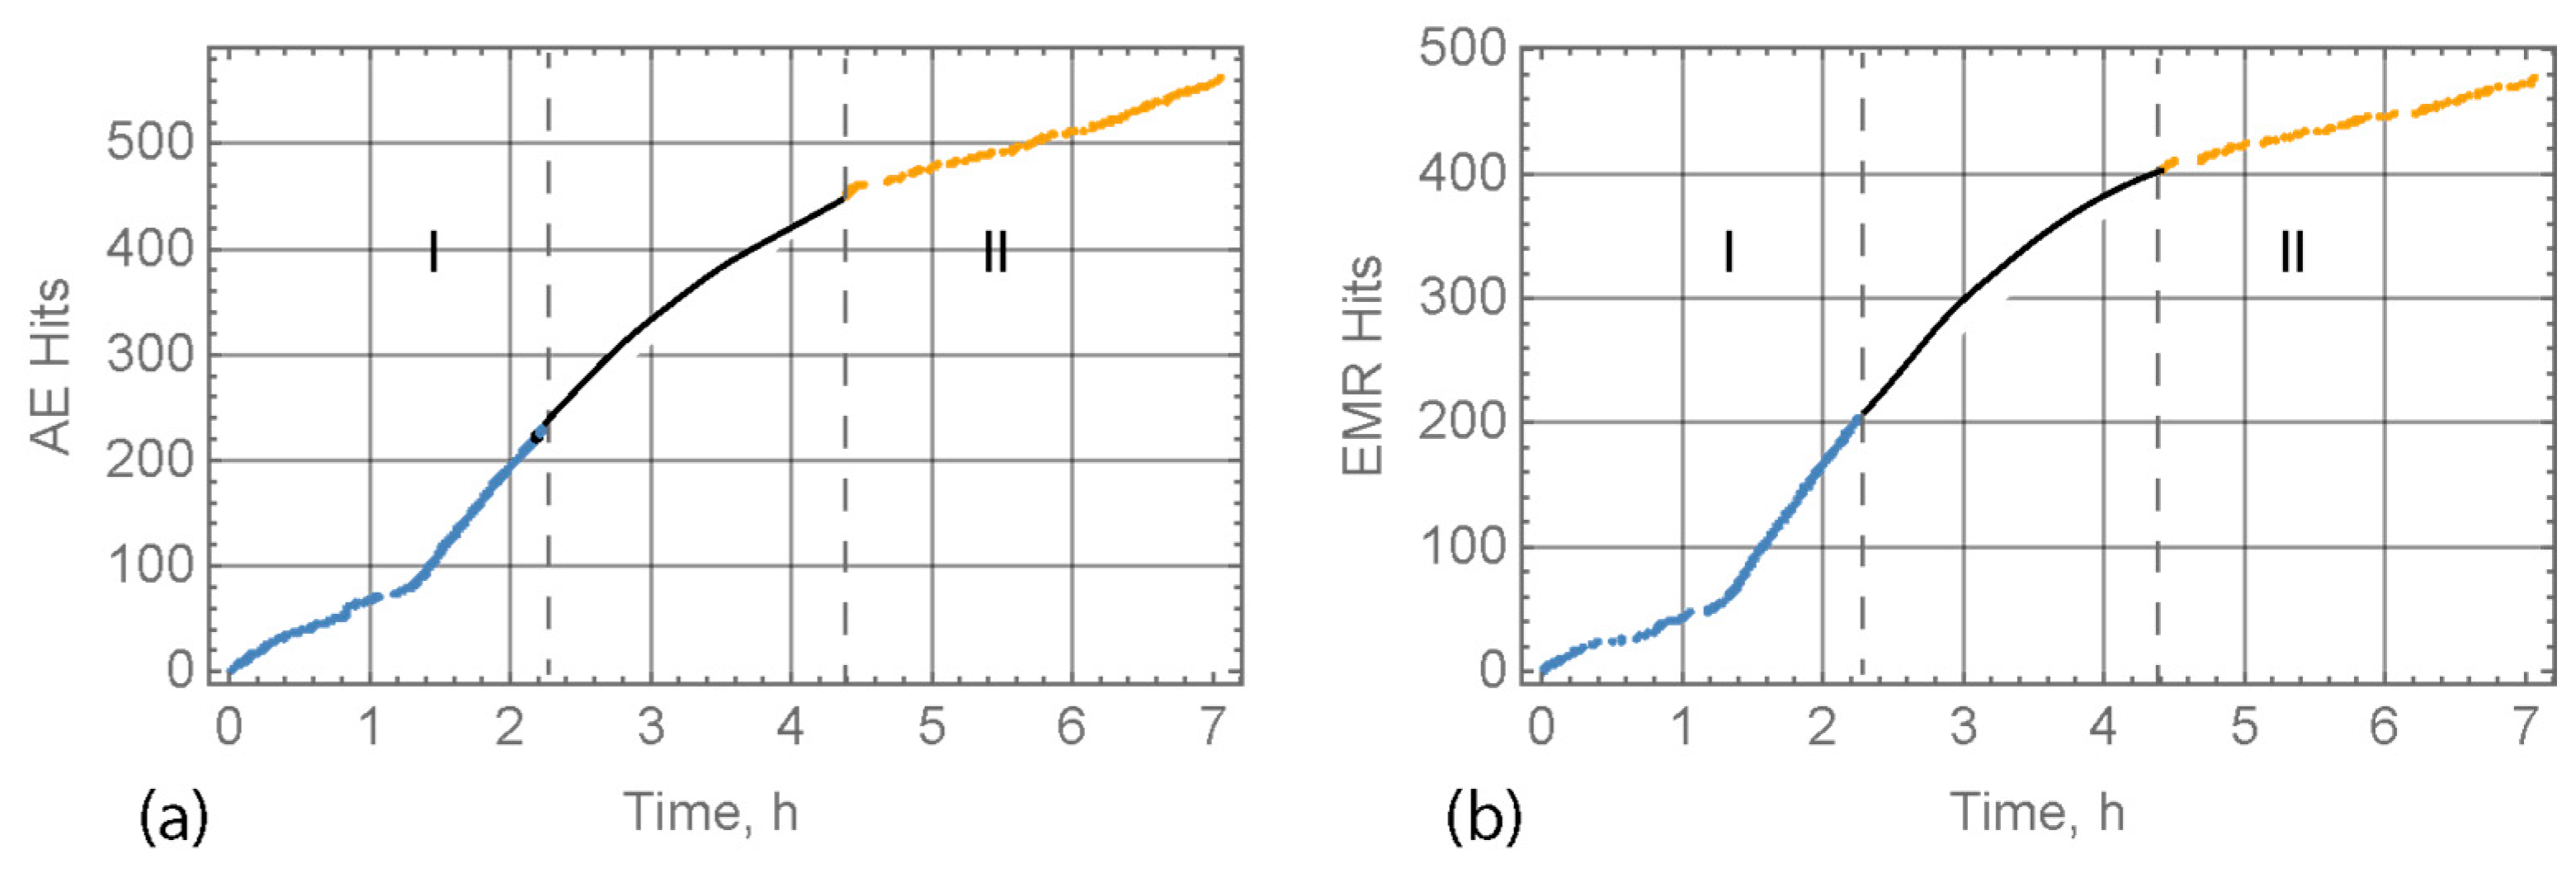
Figure 26 shows the displacement of the beam surface versus time. There is a segment 1.4 < t < 5 h with an almost constant displacement rate, corresponding to the stage when cracks did not develop and the beam deformed due to the creep. The numbers of AE and EMR hits are pointed out in Figure 26 on the intervals I and II when the AE and EMR were measured. The blue and yellow lines in Figure 27 show the numbers of AE and EMR hits depending on time on the intervals I and II. The black lines show an approximation of the dependence on the time interval when measurements were not taken. The AE and EMR hit rates decreased monotonically with time from t = 1.4 h to t = 5 h, and then the hit rates gradually became higher.
Figure 26. The displacement versus time. The numbers of AE and EMR hits are pointed out for measurement intervals I and II. Dashed lines mark the boundaries of intervals I and II.
Figure 27. The number of AE (a) and EMR (b) hits versus time at measurement intervals I (blue lines) and II (yellow lines). The black lines show the approximate dependence of the number of AE and EMR hits in the time interval when measurements were not taken.
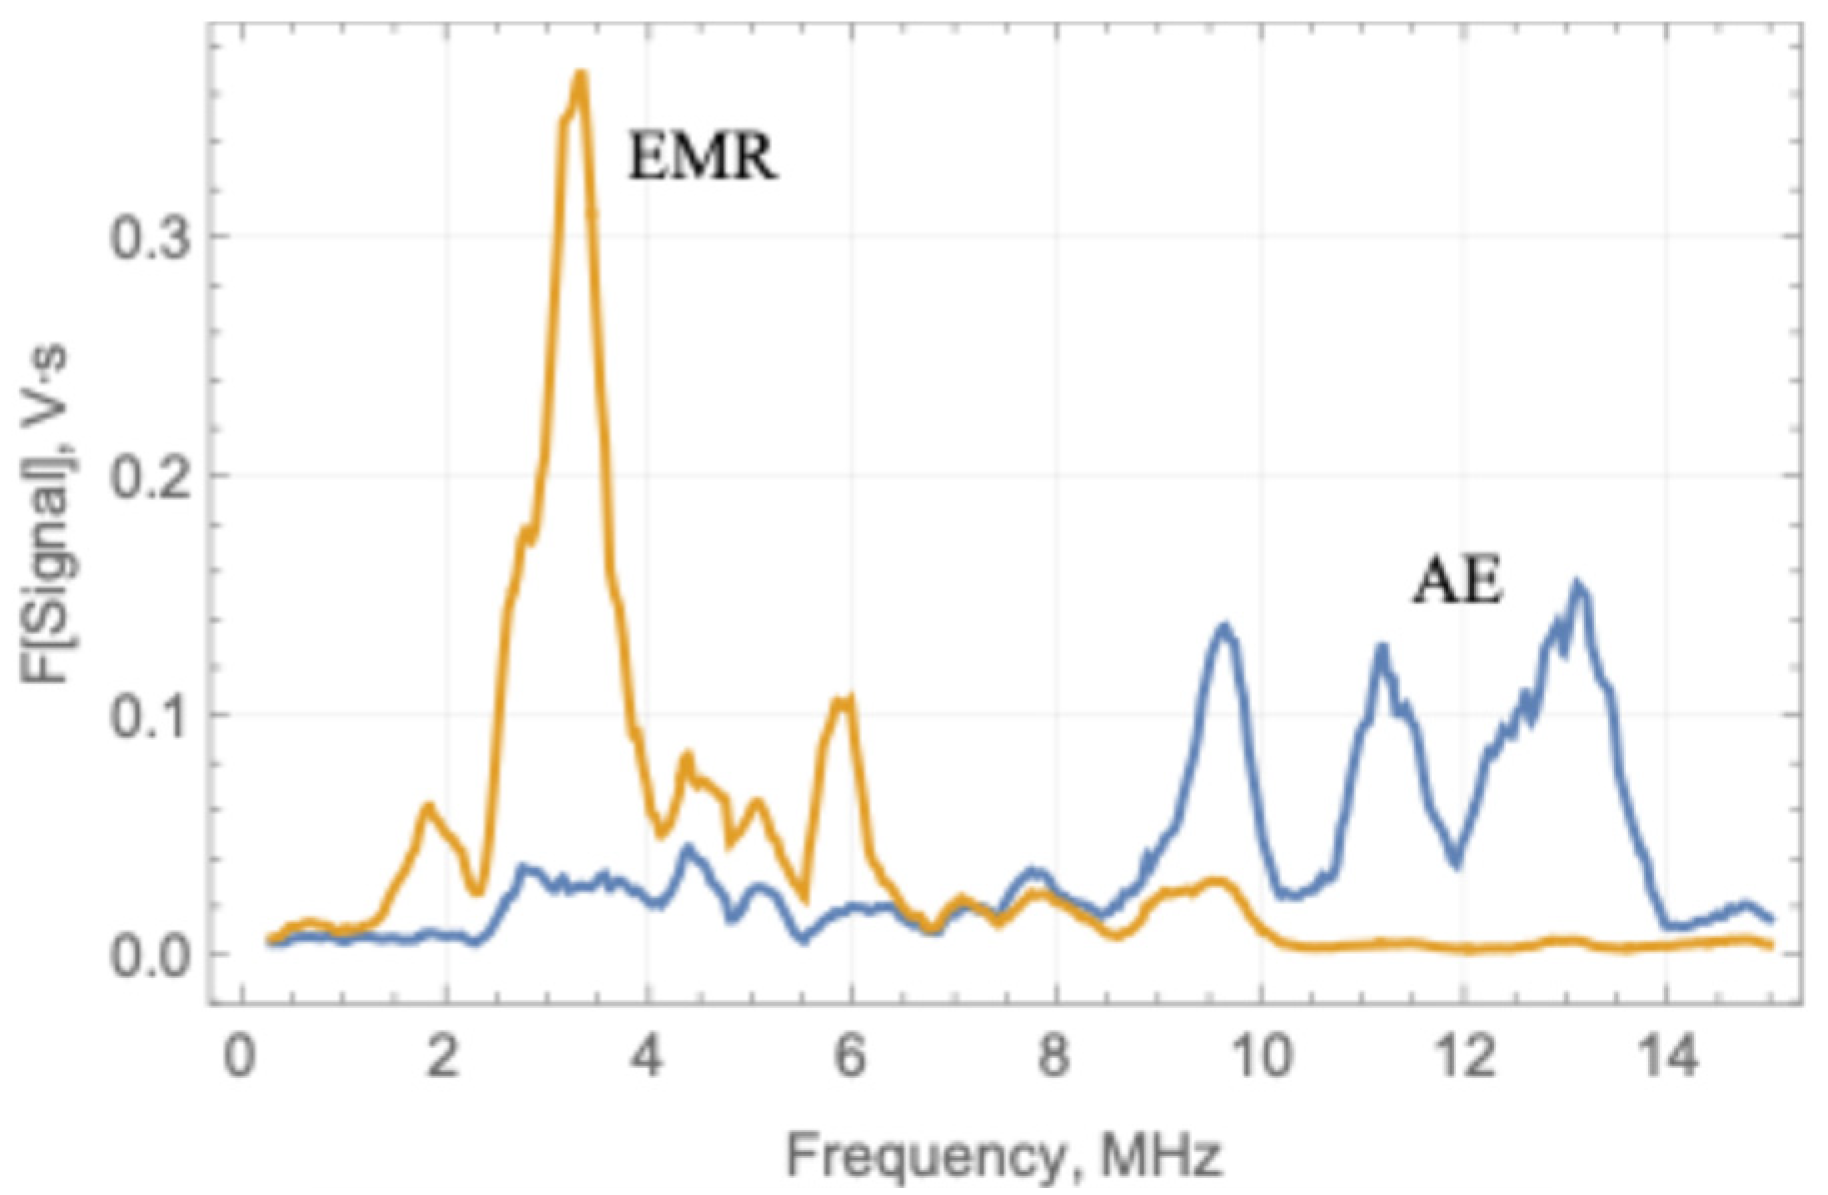
The typical shape of AE and EMR signals recorded in the test is shown in Figure 28. The AE and EMR events are synchronized but have different spectrums, shown in Figure 29. The peak frequency of EMR is approximately equal to 3 MHz. There are peak frequencies below 2 MHz and at 6 MHz. The frequency of 3 MHz was the dominant peak frequency during the test. In the other tests, the EMR peak frequencies changed in the range of 0.5 MHz to 10 MHz.
Figure 28. An example of AE (a) and EMR (b) records.
Figure 29. The spectrums of AE (blue line) and EMR (yellow line) shown in Figure 25.
Figure 30 shows the dependencies of the logarithms of the AE and EMR hit numbers from the logarithm of relative maximum amplitude of AE and EMR wave forms for A m i n = 1 mV. The blue and yellow lines correspond to measurement intervals I and II. Tangents of the slope angles of straight lines approximating the blue and yellow lines are equal to the b -values at intervals I and II. The b -values of AE are equal to 2 (interval I) and 1.4 (interval II) (Figure 30a). The b-values of EMR are equal to 1.16 (interval I) and 0.87 (interval II) (Figure 30b).
Figure 30. The Gutenberg–Richter law fitted to the data of AE (a) and EMR (b) at measurement intervals I and II. The dashed straight lines show the linear interpolations. A m i n = 1 mV.

6. Discussion

Numerous studies confirmed that both effects of AE and EMR exist in different types of materials subjected to deformations and destruction. In ice mechanics, AE data were mostly used for the characterization of physical mechanisms of ice failure, i.e., for scientific goals. Practical application of AE data in relation to other materials is related to structural health monitoring. Practical use of AE data in ice processes is problematic because of strong attenuation of elastic waves emitted by cracks in ice [13]. The frequency range of AE of 100–200 kHz corresponds to p-waves with a length smaller than 5 cm. Such waves have strong attenuation at distances above 1 m due to the damping, scattering, and radial divergence. In the case of a massive source of AE, the radial divergence of AE signals is smaller, and a part of elastic energy can be transferred into the water and transmitted further by acoustic waves, which have low attenuation in the water. Further study of these effects may have practical applications.
The frequency range of EMR signals caused by ice processes is extended from hundreds of kHz to several MHz. The spectral maxima of EMR signals in the tests with fixed-end beams were found in the range of 0.5–10 MHz. The EMR propagates in the air directly from the point of its origin and, unlike AE, can be measured using an antenna installed at a distance from the point of origin of the EMR signal. The power of EMR signals caused by ice deformations and ice failure is very low. In the experiments of Fifolt et al. [61,62] Thiel [66] and O’Keefe and Thiel [67], the electrode had contact with the ice specimen. In the experiments of Shibkov et al. [68], the distance from a plane capacitance sensor to the ice specimen was 5 mm. In the experiments with a fixed-end beam, the distance from aluminum plates to the ice specimen was smaller than 1 m. Additional studies are needed to specify range for the monitoring of EMR from ice. The characteristics of the antenna for EMR monitoring and the massiveness of the EMR source are of great importance for remote detection of ice processes. For example, large areas of sea ice subjected to compression and ridging can emit EMR detectable from an aircraft equipped with specific antenna. Unlike AE, there is a problem of the influence of ambient electromagnetic noise on the useful EMR signal received by the antenna in laboratory conditions near industrial objects. Therefore, information on the EMR spectrum is important for antenna design. In open and remote areas of the Arctic, electromagnetic noise in the radio frequency range is absent. In contrast to EMR, in remote areas there is strong ambient acoustic noise caused by natural processes such as thermal cracking of ice, wind-driven snow motion, etc., which can be stronger than the acoustic signals from the bending and breaking of floating ice.
There is a difference in the shape and frequency of the EMR signals described in the papers of Fifolt et al. [60,61] and Shibkov et al. [68] and the EMR signals caused by rock failure [34] and the EMR signals measured in the tests with fixed-end beams. Shibkov et al. [68] and Mastrogiannis et al. [42] confirmed that the AE and EMR signals are generated practically synchronously but may have different characteristics, but in the tests of Shibkov et al. [68], EMR pulses had triangular topology, while in the paper of Mastrogiannis et al. [42], both EMR and AE signals had the shape of wave packets. Synchronous wave packets of AE and EMR were also observed in the tests with fixed-end beams. Differences in the geometry of the tests and the loading methods may potentially explain the difference in the results.
Special equipment was elaborated to detect EMR caused by rock failure in mines [74,75]. The method of measurements is based on the detection of EMR at Rayleigh wave frequencies with lengths less than twice the crack diameters. The sizes of microcracks and weaknesses at intergranular surfaces inside the ice are of the order of grain diameters, which can be less than 1 mm. During the indentation tests, the formation of a very fine-grained layer was observed in compression zones near the surface of indentation [49,76]. A very fine grain structure was also observed in the compression zone formed near the central crack in full-scale tests with fixed-ends beams [49]. Rayleigh waves excited at the crack surfaces generate EMR due to the flexoelectric effect in addition to EMR caused by stress concentrations near the crack tips. The frequencies of Rayleigh waves in ice with wavelength smaller 1 mm are greater 1.8 MHz, and, respectively, the wave periods are smaller than 0.5 µs. The front width t f r measured in [68] for EMR pulses of type II was greater than 10   μ s , and t d > 100   μ s according to [60,61]. The EMR caused by the dislocation development consists of longer pulses of triangular shape than EMR caused by the oscillations of crack faces.
Measuring of AE from ice caused by wave propagation under the ice makes it possible to detect EMR from wave-deformed ice and predict ice failure using waves. Ocean swell travels long distances under the Arctic ice and can break up large areas of sea ice in a relatively short time. To study the properties of EMR from wave-deformed ice, it is necessary to conduct special experiments.
Tests with fixed-end beams imitate deformations and failure of floating ice under concentrated loads. Bending and compression deformations and failure of ice are naturally combined in the test. Properties of AE and EMR obtained in the tests have clear physical application to the prediction of ice break up under the action of concentrated loads. The EMR from bending failure of ice had not previously been measured. Acoustic emission in the fixed-end beam tests is an indicator of longitudinal pressure in the beams. From full-scale tests, it was found that the maximum AE is reached synchronously with maximum longitudinal pressure at the stage of decreasing applied load.
Laboratory tests with fixed-end beams confirmed increasing AE and EMR sometime before the beam failure. In the long-term tests of 7.5 h duration, this time was about one hour. In shorter tests, this time was shorter. Gradual increase in AE and EMR after a period with negative time gradient can be considered as a predictor of ice failure. The role of water in the generation of AE and EMR caused by the failure of floating ice requires further study. Water pressure affects the shape of floating ice under constant load and can alter the characteristics of ice destruction.

7. Conclusions

  • Both AE and EMR methods are useful for studying ice destruction processes under compression and bending.
  • The development of specialized equipment, including antennas and recording units detecting the EMR from ice, can improve the quality of remote sensing of sea ice by the monitoring of stressed ice subjected to failure.
  • Further analysis of the shape and spectrum of the EMR signals from deformed ice is needed for the development of new methods of remote sensing of stressed ice subjected to failure.
  • A gradual increase in AE and EMR before ice failure can be considered as a predictor of floating ice destruction under the action of concentrated load.

Funding

This research was funded by the Research Council of Norway through the IntPart project Arctic Offshore and Coastal Engineering in Changing Climate (274951).

Data Availability Statement

The original contributions presented in this study are included in the article material. Further inquiries can be directed to the corresponding author.

Acknowledgments

Many thanks to UNIS Logistic and participants of the field works Evgeny Karulin, Marina Karulina, Nataly Marchenko, Dave Cole, Devinder Sodhi, Peter Chistyakov, Alexander Sakharov, Ben Lishman, Peter Sammonds, and students of AT-211 and AT-332. Thanks to Valery Marchenko for discussion of EMR measurements.

Conflicts of Interest

The author declares no conflicts of interest.

References

  1. ISO 19906: 2019; Petroleum and National Gas Industries—Arctic Offshore Structures. ISO: Geneva, Switzerland.
  2. Roberts, A.; Hunke, E.; Allard, R.; Bailey, D.; Craig, A.; Lemieux, J.-F.; Turner, M. Quality control for community-based sea-ice model development. Philos. Trans. R. Soc. A 2018, 376, 17. [Google Scholar] [CrossRef] [PubMed]
  3. Yadav, J.; Kumar, A.; Mohan, R. Dramatic decline of Arctic sea ice linked to global warming. Nat. Hazards 2020, 103, 2617–2621. [Google Scholar] [CrossRef]
  4. Squire, V.A. Ocean wave interactions with sea ice: A reappraisal. Annu. Rev. Fluid Mech. 2020, 52, 37–60. [Google Scholar] [CrossRef]
  5. Ardhuin, F.; Sutherland, P.; Doble, M.; Wadhams, P. Ocean waves across the Arctic: Attenuation due to dissipation dominates over scattering for periods longer than 19 s. Geophys. Res. Lett. 2016, 43, 5775–5783. [Google Scholar] [CrossRef]
  6. Li, S.; Babanin, A.; Liu, Q.; Liu, J.; Li, R.; Voermans, J. Effect of ocean surface waves on sea ice using coupled wave-ice-ocean modelling. Ocean Model. 2025, 196, 102540. [Google Scholar] [CrossRef]
  7. Sun, H.; Li, C.; Cheng, Y. Monitoring Polar Sea Ice Using Optical and SAR Data. Mar. Technol. Soc. J. 2019, 53, 35–41. [Google Scholar] [CrossRef]
  8. Stepaniuk, I.A.; Smirnov, V.N. Methods of Measurements of Ice Dynamics Characteristics; Hydrometeoizdat: St.-Peterburg, Russian, 2001; 136p. (In Russian) [Google Scholar]
  9. Pritchard, R.S. Arctic ocean background noise caused by ridging of sea ice. J. Acoust. Soc. Am. 1984, 75, 419–427. [Google Scholar] [CrossRef]
  10. Kinda, G.B.; Simrad, Y.; Gervaise, C.; Mars, J.I.; Fortier, L. Arctic underwater noise transients from sea ice deformation: Characteristics, annual time series, and forcing in Beaufort Sea. J. Acoust. Soc. Am. 2015, 138, 2034–2045. [Google Scholar] [CrossRef] [PubMed]
  11. Williams, K.L.; Boyd, M.L.; Soloway, A.G.; Thorsos, E.I.; Kargl, S.G.; Odom, R.I. Noise Background Levels and Noise Event Tracking/Characterization Under the Arctic Ice Pack: Experiment, Data Analysis, and Modeling. IEEE J. Ocean. Eng. 2018, 43, 145–159. [Google Scholar] [CrossRef]
  12. Betlaos, S. Collapse of floating ice covers under vertical loads: Test data vs. theory. Cold Reg. Sci. Technol. 2002, 34, 191–207. [Google Scholar] [CrossRef]
  13. Cole, D.M.; Dempsey, J.P. In situ sea ice experiments in McMurdo Sound: Cyclic loading, fracture, and acoustic emissions. J. Cold Reg. Eng. 2004, 18, 155–174. [Google Scholar] [CrossRef]
  14. Zhang, G.; Li, H.; Wang, M.; Li, X.; Wang, Z.; Deng, S. Crack-induced acoustic emission and anisotropy variation of brittle rocks containing natural fractures. J. Geophys. Eng. 2019, 16, 599–610. [Google Scholar] [CrossRef]
  15. Khan, T.I.; Rashid, A.A.; Nanami, T. Theoretical and experimental analysis of acoustic emission signal for resonant sensor on homogenous material. Sens. Bio-Sens. Res. 2023, 39, 100550. [Google Scholar] [CrossRef]
  16. Gutenberg, B.; Richter, C.F. Frequency of earthquakes in California. Bull. Seismologic. Soc. Am. 1944, 34, 185–188. [Google Scholar] [CrossRef]
  17. Sammonds, P.R.; Meredith, P.G.; Murrell, S.A.F.; Main, I.G. Modelling the damage evolution in rock containing pore fluid by acoustic emission. In Rock Mechanics in Petroleum Engineering; Society of Petroleum Engineers: Houston, TX, USA, 1994. [Google Scholar]
  18. Lawrence, F.S.; Cole, D.M. Acoustic emission from polycrystalline ice. In CRREL Report 82-21; U.S. Army Corps of Engineers, Cold Regions Research and Engineering Laboratory: Hanover, NH, USA, 1982; 26p. [Google Scholar]
  19. Langhorne, P.J.; Haskell, T.G. Acoustic emission during fatigue experiments on first year sea ice. Cold Reg. Sci. Technol. 1996, 24, 237–250. [Google Scholar] [CrossRef]
  20. Li, D.; Du, F. Monitoring and evaluating the failure behavior of ice structure using the acoustic emission technique. Cold Reg. Sci. Technol. 2016, 129, 51–59. [Google Scholar] [CrossRef]
  21. Marchenko, A.; Chistyakov, P.; Cole, D.; Karulin, E.; Karulina, M.; Markov, V.; Marchenko, N.; Sakharov, A.; Sliusarenko, A.; Sodhi, D. Ice failure properties in fixed-ends beam tests. In Proceedings of the 26th IAHR International Symposium on Ice, Montreal, QC, Canada, 19–23 June 2022. [Google Scholar]
  22. Sinha, N.K. Acoustic emission and microcracking in ice. In Proceedings of the 1982 Joint Conference on Experimental Mechanics, Society of Experimental Stress Analysis/Japan Society for Mechanical Engineers, Honolulu/Maui, Hawaii, 23–28 May 1982; Part 11, pp. 767–772. [Google Scholar]
  23. Lishman, B.; Marchenko, A.; Sammonds, P.; Murdza, A. Acoustic emissions from in situ compression and indentation experiments on sea ice. Cold Regions Sci. Technol. 2020, 172, 102987. [Google Scholar] [CrossRef]
  24. Stavrianaki, K.; Shortt, M.; Sammonds, P. Source Location and Dataset Incompleteness in Acoustic Emissions from Ice Tank Tests on Ice-Rubble-Ice Friction. In IUTAM Symposium on Physics and Mechanics of Sea Ice; Tuhkuri, J., Polojärvi, A., Eds.; IUTAM Bookseries 39; Springer: Cham, Switzerland, 2022. [Google Scholar] [CrossRef]
  25. Weiss, J.; Grasso, J.-R. Acoustic emission in single crystal of ice. J. Phys. Chem. B 1997, 101, 6113–6117. [Google Scholar] [CrossRef]
  26. McLaskey, G.C.; Glaser, S.D. Acoustic emission sensor calibration for absolute source measurements. J. Nondestruct. Eval. 2012, 31, 157–168. [Google Scholar] [CrossRef]
  27. Langlebben, M.P.; Pounder, E.R. Elastic parameters of sea ice. In Ice and Snow: Properties, Processes, and Application; Kingery, W.E., Ed.; MIT Press: Cambridge, MA, USA, 1963; pp. 69–78. [Google Scholar]
  28. Bogorodskii, V.V. Elastic moduli of ice crystals. Sov. Phys. Acoust. 1964, 10, 124–126. [Google Scholar]
  29. Dantl, G. Elastic moduli of ice. In Physics of Ice; Riehl, N., Builemer, B., Engelhardt, H., Eds.; Plenum Press: New York, NY, USA, 1969; pp. 223–230. [Google Scholar]
  30. Skatulla, S.; Audh, R.R.; Cook, A.; Hepworth, E.; Johnson, S.; Lupascu, D.C.; MacHutcchon, K.; Marquart, R.; Mielke, T.; Omatuku, E.; et al. Physical and mechanical properties of winter first-year ice in the Antarctic marginal ice zone along the Good Hope Line. Cryosphere 2022, 16, 2899–2925. [Google Scholar] [CrossRef]
  31. Marchenko, A. Elastic moduli of first-year sea ice calculated from tests with vibrating beams. Ocean Model. 2024, 189, 102365. [Google Scholar] [CrossRef]
  32. Sharma, S.K.; Chauhan, V.S.; Sinapius, M. A review on deformation-induced electromagnetic radiation detection: History and current status of the technique. J. Mater. Sci. 2021, 56, 4500–4551. [Google Scholar] [CrossRef]
  33. Mori, Y.; Obata, Y.; Sikula, J. Acoustic and electromagnetic emission from crack created in rock sample under deformation. Acoust. Emiss. 2009, 27, 157–166. [Google Scholar]
  34. Gokhberg, M.; Morgounov, V.; Yoshino, T.; Tomizawa, I. Experimental measurement of electromagnetic emissions possibly related to earthquakes in Japan. J. Geophys. Res. Solid Earth 1982, 87, 7824–7828. [Google Scholar] [CrossRef]
  35. Petrenko, V.F.; Colbeck, S.C. Generation of electric fields by ice and snow friction. J. Appl. Phys. 1995, 77, 4518–4521. [Google Scholar] [CrossRef]
  36. Wang, E.; Jia, H.; Song, D.; Li, N.; Qian, W. Use of ultralow-frequency electromagnetic emission to monitor stress and failure in coal mines. Int. J. Rock Mech. Min. Sci. 2014, 70, 16–25. [Google Scholar] [CrossRef]
  37. Frid, V. Electromagnetic radiation method for rock and gas outburst forecast. J. Appl. Geophys. 1997, 38, 97–104. [Google Scholar] [CrossRef]
  38. Frid, V.; Rabinovitch, A.; Bahat, D. Fracture induced electromagnetic radiation. J. Phys. D Appl. Phys. 2003, 36, 1620–1628. [Google Scholar] [CrossRef]
  39. Rabinovitch, A.; Frid, V.; Bahat, D. Surface oscillations-a possible source of fracture induced electromagnetic radiation. Tectonophysics 2007, 431, 15–21. [Google Scholar] [CrossRef]
  40. Rabinovitch, A.; Frid, V.; Bahat, D. Directionality of electromagnetic radiation from fractures. Int. J. Fract. 2017, 204, 239–244. [Google Scholar] [CrossRef]
  41. Song, D.Z.; Wang, E.Y.; Song, X.Y.; Jin, P.J.; Oiu, L.M. Changes in frequency of electromagnetic radiation from Loaded coal. Rock Mech. Rock Eng. 2016, 49, 291–302. [Google Scholar] [CrossRef]
  42. Mastrogiannis, D.; Antsygina, T.N.; Chishko, K.A.; Mavromatou, C.; Hadjicontis, V. Relationship between electromagnetic and acoustic emissions in deformed piezoelectric media: Microcracking signals. Int. J. Solids Struct. 2015, 56–57, 118–125. [Google Scholar] [CrossRef]
  43. Yudin, P.V.; Tagantsev, A.K. Fundamentals of flexoelectricity in solids. Nanotechnology 2013, 24, 432001. [Google Scholar] [CrossRef] [PubMed]
  44. Wang, H.; Jiang, X.; Wang, Y.; Stark, R.W.; van Aken, P.A.; Mannhart, J.; Boschker, H. Direct Observation of Huge Flexoelectric Polarization around Crack Tips. Nano Lett. 2020, 20, 88–94. [Google Scholar] [CrossRef]
  45. Wu, M.; Zhang, X.; Li, X.; Qu, K.; Sun, Y.; Han, B.; Zhu, R.; Gao, X.; Zhang, J.; Liu, K.; et al. Engineering of atomic-scale flexoelectricity at grain boundaries. Nat. Commun. 2022, 13, 216. [Google Scholar] [CrossRef]
  46. Daigle, H. Structure of the electrical double layer at the ice-water interface. J. Chem. Phys. 2021, 154, 214703. [Google Scholar] [CrossRef]
  47. Wen, X.; Ma, Q.; Mannino, A.; Fernandez-Serra, M.; Shen, S.; Catalan, G. Flexoelectricity and surface ferroelectricity of water ice. Nat. Phys. 2023, 21, 1587–1593. [Google Scholar] [CrossRef]
  48. Wen, X.; Ma, Q.; Liu, J.; Saeed, U.; Shen, S.; Catalan, G. Streaming flexoelectricity in saline ice. Nat. Mater. 2024, 24, 1533–1537. [Google Scholar] [CrossRef]
  49. Marchenko, A.; Karulin, E.; Karulina, M.; Sakharov, A.; Chistyakov, P.; Sodhi, D.; Sliusarenko, A. Scale effects in compressive strength of sea ice. In Proceedings of the 24th IAHR International Symposium on Ice, Vladivostok, Russia, 4–10 June 2018; p. 18-004. [Google Scholar]
  50. Marchenko, A.; Karulin, E.; Sakharov, A.; Chistyakov, P. On the influence of the hydraulic characteristics of the rig during full-scale compression and indentation tests on sea ice. In Proceedings of the Port and Ocean Engineering under Arctic Conditions, Delft, The Netherlands, 9–13 June 2019; p. 32. [Google Scholar]
  51. Moreau, L.; Boué, P.; Serripierri, A.; Weiss, J.; Hollis, D.; Pondaven, I.; Garambois, S.; Larose, É.; Helmstetter, A.; Stehly, L.; et al. Sea ice thickness and elastic properties from the analysis of multimodal guided wave propagation measured with a passive seismic array. J. Geophys. Res. Oceans 2020, 125, e2019JC015709. [Google Scholar] [CrossRef]
  52. Marchenko, A.; Tanurkov, A. Full-scale measurements of deflection and stresses in floating sea ice subjected to long-term concentrated load. In Proceedings of the International Conference on Port and Ocean Engineering under Arctic Conditions, St. John’s, NL, Canada, 13–17 June 2025; p. 38. [Google Scholar]
  53. Mansurov, V.A. Acoustic emission from failing rock behavior. Rock Mech. Rock Eng. 1994, 27, 173–182. [Google Scholar] [CrossRef]
  54. Marchenko, A.; Haase, A.; Jensen, A.; Lishman, B.; Rabault, J.; Evers, K.-U.; Shortt, M.; Thiel, T. Laboratory Investigations of the Bending Rheology of Floating Saline Ice and Physical Mechanisms of Wave Damping in the HSVA Hamburg Ship Model Basin Ice Tank. Water 2021, 13, 1080. [Google Scholar] [CrossRef]
  55. Sodhi, D.S. Breakthrough loads of floating ice sheets. ASCE J. Cold Reg. Eng. 1995, 9, 4. [Google Scholar] [CrossRef]
  56. Sodhi, D.S. Vertical penetration of floating ice sheets. Int. J. Solids Struct. 1998, 35, 4275–4294. [Google Scholar] [CrossRef]
  57. Tanurkov, A.G.; Marchenko, A.V. Electromagnetic radiation at ice compression and failure. Vesti gazovoy nauki: Modern approach and promising technologies within the projects for development of oil-and-gas fields at the Russian continental shelf. Mosc. Gazprom VNIIGAZ LLC 2023, 3, 159–171. (In Russian) [Google Scholar]
  58. Evtushenko, A.A.; Petrenko, V.F.; Ryzhkin, I.A. Electric polarization of ice at nonuniform elastic strains. Phys. Status Solidi (a) 1984, 86, K31. [Google Scholar] [CrossRef]
  59. Petrenko, V.; Whitworth, R. Electric currents associated with dislocation motion in ice. J. Phys. Chem. 1983, 87, 4022–4024. [Google Scholar] [CrossRef]
  60. Fifolt, D.A.; Petrenko, V.F.; Schulson, E.M. Electrical signals from cracks in ice. In Physics and Chemistry of Ice; Maeno, N., Hondoh, T., Eds.; Hokkaido University Press: Sapporo, Japan, 1992; pp. 470–475. [Google Scholar]
  61. Fifolt, D.A.; Petrenko, V.F.; Schulson, E.M. A preliminary study of electro-magnetic emissions from cracks in ice. Philos. Mag. B 1993, 673, 289–299. [Google Scholar] [CrossRef]
  62. Jaccard, C. Thermodynamics of irreversible processes applied to ice. Phys. Der Kondens. Mater. 1964, 3, 99–118. [Google Scholar] [CrossRef]
  63. Petrenko, V.F. Electromechanical phenomena in ice. In Special Report 96-2; CRREL: Hanover, NH, USA, 1996; 30p. [Google Scholar]
  64. del Pennino, U.; Loria, A.; Mantovani, S.; Mazzega, E. Polarization phenomena induced by cracks in Ih ice crystals. Nuovo C. 1974, 24, 108–120. [Google Scholar] [CrossRef]
  65. Petrenko, V.F. The surface of ice. In USA Cold Regions Research and Engineering Laboratory; Special Report 94-22; CRREL: Hanover, NH, USA, 1994. [Google Scholar]
  66. Thiel, D.V. Electromagnetic emission (EME) from ice crack formation: Preliminary observations. Cold Reg. Sci. Technol. 1992, 21, 49–60. [Google Scholar] [CrossRef]
  67. O’Keefe, S.G.; Thiel, D.V. Conductivity effects on electromagnetic emissions (EME) from ice fracture. J. Electrost. 1996, 36, 225–234. [Google Scholar] [CrossRef]
  68. Shibkov, A.A.; Zheltov, M.A.; Skvortsov, V.V.; Kol’tsov, R.Y.; Shuklinov, A.V. Electromagnetic Emission under Uniaxial Compression of Ice: I. Identification of Nonstationary Processes of Structural Relaxation by Electromagnetic Signals. Crystallogr. Rep. 2005, 50, 994–1004. [Google Scholar] [CrossRef]
  69. Shibkov, A.A.; Kol’tsov, R.Y.; Zheltov, M.A. Electromagnetic Emission under Uniaxial Compression of Ice: II. Analysis of the relationship between an electromagnetic signal and the dynamics of charged dislocation pile-ups. Crystallogr. Rep. 2006, 51, 96–103. [Google Scholar] [CrossRef]
  70. Head, A.K. Dislocation Group Dynamics, I: Similarity Solutions of the n-body Problem. Philos. Mag. 1972, 26, 43–53. [Google Scholar] [CrossRef]
  71. Frank, F.C.; Read, W.T., Jr. Multiplication Processes for Slow Moving Dislocations. Phys. Rev. 1950, 79, 722–723. [Google Scholar] [CrossRef]
  72. Shibkov, A.A.; Kazakov, A.A. Electromagnetic Emission under Uniaxial Compression of Ice: II. Dynamics and statistic of dislocation avalanches and cracks. Crystallogr. Rep. 2009, 54, 299–305. [Google Scholar] [CrossRef]
  73. Schulson, E.M.; Duval, P. Creep and Fracture of Ice; Cambridge University Press: Cambridge, UK, 2009. [Google Scholar]
  74. Frid, V.; Wang, E.Y.; Mulev, S.N.; Li, D.X. The Fracture Induced Electromagnetic Radiation: Approach and Protocol for the Stress State Assessment for Mining. Geotech. Geol. Eng. 2021, 39, 3285–3291. [Google Scholar] [CrossRef]
  75. Maniak, K.; Mydlikowski, R. Autonomous Instrumentation for Measuring Electromagnetic Radiation from Rocks in Mine Conditions-A Functional Analysis. Sensors 2022, 22, 600. [Google Scholar] [CrossRef] [PubMed]
  76. Sinha, N.K.; Shkhinek, K.; Smirnov, V. On borehole indenter (BHI) measurements and analysis. Cold Reg. Sci. Technol. 2012, 76–77, 109–120. [Google Scholar] [CrossRef]
Disclaimer/Publisher’s Note: The statements, opinions and data contained in all publications are solely those of the individual author(s) and contributor(s) and not of MDPI and/or the editor(s). MDPI and/or the editor(s) disclaim responsibility for any injury to people or property resulting from any ideas, methods, instructions or products referred to in the content.

Article Metrics

Citations

Article Access Statistics

Article metric data becomes available approximately 24 hours after publication online.