Article

A Novel Model of an S-Shaped Tooth Profile Gear Pair with a Few Pinion Teeth and Tooth Contact Analysis Considering Shaft Misalignments

School of Mechanical Engineering, Shijiazhuang Tiedao University, Shijiazhuang 050043, China
*
Author to whom correspondence should be addressed.
Appl. Sci. 2023, 13(15), 8959; https://doi.org/10.3390/app13158959
Submission received: 7 June 2023 / Revised: 27 July 2023 / Accepted: 29 July 2023 / Published: 4 August 2023
(This article belongs to the Section Mechanical Engineering)

Abstract

:
Due to the special meshing of convex and concave tooth profiles, an S-shaped tooth profile gear with a few teeth has the advantage of reducing the contact stress and improving the contact ratio. However, the theoretical inseparability of the center distance of an S-shaped tooth profile and shaft misalignments, including center distance errors and axis parallelism errors caused by manufacturing or installation errors, can easily cause tip contact and produce transmission errors. Accordingly, it is necessary to analyze the influence of shaft misalignments on the meshing performance. In this paper, a unified mathematical model of spur and helical gears with an S-shaped tooth profile is established and an analytic method for determination of the contact pattern, meshing path, and transmission error of a gear pair with shaft misalignments is proposed. Then, the validity of the analytic method is proved by practical examples and the influence of shaft misalignments on the contact pattern of an S-shaped tooth profile gear pair is obtained. Through comparison with an involute gear with the same parameters, it is found that shaft misalignments within a certain range result in an acceptable transmission error and contact area migration of the S-shaped tooth profile gear pair similar to that of the involute gear pair.

1. Introduction

The tooth profile is the basic factor determining gear transmission performance and a fundamental factor affecting the sensitivity of the gear to error. At present, most of the research regarding gears with a few teeth are based on an involute tooth profile. However, inherent geometrical properties affect the load carrying capacity, transmission quality, and improvement of lubrication performance. Theoretical analysis [1] and experimental research [2] has shown that the involute profile has a large curvature owing to the meshing of two convex surfaces, which makes the tooth prone to fatigue damage and the load capacity of gears with a few teeth (gear pair with 2–6 pinion teeth) more sufficient. Therefore, certain experts and scholars have proposed new types of tooth profile, new theories, and new methods to meet the application needs of gears in special or extreme occasions [3,4,5,6,7]. By using a variable involute forming principle [2], a novel S-shaped profile, machined by a rack cutter with a sine curve and suitable for a gear pair with a few teeth to greatly improve the bearing capacity, have been proposed in several patents [8,9]. At present, other scholars have also made some progress in the research of S-profile gears. Although the generation mechanism of an S-shape is different, its practical application can be realized. The literature [10,11,12] verifies the correctness of the S-shape gear theory and the feasibility of practical application from the aspects of S-curve formation theory, actual manufacturing, and gear failure forms, etc. It has a greater advantages than an involute tooth shape.
At the same time, new problems were introduced; the involute tooth has a good contact performance and separability of the center distance. What are the characteristics of the meshing performance and the sensitivity to shaft misalignments of an S-shaped tooth profile gear pair? And its separability of the center distance? These issues will be analyzed in this article.
To explore the above questions, mathematical models of an S-shaped tooth surface are established and the tooth contact analysis and transmission error analysis of an S-shaped tooth profile gear pair with shaft misalignments are carried out. MO Shuai et al. [13] proposed a complex geometric modeling method of a helical face gear pair with an arc-tooth generated by an arc-profile cutting (APC) disc. Its tooth contact characteristics were analyzed; through the contact analysis of the tooth surface, the sensitivity of the APC face gear to different installation errors was obtained. The results showed that the APC face gear pair is most sensitive to the installation error in the direction of tooth thickness. Li Yufan [14] took the cylindrical gear pair as the research object, considering the influence of the flexibility of the shaft and bearing and the installation form of the gear pair on the contact characteristics of the gear system. The corresponding modification methods have been put forward for the meshing extension of the gear pair and the meshing misalignment of the gear system. Tsai and Tsay [15] put forward a computer simulation method to carry out loaded contact analysis of a large contact ratio spur gear pair of a modified tooth profile and an arc-involute tooth profile helical gear pair, respectively, considering tip corner contact and shaft misalignments, which obtained the contact path and contact stress distribution on the tooth surface under the condition of different modification parameters and errors. Based on the penetration gear contact model, M. Vivet [16] performed an accurate and efficient numerical analysis of the tooth surface contact of spiral bevel gears and simulated the alignment error of gears. The developed gear contact model with surfaces of roll angles, computed for the gear pair’s tooth flanks in the absence of misalignments, is shown to be well capable of predicting a misaligned gear pair’s contact performance. Francisco [17] used the discretization and adaptive refinement of the contact surfaces to obtain the numerical tooth contact analysis of tooth flank surfaces, which had a higher computation accuracy and smaller computation cost. Wang [18] put forward a tooth contact analysis of a spiral bevel gear based on digital real tooth surfaces with high precision and introduced the concept of digital synthesis error, realizing the establishment of a digital real tooth flank of a spiral bevel gear with the tooth profile error and installation error, which can reflect the actual tooth contact. Patil [19] and Zhou [20] investigated the effects of friction on the bending and contact strength of spur and helical gears by TCA. Tang [21] built the contact analysis model of the drum-shaped tooth profile driving the pinion and unmodified involute tooth profile driven gear with installation error. In addition, the position of the contact path could be accurately controlled by adjusting the modification parameters and installation error. The analysis of the corresponding errors on the contact performance of gears with different tooth profiles by the above experts shows that the errors have a crucial impact on the gear contact and gear transmission. At the same time, it is necessary to explore the separability of the center distance and the sensitivity to shaft misalignments of an S-shaped tooth profile gear pair on the basis of the separability of the center distance of an involute gear. Then, on the basis of those research studies, this paper proposes a novel model of tooth contact analysis which is more visible, interactive, and highly efficient.
In engineering practice, due to the machining and installation errors of the gear box, the shaft misalignment of the gear pair is inevitable. Considering the theoretical inseparability of the center distance of the S-shaped tooth profile gear, analyzing the influence of the center distance error on the transmission error is beneficial to the control of the machining and installation accuracy in practical applications. In order to obtain the contact performance of an S-shaped tooth profile gear with a few pinion teeth and the effect of shaft misalignments on the transmission error, this paper establishes the unified mathematical models of an S-shaped tooth profile spur gear and helical gear and proposes analytical approach for the contact pattern on tooth flank and combines the tooth contact analysis theory; the contact pattern and the function of transmission errors is provided, while taking into consideration the conditions of shaft misalignments. Through analyzing cases and verifying the correctness of numerical theory analysis, the effect regularity of shaft misalignments on the contact performance and transmission error of an S-shaped tooth profile gear are obtained.

2. Mathematical Models of an S-Shaped Tooth Profile Gear

2.1. Generation of an S-Shaped Tooth Profile

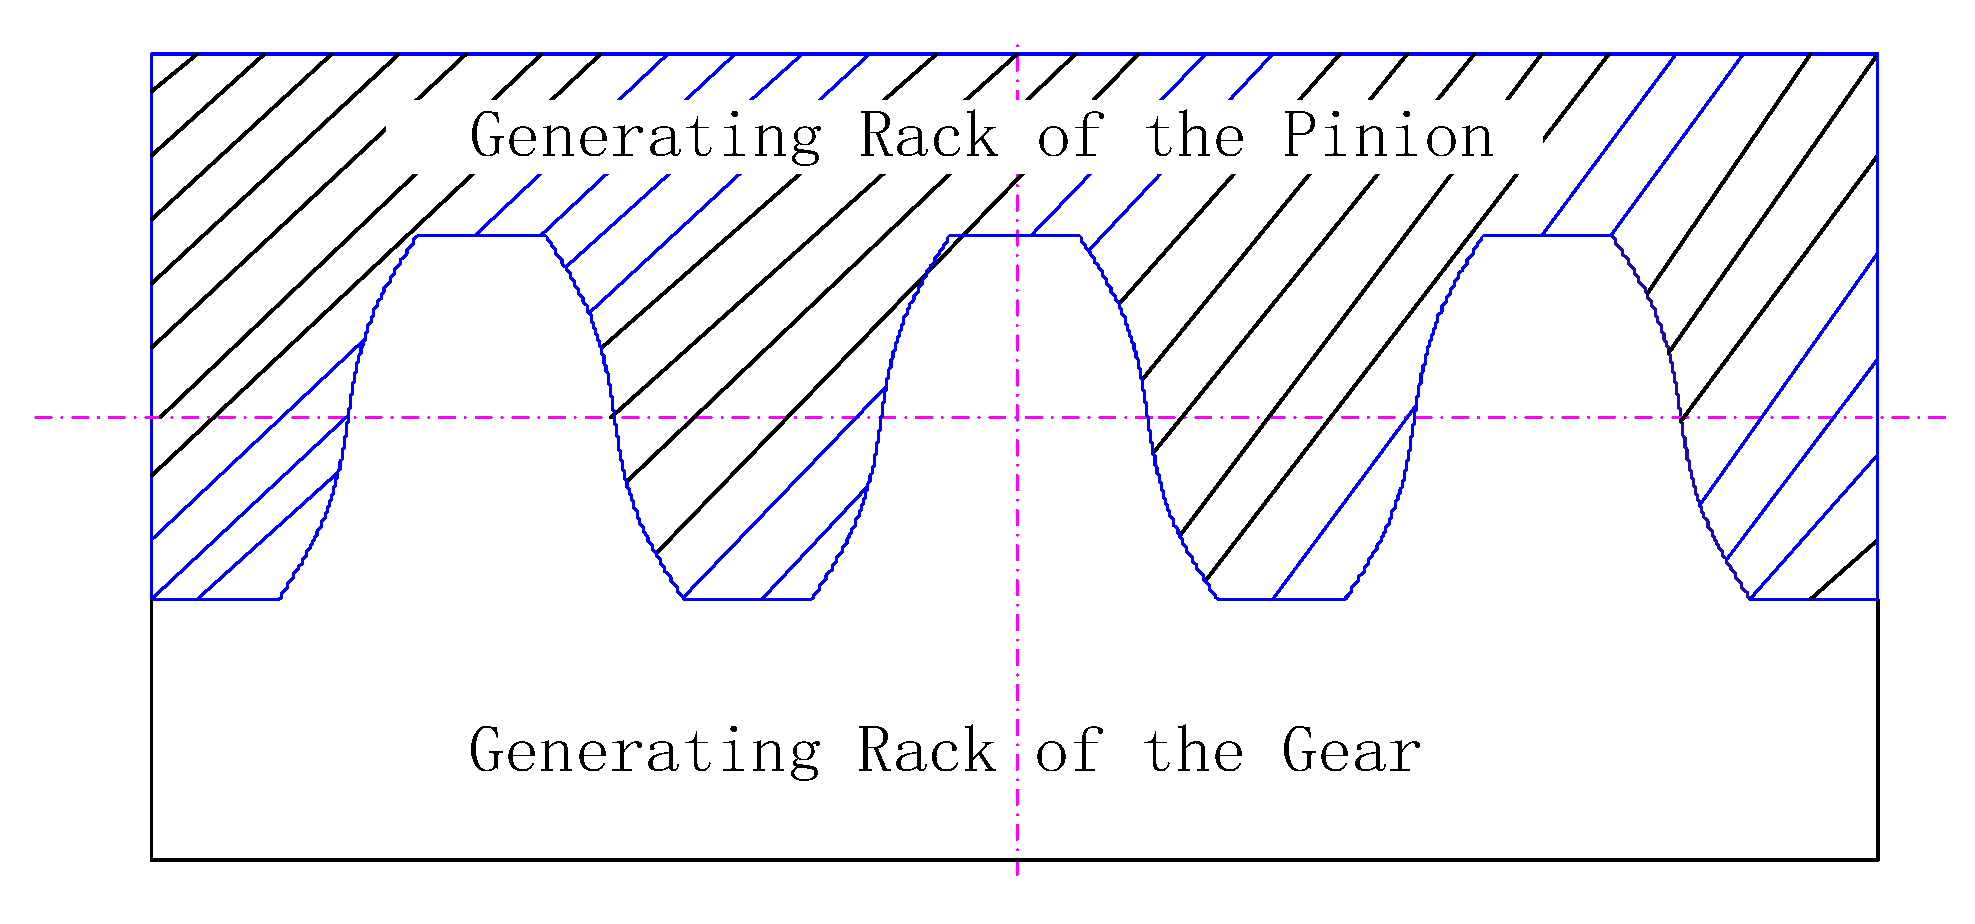
According to the Camus theorem and the principle of conjugate motion, a pair of gear pairs processed by a pair of mutual rack cutters which achieve gomphosis on tooth shape can realize conjugate contact. The involute gear pair can be processed by a pair of linear mutual gomphosis rack cutters. While the line of the blade is replaced by a sine curve, an S-shaped tooth profile gear pair is obtained.
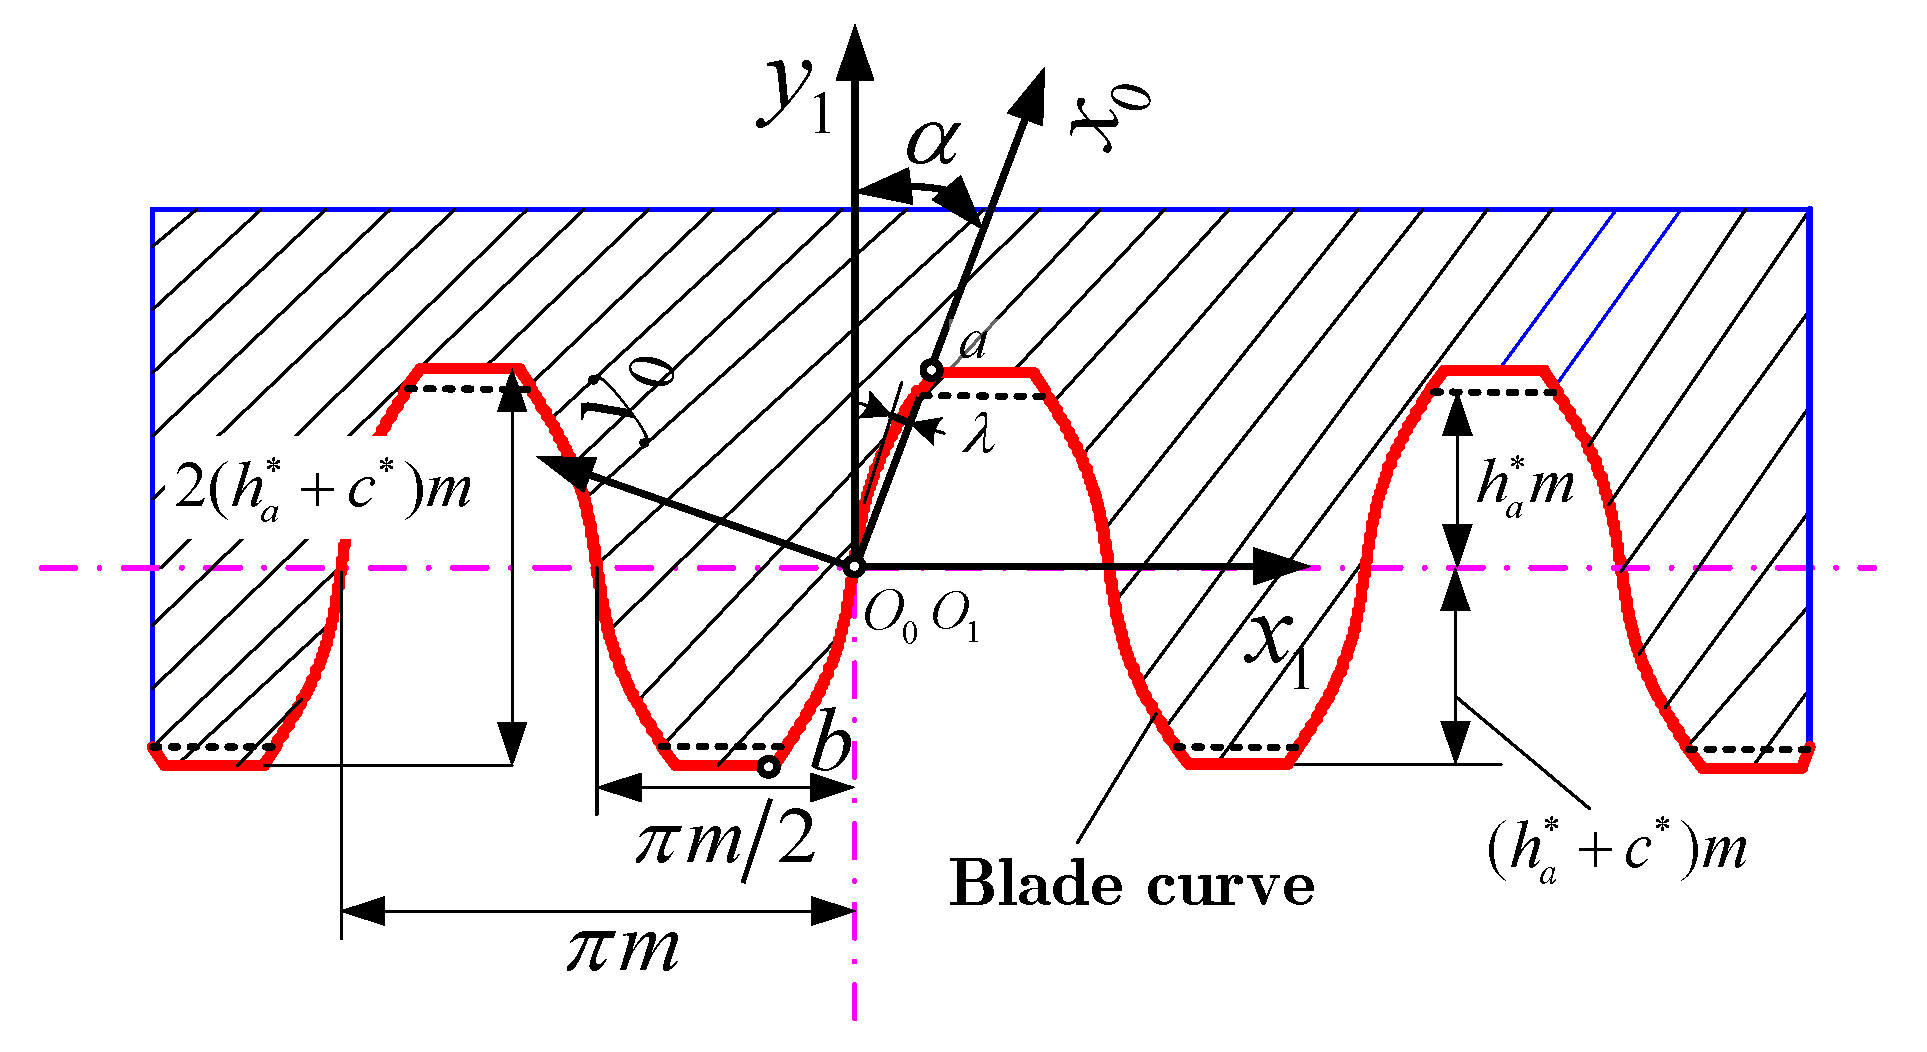
A rack cutter with sine a curve tooth profile is shown in Figure 1. It can be seen that the two rack cutters are in mutual gomphosis when their tooth profiles are mutually fitted with the same sine curve, then the geometry of the cutting parts of the two rack cutters is exactly the same; therefore, one tool can process a pair of mutually conjugate meshing gear pairs exclusively.
The gear tooth profile shown in Figure 2 can be obtained by the above-mentioned rack cutter using an envelope processing method. A pair of mutually conjugate meshing gear pairs as shown in Figure 3 can also be processed by the same cutter. It can be seen that the special meshing of convex and concave tooth profiles lengthens the relative radius of curvature of the contacting point, which reduces the contact stress on the teeth and improves the contact ratio effectively.
As shown in Figure 4, there is a coordinate system O 1 x 1 y 1 fixed to the rack cutter. In order to make the equations of the rack cutter intuitive and simple, a new coordinate system O 0 x 0 y 0 is established based on the basic coordinate system, which has the same origin with O 1 x 1 y 1 , and the angle between them is α ; the tooth profile equations of the rack cutter from point “a” to point “b” are established on the coordinate system O 0 x 0 y 0 .
x 0 = u y 0 = λ sin   ω u π / ω u π / ω
λ = λ m  
where ω = π cos   α / ( h a + c ) ; h a * is the addendum coefficient; c * is the tip clearance coefficient; m represents the modules; and λ is the derivative coefficient, which shows the amplitude degree of the curve.
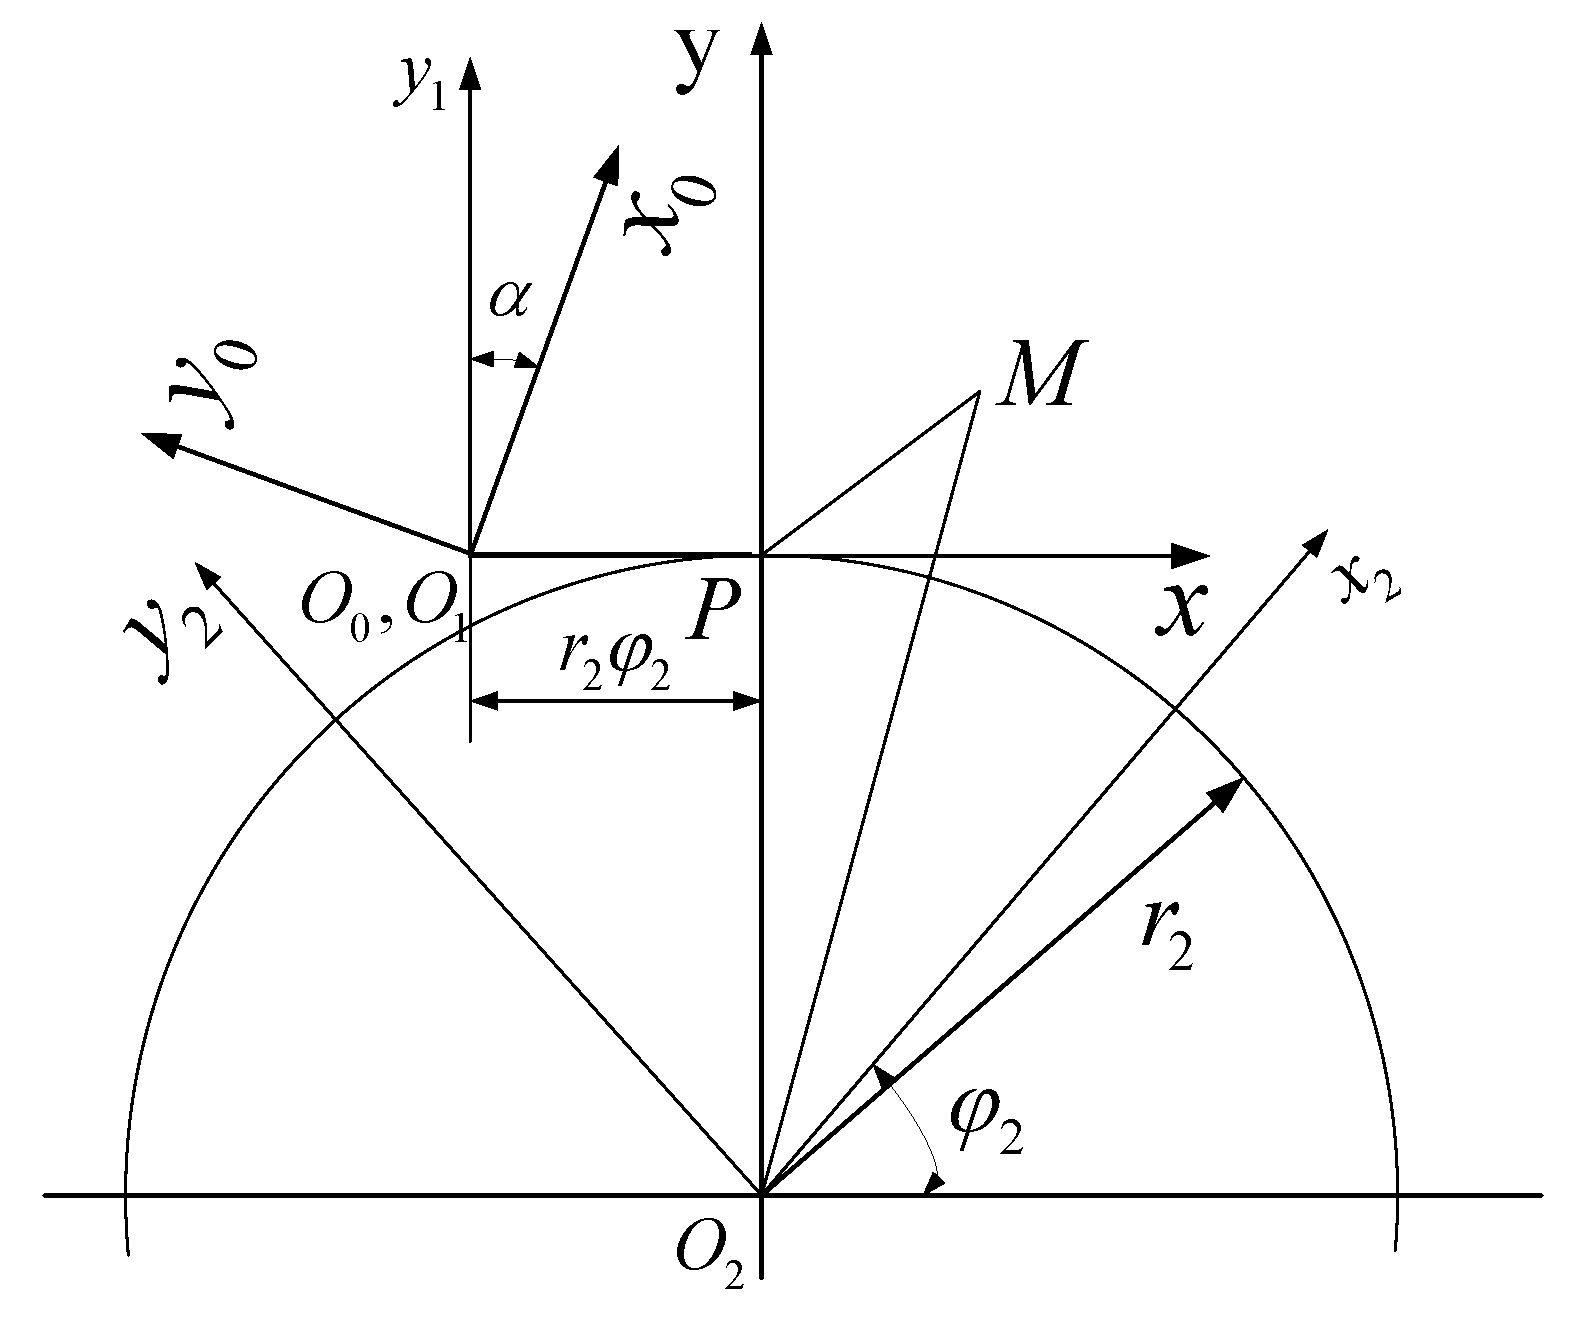
As shown in Figure 5, the rack cutter equation in the coordinate system O 0 x 0 y 0 is converted to the coordinate system O 2 x 2 y 2 fixed with gears. With the help of the coordinate system P x y , the tooth profile equation can be obtained, and the transformation matrices are given by
M 10 = s i n   α c o s   α 0 c o s   α s i n   α 0 0 0 1
M P 1 = 1 0 r 2 φ 2 0 1 0 0 0 1
M 2 P = c o s   φ 2 s i n   φ 2 r 2 s i n   φ 2 s i n   φ 2 c o s   φ 2 r 2 c o s   φ 2 0 0 1
x 2 y 2 t 2 = M 2 P M P 1 M 10 x 0 y 0 t 0 = M 20 x 0 y 0 t 0
Substituting Equation (1) into Equation (6) and simplifying can obtain the tooth profile equations of the gear.
According to the forming theory of an S-shaped tooth profile, a pair of S-shaped gears that can be meshed with each other have the same tooth profile equation. As shown in Figure 6, in the coordinate system O 1 x 1 y 1 , O 2 x 2 y 2 fixed with gears and based on the origin of the gear center, the parameter equations of the mutually conjugate meshing gear tooth profile can be unified as
x ( u ) = u cos   ( α + φ ) + λ sin   ω u sin   ( α + φ ) + r ( cos   φ + φ sin   φ ) y ( u ) = u sin   ( α + φ ) λ sin   ω u cos   ( α + φ ) + r ( sin   φ φ cos   φ )
in which u , φ satisfy equation
f ( u , φ ) = u + λ ω r φ cos   α cos   ω u r φ sin   α λ 2 ω sin 2 ω u / 2 = 0
where α is the pressure angle at the node when λ = 0 , r = m z / 2 is the radius of reference diameter, and z represents the number of teeth.

2.2. Tooth Surface Equation of the Pinion

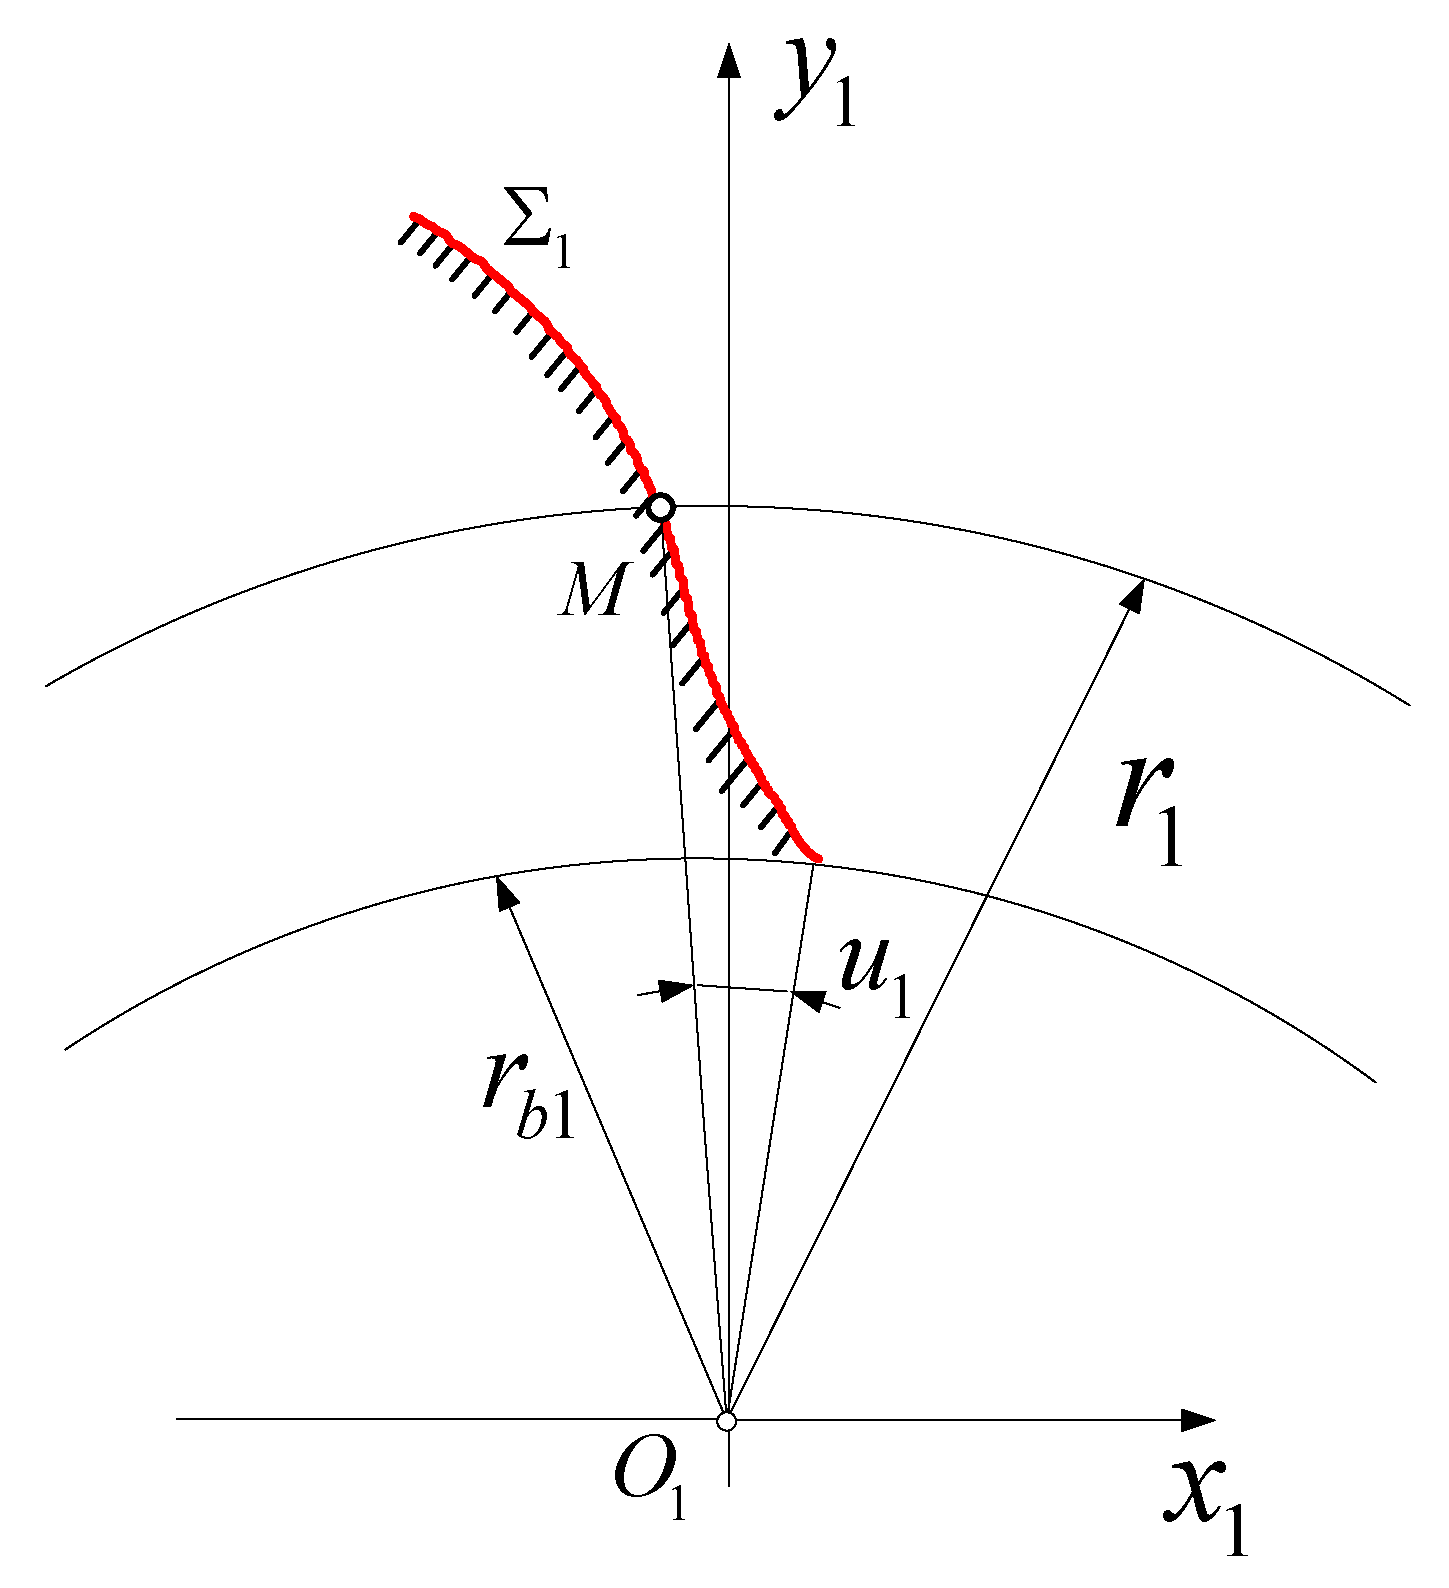
For an S-shaped tooth profile, the equations of the gear and pinion tooth profiles are in the same form. In Figure 7, the pinion tooth profile can be given by the following equation in the Cartesian coordinate system.
x 1 ( u 1 ) = u 1 cos   ( α + φ 1 ) + λ sin   ω u 1 sin   ( α + φ 1 ) + r 1 ( cos   φ 1 + φ 1 sin   φ 1 ) y 1 ( u 1 ) = u 1 sin   ( α + φ 1 ) λ sin   ω u 1 cos   ( α + φ 1 ) + r 1 ( sin   φ 1 φ 1 cos   φ 1 )
And u 1 , φ 1 satisfy the following equation
f ( u 1 , φ 1 ) = u 1 + λ ω r 1 φ 1 cos   α cos   ω u 1 r 1 φ 1 sin   α λ 2 ω sin   2 ω u 1 / 2 = 0
where π / ω u 1 π / ω , r 1 = m z 1 / 2 represents the radius of the reference circle, and z 1 represents the number of pinion teeth.
A cylindrical gear can be divided into a spur gear and a helical gear; to facilitate subsequent analysis and calculations, the unified mathematical equations of spur gear and helical gear tooth profiles are established. According to the forming theory of a helicoid, the tooth surface equations are given by
r 1 ( p ) ( u 1 , v 1 ) = [ x 1 cos κ v 1 y 1 sin κ v 1 ] i + [ x 1 sin κ v 1 + y 1 cos κ v 1 ] j + p 1 v 1 k f ( u 1 , φ 1 ) = 0
where the helix parameter P 1 = r 1 tan π / 2 β , 0 v 1 B / p 1 , and B represents tooth width. Introducing the parameter K as a helix angle coefficient, its value is
K = 0 , β = 0 1 , β 0
The normal vector of a pinion tooth is given by
n 1 P = r u 1 × r v 1 r u 1 × r v 1
r u 1 ( p ) = x 1 ( u 1 , v 1 ) u 1 , y 1 ( u 1 , v 1 ) u 1 , z 1 ( u 1 , v 1 ) u 1
r v 1 ( p ) = x 1 ( u 1 , v 1 ) v 1 , y 1 ( u 1 , v 1 ) v 1 , z 1 ( u 1 , v 1 ) v 1
And the derivation formulas of function f ( u 1 , φ 1 ) are
f ( u 1 , φ 2 ) u 1 = 1 λ ω 2 r 2 φ 2 cos   α sin ω u 1 λ 2 ω 2 cos   2 ω u 1
f ( u 1 , φ 2 ) φ 2 = r 2 sin   α + λ ω r 2 cos   α cos ω u 1
d φ 1 d u 1 = f u 1 f φ 1

2.3. Tooth Surface Equations of the Gear

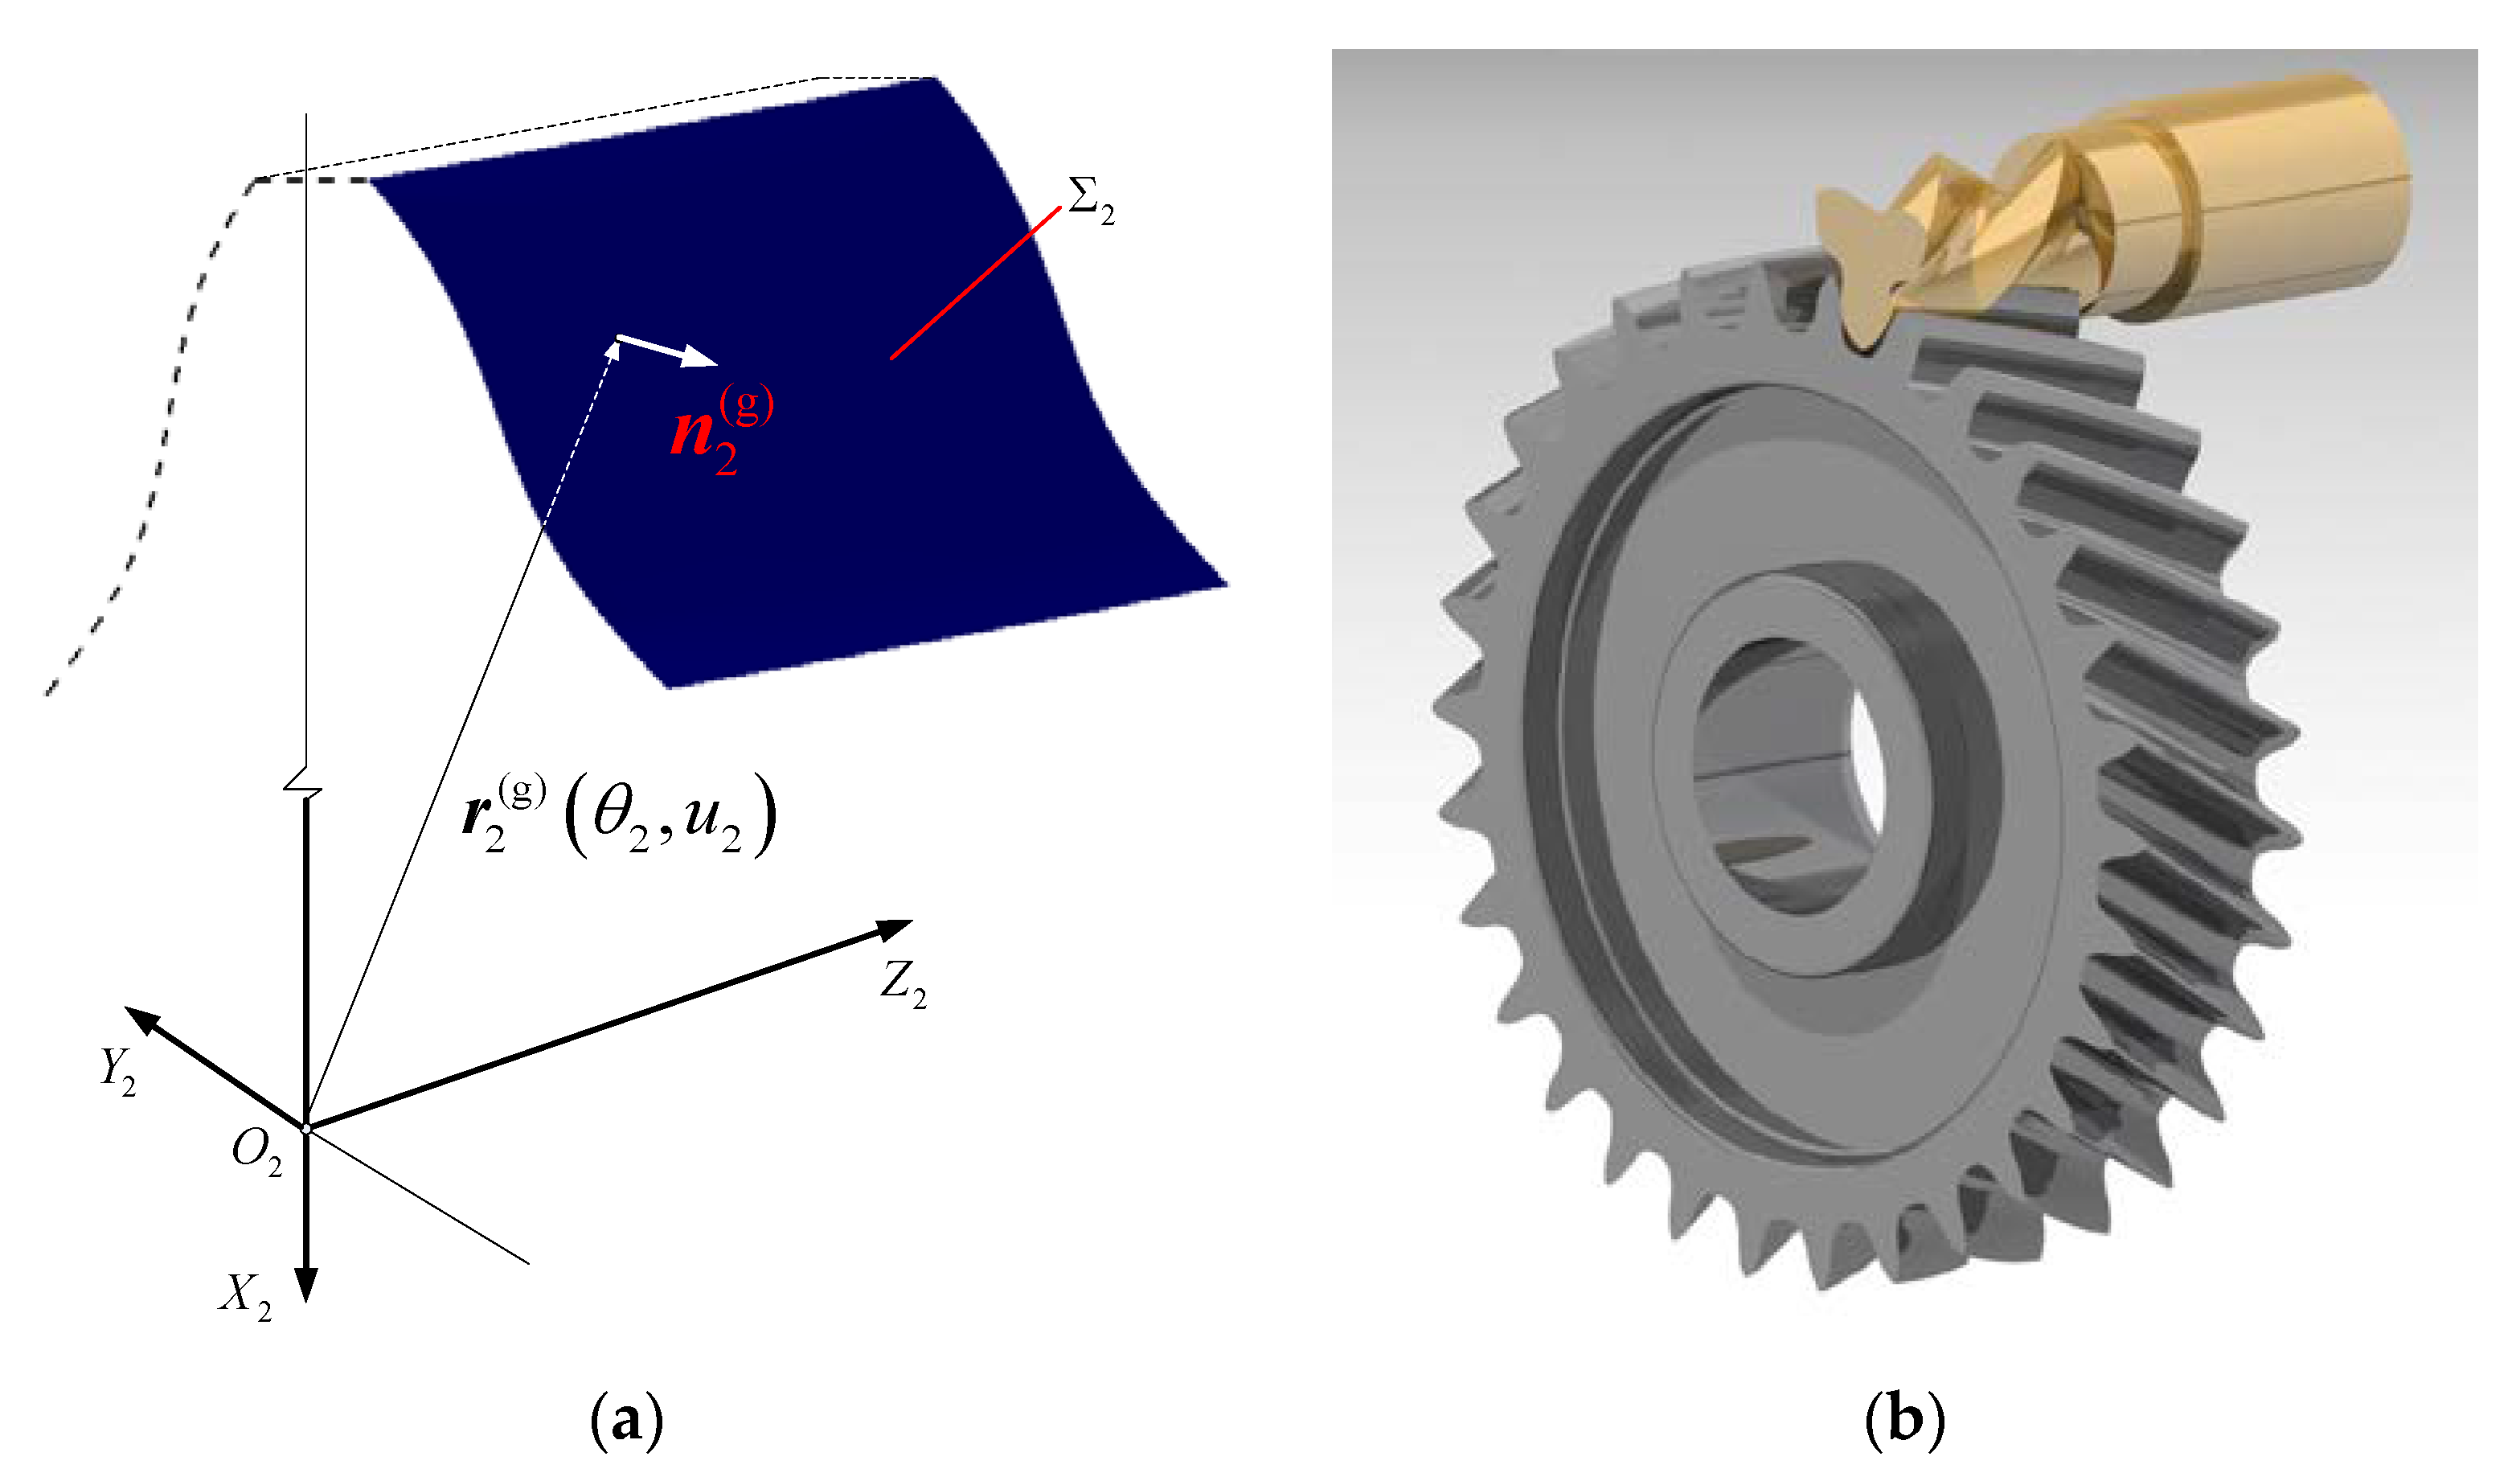
As shown in Figure 8a, there is a coordinate system O 2 X 2 Y 2 Z 2 fixed on the gear, and the negative semi-axis of the O 2 X 2 axis coincides with the symmetric line of its adjacent tooth profiles. The O 2 Z 2 axis coincides with that of the gear. Then, the tooth profile equations of the gear in the plane of O 2 X 2 Y 2 are given by
x 2 ( u 2 ) = u 2 sin   ( α + φ 2 ) + λ sin   ω u 2 cos   ( α + φ 2 ) r 2 ( sin   φ 2 φ 2 cos   φ 2 ) y 2 ( u 2 ) = u 2 cos   ( α + φ 2 ) λ sin   ω u 2 sin   ( α + φ 2 ) r 2 ( cos   φ 2 + φ 2 sin   φ 2 )
f ( u 2 , φ 2 ) = u 2 + λ ω r 2 φ 2 cos   α cos ω u 2 r 2 φ 2 sin   α λ 2 ω sin   2 ω u 2 / 2 = 0
According to the forming theory of a helicoid, the equations of the gear tooth profile are given by
r 2 ( g ) ( u 2 , v 2 ) = [ x 2 cos κ v 2 y 2 sin κ v 2 ] i + [ x 2 sin κ v 2 + y 2 cos κ v 2 ] j p 2 v 2 k f ( u 2 , φ 2 ) = 0
where the helix parameter p 2 = r 2 tan   ( π / 2 β ) , r 2 = m z 2 / 2 is the radius of the reference circle, and z 2 is the number of gear teeth.
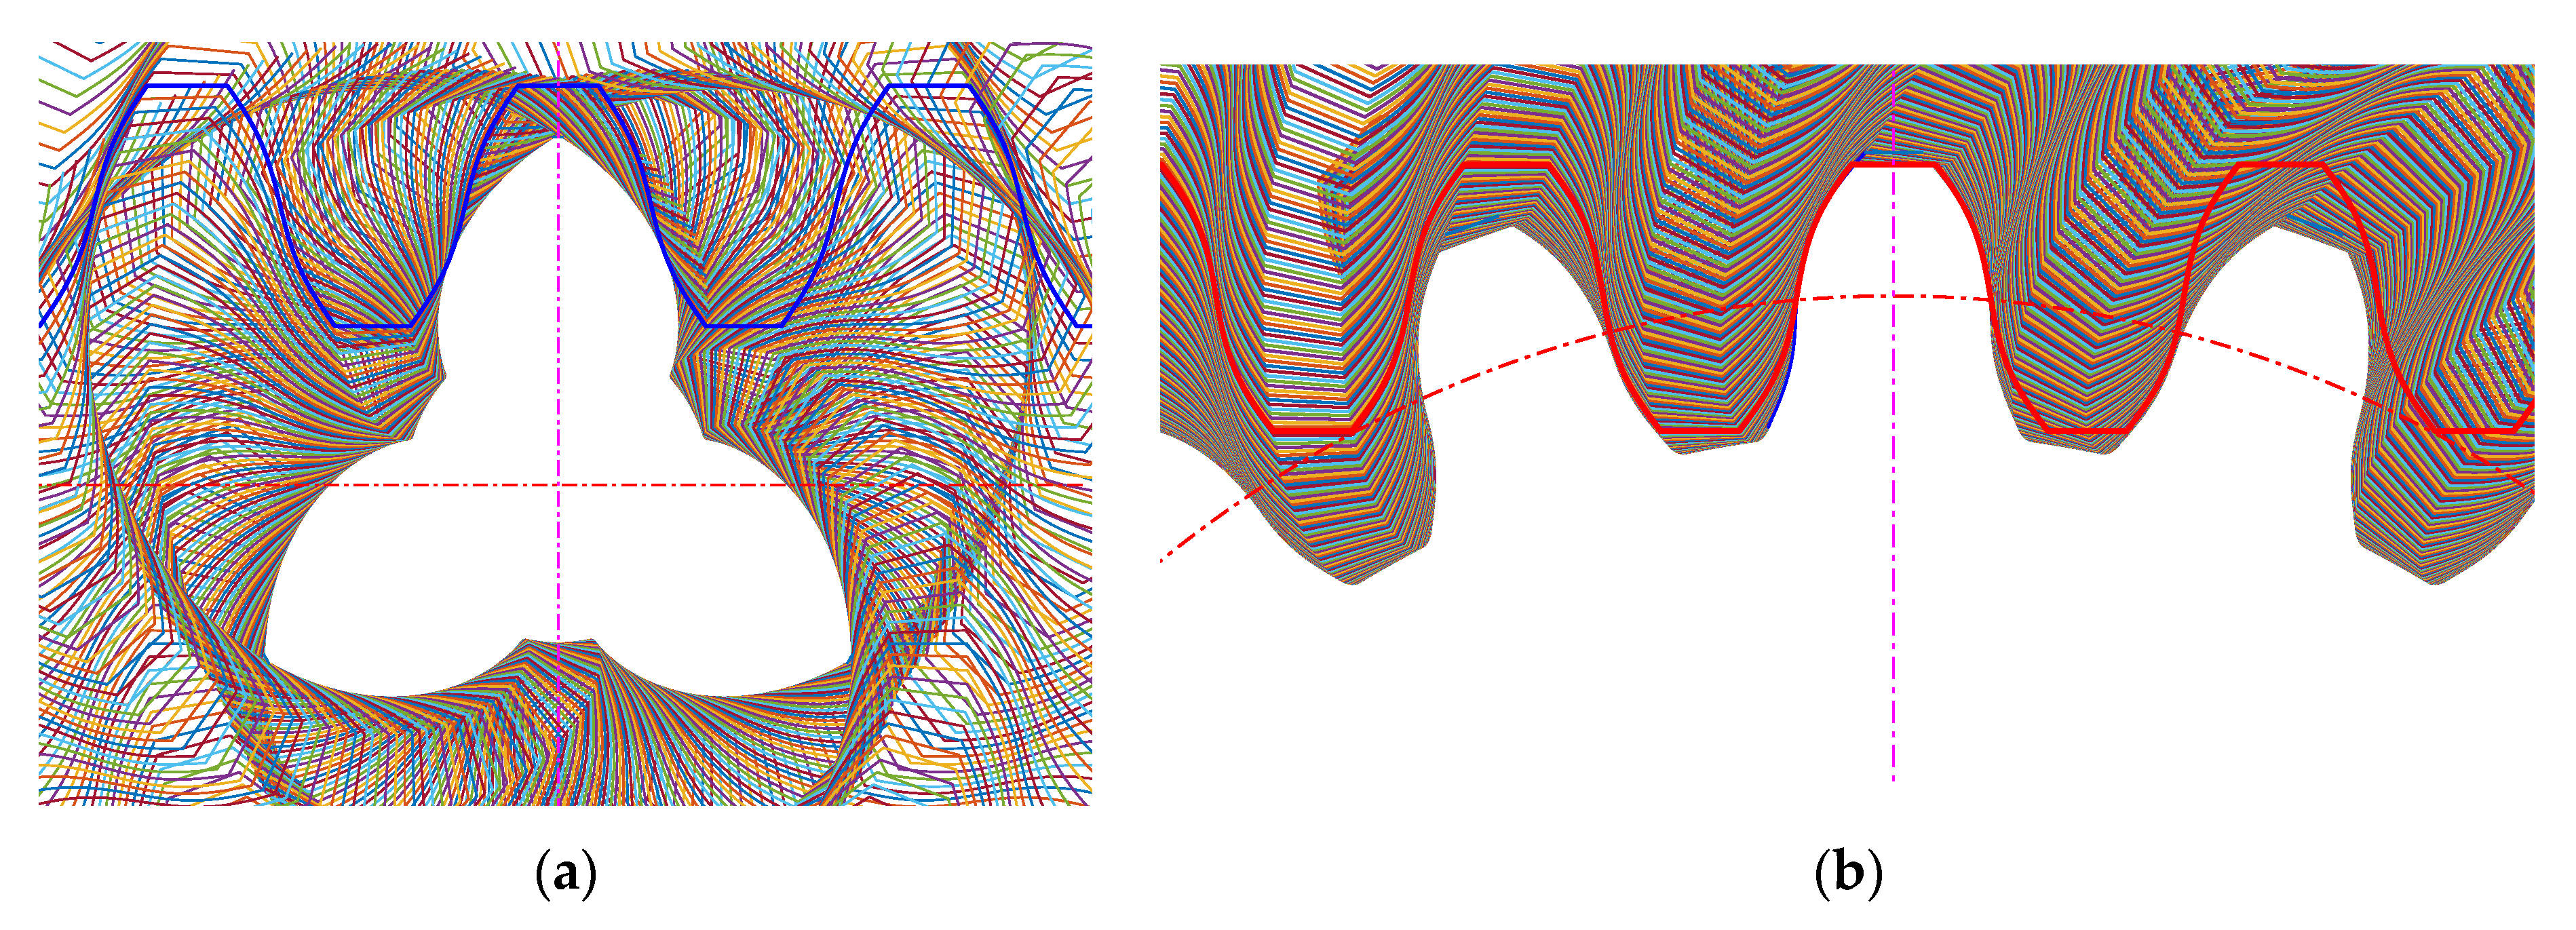
The meshing surfaces can be constructed from Equations (11) and (21) by using solid modelling software and a parametric method; a visualization three-dimensional solid model of the S-shaped tooth profile gear pair with three pinion teeth is established as shown in Figure 8b.
The normal vector of the gear tooth is given by
n 2 ( g ) = r u 2 × r v 2 r u 2 × r v 2
r u 2 ( g ) = x 2 ( u 2 , v 2 ) u 2 , y 2 ( u 2 , v 2 ) u 2 , z 2 ( u 2 , v 2 ) u 2
r v 2 ( g ) = x 2 ( u 2 , v 2 ) v 2 , y 2 ( u 2 , v 2 ) v 2 , z 2 ( u 2 , v 2 ) v 2

2.4. Inseparability Analysis of S-Shaped Tooth Profile Gear

What the separability of the center distance of an involute gear means is that when the actual installation center distance and the design center distance do not coincide exactly, it will not affect the instantaneous transmission ratio of the gear pair and the conjugate characteristic of the tooth profile [22,23,24]. Figure 9a briefly states the advantages of the involute gear: theoretically, the racks corresponding to a pair of mutually conjugated involutes are completely meshed. When the gear installation center distance has an error value of a , the corresponding counterpart rack’s reference line will move a too, in this case; simply making another counterpart rack move a along the reference line can promise the tooth profiles meshing with each other on one side of the racks. Then, the corresponding involute is still a conjugate and a has constant transmission ratio except for a constant transmission error caused at the beginning of transmission. From Figure 9b, when an error of the center distance appears between the S-shaped tooth profile gear pair, the corresponding counterpart racks do not have the advantage of the similar characteristics of the above involute gear, which can generate a periodic wave error during the transmission, so that the S-shaped tooth profile is inseparable. Theoretically speaking, most of the self-designed tooth profiles will face the same problem except for involute gears, but the sensitivity of the tooth meshing performance and transmission error caused by the gear pair center distance error of different tooth profiles are different.

3. Model of Tooth Contact Analysis with Shaft Misalignments

3.1. Determination of Tooth Contact Coordinate System

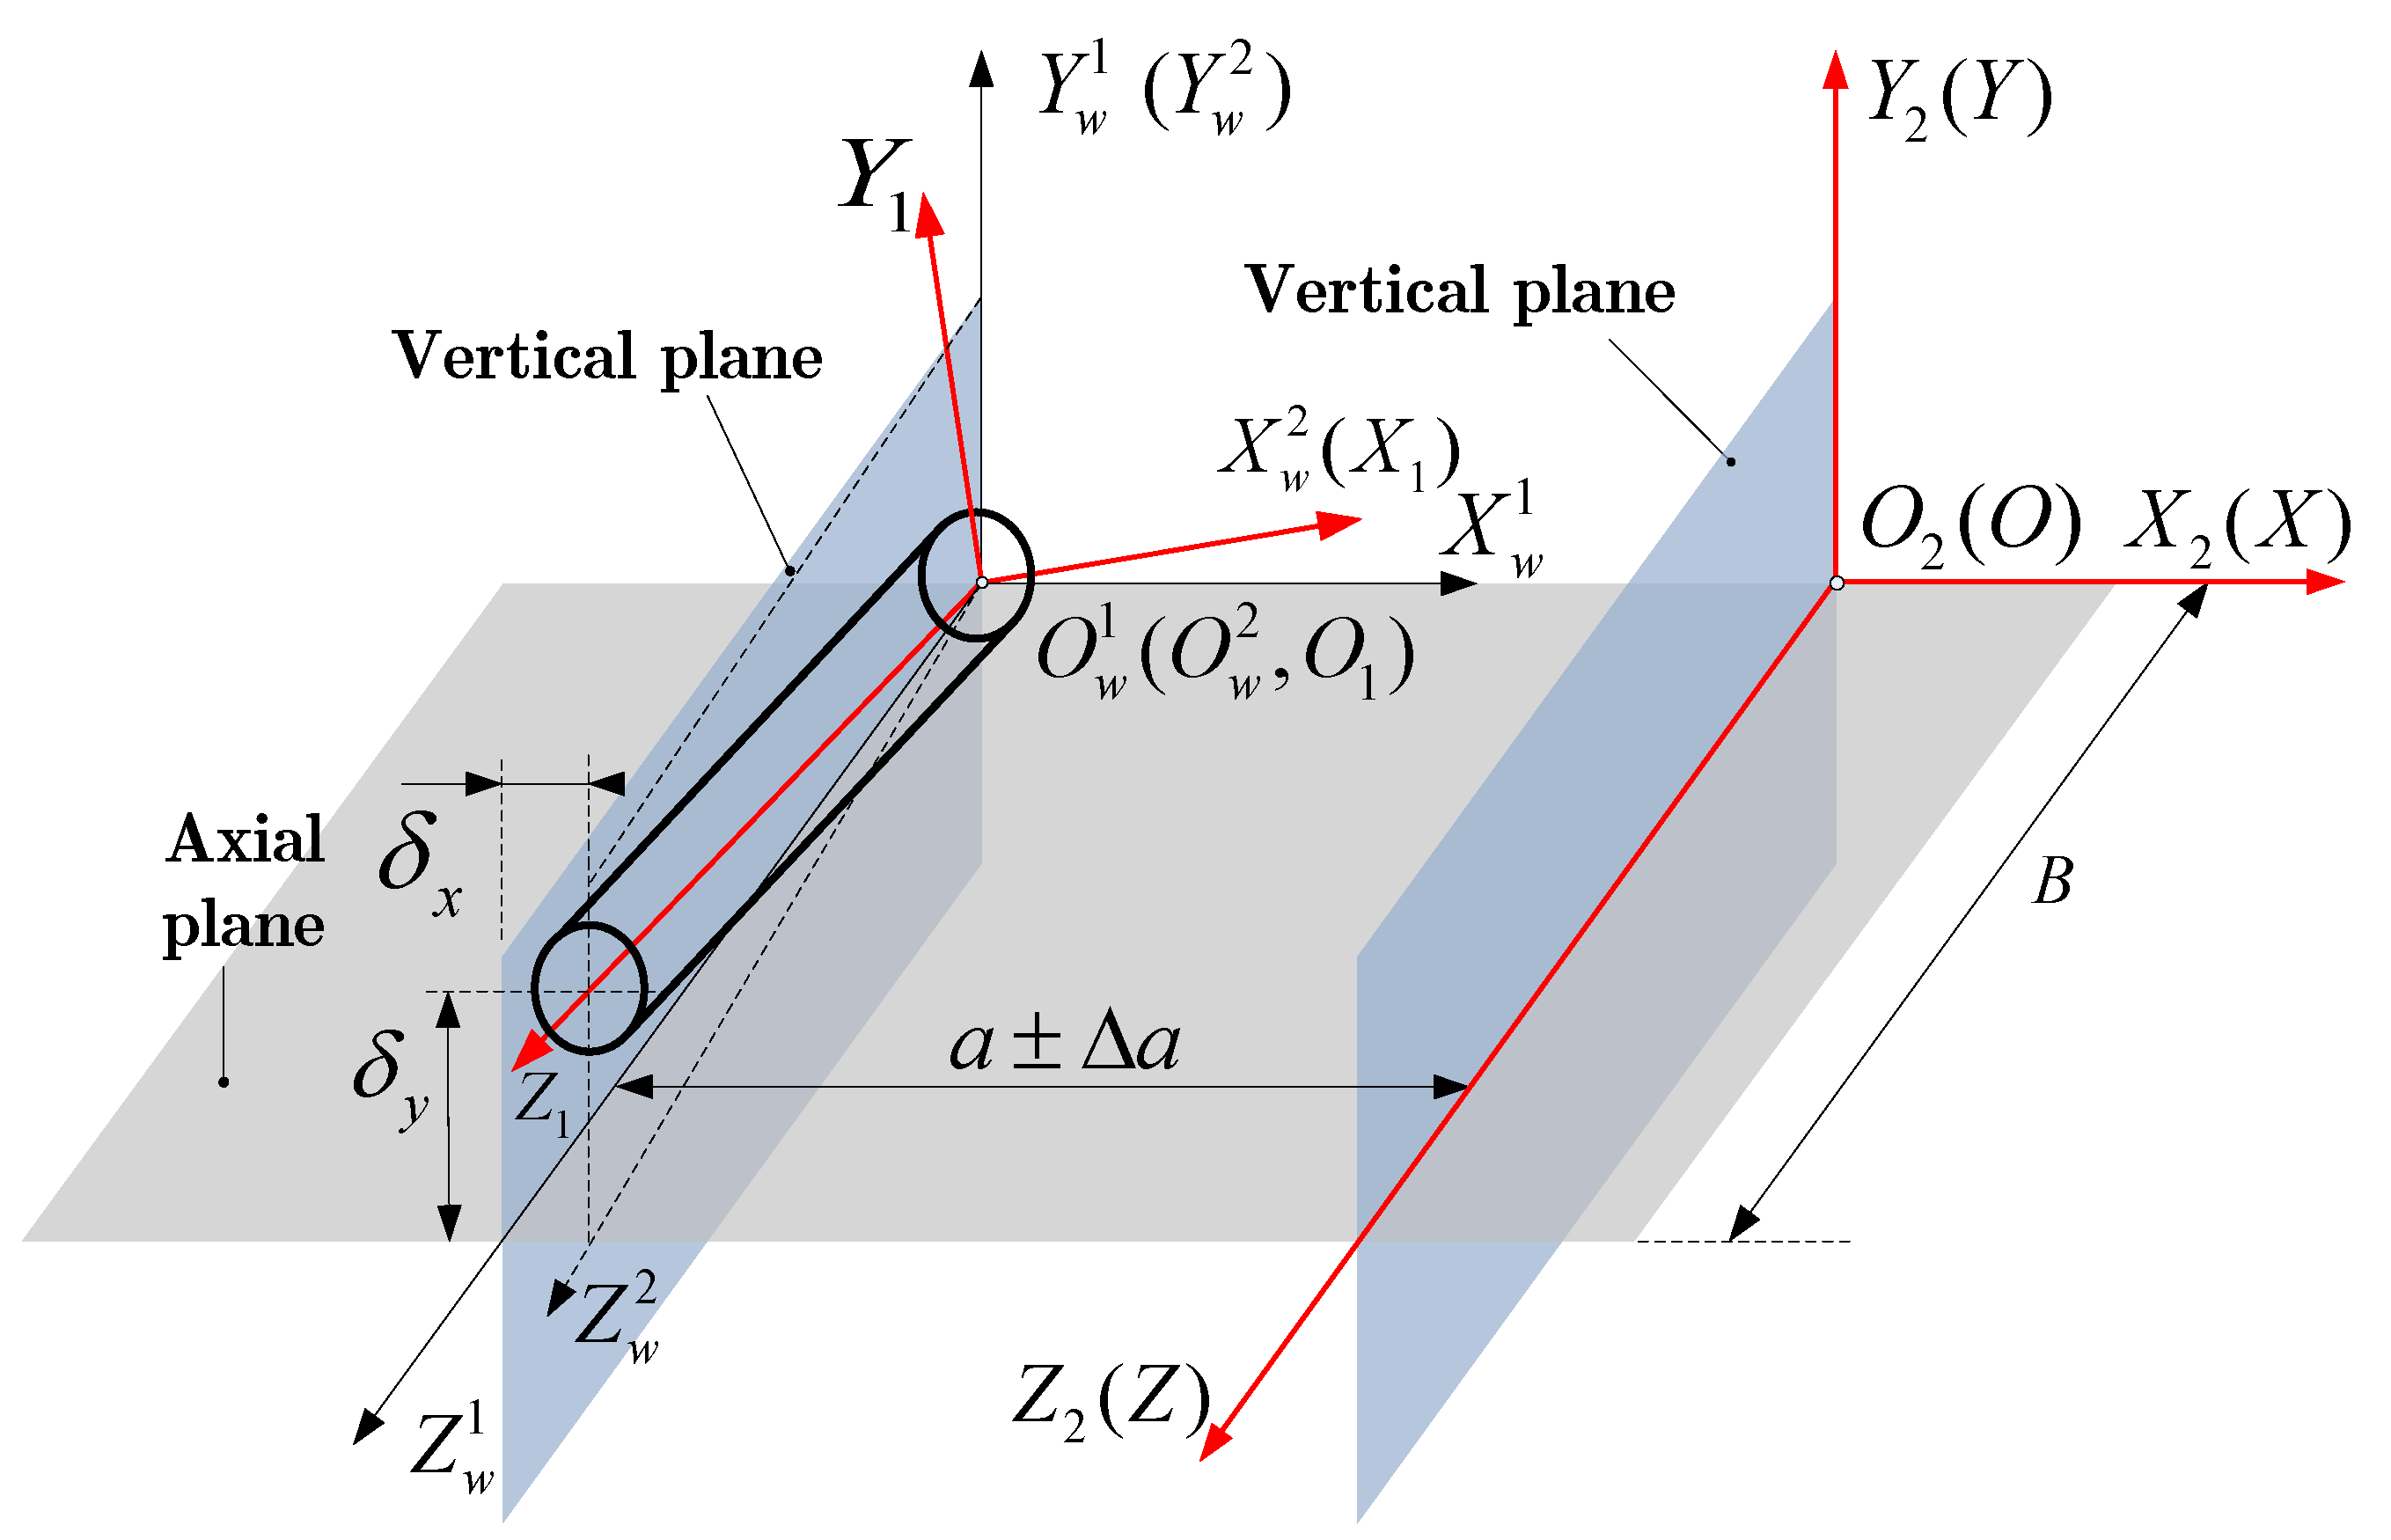
Based on the installation position of the gear, the tooth contact coordinate systems with a center distance error and installation deflection are set up in Figure 10.
(a)
The axial plane determined by the theoretical axis of the gear and pinion is established. The two vertical planes pass the theoretical axis of the two gears and are perpendicular to the axial plane, respectively.
(b)
The center of one end face of the gear is taken as the coordinate origin The axis of the gear is the Z axis, and the plane X Z coincides with the axial plane. The absolute coordinate system S ( O X Y Z ) is established. The initial position of coordinate system S 2 ( O 2 X 2 Y 2 Z 2 ) fixed to the gear coincides with the absolute coordinate system, as shown in Figure 5.
(c)
Firstly, the reference coordinate system S w 1 ( O w 1 X w 1 Y w 1 Z w 1 ) of the pinion with only the center distance error is obtained by translating the origin O of the absolute coordinate system S ( O X Y Z ) by the distance a + Δ a to the shaft end center of the pinion. Secondly, the coordinate system S w 1 is deflected around Y w 1 axis in the axial plane. The integrated deflection angle is μ = arcsin ( δ x / b ) and δ x is the axis error deflection of the axial plane. Accordingly, the reference coordinate system S w 2 ( O w 2 X w 2 Y w 2 Z w 2 ) with installation error angle in the axial plane is obtained. Thirdly, the coordinate system S w 2 is rotated around the X w 2 axis in the vertical plane where the integrated deflection angle is υ = arcsin ( δ y / b ) . And δ y is the axis error deflection of the vertical plane. Thus, the reference coordinate system with an installation error angle in the vertical plane is obtained, which is the actual installation coordinate system S 1 ( O 1 X 1 Y 1 Z 1 ) of the pinion at the same time.
The transformation matrix M 01 P was used to transform the pinion from the coordinate system S 1 ( O 1 X 1 Y 1 Z 1 ) to the absolute coordinate system S ( O X Y Z ) . Assuming a pinion rotate angle κ 1 relative to the initial position during the transmission, the transformation matrix M K 1 p could transform the pinion from the coordinate system S 1 ( O 1 X 1 Y 1 Z 1 ) to the initial position. And the position vector of the pinion in the absolute coordinate system is given by
r Σ 1 ( p ) = M 01 ( p ) · ( M κ 1 · r 1 ( p ) )
M 01 ( p ) = cos υ 0 sin υ ( a + Δ a ) sin μ sin υ cos μ sin μ cos υ 0 cos μ sin υ sin μ cos μ cos υ 0 0 0 0 1
M κ 1 ( p ) = cos κ 1 sin κ 1 0 0 sin κ 1 cos κ 1 0 0 0 0 1 0 0 0 0 1
The gear can always rotate by an angle κ 2 as the pinion rotation angle passes the angle κ 1 which can make the gear pair satisfy the condition of conjugate contact again. The transformation matrix M κ 2 ( g ) is to transform the gear from the coordinate system S 2 ( O 2 X 2 Y 2 Z 2 ) to the absolute coordinate system S ( O X Y Z ) . Thus, the position vector of the gear in the absolute coordinate system is given by
r Σ 2 ( g ) = M κ 2 ( g ) · r 2 ( g )
M κ 2 ( g ) = cos κ 2 sin κ 2 0 0 sin κ 2 cos κ 2 0 0 0 0 1 0 0 0 0 1
In the above formula, Δ a represents the center distance error, κ 1 represents the rotation angle of the pinion, and κ 2 represents the rotation angle of the gear.

3.2. Theories of Meshing Point and Transmission Error

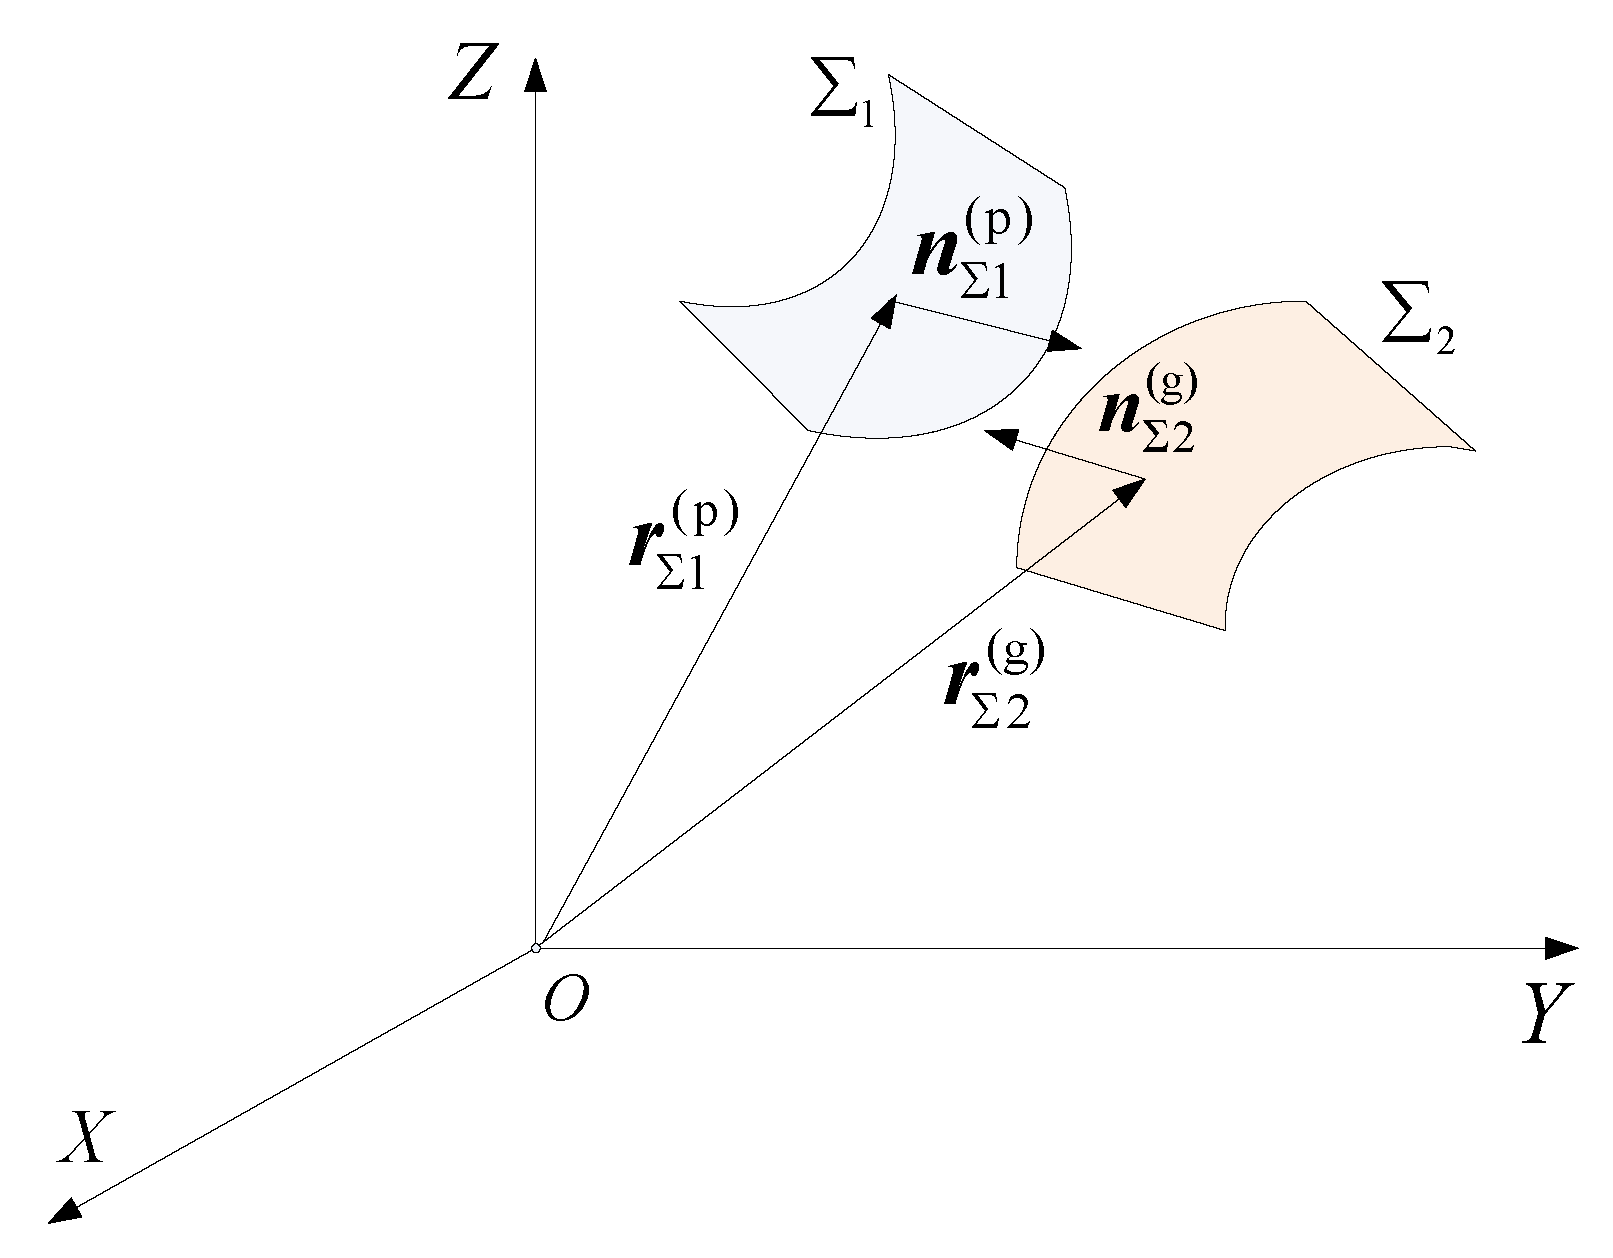
The calculation of the meshing points of the theoretical tooth surface without load is discussed below. As shown in Figure 11, we assume that the gear and pinion are at a certain rotational angle κ 1 , κ 2 and the theoretical tooth flanks are 1 , 2 , on which the location vectors and normal vectors of any points are r Σ 1 ( p ) κ 1 , u 1 , v 1 , r Σ 2 ( g ) κ 2 , u 2 , v 2 and n Σ 1 ( p ) κ 1 , u 1 , v 1 , n Σ 1 ( p ) κ 1 , u 1 , v 1 , respectively. These vectors are given by
n Σ 1 ( p ) κ 1 , u 1 , v 1 = M 01 ( p ) · ( M κ 1 ( p ) · n 1 ( p ) )
n Σ 2 ( g ) κ 2 , u 2 , v 2 = M κ 2 ( g ) · n 2 ( g )
If there are contact points on the tooth surface, the following requirements should be determined: the position vector and unit normal vector need to be equal to that of the other tooth surface at the tooth contact point of the gear pair in the absolute coordinate system at any time.
M 01 ( p ) · ( M κ 1 ( p ) · r 1 ( p ) ) = M κ 2 ( g ) · r 2 ( g )
M 01 ( p ) · ( M κ 1 ( p ) · n 1 ( p ) ) = M κ 2 ( g ) · n 2 ( g )
From the above Equations (30) and (31), we can obtain five independent equations, including three independent equations of the corresponding coordinate vectors on the contact points of the gear and pinion and two independent equations of the unit normal vectors of the contact points which are opposite to each other. Therefore, when κ 1 is determined, the meshing point can be calculated correspondingly. Further, the contact trajectory of meshing points can be calculated by rotating the pinion. Generally, the contact trajectory of meshing points is called the tooth contact path.
We assume that the rotation angle of the pinion is a function of time t; that is, κ 1 = κ 1 ( t ) . The rotation angle of the meshing point of the gear can be a function of time t by Equations (20) and (21); that is, κ 1 = κ 1 ( t ) . Thus, the rotation error of the gear is given by
ψ ( t ) = κ 2 ( t ) κ 1 ( t ) · z 1 z 2
The heterogeneity of gear transmission can be obtained through analyzing ψ ( t ) with its variation to time, which can be used as an evaluation index to evaluate the dynamic characteristics, transmission stability, and separation of center distance about the new tooth profile gears.

3.3. Analysis of Contact Pattern without Loading

In the process of the transmission of the gear, the path of the contact area on the tooth flank is called the tooth contact pattern. The distribution of the tooth contact pattern is an important basis for judging the load characteristics of the tooth flank and the dynamic characteristics of the gear [25].
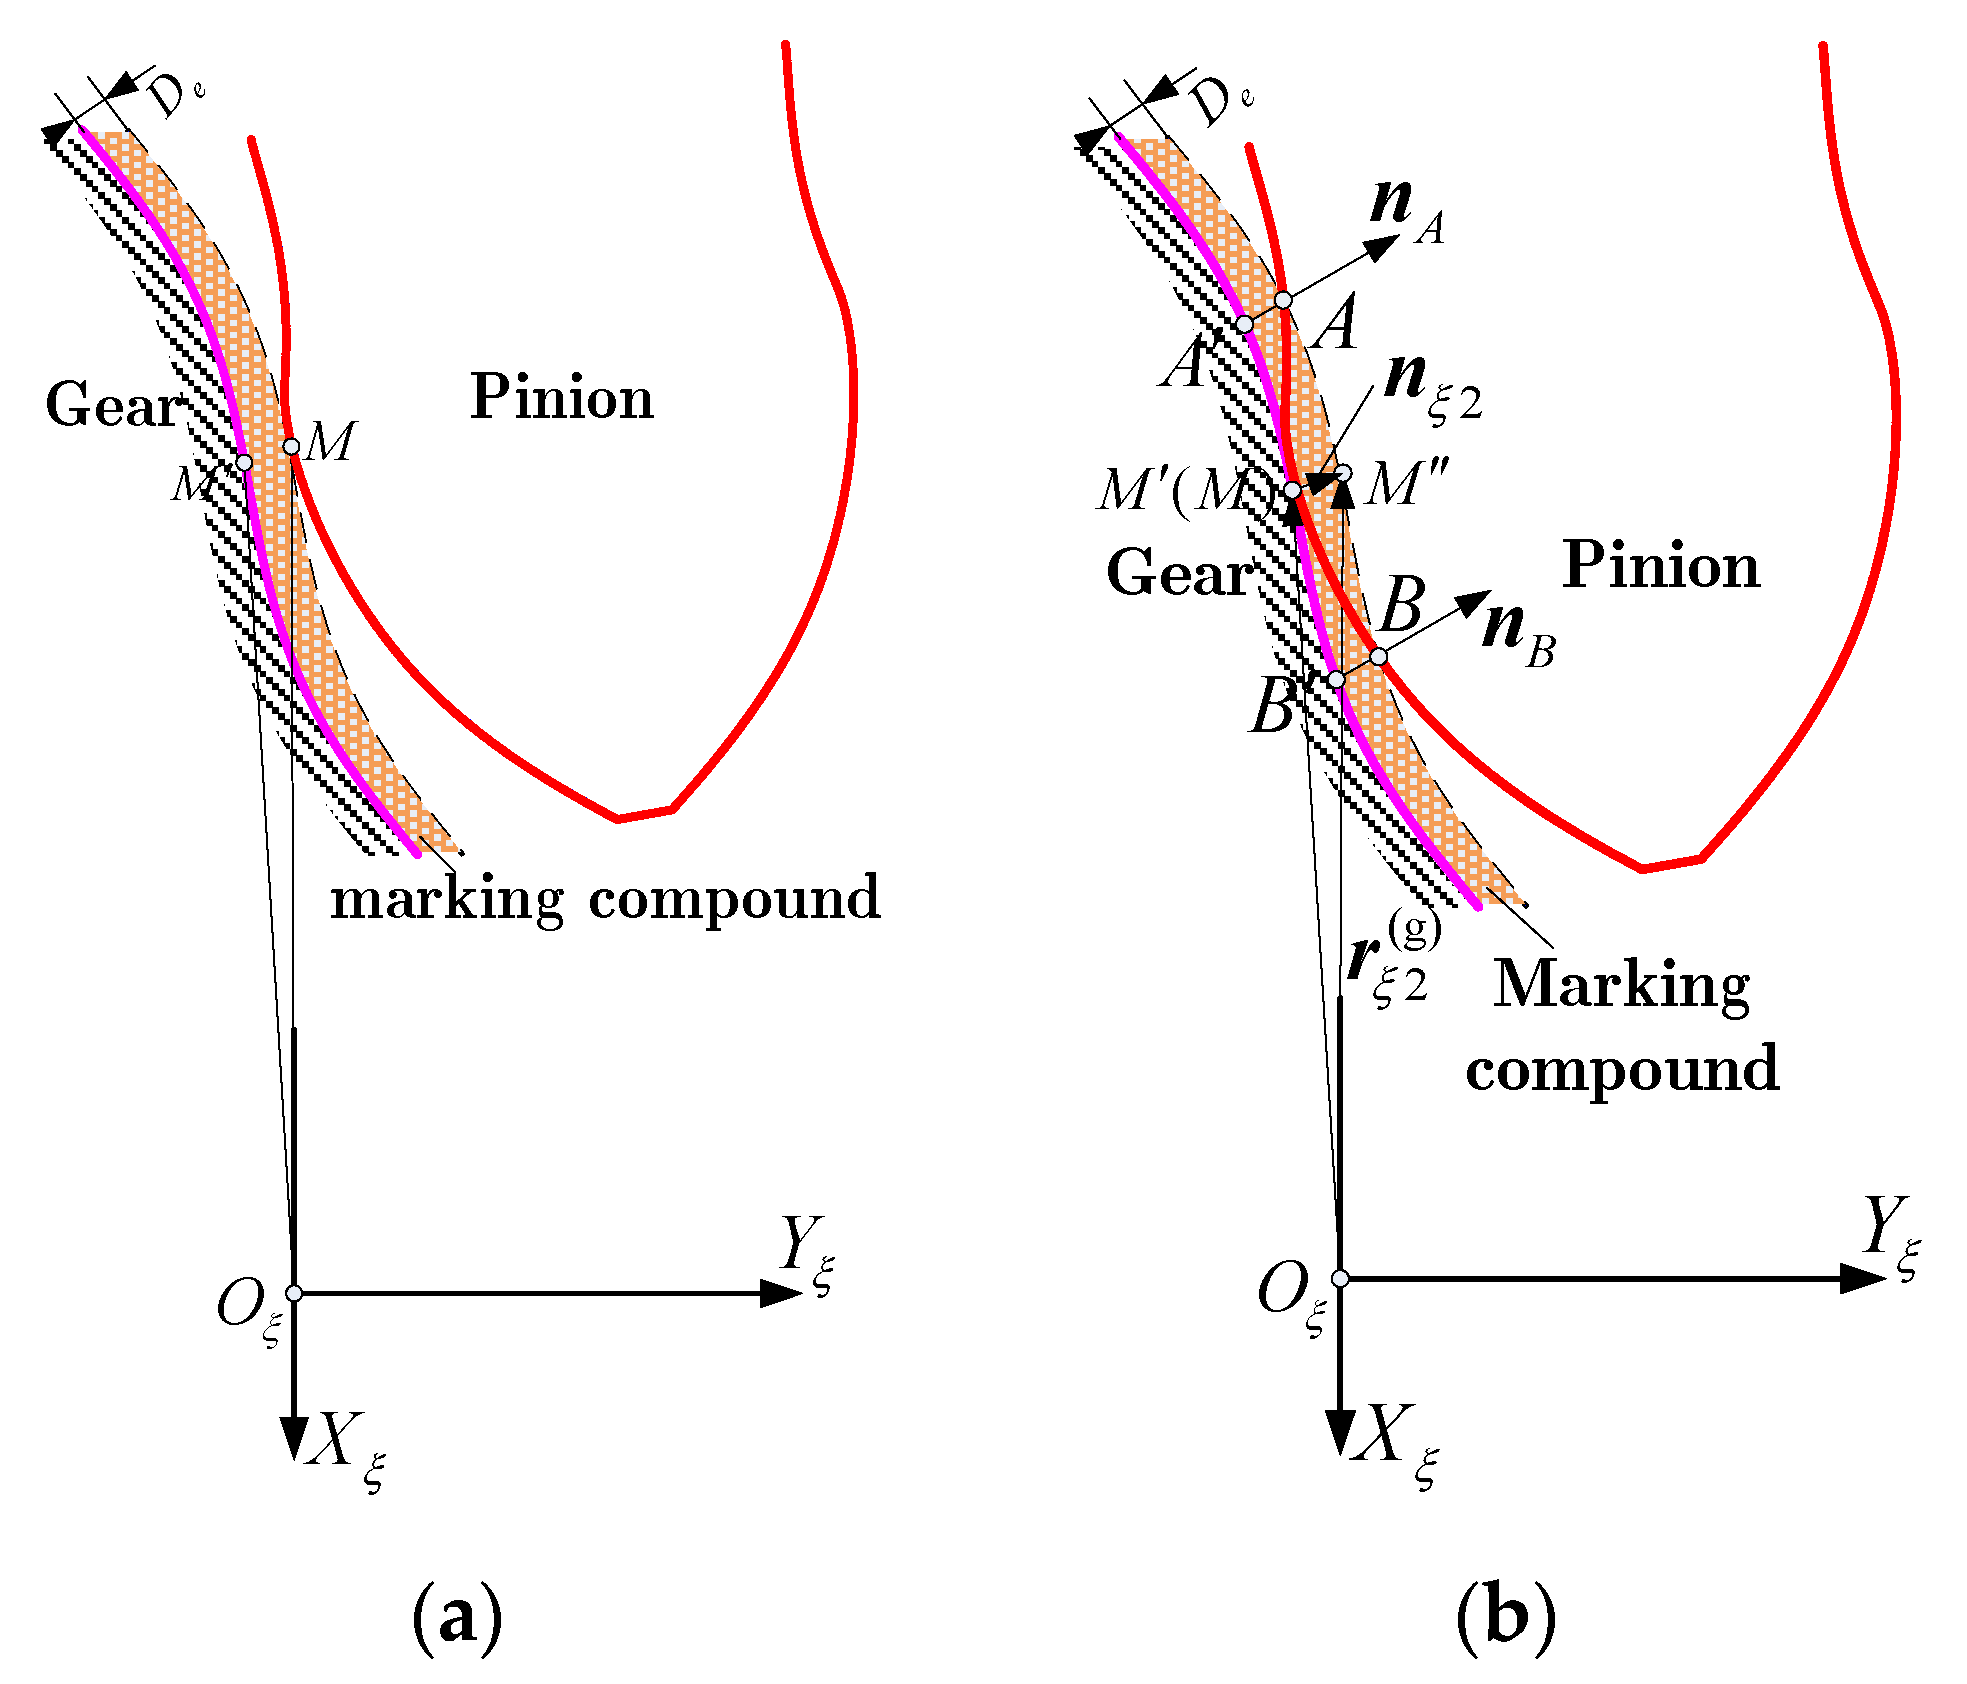
To determine the tooth contact pattern, an arbitrary cross section of the tooth was taken as an example. It is assumed that the tooth flank of the gear is painted with a layer of marking compound with a thickness of D e . According to the contact state of Figure 12a, the surface of the marking compound contacts the surface of the pinion at the point M. As shown in Figure 12b, the gear installation position is fixed, and the pinion is rotated around the shaft until the point M on the tooth flank of the pinion in contact with the point M on the gear tooth flank which is the theoretical meshing point. In this case, A B on the pinion tooth flank is the interference area produced by the tooth surface of the gear and the marking compound, which is the tooth contact pattern, and the A B is the tooth contact pattern of the gear.
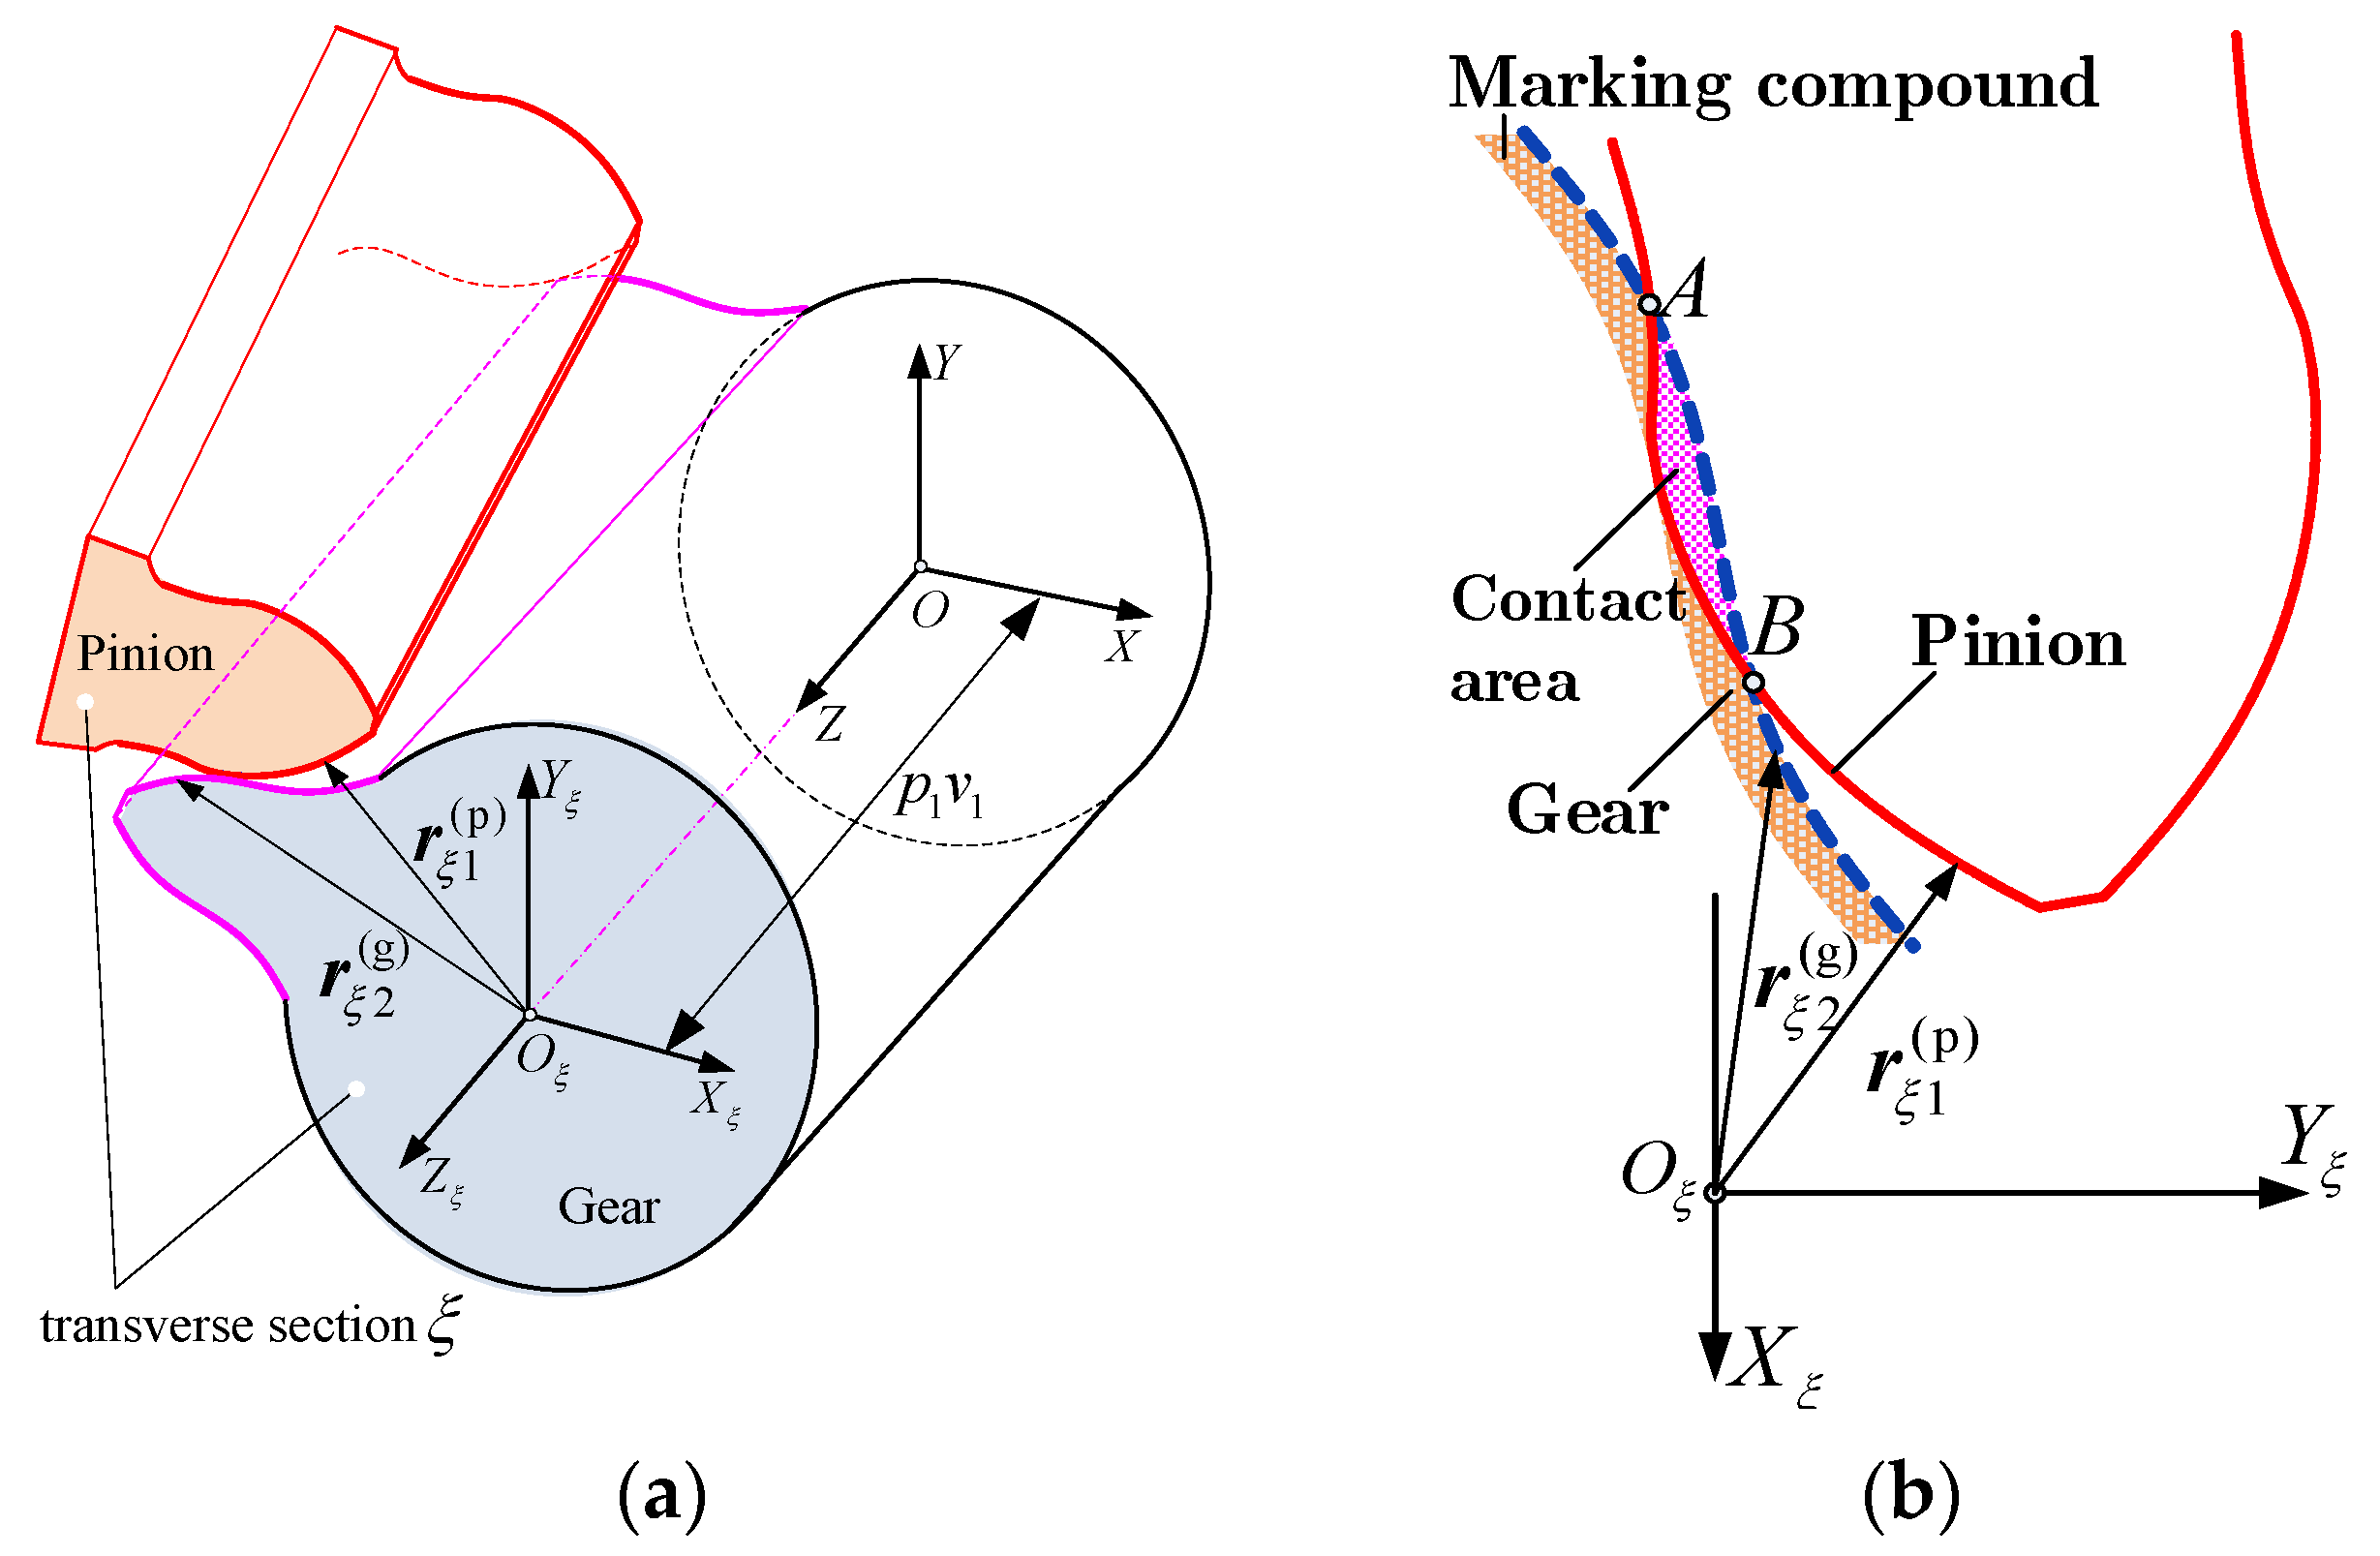
According to the above theories, the tooth profile equation based on any section plane of the gear which was parallel to plane OXY could be obtained. Figure 13a shows the dynamic coordinate system where the section plane is located, the O ξ Z ξ axis coincides with the O Z axis, and the O ξ X ξ , O ξ Y ξ axis in the section plane is respectively parallel to the O X axis, O Y axis. The transformation matrix from the absolute coordinate system S ( O X Y Z ) to the dynamic coordinate system S ξ ( O ξ X ξ Y ξ Z ξ ) was M ξ ( p g ) .
M ξ ( p g ) = 1 0 0 0 0 1 0 0 0 0 p 1 v 1 0 0 0 0 1
In the coordinate system S ξ ( O ξ X ξ Y ξ Z ξ ) , r ξ 1 ( p ) is the tooth profile vector of the pinion, r ξ 2 ( g ) is the tooth profile vector of the gear with a layer of marking compound, and n ξ 2 ( g ) is the tooth profile normal vector of the gear.
r ξ 1 ( p ) = M ξ ( p g ) · r Σ 1 ( p )
n ξ 2 ( g ) = M ξ ( p g ) · n Σ 2 ( g )
r ξ 2 ( g ) = M ξ ( p g ) · r Σ 2 ( g ) + n ξ 2 ( g ) · D e
According to the geometric relation in Figure 8b, for a tooth profile vector r ξ 1 ( p ) corresponding to an arbitrary global variable u 1 , and if there is a unique global variable u 2 such that r ξ 2 ( g ) is collinear with r ξ 1 ( p ) , under this condition, if and only if the modules length of r ξ 2 ( g ) is greater than or equal to the module length of r ξ 1 ( p ) , the tooth contact area appears on the tooth surface. Therefore, the condition equations of generating the contact area are given by
p 1 v 1 = p 2 v 2 r ξ 2 ( g ) r ξ 2 ( g ) = r ξ 1 ( p ) r ξ 1 ( p ) r ξ 2 ( g ) r ξ 1 ( p )
The actual calculation process is as follows. Firstly, working out the mesh point M according to Equations (24) and (25) and putting the calculation results of κ 1 with κ 2 into Equation (31), we can obtain three independent equations about u 1 , v 1 , u 2 , v 2 . Then, assigning values to v 1 from 0 to B / p 1 in a fixed step, the contact area on the tooth flank can be searched by the conditions in Equation (31). Finally, the contact pattern of different meshing positions can be obtained by changing the value of κ 1 .

4. Cases Analysis

According to the above numerical analysis theory, a pair of S-toothed spur and helical gears will be used to study the effect of shaft misalignment on tooth contact patterns. The gear parameters are shown in Table 1.
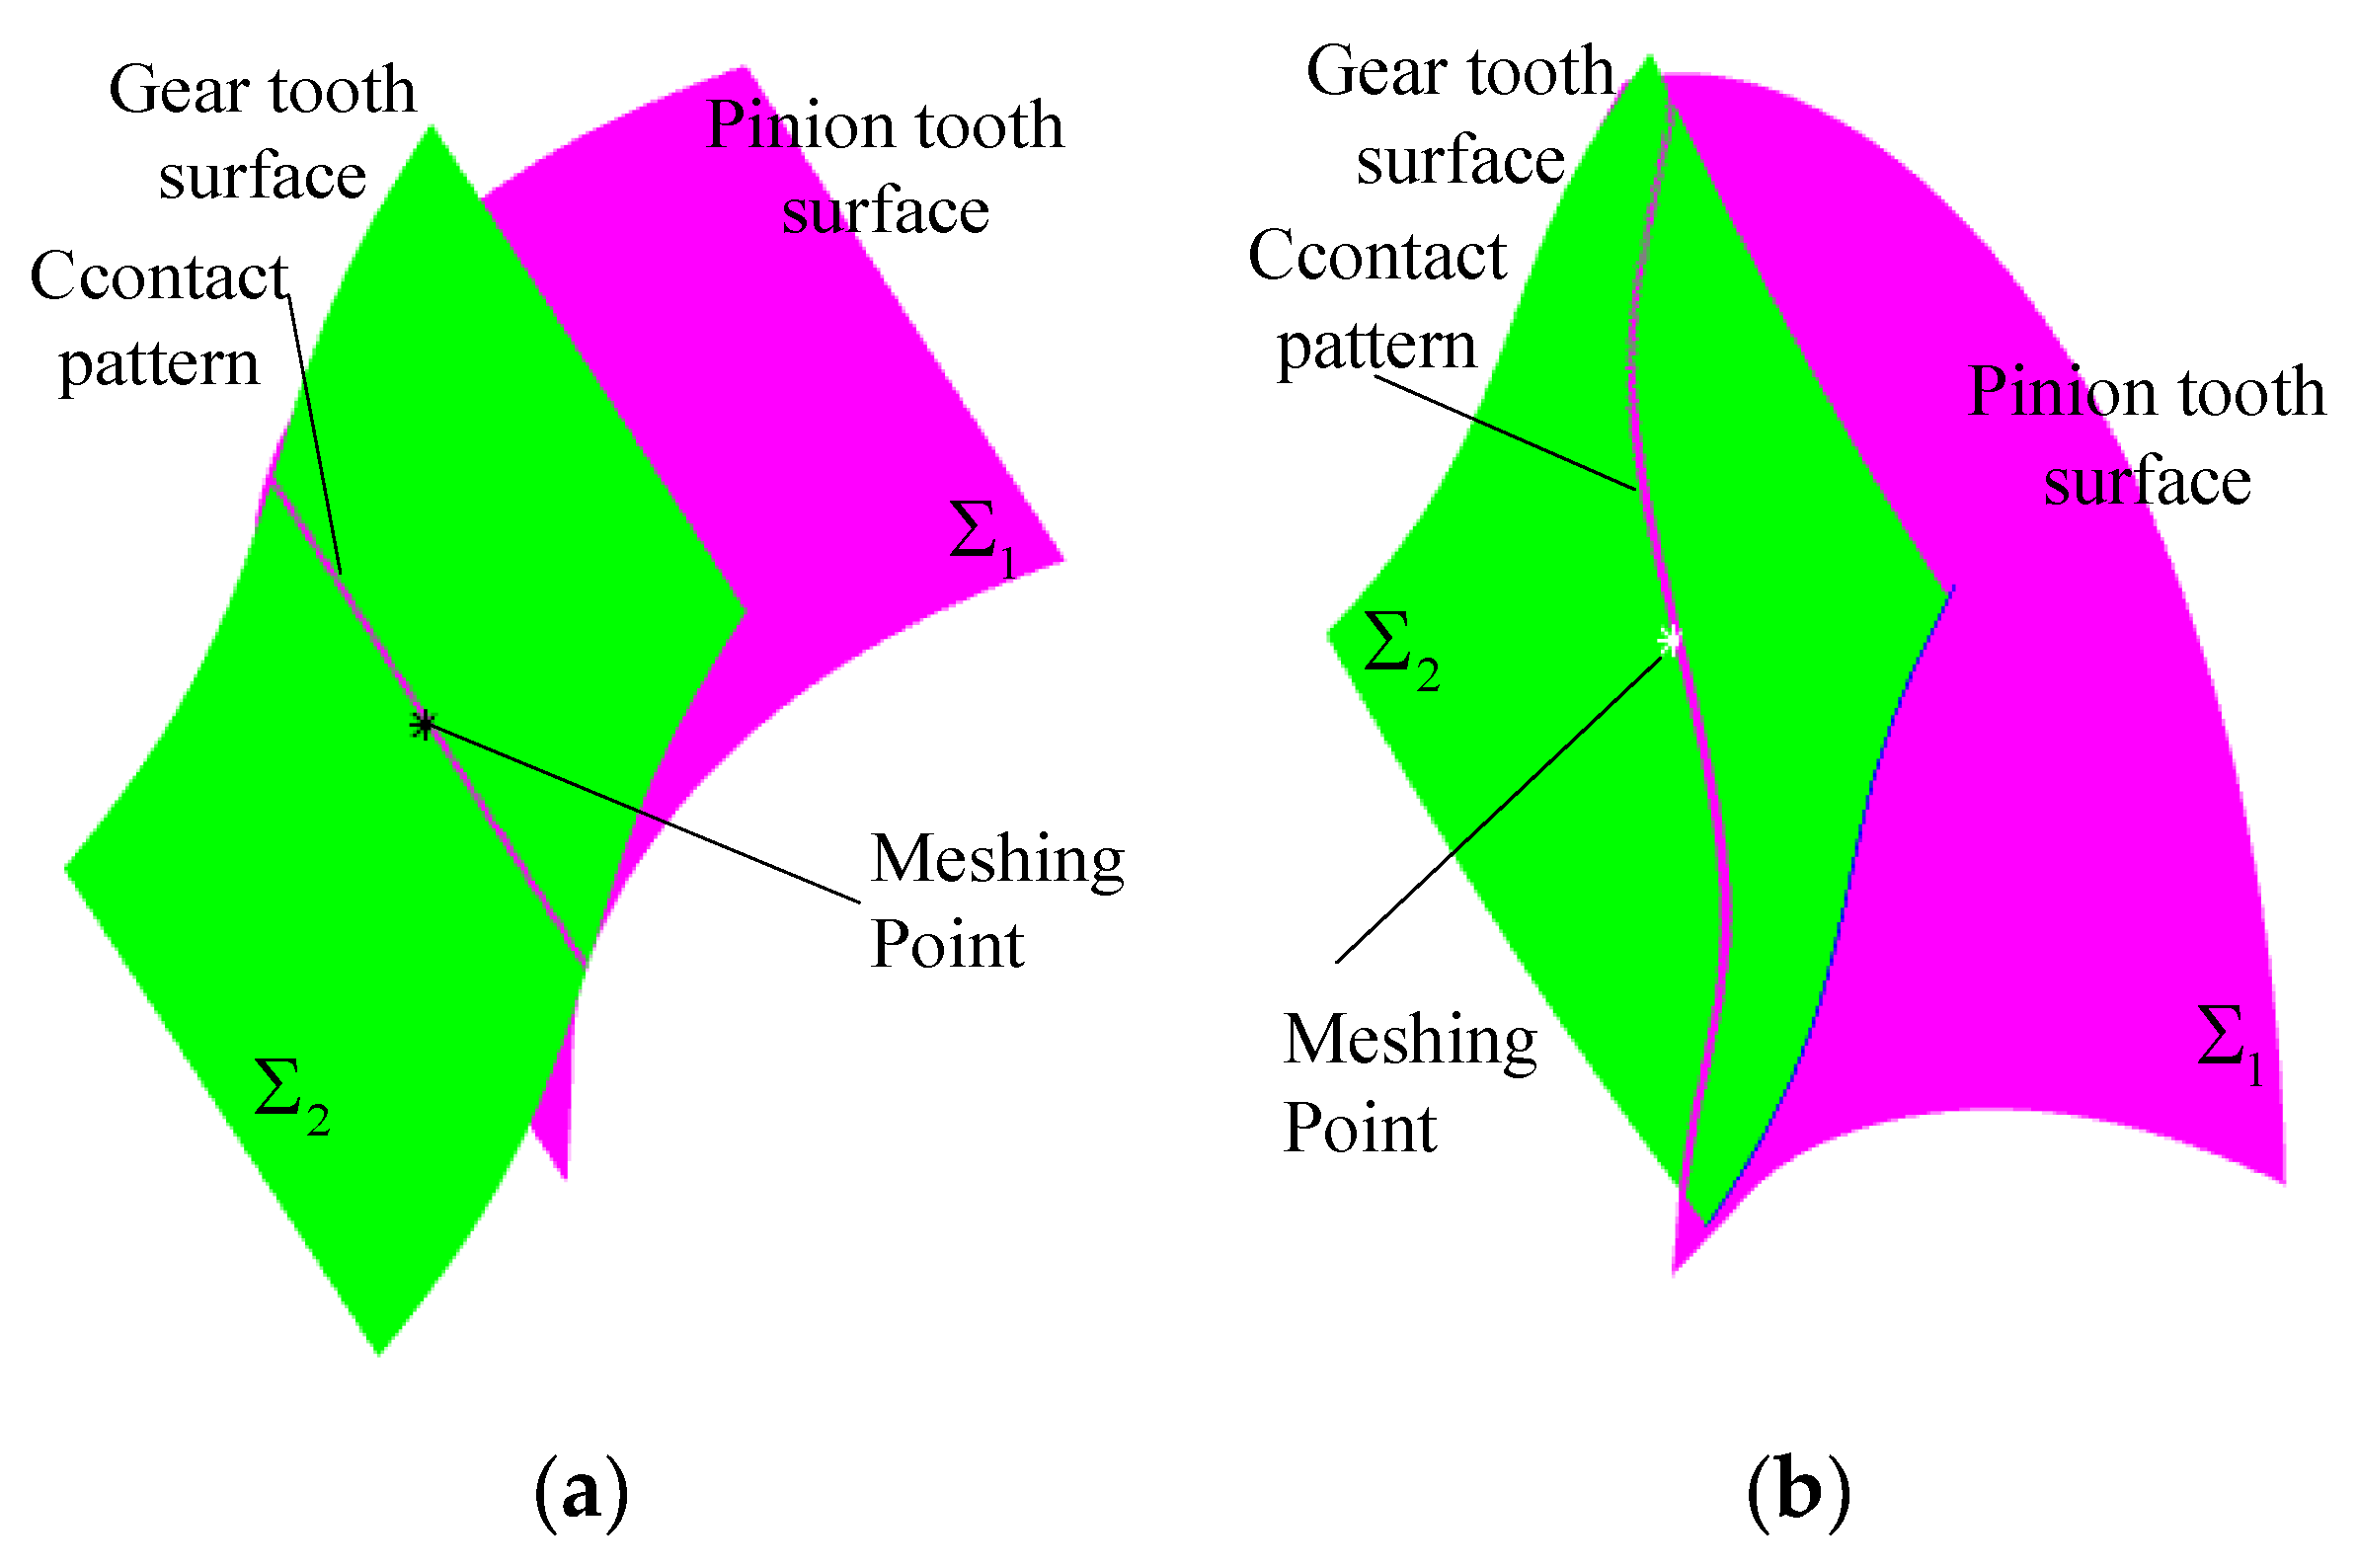
According to the above tooth flank equation and the parameters in Table 1, the mathematical model of the tooth flank is established. As shown in Figure 14, the curved surface 2 is the tooth flank of gear with a layer of marking compound whose thickness is represented by D e = 10   um (this value can be found below, the thickness of the marking compound will affect the size of contact area, so we generally choose values whose order of magnitude is the same as the error) and the curved surface 1 is the tooth flank of the pinion. Further, the initial position of the meshing point of the spur gear and the helical gear and the tooth contact pattern can be obtained by using the above numerical analysis method [24].
To analyze the contact performance and transmission error of an S-shaped tooth profile gear with center distance error and shaft misalignments, the spur gear and helical gear are respectively analyzed below.

4.1. S-Shaped Tooth Profile Spur Gear

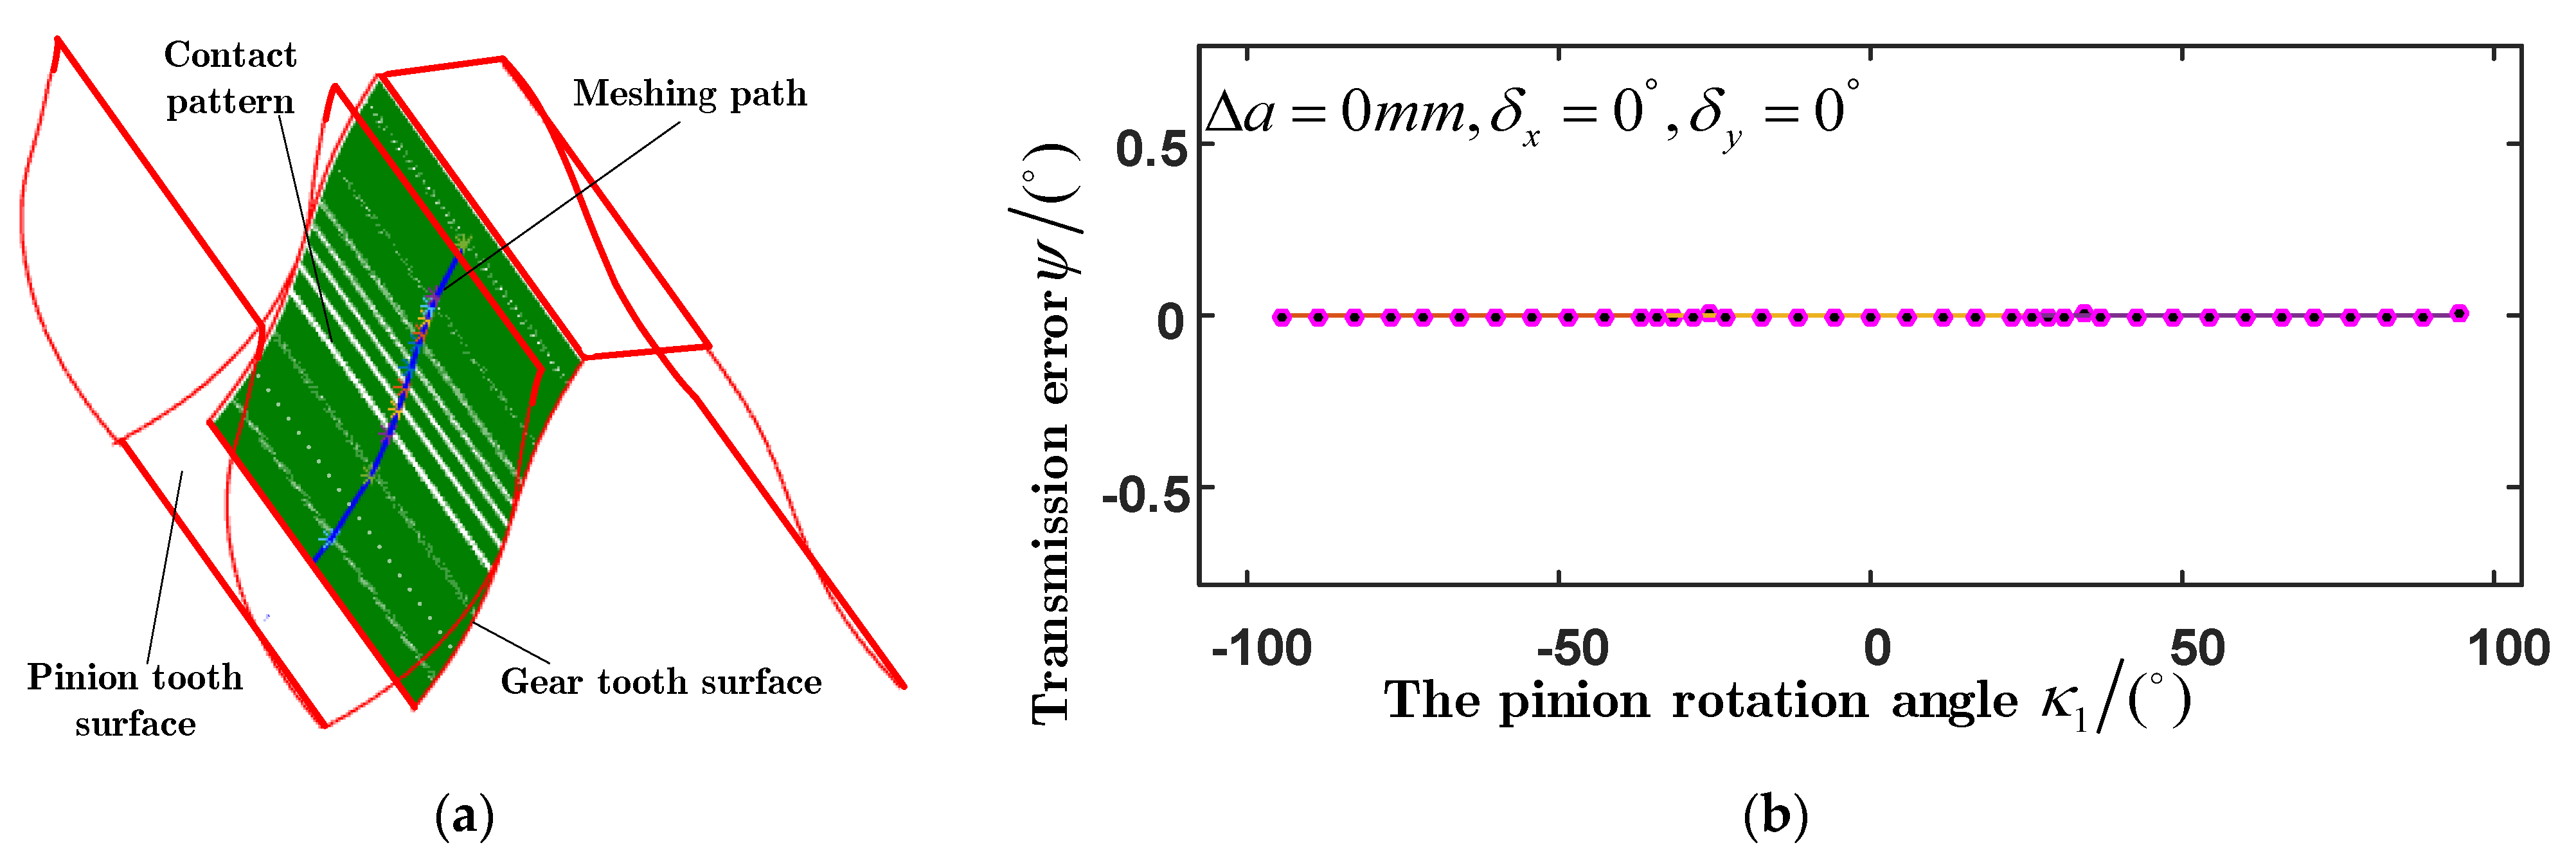
In order to explore the influence of the center distance error Δ a on the contact performance individually, the control variable method was adopted to obtain the contact performance and transmission error of the tooth flank under the condition of a shaft deflection error of δ x = 0 , δ y = 0 . As shown in Figure 15a, the contact path (solid line perpendicular to the axis in the figure) and the contact path (white line in the figure) from the top of the gear tooth flank to the root (white line in the figure) for standard installation without error are given, which shows that the tooth contact is relatively stable. As shown in Figure 15b, the transmission error curves are given, which shows that the transmission error is zero when the pinion rotation angle range is κ 1 [ 96 ° , 98 ° ] . On the one hand, this proves the correctness of the above mathematical models; on the other hand, the S-shaped tooth profile gear meets the conjugate characteristics of the constant ratio transmission.
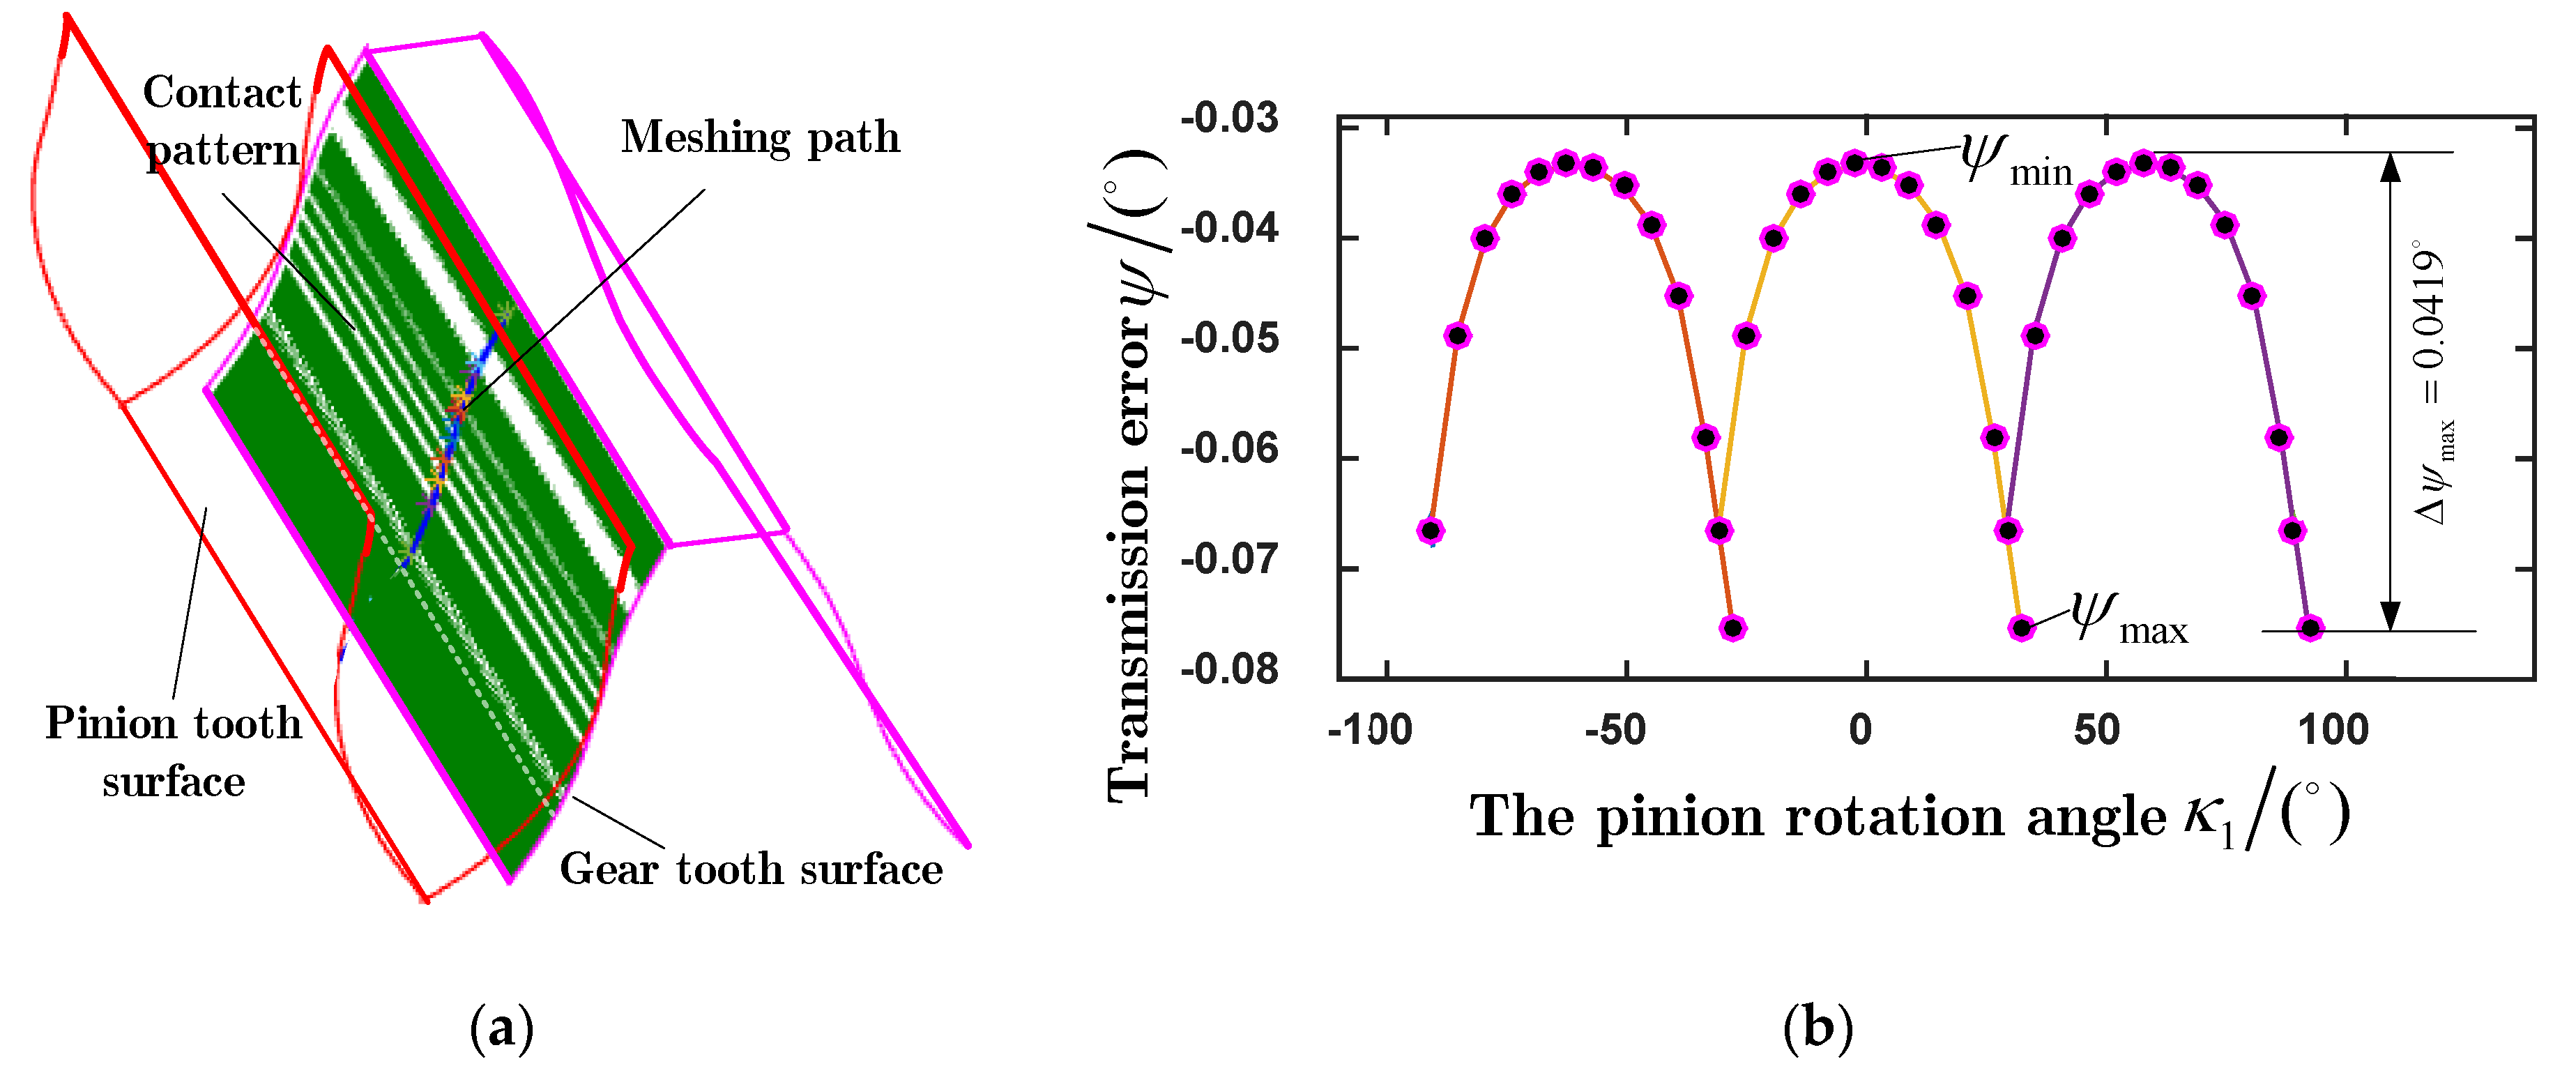
In Figure 16, the tooth meshing path and contact trace are given under the condition that the error of the center distance is Δ a = 0.1 , δ x = 0 , δ y = 0 , and there are no other errors, which shows that the effective contact area moves to the top of tooth, but the tooth contact trace moves relatively steadily and the transmission error presents parabolic regularity. In addition, the maximum of error is 0.078° and the minimum is 0.033°.
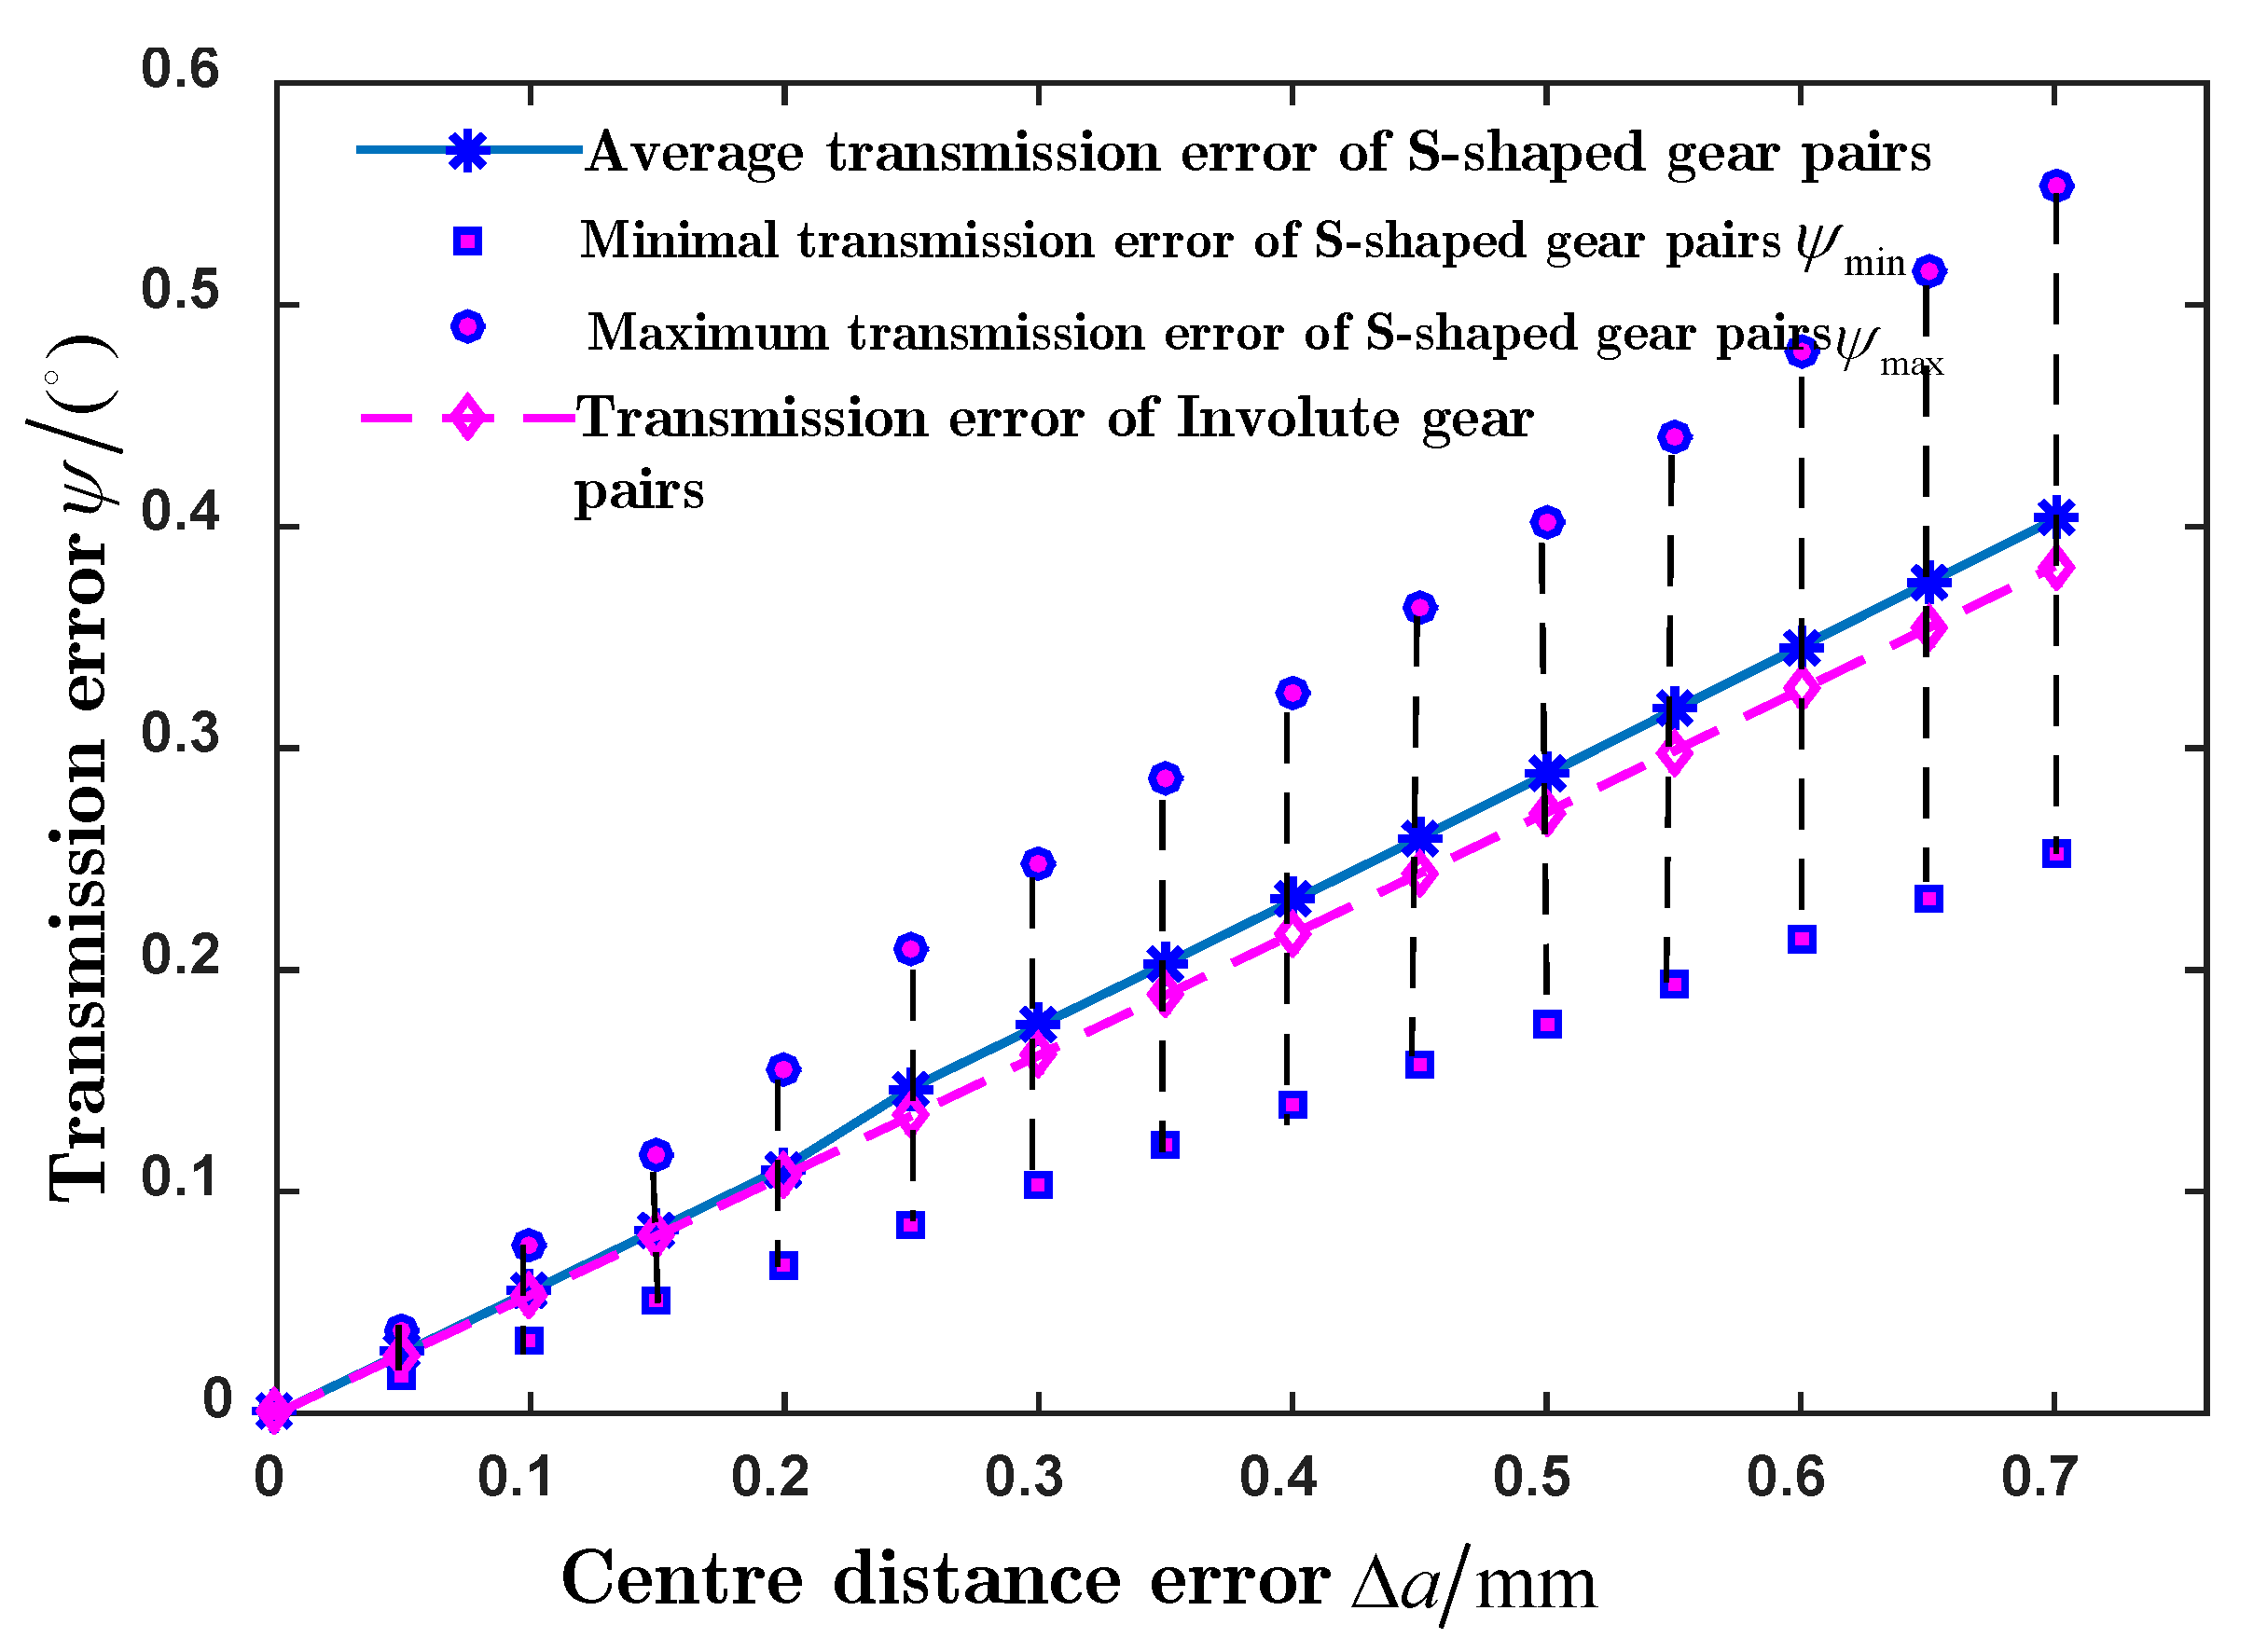
By using the above method, the change regularity in the transmission error varying with the center distance error from 0 to 0.7 mm was analyzed, and the maximum, minimum, and average error of the transmission error corresponding to an error period are given in Figure 17. For comparative analysis, under the condition of a given center distance error and derivation coefficient λ = 0 (i.e., involute gear pair with the same parameter), the involute transmission error has a constant value, and the change regularity is shown in Figure 17.
Through contrastive analysis, the average transmission error of an S-shaped tooth profile gear pair and the transmission error of the involute gear pair with the same parameters both show the change regularity of an approximate proportional function, and their values are approximately equal to each other; but the difference in the transmission error between the maximum and the minimum of an S-shaped tooth profile gear, which is Δ ψ max , presents a trend of getting bigger, which shows that the increase in the center distance error of the S-shaped tooth profile gear which is Δ a could lead to a larger transmission error fluctuation. Therefore, in the application of the S-shaped tooth profile gear, the transmission error caused by the center distance error needs to be analyzed, then the allowable center distance error range under the corresponding working conditions can be obtained so as to ensure the transmission accuracy and reduce the vibration.
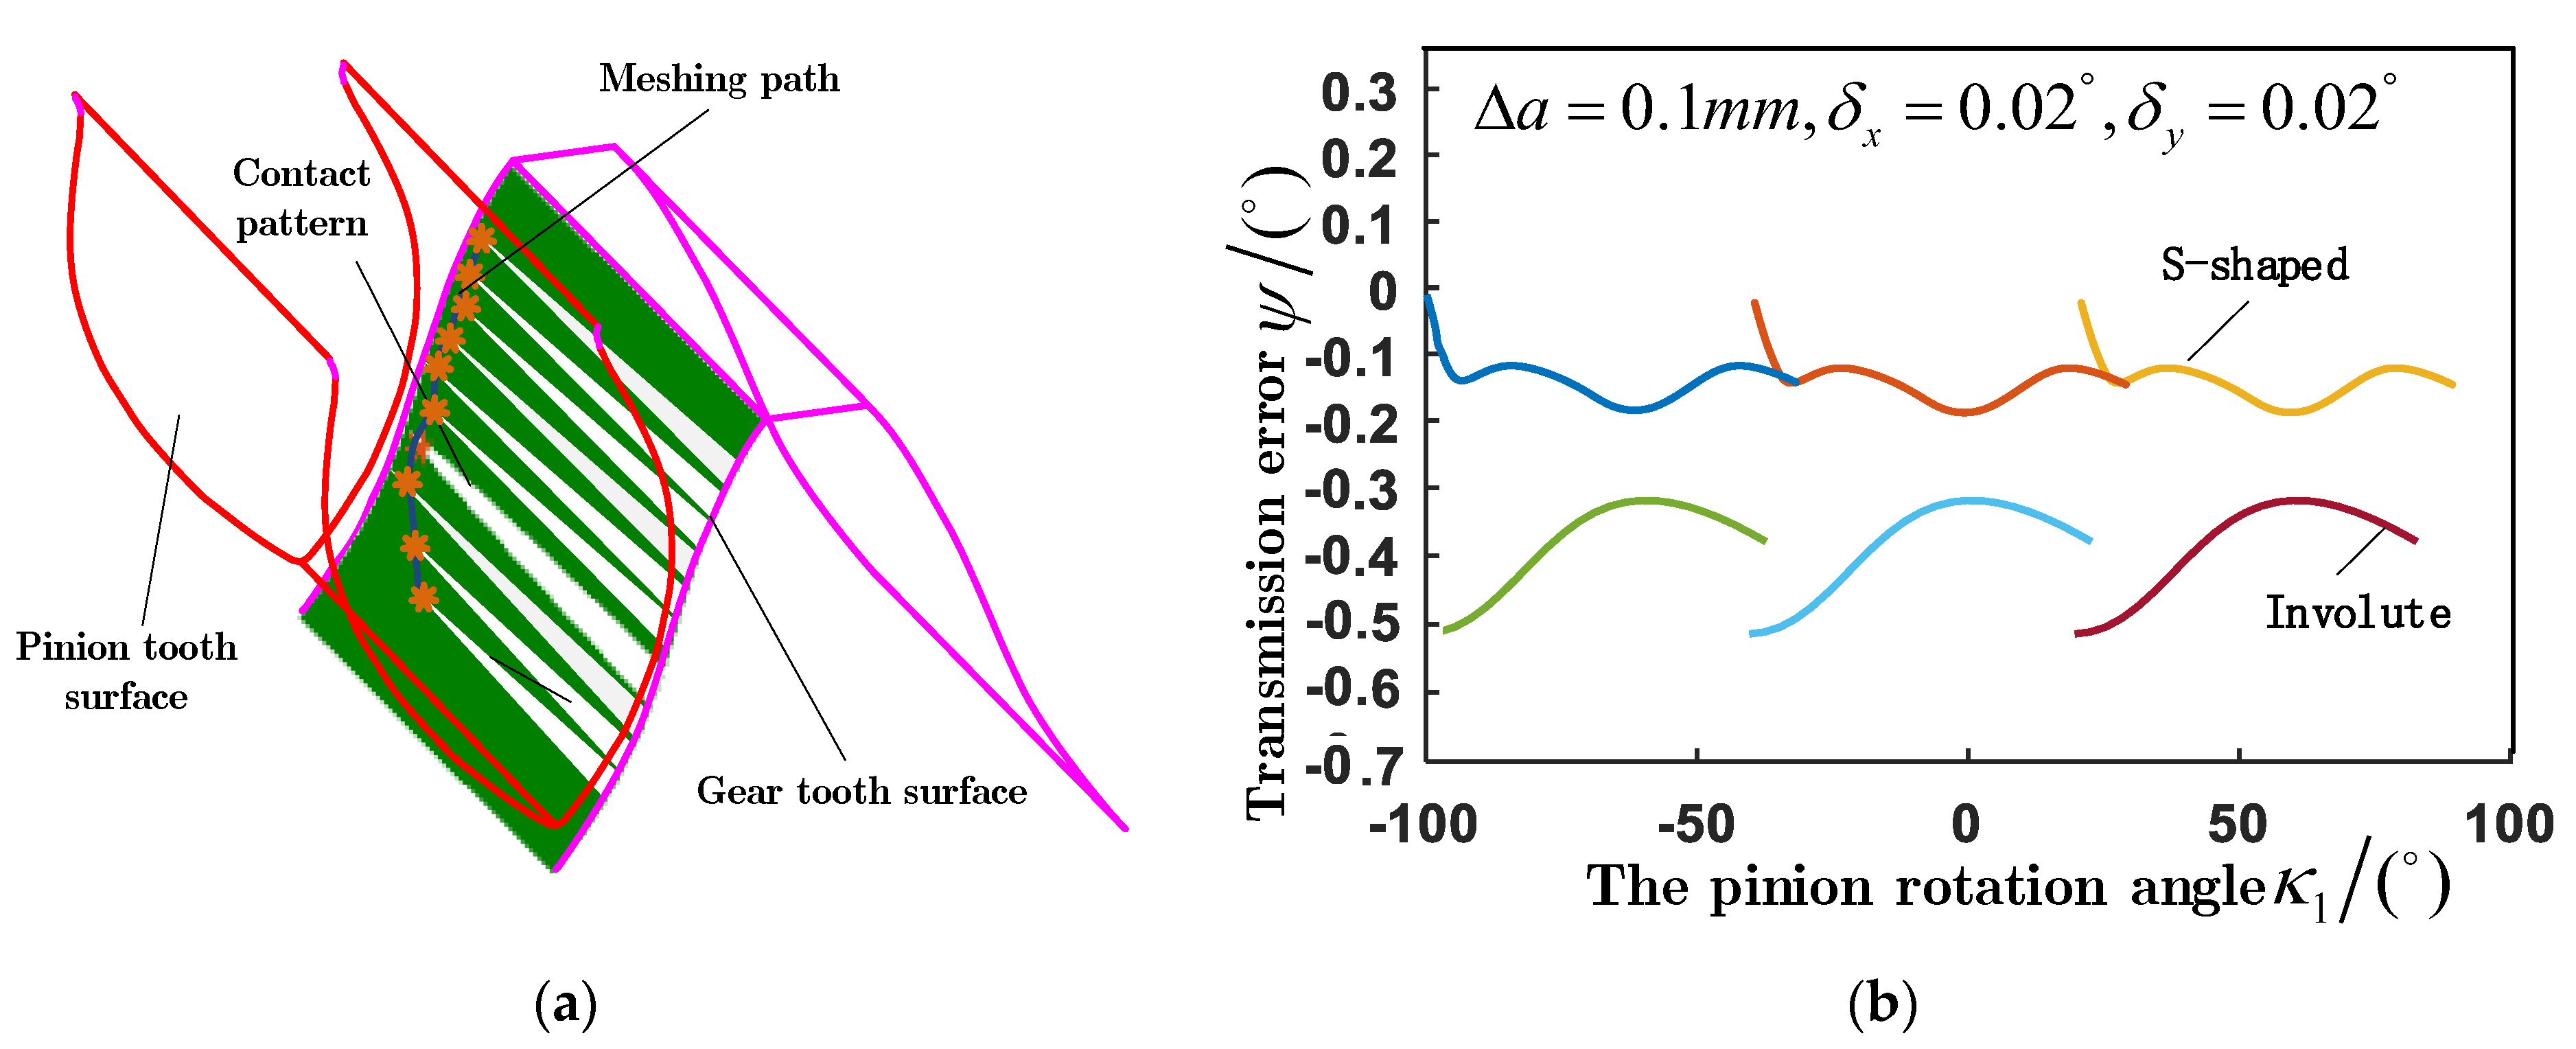
Considering that any installation error may exist in engineering practice, the contact pattern, meshing path, and transmission error of an S-shaped tooth profile spur gear with center distance error and shaft misalignments are given by Figure 18. At the same time, the involute gear with the same parameters is compared and analyzed. It can be seen that the influence of an involute gear pair on the meshing dynamic performance caused by shaft misalignment error is more sensitive than that of an S-shaped tooth profile gear.

4.2. S-Shaped Tooth Profile Helical Gear

Under ideal conditions in which the tooth flank has no error and the center distance and the shaft misalignment are zero, the contact pattern and the meshing path of the S-shaped tooth profile helical gear are shown in Figure 19a, and the transmission error is shown in Figure 19b.
Figure 20 shows the tooth meshing path and contact pattern under the condition of the center distance error Δ a = 0.1 , δ x = 0 , δ y = 0 , and no other errors. It can be seen that the effective tooth surface contact area focuses on the pitch circle, while the tooth contact pattern mobile is relatively stable, and the transmission error shows a constant value at 0.0336 degrees.
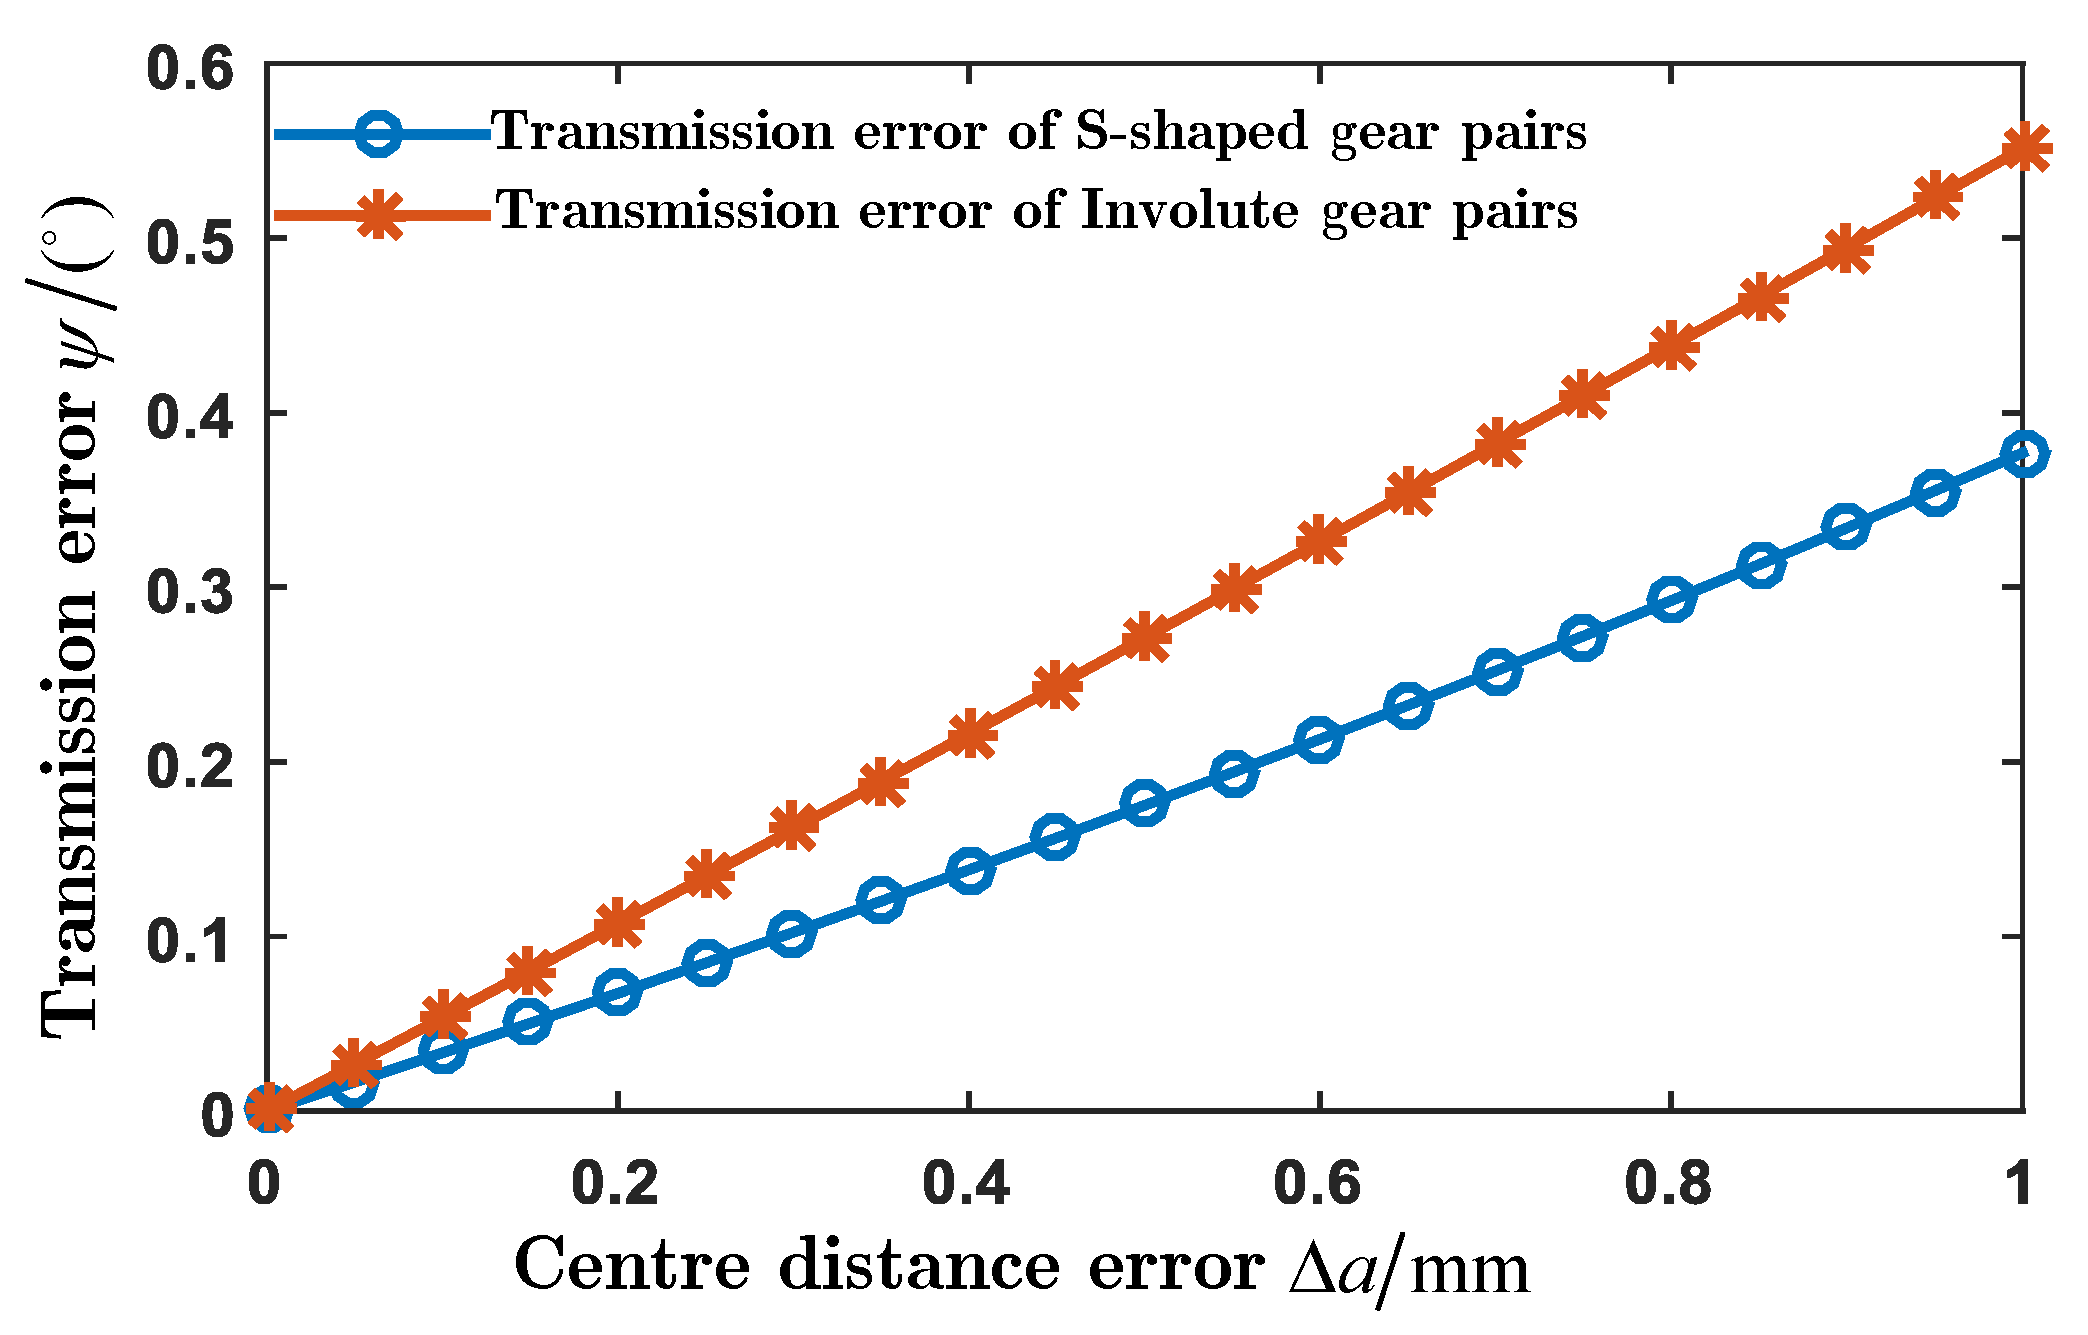
By using the above method, the change regularity in the transmission error varying with the center distance error from 0 to 1 mm is analyzed as shown in Figure 21. Through the contrastive analysis, the transmission error of the S-shaped tooth profile gear pair and that of the involute gear pair with the same parameters show a change regularity of an approximate proportional function. In addition, the value of the S-shaped tooth profile gear pair is smaller, which shows that the involute helical gear pair is more sensitive to the center distance error value of Δ a than the S-shaped tooth profile gear pair.
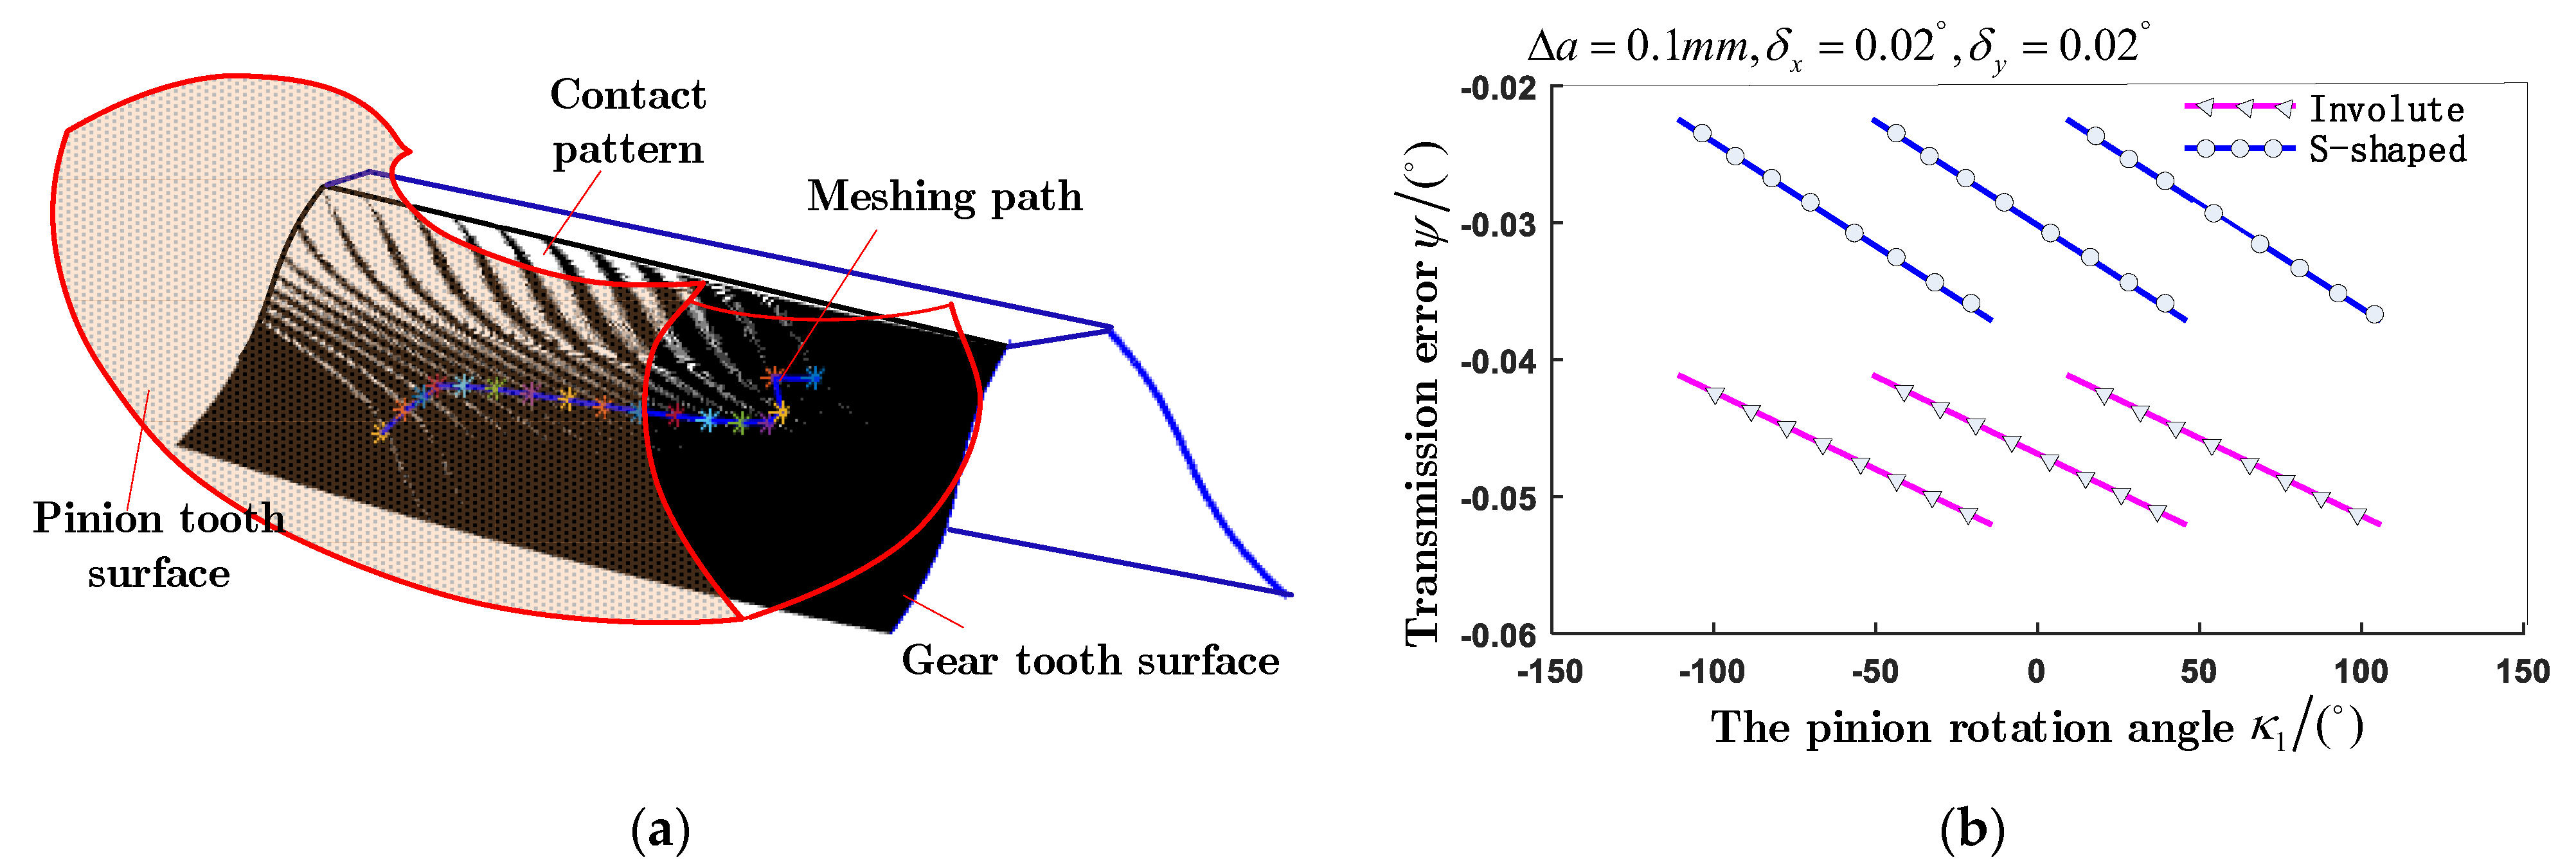
Similar to the above analysis method for the spur gear, the contact pattern, meshing path, and transmission error of an S-shaped tooth profile spur gear with center distance error and shaft misalignments are given in Figure 22. As shown in this figure, the involute gear pair has a larger transmission error, which is more sensitive to the influence of the shaft misalignment error on the meshing performance than the S-shaped toothed gear.

5. Conclusions

In this study, the sensitivity of an S-shaped tooth profile gear pair with a few pinion teeth to shaft misalignments has been investigated, and theoretical derivations and numerical examples in support of the new gear pair have been presented. The theoretical analysis and numerical calculation of the spur gear and the helical gear showed that an S-shaped tooth profile gear with a few teeth has a good meshing performance under a certain range of center distance error, although its center distance does not exhibit separability of the center distance. It is not sensitive to the center-to-center distance error within a certain range of values, and the transmission error presents a certain rule. Specifically, the following conclusions can be drawn:
  • For the spur gear, when there is only a certain range of center distance error a (0–0.7 mm), the transmission error of involute gear is smaller than that of S-shaped tooth profile, and the transmission error increases with the increase in the center distance error. When there is a central error a = 0.1   m m,   δ x = 0.02 ° , δ y = 0.02 ° , the transmission error of the S-shaped tooth profile gear is obviously smaller than that of the involute gear, and the transmission error difference is a maximum of 0.5 ° and a minimum of 0.1 ° in one engagement cycle. Therefore, the meshing performance of the S-shaped tooth profile is less sensitive to shaft deviation than that of the involute gear, which has obvious advantages over the involute gear.
  • For the helical gear, when there is only a certain range of center distance error ∆ A (0–1 mm), the transmission error of the involute gear is greater than that of the S-shaped tooth profile. When the center error is a = 0.1   mm ,   δ x = 0.02 ° , δ y = 0.02 ° , the transmission error of the S-shaped tooth profile gear is smaller than that of the involute tooth profile, and the transmission error gap is stable at 0.02 ° . It can be seen that the helical gear has fewer advantages in shaft deviation sensitivity than the straight gear, but similarly, the S-shaped tooth profile has a greater number of superiorities.
Meanwhile, a visible, interactive, and high efficiency model of TCA has been proposed which can obtain the contact pattern and meshing path and display them intuitively.
To summarize, applying an S-shaped tooth profile instead of an involute gear has advantages in bearing capacity and meshing performance, enjoying a good application prospect.
The related studies on this innovative gear drive, which include experiments on prototypes and processing methods, are being carried out. Efforts putting this drive forward into practical application are also needed soon.
Author Contributions

Methodology, W.C.; software, Q.S. and Y.T.; validation, W.C.; formal analysis, Y.T. and Q.S.; resources, Q.S. and W.C.; data curation, Q.S. and W.C.; writing—original draft preparation, Y.T. and Q.S.; writing—review and editing, P.Z., Q.S. and W.C.; visualization, Q.S. and P.Z.; supervision, Q.S. and W.C. All authors have read and agreed to the published version of the manuscript.

Funding

The authors gratefully acknowledge the financial support provided to this study by the Natural Science Foundation of Hebei Province under Grant No. E2021210066.

Informed Consent Statement

In this study, all participants have been fully informed about the purpose, methods, and potential risks involved, and have provided informed consent by signing a consent form. Participants are aware of their voluntary participation and have the right to withdraw from the study at any time without any adverse consequences. We strictly adhere to principles of privacy protection and maintain confidentiality of participants’ personal information.

Data Availability Statement

Not applicable.

Acknowledgments

The authors would like to thank the anonymous reviewers for their valuable comments and suggestions to improve the quality of the paper.

Conflicts of Interest

The authors declare no conflict of interest.

References

  1. Sun, Y.H.; Liu, Y.F.; Duan, L.Q. Modification of involute gear pair with fewer teeth based on equal bending strength. J. Tianjin Univ. Sci. Technol. 2014, 47, 1001–1007. [Google Scholar]
  2. Sun, Q.; Sun, Y.H. The generation principle, mathematical models of variable involute, and its application. Proc. Inst. Mech. Eng. Part C J. Mech. Eng. Sci. 2017, 5, 828–841. [Google Scholar] [CrossRef]
  3. Zhou, G.C.; Yang, Y.H.; Ran, X.; Tao, S.Y. A design method for a novel movable tooth drive with logarithmic spiral conjugated tooth profiles. Proc. Inst. Mech. Eng. Part C J. Mech. Eng. Sci. 2022, 236, 9527–9542. [Google Scholar] [CrossRef]
  4. Gui, X.C.; Zhan, J.Q.; Peng, Y. Design and Analysis of Internal Compound Cycloid Gear Transmission with High Contact Ratio. Chin. J. Mech. Eng. 2017, 53, 55–64. [Google Scholar] [CrossRef]
  5. Kawasaki, K.; Tsuji, I.; Gunbara, H. Manufacturing method of double-helical gears using CNC machining center. Proc. Inst. Mech. Eng. Part C J. Mech. Eng. Sci. 2016, 230, 1149–1156. [Google Scholar] [CrossRef]
  6. Zhuang, W.; Hua, L.; Han, X.; Zheng, F. Design and hot forging manufacturing of non-circular spur bevel gear. Int. J. Mech. Sci. 2017, 133, 129–146. [Google Scholar] [CrossRef]
  7. Lee, C.; Lin, H.H.; Oswald, F.B.; Townsend, D.P. Influence of Linear Profile Modification and Loading Conditions on The Dynamic Tooth Load and Stress of High-Contact-Ratio Spur Gears. J. Mech. Des. 1991, 113, 473–480. [Google Scholar] [CrossRef]
  8. Sun, Y.H.; Sun, Q. A New Type of Gear Cutting Tools. CN104439540A, 25 March 2015. [Google Scholar]
  9. Sun, Y.H.; Sun, Q. A Kind of Special Type Profile Gear. CN104455315A, 25 March 2015. [Google Scholar]
  10. Yahaya, S.H.; Salleh, M.S.; Ali, J.M. Spur Gear Design With an S-shaped Transition Curve Application Using MATHEMATICA and CAD Tools. In Proceedings of the 2009 Second International Conference on Machine Vision, Dubai, United Arab Emirates, 28–30 December 2009; pp. 273–276. [Google Scholar] [CrossRef]
  11. Damijan, Z.; Simon, K.; Joze, T.; Joze, D. Different teeth profile shapes of polymer gears and comparison of their performance. J. Adv. Mech. Des. Syst. Manuf. 2017, 11, JAMDSM0083. [Google Scholar] [CrossRef] [Green Version]
  12. Hlebanja, G. Gradual development of S-shaped gears. MATEC Web Conf. 2022, 366, 01001. [Google Scholar] [CrossRef]
  13. Mo, S.; Song, W.-H.; Zhu, S.-P.; Feng, Z.-Y.; Tang, W.-J.; Gao, H.-J. Complex geometric modeling and tooth contact analysis of a helical face gear pair with arc-tooth. J. Cent. South Univ. 2022, 29, 1213–1225. [Google Scholar] [CrossRef]
  14. Li, Y.F. Research on Contact Characteristics and Modification Design of Gear System Considering Meshing Misalignment. Master’s Thesis, Chang’an University, Xi’an, China, 2021. [Google Scholar] [CrossRef]
  15. Ye, S.Y.; Tsai, S.J. A computerized method for loaded tooth contact analysis of high-contact-ratio spur gears with or without flank modification considering tip corner contact and shaft misalignment. Mech. Mach. Theory 2016, 97, 190–214. [Google Scholar] [CrossRef]
  16. Vivet, M.; Tamarozzi, T.; Desmet, W.; Mundo, D. On the modelling of gear alignment errors in the tooth contact analysis of spiral bevel gears. Mech. Mach. Theory 2020, 155, 104065. [Google Scholar] [CrossRef]
  17. Marin, S.F.; Iserte, J.L.; Casanova, V.C. Numerical tooth contact analysis of gear transmissions through the discretization and adaptive refinement of the contact surfaces. Mech. Mach. Theory 2016, 101, 75–94. [Google Scholar] [CrossRef]
  18. Wang, Z.H.; Li, G.; Aizoh, K. Tooth Contact Analysis of Spiral Bevel Gears Based on Digital Real Tooth Surfaces. J. Mech. Eng. 2014, 50, 1–11. [Google Scholar] [CrossRef]
  19. Patil, S.S.; Karuppanan, S.; Atanasovska, I.; Wahab, A.A. Contact stress analysis of helical gear pairs, including frictional coefficients. Int. J. Mech. Sci. 2014, 85, 205–211. [Google Scholar] [CrossRef]
  20. Zhou, C.; Li, Z.; Hu, B. Analytical Solution to Bending and Contact Strength of Spiral Bevel Gears in Consideration of Friction. Int. J. Mech. Sci. 2017, 128, 475–485. [Google Scholar] [CrossRef]
  21. Tang, J.Y.; Chen, X.M.; Luo, C.W. Contact analysis of spur gears based on longitudinal modification and alignment errors. J. Cent. South Univ. (Sci. Technol.) 2012, 5, 1703–1709. [Google Scholar]
  22. Wu, X.T. Gear Geometry and Applied Theory, 2nd ed.; China Machine Press: Beijing, China, 2009. [Google Scholar]
  23. Gear Manual Editing Committee. Gear Manual; China Machine Press: Beijing, China, 2000. [Google Scholar]
  24. Wang, Z.H. Simulation of Dynamic Performance of Hypoid Gears; Science Press: Beijing, China, 2013. [Google Scholar]
  25. Xue, D.Y.; Chen, Y.Q. Advanced Applied Mathematics Problem Solving by MATLAB; Tsinghua University Press: Beijing, China, 2004. [Google Scholar]
Figure 1. A pair of mutual gomphosis rack cutters.
Applsci 13 08959 g001
Figure 2. S-shaped tooth profile envelope processed by sine shape cutter. (a) The pinion; (b) the gear.
Applsci 13 08959 g002
Figure 3. A pair of mutually meshing S-shaped tooth profile gears.
Applsci 13 08959 g003
Figure 4. Coordinate system of the rack cutter.
Applsci 13 08959 g004
Figure 5. Rack and pinion meshing coordinate system.
Applsci 13 08959 g005
Figure 6. Parameters of an S-shaped tooth profile.
Applsci 13 08959 g006
Figure 7. One tooth surface of the pinion.
Applsci 13 08959 g007
Figure 8. Tooth surface of the gear and visualization models. (a) One tooth surface of the gear; (b) accurate three-dimensional models.
Applsci 13 08959 g008
Figure 9. The corresponding counterpart rack of a gear pair. (a) Involute tooth profile counterpart rack; (b) S-shaped tooth profile counterpart rack.
Applsci 13 08959 g009
Figure 10. Transformation coordinate system of tooth contact analysis of a gear pair.
Applsci 13 08959 g010
Figure 11. Tooth surface vectors.
Applsci 13 08959 g011
Figure 12. Analysis method of a contact pattern. (a) Initial stage of tooth contact; (b) analysis of contact.
Applsci 13 08959 g012
Figure 13. Contact area conditions. (a) Section plane of a gear; (b) contact area.
Applsci 13 08959 g013
Figure 14. Initial position of meshing point and tooth contact pattern of a spur gear and a helical gear. (a) Spur gear; (b) helical gear.
Applsci 13 08959 g014
Figure 15. Contact analysis of center distance without error. (a) Contact trace and meshing path; (b) transmission error.
Applsci 13 08959 g015
Figure 16. Contact analysis with the value of center distance error being 0.1. (a) Contact trace and meshing path; (b) transmission error.
Applsci 13 08959 g016
Figure 17. Change regularity in the transmission error with varying center distance error.
Applsci 13 08959 g017
Figure 18. Change regularity in the transmission error with shaft misalignment. (a) Contact trace and meshing path; (b) transmission error.
Applsci 13 08959 g018
Figure 19. Contact analysis of the center distance without error. (a) Contact trace and meshing path; (b) transmission error.
Applsci 13 08959 g019
Figure 20. Contact analysis with the value of the center distance error being 0.1. (a) Contact trace and meshing path; (b) transmission error.
Applsci 13 08959 g020
Figure 21. Change regularity in transmission error with varying center distance error.
Applsci 13 08959 g021
Figure 22. Change regularity of transmission error with shaft misalignment. (a) Contact trace and meshing path; (b) transmission error.
Applsci 13 08959 g022
Table 1. Gear parameters.
Gear PairCase 1Case 2
PinionGearPinionGear
Type of gearSpur gearHelical gear
Modules1.75 mm1.75 mm
Pressure angle25°25°
Helix angle020°
Derivative coefficient0.10.1
Number of teeth660560
Face width16 mm16 mm
Center distance57.75 mm + Δ a 56.875 mm + Δ a
Alignment statusAxial plane δ x δ x
Vertical plane δ y δ y
Disclaimer/Publisher’s Note: The statements, opinions and data contained in all publications are solely those of the individual author(s) and contributor(s) and not of MDPI and/or the editor(s). MDPI and/or the editor(s) disclaim responsibility for any injury to people or property resulting from any ideas, methods, instructions or products referred to in the content.