Article

Bending Fatigue Behavior of 17-4 PH Gears Produced by Additive Manufacturing

1
Faculty of Science and Technology, Free University of Bolzano/Bozen, piazza Università 1, 39100 Bolzano, Italy
2
Department of Mechanical Engineering, Politecnico di Milano, 20157 Milan, Italy
3
Department of Mechanical and Aerospace Engineering, Sapienza University of Rome, 00185 Rome, Italy
*
Author to whom correspondence should be addressed.
Appl. Sci. 2021, 11(7), 3019; https://doi.org/10.3390/app11073019
Submission received: 10 March 2021 / Revised: 22 March 2021 / Accepted: 24 March 2021 / Published: 28 March 2021
(This article belongs to the Section Additive Manufacturing Technologies)

Abstract

:
The introduction of Additive Manufacturing (AM) is changing the way in which components and machines can be designed and manufactured. Within this context, designers are taking advantage of the possibilities of producing parts via the addition of material, defining strategies, and exploring alternative design or optimization solutions (i.e., nonviable using subtractive technologies) of critical parts (e.g., gears and shafts). However, a safe and effective design requires specific resistance data that, due to the intrinsic modernity of additive technologies, are not always present in the literature. This paper presents the results of an experimental campaign performed on gear-samples made by 17-4 PH and produced via Laser Powder Bed Fusion (PBF-LB/M). The tests were executed using the Single Tooth Bending Fatigue (STBF) approach on a mechanical pulsator. The fatigue limit was determined using two different statistical approaches according to Dixon and Little. The obtained data were compared to those reported in the ISO standard for steels of similar performance. Additional analyses, i.e., Scanning Electron Microscopy SEM, were carried out to provide a further insight of the behavior 17-4PH AM material and in order to investigate the presence of possible defects in the tested gears, responsible for the final failure.

1. Introduction

Since their introduction on the market in the late 1980s, 3D printing technologies have been shown to be an important growth factor in moving from the production of prototypes up to the possibility of producing metal parts with full structural properties [1]. It has been proven that Additive Manufacturing (AM) technologies are cheaper than the traditional ones, but only in case of small batch productions [2,3,4,5,6] or of parts not realizable via traditional technologies [5]; these are the reasons why designers are looking for the possibilities of designing and producing parts via AM. AM, in fact, allows the realization of parts with geometry that cannot be realized via the traditional production processes, such as, for instance, internal cavities and lattice structures. It is therefore possible to realize lightweight components as well as to optimize some mechanical properties, such as those related to their dynamic and vibrational behavior.
With a specific focus on metallic AM gears, in [7] a methodology to realize a lightweight gear by modifying the gear body is proposed. A tooth lightweight design is proposed in [8], in [9,10] a gear with internal cooling channel is shown, and in [11] the gear Noise Vibration Harshness (NVH) behavior and weight optimization by replacing a full gear body with a lattice structure is reported. Moreover, in [4] the design of a gearbox in which gears are produced by using AM technology is presented. The American Gear Manufacturing Association (AGMA) has recently published a document calling for the necessity of investigating all the aspects related to AM steel gear production [12]. However, despite the fact that static and fatigue properties of AM materials were deeply investigated [13,14,15,16,17,18,19], the literature is lacking in terms of reliable data that can be used to design such critical components (e.g., tooth root bending properties).
In any case, the design of critical components, such as shafts or gears, must pass through analytical standardized codes (e.g., see [20,21,22] for gears). Those require reliable resistance data which, if not directly known, can be easily found within the standards too (e.g., see [20,23] for gear materials resistance). Unfortunately, due to the modernity of AM technologies, the standard codes do not present any resistance values that can be used to design components produced via AM. Only a few piece of data about the wear behavior can be found in the literature [24,25]. In any case, the standards present the possibility of us resistance data coming directly from experimental campaigns. Nevertheless, it is common practice in gear design to perform the resistance tests directly on the gear specimens. This is related to the specific manufacturing technology, typically hobbing, which produces, for example, characteristic surface patterns and residual stresses that cannot be accurately considered with tests on traditional samples.
Therefore, provided that tooth root fatigue (i.e., bending) is one of the most relevant gear failure phenomena [26], this work presents the results of an experimental campaign aimed at determining the tooth root stress limit obtained directly by testing AM gears via the Single Tooth Bending Fatigue (STBF) approach. In the STBF tests, the gear-specimens are tested by applying a normal cyclic load to two flanks taking advantage of the involute properties and the Wildhaber distance. While two teeth are tested at the same time, the friction between the teeth flanks and the anvils (used for applying the load), ensures that the forces acting on the gear-sample are automatically balanced and no additional supporting structures are required. On the other hand, this implies the existence of a stress ratio ≠ 0 (the load varies between the maximum values and a fixed percentage of it, e.g., 10% → R = 0.1) to maintain the preload on the system [27,28,29].
An additional microstructural investigation is carried out to support the results of the mechanical characterization [30,31] and to highlight possible mechanisms or defects that could affect fatigue life and trigger the final material failure.
It is worth noting that testing actual gears instead of standard cylindrical samples helps in reducing many uncertainties related to the manufacturing process. The influences of all the surface durability-related aspects for instance, are automatically incorporated in the proposed approach, without any need for empirical correcting factors. Consequently, the fatigue life or fatigue limit that will be found can be considered quite representative of the actual performance of the tested components, in terms of high cycle bending fatigue behavior.

2. Experimental Set Up

To investigate the bending fatigue properties of gears produced via AM technologies, the STBF were performed on a Schenk mechanical pulsator capable of applying a maximum load of 60 kN. This machine, originally developed and usually used for uniaxial fatigue tests, has been equipped with a specifically designed fixture to perform the STBF tests.
As shown in Figure 1, the machine’s working principle is based on two coaxial springs: the inner one applies the constant part of the load, while the outer spring, thanks to rotative unbalanced masses, is responsible for the sinusoidal part of the load. A load cell and a dedicated control unit are responsible for keeping the sinusoidal load at its correct value.
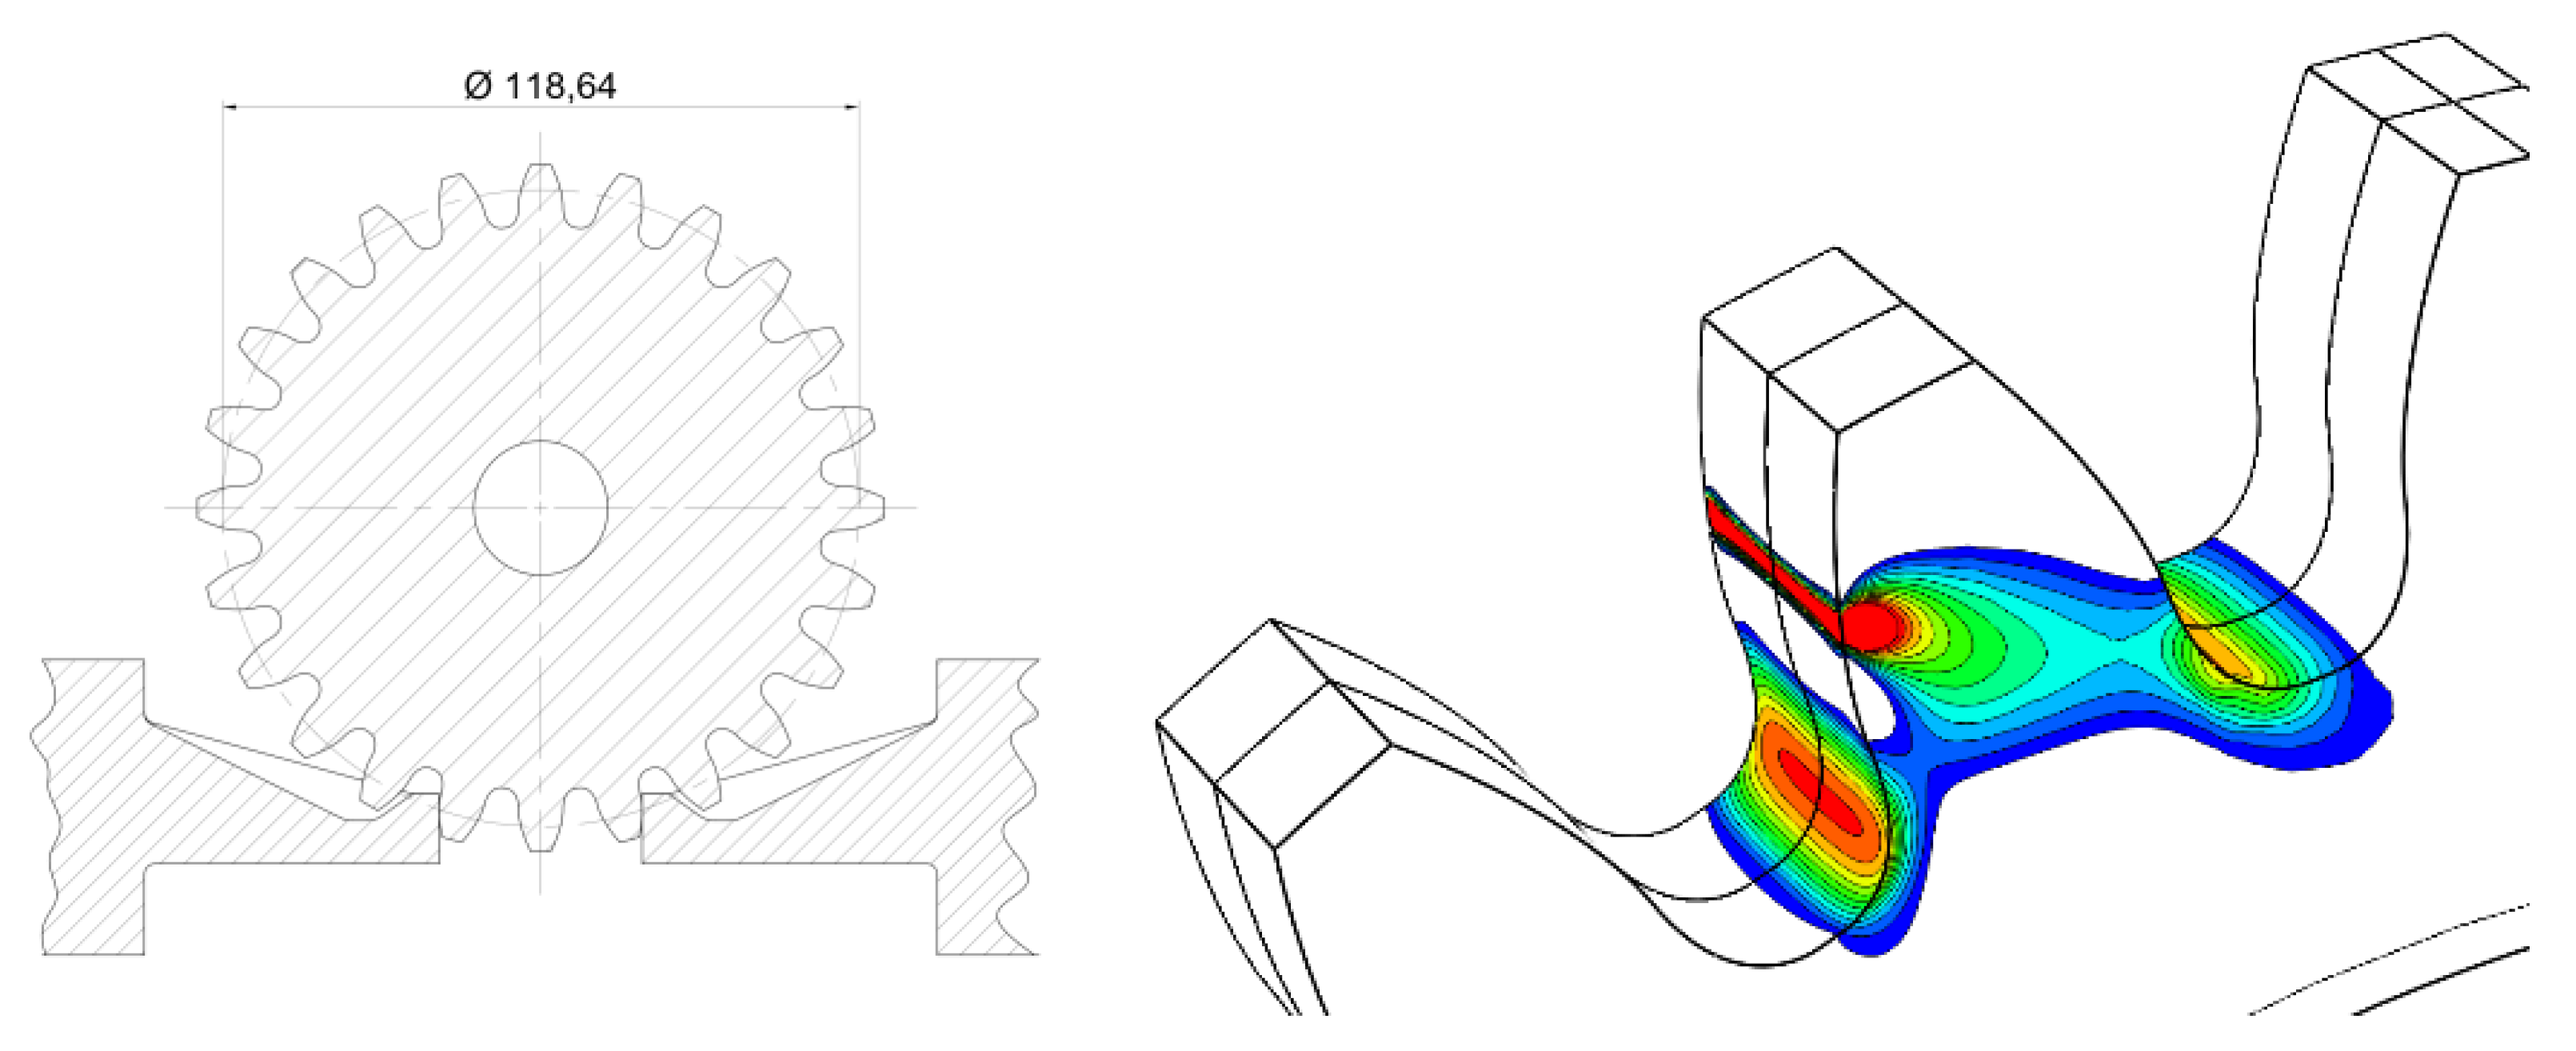
The equipment used to test the gears consists of two anvils, a fork, and a pin. According to the characteristic dimensions of the equipment (e.g., the distance between the anvils and the contact surface), the STBF test may assume two different configurations: asymmetric and symmetric. In the first configuration two teeth are loaded at different heights; therefore, one tooth root is more stressed. Only one tooth is effectively under test, while the other one just acts as a reacting tooth. On the opposite side, in the symmetric case, two teeth are simultaneously loaded at the same height and, therefore, both teeth are simultaneously under testing. As shown in Figure 2, the present research adopts the symmetric configuration together with the induced stress state calculated via FEM.
For the purpose of obtaining the symmetric configuration, the distance between the contact surfaces of the anvils is equal to the span measure over three teeth (also called the Wildhaber measure over three teeth [32], W3), with the axis of the pin/fitting hole positioned in the middle between the two surfaces. The presence of the pin and fork is justified by the necessity of ensuring the correct mounting of the gear during the test set-up phase. As the kinematic chain composed by pin, fork and anvils gives statically indeterminate results, during the test, the pin is removed just after positioning the gear, ensuring the correct teeth/anvils contact. Then, a minimum preload (i.e., 10% of the maximum) is applied. In this way, by removing the pin, the kinematic chain gives isostatic results. The test fixture is also equipped with a spring, which oversees the gear’s quick removal when the test ends.
Thus, as explained above, to ensure the correct position of the gear during the whole test, a preload always has to be applied to the gear. Therefore, all the tests have been performed with a load ratio R (i.e., minimum to maximum ratio) equal to 0.1. On the basis of the authors’ experience (e.g., see ([33,34,35,36,37]) this value of R is sufficient to ensure that no undesired movement will take place. All the tests were performed at a frequency of ≈35 Hz; as a mechanical pulsator was used, the test frequency was not chosen a priori, but it depends only on system mass/stiffness. Figure 3 shows the experimental set-up of the present research.
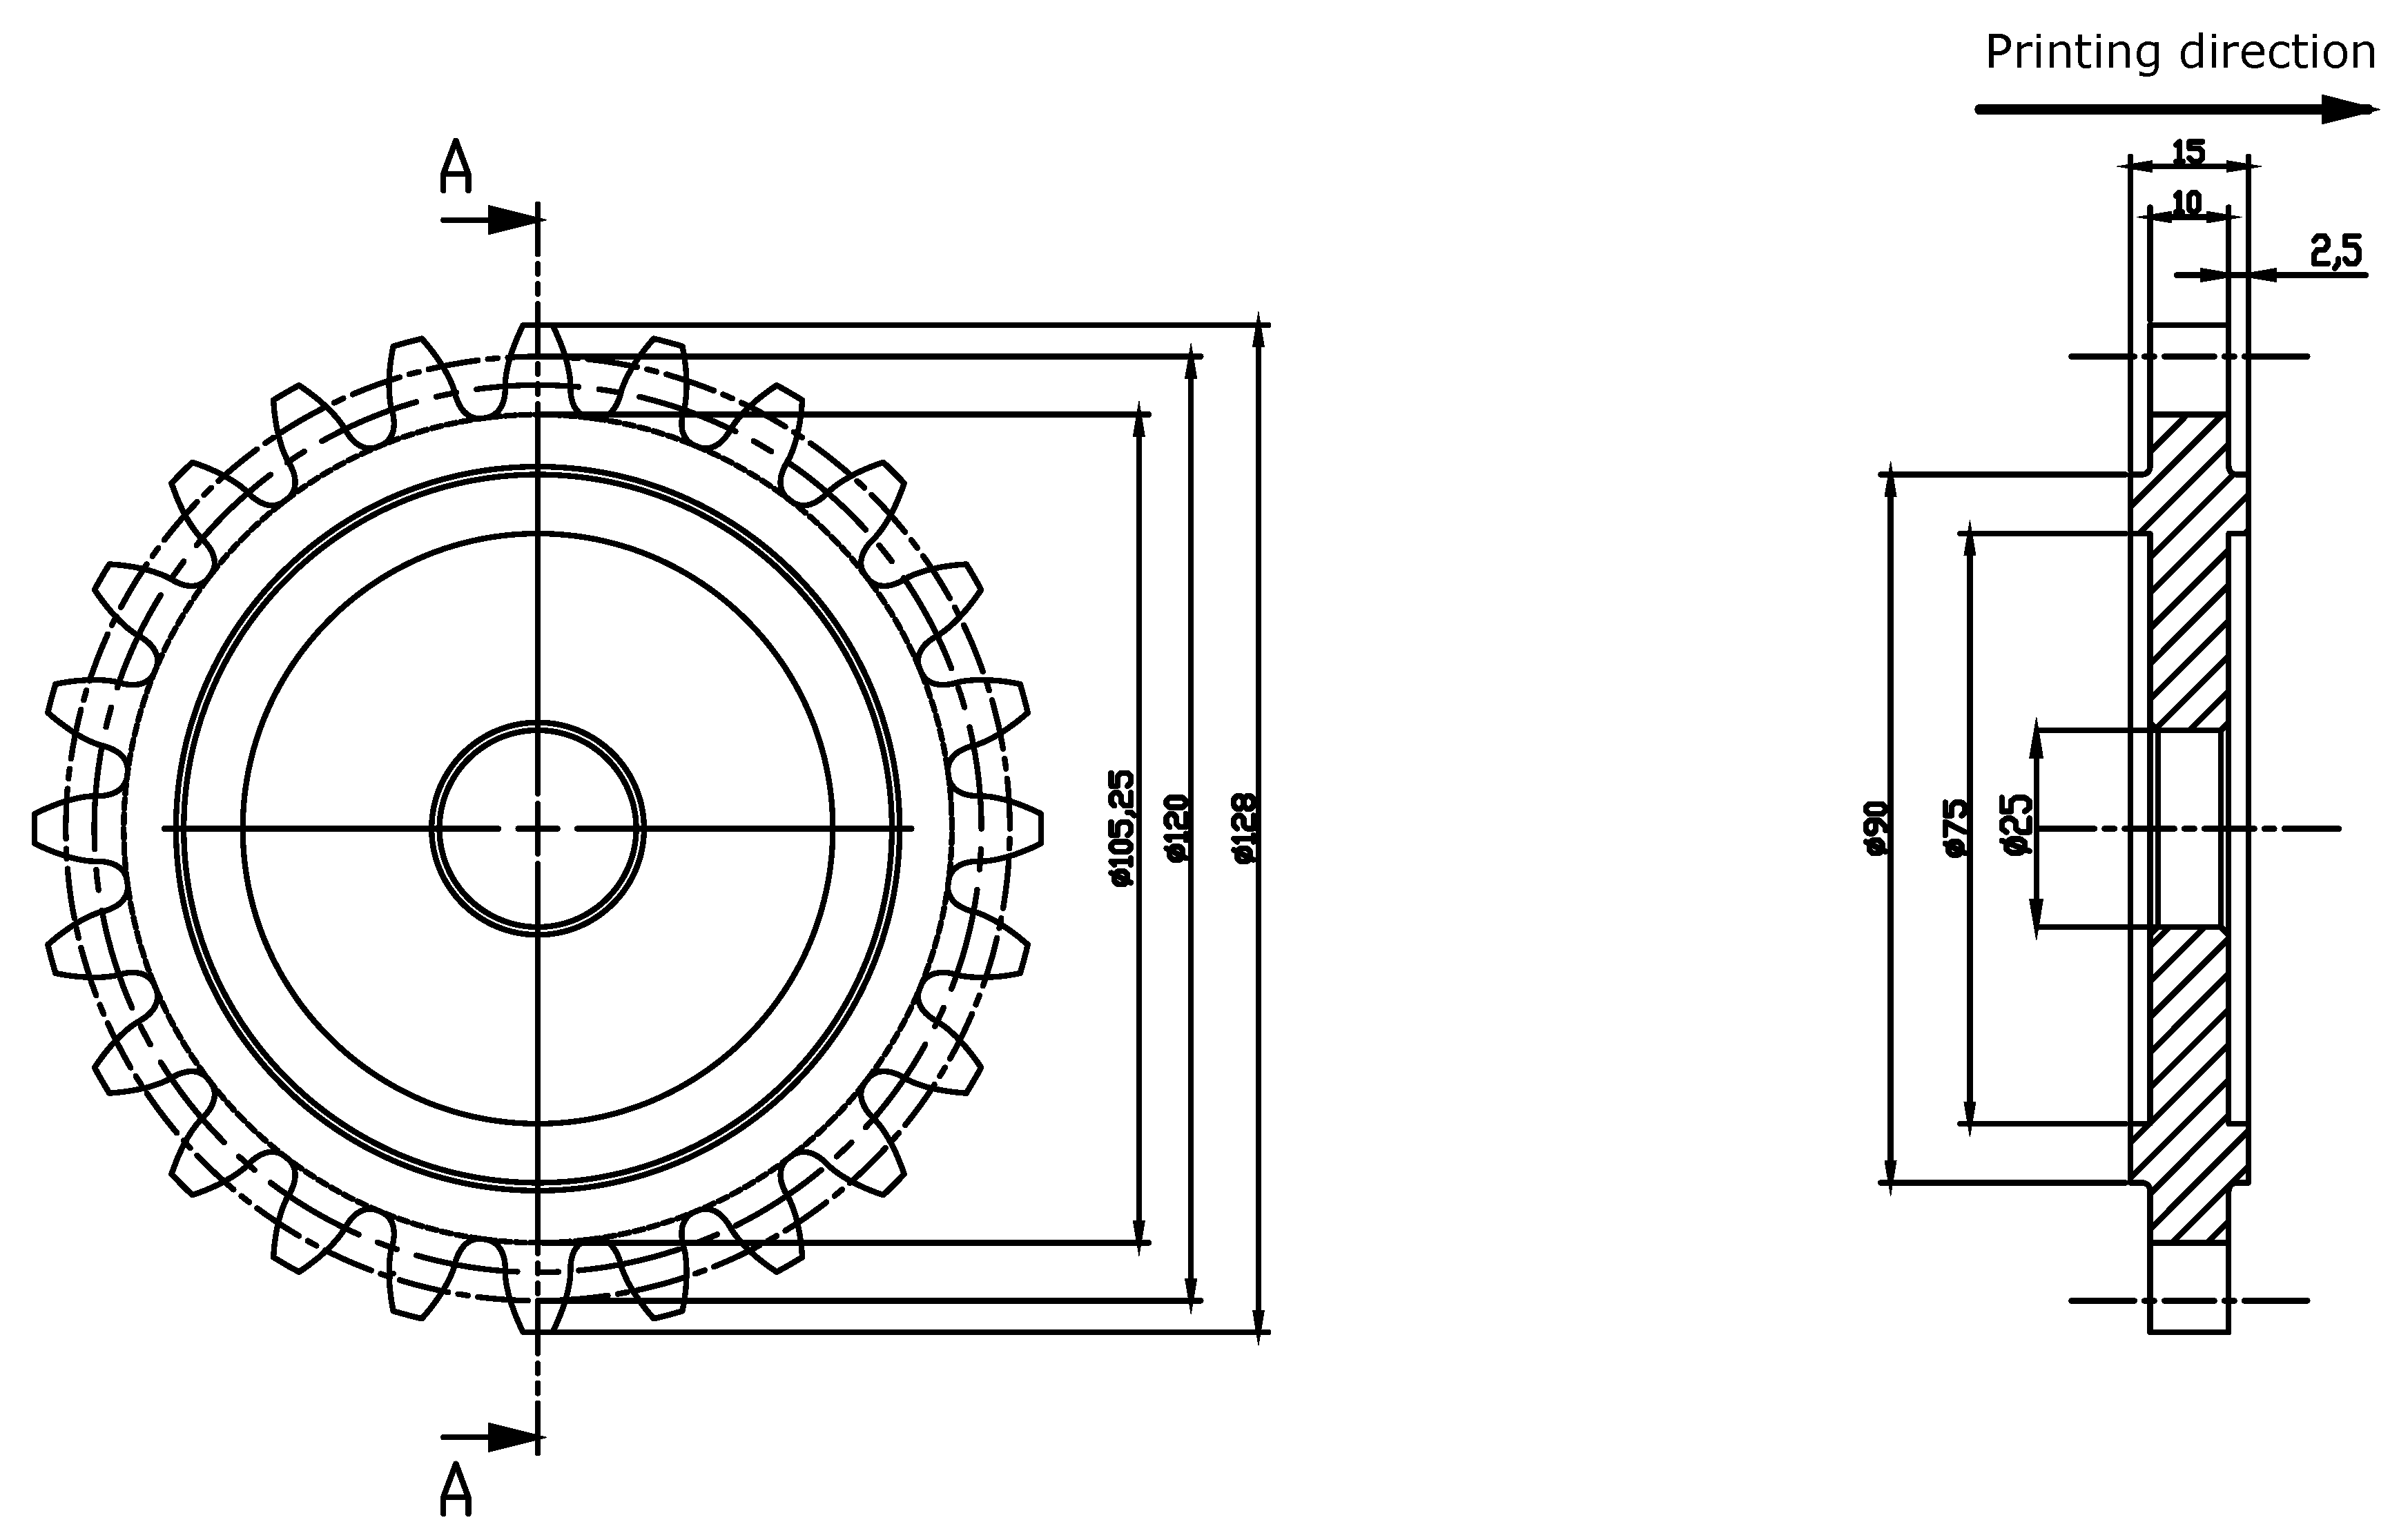
Figure 4 and Table 1 report the main characteristics of the gear. The gear dimensions, especially the profile shift coefficient x, were chosen to have a tooth profile highly sensitive to the bending phenomena. The gears, made by 17-4 PH, were produced by Laser Powder Bed Fusion (PBF-LB/M). The gears were manufactured (see Table 2 for the main process parameters) and then machined with traditional machine tools (i.e., lathe and hobbing machine) to obtain the proper roughness and the right shape.
After machining, the surface roughness was measured by means of a roughness meter. The arithmetic mean roughness Ra is equal to 0.75 µm and mean peak-to-valley roughness Rz is equal to 2.98 µm. The material was tested as-built without being subject to any thermal treatment. The experimental points are shown in Table 3.
The testing gears have 24 teeth. Tests were performed by applying the load on 2 teeth separated by one tooth, e.g., tooth 1 and tooth 3. Teeth adjacent to the tested ones were not used, e.g., tooth 2 or tooth 6. Table 3 shows the teeth pairs tested.
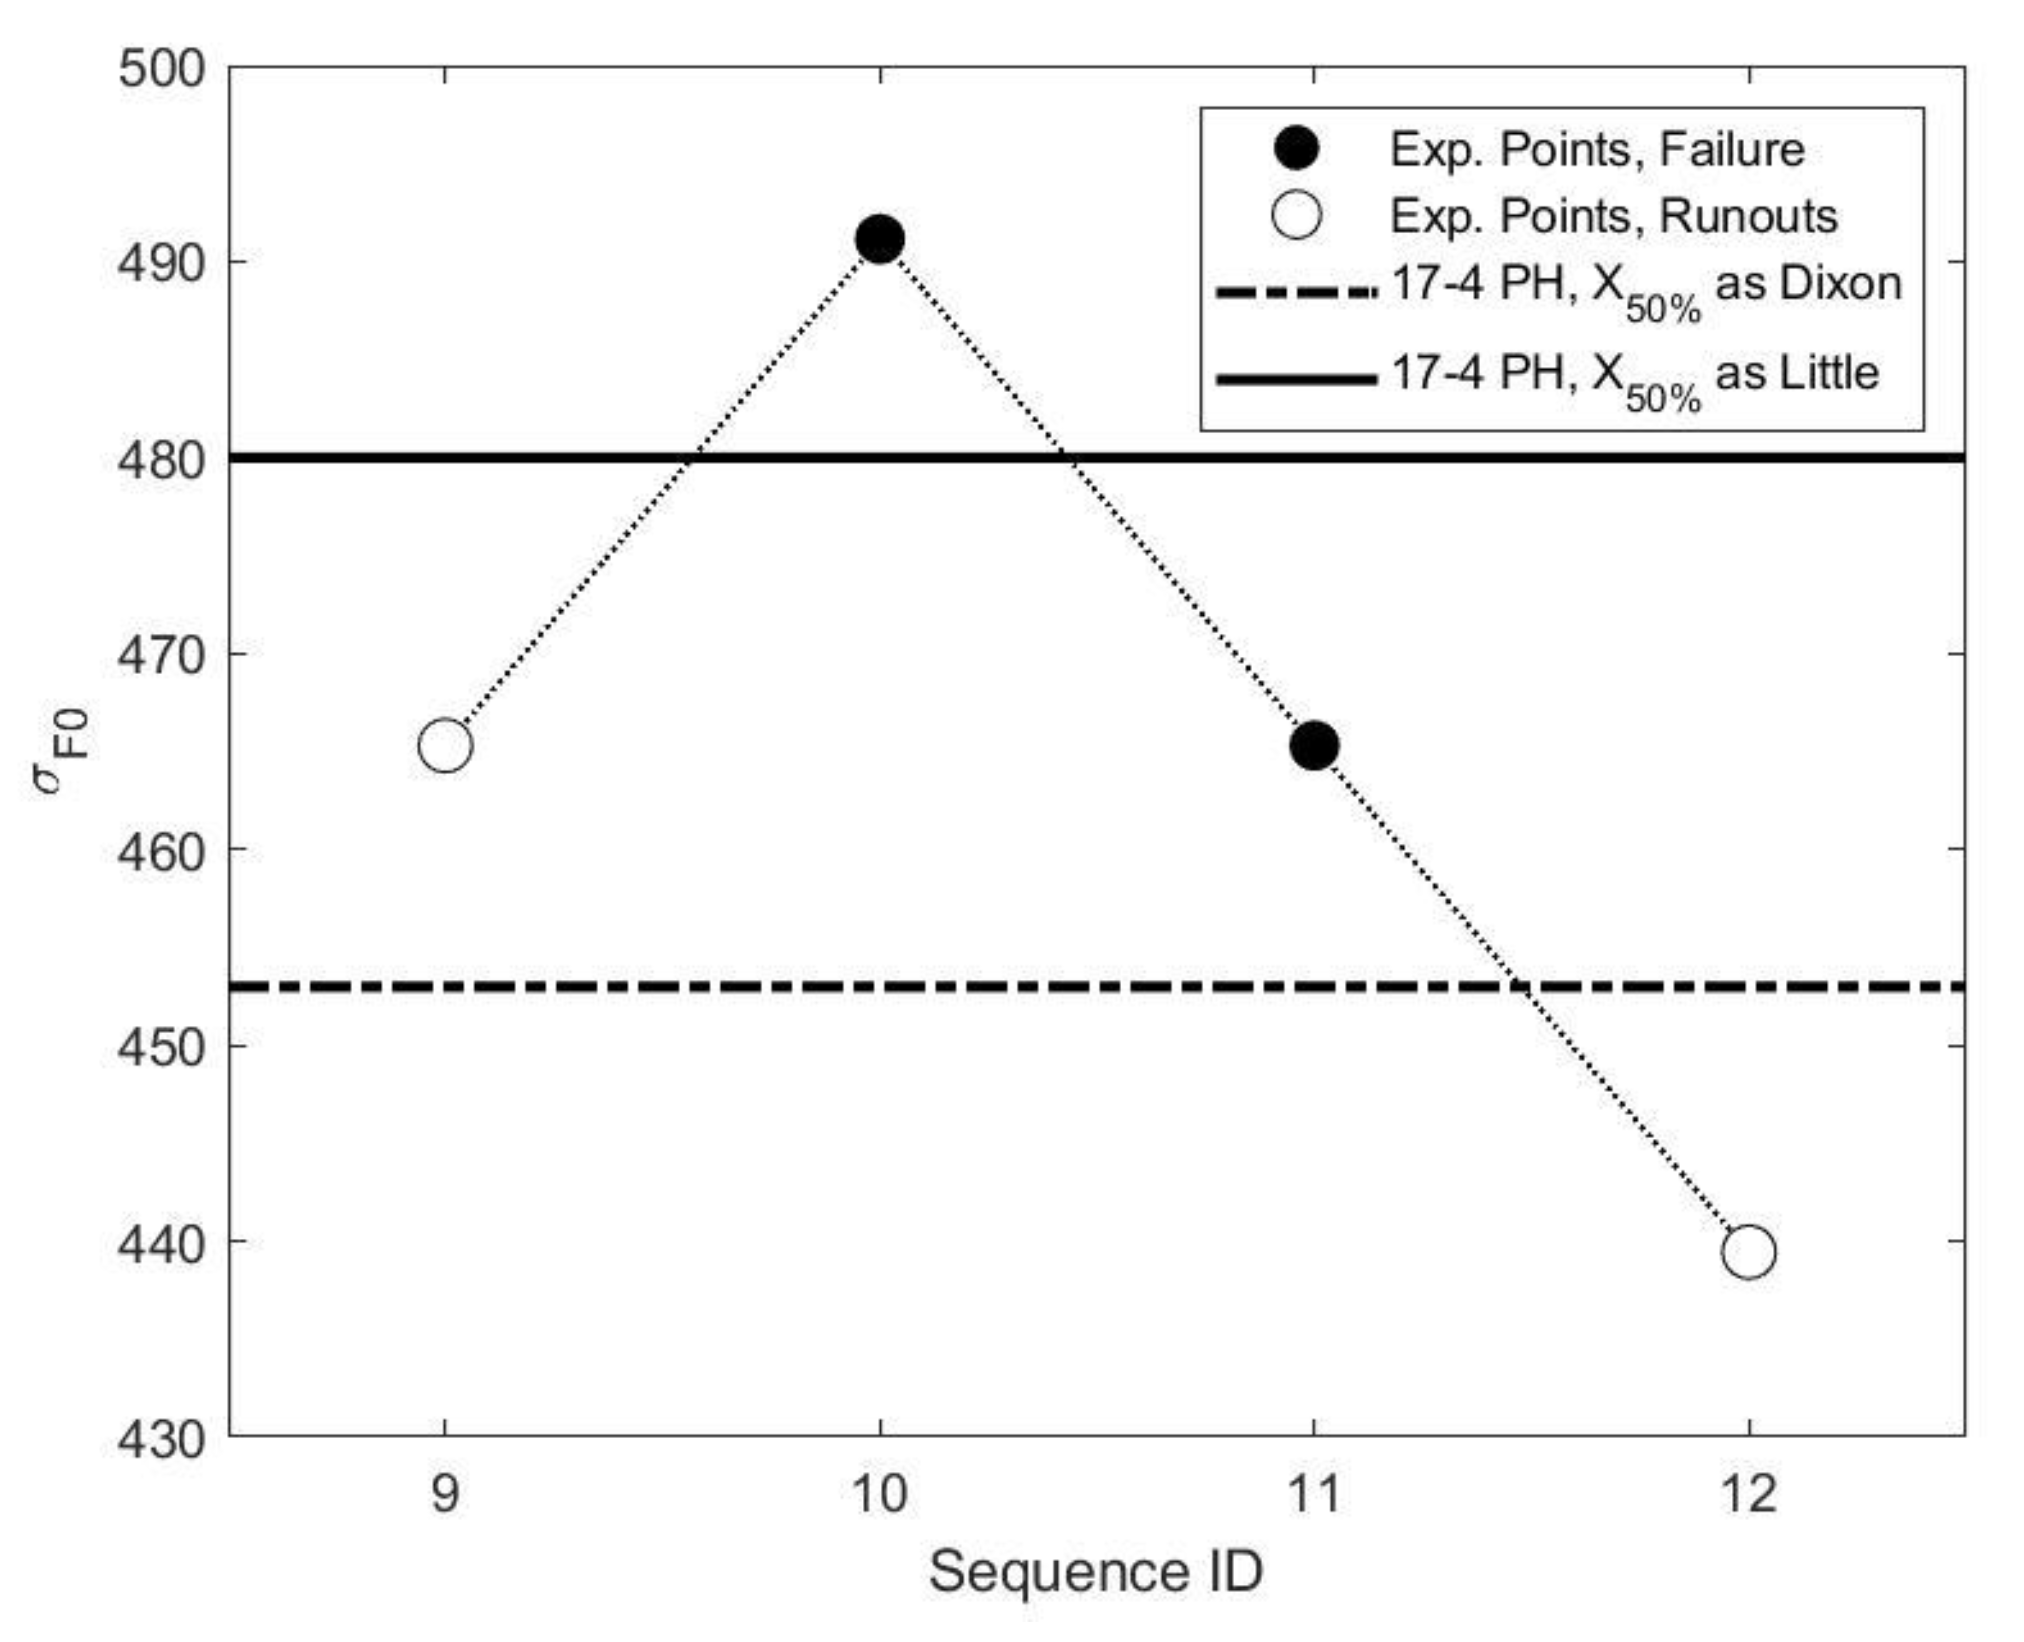
The tests were performed according to the staircase approach. If a test at a certain force level Fi ended with a failure, the force for the successive test was decreased by ΔF. If the test ended with a run-out (i.e., the sample withstood 5 M cycles) the force was increased by ΔF. The force interval ΔF was set to 1000 N.

3. Toot Root Stress According to ISO Standard

To compare the bending fatigue behavior with the ones of the common gear materials it is necessary to define the tooth root stress σF0. To do that, method B of ISO 6336-3 [22] was used. According to this, and considering that the applied load is not the tangential one, Ft defined in the standard for two mating gears, but the one coming from the interaction from the gear-sample and the anvils, σF0 can be written as:
σ F 0 = F t bm n Y F Y s Y β Y B Y DT = F bm n Y F Y s Y β Y B Y DT cos α n
As the tested gears are full-body spur gears, Yβ and YDT have unitary value. The teeth profile was simply finished with the hobbing machine; therefore, it is impossible to reach an accuracy grade of lower than 5 ([38,39]) (see [40] for the definition of gear accuracy). As the gear accuracy is surely >4, YB is equal to 1. YF and YS do not have a unitary value and they are calculated as in (2) and (3).
Y F = 6 h Fe m n cos ( α Fen ) ( s Fn m n ) cos ( α n )
Y S = ( 1.2 + 0.1 L ) q s 1 1.2 + 2.3 L
While sFn is related only to the gear data, hFe and αFen are related to the point of load application. As the standards always consider two meshing gears, the outer point of the single contact is considered as the point of the load application. In this case, dealing with the STBF tests, the load application point is defined by the contacts between the gear and anvils (which are shown in Figure 2).
Starting from the geometrical characteristics of the gear (Figure 4 and Table 1), it is possible to determine all the Equation (1) coefficients; the results are shown in Table 1. Therefore, hFe and αFen values and, subsequently, YF and YS have been calculated according to that diameter. hFe results to be equal to 0.53 mm,
αFen equal to 13.79° and, subsequently
YF = 1.5805 and YS = 1.5805.
Thus, it is possible to obtain the stress–load relationship by using Equation (4):
σ F 0 = 5.17 · 10 2 F
where F is in N and σF0 is in MPa.

4. Determination of the Fatigue Limit

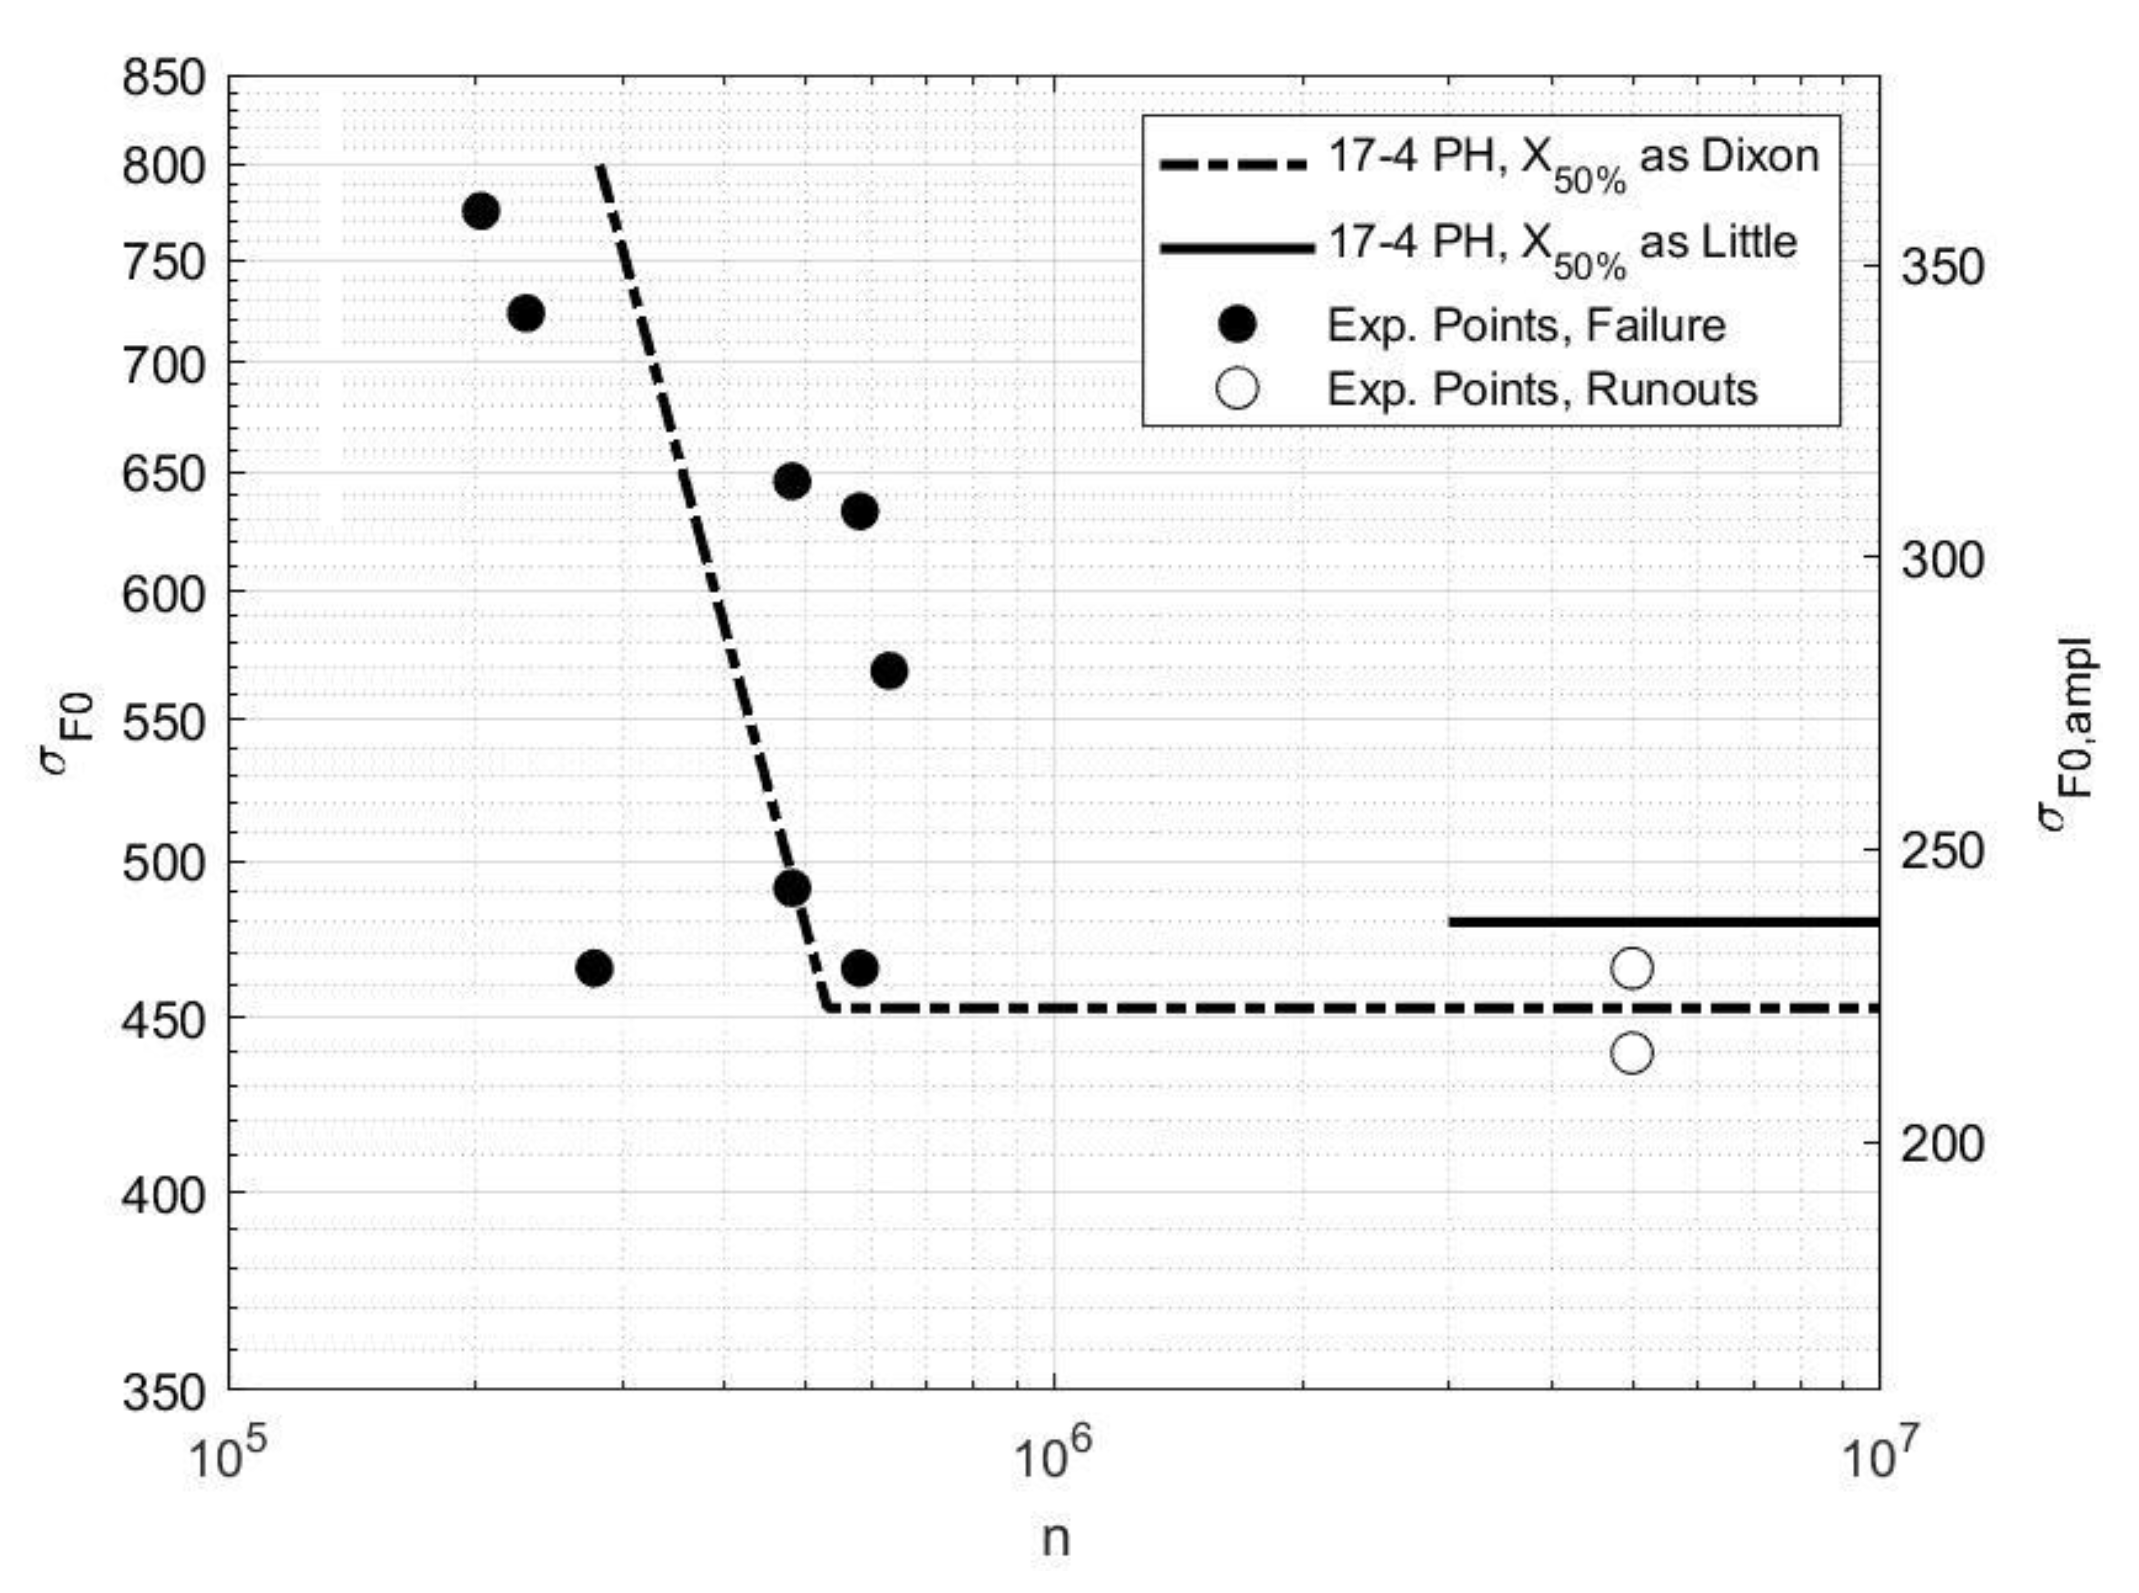
By applying Equation (4) to the experimental points, reported in Table 1, it is possible to draw the σF0-N curve (at R = 0.1) shown in Figure 5. The initial points of Table 1 have been used to have an idea about the high cycle behavior of the tested gears. The last four points have been used to calculate the fatigue limit.
The standards regarding the statistical elaborations of the fatigue data ([41,42]) require, even in the case of exploratory research, the use of several points greater than the one presented in Figure 5. However, many approaches to short staircase are present in the literature (e.g., [43,44,45]). The short staircase methodologies defined by Dixon et al. [45] and Little [44] are used here to calculate the fatigue limit. Both approaches allow us to determine the fatigue limit X50% (considered as a sensitivity analysis) at a given number of cycles (i.e., 5 × 10⁶ cycles) at a failure probability of 50%.
Beside the formulas, the practical difference between the two proposed methods is the condition considered to increase/decrease the load during the staircase sequence. For the first method, the failure condition is represented by the breakdown (i.e., tooth breakage) of the specimen, while in the second case, the failure condition is considered as the breakdown of one of the two specimens that are tested at the same time under the same test conditions (i.e., applied load).
In previous works [36,37], the couple of tested teeth is considered as a unique specimen. Therefore, the fatigue limit is calculated according to the first method. X50% can be calculated as:
X 50 % = X f + kd
Xf, defined as the last test level, is equal to 440 MPa and k, a constant depending on the failure-runout history, is set equal to 0.50; therefore, X50%, the fatigue limit with 50% reliability, results to be 453 MPa.
As highlighted previously, in the symmetric test case, both teeth are subject to the same stress level. If we consider the tested teeth as two separate specimens, the choice to increase/decrease the test load (i.e., the failure condition) is done “ as soon as the first of the two specimen (i.e., the tested teeth) fails under simultaneous testing responds”. This situation is the so-called “specimen in series” [44].
In this way it is possible to determine X50% also considering the fact that, in reality, only one tooth is broken, while the other one (which is subject to the same stress level) is still intact.
In this case, X50% can be calculated as:
X 50 % = X 0 + d ( Δ )
where X0 is the initial test level and Δ is a coefficient related to the staircase sequence and to the hypothesized statistical distribution. X_0 is equal to 446 MPa and, under the assumption of normality, Δ is equal to 0.54. Therefore, the fatigue limit X50% is evaluated to be equal to 480 MPa.
For the sake of completeness, in Figure 4, the sloping part of the high-cycle fatigue curve is also shown. This part of the curve has been calculated by fitting the data related to the failed tests [45] using a least squares regression. As it has been performed by considering the couple of tested teeth as a unique specimen, the fitting has been extended until the limit calculated with the same statistical consideration (i.e., Equation (5)).
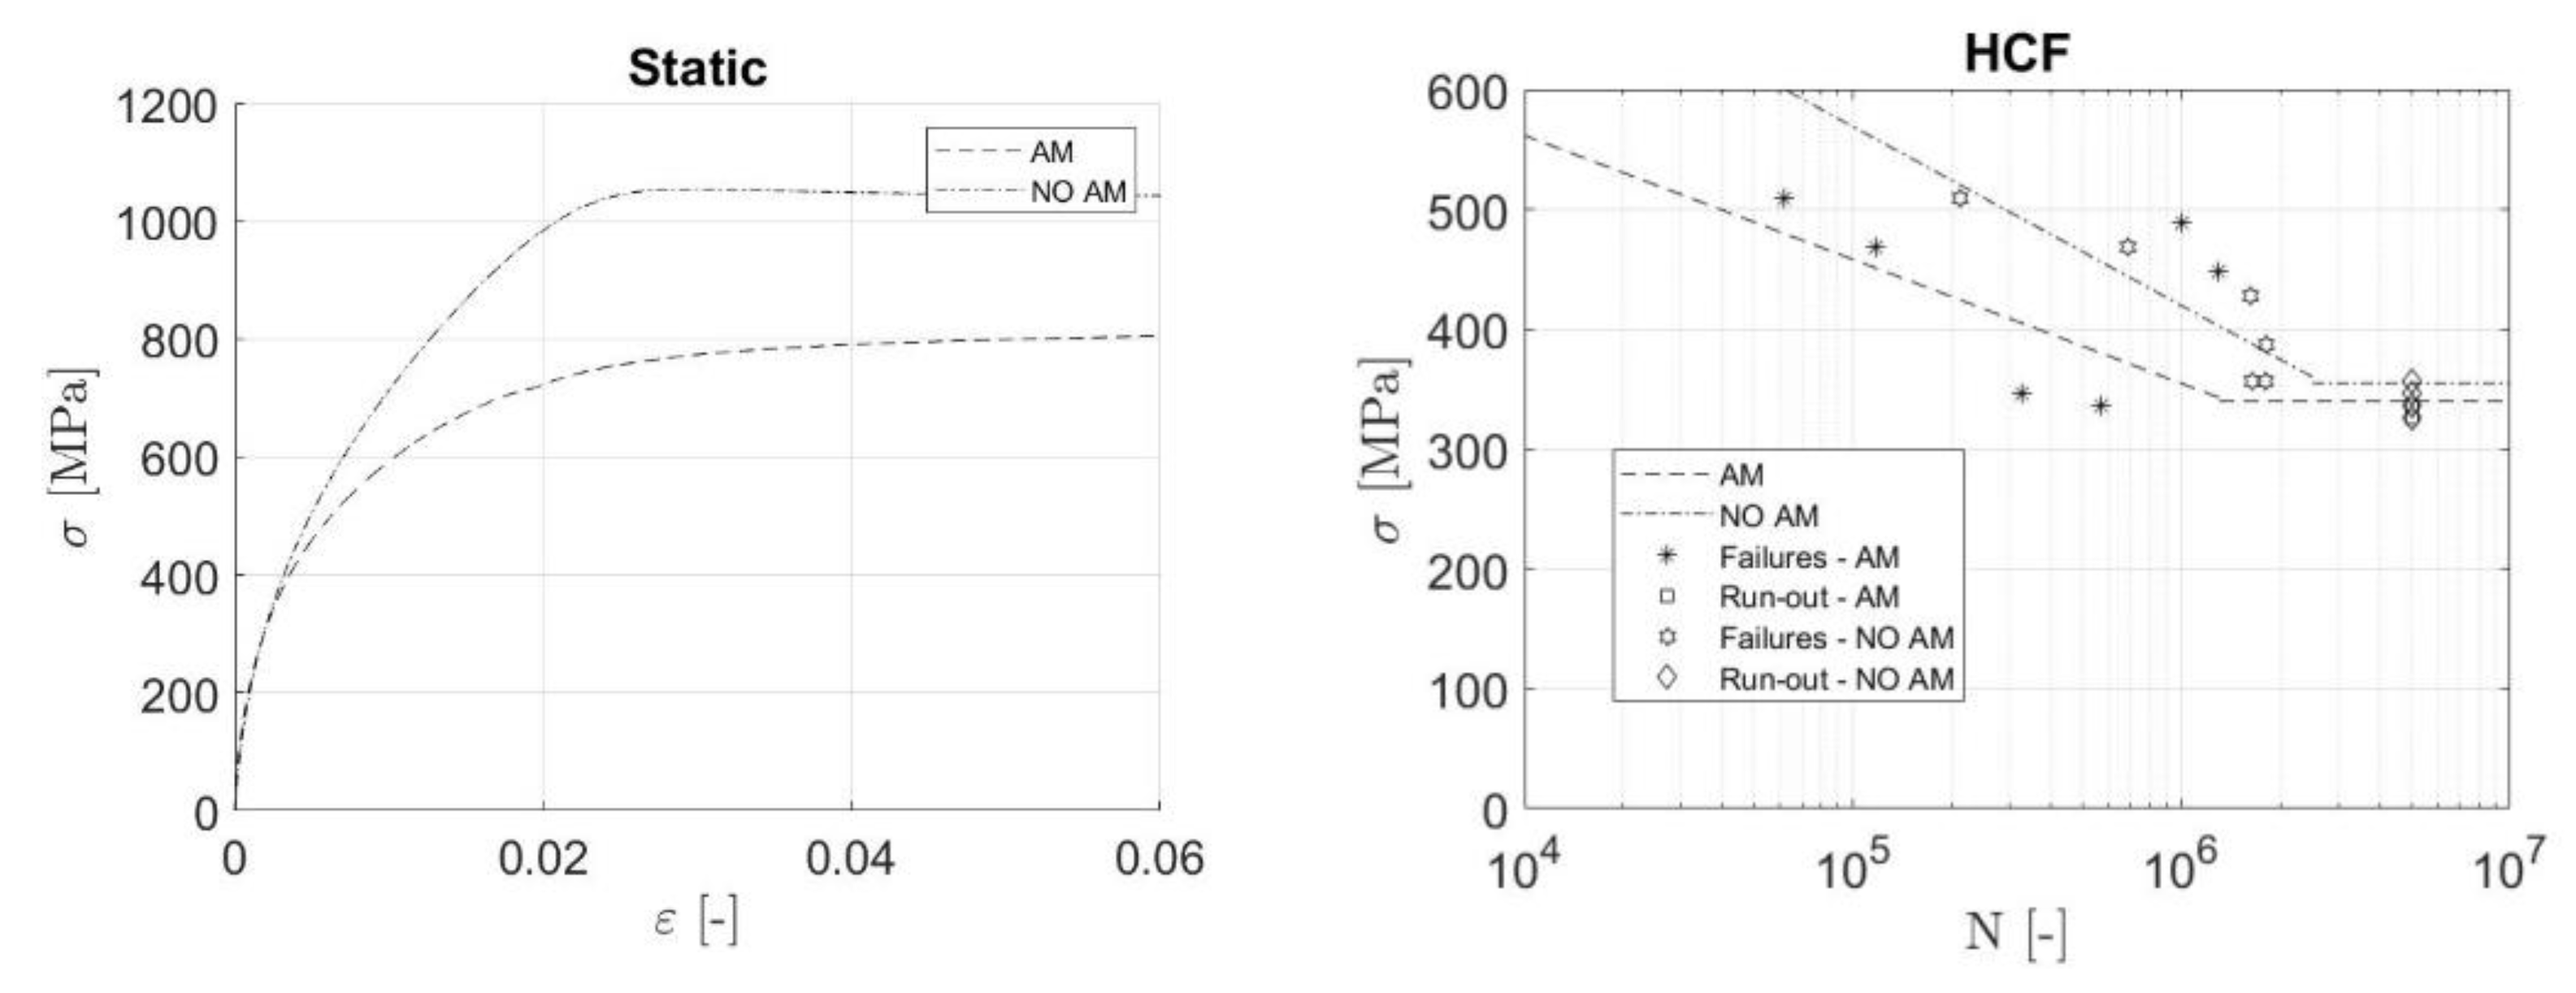
Moreover, while tests on the equivalent wrought counterpart were not conducted, the results of monoaxial fatigue tests have shown that the wrought material performs better by approximately 30% [30] (Figure 6).

5. Additional Analyses

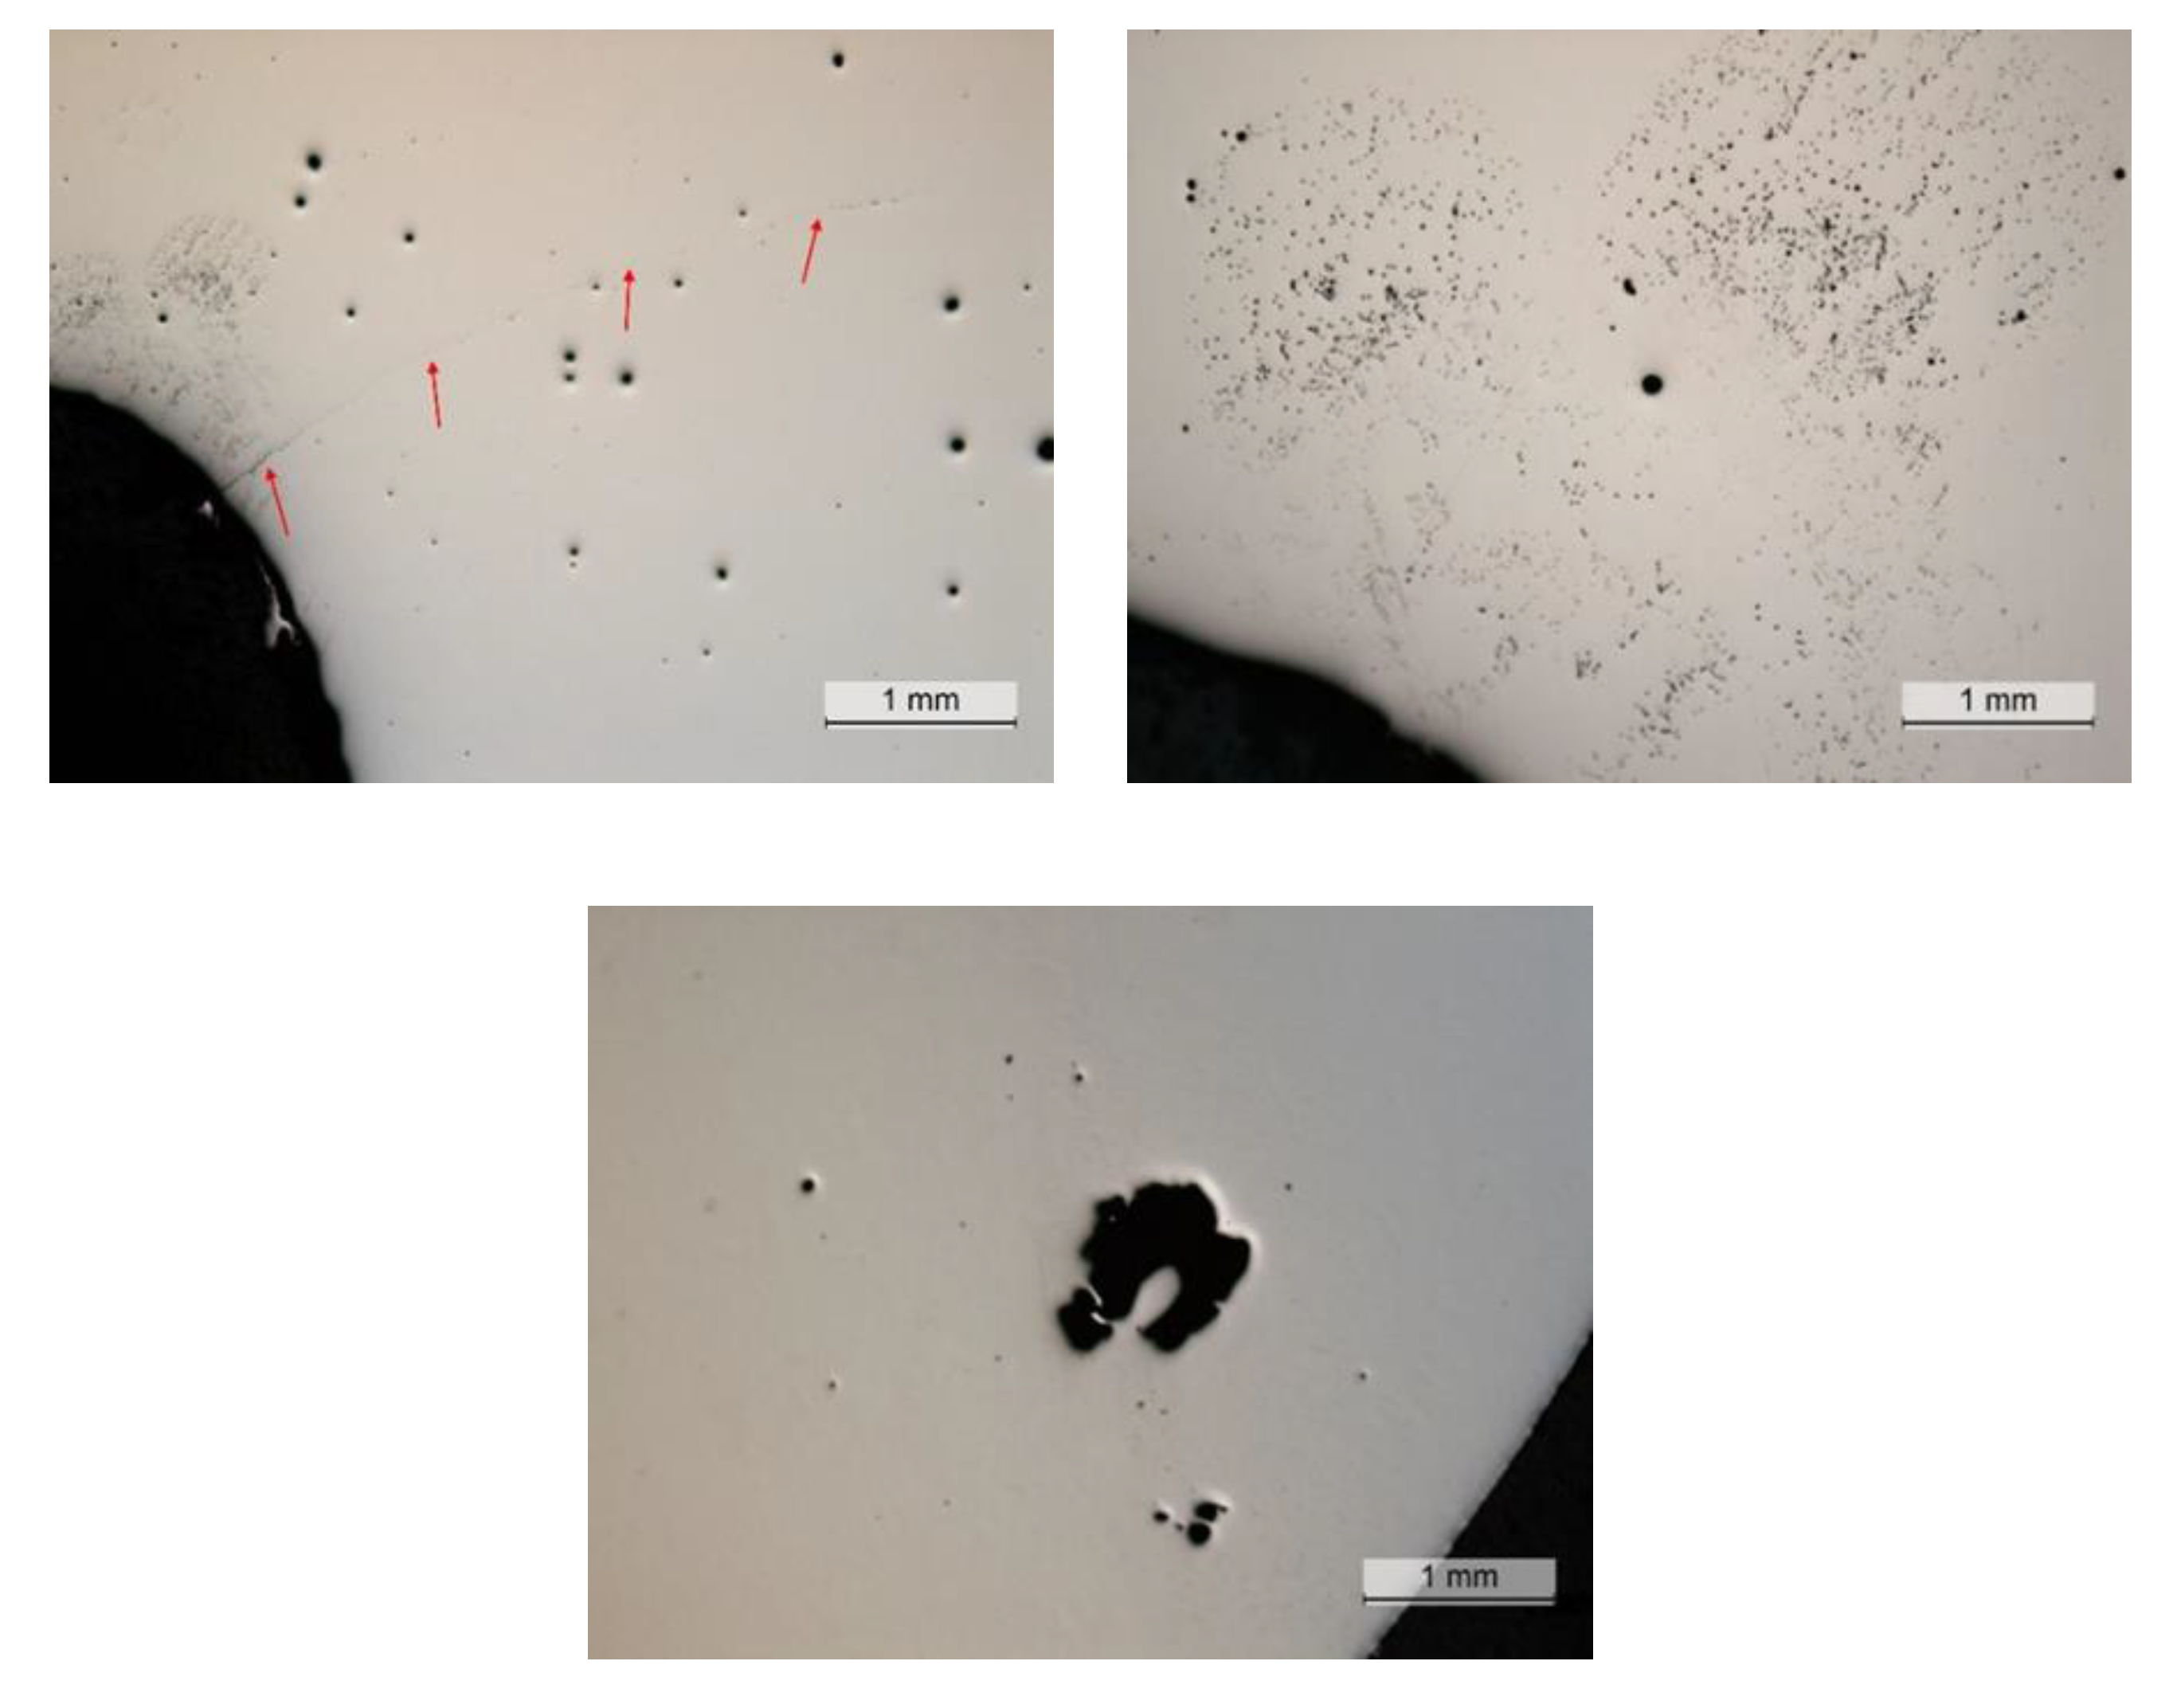
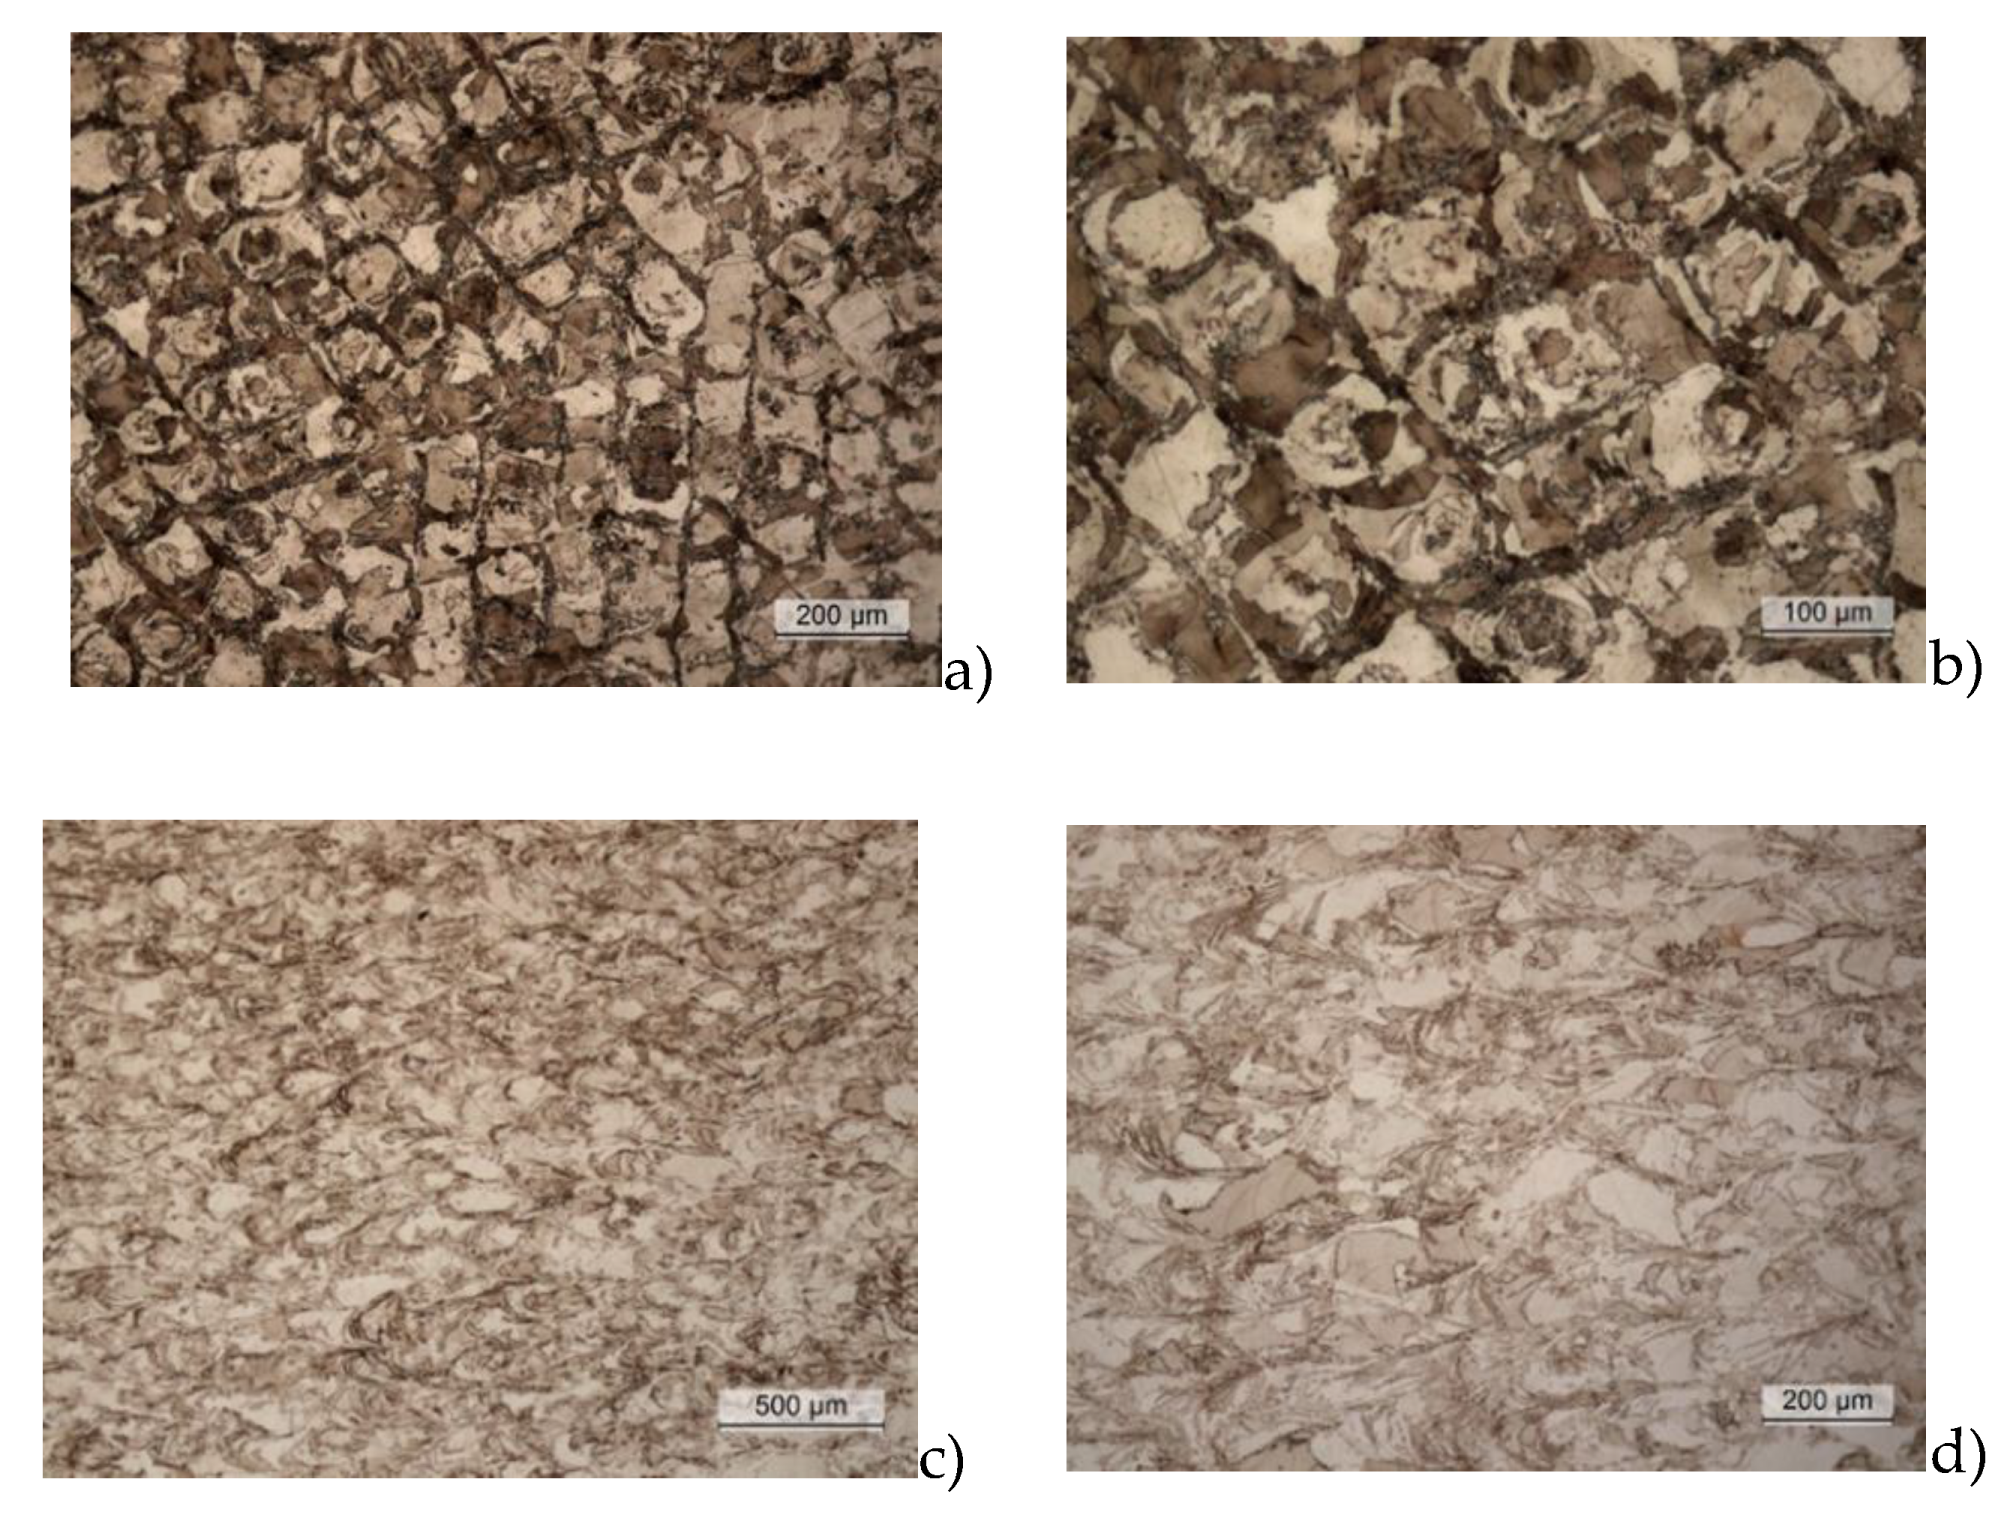
Aiming to characterize the gears completely, metallographic observations and fracture surface analysis were carried out on some of the failed teeth. In particular, the crack path was investigated on the A3 tooth: after having cut it along the midplane, the section was mounted in a suitable resin and mirror polished according to the standard metallographic technique. Some porosities were observed on the surface both far from and close to the crack. In Figure 7 some examples are reported. After etching, the melt pools were clearly visible both in the build and in the transversal direction. Figure 8 shows the observed microstructures.
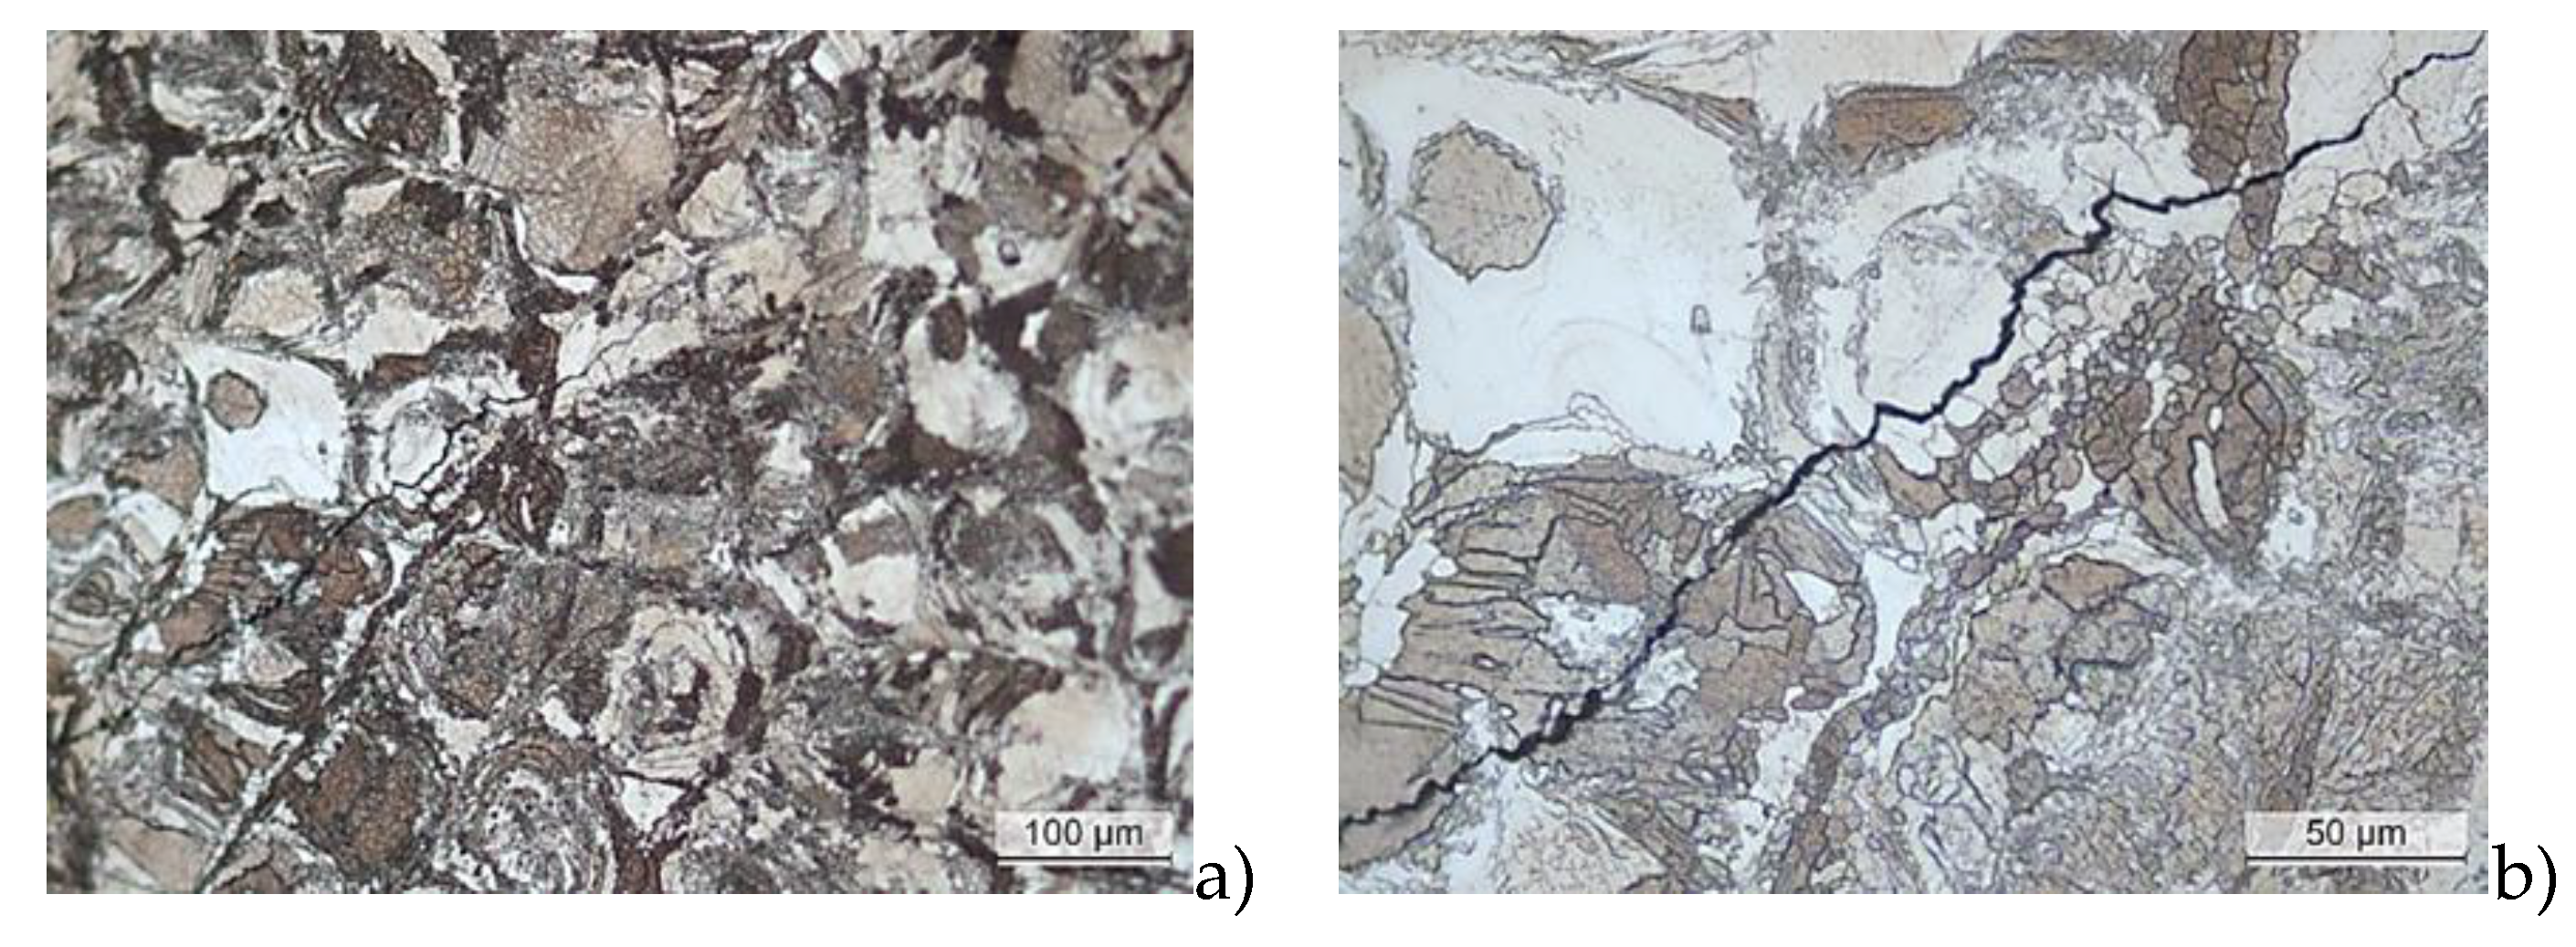
In Figure 9, the crack path was compared with the tooth microstructural features. It is clearly visible that the propagation direction is not influenced by the melt pool boundaries, but it is instead completely inside the pools.
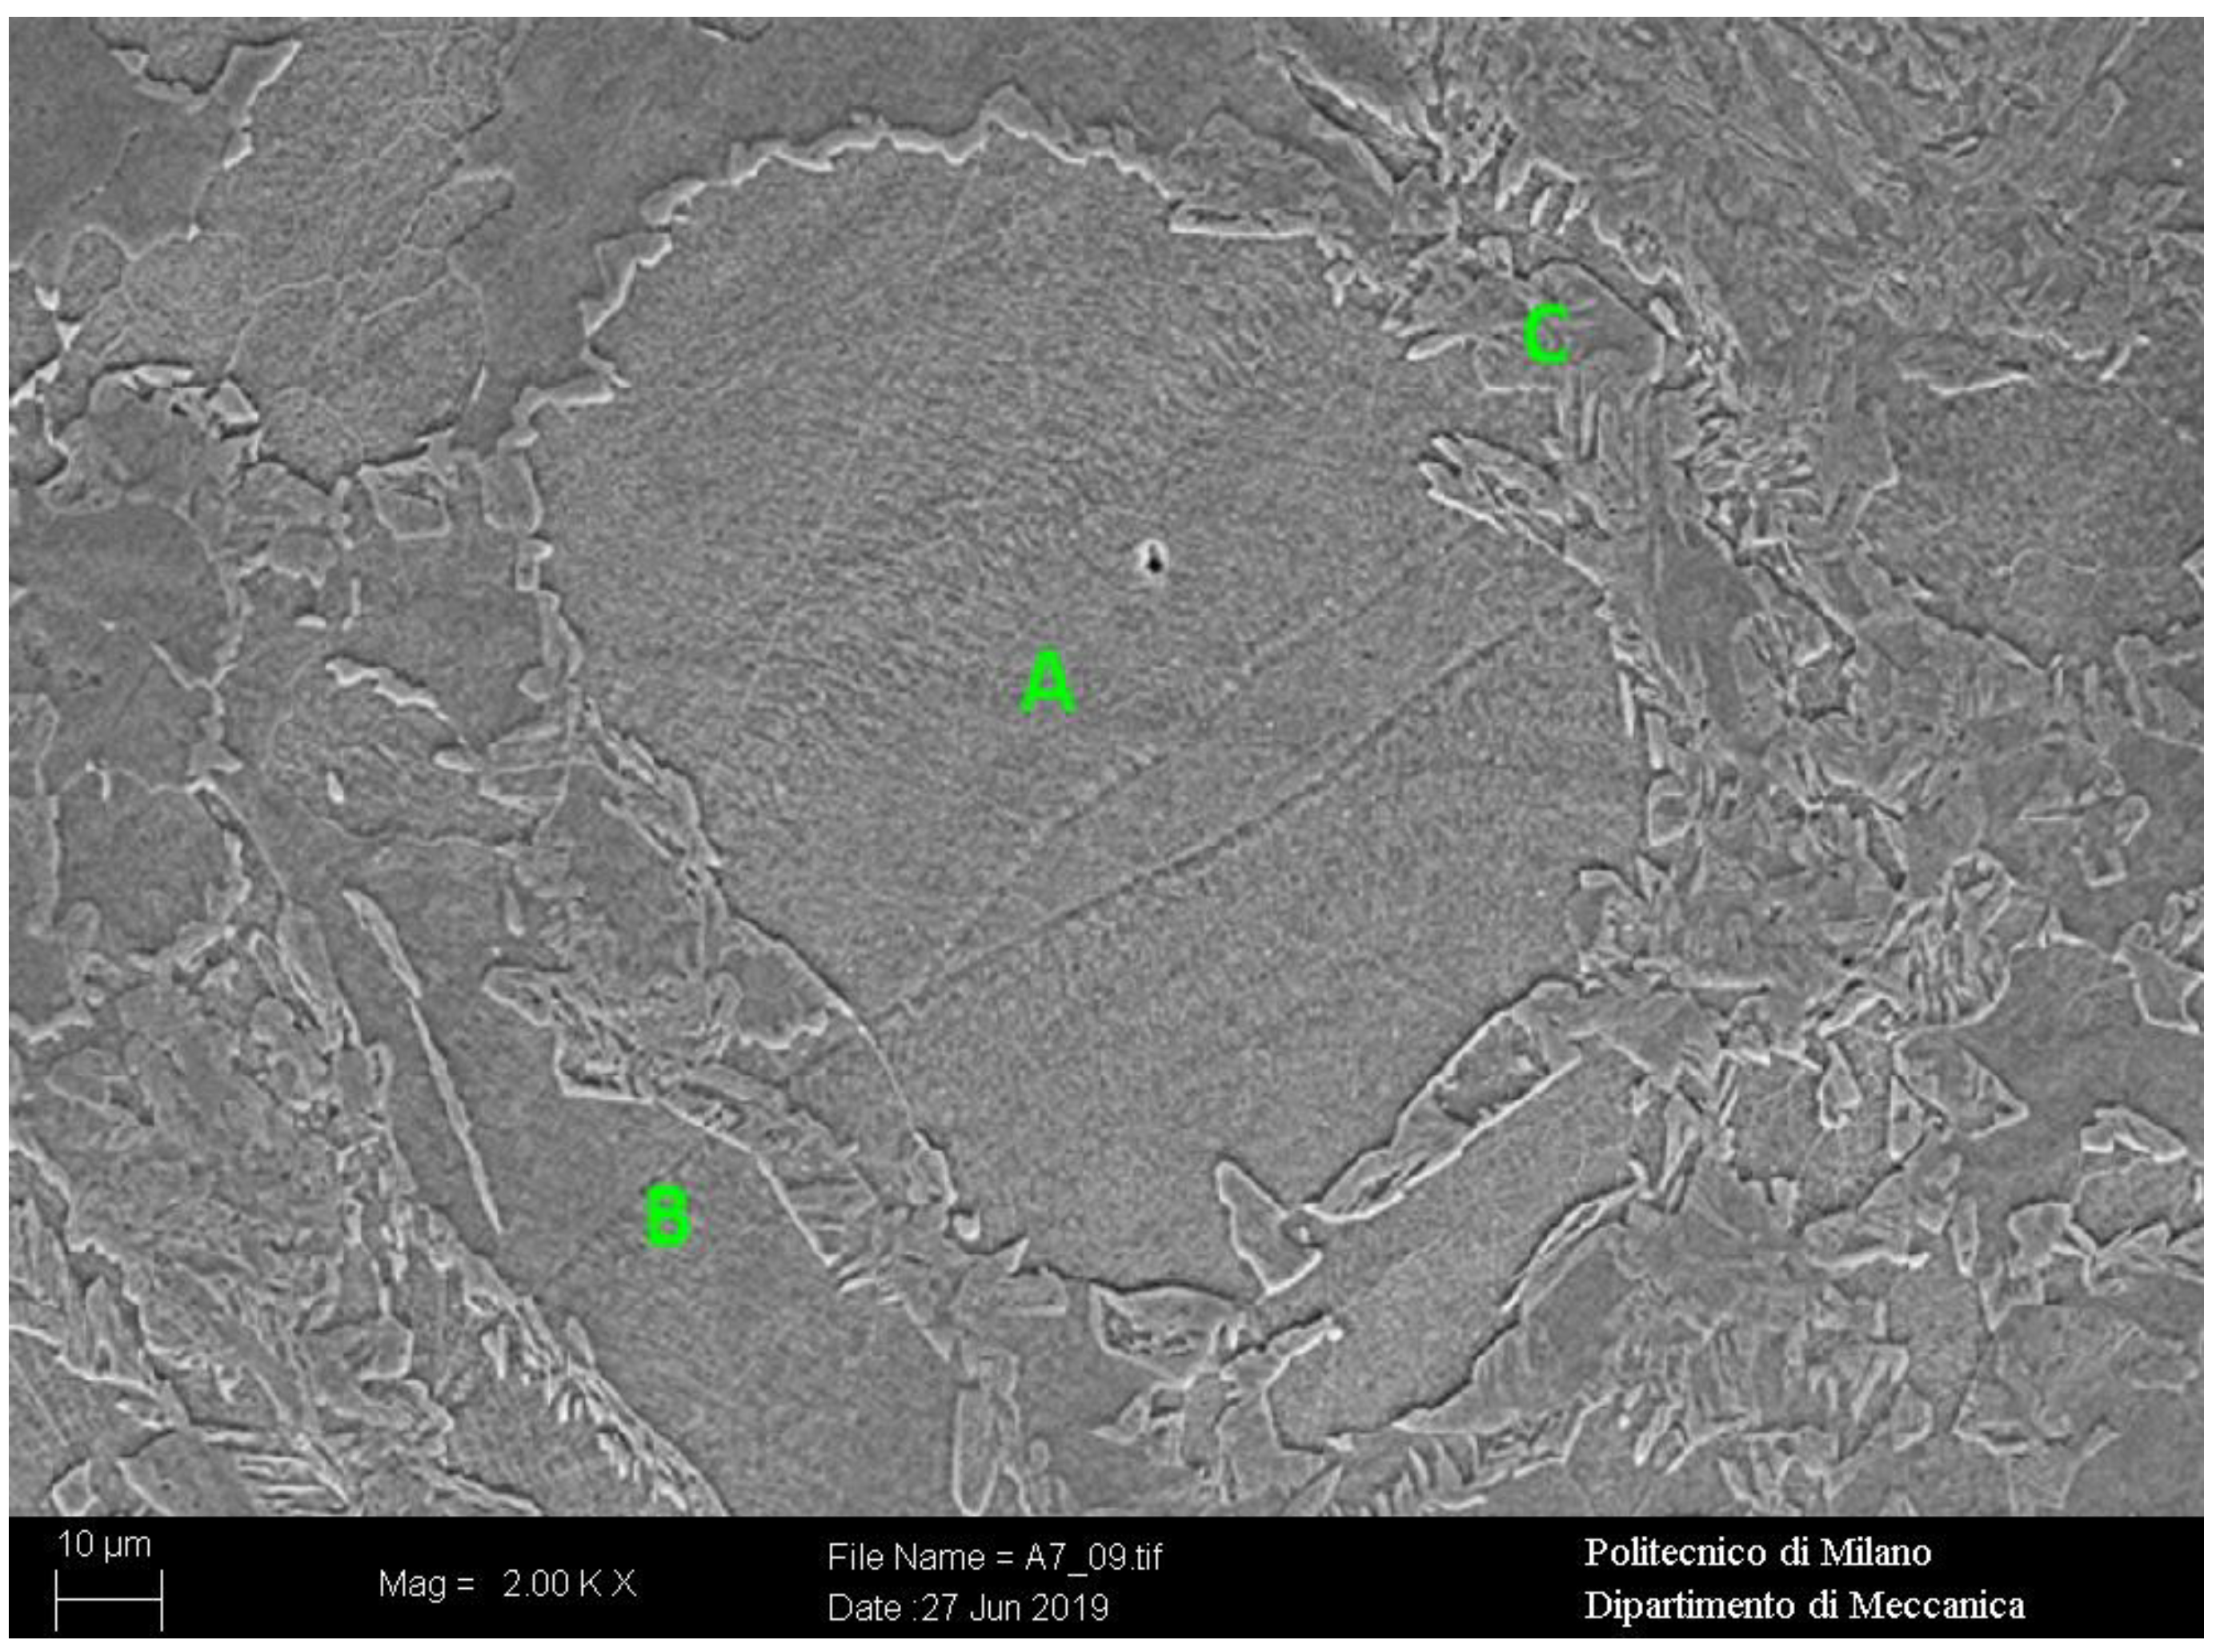
The chemical composition of the melt pools was investigated by Energy-Dispersive X-ray Spectroscopy (EDS) analysis as reported in Figure 10 and Table 4. No appreciable difference was detected among the pool center and boundaries.
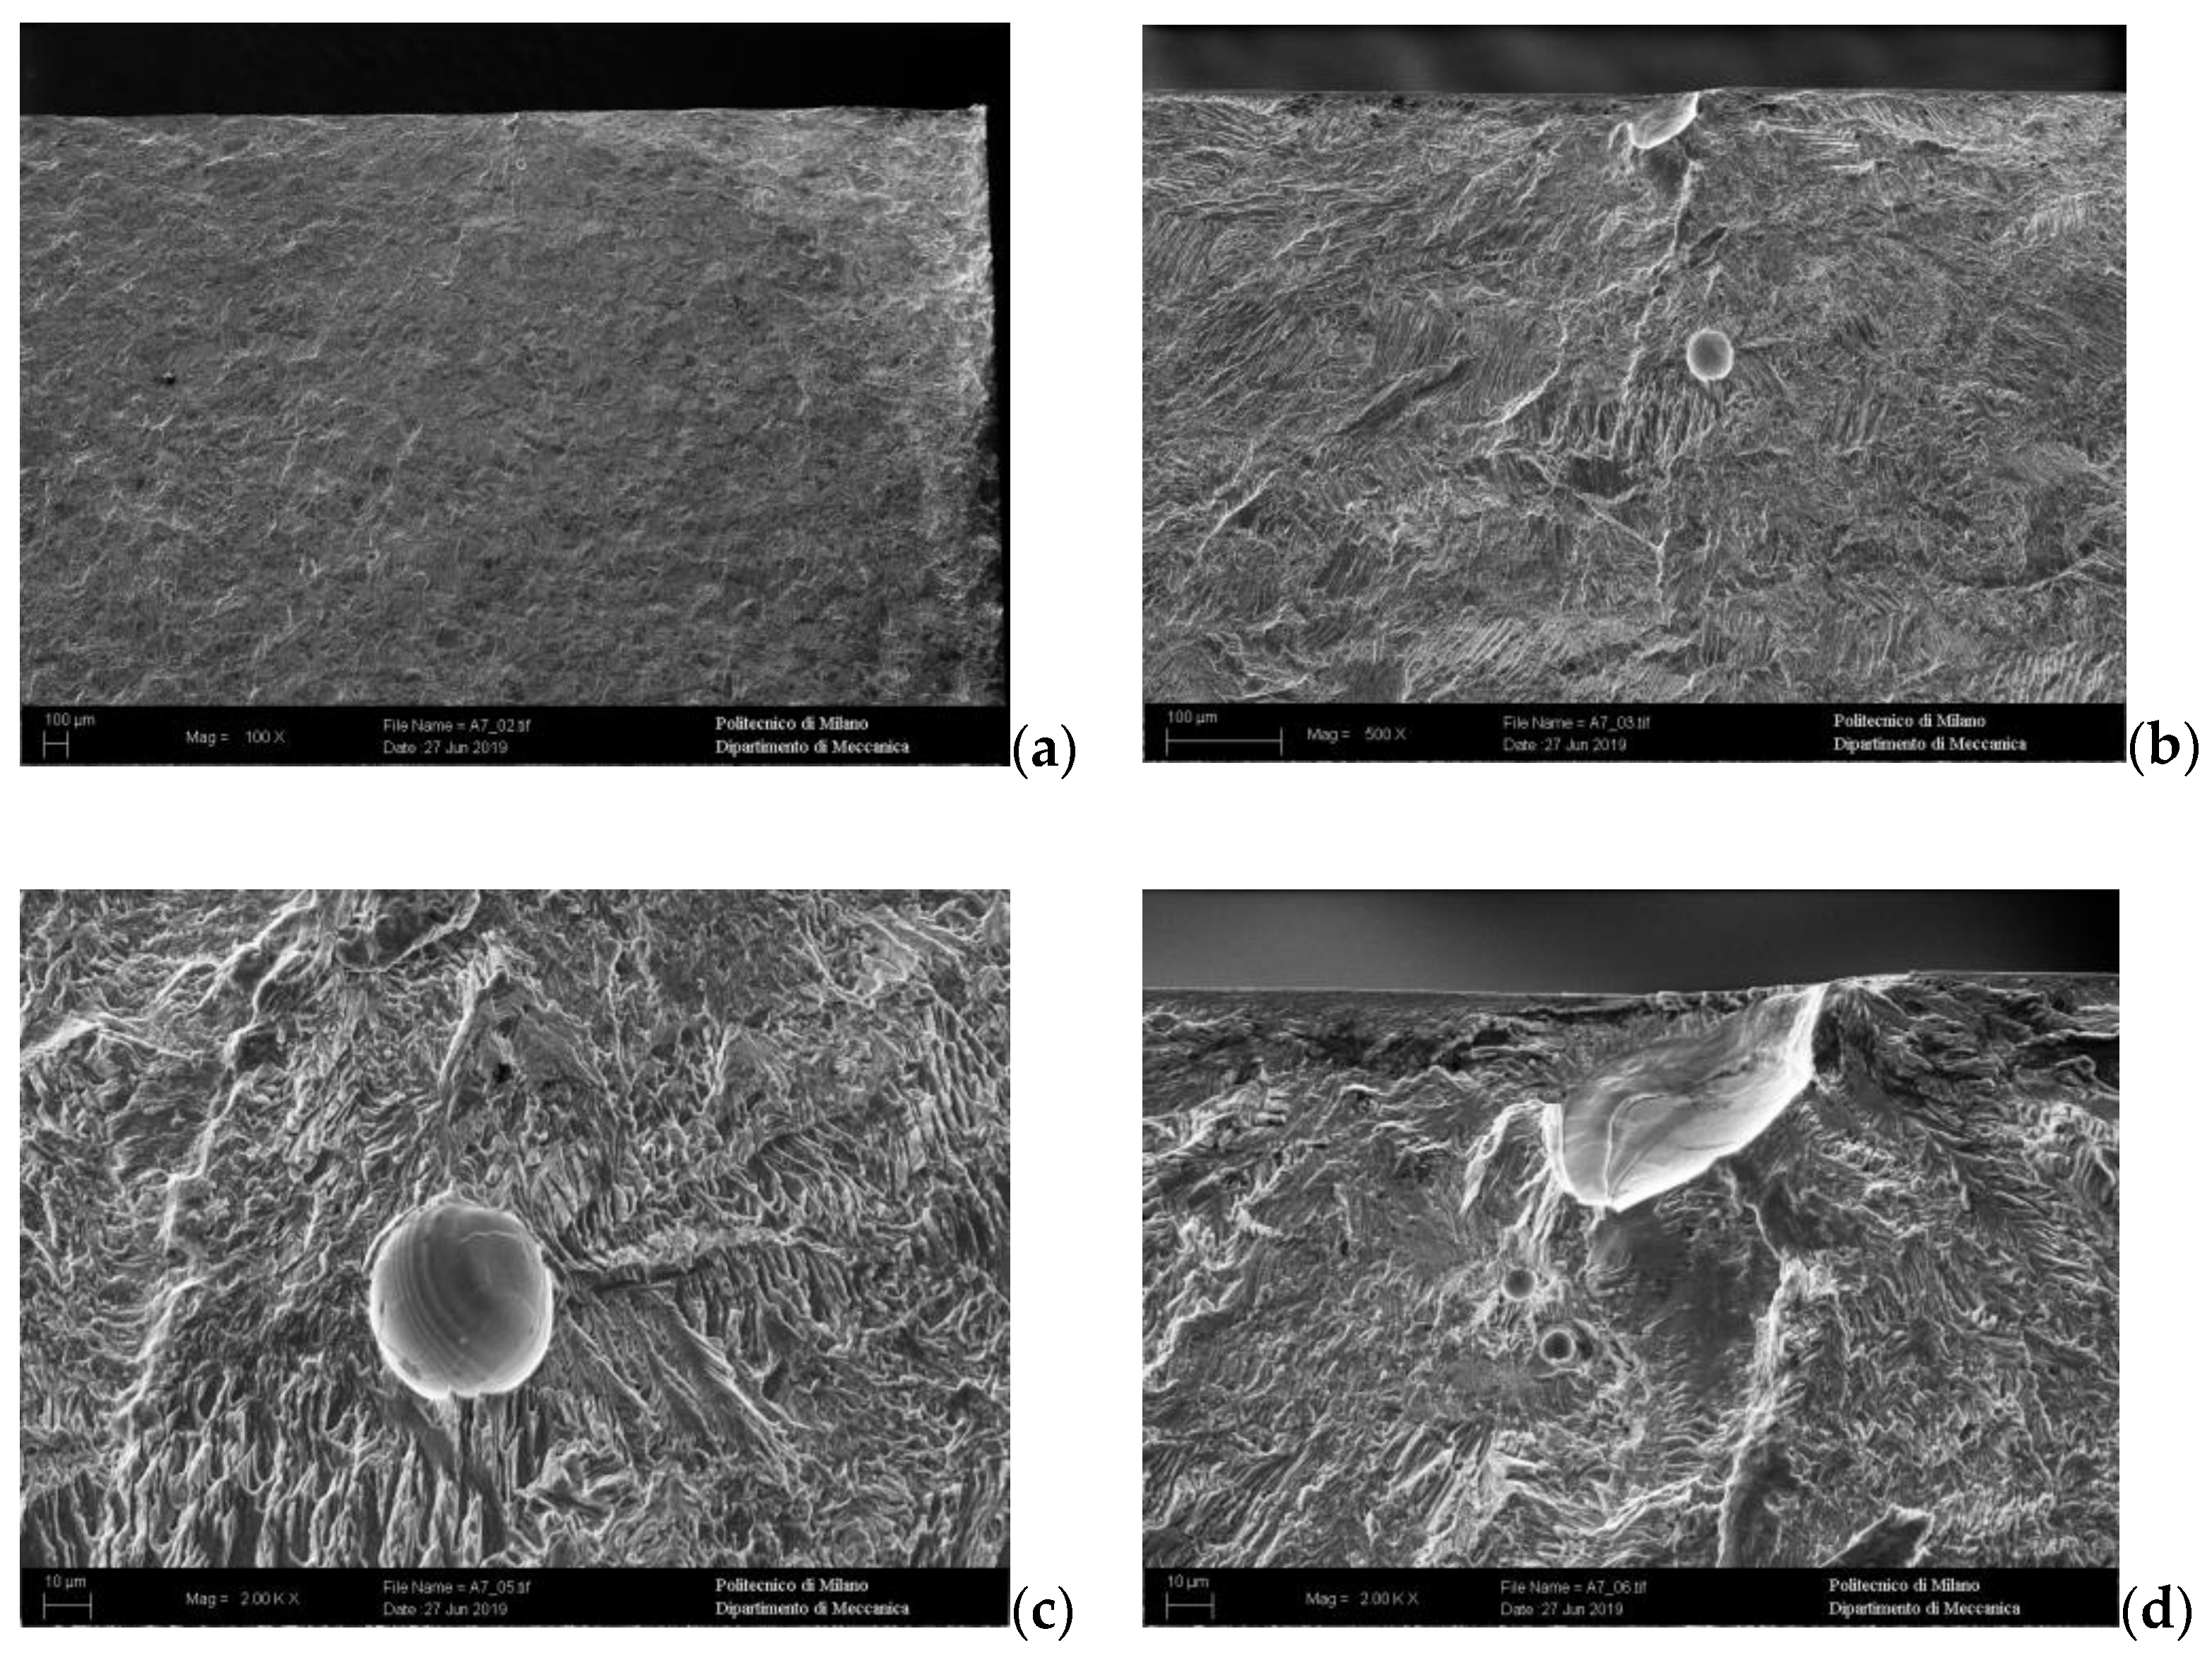
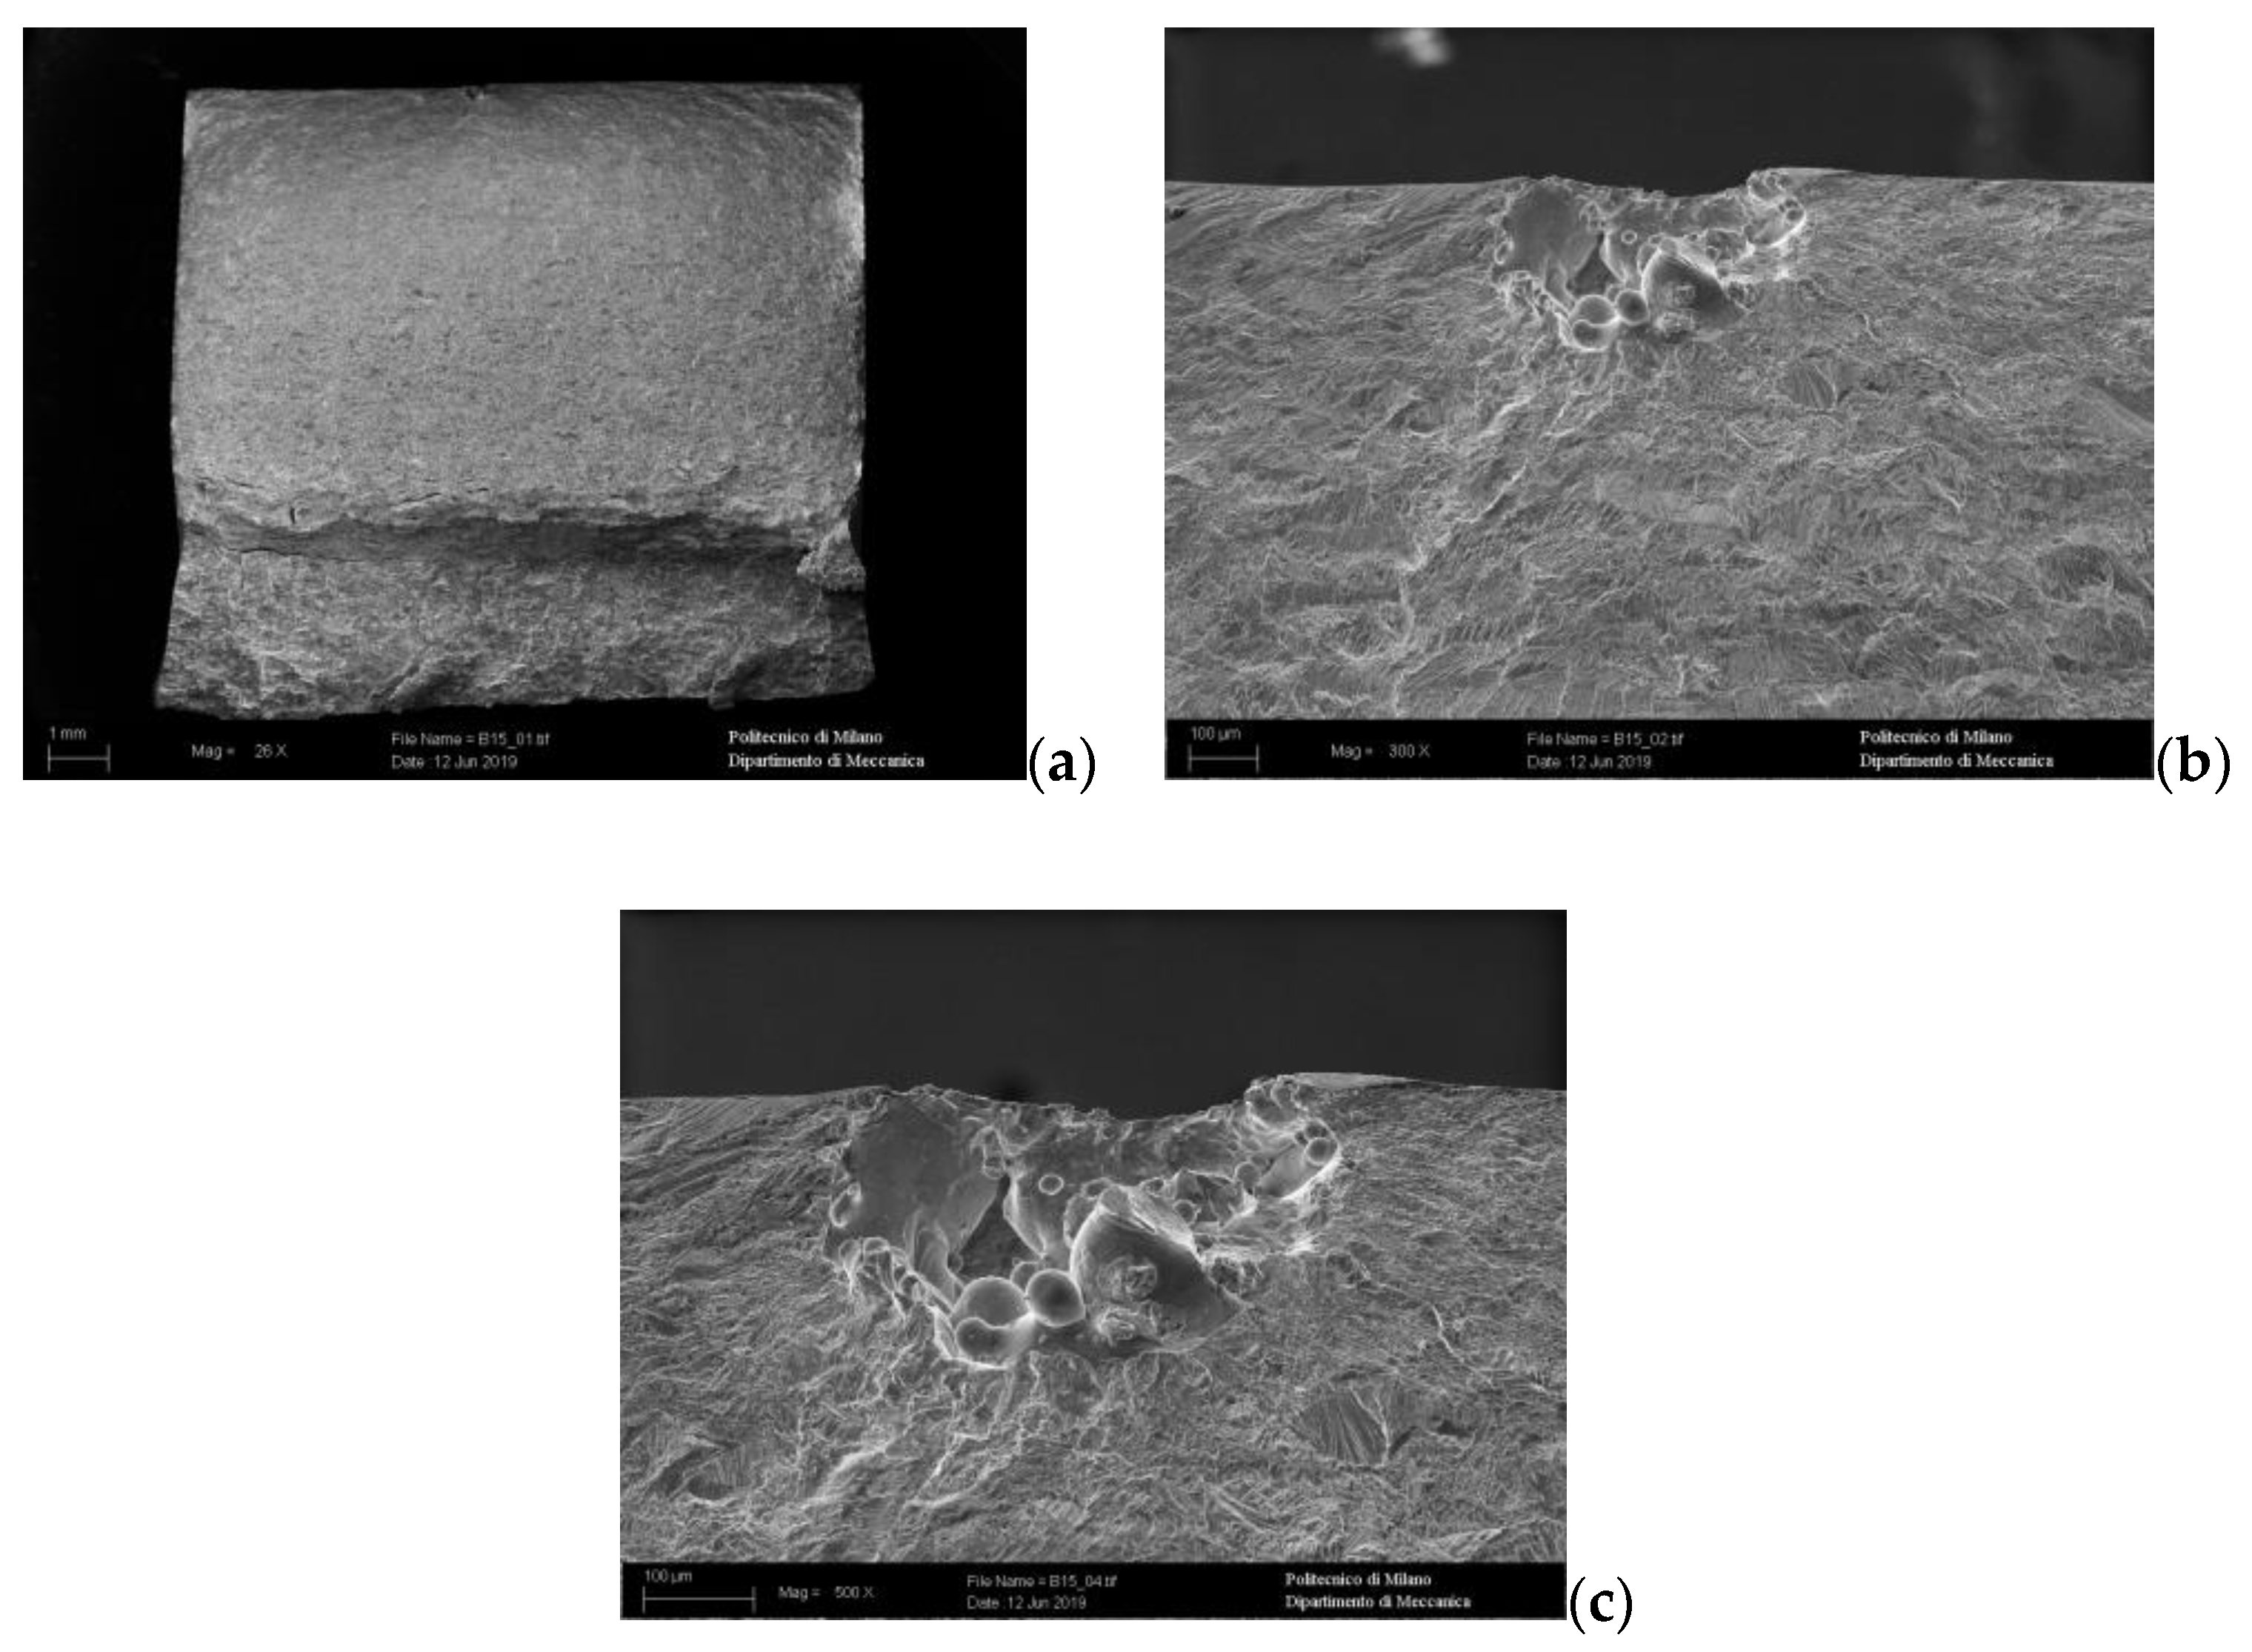
Finally, the fracture surfaces of some of the broken teeth belonging to gears A and B were analyzed by SEM (Figure 11 and Figure 12). The crack origin was often related to surface and subsurface defects related to the production process (lack of fusion and gas porosities). In some cases, nonmelted metallic particles were observed too.
In the literature there are several studies about the fatigue behavior of AM parts (e.g., [46,47,48,49]). All of them, even if done on different materials, report that the presence of such defects has a strong influence on the fatigue behavior. These considerations agree with the results coming from the present fatigue campaign.

6. Results Discussion

The present work is a part of a project aimed at the mechanical characterization of AM materials [50,51,52], specifically the determination of the fatigue limit, and their application to a classical machine element such as gears. In this context, it is of interest to compare the results of the present experimental campaign with the classical gear literature data aiming at evaluating the applicability of AM technologies in the context of gearbox design. ISO 6336-5:2016 [23] presents fatigue limits for steel which are like the one obtained in this experimental campaign. As an example, according to the aforementioned code, the bending fatigue limit σFE in the case of hardened wrought steel of medium quality (ME), at 1% failure probabilities and without considering any correction factors, typically ranges between 425 and 500 MPa, values comparable with the ones found in this experimental campaign.
In future works, the effects of the various mechanical and thermal treatments on which the tooth root can undergo, will be studied. In this work, gears have been tested after hobbing and without any thermal treatment to set a reference for future studies. Therefore, there is still room for the increase of the tooth root bearing capacity by improving the tooth root roughness and adopting proper thermal treatment. For instance, ageing and Hot Isostatic Pressing (HIP) have beneficial effects on the fatigue behavior of an AM 17-4 Ph specimen [53,54].
Despite the degree of freedom given by the design of the parts via AM, the low geometrical accuracy often requires the machining of the parts. This aspect is even more crucial in gears because the tooth profile must be as close as possible to the theoretical involute to avoid undesired levels of noise, vibration, wear, and fatigue phenomena. Thus, gear postprocess machining of the meshing parts remains necessary. Regarding the real advantages of producing small batches of full body gears, AM remains necessary when aiming at a gear tuning that wants to overcome the limits of the classic manufacturing processes and become an affordable technique for prototypes. Within this context, the evaluated fatigue resistance properties are a key positive factor.

7. Conclusions

The aim of this work was to determine the fatigue limit at 50% failure probability X50% for gears made by 17-4 PH produced via Laser Powder Bed Fusion (PBF-LB/M) according to ISO 6336. This was done with STBF tests, the results of which were successively analyzed by means of two different statistical approaches (Dixon and Little). The results could be used in accordance with the ISO 6336 standard for designing gears. In order to have a starting point for the evaluation of the effect that specific treatments (e.g., shoot peening, grinding, etc.) may have on the gear resistance, in the present work the gears have been tested without any treatment, which could further improve the gear resistance, to set a reference.
By comparing the results with the data provided by the literature and by the standards (425 to 500 MPa for a case-hardened steel with MD quality), it results that the tested material’s properties are similar to the ones that are commonly used steel for gear applications. As confirmed by the SEM analysis, AM gears are affected by an important presence of defects related to the production process. These defects are the main source of nucleation of cracks in AM materials. This evidence supports the literature data (mainly obtained for other components or from cylindrical samples) confirming that the AM defects also negatively affect the gear behavior.

Author Contributions

F.C. followed the development of the rig, postprocessed the results and wrote the paper; L.B. performed the fatigue tests and wrote the paper; R.G. performed the fracture analyses; L.C., F.N., F.R. and C.G. revised the paper. All authors have read and agreed to the published version of the manuscript.

Funding

The authors would like to thank the Free University of Bozen-Bolzano for the financial support given to this study through the project M.AM.De (TN2092, call CRC2017 Unibz PI Franco Concli [email protected]).

Data Availability Statement

The datasets used and/or analyzed during the current study are available from the corresponding author on reasonable request.

Conflicts of Interest

The authors declare that they have no competing interests.

Abbreviations

AMAdditive Manufacturing
NVHNoise Vibration Harshness (NVH)
PBF-LB/MLaser Powder Bed Fusion
RORun-Out
SEMScanning Electron Microscopy
STBFSingle Tooth Bending Fatigue

References

  1. Thompson, M.K.; Moroni, G.; Vaneker, T.; Fadel, G.; Campbell, R.I.; Gibson, I.; Bernard, A.; Schulz, J.; Graf, P.; Ahuja, B.; et al. Design for Additive Manufacturing: Trends, opportunities, considerations, and constraints. CIRP Ann. 2016, 65, 737–760. [Google Scholar] [CrossRef] [Green Version]
  2. Atzeni, E.; Salmi, A. Economics of additive manufacturing for end-usable metal parts. Int. J. Adv. Manuf. Technol. 2012, 62, 1147–1155. [Google Scholar] [CrossRef]
  3. Kamps, T.; Lutter-Guenther, M.; Seidel, C.; Gutowski, T.; Reinhart, G. Cost- and energy-efficient manufacture of gears by laser beam melting. CIRP J. Manuf. Sci. Technol. 2018, 21, 47–60. [Google Scholar] [CrossRef]
  4. Kluge, M.; Kotthoff, G.; Cavallini, C.; Driveline, G.K.N.; Höges, S.; Metallurgy, G.K.N.P. Design and Production of Innovative Transmission Components with Additive Manufacturing. In Proceedings of the 16th International CTI Symposium Automotive Transmissions, HEV and EV Drives, Berlin, Germany, 5–7 December 2017. [Google Scholar]
  5. ISO/ASTM. 52910:2018 Additive Manufacturing-Design-Requirements, Guidelines and Recommendations 1.
  6. Kozmel, T.; Kantner, C.; Nez, B.; Grabowski, J.; Sebastian, J.; Fetty, J.; Kantner, C.; Sebastian, J.; Nez, B.; Fetty, J. Additive Manufacturing of Ferrium® C64® for Aerospace Gear Applications. The Vertical Flight Society-Forum 75: The Future of Vertical Flight. In Proceedings of the 75th Annual Forum and Technology Display, AHS International, Philadelphia, PA, USA, 13–16 May 2019. [Google Scholar]
  7. Mura, A.; Curà, F.; Pasculli, L. Optimisation methodology for lightweight gears to be produced by additive manufacturing techniques. Proc. Inst. Mech. Eng. Part C J. Mech. Eng. Sci. 2017, 232, 3512–3523. [Google Scholar] [CrossRef]
  8. Muminovic, A.J.; Colic, M.; Mesic, E.; Saric, I. Innovative Design of Spur Gear Tooth with Infill Structure. Bull. Polish Acad. Sci. Tech. Sci. 2020, 68, 477–483. [Google Scholar]
  9. Kamps, T.; Proceedings, G.R. Increasing Transmission Efficiency by Implementation of a Conformal Cooling System Using Additive Manufacturing; Fraunhofer: Stuttgart, Germany, 2014. [Google Scholar]
  10. Bräunig, J.; Töppel, T.; Müller, B.; Burkhardt, M.; Hipke, T.; Drossel, W.-G. Advanced Material Studies for Additive Manufacturing in terms of Future Gear Application. Adv. Mech. Eng. 2014, 6, 741083. [Google Scholar] [CrossRef] [Green Version]
  11. Ramadani, R.; Belsak, A.; Kegl, M.; Predan, J.; Pehan, S. Topology Optimization Based Design of Lightweight and Low Vibration Gear Bodies. Int. J. Simul. Model. 2018, 17, 92–104. [Google Scholar] [CrossRef]
  12. Rogers, K. Additive Manufacturing Technologies for Gears. Am. Gears Manuf. Assoc. Publ. Barners Gr. Advis 2019. [Google Scholar]
  13. Concli, F.; Gilioli, A. Numerical and experimental assessment of the static behavior of 3D printed reticular Al structures produced by Selective Laser Melting: Progressive damage and failure. Procedia Struct. Integr. 2018, 12, 204–212. [Google Scholar] [CrossRef]
  14. Concli, F.; Gilioli, A. Numerical and experimental assessment of the mechanical properties of 3D printed 18-Ni300 steel trabecular structures produced by Selective Laser Melting—A lean design approach. Virtual Phys. Prototyp. 2019, 14, 267–276. [Google Scholar] [CrossRef]
  15. Concli, F.; Gilioli, A.; Nalli, F. Experimental-numerical assessment of ductile failure of Additive Manufacturing selective laser melting reticular structures made of Al A357. Proc. Inst. Mech. Eng. Part C J. Mech. Eng. Sci. 2019, 0954406219832333. [Google Scholar] [CrossRef]
  16. Beretta, S.; Romano, S. A comparison of fatigue strength sensitivity to defects for materials manufactured by AM or traditional processes. Int. J. Fatigue 2017, 94, 178–191. [Google Scholar] [CrossRef]
  17. Romano, S.; Brückner-Foit, A.; Brandão, A.; Gumpinger, J.; Ghidini, T.; Beretta, S. Fatigue properties of AlSi10Mg obtained by additive manufacturing: Defect-based modelling and prediction of fatigue strength. Eng. Fract. Mech. 2018, 187, 165–189. [Google Scholar] [CrossRef]
  18. Romano, S.; Nezhadfar, P.; Shamsaei, N.; Seifi, M.; Beretta, S. High cycle fatigue behavior and life prediction for additively manufactured 17-4 PH stainless steel: Effect of sub-surface porosity and surface roughness. Theor. Appl. Fract. Mech. 2020, 106, 102477. [Google Scholar] [CrossRef]
  19. Fatemi, A.; Molaei, R.; Phan, N. Multiaxial fatigue of additive manufactured metals: Performance, analysis, and applications. Int. J. Fatigue 2020, 134, 105479. [Google Scholar] [CrossRef]
  20. ANSI/AGMA. 2101-D04 (R2016)—Fundamental Rating Factors and Calculation Methods for Involute Spur and Helical Gear Teeth (Metric Edition).
  21. ISO. 6336-2: 2019 Calculation of Load Capacity of Spur and Helical Gears—Part 2: Calculation of Surface Durability (Pitting).
  22. ISO. 6336-3:2019 Calculation of Load Capacity of Spur and Helical Gears—Part 3: Calculation of Tooth Bending Strength.
  23. ISO. 6336-5:2016 Calculation of Load Capacity of Spur and Helical Gears—Part 5: Strength and Quality of Materials.
  24. Tezel, T.; Topal, E.S.; Kovan, V. Characterising the wear behaviour of DMLS-manufactured gears under certain operating conditions. Wear 2019, 440, 203106. [Google Scholar] [CrossRef]
  25. Tezel, T.; Topal, E.S.; Kovan, V. Failure analysis of 3D-printed steel gears. Eng. Fail. Anal. 2020, 110, 104411. [Google Scholar] [CrossRef]
  26. Niemann, G.; Winter, H. Elementi Di Macchine; Tecniche Nuove: Milano, Italy, 1983; Volume II. [Google Scholar]
  27. Bonaiti, L.; Bayoumi, A.B.M.; Concli, F.; Rosa, F.; Gorla, C. Gear root bending strength: A comparison between Single Tooth Bending Fatigue Tests and meshing gears. J. Mech. Des. 2021, 1–17. [Google Scholar] [CrossRef]
  28. Meneghetti, G.; Dengo, C.; Conte, F.L. Bending fatigue design of case-hardened gears based on test specimens. Proc. Inst. Mech. Eng. Part C J. Mech. Eng. Sci. 2017, 232, 1953–1969. [Google Scholar] [CrossRef]
  29. Benedetti, M.; Fontanari, V.; Höhn, B.R.; Oster, P.; Tobie, T. Influence of shot peening on bending tooth fatigue limit of case hardened gears. Int. J. Fatigue 2002, 24, 1127–1136. [Google Scholar] [CrossRef]
  30. Maccioni, L.; Fraccaroli, L.; Borgianni, Y.; Concli, F. High-Cycle-Fatigue Characterization of an Additive Manufacturing 17-4 PH Stainless Steel. Key Eng. Mater. 2021, 877, 49–54. [Google Scholar] [CrossRef]
  31. Maccioni, L.; Rampazzo, E.; Nalli, F.; Borgianni, Y.; Concli, F. Low-Cycle-Fatigue Characterization of an Additive Manufacturing 17-4 PH Stainless Steel. Key Eng. Mater. 2020, 887, 55–60. [Google Scholar]
  32. Ltd, M.G.C. Maag Gear Book: Calculation and Practice of Gears, Gear Drives Toothed Couplings and Synchronous Clutch Couplings; Maag Gear Company Limited: Oberglatt, Switzerland, 1990. [Google Scholar]
  33. Gasparini, G.; Mariani, U.; Gorla, C.; Filippini, M.; Rosa, F. Bending Fatigue Tests of Helicopter Case Carburized Gears: Influence of Material, Design and Manufacturing Parameters. Gear Tech. 2008, 68, 76. [Google Scholar]
  34. Gorla, C.; Rosa, F.; Concli, F.; Albertini, H. Bending Fatigue Strength of Innovative Gear Materials for Wind Turbines Gearboxes: Effect of Surface Coatings. In Volume 1: Advances in Aerospace Technology; ASME International: New York, NY, USA, 2012; pp. 3141–3147. [Google Scholar]
  35. Gorla, C.; Rosa, F.; Conrado, E.; Albertini, H. Bending and contact fatigue strength of innovative steels for large gears. Proceedings of the Institution of Mechanical Engineers, Part C. J. Mech. Eng. Sci. 2014, 228, 2469–2482. [Google Scholar] [CrossRef] [Green Version]
  36. Gorla, C.; Rosa, F.; Conrado, E.; Concli, F. Bending Fatigue Strength of Case Carburized and Nitrided Gear Steels for Aeronautical Applications. Int. J. Appl. Eng. Res. 2017, 12, 11306–11322. [Google Scholar]
  37. Gorla, C.; Conrado, E.; Rosa, F.; Concli, F. Contact and bending fatigue behaviour of austempered ductile iron gears. Proc. Inst. Mech. Eng. Part C J. Mech. Eng. Sci. 2017, 232, 998–1008. [Google Scholar] [CrossRef]
  38. Niemann, G.; Winter, H. Getriebe Allgemein, Zahnradgetriebe-Grundlagen, Stirnradgetriebe; Springer: Berlin/Heidelberg, Germany, 1989. [Google Scholar]
  39. Dudley, D.W.; Townsend, D.P. Manuale Degli Ingranaggi—Edizione Italiana—Tecniche Nuove; Milano: Milano, Italy, 1996. [Google Scholar]
  40. ISO. 1328—1: Cylindrical Gears—ISO System of Flank Tolerance Classification—Part 1: Definitions and Allowable of Value of Deviations Relevant to Flanks of Gear Teeth. 2013.
  41. ISO. 12107, 2012 Metallic Materials-Fatigue Testing-Statistical Planning and Analysis of Data. Int. Organ. Stand 2012. [Google Scholar]
  42. ASTM, E. 739-91: Standard Practice for Statistical Analysis of Linear or Linearized Stress-Life (S–N) and Strain-Life (e–N) Fatigue Data. Am. Soc. Test. Mater. Phila. 2006. [Google Scholar]
  43. Brownlee, K.A.; Hodges, J.L., Jr.; Rosenblatt, M. The Up-and-down Method with Small Samples. J. Am. Stat. Assoc. 1953, 48, 262–277. [Google Scholar] [CrossRef]
  44. Little, R.E. The Up-and-Down Method for Small Samples with Two Specimens “in Series”. J. Am. Stat. Assoc. 1975, 70, 846. [Google Scholar] [CrossRef]
  45. Dixon, W.J. The Up-and-down Method for Small Samples. J. Am. Stat. Assoc. 1965, 60, 967–978. [Google Scholar] [CrossRef]
  46. Bonaiti, L.; Concli, F.; Gorla, C.; Rosa, F. Bending fatigue behaviour of 17-4 PH gears produced via selective laser melting. Procedia Struct. Integr. 2019, 24, 764–774. [Google Scholar] [CrossRef]
  47. Yadollahi, A.; Shamsaei, N. Additive manufacturing of fatigue resistant materials: Challenges and opportunities. Int. J. Fatigue 2017, 98, 14–31. [Google Scholar] [CrossRef] [Green Version]
  48. Koutiri, I.; Pessard, E.; Peyre, P.; Amlou, O.; De Terris, T. Influence of SLM process parameters on the surface finish, porosity rate and fatigue behavior of as-built Inconel 625 parts. J. Mater. Process. Technol. 2018, 255, 536–546. [Google Scholar] [CrossRef]
  49. Carneiro, L.; Jalalahmadi, B.; Ashtekar, A.; Jiang, Y. Cyclic deformation and fatigue behavior of additively manufactured 17–4 PH stainless steel. Int. J. Fatigue 2019, 123, 22–30. [Google Scholar] [CrossRef]
  50. Nalli, F.; Cortese, L.; Concli, F. Ductile damage assessment of Ti6Al4V, 17-4PH and AlSi10Mg for additive manufacturing. Eng. Fract. Mech. 2021, 241, 107395. [Google Scholar] [CrossRef]
  51. Fraccaroli, L.; Concli, F. 17-4 PH SS Manufactured via Selective Laser Melting: High Cycle Fatigue Properties. World Symposium on Mechanical—Materials Engineering & Science. In Proceedings of the WMMES, Prague, Czech, 9–11 September 2020. [Google Scholar]
  52. Fraccaroli, L.; Concli, F. 17-4 PH SS Manufactured via Selective Laser Melting: Low-Cycle-Fatigue Properties. World Symposium on Mechanical—Materials Engineering & Science. In Proceedings of the WMMES, Prague, Czech, 9–11 September 2020. [Google Scholar]
  53. Nezhadfar, P.; Shrestha, R.; Phan, N.; Shamsaei, N. Fatigue behavior of additively manufactured 17-4 PH stainless steel: Synergistic effects of surface roughness and heat treatment. Int. J. Fatigue 2019, 124, 188–204. [Google Scholar] [CrossRef]
  54. Molaei, R.; Fatemi, A.; Phan, N. Multiaxial fatigue of LB-PBF additive manufactured 17–4 PH stainless steel including the effects of surface roughness and HIP treatment and comparisons with the wrought alloy. Int. J. Fatigue 2020, 137, 105646. [Google Scholar] [CrossRef]
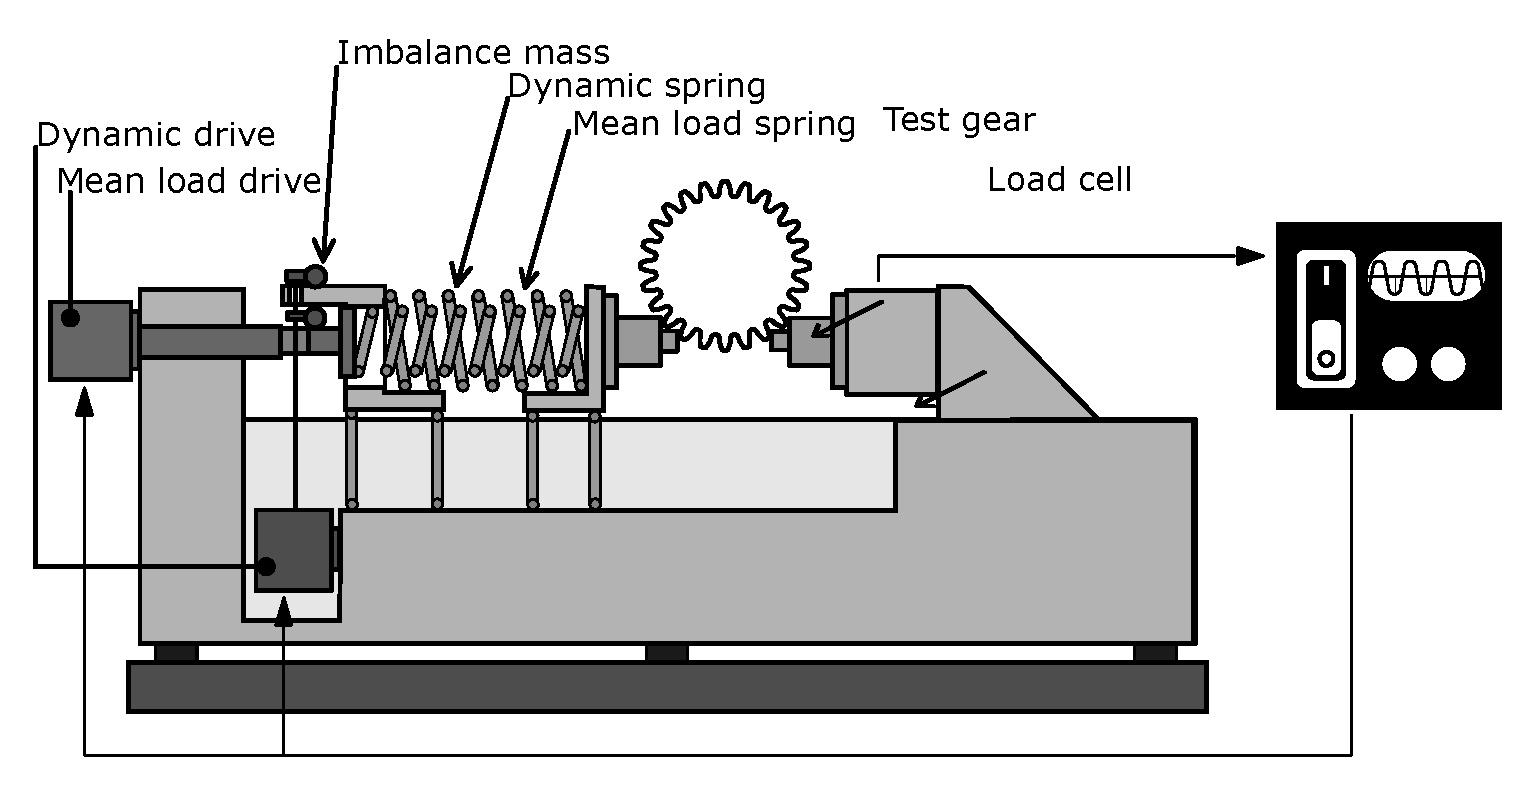
Figure 1. Scheme of the mechanical pulsator.
Applsci 11 03019 g001
Figure 2. Scheme of the gear/anvils contact; dimensions are in mm; FEM analysis of the loaded tooth during Single Tooth Bending Fatigue (STBF) tests.
Applsci 11 03019 g002
Figure 3. Schematic drawing of the tested gears; dimensions are in mm.
Applsci 11 03019 g003
Figure 4. σ F 0 N curve.
Applsci 11 03019 g004
Figure 5. Staircase sequence.
Applsci 11 03019 g005
Figure 6. Quasistatic test results and monoaxial tensile fatigue test results [30].
Applsci 11 03019 g006
Figure 7. Porosities observed close to (a) and far (b,c) from the crack (marked by the arrows in picture (a)).
Applsci 11 03019 g007
Figure 8. Melt pools in the transversal direction (a,b) and in the build direction (c,d).
Applsci 11 03019 g008
Figure 9. Comparison between the crack path and the microstructure. (a) 100 μm, (b) 50 μm.
Applsci 11 03019 g009
Figure 10. Melt pool SE image.
Applsci 11 03019 g010
Figure 11. Tooth A7—the nucleation zone is remarked in (a). Surface and subsurface porosities have been observed in the nucleation zone (b). The pore diameter is about 40 m (c). Close to the surface defects, two smaller porosities are clearly visible; the surface defect is about 50 µm deep and 60 µm width (d).
Applsci 11 03019 g011
Figure 12. Tooth B15—the nucleation zone is remarked in (a), where large fusion defect (about 240 μm deep) with unmelted particles is clearly visible on the outer surface (b,c).
Applsci 11 03019 g012
Table 1. Gear main data.
m n 5 mmNormal module
α n 20Normal Pressure angle
β 0Pressure angle at normal section
z 24Number of teeth
b 10 mmFace width
x −0.2Profile shift coefficient
h f P * 1.25Dedendum coefficient of the basic rack profile
ρ f P * 0.380Root radius factor of the basic rack profile
h a P * 1.00Addendum coefficient of the basic rack profile
Table 2. Process parameters.
MachineEOS M280
Laser sourcefiber
Printing direction according to gear axis (see Figure 4)
Gasnitrogen
Power200W
Scanning speed600 mm/s
Spot diameter100 μm
Layer thickness40 μm
Average particle size42.61 μm
Table 3. Experimental points.
Test IDGear TestedTeethFmin [N]Fmax [N]CyclesBroken Tooth
1A1–3−15,000−1500202,5501
2A5–7−14,000−1400229,5757
3A9–11Interrupted test
4A13–15−12,500−1250481,89713
5A17–19−12,250−1225581,95117
6A21–23−11,000−1100631,46021
7B1–3Interrupted test
8B5–7−9000−900277,6907
9B9–11−9000−900Runout-
10B13–15−9500−950481,89715
11B17–19−9000−900581,95119
12B21–23−8500−850Runout-
Table 4. EDS analysis of the melt pool in the zones remarked in Figure 10.
Al (%)Si (%)Cr (%)Fe (%)Ni (%)Cu (%)Nb (%)
A0.310.5117.2374.643.793.270.25
B0.280.4717.173.153.763.300.24
C0.320.4817.474.483.763.310.25
Publisher’s Note: MDPI stays neutral with regard to jurisdictional claims in published maps and institutional affiliations.