Performance Characterization of the UAV Chemical Application Based on CFD Simulation


Abstract
:1. Introduction
2. Materials and Methods
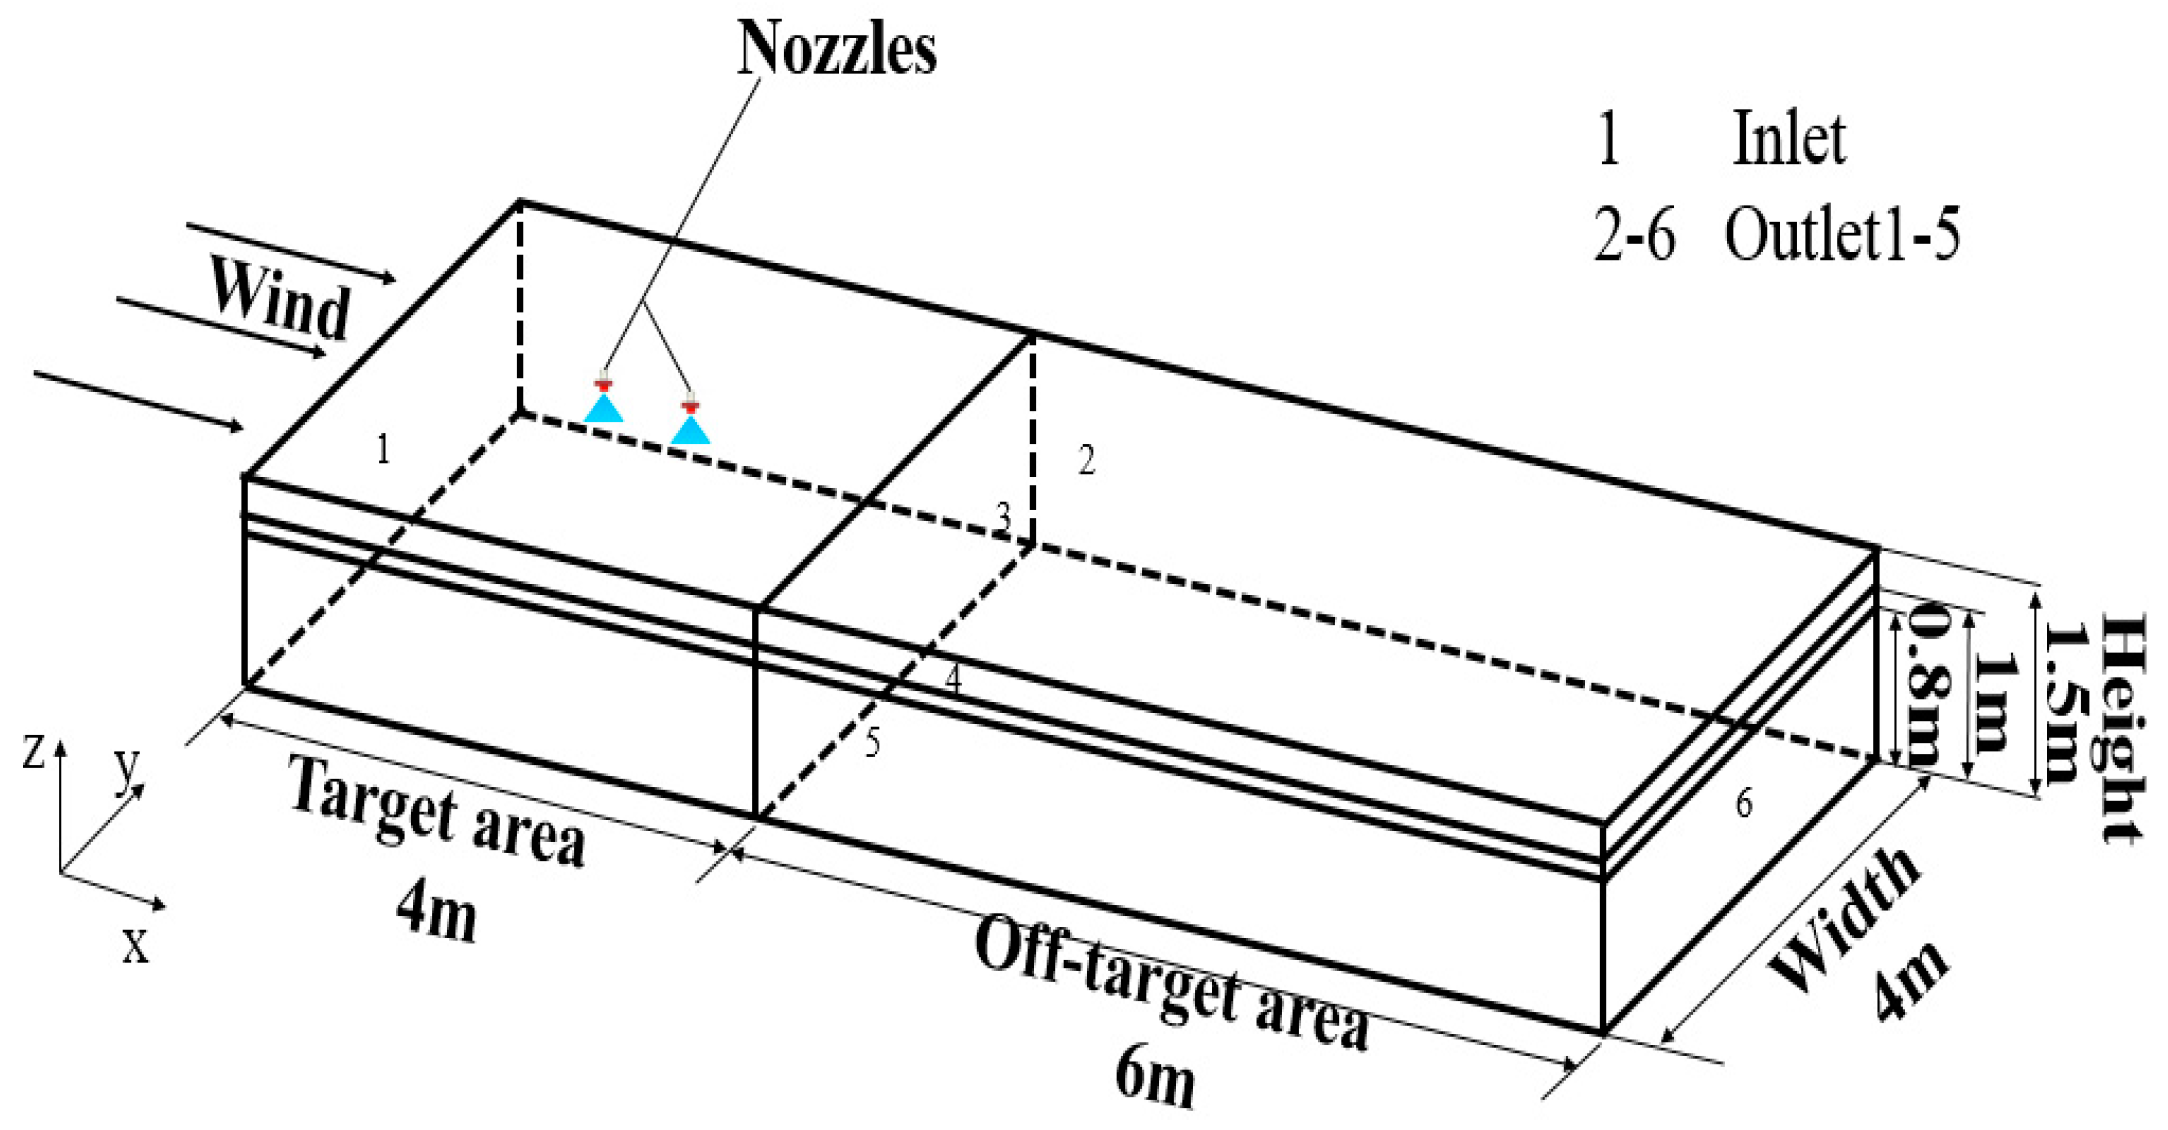
2.1. Geometric Model Building
2.2. Design of Experiment
2.3. Method of Analysis
3. Results and Discussion
3.1. Simulation of Influence of Different Factors on Droplet Drift
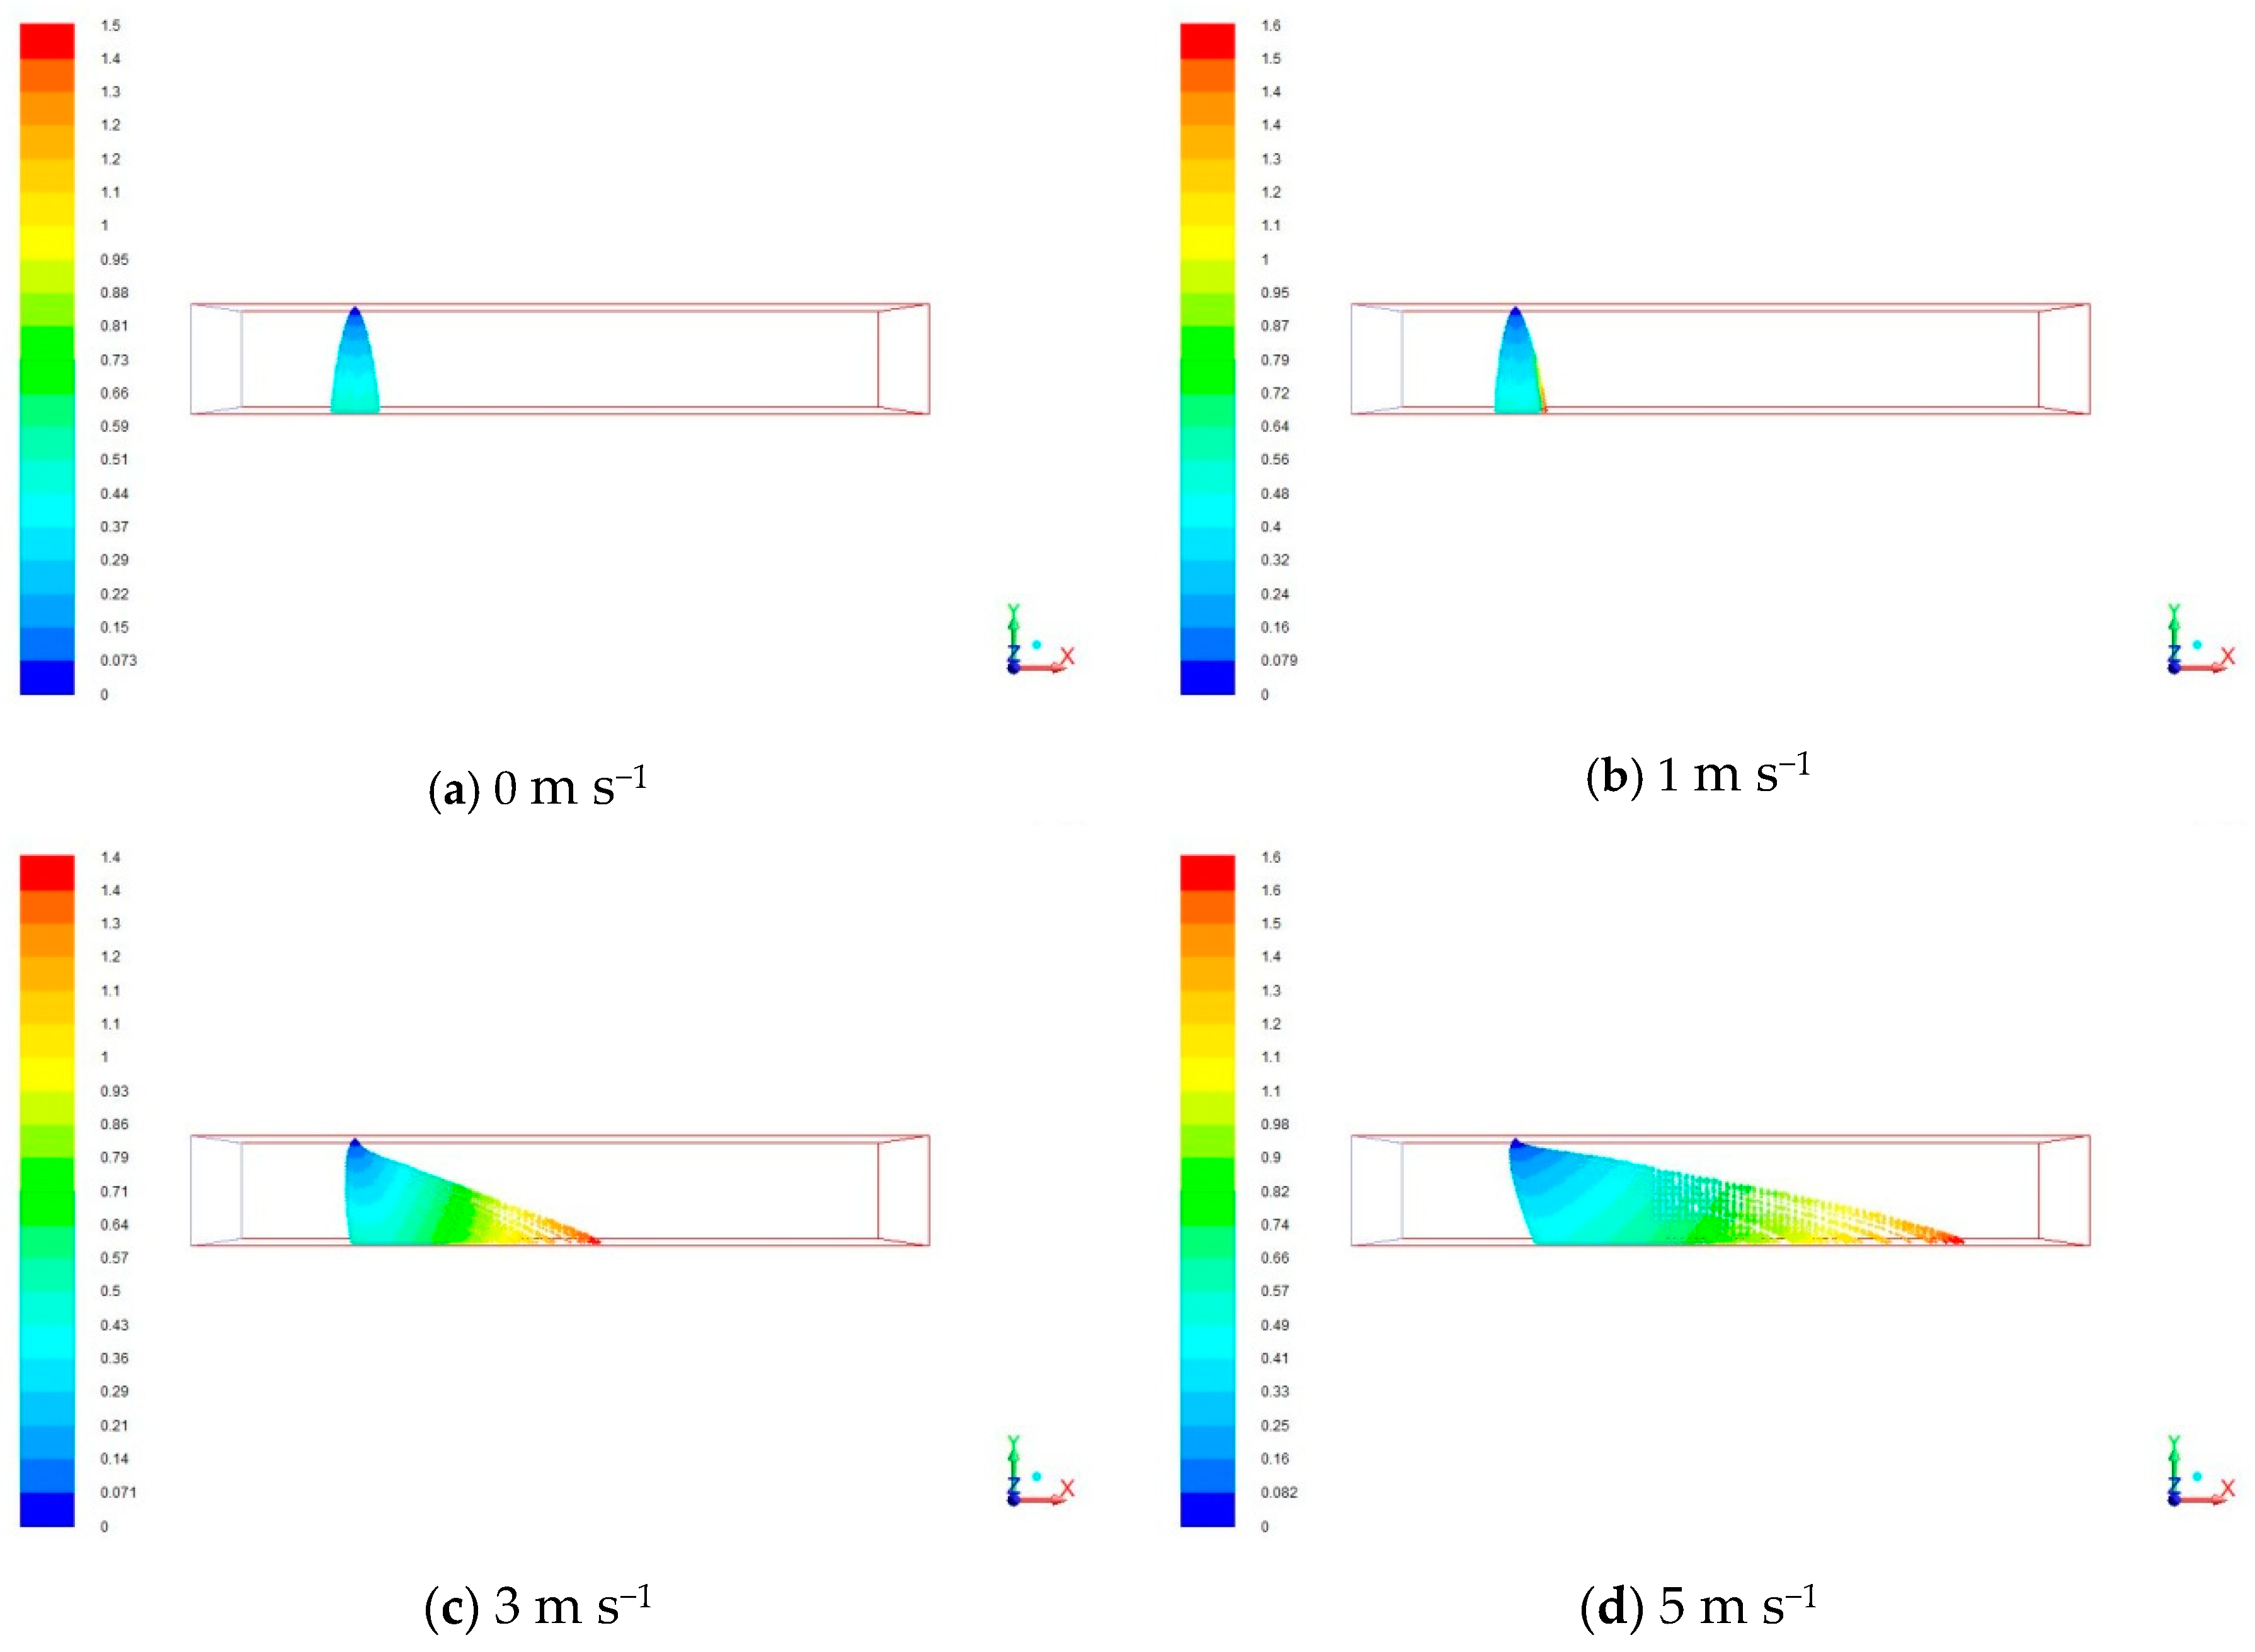
3.1.1. Influence of Wind Speed on Droplet Drift
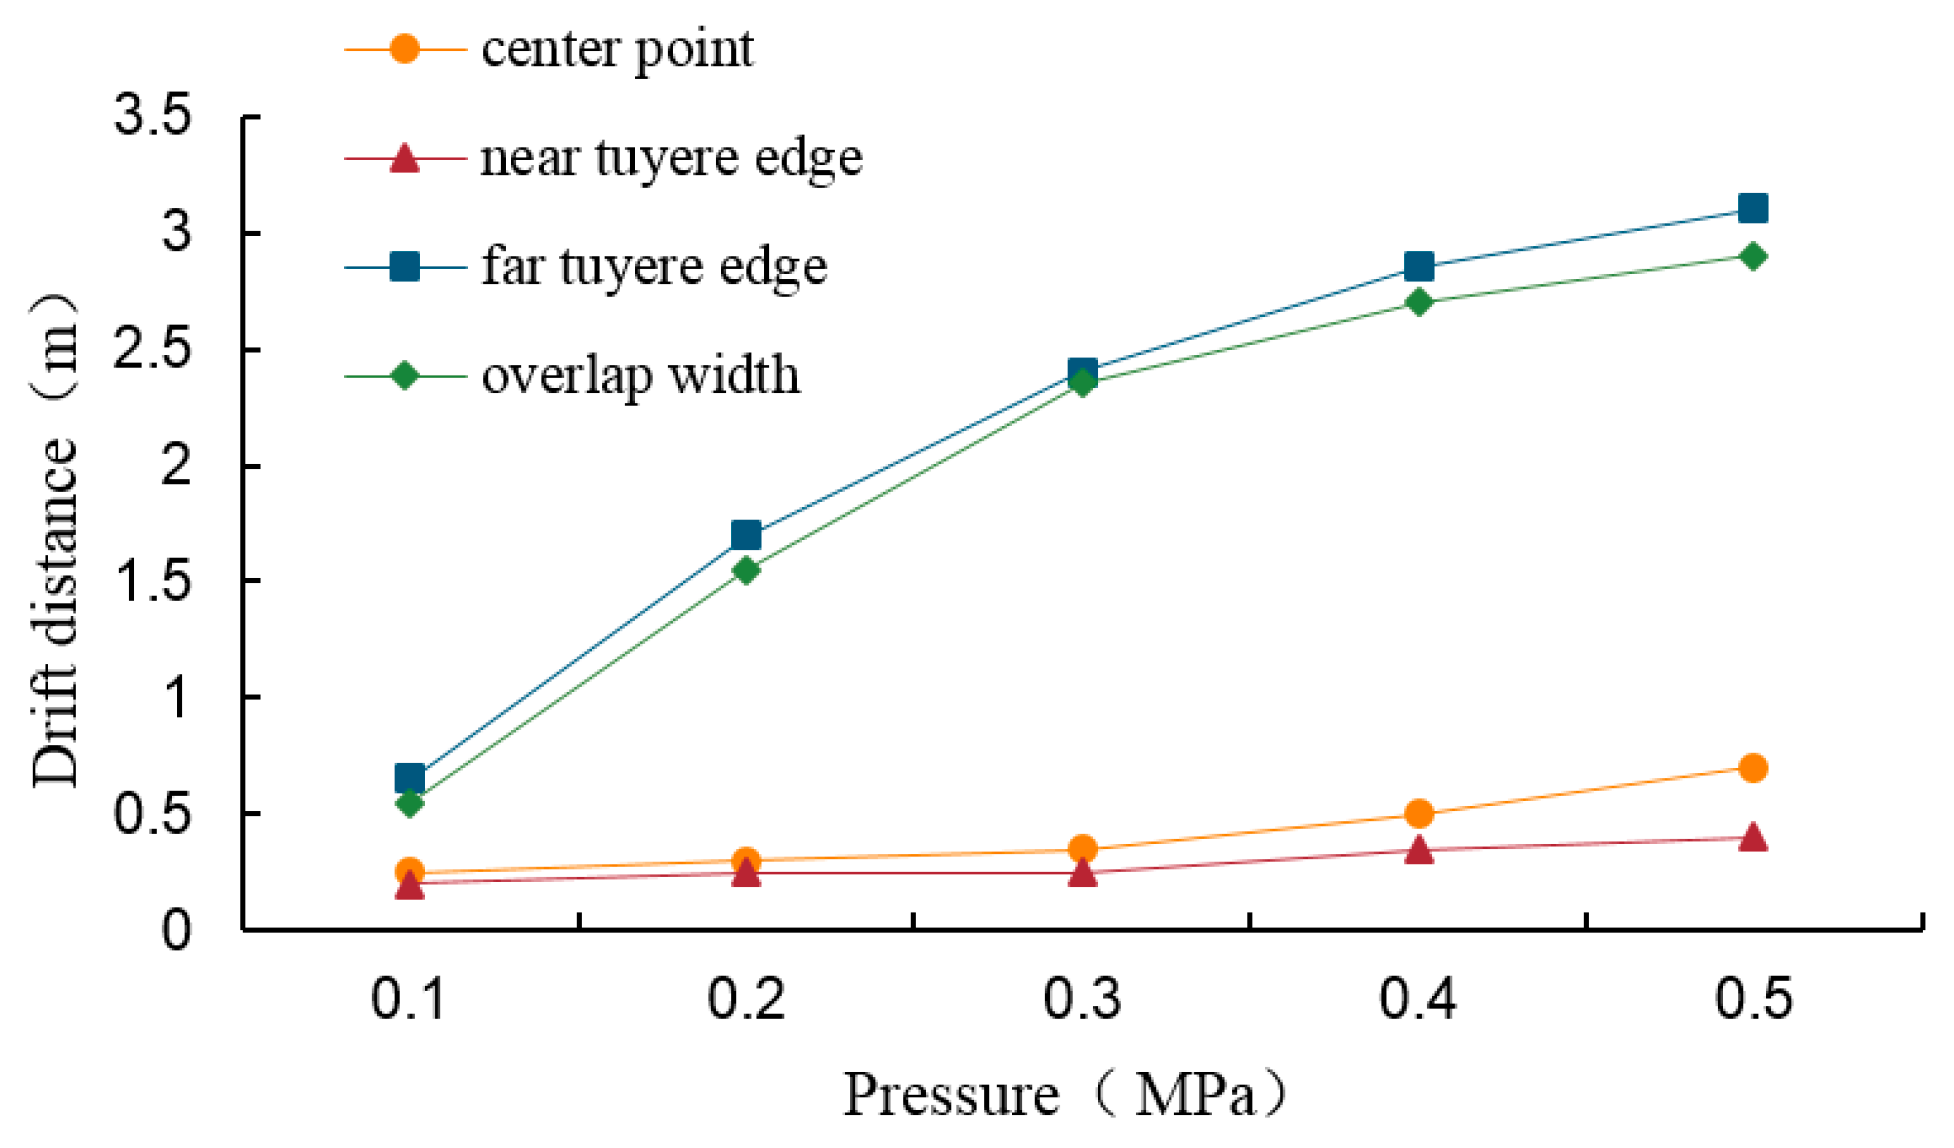
3.1.2. Influence of Inlet Pressure on Droplet Drift
3.1.3. Influence of Spray Height on Droplet Drift
3.2. Drift Distance Analysis of Fitting Regression Results
3.3. Analysis of Droplet Drift Curve Characteristic
4. Conclusions
Author Contributions
Funding
Conflicts of Interest
References
- Han, H.Q.; Gao, H.J.; Yang, H.T.; Zhang, X.; Hu, T.; Zhou, Q.Q. Analysis on decoupling between total grain production and pesticide usage in China. Subtrop. Agric. Res. 2018, 14, 91–98. [Google Scholar]
- Cheng, X.B. Current situation and development countermeasures of agricultural extension in China. Agric. Sci. Technol. 2018, 23, 255–259. [Google Scholar]
- Wu, K.M.; Lu, Y.H.; Wang, Z.Y. Advance in integrated pest management of crops in China. Chin. Bull. Entomol. 2009, 46, 831–836. [Google Scholar]
- Wang, G.; Gong, Y.; Zhang, X.; Chen, X.; Liu, D.J.; Chen, W.; Miao, Y.Y. The test of droplet deposition distribution for different kinds of pesticide application equipment in corn field. J. Agric. Mech. Res. 2017, 39, 177–182. [Google Scholar]
- Meng, Y.H.; Zhou, G.Q.; Wu, C.B. Discussion on application and promotion of agricultural plant protection unmanned aerial vehicle in China. China Plant Prot. 2014, 34, 33–39. [Google Scholar]
- Shang, C.Y.; Cai, J.F.; Huang, S.J.; Pan, H.L.; Zhong, F.L. Applications status and prospect analysis of agricultural UAVs in China. J. Anhui Agric. Sci. 2017, 45, 193–195. [Google Scholar]
- Wang, X.N.; He, X.K.; Wang, C.L.; Wang, Z.C.; Li, L.L.; Wang, S.L.; Janes, B.; Andreas, H.; Wang, Z.G. Spray drift characteristics of fuel powered single-rotor UAV for plant protection. Trans. Chin. Soc. Agric. Eng. 2017, 33, 117–123. [Google Scholar]
- Bradley, K.F. Role of atmospheric stability in drift and deposition of aerially applied sprays-preliminary results. ASAE 2004, 58, 742–755. [Google Scholar]
- Kirk, L.W.; Teske, M.E.; Thistle, H.W. What about upwind buffer zones for aerial applications? J. Agric. Saf. Health 2002, 8, 333–336. [Google Scholar] [CrossRef]
- Ivan, W.K.; Bradley, K.F.; Wesley, C.H. Aerial methods for increasing spray deposits on wheat heads. ASAE 2004, 58, 716–729. [Google Scholar]
- Chen, S.D.; Lan, Y.B.; Bradley, K.F. Effect of wind Field below Rotor on Distribution of Aerial Spraying Droplet Deposition by Using Multi-rotor UAV. Trans. Chin. Soc. Agric. Mach. 2017, 48, 105–113. [Google Scholar]
- Qiu, B.J.; Wang, L.W.; Cai, D.L.; Wu, J.H.; Ding, G.R.; Guan, X.P. Effects of flight altitude and speed of unmanned helicopter on spray deposition uniform. Trans. Chin. Soc. Agric. Mach. 2013, 29, 25–32. [Google Scholar]
- Shen, A.; Zhou, S.D.; Wang, M. Simulation and analysis of multi-rotor UAV flow field. Trans. Chin. Soc. Agric. Mach. 2018, 36, 29–33. [Google Scholar]
- Nuyttens, D.; De Schampheleire, M.; Baetens, K.; Brusselman, E.; Dekeyser, D.; Verboven, P. Drift from field crop sprayers using an integrated approach: Results of a 5-year study. Trans. ASABE 2011, 54, 403–408. [Google Scholar] [CrossRef]
- Teske, M.E.; Bird, S.L.; Esterly, D.M.; Curbishley, T.B.; Ray, S.L.; Perry, S.G. AgDrift: A model for estimating near-field spray drift from aerial applications. Environ. Toxicol. Chem. 2002, 21, 659–671. [Google Scholar] [CrossRef] [PubMed]
- Teske, M.E.; Thistle, H.W.; Riley, C.M.; Hewitt, A.J. Laboratory measurements on the sensitivity of evaporation rate of droplets inside a spray cloud. Trans. ASABE 2017, 60, 361–366. [Google Scholar]
- Bilanin, A.J.; Teske, M.E.; Barry, J.W.; Ekblad, R.B. AGDISP: The aircraft spray dispersion model, code development and experimental validation. Trans. ASABE 1989, 32, 327–334. [Google Scholar] [CrossRef]
- Luo, J.; Zeng, G.H.; Li, B.K. Simulation analysis of two-phase flow field inside pass of nozzle base on FLUENT. Modul. Mach. Tool Autom. Manuf. Tech. 2016, 10, 44–47. [Google Scholar]
- Chen, X.; Ge, S.C.; Zhang, Z.W.; Jing, D.J. Numerical simulation and analysis of multi-nozzle interference base on fluent. Chin. J. Environ. Eng. 2014, 8, 2503–2508. [Google Scholar]
- Sun, G.X.; Wang, X.C.; Ding, W.M.; Zhang, Y. Simulation and analysis on characteristics of droplet deposition base on CFD discrete phase model. Trans. Chin. Soc. Agric. Eng. 2012, 28, 13–19. [Google Scholar]
- Zhang, S.F.; Song, L.L. Simulation of Spray characteristics of pressure swirl nozzle. J. Anhui Agric. Sci. 2009, 37, 8098–8100. [Google Scholar]
- Adeniyi, A.A.; Morvan, H.P.; Simmons, K.A. A coupled Euler-Lagrange CFD modelling of droplets-to-film. Aeronaut. J. 2017, 121, 1897–1918. [Google Scholar] [CrossRef]
- Ryan, S.D.; Gerber, A.G.; Holloway, A.G.L. A computational study on spray dispersal in the wake of an aircraft. Trans. ASABE 2013, 56, 847–868. [Google Scholar]
- Zhang, B.; Tang, Q.; Chen, L.P.; Xu, M. Numerical simulation of wake vortices of crop spraying aircraft close to the ground. Biosyst. Eng. 2016, 145, 52–64. [Google Scholar] [CrossRef]
- Yang, F.B.; Xue, X.Y.; Cai, C. Numerical Simulation and analysis on spray drift movement of multirotor plant protection unmanned aerial vehicle. Energies 2018, 11, 2399. [Google Scholar] [CrossRef]
- Roberts, T.W.; Murman, E.M. Solution method for a hovering helicopter rotor using the Euler equations. In Proceedings of the 23rd Aerospace Sciences Meeting, Reno, NV, USA, 14–17 January 1985. [Google Scholar]
- Jin, Y.H.; Jae, S.R.; Kyu, H.K. New least squares method with geometric conservation law (GC-LSM) for compressible flow computation in meshless method. Comput. Fluids 2018, 172, 122–146. [Google Scholar]
- Salazar-Campoy, M.M.; Morales, R.D.; Najera-Bastida, A.; Calderon-Ramos, I.; Cedillo-Hernandez, V.; Delgado-Pureco, J.C. A physical model to study the effects of nozzle design on dispersed two-phase flows in a slab mold casting ultra-low-carbon steels. Metall. Mater. Trans. B 2018, 49, 812–830. [Google Scholar] [CrossRef]


| Parameters (Unit) | Value |
|---|---|
| X-Center (m) | 1.75/2.25 |
| Y-Center (m) | 2 |
| Z-Center (m) | 1.494 |
| X-Virtual Center (m) | 1.75/2.25 |
| Y-Virtual Center (m) | 2 |
| Z-Virtual Center (m) | 1.5 |
| X-Fan Normal Vector | 0 |
| Y-Fan Normal Vector | −1 |
| Z-Fan Normal Vector | 1 |
| Flow Rate (kg s−1) | 0.01316 |
| Spray Half Angle (deg) | 40 |
| Orifice Width (m) | 0.00091 |
| Flat Fan Sheet Constant | 3 |
| Atomizer Dispersion Angle (deg) | 6 |
| Spray Height(m) | 0.8 | 1 | 1.5 | ||||||
|---|---|---|---|---|---|---|---|---|---|
| Pressure (MPa) | 0.2 | 0.3 | 0.4 | 0.2 | 0.3 | 0.4 | 0.2 | 0.3 | 0.4 |
| Wind Speed (m s−1) | |||||||||
| 0 | A11 | A12 | A13 | B11 | B12 | B13 | C11 | C12 | C13 |
| 1 | A21 | A22 | A23 | B21 | B22 | B23 | C21 | C22 | C23 |
| 3 | A31 | A32 | A33 | B31 | B32 | B33 | C31 | C32 | C33 |
| 5 | A41 | A42 | A43 | B41 | B42 | B43 | C41 | C42 | C43 |
| Wind Speed (m s−1) | Deposition Center (m) | Near Tuyere Edge (m) | Far Tuyere Edge (m) | Overlap Width (m) |
|---|---|---|---|---|
| 0 | 0 | 0 | 0 | 0.20 |
| 1 | 0.05 | 0.05 | 0.05 | 0.65 |
| 3 | 0.45 | 0.25 | 2.40 | 2.35 |
| 5 | 0.85 | 0.55 | 4.60 | 3.95 |
| Pressure (MPa) | Deposition Center (m) | Near Tuyere Edge (m) | Far Tuyere Edge (m) | Overlap Width (m) |
|---|---|---|---|---|
| 0.2 | 0.60 | 0.25 | 1.70 | 1.55 |
| 0.3 | 0.45 | 0.25 | 2.40 | 2.35 |
| 0.4 | 0.65 | 0.35 | 2.85 | 2.70 |
| Spray Height (m) | Deposition Center (m) | Near Tuyere Edge (m) | Far Tuyere Edge (m) | Overlap Width (m) |
|---|---|---|---|---|
| 0.8 | 0.35 | 0.15 | 1.55 | 1.35 |
| 1 | 0.45 | 0.25 | 2.40 | 2.60 |
| 1.5 | 0.60 | 0.35 | 3.25 | 2.75 |
| Dependent Variable | Source of Difference | Regression Coefficient | T-Distribution Value | Significance | 95% Confidence Interval | R | R2 | |
|---|---|---|---|---|---|---|---|---|
| Lower Limit | Upper Limit | |||||||
| Y1 | Xw | 0.887 | 9.941 | ** | 0.702 | 1.071 | 0.915 | 0.837 |
| Xp | 0.550 | 3.083 | * | 0.181 | 0.919 | |||
| Xh | 1.552 | 3.137 | * | 0.529 | 2.576 | |||
| C | −3.096 | −4.752 | −5.606 | −2.206 | ||||
| Y2 | Xw | 0.167 | 8.196 | ** | 0.125 | 0.209 | 0.880 | 0.774 |
| Xp | 0.085 | 2.083 | * | 0.001 | 0.169 | |||
| Xh | 0.308 | 2.728 | * | 0.074 | 0.541 | |||
| C | −0.667 | −3.558 | −1.054 | −0.279 | ||||
| Y3 | Xw | 0.692 | 8.303 | ** | 0.520 | 0.865 | 0.892 | 0.795 |
| Xp | 0.529 | 3.173 | * | 0.184 | 0.874 | |||
| Xh | 1.469 | 3.176 | * | 0.512 | 2.426 | |||
| C | −3.374 | −4.391 | −4.963 | −1.785 | ||||
© 2019 by the authors. Licensee MDPI, Basel, Switzerland. This article is an open access article distributed under the terms and conditions of the Creative Commons Attribution (CC BY) license (http://creativecommons.org/licenses/by/4.0/).
Share and Cite
Zhu, H.; Li, H.; Zhang, C.; Li, J.; Zhang, H. Performance Characterization of the UAV Chemical Application Based on CFD Simulation. Agronomy 2019, 9, 308. https://doi.org/10.3390/agronomy9060308
Zhu H, Li H, Zhang C, Li J, Zhang H. Performance Characterization of the UAV Chemical Application Based on CFD Simulation. Agronomy. 2019; 9(6):308. https://doi.org/10.3390/agronomy9060308
Chicago/Turabian StyleZhu, Hang, Hongze Li, Cui Zhang, Junxing Li, and Huihui Zhang. 2019. "Performance Characterization of the UAV Chemical Application Based on CFD Simulation" Agronomy 9, no. 6: 308. https://doi.org/10.3390/agronomy9060308
APA StyleZhu, H., Li, H., Zhang, C., Li, J., & Zhang, H. (2019). Performance Characterization of the UAV Chemical Application Based on CFD Simulation. Agronomy, 9(6), 308. https://doi.org/10.3390/agronomy9060308