1. Introduction
An interpretation of experimentally measured local loads and pressures is impossible without correct calibration of measuring equipment. Despite the fact that some pressure tools are already widely used in various applications, discussions on the methods and effectiveness of their calibration still take place. This is because pressure measurements are carried out by groups of researchers from different fields who operate in very different technical conditions. Thin tactile pressure sensors based on the use of piezoresistive ink can be the example of such a measuring tool. The principles of manufacturing such pressure sensors were developed about 40 years ago at the Massachusetts Institute of Technology [
1]. Later, such sensors and the equipment for their operation have been manufactured by Tekscan (USA).
Tekscan tactile pressure sensors are glued polyester sheets with piezoresistive ink strips applied to them. The intersections of the strips form sensitive elements—so called, sensels. The 8-bit signals received from these elements when the sensor surface is loaded give the resulting pressure matrix measured by the sensor. For protection purposes, the sensor is additionally laminated. The terminal of a sensor sheet with TAB-area connects with the Handle, which contains Amplifiers, Multiplexers, Control and other blocks, and can support the sampling rate up to 1000 Hz [
2]. However, in the 7.70-16I version of the I-Scan Versatek System, which is used by the author, the maximum sampling rate is indicated at 730 Hz.
The sensors manufactured by Tekscan have been used in the studies on the pressures in the soil [
3,
4,
5,
6,
7], railroad track pressure [
8], pressure in the joints [
9,
10], pressure by medical pressure garments and socks [
11,
12,
13], pressure when gripping tools and handles [
14,
15,
16], pressures between rolling elements [
17] and others. This variability of applications is provided by the very small thickness of the sensors (usually 0.1–0.3 mm), their flexibility and relative unpretentiousness to external conditions. In addition, the sensors are available in various shapes and density of sensitive elements.
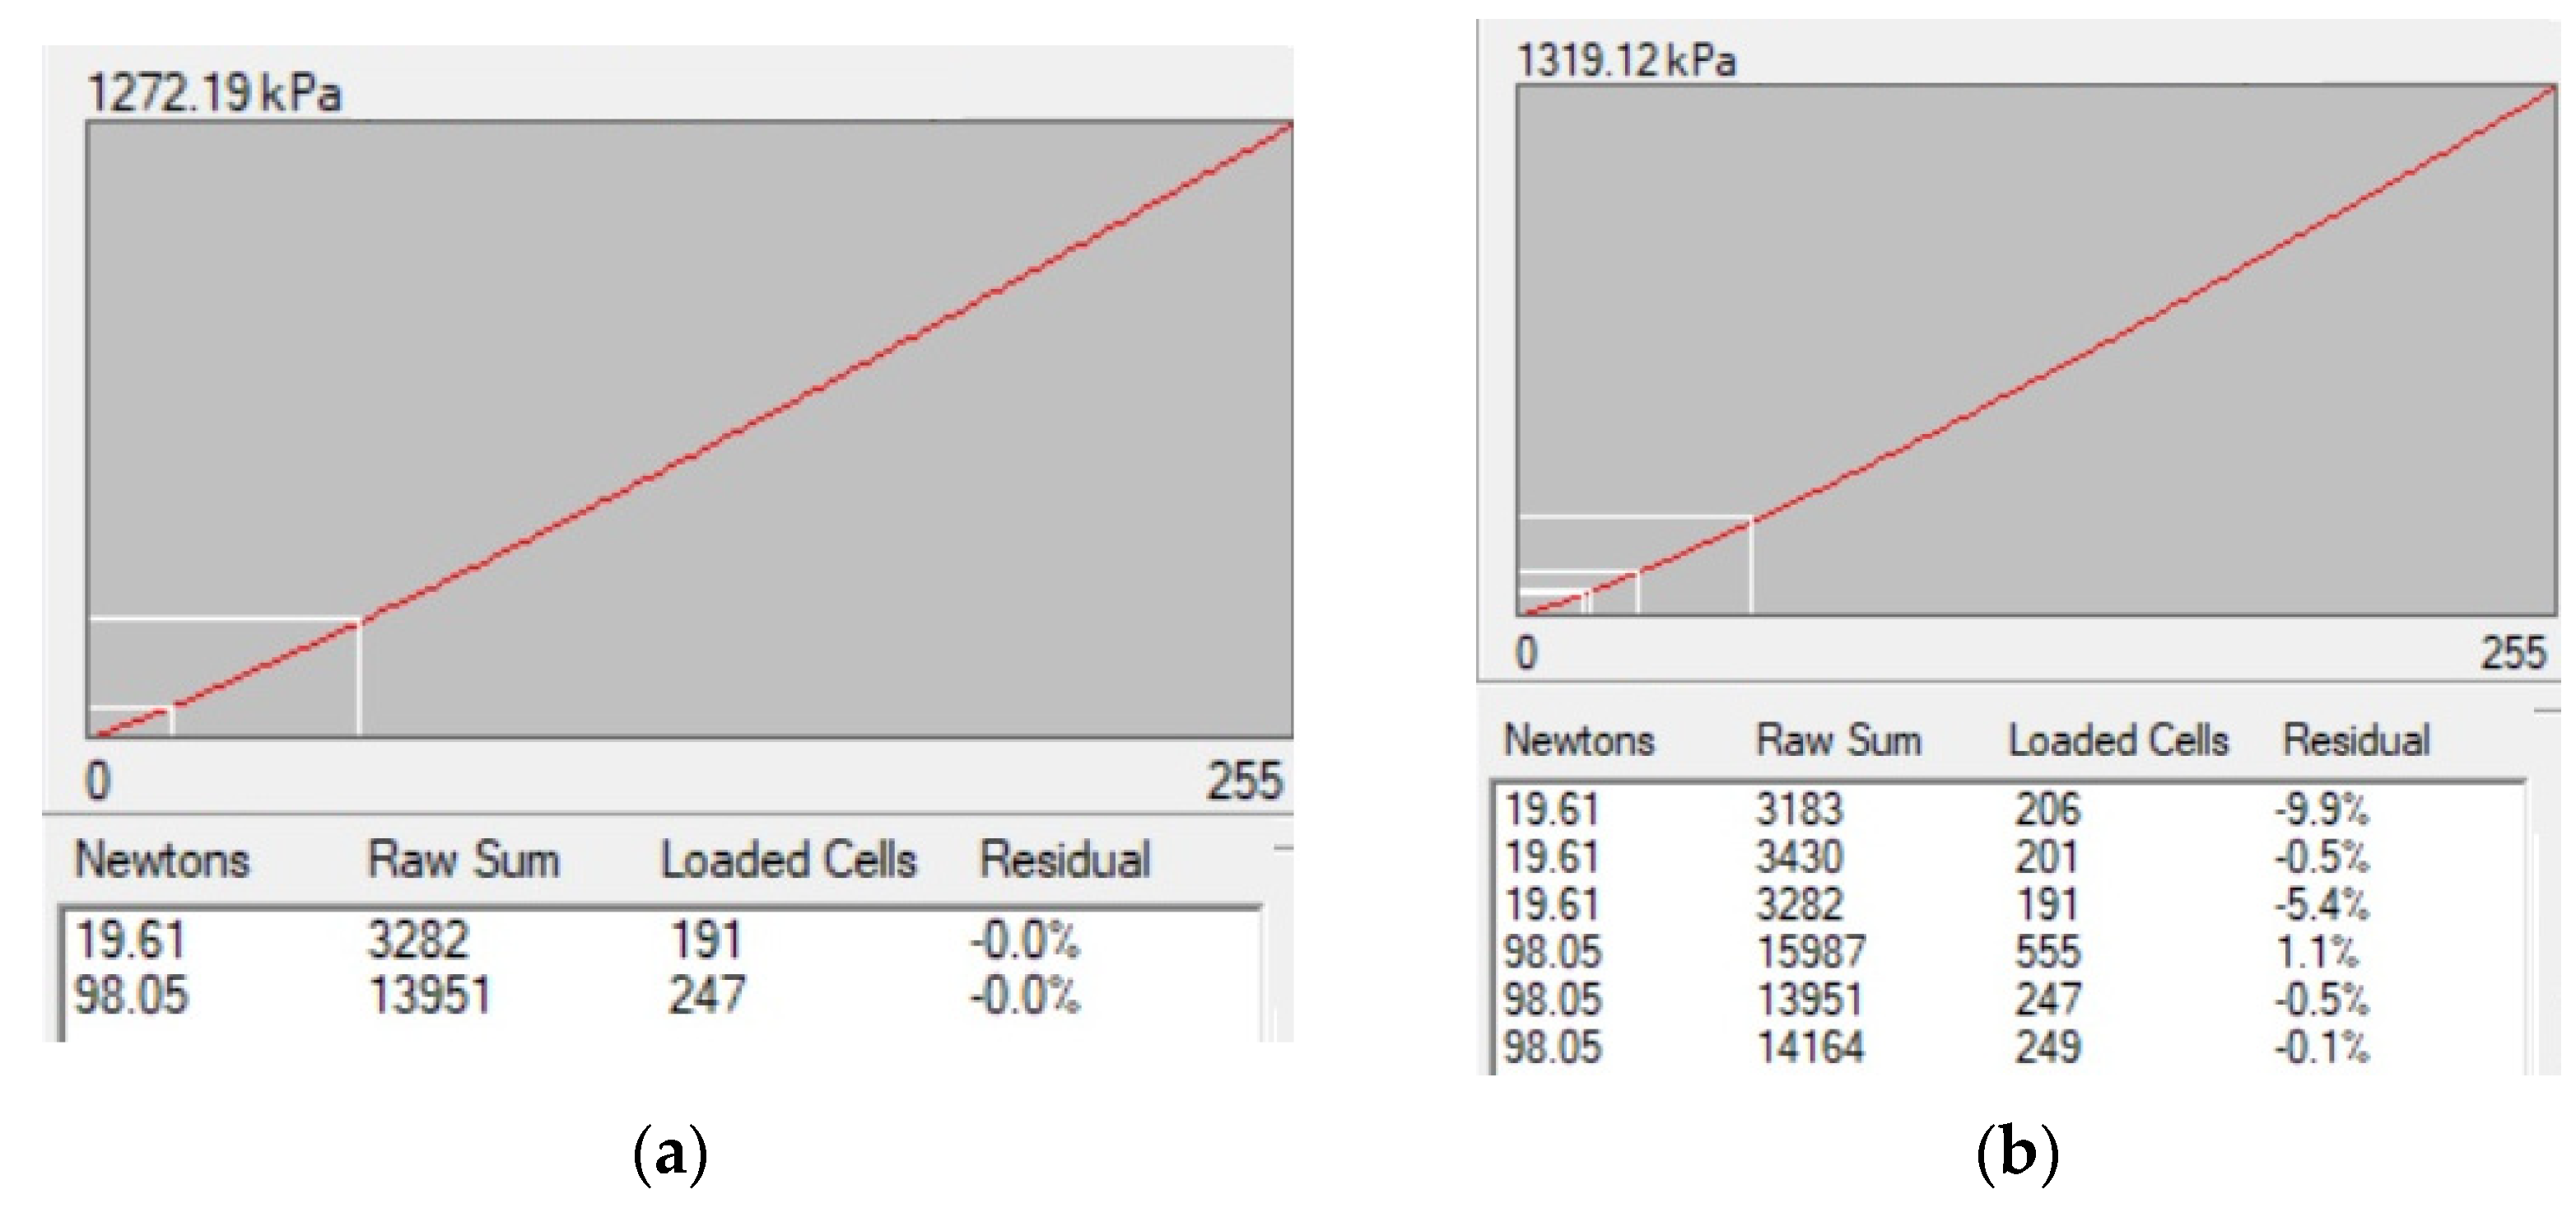
In the software I-Scan, which is supplied by the manufacturer, single-point and two-point (
Figure 1a) calibration options are available for tactile pressure sensors [
18]. Multipoint (
Figure 1b) calibration is limited by no more than 10 measurements. I-Scan apparently uses the averaging of the measured pressures over the patch area for calibration, which requires the flatness of both the base material and the indenter exerting the load. For example, the work [
19] indicates that a servohydraulic materials-testing machine (Model 8500, Instron Corp., Canton, MA, USA) has been used for calibration. Despite the conducted balancing procedures and fine grounding of the metal pad, the pressure patch on this pad provided in the paper [
19] demonstrates the wide range of various pressure values. They vary from small to very high, with the highest pressure zone occupying only 8.4% of the overall patch area.
Accuracy and repeatability [
9,
20] are considered as key factors in calibration, which ensure successful investigations are performed by means of tactile pressure sensors. The calibration options provided in the proprietary software are widely discussed in research papers, including the aforementioned ones. A number of researchers [
8,
12] describe the insufficient accuracy of these options, and some [
21] even claim that the research goals are not achieved due to the problems with accuracy and repeatability of sensors calibration.
Calibration of tactile pressure sensors is carried out using loading machines [
8,
9,
17,
19,
20], pneumatic devices [
11,
12] and dead weights [
12,
16,
21].
A calibration formula requires recalculation of raw 8-bit values measured by single sensels into the required physical units of pressure (Pa, mmHg, psi) or load (N). The manufacturer recommends using an exponential calibration formula [
18] with two parameters. Stith, who has performed an extensive practical study of railroad track pressures [
8], notes that the calibration curves obtained from low and medium calibration pressures on the same Tekscan sensor differed significantly from the curves obtained from the calibration points with high pressures. In particular, one of the coefficients in the calibration formula increased significantly. The author suggests setting a piecewise calibration curve with different parameters for the ranges of low, medium and high pressures.
The validation of the acquired calibration formula consists in comparing applied and calculated load, which sometimes reveals significant discrepancy. Such discrepancy is associated, among other factors, with the use of a pressure interval within the first 15% of the nominal value of the sensor [
20,
22]. For example, in [
3,
5] it is noted that for low pressure values (less than 25 kPa in [
3] and less than 50 kPa in [
5]), the discrepancy was significant. In [
8], where 1200 psi sensors were tested, a similar effect was observed for high pressure values with two-point calibration.
There is a rule of thumb stating that pressures of approximately 20% and 80% of expected maximum experimental pressures should be applied in the calibration process. However, this did not help much in obtaining adequate results in some medical applications, where low pressures are of interest. For instance, in medical compressive textile and garment tests the pressures of the range 10–50 mmHg (1.33–6.67 kPa) should be investigated. Thus, [
12] writes that the attempts to calibrate 9801 Tekscan sensors were unsuccessful. In [
21] it was noted that with 9833E Tekscan sensor it was impossible to measure the pressures exerted by compression garments due to the impossibility of correct calibration. Nevertheless, in [
13] it is reported that the 5027 sensor has provided satisfactory results of measuring such pressures in vivo and in vitro, allowing to find out the ratio of pressures from compression garments, for example, for the calf and for the ankle.
Another widespread application of tactile sensors with challenging calibration is measuring pressures caused by soils and granular matters [
3,
6,
7,
22]. In particular, in [
3], the loads exerted by soil on a pipe moved by a horizontally directed force have been experimentally studied. Calibration of sensors for such an experiment has been carried out by loading the entire surface of the sensor with a system of protective and distributive shield pads with massive lead plates, which required a crane to work with.
Application of tactile sensors for pressure measurements in soils besides the common calibration problem leads to specific challenges. Large variation in values over the loaded patch is a typical feature of pressures measured in the experiments with granular matters. The study [
7] demonstrates the calibration of sensors under loading applied to a sample with a contact surface representing medium sand. The presented images of the pressure distribution over the area show significant inhomogeneity with the presence of spot-like high-pressure zones. With each new loading, the distribution of the displayed pressures changed. The works on pressure measurements in soils and in soil-structure interaction using tactile pressure sensors pay considerable attention to the effects of the signal drift. This is because pressures applied are relatively long-lasting.
A large number of investigations with Tekscan tactile pressure sensors are performed to study local ice loads in physical model conditions. The first among such experiments was performed in the USA [
23], considering the interaction of fresh-water ice with a vertical wall. Then, sensors were utilized in the ice tank of Aalto University in Finland for measuring local pressures exerted by model ice on a hull of the icebreaker model [
24]. Later, the studies on measuring local loads on a cylindrical structure were performed in the ice tank of HSVA (Hamburg, Germany) [
25,
26,
27]. The researchers from South Korea [
28] reported obtaining integral model ice loads on different parts of the hull of the model of an ice-resistant vessel. A recent study performed at Hamburg University of Technology [
29] carries out an investigation on tactile sensor measurements of local loads caused by failure of a specially prepared granular ice specimen at different test speeds.
A lot of investigators from various research domains consider calibration of 8-bit matrix piezoresistive tactile sensors challenging [
5,
8,
12,
22,
30]. Tekscan sensors usually appear in geotechnical and ice studies on local pressures. However, there are many other producers and prototype developers of piezoresistive sensors. For example, prototypic solutions of resistive sensors are widely used in micro-elecromechanical applications. The variety of resistive sensors is used in medical applications and especially in orthopedy, including products of Pressure Profile Systems, Inc., Hawthorne, CA, USA, Medilogic and RSScan. There are studies comparing different sensors workability by means of pressure tests [
31,
32]. For state-of-the-art description of resistive tactile pressure sensors, the following papers can be addressed [
33,
34,
35,
36].
Summarizing problems on 8-bit tactile pressure sensors calibration, it is possible to list the following requirements for the method:
It should consider measurements of individual sensels in a calibration patch instead of averaging the pressure on the patch.
It should work relatively fast.
It should take into account multiple calibration patches, which imitate possible ways of loading in an experiment.
In this paper, the algorithm of tactile pressure sensor calibration, which satisfies the aforementioned conditions, is developed. Unlike previous methods of sensors calibration where a special machinery is required, the proposed method makes sense out of high-pressure zones appearing at an uneven loading. In previous works, calibration required special equipment like bladders and super-flat surfaces to ensure the most even pressure distribution on the sensor. Temperature and humidity conditions appropriate for such equipment may differ from conditions of an experiment with calibrated sensors. This can result in errors of the experimental measurements interpretation. The newly developed method allows to perform calibration actions in wide range of environments. Up to now, the progress in calibration of tactile pressure sensors has been based more on equipment and less on the calibration data interpretation. This paper makes an attempt to shift the focus from hardware to analysis of measurements.
The structure of the paper is as follows.
Section 1 is introductive.
Section 2 describes the equipment used for data acquisition. In
Section 3, the multiple patches method for 8-bit tactile pressure sensors calibration is developed.
Section 4 is the discussion.
Section 5 describes the results of 5051 Tekscan sensors calibration, both for the new and used sensors. The
Section 6 is the conclusion.
2. Experimental Set-Up
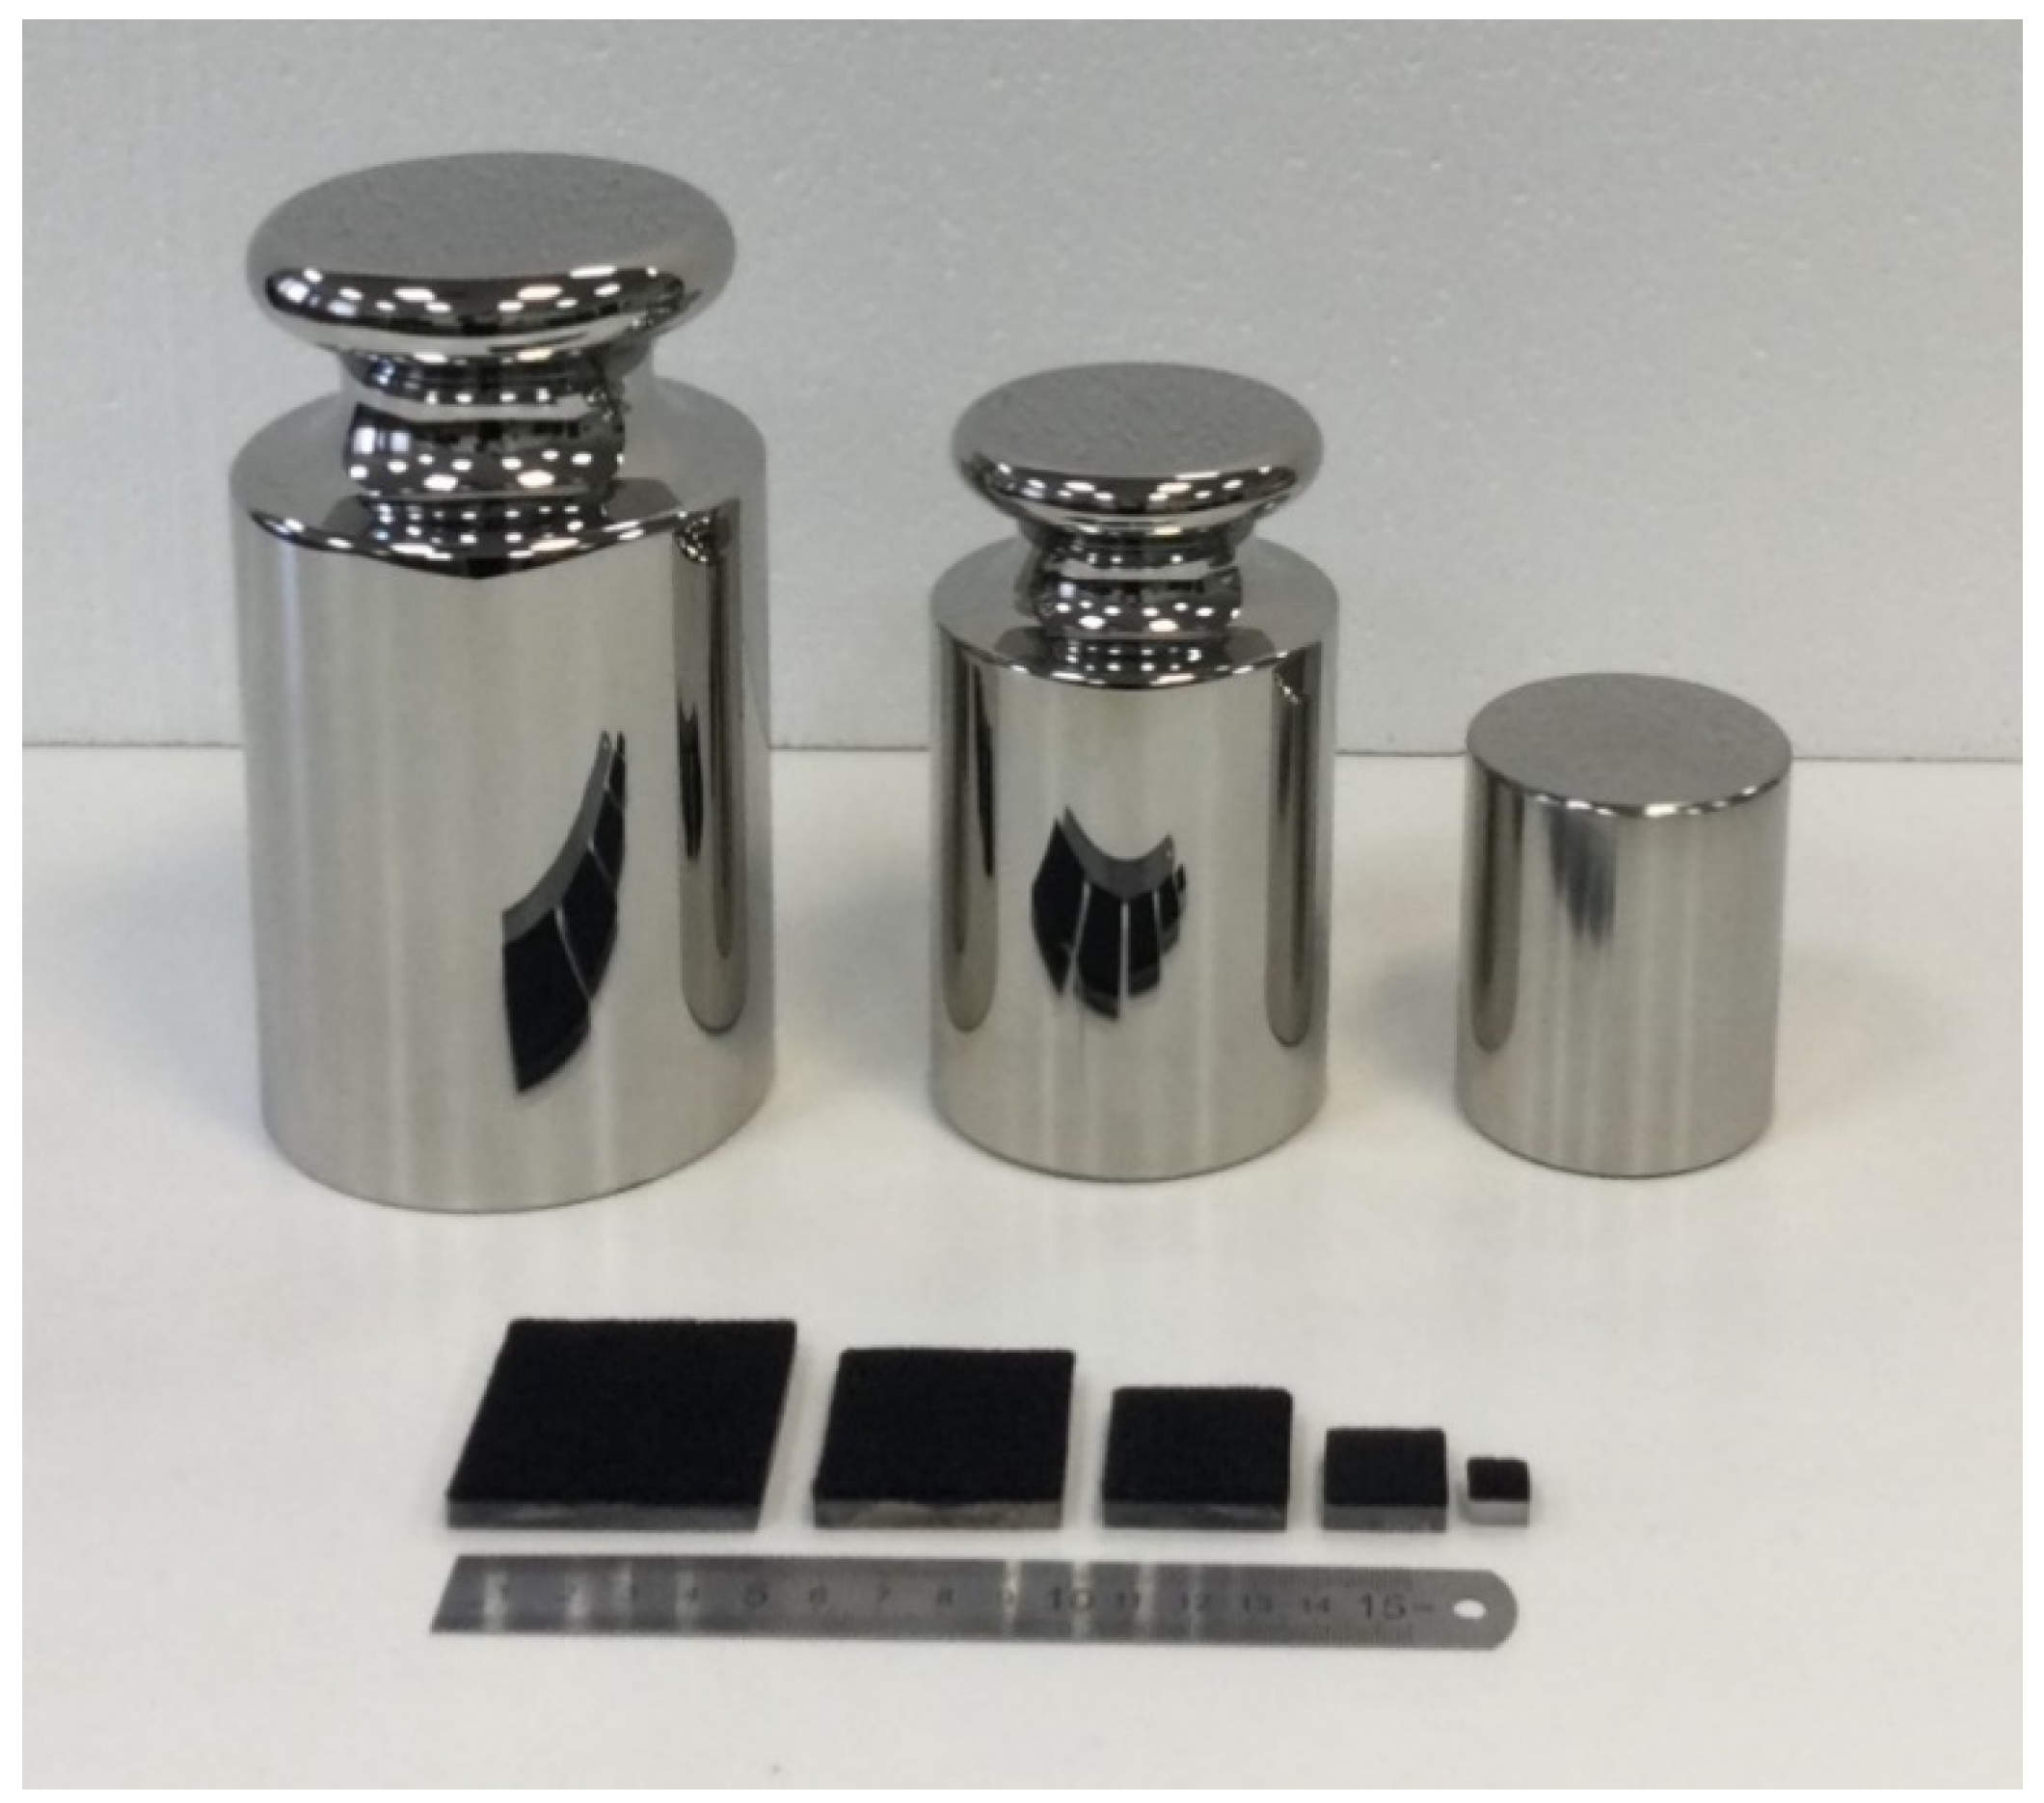
The method presented in the article is designed for dead weight calibration, but can be applied for other calibration approaches. In this study, three calibrated weights of classes E
2 [
37] have been used: 2, 5 and 10 kg. Implemented metal weights did not have specially flattened basements, so light plexiglass platforms with a stress distributing layer attached at one side have been used as stress distributive pads under them. Multiple loadings of the sensor surface have been performed with variation of pad size and its position on the sensor. The weights and pads are shown in
Figure 2. The characteristics of dead weights and platforms are provided in
Table 1.
For the case study provided in
Section 5, tactile Tekscan 5051 sensors (
Figure 3A) have been used with a nominal resolution of 350 psi (2413 kPa). These sensors have a sensitive matrix of 55.9 × 55.9 mm, which consists of 44 rows and 44 columns of intersecting strips that contain resistive ink. This way, each of the sensors consists of 1936 sensitive elements or sensels. The principles of tactile sensors operation are described, for example, in [
1]. Each elementary square part of the matrix (sensel) has dimensions of 1.27 × 1.27 mm and includes both the actual area of intersection of the strips with resistive ink and an insensitive contour around it.
In
Figure 3 the equipment utilized for recording local pressures in the calibration process is shown: operator’s workplace with I-Scan software (D), VersaTek Hub (C), Versatek Handle (B) with pressure sensor 5051 plugged into it (A). For recording, the regular sensitivity regime S-29 has been utilized, and the sampling rate frequency 200 Hz has been set.
During calibration operations, obtaining the most uniform distribution of pressures in the loaded patch has not been considered. With the dead weights’ calibration, it is almost impossible to achieve uniform distribution of pressures on the sensor, which lies on the surface of the table. Instead, a technique has been developed for obtaining calibration coefficients using the variety of pressure values registered by different sensels in the loaded area.
Figure 4 demonstrates the examples of pressure patches obtained during calibration with weights of 2, 5 and 10 kg on the platforms with sides of 1, 2 and 3 cm. It can be seen that the peak pressures exceed the periphery pressures of the patch by 5–10 times. It should be noted that similar pressure distributions have been observed in local ice pressure measurements performed in the ice tank (see
Section 4). In these experiments, the sensor has been mounted on a vertical wooden wall of a model of an offshore structure, half submerged in water. The after-experiment calibration of this sensor is described in
Section 5.
3. Method
The relationship between load
on a cell in raw units and load
on this cell in Newtons according to the producer’s guide [
18] is governed by the power function
Thus, load
on the whole patch
divided by the factor is
is the following sum:
where
is the indexation of loaded cells in patch
. Based on the calibration results, the manufacturer [
18] recommends taking such parameters as
and
that minimize the function
It should be noted that each of the patches
at dead weight calibration with the use of plexiglass pads provides an individual combination of different values
(see
Figure 4). Thus, finding a single
as an analytic solution of (3) becomes impossible. A numerical finding of (3) solution is possible, but is computationally demanding. The preliminary averaging of all
in
is helpful in solving (3) using a pair of calibration patches, but usually does not help to learn much about the range of high pressures (
Figure 1).
Let us denote a raw sum of readings of all the loaded cells in the patch
with
:
For evaluation of the parameters
and
we will use an approximation of
with
, where
and
. Hence, we substitute an 8-bit value of
, which is practically from 3 to 255, with the value from the set
. To do so, it is required to separate a segment
with intermediate boundaries
,
,
,
in a way, presented in
Figure 5. Values of
, which are from
are substituted with 3; values from
are substituted with 9; from
–with 27; from
–with 81; from
–with 243. An example of such an approximation will be provided in the case study section.
Substituting all
in a load patch with corresponding
, an approximation
of (4) is required:
where
,
,
¸
,
are counts of obtained values
,
,
,
,
in the approximation, correspondingly. The success of such an approximation depends on the selected
. Let us introduce the function
to measure the goodness of a particular
:
here
is the number of cells in patch
. Function
is measured in raw units and shows how a single cell reading differs from the approximation in average. In the following, we consider a set
of patches
,
. Thus, the discrepancy value averaged by all the patches will be as follows:
For finding optimal vector
of all the possible
with respect to the particular sensor type and loading technique represented by the set
, we introduce the following criteria:
Here,
is the domain of all
such as
For every set , we can find the vector numerically.
Taking into account that
, we can consider the following system of the equations,
:
Knowing
and
as the corresponding calibration loads, bringing right parts to equal values, subtracting the second equation from the first one and dividing the result by the non-zero
, we obtain the single algebraic equation
For this equation, a root
is of interest due to the expected shape of the calibration curve. If such a root exists, then we can take the following
as estimation of
from (1):
The estimation of the parameter can be found from one of the equations (11) with respect to (5). This way, we come to the pair , which estimates in a computationally fast manner by means of two calibration load patches, and . Note that the desired root of (12) exists not for every (11), but in a large number of practical cases it occurred to be existing.
Processing all the pairs of and , , we obtain a set each element of which provides the estimation of unknown parameters of (1). It seems that if we find the average values of and , it will give us the desired estimation of , which is more or less good for calibration points from ; however, this is not the case.
The investigation of the plots of
derived from calibration of sensors 5051 and 5101 has revealed that these scatterplots follow the specific law (see, for example,
Section 5). This law can be described by the exponential curve:
Finding
and
by the least square method, we can find such a point
,
, which provides minimum for the function:
We take the evaluated point as an estimation for unknown parameters and .
The proposed algorithm for finding calibration formula parameters can be written as follows:
Obtain a set of the calibration patches ;
Find , which provides minimum to ;
For each pair and , , solve the system (11). If the solution , then evaluate using (13) and (11);
Using the found set , get the estimation as the solution of (15). The obtained pair estimates the parameters in the calibration Formula (1).
4. Discussion
The main motivation for developing a new calibration method was the need in the proper interpretation of pressure patches obtained in the ice tank experiment. The experiment has been performed by the Laboratory of Ice Engineering Research Fundamentals (SPbPU, St. Petersburg, Russia) in the ice tank of the Krylov State Research Centre (St. Petersburg, Russia). Tekscan sensor 5051 has been mounted on the vertical wall of the model of an ice resistant marine structure experiencing loads caused by model ice. The experiment has been performed according to the inversed motion principles: ice floe was motionless, while the model of the structure was towed by a trolley. Model ice floe with a granular structure and thickness of ~50 mm has been prepared according to the fine grain technology [
38].
Earlier, the study of global loads on the model structure with sloped and vertical walls demonstrated their non-stationarity [
39]; thus, the aim of the new experiment was to reveal local loads caused by model ice. For this purpose, special software [
40] for a tactile sensors local load measurements analysis has been developed. An example of 5051-350 sensor (Sensor1) ice pressure measurements in raw units is provided in
Figure 6. It can be seen that the distribution of the pressures in high pressure zone in the left bottom corner of the frame looks like patches from dead weight calibration provided earlier in
Figure 4. It was one of the reasons why the focus has been made on uneven patches in the calibration process.
The process of obtaining calibration points using dead weights is influenced by many factors that lead to variation in the obtained measurements. They include the method of placing the load, the time of fixing the measurement after applying the load, the individual characteristics of the sensor used, the unevenness of the surface where the sensor is located and the surface that transmits the applied force. The use of a large number of calibration patches helps to decrease the influence of individual factors on the result obtained.
Using the degree-of-three approximation for a single sensel raw measurement seems quite convenient. The similar use of the degree-of-two was unsuccessful due to the following circumstances:
For now, the reasons why the obtained pairs of the parameters for the calibration Formula (1) line up along the exponential curve remain unknown to the author. It should be noted that a similar effect is observed when calibrating the sensor 5101, which is twice the size of the 5051 and also has a square matrix of 44 × 44.
5. Results
The calibration of two 5051-350 sensors, one of which had been used earlier in the ice tank experiment, and another one as a control, was carried out four times during the month, from 21 March to 18 April 2022 (
Table 2). A four-time calibration procedure was carried out in order to estimate the possible magnitude of the sensor capacity drop-in time. The number of measured calibration points was different each time and is given in the third column of
Table 2.
After receiving a set
of calibration patches, an optimal separation vector
should be estimated for substituting the values measured by single sensels by their degrees-of-three approximations. As soon as integer vector
satisfies (10), the set
of all the possible
is finite. The value of
, which provides minimum to function
, can be simply found by the brute force. Still, the computational efforts can be decreased by considering only those
, which are more or less close to the centers of the intervals shown in
Figure 5. The problem of finding
is easier if in both calibration and experimental measurements only small raw values are registered; in this case, only two or three components of
can be considered instead of four, and (12) can be solved analytically. However, all four components of
should be considered in the problem of finding calibration parameters valid for the whole range of possible raw values.
In
Table 2, vectors
are provided for different sets of the calibration patches. They did not coincide with the midpoints of the intervals, which are 6, 18, 54 and 162, respectively. An example of variation of
for the particular set of the load patches on the sensor 5051 at fixed
and varying
is presented in
Figure 7. The Figure demonstrates a rather large subset of
where the value of
was close to minimal.
The third step of the algorithm is to solve the system (11) for all the possible individual pairs of the calibration patches and try to find the root, which is larger than three. In
Figure 8, the chart which demonstrates the processing of 49 calibration patches obtained for Sensor2 on 18 April 2022 is provided. The green and cyan signs show calibration patches pairs for which Equation (12) had a root greater than three, while the raw sum approximation absolute error of each patch was less than 10%. Each of these pairs provided a value
. Commutation of calibration patches in the pair provides the same result. The orange signs show the pairs, for which the Equation (12) had the required solution, but the raw sum approximation absolute error was larger or equal to 10% at least for one patch from the pair. Values
from such pairs have not been considered later. The resulting chart has a symmetrical form.
In the set
, several calibration patches occurred, which have not provided the solution of (11) satisfying
in a pair with any or almost any other patch. The rows and columns, which correspond to such patches are marked with grey color. Such patches in this set
made up about 12% of the total number of the patches. A larger number of such patches at loading with 2 kg of weight is probably connected with a smaller area of the loaded patch, which was 1 cm
2–about 3% of the overall sensor area. From
Figure 8 we can see that the patches with different applied weights provided more (
A*,
b*) than the same applied weight pairs positioned differently on the surface of the sensor. For example, approximation (5) led to obtaining
in about 34% of the pairs “2 kg–5 kg”, 32% of the pairs “2 kg–10 kg”, 25% of the pairs “5 kg–10 kg”. The effectiveness of the pairs “2 kg–2 kg” was 23%, of the pairs “5 kg–5 kg”–14% and of the pairs “10 kg–10 kg”–only 11%.
As mentioned in the previous section, the obtained pairs
do not seem disordered. Hence, simple averaging does not provide proper results in evaluating the single estimation of unknown
. An example of the distribution of pairs of points
is shown in
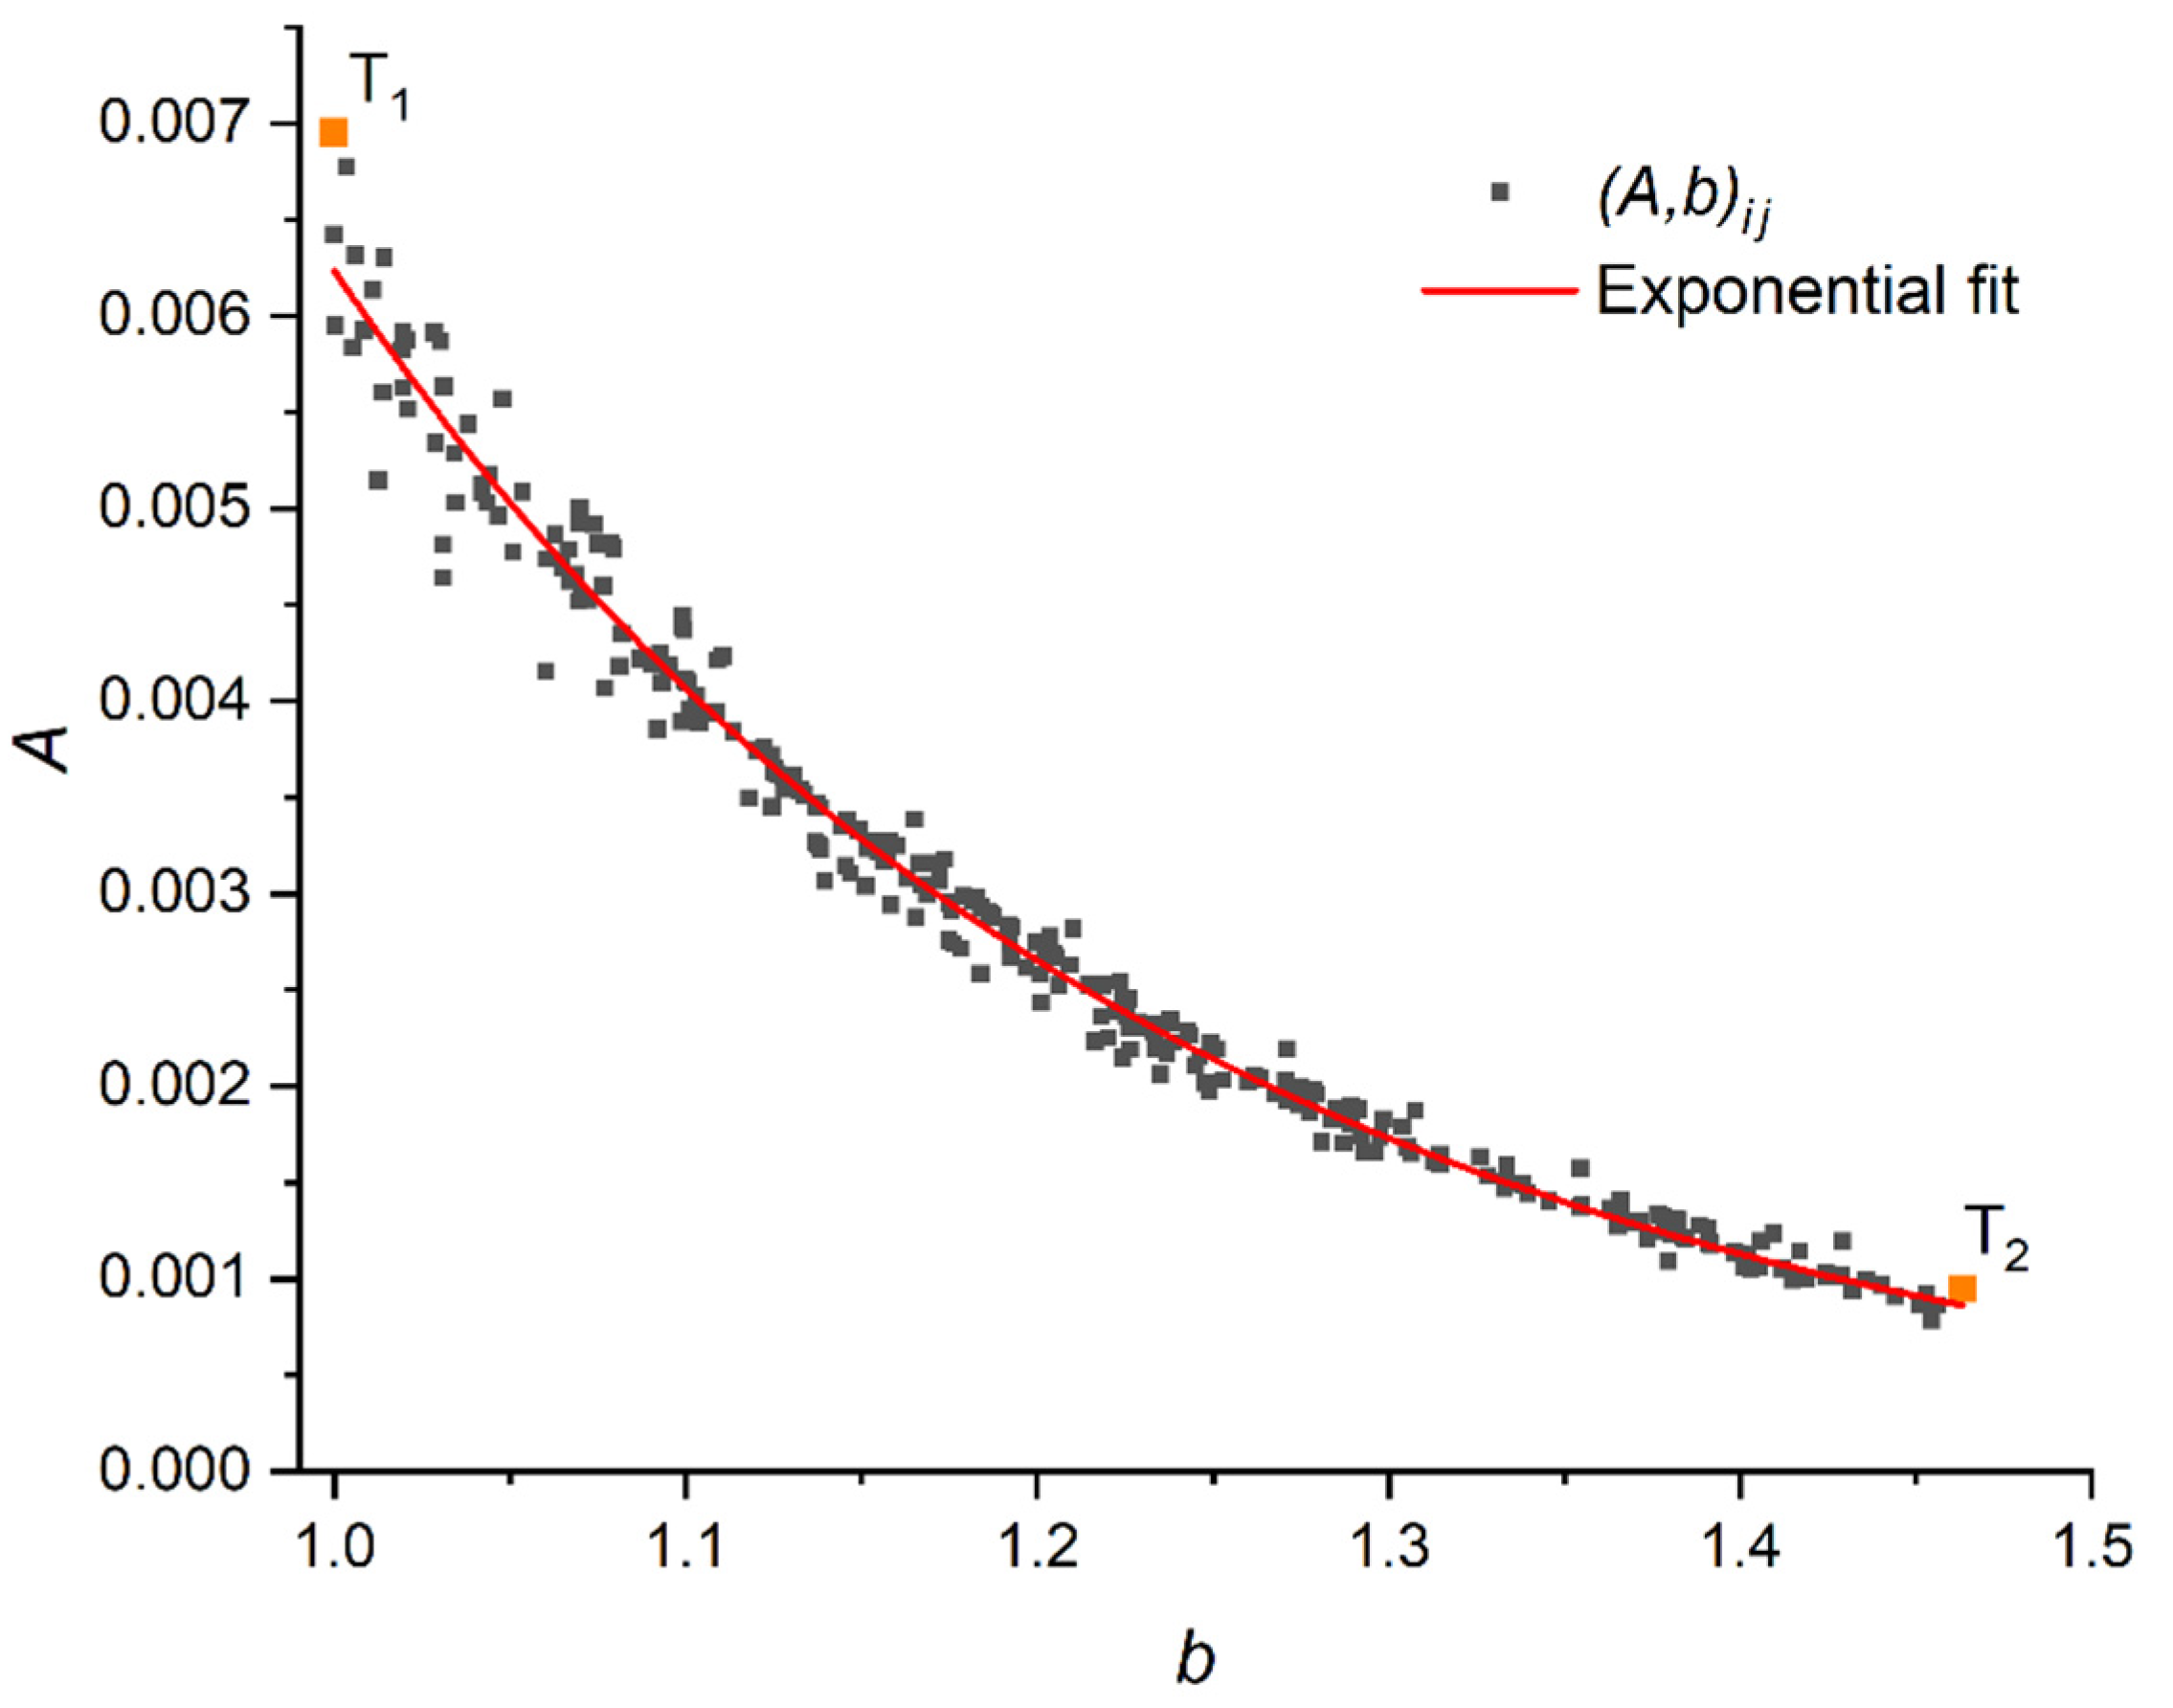
Figure 9. Here, the upper left point
with coordinates (1; 0.007) is obtained on the basis of two calibration patches with the same weights (10 kg) and pads (9 cm
2). The rightmost point on the graph,
, has coordinates (1.463; 0.001), obtained on the basis of calibration patches with 5 and 10 kg on the 9 cm
2 pad. We estimate the tendency in the scatterplot of points
by a power–law curve (14). In
Figure 9, such a curve is shown.
Table 2 shows the values
minimizing function (16) for each of the sets of the calibration patches. The found values are taken as final estimations of unknown
.
As the key indicator in a calibration procedure, the manufacturer considers the saturation pressure, which corresponds to the 255 raw sensel value. Pressures exceeding the saturation pressure will not be correctly registered by the sensor. If raw units are related to load in Newtons by means of calibration Formula (1), the saturation pressure is the following:
where
is the area of a sensel. In the last column of
Table 2, saturation pressures calculated according to this formula are provided. From the obtained values we can make a conclusion that the saturation pressure of a sensor can slightly decrease in time.
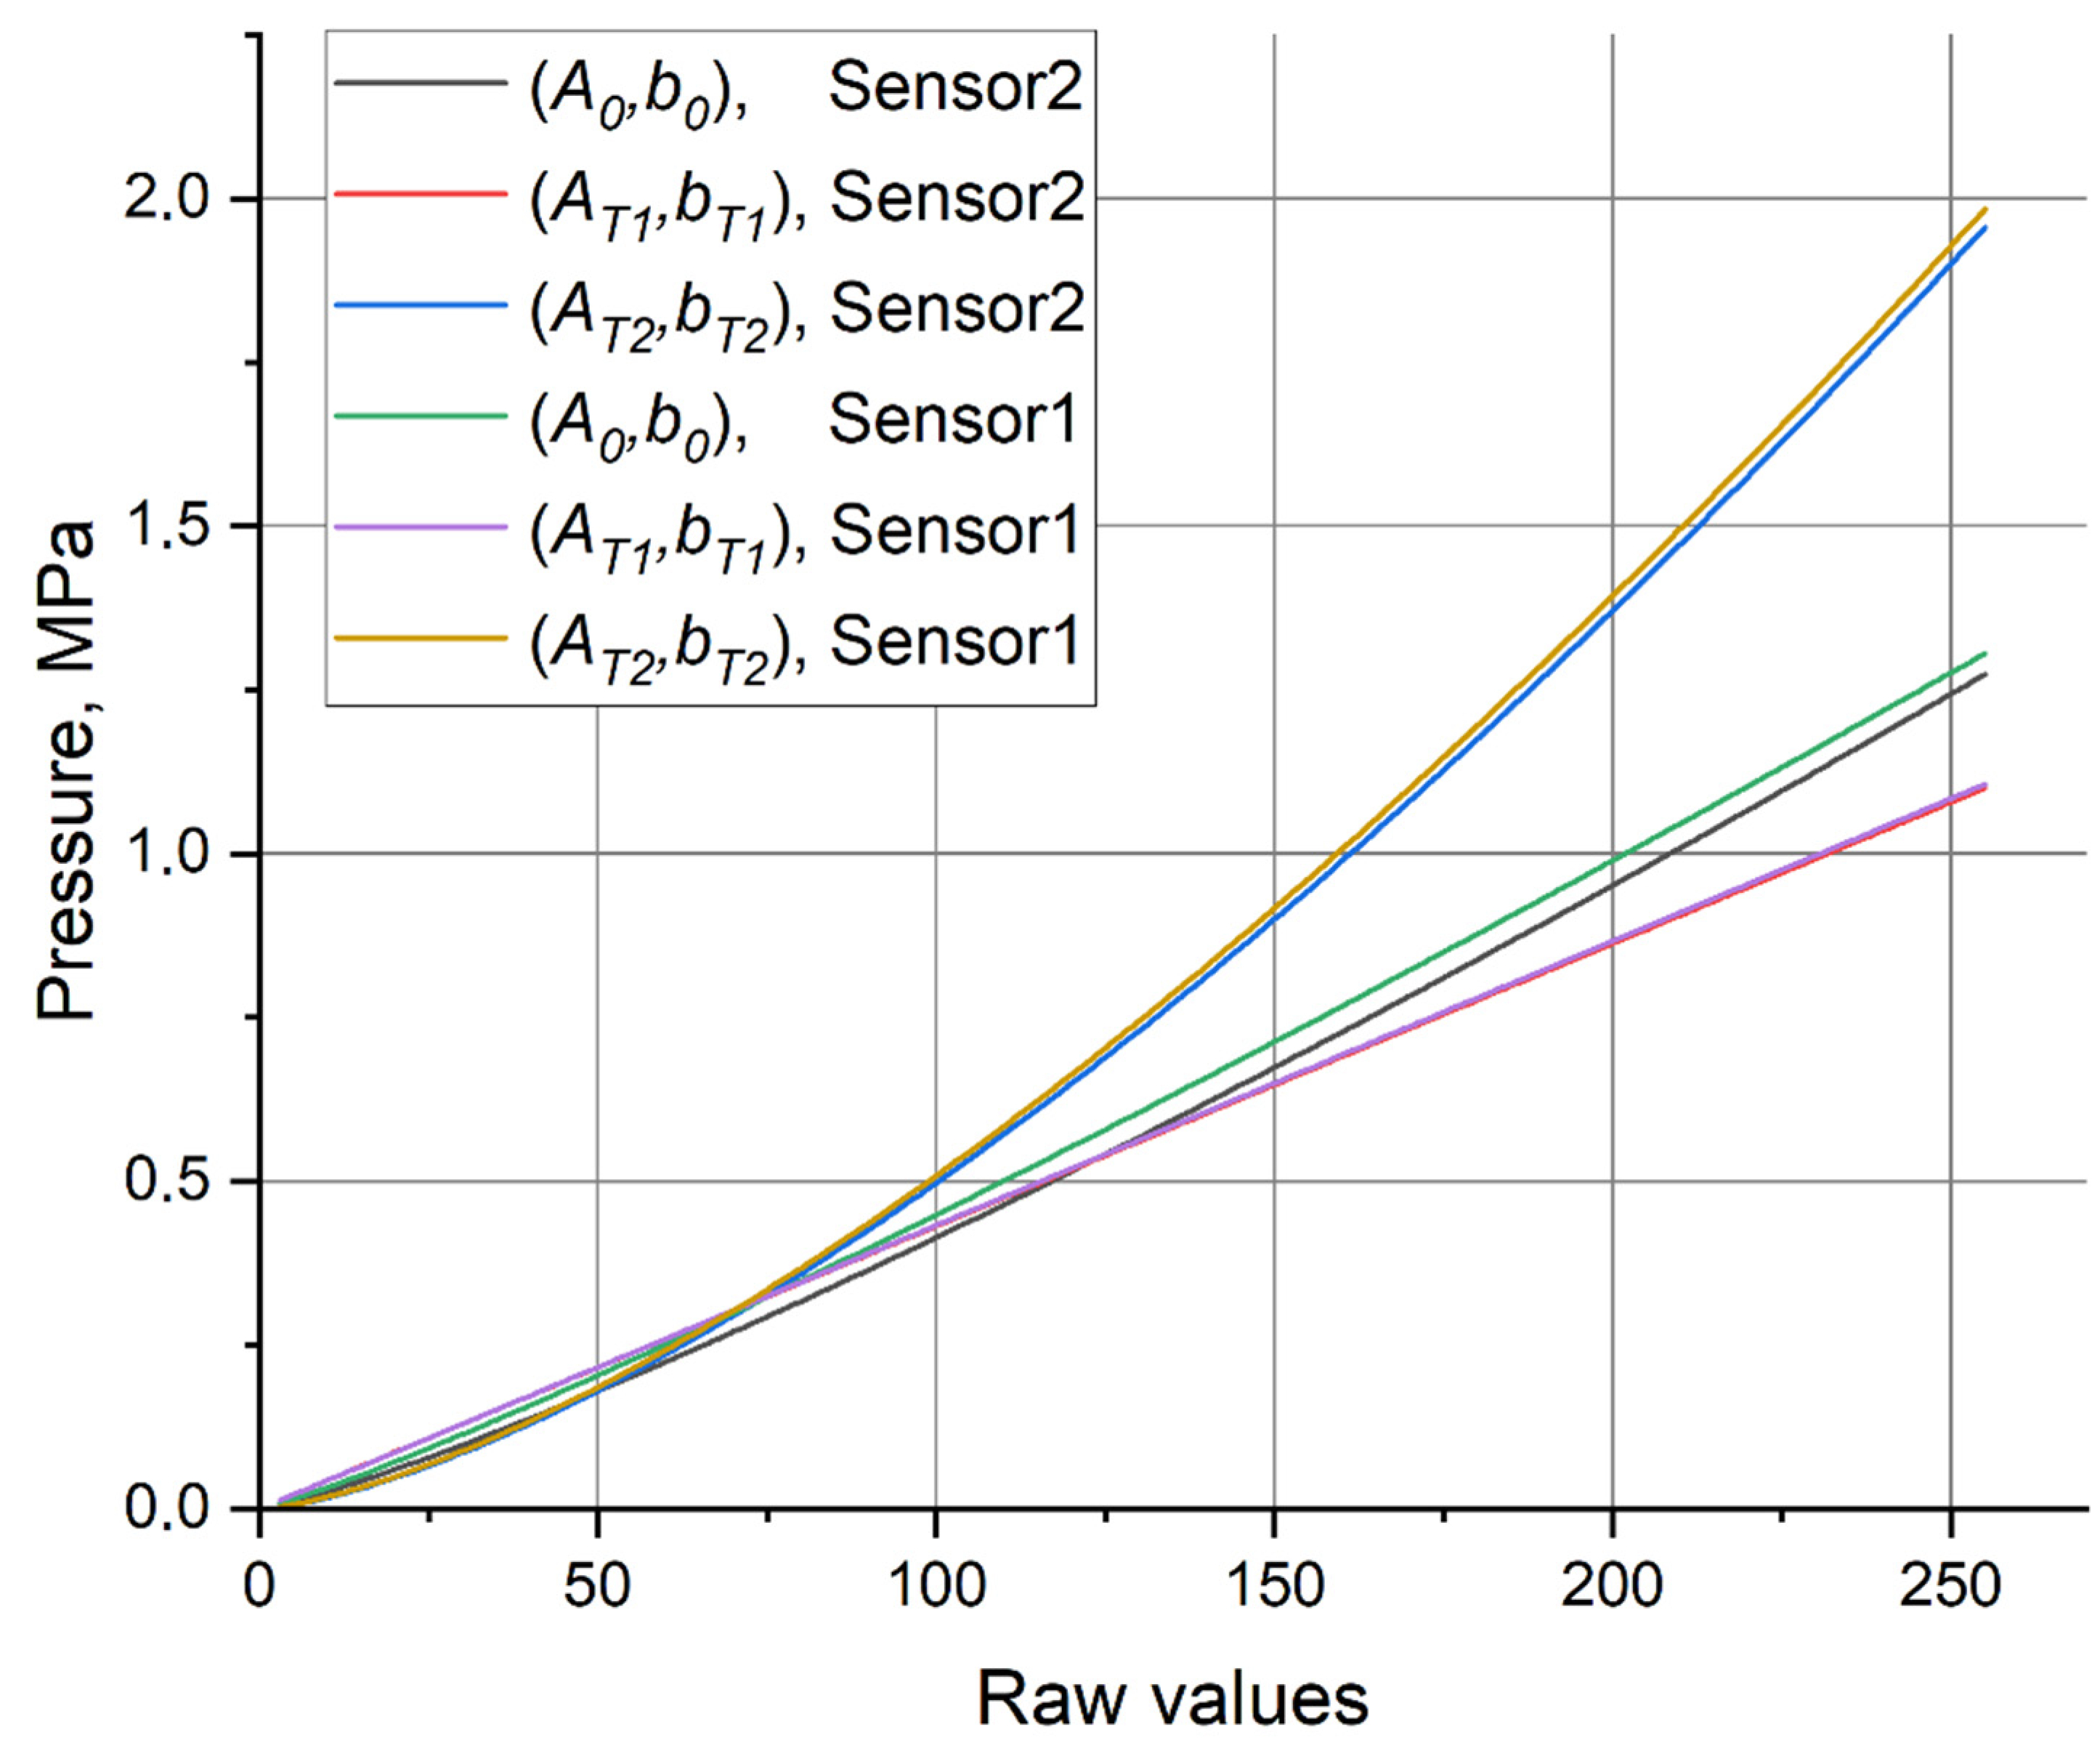
The resulting calibration curve for the new 5051-350 Sensor2 evaluated from the calibration procedure dated 18 April 2022, is shown in
Figure 10 with a black line. The corresponding curve for Sensor1 evaluated from the calibration procedure on the same day is shown with a green line. Two additional curves are plotted for each of the sensors to provide an idea on scattering of the calibration curves delivered by various pairs of the calibration patches. These additional curves correspond to “terminal” cases of
Finally, the actual load on a calibration patch should be compared with the load calculated for this patch by means of the model (1) with
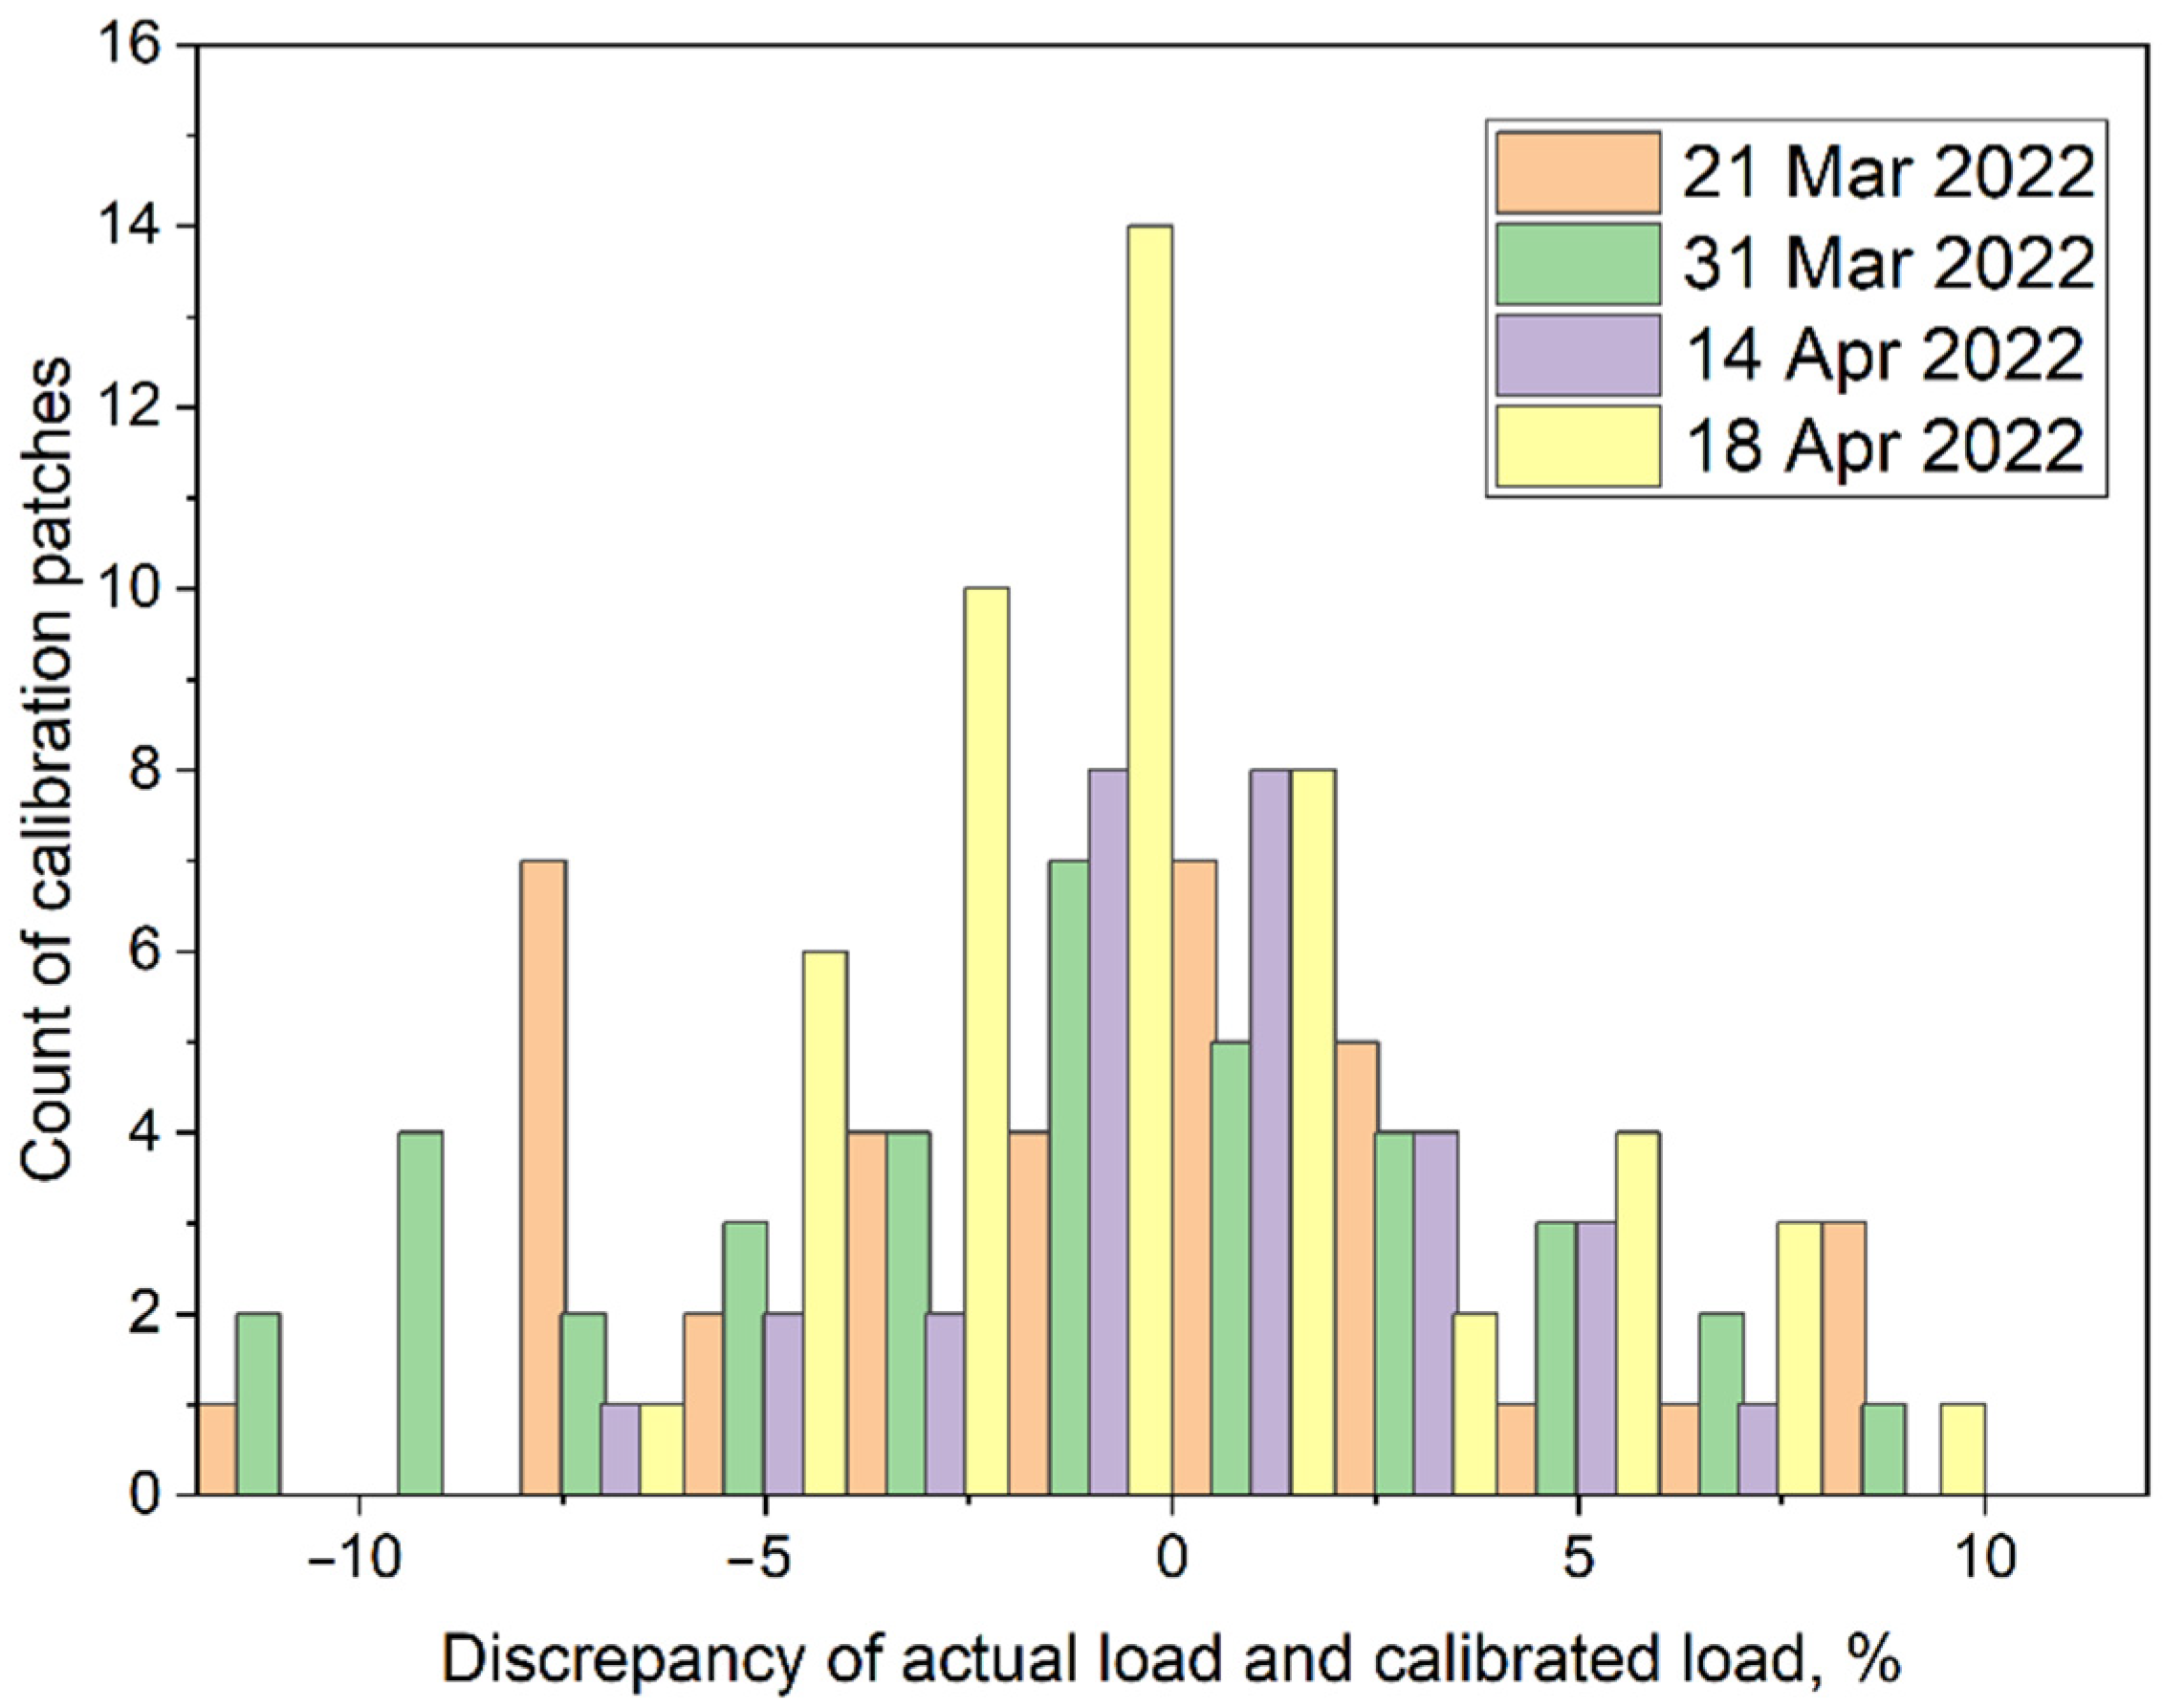
. For this reason, the corresponding values of the errors have been evaluated. These errors are presented in
Figure 11 in the form of combined histograms. One can see that for the majority of the patches the absolute discrepancy did not exceed 5%. However, the discrepancy in a range of 5–10% has also been present. Among 150 investigated patches, three had absolute discrepancies in the range of 10–12%.
