Article

Analysis of the Surface Stereometry of Alloyed Austenitic Steel after Fibre Laser Cutting using Confocal Microscopy

by
Sławomir Janusz Krajewski
1,*,
Daniel Grochała
1,
Jacek Tomków
2 and
Rafał Grzejda
1
1
Faculty of Mechanical Engineering and Mechatronics, West Pomeranian University of Technology in Szczecin, 19 Piastow Ave., 70-310 Szczecin, Poland
2
Faculty of Mechanical Engineering and Ship Technology, Gdansk University of Technology, 11/12 Gabriela Narutowicza Str., 80-229 Gdansk, Poland
*
Author to whom correspondence should be addressed.
Coatings 2023, 13(1), 15; https://doi.org/10.3390/coatings13010015
Submission received: 31 October 2022 / Revised: 9 December 2022 / Accepted: 19 December 2022 / Published: 22 December 2022
(This article belongs to the Special Issue Coatings in Industry)

Abstract

:
The paper extends the concept of cut edge quality and examines the fibre laser cutting process. A Prima Power Platino Fiber Evo device with a reference speed (RS) of 3500 mm/min was used for laser cutting. In order to analyse the influence of the laser cutting speed on the cut edge quality of X5CrNi18-10 stainless steel sheets, macroscopic studies were conducted on a stereoscopic microscope and surface stereometry on a confocal microscope. The obtained results were analysed to evaluate 2D and 3D parameters. These parameters make it possible to determine the cut edge quality and the susceptibility to the application of protective coatings. It was observed that the value of the Sa parameter is the highest for a cutting speed equal to 130% of RS. The Sz parameter is similar, while the Sk, Spk and Svk parameters rise as the speed increases, which is a negative phenomenon. Comparative tests were also conducted for four specimens made at cutting speeds of 70%, 85%, 100% and 115% of RS, respectively. It was found that the laser cutting speed has a significant impact on the cut edge quality and that stainless steel can be cut while maintaining the technological regime at 115% of RS.

1. Introduction

Modern technology for small and off-shore (large-scale) structures is based on the application of part preparation operations using various cutting, machining, joining, coating and painting techniques [1,2,3,4,5]. This is followed by major component assembly operations using welding or other techniques. Auxiliary technological operations, on the other hand, usually consist of corrosion protection of the entire structure at the very end of the process. They typically consist of the application of galvanic coatings or paint coatings.
While the edges of the cut parts to be welded are usually well prepared, aligned and inspected, the quality of the remaining cut edges is shaped during preparation operations. These edges can either be visible to the end recipient (the device user) or subject to painting. Surface geometric structure (SGS) formed during the cutting operation directly affects the technology of the welding operation and it is also responsible for the development of the adhesion mechanism and the mechanical anchorage mechanism of galvanic and painting coatings [6]. Lack of due care in the preparation of cut edges not only results in the loss of mechanical properties of the welded structure but also deteriorates the visual aspects, contributing to the development of corrosion and faster wear of the device [7,8,9].
In the sector of large-scale structures, thermal cutting is an essential process for preparing edges for further work such as welding or painting. Ordered materials are delivered in the form of steel sheets or linear sections and can be cut to size using various techniques. Solid or porous metallic materials can be successfully cut using the methods listed in [10,11,12], which include cavity cutting (e.g., water jet cutting, electric discharge machining), mechanical cutting (using a circular or band saw) or thermal cutting (i.e., thermal cutting with oxygen, plasma or laser). The technique listed last is most commonly used in cutting large parts in the welded structures industry.
Laser cutting is one of the advanced methods of thermal cutting, along with plasma cutting and thermal oxygen cutting. This method produces precision cut parts at high cutting speeds, achieving a narrow heat zone. The process is contactless, so it does not contribute to tool wear, and the resulting cut edge is smooth and clean and does not require finishing [13]. In recent years, this method has gradually become a practical cutting method due to its availability and lower price. Laser cutting can be applied in various industries such as medical, marine, aviation, automotive and construction. This method is often used to cut parts made of unalloyed steel, stainless steel, aluminium and its alloys and synthetic materials. It can be used to cut almost any material [14,15,16]. The popularity of this method, the simplicity of automation and the high quality of the edges obtained have led to various studies on the application of this method to different materials. Laser radiation sources used in laser cutting include CO2 lasers, Nd: YAG lasers, fibre lasers and disk lasers. In the following sections, a fibre laser [17] is discussed, which was used to make samples for further studies of surface stereometry and the determination of functional parameters. This method uses a high-powered laser beam to achieve a narrow slit, resulting in greater material savings. The laser beam emitted from the interconnected semiconductor diodes is delivered directly to the head via an optical fibre, so transmission losses are minimal. The laser emits radiation with a wavelength of approximately 1064 nm. The maximum impulse emission frequency is 250 kHz, the minimum duration is 2 μs and the maximum duration is 65 ms. Moreover, the wavelength of the laser light obtained is 10 times smaller than that of a CO2 laser (with a wavelength of 10600 nm), which translates into a higher concentration of energy, allowing the cutting of more reflective materials. The small focal length and the laser beam quality are the distinguishing features of fibre lasers, translating into efficiency and very good quality cut edges. The power of the fibre resonator in this type of laser ranges from 0.5 kW to 8 kW, and cutting speeds exceed 20 m/min. Therefore, it is possible to perform cutting speed optimisation [18,19,20,21,22,23,24].
Innovative cutting technologies are also being developed, such as the new NVEB cutting process with local suction, which produces extremely high cutting speeds of up to 17 m/min with high edge quality, making this method a significant advance for new NVEB applications [25]. Due to the specific environment, many structures, including offshore structures (such as oil and gas platforms, wind farms, ports, hydraulic structures, subsea oil and gas pipelines) need to be repaired, and components to be scrapped or reconditioned, so underwater cutting work is being carried out [26]. An exemplary study on this topic was published by Parshin et al. [27,28]. They present a study on underwater wet cutting with the use of flux-cored wires to improve quality and performance. The mechanism of underwater wet cutting is a cyclic process with the formation of periodic keyholes in the metal and consists of operating and idle cycles [29,30].
Due to the specific nature of the metalworking industry, a high workload occurs in CNC portals with thermal cutting heads. It is the duty of every manufacturer to ensure the quality of the manufactured structures and to meet the technical requirements during the manufacturing process of steel and aluminium structures in accordance with the requirements of PN-EN 1090-2 [31]. The quality of the edge after thermal cutting is often underestimated, which contributes to cracks in welded joints of low-alloy and stainless steels. If cracks appear after the cutting process, the coatings applied in this area will not adhere properly.
Various authors have attempted to compare mechanical and thermal cutting methods according to different criteria. For example, Bursi et al. [32] report that mechanically cut specimens for unalloyed S355N steel better meet the requirements of the standard [31]. Similar conclusions were obtained for holes drilled specifically for bolted connections, where higher fatigue strengths were found. Eltawahni et al. [33] extensively describe the impact of laser cutting on the quality of the cut edge in AISI 316L alloy steel. The width of the upper kerf increases with increasing laser power and decreases with increasing cutting speed. If the cutting speed is too high, the lower kerf can be negatively affected and will decrease. The authors noticed that cutting speed increases surface porosity. Cutting parameters were optimised in terms of edge quality or process economics.
Anghel et al. [34] obtained lower surface porosity of AISI 304 steel at low cutting speed, high laser power and average gas volumes and laser focal length. The process is more complicated in the case of thermal cutting due to the low melting point. It is recommended to use a high speed and optimum laser power, suitable for the thickness, in order to obtain low surface roughness [35,36,37,38,39]. Taking into account the above literature data, it can be concluded that cutting speed and auxiliary gas pressure are the most significant parameters affecting the change in surface porosity, while the impact of laser power is much less [40,41,42].
Another obvious conclusion from the literature is that the state of the geometric structure changes with changes in the technological parameters of cutting [32,33,34,35,36,40,41,42]. However, it is rarely emphasised that changes in roughness, micro-roughness and waviness and shape errors of the cut surfaces at the upper and lower edges occur simultaneously. In addition, a transition surface condition appears between the upper and lower edges of the cut surface. The quality of the cut edges is an important factor in determining the suitability of the cutting process used for subsequent welding work. This is particularly important in the case of surface preparation for welding, i.e., cutting with simultaneous chamfering.
The examination of surface properties prior to the application of coatings is sometimes necessary. The initial state of the surface geometric structure determines the subsequent performance and durability of the coatings applied to the surface of the finished product. The mechanism of the adhesion process of the coating to the metallic material is based on the attachment of particles to the micro-roughness of the surface (as a result of the so-called mechanical anchoring effect of the coating). If chemical interactions (diffusion) occur at the surface-coating interface or if additional bonds are created through adhesion forces, the durability of such a coating will be highest. However, it is not always possible to produce and combine all three effects simultaneously in the coating application process. Most often, the technologist considers the influence of the roughness parameter values Ra or Rz on the mechanical anchorage of the protective paint coating or abrasive coating (metallic or ceramic). Among abrasion coatings, polymer-based epoxy resin technology is often used as an effective anti-corrosion coating for steel with peel resistance. Savinkin et al. [43] remanufactured turbine blades and found that in order to achieve high-quality adhesion of the coating to the remanufactured component, the roughness of the surface for plasma spraying should be in the range of 10 to 60 Rz. This means that the surface should be matt. At the same time, they did not provide information on the height of the surface peaks and the depth of the valleys.
Sometimes different types of techniques are used to improve the adhesion of coatings, such as surface anodising using aluminium, electrochemical or plasma methods, or blasting, sandblasting and sodding. Ra is the most common surface roughness parameter used to measure flat surfaces [44,45]. However, without the determination of volumetric parameters such as Vvv (valley void volume) and Vvc (core void volume), the surface during electrolytic etching may lose the ability to mechanically anchor the coating. In contrast, the contact surface is characterised by other properties, such as roughness, hardness, contact area, tangential frictional force, longitudinal vibration velocity, elastic modulus and material hardness, on which the anchoring mechanism of the coating depends [46]. More recently, it has begun to define for a surface its load-bearing parameter Sbi, or indices such as Sci (surface core fluid retention parameter describing the main void volume acting as a lubricant reserve) or Svi (surface valley fluid retention parameter describing, like Svk, the void volume of the deepest valleys).
In order to compare the surface topography of the thermal cutting kerf, three main regions are defined, which include the cut zone, the reflection zone and the dross zone. The surface topography of the cut material at different laser beam parameters proved that the variation of the dross is caused by the laser cutting speed and the intensity of the laser interaction. At slow speed, a spinning effect is created upon reflection and the molten metal is displaced into the dross zone. Thus, the variation in the cut zone progresses as a function of the laser feed rate [47].
This paper is based on experience gathered from a literature review as well as our own experience. Confocal microscopy data allowed us to map the cut surface and characterise the volumes describing it. The concept of “cut edge quality” has been extended, based on PN-EN ISO 4287 [48] and PN-EN ISO 25178-600 [49] to define the surfaces to be tested in terms of 2D and 3D dimensions. On the other hand, the fact that the cut surface of an object is to be welded or further processed in order to obtain corrosion protection should determine the set of functional features by which such a surface should be defined, as well as how they should be measured [50,51,52].
In conducting the literature review on the assessment of the structure of machined surfaces, no sources were found that directly addressed the influence of cut edge topography on the ability to apply coatings after welding. However, the difficulties of applying coatings to welded joints are well known. The presented paper can therefore be considered to fill this gap in the state of knowledge.
X5CrNi18-10 steel (also known as 1.4301 and AISI 304) with enhanced mechanical properties was selected for the study, as its share in structures is increasing year and year [53,54,55,56]. The chosen material is also used for nitriding or the application of various types of coatings, such as those made of ZrSiN [57,58,59,60,61].

2. Materials and Methods

The chemical composition of the X5CrNi18-10 austenitic steel used in the study was determined on a LECO GDS 500A glow discharge spectrometer (Leco Inc., St. Joseph, MI, USA). The percentage of elements by weight obtained from the spectrometric analysis is presented in Table 1. Static tensile testing of the steel was performed on the material in delivery condition. During the test, the correlation between the tensile force and the increase in sample length was recorded. The tensile stresses Rm, yield strength Re/Rp0.2 and relative elongation A were determined for the obtained force values. The tests were performed using an INSTRON 5585H testing machine (Instron, Norwood, MA, USA), recording the parameters electronically in Bluehill 2 software. The obtained mechanical parameters of the steel are shown in Table 2.
Studies of the impact of cutting speed on the edge quality of sheets were performed using a Prima Power Platino Fiber Evo device (Prima Industrie S.P.A., Collegno, Italy) with a YLS-4000 source, at a reference speed (RS) of 3500 mm/min. They were carried out on 5 samples made at cutting speeds equal to 70%, 85%, 100%, 115% and 130% of the reference speed, respectively. Table 3 presents all the cutting parameters applied in the tests. They were selected based on preliminary investigations so that they would allow the cutting of sheets without the occurrence of problems and the process would be stable.
The adopted cutting speeds are within ± 30% of RS and are acceptable speeds that the laser device operator can use without consulting the technologist and without compromising the quality of machining.
In order to characterise the stereometry of the surface after fibre laser cutting, an analysis of the cut edges was performed with the use of an AltiSurf A520 confocal microscopy (Altimet, Chambéry, France). Macroscopic studies were carried out using a Nikon AZ100 stereo microscope with AZ Plan Apo 1x lens (Nikon Industrial Metrology, Tokyo, Japan). The geometry of the resulting cut surfaces was determined by examining the samples in confocal microscope. Due to the atypical structure of the stainless steel, a CL3 confocal sensor with a maximum measurement range of 1.2 mm was used, which allowed the focus on the foam cutting plane in order to continue measurements on a surface characterised by a high degree of waviness. With the microscope used, the examined surface can be tilted at a maximum angle of ±27° to the lens axis. The surface can be scanned with a vertical resolution of 25 nm, an accuracy of 60 nm and a range of 1.2 mm. The device allows full CNC control in five axes: X, Y, Z and two additional ones. The stepper motor resolution is 0.1 μm in the XY plane and 0.5 μm along the Z axis, while the resolution of each rotary axis is 0.0005°. The maximum dimensions of the sample can be 200 mm × 200 mm × 200 mm and the sample mass may not exceed 20 kg. The test consists in focusing white light on a measured surface so that the spot has the smallest possible diameter. The reflected light returns to the lens, passes through a chromatic lens and is scattered. The spectral band of the scattered light passes through the detector aperture. The background light reflected from the unmeasured surface is separated. Therefore, confocal examination with optical sensors provides high contrast and measurement accuracy [10,11,62,63,64,65].
In addition to the calculation of standard parameters of surface roughness, i.e., Rz and Ra [66], confocal microscopy allows multi-criteria spatial analysis of the topography and evaluation of 3D stereometric parameters of the surface according to PN-EN ISO 25178-600 [49]. The parameters include:
  • Amplitude parameters (Sq, Ssk, Sku, Sp, Sv, Sz, Sa);
  • Volume functional parameters (Vm, Vv, Vmp, Vmc, Vvc, Vvv);
  • Feature parameters (Spd, Spc, S10z, S5p, S5v, Sda, Sha, Sdv, Shv);
  • Other 3D parameters (Smean, Sdar, Spar).
Confocal microscopy also allows the following 2D stereometric parameters to be determined according to PN-EN ISO 4287 [48]:
  • Distribution parameters—roughness profile (RSm, Rdq);
  • Peak parameters—roughness profile (RPc);
  • Material ratio parameters—basic profile (Pmr, Pdc);
  • Amplitude parameters—profile (Rp, Rv, Rz, Rc, Rt, Ra, Rq, Rsk, Rku).
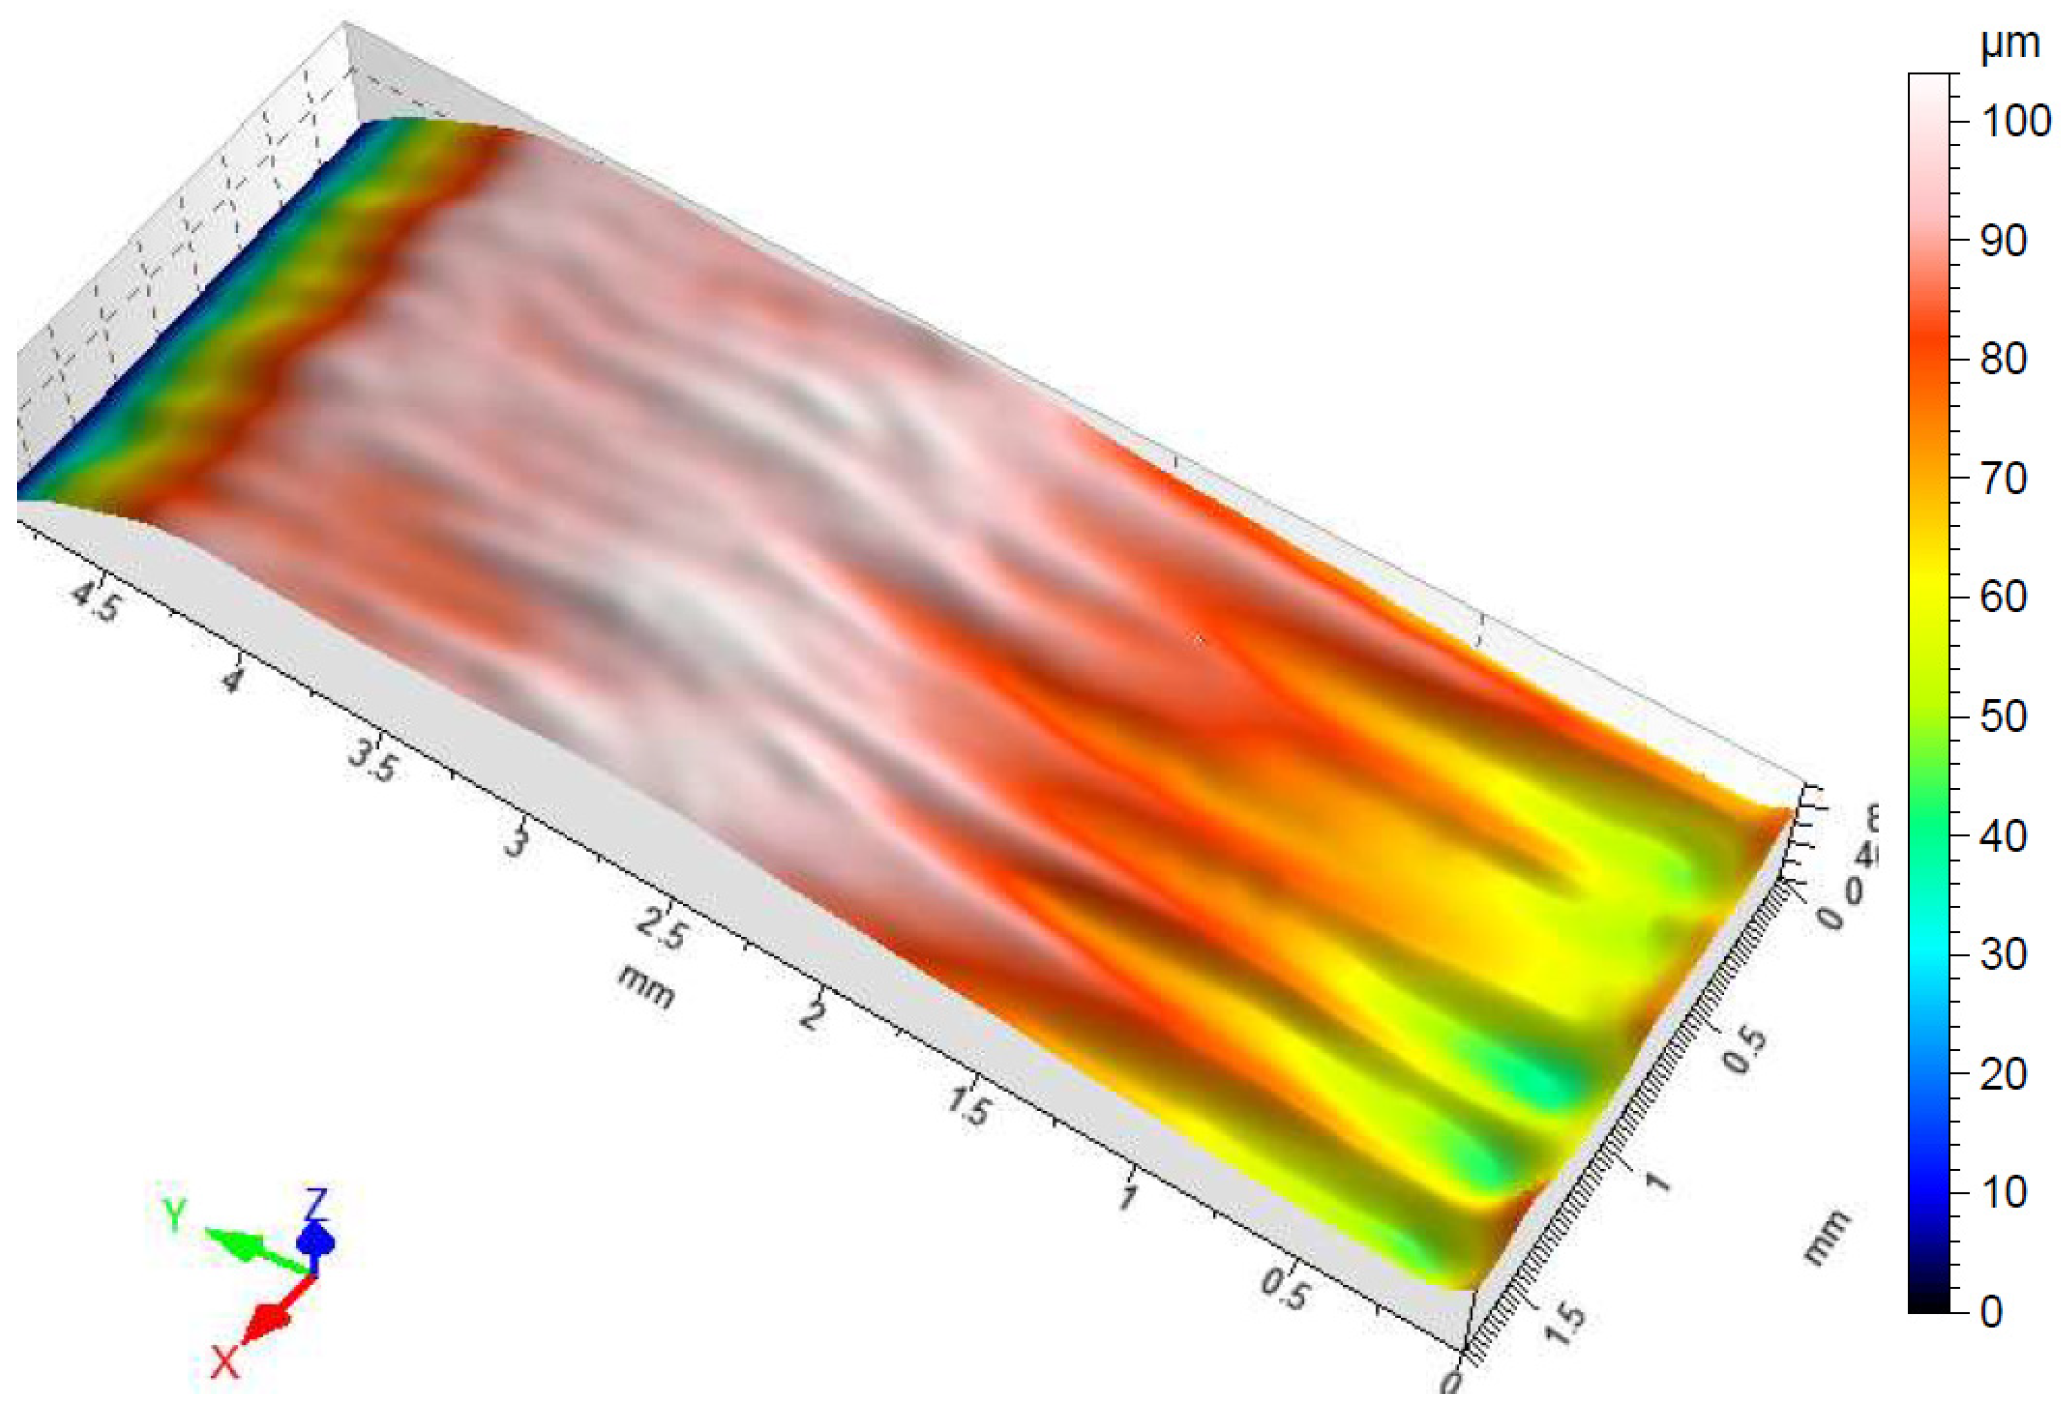
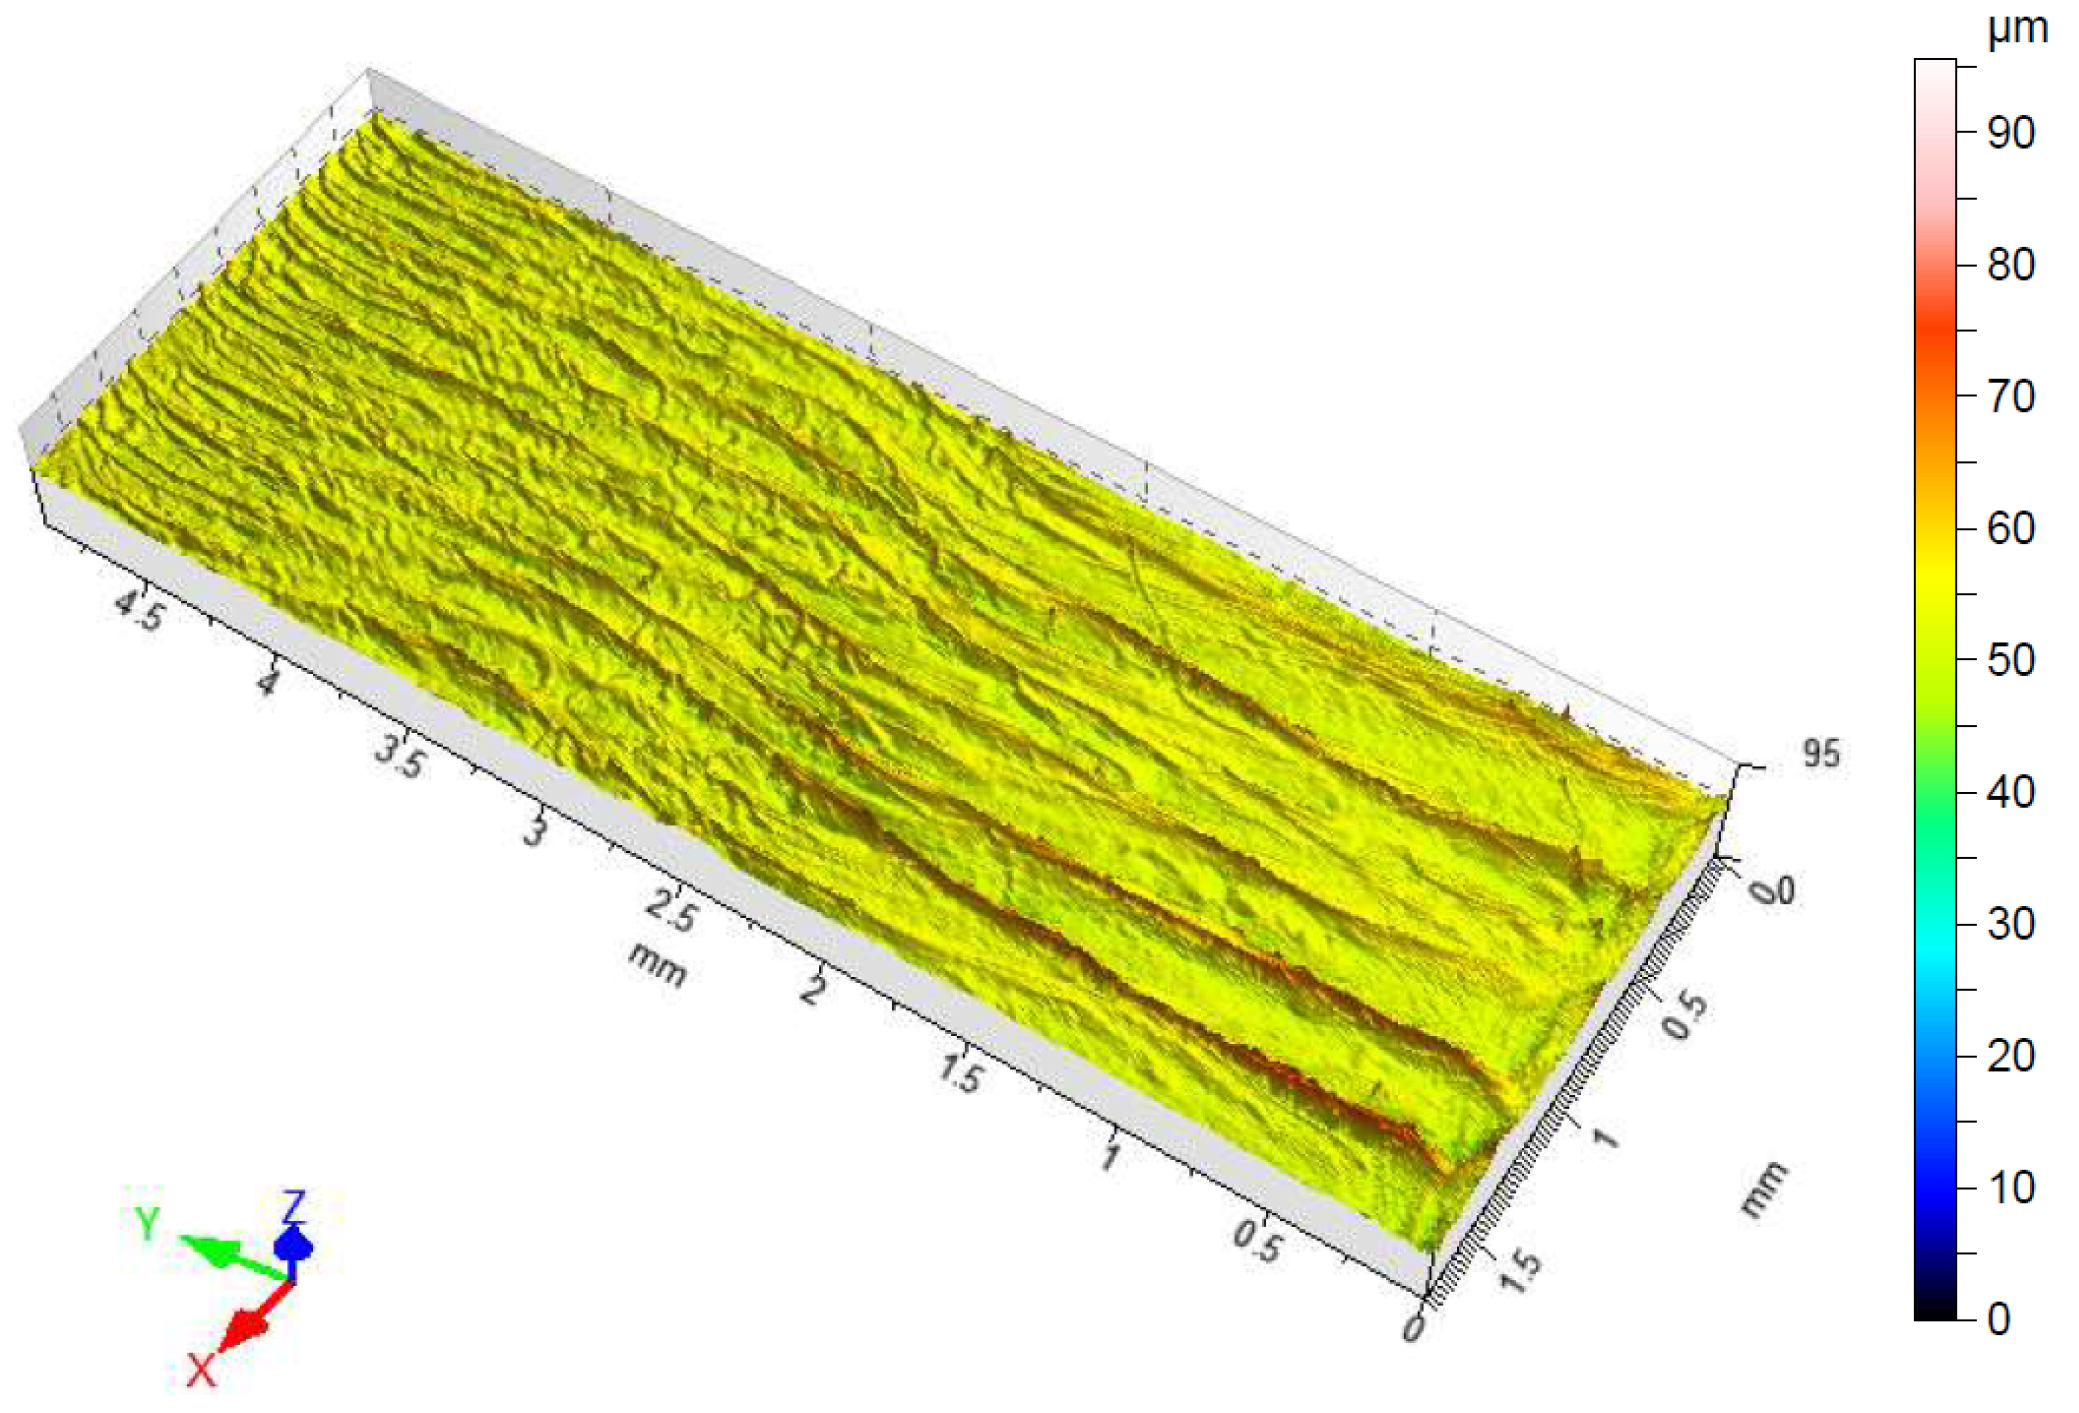
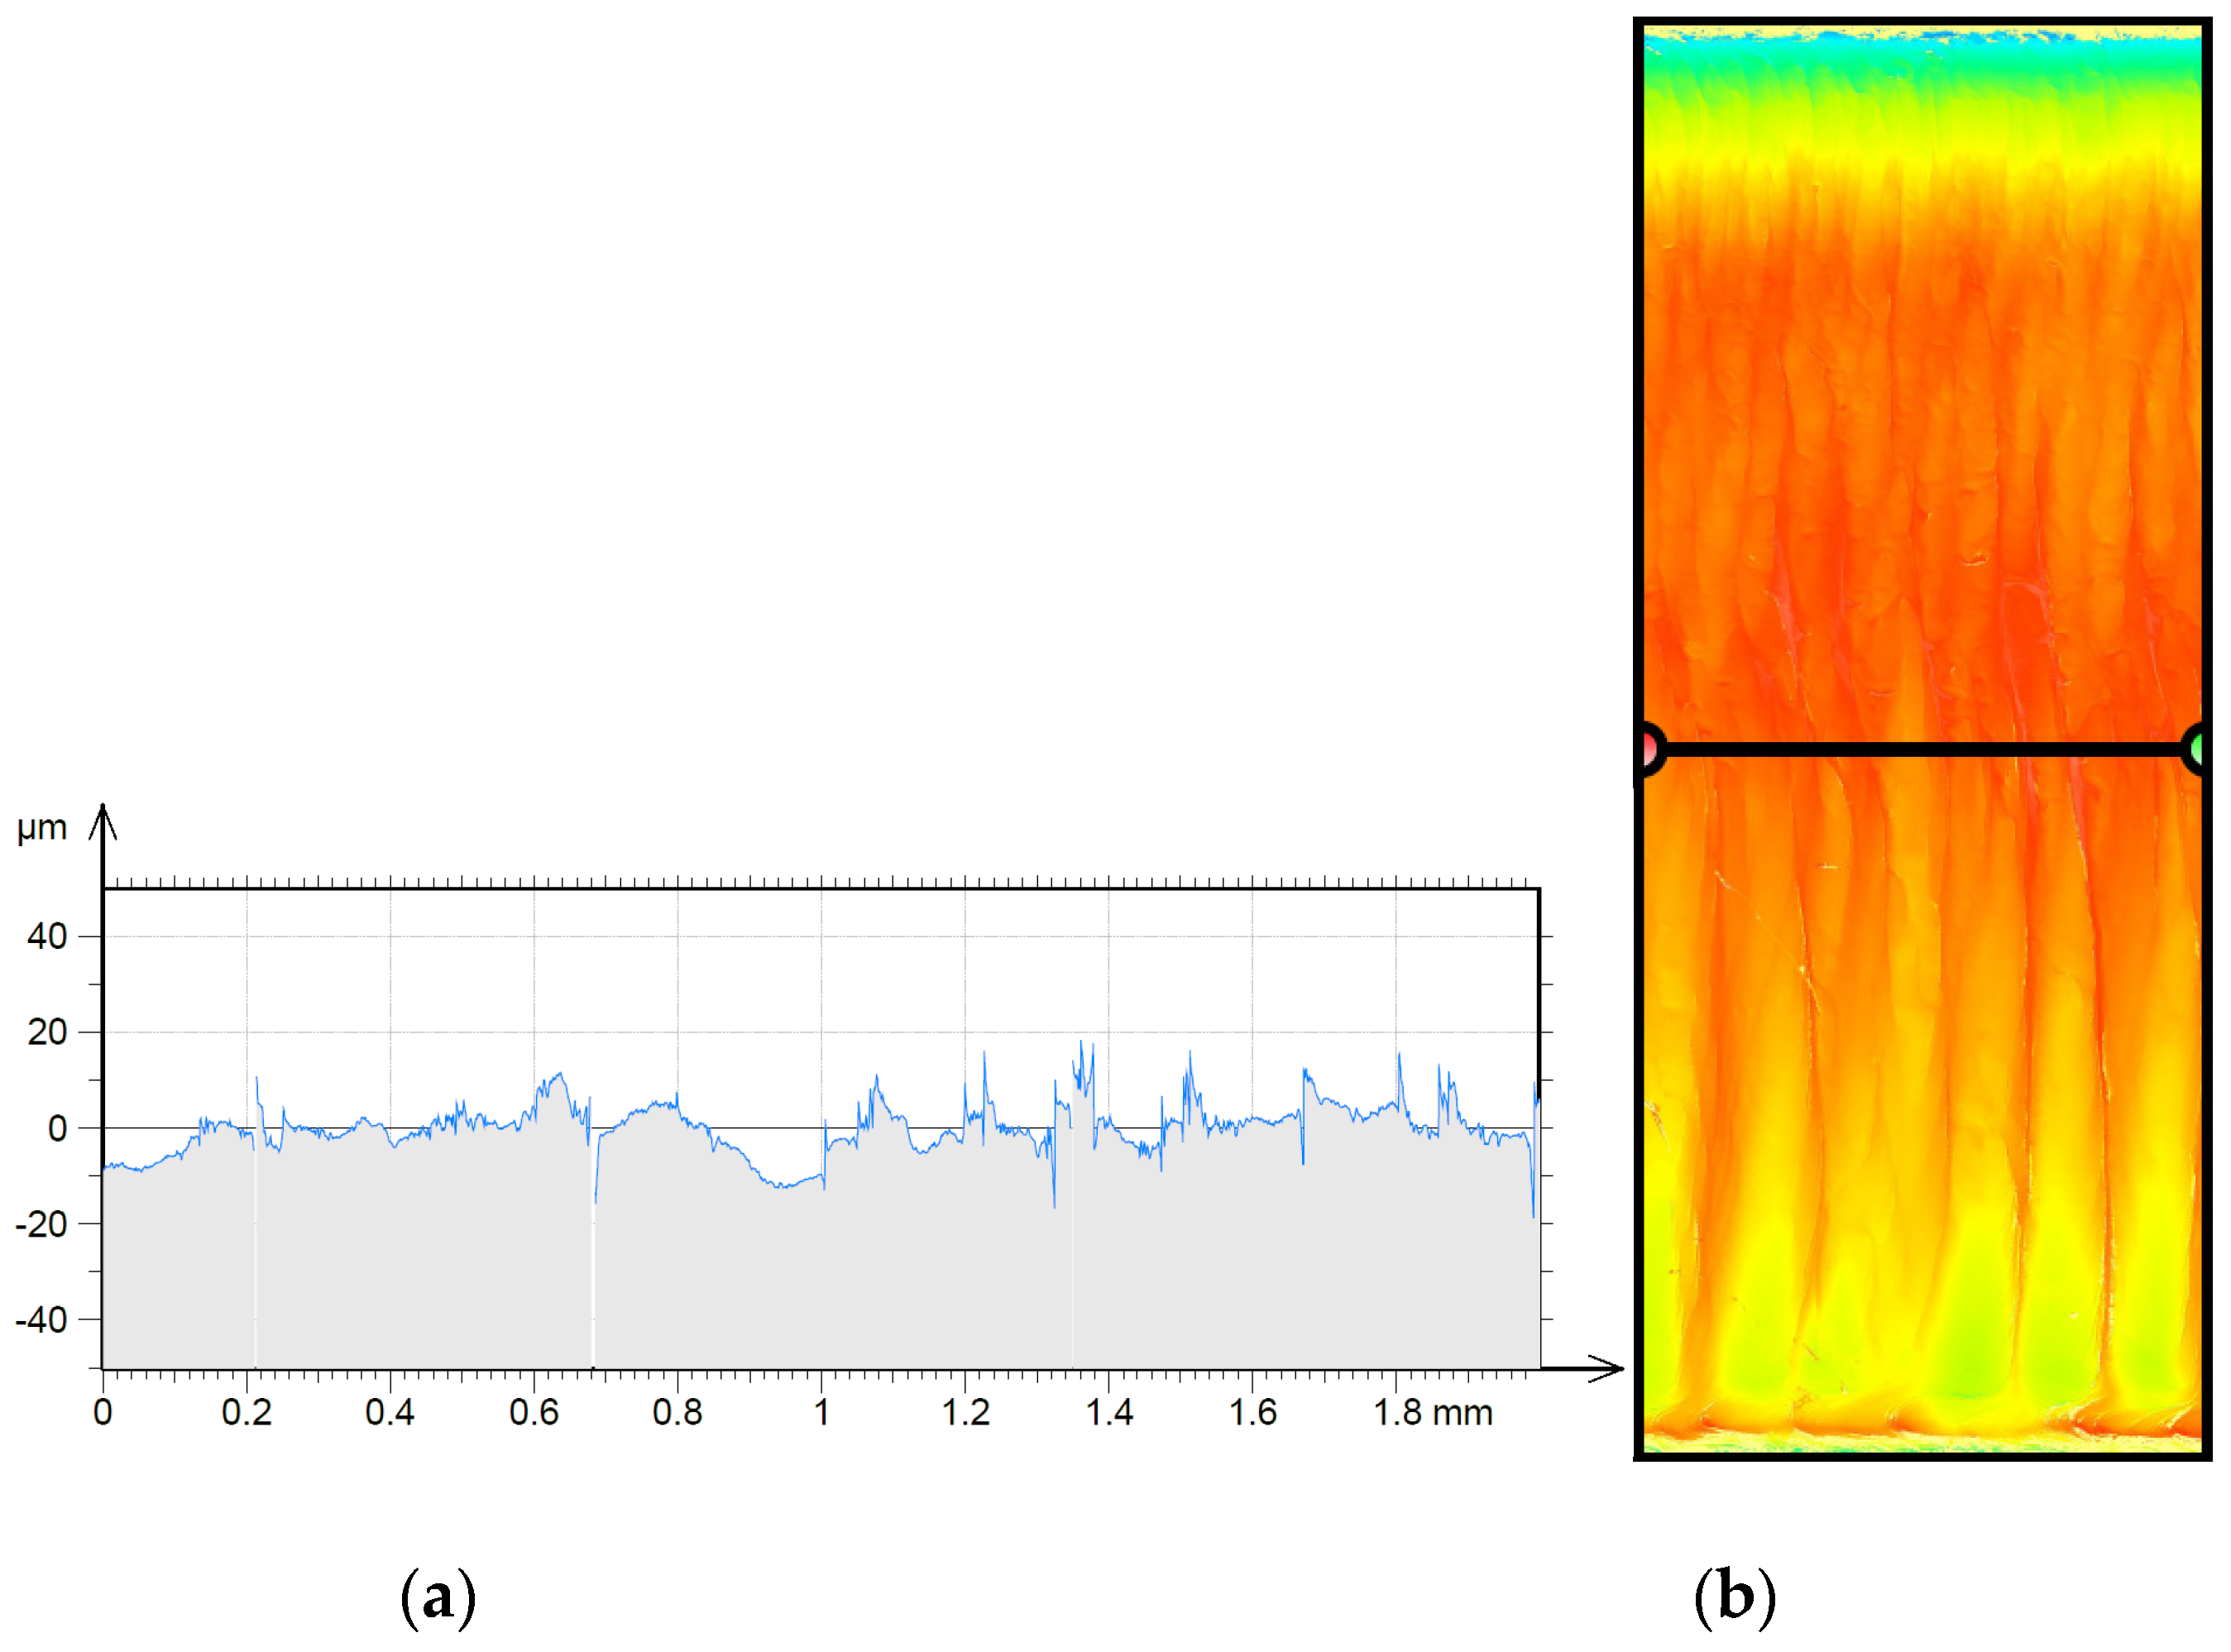
The processing of the measurement results is illustrated in Figure 1, Figure 2, Figure 3 and Figure 4 using sample No. 3 as an example.
The raw data are shown in Figure 1. In the first step, artefacts were removed from the image, resulting, for example, from an incorrect measurement at a given point by assigning a threshold value. The image of the sample after this operation is shown in Figure 2. Then, the surface was levelled (Figure 3). The last stage in processing the stereometric data was the calculation of the roughness and 3D and 2D profile parameters of the test object. The 2D profile parameters are shown in Table 4 and Figure 4.
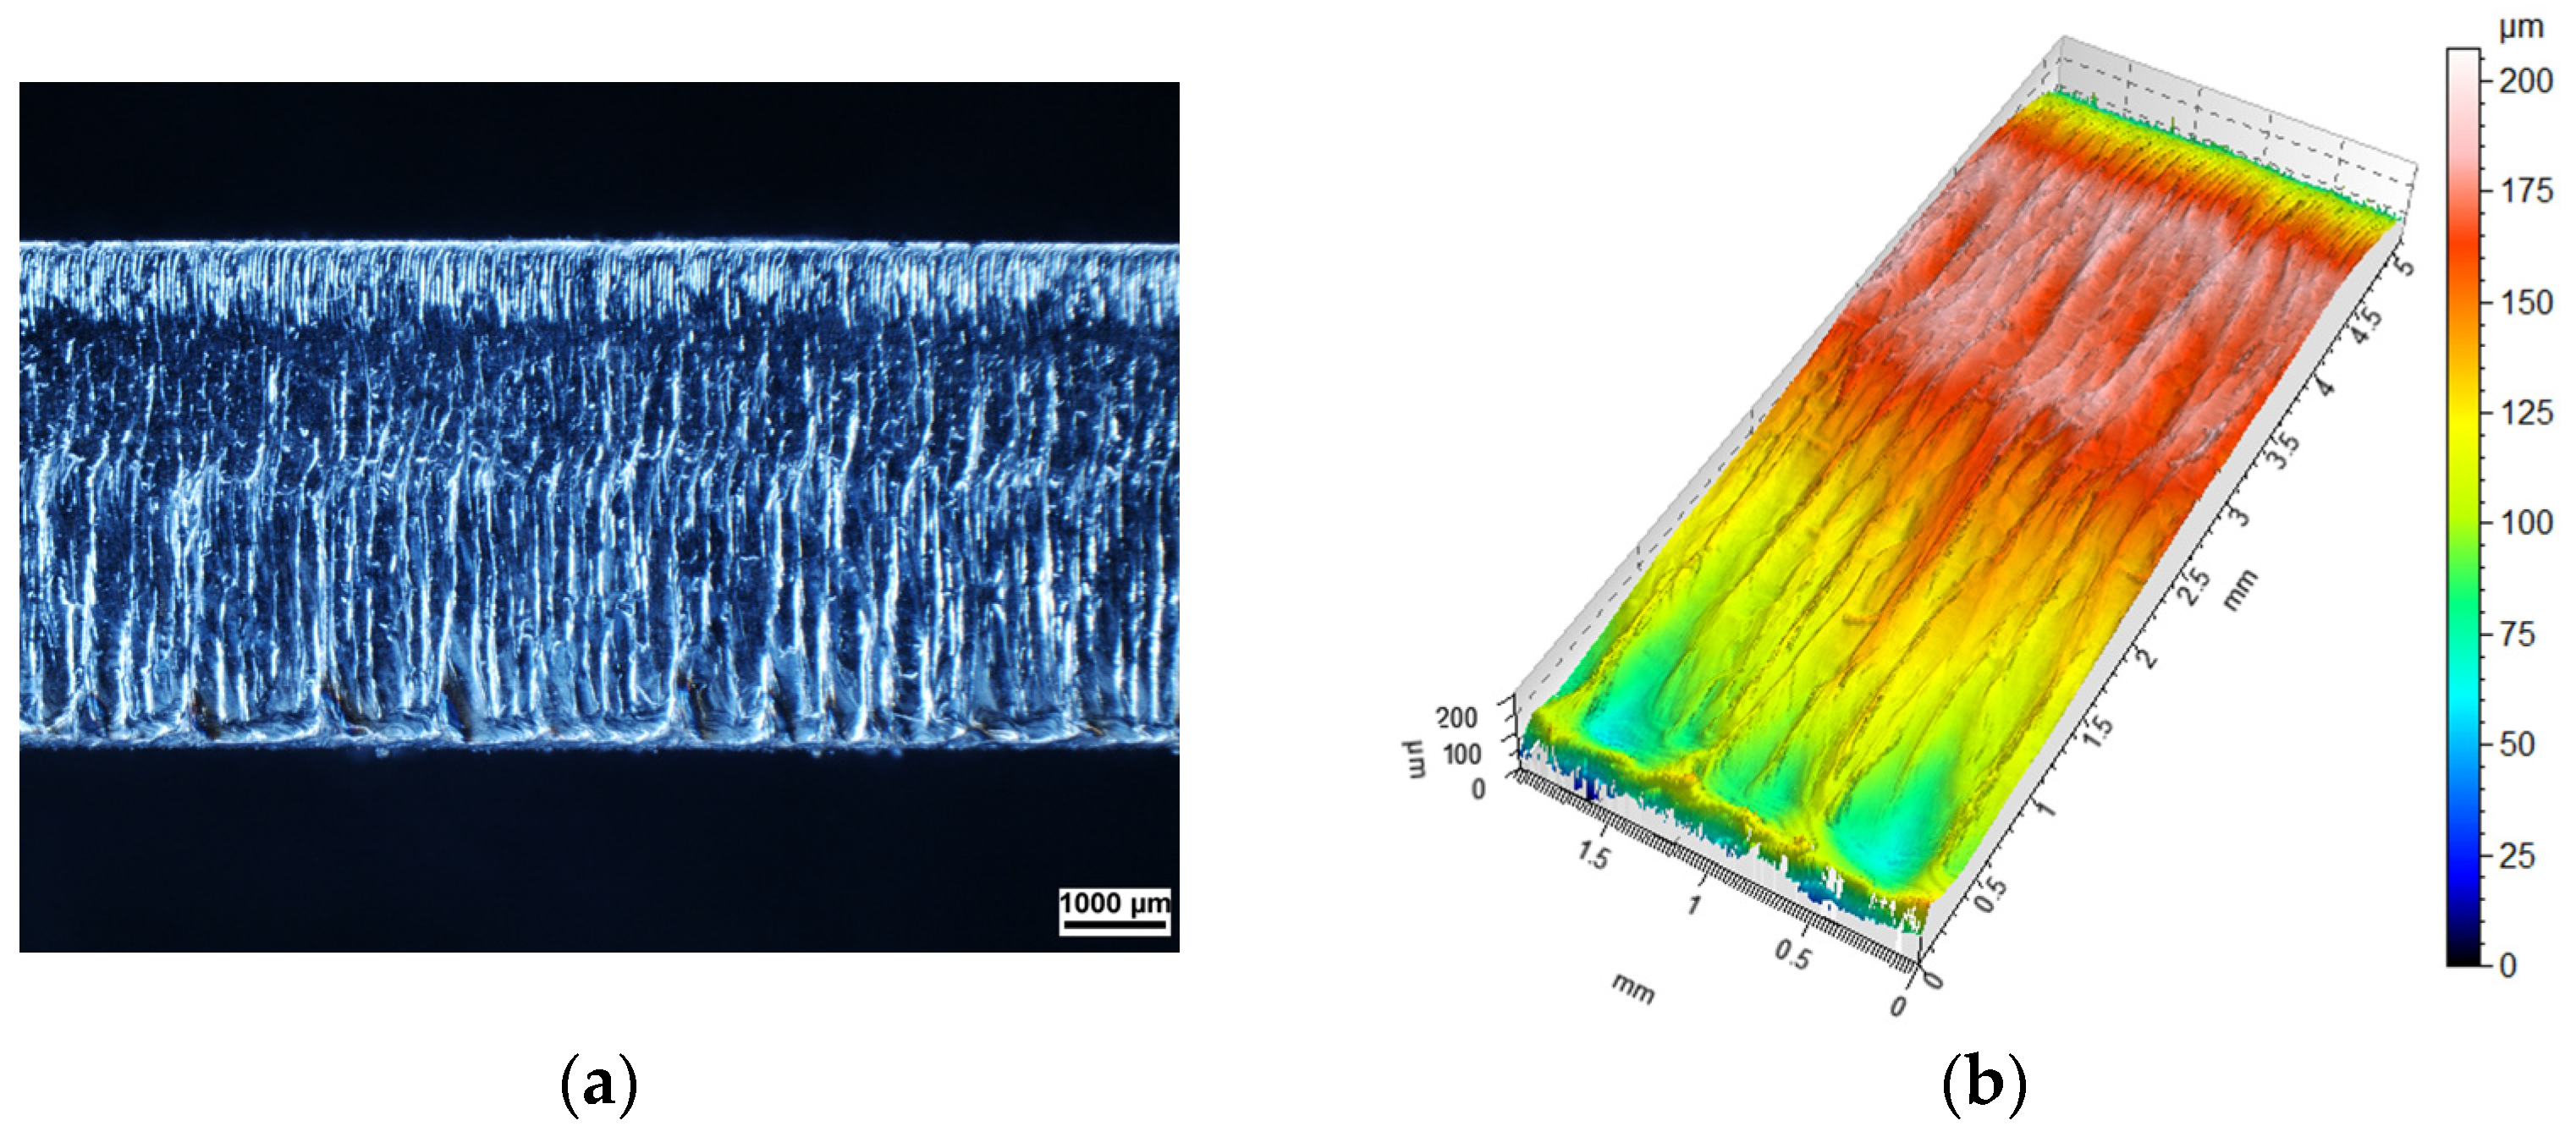
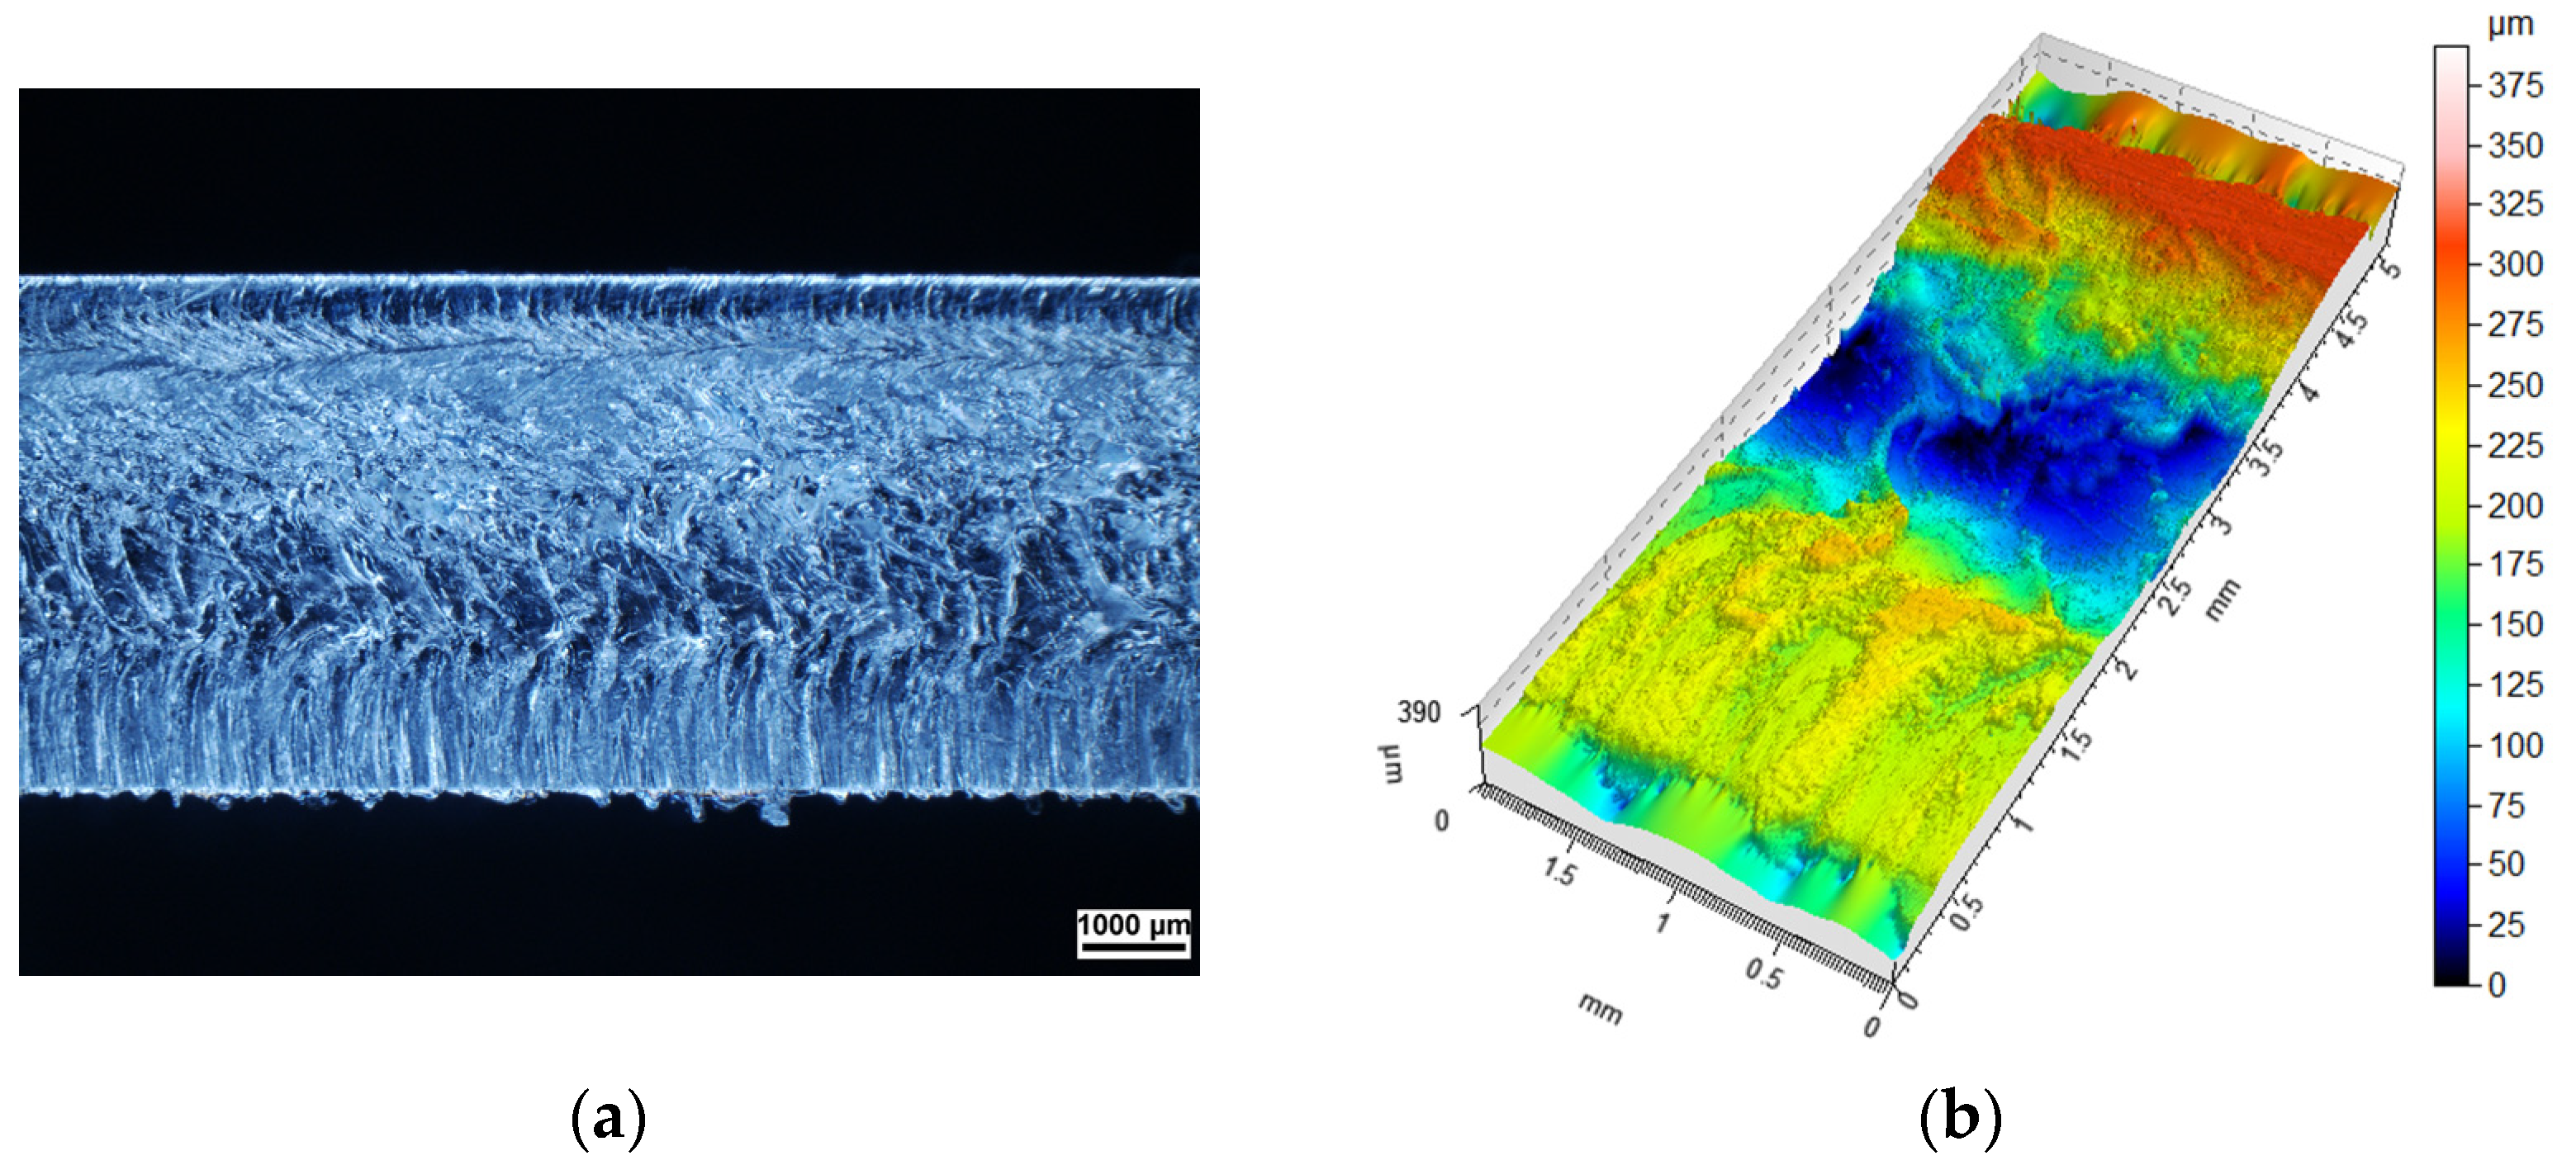
Macroscopic results from the stereo microscope are shown in Figure 5a, Figure 6a, Figure 7a, Figure 8a and Figure 9a. The AltiMapa 6 software, which was used to process the raw confocal microscope data, allowed the recorded topography to be analysed taking into account surface examination standards. The results are shown in Figure 5b, Figure 6b, Figure 7b, Figure 8b and Figure 9b.
Based on the presented research methodology, an analysis of the stereometric parameters of fibre laser cut edges was performed. The results obtained allow the optimisation of the cutting process parameters and characterisation of a set of functional parameters of the cut edge.

3. Results and Discussion

The Altisurf A520 confocal microscope, together with AltiMapa 6 software, made it possible to measure and evaluate the geometric structures of 2D profiles and the 3D topography of the surfaces after fibre laser cutting. Figure 5, Figure 6, Figure 7, Figure 8 and Figure 9 present the geometry of the planes in two variants, as macroscopic images and mapped surfaces. The surfaces show significant differences depending on the cutting speed. For X5CrNi18-10 stainless steel, the most favourable cutting speed appears to be between 85 and 100% of RS. Then the profile of the bottom surface, the upper edge and the transition surface show the lowest height difference.
The changes in morphology at the upper and lower edges of the cutting surface are perfectly visible in all the figures showing the surface of the samples. The image of the so-called transition surface, whose nature varies depending on the value of the cutting speed, is also visible. Moreover, in the case of sample No. 5, the formation of a ridge approximately 100 to 150 µm high at the interface of the transition surfaces was also observed. Its presence restricts the contact of the joined objects, limiting the possibility of full remelting of the welded surfaces without adequate preparation. Its presence can also contribute to a reduction in the thickness of the protective (paint) coating. The formation of rounds with a radius of up to 70 µm along the lower cut edge was also observed in all samples.
The value of Sa (arithmetical mean height of the scale limited surface) is the highest for a speed of 130% of RS. Optimum cutting parameters are speeds between 100 and 115% of RS. The same is true for the Sq parameter (root mean square height of the scale-limited surface). Surfaces with the smallest values of deviation of irregularities from the mean plane were recorded for samples made at 70% and 100% of RS, as illustrated in Figure 10.
According to PN-EN ISO 9013 [67], samples characterised by an Rz5 parameter below 119 µm meet the range acceptance criteria for EXC4, according to PN-EN 1090-2 [31]. In contrast, the Sz parameter (for the 3D system), which is similar to the Rz5 parameter in the 2D system, exceeds the 119 µm level for speeds of 130% of RS. From the point of view of the welding process, it is desirable that the surface is characterised by single high peaks, which first melt and—in liquid form—fill small gaps in the material in its plasticised state. Taking this aspect and the economics of the cutting process into account, the optimum speed for X5CrNi18-10 stainless steel is also 115% of RS. The correlation between the Sz parameter (maximum height of the scale-limited surface), the Sp parameter (maximum peak height of the scale limited surface) and the Sv parameter (maximum pit height of the scale limited surface) is shown in Figure 11.
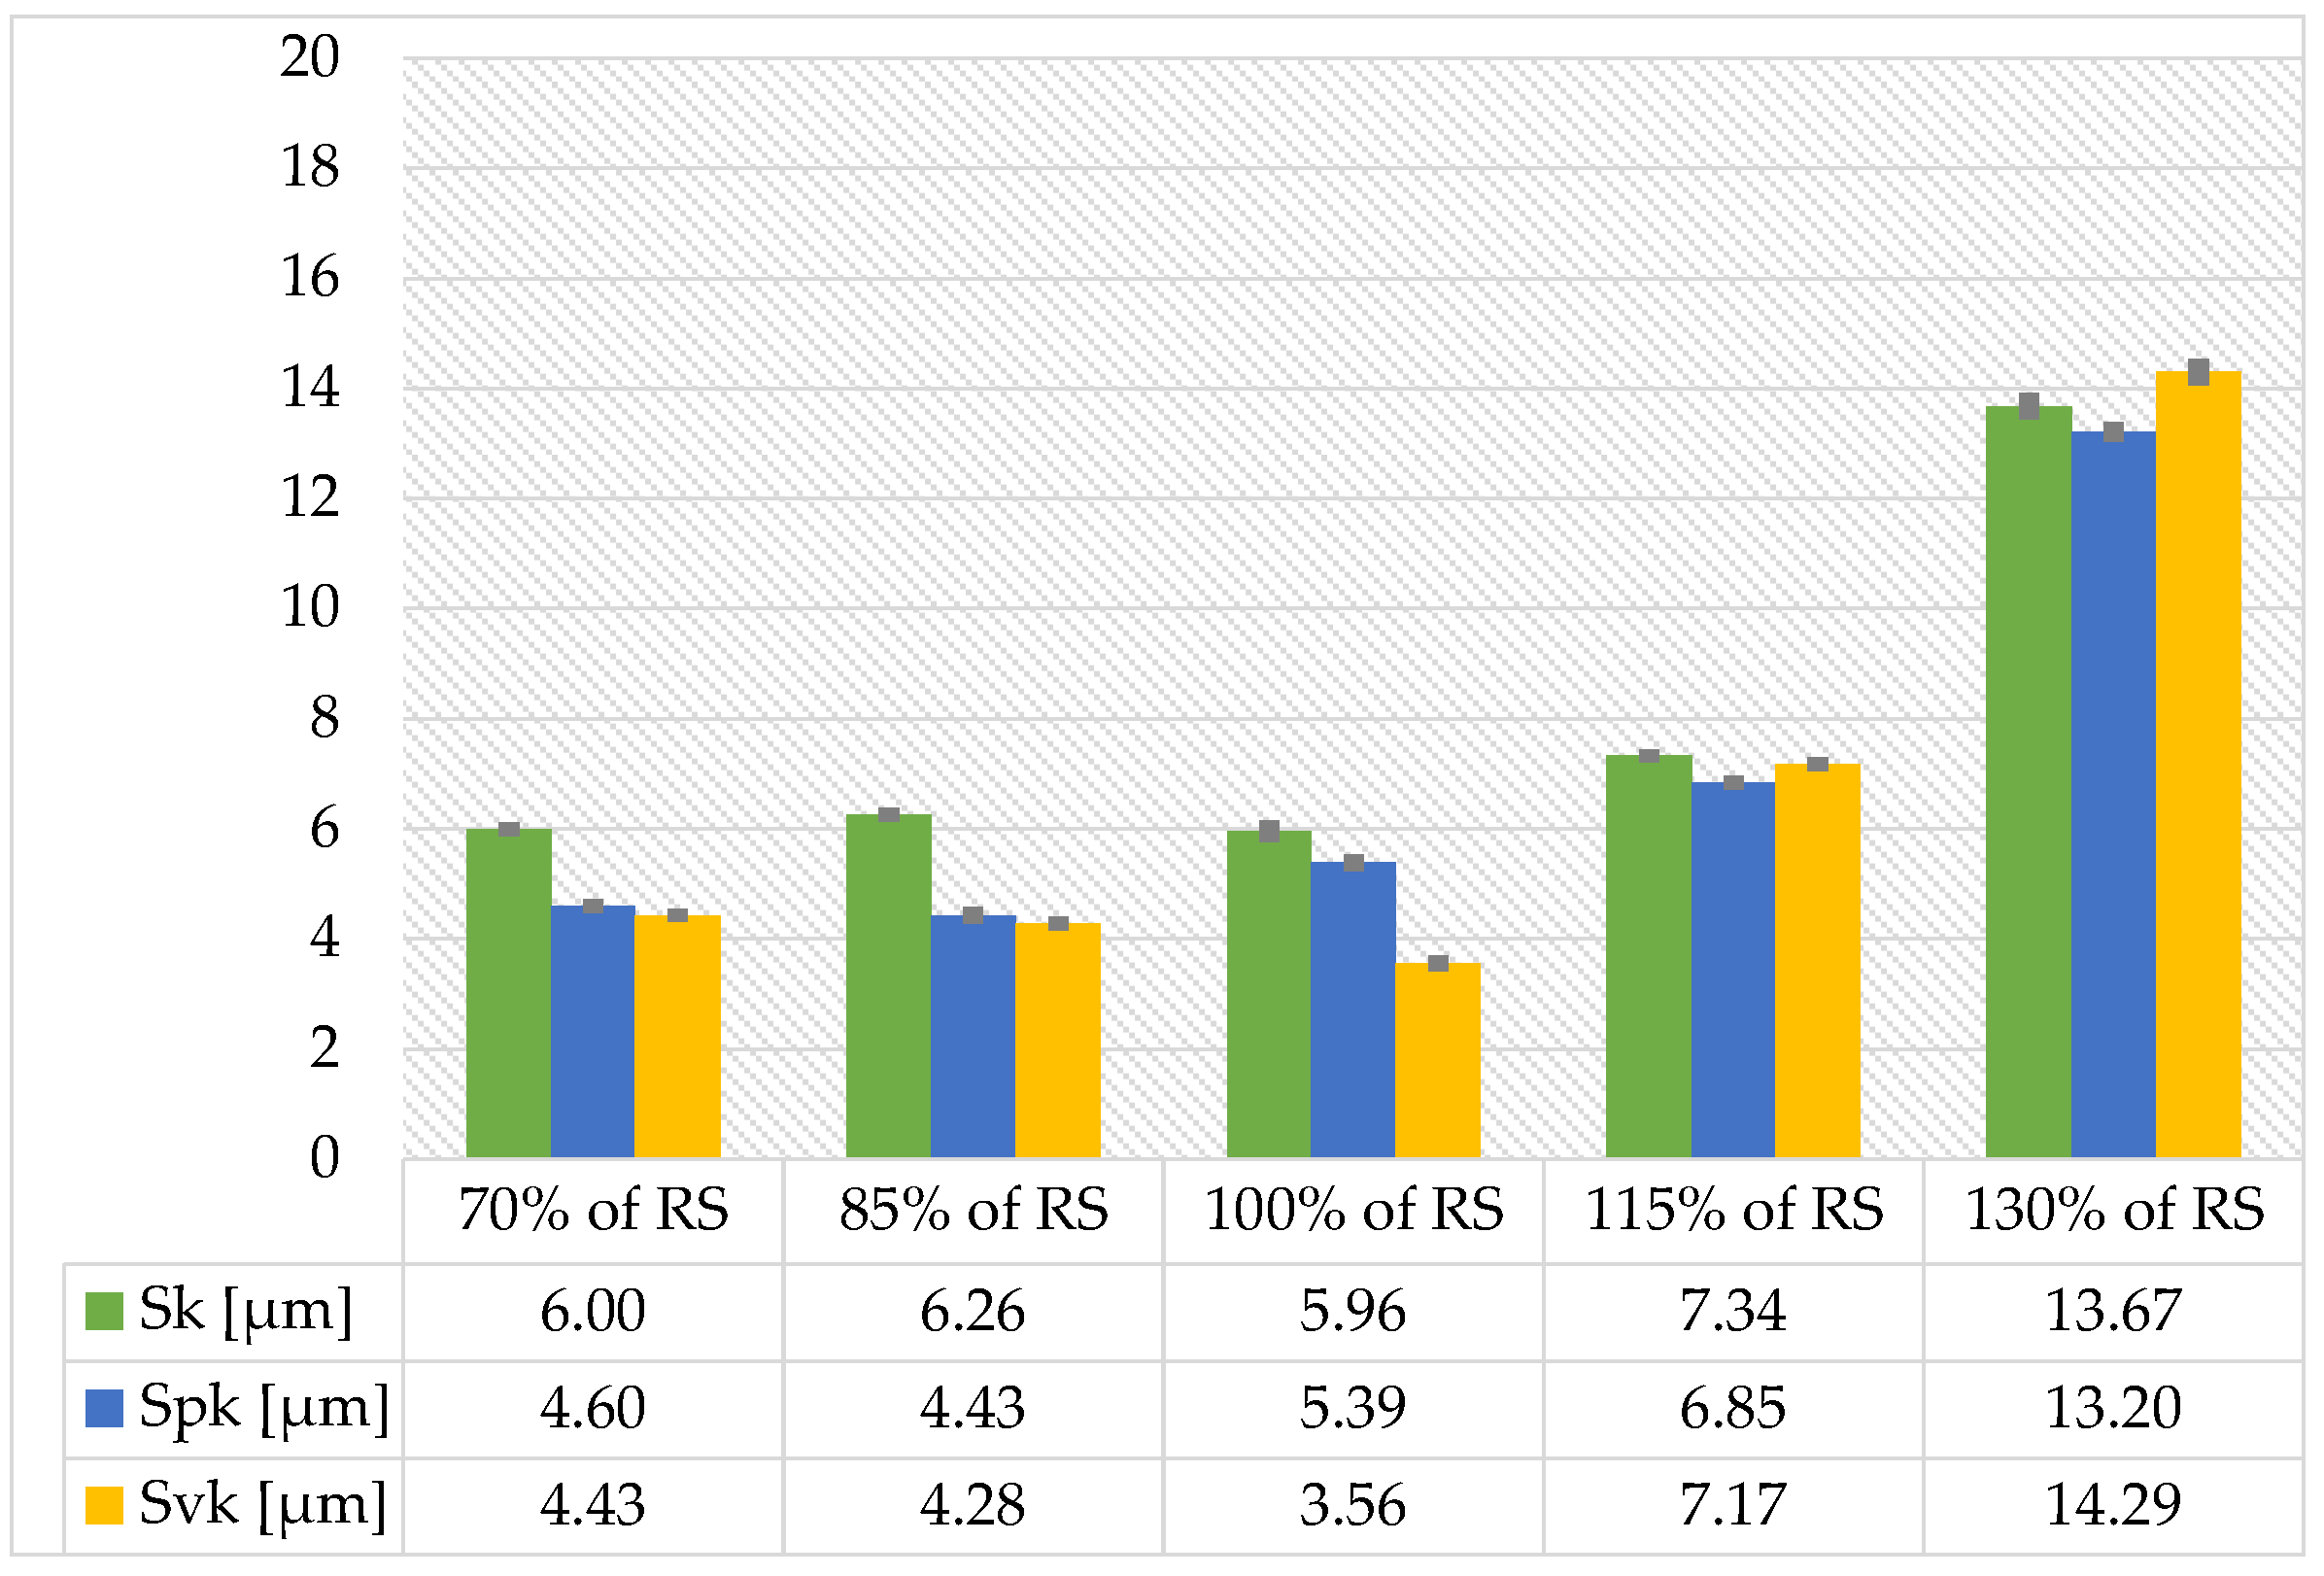
On the other hand, due to the application of protective coatings (surface painting), it is desirable for the coating to anchor mechanically in the material. Hence, it is also desirable that, in addition to high peaks, there are deep valleys and a surface core with a small width. Thus, it is judged that the best surface for painting is the surface obtained on sample No. 3. However, the analysis carried out for X5CrNi18-10 steel shows that the Sk parameter (core height) is lowest for a cutting speed of 85% of RS. Under these conditions, the plane level is averaged over the largest area. Differences in the Spk (reduced peak height) and Svk (reduced valley height) parameters start to occur more often at higher speed values. These correlations are shown in Figure 12.
The functional parameters (Sbi, Sci and Svi) are important tribological parameters and can be used to analyse contact surfaces of all types. The levels of Sbi (surface bearing parameter) and Svi (stroke volume parameter) are similar, but Sbi is lowest for a cutting speed of 130% of RS, whereas Sci (core fluid retention parameter) is lowest for a speed of 115% of RS, as shown on Figure 13. Svi indicates that all samples have a similar number of indentations relative to the load-bearing surface. Sbi indicates that all samples have a similar bearing capacity (calculated for the height of the entire surface). A reduced Sci value indicates a fairly flat cut edge, where the cut zone, reflection zone and dross zone are similar in the three areas. If large-scale structures with such shaped cut surfaces need to be painted, the cutting speed should not have a significant impact on the paint demand.
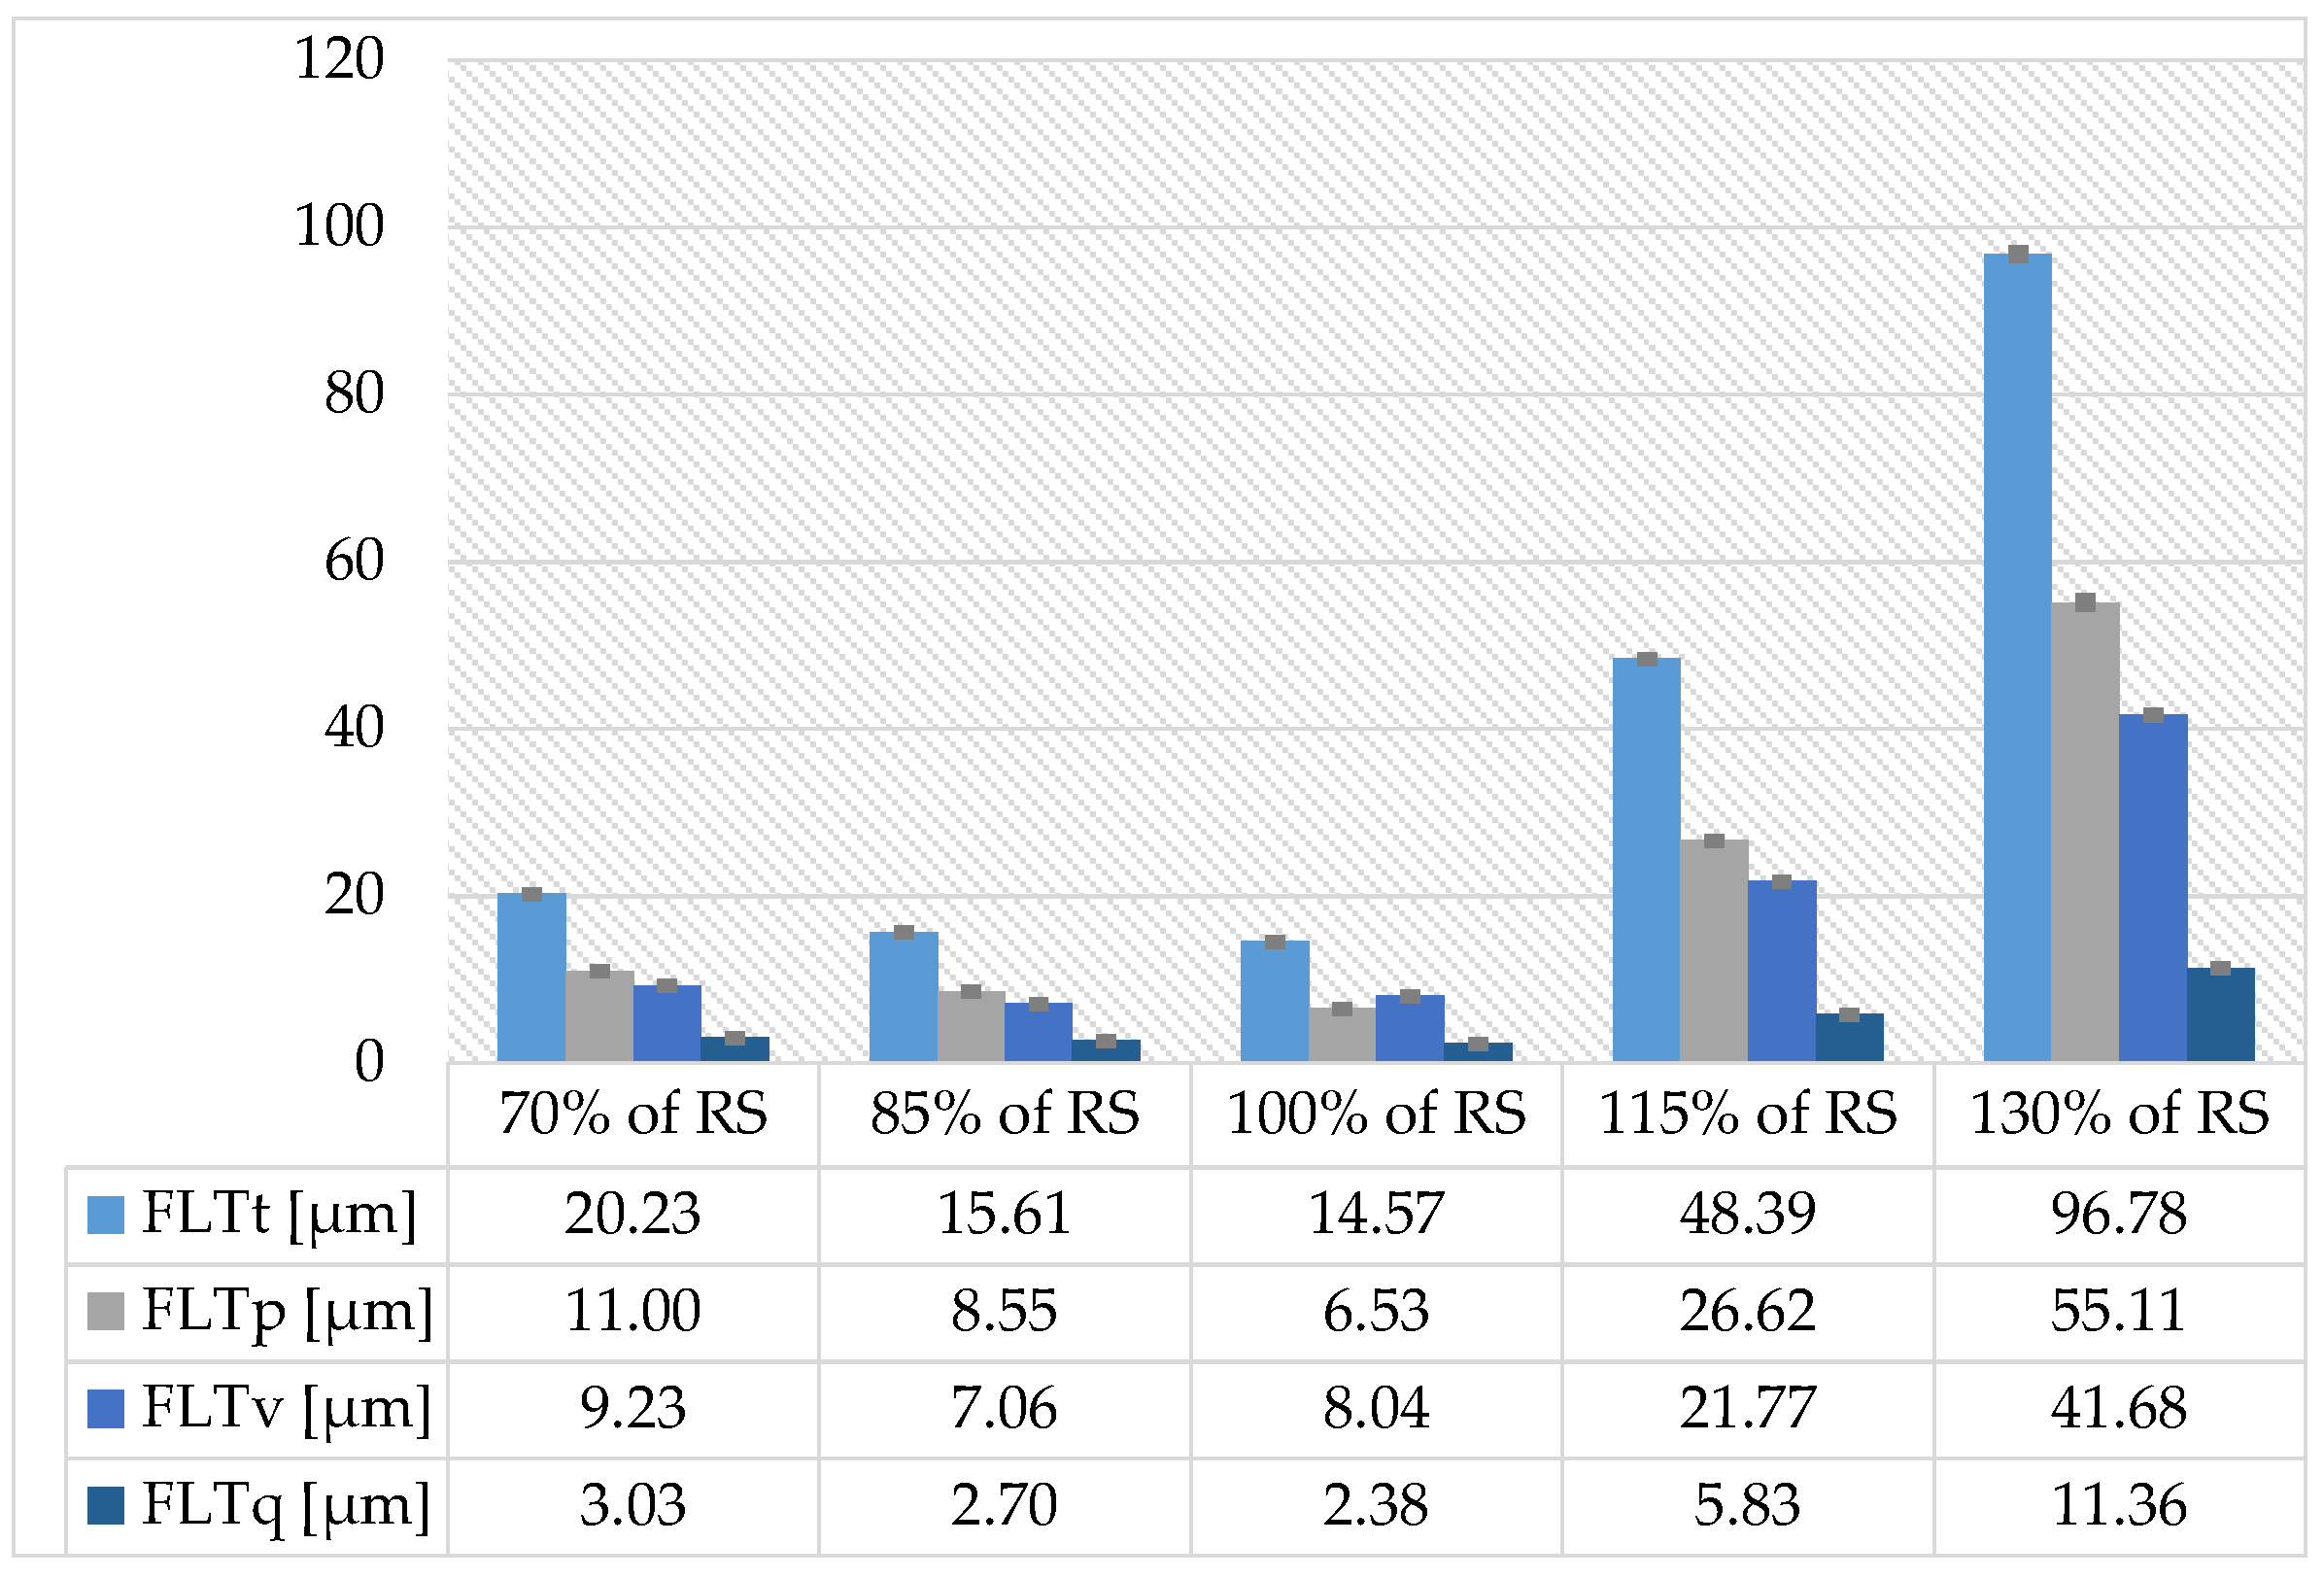
The flatness of the joined surfaces is a very important aspect of welding. The FLTt parameter (peak-to-valley flatness deviation of the surface) is lowest for 85% and 100% of RS. A weld of uniform strength along the entire length should be formed on the edges of long workpieces shaped in this way, and a weld made on the edge of workpieces cut at the most cost-effective speed of 100% of RS should look similar. The FLTt, FLTp (peak to reference flatness deviation), FLTv (reference to valley flatness deviation), FLTq (root mean square flatness deviation) parameters are highest at a cutting speed of 130% of RS, as shown in Figure 14.
The issue of the influence of cutting speed on the quality of the edges of metal sheets is a very interesting and important issue from a technological point of view, as the correct choice of cutting speed makes it possible to obtain a good cut surface. This eliminates further surface processing, thus shortening the technological process, which affects the final cost of the product. It would be advisable to study the impact of fibre laser cutting speed on the stereometric parameters and the cut edge quality in order to select the best parameters.
The conducted studies show that the best edge for welding for X5CrNi18-10 steel is obtained using speeds in the range of 100% to 115% of RS. On the other hand, it is recommended to paint the edges of the structure immediately after shape cutting at speed values between 85% to 100% of RS. Variations in the technological parameters of edges for different purposes should be noted in the design documentation so that the cutting machine operator can set up the CNC machine correctly.
With the exception of additional descriptions on the technical drawing, this variation should be defined by the appropriate SGS parameter, e.g., Sz ≤ 120 μm. On the other hand, as a supplementary condition, the designer should specify the value of the FLTt parameter, e.g., FLTt ≤ 60 μm, for the welded edge surfaces and a set of Sz, Svk and Spk parameters for the surfaces that will be painted subsequently.
The research shows that the cutting of stainless steels (e.g., X5CrNi18-10) can be performed at a cutting speed of 115% of RS when maintaining the technological regime. After analysing the data obtained from the performed tests, it was found that the speed of laser cutting has a significant impact on the quality of the edge obtained. The studies initiated on a set of functional parameters for the cut surfaces will be continued in order to determine the limits that are achievable from a technological, quality and economic point of view, so that they can become the grounds for their implementation in the documentation by designers (on technical drawings).

4. Conclusions

It is worth taking a closer look at the parameters of the cutting programmes on the machine, as they are not always favourable for particular types of materials. The cutting speed has a significant impact on the temperature variation in the cutting kerf due to the regular changes in the amount of linear laser energy per unit time. Stainless steel can be cut at speed of 115% of the reference speed while maintaining the technological regime. As a result of increasing the speed by more than 30%, there may be a significant change in the SGS character, which may affect the weakening of the mechanical anchoring effect of paint coatings.
The operation cost of a laser system is high when it is used inefficiently. Parameter optimisation based on the surface stereometrics analysis performed by confocal microscopy favours a reduction in the cost of preparing semi-finished products for welding and the subsequent operation of the structure. In order to obtain the desired cut quality, it is very important to correctly select the laser parameters and type of cut for the material to be machined.

Author Contributions

Conceptualisation, S.J.K.; methodology, S.J.K. and D.G.; software, S.J.K. and D.G.; validation, S.J.K. and D.G.; formal analysis, S.J.K. and D.G.; investigation, D.G.; resources, S.J.K. and D.G.; data curation, D.G.; writing—original draft preparation, S.J.K. and D.G.; writing—review and editing, J.T. and R.G.; visualisation, S.J.K. and R.G.; supervision, S.J.K.; project administration, S.J.K.; funding acquisition, R.G. All authors have read and agreed to the published version of the manuscript.

Funding

This research received no external funding.

Institutional Review Board Statement

Not applicable.

Informed Consent Statement

Not applicable.

Data Availability Statement

Not applicable.

Conflicts of Interest

The authors declare no conflict of interest.

References

  1. Wysmulski, P.; Debski, H. Post-buckling and limit states of composite channel-section profiles under eccentric compression. Compos. Struct. 2020, 245, 112356. [Google Scholar] [CrossRef]
  2. Borawski, A. Impact of operating time on selected tribological properties of the friction material in the brake pads of passenger cars. Materials 2021, 14, 884. [Google Scholar] [CrossRef] [PubMed]
  3. Rozylo, P.; Wysmulski, P. Failure analysis of thin-walled composite profiles subjected to axial compression using progressive failure analysis (PFA) and cohesive zone model (CZM). Compos. Struct. 2021, 262, 113597. [Google Scholar] [CrossRef]
  4. Borawski, A. Testing passenger car brake pad exploitation time’s impact on the values of the coefficient of friction and abrasive wear rate using a pin-on-disc method. Materials 2022, 15, 1991. [Google Scholar] [CrossRef]
  5. Debski, H.; Rozylo, P.; Wysmulski, P.; Falkowicz, K.; Ferdynus, M. Experimental study on the effect of eccentric compressive load on the stability and load-carrying capacity of thin-walled composite profiles. Compos. Part B Eng. 2021, 226, 109346. [Google Scholar] [CrossRef]
  6. Sadowski, Ł.; Mathia, T.G. Multi-scale metrology of concrete surface morphology: Fundamentals and specificity. Constr. Build. Mater. 2016, 113, 613–621. [Google Scholar] [CrossRef]
  7. Thomas, T.R. Rough Surfaces, 2nd ed.; Imperial College Press: London, UK, 1999. [Google Scholar]
  8. Whitehouse, D.J. Surfaces and their Measurement; Hermes Penton Science: London, UK, 2002. [Google Scholar]
  9. Garbacz, A.; Courard, L.; Bissonnette, B. A surface engineering approach applicable to concrete repair engineering. Bull. Pol. Acad. Sci. Tech. Sci. 2013, 61, 73–84. [Google Scholar] [CrossRef]
  10. Krajewski, S.; Nowacki, J. Preparation of aluminium foam edges for welding. Adv. Mater. Sci. 2013, 13, 64–75. [Google Scholar] [CrossRef] [Green Version]
  11. Krajewski, S.; Nowacki, J. Structure of AlSi-SiC composite foams surface formed by mechanical and thermal cutting. Appl. Surf. Sci. 2015, 327, 523–531. [Google Scholar] [CrossRef]
  12. Gustowski, T.; Kurek, W.; Grzejda, R. Concept of an innovative technological line for the processing of linear profiles. Prod. Eng. Arch. 2023, 29. in press. [Google Scholar]
  13. Lin, Z.; Hong, M. Femtosecond laser precision engineering: From micron, submicron, to nanoscale. Ultrafast Sci. 2021, 2021, 9783514. [Google Scholar] [CrossRef]
  14. Liu, X.; Popa, D.; Akhmediev, N. Revealing the transition dynamics from q switching to mode locking in a soliton laser. Phys. Rev. Lett. 2019, 123, 093901. [Google Scholar] [CrossRef] [PubMed] [Green Version]
  15. Liu, X.; Pang, M. Revealing the buildup dynamics of harmonic mode-locking states in ultrafast lasers. Laser Photonics Rev. 2019, 13, 1800333. [Google Scholar] [CrossRef]
  16. Yong, J.; Yang, Q.; Hou, X.; Chen, F. Nature-inspired superwettability achieved by femtosecond lasers. Ultrafast Sci. 2022, 2022, 9895418. [Google Scholar] [CrossRef]
  17. Zhang, C.; Li, X.; Chen, E.; Liu, H.; Shum, P.P.; Chen, X.-H. Hydrazone organics with third-order nonlinear optical effect for femtosecond pulse generation and control in the L-band. Opt. Laser Technol. 2022, 151, 108016. [Google Scholar] [CrossRef]
  18. Parthiban, A.; Chandrasekaran, M.; Muthuraman, V.; Sathish, S. Optimization of CO2 laser cutting of stainless steel sheet for curved profile. Mater. Today Proc. 2018, 5, 14531–14538. [Google Scholar] [CrossRef]
  19. Li, M. Evaluation of the effect of process parameters on the cut quality in fiber laser cutting of duplex stainless steel using response surface method (RSM). Infrared Phys. Technol. 2021, 118, 103896. [Google Scholar] [CrossRef]
  20. Powell, J.; Al-Mashikhi, S.O.; Kaplan, A.F.H.; Voisey, K.T. Fibre laser cutting of thin section mild steel: An explanation of the ‘striation free’ effect. Opt. Laser Technol. 2011, 49, 1069–1075. [Google Scholar] [CrossRef] [Green Version]
  21. Oh, S.Y.; Shin, J.S.; Park, S.; Kwon, S.; Nam, S.; Kim, T.; Park, H.; Lee, J. Experimental investigation of underwater laser cutting for thick stainless steel plates using a 6-kW fiber laser. Ann. Nucl. Energy 2022, 168, 108896. [Google Scholar] [CrossRef]
  22. Shin, J.S.; Oh, S.Y.; Park, H.; Kim, T.-S.; Lee, L.; Chung, C.-M.; Lee, J. Underwater cutting of 50 and 60 mm thick stainless steel plates using a 6-kW fiber laser for dismantling nuclear facilities. Opt. Laser Technol. 2019, 115, 1–8. [Google Scholar] [CrossRef]
  23. Kotadiya, D.J.; Kapopara, J.M.; Patel, A.R.; Dalwadi, C.G.; Pandya, D.H. Parametric analysis of process parameter for laser cutting process on SS-304. Mater. Today Proc. 2018, 5, 5384–5390. [Google Scholar] [CrossRef]
  24. Nikolidakis, E.; Choreftakis, I.; Antoniadis, A. Experimental investigation of stainless steel SAE304 laser engraving cutting conditions. Machines 2018, 6, 40. [Google Scholar] [CrossRef] [Green Version]
  25. Beniyash, A.; Klimov, G.; Hassel, T. The use of non-vacuum electron beam (NVEB) technology as an universal manufacturing process for welding and cutting of high-strength steels. J. Phys. Conf. Ser. 2018, 1089, 012012. [Google Scholar] [CrossRef]
  26. Tomków, J.; Landowski, M.; Fydrych, D.; Rogalski, G. Underwater wet welding of S1300 ultra-high strength steel. Mar. Struct. 2022, 81, 103120. [Google Scholar] [CrossRef]
  27. Parshin, S.; Levchenko, A.; Wang, P.; Maystro, A. Mathematical analysis of the influence of the flux-cored wire chemical composition on the electrical parameters and quality in the underwater wet cutting. Adv. Mater. Sci. 2021, 21, 77–89. [Google Scholar] [CrossRef]
  28. Parshin, S.G.; Levchenko, A.M.; Wang, P. Metallurgy and mechanism of underwater wet cutting using oxidizing and exothermic flux-cored wires. Materials 2021, 14, 4655. [Google Scholar] [CrossRef]
  29. Kim, K.; Song, M.-K.; Lee, S.-J.; Shin, D.; Suh, J.; Kim, J.-D. Fundamental study on underwater cutting of 50 mm-thick stainless steel plates using a fiber laser for nuclear decommissioning. Appl. Sci. 2022, 12, 495. [Google Scholar] [CrossRef]
  30. Kim, R.; Lee, S.-J.; Choi, J.; Shin, D.; Kim, J.-D. Effect of process variables for reducing assist gas pressure in 50 mm-thick stainless steel underwater laser cutting. Appl. Sci. 2022, 12, 9574. [Google Scholar] [CrossRef]
  31. PN-EN 1090-2; Execution of Steel Structures and Aluminium Structures, Part 2: Technical Requirements for Steel Structures. Polish Committee for Standardization: Warsaw, Poland, 2018.
  32. Bursi, O.S.; D’Incau, M.; Zanon, G.; Raso, S.; Scardi, P. Laser and mechanical cutting effects on the cut-edge properties of steel S355N. J. Constr. Steel Res. 2017, 133, 181–191. [Google Scholar] [CrossRef]
  33. Eltawahni, H.A.; Hagino, M.; Benyounis, K.Y.; Inoue, T.; Olabi, A.G. Effect of CO2 laser cutting process parameters on edge quality and operating cost of AISI316L. Opt. Laser Technol. 2012, 44, 1068–1082. [Google Scholar] [CrossRef] [Green Version]
  34. Anghel, C.; Gupta, K.; Jen, T.C. Analysis and optimization of surface quality of stainless steel miniature gears manufactured by CO2 laser cutting. Optik 2020, 203, 164049. [Google Scholar] [CrossRef]
  35. Stournaras, A.; Stavropoulos, P.; Salonitis, K.; Chryssolouris, G. An investigation of quality in CO2 laser cutting of aluminum. CIRP J. Manuf. Sci. Technol. 2009, 2, 61–69. [Google Scholar] [CrossRef]
  36. Sharifi, M.; Akbari, M. Experimental investigation of the effect of process parameters on cutting region temperature and cutting edge quality in laser cutting of AL6061T6 alloy. Optik 2019, 184, 457–463. [Google Scholar] [CrossRef]
  37. Zubko, M.; Loskot, J.; Świec, P.; Prusik, K.; Janikowski, Z. Analysis of stainless steel waste products generated during laser cutting in nitrogen atmosphere. Metals 2020, 10, 1572. [Google Scholar] [CrossRef]
  38. Mahrle, A.; Borkmann, M.; Pfohl, P. Factorial analysis of fiber laser fusion cutting of AISI 304 stainless steel: Evaluation of effects on process performance, kerf geometry and cut edge roughness. Materials 2021, 14, 2669. [Google Scholar] [CrossRef]
  39. Buj-Corral, I.; Costa-Herrero, L.; Domínguez-Fernández, A. Effect of process parameters on the quality of laser-cut stainless steel thin plates. Metals 2021, 11, 1224. [Google Scholar] [CrossRef]
  40. Madić, M.; Radovanović, M.; Slatineanu, L. Surface roughness optimalization in CO2 laser cutting by using Taguchi method. UPB Sci. Bull. Ser. D Mech. Eng. 2013, 75, 97–106. [Google Scholar]
  41. Karthikeyan, R.; Senthilkumar, V.; Thilak, M.; Nagadeepan, A. Application of grey relational analysis for optimization of kerf quality during CO2 laser cutting of mild steel. Mater. Today Proc. 2018, 5, 19209–19215. [Google Scholar] [CrossRef]
  42. Parthiban, A.; Dhanasekaran, C.; Sivaganesan, S.; Sathish, S. Modeling on surface cut quality of CO2 laser cutting for austenitic stainless steel sheet. Mater. Today Proc. 2020, 21, 823–827. [Google Scholar] [CrossRef]
  43. Savinkin, V.V.; Vizureanu, P.; Sandu, A.V.; Ratushnaya, T.Y.; Ivanischev, A.A.; Surleva, A. Improvement of the turbine blade surface phase structure recovered by plasma spraying. Coatings 2020, 10, 62. [Google Scholar] [CrossRef] [Green Version]
  44. Bekmurzayeva, A.; Duncanson, W.J.; Azevedo, H.S.; Kanayeva, D. Surface modification of stainless steel for biomedical applications: Revisiting a century-old material. Mater. Sci. Eng. C 2018, 93, 1073–1089. [Google Scholar] [CrossRef]
  45. Mat Tahir, N.A.; Liza, S.; Fukuda, K.; Mohamad, S.; Hashimi, M.Z.F.; Yunus, M.S.M.; Yaakob, Y.; Othman, I.S. Surface and tribological properties of oxide films on aluminium alloy through fly-ash reinforcement. Coatings 2022, 12, 256. [Google Scholar] [CrossRef]
  46. Padgurskas, J.; Rukuiža, R.; Žunda, A. Evaluation of tribological and mechanical properties of carbon steel with fluoroligomeric film at piezoelectric actuator contact. Coatings 2022, 12, 463. [Google Scholar] [CrossRef]
  47. Khan, M.A.; Gupta, K. Experimental evaluation of surface quality characteristics in laser machining of nickel-based superalloy. Optik 2019, 196, 163199. [Google Scholar]
  48. PN-EN ISO 4287; Geometrical Product Specifications (GPS), Surface Texture: Profile Method, Terms, Definitions and Surface Texture Parameters. Polish Committee for Standardization: Warsaw, Poland, 1999.
  49. PN-EN ISO 25178-600; Geometrical Product Specifications (GPS), Surface Texture: Areal, Part 600: Metrological Characteristics for Areal-Topography Measuring Methods. Polish Committee for Standardization: Warsaw, Poland, 2019.
  50. Mathia, T.G.; Pawlus, P.; Wieczorowski, M. Recent trends in surface metrology. Wear 2011, 271, 494–508. [Google Scholar] [CrossRef]
  51. Sezen, H.; Fisco, N. Evaluation and comparison of surface macrotexture and friction measurement methods. J. Civ. Eng. Manag. 2013, 19, 387–399. [Google Scholar] [CrossRef]
  52. Niemczewska-Wójcik, M.; Mathia, T.; Wójcik, A. Measurement techniques used for analysis of the geometric structure of machined surfaces. Manag. Prod. Eng. Rev. 2014, 5, 27–32. [Google Scholar] [CrossRef]
  53. Skowrońska, B.; Chmielewski, T.; Golański, D.; Szulc, J. Weldability of S700MC steel welded with the hybrid plasma + MAG method. Manuf. Rev. 2020, 7, 4. [Google Scholar] [CrossRef] [Green Version]
  54. Kik, T.; Moravec, J.; Švec, M. Experiments and numerical simulations of the annealing temperature influence on the residual stresses level in S700MC steel welded elements. Materials 2020, 13, 5289. [Google Scholar] [CrossRef]
  55. Mičian, M.; Winczek, J.; Gucwa, M.; Koňár, R.; Málek, M.; Postawa, P. Investigation of welds and heat affected zones in weld surfacing steel plates taking into account the bead sequence. Materials 2020, 13, 5666. [Google Scholar] [CrossRef]
  56. Górka, J.; Poloczek, T.; Kotarska, A.; . Jamrozik, W. Analysis of precipitates in heat treated thermo-mechanically processed steel with a high yield strength. IOP Conf. Ser. Mater. Sci. Eng. 2021, 1182, 012026. [Google Scholar] [CrossRef]
  57. Balusamy, T.; Sankara Narayanan, T.S.N.; Ravichandran, K.; Park, I.S.; Lee, M.H. Plasma nitriding of AISI 304 stainless steel: Role of surface mechanical attrition treatment. Mater. Charact. 2013, 85, 38–47. [Google Scholar] [CrossRef]
  58. Dinu, M.; Mouele, E.S.M.; Parau, A.C.; Vladescu, A.; Petrik, L.F.; Braic, M. Enhancement of the corrosion resistance of 304 stainless steel by Cr–N and Cr(N,O) coatings. Coatings 2018, 8, 132. [Google Scholar] [CrossRef]
  59. Mateescu, A.O.; Mateescu, G.; Balan, A.; Ceaus, C.; Stamatin, I.; Cristea, D.; Samoila, C.; Ursutiu, D. Stainless steel surface nitriding in open atmosphere cold plasma: Improved mechanical, corrosion and wear resistance properties. Materials 2021, 14, 4836. [Google Scholar] [CrossRef]
  60. Dinu, M.; Parau, A.C.; Vladescu, A.; Kiss, A.E.; Pana, I.; Mouele, E.S.M.; Petrik, L.F.; Braic, V. Corrosion improvement of 304L stainless steel by ZrSiN and ZrSi(N,O) mono- and double-layers prepared by reactive cathodic arc evaporation. Coatings 2021, 11, 1257. [Google Scholar] [CrossRef]
  61. Chabanon, A.; Michau, A.; Schlegel, M.L.; Gündüz, D.C.; Puga, B.; Miserque, F.; Schuster, F.; Maskrot, H.; Pareige, C.; Cadel, E.; et al. Surface modification of 304L stainless steel and interface engineering by HiPIMS pre-treatment. Coatings 2022, 12, 727. [Google Scholar] [CrossRef]
  62. Bachtiak-Radka, E.; Dudzińska, S.; Grochała, D.; Berczyński, S.; Olszak, W. The influence of CNC milling and ball burnishing on shaping complex 3D surfaces. Surf. Topogr. Metrol. Prop. 2017, 5, 015001. [Google Scholar] [CrossRef]
  63. Oyman, H.A.; Icel, M.A.; Efe, B.C.; Gokdel, Y.D.; Ferhanoglu, O.; Yalcinkaya, A.D. A laser-machined stainless-steel micro-scanner for confocal microscopy. Proceedings 2017, 1, 564. [Google Scholar]
  64. Dudzińska, S.; Szydłowski, M.; Grochała, D.; Bachtiak-Radka, E. Application of correlation function for analysis of surface structure shaping by hybrid manufacturing technology. In Advances in Manufacturing. Lecture Notes in Mechanical Engineering; Hamrol, A., Ciszak, O., Legutko, S., Jurczyk, M., Eds.; Springer: Cham, Switzerland, 2018; pp. 651–659. [Google Scholar]
  65. Martínez, A.M.; de Vicente y Oliva, J. Industrial calibration procedure for confocal microscopes. Materials 2019, 12, 4137. [Google Scholar] [CrossRef] [Green Version]
  66. Grzelak, K.; Kluczyński, J.; Szachogłuchowicz, I.; Łuszczek, J.; Śnieżek, L.; Torzewski, J. Modification of structural properties using process parameters and surface treatment of monolithic and thin-walled parts obtained by selective laser melting. Materials 2020, 13, 5662. [Google Scholar] [CrossRef]
  67. PN-EN ISO 9013; Thermal Cutting, Classification of Thermal Cuts, Geometrical Product Specification and Quality Tolerances. Polish Committee for Standardization: Warsaw, Poland, 2017.
Figure 1. Mapped surface of sample No. 3.
Coatings 13 00015 g001
Figure 2. Surface of sample No. 3 after consideration of the threshold value.
Coatings 13 00015 g002
Figure 3. Levelled surface of sample No. 3.
Coatings 13 00015 g003
Figure 4. Surface of sample No. 3: (a) 2D profile; (b) 2D profile−location.
Coatings 13 00015 g004
Figure 5. View of the edge made at 70% of RS from: (a) stereo microscope; (b) confocal microscope.
Coatings 13 00015 g005
Figure 6. View of the edge made at 85% of RS from: (a) stereo microscope; (b) confocal microscope.
Coatings 13 00015 g006
Figure 7. View of the edge made at 100% of RS from: (a) stereo microscope; (b) confocal microscope.
Coatings 13 00015 g007
Figure 8. View of the edge made at 115% of RS from: (a) stereo microscope; (b) confocal microscope.
Coatings 13 00015 g008
Figure 9. View of the edge made at 130% of RS from: (a) stereo microscope; (b) confocal microscope.
Coatings 13 00015 g009
Figure 10. Variation of Sa and Sq parameters depending on the cutting speed calculated according to PN-EN ISO 25178-600 [49].
Coatings 13 00015 g010
Figure 11. Variation of the Sz, Sp and Sq parameters depending on the cutting speed calculated according to PN-EN ISO 25178-600 [49].
Coatings 13 00015 g011
Figure 12. Variation of the Sk, Spk and Svk parameters depending on the cutting speed calculated according to PN-EN ISO 25178-600 [49].
Coatings 13 00015 g012
Figure 13. Variation of the Sbi, Sci and Svi parameters depending on the cutting speed calculated according to PN-EN ISO 25178-600 [49].
Coatings 13 00015 g013
Figure 14. Variation of the FLTt, FLTp, FLTv, FLTq parameters depending on the cutting speed.
Coatings 13 00015 g014
Table 1. The chemical composition of the X5CRNI18-10 steel.
Element Content, % by Mass
CMnSiPSCrNiFe
0.051.390.4270.030.00319.07.48
CuAlTiCoWMoV(rest)
0.3840.0190.0030.0930.0650.2420.044
Table 2. Mechanical properties of the X5CRNI18-10 steel.
Sample No.Re [MPa]Rm [MPa]A [%]
X5CRNI18-10—127856348
X5CRNI18-10—228556147
Table 3. Fibre laser cutting process parameters.
Sample No.12345
Cutting speed [mm/min]24502975350040254550
Laser power [W]40004000400040004000
Frequency [Hz]10001000100010001000
Gas pressure [bar]1515151515
Focal length [mm]−1.5−1.5−1.5−1.5−1.5
Sample thickness [mm]55555
Type of gasnitrogennitrogennitrogennitrogennitrogen
Table 4. 2D stereometric parameters for sample No. 3.
2D Parameters
Rp [μm]Rv [μm]Rz [μm]Rc [μm]Rt [μm]Ra [μm]
10.79.8220.510.732.42.3
Rq [μm]RskRkuRSm [mm]Rdq [°]RPc [1/mm]
3.080.5175.10.048754.420.8
Disclaimer/Publisher’s Note: The statements, opinions and data contained in all publications are solely those of the individual author(s) and contributor(s) and not of MDPI and/or the editor(s). MDPI and/or the editor(s) disclaim responsibility for any injury to people or property resulting from any ideas, methods, instructions or products referred to in the content.