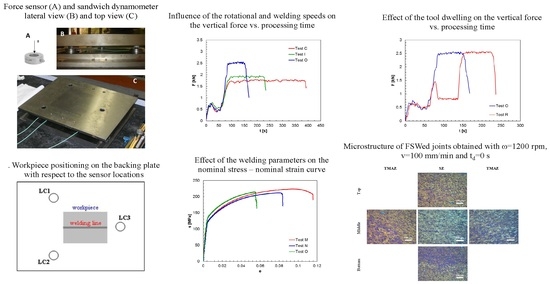
Article

Influence of Process Parameters on the Vertical Forces Generated during Friction Stir Welding of AA6082-T6 and on the Mechanical Properties of the Joints

by
Archimede Forcellese
1,
Michela Simoncini
2 and
Giuseppe Casalino
3,*
1
Dipartimento di Ingegneria Industriale e Scienze Matematiche (DIISM), Università Politecnica delle Marche, Via Brecce Bianche, 60100 Ancona, Italy
2
Università e-Campus, Via Isimabrdi 10, 22060 Novedrate (Como), Italy
3
Dipartimento di Meccanica Management Matematica (DMMM), Politecnico di Bari, Viale Japigia 182, 70126 Bari, Italy
*
Author to whom correspondence should be addressed.
Metals 2017, 7(9), 350; https://doi.org/10.3390/met7090350
Submission received: 31 July 2017 / Revised: 28 August 2017 / Accepted: 31 August 2017 / Published: 5 September 2017

Abstract

:
The influence of the process parameters on the vertical force generated during friction stir welding of AA6082-T6 aluminium alloy sheet blanks was studied by performing experiments with constant values of the rotational speed, varying between 1200 and 2500 rpm, and welding speed, ranging between 30 and 100 mm/min. The effect of the tool dwelling was also analysed. The force vs. processing time curve has shown a very complex behaviour during the lowering motion of the pin tool related to the occurrence of both primary and secondary plunging. The tool dwelling produces a quick decrease in the vertical force with growing processing time until reaching a constant value. It was also seen that the tool dwelling does not influence the vertical force in the subsequent stage. As the tool began its welding motion, the vertical force immediately gets to a constant value until tool pulling out takes place. Furthermore, it was shown that the growth in the welding speed and the decrease in the rotational speed lead to an increase in the vertical force. The mechanical properties of the joints were evaluated versus the process parameters and the relationships among the ultimate tensile strength and ultimate elongation and the vertical force were defined. Finally, the microstructure developed during the friction stir welding was investigated and related to the mechanical properties of the joints.

Graphical Abstract

1. Introduction

In friction stir welding (FSW), the shoulder of a non-consumable rotating tool rubs onto the surface of the sheets to be welded and produces heat; at the same time, the pin of the tool exerts a stirring action into the sheet edges. As the pin tool moves along the welding line, the two sheets are joined through a solid-state process owing to the severe plastic strain and the metal mixing across the weld. Such mechanism prevents the formation of the defects associated with the fusion welding processes. Furthermore, under suitable process conditions, FSW can allow the obtaining of a microstructure able to provide mechanical properties much higher than those of most fusion welding processes and formability levels so high that post-welding forming processes of welded blanks can be performed. Because of these advantages, FSW can be very useful both in joining materials with poor weldability or that are un-weldable, such as aluminium and magnesium alloys, and in the obtaining of joints characterised by high efficiency [1,2,3,4,5,6,7,8,9,10,11].
To improve the FSW performance and tool wear, friction stir welding has been combined with other heating source such as laser, plasma, and ultrasounds [12,13]. For instance, Laser Assisted Friction Stir Welding (LAFSW) is a combined process in which the FSW is used to join the sheet blanks and the laser source to pre-heat the edges to be welded. Along with an improved weldability, it is possible to obtain benefits such as the reduction in tool wear, increase in welding speed, and lowering in clamping force [14].
Forces occurring during FSW can provide data on the joint quality and useful for the process optimisation [15]. The vertical force is the component of the resultant force upon which the greatest attention is paid owing to its high value and its sensitivity to the process parameters [16,17,18]. Furthermore, the importance of vertical force lies in the possibility of using its predetermined value as the parameter to be kept constant, instead of the tool plunging, throughout the welding motion of the tool. To this purpose, the influence of the welding parameters on vertical force and temperature arising in FSW of AZ31 magnesium alloy was investigated in a previous work [19]. It was shown that the vertical force vs. time curve, as well as the workpiece temperature, strongly depend on the rotational and welding speeds, according to the results shown by other authors in [20,21,22]. The relationships among forces, temperatures, and mechanical properties of the joints were also defined. The highest values of the ultimate tensile strength and ultimate elongation were obtained under rotational and welding speeds characterized by the lowest vertical force and highest temperature. Such results were used to define an adaptive control constraint system in which the controlled variable was the rotational speed and the measured one was the vertical force [23]. On the basis of the conditions occurring during FSW in terms of inhomogeneities in thickness and/or mechanical properties of the workpiece material, the rotational speed was adjusted to maintain a constant value of the vertical force during the welding stage of the process. As far as aluminium alloys are concerned, Astarita et al. [17] studied the effect of the welding parameters on the forces occurring during friction stir welding of AA2024-T3 rolled sheets and assessed the relation between force and grain size. Shrivastava et al. [24] defined a force parameter, based on a ratio of force magnitudes recorded throughout FSW of AA6061-T6 sheets taken from the frequency spectrum of the force signal, in order to detect, in real time, the occurrence of subsurface voids generated during the process, and the void sizes.
The utilisation of the vertical force as an indicator of the joint quality or as a measured variable in an adaptive control system of FSW requires the knowledge of the relationship among the mechanical properties of the weld and the vertical force. Unfortunately, in FSW of aluminium alloys, the heterogeneity of precipitation and grain size, ascribed to the non-uniform distribution in temperature, strain and strain rate in the stirred and thermo-mechanically affected zones, and in temperature in the heat affected zone [1,25], make such relations strongly dependent on the chemical composition and temper state of the alloy.
In this work, the influence of the tool dwelling and rotational and welding speeds on the vertical force generated during FSW of AA6082-T6 aluminium alloy sheets has been studied. Then, the ultimate tensile strength and ultimate elongation of the welds were evaluated and related to the process parameters for the obtaining of data useful in the friction stir welding optimisation. The relationships among the ultimate tensile strength and ultimate elongation of the joints and the vertical force were also defined. Finally, the microstructure derived from the FSW experiments was studied and related to the mechanical properties of the joints.

2. Experimental Procedures

The material investigated was AA6082 aluminium alloy in the T6 temper state. The butt joints were obtained by friction stir welding, carried out on a machining centre, using a pin tool (REMU, Manoppello Scalo, Italy) with a truncated cone characterised by a base diameter of 3.5 mm, a height of 1.7 mm, and a pin angle of 30°; the shoulder diameter of the tool was 12 mm. The 2 mm thick sheet blanks were 180 mm in length and 80 mm in width.
The influence of the process parameters on the vertical forces (F) generated during FSW was studied by performing the FSW experiments with constant values of the rotational speed (ω) and welding speed (v). Preliminary tests allowed to define the weldability window, in terms of ω and v values. Furthermore, the trials were carried out both with and without the presence of a tool dwelling (td) before the welding stage. Irrespective of the process condition, the tool lowering speed during plunging was set equal to 1.5 mm/min, the plunging depth to 0.1 mm, and the tool displacement along the welding line equal to 160 mm. Table 1 reports the testing conditions investigated in the work.
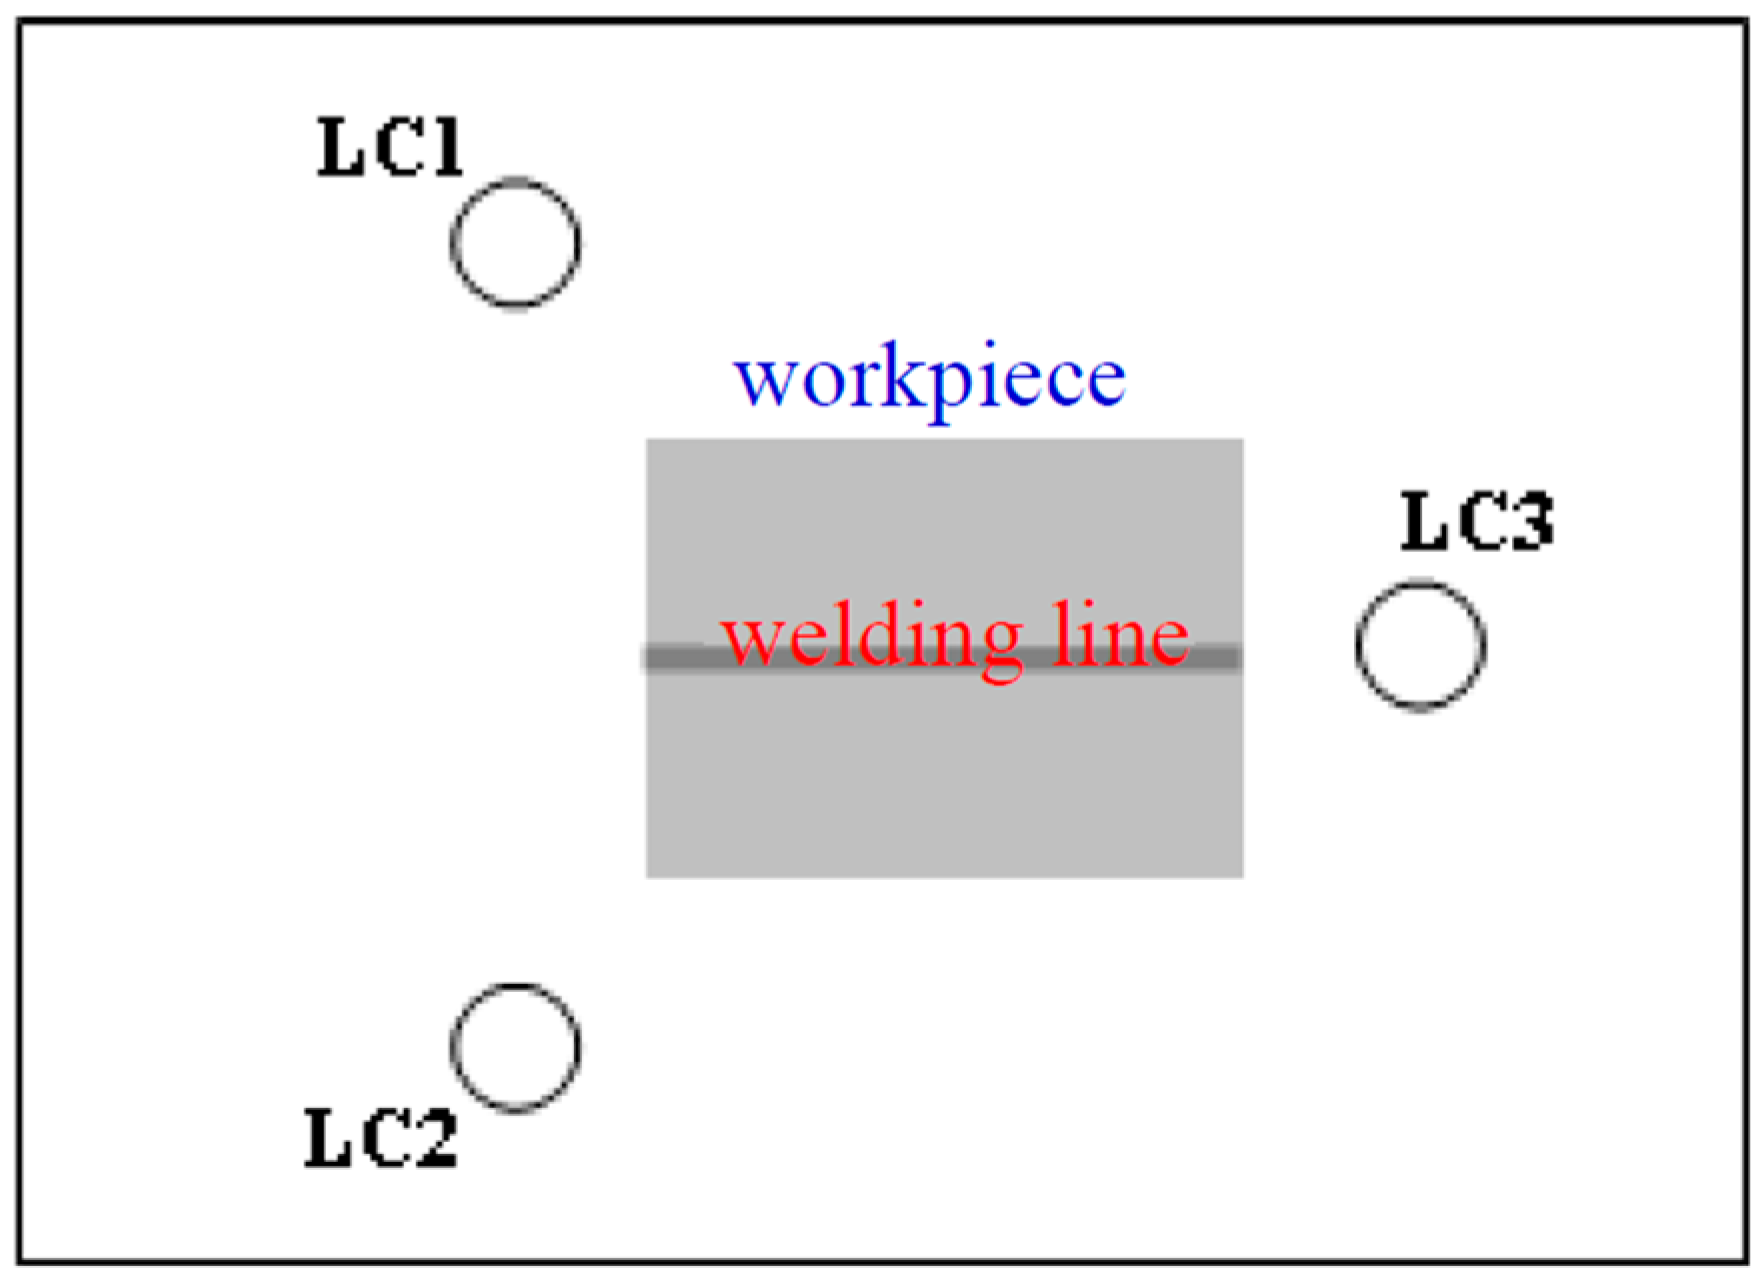
The sandwich dynamometer (DIISM, Ancona, Italy) shown in Figure 1 was used to measure the vertical force. It is composed of three piezoelectric one-component force sensors (LC1, LC2, and LC3) fixed between two rigid plates with a high preload. Blanks were clamped on the backing plate so that a uniform load distribution on sensors was obtained. The sensitivity of the complete measuring setup was evaluated by a calibration procedure performed by applying vertical loads on the dynamometer along the line corresponding to the welding one (Figure 2).
The sample rate of the data acquisition system was set to 1 Hz.
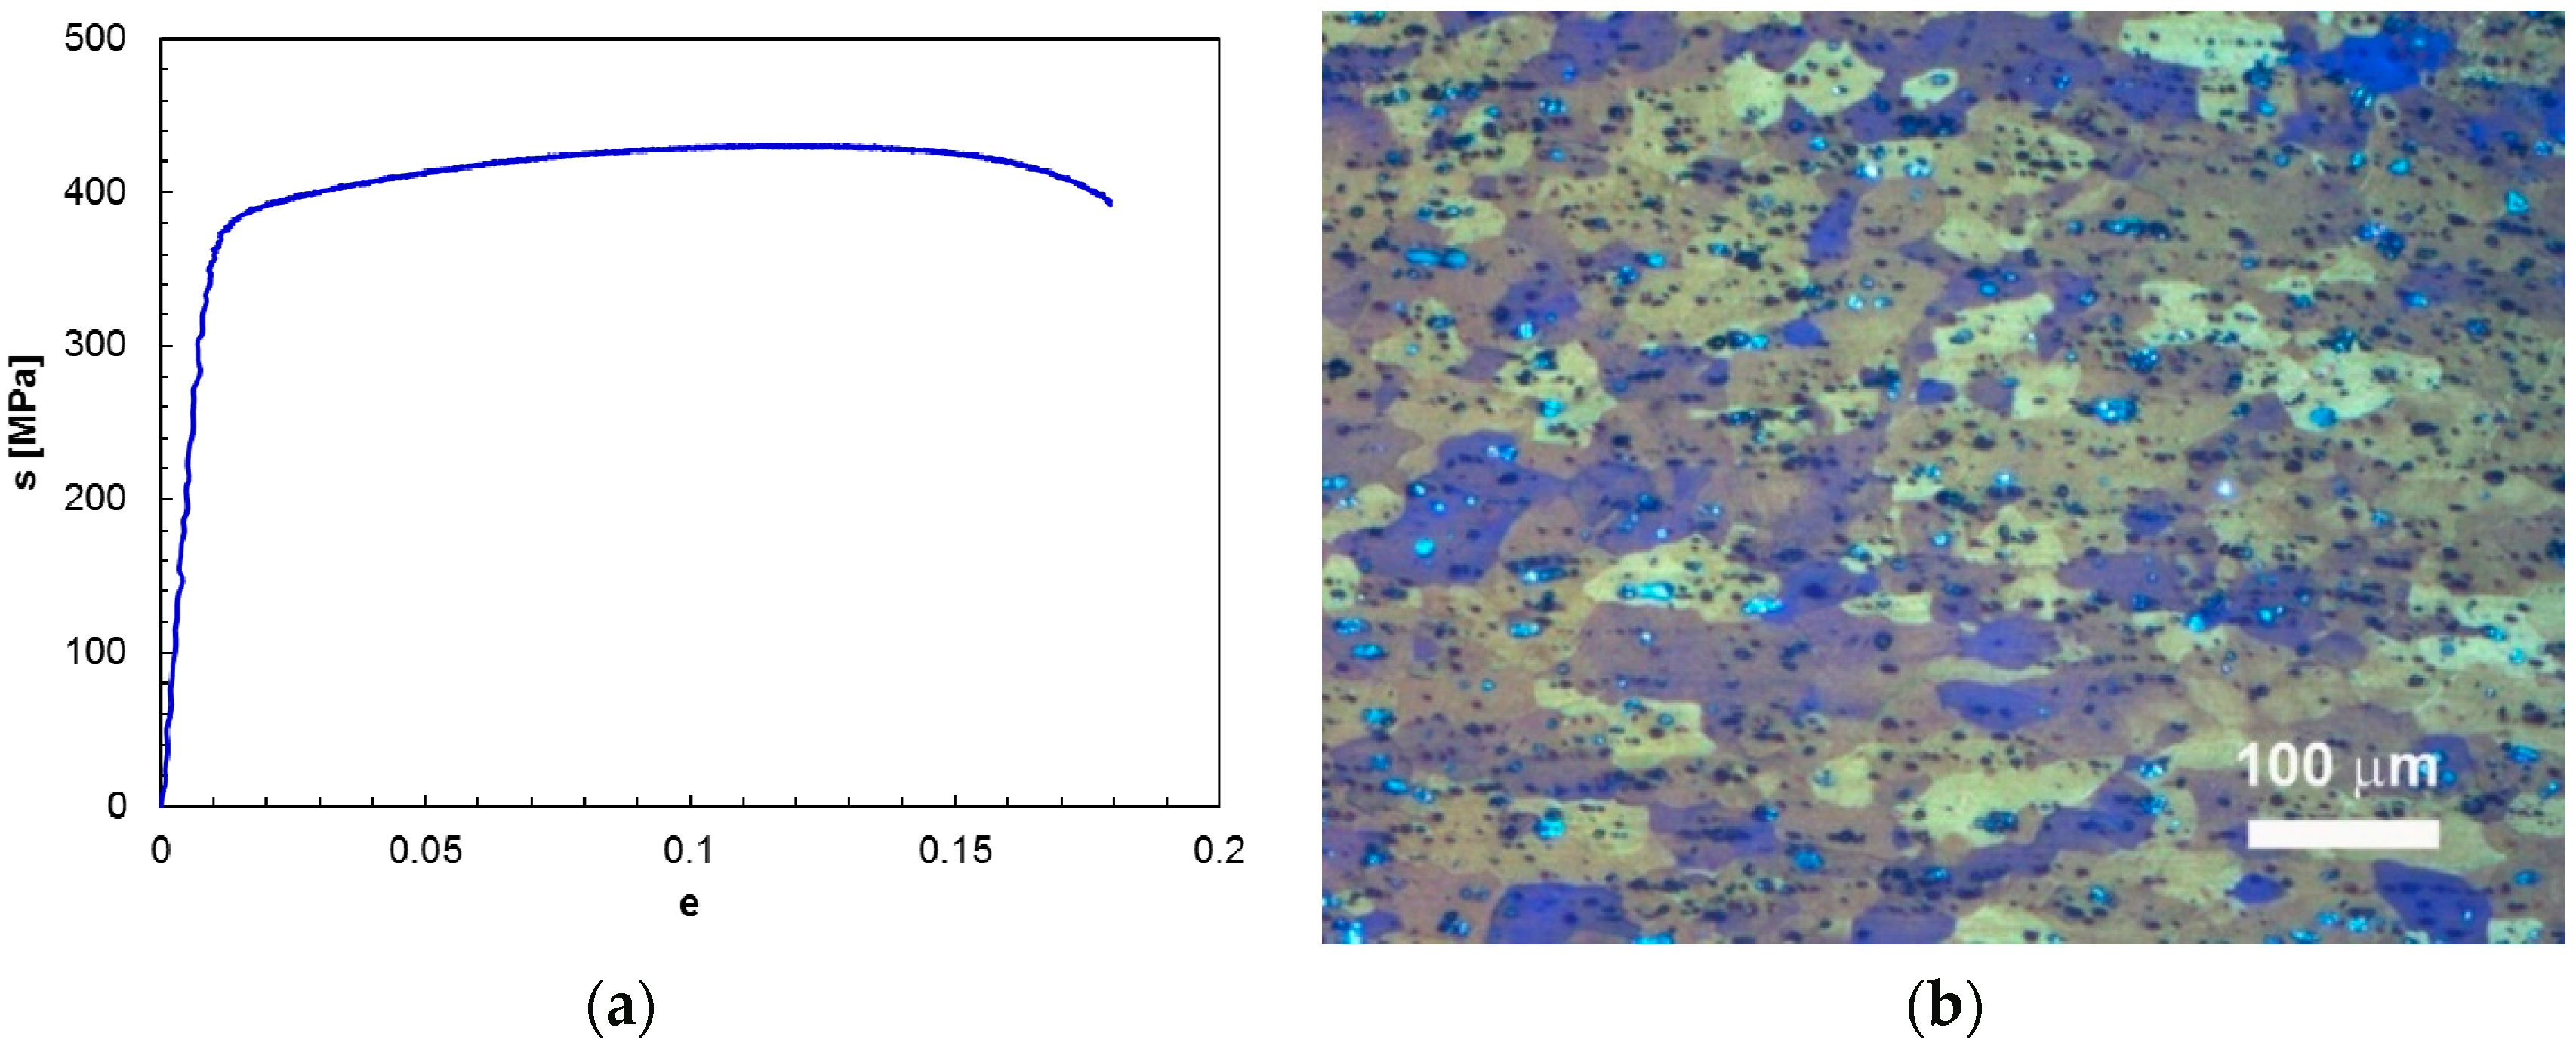
A servo-hydraulic universal testing machine (MTS Systems Corporation, Eden Prairie, MN, USA) was used to subject the FSWed joints to room temperature uniaxial tensile tests. The tensile tests were performed with a constant crosshead speed of 0.1 mm/s. To this purpose, samples characterised by a gauge length equal to the shoulder diameter were machined from the FSWed blanks with the loading direction perpendicular to the welding line. The tests were conducted in accordance with the standard ASTM E8/E8M and BS EN 895; each testing condition was repeated at least three times. During each test, the nominal stress (s)—nominal strain (e) curves were recorded. Figure 3a shows the typical s-e curve of the base material (BM) which can be used as reference in evaluating the joint efficiency. This curve was obtained from the average of the results provided by three different tensile specimens.
Finally, microstructure of the welds was investigated using a Reichert-Jung™ MeF-3s light optical microscope (Reichert Inc., Depew, NY, USA). Samples were prepared by polishing their surfaces and then subjecting them to an etching with a solution consisting of 10 mL acetic acid, 6 g picric acid, 10 mL distilled water, in 100 mL of ethanol. Details of the different zones were acquired on the transverse cross section of the FSWed joint. The microstructural analysis was carried out at different depths from the top to the bottom sheet surfaces, in proximity of the weld axis. As reference, the microstructure of the base material is shown in Figure 3b.

3. Results and Discussion

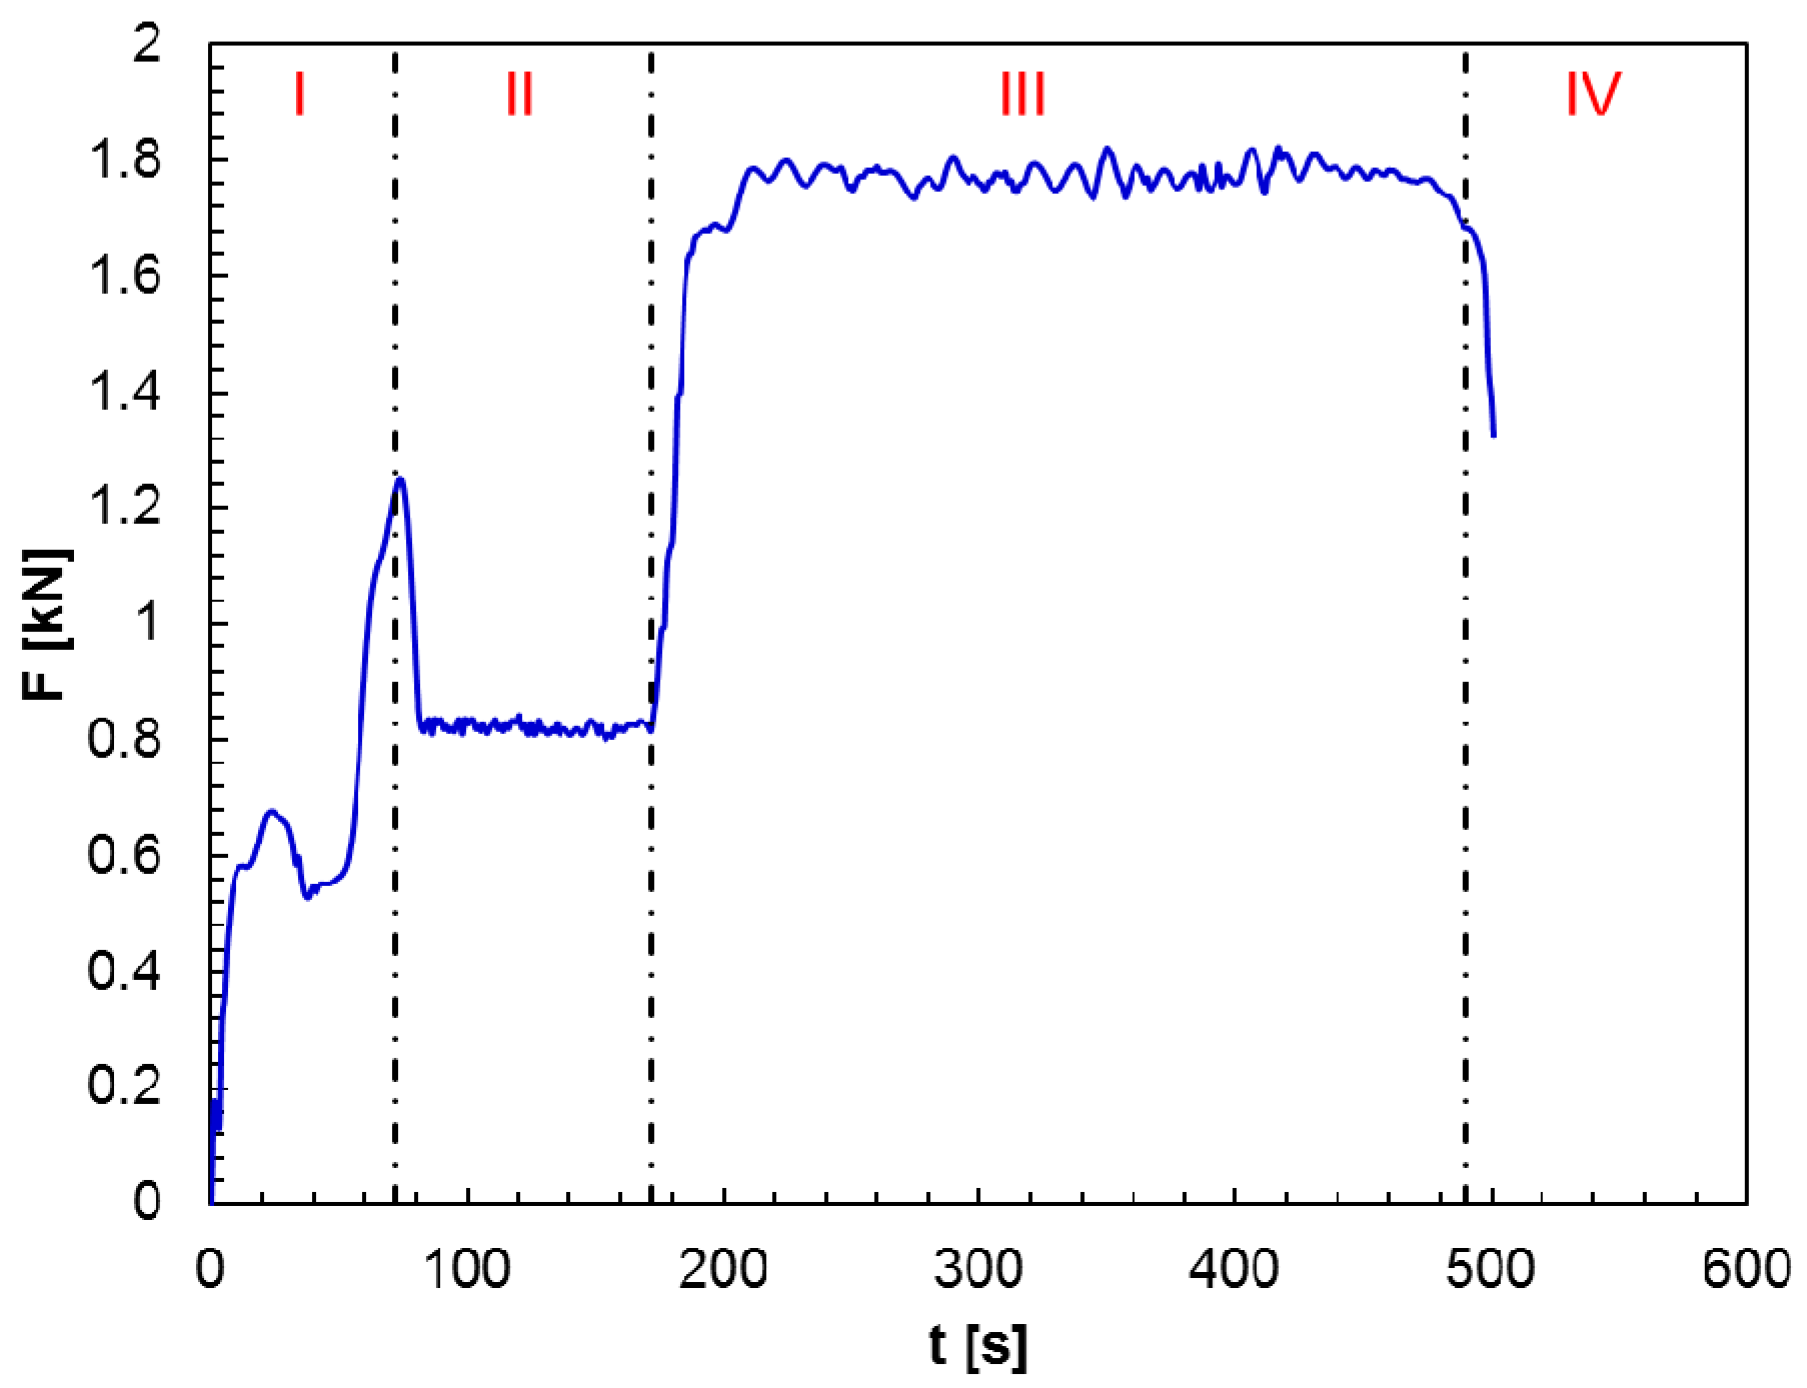
The typical vertical force—processing time curve recorded during the FSW process of AA6082-T6 sheet blanks is shown in Figure 4. Plunging, dwelling, welding, and pulling out stages can be recognised.
A very complex behaviour is exhibited by the F-t curve during plunging: the pin penetrates the sheet blanks (primary plunging) and then the tool shoulder contacts the top surface of the blanks (secondary plunging). More in detail, the pin tool plunges into the sheet blanks at the beginning of the process with a growth in the deformed material volume. The F value increases due to the strengthening effect due to the high strain rate deformation produced by the combined rotation and penetration of the pin. Then, softening produced by the heat generated by the stirring action of the pin becomes the prevailing effect and the vertical force diminishes. The F value gets back to grow as the plunging depth is equal to about two thirds of the sheet thickness, since the cooling effect on the material strength produced by the heat exchange between the sheet blanks and the backing plate, along with the strengthening effect, overcomes the one caused by the heat generation. A further growth in the vertical force occurs until the plunging depth is reached owing to the rise in the contact area between tool and workpiece taking place as the shoulder contacts the sheet surface.
The tool dwelling is carried out to guarantee an appropriate heating of the workpiece before the tool moves along the welding line. At the beginning of such stage, the effect of the heat generation prevails on the heat dissipation one; consequently, the F value decreases reaching, in a very brief time, a steady-state regime due to the thermal equilibrium between generation and loss of heat.
As the rotating pin tool moves along the welding line, the vertical force quickly grows and reaches a steady state which is maintained for the whole stage.
In the final stage, the tool pulling out occurs: the rotating tool moves upward and the vertical force promptly decreases down to zero.
The vertical force as a function of processing time of AA6082-T6 alloy shows a behaviour that is in excellent agreement with the one obtained on AA2024 by Su et al. [15], by Astarita et al. [17], and by Trimble et al. [18], on AA6061 by Janaki Ramulu et al. [26] and on AZ31 Mg alloy by Forcellese et al. [19].
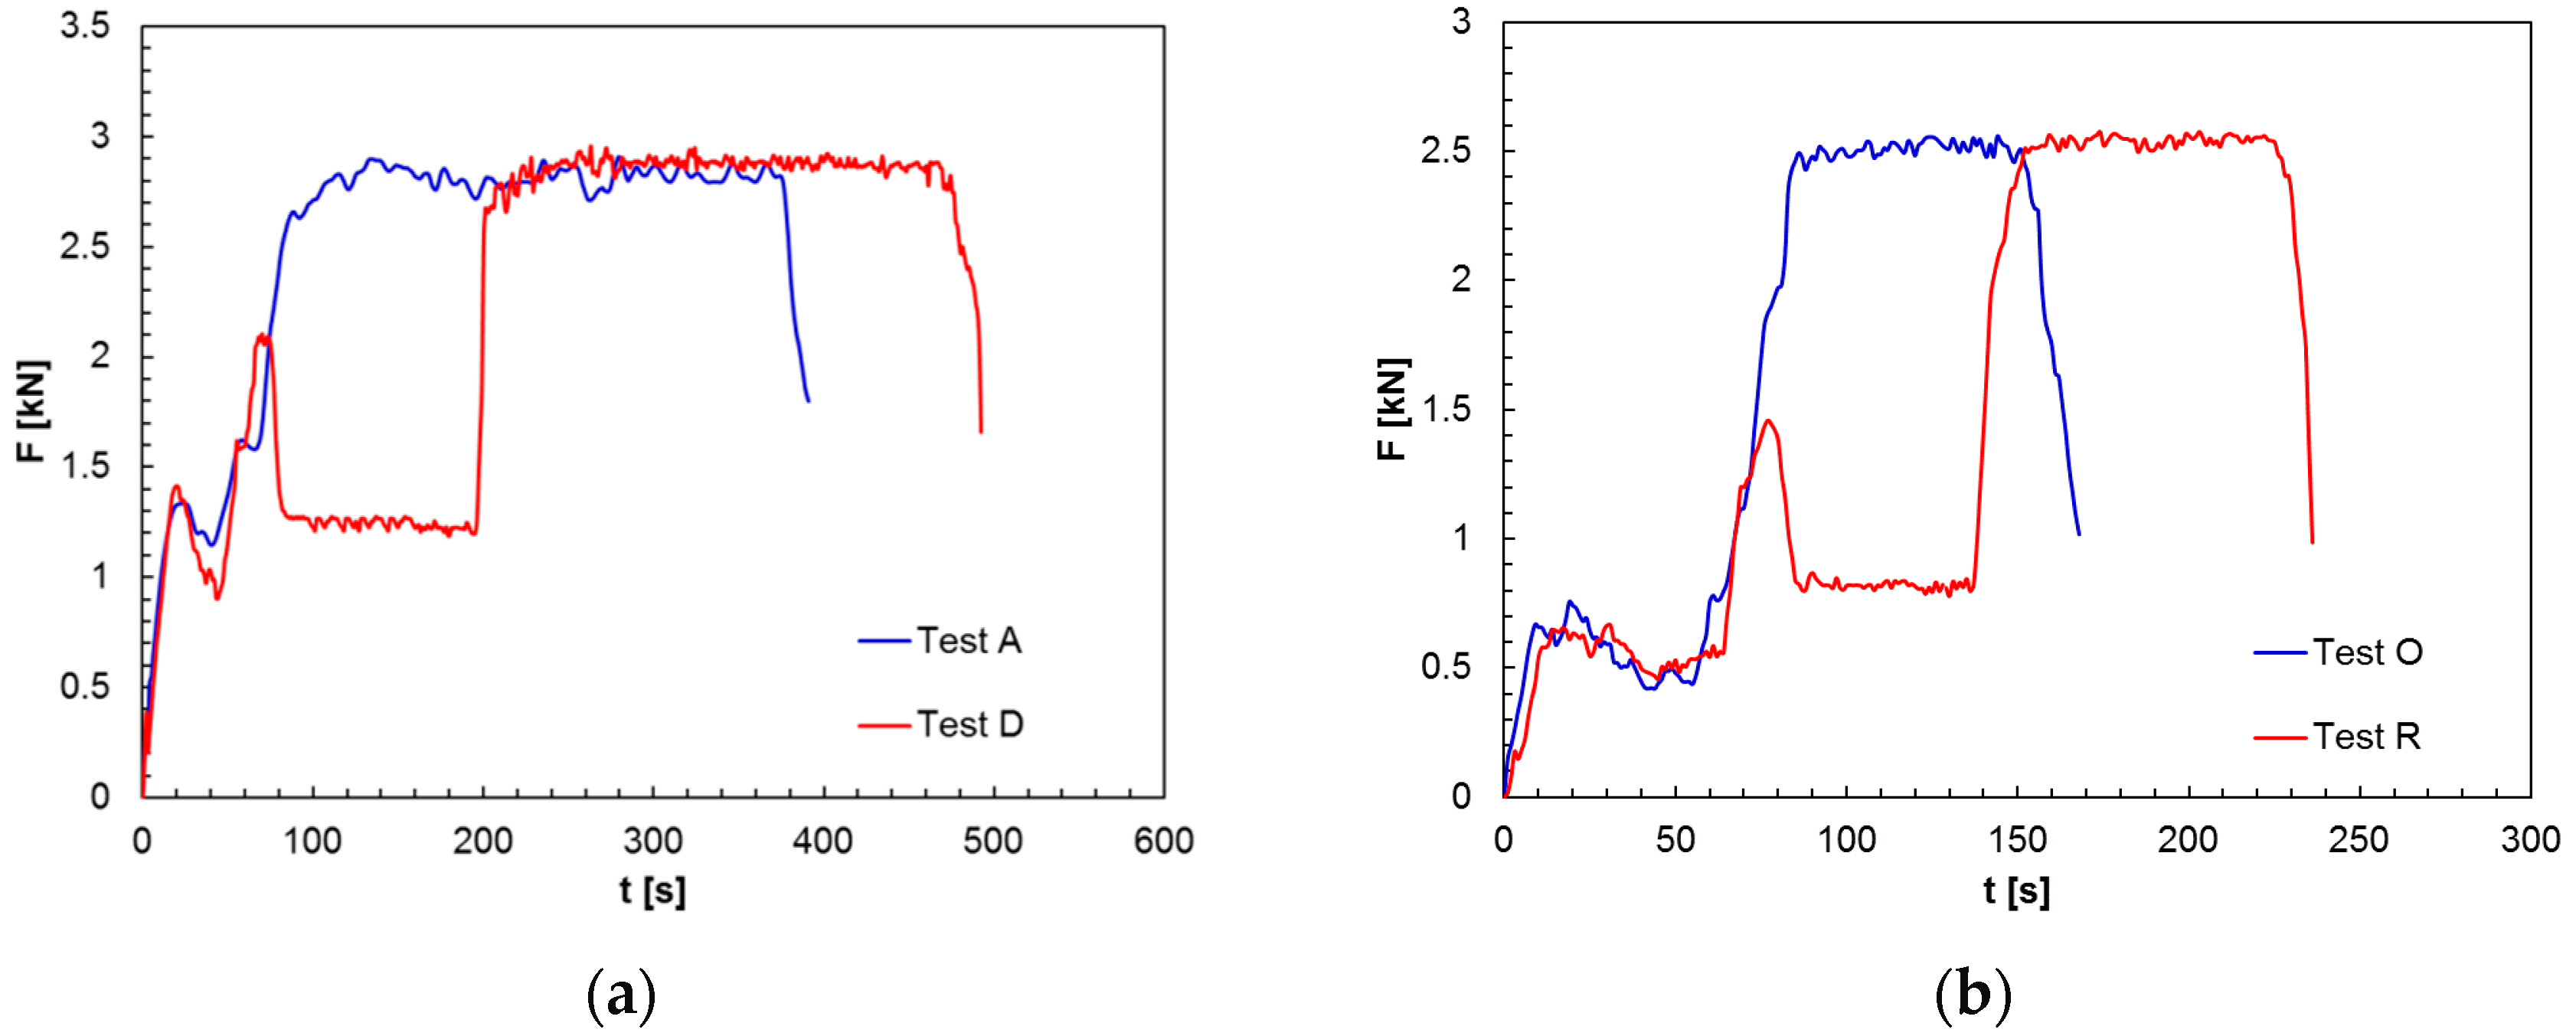
Figure 5 shows the comparison between the F-t curves as a function of the ω and v values, with and without the dwelling stage. For td = 0 s, the increase in the vertical force in the final part of the tool plunging is followed by a further growth taking place at the beginning of the welding stage until reaching a constant value. Furthermore, the vertical force during the welding state is almost coincident with that obtained with td = 100 s notwithstanding the softening effect produced by the tool dwelling. Such results do not depend on the welding parameters investigated and are in accordance with those obtained in the FSW of AZ31 magnesium alloy [19]. For this reason, the data processing made in the following will be referred to the case in which the dwelling stage is absent (td = 0 s).
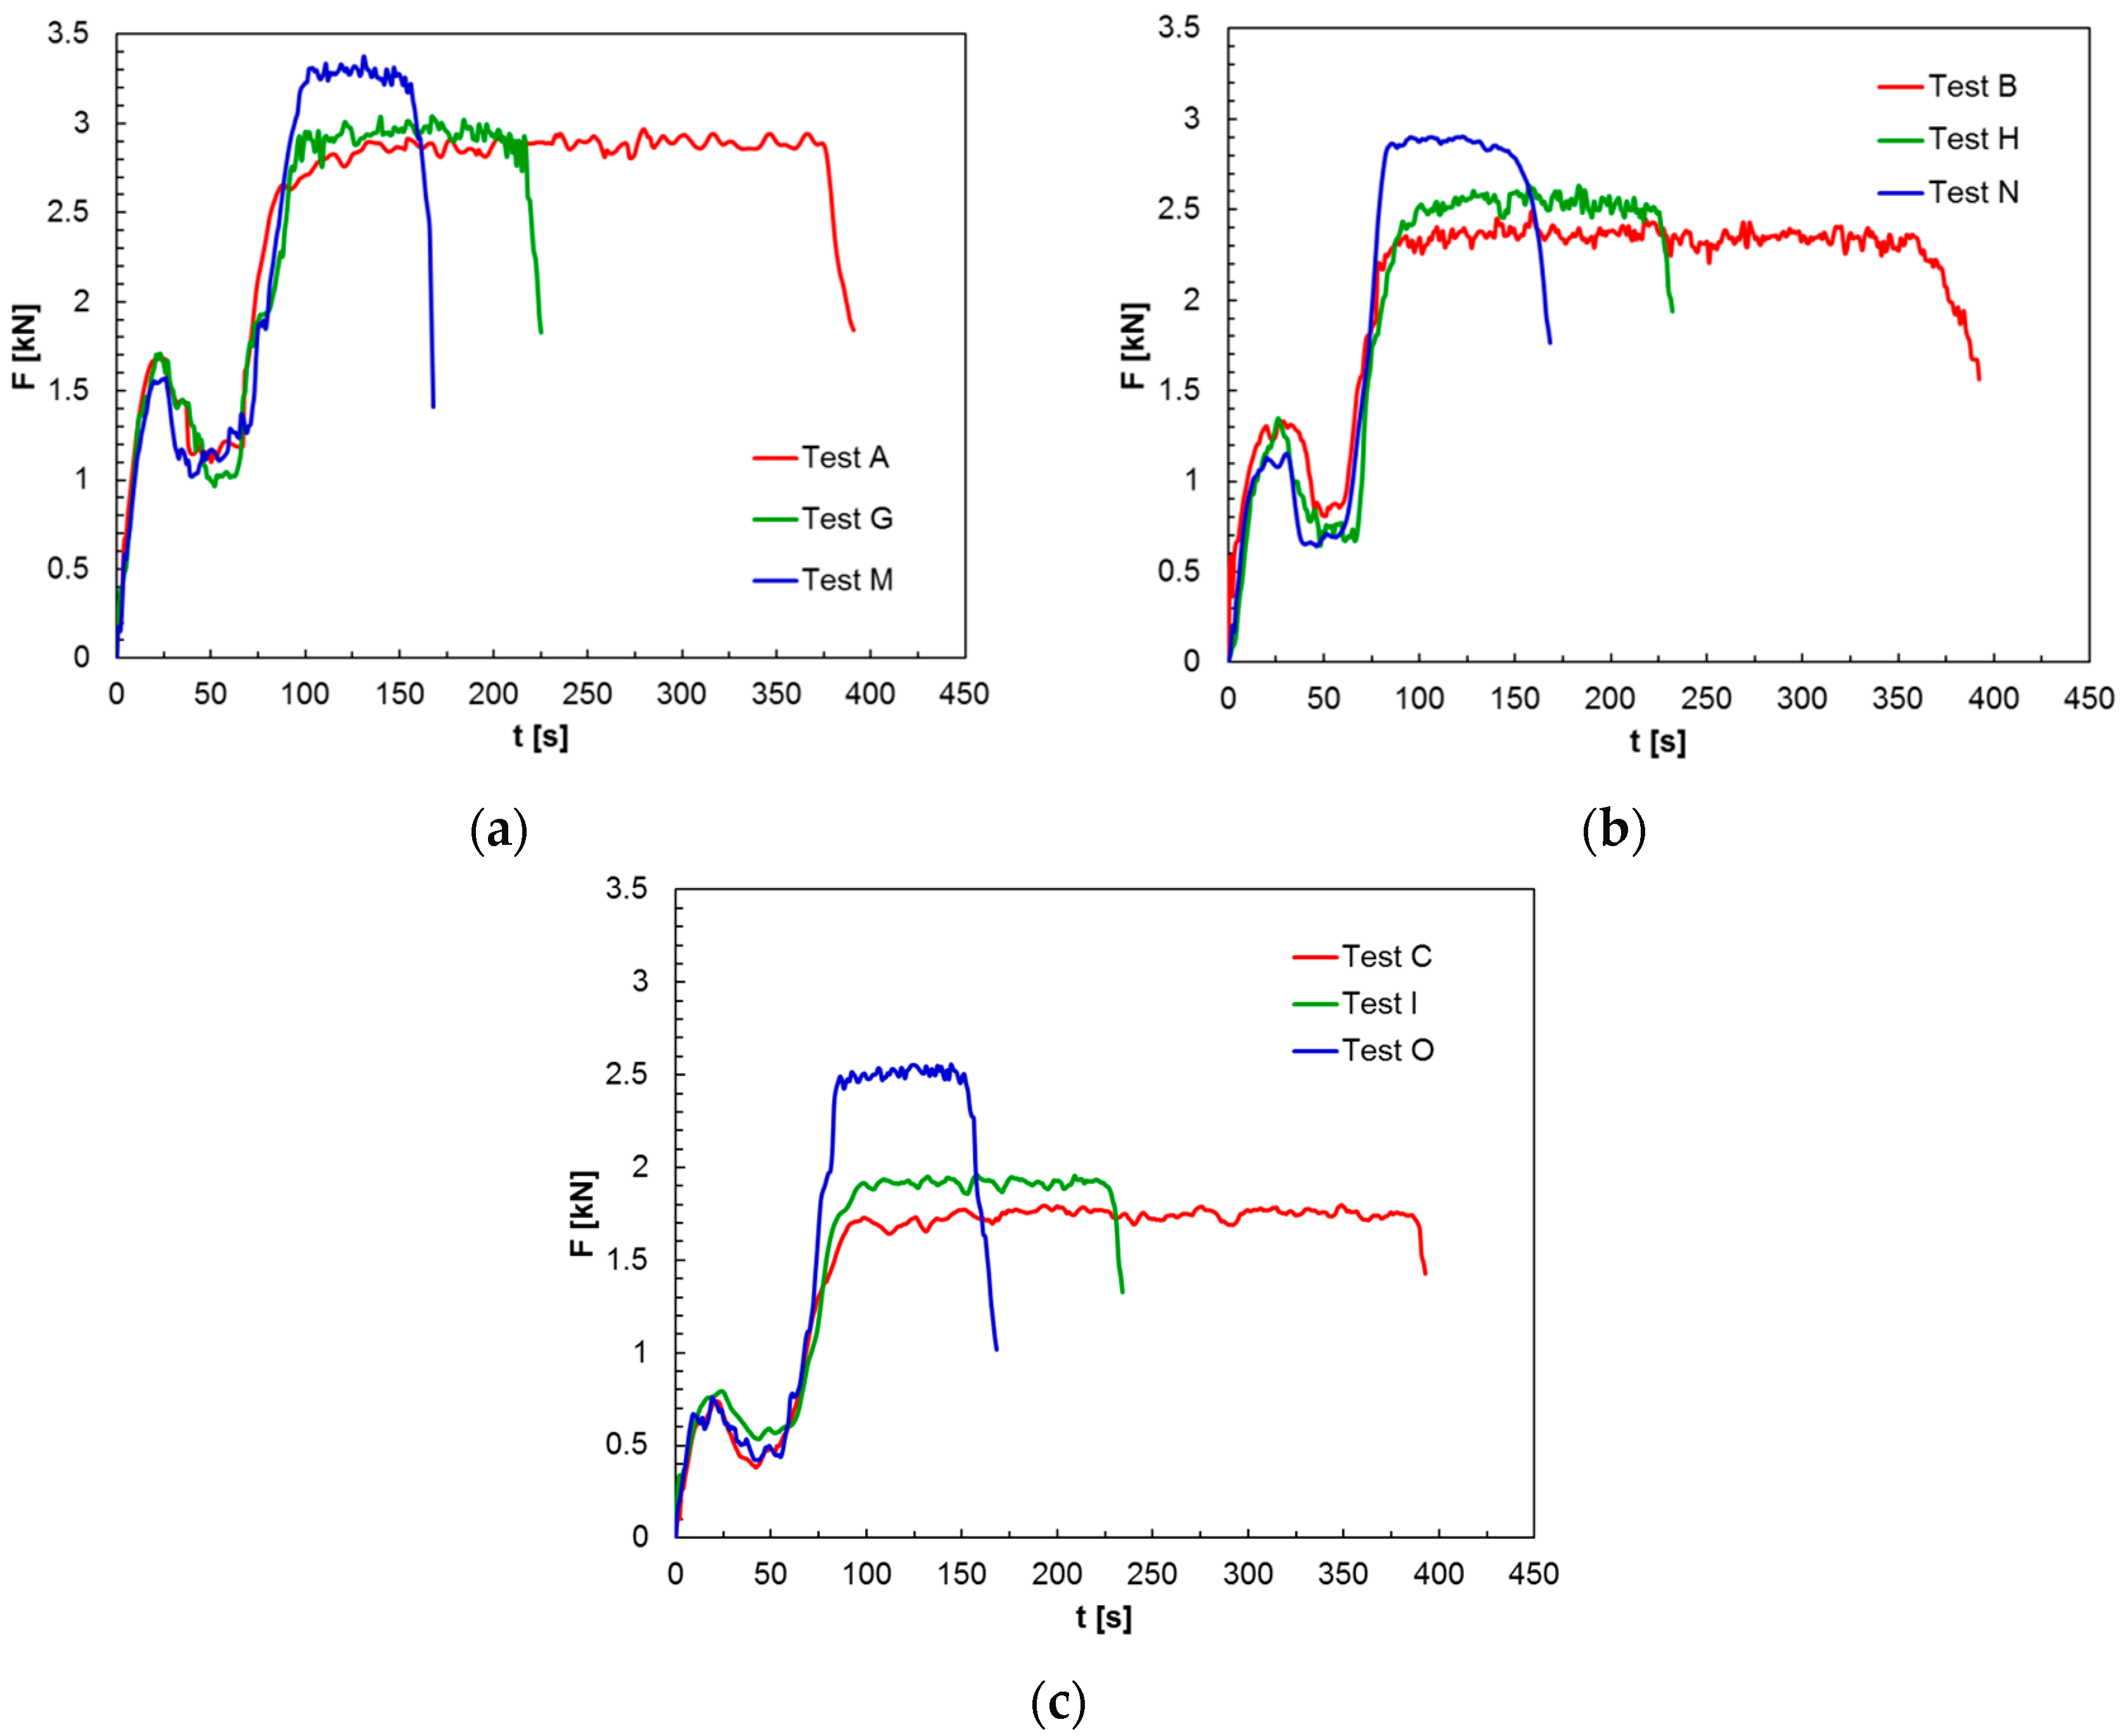
The effect of the ω and v values on the vertical force vs. processing time curves is shown in Figure 6. As far as the ω value is considered, it can be seen that, for a given rotational speed, the duration of the welding stage increases with decreasing the v value due to the slower travel movement along the welding line. Furthermore, for a given processing time, the F value increases with the welding speed. Concerning the effect of the ω value, irrespective of the welding speed, F decreases with growing ω.
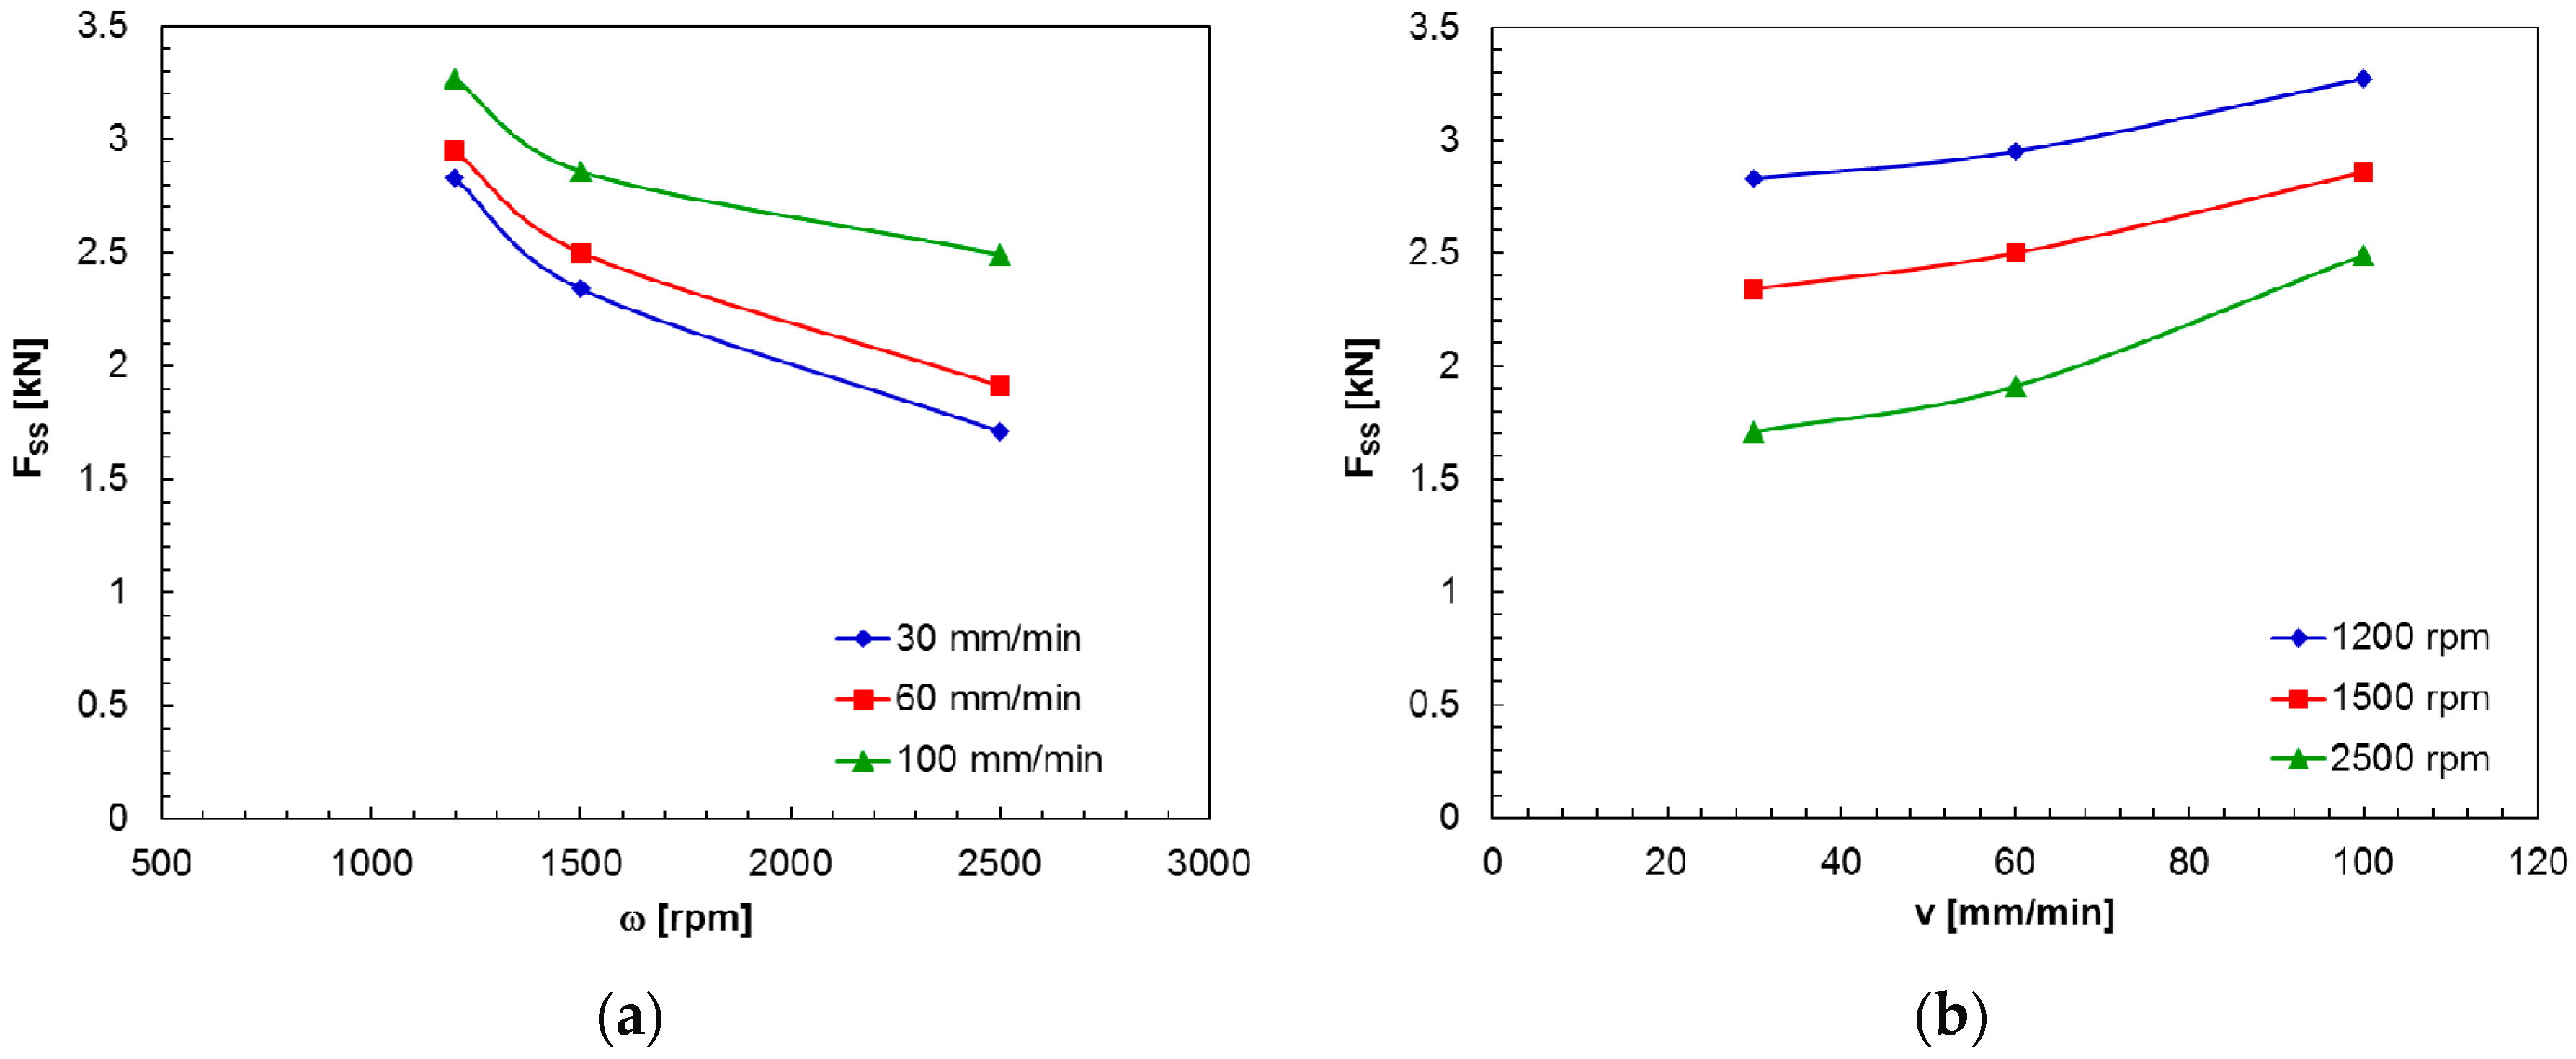
The effect of the process parameters on the average steady state value of the vertical force (FSS), measured during the welding stage, is summarised in Figure 7. The growth of FSS with the welding speed, for a given rotational speed, becomes more significant as the ω value grows, i.e., as the overall heat input into the joint increases. In particular, at the lowest rotational speed (1200 rpm), the FSS value rises by approximately 15.5% as ω increases from 30 to 100 mm/min, whilst at the highest ω (2500 rpm), it grows approximately 45.6%. On the contrary, the growth of FSS with ω, for a given v value, becomes less significant as the welding speed rises. In particular, at the lowest v (30 mm/min), the F value rises by approximately 39.6% as ω grows from 1200 to 2500 rpm, whilst at the highest v value (100 mm/min) it increases approximately 23.9%.
To understand the influence of the ω value on the FSS, it must be remembered that the heat input generated during welding is the parameter that influences with a greater extent, with a positive correlation, the workpiece temperature [23]. Therefore, as the ω value increases, the corresponding growth of the heat input produces higher workpiece temperatures which make the deforming material softer and lead to a reduction in the vertical force during FSW. The reduction in the heat input caused by the rise in the v value produces a decrease in workpiece temperature, and consequently, a growth in the material strength and in the vertical force.
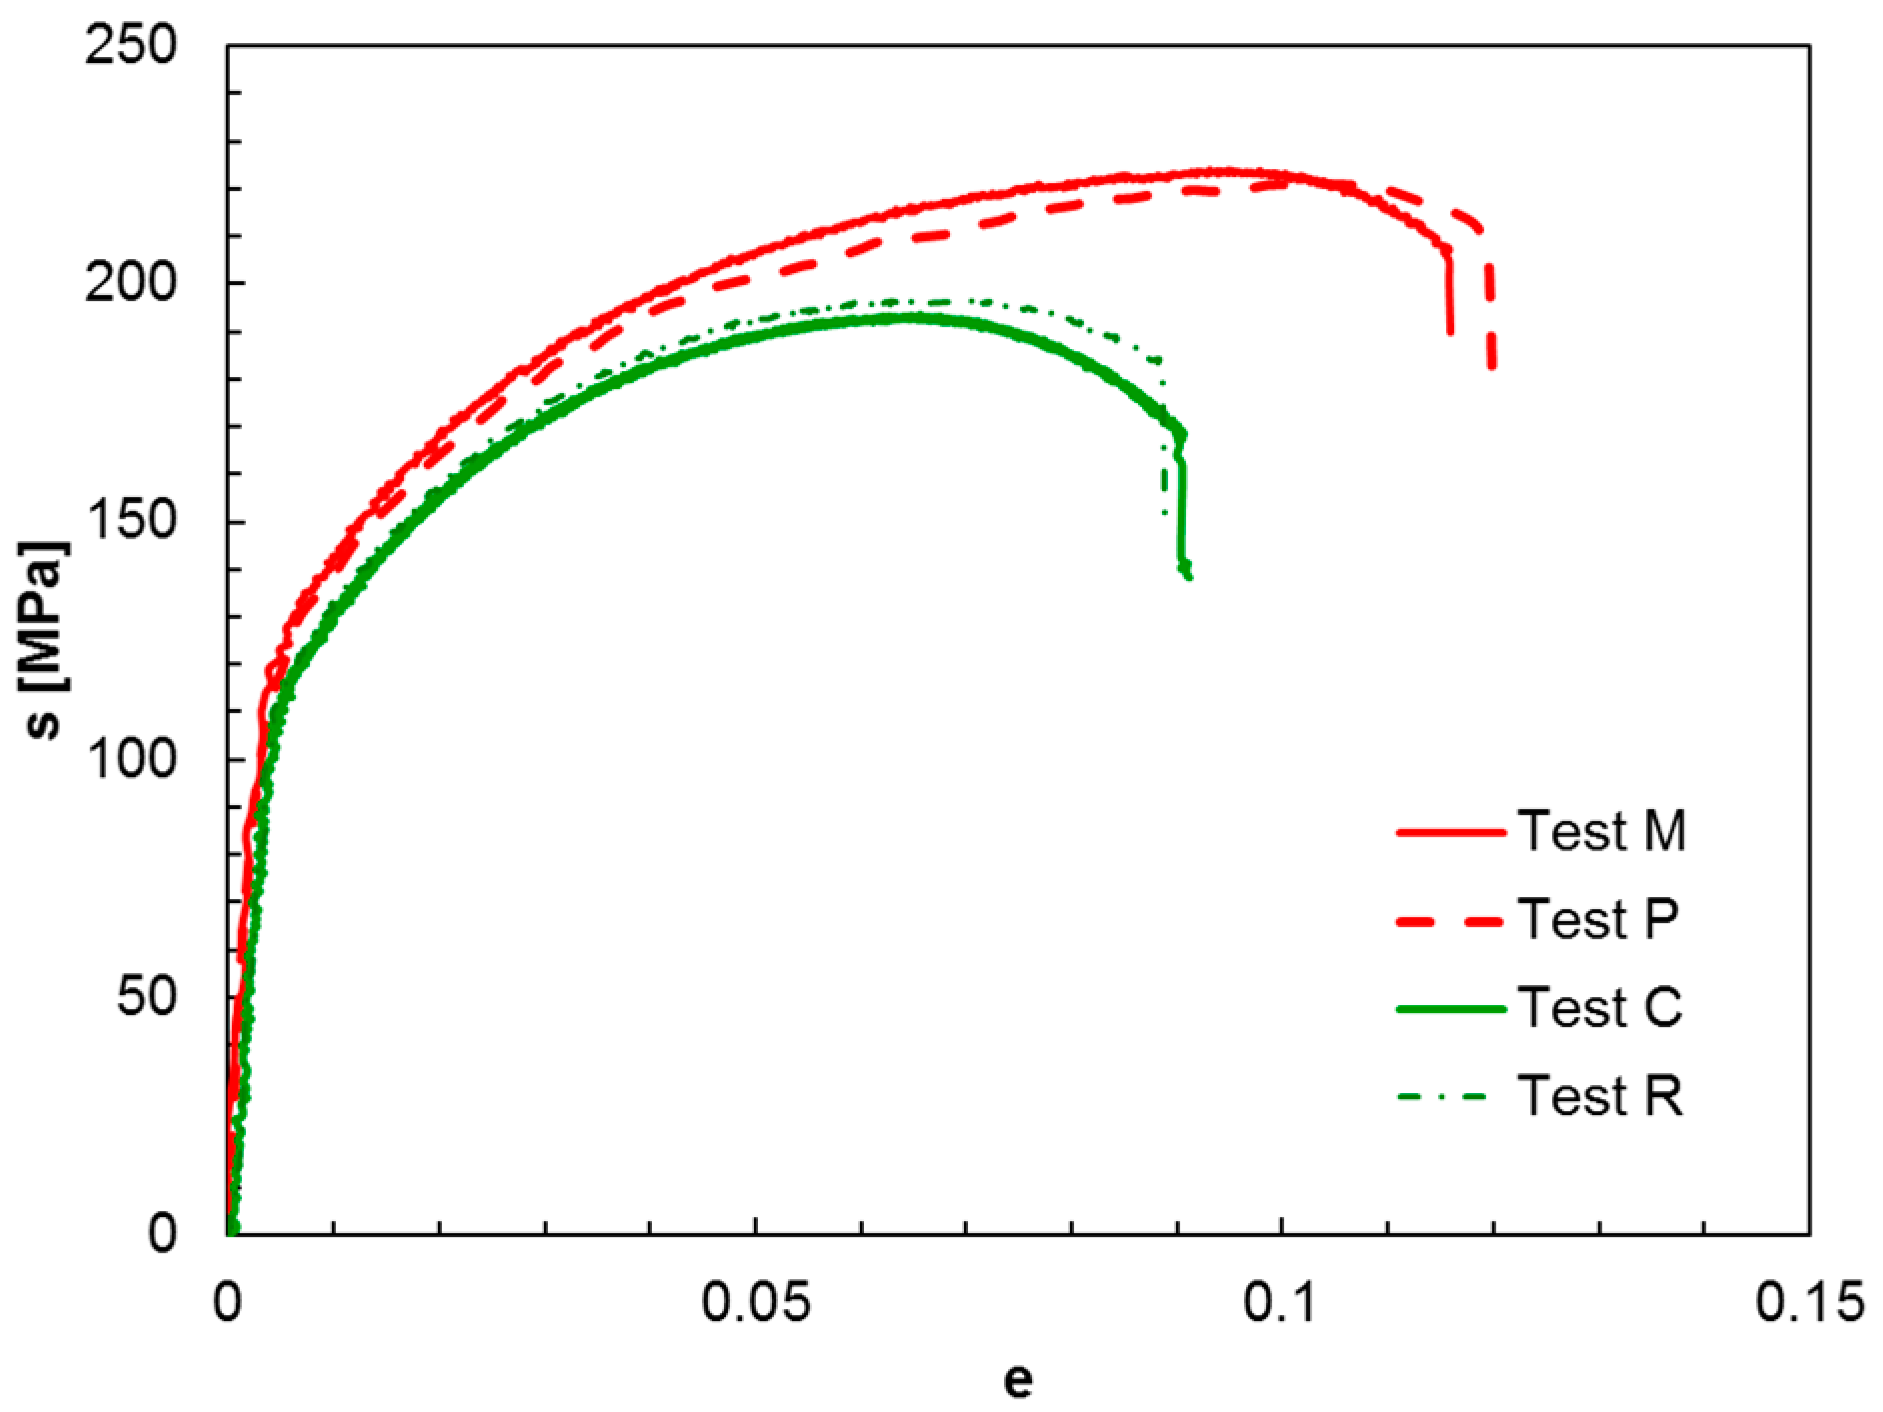
The availability of the mechanical data on welds obtained at different ω and v values and their relationships with the vertical force occurring during FSW of AA6082 alloy can be useful for the process optimisation. Preliminarily, the effect of the tool dwelling on the nominal stress-nominal strain curves was investigated (Figure 8). It can be seen that the td does not affect the material strength and ductility, according to its influence on the vertical force generated during FSW process (Figure 5); as a matter of fact, the s-e curves of FSWed joints obtained with the same ω and v values but with different td, are almost coincident.
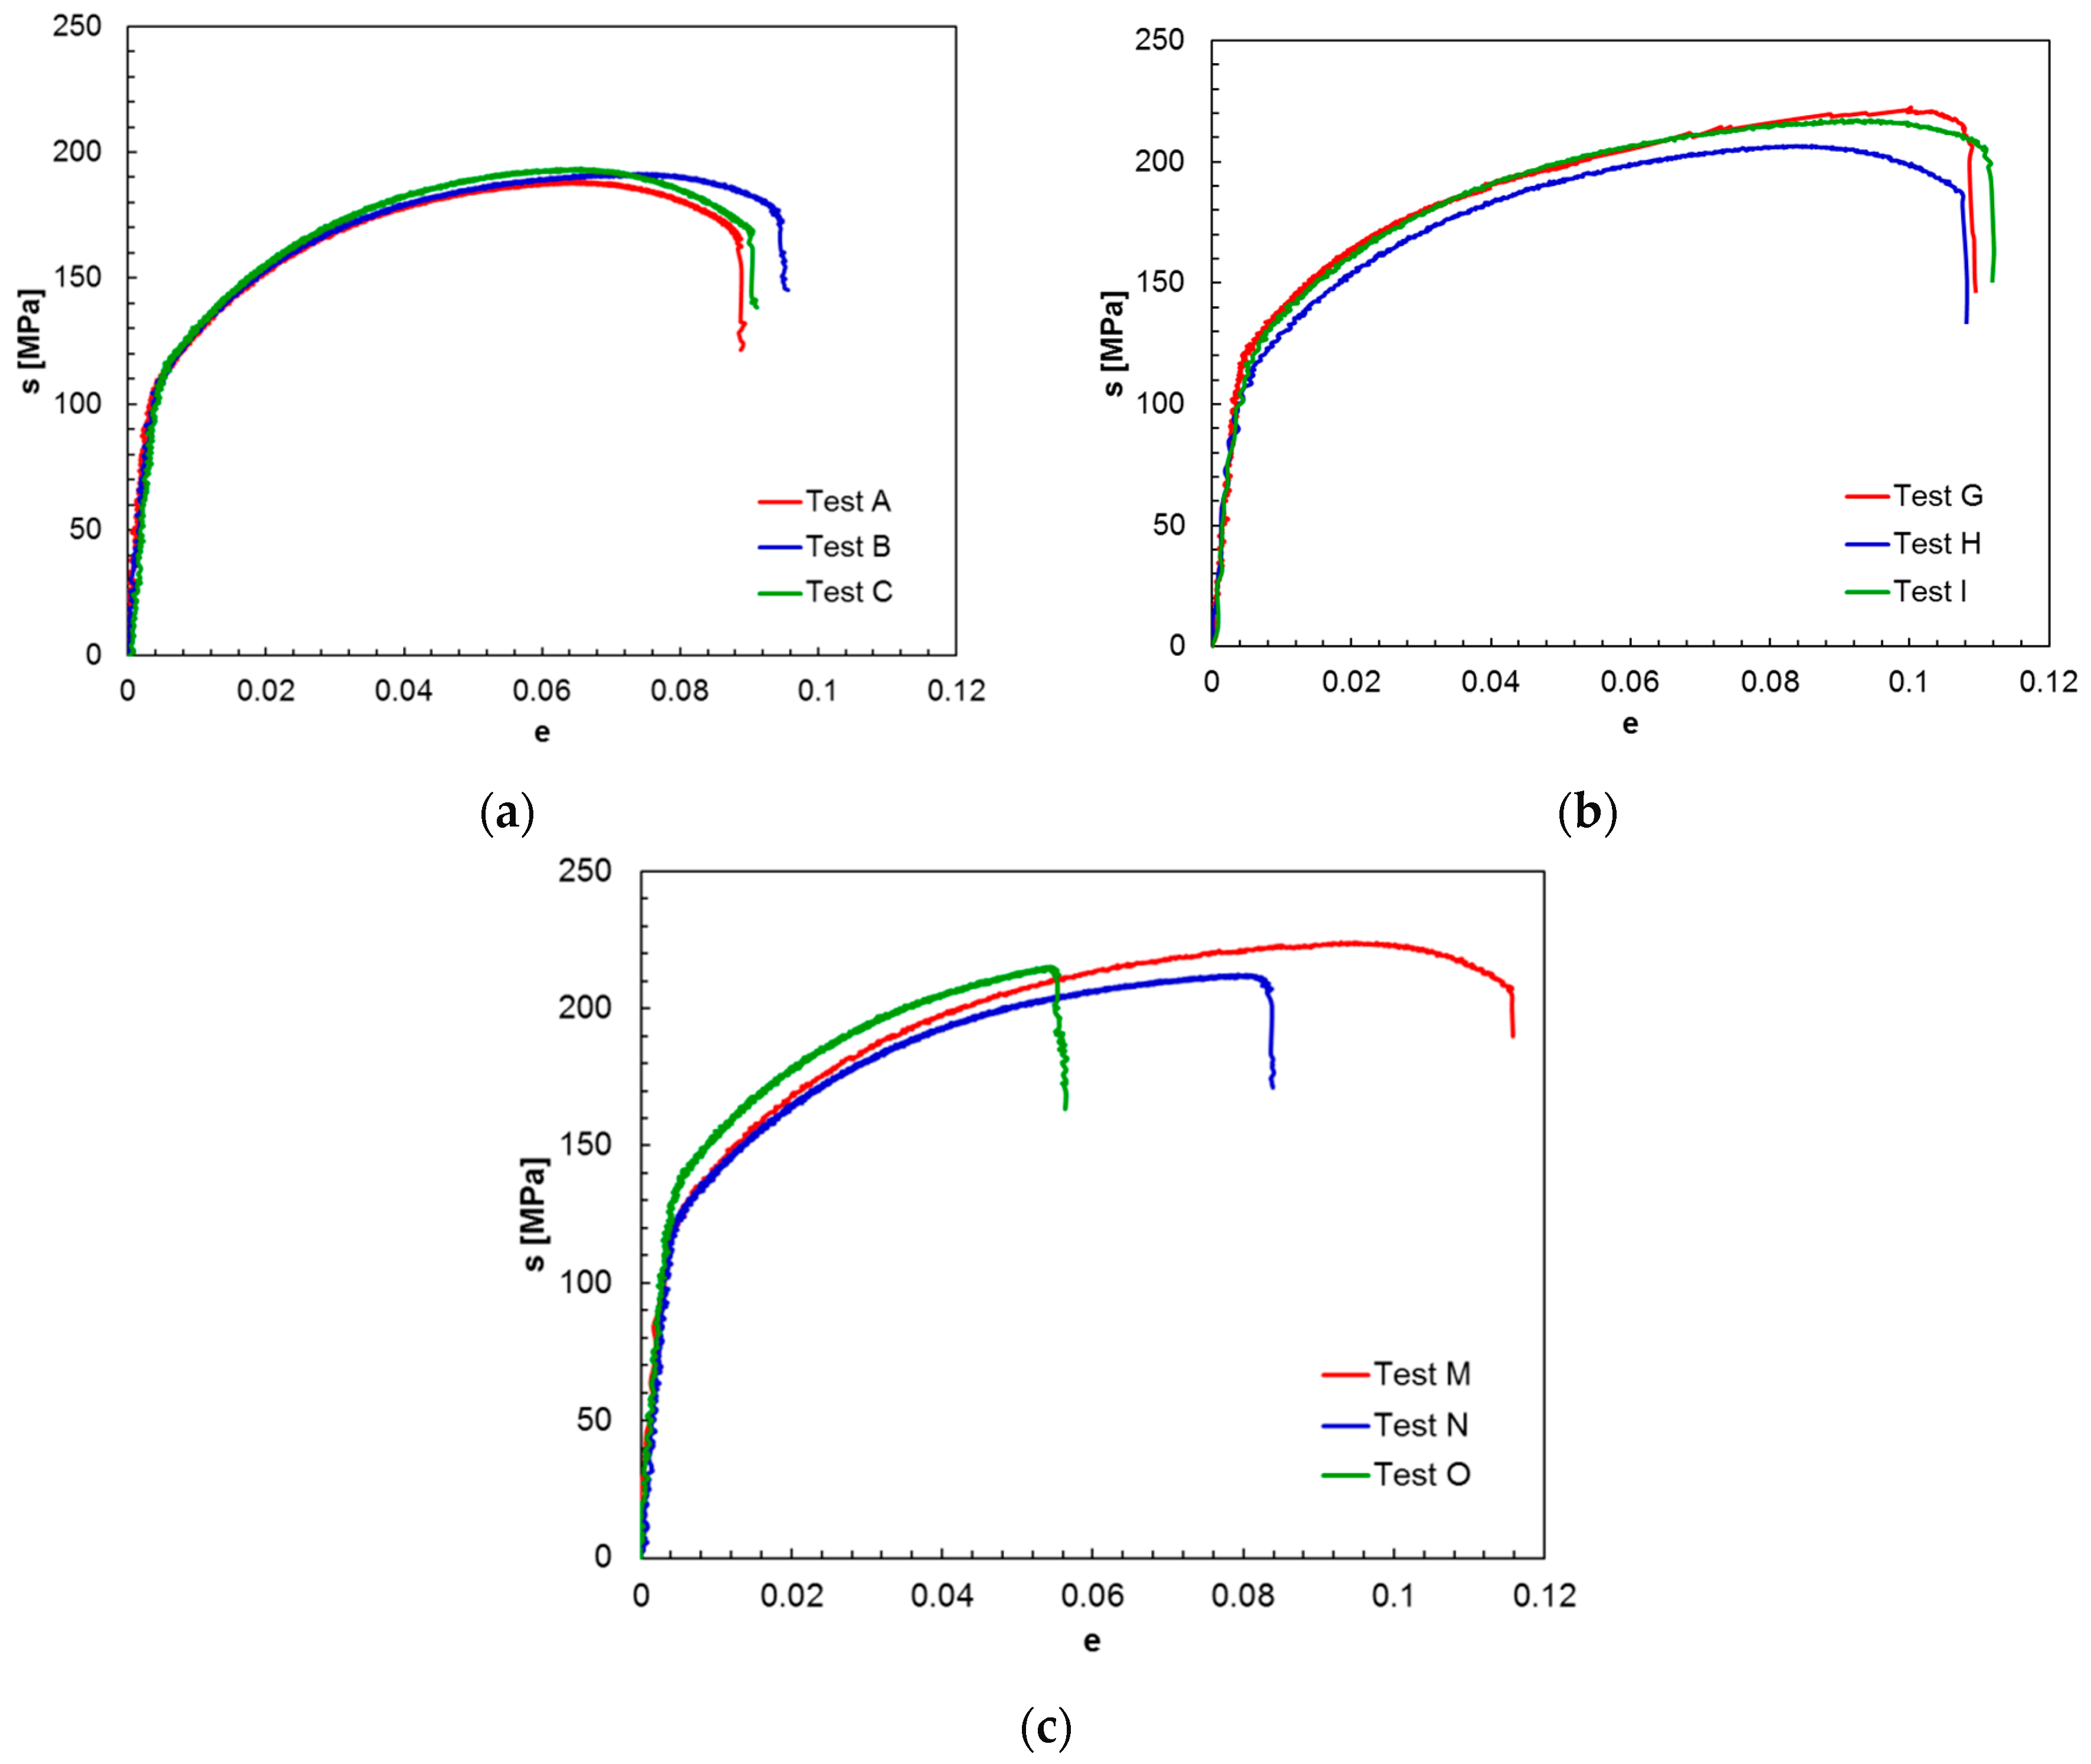
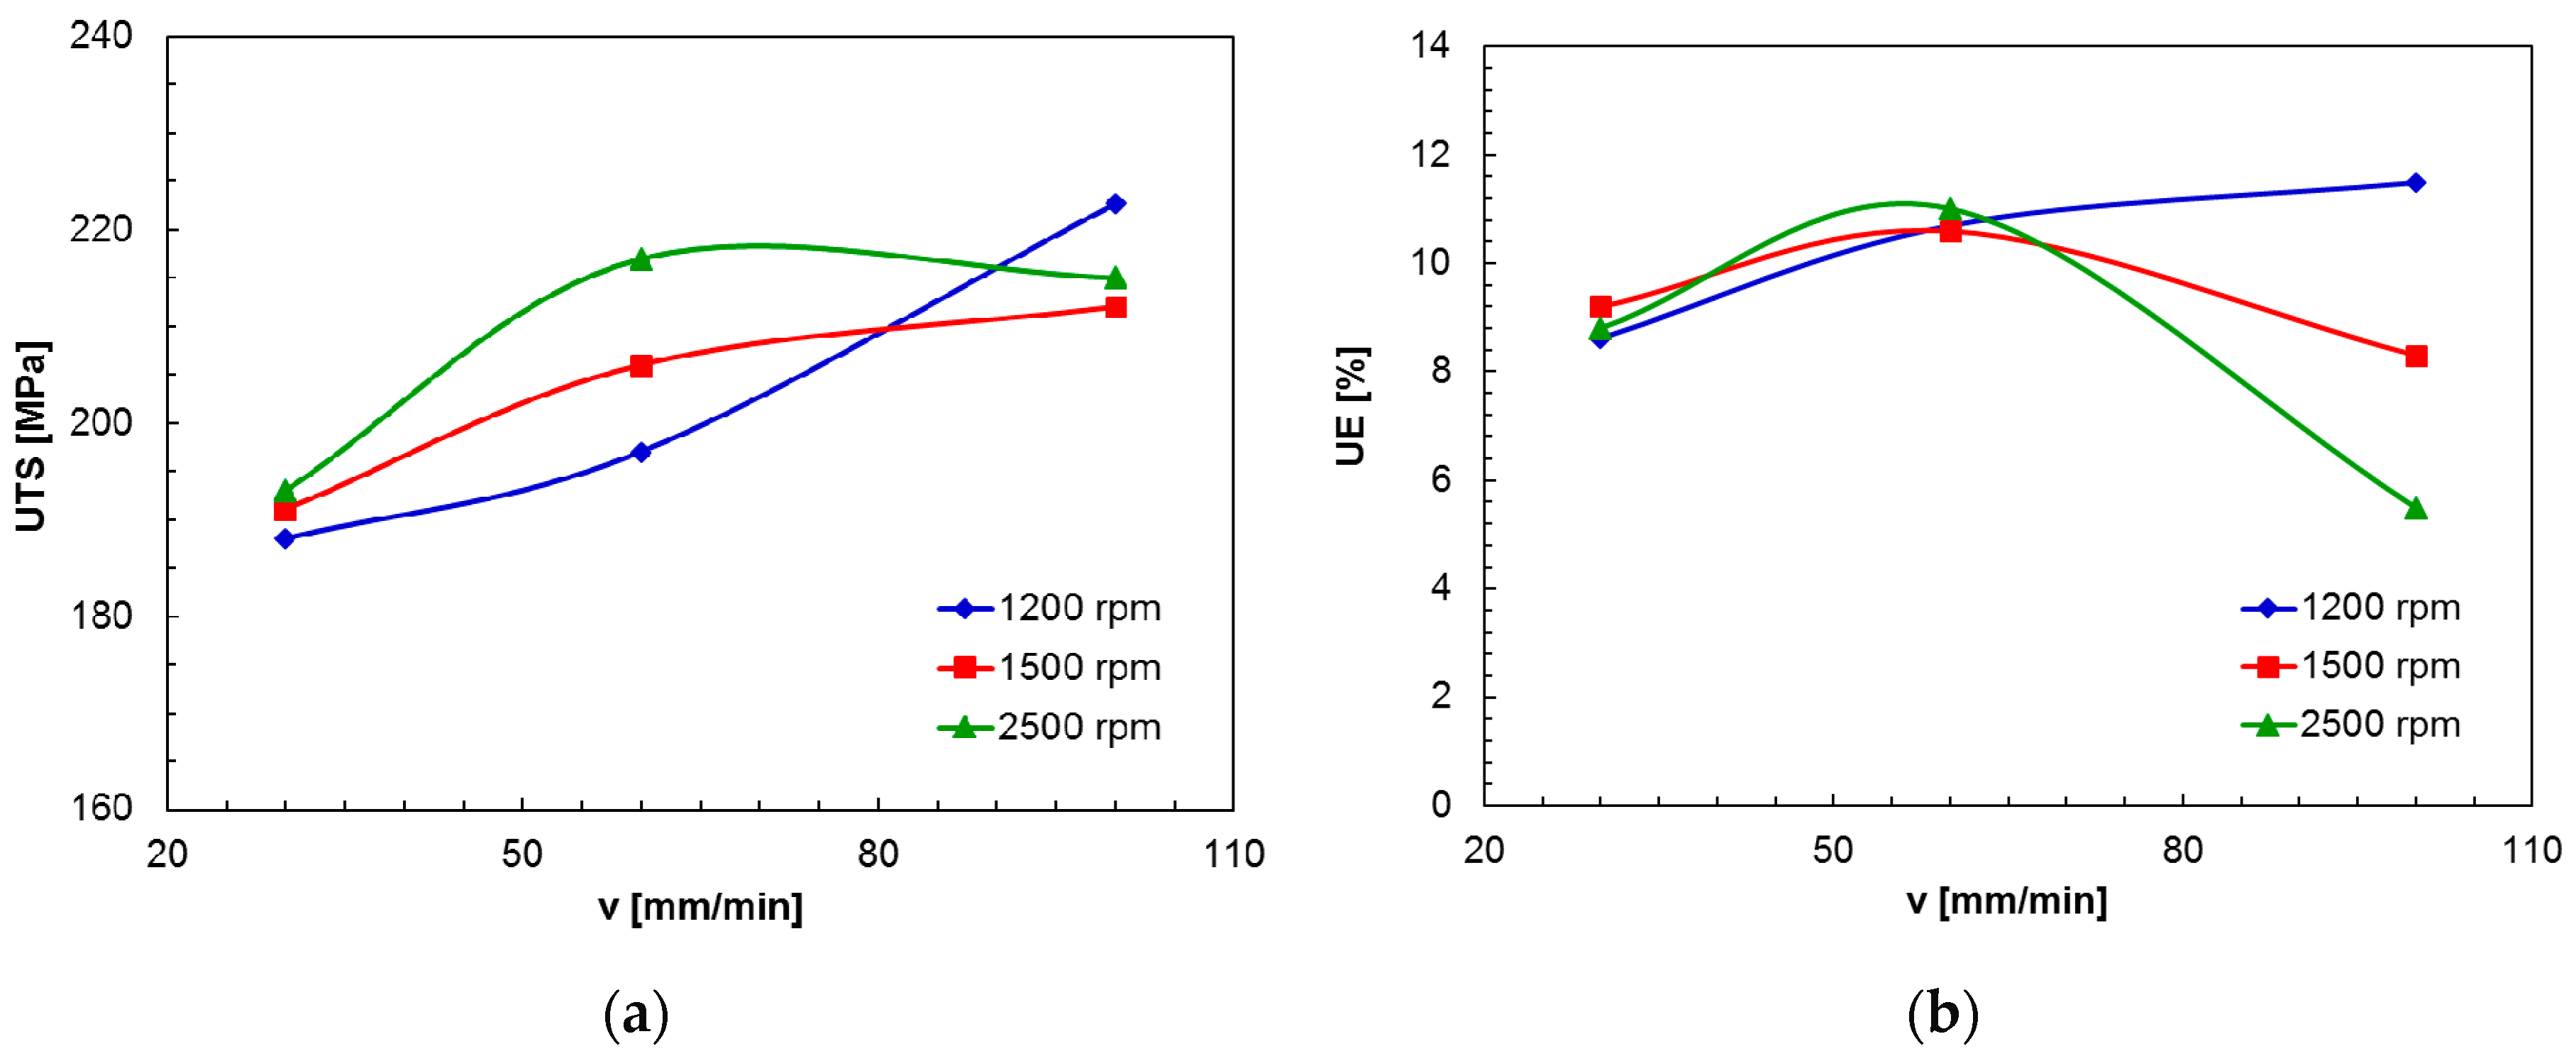
Figure 9 shows the effect of the process parameters on the s-e curves provided by uniaxial tensile tests performed on samples obtained from the FSWed joints. Irrespective of the rotational and welding speeds investigated, fracture occurs at the retreating side, in the heat affected zone (HAZ), as shown in Figure 10, in which a typical fractured tension tested FSWed sample is observed. Such result is in agreement with that observed on FSWed joints in AA5754 aluminium blanks [27]. For a given ω value, both material strength and ductility of the welds increase as the welding speed rises from 30 to 60 mm/min (Figure 9a,b). As the v value further grows reaching 100 mm/min, a strict dependence of the rotational speed on the behaviour of the s-e curves is observed (Figure 9c).
Figure 11 summarises the influence of the ω and v values on the ultimate tensile strength (UTS) and ultimate elongation (UE) calculated by analysing the curves shown in Figure 9. For ω = 1200 rpm, both the UTS (Figure 11a) and UE (Figure 11b) monotonically increase with the v value. For ω ≥ 1500 rpm, the UTS increases with welding speed until 60 mm/min and then keeps almost constant as v value further grows until 100 mm/min (Figure 11a) whilst the UE reaches a peak value at 60 mm/min and then decreases (Figure 11b).
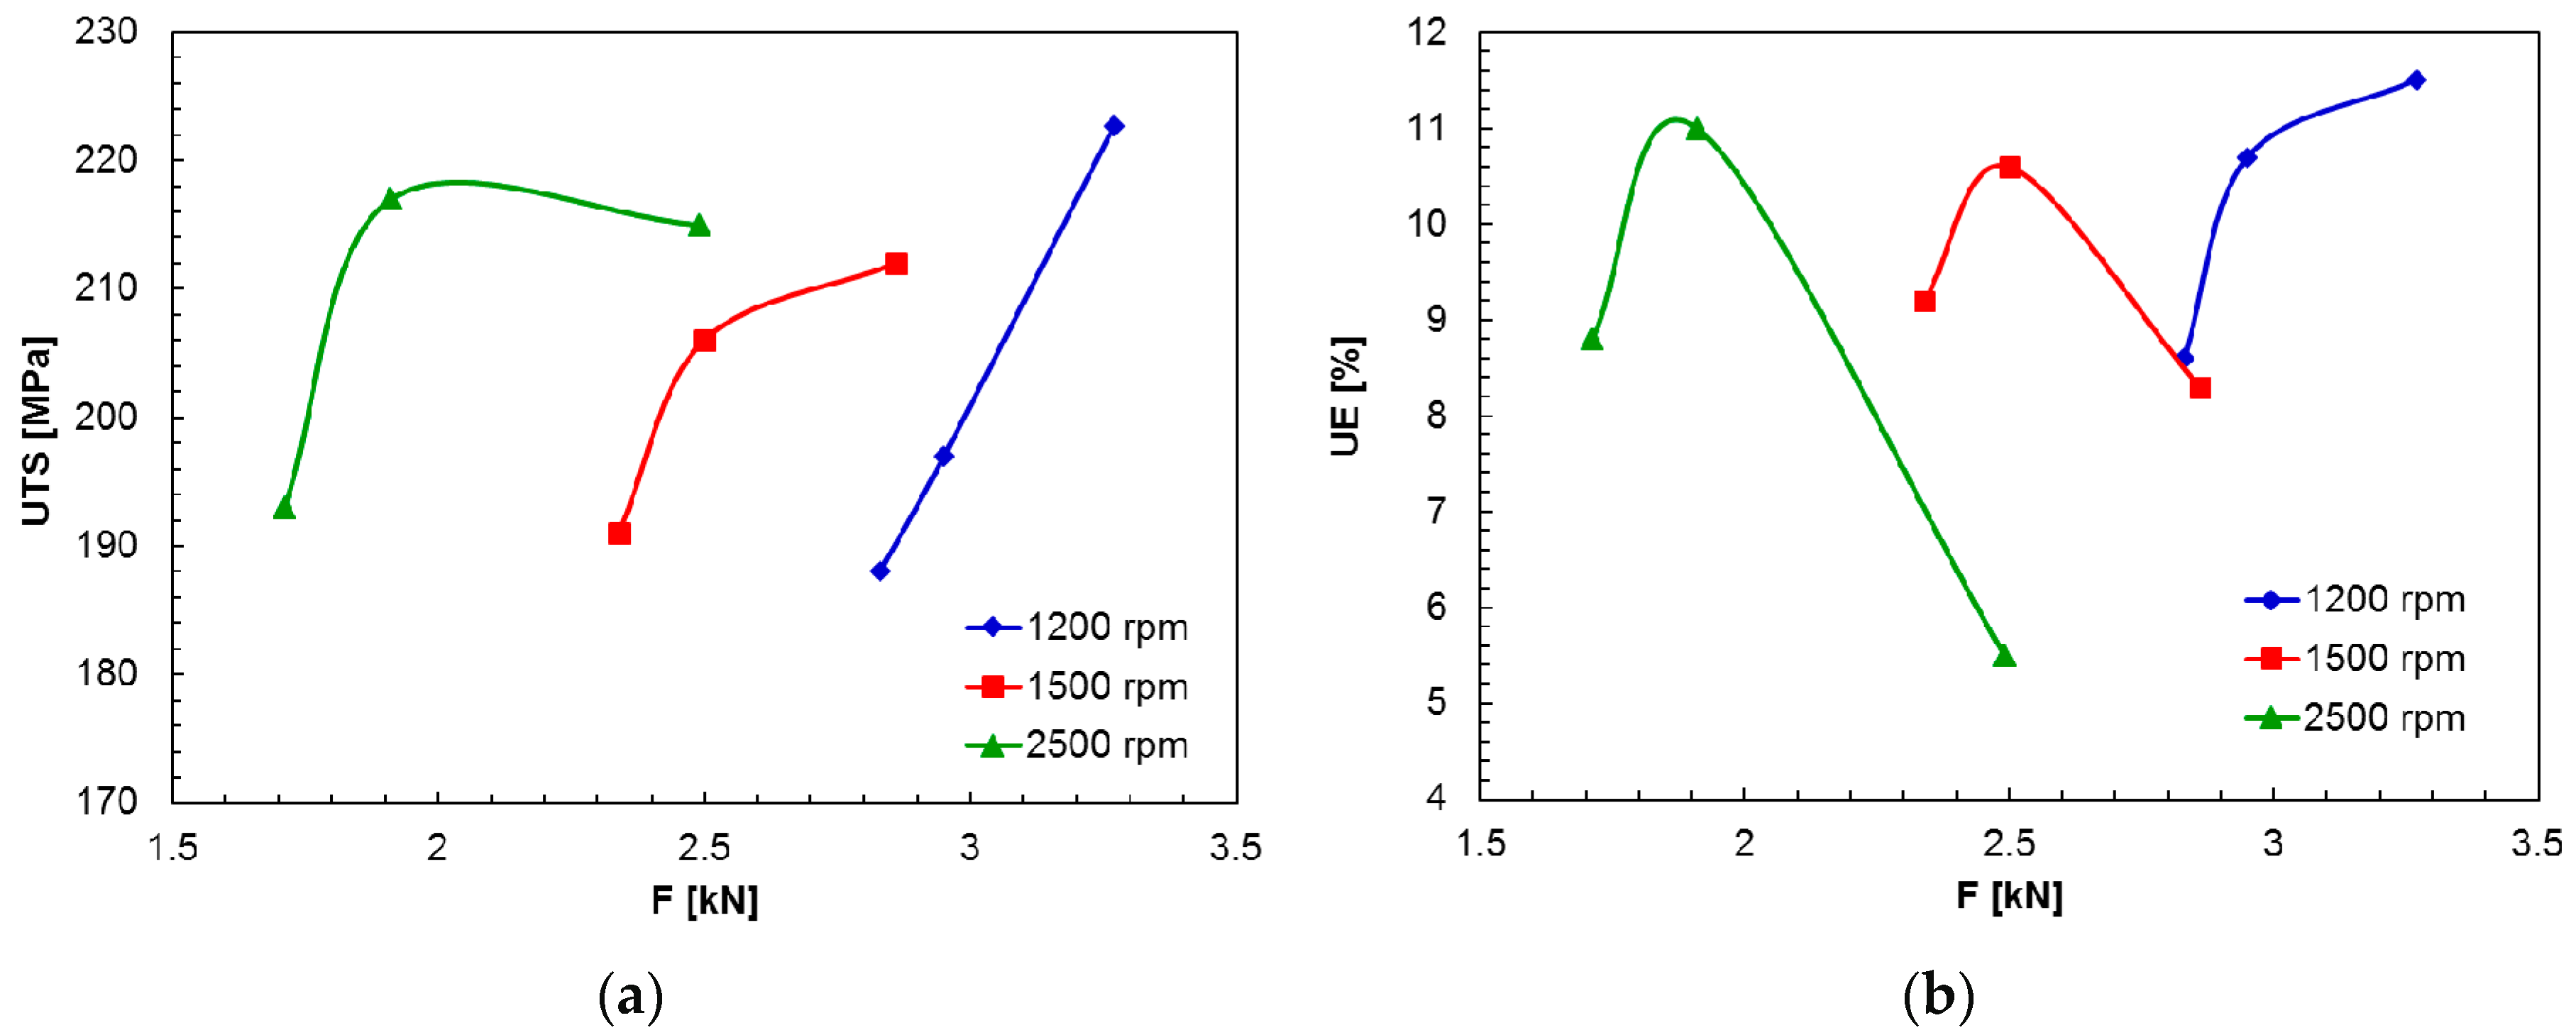
Figure 12 shows the relationships among the UTS and UE of the joints and the vertical force during FSW of AA6082-T6 alloy. As far as the correlation between the UTS and F is considered, Figure 12a shows that, for ω = 1200 rpm, a positive relationship takes place and the UTS increases with F following an almost linear trend. Also for ω = 1500 rpm a direct correlation between UTS and F occurs even though the experimental data points are fitted by a polynomial function. The UTS vs. F behaviour changes as ω = 2500 rpm since the ultimate tensile strength increases with vertical force until reaching a peak value and then slightly decreases as F further rises. By concerning the relationship between UE and F, the direct correlation takes place only for ω = 1200 rpm whilst, as ω ≥ 1500 rpm, the ultimate elongation grows with the vertical force up a peak and then decreases with increasing the F value (Figure 12b). Such decrease, for a given rotational speed, can be attributed to the temperature increase caused by the growth in the welding speed corresponding to the rise in the vertical force that, as will be shown later, can lead to a detrimental effect on the microstructural transformations occurring during FSW in the different zones of the joint. The increase in the rotational speed, in turn, makes the augment in temperature more pronounced and results in even more marked reduction in the UE with increasing F value (i.e., welding speed).
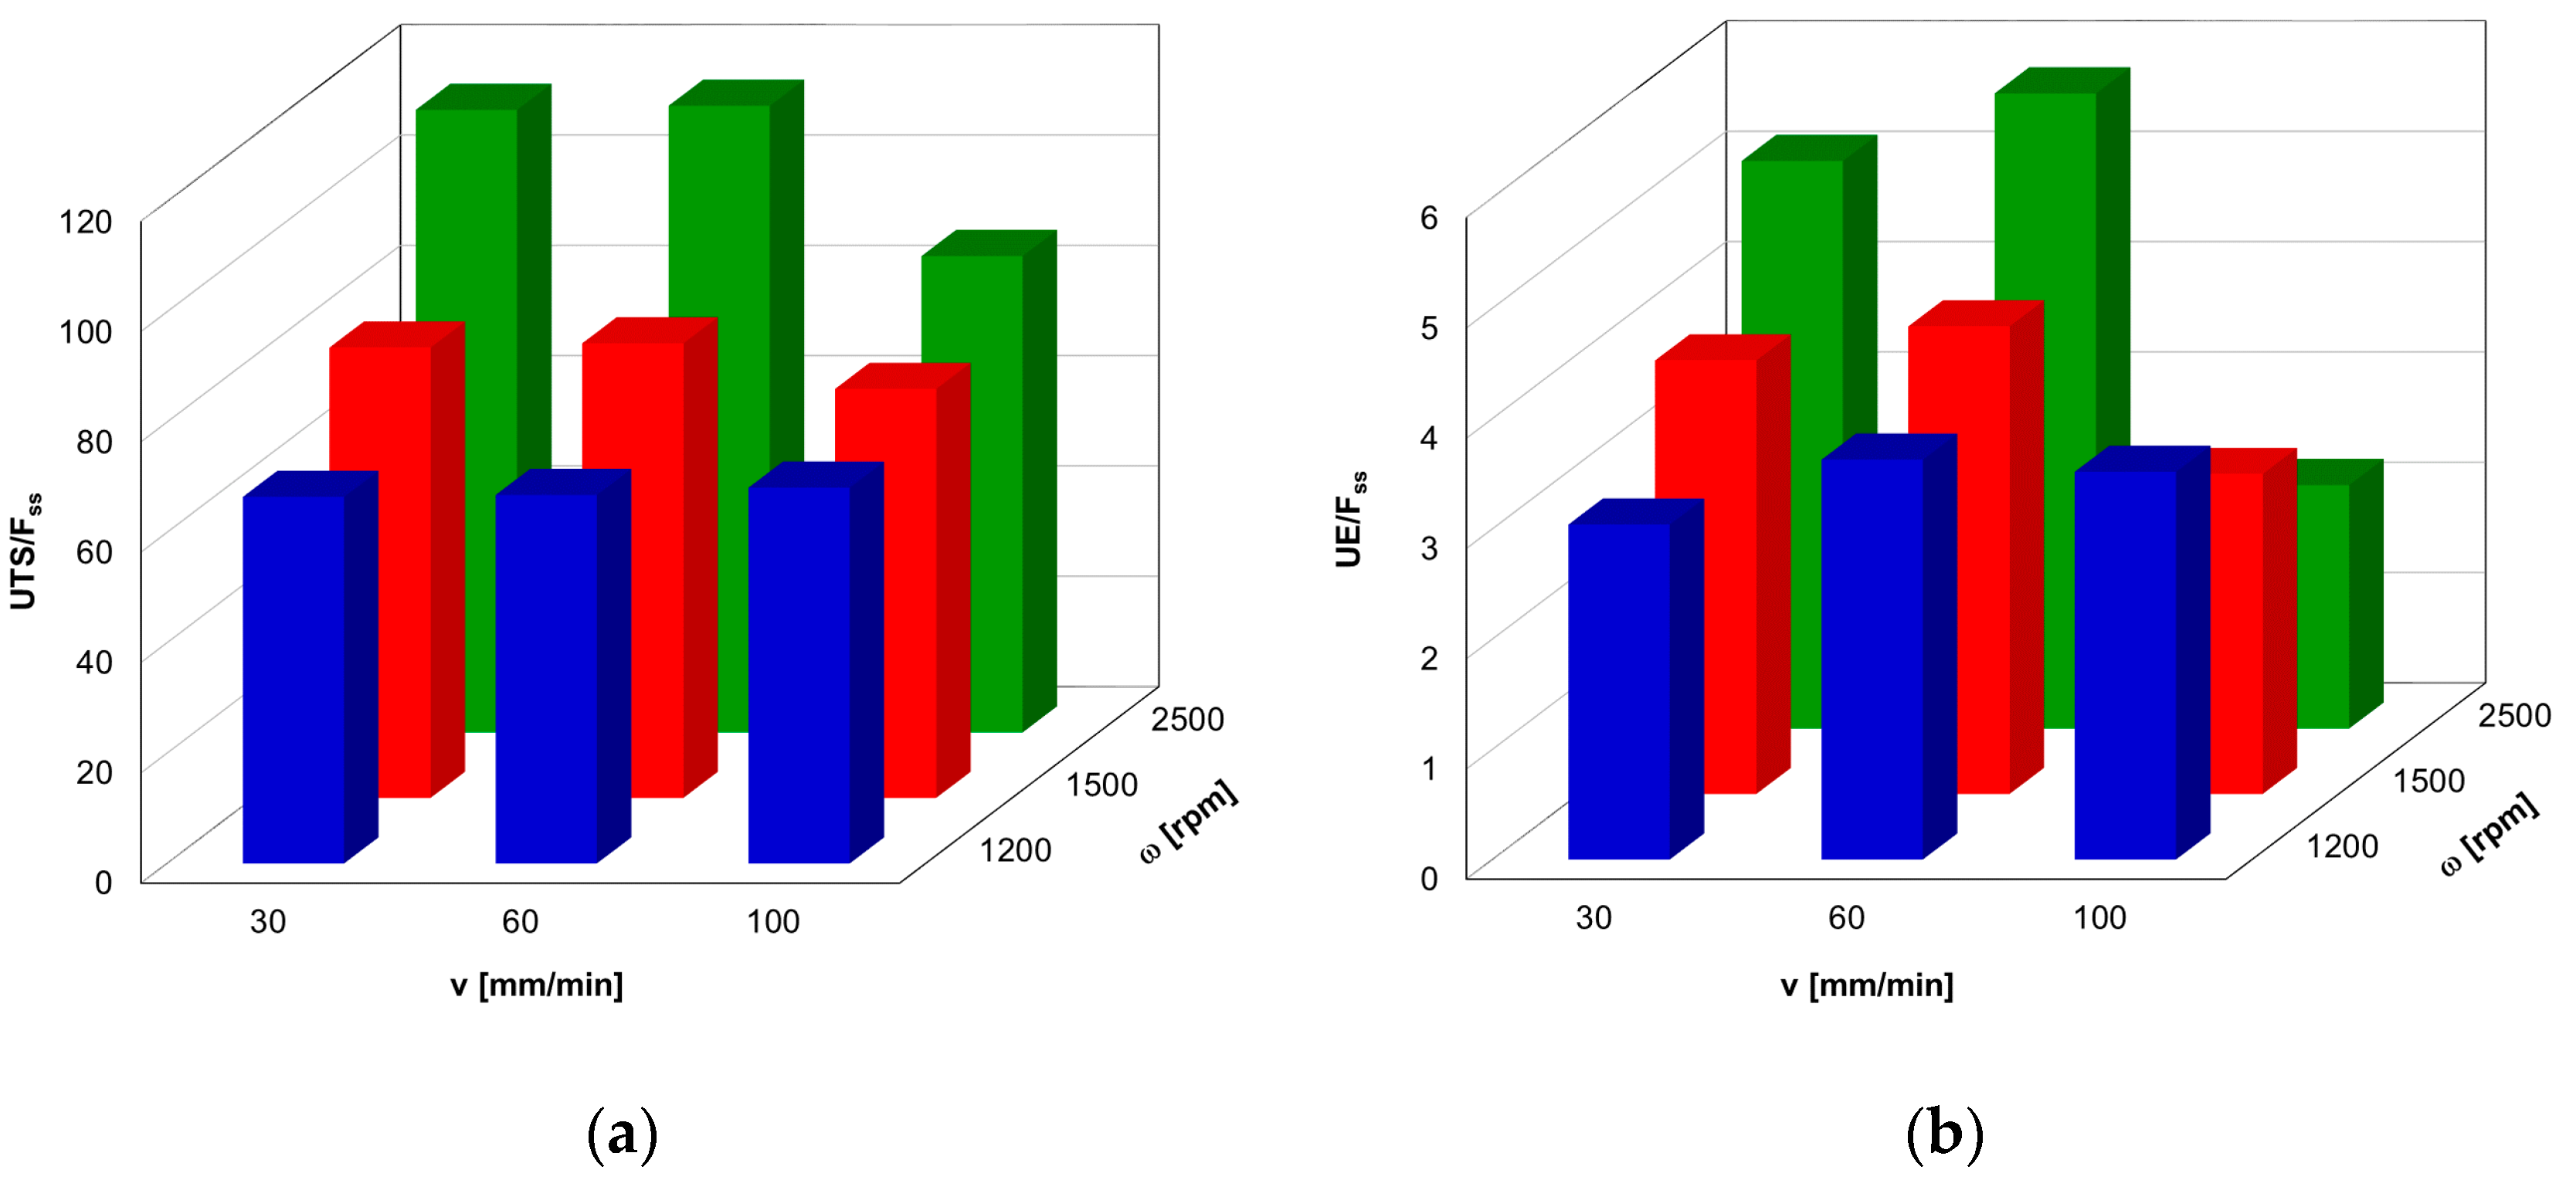
Summarizing the results obtained in terms of vertical force during FSW and mechanical behaviour of the joints, it is noted that the F value is minimized by carrying out the process at the highest rotational speed (ω = 2500 rpm) and the lowest welding speed (v = 30 mm/min) while the UTS and UE values of the joints are maximized with ω = 1200 rpm and v = 100 mm/min. It might be useful to identify the welding parameters that allow the obtaining of the best compromise among the need to maximize the mechanical properties and the requirement to minimize the vertical force. To this purpose, the ratios between UTS and Fss and between UE and Fss can be used as functions to optimize. Figure 13 shows UTS/Fss and UE/Fss plotted as a function of rotational and welding speeds; it can be noted that both ratios are maximized as ω = 2500 rpm and v = 60 mm/min, that is the process parameters providing the desired compromise.
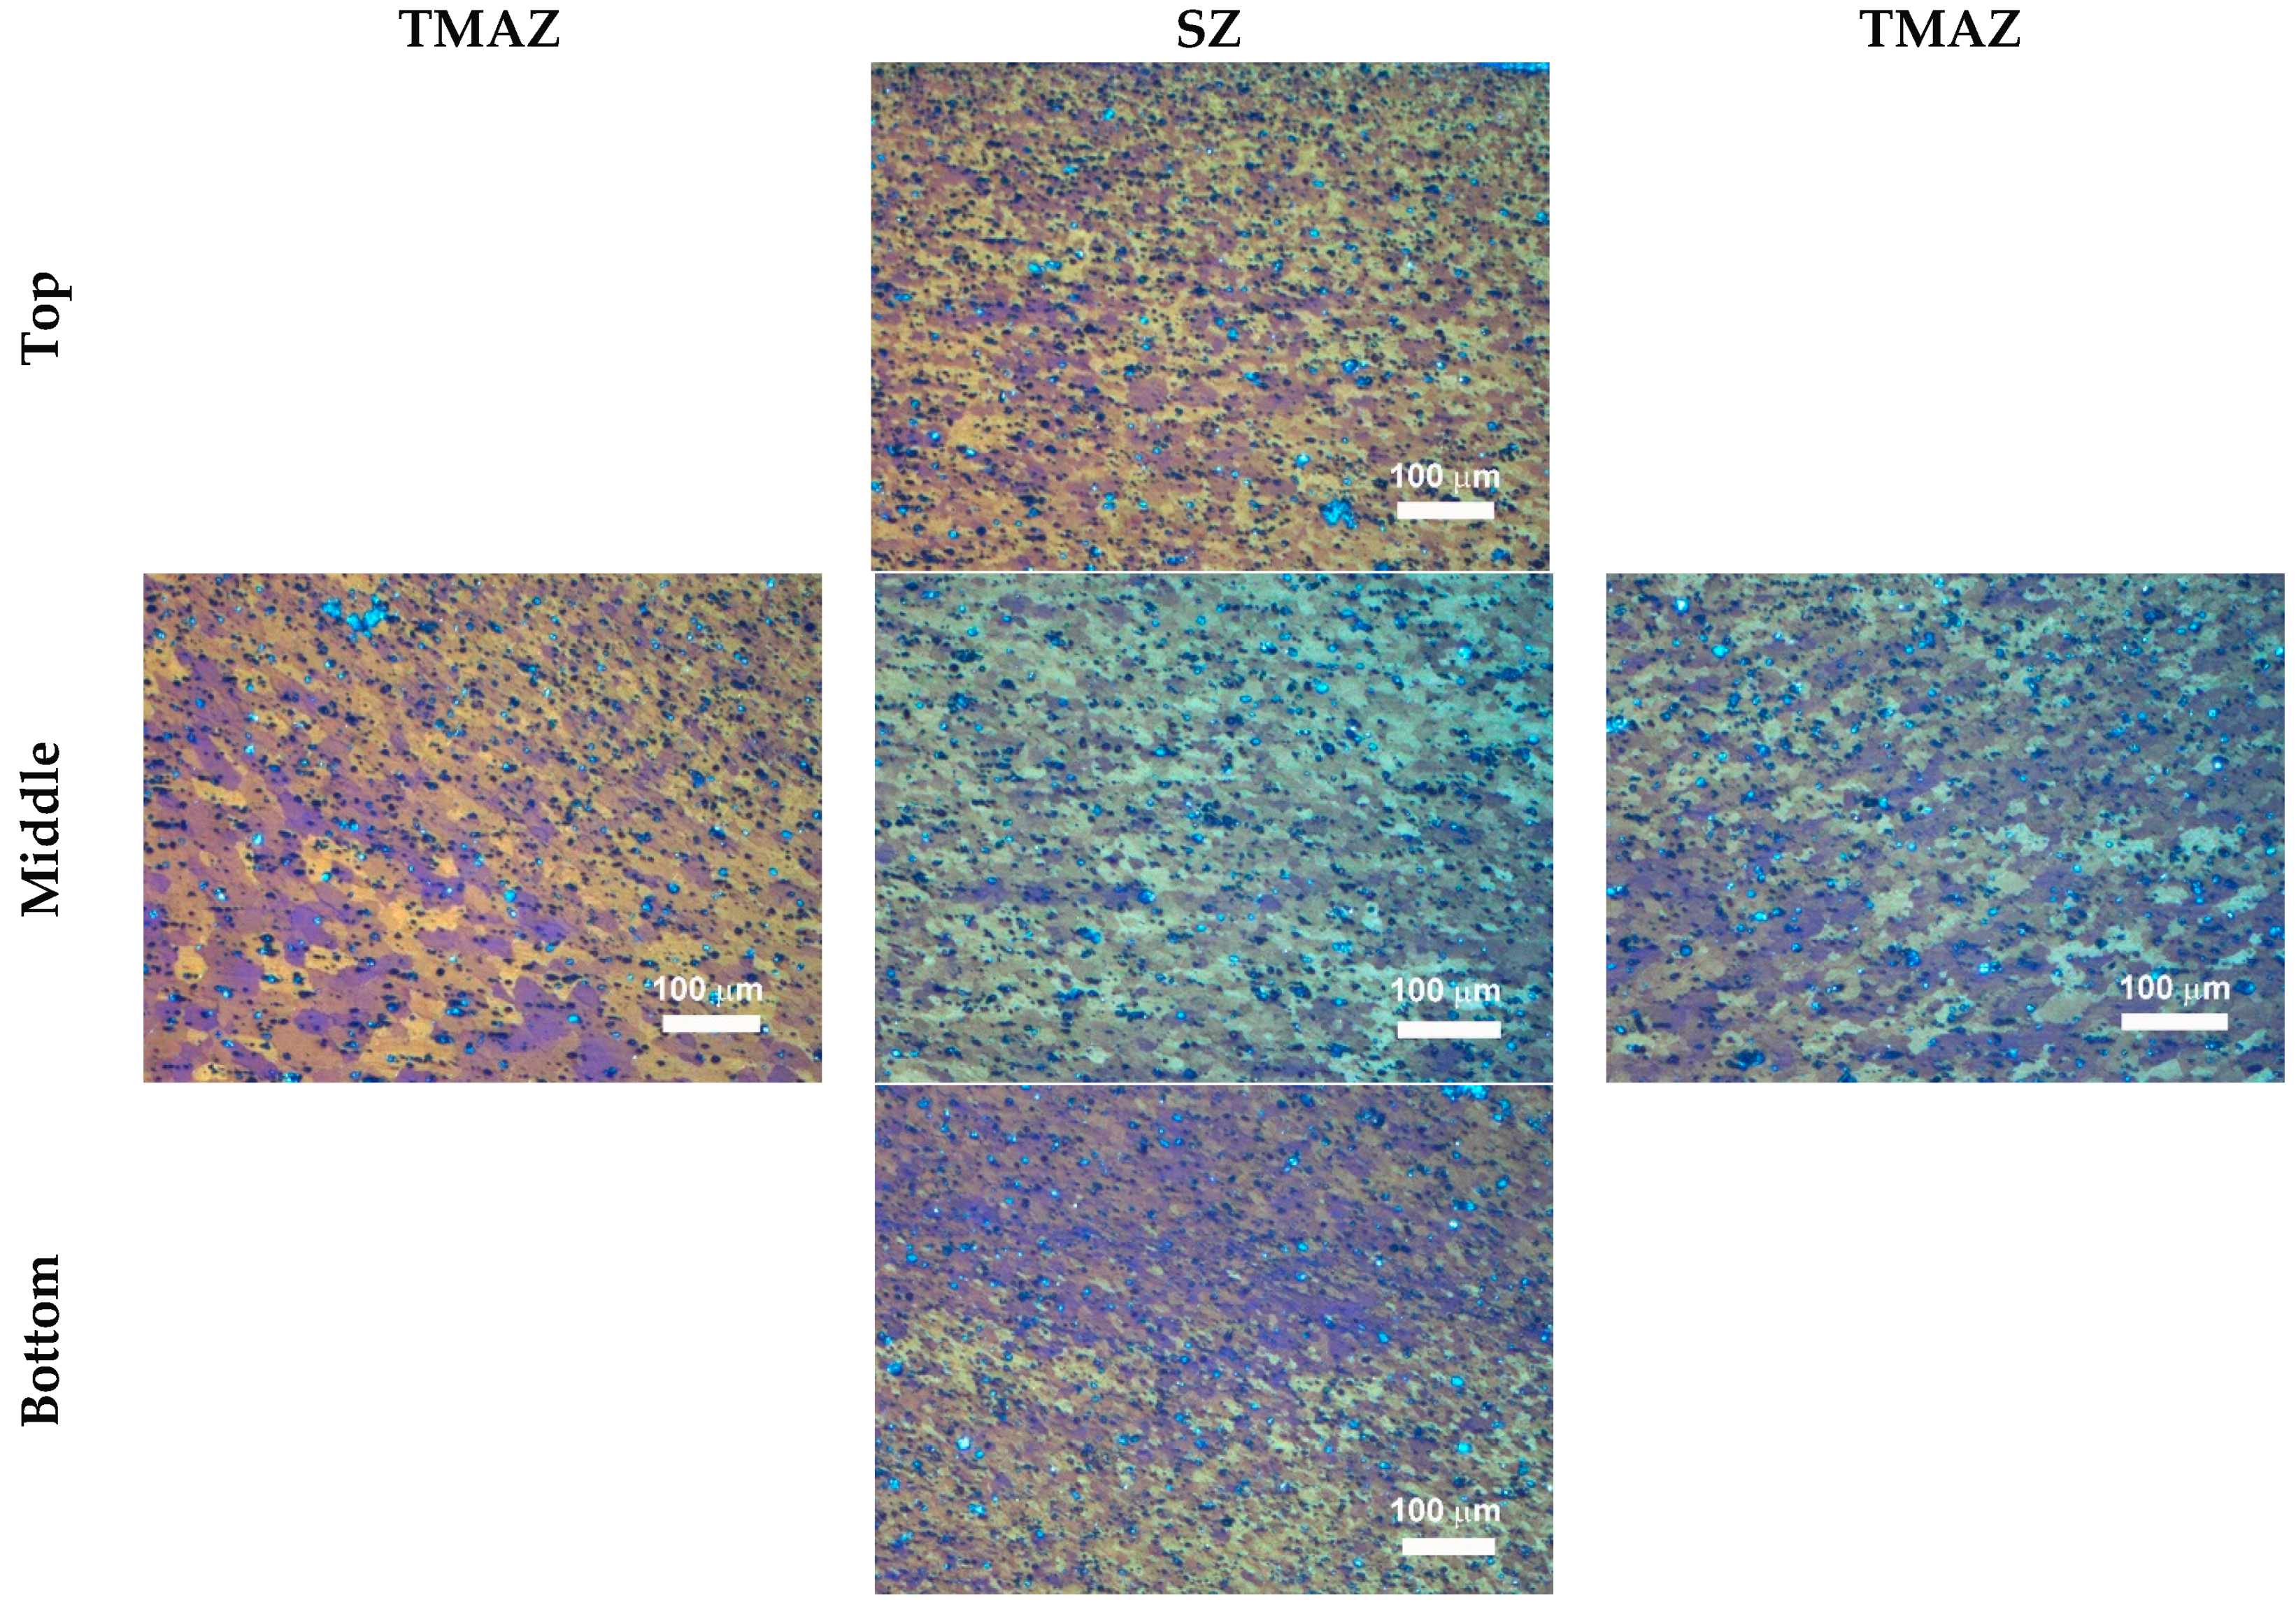
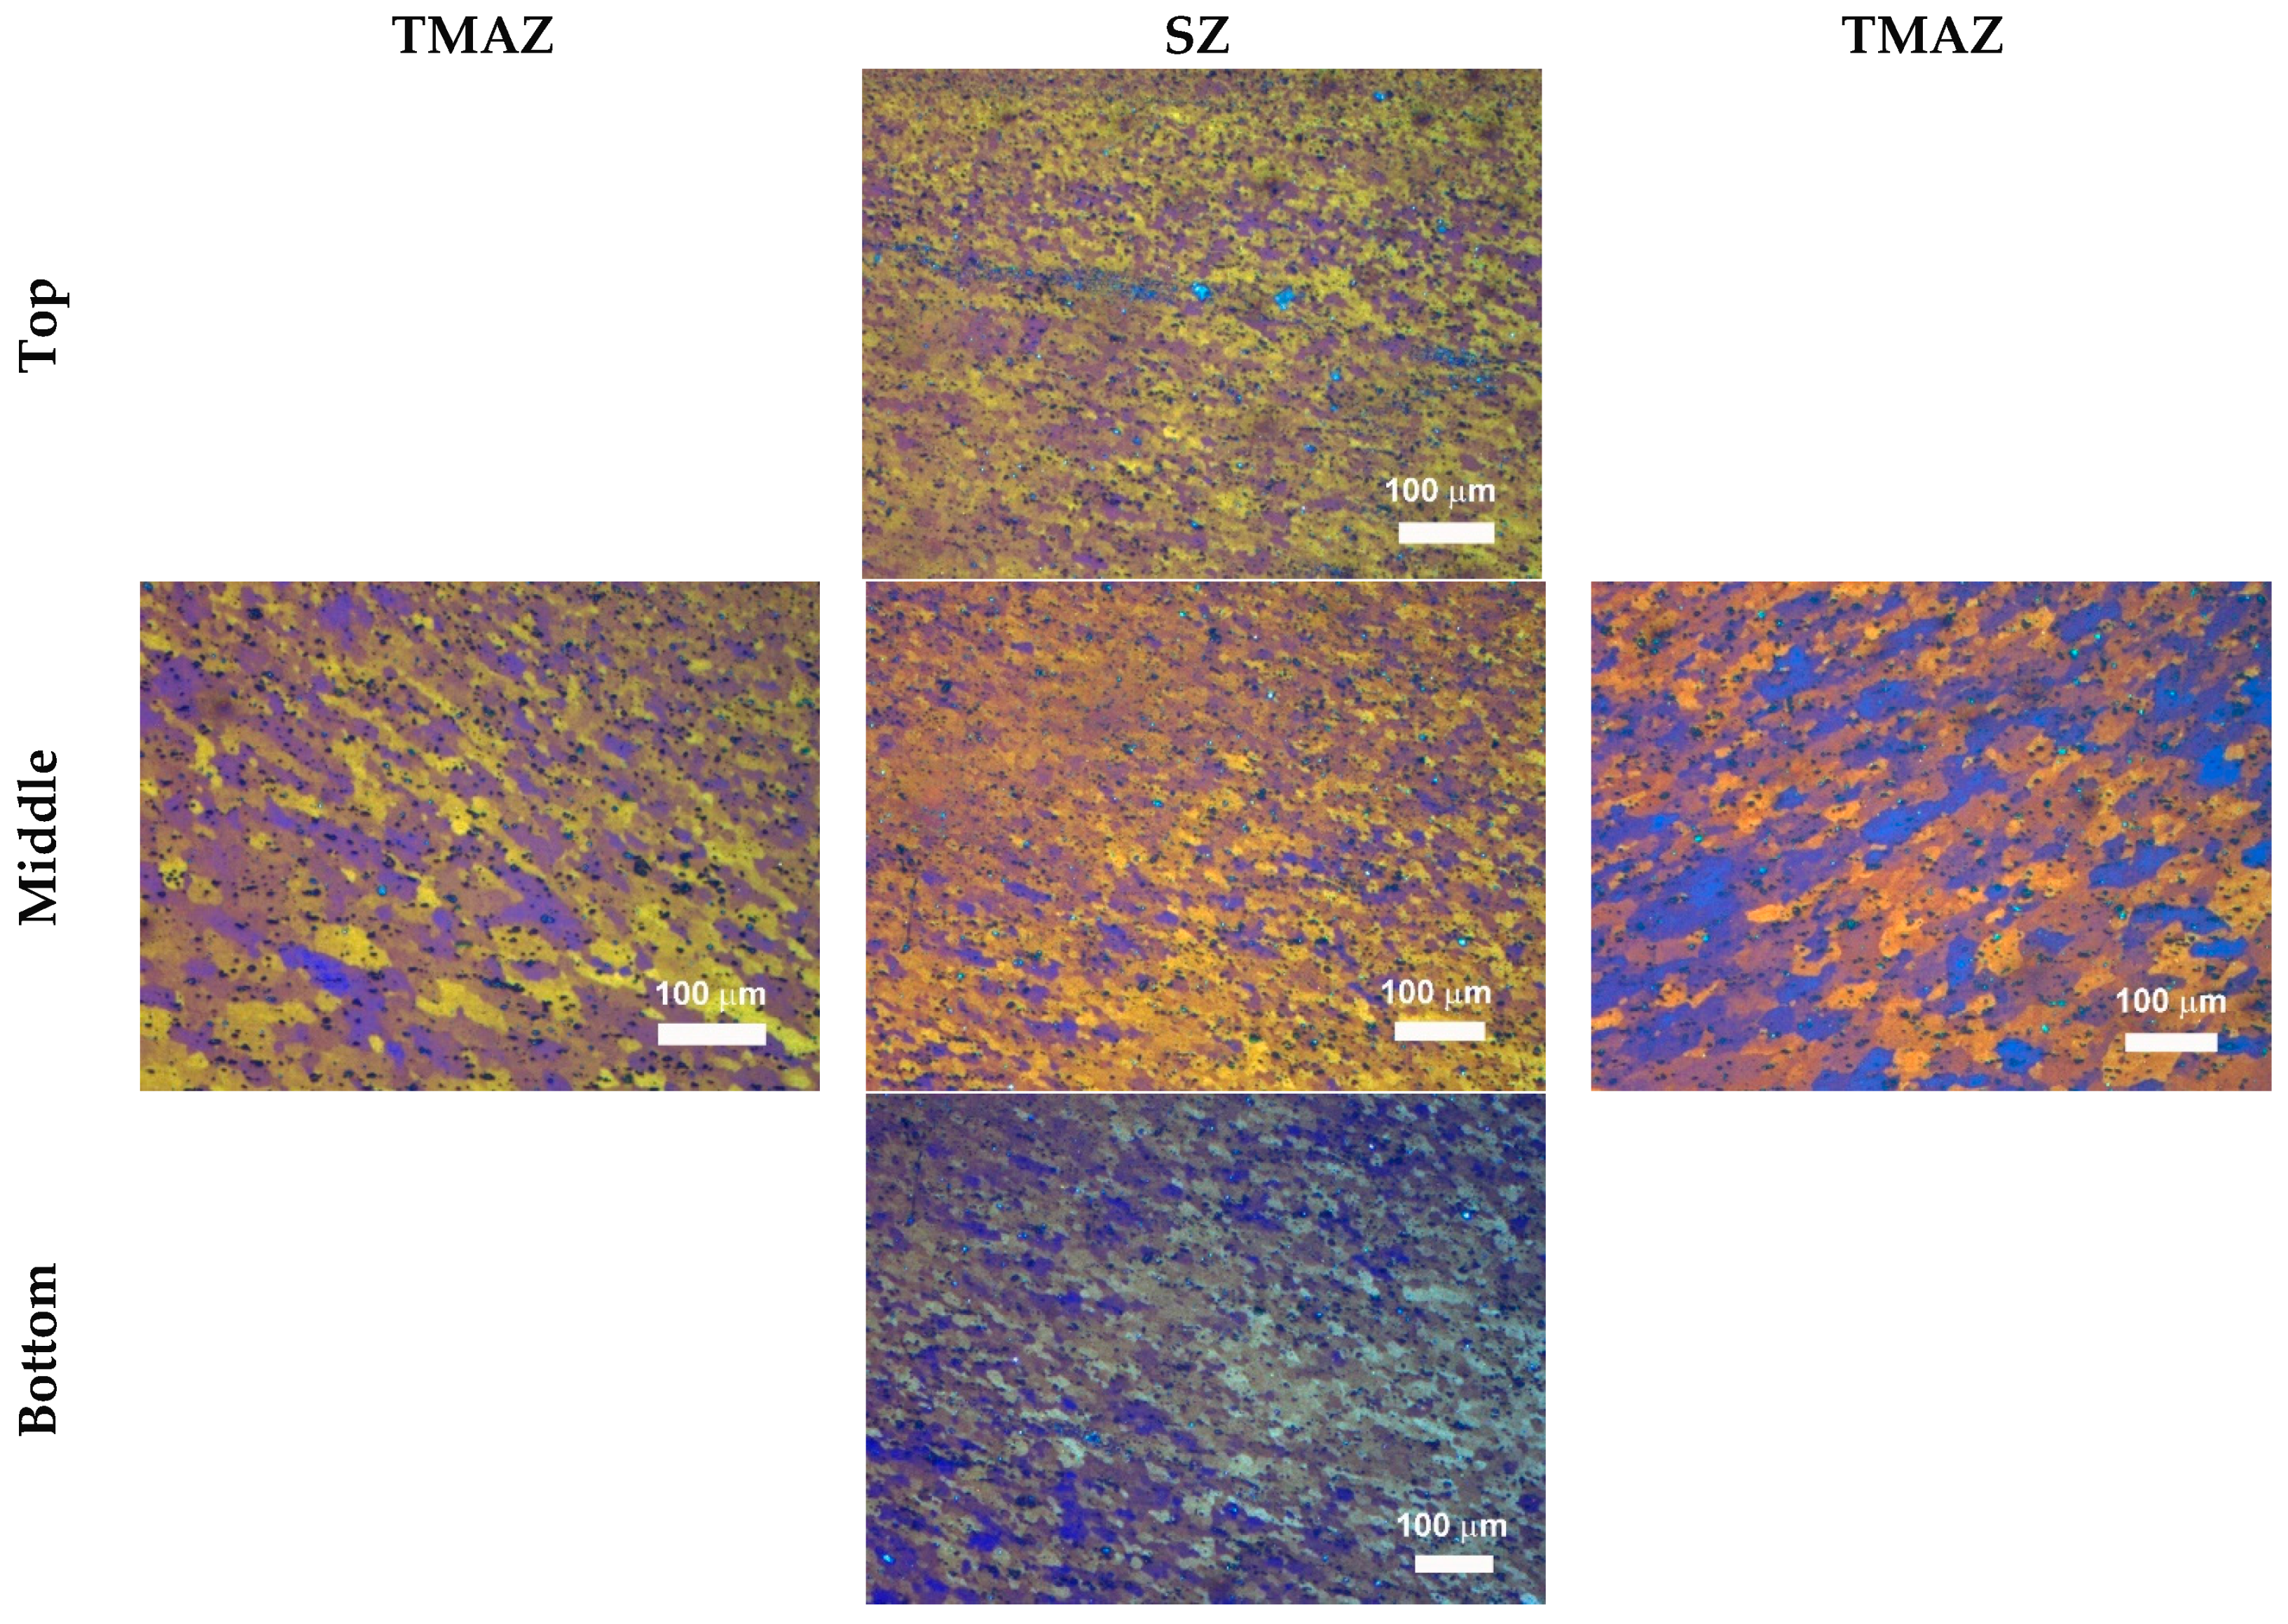
The relationships among the mechanical properties of the joint and the vertical force generated during the friction stir welding process are attributable to the very complex microstructural transformations taking place during FSW of AA6082-T6. Figure 14 shows the presence in the stirred zone of fine equiaxed grains contrary to what observed in the base material which exhibits large and elongated grains (Figure 3b); this demonstrates the occurrence of the dynamic recrystallization within the stirred zone (SZ) because of deformation and temperature, which can reach 80% of the melting temperature [28,29,30]. The FSW also induces both dissolution and coarsening of the second phase particles. Finally, the SZ shows a heterogeneity in both grain size and second phase particles, which can be attributed to the non-uniformity in temperature, strain, and strain rate across the stirred zone [1]. As far as the thermo-mechanically affected zone (TMAZ) is concerned, the aluminium alloy undergoes a marked plastic deformation of the original elongated grains; however, the dynamic recrystallization does not take place owing to a strain level not high enough to activate such restoration mechanism. Moreover, a complex mixture of non-equilibrium phases takes place in the TMAZ. The phenomena described above become more marked as the rotational and welding speeds increase (Figure 15) since they produce a growth in temperatures and strain rates involved in the FSW process.

4. Conclusions

The influence of the process parameters on the vertical force generated during friction stir welding of AA6082-T6 sheet blanks was studied. To this purpose, FSW experiments were performed in extended ranges of rotational and welding speeds; furthermore, the effect of the tool dwelling was analysed. During each test, the vertical force as a function of the processing time was recorded. The main results can be summarised as follows:
  • plunging, dwelling, welding, and pulling out stages characterise the F-t curves;
  • the vertical force increases, decreases, and backs to increase with rising processing time throughout the tool plunging. Such very complex behaviour can be attributed to the occurrence of both primary and secondary plunging;
  • in spite of softening caused by the rotating tool action, the dwelling stage does not significantly affect the vertical force in the subsequent stage;
  • the F value grows and immediately gains a constant value as the tool began its welding motion. Moreover, the vertical force increases with growing welding speed and diminishing rotational speed;
  • both ultimate tensile strength and ultimate elongation of the welds grow with welding speed up to 60 mm/min. For v = 100 mm/min, the mechanical properties strongly depend on the tool rotational speed;
  • the best compromise among the need to maximize the mechanical properties and the requirement to minimize the vertical force is obtained performing FSW at ω = 2500 rpm and v = 60 mm/min;
  • a direct correlation between ultimate tensile strength and vertical force and between ultimate elongation and vertical force is achieved as ω = 1200 rpm. More complex relationships among the mechanical properties and vertical force are obtained as higher rotational speeds are concerned owing to the heterogeneity of both second phase particles and grain size which are more marked as the FSW is carried out at the highest welding and rotational speeds.

Acknowledgments

The authors thank Massimiliano Pieralisi, Luciano Greco, and Daniele Ciccarelli for their contribution in conducting the experimental work.

Author Contributions

Archimede Forcellese and Michela Simoncini conceived and designed the experiments; Michela Simoncini and Giuseppe Casalino performed the experiments; Michela Simoncini and Giuseppe Casalino analyzed the data; Archimede Forcellese wrote the manuscript, Archimede Forcellese and Michela Simoncini edited the manuscript.

Conflicts of Interest

The authors declare no conflict of interest.

References

  1. Mishra, R.S.; Ma, Z.Y. Friction stir welding and processing. Mater. Sci. Eng. Rep. 2005, 50, 1–78. [Google Scholar] [CrossRef]
  2. Nandan, R.; DebRoy, T.; Bhadeshia, H.K.D.H. Recent advances in friction stir welding process, weldment structure and properties. Prog. Mater. Sci. 2008, 53, 980–1023. [Google Scholar] [CrossRef]
  3. Kinsey, B.; Viswanathan, V.; Cao, J. Forming of aluminum tailor welded blanks. SAE Tech. Pap. 2001, 673–679. [Google Scholar] [CrossRef]
  4. Casalino, G.; Campanelli, S.; Mortello, M. Influence of shoulder geometry and coating of the tool on the friction stir welding of aluminium alloy plates. Procedia Eng. 2014, 69, 1541–1548. [Google Scholar] [CrossRef]
  5. Forcellese, A.; Simoncini, M. Plastic flow behaviour and formability of friction stir welded joints in AZ31 thin sheets obtained using the “pinless” tool configuration. Mater. Des. 2012, 36, 123–129. [Google Scholar] [CrossRef]
  6. Bruni, C.; Forcellese, A.; Gabrielli, F.; Simoncini, M. Post welding formability of AZ31 magnesium alloy. Mater. Des. 2011, 32, 2988–2991. [Google Scholar] [CrossRef]
  7. Fadaeifard, F.; Amin Matori, K.; Abd Aziz, S.; Zolkarnain, L.; Rahim, M.A.Z.B.A. Effect of the welding speed on the macrostructure, microstructure and mechanical properties of AA6061-T6 friction stir butt welds. Metals 2017, 7, 48. [Google Scholar] [CrossRef]
  8. Celik, S.; Cakir, R. Effect of friction stir welding parameters on the mechanical and microstructure properties of the Al-Cu butt joint. Metals 2016, 6, 133. [Google Scholar] [CrossRef]
  9. Sakthivel, T.; Sengar, G.S.; Mukhopadhyay, J. Effect of welding speed on microstructure and mechanical properties of friction-stir welded aluminum. Int. J. Adv. Manuf. Technol. 2009, 43, 468–473. [Google Scholar] [CrossRef]
  10. Sun, Y.; Tsuji, N.; Fujii, H. Microstructure and mechanical properties of dissimilar friction stir welding between ultrafine grained 1050 and 6061-T6 Aluminum alloys. Metals 2016, 6, 24. [Google Scholar] [CrossRef]
  11. Zimmer, S.; Langlois, L.; Laye, J.; Goussain, J.-C.; Martin, P.; Bigot, R. Influence of processing parameters on the tool and workpiece mechanical interaction during friction stir welding. Int. J. Mater. Form. 2009, 2, 299–302. [Google Scholar] [CrossRef] [Green Version]
  12. Yaduwanshi, D.K.; Bag, S.; Pal, S. Numerical modeling and experimental investigation on plasma-assisted hybrid friction stir welding of dissimilar materials. Mater. Des. 2016, 92, 166–183. [Google Scholar] [CrossRef]
  13. Ji, S.; Meng, X.; Liu, Z.; Huang, R.; Li, Z. Dissimilar friction stir welding of 6061 aluminum alloy and AZ31 magnesium alloy assisted with ultrasonic. Mater. Lett. 2017, 201, 173–176. [Google Scholar] [CrossRef]
  14. Campanelli, S.L.; Casalino, G.; Casavola, C.; Moramarco, V. Analysis and comparison of friction stir welding and laser assisted friction stir welding of aluminum alloy. Materials 2013, 6, 5923–5941. [Google Scholar] [CrossRef] [PubMed]
  15. Su, H.; Wu, C.S.; Pittner, A.; Rethmeier, M. Simultaneous measurement of tool torque, traverse force and vertical force in friction stir welding. J. Manuf. Process. 2013, 15, 495–500. [Google Scholar] [CrossRef]
  16. He, X.; Gu, F.; Ball, A. A review of numerical analysis of friction stir welding. Prog. Mater. Sci. 2014, 65, 1–66. [Google Scholar] [CrossRef]
  17. Astarita, A.; Squillace, A.; Carrino, L. Experimental study of the forces acting on the tool in the friction-stir welding of AA 2024 T3 sheets. J. Mater. Eng. Perform. 2014, 23, 3754–3761. [Google Scholar] [CrossRef]
  18. Trimble, D.; Monaghan, J.; O’Donnell, G.E. Force generation during friction stir welding of AA2024-T3. CIRP Ann. Manuf. Technol. 2012, 61, 9–12. [Google Scholar] [CrossRef]
  19. Forcellese, A.; Martarelli, M.; Simoncini, M. Effect of process parameters on vertical forces and temperatures developed during friction stir welding of magnesium alloys. Int. J. Adv. Manuf. Technol. 2016, 85, 595–604. [Google Scholar] [CrossRef]
  20. Serio, L.; Palumbo, D.; Galietti, U.; De Filippis, L.; Ludovico, A. Monitoring of the friction stir welding process by means of thermography. Nondestruct. Test. Eval. 2016, 31, 371–383. [Google Scholar] [CrossRef]
  21. Serio, L.; Palumbo, D.; Galietti, U.; De Filippis, L.; Ludovico, A. Effect of friction stir process parameters on the mechanical and thermal behavior of 5754-H111 aluminium plates. Materials 2016, 9, 122. [Google Scholar] [CrossRef] [PubMed]
  22. Pratik, H.S.; Vishvesh, J.B. Friction stir welding of aluminium alloys: An overview of experimental findings—Process, variables, development and applications. Proc. Inst. Mech. Eng. Part L 2017. [Google Scholar] [CrossRef]
  23. Buffa, G.; Fratini, L.; Simoncini, M.; Forcellese, A. In-process tool force and rotation variation to control sheet thickness change in friction stir welding of magnesium alloys. AIP Conf. Proc. 2016, 1769, 100008. [Google Scholar]
  24. Shrivastava, A.; Zinn, M.; Duffie, N.A.; Ferrier, N.J.; Smith, C.B.; Pfefferkorn, F.E. Force measurement-based discontinuity detection during friction stir welding. J. Manuf. Process. 2017, 26, 113–121. [Google Scholar] [CrossRef]
  25. Simoncini, M.; Cabibbo, M.; Forcellese, A. Development of double-side friction stir welding to improve post-welding formability of joints in AA6082 aluminium alloy. Proc. Inst. Mech. Eng. B 2016, 230, 807–817. [Google Scholar] [CrossRef]
  26. Janaki Ramulu, P.; Narayanan, R.G.; Kailas, S.V.; Reddy, J. Internal defect and process parameter analysis during friction stir welding of Al 6061 sheets. Int. J. Adv. Manuf. Technol. 2013, 65, 1515–1528. [Google Scholar] [CrossRef]
  27. Callegari, M.; Forcellese, A.; Palpacelli, M.; Simoncini, M. Robotic friction stir welding of AA5754 aluminium alloy sheets at different initial temper states. Key Eng. Mater. 2014, 622–623, 540–547. [Google Scholar] [CrossRef]
  28. Rhodes, C.G.; Mahoney, M.W.; Bingel, W.H.; Spurling, R.A.; Bampton, C.C. Effects of friction stir welding on microstructure of 7075 aluminum. Scr. Mater. 1997, 36, 69–75. [Google Scholar] [CrossRef]
  29. Johnsen, M.R. US pipeline industry enters new era. Weld. J. 1999, 78, 37–41. [Google Scholar]
  30. Cabibbo, M.; Forcellese, A.; El Mehtedi, M.; Simoncini, M. Double side friction stir welding of AA6082 sheets: Microstructure and nanoindentation characterization. Mater. Sci. Eng. A 2014, 590, 209–217. [Google Scholar] [CrossRef]
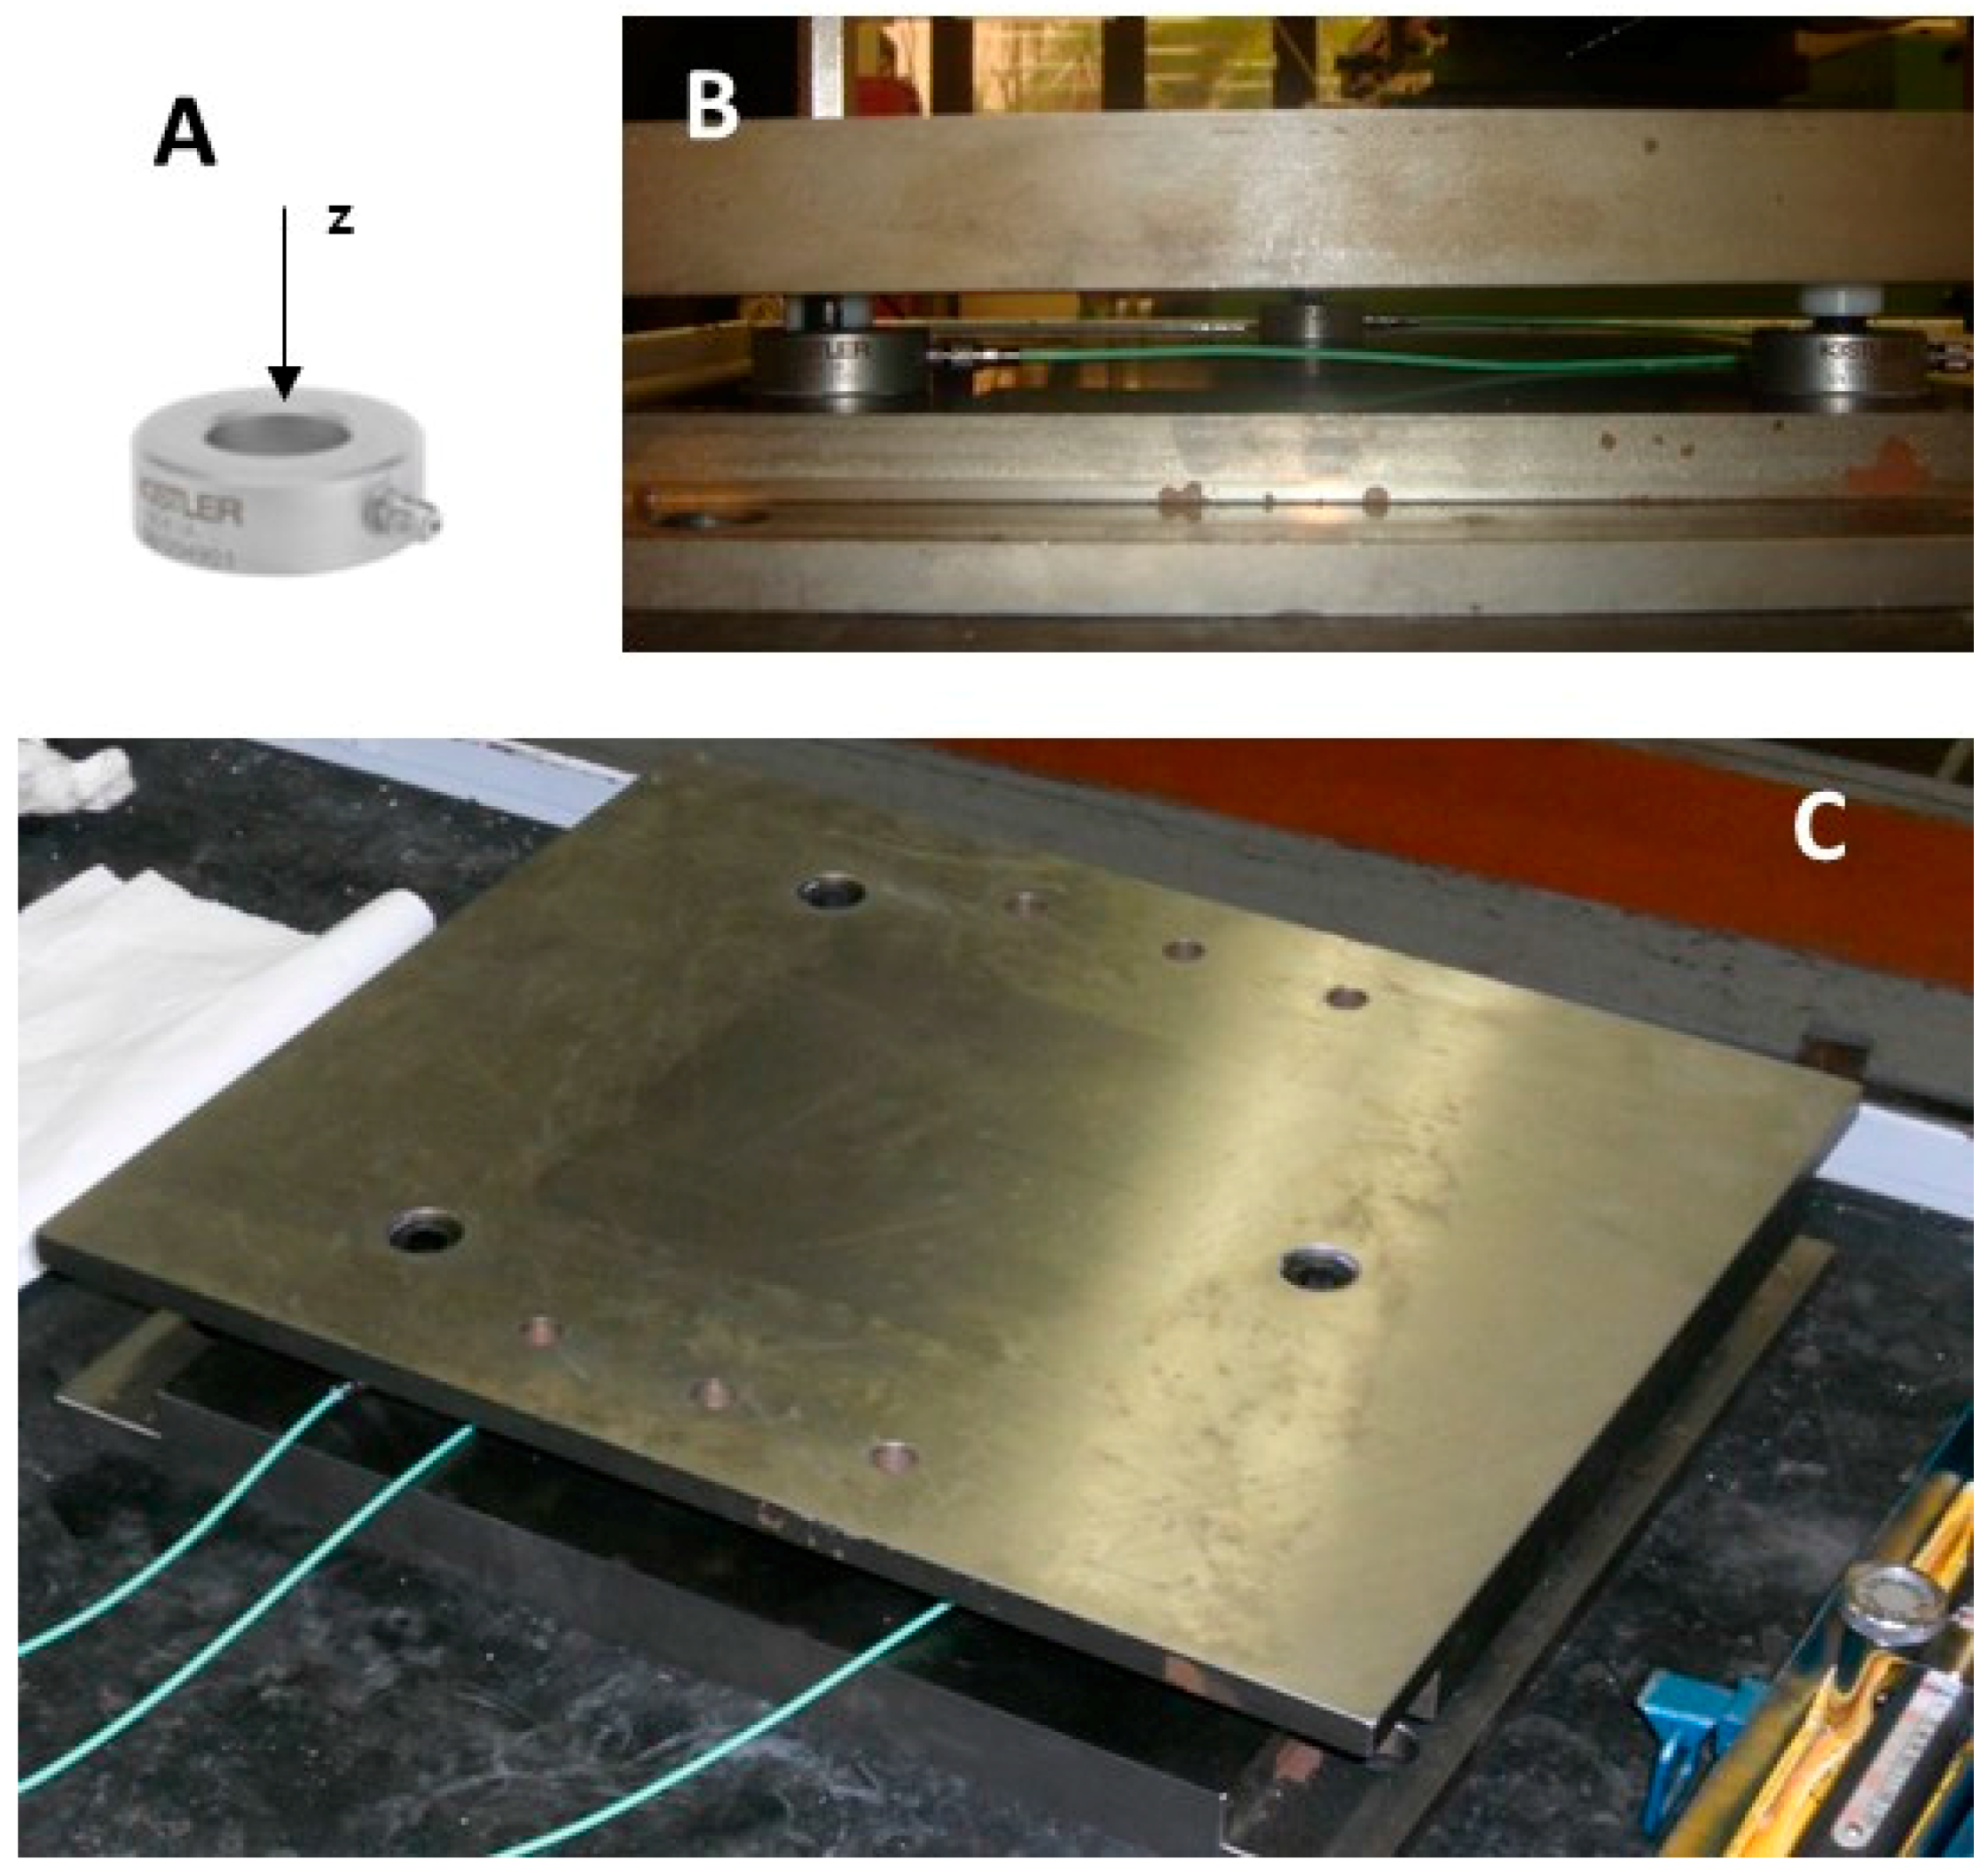
Figure 1. Force sensor (A) and sandwich dynamometer lateral view (B) and top view (C).
Metals 07 00350 g001
Figure 2. Workpiece positioning on the backing plate with respect to the sensor locations.
Metals 07 00350 g002
Figure 3. (a) Typical nominal stress—nominal strain curve and (b) microstructure of AA6082-T6 aluminium alloy.
Metals 07 00350 g003
Figure 4. Representative vertical force vs. processing time behaviour during FSW of sheet blanks in AA6082-T6 aluminium alloy (Test F). I: plunging stage; II: dwelling stage; III: welding stage; IV: pulling out stage.
Metals 07 00350 g004
Figure 5. Influence of the tool dwelling on the vertical force vs. processing time behaviour in FSW of AA6082-T6 carried out with different rotational and welding speeds: (a) ω = 1200 rpm, v = 30 mm/min; (b) ω = 2500 rpm, v = 100 mm/min.
Metals 07 00350 g005
Figure 6. Influence of the welding parameters on the vertical force vs. processing time curves during FSW of AA6082-T6 alloy obtained with td = 0 s: (a) ω = 1200 rpm; (b) ω = 1500 rpm; and (c) ω = 2500 rpm.
Metals 07 00350 g006
Figure 7. Effect of the process parameters on the average steady state value of the vertical force during the welding stage in FSW of AA6082-T6 alloy with td = 0 s: (a) FSS vs. rotational speed plots and (b) FSS vs. welding speed plots.
Metals 07 00350 g007
Figure 8. Effect of the dwelling time on the nominal stress-nominal strain curves of FSWed joints in AA6082-T6 obtained at different process parameters (ω = 1200 rpm and v = 100 mm/min; ω = 2500 rpm and v = 30 mm/min).
Metals 07 00350 g008
Figure 9. Influence of the tool rotational and welding speeds on the nominal stress—nominal strain curves obtained from FSW joints in AA6082-T6 (td = 0 s): (a) v = 30 mm/min; (b) v = 60 mm/min; and (c) v = 100 mm/min.
Metals 07 00350 g009
Figure 10. Typical fractured tension tested FSWed sample (ω = 1500 rpm; v = 60 mm/min; td = 100 s).
Metals 07 00350 g010
Figure 11. Influence of the tool rotational and welding speeds on: (a) ultimate tensile strength (UTS) and (b) ultimate tensile strength (UE) of the FSWed joints in AA6082-T6 (td = 0 s).
Metals 07 00350 g011
Figure 12. Relationships among the mechanical properties of the weld and the vertical force generated during FSW of AA6082-T6 sheets with td = 0 s: (a) ultimate tensile strength vs. vertical force and (b) ultimate elongation vs. vertical force.
Metals 07 00350 g012
Figure 13. Effect of rotational speeds (blue for 1200 rpm, red for 1500 rpm, and green for 2500 rpm) and welding speeds on the ratio between: (a) UTS and (b) UE and the average steady state value of the vertical force during the welding stage in FSW of AA6082-T6 alloy with td = 0 s.
Metals 07 00350 g013
Figure 14. Typical microstructure of FSWed joints obtained with ω = 1200 rpm, v = 100 mm/min, and td = 0 s, at different zones with respect the weld axis.
Metals 07 00350 g014
Figure 15. Typical microstructure of FSWed joints obtained with ω = 2500 rpm, v = 100 mm/min, and td = 0 s, at different zones with respect the weld axis.
Metals 07 00350 g015
Table 1. Friction stir welding (FSW) conditions investigated in the experimental campaign.
v (mm/min)td (s)ω (rpm)
120015002500
300Test ATest BTest C
100Test DTest ETest F
600Test GTest HTest I
100Test JTest KTest L
1000Test MTest NTest O
100Test PTest QTest R