Abstract
Press Hardening offers the possibility to obtain a wide range of mechanical properties through microstructural tailoring. This strategy has been successfully applied in thin sheet components, for instance, through differential cooling strategies. The application of these added value features to truck components implies adapting the process to the manufacture of thick sheet metal. This introduces an additional layer of complexity, but also opportunity, in a process where the final microstructure and, thus the mechanical performance is generated in the press shop. This work presents a study on optimizing the crash worthiness and impact energy absorption on a press hardened thick 22MnB5 steel sheet. Different microstructure design strategies have been studied, including ferrite-Pearlite (representative of a differential heating and austenitization strategy), in-die generated Bainite (representative of differential cooling) and Tempered Martensite (generated through laser tempering), keeping a fully hardened martensite as a reference condition. The material performance has been compared in terms of the monotonic properties, useful for anti-intrusion performance, and Essential Work of Fracture, a well-suited parameter to predict the crash failure behavior of high strength steels. The results show that laser tempering offers properties similar to Bainite-based microstructures and can be a successful replacement in components where the sheet thickness does not allow for the fine control of the in-die thermomechanical evolution.
1. Introduction
Since the early 2000s, press hardening has evolved from being a specialty technique into becoming a mainstay in the production of crash-resistant structures in automobiles [1], thanks to a combination of high performance, cost-competitiveness, and robustness. This success has led, in the last few years, to proposals to export the technology into similar or related applications. One such sector is in heavy vehicles, such as trucks or busses, that could benefit from a weight reduction in its safety-responsible parts. Preliminary studies appeared as early as 2017 [2], and a quick introduction into the market followed, demonstrating that it is indeed a competitive option.
This process of adoption into truck parts can still be enhanced by porting added-value solutions from the thin sheet market, and microstructural tailoring immediately comes to mind. The introduction of soft zones, or areas with tailored properties inside a component, has been proposed since the popularization of press hardening and has indeed shown great results through various implementations, including selective heating or differential cooling [3]. Again, applying microstructural tailoring to heavy vehicles is not straightforward due to the sheet thickness. While employing heated dies to reduce the cooling rate is common in thin sheets [3], it is not clear that the same time temperature profiles can be obtained on thick products due to the difficulty of precisely controlling the tool temperature through cartridge heating, while at the same time, extracting a large amount of heat from a thick steel section.
In this regard, laser tempering on fully martensitic material has been proposed as an alternative and has been demonstrated to be feasible for both thin and thick sheets [4,5,6]. Laser tempering technologies offer great potential for tailoring, opening the possibility of complex and intricate zones, sharp transitions, and cost-competitive alternatives in cases where heated dies cannot be produced (e.g., short productions).
As an added layer of potential, varying the microstructure does not only affect the monotonic performance, but also has a strong effect on the fracture toughness, a property that has been demonstrated to be strongly linked to crashworthiness [6,7]. In the last few years, a great deal of work has been devoted to measuring the fracture toughness in sheet metal, something that is reliably accomplished through the Essential Work of Fracture (EWF) methodology [8]; this method can therefore be applied to predict the performance of laboratory-produced microstructures in crash conditions.
This work explores local tailoring as a cost-competitive strategy to produce optimized and added value thick sheet metal parts. Two options are explored: in-die bainitizing (quenching in-die heated at a controlled temperature) to create a Bainite-based soft zone and laser tempering, applying a laser post-treatment to a fully martensitic component, resulting in a Tempered Martensite region; industrially valid implementations are offered for both. Finally, the obtained microstructures are compared in terms of two mechanical properties related to crashworthiness: monotonic load strength (anti-intrusion potential) and fracture toughness (and therefore energy-absorption capacity).
2. Materials and Methods
2.1. Materials
All of the samples were obtained from a single batch of commercial 6.2 mm thick 22MnB5 sheet. The chemical composition was verified by means of spectroscopy (Table 1).

Table 1.
Chemical composition of the studied material, compared to 22MnB5 standard; amounts in [wt%].
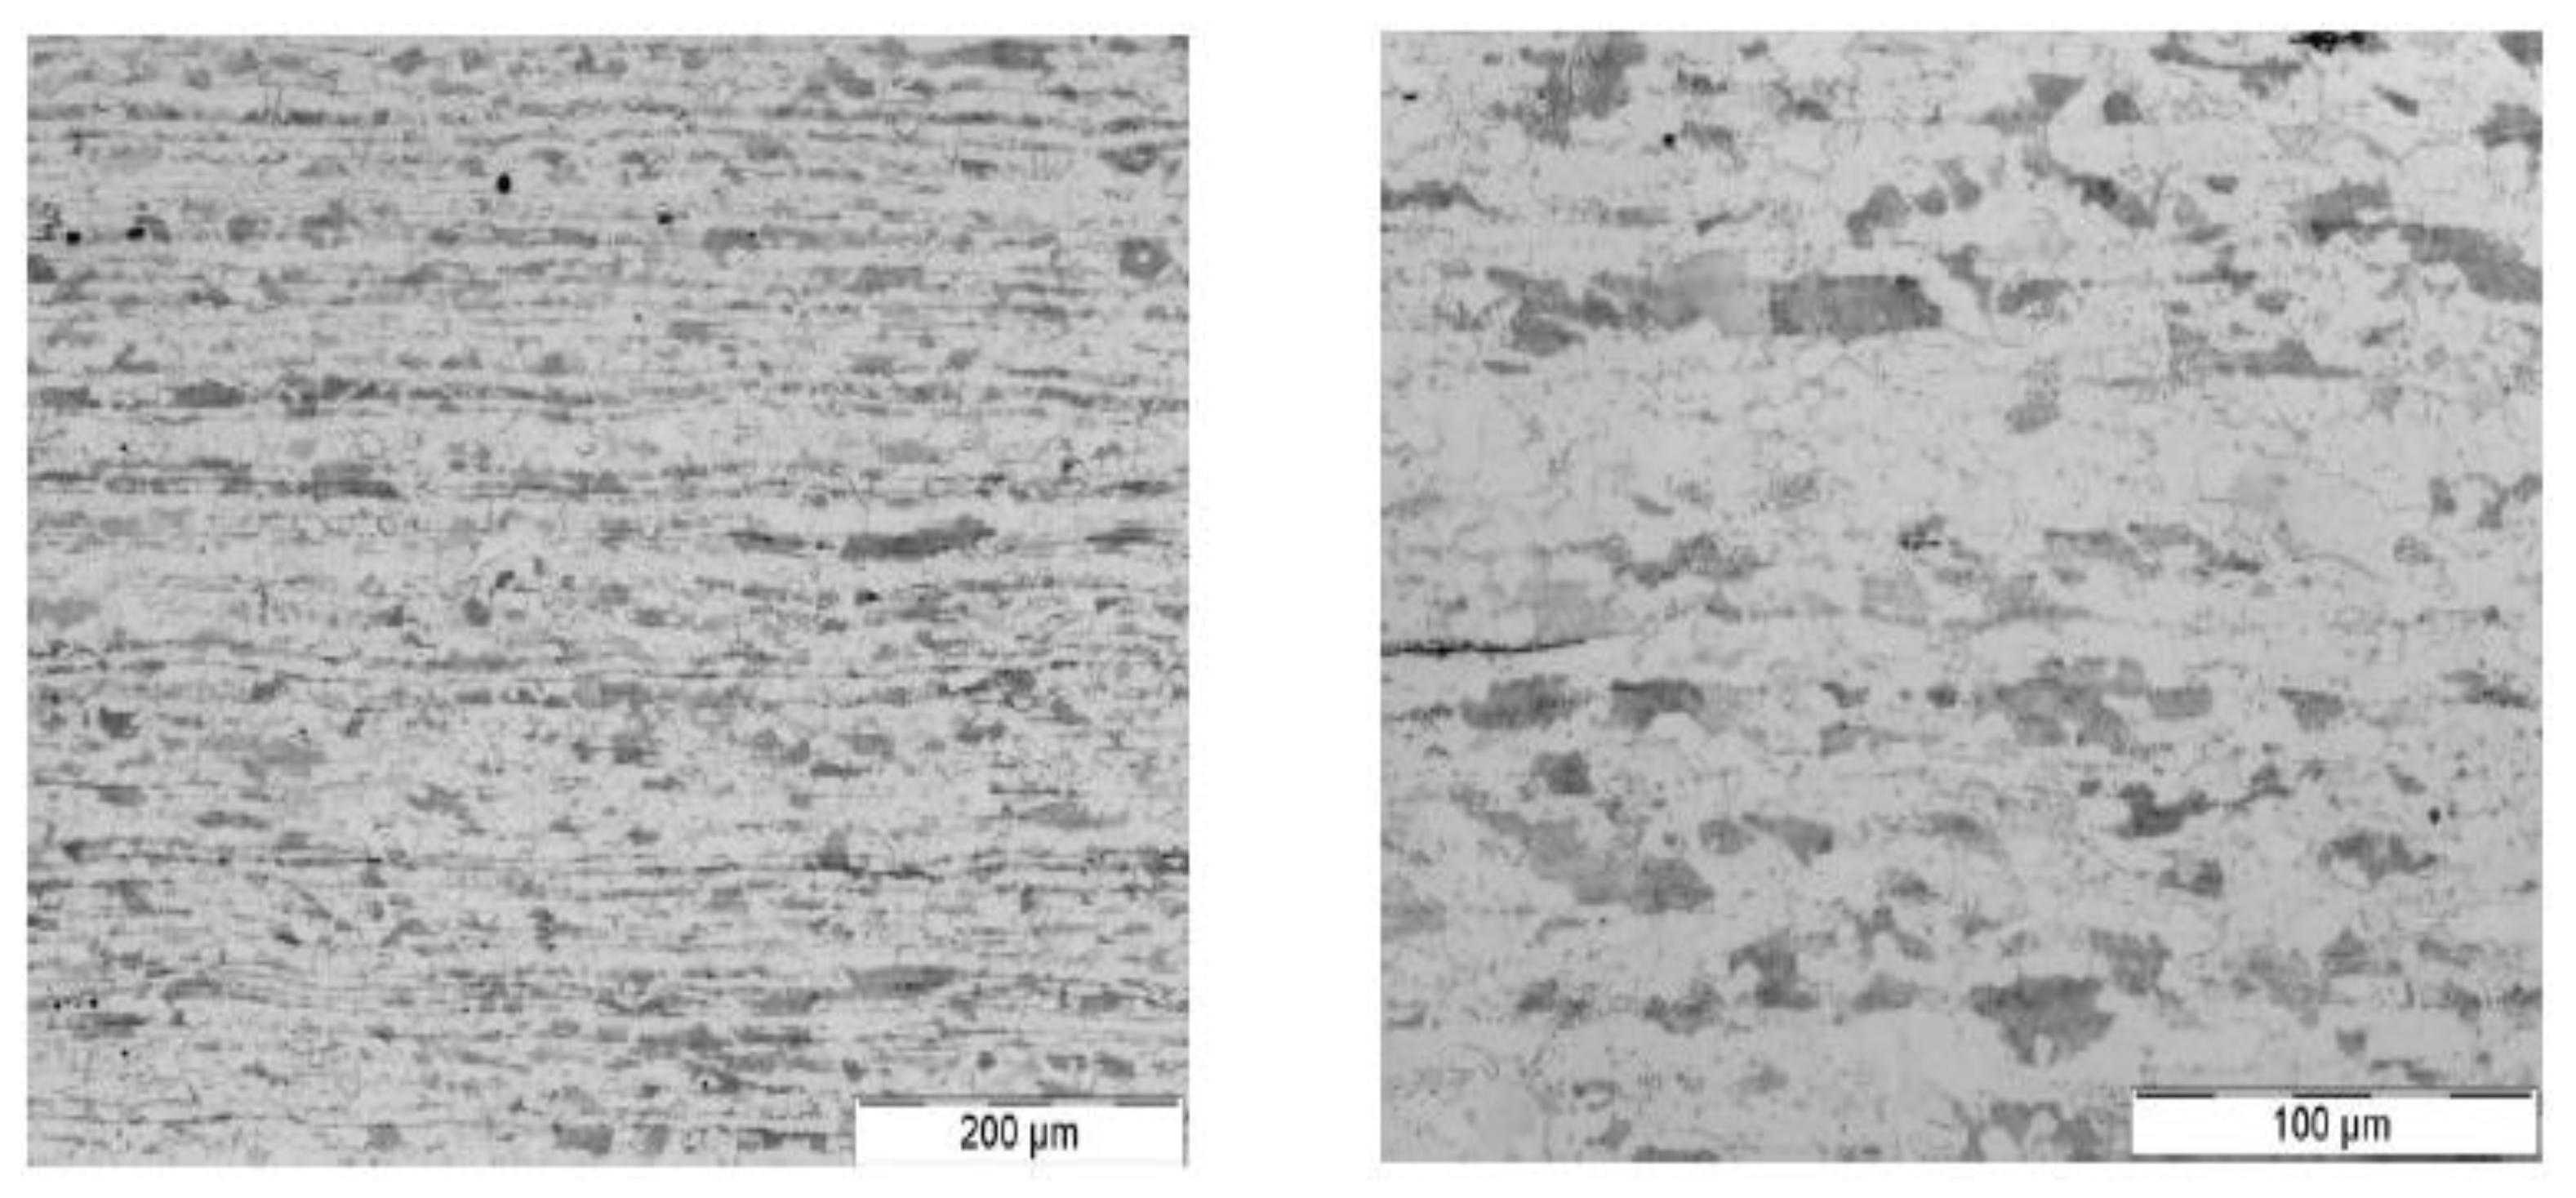
As is usual for this format, the material was received hot rolled and in a Ferritic-Pearlitic microstructure and was not coated. The starting microstructure did not show significant differences from a conventional thin sheet hot stamping product (Figure 1).

Figure 1.
Initial microstructure of the studied 6.2 mm thick 22MnB5 material.
2.2. Sample Production and Heat Treatment
Small blanks (100 mm × 100 mm) were cut from the as-supplied material, using an angle grinder at low speed to avoid excess frictional heating. Afterwards, different heat treatments (Table 2) were applied on these blanks. Finally, the test specimens were wire-cut from this heat-treated material.

Table 2.
Summary of heat treatment conditions applied.
In all cases, austenitization was conducted in an open (oxygen-containing) atmosphere roller hearth furnace, 2.5 m long. The furnace was preheated at 930 °C, and the samples were allowed 690 s residence time, including the heating time and dwell time for homogenization.
The martensitic samples were then manually transferred to a water-cooled (16 °C) flat die installed in a 150-t hydraulic press, where they were press hardened under an average pressure of 25 MPa. The samples were extracted after 60 s, at approximately room temperature.
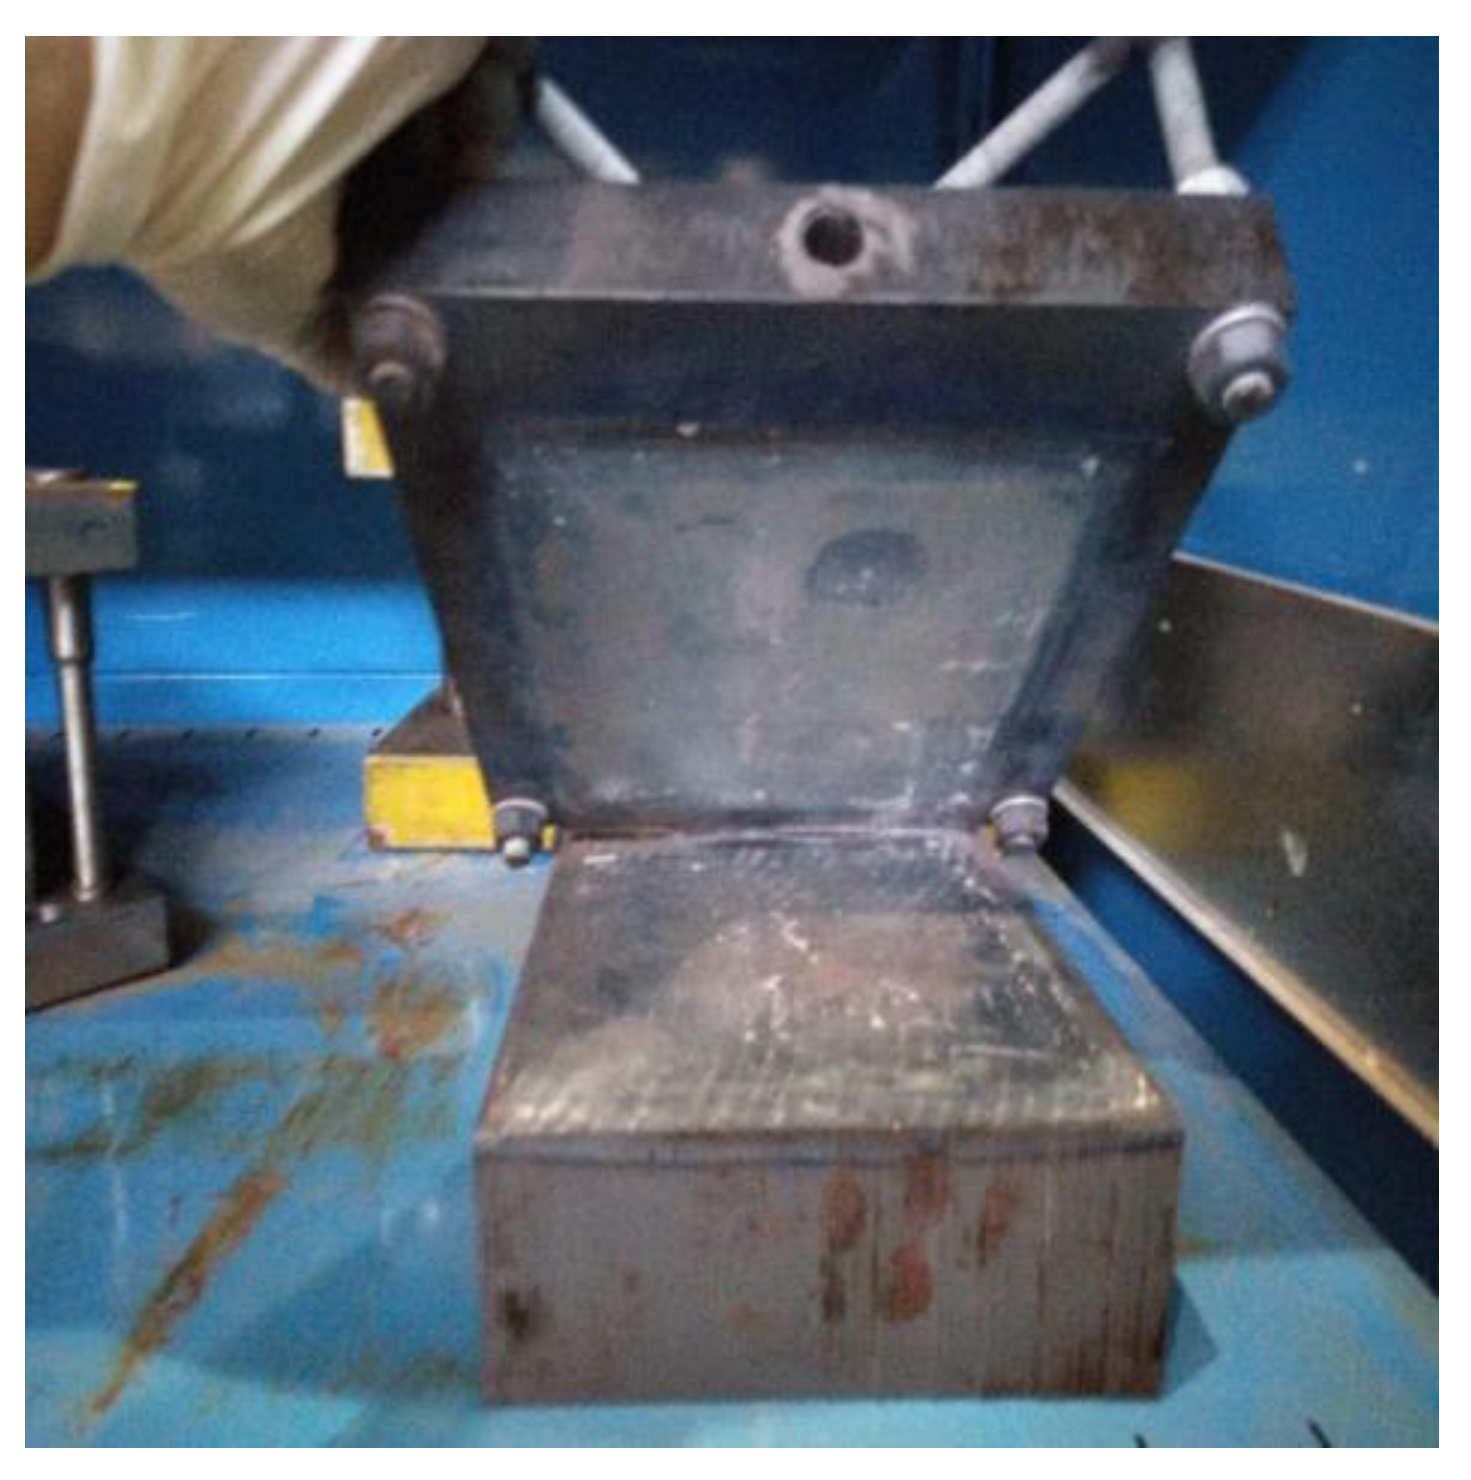
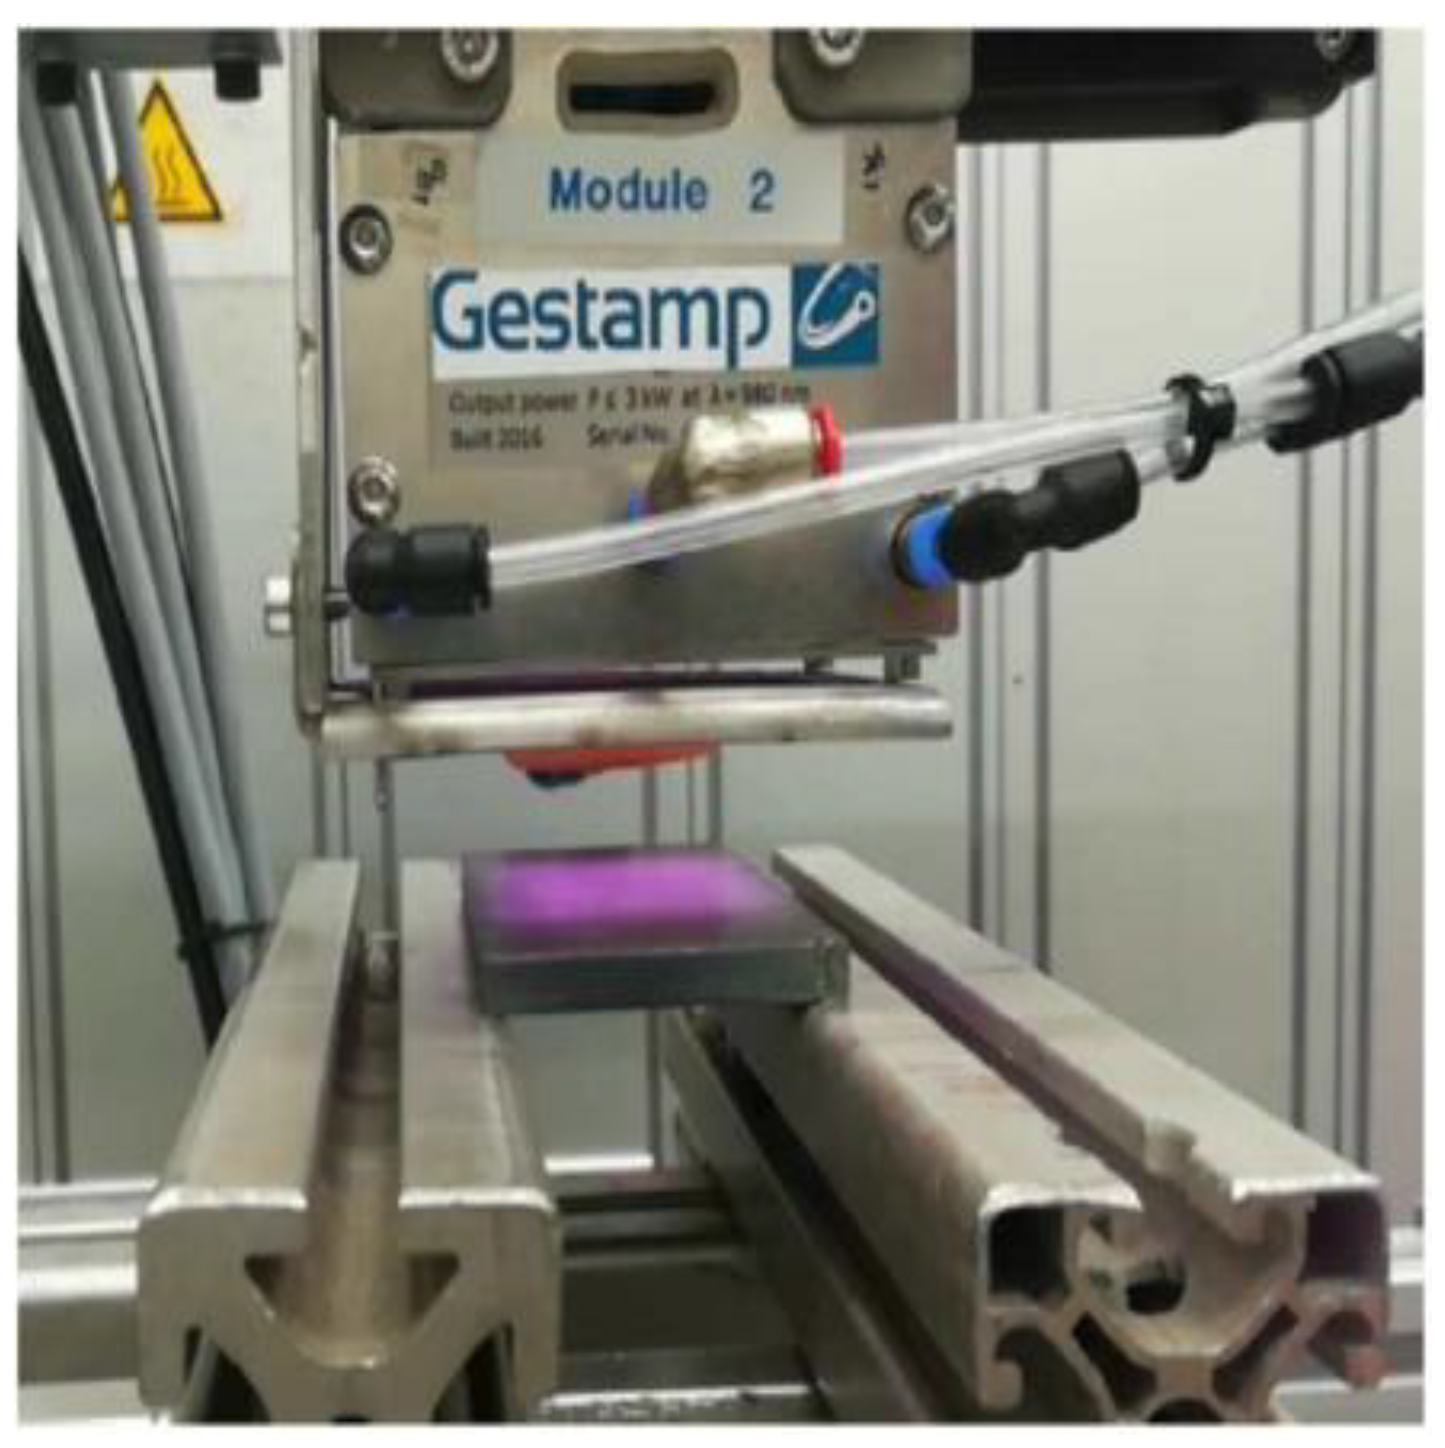
The bainitic samples were instead introduced into a tool formed by two hinged steel blocks held at a constant temperature (Figure 2). Due to limitations in the technical apparatus, no external pressure could be applied on this tool. This experiment was performed at different tool temperatures: 200, 300, 400 and 450 °C. Laser tempering was performed on the martensitic samples using a TRUMPF VCSEL Module of 2.4 kW laser equipment (Figure 3).

Figure 2.
Heated blocks used for bainitic quench.
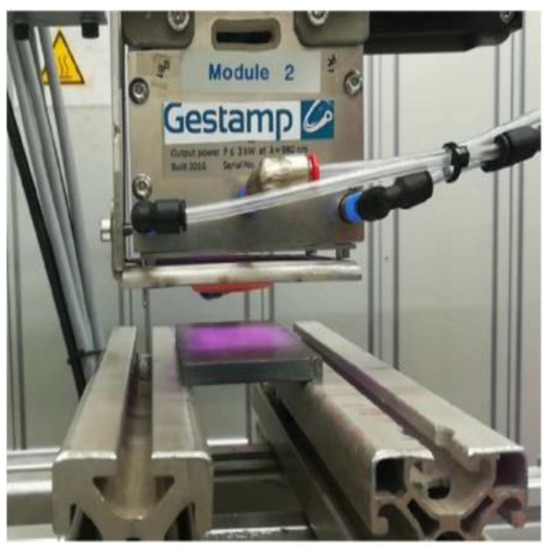
Figure 3.
Laser treatment of thick sheet.
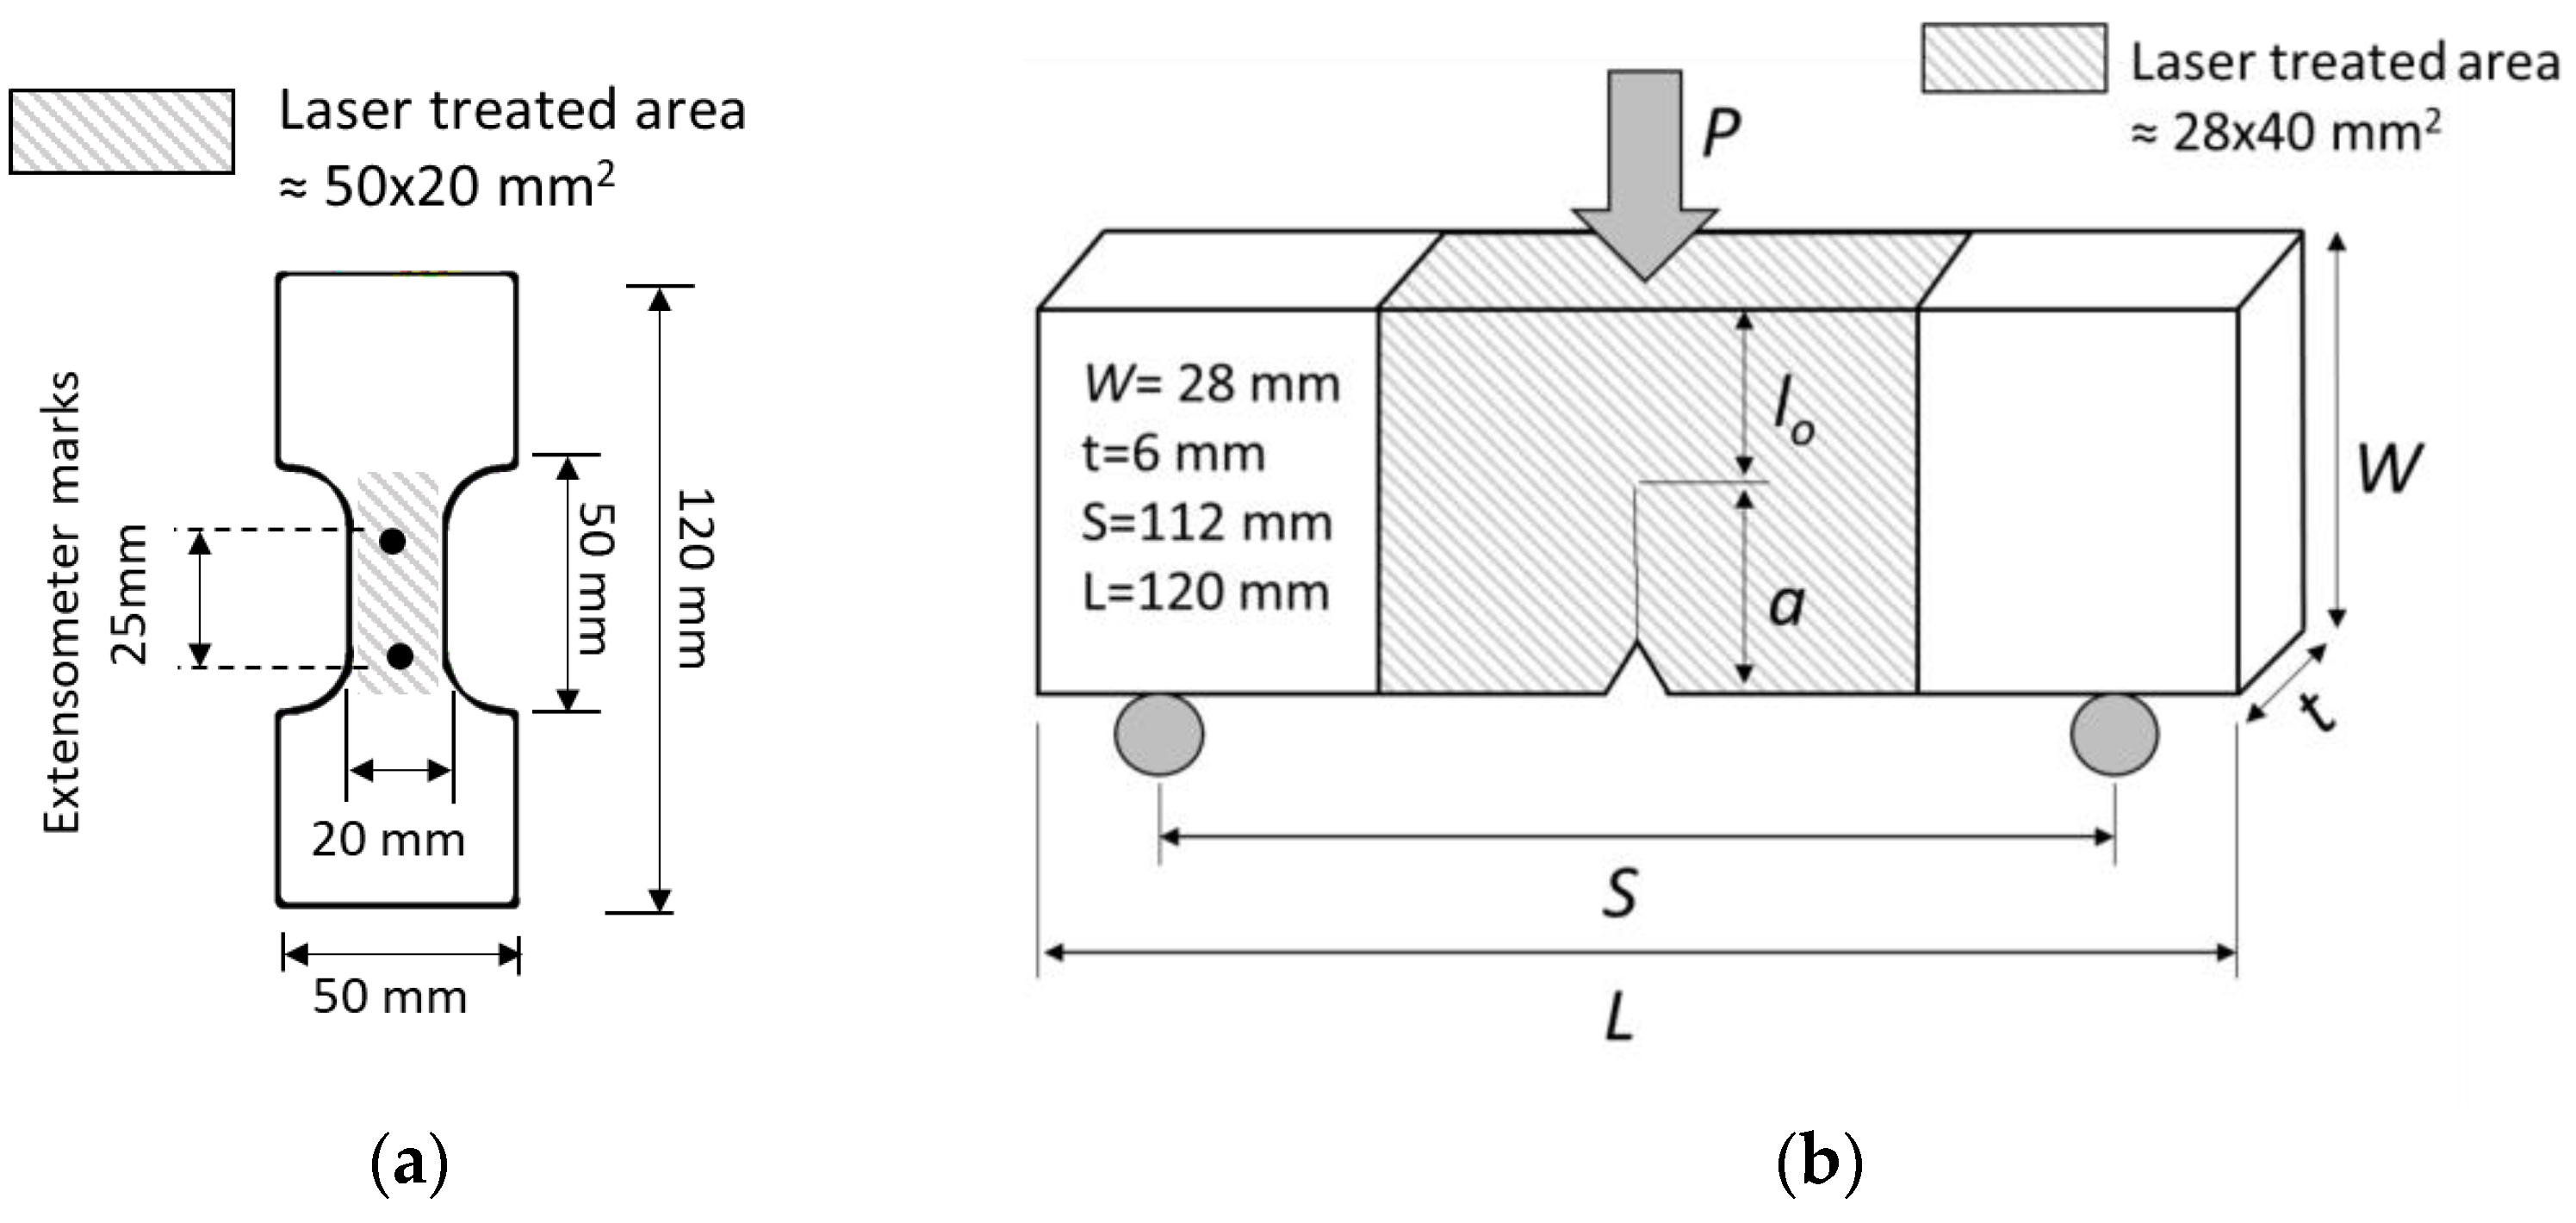
Dog-bone tensile specimens (Figure 4a) and Single Edge Notched Bending (SENB) specimens, for the EWF tests (Figure 4b), were wire-cut from the heat-treated blanks, produced as described above. In the case of the laser-tempered material, samples were cut from the fully martensitic blanks and laser tempering was applied on the area of interest (Figure 4a,b).
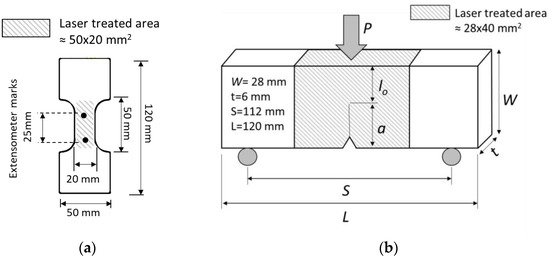
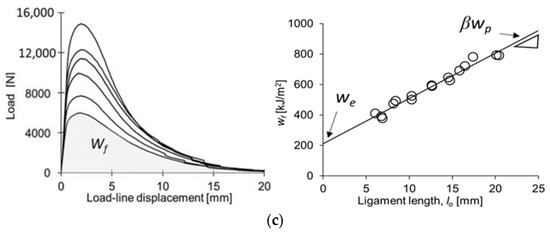
Figure 4.
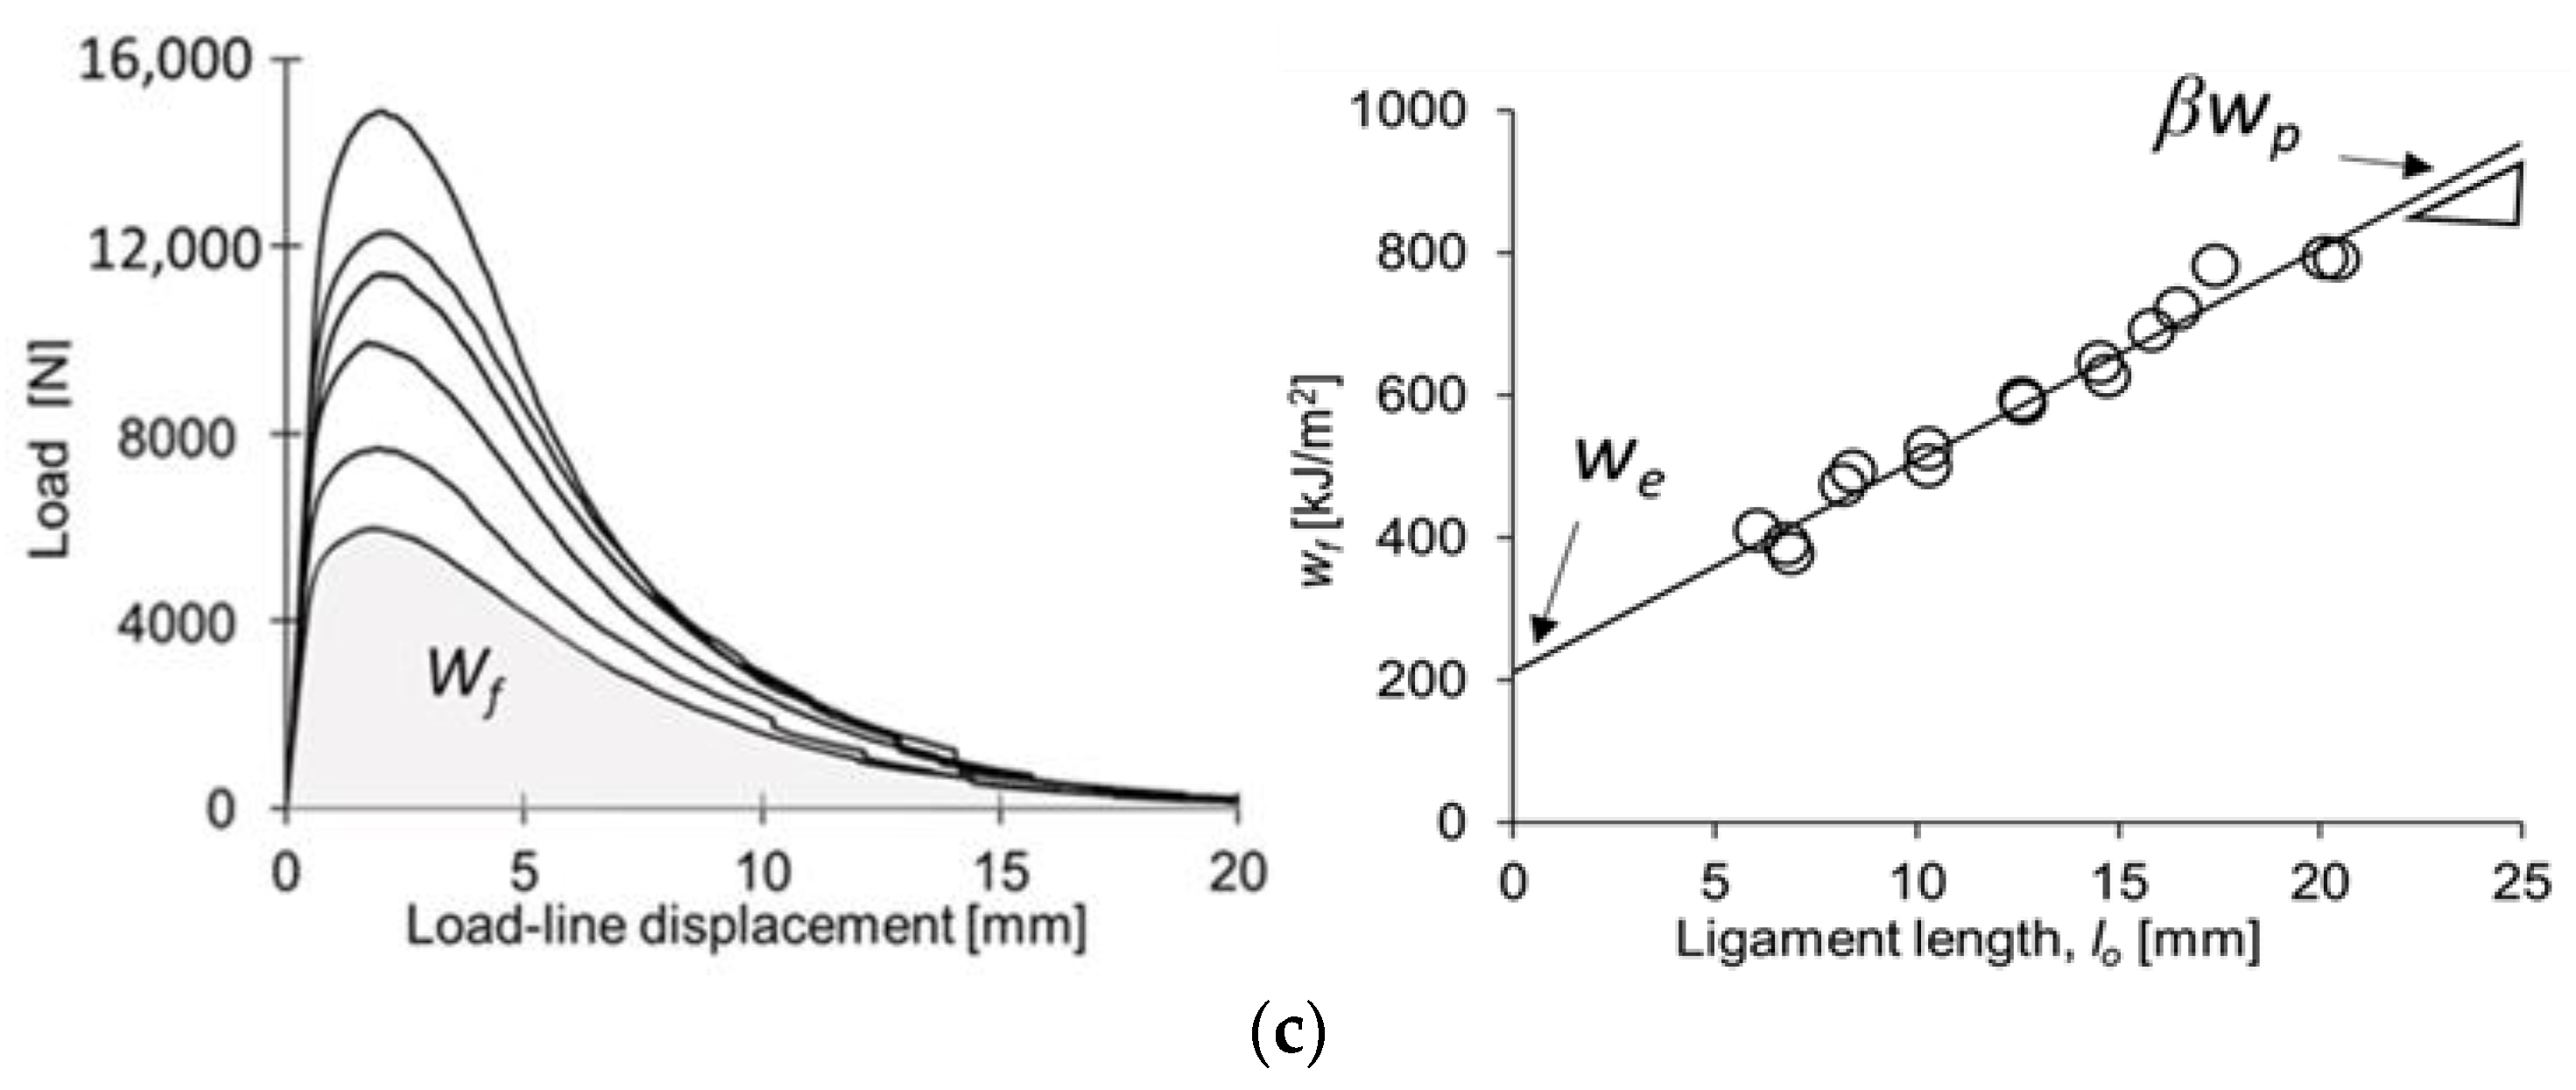
(a) Tensile test specimen geometry; (b) SENB specimen for EWF testing; W: width, t: thickness, L: length, S: Span, lo: original ligament length; a: initial crack length (notch + fatigue pre-crack); (c) experimental procedure for we determination.
2.3. Uniaxial Tensile Tests
Uniaxial tensile tests were performed to obtain the main tensile properties of the different microstructures. Tensile specimens with a width of 20 mm and a parallel calibrated length of 50 mm were used. All of the specimens were machined with the parallel length oriented longitudinally to the rolling direction. The strain was measured by means of a video extensometer, using extensometer marks separated 25 mm (lo = 25 mm). The test speed was 6 MPa/s until the end of the elastic deformation, then 6.7 × 10⁻³ s−1 until the failure of the sample. Three specimens per condition were tested.
2.4. Essential Work of Fracture Test
The fracture toughness of the different microstructures was evaluated using the EWF methodology, following the recommendation provided in the previous work by the authors [9].
For the evaluation of the EWF, rectangular Single Edge Notched Bending (SENB) specimens of 120 × 28 × 6 (L × W × t) mm3 were used (Figure 4b). The specimens were machined at the transverse orientation with respect to the rolling direction. In order to determine the specific essential work of fracture (we), specimens with different ligament lengths (lo) were tested up to fracture.
For each specimen, the total work of fracture (Wf, area under the load-displacement curve, Figure 4c left) was calculated and normalized by the cross-section area, obtaining the specific total work of fracture (wf). we was obtained through the linear extrapolation of the wf vs. lo data to zero ligament length. The slope in the linear data regression represents the non-essential plastic work, wp, multiplied by a shape geometry factor, β (Figure 4c right). Ligament lengths ranging between 6 and 20 mm (a/W = 0.29–0.79) were used. Two specimens per ligament length were tested. The tests were conducted at a constant cross-head displacement of 1 mm/min. The distance between supports, S, was 112 mm. To avoid the effect of the notch radius on the fracture toughness values, a fatigue pre-crack was nucleated on the notch root, following the recommendations of the fracture mechanics standard procedures.
3. Results and Discussion
3.1. Heat Treatment Results
3.1.1. In-Die Bainite Formation
In-die bainitic quench was performed at different temperature levels in order to identify a condition that would result in a lower bainite microstructure, with hardness in the 300–350 Vickers hardness (HV1) range. This would result in a material comparable to the commercial soft zones in a thin metal sheet [10]. The results, summarized in Figure 5, show that a relatively low tool temperature (200 °C) is required to achieve this microstructure; otherwise, the limited heat extraction combined with thick material results in structures too close to equilibrium. As discussed in the introduction, this temperature range can be difficult to control in production tools interacting with thick material, although this can be improved through the use of advanced closed-loop temperature control strategies.

Figure 5.
Microstructure and Vickers hardness obtained in in-die bainitizing trials at different tool temperatures.
3.1.2. Laser Tempering
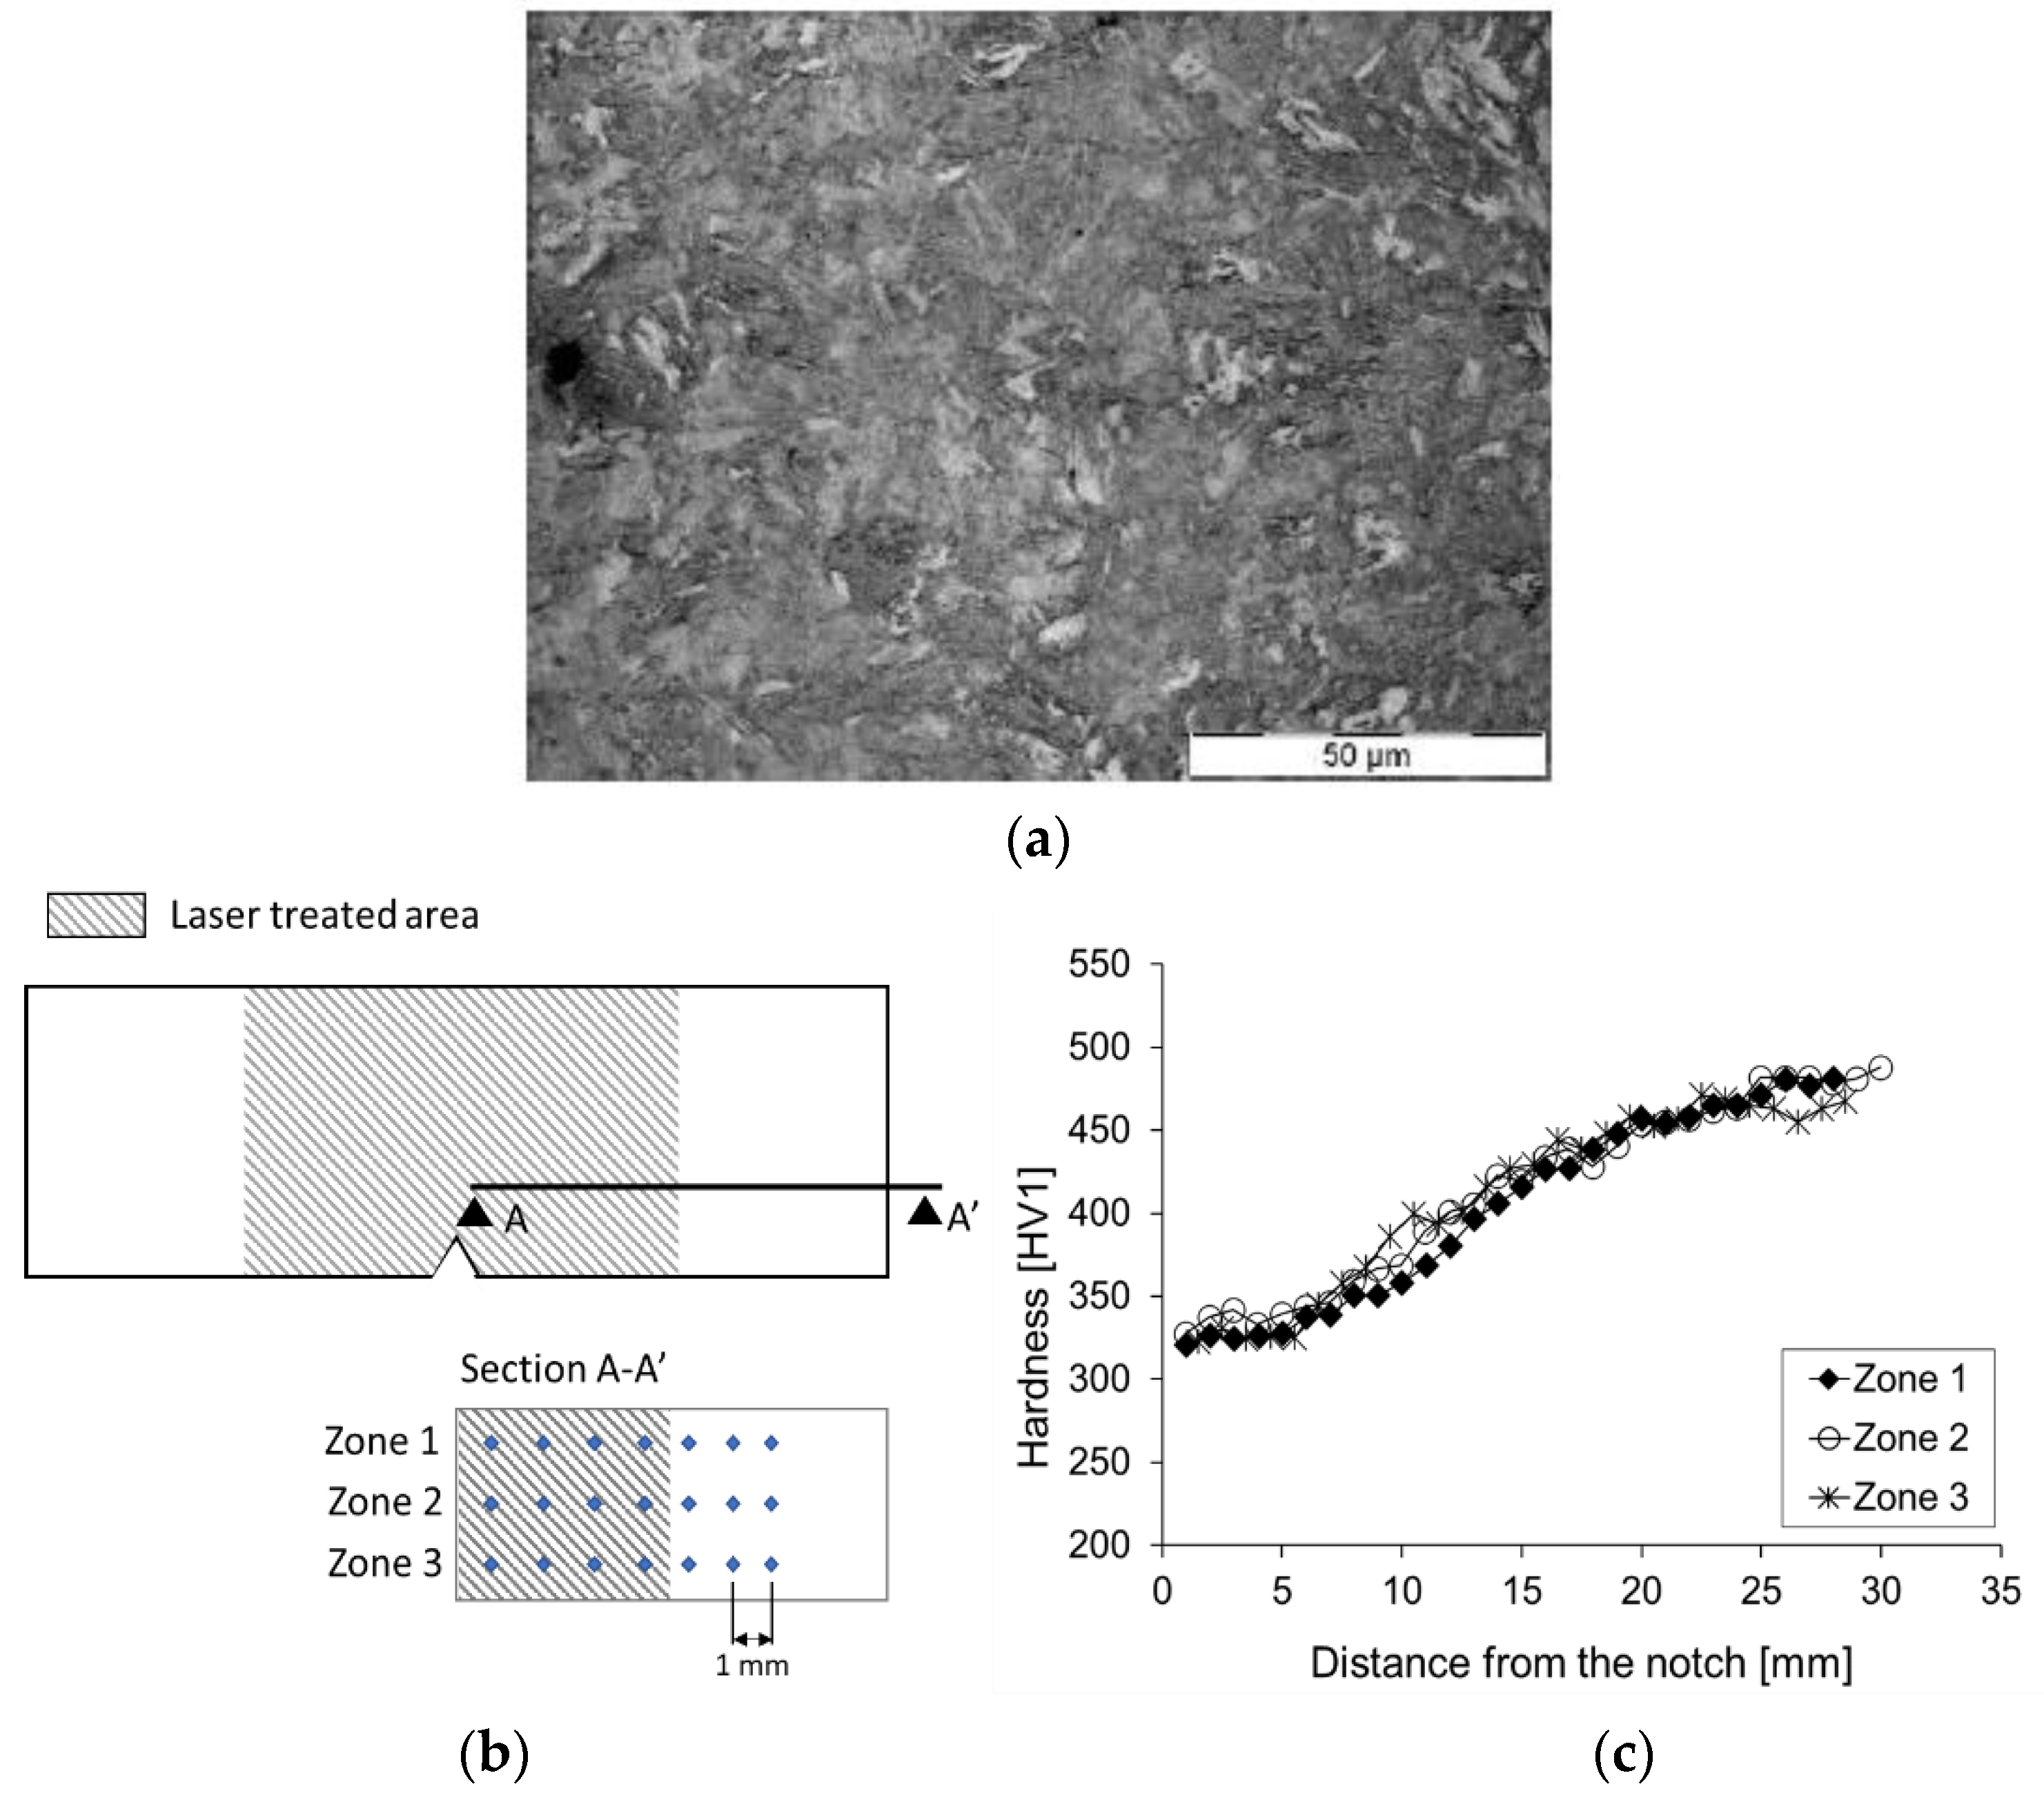
Laser tempering was set up with the same target (300–350 HV1) as the bainitic quench. After different trials, a set of conditions (1.92 KW on a ~40 mm × 40 mm spot) was found that resulted in a temperature peak around 600 °C, resulting in a Tempered Martensite microstructure with 330 ± 6 HV1 Vickers hardness (Figure 6).
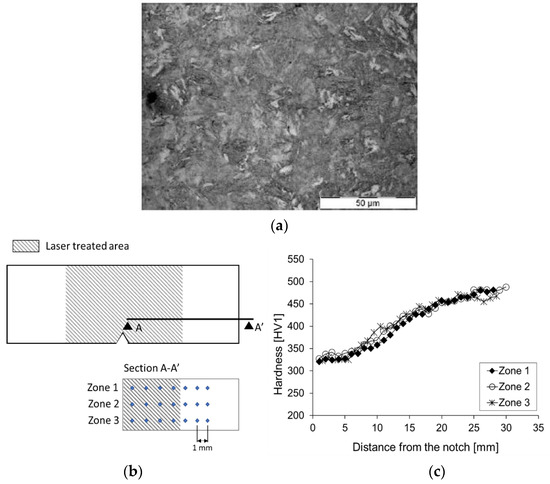
Figure 6.
Laser tempering of thick sheet: (a) Tempered Martensite microstructure; (b) schematic representation of the indentations performed for hardness measurements in laser treated specimens and (c) Vickers hardness (HV1) profiles.
The width of the generated transition zone was evaluated on the SENB samples, where the treatment had only been applied to the section corresponding to the sample notch (see Figure 4b). The hardness profiles were extracted from the center of the laser-treated zone in the SENB specimens, as illustrated in Figure 6b. Three rows of indentations were performed on a cross-section of the specimen: two were close to the specimen surfaces (approx. 1 mm from the outer surface) and one was in the mid-thickness. The hardness profiles (Figure 6c) show a homogeneous through-thickness hardness distribution and a transition zone approximately 20 mm wide from the center of the specimen.
3.2. Mechanical Performance
3.2.1. Tensile Properties
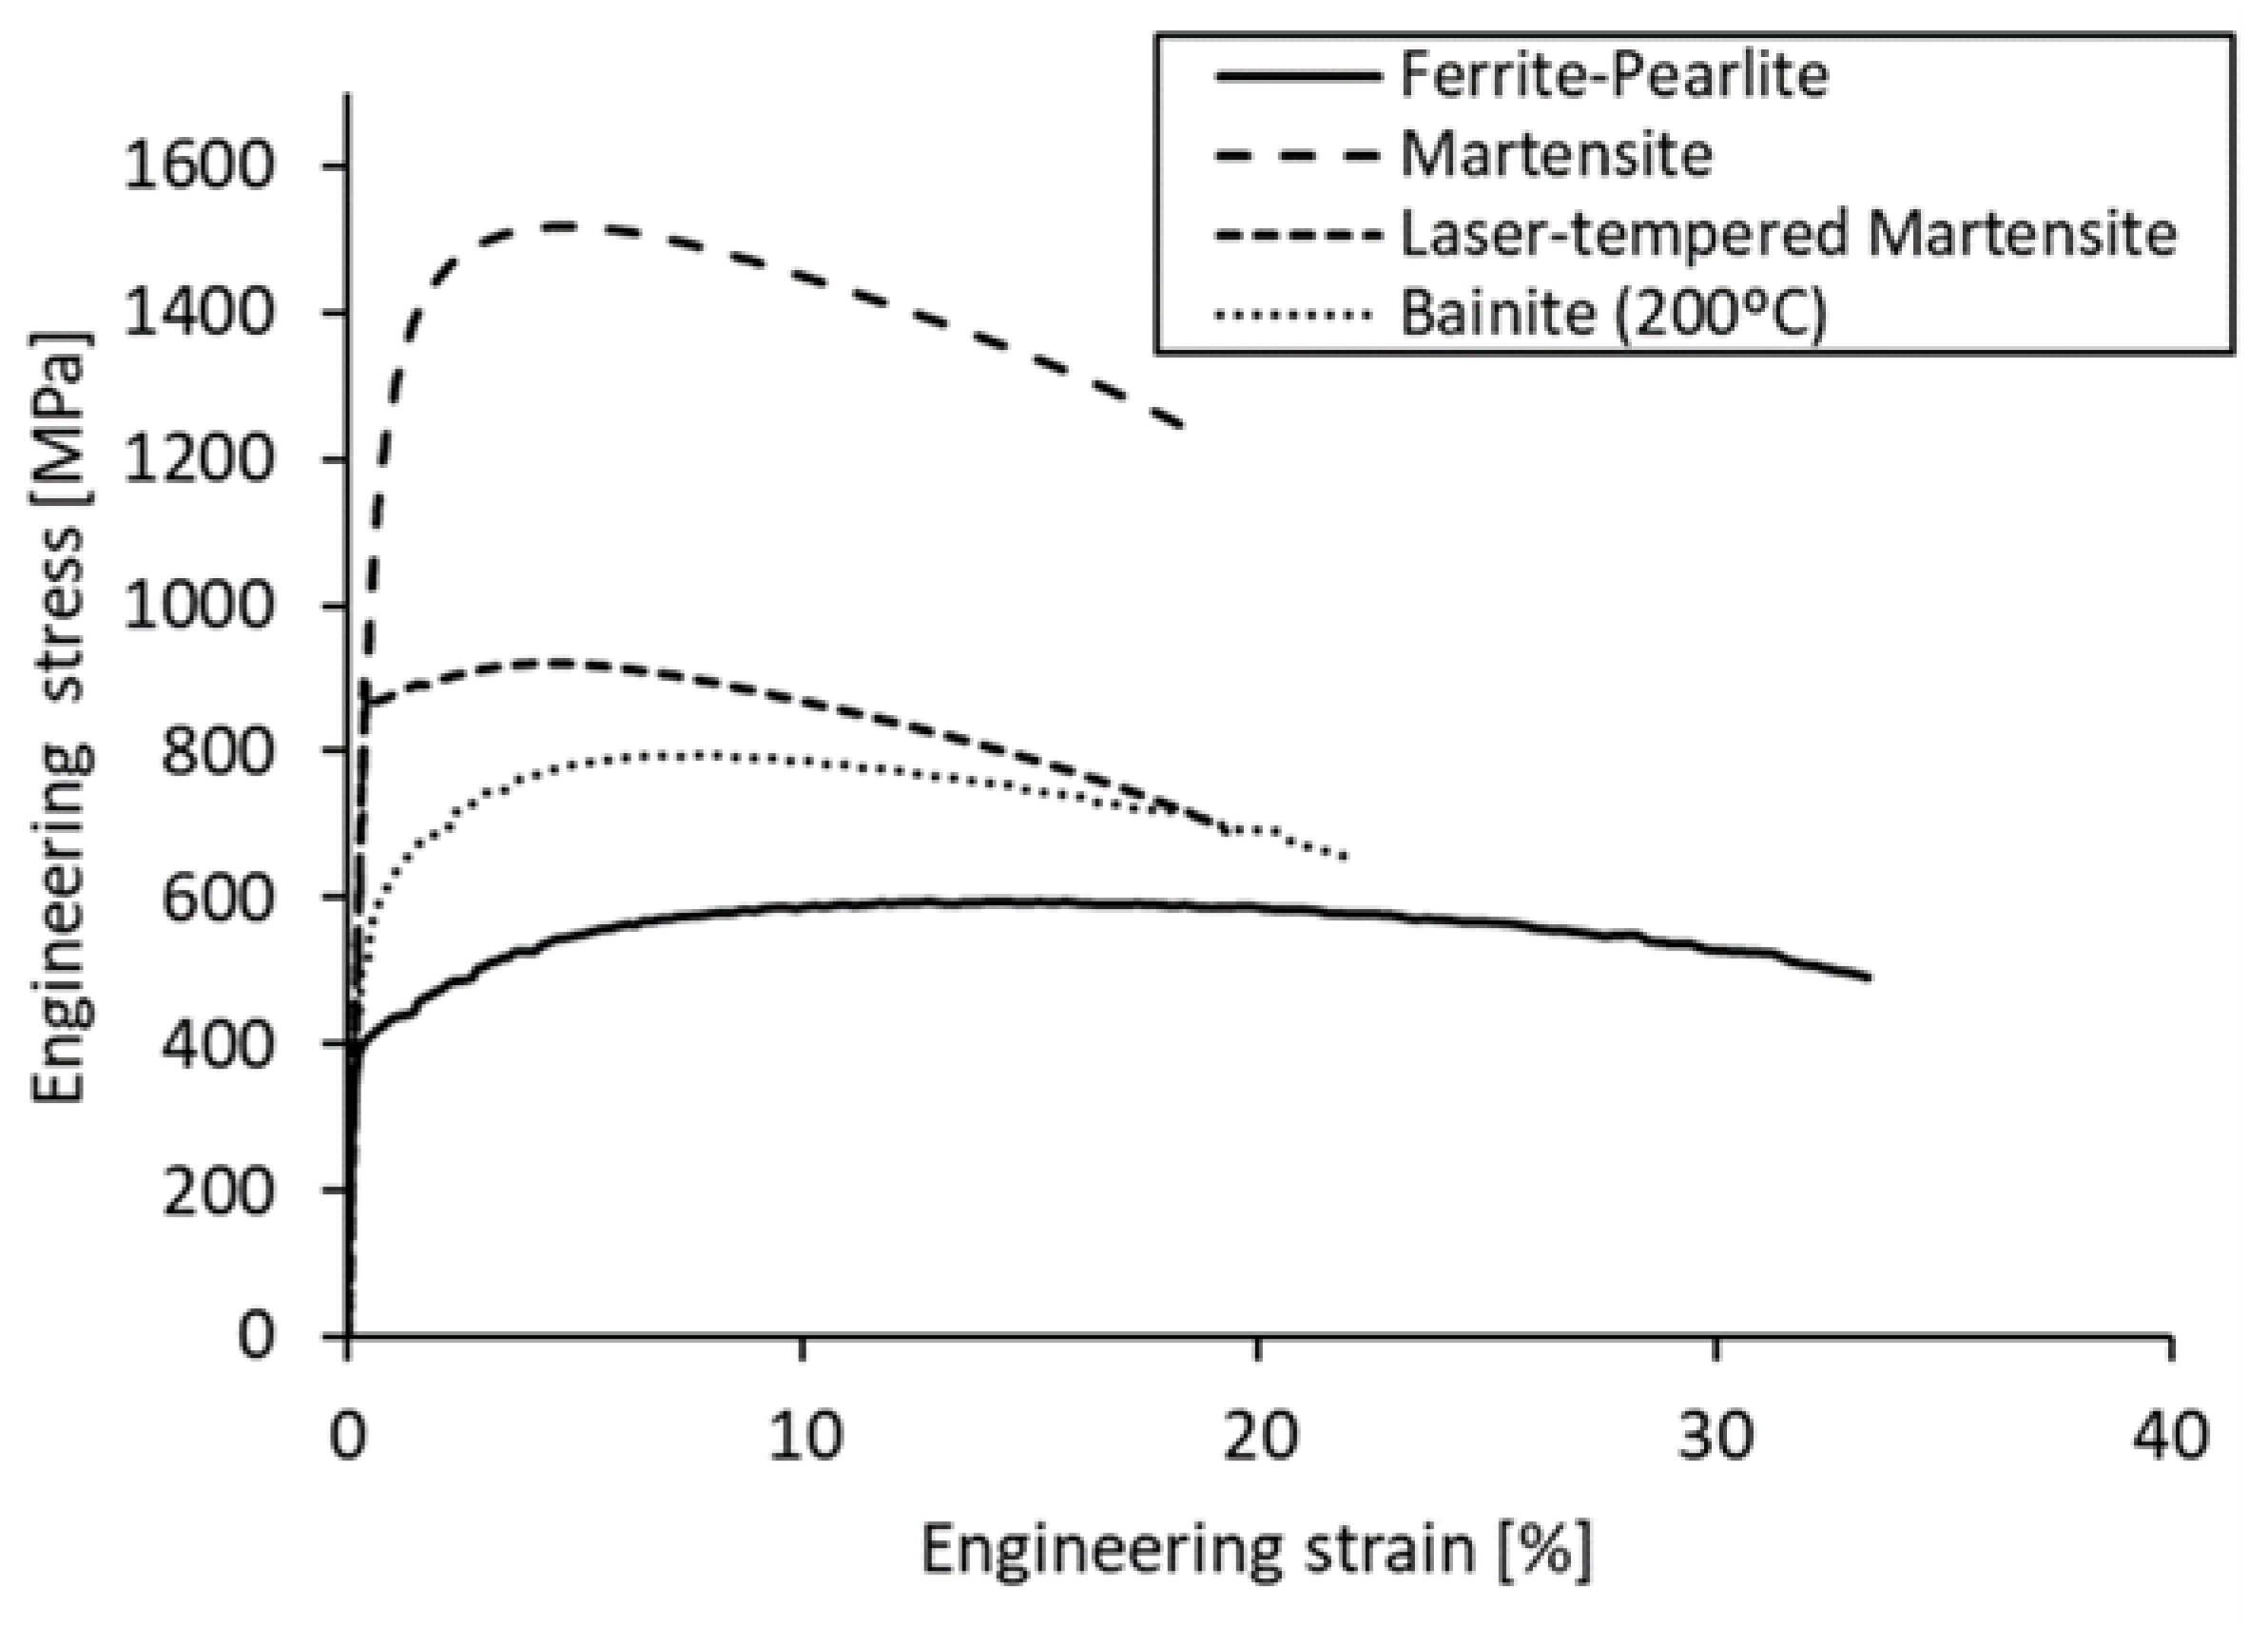
Figure 7 shows the engineering stress-strain curves for the studied microstructures. The tensile properties are shown in Table 3. As expected, the fully martensitic microstructure shows the highest strength, reaching the full 1500 MPa UTS that can be expected in 22MnB5; this shows, that despite the high thickness, the samples were satisfactorily quenched. The laser-Tempered Martensite shows a significant decrease in strength, but no noticeable gain in ductility. The Bainite and Ferrite-Pearlite show much lower strength values. It should be noted that the elongation at the fracture is only comparative and should not be taken as an absolute value because the test samples could not be manufactured in a standardized geometry due to equipment limitations.

Figure 7.
Engineering stress-strain curves for the studied press-hardened microstructures.

Table 3.
Tensile test results.
3.2.2. Essential Work of Fracture
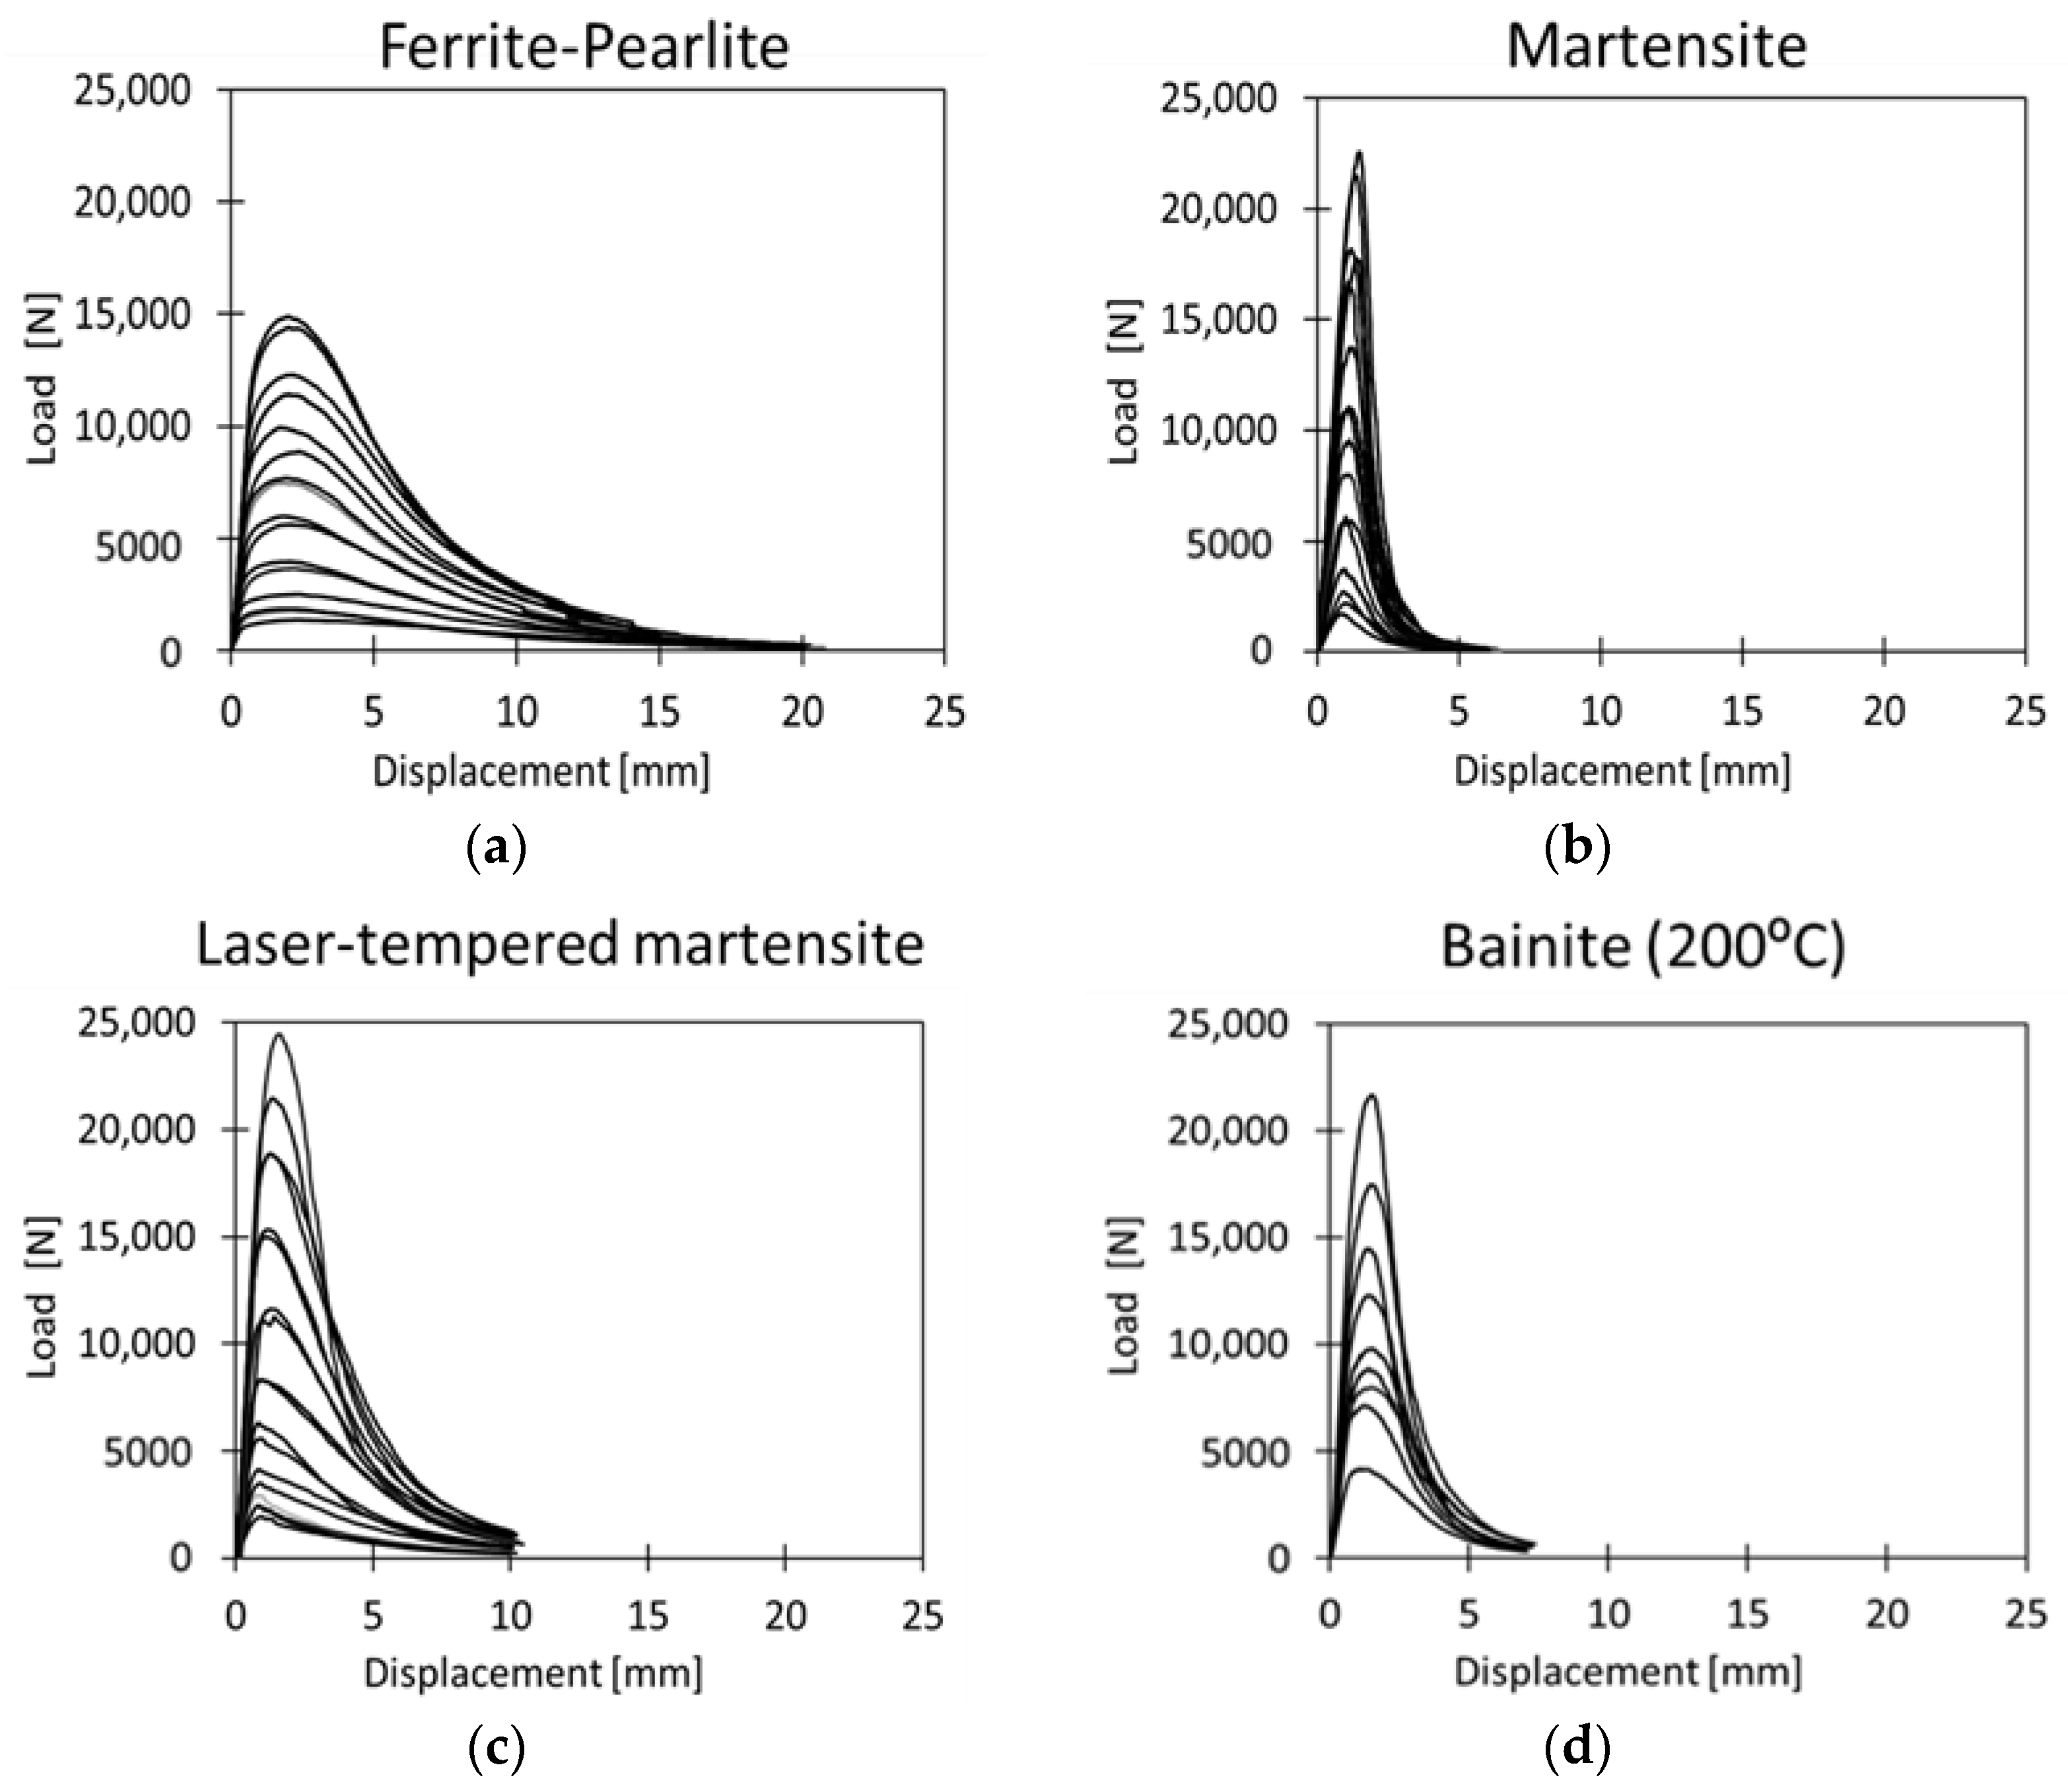
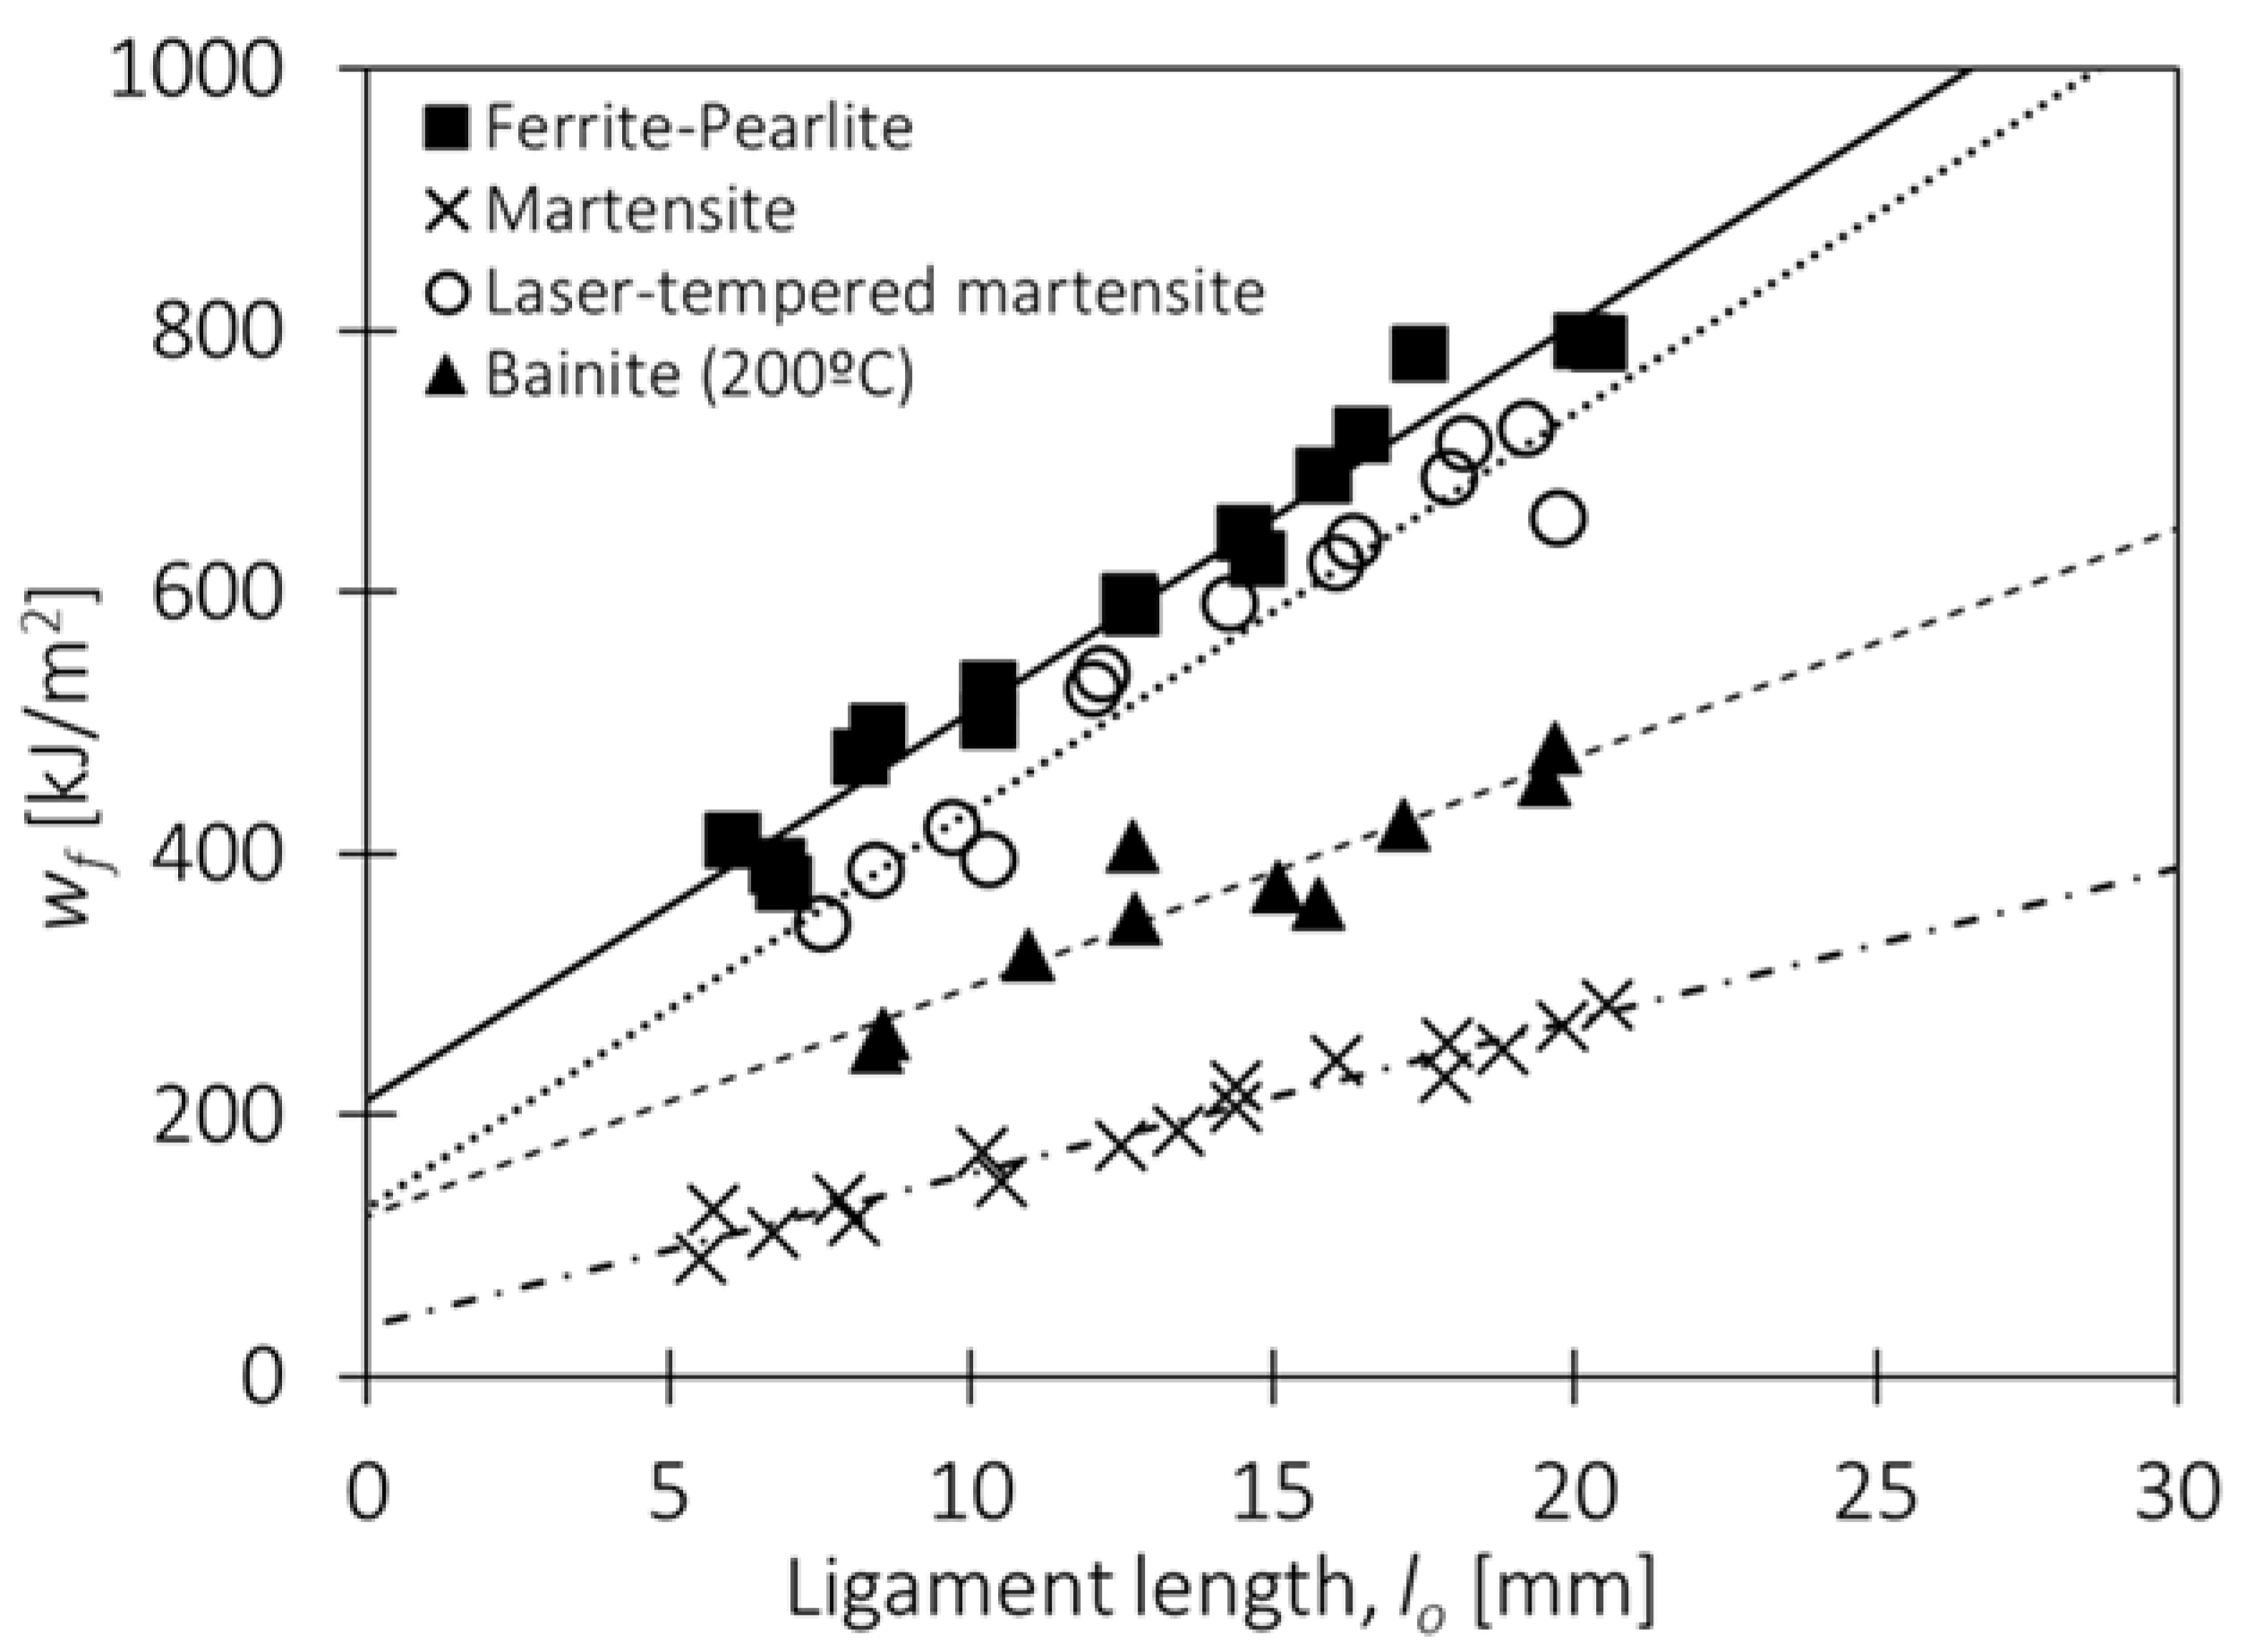
The load-displacement curves obtained from the EWF tests are shown in Figure 8. The results showed good repeatability, as indicated by the self-similarity of the curves for the different ligament lengths, which is one of the requirements for the application of the EWF [11]. It is worth mentioning that none of the tested samples fractured completely at the end of the test due to the compression load at the back edge of the specimens in the final stage of fracture. Therefore, the tests were manually stopped when a near-zero load was reached. The resulting wf values are plotted as a function of the ligament length in Figure 9. The linear regression for each dataset is also displayed. A summary of the we (essential work of fracture) and βwp (non-essential plastic work) values are reported in Table 4.
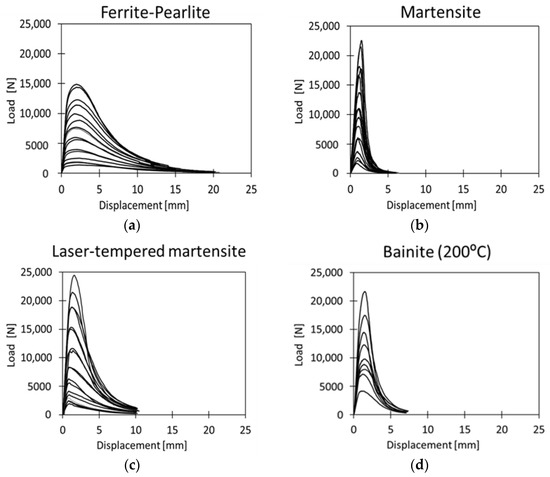
Figure 8.
Load-displacement curves obtained from fracture tests with SENB specimens, (a) Ferrite-Pearlite, (b) Martensite, (c) Laser-Tempered Martensite and (d) Bainite.

Figure 9.
wf as a function of the ligament length, lo and linear data regression obtained for the different microstructures.

Table 4.
Summary of essential work of fracture (we) and non-essential plastic work (βwp) values.
The results show a clear gradation of the fracture toughness values, with a very high we value for the soft and ductile Ferritic-Pearlitic microstructure and the lowest we value for quenched Martensite. Such differences in the fracture resistance can be also discerned by the fracture behavior inferred from the load-displacement curves. The Ferritic-Pearlitic microstructure shows the lowest maximum load, but it exhibits a gradual decrease in the load after the peak load up, reaching a maximum load-line displacement of around 20 mm, indicating a slower stable crack propagation. On the other hand, the Martensite shows higher peak loads and a much more pronounced load drop during the crack propagation stage (post-peak load), resulting in faster crack propagation, as suggested by the low displacement at the fracture (<5 mm) and we.
Both the Bainite and Tempered Martensite showed toughness values that were noticeably higher than the Martensite, nearly thrice as much, which contrasts with the small differences observed in the elongation values for the three microstructures (Table 3). This is particularly relevant for the Tempered Martensite, which was obtained from a short post-treatment from the martensitic samples.
Interestingly, the Laser-Tempered Martensite and Bainite show basically equivalent fracture toughness, indicating that both microstructures dissipate the same amount of energy in the fracture process zone during crack propagation.
This is despite showing a very different behavior during the test, in which the Laser Tempered samples showed greater displacement at the fracture and higher wf values than the Bainite for the same ligament length. Nevertheless, in the Laser-Tempered microstructure, the fracture energy has a greater contribution from the non-essential plastic work (βwp), as pointed out by the slope of the linear regression.
The trends observed in this study are consistent with the observations made in the previous investigations focused on thin press hardening steels (PHS) sheets with different microstructures [6,12], and show the potential benefits of Tempered Martensite and Bainite for crash-resistant and damage-tolerant parts in heavy duty vehicles. In particular, laser tempering provides an interesting combination of high strength and high fracture toughness, which makes it an effective choice for the generation of soft zones in fully hardened martensitic microstructures, thus improving the crash performance of PHS safety components [6].
4. Conclusions
This work explores the press hardening of thick sheet, focusing on the possibility of optimizing the component performance through a microstructural design. The following conclusions could be drawn:
- It is possible to obtain soft zones or microstructural tailoring on thick 22MnB5 sheet.
- Four variants of microstructures were analyzed, together with the process in which they can be generated. These different microstructures offer different and interesting compromises in terms of their anti-intrusion performance, fracture toughness and process window.
- The fully martensitic samples presented UTS levels (1500 MPa) on a par with thin sheet, confirming that the material can be satisfactorily quenched.
- Ferritic-Pearlitic structures present the highest value in terms of the fracture toughness of the studied microstructures.
- The Tempered Martensite, generated through laser tempering, offered a very attractive combination of properties, presenting a fracture toughness on a par with the in-die Bainite, but much higher monotonic strength and, therefore, anti-intrusion performance.
- In general terms, both Bainitic and Laser-Tempered Martensite structures offer the potential to be applied in microstructural tailoring.
Author Contributions
Conceptualization, S.G., J.P, D.C. (Daniel Casellas) and D.F., writing, J.P., E.G.-L. and D.F.; materials design, D.C. (David Corón), L.G., C.S. and D.F.; mechanical tests, D.F. and E.G.-L.; data analysis, D.C. (David Corón), L.G. and D.F.; writing—review and editing, E.G.-L., L.G., J.P. and D.F; supervision, J.P. and D.C. (Daniel Casellas); funding acquisition, D.C. (Daniel Casellas). All authors have read and agreed to the published version of the manuscript.
Funding
The authors would like to acknowledge the financial support inside the framework of Eureka-PID Worthtruck (PID, IDI-20171259) and the European Union’s Research Fund for Coal and Steel program under grant agreement No. 101034036–ToughSteel project.
Data Availability Statement
Not applicable.
Conflicts of Interest
The authors declare no conflict of interest.
References
- Bian, J.; Mohrbacher, H.; Zhang, J.; Zhao, Y.; Lu, H.; Dong, H. Application potential of high performance steels for weight reduction and efficiency increase in commercial vehicles. Adv. Manuf. 2015, 3, 27–36. [Google Scholar] [CrossRef]
- Pujante, J.; Garcia-Llamas, E.; Golling, S.; Casellas, D. Microstructural and mechanical study of press hardening of thick boron steel sheet. J. Phys. Conf. Ser. 2017, 896, 012085. [Google Scholar] [CrossRef]
- Nagathan, A.; Penter, L. Chapter 7: Hot stamping. In Sheet Metal Forming—Processes and Applications; Altan, T., Tekkaya, A., Eds.; ASM International: Novelty, OH, USA, 2012; pp. 153–163. [Google Scholar]
- Järvenpää, A.; Jaskari, M.; Hietala, M.; Mäntyjärvi, K. Local laser heat treatment of steel sheets. Phys. Procedia 2015, 78, 296–304. [Google Scholar] [CrossRef]
- Artola, O. Characterization of Press Hardened 36MnB5 during Rapid Heating Laser Tempering. Master’s Thesis, Escola d’Enginyeria de Barcelona Est, Universitat Politècnica de Catalunya, Barcelona, Spain, 2018. [Google Scholar]
- Frómeta, D.; Parareda, S.; Pujante, J.; Corón, D.; Galcerán, L.; Casellas, D. Influence of laser tempering on fracture toughness of press hardened steels- correlation with component crash performance. In Proceedings of the 8th CHS2 Conference: Hot Sheet Metal Forming of High-Performance Steel, Barcelona, Spain, 30 May–2 June 2022. [Google Scholar]
- Frómeta, D.; Lara, A.; Molas, S.; Casellas, D.; Rehrl, J.; Suppan, C.; Larour, P.; Calvo, J. On the correlation between fracture toughness and crash resistance of advanced high strength steels. Eng. Fract. Mech. 2015, 205, 319–332. [Google Scholar] [CrossRef]
- Cotterell, B.; Reddel, J.K. The essential work of plane stress ductile fracture. Int. J. Fract. 1977, 13, 267–277. [Google Scholar] [CrossRef]
- Frómeta, D.; Parareda, S.; Lara, A.; Casellas, D. Fracture toughness evaluation of thick press hardened 22MnB5 sheets for high crash performance applications in trucks. In Proceedings of the 7th CHS2 Conference: Hot Sheet Metal Forming of High-Performance Steel, Luleå, Sweden, 2–5 June 2019. [Google Scholar]
- Karbasian, H.; Tekkaya, A. A review on hot stamping. J. Mater. Process. Technol. 2010, 210, 2103–2118. [Google Scholar] [CrossRef]
- Martinez, A.B.; Gamez-Perez, J.; Sanchez-Soto, M.; Velasco, J.I.; Santana, O.O.; Maspoch, M.L. The Essential Work of Fracture (EWF) method—Analyzing the Post-Yielding Fracture Mechanics of polymers. Eng. Fail. Anal. 2009, 16, 2604–2617. [Google Scholar] [CrossRef]
- Golling, S.; Frómeta, D.; Casellas, D.; Jonsén, P. Influence of microstructure on the fracture toughness of hot stamped boron steel. Mat. Sci. Eng. A 2019, 743, 529–539. [Google Scholar] [CrossRef]
Disclaimer/Publisher’s Note: The statements, opinions and data contained in all publications are solely those of the individual author(s) and contributor(s) and not of MDPI and/or the editor(s). MDPI and/or the editor(s) disclaim responsibility for any injury to people or property resulting from any ideas, methods, instructions or products referred to in the content. |
© 2023 by the authors. Licensee MDPI, Basel, Switzerland. This article is an open access article distributed under the terms and conditions of the Creative Commons Attribution (CC BY) license (https://creativecommons.org/licenses/by/4.0/).

