Abstract
The present study introduces a comprehensive machine-learning framework for modeling, interpretation and optimization of the CNC turning procedure employing coated cutting inserts. The primary novelty of this work lies in the integrated pipeline that leverages a multimodal experimental dataset in order to simultaneously model surface roughness and residual stresses, as well as to interpret these predictions within a unified optimization scheme. Particularly, a deep learning model was developed incorporating a convolutional encoder for analyzing time-series signals and a static encoder for the investigated machining parameters. This fused representation enabled accurate multi-task predictions, capturing the thermo-mechanical interactions that govern surface integrity. Additionally, to ensure interpretability, a surrogate meta-model based on the deep model’s predictions was established and evaluated via Shapley Additive Explanations. This analysis quantified the relative influence of each cutting parameter, linking data-driven insights to contact-mechanical principles. Furthermore, a multi-objective optimization scheme was implemented to derive Pareto optimal trade-offs among the examined parameters that could enhance the machining efficiency. Overall, the integration of deep learning, interpretable modeling and optimization established a coherent framework for data-driven decision making in turning, highlighting the importance of model transparency in advancing intelligent manufacturing systems.
1. Introduction
Turning operations continue to be one of the most prevalent manufacturing processes for the fabrication of cylindrical components, offering high levels of productivity and precision. In such tasks, the efficiency of the cutting tool represents a critical determinant of key manufacturing outcomes like surface quality, dimensional accuracy and product life [1]. In general, a workpiece’s surface integrity is defined by the condition of its surface layer, including roughness, residual stresses (RS), work hardening and microstructural changes, all of which play a decisive role in fatigue life and the overall performance of machined parts [2]. To that end, advancements in coated cutting tools like Physical Vapor Deposition (PVD) and Chemical Vapor Deposition (CVD) coatings have enabled enhanced tool life, higher cutting speeds and improved wear resistance [3]. At the same time, the interaction between coating systems and the manufacturing parameters remains complex and often nonlinear, as it governs not only surface roughness but also subsurface microstructure and residual stress states [4]. This complexity frequently necessitates combined experimental and modeling approaches in order to identify parameter windows that yield both high productivity and acceptable surface quality. Such considerations are particularly important for engineered equipment and high-value parts, where achieving optimal surface integrity constitutes a critical aspect in guaranteeing long-term reliability and safe operation [5].
In CNC turning, the surface integrity of machined components is governed primarily by three factors: (i) geometric and kinematic parameters, such as geometry and cutting conditions, which strongly influence the uncut-chip geometry and the resulting contact pressures; (ii) tribological conditions at the tool–chip and tool–workpiece interfaces, which regulate the real area of contact and interfacial shear strength; and (iii) thermo-mechanical mechanisms that determine near-surface plastic deformation and thermal exposure [6,7]. From an energy-dissipation perspective, cutting power is mainly expended through plastic work in the primary shear zone and frictional dissipation at the tool–chip and flank/workpiece contacts, with most of this work ultimately converted into heat and distributed according to heat partition. This resulting temperature field may shift the balance between mechanically driven flank-contact effects, which typically induce compressive residual stresses and thermally driven mechanisms that tend to promote tensile stresses [8]. Regarding the roughness generation during turning, it is not determined solely by kinematic-geometric effects like feed, nose radius and the associated cusp height. In particular, tribological phenomena like built-up edge could change the effective cutting-edge geometry, producing that way irregular material tearing and adhesive smearing on the surface. Likewise, tool wear modifies the tool–workpiece contact conditions, amplifying frictional heat generation and the tendency for vibrations, which in turn alter the resulting surface topography [9].
In this context, surface roughness influences contact behavior, sealing, fatigue performance, mechanics and lubrication [10,11]. A rougher surface typically contains higher concentrations of micro-notches, cracks and plastically deformed layers, which act as stress raisers and initiation sites for fatigue failure, corrosion and wear. These phenomena accelerate degradation mechanisms, shorten the functional lifespan and amplify performance inconsistency [12]. At the same time, residual stresses induced during machining can be either beneficial or detrimental, depending on process dynamics, tool–workpiece interaction and thermo-mechanical loading [13]. This behavior is corroborated by the work presented in [14], where the authors exhibited how process parameters including cutting speed, feed rate, depth of cut and tool coating determine the developed residual stress profiles in hardened steel turning. It is worth mentioning that the relationships between surface finish, surface integrity, residual stresses and reliability have been widely documented in the literature; however, most industrial applications still rely on empirical relations or classical regression methods. At the same time, the move toward Industry 4.0 and smart manufacturing has prompted the use of sensor systems (e.g., force, acoustic emission, vibration, temperature), as well as data-rich methods towards the optimization of machining procedures [15]. Furthermore, it should also be noted that manufacturing environments are becoming increasingly complex, characterized by multiphase coatings, variable tool wear, multimodal sensors and multiple quality target; thereby, there is a pronounced need for data-driven frameworks that are both predictive and interpretable [16]. To address this need, data-centric approaches that link cutting parameters, tool/coating state, sensor-measured signals and surface integrity outcomes are of high relevance.
A key development in this regard involves the utilization of Machine Learning (ML) techniques, which are increasingly integrated into machining operations in order to model, predict and control surface roughness. Recent studies have demonstrated that data-driven models can estimate surface roughness in turning with very high precision, directly supporting the control of the machined surface finish. In particular, Jacob et al. [17] developed an ensemble of ML models to forecast roughness in finishing turning of 16MnCr5, showing that combining multiple learners increases robustness and predictive reliability compared with single models. In the same direction, Mane et al. [18] utilized RSM and neural networks to model roughness and cutting temperature under minimal cutting fluid application. Another approach was introduced in [19], where the researchers employed ML to estimate the mean roughness depth during the dry turning of super duplex stainless steel with textured tools. These models successfully captured the complex interactions between cutting variables and tool condition, enabling the identification of optimal cutting parameters that maintain surface roughness within acceptable limits for difficult-to-machine alloys. Beyond pure predictions, Artificial Intelligence (AI) techniques are also being utilized with optimization and digital-twin (DT) concepts to actively minimize roughness and stabilize surface quality during turning. Specifically, Ramesh [20] constructed a digital-twin framework for dry turning of Ti-6Al-4V, where the workflow was designed by combining experimental data, an ANFIS intelligent model and genetic-algorithm optimization. Its main objective was to predict and reduce roughness while simultaneously monitoring cutting forces, chip thickness and flank wear. In parallel, Khan et al. [16] proposed a data-driven DT for CNC turning that uses several ML algorithms to estimate surface quality and power consumption, highlighting the capacity of these models to be embedded in smart-manufacturing systems for real-time decision support. These studies demonstrate that AI-enabled prediction, optimization and DT methodologies could improve the accuracy of surface-roughness forecasts in turning. More significantly, they provide a foundation for systematic parameter selection and adaptive control, leading to superior and more uniform surface integrity in production.
Another major application of ML within turning procedures composes the critical challenge of modeling and controlling machining-induced residual stresses, which are fundamental to surface integrity. Specifically, Farias et al. [21] developed a hybrid ML model that combines Principal Component Analysis (PCA) with a Radial Basis Function Network (RBFN) to predict the generated residual stresses when turning hard materials. The work emphasized that high cutting temperatures and plastic deformation could create residual stress states that strongly influence surface integrity, as well as the lifespan of the manufactured component. Furthermore, the paper stressed the need to guarantee compressive residual stresses and avoid tensile states that could potentially degrade the product’s performance. In a related direction, Fu et al. [22] reports a DT-driven multi-scale characterization approach, where residual stresses and surface material properties are visualized during processing using DT technology, underlining that residual stresses should be treated as a real-time controllable quantity rather than an after-the-fact measurement. Additionally, when combined with data-driven residual-stress predictors developed, these DT models could potentially provide a pathway toward closed-loop turning systems. In this framework, cutting parameters are continuously adjusted to maintain residual stresses within a specified compressive window, thereby improving fatigue resistance and dimensional stability of the machined part. A further contribution to this area is provided in [23], in which the authors developed an AI–based prognostic model and fine-tuned using the Pigeon Optimizer metaheuristic in order to estimate residual stresses generation during the turning of Inconel 718. Specifically, the work models the relationship between key machining parameters and the resulting residual stress state in the machined surface and near-surface region. The main goal was to provide an accurate, data-driven tool to support process optimization and enhance the integrity of the machined components. Another relevant study addressing this topic was exhibited in [24], where the authors investigated the application of AI-based methods to forecast residual stresses induced during the turning of pure iron. The research established data-driven models that relate machining parameters to the resulting surface and subsurface residual stress distributions in order to improve the prediction accuracy, as well as to reduce the experimental effort in assessing machining-induced residual stresses.
Despite the progress outlined above, several important gaps remain to be addressed within the existing literature. Specifically, the majority of the available studies examine surface roughness and residual stresses independently, rather than addressing both within a unified and comprehensive framework. Moreover, most predictive models rely primarily on static input cutting parameters or on relatively simple sensor signals. So, there is comparatively limited work that combines time-series sensor data coupled with static process parameters in an integrated model capable of estimating multiple surface integrity outcomes. In addition, many existing ML models function as “black boxes” that provide accurate projections but lack interpretability and consequently deliver limited actionable insights for end users in industrial settings. Finally, a significant research gap exists in the development of multi-objective optimization approaches that leverage fused sensor–process ML models to control surface roughness and residual stresses. Motivated by these gaps, the present paper proposes a comprehensive scheme for modeling, interpreting and optimizing the turning process using coated cutting inserts. In particular, the introduced workflow: (i) considers an experimental multimodal sensor dataset in turning operations; (ii) constructs a Deep Learning (DL) model that fuses time-series sensor data with static machining parameters; (iii) estimates surface roughness and residual stresses; (iv) provides interpretability of the learned relationships, thereby connecting data-driven models with established domain knowledge; and (v) performs multi-objective optimization to deliver optimal trade-offs in turning performance. By addressing these aspects, the suggested methodology moves beyond single-output predictions and purely modelling, delivering thus a ML-empowered, industry-relevant solution that encompasses sensor data for predictive modelling, interpretability and optimization.
2. Materials and Methods
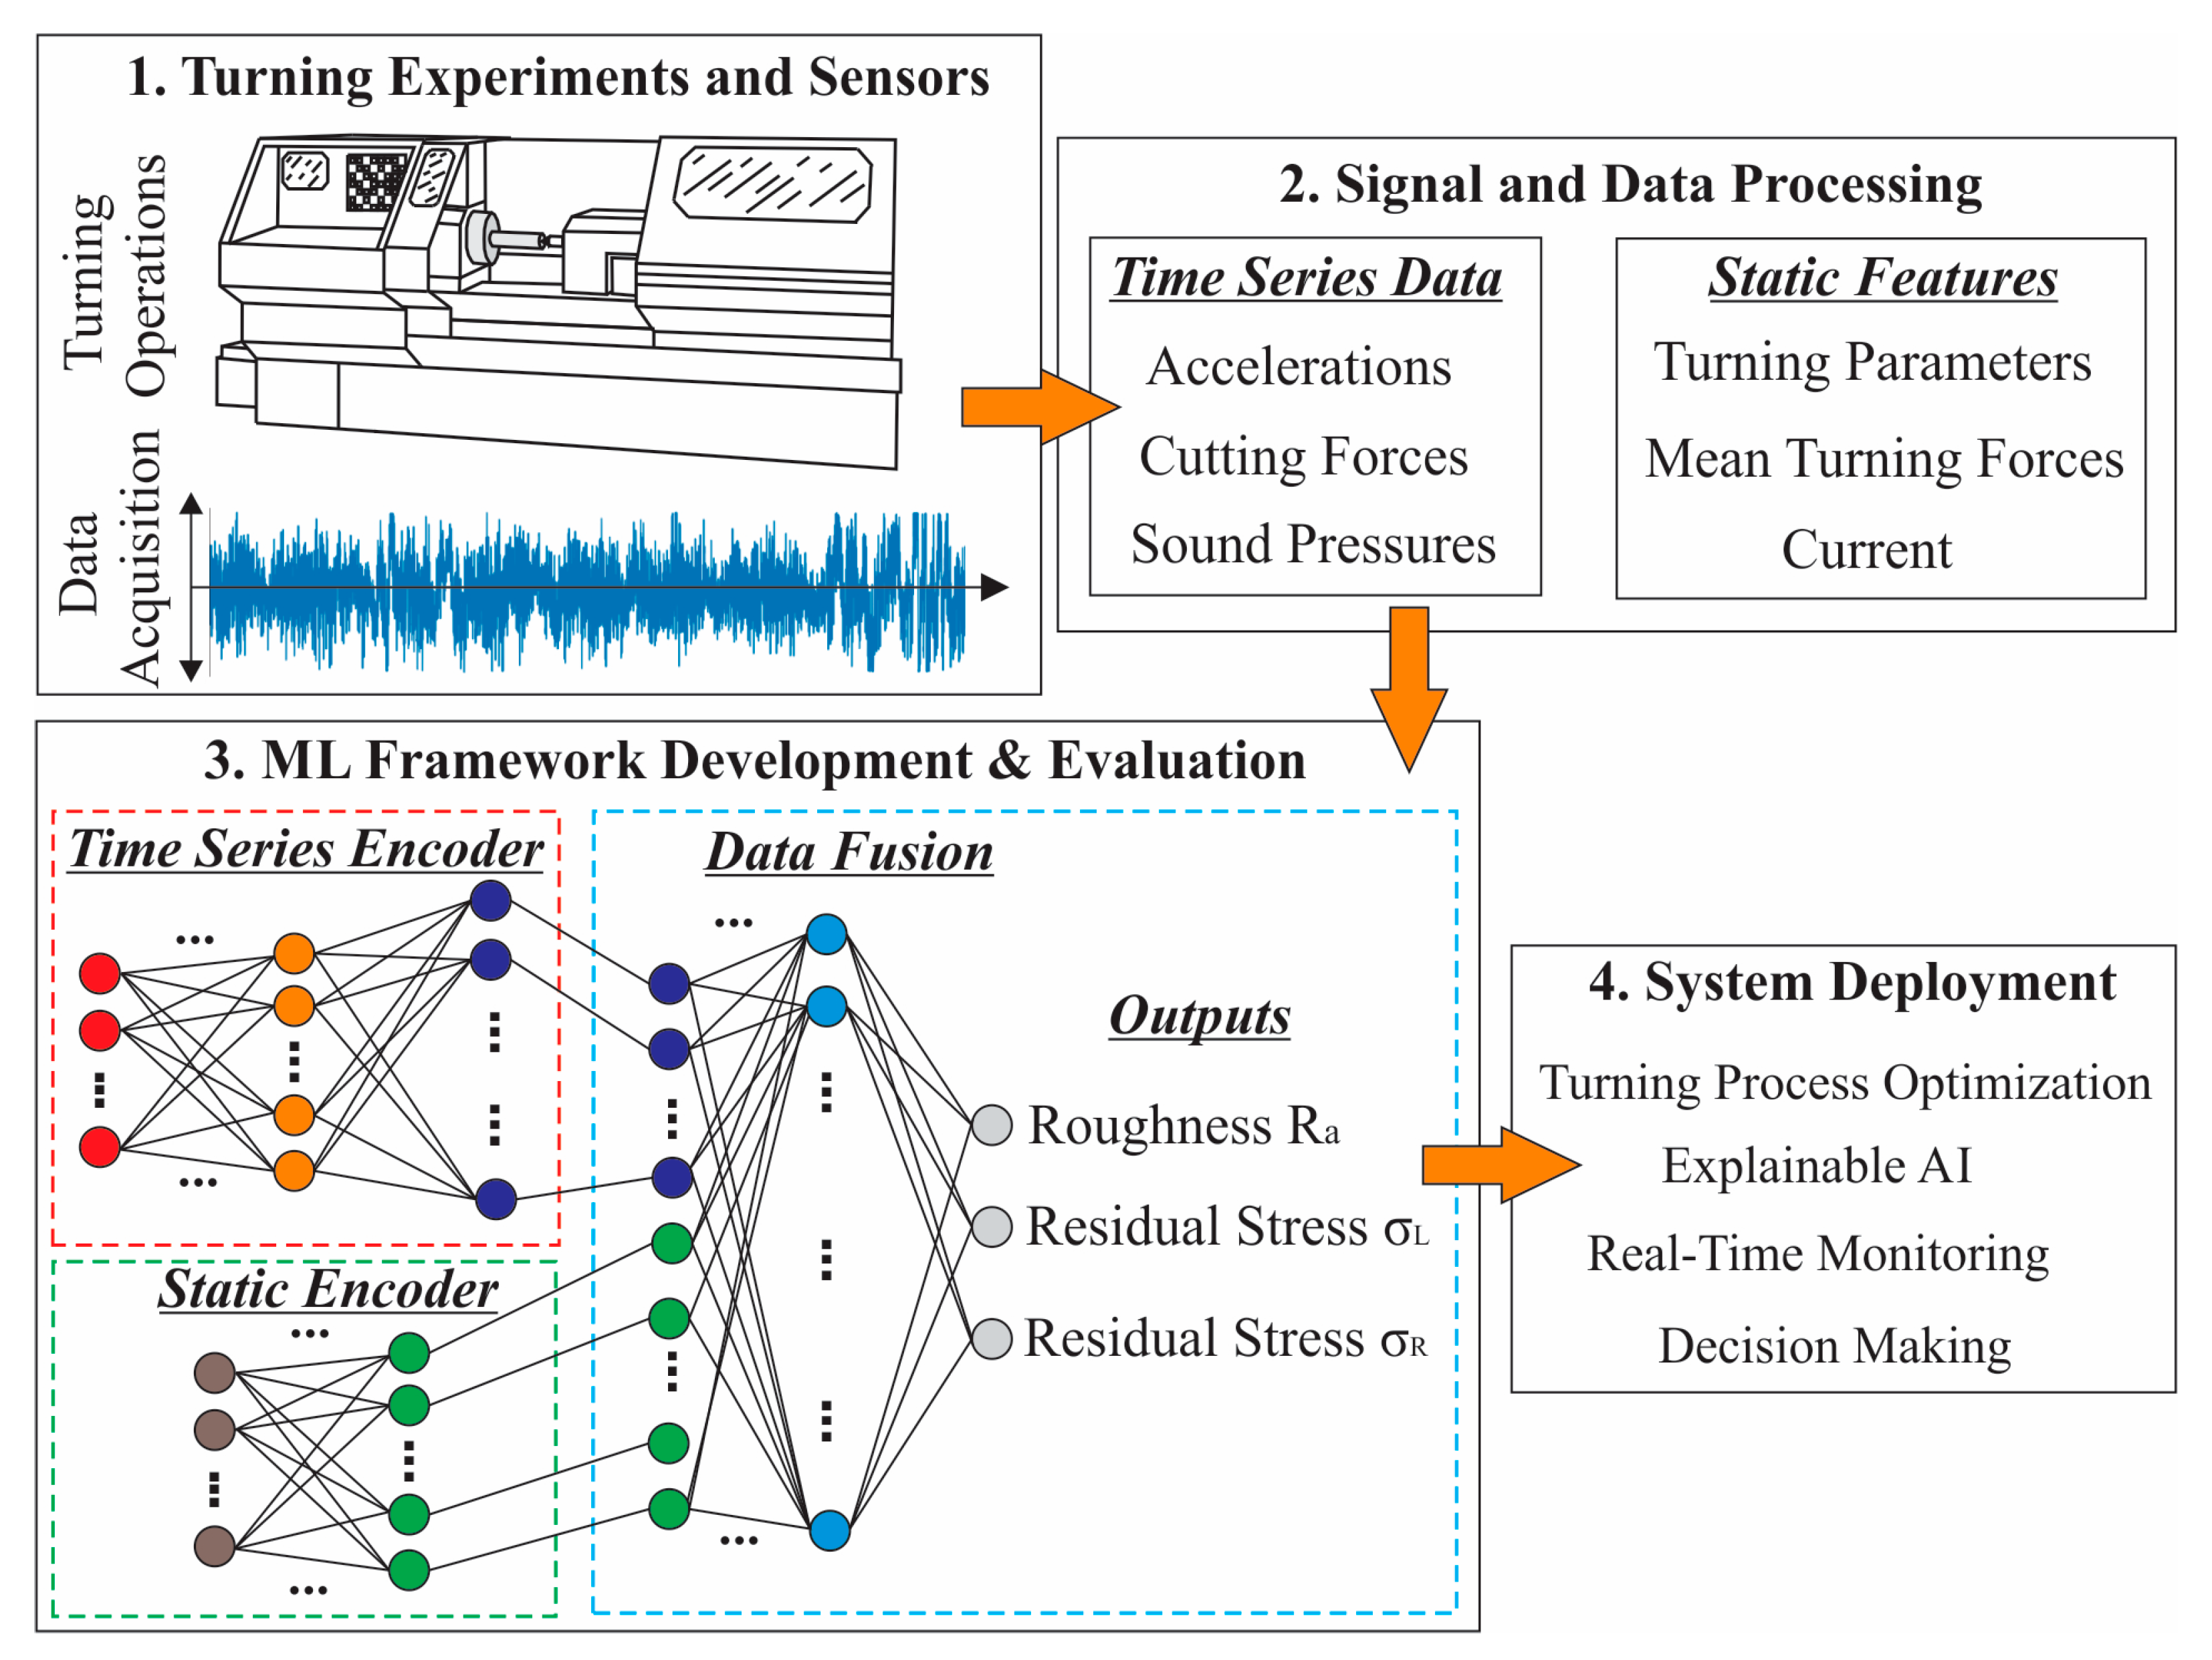
In this study, an experimental publicly available dataset [25] was utilized to ensure transparency, reproducibility and comparability of the results. The selection of this dataset was based on its comprehensive documentation, which details an extensive multimodal experimental study on turning 42CrMo4 + QT using coated cutting inserts. The documented experiments involve multiple cutting-parameter combinations, the corresponding sensor and the resulting surface integrity. Specifically, each experiment is associated with measured surface roughness and residual stress outcomes (longitudinal residual stress and radial residual stress), thereby enabling a multi-task predictive modelling environment. Accordingly, the dataset led to the development of an ML model that fuses a convolutional encoder designed to capture dynamic process behavior from time-series sensor signals along with a static encoder for the applied machining parameters. The resulting fused representation facilitates the accurate forecast of surface roughness and residual stresses by establishing complex nonlinear relationships among sensory, process and cutting tool variables. Additionally, in order to ensure model interpretability and manufacturing relevance, a surrogate meta-model was constructed based on the deep model’s projections and analyzed via Shapley Additive Explanations (SHAP). This interpretability layer quantifies the relative influence of individual cutting parameters and fused-representation components on the predicted outputs, providing a physically consistent interpretation of the learned relationships. Finally, a multi-objective optimization pipeline was also implemented that simultaneously minimizes surface roughness and residual stresses of the manufactured component by generating Pareto-optimal trade-offs in the machining-parameter space. Figure 1 exhibits the overview of the applied approach that integrates DL, interpretable modeling and optimization into a unified workflow, introducing that way a coherent and transparent data-driven operational framework in turning procedures.
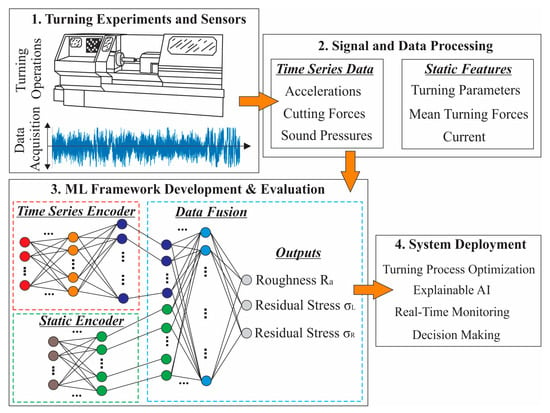
Figure 1.
Schematic of the introduced methodology.
2.1. Experimental Procedure and Data Pre-Processing
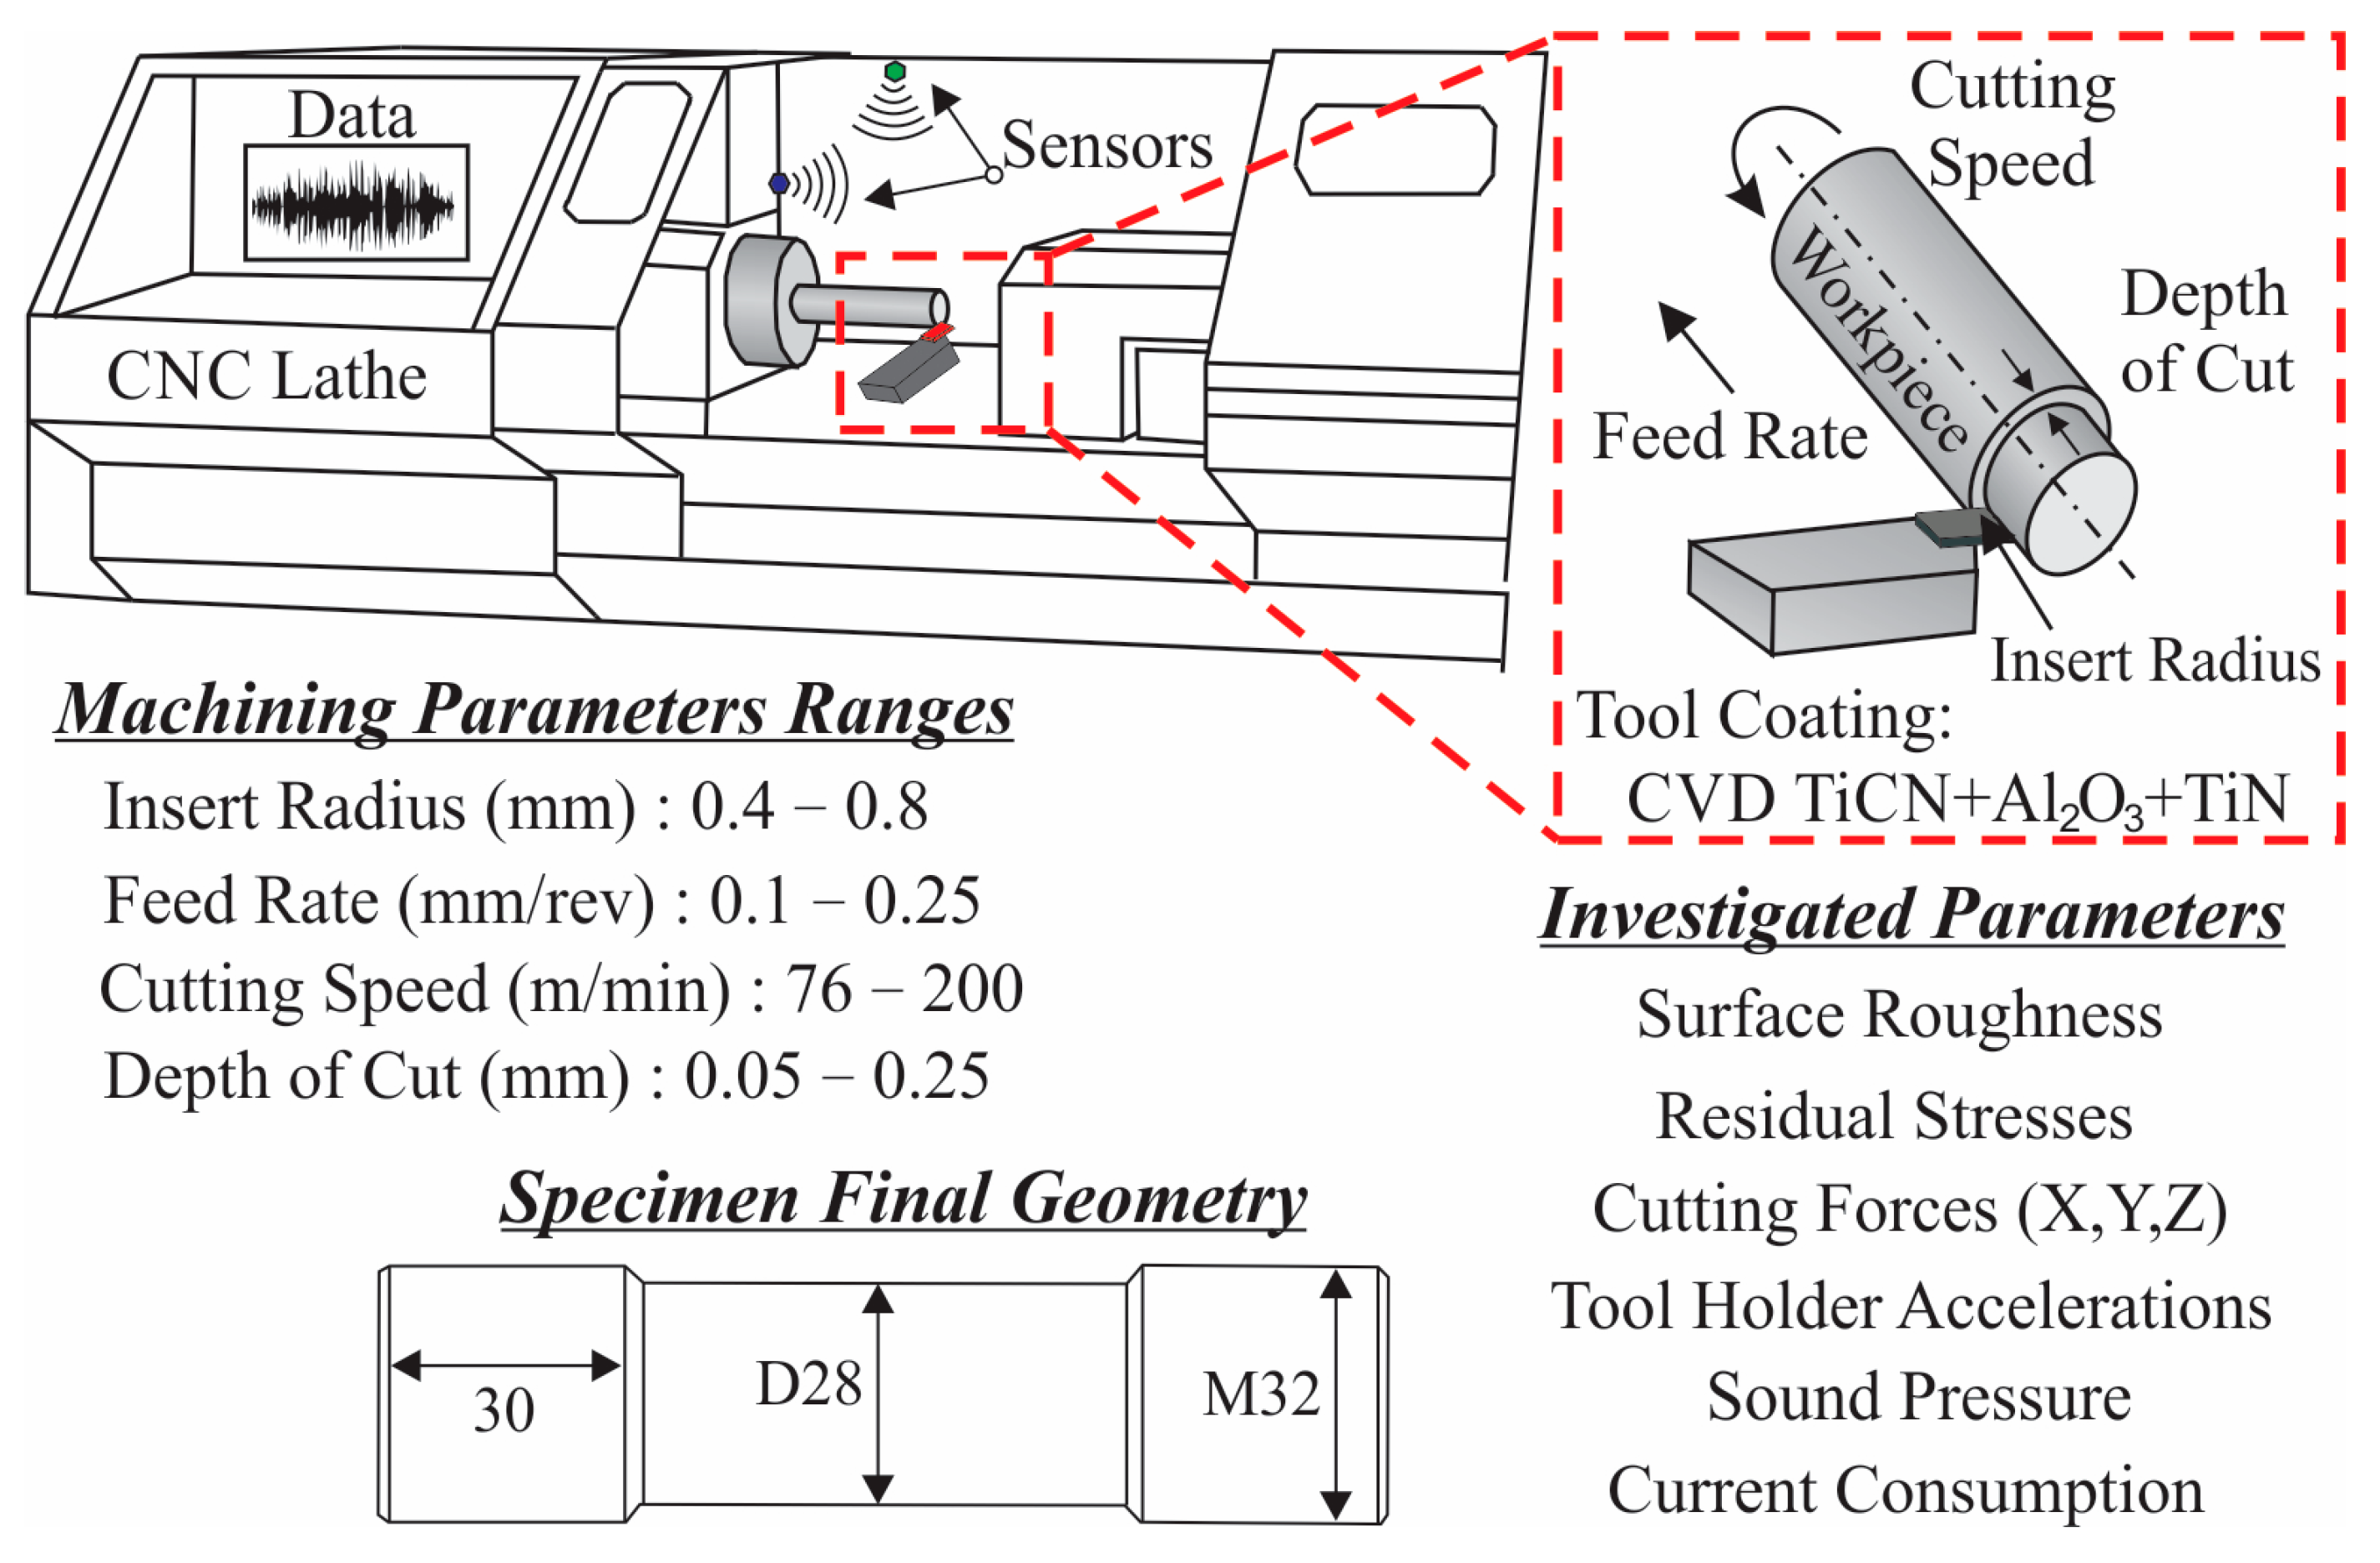
The turning experiments and the corresponding dataset were generated through a systematic procedure adopted in the study [26] in order to investigate the influence of feed rate (f), cutting speed (v), depth of cut (DoC) and insert radius (r) on the surface integrity of 42CrMo4 + QT steel, as schematically illustrated in Figure 2. A total of sixty-eight machining experiments of a cylindrical specimen were performed, each defined by a combination of the examined cutting conditions within the operational ranges of insert radius (0.4 and 0.8 mm), depth of cut (0.05–0.25 mm), cutting speed (76–200 m/min) and feed rate (0.10–0.25 mm/rev). These ranges were chosen based on the capabilities of the applied JATOR TAJ-42 CNC lathe and the specifications of the Sandvik Coromant coated inserts (DCMX 11 T3 04-WF 4325 and DCMX 11 T3 08-WF 4425) that feature a multilayer Chemical Vapor Deposition (CVD) coating composed of TiCN, Al2O3 and TiN.
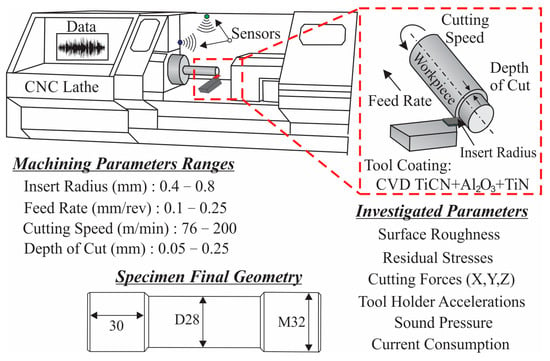
Figure 2.
Experimental design and key turning parameters.
During each turning operation, the process was monitored using a multimodal sensing configuration that captured tri-axial cutting forces, bi-axial accelerations, spindle motor current and acoustic emissions, all recorded as synchronized time-series signals. Moreover, scalar indicators such as mean cutting forces and mean current consumption were also derived from the recorded experimental data. Following the machining procedure, each specimen underwent surface integrity characterization, which included residual stress analysis and surface roughness measurements. Hence, the resulting dataset consolidates the complete set of machining parameters, time series sensor signals, machining indicators, as well as post-process surface integrity metrics, thereby supporting the development of predictive ML models that could relate cutting conditions and process dynamics to material response and surface quality.
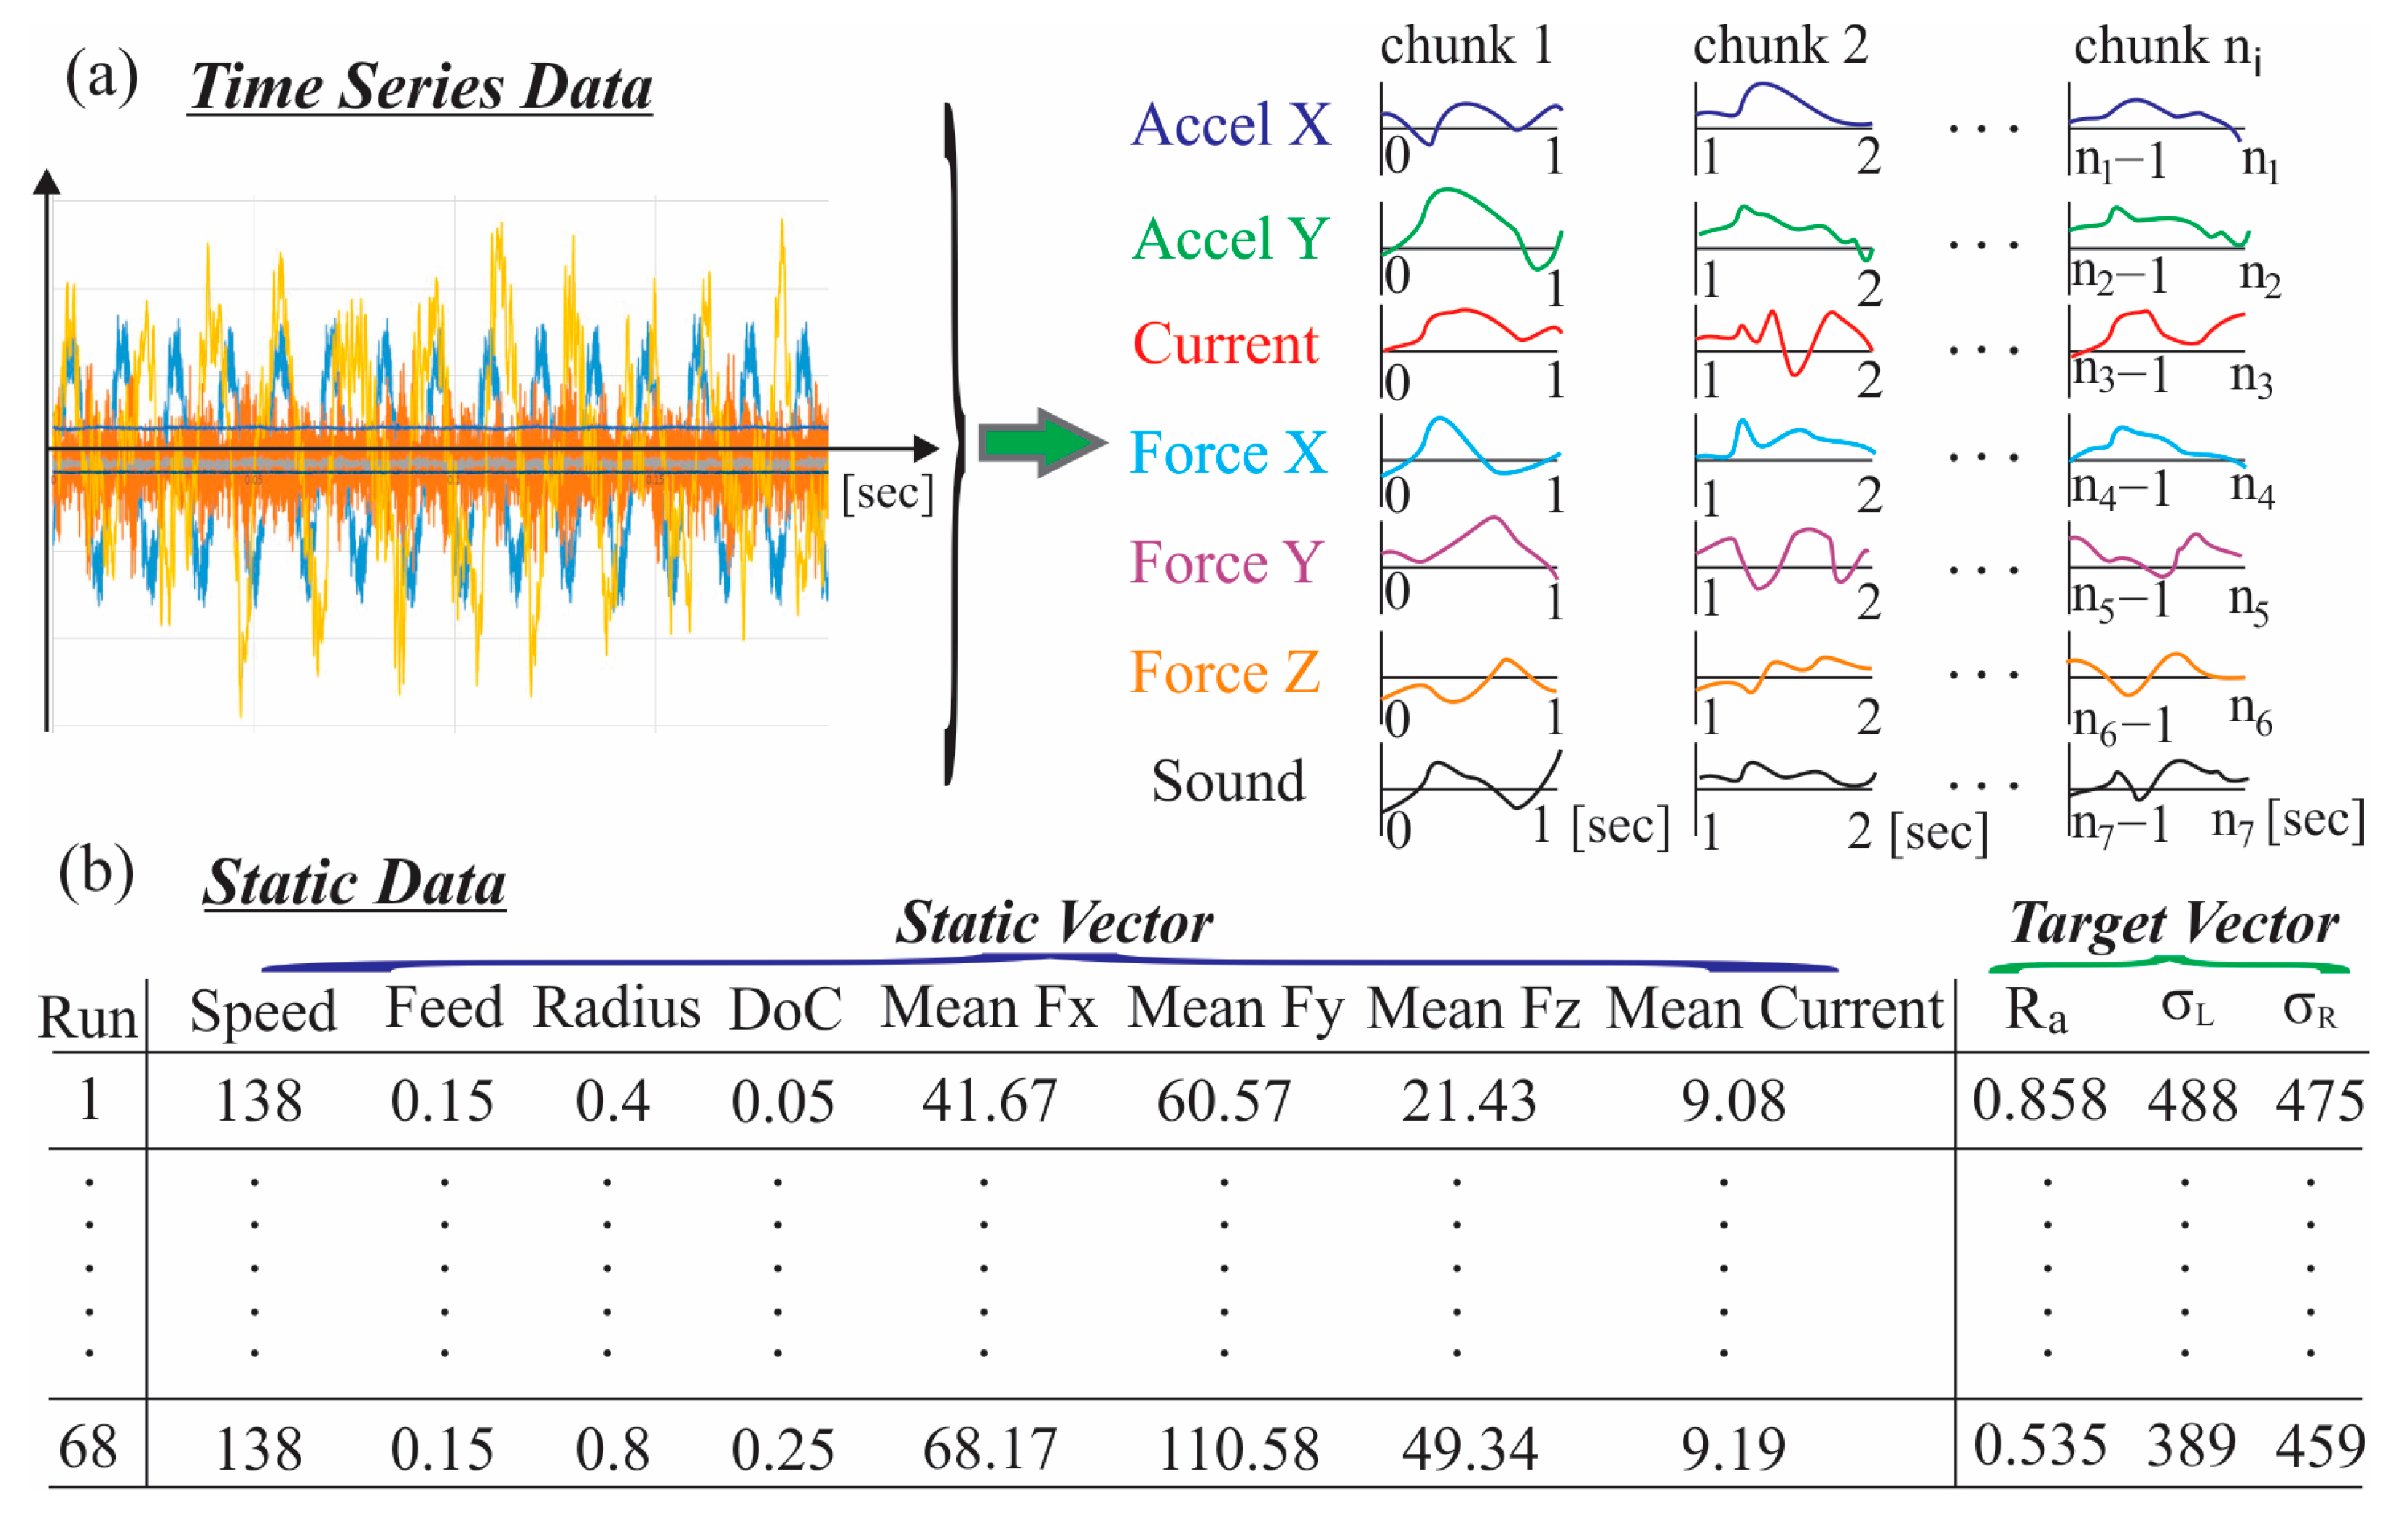
In order to systematically organize the multimodal sensor dataset, a hierarchical scheme was implemented in the present study. This structure assigned a dedicated container to each experiment and, within it, to each sensing modality. Within each container, the time-series signals were preprocessed and segmented into consecutive, fixed-duration recordings of one second, hereafter referred to as “chunks.” These chunks were obtained by processing the original recordings and partitioning them into uniform temporal segments. Notably, the recorded signals were partitioned into non-overlapping one-second chunks prior to feature computation. In general, a one-second window provided ample samples per segment, supported robust and repeatable feature estimation, aligned with a quasi-stationary assumption for the cutting dynamics under constant parameters and yielded a tractable dataset size for subsequent model training. Thus, each chunk represents an independent one-second temporal window of the turning process, as illustrated in Figure 3a. This segmentation established a standardized temporal framework that enabled every second of the machining operation to be treated as a distinct observation containing synchronized measurements across all seven sensing modalities. Particularly, for each chunk, seven univariate time-series signals (acceleration X, acceleration Y, current, force X, force Y, force Z and sound pressure) were concatenated to construct a multivariate matrix characterizing the process dynamics during the corresponding one-second interval.

Figure 3.
Preprocessing of (a) time-series and (b) static data.
Additionally, a consolidated metadata record was established to aggregate the static input parameters and outcome variables across all the experimental procedures. Each entry represented a distinct experimental condition, including the cutting parameters along with the computed mean forces and mean currents, as well as the investigated outputs like surface roughness (Ra), longitudinal residual stress (σL) and radial residual stress (σR). On the basis of this data, a static feature vector consisting of eight numerical descriptors (the applied turning parameters, the mean cutting forces and the current) was defined for each experiment, as displayed in Figure 3b. Moreover, the associated target vector comprising the three measured output quantities, which served as ground-truth values for model supervision. Hereupon, each one-second chunk originating from a given turning experiment was associated with its corresponding static input vector and target vector, establishing that way a direct linkage between the dynamic process signals, the underlying physical conditions and the resulting machining outcomes.
It is also important to note that a systematic standardization procedure was applied to all input features and output variables. This preprocessing step was essential to achieve numerical stability, balanced feature scaling and reliable model training. Therefore, in order to prevent dominance of variables with large numerical magnitudes, as well as to facilitate stable gradient-based optimization, all input and output features were standardized. Particularly, the normalization statistics, namely the mean and standard deviation, were computed on the training data to avoid data leakage into the validation process. For each of the seven time-series channels, channel-wise mean and standard deviation values were calculated, yielding channel-specific normalization parameters. Accordingly, each time-series chunk was standardized by subtracting the corresponding mean and dividing by its standard deviation. An analogous procedure was also applied to the eight static features, for which feature-wise statistics were calculated across all training chunks. Moreover, the three output variables were standardized to unit variance, establishing that the multi-task loss function assigned comparable influence to each output. Therefore, the trained ML model operated in a normalized space and its predictions were subsequently rescaled to physical units for interpretation.
2.2. Machine Learning Models Formulation
The dataset structure described in the previous paragraph was specifically designed in order to enable the developed multimodal ML model to capture local temporal patterns within the process data, as well as to evaluate their impact on the global surface integrity outcomes. Notably, each data sample consisted of three main components: (i) a time-series matrix of size T × 7 (where T denotes the number of sampled time points within the one-second chunk and 7 corresponds to the number of synchronized channels) representing the sensor response, (ii) a static vector of size eight containing the experimental conditions and mean process statistics, and (iii) a three-dimensional output vector representing the target values of surface roughness and residual stresses. Hence, this data structure combined high-frequency process dynamics with low-frequency contextual information, facilitating the capturing of both transient and steady-state phenomena. It is noteworthy that the employed data arrangement produced thousands of samples (one per second of machining for each experiment), providing sufficient data for DL model training.
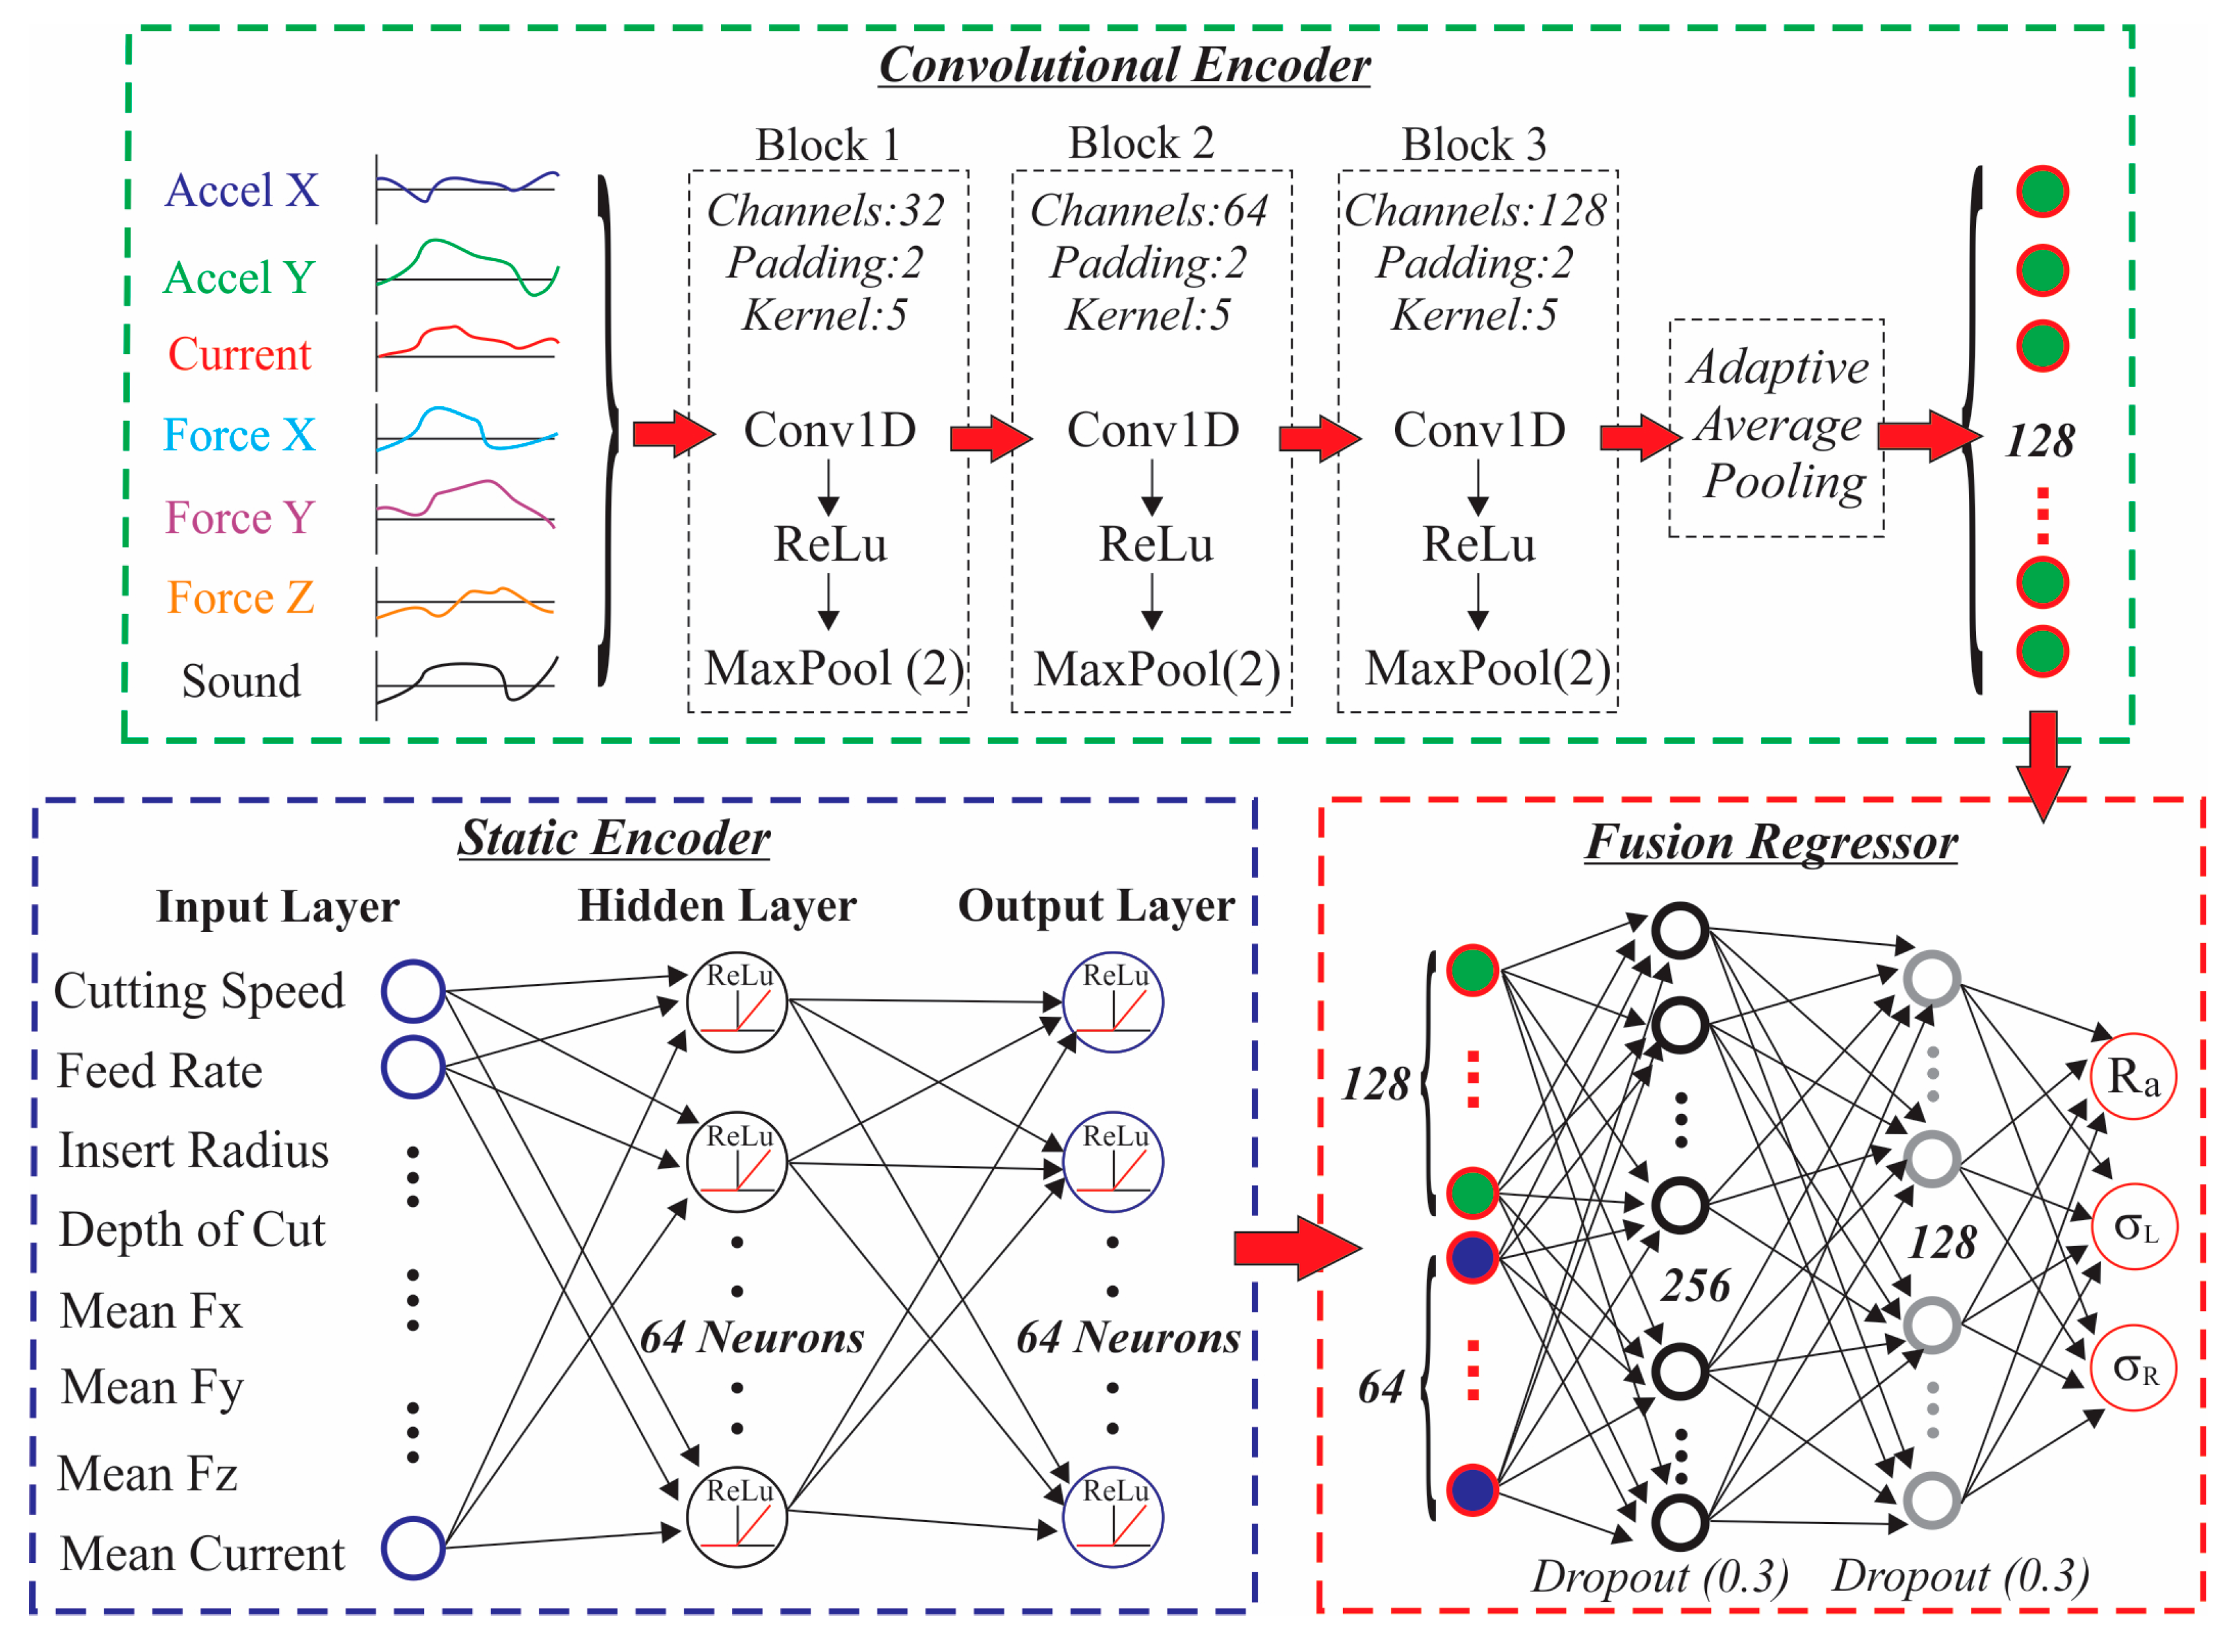
This study introduces a multimodal architecture for the joint modeling of surface integrity. Particularly, the architecture uniquely integrates time-series and static inputs to simultaneously estimate surface roughness and residual stresses. Figure 4 displays the applied multimodal ML framework consisting of three functional components: a convolutional encoder for time-series data, a feed-forward encoder for static variables and a fusion regressor that combined both latent representations into a joint prediction layer. The time-series encoder employed one-dimensional convolutional layers to extract temporal and frequency-related features from the seven-channel signals. More specifically, three convolutional blocks were used, each comprising a convolutional layer with Rectified Linear Unit (ReLU) activation followed by max-pooling to progressively reduce the temporal dimension, while capturing hierarchical representations of the sensor signals. Furthermore, a global average pooling operation was applied to collapse the temporal axis, resulting in a fixed-size embedding of 128 dimensions that summarized the dynamic characteristics of the turning process. Concerning the static encoder, it was implemented as a multilayer perceptron operating on the eight static input variables. It consisted of two fully connected layers with ReLU activations, producing a 64-dimensional feature vector representing the static machining context. In addition, the fusion regressor concatenated the 128-dimensional time-series embedding with the 64-dimensional static representation, forming a 192-dimensional joint feature vector. This vector was passed through two fully connected layers with 256 and 128 neurons, respectively, each followed by ReLU activation and dropout regularization with rate equal to 0.3 in order to mitigate overfitting. Finally, the output layer was configured with three linear neurons to predict the standardized values of the surface integrity parameters under examination, namely surface roughness, longitudinal and radial residual stress. As a result, the utilized architecture allowed simultaneous multi-task learning, empowering the network to exploit shared information among the correlated target variables.

Figure 4.
Multimodal ML framework architecture.
Regarding the training, the dataset was randomly shuffled and split into training (80%) and validation (20%) subsets to ensure reproducible results. This approach allowed the network to generalize patterns that occur repeatedly across different experiments rather than memorizing specific conditions. Consequently, each training and validation sample corresponded to a single one-second window of the process; containing both the dynamic sensor information, as well as the associated static features. The training was performed in a supervised manner using mini-batch gradient descent with the Adam optimizer, the initial learning rate was set to 10−3 and weight decay regularization (10−4) was applied to prevent overfitting. Moreover, a weighted mean squared error (MSE) loss function was applied to the standardized output variables. All weights were initially set to one, thereby assigning equal importance to the three outputs, though the formulation allowed for reweighting if necessary. The learning rate was dynamically adjusted using a “Reduce on Plateau” scheduler, which halved the learning rate when the validation loss stopped improving for several epochs. It should also be noted that model training incorporated an early stopping criterion, whereby validation loss was continuously monitored and the training was terminated after a predefined patience period without improvement. Therefore, the combination of adaptive learning rate scheduling coupled with early termination ensured stable convergence and prevented overfitting on the training phase. Notably, all the experiments were implemented in Python (v 3.10.19) using PyTorch (v 2.5.1) and trained on an NVIDIA GeForce RTX 3060 GPU with 12 GB of dedicated memory, where the total end-to-end preprocessing and training time was approximately one hour.
2.3. Interpretability and Multi-Objective Optimization Workflow
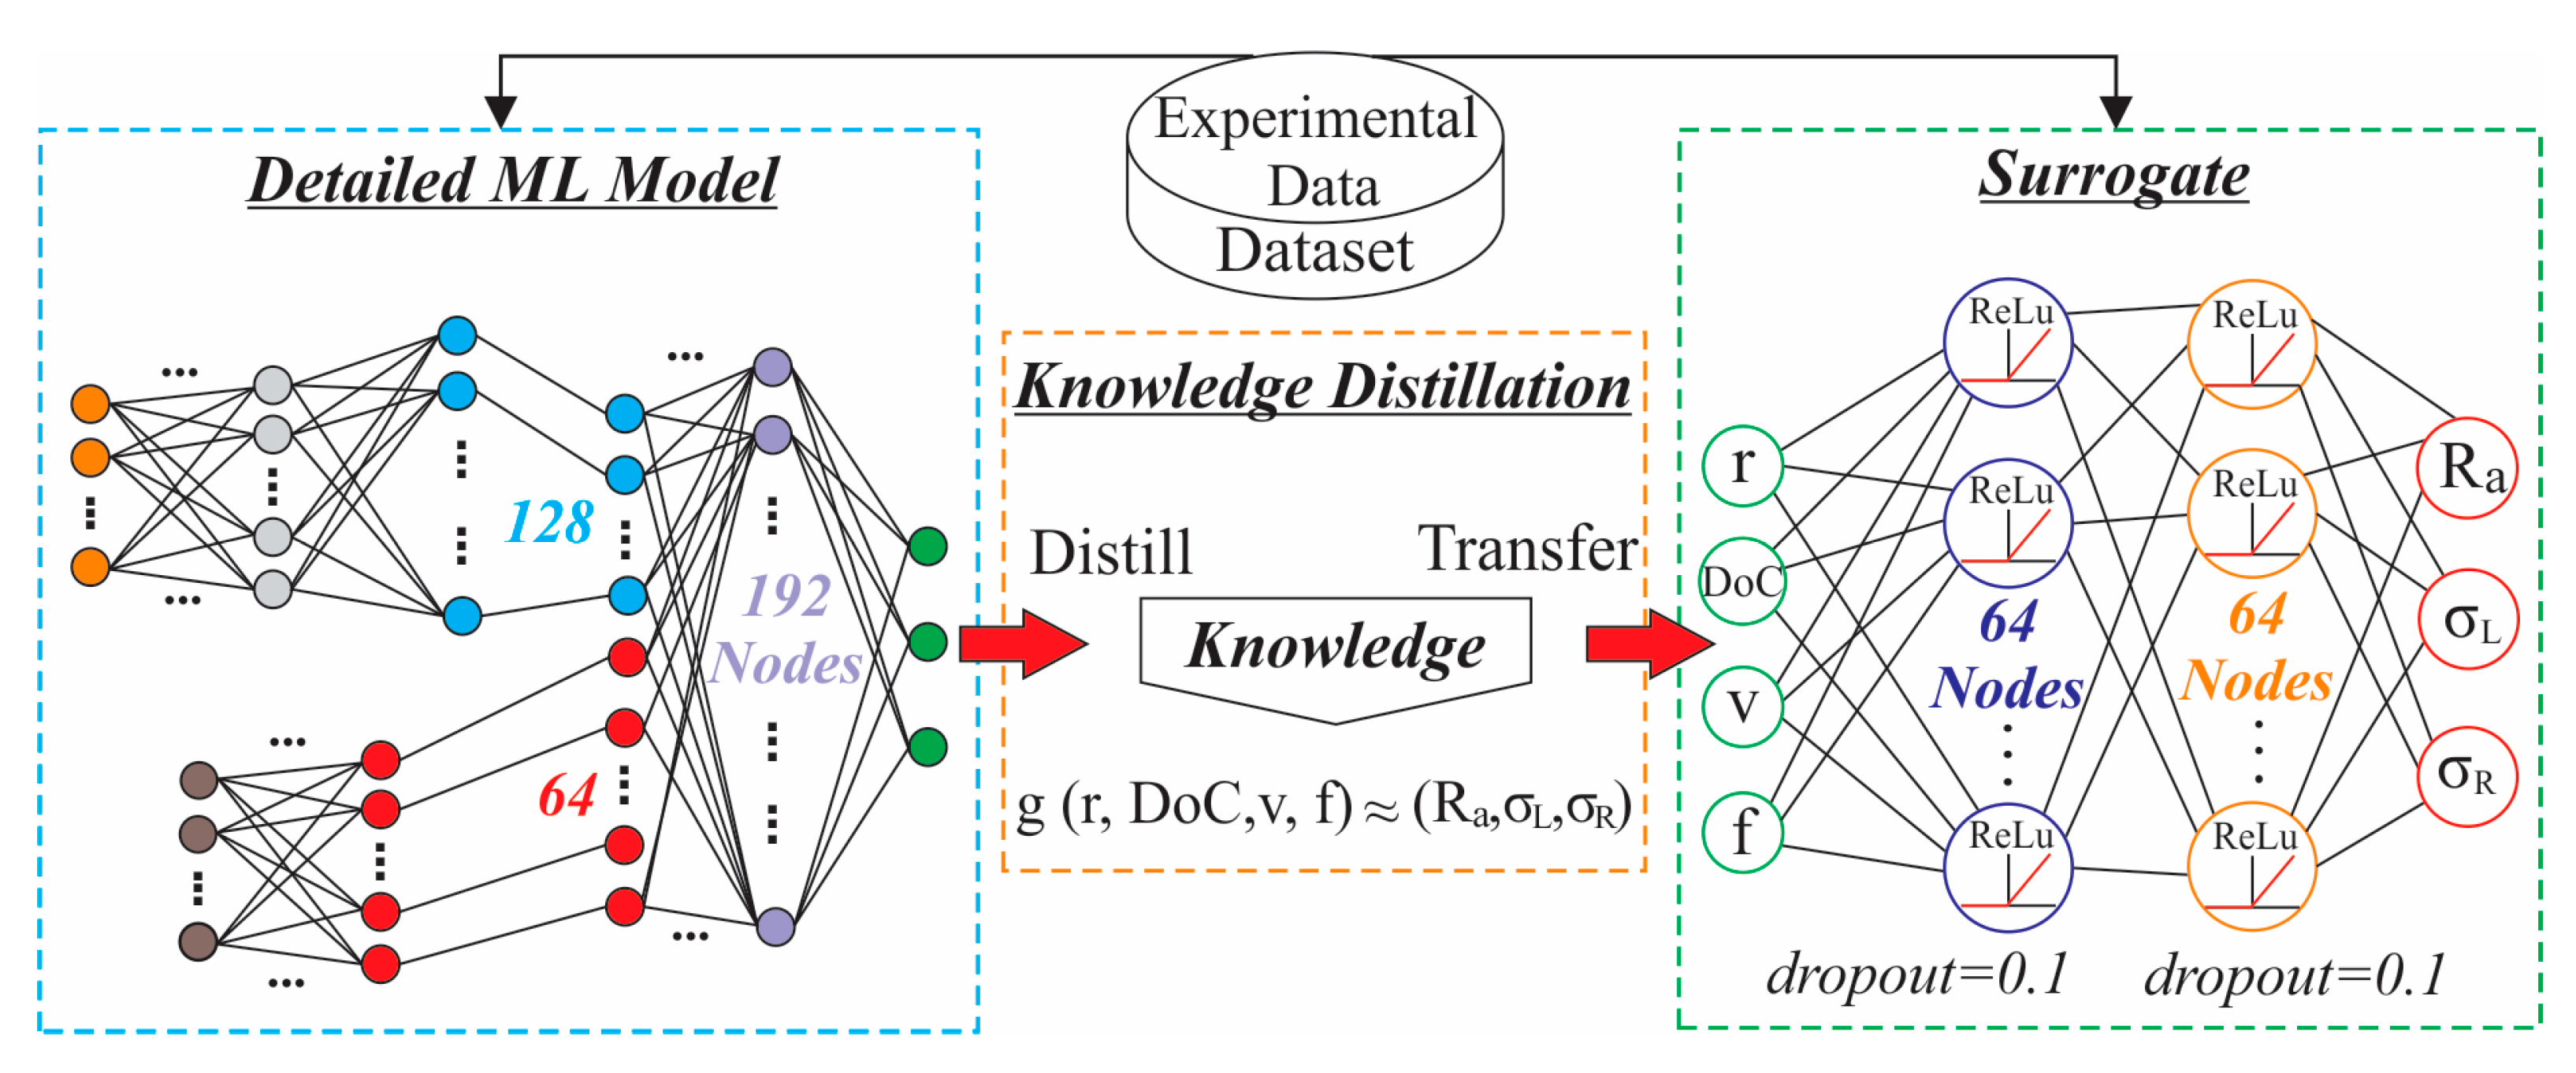
Even though the proposed architecture could effectively capture complex nonlinear dependencies between multimodal process signals and machining outcomes, it cannot provide explicit insight into the individual contributions of specific cutting parameters. Specifically, the direct use for performance enchantment or explainability is not feasible, since the predictive model requires time-series sensor streams as inputs, which are not available for hypothetical parameter combinations that were not physically examined. Accordingly, in order to facilitate both interpretability and optimization, a surrogate modeling strategy based on model distillation was adopted, as presented in Figure 5. This approach captures the prognostic behavior of the full multimodal ML model, while relying solely on input variables that are available for optimization and interpretation. In particular, the trained network was evaluated for each experiment across all time-series windows, and its projections were aggregated to obtain a single experiment-level forecast (Ra, σL, σR) that could reflect the behavior of the full-detailed model under that specific set of cutting parameters. These distilled predictions were then paired with the corresponding cutting parameters (r, DoC, v, f); forming that way a dataset in which each input vector consists solely of the controllable machining parameters and each target vector represents the aggregated response predicted by the ML model. However, it must be noted that while segmenting the time-series data yields a large number of learning instances for the deep multimodal model, it does not increase the number of distinct controllable parameter configurations. Hereupon, the surrogate (trained on experiment-level distilled outputs) learns from a modest number of unique parameter combinations, which is sufficient for trend-level interpretability but may limit fine-scale characterization of interactions and nonlinearities. Nevertheless, despite not requiring sensor data at inference time, the surrogate model still preserves the learned relationships between cutting parameters and the corresponding surface integrity responses. This behavior makes the distilled model suitable for parameter optimization, sensitivity analysis and multi-objective search. Consequently, a parametric surrogate model was employed in order to approximate the mapping established by the detailed multimodal network.
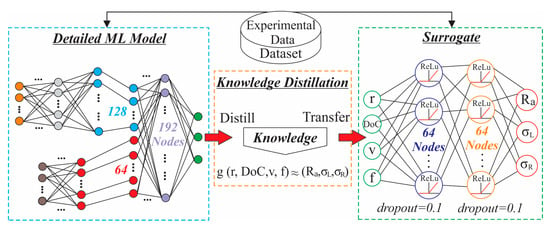
Figure 5.
Surrogate model development via knowledge distillation.
Based on the surrogate model, a Shapley Additive Explanations (SHAP) analysis was conducted to quantify the contribution of each controllable cutting parameter to the predictions of surface roughness and residual stresses. In general, the SHAP methodology is founded in cooperative game theory and assigns each feature a contribution value (the Shapley value) representing its average marginal effect on the model output over all possible subsets of features [27]. So, the method computes for each feature a marginal contribution value, reflecting how much a feature changes the model’s output across all possible feature combinations. Specifically, for the developed surrogate model ‘g(x)’ with the input vector x = [feed rate, radius, depth of cut, speed], the Shapley value ‘φj(x)’ of the input feature ‘xj’ can be defined as
where ‘d’ represents the full set of input features and ‘xs’ denotes a version of the input vector ‘x’ such as only the features in subset ‘S’ are retained, and the remaining features are replaced. These SHAP values provide a model-consistent interpretation of the predictions, rather than a direct statistical analysis of the experimental data.
Since the surrogate model produces three outputs (Ra, σL, σR), three separate SHAP analyses were conducted, one for each scalar output. Moreover, a SHAP KernelExplainer was applied for each output function in order to approximate the corresponding Shapley values via a weighted local linear regression around the point of interest, using weights derived from the Shapley kernel. These calculated SHAP values reveal how variations in each cutting parameter contribute to changes in the estimated surface quality and residual stress state. For instance, a positive SHAP value for the feed rate signifies that higher feed tends to increase the estimated surface roughness, while a negative SHAP value for the cutting speed indicates that higher speeds generally reduce roughness. Aggregating SHAP values across all samples provides a global importance ranking that directly reflects the sensitivity of the model’s forecasts in each parameter. Hereupon, SHAP acts as a bridge connecting the complex data-driven model with human-interpretable process knowledge, transforming the surrogate model from a black box into a transparent, physically consistent decision-support tool for the turning process.
Additionally, in order to achieve a balanced trade-off between surface quality and residual stresses, a Pareto-based multi-objective optimization scheme was established to identify optimal cutting parameter configurations. More specifically, two conflicting objectives were defined, where the first one composed the predicted surface roughness,
which was minimized to promote improved surface quality. The second objective quantified the total magnitude of the residual stress state and was formulated as
which penalizes both high tensile and compressive stresses. The objective of minimizing the absolute sum of the residual stresses was formulated to penalize high-magnitude longitudinal and radial residual stresses, irrespective of sign. This provides a conservative objective that suppresses extreme residual-stress states, avoiding highly stressed states even when the sign-dependent influence on performance is not fully known. High tensile residual stresses could increase crack-opening driving forces and are generally most critical for stress-corrosion cracking, while compressive stresses are typically preferred for fatigue resistance. Nevertheless, a sign-agnostic formulation provides a generalized objective to limit extreme residual-stress magnitudes when the dominant failure mechanism is uncertain. Thus, the optimization problem can be defined as
Since the surrogate model provides rapid evaluation and is defined over a continuous parameter space, a large set of candidates cutting parameter configurations could be generated by uniformly sampling the vector x = [r, DoC, v, f]. These values should be within the hyper-rectangular domain bounded by the minimum and maximum observed values of each cutting parameter. Therefore, for each sampled configuration, the surrogate produced predictions of surface roughness and residual stresses, which were subsequently mapped to the corresponding objective functions. Next, Pareto dominance relations were assessed in order to identify the set of solutions representing optimal trade-offs among the competing objectives, where each candidate solution represents a unique vector of cutting parameters. The method proceeds through iterative generations that evolve the population toward the Pareto-optimal front [28]. In this multi-objective setting, a solution ‘xa’ is superior to another one if and only if the following two conditions hold, such as the ‘xa’ is no worse than ‘xb’ in all objectives and strictly better in at least one:
This Pareto front characterizes the set of machining conditions for which a reduction in surface roughness cannot be obtained without increasing the residual stress magnitude and vice versa. The resulting Pareto-optimal set expresses the inherent trade-offs predicted by the distilled multimodal ML model and provides a principled basis for selecting machining configurations that balance surface quality and mechanical performance.
3. Results
3.1. Model Inference, Aggregation and Evaluation
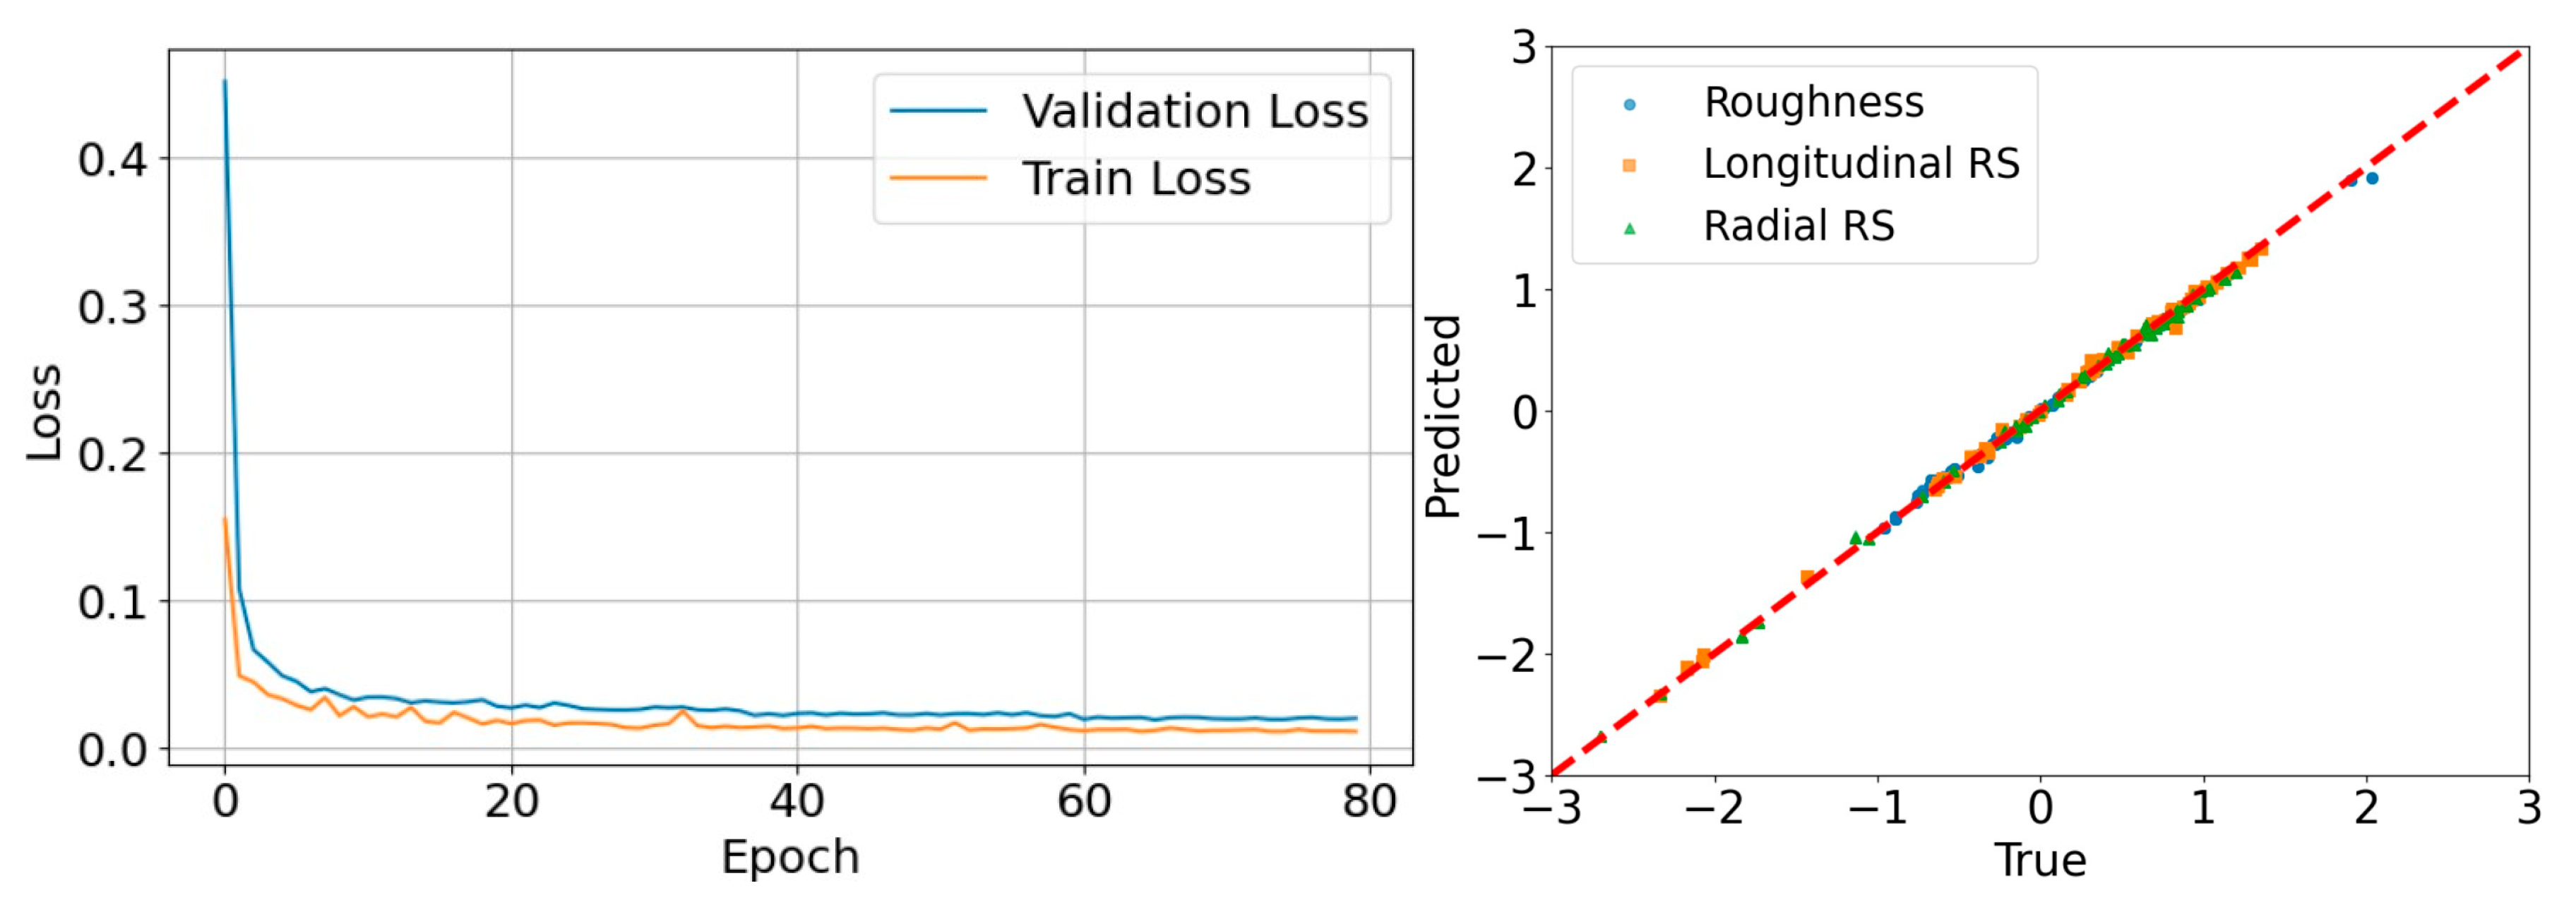
The following post-training workflow presents the ML model’s forecasting ability, aggregates sample-level outputs into experiment-level estimates and evaluates the predictive performance employing both tolerance-based accuracy and normalized error metrics. Notably, the left part of Figure 6 illustrates the evolution of the training and validation loss as a function of the number of training epochs for the introduced multimodal ML model. In the beginning of the training phase, both loss values are relatively high, with the validation loss noticeably exceeding the training loss. During the initial epochs, both curves exhibit a pronounced decrease, reflecting a rapid learning and an effective reduction in the objective function. Following this phase, the rate of decrease becomes more gradual, and the loss values progressively stabilize at low levels. Throughout most of the training process, the training loss remains consistently lower than the validation loss, signifying a slightly better fit to the training data compared to unseen data. Furthermore, the validation loss closely follows the trend of the training loss and does not exhibit divergence or sustained increases, suggesting the absence of overfitting. Although minor fluctuations are observed in both curves, they remain limited and stable. Overall, the loss trajectories demonstrate that the developed ML model converges successfully and achieves satisfactory generalization performance, maintaining stable validation behavior throughout continued training. In addition, the right part of the figure displays the parity scatter plot for the output variables, where most of the points lie very close to the red dashed reference line, pointing out the strong agreement between the predictions and ground truth across all of the examined variables.
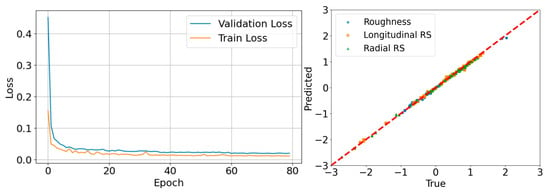
Figure 6.
Training and validation loss of the multimodal ML model and parity scatter plot of the investigated parameters.
Following the training phase, the ML model was deployed to generate predictions for all the available experimental data. For each experiment, every one-second chunk was loaded sequentially, normalized and passed through the trained network to obtain the predicted values for surface roughness and residual stresses in the normalized output space. Although the estimations were produced at the per-chunk level, the final assessment of model performance was carried out at the experiment level in order to match the available ground-truth measurements. In particular, for each experiment, the forecasted outputs (Ra, σL, σR) from all chunks were averaged to produce a single set of mean predictions and then compared against the experimentally measured ones. Hence, the efficiency of the model was quantified using the Mean Absolute Error (MAE), providing an overall measure of the average prediction error. Figure 7 displays the forecast accuracy of the proposed multimodal ML model across all the investigated parameter configurations. Namely, the left subplot reports the MAE between the estimated and measured surface roughness, while the middle and right subplots exhibit the corresponding values for the longitudinal residual stress and the radial residual stress, respectively. Notably, the majority of experiments present low errors, indicating good prognostic capability of the model across the explored design space. However, a limited number of experiments manifest relatively higher MAE values, suggesting that specific combinations of cutting conditions or dynamic signal characteristics are more challenging to generalize, potentially due to measurement noise or reduced representativeness in the training set.

Figure 7.
Experiment-wise accuracy for surface roughness and residual stresses.
In order to further evaluate the practical accuracy as well as the manufacturing relevance of the proposed multimodal ML framework, a tolerance-based performance metric was also considered. Specifically, the experimental-level predicted mean outputs were compared with the corresponding measured values using acceptance bands of ±0.05 μm for surface roughness and ±20 MPa for residual stresses, consistent with realistic tolerances for the investigated turning process. Using this criterion, within-tolerance accuracies of 97% for surface roughness, 90% for the longitudinal and 95% for the radial residual stress were obtained as displayed in Table 1, highlighting the strong agreement between estimated and real experimental values across all targets. These results demonstrate that the proposed methodology delivers forecasts with industrially acceptable precision, supporting its suitability for turning-process monitoring and decision making. Moreover, the performance of the multimodal learning framework was also evaluated using the normalized root mean square error (nRMSE) to provide a scale-independent measure of accuracy. For each response variable (Ra, σL, σR), the RMSE between the projected and measured values was normalized by the data range (i.e., the difference between the maximum and minimum observed values). This normalization delivers an intuitive error measure relative to the process’s natural variability. Table 1 also includes the computed nRMSE values that were exceptionally low, signifying that the model’s prediction error constitutes less than one percent of the total observed variability for each quantity. These outcomes demonstrate that (a) the introduced ML framework captures the underlying input–output relationships with high fidelity and (b) the deviations from experimental measurements are negligible relative to the value-range of the examined cutting conditions.

Table 1.
Multimodal ML model performance on tolerance-based accuracy and nRMSE.
3.2. Explaining Model Predictions
Interpretability was achieved through the SHAP analysis, which offers a quantitative and rigorous assessment of feature importance. In particular, the SHAP framework interpreted the surrogate’s prediction by decomposing it into additive contributions from each feature. For the three target outputs (Ra, σL, σR), SHAP decomposed the model’s forecast into a starting baseline, to which the individual influence (positive or negative) of each turning parameter is added. Therefore, by decomposing each estimation into additive feature contributions relative to a baseline, the employed analysis supports both local explanation of individual machining conditions and global assessment of feature influence across the experimental domain.
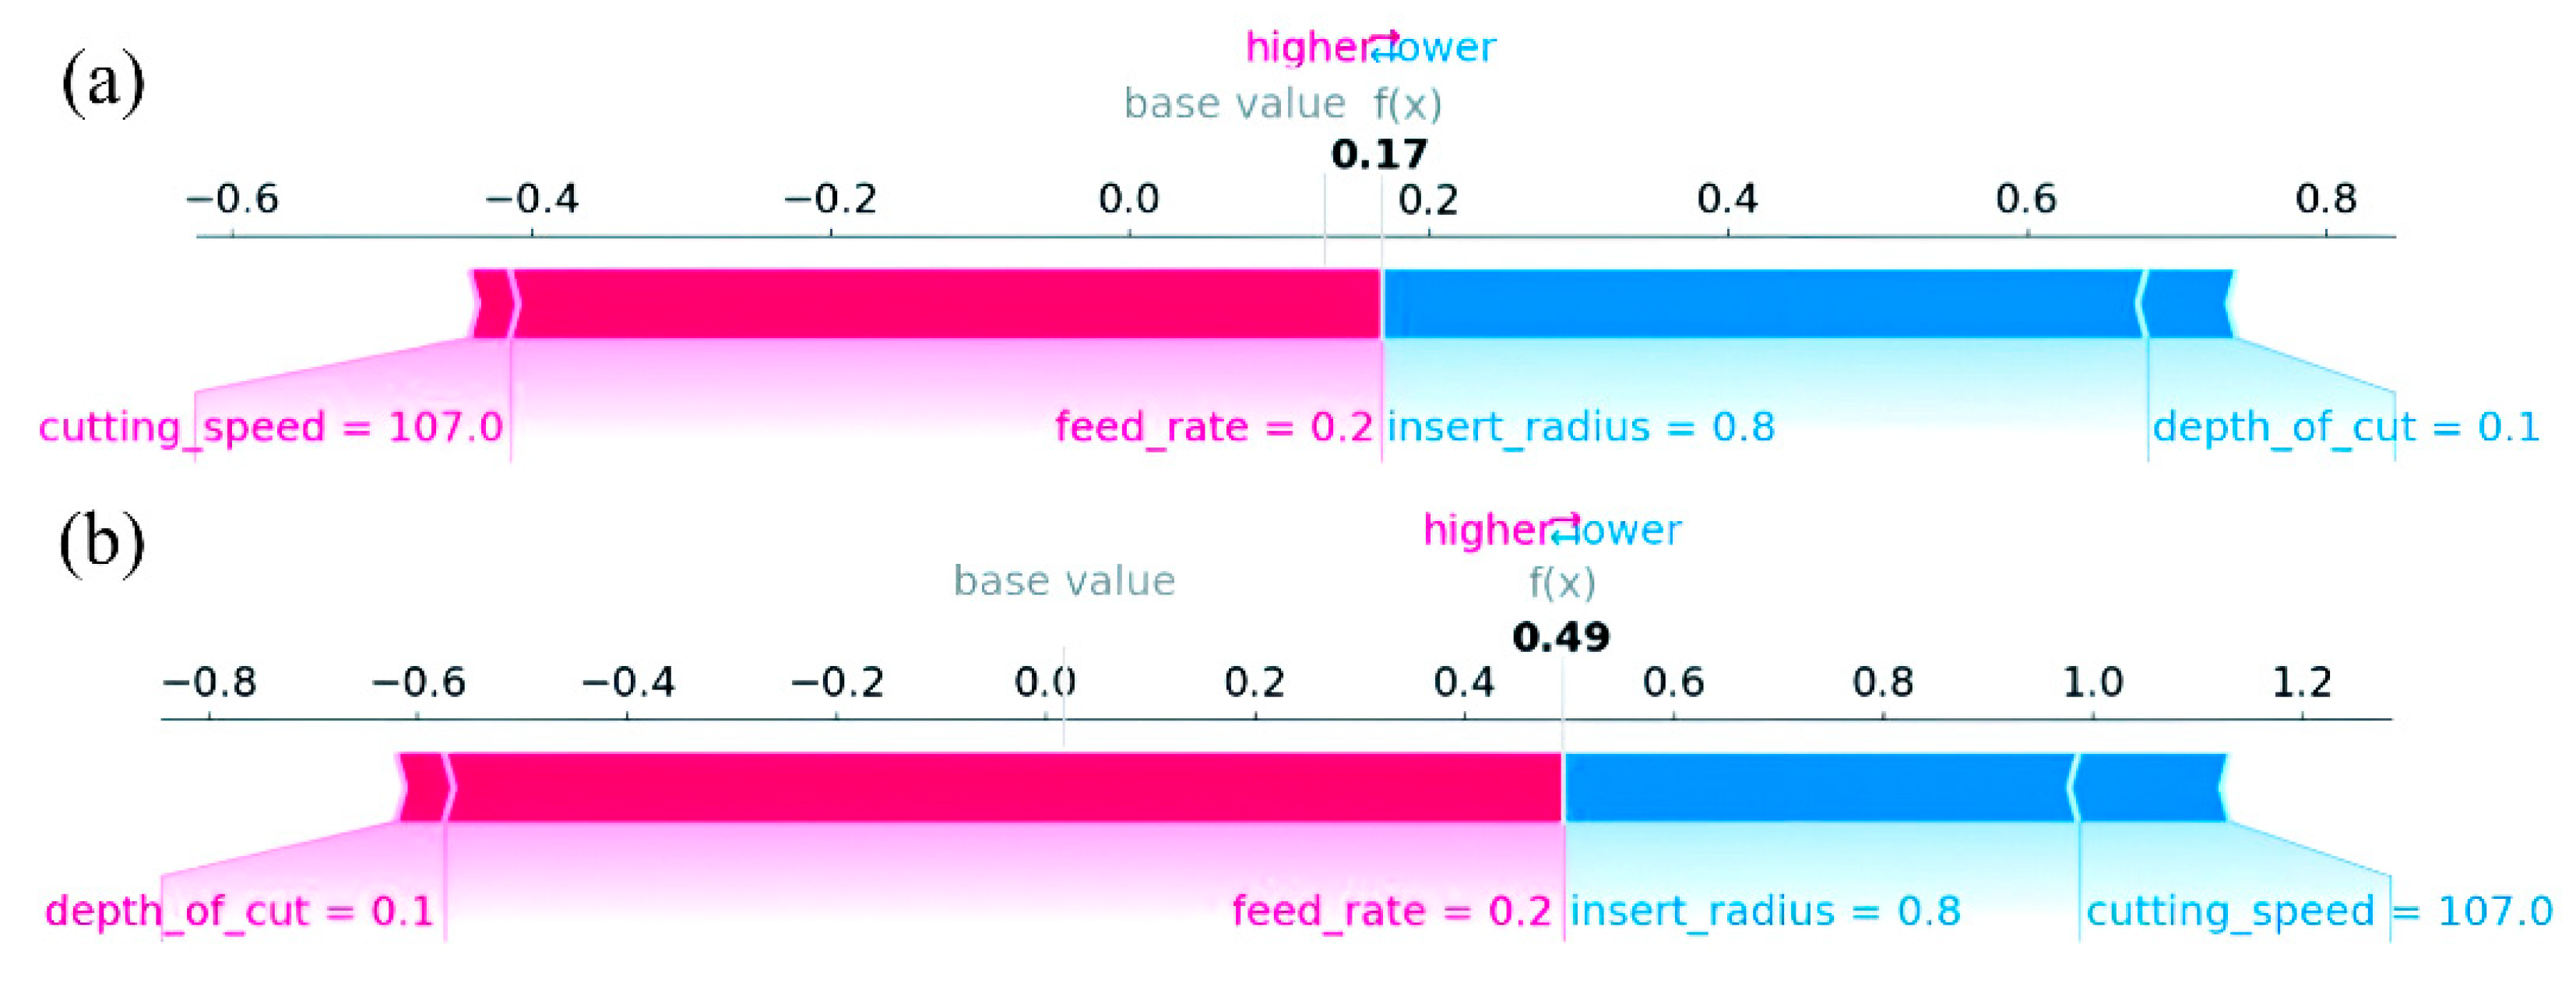
Specifically, Figure 8 illustrates the contribution of each cutting parameter to the surrogate’s prediction for an individual turning experiment. In each force plot, the prediction ‘f(x)’ is decomposed into a baseline (the model’s average prediction) plus the sum of feature-wise SHAP contributions. Features shown in red shift the prediction toward higher values relative to the baseline, whereas features shown in blue shift the prediction toward lower values. Moreover, the horizontal extent of each colored segment reflects the magnitude of the corresponding cutting parameter, enabling a direct assessment of which process variable dominate each individual forecast. In Figure 8a, the model output (f(x) = 0.17) is slightly above its baseline, indicating that for the applied cutting conditions, the prediction of surface quality is governed by a balance between (i) roughness-increasing effects associated with cutting speed and feed rate, and (ii) roughness-reducing impacts related to insert radius and depth of cut. Regarding the residual-stress instance that is displayed in Figure 8b, the predicted value is equal to ‘0.49’, signifying a substantially higher output relative to the baseline. In this case, the net positive contributions outweigh the negative ones, producing a larger separation between the baseline and the final prediction compared to the roughness plot.

Figure 8.
Local SHAP explanation of the predictive (a) Surface roughness and (b) Longitudinal residual stress during a specific turning experiment.
A key observation is that the same machining parameters exhibit output-dependent effects. Notably, while feed rate consistently increases both predicted responses in the presented examples, the effects of cutting speed and depth of cut differs between targets. Furthermore, the consistent downward influence of the insert radius across both plots suggests that, under these operating conditions, the increase in the tool’s radius tends to reduce both predicted roughness and residual-stress magnitude relative to baseline. These sign changes and differences in contribution magnitude suggest that the learned relationships are not purely monotonic and likely involve nonlinearities and interactions among the investigated process parameters.
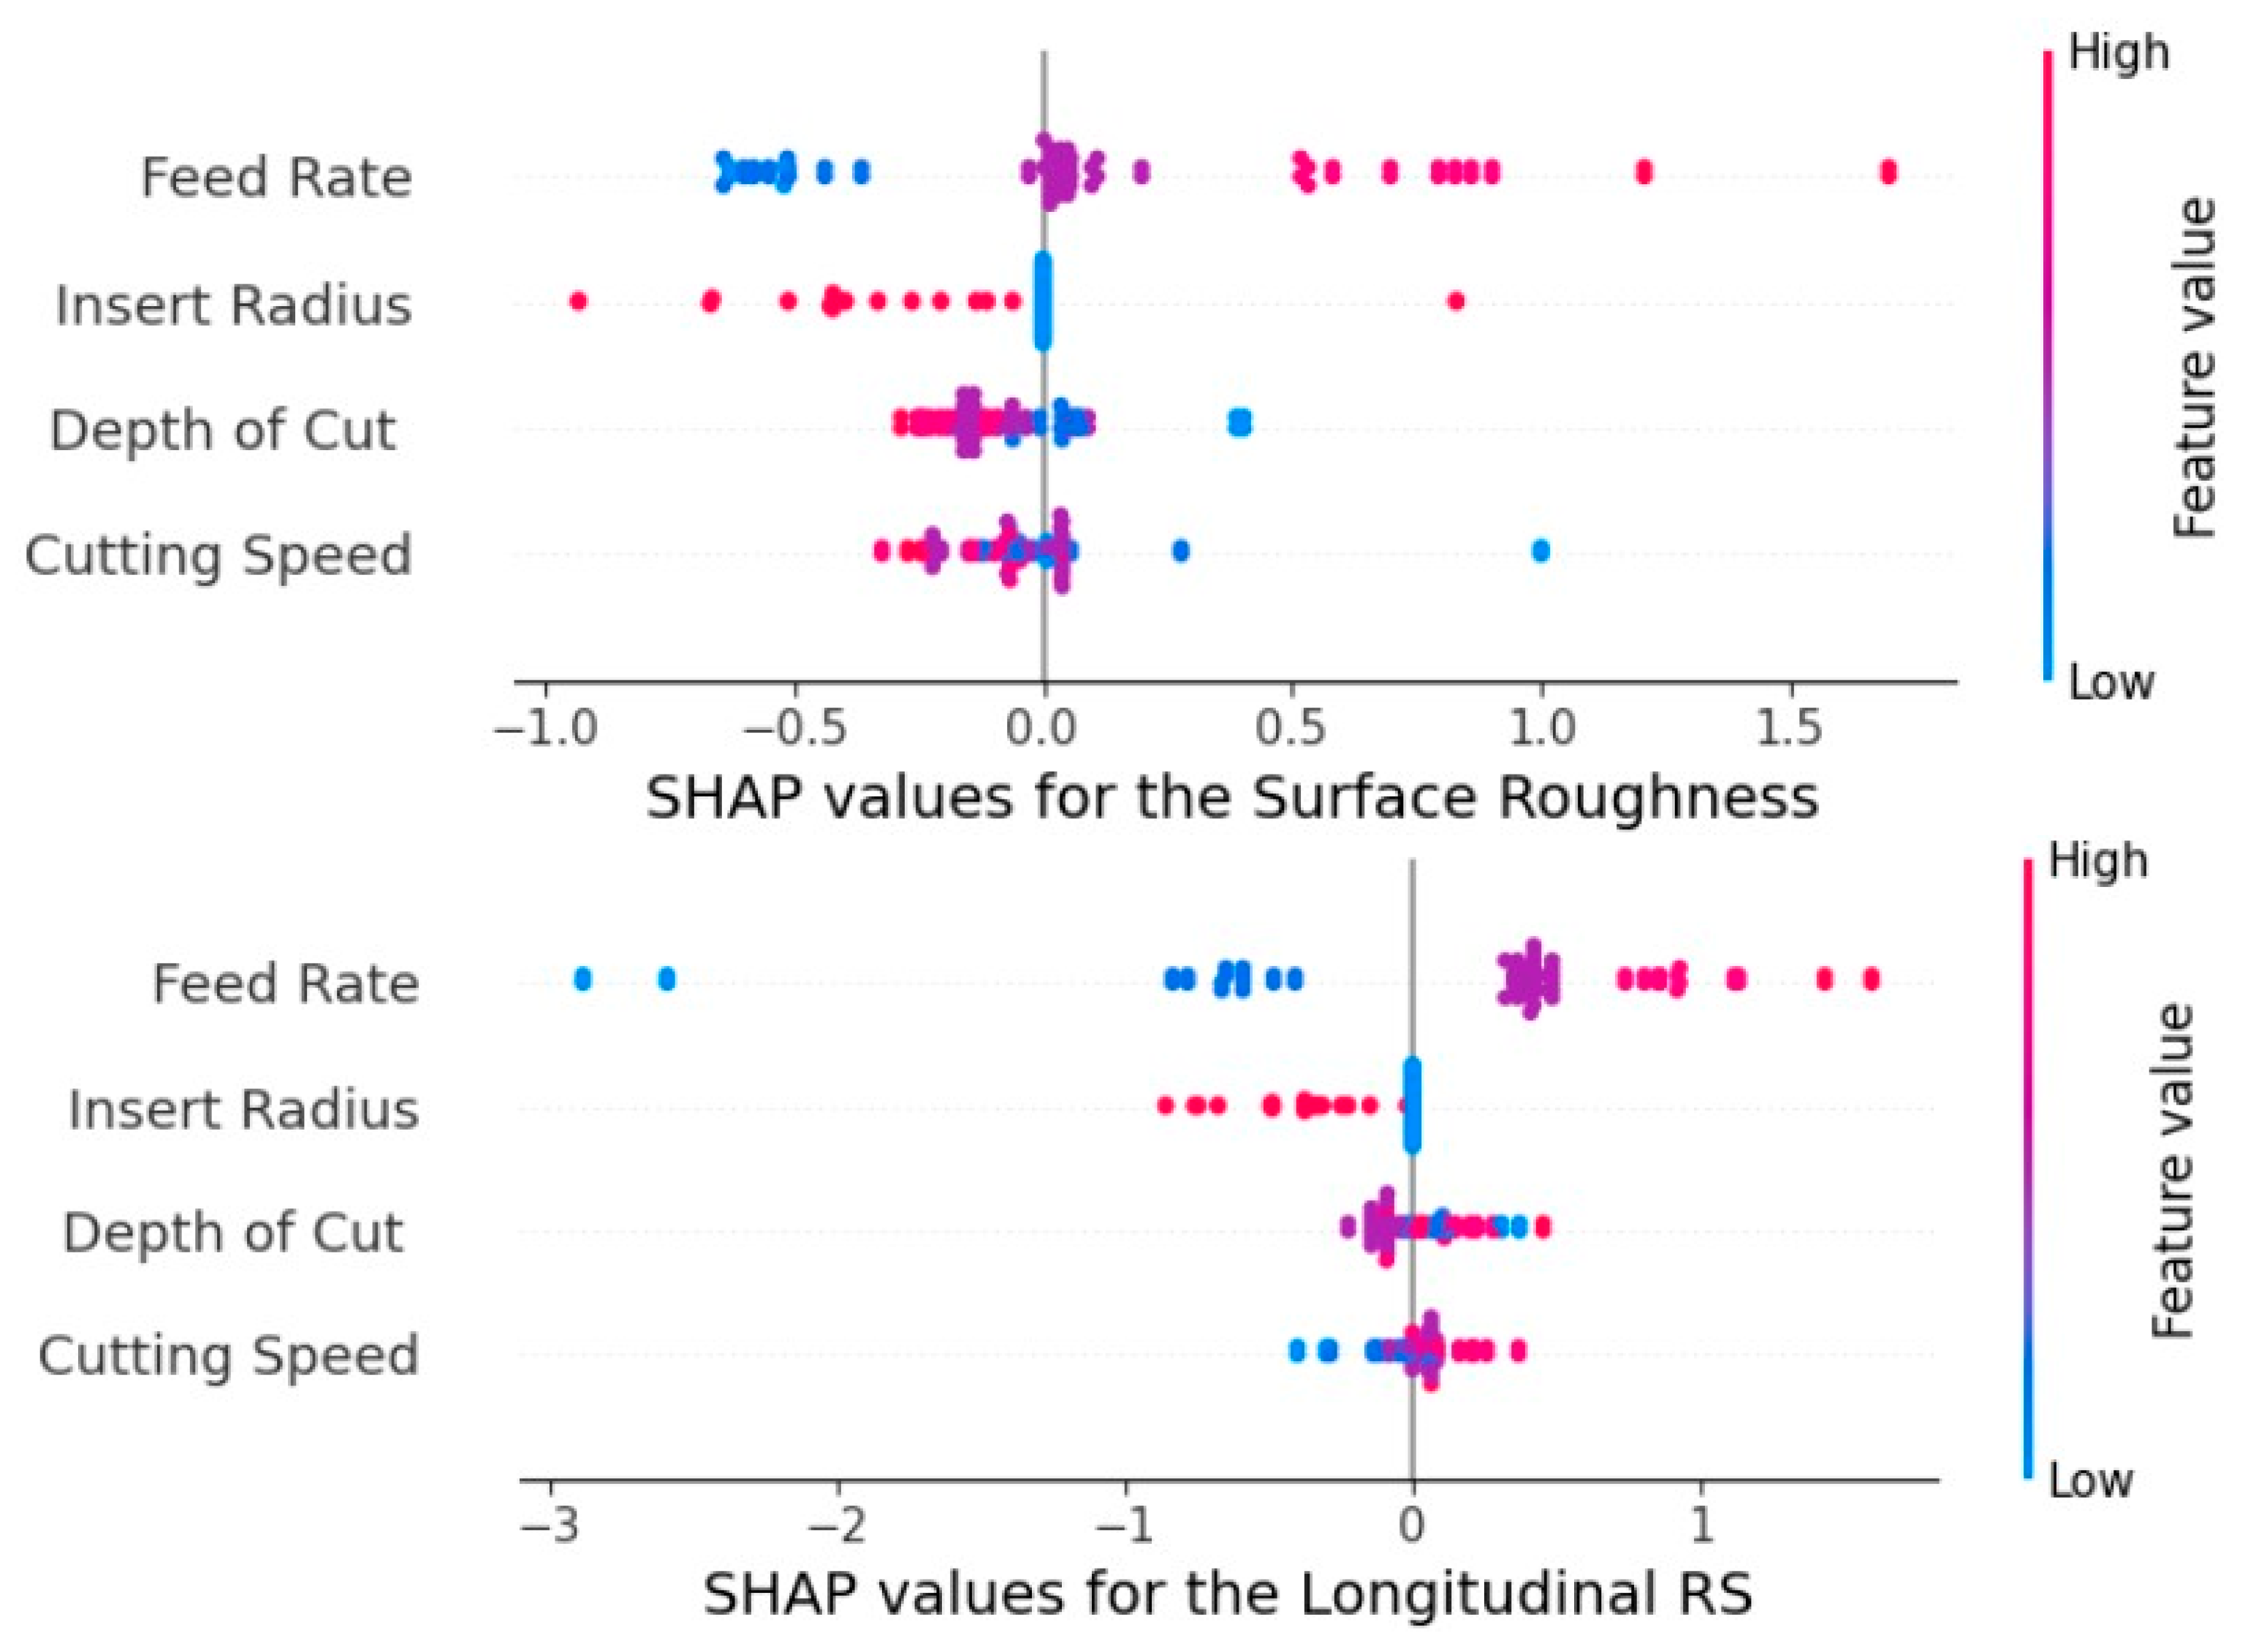
Figure 9 presents the SHAP summary plots that quantify the global contribution of each cutting parameter to the surrogate model’s projection of surface roughness and longitudinal residual stress. Each point corresponds to an individual experimental instance, where the horizontal position indicates how strongly the specific feature shifts the estimation relative to the baseline; positive values increase the predicted parameter, while negative values decrease it. Among the investigated cutting parameters, feed rate exhibits the widest spread of SHAP values, denoting the strongest influence on the model output for the surface quality. Generally, high feed values (red color) consistently shift predictions toward higher roughness, whereas low feed values (blue color) tend to reduce the forecasted roughness. Insert radius shows a clear opposite trend, where larger radii cluster mainly on the negative SHAP side, implying a reduction in roughness. It is worth noting that the narrower SHAP distributions for depth of cut and cutting speed suggest these parameters have secondary effects on the surface quality. In the same direction for the longitudinal residual stresses, feed rate is the dominant feature exhibiting the widest SHAP value distribution. Specifically, low feed rates contribute negatively (reducing stress), while high feed rates contribute positively (increasing stress), establishing feed rate as the primary control lever for stress generation. Additionally, insert radius displays a clear trend as well, with larger radii generally producing negative SHAP values. In contrast, depth of cut and cutting speed exhibit a more moderate effect, demonstrating their weakest impact. This is reflected in their narrow and more balanced SHAP value distributions near zero, revealing a secondary role within the tested parameter range. It should be stated that both radial and longitudinal residual stresses exhibit the same trend in the SHAP analysis.

Figure 9.
Impact of the applied machining parameters on investigated outputs.
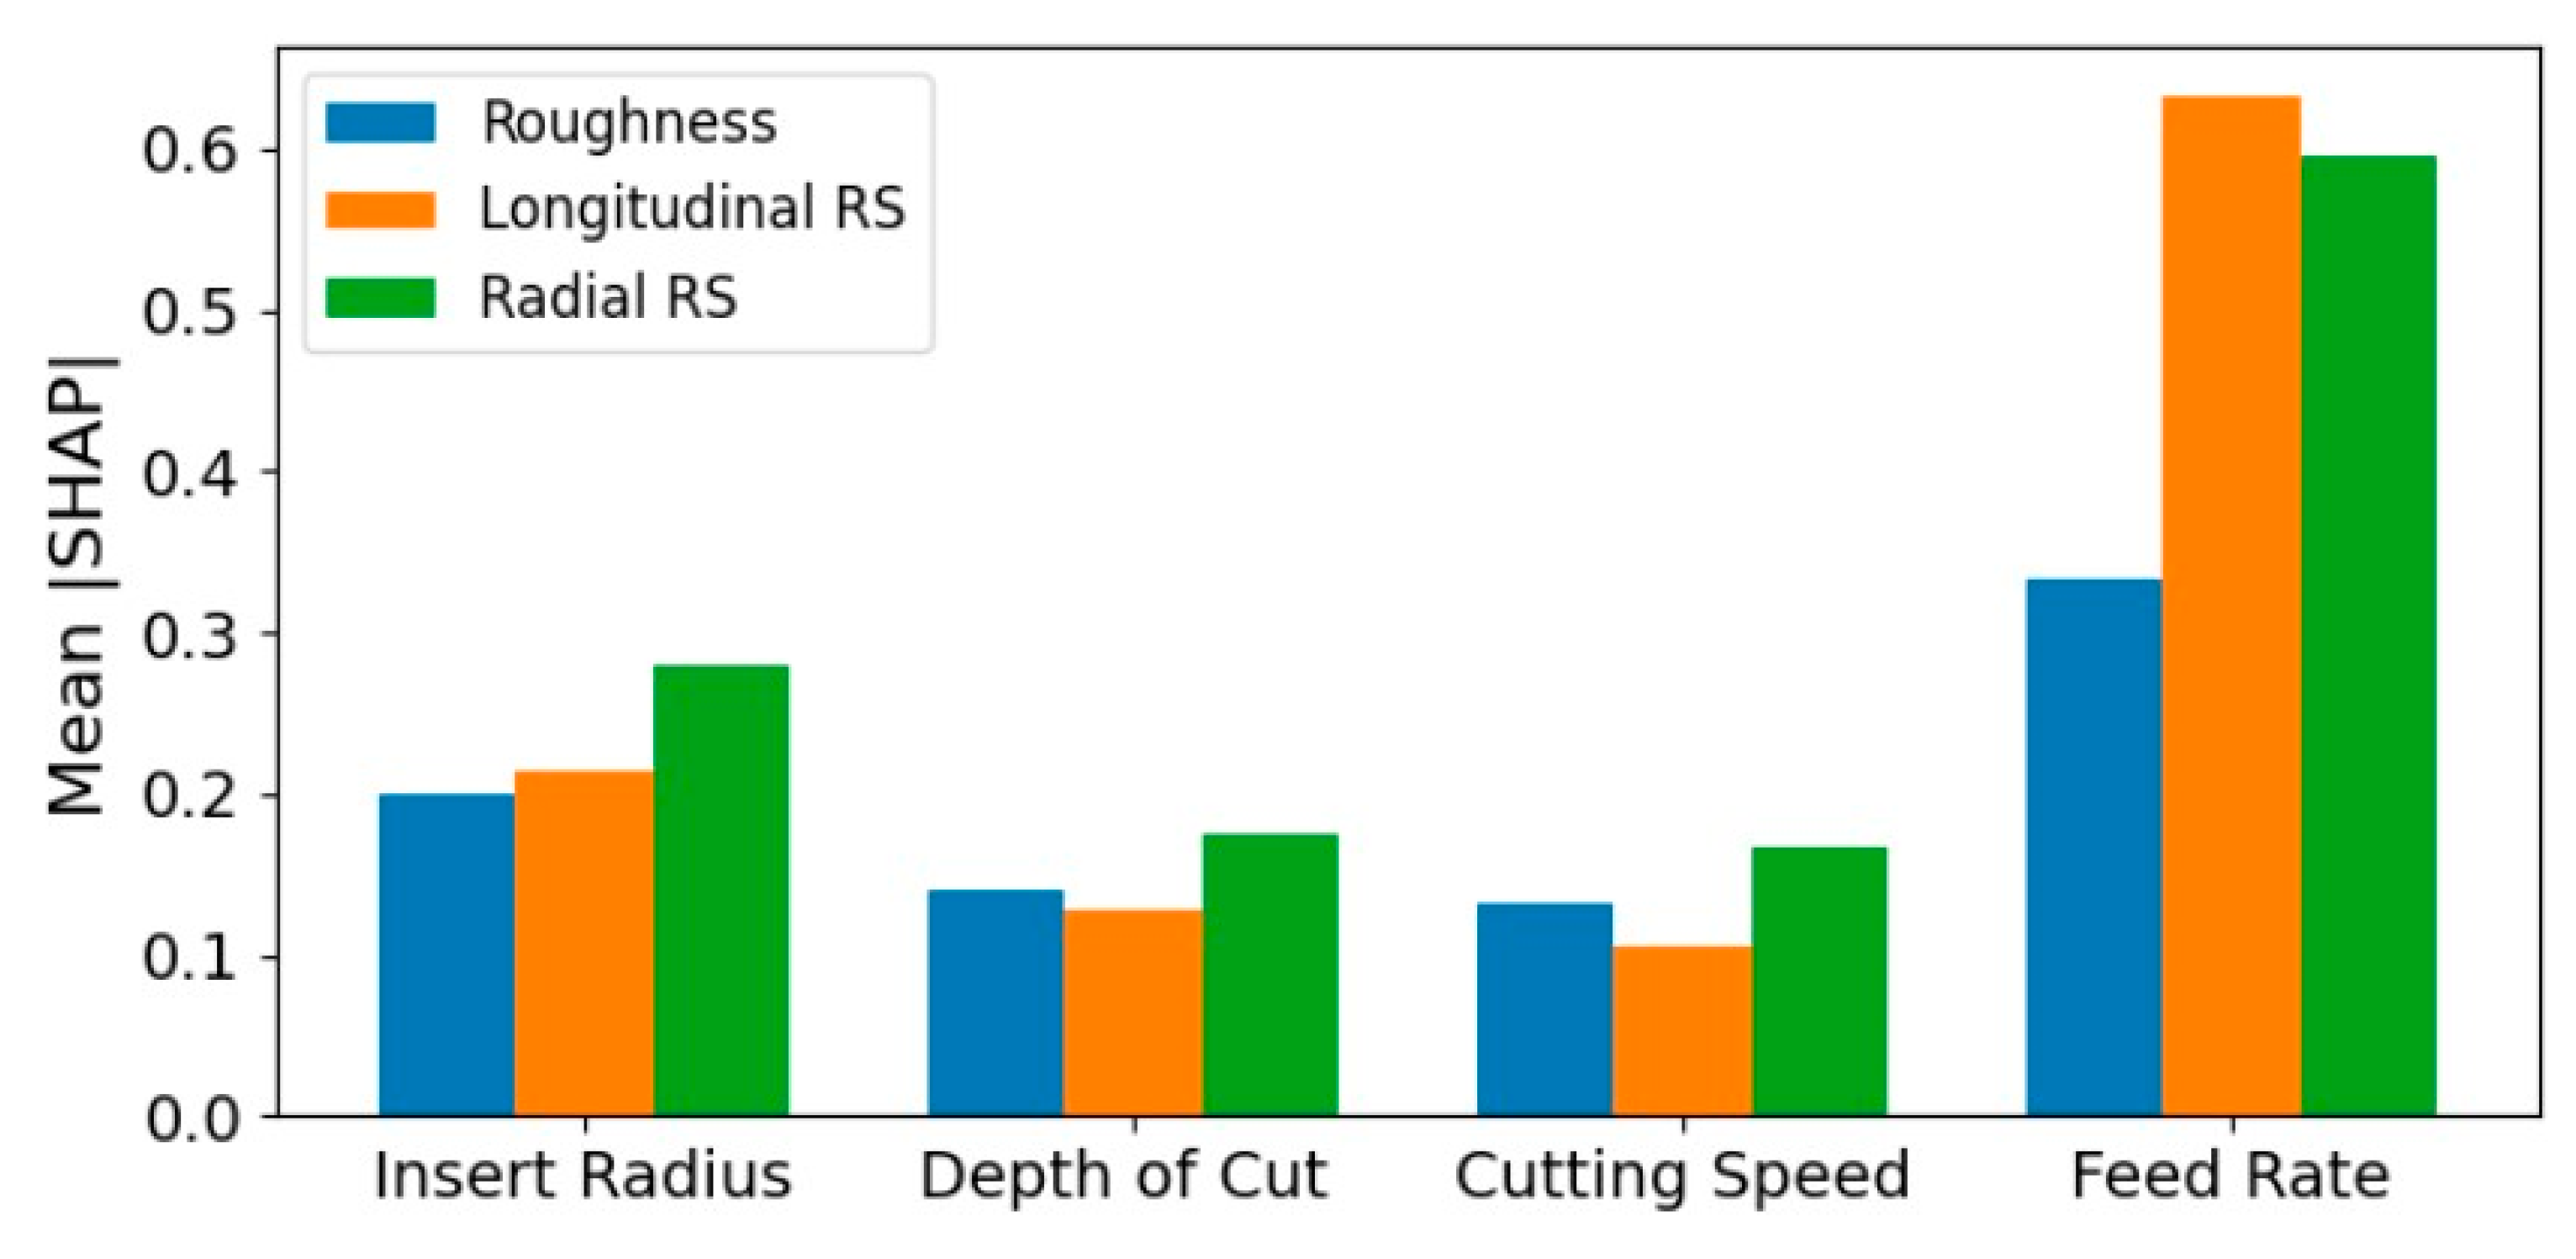
In summary, Figure 10 presents the mean absolute SHAP values computed for each of the investigated cutting parameters across all the experimental conditions. Overall, the analysis provided an interpretable, physically consistent explanation of the surrogate, confirming the hierarchy of influence as feed rate first, followed by insert radius and depth of cut, with cutting speed contributing least. In specific, higher mean SHAP values indicate stronger overall influence of a parameter on the corresponding predictions. Across all variables, feed rate exhibited the highest importance, demonstrating its dominant role in governing both surface quality and stress response. Furthermore, insert radius showed moderate influence, while depth of cut and cutting speed contribute comparatively less. These findings highlight the relative sensitivity of the surrogate model to each input parameter and confirm that feed rate is the primary driver of variation in both surface roughness and residual stresses within the evaluated process window. It is worth mentioning that a prior study [29] analyzed the same dataset using a different methodological framework. A critical point of convergence is the identification of consistent process sensitivities; both investigations pinpoint feed rate and insert radius as the primary drivers of residual stress and surface roughness, while attributing a secondary influence to cutting speed and depth of cut. This agreement across independent analytical paradigms supports the robustness of these influential cutting parameters.

Figure 10.
Global feature importance per cutting parameter.
Notably, these SHAP results can be interpreted through fundamental contact mechanics and machining theory. The emergence of feed rate as the dominant parameter aligns with its direct proportionality to uncut chip thickness. A higher feed rate increases the chip load, leading to more intense thermo-mechanical loading in the primary shear zone and at the tool–workpiece interface. This elevates both the thermal gradient and the plastic strain, which can increase residual stress magnitude and exacerbate surface roughness through more pronounced side-flow and built-up edge tendencies. Furthermore, the significant role of the insert nose radius is consistent with Hertzian-type contact principles. A larger radius increases the effective contact area between the tool flank and the newly machined surface, thereby reducing the average contact pressure and the associated local stress gradients. This smoother interaction mitigates plastic deformation severity, leading to the observed reductions in both residual stress and surface roughness. Conversely, a smaller radius concentrates the contact force, creating steeper stress gradients that promote higher local plasticity and higher surface roughness.
3.3. Integrated Optimization Framework
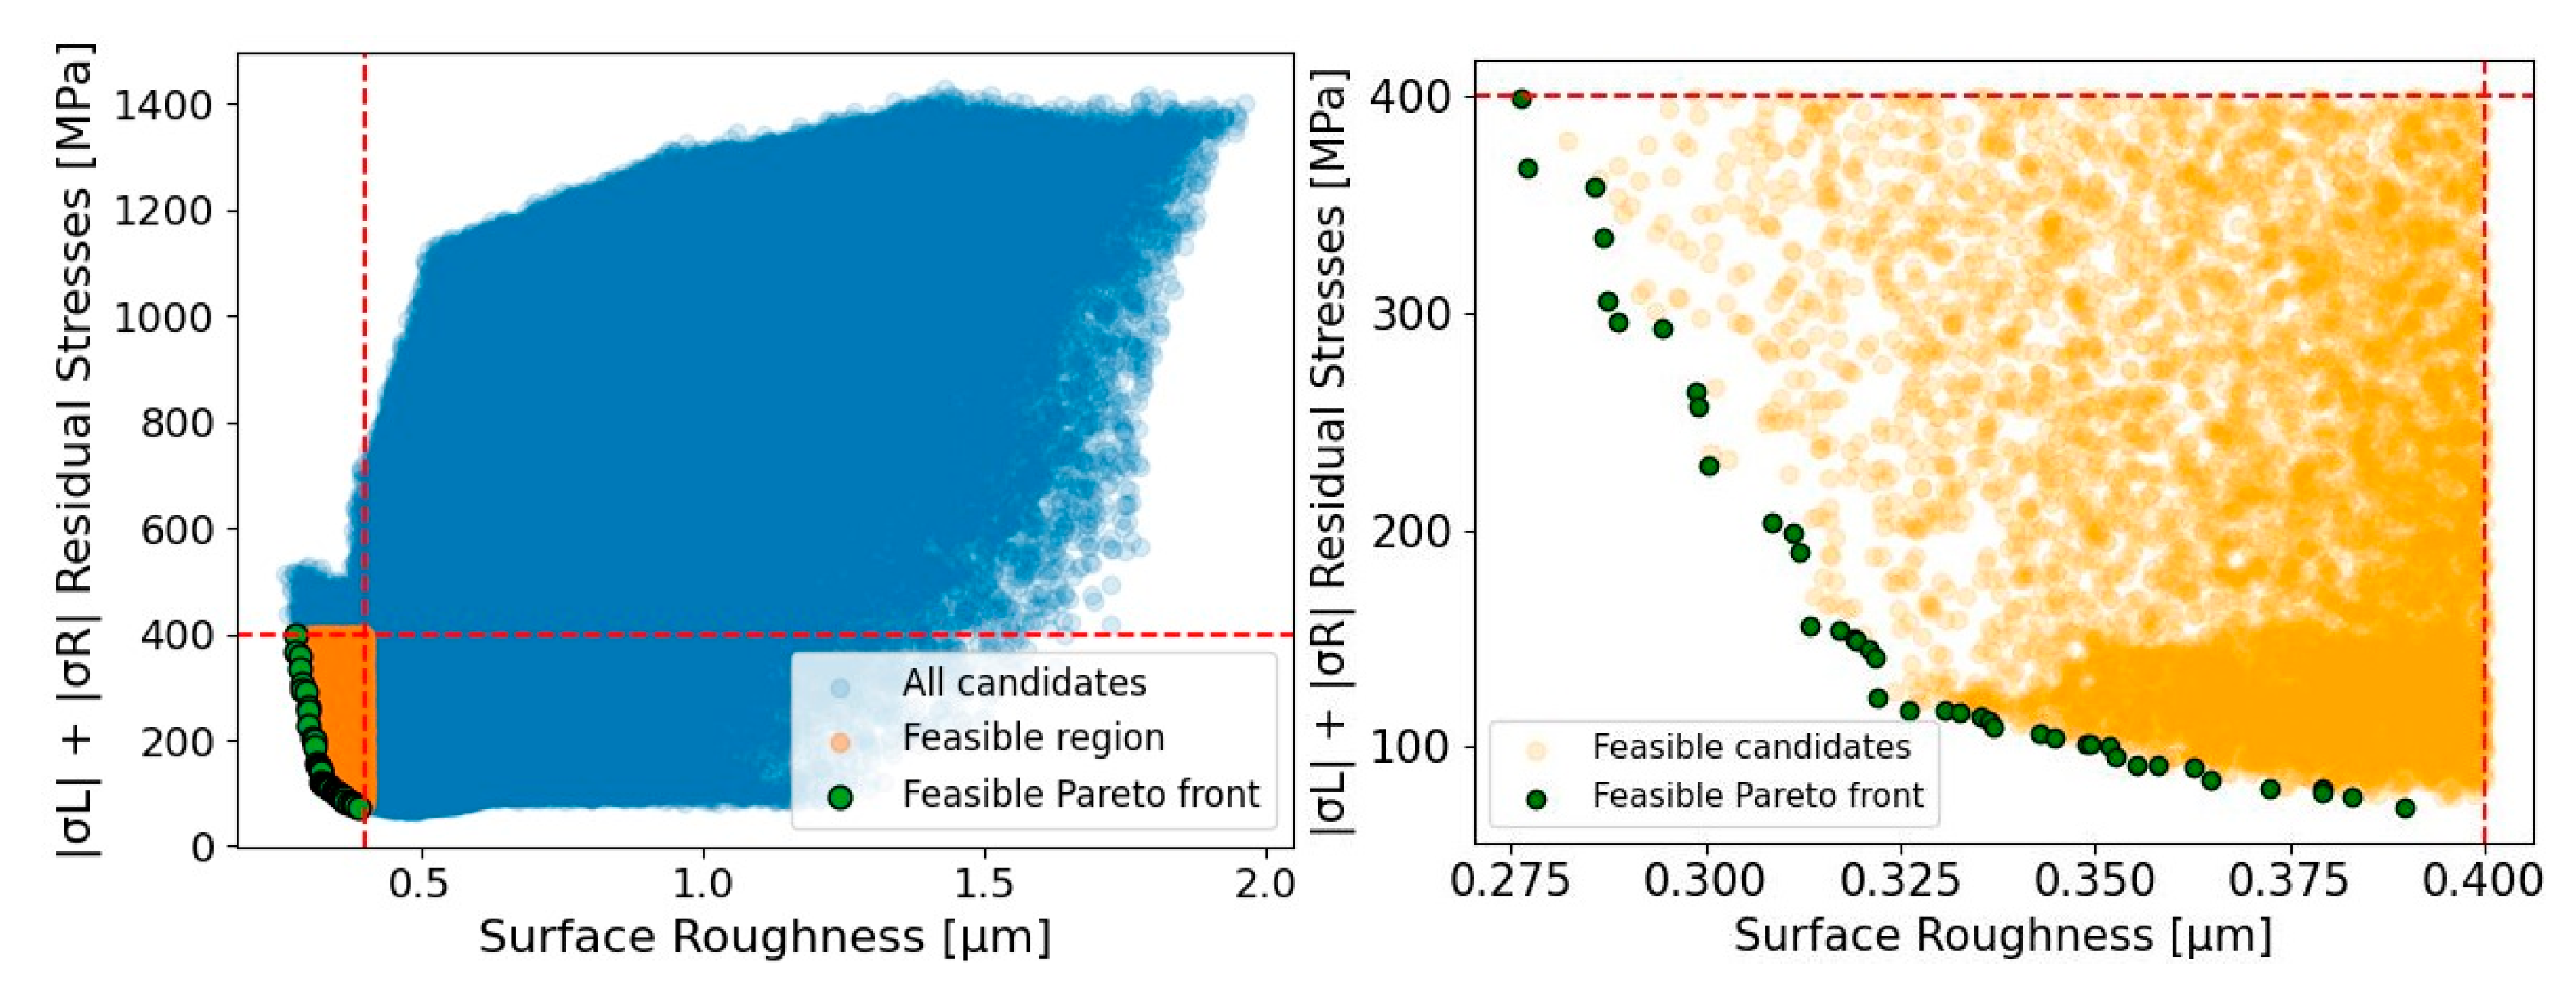
The trade-off between surface quality and residual stresses, as determined by the employed Pareto optimization scheme, is visualized in Figure 11. Within these plots, the objective space is defined by the value of the surface roughness and the sum of the residual stress components. Specifically, the plots portray the feasible region, the identification of nondominated (Pareto-optimal) solutions within that region, as well as the comparison of these suggestions against the complete set of sampled candidates drawn from the discrete design space. The left part of the figure displays the complete optimization landscape, where all sampled candidates generated from the discrete parameter grid are illustrated in blue, revealing the full range of surrogate-predicted roughness and residual stress outcomes. The orange points denote the subset of candidates that meet certain prescribed feasibility thresholds (Ra < 0.4 μm and |σL| + |σR| < 400 MPa), which imply cutting parameter combinations associated with acceptable manufactured-part quality. Bounded by the red dashed lines, the admissible design space comprises only the points lying below the roughness limit and to the left of the stress boundary. Additionally, the green points signify the feasible Pareto front, comprising nondominated designs within the feasible region for which no alternative feasible candidate can reduce both surface roughness and residual stresses simultaneously. Hereupon, the left diagram summarizes how the feasible design space is carved out of the full candidate set and shows that optimal solutions concentrate toward the lower-left corner, where both objectives are minimized. The right part of Figure 11 focuses exclusively on the feasible region and magnifies the domain of the objective space containing the Pareto front. In this detailed view, the Pareto front becomes more visually distinct, forming a clear descending curve that highlights the inverse relationship between roughness and residual stresses along the nondominated set. Hence, the plot provides a clear depiction of the achievable trade-off structure after excluding infeasible designs and demonstrates that the optimization concentrates within a compact portion of the feasible space, where improvement in one objective involves the degradation of the other.

Figure 11.
Objective space: All candidates, feasible region and feasible Pareto front.
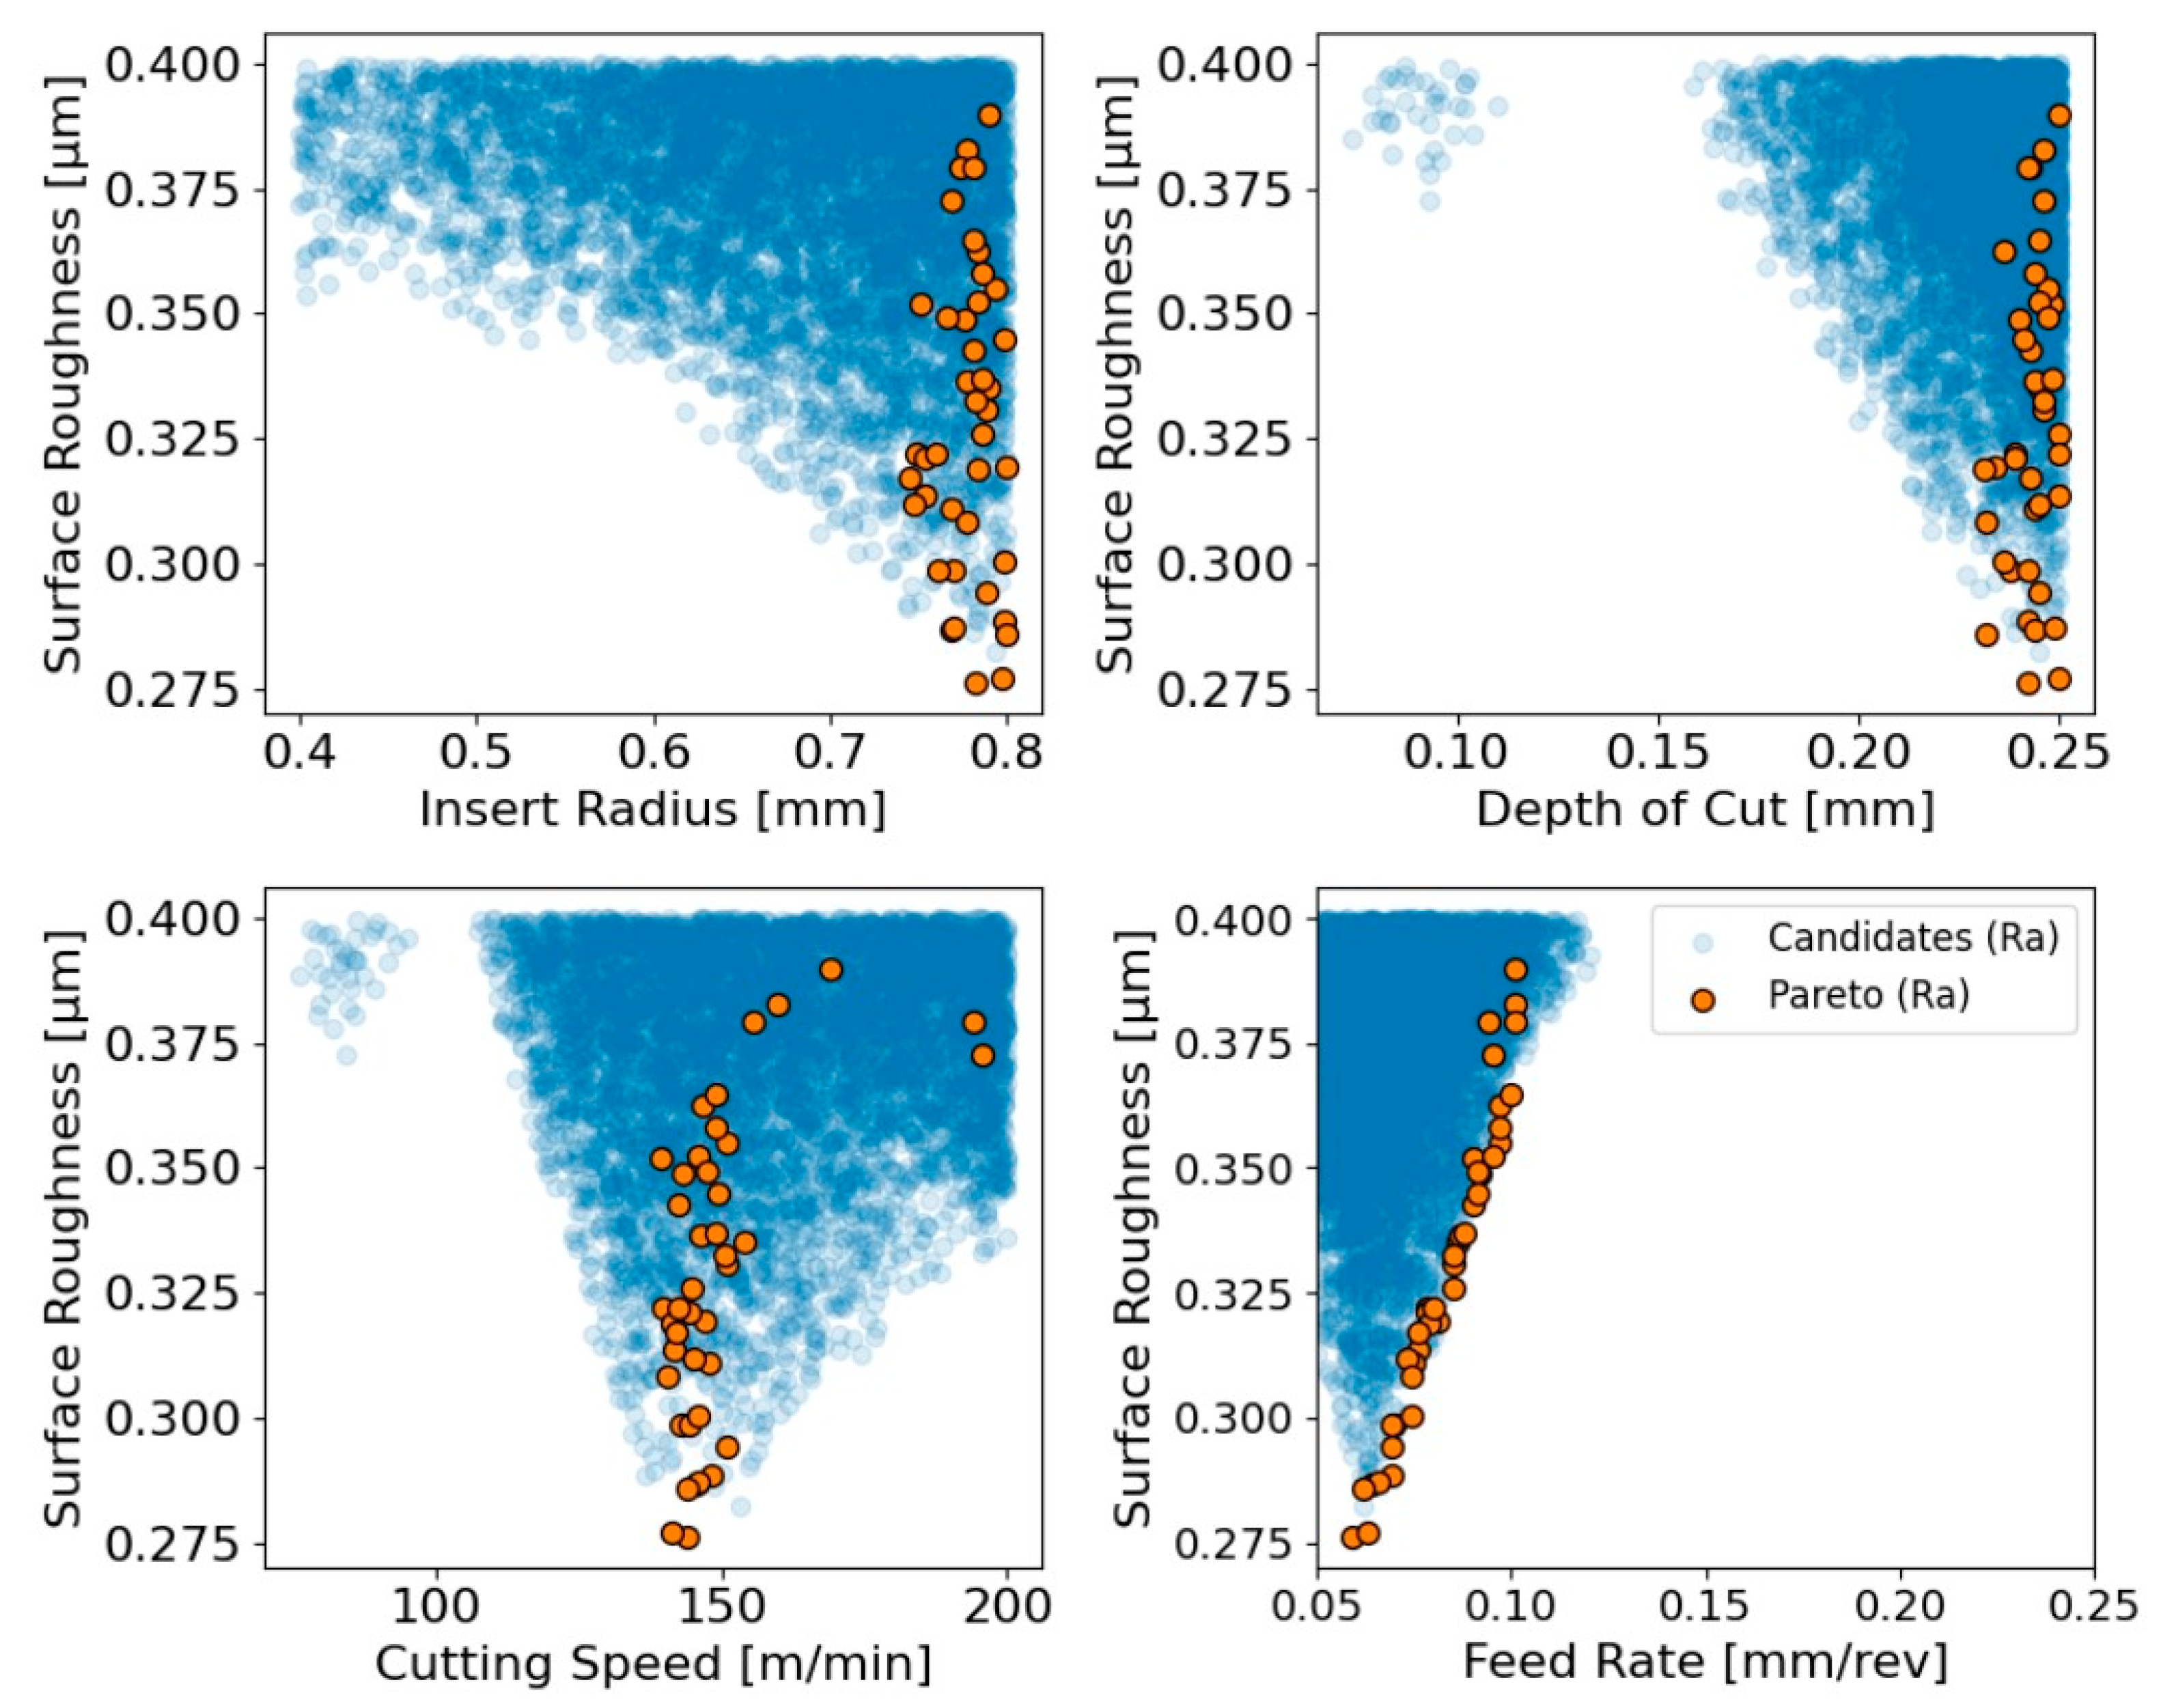
Regarding the investigation of the surface finish enhancement, Figure 12 depicts how the Pareto-optimal solutions emerge relative to the full population of candidates evaluated by the surrogate model. In each plot, the blue markers represent all feasible combinations that satisfy the imposed thresholds on roughness and combined residual stress, while the orange markers denote the subset that form the Pareto front, meaning that no other feasible point provides a simultaneous improvement in both objectives. The relationship between insert radius and surface quality shows a clear trend in the top left plot, where larger radius yields lower roughness values as suggested in the study [30], with the Pareto-optimal points concentrated exclusively at the upper limit of the allowed range. In the top right plot, a similar pattern is observed for the depth of cut, where increased depths consistently decrease surface roughness across the feasible region [31], and all Pareto-optimal points cluster near the maximum allowable depth. Lower depths are uniformly suboptimal, as they do not yield competitive surface quality and do not provide offsetting reduction in residual stresses.
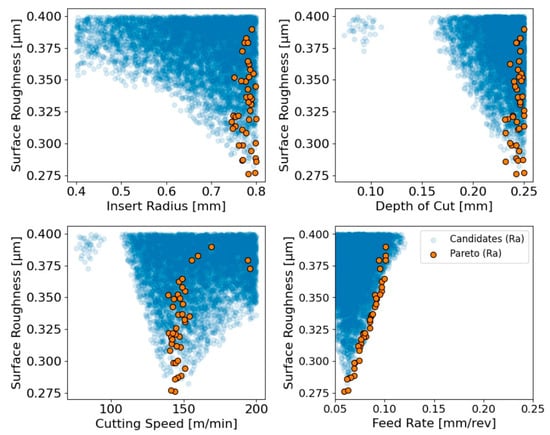
Figure 12.
Design space exploration for minimizing surface roughness with Pareto set.
On the other hand, the feed rate parameter influences the objective in the opposite direction as displayed in the bottom right plot, where increasing the feed results in a clear deterioration of surface finish across the feasible domain, as was also stated in the study [32]. The Pareto-optimal points occur only at the lowest feed rates, demonstrating that minimal feed is required in order to achieve nondominated performance. Although some feasible candidates at slightly higher feeds achieve acceptable surface quality, they remain dominated because alternative combinations simultaneously deliver lower roughness and lower residual stress. Considering the impact of cutting speed, the results in the bottom-left plot indicate a nonlinear influence on the surface quality. More specifically, very low speeds correspond to uniformly high roughness, whereas intermediate values define a distinct low window in which the minimum values occur [33]. The Pareto solutions track this trend, revealing that the most favorable roughness emerges at moderate speeds where the thermo-mechanical cutting conditions stabilize. At higher speeds, the feasible region tightens and the predictions rise again, suggesting that there is little benefit to operating beyond the intermediate speed range. Taken together, Figure 12 demonstrates that the minimum achievable roughness occurs with large insert radius, relatively large depths of cut, intermediate cutting speeds and the smallest feasible feed rates. Hereupon, the developed Pareto structure reinforces findings that are consistent with the literature, highlighting the combined parameter regimes where optimal surface quality is attained.
With respect to the optimization of residual stresses in turning, the plots in Figure 13 show the relationship between each cutting parameter and the predicted residual stresses for all feasible candidates, highlighting the Pareto-optimal points. More specifically, the insert radius plot portrays that larger radius is associated with lower residual stress, as it was also indicated in [34]. Although feasible points do exist across the full range of radius, the surrogate model estimates a strong downward trend as radius increases and the Pareto-optimal solutions concentrate exclusively at the upper bound of the investigated range. The top-right plot displays an analogous trend, in which increasing the depth of cut reduces the predicted residual stresses [35]. In addition, the Pareto points cluster at the maximum depth, revealing that the surrogate identifies higher values of DoC as the most favorable compromise between surface finish and mechanical response.
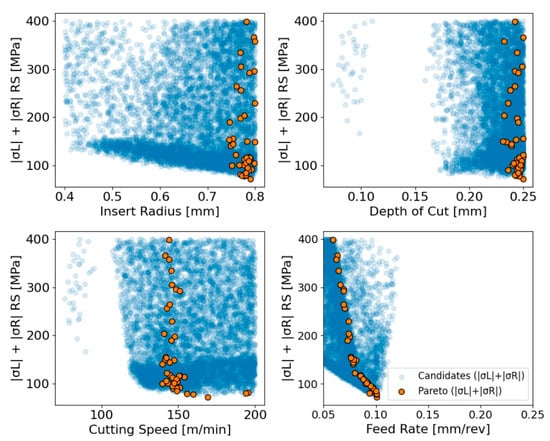
Figure 13.
Multi-parameter optimization of residual stresses through Pareto selection.
In contrast, the cutting-speed plot demonstrates a more nonlinear relationship. In particular, very low speeds produce substantial scatter with many high-stress outcomes, whereas intermediate speeds form a narrower band in which the lowest stress values emerge [36]. The Pareto points outline a descending trajectory within this intermediate-speed region and then rise again as speed increases beyond roughly 160–170 m/min. This behavior suggests that an optimal speed window exists in which thermo-mechanical effects reduce stress accumulation, but excessively high or low speeds destabilize the process enough to increase residual stress. Regarding the impact of feed rate and taking into account its monotonic influence on the developed residual stresses, even a slight feed-rate increase leads to a rise on the corresponding stresses markedly [37], forcing nearly all Pareto-optimal points to the minimum feasible feed. The boundary traced by these points forms a steep declining curve in order to achieve a minimum close to 0.10 mm/rev, confirming that low feed rate values are essential for suppressing residual stresses. This aligns with the well-established influence of feed on chip load and tool indentation forces, both of which directly contribute to stress formation in the machined part. Consequently, the present analysis demonstrates that a consistent parameter combination yields low residual stresses, corroborating with existing research. This optimal regime comprises a large insert radius, high depth of cut, intermediate cutting speed and low feed rate, representing an optimal trade-off region, where residual stresses are minimized while maintaining compatibility with the surface-quality objective.
4. Conclusions
The introduced multimodal framework presented in this study demonstrates how fused multisensory experiments, deep learning architectures and explainability tools can be combined to support data-driven optimization in CNC turning operations for a specific workpiece-tool system. By structuring the generated accelerations, cutting forces, current and acoustic measurements during the machining process into synchronized time-series windows, the developed ML model successfully captured the dynamic signatures associated with the examined cutting conditions, enabling the accurate estimation of surface roughness and residual stresses. Moreover, the distillation of the ML model into a low-dimensional surrogate one provided a computationally efficient mapping from cutting conditions to predicted outcomes, allowing that way the rapid exploration of the design space. In addition, the SHAP analysis delivered a transparent interpretation of both global and local feature effects, revealing the impact of each machining parameter. Finally, the surrogate facilitated also in the Pareto-based multi-objective optimization, yielding parameter combinations that balance surface quality and residual stress levels.
It is worth noting that cutting mechanics and parameter sensitivities can vary with the workpiece material, tool geometry, applied coating and machine–tool dynamics. Accordingly, the results drawn in the present work are restricted to the utilized material–tool–machine configuration and the parameter ranges represented in the dataset. It is also crucial to acknowledge the limitations of the present approach. In particular, although the experimental dataset was rich in dynamic signals, the machining-parameter configurations were limited and covered a subset of the feasible parameter space. Consequently, the predictive model is specific to this parameter space and the defined input–output variables, and its outcomes regarding parameter influence are therefore valid primarily within these bounds. This condition influences the surrogate model’s performance, thereby affecting both the fidelity of the learned relationships, as well as the resulting SHAP explanations. Moreover, the Pareto optimization identifies promising operating windows, but its recommendations remain confined to the parameter bounds represented in the utilized dataset. However, the modular nature of the introduced workflow provides numerous pathways for extension. Notably, increasing the diversity of cutting conditions, tool geometries and sensor modalities would broaden the model’s generalizability. Furthermore, incorporating tool-wear evolution, stability limits or thermal behavior could potentially enrich both prediction and optimization capabilities. Embedding the surrogate within an adaptive control loop or extending the optimization to include also cost and productivity metrics would move the proposed pipeline towards real-time industrial applicability. Overall, the present study establishes a rigorous and extensible methodology that integrates data-driven modeling with actionable interpretability. The findings, supported by the specific evidence presented in Section 3, provide a validated basis for more informed decisions in the advanced manufacturing environments.
The outcomes of this research confirm the initial expectation that feed rate and insert radius are the dominant control parameters for surface integrity, as robustly quantified by the SHAP analysis. Additionally, the multi-objective Pareto front successfully mapped the anticipated trade-off between surface roughness and residual stresses. In order to transition the introduced methodology from a research framework to an industrially applicable tool, several critical steps are required. First, coupling the data-driven model with FEM/CFD simulations would ground the predictions in physical laws, enabling that way extrapolation and deeper mechanistic insight. Second, the experimental validation of the Pareto-optimal operating points composes an essential next step to confirm their practical efficacy and robustness. Finally, for integration into process design, the suggested framework must be embedded within a decision-support system that incorporates additional practical constraints, like cost and tool life in order to allow for interactive exploration of the trade-off space by process engineers.
Funding
This research received no external funding.
Institutional Review Board Statement
Not applicable.
Informed Consent Statement
Not applicable.
Data Availability Statement
The original contributions presented in this study are included in the article. Further inquiries can be directed to the corresponding author.
Conflicts of Interest
The author declares no conflicts of interest.
References
- Mane, S.; Patil, R.B.; Roy, A.; Shah, P.; Sekhar, R. Analysis of the Surface Quality Characteristics in Hard Turning Under a Minimal Cutting Fluid Environment. Appl. Mech. 2025, 6, 5. [Google Scholar] [CrossRef]
- Malakizadi, A.; Mallipeddi, D.; Dadbakhsh, S.; M’Saoubi, R.; Krajnik, P. Post-processing of additively manufactured metallic alloys—A review. Int. J. Mach. Tools Manuf. 2022, 179, 103908. [Google Scholar] [CrossRef]
- Yaqoob, S.; Ghani, J.A.; Jouini, N.; Juri, A.Z. Performance Evaluation of PVD and CVD Multilayer-Coated Tools in Machining High-Strength Steel. Coatings 2024, 14, 865. [Google Scholar] [CrossRef]
- Schulze, V.; Aurich, J.; Jawahir, I.S.; Karpuschewski, B.; Yan, J. Surface conditioning in cutting and abrasive processes. CIRP Ann. 2024, 73, 667–693. [Google Scholar] [CrossRef]
- Maximov, J.; Duncheva, G.; Anastasov, K.; Ichkova, M.; Daskalova, P. Influence of Previous Turning on the Surface Integrity Stability of Diamond-Burnished Medium-Carbon Steel. Machines 2025, 13, 864. [Google Scholar] [CrossRef]
- Jawahir, I.S.; Brinksmeier, E.; M’Saoubi, R.; Aspinwall, D.K.; Outeiro, J.C.; Meyer, D.; Umbrello, D.; Jayal, A.D. Surface integrity in material removal processes: Recent advances. CIRP Ann. 2011, 60, 603–626. [Google Scholar] [CrossRef]
- Liao, Z.; Monaca, Z.; Murray, J.; Speidel, A.; Ushmaev, D.; Clare, A.; Axinte, D.; M’Saoubi, R. Surface integrity in metal machining—Part I: Fundamentals of surface characteristics and formation mechanisms. Int. J. Mach. Tools Manuf. 2021, 162, 103687. [Google Scholar] [CrossRef]
- Schulze, V.; Autenrieth, H.; Deuchert, M.; Weule, H. Investigation of surface near residual stress states after micro-cutting by finite element simulation. CIRP Ann. 2010, 59, 117–120. [Google Scholar] [CrossRef]
- Bhushan, R.K. Effect of tool wear on surface roughness in machining of AA7075/ 10 wt.% SiC composite. Compos. Part C Open Access 2022, 8, 100254. [Google Scholar] [CrossRef]
- Bukvić, M.; Vencl, A.; Milojević, S.; Skulić, A.; Gajević, S.; Stojanović, B. The Influence of Carbon Nanotube Additives on the Efficiency and Vibrations of Worm Gears. Lubricants 2025, 13, 327. [Google Scholar] [CrossRef]
- Alsoufi, M.S.; Bawazeer, S.A. Probabilistic Analysis of Surface Integrity in CNC Turning: Influence of Thermal Conductivity and Hardness on Roughness and Waviness Distributions. Machines 2025, 13, 385. [Google Scholar] [CrossRef]
- Liu, H.; Kang, R.; Zhu, X.; Dong, Z.; Xu, Z.; Song, Y. Study on the effect of surface rolling process on fatigue behavior and surface integrity of 300M steel thread root. J. Mater. Res. Technol. 2025, 38, 5996–6010. [Google Scholar] [CrossRef]
- Li, Y.; Gan, W.; Zhou, W.; Li, D. Review on residual stress and its effects on manufacturing of aluminium alloy structural panels with typical multi-processes. Chin. J. Aeronaut. 2023, 36, 96–124. [Google Scholar] [CrossRef]
- Mane, S.; Patil, R.B.; Siddiqui, M.I.H.; Chan, C.K.; Xu, Y. Effect of cutting parameters and tool coating on residual stress and cutting temperature in dry hard turning of AISI 52100 steel using finite element method. Front. Mater. 2025, 12, 1613630. [Google Scholar] [CrossRef]
- Ghosh, A.K.; Fattahi, S.; Ura, S. Towards Developing Big Data Analytics for Machining Decision-Making. J. Manuf. Mater. Process. 2023, 7, 159. [Google Scholar] [CrossRef]
- Khan, T.; Khan, U.; Khan, A.; Mollan, C.; Morkvenaite-Vilkonciene, I.; Pandey, V. Data-Driven Digital Twin Framework for Predictive Maintenance of Smart Manufacturing Systems. Machines 2025, 13, 481. [Google Scholar] [CrossRef]
- Jacob, J.; Meurer, M.; Bergs, T. Surface Roughness Prediction in Hard Turning (Finishing) of 16MnCr5 Using a Model Ensemble Approach. Procedia CIRP 2024, 126, 504–507. [Google Scholar] [CrossRef]
- Mane, S.; Patil, R.B.; Al-Dahidi, S. Predictive Modeling of Surface Roughness and Cutting Temperature Using Response Surface Methodology and Artificial Neural Network in Hard Turning of AISI 52100 Steel with Minimal Cutting Fluid Application. Machines 2025, 13, 266. [Google Scholar] [CrossRef]
- Pawanr, S.; Gupta, K. Analysis of Surface Roughness and Machine Learning-Based Modeling in Dry Turning of Super Duplex Stainless Steel Using Textured Tools. Technologies 2025, 13, 243. [Google Scholar] [CrossRef]
- Sumesh, C.S.; Ramesh, A. Digital twin-enabled surface quality prediction and optimization in dry turning of Ti6Al4V using ANFIS and genetic algorithm. J. King Saud Univ. Eng. Sci. 2025, 37, 17. [Google Scholar] [CrossRef]
- Farias, A.; Paschoalinoto, N.W.; Bordinassi, E.C.; Leonardi, F.; Delijaicov, S. Predictive modelling of residual stress in turning of hard materials using radial basis function network enhanced with principal component analysis. Eng. Sci. Technol. Int. J. 2025, 55, 101743. [Google Scholar] [CrossRef]
- Fu, X.; Li, S.; Song, H.; Lu, Y. Digital Twin-driven multi-scale characterization of machining quality: Current status, challenges, and future perspectives. Robot. Comput.-Integr. Manuf. 2025, 93, 102902. [Google Scholar] [CrossRef]
- Elsheikh, A.H.; Muthuramalingam, T.; Shanmugan, S.; Ibrahim, A.M.M.; Ramesh, B.; Khoshaim, A.B.; Moustafa, E.B.; Bedairi, B.; Panchal, H.; Sathyamurthy, R. Fine-tuned artificial intelligence model using pigeon optimizer for prediction of residual stresses during turning of Inconel 718. J. Mater. Res. Technol. 2021, 15, 3622–3634. [Google Scholar] [CrossRef]
- Khoshaim, A.B.; Elsheikh, A.H.; Moustafa, E.B.; Basha, M.; Mosleh, A.O. Prediction of residual stresses in turning of pure iron using artificial intelligence-based methods. J. Mater. Res. Technol. 2021, 11, 2181–2194. [Google Scholar] [CrossRef]
- Diaz-Salamanca, D.; Álvarez Álvarez, S.; Muniz Calvente, M.; Ebrahimzadeh, P.; Llavori, I.; Zabala, A.; Pando, P.; Suárez, C.; Fernández-Pariente, I.; Larrañaga, M.; et al. MaRoReS (Machining, Roughness and Residual Stresses Generated in Turning of 42CrMo4+QT Steel), V1; Mendeley Data: London, UK, 2024. [Google Scholar] [CrossRef]
- Diaz-Salamanca, D.; Álvarez Álvarez, S.; Muniz Calvente, M.; Ebrahimzadeh, P.; Llavori, I.; Zabala, A.; Pando, P.; Suárez, C.; Fernández-Pariente, I.; Larrañaga, M.; et al. Turning of 42CrMo4+QT under different scenarios: Dataset of machining, roughness and residual stress. Data Brief 2024, 56, 110793. [Google Scholar] [CrossRef]
- Hermosilla, P.; Berríos, S.; Allende-Cid, H. Explainable AI for Forensic Analysis: A Comparative Study of SHAP and LIME in Intrusion Detection Models. Appl. Sci. 2025, 15, 7329. [Google Scholar] [CrossRef]
- Dehnad, P.; Asilian Bidgoli, A.; Rahnamayan, S. Beyond the Pareto Front: Utilizing the Entire Population for Decision-Making in Evolutionary Machine Learning. Mathematics 2025, 13, 2579. [Google Scholar] [CrossRef]
- Díaz-Salamanca, D.; Muñiz-Calvente, M.; Ebrahimzadeh, P.; Llavori, I.; Zabala, A.; Pando, P.; Álvarez, C.S.; Fernández-Pariente, I.; Larrañaga, M.; Papuga, J. Influence of turning parameters on residual stresses and roughness of 42CrMo4 + QT. Int. J. Adv. Manuf. Technol. 2024, 134, 2897–2919. [Google Scholar] [CrossRef]
- Bhushan, R.K. Impact of nose radius and machining parameters on surface roughness, tool wear and tool life during turning of AA7075/SiC composites for green manufacturing. Mech. Adv. Mater. Mod. Process. 2020, 6, 1. [Google Scholar] [CrossRef]
- Parhad, P.; Likhite, A.; Bhatt, J.; Peshwe, D. The Effect of Cutting Speed and Depth of Cut on Surface Roughness During Machining of Austempered Ductile Iron. Trans. Indian Inst. Met. 2015, 68, 99–108. [Google Scholar] [CrossRef]
- Franczyk, E.; Zębala, W. Impact of Cutting Data on Cutting Forces, Surface Roughness, and Chip Type in Order to Improve the Tool Operation Reliability in Sintered Cobalt Turning. Materials 2024, 17, 2210. [Google Scholar] [CrossRef]
- Lai, F.; Hu, A.; Mao, K.; Wu, Z.; Lin, Y. Effect of Milling Processing Parameters on the Surface Roughness and Tool Cutting Forces of T2 Pure Copper. Micromachines 2023, 14, 224. [Google Scholar] [CrossRef]
- Javidi, A.; Rieger, U.; Eichlseder, W. The effect of machining on the surface integrity and fatigue life. Int. J. Fatigue 2008, 30, 2050–2055. [Google Scholar] [CrossRef]
- Ulutan, D.; Erdem Alaca, B.; Lazoglu, I. Analytical modelling of residual stresses in machining. J. Mater. Process. Technol. 2007, 183, 77–87. [Google Scholar] [CrossRef]
- Ji, C.; Sun, S.; Lin, B.; Fei, J. Effect of cutting parameters on the residual stress distribution generated by pocket milling of 2219 aluminum alloy. Adv. Mech. Eng. 2018, 10, 12. [Google Scholar] [CrossRef]
- Hua, J.; Shivpuri, R.; Cheng, X.; Bedekar, V.; Matsumoto, Y.; Hashimoto, F.; Watkins, T.R. Effect of feed rate, workpiece hardness and cutting edge on subsurface residual stress in the hard turning of bearing steel using chamfer + hone cutting edge geometry. Mater. Sci. Eng. A 2005, 394, 238–248. [Google Scholar] [CrossRef]
Disclaimer/Publisher’s Note: The statements, opinions and data contained in all publications are solely those of the individual author(s) and contributor(s) and not of MDPI and/or the editor(s). MDPI and/or the editor(s) disclaim responsibility for any injury to people or property resulting from any ideas, methods, instructions or products referred to in the content. |
© 2026 by the author. Licensee MDPI, Basel, Switzerland. This article is an open access article distributed under the terms and conditions of the Creative Commons Attribution (CC BY) license.

