Article

B-Scan Imaging and 3D Visualization of Hardened Layer Depth Profile in Linear Guide Rails Based on Ultrasonic Shear Wave Backscattering Technique

College of Mechanical Engineering, Zhejiang University, Hangzhou 310012, China
*
Author to whom correspondence should be addressed.
Acoustics 2025, 7(3), 55; https://doi.org/10.3390/acoustics7030055
Submission received: 31 May 2025 / Revised: 24 August 2025 / Accepted: 29 August 2025 / Published: 31 August 2025

Abstract

In order to measure the depth profile of the heat-treated case-hardened layer of linear guides, this paper proposes a B-scan imaging and 3D visualization method for detecting the depth profile of the case-hardened layer of linear guides based on the ultrasonic transverse wave backscattering technology. Firstly, by analyzing the generation mechanism of ultrasonic transverse waves and their advantages in material detection, and combining the differences in metallographic structure and hardness properties between the case-hardened layer and the base material, an ultrasonic transverse wave backscattering model for the case-hardened layer of linear guides was established. Then, an ultrasonic transverse wave detection experiment for the GH20 linear guide was designed and carried out to obtain the A-scan signals of the case-hardened layer depth at different positions on the cross-section of the linear guide. Finally, the A-scan signals obtained from the detection were used to generate the B-scan image of the case-hardened layer depth profile, and the 3D visualization of the case-hardened layer of the linear guide was achieved using Python and VTK tools. The experimental results show that the error between the measurement results of ultrasonic transverse waves and those of the metallographic method is 0.063 mm, and the detection results are within the allowable error range. This research provides an efficient, intuitive, and reliable technical method for detecting the depth of the case-hardened layer of linear guides in the industrial field.

1. Introduction

1.1. Research Background

In the machine tool industry, machine tools are lauded as “working mothers” and play a key part in the production process of mechanical equipment. As the mechanical transmission mechanism of machine tools, linear guides allow smooth and accurate linear motion [1,2], significantly boosting equipment production efficiency, enhancing machining accuracy, and decreasing manufacturing costs. As one of the key functional components of machine tools, linear guides commonly work in situations involving cyclic linear motion, placing exceptionally high requirements on their surface wear resistance, load-bearing capacity, and fatigue life [3]. Consequently, linear guides usually undergo heat treatment techniques to form a surface hardened layer of a specified depth, thereby increasing their material qualities.
The depth of the hardened layer acts as a vital signal for measuring the surface strengthening effect of metal materials. The depth information and distribution strongly affect the service life and durability of metal components [4]. In light of the aforementioned history, precisely assessing the depth profile of the hardened layer in linear guides is crucial for assuring the quality and performance of the guides.

1.2. Research Status

Traditional techniques for measuring the depth of hardened layers essentially involve metallographic and microhardness tests [5,6]. These approaches are often damaging and demonstrate poor detection effectiveness. With the evolution of non-destructive testing (NDT) technologies, ultrasonic testing has gained significance in the area of toughened layer depth detection owing to its effectiveness and non-destructive nature [7,8,9]. In particular, ultrasonic backscattering technology, which examines the microstructure of metal materials based on the propagation properties of ultrasonic waves, has gained substantial interest.
Following heat treatment, the surface of metal materials acquires a martensitic hardened layer with dense grains, while the inner matrix maintains coarse grains such as austenite, ferrite, and pearlite [10]. In ultrasonic backscattering technology, high-frequency ultrasonic waves flow easily through dense grains but meet trouble penetrating the coarse-grained matrix material, resulting in scattering at the interface between the two and creating an ultrasonic backscattering effect. Compared to longitudinal ultrasonic waves, transverse ultrasonic waves travel more slowly in metals and display better sensitivity to microstructural changes, delivering larger benefits for toughened layer depth identification. By exciting an ultrasonic pulse and obliquely incidenting it into a linear guide to generate transverse ultrasonic waves, collecting the ultrasonic signals within the workpiece, calculating the propagation time from the surface of the linear guide to the interface between the hardened layer and the matrix, and combining it with the transverse ultrasonic wave velocity in the workpiece, non-destructive detection of the hardened layer depth can be achieved.
In the field of ultrasonic testing for hardened layer depth, a review of current research by domestic and foreign scholars reveals that for alloy steel components with regular shapes and simple external geometries, the Fraunhofer Institute for Non-Destructive Testing in Germany and Kobe Steel in Japan have developed relevant NDT equipment and applied it in practical production [11,12]. Subsequent studies have achieved higher-precision localization of backscattering signal fluctuations and solved difficulties such as signal unrecognizability by applying different ultrasonic signal processing techniques [13,14,15].
However, for workpieces with complex external geometries, such as GH series linear guides, challenges arise in accurately directing the excited ultrasonic signals onto the workpiece surface during detection, leading to disordered ultrasonic signals and difficulties in ensuring measurement accuracy and repeatability. Furthermore, conventional protected layer depth detection methods can only offer depth information at particular regions of the workpiece, missing a complete and comprehensible evaluation of the depth profile distribution throughout the whole workpiece [16]. Consequently, from a long-term perspective, designing an ultrasonic testing system with sufficient precision for metal components with complex profiles, such as linear guides, and employing B-scan imaging and 3D visualization technologies to achieve a more intuitive observation of the hardened layer depth profile holds significant engineering implications.

1.3. Research Objectives and Significance

This work intends to establish an ultrasonic testing method for the toughened layer depth of GH20 linear guides by applying transverse ultrasonic wave backscattering technology, based on their morphological properties. Leveraging the detection findings of the hardened layer depth and combining B-scan imaging technology, the research will create B-scan pictures of the hardened layer depth profile of the linear guides. Ultimately, 3D visualization techniques will be applied to generate a 3D reconstruction of the hardened layer depth profile.
By acquiring the hardened layer depth profile of the linear guides with this study, the efficacy of the heat treatment technique for the linear guides may be examined. This allows the rapid discovery and rectification of process faults, optimization of manufacturing processes, and development of production efficiency. Furthermore, it helps the design of sensible maintenance programs, hence decreasing equipment downtime and significant repair charges arising from linear guide failures.

2. Materials and Methods

2.1. Principle of Ultrasonic Shear Wave Detection

Both longitudinal and transverse wave (shear wave) components are often seen in ultrasonic waves. In order to identify shear waves using mode conversion, a popular technique for producing pure shear waves uses an obliquely incident longitudinal wave at an interface.
Total reflection of the longitudinal wave happens when the ultrasonic wave’s incidence angle is greater than the first critical angle but less than the second critical angle. As a result, the second medium only allows for the propagation of a refracted shear wave (Figure 1). Shear waves can only move through solid media; they cannot move through liquids or gases. They also propagate at a slower speed than longitudinal waves in solids.
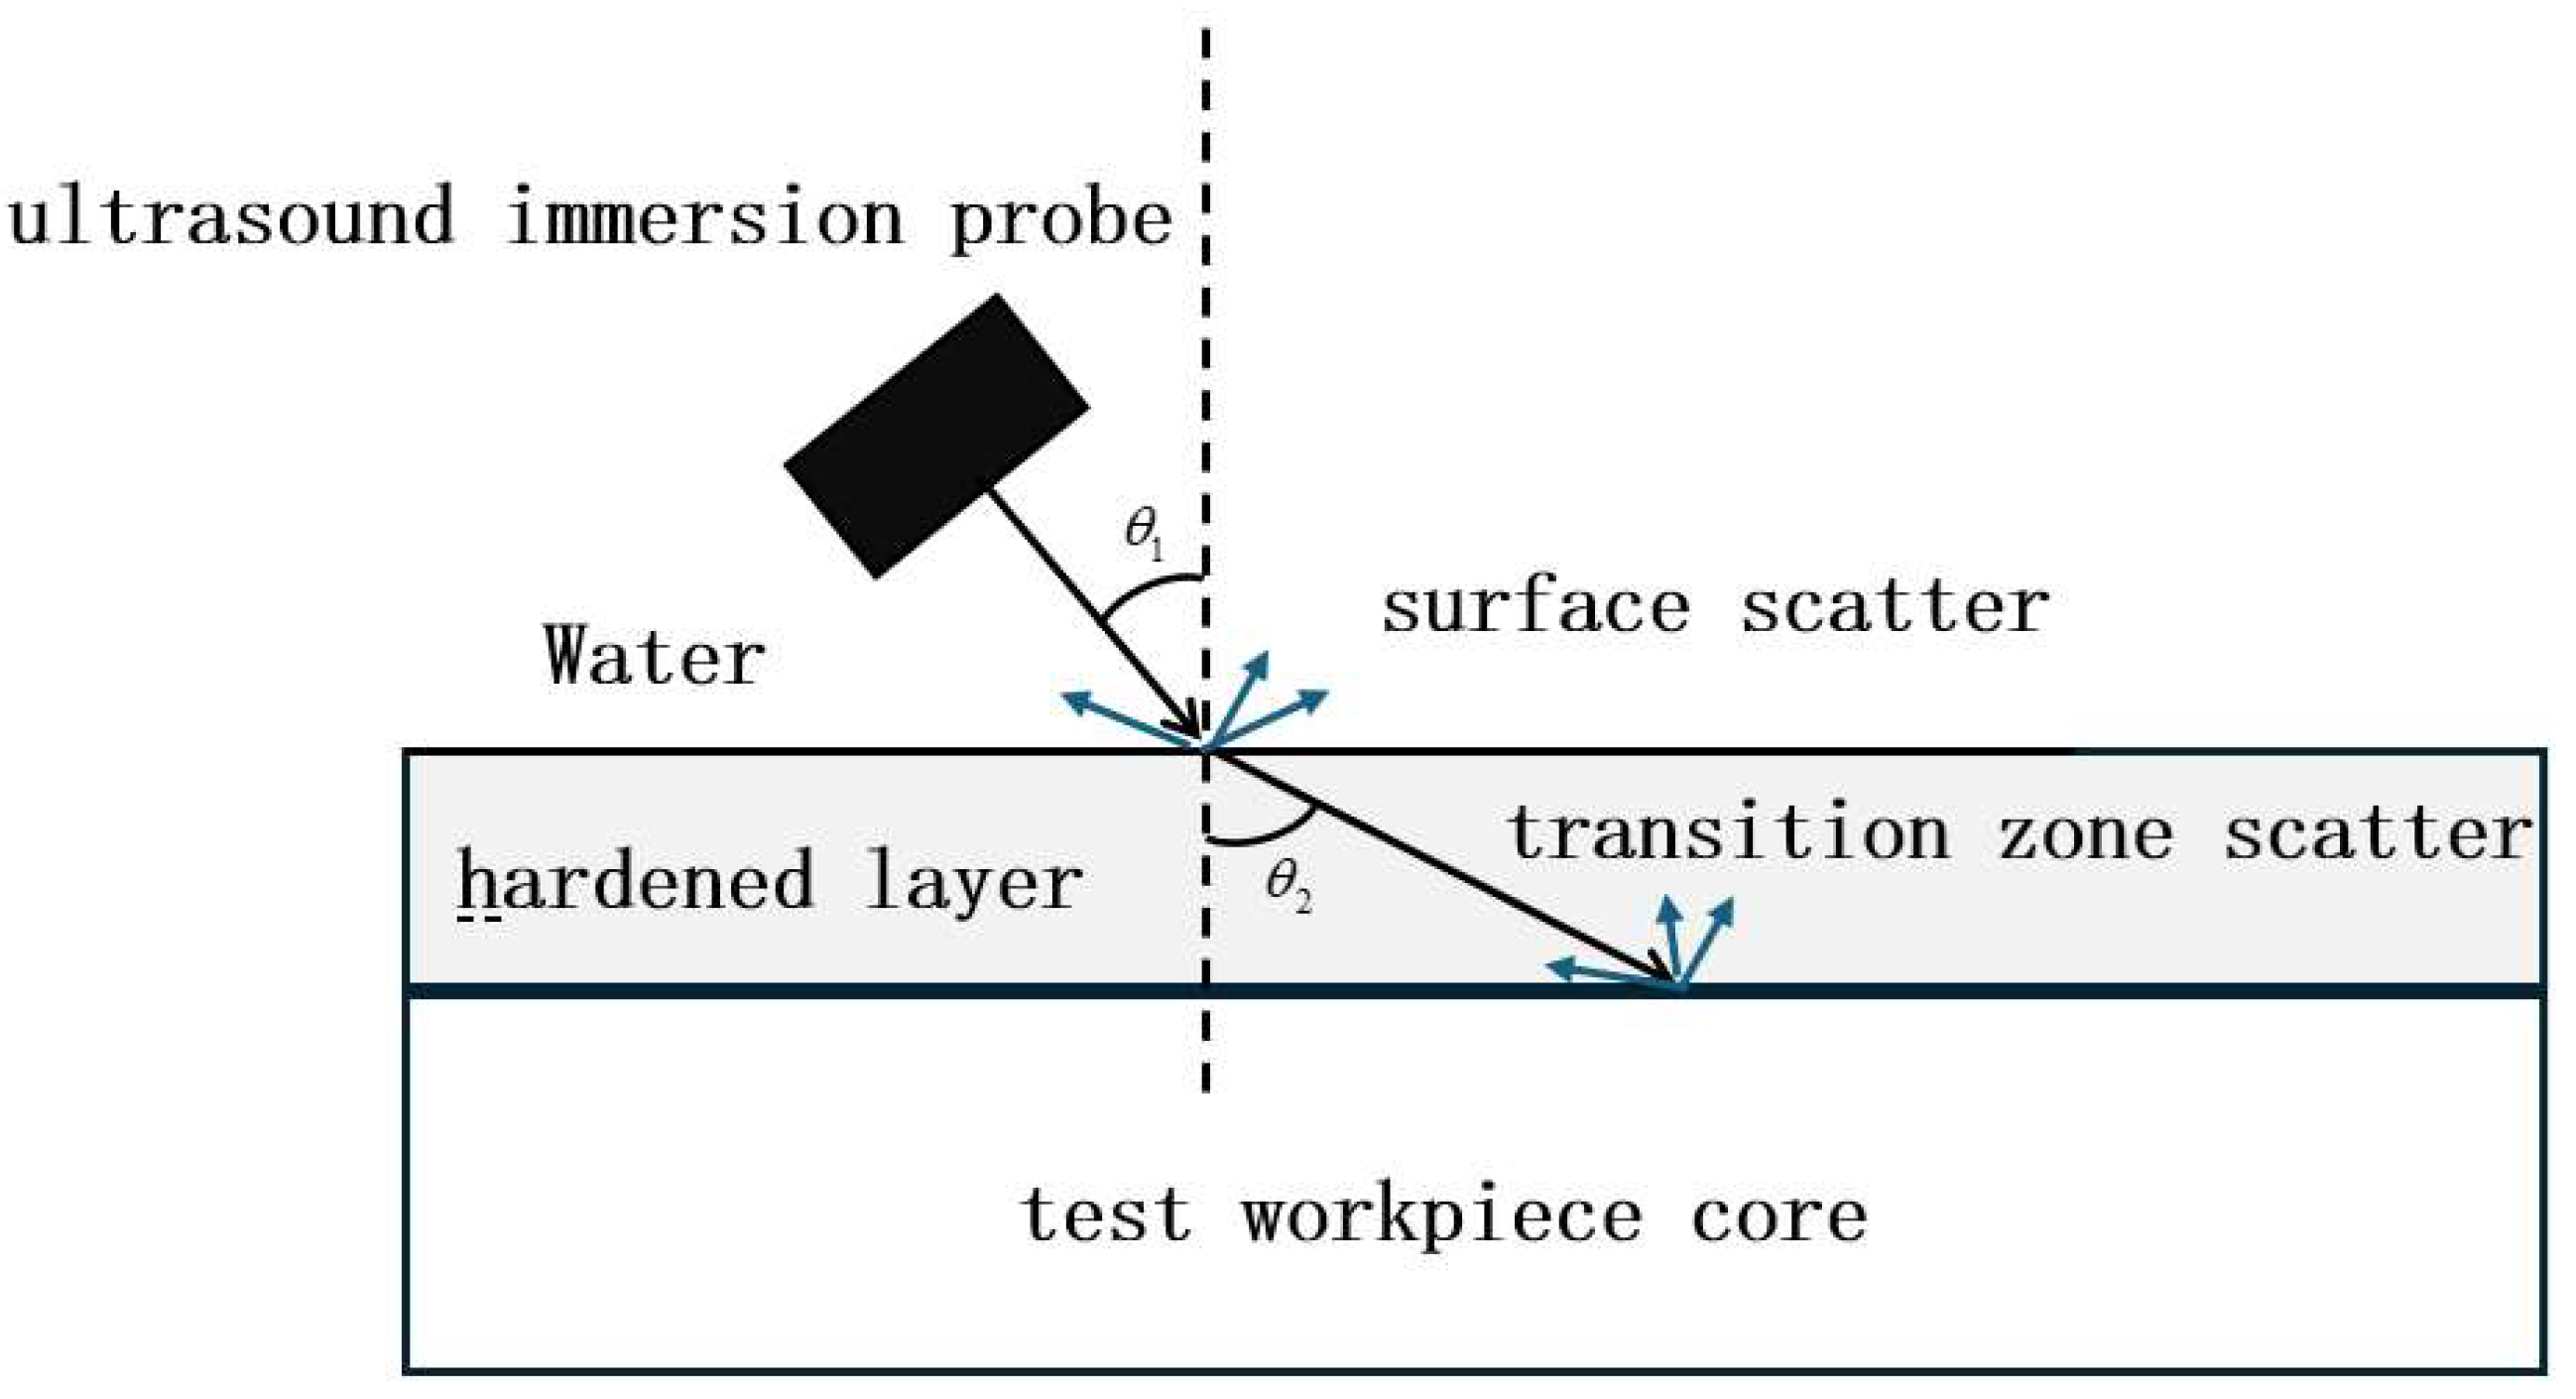
For the purpose of identifying shallow transition zones in hardened materials (Figure 2), shear wave inspection provides a number of benefits over longitudinal wave inspection based on this technological basis [17]. The main reason for this is that when the ultrasonic wavelength surpasses microstructural characteristics like grain size, shear waves undergo more Rayleigh scattering than longitudinal waves, which causes a more noticeable backscattered signal for shear waves. Moreover, shear waves’ intrinsically shorter wavelength at the same frequency offers greater axial resolution, which is essential for discerning thin layers; this resolution is further improved by the oblique propagation route often used in shear wave inspection. Therefore, the combination of these physical properties (sharper resolution and greater dispersion) allows shear waves to detect signals from shallow transition zones consistently, but longitudinal waves cannot detect similar signals.
Oblique acoustic beam creation basically involves two approaches. The first employs an ultrasonic wedge with a specified angle to transmit ultrasonic waves at an oblique angle to the contact surface, causing waveform conversion and creating refracted shear waves in the workpiece [18]. The second approach includes an inclined probe holder with specified tilt degrees, enabling acoustic waves to pass through water at an oblique angle before creating refracted shear waves in the workpiece.
The incidence angle changes with various test materials, based on the ultrasonic propagation velocities in the corresponding media. The calculating formula is stated in Equation (1).
θ c = a r c s i n ( v 1 v 2 )   ( v 1 < v 2 )
To enable water-immersion ultrasonic non-destructive examination of the toughened layer in GH20 linear guide rails, this article develops and builds a specific ultrasonic probe clamping mechanism. This section includes a full introduction from the viewpoints of design requirement and structural functioning, complemented by 3D assembly diagrams, exploded views, and physical images to explain the overall structure and functional application of this mechanism.
During ultrasonic assessment, the coupling state between the probe and the workpiece under inspection is crucial for detection accuracy, especially in inspection systems involving water-immersion coupling to accomplish shear wave incidence. The probe’s incidence angle, water route length, and probe-workpiece contact condition must stay steady. Since linear guide rails typically display modest curvature changes arising from residual stress after heat treatment, the effect of such morphological variances on probe coupling is very important. To guarantee steady and precise transmission/reception of ultrasonic beams during assessment, the clamping mechanism must meet the following functional requirements: (1) maintain a stable angle between the ultrasonic probe and the rail surface under inspection;(2) ensure a constant water path length between the ultrasonic probe and the inspected surface; (3) achieve flexible contact with the rail to accommodate morphological variations and prevent coupling failure; (4) provide excellent operability and system compatibility for both handheld and fixture-mounted inspection scenarios.
To achieve these objectives, this study builds an ultrasonic probe clamping mechanism based on the geometric properties of GH20 linear guide rails. This equipment incorporates adjustable angles, variable water channel length, and flexible surface adaptation into a unitary system. The total assembly structure is represented in Figure 3a, with its component explosion diagram provided in Figure 3b.
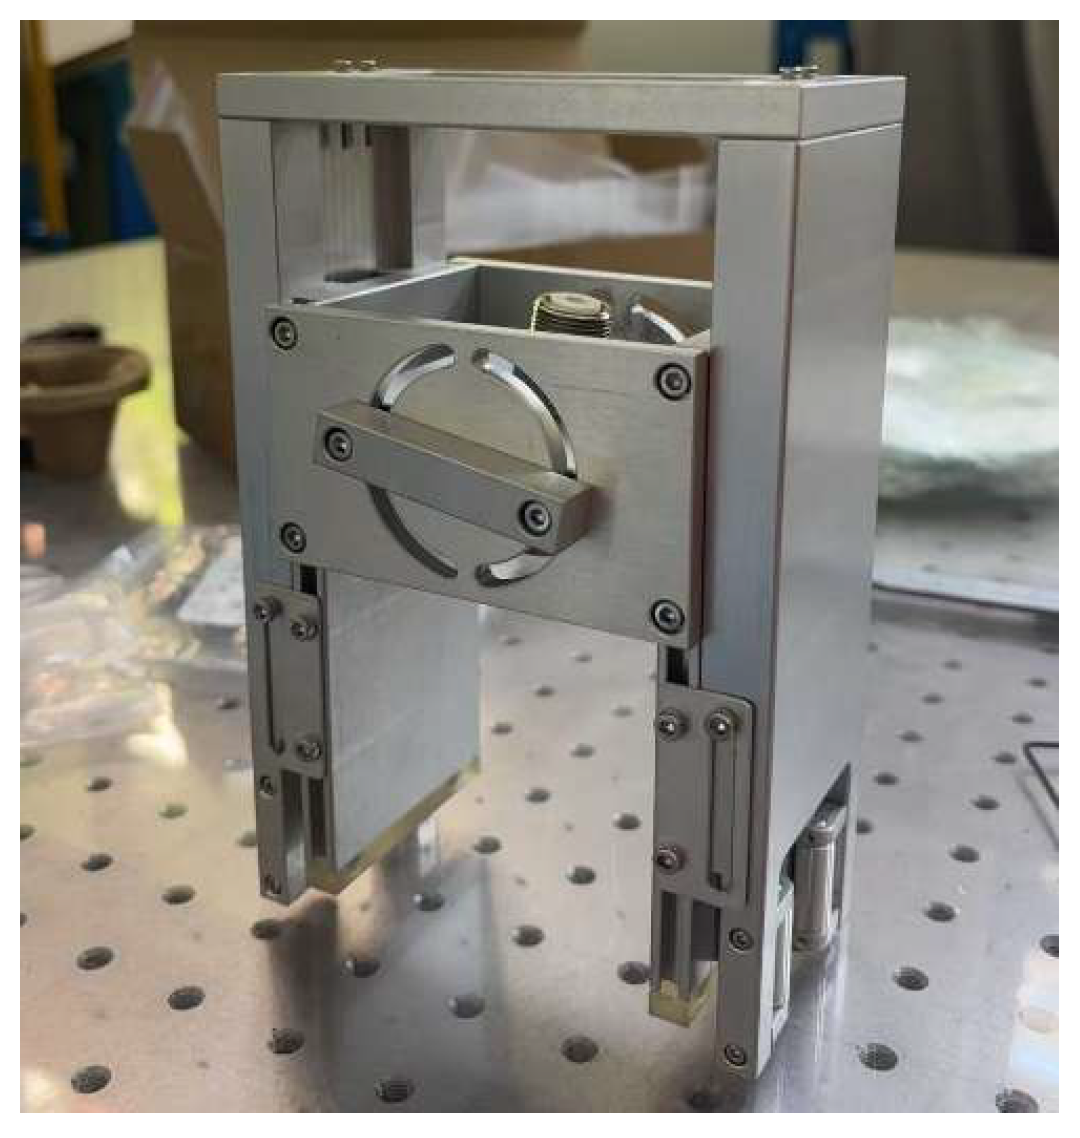
The clamping device’s inner and outer sliding modules with dovetail grooves work in tandem to provide secure rail fixation. While the inner slider uses planar compression to provide conformal attachment to the rail’s exterior contour profile, the outer slider uses friction rollers to securely clamp the top and bottom surfaces of the rail. An angular adjustment mechanism that is actuated by a knob is centrally incorporated inside the assembly. This mechanism, which is attached to the probe mounting base, allows the probe’s incident angle to be precisely adjusted, guaranteeing constant maintenance of the necessary incidence angles throughout various inspection zones. Limit holes are inserted along the rail to restrict slider motion and stop accidental disengagement in order to ensure operational dependability and safeguard the rail. In order to provide compliant compressive contact, spring loading is simultaneously supplied at clamping interfaces. Additionally, rubber or polyurethane cushioning pads are installed on all parts that come into direct contact with the rail. This successfully prevents surface scratches and related coupling failures, resulting in non-marring clamping. In conclusion, the device’s small size and easy installation allow it to be widely adapted to a range of ultrasonic testing situations. Its exceptional operational stability and user-friendliness are further supported by experimental validation. In Figure 4, the actual prototype is shown.
Leveraging the capabilities of this clamping mechanism, which ensures precise and stable incidence angles, this research predominantly utilizes Method 2 with a water-linear guide rail coupling interface. The critical incidence angle for generating shear waves within the rail material is determined by the acoustic properties of the coupling media. Substituting the ultrasonic velocity in water (1480 m/s) and the longitudinal wave velocity in steel (5900 m/s) into Equation (1) provides a first critical incidence angle of 14.557°. To facilitate practical implementation and manufacturing of the probe holder integrated within the clamping mechanism, the ultimate incidence angle was adjusted to 15°. This adjusted angle is readily achievable and maintained by the clamping mechanism’s integrated knob-operated angle adjustment feature during scanning operations.
During propagation, ultrasonic shear waves interact with internal material defects (e.g., cracks, voids, inclusions) via reflection, refraction, and scattering, modifying waveform properties owing to the elastic property mismatch between defects and the surrounding matrix. Additionally, microstructural differences such as grain boundaries, phase transformations, and textures significantly impact ultrasonic propagation, generating changes in wave velocity, amplitude, and phase parameters [19]. These differences are evident in received transmissions. Compared to longitudinal waves, shear waves display increased sensitivity to microstructural changes, allowing better separation of material microstructures and improved detection accuracy.

2.2. Material Characterization and Microhardness Measurement of Linear Guide Rails

The primary method for detecting hardened layer depth in linear guide rails rests in exploiting ultrasonic signal changes to identify material differences between the hardened layer and substrate, hence providing depth information of their interface. The material property discrepancies between the hardened layer and substrate of linear guide rails generally appear in hardness/strength, wear resistance, and fracture toughness.
To perform symmetrical assessment of the toughened layer depth profile in guide rails based on ultrasonic transverse wave backscattering effects, this section creates a specific ultrasonic evaluation method for GH20 linear guide rails. The system utilizes a modular design to permit flexible debugging, quick component replacement, and collection of high-quality ultrasonic signal data during tests. Its key hardware components include (1) industrial PC; (2) ultrasonic signal transmitter and receiver devices; (3) water-immersion point-focused ultrasonic probe; (4) inspection water tank; (5) probe clamping assembly designed for GH20 rails. Detailed setup settings are shown in Table 1.
The aforementioned hardware equipment represents an ultrasonic assessment system for rail-protected layers characterized by adjustability, high adaptability, and stability. Its physical arrangement is depicted in Figure 5. This verification approach offers a strong platform for upcoming hardened layer depth detection investigations.
To extensively analyze the material distribution characteristics of the GH20 linear guide rail’s hardened layer and substrate, and to provide a benchmark for validating the ultrasonic transverse wave backscattering results, this research first performed microhardness testing throughout the rail’s cross-section. By conducting depth-resolved microhardness measurements, hardness distribution curves were created to graphically illustrate hardness changes with depth—a traditional method for hardened layer depth assessment. The detailed measuring process is as follows:
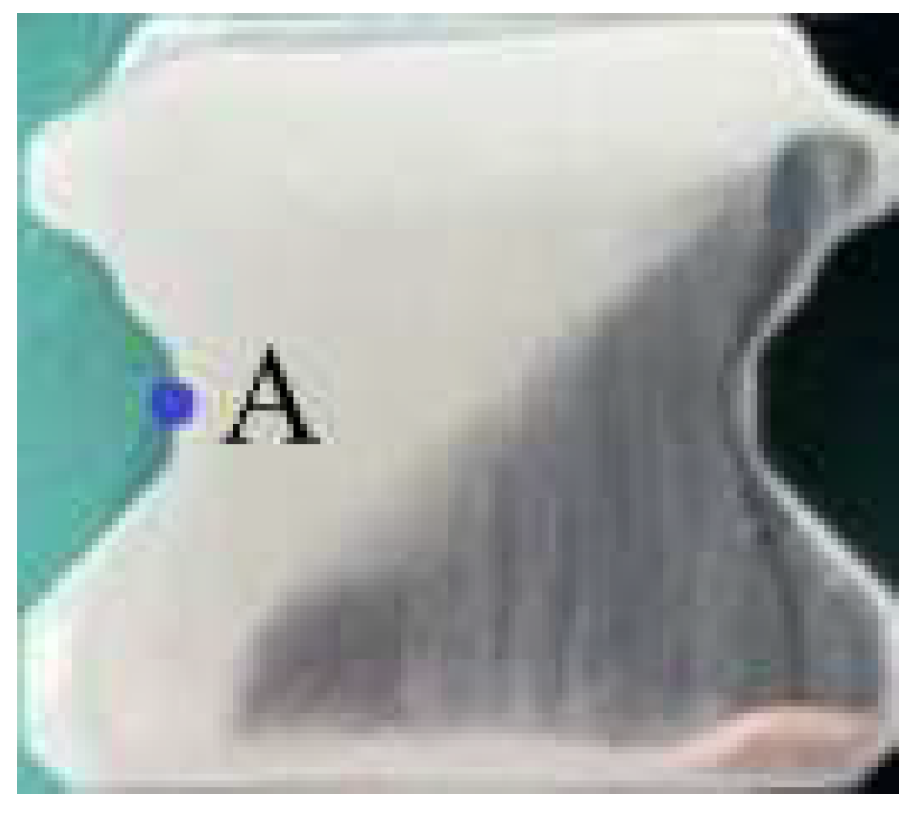
First, test specimens were extracted from GH20 linear guide rail products using wire electrical discharge machining (WEDM) equipment (Zhonggu Electronic Discharge Machining (EDM) Industrial Co., Suzhou, China), with the cutting process and resultant specimen block displayed in Figure 6a,b, respectively. The specimen’s cross-section was later ground and polished to provide a smooth testing surface, with the polished interface illustrated in Figure 7. Microhardness measurements were performed using a Rockwell hardness tester (Laizhou Veiyee Experimental Machine Manufacturing Co., Ltd., Laizhou, China) with the C scale chosen initially owing to the high hardness of the rail’s surface material (quenched steel), applying a 150 kgf test load. The measurement points, as illustrated in Figure 8, were separated at 0.4 mm intervals beginning from the surface, yielding the hardness variation curve given in Figure 9.
From the aforementioned testing results, it can be noted that within 1.2 mm from the surface, the hardness value of the guide rail material maintains about 60 HRC, suggesting that this area comprises a high-hardness hardened layer with exceptional wear resistance. At a depth of 1.6 mm, the material hardness reduces dramatically to roughly 45 HRC, indicating a progressive transition from the hardened layer to the substrate. As the depth reaches 2 mm and beyond, the hardness lowers to 14 HRC, indicating the substrate area of the guide rail. Therefore, it may be preliminarily determined that the hardened layer depth at this measurement location ranges between 1.2 mm and 1.6 mm. This also illustrates the large hardness discrepancy between the hardened layer and the substrate of the linear guide, which gives the possibility for transverse ultrasonic wave detection.

2.3. Ultrasonic Shear Wave Backscattering Effect in Hardened Layers

Building upon the introduction to the principles of ultrasonic shear wave detection and the material property differences between the hardened layer and substrate of linear guides, this section elaborates on the ultrasonic shear wave backscattering effect in hardened layers and establishes a corresponding model.
The employment of ultrasonic shear waves for determining material hardening levels was initially described by Koppelmann in the hardened layer examination of induction-hardened steel coils [20]. Subsequently, H. Willems [21] applied this approach to the hardened layer testing of bearing rings. In H. Willems’ studies, chrome-molybdenum steel bearing rings were utilized, and their hardening depths were carefully evaluated using hardness testing procedures, with hardness data collected at different depths.
As illustrated in the experimental setup shown in Figure 10a, a water-immersion probe was obliquely incident at a given angle, creating shear waves with maximum transmitted amplitude at the water-steel coupling contact by refraction. The original signal is segmented to target the ultrasonic transverse wave backscatter zone between the two signal amplitude peaks in order to make further processing easier. Figure 10b displays the split ultrasonic signal’s time-domain waveform.
After smoothing, time-of-flight interpolation processing is applied to this ultrasonic signal. 20 data points are linearly inserted between neighboring original data points using piecewise linear interpolation, which is based on the initial sampling frequency of 50 MHz. In effect, the sampling frequency is raised to 1 GHz (1050 MHz). Figure 11 displays the ultrasonic transverse wave signal’s ensuing time-domain waveform.
The time delay (Time-of-Flight, TOF) between the reflection from the transition zone and the front surface reflection is used to calculate the case hardening depth (CHD). A detection threshold is established at 30% of each peak amplitude in order to more accurately pinpoint the location of each echo. The echo location point is the position at which the signal first passes this threshold. The distance (time gap) between these two echo location spots is hence the definition of TOF. Equation (2) provides the TOF detection result.
Rockwell hardness readings from a cross-section of the rail are used in this research to calibrate the threshold selection. In comparison to values acquired “conventionally” by Rockwell hardness testing under static circumstances, the case depth values measured ultrasonically are usually within an accuracy of 0.1 mm. The threshold selection approach used here has a precision of 0.062 mm, which satisfies the necessary accuracy requirement. Figure 12 displays the hardened layer depth values obtained by the Rockwell hardness measurement method at the measured points on the guide rail section.
The ultrasonic transverse wave signal is used to compute the case hardening depth at the inspection location after the aforementioned processing processes. The results of the computation are shown in full below.
D = T   ·   v s 2 · c o s β = 1472 × 10 9 × 3350   m / s 2 × 1 3350   sin 20 ° 1500 2 = 1.027   m m

2.4. 3D Visualization Technology

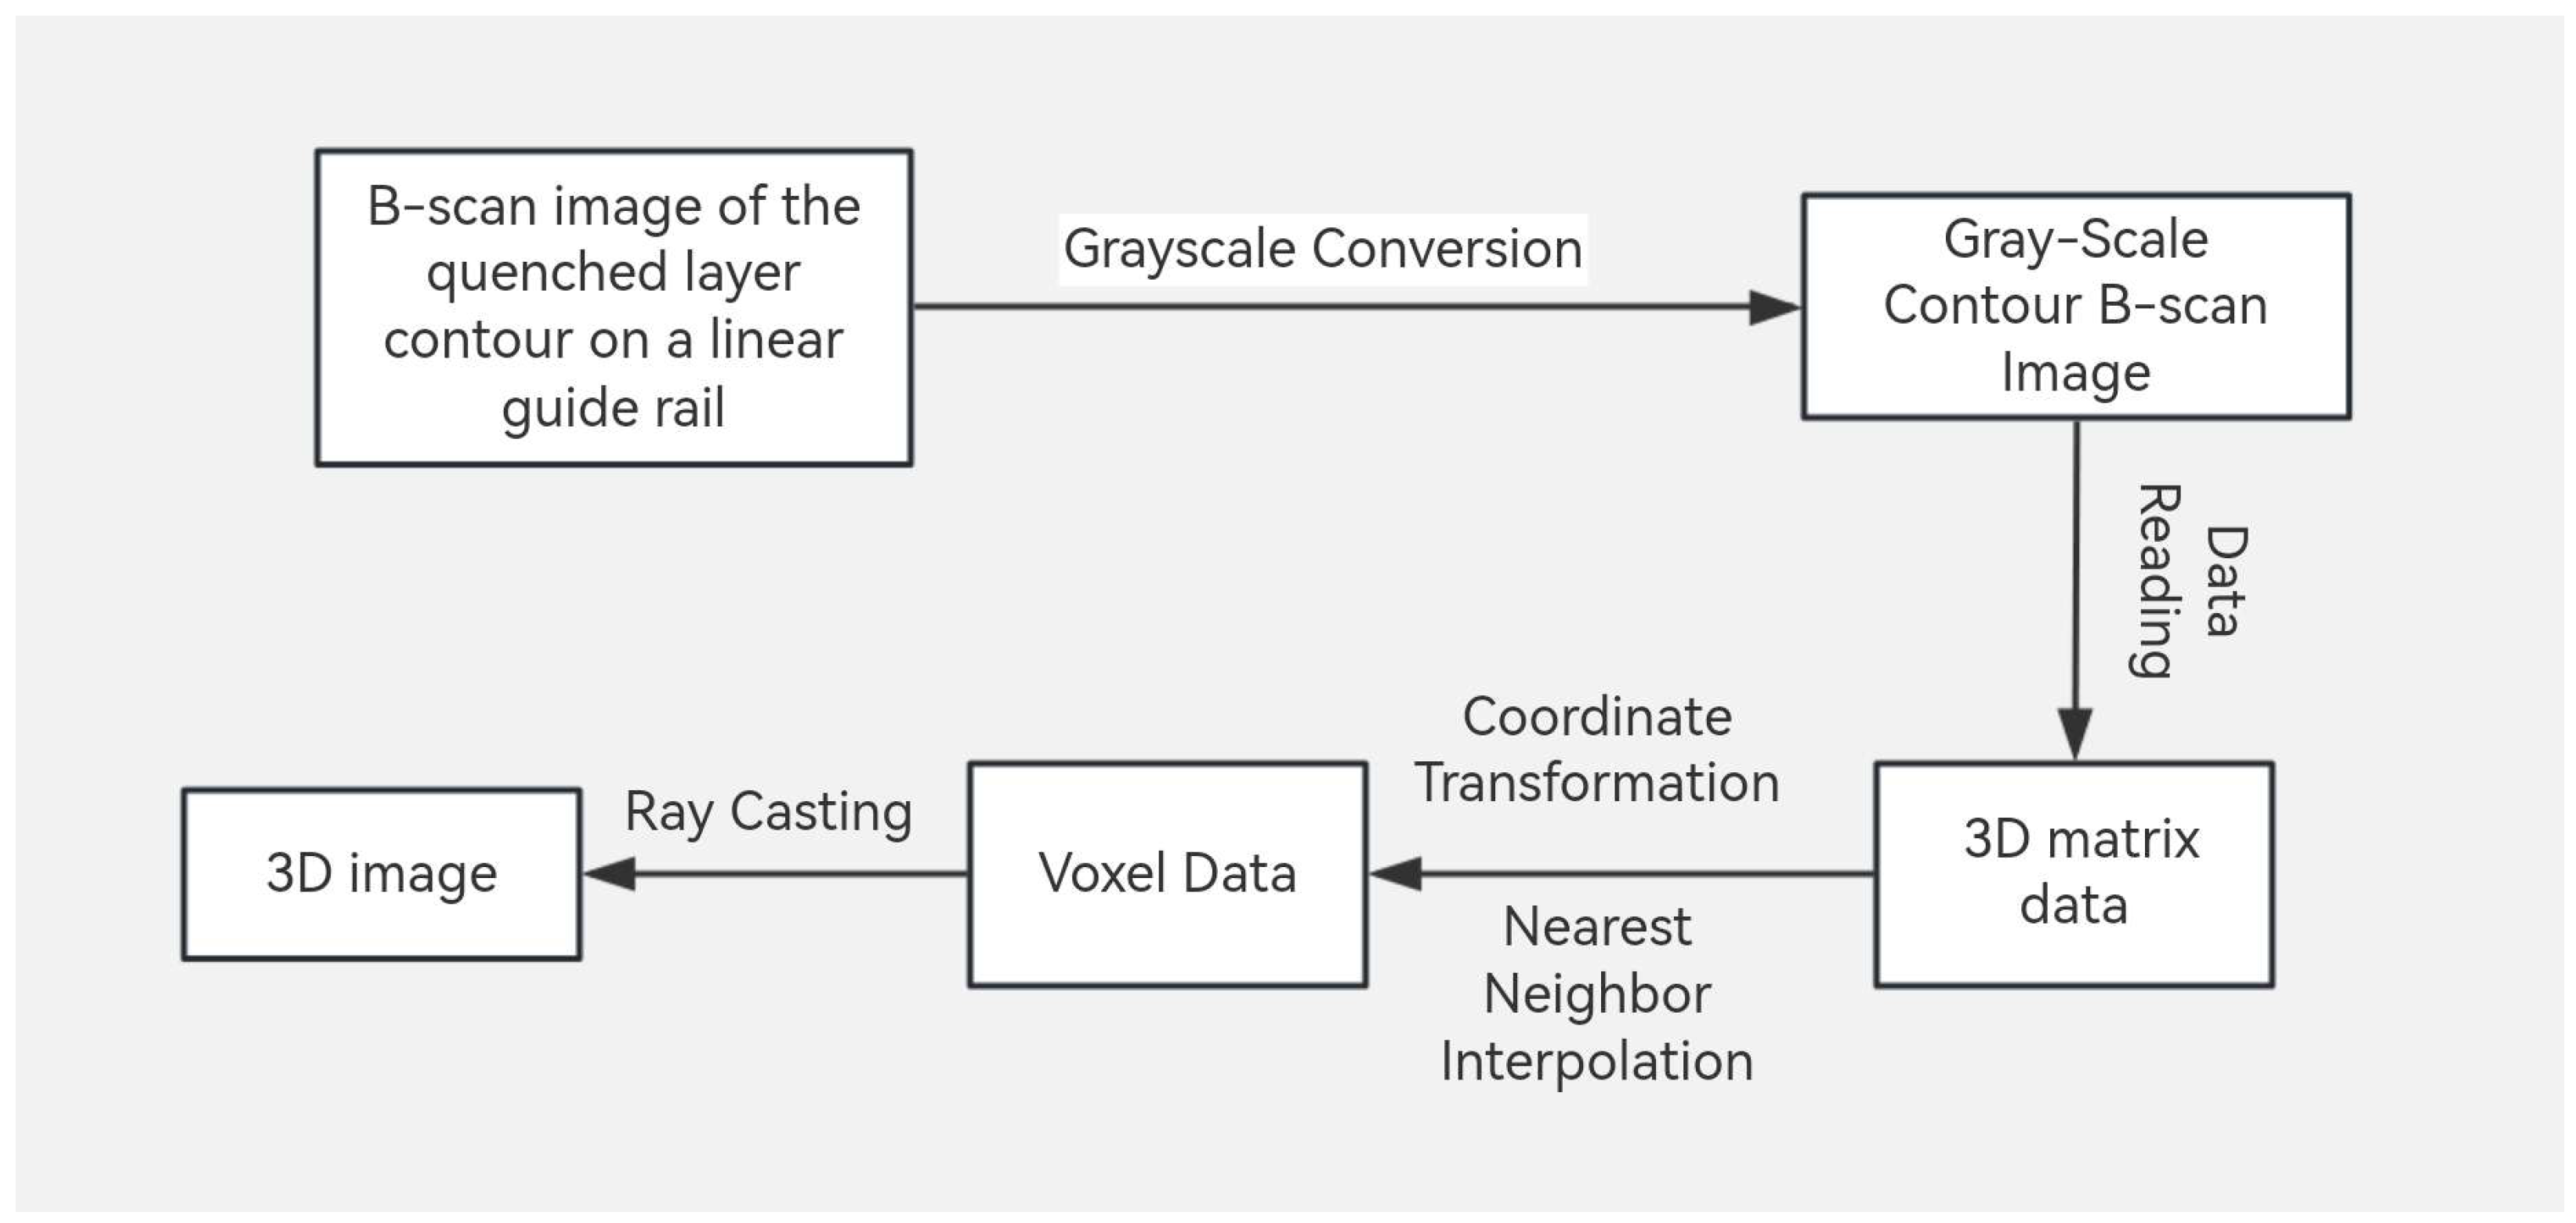
3D visualization technology is based on computer graphics and digital image processing theories, applying multi-source heterogeneous data fusion methods (incorporating 2D data sources such as CT imaging and optical imagery) to generate volumetric models with spatial topological links. From a technological implementation standpoint, the standard 3D visualization pipeline involves four progressive processing stages: (1) Data acquisition, requiring selection of appropriate sensing devices (e.g., CT scanners, LiDAR) based on target characteristics; (2) Data preprocessing, involving noise filtering, distortion correction, and data registration; (3) Volumetric reconstruction, utilizing 3D interpolation methods like the Marching Cubes algorithm to establish geometric topology; (4) Visualization rendering, employing techniques such as ray casting and texture mapping to achieve model visualization. The process architecture diagram illustrated in Figure 13 completely depicts the methodical execution of this technological technique.
The Visualization Toolkit (VTK-8.2.0.) is an open-source software package for scientific image data processing, allowing users to execute image processing, improvement, and other customized setups while using its built-in algorithms for 3D visualization. With its extensive image processing capabilities and open-source 3D visualization functionality, VTK-8.2.0 has found significant applications across several scientific study disciplines [21].
When utilizing VTK-8.2.0 for image 3D visualization, the process primarily involves two stages: (1) Data preparation, where VTK-8.2.0 facilitates raw image data reading and processing through its multi-format data import capabilities and diverse image processing tools; and (2) Image rendering, where VTK-8.2.0 enables 3D volume generation from processed data using various rendering techniques.
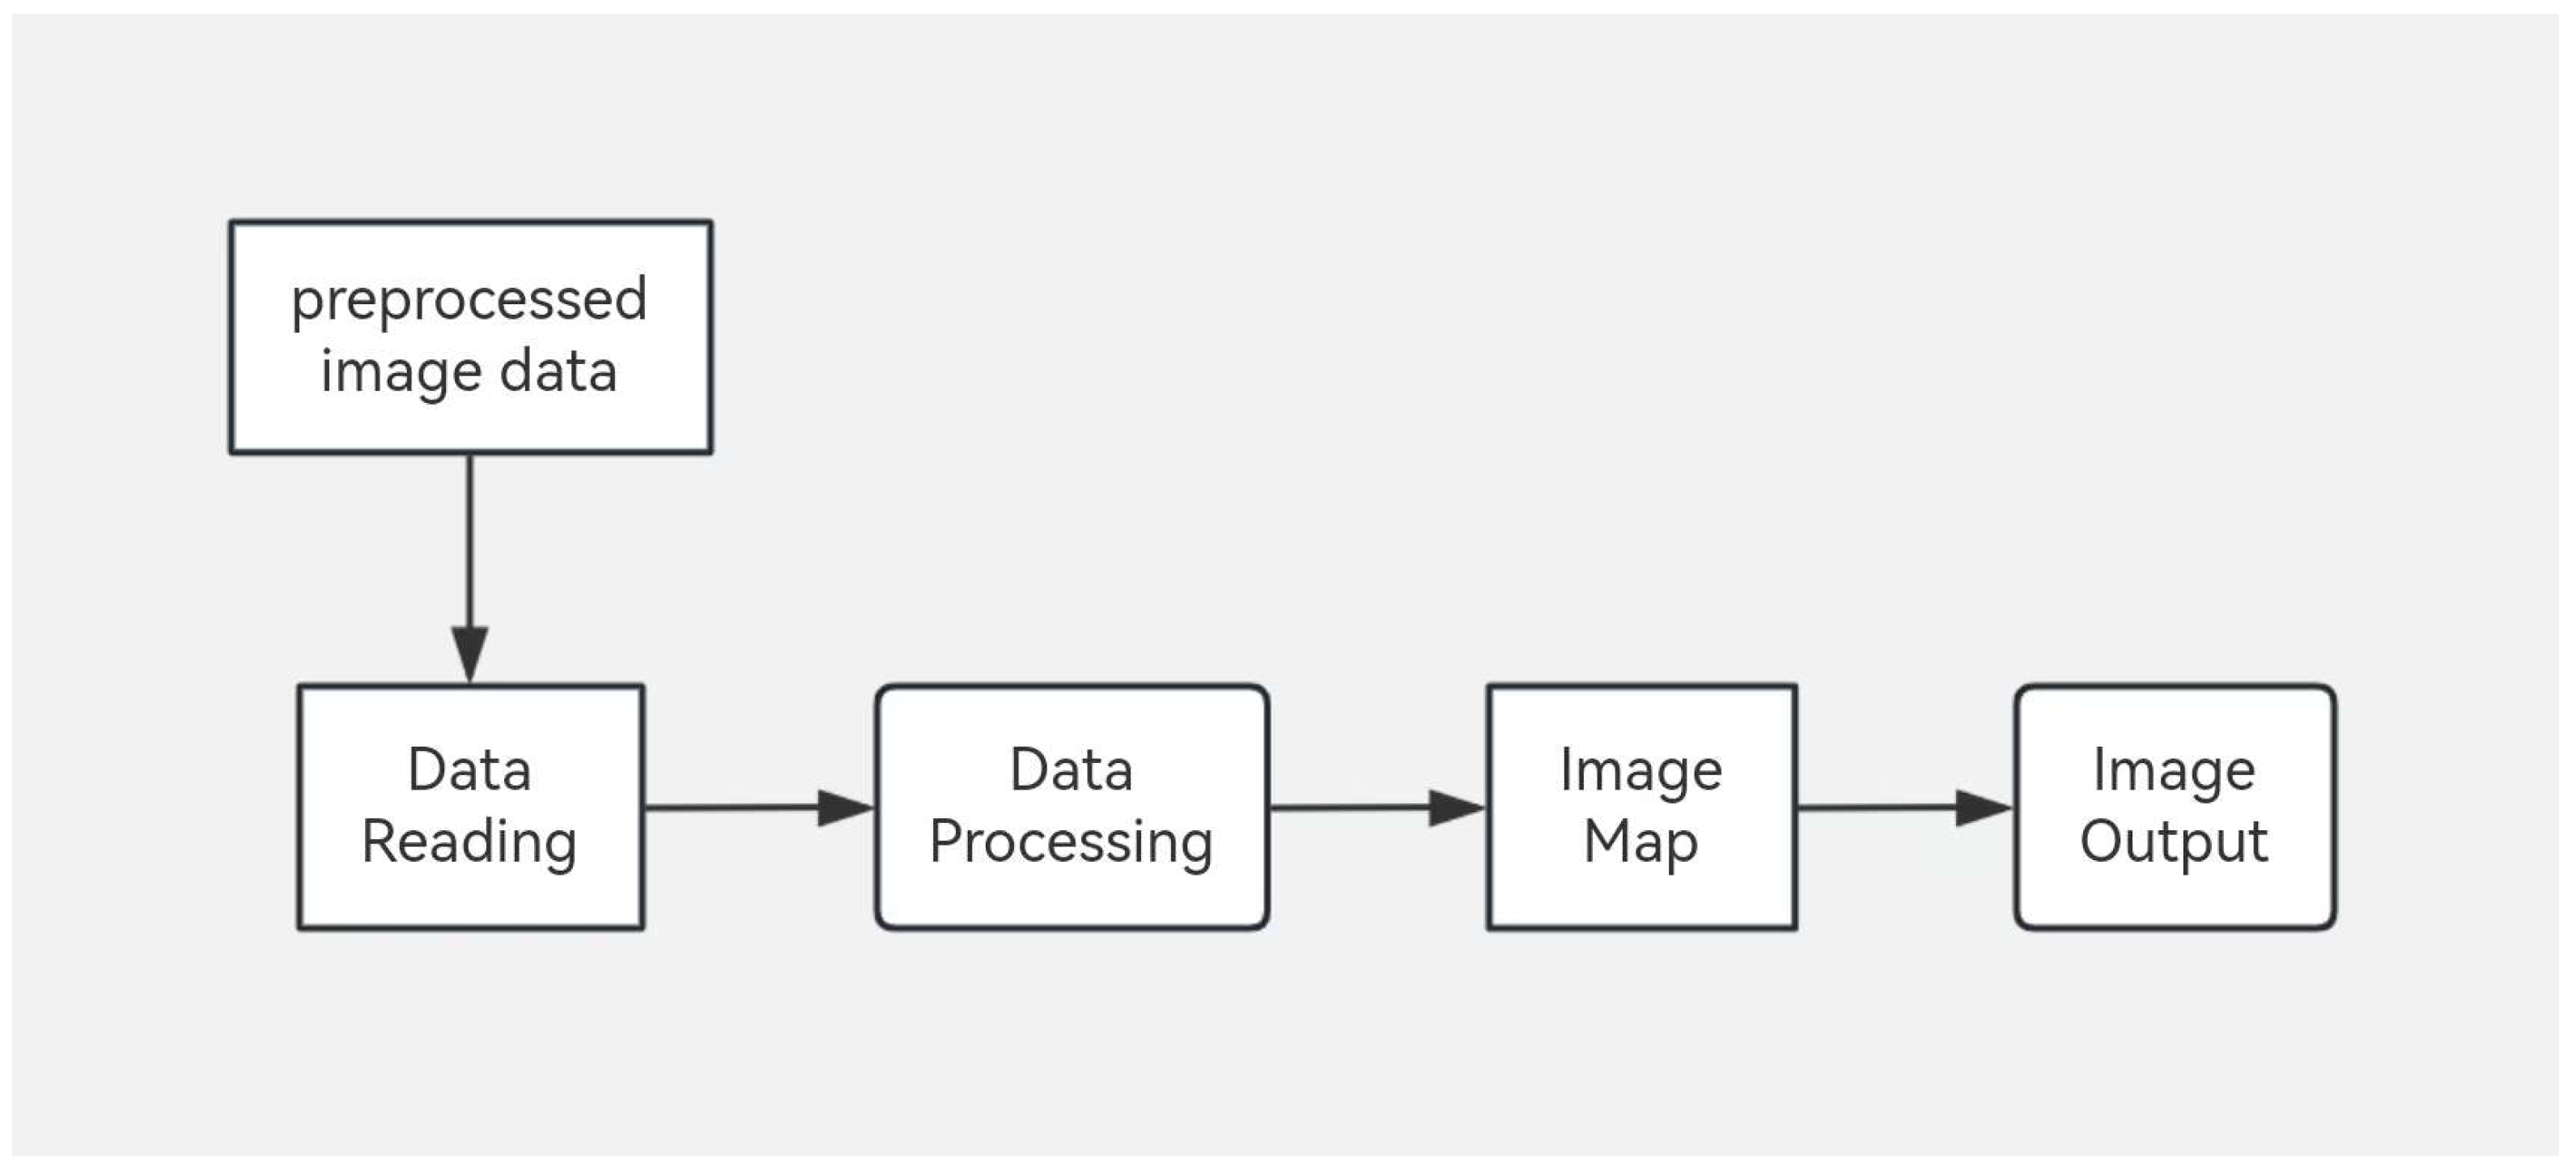
Researchers typically apply Python in combination with VTK-8.2.0 for image data processing and display. The normal process continues as follows: First, raw picture data (in JPEG or PNG formats) is pre-acquired and saved. VTK-8.2.0’s Python-integrated utility classes (e.g., VTK-8.2.0JPEGReader and VTK-8.2.0PNGReader) subsequently handle data reading, preprocessing, and rendering. Through image data intake, VTK-8.2.0 translates and saves raw pictures as matrices, which undergo filtering via VTK-8.2.0ImageImport followed by coordinate transformation and quantization to provide voxel data for graphic mapping. The VTK-8.2.0VolumeMapper then maps this voxel data into 3D volumes, with VTK-8.2.0Render eventually providing graphic rendering and interactive 3D visualization output.
In contrast to standard 3D visualization processes, the VTK-8.2.0-based method blends volumetric reconstruction and 3D visualization phases. By entering preprocessed picture data and employing Python’s inherent VTK-8.2.0 utilities, further 3D visualization operations (as depicted in Figure 14) are methodically implemented.

3. Results

3.1. Test Specimen and Expected Outcomes

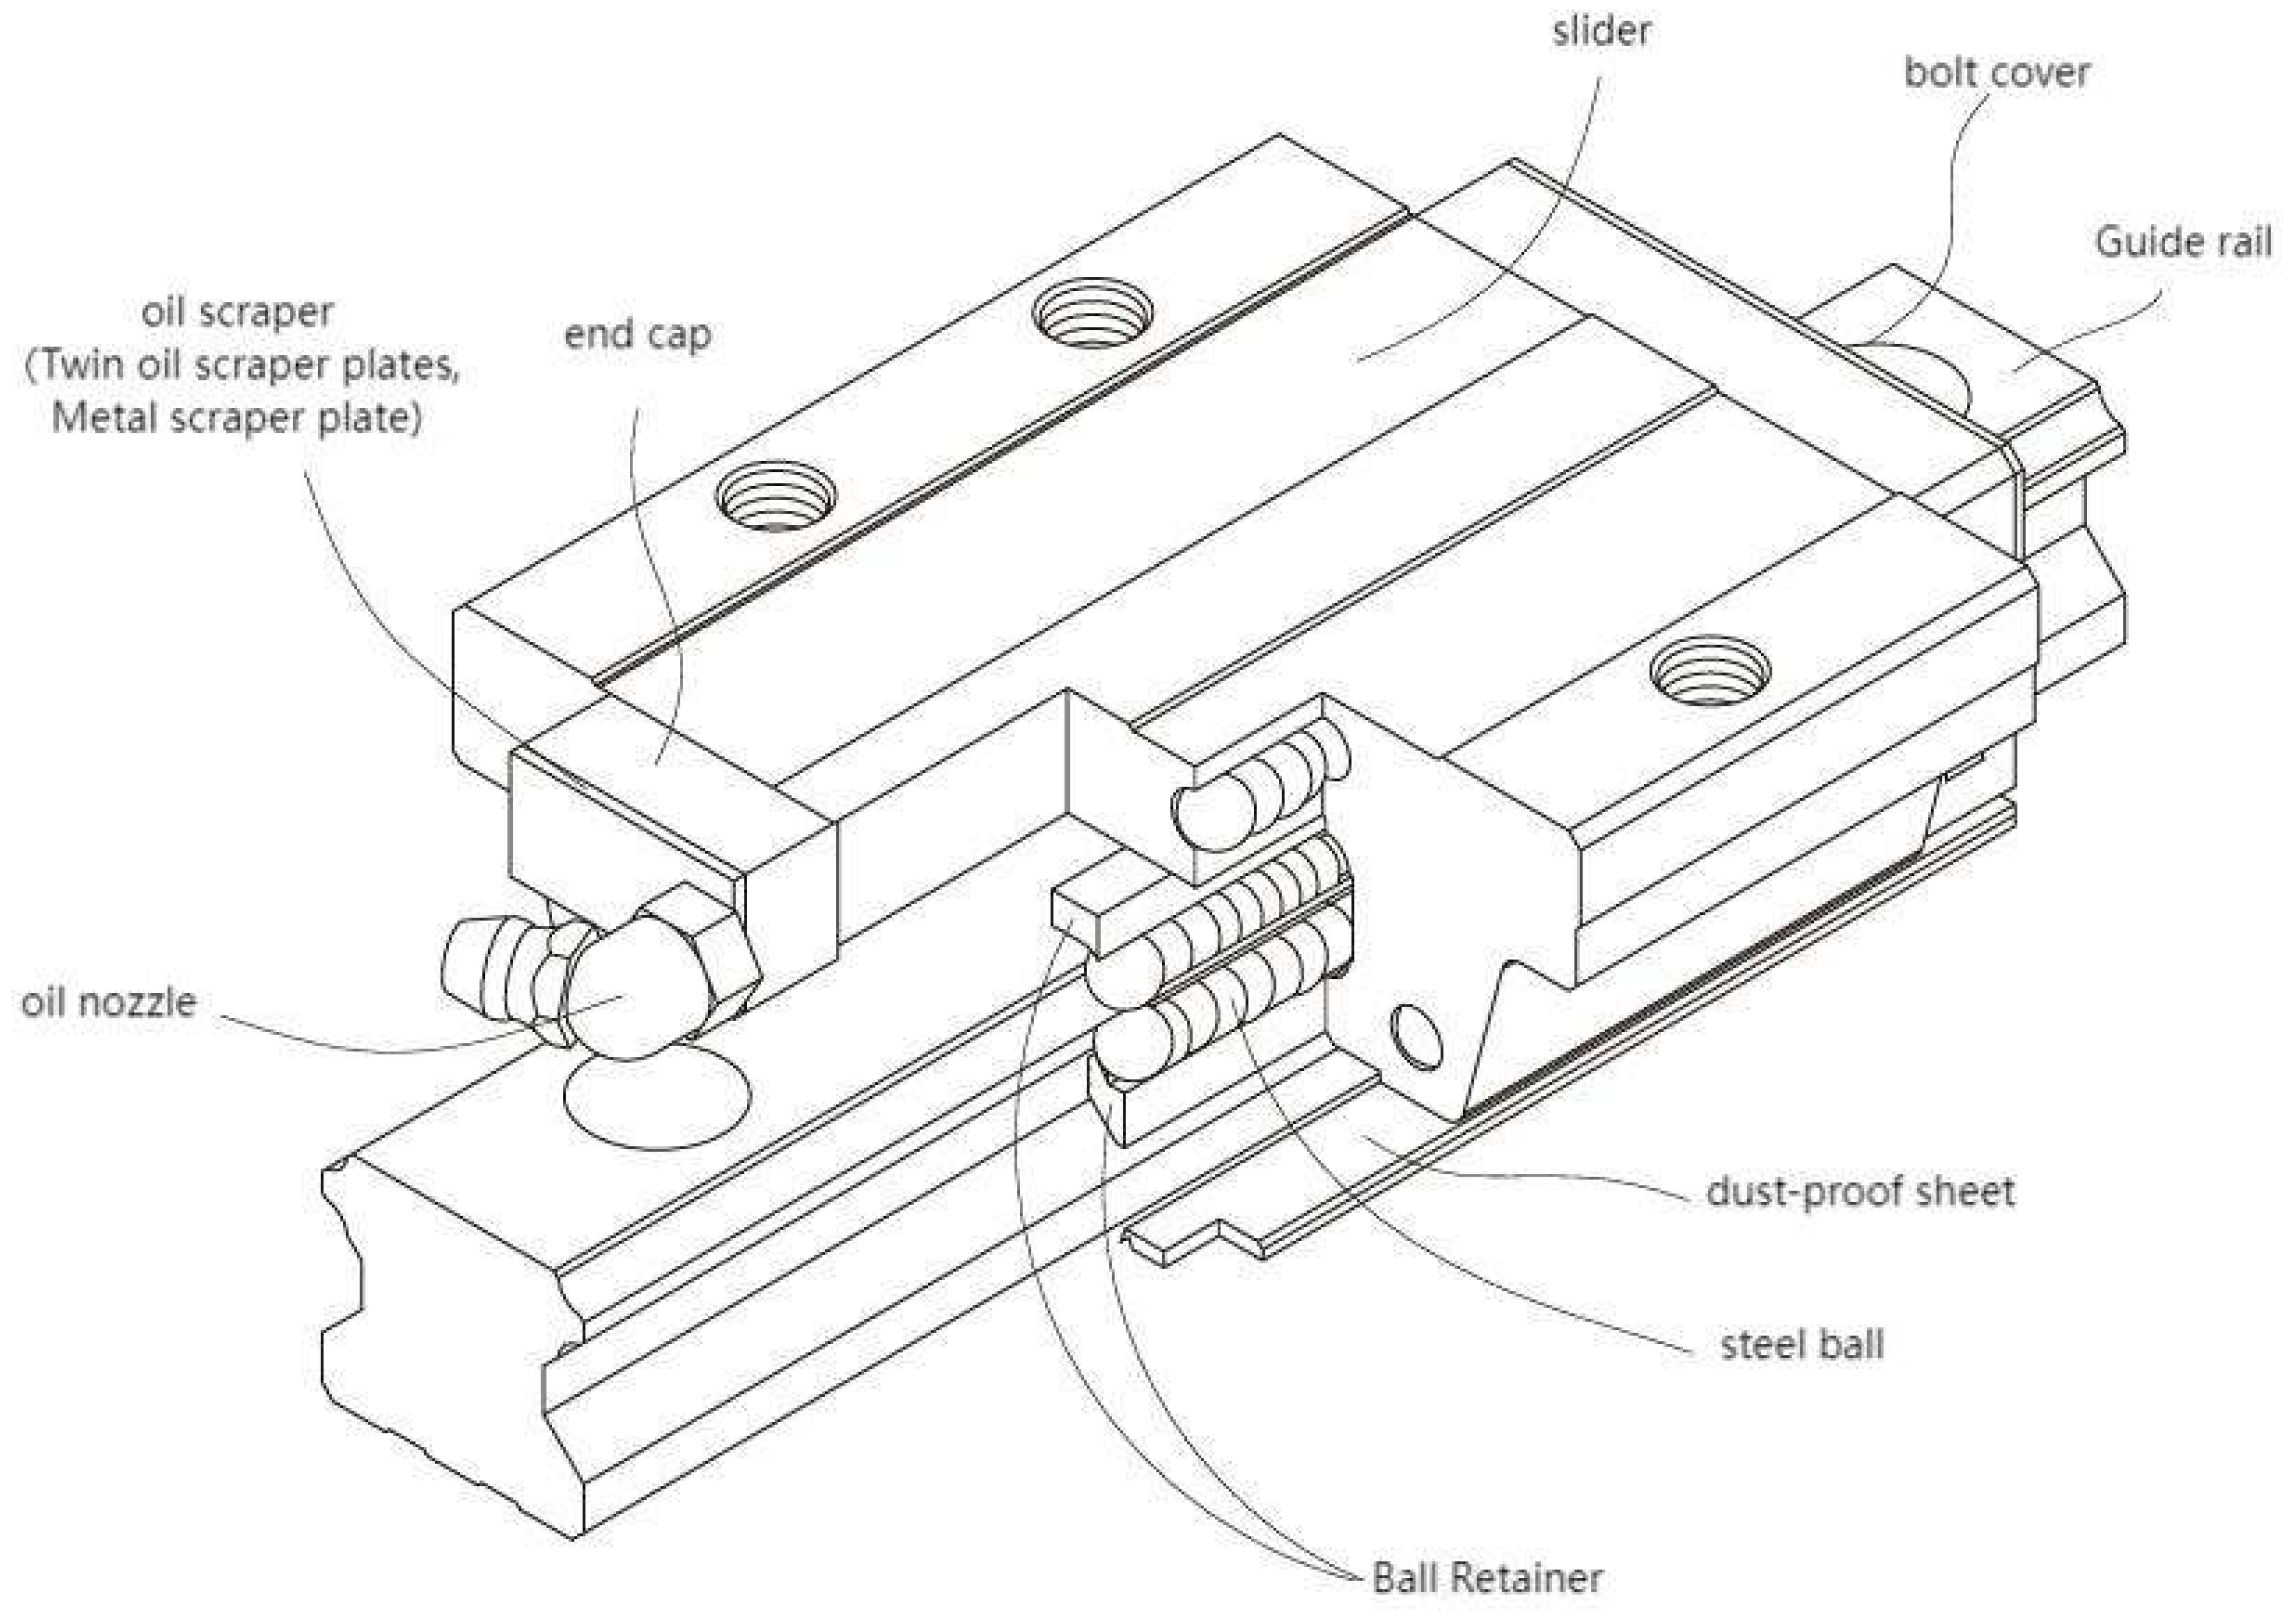
The inspection objective for this research is the GH20 linear guide rail, with its operating arrangement indicated in Figure 15. As illustrated in the cross-sectional image (Figure 16), the GH20 rail presents a complicated geometry defined by an outside contour formed of several arcs and straight lines, with overall sectional dimensions spanning 20.4 mm × 17.83 mm.
During the manufacturing process of GH20 guide rails, the entire procedure is as follows: blank → straightening → heat treatment → straightening → drilling → straightening → flat grinding → three-side grinding → inspection and grading → cleaning and packing. A certified linear guide rail must feature both outstanding material mechanical qualities and great geometric precision. In agreement with the detection goals of this system, research suggests that the allowable toughened layer depth for approved GH20 linear guide rails spans from 1.4 mm to 2.2 mm. Consequently, the detection system is originally designed to conduct ultrasonic testing of the toughened layer depth for GH20 linear guide rails, with a necessary detection accuracy of ±0.08 mm. Furthermore, the system is intended to undertake a full evaluation of the hardened layer depth profile throughout the whole linear guide rail, rather than being confined to isolated point measurements. This provides an assessment of the conformance of the hardened layer depth profile for the complete linear guide rail.
Based on the aforementioned analysis and summary of the experimental goals and targets, the following highlights the detection performance requirements for this system: (1) to achieve hardened layer depth detection across all characteristic surfaces of the GH20 guide rail profile; (2) to evaluate the hardened layer depth profile of the linear guide rail using the acquired detection results; (3) to ensure the detection system attains a specified level of detection accuracy.

3.2. Detection System Design and Experimental Procedure

In summary, the ultrasonic detection system for the hardened layer depth profile of linear guide rails is eventually created, including an industrial computer, ultrasonic acquisition card, water-immersion focused ultrasonic probe, and inspection water tank.The specific operation process is shown in Figure 17.
In the detection process, the collection of hardened layer depth information in linear guide rails predominantly depends on the time-of-flight (TOF) of the ultrasonic shear wave backscattering signal. By combining the TOF with the propagation velocity of ultrasonic shear waves inside the hardened layer area of the guide rail, the propagation route length of the acoustic wave within the hardened layer can be estimated. Subsequently, the depth information may be obtained based on the connection between the propagation route length and the depth. Figure 18 demonstrates the propagation route of ultrasonic shear waves inside the hardened layer of the guide rail.
During the propagation of ultrasonic shear waves through the hardened layer, there exists a link among the flight time of the acoustic wave (t), the total propagation path distance (L), the shear wave velocity in the hardened layer (vs), and the hardened layer depth (HD):
H D = L c o s β = t   ·   v s 2 · c o s β
In the ultrasonic shear wave detection system, t denotes the flight duration inside the backscattering zone, computed as flight time = number of sample sites (N)/sampling frequency. By utilizing this formula and selecting proper gate length and threshold values, the flight duration of the backscattering signal may be collected, hence acquiring the depth information of the toughened layer in the linear guide rail.

3.3. Detection Results of Ultrasonic Shear Wave A-Scan Signals for Hardened Layer Depth

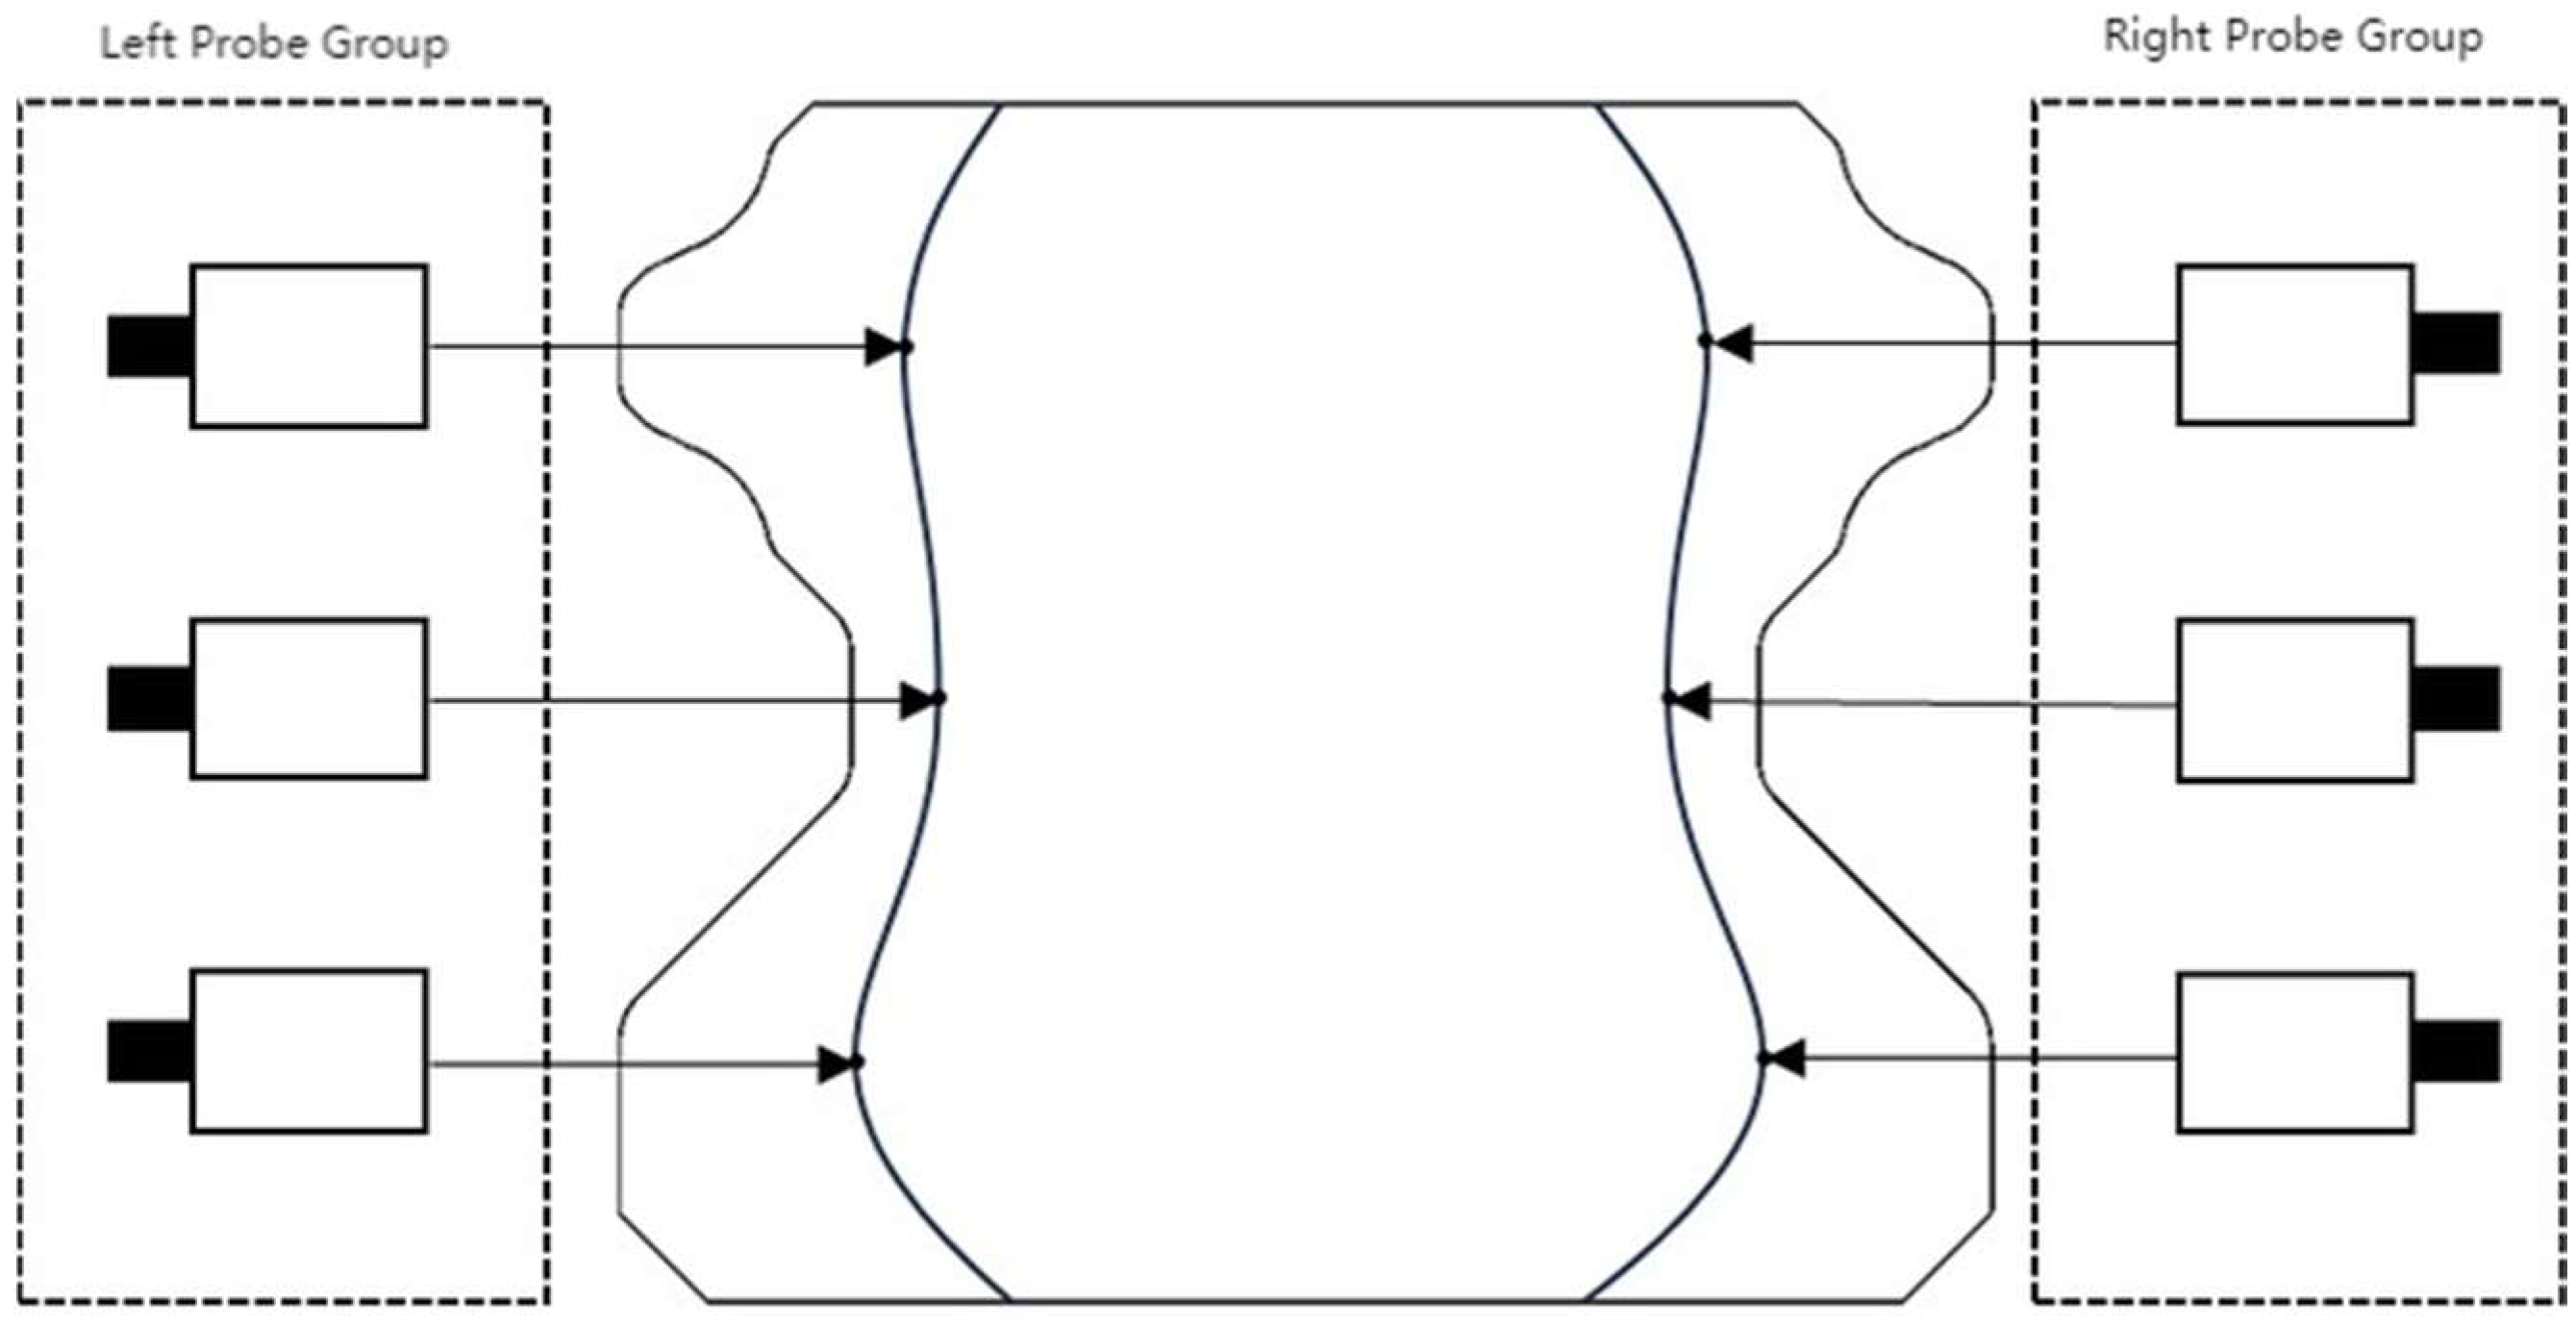
Based on detailed examination of the acoustic field projection impact and the convenience of probe configuration, three places on each side (left and right) were ultimately selected for ultrasonic evaluation of the hardened layer depth profile along the guide rail. The total layout scheme is represented in Figure 19.
Following the completion of the experimental preparations and ultrasonic signal acquisition, this component processes the received ultrasonic signals and evaluates the results. The major purpose is to evenly truncate the acquired ultrasonic transverse wave signals and batch-acquire the hardened layer depth information at each characteristic point along the scanning path. To explain the ultrasonic signal processing workflow, the transverse wave signal acquired at a given point during groove area inspection is presented as an example.
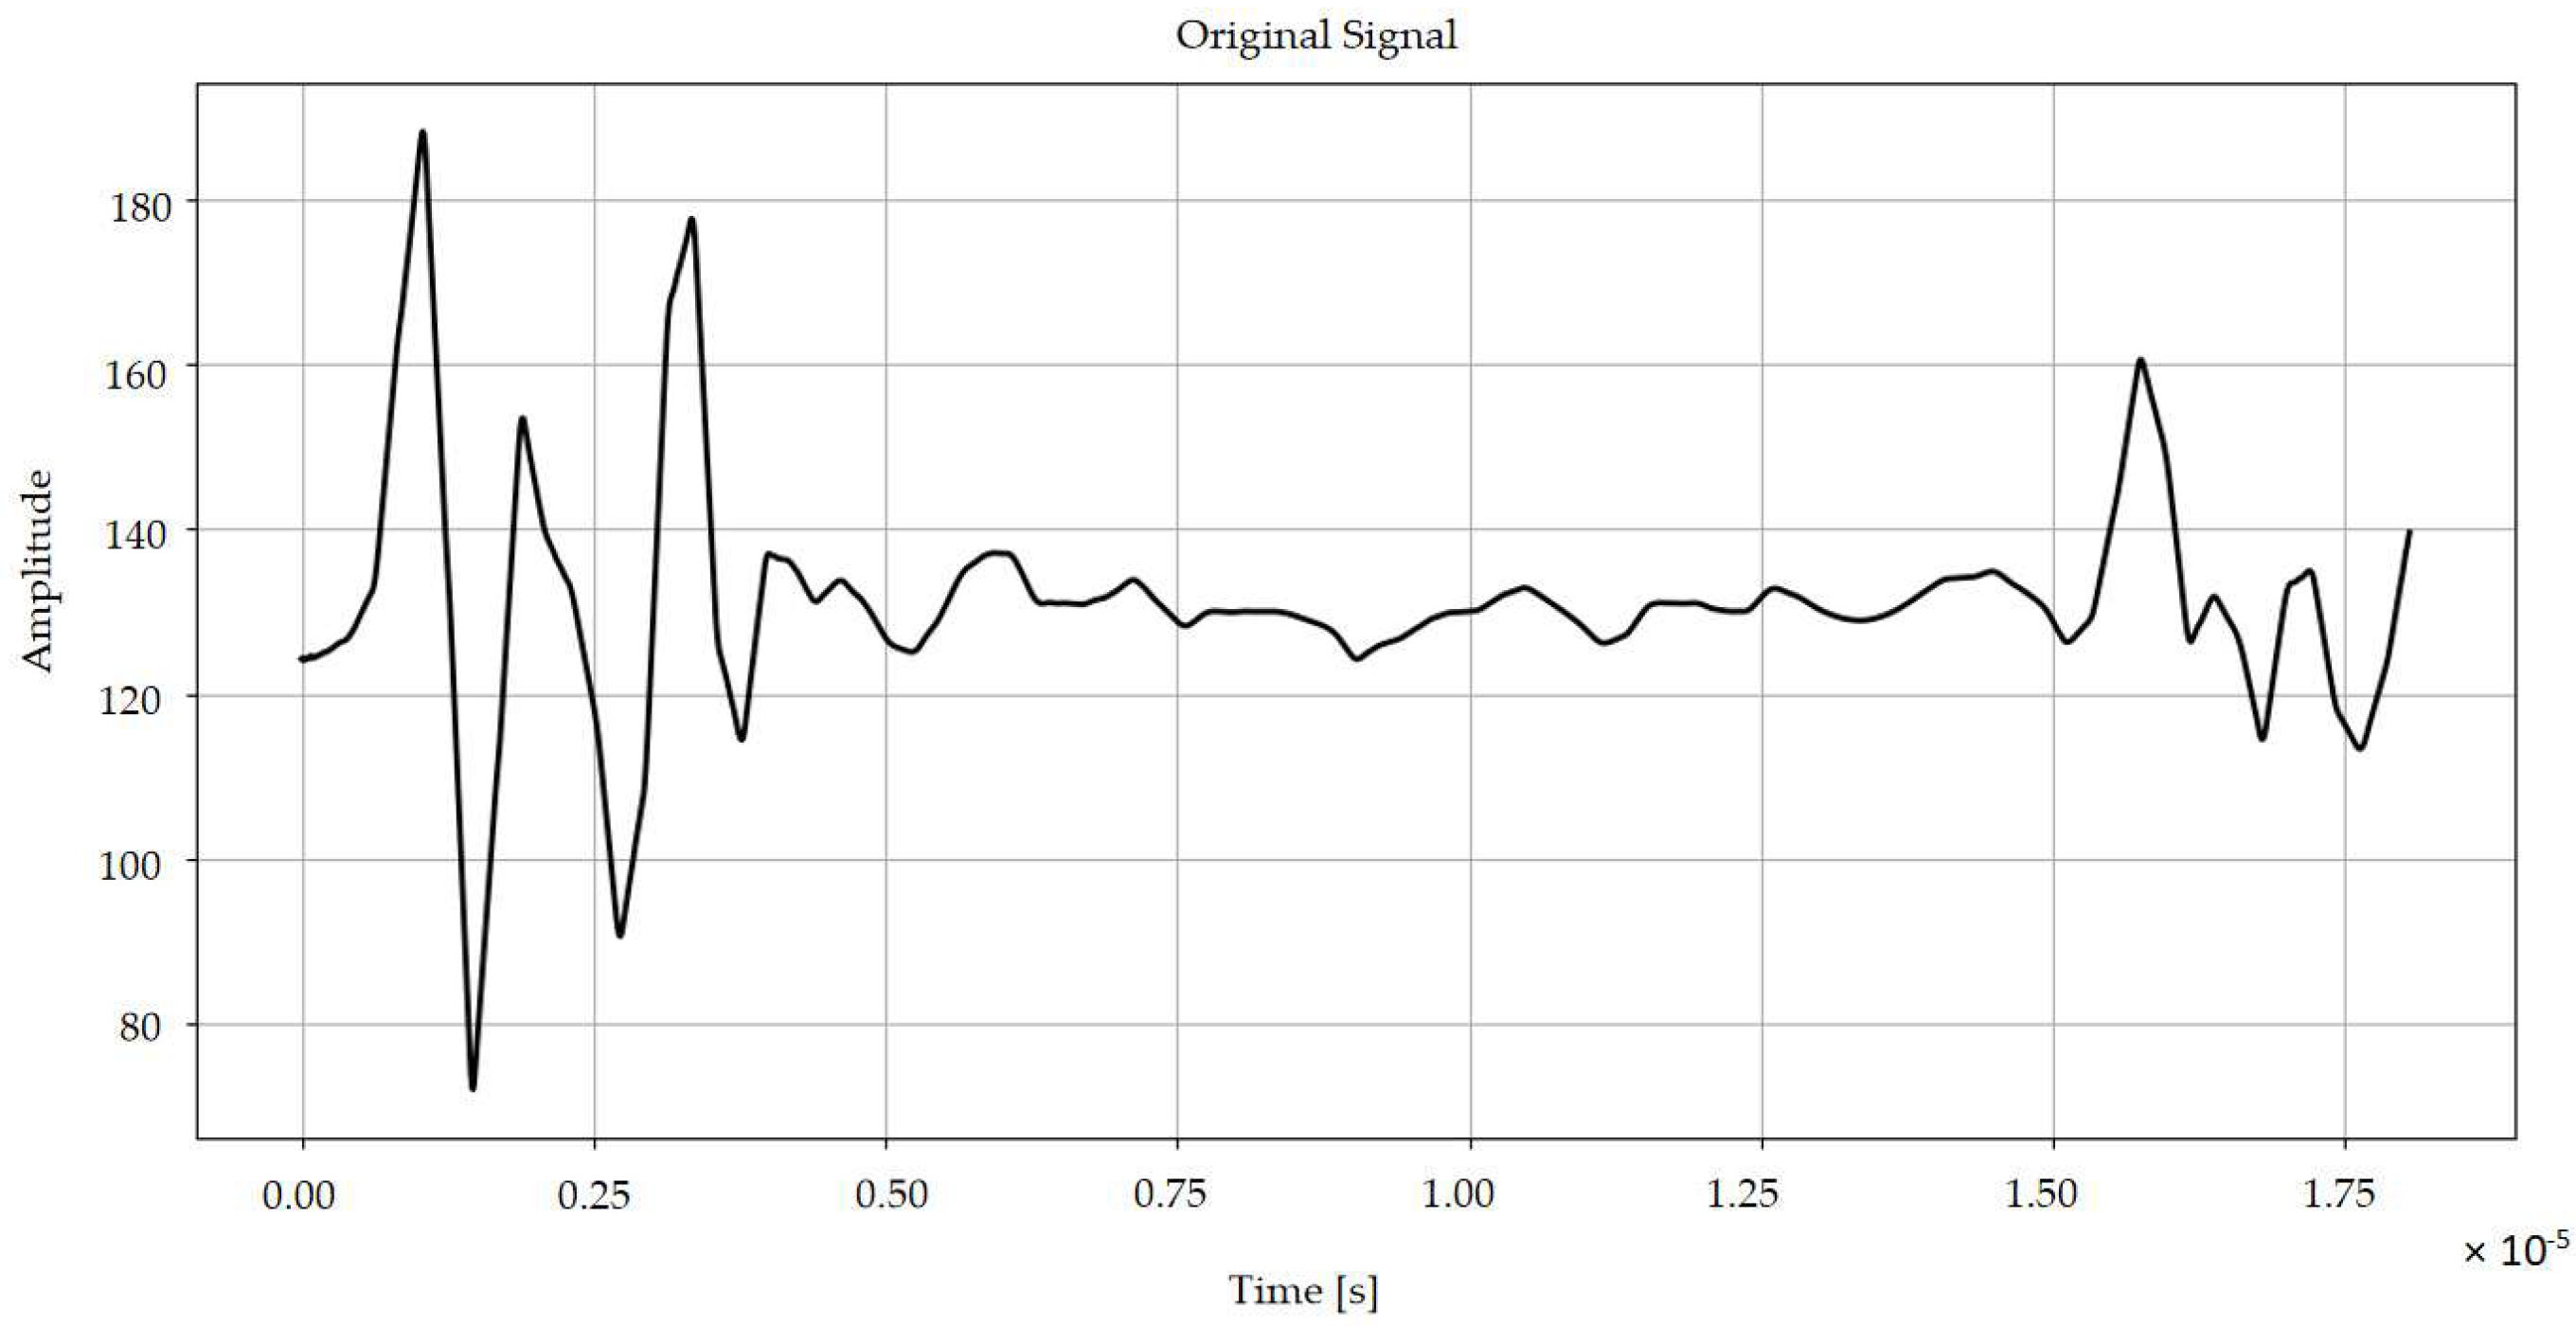
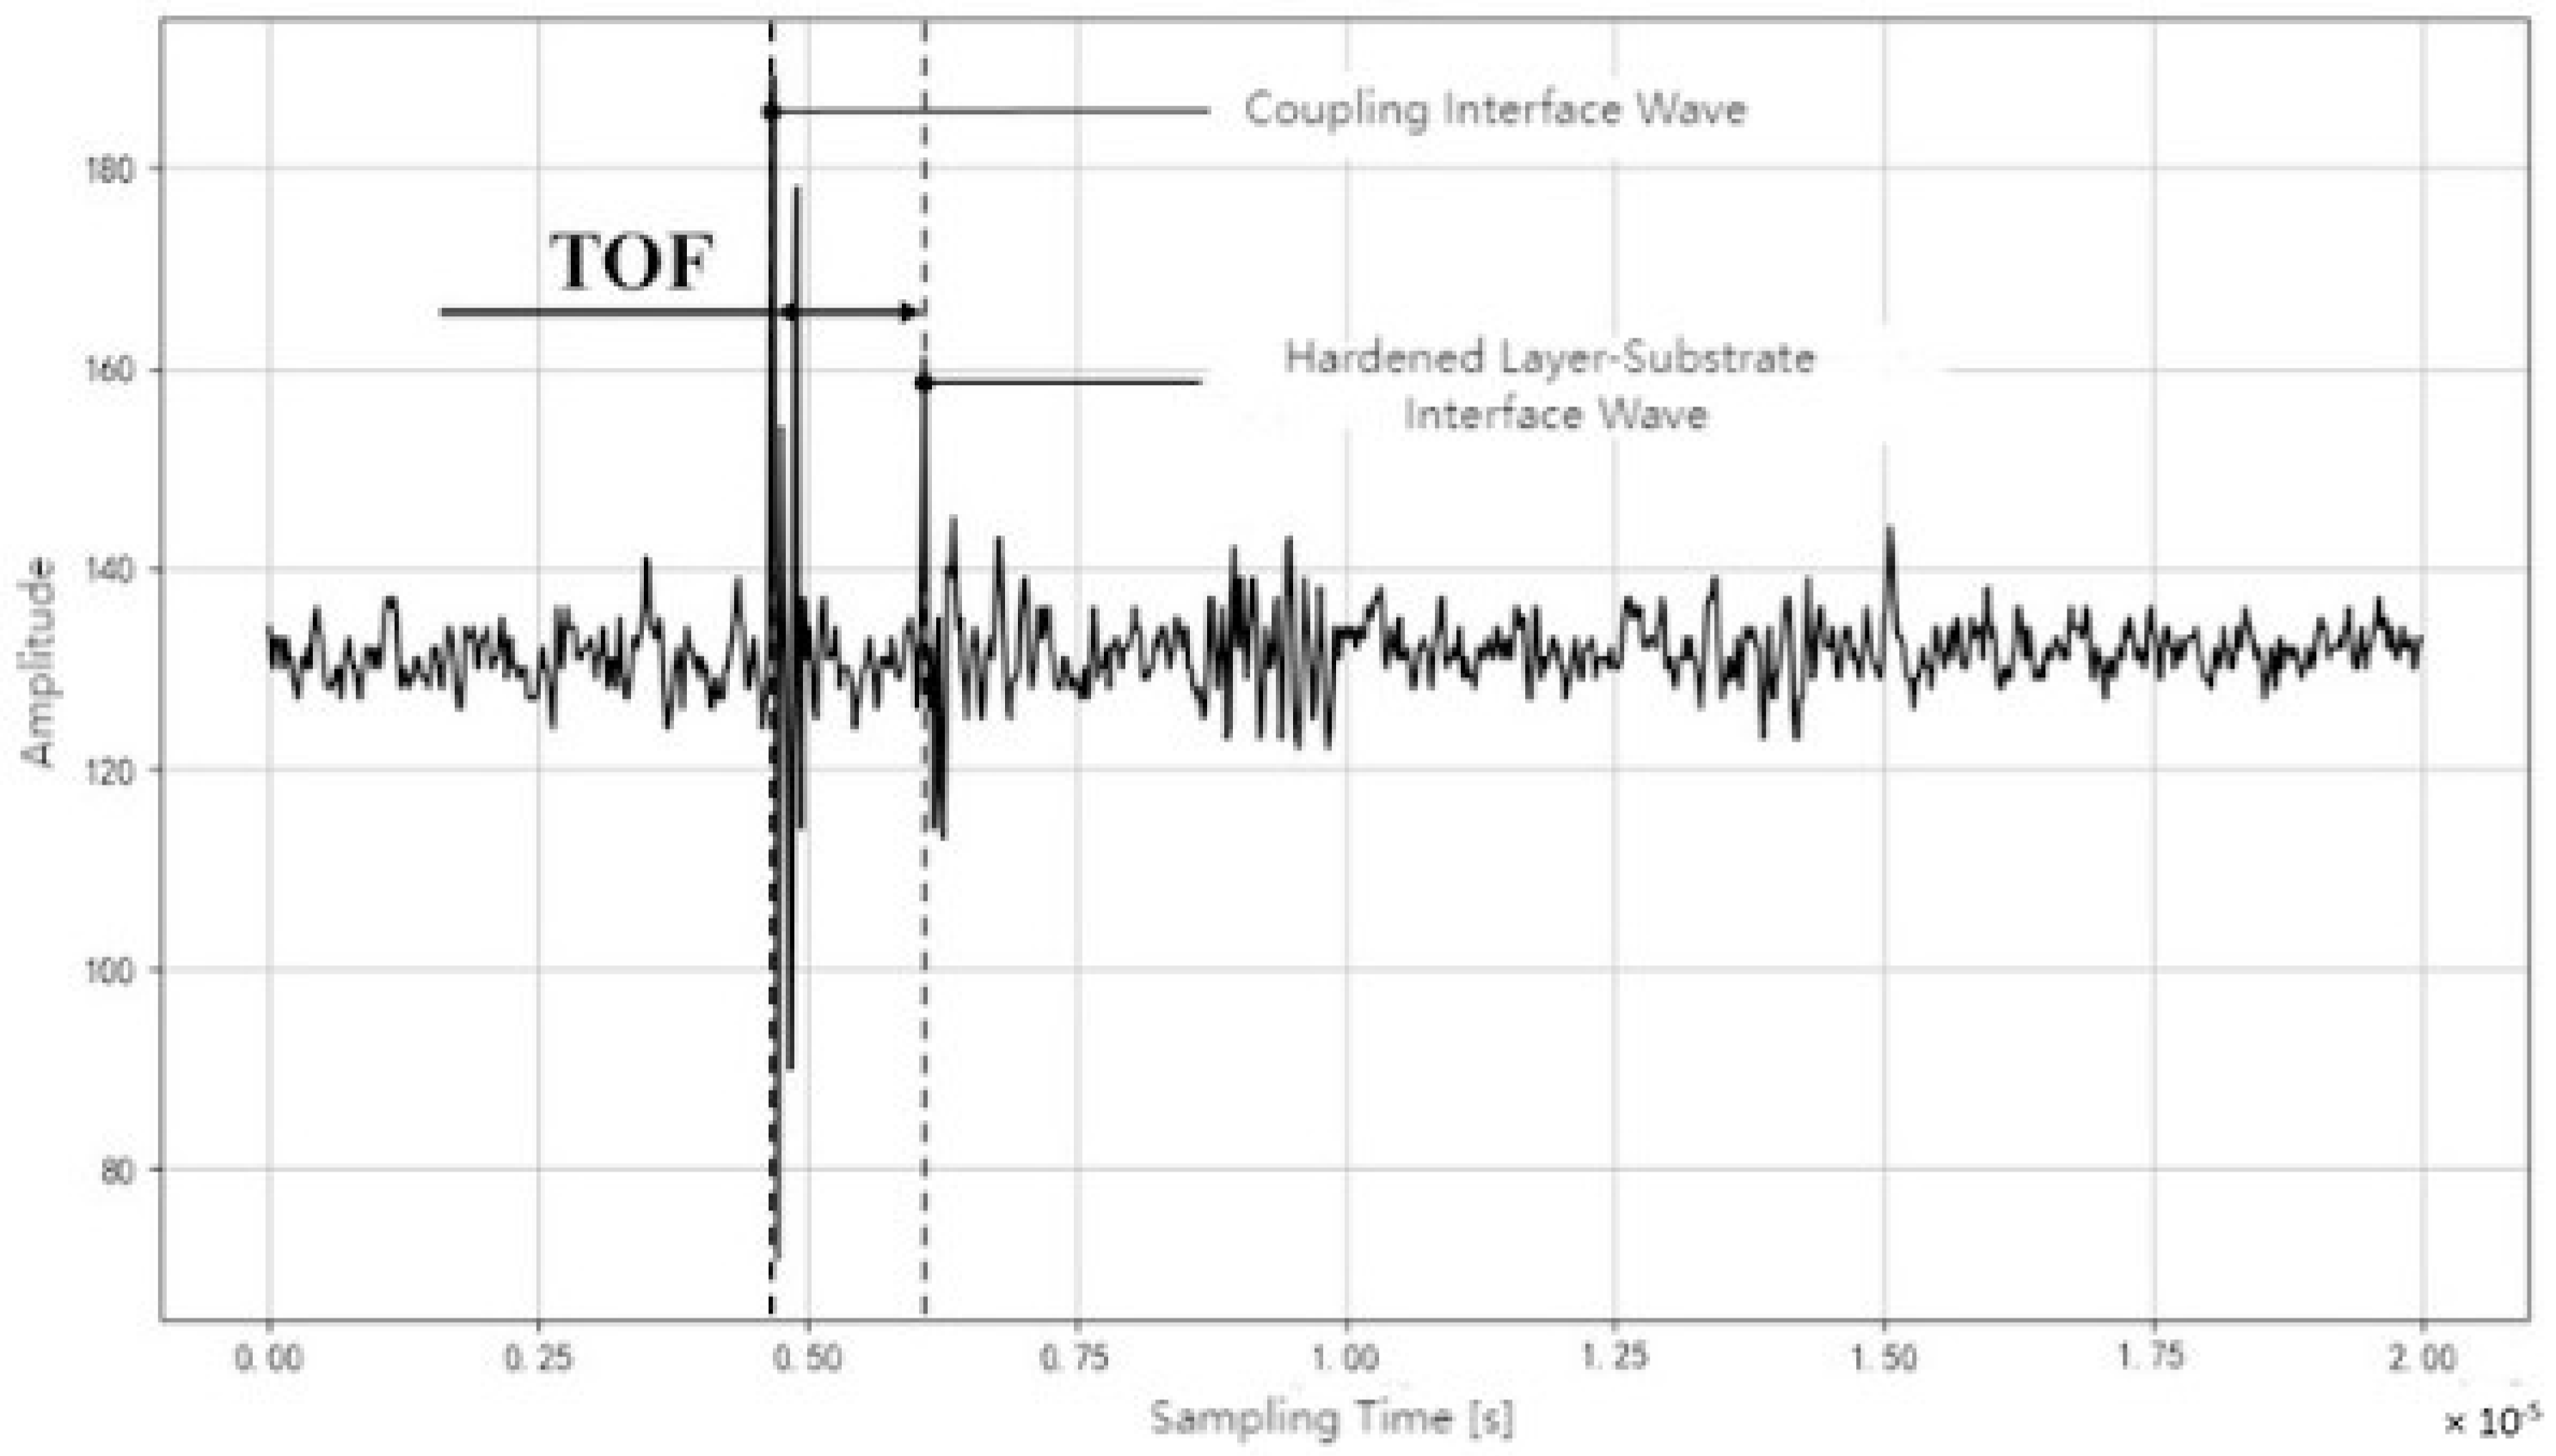
First, the unprocessed ultrasonic A-scan data is shown in the time domain to aid the following signal processing stages. This phase is not required in actual practice and is included mainly for visualization and clarity. The time-domain waveform of the ultrasonic signal at this groove inspection site is illustrated in Figure 20.
From the composition of the ultrasonic waveform, the first signal amplitude clearly corresponds to the test surface of the linear guide rail—specifically, the water-rail coupling interface surface wave. The second signal amplitude relates to the interface wave created by microstructural variations between the hardened layer and the substrate, namely the hardened layer-substrate interface echo. As annotated in Figure 21, the signal between the two amplitude peaks corresponds to the ultrasonic backscattering region. The time-of-flight (TOF) of signals within this region is crucial for calculating the hardened layer depth information.
First, to assist further processing, the raw signal requires truncation targeting the ultrasonic transverse wave backscatter region between the two signal amplitude peaks. The time-domain picture of the shortened ultrasonic signal is presented in Figure 10b.
Subsequently, following the procedure outlined in Section 2.3, time difference interpolation processing is applied to this ultrasonic signal. Using 30% of each peak amplitude as the detection threshold, the first point surpassing the threshold is recognized as the echo location point. The resulting time-domain waveform of the ultrasonic transverse wave signal is displayed in Figure 11. The time-of-flight (TOF) detection findings for the groove region are given by Equation (2).
The above processing will be run using a built Python application, which also provides batch processing capabilities for ultrasonic signals. Example processing results for the other two distinctive regions are given in Figure 22, with their matching hardened layer depth information summarized in Table 2.
To validate the detection accuracy of the existing ultrasonic transverse wave backscattering technology, this section applies the microhardness method for destructive measurement of the hardened layer depth on the test guide rail specimen. The microhardness measurement findings are compared with the real ultrasonic transverse wave detection results to evaluate the accuracy of the existing inspection method and perform corresponding error analysis.
First, the test specimen is sectioned using an electrical discharge wire-cutting machine (as shown in Figure 23a). Subsequently, the cut blocks are polished using a polishing machine (as shown in Figure 23b). The blocks before and after polishing are represented in Figure 24.
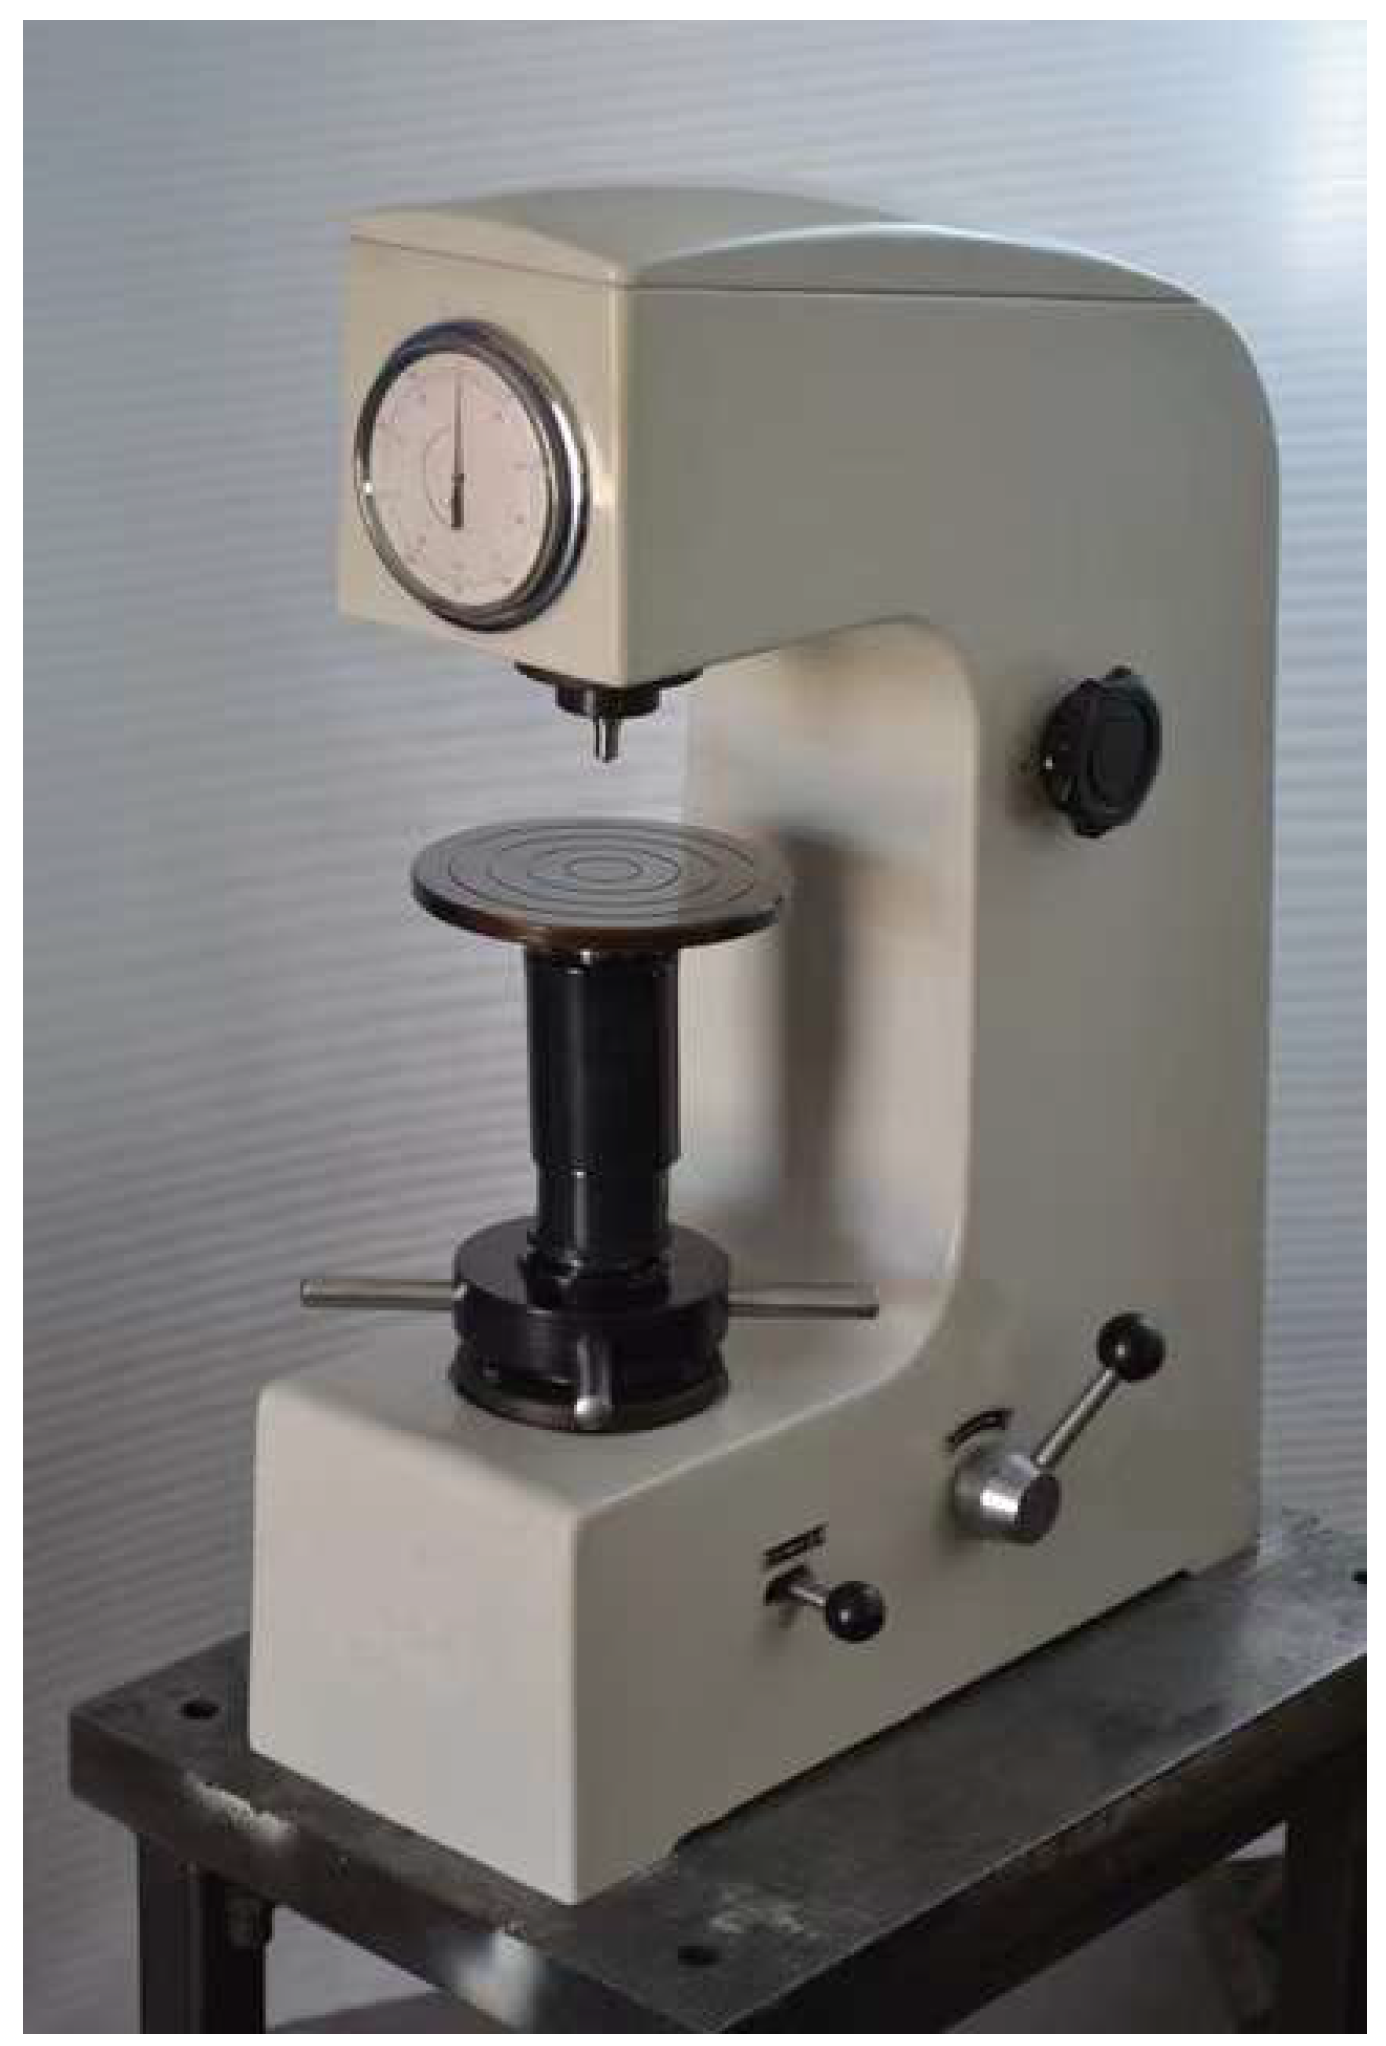
After polishing, microhardness measurements are made on the cross-section of the blocks using a Rockwell hardness tester. The HR-150A manual Rockwell hardness tester (shown in Figure 25) is deployed for this purpose.
Hardness is progressively assessed from the edge into the center of the test specimen at 0.1 mm intervals, providing the hardness–depth data illustrated in Figure 26.
As defined by the hardness threshold approach, the material is regarded as entering the base metal region when the hardness of a measurement point falls below 60% of the hardened layer hardness. Based on this criterion, the corresponding depth values are derived for two hardness–depth distribution curves using 60% of the hardened layer hardness (equal to 36 HRC Rockwell hardness) as the demarcation point.
Meanwhile, to reduce measurement errors, five repeated measurements are taken on the cross-section of the present test specimen. Five sets of hardened layer depth data for this cross-section are gathered, with complete data shown in Table 3.
Following several measurements, the aforementioned data are processed utilizing data processing methods such as standard deviation calculation, outlier removal, and overall averaging. The processed hardness measurement data are provided in Table 4.
Simultaneously, the ultrasonic transverse wave examination findings for this cross-section are retrieved, with the measured hardened layer depths presented in Table 5.
Using the hardened layer depth findings obtained from multiple hardness measurements (Table 4) as the benchmark, error analysis is performed against the ultrasonic inspection results in Table 5. This study generally involves absolute error, relative error, root mean square error (RMSE), and mean absolute error (MAE). The resulting regional error analysis is reported in Table 6, and the overall error analysis is shown in Table 7.
Based on the aforesaid research, it is proven that the employment of ultrasonic transverse wave backscattering technology for hardened layer depth inspection of linear guide rails is practical and achieves good detection accuracy. Additionally, the Time Difference Interpolation Method is further tested to substantially boost the detection accuracy of the ultrasonic transverse wave inspection system. Subsequently, the gathered hardened layer depth data will be utilized to build a 3D depiction of the guide rail’s hardened layer depth profile.

3.4. B-Scan Imaging of Hardened Layer Depth Profile in Linear Guides

To obtain a full assessment of the hardened layer depth profile in linear guides, relying simply on ultrasonic A-scan signals for point-wise detection is inadequate. This research consequently leverages densely obtained ultrasonic A-scan signals together with the depth information of the rail’s toughened layer included in each signal. Following a method comparable to ultrasonic B-scan image creation, the collected depth information is systematically translated into a B-scan visualization.
Based on this technology, the study fuses the outside contour data of the GH20 linear guide rail with ultrasonic A-scan inspection findings via data fusion. By densely presenting hardened layer depth measurements at all inspection places throughout the rail’s cross-section as data points, a B-scan picture particularly describing the depth profile of the hardened layer is obtained. The final visualization output is displayed in Figure 27.
By employing the existing ultrasonic shear wave detection technology, the detected hardened layer depth information at each place is shown in the form of data points on the cross-section of the linear guide rail. Compared with the one-dimensional ultrasonic A-scan signal picture, the B-scan image of the hardened layer depth profile of the linear guide rail more naturally depicts the distribution of the hardened layer.
On this premise, this research will further apply 3D visualization technology to analyze the B-scan picture of the hardened layer depth profile and investigate the distribution of the hardened layer of the linear guide rail in a higher dimension.

3.5. 3D Visualization of Hardened Layer Depth Profile in Linear Guides

After obtaining the time-series data of the B-scan image for the hardened layer profile of the linear guide rail in Section 3.3, the 3D visualization of the hardened layer profile may be achieved using VTK-8.2.0 and Python. The exact operating method is given in Figure 28.
During this procedure, Python and VTK-8.2.0 were applied to produce 3D visualization of the B-scan pictures of the guide rail toughened layer profile. The picture format utilized was PNG, with volume reconstruction achieved by the nearest-neighbor interpolation voxel approach. For VTK-8.2.0 visualization, the voxel rendering approach was employed.
Initially, the time-series B-scan pictures of the toughened layer profile underwent preprocessing. Picture-enhancing methods were utilized to increase picture quality. Subsequently, the processed data was saved to a given file directory, and the VTK-8.2.0PNGReader method was applied to read the picture data. This approach permitted the reading of the PNG format B-scan grayscale pictures of the profile into memory and their conversion into matrix format data, allowing future image analysis and processing activities.
Following this, during the data processing step, coordinate transformation and rounding were performed on the matrix. The preprocessed B-scan grayscale pictures of the hardened layer depth profile were read, and the grayscale value information from the photographs was saved in a 3D matrix. The dimensions of this 3D matrix were principally determined by the pixel width, pixel height, and overall data volume of the photos. Assuming the pixel width of a picture is L, the height is M, and the total number of images is N, an empty matrix of size X × Y × Z was formed. Let the voxel coordinate be (x, y, z), with a corresponding length of d, and the associated pixel coordinates be (l, m, n). The connection among d, l, m, and n is as follows:
d = D N × y l = x
m = z n = y
where D is the entire length of the linear guide rail under test. Through the aforementioned coordinate transformation, the transformed three-dimensional matrix, namely the voxel matrix of the linear guide rail, may be produced. The precise schematic design of the 3D visualization is given in Figure 29.
Following the coordinate transformation, the VTK-8.2.0ImageImport method is applied to filter the matrix data, transforming the original B-scan grayscale pictures of the profile into voxel data. The voxel size is set at 0.5 mm × 0.5 mm × 0.5 mm. This procedure permits the mapping of 2D image data into 3D space, laying the basis for later processes such as volume rendering, segmentation, and visualization.
During the graphic mapping step, the VTK-8.2.0VolumeMapper class is deployed for data mapping, translating the voxel data into a 3D object. Initially, color and opacity mapping parameters are applied based on voxel grayscale values. Specifically, regions with grayscale values ranging from 0 to 50 are assigned a red color with an opacity of 1. Regions with grayscale values between 50 and 150 are mapped to yellow with an opacity of 0.7. For grayscale values in the range of 150 to 200, the color is set to blue with an opacity of 0.3. Finally, areas with grayscale values from 200 to 255 are classified as white with an opacity of 0. Through these color and opacity mapping configurations, areas with lower grayscale values (darker regions) appear red, regions with slightly higher grayscale values (less dark) are rendered in yellow, areas with even higher grayscale values (lighter regions) take on a blue hue, and the highest grayscale regions (brightest areas) are displayed in white. Additionally, higher grayscale values correspond to greater transparency, while lower grayscale values result in reduced transparency.
In the final picture output step, VTK-8.2.0Render is used to render and export the graphics, providing an interactive 3D image. Leveraging the color and opacity mapping algorithms, the white portions in the final picture are entirely transparent, the red sections are completely opaque, while the yellow and blue regions demonstrate partial transparency. These settings enable users to naturally interact with the data, allowing for a thorough and clear inspection of the hardened layer profile information of the linear guide rail from different views.
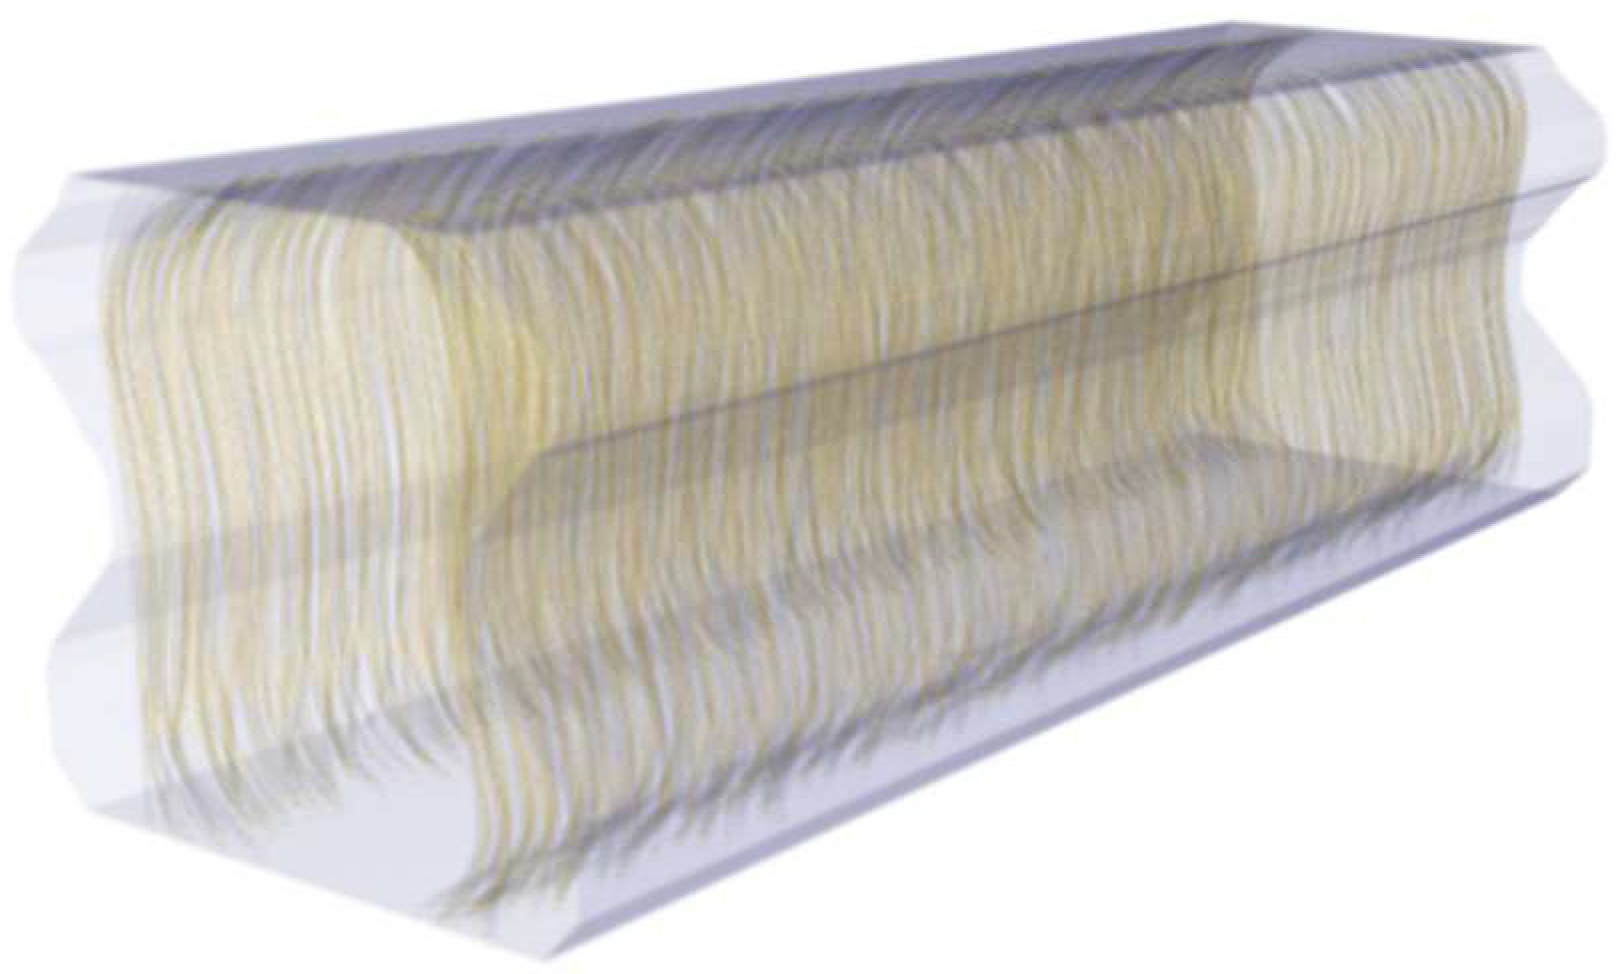
Figure 30 depicts the 3D visualization outcome of the toughened layer profile of the linear guide rail, obtained using 500 B-scan image datasets using the aforementioned method. The 3D images generated using Python and the VTK-8.2.0 framework offer human–computer interaction, enabling more thorough observation of the 3D visuals.
Observing the above 3D visualization results allows for a more intuitive evaluation of the hardened layer distribution in the linear guide rail, enabling timely identification of poorly formed hardened layer regions and facilitating a preliminary assessment of the overall material performance of the linear guide rail. This bears major relevance for boosting the production quality of linear guide rails.

4. Discussion

This study demonstrates the feasibility of using ultrasonic transverse wave backscattering technology to detect the carburizing layer depth in linear guides. Experimental results show that the measurement error between this method and the metallographic method is only 0.3 mm, while B-scan and 3D imaging techniques provide intuitive visualization of the carburizing layer distribution. Compared to traditional destructive testing methods, this approach offers significant advantages in non-destructiveness and efficiency.
In contrast to existing research, this work optimizes the detection model for the unique structural characteristics of linear guides. The proposed technology not only facilitates quality control during production but also supports the optimization of heat treatment processes.
Future research should focus on: (1) improving the adaptability of the detection system for diverse applications, (2) integrating AI algorithms to enhance measurement precision, and (3) scaling up industrial implementation. This study provides a novel strategy for non-destructive testing in manufacturing, with broader implications for quality assurance and process refinement.

5. Conclusions

This study offers a technique for detecting the toughened layer depth profile of linear guide rails based on ultrasonic shear wave backscattering technology, meeting the detection needs for such profiles. The benefits of ultrasonic shear waves in detection are evaluated, and an ultrasonic shear wave backscattering model targeting the hardened layer of linear guide rails is constructed by considering the differences between the hardened layer and the base material. Subsequently, an ultrasonic shear wave detection system is designed to capture ultrasonic A-scan signals of the toughened layer depth at different points throughout the rail cross-section. Finally, 3D viewing of the rail’s hardened layer depth is produced by B-scan imaging and 3D reconstruction methods. Experimental findings reveal that the measurement error between the ultrasonic shear wave technique and the metallographic method is just 0.063 mm, which is within the permissible error range, hence validating the efficacy and reliability of the suggested approach.
However, several limitations still remain in this investigation. Future study will concentrate on the following aspects: First, further improving the detection system to expand its flexibility to diverse rail types and improve detection accuracy; second, studying other aspects impacting hardened layer identification accuracy, such as residual stress and grain size, to optimize the detection model. Through these advances, this technology is intended to be applied to larger industrial applications, offering more strong technological support for quality control in the mechanical manufacturing business.

Author Contributions

Conceptualization, P.C. and L.C.; methodology, P.C.; software, P.C.; validation, P.C., L.C. and M.X.; formal analysis, L.C.; investigation, M.X.; resources, M.X.; data curation, M.X.; writing—original draft preparation, P.C.; writing—review and editing, C.Y.; visualization, P.C.; supervision, P.C.; project administration, P.C.; funding acquisition, C.Y. All authors have read and agreed to the published version of the manuscript.

Funding

This research was funded by: Zhejiang provincial natural science foundation of China under Grant No. LLSSZ24E050001.

Institutional Review Board Statement

Not applicable.

Informed Consent Statement

Not applicable.

Data Availability Statement

The original contributions presented in this study are included in the article. Further inquiries can be directed to the corresponding author.

Acknowledgments

This work was funded by the Zhejiang Natural Science Joint Fund. We thank colleagues for their technical and administrative support.

Conflicts of Interest

The authors declare no conflicts of interest.

References

  1. Qu, X.M. China Manufacturing 2025 and Its Profound Impact on the Future Development of the Manufacturing Industry. Eng. Mach. Dig. 2016, 2016, 51–55. [Google Scholar]
  2. Tool, C.M.; Association, T. The 14th Five-Year Plan for Intelligent Manufacturing Development; Department of Equipment Industry, Ministry of Industry and Information Technology: Beijing, China, 2021. [Google Scholar]
  3. Zhang, S.S. Principle and Application of Linear Guide Rails. Hongdu Sci. Technol. 2004, 2, 44–49. [Google Scholar]
  4. Bai, Y.; Li, S.; Zong, W. Analysis of Heat Treatment Process and Technology for Metallic Materials. Chem. Manag. 2024, 25, 151–154. [Google Scholar]
  5. Zhang, H.Y.; Huang, F.P. Effect of Induction Heating Parameters on Quenching Microstructure and Hardened Layer Depth of 40Cr Steel. Heat Treat. 2015, 2015, 11–14. [Google Scholar]
  6. Yan, W.B.; Yan, M.; Yan, Z.F. Influence of Carburized Quenching Hardness on the Measurement of Hardened Layer Depth. China Stand. 2018, 2018, 157–159. [Google Scholar]
  7. Haderer, W.; Scherleitner, E.; Gseller, J.; Heise, B.; Mitter, T.; Ryzy, M.; Hettich, M. Spatial imaging of stratified heterogeneous microstructures: Determination of the hardness penetration depth in thermally treated steel parts by laser ultrasound. NDT E Int. 2023, 138, 102868. [Google Scholar] [CrossRef]
  8. Wei, Y.; Melnikov, A.; Wang, M.; Mandelis, A. Quantitative non-destructive single-frequency thermal-wave-radar imaging of case depths in hardened steels. J. Appl. Phys. 2020, 127, 245102. [Google Scholar] [CrossRef]
  9. Mao, H.; Li, Q.; Mao, H.; Huang, Z.; Tang, W.; Huang, H.; Li, X. Nonlinear ultrasonic characterization of carburized case depth. NDT E Int. 2020, 112, 102244. [Google Scholar] [CrossRef]
  10. Zhang, D.Y. Research on Ultrasonic Testing Methods for Hardened Layers. Master’s Thesis, Shenyang University of Technology, Shenyang, China, 2018. [Google Scholar]
  11. Sun, X.D.; Wang, Y.G.; Duanmu, P.L. Applicability of Ultrasonic Testing Method for Induction-Hardened Layer Depth. Bearing 2016, 8, 39–41. [Google Scholar] [CrossRef]
  12. Salchak, Y.; Sednev, D.; Kroening, M.; Borisovich, A. Method of case hardening depth testing by using multifunctional ultrasonic testing instrument. IOP Conf. Ser. Mater. Sci. Eng. 2015, 81, 012080. [Google Scholar] [CrossRef]
  13. Sinding, K.; Drapaca, C.; Tittmann, B. Digital Signal Processing Methods for Ultrasonic Echoes. IEEE Trans. Ultrason. Ferroelectr. Freq. Control. 2016, 63, 1172–1176. [Google Scholar] [CrossRef] [PubMed]
  14. Honarvar, F.; Zeighami, M. Application of signal processing techniques to case depth measurements by ultrasonic method. In Proceedings of the 17th World Conference on Nondestructive Testing, Shanghai, China, 25–28 October 2008. [Google Scholar]
  15. Bogaerts, M. Surface hardness depth measurement using ultrasound backscattering. Adv. Mater. Process. 2019, 177, 58. [Google Scholar] [CrossRef]
  16. Prisco, U. Case microstructure in induction surface hardening of steels: An overview. Int. J. Adv. Manuf. Technol. 2018, 98, 2619–2637. [Google Scholar] [CrossRef]
  17. Beneš, P.; Vítovec, V. Selected NDT techniques in heat treatment control. Manuf. Technol. 2021, 21, 20–28. [Google Scholar] [CrossRef]
  18. Dong, M.; Ma, H.W.; Chen, Y. Acoustic Field Simulation of Ultrasonic Transducer Under Oblique Wedge Conditions. J. Vib. Shock. 2017, 36, 152–156. [Google Scholar] [CrossRef]
  19. Koppelmann, J. Ultrasonic Measurement of Hardening Depth on Steel Rolls. Mater. Test. 1967, 1967, 401–405. [Google Scholar] [CrossRef]
  20. Willems, H. Nondestructive Determination of Hardening Depth in Induction Hardened Components by Ultrasonic Backscattering. In Review of Progress in Quantitative Nondestructive Evaluation: Volume 10B; Thompson, D.O., Chimenti, D.E., Eds.; Springer: Boston, MA, USA, 1991; pp. 1707–1713. [Google Scholar]
  21. Yu, Y. Research on Ultrasonic Testing Technology for Defects in Carbon Fiber Winding Reinforced Structures. Master’s Thesis, Zhejiang University, Hangzhou, China, 2022. [Google Scholar]
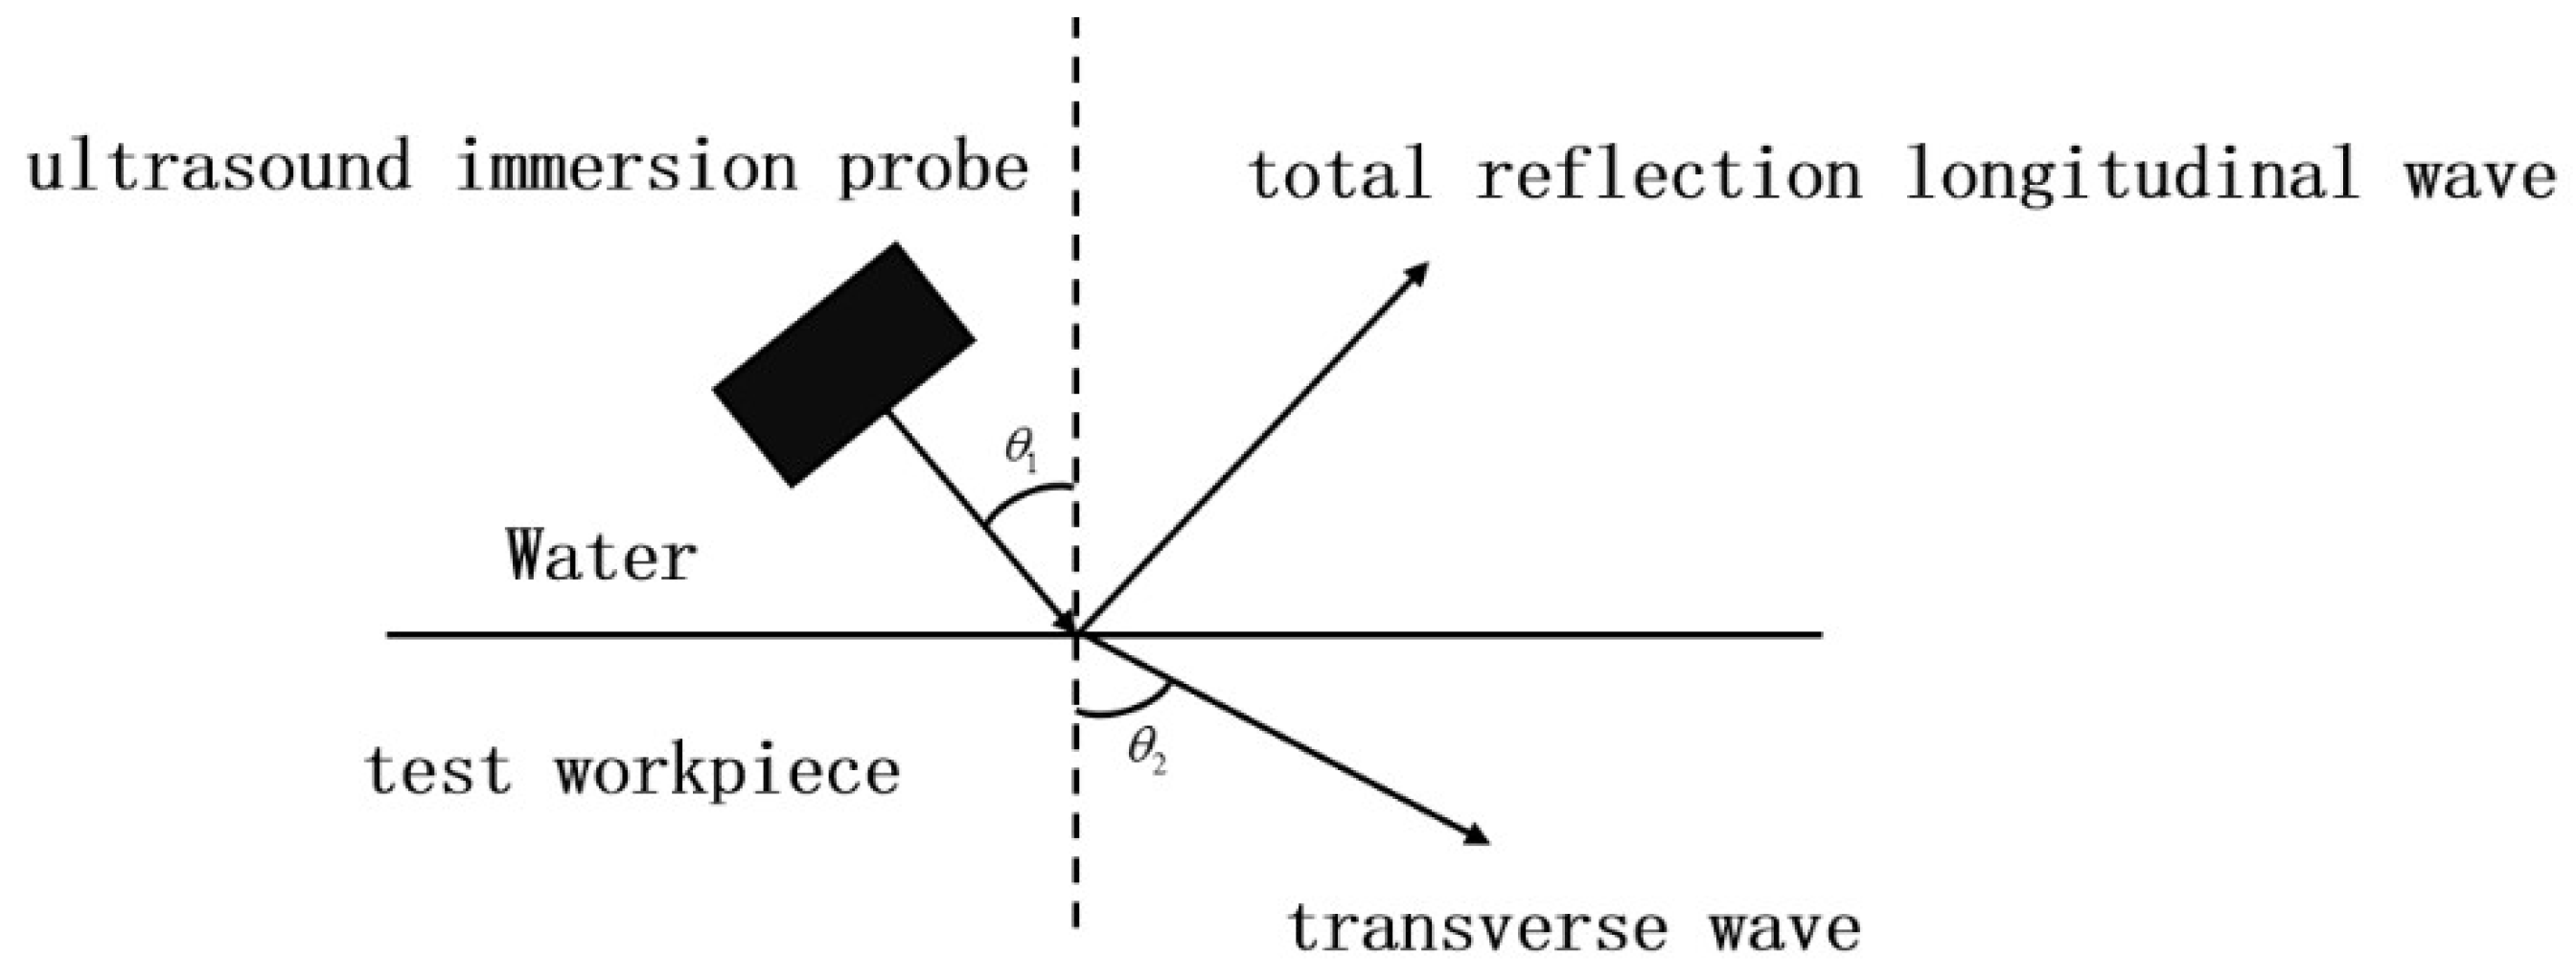
Figure 1. Schematic diagram of ultrasonic transverse wave generation.
Acoustics 07 00055 g001
Figure 2. Scatter of ultrasonic waves from surface and transient zone of hardened materials.
Acoustics 07 00055 g002
Figure 3. (a) Ultrasonic probe clamping mechanism composition; (b) Exploded view diagram of ultrasonic probe clamping mechanism components.
Acoustics 07 00055 g003
Figure 4. Schematic diagram of ultrasonic transverse wave generation.
Acoustics 07 00055 g004
Figure 5. Physical diagram of ultrasonic evaluation system.
Acoustics 07 00055 g005
Figure 6. (a) Electrical discharge wire cutting process; (b) GH20 linear guide test piece.
Acoustics 07 00055 g006
Figure 7. Cross-section of the polished GH20 guide.
Acoustics 07 00055 g007
Figure 8. Schematic diagram of hardness measurement points.
Acoustics 07 00055 g008
Figure 9. Hardness curve with depth variation.
Acoustics 07 00055 g009
Figure 10. (a) Schematic of the ultrasonic signal profile; (b) Corresponding temporally truncated waveform.
Acoustics 07 00055 g010
Figure 11. The ultrasonic signal response in the time domain after interpolation and smoothing.
Acoustics 07 00055 g011
Figure 12. (a) The depth value of the hardened layer obtained by the Rockwell hardness measurement method; (b) Location requirements and material hardness classification for Rockwell hardness measurement.
Acoustics 07 00055 g012
Figure 13. Schematic diagram of the 3D visualization process.
Acoustics 07 00055 g013
Figure 14. 3D visualization process implemented by VTK-8.2.0 tools.
Acoustics 07 00055 g014
Figure 15. Schematic diagram of the operation of the GH20 linear guide.
Acoustics 07 00055 g015
Figure 16. Schematic diagram of the cross-section of the GH20 linear guide.
Acoustics 07 00055 g016
Figure 17. Ultrasonic shear wave detection process for the depth of the case-hardened layer of the linear guide.
Acoustics 07 00055 g017
Figure 18. Propagation path of ultrasonic shear waves in the case-hardened layer of the linear guide.
Acoustics 07 00055 g018
Figure 19. The layout scheme of three ultrasonic detection points on both sides (left and right) of the guide rail.
Acoustics 07 00055 g019
Figure 20. Time-domain waveform of the ultrasonic signal.
Acoustics 07 00055 g020
Figure 21. Constituents of the ultrasonic signal.
Acoustics 07 00055 g021
Figure 22. (a) Time-domain ultrasonic waveform acquired from the upper chamfer region; (b) Time-domain ultrasonic waveform acquired from the lower chamfer region.
Acoustics 07 00055 g022
Figure 23. (a) Electrical discharge wire cutting process; (b) Metallographic polishing process.
Acoustics 07 00055 g023
Figure 24. (a) Before test block polishing; (b) Test block polished.
Acoustics 07 00055 g024
Figure 25. HR-150A Manual Rockwell Hardness Tester.
Acoustics 07 00055 g025
Figure 26. (a) Hardness measurement results at left inspection point; (b) Hardness measurement results at right inspection point.
Acoustics 07 00055 g026
Figure 27. B-scan image of the depth profile of the case-hardened layer of the linear guide rail.
Acoustics 07 00055 g027
Figure 28. 3D reconstruction process of the case-hardened layer profile of the linear guide rail.
Acoustics 07 00055 g028
Figure 29. Schematic diagram of the 3D visualization of the case-hardened layer profile of the linear guide rail.
Acoustics 07 00055 g029
Figure 30. The result of 3D visualization of the case-hardened layer profile of the linear guide rail.
Acoustics 07 00055 g030
Table 1. Ultrasonic detection system dedicated to GH20-Type linear rails.
Equipment TypeModel/SpecificationsManufacturer (Location)Key Specifications/Functions
Ultrasonic Signal Transmitter & ReceiverUltratek USB-UT350US Ultratek (Walnut Creek, CA, USA)Sampling Frequency: 50 MHz
Adjustable Pulse Width
Adjustable Gain & Filter
Real-time A-scan Display & Data Export
USB Interface Communication
Water-Immersed Point-Focusing ProbeOLYMPUS V313-SUOLYMPUS (Tokyo, Japan)Center Frequency: 15 MHz
Element Diameter: 0.375 in
Focal Length: 4 in
Wave Type: Longitudinal Wave Transducer
Inspection Water TankAcrylic MaterialWuxi Ivoyage Control Technology Co., Ltd. (Wuxi, China)Dimensions: 280 mm × 280 mm × 300 mm
Transparent Design
Custom Ultrasonic Probe HolderSelf-designed & fabricatedWuxi Ivoyage Control Technology Co., Ltd. (Wuxi, China)Adjustable Incident Angle
Adjustable Water Path
Curvature-Adaptive to Rail Profile
Portable Design
Ensures Incident Angle Consistency
Table 2. Measured hardened layer depth (mm) for each region on both sides of the guide rail.
Left Upper
Chamfer
Left
Groove
Left Lower
Chamfer
Right Upper ChamferRight
Groove
Right Lower Chamfer
3.4501.0273.4753.4621.0263.498
3.4491.0293.4743.4601.0273.495
..................
3.4511.0283.4763.4621.0253.496
Table 3. Hardened layer depth (mm) at various measurement points on the same cross-section using the hardness measurement method.
Left Upper
Chamfer
Left
Groove
Left Lower
Chamfer
Right Upper ChamferRight
Groove
Right Lower Chamfer
3.5001.0763.4623.5221.0803.463
3.4971.0763.4583.5191.0823.465
3.5021.0743.4613.5201.0823.462
3.5001.0763.4623.5201.0803.463
3.5001.0733.4603.5201.0793.460
Table 4. Processed hardened layer depth (mm) at various measurement points.
Left Upper
Chamfer
Left
Groove
Left Lower
Chamfer
Right Upper ChamferRight
Groove
Right Lower Chamfer
3.49981.07553.46063.52021.08063.4626
Table 5. Hardened layer depth (mm) at various measurement points using ultrasonic transverse wave inspection.
Left Upper ChamferLeft GrooveLeft Lower ChamferRight Upper ChamferRight GrooveRight Lower Chamfer
3.4221.0273.4583.4181.0283.458
Table 6. Regional error analysis results.
Region TypeAbsolute Error (mm)Relative Error (%)
Left Upper Chamfer Region0.04581.33
Left Groove0.04851.24
Left Lower Chamfer Region0.01940.56
Right Upper Chamfer Region0.06321.83
Right Groove0.05620.59
Right Lower Chamfer Region0.03941.13
Table 7. Overall error analysis results.
Data SourceRoot Mean Square Error (mm)Mean Absolute Error (mm)
Interpolated and Smoothed Results0.03710.0313
Disclaimer/Publisher’s Note: The statements, opinions and data contained in all publications are solely those of the individual author(s) and contributor(s) and not of MDPI and/or the editor(s). MDPI and/or the editor(s) disclaim responsibility for any injury to people or property resulting from any ideas, methods, instructions or products referred to in the content.