Article

Analysis of the Suitability of Additive Technologies for the Production of Stainless Steel Components

1
Department of Machining and Manufacturing Technology, Faculty of Mechanical Engineering, University of Žilina, Univerzitná 1, 010 26 Žilina, Slovakia
2
Department of Machining, Process Planning and Metrology, Faculty of Mechanical Engineering, Czech Technical University in Prague, 160 00 Prague, Czech Republic
*
Author to whom correspondence should be addressed.
J. Manuf. Mater. Process. 2025, 9(8), 283; https://doi.org/10.3390/jmmp9080283 (registering DOI)
Submission received: 26 June 2025 / Revised: 9 August 2025 / Accepted: 13 August 2025 / Published: 18 August 2025

Abstract

This study presents a comparative analysis of three metal additive manufacturing processes: selective laser melting (SLM), also known as powder bed fusion (PBF); binder jetting (BJ); and atomic diffusion additive manufacturing (ADAM), a form of Material Extrusion (MEX). It focuses on the geometric and dimensional accuracy of ADAM-fabricated 17-4 PH stainless steel components, while AISI 316L stainless steel is the benchmark material for BJ and SLM technologies. In addition to dimension and geometry inspections, this study also measures the distribution of residual stresses and microstructural features of the printed components. Residual stresses were determined quantitatively to identify the internal state of stress developed because of each processing technology. The results reveal significant differences in dimensional accuracy, residual stress profiles, surface roughness, and microstructural characteristics among the three additive manufacturing technologies. The observed trends and correlations provide valuable guidance for selecting the most appropriate additive manufacturing technique based on required accuracy, mechanical properties, and product complexity.

1. Introduction

Metal additive manufacturing (AM) has emerged as a transformative technology in modern industry, offering the ability to fabricate complex and optimized geometries directly from digital models. This capability has broadened its application across a wide range of sectors, including aerospace, automotive, medicine, and energy [1,2]. These industries increasingly demand lightweight, high-strength components that are often challenging or uneconomical to produce using traditional manufacturing methods [1,3]. Additive manufacturing addresses these challenges through a layer-by-layer approach, which enables material efficiency, waste reduction, shortened production times, and improved cost-effectiveness [4,5].
One of the key advantages of metal AM lies in its suitability for producing small-batch or customized components based on computer-aided design (CAD) [6,7]. In this digital-first approach, the component’s geometry, topology, and functional features are defined in the design phase, influencing all subsequent steps—from slicing and parameter selection to final fabrication [8]. Proper design is essential for ensuring mechanical performance, dimensional accuracy, and post-processing requirements [6,9].
However, despite its many advantages, metal AM faces persistent challenges, particularly in achieving consistent geometric and dimensional accuracy—factors that are critical for component reliability, functionality, and interchangeability [9,10,11]. Moreover, defects such as porosity, residual stresses, and microstructural inconsistencies can significantly degrade mechanical performance. For example, pores serve as stress concentrators, promoting crack initiation and fatigue failure [12], while laser processing parameters directly affect microstructure and strength in powder bed fusion processes [1].
Recent studies have also highlighted the trade-offs between accuracy, mechanical properties, and production cost in various AM technologies [13,14]. As a result, selecting the most suitable AM technology requires a deep understanding of process-specific capabilities, limitations, and the influence of processing parameters on final component quality.
This study focuses on a comparative evaluation of three prominent metal additive manufacturing technologies: binder jetting (BJ), selective laser melting (SLM), and atomic diffusion additive manufacturing (ADAM) [5,8]. These methods were chosen due to their distinct deposition mechanisms, maturity levels, and growing relevance in industrial applications. Vafadar et al. investigated key metal additive manufacturing technologies, analysing their physical principles, material processability, application domains, and process limitations. The study also identifies major challenges related to output quality, economic efficiency, and prospects for industrial implementation [15].
Miteva et al. conducted a comprehensive analysis of principal metal additive manufacturing technologies, including powder bed fusion, Directed Energy Deposition, binder jetting, Metal Extrusion, and Sheet Lamination, focusing on their operating principles, performance characteristics, limitations, and application potential across industries.
The study further addresses prevailing technical and environmental challenges while outlining emerging directions in hybrid manufacturing, AI-based process optimization, and sustainable production practices [16].
Several review studies have thoroughly addressed the use of metal additive manufacturing (AM) in the aerospace industry. Madhavadas et al. [6] examine various metal AM technologies, their process parameters, and material characteristics, comparing them with conventional manufacturing methods, with a particular emphasis on complex-shaped aerospace components. In contrast, Yusuf, Cutler, and Gao [7] explore the broader impact of metal AM on the aerospace sector, highlighting the advantages of the technology, associated technical challenges, and the future potential of laser-based processes.
Binder jetting (BJ) is known for its high production speed and minimal post-processing, although its mechanical performance is highly dependent on powder characteristics and sintering parameters [1,17,18,19]. Binder jetting (BJ) has gained attention as a promising additive manufacturing technique for producing 316L stainless steel components. Studies by Do et al. [20], Mirzababaei et al. [21], and Miyanaji et al. [22] highlight the importance of optimizing binder saturation, powder properties, and sintering parameters to improve part density, hardness, and structural integrity. These insights collectively support ongoing efforts to achieve fully dense, high-performance metal parts using the binder jetting (BJ) process.
Selective laser melting (SLM) offers high resolution and excellent mechanical properties but requires careful control of process parameters to mitigate residual stresses and geometric distortions [14,23,24,25,26]. Selective laser melting (SLM) is a key additive manufacturing method for producing complex metal parts with tailored properties. Studies by Dai et al. [14] and Jia et al. [23] highlight the importance of thermal behaviour and scanning strategies on part quality. Wang et al. [24] identify spatter formation as a major factor affecting surface integrity, while Nandhakumar and Venkatesan [25] review key process parameters influencing microstructure and surface finish. Optimizing these factors is crucial for improving SLM component performance.
Atomic diffusion additive manufacturing (ADAM), a relatively new method, simplifies workflow and enhances safety by using bound powder filaments, offering competitive mechanical properties and dimensional accuracy with reduced handling risk [26,27]. Studies have shown that components produced using the atomic diffusion additive manufacturing (ADAM) technology achieve favourable mechanical properties [26], with the final weight being effectively adjustable through the design of the infill structure—for example, by using triangular or other patterned geometries. ADAM also demonstrates excellent surface quality compared to other powder metallurgy technologies [27] and achieves higher dimensional accuracy than the binder jetting process [28].
While each of these technologies offers distinct benefits, they also present unique limitations, particularly in terms of dimensional accuracy, residual stress development, surface finish, and geometrical fidelity—all of which are critical for advanced manufacturing applications. However, no comprehensive comparative analysis currently exists that quantifies these differences in a systematic and process-focused way.
Therefore, the objective of this study is to evaluate BJ, SLM, and ADAM through a comparative analysis of four key quality metrics: dimensional accuracy, cylindricity, residual stress distribution, and surface roughness. These three technologies were selected based on their practical relevance and widespread use in industry. The goal is to provide a data-driven comparison that supports informed decision-making when selecting an appropriate technology for specific application requirements.

2. Materials and Methods

The materials investigated in this study were stainless steels AISI 316L and 17-4 PH, two of the most used alloys in metal additive manufacturing. These materials were selected based on their compatibility with the applied additive manufacturing technologies and their relevance in industrial applications requiring high corrosion resistance, mechanical strength, and good processability. AISI 316L was processed using selective laser melting (SLM) and binder jetting (BJ) technologies. This austenitic stainless steel is well known for its excellent corrosion resistance, high weldability, and favourable powder characteristics. For the SLM process, a gas-atomized AISI 316L powder with controlled particle size distribution and high purity was used, optimized to minimize porosity and ensure uniform layer fusion. Manufacturing was carried out using the Renishaw AM 400 system (Renishaw plc, Wotton-under-Edge, Gloucestershire, UK). The binder jetting process with AISI 316L was performed on a system from ExOne (The ExOne Company, North Huntingdon, PA, USA), which enables high-resolution layer-wise deposition of metal powder and binder, followed by thermal post-processing (sintering) aimed at achieving full densification of the final parts. The 17-4 PH stainless steel was produced using atomic diffusion additive manufacturing (ADAM), a process that combines extrusion of a filament composed of metal powder and a polymer binder. The components were manufactured using the Metal X system (Markforged Inc., Watertown, MA, USA), representing the ADAM technology. The chemical composition of the AISI 316L powder used in the SLM process is presented in Table 1.
In BJ, powders with a broader size range and greater porosity are selected to optimize to ensure uniform layer spreading and efficient binder infiltration. The composition is also designed with the sintering stage in mind, aiming to minimize deformation and residual porosity. The printing speed for BJ was 100 mm/s. The chemical composition used for BJ is listed in Table 2.
The ADAM process used a martensitic 17-4 PH alloy, which is specifically optimized for this method and is known for its high strength, hardness, and ability to undergo precipitation hardening. The chemical composition of the ADAM powder is shown in Table 3.

2.1. Sample Design

The test samples were designed as solid cylindrical rods with a diameter of Ø5 mm and a length of 100 mm. This geometry was chosen to ensure comparability across different additive manufacturing technologies (SLM, BJ, and ADAM) and complies with widely accepted standards used to evaluate the geometry and surface quality of metallic components.
For each of the applied additive manufacturing technologies (BJ, SLM, and ADAM), the processing parameters were designed to meet the specific material requirements and technical capabilities of the respective process. The parameters listed in Table 4 were optimized to ensure stable manufacturing conditions, achieve the required surface quality, and minimize defects in the produced samples. Their selection also takes into account typical industrial conditions characteristic of the BJ, SLM, and ADAM technologies. The choice of parameters was based on the recommendations and findings of previous studies [29,30,31], which focused on comparing the dimensional accuracy, porosity, and mechanical properties of samples produced by these technologies.

2.2. Methodology for Metallographic Sample Preparation and Microscopic Observation

Samples of AISI 316L and 17-4 PH stainless steels, produced by additive manufacturing, were prepared for metallographic analysis. The samples were sectioned to a suitable size and processed using standard metallographic procedures.
Initial preparation involved grinding followed by polishing to achieve a mirror surface finish. After mechanical preparation, the samples were chemically etched to reveal their microstructures. Kalling’s Reagent No. 2, composed of ferric chloride, methanol, and hydrochloric acid, was used as the etchant. Mild etching was performed at room temperature. Post-etching, the samples were rinsed with distilled water, followed by ethanol, and thoroughly dried.
Microstructural analysis was conducted using a ZEISS Neophot 32 optical microscope (Carl Zeiss Microscopy GmbH, Jena, Germany) under transmitted light. The aim was to evaluate structural features and morphological details related to the additive manufacturing process.

2.3. Analysis of Geometrical Accuracy Using CT Method

The geometrical accuracy of the samples, specifically diameter and cylindricity deviations, was analysed using computed tomography (CT) with a ZEISS METROTOM system (Carl Zeiss Industrielle Messtechnik GmbH, Jena, Germany). The samples were scanned axially to minimize distortion and ensure consistent measurement conditions. The system settings included an X-ray tube voltage of 180 kV, a current of 150 µA, the use of a 0.5 mm copper filter, and an exposure time ranging from 500 to 1000 ms per projection. During a complete 360° tomographic scan of each sample, approximately 1500 to 2000 projections were acquired, providing high spatial resolution with a voxel size ranging from 10 to 15 µm. The CT scan data were processed using VGStudio MAX 3.6 software (Hexagon AB, Heidelberg, Germany), where cylindricity analysis was carried out by ISO 1101:2017 [29]. The evaluation focused on the maximum deviations from the ideal cylindrical shape along the entire length of each sample.

2.4. Residual Stress Measurement via X-Ray Diffraction

Residual stresses were measured using the Proto iXRD system (Proto Manufacturing Inc., LaSalle, ON, Canada), equipped with the MG40 unit and employing MnKα radiation. The irradiated area was 1 mm2, with a collimator diameter of 1 mm used throughout all measurements. For AISI 316L samples, residual stresses were evaluated in the axial and tangential directions. Diffraction patterns were recorded from the {311} crystallographic plane at a diffraction angle of 152.80, using the sin2ψ method with a tilt range of ±39°. The X-ray tube operated at 20 kV and 4 mA. Gain correction was applied via the P/G (s) function. A β-oscillation of 3.00 was used during the measurement, with no rotation along the φ, X, or Y axes. Peak shifts were determined based on the absolute displacement of the diffraction peak maximum.
Measurements on 17-4 PH stainless steel samples were conducted under identical conditions. A MnKα X-ray tube with a Cr filter was used, maintaining a 1 mm collimator diameter, 20 kV tube voltage, 4 mA current, and 3 β-oscillation. Diffraction patterns were recorded from the {211} crystallographic plane at a diffraction angle of 152.80°, again using the sin2ψ method with a ±39° tilt range. The estimated X-ray penetration depth was approximately 10 µm. The X-ray tube settings, gain correction via the P/G (s) function, and absence of φ, X, or Y axis rotation were consistent with the previous measurements. Peak shifts were calculated as absolute displacements of the diffraction peak maximum.
Residual stress was measured at three positions along the sample axis and three angular positions, as shown in Figure 1. The red arrows indicate the collimator orientation during measurements at each specific location. At each position, residual stresses were assessed in the axial direction (parallel to the sample axis) and the radial direction (perpendicular to the sample axis).

2.5. Surface Roughness Measurement

As part of the research, surface roughness parameters of samples produced by additive manufacturing were systematically evaluated. The samples had a cylindrical shape with dimensions of Ø5 × 100 mm. Surface analysis was carried out using an optical confocal microscope (Alicona InfiniteFocus, Alicona Imaging GmbH, Raaba, Austria) at 20× magnification, allowing for a detailed surface topography evaluation. The measurements were conducted by ISO 25178 [32].
Which specifies areal surface roughness parameters for 3D surface characterization. Parameters such as Sa, Sz, S10z, Spk, and other characteristic surface indicators were evaluated. The gained data were used for a comprehensive evaluation of the surface quality of the samples after additive manufacturing.

3. Results

3.1. Macroscopic Surface Analysis

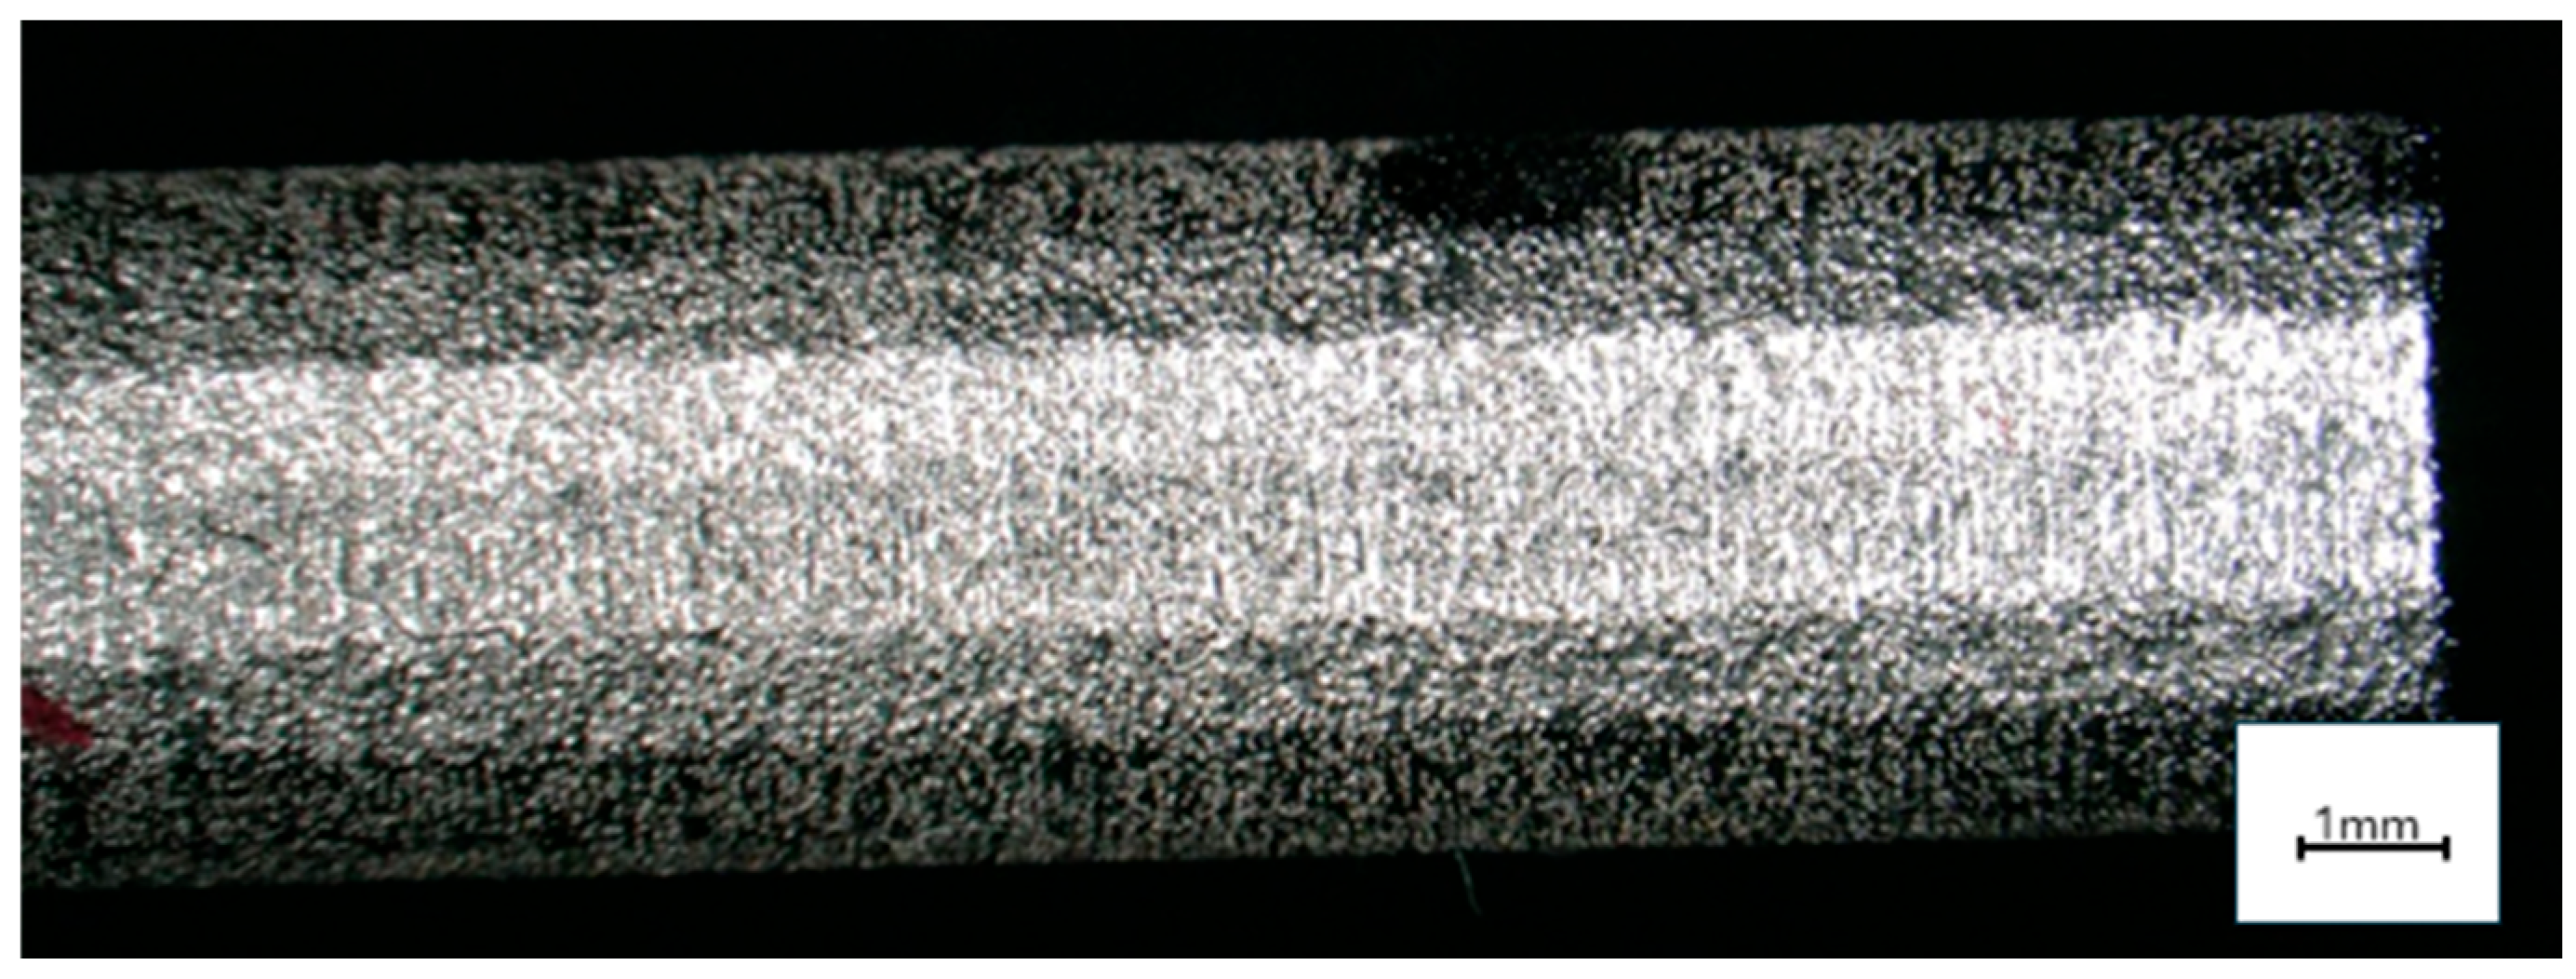
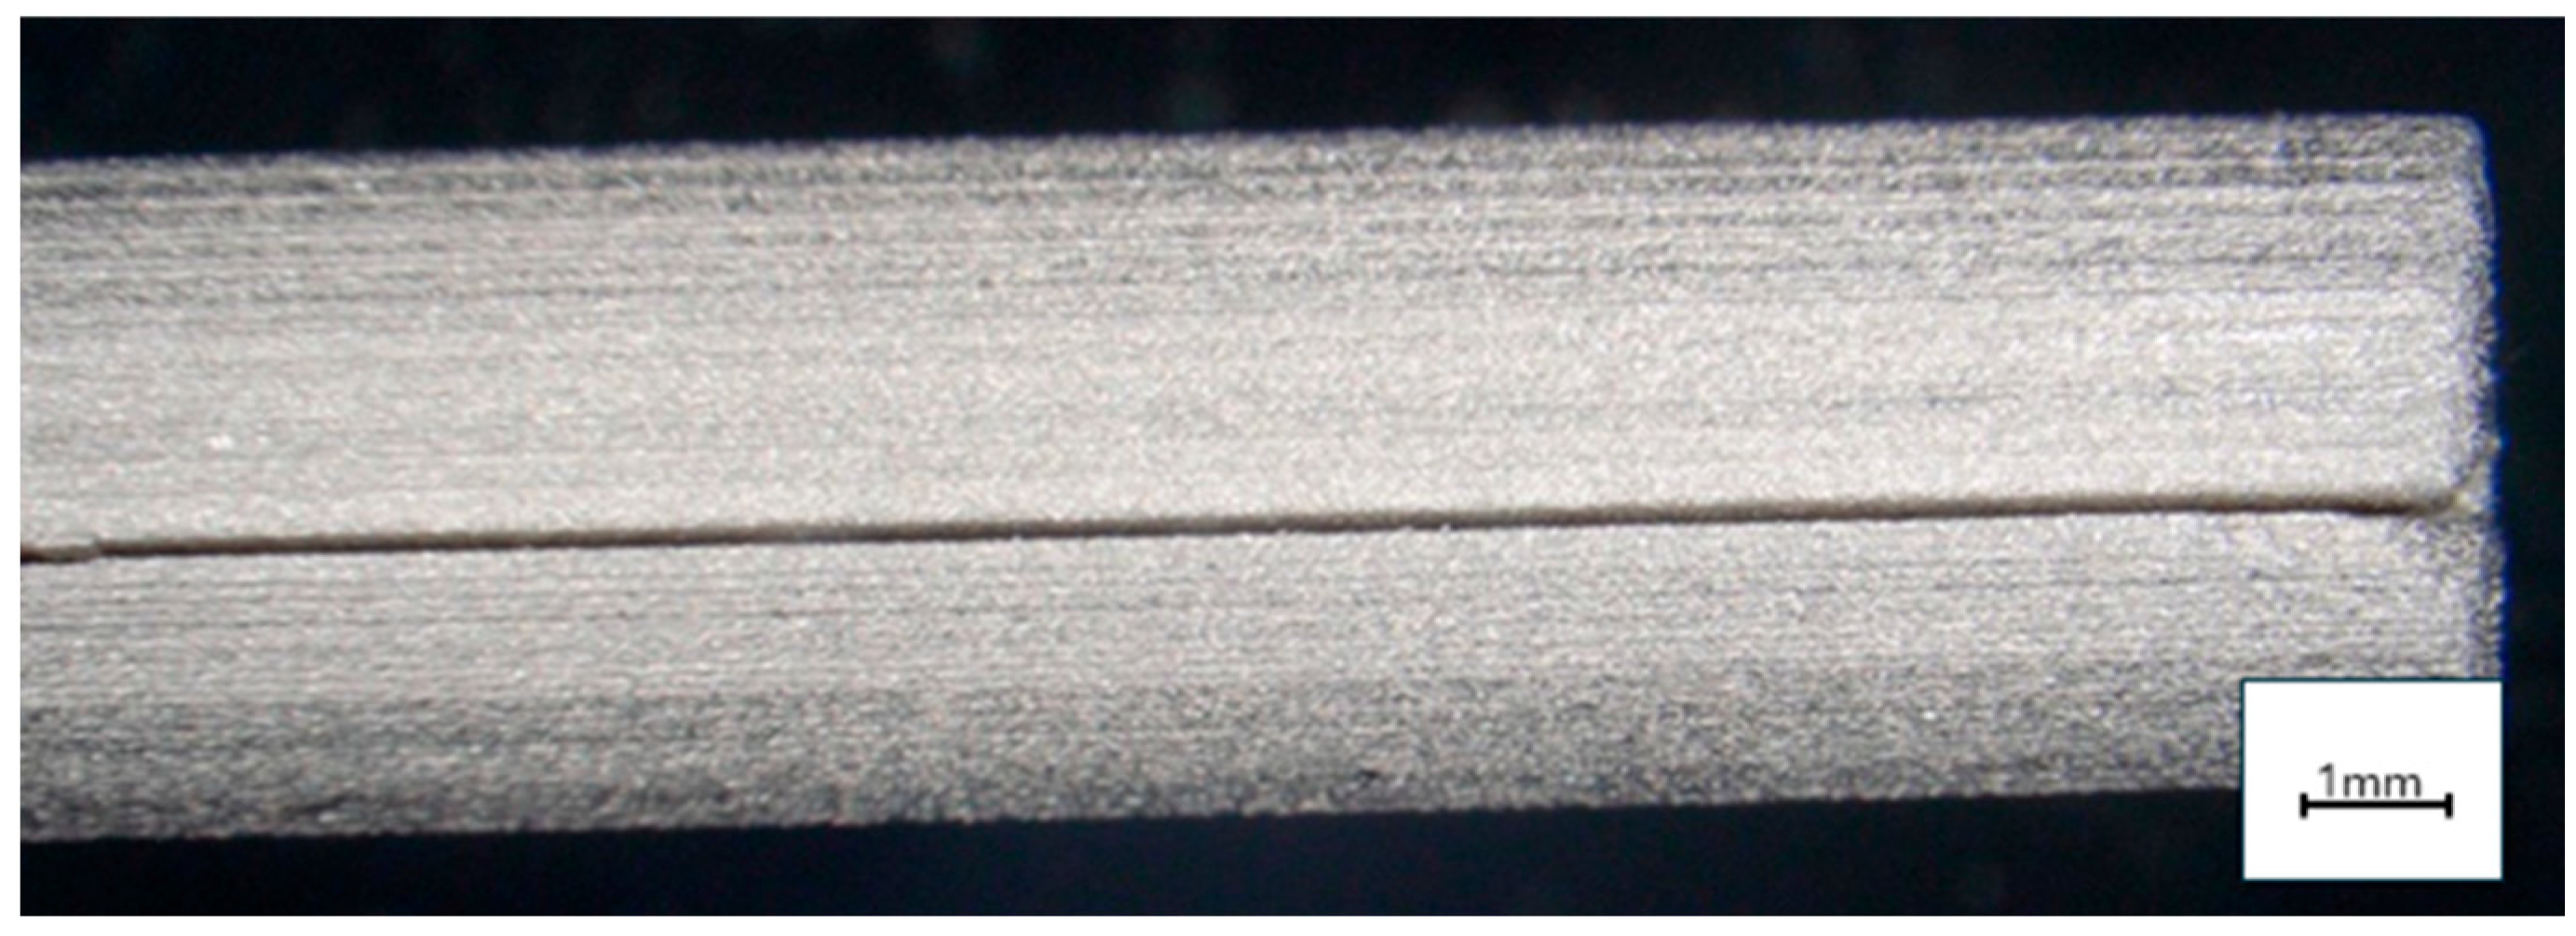
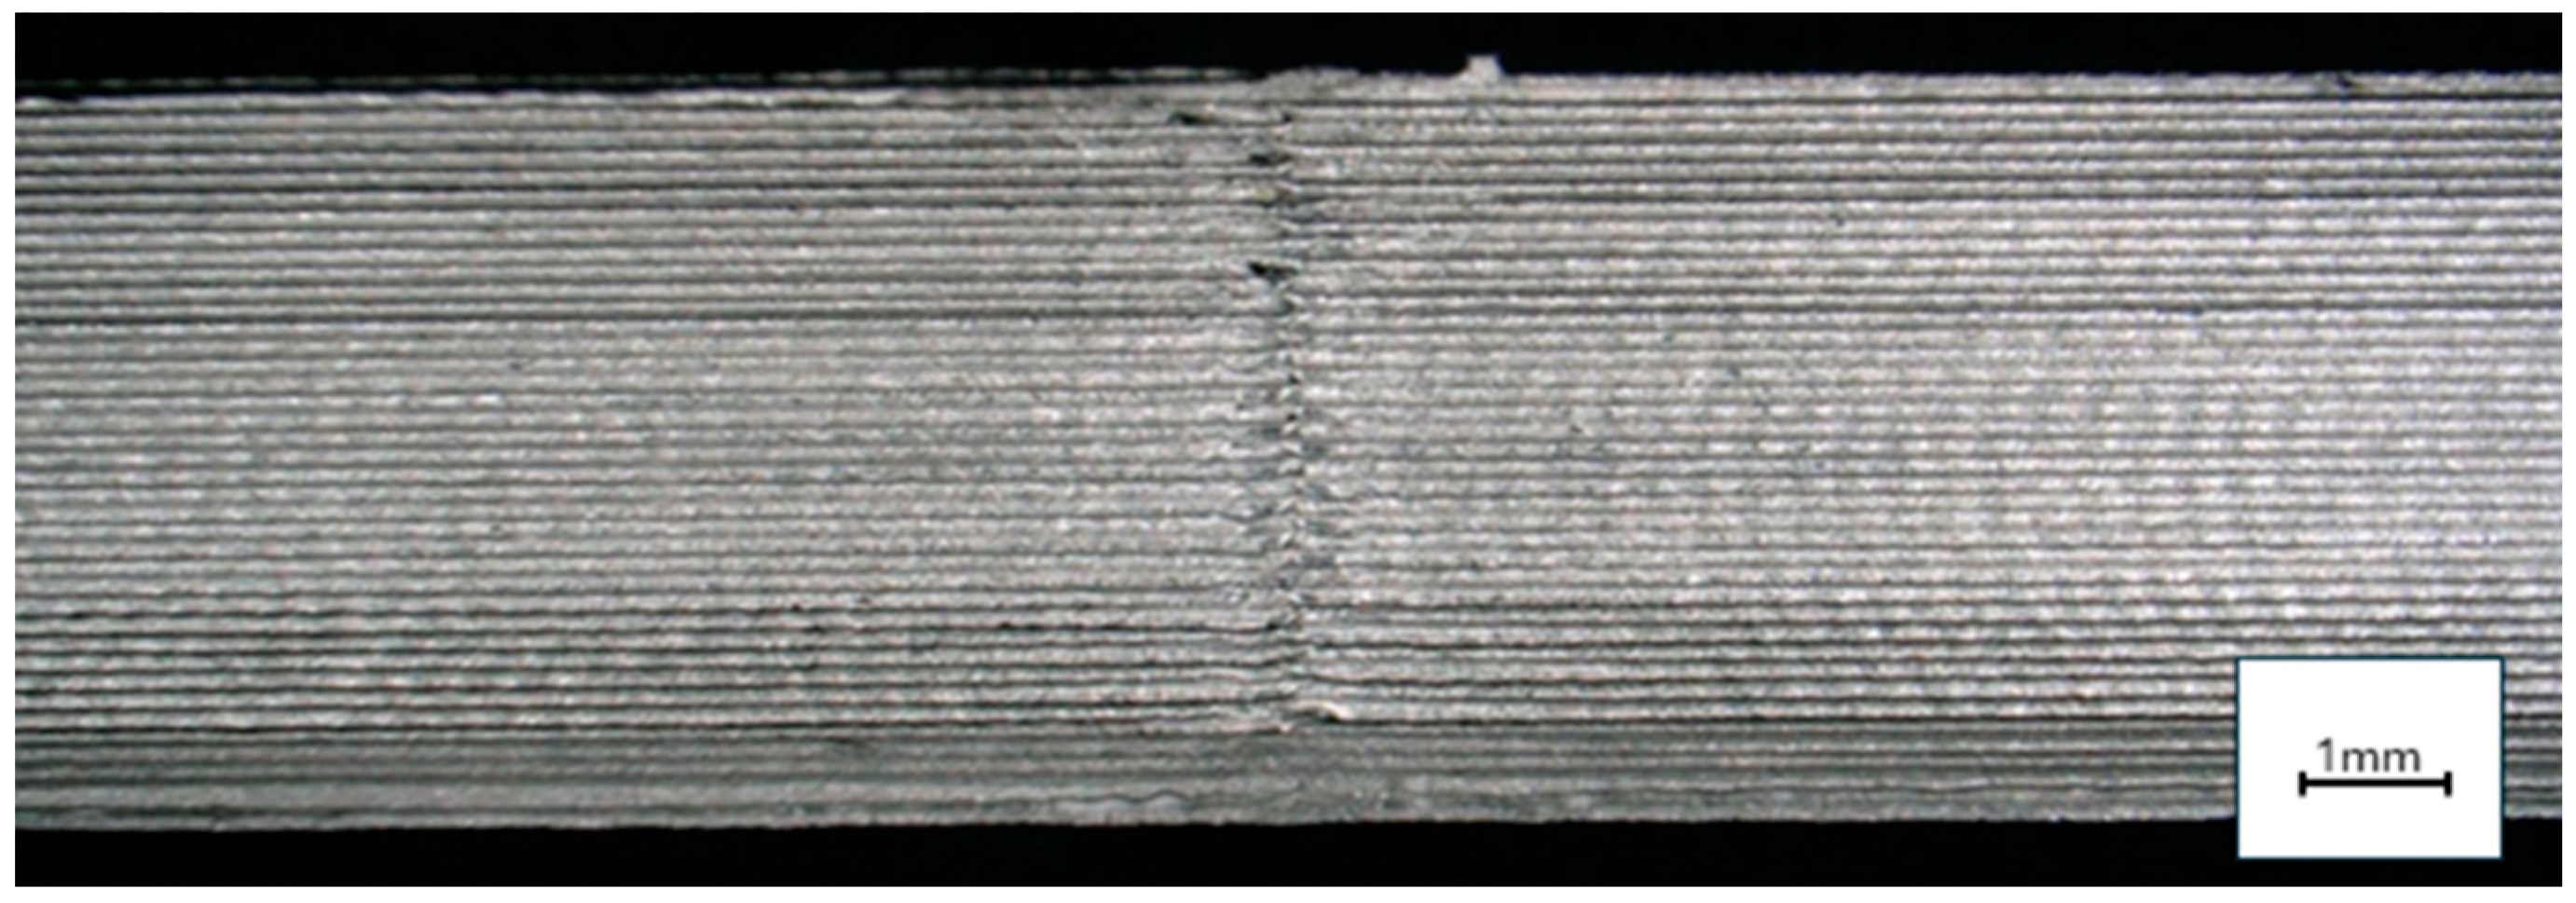
Macroscopic images of the samples manufactured using SLM, BJ, and ADAM demonstrate distinct and visually identifiable surface characteristics directly attributable to the respective process principles.
1.
SLM macroscopic surface
The SLM sample shows a relatively uniform and compact surface with fine granularity (Figure 2). Localized melt traces are visible, which are typical for powder bed fusion technologies using a laser source. Layering is barely noticeable, and the overall appearance is dense and homogeneous.
2.
BJ macroscopic surface
In the case of the BJ sample, the surface appears matte and visually consistent in tone. Although less dense than the SLM counterpart, it presents a smoother and more uniform texture. A distinct horizontal line across the sample indicates a discontinuity likely caused during the sintering stage, possibly due to shifting or uneven heating (Figure 3).
3.
ADAM macroscopic surface
The ADAM sample presents a coarse surface texture with clearly visible layer lines along the build direction (Figure 4). These stepped features are consistent across the sample and are characteristic of filament-based extrusion methods. The surface shows the highest degree of visible layering among the three technologies.

3.2. Microstructure and Morphology of the Powder

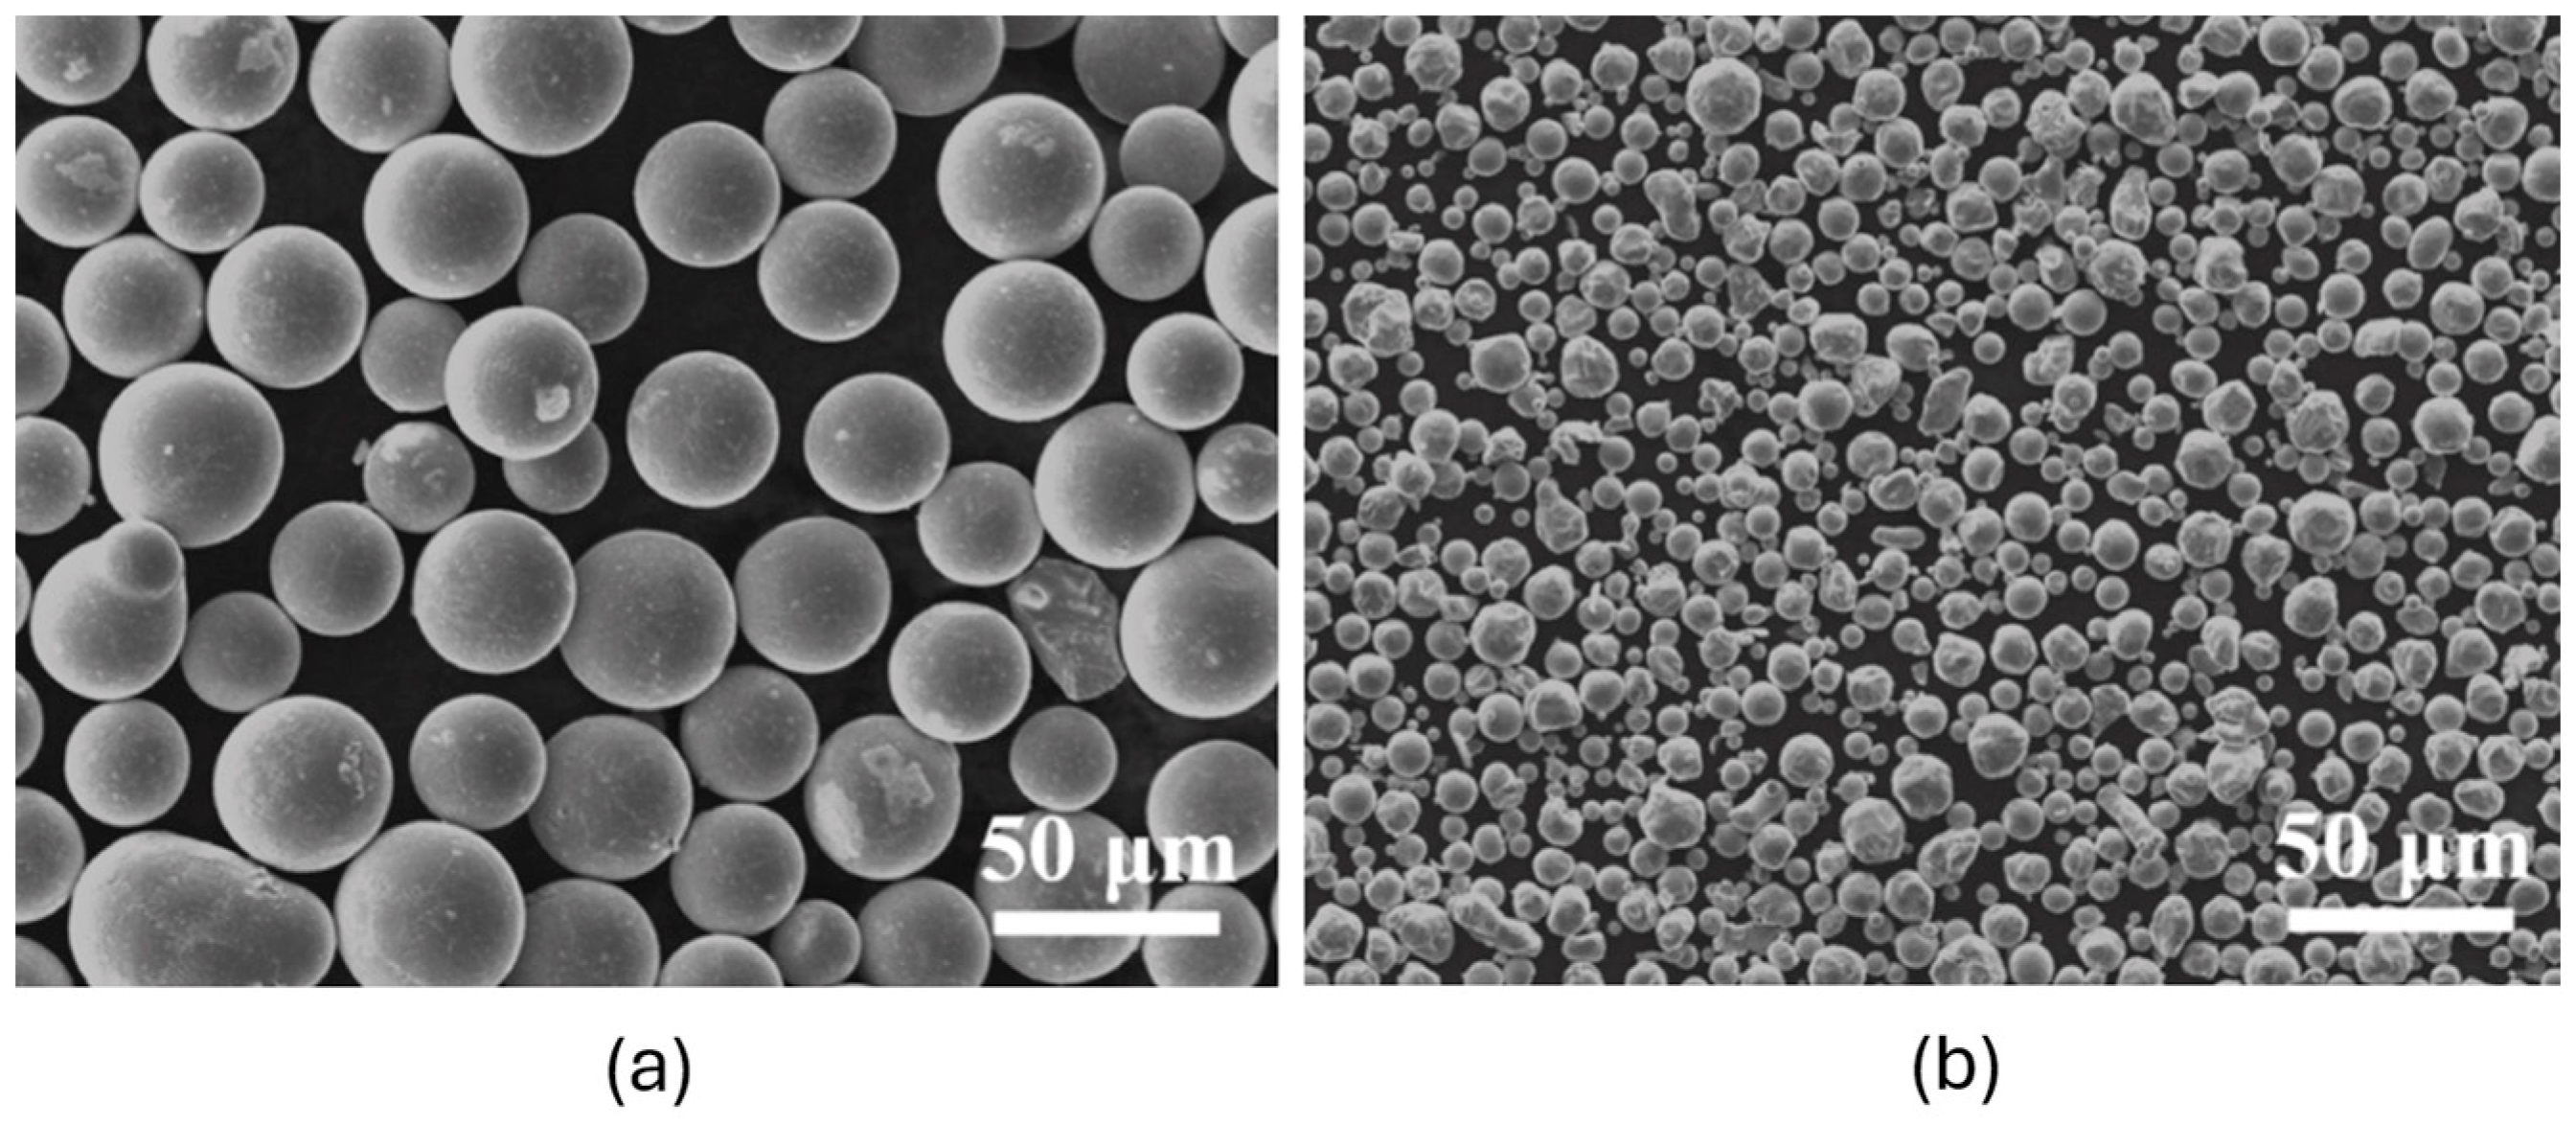
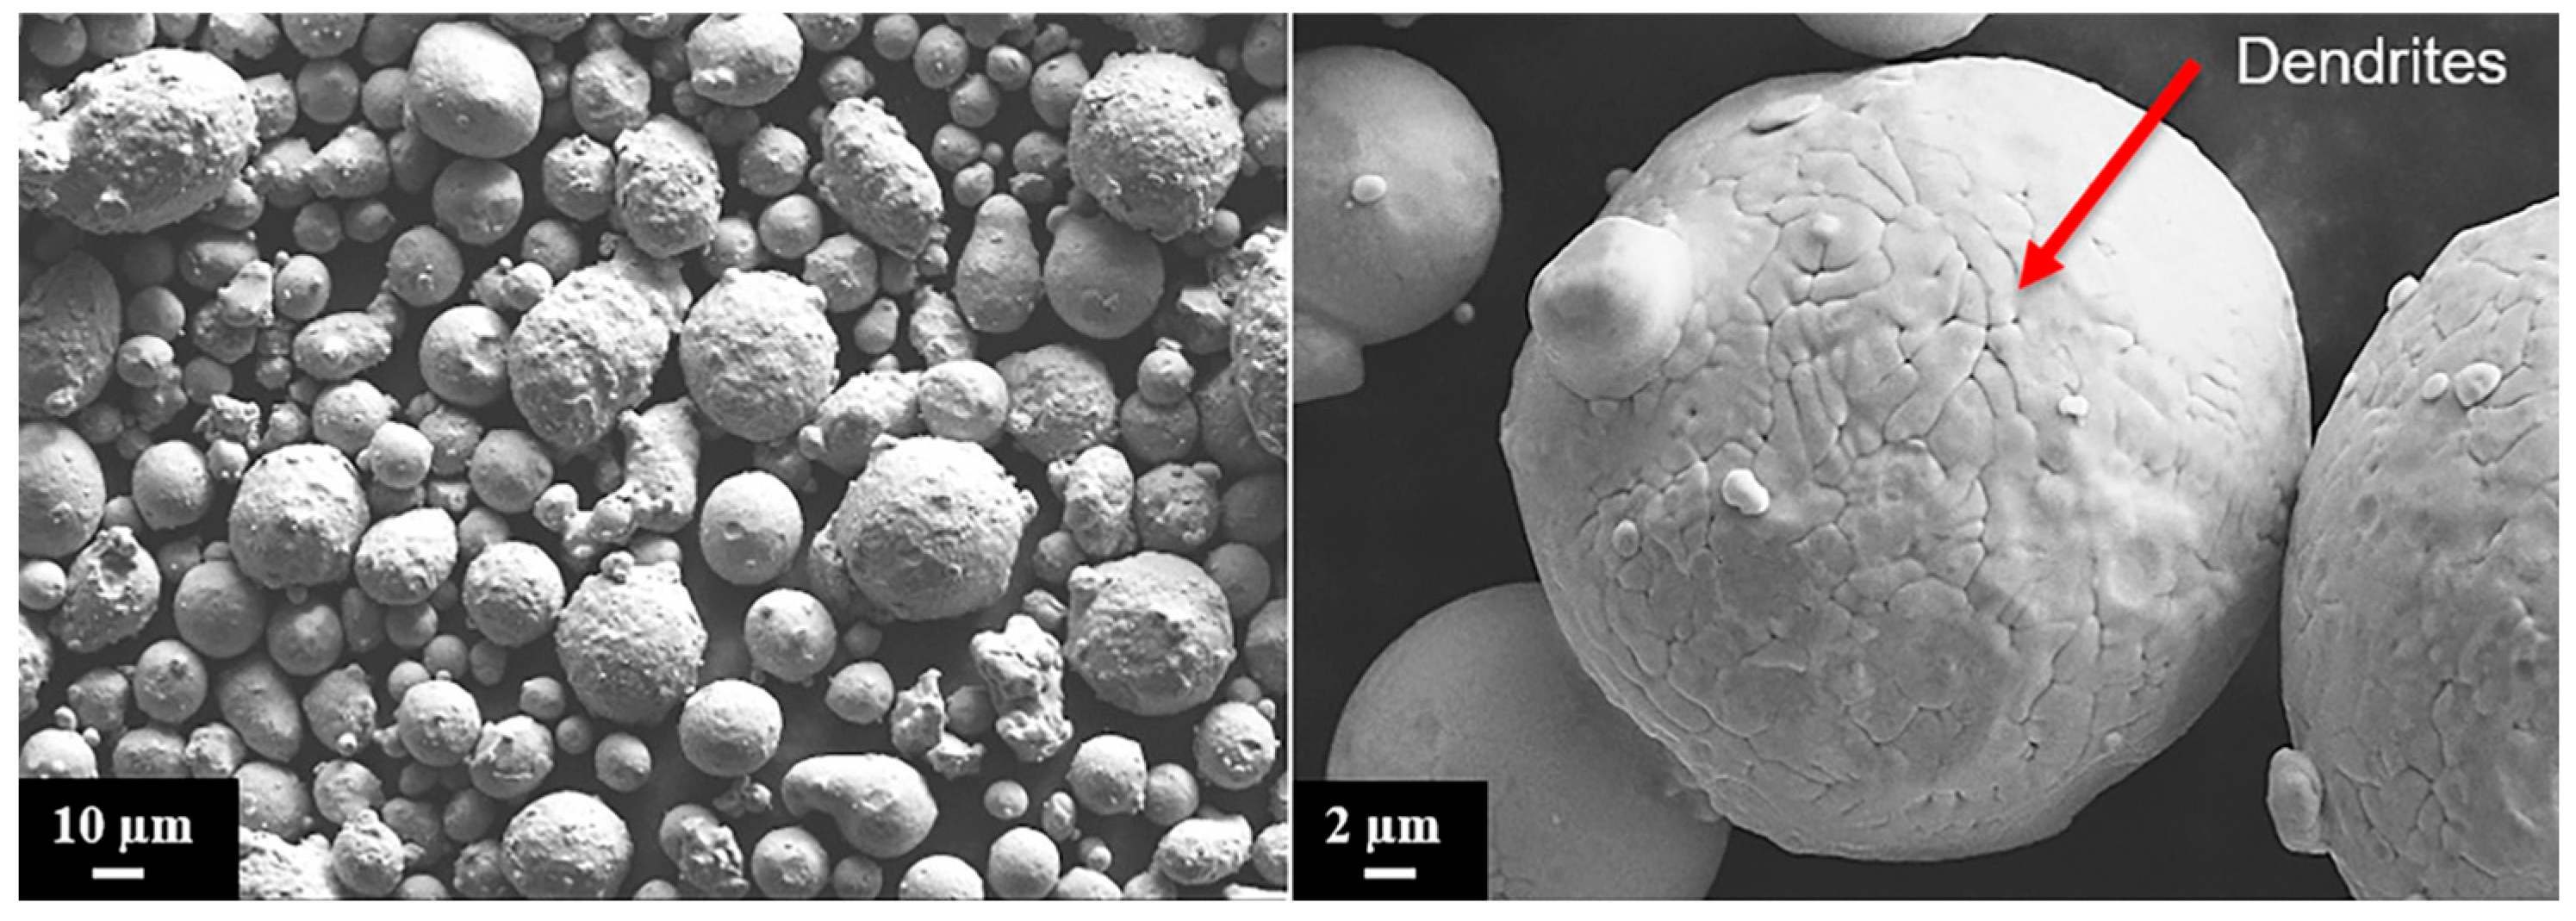
Chen et al. [33] reported that the morphological characteristics of unimodal 316L stainless steel powders, produced by binder jetting (BJ), are illustrated in Figure 5 using SEM images and their data. Figure 5a corresponds to the coarse powder, while Figure 5b shows the fine powder. The particles predominantly exhibited spherical morphology and a unimodal particle size distribution. Bimodal powder blends were prepared by combining coarse and fine powders in varying weight ratios. The resulting particle size distributions displayed two distinct peaks, with the intensity difference between these peaks diminishing as the proportion of fine powder increased. These bimodal blends were reported to possess favourable properties for application in additive manufacturing processes.
For this study, data from the publication by Heiden et al. [34] were utilized, which provides a comprehensive investigation into the evolution of 316L stainless steel powder feedstock during the laser powder bed fusion (LPBF) process. This work includes detailed microstructural and morphological analyses of the powder particles in both their initial state and after multiple reuse cycles.
Particle size and shape characterization was performed using ASPEX/SEM analysis, laser diffraction, and micro-CT scanning. The results confirmed that the virgin 316L powder predominantly consists of spherical particles with well-defined surface features and visible grains, corresponding to high sphericity and a low incidence of satellite particles. Such morphology ensures optimal powder flowability and consistent layer deposition during the LPBF process. The morphology is illustrated in Figure 6 for AISI 316L, where spherical particles with smooth surfaces and minimal satellite occurrence are clearly visible, confirming their suitability for additive manufacturing.
As reported by Maamoun et al. [35], repeated recycling of 316L powder during LPBF had no significant effect on its chemical composition or the microstructure of the produced parts, with only a slight increase in the average particle size and the fraction of irregularly shaped particles. These changes were not considered critical to the quality of the final components.
Figure 7 illustrates the morphology of 17-4 PH powder and various production stages, where Figure 7a shows the green part after extrusion and Figure 7b depicts the brown part following the debinding process, i.e., after the removal of low-molecular-weight binder components. Powder characterization prior to sintering is essential for understanding material behaviour throughout the manufacturing process. Due to the inability to perform an independent powder morphology analysis, data from Romero et al. [36] were utilized. These authors examined the filament and green parts at different production stages using scanning electron microscopy (SEM), revealing that the metal particles within the filament predominantly exhibit a spherical shape and are uniformly distributed within the polymer matrix. This morphology ensures a stable extrusion process and a homogeneous microstructure of the green parts.
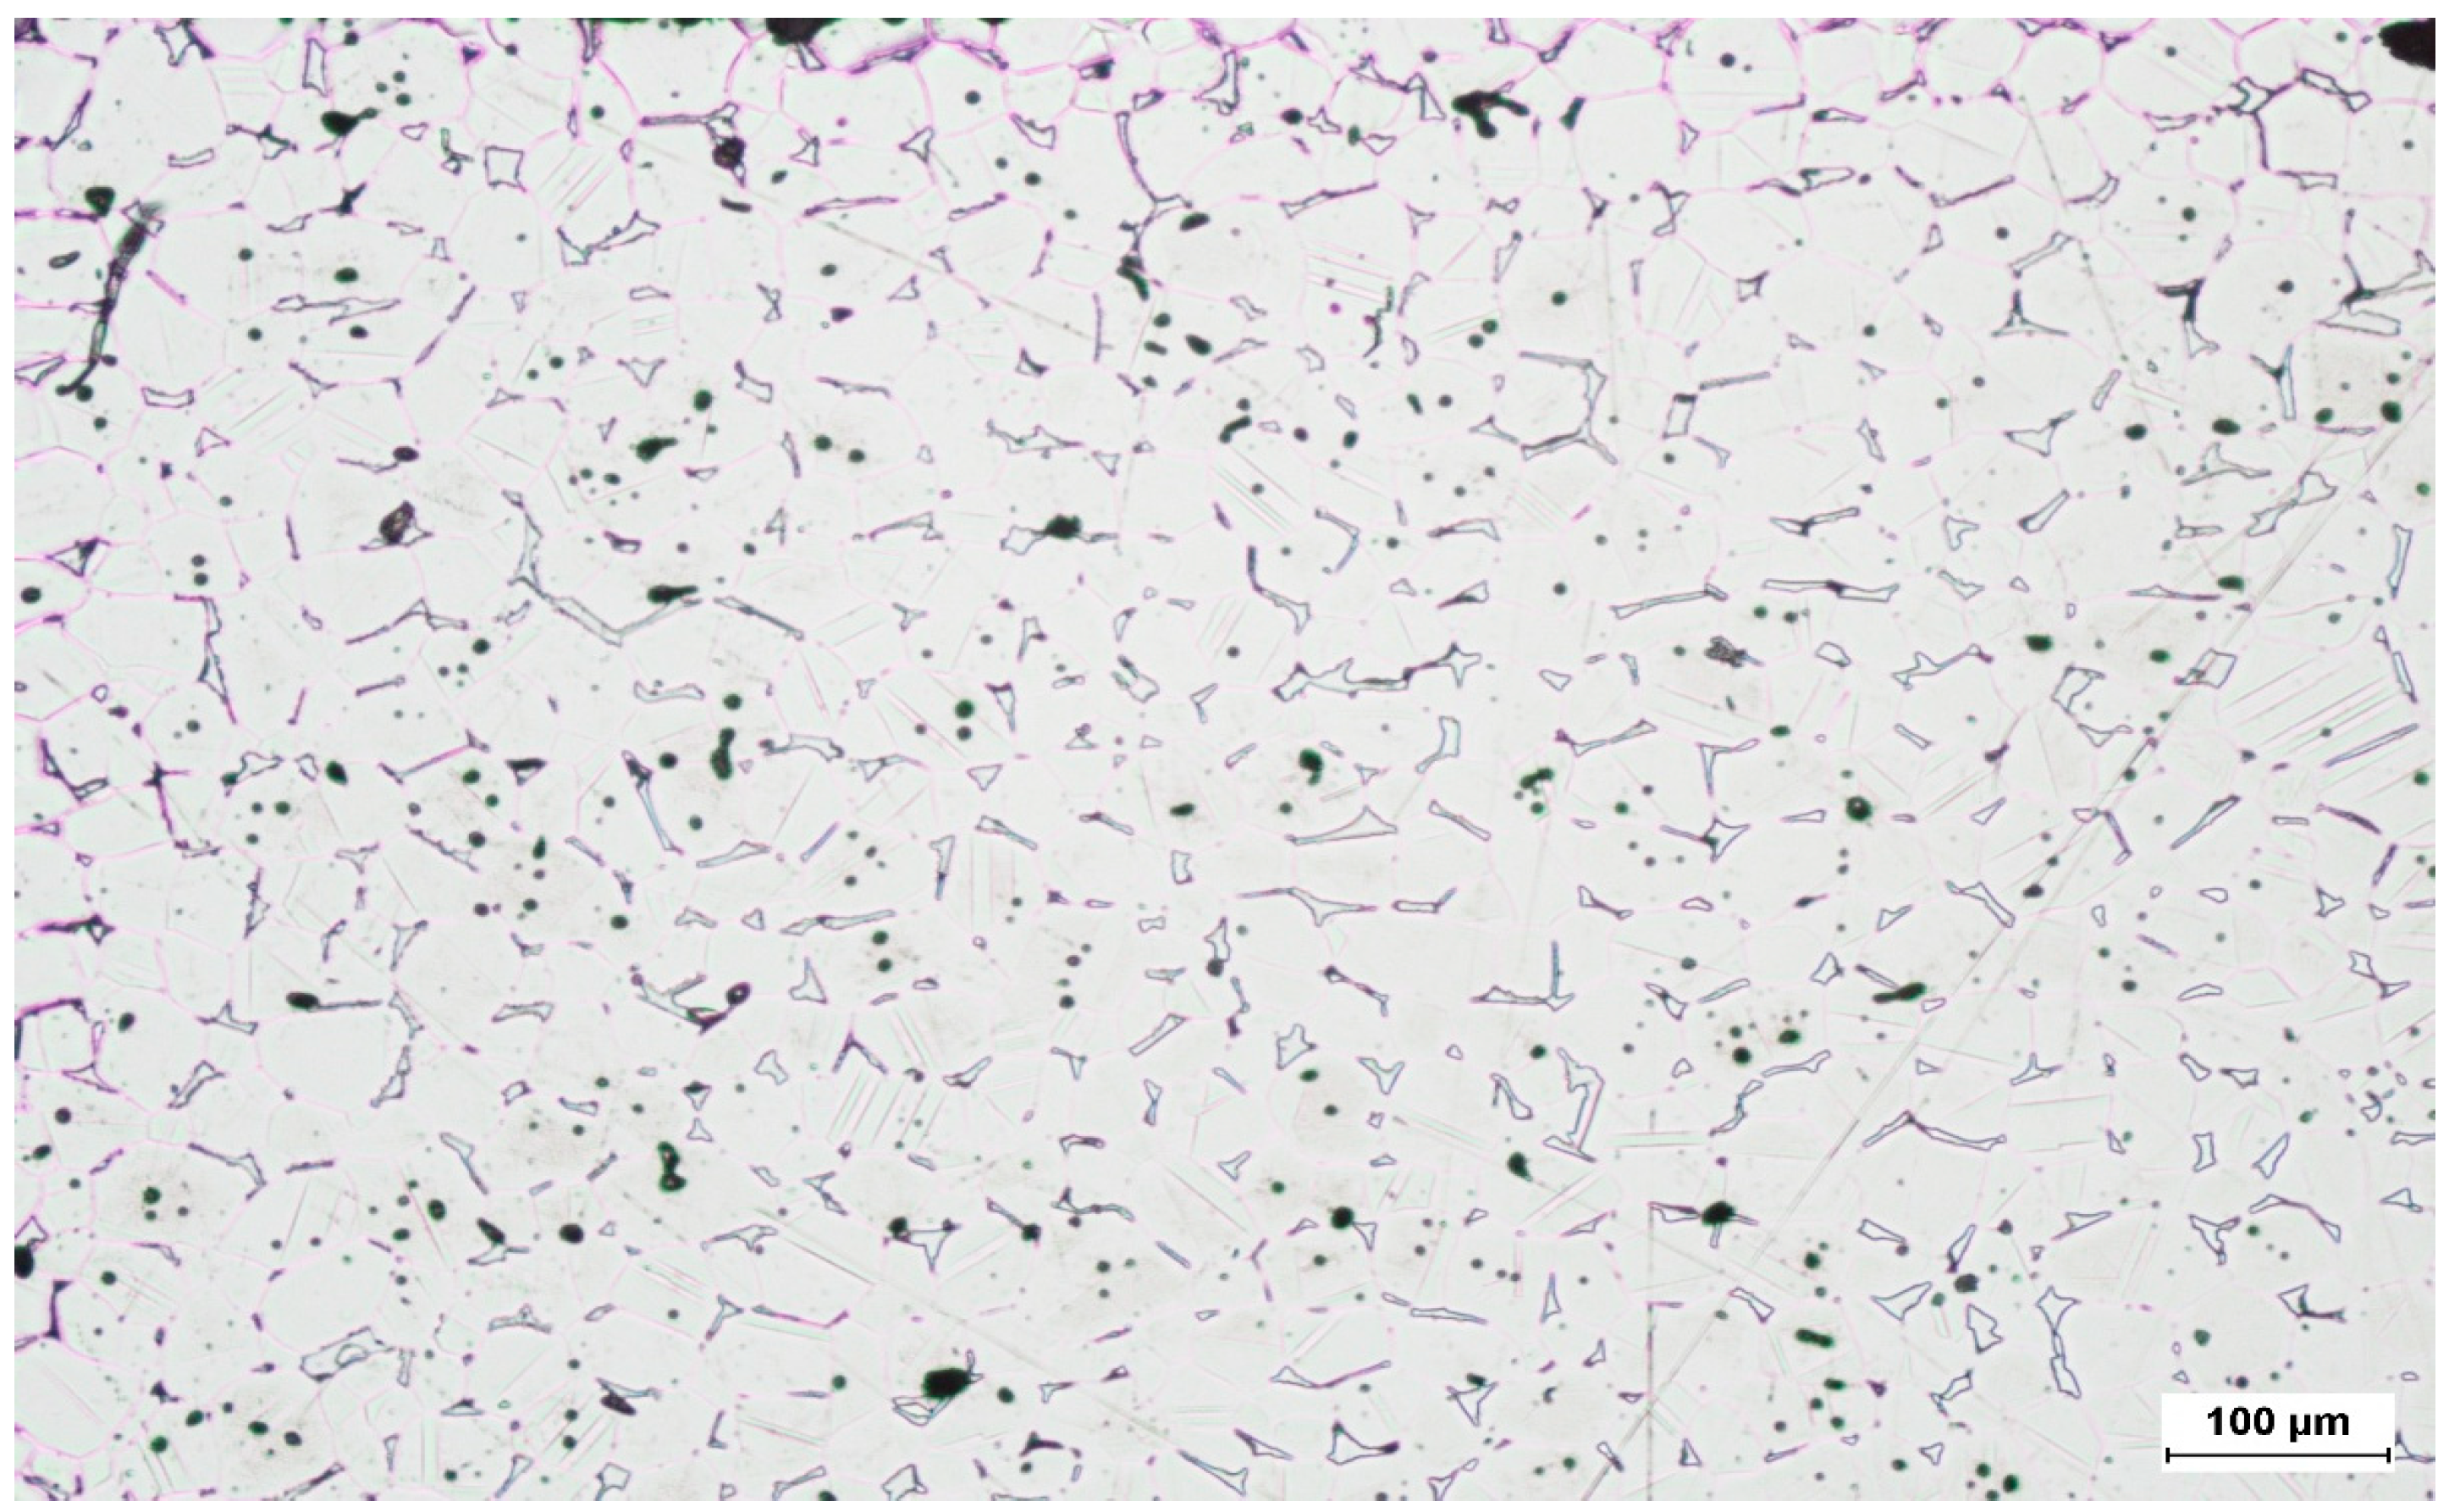
The microstructure of the sintered AISI 316L sample (Figure 8) reveals a fully austenitic phase characterized by equiaxed grains with a uniform grain size distribution. Grain boundaries are clearly defined. An acceptable amount of small, rounded pores is observed, primarily located along grain boundaries. These pores are typical of the binder jetting process and result from partial densification during sintering. Furthermore, small oxide inclusions or residual binder particles appear as black dots dispersed throughout the matrix. An acceptable amount of small, rounded pores is observed, primarily located along grain boundaries. These pores are typical of the binder jetting process and result from partial densification during sintering. Furthermore, small oxide inclusions or residual binder particles appear as black dots dispersed throughout the matrix.
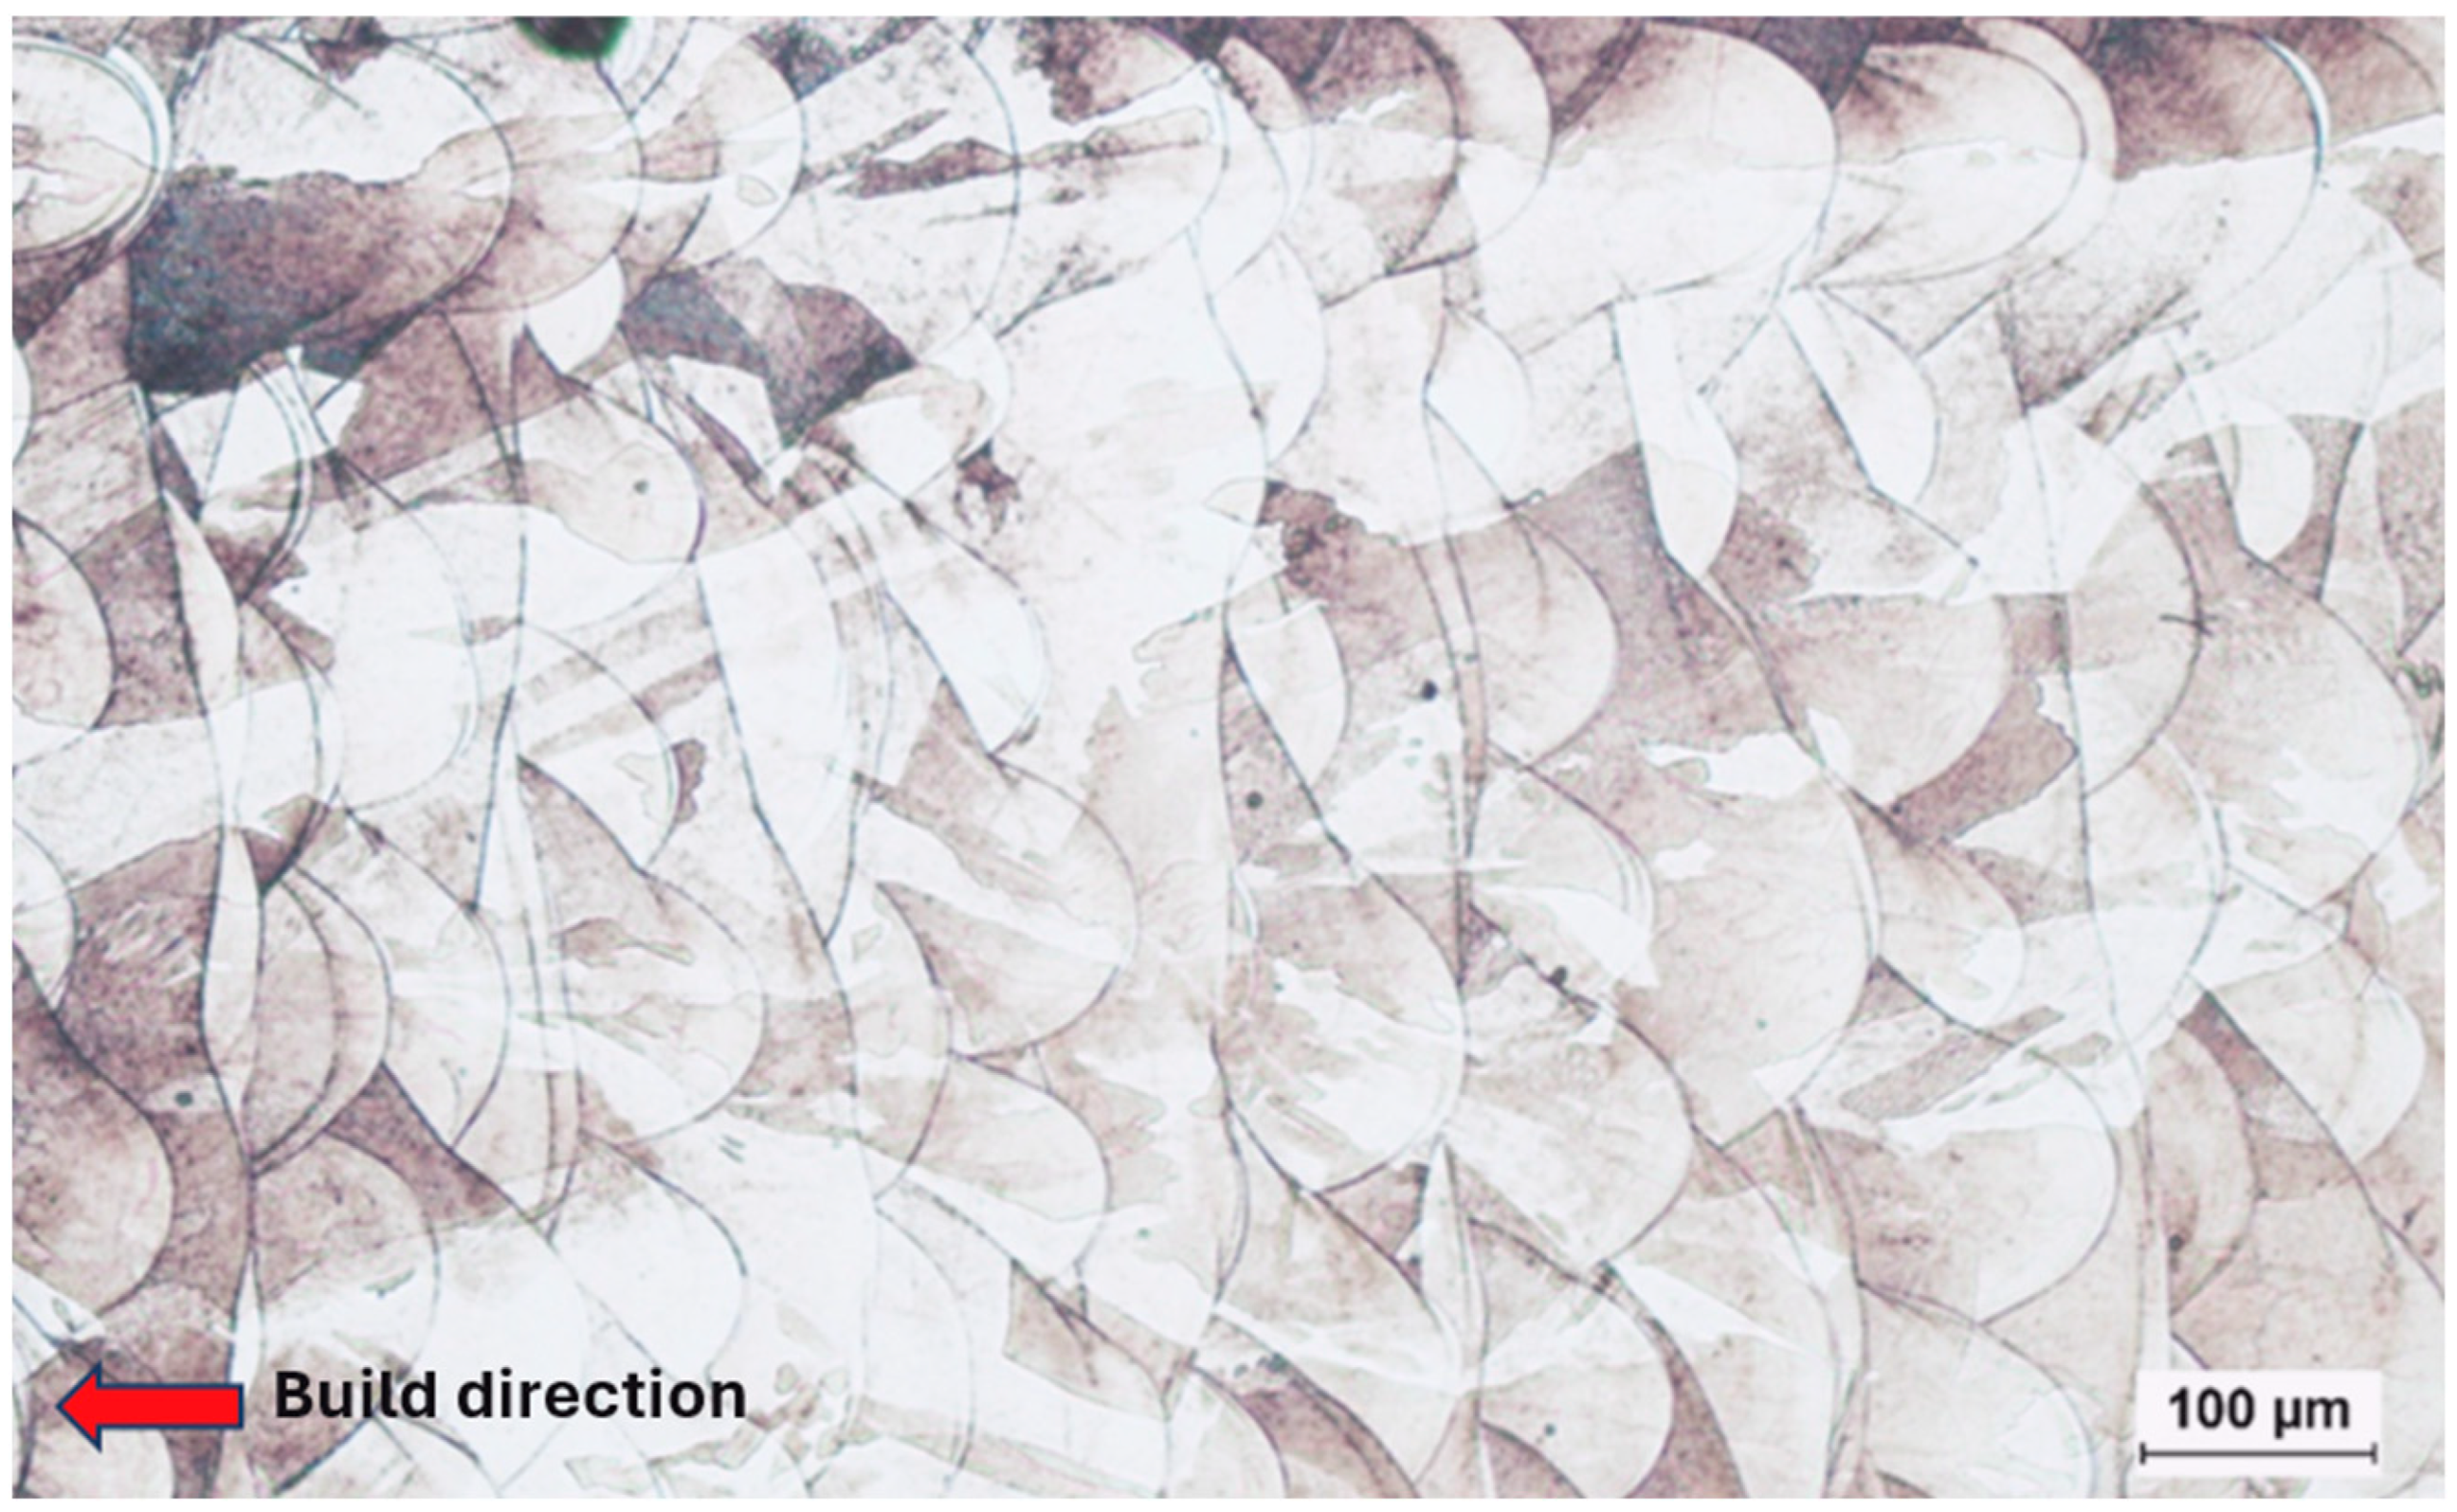
The microstructure of AISI 316L achieved by selective laser melting (Figure 9) displays characteristic melt pool morphologies, typically appearing as superimposed half-moon-shaped bands aligned with successive laser scan tracks. These melt pools reveal a refined cellular or columnar austenitic microstructure, which develops due to the high cooling rates intrinsic to the SLM process. The material displays directional solidification patterns consistent with the laser scanning strategy employed. No evidence of secondary phases or cracking was detected. However, slight variations in etching contrast may indicate substructural differences related to solidification dynamics or variations in residual stress distribution.
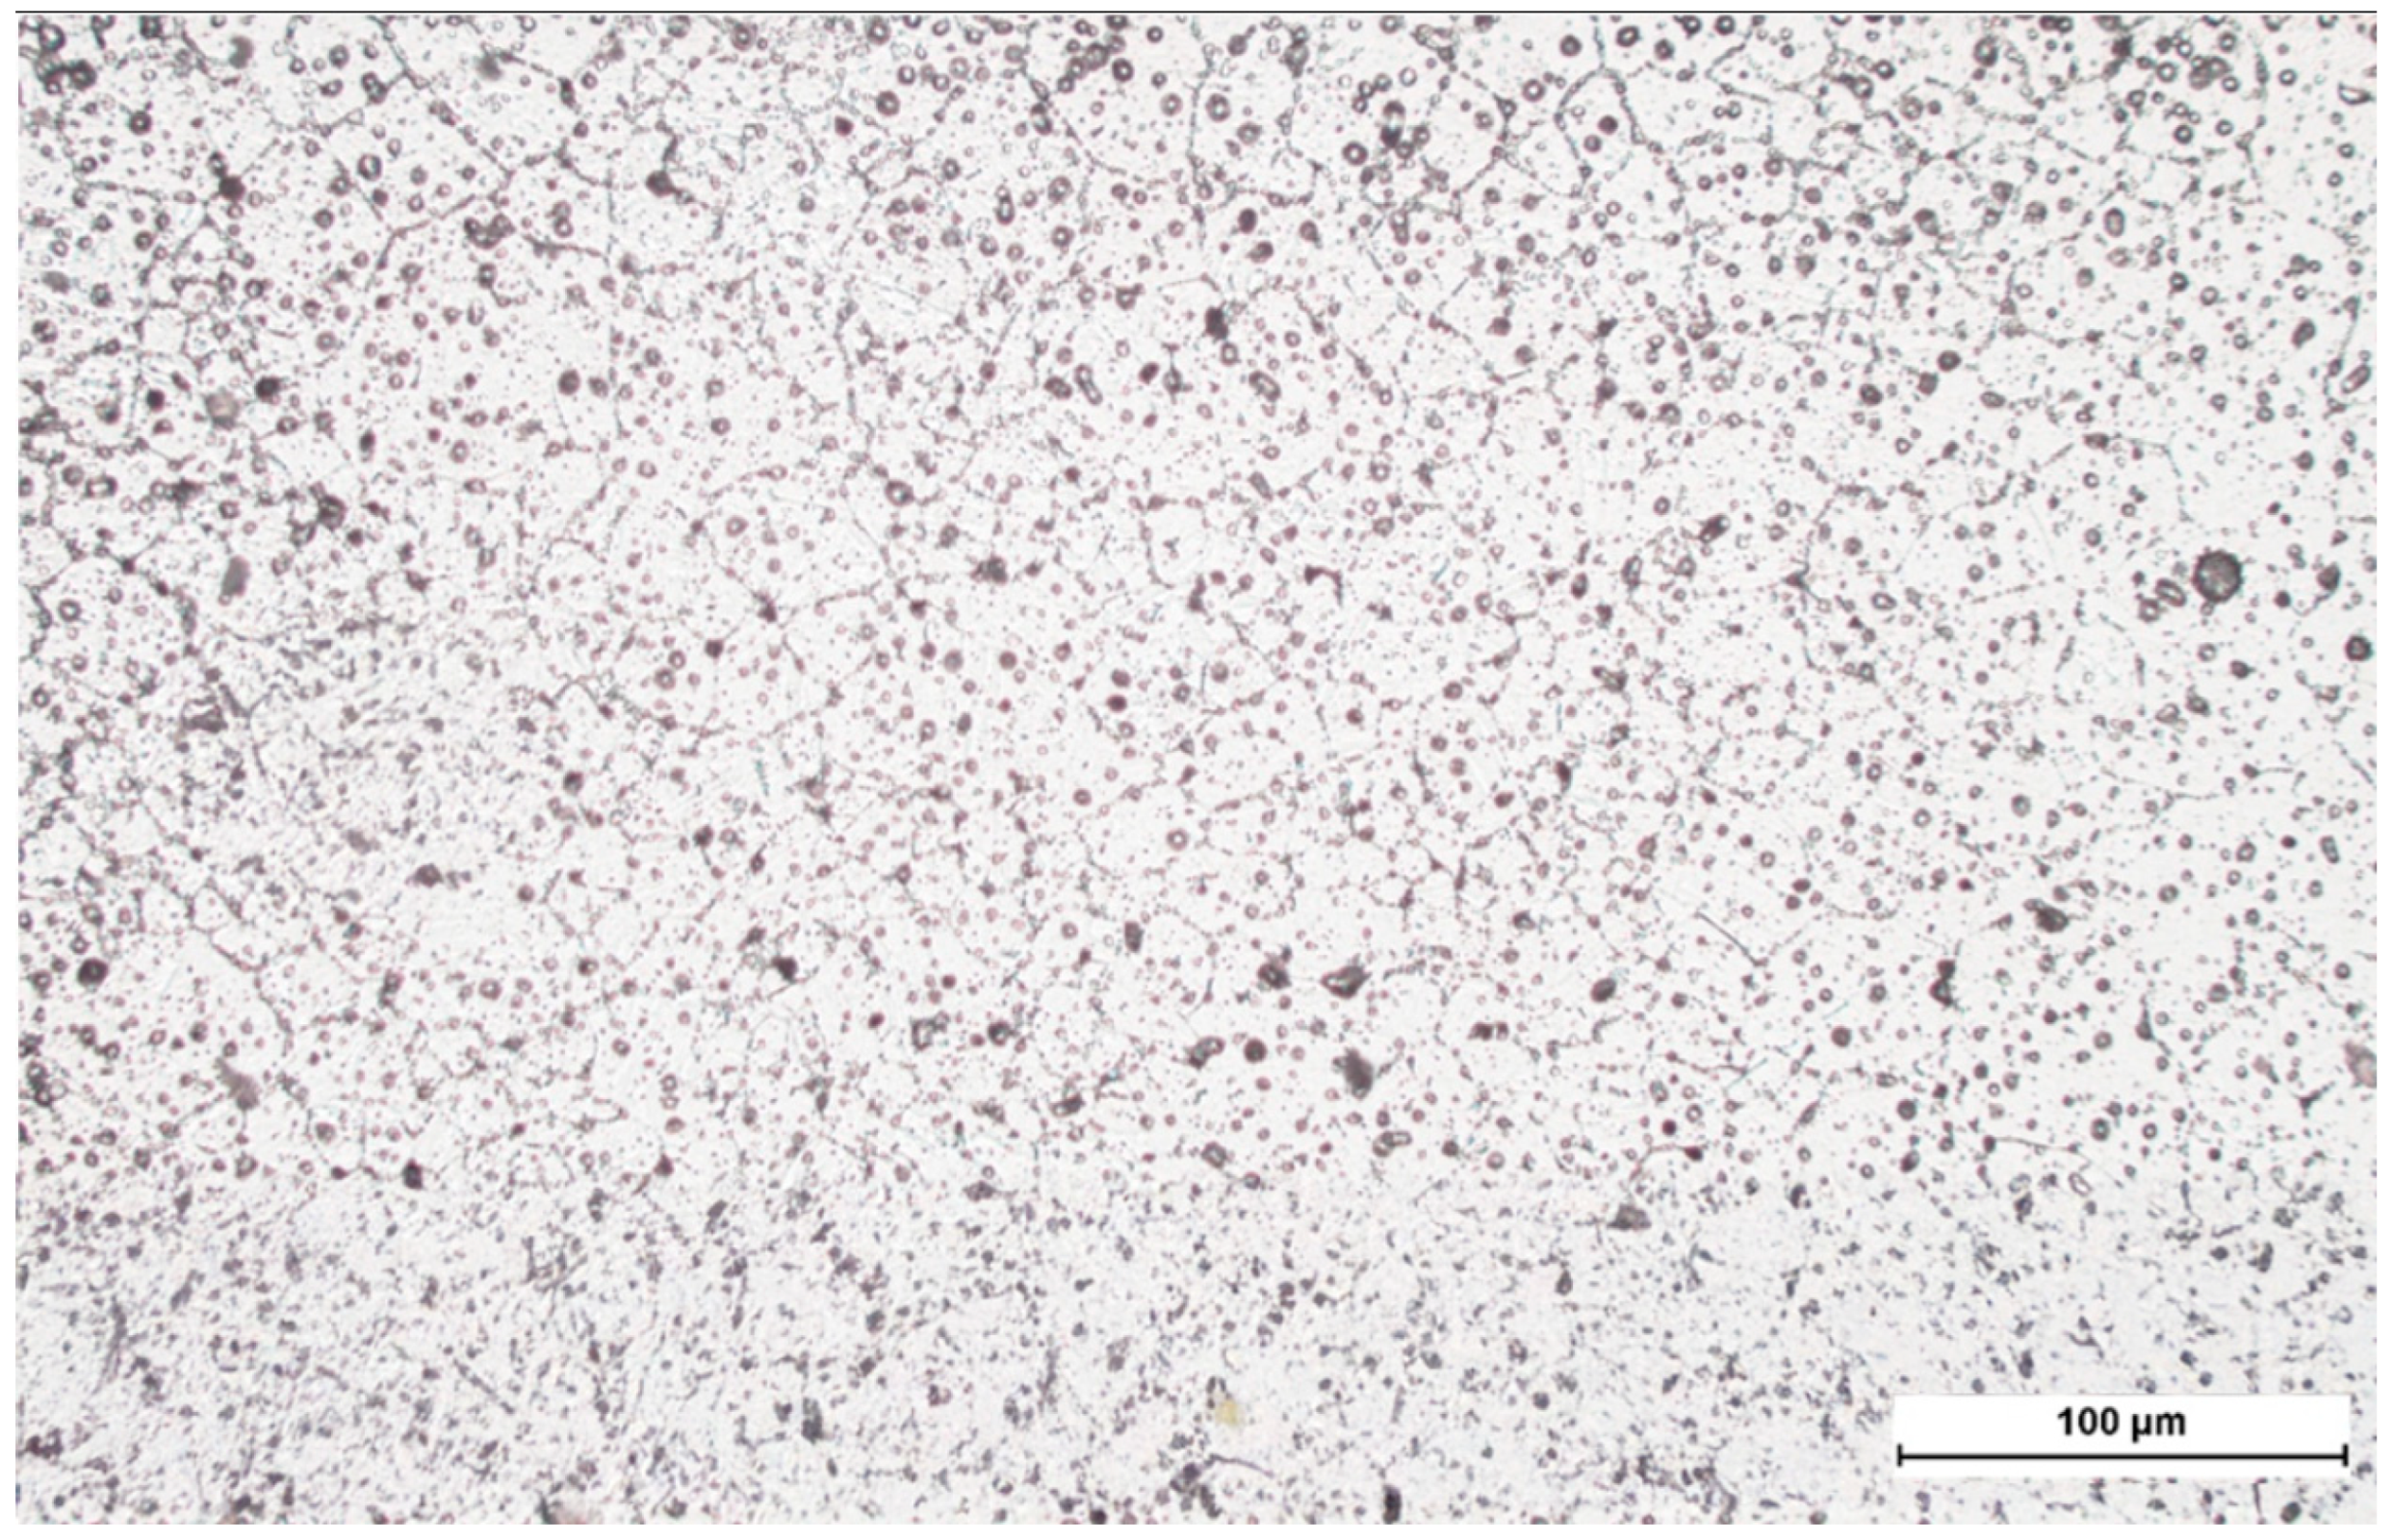
The morphological structure of the 17-4 PH stainless steel sample produced by ADAM was examined using optical microscopy (Figure 10), which revealed a homogeneous and fine-grained microstructure. Based on observed features, it can be inferred that the as-sintered material (i.e., without post-sintering ageing treatment) predominantly consists of an austenitic phase. Spherical micropores were present throughout the structure, likely resulting from gas release during binder burnout and incomplete densification of the powder matrix during sintering. These pores are typical of components manufactured using additive techniques involving bound metal powders and may affect the mechanical performance of the final product.

3.3. Evaluation of Geometrical Accuracy

Measurements of samples produced by SLM revealed a high level of dimensional accuracy. The diameters of individual components ranged from 5.06 mm to 5.08 mm, with a mean value of 5.07 mm, see (Table 5). The sample standard deviation for the diameter was only 0.0092 mm, indicating excellent repeatability. Deviations from the nominal dimension (5.00 mm) ranged from +0.06 mm to +0.08 mm, with an average deviation of +0.07 mm. These values indicate a slight dimensional overshoot. However, they remain within a tightly controlled range. Regarding shape accuracy, the cylindricity values ranged from 0.13 mm to 0.18 mm, with an average of 0.15 mm and a standard deviation of 0.0240 mm.
Table 6 presents the dimensional accuracy results for five samples produced by BJ. The analysis focused on three key parameters: measured diameter, deviation from the nominal value (5.00 mm), and cylindricity. The measured diameters ranged from 4.63 mm to 4.78 mm, with an average value of 4.71 mm. The sample standard deviation was 0.0705 mm, indicating moderate variability among the samples. All deviations were negative, with a mean value of −0.29 mm, indicating a consistent trend of undersizing. Cylindricity values ranged from 0.34 mm to 0.73 mm, with an average of 0.52 mm and a standard deviation of 0.1511 mm. These values suggest the presence of shape inaccuracies likely influenced by technological factors such as shrinkage during sintering and uneven powder or binder deposition.
The ADAM technology demonstrated highly stable results regarding dimensional accuracy (see Table 7). Measurements of five tested samples showed diameters ranging from 4.98 mm to 4.99 mm, with an average of 4.98 mm. The variation in measurements was minimal, as confirmed by a sample standard deviation of just 0.0023 mm. Deviations from the nominal value (5.00 mm) were minimal, ranging from −0.01 mm to −0.02 mm, demonstrating the high accuracy in the output. Cylindricity values ranged from 0.21 mm to 0.46 mm, with an average of 0.34 mm and a standard deviation of 0.0876 mm. These results highlight ADAM’s ability to maintain shape stability even after the sintering process inherent to this method.

3.4. Evaluation of Selected Roughness Parameters

Surface roughness parameter (Spk), defined by ISO 25178-2 [37], exhibited significant differences among the additive manufacturing technologies. As illustrated in Figure 11, the highest Spk values were recorded in samples produced by SLM, indicating prominent surface peaks and the roughest profiles among all tested samples. BJ samples showed intermediate Spk values with greater within-group variability, suggesting a moderate improvement in surface quality compared to SLM. The lowest Spk values were observed in ADAM samples, confirming the technology’s ability to produce smooth surfaces with minimal protrusions.
Another evaluated parameter was Sz, which represents the maximum surface profile height. The results (Figure 12) showed considerable variation in Sz values for SLM, reflecting significant surface irregularities. In contrast, BJ samples exhibited more uniform Sz values, ranging from approximately 50 to 110 µm, indicating a more stable surface texture. Notably, ADAM samples generally showed lower Sz values; however, one outlier (Sample No. 11) reached an extreme value of approximately 220 µm, likely due to a surface defect or irregularity.
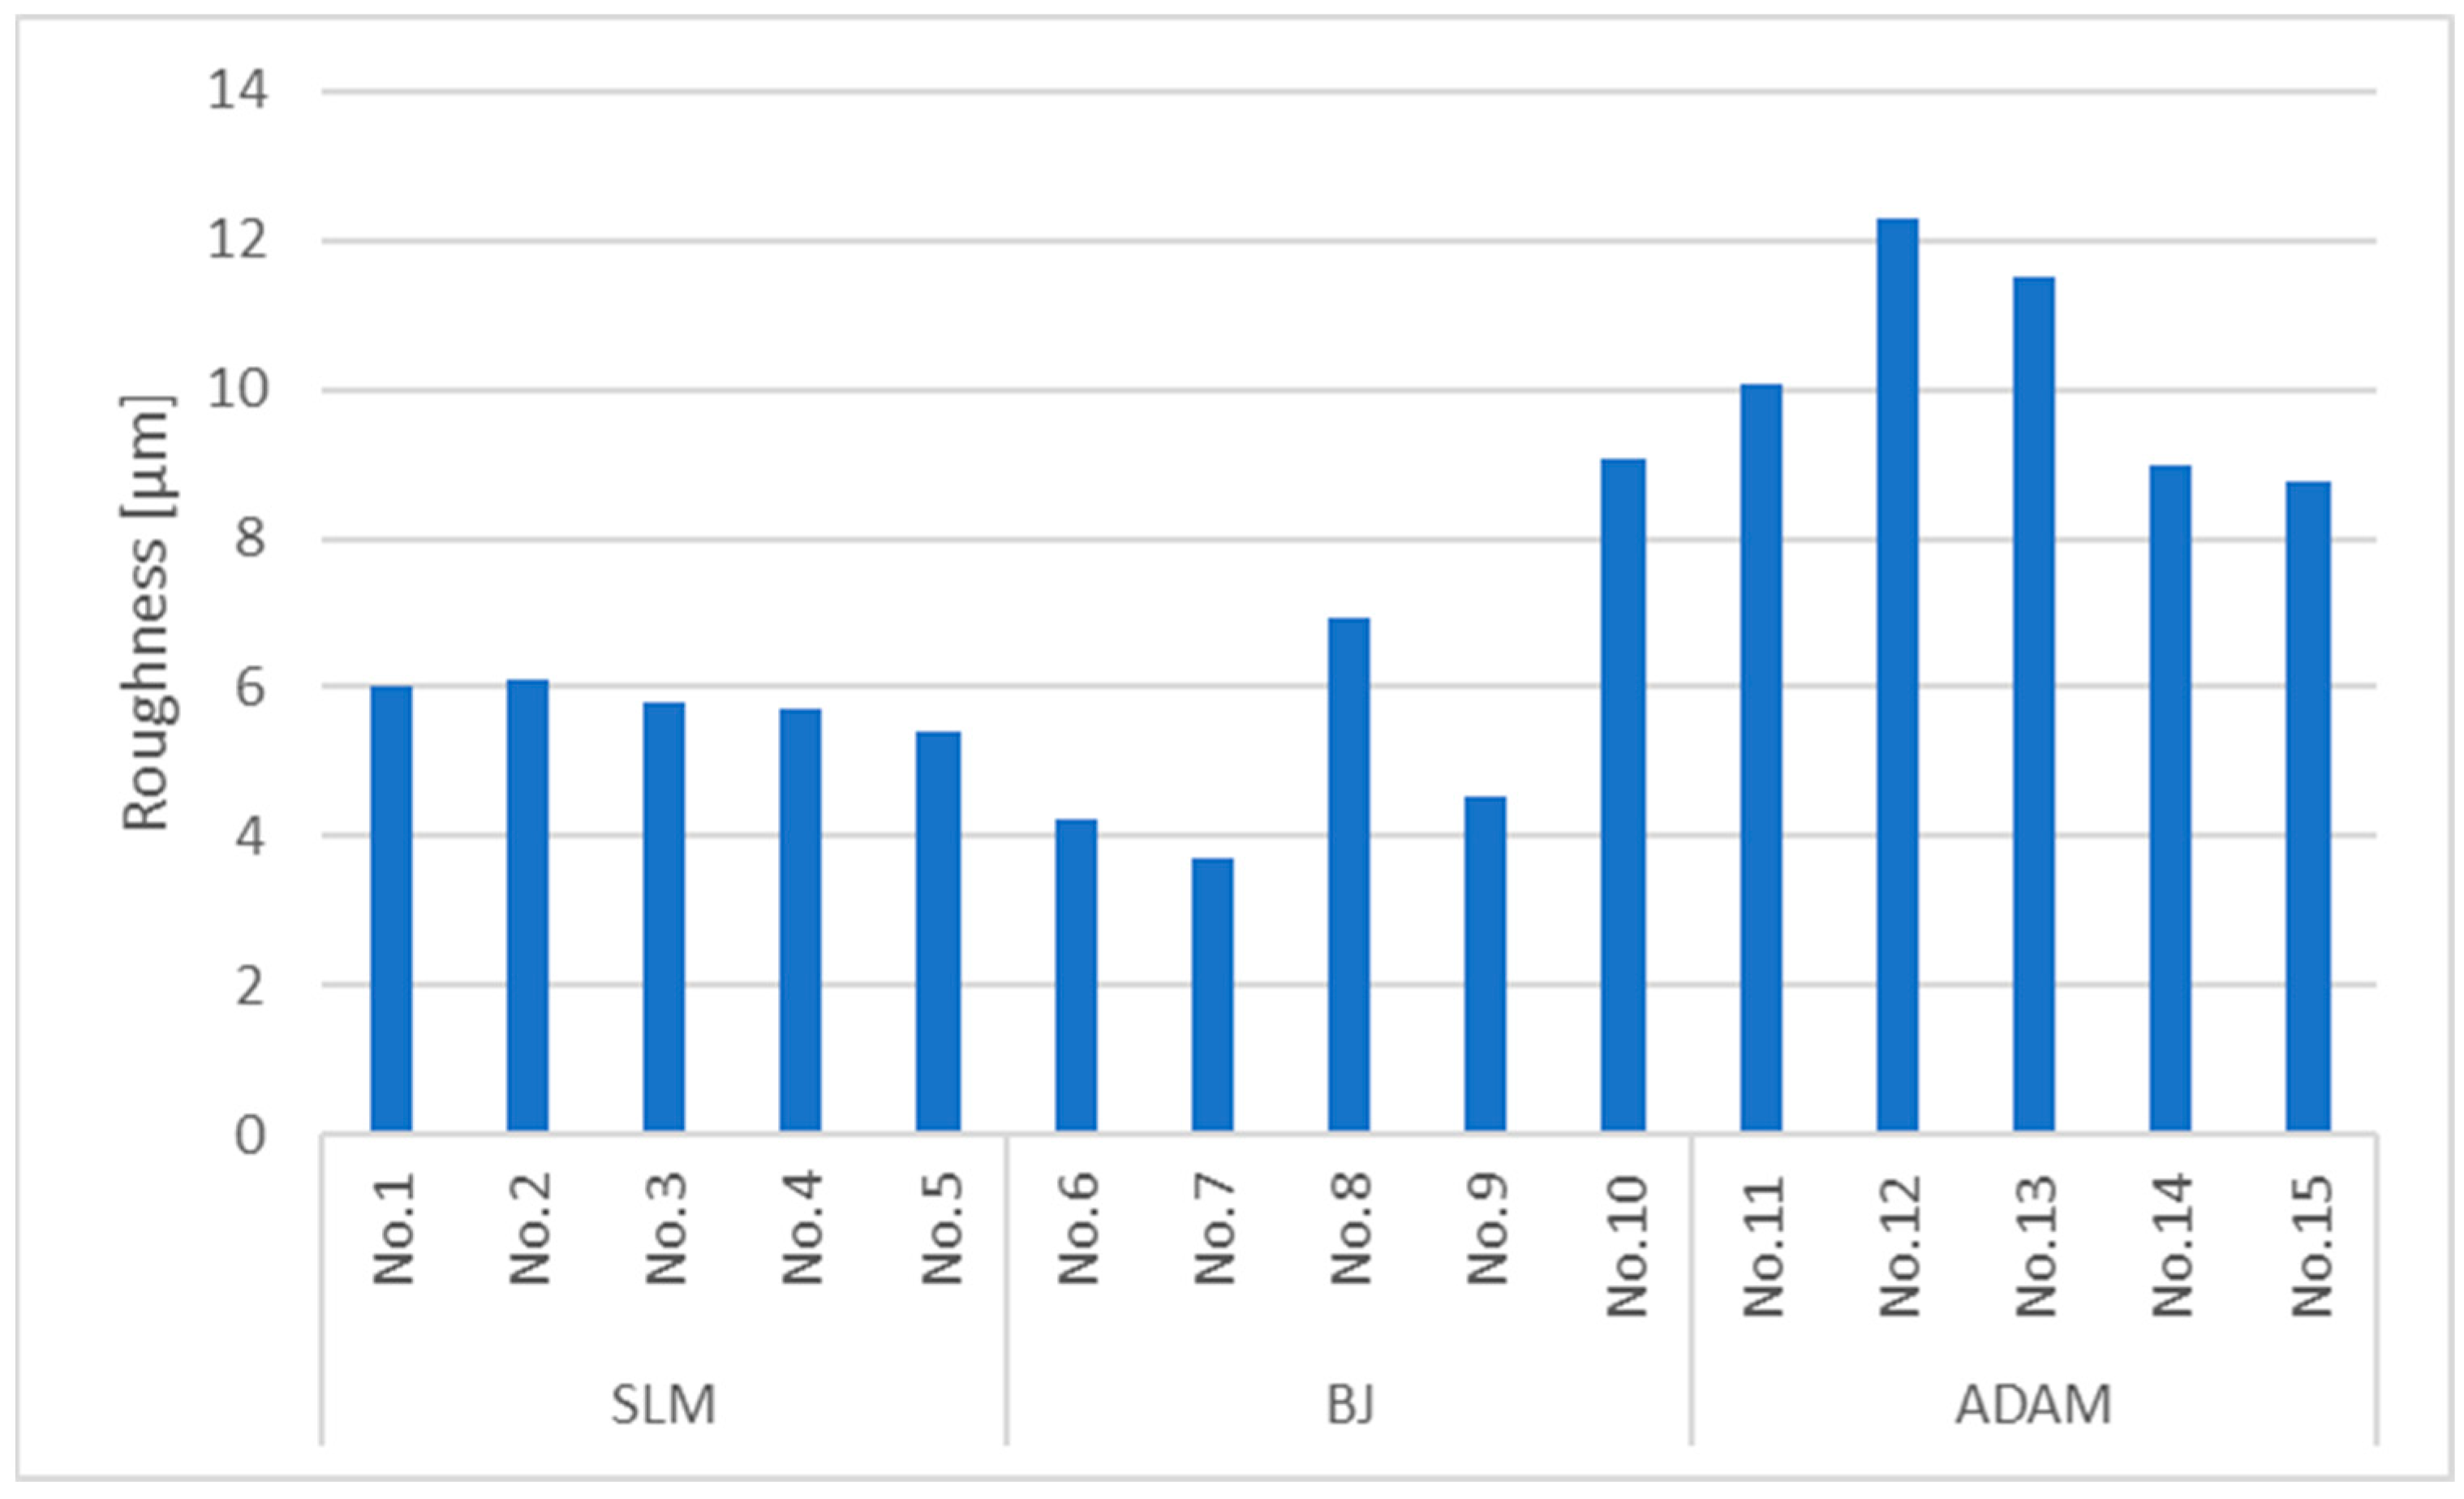
Lastly, the arithmetic mean roughness Sa, which reflects overall surface flatness, was evaluated. SLM demonstrated the most consistent Sa values, ranging from approximately 5.5 to 6 µm, indicating stable surface quality across samples. BJ achieved slightly lower Sa values, with the smoothest surface (3.8 µm) recorded for Sample No. 7, although variability among samples was higher. The highest Sa values were observed in ADAM samples, ranging from 8.5 to 12.2 µm, suggesting greater surface unevenness, potentially caused by the sintering process and material structure. Overall, BJ produced the smoothest surfaces regarding Sa values, while ADAM exhibited the highest surface roughness (Figure 13).
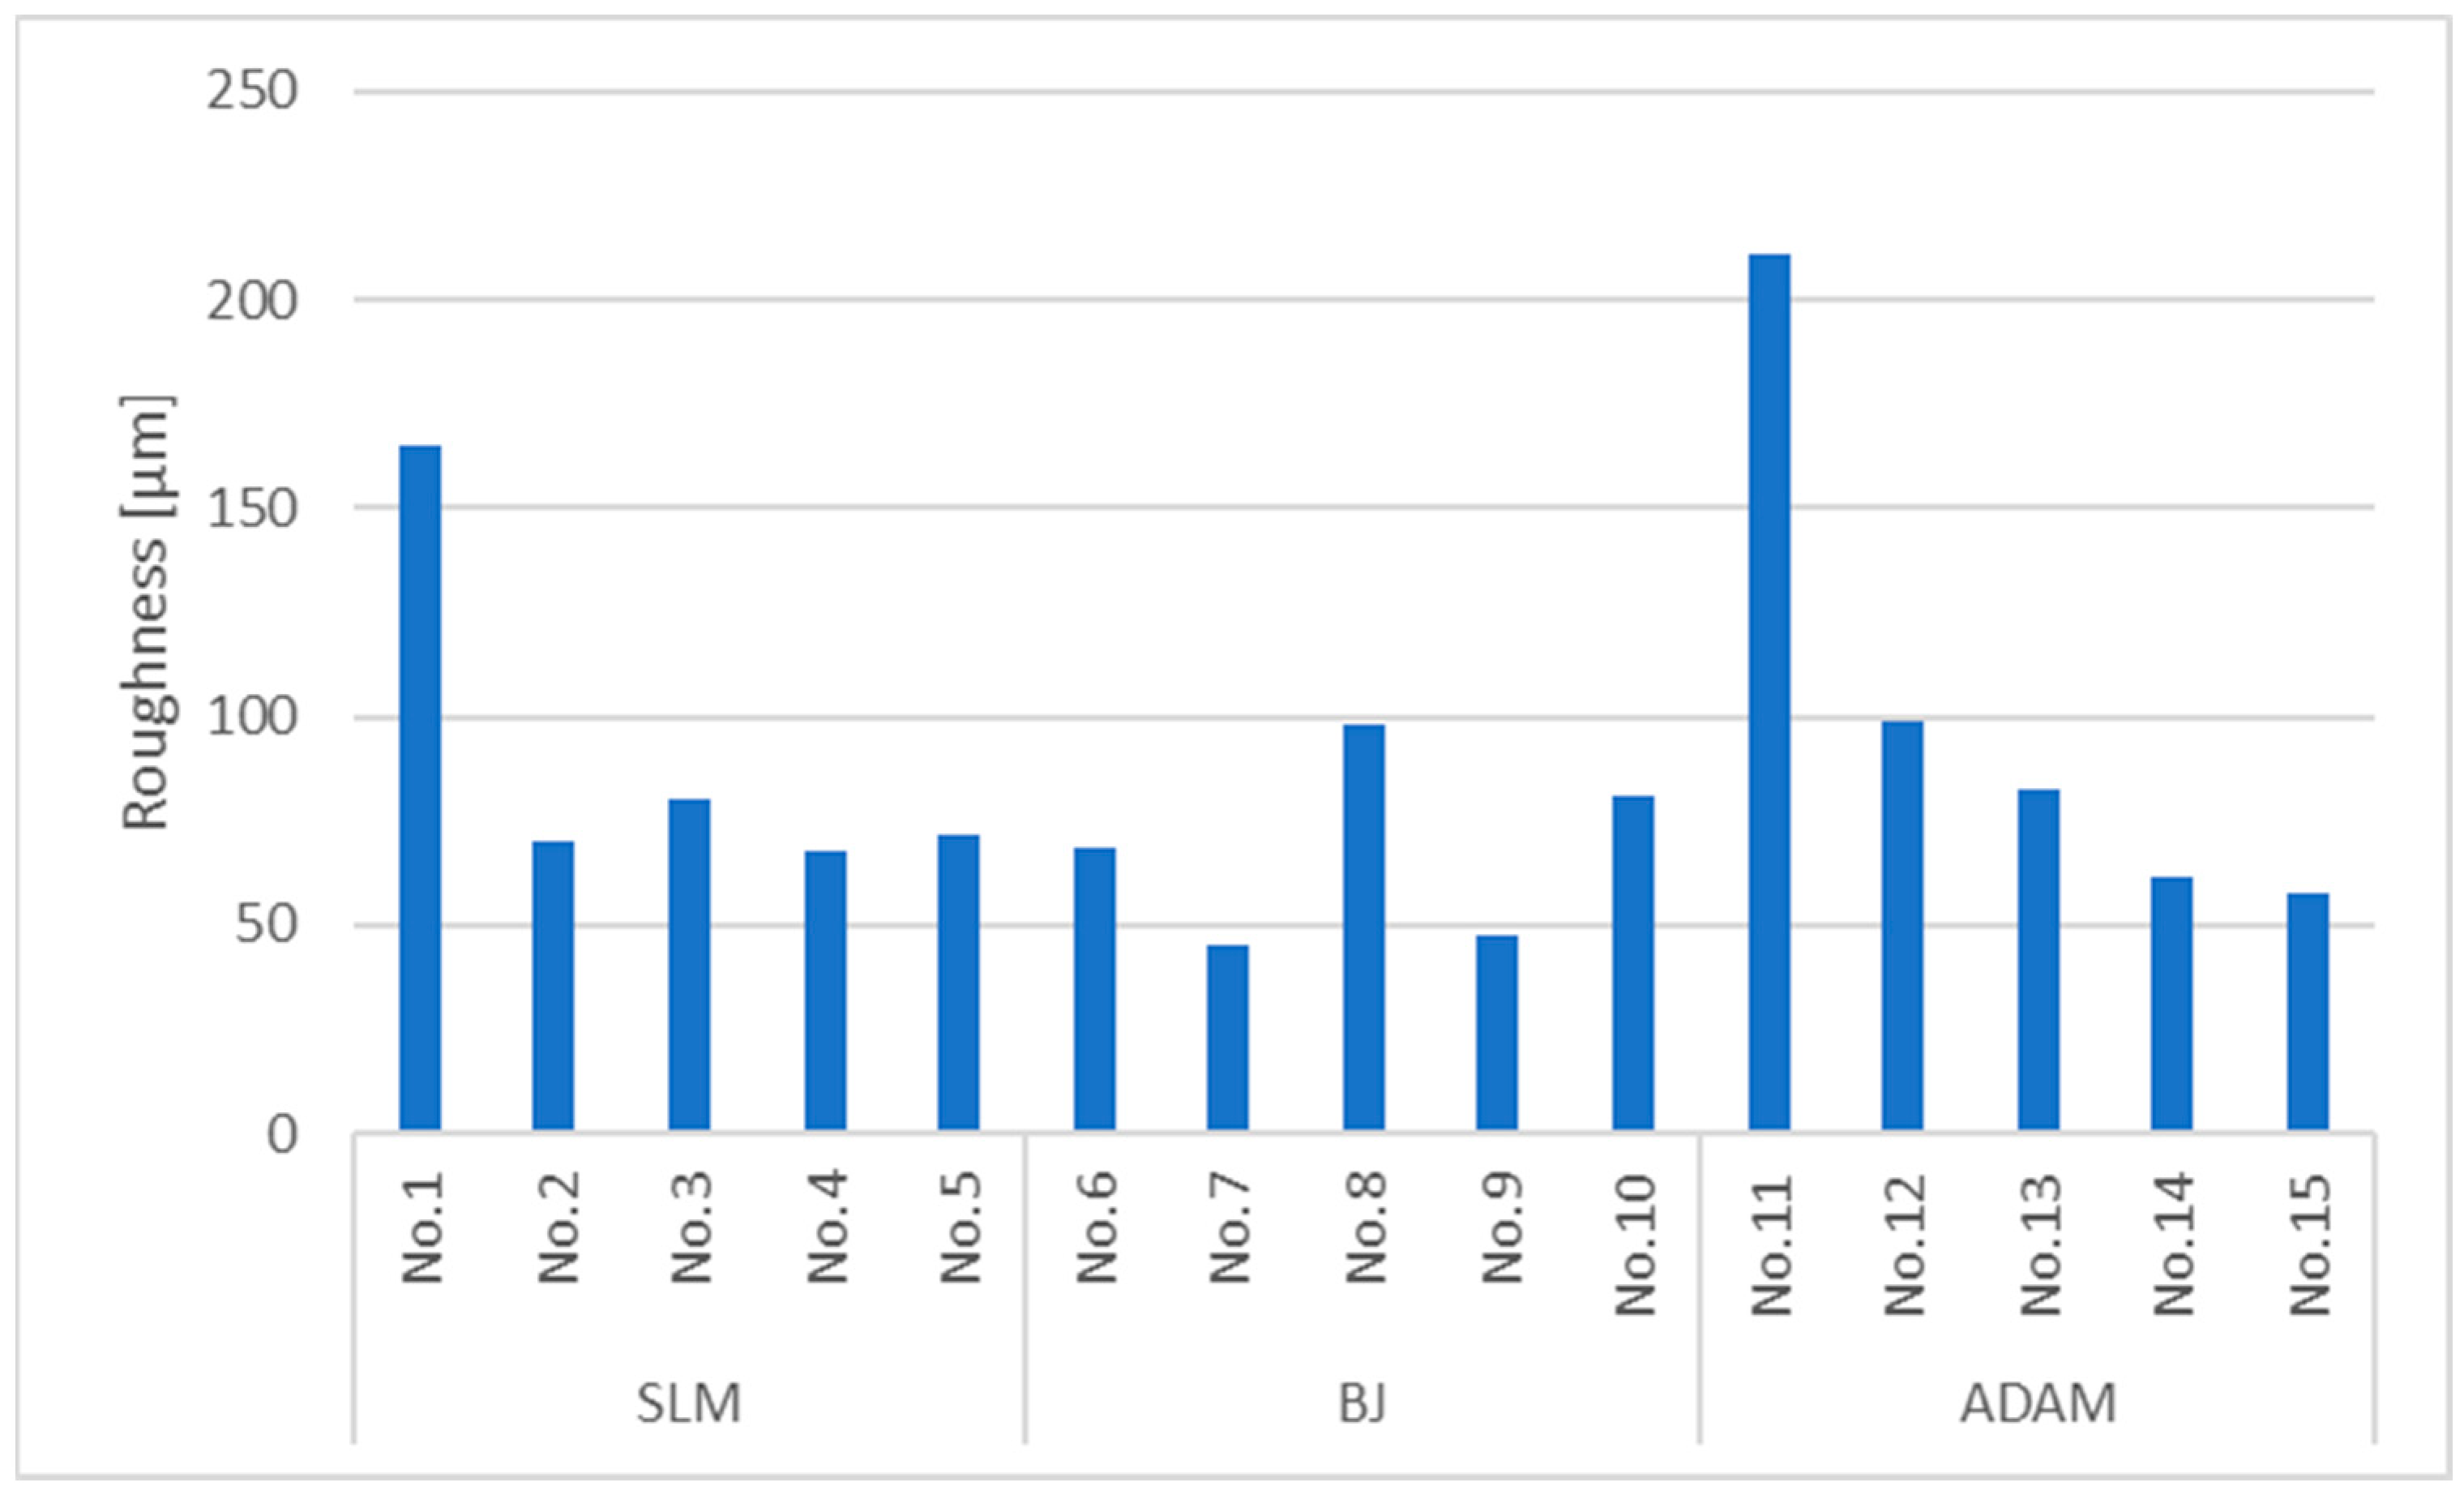
For SLM technology (samples No. 1 to No. 5), relatively high surface roughness values were observed. The peak value was that of sample No. 1 (165 μm), and the rest of the samples in this series were in the range of 70 to 85 μm (Figure 14).
BJ technology (samples No. 6 to No. 10) had the lowest and most uniform surface roughness values. Sample No. 7 had the lowest roughness (45 μm), while the values of the other samples were around 45 to 95 μm.
Using the ADAM technology (samples No. 11 to No. 15), maximum variability of roughness was observed. Sample No. 11 reached the highest value of approximately 210 μm, representing the highest roughness within the entire data set. The remaining samples ranged between 60 μm and 100 μm.

3.5. Evaluation of Residual Stress

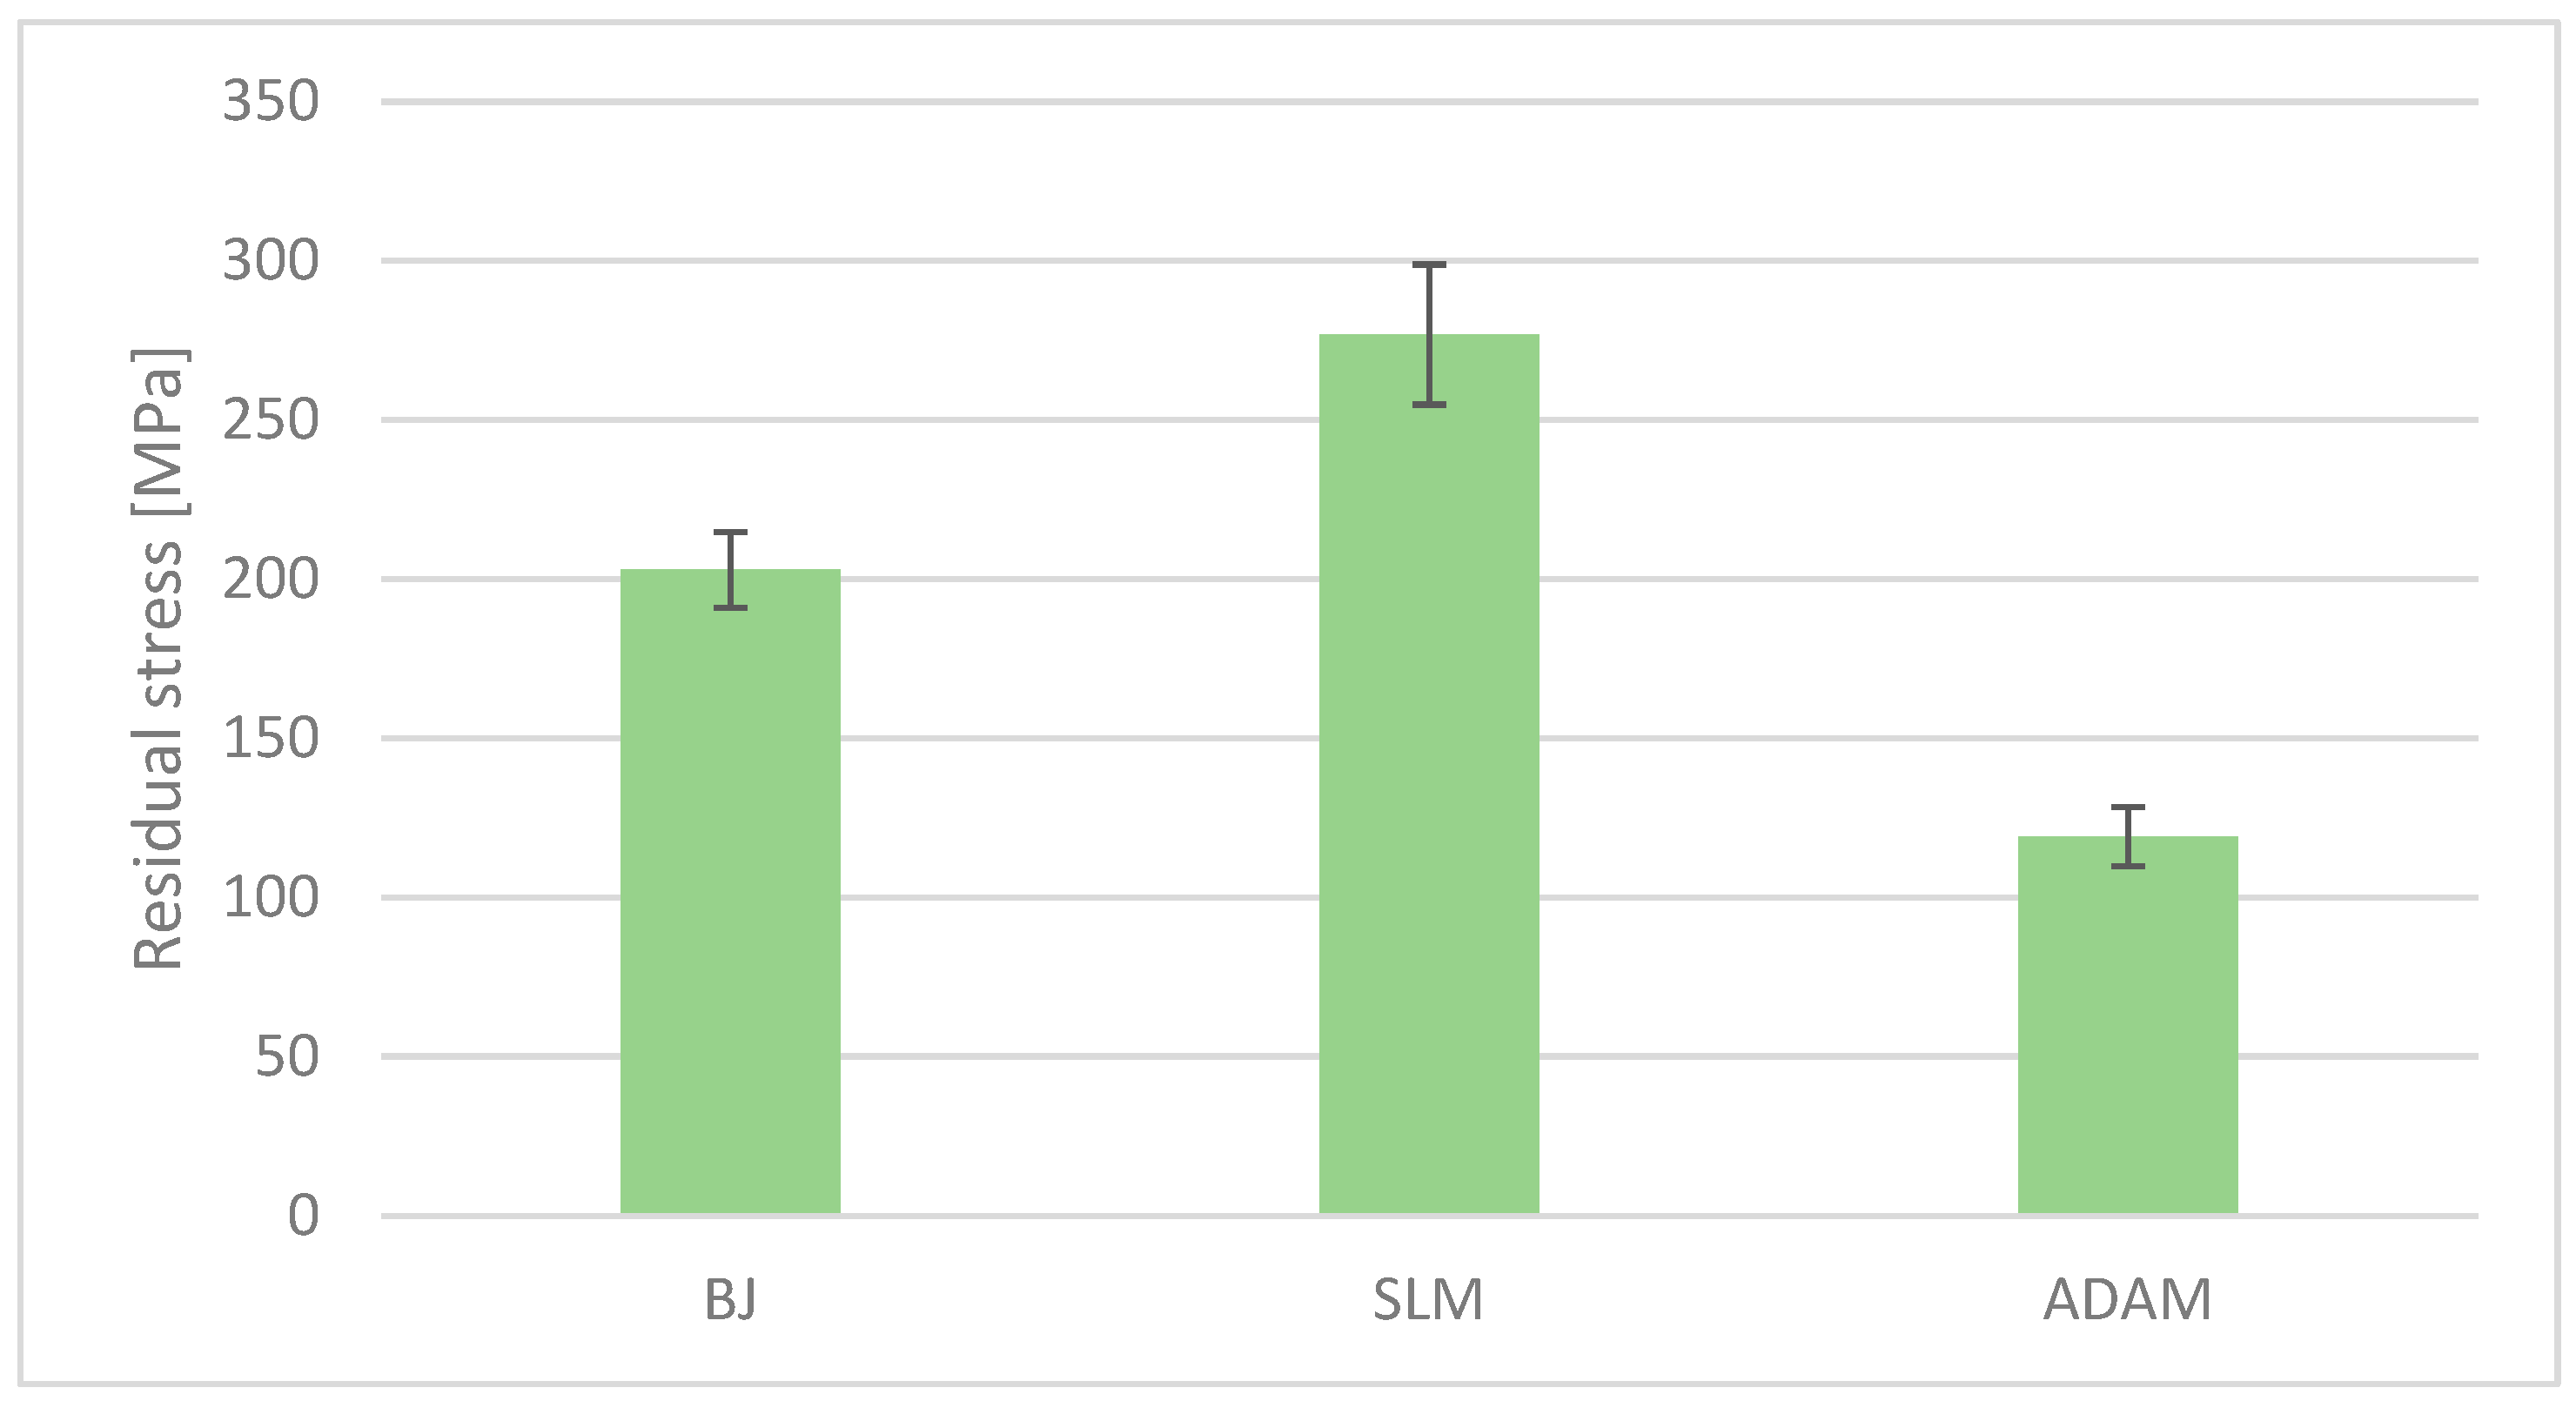
The residual stress analysis was performed in accordance with ISO EN 15305:2008 [38], considering the normal components in the axial and tangential directions. As shown in Figure 15, tensile residual stresses were predominant in all examined cases. These stresses are undesirable, as they promote crack initiation and significantly reduce the fatigue life of components.
In general, lower tensile residual stress correlates with improved fatigue performance. The evaluation was based on the average values of five samples for each manufacturing method. The average residual tensile stress measured for the binder jetting process was 203 MPa ± 23 MPa. In contrast, the selective laser melting process exhibited a higher average stress of 277 MPa ± 44 MPa. The atomic diffusion additive manufacturing process produced the lowest average residual stress, recorded at 119 MPa with a margin of ±18 MPa.
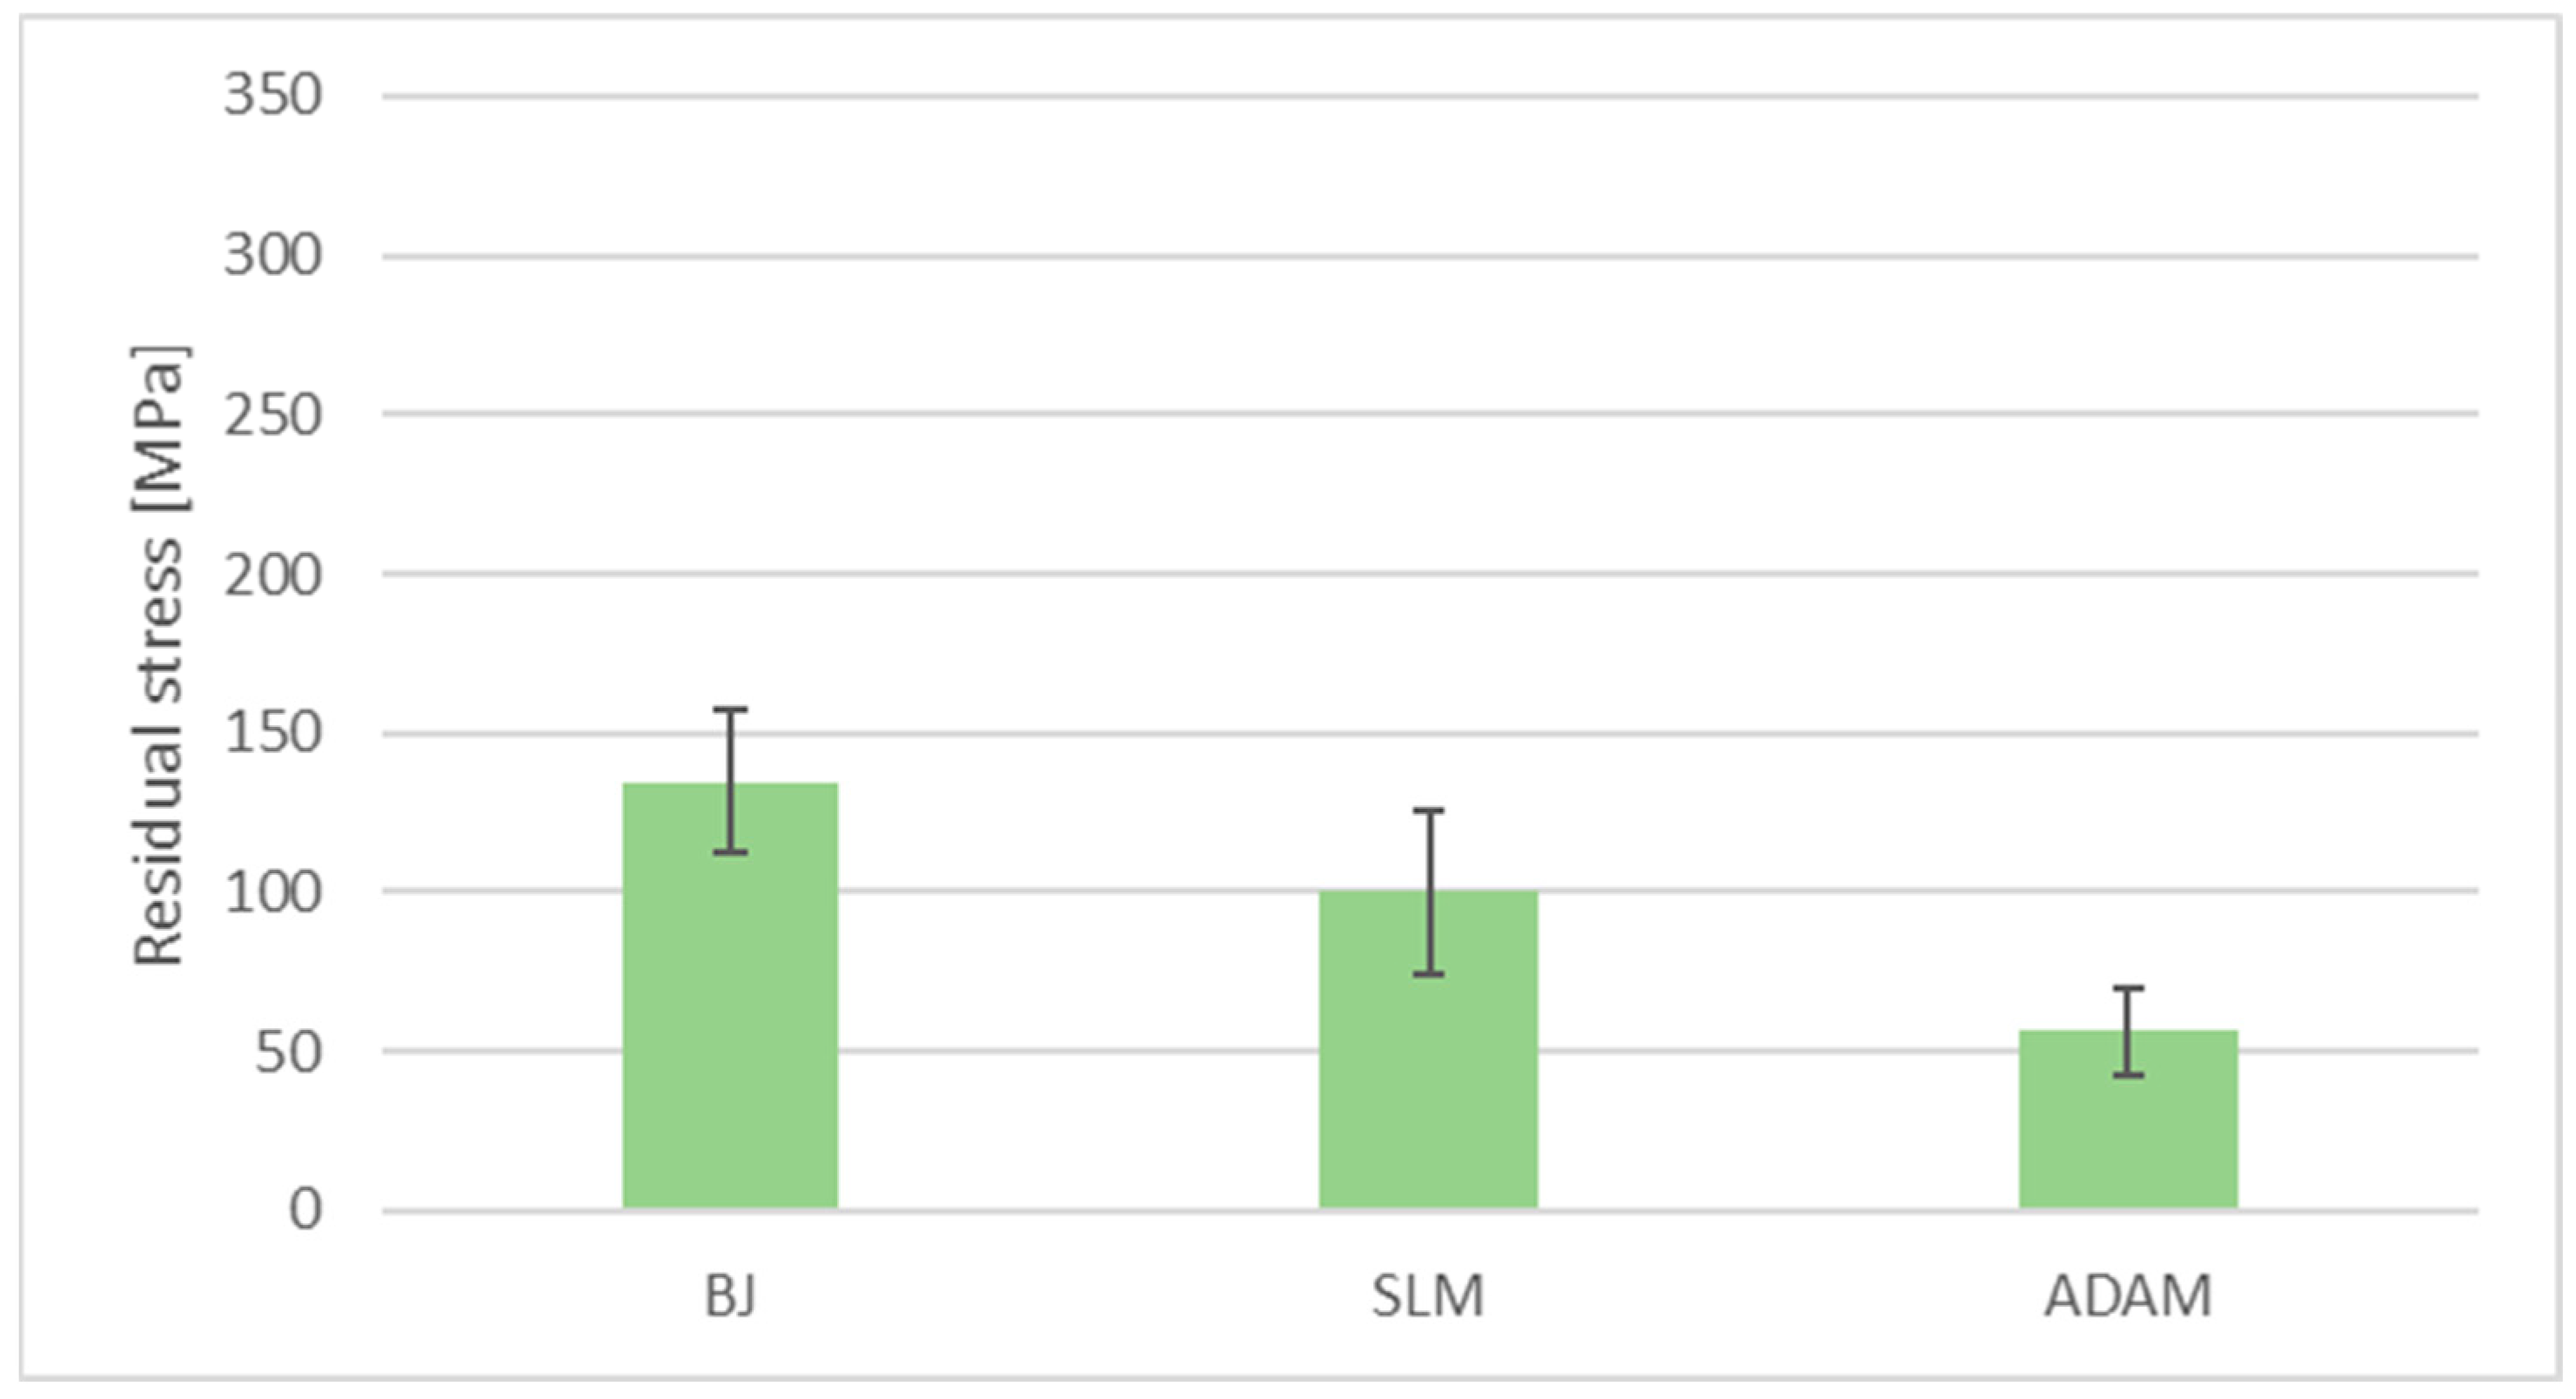
It was observed that the residual tensile stresses in the tangential direction, i.e., along the layer deposition direction, were generally lower in magnitude (Figure 16). This behaviour is attributed to the nature of the layer-by-layer additive manufacturing process, in which the successive bonding of individual layers facilitates stress redistribution, reducing the tensile stress component in this direction.
The reported values represent averages obtained from five samples per manufacturing method. The highest tangential residual tensile stress was recorded for the BJ process, measuring 134 MPa ± 44 MPa. The SLM process exhibited a slightly lower value of 100 MPa ± 51 MPa, while the ADAM process resulted in the lowest tangential residual stress, measured at 56 MPa ± 27 MPa.

4. Discussion

The objective of this study was to compare three metal additive manufacturing technologies, selective laser melting, binder jetting, and atomic diffusion additive manufacturing, in terms of dimensional accuracy, surface quality, microstructure, and residual stress, using stainless steels AISI 316L and 17-4 PH. Each technology demonstrated distinct characteristics and performance outcomes across the evaluated parameters.
1.
Selective laser Melting
SLM demonstrated the highest dimensional accuracy, with an average cylinder diameter of 5.07 mm (nominal value: 5.00 mm) and a standard deviation of only 0.0092 mm. Although a slight systematic oversizing of +0.07 mm was observed, the results indicate excellent process control and repeatability. Cylindricity was also favourable, with an average deviation of 0.15 mm.
According to Du et al. [39], pore defects in LPBF arise due to rapid cooling and unstable molten pool flow, which directly affect tensile strength and fatigue life. Gu et al. [40], through multi-physics modelling, confirmed that the development of the molten pool and track formation depend on laser parameters and deposition geometry, which directly influence the microstructure and the formation of defects. Compensation models based on melt pool geometry have been shown to provide better dimensional accuracy than those based solely on laser spot diameter [41].
SLM samples exhibited the highest Spk values with irregular powder melting and the formation of elevated ridges along laser scan paths. Although the Sa values across the technologies were relatively similar (ranging from 5.5 to 6 µm), SLM samples showed the roughest surface texture. Surface roughness analysis of the as-sintered samples revealed an average Ra value of 4.1 μm with a standard deviation of 0.3 μm, indicating relatively consistent surface quality. Compared to the literature values for 17-4 PH stainless steel manufactured by selective laser melting, which report average Ra values around 3 μm with a standard deviation of ±1.1 μm [42,43], the evaluated SLM surfaces show slightly higher roughness.
SLM-manufactured AISI 316L samples displayed a fine-grained, columnar austenitic microstructure typical of rapid solidification processes. Clearly defined melt pool boundaries were observed, suggesting controlled solidification consistent with the laser scanning strategy.
Residual stress analysis showed that SLM samples exhibited tensile residual stresses, corresponding to the high thermal gradients and rapid cooling during the process. Stresses were measured in the near-surface region (10 µm depth), which is most sensitive to the material’s thermal history and localized deformation. Similar findings were reported by Suvi Santa-Aho et al. [44], who investigated residual stress distributions in components manufactured by laser powder bed fusion.
2.
Binder Jetting
Samples produced by the BJ process exhibited the largest dimensional deviations (average: −0.29 mm), attributed to shrinkage during sintering and the inherently lower powder packing density. The relatively poor cylindricity (0.52 mm) suggests suboptimal shape stability, likely resulting from inhomogeneous powder spreading or uneven sintering behaviour.
Binder jetting produced the lowest Sa values, indicating the smoothest average surfaces, which can be attributed to the finer powders and thinner layer deposition. However, residual binder materials may still influence the final surface texture. Surface roughness analysis of the sintered samples revealed an average Ra value of 4.1 μm, which is comparable to SLM, though with lower variability.
Samples produced by binder jetting exhibited a relatively uniform austenitic microstructure, with small pores mainly located at grain boundaries, indicating partial densification and binder-driven sintering.
BJ samples exhibited the lowest residual stress values, likely due to the absence of intense thermal gradients during printing and the delayed heat exposure introduced during sintering. This aligns with the general observation that lower processing temperatures and slower thermal cycles lead to reduced internal stresses.
3.
Atomic Diffusion Additive Manufacturing
The ADAM technology produced highly consistent results, with an average cylinder diameter of 4.98 mm and a minimal standard deviation of 0.0023 mm, reflecting excellent dimensional repeatability. Although its cylindricity was slightly inferior to that of SLM, it was significantly better than that of BJ, confirming ADAM’s capability to maintain geometric stability even after the debinding and sintering stages. Czan et al. [28] similarly found that ADAM offered superior dimensional accuracy and finer surface finishes than binder jetting.
ADAM samples exhibited the lowest Spk values, indicating fewer pronounced surface peaks, but the highest average Sa values (8.5–12.2 µm), likely due to the characteristics of filament feedstock and the thermal debinding and sintering processes. Isolated high Sz values (up to 220 µm) suggest localized defects or surface anomalies.
The 17-4 PH samples produced by the ADAM process exhibited a martensitic microstructure in the as-sintered state, with increased hardness resulting from precipitation hardening. However, residual binder particles may have locally disrupted microstructural homogeneity.
Residual stress analysis showed that ADAM samples exhibited relatively high tensile residual stresses, which likely result from diffusion-driven phase transformations and thermal shrinkage during sintering.
4.
Microstructure
The microstructure exhibited no signs of texture or grain orientation, consistent with the nature of the binder jetting process, in which local melting of the material—as observed in laser-based processes such as SLM—does not occur. The resulting isotropic microstructure confirms uniform thermal conditions during final processing.
These findings are consistent with the work of Mirzababaei et al. [45] who also reported a nearly isotropic microstructure after vacuum sintering of binder jetting-fabricated AISI 316L samples, thus confirming that the material exhibits uniform properties in all directions.
In the microstructure of samples produced by the SLM process, a fine-grained austenitic matrix dominates as a result of the high cooling rates typical for this manufacturing method. Etching revealed melt pools and slightly different solidification regions formed due to repeated reheating during the deposition of subsequent layers (the so-called re-melting effect). The irregular orientation of the melt pools and their layered character indicate anisotropic microstructural growth caused by the layer-wise nature of SLM. Nevertheless, no macroscopic defects such as pores or cracks were observed, indicating high densification quality and well-optimized process parameters, which is consistent with the findings of Iqbal et al. [46].
The microstructure of materials produced by the ADAM process does not exhibit features of directional solidification or melt pool tracks, distinguishing it from laser-based techniques such as SLM. This observation aligns with the nature of the ADAM process, which involves no localized melting but rather diffusion bonding during sintering after extrusion [43]. The material density is noticeably lower compared to SLM or conventional powder compaction methods, indicating limited diffusion between particles during sintering. Nevertheless, the porosity within the ADAM microstructure appears uniform, without crack formation or large voids, reflecting well-optimized post-processing parameters [47].

5. Conclusions

This study provided a comparative analysis of three metal additive manufacturing technologies—SLM, BJ, and ADAM—in terms of dimensional accuracy, surface quality, microstructure, and residual stress.
(1)
The ADAM technology demonstrated the highest dimensional accuracy with minimal deviations from the nominal values and the lowest variability across measurements. In terms of surface characteristics, it showed favourable Spk values, although Sa values indicated higher roughness compared to BJ. Residual stresses were the lowest among the evaluated technologies.
(2)
SLM achieved high-dimensional precision and consistency but exhibited higher levels of residual stress and rougher surfaces with pronounced peaks. The microstructure was fine-grained and displayed features typical of rapid solidification processes.
(3)
BJ technology showed the lowest dimensional accuracy and the highest variability in shape, likely due to shrinkage during sintering. However, it achieved the lowest average surface roughness (Sa) and exhibited a uniform microstructure.
Based on the results, it can be concluded that each technology presents specific advantages and limitations that should be carefully considered when selecting a manufacturing method according to application requirements.
In future work, research will focus on comparing and evaluating the residual stresses induced by various additive manufacturing methods following the application of Laser Shock Peening (LSP), to gain a deeper understanding of their impact on mechanical performance and fatigue resistance.

Author Contributions

Conceptualization, M.S. and L.B.; methodology M.M., M.S. and L.B.; validation, A.C. and R.J.; formal analysis and investigation, M.M. and P.S.; data curation, P.S. and M.S.; writing—original draft preparation, M.S. and P.S.; writing—review and editing, M.S. and L.B.; software, R.J. and M.S.; project administration, M.S.; visualization, M.M., P.S. and M.S.; funding acquisition, M.S. and A.C. All authors have read and agreed to the published version of the manuscript.

Funding

This article was supported by the Slovak Research and Development Agency, grant APVV-20-0216: Research on the implementation of high-impact surface technologies for precision automotive structural elements; the Slovak Research and Development Agency, grant APVV-20-0561: “Research on the implementation of new measurement methods for the calibration of measurement systems for industrial metrology practice”; the grant scheme of The Ministry of Education, Research, Development and Youth of the Slovak Republic: VEGA 1/0722/25 “Research on additive technologies with a focus on their application in the design and construction of cutting tools”; and the Recovery and Resilience Plan of the Slovak Republic 09I05-03-V02: Research on the Digitalization of Dental Implant Components for the Creation of Personalized 3D Models for the Manufacturing Process and by the Faculty of Mechanical Engineering, Czech Technical University in Prague (Project No. SGS25/134/OHK2/3T/12 Technological development for the competitiveness of the industry) and supported by the infrastructure of the Centre of Advanced Aerospace Technology (Project No. CZ.02.1.01/0.0/0.0/16_019/0000826).

Data Availability Statement

The data that support the findings of this study are available from the corresponding author (M.Š.), upon reasonable request.

Conflicts of Interest

The authors declare no conflict of interest.

References

  1. Armstrong, M.; Mehrabi, H.; Naveed, N. An overview of modern metal additive manufacturing technology. J. Manuf. Process. 2022, 84, 1001–1029. [Google Scholar] [CrossRef]
  2. Johnson, N.S.; Vulimiri, P.S.; To, A.C.; Zhang, X.; Brice, C.A.; Kappes, B.B.; Stebner, A.P. Invited review: Machine learning for materials developments in metals additive manufacturing. Addit. Manuf. 2020, 36, 101641. [Google Scholar] [CrossRef]
  3. Tofail, S.A.M.; Koumoulos, E.P.; Bandyopadhyay, A.; Bose, S.; O’Donoghue, L.; Charitidis, C. Additive manufacturing: Scientific and technological challenges, market uptake and opportunities. Mater. Today 2018, 21, 22–37. [Google Scholar] [CrossRef]
  4. Tebianian, M.; Aghaie, S.; Razavi Jafari, N.S.; Elmi Hosseini, S.R.; Pereira, A.B.; Fernandes, F.A.O.; Farbakhti, M.; Chen, C.; Huo, Y. A review of the metal additive manufacturing processes. Materials 2023, 16, 7514. [Google Scholar] [CrossRef]
  5. Sames, W.J.; List, F.A.; Pannala, S.; Dehoff, R.R.; Babu, S.S. The metallurgy and processing science of metal additive manufacturing. Int. Mater. Rev. 2016, 61, 315–360. [Google Scholar] [CrossRef]
  6. Madhavadas, V.; Srivastava, D.; Chadha, U.; Raj, S.A.; Hameed Sultan, M.T.; Shahar, F.S.; Md Shah, A.U. A Review on Metal Additive Manufacturing for Intricately Shaped Aerospace Components. CIRP J. Manuf. Sci. Technol. 2022, 39, 18–36. [Google Scholar] [CrossRef]
  7. Mohd Yusuf, S.; Cutler, S.; Gao, N. Review: The Impact of Metal Additive Manufacturing on the Aerospace Industry. Metals 2019, 9, 1286. [Google Scholar] [CrossRef]
  8. DebRoy, T.; Wei, H.L.; Zuback, J.S.; Mukherjee, T.; Elmer, J.W.; Milewski, J.O.; Beese, A.M.; Wilson-Heid, A.; De, A.; Zhang, W. Additive manufacturing of metallic components—Process, structure and properties. Prog. Mater. Sci. 2018, 92, 112–224. [Google Scholar] [CrossRef]
  9. Li, C.; Liu, Z.Y.; Fang, X.Y.; Guo, Y.B. Residual stress in metal additive manufacturing. Procedia CIRP 2018, 71, 348–353. [Google Scholar] [CrossRef]
  10. Badiru, A.B.; Valencia, V.V.; Badiru, A.B.; Liu, D.; Hartsfield, C.R. (Eds.) Additive Manufacturing Handbook: Product Development for the Defense Industry, 1st ed.; CRC Press: Boca Raton, FL, USA, 2017. [Google Scholar] [CrossRef]
  11. Guo, C.; Li, S.; Shi, S.; Li, X.; Hu, X.; Zhu, Q.; Ward, R.M. Effect of processing parameters on surface roughness, porosity and cracking of as-built IN738LC parts fabricated by laser powder bed fusion. J. Mater. Process. Technol. 2020, 285, 116788. [Google Scholar] [CrossRef]
  12. Sanaei, N.; Fatemi, A. Defects in Additive Manufactured Metals and Their Effect on Fatigue Performance: A State-of-the-Art Review. Prog. Mater. Sci. 2021, 117, 100724. [Google Scholar] [CrossRef]
  13. Kumar, S.; Kushawaha, M.K.; Kumar, R. Comprehensive Study on Additive Manufacturing Process Methods, Cost Comparision, Challenges and Industrial Applications. i-Manager’s J. Future Eng. Technol. 2022, 17, 31–44. [Google Scholar] [CrossRef]
  14. Dai, D.; Gu, D. Thermal Behavior and Densification Mechanism during Selective Laser Melting of Copper Matrix Composites: Simulation and Experiments. Mater. Des. 2014, 55, 482–491. [Google Scholar] [CrossRef]
  15. Vafadar, A.; Guzzomi, F.; Rassau, A.; Hayward, K. Advances in Metal Additive Manufacturing: A Review of Common Processes, Industrial Applications, and Current Challenges. Appl. Sci. 2021, 11, 1213. [Google Scholar] [CrossRef]
  16. Miteva, A.; Hodjaoglu, G. Technologies for Additive Manufacturing of Metal Structures. Int. Sci. J. Mach. Technol. Mater. 2024, 18, 290–293. [Google Scholar]
  17. Ziaee, M.; Crane, N.B. Binder Jetting: A Review of Process, Materials, and Methods. Addit. Manuf. 2019, 28, 781–801. [Google Scholar] [CrossRef]
  18. Verlee, B.; Dormal, T.; Lecomte-Beckers, J. Density and Porosity Control of Sintered 316L Stainless Steel Parts Produced by Additive Manufacturing. Powder Metall. 2012, 55, 260–267. [Google Scholar] [CrossRef]
  19. Do, T.; Kwon, P.; Shin, C.S. Process Development toward Full-Density Stainless Steel Parts with Binder Jetting Printing. Int. J. Mach. Tools Manuf. 2017, 121, 50–60. [Google Scholar] [CrossRef]
  20. Do, T.; Bauder, T.J.; Suen, H.; Rego, K.; Yeom, J.; Kwon, P. Additively Manufactured Full-Density Stainless Steel 316L with Binder Jet Printing. In Proceedings of the ASME 2018 13th International Manufacturing Science and Engineering Conference, College Station, TX, USA, 18–22 June 2018; Volume 1: Additive Manufacturing; Bio and Sustainable Manufacturing. p. V001T01A017. [Google Scholar] [CrossRef]
  21. Mirzababaei, S.; Pasebani, S. A Review on Binder Jet Additive Manufacturing of 316L Stainless Steel. J. Manuf. Mater. Process. 2019, 3, 82. [Google Scholar] [CrossRef]
  22. Miyanaji, H.; Orth, M.; Akbar, J.M.; Yang, L. Development of a process for additive manufacturing of green parts using binder jetting. Front. Mech. Eng. 2018, 13, 504–512. [Google Scholar] [CrossRef]
  23. Jia, H.; Sun, H.; Wang, H.; Zhang, Y.; Shi, Y.; Liu, Y.; Huang, Y. Scanning Strategy in Selective Laser Melting (SLM): A Review. Int. J. Adv. Manuf. Technol. 2021, 113, 2413–2435. [Google Scholar] [CrossRef]
  24. Wang, D.; Wu, S.; Fu, F.; Mai, S.; Yang, Y.; Liu, Y.; Song, C. Mechanisms and Characteristics of Spatter Generation in SLM Processing and Its Effect on the Properties. Mater. Des. 2017, 117, 121–130. [Google Scholar] [CrossRef]
  25. Nandhakumar, R.; Venkatesan, K. A Process Parameters Review on Selective Laser Melting-Based Additive Manufacturing of Single and Multi-Material: Microstructure, Physical Properties, Tribological, and Surface Roughness. Mater. Today Commun. 2023, 35, 105538. [Google Scholar] [CrossRef]
  26. Henry, T.C.; Morales, M.A.; Cole, D.P.; Shumeyko, C.M.; Riddick, J.C. Mechanical Behavior of 17-4 PH Stainless Steel Processed by Atomic Diffusion Additive Manufacturing. Int. J. Adv. Manuf. Technol. 2021, 114, 2103–2114. [Google Scholar] [CrossRef]
  27. Galati, M.; Minetola, P. Analysis of Density, Roughness, and Accuracy of the Atomic Diffusion Additive Manufacturing (ADAM) Process for Metal Parts. Materials 2019, 12, 4122. [Google Scholar] [CrossRef]
  28. Czan, A.; Czanova, T.; Holubjak, J.; Krisak, D. Comparative Evaluation of Working Accuracy in the Atomic Diffusion Additive Manufacturing (ADAM) Process and the Binder Jetting (BJ) Process by Analysing Key Characteristics. Manuf. Technol. 2023, 23, 6. [Google Scholar] [CrossRef]
  29. ISO 1101:2017; Geometrical Product Specifications (GPS)—Geometrical Tolerancing—Tolerances of Form, Orientation, Location and Run-Out. ISO: Geneva, Switzerland, 2017. Available online: https://www.iso.org/standard/66777.html (accessed on 1 August 2025).
  30. Czan, A.; Czanova, T.; Holubjak, J.; Novak, M.; Czanova, N.; Czan, A.; Krisak, D. Analysis of the Basic Characteristics of the Working Accuracy of the Atomic Diffusion Additive Manufacturing (ADAM) Process by Comparison with the Selective Laser Melting (SLM) Process. Manuf. Technol. 2024, 24, 15–27. [Google Scholar] [CrossRef]
  31. Cegan, T.; Pagac, M.; Jurica, J.; Skotnicova, K.; Hajnys, J.; Horsak, L.; Soucek, K.; Krpec, P. Effect of Hot Isostatic Pressing on Porosity and Mechanical Properties of 316 L Stainless Steel Prepared by the Selective Laser Melting Method. Materials 2020, 13, 4377. [Google Scholar] [CrossRef]
  32. ISO 4289:2019; Documentation—Rules for the Presentation of Periodicals. ISO: Geneva, Switzerland, 2019. Available online: https://www.iso.org/standard/4289.html (accessed on 2 August 2025).
  33. Chen, L.; Chen, W.; Zhang, S.; Zou, S.; Cheng, T.; Zhu, D. Effect of bimodal powder on densification and mechanical properties of 316L stainless steel fabricated by binder jet 3D printing. J. Mater. Res. Technol. 2023, 27, 4043–4052. [Google Scholar] [CrossRef]
  34. Heiden, M.J.; Deibler, L.A.; Rodelas, J.M.; Koepke, J.R.; Tung, D.J.; Saiz, D.J.; Jared, B.H. Evolution of 316L stainless steel feedstock due to laser powder bed fusion process. Addit. Manuf. 2019, 25, 84–103. [Google Scholar] [CrossRef]
  35. Maamoun, A.H.; Xue, Y.F.; Elbestawi, M.A.; Veldhuis, S.C. Effect of Selective Laser Melting Process Parameters on the Quality of Al Alloy Parts: Powder Characterization, Density, Surface Roughness, and Dimensional Accuracy. Materials 2018, 11, 2343. [Google Scholar] [CrossRef]
  36. Romero, A.; Caminero, M.A.; García-Plaza, E.; Núñez, P.J.; Chacón, J.M.; Rodríguez, G.P.; Cañadilla, A.; Martínez, J.L. Mechanical and metrological characterisation of 17-4PH stainless steel structures processed by Material Extrusion Additive Manufacturing. J. Mater. Res. Technol. 2025, 38, 1699–1716. [Google Scholar] [CrossRef]
  37. ISO 25178-2:2021; Geometrical Product Specifications (GPS)—Surface Texture: Areal—Part 2: Terms, Definitions and Surface Texture Parameters. ISO: Geneva, Switzerland, 2021.
  38. EN ISO 15305:2008; Non-Destructive Testing—Test Method for Residual Stress Analysis by X-Ray Diffraction. CEN: Brussels, Belgium, 2008.
  39. Du, C.; Zhao, Y.; Jiang, J.; Wang, Q.; Wang, H.; Li, N.; Sun, J. Pore Defects in Laser Powder Bed Fusion: Formation Mechanism, Control Method, and Perspectives. J. Alloys Compd. 2023, 945, 169215. [Google Scholar] [CrossRef]
  40. Gu, H.; Wei, C.; Li, L.; Han, Q.; Setchi, R.; Ryan, M.; Li, Q. Multi-physics Modelling of Molten Pool Development and Track Formation in Multi-track, Multi-layer and Multi-material Selective Laser Melting. Addit. Manuf. 2020, 34, 101276. [Google Scholar] [CrossRef]
  41. Zhang, L.; Zhang, S.; Zhu, H.; Hu, Z.; Wang, G.; Zeng, X. Horizontal dimensional accuracy prediction of selective laser melting. Mater. Des. 2018, 160, 9–20. [Google Scholar] [CrossRef]
  42. Nezhadfar, P.D.; Shrestha, R.; Phan, N.; Shamsaei, N. Fatigue Behavior of Additively Manufactured 17-4 PH Stainless Steel: Synergistic Effects of Surface Roughness and Heat Treatment. Int. J. Fatigue 2019, 124, 188–204. [Google Scholar] [CrossRef]
  43. Alfieri, V.; Argenio, P.; Caiazzo, F.; Sergi, V. Reduction of Surface Roughness by Means of Laser Processing over Additive Manufacturing Metal Parts. Materials 2017, 10, 30. [Google Scholar] [CrossRef]
  44. Santa-aho, S.; Kiviluoma, M.; Jokiaho, T.; Gundgire, T.; Honkanen, M.; Lindgren, M.; Vippola, M. Additive Manufactured 316L Stainless-Steel Samples: Microstructure, Residual Stress and Corrosion Characteristics after Post-Processing. Metals 2021, 11, 182. [Google Scholar] [CrossRef]
  45. Mirzababaei, S.; Paul, B.K.; Pasebani, S. Microstructure-Property Relationship in Binder Jet Produced and Vacuum Sintered 316L. Addit. Manuf. 2022, 53, 102720. [Google Scholar] [CrossRef]
  46. Iqbal, N.; Jimenez-Melero, E.; Ankalkhope, U.; Lawrence, J. Microstructure and Mechanical Properties of 316L Stainless Steel Fabricated Using Selective Laser Melting. MRS Adv. 2019, 4, 2431–2439. [Google Scholar] [CrossRef]
  47. Opoz, T.T.; Burgess, A.; Ahuir-Torres, J.I.; Kotadia, H.R.; Tammas-Williams, S. The Effect of Surface Finish and Post-Processing on Mechanical Properties of 17-4 PH Stainless Steel Produced by the Atomic Diffusion Additive Manufacturing Process (ADAM). Int. J. Adv. Manuf. Technol. 2024, 130, 4053–4066. [Google Scholar] [CrossRef]
Figure 1. Residual stress measurement procedure applied to the sample.
Jmmp 09 00283 g001
Figure 2. Macroscopic surface of SLM technology.
Jmmp 09 00283 g002
Figure 3. Macroscopic surface of BJ technology.
Jmmp 09 00283 g003
Figure 4. Macroscopic surface of ADAM technology.
Jmmp 09 00283 g004
Figure 5. SEM micrographs of AISI 316L powder produced by binder jetting (BJ): (a) coarse powder and (b) fine powder [33].
Jmmp 09 00283 g005
Figure 6. SEM morphology of AISI 316L powder (LPBF) [34].
Jmmp 09 00283 g006
Figure 7. SEM morphology showing 17-4 PH (ADAM): (a) the green part after 3D printing and (b) the brown part following the solvent debinding step [36].
Jmmp 09 00283 g007
Figure 8. Microstructure of AISI 316L (BJ).
Jmmp 09 00283 g008
Figure 9. Microstructure of AISI 316L (SLM).
Jmmp 09 00283 g009
Figure 10. Microstructure of 17-4 PH (ADAM).
Jmmp 09 00283 g010
Figure 11. Comparison of Spk parameters across technologies.
Jmmp 09 00283 g011
Figure 12. Comparison of Sz parameters across technologies.
Jmmp 09 00283 g012
Figure 13. Comparison of Sa parameters across technologies.
Jmmp 09 00283 g013
Figure 14. Comparison of S10z parameters across technologies.
Jmmp 09 00283 g014
Figure 15. Comparison of axial residual stress among different AM technologies.
Jmmp 09 00283 g015
Figure 16. Comparison of tangential residual stresses among different AM technologies.
Jmmp 09 00283 g016
Table 1. Chemical composition of AISI 316L for SLM technology.
ElementCCrNiMoSiMnNPS
% of Weight0.0616.912.72.10.60.50.090.020.01
Table 2. Chemical composition of AISI 316L for BJ technology.
ElementCCrNiMoSiMnNP
% of Weight0.0416.810.82.20.841.40.20.02
Table 3. Chemical composition of 17-4 PH for ADAM technology.
Element.CCrNiMoSiMnNCuS
% of Weight1.7116.54.030.010.360.150.523.770.05
Table 4. Manufacturing parameters for SLM, BJ, and ADAM additive processes.
TypeBJSLMADAM
Layer height [μm]5050125
Print velocity [cm3/h]200010025
Laser power [W] 500
Scanning strategy chessboard
Print orientationXYXYXY
Table 5. Dimensional accuracy of SLM technology.
SLMNo. 1No. 2No. 3No. 4No. 5DiameterSample Standard Deviation
Diameter [mm]5.065.085.085.075.065.070.0092
Deviation [mm]0.060.080.080.070.060.070.0092
Cylindricity [mm]0.180.130.130.160.150.150.0240
Table 6. Dimensional accuracy of binder jetting technology.
BJNo. 1No. 2No. 3No. 4No. 5DiameterSample Standard Deviation
Diameter [mm]4.784.634.754.644.764.710.0705
Deviation [mm]−0.22−0.37−0.25−0.36−0.24−0.290.0705
Cylindricity [mm]0.340.540.420.590.730.520.1511
Table 7. Dimensional accuracy of ADAM technology.
ADAMNo. 1No. 2No. 3No. 4No. 5DiameterSample Standard Deviation
Diameter [mm]4.984.994.984.984.994.980.0023
Deviation [mm]−0.02−0.01−0.02−0.02−0.01−0.020.0023
Cylindricity [mm]0.210.460.370.320.350.340.0876
Disclaimer/Publisher’s Note: The statements, opinions and data contained in all publications are solely those of the individual author(s) and contributor(s) and not of MDPI and/or the editor(s). MDPI and/or the editor(s) disclaim responsibility for any injury to people or property resulting from any ideas, methods, instructions or products referred to in the content.