Figure 1.
Experimental setup for stamping tests: a 25 kN hydraulic jack mounted on a rigid frame, a custom multi-geometry stamp block with interchangeable inserts, and an integrated force measurement unit under the floating steel platen. Insets show the stamp head, the actuator connection, and the digital force meter used to record applied loads.
Figure 2.
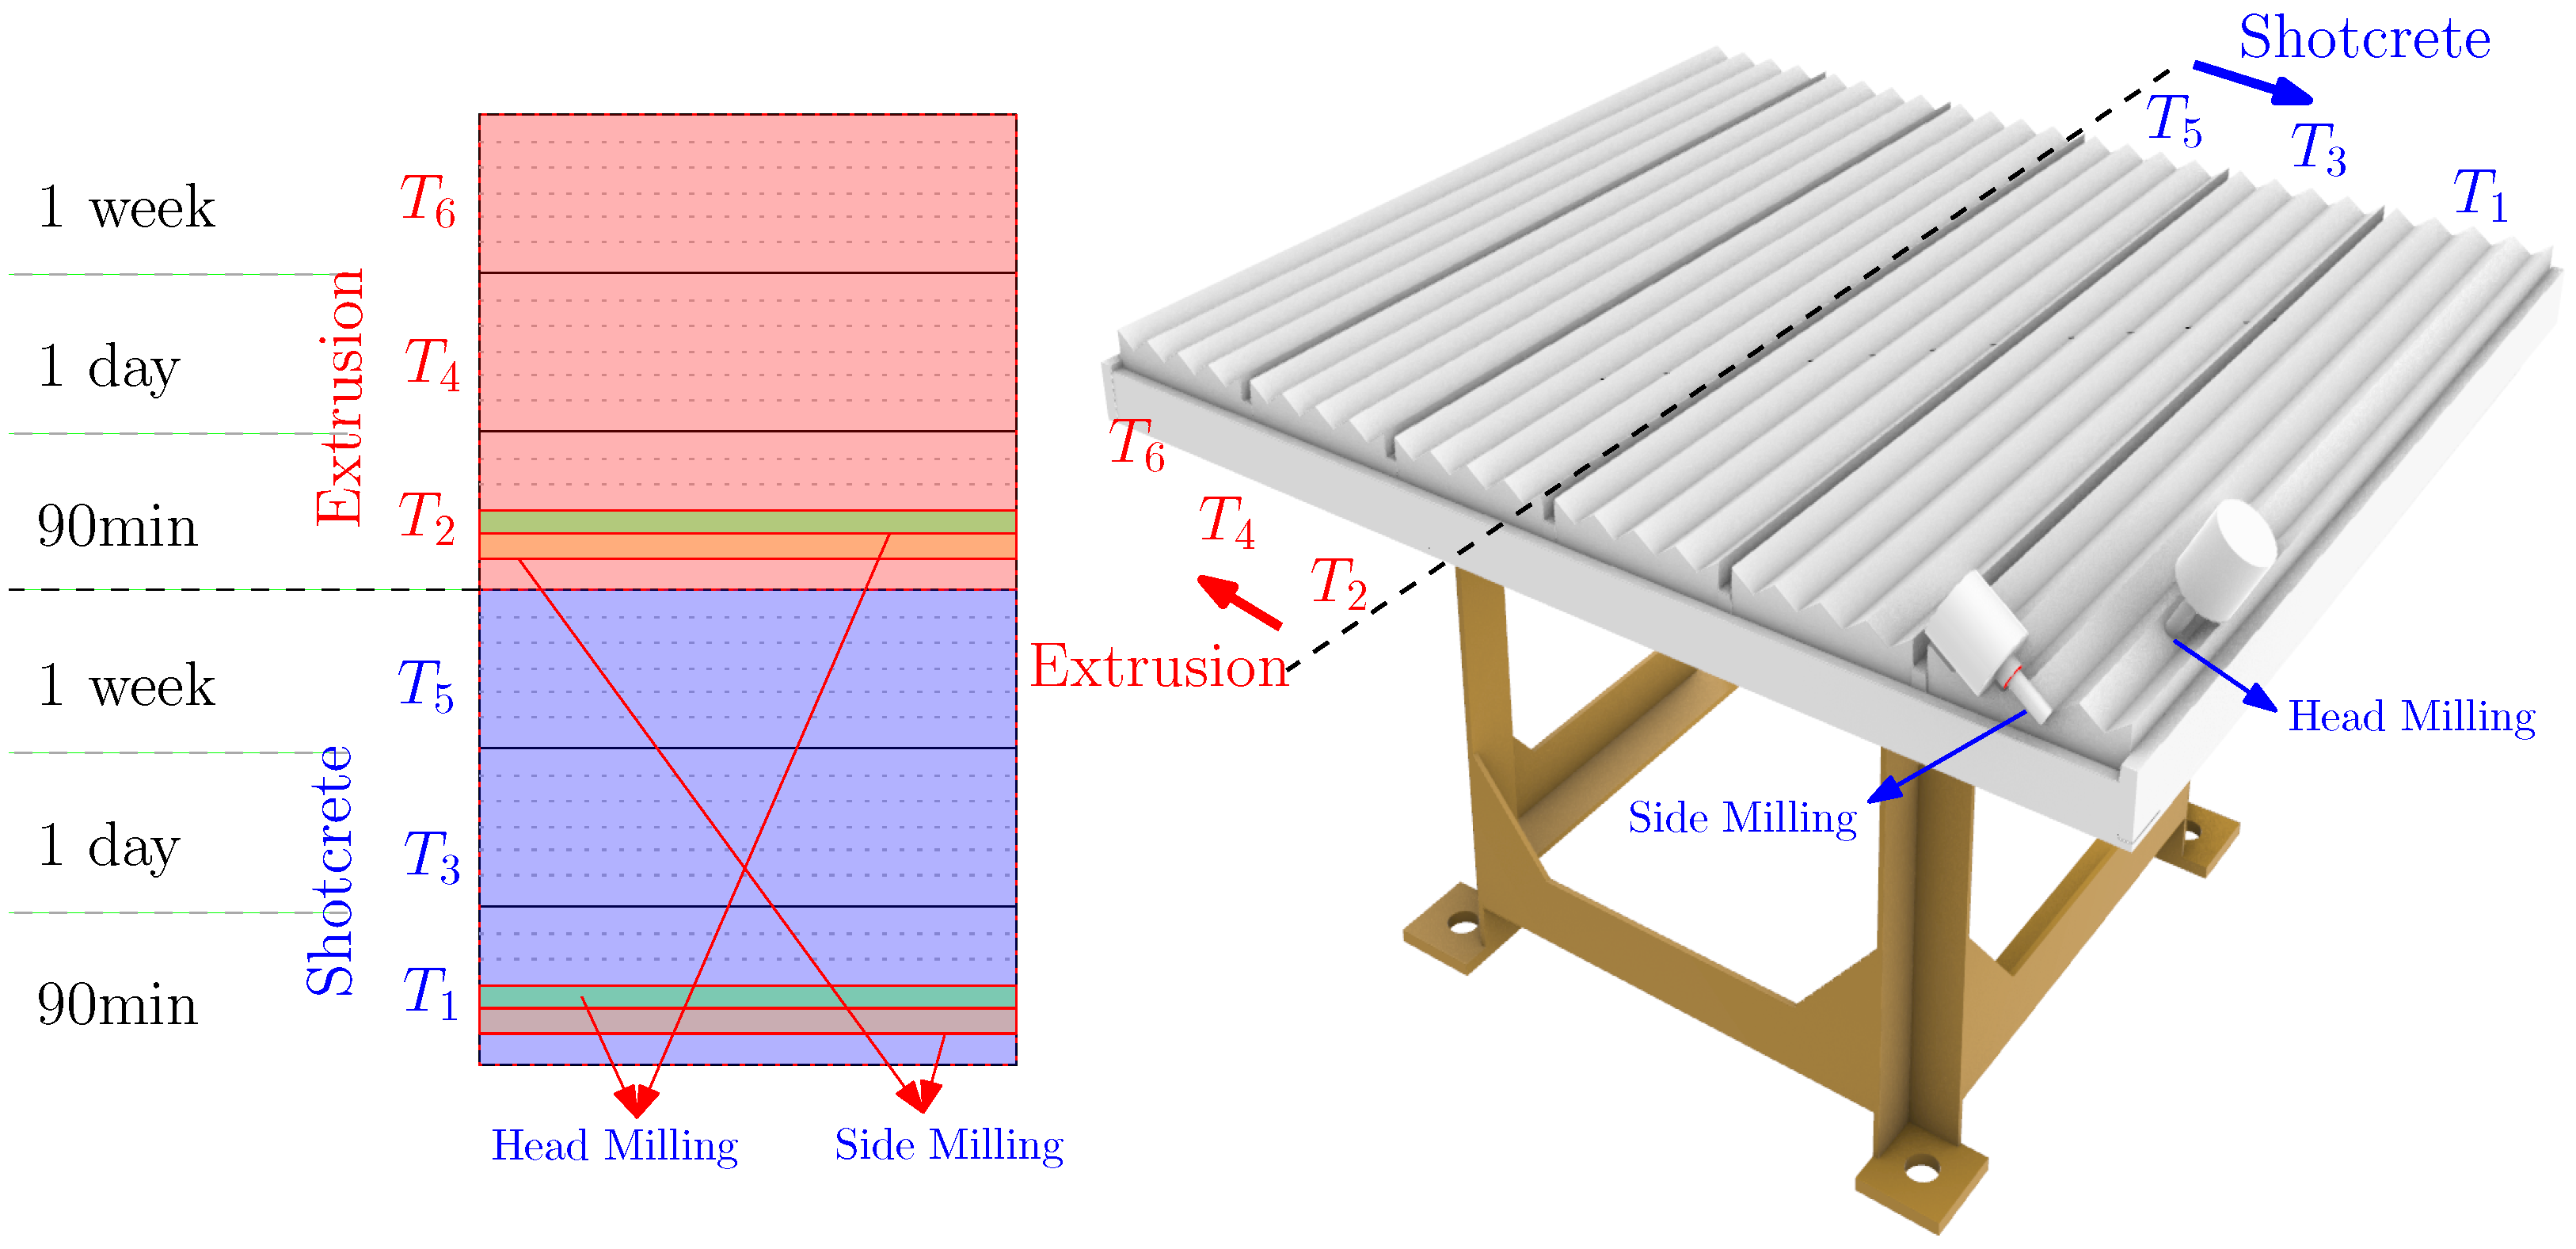
Experimental set-up for green-state and time-step milling.
Figure 2.
Experimental set-up for green-state and time-step milling.
Figure 3.
Workflow for geometric accuracy assessment: (a) fabricated concrete sample, (b) high-resolution 3D scan, (c) reference CAD model, and (d) scan-to-CAD overlay and deviation visualization.
Figure 3.
Workflow for geometric accuracy assessment: (a) fabricated concrete sample, (b) high-resolution 3D scan, (c) reference CAD model, and (d) scan-to-CAD overlay and deviation visualization.
Figure 4.
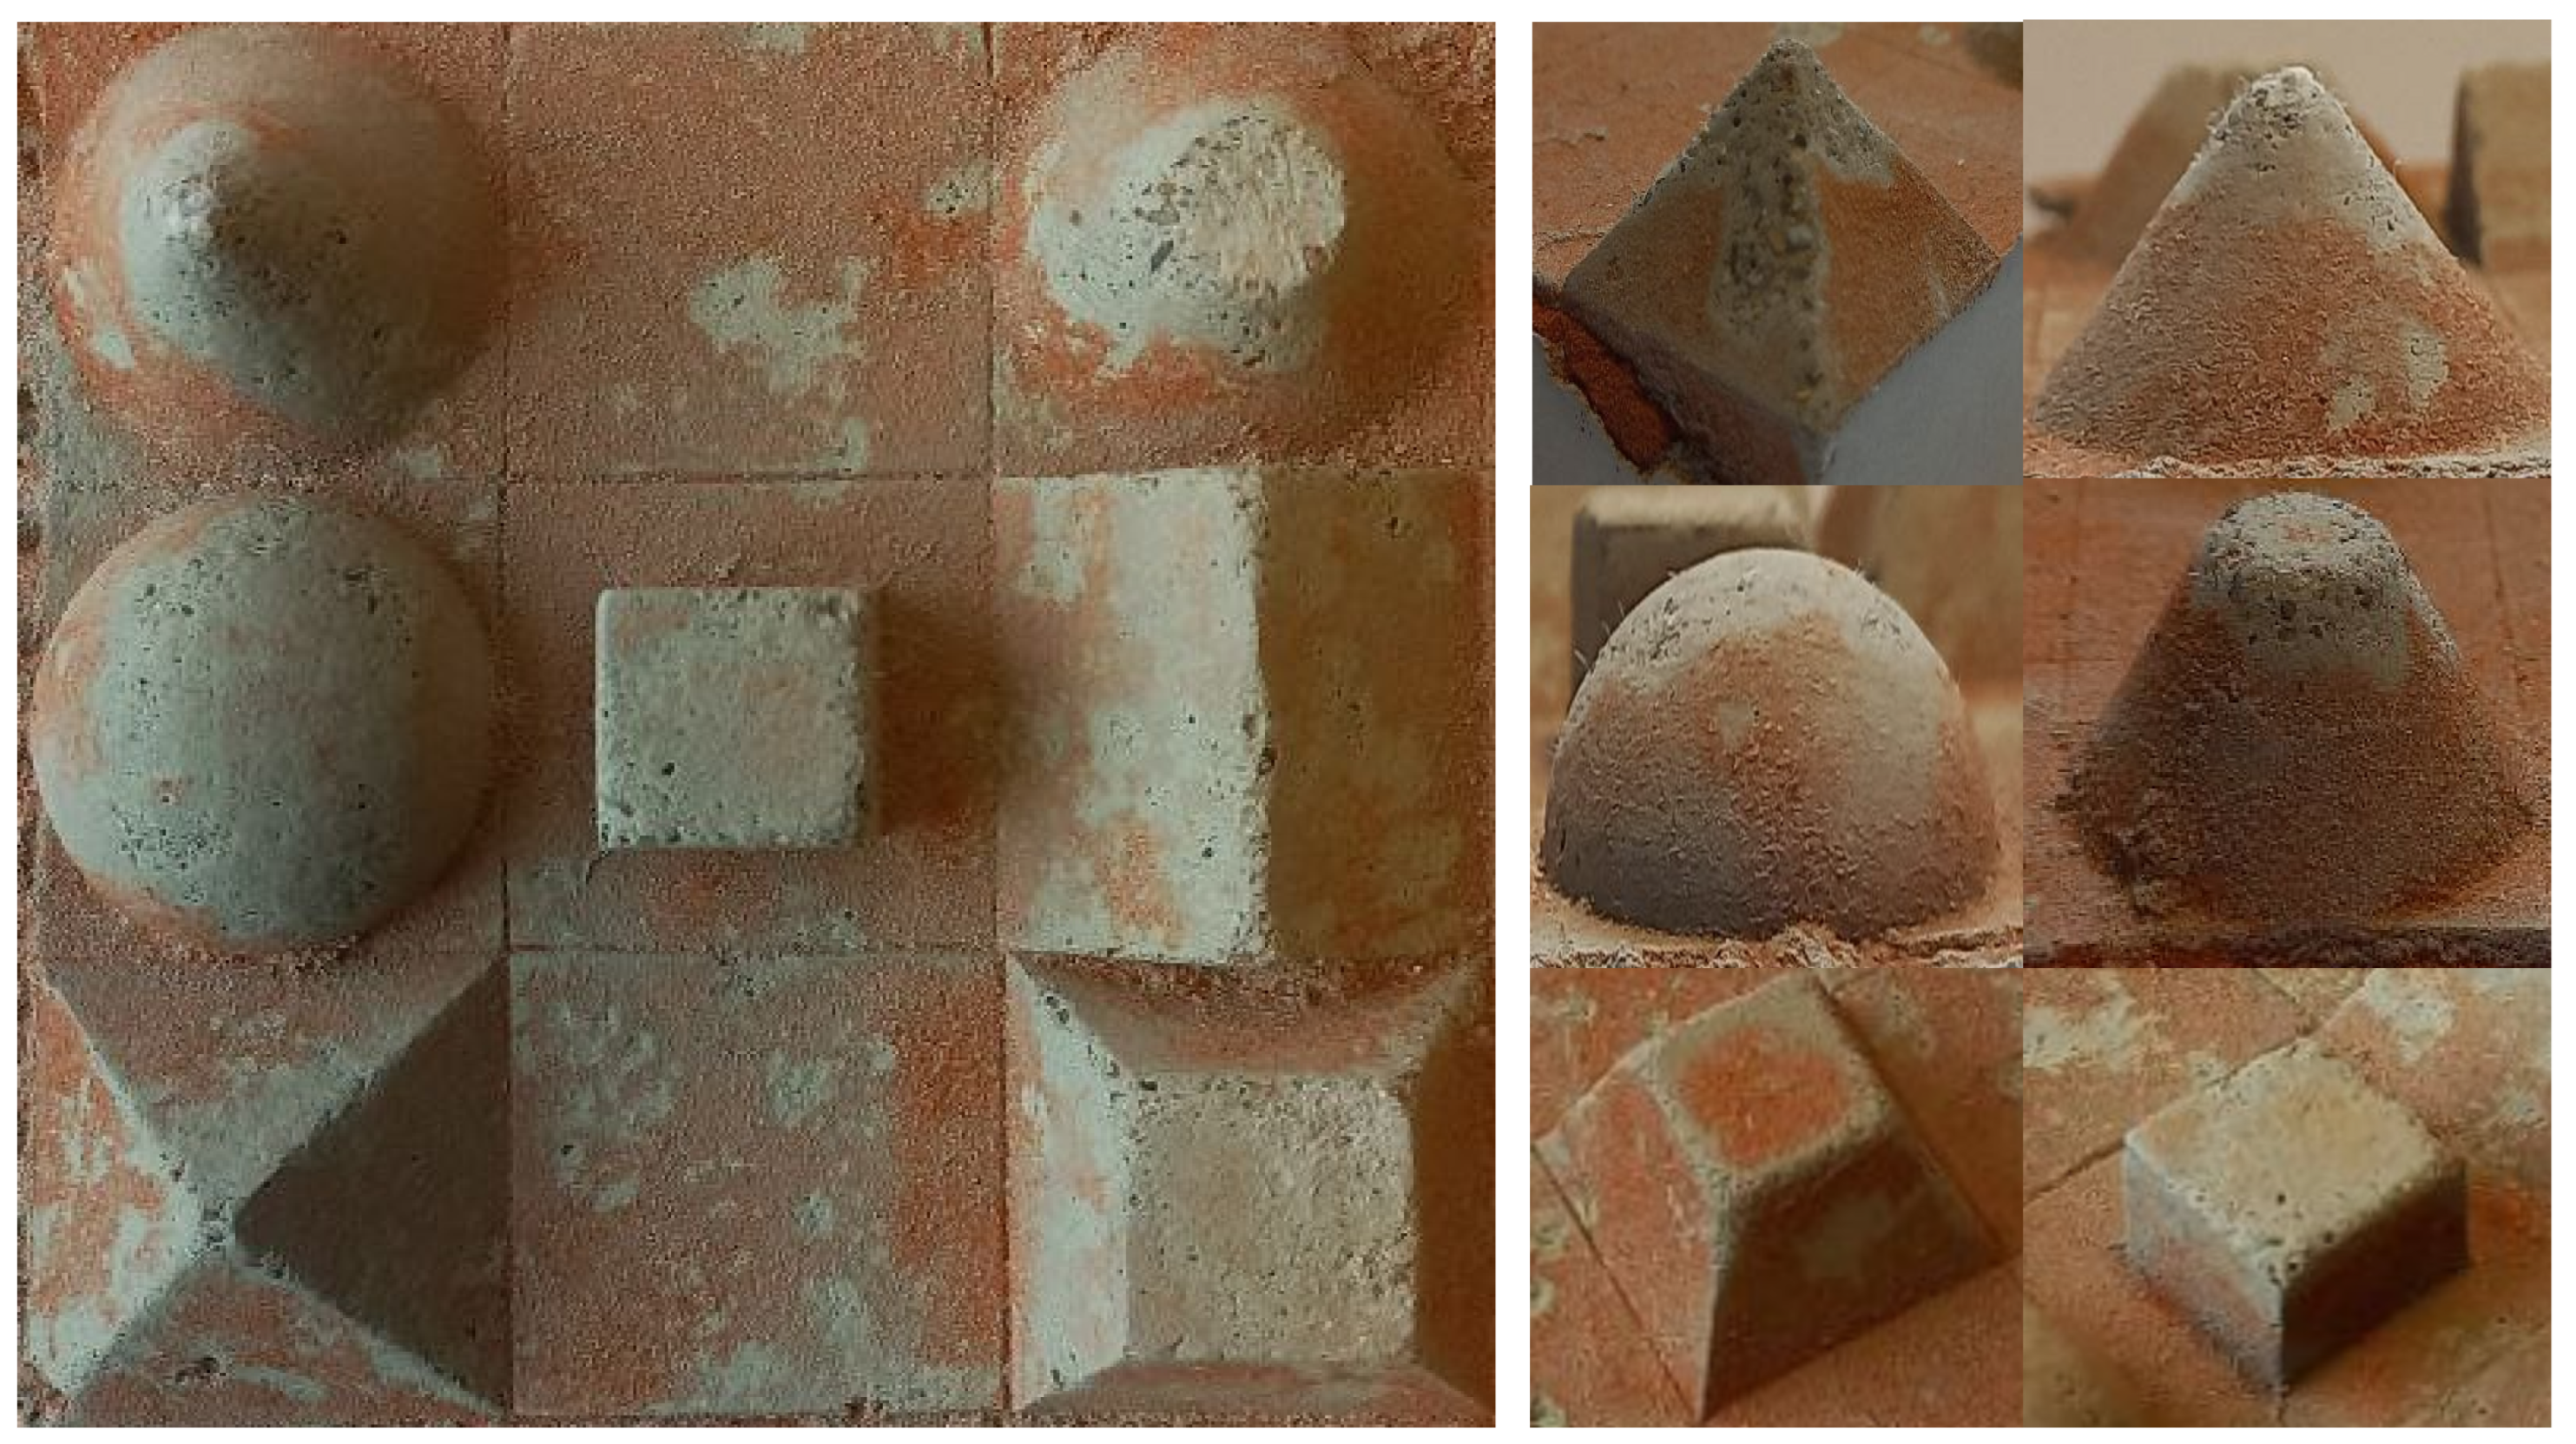
Representative fabricated stamps and imprints: cone, truncated cone, hemisphere, pyramid, triangular wedge, and truncated pyramid.
Figure 4.
Representative fabricated stamps and imprints: cone, truncated cone, hemisphere, pyramid, triangular wedge, and truncated pyramid.
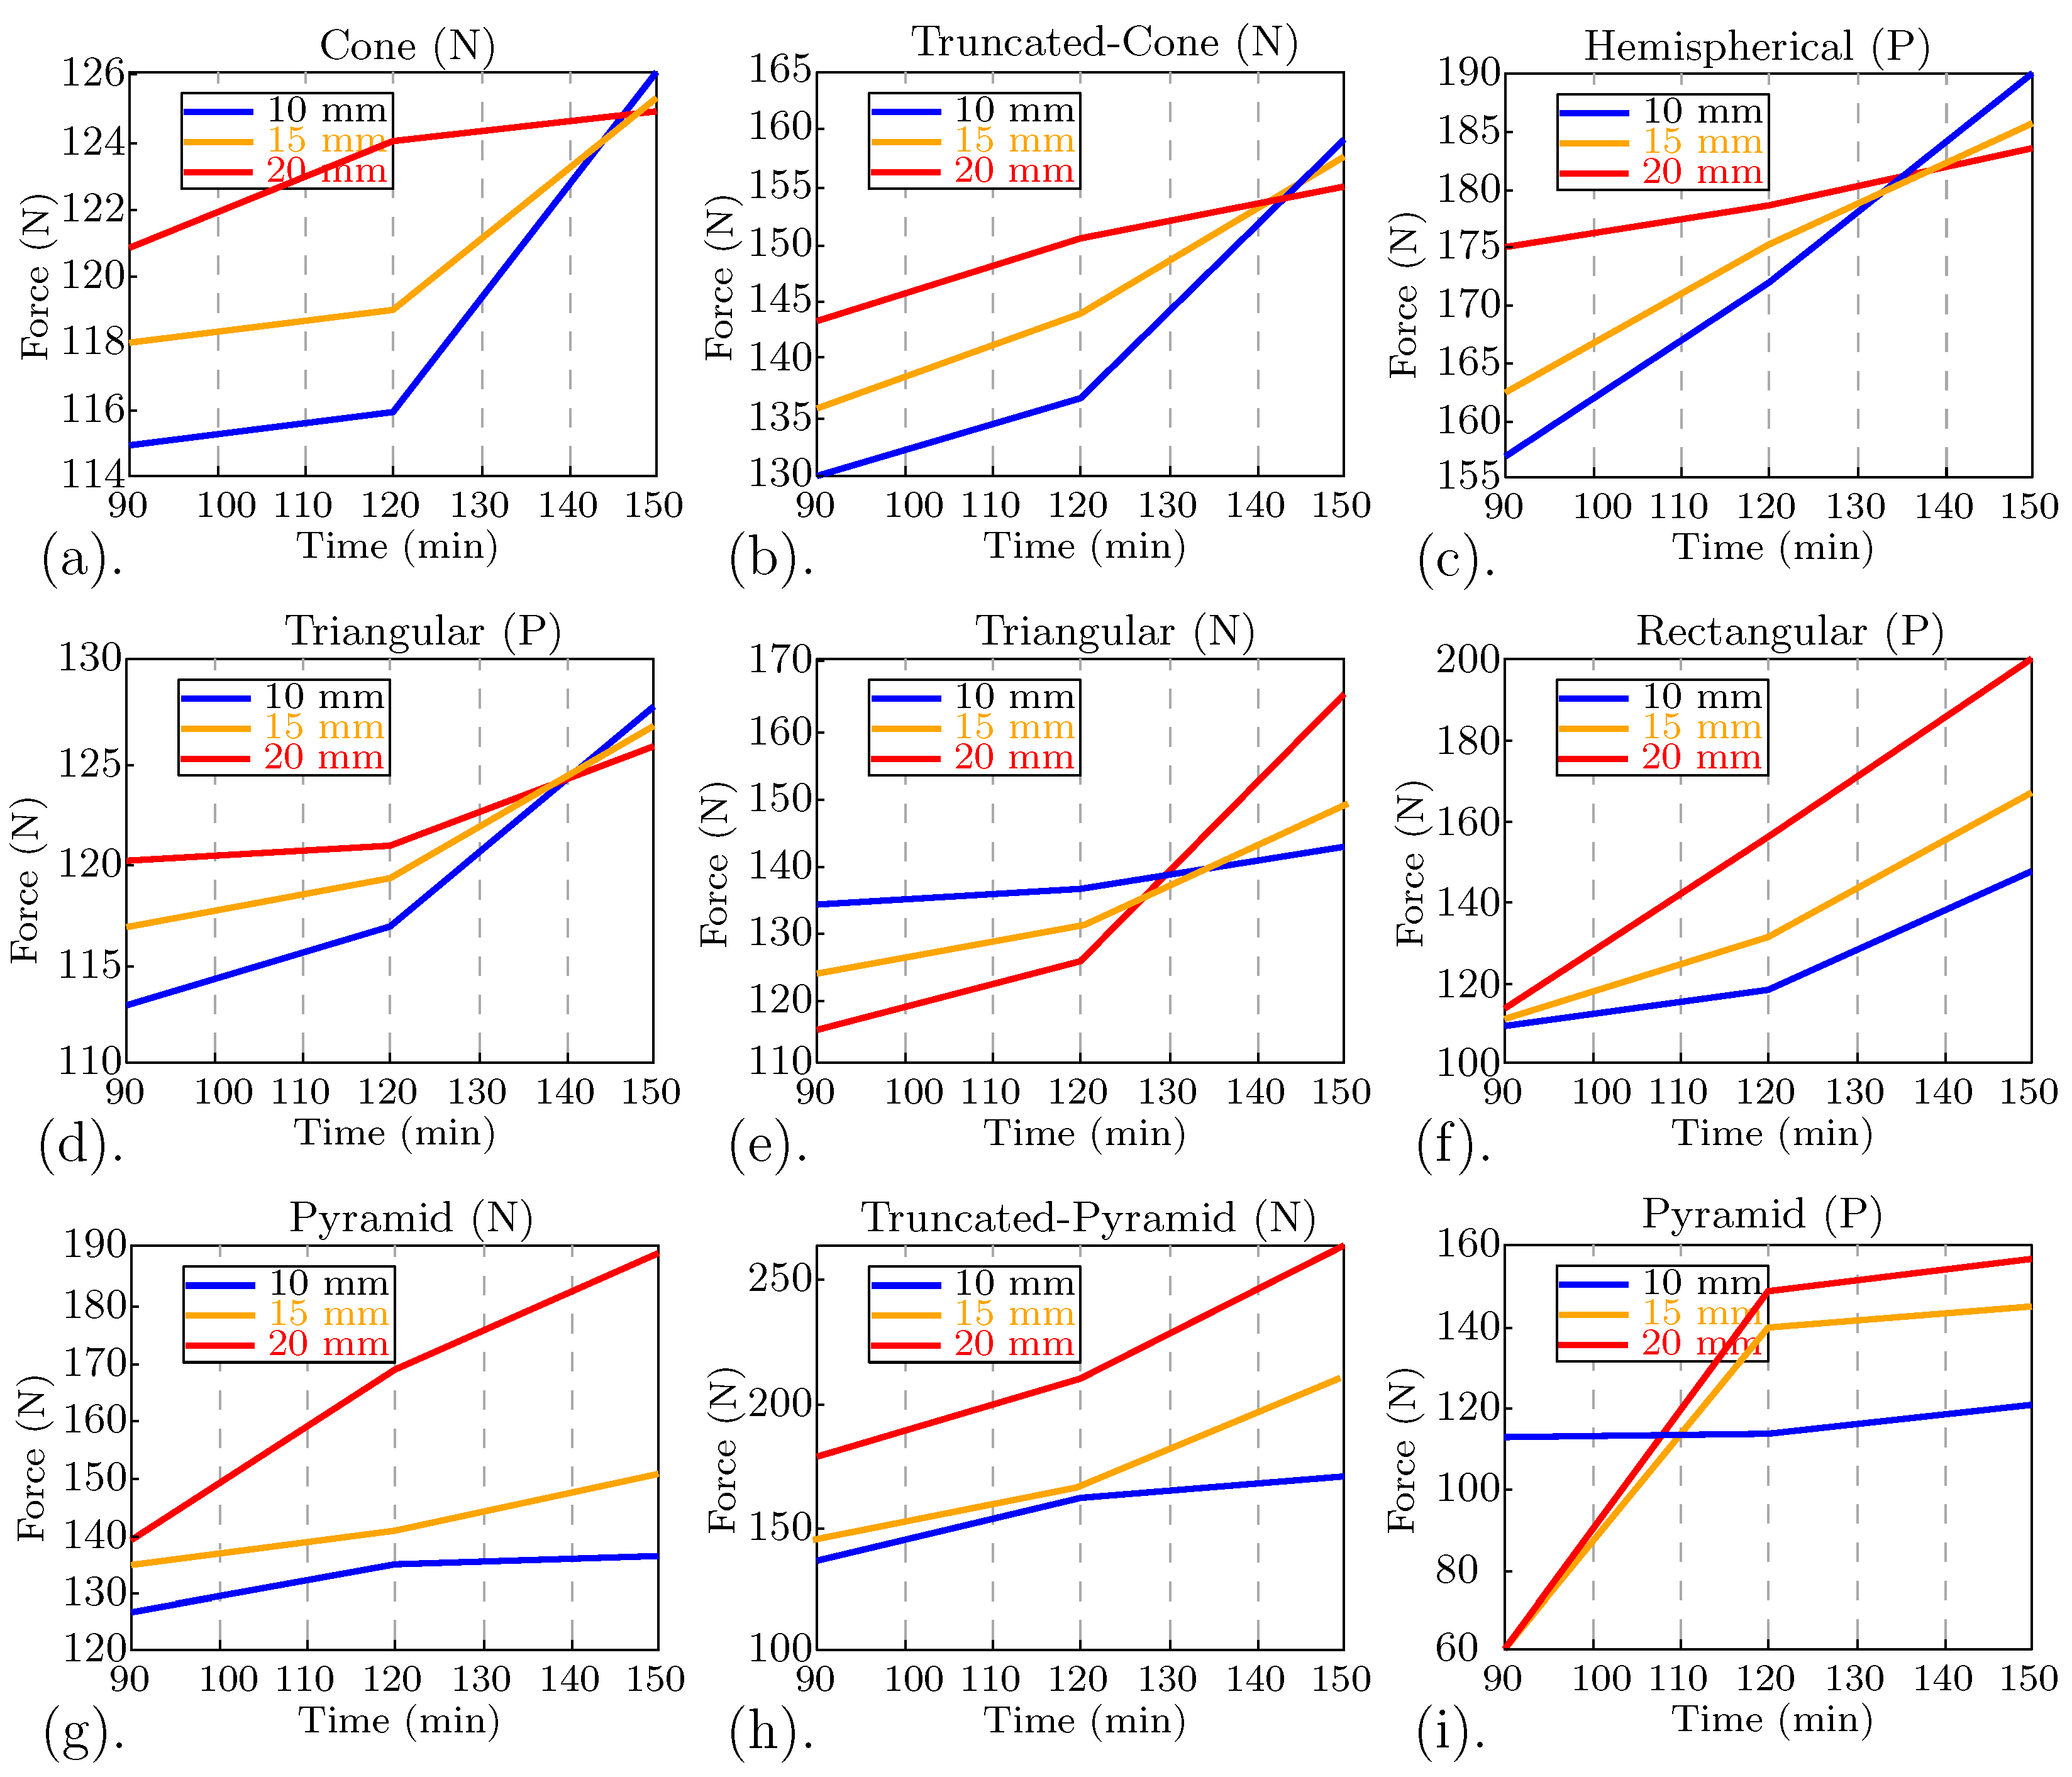
Figure 5.
Force–age response for stamp penetration between 90 and 150 min at . Each subplot shows the measured reaction force during stamping for a given geometry and polarity: (a) cone (N), (b) truncated cone (N), (c) hemispherical (P), (d) triangular (P), (e) triangular (N), (f) rectangular (P), (g) pyramid (N), (h) truncated pyramid (N), and (i) pyramid (P). Curves correspond to nominal imprint depths of 10, 15, and 20 mm (blue, orange, and red, respectively). Here, P and N denote positive and negative stamp polarities.
Figure 6.
Stamp layouts for grouped geometries (G1–G6) along with corresponding force testing results. Each group contains a specific arrangement of positive and negative geometries to evaluate combined stamping effects. The right image shows an example of the resulting impressions on the concrete surface after testing.
Figure 7.
Typical failure modes during stamping: (a) overpressure or broken formwork, (b) excessive water fraction, (c) insufficient lubrication, and (d) inadequate stamp travel or poor leveling.
Figure 7.
Typical failure modes during stamping: (a) overpressure or broken formwork, (b) excessive water fraction, (c) insufficient lubrication, and (d) inadequate stamp travel or poor leveling.
Figure 8.
Examples of degraded stamp impressions on cured concrete surfaces. The quality of the impressions varies depending on geometry type, surface preparation, and material compaction. Circular and hemispherical shapes tend to maintain sharper definition, while elongated and narrow features are more prone to edge erosion and surface roughness.
Figure 9.
Hardware details of the stamping setup: adjustable clamping frame, mounted stamp assembly with hydraulic linkage, and side view showing alignment and fastening.
Figure 9.
Hardware details of the stamping setup: adjustable clamping frame, mounted stamp assembly with hydraulic linkage, and side view showing alignment and fastening.
Figure 10.
General stamping process and setup: (a) assembled stamp block containing multiple geometries, (b) measurement of concrete mix weight before casting, (c) freshly poured concrete in the mold before stamping, and (d) final imprinted geometry after demolding.
Figure 10.
General stamping process and setup: (a) assembled stamp block containing multiple geometries, (b) measurement of concrete mix weight before casting, (c) freshly poured concrete in the mold before stamping, and (d) final imprinted geometry after demolding.
Figure 11.
Examples of surface irregularities and loss of edge sharpness attributed to inadequate drainage during stamping. Entrapped water in cavities likely caused local erosion, voids, and incomplete feature definition.
Figure 11.
Examples of surface irregularities and loss of edge sharpness attributed to inadequate drainage during stamping. Entrapped water in cavities likely caused local erosion, voids, and incomplete feature definition.
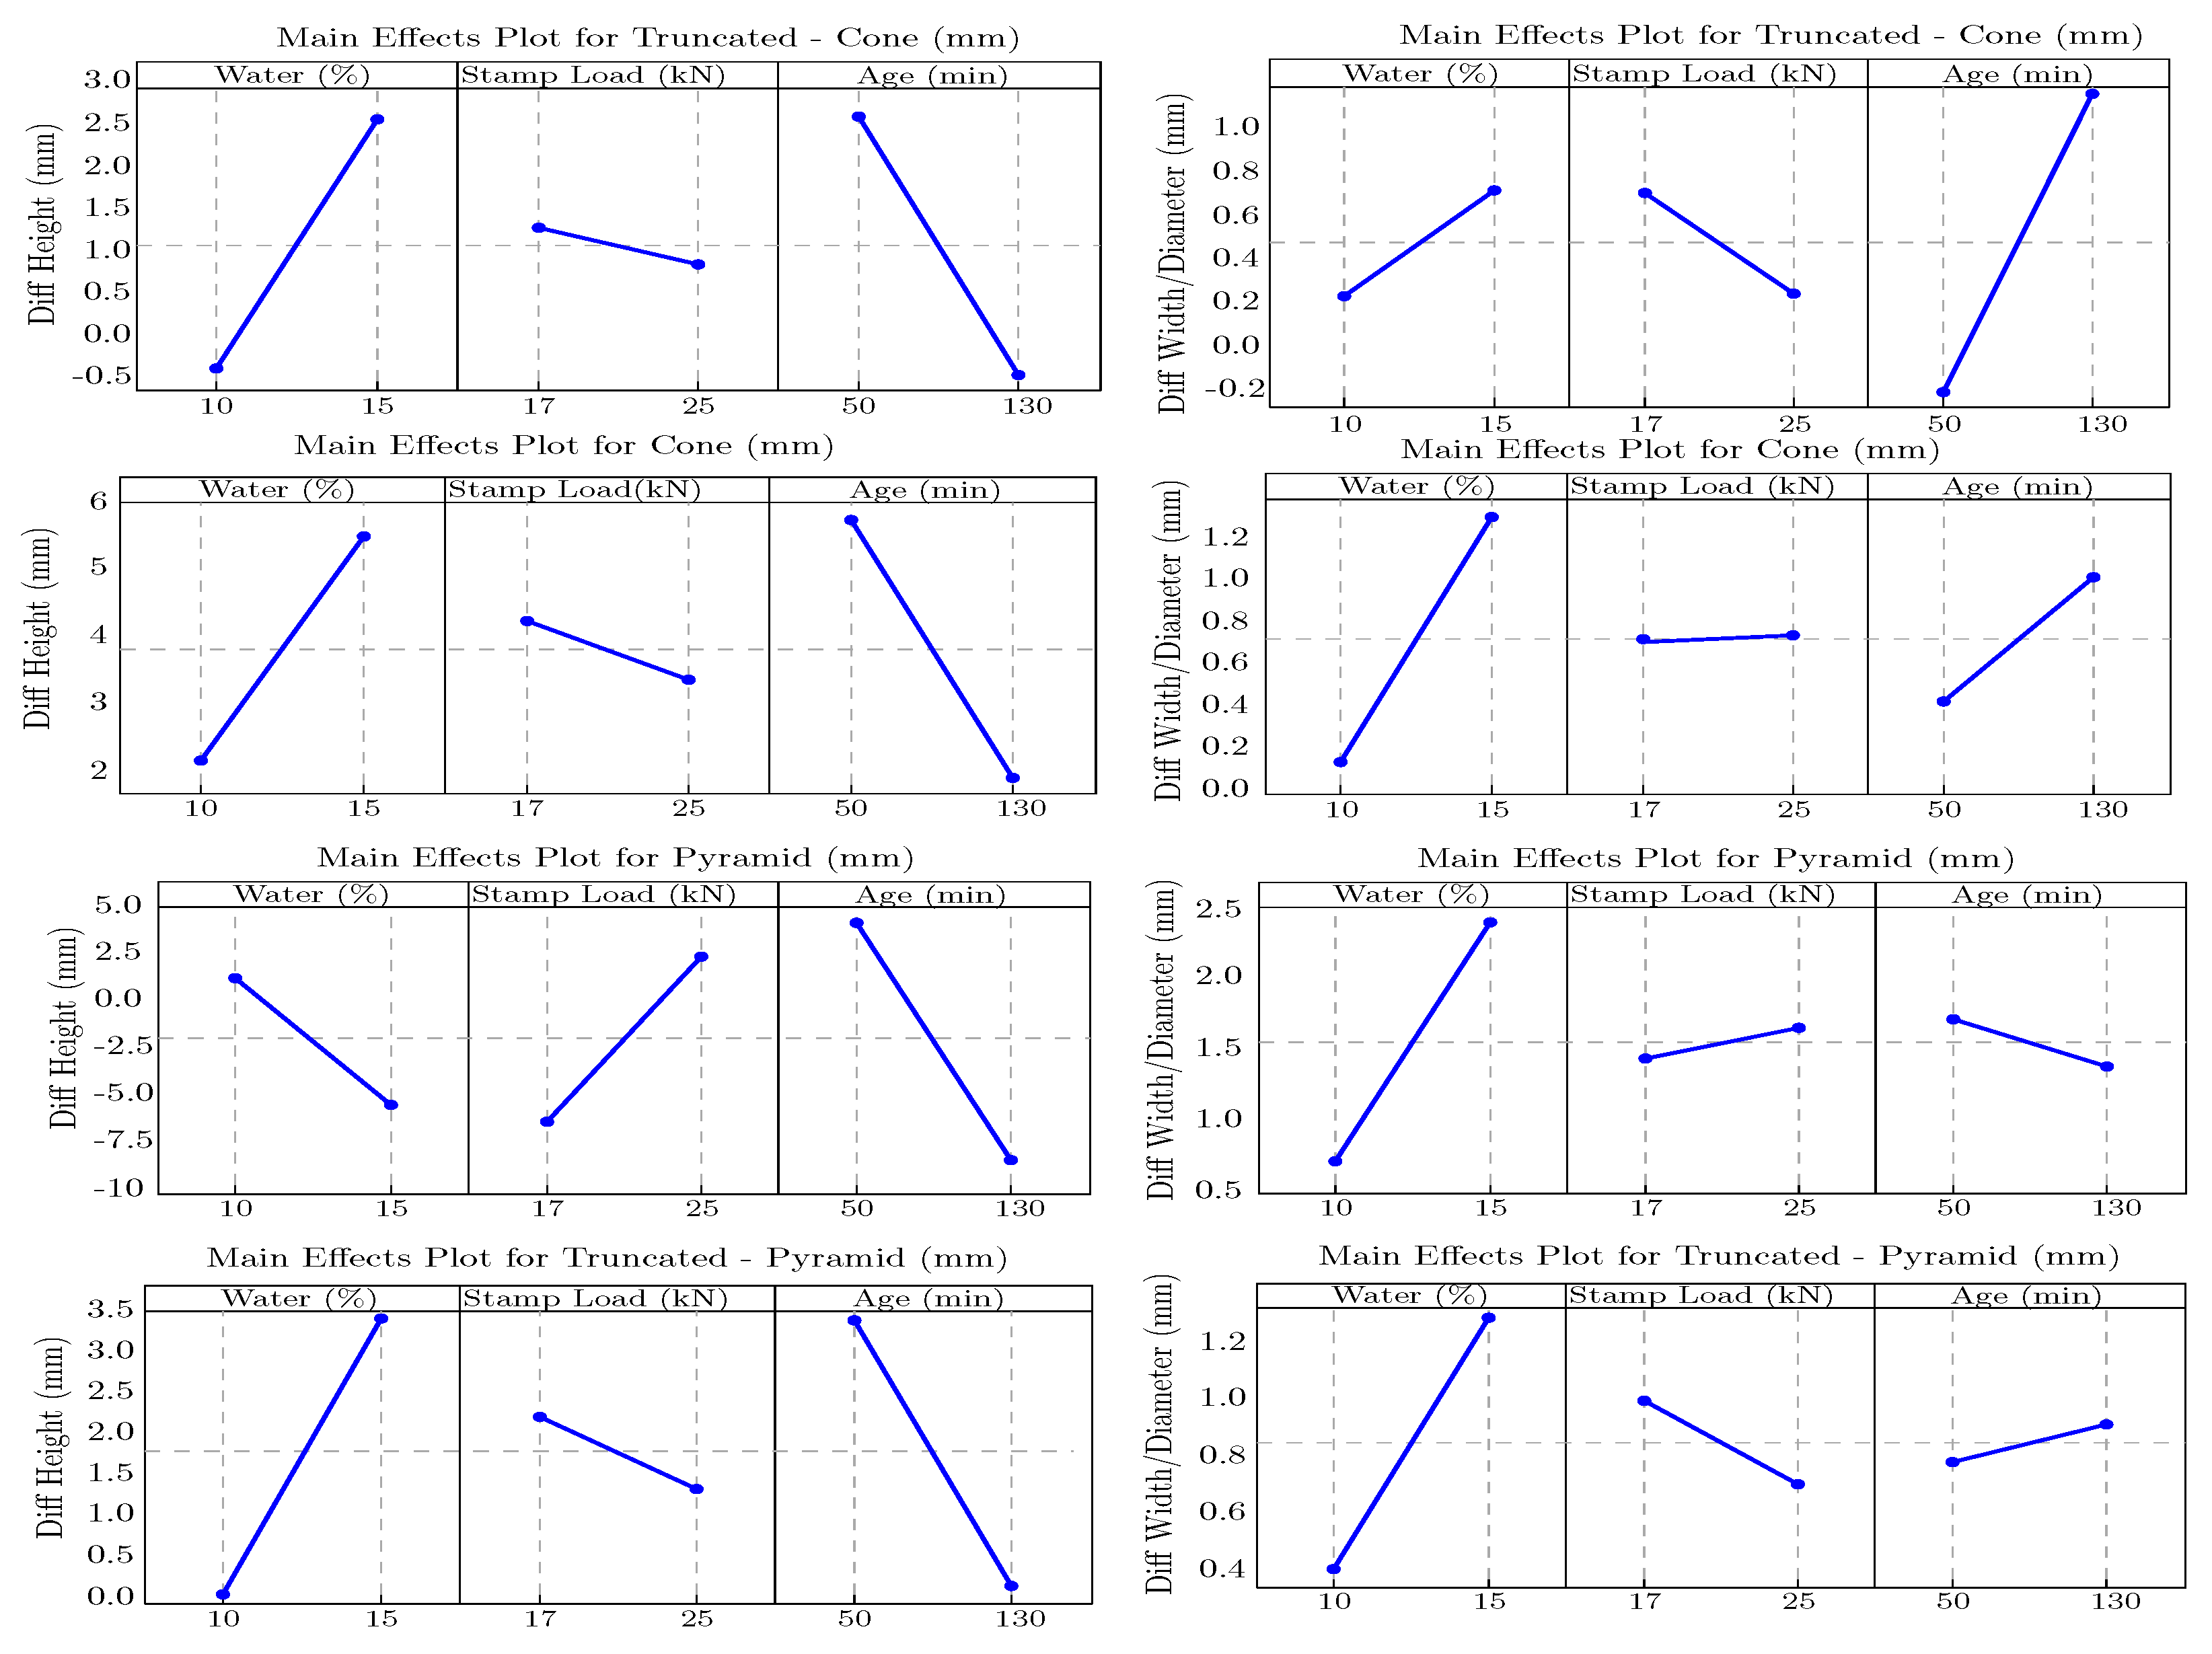
Figure 12.
Main -effect plots for four stamp geometries (truncated cone, cone, pyramid, and truncated pyramid) showing the influence of water fraction (10%/15%), stamping load (16.2–25.5 kN), and age (50/130 min) on deviations in height, width, and diameter. Lower deviations are observed at 130 min, highlighting the stabilizing effect of age.
Figure 13.
CAD geometries (left column) and corresponding concrete imprints under varied water, load, and age (three right columns) for pyramid, truncated pyramid, box (square recess), and hemisphere. Differences in edge definition and surface finish illustrate sensitivity to green-state rheology and loading.
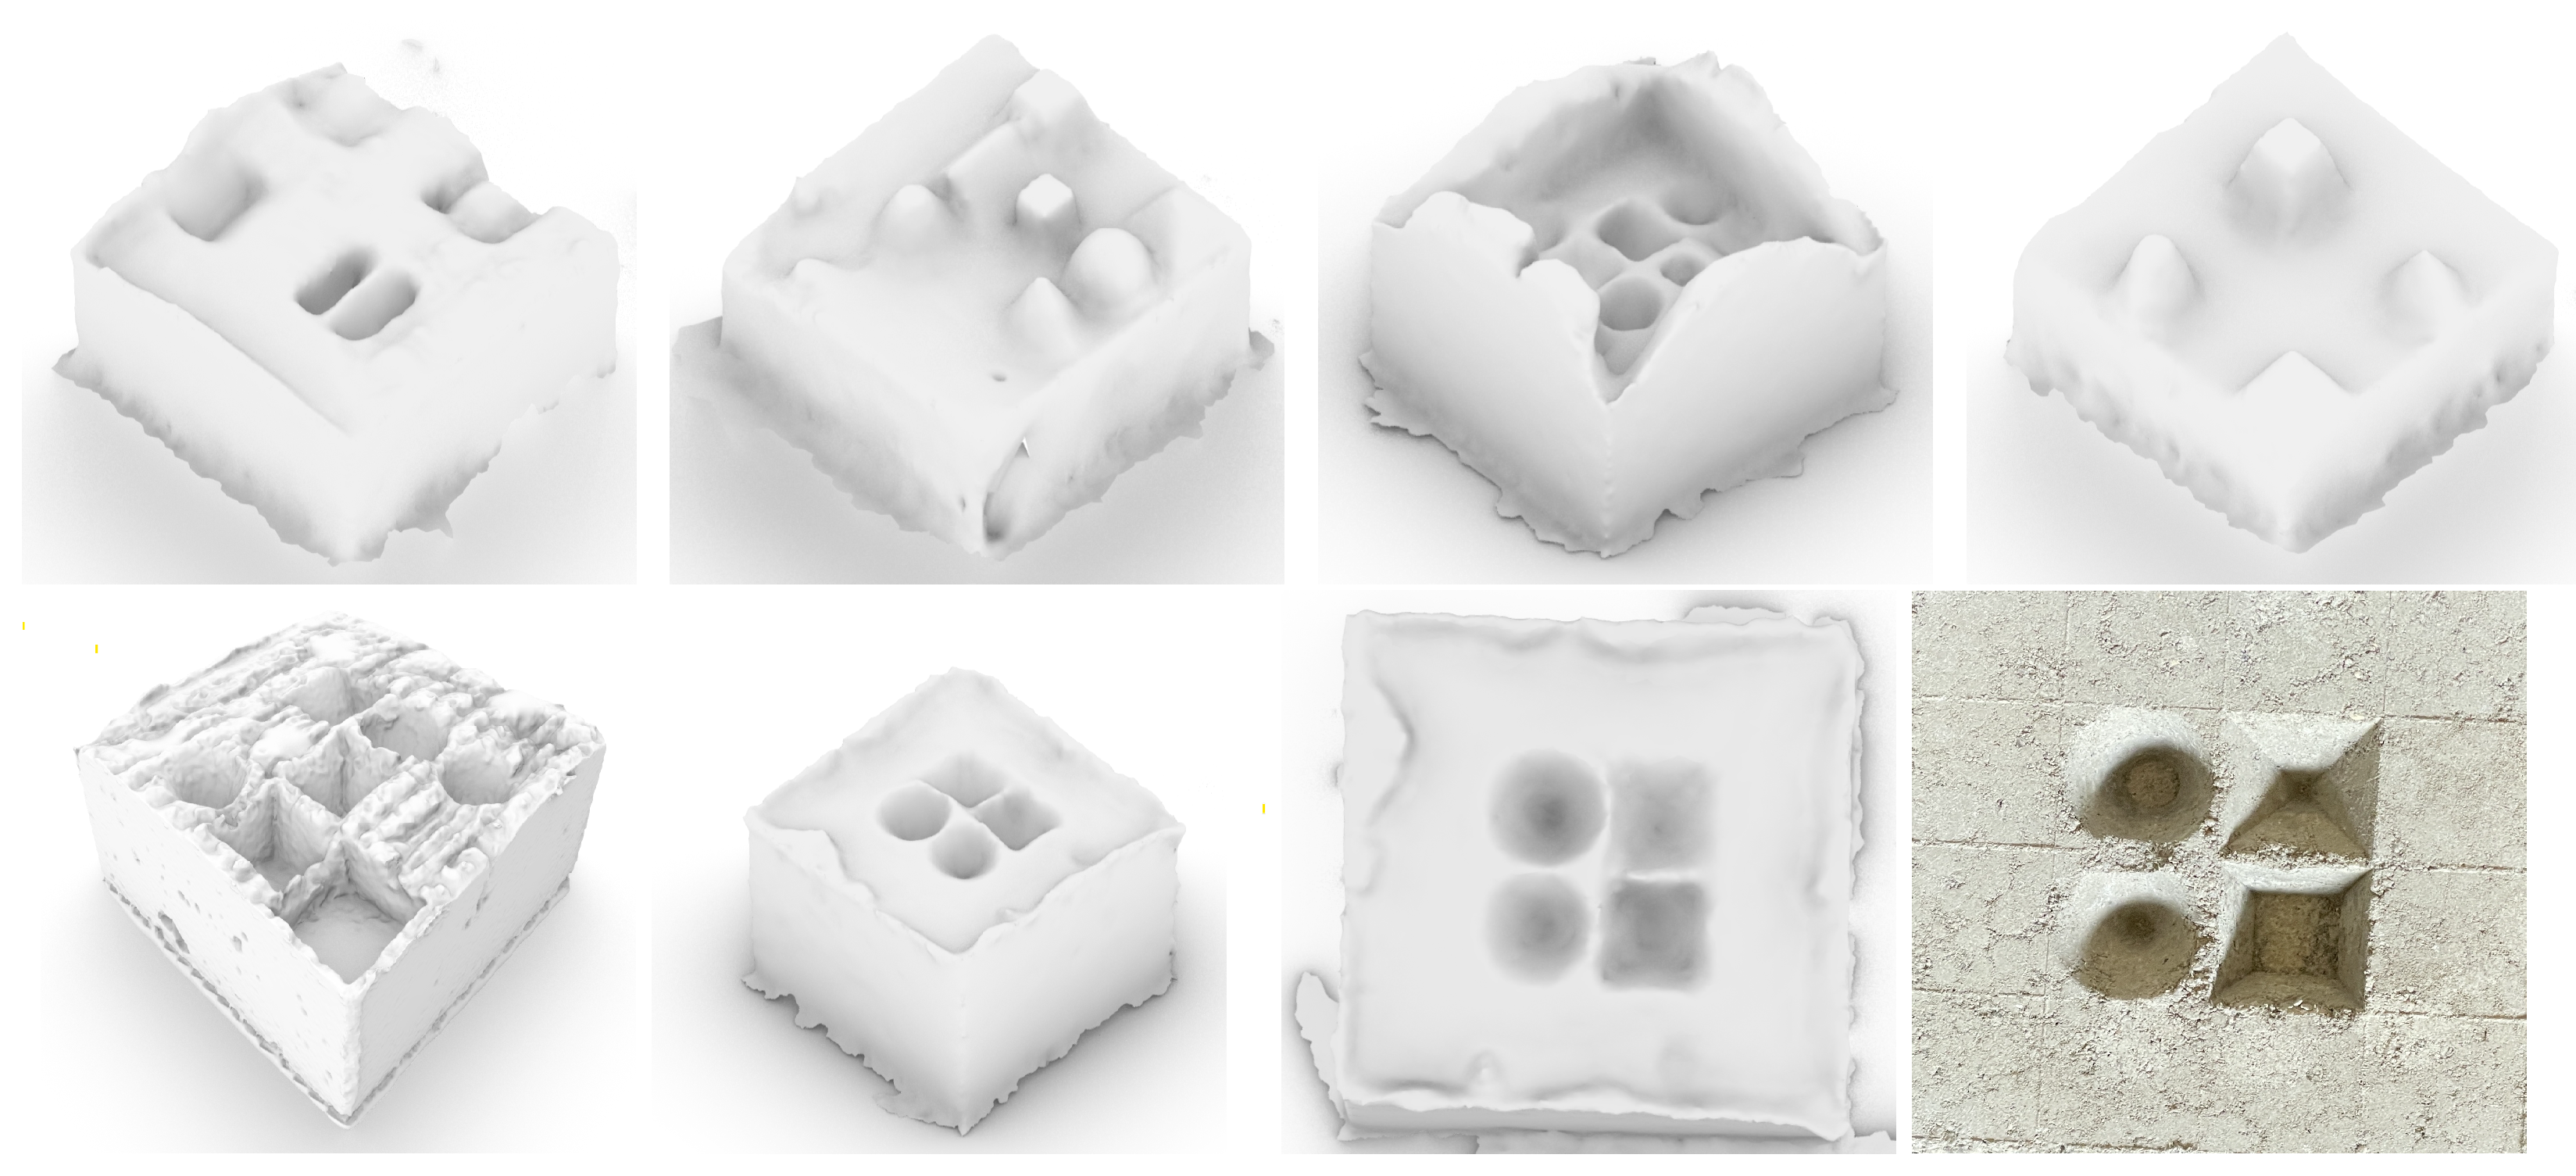
Figure 14.
3D scan results of stamped concrete geometries, showing variations in accuracy and surface quality across different shapes and production parameters. The last image illustrates the corresponding physical stamped sample for reference.
Figure 14.
3D scan results of stamped concrete geometries, showing variations in accuracy and surface quality across different shapes and production parameters. The last image illustrates the corresponding physical stamped sample for reference.
Figure 15.
Process of forming concrete geometries using oil-treated fine sand as a mold material. From left to right: (1) the prepared soft-soil surface, leveled and compacted with fine aggregate; (2) stamped impressions made using 3D-printed geometries; (3) concrete cast within the soil mold using either manual pouring or shotcrete application; and (4) final hardened concrete piece after soil removal, showing minimal deformation and high geometric precision. This method allows for clean release and accurate reproduction of detailed features.
Figure 16.
Examples of concrete elements produced by the soil stamping technique, demonstrating high geometric fidelity for various shapes, including pyramids, hemispheres, and truncated cones.
Figure 16.
Examples of concrete elements produced by the soil stamping technique, demonstrating high geometric fidelity for various shapes, including pyramids, hemispheres, and truncated cones.
Figure 17.
Detailed views of surface-formed elements produced via the soil-mold method, highlighting edge quality and feature fidelity.
Figure 17.
Detailed views of surface-formed elements produced via the soil-mold method, highlighting edge quality and feature fidelity.
Figure 18.
Milling workflow: (left) EasyStone-programmed toolpath for the trapezoidal profile; (middle) fixtured concrete block on the CNC table; (right) in-process cut on an extrusion specimen.
Figure 18.
Milling workflow: (left) EasyStone-programmed toolpath for the trapezoidal profile; (middle) fixtured concrete block on the CNC table; (right) in-process cut on an extrusion specimen.
Figure 19.
Milling of green-state specimens (extrusion and shotcrete) under test conditions T1 and T4.
Figure 19.
Milling of green-state specimens (extrusion and shotcrete) under test conditions T1 and T4.
Figure 20.
Circumference-loss measurements for T1–T6 plotted separately for head (end face) and side (flank band), contrasting shotcrete and extrusion routes. Measurements by digital caliper; initial rim circumference mm.
Figure 20.
Circumference-loss measurements for T1–T6 plotted separately for head (end face) and side (flank band), contrasting shotcrete and extrusion routes. Measurements by digital caliper; initial rim circumference mm.
Figure 21.
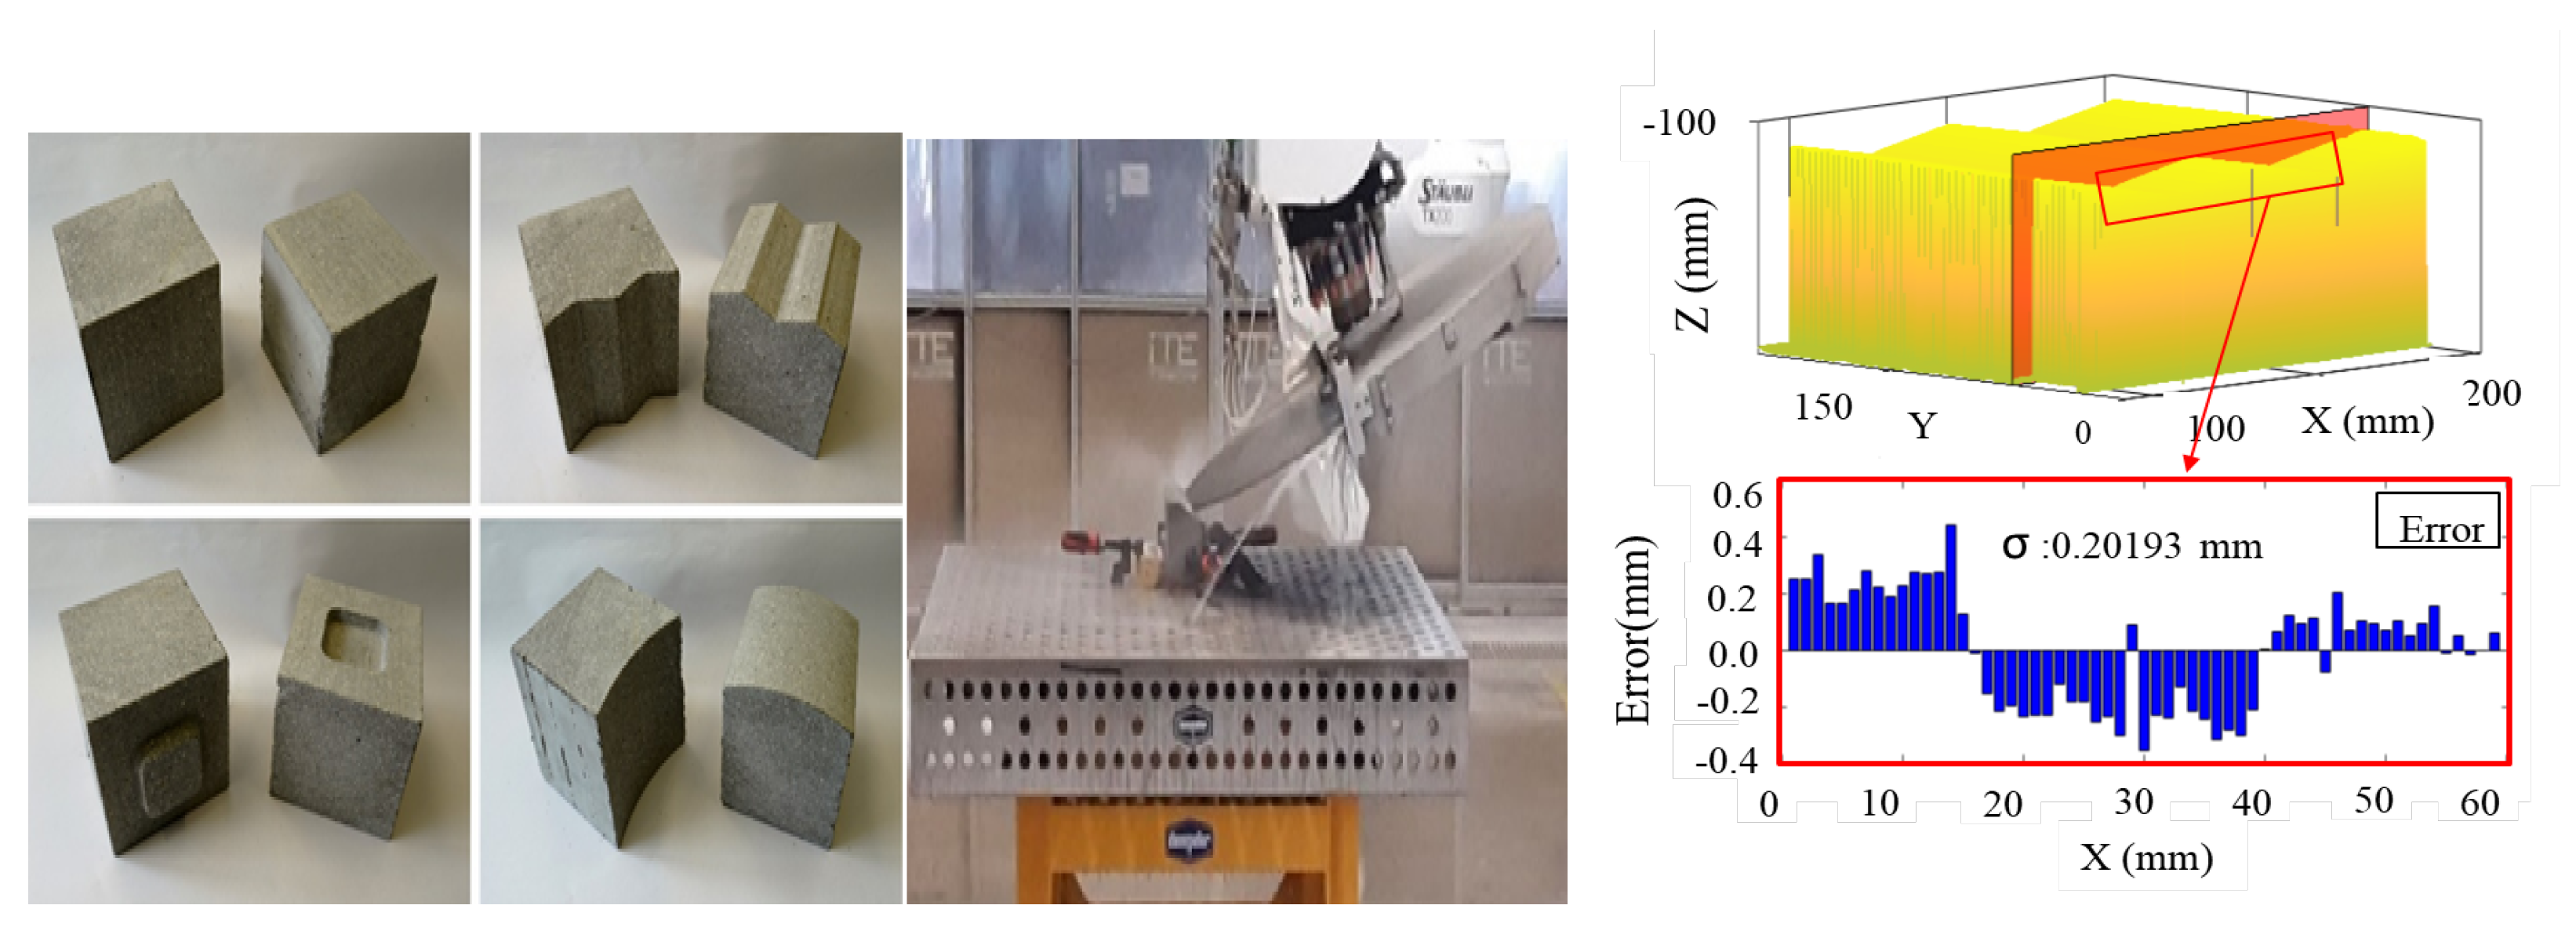
Milling process and accuracy evaluation: examples of milled concrete geometries, robotic milling setup, 3D surface profile measurement, and corresponding dimensional error analysis with a standard deviation of 0.20 mm.
Figure 21.
Milling process and accuracy evaluation: examples of milled concrete geometries, robotic milling setup, 3D surface profile measurement, and corresponding dimensional error analysis with a standard deviation of 0.20 mm.
Figure 22.
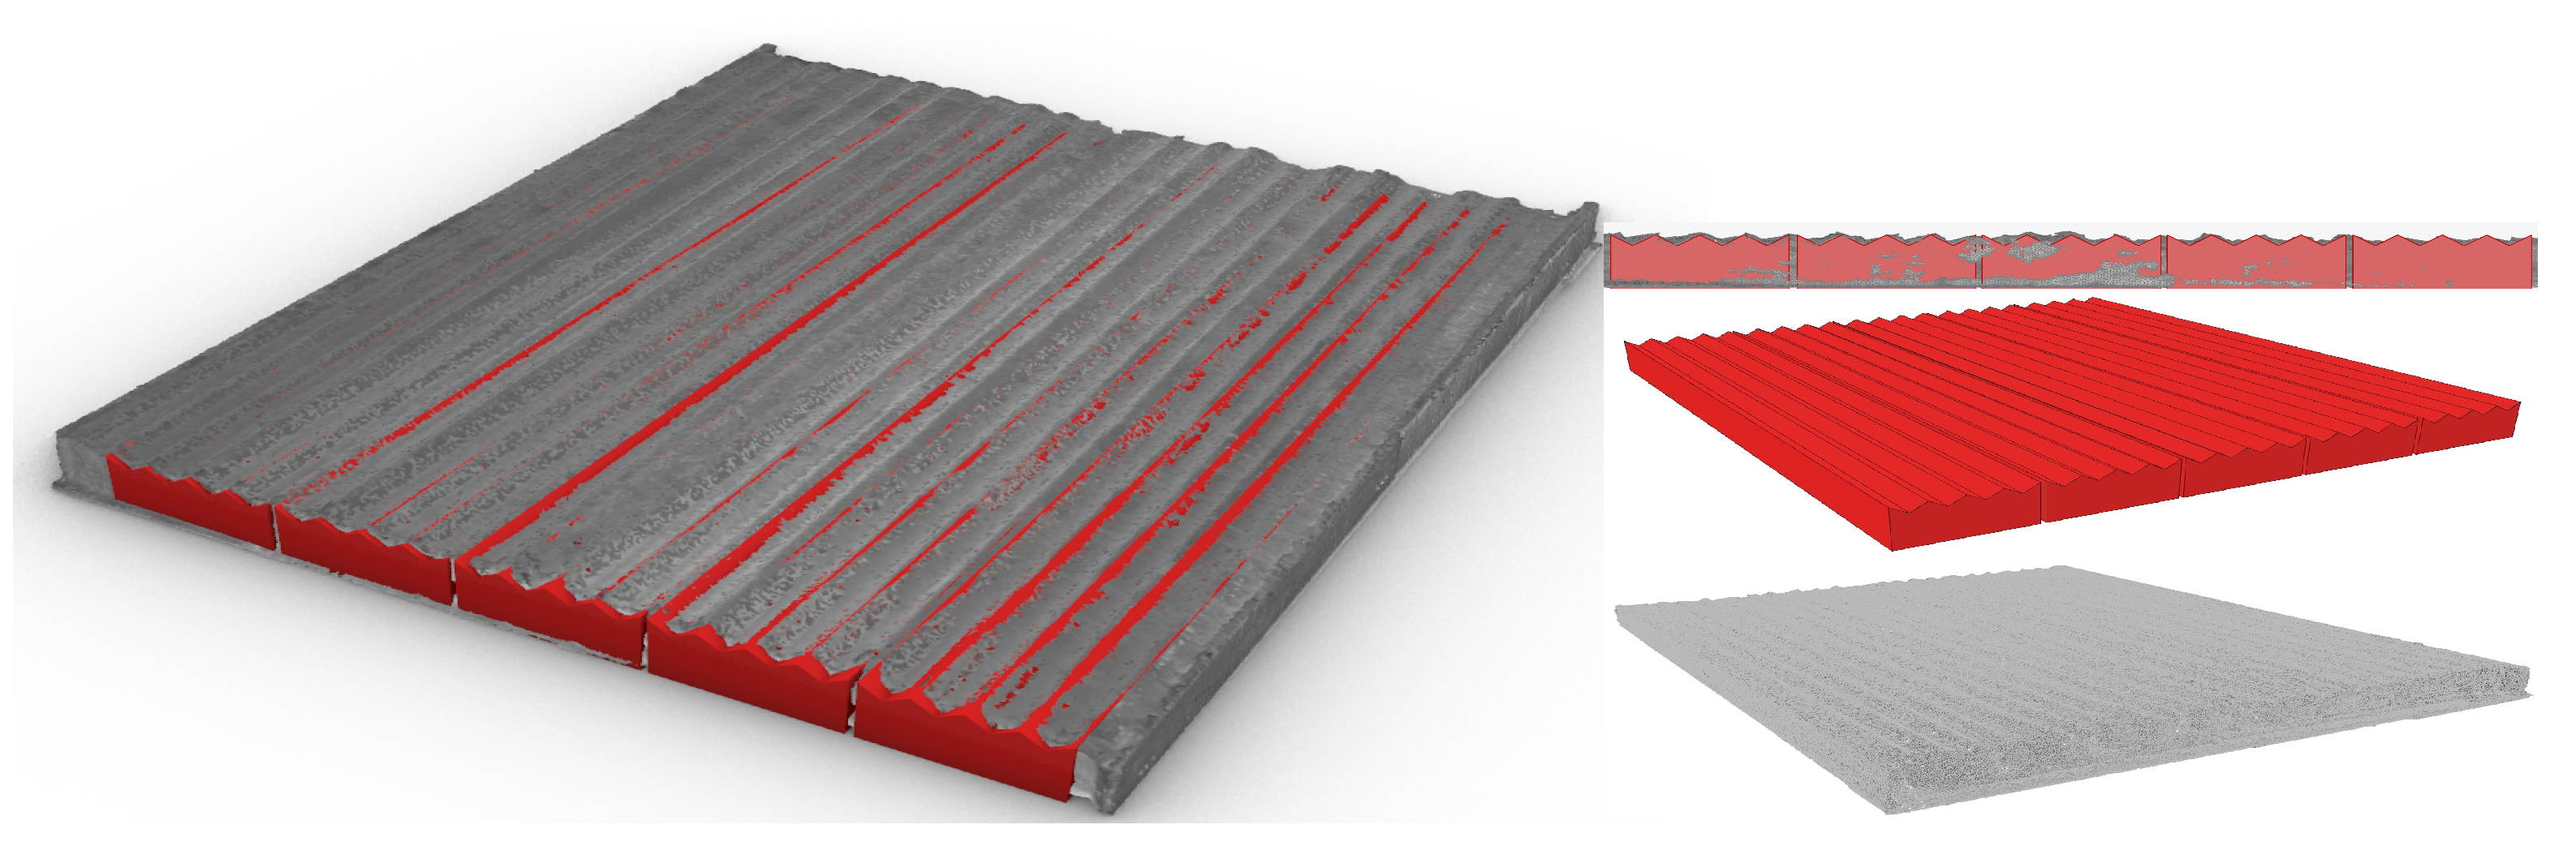
Three-dimensional scans of the entire milled concrete surface, compared with the corresponding CAD model, highlighting deviations and matching areas.
Figure 22.
Three-dimensional scans of the entire milled concrete surface, compared with the corresponding CAD model, highlighting deviations and matching areas.
Figure 23.
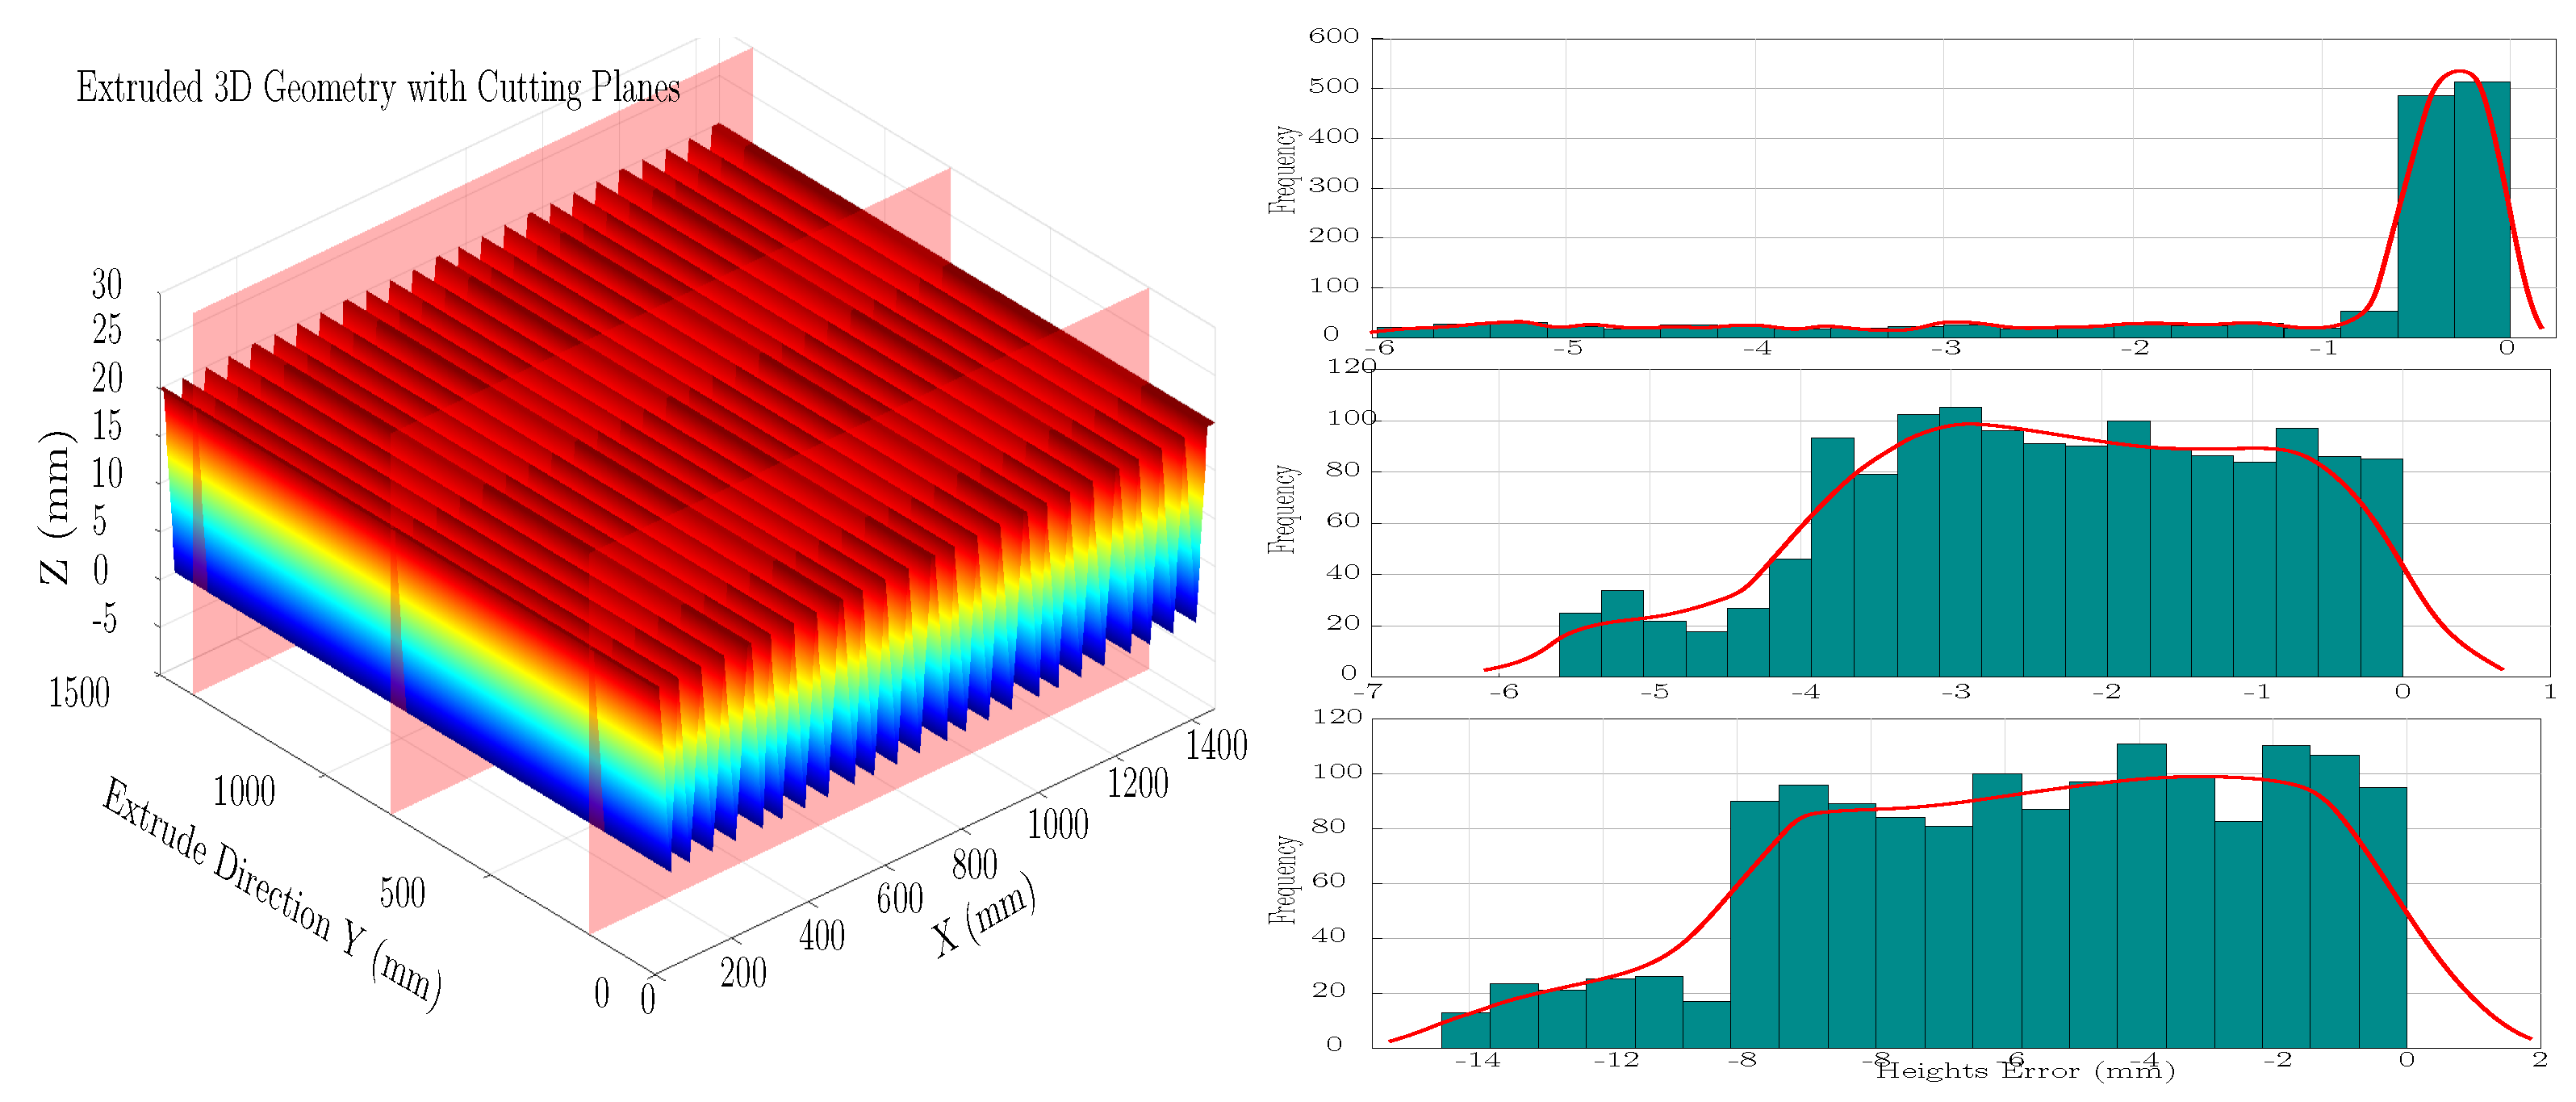
Comparison of the CAD reference geometry with the measured milled surface profile, showing deviations across multiple cross-sections and the overall 3D surface topology.
Figure 23.
Comparison of the CAD reference geometry with the measured milled surface profile, showing deviations across multiple cross-sections and the overall 3D surface topology.
Figure 24.
CAD–scan comparison along sampled sections: blue = CAD reference profile, red = 3D-scan profile of the milled element. Plots show Z vs. X along sampled toolpaths; deviations indicate residual waviness and local over/under-cut.
Figure 24.
CAD–scan comparison along sampled sections: blue = CAD reference profile, red = 3D-scan profile of the milled element. Plots show Z vs. X along sampled toolpaths; deviations indicate residual waviness and local over/under-cut.
Figure 25.
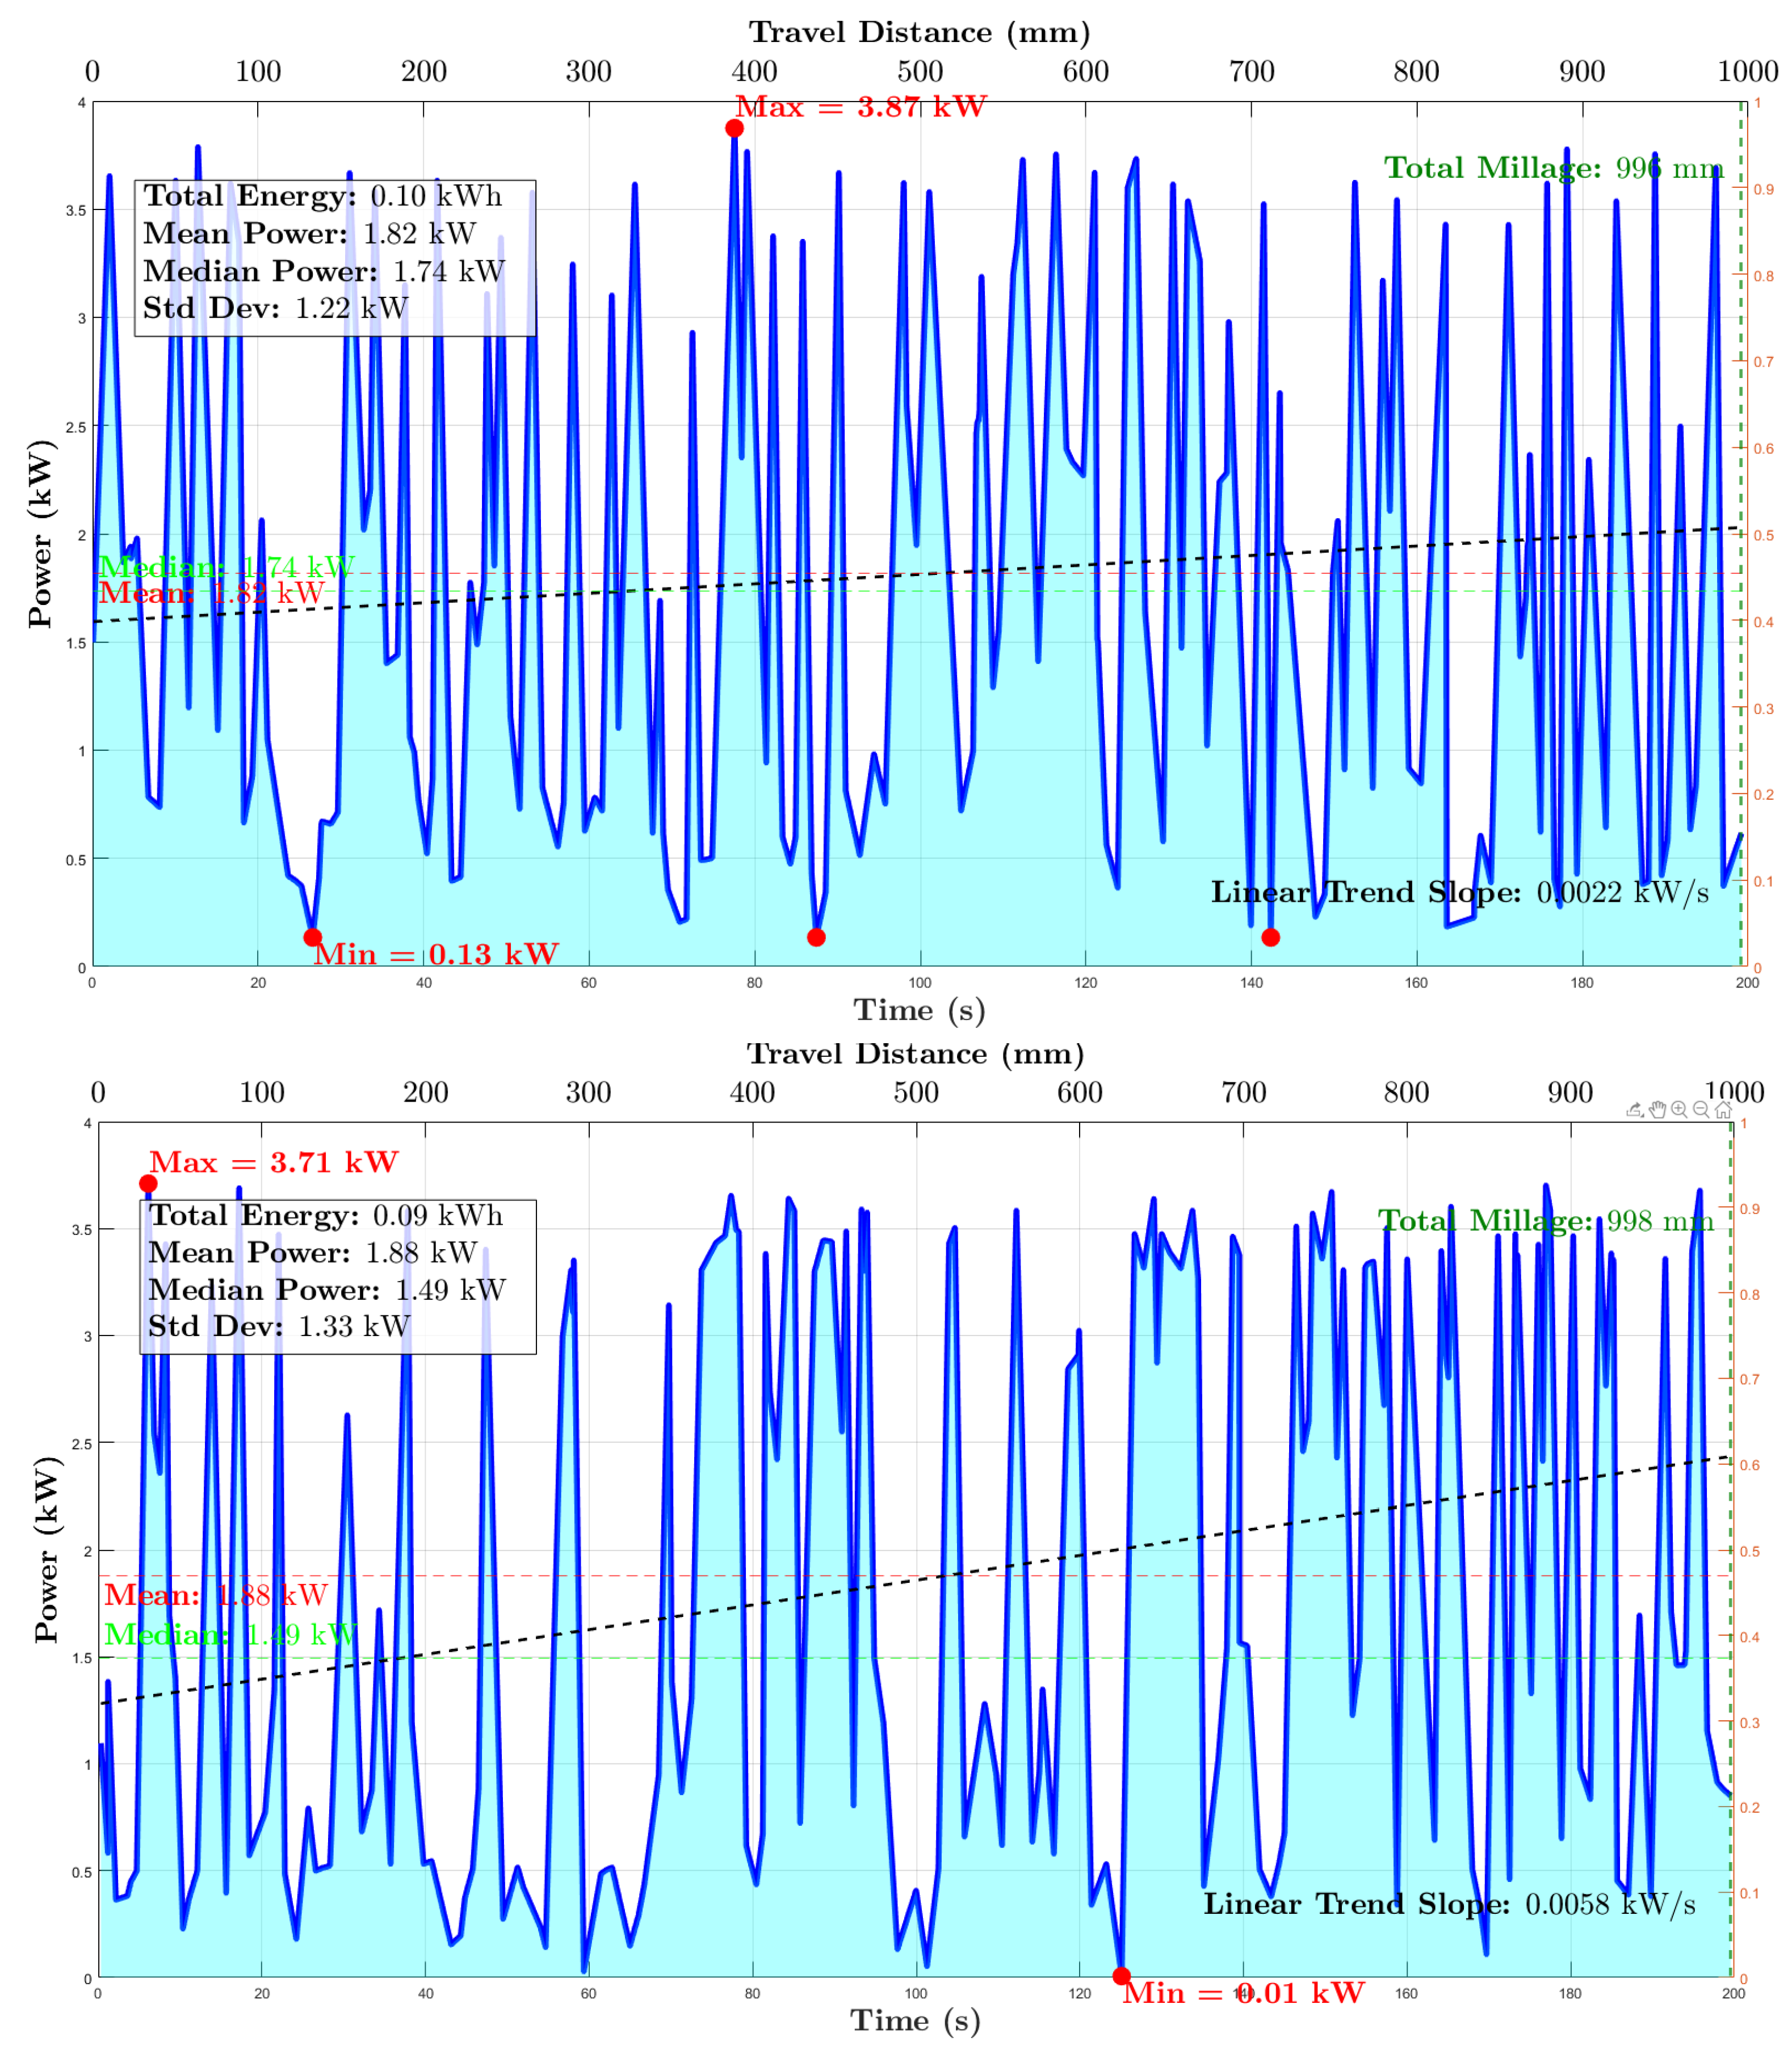
Power–time records for two divisions (examples T1 and T2). The shaded area represents total milling energy . Mean power levels are indicated with dashed lines; extrema are annotated. The upper abscissa maps time to the equivalent travel distance at the programmed feed rate.
Figure 25.
Power–time records for two divisions (examples T1 and T2). The shaded area represents total milling energy . Mean power levels are indicated with dashed lines; extrema are annotated. The upper abscissa maps time to the equivalent travel distance at the programmed feed rate.
Figure 26.
Superimposed electric-power time histories for shotcrete (T1,3,5) and extrusion (T2,4,6), illustrating the rise in baseline level and peak evolution with curing time.
Figure 26.
Superimposed electric-power time histories for shotcrete (T1,3,5) and extrusion (T2,4,6), illustrating the rise in baseline level and peak evolution with curing time.
Table 1.
Time-dependent changes in core yield stress and surface texture metrics (ETD, MPD) measured by penetrometer for the printable concrete (water fraction ). Penetrometer values reflect material yield stress under quasi-static loading with a small tip (low confinement).
Table 1.
Time-dependent changes in core yield stress and surface texture metrics (ETD, MPD) measured by penetrometer for the printable concrete (water fraction ). Penetrometer values reflect material yield stress under quasi-static loading with a small tip (low confinement).
| Age [min] | Yield Stress (Core) [N/mm2 | ETD [mm] | MPD [mm] |
|---|
| 10 | ≈0.000 | ≈0.70 | ≈0.65 |
| 15 | ≈0.016 | – | – |
| 45 | ≈0.031 | ≈0.35 | ≈0.25 |
| 90 | ≈0.050 | ≈0.30 | ≈0.15 |
Table 2.
Screening matrix: measured stamping force F [N] and nominal stress [N/mm2] with mm2, for four water fractions and five ages t. Highlighted cells mark the practical operational range for stamping (–120 min).
Table 2.
Screening matrix: measured stamping force F [N] and nominal stress [N/mm2] with mm2, for four water fractions and five ages t. Highlighted cells mark the practical operational range for stamping (–120 min).
| | Force F [N] | Stress [N/mm2] |
|---|
| Age [min] | 11.5% | 13.0% | 15.0% | 16.7% | 11.5% | 13.0% | 15.0% | 16.7% |
|---|
| 15 | 70 | 55 | 20 | 20 | 0.112 | 0.088 | 0.032 | 0.032 |
| 40 | 200 | 90 | 117 | 62 | 0.320 | 0.144 | 0.187 | 0.099 |
| 65 | 219 | 106 | 120 | 86 | 0.350 | 0.170 | 0.192 | 0.137 |
| 90 | 260 | 124 | 111 | 98 | 0.416 | 0.198 | 0.177 | 0.156 |
| 120 | 270 | 158 | 159 | 112 | 0.432 | 0.253 | 0.254 | 0.179 |
Table 3.
Factor levels and coding for the PB12 screening and subsequent 2-level factorial regressions on the composite stamp.
Table 3.
Factor levels and coding for the PB12 screening and subsequent 2-level factorial regressions on the composite stamp.
| Factor | Low Level () | High Level () |
|---|
| Water fraction [%] | 10% | 15% |
| Age at stamping t [min] | 50 | 130 |
| Stamping load F [kN] | ≈17 | ≈25 |
Table 4.
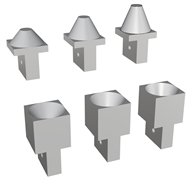
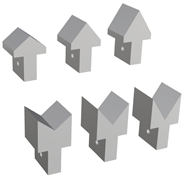
Details of the stamping tools used in the experiments, showing (a) assembled multi-geometry stamp block, (b) examples of individual stamp pairs with corresponding positive and negative geometries, and (c) CAD models of all stamp types, including pyramid, truncated pyramid, cone, cylindrical, hemisphere, truncated cone, box, and triangular forms.
![Buildings 15 04521 i001 Buildings 15 04521 i001]() | ![Buildings 15 04521 i002 Buildings 15 04521 i002]() | ![Buildings 15 04521 i003 Buildings 15 04521 i003]() |
| Assembled Stamp | Pyramid and Truncated Pyramid | Stamp Pair |
![Buildings 15 04521 i004 Buildings 15 04521 i004]() | ![Buildings 15 04521 i005 Buildings 15 04521 i005]() | ![Buildings 15 04521 i006 Buildings 15 04521 i006]() | ![Buildings 15 04521 i007 Buildings 15 04521 i007]() |
| Cone | Cylindrical | Hemisphere | Truncated-Cone |
![Buildings 15 04521 i008 Buildings 15 04521 i008]() | ![Buildings 15 04521 i009 Buildings 15 04521 i009]() | ![Buildings 15 04521 i010 Buildings 15 04521 i010]() | ![Buildings 15 04521 i011 Buildings 15 04521 i011]() |
| Box | Truncated-Pyramid | Pyramid | Triangular |
Table 5.
Stamping forces for grouped configurations (G1–G6) at . Values are global reactions (N) measured during the grouped press at the indicated ages.
Table 5.
Stamping forces for grouped configurations (G1–G6) at . Values are global reactions (N) measured during the grouped press at the indicated ages.
| Config. | 90 min | 120 min | 150 min | Config. | 90 min | 120 min | 150 min |
|---|
| G1 | 608 | 1100 | 1371 | G4 | 1970 | 1900 | 2200 |
| G2 | 900 | 1212 | 1411 | G5 | 1140 | 1150 | 1537 |
| G3 | 1380 | 1700 | 2093 | G6 | 912 | 1371 | 1400 |
Table 6.
Control mode and stamping cycle timing for the main test series. Each cycle consists of a displacement-controlled () downstroke, a dwell under nominally constant load, and a linear upstroke.
Table 6.
Control mode and stamping cycle timing for the main test series. Each cycle consists of a displacement-controlled () downstroke, a dwell under nominally constant load, and a linear upstroke.
| Series | Stamp type | Downstroke | Dwell | Upstroke |
|---|
| Screening (Table 2) | single 25 × 25 mm | ≈2 s, | ≈0 s | ≈1 s, |
| Composite DOE (, ) | four-feature stamp | ≈2 s, | ≈3 min | ≈1 s, |
| Duration series (B.1–B.6) | four-feature stamp | ≈2 s, | 0.5, 3, 10 min | ≈1 s, |
Table 7.
Experimental matrix for composite stamping tests: water fraction (10% or 15%), concrete age (50 or 130 min), and applied stamping load F (kN). The 12 runs follow a PB12 testing plan.
Table 7.
Experimental matrix for composite stamping tests: water fraction (10% or 15%), concrete age (50 or 130 min), and applied stamping load F (kN). The 12 runs follow a PB12 testing plan.
| Test | A.1 | A.2 | A.3 | A.4 | A.5 | A.6 | A.7 | A.8 | A.9 | A.10 | A.11 | A.12 |
|---|
| Water (%) | 10 | 15 | 15 | 15 | 10 | 15 | 15 | 10 | 10 | 10 | 10 | 15 |
| Age (min) | 130 | 50 | 50 | 130 | 130 | 50 | 130 | 50 | 130 | 50 | 50 | 130 |
| Load F (kN) | 25.5 | 21.0 | 16.2 | 15.0 | 18.1 | 17.1 | 18.0 | 16.2 | 25.0 | 24.6 | 17.3 | 17.1 |
Table 8.
Multi-response optimization for the four stamp geometries was carried out in Minitab over the tested ranges of water fraction (10–15 %), stamping load F (17–25 kN), and age t (50–130 min). The responses were the absolute deviations in height and lateral diameter/width. Each response was converted to a desirability , and the composite desirability was used ( = perfect match). The table lists, for each geometry, the three settings with the highest D in the tested domain.
| Geometry | (%) | F (kN) | t (min) | | | D |
|---|
| Pyramid | 10 | 17 | 130 | 0.29 | 0.95 | 0.52 |
| Pyramid | 15 | 17 | 50 | 0.20 | 0.20 | 0.20 |
| Pyramid | 15 | 25 | 50 | 0.08 | 0.11 | 0.11 |
| Cone | 10 | 25 | 104.2 | 0.73 | 1.00 | 0.86 |
| Cone | 15 | 25 | 50 | 0.53 | 0.58 | 0.55 |
| Cone | 15 | 17 | 50 | 0.53 | 0.51 | 0.52 |
| Truncated cone | 10 | 25 | 67.8 | 0.95 | 0.83 | 0.89 |
| Truncated cone | 15 | 25 | 130 | 0.63 | 0.79 | 0.70 |
| Truncated cone | 15 | 17 | 130 | 0.54 | 0.76 | 0.64 |
| Truncated pyramid | 10 | 25 | 96.9 | 1.00 | 0.90 | 0.95 |
| Truncated pyramid | 15 | 25 | 50 | 0.61 | 0.48 | 0.54 |
| Truncated pyramid | 15 | 17 | 50 | 0.55 | 0.32 | 0.42 |
Table 9.
Optimized settings and resulting lowest experienced deviations for each geometry. The applied quantity is the stamping load F. and denote signed scan-to-CAD differences in diameter/width and height.
Table 9.
Optimized settings and resulting lowest experienced deviations for each geometry. The applied quantity is the stamping load F. and denote signed scan-to-CAD differences in diameter/width and height.
| | Water | Load F | Age t | | | D |
|---|
| Geometry | (%) | (kN) | (min) | (mm) | (mm) | - |
|---|
| Truncated Pyramid | 10 | 25 | 96.9 | 0.268 | −0.59 | 0.9536 |
| Truncated Cone | 10 | 25 | 67.8 | −0.376 | 0.24 | 0.8927 |
| Cone | 10 | 25 | 104.2 | 0.254 | 1.07 | 0.8959 |
| Pyramid | 10 | 17 | 130 | 0.435 | −9.30 | 0.5266 |
Table 10.
Experimental matrix for the stamping-duration study. Water fraction is fixed at 10%, and the applied quantity is stamping loadF (kN).
Table 10.
Experimental matrix for the stamping-duration study. Water fraction is fixed at 10%, and the applied quantity is stamping loadF (kN).
| Specimen ID | Stamping Duration (min) | Concrete Age t (min) | Load F (kN) |
|---|
| B.1 | 0.5 | 60 | 25 |
| B.2 | 3.0 | 60 | 25 |
| B.3 | 10.0 | 60 | 25 |
| B.4 | 0.5 | 90 | 25 |
| B.5 | 3.0 | 90 | 25 |
| B.6 | 10.0 | 90 | 25 |
Table 11.
Parameter matrix for the second geometry study (C.1–C.12). Vibration is the duration of an external vibration applied after seating (exactly 1 min or 3 min).
Table 11.
Parameter matrix for the second geometry study (C.1–C.12). Vibration is the duration of an external vibration applied after seating (exactly 1 min or 3 min).
| Name | C.1 | C.2 | C.3 | C.4 | C.5 | C.6 | C.7 | C.8 | C.9 | C.10 | C.11 | C.12 |
|---|
| Age (min) | 50 | 130 | 50 | 130 | 130 | 50 | 50 | 130 | 50 | 50 | 130 | 130 |
| Water (%) | 10 | 15 | 15 | 10 | 15 | 10 | 10 | 10 | 15 | 15 | 15 | 10 |
| Vibration (min) | 3 | 1 | 3 | 1 | 1 | 1 | 1 | 3 | 1 | 3 | 3 | 3 |
Table 12.
Condensed error summary from C.1–C.12. Values are mean absolute deviations (mm, lower is better), averaged over six distinct test conditions with exactly 1 min or 3 min external vibration ( per condition; six conditions per group). Lateral error uses diameter for cone/hemisphere and diameter+width for truncated shapes.
| Geometry | Mean | Mean | Mean |
|---|
| 1 min | 3 min | 1 min | 3 min | 1 min | 3 min |
|---|
| Cone | 0.75 | 1.02 | 0.63 | 0.35 | – |
| Truncated pyramid | 0.33 | 0.43 | 1.32 | 0.53 | 0.85 | 0.77 |
| Hemisphere | 0.28 | 0.20 | 0.78 | 0.54 | – |
| Truncated cone | 0.63 | 0.33 | 0.93 | 0.55 | 0.97 | 0.77 |
Table 13.
Measured tool abrasion as circumference loss (mm) at the head (end face) and side (flank band) for different substrate ages and printing routes. Each tool (–) was used for one run. Measurements by digital caliper; initial circumference (≈20 mm diameter).
Table 13.
Measured tool abrasion as circumference loss (mm) at the head (end face) and side (flank band) for different substrate ages and printing routes. Each tool (–) was used for one run. Measurements by digital caliper; initial circumference (≈20 mm diameter).
| Tool | Age State (min) | Printing Route | Head Loss (mm) | Side Loss (mm) |
|---|
| 0–190 | Shotcrete | 0.345 | 0.100 |
| 200–315 | Extrusion | 0.785 | 0.320 |
| 1360–3320 | Shotcrete | 2.372 | 0.340 |
| 1375–1450 | Extrusion | 2.748 | 0.597 |
| 12,786–12,887 | Shotcrete | 3.046 | 0.784 |
| 12,905–13,037 | Extrusion | 3.344 | 1.193 |
Table 14.
Electrical energy per unit tool path length and measured head circumference loss for the six milling scenarios T1–T6. The total programmed tool path per test was m (identical G-code for all cases).
Table 14.
Electrical energy per unit tool path length and measured head circumference loss for the six milling scenarios T1–T6. The total programmed tool path per test was m (identical G-code for all cases).
| Scenario | Printing Route | E [kWh] | [kJ/m] | [mm] |
|---|
| T1 | Shotcrete | 0.0960 | 13.0 | 0.35 |
| T2 | Extrusion | 0.0969 | 13.1 | 0.79 |
| T3 | Shotcrete | 0.1093 | 14.8 | 2.37 |
| T4 | Extrusion | 0.0928 | 12.6 | 2.75 |
| T5 | Shotcrete | 0.1662 | 22.5 | 3.05 |
| T6 | Extrusion | 0.1450 | 19.6 | 3.34 |
Table 15.
Summary of power measurements for different milling tests, including total energy consumption, mean and median, standard deviation, and minimum and maximum power values.
Table 15.
Summary of power measurements for different milling tests, including total energy consumption, mean and median, standard deviation, and minimum and maximum power values.
| | TotalEnergy | MeanPower | MedianPower | StdDev | MaxPower |
|---|
| Names | (kWh) | (kW) | (kW) | (kW) | (kW) |
|---|
| 0.0960 | 1.818 | 1.737 | 1.217 | 3.874 |
| 0.0969 | 1.849 | 1.323 | 1.323 | 4.195 |
| 0.1093 | 1.970 | 1.214 | 1.490 | 4.490 |
| 0.0928 | 1.881 | 1.493 | 1.333 | 3.710 |
| 0.1662 | 2.982 | 3.714 | 1.531 | 5.313 |
| 0.1450 | 2.610 | 2.507 | 1.583 | 4.911 |

















_Su.png)


