Article

Determination of Acceptable Quality Limit for Casting of A356 Aluminium Alloy: Supplier’s Quality Index (SQI)

1
Metallurgical and Materials Engineering Department, Istanbul University-Cerrahpasa, 34320 Istanbul, Turkey
2
Metallurgical and Materials Engineering Department, Istanbul Technical University, 34469 Istanbul, Turkey
3
Metallurgical and Materials Engineering Department, Ataturk University, 25240 Erzurum, Turkey
4
Mechanical Engineering, Bayburt University, 69000 Bayburt, Turkey
*
Author to whom correspondence should be addressed.
Metals 2019, 9(9), 957; https://doi.org/10.3390/met9090957
Submission received: 2 August 2019 / Revised: 27 August 2019 / Accepted: 29 August 2019 / Published: 30 August 2019
(This article belongs to the Special Issue Dedicating to Professor John Campbell's 80th Birthday)

Abstract

:
Aluminium and its alloys have been widely used in the automotive industry for some time and A356 is one of the most popular aluminium alloys today in the sector. It contains approximately 7 wt.% Si and 0.3 wt.% Mg. Due to the defects that may be present in the cast parts, expected mechanical properties may not be reached and this alloy may perform in service under its potential. In a low pressure die casting, several precautions have to be taken in order to produce high quality and defect-free castings. Temperature of casting and the schemical composition of the melt is recorded continuously. Die temperature, pressure levels and their durations are optimized; degassing and fluxing operations are performed. Yet, regardless of the precautions, there could still be rejected parts. It is becoming clear that a good quality raw material is one of the most underrated points of the industry and that the starting material has a great effect on the final product and it should be taken in to account more seriously. Therefore, regarding the first rule of Campbell’s 10 Rules of Casting, in this study, the quality of the starting material of supply chains for a wheel manufacturer was investigated. Chemical compositions were compared, fluidity tests, mechanical tests and bifilm indexes of these various sources and ingots were measured and a final quality index was proposed to create a reference for the quantification of quality of supplier’s ingots. This new index was compared with the rejection rates.

1. Introduction

Low pressure die casting (LPDC) is one of the most popular choices of cast in aluminium part production methods, particularly in highly critical applications. This is mainly due to the complete control of filling, lowered runner design and feeders, and high production rates. The method uses pressure to fill in the mould cavity thereby the critical velocity [1] is not exceeded. The importance of critical velocity (0.5 m/s) lies in the fact that surface turbulence does not occur, and laminar filling of the mould cavity is achieved. Liu et al. [2] show the importance of mould filling during LPDC. The change in geometry, particularly the cross-section area during filling will result in uncontrolled flow of the melt and thus occurrence of turbulence will lead to porosity formation.
The turbulent casting of aluminium alloys generates a defect called bifilm [3]. Bifilms are folded oxide skins which act as a crack in the liquid and once solidified in the cast part, would lead to the deterioration of the properties. Therefore, it is vital that the cast part should be free from bifilms. Dispinar [4,5,6,7,8] has introduced a new index to quantitatively determine the melt quality, which is called the bifilm index.
When it comes to quality control prior to casting operations, in many cases, only the chemical composition of the alloy is considered as the first quality check. In foundries, the casting operations are controlled tightly, and parameters do not change frequently. Maijer et al. [9] looked into these parameters and proposed a model-based predictive control tool for low pressure die casting. There are several tests that are typically used for additional control parameters such as microstructure (secondary dendrite arm spacing (SDAS) and eutectic modification), X-ray (for porosity) or mechanical tests by sampling from the cast part. Yet, once rejection rates increase, actions take place and engineers start to concentrate on where the problem could have been in the system and every recorded parameter is re-checked and scenarios are put on the table to solve the problem. However, the quality of the supplier’s material is not controlled, and in many occasions the cleanliness of the supplier is disregarded. Several melt cleanliness analysis methods are used but these are only used at different process steps. Most of which are expensive and require consumables. The reliability of these test methods is also debatable. On the other hand, Dispinar [4,5,8] has shown that the reduced pressure test can be used to quantify aluminium melt quality quantitatively. A numerical indication of the melt cleanliness can be measured by the bifilm index.
There usually exists an acceptable range of porosity in cast parts which determines whether they pass the quality control or not. This is particularly related to the fatigue life of cast parts. Avalle et al. [10] studied the comparison of mechanical properties of test specimens and component part sampling. It was shown that after radioscopic investigation, there was no change in fatigue properties of “pass” and “no-pass” samples. This is quite similar to what Dispinar et al. [11] found. Dispinar [11,12] carried out a study on the effect of unravelling of bifilms and their correlation with porosity and mechanical properties. A mould design was used where the same geometry was cast by both gravity and low pressure die casting methods. Two different melts were prepared. The melt with a high bifilm index was cast in a low pressure system and the melt with a low bifilm index was cast as gravity. In gravity casting, the pressure exerted by the feeders was decreasing along the cast part and thus, bifilms had time to open up to form porosity. Thereby, the volumetric porosity was higher in gravity casting compared to the low pressure cast parts. In low pressure, although the bifilm content was higher in the melt, but because the cast part was solidified under constant pressure, bifilms were not unravelled and thus, volumetric porosity was lower. However, the most significant finding of that work was found in the tensile properties. The castings with lower porosity and a higher bifilm index revealed lower mechanical properties and vice versa. Li et al. [13] determined the quality of the cast parts by computed tomography (CT) and concluded that LPDC significantly reduced porosity. Bozchaloei et al. [14] reported the importance of melt quality. It was reported that pouring from a different height causes an increase in bifilm and porosity.
There are several reported works in the literature that show the importance of melt cleanliness. Haberl et al. [15] emphasised the difference between old and new oxides. By degassing, bifilms were removed from the melt and fatigue life of cast parts were increased. Gallo [16] reviewed the importance of optimisation of rotary degassing for improved melt quality. Mostafai et al. [17] showed the correlation between rotary degassing efficiency and quality index of cast aluminium alloys. Different methods were also studied in an aim to clean the melt from defects such ultrasonic degassing and shear methods [18,19,20]. Puga et al. [21,22,23] worked with ultrasonic degassing and claimed that 3 min was good enough to clean the melt and thus tensile properties were increased significantly.
Yao et al. [24] had shown that oxides were the cause of porosity. It was also reported that Sr had decreased porosity. Ramin and Griffiths [25] reported that in the presence of Sr, two folded oxide skins bind together, which was described by Campbell [1] as the healing mechanism. Thereby the porosity was decreased since bifilms were unable to unravel. Uludag et al. [26,27,28,29] studied the influence of Sr on bifilm index. It was found that addition of Sr had decreased the size and length of pores which was attributed to the healing of bifilms as was reported by Ramin [25,30,31].
Many researchers tried to correlate the microstructure with the mechanical properties. In most of the cases [32,33,34,35,36,37,38,39,40,41], it was found that size and distribution of porosity had dominantly affected the fatigue life of LPDC cast parts. It is important to note that most pores were associated with oxides.
Cáceres et al. [42,43,44,45,46,47] proposed the quality index and Alexopoulos [48,49,50,51] worked on the quality index to evaluate the quality of cast aluminium parts. Tiryakioglu et al. [52,53,54] has developed an alternative index. Finding the potential mechanical strength of the aluminium alloys was intended.
It is clear that the control of the quality of the product begins with the control of the melt. Learning the background or the history of the charge material is vital for the process. The kind of scrap that is used to produce these ingots directly determines the oxide films (bifilms) content of the ingot and also the processes that these ingots are used in. Many of the studies have focused on the cleanliness of the melt and the efficiency of degassing mainly due to the dissolved hydrogen. However, the quantification of the bifilm content of the melts were disregarded. Therefore, in this work, four different ingot supplier’s quality was assessed and the correlation between melt quality and the rejection rate of cast parts were evaluated.

2. Experimental

Four different A356 ingot suppliers that are used in wheel production were selected for the tests. For commercial reasons, the names of the sources were coded as A, B, C and D where the chemical composition of these alloys are shown in Table 1.
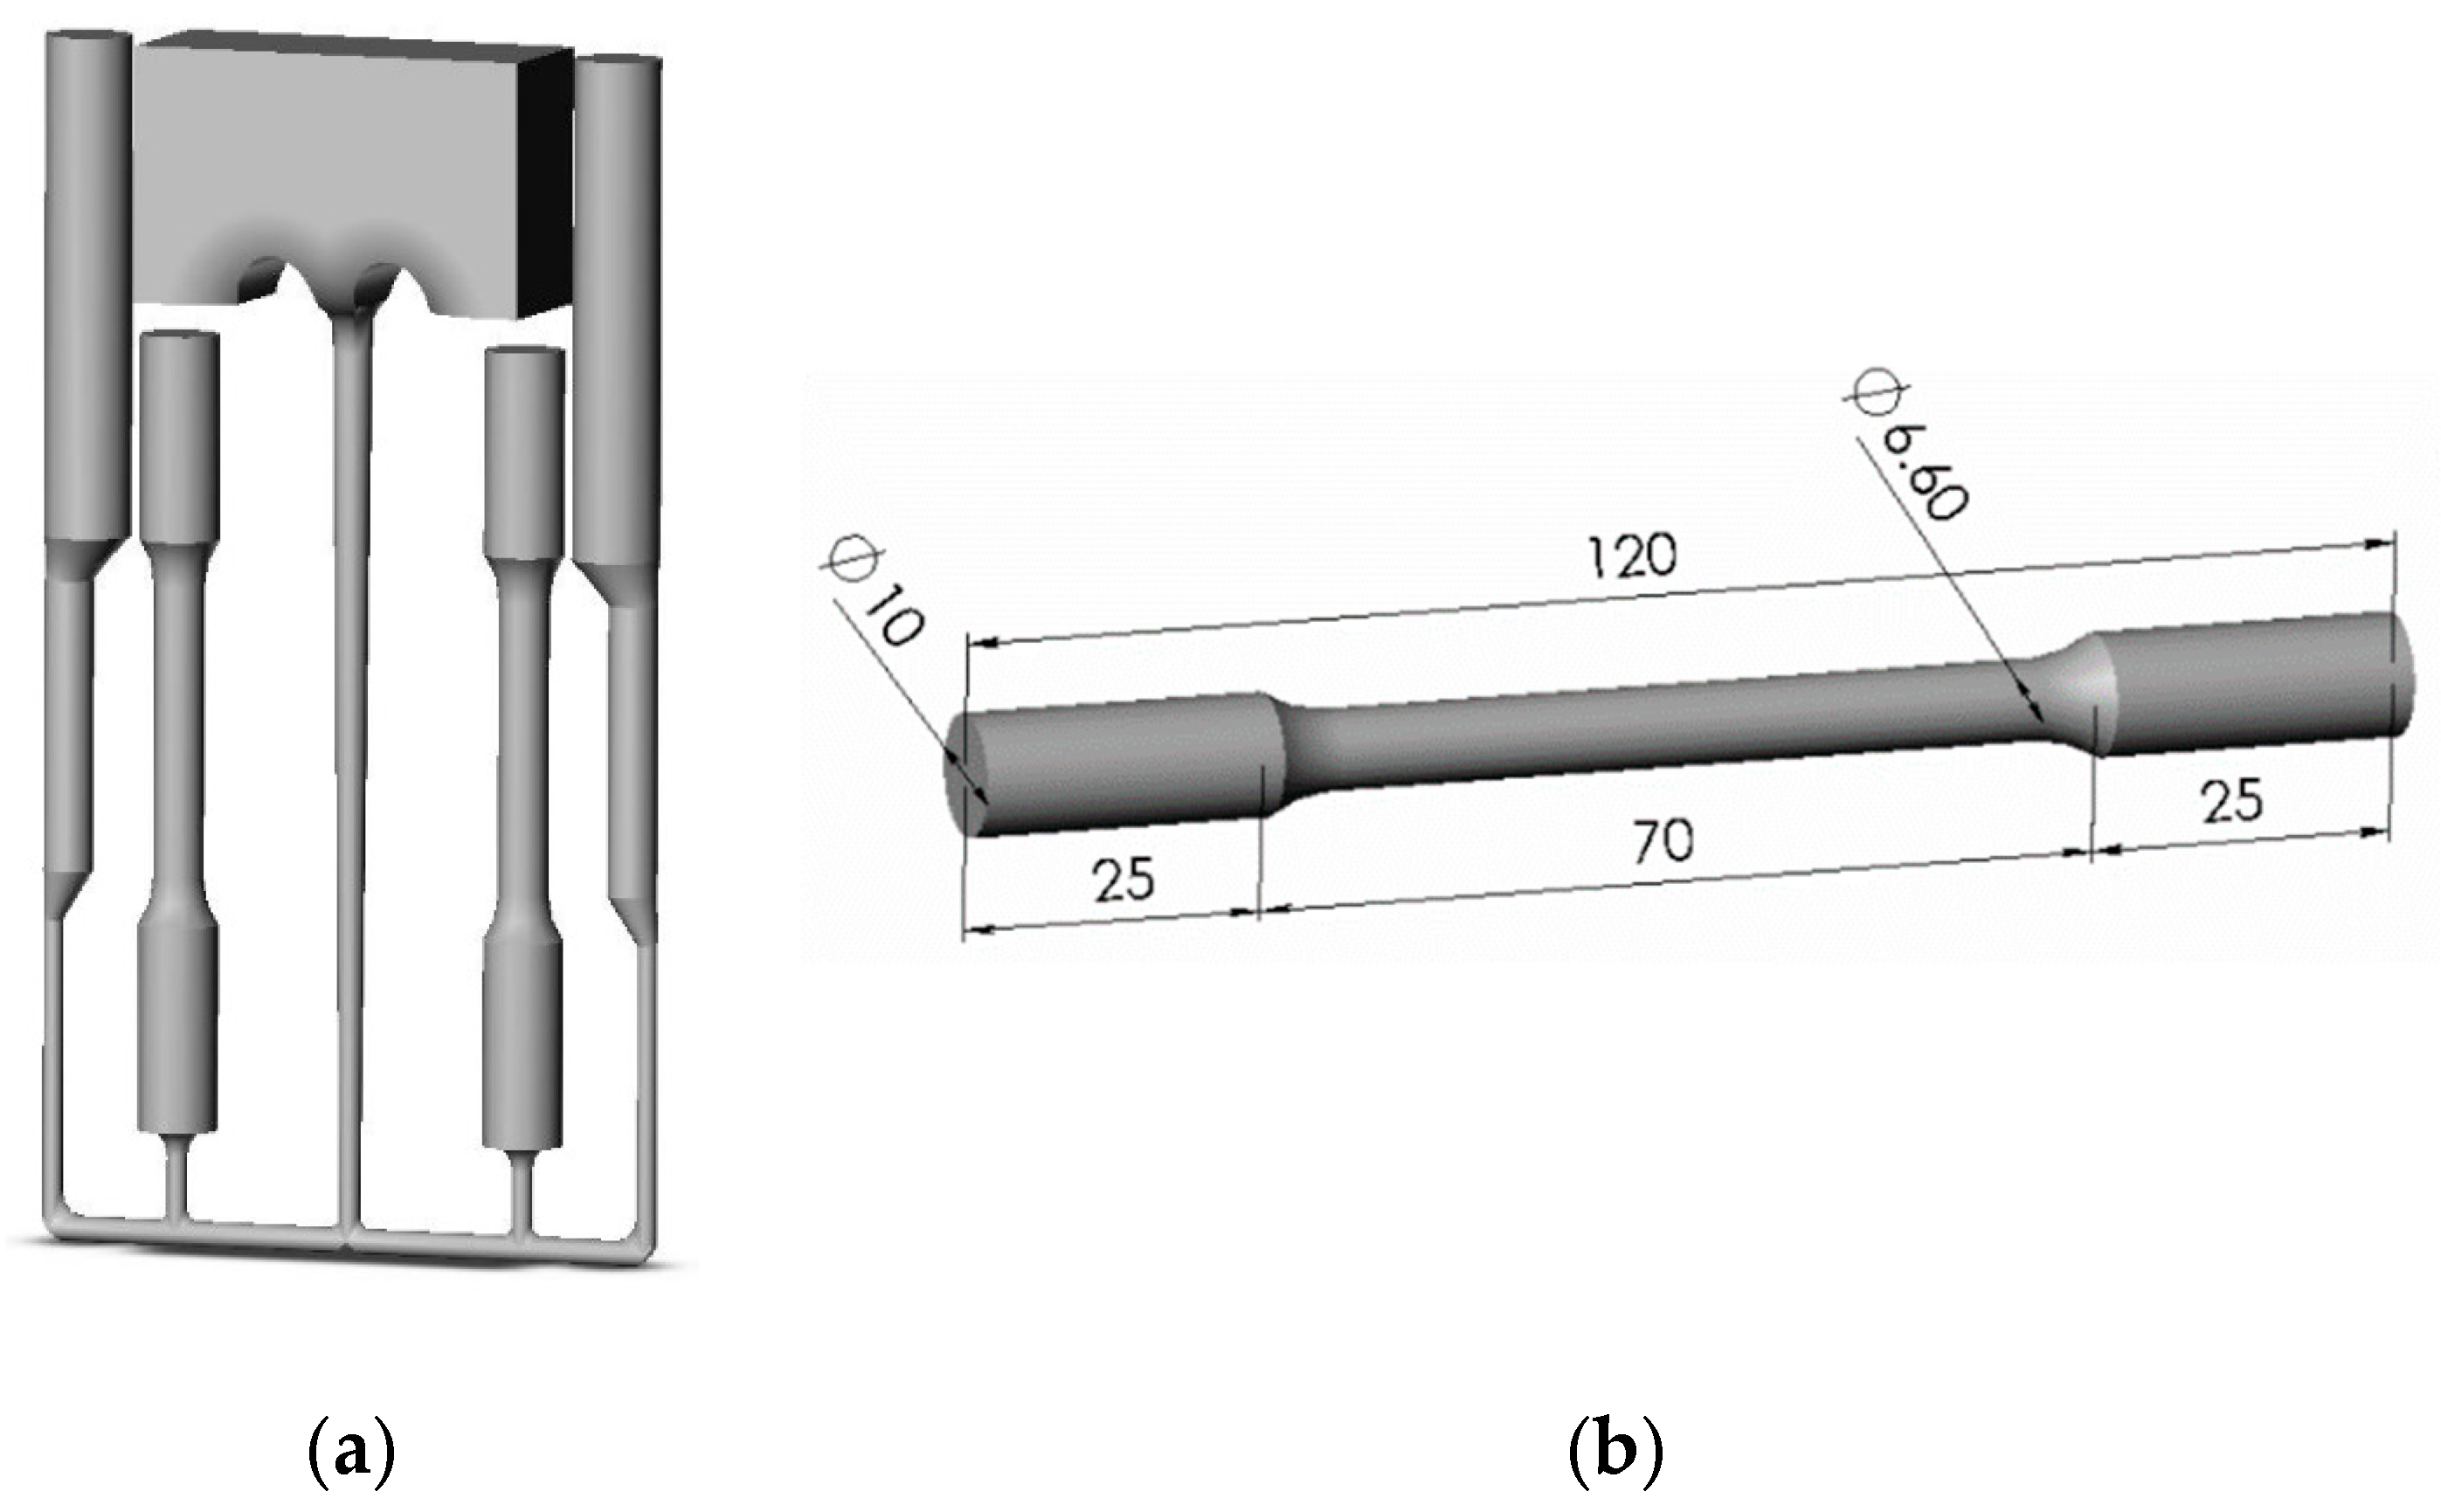
A charge of 10 kg ingots were melted in resistance furnace in SiC crucible at 745 °C. In order to investigate the quality of providers, all casting operations were carried out under the same conditions and no treatment was carried out (no degassing, no addition of modifier or grain refiners). Reduced pressure test samples were collected to measure the bifilm index. Dispinar [4,5,8] has shown how the bifilm index is measured in detail. The main principle is the image analysis of the cross-section of RPT samples where the sum of maximum pore length is measured as an indication of total oxide length. Thus, higher the bifilm index, lower the melt quality. A spiral fluidity test mould was used where dimension is shown in Figure 1. It is well known that fluidity is affected by the oxide content (i.e., bifilm). Therefore, the use of a fluidity test would reveal a correlation between bifilm content and fluidity length. For mechanical property characterisation, tensile bars produced from die mould as seen in Figure 2. The tensile properties are affected by the quantity of oxides that may be present in the cast piece. The higher the quantity of the oxides, more premature fracture will be observed. Thus, the correlation between tensile properties and bifilm content is vital. For both fluidity and tensile tests, the moulds were preheated to 150 °C. The tests were repeated four times.

3. Results and Discussion

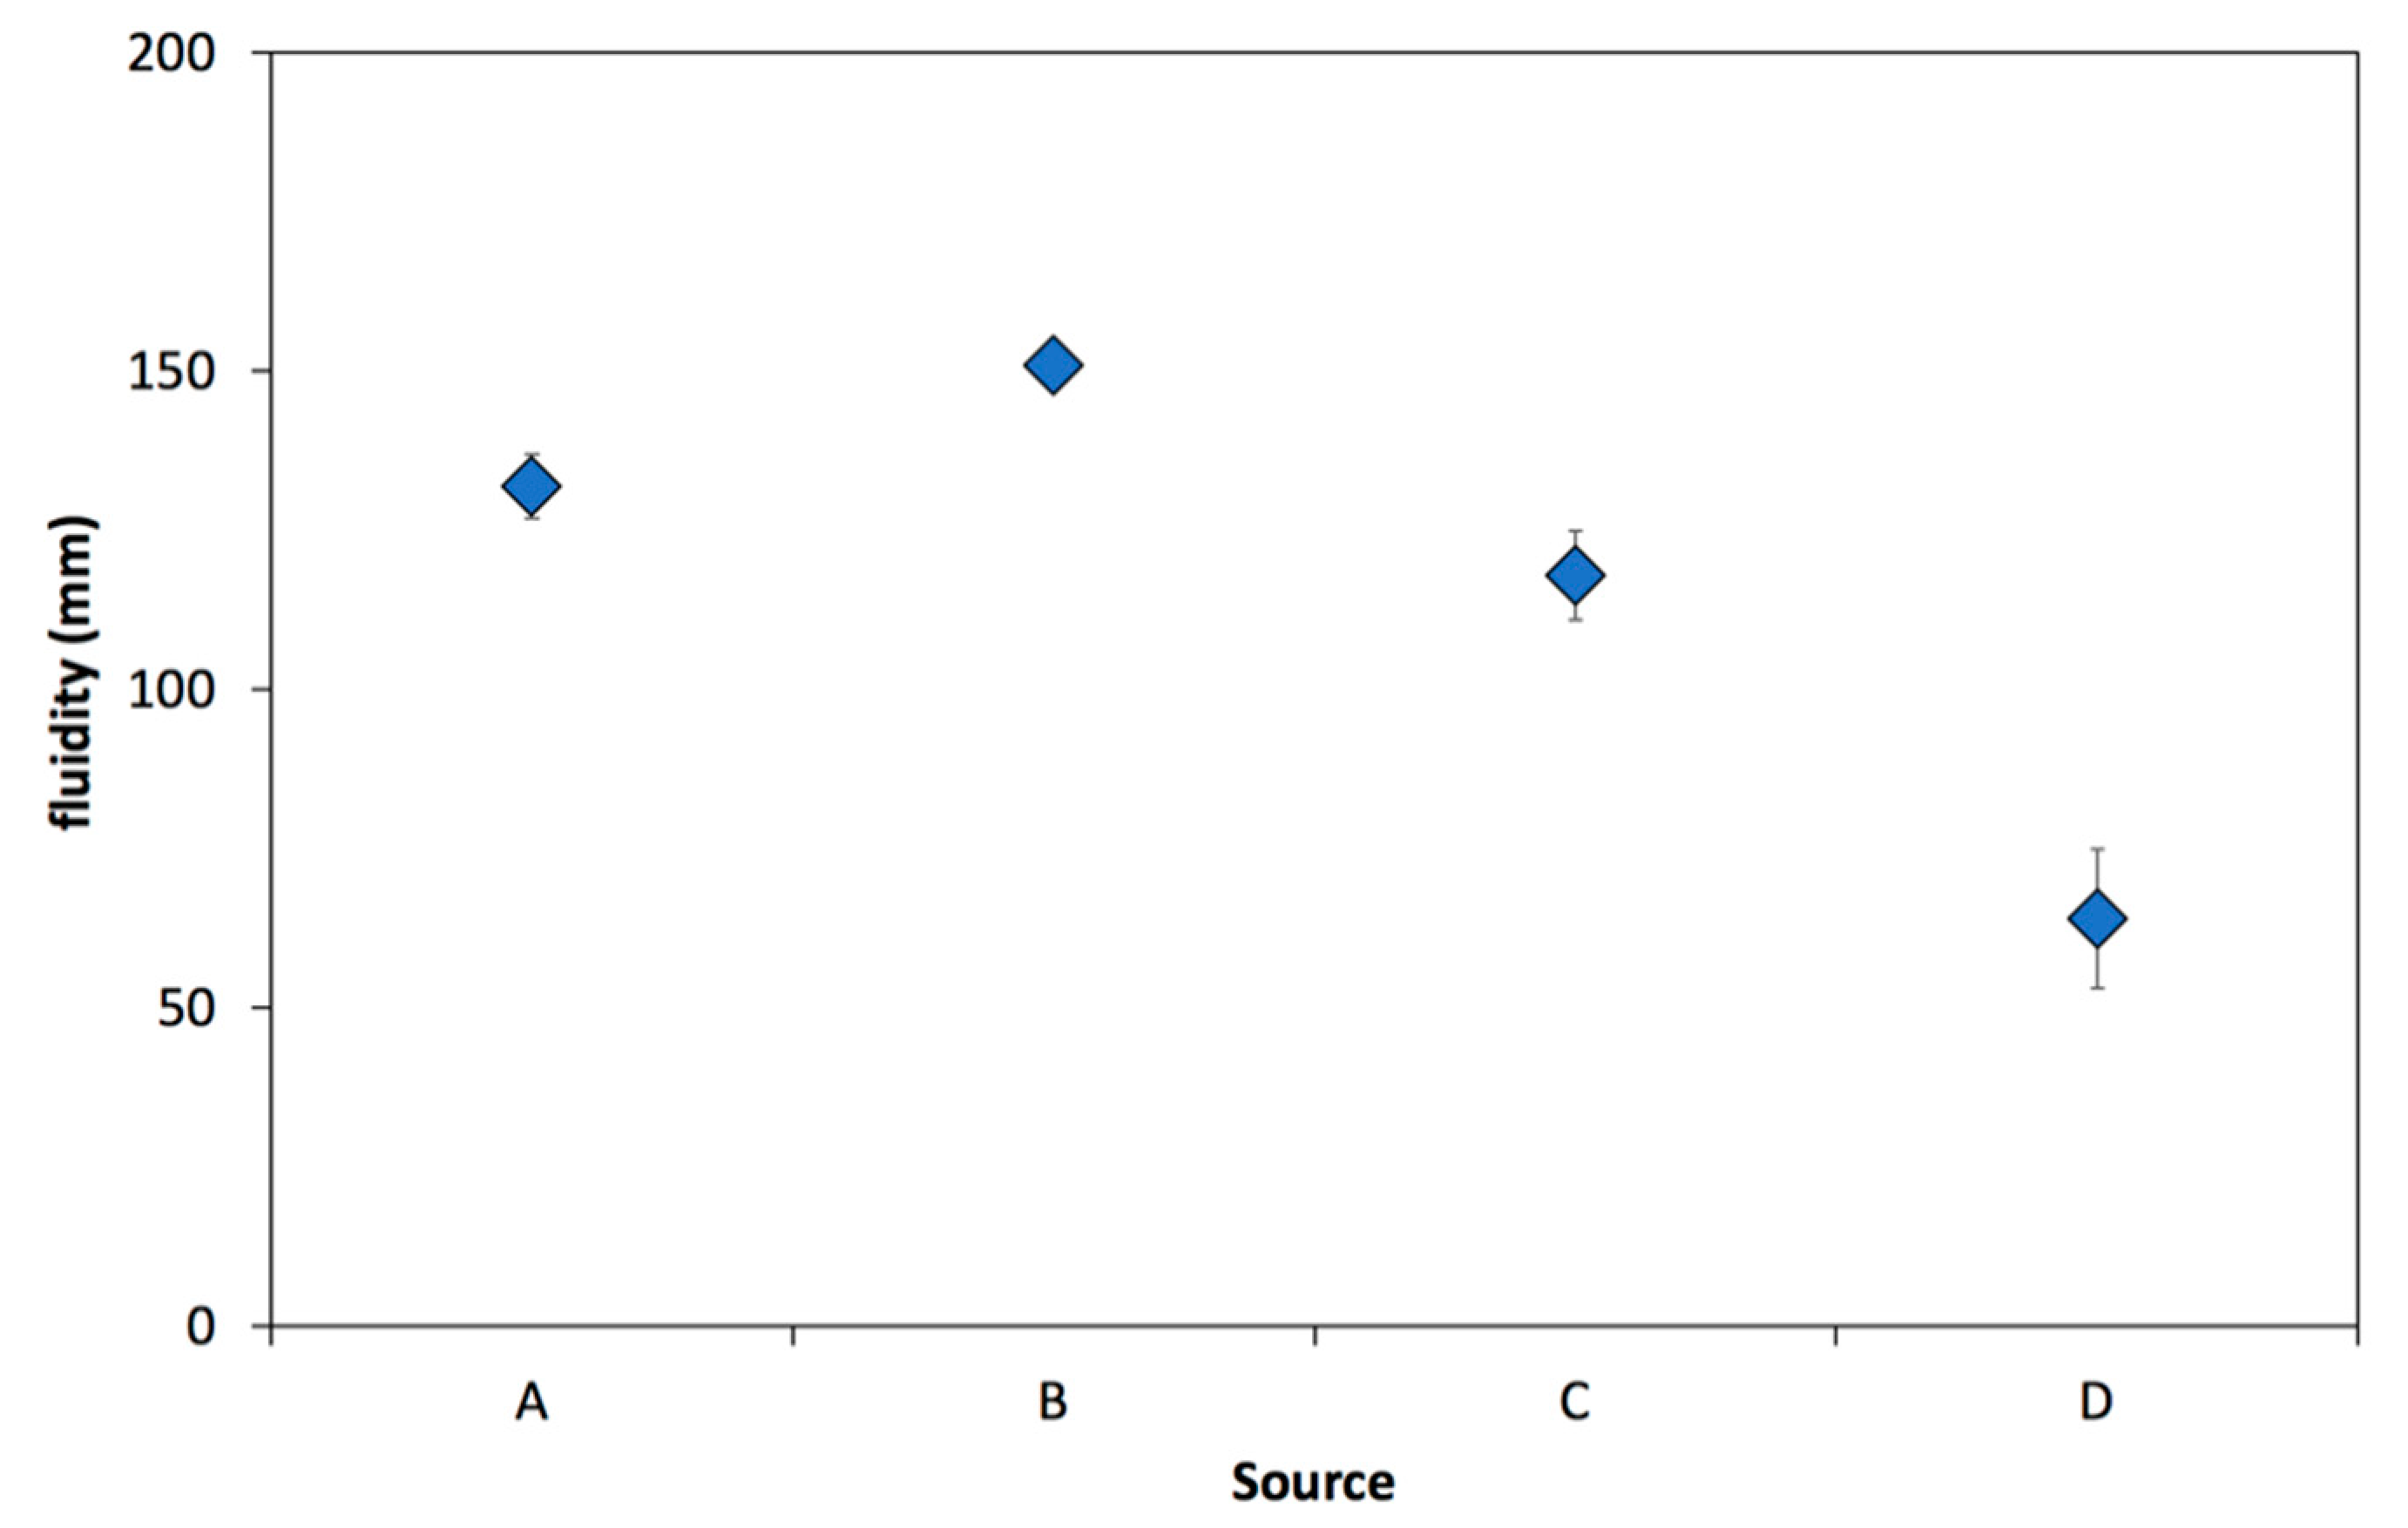
The test results were initially analysed with regard to the sources codes. These are given in Figure 3, Figure 4, Figure 5, Figure 6 and Figure 7. The highest fluidity was obtained from Source B as 151 mm (Figure 3). Source D had the lowest fluidity length of 64 mm. Di Sabatino et al. [55,56] had shown that as the oxide content was increased due to the amount of secondary scrap addition, the fluidity was decreased.
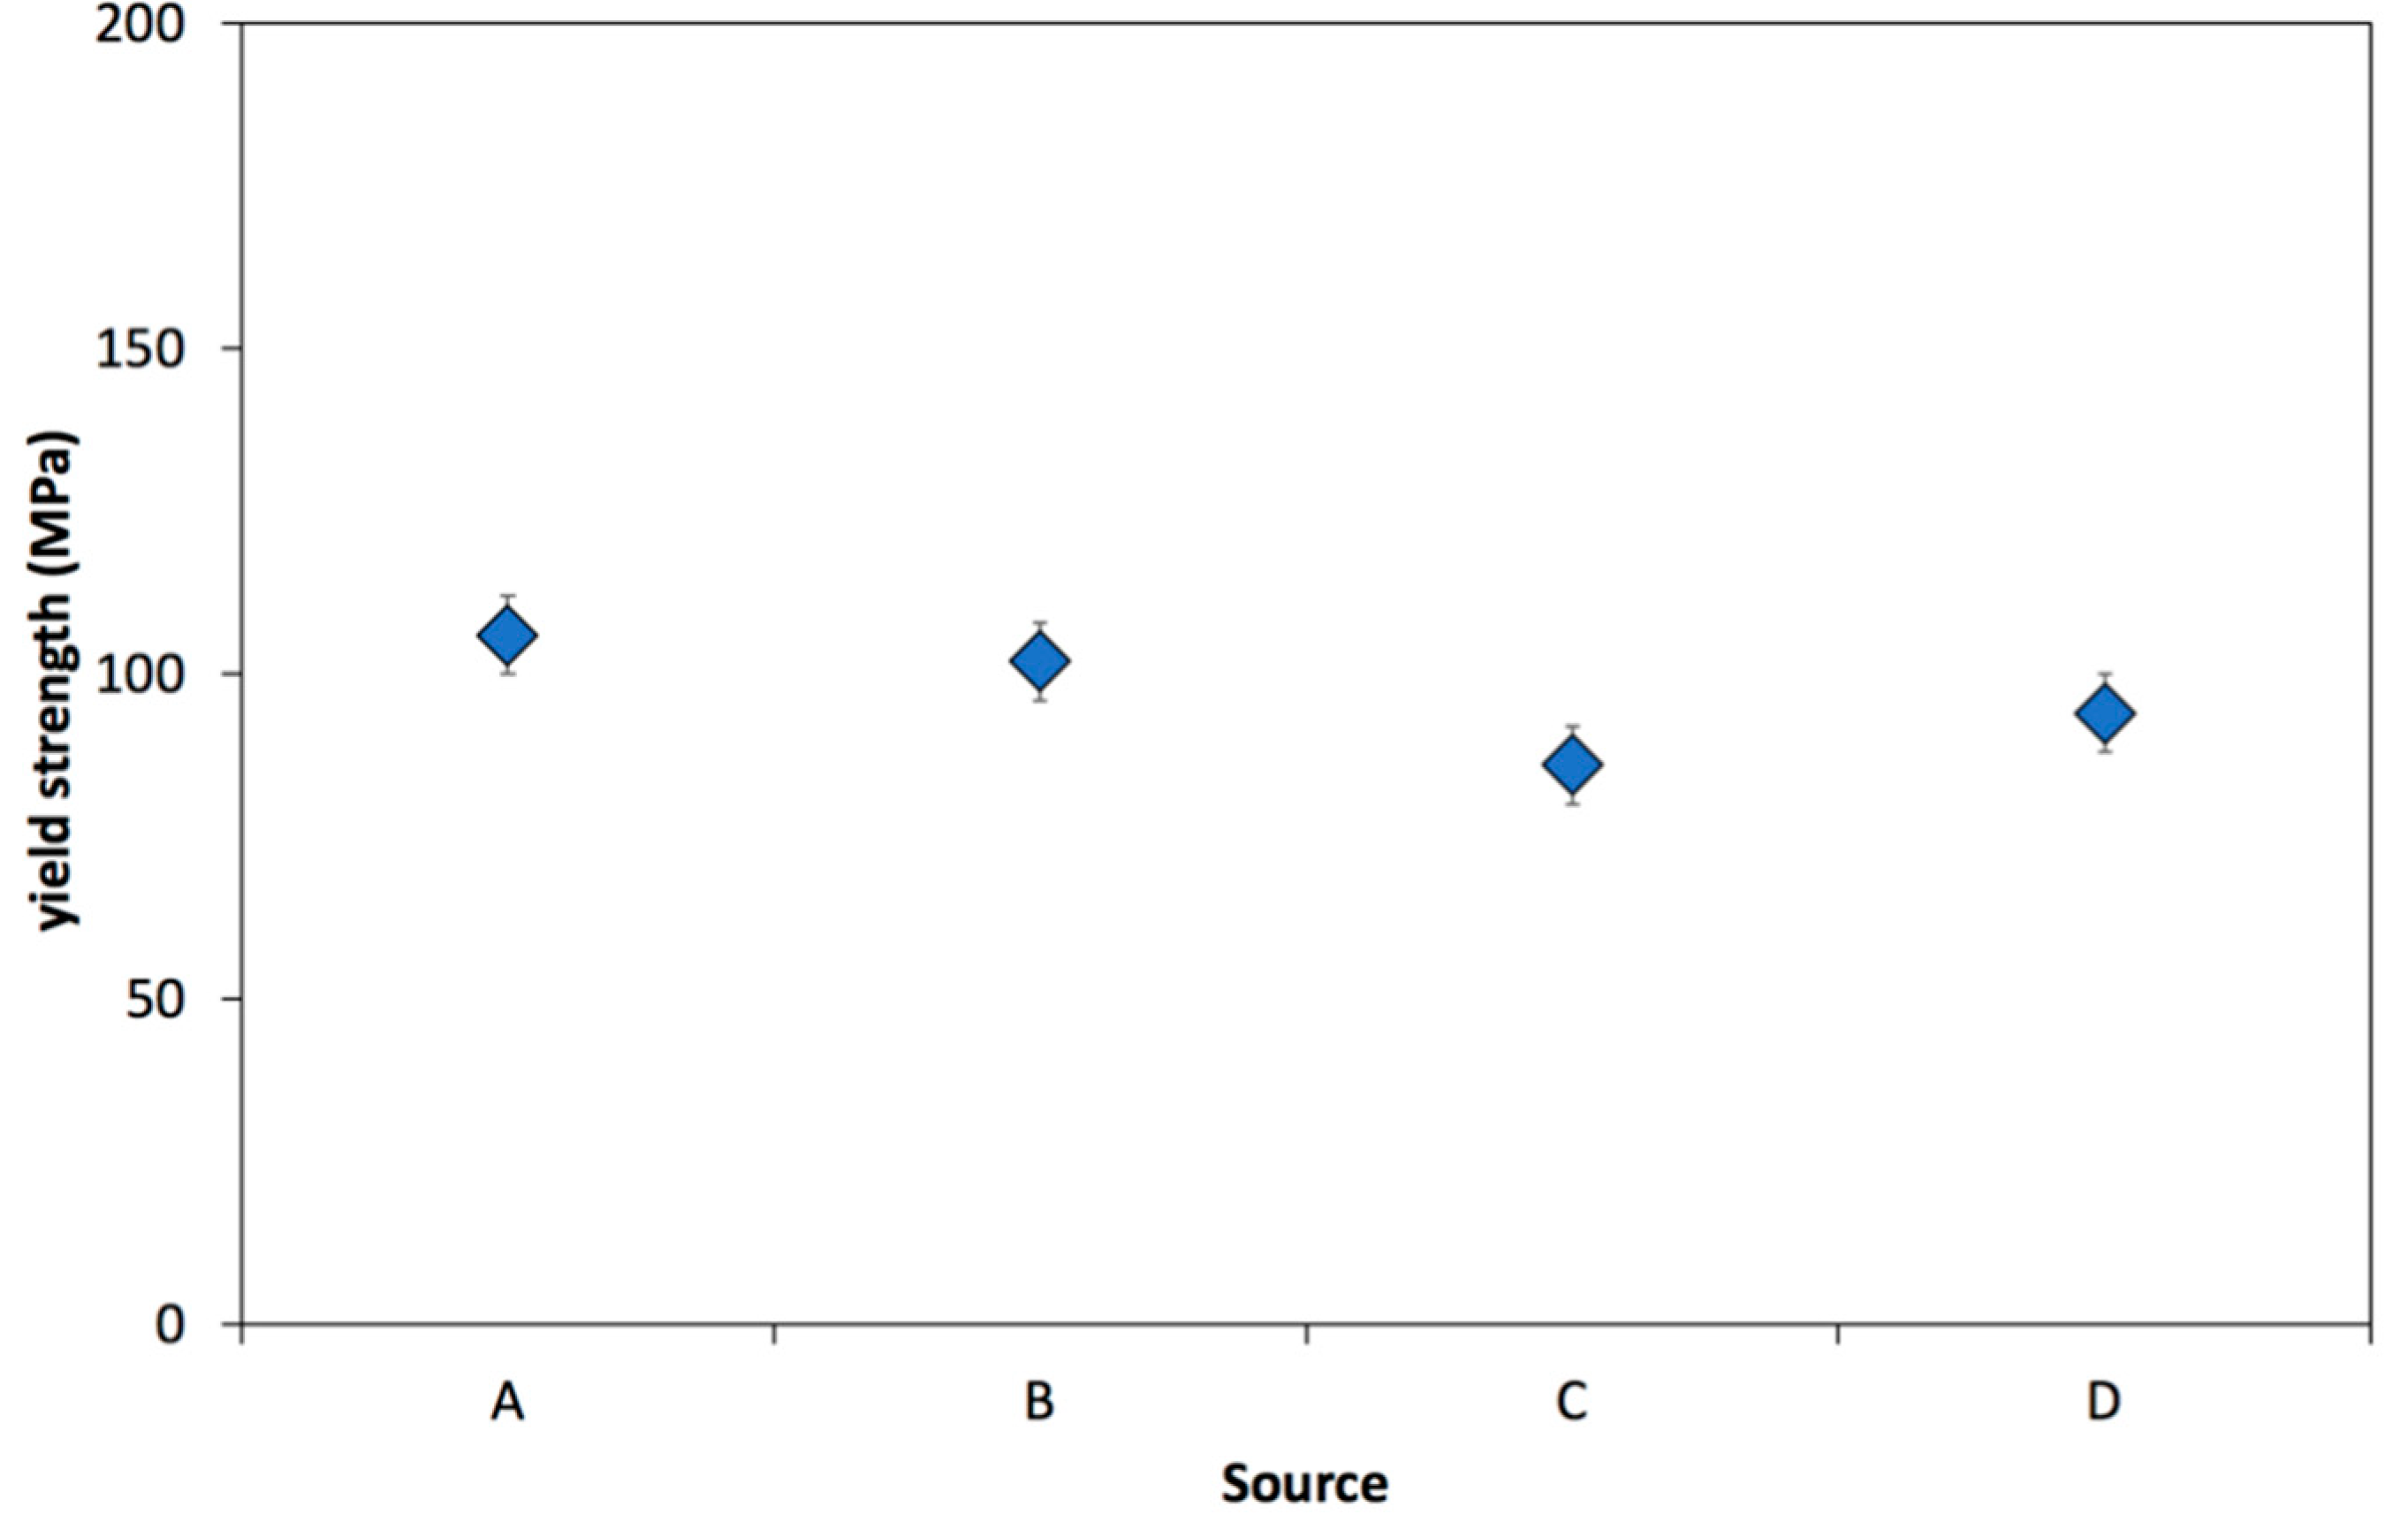
The yield strength was not changed by different sources, as seen in Figure 4. There is no significant difference between the sources and an average of 105 MPa was observed for all the ingots. The quantity of the bifilm content has to be above a certain value in order for a premature fracture to occur before the yield is reached. Dispinar et al. [11] showed that at the same hydrogen content, when the bifilm index was higher than 50 mm, the scatter of the tensile test results was increased. The tensile properties are dominated by SDAS, eutectic particle size and eutectic phase distribution in the absence of defects. Liu and Samuel [57] had found a linear relationship between the elongation at fracture and area percentage of oxides along the tensile axis. The decreased ductility was correlated with the oxides that were coming from the scrap. They also concluded that uncontrolled degassing may introduce more oxides and/or the oxides in the melt may not be reduced which would lead to decreased ductility.
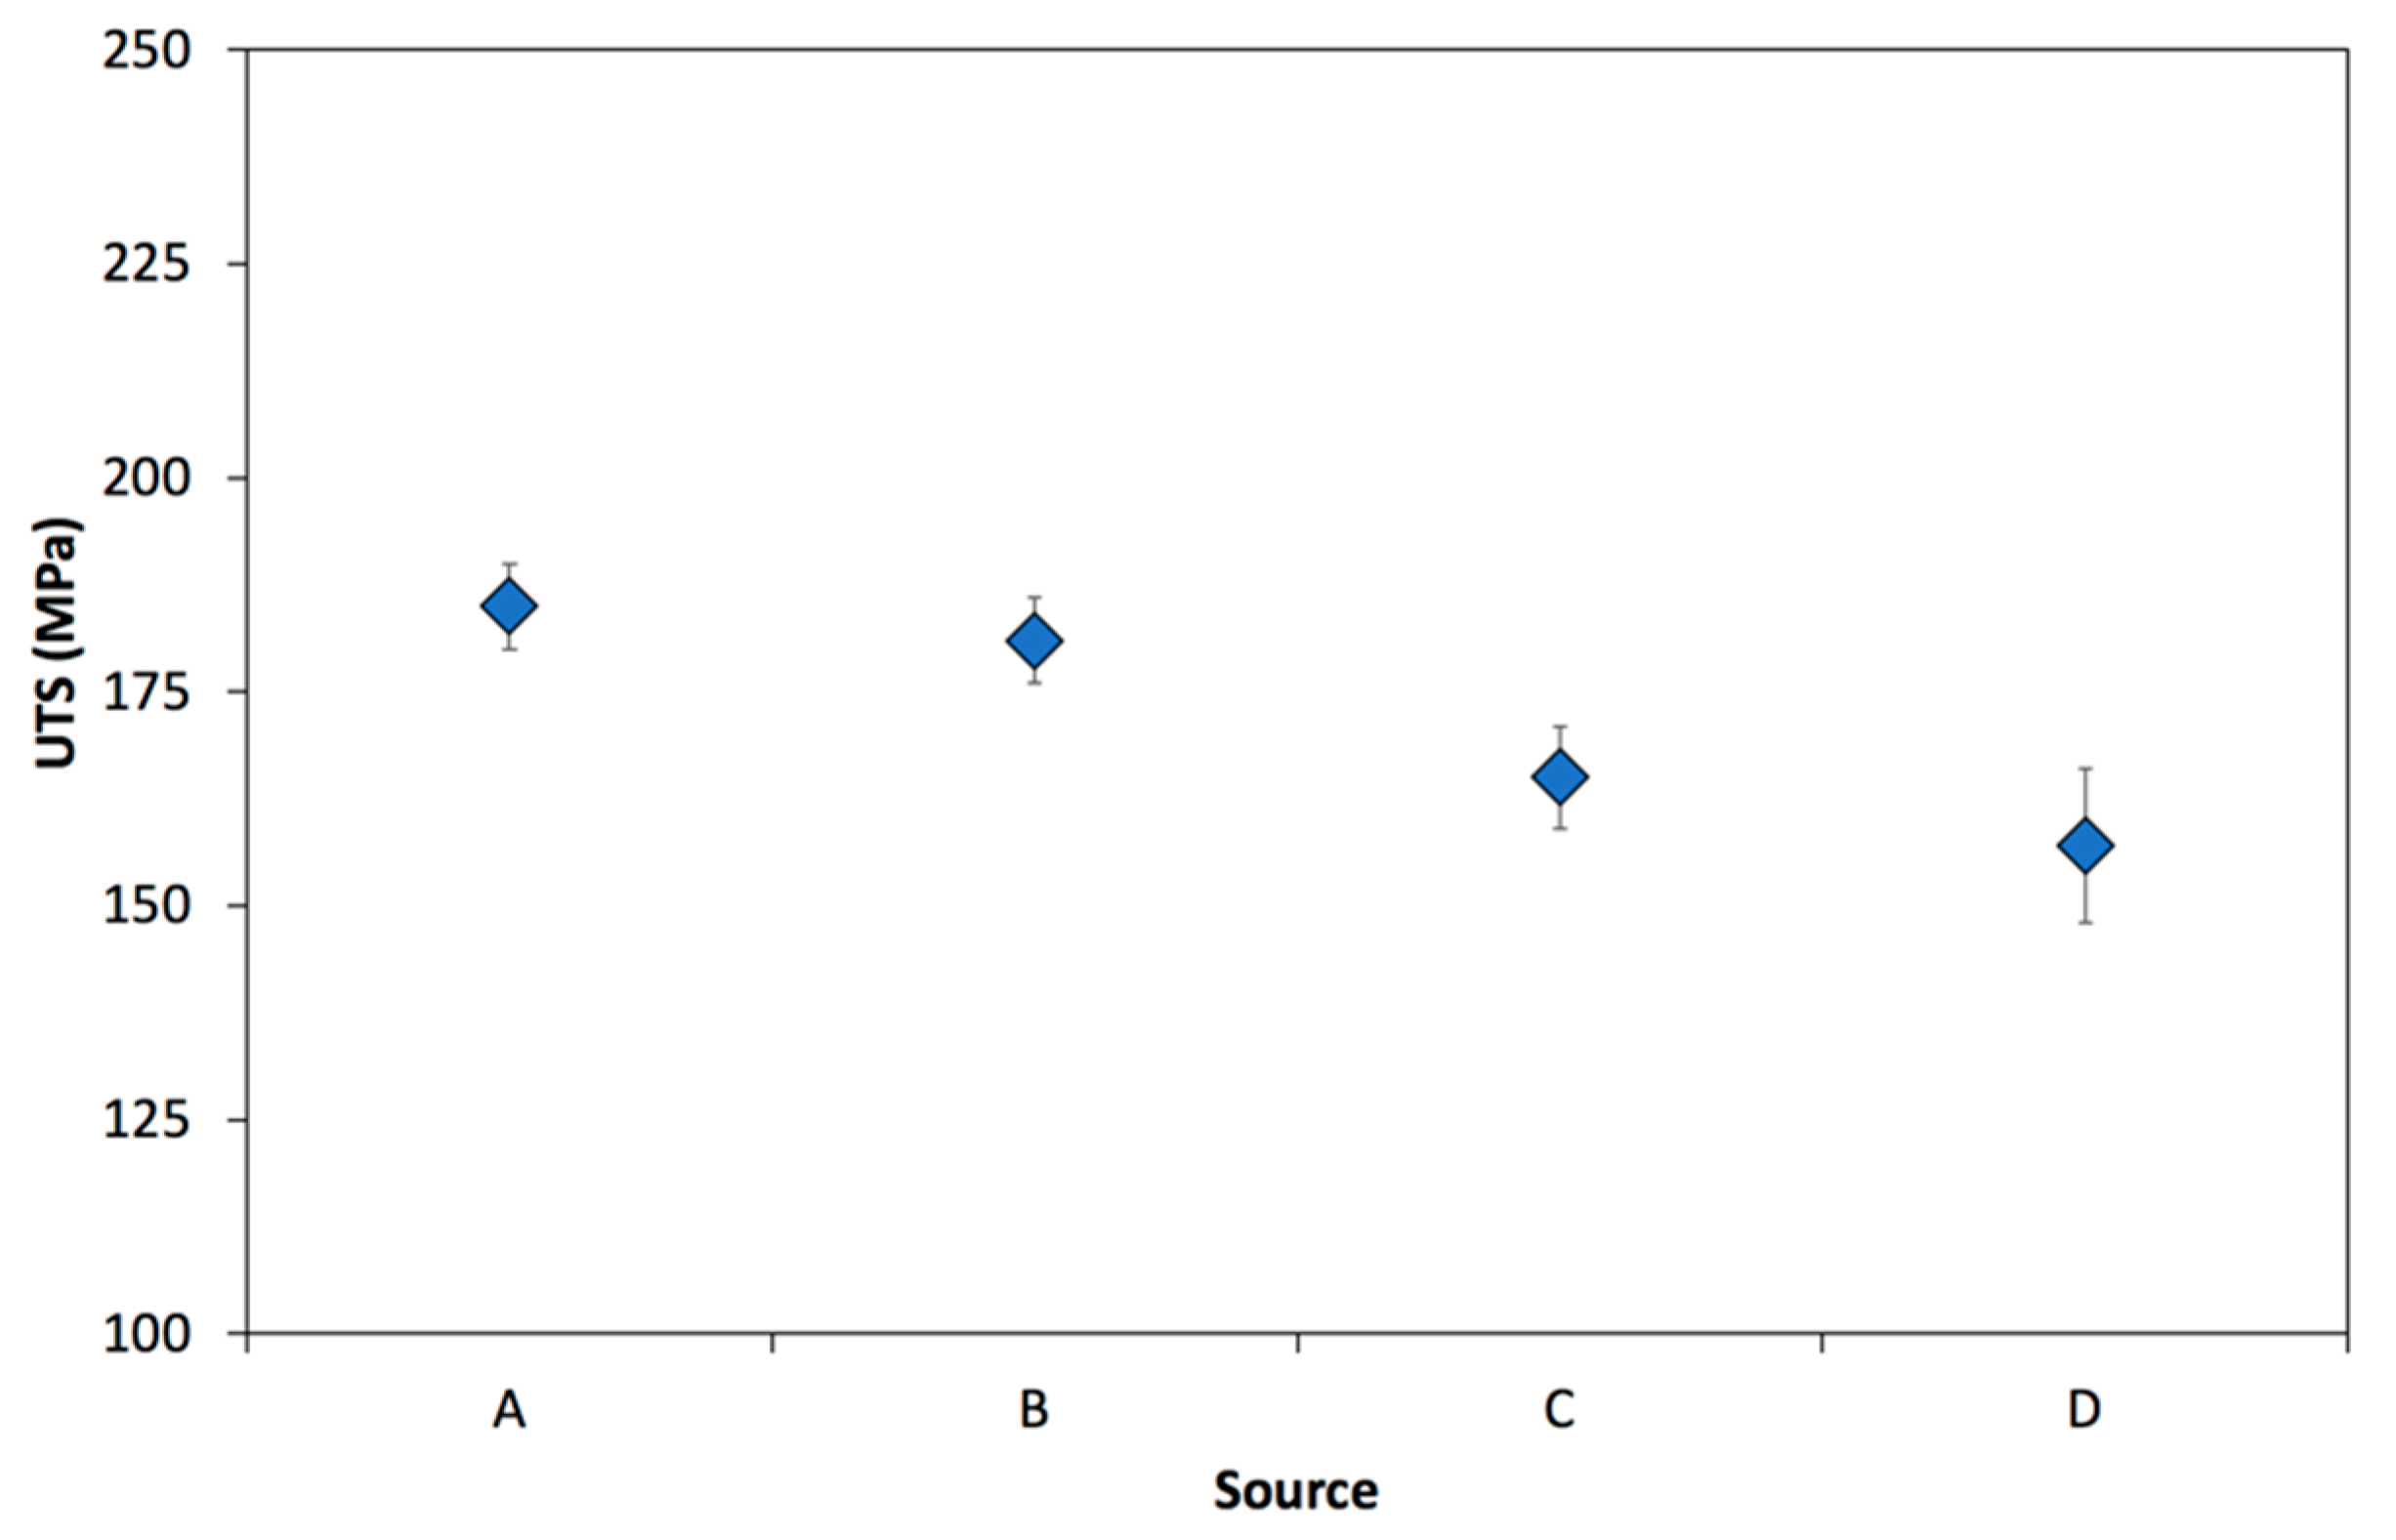
On the other hand, UTS (ultimate tensile strength) and elongation at fracture appear to have a noteworthy difference between the sources (Figure 5). The highest UTS was found with Source A (185 MPa) and the lowest UTS was 157 MPa (Source D) with a difference of 28 MPa. Similarly, Source A provided the highest elongation at fracture (5.2%), while Source D resulted in 3.8% with a large scatter of values.
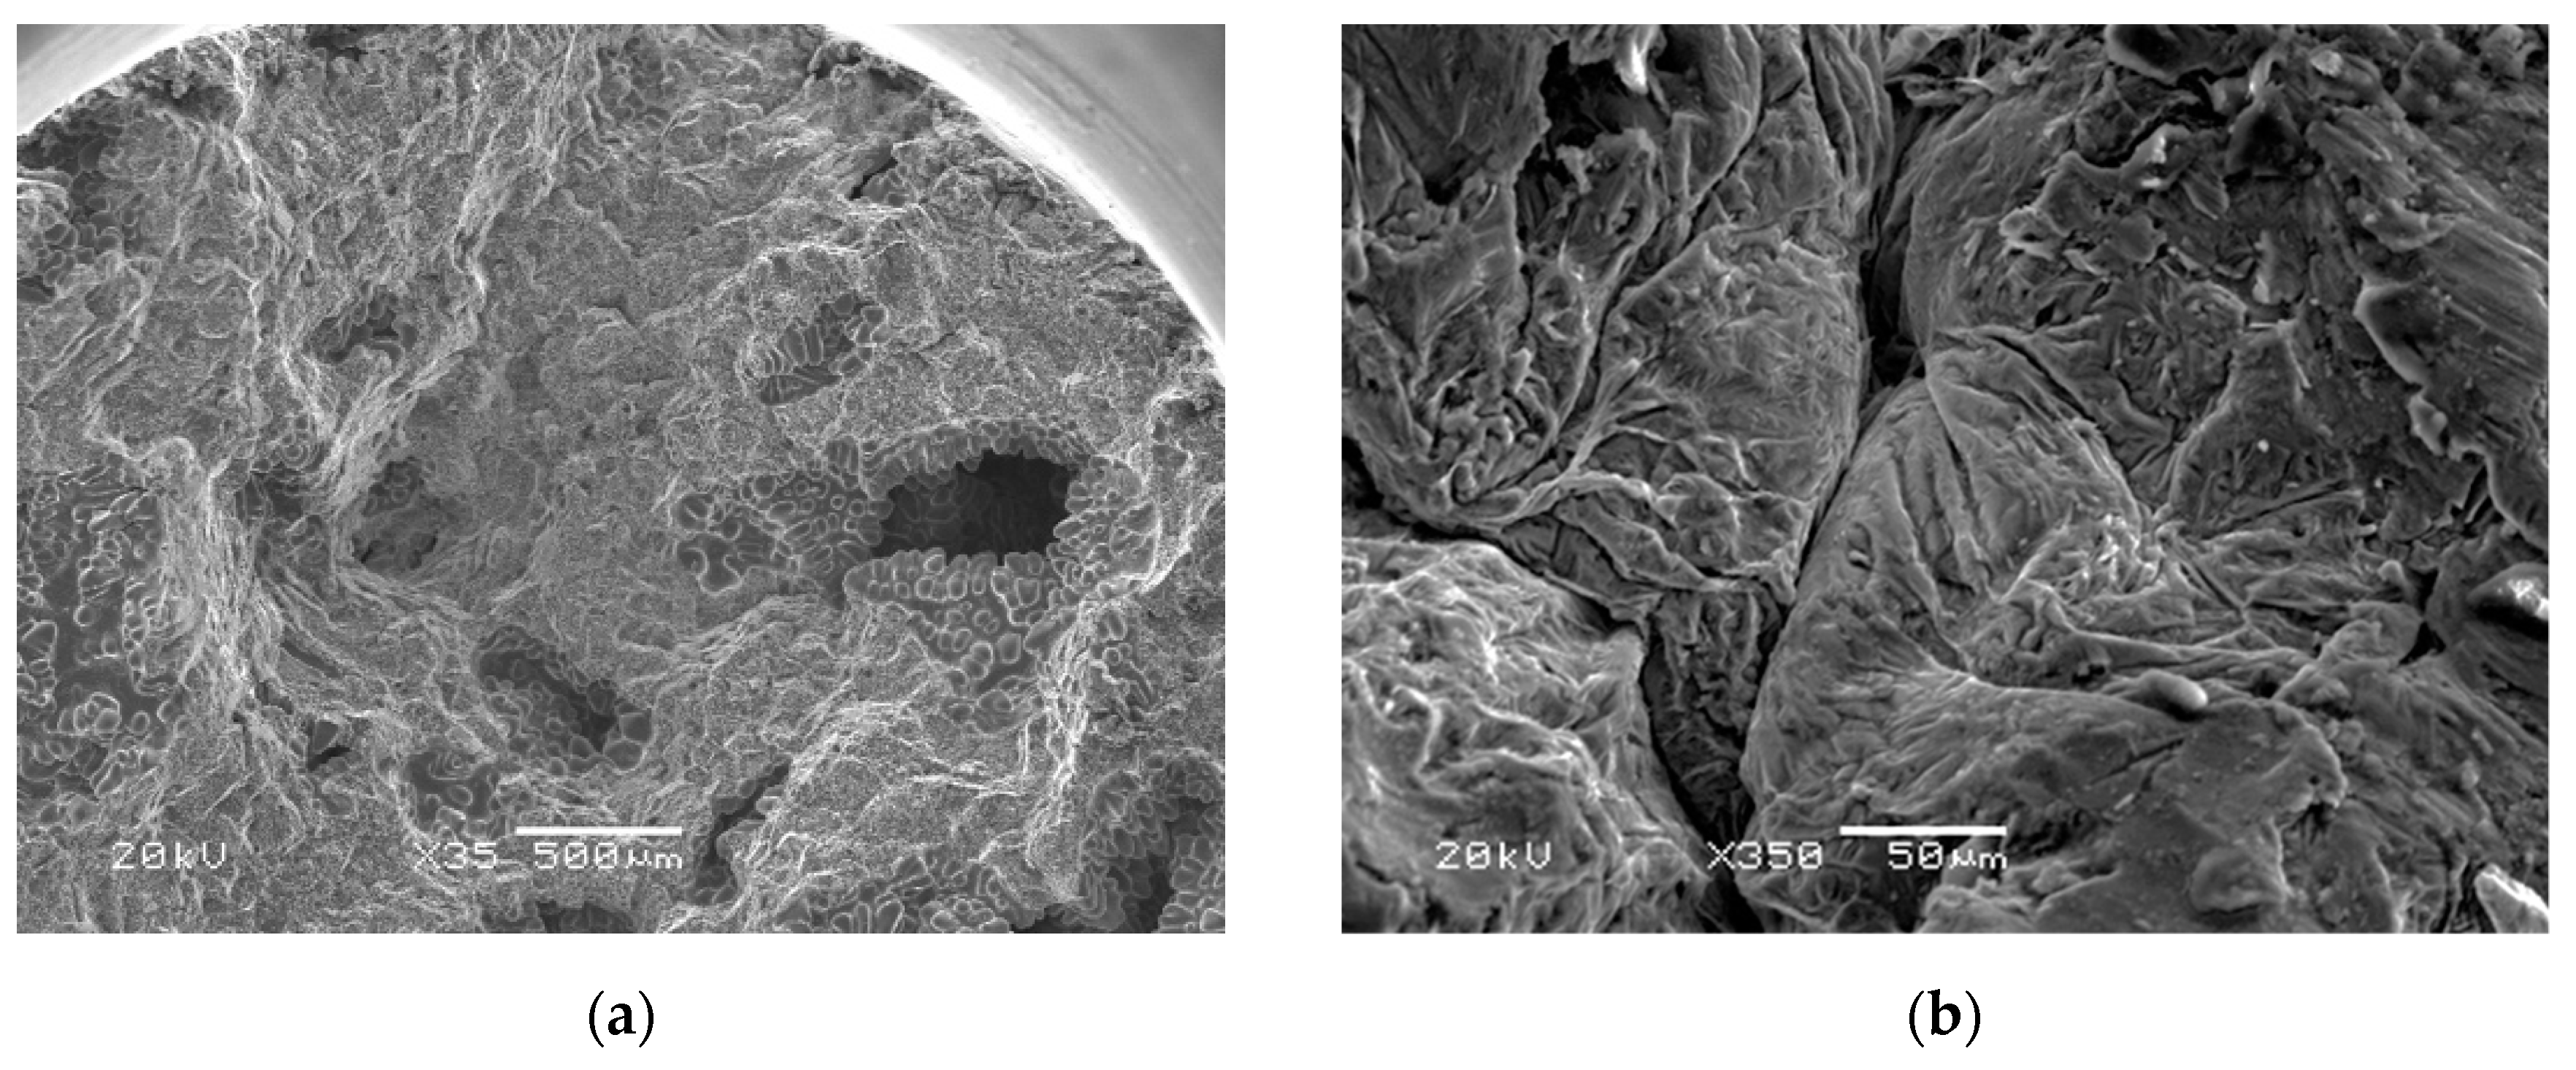
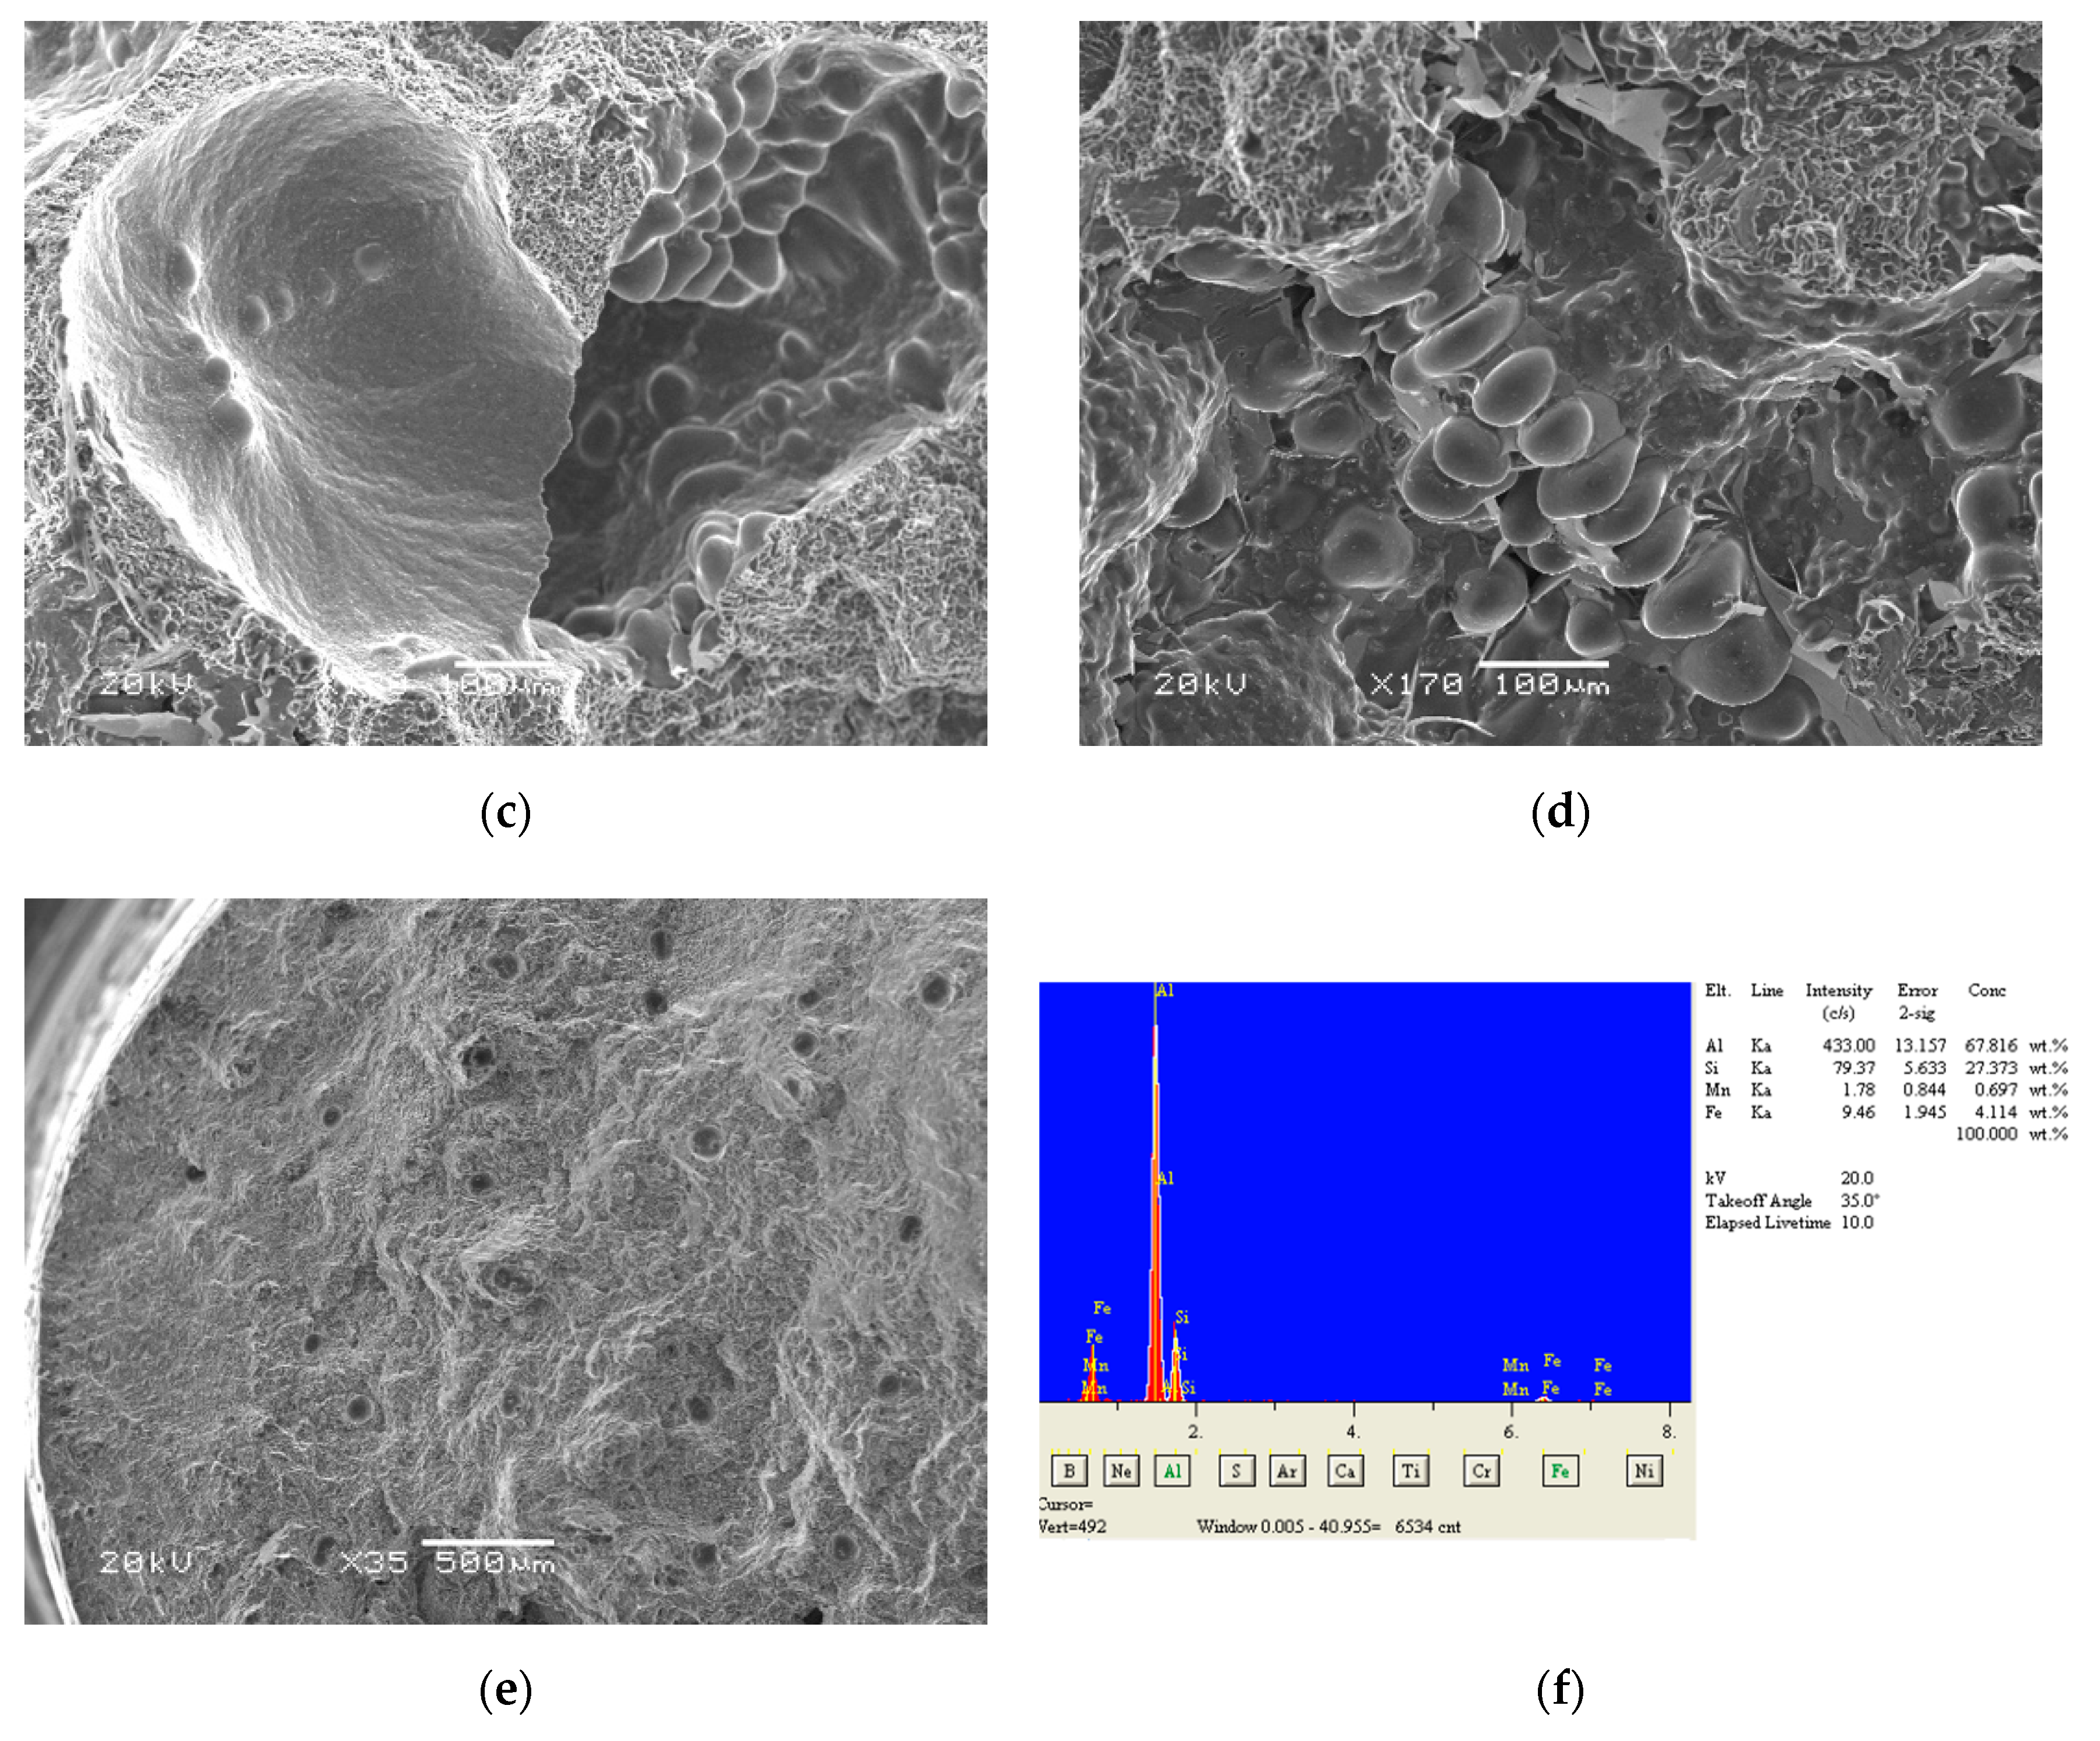
SEM (scanning electron microscopy) pictures were taken from the fracture surface of tensile test bars. As seen in Figure 7, oxides in the form of crumpled shapes and fully opened bifilms were observed on the fracture surfaces. These oxides were also observed on the microstructures as well (Figure 8).
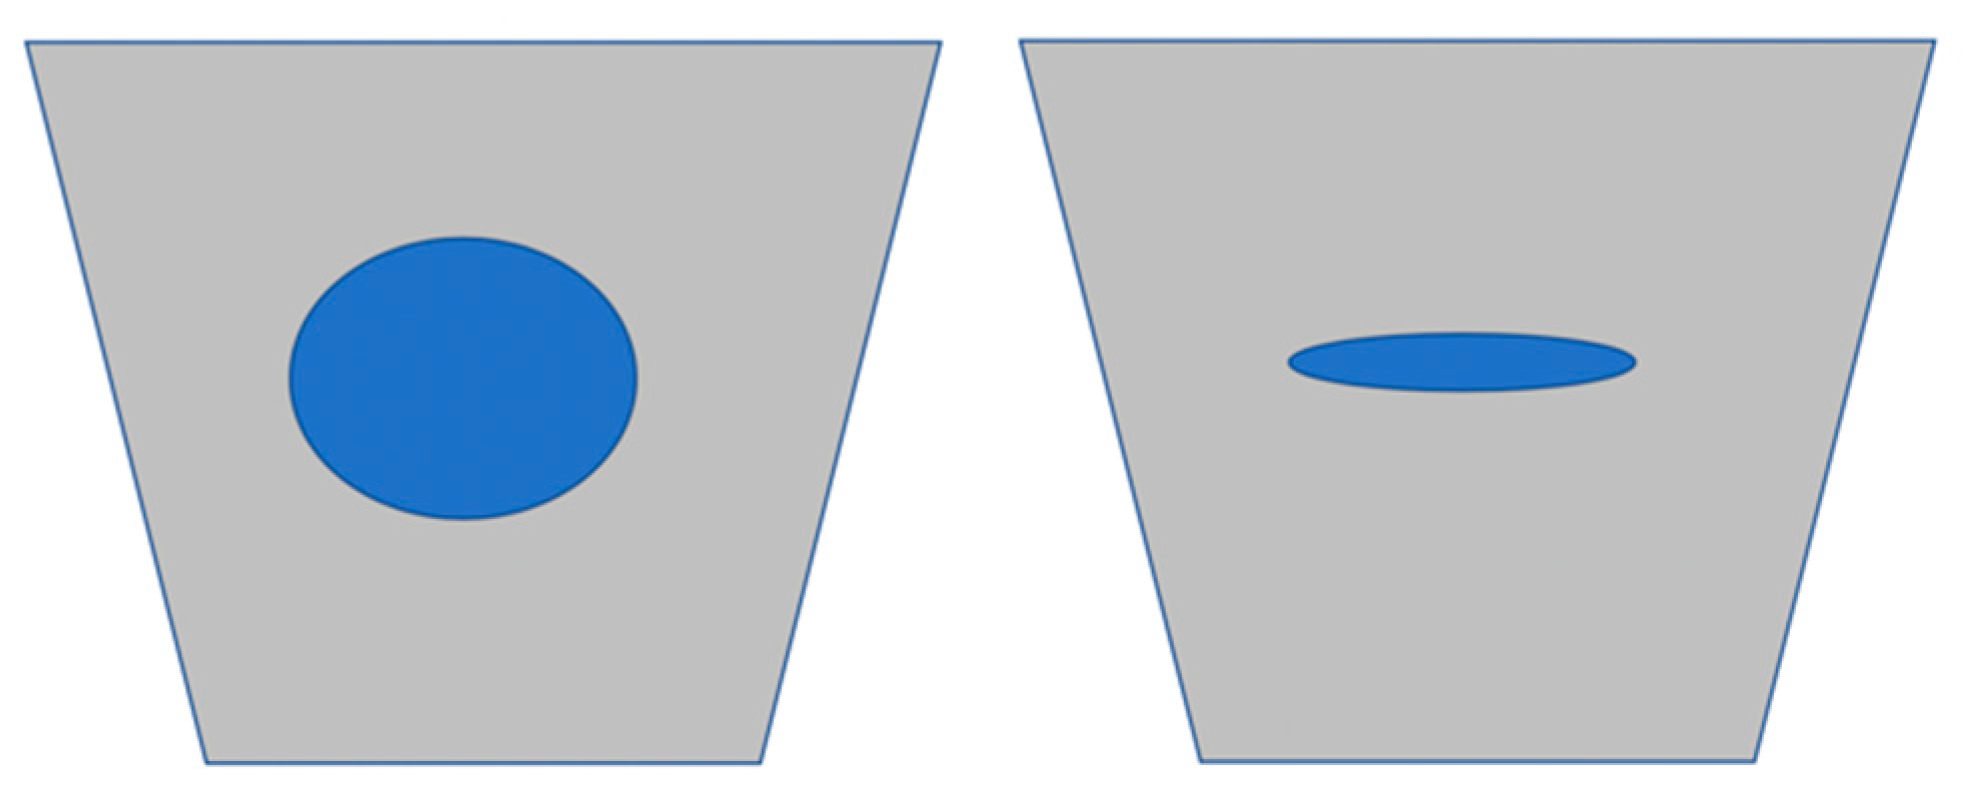
Several researchers [58,59,60,61] have attempted to quantify melt quality by RPT (Reduced Pressure Test). Most of the approaches were focused on the correlation between hydrogen and the density of the RPT samples. There are several other methods [62,63] where filtration technique is used as an indication of melt cleanliness. Recently, Hudson [64] introduced the in-situ analysis of inclusion detection in liquid aluminium. Laser induced breakdown spectroscopy is used to quantify melt quality. Dispinar [4,5,12,65] showed that the measurement of the density index would be misleading and instead, the use of the bifilm index was proposed. As shown schematically in Figure 9, an RPT sample might have the same bifilm index but the pore could have different volume. Both of these melts would have the same bifilm content. However, the density index would be different although they have the same oxide content. Yorulmaz et al. [66] demonstrated the efficiency of degassing process and how bifilms can be removed depending on the degassing operation.
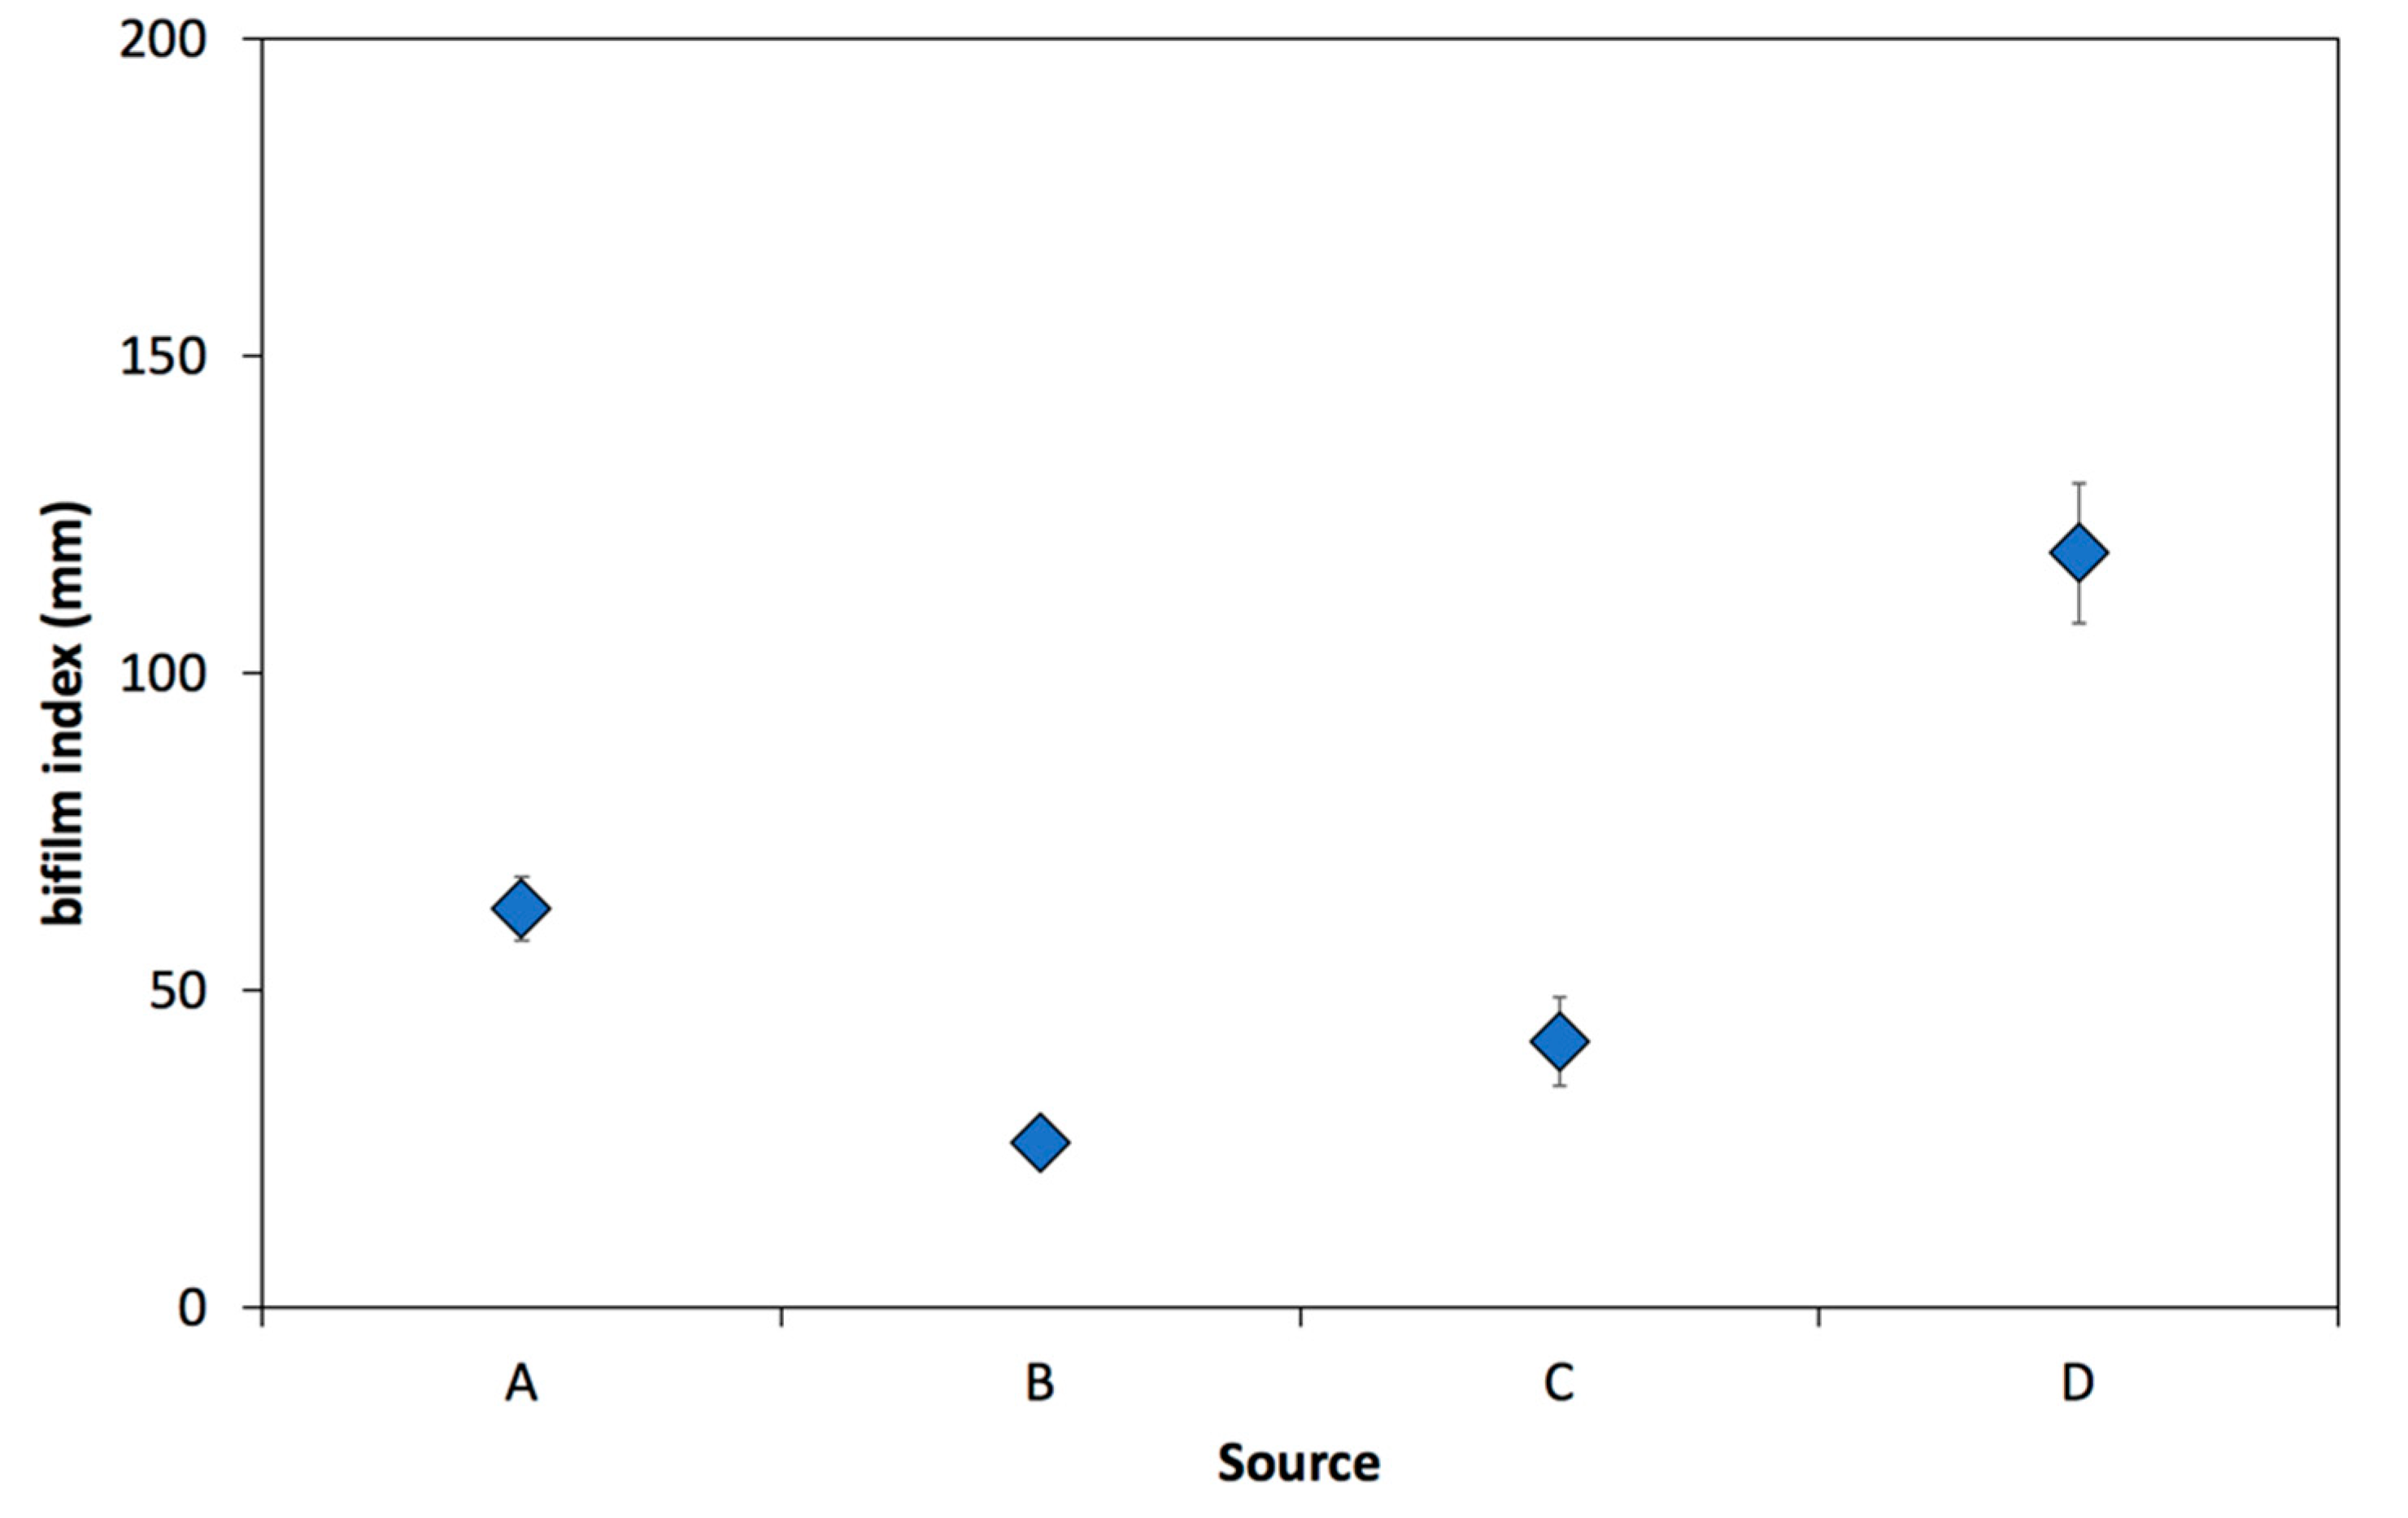
Thus, melt cleanliness measurement was made by comparing the bifilm index of different sources. As seen in Figure 10, Source B has the lowest bifilm index of 26 mm while Source D had 119 mm. Bifilm index of Source A and C are close to each other which is around 50 mm. Uludag [29] had interpreted the meaning of bifilm index. According to the approach, it was indicated that any melt with bifilm index higher than 50 mm would classify as “bad quality”. Thus, Sources A and D fall in this category.
In this work, a new quality index was extracted by using the results given in Figure 3, Figure 4, Figure 5, Figure 6 and Figure 7. This index was named the “Supplier Quality Index—SQI” which was directly measured by the following equation:
SQI = (YS + UTS + %e + F) − (BI)
Here, YS is yield stress, UTS is ultimate tensile strength, %e is elongation at fracture, F is fluidity and BI is bifilm index. Besides bifilm content, all the other values are demanded to be as high as possible. On the other hand, higher the bifilm index indicates low melt cleanliness. Therefore, the bifilm index is required to be as minimal as possible (zero if it can be achieved). Thus, BI was chosen to be subtracted from the equation. The results of the four different sources are given in Figure 11. As can be seen, Source B reveals the highest index (426) whereas Source D shows the lowest value of 225. The difference between Source D and the rest of the sources is approximately 40%.
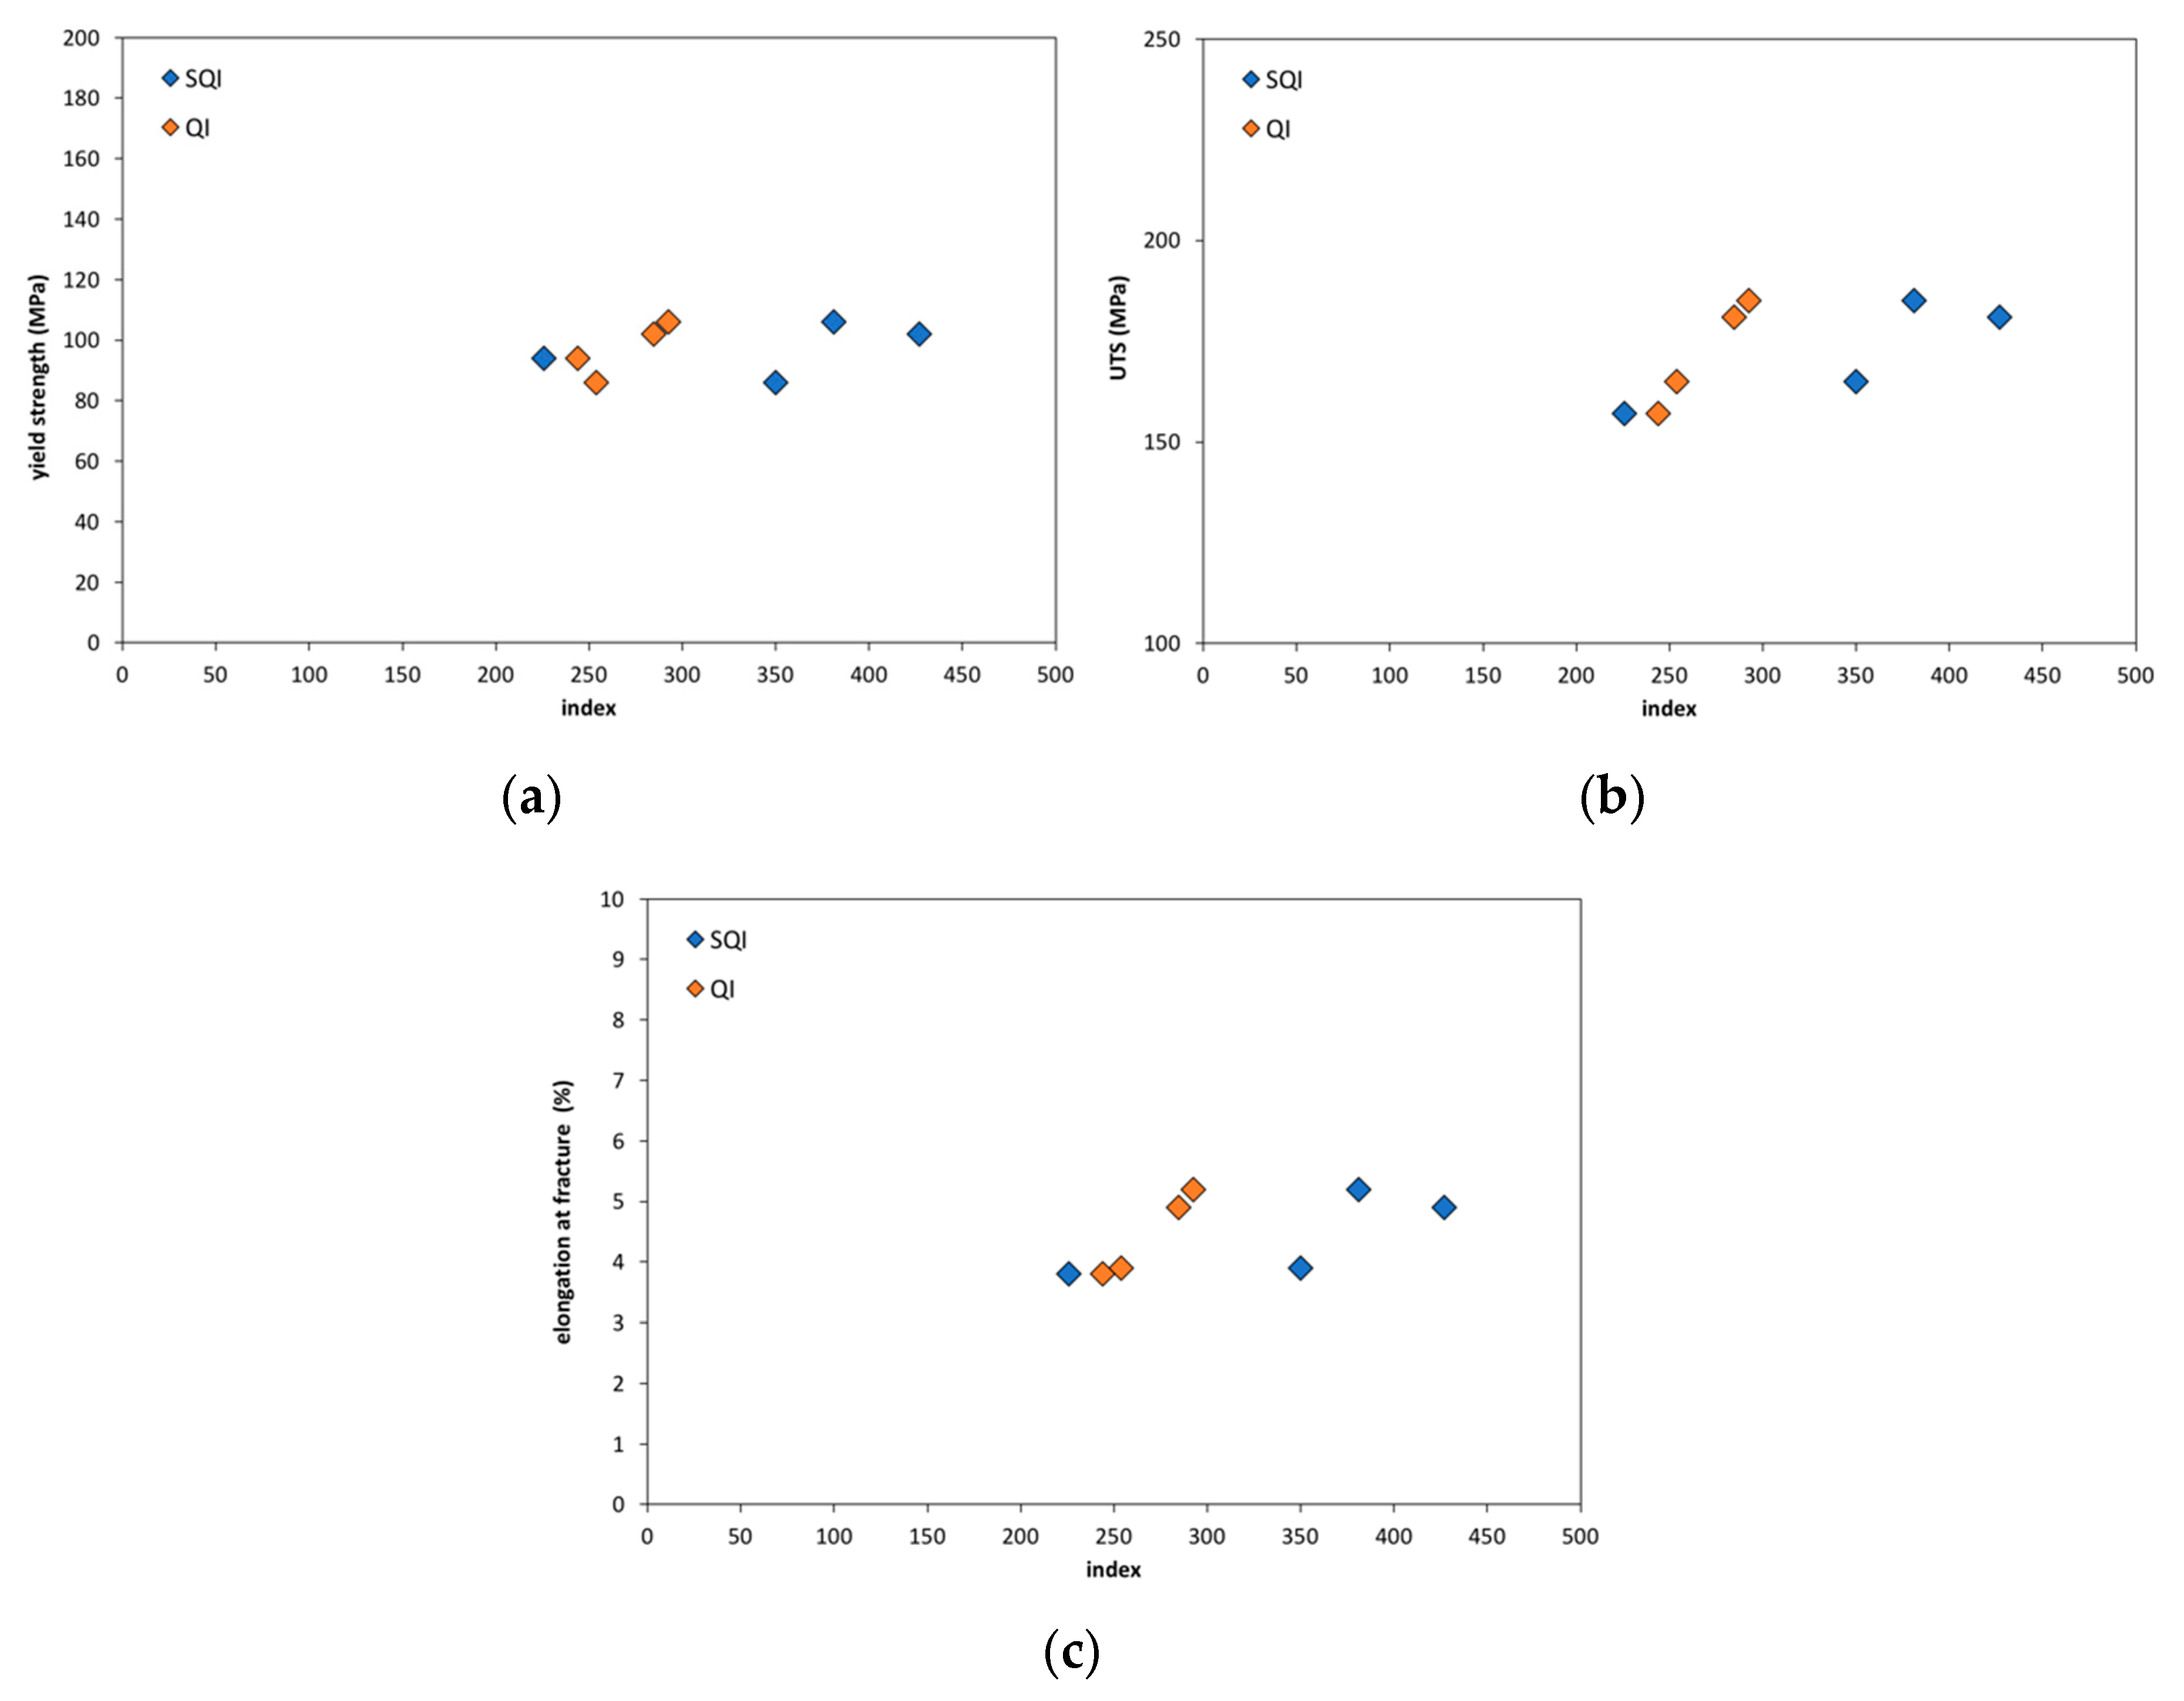
Drozy [67] developed a quality index (QI) that involves tensile strength and elongation at fracture. Since a new index was proposed in this work, a correlation between both of the quality indices were carried out and they are shown in Figure 12, Figure 13, Figure 14 and Figure 15. As it can be seen in Figure 12a, there is no change in yield strength with the quality indices. However, QI is dominantly affected by UTS and %e since it already uses these values as a parameter. SQI, on the other hand, shows no noteworthy relationship with UTS and %e.
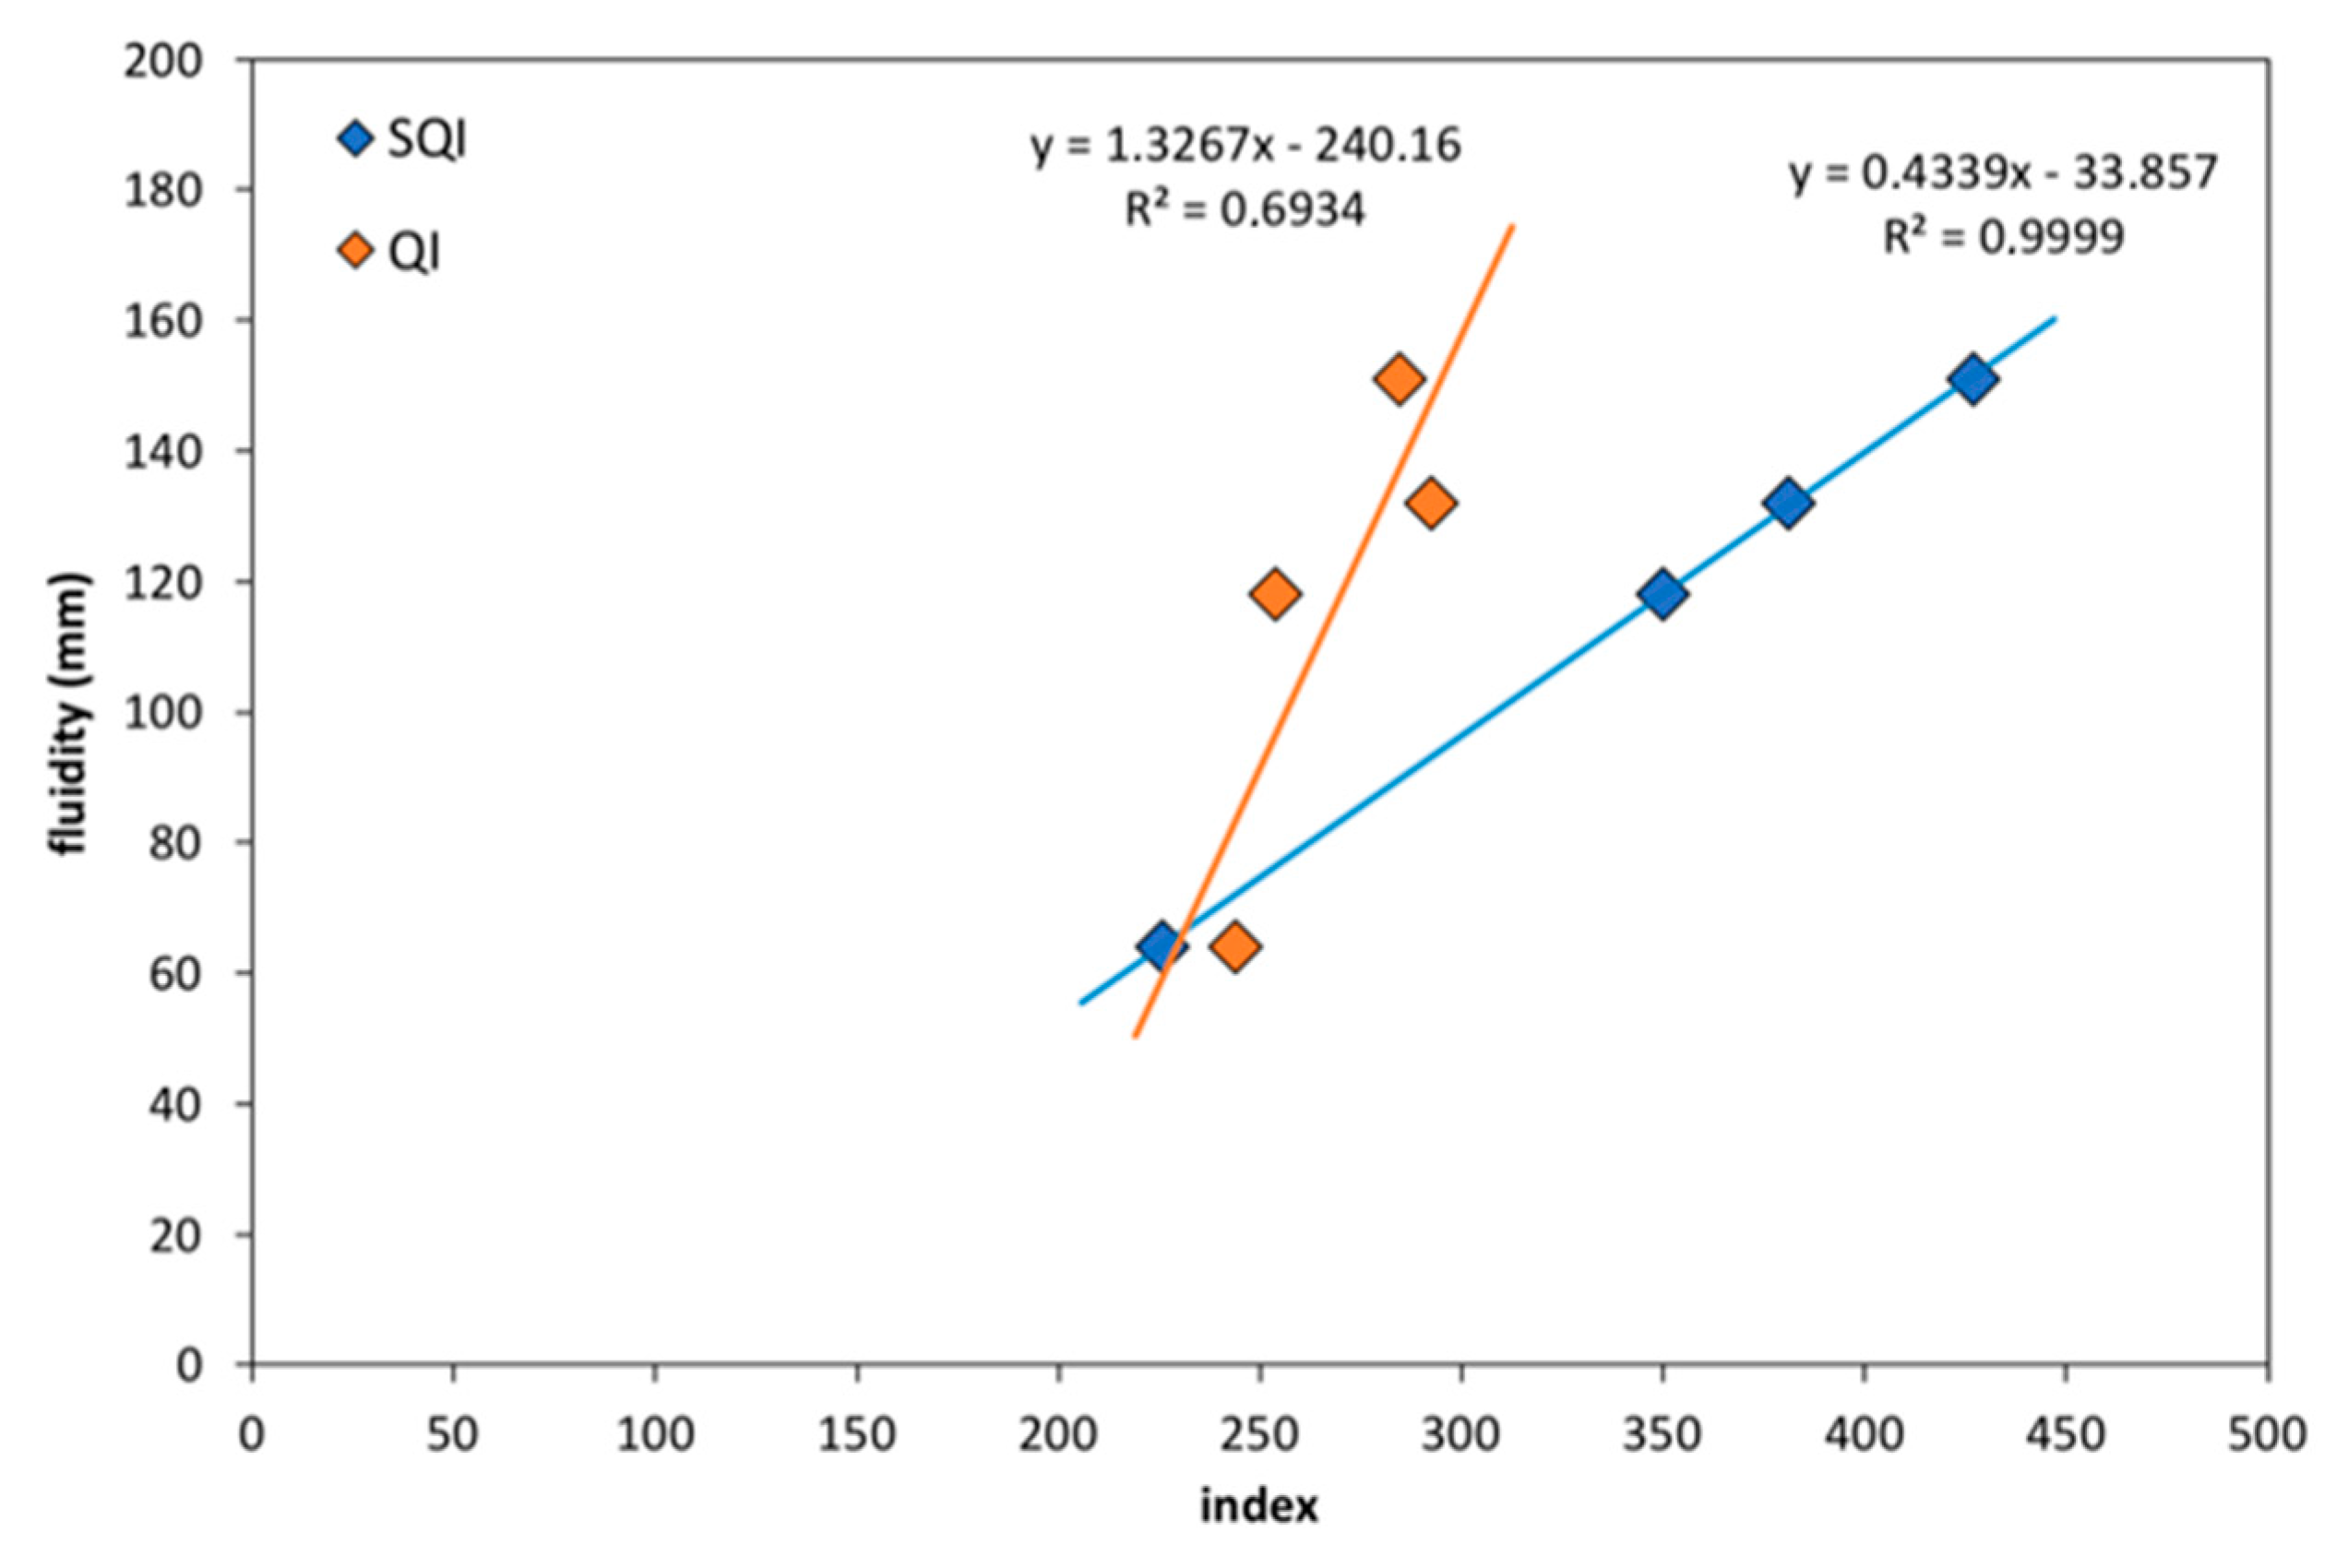
The clearest correlation was found between fluidity and SQI (Figure 13).
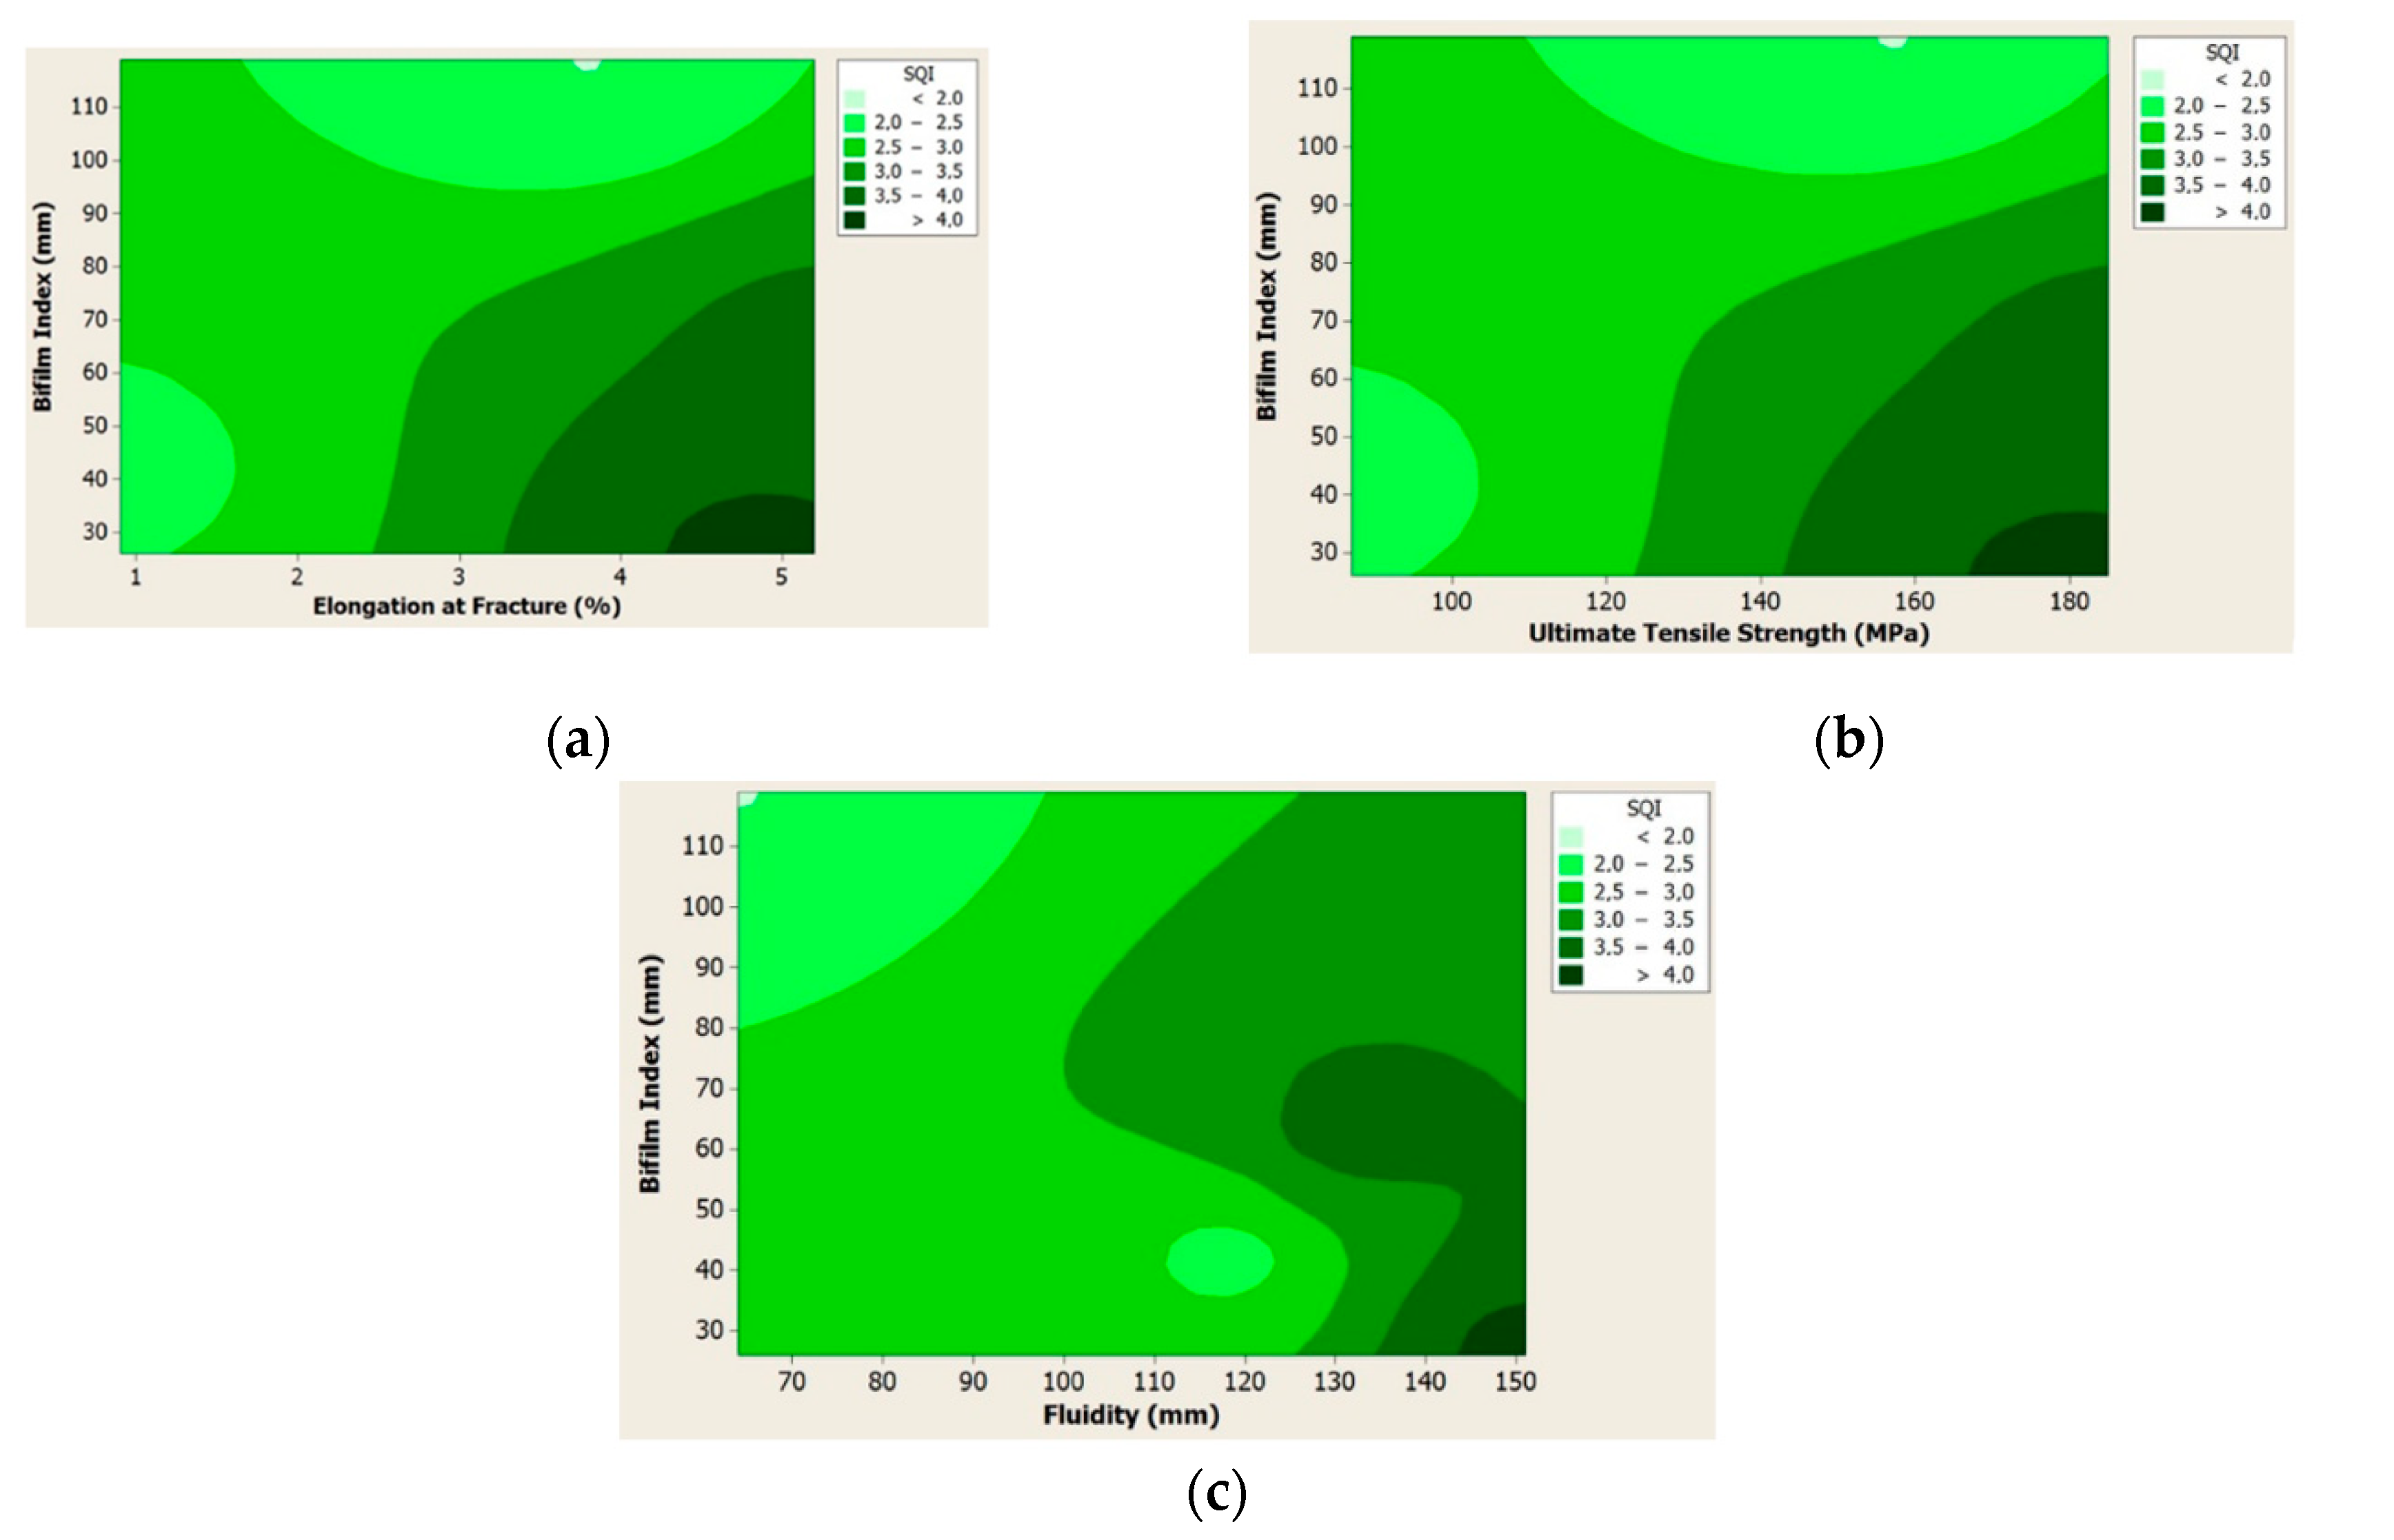
Yield stress is one of the main characteristics of a material. No correlation between the bifilm index and yield strength was found. As seen in Figure 16, it can be concluded that for the bifilm index values that are below 120 mm, the melt cleanliness has no effect over yield stress. However, ultimate tensile strength and elongation at fracture values are affected by bifilm index. As the bifilm index decreases, UTS and %e increases and the highest SQI is observed at the lowest bifilm index (Figure 16).

4. Conclusions

In this work, it was found that the first rule of Campbell’s 10 Rules of Casting plays an important role on the final cast parts overall quality. Particularly, the providers ingot quality needs to be determined and quantified in an aim to start the casting with a “good melt”. Hydrogen has always been considered as the major source of defects. However, the bifilm content of the melt is far more important than the dissolved gas content. With proper degassing, bifilms can be removed from the melt and regardless of hydrogen content, defect-free castings can be produced.
A new quality factor has been proposed in this work in an aim to correlate the rejection rates with supplier’s quality. The index was called the Supplier Quality Index (SQI) which includes fluidity, tensile test results and the bifilm index.
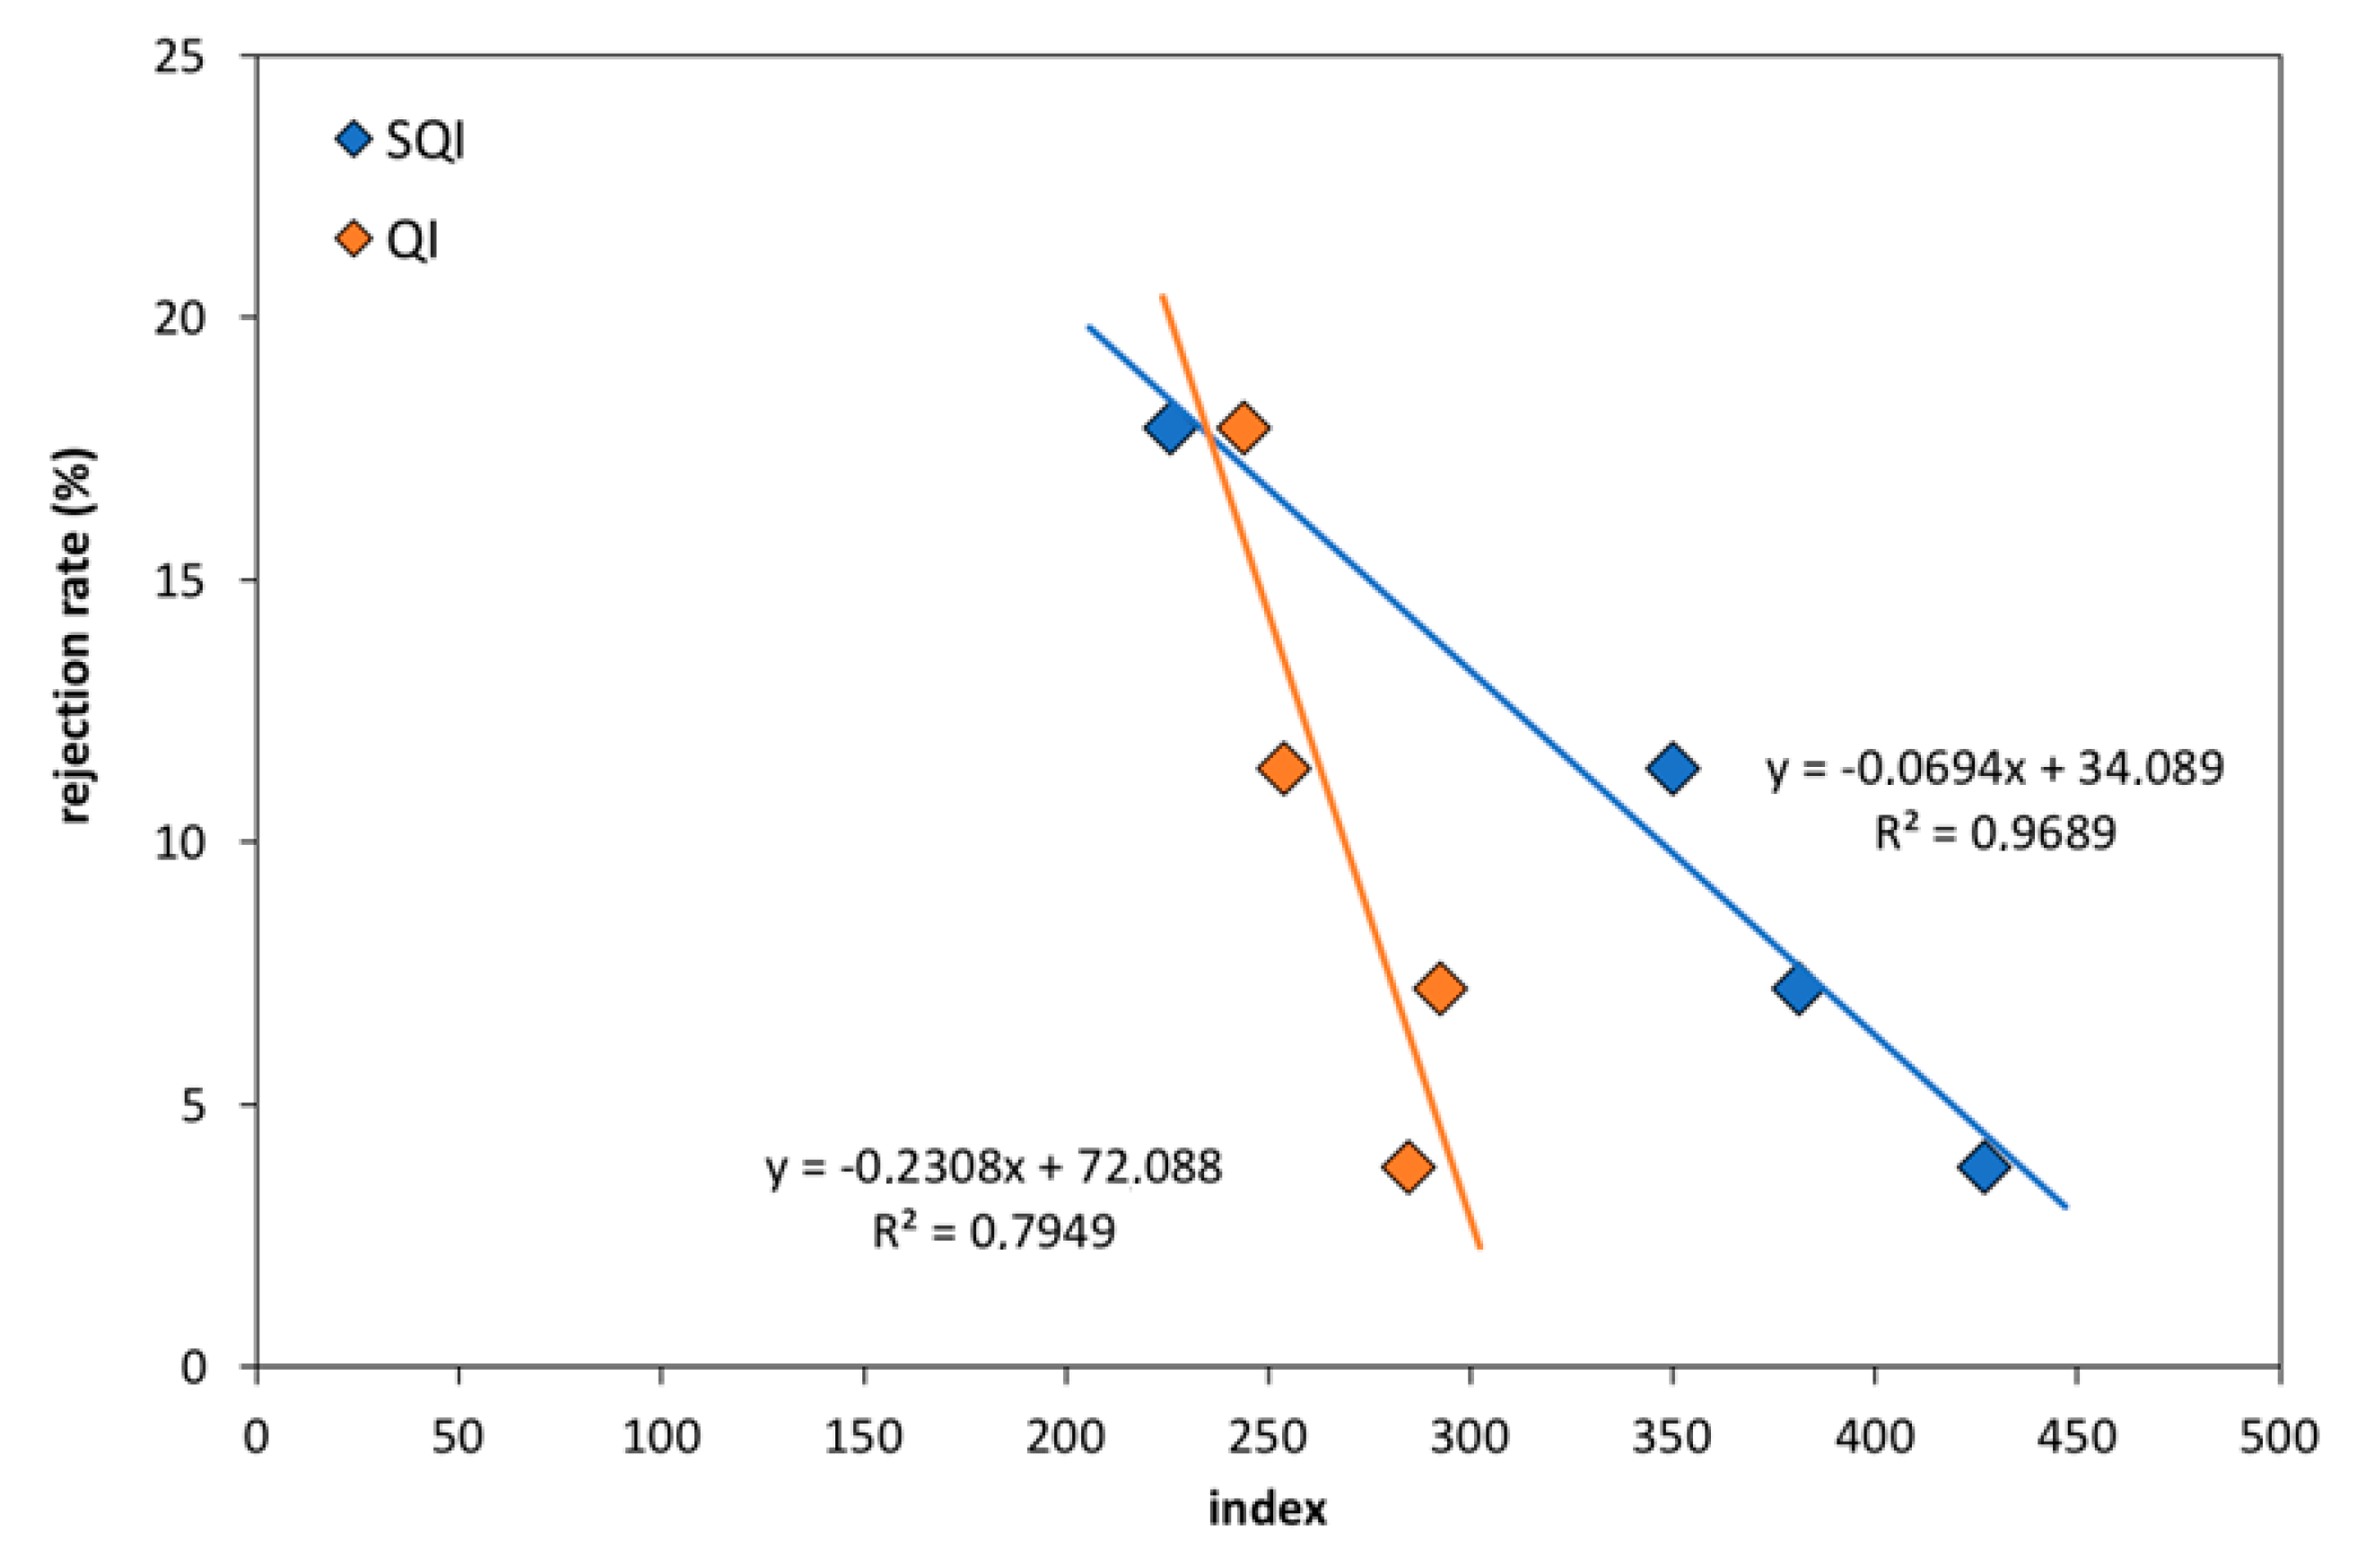
The SQI has the potential to be used on the foundry floor for the characterisation of source quality. The results show that there is a linear relationship between fluidity, bifilm index, rejection rate and SQI.

Author Contributions

Conceptualization, D.D.; methodology, E.E.; formal analysis, O.G., E.E., C.Y.; investigation, O.G., E.E., M.C.; data curation, M.C.; writing—original draft preparation, D.D.; writing—review and editing, D.D.; supervision, D.D.

Funding

This research received no external funding.

Acknowledgments

This work was supported by Maxion Wheels, Manisa, Turkey.

Conflicts of Interest

The authors declare no conflict of interest.

References

  1. Campbell, J. Complete Casting Handbook: Metal Casting Processes, Metallurgy, Techniques and Design; Elsevier Science: Kidlington, UK, 2015. [Google Scholar]
  2. Liu, S.G.; Cao, F.Y.; Zhao, X.Y.; Jia, Y.D.; Ning, Z.L.; Sun, J.F. Characteristics of mold filling and entrainment of oxide film in low pressure casting of A356 alloy. Mater. Sci. Eng. A 2015, 626, 159–164. [Google Scholar] [CrossRef]
  3. Campbell, J. Entrainment defects. Mater. Sci. Technol. 2006, 22, 127–145. [Google Scholar] [CrossRef]
  4. Dispinar, D.; Campbell, J. Critical assessment of reduced pressure test. Part 2: Quantification. Int. J. Cast Met. Res. 2004, 17, 287–294. [Google Scholar] [CrossRef]
  5. Dispinar, D.; Campbell, J. Critical assessment of reduced pressure test. Part 1: Porosity phenomena. Int. J. Cast Met. Res. 2004, 17, 280–286. [Google Scholar] [CrossRef]
  6. Dispinar, D.; Campbell, J. Use of bifilm index as an assessment of liquid metal quality. Int. J. Cast Met. Res. 2006, 19, 5–17. [Google Scholar] [CrossRef]
  7. Dispinar, D.; Campbell, J. Effect of casting conditions on aluminium metal quality. J. Mater. Process. Technol. 2007, 182, 405–410. [Google Scholar] [CrossRef]
  8. Dispinar, D.; Campbell, J. Reduced Pressure Test (RPT) for Bifilm Assessment. In Proceedings of the 5th International Symposium 2014; John Wiley & Sons: Hoboken, NJ, USA, 2013. [Google Scholar]
  9. Maijer, D.; Owen, W.; Vetter, R. An investigation of predictive control for aluminum wheel casting via a virtual process model. J. Mater. Process. Technol. 2009, 209, 1965–1979. [Google Scholar] [CrossRef]
  10. Avalle, M. Casting defects and fatigue strength of a die cast aluminium alloy: A comparison between standard specimens and production components. Int. J. Fatigue 2002, 24, 1–9. [Google Scholar] [CrossRef]
  11. Dispinar, D.; Akhtar, S.; Nordmark, A.; Di Sabatino, M.; Arnberg, L. Degassing, hydrogen and porosity phenomena in A356. Mater. Sci. Eng. A 2010, 527, 3719–3725. [Google Scholar] [CrossRef]
  12. Dispinar, D.; Campbell, J. Porosity, hydrogen and bifilm content in Al alloy castings. Mater. Sci. Eng. A 2011, 528, 3860–3865. [Google Scholar] [CrossRef]
  13. Li, P.; Maijer, D.; Lindley, T.; Lee, P.; Lee, P. A through process model of the impact of in-service loading, residual stress, and microstructure on the final fatigue life of an A356 automotive wheel. Mater. Sci. Eng. A 2007, 460, 20–30. [Google Scholar] [CrossRef]
  14. Bozchaloei, G.E.; Varahram, N.; Davami, P.; Kim, S.K. Effect of oxide bifilms on the mechanical properties of cast Al–7Si–0.3Mg alloy and the roll of runner height after filter on their formation. Mater. Sci. Eng. A 2012, 548, 99–105. [Google Scholar] [CrossRef]
  15. Haberl, K.; Schumacher, P.; Geier, G.; Stauder, B. Characterization of the Melt Quality and Impurity Content of an Lm25 Alloy. Met. Mater. Trans. A 2009, 40, 812–821. [Google Scholar] [CrossRef]
  16. Gallo, R. Cleaner aluminum melts in foundries: A critical review and update. AFS Trans. 2008, 166, 195–220. [Google Scholar]
  17. Mostafaei, M.; Ghobadi, M.; Eisaabadi B., G.; Uludağ, M.; Tiryakioğlu, M. Evaluation of the Effects of Rotary Degassing Process Variables on the Quality of A357 Aluminum Alloy Castings. Met. Mater. Trans. A 2016, 47, 3469–3475. [Google Scholar] [CrossRef]
  18. Haberl, K.; Schumacher, P.; Geier, G.; Stauder, B. Ultrasonic degassing of aluminium alloys: Basic studies and practical implementation. Mater. Sci. Technol. 2015, 31, 79–84. [Google Scholar]
  19. Fan, Z.Y.; Zuo, Y.B.; Jiang, B. A New Technology for Treating Liquid Metals with Intensive Melt Shearing. Mater. Sci. Forum 2011, 690, 141–144. [Google Scholar] [CrossRef]
  20. Zuo, Y.B.; Jiang, B.; Zhang, Y.J.; Fan, Z. Degassing LM25 aluminium alloy by novel degassing technology with intensive melt shearing. Int. J. Cast Met. Res. 2013, 26, 16–21. [Google Scholar] [CrossRef]
  21. Puga, H.; Barbosa, J.; Azevedo, T.; Ribeiro, S.; Alves, J.L. Low pressure sand casting of ultrasonically degassed AlSi7Mg0.3 alloy: Modelling and experimental validation of mould filling. Mater. Des. 2016, 94, 384–391. [Google Scholar] [CrossRef]
  22. Puga, H.; Barbosa, J.; Seabra, E.; Ribeiro, S.; Prokić, M.; Ribeiro, C.A.S. The influence of processing parameters on the ultrasonic degassing of molten AlSi9Cu3 aluminium alloy. Mater. Lett. 2009, 63, 806–808. [Google Scholar] [CrossRef]
  23. Puga, H.; Barbosa, J.; Teixeira, J.C.; Prokić, M. A New Approach to Ultrasonic Degassing to Improve the Mechanical Properties of Aluminum Alloys. J. Mater. Eng. Perform. 2014, 23, 3736–3744. [Google Scholar] [CrossRef]
  24. Yao, L.; Cockcroft, S.; Reilly, C.; Zhu, J. Factors affecting the nucleation kinetics of microporosity formation in aluminum alloy A. Metall. Mat. Trans. A 2012, 43, 1004–1016. [Google Scholar] [CrossRef]
  25. Raiszadeh, R.; Griffiths, W.D. The effect of holding liquid aluminum alloys on oxide film content. Metall. Mat. Trans. A 2011, 42, 133–143. [Google Scholar] [CrossRef]
  26. Uludağ, M.; Çetin, R.; Dişpinar, D. Freezing Range, Melt Quality, and Hot Tearing in Al-Si Alloys. Met. Mater. Trans. A 2018, 49, 1948–1961. [Google Scholar] [CrossRef]
  27. Uludağ, M.; Çetin, R.; Dispinar, D.; Tiryakioğlu, M. Characterization of the Effect of Melt Treatments on Melt Quality in Al-7wt %Si-Mg Alloys. Metals 2017, 7, 157. [Google Scholar] [CrossRef]
  28. Uludağ, M.; Çetin, R.; Dispinar, D.; Tiryakioğlu, M. Effect of Degassing and Grain Refinement on Hot Tearing Tendency in Al8Si3Cu Alloy. Int. J. Met. 2017, 12, 589–595. [Google Scholar] [CrossRef]
  29. Uludağ, M.; Çetin, R.; Dişpinar, D.; Tiryakioğlu, M.; Tiryakioǧlu, M. On the Interpretation of Melt Quality Assessment of A356 Aluminum Alloy by the Reduced Pressure Test: The Bifilm Index and Its Physical Meaning. Int. J. Met. 2018, 12, 853–860. [Google Scholar] [CrossRef]
  30. Bakhtiarani, F.N.; Raiszadeh, R. Healing of Double-Oxide Film Defects in Commercial Purity Aluminum Melt. Met. Mater. Trans. A 2011, 42, 331–340. [Google Scholar] [CrossRef] [Green Version]
  31. Nateghian, M.; Raiszadeh, R.; Doostmohammadi, H. Behavior of Double-Oxide Film Defects in Al-0.05 wt pct Sr Alloy. Met. Mater. Trans. A 2012, 43, 1540–1549. [Google Scholar] [CrossRef]
  32. Dos Santos, S.L.; Antunes, R.A.; Santos, S.F. Influence of injection temperature and pressure on the microstructure, mechanical and corrosion properties of a AlSiCu alloy processed by HPDC. Mater. Des. 2015, 88, 1071–1081. [Google Scholar] [CrossRef]
  33. González, R.; Martínez, D.I.; González, J.A.; Talamantes, J.; Valtierra, S.; Colás, R. Experimental investigation for fatigue strength of a cast aluminium alloy. Int. J. Fatigue 2011, 33, 273–278. [Google Scholar] [CrossRef]
  34. Lee, K.; Kwon, Y.N.; Lee, S. Effects of eutectic silicon particles on tensile properties and fracture toughness of A356 aluminum alloys fabricated by low-pressure-casting, casting-forging, and squeeze-casting processes. J. Alloy. Compd. 2008, 461, 532–541. [Google Scholar] [CrossRef]
  35. Lee, K.; Kwon, Y.N.; Lee, S. Correlation of microstructure with mechanical properties and fracture toughness of A356 aluminum alloys fabricated by low-pressure-casting, rheo-casting, and casting–forging processes. Eng. Fract. Mech. 2008, 75, 4200–4216. [Google Scholar] [CrossRef]
  36. Merlin, M.; Timelli, G.; Bonollo, F.; Garagnani, G.L. Impact behaviour of A356 alloy for low-pressure die casting automotive wheels. J. Mater. Process. Technol. 2009, 209, 1060–1073. [Google Scholar] [CrossRef]
  37. Miller, A.; Maijer, D. Investigation of erosive-corrosive wear in the low pressure die casting of aluminum A. Mater. Sci. Eng. A 2006, 435, 100–111. [Google Scholar] [CrossRef]
  38. Teng, X.; Mae, H.; Bai, Y.; Wierzbicki, T. Pore size and fracture ductility of aluminum low pressure die casting. Eng. Fract. Mech. 2009, 76, 983–996. [Google Scholar] [CrossRef]
  39. Yuksel, C.; Tamer, O.; Erzi, E.; Aybarc, U.; Cubuklusu, E.; Topcuoglu, O.; Cigdem, M.; Dispinar, D. Quality Evaluation of Remelted A356 Scraps. Arch. Foundry Eng. 2016, 16, 151–156. [Google Scholar] [CrossRef] [Green Version]
  40. Zhang, B.; Maijer, D.; Cockcroft, S. Development of a 3-D thermal model of the low-pressure die-cast (LPDC) process of A356 aluminum alloy wheels. Mater. Sci. Eng. A 2007, 464, 295–305. [Google Scholar] [CrossRef]
  41. Lee, C.D. Effect of T6 heat treatment on the defect susceptibility of fatigue properties to microporosity variations in a low-pressure die-cast A356 alloy. Mater. Sci. Eng. A 2013, 559, 496–505. [Google Scholar] [CrossRef]
  42. Cáceres, C.H. A rationale for the quality index of Al-Si-Mg casting alloys. Int. J. Cast Met. Res. 1998, 10, 293–299. [Google Scholar] [CrossRef]
  43. Cáceres, C.H. A phenomenological approach to the Quality Index of Al-Si-Mg casting alloys. Int. J. Cast Met. Res. 2000, 12, 367–375. [Google Scholar] [CrossRef]
  44. Caceres, C. Microstructure Design and Heat Treatment Selection for Casting Alloys Using the Quality Index. J. Mater. Eng. Perform. 2000, 9, 215–221. [Google Scholar] [CrossRef]
  45. Cáceres, C.; Barresi, J. Selection of temper and Mg content to optimise the Quality Index of Al-7Si-Mg casting alloys. Int. J. Cast Met. Res. 2000, 12, 377–384. [Google Scholar] [CrossRef]
  46. Caceres, C.; Din, T.; Rashid, A.; Campbell, J. Effect of aging on quality index of an Al–Cu casting alloy. Mater. Sci. Technol. 1999, 15, 711–716. [Google Scholar] [CrossRef]
  47. Cáceres, C.; Makhlouf, M.; Apelian, D.; Wang, L.; Cáceres, C. Quality index chart for different alloys and temperatures: A case study on aluminium die-casting alloys. J. Light Met. 2001, 1, 51–59. [Google Scholar] [CrossRef]
  48. Alexopoulos, N. Generation of quality maps to support material selection by exploiting the quality indices concept of cast aluminum alloys. Mater. Des. 2007, 28, 534–543. [Google Scholar] [CrossRef]
  49. Alexopoulos, N.D.; Pantelakis, S.G. Quality assessment of artificially aged A357 aluminum alloy cast ingots by introducing approximate expressions of the quality index Q D. Met. Mater. Trans. A 2004, 35, 3079–3089. [Google Scholar] [CrossRef]
  50. Alexopoulos, N.D.; Pantelakis, S.G. A new quality index for characterizing aluminum cast alloys with regard to aircraft structure design requirements. Met. Mater. Trans. A 2004, 35, 301–308. [Google Scholar] [CrossRef]
  51. Alexopoulos, N.; Pantelakis, S. Quality evaluation of A357 cast aluminum alloy specimens subjected to different artificial aging treatment. Mater. Des. 2004, 25, 419–430. [Google Scholar] [CrossRef]
  52. Tiryakioğlu, M.; Campbell, J. Quality Index for Aluminum Alloy Castings. Int. J. Met. 2014, 8, 39–42. [Google Scholar] [CrossRef]
  53. Tiryakioğlu, M.; Campbell, J.; Alexopoulos, N.D. On the Ductility of Cast Al-7 Pct Si-Mg Alloys. Met. Mater. Trans. A 2009, 40, 1000–1007. [Google Scholar] [CrossRef]
  54. Tiryakioğlu, M.; Staley, J.T.; Campbell, J. Evaluating structural integrity of cast Al–7% Si–Mg alloys via work hardening characteristics: II. A new quality index. Mater. Sci. Eng. A 2004, 368, 231–238. [Google Scholar] [CrossRef]
  55. Di Sabatino, M.; Arnberg, L.; Rørvik, S.; Prestmo, A. The influence of oxide inclusions on the fluidity of Al–7wt. %Si alloy. Mater. Sci. Eng. A 2005, 413, 272–276. [Google Scholar] [CrossRef]
  56. Di Sabatino, M.; Syvertsen, F.; Arnberg, L.; Nordmark, A. An improved method for fluidity measurement by gravity casting of spirals in sand moulds. Int. J. Cast Met. Res. 2005, 18, 59–62. [Google Scholar] [CrossRef]
  57. Liu, L.; Samuel, F. Effect of inclusions on the tensile properties of Al–7% Si–0.35% Mg (A356.2) aluminium casting alloy. J. Mater. Sci. 1998, 33, 2269–2281. [Google Scholar] [CrossRef]
  58. Chiesa, F.; Mammen, J. Correlating Microporosity to Local Solidification Conditions and RPT in Aluminum A356 Castings (99-18). Trans. Am. Foundrymen’s Soc. 1999, 107, 103–112. [Google Scholar]
  59. DasGupta, B.; Parmenter, L.; Apelian, D. Relationship between the Reduced Pressure Test and Hydrogen Content of the Melt. In Proceedings of the 5th International Conference on Molten Metal Processing, Orlando, FL, USA, 8–10 November 1998. [Google Scholar]
  60. LaOrchan, W.; Mulazimoglu, M.; Gruzleski, J. Constant volume risered mold for reduced pressure test. AFS Trans. 1994, 101, 253–259. [Google Scholar]
  61. DeWeese, S.; Atkinson, R.; Rasmussen, W. RPT measures hydrogen gas, effects on casting quality. Mod. Cast. 1992, 82, 29–31. [Google Scholar]
  62. Samuel, A.M.; Doty, H.W.; Valtierra, S.; Samuel, F.H. Inclusion Measurements in Al–Si Foundry Alloys Using Qualiflash and Prefil Filtration Techniques. Int. J. Met. 2018, 12, 625–642. [Google Scholar] [CrossRef]
  63. Samuel, A.M.; Doty, H.W.; Valtierra, S.; Samuel, F.H. Metallurgical Aspects of Inclusion Assessment in Al–6%Si Casting Alloy Using the LiMCA Technique. Int. J. Met. 2018, 12, 643–657. [Google Scholar] [CrossRef]
  64. Hudson, S.W.; Apelian, D. Inclusion Detection in Molten Aluminum: Current Art and New Avenues for In Situ Analysis. Int. J. Met. 2016, 10, 289–305. [Google Scholar] [CrossRef]
  65. Dispinar, D.; Nordmark, A.; Syvertsen, F. Melt Cleanliness, Hydrogen Content and Tensile Properties of A356. In Proceedings of the Shape Casting; Wiley: Hoboken, NJ, USA, 2011; pp. 173–180. [Google Scholar]
  66. Yorulmaz, A.; Erzi, E.; Gursoy, O.; Dispinar, D. End product rejection rate and its correlation with melt treatment in direct-chill casted hot rolling slabs. Int. J. Cast Met. Res. 2019, 32, 164–170. [Google Scholar] [CrossRef]
  67. Drouzy, M.; Jacob, S.; Richard, M. Interpretation of tensile results by means of quality index and probable yield strength-application to Al-Si7 Mg foundry alloys-France. Int. Cast Met. J. 1980, 5, 43–50. [Google Scholar]
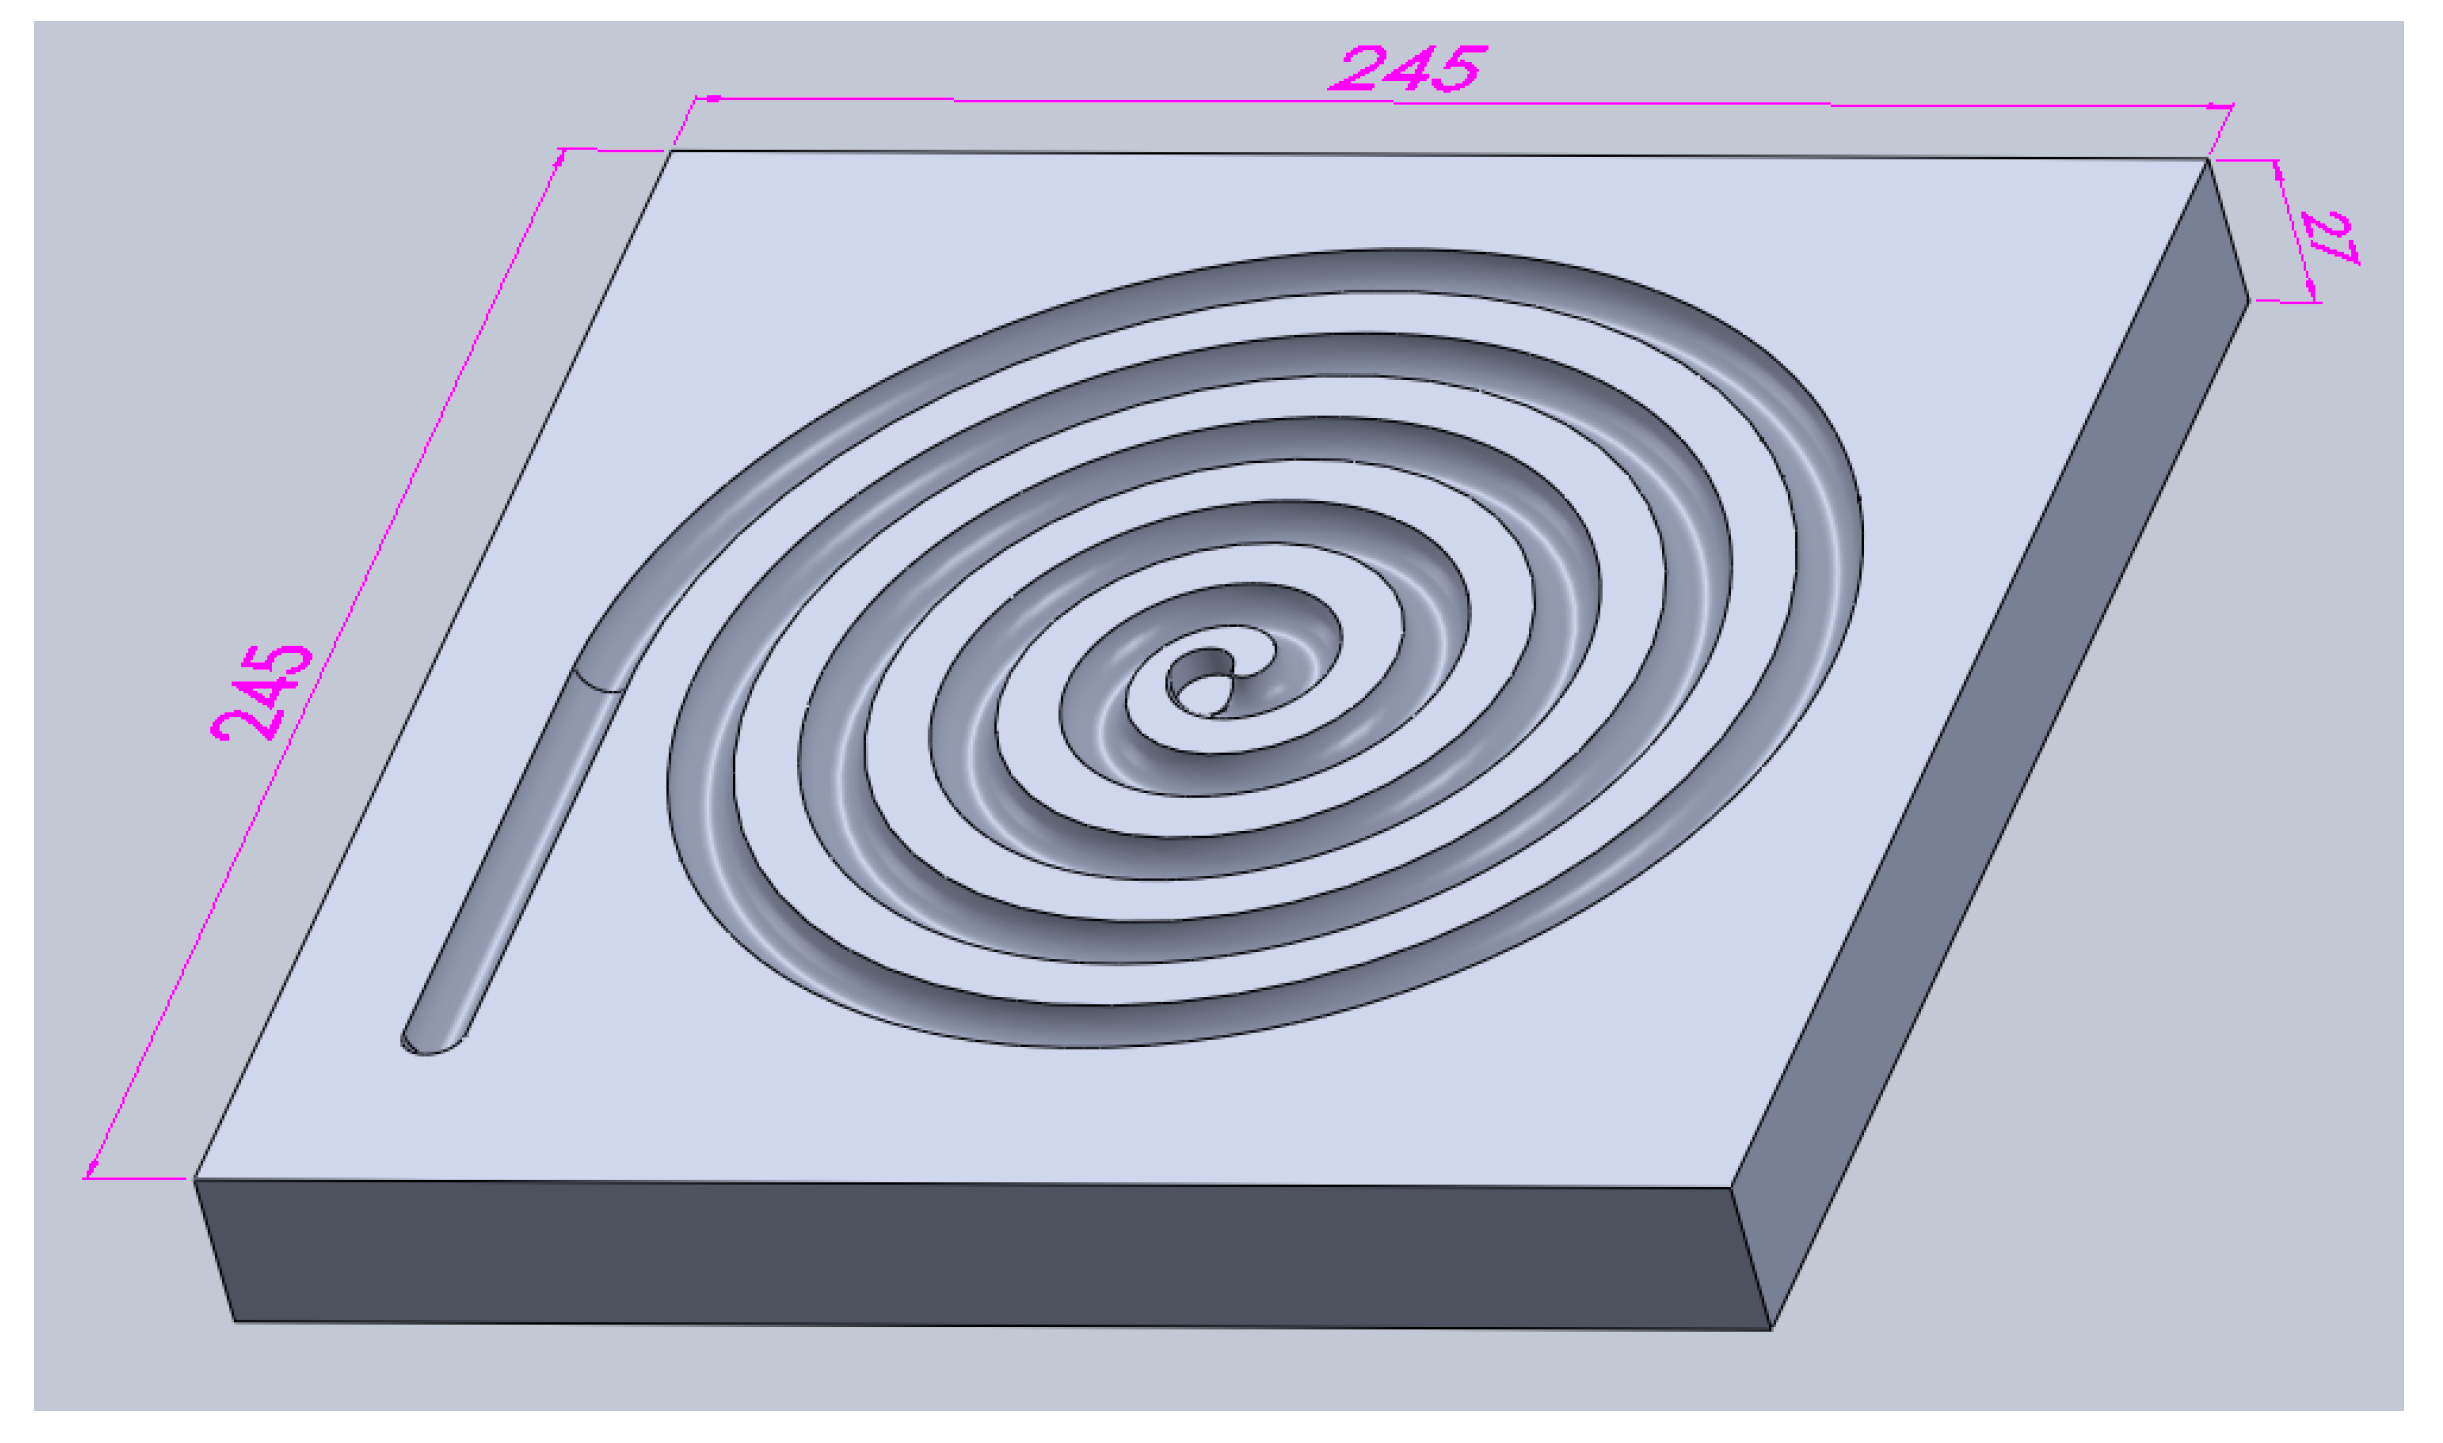
Figure 1. Fluidity test mould. The radius of the mould cavity is 10 mm and the units are in mm.
Metals 09 00957 g001
Figure 2. (a) The schematic representation of the tensile test mould design and (b) the dimension of test bars (in mm).
Metals 09 00957 g002
Figure 3. Change in fluidity length with source.
Metals 09 00957 g003
Figure 4. Change in yield strength with source.
Metals 09 00957 g004
Figure 5. Change in ultimate tensile strength with source.
Metals 09 00957 g005
Figure 6. Change in elongation at fracture with source.
Metals 09 00957 g006
Figure 7. SEM images of tensile test bar fracture surfaces. (a) Source D with pores, (b) Source D with crumples oxides (bifilm) inside the pores. (c) Source D with large oxides and pores (d) Source D with plate-like β-iron intermetallic. (e) Source C with fine and distributed pores. (f) EDS (Energy Dispersive X-Ray Spectroscopy) analysis of arrows marked in “d”.
Metals 09 00957 g007aMetals 09 00957 g007b
Figure 8. Optical microscopy images of Source D. (a) oxide bifilm in between the dendrites (b) pores.
Metals 09 00957 g008
Figure 9. Cross section of two RPT samples with the same bifilm index but a different volume of pores.
Metals 09 00957 g009
Figure 10. Change in bifilm index of different sources.
Metals 09 00957 g010
Figure 11. Supplier Quality Index of different source.
Metals 09 00957 g011
Figure 12. Comparison of quality indices with mechanical properties (a) Yield strength, (b) Ultimate tensile strength, (c) elongation at fracture.
Metals 09 00957 g012
Figure 13. Fluidity change with different indices.
Metals 09 00957 g013
Figure 14. Change of bifilm index with different indices.
Metals 09 00957 g014
Figure 15. Change of rejection rate with different indices.
Metals 09 00957 g015
Figure 16. Contour maps of SQI and the bifilm index with (a) elongation at fracture, (b) UTS and (c) fluidity.
Metals 09 00957 g016
Table 1. Chemical analysis of the A356 aluminium ingots used in the experiments.
SourceSiMgCuFeMnTiAl
A7.130.3890.0230.1350.0020.114Remainder
B6.930.2840.0260.0890.0020.193Remainder
C6.770.2980.0160.0830.0020.177Remainder
D7.200.3700.0330.1690.0030.103Remainder