1. Introduction
The advancement of optical design and processing capability contributes to the evolution of remote-sensing cameras, which develop towards high resolution and large field of view gradually. The imaging capability of an optical system is dependent on design, manufacturing, and alignment. Compared with traditional spherical or aspherical mirrors, free-form mirrors can achieve more complex and diverse designs, improving the ability to eliminate high-order aberrations. It is beneficial to reduce the system volume and increase the field of view. In the field of space remote sensing and mapping, a line-of-sight field of view is employed with a line-array detector for push-broom imaging. The width is determined by the size of the line field of view angle. The Changchun Institute of Optics and Fine Mechanics and Physics [
1,
2] designed a camera with a 76° field of view in the sagittal direction, including three free-form mirrors. However, the processing and testing of free-form mirrors are more difficult. The testing accuracy determines the processing accuracy directly. The surface shape errors of mirrors affect the imaging quality of the remote-sensing system. Therefore, high-precision detection methods are crucial for the processing of free-form mirrors [
3]. The surface shape interferometry detection method based on computer-generated holography (CGH) is popular currently because of its high degree of design freedom, which can meet the requirements of a high-precision null test for mirrors.
However, CGH requires the processing of diffractive structures. At present, the most commonly employed techniques are laser and electron beam direct writing. The processing capability of the CGH is restricted by the minimum linewidth and maximum aperture, which are limited to ensure high accuracy. For the detection of convex free-form mirrors, the aperture of the CGH must be larger than that of the mirror under test. As a result, it is difficult to achieve full aperture surface shape detection by CGH for convex free-form mirrors with larger apertures.
In order to achieve the detection of convex free-form surfaces with large apertures, several feasible methods have been proposed. The most prevalent method is to design multiple CGHs for sub-aperture splicing [
4], which facilitates the detection of large aperture mirrors. The accuracy of sub-aperture detection is high, but different CGHs for each sub-aperture are necessary to achieve a null test, especially for free-form mirrors. Therefore, the method is costly and is also affected by the accuracy of the displacement platform and the splicing algorithm. Tricard M. [
5,
6] proposed a rotating double optical wedge compensation measurement method; two rotatable optical wedges (Risley prism pairs) are used to transform the spherical wavefront into the wavefront that matches each sub-aperture. It can reduce costs and expand the applicability for the test, but in addition to the splicing errors, this approach introduces the transmission wavefront errors of the wedges and the error of the wedge position adjustment. In comparison to splicing or non-null test methods, full aperture null test is a more suitable approach for high-precision mirror surface shape detection. Zhang Haidong [
7] proposed a combination of CGH and illuminated lenses to achieve the detection. The illumination lens is placed in front of the tested mirror to converge the beam, and the aberration in the detection optical path is compensated through the CGH, which is not limited by the CGH maximum processing aperture. But the non-uniformity of illuminated lens material will reduce the measurement precision. Compared with the lens, less error is introduced by using the mirror to converge the light.
This paper proposes a hybrid refractive and diffractive convex free-form surface shape testing method, which employs a combination of CGH and spherical standard mirrors to achieve the detection. The light from the interferometer is diffracted by the CGH, reflected by the tested mirror, and then incident on the surface of the spherical mirror; afterward, it is returned to the original way to achieve an interferometric measurement. In this method, the requirement for the spherical mirror’s surface accuracy is reduced, the tilt of the spherical mirror will not introduce a systematic error, and the spherical mirror is more readily processed than other components. Furthermore, because the light path is reflected twice on the mirror to be inspected, the system has a higher detection accuracy. Comparative validation is performed by designing and analyzing the hybrid refractive and diffractive testing optical path.
2. Methods
The basic requirement for interference surface shape measurement is that the reference beam interferes with the test beam. If the tested mirror is an ideal surface shape without manufacturing errors, ideal straight or zero stripes will be obtained when the null test condition is met.
CGH is a diffraction element whose principle is approximated to that of a diffraction grating. The phase function of the CGH is designed to generate a diffraction pattern, which modulates the incident light and produces an irregular wavefront that matches the measured free-form surface.
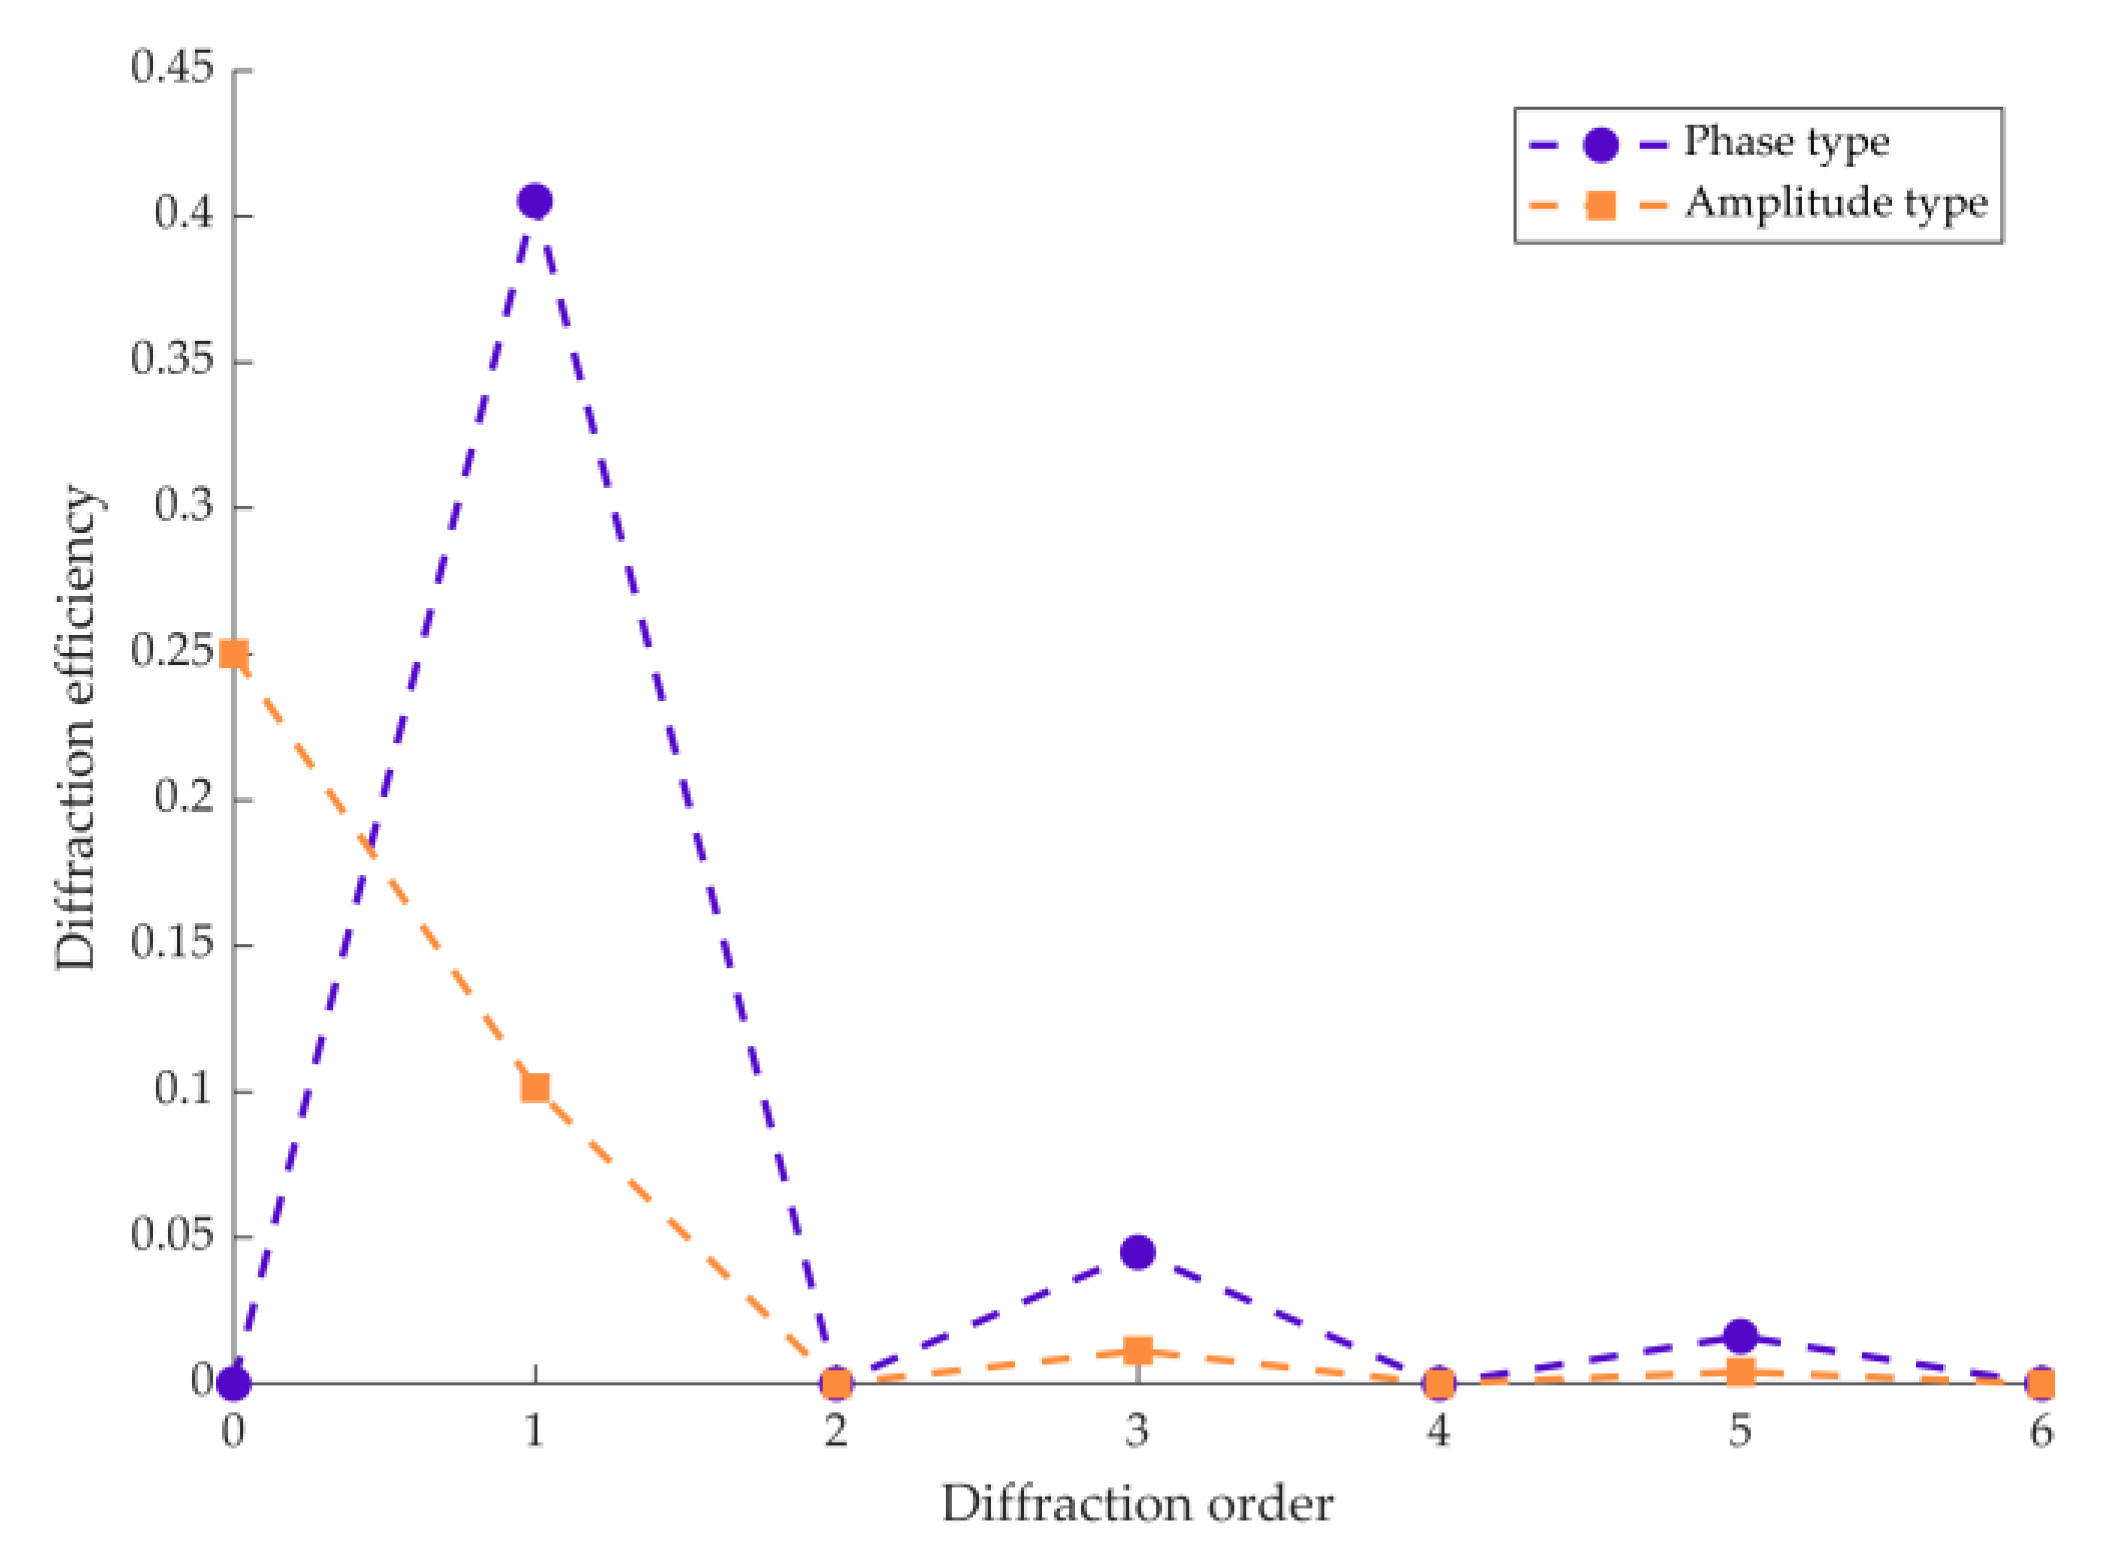
CGH can be considered a method of compensating for the optical path difference (OPD) in the detected optical path through phase modulation, with the result that the total system wavefront RMS is approximately zero. As a diffractive element with multiple diffraction orders, the CGH exhibits a relatively low transfer efficiency. For the case of 50% duty cycle and non-zero order, the diffraction efficiency of the phase type is four times that of the amplitude type. The relationship between the diffraction efficiency and the diffraction order of the amplitude type is as follows:
The efficiency of each diffraction order is illustrated in
Figure 1. Under the properties of the detection optical path, such as the reflectivity of the free-form mirror, the detection distance, and other factors that affect the contrast of the interference fringes, the optimal CGH type and working order can be selected appropriately.
In general, the surface shape detection region of CGH is referred to as the main holography area. Considering the diffraction efficiency, it is typical to use the +1 diffraction order, with the phase exhibiting a definitive correlation with the optical path difference:
where λ is the wavelength and
OPDmain is the optical path difference in the main holographic area.
Generally, a converging beam is generated by CGH to match the convex free-form mirror, whose focus point coincides with the imaginary focus point of the convex mirror. Therefore, the aperture of the CGH needs to be larger than that of the mirror. To reduce the aperture of CGH, a spherical mirror can be used to achieve the convergence of the beam by backward reflection. CGH is only used to compensate for residual aberrations in the detection optical path. The radius of curvature and the aperture of the spherical mirror are determined by the distance between the spherical mirror and the free-form mirror. As the distance between the two mirrors increases, the radius of curvature and the aperture of the spherical mirror also increase.
If
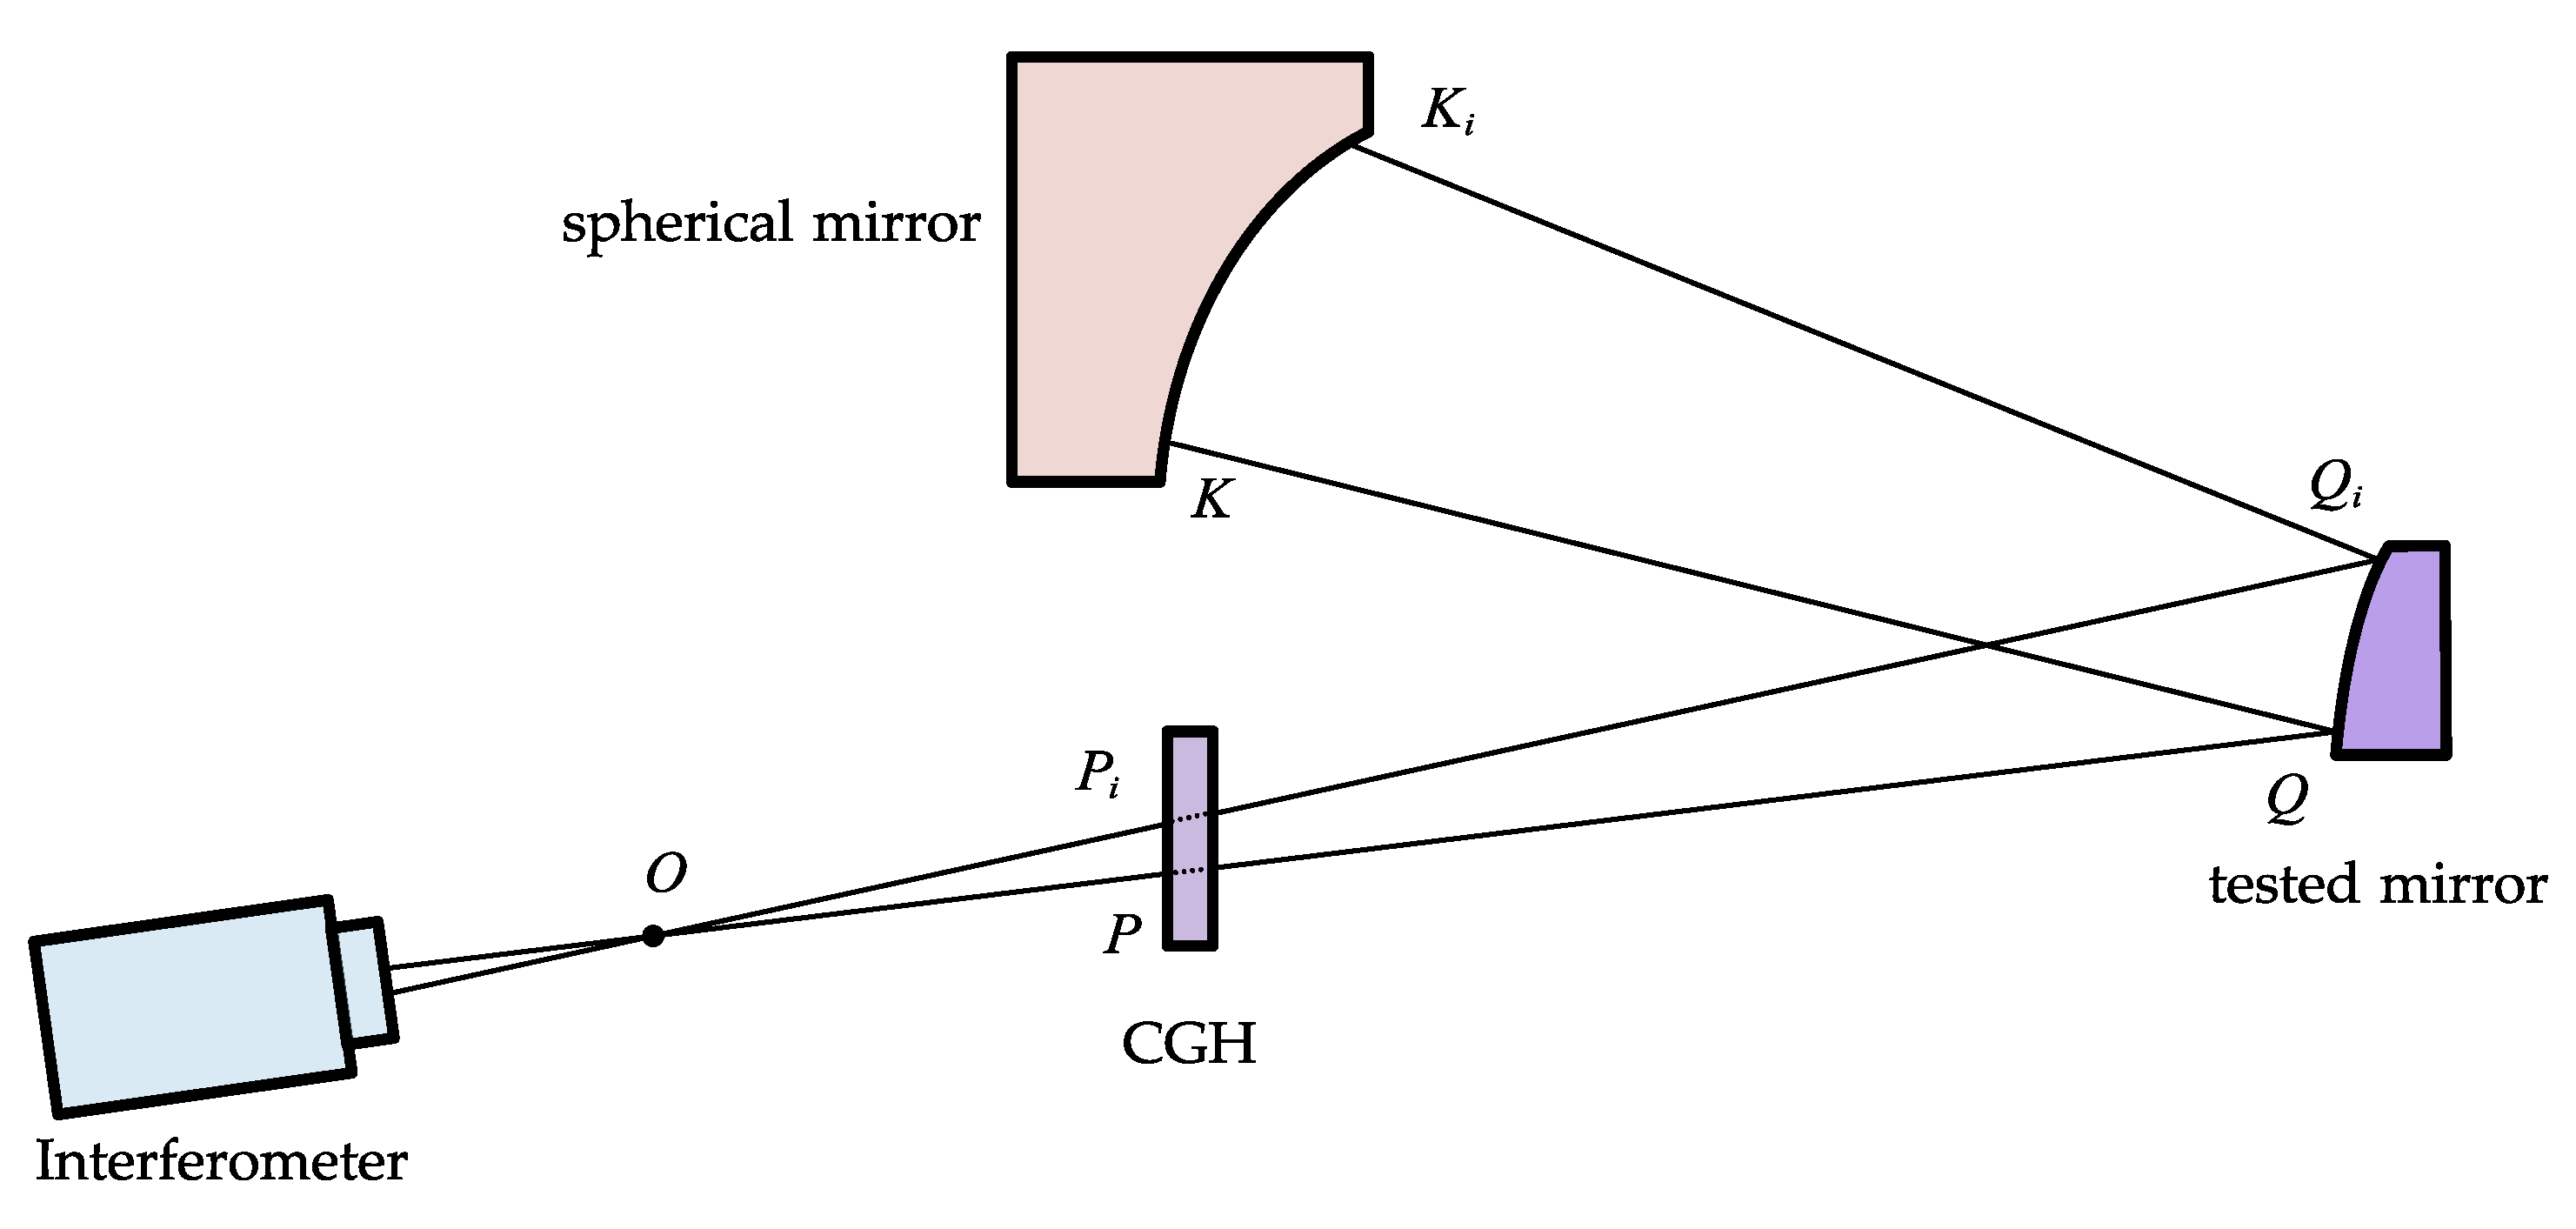
Pi is a point on CGH, the light path of the main holographic area is shown in
Figure 2. The CGH phase expression can be derived by a single-pass model. For the convenience of analysis, it is simple to ignore the influence of CGH thickness on optical path difference. The influence of thickness follows Snell’s law. The point on CGH corresponds to point
Qi on the free-form mirror to be under examination and also to point
Ki on the standard spherical mirror. The focal point of the standard lens of the interferometer is located at point
O. The light beam is diffracted by CGH, subsequently incident on the free-form mirror to be measured, and then reflected by the convex free-form surface to the spherical mirror. Finally, the beam is reflected to the interferometer in the same path. Any ray
QiKi incident on the standard spherical mirror is perpendicular to point
Ki. According to the geometric light path, the relationship equations are as follows:
where
OPD(
i) is the magnitude of the optical path difference that requires compensation at point
i on the main holographic area.
The spherical mirror’s light-reflection properties dictate that the light must be incident along the normal direction of each point on the mirror’s surface for the light to return along its original path. Thus, if the radius of curvature
R of the spherical mirror is determined, the normal vector
K⊥ (
FxK,
FyK,
FzK), which is the same as the direction vector of
KQ, of the spherical mirror vector height matrix
K (
xK,
yK,
zK) is also determined. The formula is as follows:
According to the law of light reflection, the reflection angle
θ of the light at each point can be obtained as follows:
The direction vector
QP can be obtained, when the vector height matrix
Q (
xQ,
yQ,
zQ), the normal vector
Q⊥, and the direction vector
KQ of the free-form mirror are known.
where
is the unit vector along the X-direction.
By determining the distance
l1 between the free-form surface and the spherical mirror, the distance
l2 between the free-form surface and the CGH, and the distance
l3 between the CGH and the focal point, the optical path difference size corresponding to each point on the CGH can be obtained.
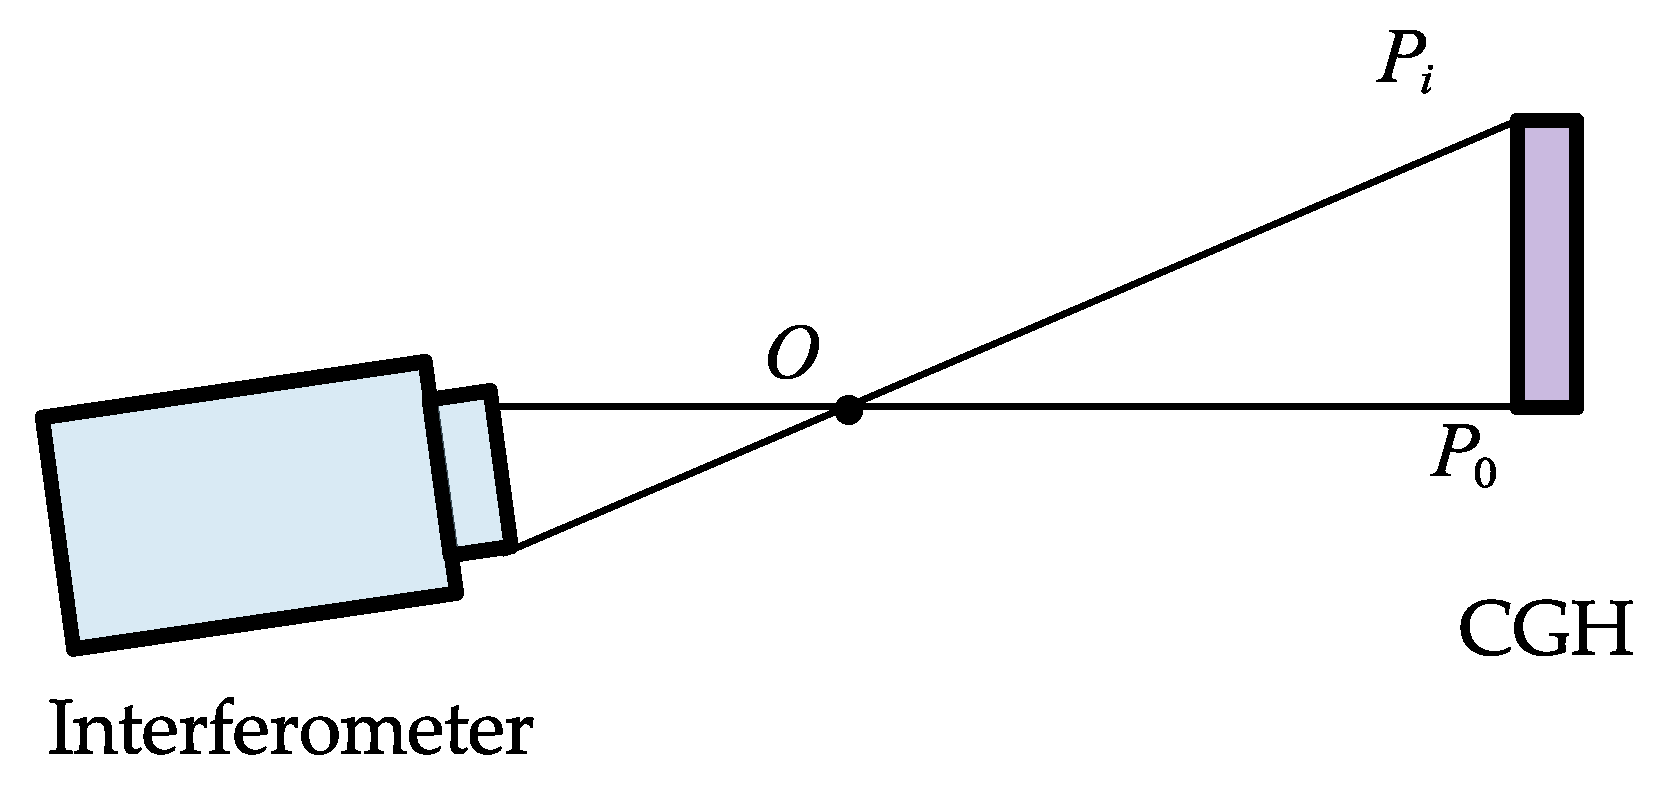
Similarly, to achieve the alignment of the position and angular between the CGH and the interferometer, it is necessary to design the alignment holography, which determines the correctness of the CGH’s position and angular through the interference fringes in the region, as shown in
Figure 3. The alignment holography is reflected only once in the optical path; therefore, the diffraction efficiency is high. The +1 or +3 diffraction levels can be selected according to the phase. The higher level of diffraction is less efficient, but the phase is easier to process.
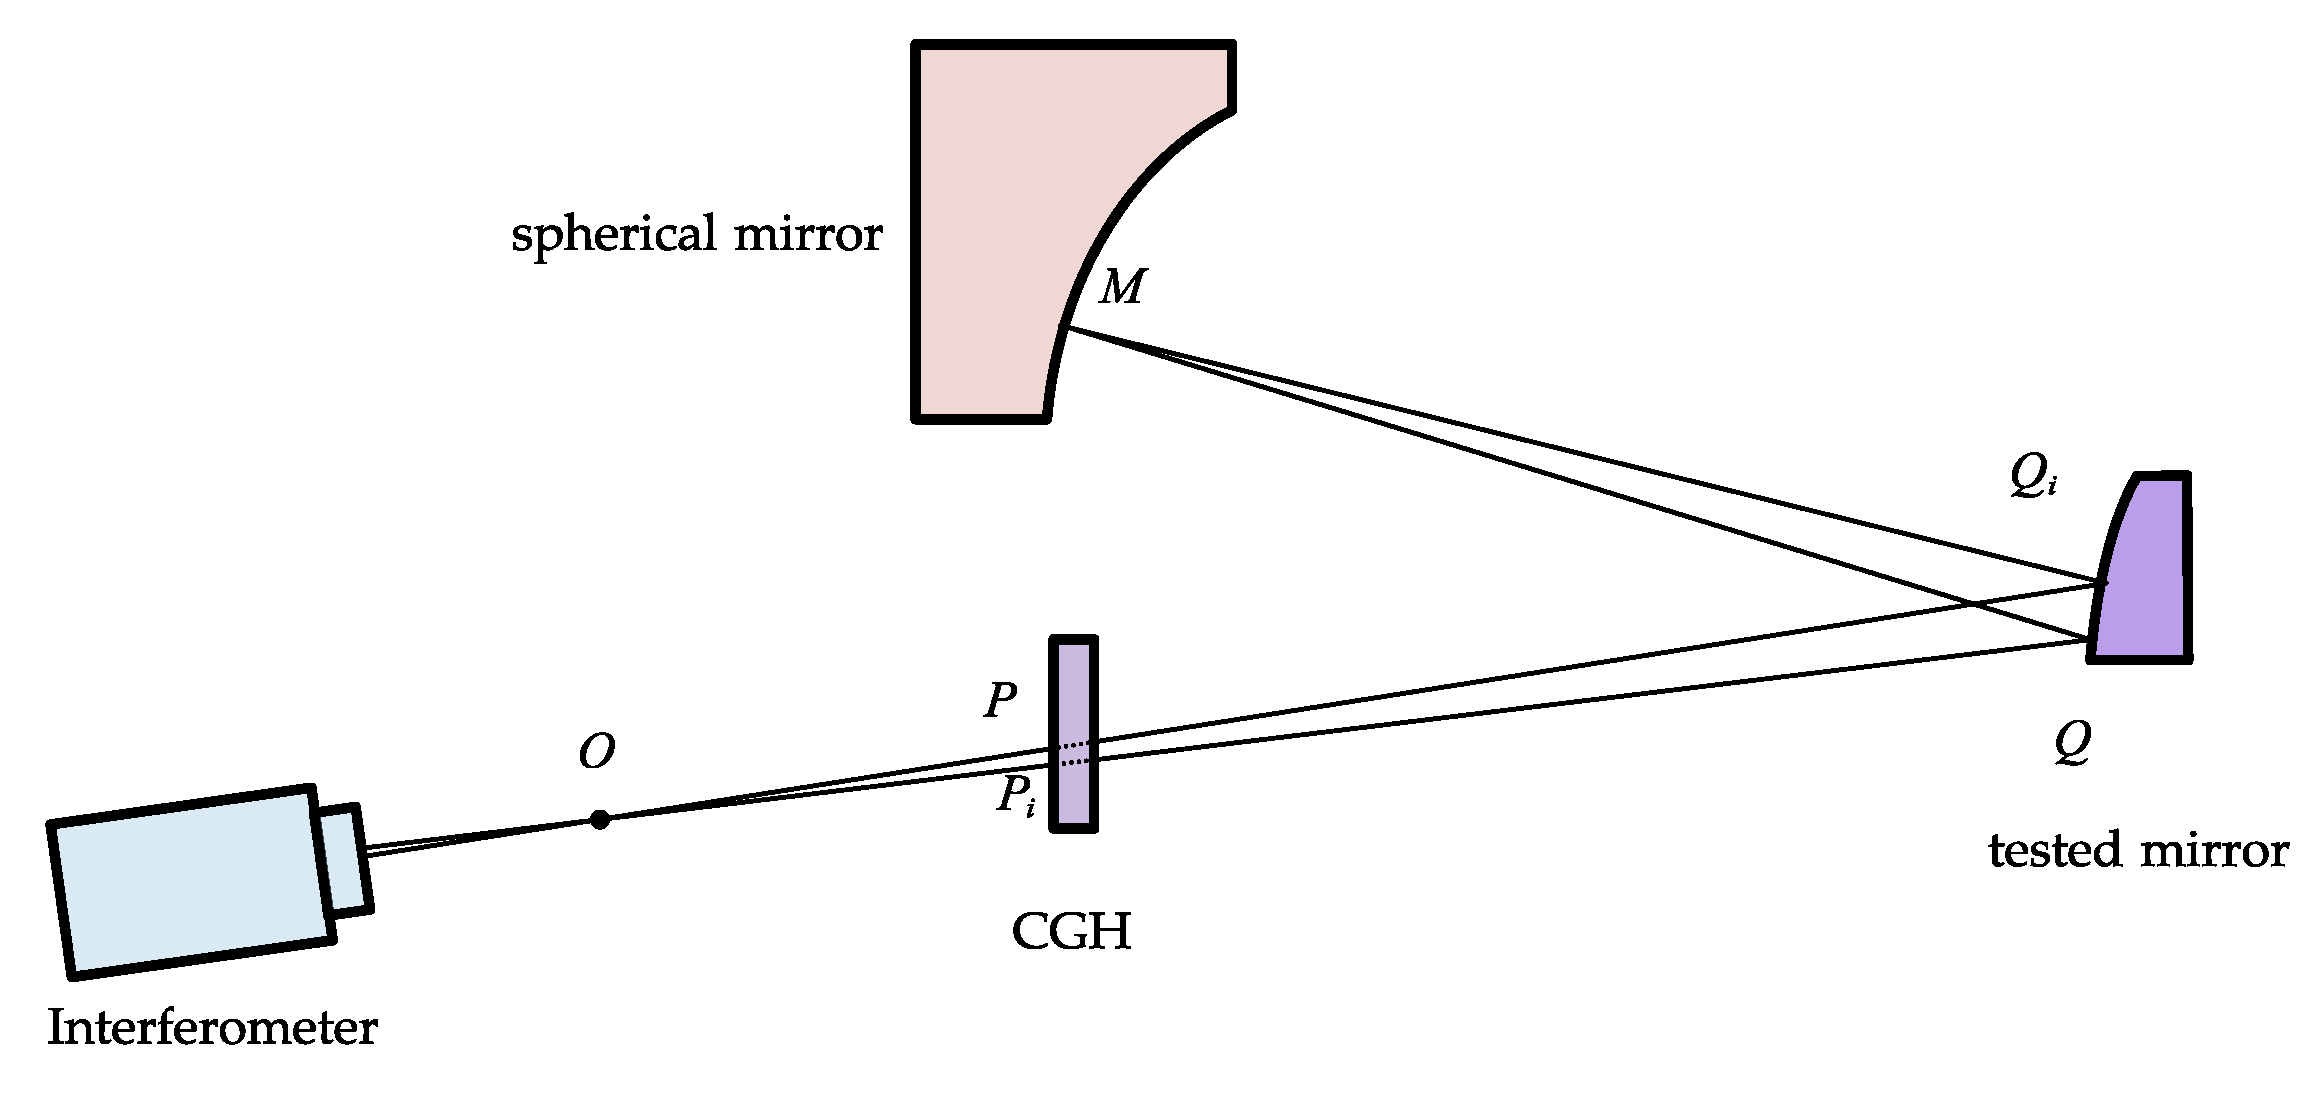
One of the challenges associated with the measuring method is the determination of the position of the standard spherical mirror. The characteristic of spherical mirrors is that any line passing through the center of the sphere represents the optical axis. Consequently, the tilt of the spherical mirror primarily affects the size of the inspection area. It is necessary to ascertain the distance between the spherical mirror and the mirror to be inspected. The cat-eye image can be used to determine the position of the spherical mirror. The position of the cat-eye is where the light is focused on the mirror, and the interference fringes appear in the shape of a cat’s eye. The optical path of the cat-eye image is a backward-reflecting system, and the cat-eye image is contingent upon accurate detection distance and precise relative positional alignment of the two mirrors. Therefore, the cat-eye can be used to realize the positional alignment of the elements. The cat-eye image optical path is shown in
Figure 4.
The interferometer test is the measurement of the optical path difference of the test beam relative to the reference beam. It has a proportional conversion relationship with the surface shape error h of the tested mirror, called the scale factor. When a single reflection occurs on the tested mirror, the corresponding scale factor is 0.5, indicating that h = 0.5 × OPD. The surface shape error of the measured mirror modulates the reflected test wavefront twice. If the light on the tested mirror is reflected twice, h = 0.25 × OPD. Consequently, the measurement sensitivity is doubled.
In the majority of CGH detection schemes, the light is reflected once on the tested mirror. The wavefront error result, which is captured by the interferometer, corresponds to the mirror surface shape error by a factor of two. In the convex free-form surface-detection optical path, the incident light is reflected by the free-form mirror to the standard spherical mirror and then passes through the mirror to be inspected again. In other words, the light is reflected twice on the convex free-form mirror, and the interferometer detection result corresponds to four times the surface shape error. This improves the sensitivity of surface shape detection, while the single reflection at the standard spherical mirror simultaneously reduces the system error, thereby improving the accuracy of surface shape detection.
3. Results
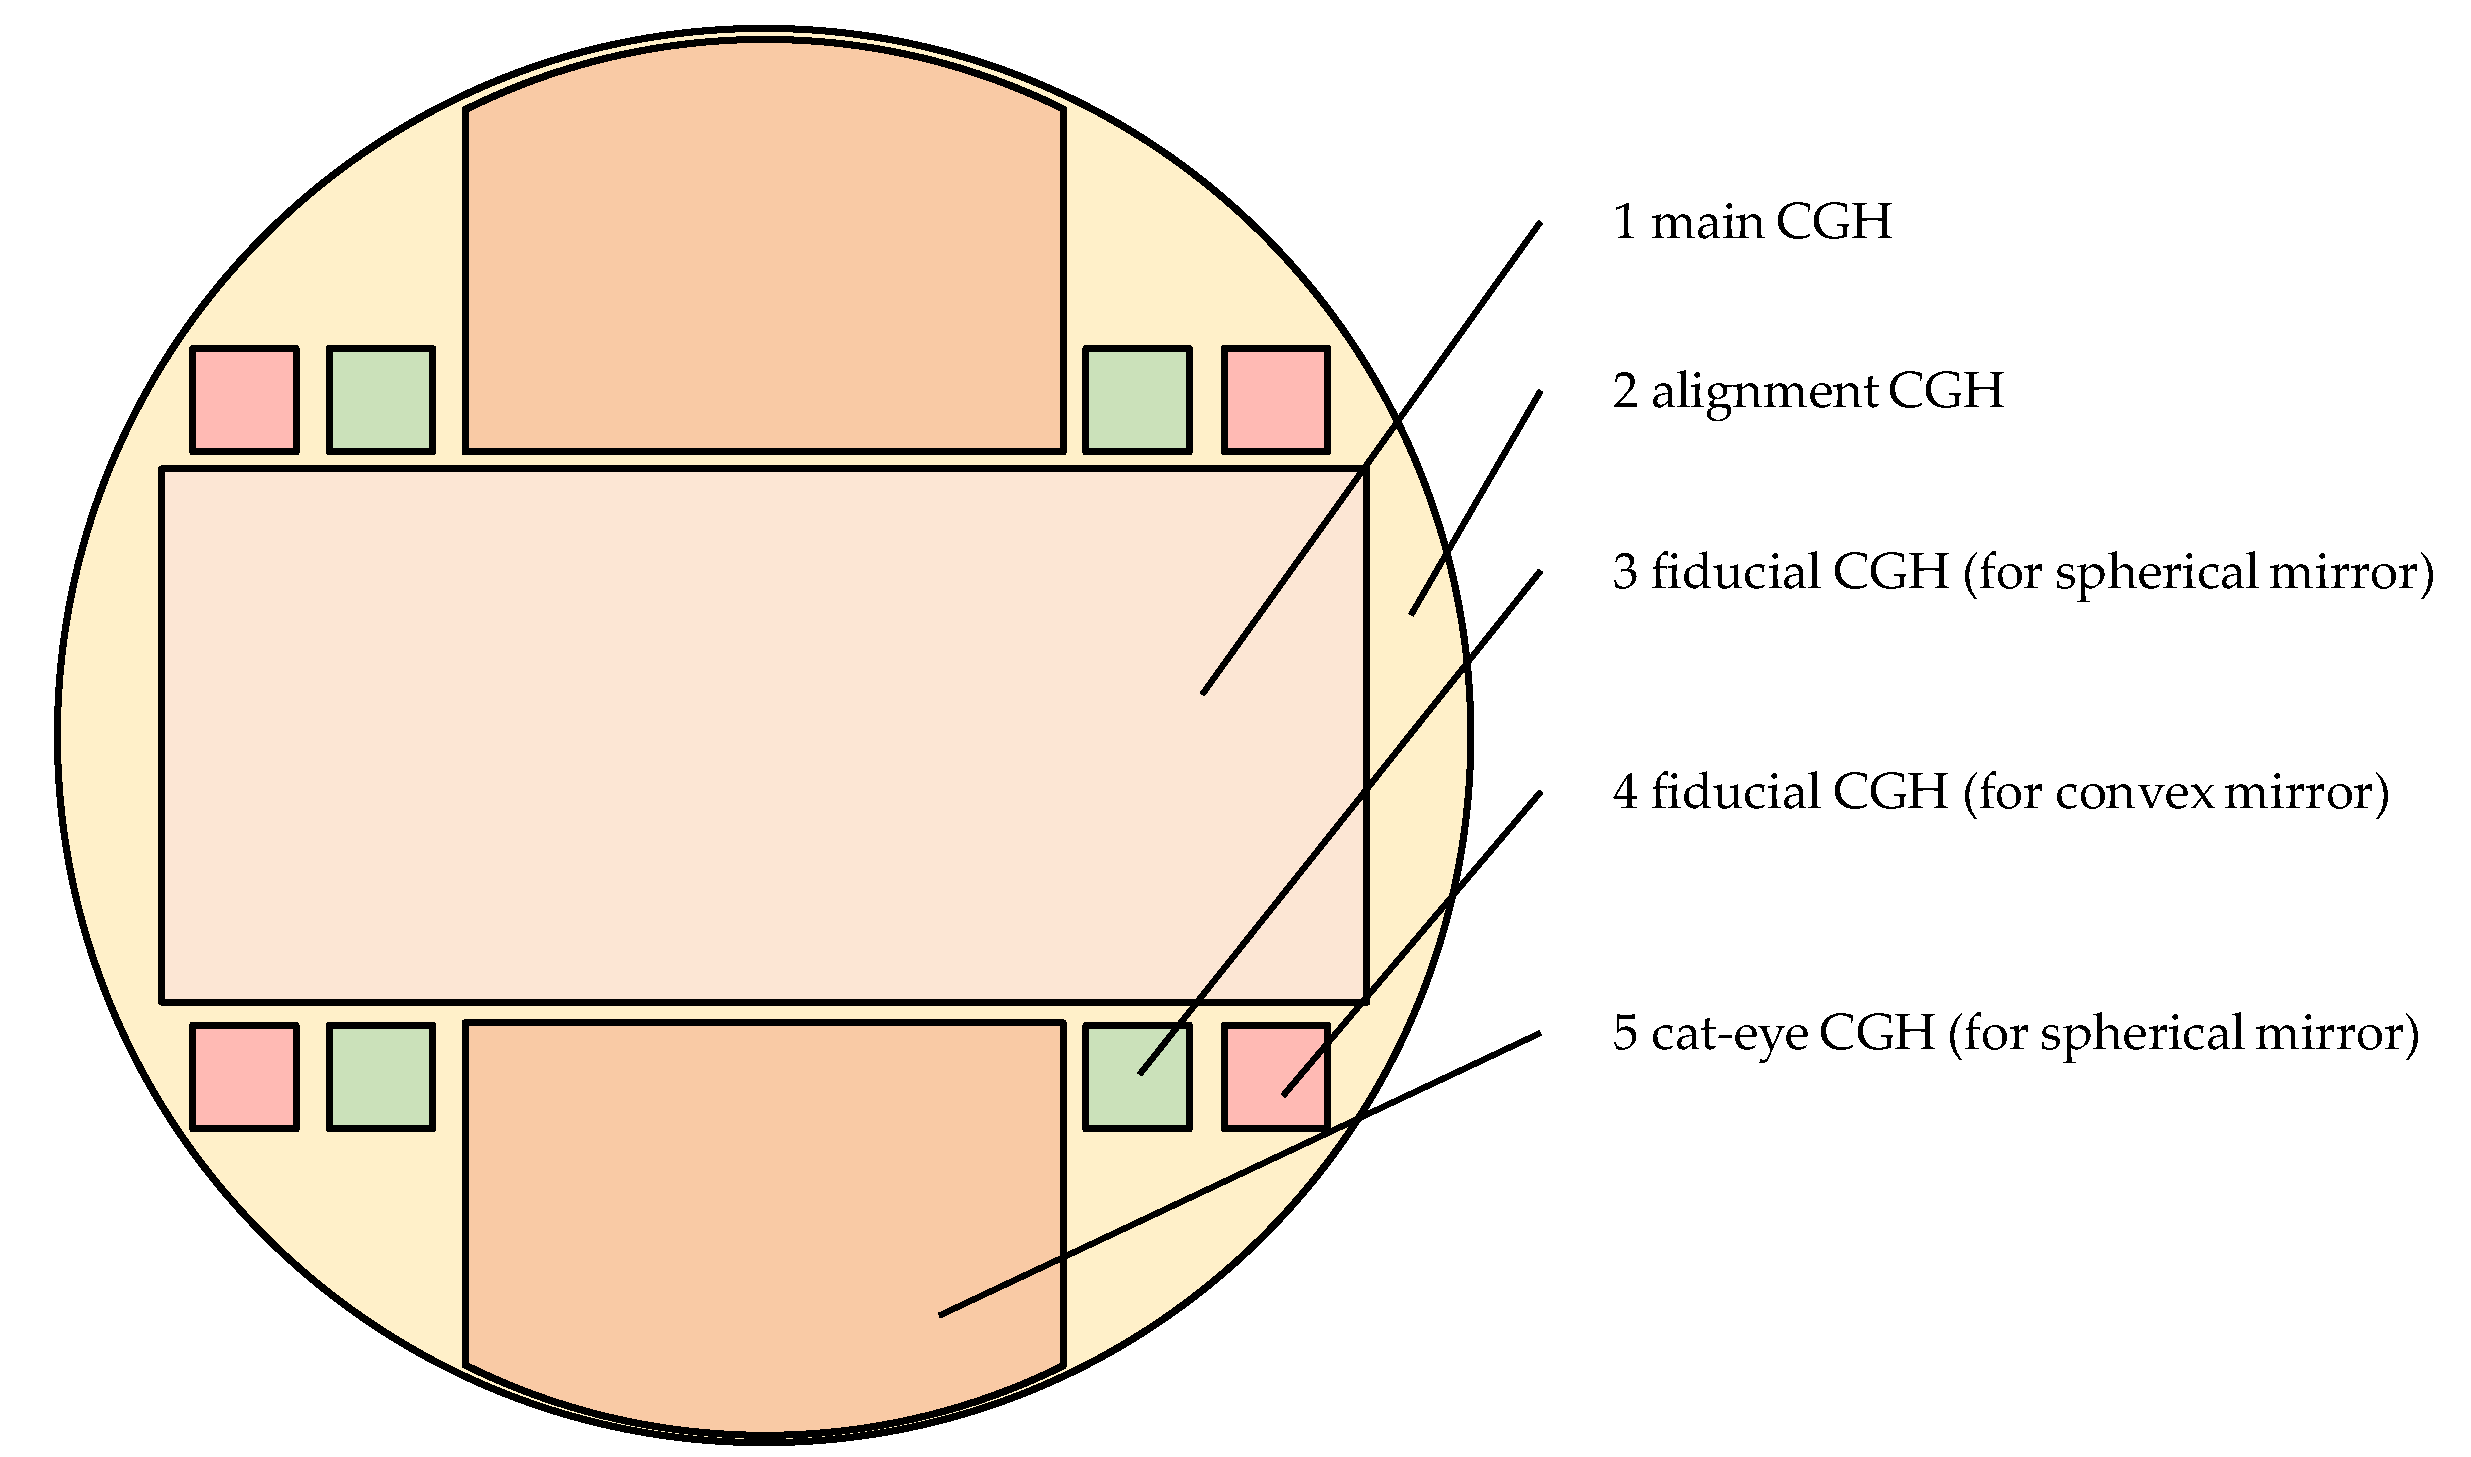
The method described above is employed to design the detection optical path of the convex free-form mirror with an aperture of 340 mm × 180 mm. The layout of each functional area of the CGH is shown in
Figure 5.
The CGH comprises five distinct parts: the main CGH for the detection of the free-form mirror; the alignment CGH for the alignment with the interferometer; the fiducial CGH for the assistance in the positional adjustment of the spherical mirror; the fiducial CGH for the assistance in the positional adjustment of the free-form mirror; and the cat-eye CGH for the determination of the axial position of the spherical mirror.
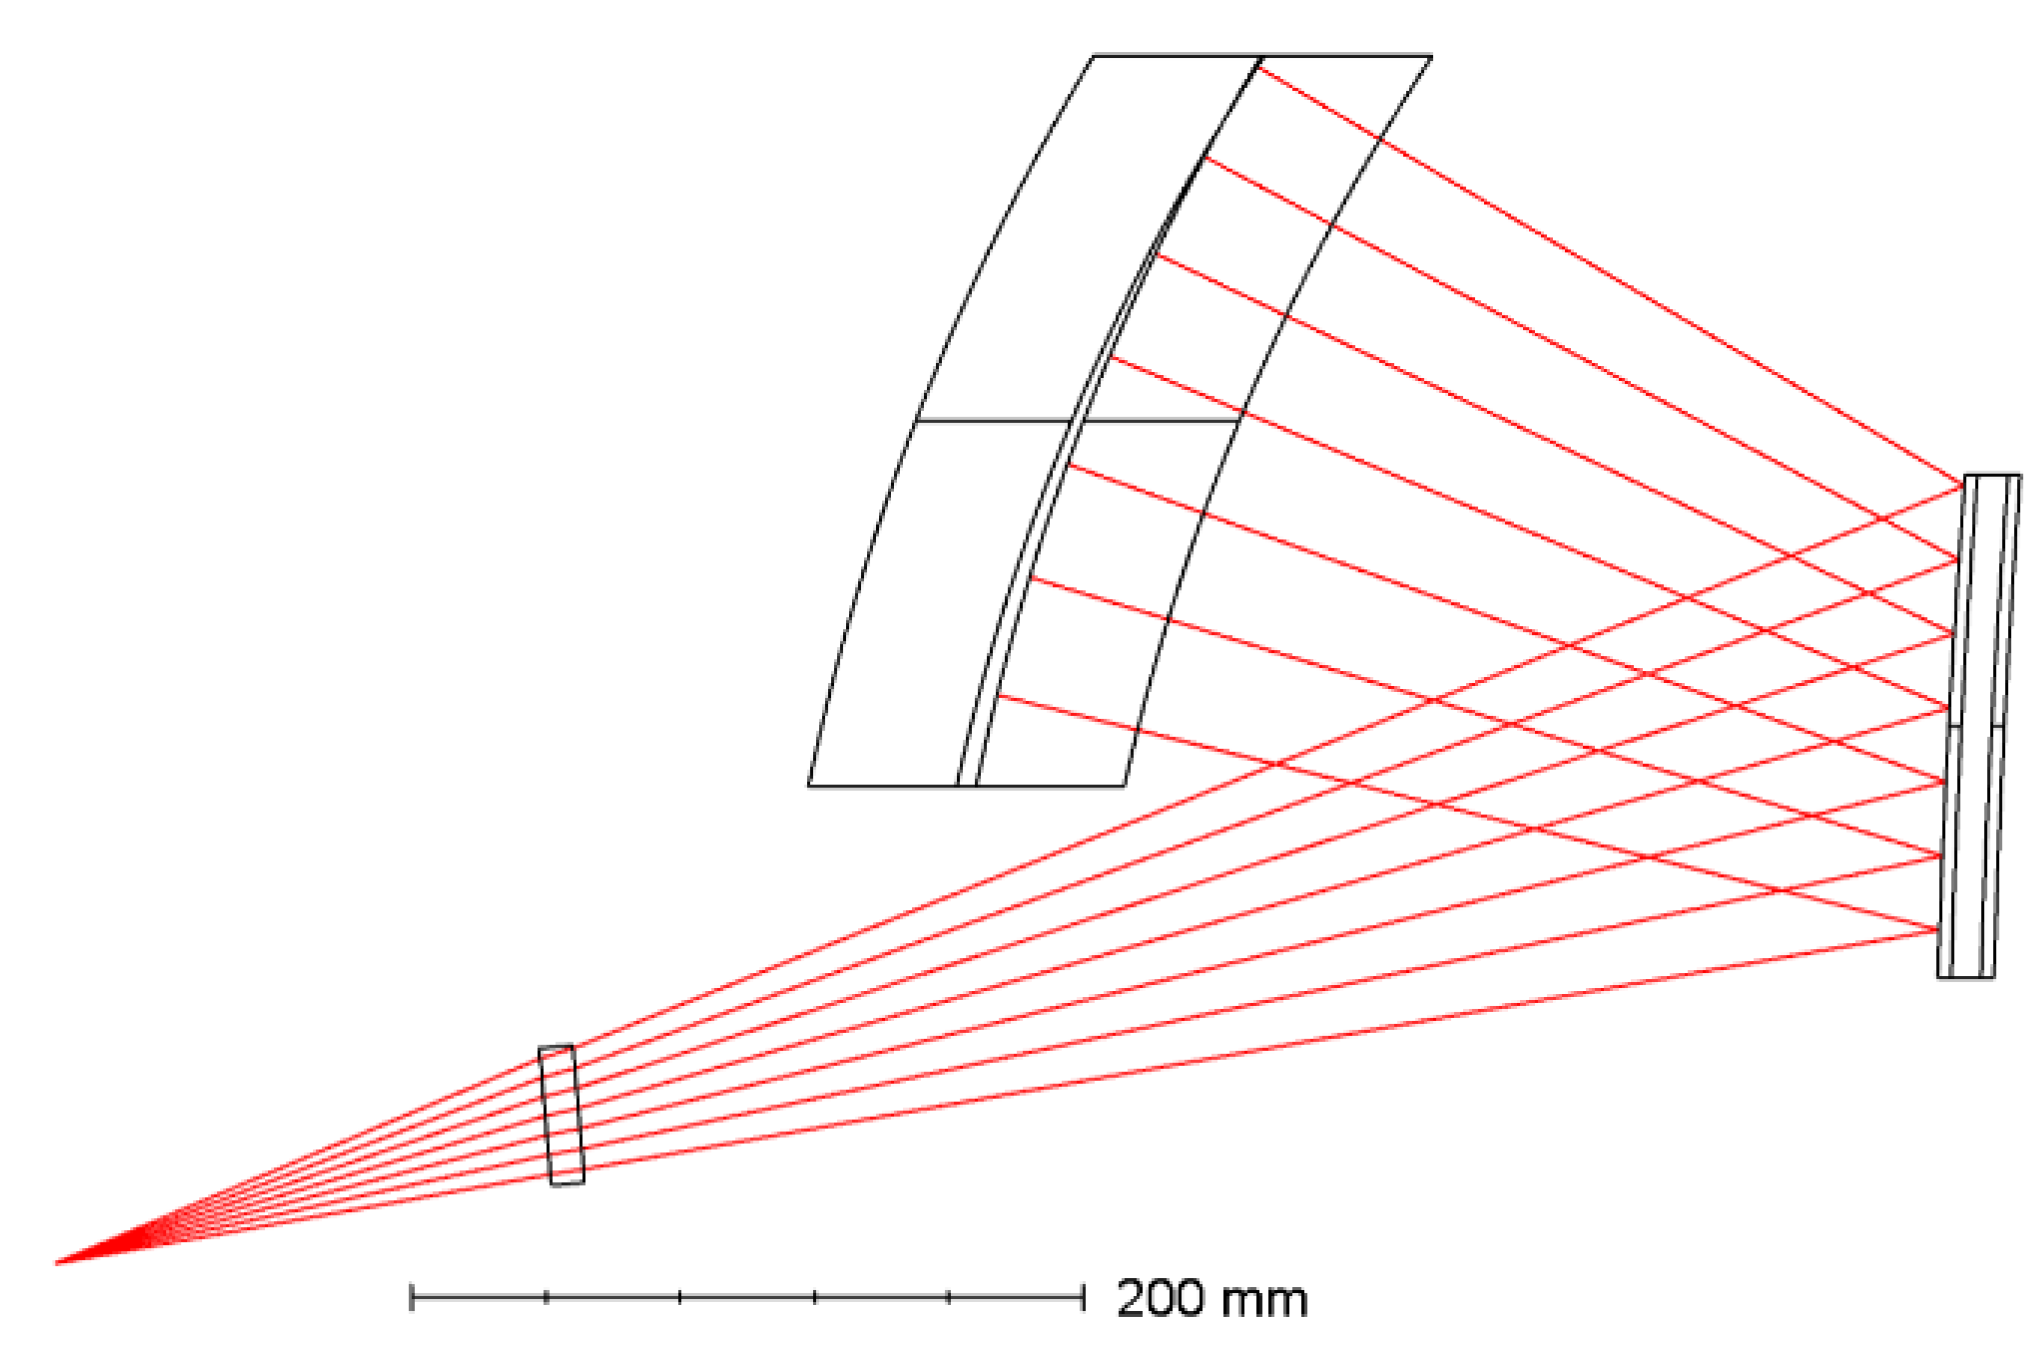
The design of the surface shape detection optical path is shown in
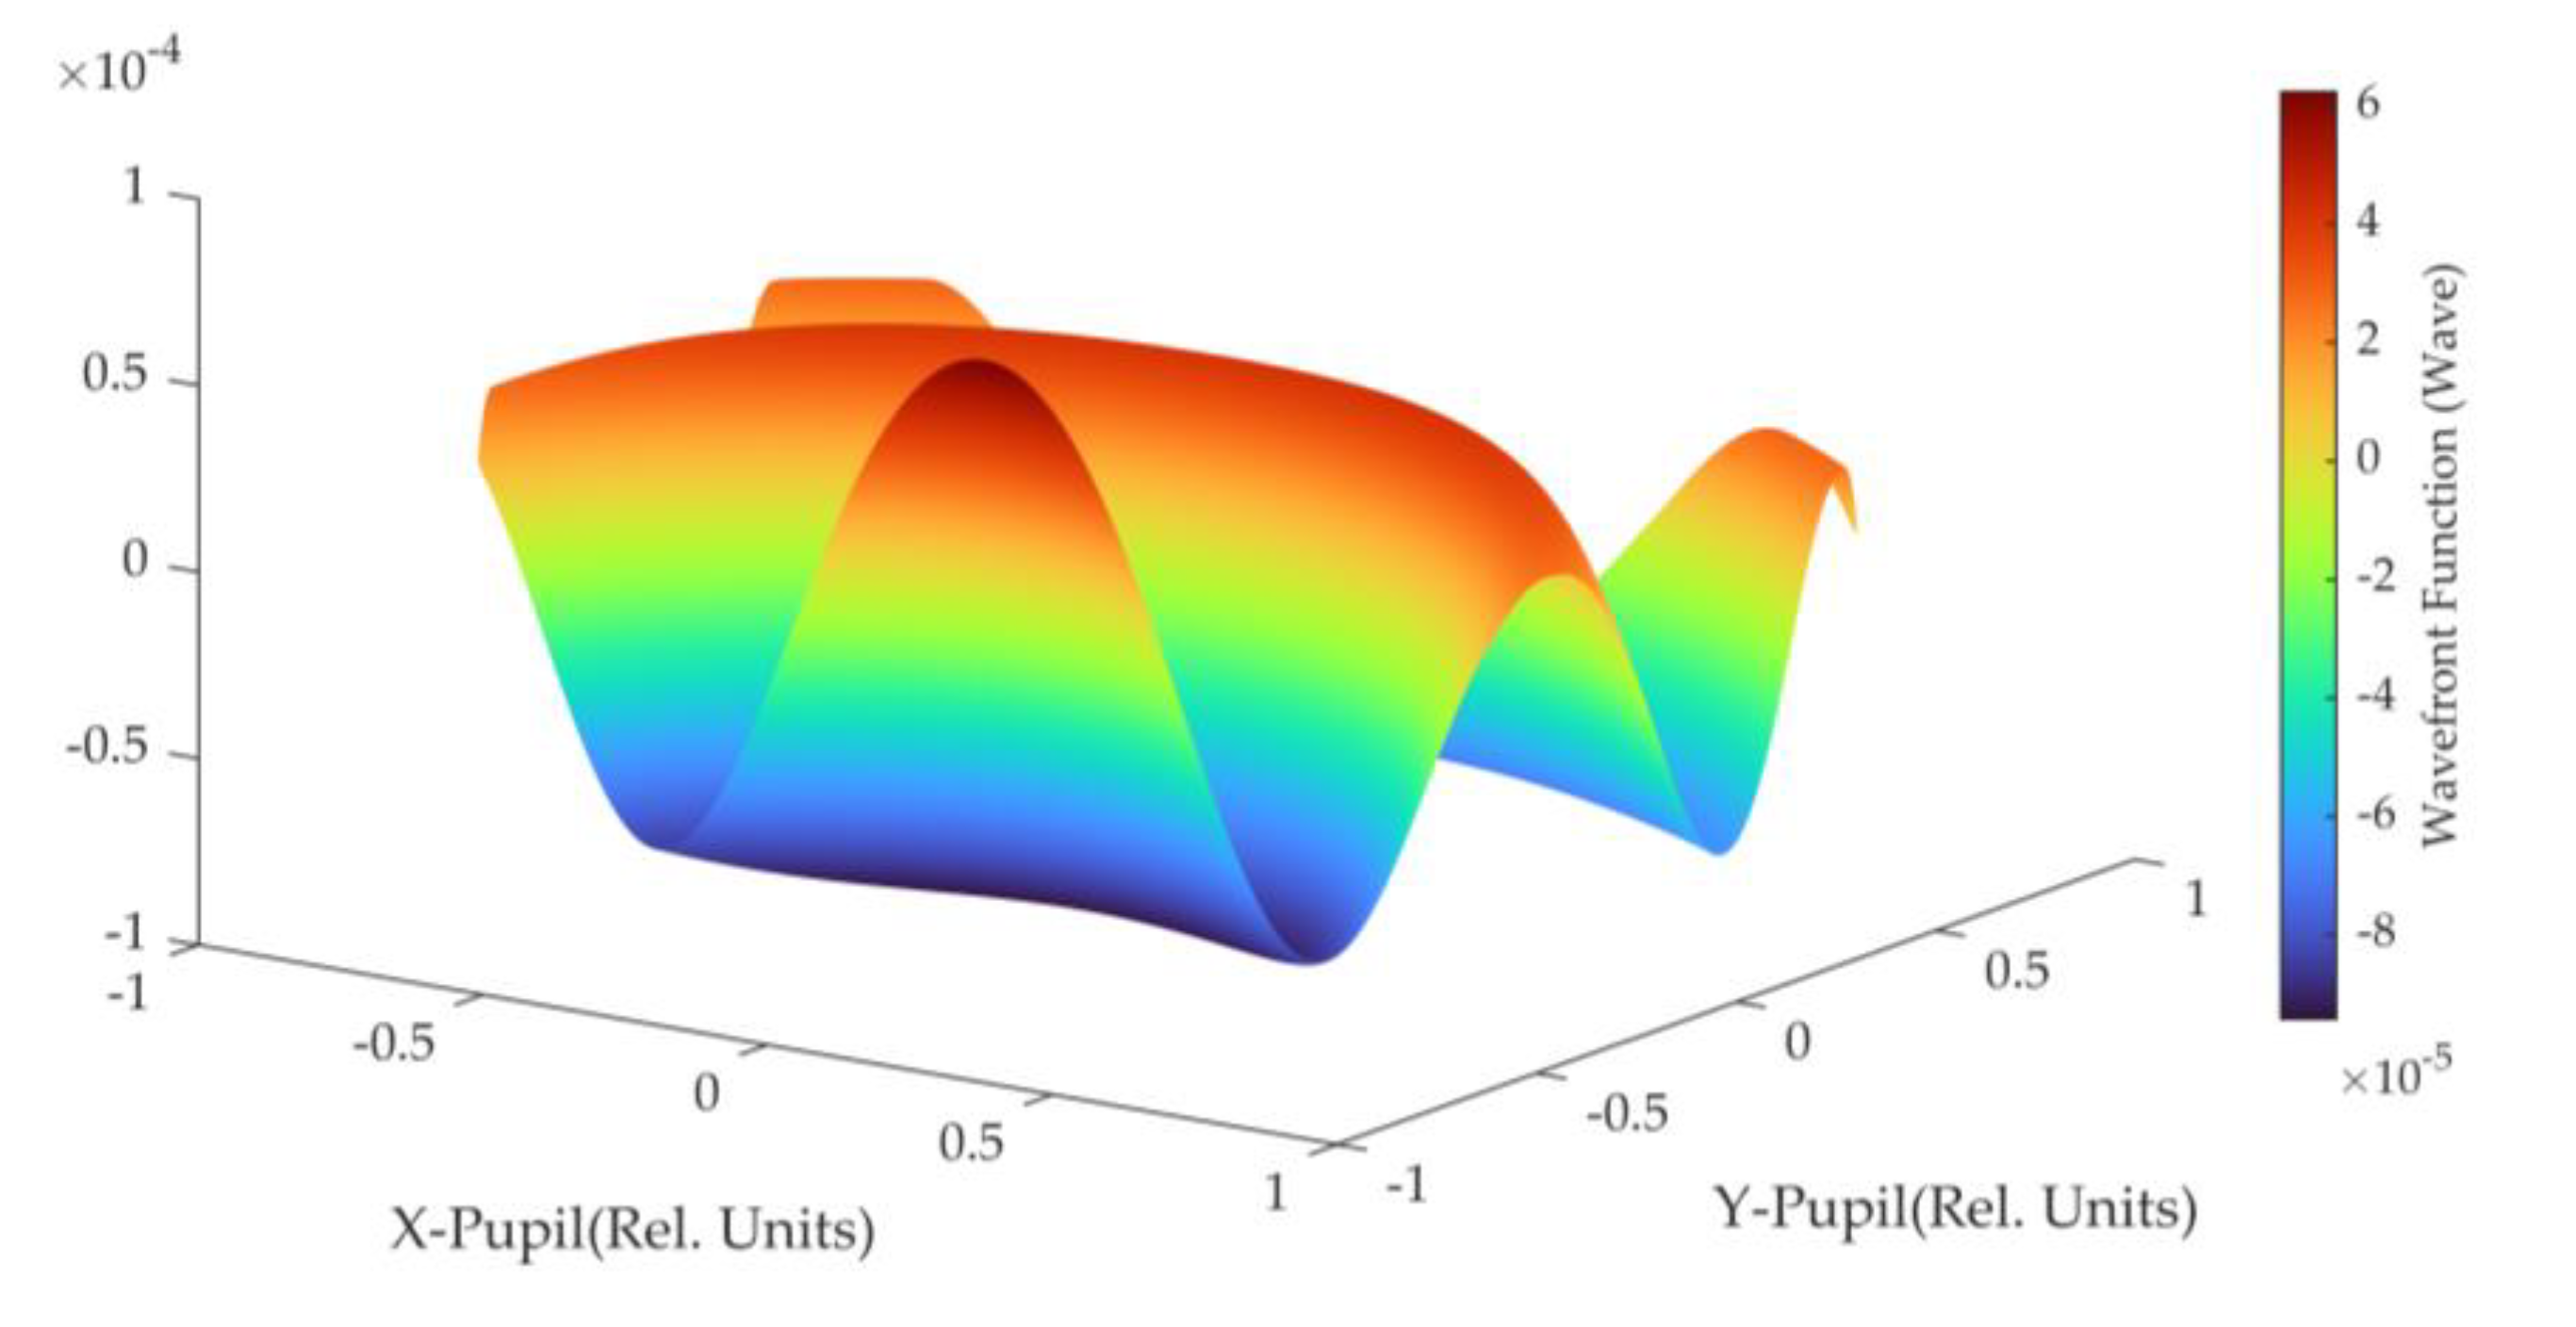
Figure 6. The free-form mirror and the standard spherical mirrors are placed offset from the optical axis, which is expected to avoid the obstruction in the detection optical path. The RMS residual of the detection design is 0.0000λ, with the wavelength 632.8 nm, as shown in
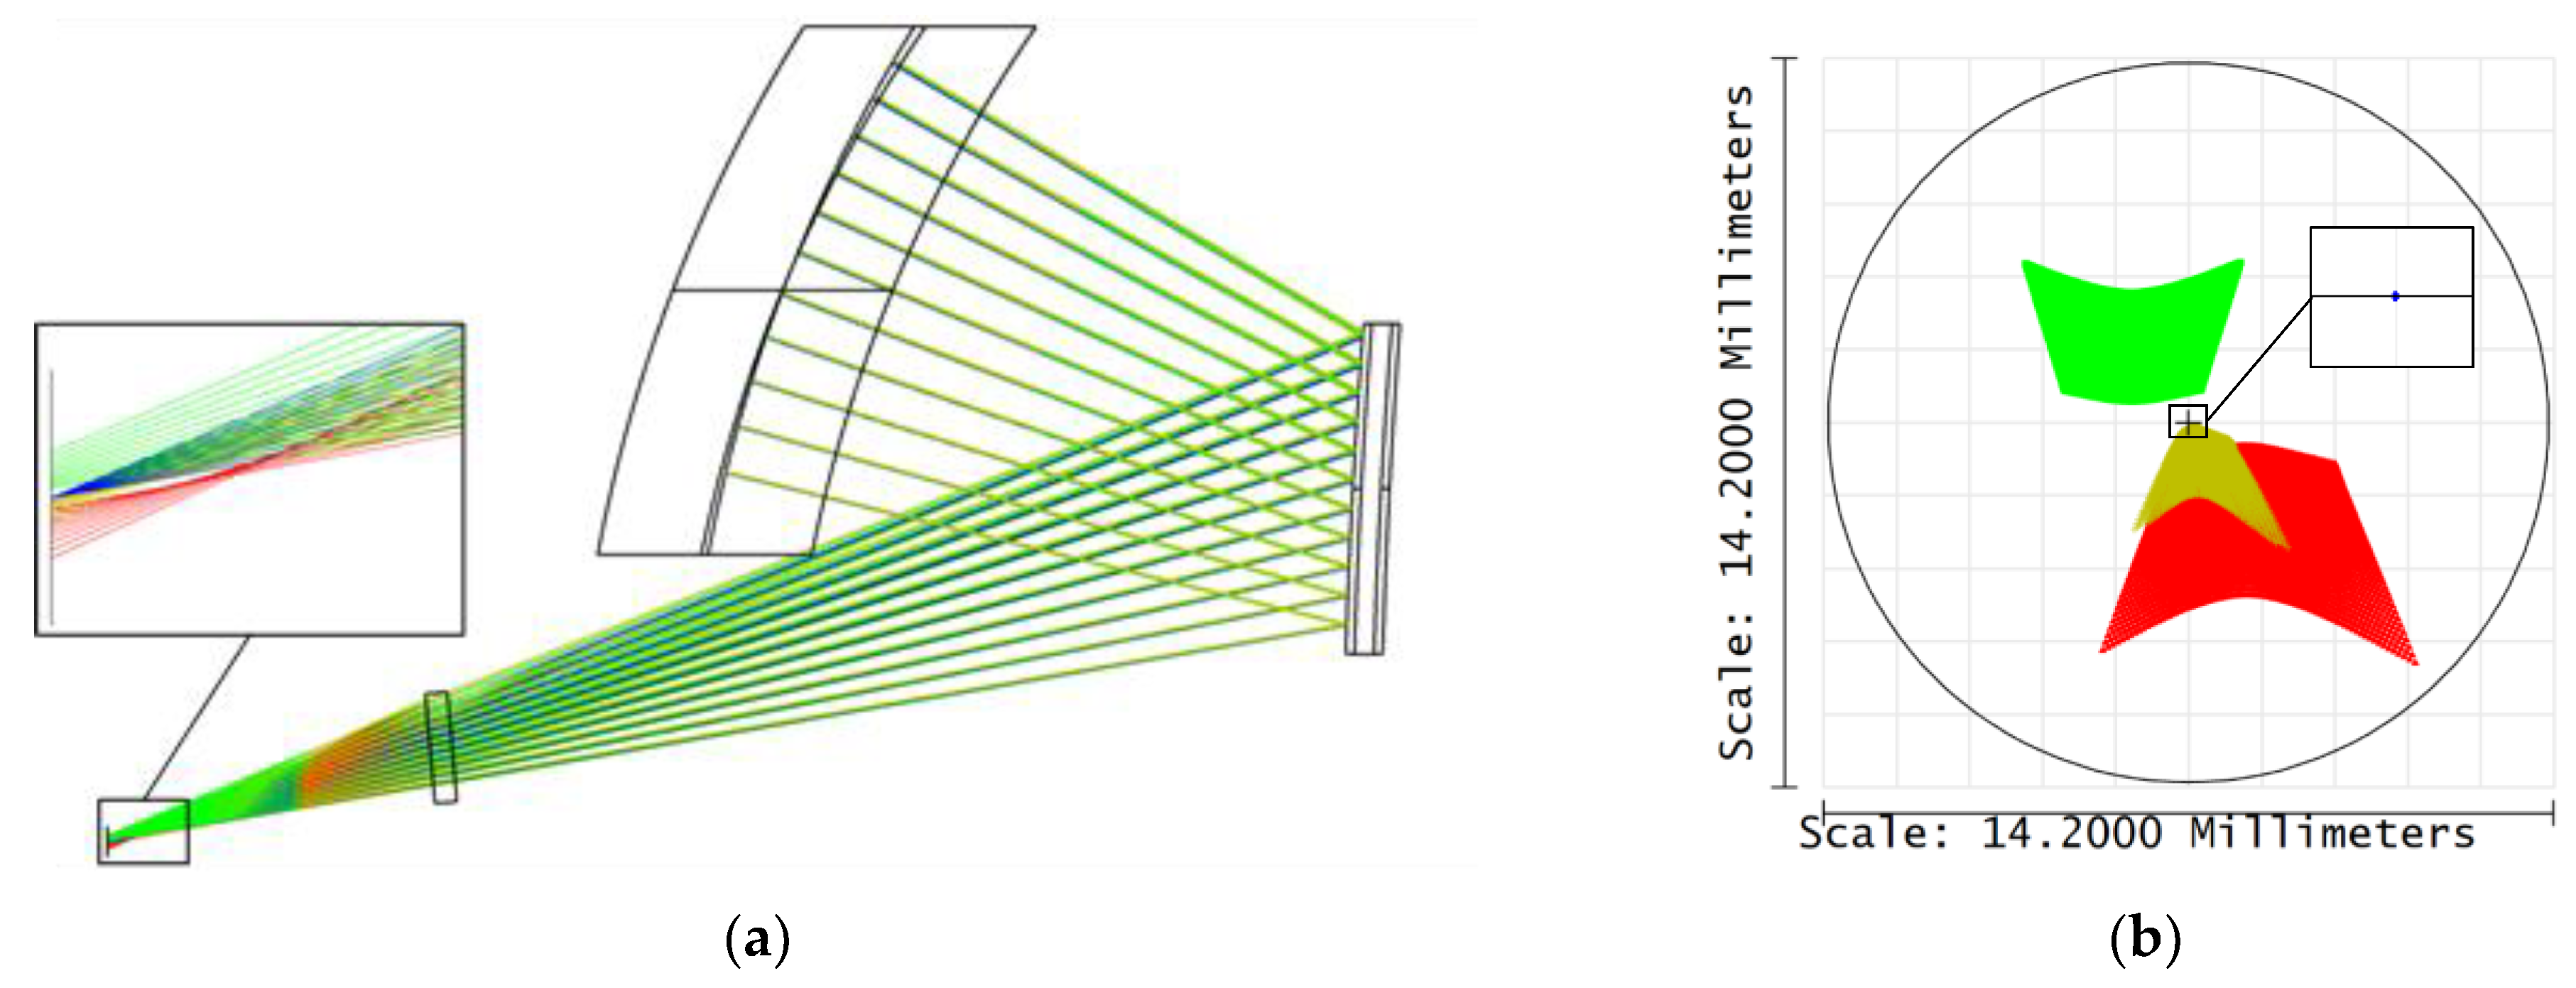
Figure 7. It is necessary to analyze the diffraction order separation of the system. The working diffraction order is situated at the center of the field, while the other interference diffraction orders are separated laterally, which will not affect the detection, as shown in
Figure 8.
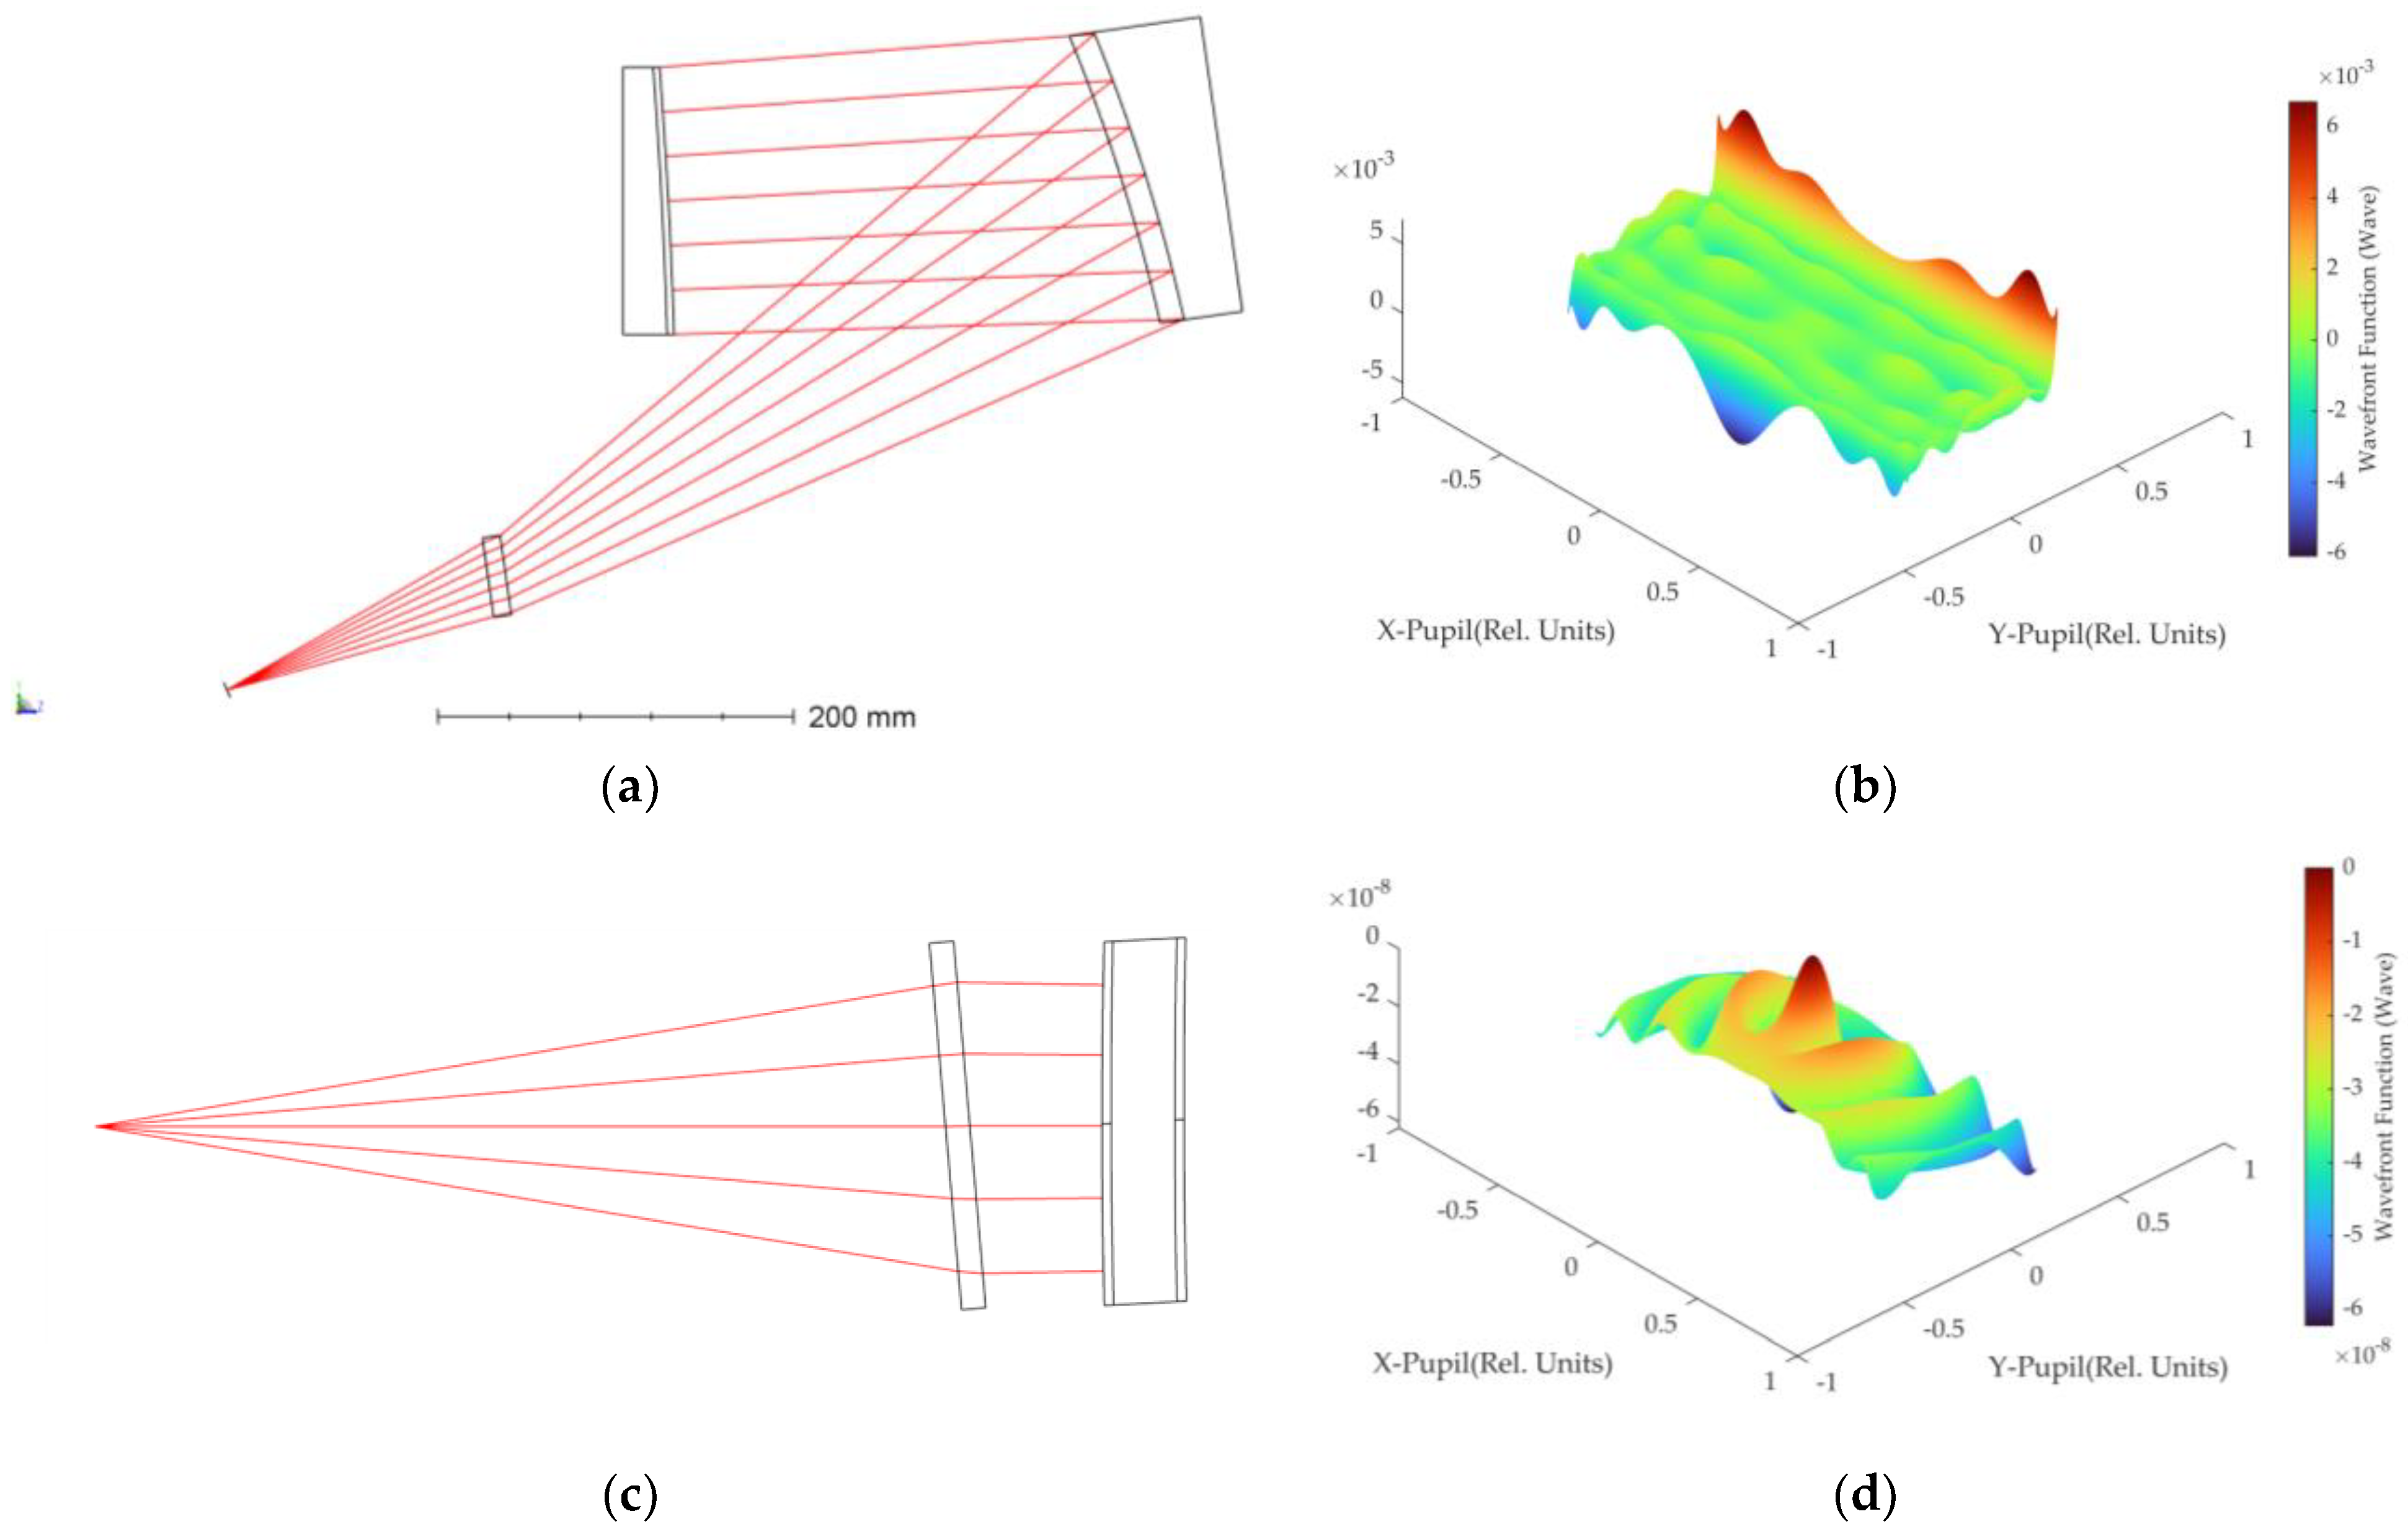
For comparative analysis, a spherical mirror is designed to be located before the free-form mirror [
8]. The CGH-diffracted light is reflected by the standard spherical mirror and then incident on the free-form mirror, and then it is finally reflected back to the CGH surface by the standard spherical mirror. The distance between the focus of the interferometer and the last mirror surface is 860 mm, which is the same as the design above. The optical path is shown in
Figure 9a, and the design RMS residual is 0.0008 λ. In addition, a detection optical path for the convex free-form mirror using a single CGH is designed, ignoring the limitations of CGH processing, as shown in
Figure 9c. The design RMS residual is 0.0000 λ.
A single CGH detection method requires a CGH aperture of about Φ340 mm, which is beyond the current high-precision CGH processing capability. In the two schemes with different relative positions of spherical mirrors, the distance between CGH and the interferometer focus is 150 mm, and the distance between the spherical mirror and the free-form mirror is 300 mm.
The sensitivity of component error and the detection sensitivity are analyzed for two different spherical mirror settings of the detection optical path. The results are shown in
Table 1 and
Table 2.
In the configuration proposed in this paper, the spherical mirror reflects once, and the free-form mirror reflects twice. In another method, the spherical mirror undergoes two reflections, while the inspected mirror undergoes one reflection. Therefore, the surface shape detection scale factor of this scheme is 0.25, and that of the other method is 0.5. The errors caused by the position and surface shape of the spherical mirror are approximately four times greater than the method in this paper. CGH undergoes two transmissions in both schemes, resulting in an error caused by CGH that is about twice as large as this scheme. It follows that this scheme has a significant advantage for reducing the precision requirements for processing and adjusting the standard spherical mirrors and CGH.
On the other hand, the surface shape detection scale factors of the two schemes are different. The interferometer detection results of this scheme are more sensitive to the same position and angle errors, thereby enhancing the accuracy of the surface shape test.
4. Analysis of CGH Errors
The errors of the CGH compensation test can be attributed to various factors, including the errors introduced by CGH design and coding, diffraction wavefront errors resulting from CGH manufacturing errors, misalignment of the CGH and the free-form mirror, CGH substrate errors, and the interferometer system errors. The design error, coding error, and interferometer error are inherent errors, which can be calibrated. The impact of misalignment can be quantified through the sensitivity matrix. Therefore, the error analysis mainly focuses on the CGH substrate error and the manufacturing error.
Currently, CGH substrate surfaces can proceed into flat, spherical, and aspherical surfaces. The accuracy of the surface shape measurement is dependent on the machining error of the surfaces, the angular error between the two surfaces, the refractive index error, and the inhomogeneity error of the material. To facilitate the machining, most CGHs use parallel flat plates as the substrate. It is possible to use a high-precision parallel plate for processing to ignore the effect of the substrate error, or to compensate for the substrate error by testing and calibrating the transmission wavefront of the parallel plate.
CGH is generally designed as a variable-period binary step structure. Burge et al. [
9] had systematically conducted a comprehensive analysis of the effect of manufacturing errors on the compensation test, which is based on the diffraction theory of binary linear gratings. The CGH is reduced to a linear grating, and the phase difference of the grating structure is as follows:
where λ is the diffraction wavelength,
n is the refractive index of the substrate, and
t is the grating groove depth.
For the amplitude-type CGH with a duty cycle of 0.5, the estimated manufacturing error at 632.8 nm wavelength is shown in
Table 3. The pattern distortion is caused by the deviation of the CGH etching pattern from its ideal position. The impact on wavefront error is proportional to the diffraction order.
where
m is the diffraction order,
ε is the error in the direction perpendicular to the pattern, and
S is the grating period.
The duty cycle error and etching depth error are errors caused by the etching method during the CGH process. When the duty cycle is 50%, the duty cycle error Δ
W3 is almost 0. The etching depth error is as follows:
where
A0 and
A1 are the amplitudes of the wavefront of the unetched part and the etched part, respectively, and
φ is the phase difference introduced by the grating structure.
The amplitude error is caused by the change in the surface roughness of the etched area due to the limitation of the etching process, which causes the scattering loss.
It can be seen that manufacturing errors have a relatively small impact on the detection results. With the current research on CGH test, CGH substrate errors and manufacturing errors can be calibrated through twin-CGH [
10].
