Author Contributions
Conceptualization, K.I.L., S.H.B. and S.-M.K.; methodology, K.I.L., S.H.B. and S.-M.K.; validation, K.I.L., S.H.B., S.J.K., G.L. and S.-M.K.; formal analysis, K.I.L., S.H.B., S.J.K., G.L. and S.-M.K.; investigation, K.I.L., S.H.B., S.J.K., G.L. and S.-M.K.; resources, K.I.L., S.H.B., S.J.K. and S.-M.K.; data curation, K.I.L., S.H.B., S.J.K., G.L. and S.-M.K.; writing—original draft preparation, K.I.L., S.H.B. and S.-M.K.; writing—review and editing, K.I.L., S.H.B., S.J.K., G.L. and S.-M.K.; visualization, K.I.L., S.H.B., S.J.K., G.L. and S.-M.K.; supervision, K.I.L. and S.-M.K.; project administration, K.I.L., S.H.B. and S.-M.K.; funding acquisition, K.I.L., S.H.B. and S.-M.K. All authors have read and agreed to the published version of the manuscript.
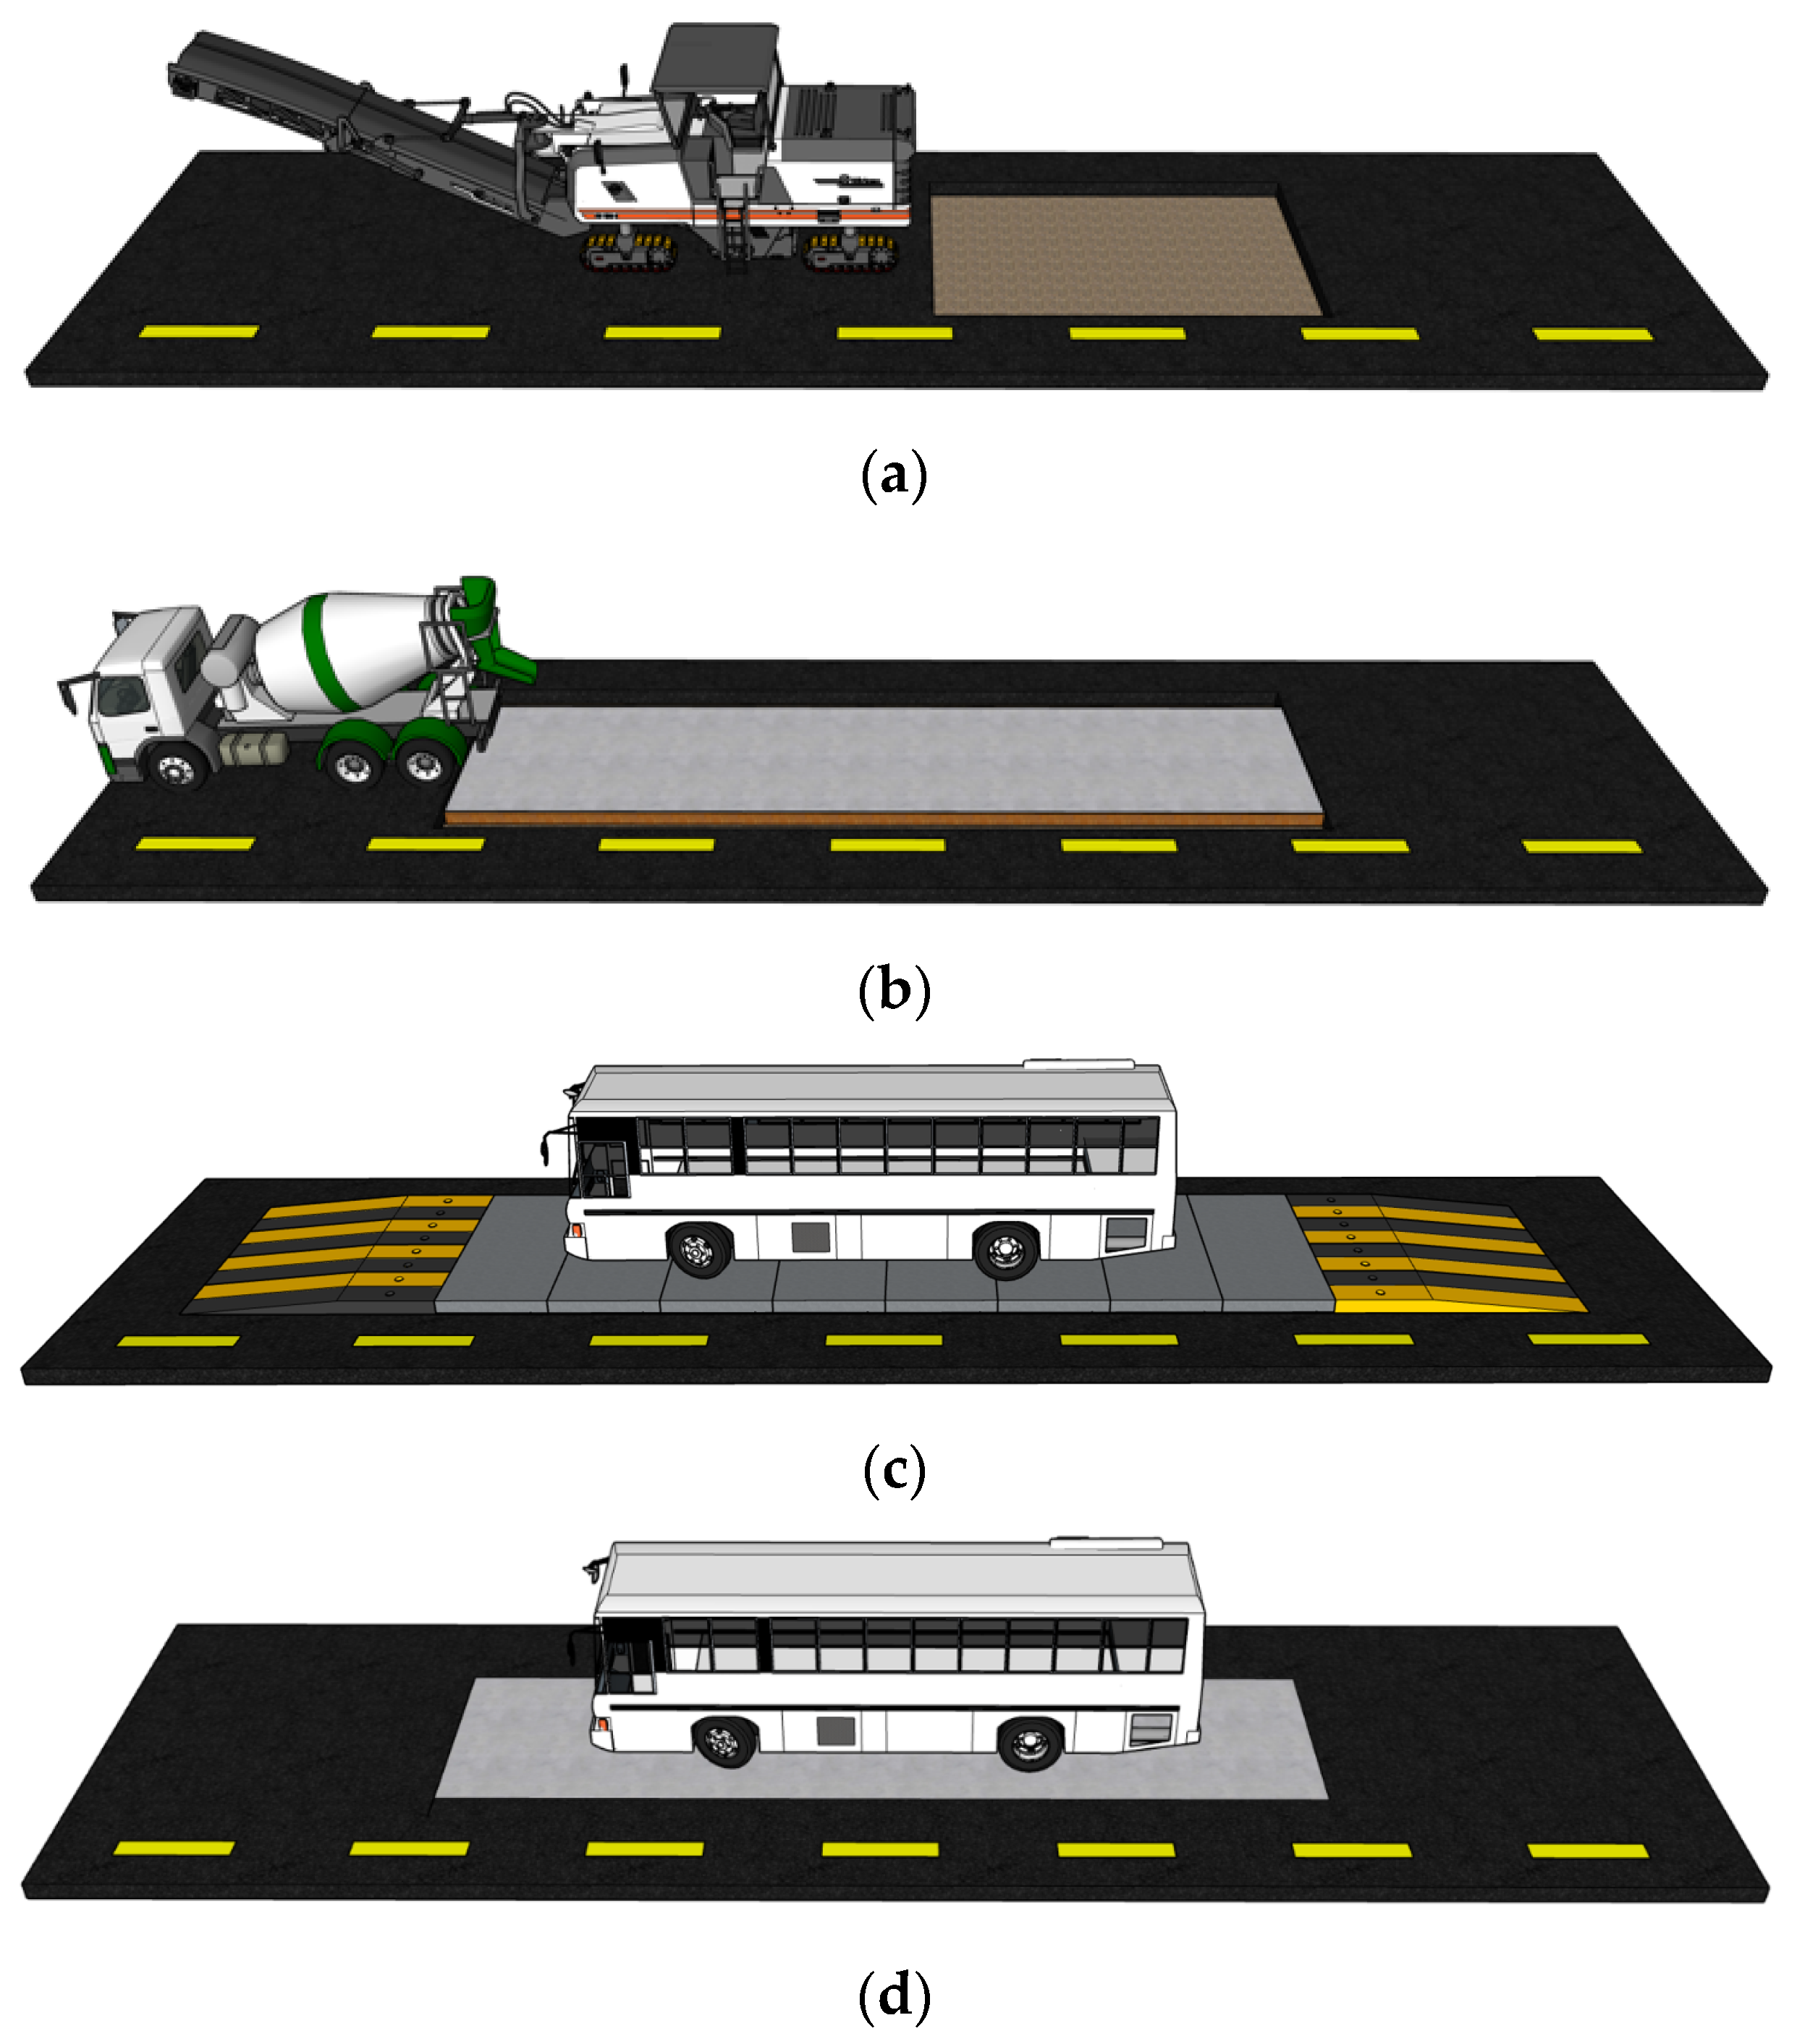
Figure 1.
Conceptual diagram of TPCP method: (a) existing pavement removal; (b) formwork installation and cement concrete pavement construction; (c) TTBS assembly and immediate traffic opening; and (d) TTBS disassembly and cement concrete pavement completion.
Figure 1.
Conceptual diagram of TPCP method: (a) existing pavement removal; (b) formwork installation and cement concrete pavement construction; (c) TTBS assembly and immediate traffic opening; and (d) TTBS disassembly and cement concrete pavement completion.
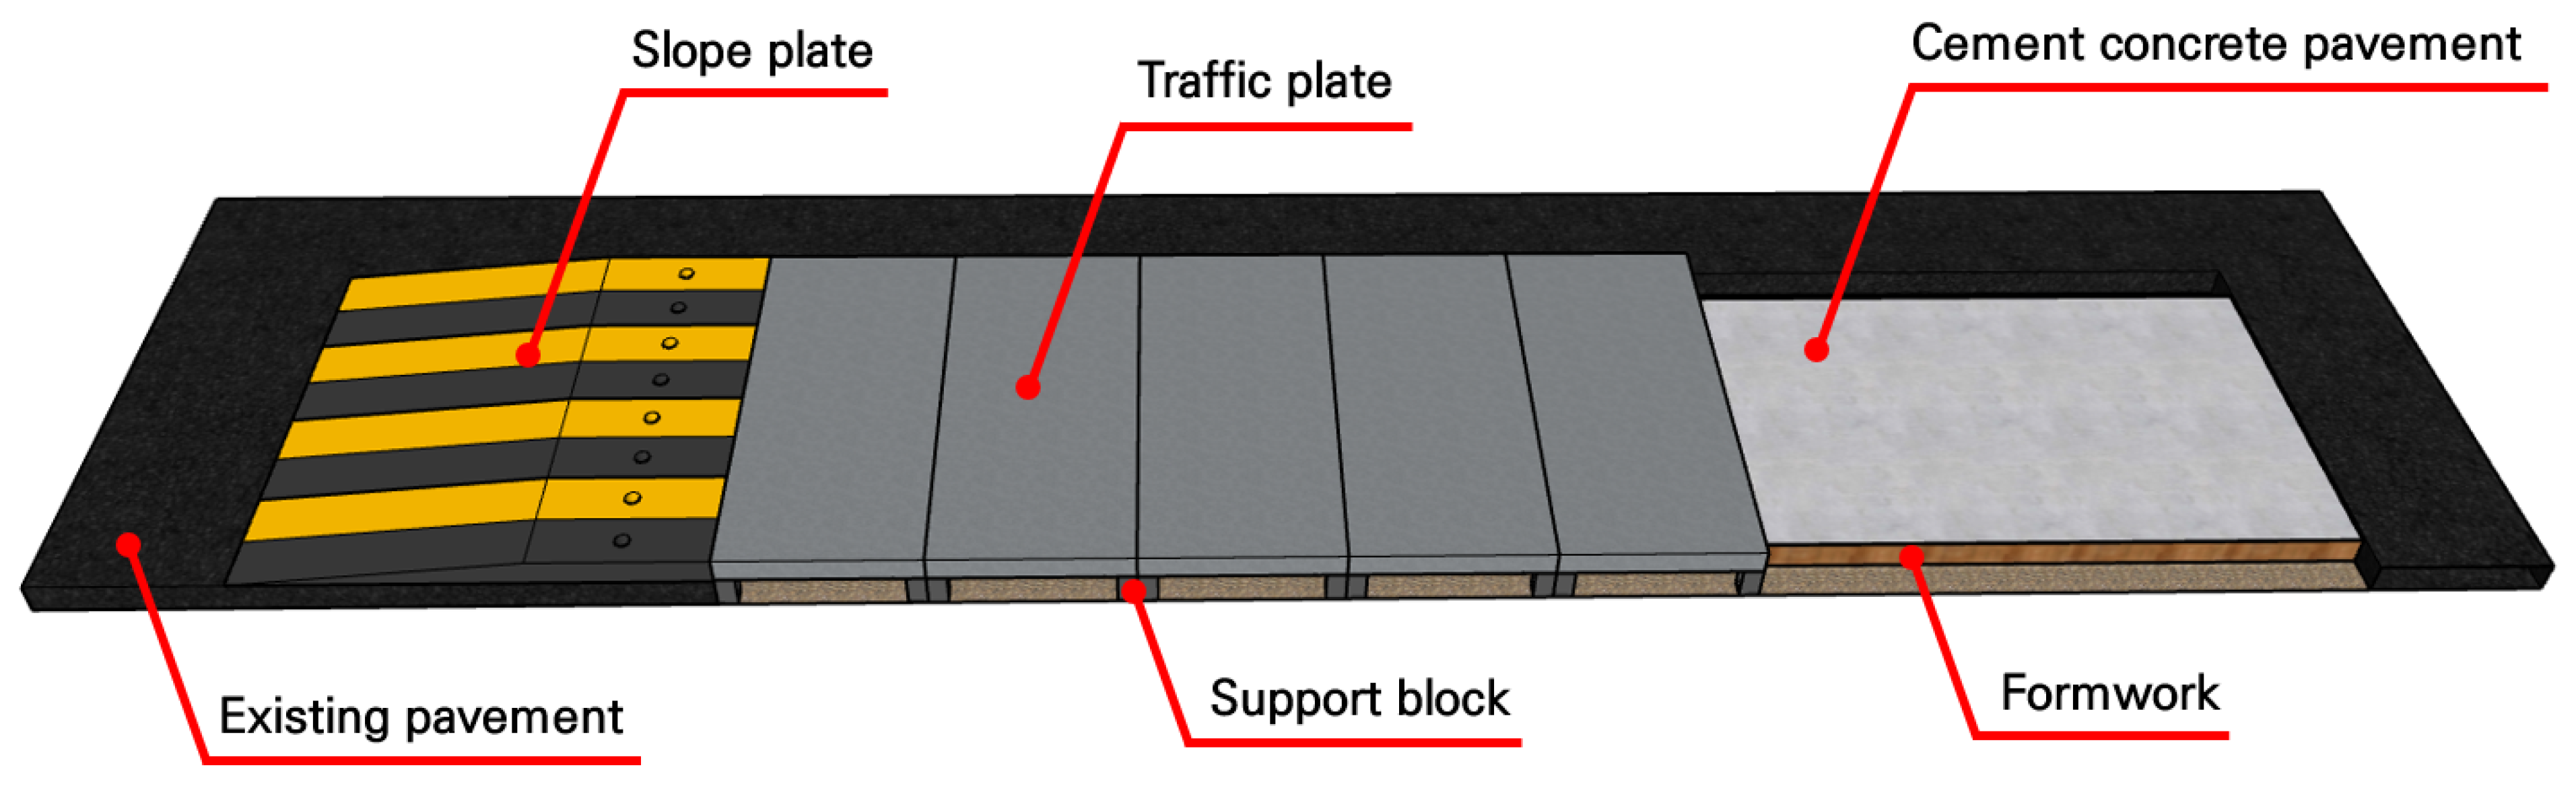
Figure 2.
Configuration of TTBS.
Figure 2.
Configuration of TTBS.
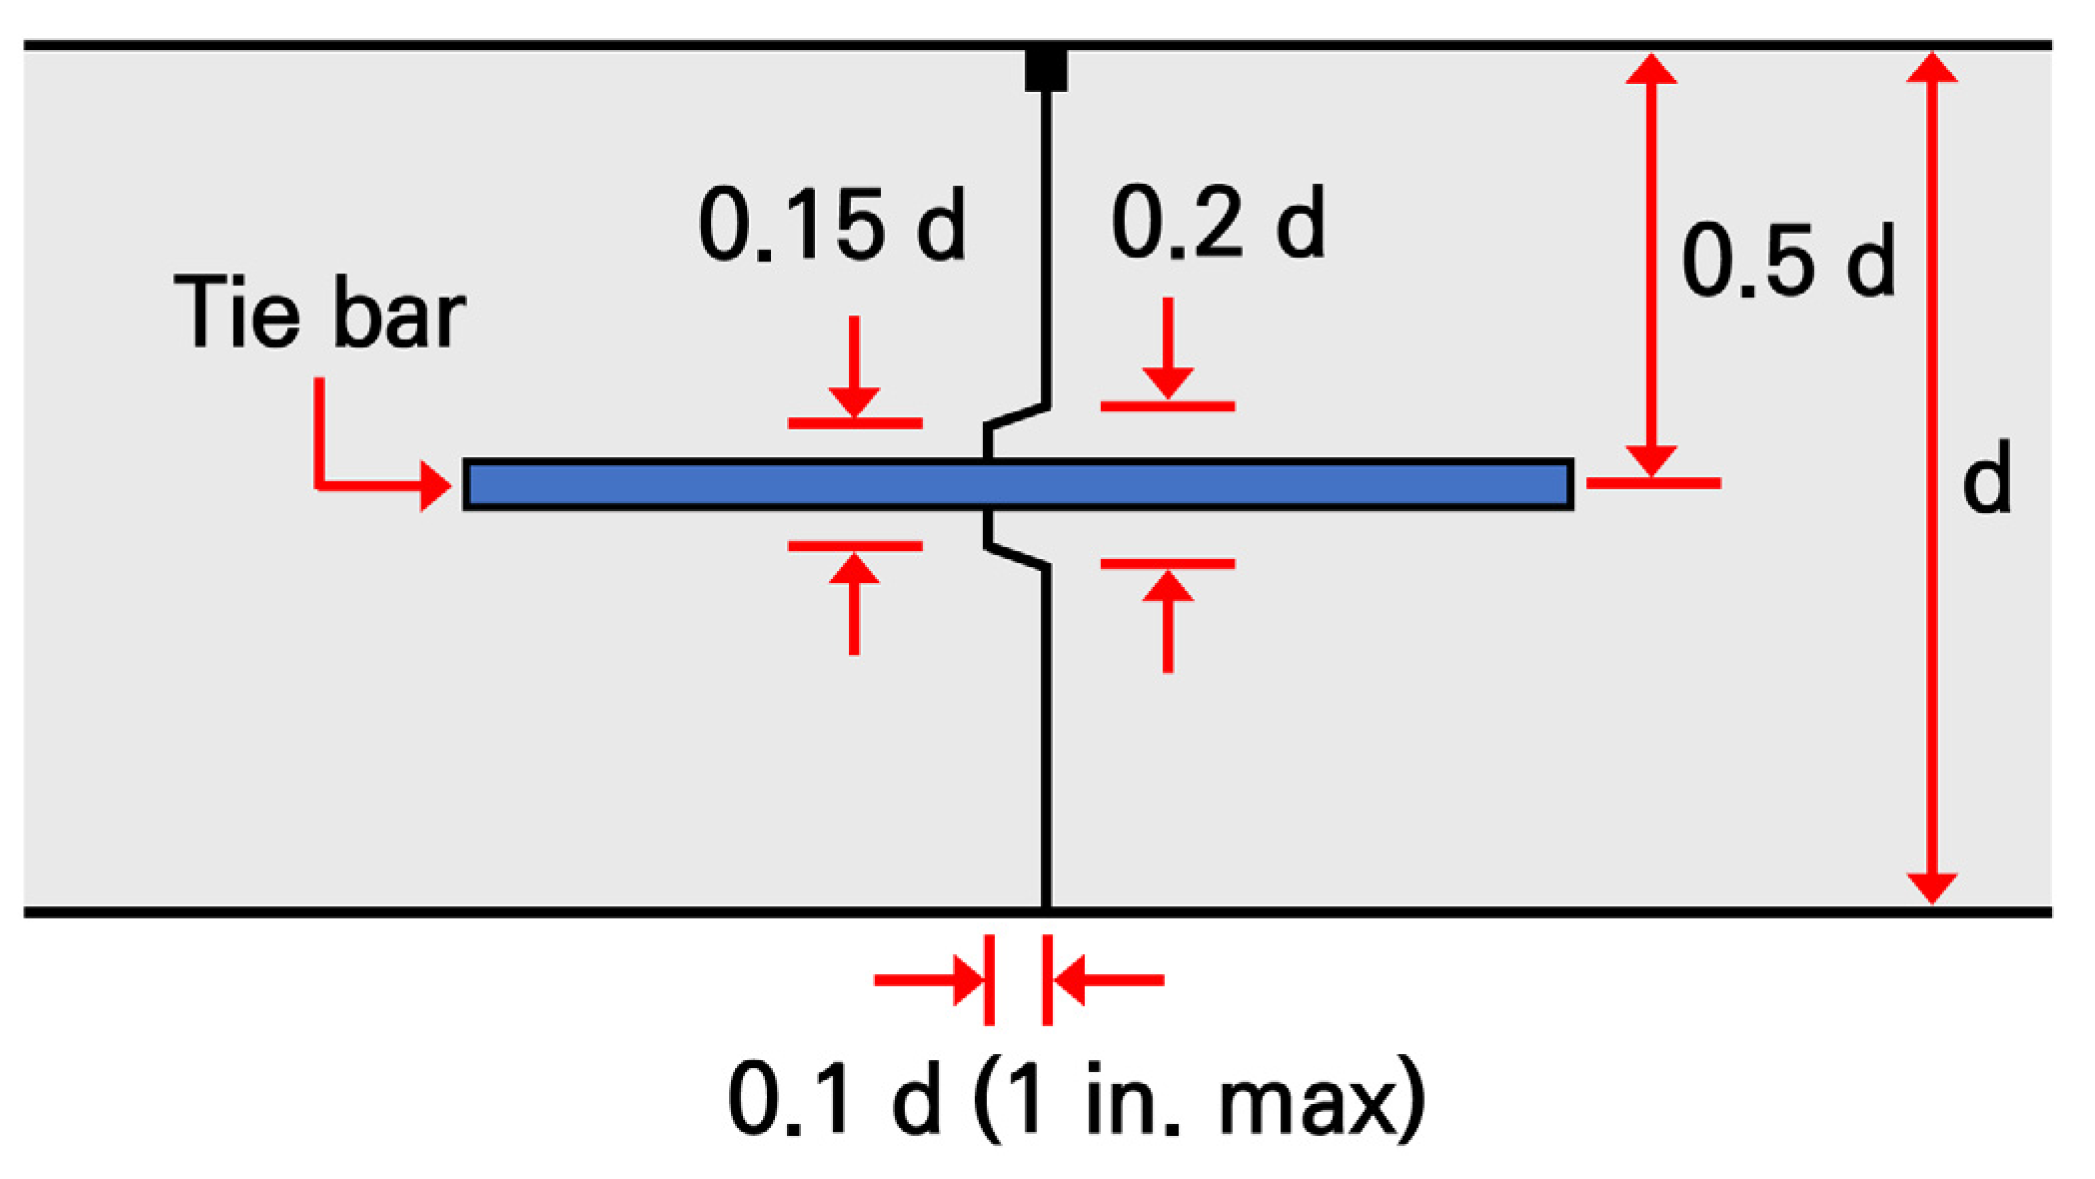
Figure 3.
Standard dimensions for shear key joint [
50].
Figure 3.
Standard dimensions for shear key joint [
50].
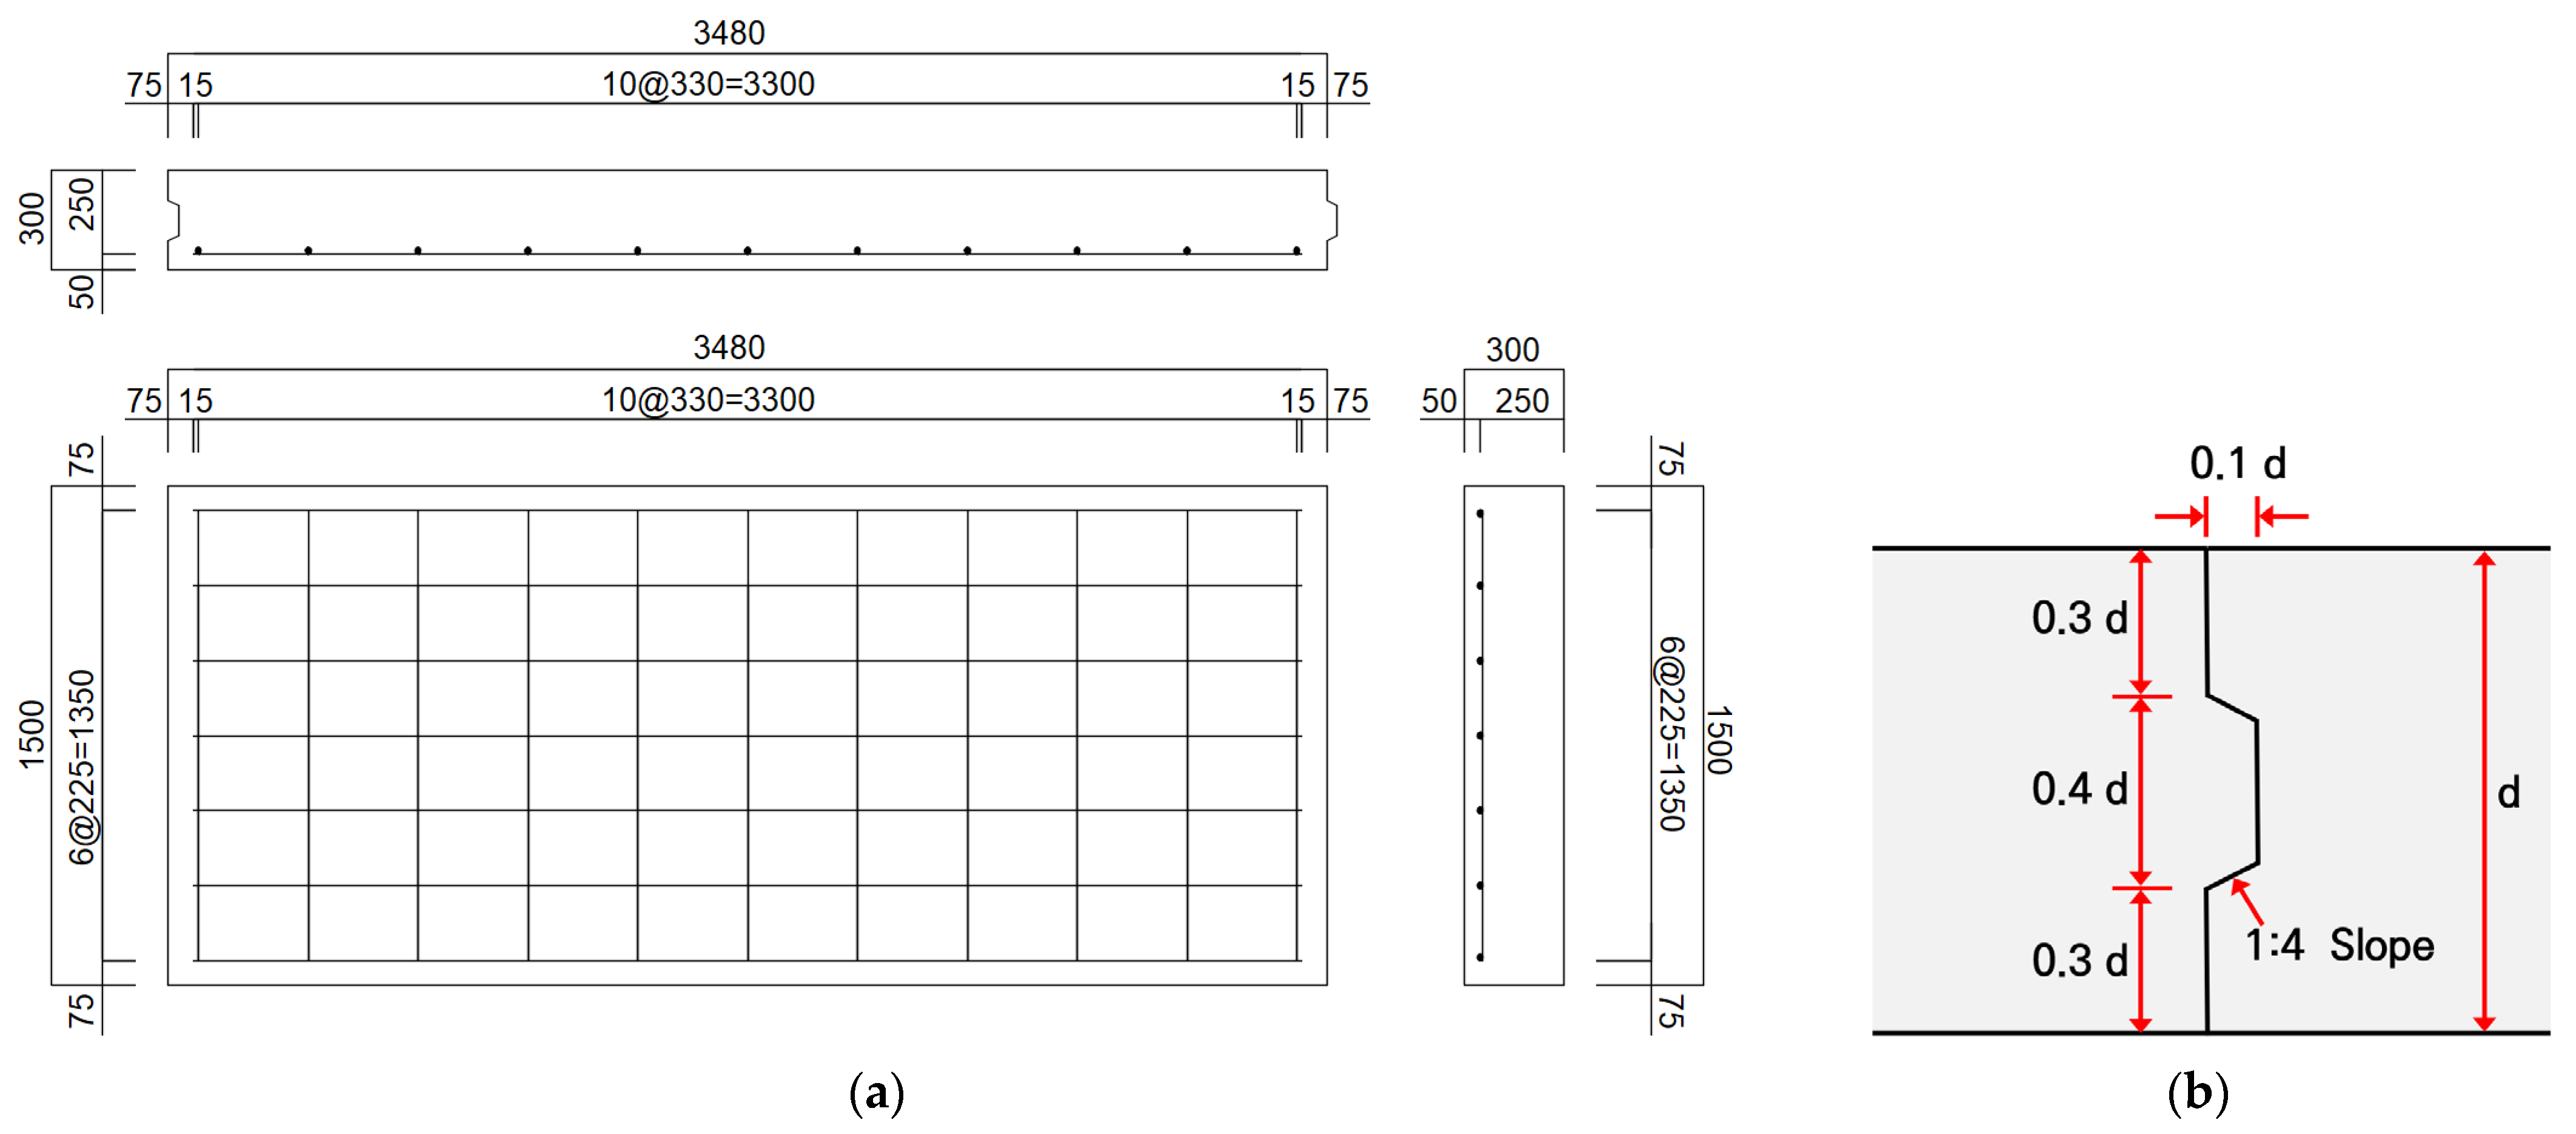
Figure 4.
Design drawing of reinforced concrete slab: (a) reinforcement design; and (b) shear key joint design.
Figure 4.
Design drawing of reinforced concrete slab: (a) reinforcement design; and (b) shear key joint design.
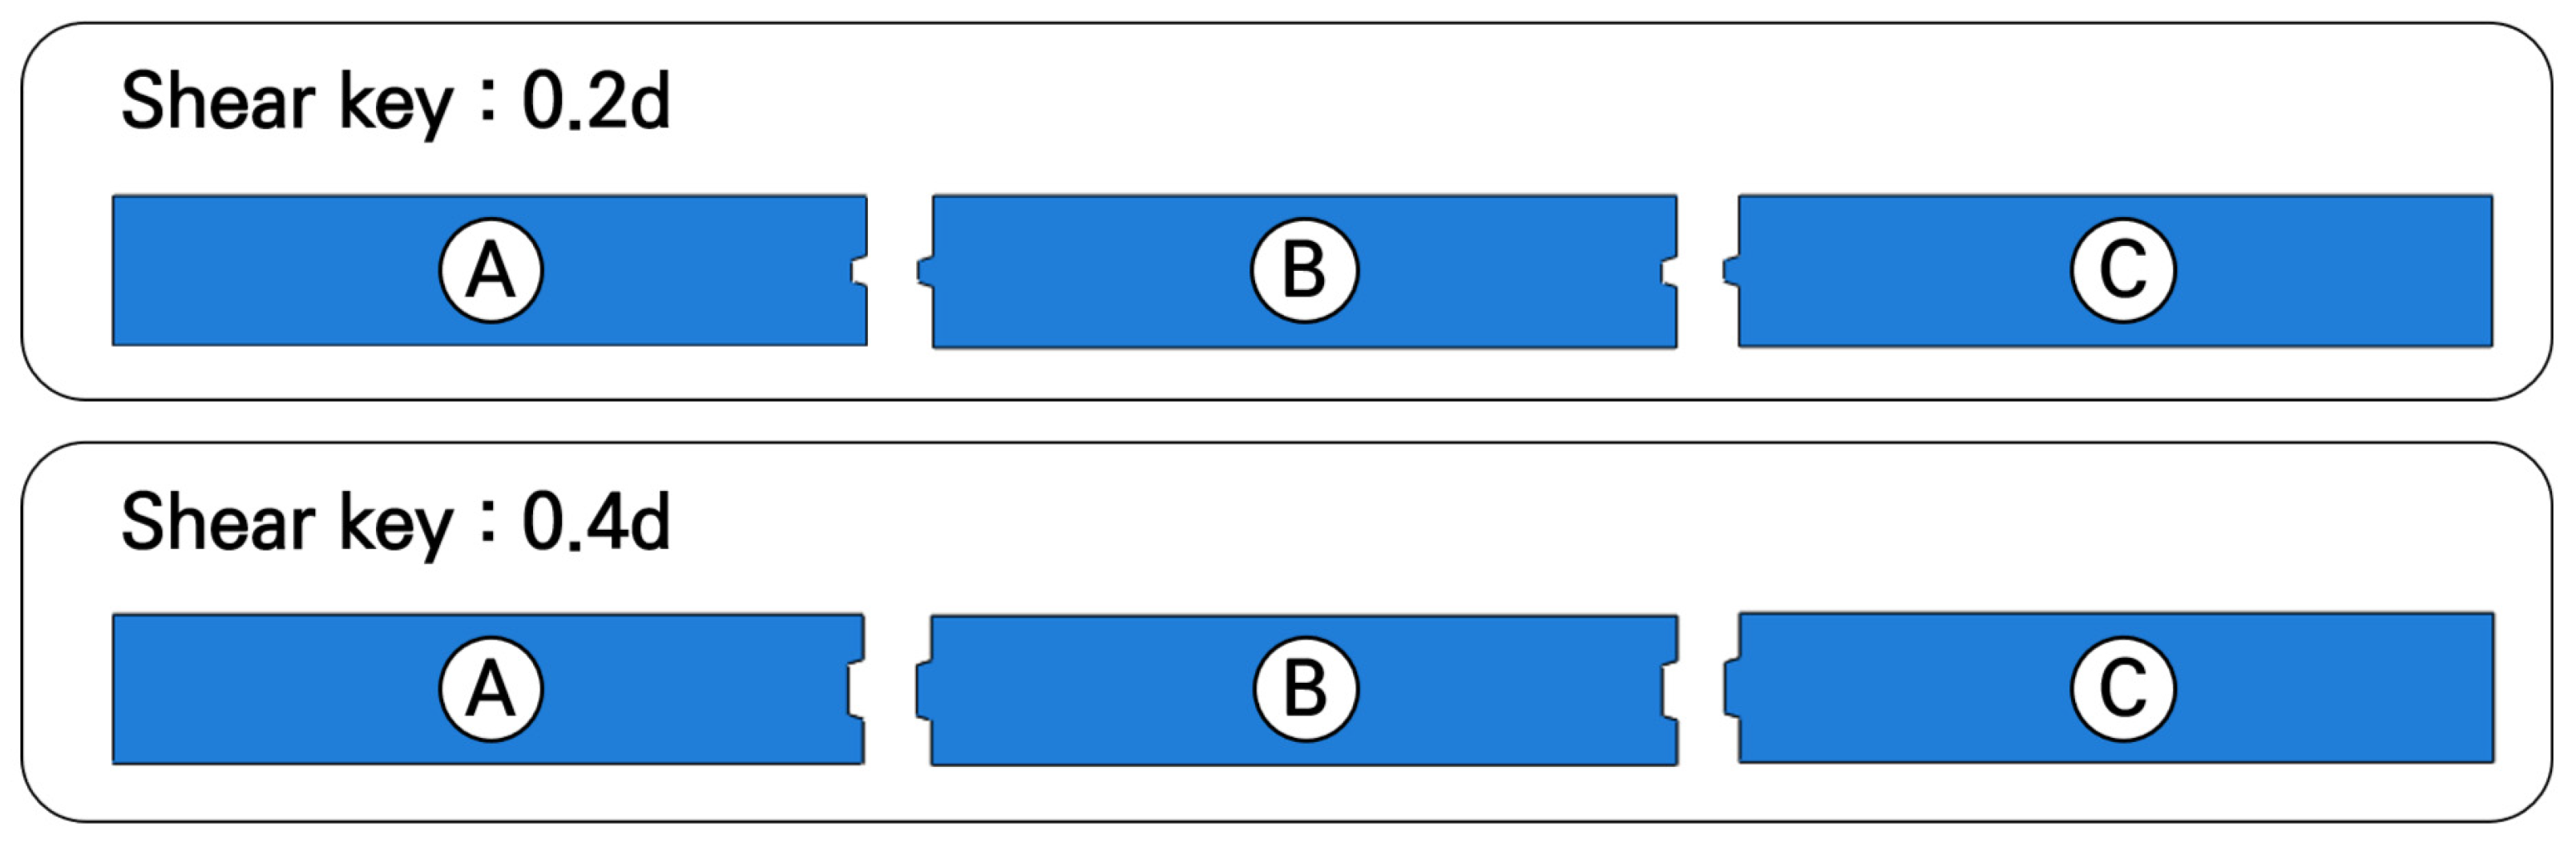
Figure 5.
Configuration of slabs according to shear key design.
Figure 5.
Configuration of slabs according to shear key design.
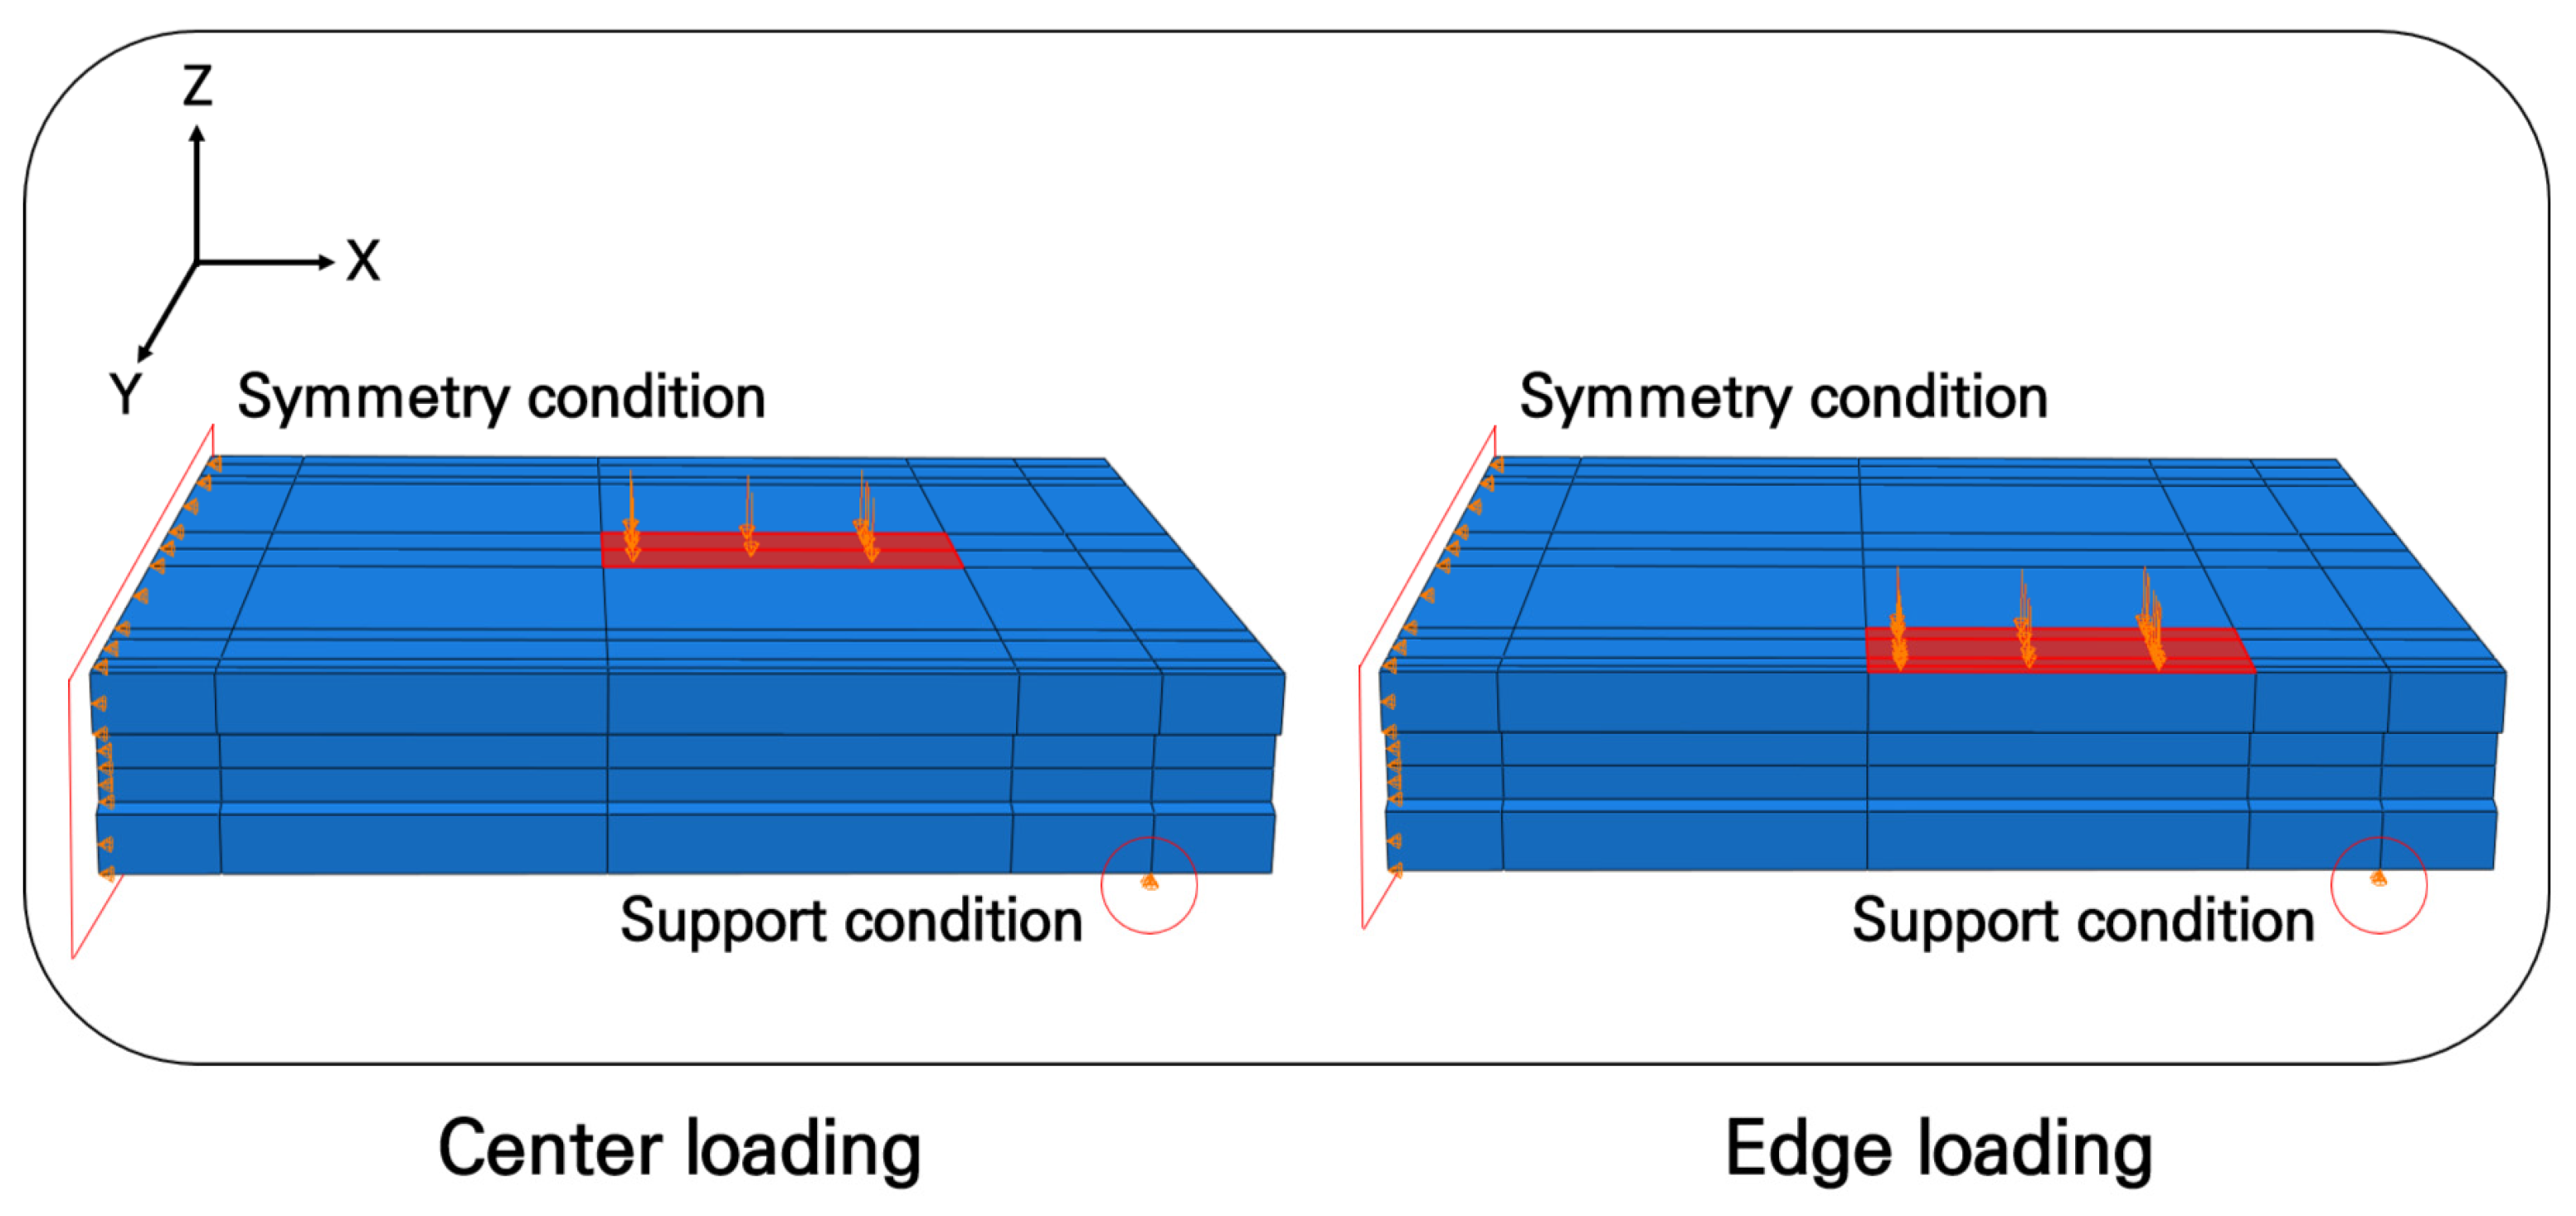
Figure 6.
Boundary and loading conditions for single slab analysis.
Figure 6.
Boundary and loading conditions for single slab analysis.
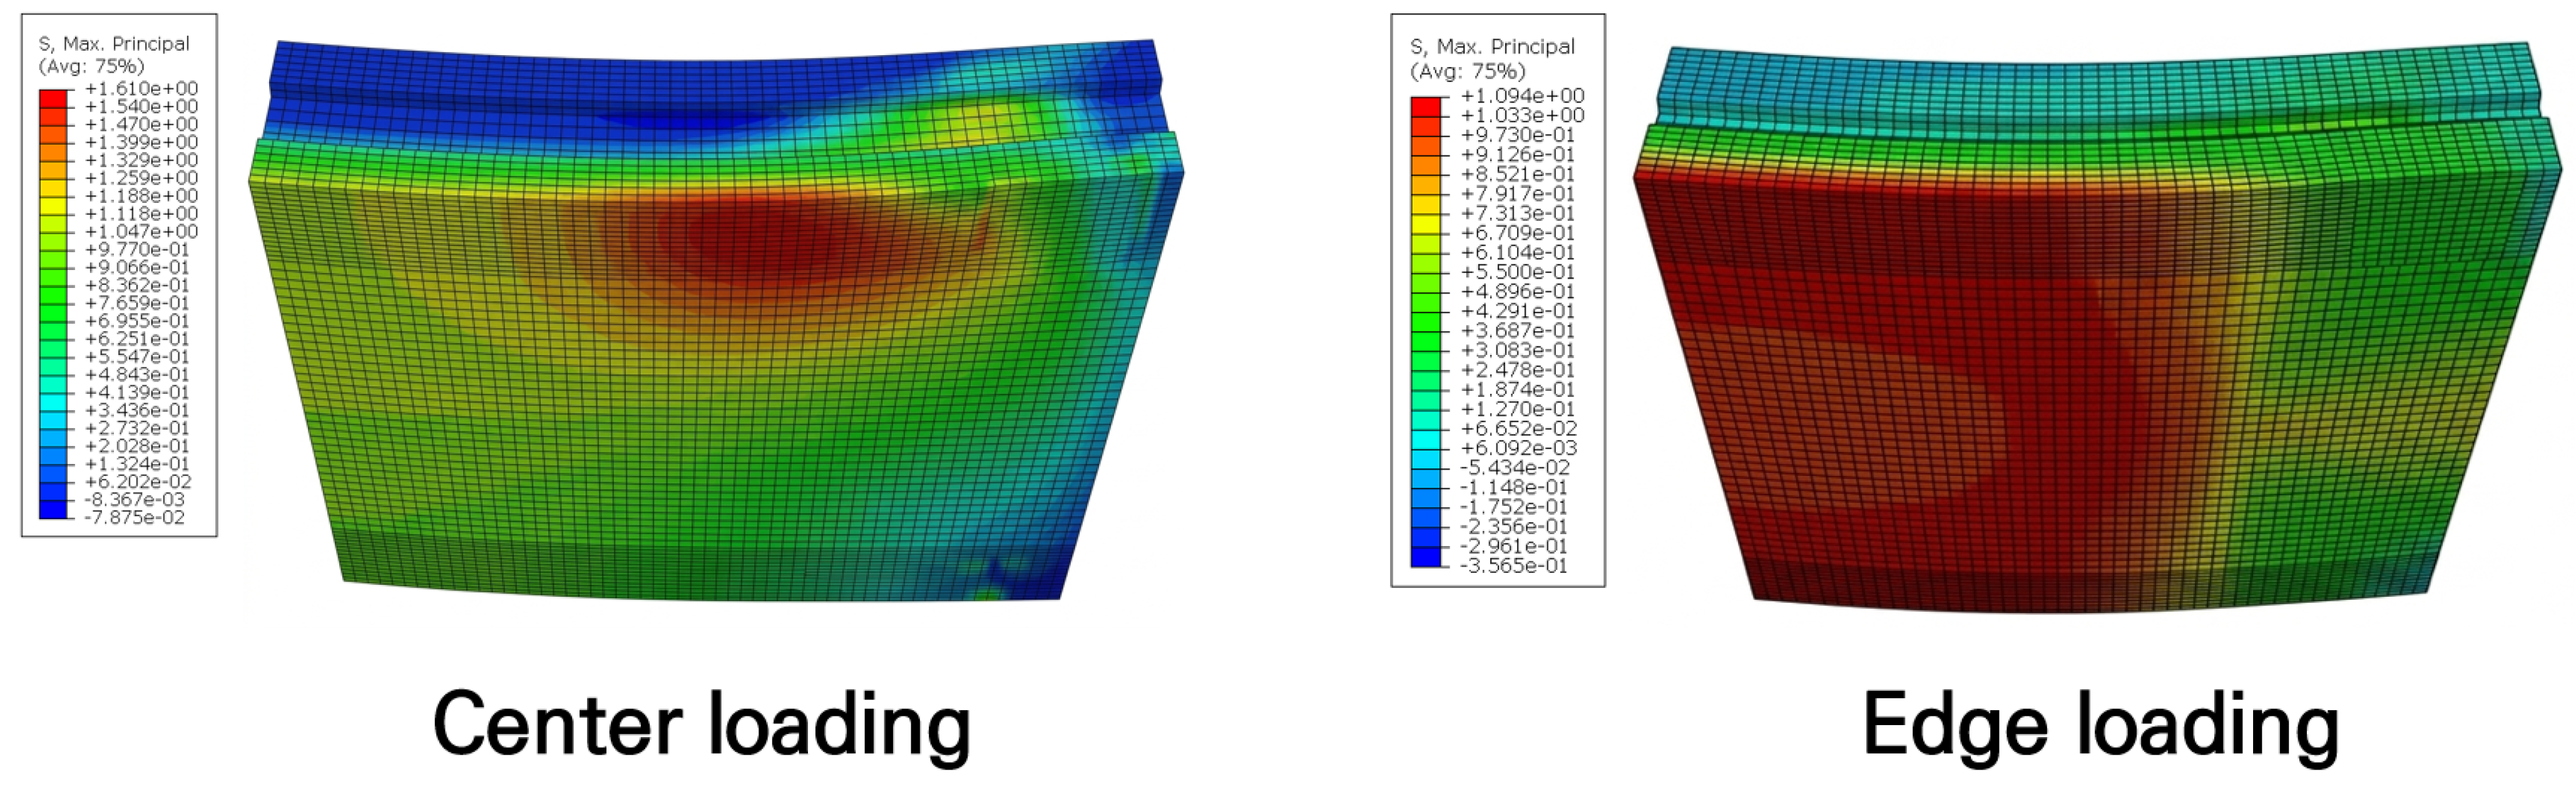
Figure 7.
Stress distribution and deflected shape of single slab according to loading position.
Figure 7.
Stress distribution and deflected shape of single slab according to loading position.
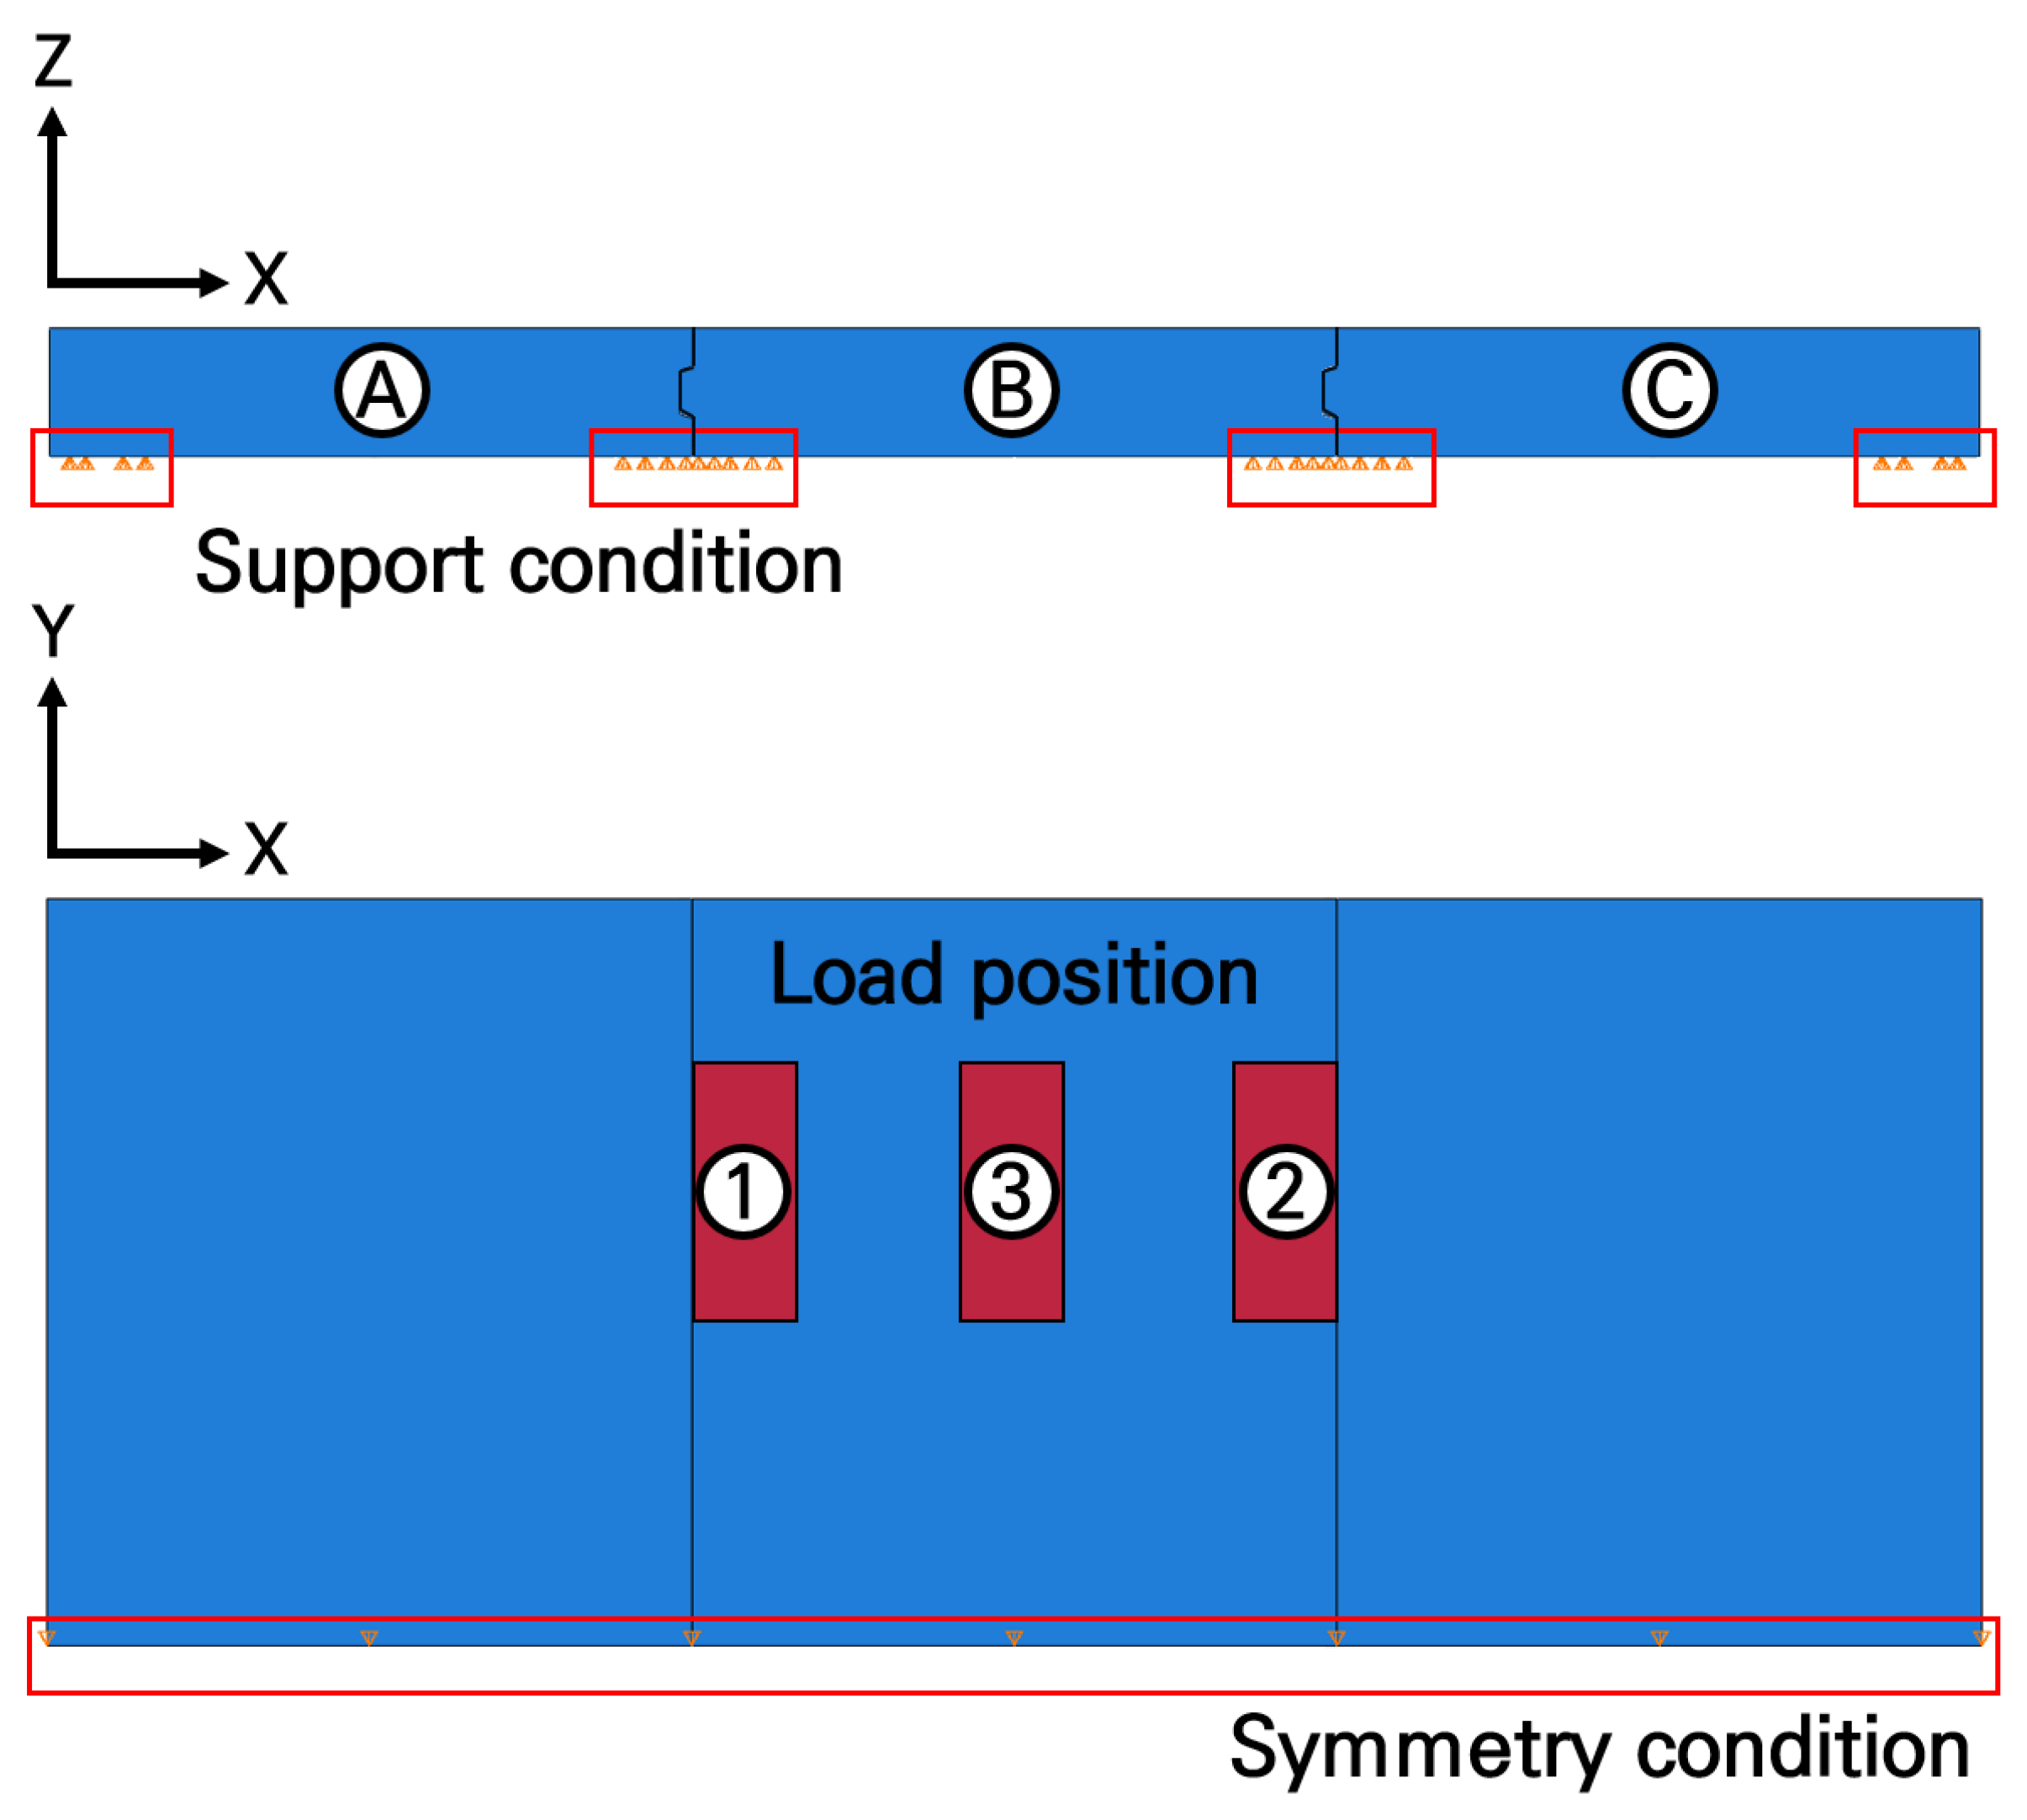
Figure 8.
Boundary and loading conditions for assembled slab analysis.
Figure 8.
Boundary and loading conditions for assembled slab analysis.
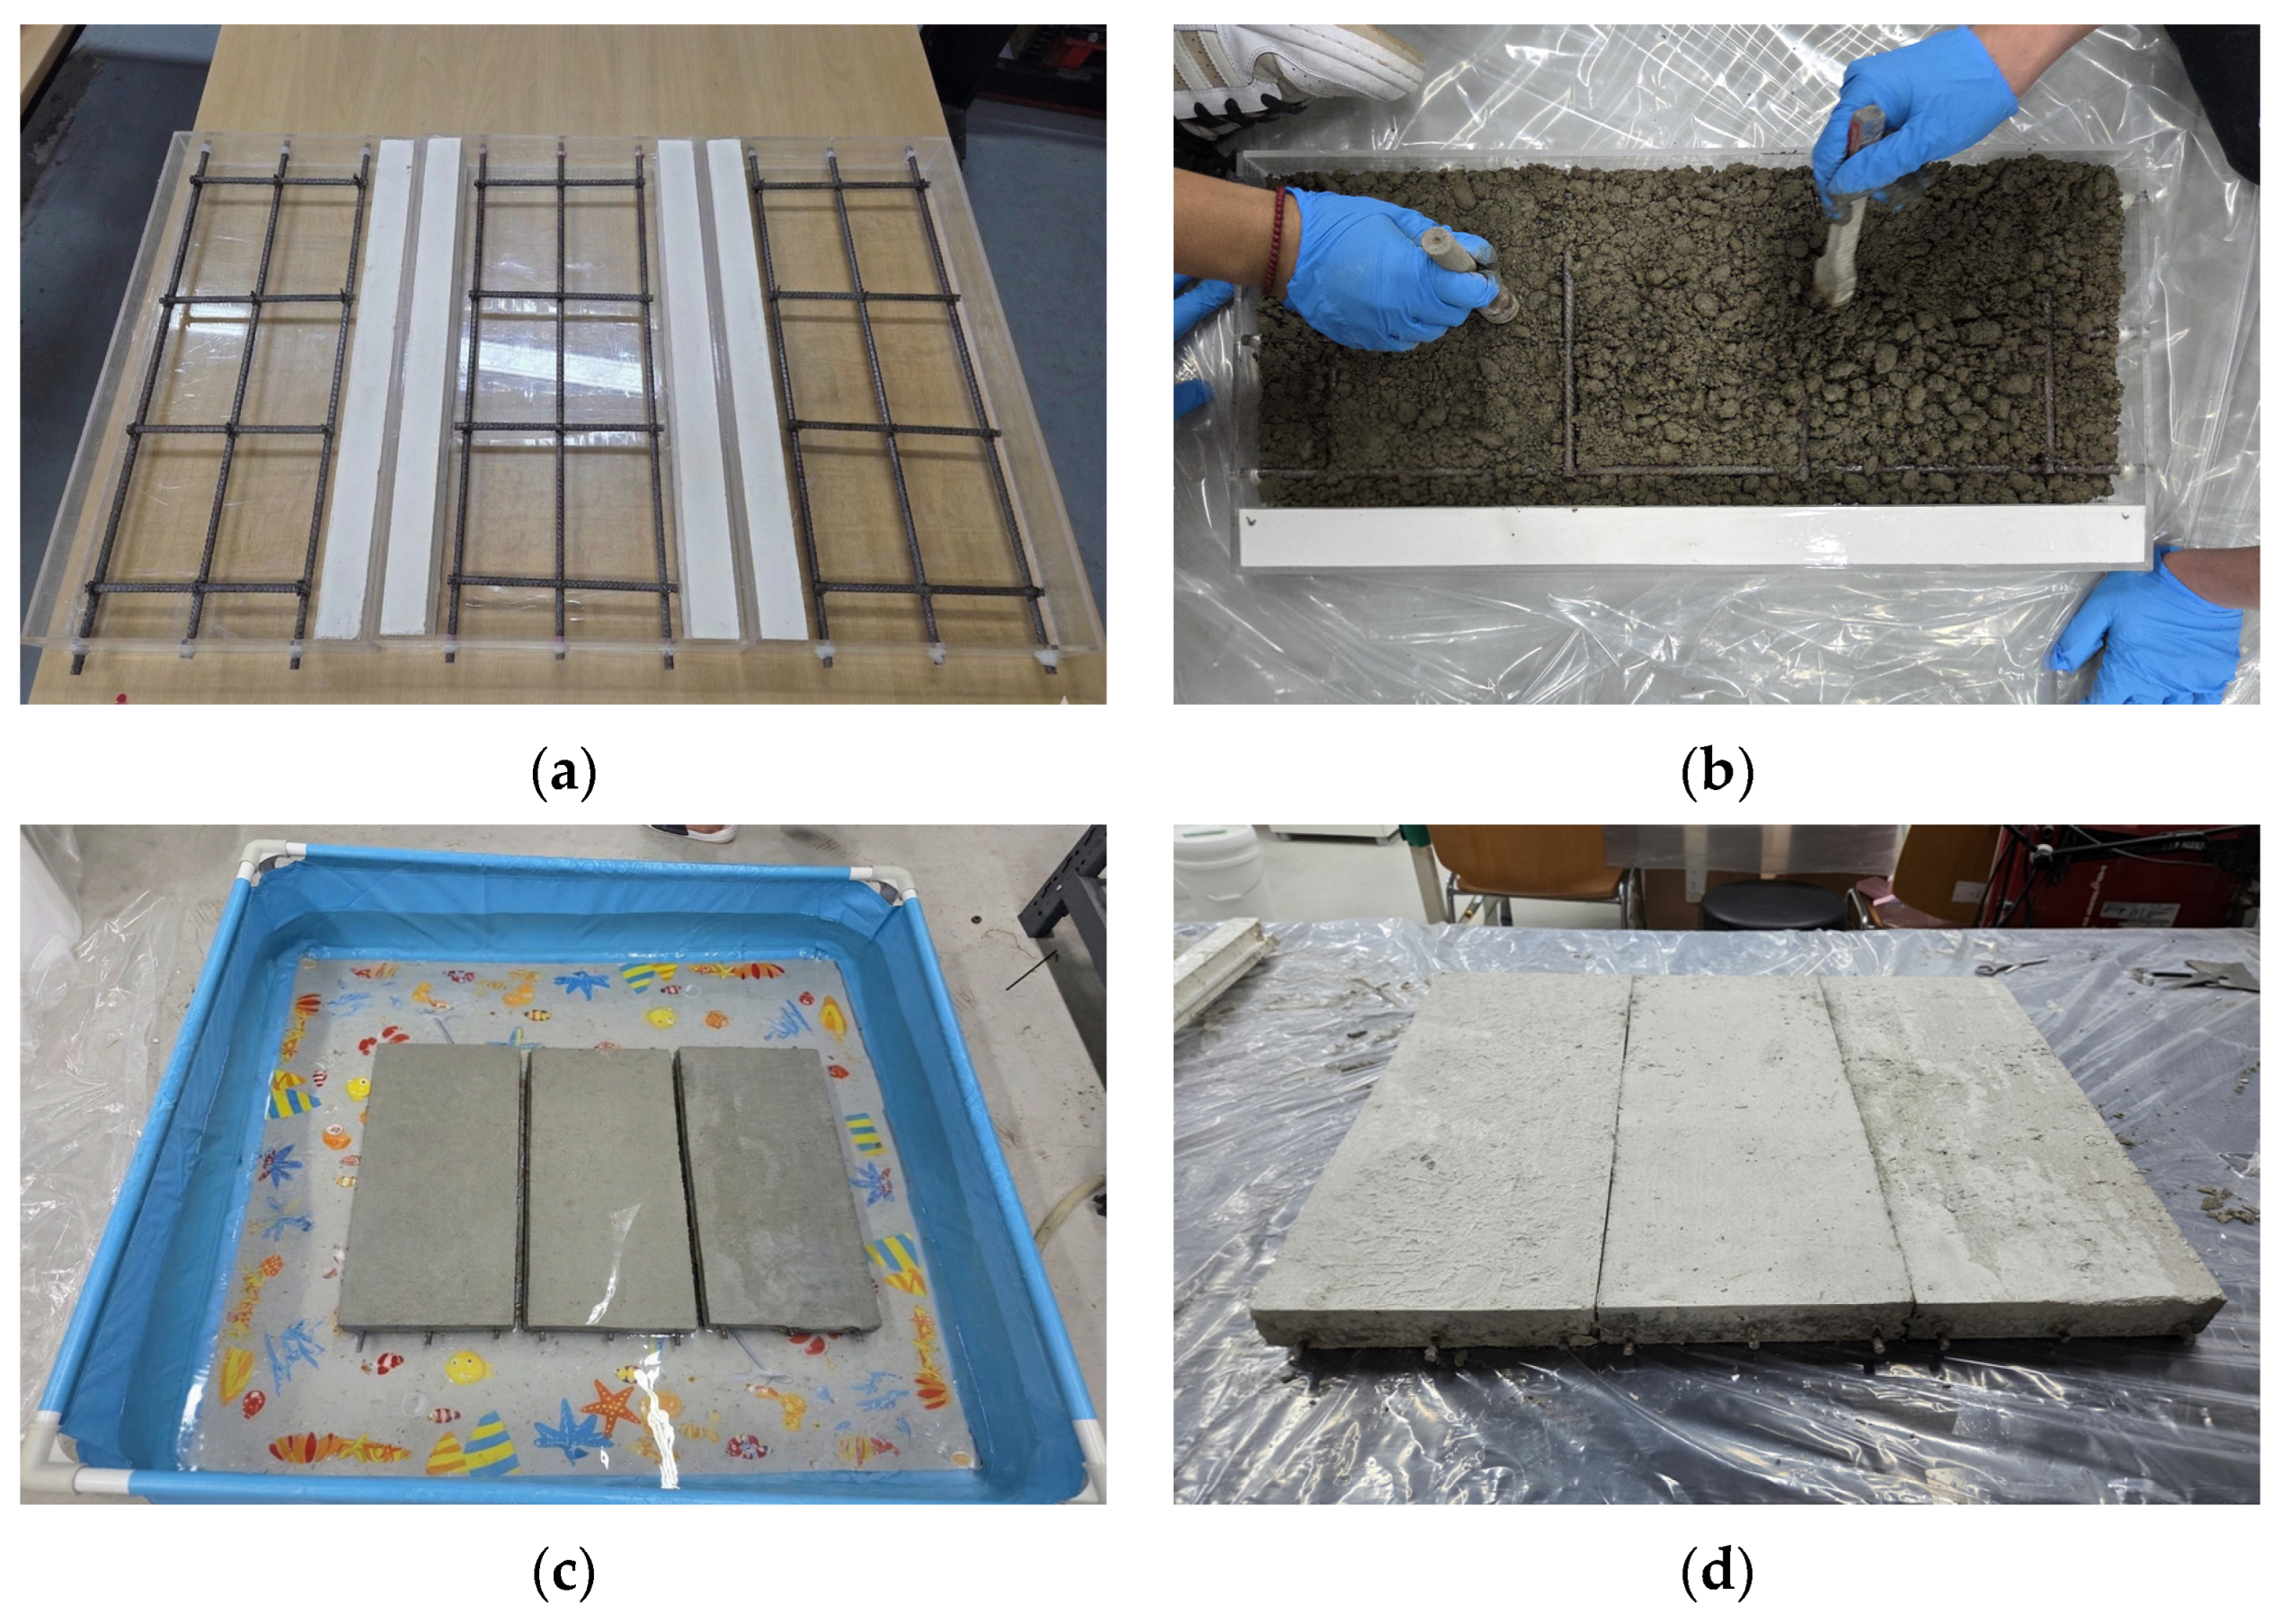
Figure 9.
Fabrication process of small-scale TTBS slabs: (a) formwork, shear key mold, and reinforcement installation; (b) concrete pouring; (c) underwater curing; and (d) completed slabs.
Figure 9.
Fabrication process of small-scale TTBS slabs: (a) formwork, shear key mold, and reinforcement installation; (b) concrete pouring; (c) underwater curing; and (d) completed slabs.
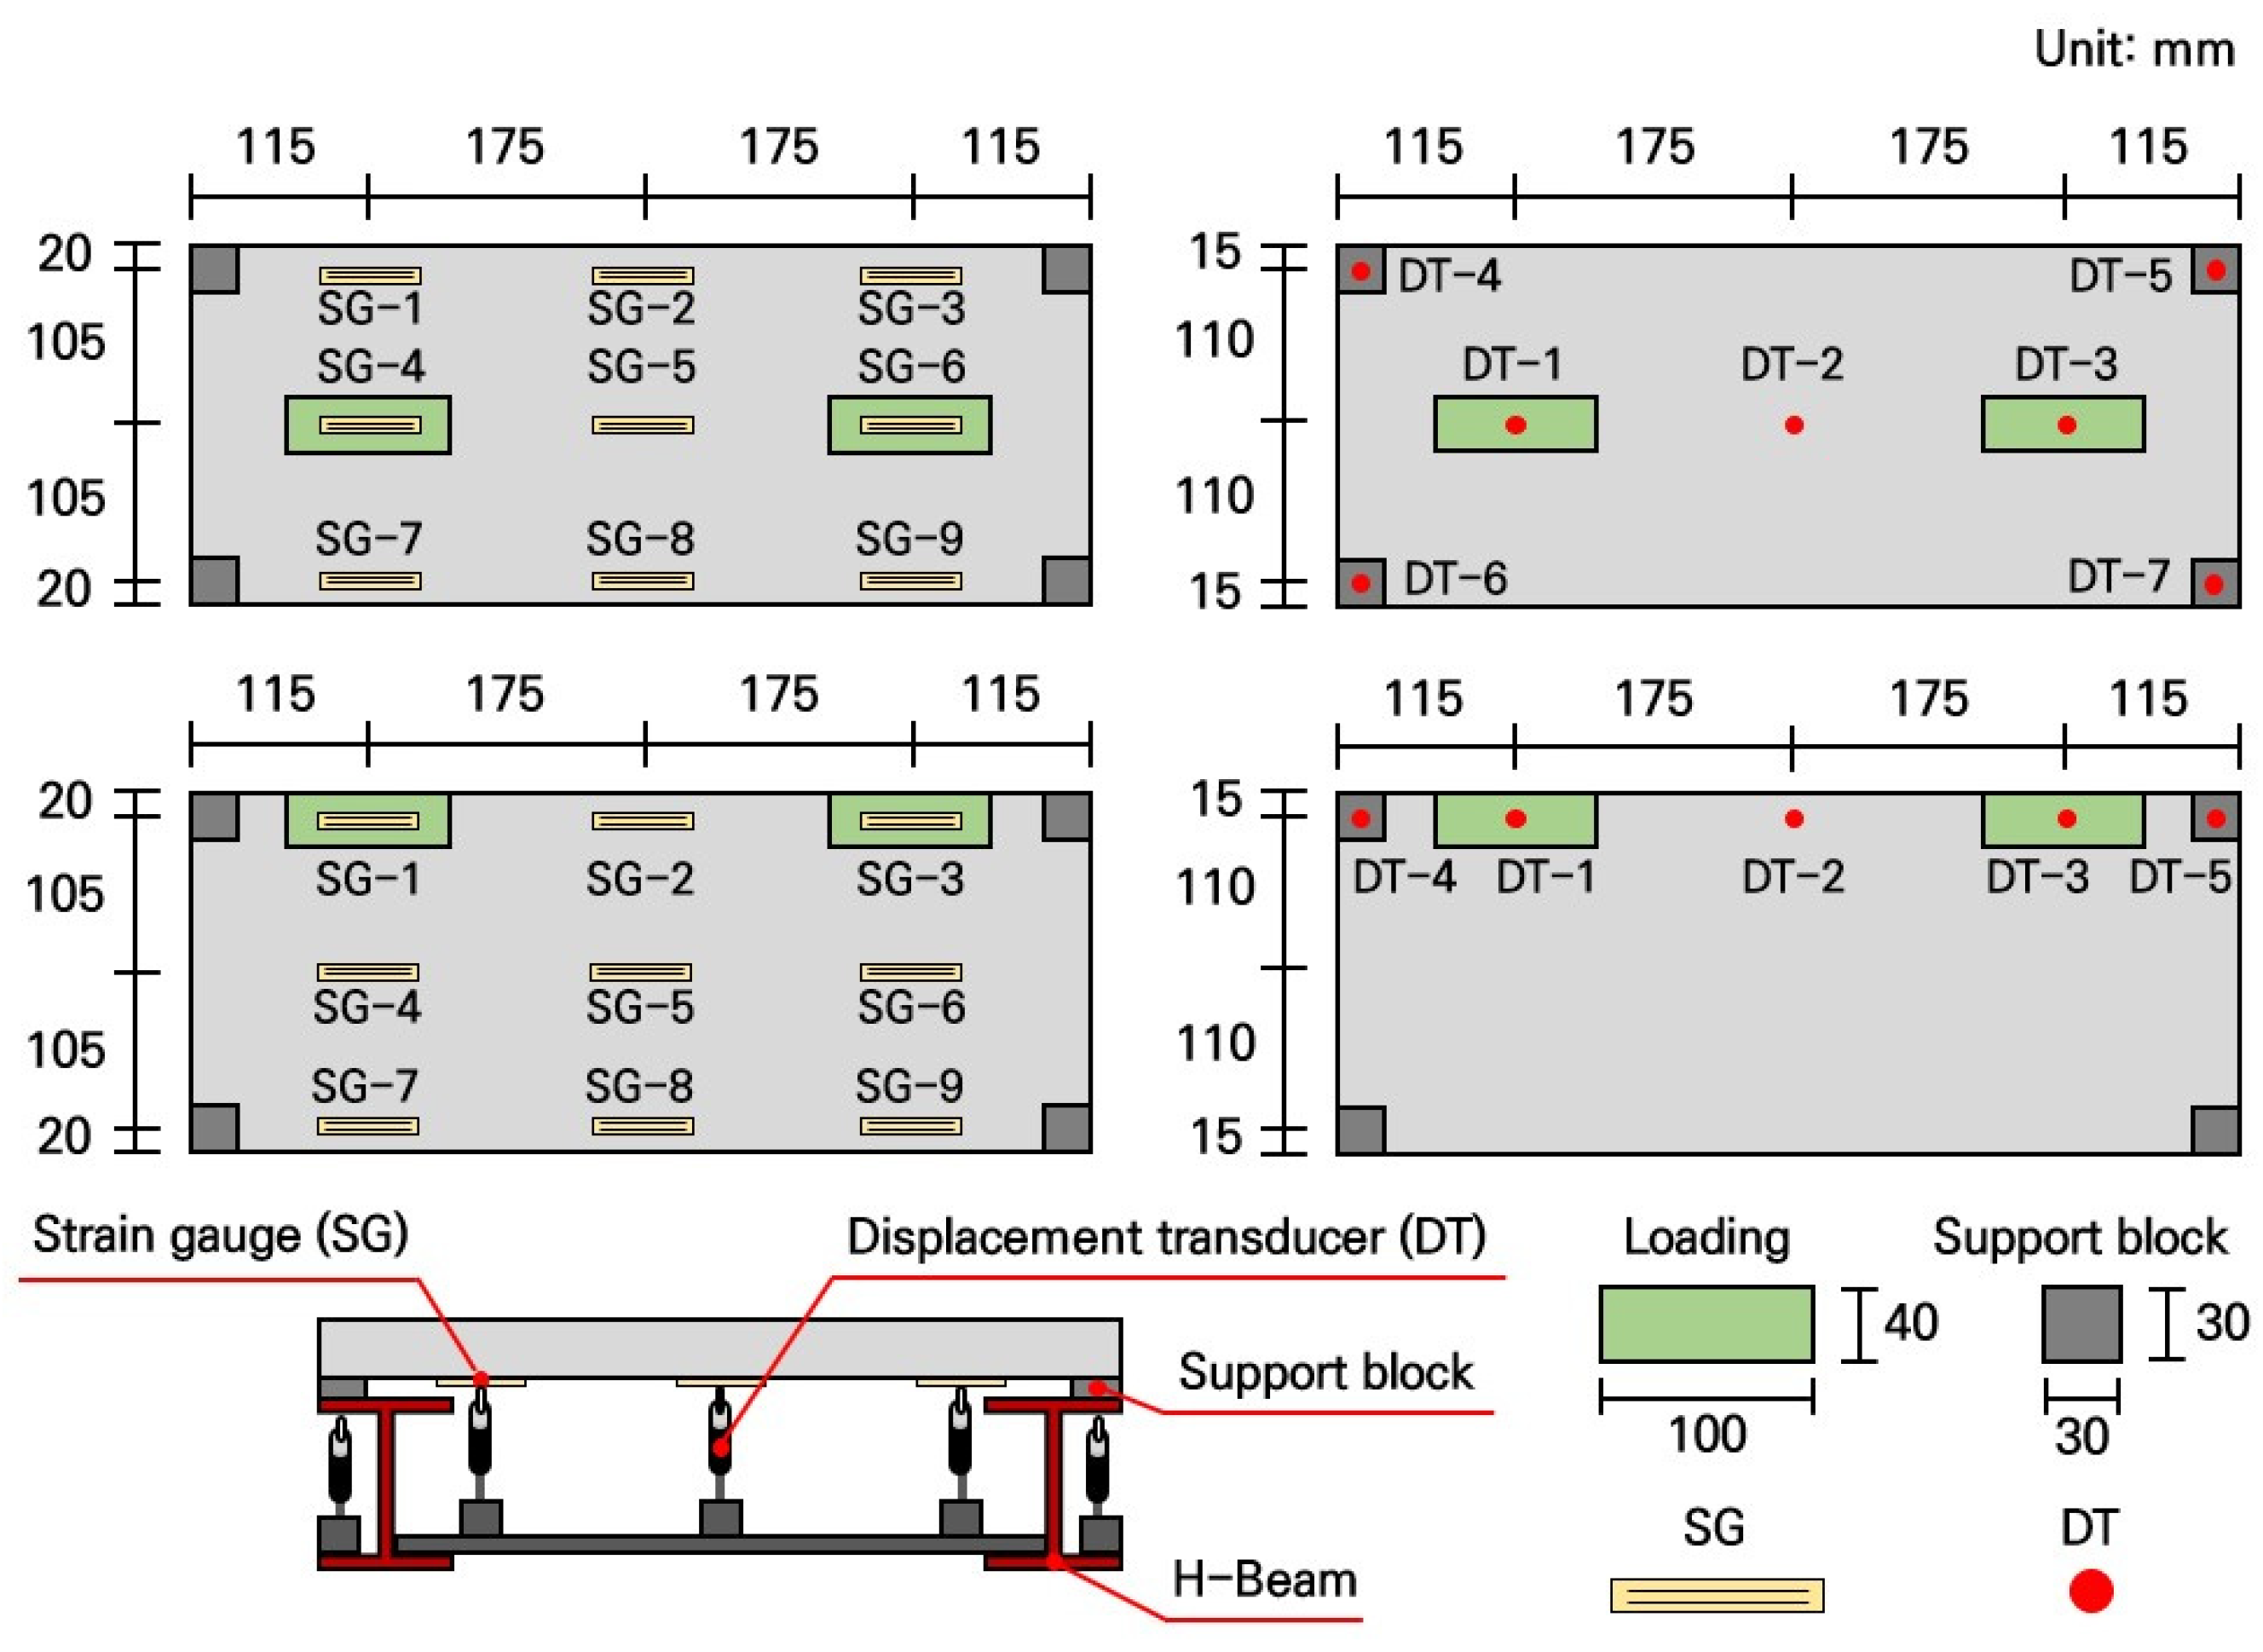
Figure 10.
Experiment configuration for single-slab tests.
Figure 10.
Experiment configuration for single-slab tests.
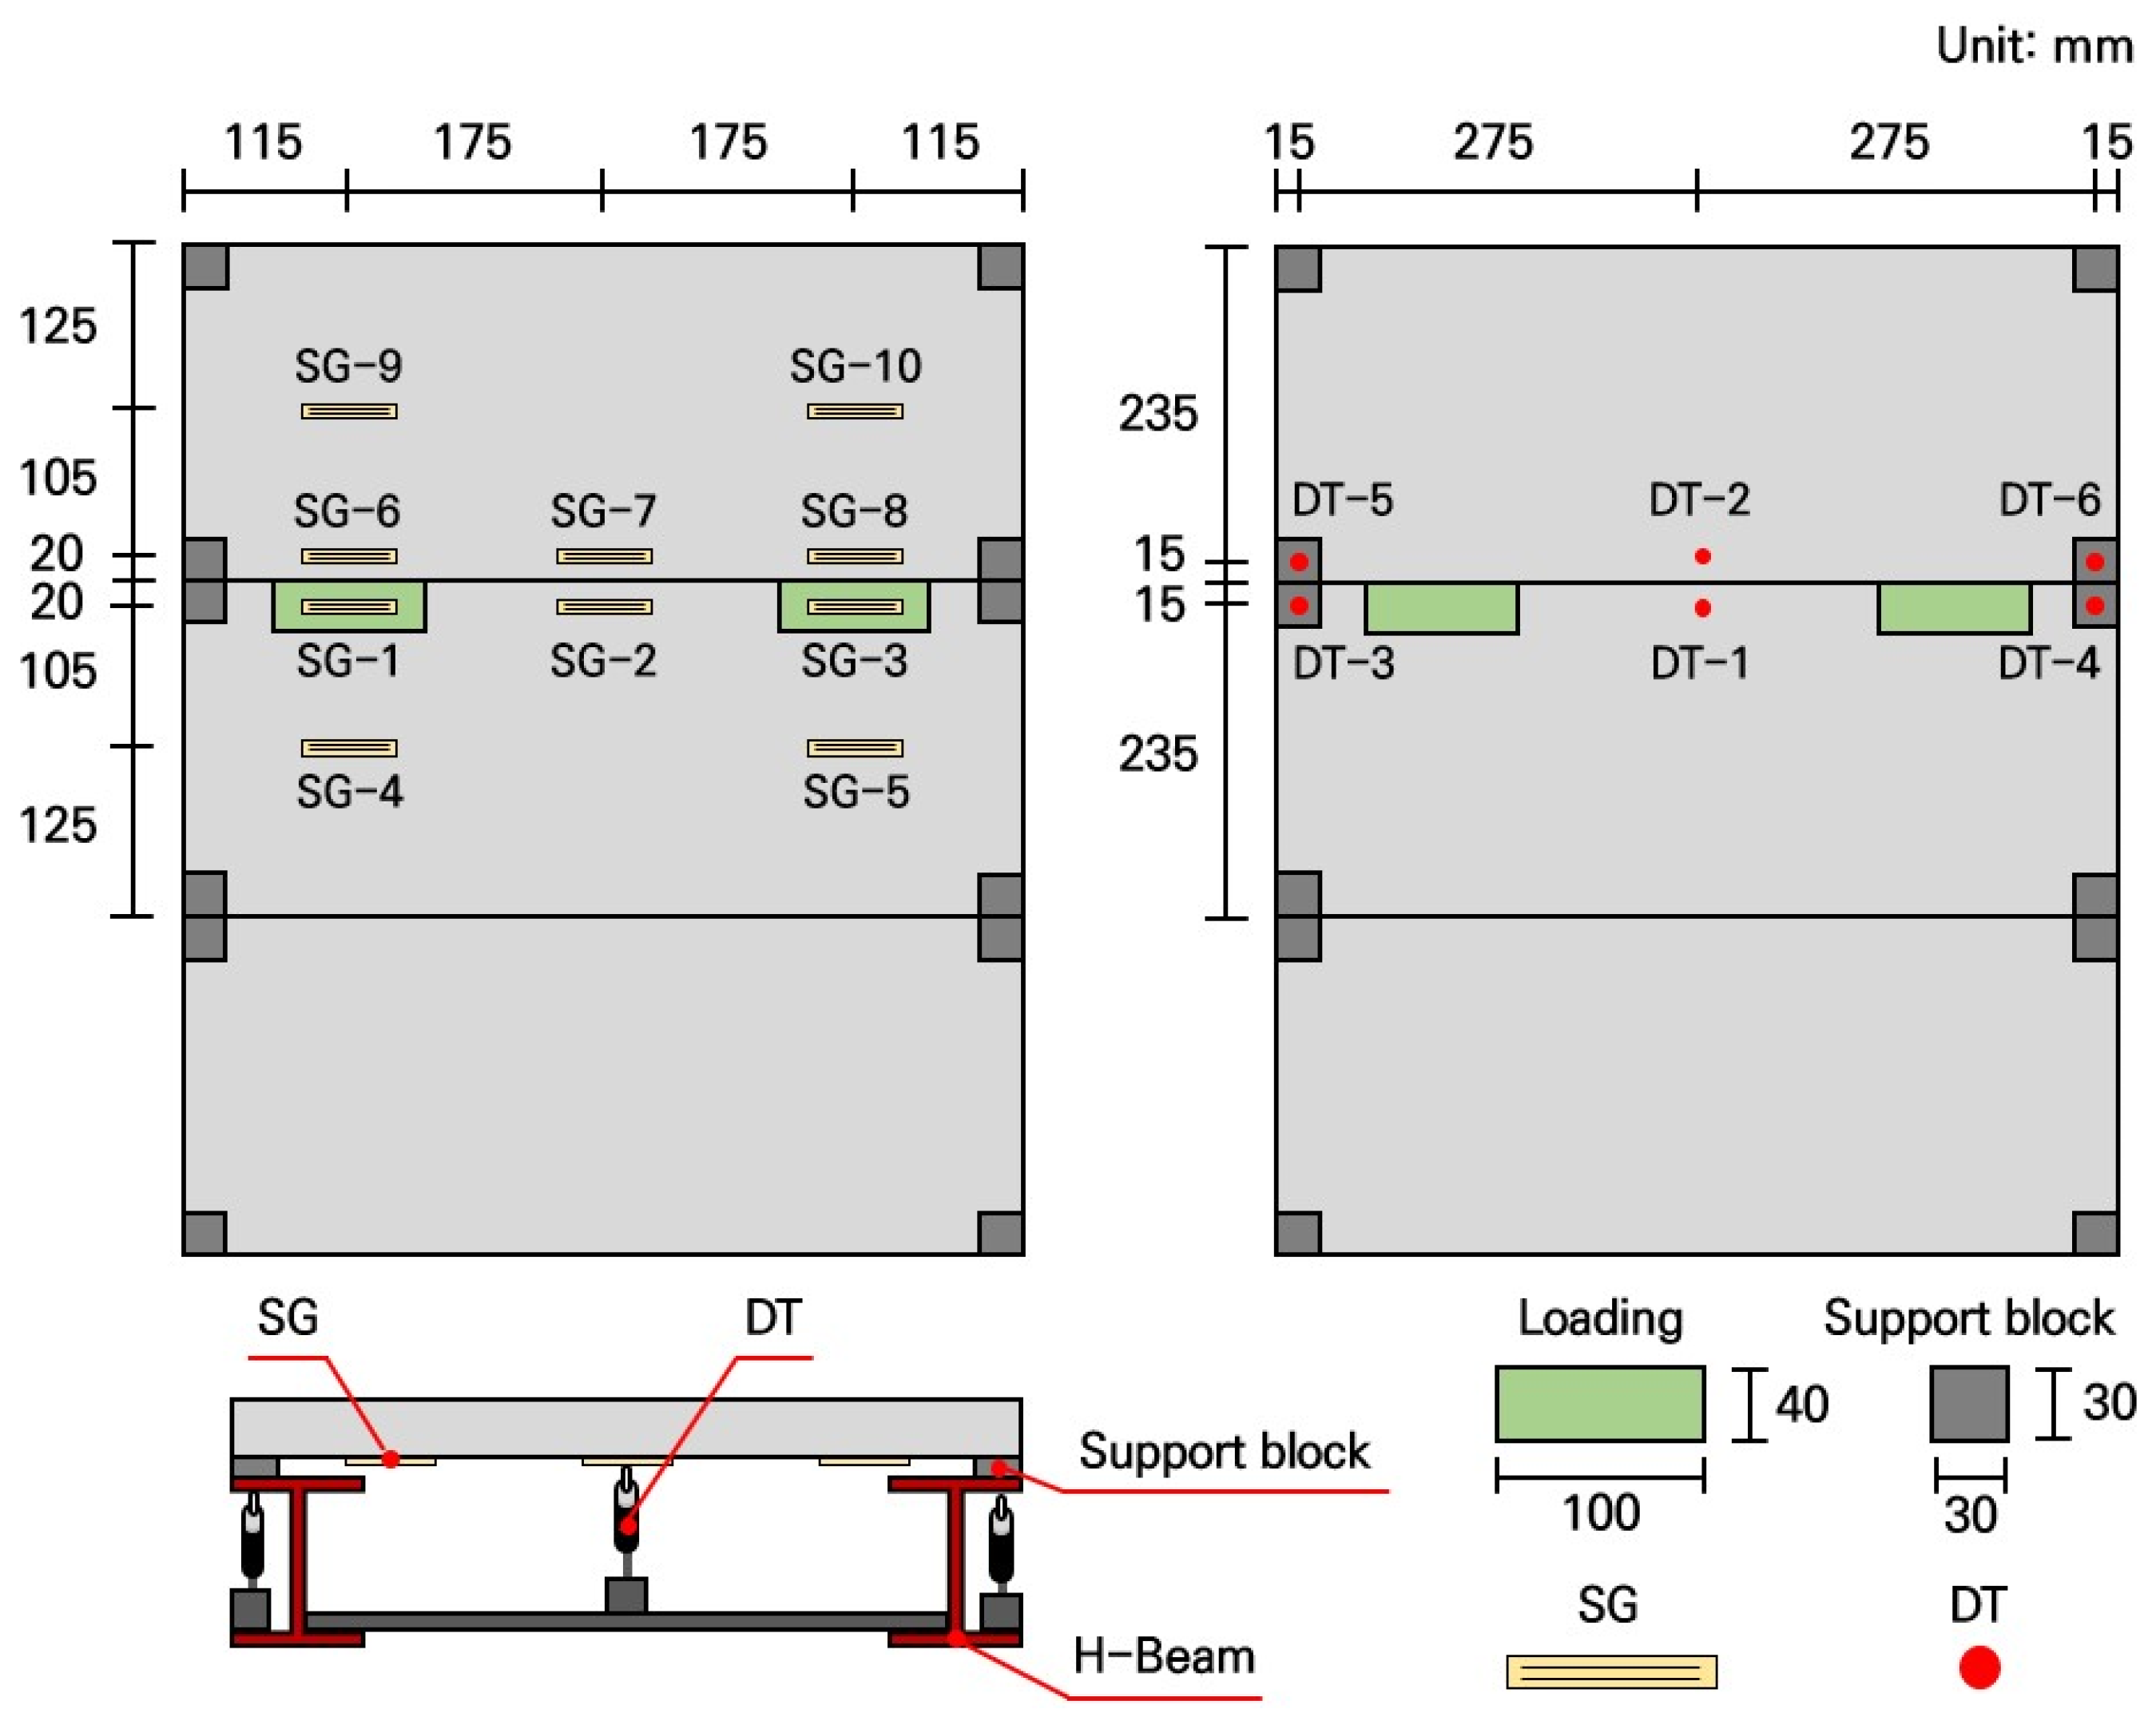
Figure 11.
Experiment configuration for assembled slab tests.
Figure 11.
Experiment configuration for assembled slab tests.
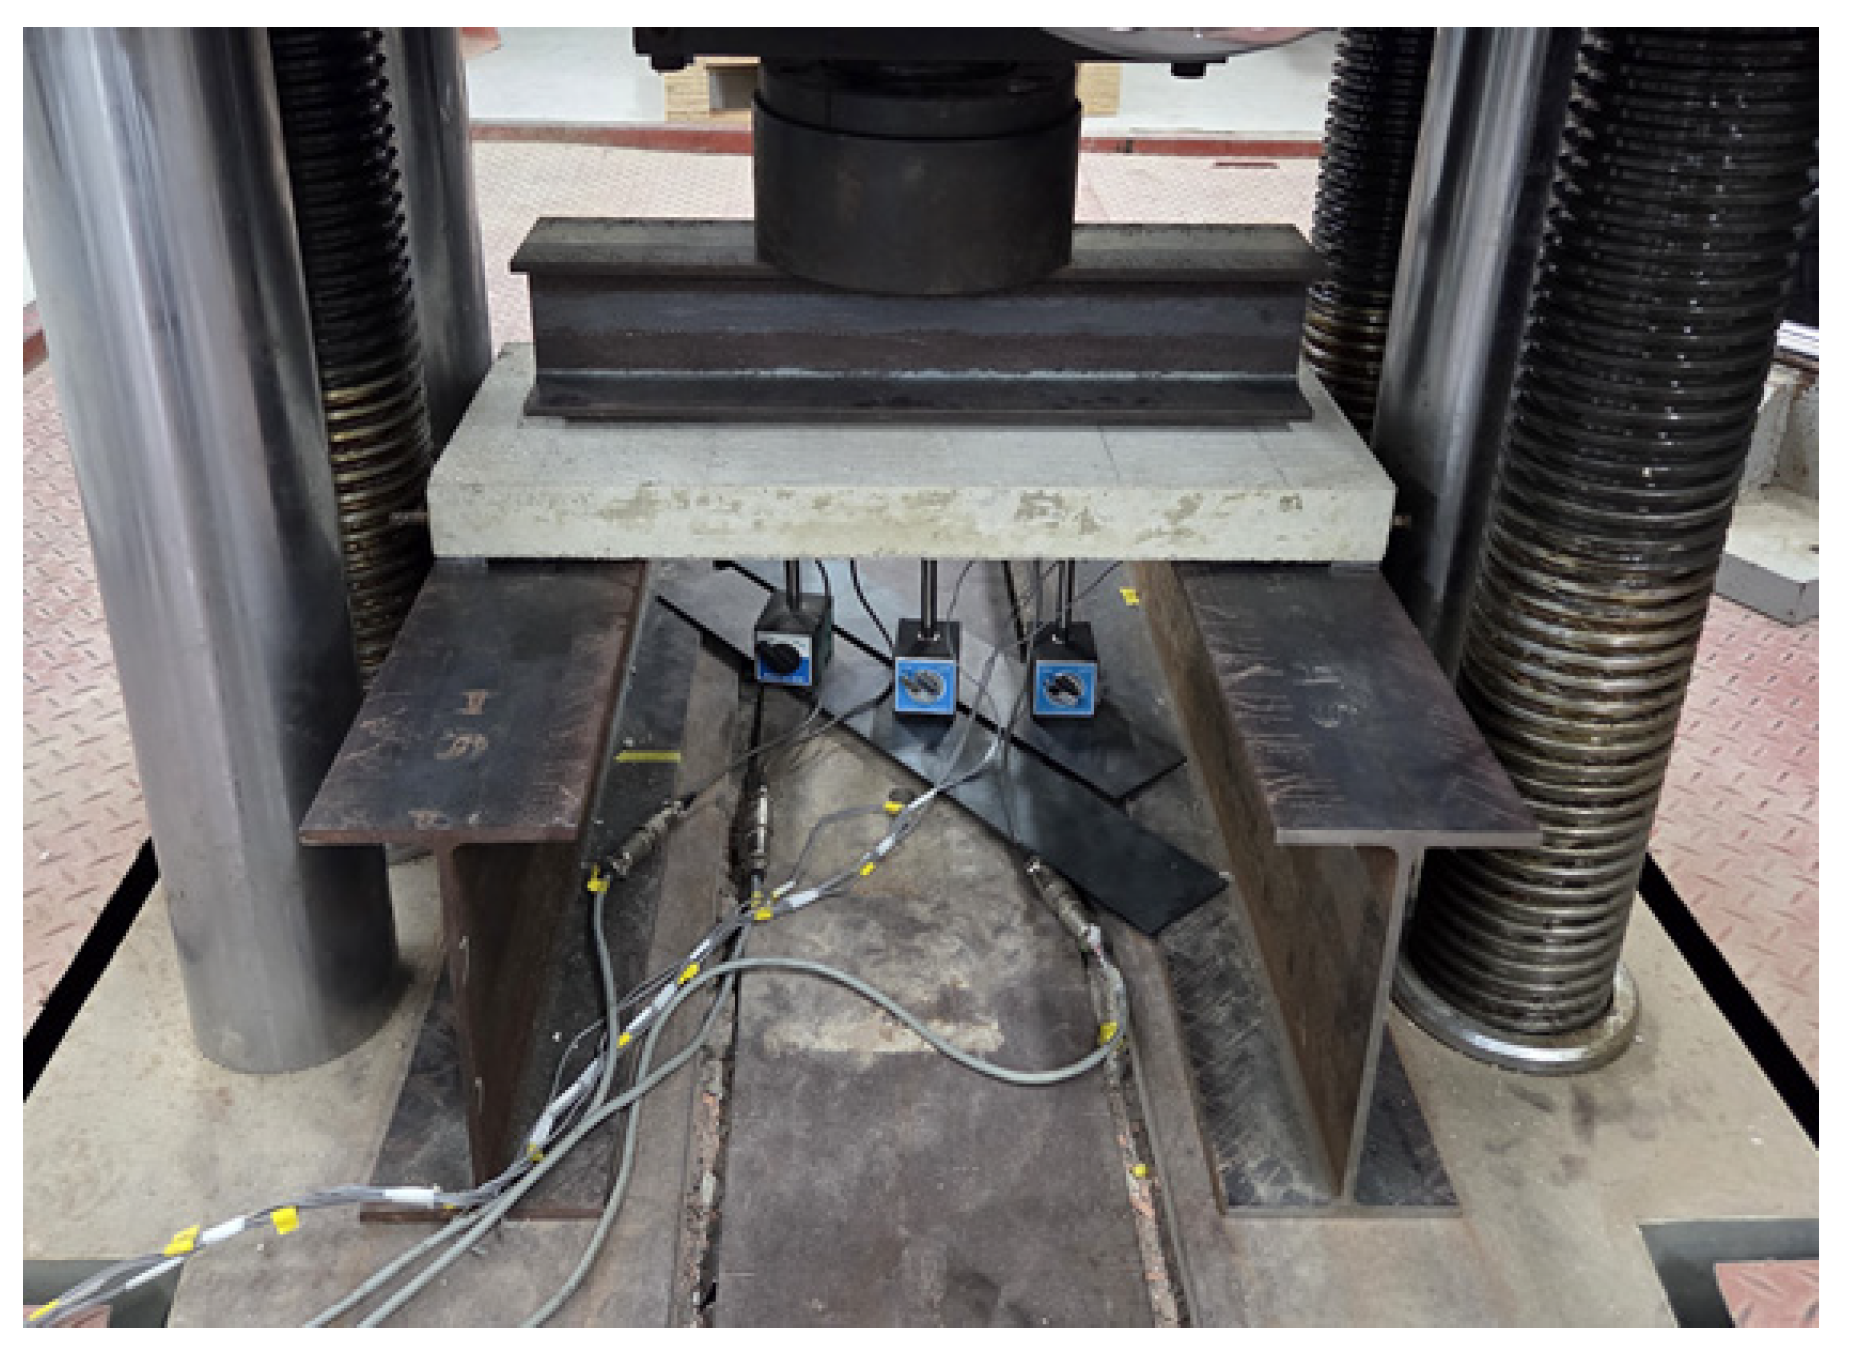
Figure 12.
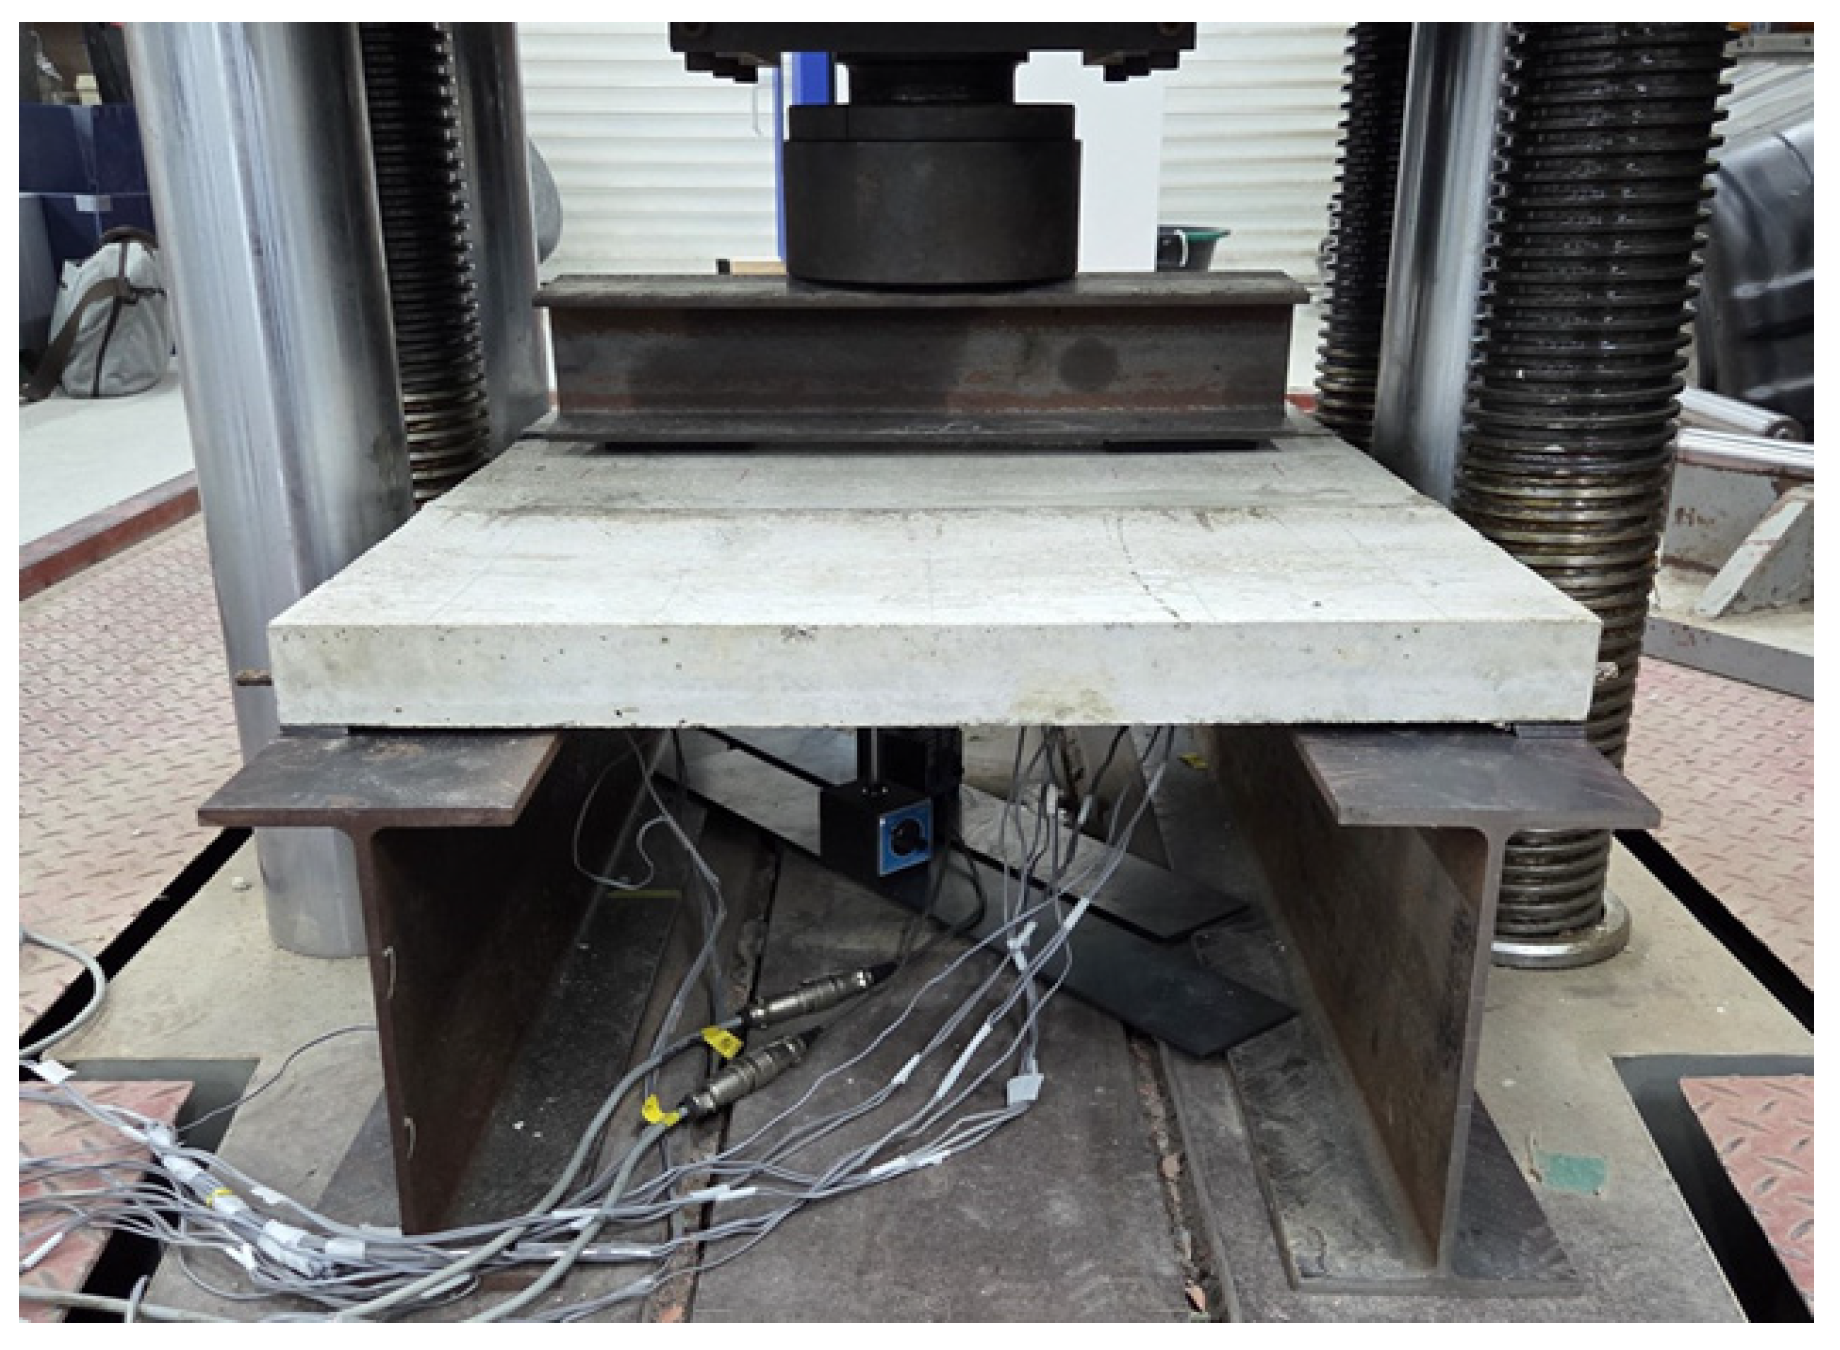
Experiment setup for single slab.
Figure 12.
Experiment setup for single slab.
Figure 13.
Experiment setup for assembled slabs.
Figure 13.
Experiment setup for assembled slabs.
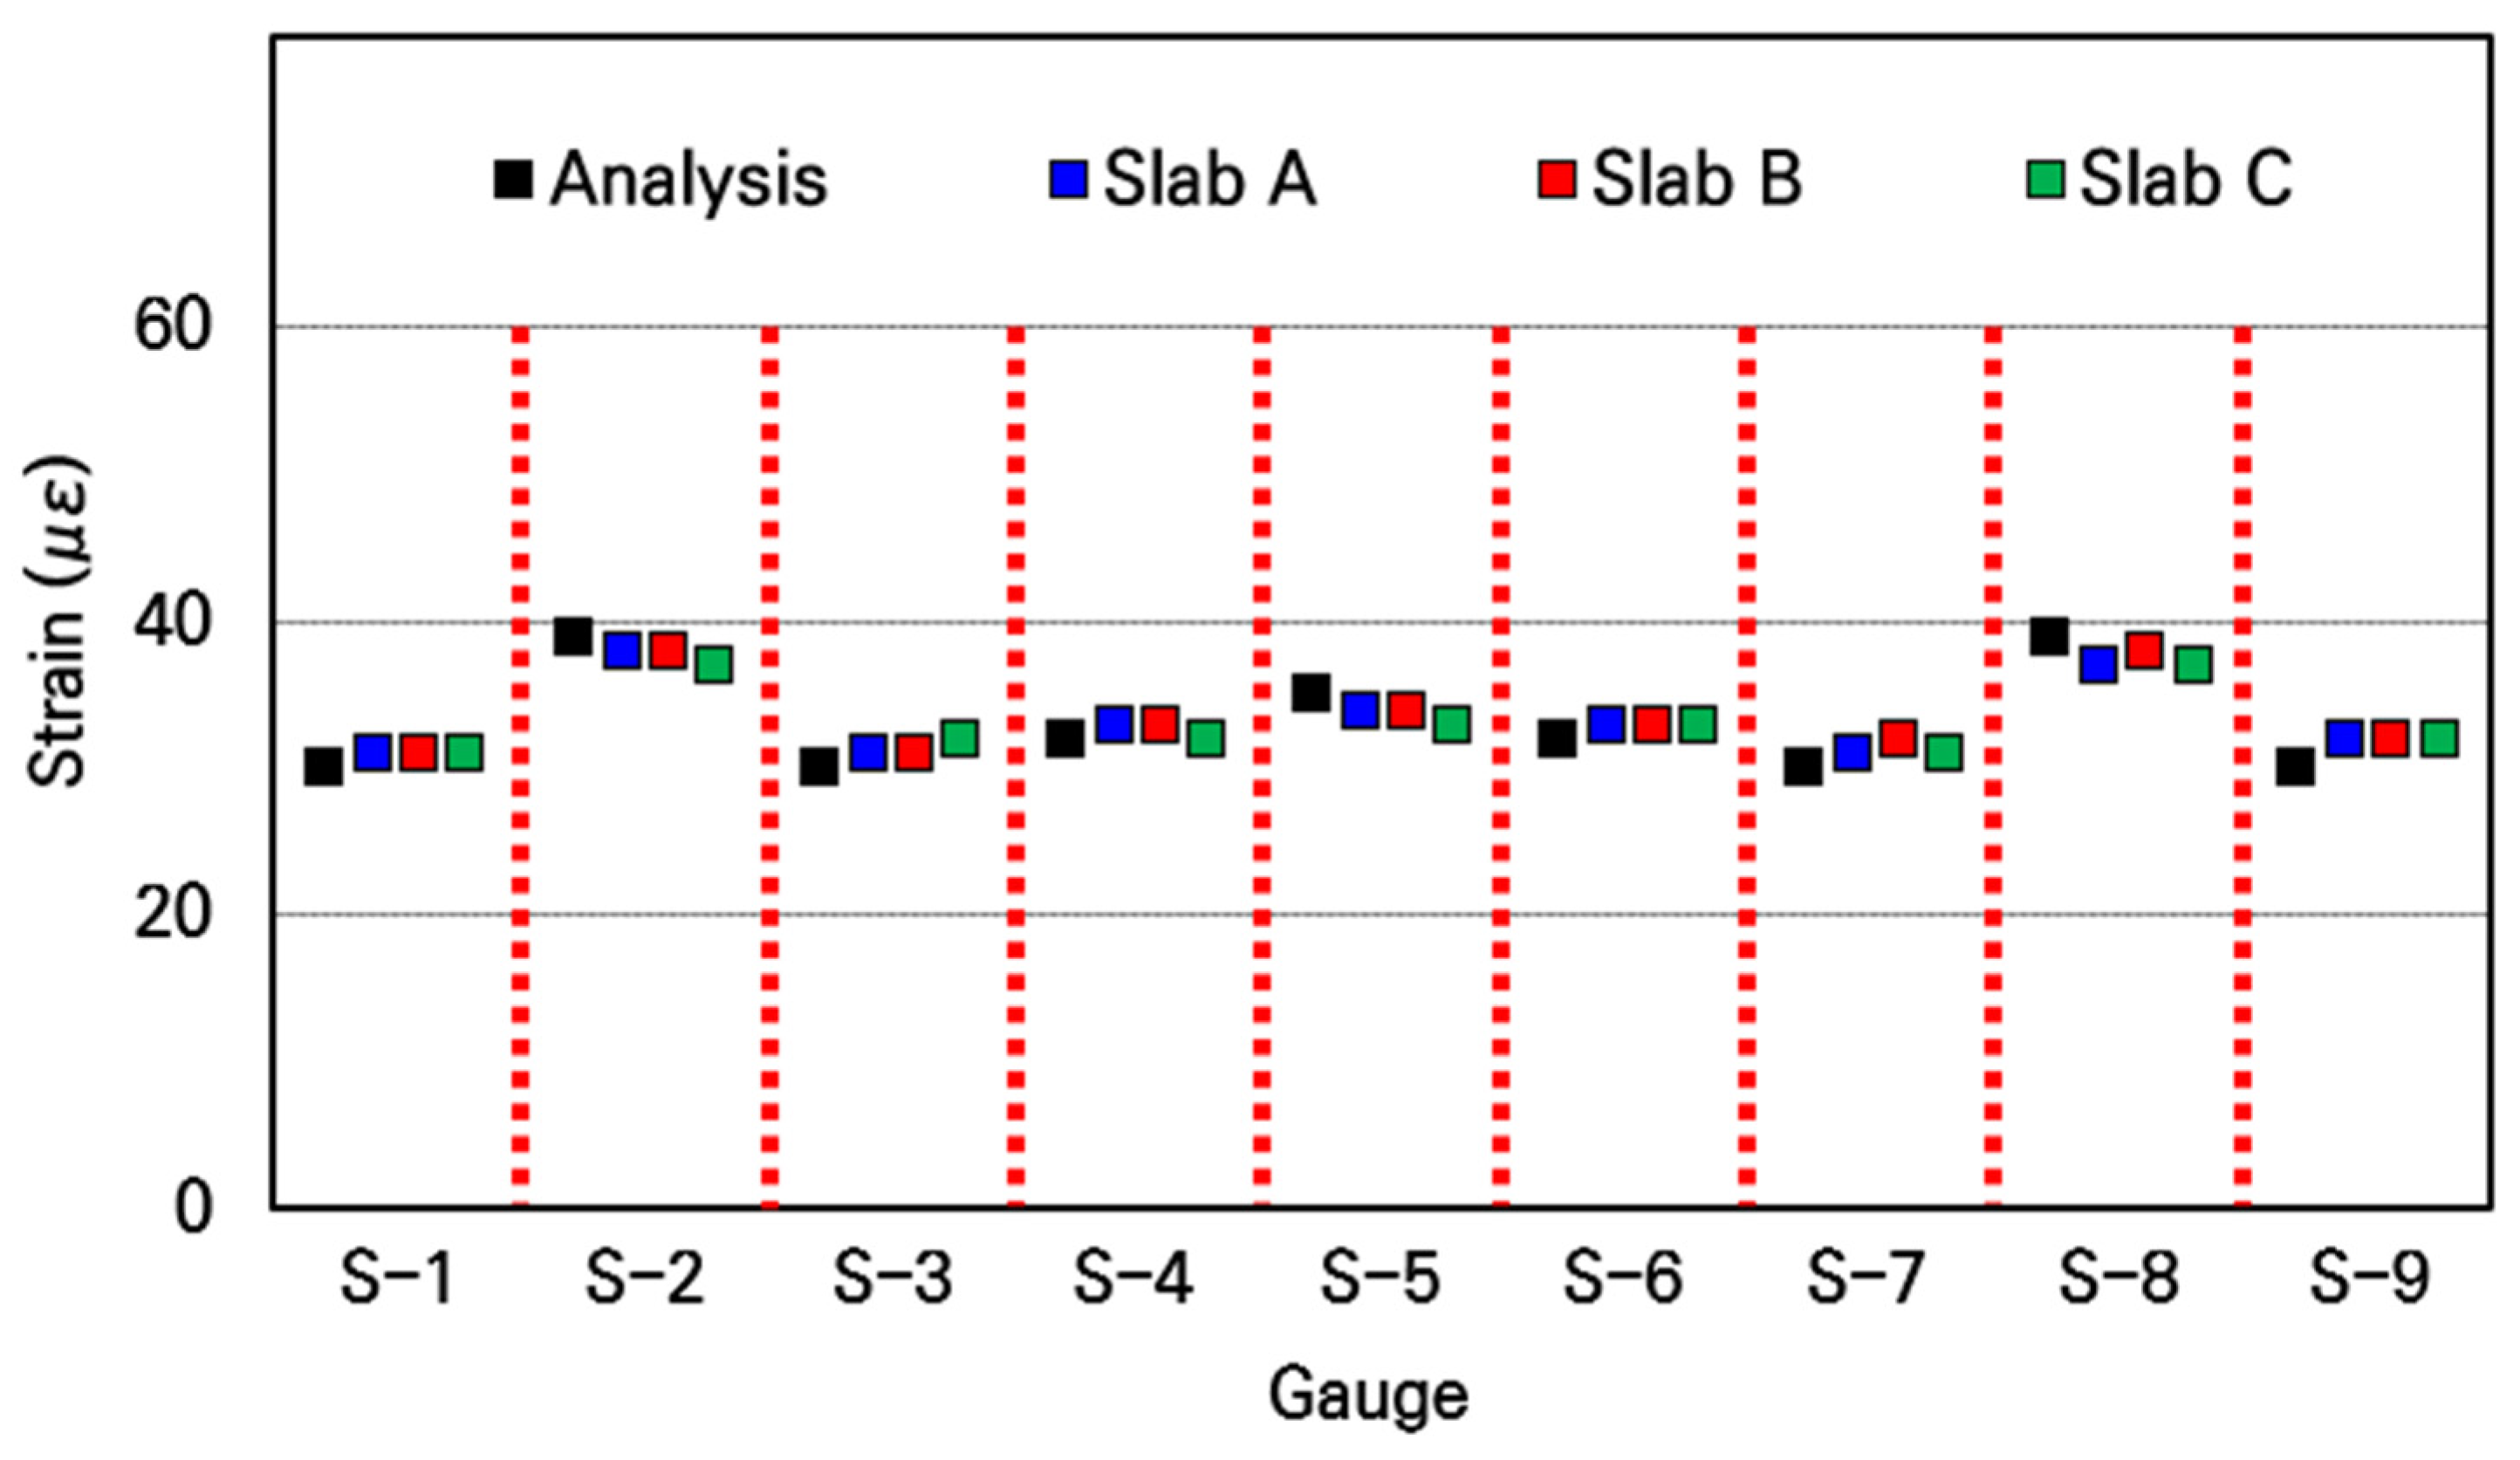
Figure 14.
Comparison of analyzed and measured strains for single slab under center loading.
Figure 14.
Comparison of analyzed and measured strains for single slab under center loading.
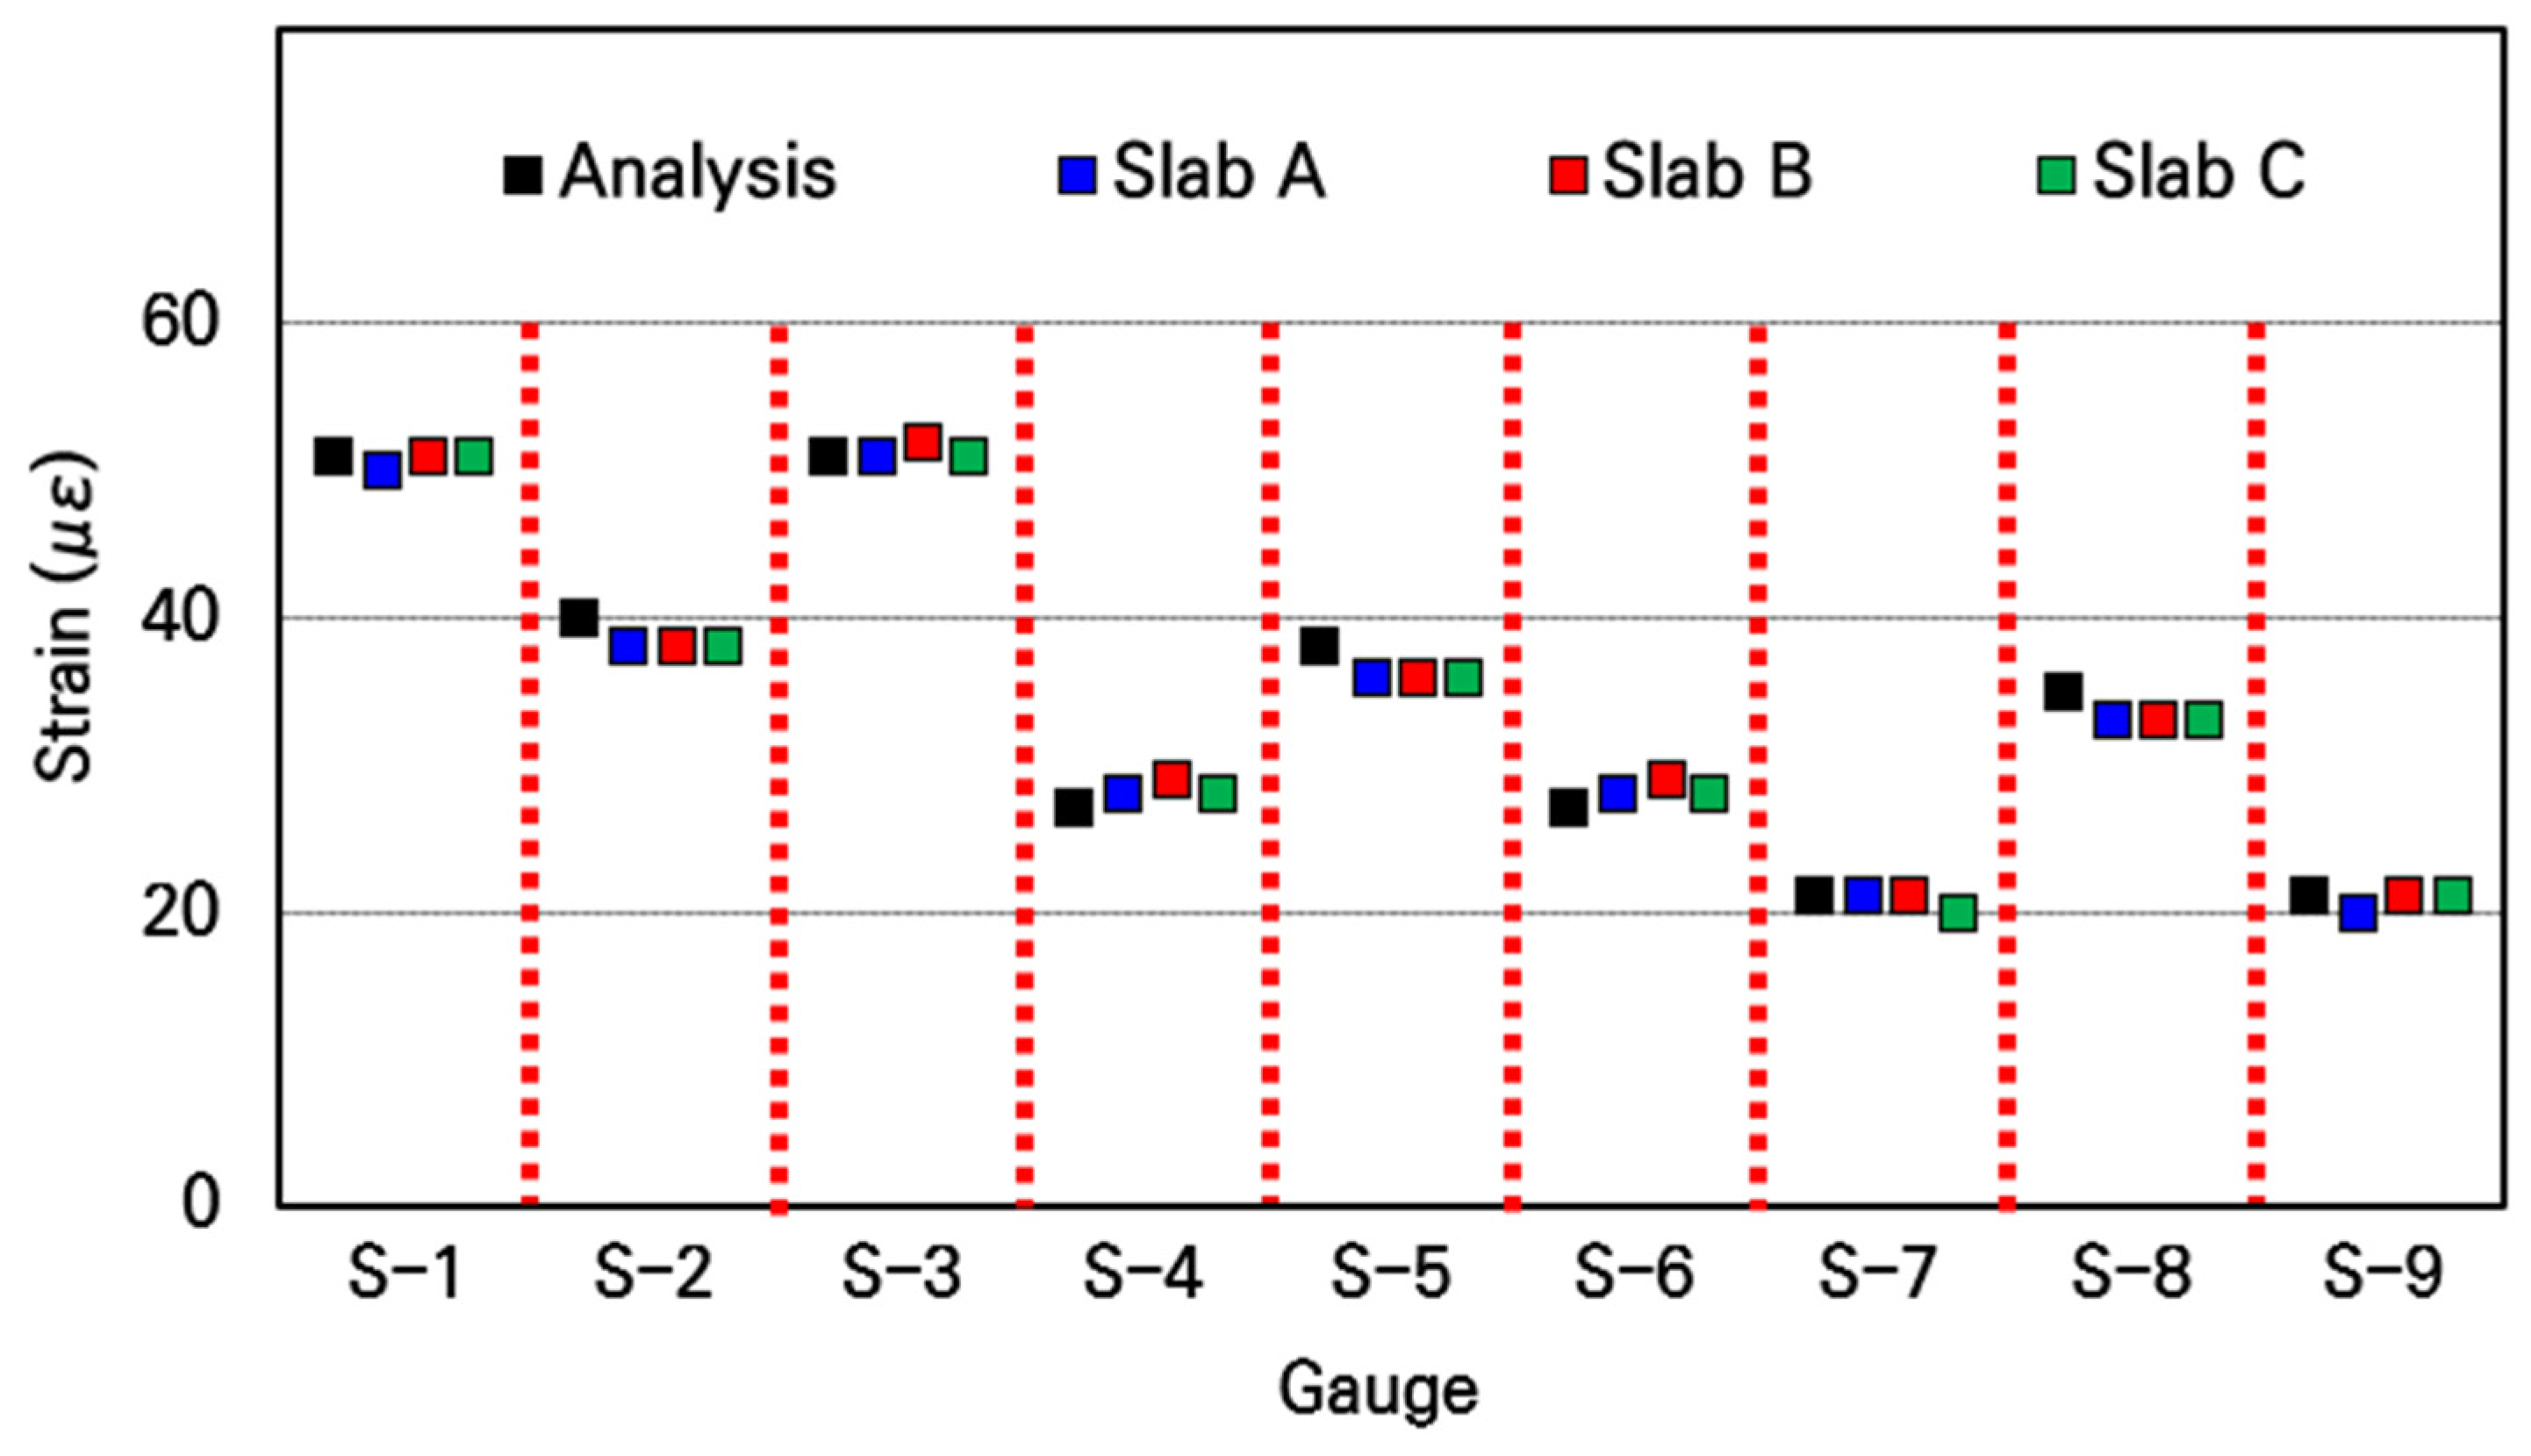
Figure 15.
Comparison of analyzed and measured strains for single slab under edge loading.
Figure 15.
Comparison of analyzed and measured strains for single slab under edge loading.
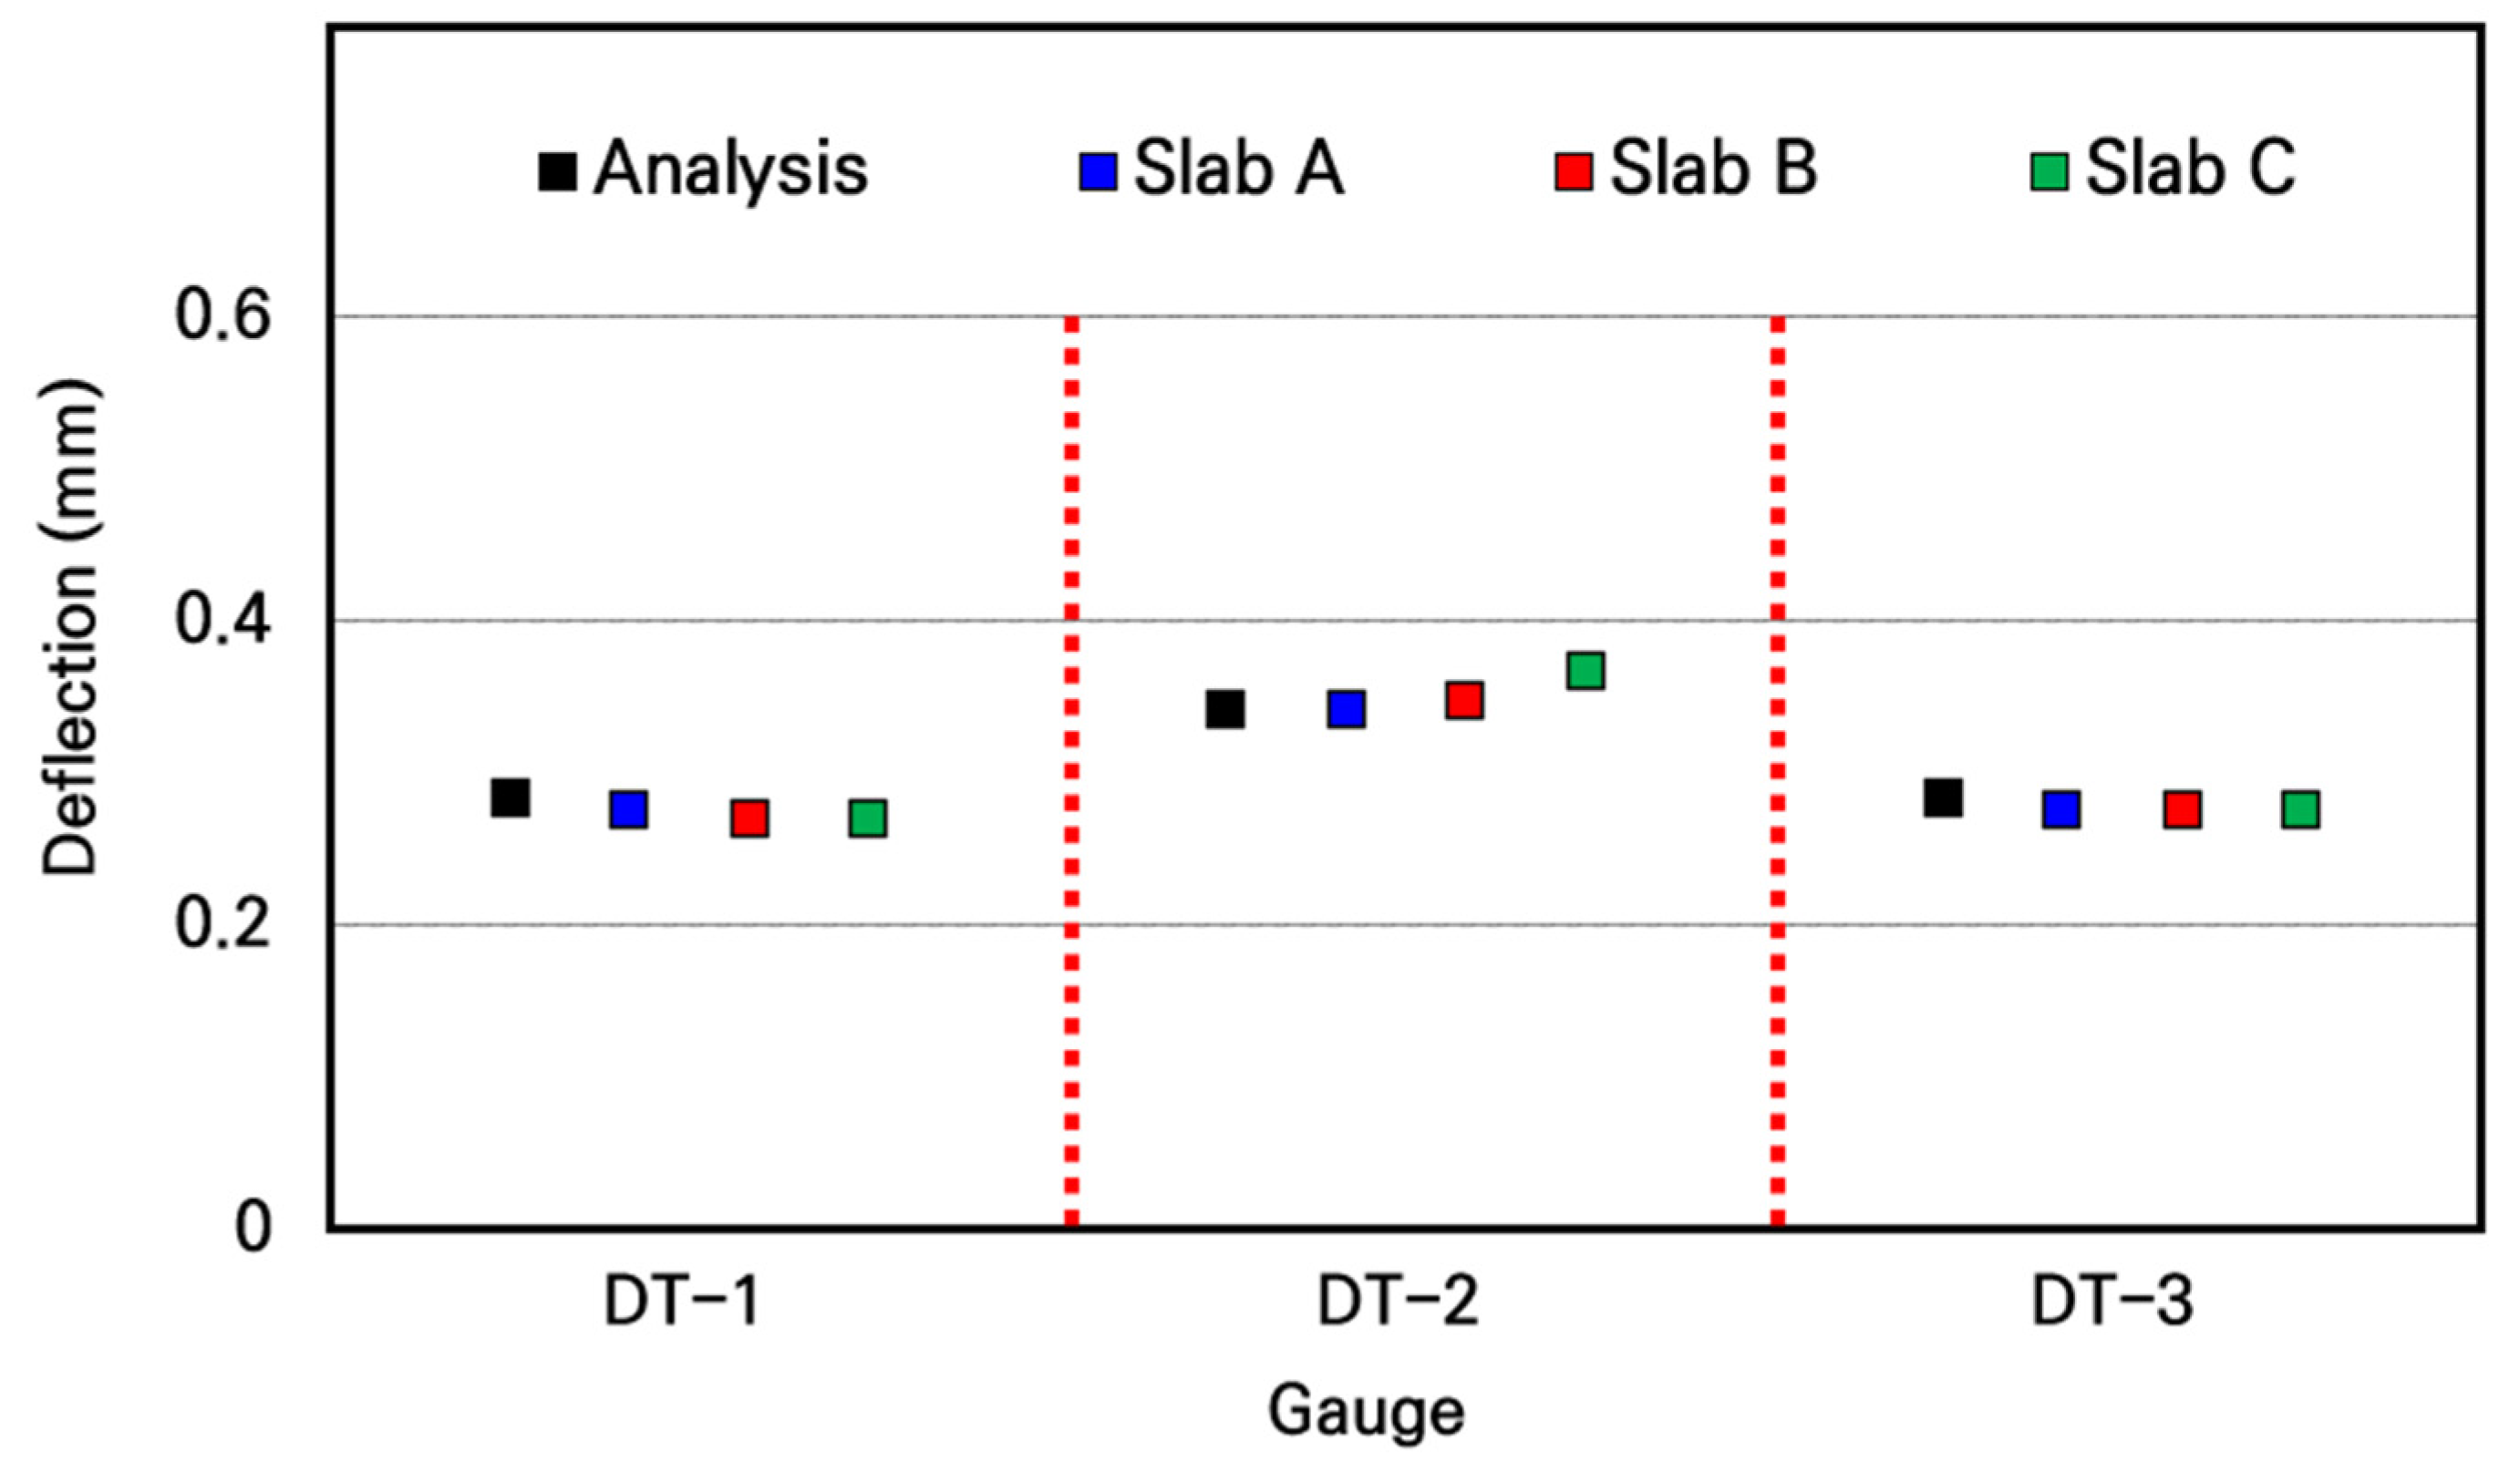
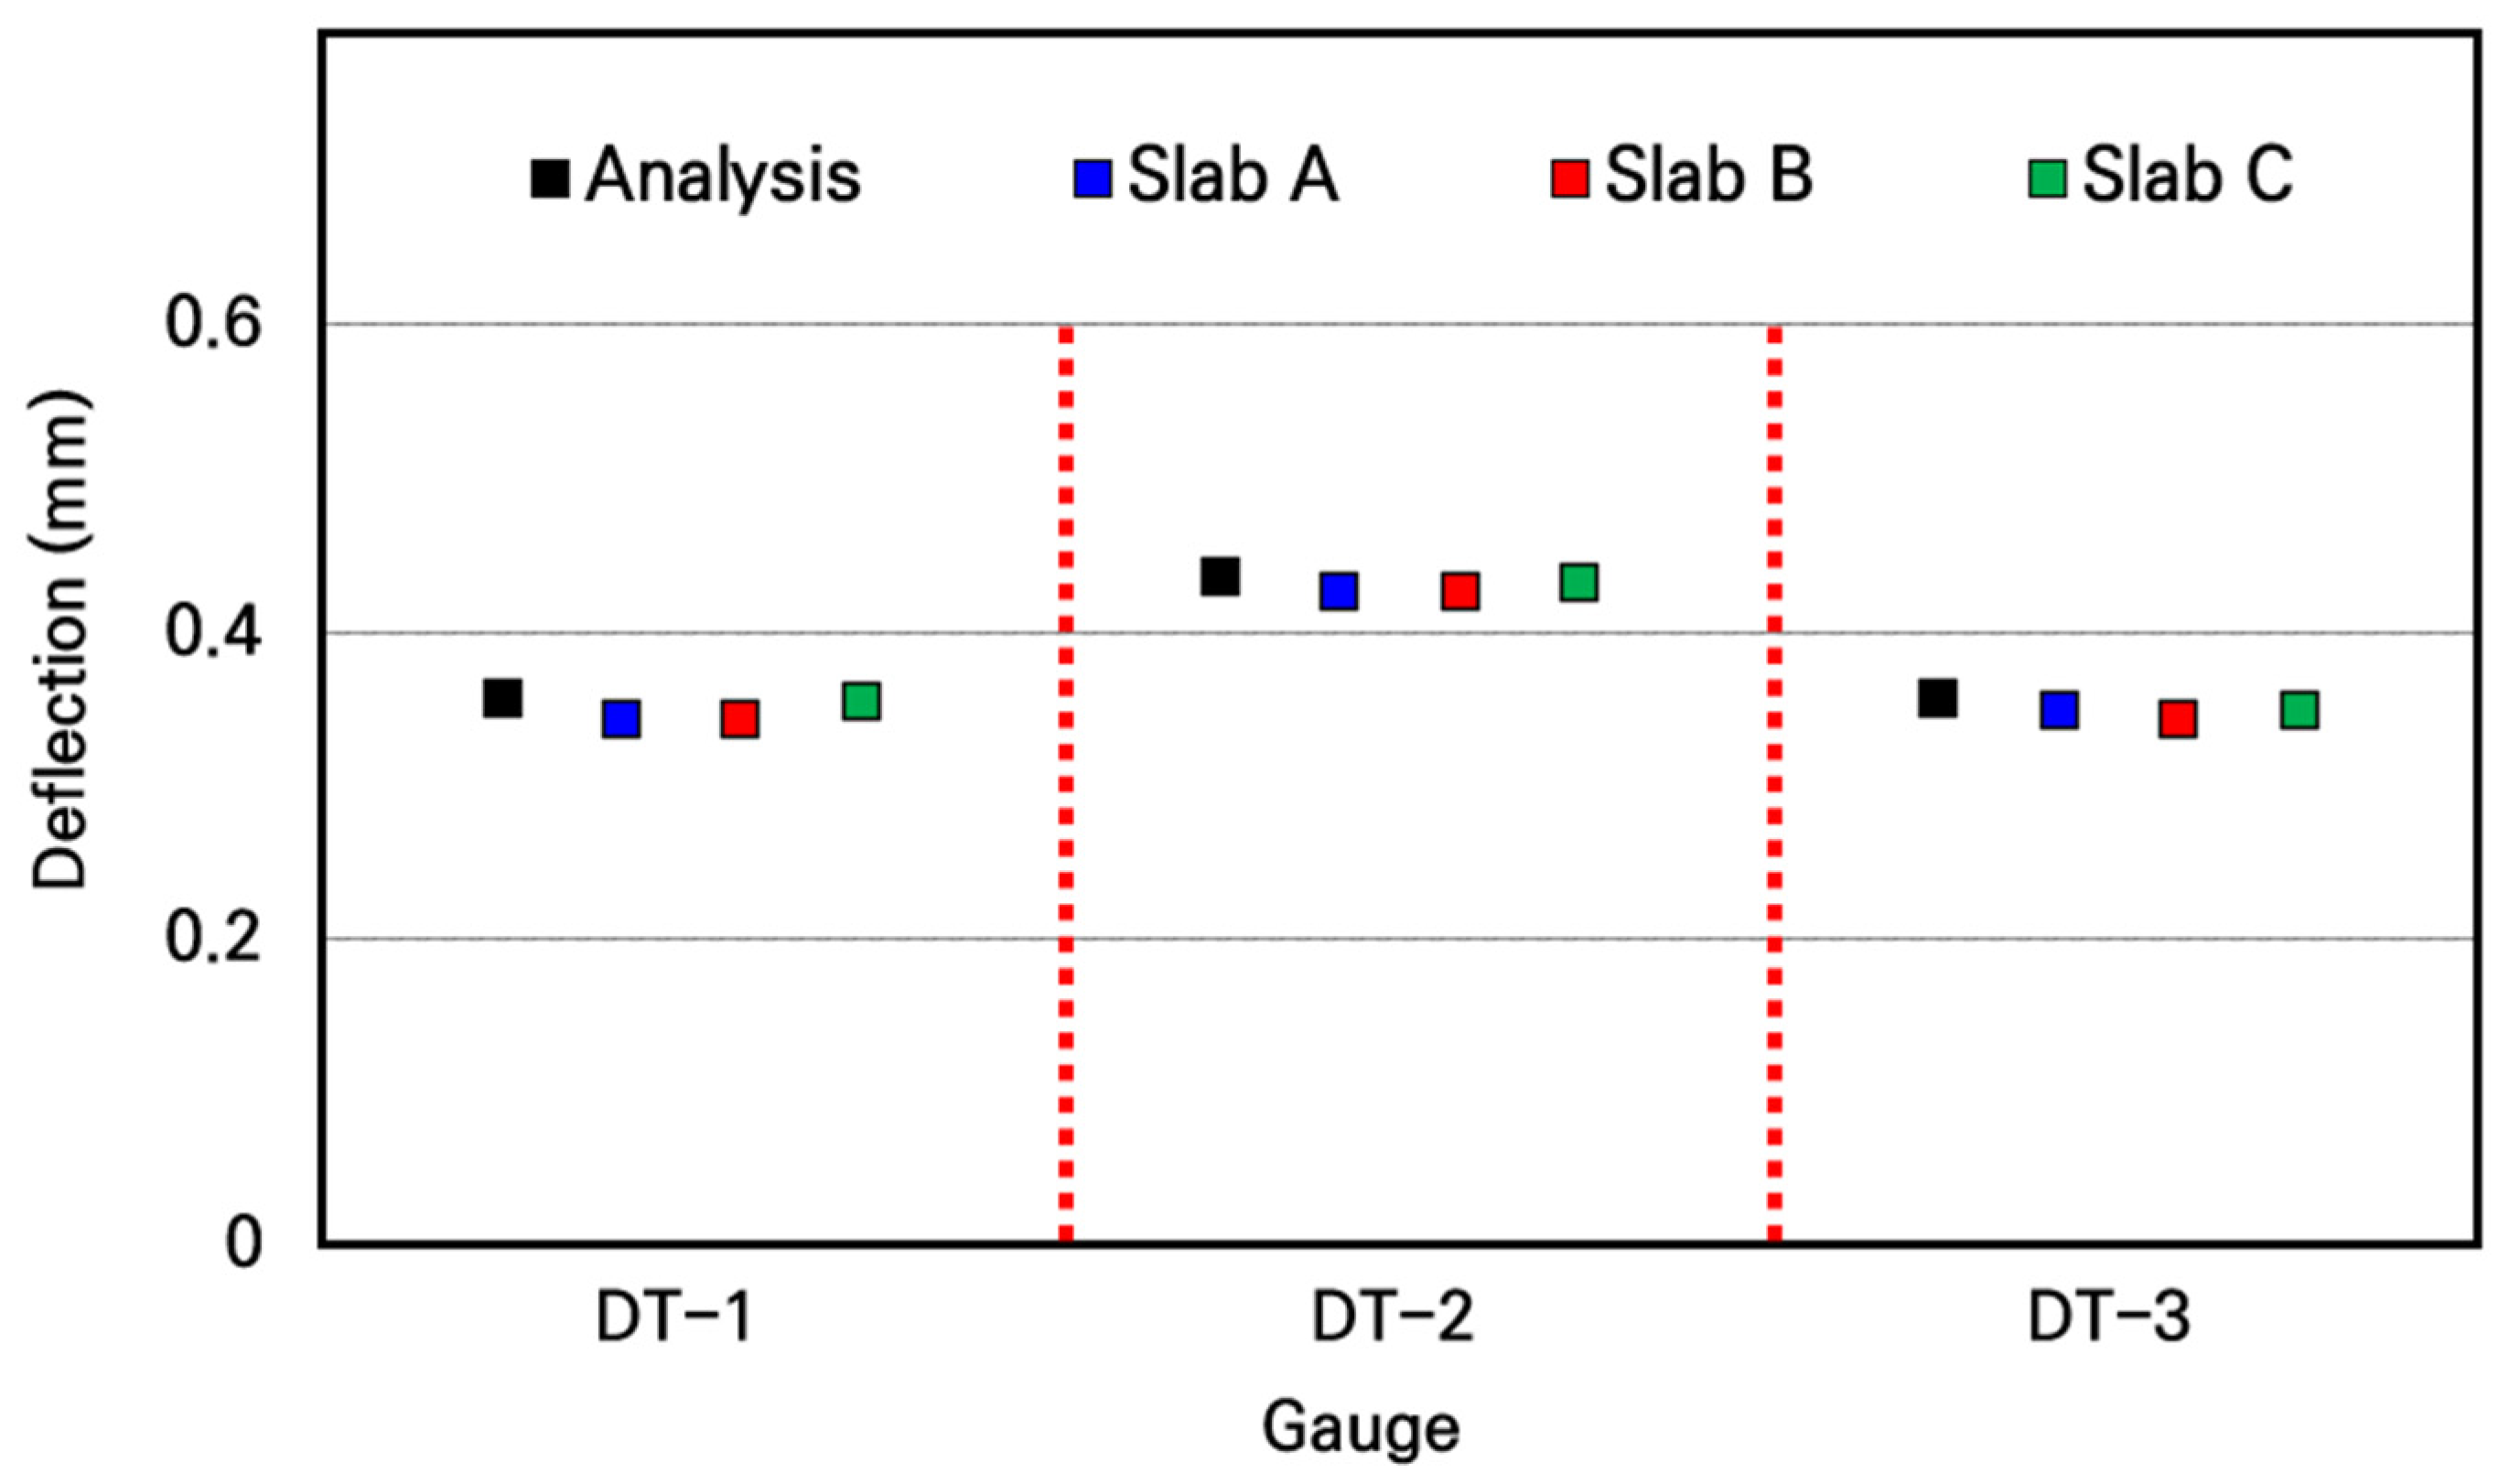
Figure 16.
Comparison of analyzed and measured deflections for single slab under center loading.
Figure 16.
Comparison of analyzed and measured deflections for single slab under center loading.
Figure 17.
Comparison of analyzed and measured deflections for single slab under edge loading.
Figure 17.
Comparison of analyzed and measured deflections for single slab under edge loading.
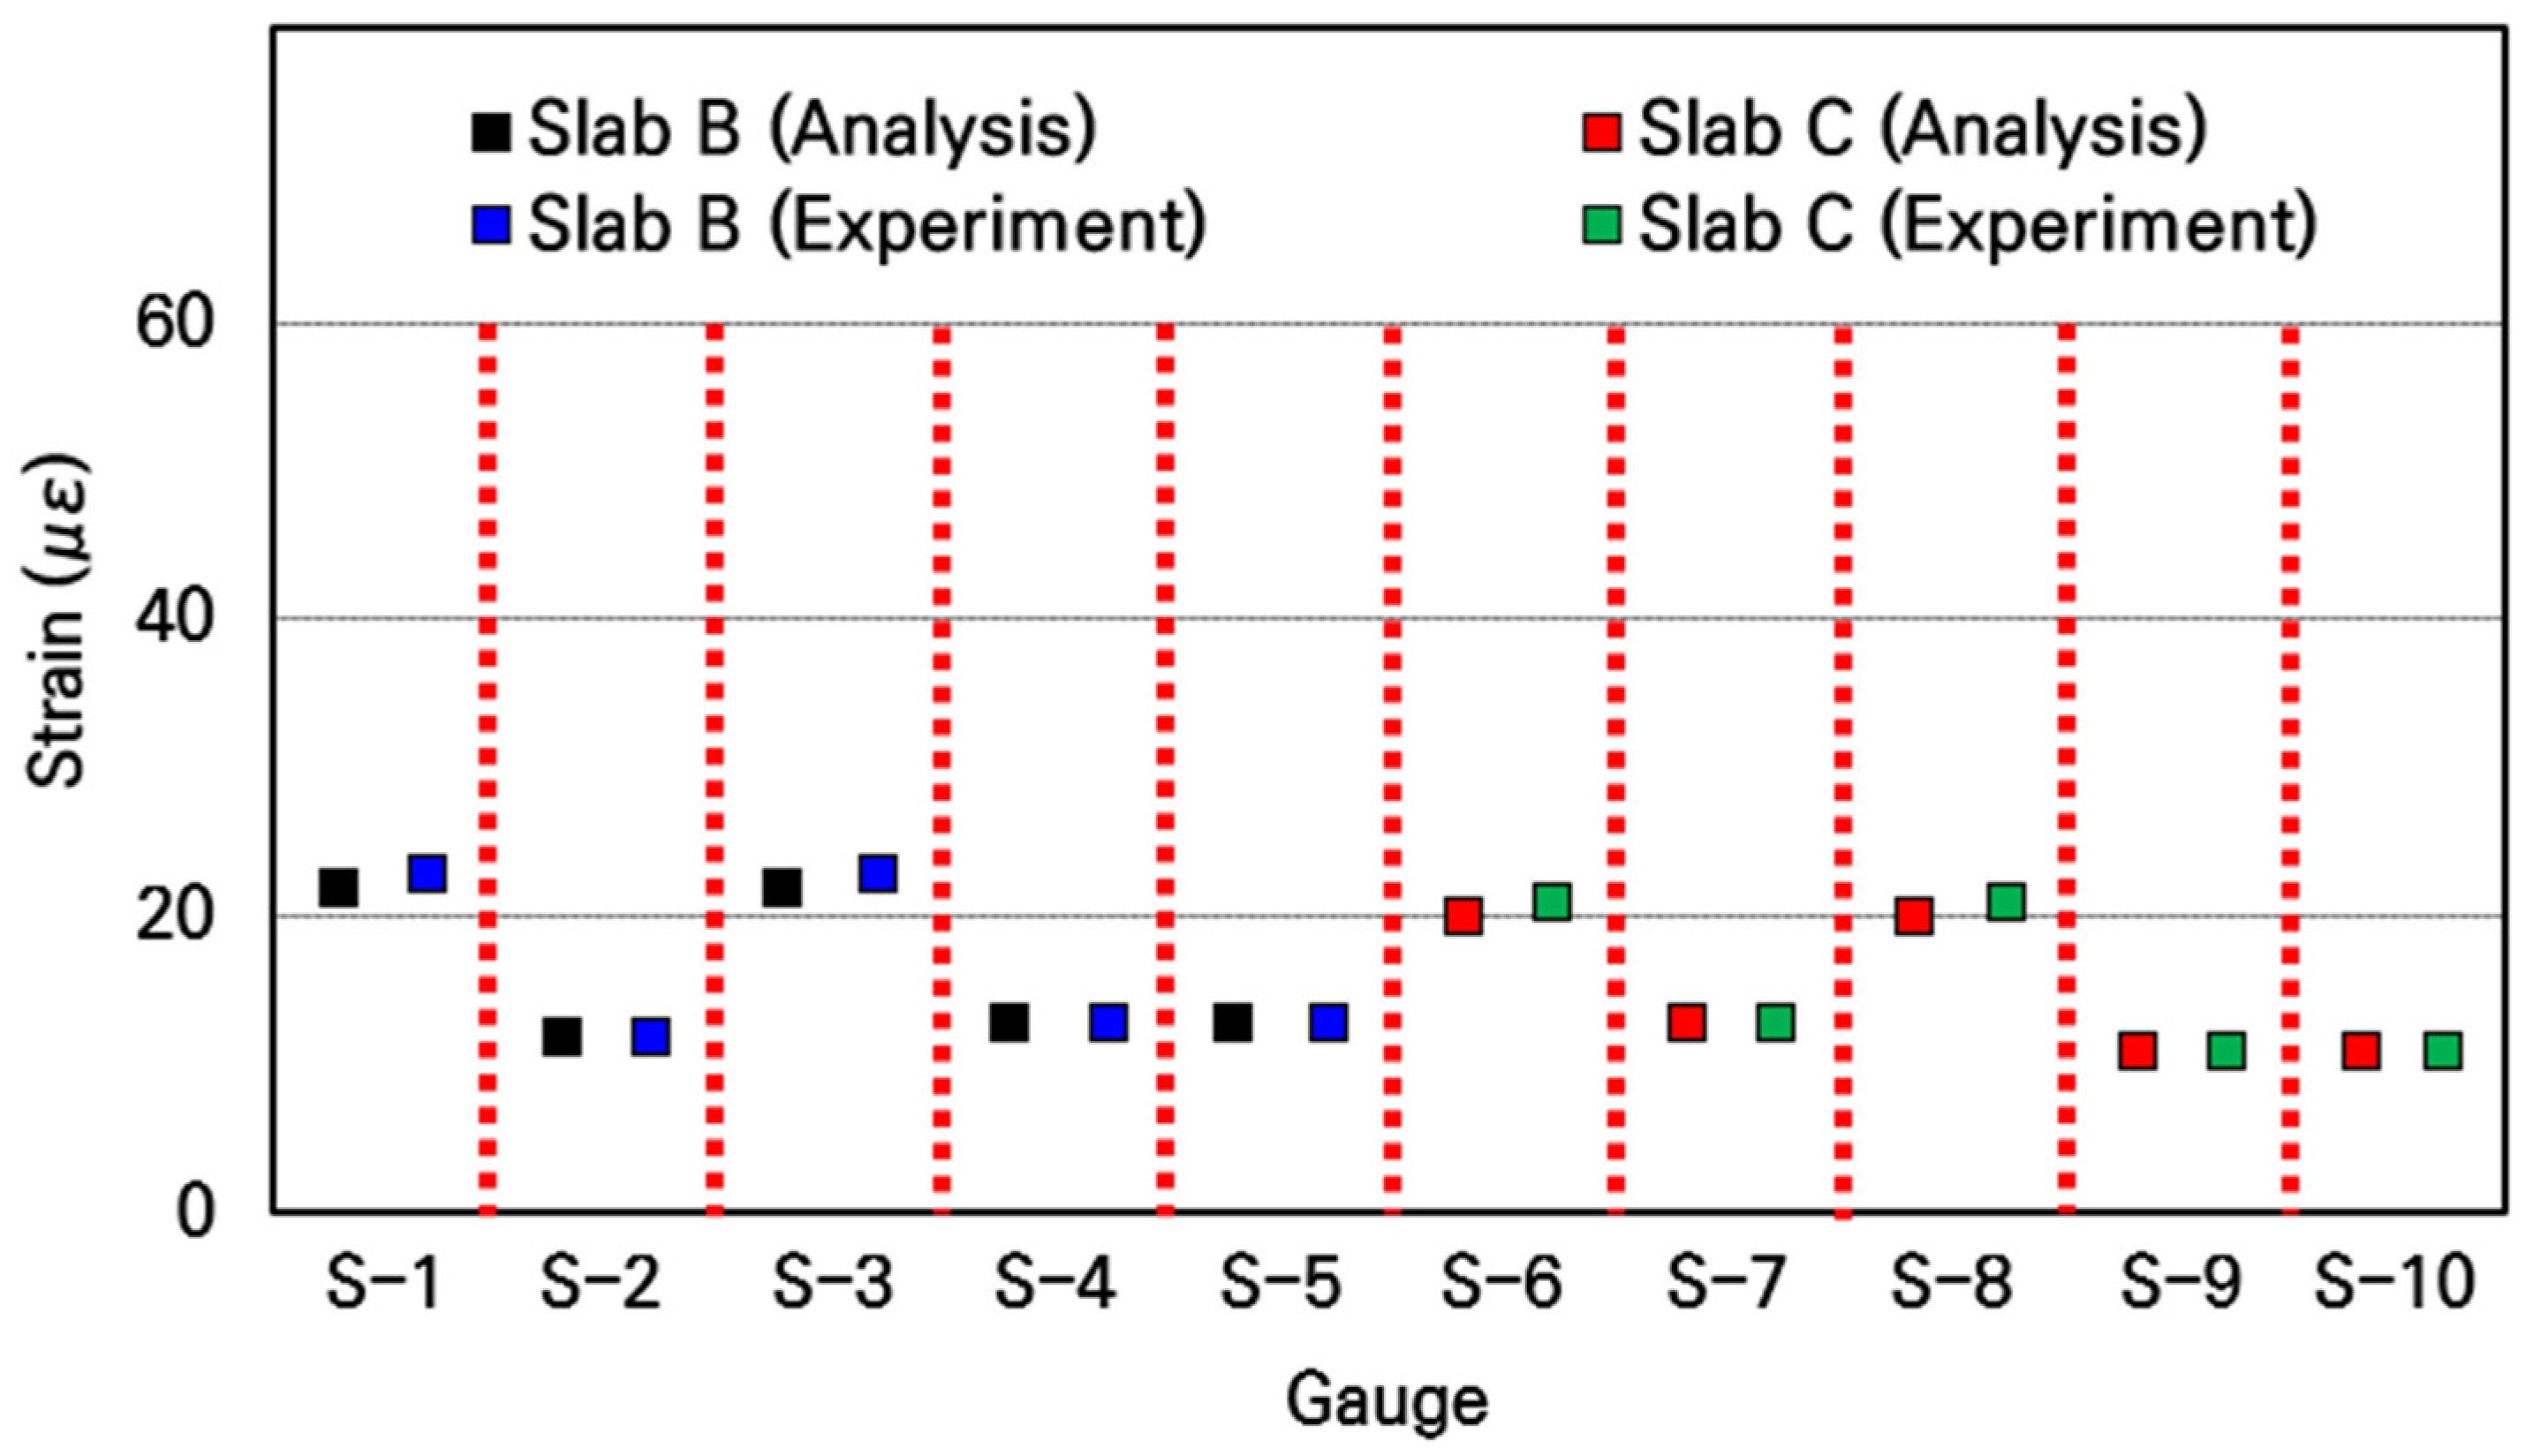
Figure 18.
Comparison of analyzed and measured strains for assembled slabs.
Figure 18.
Comparison of analyzed and measured strains for assembled slabs.
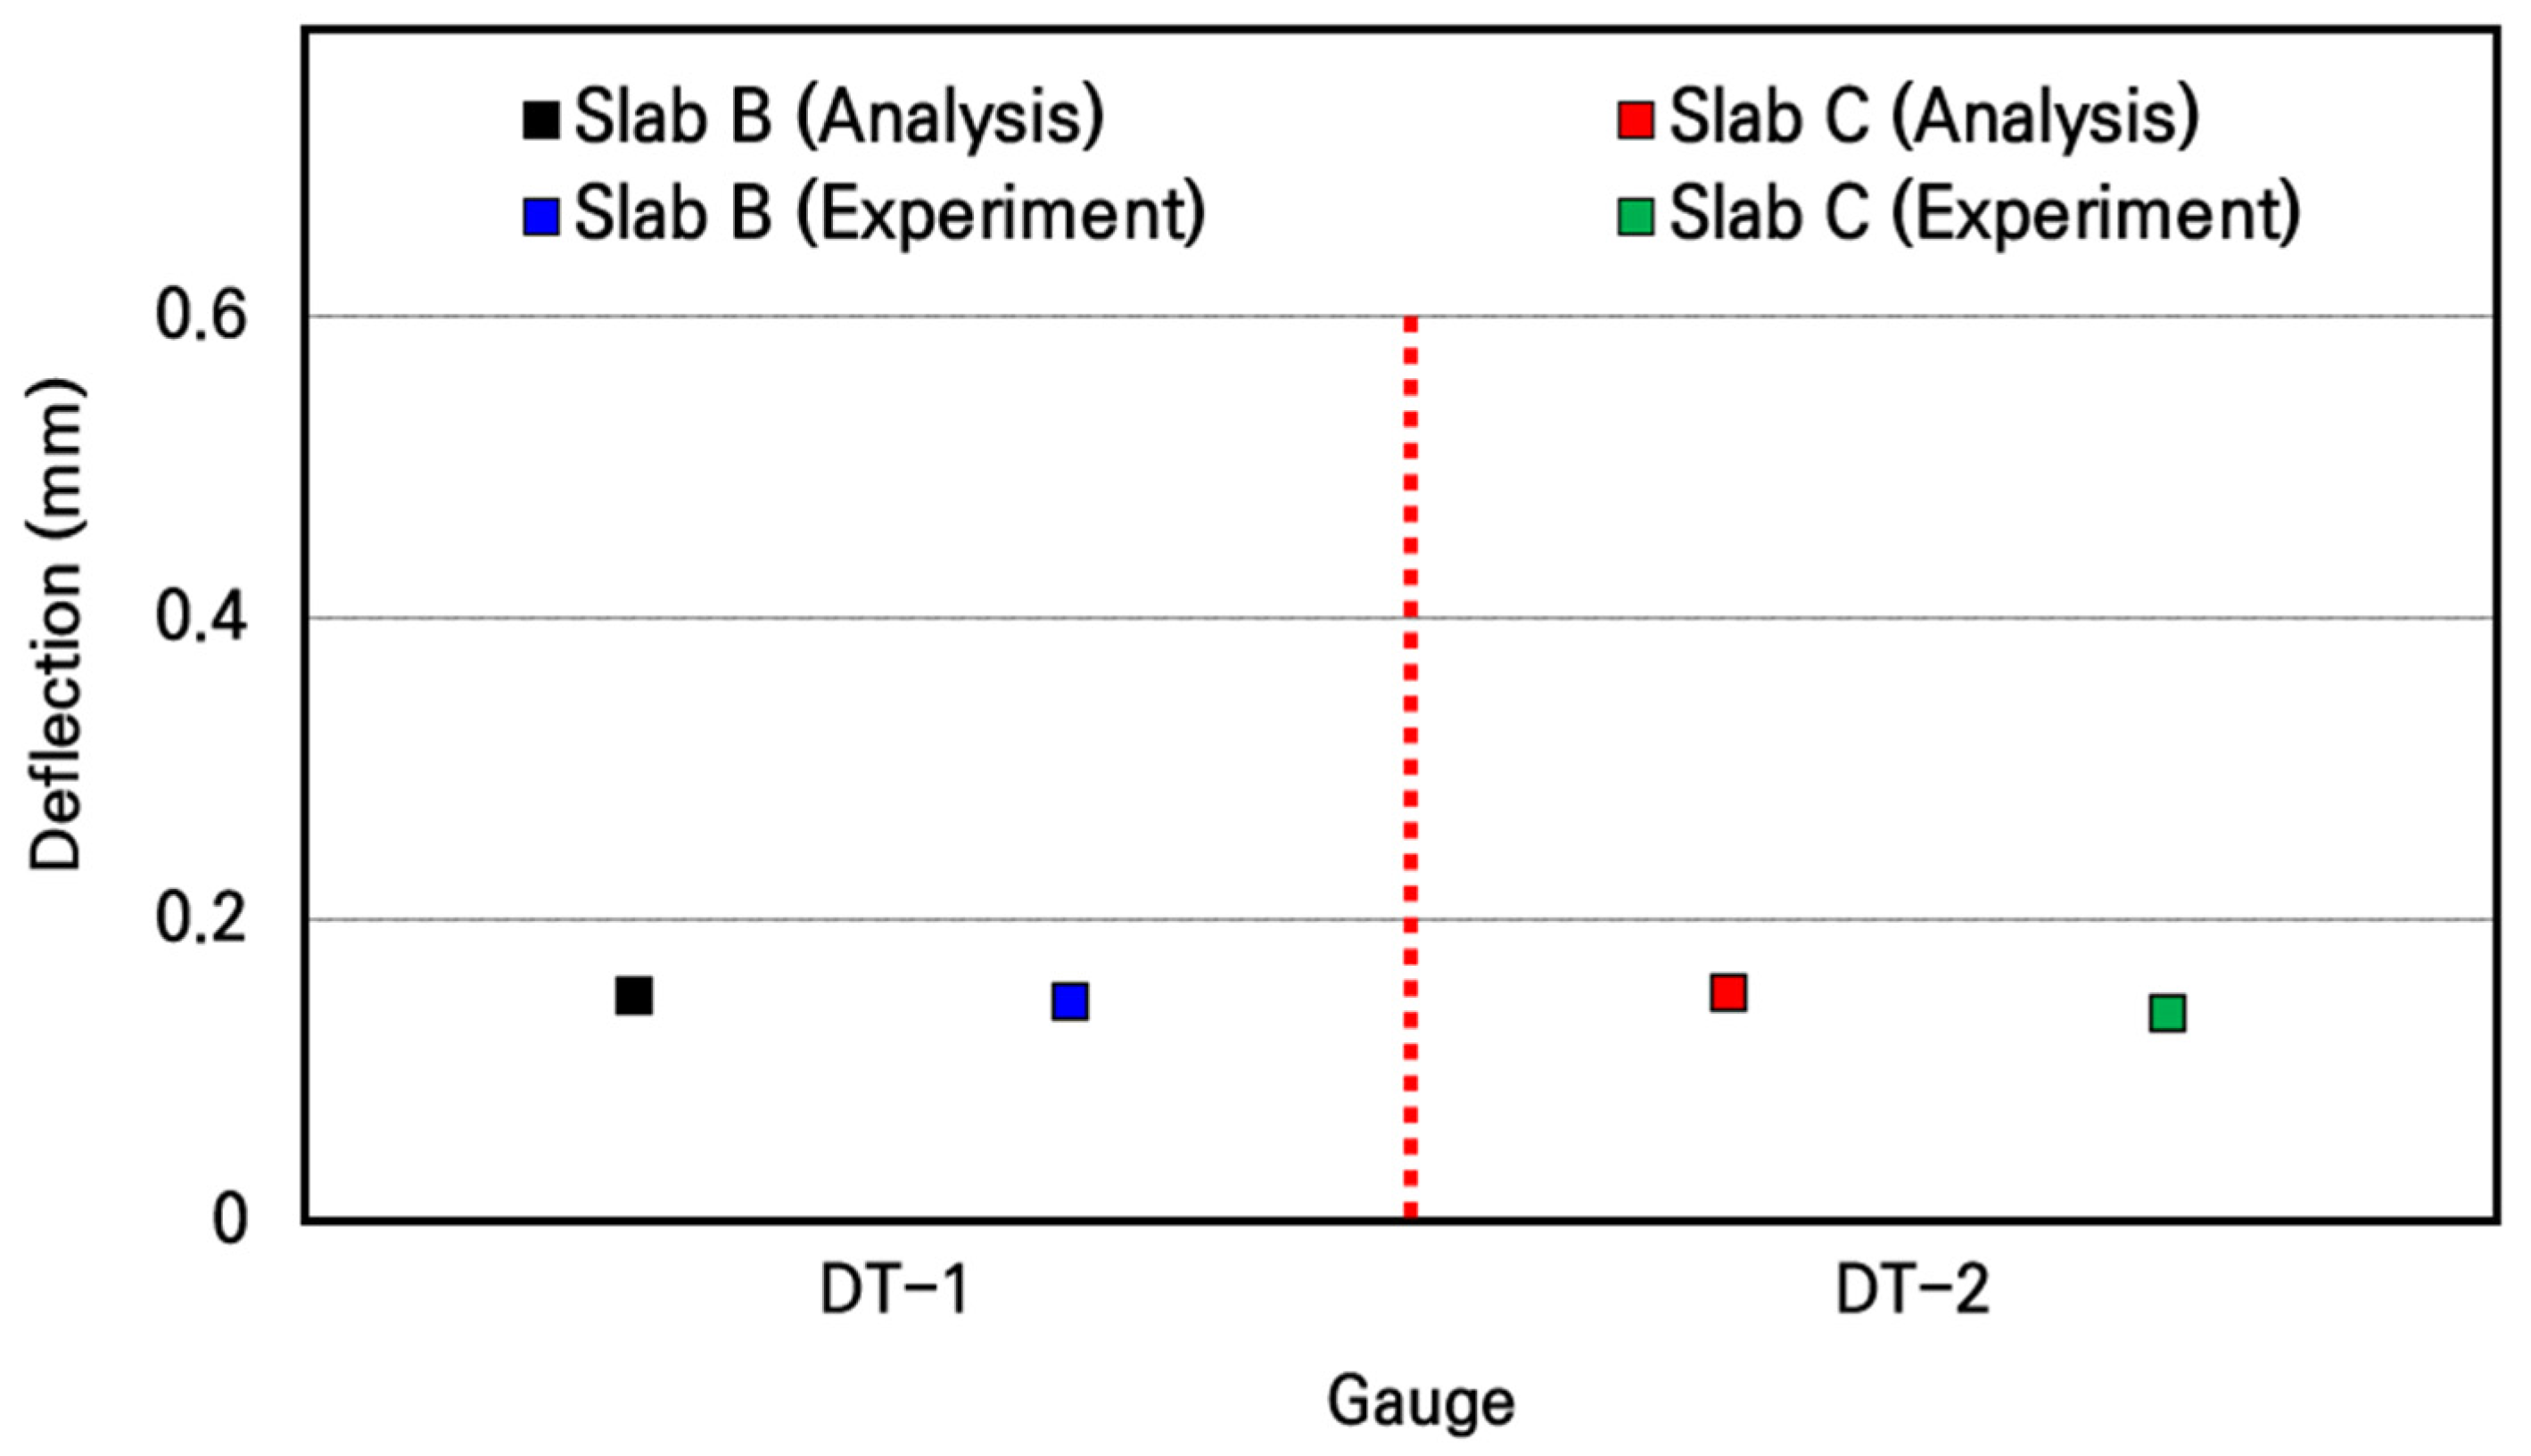
Figure 19.
Comparison of analyzed and measured deflections for assembled slabs.
Figure 19.
Comparison of analyzed and measured deflections for assembled slabs.
Table 1.
Design details of reinforced concrete slab.
Table 1.
Design details of reinforced concrete slab.
| Category | Design Parameter | Value |
|---|
| Slab dimension | Length (m) | 1.5 |
| Width (m) | 3.48 |
| Thickness (m) | 0.3 |
| Concrete | Maximum size of coarse aggregate (mm) | 20 |
| Maximum size of fine aggregate (mm) | 10 |
| Water–cement ratio (%) | 40 |
| Fine aggregate ratio (%) | 49 |
| Compressive strength (MPa) | 34 |
| Elastic modulus (GPa) | 27.5 |
| Reinforcement | Diameter of reinforcement (mm) | 16 |
| Concrete cover (mm) | 75 |
| Transverse reinforcement spacing (mm) | 225 |
| Longitudinal reinforcement spacing (mm) | 330 |
Table 2.
Numerical analysis results for single slab.
Table 2.
Numerical analysis results for single slab.
| Protrusion Height | Case | Load Position | Max. Stress (MPa) | Max. Deflection (mm) |
|---|
| 0.2d | Slab A | Center | 1.094 | 0.341 |
| Edge | 1.610 | 0.446 |
| Slab B | Center | 1.095 | 0.341 |
| Edge | 1.610 | 0.446 |
| Slab C | Center | 1.095 | 0.341 |
| Edge | 1.611 | 0.446 |
| 0.4d | Slab A | Center | 1.093 | 0.340 |
| Edge | 1.610 | 0.446 |
| Slab B | Center | 1.094 | 0.341 |
| Edge | 1.610 | 0.446 |
| Slab C | Center | 1.094 | 0.341 |
| Edge | 1.611 | 0.446 |
Table 3.
Numerical analysis results under edge loading for assembled slabs.
Table 3.
Numerical analysis results under edge loading for assembled slabs.
| Category | Protrusion Height | Between Slabs A and B | Between Slabs B and C |
|---|
| Slab A | Slab B (Loaded) | Slab B (Loaded) | Slab C |
|---|
| Max. deflection (mm) | 0.2d | 0.149 | 0.149 | 0.150 | 0.149 |
| 0.4d | 0.149 | 0.149 | 0.150 | 0.149 |
| Max. principal stress (MPa) | 0.2d | 0.638 | 0.727 | 0.720 | 0.642 |
| 0.4d | 0.627 | 0.704 | 0.706 | 0.640 |
Table 4.
Numerical analysis results under center loading for assembled slabs.
Table 4.
Numerical analysis results under center loading for assembled slabs.
| Category | Protrusion Height | Slab A | Slab B (Loaded) | Slab C |
|---|
| Max. deflection (mm) | 0.2d | 0.125 | 0.144 | 0.125 |
| 0.4d | 0.125 | 0.143 | 0.125 |
| Max. principal stress (MPa) | 0.2d | 0.400 | 0.704 | 0.400 |
| 0.4d | 0.399 | 0.703 | 0.399 |
Table 5.
Shear stress analysis results for assembled slabs.
Table 5.
Shear stress analysis results for assembled slabs.
| Category | Protrusion Height | Between Slabs A and B | Between Slabs B and C |
|---|
| Slab A | Slab B (Loaded) | Slab B (Loaded) | Slab C |
|---|
| Max. shear stress (MPa) | 0.2d | 0.100 | 0.118 | 0.096 | 0.099 |
| 0.4d | 0.093 | 0.102 | 0.086 | 0.095 |
Table 6.
Measured strains for single slab under center loading.
Table 6.
Measured strains for single slab under center loading.
| Strain at Each Gauge Location (με) |
|---|
Load
Location | Specimen | Test Number | SG-1 | SG-2 | SG-3 | SG-4 | SG-5 | SG-6 | SG-7 | SG-8 | SG-9 |
|---|
| Center | Slab A | 1 | 31 | 36 | 31 | 33 | 34 | 34 | 30 | 38 | 32 |
| 2 | 31 | 38 | 32 | 33 | 35 | 32 | 31 | 37 | 31 |
| 3 | 32 | 39 | 30 | 34 | 34 | 33 | 31 | 37 | 32 |
| Average | 31 | 38 | 31 | 33 | 34 | 33 | 31 | 37 | 32 |
| Slab B | 1 | 31 | 36 | 32 | 34 | 33 | 34 | 32 | 39 | 31 |
| 2 | 32 | 38 | 31 | 31 | 35 | 32 | 32 | 37 | 32 |
| 3 | 30 | 39 | 31 | 33 | 35 | 32 | 32 | 37 | 32 |
| Average | 31 | 38 | 31 | 33 | 34 | 33 | 32 | 38 | 32 |
| Slab C | 1 | 32 | 38 | 32 | 33 | 33 | 33 | 32 | 36 | 32 |
| 2 | 32 | 37 | 32 | 32 | 34 | 33 | 30 | 37 | 32 |
| 3 | 30 | 37 | 32 | 32 | 33 | 33 | 32 | 37 | 32 |
| Average | 31 | 37 | 32 | 32 | 33 | 33 | 31 | 37 | 32 |
| Average strain | 31 | 38 | 31 | 33 | 34 | 33 | 31 | 37 | 32 |
Table 7.
Measured strains for single slab under edge loading.
Table 7.
Measured strains for single slab under edge loading.
| Strain at Each Gauge Location (με) |
|---|
Load
Location | Specimen | Test Number | SG-1 | SG-2 | SG-3 | SG-4 | SG-5 | SG-6 | SG-7 | SG-8 | SG-9 |
|---|
| Edge | Slab A | 1 | 51 | 37 | 51 | 28 | 36 | 29 | 21 | 33 | 20 |
| 2 | 50 | 38 | 52 | 29 | 35 | 27 | 21 | 33 | 19 |
| 3 | 50 | 38 | 50 | 28 | 36 | 29 | 21 | 33 | 20 |
| Average | 50 | 38 | 51 | 28 | 36 | 28 | 21 | 33 | 20 |
| Slab B | 1 | 51 | 37 | 52 | 29 | 36 | 28 | 22 | 33 | 20 |
| 2 | 51 | 39 | 53 | 28 | 35 | 29 | 20 | 33 | 21 |
| 3 | 51 | 37 | 52 | 29 | 36 | 29 | 20 | 33 | 22 |
| Average | 51 | 38 | 52 | 29 | 36 | 29 | 21 | 33 | 21 |
| Slab C | 1 | 52 | 38 | 51 | 28 | 36 | 29 | 19 | 33 | 20 |
| 2 | 51 | 37 | 51 | 28 | 36 | 28 | 21 | 33 | 20 |
| 3 | 51 | 38 | 52 | 29 | 35 | 27 | 20 | 34 | 22 |
| Average | 51 | 38 | 51 | 28 | 36 | 28 | 20 | 33 | 21 |
| Average strain | 51 | 38 | 51 | 28 | 36 | 28 | 21 | 33 | 21 |
Table 8.
Measured deflections for single slab under center loading.
Table 8.
Measured deflections for single slab under center loading.
| Deflection at Each Displacement Transducer Location (mm) |
|---|
Load
Location | Specimen | Test Number | Correction Value | Uncorrected | Corrected |
|---|
| DT-1 | DT-2 | DT-3 | DT-1 | DT-2 | DT-3 |
|---|
| Center | Slab A | 1 | 0.137 | 0.185 | 0.194 | 0.184 | 0.048 | 0.057 | 0.047 |
| 2 | 0.136 | 0.186 | 0.194 | 0.184 | 0.050 | 0.058 | 0.048 |
| 3 | 0.139 | 0.179 | 0.195 | 0.182 | 0.040 | 0.056 | 0.043 |
| Average | 0.137 | 0.183 | 0.194 | 0.183 | 0.046 | 0.057 | 0.046 |
| Slab B | 1 | 0.127 | 0.168 | 0.183 | 0.167 | 0.041 | 0.056 | 0.04 |
| 2 | 0.127 | 0.166 | 0.182 | 0.178 | 0.039 | 0.055 | 0.051 |
| 3 | 0.127 | 0.183 | 0.191 | 0.173 | 0.056 | 0.064 | 0.046 |
| Average | 0.127 | 0.172 | 0.185 | 0.173 | 0.045 | 0.058 | 0.046 |
| Slab C | 1 | 0.127 | 0.173 | 0.199 | 0.172 | 0.046 | 0.072 | 0.045 |
| 2 | 0.126 | 0.172 | 0.183 | 0.171 | 0.046 | 0.057 | 0.045 |
| 3 | 0.128 | 0.172 | 0.181 | 0.175 | 0.044 | 0.053 | 0.047 |
| Average | 0.127 | 0.172 | 0.188 | 0.173 | 0.045 | 0.061 | 0.046 |
| Average deflection | 0.130 | 0.176 | 0.189 | 0.176 | 0.046 | 0.059 | 0.046 |
Table 9.
Measured deflections for single slab under edge loading.
Table 9.
Measured deflections for single slab under edge loading.
| Deflection at Each Displacement Transducer Location (mm) |
|---|
Load
Location | Specimen | Test Number | Correction Value | Uncorrected | Corrected |
|---|
| DT-1 | DT-2 | DT-3 | DT-1 | DT-2 | DT-3 |
|---|
| Edge | Slab A | 1 | 0.073 | 0.129 | 0.144 | 0.128 | 0.056 | 0.071 | 0.055 |
| 2 | 0.073 | 0.129 | 0.143 | 0.128 | 0.056 | 0.070 | 0.055 |
| 3 | 0.074 | 0.132 | 0.146 | 0.139 | 0.058 | 0.072 | 0.065 |
| Average | 0.073 | 0.130 | 0.144 | 0.132 | 0.057 | 0.071 | 0.058 |
| Slab B | 1 | 0.038 | 0.096 | 0.113 | 0.095 | 0.058 | 0.074 | 0.057 |
| 2 | 0.037 | 0.094 | 0.108 | 0.095 | 0.057 | 0.071 | 0.058 |
| 3 | 0.038 | 0.095 | 0.107 | 0.095 | 0.057 | 0.069 | 0.057 |
| Average | 0.038 | 0.095 | 0.109 | 0.095 | 0.057 | 0.071 | 0.057 |
| Slab C | 1 | 0.056 | 0.113 | 0.127 | 0.113 | 0.057 | 0.071 | 0.057 |
| 2 | 0.055 | 0.119 | 0.129 | 0.118 | 0.064 | 0.074 | 0.063 |
| 3 | 0.056 | 0.109 | 0.126 | 0.108 | 0.053 | 0.070 | 0.052 |
| Average | 0.055 | 0.114 | 0.127 | 0.113 | 0.059 | 0.072 | 0.058 |
| Average deflection | 0.055 | 0.113 | 0.127 | 0.113 | 0.059 | 0.072 | 0.058 |
Table 10.
Measured strains for assembled slabs.
Table 10.
Measured strains for assembled slabs.
| Strain at Each Gauge Location (με) |
|---|
| Specimen | Test Number | SG-1 | SG-2 | SG-3 | SG-4 | SG-5 |
|---|
| Slab B | 1 | 23 | 13 | 24 | 13 | 13 |
| 2 | 23 | 12 | 23 | 13 | 14 |
| 3 | 23 | 12 | 23 | 14 | 13 |
| Average | 23 | 12 | 23 | 13 | 13 |
| Specimen | Test Number | SG-6 | SG-7 | SG-8 | SG-9 | SG-10 |
| Slab C | 1 | 20 | 14 | 22 | 11 | 11 |
| 2 | 21 | 13 | 21 | 11 | 12 |
| 3 | 21 | 13 | 21 | 12 | 11 |
| Average | 21 | 13 | 21 | 11 | 11 |
Table 11.
Measured deflections for assembled slabs.
Table 11.
Measured deflections for assembled slabs.
| Deflection at Each Displacement Transducer Location (mm) |
|---|
| Specimen | Test Number | Correction Value | Uncorrected | Corrected |
|---|
| DT-1 | DT-1 |
|---|
| Slab B | 1 | 0.296 | 0.320 | 0.024 |
| 2 | 0.293 | 0.317 | 0.024 |
| 3 | 0.299 | 0.322 | 0.023 |
| Average | 0.296 | 0.320 | 0.024 |
| Specimen | Test Number | Correction Value | DT-2 | DT-2 |
| Slab C | 1 | 0.289 | 0.312 | 0.023 |
| 2 | 0.288 | 0.311 | 0.023 |
| 3 | 0.285 | 0.308 | 0.023 |
| Average | 0.287 | 0.310 | 0.023 |
Table 12.
Differences between analyzed and measured strains for single slab.
Table 12.
Differences between analyzed and measured strains for single slab.
| Difference in Strain at Each Gauge Location (%) |
|---|
Load
Location | Case | SG-1 | SG-2 | SG-3 | SG-4 | SG-5 | SG-6 | SG-7 | SG-8 | SG-9 |
|---|
| Center | Slab A | 3.3 | 2.6 | 3.3 | 3.1 | 2.9 | 3.1 | 3.3 | 5.1 | 6.7 |
| Slab B | 3.3 | 2.6 | 3.3 | 3.1 | 2.9 | 3.1 | 6.7 | 2.6 | 6.7 |
| Slab C | 3.3 | 5.1 | 6.7 | 0.0 | 5.7 | 3.1 | 3.1 | 5.1 | 6.7 |
| Edge | Slab A | 2.0 | 5.0 | 0.0 | 3.7 | 5.3 | 3.7 | 0.0 | 5.7 | 4.8 |
| Slab B | 0.0 | 5.0 | 2.0 | 7.4 | 5.3 | 7.4 | 0.0 | 5.7 | 0.0 |
| Slab C | 0.0 | 5.0 | 0.0 | 3.7 | 5.3 | 3.7 | 4.8 | 5.7 | 0.0 |
Table 13.
Differences between analyzed and measured deflections for single slab.
Table 13.
Differences between analyzed and measured deflections for single slab.
| Difference in Deflection at Each Displacement Transducer Location (%) |
|---|
Load
Location | Case | DT-1 | DT-2 | DT-3 |
|---|
| Center | Slab A | 2.8 | 0.0 | 2.8 |
| Slab B | 4.9 | 1.8 | 2.8 |
| Slab C | 4.9 | 7.0 | 2.8 |
| Edge | Slab A | 3.9 | 2.3 | 2.2 |
| Slab B | 3.9 | 2.3 | 3.9 |
| Slab C | 0.6 | 0.9 | 2.2 |
Table 14.
Differences between analyzed and measured strains for assembled slabs.
Table 14.
Differences between analyzed and measured strains for assembled slabs.
| Difference in Strain at Each Gauge Location (%) |
|---|
| Case | SG-1 | SG-2 | SG-3 | SG-4 | SG-5 | SG-6 | SG-7 | SG-8 | SG-9 | SG-10 |
|---|
| Slab B | 4.5 | 0.0 | 4.5 | 0.0 | 0.0 | - | - | - | - | - |
| Slab C | - | - | - | - | - | 5.0 | 0.0 | 5.0 | 0.0 | 0.0 |
Table 15.
Differences between analyzed and measured deflections for assembled slabs.
Table 15.
Differences between analyzed and measured deflections for assembled slabs.
| Difference in Deflection at Each Displacement Transducer Location (%) |
|---|
| Case | DT-1 | DT-2 |
|---|
| Slab B | 3.4 | - |
| Slab C | - | 8.0 |