1. Introduction
Inconel 718 alloy is of critical importance in engineering design, significantly influencing performance, durability, and overall cost-effectiveness [
1]. This material is one of the most widely used nickel-based superalloys globally, with an expected market share exceeding
$5 billion by 2026 [
2]. Inconel 718 is recognized as a difficult-to-cut material due to its superior mechanical properties, such as high strength and hardness at elevated temperatures [
3]. Furthermore, the machining process is complicated by the material’s low thermal conductivity and its strong tendency toward work hardening [
4]. These challenges lead to issues such as high cutting forces, intense heat generation in the cutting zone, rapid and severe tool wear, the formation of built-up edge (BUE), and the deterioration of the machined surface quality, which drastically limits the efficiency and precision of the machining process [
5], and consequently results in rapid and intense degradation of cutting tools, manifested through mechanisms such as adhesion (including BUE formation), abrasion, chipping, breakage, and notch wear, which directly and drastically reduces tool life and compromises the quality of the machined surface [
6].
Çelik et al. [
7] demonstrated that diffusion wear is the main wear mechanism of SiAlON tools during high-speed dry milling of Inconel 718. Banda et al. [
8] also describe diffusion wear during the dry machining of Inconel 718. Tian et al. [
9] proved that adhesion becomes dominant at higher cutting speeds during milling. Wang et al. [
10] presented adhesive wear as particularly active at low cutting speeds in the milling of nickel-based superalloy. Song et al. [
11] investigated the phenomenon of built-up edge (BUE) formation in dry cutting of Inconel 718 (turning). Pereira et al. [
12] observed severe adhesion in helical milling under MQL conditions. Zheng et al. [
13] showed that abrasive wear is a frequently observed wear mechanism of ceramic tools, including in finishing operations on Inconel 718. Sarikaya et al. [
14] indicated abrasion as a mechanism encountered during the machining of superalloys. Ucun et al. [
15] stated that the main type of wear in milling Inconel 718 is flank wear caused by abrasion. Ma et al. [
16] observed micro-chipping and brittle fracture as dominant forms of wear, particularly during the milling of Inconel 718. The authors Grguras et al. [
17] confirmed that ceramic tools are susceptible to cracks, chipping, and breakage in the context of milling. Sebbe et al. [
18] also lists chipping as a typical wear behavior in the milling of Inconel 718. Molaiekiya et al. [
19] lists crater wear as one of the primary wear mechanisms of ceramic SiAlON milling cutters. Szpunar et al. [
20] noted the occurrence of chipping in the machining of Inconel 718. Zeilmann et al. [
21] and Szablewski et al. [
22] observed notch wear also during the turning of Inconel 718. Jomaa et al. [
23] observed notch wear in dry conditions at high cutting speeds for ceramic tools.
In the context of rough machining of nickel-based superalloys, it is essential to distinguish between the strategies applied for carbide and ceramic tools. While cemented carbides dominate in finishing operations due to their precision and surface quality, SiAlON-type ceramics exhibit a distinct advantage in terms of high material removal rates (MRRs). Research by Fernández-Lucio et al. [
24] indicates that the key to effectively utilizing ceramics is the application of high cutting speeds, often exceeding 800 m/min. Under such conditions, as demonstrated by Molaiekiya et al. [
25], a localized temperature increase occurs in the cutting zone, leading to the plasticization (softening) of the workpiece material and, consequently, a reduction in cutting forces. This phenomenon, while beneficial for efficiency, imposes extreme demands on the tool material. Altin et al. [
26] noted that cutting speed optimization is a critical factor in maintaining a compromise between tool life and productivity in this context.
However, none of the mentioned publications describe wear mechanisms in the context of plunge milling. Pedroso et al. [
27] described plunge milling as a strategy in which the tool acts essentially as a drilling tool, mainly using its frontal surface to remove material. Comparing plunge milling with conventional milling, they stated that plunge milling can lead to lower global tool wear, does not increase tool tip wear, and prevents damage to lateral edges. Damir et al. [
28] discussed plunge milling in the context of tool geometry and stability but did not focus on specific wear mechanisms.
In the research on Inconel 718, tool and cutting-edge geometry also play a crucial role, which is intrinsically linked to the study of chip formation. Perez-Salinas et al. [
29] indicate that an increase in the cutting edge radius significantly influences the cutting force, particularly its component in the feed direction, during the machining of Inconel 718. Zhang et al. [
30] utilized specially designed tools that demonstrated the capability to significantly reduce milling forces and tool wear. Zhang et al. [
31] investigated the effect of chip formation on cutting force and tool wear in the high-speed milling of Inconel 718. Muhammad et al. [
32] analyzed the influence of tool coating and cutting parameters on burr formation during the micro-milling of Inconel 718. De Oliveira et al. [
33] examined chip geometry during the micro-milling of Inconel 718. Liu et al. [
34] summarized the majority of existing chip formation models in the machining of Inconel 718. In recent years, the influence of cutting parameters and machining conditions on the machining of Inconel alloys has become a dominant topic in research. Research in this area has been conducted in recent years by, among others, Guven et al. [
35], Faraz et al. [
36], Silva et al. [
37], Tasi et al. [
38], and Felusiak-Czyryca et al. [
39]. However, there is a lack of studies in this area regarding plunge milling.
Analyzing multiple diverse cutting parameters and their effect on the machining process necessitates the application of advanced mathematical methods. In the field of Inconel machining, recent years have seen the application of methods such as the Taguchi method [
40], Particle Swarm Optimization [
41], and Grey Relational Analysis [
42], as well as hybrid methods, for example, combining GRA with the Taguchi method [
43]. The optimization of the Inconel milling process is a complex task due to frequently conflicting technological objectives, such as maximizing productivity while simultaneously minimizing tool wear and energy consumption. The literature points to the growing importance of multi-criteria methods. For instance, Sanghvi et al. [
44] compared GRA, TOPSIS, and fuzzy logic methods, highlighting the high effectiveness of Grey Relational Analysis in optimizing the milling of nickel alloys without the need for arbitrarily assigning weights. Furthermore, the influence of coatings on ceramic tool durability remains a significant research area. Although PVD/CVD coatings are standard on carbides, their role on ceramic tools requires deeper analysis. Osmond et al. [
45] demonstrated that coatings on SiAlON ceramics can significantly influence the wear mechanism, although this effect depends on specific machining conditions. The use of artificial neural networks to predict the influence of parameters on the machining process is also emerging, as demonstrated in the work of Felusiak-Czyryca et al. [
46]. However, these publications relate to optimization within the scope of a single machining method and do not encompass plunge milling. A similar situation exists regarding the analysis of the influence of tool coatings on Inconel machining. Silva et al. [
37] demonstrated that coated tools exhibit lower wear during the machining of Inconel, Anand Krishnan et al. [
47] highlighted improved surface quality after machining with coated tools, and Smak et al. [
48] noted that not only the type of coating but also its deposition method influences machining results. Osmond et al. [
45] confirmed the positive impact of coatings, although for certain parameter sets, better results were achieved using an uncoated tool.
The primary aim of this study is to determine the impact of dispersed phase reinforcement (SiC whiskers) on the performance and wear mechanisms of ceramic tools during the rough milling of Inconel 718. This research represents a significant extension of our previous work [
49], which focused on establishing and validating a comprehensive evaluation methodology. While the previous study demonstrated the utility of the evaluation method itself using a limited dataset, the current study utilizes this framework to solve a specific scientific problem: quantifying the benefits of whisker reinforcement in two distinct kinematic strategies—high-feed milling and plunge milling. To the best of the authors’ knowledge, this is the first direct comparative analysis of reinforced (CW100) versus non-reinforced (CS300) ceramics in plunge milling operations, filling a critical gap in the literature regarding the stability and failure modes of oxide ceramics under high radial force conditions.
2. Materials and Methods
This work focuses on a comparative analysis of coated whisker-reinforced ceramic inserts (CW100) and uncoated ceramic inserts (CS300) applied to the milling of Inconel 718. The study investigates two machining strategies—high-feed milling and plunge milling—which have not yet been compared in the context of coated and uncoated ceramic inserts. To achieve this, the previously developed evaluation method was employed [
49]. Its main assumptions are: the method applies exclusively to roughing operations; compared processes must use tools of identical geometry (tool diameter and number of cutting edges, or, in the case of exchangeable inserts, the same tool body and number of cutting edges); the cutting speed must remain constant across tests; all trials must be carried out on the same machine tool; and the work material must originate from the same heat of steel. The comprehensive evaluation of high-performance milling of Inconel 718 in this study was based on the following process parameters: components of cutting forces Fx, Fy, and Fz [N]; total machine power consumption (Pc) [kW]; cutting-edge wear (VBB) [mm]; and material removal rate (Q) [cm
3/min].
In order to record the selected process parameters, a dedicated experimental setupwas prepared. Cutting forces and power consumption were measured in real time during milling trials, while tool wear was assessed offline after removing the inserts from the tool holder. This approach ensured both accurate acquisition of process data and reliable evaluation of tool degradation under high-feed and plunge milling conditions.
The work material used in the experiments was Inconel 718 (UNS N07718) in the form of a forged round bar with a diameter of 152.4 mm, produced by Daido Steel Co., Ltd, (Nagoya, Japan). via the VIM + VAR (Vacuum Induction Melting followed by Vacuum Arc Remelting) process. The material was supplied in the solution annealed and age-hardened condition, compliant with the [
50]. The heat treatment cycle consisted of solution annealing at 965 °C for 2 h (water quenched), followed by two-stage aging: 718 °C for 8 h, furnace cooling (56 °C/h) to 621 °C, holding for 8 h, and air cooling.
The measured hardness of the material was 429 HBW (approx. 45 HRC). The complete documentation of the alloy (Inspection Certificate) is available in the
Supplementary Materials (File S1). Metallographic analysis confirmed a uniform microstructure with an average grain size of ASTM No. 8.0. [
51] The specific chemical composition of the test material is presented in
Table 1.
From this cylindrical stock, the test samples were machined using wire EDM (FANUC Robocut C600iA, Oshino, Japan). To facilitate rigid clamping on the dynamometer, the samples were symmetrically truncated on two sides to create parallel flats with a spacing of 125 mm, while retaining the original diameter in the perpendicular direction (
Figure 1).
Cutting forces were measured in three orthogonal directions (Fx, Fy, Fz) using a Kistler 9199AA piezoelectric dynamometer (Milfin County, PA, USA). The signal was amplified by a Kistler 5070A charge amplifier and recorded with a Kistler 5697A data-acquisition system connected to a laptop running DynoWare 2825D software (Winterthur, Switzerland). This configuration allowed real-time monitoring of force components during milling, ensuring accurate detection of process stability and force fluctuations.
Power consumption was monitored using a Sonel PQM-701 power quality analyzer (Świdnica, Poland). The device was connected directly to the HAAS VF3/YT milling center (Oxnard, CA, USA) and recorded active and reactive power values with high temporal resolution. This setup made it possible to evaluate the energetic efficiency of both high-feed and plunge milling trials.
Tool wear was analyzed outside the machine tool after completing selected machining passes. A ZEISS O-INSPECT 332 multisensory measurement system (Oberkochen, Germany) was employed, enabling both tactile scanning and optical inspection under transmitted and reflected light. This equipment provided high-accuracy measurements of flank wear (VBB), allowing the determination of tool life progression.
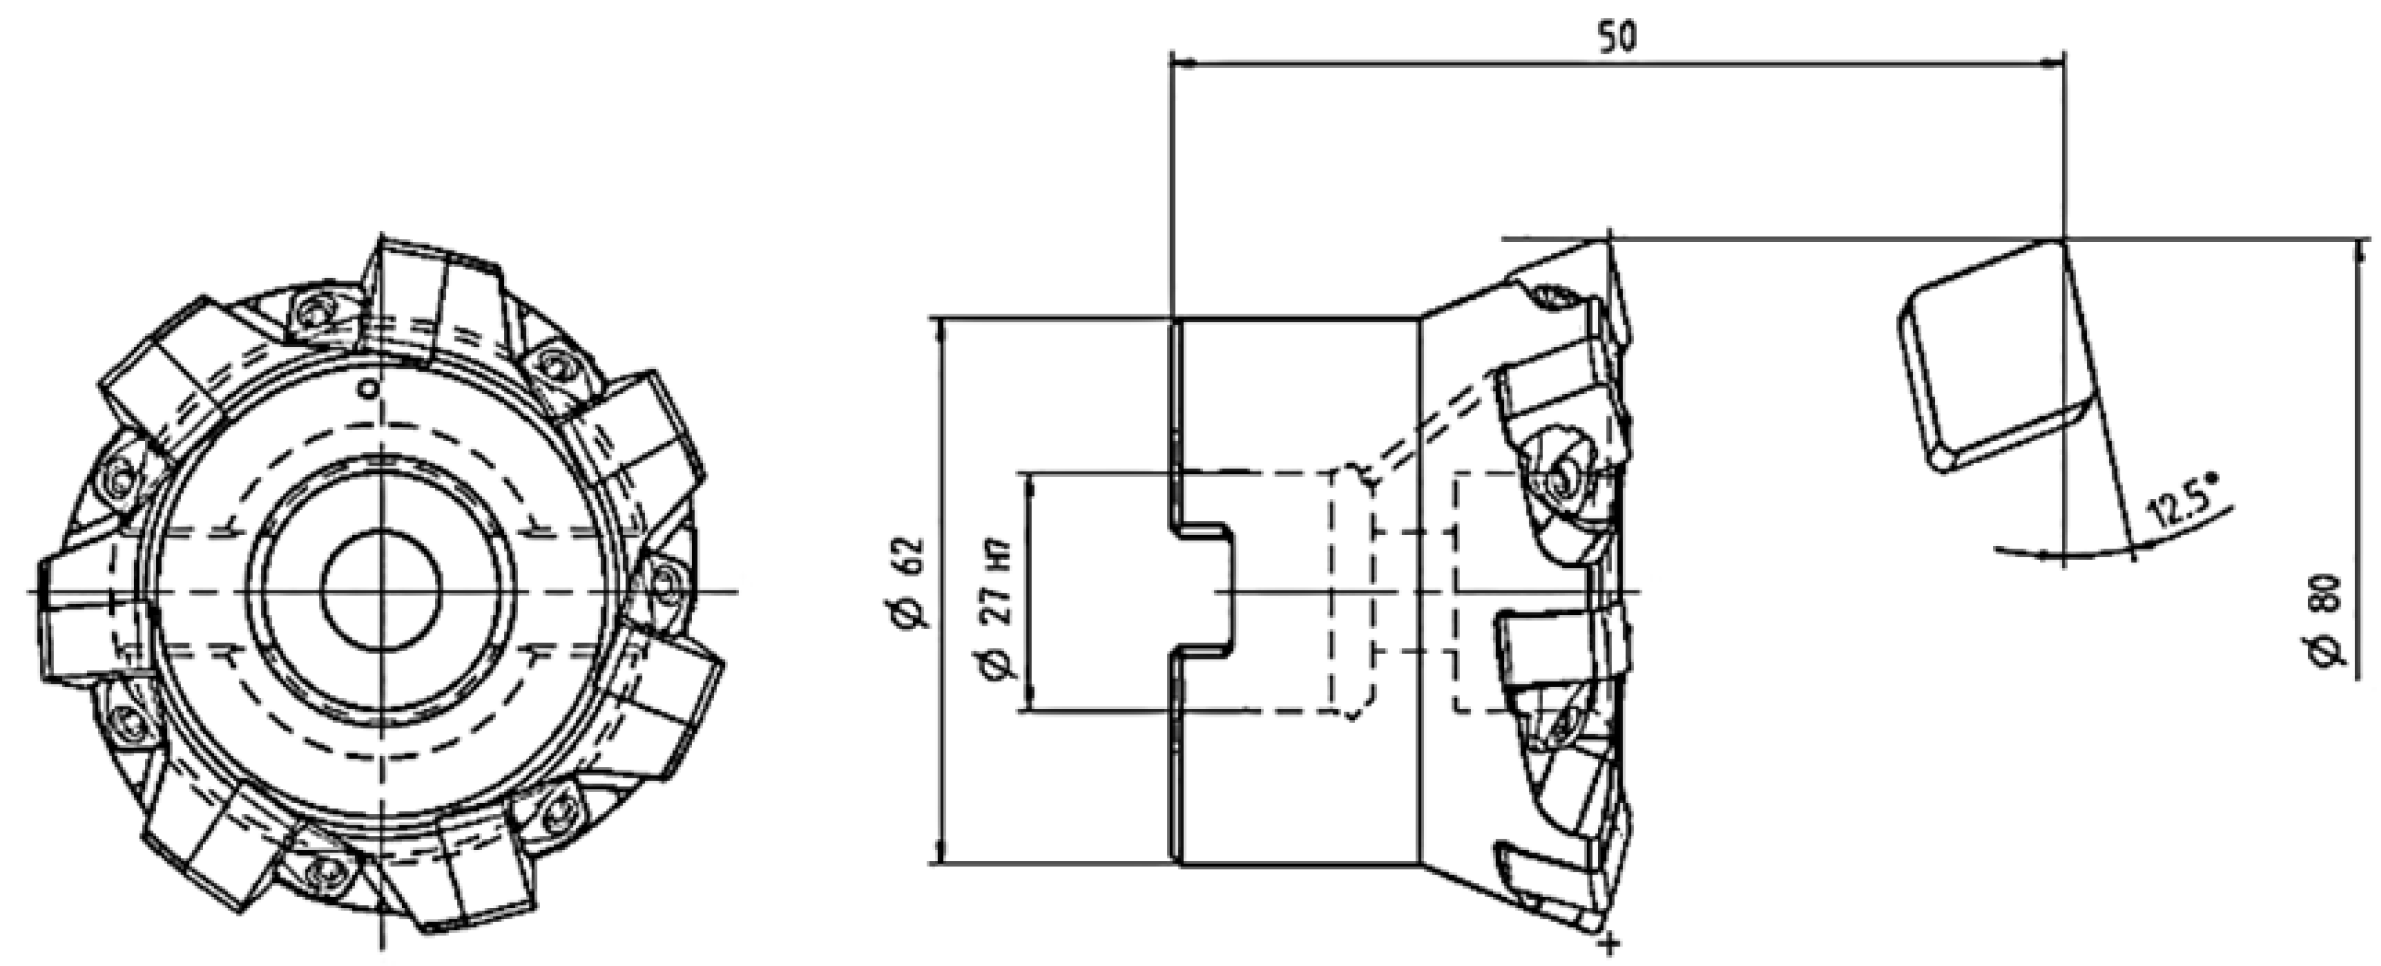
All cutting trials were conducted on a HAAS VF3/YT four-axis vertical machining center with a working area of 1016 × 660 × 635 mm. The machine is equipped with an SK50 tool holder system and a spindle delivering up to 22.4 kW of power, making it suitable for heavy-duty roughing operations. Stable clamping and high structural rigidity of the machine ensured consistent experimental conditions.
Two types of ceramic inserts manufactured by Seco Tools (Fagersta, Sweden) were selected for the study: CW100 and CS300 (
Figure 2). Both inserts feature the standardized CNGN120712 geometry (according to [
52]). The detailed geometric parameters of the inserts are presented in
Table 2.
The CW100 grade is an Al2O3-based ceramic reinforced with silicon carbide (SiC) whiskers. The whiskers are uniformly distributed throughout the entire volume of the insert matrix to enhance fracture toughness, and the insert is additionally coated to reduce chemical affinity with the workpiece. The CS300 grade is an uncoated SiAlON ceramic designed for high wear resistance.
Regarding the tool life criteria, based on the manufacturer’s technical recommendations for roughing Inconel 718, a critical flank wear value of VBBmax = 1.5 mm was adopted as the failure criterion. This limit was selected to ensure process safety and prevent catastrophic tool breakage during the experimental trials.
The initial experimental matrix comprised 20 test conditions combining two machining strategies (high-feed vs. plunge milling) and two ceramic insert types (CW100 coated vs. CS300 uncoated). Each condition was intended to be repeated three times at a constant cutting speed of vc = 800 m/min. Due to spindle load and stability limitations of the HAAS VF3/YT machine tool, not all parameter combinations could be completed.
The experimental research was structured according to the following design outline:
Independent Variables (Factors): Machining strategy (High-Feed Milling vs. Plunge Milling) and Insert material (Whisker-reinforced ceramic CW100 vs. Non-reinforced ceramic CS300).
Variable Process Parameters: Feed per tooth (f
z), Depth of cut (a
p), and Width of cut (a
e) were varied according to the specific experimental sets detailed in
Table 3.
Fixed Parameters (Constants): Cutting speed (vc = 800 m/min), Workpiece material (Inconel 718, 429 HBW), Machine tool (HAAS VF3/YT), and cooling conditions (dry machining).
Dependent Variables (Responses): Cutting force components (Fx, Fy, Fz), Peak power consumption (Ppeak), Tool flank wear (VBB), and Material Removal Rate (Q).
In total, 14 test conditions (
Table 3) were executed: 8 in high-feed milling (4 with uncoated CS300 inserts and 4 with coated CW100 inserts) and 6 in plunge milling (3 with CS300 and 3 with CW100). This ensured a balanced comparison between machining strategies and insert types. For each parameter set, five cutting trials were conducted, and the results were processed according to the methodology described in the literature [
49].
3. Results and Discussion
3.1. Analysis of Cutting Forces
The analysis of cutting forces is a critical factor in evaluating process stability and assessing the impact of tool wear. Machining Inconel 718 poses a significant technological challenge due to its superior mechanical properties, such as high strength and hardness at elevated temperatures, combined with low thermal conductivity. These properties result in the generation of high cutting forces and rapid, intense tool wear. Consequently, the adopted evaluation method required the measurement of cutting force components (Fx, Fy, Fz) to continuously monitor machining conditions. These measurements were conducted in real-time across three orthogonal directions. A crucial aspect of this study was the analysis of the maximum cutting force, as this value serves as an indicator of process instability, potentially leading to catastrophic tool wear caused by edge chipping or breakage.
In the case of high-feed milling utilizing CW100 ceramic inserts, a distinct dominance of the axial force component (F
z) over the lateral components (F
x, F
y) was observed (
Figure 3). The analysis of the recorded data revealed a strong correlation between the magnitude of Fz and the progressive wear of the cutting edge. In the initial phase of the process (first pass), the average axial force was recorded at 1764 N. Subsequently, a systematic, nearly linear increase was observed, reaching a peak value of 4270 N in the final, ninth pass. This represents an increase in axial load of over 140% across the investigated tool life cycle. In contrast to the axial component, the F
x and F
y forces were characterized by relative stability, showing no clear upward trend associated with tool degradation. The values for F
x oscillated within the range of 347 N to 482 N, while Fy remained between 386 N and 469 N. Such a force distribution is characteristic of high-feed tool geometries, where the primary cutting force vector is directed along the tool axis. The error bars visible in the graphs indicate the dynamic nature of the process; however, the lack of a significant increase in lateral forces suggests that, despite progressive edge degradation, the tool maintained stability in the XY plane.
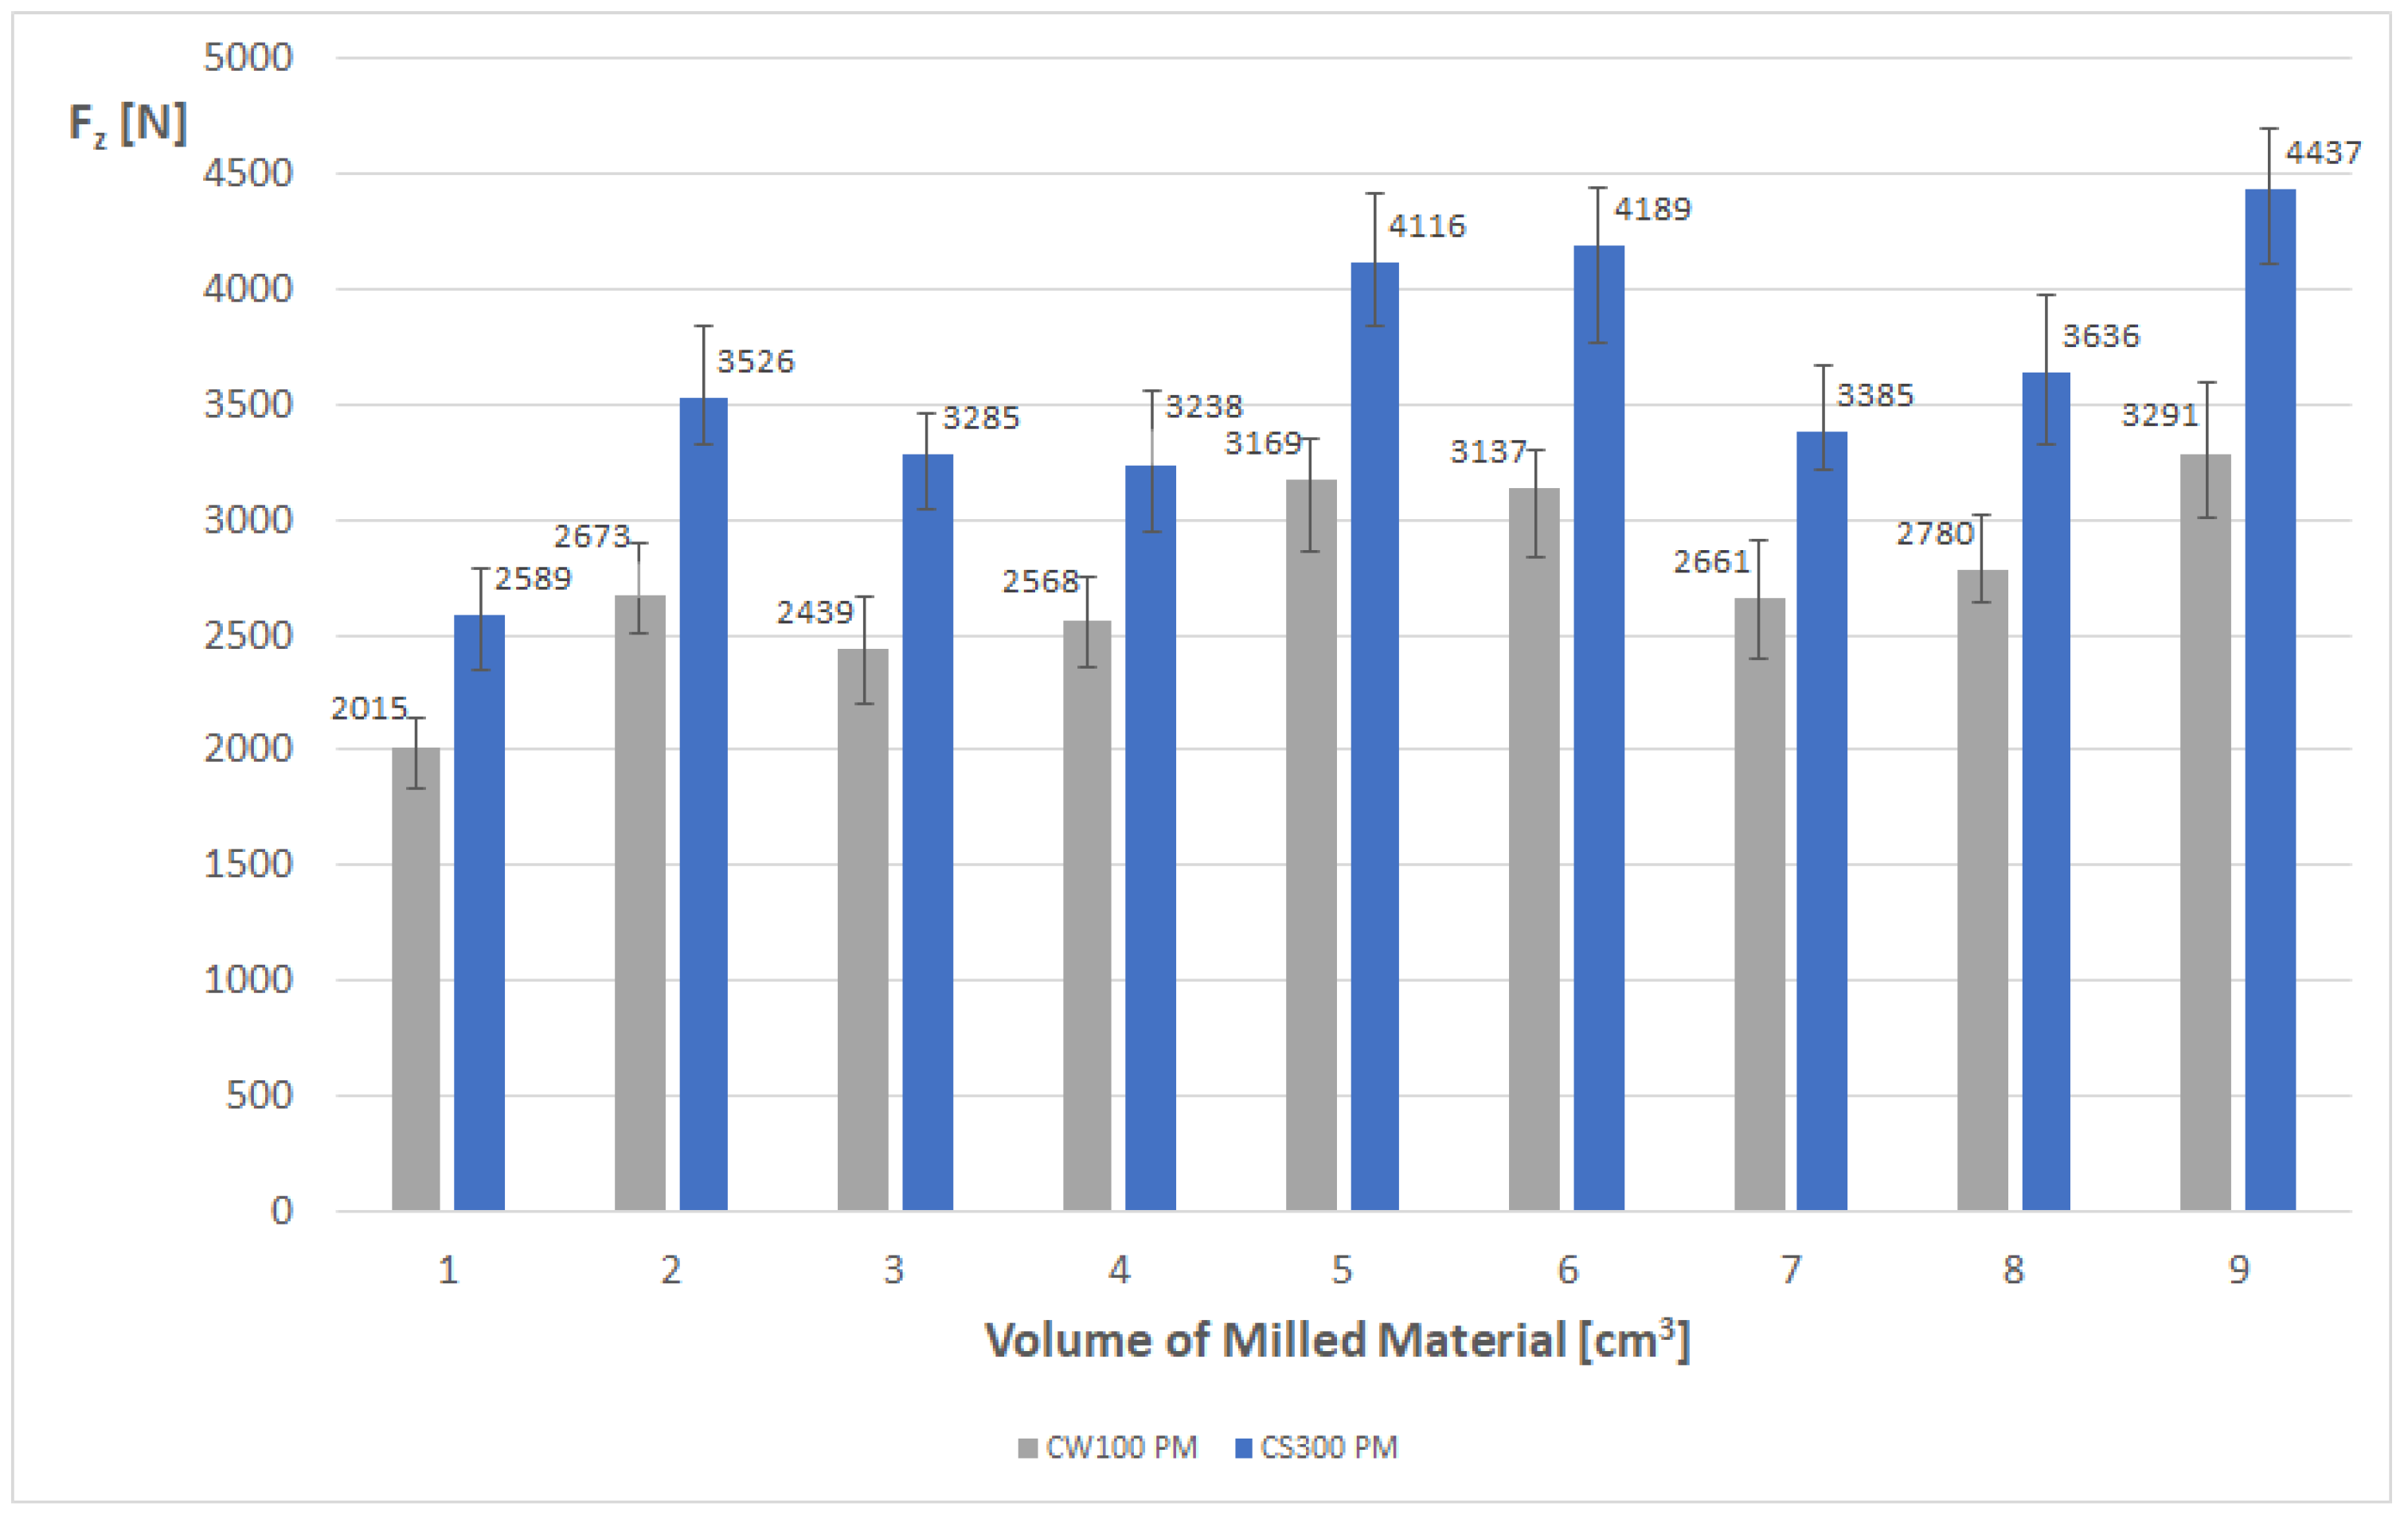
A distinct force distribution characteristic was observed during the plunge milling trials (
Figure 4). Similar to the high-feed method, the axial force (F
z) remained the dominant component; however, its magnitude relative to the lateral forces was significantly less pronounced. The value of F
z increased from 2015 N in the first pass to 3291 N in the final, ninth pass. This corresponds to an increase of approximately 63%, which, while significant, indicates a much lower rate of change compared to the dynamics observed in high-feed milling.
A key distinction in this strategy lies in the significantly higher values of the Fx and Fy components, which oscillated within the range of 820–1250 N, exceeding the values recorded for the previous method by more than twofold. Despite these high amplitudes, the forces exhibited substantial stability throughout the machining cycle, showing no clear upward trend correlated with progressive tool wear. This load distribution confirms the specific kinematics of plunge milling, where, despite the primary feed motion being along the Z-axis, a substantial portion of the cutting resistance is transferred to lateral directions, thereby imposing high rigidity demands on the Machine-Fixture-Workpiece-Tool system.
The analysis of the high-feed milling process using CS300 ceramic inserts (
Figure 5) revealed behavior analogous to that observed for the composite inserts. In this case, too, the axial component (F
z) dominated the load spectrum, demonstrating a strict dependence on the progression of tool wear. The value of this force increased from 1878 N in the first trial to 4526 N in the final pass, representing an increment of approximately 141%. This confirms that in the high-feed strategy, the axial force serves as the primary indicator of tool condition, regardless of the specific material characteristics of the insert itself.
The lateral components Fx and Fy maintained a stable level throughout the testing period, oscillating within the ranges of 333–488 N and 374–464 N, respectively. The absence of a clear upward trend for these components, despite the intense tool wear evident in the Fz force increase, indicates the preservation of the process’s kinematic characteristics, wherein radial forces are minimized in favor of axial load transmission.
The final measurement series (
Figure 6), covering plunge milling with CS300 inserts, confirmed the force distribution characteristics specific to this machining strategy, while exhibiting certain differences in dynamics compared to the reinforced inserts. The axial component (F
z) was again dominant, recording an increase from an initial value of 2589 N to 4437 N in the final pass. This represents an increment of approximately 71%, a value comparable to that observed for CW100 inserts in the same strategy1. However, it should be noted that the progression of the F
z force was characterized by greater fluctuations between successive passes than in the case of high-feed milling.
The lateral components Fx and Fy maintained high values, oscillating within the ranges of 1087–1362 N and 836–1049 N, respectively. Similar to the reinforced inserts, these forces exhibited stability throughout the machining cycle, showing no clear upward trend resulting from tool wear. The persistence of lateral forces at levels exceeding 1000 N confirms that, regardless of the ceramic grade used, plunge milling generates significant radial loads that must be compensated for by the rigidity of the machine tool system.
3.2. Energy Consumption
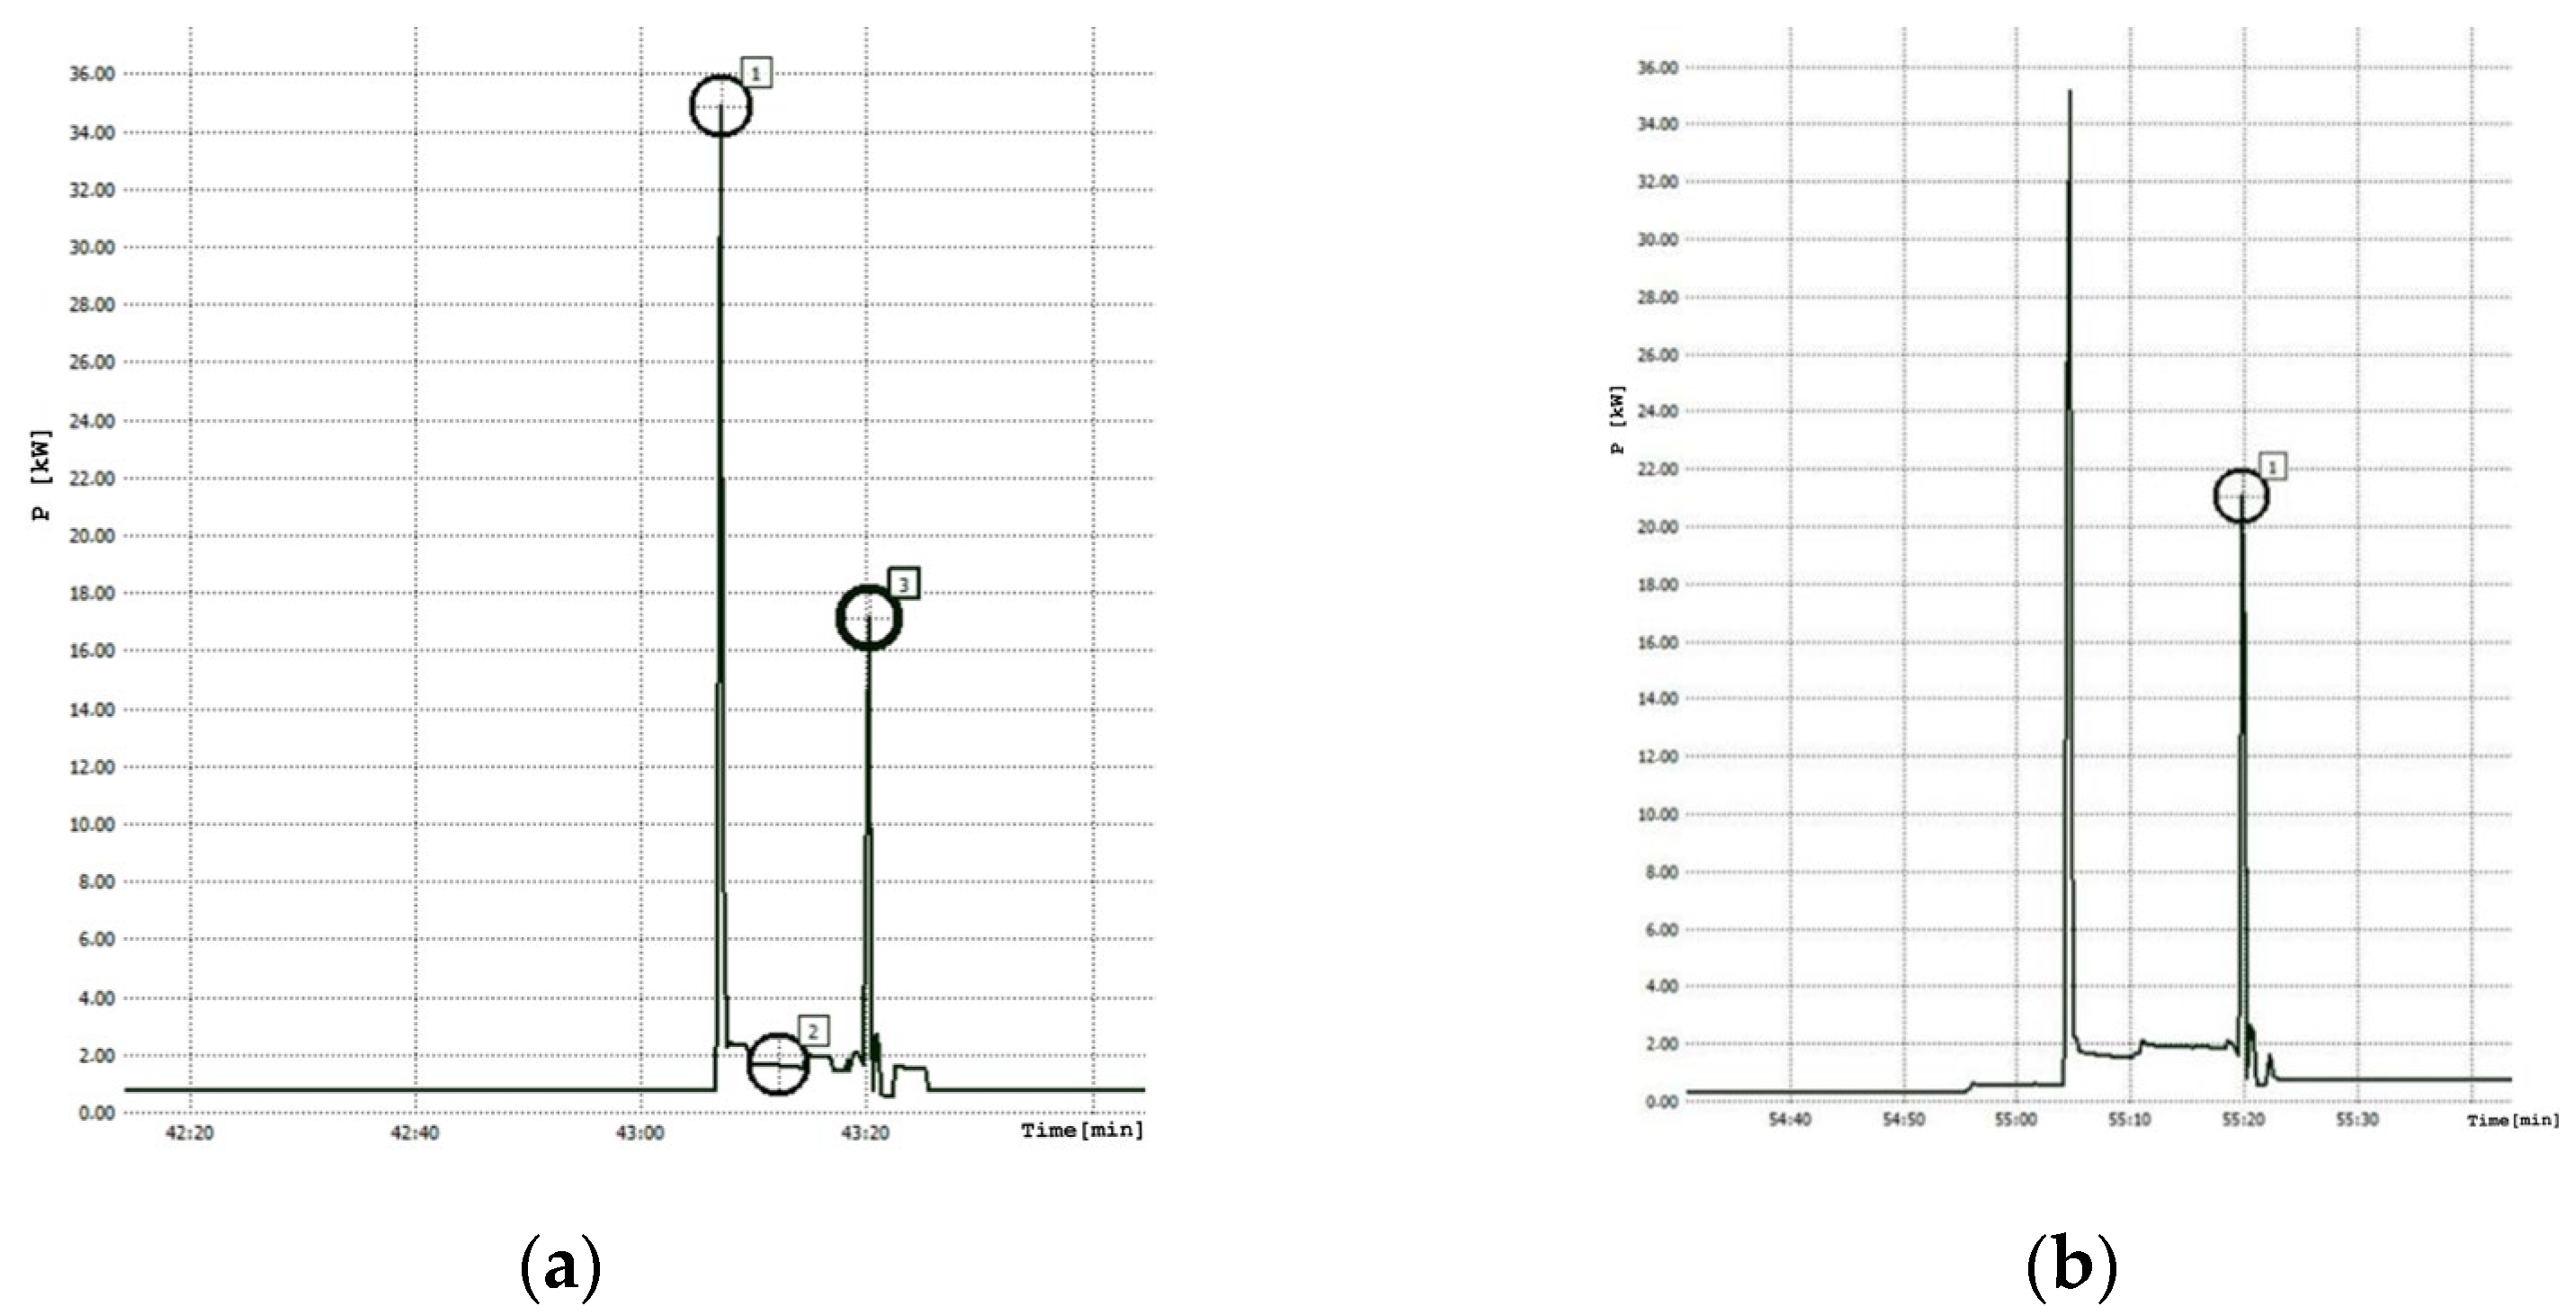
The analysis of the process energy consumption revealed a highly repeatable characteristic of active power profiles, independent of the applied machining strategy (high-feed vs. plunge milling) or the type of tool used. As shown in the representative graphs (
Figure 7), the machining cycle is dominated by dynamic phenomena occurring at its boundaries. The first distinct peak corresponds to the moment of tool entry into the material. This is a critical phase characterized by a rapid surge in cutting resistance associated with the impact loading of the cutting edge striking the hard Inconel 718 material. This is followed by the actual cutting phase, after which a second peak is recorded, corresponding to the moment of tool exit from the material. This phenomenon is characteristic of superalloy machining, where the sudden unloading of the system and the specific nature of chip formation in the exit zone generate momentary spikes in power demand. Despite the kinematic differences between high-feed milling and plunge milling, this ‘dual-peak’ energy signature remains consistent across all trials.
Within the framework of the adopted evaluation method, a decision was made to use the maximum power consumption (peak) recorded during the entire pass (regardless of whether it occurred at entry or exit) as the key indicator of energy efficiency. This decision is dictated by the specific nature of roughing hard-to-cut materials. In the case of alloys such as Inconel 718, it is the transient values, rather than the average cutting power, that constitute the process bottleneck. The peak value represents the critical energy demand that determines whether the machine tool spindle possesses sufficient torque to prevent stalling or excessive RPM drop upon impact with the material. Averaging the result over the entire pass could ‘smooth out’ these dangerous spikes, potentially leading to erroneous conclusions regarding the machine tool requirements. Therefore, from the perspective of process safety and stability, the analysis of the maximum value is a more rigorous and engineeringly justified approach.
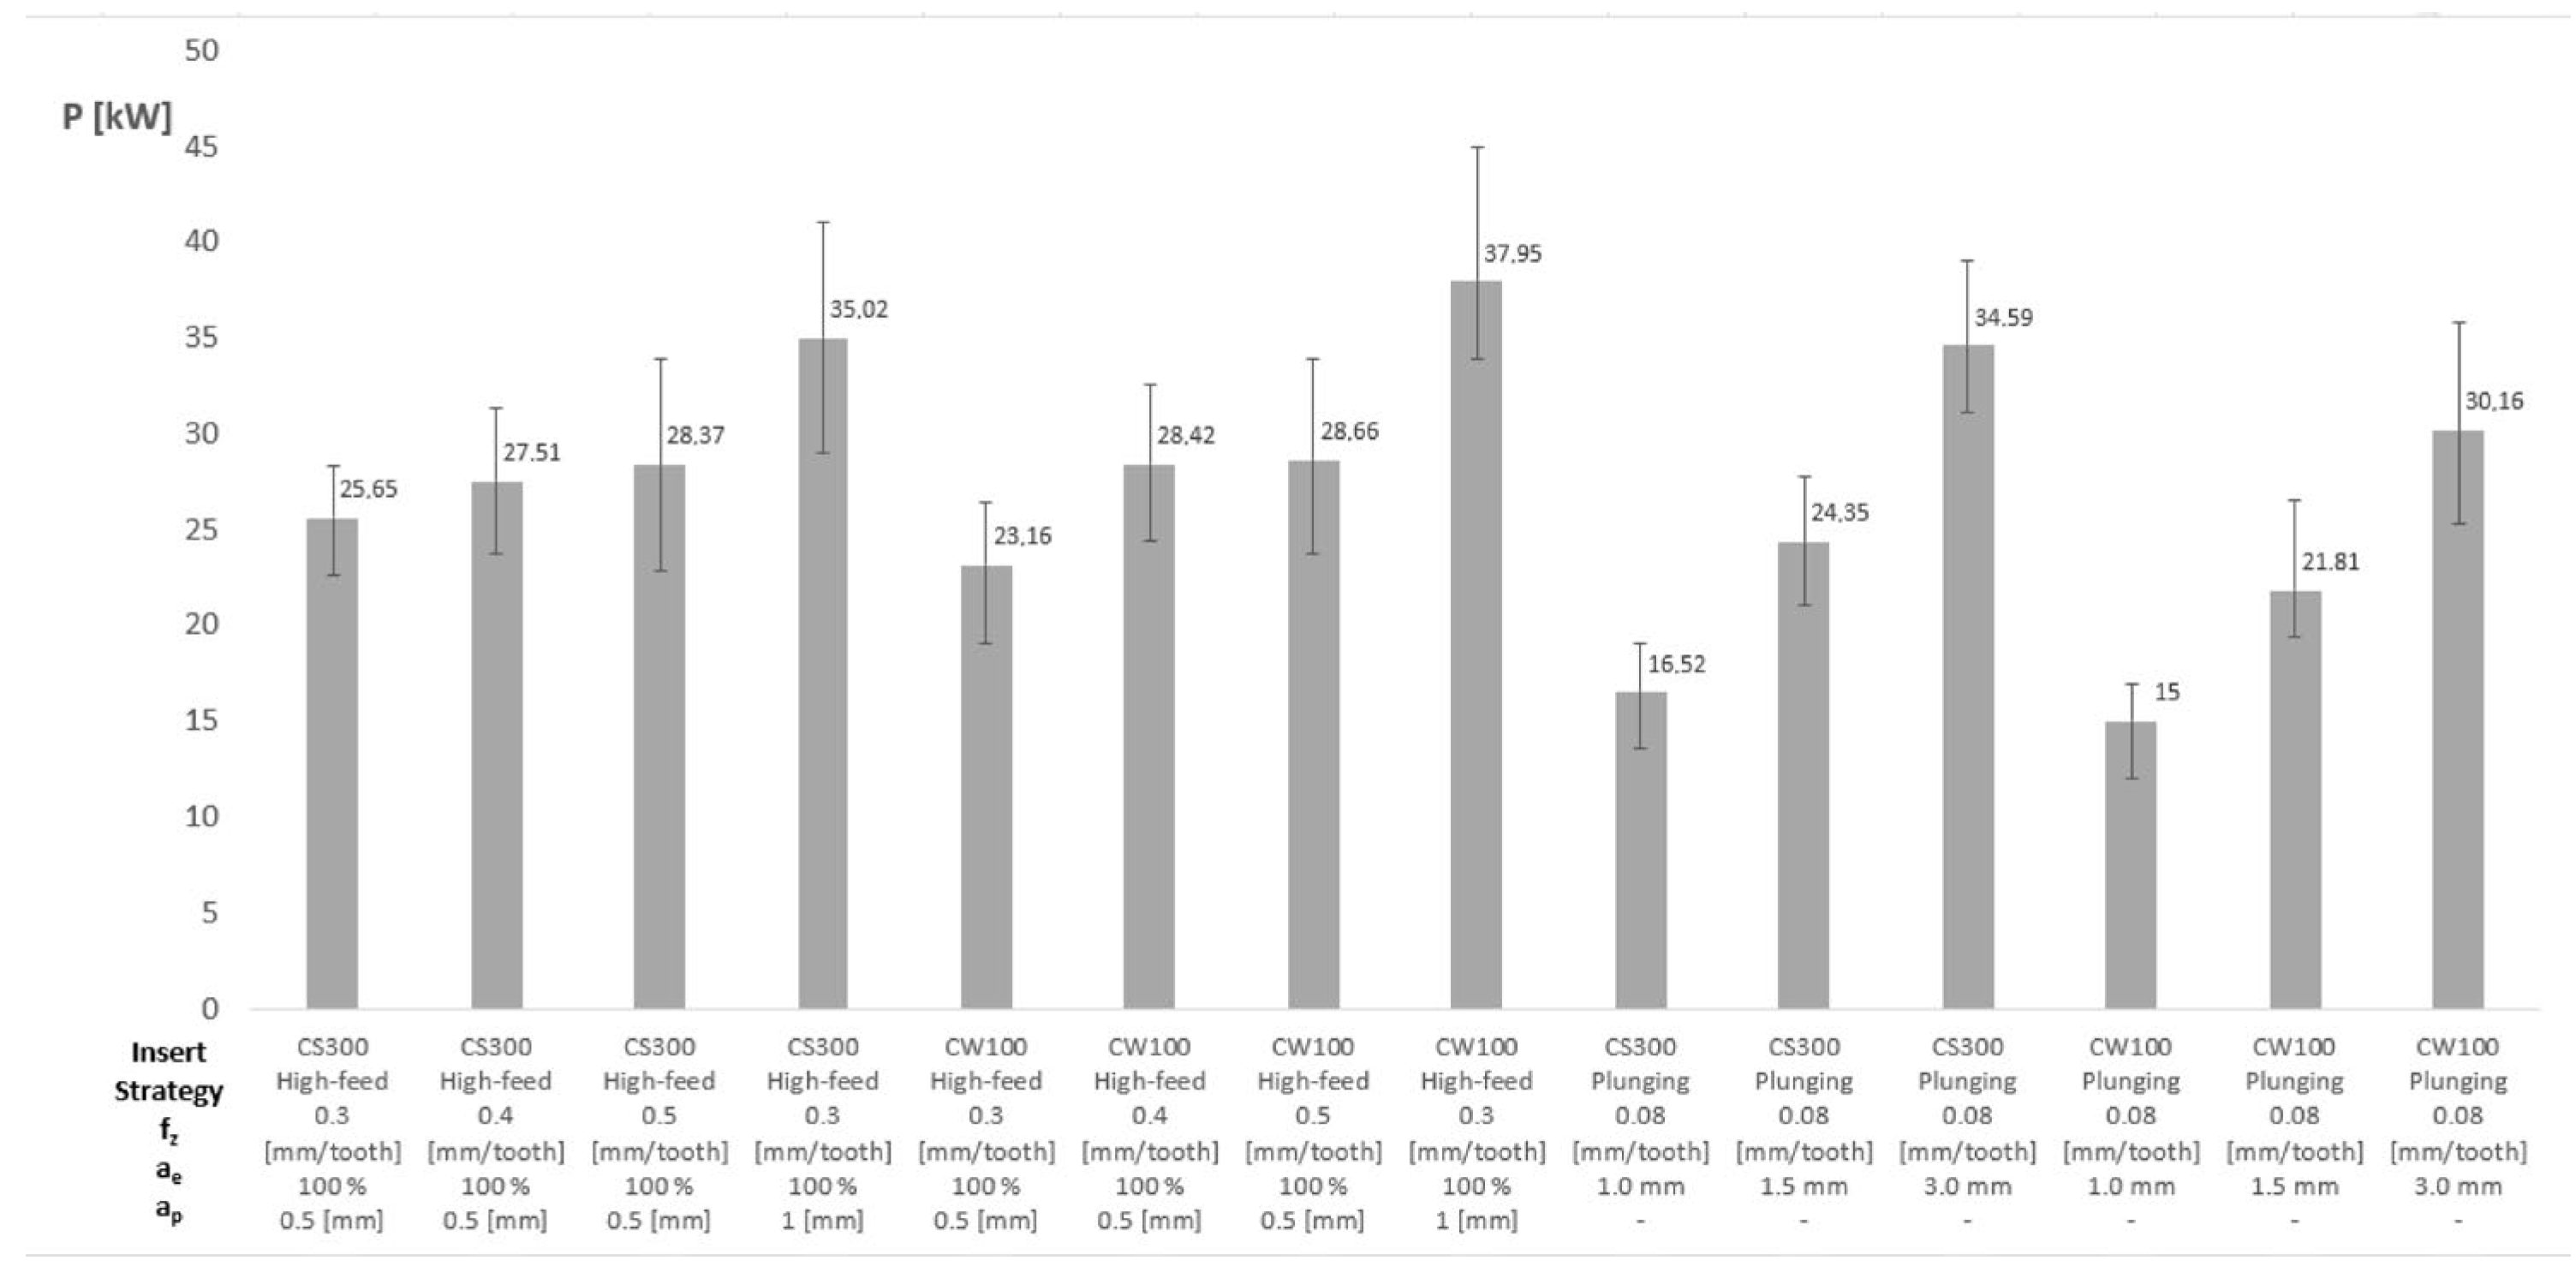
The compilation of average maximum power consumption values for all 14 parameter sets (
Figure 8) reveals a complex relationship between the machining strategy, chip geometry, and the type of tool material used. Analyzing the results by method, high-feed milling (sets 1–8) generally generated higher power demand, oscillating within the range of 23–38 kW, whereas plunge milling (sets 9–14) was characterized by a broader span of results (15–35 kW), strictly correlated with the radial width of cut.
Particular attention is drawn to the influence of the insert type on the process energy consumption while maintaining identical cutting parameters. In the case of plunge milling, the whisker-reinforced CW100 inserts (sets 12–14) consistently exhibited lower power consumption compared to the non-reinforced CS300 inserts (sets 9–11). This is most evident at maximum load, where trial No. 14 (CW100) required 30.16 kW, whereas the analogous trial No. 11 (CS300) reached a level of 34.59 kW. This represents a reduction in energy demand of nearly 13% due to the use of composite tools, which can be attributed to the lower frictional resistance of the coating and superior edge integrity.
In the high-feed method, this relationship is not as unequivocal. At an increased depth of cut, set No. 8 (CW100) recorded the highest power consumption in the entire experiment (37.95 kW), exceeding the analogous set No. 4 with the CS300 insert (35.02 kW). The analysis of the error bars indicates that the trials characterized by the highest loads (sets 4, 8, 11, 14) exhibit significant standard deviations, which suggests the occurrence of strong vibrations and process instability during peak load moments. In particular, the substantial dispersion of results for set No. 8 suggests that at such aggressive high-feed milling parameters, the reinforced insert may have generated higher dynamic resistances, leading to operation at the stability limit of the machine tool’s drive system.
3.3. Tool Wear
A critical component of the comprehensive evaluation of the machining process, alongside the analysis of forces and energy consumption, is the investigation of tool wear progression. In this study, the flank wear width (VBB) was adopted as the primary indicator of tool life. Measurements were conducted in an offline mode after selected machining passes, utilizing a microscope for the precise assessment of edge degradation. This approach allowed for the determination of wear curves as a function of the removed material volume, with three distinct wear phases precisely defined. This provides a basis for a direct performance comparison between whisker-reinforced (CW100) and non-reinforced (CS300) inserts under accelerated wear conditions for both analyzed milling strategies.
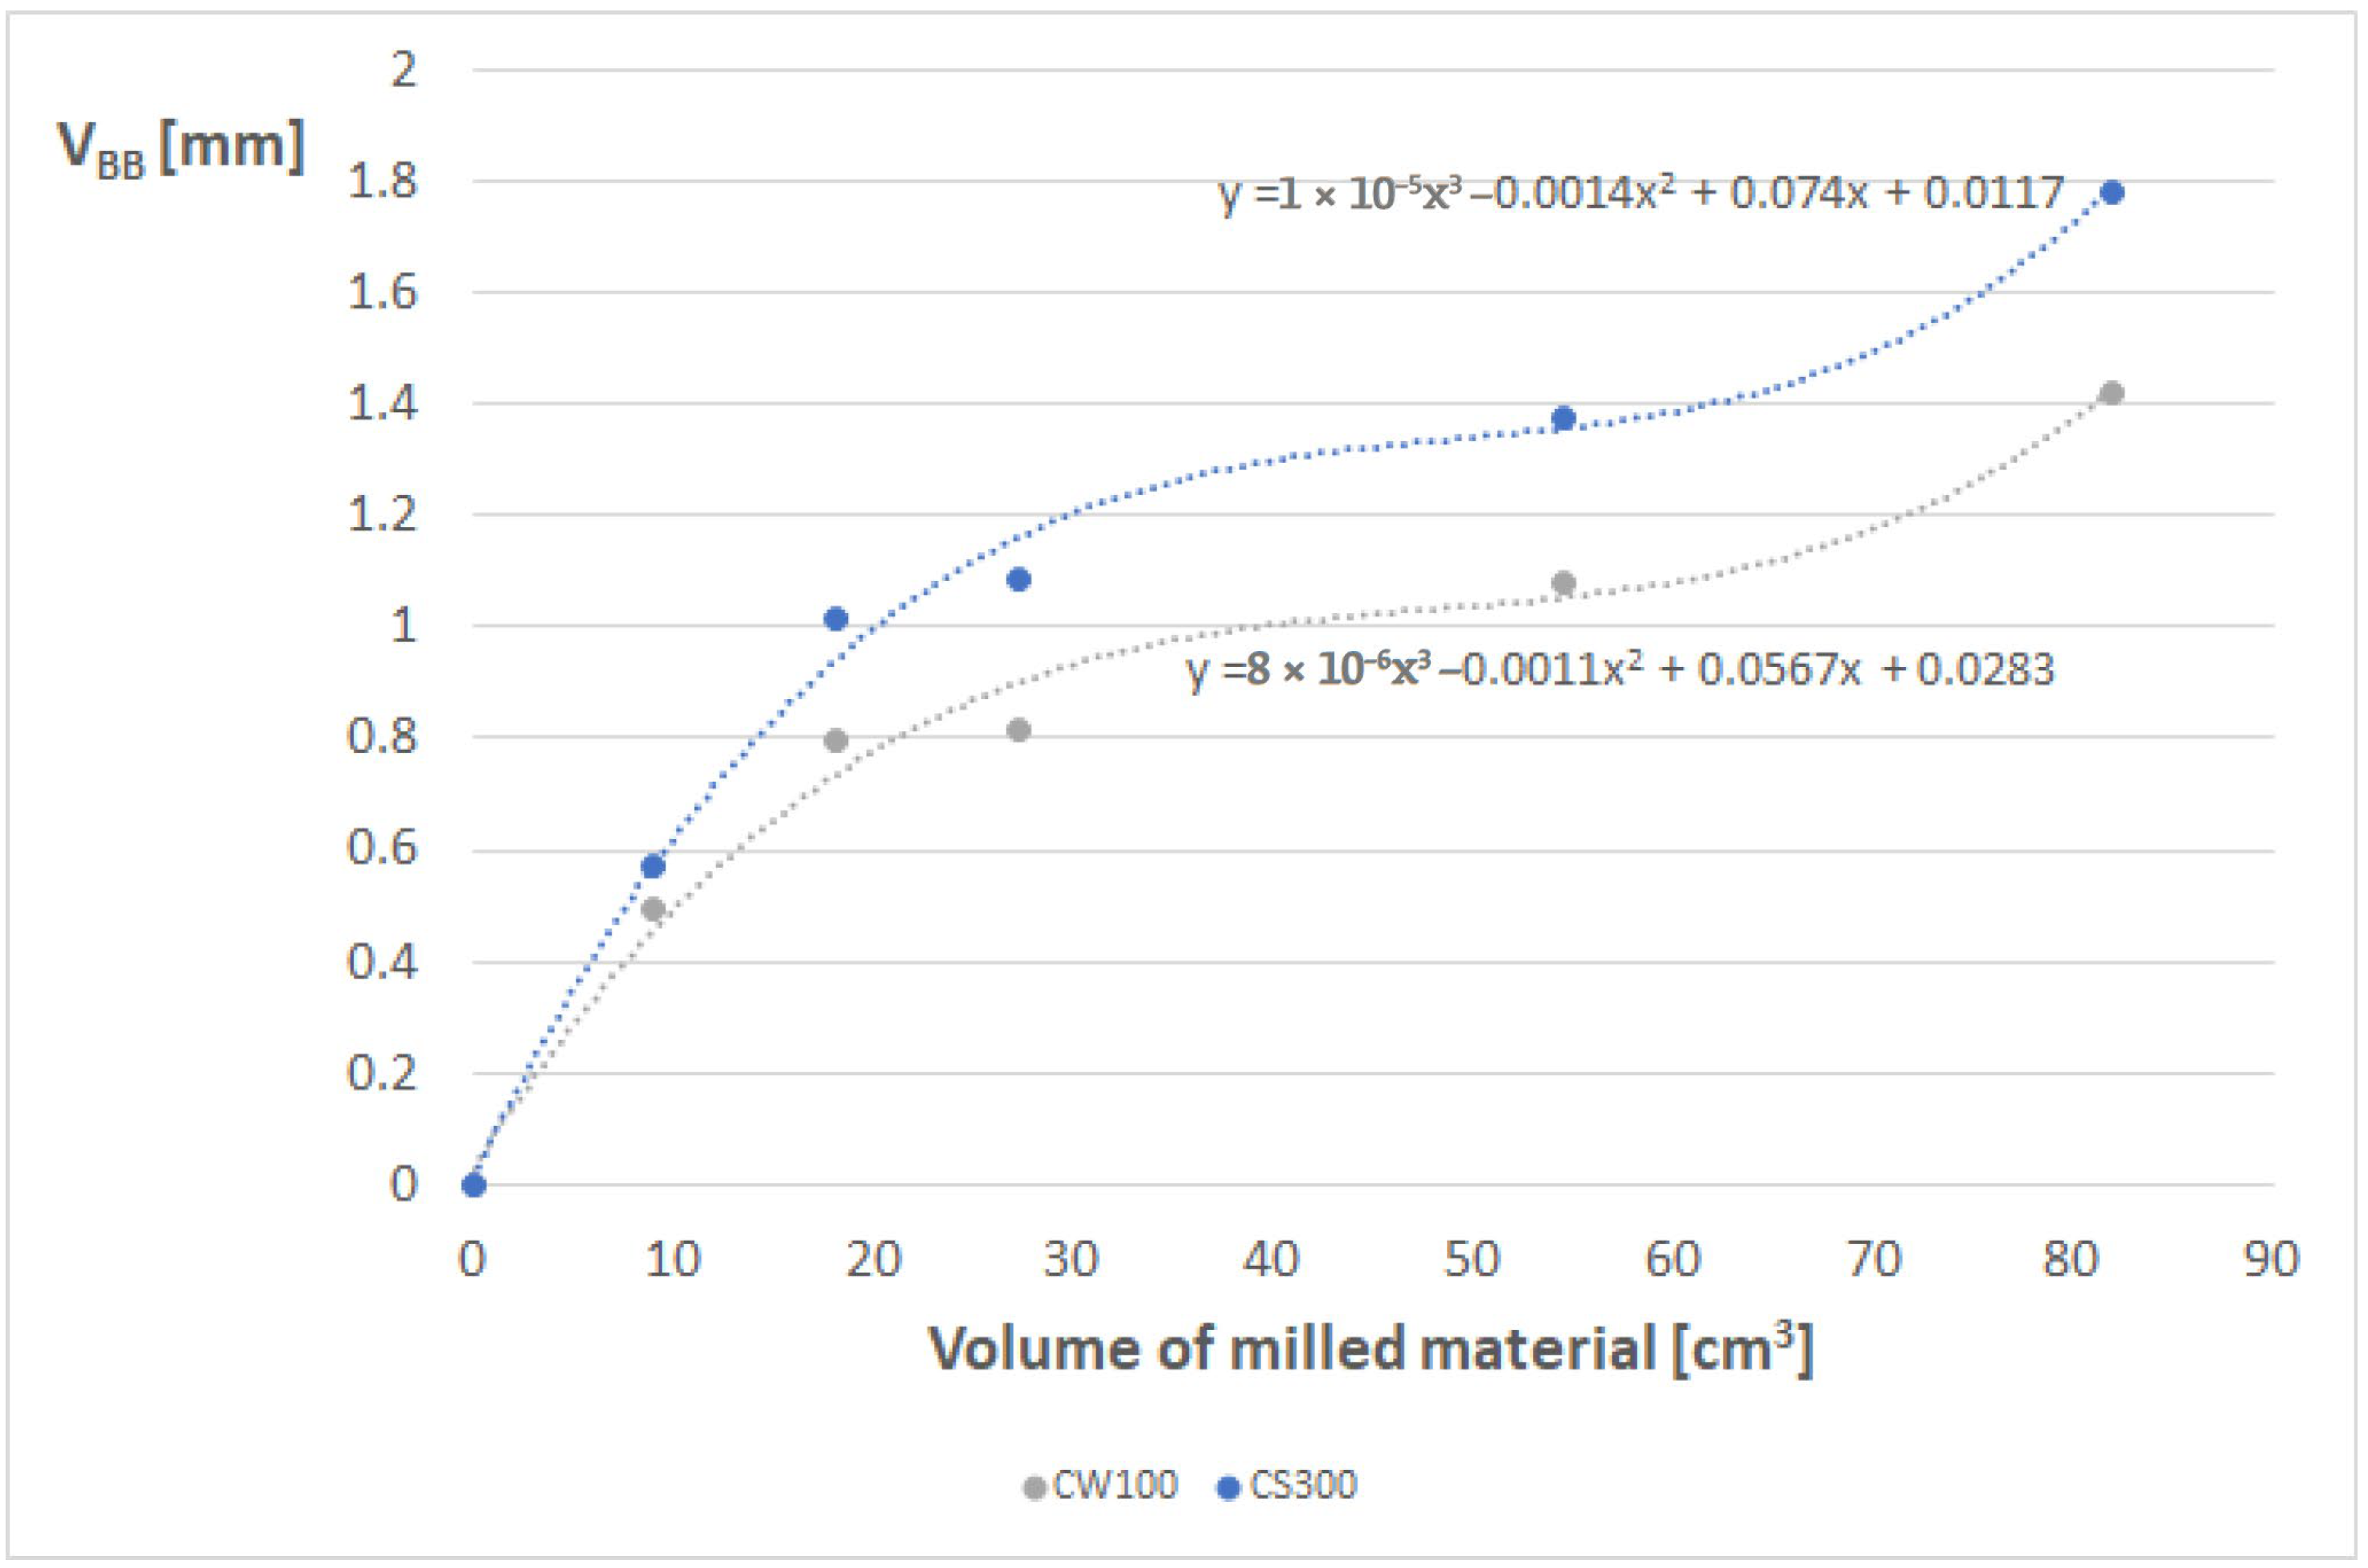
In the case of high-feed milling (
Figure 9), the wear curves clearly indicate the superior resistance of the composite inserts (CW100) compared to the non-reinforced ceramic (CS300). Although both curves exhibit an upward trend characteristic of nickel alloy machining, the degradation dynamics of the CS300 edge were significantly higher. Already after removing approximately 18 cm
3 of material, the V
BB parameter for the non-reinforced insert exceeded 1.0 mm, whereas for the CW100 insert, it remained at approximately 0.8 mm. This divergence widened as the process progressed. At the final measurement point, the CS300 insert reached a wear level of nearly 1.8 mm, which is approximately 28% higher than that of the CW100 insert (approximately 1.4 mm). This trajectory confirms that the presence of whiskers effectively inhibits abrasion and flank wear degradation under high-feed conditions.
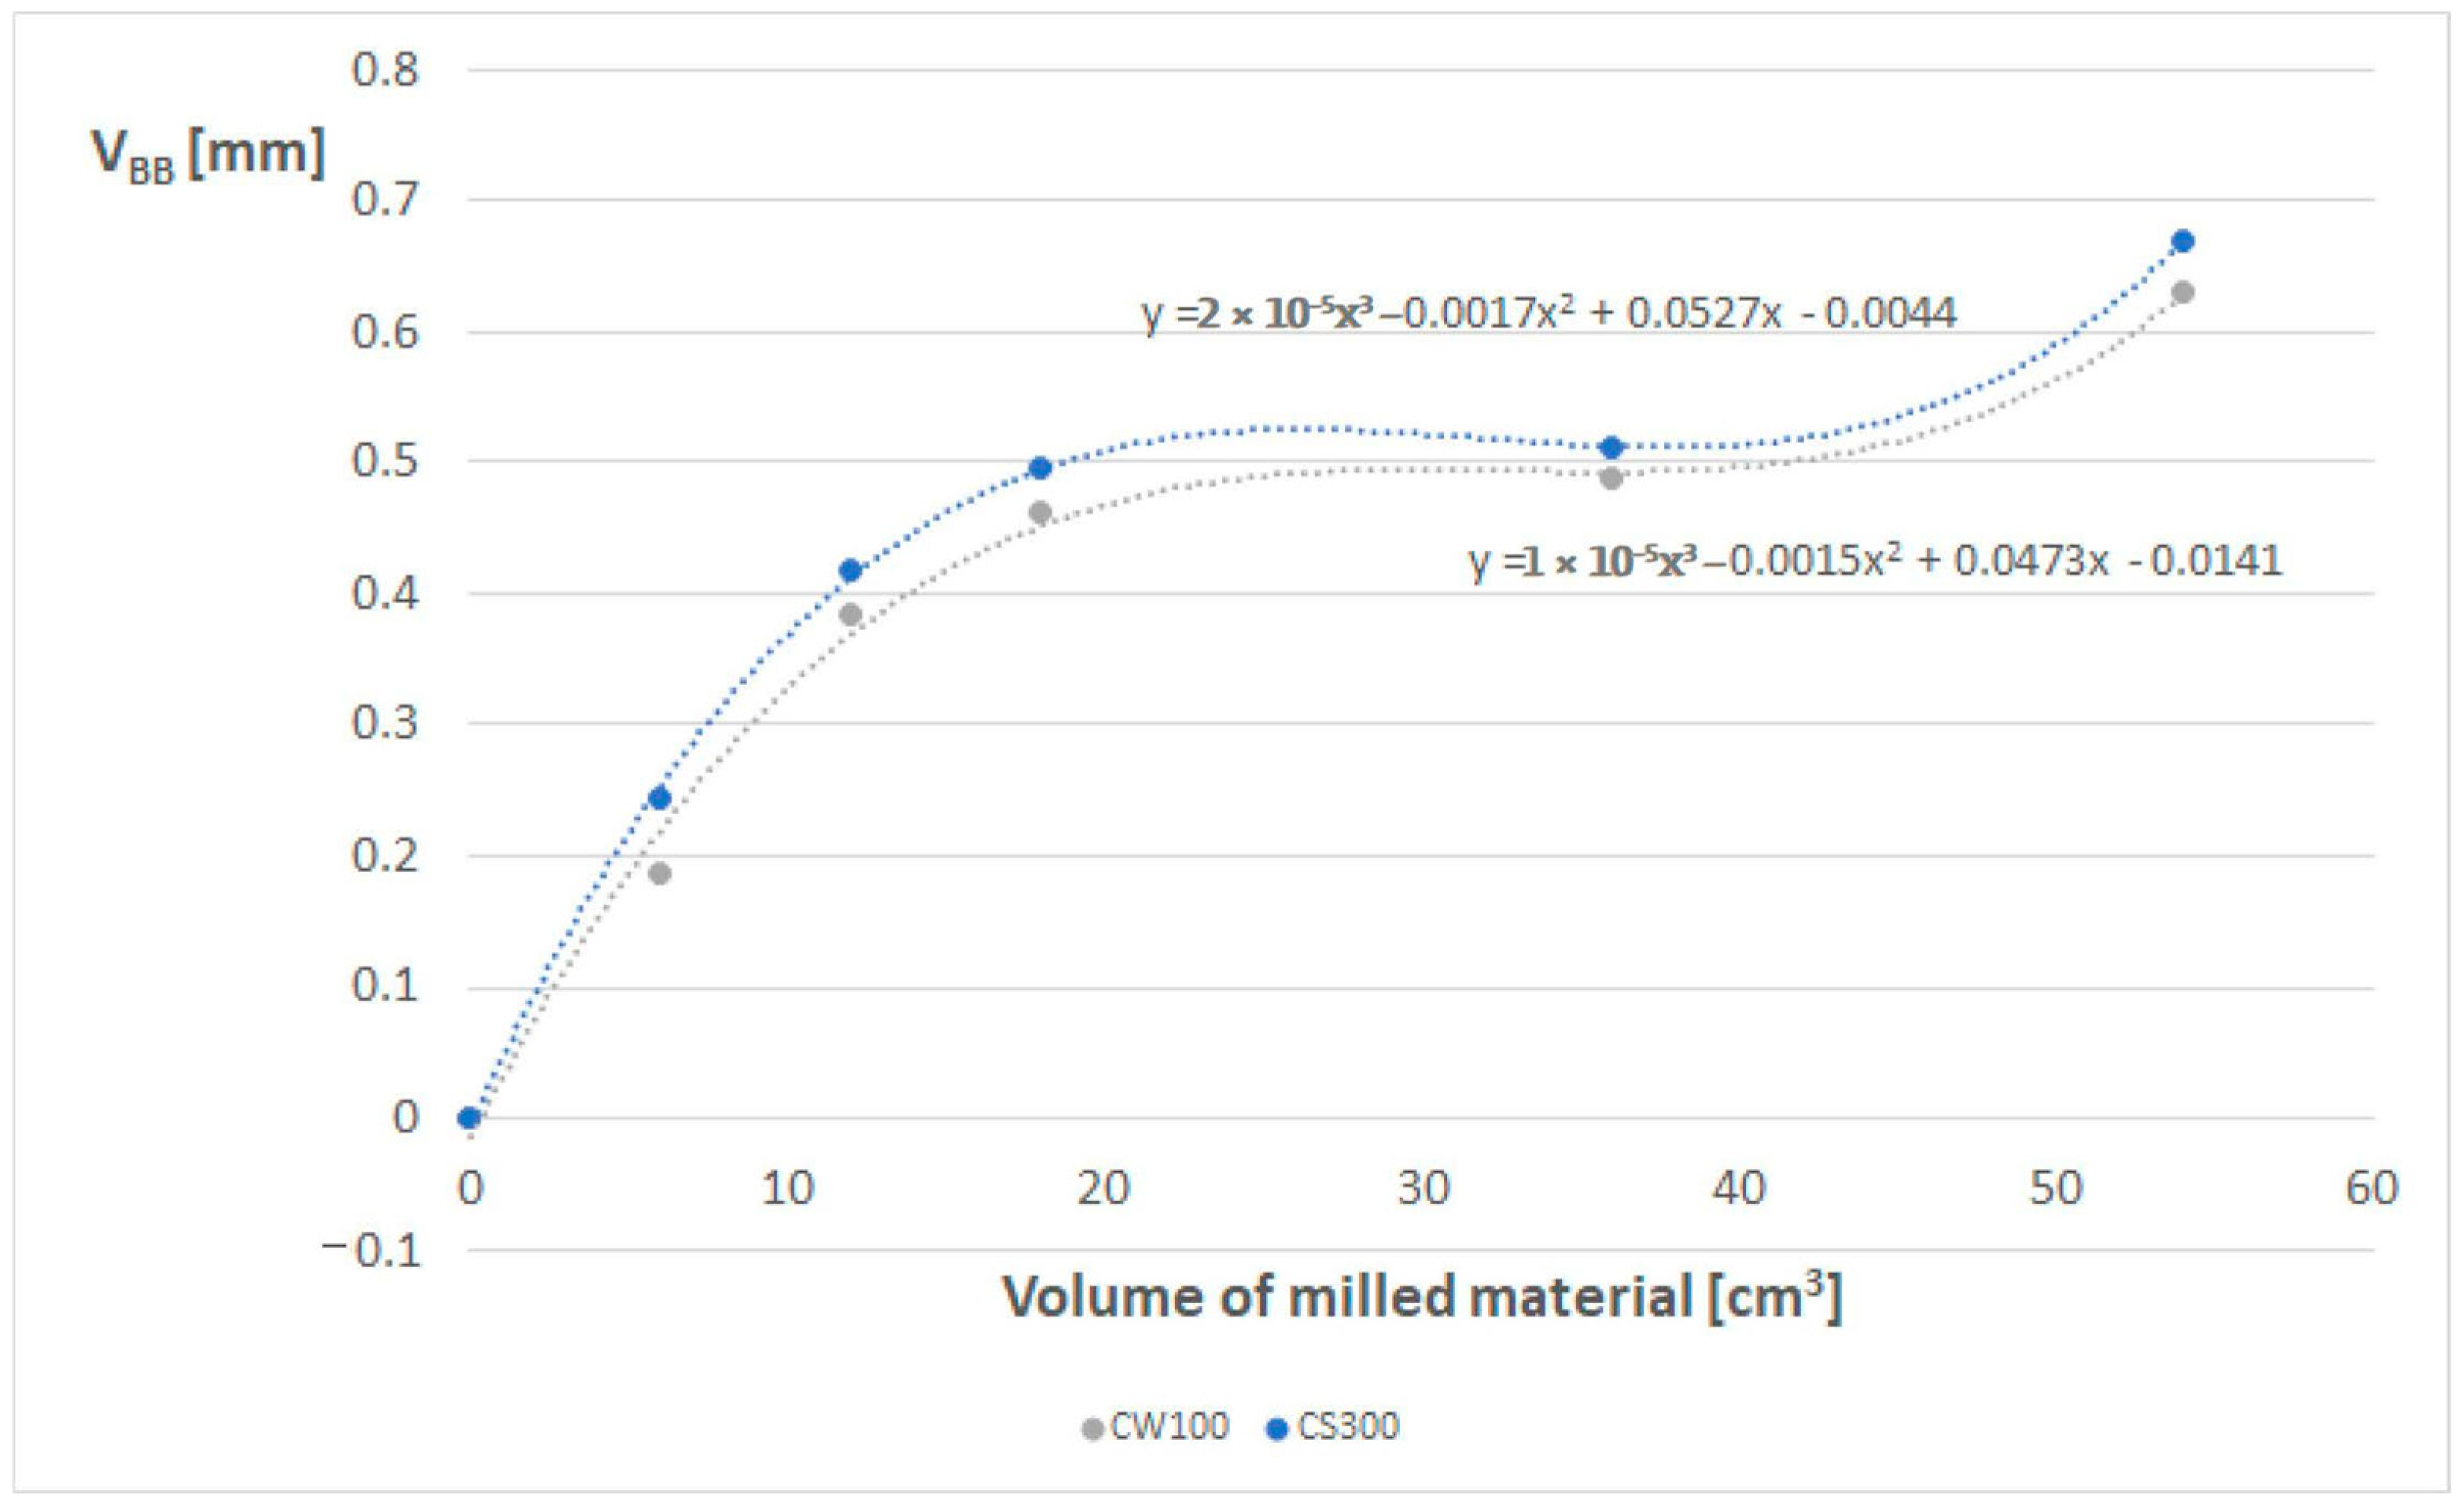
The analysis of results for plunge milling (
Figure 10) corroborates this trend, albeit at a different scale of absolute values due to the distinct kinematics and shorter contact time in this test series. Here too, the non-reinforced inserts (CS300) consistently exhibited higher wear values at each measurement point. It is noteworthy that the CS300 curve is characterized by a steeper slope in the initial run-in phase, suggesting lower edge resistance to the impact loads accompanying tool entry in the vertical motion (along the Z-axis). The CW100 insert maintained a more linear and predictable V
BB increment, which is crucial for tool change planning in industrial conditions.
The quantitative wear assessment based on the VBB parameter provides a macroscopic view of tool life, indicating a clear advantage of composite materials. However, the wear curves alone do not fully explain the physical nature of the degradation processes occurring at the cutting edge. To understand why non-reinforced inserts wore down more rapidly and whether their failure mechanism differed from that observed in reinforced inserts, a qualitative analysis was required. To this end, microscopic examinations of the cutting edges were conducted, allowing for the identification of the dominant wear mechanisms for both ceramic grades tested.
Detailed microscopic analysis of the whisker-reinforced inserts (CW100) employed in the high-feed strategy (
Figure 11) allowed for tracking the evolution of edge degradation. In the initial phase of the process (
Figure 11a), only minor defects in the form of micro-chipping were recorded, with a depth not exceeding 0.12 mm. This indicates the composite’s high resistance to cyclic impact loads during the run-in phase. With the progression of the machining process and upon reaching the limiting volume of removed material, the nature of wear evolved toward deep structural defects. The image from the final test phase (
Figure 11b) reveals distinct notch wear with a depth of 0.805 mm. The formation of this type of damage is characteristic of nickel alloy machining and results from severe work hardening of the surface layer at the depth-of-cut line. However, it must be emphasized that despite the significant depth of the notch, the structure of the CW100 insert prevented crack propagation to the remainder of the cutting edge, confirming the role of SiC whiskers in crack bridging and preventing catastrophic tool failure.
A distinctly different pattern of failure mechanisms was revealed by the analysis of non-reinforced oxide ceramic inserts (CS300) operating under identical high-feed conditions (
Figure 12). Already in the initial machining phase (
Figure 12a), a defect with a depth of 0.363 mm was recorded, which is more than three times the value observed for the composite inserts. The nature of the damage indicates typical chipping, resulting from the lower fracture toughness of the matrix material lacking a reinforcing phase. In the final phase of the test (
Figure 12b), edge degradation assumed a catastrophic character. Extensive material breakage with a depth of 1.08 mm was recorded. The structure of the fracture surface is irregular and granular, confirming the dominance of brittle fracture mechanisms. Unlike the CW100 inserts, where wear appeared as a controlled notch, the CS300 inserts underwent uncontrolled disintegration in the contact zone, which explains the rapid increase in cutting forces and energy consumption discussed in the previous sections.
In the case of plunge milling, microscopic analysis revealed a significant difference not merely in the depth of the damage itself, but in its morphology and extent along the cutting edge (
Figure 13). For the reinforced CW100 insert (
Figure 13a), a defect with a depth of 0.285 mm was recorded. Crucially, this damage is localized in nature—it presents as a singular, isolated chip, while the adjacent sections of the edge retained relative integrity. This attests to the composite’s ability to inhibit crack propagation. Contrasting this image with the non-reinforced CS300 insert (
Figure 13b) highlights the negative impact of the matrix material’s brittleness. Although the maximum defect depth is 0.401 mm (a value comparable in order of magnitude), the degradation zone encompasses a much wider section of the edge. A series of consecutive chips is visible, creating an irregular, jagged cutting line. This indicates that under the strong radial stresses characteristic of the plunge method, the absence of a reinforcing phase in CS300 inserts facilitates the lateral propagation of cracks, leading to flank face degradation over a significantly greater width compared to the whisker-reinforced composite.
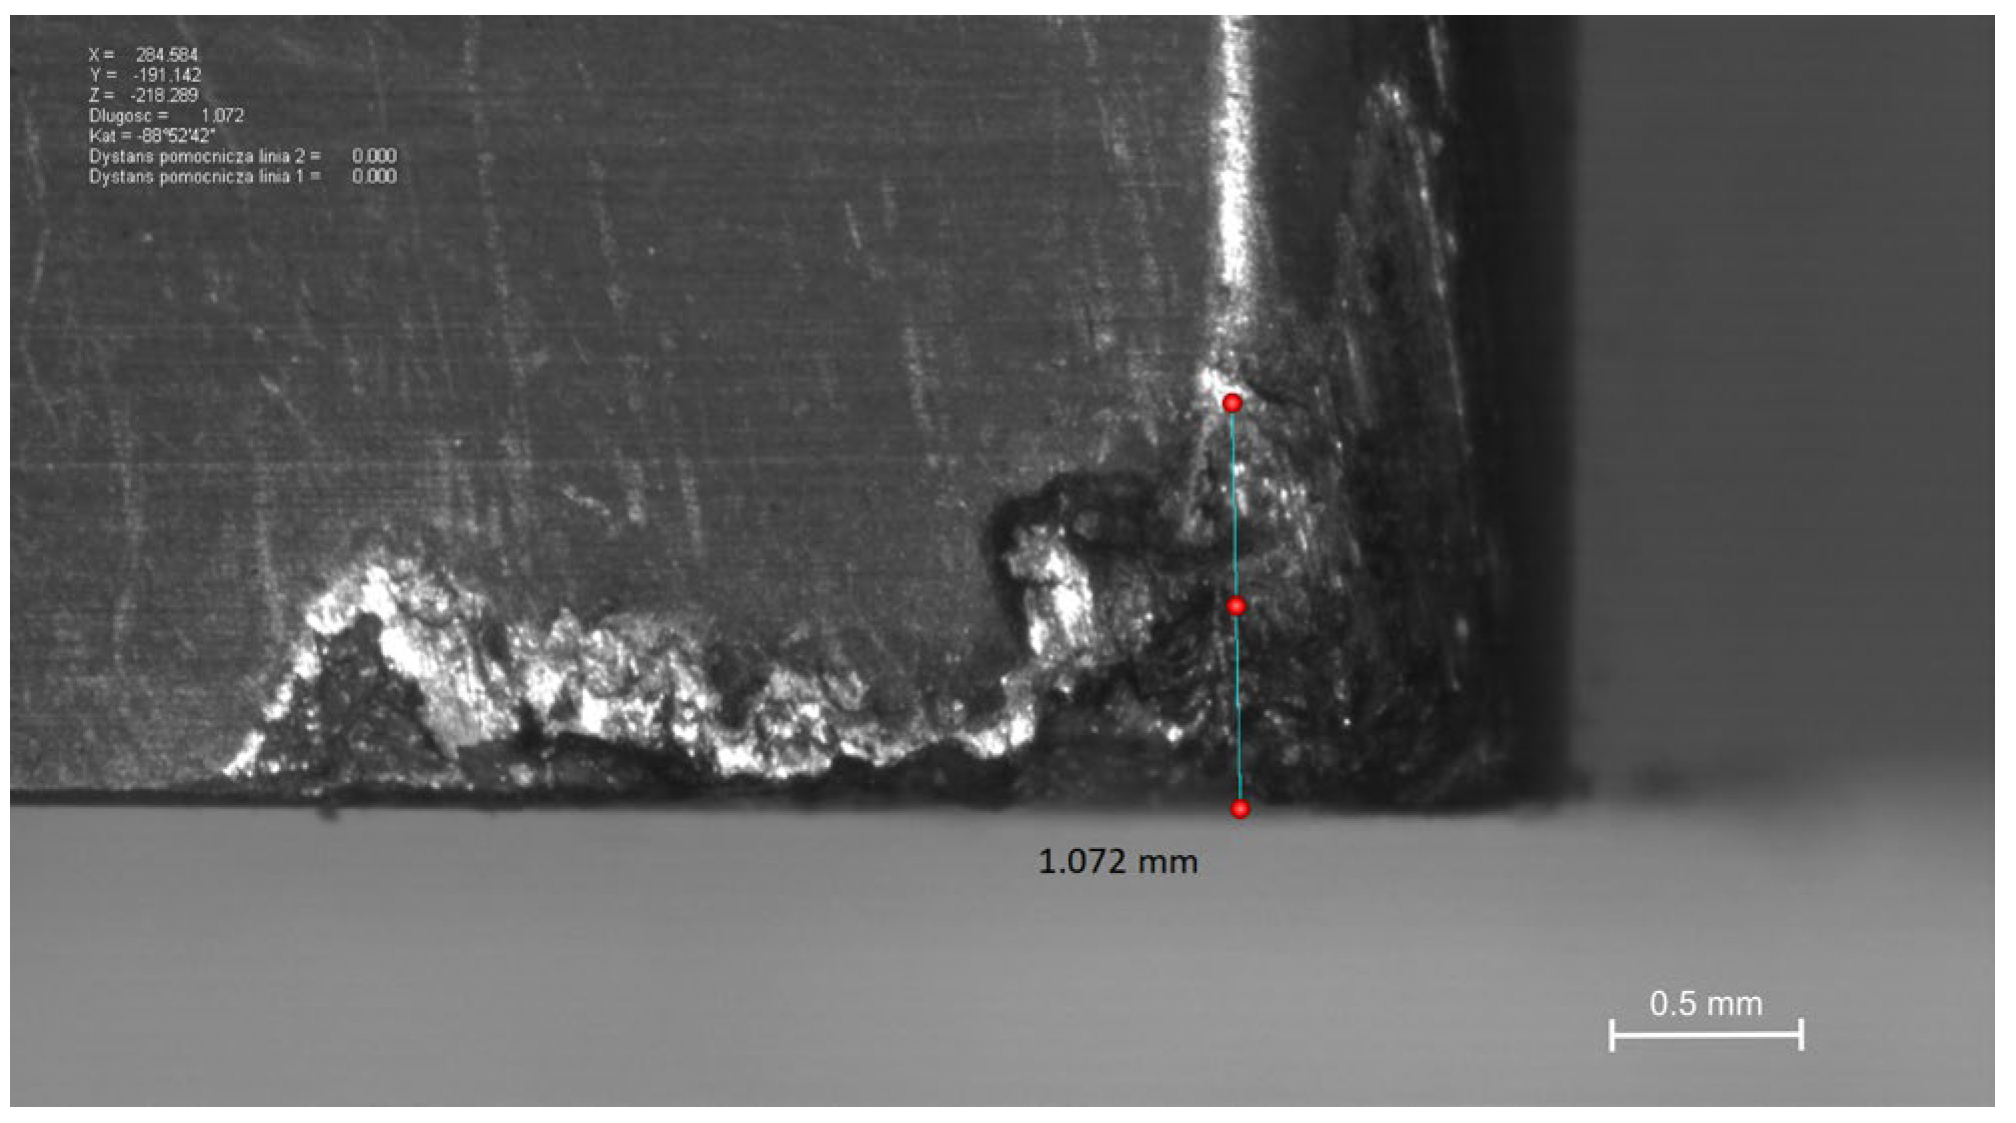
As a summary of the microscopic analysis, the condition of the non-reinforced CS300 insert after the final, ninth pass of the plunge milling process is presented (
Figure 14). This image vividly illustrates the scale of destruction suffered by oxide ceramics when subjected to the extreme conditions of plunge machining. Although the linearly measured V
BB parameter value is 1.072 mm, this figure does not fully reflect the critical condition of the tool. What is visible is not merely classical abrasive wear, but rather extensive structural disintegration in the form of deep, irregular spalling covering a significant volume of the cutting corner. This case serves as important evidence that in the tool life analysis of ceramic tools—particularly in the absence of dispersed phase reinforcement—relying solely on the one-dimensional V
BB indicator may be insufficient. This parameter does not account for volumetric tool material loss resulting from brittle fracture, which, in real-world production conditions, disqualifies the tool from further operation much earlier than indicated by flank wear width measurements alone.
3.4. Grey Relational Analysis
Before proceeding to the multi-criteria optimization of the process, attention must be drawn to the productivity aspect. While the previously discussed indicators (cutting forces, tool wear, and power consumption) are cost-related characteristics (to be minimized), the volumetric material removal rate constitutes a key parameter of technological gain. In the conducted research, the highest material removal rate of 534 cm3/min was achieved for the high-feed method at a depth of cut of ap = 1 mm (Sets 4 and 8). This value is more than double that of the most productive plunge milling trials (213–427 cm3/min). This disparity in material removal potential renders a simple comparison of forces or wear insufficient for evaluating process efficiency. Therefore, it is necessary to employ a method that balances these conflicting objectives—high productivity versus durability and energy consumption.
The first stage of the analysis involved compiling the averaged experimental results for all 14 research trials. Four key decision criteria were considered: volumetric material removal rate (Q), total volume of material removed during the tool life cycle (G
max), average maximum power consumption (P), and average maximum cutting force (F
max). A summary of the input data is presented in
Table 4.
To enable the comparison of parameters expressed in different units and orders of magnitude, data normalization (data pre-processing) was carried out within the range of 0 to 1. For the Q and G
max parameters, the ‘higher-the-better’ criterion was applied, whereas for P and F
max, the ‘lower-the-better’ criterion was adopted. The results of the normalization are presented in
Table 5.
Based on the normalized data sequences, the Grey Relational Coefficients (GRCs) were calculated for each performance characteristic, adopting a standard distinguishing coefficient value = 0.5. These values (
Table 6) reflect the degree of correlation between the ideal reference sequence and the actual experimental results for the individual characteristics.
The final step involved calculating the Grey Relational Grade (GRG), which represents the average of the GRC values for a given trial. The GRG serves as the definitive evaluation metric—the higher the value, the closer the process is to the optimal solution. The ranking results are presented in
Table 7.
The analysis of the GRA ranking (
Table 7) indicates that the highest score (Rank 1) was achieved by parameter set No. 8 (high-feed milling, CW100). The second position was secured by set No. 12 (plunge milling, CW100). The lowest positions in the ranking were occupied by trials conducted with non-reinforced CS300 inserts at high depths of cut.
4. Discussion
A direct comparison of the maximum axial force component (F
z) values for the high-feed method (
Figure 15) allowed for a quantitative assessment of the influence of the tool’s material structure on cutting resistance. The analysis of the graph unequivocally indicates the advantage of using whisker-reinforced inserts (CW100). In each of the nine recorded passes, the non-reinforced tools (CS300) generated higher axial force values. Already in the first pass, this difference was nearly 6.5% (114 N) to the disadvantage of the CS300 inserts. The greatest divergence was noted in the initial phase of abrasive wear (passes 2 and 3), where forces for the non-reinforced inserts were higher by 16.2% and 14.5%, respectively, compared to the composite inserts. In the final phase of the test (pass no. 9), although both tools were in the accelerated wear stage, the CS300 insert still generated a force 6% higher (256 N). The higher cutting resistance recorded for the non-reinforced ceramic indicates a more rapid degradation of the cutting edge geometry, which, lacking reinforcement from the dispersed phase (SiC whiskers), blunts more quickly, directly translating into an increase in thrust force.
The comparative analysis of the axial force component (F
z) in the plunge milling process revealed an even more drastic influence of the tool’s material structure on the generated cutting resistance than was observed in the high-feed method (
Figure 16). In the case of this strategy, the non-reinforced inserts (CS300) exhibited significantly poorer performance characteristics throughout the entire tested range. Already in the first pass, the force difference was nearly 28.5% (574 N) in favor of the whisker-reinforced inserts (CW100). As the process progressed, this disparity not only persisted but actually intensified. At the midpoint of the cycle (pass no. 5), the difference was approximately 30%, reaching a maximum value of nearly 35% (1146 N) in the final phase (pass no. 9). Such a significant difference in F
z values suggests that under plunge milling conditions, where axial load is dominant, the presence of the reinforcing phase (whiskers) plays a critical role in maintaining edge integrity and reducing cutting resistance.
Synthesizing the results obtained for both machining strategies, it can be concluded that while whisker reinforcement yields benefits in both cases, the magnitude of this effect differs radically. In the high-feed method, the advantage of the composite CW100 inserts over the non-reinforced CS300 ceramic was noticeable, oscillating within the range of 6–16%. In contrast, for plunge milling, this benefit was significantly amplified, consistently remaining above the 28% level. This indicates that the kinematics of plunge milling, characterized by a specific force distribution and a substantial contribution of radial forces, make the process much more sensitive to the tool’s material properties. Consequently, whisker reinforcement proves to be a far more determining factor for process efficiency and stability in the plunge method than in the high-feed strategy.
A critical aspect of interpreting these results involves distinguishing between the effects of the coating and the substrate material. As noted in the experimental design, the CW100 inserts feature both SiC whisker reinforcement and a coating, whereas the CS300 inserts are uncoated. While the coating undoubtedly contributes to reduced friction and thermal barrier protection during the initial cutting phase, its influence on preventing the catastrophic failure observed in CS300 inserts is considered secondary.
The microscopic analysis revealed that the primary failure mode of the non-reinforced CS300 inserts was not abrasive wear of the surface, but rather extensive spalling and deep brittle fracture extending well into the substrate. This observation aligns with the findings of Grguraš et al. [
17], who identified brittle fracture as a limiting factor for full-body ceramic tools under interrupted cutting conditions. A thin surface coating (typically measurable in micrometers) provides negligible resistance to such bulk fracture caused by high mechanical impact. Therefore, the superior performance and structural integrity of the CW100 inserts are attributed primarily to the increased fracture toughness (K
Ic) of the whisker-reinforced matrix, which effectively inhibits crack propagation under heavy load conditions. This confirms the mechanism described by Molaiekiya et al. [
19] regarding the critical role of reinforcement in stabilizing the cutting edge in superalloy machining. The coating likely plays a supportive role in delaying the onset of wear, as suggested by Osmond et al. [
45], but the bulk reinforcement is the dominant factor ensuring tool survival in the aggressive plunge milling strategy.
The multi-criteria optimization via GRA highlighted a significant trade-off between productivity and energy efficiency. The high-feed milling strategy (Rank 1) offers the highest material removal rates (Q), making it the preferred choice for time-critical roughing operations on rigid machine tools. However, this comes at the cost of higher peak power consumption (Ppeak) and increased axial loads.
Conversely, the plunge milling strategy with reinforced inserts (Rank 2) emerged as a highly competitive alternative, particularly in terms of energy efficiency. It generated approximately 13% lower power demand at comparable wear levels. This is consistent with the general characteristics of plunge milling described by Damir et al. [
28], who noted its stability advantages in specific setups. From an industrial perspective, our results position plunge milling with CW100 inserts as the optimal strategy for machining scenarios with limited spindle power or less rigid setups, such as machining deep cavities or thin-walled aerospace components, where minimizing radial deflection and power spikes is more critical than maximizing MRR alone. Furthermore, the high variance in power consumption observed for high-feed milling at maximum parameters (
Figure 8) suggests operation near the stability limit, a phenomenon also cautioned against by Perez-Salinas et al. [
29] in the context of high-speed machining forces.
The results of this study provide a crucial extension to our previous work [
49], which focused on the validation of the comprehensive evaluation methodology. While the previous study established that Plunge Milling could be a competitive alternative to High-Feed Milling in terms of axial force reduction, the current research refines this conclusion by identifying the material limitations of this strategy.
Specifically, we confirmed the trend observed in [
49] regarding the energetic characteristics of the processes—High-Feed Milling remains more power-intensive but productive. However, the new and fundamental achievement of this study is the demonstration that the stability of Plunge Milling is strictly conditional on the use of whisker-reinforced ceramics. In our previous work, the distinction between reinforced and non-reinforced failure modes was not the primary focus. Here, we proved that using standard oxide ceramics (CS300) in Plunge Milling leads to catastrophic failure (
Figure 14), rendering the strategy unfeasible. Thus, the current findings advance the state of the art by specifying that SiC whisker reinforcement is a prerequisite for exploiting the benefits of Plunge Milling in nickel-based superalloys.

