3.3.1. Part Printing
The parts were designed using 3D modeling software, Z-Suite v2.26.0 and printed with the Z-ULTRAT material. Key parameters adjusted during the printing process include wall thickness, wall count, and infill density. In this study, wall thickness refers to the total width of the external perimeters (shells) forming the outer contour of the printed part, while wall count represents the number of these adjacent perimeter lines deposited by the printer. These variables are essential for controlling the dimensional stability and behavior of the parts under thermal influence,
Figure 1. To ensure optimal printing performance, the Z-Suite software—the dedicated platform for Zortrax printers—was utilized to prepare, configure, and optimize the 3D printing process. The software facilitated model slicing, automatic generation of support structures, and fine-tuning of parameters such as layer thickness, infill pattern, and print orientation. Additionally, printing temperatures were set to 210 °C for the extruder and 60 °C for the heated bed, in accordance with the manufacturer’s recommendations for the Z-ULTRAT material. This combination of hardware precision and software optimization contributed to achieving high-quality prints with excellent mechanical stability and surface integrity.
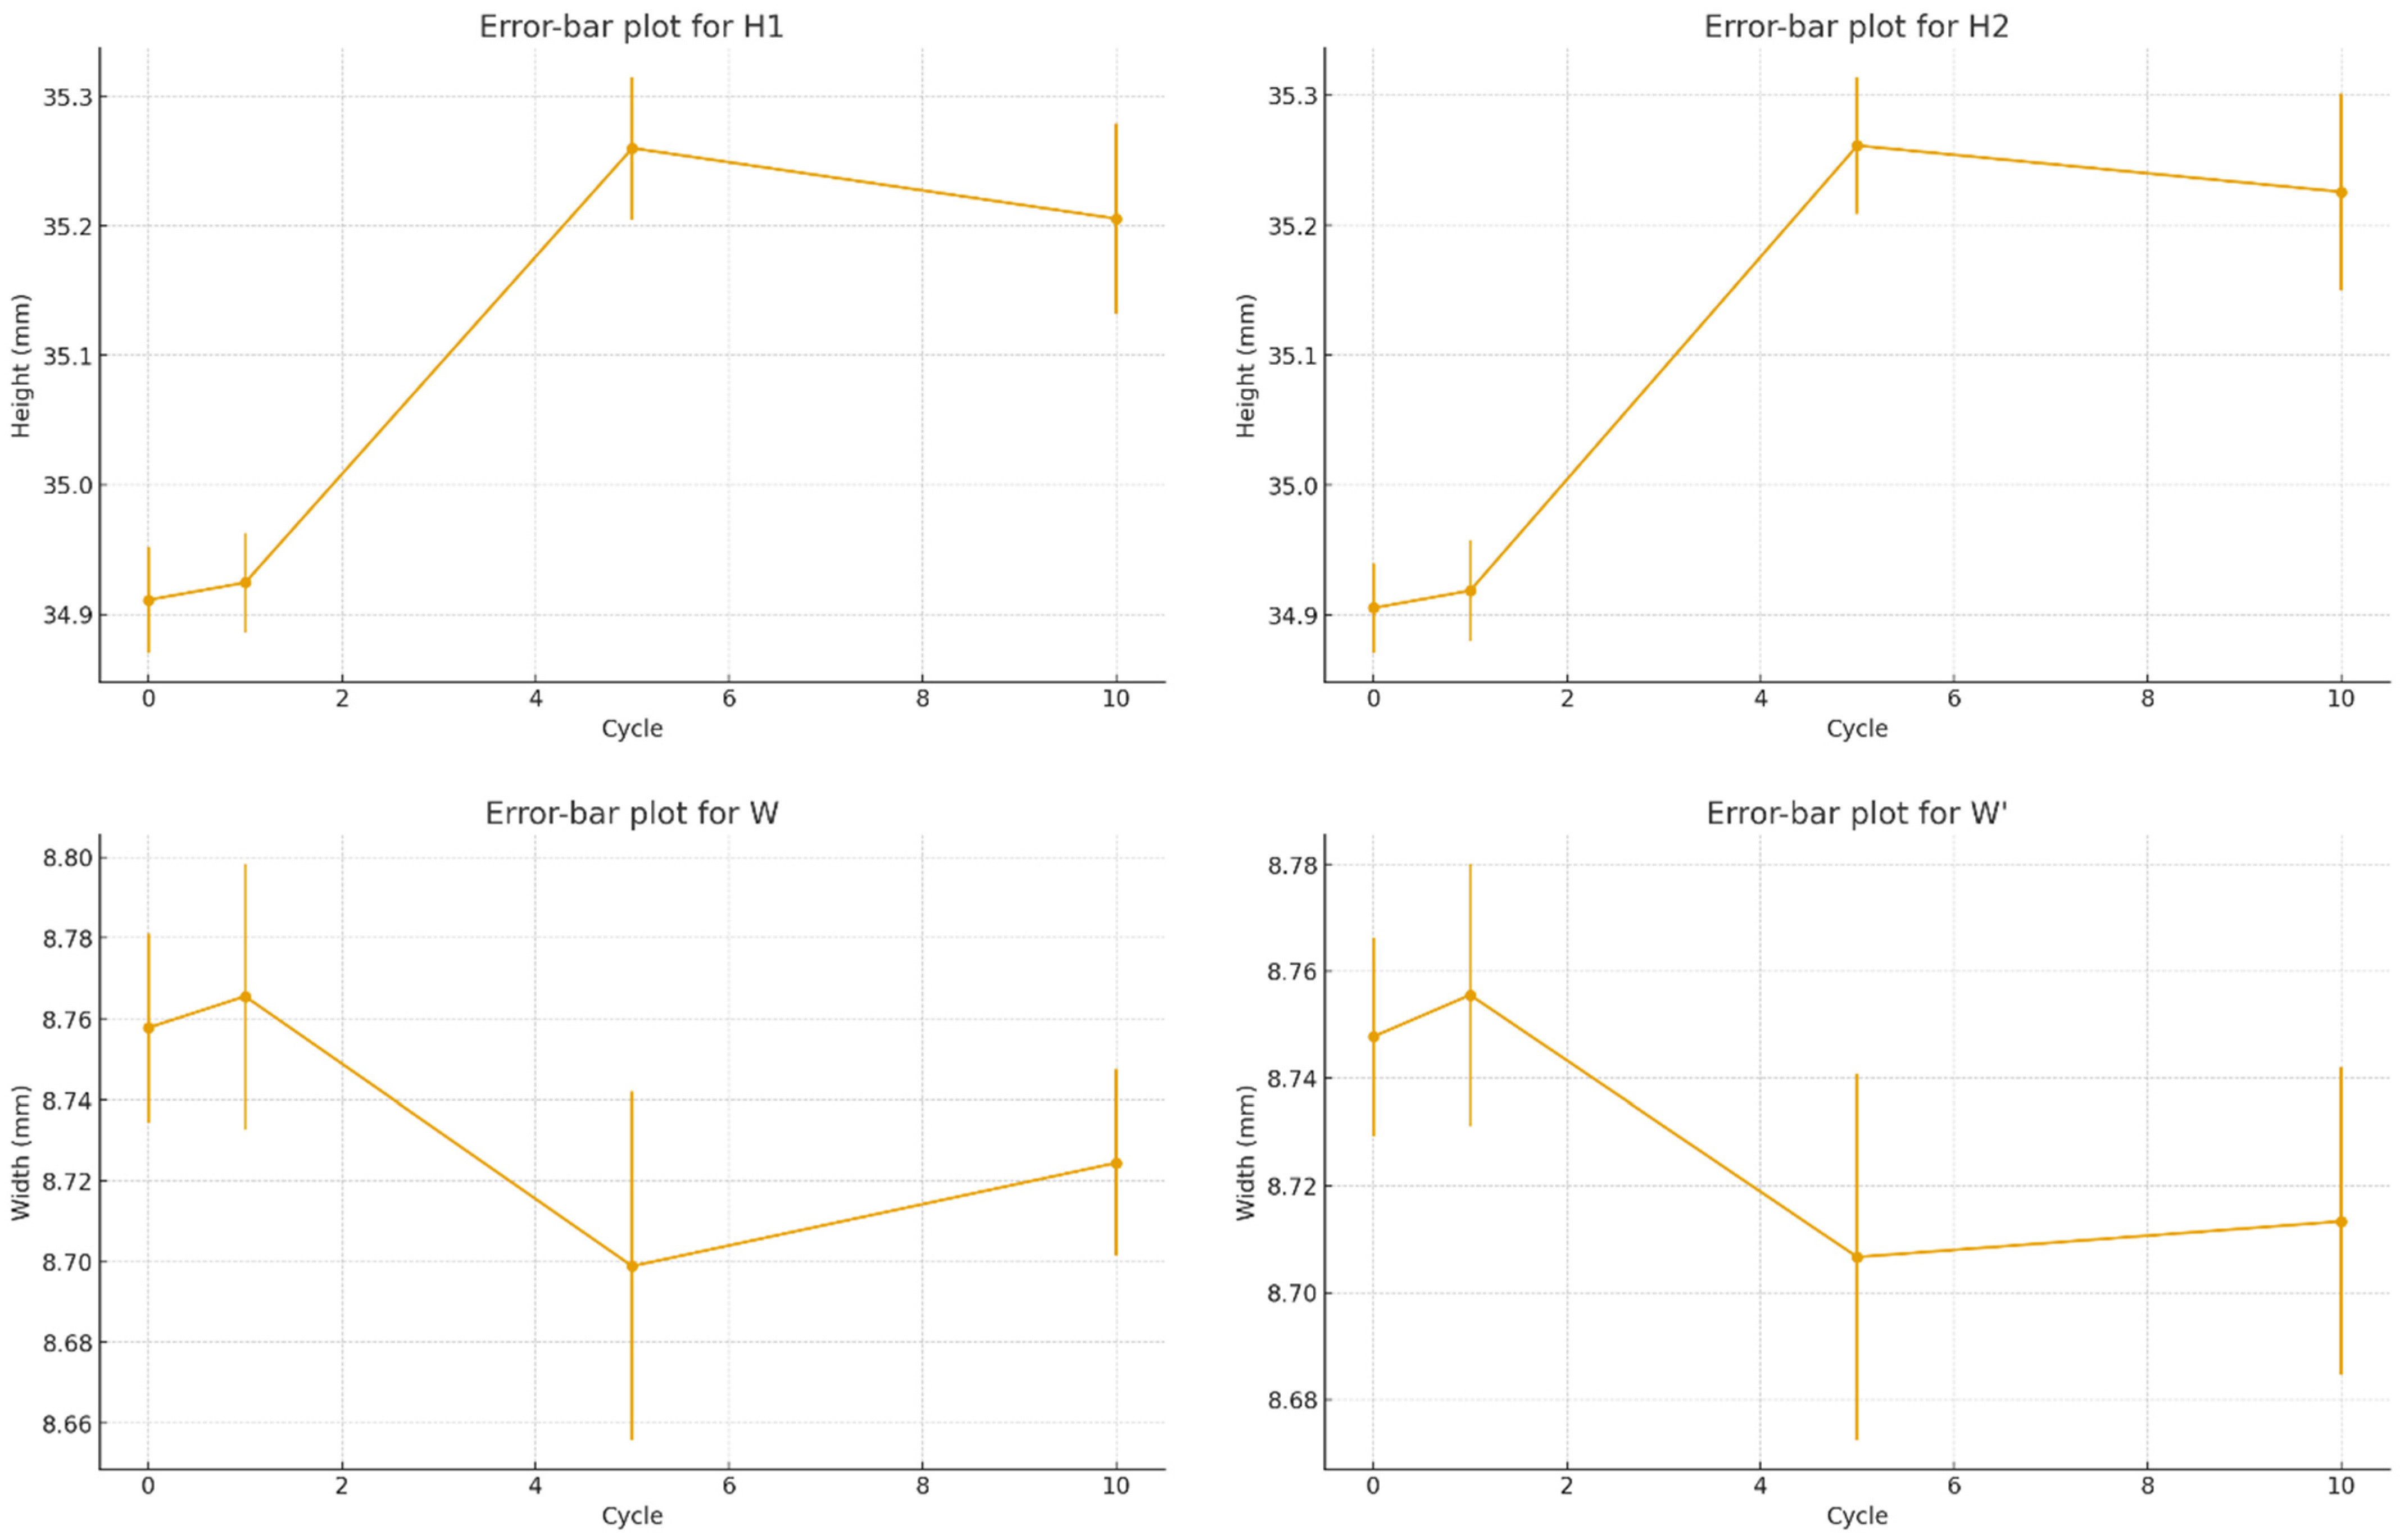
A completely randomized design (CRD) was adopted, in which nine printed specimens were subjected to thermal cycling. The choice of nine specimens was based on statistical power considerations, ensuring that one-way ANOVA could detect significant differences (p < 0.05) with a confidence level above 95%. This number also provided a balanced design, with three samples assigned to each thermal cycle condition (1, 5, and 10 cycles), following standard practices in FDM dimensional analysis studies. Dimensional measurements (H1, H2, W, and W′) were collected before and after 1, 5, and 10 thermal cycles. Mean and standard deviation were calculated at each condition. A one-way ANOVA was performed independently for each dimensional parameter to evaluate whether the number of cycles had a statistically significant impact on dimensional change. Significance was accepted at p < 0.05. Variability distributions were illustrated using box plots, while mean evolution and uncertainty propagation were represented using error-bar plots.
To clarify the experimental setup and ensure reproducibility,
Table 2 summarizes all parameters used in this study, distinguishing between those that were fixed and those that were varied. The only variable factor was the number of thermal cycles (1, 5, and 10), while all 3D printing parameters and thermal profile conditions were kept constant. This approach ensures that any dimensional deviations can be directly attributed to the cumulative effect of thermal cycling rather than to variations in the printing process or material preparation.
The parts were manufactured using FDM technology (Zortrax M200 Plus, Zortrax S.A., Olsztyn, Poland) with Z-ULTRAT material under identical printing settings. All tests were performed in a controlled laboratory environment, maintaining constant humidity and ambient temperature to minimize external influences.
A single-factor experimental design was intentionally employed to isolate the direct influence of thermal cycling on dimensional deviations. All printing parameters (extruder temperature, bed temperature, layer height, wall thickness, infill density, raster orientation) were strictly fixed across specimens. This controlled approach ensures that any dimensional changes can be confidently attributed to the thermal cycling process rather than confounding variations in manufacturing conditions.
3.3.2. Thermal Cycles
In industrial applications, components produced via additive manufacturing (AM) are increasingly exposed to fluctuating thermal environments—ranging from sub-zero storage to high-temperature operation. These repeated temperature variations can compromise the structural integrity, dimensional accuracy, and long-term performance of AM parts. Unlike traditionally manufactured components, AM structures often exhibit anisotropic mechanical behavior and residual stresses due to their layer-by-layer fabrication process. Therefore, understanding how cyclic thermal loads affect these materials is critical for ensuring their durability and reliability in real-world service conditions. The applied thermal profile follows the general principles of standardized thermal aging procedures for polymers, such as those described in ASTM D2126 [
24].
To evaluate the dimensional stability and thermomechanical response of additively manufactured specimens, a controlled thermal cycling protocol was employed. This accelerated aging regimen was designed to simulate the cyclic thermal fatigue experienced in industrial environments, where repeated heating and cooling can induce progressive structural degradation. The protocol specifically targets thermal fatigue mechanisms arising from internal stresses generated by anisotropic and constrained thermal expansion and contraction—conditions intrinsic to layer-wise manufacturing processes.
Although
Figure 2 illustrates the initial printed samples, the same specimens were used throughout the entire experimental procedure, and their final condition after ten thermal cycles was evaluated through dimensional measurements rather than visual comparison. The visual aspect of the samples remained almost unchanged, with only slight surface matting observed due to thermal exposure, hence additional photographic documentation was not essential for illustrating the results.
All parts were printed with a vertical build orientation, where the height (H) corresponded to the Z-axis (build direction) and the width (W) lay in the X–Y plane. The filament deposition direction alternated between +45° and −45° for successive layers, following a bidirectional raster pattern to enhance interlayer bonding and minimize warping.
The specimens were positioned centrally on the build platform in a 3 × 3 matrix layout, ensuring uniform temperature distribution and consistent material flow across all parts. This configuration reduced the influence of edge effects or local thermal gradients during printing.
Given the well-known anisotropy of FDM-printed materials, the chosen orientation and deposition strategy ensured that dimensional variations induced by thermal cycling could be directly correlated with the build direction. Consequently, the analysis of H and W directions presented in
Section 4 explicitly reflects the anisotropic behavior of the printed Z-ULTRAT parts under cyclic thermal stress.
The temperature range of −20 °C to +80 °C was selected to reproduce realistic operational conditions encountered by polymer-based components in industrial and environmental applications, such as automotive, aerospace, or consumer devices. This interval ensures exposure both below and above ambient levels, generating repeated expansion–contraction phenomena without exceeding the glass transition temperature of Z-ULTRAT (≈96 °C). Thus, the applied profile induces cumulative thermo-mechanical stress representative of practical service environments while avoiding irreversible softening.
Thermal cycling was performed using a commercial environmental chamber. The system integrates PID-controlled Peltier and resistive heating modules with forced-air circulation for uniform heat transfer. The internal temperature is monitored and controlled with an accuracy of ±0.2 °C, while uniformity across the test volume remains within ±1.5 °C, as verified by three Type-K thermocouples positioned at the upper, central, and lower regions of the chamber. Relative humidity was not controlled in this experiment and remained at ambient levels (approximately 40–45%) to isolate the effect of thermal variation.
During testing, all samples were placed on a perforated aluminum support grid and remained free-standing to allow unrestricted dimensional response under cyclic heating and cooling. This configuration ensures that the observed dimensional deviations are exclusively due to thermal stresses within the material rather than external mechanical constraints.
The thermal cycles were applied using a programmable environmental chamber, following a standardized 75 min profile per cycle. This cycle, graphically represented in
Figure 3, is composed of five sequential stages:
Cooling Ramp: A linear decrease in temperature from +20 °C to −20 °C over 30 min, corresponding to a cooling rate of −1.33 °C/min.
Dwell at Minimum Temperature: Upon reaching −20 °C, the chamber held this temperature for 30 min to ensure full thermal equilibration before reheating.
Heating Ramp: A linear increase in temperature from −20 °C to +80 °C over 30 min, corresponding to a heating rate of +3.34 °C/min.
Dwell at Maximum Temperature: After reaching +80 °C, the chamber held this temperature for 30 min to allow thermal stabilization throughout the samples.
Cooling Ramp: * A linear decrease from +80 °C back to +20 °C over 30 min, corresponding to a cooling rate of −2.0 °C/min.
Intermediate Isothermal Dwell: A 15 min isothermal hold at +20 °C allowed for thermal stabilization prior to the next thermal cycle.
This thermal profile was repeated for a predetermined number of cycles to evaluate the cumulative effects of thermal stress on the dimensional accuracy of the specimens [
25]. The profile ensures thermal gradients and stress reversals that replicate harsh operational conditions.
Figure 3 illustrates the initial cycles of this protocol, highlighting the symmetric heating and cooling ramps and the intermediate dwell at 20 °C. This graphical depiction underscores the consistency and precision of the applied thermal loading, which is essential for correlating dimensional changes to thermal fatigue behavior.
3.3.3. Dimensional Measurements
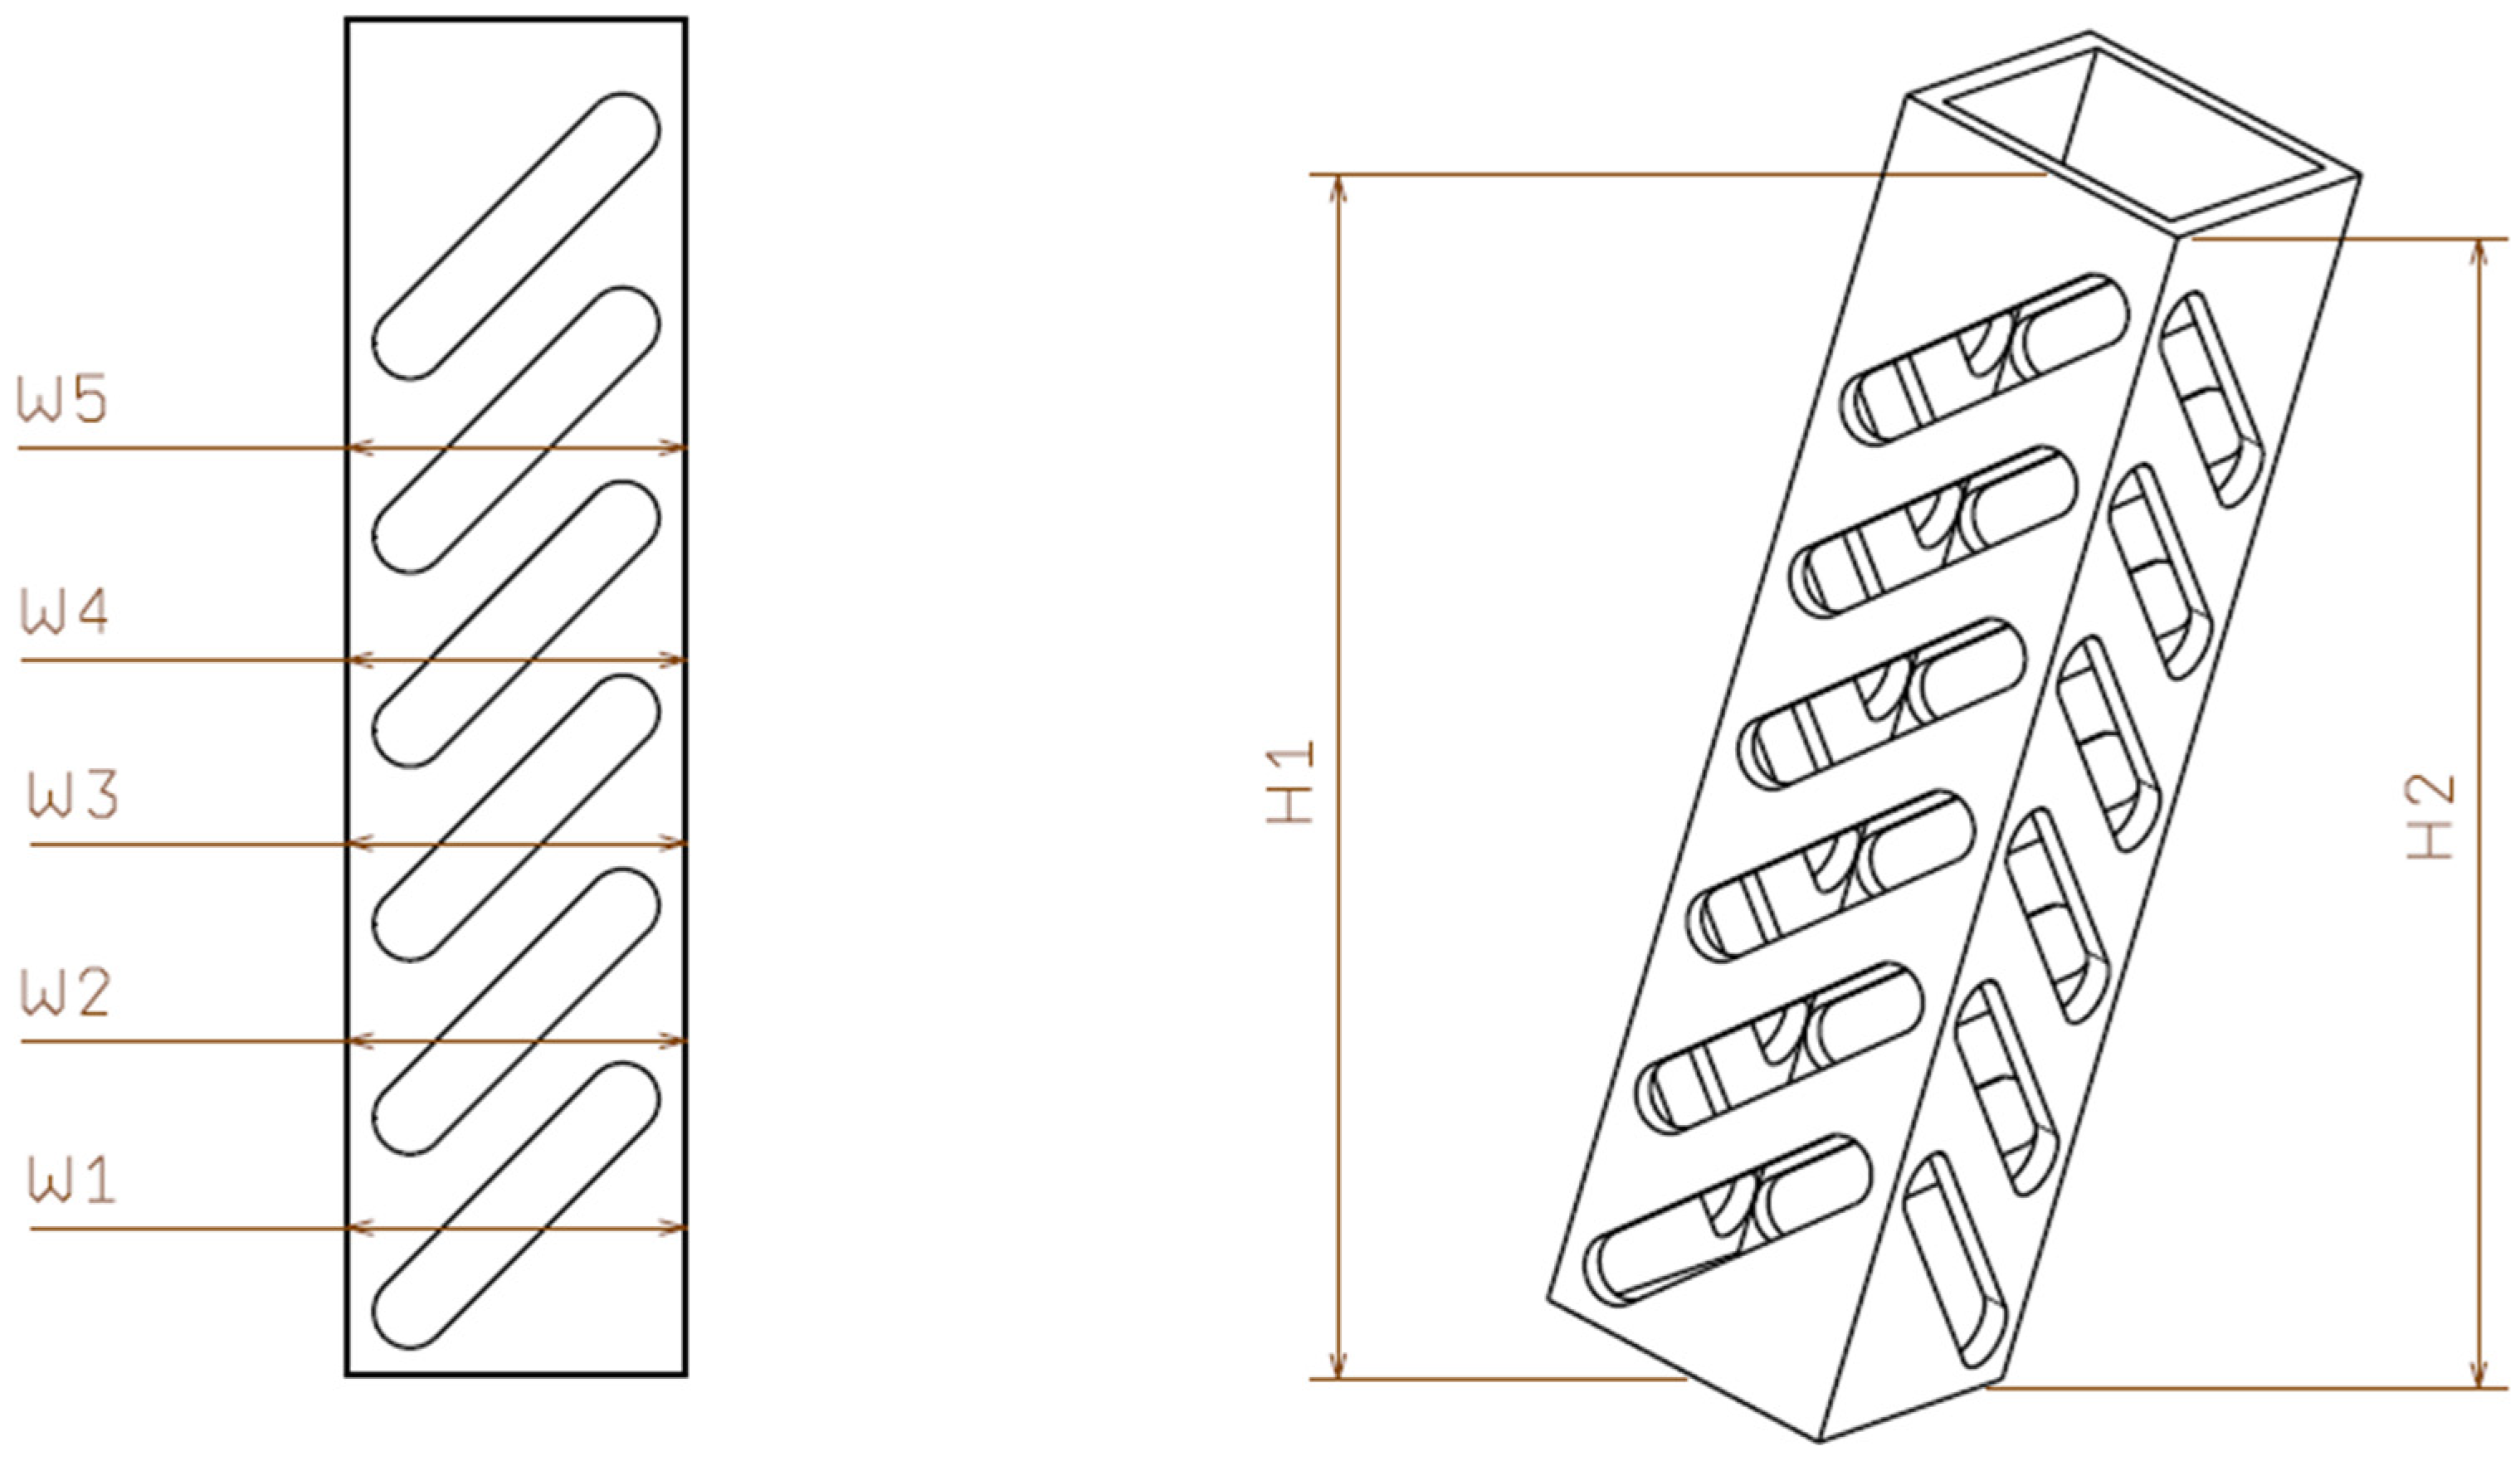
The parts’ dimensions were measured both before exposure to thermal cycles and after each set of cycles (1, 5, and 10 cycles). The CAD model of the specimen was a rectangular prism with nominal dimensions of 35.00 mm in height (H), 8.75 mm in width (W), and 20.00 mm in length (L). The points marked as W
1–W
5 and W′
1–W′
5 in
Figure 4 represent measurement locations distributed at 2.0 mm intervals along two perpendicular directions. These points were used to record dimensional data at multiple sections of the part, ensuring consistent evaluation of width variation after thermal cycling. Measurements were taken using a digital caliper, providing precise data at the millimeter level. Both H
1 and H
2 represent height measurements taken along the Z-axis at two opposite sides of the specimen to detect possible non-uniformities in vertical expansion. The schematic representation in
Figure 4 is intended to illustrate the measurement points and does not imply that the height was measured at an angle. The measurements were performed in two directions:
H direction (height of the part) to observe any vertical changes in the part.
W direction (widths of the part) to evaluate the thermal effects on the part’s thickness at multiple measurement points,
Figure 4. In the figure as show only the W
1 to W
5. The widths W’
1 to W’
5 are measured in a perpendicularly direction.
After measurements, the data were organized in a table to evaluate dimensional changes and calculate the average differences between initial and post-cycle measurements. Statistical analyses (such as t-tests, ANOVA) were also applied to verify the significance of the observed differences and to identify the factors that most influence the dimensional accuracy of the parts.
To ensure the accuracy of the measurements, a Mitutoyo digital caliper with a precision of 0.01 mm was used. This tool was used to measure the parts’ dimensions in both the H and W directions at multiple points to obtain an average and evaluate variations. The measurements were conducted in a controlled environment to minimize the influence of external factors such as humidity or temperature fluctuations.


