1. Introduction
Nickel-based superalloys exhibit exceptional mechanical properties at temperatures up to 1473 K [
1,
2]. Hastelloy X (UNS N06002) demonstrates superior oxidation resistance, creep strength, and thermal stability, making it one of the key materials for gas turbine hot-section components and heat exchanger applications [
3]. The geometric complexity required in modern aerospace components has necessitated the adoption of Laser Powder Bed Fusion (LPBF), which enables near-net-shape fabrication of intricate geometries unattainable by conventional methods [
4,
5].
LPBF processing of nickel superalloys presents fundamental metallurgical challenges associated with extreme thermal gradients (10
5–10
6 K/m) and rapid solidification rates (10
3–10
6 K/s) [
6]. The as-built microstructure exhibits characteristic features including (i) fine cellular–dendritic substructures with intercellular spacing of 0.5–2.0 μm, (ii) a pronounced <001> crystallographic texture aligned with the build direction [
7], and (iii) residual porosity typically ranging from 0.01 to 0.1% [
8]. These microstructural characteristics induce significant mechanical anisotropy and reduced ductility through Hall–Petch strengthening mechanisms and cellular boundary impedance to dislocation motion [
9,
10].
Process optimization studies have identified volumetric energy density, E = P/(v·h·t), as a primary control parameter for LPBF processing, where P, v, h, and t represent, respectively, laser power, scan velocity, hatch spacing, and layer thickness [
11]. Systematic investigations of Hastelloy H have established optimal processing windows within 100 to 150 J/mm
3, achieving relative densities exceeding 99.9% [
12]. However, equivalent energy densities achieved through different parametric combinations yield substantially different microstructural characteristics, indicating complex process–structure relationships beyond simplistic energy density considerations [
13].
The rapid solidification kinetics of LPBF induce severe microsegregation phenomena, with preferential partitioning of refractory elements (Mo, W, and Cr) to intercellular regions, creating local compositional heterogeneities that deviate significantly from equilibrium conditions [
14,
15]. This chemical inhomogeneity, combined with thermal stress-induced defects, including microcracks and lack-of-fusion boundaries, substantially limits the mechanical performance of as-built components relative to wrought counterparts [
16,
17].
Post-processing treatments represent a critical requirement for achieving acceptable mechanical properties in LPBF nickel superalloys. Conventional heat treatment is typically conducted by solution annealing at 1323–1423 K, followed by aging treatments at 973–1123 K, demonstrating effectiveness in precipitate optimization and residual stress relief [
18,
19]. However, conventional thermal treatments exhibit a limited capability for addressing fundamental microstructural limitations, including cellular morphology and porosity [
20,
21]. Research on LPBF Inconel 718 has shown that standard heat treatment yields γ″ and γ′ precipitate formation with corresponding yield strength increases of 15–25%, while cellular substructures and porosity remain largely unaffected [
22]. Similarly, solution treatment of LPBF Hastelloy X at 1450 K effectively dissolves carbide precipitates and reduces microsegregation but fails to eliminate cellular morphology and residual porosity [
23,
24].
Hot Isostatic Pressing (HIP) has emerged as the superior post-processing approach due to its simultaneous application of elevated temperature (1393–1473 K) and isostatic pressure (75–150 MPa), enabling comprehensive microstructural reconstruction beyond conventional heat treatment capabilities [
25,
26]. The HIP treatment is demonstrated by recent studies on LPBF nickel superalloys, which demonstrated complete porosity elimination (from 0.15% to <0.01%) and cellular structure dissolution in LPBF Inconel 718 following HIP at 1393 K/100 MPa/4 h, with corresponding ductility improvements exceeding 60% [
27]. The high pressure of HIP treatment enables pressure-assisted diffusion mechanisms for closing microcracks and lack-of-fusion defects that remain unaffected by thermal treatment alone [
28]. Extended exposure times typical of HIP processing (2–6 h) promote complete homogenization and recrystallization processes, evidenced by cellular boundary elimination and equiaxed grain morphology development [
29,
30].
According to the available literature, the advantage of HIP over conventional heat treatment is substantial when analyzing fatigue performance data: while heat-treated LPBF Inconel 718 demonstrates 2-fold fatigue life improvement compared to as-built conditions, HIP-treated specimens exhibit 4–5-fold enhancements, attributed to synergistic effects of defect elimination, microstructural homogenization, and reduced stress concentration factors [
31,
32]. For Hastelloy H specifically, preliminary studies indicate that HIP treatment at 1433 K/100 MPa represents an optimal processing window, achieving thermodynamic driving forces for recrystallization and sufficient pressure for defect closure without inducing excessive grain coarsening beyond 100 μm [
33]. The analysis for superalloy processing optimization reveals that nickel-based alloy exhibits optimal densification and mechanical properties when subjected to HIP conditions of 1453 K at 175 MPa for 4 h, with this parameter set demonstrating superior grain structure uniformity and enhanced tensile properties compared to lower-pressure treatments [
34]. Furthermore, comparative microstructural analysis shows that HIP treatment completely consolidates LPBF materials by closing cracks and reducing residual porosity to less than 0.1%, while simultaneously promoting recrystallization with the formation of nearly equiaxed grains and the dissolution of detrimental carbide films along grain boundaries [
2]. Research demonstrates that HIP combined with direct aging treatment protocols can achieve fatigue life improvements of up to 134.7% compared to standard heat treatment, with the enhanced performance attributed to optimized γ″ phase distribution and increased dislocation motion resistance from relatively coarse precipitates formed at grain boundaries [
35].
Hastelloy X shows different mechanical properties depending on the manufacturing technology. LPBF as-built material has the highest strength, with yield strength usually above 600 MPa and ultimate tensile strength (UTS) over 700 MPa, but it is less ductile and can have more tiny pores (
Table 1). After HIP treatment, the material becomes less porous and more ductile, with a yield strength of around 450–500 MPa and a UTS of about 650–700 MPa. Forged Hastelloy X has a yield strength of 400–500 MPa and a UTS of 650–750 MPa, with the best ductility.
The present investigation addresses the knowledge gap regarding the systematic characterization of HIP treatment effects on optimally processed LPBF Hastelloy X. Building upon previous optimization work identifying superior LPBF parameters (v = 900 mm/s, P = 120 W, h = 0.06 mm, and E = 111 J/mm
3), yielding 99.96% relative density [
34], this study evaluates comprehensive microstructural evolution and mechanical property enhancement following HIP treatment at 1433 K and 100 MPa for 4 h. This research employs advanced characterization techniques, including quantitative metallography, electron backscatter diffraction, and comprehensive mechanical testing, to establish processing structure relationships essential for industrial implementation of HIP-post-processed LPBF nickel superalloys in critical aerospace applications.
Many studies have looked at how Hot Isostatic Pressing (HIP) affects nickel-based superalloys made by LPBF. However, few have clearly analyzed the balance between reducing material anisotropy and keeping mechanical strength—especially in high-quality, dense LPBF Hastelloy X. This study aims to fill that gap by (1) measuring how HIP changes the microstructure of well-processed LPBF Hastelloy X, (2) comparing how well HIP removes defects versus how much it reduces anisotropy, and (3) linking those microstructural changes to differences in mechanical properties.
2. Materials and Methods
2.1. Materials and Powder Characterization
The investigated material was gas-atomized Hastelloy X powder supplied by EOS GmbH (Krailling, Germany). The composition confirmed compliance with Hastelloy X specifications [
37] (
Table 2).
2.2. Powder Characterization
Particle size distribution was determined using laser diffraction spectroscopy ((LA-950V2, Horiba Scientific, Kyoto, Japan)) following the ISO 13320:2020 standard [
38]. The refractive index was set to 1.65 for the NiCrFe alloy.
Powder morphology was characterized using scanning electron microscopy SEM (TM-1000, Hitachi High-Technologies Corporation, Tokyo, Japan)) operated at an accelerating voltage of 15 kV. Samples were mounted on carbon tape.
2.3. Laser Powder Bed Fusion Processing
LPBF processing was conducted using an EOS M100 system equipped with. The process parameters used for manufacturing the samples are as follows (
Table 3).
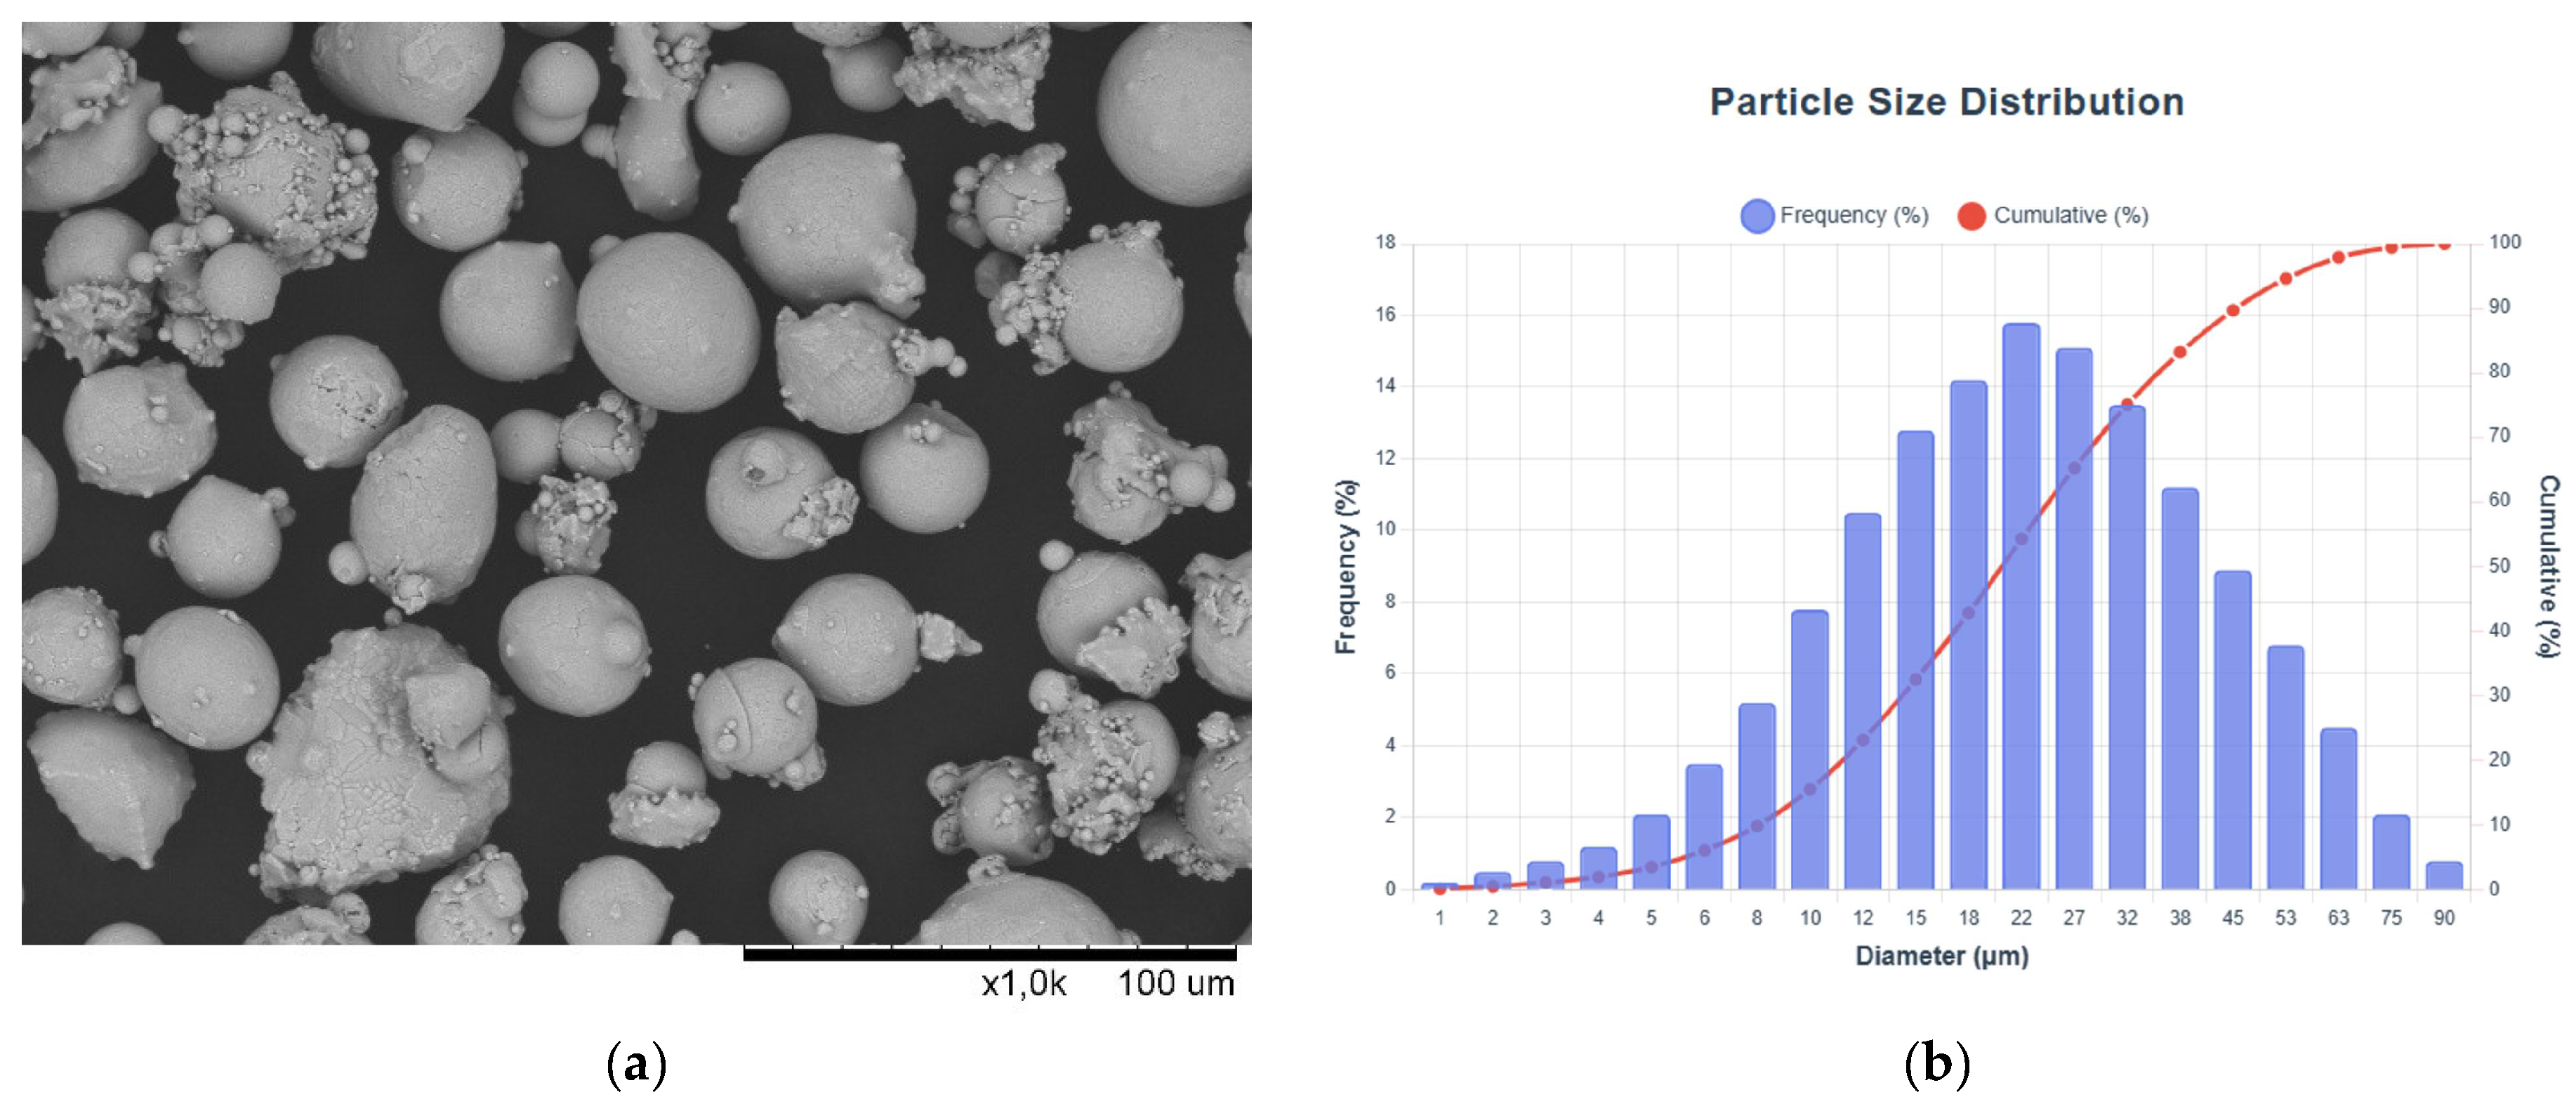
Laser diffraction yielded D10 = 18.2 ± 0.5 µm, D50 = 32.1 ± 0.8 µm, and D90 = 47.8 ± 1.2 µm (
Figure 1). The span factor was 0.92 ± 0.04, indicating a narrow distribution with minimal fine (<15 µm) and oversized particles (>50 µm), suitable for consistent layer deposition.
2.4. Sample Preparation and Hot Isostatic Pressing
Cubic specimens measuring 20 × 25 × 20 mm3 were positioned with their largest faces parallel to the build platform. In order to eliminate porosity and homogenize the material properties, one of the 20 × 25 × 20 mm samples was subjected to heat treatment. HIP was performed at 1160 °C and 100 MPa for 4 h, followed by furnace cooling to room temperature. After the process, an identical set of specimens was extracted from the as-printed material.
2.5. Microstructure, Hardness, and Density Analysis
Metallographic preparation: The grinding sequence progressed through 240-, 400-, 800-, and 1200-grit SiC papers with decreasing rotational speeds and forces, followed by polishing with 3 μm and 1 μm diamond suspensions and final polishing with 0.05 μm colloidal silica.
Electrochemical etching was used to reveal the microstructure. A 10% perchloric acid solution in oxalic acid was used. The etching parameters included 5 V DC applied voltage, current density of 0.1–0.15 A/cm2, etching time of 160 s, and temperature maintained at 293 K ± 2 K. The process was conducted using a Struers LectroPol-5 (Struers A/S, Ballerup, Denmark)with automatic current control under proper safety protocols, including fume extraction and emergency neutralization procedures.
Relative density was determined using Archimedes’ principle. The procedure involved dry mass measurement in air followed by wet mass measurement in distilled water, with calculation of relative density as the ratio of measured density to theoretical density multiplied by 100%.
Vickers microhardness measurements were performed according to ASTM E384-17 [
39] using a Zwick Roell ZHVμ with an automatic positioning system. There were 7 indentations per line with 3 lines per specimen, with spacing of 0.5 mm between indentations and measurements in both the XY (build plane) and XZ (build-normal) directions.
2.6. XRD and EBSD Analysis
X-ray diffraction analysis was performed using a Bruker D8 Advance system configured with Cu Kα (λ = 1.5406 Å) generator settings of 40 kV and 40 mA and a Lynx-Eye position-sensitive detector in Bragg–Brentano geometry. Measurement parameters included a scan range of 15° to 120° (2θ) with a step size of 0.02° and a counting time of 2 s per step while maintaining sample rotation at 15 rpm.
Electron backscatter diffraction (EBSD) analysis was conducted using a Hitachi SU-70 SEM equipped with an Oxford Instruments Symmetry EBSD detector. Sample preparation involved mechanical polishing to a 0.05 μm finish, followed by argon ion beam polishing using a Gatan PIPS II system with a beam energy of 6 keV, an incident angle of 6°, a polishing time of 4 h, and a final energy of 1 keV for 30 min. EBSD measurements were performed with a step size of 0.65 µm.
2.7. Tensile Tests
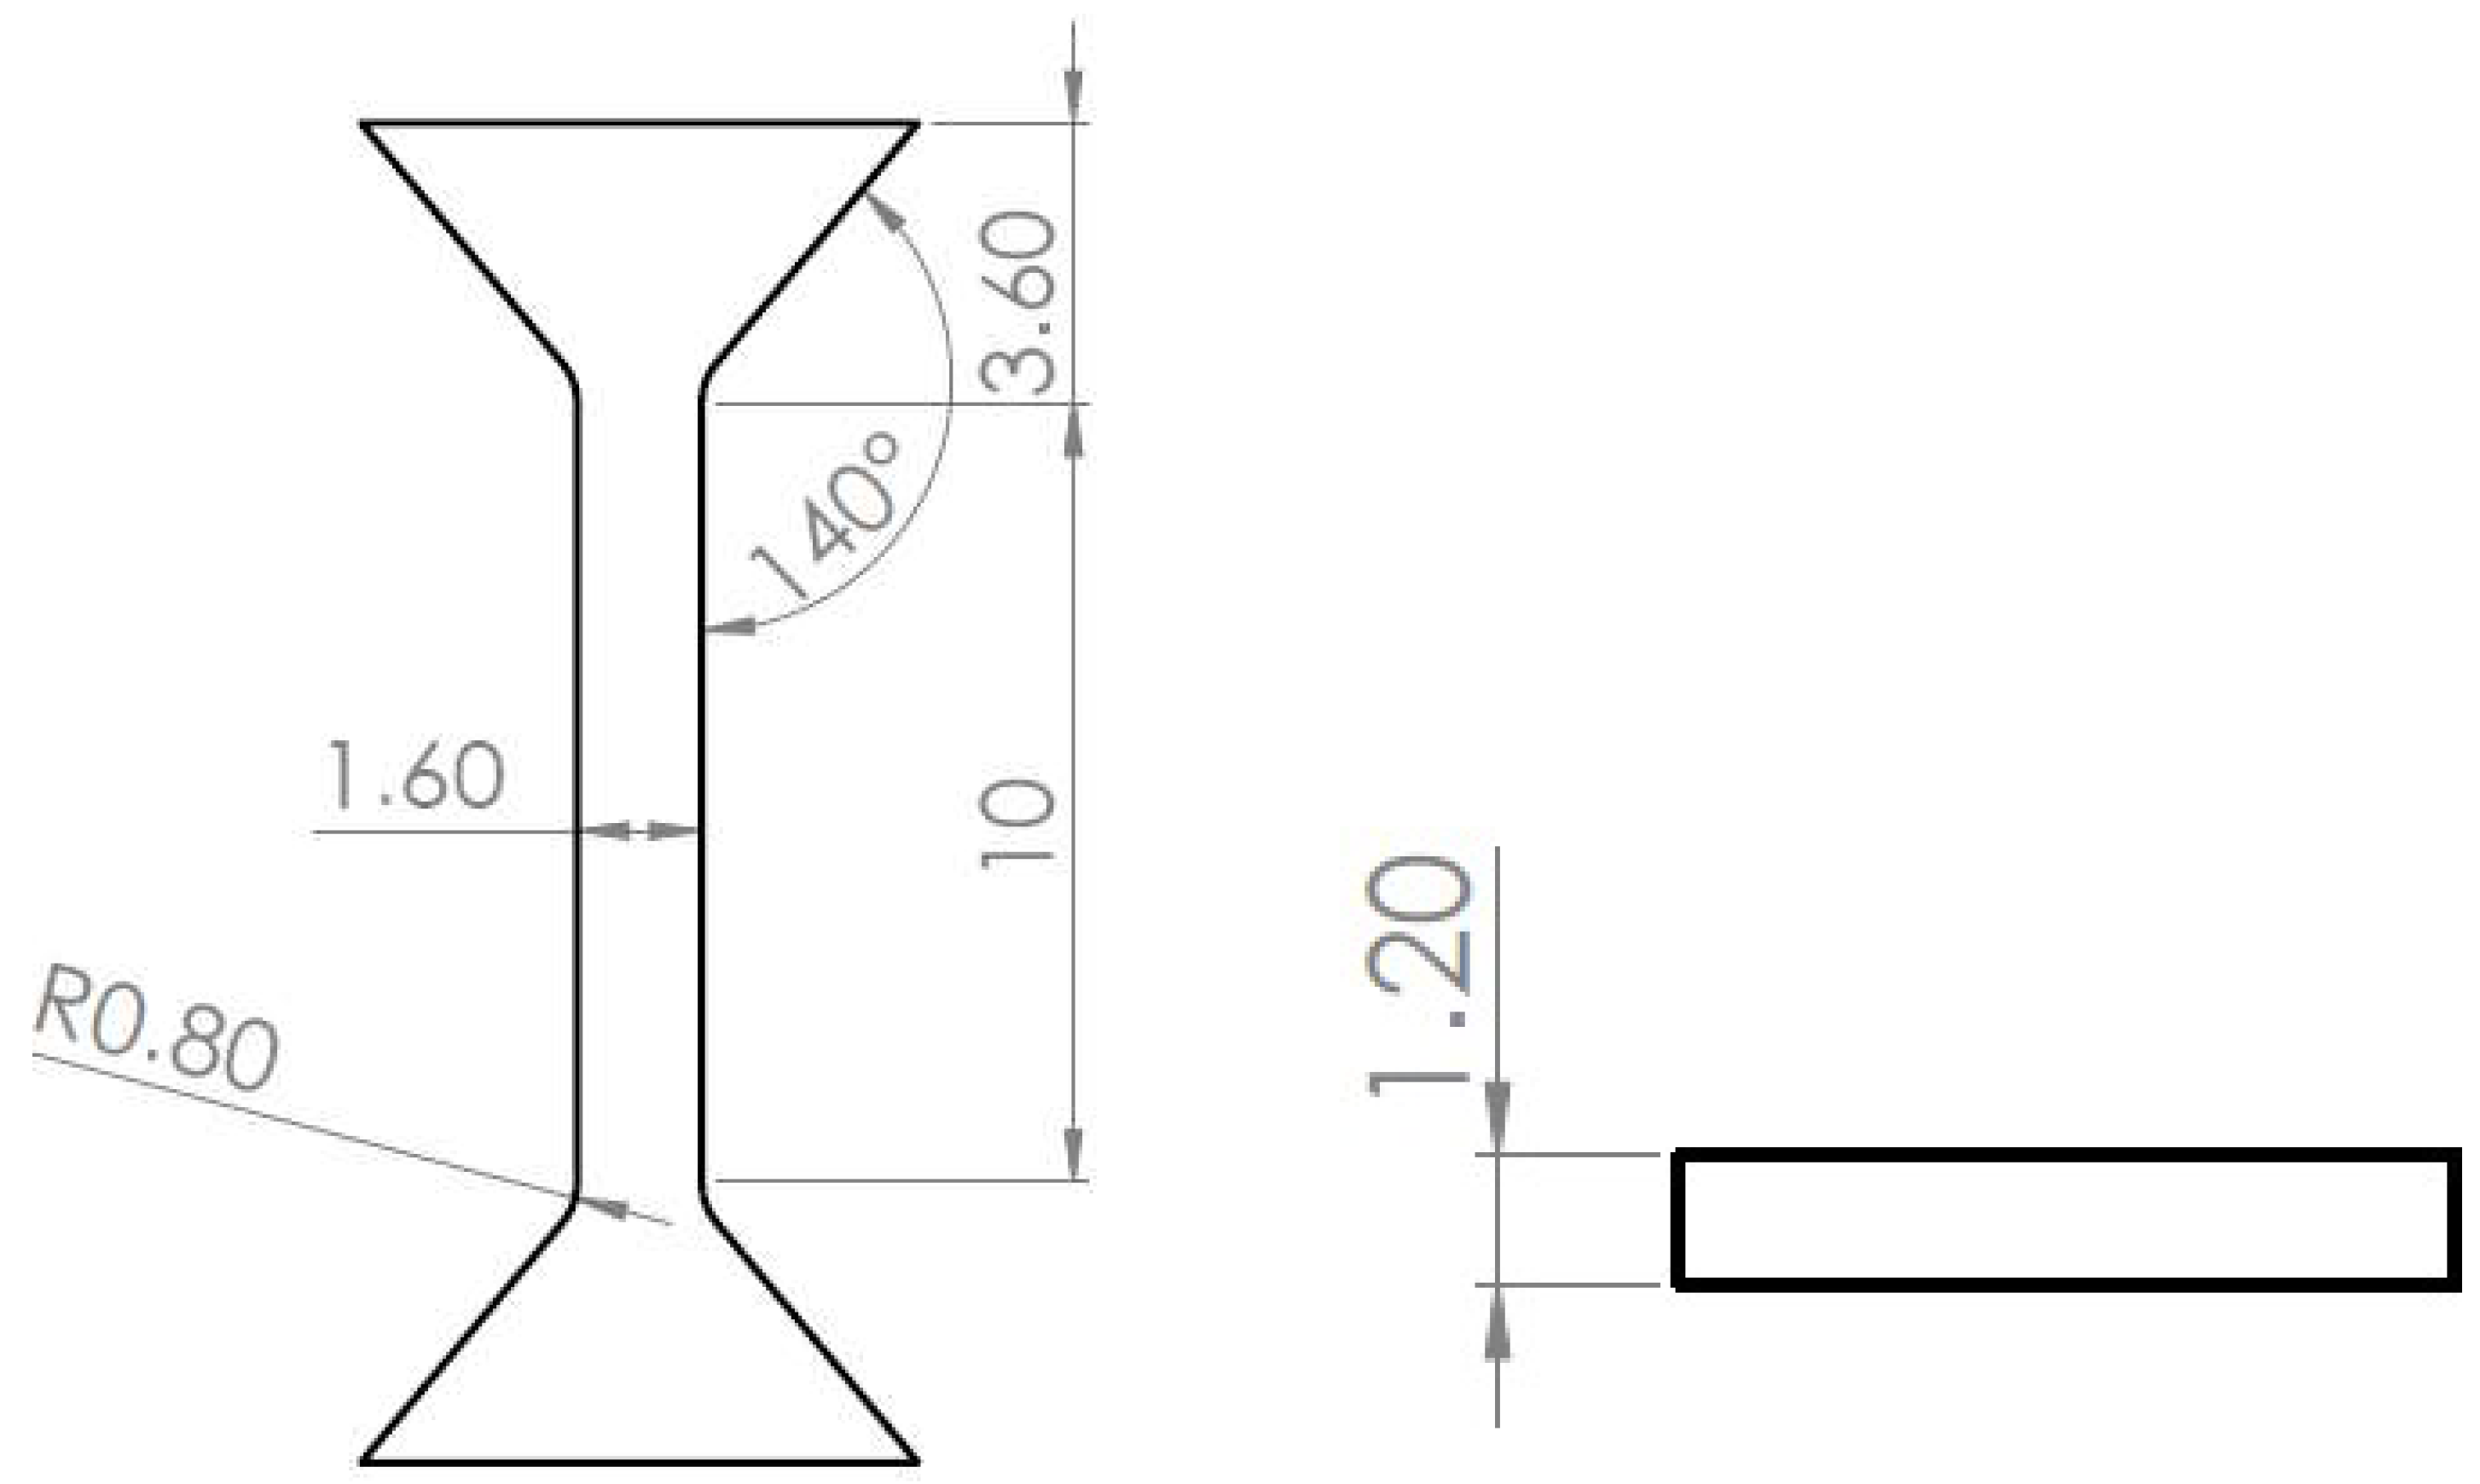
Tensile tests on the miniature specimens (
Figure 2) were carried out using a Zwick/Roell Z005 testing machine (ZwickRoell, GmbH & Co., Ulm, Germany) equipped with a ±5 kN load cell. Elongation during testing was measured using a non-contact optical strain analysis method based on Digital Image Correlation (DIC), implemented via Vic 2D software (Version 7, Correlated Solutions, Inc., Columbia, SC, USA). The tests were performed at an initial strain rate of 1 × 10
−3 s
−1, corresponding to a crosshead speed of 0.01 mm/s. For this study, a minimum of three samples were tested for each corresponding condition. The results exhibited low variability, with deviations below 3% for both yield strength (YS) and ultimate tensile strength (UTS). Regarding maximum elongation, the deviation remained under 2 percentage points. The methodology and sample preparation were verified in another study, in which the results showed that machining does not affect the mechanical properties [
40].
3. Results
3.1. Hardness and Porosity Analysis
The volumetric energy density optimization study revealed that a VED of 75 J/mm3 provided the best processing conditions with a relative density of 99.85 ± 0.15% and a microhardness of 254 ± 6 HV2. An initial study was performed to determine the optimal processing parameters for achieving the highest density. Small cubes were printed that showed the following results. The chosen parameters resulted in a density greater than 99,5%. Lower VED values of 45 J/mm3 resulted in insufficient melting with a relative density of only 97.2 ± 0.8% and lack-of-fusion porosity. Higher VED values of 79 J/mm3 caused keyhole porosity formation and surface degradation with a decreased density of 99.3 ± 0.3%. The high relative density and minimal defect content demonstrate successful process optimization for Hastelloy X processing.
3.2. Microstructural Evolution
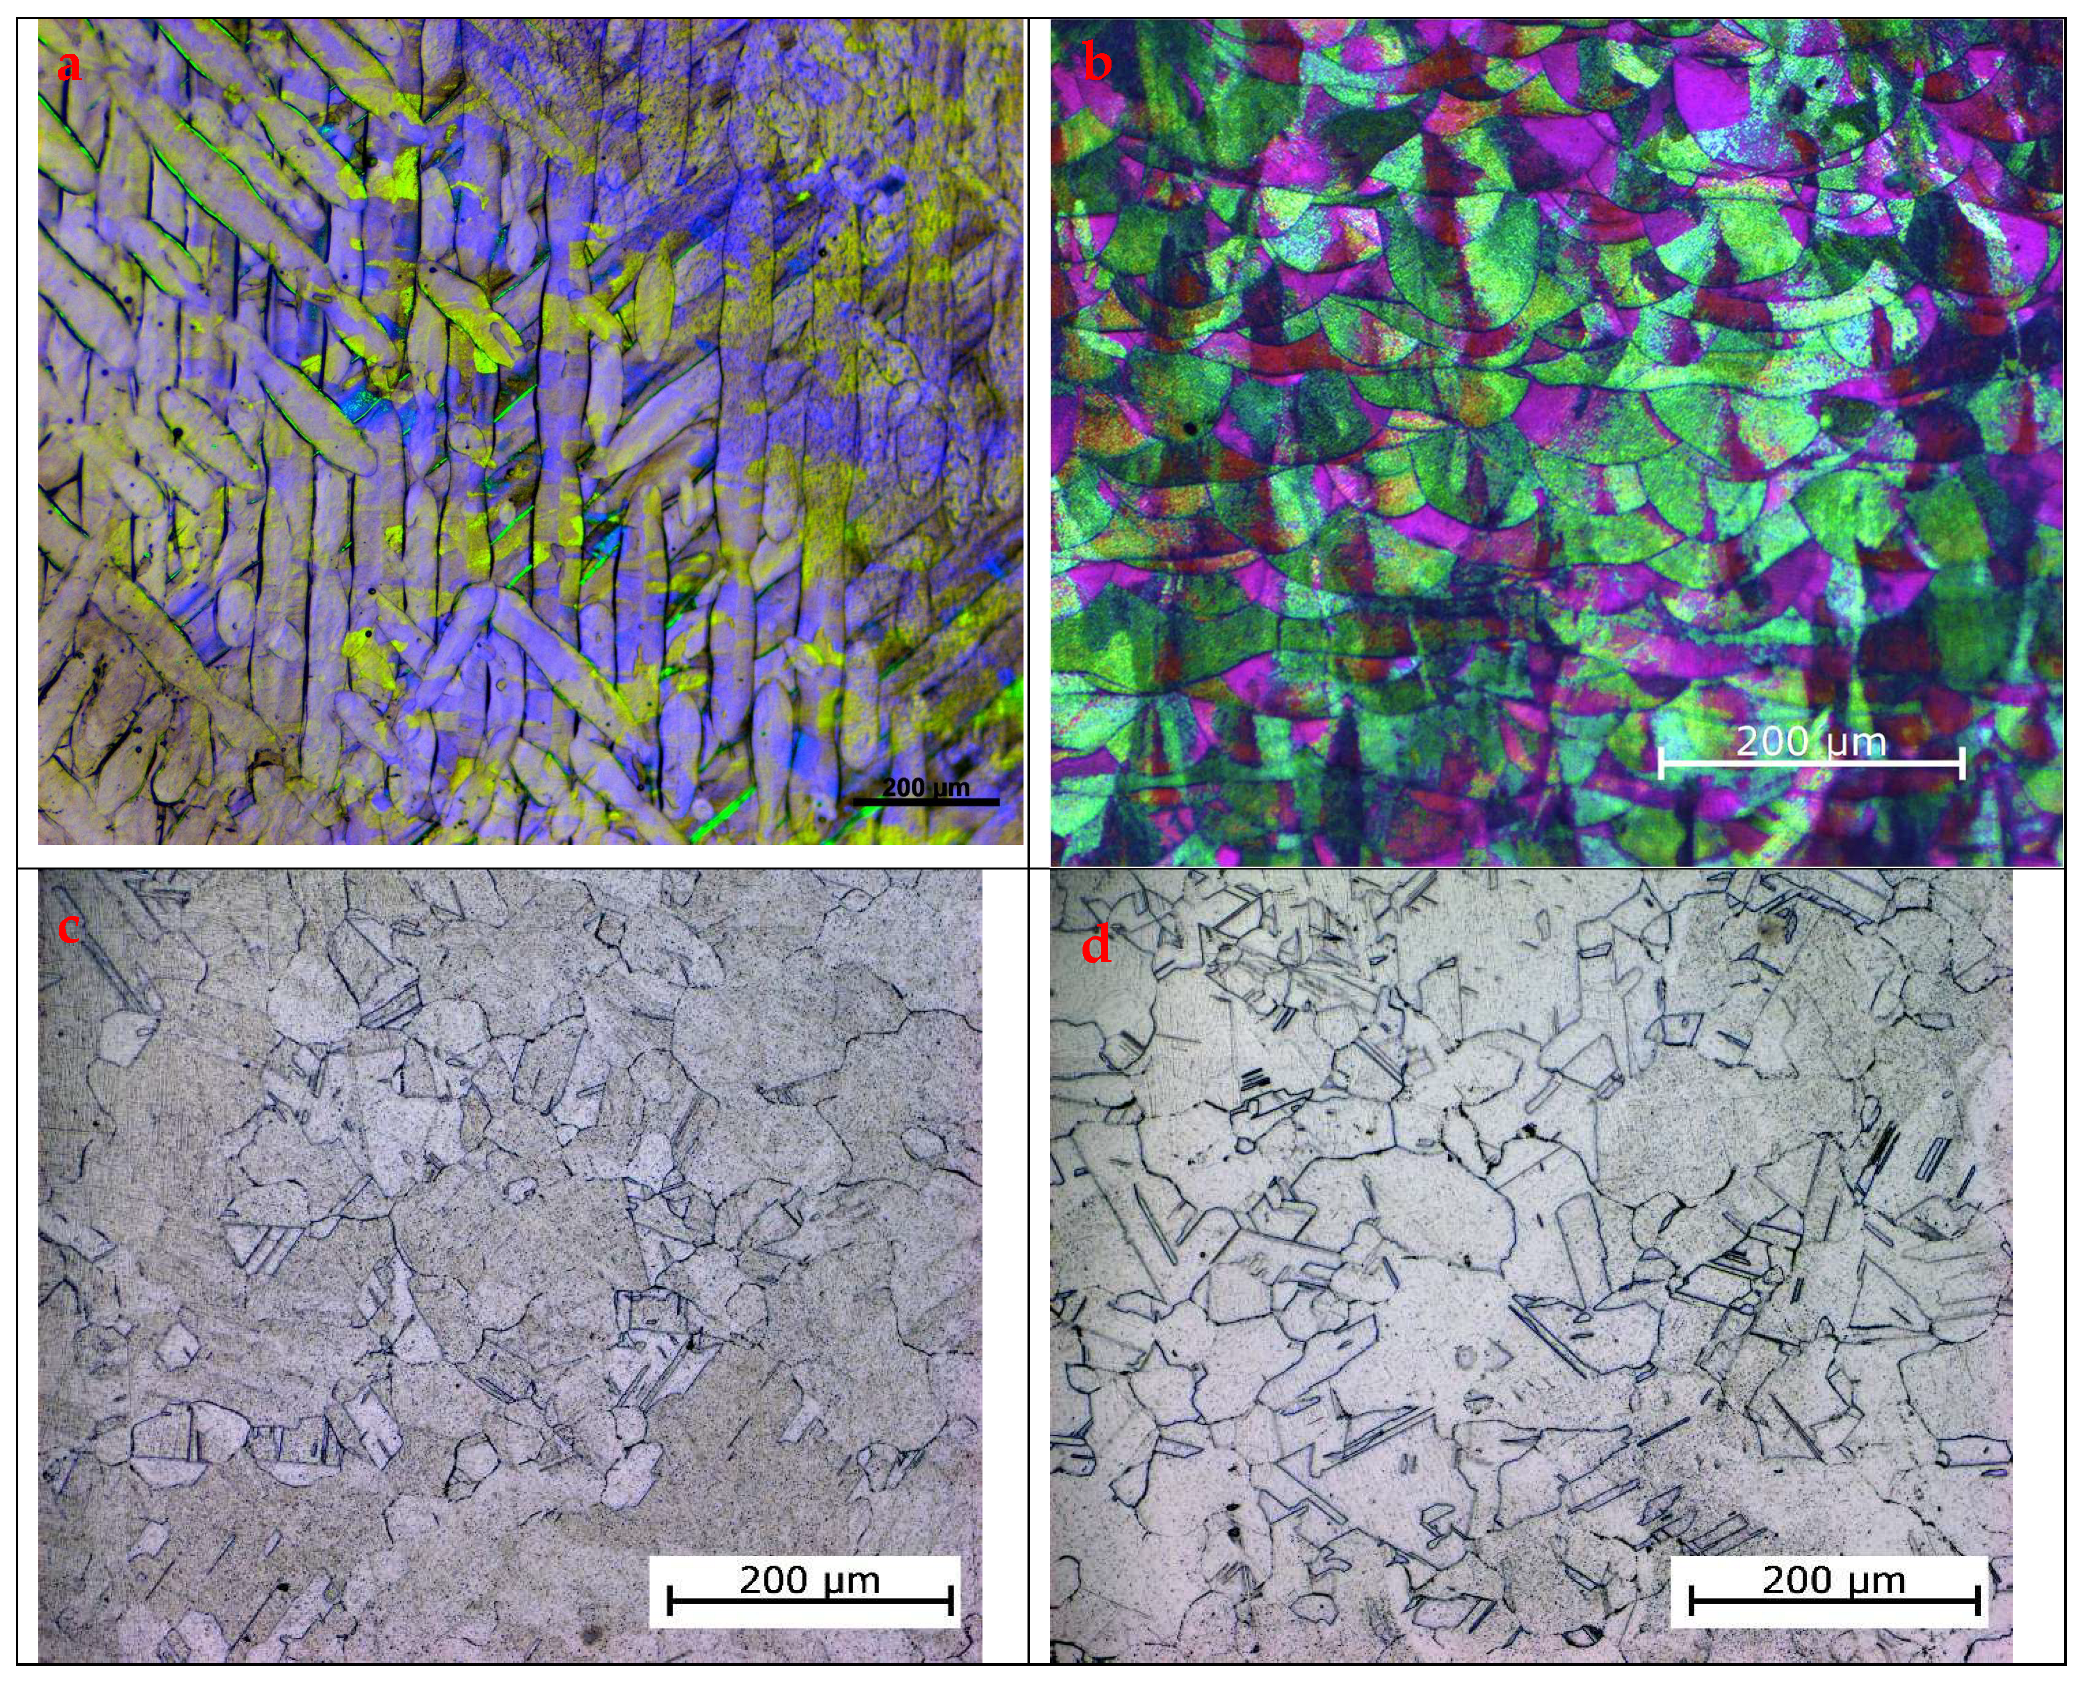
The as-built microstructure exhibited characteristic LPBF features, including fine cellular–dendritic solidification structures with primary dendrite arm spacing of 1.2 ± 0.3 μm and secondary dendrite arm spacing of 0.4 ± 0.1 μm (
Figure 3a,b). The microstructure showed evidence of epitaxial grain growth across multiple layers with preferential <001> texture aligned with the build direction. Melt pool boundaries were clearly visible with overlapping geometry indicating proper track-to-track and layer-to-layer fusion.
Following HIP treatment (
Figure 3c,d), significant microstructural changes occurred, including complete dissolution of cellular–dendritic substructures, formation of equiaxed grain structure through recrystallization and grain growth, and homogenization of chemical composition through elimination of microsegregation. The grain boundary network became more uniform with a reduced density of low-angle boundaries and an increased proportion of high-angle boundaries, indicating completion of recovery and recrystallization processes.
The uniform grain growth across multiple layers is a well-documented phenomenon in LPBF processing, where the partially remelted previous layers serve as nucleation sites for new grains, promoting texture development along the build direction [
3]. This texture formation is particularly pronounced in nickel-based superalloys due to their relatively high thermal conductivity and the preferential growth of <001> oriented grains during rapid solidification.
Following HIP treatment at 1160 °C for 4 h under 100 MPa pressure, significant microstructural changes occurred. Complete dissolution of cellular–dendritic substructures: The fine cellular network formed during rapid solidification was eliminated through thermally activated diffusion processes. Homogenization of chemical composition: The elimination of microsegregation through enhanced diffusion at high temperature resulted in a more uniform chemical distribution. Grain boundary network evolution: The grain boundary character distribution shifted from high-energy, high-angle boundaries to a more stable configuration with reduced internal stress (
Figure 3c,d).
These microstructural changes are consistent with the typical response of additively manufactured nickel-based superalloys to high-temperature post-processing treatments. The HIP treatment effectively addresses the primary microstructural limitations of as-built LPBF materials, including residual porosity, microsegregation, and internal stress concentrations.
3.3. EBSD Analysis and Grain Structure Evolution
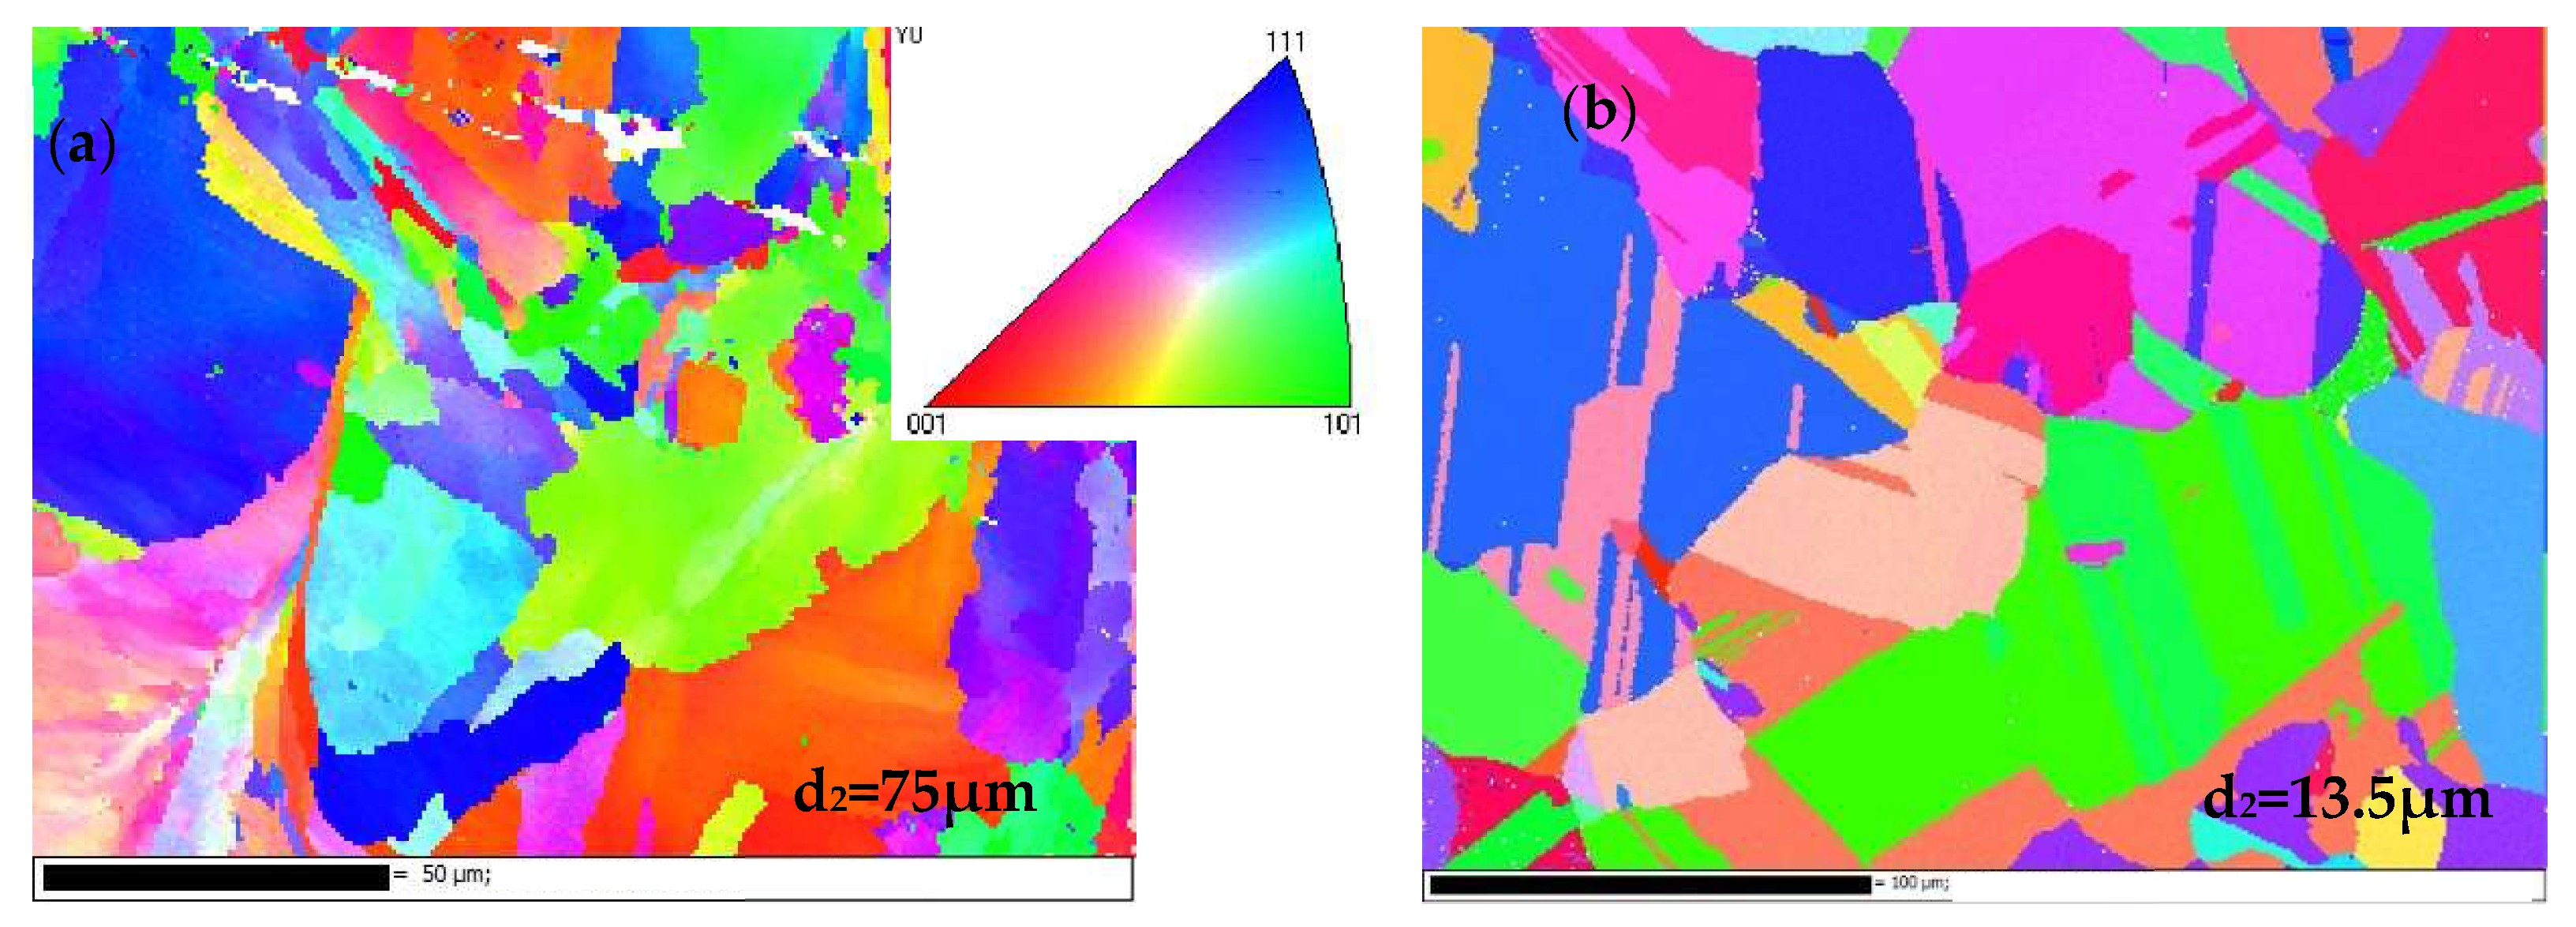
EBSD mapping revealed substantial grain structure evolution following HIP treatment. The as-built condition exhibited an equivalent grain diameter (d2) of 7.5 μm with elongated grains oriented parallel to the build direction and a strong <001> texture with a maximum intensity of 12.3 times random. The grain boundary character distribution showed a high proportion of low-angle boundaries (15–45°) comprising 34% of the total boundaries, indicating significant stored energy from rapid solidification.
Post-HIP treatment resulted in grain coarsening with equivalent grain diameter increasing to 13.5 μm, representing an 80% increase (
Figure 4a). The texture intensity reduced to 3.2 times random, indicating significant weakening of the build-direction-dependent crystallographic orientation (
Figure 4b). The proportion of low-angle boundaries decreased to 18%, while high-angle boundaries increased correspondingly, demonstrating completion of the recrystallization processes.
3.4. Mechanical Properties and Hardness Evolution
Vickers microhardness measurements revealed significant changes following HIP treatment. The as-built condition exhibited hardnesses of 254 ± 8 HV2 in the XY plane and 250 ± 8 HV2 in the XZ plane, representing a minimal anisotropy of 1.6%. The slight hardness difference between orientations was attributed to crystallographic texture and grain boundary density variations associated with the build direction.
Post-HIP treatment resulted in substantial hardness reductions to 170 ± 8 HV2 in the XY plane and 172 ± 8 HV2 in the XZ plane, representing a 32% decrease from the as-built condition. The hardness anisotropy was completely eliminated with a less than 1% difference between orientations. This hardness reduction correlates directly with the observed grain coarsening through the Hall–Petch relationship, where hardness decreases with increasing grain size according to H = H0 + kd−1/2, where H is hardness, H0 is friction stress, k is the Hall–Petch constant, and d is average grain diameter.
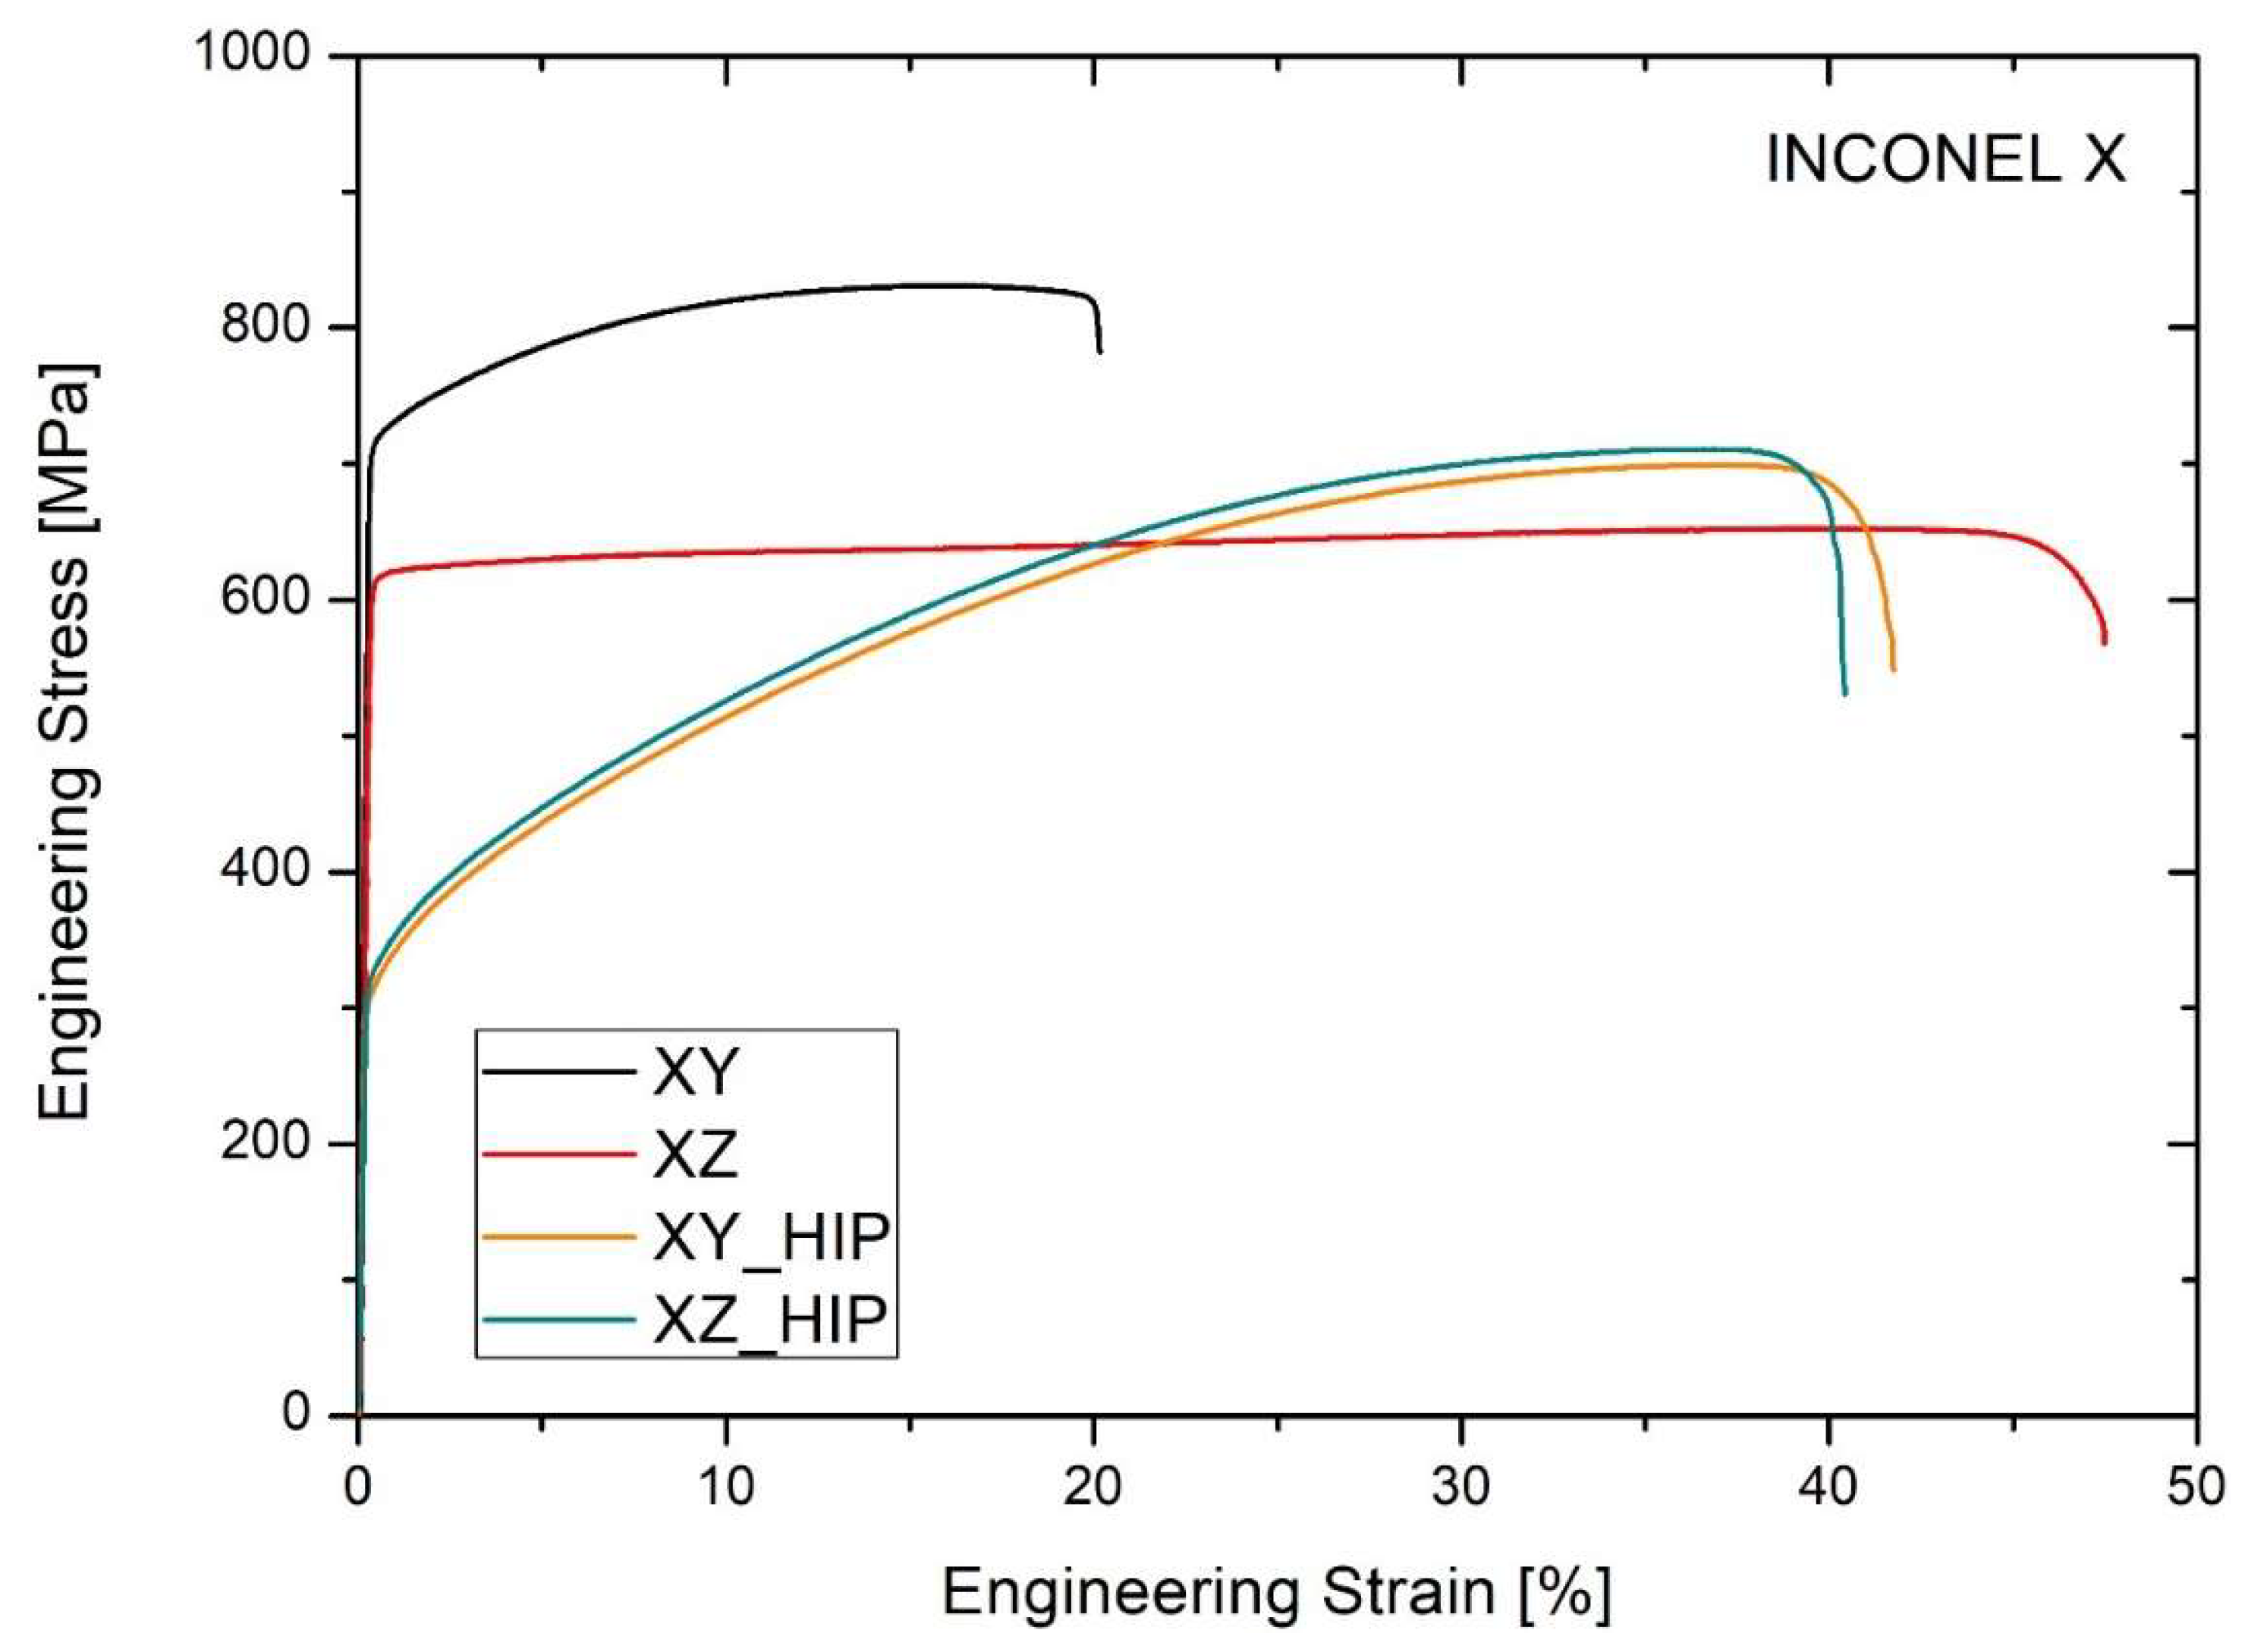
The tensile test results presented in
Figure 5 and
Table 4 provide conclusive evidence of the significant influence of build orientation and Hot Isostatic Pressing (HIP) post-processing on the mechanical properties of Hastelloy X alloy fabricated via Laser Powder Bed Fusion (LPBF). As-built LPBF specimens exhibited pronounced mechanical anisotropy, directly attributable to the layer-by-layer manufacturing process, where specimens built in the XY orientation demonstrated superior strength characteristics with yield strength (YS) reaching 682 MPa and an ultimate tensile strength (UTS) of 864 MPa, albeit with limited ductility (17% elongation to failure). Conversely, XZ-oriented specimens showed substantially reduced strength properties (YS = 621 MPa, UTS = 653 MPa) but exhibited very high ductility with elongation reaching 47%, reflecting the influence of inter-layer boundaries and columnar grain structure orientation relative to the loading direction. A direct comparison of elongation at break for XZ and XZ after HIP is not appropriate due to the completely different behavior of these two materials. Based on the curve for XZ, we can conclude that the material has no strengthening (or weakening) effect during the tensile test, which is uncommon. In the case of the HIP-treated material, we see a clear strengthening of the material during the tensile test until the tensile strength is reached. Once this is reached, there is a clear localization of deformation in the form of a neck and effective breakage of the sample. A typical strengthening effect is a reduction in the plasticity of the material, and a decrease in plasticity, defined as elongation to failure, from 47% to 38% speaks very well for the properties of the material after the HIP process.
Post-processing via HIP treatment resulted in significant microstructural homogenization, manifesting as a substantial reduction in yield strength to approximately 315 MPa, regardless of build orientation, due to comprehensive stress relaxation mechanisms and fundamental microstructural modifications, including complete elimination of process-induced porosity; grain recrystallization and growth; and relief of residual stresses accumulated during the LPBF process. Following HIP treatment, specimens demonstrated remarkable mechanical isotropy with comparable ductility values independent of build orientation (41% for XY_HIP and 38% for XZ_HIP), while ultimate tensile strength values remained at elevated levels of 682 MPa (XY_HIP) and 691 MPa (XZ_HIP), indicating an optimal strength–ductility balance achieved through the HIP process.
These findings validate HIP as an effective post-processing technique for enhancing ductility and achieving mechanical property homogenization in additively manufactured components, where the improved mechanical isotropy and balanced strength–ductility characteristics make HIP-treated LPBF Hastelloy X particularly suitable for critical applications involving high-temperature service conditions and complex, multi-directional loading scenarios, such as aerospace turbine components and chemical processing equipment where mechanical reliability and performance consistency are paramount requirements.
3.5. X-Ray Diffraction Analysis
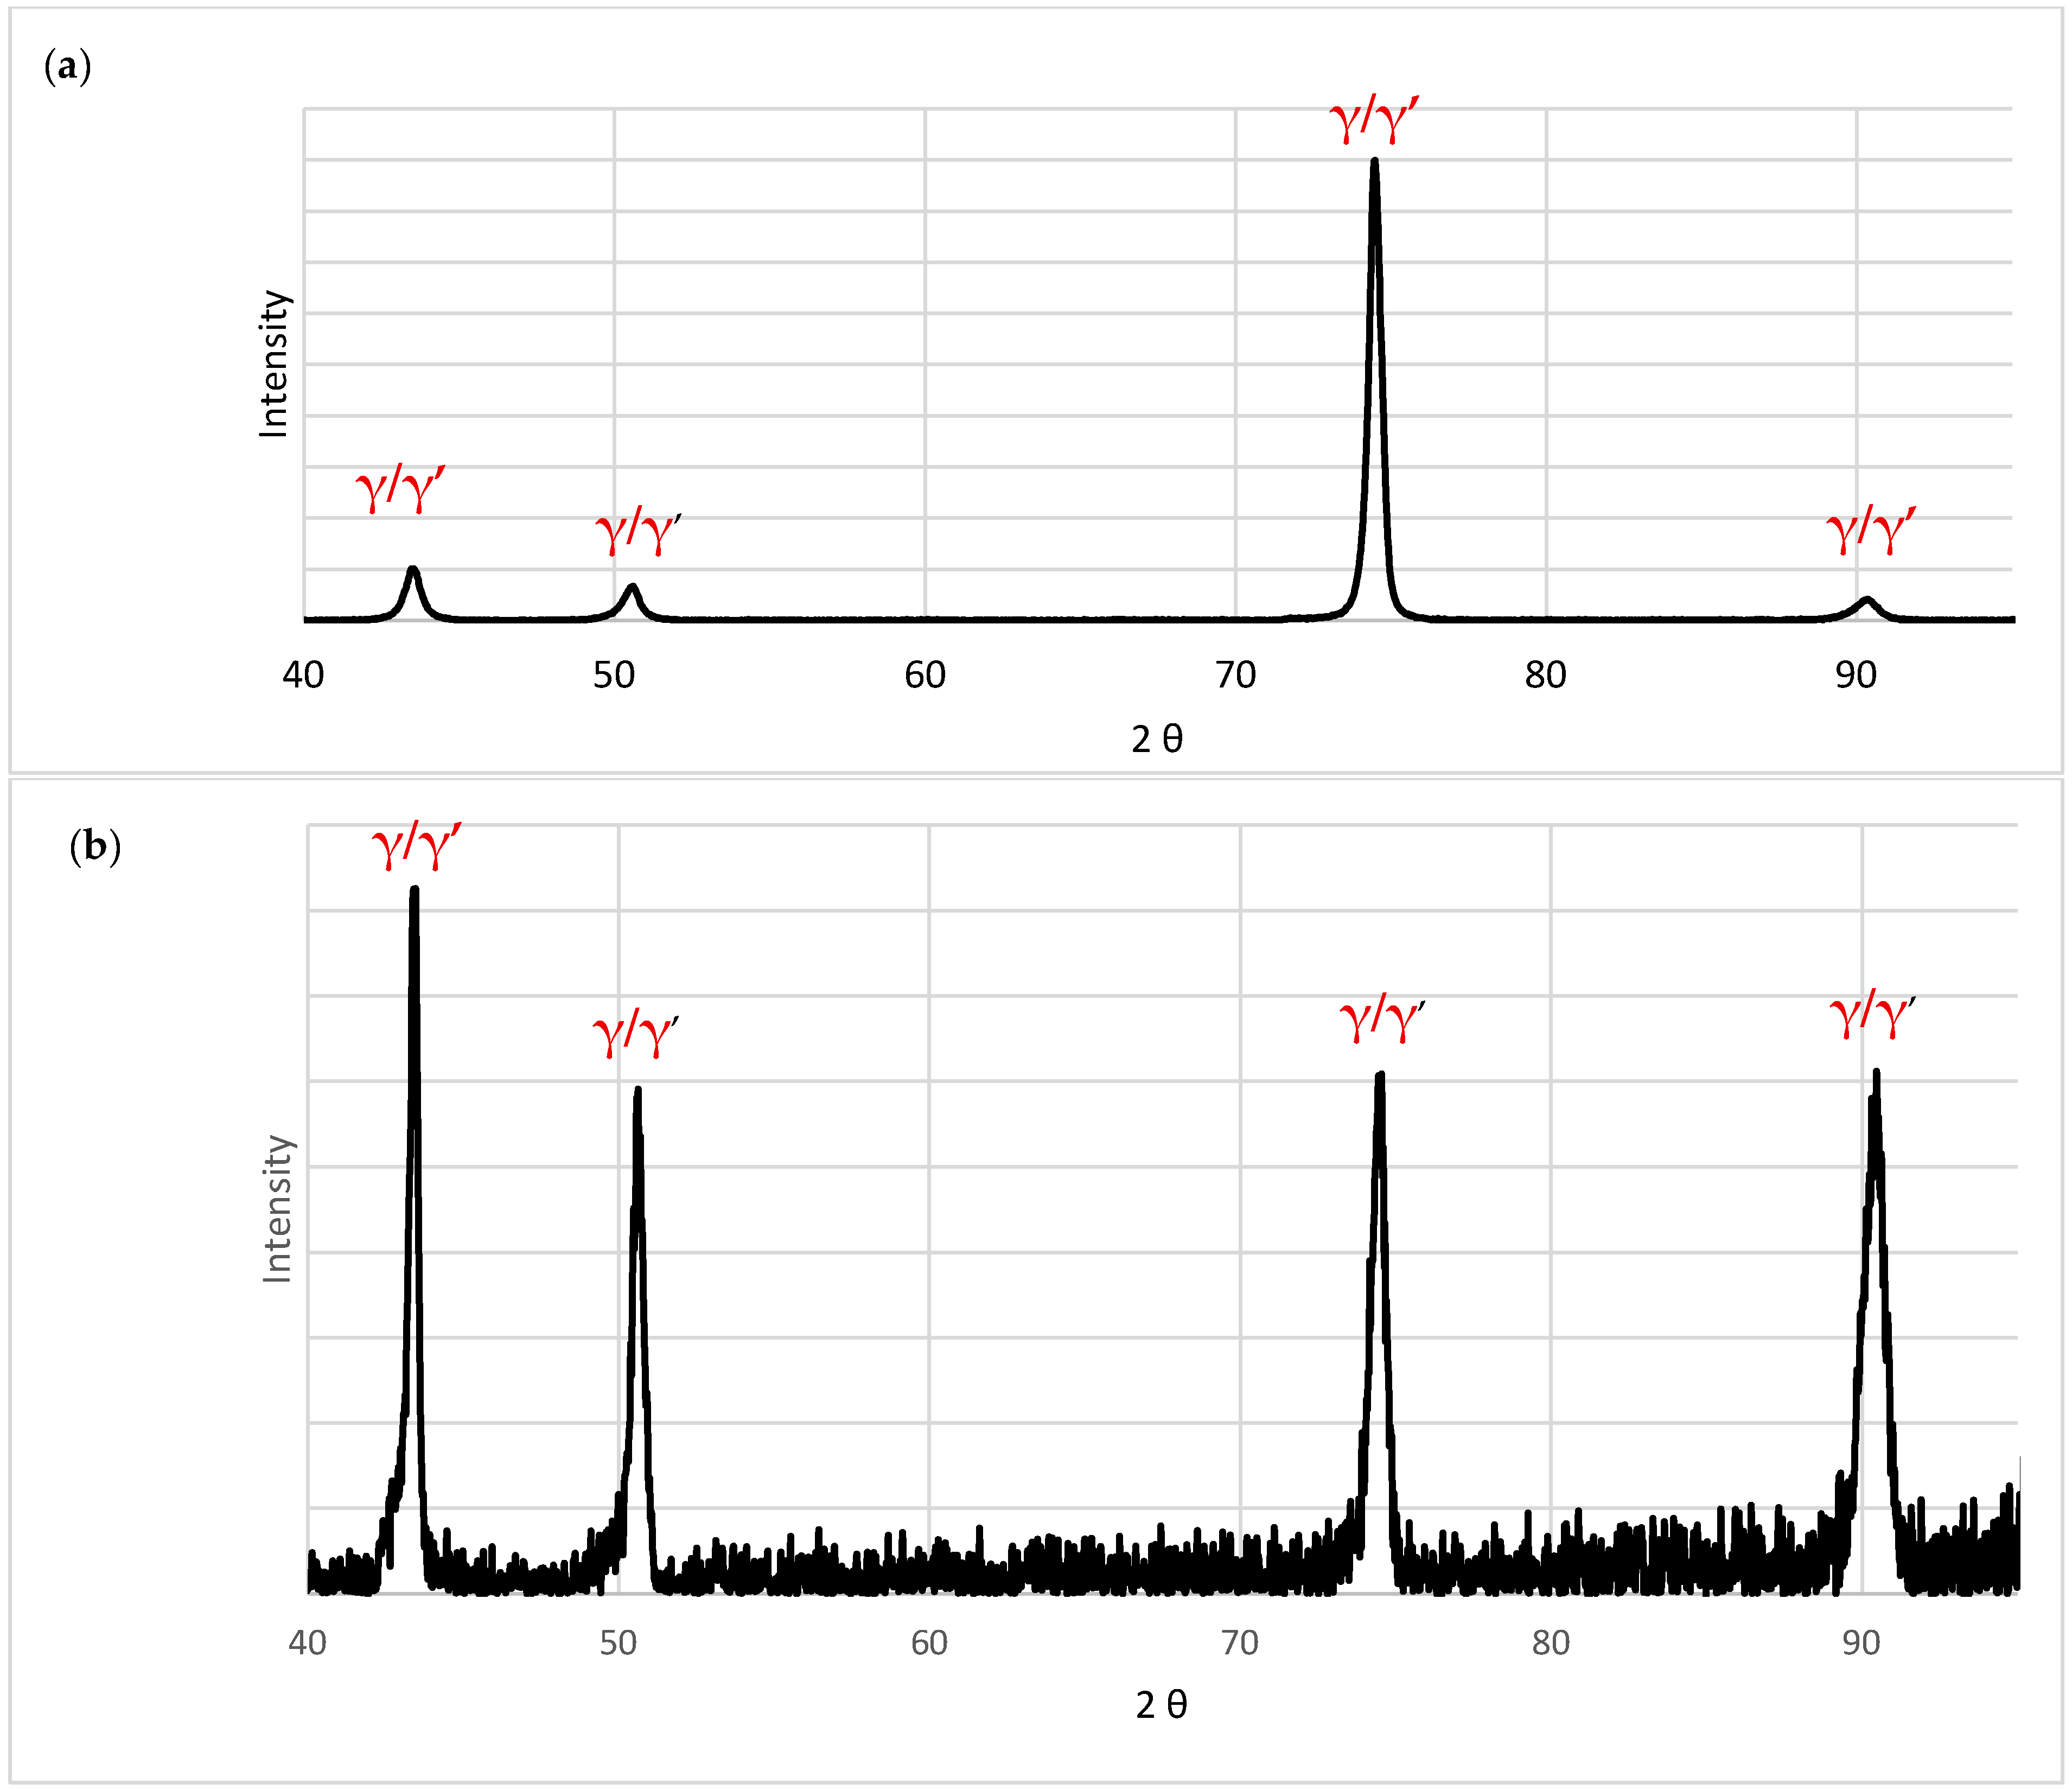
XRD analysis confirmed phase stability throughout the processing sequence, with the austenitic γ-phase (FCC) remaining as the primary constituent under both as-built (
Figure 6a) and post-HIP conditions (
Figure 6b). Furthermore, when compared to the HIP sample, it is clear that the phase composition remains the same, whereas anisotropy decreases after the HIP treatment.
4. Discussion
The microstructural evolution observed in the LPBF-processed Hastelloy X following HIP treatment demonstrates characteristics consistent with the established literature on nickel-based superalloys while revealing unique aspects specific to this alloy system. The observed grain coarsening from 7.5 μm to 13.5 μm (80% increase) aligns closely with findings reported for similar nickel-based superalloys processed under comparable conditions.
According to the comprehensive review by Mostafaei et al., grain coarsening during post-processing treatments is a common phenomenon in fusion-based AM processes, with LPBF-processed SB-CoNi-10 superalloy showing grain size increases exceeding 100 μm under similar thermal conditions [
41]. However, the relatively modest grain growth observed in this study suggests that Hastelloy X exhibits thermal stability compared to other superalloy systems. This stability can be attributed to the alloy’s balanced composition and the presence of stable carbide phases that pin grain boundaries during thermal exposure.
The texture weakening from 12.3× random to 3.2× random demonstrates the significant effect of recrystallization on material anisotropy. This finding is particularly noteworthy when compared to studies on conventional heat treatment approaches, where texture retention remains a persistent challenge. Park et al. demonstrated that standard heat treatments often fail to achieve substantial texture reduction due to insufficient thermal energy for complete recrystallization [
42]. The effectiveness of HIP treatment in texture modification can be attributed to the combination of elevated temperature (1160 °C) and extended exposure time (4 h), which provides sufficient driving force for grain boundary migration and texture randomization.
The complete dissolution of cellular–dendritic substructures observed in this study represents a fundamental advantage of HIP treatment over conventional heat treatment approaches. Studies on similar alloy systems consistently report the persistence of cellular morphology following standard solution annealing treatments. For instance, studies on LPBF Inconel 718 have shown that conventional heat treatment at 1065 °C for 1 h, while effective for precipitate optimization, fails to eliminate cellular boundaries due to insufficient thermal energy and time [
41,
43].
The superior effectiveness of HIP treatment can be attributed to several factors, such as enhanced diffusion kinetics through applied pressure (100 MPa), creating excess vacancies and enhanced atomic mobility, accelerating the dissolution of cellular boundaries. This pressure-assisted diffusion mechanism is absent in conventional heat treatment, where only thermal energy drives the process. The extended processing time of 4 h provides a sufficient duration for complete homogenization compared to typical solution annealing treatments of 1–2 h.
The observed hardness reduction from 254 HV2 to 170 HV2 (a 32% decrease) following HIP treatment reflects fundamental changes in strengthening mechanisms. This hardness evolution follows the Hall–Petch relationship, where the 80% increase in grain size directly correlates with the observed hardness reduction. The relationship H = H0 + kd−1/2 predicts that grain coarsening from 7.5 μm to 13.5 μm should result in approximately 25–30% hardness reduction, which aligns well with experimental observations.
However, it is crucial to note that while the HIP treatment increased material homogeneity, there was a noticeable drop in strength. The increase in elongation can be observed only in the XY direction, whereas in the perpendicular direction, it has decreased. This behavior is attributed to the anisotropic structure of the material oriented along the printing directions. The persistence of some anisotropy despite HIP treatment demonstrates the importance of initial parameter optimization during the LPBF process [
44].
Comparative studies reveal varying responses to HIP treatment depending on alloy composition and processing parameters [
45]. For LPBF Inconel 718, Gribbin et al. reported similar hardness reductions (30–35%) following HIP treatment, attributed to the combined effects of grain coarsening and precipitation changes [
37]. However, studies on LPBF Hastelloy X have shown more modest hardness changes (15–20%), suggesting that solid-solution-strengthened alloys like Hastelloy X exhibit different responses compared to precipitation-strengthened systems.
While HIP treatment achieved >99.8% theoretical porosity reduction through pressure-assisted diffusion mechanisms, the practical impact in this study was limited. The initial porosity of 0.15 ± 0.03% was already relatively low, and the reduction to <0.01% represents a modest absolute improvement. This observation is significant, as it demonstrates that the primary benefit of HIP treatment for well-optimized LPBF parameters lies in addressing homogeneity rather than gross defect elimination.
The temperature–pressure combination promotes creep deformation. However, comparing the porosity in the as-printed material, it can be seen that the pores are not significant, and the HIP treatment does not improve this in a meaningful way, primarily addressing only the issue concerning material homogeneity.
The selected HIP parameters (1160 °C/100 MPa/4 h) represent optimal conditions based on thermodynamic and kinetic considerations. The cooling rate of 10 °C/min prevents thermal stress accumulation while allowing for controlled phase precipitation. Faster cooling rates (>20 °C/min) introduce residual stresses, while slower rates (<5 °C/min) promote excessive grain growth.
The HIP treatment in this particular case has not made a significant impact on defect elimination, which demonstrates the importance of initial parameter optimization during LPBF processing. However, one factor that significantly benefits from HIP treatment is anisotropy reduction, which is a crucial factor in engineering practice. The elimination of hardness anisotropy (from 1.6% to <1%) represents a significant achievement for applications requiring isotropic mechanical properties.
The results demonstrate that HIP treatment effectiveness strongly depends on the initial quality of LPBF-processed components. For materials with well-optimized printing parameters and low initial porosity, the primary benefits lie in microstructural homogenization and anisotropy reduction rather than defect healing. This finding has important implications for cost–benefit analyses of post-processing treatments in industrial applications.
HIP mitigates texture-induced anisotropy and chemical inhomogeneity inherent to LPBF microstructures. Complete chemical homogenization and significant texture reduction enable full homogeneity. However, the trade-off between improved homogeneity and reduced strength must be carefully considered for specific applications.
5. Conclusions
The most significant finding is that HIP treatment completely eliminates the directional mechanical properties that typically occur in 3D-printed parts. Our study shows similar hardnesses between different orientations, while the strong crystallographic texture weakens dramatically (from 12.3× to 3.2× random orientation). This happens because the combination of high temperature and pressure allows grains to reorganize and grow more uniformly, breaking down the columnar grain structure that forms during layer-by-layer printing. This shows that the HIP method is an effective method for the mechanical anisotropy problem that limits many additive manufacturing applications.
- 2.
HIP-induced microstructural transformation improves isotropy in the two main directions; however, the grain-coarsening mechanism reduces the strength values.
The microstructural analysis reveals that HIP treatment changes the overall structure in LPBF Hastelloy X through grain coarsening from 7.5 μm to 13.5 μm, which eliminates cellular–dendritic strengthening structures and reduces hardness by 32% (254 HV2 to 170 HV2). The hardness decrease results from multiple mechanisms, including grain boundaries, substructures, and carbide contributions. A pronounced reduction in yield strength was observed in the XY orientation, from above 682 MPa to 315 MPa after HIP treatment. On the other hand, a significant increase in the isotropy of LPBF was observed after HIP as a result of recrystallization processes that strongly affect the mechanical properties.
Future Work
Future investigations will focus on a more comprehensive characterization of post-processing phenomena in LPBF alloys. Specifically, planned studies include the following: (i) applying combined HIP and aging treatments to optimize microstructure, phase stability, and carbide precipitation; (ii) systematically comparing different post-HIP heat treatment schemes, including conventional solution + aging, with respect to creep resistance and high-temperature mechanical performance; (iii) employing advanced TEM and high-resolution XRD to directly correlate precipitation mechanisms with grain boundary strengthening; (iv) assessing the response of specimens produced under varying LPBF parameters to HIP to establish broader process–property relationships; and (v) conducting EBSD-ODF and XRD texture analyses to clarify the influence of crystallographic orientation on post-HIP isotropy.
