Article

Effect of Al 6061 Alloy Compositions on Mechanical Properties of the Automotive Steering Knuckle Made by Novel Casting Process

1
School of Energy, Materials and Chemical Engineering, Korea University of Technology and Education (KOREATECH), Cheonan 31253, Korea
2
R&D Center, Myunghwa Ind. Co., ltd., Ansan 15429, Korea
3
Liquid Processing & Casting R&D Group, Incheon 21999, Korea
*
Authors to whom correspondence should be addressed.
Metals 2018, 8(10), 857; https://doi.org/10.3390/met8100857
Submission received: 1 October 2018 / Revised: 15 October 2018 / Accepted: 17 October 2018 / Published: 20 October 2018
(This article belongs to the Special Issue Processing-Structure-Property Relationships in Metals)

Abstract

:
This study demonstrates the feasibility of a novel casting process called tailored additive casting (TAC). The TAC process involves injecting the melt several times to fabricate a single component, with a few seconds of holding between successive injections. Using TAC, we can successfully produce commercial-grade automotive steering knuckles with a tensile strength of 383 ± 3 MPa and an elongation percentage of 10.7 ± 1.1%, from Al 6061 alloys. To produce steering knuckles with sufficient mechanical strength, the composition of an Al 6061 alloy is optimized with the addition of Zr, Zn, and Cu as minor elements. These minor elements influence the thermal properties of the melt and alloy, such as their thermal stress, strain rate, shrinkage volume, and porosity. Optimal conditions for heat treatment before and after forging further improve the mechanical strength of the steering knuckles produced by TAC followed by forging.

Graphical Abstract

1. Introduction

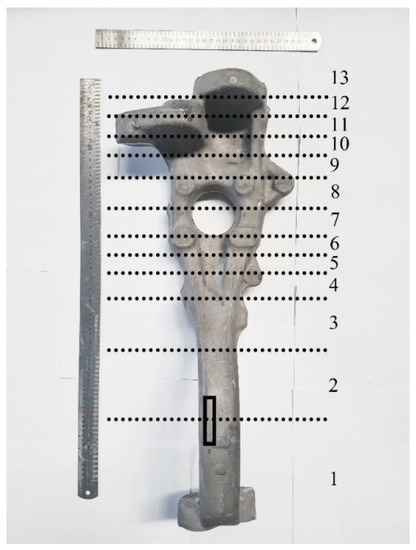
Metal casting is one of the oldest manufacturing processes, in which molten metal is poured into a mold to form the desired shape and then allowed to solidify [1]. Its relative simplicity makes casting highly advantageous for mass production; however, an inherent problem with casting is the formation of a shrinkage cavity caused by volume reduction, which is inevitably introduced in the phase transformation from liquid to solid [2,3,4]. A general solution for eliminating the shrinkage cavity is the installation of excess materials, such as biscuits, runners, risers, and overflows [5,6]. Consequently, the normal recovery rate of casting (i.e., the weight ratio of the final product to the molten metal used for fabrication) is approximately 70%, and 30% of the material is wasted. Additionally, subsequent processing is required to remove the excess material after casting; this implies that extra material and energy are inevitably required to fix this intrinsic problem of the casting process. Here, we propose a novel method called tailored additive casting (TAC) to improve material recovery to approximately 90%. TAC consists of several steps, and in each of these steps, melt injection is started, stopped, and held [7]. The number of steps and the injection and holding times in each step are determined by the complexity of the mold’s shape. In the TAC process, molten metal is prepared in a reservoir heated at a constant temperature. The molten metal is injected into a mold via an outlet; the physical position of this outlet is moved upwards as the level of the molten metal in the mold rises to maintain a small distance between the outlet and the top surface of the molten metal. Using TAC, we improve recovery to over 90% and eliminate the need for subsequent processing to remove excess materials. In addition to the improvement of recovery, TAC technique enables us to cast various alloys, regardless of their melt viscosity. Currently, the steering knuckles are fabricated by tilt casting process, using A356 Al alloy in industry. A melt viscosity of A356 is low enough for the casting process, yet its mechanical strength is a low: ultimate tensile strength is at about 300 MPa or lower. Other Al alloys with higher mechanical strengths, such as Al 6xxx or Al 7xxx alloys, are not suitable for the fabrication of the knuckles by tilt casting process, due to their high melt viscosity. The alloys with high mechanical strength yet high melt viscosity are used in continuous casting, by which castings with only simple geometry can be produced. However, these alloys are not applicable to fabricate castings with complex shapes. Another possible advantage of TAC is that forging can occur immediately after solidification because of the remaining heat in the casting alloys. Here, we demonstrate the clear superiority of our method by fabricating steering knuckles with outstanding mechanical strength from the Al 6061 alloy, as shown in Figure 1. A steering knuckle is an important component of automotive suspension systems, and many attempts have been made to fabricate steering knuckles with Al alloys to reduce vehicle weight [8,9,10,11,12]. To improve the mechanical properties of steering knuckles, we evaluate various compositions of Al alloys by analyzing their thermal properties, such as thermal stress, shrinkage starting temperature (SST), shrinkage characteristics, and pore formation. In addition, like previous studies, we perform forging and heat treatment to further improve the mechanical strength of the steering knuckles [13].

2. Material and Methods

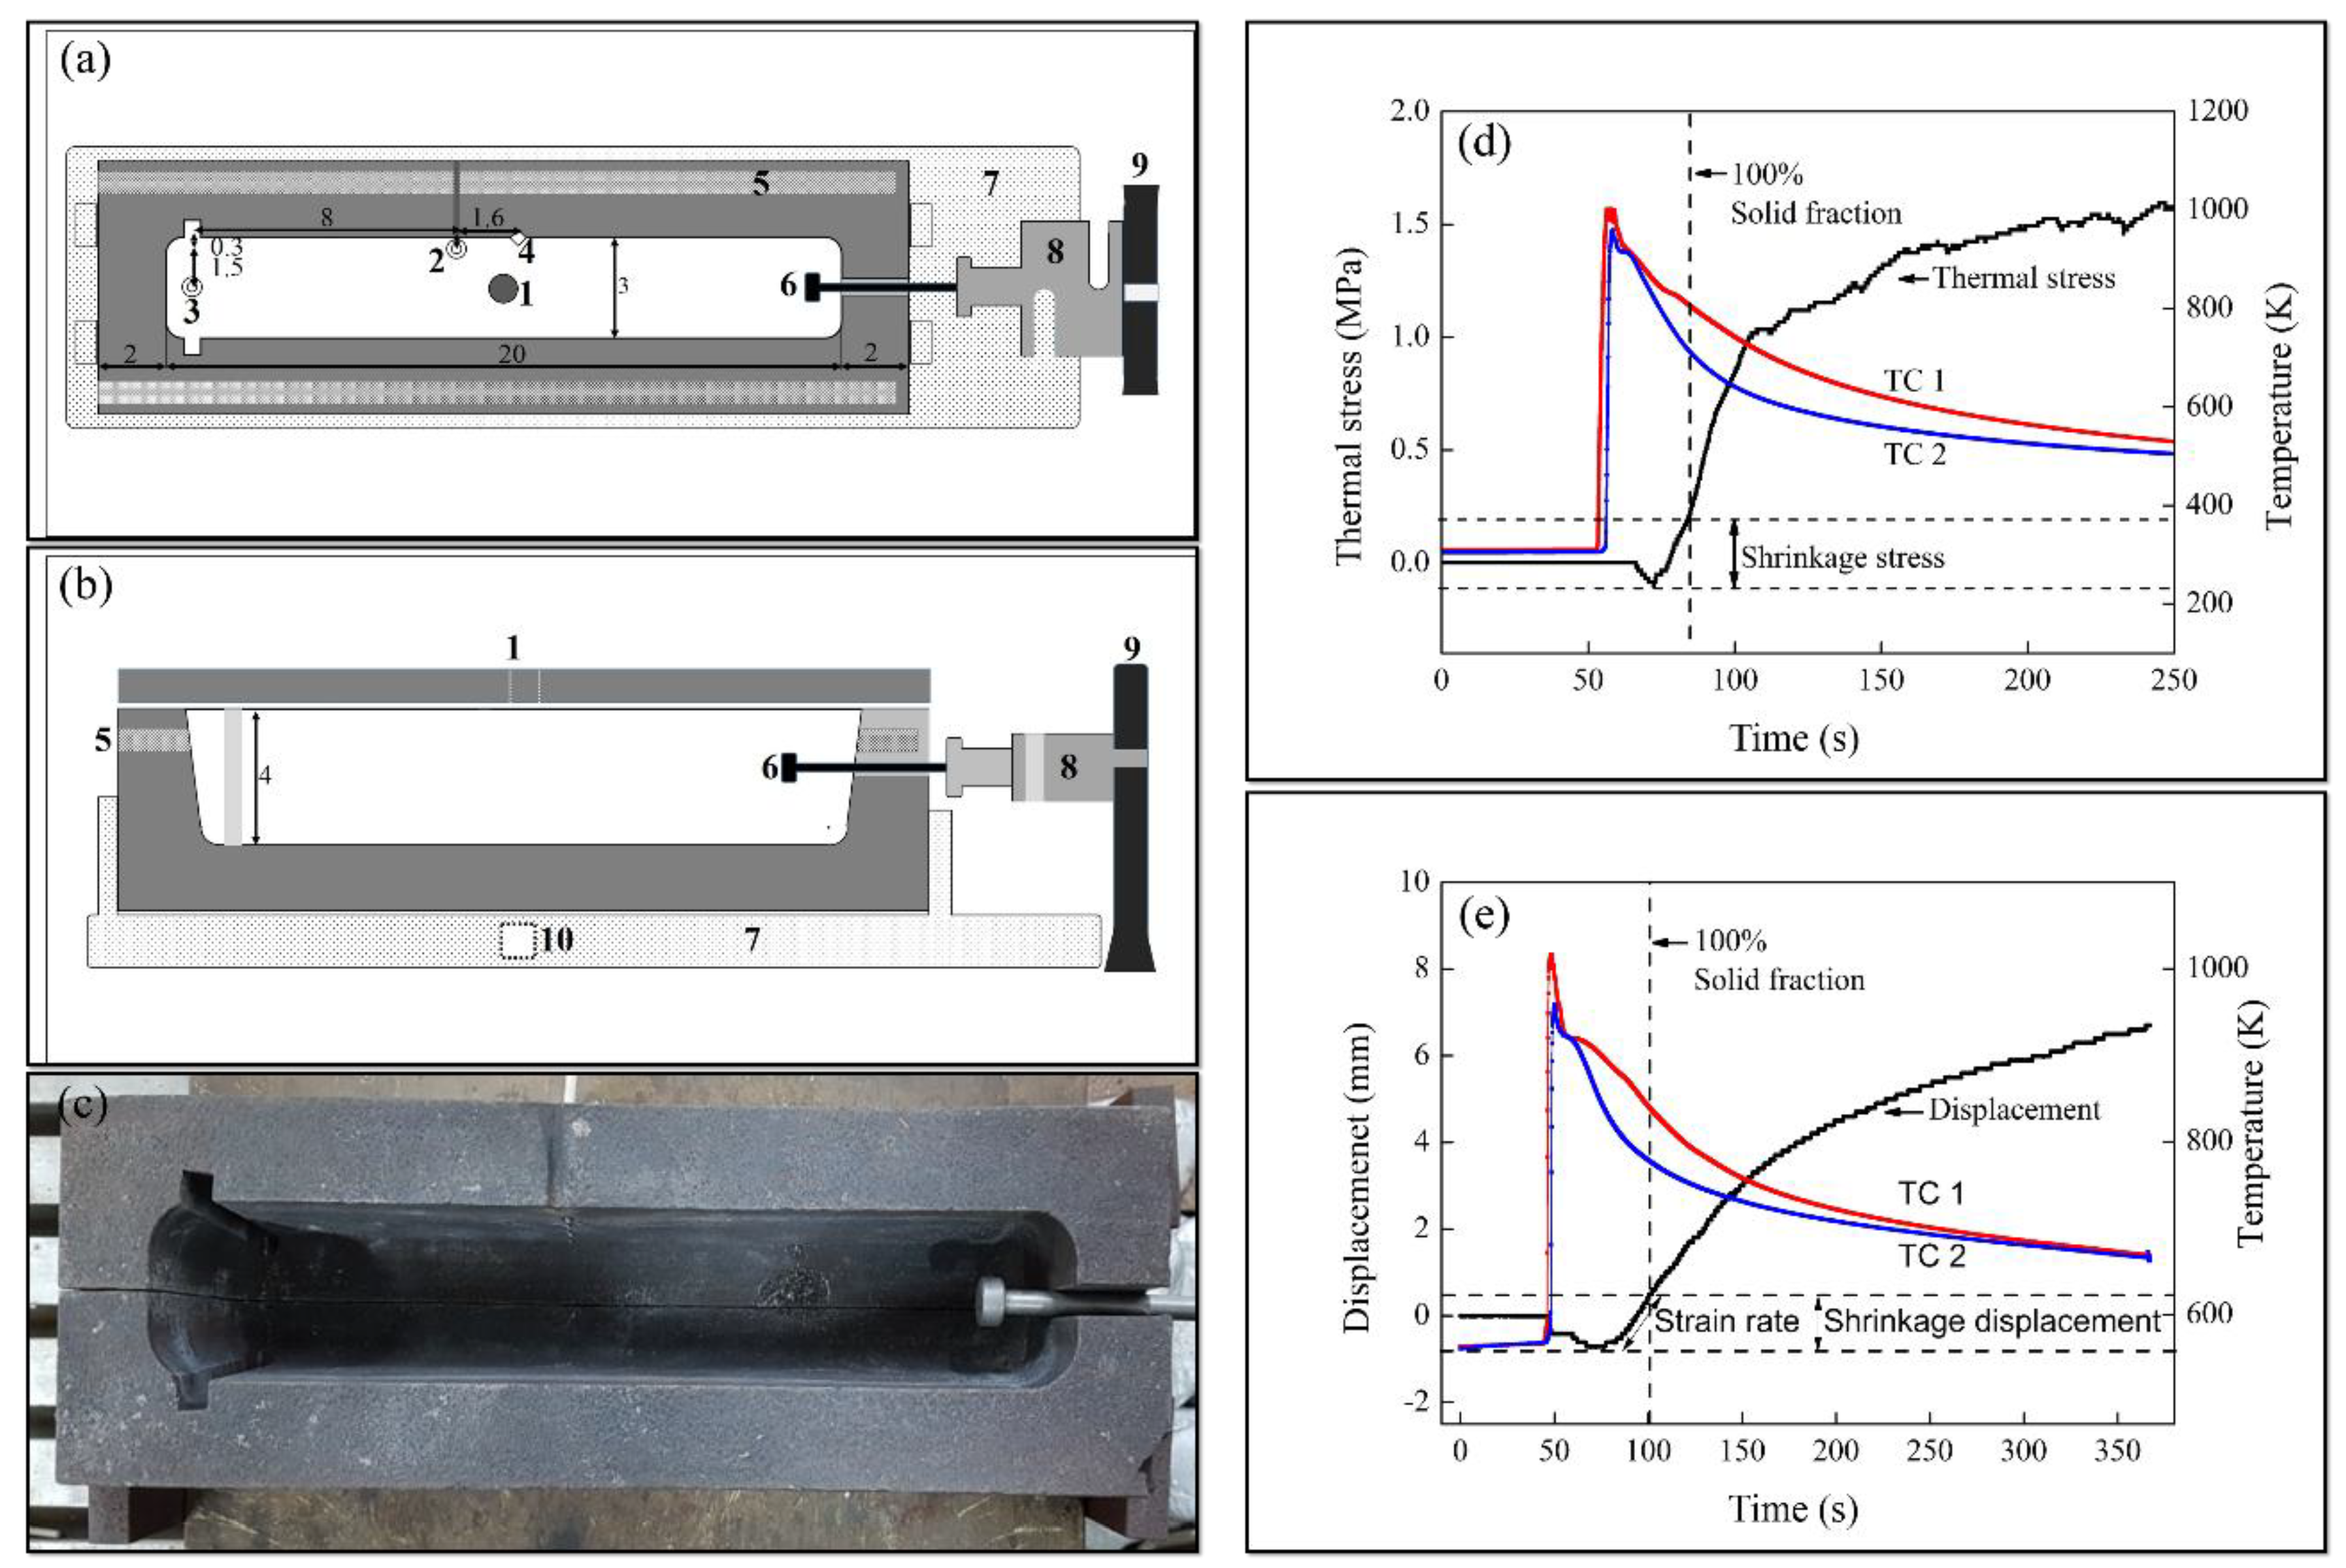
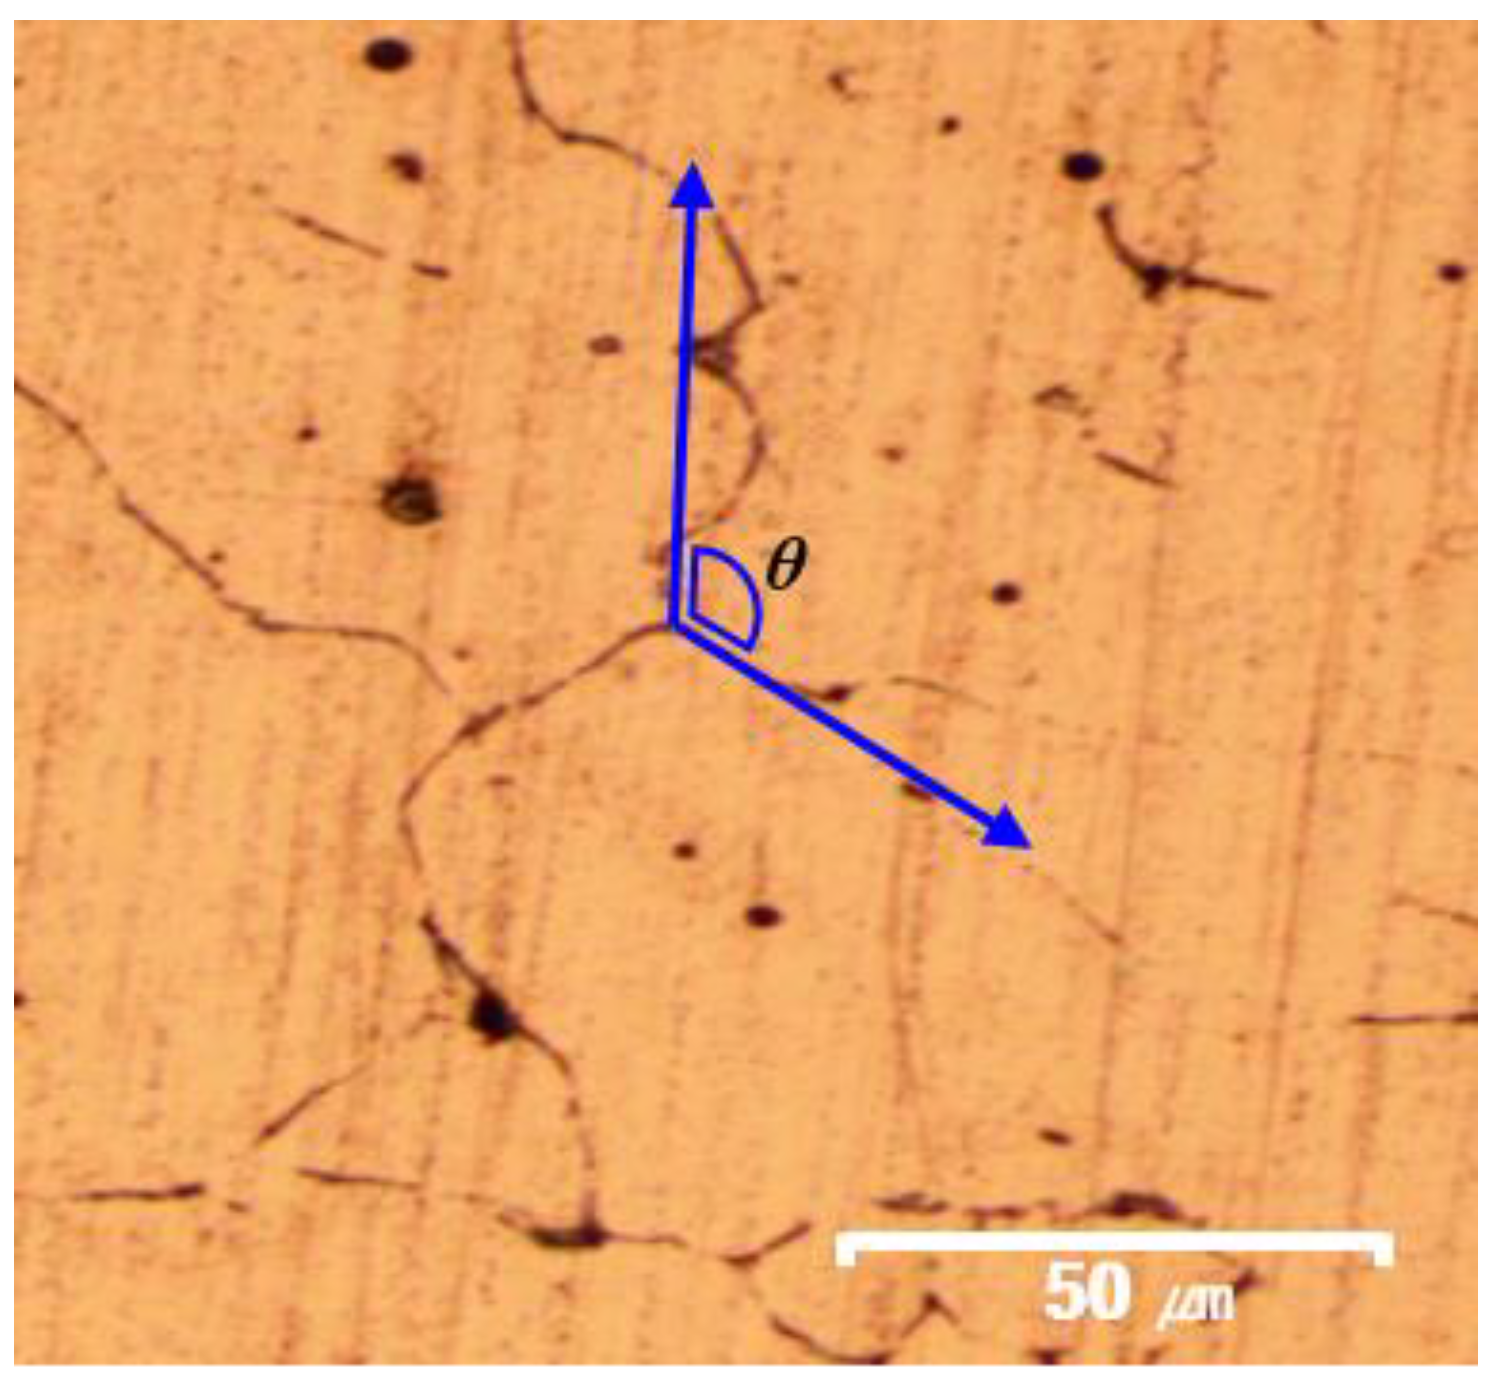
We prepared 5 kg of melt for each of the five alloys listed in Table 1 and, after holding the melts at 1163 K for 3 h to ensure that all additions were fully dissolved, we measured the thermal stress, SST, shrinkage volume, and porosity. A schematic diagram of the mold used to measure thermal stresses and SST is provided in Figure 2. The melt was poured into the mold via gravity through the injection hole (Figure 2(1)) to measure the thermal stress and SST. Temperatures from two points in the melt (Figure 2(2) and (3)) were measured to estimate the SST at point (4) in Figure 2. Similarly, the temperature at point (4) was calculated using the slope of temperature versus distance between points (2) and (3). The melt at point (4) solidifies when shrinkage starts because shrinkage begins to occur once the solidified parts are coherently connected in the mold [14], and point (4) is the last area to solidify for the coherent connection. Thermal stress and SST during solidification were measured by analyzing the displacement of the pin (Figure 2(6)). The displacement and the force generated during the displacement were accurately measured using two load cells (RUU-200K (Minor Tech, Guangdong, China) and KTM-10mm (Radian, Seoul, Korea)). Shrinkage volume and porosity were measured using the Tatur mold, schematically presented in Figure 3. The porosities and shrinkage volumes of the casting alloys produced in the Tatur mold were estimated using densities measured by Archimedes’ principle and water displacement. Grain boundary angles were measured at the triple junctions where two solid-liquid interfaces and one solid–solid boundary met each other, as shown in Figure 4. The grain boundaries with and without positive curvature were defined as the solid–liquid and solid–solid interfaces in the mushy zone, respectively. The contained angle between the two solid–liquid interfaces was considered as the grain boundary angle in this study.
To fabricate preforms of steering knuckles with TAC, 500 kg of melt was held at 1033 K until all additional elements were fully dissolved, and 500 g of Al-Ti-B alloy was added for gas bubbling filtration to suppress the gas quantity in the melt. We fabricated a steering knuckle preform over 13 steps of TAC; the average injection and holding times in each step were approximately 2 s and 3 s, respectively. The injection rate ranged from 250 g/s to 280 g/s. The casted preforms were homogenized at 813 K for 8 h and then cooled in a furnace. After homogenization, the casted preforms were heated at 813 K for 1 h and then forged. The mold temperature for forging was 573 K and the forging ratio was 3:1, with a forging load ranging from 1600 to 1800 tons. The forged steering knuckles were treated at 813 K for 4 h or 6 h, and then ice water quenched. After the forging, they were aged at 443 K for 4–7 h. The hardness of the samples was measured using a Rockwell hardness tester (Series 500, Wilson, Lake Bluff, IL, USA) with a 1.58 mm ball and 100 kg force that was applied for 10 s. The tensile strength and elongation percentage were measured using a universal testing machine (DTU 900 MH, Daekyung Tech, Incheon, Korea). This test was performed at 0.5 mm/min until a 0.2% yield offset was reached, and then the speed was increased to 3 mm/min. The samples for testing the tensile strength were prepared following the recommendations of ASTM E8/E8M-16a. The microstructures before and after heat treatments were analyzed using an optical microscope (eclipse MA200, Nikon, Tokyo, Japan).

3. Results and Discussion

The thermal stresses of the Al 6061 alloy melt varied depending on the mold temperatures and the addition of minor elements; this variation was mainly attributed to their grain sizes. The effect of mold temperature and alloy composition on thermal stress should be analyzed because thermal stress in the mushy zone is a critical factor in the occurrence of hot tearing, which severely degrades mechanical properties [15,16]. In this study, we observed a clear relationship between thermal stress and mold temperature; however, the effect of alloy composition on thermal stress was detected only in the experiment with the heated mold. We confirmed that larger grain sizes led to higher rates of thermal stress. The thermal stresses measured in the heated mold ranged from 0.57 MPa–0.90 MPa, and they were higher than the thermal stresses in the unheated mold (0.24–0.31 MPa). The measured thermal stresses were comparable to the tensile strengths of Al alloys in the mushy zone in previous studies (0–3 MPa) [17]. The average grain sizes of the alloys fabricated in the heated mold (0.9 × 10⁴–1.2 × 10⁴ (m2)) were nearly twice as large as those of the alloys fabricated in the unheated mold (0.6 × 10⁴–0.7 × 10⁴ (m2)). The proportional relationship between the thermal stress and grain size demonstrated in this study was consistent with previous reports [17], in which alloys with finer grain sizes exhibited lower ductility in the mushy zone. This lower ductility was attributed to a looser connection between grains, which led to weaker pulling force between the grains. The dependency of thermal stresses measured in the heated mold on minor additional elements was also related to the variety of grain sizes. Compared to the grain size of alloy A, the addition of a few hundred or thousand ppm of Zr, Zn, and Cu (see Table 1) increased the alloys’ average grain size. The dependence of grain size on the melt composition was also confirmed by the difference between the SST and eutectic temperature (ET). The alloys with minor additions (B, C, D, and E) exhibited larger differences between the SST and ET, indicating that shrinkage began at a relatively lower solid fraction. This outcome was supported by previous results: Larger grain sizes increased the temperature at which strength began to build up in the mushy zone [18,19], because larger grains have a greater chance of branching than smaller grains at the same solid fraction so that they can entangle and participate in shrinkage rather than rearrangement. Another possible reason for the variation of thermal stress and SST-ET, depending on minor additions, is the formation of intermetallic phases with the minor additions. The intermetallics may prevent the molten metal from flowing, and thus may lead to an increase in both shearing stress (i.e., thermal stress) and SST [20].
We must note that these minor elements were initially added to improve the mechanical properties of alloys. These elements normally become effective during thermal treatments such as solution treatment and aging [21,22,23]. The results in this study proved that these minor elements also influenced the thermal properties of the melt, such as thermal stress in the mushy zone and SST. Additionally, unlike the thermal stresses measured in the heated mold, thermal stresses measured in the unheated mold exhibited no apparent differences, regardless of minor additive elements. It seems that the faster cooling rate mainly influenced thermal stress and grain size, overwhelming other factors.
γ S L γ S S = 1 2 ( c o s ( θ / 2 ) ) = δ
(γSL, γSS, and θ are interface energy between solid and liquid, interface energy between solid and solid, and dihedral angle, respectively).
In addition to thermal stress, strain rate plays a critical role in the occurrence of hot tearing. When minor elements were added, the strain rate decreased, while the corresponding thermal strengths increased (see Table 2 and Figure 5a.) Lower strain rates should be attributed to longer cooling times and less strain. Longer cooling times can be expected because of the larger difference between the SST and ET in Figure 5b; no noticeable differences in cooling rate occurred among melts with different compositions. The decreased strain can be explained by the difference in γSL. The strain rate should be proportional to the rate at which solid bridges form between grains in the mushy zone. The formation of solid bridges is a function of γSL: A lower γSL reduces the chance of formation of solid bridges because it results in the formation of more continuous liquid films on solid grains. The ratio between γSL and the γSS was calculated by introducing the measured dihedral angles (see Figure 5c,d) into Equation (1); these results are summarized in Table 2. As minor elements were added, dihedral angles decreased; hence, the value of δ = γSL/γSS also decreased. The reduction in the value of δ was more apparent when the mold temperature was 673 K than when it was 300 K. This result shows that minor elements were utilized to reduce γSL, leading to more continuous liquid films on grains in the mushy zone. The continuous liquid films on grains inhibited the formation of solid bridges between them, thus reducing the strain rate.
Based on this analysis of thermal stresses and strain rates, we chose the mold temperature for TAC to be 673 K. A higher mold temperature helps the melt to fill a mold with a complex shape because the melt has a lower viscosity at higher temperatures. The higher thermal stress of the melt in the heated mold could increase the probability of hot tearing; however, it was not observed in this study, potentially because of the lower strain rates [1].
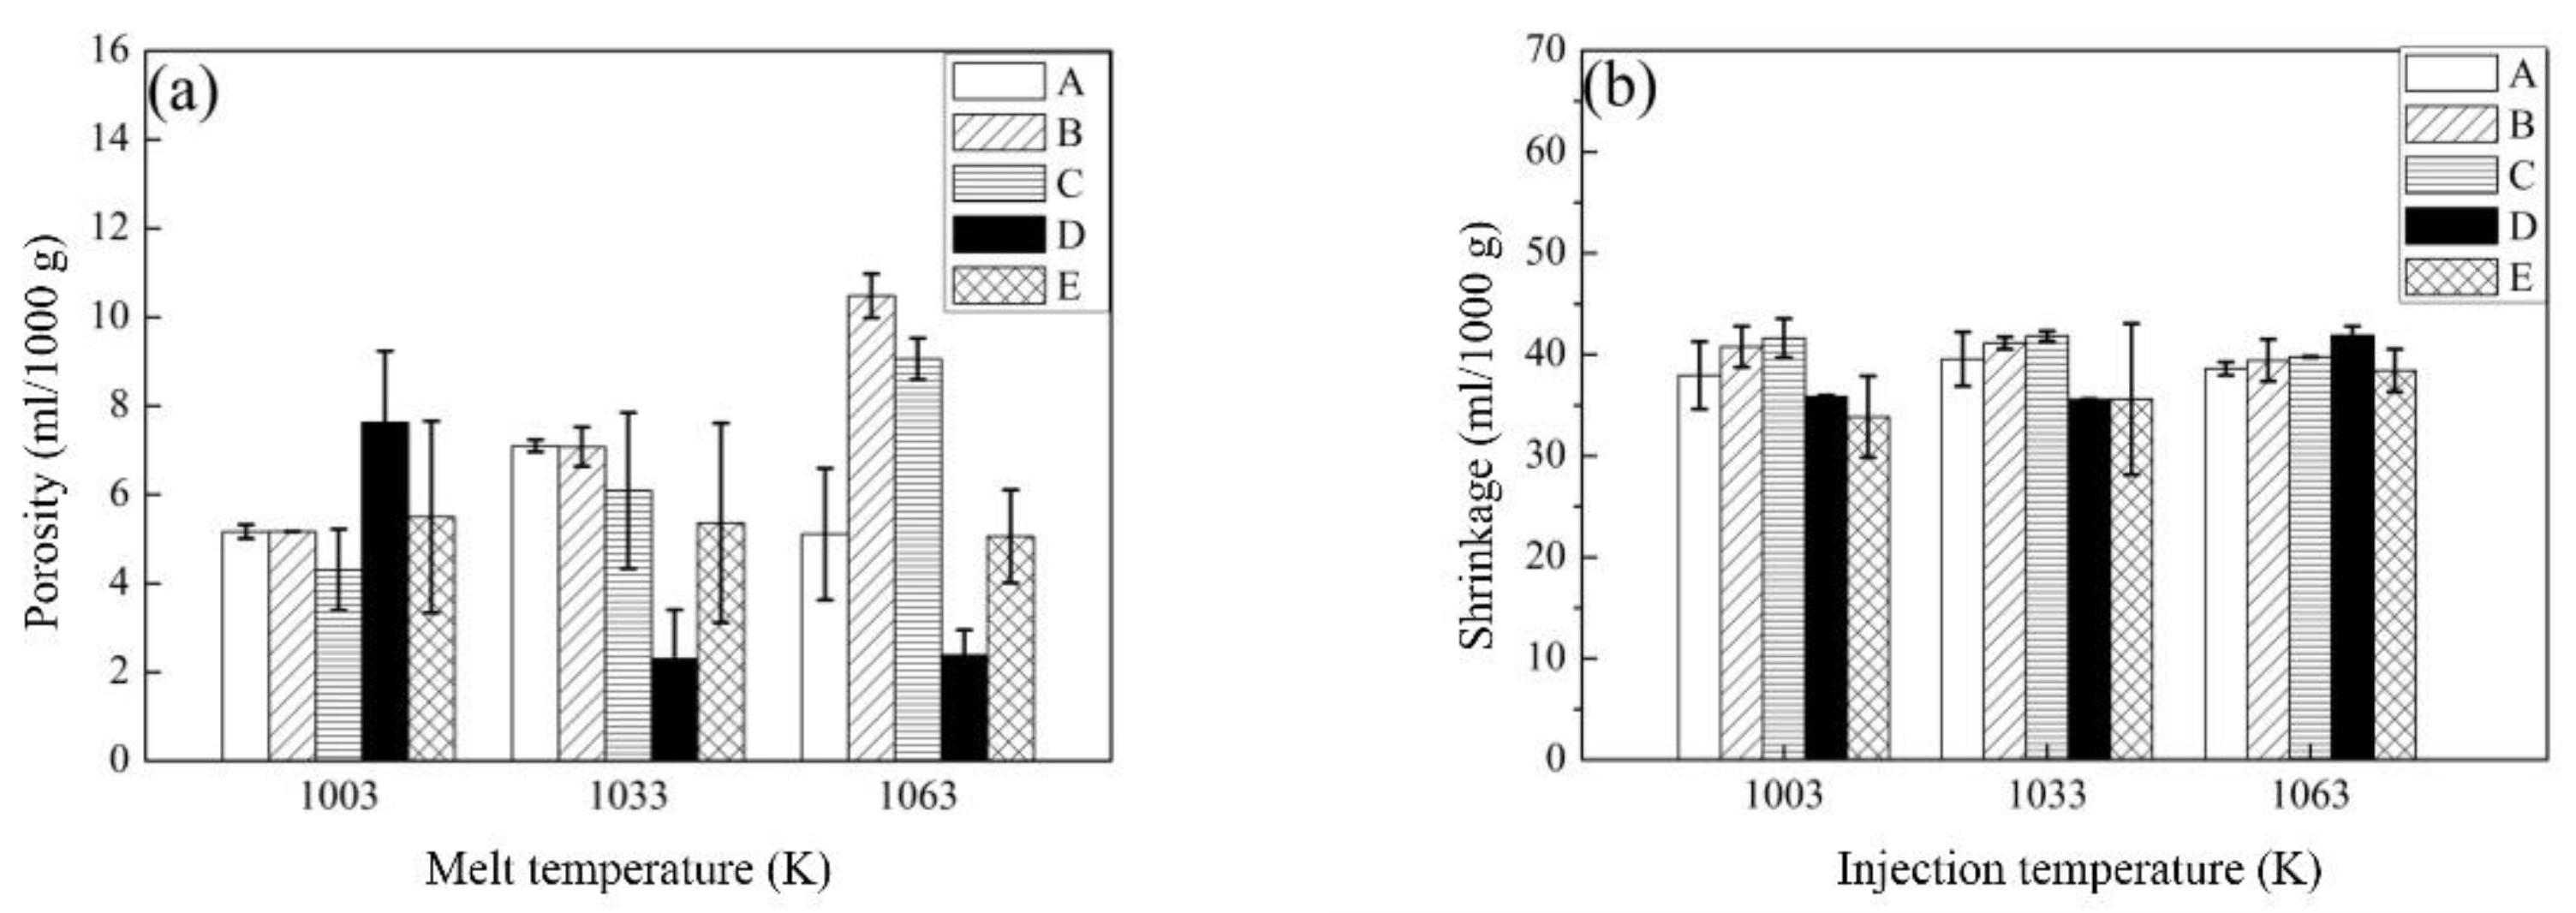
The melt temperature and its composition influenced the alloys’ shrinkage volume and porosity. The shrinkage information is important for determining the amount of melt added in each step during TAC. The porosity should be minimized to improve the mechanical properties of casted products. The porosity in alloys B and C (to which Zr was added) increased as the melt temperature increased from 1003 K to 1063 K, whereas the porosity in alloys D and E (with Zn and Cu added) decreased, as shown in Figure 6. The shrinkage volume of the alloys exhibited the opposite trend as the melt temperature increased (i.e., the shrinkage volume of alloys B and C decreased, whereas those of alloys D and E increased) because the sum of the porosity and shrinkage volume of an alloy is fixed, while the processing conditions vary [24]. Based on this analysis of porosity and shrinkage volume, alloy D and a melt temperature of 1033 K were selected as the composition and condition for TAC fabrication of steering knuckle preforms. Alloy D had relatively lower porosity for melt temperatures of 1033 K and 1063 K; although the shrinkage volume of alloy D was relatively higher at 1033 K, it can be compensated for during TAC by successively adding melt. Steering-knuckle preforms with alloy A were also fabricated for comparison. After TAC fabrication, the steering knuckle preforms were heated at 813 K for 8 h for homogenization and then cooled in a furnace. The homogenized samples were forged in a mold preheated to 573 K with a forging ratio of 3:1.
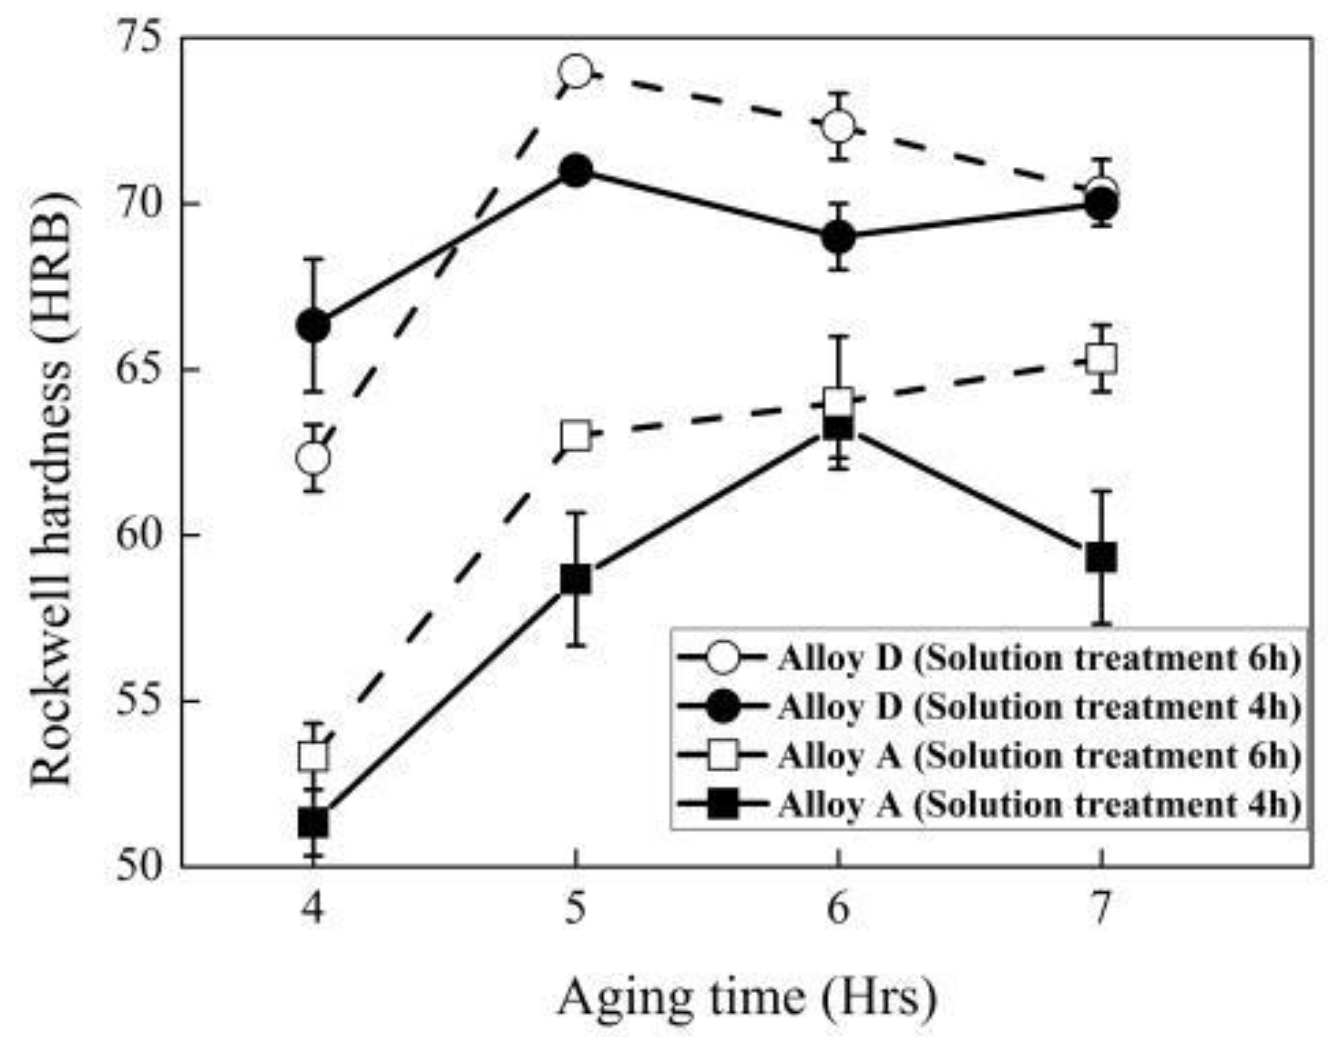
Heat treatment following forging improved the mechanical properties of the knuckles made of alloy D more than the properties of those made of alloy A. The forged steering knuckles were treated at 813 K for 4 h or 6 h, and then quenched with ice water. After the forging, they were aged at 443 K for 4–7 h. The hardness of the heat-treated knuckles was measured, and the results are summarized in Figure 7. The knuckles made of alloy D exhibited higher hardness than those made of alloy A after the same solution treatment and aging process. The hardness of alloy A increased as aging duration increased to 6 h, regardless of the duration of solution treatment. In the case of alloy D, the maximum hardness was achieved after aging for 6 h for both durations of solution treatment. The higher hardness of the knuckles made of alloy D was attributed to the addition of Zn, which prevented secondary phase particles from precipitating [25].
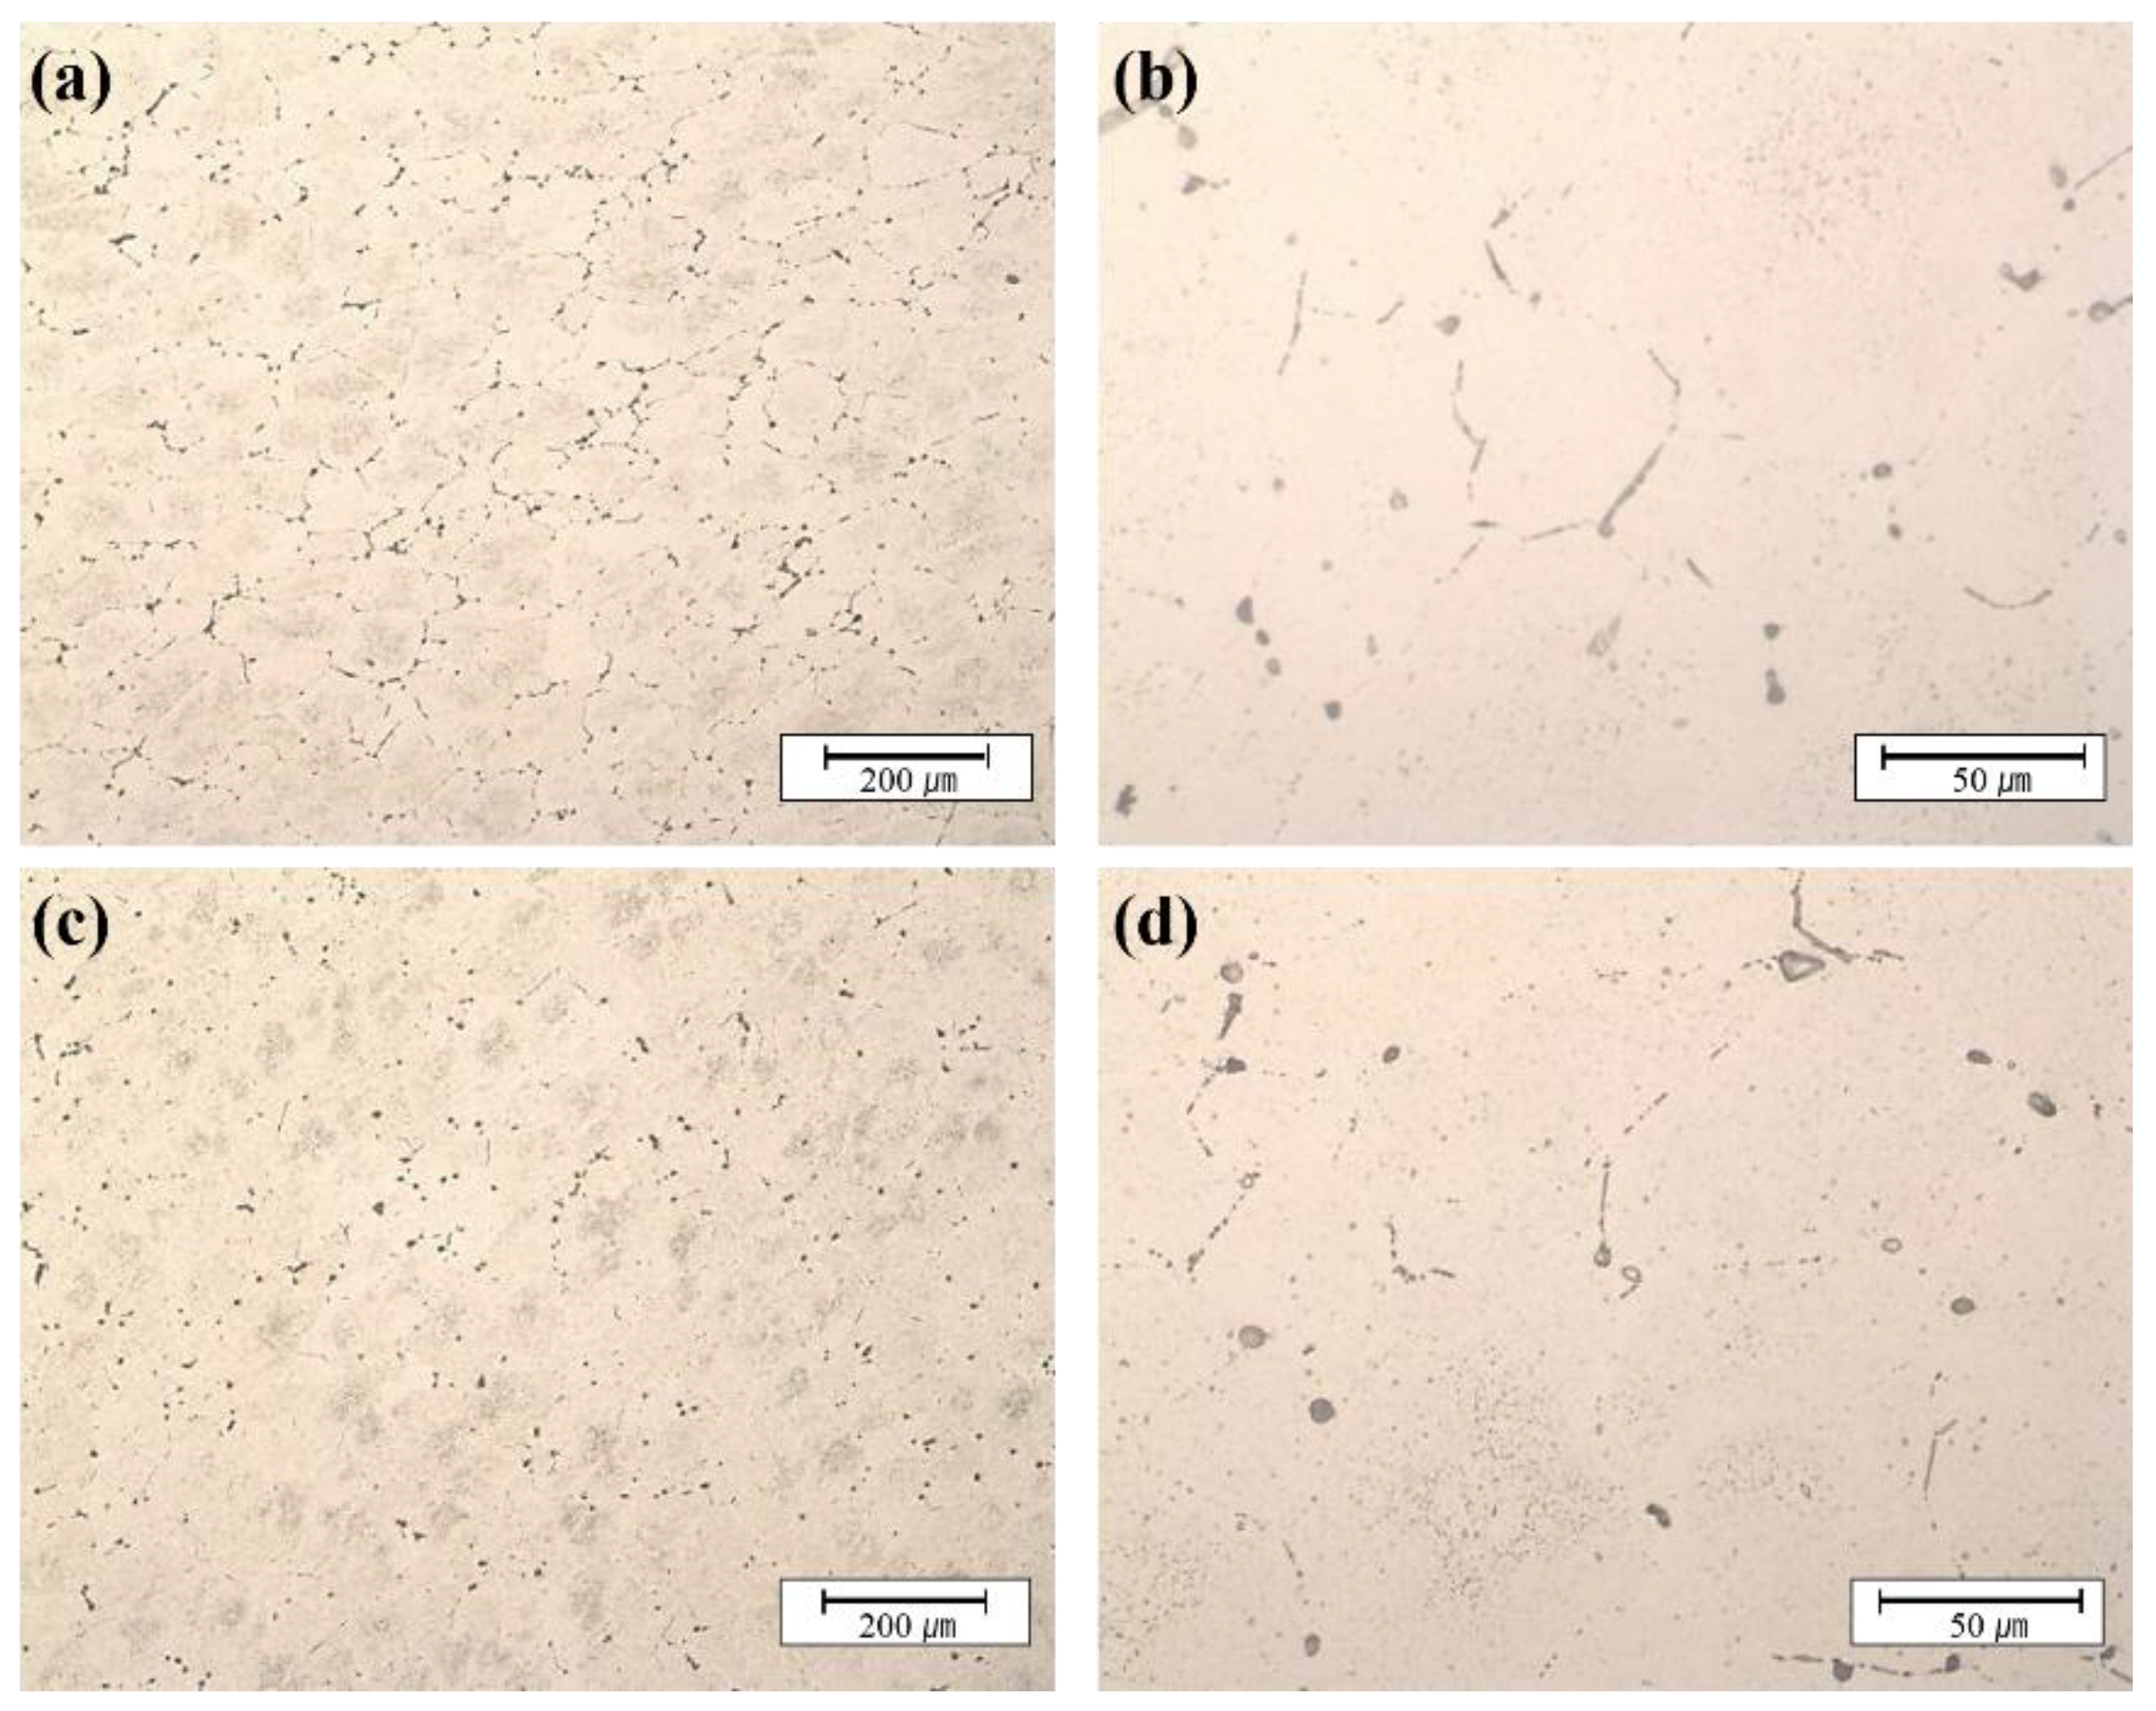
The uniformity of microstructures of alloy D was noticeably improved after solution treatment. Microstructures of the D alloy after forging (Figure 8a,b) and after heat treatment following forging (Figure 8c,d) showed that the precipitates reduced significantly after the solution treatment. After forging at a forging ratio of 3:1, as shown in Figure 8a,b, the precipitates of Mg2Si and the alloy consisting of Al, Fe, Si, and Mn were segregated mostly along the grain boundaries (their compositions were confirmed by using SEM-EDS; however, this is not described in this report). The amount of these precipitates reduced significantly after heat treatment for 6 h, as shown in Figure 8c,d. The reduction of the precipitates and the increase in the uniformity of microstructure should influence the mechanical properties of the knuckles.
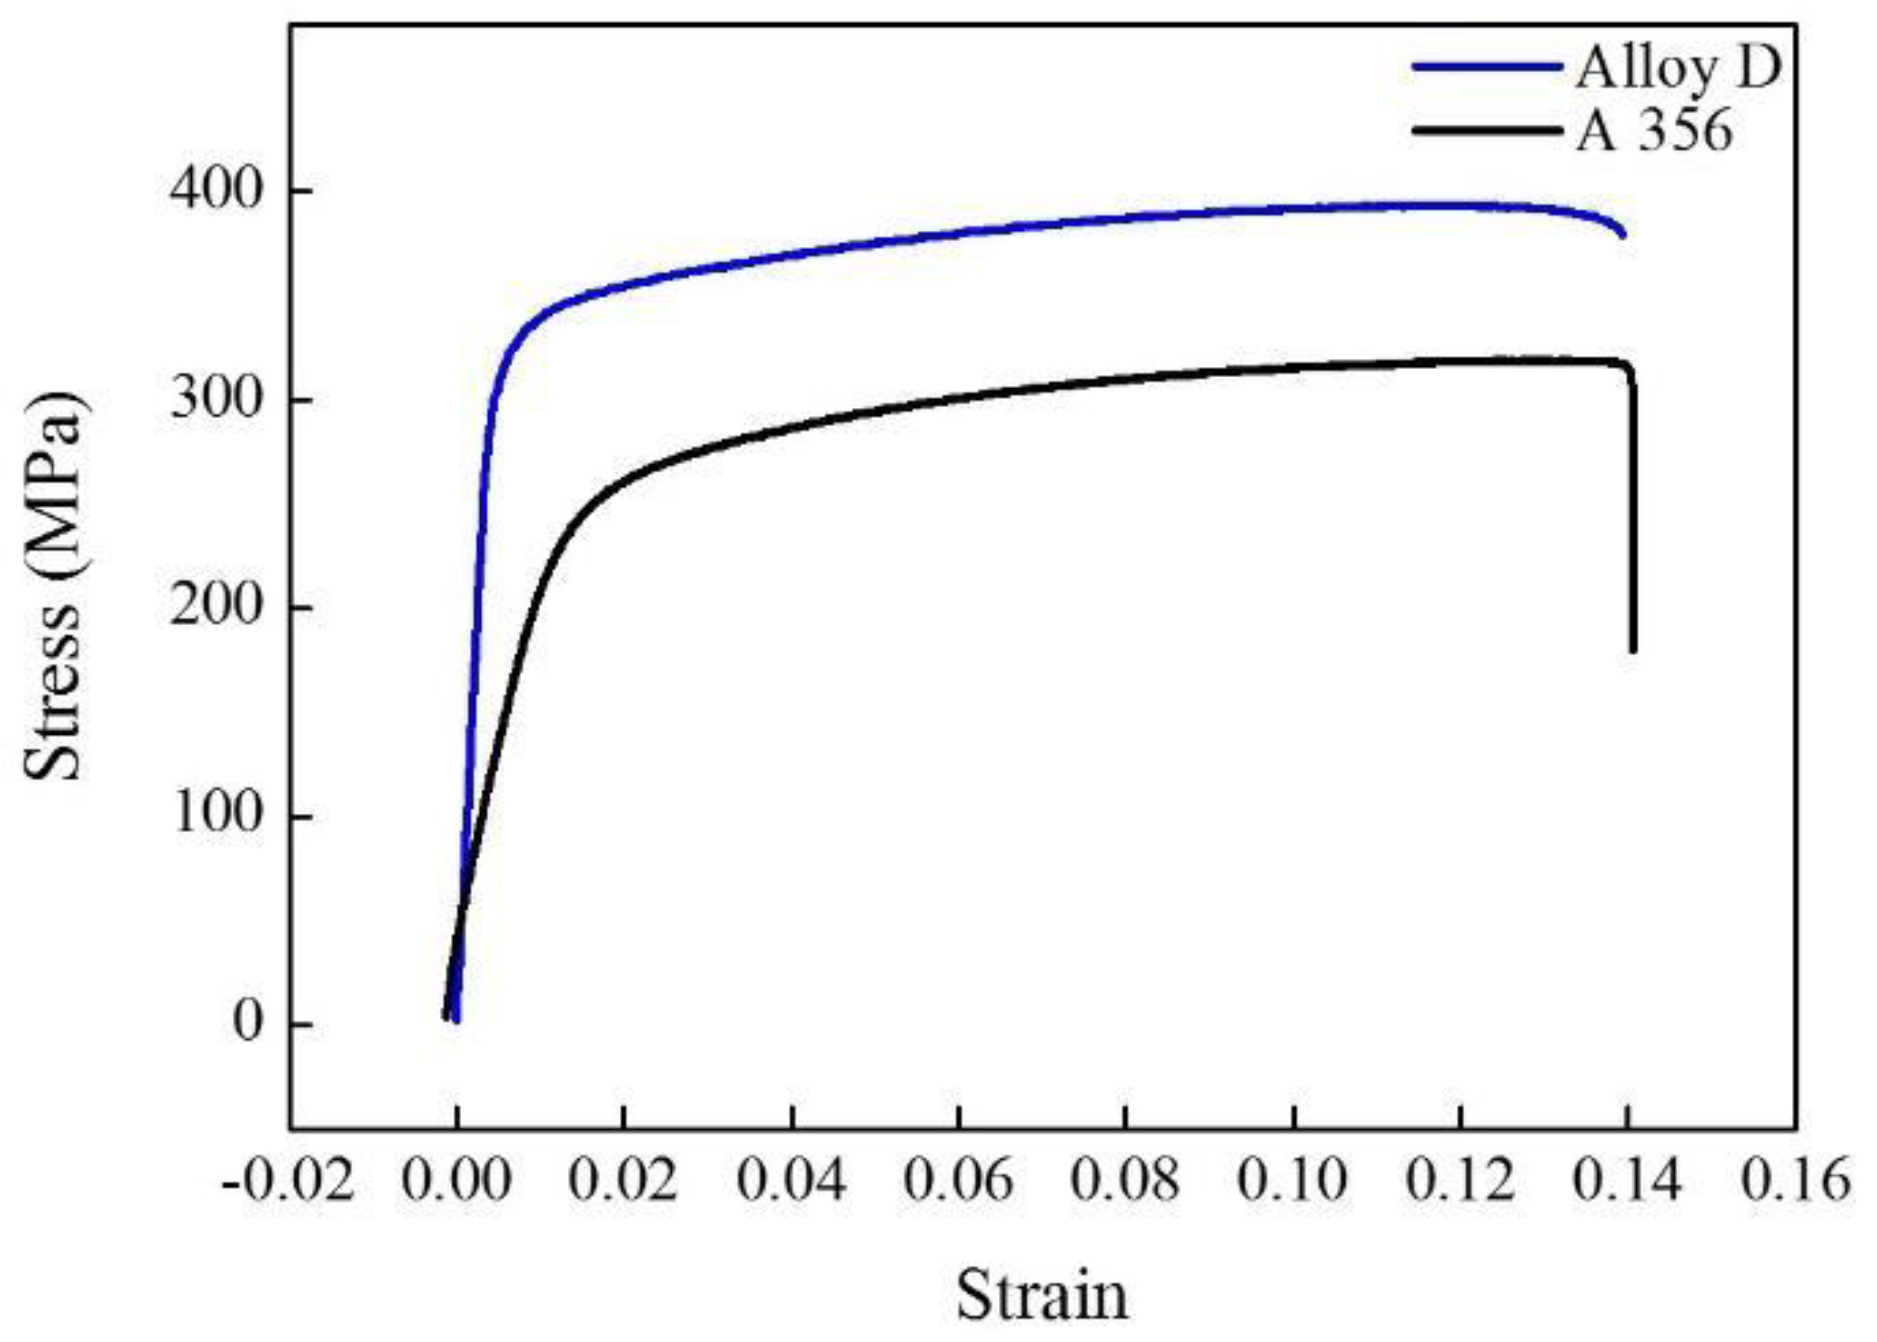
Finally, knuckles made of alloy D were fabricated by TAC followed by optimized forging and heat treatment, as shown in Figure 1. An ultimate tensile strength of 383 ± 3 MPa with an elongation percentage of 10.7 ± 1.1% was achieved from the steering knuckles fabricated in this study (Figure 9). Its UTS was about 70 MPa higher than the one made of A356 alloy fabricated by the TAC process. The mechanical properties of the fabricated steering knuckles are sufficient to satisfy the minimum customer specifications (tensile strength of 290 MPa and an elongation percentage of 8%) and are markedly superior to previously reported examples [26] that had corresponding tensile strengths and elongation percentage of 305 MPa and 7.8%, 334 MPa and 14.3%, and 345 MPa and 11% [26,27]. Therefore, the results reported in this study prove the TAC’s ability to produce commercial-grade vehicle components [24]. TAC’s applicability was confirmed by the outstanding mechanical properties of the steering knuckles that it produced. We also believe that our results can contribute to a reduction in the weight of vehicles by replacing steel components with Al ones.

4. Conclusions

The TAC process using Al alloys successfully produced vehicle steering knuckles with an average ultimate tensile strength of 383 MPa and an elongation of 10.7% on average. To produce steering knuckles with sufficient mechanical strength, the composition of an Al 6061 alloy was optimized by adding minor quantities of elements Zr, Zn, and Cu. Among the candidate alloys, the Cu- and Zn-added alloy was applicable to the TAC process according to the analyses of thermal stress, strain rate, shrinkage volume, and porosity. This alloy exhibited both larger thermal stresses and lower strain rates. These were due to its larger grain size and smaller interface energy between solid and liquid phases, respectively. Additionally, this alloy led to castings with less porosity. The mechanical property of the steering knuckles cast by TAC using the optimized melt was further improved by optimizing the conditions for solution treatment and aging [24].

Author Contributions

W.J.K. and J.W.M. conceived the concept and S.J.K. and K.Y.K. designed the experiments, J.W.M, K.T.J. and C.L. performed the experiments, and S.J.K. analyzed data and wrote the paper.

Funding

This work was funded by “The Industrial Convergence, Fundamental Technology Development Program” through the Ministry of Trade, Industry and Energy (MOTIE) (10045239, 2017).

Acknowledgments

This work was supported by KOREATECH. Hardness measurement was performed by Cooperative Equipment Center at KOREATECH.

Conflicts of Interest

The authors declare no conflict of interest.

References

  1. Campbell, J. Castings, 2nd ed.; Elsevier Butterworth-Heinemann: Burlington, MA, USA, 2003; p. 1. [Google Scholar]
  2. Skallerud, B.; Iveland, T.; Härkegård, G. Fatigue life assessment of aluminum alloys with casting defects. Eng. Fract. Mech. 1993, 44, 857–874. [Google Scholar] [CrossRef]
  3. Suyitno; Kool, W.H.; Katgerman, L. Micro-mechanical model of hot tearing at triple junctions in dc casting. 2002, 396–402, 179–184. [Google Scholar]
  4. Liu, Y.; Jie, W.; Gao, Z.; Zheng, Y. Investigation on the formation of microporosity in aluminum alloys. J. Alloys Compd. 2015, 629, 221–229. [Google Scholar] [CrossRef]
  5. Seo, K.H.; Jeon, J.B.; Youn, J.W.; Kim, S.J.; Kim, K.Y. Recycling of al-si die casting scraps for solar si feedstock. J. Cryst. Growth 2016, 442, 1–7. [Google Scholar] [CrossRef]
  6. Hanko, G.; Antrekowitsch, H.; Ebner, P. Recycling automotive magnesium scrap. JOM 2002, 54, 51–54. [Google Scholar] [CrossRef]
  7. Arafune, K.; Ohishi, E.; Sai, H.; Ohshita, Y.; Yamaguchi, M. Directional solidification of polycrystalline silicon ingots by successive relaxation of supercooling method. J. Cryst. Growth 2007, 308, 5–9. [Google Scholar] [CrossRef]
  8. Vijayarangan, S.; Rajamanickam, N.; Sivananth, V. Evaluation of metal matrix composite to replace spheroidal graphite iron for a critical component, steering knuckle. Mater. Des. 2013, 43, 532–541. [Google Scholar] [CrossRef]
  9. Sharma, M.M.; Ziemian, C.W.; Eden, T.J. Fatigue behavior of sic particulate reinforced spray-formed 7xxx series al-alloys. Mater. Des. 2011, 32, 4304–4309. [Google Scholar] [CrossRef]
  10. Sivananth, V.; Vijayarangan, S.; Rajamanickam, N. Evaluation of fatigue and impact behavior of titanium carbide reinforced metal matrix composites. Mater. Sci. Eng. A 2014, 597, 304–313. [Google Scholar] [CrossRef]
  11. Morri, A.; Ceschini, L.; Messieri, S.; Cerri, E.; Toschi, S. Mo addition to the a354 (al–si–cu–mg) casting alloy: Effects on microstructure and mechanical properties at room and high temperature. Metals 2018, 8. [Google Scholar] [CrossRef]
  12. Kernebeck, S.; Weber, S. Influence of short-term heat treatment on the mechanical properties of al–mg–si profiles. Metals 2018, 8. [Google Scholar] [CrossRef]
  13. Liu, K.; Mirza, F.A.; Chen, X.G. Effect of overaging on the cyclic deformation behavior of an aa6061 aluminum alloy. Metals 2018, 8. [Google Scholar] [CrossRef]
  14. Stangeland, A.; MO, A.; Nielsen, Ø.; M’Hamdi, M.; Eskin, D. Development of thermal strain in the coherent mushy zone during solidification of aluminum alloys. Metall. Mater. Trans. A 2004, 35, 2903–2915. [Google Scholar] [CrossRef]
  15. Rappaz, M.; Drezet, J.M.; Gremaud, M. A new hot-tearing criterion. Metall. Mater. Trans. A Phys. Metall. Mater. Sci. 1999, 30, 449–455. [Google Scholar] [CrossRef] [Green Version]
  16. Liu, B.C.; Kang, J.W.; Xiong, S.M. A study on the numerical simulation of thermal stress during the solidification of shaped castings. Sci. Technol. Adv. Mater. 2001, 2, 157–164. [Google Scholar] [CrossRef] [Green Version]
  17. Eskin, D.G.; Suyitno; Katgerman, L. Mechanical properties in the semi-solid state and hot tearing of aluminium alloys. Prog. Mater. Sci. 2004, 49, 629–711. [Google Scholar] [CrossRef]
  18. Dahle, A.K.; Arnberg, L. Development of strength in solidifying aluminium alloys. Acta Mater. 1997, 45, 547–559. [Google Scholar] [CrossRef]
  19. Metz, S.A.; Flemings, M.C. Fundamental study of hot tearing. AFS Trans. 1970, 78, 453–460. [Google Scholar]
  20. Kamguo Kamga, H.; Larouche, D.; Bournane, M.; Rahem, A. Hot tearing of aluminum-copper b206 alloys with iron and silicon additions. Mater. Sci. Eng. A 2010, 527, 7413–7423. [Google Scholar] [CrossRef]
  21. Li, X.M.; Starink, M.J. Effect of compositional variations on characteristics of coarse intermetallic particles in overaged 7000 aluminium alloys. Mater. Sci. Technol. 2001, 17, 1324–1328. [Google Scholar] [Green Version]
  22. Li, X.M.; Starink, M.J. Identification and analysis of intermetallic phases in overaged zr-containing and cr-containing al-zn-mg-cu alloys. J. Alloys Compd. 2011, 509, 471–476. [Google Scholar] [CrossRef]
  23. Senkov, O.N.; Shagiev, M.R.; Senkova, S.V.; Miracle, D.B. Precipitation of al3(sc,zr) particles in an al-zn-mg-cu-sc-zr alloy during conventional solution heat treatment and its effect on tensile properties. Acta Mater. 2008, 56, 3723–3738. [Google Scholar] [CrossRef]
  24. Morimoto, K.; Takamiya, H.; Awano, Y.; Nakamura, M. Effects of si content and gas dissolution on shrinkage morphology of hypoeutectic al-si alloys. J. Jpn. Inst. Light Met. 1988, 38, 216–221. [Google Scholar] [CrossRef]
  25. Wang, X.; Guo, M.; Luo, J.; Zhu, J.; Zhang, J.; Zhuang, L. Effect of zn on microstructure, texture and mechanical properties of al-mg-si-cu alloys with a medium number of fe-rich phase particles. Mater. Charact. 2017, 134, 123–133. [Google Scholar] [CrossRef]
  26. Anyalebechi, P.N. Effect of process route on the structure, tensile, and fatigue properties of aluminium alloy automotive steering knuckles. Foundry Trade J. Int. 2012, 186, 189–196. [Google Scholar]
  27. Ruff, G.; Prucha, T.E.; Barry, J.; Patterson, D. Pressure counter pressure casting (pcpc) for automotive aluminum structural components. SAE Tech. Pap. 2001. [Google Scholar] [CrossRef]
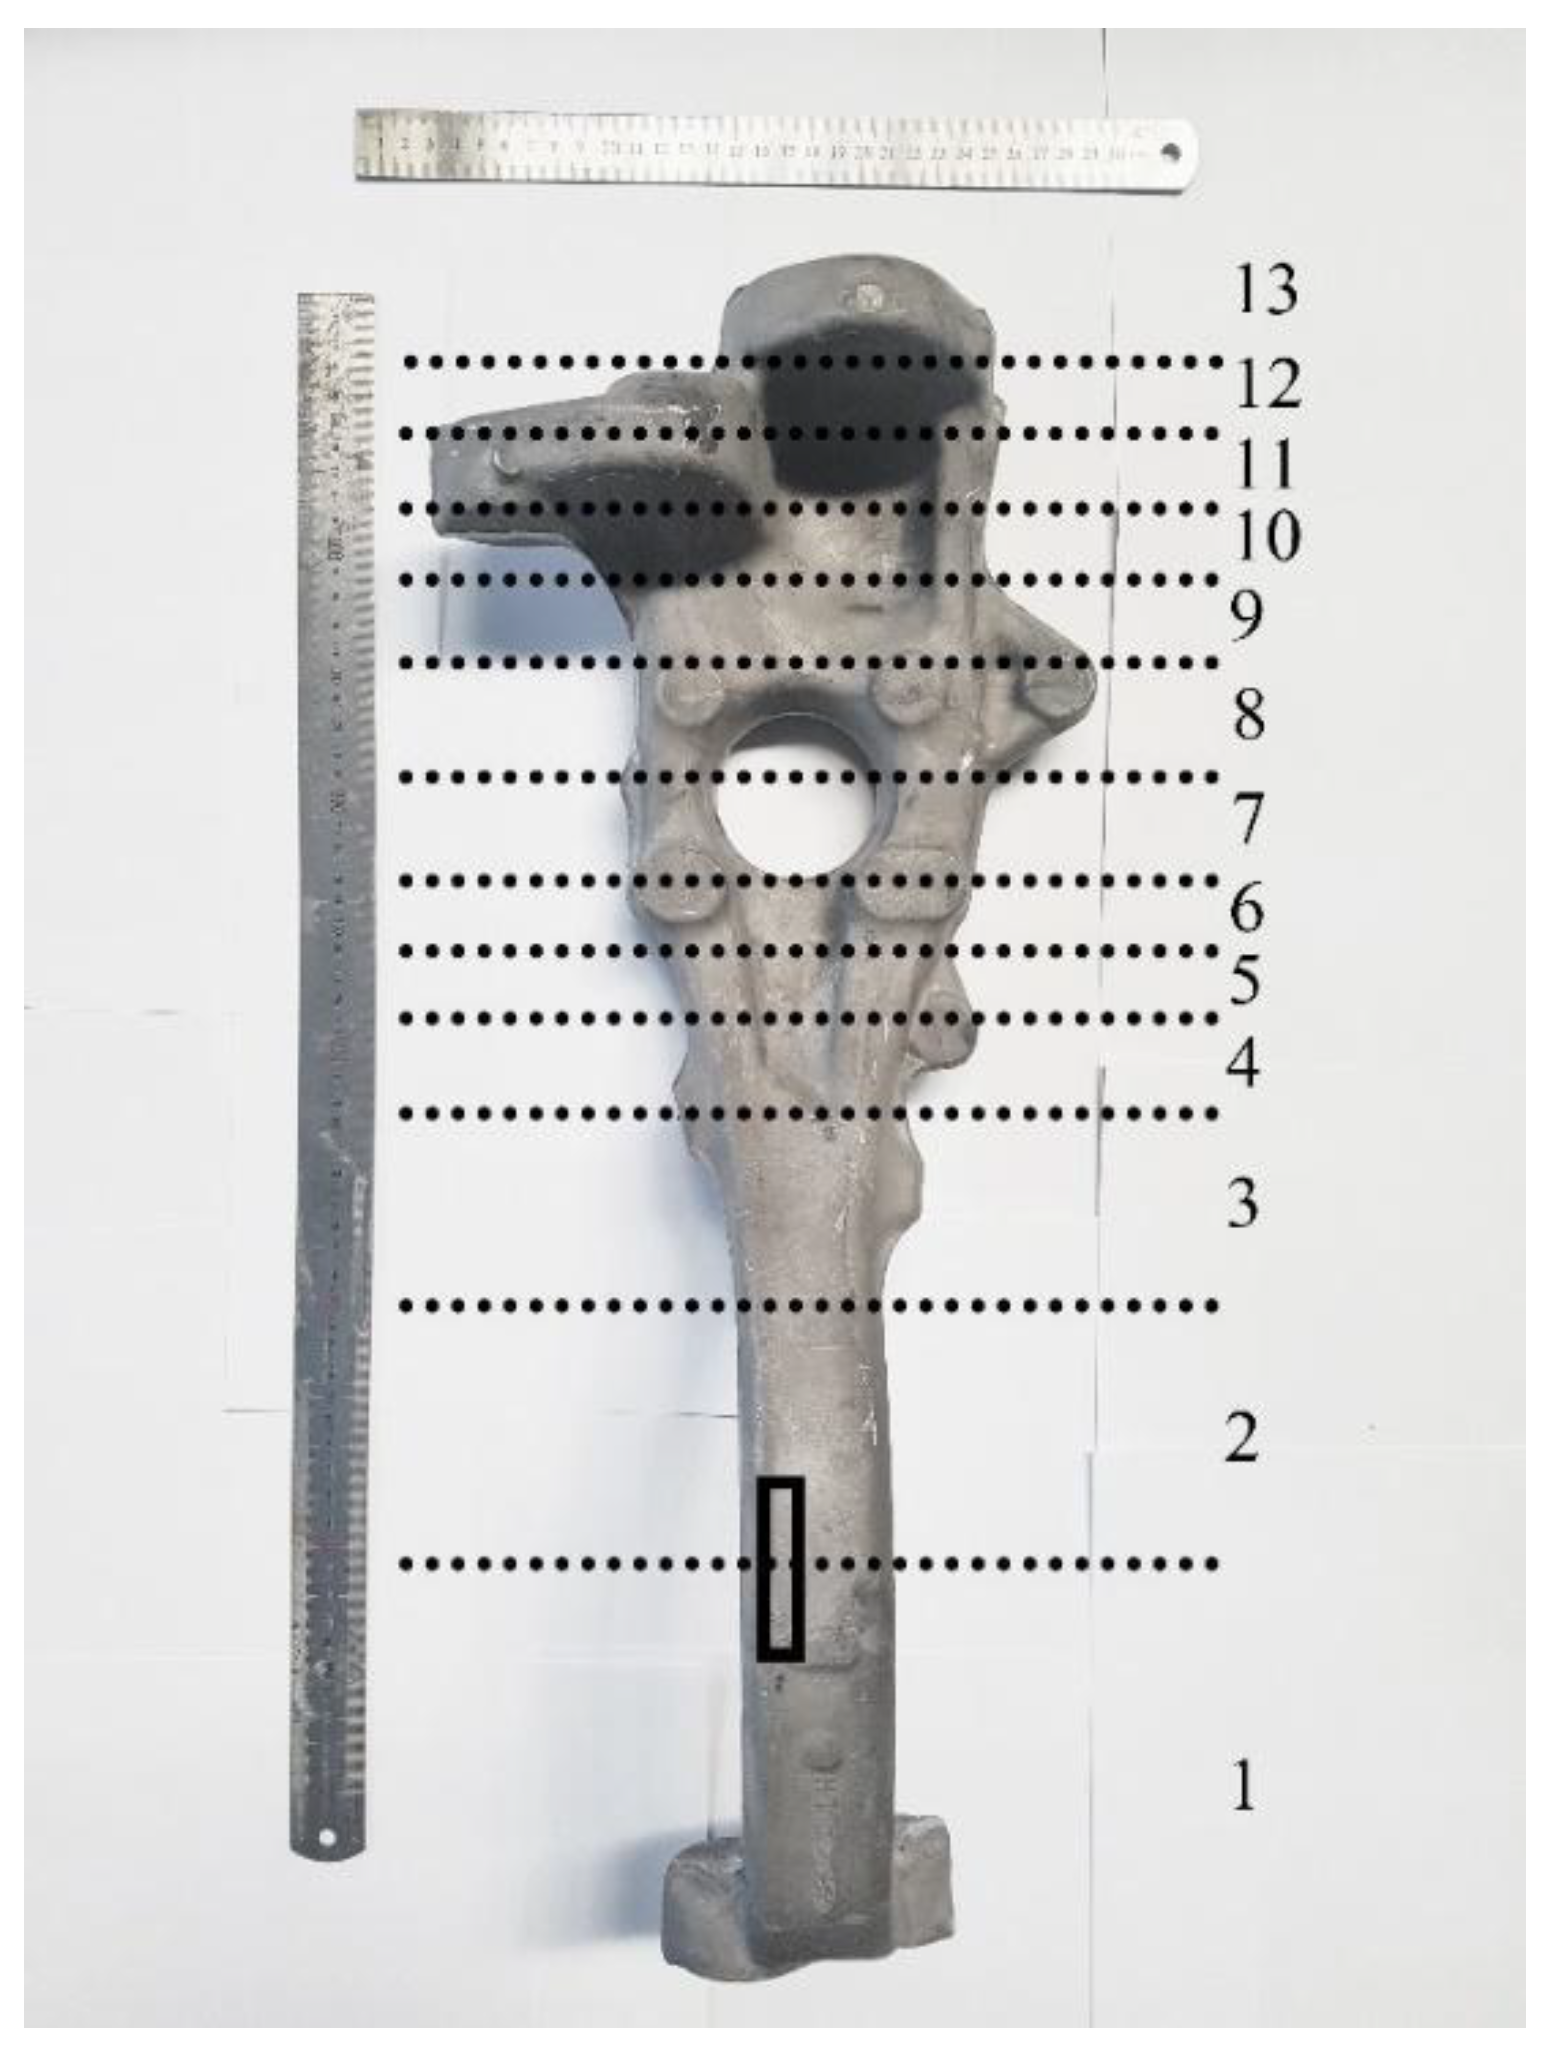
Figure 1. A steering knuckle produced by tailored additive casting (TAC), followed by forging and heat treatment. The length and maximum width of the knuckle are 68 cm and 26 cm, respectively. The TAC process consists of 13 steps; melt injected at each step is indicated by the dotted lines. Measurement samples for determining the ultimate tensile strength and elongation percentage were collected from the area indicated by the black box.
Metals 08 00857 g001
Figure 2. Schematic diagram showing (a) top and (b) side views of the mold used to measure thermal stress and shrinkage starting temperature (SST): (1) injection hole, (2) thermocouple 1, (3) thermocouple 2, (4) the point at which the temperature of melt in the mold was estimated, (5) inner heaters, (6) pin, (7) heating plate, (8) load cell, (9) fixed column, (10) thermocouple 3. (c) Image of the top view of the actual mold. Typical profiles of (d) thermal stress and (e) shrinkage displacement measured in the mold. Thermocouple 1 and 2 were fixed at 20 mm above the bottom of the mold.
Metals 08 00857 g002
Figure 3. Schematic diagram of a mold for the Tatur test: (1) k-type thermocouple, (2) stopper, (3) pouring cup, (4) Tatur mold, (5) band heater, (6) heating controller, and (7) firebrick.
Metals 08 00857 g003
Figure 4. Measurement of the dihedral angle of grain boundaries.
Metals 08 00857 g004
Figure 5. Summaries of (a) thermal stresses, (b) the difference between SSTs and eutectic temperatures (ETs), and (c,d) grain sizes and dihedral angles of the five different alloys prepared in the mold without heating and with heating to 673 K, respectively.
Metals 08 00857 g005
Figure 6. Porosities and shrinkage volumes of alloys A, B, C, D, and E were measured by the Tatur test.
Metals 08 00857 g006
Figure 7. The hardness of alloys A and D as a function of solution treatment and aging times.
Metals 08 00857 g007
Figure 8. Microstructures of the D alloy observed by optical microscopy after forging (a,b) and microstructures after solution treatment of the alloy for 6 h plus following the forging (c,d).
Metals 08 00857 g008
Figure 9. Engineering stress-strain curves of the samples taken from the steering knuckles cast with D alloy and A356 alloy. The tensile strength and elongation percentage for D alloy and A 356 alloy are 392.8 MPa and 12.3% and 318.7 MPa and 13.0%, respectively.
Metals 08 00857 g009
Table 1. Compositions of the five different Al alloys analyzed in this study and their shrinkage starting temperatures (SST) and eutectic temperatures (ET). The SST was measured by a displacement sensor and ETs were calculated by the J-mat pro commercial software.
SamplesAlSiMgCuCrMnFeZnTiZrSST (K)ET (K)
300 K673 K
ABal.0.9750.6780.3080.1360.09580.08310.0010.1390591.74 ± 8.47 615.28 ± 8.47580.0
BBal.0.9750.6780.3080.1360.09580.08310.0010.1390.01602.73 ± 6.46624.12 ± 2.87576.5
CBal.0.9750.6780.3080.1360.09580.08310.0010.1390.02610.09 ± 8.39623.82 ± 8.70576.5
DBal.0.9750.6780.3080.1360.09580.08310.7000.1390613.29 ± 10.73630.33 ± 6.73576.2
EBal.0.9750.6780.5000.1360.09580.08311.5000.1390600.94 ± 11.44630.17 ± 2.91573.7
Table 2. Comparison of strain rates, grain boundary angles, and δ values measured from the five different alloys cast at 300 K and 673 K.
SamplesStrain Rate (×10−3, s−1)Grain Boundary Angle (θ)Value of δ
300 K673 K300 K673 K300 K673 K
A1.480.99108.85 ± 12.25104.57 ± 14.500.88 ± 0.140.84 ± 0.14
B1.030.76109.63 ± 13.71101.83 ± 14.850.89 ± 0.140.81 ± 0.13
C2.120.27108.17 ± 15.8298.64 ± 15.610.89 ± 0.180.79 ± 0.15
D0.760.45102.06 ± 11.6893.91 ± 16.850.81 ± 0.110.75 ± 0.11
E0.570.30104.21 ± 13.1187.83 ± 15.320.84 ± 0.150.71 ± 0.03